
Part 2 Accounts - LetMC.com · Sales Accounts ... a paper statement. If available always remember...
116
Page | 1 LetMC.com Software Support Part 2 Accounts For use in Training only Not to be removed from Training Room (Tantum eruditi sunt liberi)
Transcript of Part 2 Accounts - LetMC.com · Sales Accounts ... a paper statement. If available always remember...

Page | 1
LetMC.com Software Support
Part 2
Accounts
For use in Training only Not to be removed from Training Room
(Tantum eruditi sunt liberi)

Page | 2
Client Manager Login ....................................................................................................................................... 5 Client Finance Login ......................................................................................................................................... 6 Client Administrator Login ................................................................................................................................ 7
Introduction ................................................................................................................................................................. 8 Payments and Deposits ............................................................................................................................................ 10
Take a Payment .................................................................................................................................................. 10 Payment details .............................................................................................................................................. 10 Receipt for payment ....................................................................................................................................... 11 Effect on Account: .......................................................................................................................................... 11 Stage in accounts ........................................................................................................................................... 11
Make a Bank Deposit .......................................................................................................................................... 12 Bank Deposit Details ...................................................................................................................................... 12 Confirmation ................................................................................................................................................... 12 Paying in Slip ................................................................................................................................................. 12
Credit Card Payments ......................................................................................................................................... 13 Activating card payments ............................................................................................................................... 13
Banking Credit and Debit Cards .......................................................................................................................... 14 Reconcile Card Payments ................................................................................................................................... 14 Points to note about Card Reconciliation ............................................................................................................. 14 Paying people through the LetMC System ........................................................................................................... 15
Payments ....................................................................................................................................................... 15 Pay a Person.................................................................................................................................................. 15 People in Credit .............................................................................................................................................. 15 Draw Down Sales ........................................................................................................................................... 15 Draw down NRL ............................................................................................................................................. 15
Methods of Payment ............................................................................................................................................ 15 Make a Cheque Payment .................................................................................................................................... 15
Payment Details ............................................................................................................................................. 16 Confirm Payments .......................................................................................................................................... 16
Make an Online Payment .................................................................................................................................... 17 Select People ................................................................................................................................................. 17 Invoicing ......................................................................................................................................................... 17 Print Payments ............................................................................................................................................... 18
Make a BACS Payment ....................................................................................................................................... 18 Payment Method ............................................................................................................................................ 18 Select Recipients ........................................................................................................................................... 18 Payment Details ............................................................................................................................................. 19 Confirm Payments .......................................................................................................................................... 19 BACS File ...................................................................................................................................................... 19
Draw Down Sales ................................................................................................................................................ 20 Draw Down Sale Classic Method ................................................................................................................... 20
Draw down sales by paid invoices only ................................................................................................................ 22 NRL Draw Down .................................................................................................................................................. 23 Make a Card Refund ........................................................................................................................................... 23 View and Search History ..................................................................................................................................... 24
Download your bank statement ................................................................................................................................. 25 Upload your statement onto the LetMC System ........................................................................................................ 25 Reconcile Bank Statements ...................................................................................................................................... 27
Lock Down Bank Statement History. .................................................................................................................... 34 Electronic Payment References Management .......................................................................................................... 35
Electronic Payment References by User .............................................................................................................. 35 Manage All Electronic Payment References ........................................................................................................ 35 Manage Payment Groups .................................................................................................................................... 36 'Lock Down' Bank Statement History. .................................................................................................................. 37 Manage Bank Accounts ....................................................................................................................................... 37
Associate Bank accounts with selected branches. .......................................................................................... 37 Manage Custom Accounts ................................................................................................................................... 38
Associate Custom Accounts with selected Bank Accounts. ............................................................................ 38 Apply Transfer .......................................................................................................................................................... 39 Maintenance Deductions .......................................................................................................................................... 39
Make a Transfer Between People ........................................................................................................................ 41 Make a Manual Rent Transfer ............................................................................................................................. 42 Make a Manual Rent Refund ............................................................................................................................... 42 Make a Manual Float Refund ............................................................................................................................... 43 Manage Landlord Float ........................................................................................................................................ 43 Make a Journal Transfer ...................................................................................................................................... 44 Manage Person's Auto Transfers ......................................................................................................................... 46 Manage Auto Transfers by Property .................................................................................................................... 47 Manage All Auto Transfers .................................................................................................................................. 47 Guaranteed Rent ................................................................................................................................................. 48
Activate the Functionality ................................................................................................................................ 48 Setting the Landlord Charge for the Guaranteed Rent Service. ...................................................................... 48 How the System Makes a Guaranteed Rent Payment. ................................................................................... 49 Tenants Rent covered by Guaranteed Rent?.................................................................................................. 50 Covering the Real Money Required to make Guaranteed Rent Payment. ....................................................... 50
Page | 3
Guaranteed Rent Balances Report. ................................................................................................................ 50 Applying Charges or Refunds ................................................................................................................................... 51
Charge/Refund a Tenant ..................................................................................................................................... 51 Charge/Refund a Contractor ................................................................................................................................ 51 Charge Landlord by Property ............................................................................................................................... 52 Refund Landlord by Property ............................................................................................................................... 53 Make a Deduction from Tenants Bond Account ................................................................................................... 53 Disputed Bond Deduction .................................................................................................................................... 53 Agreed Bond Deduction ....................................................................................................................................... 55
Chase Money ........................................................................................................................................................... 56 Tenant Money Owed Chase ................................................................................................................................ 56 Chase Tenant ...................................................................................................................................................... 57 Tenant Details ..................................................................................................................................................... 59 Tenant Statement ................................................................................................................................................ 59 Tenancy Details ................................................................................................................................................... 59 Chase History ...................................................................................................................................................... 60 Tenants Notes ..................................................................................................................................................... 60
Direct Debits ............................................................................................................................................................. 61 Enabling DD ........................................................................................................................................................ 61 Enable Tenant to pay by DD ................................................................................................................................ 61 Tenant Payment Schedule .................................................................................................................................. 62 Direct Debit Form ................................................................................................................................................ 62 Call Direct Debits ................................................................................................................................................. 63 DD Confirmation Letter ........................................................................................................................................ 63 Manage Direct Debits .......................................................................................................................................... 64 Amending DD details ........................................................................................................................................... 64 AUDDIS (Automated Direct Debit Instruction Service) ......................................................................................... 64
View Account Activity ................................................................................................................................................ 65 View a Person's Accounts ................................................................................................................................... 65 View a Branch's Sales Accounts .......................................................................................................................... 65 View Your Company's Accounts .......................................................................................................................... 66
Manage Invoices ....................................................................................................................................................... 67 View All Invoices.................................................................................................................................................. 67 View a Person's Invoices ..................................................................................................................................... 68 Create an Invoice ................................................................................................................................................ 69
Tax Reports .............................................................................................................................................................. 71 NRL Quarterly Return .......................................................................................................................................... 71 NRL Annual Return ............................................................................................................................................. 71 Section 19(1)(c) Tax Report................................................................................................................................. 71
Send Self Assessment Tax Report ................................................................................................................. 71 Landlord NRL 6 .............................................................................................................................................. 72
Head Tenants and Accounting .................................................................................................................................. 73 Accounts Reports ..................................................................................................................................................... 75
Branch Sales Net ........................................................................................................................................... 75 Forecast Management Fees ........................................................................................................................... 75 Advertised Tenancy Pipeline Report. .............................................................................................................. 75 Let Agreed Pipeline ........................................................................................................................................ 76
Accounts Reports ..................................................................................................................................................... 77 Invoiced Sales ..................................................................................................................................................... 77 Un-Invoiced Sales ............................................................................................................................................... 78 Bond Deposits Held ............................................................................................................................................. 79 Bond Deposit Held by DPS .................................................................................................................................. 79 Tenants Bond Deposits Outstanding ................................................................................................................... 80 Guaranteed Rent Balances Report. ..................................................................................................................... 80 Landlord Float Held ............................................................................................................................................. 81 Bank Control Account Transactions ..................................................................................................................... 82 Bank Control Account Movement......................................................................................................................... 82 Retired PDQ Transactions ................................................................................................................................... 82 People Invoiced not Paid ..................................................................................................................................... 83
Reconciliation Reports .............................................................................................................................................. 84 Reconcile System to Bank Report. ...................................................................................................................... 84 Debtors and Creditors.......................................................................................................................................... 89
Control Panel ............................................................................................................................................................ 90 My Account.......................................................................................................................................................... 90 Change Password ............................................................................................................................................... 90 Company Settings ............................................................................................................................................... 90 System Details .................................................................................................................................................... 90 Lettings................................................................................................................................................................ 91 Accounting .......................................................................................................................................................... 91 Sales Accounts .................................................................................................................................................... 91 Staff ..................................................................................................................................................................... 92
Create a staff Member .................................................................................................................................... 92 View a Staff Member ...................................................................................................................................... 92 Modify a Staff Member ................................................................................................................................... 92 Staff Job Details ............................................................................................................................................. 93

Page | 4
Security Details .............................................................................................................................................. 93 Upload a Staff Signature ................................................................................................................................ 93 Delete a Staff Member ................................................................................................................................... 93 Reset Staff Password ..................................................................................................................................... 93 (Administrators only) ...................................................................................................................................... 93
Branches ............................................................................................................................................................. 94 Branch details ................................................................................................................................................ 94 Opening hours ................................................................................................................................................ 95 Internet advertising and up-loaders ................................................................................................................ 95 Branch trading account .................................................................................................................................. 95
Object Types ....................................................................................................................................................... 96 Tenancy Service Types .................................................................................................................................. 96 Tenancy Agreement Types ............................................................................................................................ 96 Tenancy Cancel Types ................................................................................................................................... 97 Tenancy Special Requirements ...................................................................................................................... 97 Facility Types ................................................................................................................................................. 97 Inventory Item Types ...................................................................................................................................... 97 Contractor Types ............................................................................................................................................ 98 Certificate Types ............................................................................................................................................ 98 Appointment Types ........................................................................................................................................ 98 Recommended Tenant Contact Details .......................................................................................................... 98 Applicant Source Types.................................................................................................................................. 99 Applicant Status Types ................................................................................................................................... 99 Tenant Account Status Types......................................................................................................................... 99 Tenant Chase Methods .................................................................................................................................. 99
LetMC.COM Accounts and sage ............................................................................................................................. 100 Introduction To Credit Checking and Referencing ................................................................................................... 101 How to Access functionality .................................................................................................................................... 102
Marketing Section .............................................................................................................................................. 102 Lettings Section ................................................................................................................................................. 102 Maintenance Section ......................................................................................................................................... 102 In Tray ............................................................................................................................................................... 102 Further Functionality within the Referencing section .......................................................................................... 102
Q & A ...................................................................................................................................................................... 103 What is a Credit Check? .................................................................................................................................... 103 What factors do I need to consider when credit checking.? ................................................................................ 103 If I credit check an applicant; will their information be transferred when they become a tenant?......................... 103 What are the legal guidelines to credit checking? .............................................................................................. 103
Individuals Reference Notes and Documents .......................................................................................................... 104 Tenancy Reference Notes & Documents ................................................................................................................ 105 Credit Checking ...................................................................................................................................................... 106
Referencing an Applicant ................................................................................................................................... 106 Credit Information Provided. .............................................................................................................................. 107 Referencing a Landlord ..................................................................................................................................... 108 Credit Check an Individual ................................................................................................................................. 108 Credit Check a Tenancy .................................................................................................................................... 109 Referencing a Contractor ................................................................................................................................... 109
Manage all Credit Checks ....................................................................................................................................... 110 Not Yet Credit Checked .......................................................................................................................................... 110 Equifax Settings ...................................................................................................................................................... 111 Suggested work flow diagram. ................................................................................................................................ 115

Page | 5
ACCOUNTING Next to lettings, accounting is the second biggest section of the software and if not kept up to date and reconciled every day, the accounts will soon become out of date. The ‘Golden Rule’ of the accounts section is; “What happens on the system must be mirrored outside the system and what happens outside the system must happen in the system”, LetMC does not integrate with your bank account. The menu you see and the actions you can perform within the accounts section of the system is dependent on your log in level Client Colleague Logon This level has no access to accounting
Client Staff Login
Accounting
Payments and Deposits Take a Payment
Apply Charges or Refunds
Charge a Tenant Charge a Contractor Charge Landlord by Property Charge a Landlord Refund a Tenant Refund a Contractor Refund Landlord by Property Refund a Landlord
Manage Invoices View a Persons Invoices
Chase Money Tenant Money Owed Chase
Staff View a Staff Member
Branches View a Branch
Client Manager Login
Accounting
Payments and Deposits
Take a Payment Make a Bank Deposit Banking Debit & Credit Cards Make a Cheque Payment Make an Online Payment Make a BACS Payment Make a Card Refund View and Search History
Bank Reconciliation
Upload a Bank Statement Reconcile Bank Statements Manage Payment Groups Manage Bank Accounts Manage Custom Accounts
Electronic Payment References
Apply Transfer Make a Property Maintenance Deduction Make a Landlord Maintenance Deduction
Apply Charge or Refund
Charge a Tenant Charge a Contractor Charge Landlord by Property Charge a Landlord Refund a Tenant Refund a Contractor Refund Landlord by Property Refund a Landlord
View Account Activity
View a Person's Accounts View a Branch's Accounts View Your Company's Accounts
Manage Invoices View a Persons Invoices
Chase Money Tenant Money Owed Chase
Tax Reports NRL Annual Return Section 19(1)(c) Tax Report Send Self Assessment Tax Report

Page | 6
Client Finance Login
Accounting
Payments and Deposits
Take a Payment Make a Bank Deposit Banking Debit & Credit Cards Make a Cheque Payment Make an Online Payment Make a BACS Payment Make a Card Refund View and Search History
Bank Reconciliation
Upload a Bank Statement Reconcile Bank Statements Manage Payment Groups Manage Bank Accounts Manage Custom Accounts
Electronic Payment References
Manage References by User Manage all References
Apply Transfers Make a Property Maintenance Deduction Make a Landlord Maintenance Deduction
Apply Charges or Refunds
Charge a Tenant Charge a Contractor Charge Landlord by Property Charge a Landlord Refund a Tenant Refund a Contractor Refund Landlord by Property Refund a Landlord
View Account Activity View a Person's Accounts View a Branch's Accounts View Your Company's Accounts
Manage Invoices View a Persons Invoices
Chase Money Tenant Money Owed Chase
Tax Reports
NRL Quarterly Return NRL Annual Return Section 19(1)(c) Tax Report Send Self Assessment Tax Report

Page | 7
Client Administrator Login
Accounting
Payments and Deposits
Take a Payment Make a Bank Deposit Banking Debit & Credit Cards Make a Cheque Payment Make an Online Payment Make a BACS Payment Make a Card Refund View and Search History
Bank Reconciliation
Upload a Bank Statement Reconcile Bank Statements Manage Payment Groups Manage Bank Accounts Manage Custom Accounts
Electronic Payment References
Manage References by User Manage all References
Apply Transfers
Make a Property Maintenance Deduction Make a Landlord Maintenance Deduction Make a Manual Rent Transfer Make a Manual Rent Refund Make a Manual Float Refund Make a Journal Transfer Manage Person's Auto Transfers Manage Auto Transfers by Property Manage All Auto Transfers
Apply Charges or Refunds
Charge a Tenant Charge a Contractor Charge Landlord by Property Charge a Landlord Refund a Tenant Refund a Contractor Refund Landlord by Property Refund a Landlord
View Account Activity View a Person's Accounts View a Branch's Accounts View Your Company's Accounts
Manage Invoices View All Invoices View a Persons Invoices Create an Invoice
Chase Money Tenant Money Owed Chase
Tax Reports
NRL Quarterly Return NRL Annual Return Section 19(1)(c) Tax Report Send Self Assessment Tax Report

Page | 8
Introduction Accounts can include collecting and paying money, credit cards, bank deposits, receipts, and reconciling the clients account to meet strict criteria. Then there is invoicing, VAT and NRL (Non resident landlord) tax. LetMC.com accounts system works very similarly to a personal bank account. Each Landlord, tenant and contractor has an account within your system. A tenant’s LetMC account can become overdrawn when rent is due, or if you have applied charges or a bond deposit. When they are in credit, money such as rent and your fees are automatically moved to the landlords account and the agents’ sales account.
Clients’ overdrawn account Rent showing as outstanding
Payment Priority Order given to Outstanding Money. When a tenant has money paid into his LetMC account the order that the system distributes this from Main Account to outstanding accounts is:- Outstanding Bond – This is bond deposit money to be held by the Agent (or passed to the Agent’s DPS account) any outstanding bond amounts are first to be paid Outstanding Rent – This is rent collected for Managed Landlords, this has second priority in the system for payment. Outstanding General – These are usually bond deposits and rent collected for let-only/tenant-find landlords. The Letting Agent’s administration fees charged to the tenant is effectively ‘paid’ last. This movement of money in the system TOTALLY relies on an electronic copy of your bank statement uploaded to LetMC.com. This statement will need to be downloaded from your bank via online banking and saved to a folder on your computer then uploaded onto the LetMC system. This allows the set of transactions (rent in and money out) on LetMC.com to be compared to the uploaded bank statement (rent in and money out). When these amounts are reconciled within the system payments to creditors will be authorised. Tip: Without the electronic bank statement you will need to enter each payment by hand from a paper statement. If available always remember to download the statement daily from your bank and upload it onto the LetMC system. You will probably need to speak to your bank to enable this service.

Page | 9
The money automatically moves to the landlord account when a tenant's rent clears into the agent's bank (after it’s “authorised”)
Once rent paid, money moves to landlord account
Tenants account can become over
drawn
Rent owed
becomes due
Rent
The movement of rent and fees through LetMC.com accounts
The tenancy agreement “payment schedule” sets the amount and due date per tenant
The tenant account becomes overdrawn (owing rent).
Management Fees automatically
taken
Landlord in credit and ready to be
paid
Once the landlord is in credit they are ready for the invoice to be created and paid.
As this money is moved the management fees are deducted and transferred to the agent’s sales account

Page | 10
Payments and Deposits
Take a Payment
If anyone comes in and pays you by cash, card or cheque this must be recorded on the system that you have taken the money, you can then create a receipt. These payments could be for:
Agency fees Bond Rent Reference fees Damage charges Cleaning charge Paying a maintenance invoice
In the accounting menu select Payments and Deposits/Take a payment. Using the search criteria locate the person that is making the payment. Tick the box next to the person and click the next action button.
Payment details
On the take payment first screen check the details of the person paying. In the case of a tenant paying rent the upper part of the screen will give you details of the Person, Property, Tenancy and a balance of their account. From the drop down menu select the Type of deposit, (Cash, Cheque, Card or Bankers Draft). In the deposit details section, fill in the amount and finally a good description of the payment. For Card Payments make sure that you enter the description and the authorisation code from the Debit or Credit card slip. If using multiple accounts make sure that you have selected the correct account from the drop down menu.
When complete, click next on the action buttons and you will be requested to confirm the payment. If any details are wrong you will be able to click on the Back action button to return to the previous screen to make any corrections.

Page | 11
Receipt for payment
On the next screen you will be asked to print a receipt for the payment. Click on the Print button and you will be able to print a receipt for the payee. Once you have printed the receipt click finish on the action buttons.
Effect on Account:
If you were to now look at the persons account the amount is shown with the description wording on the transaction will show “un-made”. This is to indicate that the payment has been recorded on the system but not yet banked or reconciled. No money is available in the system to be paid out to recipients. All you are doing at this time is telling the system that you have taken money.
Stage in accounts
Note: If one cheque is paying for more than one person then each tenant/landlord benefiting should be added separately. The total of the cheque should be added into the Description. For example John Smith pays a cheque for £100 of which £50 is rent for Peter Davies and £50 is rent for John Smith. John Smith is added to the "Deposit Batch Payment" list with an amount of £50 and in the Description you should write "Cheque for £100 paid by John Smith, £50 for Peter Davies and £50 for John Smith". Peter Davies is then added to the "Deposit Batch Payment" list with an amount of £50 and the same description.

Page | 12
Make a Bank Deposit
With the cash and cheques you have collected, at some point you will need to pay them into the bank. LetMC.com creates the paying in slip, saving time by adding up all the separate amounts of payments from customers.
Bank Deposit Details
Selecting payments
Select the account that you are paying this money too if running more than one account. Enter the paying in slip number from your paying in book. Select the payments to bank by ticking the check box next to the payment. And click on update Total, this will total all payments selected for you. Enter this total on your paying in slip with details of what is being paid in.
Confirmation
The next screen will show a non-editable view of the Deposit details screen and ask you to confirm the deposit. If details are incorrect e.g. you have selected a payment that you do not want to pay in, click on the action back button and make any amendments. This is the final step for you to check before these deposits are entered as being paid into the bank on the system. Click Next on the action buttons to create a paying in slip and save the bank deposit on the system.
Paying in Slip
You can now print out copies of the system generated paying in slip. Click on the print button and you will get two slips, one file copy if you need to keep hard copies and one bank copy for use in conjunction with your paying in slip if required. Click cancel to abort this bank deposit if you feel that anything is wrong and start again. Remember it is better to be sure than make a mistake. Effect on Account: When the deposit has been made through the LetMC system the persons account description will indicate that the payment has been “made”. The system now knows that the money has been banked, but still the money is unavailable to be moved to the recipients account as it is yet to be reconciled.

Page | 13
Credit Card Payments
Activating card payments
(Call LetMC) If you are using card machines to take payments you will need to have the functionality switched on by LetMC (Call Support for assistance).this now shows on the take payment screen as a method of receiving money. Using Take a Payment – Card Deposit means that card payments collected will immediately be “Authorised” on the persons account this would mean that the money is immediately available to transfer to the landlord as rent. You can however make all card payments subject to reconciliation (Call LetMC support for assistance)*. With this activated payments taken by card will not become Authorised transactions until they are reconciled in Reconcile Bank Statements. This means that for example, rent collected from a tenant would not be transferred to the landlord until the Card Company had paid the money into the Client Bank Account and reconciled in LetMC. To take a card payment, go to Accounting Payments and Deposits search for the payee on the system. In the Deposit Details Type select Card Deposit the procedure is then the same as taking any other payment.
*On activating Enable Credit & Debit Card Reconciling a new option will appear in Accounting called Banking Debit & Credit Cards which is similar to Make a Bank Deposit. This option is shown to staff members set to the security level Client Manager and above.

Page | 14
Banking Credit and Debit Cards
Group together the day’s card payments in Banking Debit & Credit Cards. (The card payments should be grouped together to match the amount expected to be paid by the Card Company into the Letting Agent’s Client Bank Account) A good method of working would be to check the merchant slips from the card machine against the entries in Banking Debit & Credit Cards and then attaching the merchant slips to the summary printed on completing the Banking Debit & Credit Cards steps.
Reconcile Card Payments
Banking Debit & Credit Cards adds a Payment Group into Manage Payment Groups in readiness for reconciling in Reconcile Bank Statements. Only once the card payment group is linked (and posted) against a bank statement entry does the money become “Authorised” on the tenant’s account and therefore be made available to transfer to the landlord as rent.
Points to note about Card Reconciliation
Letting Agencies that use Card Companies who don’t transfer the card payments taken to the Letting Agents Client Bank Account within a few days should consider not activating Reconciling Banking Debit & Credit Cards . This is because there will be a considerable delay in rent collected by card being transferred to the landlord. These Letting Agents should manually reconcile payments taken by card by using Reports>Accounts Reports> Retired – PDQ Transactions
Page | 15
Paying people through the LetMC System
If you are reconciling daily in the system then you will have the ability to pay daily this not only helps you to keep on top of payments but it will also keep your landlords happy as they will not be waiting for 2-3 weeks to be paid, they will be receiving their money within 2-3 days!
Payments
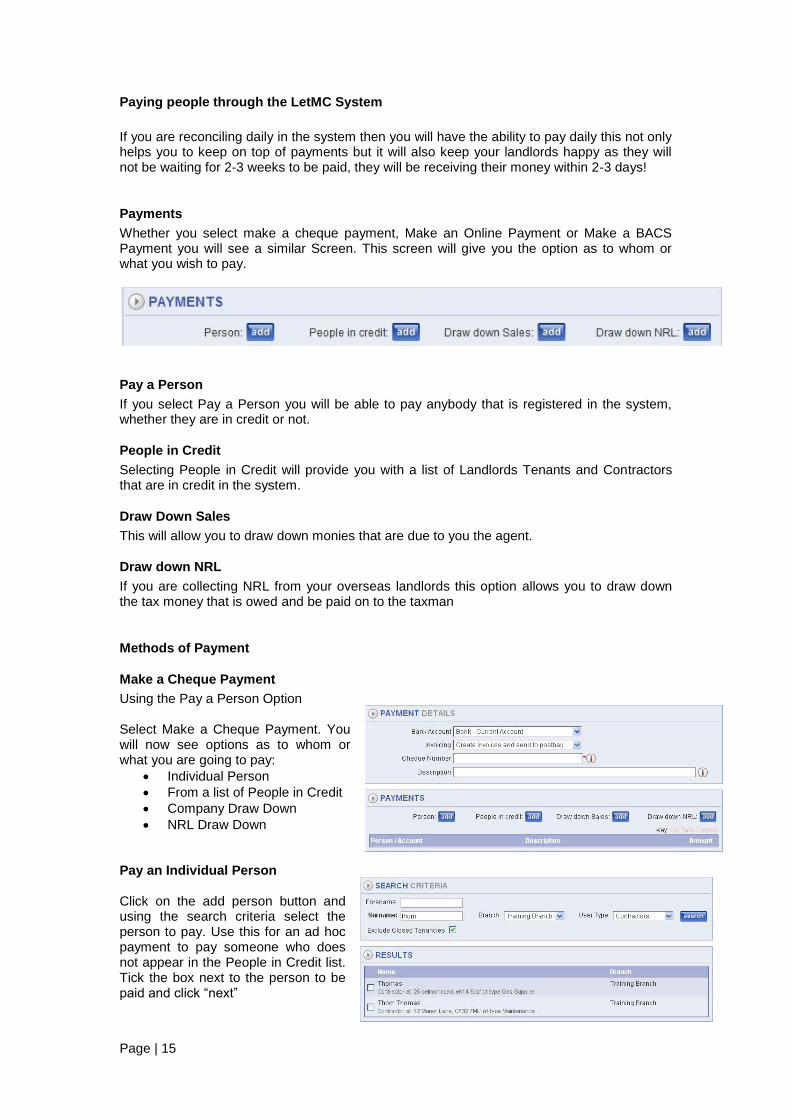
Whether you select make a cheque payment, Make an Online Payment or Make a BACS Payment you will see a similar Screen. This screen will give you the option as to whom or what you wish to pay.
Pay a Person
If you select Pay a Person you will be able to pay anybody that is registered in the system, whether they are in credit or not.
People in Credit
Selecting People in Credit will provide you with a list of Landlords Tenants and Contractors that are in credit in the system.
Draw Down Sales
This will allow you to draw down monies that are due to you the agent.
Draw down NRL
If you are collecting NRL from your overseas landlords this option allows you to draw down the tax money that is owed and be paid on to the taxman
Methods of Payment
Make a Cheque Payment
Using the Pay a Person Option Select Make a Cheque Payment. You will now see options as to whom or what you are going to pay:
Individual Person
From a list of People in Credit
Company Draw Down
NRL Draw Down Pay an Individual Person Click on the add person button and using the search criteria select the person to pay. Use this for an ad hoc payment to pay someone who does not appear in the People in Credit list. Tick the box next to the person to be paid and click “next”

Page | 16
Payment Details
Enter the amount and description and click “finish”. Payment will be added to the payment details. Remember to select from the drop down menu the Invoicing method, then enter a cheque number followed by the description, finally click “next” on the action buttons.
Confirm Payments
Confirm the payment details and click next, on the following screen you can print payments and invoices if required (the invoice will go to the postbag anyway). Click “finish” on the action buttons to complete the process This method of payment can also be used with:
People in Credit Draw Down Sales NRL Draw Down
Stop Duplicate Cheque Numbers Being Used.
This can only be set by LetMC staff. Please contact LetMC if you wish to activate this function. If duplicate cheque numbers are not allowed then on entering a duplicate cheque number in Accounting>Make a Cheque Payment it will not be possible to continue the process. A pop-up warning informs the user of the date, the person paid and payment description for the duplicate cheque(s). In the
situation where the cheque number is correct then the Letting Agent can either destroy the cheque and use the next one in the book or ask LetMC to un-tick Allow duplicate cheque numbers to allow them to use the duplicate cheque number.

Page | 17
Make an Online Payment
Using the People in Credit Method Payment Method After you have opened the Make an Online Payment method, click on the People in Credit Button.
Select People
On the following screen select whom you are going to pay from the drop down Menu, and tick the selection boxes next to their name, paying particular attention to the bank details column. For this method you cannot select people with no bank details.
With the people selected click the ok action button. Check the Payments Payments to be made online will now be listed. If any payment shows the recipients’ name and the amount in deep red then this is indicating that the system threshold has been exceeded. It does not mean you cannot pay that person but it is just indicating that you are paying out a large amount and you may wish to confirm this before going any further. Other payments may show the payment completely highlighted this indicates that the recipient has no bank details entered into the system. You can remove this particular payment by clicking the delete button and then pay that person by another method.
If you had not noticed that someone in the list did not have bank details registered you will be prompted to remove them from the list.
Invoicing
Select your invoicing method and then type in a good description for the payment. Click next to continue

Page | 18
Confirm Payments The confirmation page is once again your last chance to check your payments and invoicing method before you tell the system that you are actually going to make these payments. If all is confirmed click on the next button
Print Payments
On the next screen you will now need to click on the Print Payments button to download a list of the payments that you are going to make online.
This will give you all the details that you require to make these online payments.
Make a BACS Payment
Using People in Credit
Payment Method
After you have opened the Make a BACS Payment method, click on the People in Credit Button.
Select Recipients
Tick the boxes next to the people that you are paying by this BACS method. Once again take care not to select anyone without bank details, registered on the system. Click ok on the action buttons to continue.

Page | 19
Payment Details
Make sure that the correct details are showing in the Bank and Invoicing method drop down menus then type in a description for the payments. Click next on the action buttons.
Confirm Payments
Confirm your payments to be made and then click the next action button.
BACS File
When the payments screen shows you will need to click on the button that shows ‘Export BACS Payments. You will then be prompted to save this file to your pc. After you have downloaded the
BACS file click finish on the action buttons. You must now log on to your online bank and complete the transaction by uploading the BACS file to the bank. When this is uploaded all the payments will be made.

Page | 20
Draw Down Sales
The system can be configured in two different ways to draw down sales both methods are explained below. If possible sales should be drawn down at the Month end. Obviously there are times when a company may need working capital so a mid month draw down will need to be done these draw downs will be explained in this section.
Draw Down Sale Classic Method
Select a method of payment (Make an Online Payment) Enter a description e.g. Draw Down November Sales Click on the Draw down Sales button.
When the draw down screen opens the sales made figure will be default to the previous month. This figure is the total of all invoiced sales made and is available to draw down for the selected month. It is recommended that the monthly draw down is carried out on the first of each month. If the company is VAT registered then there will be two draw down boxes one for Net Sales and the other for VAT (if VAT registered) The example shown below is showing that the previous month is November and the total sales for that month. This would have been drawn down on the first of December. The figures shown at the top of the screenshot are the balances of Sales and VAT for the current Month. These figures are available to be drawn down if required during the current month. They are sales that an Invoice has been produced for and not necessarily been paid to the agent.

Page | 21
If a mid month draw down is to be carried out then in the draw down screen the current month must be selected. The screen below now shows that the current month is selected and that the current sales total is equal to the amount that is available in the account for the agent to draw down.
If the agent is now carrying out a mid month draw down for working capital then the amount required must be entered into the Draw down Sales box. As VAT will not be dealt with at this time the agent must enter 0 in the Draw down VAT box.
Once the draw down amount has been entered the Update totals button should be clicked this amount is now available to draw down. Complete the draw down procedure by clicking ok, next, next and finish on the action buttons. The agent should now go to their online bank and physically transfer that amount into their trading account. If the agent were to look at the draw down figures on the system now they would reflect the money taken. Balance of Company Sales account shows money available to the agent but the month’s sales still shows that accumulative total of sales (see graphic below)

Page | 22
Draw down sales by paid invoices only
The system can be configured for Agents who want to ensure that only money for paid invoices is transferred out of the Clients Account (i.e. drawn down). It also ensures that only authorised funds are used to pay invoices. To activate the paid invoices method the agent should contact LetMC support. You should first check that the new functionality suits your business and then carefully plan the transition. When using this method the draw down screen will only allow you to take money that has been reconciled. There is no ability to select a specific amount to draw down as in the classic method. On open the draw down screen the balance of the company account will be shown. This may be a positive balance if you have yet to draw down or if you are drawing down daily it will be zero or a balance of the current days reconciled bank statement. The draw down paid invoices section of the screen will indicate what you can currently draw down. This is default to one day in arrears. In the example shown above the balance of the sales account is positive but there is nothing to draw down. This is because the reconciliation was only carried out on the current date. If you need to draw down any monies taken on the same day you will need to change the calendar to indicate the current days date. On the following day if the draw down screen is opened then the sales account balance will be available to be drawn down. The Invoices to Drawdown button will open up a excel file listing all paid invoices involved in the draw down and their details. To carry out the draw down tick the check box beside the default branch, click the update totals button and click ok on the action buttons. Confirm the transaction and transfer the funds from your client account to the Trading account.
Page | 23
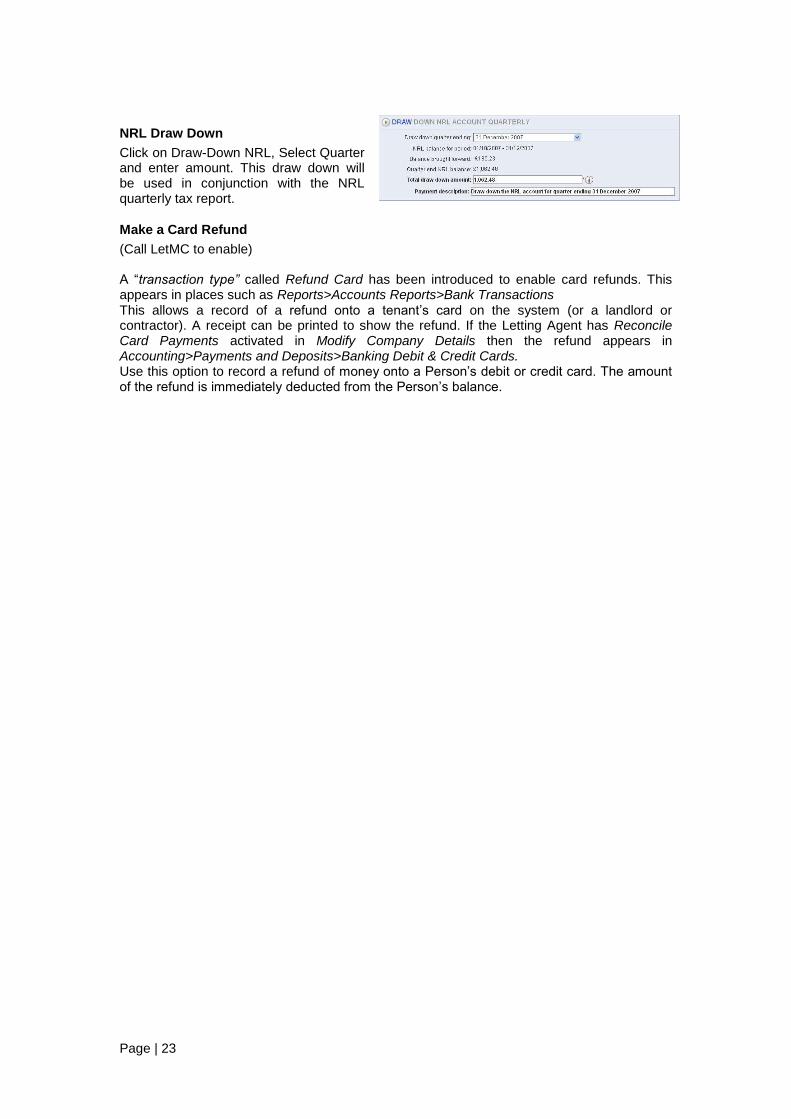
NRL Draw Down
Click on Draw-Down NRL, Select Quarter and enter amount. This draw down will be used in conjunction with the NRL quarterly tax report.
Make a Card Refund
(Call LetMC to enable) A “transaction type” called Refund Card has been introduced to enable card refunds. This appears in places such as Reports>Accounts Reports>Bank Transactions
This allows a record of a refund onto a tenant’s card on the system (or a landlord or contractor). A receipt can be printed to show the refund. If the Letting Agent has Reconcile Card Payments activated in Modify Company Details then the refund appears in Accounting>Payments and Deposits>Banking Debit & Credit Cards. Use this option to record a refund of money onto a Person’s debit or credit card. The amount of the refund is immediately deducted from the Person’s balance.

Page | 24
View and Search History
The history option will show you a history of payments and deposits made. Set date range to search and number of results required A search tab enables a user to search for a specific amount or a cheque number reference code. When searching for an amount it must be entered exactly as it appears in the accounts. The search will only return amounts that match the value entered into the search exactly. Match correct to 2 decimal figures; if no decimal point is entered then the results will only include matching round figures (e.g. no decimal point). Take into account whether a plus or minus sign has been entered (outgoing payments must be pre-fixed with a minus sign).
Search for £200
The search will return all payment groups which contain the matching amount entered in the search i.e. when a Paying In slip has a total of £700 that is made up of 2 items of £200 and £500 then a search for £200 will display the paying in slip with a note saying: 'This includes a £200 amount within it'.
System returns all activity with a £200 transaction
Open print job for details All amounts searched for must have been reconciled otherwise they will not show in the search. If you search by Cheque Number then you must put the whole number. You cannot search by a partial number.

Page | 25
Download your bank statement The first stage of Bank reconciliation comes by downloading your bank statement from your bank. By logging on to your online banking system you can download a current statement this will show entries up until midnight from the day previous. This file will be in the format of an xml file (Extensible Markup Language, as used by excel) or a csv file (comma-separated values). These data files contain all the transaction data from your bank account. Once you have downloaded the statement from your bank save it to a folder on your PC.
Upload your statement onto the LetMC System To upload your bank statement onto the LetMC system select: Accounting > Bank Reconciliation > Upload a Bank Statement
In the upload screen you will now have to click on the Browse button this will take your PC’s folders where you now need to navigate to the location where you saved the bank statement. When you have found the statement highlight it by clicking on it once then click on the “open” button.
Uploaded file name appears here

Page | 26
You should now see the file name appear in the upload statement screen in the LetMC System you should now click on the upload button to load it into LetMC. Finally click finish on the Actions toolbar. Points to note on statement upload. The system will only process bank statement entries with a date before the upload, i.e. it will not process any statement entries for the current uploaded day. This is to avoid missing entries that may take place later in the banking day. The system registers the date of the most recent statement entries uploaded to each bank account. The system will then not process any subsequently-uploaded bank statement entries with a date on or before that date. This is to avoid duplicate bank statement entries. If you realise that you have missed a bank statement upload for a date earlier than the last bank upload then please contact the LetMC. LetMC will then upload any missing entries for you.

Page | 27
Reconcile Bank Statements Note; if you are not using the reconcile Bank Statements option this section will not appear on the software. To begin the bank reconciliation process you should select: Accounting > Bank Reconciliation > Reconcile Bank Statements You should see a similar graphic to the one below.
A list of bank statement entries will be displayed. By default, the list is filtered to show Un-posted entries with a date within the last month. You can set this date period to suit. Looking at the statement now in the system you will notice that the figures show some positive and some negative. The positive amounts are monies being paid to the system and the negative amounts are monies that are being paid out. There are likely to be multiple pages of statement entries.
All these figures now need to be linked with their corresponding Payments or Payment Groups within the system. Payment groups Take a payment’ then ‘make a bank deposit’ and ‘make an online/cheque/BACS payment’ all create PAYMENT GROUPS on LetMC.com. You can see these in ‘Manage Payment Groups’ or when you ‘link as payment or deposit’ in the bank reconciliation. So, anything coming into the office and banked and any payments you make and record on LetMC.com create PAYMENT GROUPS. The system will expect to see these in the bank statement in the next few days.
Page | 28
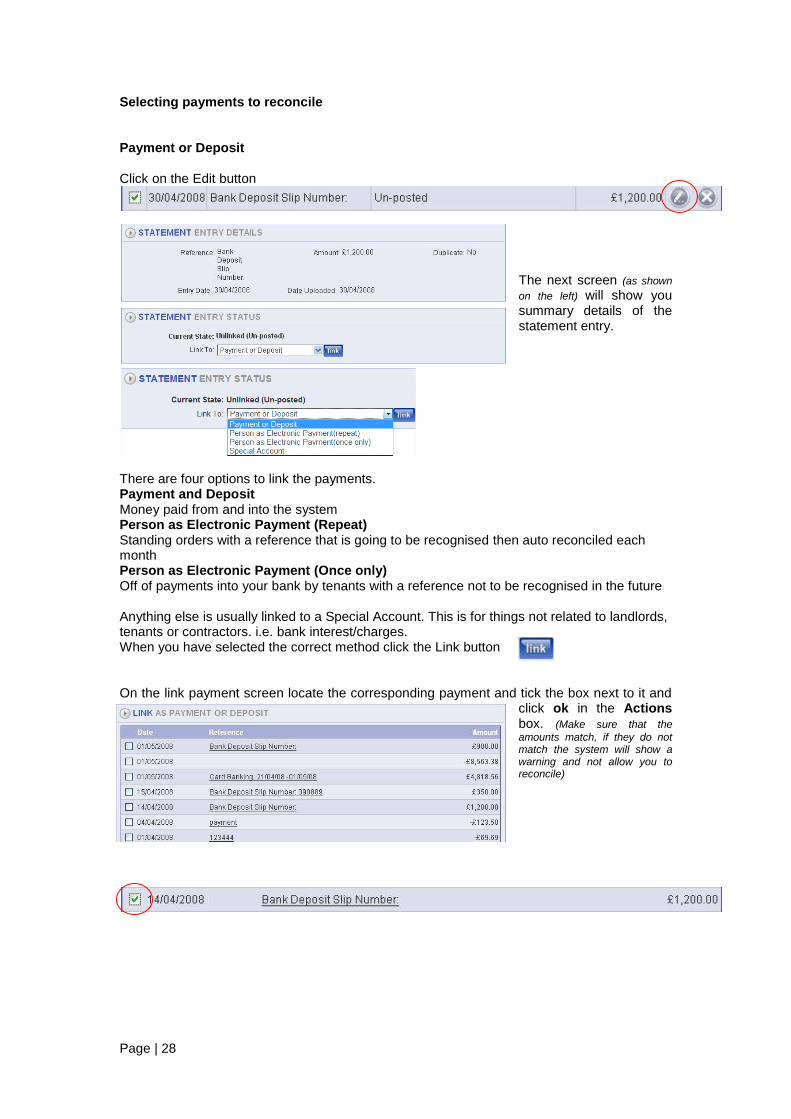
Selecting payments to reconcile Payment or Deposit Click on the Edit button
The next screen (as shown
on the left) will show you summary details of the statement entry.
There are four options to link the payments. Payment and Deposit Money paid from and into the system Person as Electronic Payment (Repeat) Standing orders with a reference that is going to be recognised then auto reconciled each month Person as Electronic Payment (Once only) Off of payments into your bank by tenants with a reference not to be recognised in the future Anything else is usually linked to a Special Account. This is for things not related to landlords, tenants or contractors. i.e. bank interest/charges. When you have selected the correct method click the Link button On the link payment screen locate the corresponding payment and tick the box next to it and
click ok in the Actions box. (Make sure that the
amounts match, if they do not match the system will show a warning and not allow you to reconcile)

Page | 29
Once the ok button is clicked a Statement Entry Status screen will open. On here you will see that the entry has been resolved yet still un-posted within the system. Also the system will have linked it to the person connected to the Payment Group. You may also unlink the entry if required.
Click Finish on the Actions bar to continue You will now have been returned to the statement screen where you should notice that the statement
entry has now changed to blue text. This is showing that the entry has been resolved but not yet posted.
Electronic Payments (Standing Orders) When a standing order shows on the statement you will not find a payment group on the system to link it to as it has happened solely outside of the system. For instance a tenant has set up a standing order to pay their rent. So you now need to link it to the person. Then click on the Edit button
On the entry Status Screen select Person as Electronic Payment (Repeat) and click
Using the search criteria enter the person’s name to link the payment to (Closed tenancies can also be searched for). Tick the box next to their name then click the ok button on the Actions bar
The Entry Status screen will now show that the entry has been resolved but not posted. You may also unlink the entry if required. Click Finish

Page | 30
The statement screen will now show Un-Posted - Resolved This standing order will now be logged as an electronic payment reference. This can be verified by opening Accounting > Bank Reconciliation > Electronic Payment References > Manage References by User
When you are in here use the search criteria to find the person. Tick the box next to their name and click next.
The next screen will give you a list of electronic payments that have been recorded in the system.
This Electronic reference will enable automatic recognition of the standing order payment next time it shows on your uploaded bank statement. The system will then automatically resolve the payment and it will show as blue ready to be posted.
Electronic references can be cancelled at any time by ticking the box next to the one you want to cancel and then clicking the Cancel button.
Linking and unlinking a tenant Standing Order in a bank statement. In Accounting>Bank Reconciliation>Reconciling Bank Statements, it is possible to unlink 'Person as Electronic Payment' for a particular payment reference and link a different person (e.g. different payee on the same tenancy) to a Standing Order reference without affecting statement entries which have been posted previously. The original payment reference is archived and when Accounting>Bank Reconciliation>Manage User Payment References for the original payee is selected the payment reference has 'Before dd/mm/yy' added to the reference. Bounced Cheques and Electronic Linking Cheques paid to you and subsequently bounce in the bank can also be linked as an electronic payment, thus cancelling out the initial payment. Tenant owes Account shows Debit balance -£200 Take payment by cheque of £200 Account shows balance of £0 Bounced cheque shows on reconciliation -£200 Electronic link to account Account Shows balance of -£200 Representation of cheque shows on reconciliation £200 Electronic link to account Account Shows balance of £0

Page | 31
Electronic Payments (Payments made into your bank by tenants) If tenants pay into your account not using a standing order these payments will show on your uploaded statement with a reference that may differ each month, these are then linked once only.
The example above shows a credit Payment that has come from a Branch of Barclays. In the first instance you should investigate who this money belongs to. A good place to start is probably the Tenant Money Owed Chase List. When you have identified the correct recipient begin the reconciliation process by clicking on the edit button.
On the entry Status Screen select Person as Electronic Payment (Once Only) and click the link button
As in the repeat method use the search criteria enter the person’s name to link the payment to (Closed tenancies can also be searched for). Tick the box next to their name then click the ok button on the Actions bar.
The Entry Status screen will now show that the entry has been resolved but not posted. You may also unlink the entry if required. Click Finish

Page | 32
Special Account Payments to the Special Account will be monies that not related to landlords, tenants or contractors. i.e. bank interest/charges. These “custom” accounts can be created in Accounting > Bank Reconciliation > Manage Custom Accounts
Click on the Edit button
On the entry Status Screen select Special Account and click
On the Select Account page you now need to place a tick in the Interest and Bank Charges box.
Now click on ok on the Actions Bar
Statement Entry Status will now show Un-Posted – Resolved. You may also unlink the entry if required.
Click Finish to return to the statement page The payments that have been resolved will now need to be posted. That is, telling the system that all these payments can now be directed to the correct accounts and debits and credits applied.

Page | 33
To post the resolved items tick the boxes next to the payments then click the Post Button. You can do these individually or as the example shows select all the resolved items and post them all together. Posting the Statement Entry will debit the Company 'Clearing' Account and credit the Person’s 'Main' Account or Company Account, depending on how the entry has been linked. The transaction displays the Statement Entry Description.
The statement will now show only payments left to resolve Continue the process until all payments have been resolved and posted
Click Finish on the Action Bar when done
Effect on Account: Once the payments have been reconciled the corresponding transaction on an account will now show that the payment has been “reconciled” which means that the system recognises that the payment is agreed but they may still be subject to an authorisation period, when the amount is deemed as “authorised”. This means that the money is now available to be transferred to the recipient. E.g. A tenants’ payment of rent is now available to be transferred to the landlord automatically.
Page | 34
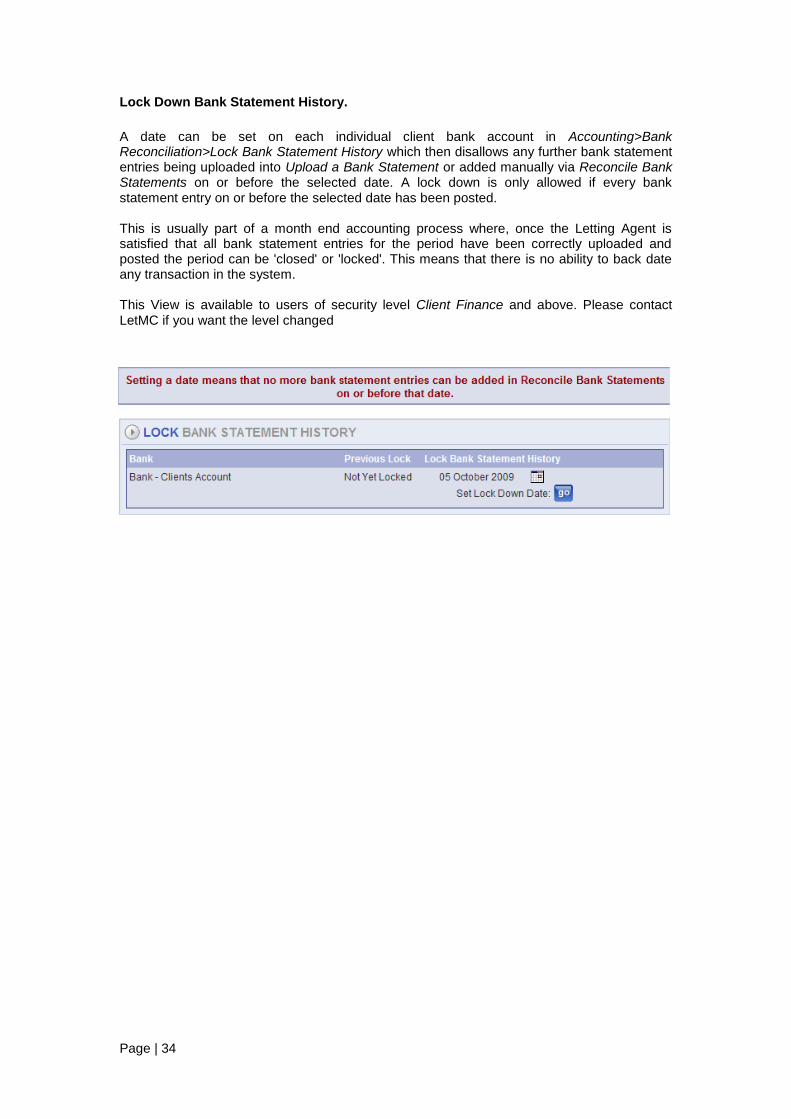
Lock Down Bank Statement History.
A date can be set on each individual client bank account in Accounting>Bank Reconciliation>Lock Bank Statement History which then disallows any further bank statement entries being uploaded into Upload a Bank Statement or added manually via Reconcile Bank Statements on or before the selected date. A lock down is only allowed if every bank statement entry on or before the selected date has been posted. This is usually part of a month end accounting process where, once the Letting Agent is satisfied that all bank statement entries for the period have been correctly uploaded and posted the period can be 'closed' or 'locked'. This means that there is no ability to back date any transaction in the system. This View is available to users of security level Client Finance and above. Please contact LetMC if you want the level changed

Page | 35
Electronic Payment References Management
Electronic Payment References by User
Electronic Payment References enable a transaction to be linked to a Person automatically when Reconciling Bank statements. Select a Person: Select whether to view References for a Landlord, Tenant or Contractor using the User Type drop-down list. Then search for and tick the box next to the person required. When selecting a Tenant, make sure you choose the tenant record for the correct property and tenancy. Click next action to view the selected person's References (you will only see EPR in here if it has been set whilst reconciling). Then click finish.
Manage All Electronic Payment References
The list displays Electronic Payment References that have been linked to the person (when the person’s first Electronic Payment Reference was recognised on a bank statement). You can cancel a Reference by ticking the box next to it in the list and clicking Cancel at the bottom of the list.
Note: Cancelling a Reference means that any future transaction on a bank statement will not be automatically linked to the person. Click the finish when you have finished viewing and cancelling Electronic Payment Reference

Page | 36
Manage Payment Groups
‘Take a payment’ then ‘make a bank deposit’ and ‘make an online/cheque/BACS payment’ all create PAYMENT GROUPS on LetMC.com. You can see these in ‘Manage Payment Groups’ or when you ‘link as payment or deposit’ in the bank reconciliation. So, anything coming into the office and banked and any payments you make and record on LetMC.com create PAYMENT GROUPS. The system will expect to see these in the bank statement in the next few days. Within the Manage Payment Groups screen you can; view, combine, split and delete Payments and Payment Groups. Initially, a list of Payments and Payment Groups created within the system against the Default bank account is displayed (as set up in Manage Bank Accounts). There may be multiple pages of Payments Information included in the list: Date; This is the date the bank deposit was created; it displays the Payment or Payment Group Description, Type and Reference. Amount Outgoing money such as cheque, BACS or online payments are negative amounts. Incoming money such as deposits are positive
Payment Groups may be combined to form other Payment Groups. Any groupings may subsequently be split back into their constituent Payments. Note; Payment Groups that have been reconciled but not yet posted will still show here
Combining and Splitting Payments Combine Payment Groups Click the Combine Button to combine two or more Payments in the list into a single Payment Group. Select the payments to combine by ticking the box next to the required Payments and then click the OK Action to combine them. Split Payment Groups Click this Action to split a Payment Group into its constituent Payments. Select the Payment Group to split by ticking the box next to it and clicking the Split Button. Delete Payment Groups Use the delete button to delete Payments and/or Payment Groups. Select the Payments or Payment Groups to delete by ticking the box next to each one required and then click the delete button click OK to make the deletion. Deleting a Payment Group will contra every Payment contained within the Payment Group. (This will credit/debit the Company Clearing Account and debit /credit the Person’s 'Main' Account (or other relevant Account). The transaction will have the description 'Payment Cancellation: Statement-Entry-Reference'). Editing Payment Groups It may be that a mistake was made in the amount when a Payment was initially created using an option under Payments and Deposits. In this case, the Payment must be edited to match the Statement Entry it corresponds to so that they can be linked. To view and edit a Payment or the Payments within a Payment Group, click the edit button.

Page | 37
'Lock Down' Bank Statement History.
A date can be set on each individual client bank account in Accounting>Bank Reconciliation>Lock Bank Statement History which then disallows any further bank statement entries being uploaded into Upload a Bank Statement or added manually via Reconcile Bank Statements on or before the selected date. A lock down is only allowed if every bank statement entry on or before the selected date has been posted. This is usually part of a month end accounting process where, once the Letting Agent is satisfied that all bank statement entries for the period have been correctly uploaded and posted the period can be 'closed' or 'locked'. This means that there is no ability to back date any transaction in the system. This View is available to users of security level Client Finance and above. Please contact LetMC if you want the level changed.
Manage Bank Accounts
Use this option to amend details of your bank account or add a new Bank Account Details that can be amended:
Bank Name and Type
Card Payment Type
BACS Details
Direct Debit Details
Associate Bank accounts with selected branches.
For multi-branch companies, it is possible to restrict the bank accounts that are available for use by each individual branch. This will be useful to multi-branch companies that have separate bank accounts for each branch. This affects most views in the following sections:-
Accounting>Payments and Deposits section:-
Take a Payment Make a Bank Deposit Banking Debit and Credit Cards Make a Cheque Payment Make an Online Payment Make a BACS Payment Make a Card Refund Call Direct Debits Manage Direct Debits. In the Bank Reconciliation section:- Upload a Bank Statement, Manage Payment Groups, Electronic Payment References>Manage all References The standing order mandate (usually in the Tenancy Agreement) is also affected. *If the Tenancy Agreement relates to a Let Only/Tenant Find tenancy then the bank details listed in the standing order will be the landlord’s own bank account details. In cases where no bank account details have been recorded for the landlord, the details will be left blank and can be filled in by hand.

Page | 38
By default, new bank accounts are available for all branches. Client Administrators (call LetMC Client Support for assistance) are able to restrict bank accounts from being used by selected branches by going to Accounting>BankReconciliation>Manage Bank Accounts and editing a bank account and then if multi branch select or de-select the tick boxes for each branch in the Branch Usage section.
Manage Custom Accounts
This option allows customisation of special accounts
If you need to use these options it is advisable to call the LetMC Support team for assistance
Associate Custom Accounts with selected Bank Accounts.
Custom accounts can be restricted to only apply to selected bank accounts. The default setting will allow custom accounts to apply to all bank accounts registered; this can be restricted by Client Administrators(or LetMC Client Support) who can set custom accounts to show for selected bank accounts, for example only the bank accounts that are associated with a particular custom account. This is done by selecting the relevant custom account in Accounting>Manage Custom Accounts and selecting or de-selecting the tick boxes for each bank account in the Bank Usage section.

Page | 39
Apply Transfer
Maintenance Deductions The system may be set up to operate in different ways when it comes to maintenance deductions. LetMC support can enable the method you require. The standard setting for deductions is set at ‘Enable Supplier Pending Payments. This tells the system that, if the landlord has insufficient or no funds then the contractors invoice can be entered onto the system but no funds will be transferred to the contractor until the landlord has a positive balance. This balance may be in the way of a float balance or alternatively the system will wait until the landlords main account is in credit. If pending payments are not set then it is possible to pay the contractor even though the landlord is not in credit or request through support that they enable ‘No Deductions if Insufficient Funds’.
Property Maintenance Deduction (with Pending Enabled)
Select the property that the deduction is being made against Select Contractor that has submitted the invoice to be paid. Landlord has no funds at present which means you will not be able to pay the contractor at this time but you will still be able to lodge the deduction. Insert the amount of the contractors invoice and click the next action button Confirm what is to happen in the accounts. If the ‘NRL Exempt’ box is un-ticked then the Landlord 'Supplier Payments (NRL Inclusive)' Account is debited. This triggers a further transaction, which credits the Landlord’s 'NRL Payments' Account and debits the Company 'NRL' Account

Page | 40
Landlords account As the landlord has no funds the pending amount to pay is set against the Supplier Pending Payment Account
Contractors account The corresponding amount is shown in the contractors Pending Payments account
Most agents will work on a 30 day payment of contractors invoices so this will be satisfied when the landlord has received rent. Landlord has funds available The supplier payments pending account on the landlord is now credited and marked as fully paid
The landlords Supplier payments account is debited
The contractors payment pending account is debited and marked now as fully paid
The contractor’s Main account is credited and they can now be paid

Page | 41
Make a Transfer Between People
Select a Person (From)
Using the standard search criteria select the person from whose Main Account the transfer should come. When applying a transfer from a tenant, make sure you
choose the tenant record for the correct property and tenancy that this transfer is related to. Click Next to continue. Select a Person (To)
Using the search criteria select the person to whose Main Account the transfer should be made. Click Next to continue.
Enter the details of the transfer: Amount (mandatory) Enter the amount of the transfer. Transfer Type (This is automatically filled in and shows the people that the transfer is to be made between). Enter a description of what the transfer is for, and when you are sure that the details are correct, click Finish to make the transfer. (If you need to modify any details, click Back to return to Step 2. Effects in accounting: Person From; Main account is Debited Person To; Main Account Credited

Page | 42
Make a Manual Rent Transfer
Example: Paying the Landlord rent direct from the Tenants’ account. Using the standard search criteria select the tenant that you are going to transfer rent from and click next.
Enter the amount to transfer in the Rent Transfer Details, and then click next
You will be required then to confirm the transfer then click finish. The rent will now be transferred to the landlord Effects in accounting: Tenants Outstanding Rent Account is debited Landlords Rent Collected Account is credited
Make a Manual Rent Refund
Landlord returning rent (overpayment) Using the search criteria find the tenant and click next. Select the amount of refund and click next then finish
Select the amount of refund and click next to confirm the transfer then finish to complete the transaction.
Effects in Accounting Tenants Main Account is credited Landlords Rent Collected Account is debited

Page | 43
Make a Manual Float Refund
Returning Float Account Money to Landlord Using the standard search criteria search for the Landlord to make the transaction on, tick the box next to their name and click on next
Enter the amount to be refunded click next then click finish to confirm the transaction. The landlords Float account will be debited and his main account credited.
Effects in Accounting Landlord Float Account is debited Landlord Main Account is credited. The landlord now appears in people in credit.
Manage Landlord Float
Managing the landlords float amount alleviates the need to go to landlord details to change amounts. It enables an automatic journal to be posted that refunds or collects more float. If the landlord does not have a positive main account balance and the amount of float is increased, then the system will automatically transfer funds up to that amount when money hits the landlords main account. Manage Landlord Float can be found under Accounting > Apply Transfer, this allows the amount of float required for a landlord to be changed. After searching for the required landlord you will see a screen as shown below.
The screen shows the current float balance that you are holding against the landlord. The figure below that is the minimum amount that should be held against the landlord. The example above shows that the landlord has a custom amount set of £200. This was set in landlord details. If now you require to change the amount to be held, the new amount should be set in the Custom Float Amount box. When the new amount is set click on the next action button.
The system now resets the landlords float to be retained amount to the new figure and if more than the new figure is held then the system will refund the amount to the landlords’ main account.

Page | 44
Make a Journal Transfer
Transferring money between different accounts, for example the transaction shown below is for transferring an amount from a tenant’s Main account to their Outstanding Rent account this will make rent due on the tenants account if for some reason the payment schedule is not picked up. This schedule may not have been set or the tenancy was signed after the first rent due date.
The first action, after selecting Make a Journal Transfer, which needs to be taken is to enter a description of the transaction. When this is done click on Create Person Posting.
Using the standard search criteria select the tenant who is going to have the rent deducted from their account, and click next on the action buttons.
The next screen will be the first part of the transfer process this is to select the account you are taking money from. In this case the rent which was paid by the tenant, but missed by the late signing of the tenancy, is still in the Tenants Main account. So it is from this account that the rent has to be taken, enter the rent amount in the appropriate box as a negative amount which will deduct the money from the selected Main account. Click finish to continue.
On the postings screen you will see the first part of the transaction confirmed. To complete the transaction of rent transfer you will now need to select the person posting again
Once again you will need to search for the tenant using the standard criteria and click next on the action buttons.

Page | 45
On the next screen you will need to enter the amount to add to the outstanding account. When done click on the finish action button.
This time we need to tell the system where the money is going to. In this case we need to move it to the Rent Outstanding account for the Tenant
On the postings screen you will now see both parts of the transaction. To complete this transaction click ok. The transaction will now be complete and rent due will be ready to be transferred by Manual rent transfer.
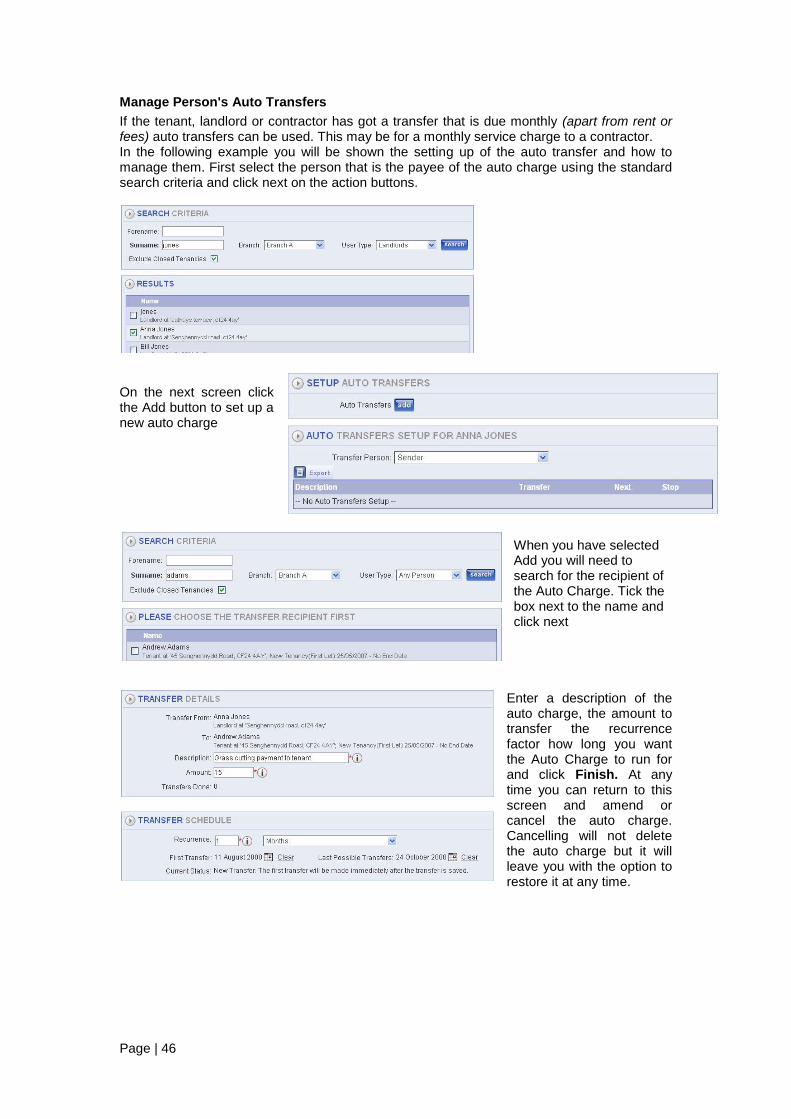
Page | 46
Manage Person's Auto Transfers
If the tenant, landlord or contractor has got a transfer that is due monthly (apart from rent or fees) auto transfers can be used. This may be for a monthly service charge to a contractor. In the following example you will be shown the setting up of the auto transfer and how to manage them. First select the person that is the payee of the auto charge using the standard search criteria and click next on the action buttons.
On the next screen click the Add button to set up a new auto charge
When you have selected Add you will need to search for the recipient of the Auto Charge. Tick the box next to the name and click next
Enter a description of the auto charge, the amount to transfer the recurrence factor how long you want the Auto Charge to run for and click Finish. At any time you can return to this screen and amend or cancel the auto charge. Cancelling will not delete the auto charge but it will leave you with the option to restore it at any time.

Page | 47
Looking at a person’s auto transfers, you will now see a list of Auto Charges that are set. If you now click on the edit button you will see a screen showing the auto charge details.
This time you may notice an extra button; Transfer Cancel. Selecting this cancel will stop the Auto transfer but it will remain on the system if required at a later date. The button now shows Restore. Clicking the finish action button will take you back to the menu screen.
Manage Auto Transfers by Property
This function will list auto charges by property cancelling and restoration of auto charges can also be carried out here. Search and select the property you want to look at auto charges for.
With the property selected a list of auto charges that are set to the property selected will be displayed. From here you can edit, cancel or restore by clicking on the Edit button. Filter by User Type, Transfer Person (Sender or Receiver and expired transfers)
Manage All Auto Transfers
This function will list all auto charges, cancelling and restoration of auto charges can also be done here by clicking on the edit button. Filtering is by User Type and if required tick the Expired transfers box to show those transfers that have ended.

Page | 48
Guaranteed Rent
The system automatically operates a ‘Guaranteed Rent Scheme’. This means that when the rent due date is reached and the tenant has still yet to pay or funds or they are not yet authorised then a guaranteed payment is made to the landlord from the Company Guaranteed Rent Account. (View Account Activity/ View Company Accounts or View Branch Accounts. The agent must have a ‘Pot’ of money set aside for these payments. When the tenant eventually pays the outstanding rent or it has now become authorised. Instead of the usual route of rent money, because the landlord has already been paid, then the money paid by the tenant is transferred to the Company Rent guaranteed account. The money is transferred to the Company Guaranteed Rent Account to replace the money already paid to the landlord.
Activate the Functionality
To activate the Guaranteed Rent Functionality go to Control Panel>Object Types>Tenancy Service Types. Click the add button to create a new service type or open an existing one. Name the new service type something like Fully Managed – Rent Guaranteed Tick the rent guaranteed box and in the Fee put a percentage that you as an agent are charging This service type is now available to be set up per landlord
Setting the Landlord Charge for the Guaranteed Rent Service.
If an Agent wants to charge a landlord a monthly fee for the rent guarantee service then the system will apply this charge in the same way as it applies the rent collected management fee. A new income type has been added called Guaranteed Rent Fees. This income type has been added to all Agents and cannot be removed. It can however, be re-named in Control Panel>Company Settings>Modify Company Details. On applying the charge to a landlord the transaction description appears as: Guaranteed Rent Fee Charge at 2.50% + VAT
If the Agent applies a different % charge to some landlords then this can be set by going to Modify Landlord Details – Management Fees.
The system does not record the history of any changes to the percentage charge set and it’s not possible to set a different percentage to be applied from a future date.

Page | 49
How the System Makes a Guaranteed Rent Payment.
System: Makes rent due. The Tenants account is debited for the Rent Due
Tenant: Insufficient authorised/cleared funds. Because the tenant has insufficient funds the money must be drawn from the Company/Branch Rent Guaranteed account System: Debits the Company/Branch Guaranteed Rent Account
System: Credits the landlord’s Rent Collected Account Landlords account is credited with the rent due. Management fees and rent guaranteed fees are deducted Landlord: Account transaction appears as: Guaranteed Rent Payment for '71 High Street, CF24 4ET' from 'William Jones' for period 01/04/2009 to 30/04/2009.
Tenant: Account remains unaffected they still owe rent in the normal way

Page | 50
Tenants Rent covered by Guaranteed Rent?
A Tenancy Service Type filter can be found in the Money Owed Chase View in order to only display the tenants whose landlords have been paid Guaranteed Rent. There is also a report called Guaranteed Rent Balances that provides a list of all tenants. Tenant Rent Paid When the tenant pays their rent money in or funds are now authorised the following happens in the system: System: Refunds Rent Guarantee account Tenants Rent Outstanding Account Is debited
Company Rent Guaranteed Account Credited
The First rent due on a New Tenancy is not covered by Rent Guarantee. Therefore the system will not instigate a Guaranteed Rent payment to the landlord if a tenant fails to pay the first month’s rent on a non-renewal tenancy.
Covering the Real Money Required to make Guaranteed Rent Payment.
The balance of the Company /Branch Rent Guarantee Account at any point in time is the total amount of Rent Guaranteed transactions made to Landlords. In order to comply with good practice, this amount of money should be transferred into the Client Bank Account from the Letting Agents Office or alternative account.
Guaranteed Rent Balances Report.
Shows all tenants who owe Rent Shows all Landlords that have had funds transferred from the, Rent Guarantee Account. Shows the number of days the rent has been outstanding. This will be useful where the Letting Agent must report to their insurance company if a tenant’s rent has been outstanding for more than 30 days.

Page | 51
Applying Charges or Refunds
Charge/Refund a Tenant
Search for and select the tenant that you are going to apply the charge on.
Complete the details of the charge. Be aware that if you are VAT registered then VAT will be added to the amount entered. Non VAT registered companies will not have VAT added on
Confirm the charge and click finish To refund the tenant select refund tenant from the menu and the procedure is similar to applying a charge but this time you are giving money back. Remember that you should deduct the VAT before entering the refund amount as the system will add VAT to the amount that you enter.
Charge/Refund a Contractor
Search for and select the contractor to be charged. Click the next action button.
Enter the details of the charge and click the next action button. Confirm the Payment and finally click finish.
With refunding remember to deduct the VAT before entering the refund amount as the system will add VAT to the amount entered if you are VAT registered. .

Page | 52
Charging Landlords Charges applied and refunds applied on the system are slightly different to the other Charges and Refunds, with multi-landlords the system splits any charges between the landlords according to the percentage of ownership. Charging a single ownership landlord is the same as other charging procedures. Charge options available:
Charge Landlord by Property Charge a Landlord Refund Landlord by Property Refund a Landlord
Charge Landlord by Property
This should be used to apply property related charges to the landlords because it splits the charge as per the % ownership split and the invoice lists the charge under the appropriate property. Search for the property that the charge is to levied on, tick the box next to it and click next. Enter an amount, set the sales charge type and enter a description to appear on the invoice. Landlords will now be charged based on % of ownership unless one is set as Zero Financial Share
The following screen will ask to confirm the charge. Click the finish action button to confirm.
If you were to now check on the respective landlord accounts in View a person’s account you will see transactions on each landlord account for their share of the charge. Activity numbers and Transaction numbers will be the same.

Page | 53
Gavin Evans account
Jamie Amos’ account
Opening up the Activity/Transaction will show full details of what has happened with the accounts
Refund Landlord by Property
Similar screens as in Charge by Property but transaction going the other way
Make a Deduction from Tenants Bond Account
There are two ways to open this screen to make a bond deposit deduction. 1. Lettings/Instruction and Tenancies/Modify Instruction/Tenancy/Record Bond Deposit Deductions. Search for the property and click ok 2. Lettings/Inventories and Inspections/Deposit Management
Disputed Bond Deduction
Search for the property and click “ok” on the actions buttons.

Page | 54
Enter the deduction type, who the deduction is applicable to and the amount that has been claimed. Type in a description, and then click the “add” button.
On the next screen if the charge is disputed by the tenant then the amount that they are prepared to pay is entered in the dispute box, click the Go button.
This charge is now marked as being in dispute. The matter is now handed over to the dispute service for arbitration When the decision has been reached by the deposit scheme you can close the dispute by clicking on the Resolved Go button and then the Close Go button
Two messages will appear in succession on clicking the Close button “OK” both of these and “finish”

Page | 55
Agreed Bond Deduction
Search for the property that you need to make a deduction on and click on “next” Enter the details of the amount Claimed, enter a description and click “next” This time, as the tenant is agreeing with the deduction there is no need to make any changes. Click the Agrees Deduction Go button
Finally click the Close Go button
After clicking the close button the following two messages will appear. “OK both of these and “finish” the item is now closed with the deduction amount credited to the landlord.

Page | 56
Chase Money
Tenant Money Owed Chase
On selecting the Chase option you will see a total amount of rent outstanding and a list of tenants that owe money. This list is gained by selecting search criteria at the top of the page. At the bottom of the list is a send method and letter type drop down set this to the required send method (these methods can be amended by LetMC staff at the request of the agent), tick the boxes next to the tenants you are sending a chase email/letter etc to (this can be multiple tenants) and click the Go button.
Included in this drop down list there are options to send the landlord a Text, Email or letter, keeping them updated on the progress of the chase. The letter includes the last 30 days of tenant chase notes so that the landlord can see the chase activity. This allows the Staff member chasing rent to keep landlords informed at a click of a button.
The Chase criteria can be filtered and ordered. Criteria available: Branch/Area When Rent Became Due
Last Chased Tenancy Stage
Staff Member Involved Order By

Page | 57
Last Chase Method
Finally set the status of the tenant you are making the enquiry on.
Chase Tenant
To access the tenant chase details click on the edit button on the left side next to the tenant. These details are split into 6 Tabs.
Chase Tenant Tab: Information that is available here is:
Debt details: When the tenant first went into debt The outstanding amount Account Status Member of staff involved Details of last payment When last chased
SMS From, this will be your company Mobile Number as assigned by LetMC. Send, What is being sent e.g. Reminder etc. Message content Send Button, Sends the text message.
Email and Letter Clicking on the send button for each option will activate each method. Emails will go immediately and letters will be sent to the postbag for Authorisation.

Page | 58
Landline Contact
If you are making contact by landline record what you have discussed with the tenant in the available box, when finished click on Record Telephone Call, this will now be stored in the tenants notes and in the tenants chase history.
Charging and Refunding
If it is required that you charge the tenant for overdue payment you will do so here. Click on the Charge Tenant Go button. This will take you into the make a charge screen where you can now apply a charge to the tenant and add a description. Use the Apply a Refund button as required.

Page | 59
Tenant Details
The Tenant Details tab will give you access to the tenants quick view
Tenant Statement
Available to access separately instead of using the Quick View is the Tenant Statement Tab, giving details of all transaction for a given filter selection.
Tenancy Details
The Tenancy Details tab will access the tenancy Quick View

Page | 60
Chase History
The Chase History tab will list all the rent chasing that has been carried out on the tenant. All methods will be listed here and by clicking on either the Icon or the edit button you can open the note.
Tenants Notes
In the Tenants Notes tab you have the ability to add a note to the tenant or view any notes from a given set criteria

Page | 61
Direct Debits
Enabling DD
Open Accounting/Bank Reconciliation/Manage Bank Accounts.
On the bank accounts screen click on the edit button of the Bank account to enable.
In the Direct debit details box select the DD Type and enter your originator number which you need to obtain from your bank.
In the Accounting Menu you should now see options for Direct Debit management.
Enable Tenant to pay by DD
In the tenant’s details first page, in the Rent Details section, you will see a tick box which will enable DD. This will also generate the DD form which is printed along with the Tenancy Agreement.
Tick the box to enable payments by DD

Page | 62
Tenant Payment Schedule
The tenant’s payment schedule will reflect the fact that they are paying by Direct Debit
Direct Debit Form
The DD form is printed with the Agreement.
The form will be pre-populated with: Agents Address Agents Originator Number Tenant Name Tenant LetMC reference Tenants Bank Details This should be handed to the tenant to complete and then sent to the bank.

Page | 63
Call Direct Debits
When the tenants rent is due you will need to call forward the DD. These DD call forwards should be checked on a daily basis, so as not to miss any. In Call Direct Debits there will be a total amount to call forward and how many.
Enter a description
Following the call you will be required to confirm the payments called. When you have completed the call a payment group is set on the system in readiness for reconciliation.
Finally you will need to save the DD call file to your PC for upload to the bank. Use the Export button to get the file. Once you have exported the file to the bank you will expect to see these entries in the bank reconciliation.
DD Confirmation Letter
Confirmation letters to Tenants that are using DD can be sent to confirm payment by DD

Page | 64
Manage Direct Debits
Use this option prior to Calling. Under Manage Direct Debits you will be able to amend the description and amount or remove from the system
Amending DD details
Change call amount if required.
AUDDIS (Automated Direct Debit Instruction Service)
With the AUDDIS system there is no need for the tenant to sign the DD mandate. With the tenant marked as paying by DD go to Direct Debits/Set Up Direct Debits and download the AUDDIS File and save the file to your PC. Send confirmation letters to the postbag then click on Mark Tenants as setup & ready to call Go button
On the tenants details an AUDDIS Set date will now be set and Direct debits when available will be in the call list

Page | 65
View Account Activity LetMC has a double entry book keeping system; there must be a positive and negative for every transaction so that the total is 0. Whenever you “Take a Payment” and put some money on to a tenant account on LetMC (put them into credit) the system has to put an opposite value for the negative somewhere. This “somewhere” is your client account on LetMC, under View Company Accounts. So as you collect more and more money in to your real world bank account, your LetMC bank account will go more and more into the minus figures. The balance should always be the exact opposite of your real world balance.
View a Person's Accounts
Selecting this option will allow you to view the LetMC accounts of the selected person. Using the standard criteria search for the person whose account you want to view.
You will now be able to look at any of their LetMC accounts by ticking the box next to it and depending what date periods you set the transactions carried for that period will be shown.
If you are viewing landlords accounts and they own more than one property you will be able to use the search criteria selection of to view the accounts on a per property basis
View a Branch's Sales Accounts
By select this option you will be able to view you branches sales account for a selected period. Select search criteria to drill down further This will give you full details of the account viewed.

Page | 66
View Your Company's Accounts
Allows you to view all your company accounts on the system Select search criteria to drill down further
Contra Transactions.
When a contra action is performed on an account the system will ask for a reason as to why this action has been carried out. Process of applying a contra If a contra action needs to be carried out on a person’s account you should go to View Account Activity – View Persons Account, select the person, then locate the transaction you want to contra.
Click on the transaction number and the contra screen will open. Tick the box next to the transaction and type in the reason for carrying out this contra. Finally click the contra button. The Reason field is not
mandatory, but it can only be added at the time the contra is applied to the transaction - it is not possible to edit old or existing contra transactions to amend or add a reason.
Confirm that this is the action that you want to carry out. A Contra Summary will be displayed showing exactly what you have done.

Page | 67
Manage Invoices This menu provides options for viewing Invoices and manually creating an Invoice.
View All Invoices
This page allows you to view invoices that have been created within the system Filter Number of Results As there will potentially be a large number of past invoices, the results are initially limited to 50 invoices. To display more invoices (within the Show From - Show To range), select a higher number from the drop-down list. If you select a very large number, expect a delay of a few seconds after clicking the Search button to update the list.
To see invoices within a specific date range, set the date on the From (Calendar) icon, then set the date on the To calendar. After changing one or more of the filter options, click the Search button to display the new set of invoices. The invoices list displays the following information: Invoice Number A Unique invoice reference. Clicking on the invoice number will take you directly to this invoice. You can also print the invoice out at this stage Date This is the date on which the invoice was generated. Name The name of the person that the invoice is for. Opening Balance The person's account balance at the start of the invoice. Closing Balance The person's account balance at the end of the invoice. This is the amount being invoiced.

Page | 68
View a Person's Invoices
This page allows you to view invoices that have been created within the system for a specific person in the LetMC system . Using the search criteria select the for the Landlord, Tenant or Contractor that you want to view When viewing invoices for a tenant, make sure you choose the tenant record for the correct property and tenancy that the invoices are related to. Click Next to continue Viewing the Invoices The invoices that have been created within the system for the selected Person are listed. The invoices list displays the following information: Invoice Number The unique invoice reference. Clicking on the reference number will take you directly to this invoice. Date The date on which the invoice was generated. Opening Balance The person's account balance at the start of the invoice. Closing Balance The person's account balance at the end of the invoice. This is the amount being invoiced.
Printing Invoices To print a particular invoice, click its reference in the Invoice Number column of the list, click Print Invoice to print the invoice out. Click OK when you have finished printing. Click Finish to exit this function

Page | 69
Create an Invoice
This allows creation of an invoice for a Tenant or Landlord. You can choose which transactions you wish to include on the Invoice. Create an Invoice will rarely be used, as Invoices for Landlords should be generated using Accounting > Payments and Deposits > Pay People in Credit. However, Landlords' accounts which are not in credit will not appear on the Pay People in Credit List. Create an Invoice must therefore be used if there is a requirement to raise an Invoice for a Landlord who has a zero or negative balance. It will rarely be necessary to raise an Invoice for a Tenant as an Invoice is automatically generated (but not sent to the Postbag) when Accounting > Payments and Deposits > Apply a Charge or Apply a Refund is used (even if the Tenant has a negative balance). Select whether to create an invoice for a Landlord, Tenant or Contractor using the standard search criteria. When creating an invoice for a Tenant, make sure you choose the tenant record for the correct property and tenancy that the invoice is related to. Click Next to continue.
Choose Invoice Entries If any un-invoiced transactions exist in the selected person's Main Account, a list of these transactions is displayed. If no such transactions currently exist you will see the message "No Un-Invoiced Entries for this Person". This means that you do not need to create an invoice for this person so should click the Cancel Action to leave Create an Invoice or click Back to select a different Tenant or Landlord. If you wish to proceed with creating an invoice, select Automatically Send to Postbag: Next, select the transactions you wish to include in the invoice by ticking the box next to each required transaction. All transactions are ticked by default. When you have changed your selection of transactions, click Update Total at the bottom of the list to see the balance of the Invoice you are going to generate. Click Next to proceed. The invoice, that will be generated when you click Next at Step 3, will be sent to the Postbag for authorisation for posting in the usual way. Confirm Invoice Entries You are shown a confirmation screen of your chosen Send Method and the transactions you selected to be included in the invoice. You can click the Back Action if you need to make any changes to your selections. When you are certain that the details are correct, click the Next Action to generate the invoice and proceed to print

Page | 70
Print Invoice If you selected the Automatically Send to Postbag Send Method, the invoice will have now been sent to the Postbag for authorisation and sending in the usual way. Click the Finish Action when you have finished printing the invoice.

Page | 71
Tax Reports
NRL Quarterly Return
Payments to HM Inspector of Taxes: Shows balance of what is to pay. After printing the report go to 'Make a Payment', select 'Company Accounts: Add' and drawdown the NRL account by the Quarter End Balance shown on this report
NRL Annual Return
NRL payments To HM Inspector of Taxes
Section 19(1)(c) Tax Report
This report is required by the HMRC each year. It shows all the landlords that you have collected rent on their behalf. A branch filter is available in the 19(1)(c) Tax Report this allows branches to be displayed individually. This is particularly useful for Letting Agents which have separate companies set up as branches on the LetMC system. Restrictions can be placed on the user access level to determine who is able to view ‘All Branches’ (users may be restricted to viewing their own branch reports). The user level access constraints can be changed by Client Administrators (contact LetMC Client Support for assistance with this) in the Control Panel. Only Client Manager level users and above are able to view the Section 19 report and if the Multi-Branch Staff Restrictions>Finance Reporting setting is set to Client Administrator then Client Managers will be restricted to viewing the report for their own branch and only Client Administrators will have access to other branches. *The Branch filter is deactivated until the Year End date has been selected. The Section 19 report is only available as a download report and does not display results on screen. The download report includes a branch column, the landlord name is split into 4 columns (title, first name, middle name, and surname), landlord address is split into separate columns, and property address is also split into separate columns.
Send Self Assessment Tax Report
Using the standard search criteria, search for the Landlord to send the Self Assessment Tax Report to by entering relevant details click the Search button. When the list has come up Tick the box next to the Landlord you require then click Next. After clicking on Next you will see the screen with the option for tax year. Select the right year and click Finish. A copy will now be sent to the postbag ready to be sent to the Landlord. If a property has been linked to a new landlord during the selected tax year then the old landlord’s Self Assessment Tax Report will now include the words Sold Property:02/08/2006 . Note: The assessment only covers the land and property section Disclaimer text at the end of Self Assessment Tax Report. States: 'This self assessment form and report is intended as a guide only and does not take into account the external expenditure and incomes that have not been processed by the agent. The expenditure does not take into account tax deductable expenses. It is recommended that you confirm with a certified accountant and the Inland Revenue the calculations presented on this self assessment form. Letmc.com and (agent company name) cannot be held responsible for the content of this self assessment form and report.'

Page | 72
Landlord NRL 6
It is possible to produce a Landlord NRL6 form with a cover letter by going to Accounting>Tax Report>Send NRL6 Landlord Certificate. This certificate should be sent to Non Resident Landlords where tax has been deducted (no exemption number entered on the system) in order for them to prove the amount of tax deducted when they complete their Tax Self Assessment. Using the standard search criteria find the landlord that you want to send the NRL6 form to.
Select the period that is to be covered. This will now be sent to the Postbag ready to be
authorised
The NRL 6 form will be sent to the landlord along with a covering letter.

Page | 73
Head Tenants and Accounting Effects in accounting with a Head Tenant Selected Under the payment schedule you should notice that the rent is now attributable to the Head Tenant.
On signing a tenancy any auto charges are now filtered through the Head Tenants account
Tenant Statement If you check another Tenants account on the property you will receive notification that their account cannot be shown and transactions are being handled by the Head Tenants account, which will be shown.
Rent Payments When Tenants pay their share of the rent, monies will be routed through the Head Tenants account. When all payments have been made and reconciled through the bank transactions will appear on the Head Tenants account

Page | 74
Transactions That Route Through Head Tenants Account If a non-head tenant is chosen when applying transactions then the transaction is applied to the Head Tenant. A red panel is shown advising that the transaction will be applied to the Head Tenant rather than the selected tenant. This happens in the following:-
Take a Payment Make a Card Refund Apply a Charge or Refund
Apply a charge example shown Transactions that can be routed through a non-Head Tenant Transactions that are used by higher level users to view and correct Accounts that do not divert to the Head Tenant are:-
Accounting>View a Person’s Accounts, Accounting>Apply Transfer – all transfer options.
Electronic Payments (Standing Orders) Tenancy Renewal Existing Electronic References used to automatically link incoming standing order payments in Reconcile Bank Statements will be re-assigned from non-head tenants to the head tenant when a Head Tenant is set on a tenancy. New Tenancy When linking a first time Electronic Payment the payment will be linked to the Head Tenant even if you try linking it to a non-Head Tenant.
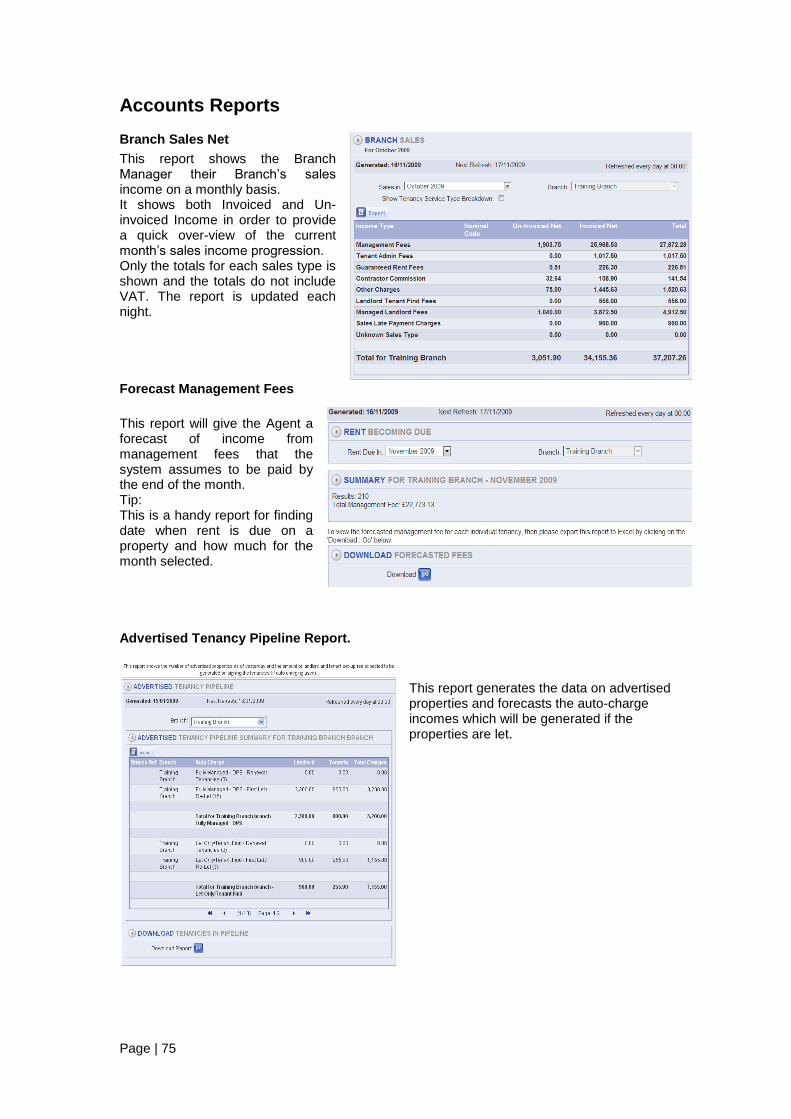
Page | 75
Accounts Reports
Branch Sales Net
This report shows the Branch Manager their Branch’s sales income on a monthly basis. It shows both Invoiced and Un-invoiced Income in order to provide a quick over-view of the current month’s sales income progression. Only the totals for each sales type is shown and the totals do not include VAT. The report is updated each night.
Forecast Management Fees
This report will give the Agent a forecast of income from management fees that the system assumes to be paid by the end of the month. Tip: This is a handy report for finding date when rent is due on a property and how much for the month selected.
Advertised Tenancy Pipeline Report.
This report generates the data on advertised properties and forecasts the auto-charge incomes which will be generated if the properties are let.

Page | 76
Let Agreed Pipeline
Let Agreed Pipeline Report. The Let Agreed Pipeline report will generate data on properties that are at the Let Agreed or unsigned stage and forecasts the auto charge income which will be generated if the properties are let. Calculation of Tenant Admin Fees The Report calculates the fees that will be charged to tenants and landlords on signing the tenancy. The report relies on the charges being set up in Control Panel>Object Types>Tenancy Service Types (often referred to as ‘auto charging’). If a Let Agreed tenancy does not yet have any tenants linked to it then it will calculate the tenant fees based on the number of beds specified in the Landlord Instruction. The report also calculates the tenant fees where the auto charge fee is a per tenant fee. This report is generated overnight which is only archived for 1 day (it is not possible to select any dates in the past). The Report can be viewed by Client Manager or higher security level users. Rent Collected Initial information available - Rent Due/Collected/Outstanding Information is shown by month selected Using the Export Report Button will give further information on the above rent data Date of payment Description of payment Service Type Landlord Name Property 1
st Line Address
How much collected

Page | 77
Accounts Reports
Invoiced Sales
This shows the invoiced sales charges applied to people's accounts. The Persons Main account is debited and the Sales Invoiced account is credited. It is filtered by month and can be expanded to show further information.
Summary Download
Summary Download with Service Types
Detailed Report Showing All Service Types

Page | 78
Un-Invoiced Sales
This shows the sales charges applied to accounts which have not yet been invoiced. Once a sale is invoiced the account is debited and the Sales Invoiced account is credited.
This report initially shows a summary of un-invoiced sales this can be broken down by Tenancy service type by clicking the export button and will be downloaded in excel format.
At the bottom of the screen you can download a detailed report by sales type.
Download of Summary with Show Service Type ticked
Example of detailed report

Page | 79
Bond Deposits Held
This report shows all tenants with a balance in any of their Bond Held accounts. This means that bond money has cleared and the Letting Agent holds the money in their bank account. To calculate the total funds held by the Letting Agent on behalf of tenants, landlords or other people, use the Debtors
and Creditors Report. Clicking on the Download button will give you a spreadsheet file of the information in regard to the Bond Deposits held.
Bond Deposit Held by DPS
This report shows all tenancies (except closed tenancies) which have a DPS Deposit ID entered in Modify a Tenant. The bond deposit amount shown is the Bond Payment Required which may not be the same as the actual amount held by the DPS
To view a list of each DPS bond deposit export this report to Excel by clicking on the Download ‘Go’ button.
Example of Download

Page | 80
Tenants Bond Deposits Outstanding
The report lists all tenants with a balance in one of the Bond Outstanding Accounts. The bond deposit will still appear in Outstanding in the situation where a tenant has paid the money but the funds have not yet cleared.
Summary listing of service type Bond/Deposit held. Export to Excel for full details
Example of Download
Guaranteed Rent Balances Report.
Shows all tenants who owe Rent Shows all Landlords that have had funds transferred from the, Rent Guarantee Account. Shows the number of days the rent has been outstanding. This will be useful where the Letting Agent must report to their insurance company if a tenant’s rent has been outstanding for more than 30 days.

Page | 81
Landlord Float Held
The report is available to users of security level Client Finance and above. Please contact LetMC if you want the user level changed.
The report will display what should be held from the landlord and what is actually in their float account
Example of Download

Page | 82
Bank Control Account Transactions
This report shows all transactions on the system Bank Control Account associated with each Bank Account. The control account reflects receipts and payments made on the system and these therefore do not always correspond to entries and dates of the actual BankStatement entries.
Using the edit button for a transaction you will display more information.
Bank Control Account Movement
This report is useful in order to reconcile the movement in the Bank Control Accounts(s) and a detailed breakdown of all Bank Control Account transactions is available in the Bank Control Account Transactions
report.
Retired PDQ Transactions
Card payments that are not subject to reconciliation are listed here. You can use this list to manually reconcile card payments

Page | 83
People Invoiced not Paid
The People Invoiced Not Paid report lists all People who have an invoiced charge against them but there is insufficient balance on their account to cover the charge. This report can be used to help Letting Agents check that all invoiced charges have been paid before drawing down their commission for the month. It can also be used to more easily identify Landlords (and Contractors) to chase for outstanding charges (the Tenant Money Owed Chase feature in Accounting>Chase Money already does this for tenants). At the end of each month the report will be cached. This means it will be possible to see the 'Invoiced Not Paid' amounts for on a month end basis for previous months. The earliest month available for selection will initially be September 2009 and each month thereafter will be cached. A Date in Debt field has been added to Landlords and Contractors in order to make this report possible. Tenant already had this field due to the requirements of rent chasing functionality. The Report is available to users of security level Client Finance and above. Please contact LetMC if you want the user level changed.

Page | 84
Reconciliation Reports
Reconcile System to Bank Report.
This new report calculates for any date in the past the balance that should be in the physical bank account. This can be used to quickly illustrate to accountants and regulatory bodies such as the RICS the amount and make-up of Client funds held. The report relies on the system being up to date, in particular that all bank statement entries have been uploaded for the period (but not necessarily posted/reconciled). The report provides the location of a full breakdown for each category of monies. Some of these are only available on a ‘month end’ basis. The report is split into 4 groups of balances:- People Balances – these are the balances of landlords, tenants and contractors accounts. Sales Commission – these are both invoiced and Un-invoiced charges applied to people’s accounts. Control Account Balances – these are other balances held including NRL. Un-reconciled and Not Banked – these are monies which have not yet completed their journey in or out of the bank account.
Go button will display a breakdown of balances

Page | 85
Go buttons allow download of excel spreadsheet with a breakdown of each section People Balances Landlords in Credit – This is usually rents collected for a landlord, but not yet paid out. It also includes Maintenance Float held. Tenants in Credit – This is usually Deposits held by the Letting Agent or rent paid in advance Contractors in Credit – This is usually maintenance deductions made from the landlord but not yet paid to the Contractor. Landlord Debtors – Any landlords account with a negative balance usually because a maintenance deduction or a charge has been made but no funds are held to cover it. Tenant Debtors – This is usually any tenants owing money to the letting agent (not owing rent to the landlord or owing a bond deposit). Contractor Debtors – Any Contractors account with a negative balance. A list of the balance for each individual person is available in Accounts Reports > Debtors & Creditors. This report provides this detail for the previous day or on a ‘month end’ basis i.e. on the last day of any month. The amounts shown will not change after the date selected as it ignores future adjustments. The report can be downloaded to excel

Page | 86
Sales Commission
Sales Commission. Sales Invoiced Net – Charges applied and invoiced but not yet drawn down. Sales Invoiced VAT – The VAT on charges applied and invoiced but not yet drawn down. Sales Un-invoiced Net – Charges applied but not yet invoiced. Sales Un-invoiced VAT – The expected VAT component of charges applied but not yet invoiced. These amounts do not necessarily reflect whether the person has paid the charge (i.e. the amount can lawfully be drawn down from the Client Account to the Trading Account). To identify charges invoiced but not yet paid use the Accounts Reports> Invoiced But Not Paid.
The amounts shown will not change after the date selected as it ignores future adjustments. Both the Invoiced and the Un-invoiced control accounts have to be included in the Reconcile System to Bank Report. This is because when a charge is applied to a person their main account is debited and the sales control account is credited (even before it’s invoiced). The person side of the transaction is reflected in the People Balances section of this report. On invoicing a charge the Un-invoiced Sales is debited and the Invoiced Sales is credited i.e. the money is moved from the Un-invoiced Sales control account to the Invoiced Sales control account. Un-reconciled and Not Banked
Less: Not Yet Banked – This is money receipted by using Take A Payment but not yet paid into the bank (using Make a Bank Deposit). This would typically be cash and cheques still sat in the Letting Agents office. The People Balances includes these amounts because on making Take a Payment the system credits the person and debits the bank control account, and creates a Payment Item which is listed in the Make a Bank Deposit. It is therefore included in the People Balances, but it hasn’t yet been paid into the bank. The Reconcile System to Bank report calculates the Not Yet Banked amount (i.e. amount listed in Make a Bank Deposit on the selected date) by including transactions that:- Transaction Created before Date Transaction is un-authorised Today or it was authorised after the Date Transaction is not yet linked to a payment or the payment was created after the Date and created after the transaction creation date. The amounts shown will not change after the date selected as it ignores future adjustments.

Page | 87
Less: Cards Not Yet Banked – This is the equivalent for Debit and Credit Cards. This is only applicable to Letting Agents with Reconcile Debit & Credit Cards activated.
Less: Un-reconciled Payment Groups – These are the ‘unused’ Payment Groups with a created date on or before the date selected on the Reconcile System to Bank Report. These will typically be outgoing cheques not yet cashed by the beneficiary and other payments in/out that take a day or more to appear on the bank statement e.g. an outgoing BACS will have debited the Landlord Account but will not appear debiting the bank statement for another 3 days. The amounts shown will not change after the date selected as it ignores future adjustments (these are reflected separately in the Less: Future Deleted / Adjusted Payment Groups field.
Less: Future Deleted / Adjusted Payment Groups - These are payment groups that existed at that time, but were later deleted or the amount changed. This would typically be an outgoing cheque lost in the post being cancelled on LetMC (by going to Manage Payment Groups and deleting it). Another example might be the amount of cash being banked is changed via the Make a Bank Deposit View. The amount shown can change after the date selected on the report as it takes into account future adjustments.
Plus: Contra of Posted Statement Entries - This is to 'catch' the situation where a staff member applies a contra to an incoming standing order payment (on a person's main account). This could arise where a bank statement entry has been 'linked as electronic payment' to the incorrect person. The correct method to reverse this would be to then transfer the money from the incorrect person to the correct person. Applying a contra does not reverse the bank statement entry onto the Reconcile Bank Statements view but places the contra in the Bank Control Account. This amount is then reflected in the Plus: Contra of Posted Statement Entries. To 'clear' the amount from this section, the contra transaction will require contra action back to the person again. Then you can apply a journal transfer to the correct person. The amount shown can change after the date selected on the report as it takes into account future adjustments.
Plus: Corrected 'Take a Payment' - This reflects the situation where a Take A Payment is done after the actual money is banked. This would typically arise where the Letting Agent banked some money (without creating a receipt in the system via Take a Payment), then when attempting to match-off/link-up incoming payments in Reconcile Bank Statements discovers the amount. Then they go to Take A Payment, then Make a Bank Deposit to create a payment group to match-off/link-up to the statement entry. The amount shown can change after the date selected on the report as it takes into account future adjustments.

Page | 88
Plus: Future Adjusted Un-reconciled Payment Groups. This reflects the effects of an additional payment items being added to a payment group at a date after the payment group was created. An example could be a situation where a payment group was created by using Banking Debit and Credit Cards on the 8th April. This payment group included a number of individual card payment items adding up to £8790.50. However, when the Letting agent came to reconcile/link-up this item to the incoming payment from the PDQ company on the 14th April , they realised there was a missing card payment item for £180 (because the incoming payment from PDQ was £8970.50). They then create a new payment item by going to Take a Payment and receipting another £180. This item is then added to the existing payment group dated 8th April. The payment group is then linked and posted to the incoming bank statement entry from PDQ. The Reconcile System to Bank report shows the payment group on the 8th April as being £8970.50 in the Less: Un-reconciled Payment Groups, but shows the £180 in the Plus: Future Adjusted Un-reconciled Payment Groups. The net effect of this on the overall balance of the report is to show £8790.50.
Plus: Bank statement entries uploaded but not reconciled within period This reflects the bank statement entries dated on or before the Reconcile System to Bank date, but were not reconciled in Reconcile Bank Statements until after this date. This is the actual bank account movement relevant to the period which was not reflected in the People Balances or similar for the period. If a Letting Agent works on a ‘month end’ basis, and uploads and reconciles bank statement entries on a daily basis, then the bank statement entries dated the last day of the month are not actually reflected on the system until the 1st of the following month. So, in this example, to get the Reconcile System to Bank Report accurate, the Letting Agent uploads the bank statement entries dated the last day of the month on the following 1st of the month. Then, they go to the Reconcile System to Bank report which will then reflect the bank movement (as a result of the entries of the previous day) in the amount shown next to Plus: Bank statement entries uploaded but not reconciled within period . It makes no difference whether the Letting Agent posts/reconciles these statement entries as the Reconcile System to Bank Report will only include these amounts in the Plus: Bank statement entries uploaded but not reconciled within period and not in the People Accounts or similar. The system design reason for this is that these reconciled bank statement entries are not subsequently reflected in the Reconcile System to Bank report, is because the Debtors and Creditors report is not updated again after midnight on the last day of the month. This then means that the Debtors and Creditors report always provides a comparable breakdown for the People Balances in the Reconcile System to Bank report.
Total - This should match the amount in the Actual Bank. The sum total of all sections should equal the balance of the real bank account at that date. As an additional check the Check against sum total of bank statement entries uploaded amount should correspond. If there is a difference, then this indicates an erroneous journal posting (or similar problem) which has not been identified in the report. The best approach to identifying the amount is to select the previous days on the Reconcile System to Bank report to identify the day that the difference is first shown. Then the focus should be around identifying the amount on that date. Often, they are related to unusual contra transactions or unusual journals posted by a staff member.

Page | 89
If no difference is shown on the report, but the balance on the actual bank statement is different, then the first area to check is that all the bank statement entries have been correctly uploaded into the software via Reconcile Bank Statements. This is done by exporting the bank statement entries from the Reconcile Bank Statements view into Excel. Then, compare the number of statement entries to the number shown on the Bank's actual bank statement (to check for missing statement entries). If these match, then the next step is to check that the amounts uploaded match the amounts in the actual Bank. To do this, separately sum the debits and the credits and then match these to the sum of the debits and credits on the actual bank statement. This then confirms that the software 'knows about' every bank statement entry.
Debtors and Creditors
This report shows the debtors and creditors to the client bank account i.e. monies which should be held in the client bank account. The 'Balance excluding statement entries posted later' excludes incoming standing order payments which were not linked and posted to the person on or before the selected date. These amounts are reflected in the Reconcile System to Bank Report in the 'Plus: Bank statement entries uploaded but not reconciled and posted within period' amount.

Page | 90
Control Panel
My Account
The My Account screen will show you details of the LetMC package that you are using
Change Password
This allows you to change your current password
Company Settings
View Company Settings Information on System, Lettings, Accounting and Sales accounts. If you require any changes within the Company settings call LetMC Support
System Details
System details shows clients short, full and marketing name. The Applicant deletion period and password encryption strength are set up on this tab (call LetMC).

Page | 91
Lettings
On the lettings tab details for Homelet (if used), TDS and NRL are stored. Periodicity of sending landlord management reports can be set. Trading statement. Option to automatically close renewed tenancies. For any alterations to the above (call LetMC).
Accounting
Payment authorisation periods Landlord float accounts, entering an amount in here will make a float due on all your landlords if using company settings when entering a landlord on the system. Company registration details Payment warning threshold, this figure is to set a warning for your information so that when paying a person over this amount it will be flagged up in red
Sales Accounts

Page | 92
Staff
Create a staff Member
(Adds new staff to the system, available to Administrators and Managers only)
Enter the details of the new staff member.
Add Job Details Safety Security Details Enter Personal Details Upload a signature if required Enter Dezrez Username if
using Dezrez This information can be used to further personalise letters. Please contact LetMC if you wish to show this information on any letters.
View a Staff Member
Allows viewing of the selected staff member’s details and their logon details. Nothing can be changed in this option. Available to all staff levels
Modify a Staff Member
Allows changes to staff details. Available to Client Administrators and Client Managers only Search for the staff member to modify by entering name, tick the box next to their name and click next. You can now amend
Job Details Security details Personal Details Upload a Signature Dezrez Username

Page | 93
Staff Job Details
Enter branch of staff member and their job title
Security Details
This shows: log in name Log In Level This sets what the Staff member
can and cannot access in the system
Log in active If a staff member leaves your
employment remember to un-tick the Log-in Active box so that the software cannot be accessed.
Shown in Diary Staff member will be seen in the Office Diary Personal Details Only surname is mandatory, you can however enter other details such as personal
mobile number and email address. These will then be recognised if the staff member calls or emails to the system.
When a staff member leaves a company it may be necessary to display their Diary for a while to follow up and clear their appointments. When their login is disabled and show in diary is enabled, their appointments will still show in the Diary. Small red text will appear next to their name stating 'Login Inactive'.
Upload a Staff Signature
To personalise system generated letters it is possible to add a staff member’s signature. Any letters generated whilst that staff member is logged on will contain their signature. Scan a signature and save it to your PC, click on the browse button and search for where the signature is saved on your PC then click the upload button.
Delete a Staff Member
Deletes selected staff member, only if they have not been linked with anything in the system. Search for the staff member to delete and click next the screen will then either allow deletion or not. Available to Client Administrators and Client Managers Only.
Reset Staff Password
(Administrators only)
Enter new Password and confirm. When staff member logs on with this Reset Password, they will be prompted to change it

Page | 94
Branches
View a Branch
Branch details
All the details that are entered here are not available for amendment by agency staff. To have any of the details changed call LetMC support. Basic Details
Branch Type Options as to who can view the Branch picker can be set per user login level (contact LetMC Client Support for assistance with this). Group together Branches into a County. It is possible to group branches together under a County. This allows a ‘Property to Rent’ list to be created for a County
Counties. The County picker can be added to all views that currently have a branch picker. The user can then select the county and then choose to view results from all branches within that county or just a single branch. Because many of the views that support the county picker contain financial or sensitive data, restrictions can be placed on the user levels that are able to access these views (contact LetMC Client Support for assistance with this). Company Overrides VAT Override Number. When the Override VAT Number tick box has been ticked but the branch-specific VAT Number has been left
blank, then the company VAT number will still be overridden and no VAT will be applied (the branch will be considered not registered for VAT and VAT will not be added when applying charges). For this reason, it is important that the tick box is only ticked if there is a branch-specific VAT number or when no VAT should be applied to transactions from that branch. This is useful for companies with franchise branches that are not yet VAT registered. Note – entering "000 0000 00" as a branch override VAT number will cause VAT to be applied to charges and the VAT number that will appear on the invoice is 000 0000 00 (the only way to avoid applying a VAT charge is to tick the Override VAT Number and leave the branch-specific VAT Number empty). In a situation where a landlord owns several properties that are managed by different branches, when Accounting>Apply Charge or Refund>Charge Landlord by Property is used, the VAT settings applied will be those that have been set for the property’s branch (not the landlord’s branch). However, when Accounting>Apply Charge or Refund>Charge a Landlord
is used, it is the landlord’s branch’s VAT settings that will be used in the invoicing.

Page | 95
Opening hours
Used in Marketing on Brochures etc.
Internet advertising and up-loaders
Internet up loaders available are: Property Finder, Right Move, Rent Right, Prime Location, Fish 4 Homes, Find a Property, Property Jungle, Globrix, EzyLet, Property News, Letting Web and any FTP up loader.
Branch trading account
Branch Bank Details Branch default bank account overrides company default bank account.
The Branch default bank account can now be set by Client Administrators (contact LetMC Client Support for assistance) in Control Panel>Branches>Modify a Branch.
The branch default bank account overrides the bank account that is set as the company default bank account (the company default bank account is set in Accounting>Bank Reconciliation>Manage Bank Accounts ).
This allows multi-branch companies to ensure that branch-specific bank account details are used in rent chase emails and letters generated through the Accounting>Chase Money>Tenant Money Owed Chase tool (it will also apply to standing orders).

Page | 96
Object Types
Available to Administrators and Managers Only Use the various Object Types to amend the drop down lists in the system to suit your needs
Tenancy Service Types
The option allows you to set up your default Service Types. On first use click on the Add button and fill in the details required.
You can set up as many different serve types as you wish. Call LetMC for assistance in setting up the Service Types. Rent Schedules The system can be set so that new tenancies automatically expect the first month's rent to be paid by cash/cheque/card and then produce a standing order mandate for the second month onwards. Please contact LetMC Client Support to switch this on for you.
The default rent payment schedule is set up using a drop down selector menu called Rent Schedule which has been included in Control Panel>Object Types>Tenancy Service Types (this can be amended by Client Administrators or LetMC Client Support).
Automatic payment for whole tenancy, one rent schedule paid by standing order
Manual payment for whole tenancy, one rent schedule paid by Cash, Cheque or Card Manual first collection and then automatic, two rent schedules, first manual then the
next by standing order from 2nd
payment When a tenancy is renewed only one rent schedule is carried forward to the renewed
tenancy (even if the first let or re-let tenancy had two rent schedules on it). In most cases this would usually be the monthly rent collected by standing order.
Tenancy Agreement Types
Default Agreement is the Standard Assured Shorthold Tenancy Other Types can be set, please call LetMC Support for assistance

Page | 97
Tenancy Cancel Types
Prior to Signing a Tenancy if it is to be cancelled you will need to state why. If your reasons are other than the default then you can use this option to add others
Tenancy Special Requirements
Add any special requirements here
Facility Types
Facility Types are used when adding a property. If the facility you want to show is not available add it here.
Inventory Item Types
Inventory Types are used when compiling an Inventory. If the item you want is not listed add it here.

Page | 98
Contractor Types
Contractor types should already be set for you by default, however if you wanted to use this facility to set up for example an EPC surveyor to facilitate payment to them then add it here.
Certificate Types
Certificate types should be set by default but if you have a certificate that is not listed add it here
Appointment Types
Once again Standard appointment types will already be listed, any new types you need, add here
Recommended Tenant Contact Details
With this option you can set what you want to appear when adding tenant’s contacts.

Page | 99
Applicant Source Types
Add sources that applicants have come to your business from. This will assist in how well your marketing is working.
Applicant Status Types
This status types are set by default, however if you have your own wording you can add more here
Tenant Account Status Types
These status types are used in conjunction with rent chasing
Tenant Chase Methods
In the rent Chase Methods you can add new and amend Text Messages and Emails
Page | 100
LetMC.COM Accounts and sage Most agents will use Sage Accounting software to account for their trading accounts (not the clients). Sage will require certain financial information so the sales can be accounted for. Step 1 – Go to the Reports section and draw down of the sales of the previous month, select Reports >> Sales. This report gives you a number of sales accounts (pots), which you can add to by selecting Control Panel >> Modify a Branch and allowing you to analyse sales types in your company accounts. Sales Account can include;
Agency Fees
Compensation
Contractor Commission
Landlord Fees
Late Payment Charges
Management Fees Step 2 – Setup the clients account as a customer in Sage (only once). Step 3 – Raise a sales invoice using the customer account for the total sales from the Sales Report on LetMC.com (analysing sales type if appropriate). Step 4 – In Accounts >> Make a Online Payment use “Add Company Account” and enter then net sales and VAT that you have raised on the Sage invoice. Step 5 – Go to your banking and transfer the total invoice amount from the clients account to your business account. Tip: Some banking systems do not allow large sum of money to be transferred, for example only in £5,000 lots. This will come through the bank upload as separate payments

Page | 101
Introduction To Credit Checking and Referencing
The integrated credit check functionality available through the LetMC system is accessible on a Pay per Reference basis. This functionality will provide clients with the ability to make credit checks on any person that is registered on the system There is a direct link between LetMC and the Equifax database allowing clients to carry out an instant credit check. Credit checks through existing companies require you to submit details and then wait for the return of the results. This system will alleviate any waiting time and provide instant results. Matching the person to an Equifax Record. To carry out a Credit Check a person's name and address is required. This can be imported/pre-filled from or it can be typed in. Pre –filled documentation: Tenant (and Guarantor) Applicant Online Tenancy Application Landlord Contractor The personal details that should be included are (mandatory fields are in bold): Title Forename Surname Date of Birth (not mandatory but recommended) House Number/ Name Postcode These details are searched on the Equifax database and any matches are returned. The correct match must be selected and then the credit record and score is returned. At this point the search fee is charged to the Letting Agent. This information is then stored in the LetMC software. Reference search for Credit Checks For multi-branch companies, the staff user level able to view credit checks that have been performed by a branch other than their own can be set by LetMC Client Support. To view credit checks performed by a different branch requires a CRED- reference code (they cannot be viewed in Manage All Credit Checks ). Linking and Un-linking Credit Checks. New credit checks can be created by manually entering a person’s details into the wizard (credit checks created this way are not linked to an existing person record). Alternatively, new credit checks can be created by importing details from a tenant/ applicant/ landlord/ online applicant/ contractor (these credit checks are linked to the imported person). Regardless of how they are created, the credit checks can be linked or unlinked to an existing person (tenant, applicant, landlord, contractor) by opening the required credit check, either by entering the CRED-XX reference number or by finding the required credit check in Referencing/Manage All Credit Checks. The credit check ‘Linked’ status is at the base of the view and shows the person that the credit check is currently linked to (if any) and also allows the letting agent to ‘un-link’ or re-link the credit check to a different person. When a credit check is unlinked from a person, the credit check is removed entirely from their record and they will re-appear in the Not Yet Credit Checked list. Similarly any person who has a credit check linked to their record will be removed from the Not Yet Credit Checked list.

Page | 102
Level of Risk Results The level of risk for each credit score result is displayed on a bar which indicates the risk level with a graduated colour scheme (red to indicate high risk, yellow for medium risk and green for low risk). LetMC Support can change this at any time for a letting agent if they have a specific view on the bandings. If the bandings for the risk score level are changed then any scores generated before the change will remain in the previous banding (ensuring historic data retains its integrity). Credit Score bandings can also be overridden on a per branch basis (in Step 6 of Modify a Branch). The credit score should be interpreted by the Letting Agent in conjunction with any other information available and the person's background. The credit score is not a guarantee, but only a guide to the person's credit worthiness at the specified address.
How to Access functionality
Referencing can be accessed in many convenient parts of the software.
Marketing Section
Applicants Create New Applicant Card Modify Applicant Card Landlords Modify Landlords Details
Lettings Section
Instructions and Tenancies Modify Landlord Instruction (Step 3 of Let Agreed) Tenants Modify Tenants Details Landlords Modify Landlords Details Referencing Credit Check an Individual
Credit Check a Tenancy
Maintenance Section
Contractors
Modify Contractors Details
In Tray
Online Tenancy Application Work item
Further Functionality within the Referencing section
Manage All Credit Checks Not Yet Credit Checked Individuals Reference Notes and Documents

Page | 103
Q & A
What is a Credit Check?
The Credit Check provides the credit history of a person based at a specific address. Based on this credit history and other information held by Equifax a Credit Score is provided which indicates how credit worthy a tenant is. It also confirms how long the person has been registered on the Electoral register at that address.
What factors do I need to consider when credit checking.?
The Credit History and the Credit Score is for the person at a specific address. If they have only lived at an address for a short while, then it may be worth credit checking them against other previous addresses as well. This is because they might have an adverse credit history at a previous address. In conjunction with credit checking, the Letting Agent should evidence photo ID for the person to check that they are who they claim to be. The Credit Check then confirms whether they have lived at the address they have provided and gives a credit history and score for them.
If I credit check an applicant; will their information be transferred when they become a tenant?
Applicant (or online applicant) credit checks are automatically re-linked to a tenant if the applicant moves on to become a tenant (credit check appears in Tenant Details and in the 'Referencing' section in Modify Instruction/ Tenancy).
What are the legal guidelines to credit checking?
Permission has to be sought by the Letting agent from the person being checked that they are willing for a credit check to be carried out. The search will leave a 'footprint' on the tenant or applicant's credit record which will mark the search as a TV (Tenant Verification) and carried out by the Letting Agent (this is required by Equifax for audit purposes). If a Credit Search is done on a Landlord or Contractor then the footprint will be marked as 'Property Letting' and carried out by the Letting Agent.

Page | 104
Credit checking functionally will be switched on by request to LetMC. If you do not have the functionality switched on you can only use the Notes and Documents section.
Individuals Reference Notes and Documents
Referencing documents (such as tenant ID, utility bills etc.) can be uploaded and stored in Lettings/Referencing/Individuals Reference Notes & Documents. Each document can be up to 512KB in size and can be any of the following formats: *.doc *.docx *.xls *.xlsx *.csv *.txt *.pdf *.gif *.png *.jpg *.jpeg *.bmp. All aspects of a person’s credit checks and referencing information can be managed from here Search for the person that you want to add notes or documents to click on the next action button.
To upload notes and documents to this person click on the Add button.
From the drop down menu select the type of document that you are going to upload. If document type is not in the list then select other and in the Note box explain the document type.
Click on the Browse button and search for the saved document on your PC and upload. The document will upload automatically after selection. Enter any notes as required then click ok
Document and note are now saved under the person. Click on the edit button to make any changes or click on the delete button to remove.

Page | 105
Tenancy Reference Notes & Documents
This is a similar view as described above in Individuals Notes and Documents and provides the same options for all tenants that are included in an existing tenancy (Let Agreed or Signed). Search for a property that the tenant occupies that you want to reference. On clicking next dependant on how many tenants are at the property you will be able to credit check each one.
Searching a single occupancy lists
one tenant
On a multiple occupancy tenancy all tenants will
be available to store documents.
As in an Individuals referencing notes you will
need to select the type of note/document to be
stored.
Click on the Browse button and search for the saved document on your PC and upload. Enter any notes as required then click ok. The documents and any notes you have entered will be saved against each tenant.

Page | 106
Credit Checking
Referencing an Applicant
Within the marketing menu to access the referencing functionality go to Applicants and Create New Applicant Card. Complete the new applicant card and save the details. Re-open applicant’s card, select the referencing tab and click on the referencing tab then click on Credit Check
Import details will show as the applicants address as selected from the ‘Using Address’ dropdown menu is linked to this reference check Applicant details will be pre-populated into the form, click on the next Action button to continue. When the next Action button has been selected the system will connect to the Equifax database to find a match.

Page | 107
The system will return matches to your query. Select the person you are carrying out a credit check on and click on the next Action button to confirm the details. The system, once again will interrogate the database
The Credit Score. Based on the information held for that person at the selected address Equifax provide a Credit Score. The score will be in the range of -1000 to + 1000, but the vast majority will be in the range of 100 to 500. LetMC have worked with Equifax and provide the following guidelines:- +350 and above – Low risk +200 to +349 – Medium risk +199 and below – High risk
Credit Information Provided.
Credit information provided in the Results is: Current Address: This confirms the address on which the credit check results are based. County Court Judgements: The credit risk score and any additional data (such as CCJs etc.) are related to matches between the person credit checked at this address only (alternative addresses must be credit checked separately). Electoral Role: This confirms the period of time the person has been on the Electoral Role at the Current Address. CCJ’s: A list of any CCJs are provided with supporting information such as date, the amount of the judgement and whether the judgement was subsequently satisfied Notices of Correction: These can be added to credit check results by the person credit checked in order to explain or justify any adverse results The credit score should be interpreted (by the Letting Agent) in conjunction with other information available and the person's background. The credit score is not a guarantee, but a guide to the person's credit worthiness at the specified address. Note: The risk results can be amended on a company basis call LetMC to enable your custom settings.

Page | 108
Results of credit checks will be stored in the applicant’s card. Further checks can be carried out by using the Credit check button under ‘Perform a new Credit Check or opening the existing
check and access the Reference this person again Credit Check button
Referencing a Landlord
Referencing a landlord can be carried out in two sections of the software, Marketing and Lettings. Step 7 of Add/Modify a Landlord
As in Applicant referencing
click on the Credit Check button to begin the referencing process.
The add button should be clicked when entering notes or uploading any referencing documentation Continue to follow the same process as in Reference an Applicant. Results will be stored in Landlords Details
Credit Check an Individual
In credit check an individual, you can call up anyone that is registered on the system to perform a check on. Click on the correct button and carry out the check Continue to follow the same process as in Reference an Applicant. Results will be stored in corresponding persons Details If you carry out a check on a person that is not registered on the system the person will be shown as unlinked. To recall any of these unlinked checks go to Manage all Credit Checks and select Un-Linked from the Type Drop-Down Menu

Page | 109
Credit Check a Tenancy
Credit chinking of a tenancy allows you to check all people within one tenancy. Select each tenant in turn to carry out the checks.
Carry out credit checking as previously described. This time you have all the tenants listed that can be credit checked. Add Notes and any referencing documentation
Referencing a Contractor
To reference a contractor go to Maintenance/Modify Contractor Details As in Applicant referencing click on the Credit Check button to begin the referencing process.
Continue to follow the same process as in Reference an Applicant. (You cannot reference a company, only individuals).

Page | 110
Manage all Credit Checks
Using the filters at the top of the screen you can call up the credit checks. There is also a credit check button at the top of the screen if you want to carry out further checks. Clicking on the edit button will display details of the check. In the person checked column will be what property on the system you have checked against, or it will show ‘unlinked’, not against any property on the system.
Not Yet Credit Checked
The ‘Not Yet Credit Checked’ report provides a list of people who have not yet been credit checked by Equifax. The report filters by branch and person type (Tenant, Landlord, Applicant, Contractor, Online Applicant) for the selected date range (Created date). The report also has a filter which allows it to only show persons who have been ‘opted out’ of credit checking (‘Non Opted Out’ is default setting). The credit check wizard is available directly from this report and will import the details for the selected person. If a person has been opted out of credit checking then the ‘Opt Out’ tick box needs to be un-ticked before the credit check can proceed.
Using the search criteria select Date range Person Type Show Non-opted out.

Page | 111
Equifax Settings
If you consider that the default scoring is not within your individual company parameters then these can be changed. You will need to call LetMC support and request new settings to be entered onto your system. The default settings as shown below are: +350 increasing – Low risk +200 to +349 – Medium risk +199 decreasing – High risk Once you have requested LetMC support to set new parameters they will be displayed in View Company Settings. Example below.
High Risk Low Risk
Default 200
Default 349

Page | 112
Supplementary to this manual it is advised that you regularly check the LetMC website for any new software releases/updates, particularly if you encounter something new on the system. These releases/updates can be found by going to: www.letmc.com selecting the Client Support Tab, clicking on Developer Info and following the update links. You can also obtain a copy of the latest version of part one and part two of this manual from the website by going to the Client support Tab and clicking on Training Manual, select which part you require, which will come up as a pdf file, then either print a copy or save it to your pc. Other printable information on stages of the software can be found in Client Support/Support Search/Search A-Z, the links will open specific sections of help and help documents to print or save.

Page | 113
INDEX
Accounts Reports, 75 Activating card payments, 13 Advertised Tenancy Pipeline Report., 75 Agreed Bond Deduction, 55 Amending DD details, 64 Applicant Source Types, 99 Applicant Status Types, 99 Apply a Transfer, 39 Applying Charges or Refunds, 51 Appointment Types, 98 BACS File, 19 Bank Control Account Movement, 82 Bank Control Account Transactions, 82 Banking Credit and Debit Cards, 14 Bond Deposit Held by DPS, 79 Bond Deposits Held, 79 Branch details, 94 Branch Sales Net, 75 Branch trading account, 95 Branches, 94 Call Direct Debits, 63 Card Refund, 23 Certificate Types, 98 Change Password, 90 Charge Landlord by Property, 52 Charge/Refund a Contractor, 51 Charge/Refund a Tenant, 51 Chase History, 60 Chase Money, 56 Client Administrator Login, 7 Client Finance Login, 6 Client Manager Login, 5 Client Staff Login, 5 Combine Payment Groups, 36 Company Settings, 90 Contractor Types, 98 Control Panel, 90 Create a staff Member, 92 Create an Invoice, 69 Credit Card Payments, 13 Custom Accounts, 38 DD Confirmation Letter, 63 Delete a Staff Member, 93 Delete Payment Groups, 36 Direct Debit Form, 62 Direct Debits, 61 Disputed Deduction, 53 Download your bank statement, 25 Draw down NRL, 15 Draw Down Sales, 15, 20 Electronic Payment References, 30, 35 Electronic Payment References by User,
35 Electronic Payment References
Management, 35 Electronic Payments, 29, 31 Enable Tenant to pay by DD, 61 Enabling DD, 61 Facility Types, 97
Forecast Management Fees, 75 Guaranteed Rent Balances Report., 80 Head Tenants and Accounting, 73 Introduction, 8 Inventory Item Types, 97 Invoiced Sales, 77 Invoicing, 17 Landlord NRL 6, 72 Let Agreed Pipeline, 76 LETMC.COM ACCOUNTS AND SAGE,
100 Make a BACS Payment, 18 Make a Bank Deposit, 12 Make a Card Refund, 23 Make a Cheque Payment, 15 Make a Deduction from Tenants Bond
Account, 53 Make a Journal Transfer, 44 Make a Manual Float Refund, 43 Make a Manual Rent Refund, 42 Make a Manual Rent Transfer, 42 Make a Transfer Between People, 41 Make an Online Payment, 17 Manage All Auto Transfers, 47 Manage Auto Transfers by Property, 47 Manage Bank Accounts, 37 Manage Custom Accounts, 38 Manage Direct Debits, 64 Manage Electronic Payment References,
35 Manage Invoices, 67 Manage Landlord Float, 43 Manage Payment Groups, 36 Manage Person's Auto Transfers, 46 Manual Float Refund, 43 Manual Rent Refund, 42 Manual Rent Transfer, 42 Methods of Payment, 15 Modify a Staff Member, 92 NRL Annual Return, 71 NRL Draw Down, 23 NRL Quarterly Return, 71 Object Types, 96 Opening hours, 95 Pay a Person, 15 Pay an Individual Person, 15 Paying in Slip, 12 Payment details, 10 Payment Groups, 36 Payment Priority, 8 Payments, 15 Payments and Deposits, 10 People Balances, 85 People in Credit, 15 Printing Invoices, 68 Receipt for payment, 11 Recommended Tenant Contact Details, 98 Reconcile Bank Statements, 27 Reconcile System to Bank Report., 84

Page | 114
Refund Landlord by Property, 53 Reset Staff Password, 93 Retired PDQ Transactions, 82 Section 19(1)(c) Tax Report, 71 Selecting payments to reconcile, 28 Self Assessment Tax Report, 71 Send Self Assessment Tax Report, 71 Special Account, 32 Split Payment Groups, 36 Staff, 92 Staff Job Details, 93 Staff Password, 93 Staff Signature, 93 Take a Payment, 10 Tax Reports, 71 Tenancy Agreement Types, 96 Tenancy Cancel Types, 97 Tenancy Service Types, 96
Tenancy Special Requirements, 97 Tenant Account Status Types, 99 Tenant Chase Methods, 99 Tenant Money Owed Chase, 56 Tenants Bond Deposits Outstanding, 80 Transfer Between People, 41 Un-Invoiced Sales, 78 Upload a Staff Signature, 93 Upload your statement onto the LetMC
System, 25 View a Branch's Sales Accounts, 65 View a Person's Accounts, 65 View a Person's Invoices, 68 View a Staff Member, 92 View Account Activity, 65 View All Invoices, 67 View and Search History, 24 View Your Company's Accounts, 66

Page | 115
Suggested work flow diagram. Use this flow chart as a guide to creating your own

Page | 116
© LetMC Training