Paragon Alignment Tooldownload.paragon-software.com/doc/PAT_eng161012.pdf · PAT WinPE environment...
41
PARAGON Software GmbH Heinrich-von-Stephan-Str. 5c 79100 Freiburg, Germany Tel. +49 (0) 761 59018201 Fax +49 (0) 761 59018130 Internet www.paragon-software.com Email [email protected] Copyright© 1994-2012 Paragon Software GmbH. All rights reserved. Paragon Alignment Tool 4.0 Professional User Manual
Transcript of Paragon Alignment Tooldownload.paragon-software.com/doc/PAT_eng161012.pdf · PAT WinPE environment...

PARAGON Software GmbH
Heinrich-von-Stephan-Str. 5c 79100 Freiburg, Germany
Tel. +49 (0) 761 59018201 Fax +49 (0) 761 59018130
Internet www.paragon-software.com Email [email protected]
Copyright© 1994-2012 Paragon Software GmbH. All rights reserved.
Paragon Alignment Tool 4.0 Professional
User Manual

2
Copyright© 1994-2012 Paragon Software GmbH. All rights reserved.
Contents
Introducing the Paragon Alignment Tool ............................................................................... 4
What is PAT? .............................................................................................................................................. 4
What’s New in PAT 4.0 Professional ............................................................................................................ 4
Product Components .................................................................................................................................. 4
Key Features ............................................................................................................................................... 4
About Partition Alignment ..................................................................................................... 5
What is Partition Alignment? ...................................................................................................................... 5
Why are Misaligned Partitions a Problem for Hard Disk Drives? ................................................................... 6
How can the Paragon Alignment Tool help? ................................................................................................ 7
Getting Started with the Paragon Alignment Tool ................................................................. 8
System Requirements ................................................................................................................................. 9
Windows-based Utility ............................................................................................................................................................ 9
Linux Based Environment ....................................................................................................................................................... 9
WinPE Based Environment ..................................................................................................................................................... 9
Additional Requirements ...................................................................................................................................................... 10
Installation ................................................................................................................................................ 10
First Start ................................................................................................................................................... 10
Obtaining PAT Bootable Environments ....................................................................................................... 10
PAT Linux Environment ......................................................................................................................................................... 10
PAT WinPE environment ....................................................................................................................................................... 11
Launching PAT Bootable Environments ...................................................................................................... 11
PAT Linux Environment ......................................................................................................................................................... 11
PAT WinPE Environment ....................................................................................................................................................... 11
Contacts .................................................................................................................................................... 12
Using PAT under Windows ................................................................................................... 12
Recovery after Interrupted Alignment ................................................................................. 17
With PAT Linux environment ...................................................................................................................... 17
With PAT WinPE environment .................................................................................................................... 18
Additional Options .............................................................................................................. 20
PAT Linux Environment .............................................................................................................................. 20
Undeleting Partition ............................................................................................................................................................. 20
Fixing the Master Boot Record (MBR) .................................................................................................................................. 23

3
Copyright© 1994-2012 Paragon Software GmbH. All rights reserved.
Correcting the Boot Configuration Data (BCD) ..................................................................................................................... 25
Marking Partitions Active ..................................................................................................................................................... 26
Changing Drive Letters .......................................................................................................................................................... 28
PAT WinPE Environment ............................................................................................................................ 31
Deleting Partition .................................................................................................................................................................. 32
Undeleting Partition ............................................................................................................................................................. 33
Correcting the Boot Configuration Data (BCD) ..................................................................................................................... 35
Adding Specific Drivers ......................................................................................................................................................... 36
Configuring Network ............................................................................................................................................................. 37
Saving Log Files ..................................................................................................................................................................... 40

4
Copyright© 1994-2012 Paragon Software GmbH. All rights reserved.
Introducing the Paragon Alignment Tool
This chapter will present general information on the Paragon Alignment Tool (PAT).
What is PAT?
The Paragon Alignment Tool is a software utility for both physical and virtual systems. It is intended to check and solve
misalignment issues on 4K physical sector size Advanced Format Drives (AF Drives) and Solid State Drives (SSDs), as well
as Redundant Array of Independent Disks (RAID). Using PAT to check and properly realign partitions will assure
maximum system and RAID performance, and in the case of SSDs also assure their maximum longevity.
What’s New in PAT 4.0 Professional
Support of Windows 8, Windows 8 Server, and Windows 2011 SBS. Install the product and do partition
alignments on computers that accommodate these operating systems.
PAT WinPE environment. Prepare a WinPE based bootable media to do partition alignments, or resume
previously interrupted operations. It provides an excellent hardware support and the same interface as the
Windows version does. Additionally it includes the Delete Partition Wizard, which might be of help in particular
emergency cases.
Faster alignment engine. Partition alignments have become much faster when protection from data loss is
disabled.
Log Saver is also added to the PAT Linux environment to help you collect log files and send them to Paragon’s
Support Team.
Product Components
PAT features several components for checking and aligning drives, and protecting user data:
Windows™-based utility – the primary tool for checking and aligning partitions from within Windows.
Blue Screen utility – aligns “locked” partitions, such as a system partition or volumes with open files.
PAT Linux environment – a set of utilities that run under Linux™ from a CD, DVD, BD, or external storage device
connected via USB or FireWire (IEEE 1394). The user-friendly “Windows-like” Linux environment requires no
installation, and is designed to be used when the operating system (OS) won’t boot in order to continue a
previously interrupted alignment operation.
PAT WinPE environment – with Boot Media Builder you can prepare a WinPE based bootable media on a
CD/DVD/BD disc, USB thumb drive, on in an ISO image format. Unlike the Linux environment it requires no
installation to do partition alignments, providing an excellent hardware support and the same interface as the
Windows version does. It also enables to resume interrupted operations.
Please use Boot Media Builder to prepare the WinPE environment, which you can get here:
www.paragon-software.com/my-account/.
Key Features
Partition Alignment without Reboot – Unlocked partitions can be aligned directly from Windows.

5
Copyright© 1994-2012 Paragon Software GmbH. All rights reserved.
Alignment in Blue Screen Mode – Reboot the system into this Blue Screen mode to align system partitions or
volumes with open files.
Linux and WinPE based media – Boot up your system when Windows won’t, or check and align drives without
installing PAT.
Total Data Protection – Data will be protected even if the alignment process was unexpectedly interrupted (e.g.
due to power outage).
About Partition Alignment
What is Partition Alignment?
To understand what partition alignment is we should first see how data is stored on a drive.
A standard hard disk drive is divided into physical sectors, where each sector is 512 bytes in size. On the Diagram 1 you
can see a simplified partitioning scheme, where one partition consumes all drive space and sectors. In this case it is
shown properly aligned with the first physical sector; that is, the partition start position corresponds with the first sector
start position:
Diagram 1
The partition consists of logical units, called clusters. In this simplified partitioning example (Diagram 2), one logical
cluster corresponds to two physical sectors:
Diagram 2
So in this example, when data is read from one logical cluster, for example a small text file, the storage device is actually
reading data from two physical sectors. Here again the partition is shown properly aligned; that is, the partition start
position and the first sector start position correspond to each other – so all clusters are aligned with all sectors, and thus
drive operations are as fast as possible.

6
Copyright© 1994-2012 Paragon Software GmbH. All rights reserved.
Why are Misaligned Partitions a Problem for Hard Disk Drives?
The next generation of hard disk drives, known as Advanced Format Drives (AF Drives) or “4K”, will have physical sectors
that are 4,096 bytes in size (instead of 512 bytes) –because a larger sector size reduces the amount of Error Correction
Code (ECC) and head positioning (servo code) data on the drive, resulting in superior read/write performance and
increased hard drive capacity.
But for drives including IDE and SATA, the sector size must be “emulated” at 512 bytes because OSs are designed to
work only with sectors of 512 bytes, even though the physical sectors of internal AF Drives are actually 4K (4,096 bytes)
in size:
Diagram 3
On the Diagram 3 you can see the three layers of an AF Drive: the bottom physical layer is divided into physical sectors
that are 4K in size. The second emulation layer is divided into 512 byte sectors. And the top layer is the actual file
system partition; here it is divided into 4K clusters, so 1 cluster = 8 emulated sectors = 1 actual physical sector.
Also notice that in this case all three layers are aligned in relation to each other and disk start position. So when you
read or write data from one cluster, it will be actualized in eight 512 byte emulated sectors and one 4K physical sector.
The amount of required read/write operations is minimized; all disk operations are at maximum performance.
But look on the Diagram #4 what happens when logical clusters are shifted (misaligned) relative to all underlying layers:
Diagram 4

7
Copyright© 1994-2012 Paragon Software GmbH. All rights reserved.
On the Diagram 4 you can see that the partition is shifted from the disk start position by 1 512 byte sector. As a result,
all logical clusters are now linked (overlapping) with two actual physical 4K sectors, and all read/write operations will be
doubled. In this case the performance of the entire system will decrease, because for each cluster of data, the drive has
to perform two operations with two sectors –instead of just one if the partition was properly aligned.
What causes this shift? All Windows versions before Vista™ use a factor of 512 bytes to create volume clusters,
meaning that the partition start position is aligned to 512 byte sectors and not to 4K sectors, where the partition start
position is indented by one 512 byte sector as shown. It is also possible under certain circumstances for any version of
Windows to create secondary partitions that are misaligned, and any third-party software which is not “4K-ready” can
also misalign partitions.
The partition start position is usually indented by 63 sectors because it’s an old measure of disk “cylinder”, and older
versions of Windows (and DOS) require that the partition has to be aligned to the “cylinder” for correct sector
addressing and access. This Cylinder/Head/Sector (CHS) addressing scheme is an old compatibility issue which modern
operating systems do not use. Instead, they use a Logical Block Addressing (LBA) scheme where there are no “cylinders”
or “heads”; sectors are addressed continuously over a whole disk drive. But for legacy reasons all Windows versions
before Vista create partitions accordingly to the “cylinder alignment” rule.
There was no problem with this rule and partition alignment until “4K” (4,096 byte) AF Drives became mainstream.
Partitions aligned to 63 sectors start position are not aligned with 4K sectors by default. This is a matter of simple math
Formula 1:
Formula 1
As you can see, 63 sectors multiplied by 512 bytes does not equal a whole number of 4K sectors, thus this partition and
as well as all other subsequent partitions on the disk are misaligned (Diagram 5):
Diagram 5
How can the Paragon Alignment Tool help?
PAT realigns all partitions that are misaligned by moving them the required number of 512 byte sectors so that all
volumes become aligned. In this example (Formula 2), PAT will move the misaligned partition forward by one 512 byte
sector to properly align it:
Formula 2

8
Copyright© 1994-2012 Paragon Software GmbH. All rights reserved.
Now the partition start position corresponds to the 4K sector start position, so this partition as well as all other
subsequent partitions on the hard drive are properly aligned (Diagram 6):
Diagram 6
There is also one other important issue: Some AF Drives have a trigger to address partition alignment issues. Their
internal controllers can be adjusted to shift the emulation layer addressing to an offset of one 512 byte sector. Thus
sector #63 becomes sector #64 so that all partitions will be aligned (Diagram 7):
Diagram 7
Most software will not detect a shifted volume such as this because all logical partitions are aligned, so applications
which are not “4K offset-aware” will actually create misaligned partitions in this case. However, PAT is “4K offset-
aware”, and is able to recognize a shifted volume such as in this example and will skip alignment of partitions on this
type of AF Drive.
Getting Started with the Paragon Alignment Tool
In this chapter you will find all the information necessary to get the product ready to use.

9
Copyright© 1994-2012 Paragon Software GmbH. All rights reserved.
System Requirements
Windows-based Utility
To use PAT under Windows, it must first be installed. Please make sure your computer meets the following minimum
system requirements:
Supported Operating Systems:
o Windows XP
o Windows Server 2003
o Windows Vista
o Windows Server 2008
o Windows 7
o Windows Server 2008 R2
o Windows SBS 2011
o Windows 8
o Windows Server 8
Supported File Systems
o FAT12
o FAT16
o FAT32
o NTFS
Internet Explorer 5.0 or higher
Intel Pentium CPU or equivalent, with 300 MHz processor clock speed
128 MB of RAM (256+MB recommended)
Hard disk drive with 100 MB of available space
SVGA video adapter and monitor
Mouse
Linux Based Environment
To use the PAT Linux environment on your computer it doesn’t matter what operating system you have installed. Please
make sure that your computer meets the following minimum system requirements:
IBM AT compatible computer with i486 or higher CPU
256 MB of RAM
SVGA-compatible monitor
Mouse (recommended)
WinPE Based Environment
To use the PAT WinPE environment on your computer it doesn’t matter what operating system you have installed.
Please make sure that your computer meets the following minimum system requirements:
Intel Pentium III CPU or its equivalent, with 1000 MHz processor clock speed

10
Copyright© 1994-2012 Paragon Software GmbH. All rights reserved.
At least 512 MB of RAM
SVGA video adapter and monitor
Keyboard
Mouse
Please use Boot Media Builder to prepare the WinPE environment, which you can get here:
www.paragon-software.com/my-account/.
Additional Requirements
Recordable CD/DVD drive to burn data to compact discs
Installation
Before installation, please make sure your platform meets the minimum system requirements. If your computer meets
these requirements, please do the following to install PAT Windows installation package:
1. Click on the setup file to initiate the installation.
2. The Welcome page will inform that the application is being installed. Click Next to continue.
3. Please read the Paragon License Agreement carefully and then select the appropriate option to accept it. By not
accepting the Paragon License Agreement you won’t be able to proceed with the installation. By clicking the
Print button, the license agreement may also be printed out.
4. Provide Registration Information. On the Registration page you are to provide your product key and serial
number, if applicable.
5. Provide Customer Information. On the Customer Information page you are to provide standard information, i.e.
a user name and an organization. You must also decide whether to make the program available for all users of
this computer (if applicable) or only for the current user.
6. Default Installation Path. Click Change to install the utility to a different location (by default C:\Program
Files(x86)\ Paragon Software\Alignment Tool 4.0\). Otherwise, click Next to continue using the default path.
7. Install PAT. On the Ready to Install the Program page click Install to start the installation or click Back to return
to any of the previous pages to review or modify the installation settings.
8. Installation Complete. The Final page reports the end of the setup process. Click Finish to complete the wizard.
First Start
To start the Paragon Alignment Tool, please double-click the Paragon Alignment Tool™ 4.0 desktop icon, or click the
Windows Start button and then select Programs > Paragon Alignment Tool™ 4.0> Paragon Alignment Tool 4.0
Obtaining PAT Bootable Environments
PAT Linux Environment
The PAT Linux-based image is delivered as a separate download from the PAT installation package. It is provided to
assist in emergency situations only; when you encounter an interrupted alignment operation.
You can download it separately from the web site. It is packaged within Paragon’s Unpack and Burn Wizard that helps to
build the PAT Linux environment on a CD/DVD/BD or flash. Using the Unpack and Burn Wizard will prevent the need of
using third-party authoring tools to create PAT media.
11
Copyright© 1994-2012 Paragon Software GmbH. All rights reserved.
PAT WinPE environment
The WinPE-based image should be prepared on-site with Paragon’s Boot Media Builder, which you can download from
the web site as well. Additionally you should have either Windows Automated Installation Kit (WAIK) or OEM
Preinstallation Kit (OPK) installed in your system. Otherwise, you won’t be able to accomplish the operation. To know
more on the subject, please consult documentation that comes with Boot Media Builder.
Launching PAT Bootable Environments
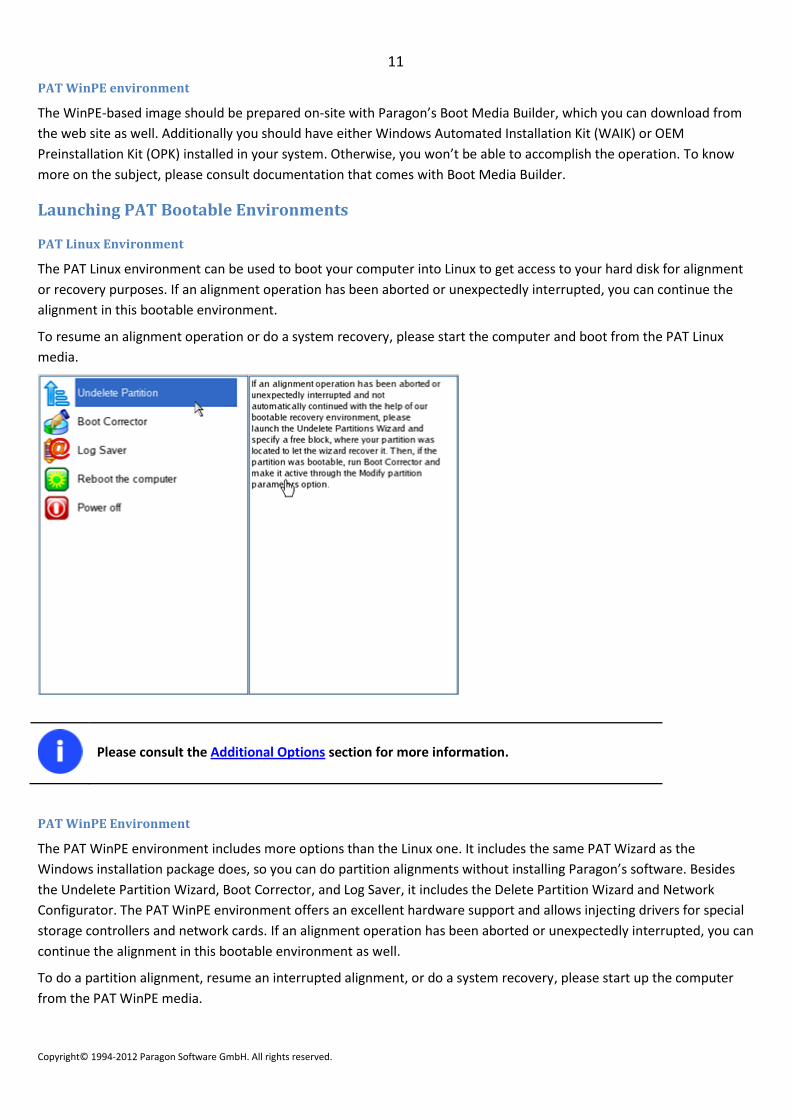
PAT Linux Environment
The PAT Linux environment can be used to boot your computer into Linux to get access to your hard disk for alignment
or recovery purposes. If an alignment operation has been aborted or unexpectedly interrupted, you can continue the
alignment in this bootable environment.
To resume an alignment operation or do a system recovery, please start the computer and boot from the PAT Linux
media.
Please consult the Additional Options section for more information.
PAT WinPE Environment
The PAT WinPE environment includes more options than the Linux one. It includes the same PAT Wizard as the
Windows installation package does, so you can do partition alignments without installing Paragon’s software. Besides
the Undelete Partition Wizard, Boot Corrector, and Log Saver, it includes the Delete Partition Wizard and Network
Configurator. The PAT WinPE environment offers an excellent hardware support and allows injecting drivers for special
storage controllers and network cards. If an alignment operation has been aborted or unexpectedly interrupted, you can
continue the alignment in this bootable environment as well.
To do a partition alignment, resume an interrupted alignment, or do a system recovery, please start up the computer
from the PAT WinPE media.

12
Copyright© 1994-2012 Paragon Software GmbH. All rights reserved.
Please consult the Additional Options section for more information.
Contacts
If you need technical assistance with the product, or want information on additional Paragon products, please use the
following links:
Service Contact
Technical Support www.paragon-software.com/support
Visit Paragon’s Website www.paragon-software.com
Using PAT under Windows
This chapter describes how the Paragon Alignment Tool is used for partition alignment.
1. Launch the program. Select Programs > Paragon Alignment Tool™ 4.0> Paragon Alignment Tool 4.0 or click the
corresponding shortcut on the Desktop.
2. Read the information on the Welcome screen, then click Next to continue. If you need to know more about the
product, click About.

13
Copyright© 1994-2012 Paragon Software GmbH. All rights reserved.
3. Your system will be checked for misaligned partitions, which requires a couple of seconds.
4. If no misaligned partitions have been found, the wizard will inform you about it, showing all hard disks and
partitions of your system in a special list. If there’s at least one partition that requires alignment, you will see
the Alignment Options page where you can choose how you would like the alignment process to be performed.

14
Copyright© 1994-2012 Paragon Software GmbH. All rights reserved.
Default options are an acceptable balance between the risk of possible data loss and the operation
performance. In this mode you will be protected from:
File system errors on partitions to be aligned
An unexpected system restart
To proceed in the fastest alignment mode, simply set the corresponding data protection settings to “None” and
“Never” respectively, then click on the “I understand the risks and want to proceed further” check box.
If you are concerned about potential power loss or other system interruptions during alignment, then one of the
following options in the “Protect from accidental data loss” section can be selected:
No protection: Protection disabled
Reset: Protects from accidentally pressing the Reset button (default)
Power loss: Protects from complete system power interruption
If you are concerned about the file system consistency of partitions (for example, “chkdsk /f” has never or rarely
been performed), then one of the following options in the “File system integrity check policy” can be selected:
Never: Do not check file systems
Once: Check file systems once for each partition before alignment (default)
Always: Check file systems for each partition before & after alignment
5. On the next screen is a display of all drives and partitions in the system on the left side, and a disk map legend
on the right side. By default all found misaligned partitions will be selected for you. Unmark checkboxes
opposite partitions you don’t want to align.

15
Copyright© 1994-2012 Paragon Software GmbH. All rights reserved.
6. Click the Align partitions button and start the operation. NOTE: If there are any opened or used files on the
partition, the program will prompt to restart the computer. The computer will restart and enter the Blue Screen
mode, where all operations will be safely performed.
7. The system will reboot.

16
Copyright© 1994-2012 Paragon Software GmbH. All rights reserved.
8. It may take several minutes before the alignment operation completes. The amount of time needed depends on
the amount of data in the partition. After alignment completes in Blue Screen Mode, your system will restart
and return to Windows. Upon returning to Windows, PAT will be automatically re-launch and provide an
alignment status update.
You can do partition alignments with the PAT WinPE media. The operation is quite similar
to the mentioned above.

17
Copyright© 1994-2012 Paragon Software GmbH. All rights reserved.
Recovery after Interrupted Alignment
With PAT Linux environment
The PAT Linux environment is intended to help you successfully finish any unintentionally interrupted alignment
operation. For example, a sudden power outage caused a computer shutdown, or an accidental button push caused a
reboot during alignment of the system partition and you can no longer boot to your operating system. Simply reboot
your computer with the PAT Linux media and continue the alignment operation.
1. Start your computer and boot from the PAT Linux media.
2. A warning message will appear, prompting that an interrupted alignment operation was detected.
3. Click the Yes button to continue the interrupted alignment operation.
18
Copyright© 1994-2012 Paragon Software GmbH. All rights reserved.
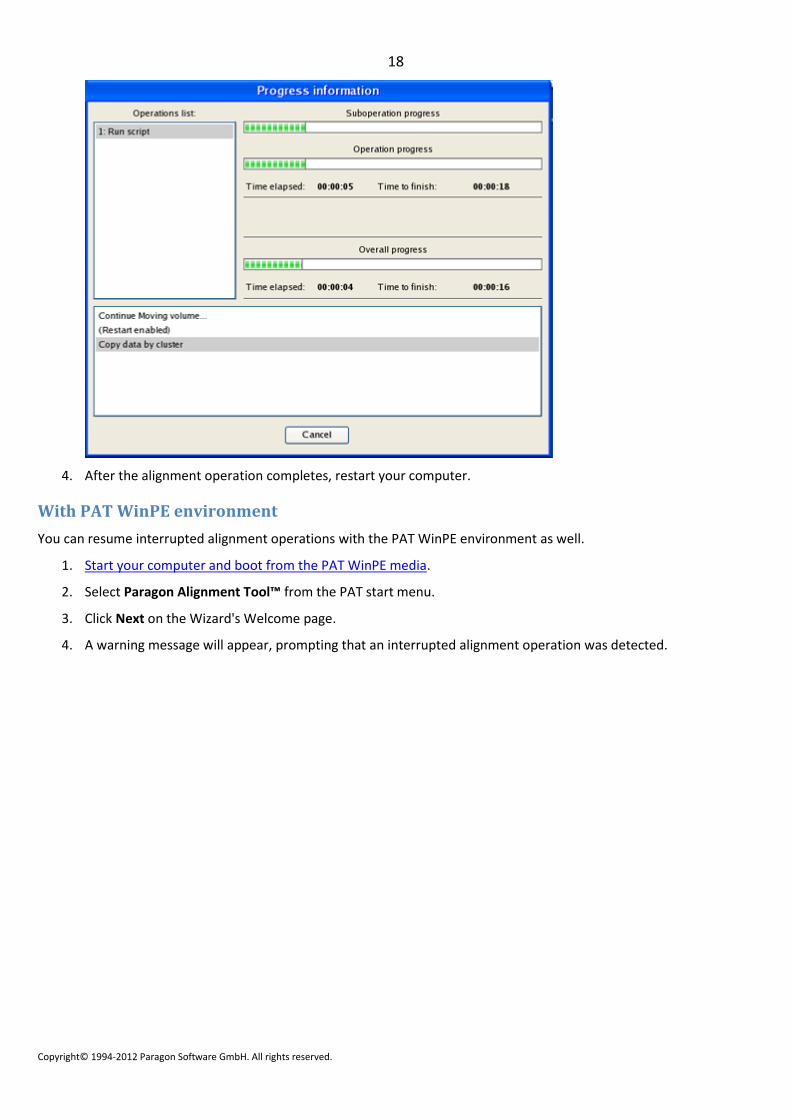
4. After the alignment operation completes, restart your computer.
With PAT WinPE environment
You can resume interrupted alignment operations with the PAT WinPE environment as well.
1. Start your computer and boot from the PAT WinPE media.
2. Select Paragon Alignment Tool™ from the PAT start menu.
3. Click Next on the Wizard's Welcome page.
4. A warning message will appear, prompting that an interrupted alignment operation was detected.

19
Copyright© 1994-2012 Paragon Software GmbH. All rights reserved.
5. Click the Yes button to continue the interrupted alignment operation.
6. When completed the wizard will provide an alignment status update. Click Close and restart your computer.

20
Copyright© 1994-2012 Paragon Software GmbH. All rights reserved.
You can resume interrupted alignments of non-system partitions directly under Windows.
The procedure is quite similar to the mentioned above.
Additional Options
PAT Linux Environment
Undeleting Partition
The program provides the ability to find and recover deleted partitions. This function is usually known as "undelete".
When PAT aligns a partition it deletes the partition from the Partition Table. In the event of a power outage during this
stage all data remains untouched, but the computer no longer finds this partition. However, a previously deleted
partition can still be recovered.
A restored partition will be fully functional, as long as other partitions were not created, moved or have not exceeded
the disk space occupied by the partition before any undelete attempts. That is why the program enables the Undelete
Partition function only for blocks of free space.
1. Start the computer and boot from the PAT Linux media.
2. Select the Undelete Partition item from the PAT start menu.
3. Click Next on the Wizard's Welcome page.

21
Copyright© 1994-2012 Paragon Software GmbH. All rights reserved.
4. Select the free block that will be scanned for lost partitions.
5. Optionally, choose specific file systems to search for.

22
Copyright© 1994-2012 Paragon Software GmbH. All rights reserved.
6. You can define how lost partitions should be searched: scan all sectors or only scan where Vista/Windows 7
creates volumes. Click Next to start the search.
7. The search progress will be shown.
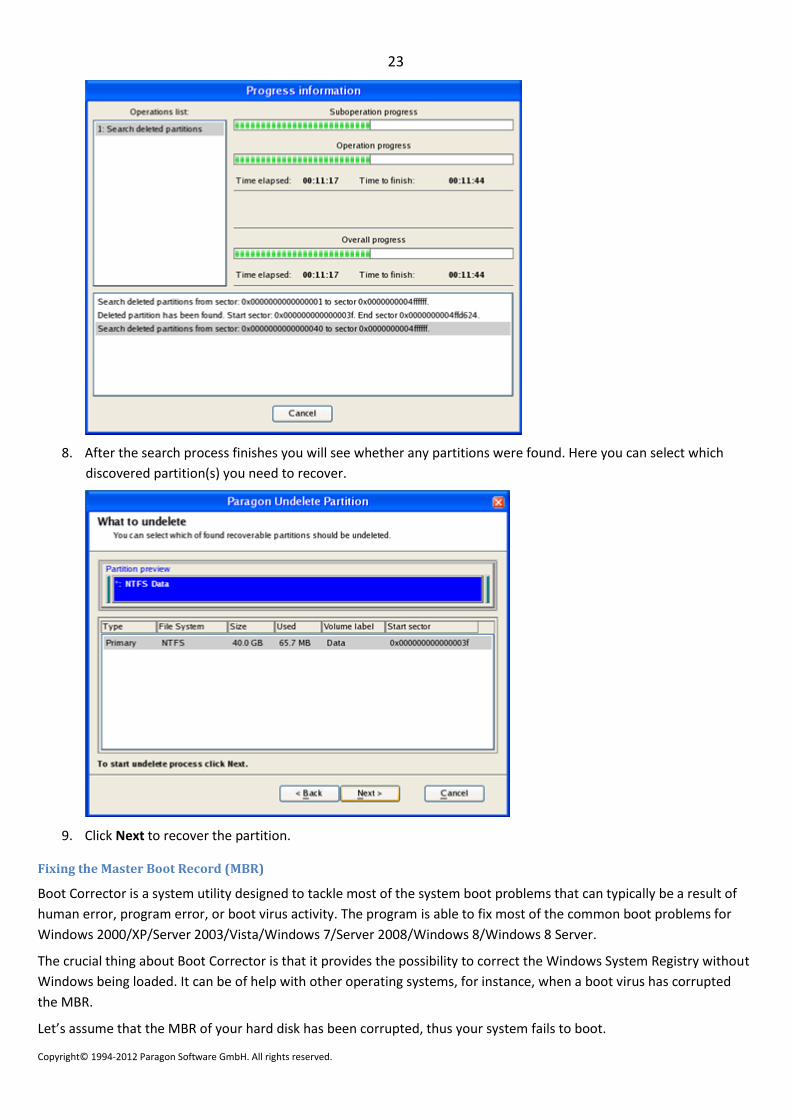
23
Copyright© 1994-2012 Paragon Software GmbH. All rights reserved.
8. After the search process finishes you will see whether any partitions were found. Here you can select which
discovered partition(s) you need to recover.
9. Click Next to recover the partition.
Fixing the Master Boot Record (MBR)
Boot Corrector is a system utility designed to tackle most of the system boot problems that can typically be a result of
human error, program error, or boot virus activity. The program is able to fix most of the common boot problems for
Windows 2000/XP/Server 2003/Vista/Windows 7/Server 2008/Windows 8/Windows 8 Server.
The crucial thing about Boot Corrector is that it provides the possibility to correct the Windows System Registry without
Windows being loaded. It can be of help with other operating systems, for instance, when a boot virus has corrupted
the MBR.
Let’s assume that the MBR of your hard disk has been corrupted, thus your system fails to boot.
24
Copyright© 1994-2012 Paragon Software GmbH. All rights reserved.
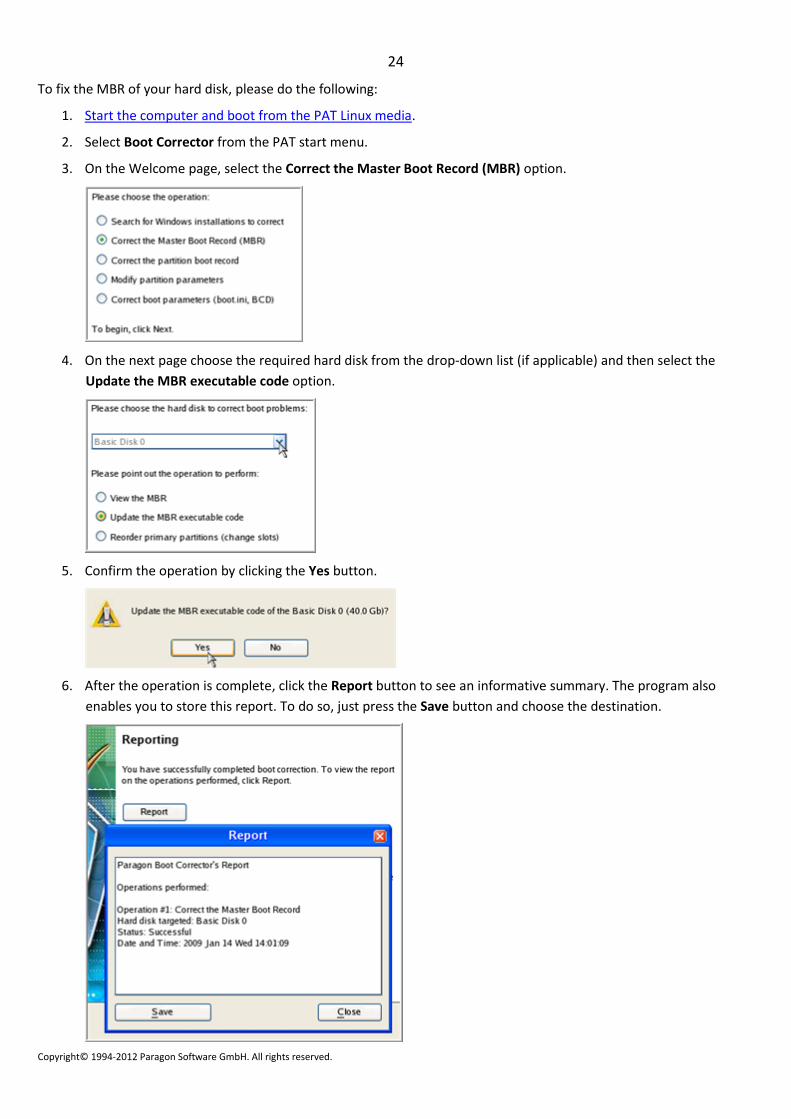
To fix the MBR of your hard disk, please do the following:
1. Start the computer and boot from the PAT Linux media.
2. Select Boot Corrector from the PAT start menu.
3. On the Welcome page, select the Correct the Master Boot Record (MBR) option.
4. On the next page choose the required hard disk from the drop-down list (if applicable) and then select the
Update the MBR executable code option.
5. Confirm the operation by clicking the Yes button.
6. After the operation is complete, click the Report button to see an informative summary. The program also
enables you to store this report. To do so, just press the Save button and choose the destination.

25
Copyright© 1994-2012 Paragon Software GmbH. All rights reserved.
7. Click the Finish button to close Boot Corrector.
8. Restart the computer.
This function is also available in the PAT WinPE environment.
Correcting the Boot Configuration Data (BCD)
To automatically correct the BCD of a Windows 2000+ system, please do the following:
1. Start the computer and boot from the PAT Linux media.
2. Select Boot Corrector from the PAT start menu.
3. Select Correct boot parameters… to let the wizard fix the BCD in all recognized Windows 2000+ installations.
4. Select the option to Correct BCD files for partitions on the selected disk.

26
Copyright© 1994-2012 Paragon Software GmbH. All rights reserved.
5. The wizard will ask you to confirm the operation. Click the Yes button to confirm the operation.
After completing the operation close the wizard, and then reboot the computer.
This function is also available in the PAT WinPE environment.
Marking Partitions Active
To mark a partition of a Windows 2000+ system as Active, please do the following:
1. Start the computer and boot from the PAT Linux media.
2. Select Boot Corrector from the PAT start menu.

27
Copyright© 1994-2012 Paragon Software GmbH. All rights reserved.
3. On the Wizard's Welcome page, select Modify partition parameters.
4. Choose the partition to modify and click Set active.

28
Copyright© 1994-2012 Paragon Software GmbH. All rights reserved.
5. The wizard will ask you to confirm the operation. Click the Yes button to confirm the operation.
After completing the operation close the wizard, and then reboot the computer.
This function is also available in the PAT WinPE environment.
Changing Drive Letters
To change a partition drive letter, please do the following:
1. Start the computer and boot from the PAT Linux media.
2. Select Boot Corrector from the PAT start menu.
3. On the Wizard's Welcome page, select Search for Windows installations to correct.

29
Copyright© 1994-2012 Paragon Software GmbH. All rights reserved.
4. Select the detected Windows installation you desire and select the Correct drive letter in the System Registry
option.
5. Select the system volume and click the Edit letters button.

30
Copyright© 1994-2012 Paragon Software GmbH. All rights reserved.
6. A window will appear where you will see the letter you chose. Click Change.
7. Select a new drive letter and click OK.

31
Copyright© 1994-2012 Paragon Software GmbH. All rights reserved.
8. The wizard will then commit the drive letter change.
After completing the operation close the wizard, and then reboot the computer.
This function is also available in the PAT WinPE environment.
PAT WinPE Environment
Please use Boot Media Builder to prepare the WinPE environment, which you can get here:
www.paragon-software.com/my-account/.

32
Copyright© 1994-2012 Paragon Software GmbH. All rights reserved.
Deleting Partition
In some emergency cases a corrupted partition needs to be deleted before recovering through the Undelete Partition
Wizard.
To delete a partition, please do the following:
1. Start your computer and boot from the PAT WinPE media.
2. Select Delete Partition from the PAT start menu.
3. Click Next on the Wizard's Welcome page.
4. Select a hard disk (if the computer has several hard disks) and then the required partition to delete.
As a result of this operation contents of the selected partition will be lost.
5. As a result of the operation you may get several blocks of the unallocated space on the hard disk. So choose
whether to merge them all and place at the beginning of the disk or at the end by selecting the required
operation from the pull-down list.

33
Copyright© 1994-2012 Paragon Software GmbH. All rights reserved.
6. Confirm the operation and click Next.
7. After completing the operation close the wizard, and then reboot the computer.
Undeleting Partition
To recover a previously deleted partition, please do the following:
1. Start your computer and boot from the PAT WinPE media.
2. Select Undelete Partition from the PAT start menu.
3. Click Next on the Wizard's Welcome page.
4. Choose a free block from a tree-like list of available hard disks.
34
Copyright© 1994-2012 Paragon Software GmbH. All rights reserved.
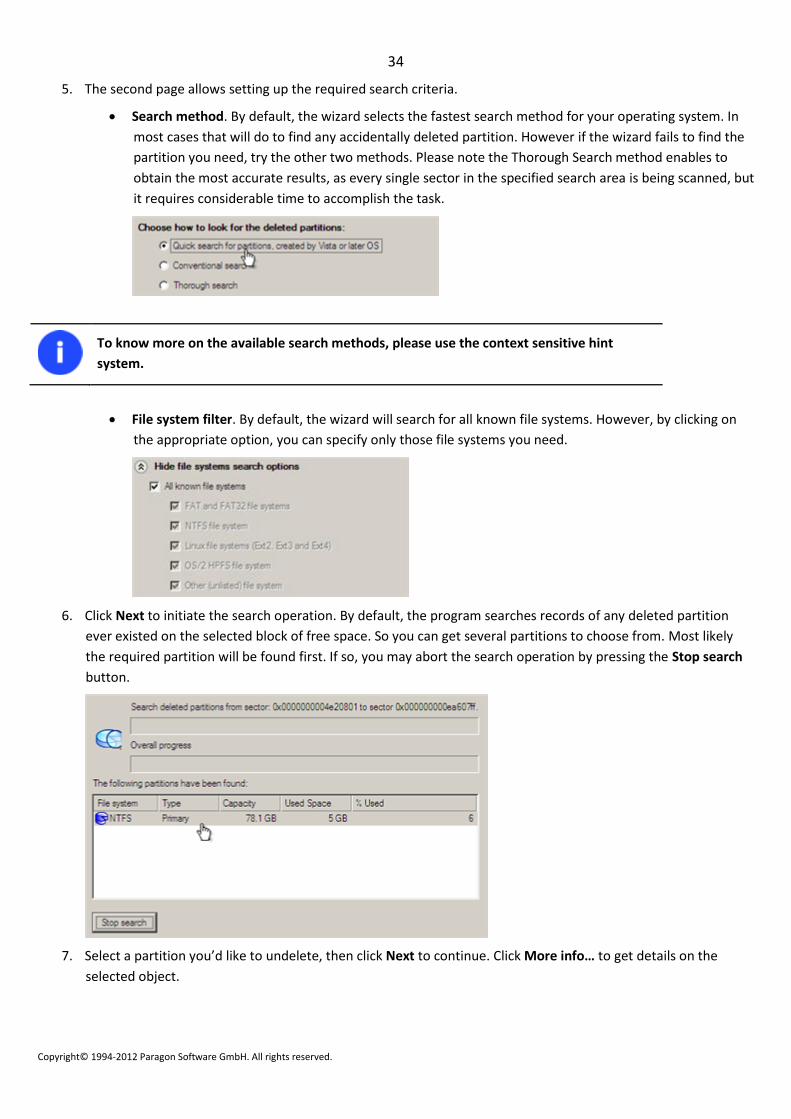
5. The second page allows setting up the required search criteria.
Search method. By default, the wizard selects the fastest search method for your operating system. In
most cases that will do to find any accidentally deleted partition. However if the wizard fails to find the
partition you need, try the other two methods. Please note the Thorough Search method enables to
obtain the most accurate results, as every single sector in the specified search area is being scanned, but
it requires considerable time to accomplish the task.
To know more on the available search methods, please use the context sensitive hint
system.
File system filter. By default, the wizard will search for all known file systems. However, by clicking on
the appropriate option, you can specify only those file systems you need.
6. Click Next to initiate the search operation. By default, the program searches records of any deleted partition
ever existed on the selected block of free space. So you can get several partitions to choose from. Most likely
the required partition will be found first. If so, you may abort the search operation by pressing the Stop search
button.
7. Select a partition you’d like to undelete, then click Next to continue. Click More info… to get details on the
selected object.

35
Copyright© 1994-2012 Paragon Software GmbH. All rights reserved.
8. Confirm the operation.
9. After completing the operation close the wizard, and then reboot the computer.
Correcting the Boot Configuration Data (BCD)
To automatically correct the BCD of a Windows 2000+ system, please do the following:
1. Start the computer and boot from the PAT WinPE media.
2. Select Boot Corrector from the PAT start menu.
3. Click Next on the Wizard's Welcome page.
4. Select Correct boot parameters… to let the wizard fix BCD in all found Windows installations.
5. Confirm the operation.

36
Copyright© 1994-2012 Paragon Software GmbH. All rights reserved.
6. Click the Finish button to close Boot Corrector.
7. Restart the computer.
Adding Specific Drivers
The PAT WinPE environment offers excellent hardware support. Anyway you’ve got the option to add drivers for specific
hardware with a handy dialog.
To add drivers for specific hardware, please do the following:
1. Start the computer and boot from the PAT WinPE media.
2. Select Load Drivers from the PAT start menu.
3. In the opened dialog browse for an .INF file of the required driver package located on a floppy disk, local disk,
CD/DVD or a network share. Then click the Open button to initiate the operation
To know how to map a network share, please consult the Configuring network scenario.

37
Copyright© 1994-2012 Paragon Software GmbH. All rights reserved.
4. You will be notified on the successful accomplishment of the operation. Click Yes to load another driver or No to
close the dialog.
The PAT WinPE environment is 32-based, thus you need to use 32-bit drivers for injection.
Configuring Network
If your local network has a DHCP server, a network connection will be automatically configured once the PAT WinPE
environment has been started up. Otherwise you will need to do it manually with a handy dialog by providing an IP
address, a network mask, default gateway, etc. Besides with its help you can easily map network shares.
To manually set up a network connection and map a network share, please do the following:
1. Start the computer and boot from the PAT WinPE media.
2. Select Configure Network from the PAT start menu.
3. In the opened dialog provide an IP address, a network mask, default gateway, etc. for your network device.
4. Click the Network drivers tab to map a network share.
38
Copyright© 1994-2012 Paragon Software GmbH. All rights reserved.
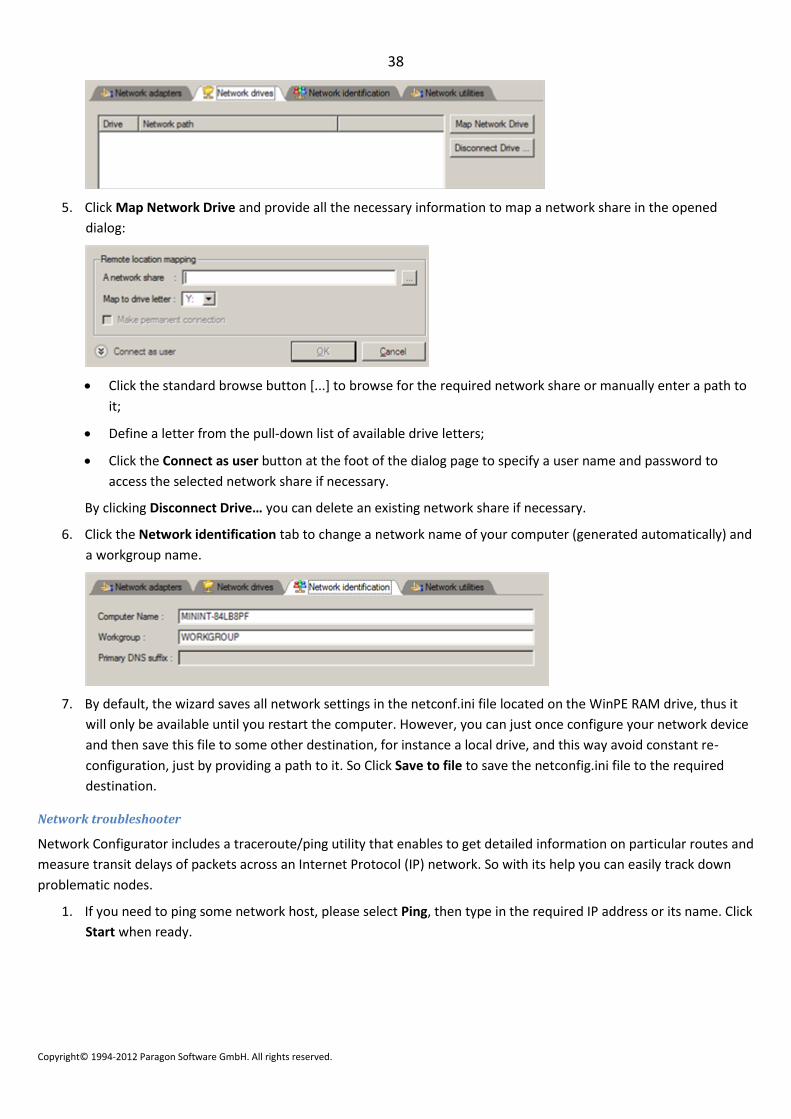
5. Click Map Network Drive and provide all the necessary information to map a network share in the opened
dialog:
Click the standard browse button [...] to browse for the required network share or manually enter a path to
it;
Define a letter from the pull-down list of available drive letters;
Click the Connect as user button at the foot of the dialog page to specify a user name and password to
access the selected network share if necessary.
By clicking Disconnect Drive… you can delete an existing network share if necessary.
6. Click the Network identification tab to change a network name of your computer (generated automatically) and
a workgroup name.
7. By default, the wizard saves all network settings in the netconf.ini file located on the WinPE RAM drive, thus it
will only be available until you restart the computer. However, you can just once configure your network device
and then save this file to some other destination, for instance a local drive, and this way avoid constant re-
configuration, just by providing a path to it. So Click Save to file to save the netconfig.ini file to the required
destination.
Network troubleshooter
Network Configurator includes a traceroute/ping utility that enables to get detailed information on particular routes and
measure transit delays of packets across an Internet Protocol (IP) network. So with its help you can easily track down
problematic nodes.
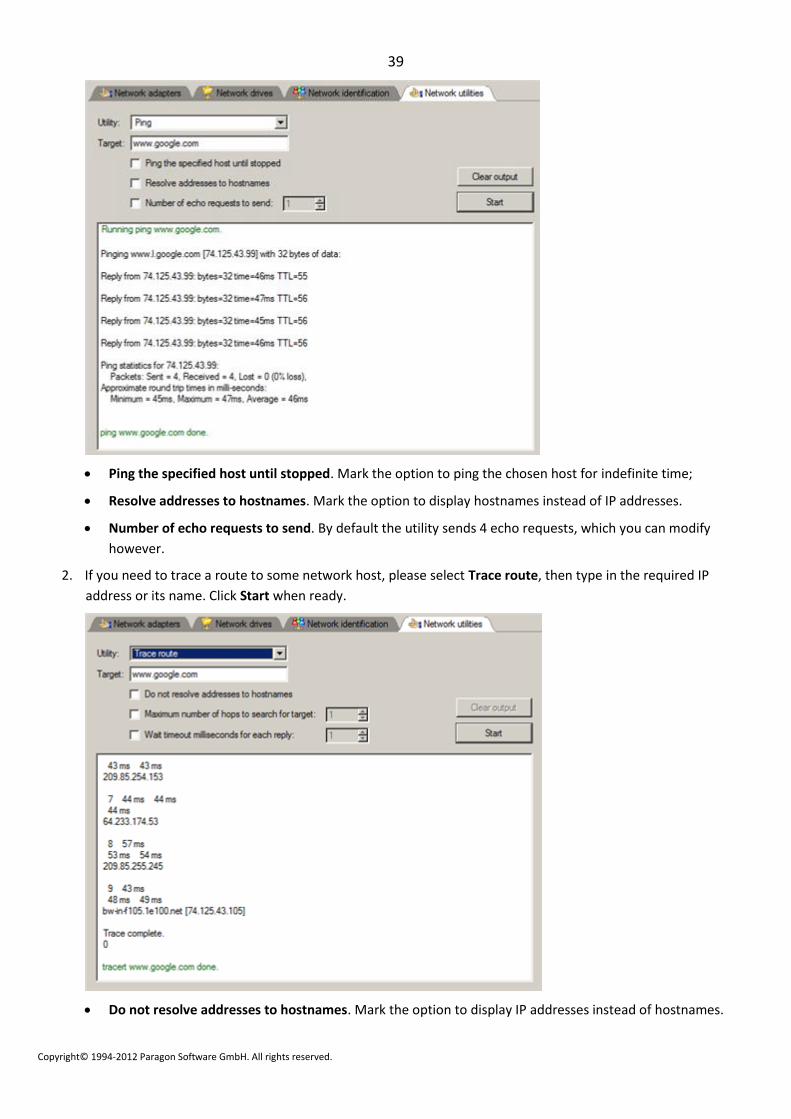
1. If you need to ping some network host, please select Ping, then type in the required IP address or its name. Click
Start when ready.
39
Copyright© 1994-2012 Paragon Software GmbH. All rights reserved.
Ping the specified host until stopped. Mark the option to ping the chosen host for indefinite time;
Resolve addresses to hostnames. Mark the option to display hostnames instead of IP addresses.
Number of echo requests to send. By default the utility sends 4 echo requests, which you can modify
however.
2. If you need to trace a route to some network host, please select Trace route, then type in the required IP
address or its name. Click Start when ready.
Do not resolve addresses to hostnames. Mark the option to display IP addresses instead of hostnames.

40
Copyright© 1994-2012 Paragon Software GmbH. All rights reserved.
Maximum number of hops to search for target. By default the utility goes through maximum 30 hops when
searching for the target host, which you can modify however.
Wait timeout milliseconds for each reply. By default the utility waits 4 seconds for each echo reply
message. If not received within the timeout, an asterisk (*) is displayed.
Saving Log Files
The program enables to simplify the procedure of sending support requests to the Paragon Support Team. In case of
having difficulties with handling the program, you, with the help of this very function, can address the company support
engineers and provide them with all the information they need such as the disk layout, performed operations, etc. in
order to tackle the encountered problem. Information of that kind is stored in log files.
To prepare a log files package, please do the following:
1. Start the computer and boot from the PAT WinPE media.
2. Select Log Saver from the PAT start menu.
3. Provide an e-mail address used for registering the product, then give a detailed description on the encountered
problem in the corresponding text fields. Please don’t worry - we respect your privacy, so none of your
confidential data will be exposed. This utility only collects the program’s operation logs to help our Support
Team find and tackle your problem. Click Next to continue.
Log files do not contain any confidential information on the operating system settings or
the user documents.
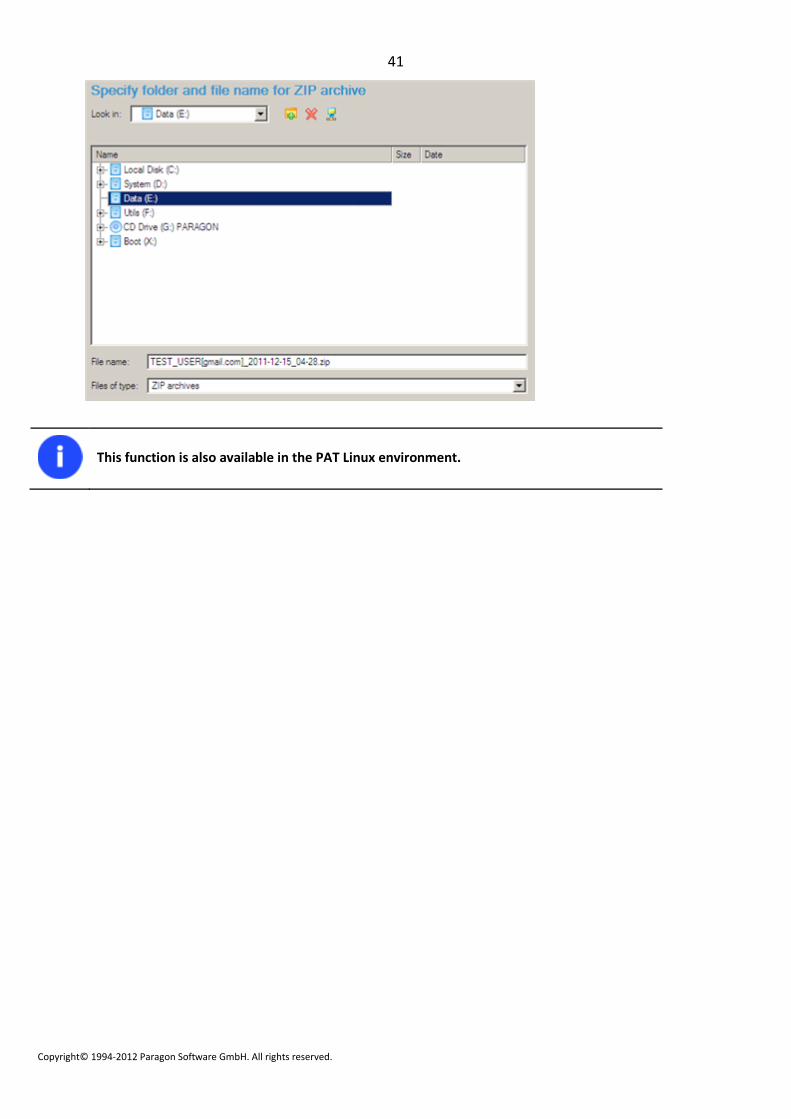
4. Browse for the required location of the log files package or manually provide a full path to it. Click Save to
initiate the operation.
41
Copyright© 1994-2012 Paragon Software GmbH. All rights reserved.
This function is also available in the PAT Linux environment.