paradigma - Axelmed · AXELMED® SURGICAL AND PROSTHETIC GUIDE PAG. 3 INTRODUCTION Axelmed®...
40
paradigma life from titanium ® ® AXELMED ® SURGICAL AND PROSTHETIC GUIDE
Transcript of paradigma - Axelmed · AXELMED® SURGICAL AND PROSTHETIC GUIDE PAG. 3 INTRODUCTION Axelmed®...
paradigma
life from titanium
®
®
AXELMED® SURGICAL AND PROSTHETIC GUIDE
AXELMED® SURGICAL AND PROSTHETIC GUIDE
PAG. 2
INTRODUCTION
GENERAL FEATURES 3 Axelmed® Paradigma® surface: SAP Surface Axelmed® Paradigma® Implant design
INDICATIONS AND CONTRA-INDICATIONS 7 Patient selection Indications Absolute contra-indications Relative contra-indications
SURGICAL PROCEDURE 9 Pre-operative planning Planning aid Axelmed® Implant Distance Indicator Axelmed® X-RayTemplates Intra-operative Steps Axelmed® Surgical Kit Implant site preparation Use of Axelmed® Bone Regeneration Drill (BRD) for collecting bone Axelmed® Paradigma® Implant insertion Management of soft tissues
PROSTHETIC PROCEDURE 21 Impression Technique Closed tray Technique Open tray Technique Axelmed® Abutments Axelmed® Titanium Temporary Abutment Screw-retained solutions Chair-side construction of the prosthesis Laboratory construction of the prosthesis Cement-retained solutions Chair-side construction of the prosthesis Laboratory construction of the prosthesis Axelmed® Titanium Esthetic Abutment Chair-side preparation of the abutment Laboratory preparation of the abutment Axelmed® Castable Abutment Axelmed® Multi Unit Abutment Overdenture Solutions Overdenture supported by Axelmed® Ball Abutment Direct Technique Indirect Technique Overdenture supported by bar
ALL-in-ONE 38
AXELMED® SURGICAL AND PROSTHETIC GUIDE
PAG. 3
INTRODUCTION
Axelmed® Paradigma® implant was designed to create a medical device of great quality,user friendly and reliable, able to encompass the actual implantology art and to summarize the research and the analysis conducted over the past 30 years. The name “Paradigma” refers to the modus operandi at the basis of the Axelmed® systematic: it relies on what is widely recognized in scientific literature, it takes inspiration from that model thus contribu-ting to its continuous improvement.
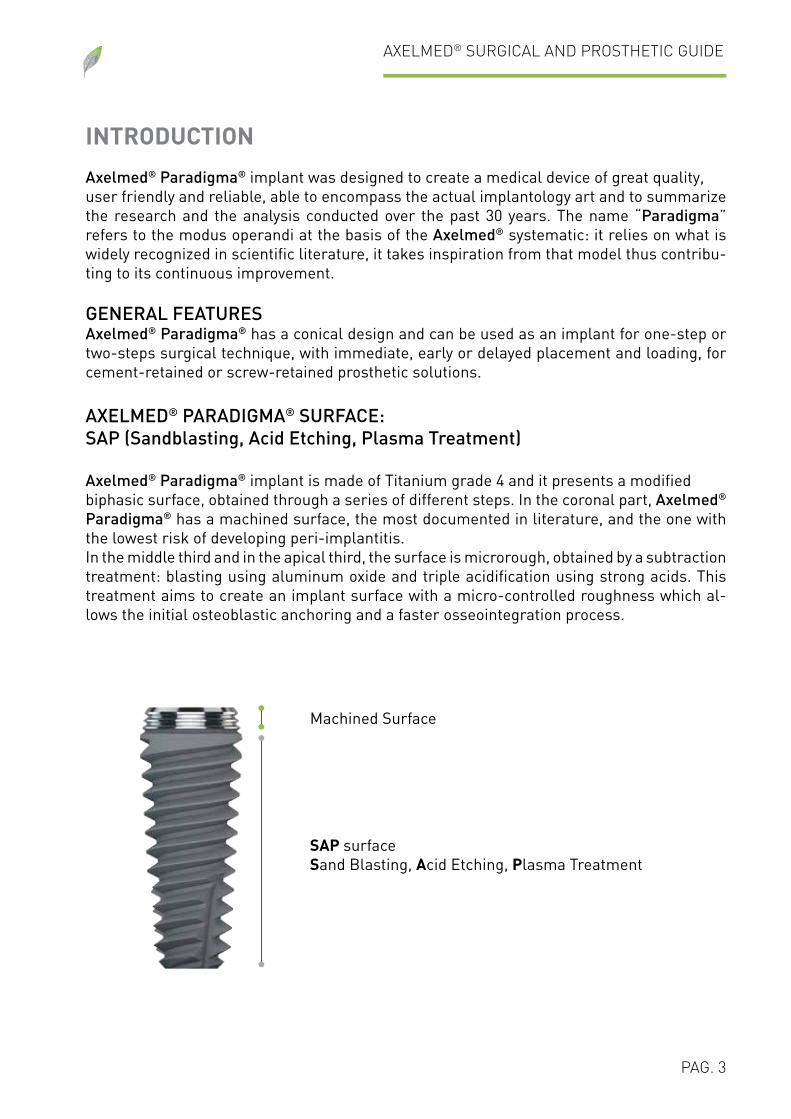
GENERAL FEATURESAxelmed® Paradigma® has a conical design and can be used as an implant for one-step or two-steps surgical technique, with immediate, early or delayed placement and loading, for cement-retained or screw-retained prosthetic solutions.
AXELMED® PARADIGMA® SURFACE: SAP (Sandblasting, Acid Etching, Plasma Treatment)
Axelmed® Paradigma® implant is made of Titanium grade 4 and it presents a modifiedbiphasic surface, obtained through a series of different steps. In the coronal part, Axelmed® Paradigma® has a machined surface, the most documented in literature, and the one with the lowest risk of developing peri-implantitis.In the middle third and in the apical third, the surface is microrough, obtained by a subtraction treatment: blasting using aluminum oxide and triple acidification using strong acids. This treatment aims to create an implant surface with a micro-controlled roughness which al-lows the initial osteoblastic anchoring and a faster osseointegration process.
Machined Surface
SAP surfaceSand Blasting, Acid Etching, Plasma Treatment
AXELMED® SURGICAL AND PROSTHETIC GUIDE
PAG. 4
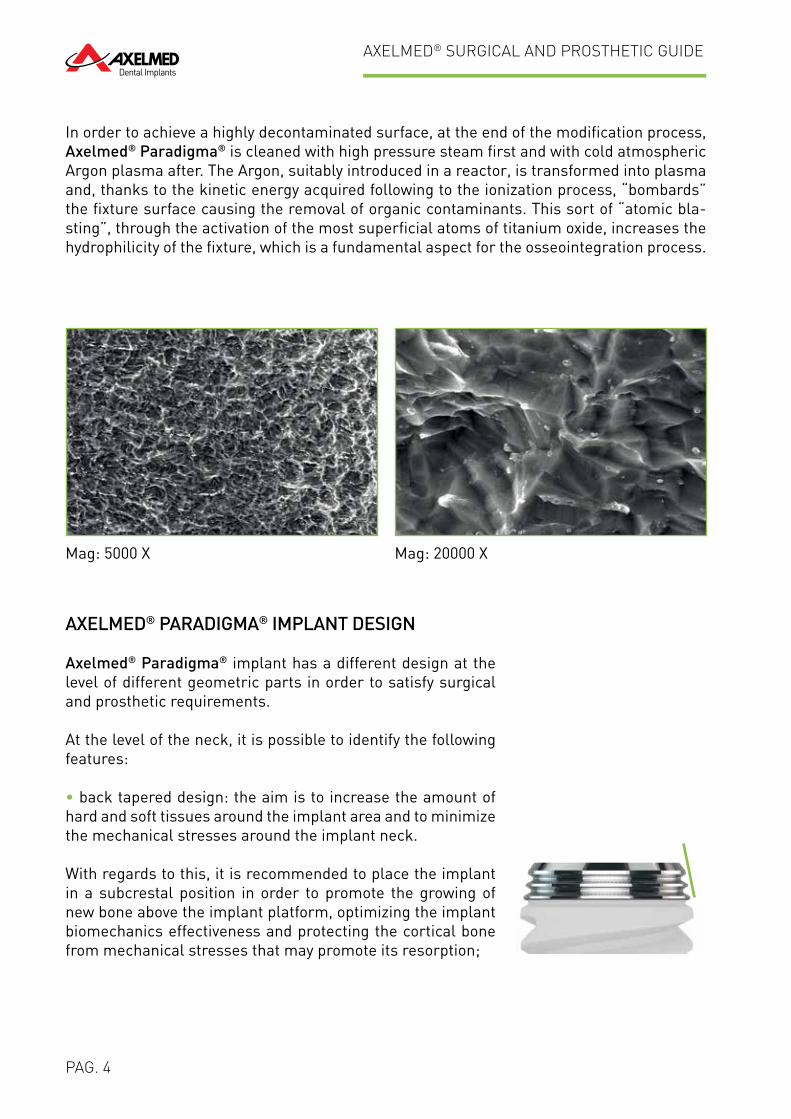
In order to achieve a highly decontaminated surface, at the end of the modification process, Axelmed® Paradigma® is cleaned with high pressure steam first and with cold atmospheric Argon plasma after. The Argon, suitably introduced in a reactor, is transformed into plasma and, thanks to the kinetic energy acquired following to the ionization process, “bombards” the fixture surface causing the removal of organic contaminants. This sort of “atomic bla-sting”, through the activation of the most superficial atoms of titanium oxide, increases the hydrophilicity of the fixture, which is a fundamental aspect for the osseointegration process.
AXELMED® PARADIGMA® IMPLANT DESIGN
Axelmed® Paradigma® implant has a different design at the level of different geometric parts in order to satisfy surgical and prosthetic requirements.
At the level of the neck, it is possible to identify the following features:
• back tapered design: the aim is to increase the amount of hard and soft tissues around the implant area and to minimize the mechanical stresses around the implant neck.
With regards to this, it is recommended to place the implant in a subcrestal position in order to promote the growing of new bone above the implant platform, optimizing the implant biomechanics effectiveness and protecting the cortical bone from mechanical stresses that may promote its resorption;
Mag: 5000 X Mag: 20000 X
AXELMED® SURGICAL AND PROSTHETIC GUIDE
PAG. 5
• microthreads: allow to reduce the magnitude of the mecha-nical stresses at the bone-implant interface and to promote new bone formation;
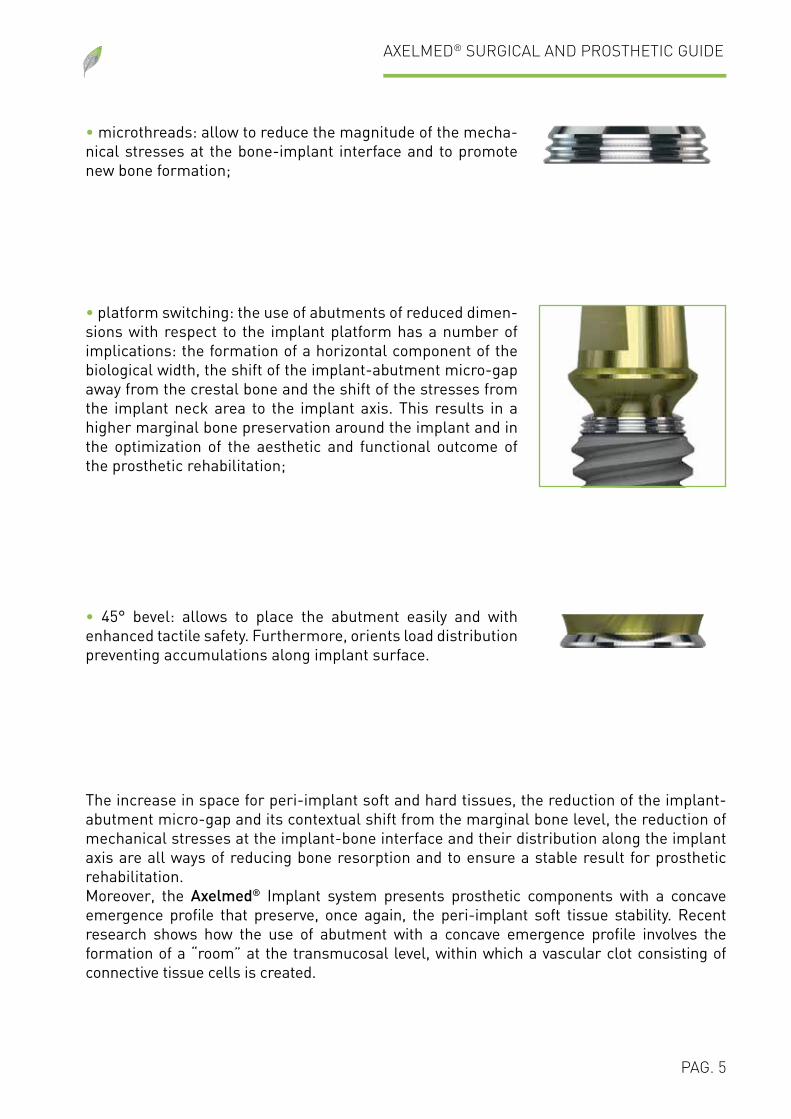
• platform switching: the use of abutments of reduced dimen-sions with respect to the implant platform has a number of implications: the formation of a horizontal component of the biological width, the shift of the implant-abutment micro-gap away from the crestal bone and the shift of the stresses from the implant neck area to the implant axis. This results in a higher marginal bone preservation around the implant and in the optimization of the aesthetic and functional outcome of the prosthetic rehabilitation;
• 45° bevel: allows to place the abutment easily and with enhanced tactile safety. Furthermore, orients load distribution preventing accumulations along implant surface.
The increase in space for peri-implant soft and hard tissues, the reduction of the implant-abutment micro-gap and its contextual shift from the marginal bone level, the reduction of mechanical stresses at the implant-bone interface and their distribution along the implant axis are all ways of reducing bone resorption and to ensure a stable result for prosthetic rehabilitation. Moreover, the Axelmed® Implant system presents prosthetic components with a concave emergence profile that preserve, once again, the peri-implant soft tissue stability. Recent research shows how the use of abutment with a concave emergence profile involves the formation of a “room” at the transmucosal level, within which a vascular clot consisting of connective tissue cells is created.
AXELMED® SURGICAL AND PROSTHETIC GUIDE
PAG. 6
The maturation of this tissue can increase the thickness of peri-implant gingiva through a non-surgical method and can reduce the risk of the onset of unpleasant gingival recessions, especially in patients with a thin gingival biotype.
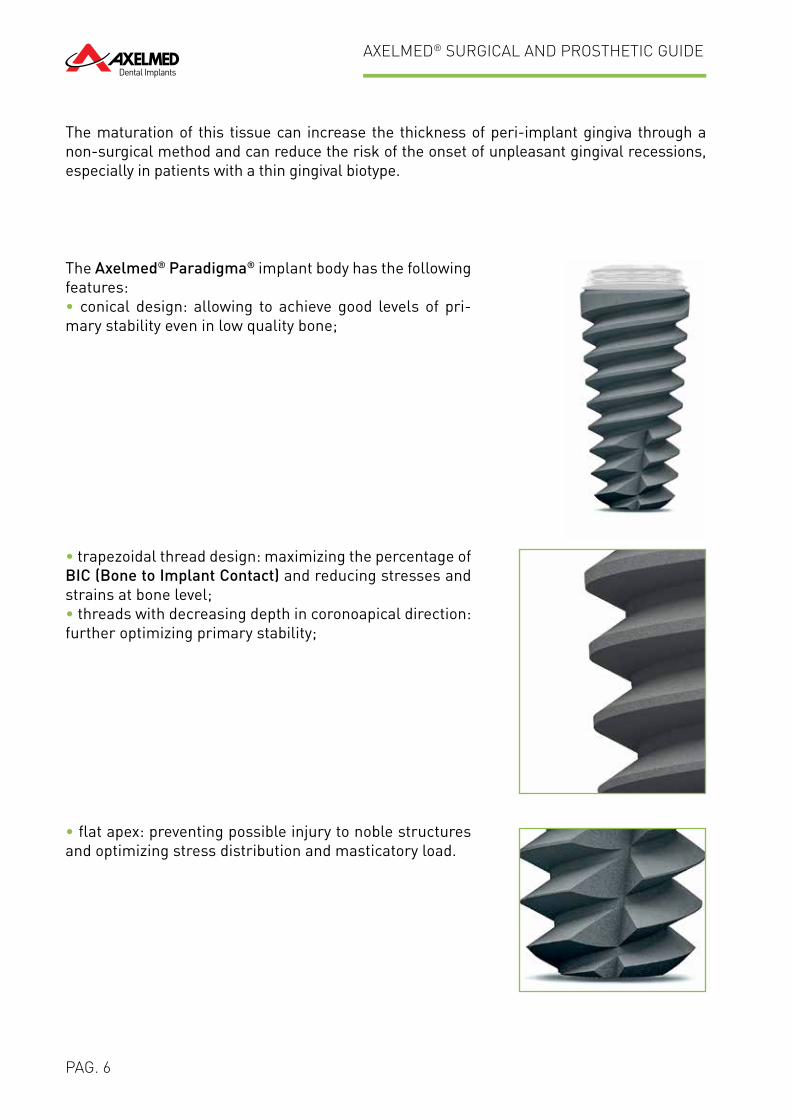
The Axelmed® Paradigma® implant body has the following features:• conical design: allowing to achieve good levels of pri-mary stability even in low quality bone;
• trapezoidal thread design: maximizing the percentage of BIC (Bone to Implant Contact) and reducing stresses and strains at bone level;• threads with decreasing depth in coronoapical direction: further optimizing primary stability;
• flat apex: preventing possible injury to noble structures and optimizing stress distribution and masticatory load.
AXELMED® SURGICAL AND PROSTHETIC GUIDE
PAG. 7
INDICATIONS AND CONTRAINDICATIONS
PATIENT SELECTION
The prosthetic long-term success of endosseous implants is obtained by a proper integration into the bone, a precise anatomical and surgical planning and the evaluation of relative and absolute indications that the dentist should consider before the surgery procedure, such as:
• Psychological assessment of patients;• Possible alternatives to implant surgery;• General medical history: general health of the patient, metabolic and cardiovascular disease, alterations in intercellular processes and / or alteration of the immune system that can be relative or absolute contraindications for surgery procedure;• Local history and healthy of hard and soft tissue;• Morphological characteristics (bone quality and quantity);• Motivation and oral hygiene commitment;• The overall design of the two dental arches: elimination of microbial contamination and consideration of the masticatory aspect;• Specific radiological exams: intraoral x-ray, orthopantomography and computed tomography;• Dental models analysis;
INDICATIONS
Axelmed® Paradigma® dental implants are suitable for endosteal insertion in the upper or lower jaw, for the resolution of mono-edentulism, partial edentulism or complete edentulism. Axelmed® Paradigma® dental implants may be used for immediate, early or late placement after extraction or loss of natural teeth.The load of the implant requires a good stability and an appropriate occlusal loading. If the primary stability is optimal, after a careful analysis and a proper bone quality assessment, it is possible to load the implant immediately. Otherwise, it is advisable to wait for a period of at least 12 weeks before proceeding with the prosthetic phase of implant rehabilitation.
AXELMED® SURGICAL AND PROSTHETIC GUIDE
PAG. 8
ABSOLUTE CONTRA-INDICATIONS
• Recent myocardial infarction (< 6 months);• Severe kidney disorders;• Osseomalacia;• Diabetes treatment-resistant (uncompensated);• Recent radiation therapy with high doses;• Coagulation disorders;• Advanced liver failure;• Chronic alcoholism;• Drugs;• Disease and cancer in terminal phase.
RELATIVE CONTRA-INDICATIONS
• Chemotherapy;• Mild kidney disorders;• Liver disorders;• Endocrine disorders;• Psychological disorders and psychosis;• AIDS, HIV-positive cases;• Prolonged use of corticosteroiods;• Disorders of calcium-phosphorus metabolism.
AXELMED® SURGICAL AND PROSTHETIC GUIDE
PAG. 9
SURGICAL PROCEDURE
PRE-OPERATIVE PLANNING
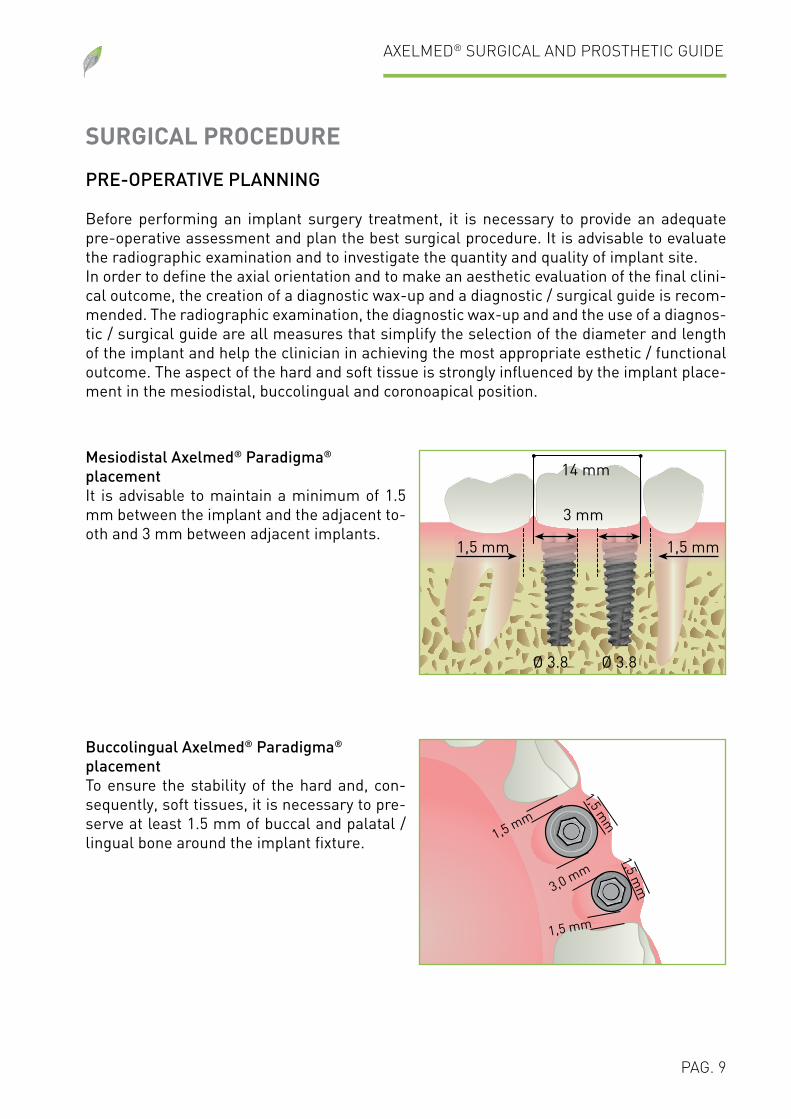
Before performing an implant surgery treatment, it is necessary to provide an adequate pre-operative assessment and plan the best surgical procedure. It is advisable to evaluate the radiographic examination and to investigate the quantity and quality of implant site.In order to define the axial orientation and to make an aesthetic evaluation of the final clini-cal outcome, the creation of a diagnostic wax-up and a diagnostic / surgical guide is recom-mended. The radiographic examination, the diagnostic wax-up and and the use of a diagnos-tic / surgical guide are all measures that simplify the selection of the diameter and length of the implant and help the clinician in achieving the most appropriate esthetic / functional outcome. The aspect of the hard and soft tissue is strongly influenced by the implant place-ment in the mesiodistal, buccolingual and coronoapical position.
Buccolingual Axelmed® Paradigma® placementTo ensure the stability of the hard and, con-sequently, soft tissues, it is necessary to pre-serve at least 1.5 mm of buccal and palatal / lingual bone around the implant fixture.
Mesiodistal Axelmed® Paradigma® placementIt is advisable to maintain a minimum of 1.5 mm between the implant and the adjacent to-oth and 3 mm between adjacent implants.
14 mm
3 mm
Ø 3.8 Ø 3.8
1,5 mm1,5 mm
1,5 mm
3,0 mm
1,5 mm
1,5 mm
1,5 mm
AXELMED® SURGICAL AND PROSTHETIC GUIDE
PAG. 10
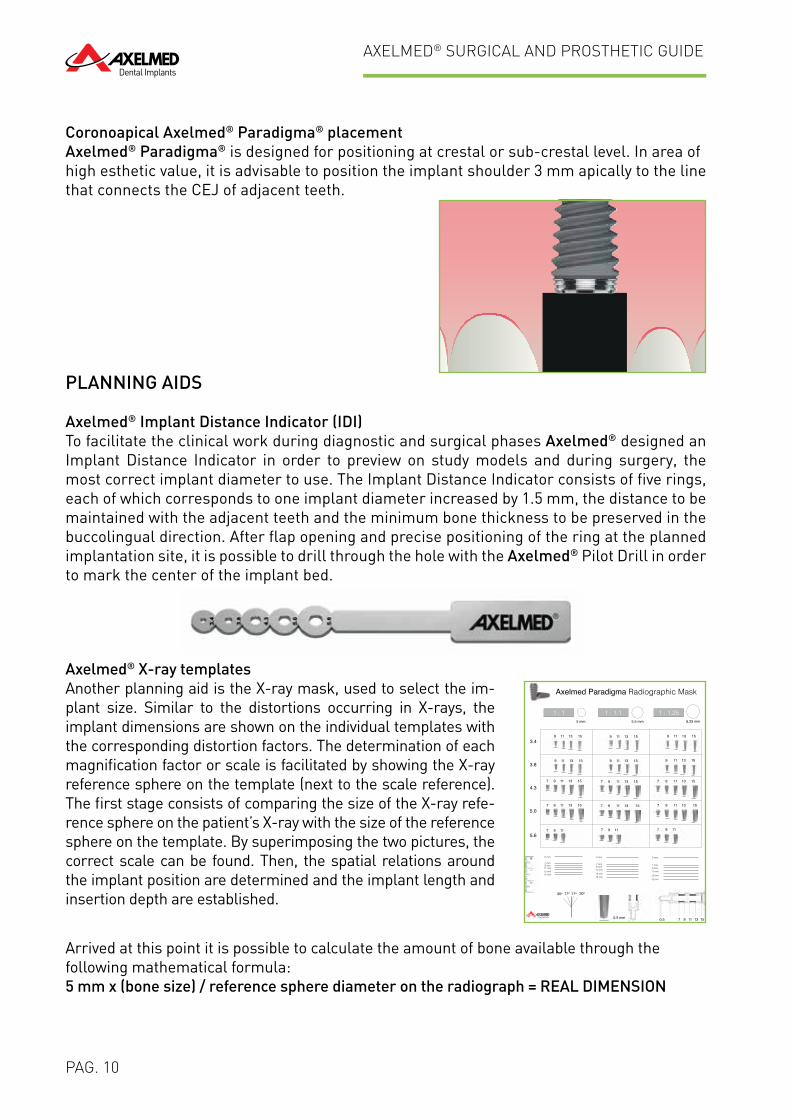
Coronoapical Axelmed® Paradigma® placementAxelmed® Paradigma® is designed for positioning at crestal or sub-crestal level. In area ofhigh esthetic value, it is advisable to position the implant shoulder 3 mm apically to the line that connects the CEJ of adjacent teeth.
PLANNING AIDS
Axelmed® Implant Distance Indicator (IDI)To facilitate the clinical work during diagnostic and surgical phases Axelmed® designed an Implant Distance Indicator in order to preview on study models and during surgery, the most correct implant diameter to use. The Implant Distance Indicator consists of five rings, each of which corresponds to one implant diameter increased by 1.5 mm, the distance to be maintained with the adjacent teeth and the minimum bone thickness to be preserved in the buccolingual direction. After flap opening and precise positioning of the ring at the planned implantation site, it is possible to drill through the hole with the Axelmed® Pilot Drill in order to mark the center of the implant bed.
Axelmed® X-ray templatesAnother planning aid is the X-ray mask, used to select the im-plant size. Similar to the distortions occurring in X-rays, the implant dimensions are shown on the individual templates with the corresponding distortion factors. The determination of each magnification factor or scale is facilitated by showing the X-ray reference sphere on the template (next to the scale reference). The first stage consists of comparing the size of the X-ray refe-rence sphere on the patient’s X-ray with the size of the reference sphere on the template. By superimposing the two pictures, the correct scale can be found. Then, the spatial relations around the implant position are determined and the implant length and insertion depth are established.
Arrived at this point it is possible to calculate the amount of bone available through thefollowing mathematical formula:5 mm x (bone size) / reference sphere diameter on the radiograph = REAL DIMENSION
1 : 1 1 : 1.1
3.4
3.8
5.6
5.0
4.3
1 : 1.25
9 11 13 15
9 11 13 15
7 9 11 13 15
7 9 11 13 15
7 9 11
9 11 13 15
9 11 13 15
7 9 11 13 15
7 9 11 13 15
7 9 11
9 11 13 15
9 11 13 15
7 9 11 13 15
7 9 11 13 15
7 119
0 mm
7 mm9 mm11 mm13 mm15 mm
0 mm
7 mm9 mm11 mm13 mm15 mm
0 mm
7 mm9 mm11 mm13 mm15 mm
Axelmed Paradigma Radiographic Mask
0.5 mm 157 9 11 130.5
17o17o 30o30o
5 mm 5,5 mm 6,25 mm

AXELMED® SURGICAL AND PROSTHETIC GUIDE
PAG. 11
INTRA-OPERATIVE STEPS
Axelmed® Paradigma® implants placement require the use of Axelmed® Surgical Kit.
AXELMED® SURGICAL KIT GREEN
The Axelmed® Surgical Kit is designed to provide the clinician with everything needed to per-form implant surgery procedures, safely and predictably. It contains the following components:
• Pilot Drill Axelmed®
• Axelmed® Twisted Drills• Set of Axelmed® Bone Regeneration Drills• Set of Axelmed® Cortical Drills• Axelmed® Drill Extender• Axelmed® Implant Distance Indicator• Axelmed® Drill Stops• Axelmed® Parallel Pins• Axelmed® Implant Drivers• Axelmed® Implant Torque Wrench• Axelmed® Screwdrivers• Axelmed® Tissue Punch• Axelmed® Surgical Organizer
AXELMED® SURGICAL AND PROSTHETIC GUIDE
PAG. 12
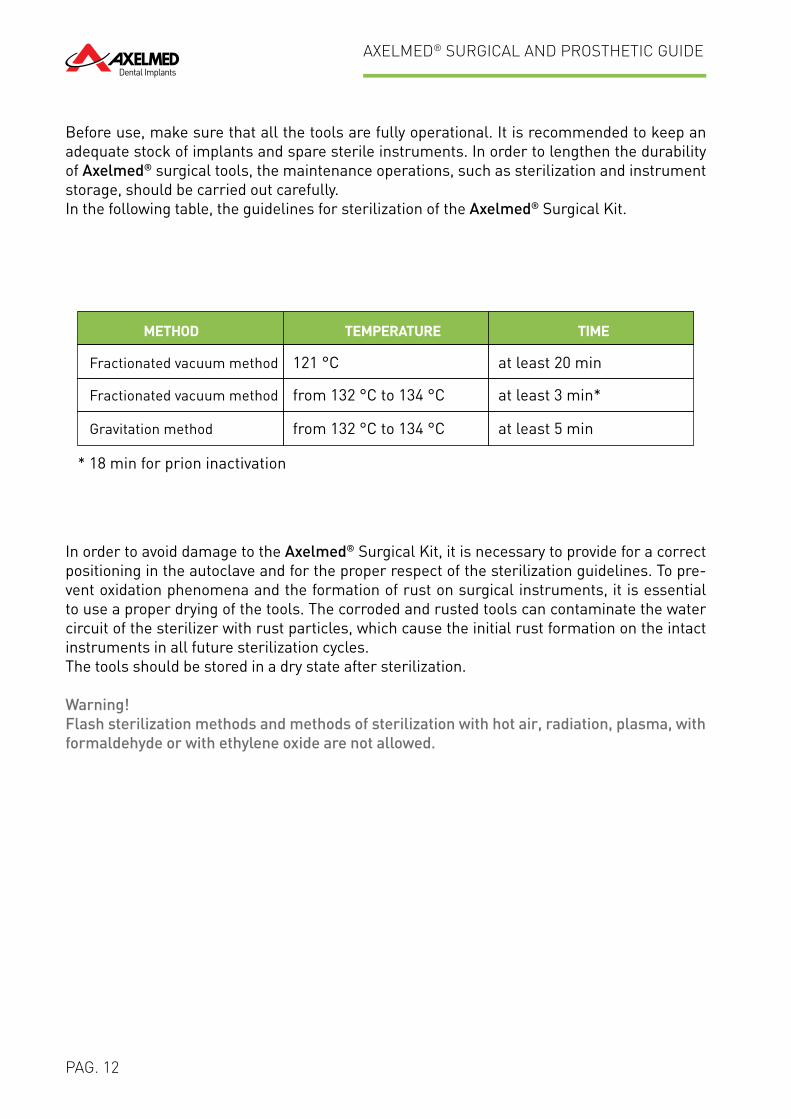
Before use, make sure that all the tools are fully operational. It is recommended to keep an adequate stock of implants and spare sterile instruments. In order to lengthen the durability of Axelmed® surgical tools, the maintenance operations, such as sterilization and instrument storage, should be carried out carefully.In the following table, the guidelines for sterilization of the Axelmed® Surgical Kit.
In order to avoid damage to the Axelmed® Surgical Kit, it is necessary to provide for a correct positioning in the autoclave and for the proper respect of the sterilization guidelines. To pre-vent oxidation phenomena and the formation of rust on surgical instruments, it is essential to use a proper drying of the tools. The corroded and rusted tools can contaminate the water circuit of the sterilizer with rust particles, which cause the initial rust formation on the intact instruments in all future sterilization cycles. The tools should be stored in a dry state after sterilization.
Warning!Flash sterilization methods and methods of sterilization with hot air, radiation, plasma, withformaldehyde or with ethylene oxide are not allowed.
* 18 min for prion inactivation
Fractionated vacuum method
Fractionated vacuum method
Gravitation method
121 °C
from 132 °C to 134 °C
from 132 °C to 134 °C
at least 20 min
at least 3 min*
at least 5 min
TIMEMETHOD TEMPERATURE
AXELMED® SURGICAL AND PROSTHETIC GUIDE
PAG. 13
IMPLANT SITE PREPARATION
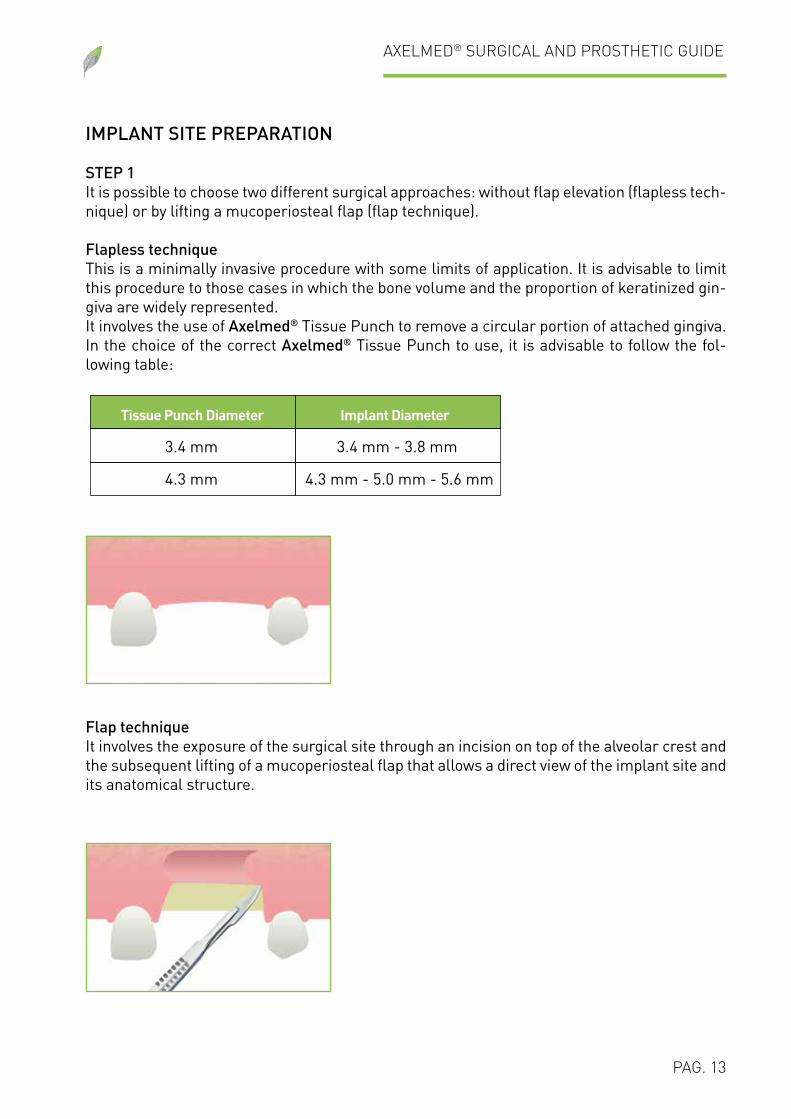
STEP 1It is possible to choose two different surgical approaches: without flap elevation (flapless tech-nique) or by lifting a mucoperiosteal flap (flap technique).
Flapless techniqueThis is a minimally invasive procedure with some limits of application. It is advisable to limit this procedure to those cases in which the bone volume and the proportion of keratinized gin-giva are widely represented.It involves the use of Axelmed® Tissue Punch to remove a circular portion of attached gingiva. In the choice of the correct Axelmed® Tissue Punch to use, it is advisable to follow the fol-lowing table:
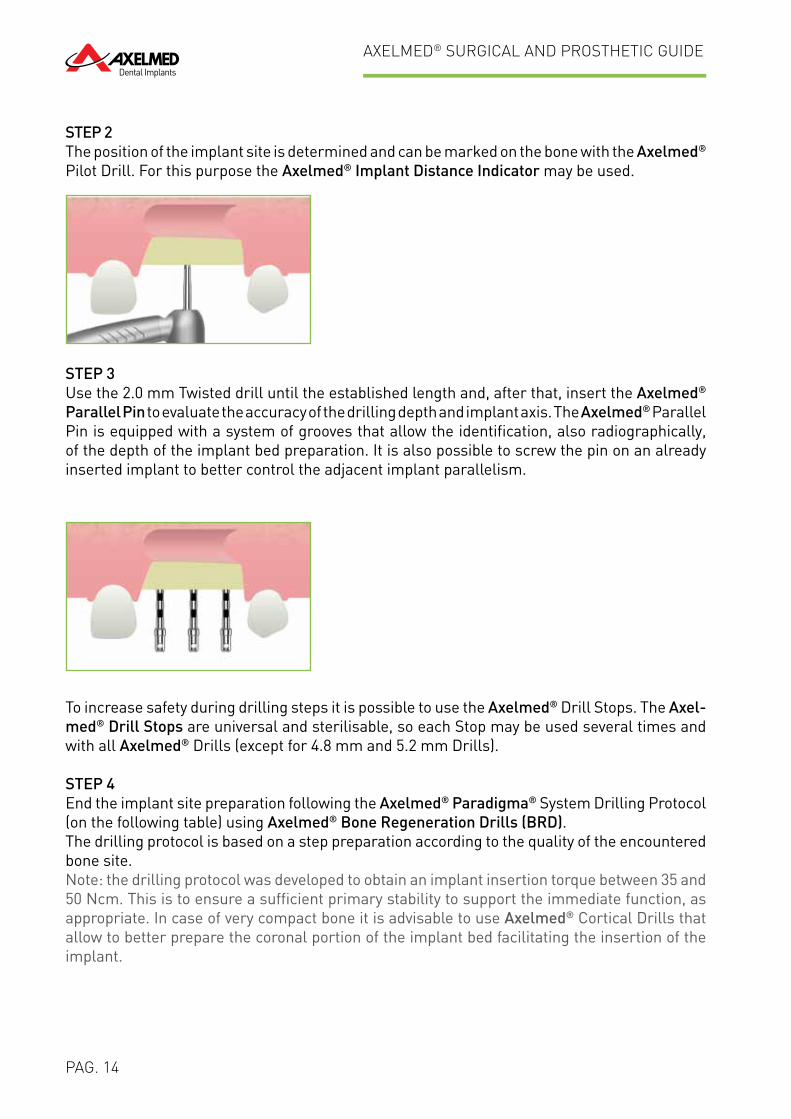
Flap techniqueIt involves the exposure of the surgical site through an incision on top of the alveolar crest and the subsequent lifting of a mucoperiosteal flap that allows a direct view of the implant site and its anatomical structure.
3.4 mm
4.3 mm
3.4 mm - 3.8 mm
4.3 mm - 5.0 mm - 5.6 mm
Tissue Punch Diameter Implant Diameter
AXELMED® SURGICAL AND PROSTHETIC GUIDE
PAG. 14
STEP 2The position of the implant site is determined and can be marked on the bone with the Axelmed® Pilot Drill. For this purpose the Axelmed® Implant Distance Indicator may be used.
STEP 3Use the 2.0 mm Twisted drill until the established length and, after that, insert the Axelmed® Parallel Pin to evaluate the accuracy of the drilling depth and implant axis. The Axelmed® Parallel Pin is equipped with a system of grooves that allow the identification, also radiographically, of the depth of the implant bed preparation. It is also possible to screw the pin on an already inserted implant to better control the adjacent implant parallelism.
To increase safety during drilling steps it is possible to use the Axelmed® Drill Stops. The Axel-med® Drill Stops are universal and sterilisable, so each Stop may be used several times and with all Axelmed® Drills (except for 4.8 mm and 5.2 mm Drills).
STEP 4End the implant site preparation following the Axelmed® Paradigma® System Drilling Protocol (on the following table) using Axelmed® Bone Regeneration Drills (BRD). The drilling protocol is based on a step preparation according to the quality of the encountered bone site. Note: the drilling protocol was developed to obtain an implant insertion torque between 35 and 50 Ncm. This is to ensure a sufficient primary stability to support the immediate function, as appropriate. In case of very compact bone it is advisable to use Axelmed® Cortical Drills that allow to better prepare the coronal portion of the implant bed facilitating the insertion of the implant.
AXELMED® SURGICAL AND PROSTHETIC GUIDE
PAG. 15
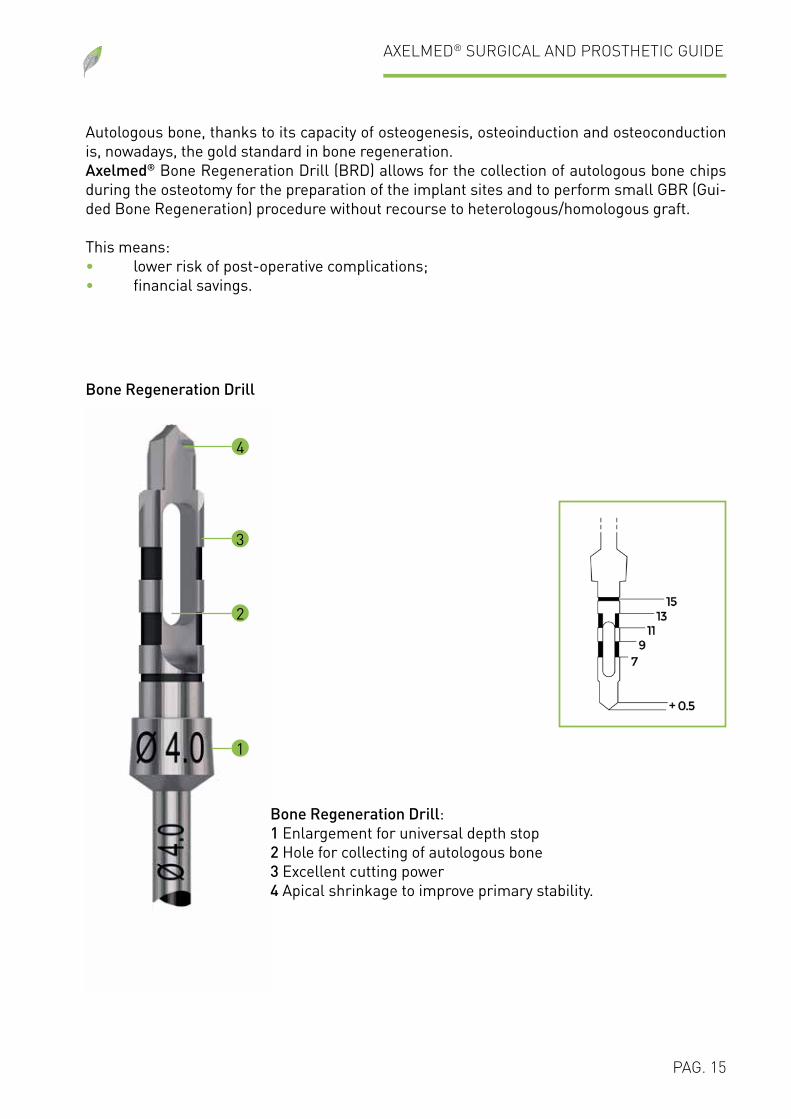
1
Bone Regeneration Drill:1 Enlargement for universal depth stop 2 Hole for collecting of autologous bone 3 Excellent cutting power 4 Apical shrinkage to improve primary stability.
2
3
4
Bone Regeneration Drill
Autologous bone, thanks to its capacity of osteogenesis, osteoinduction and osteoconduction is, nowadays, the gold standard in bone regeneration. Axelmed® Bone Regeneration Drill (BRD) allows for the collection of autologous bone chips during the osteotomy for the preparation of the implant sites and to perform small GBR (Gui-ded Bone Regeneration) procedure without recourse to heterologous/homologous graft.
This means: • lower risk of post-operative complications; • financial savings.
AXELMED® SURGICAL AND PROSTHETIC GUIDE
PAG. 16
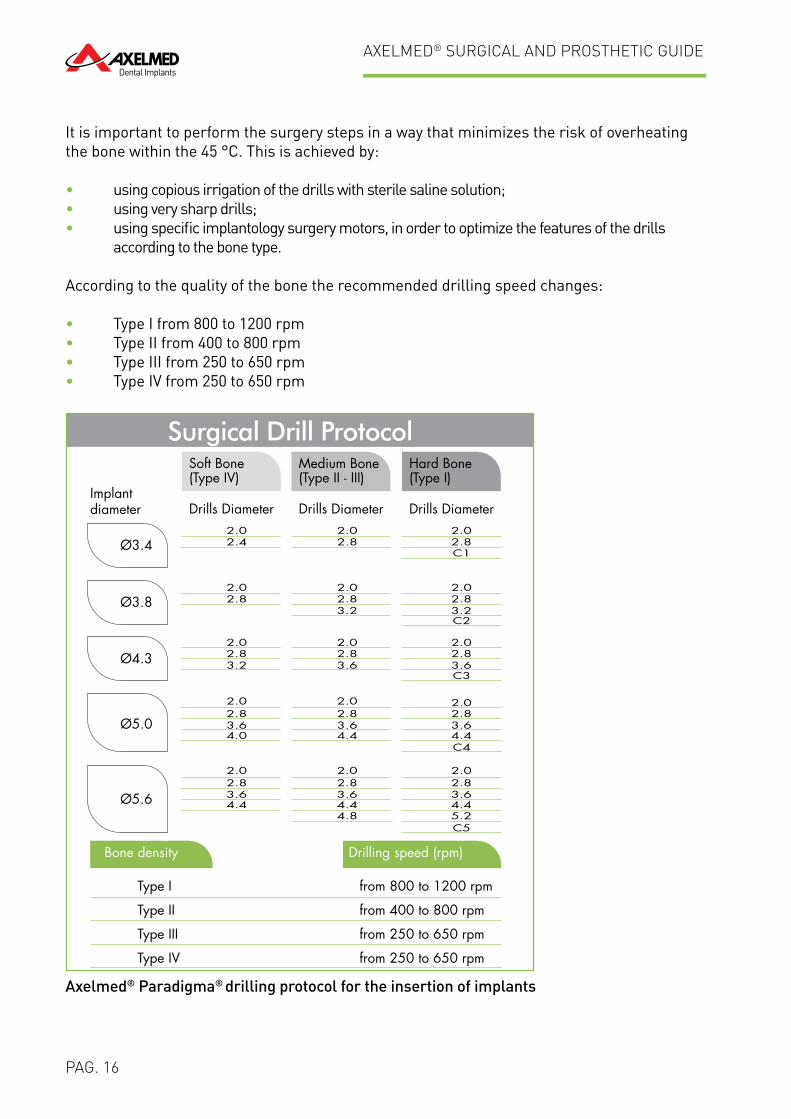
It is important to perform the surgery steps in a way that minimizes the risk of overheatingthe bone within the 45 °C. This is achieved by:
• using copious irrigation of the drills with sterile saline solution;• using very sharp drills;• using specific implantology surgery motors, in order to optimize the features of the drills according to the bone type.
According to the quality of the bone the recommended drilling speed changes:
• Type I from 800 to 1200 rpm• Type II from 400 to 800 rpm• Type III from 250 to 650 rpm• Type IV from 250 to 650 rpm
Ø5.6
Ø5.0
Ø4.3
Ø3.8
Ø3.4
Implantdiameter Drills Diameter
2.02.4 2.8 2.8
2.8 2.8 2.8
2.8 2.8 2.83.2
2.83.64.0 4.4 4.4
3.6 3.62.8 2.8
4.43.62.8
4.44.8 5.2
3.62.8
4.43.62.8
3.6 3.6
3.2 3.2
C1
C2
C3
C4
C5
2.0 2.0
2.0 2.0 2.0
2.0 2.0 2.0
2.0 2.0 2.0
2.0 2.0 2.0
Drills Diameter Drills Diameter
Soft Bone(Type IV)
Medium Bone(Type II - III)
Hard Bone(Type I)
Type IV
Type III
Type II
Type I from 800 to 1200 rpm
from 400 to 800 rpm
from 250 to 650 rpm
from 250 to 650 rpm
Bone density Drilling speed (rpm)
Surgical Drill Protocol
Axelmed® Paradigma® drilling protocol for the insertion of implants
AXELMED® SURGICAL AND PROSTHETIC GUIDE
PAG. 17
USE OF AXELMED® BRD DRILLS FOR COLLECTING BONE
The Axelmed® Bone Regeneration Drills (BRD), made of surgical steel, have morphological characteristics that allow the possible collection of bone. In order to optimize the collection of bone through these drills, it is recommended to change the surgical motor settings. In parti-cular, it is necessary to reduce the number of revolutions per minute to 100 revolutions / min and close the dispensing of saline solution. After performing the hole, pull out the drill from the implant bed and remove the collected bone with a sterile spatula putting it inside a surgical container properly filled with sterile saline solution.The same technique is repeated with larger diameter of Axelmed® Bone Regeneration Drills to complete the preparation of the implant bed. If the collection of bone is complicated due to the possible excessive alveolar hemorrhage, it is advisable to inject small doses of anesthetic with vasoconstrictor during the drilling steps. After the preparation of the implant site, the next step is the Axelmed® Paradigma® implant insertion.
Implant insertion
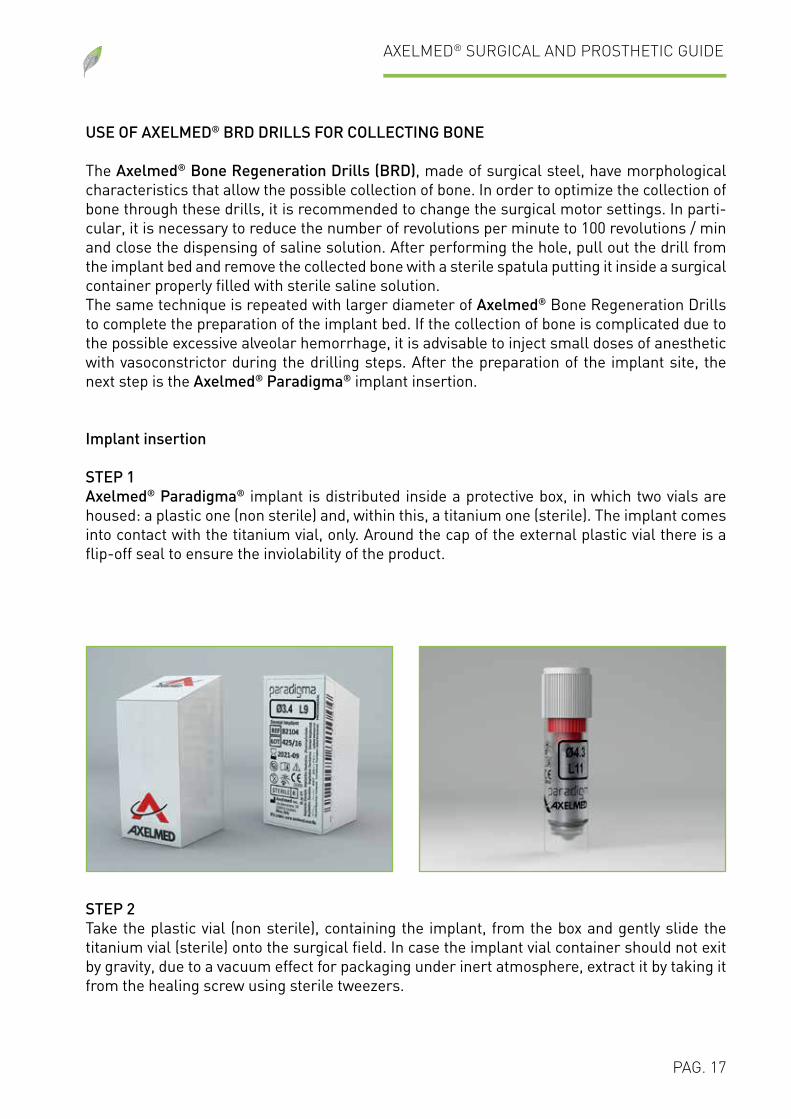
STEP 1Axelmed® Paradigma® implant is distributed inside a protective box, in which two vials are housed: a plastic one (non sterile) and, within this, a titanium one (sterile). The implant comes into contact with the titanium vial, only. Around the cap of the external plastic vial there is a flip-off seal to ensure the inviolability of the product.
STEP 2Take the plastic vial (non sterile), containing the implant, from the box and gently slide the titanium vial (sterile) onto the surgical field. In case the implant vial container should not exit by gravity, due to a vacuum effect for packaging under inert atmosphere, extract it by taking it from the healing screw using sterile tweezers.
AXELMED® SURGICAL AND PROSTHETIC GUIDE
PAG. 18
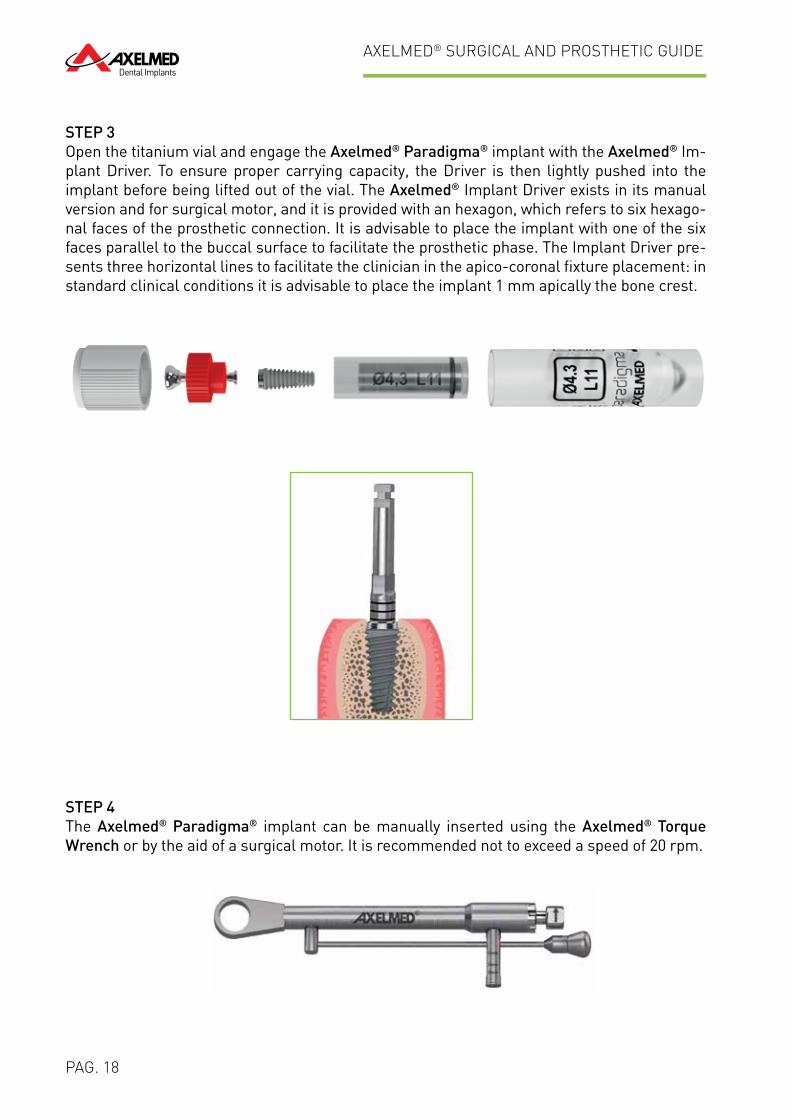
STEP 3Open the titanium vial and engage the Axelmed® Paradigma® implant with the Axelmed® Im-plant Driver. To ensure proper carrying capacity, the Driver is then lightly pushed into the implant before being lifted out of the vial. The Axelmed® Implant Driver exists in its manual version and for surgical motor, and it is provided with an hexagon, which refers to six hexago-nal faces of the prosthetic connection. It is advisable to place the implant with one of the six faces parallel to the buccal surface to facilitate the prosthetic phase. The Implant Driver pre-sents three horizontal lines to facilitate the clinician in the apico-coronal fixture placement: in standard clinical conditions it is advisable to place the implant 1 mm apically the bone crest.
STEP 4The Axelmed® Paradigma® implant can be manually inserted using the Axelmed® Torque Wrench or by the aid of a surgical motor. It is recommended not to exceed a speed of 20 rpm.
AXELMED® SURGICAL AND PROSTHETIC GUIDE
PAG. 19
Warning!Warning! It is advisable not to exceed 50 Ncm torque implant insertion. Over tightening may result in damage or breakage of the implant.
Management of soft tissuesOnce the Axelmed® Paradigma® implant has been placed, it is possible to conclude thesurgical procedure in two ways, depending on the primary stability of the implant, on theneed to use some bone regeneration procedures and on the prosthetic planning.
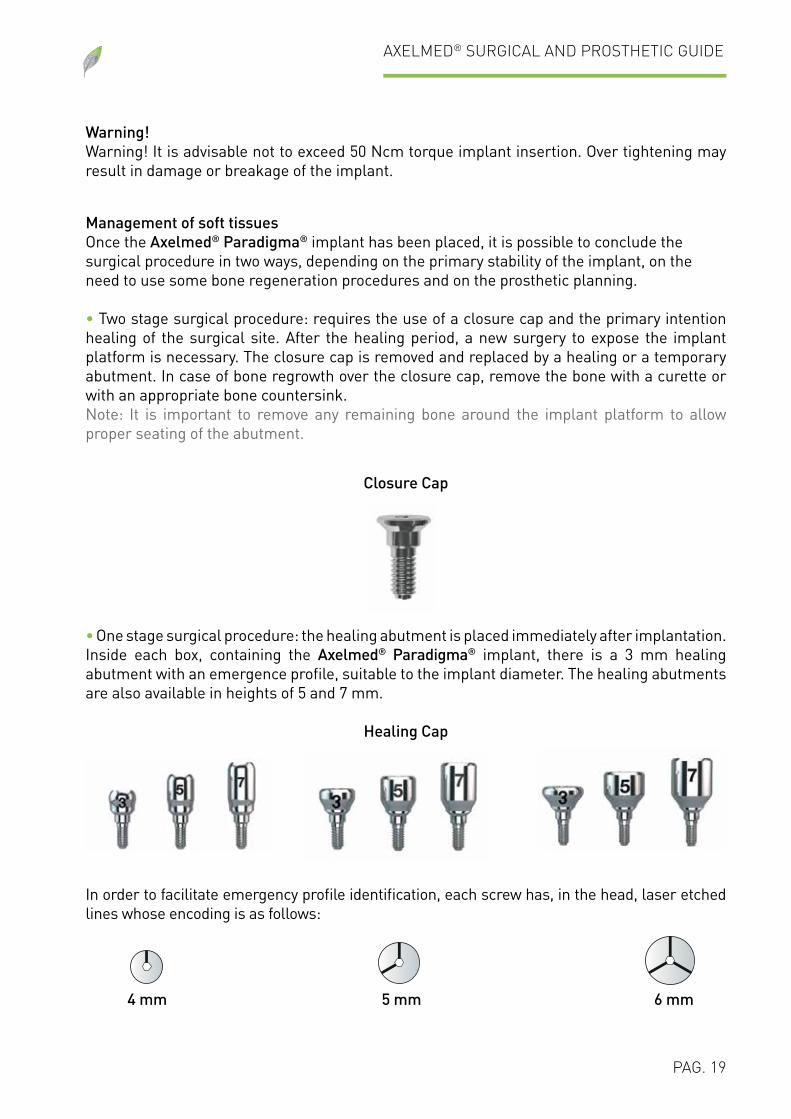
• Two stage surgical procedure: requires the use of a closure cap and the primary intention healing of the surgical site. After the healing period, a new surgery to expose the implant platform is necessary. The closure cap is removed and replaced by a healing or a temporary abutment. In case of bone regrowth over the closure cap, remove the bone with a curette or with an appropriate bone countersink.Note: It is important to remove any remaining bone around the implant platform to allow proper seating of the abutment.
• One stage surgical procedure: the healing abutment is placed immediately after implantation. Inside each box, containing the Axelmed® Paradigma® implant, there is a 3 mm healing abutment with an emergence profile, suitable to the implant diameter. The healing abutments are also available in heights of 5 and 7 mm.
In order to facilitate emergency profile identification, each screw has, in the head, laser etched lines whose encoding is as follows:
Closure Cap
Healing Cap
Ø 4mm Ø 5mm Ø 6mmØ 4mm Ø 5mm Ø 6mmØ 4mm Ø 5mm Ø 6mm4 mm 5 mm 6 mm
AXELMED® SURGICAL AND PROSTHETIC GUIDE
PAG. 20
Both the closure cap and the healing abutment must be tightened by hand or with 10 Ncm torque.
In the Axelmed® Surgical Kit, there are three manual screwdrivers and two machine screwdrivers. All these screwdrivers allow to tighten both the healing abutments and the abutment screws. All the Axelmed® instruments and drills are made of a super-hard steel treated opaque to avoid light reflections during surgery. This treatment, in the early uses after sterilization, can cause small steins and laser marking halos which may be simply removed by using a cloth or brush.
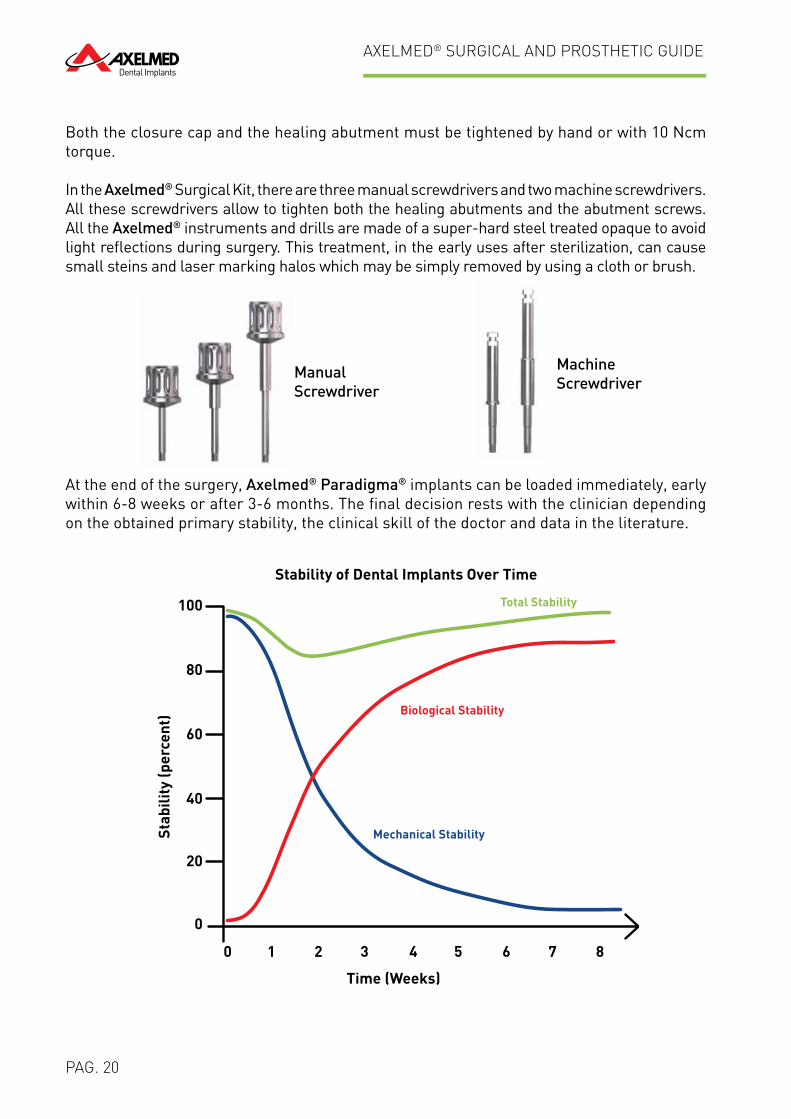
At the end of the surgery, Axelmed® Paradigma® implants can be loaded immediately, early within 6-8 weeks or after 3-6 months. The final decision rests with the clinician depending on the obtained primary stability, the clinical skill of the doctor and data in the literature.
Manual Screwdriver
Machine Screwdriver
Stability of Dental Implants Over Time
Stab
ility
(per
cent
)
Time (Weeks)
Total Stability
Biological Stability
Mechanical Stability
0
100
80
60
40
20
0
1 2 3 4 5 6 7 8
AXELMED® SURGICAL AND PROSTHETIC GUIDE
PAG. 21
PROSTHETIC PROCEDURES
IMPRESSION TECHNIQUE
The first step in dental implant prosthetic procedure consists in taking an accurate impression at implant level and to create a laboratory model which faithfully reproduces the position of the implant in relation to natural teeth or other implants as well as the soft tissue contours. This result may be achieved by using two techniques: - The closed tray technique - The open tray technique
Clinical procedure
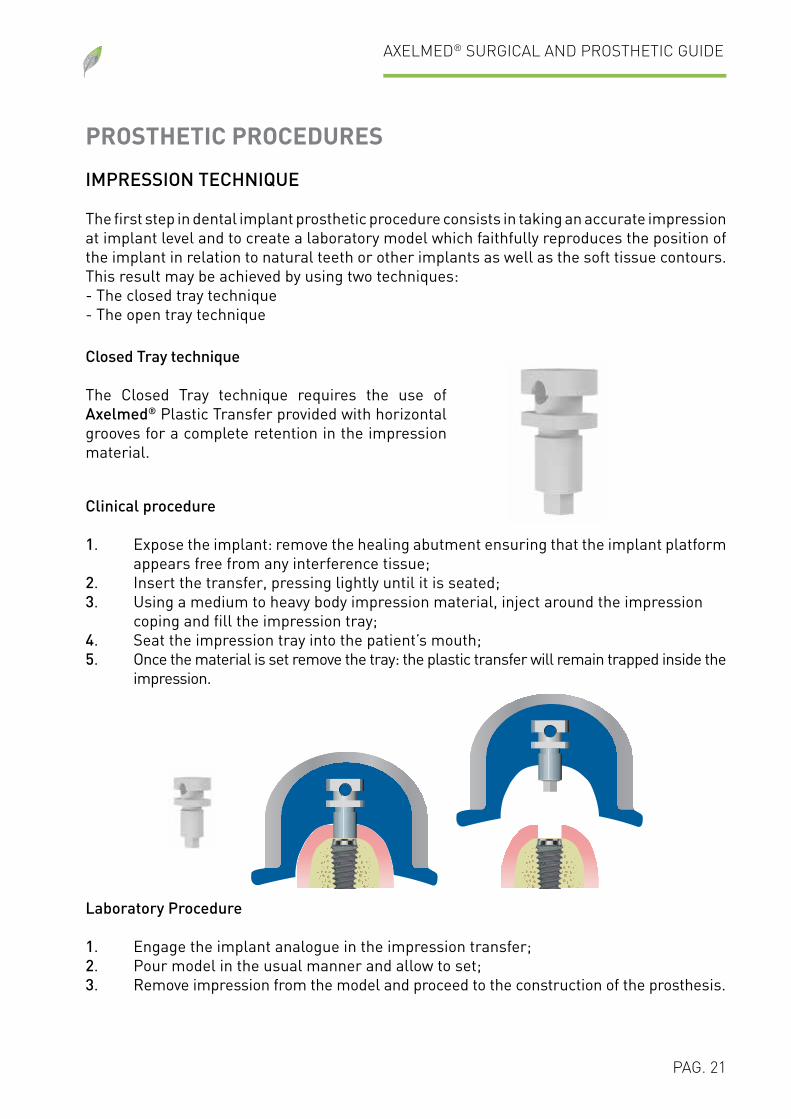
1. Expose the implant: remove the healing abutment ensuring that the implant platform appears free from any interference tissue; 2. Insert the transfer, pressing lightly until it is seated;3. Using a medium to heavy body impression material, inject around the impression coping and fill the impression tray;4. Seat the impression tray into the patient’s mouth;5. Once the material is set remove the tray: the plastic transfer will remain trapped inside the impression.
Laboratory Procedure
1. Engage the implant analogue in the impression transfer;2. Pour model in the usual manner and allow to set;3. Remove impression from the model and proceed to the construction of the prosthesis.
Closed Tray technique
The Closed Tray technique requires the use of Axelmed® Plastic Transfer provided with horizontal grooves for a complete retention in the impression material.
AXELMED® SURGICAL AND PROSTHETIC GUIDE
PAG. 22
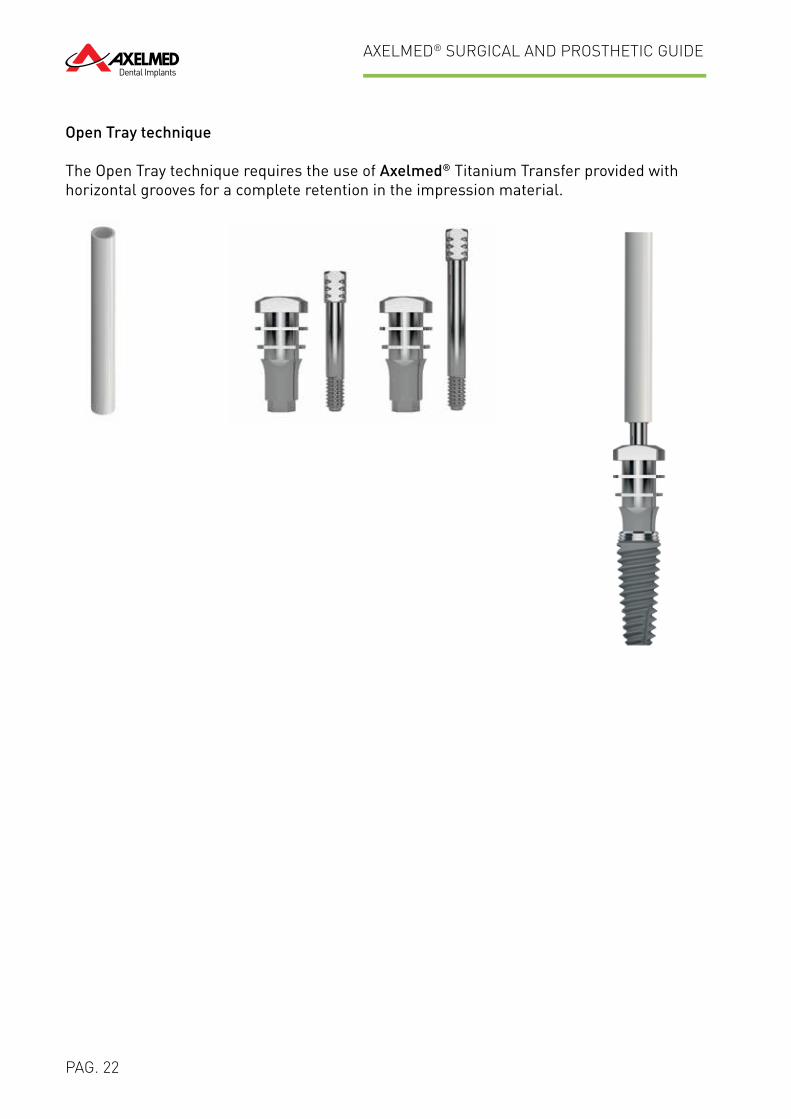
Open Tray technique
The Open Tray technique requires the use of Axelmed® Titanium Transfer provided withhorizontal grooves for a complete retention in the impression material.
AXELMED® SURGICAL AND PROSTHETIC GUIDE
PAG. 23
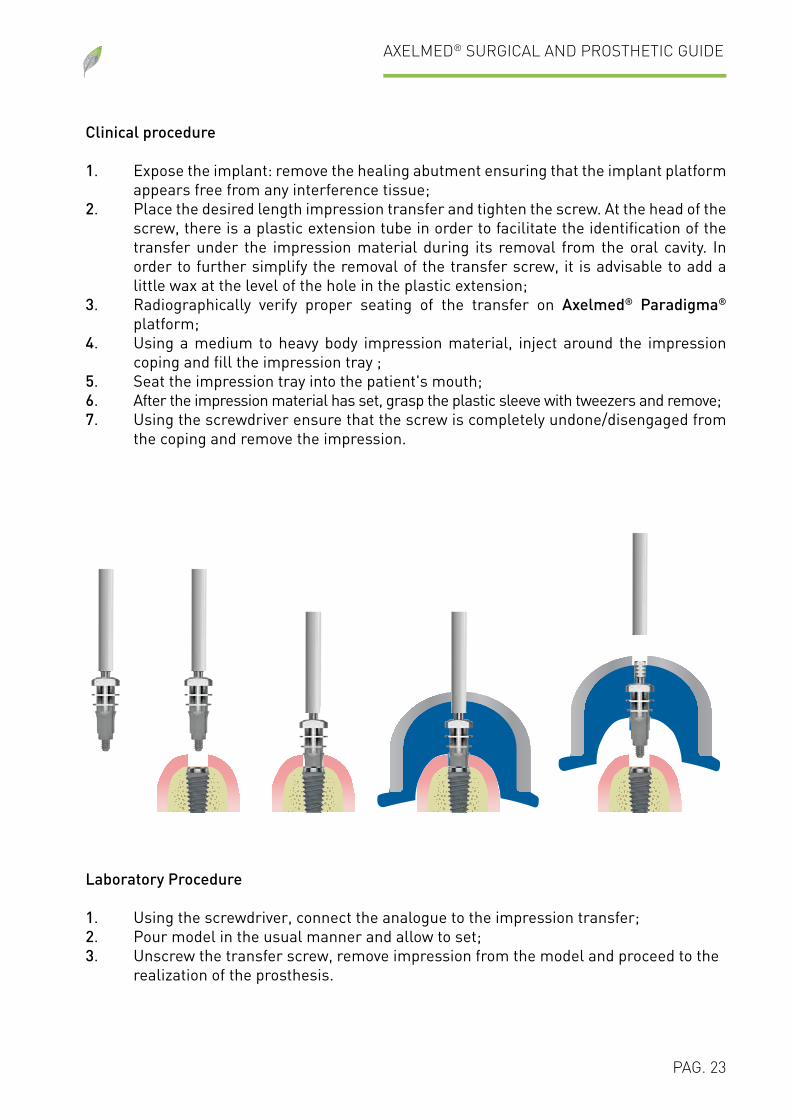
Clinical procedure
1. Expose the implant: remove the healing abutment ensuring that the implant platform appears free from any interference tissue;2. Place the desired length impression transfer and tighten the screw. At the head of the screw, there is a plastic extension tube in order to facilitate the identification of the transfer under the impression material during its removal from the oral cavity. In order to further simplify the removal of the transfer screw, it is advisable to add a little wax at the level of the hole in the plastic extension;3. Radiographically verify proper seating of the transfer on Axelmed® Paradigma® platform;4. Using a medium to heavy body impression material, inject around the impression coping and fill the impression tray ;5. Seat the impression tray into the patient's mouth;6. After the impression material has set, grasp the plastic sleeve with tweezers and remove;7. Using the screwdriver ensure that the screw is completely undone/disengaged from the coping and remove the impression.
Laboratory Procedure
1. Using the screwdriver, connect the analogue to the impression transfer;2. Pour model in the usual manner and allow to set;3. Unscrew the transfer screw, remove impression from the model and proceed to the realization of the prosthesis.
AXELMED® SURGICAL AND PROSTHETIC GUIDE
PAG. 24
AXELMED® ABUTMENT
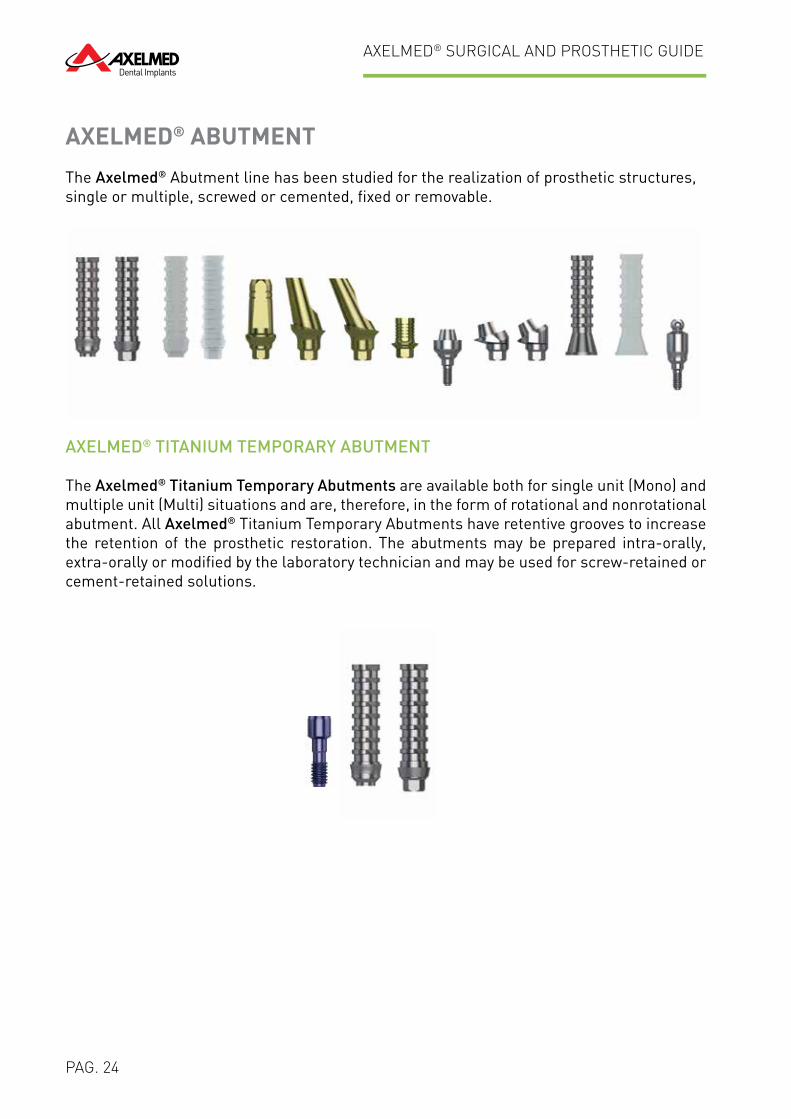
The Axelmed® Abutment line has been studied for the realization of prosthetic structures,single or multiple, screwed or cemented, fixed or removable.
AXELMED® TITANIUM TEMPORARY ABUTMENT
The Axelmed® Titanium Temporary Abutments are available both for single unit (Mono) and multiple unit (Multi) situations and are, therefore, in the form of rotational and nonrotational abutment. All Axelmed® Titanium Temporary Abutments have retentive grooves to increase the retention of the prosthetic restoration. The abutments may be prepared intra-orally, extra-orally or modified by the laboratory technician and may be used for screw-retained or cement-retained solutions.
AXELMED® SURGICAL AND PROSTHETIC GUIDE
PAG. 25
Screw-retained solutions
The screw-retained temporary prosthesis with Axelmed® Titanium Temporary Abutment can be made, directly, into the patient’s mouth (chair-side) or on a laboratory model.
Axelmed® Titanium Temporary Abutment - Chair-side construction of the prosthesis
Clinical Procedure n.1 - Dental Office
1. Screw the abutment directly on the implant and hand-tighten the appropriate connection screw. Note: for the construction of single units, it is recommended to useanti-rotational abutments with index while, for the construction of multiple units, it isrecommended the use of rotational abutments;2. Change the shape and height of the abutment according to the available space;3. Close the through hole of the screw with an easily removable material and make the prosthesis using the conventional direct relining technique;4. Unscrew and remove the temporary restoration, contour and polish the margins;5. Insert the temporary restoration and tighten the abutment screw to 32 Ncm.
Axelmed® Titanium Temporary Abutment - Laboratory construction of the prosthesis
Clinical Procedure n.1 - Dental Office
1. Take the impression at the implant level using the Open or the Closed tray technique and send it to the dental laboratory.
Laboratory procedure n.1 - Dental Laboratory
1. Screw the analogue and pour model in the usual manner and allow to set;2. Screw the Axelmed® Titanium Temporary Abutment directly on the laboratory model using the appropriate locking screw;3. The Abutment may be modified using either diamond or tungsten carbide bur;4. Construct the prosthesis using conventional laboratory techniques for the creation of a screw-retained device. Note: the abutment surface can be roughened or sandblastedto increase the retention of the restorative material;5. Send the prosthetic device to the dental office for delivery to the patient.
Clinical Procedure n.2 - Dental Office
1. Remove the healing abutment;2. Place the restoration on the implant and tighten the connection screw to 32 Ncm;3. After checking carefully the validity of the aesthetic and functional outcome, close theaccess hole of the abutment screw with a resinous material.
AXELMED® SURGICAL AND PROSTHETIC GUIDE
PAG. 26
Cement retained solutions
The cement-retained temporary prosthesis with Axelmed® Titanium Temporary Abutment can be made, directly, in the patient’s mouth (chair-side) or on a laboratory model.
Axelmed® Titanium Temporary Abutment - Chair-side construction of the prosthesis
Clinical Procedure n.1 - Dental Office
1. Screw the abutment directly on the implant and hand-tighten the appropriate connection screw. Note: for the construction of single units it is recommended to use anti-rotational abutments with index while, for the construction of multiple units, it is recommended the use of rotational abutments;2. Change the shape and height of the abutment according to the available space;3. Tighten the appropriate abutment screws to 32 Ncm;4. Close the access hole of the abutment screw with a resinous material and make the prosthesis using the conventional direct relining technique;5. Remove the temporary restoration, contour and polish the margins;6. After checking carefully the validity of the aesthetic and functional outcome, cement the prosthesis and remove the overflowing cement with great care. Note: the presence of residual cement is one of the main causes of peri-implantitis.
Axelmed® Titanium Temporary Abutment - Laboratory construction of the prosthesis
Clinical Procedure n.1 - Dental Office
1. Take the impression at the implant level using the Open or the Closed tray techniqueand send it to the dental laboratory.
Laboratory procedure n.1 - Dental Laboratory
1. Screw the analogue and pour model in the usual manner and allow to set;2. Screw the Axelmed® Titanium Temporary Abutment directly on the laboratory model using the appropriate locking screw;3. The Abutment may be modified using either diamond or tungsten carbide bur;4. Construct the prosthesis using conventional laboratory techniques for the creation of a screw-retained device. Note: the abutment surface can be roughened or sandblasted to increase the retention of the restorative material;5. Send the prosthetic device to the dental office for delivery to the patient.
AXELMED® SURGICAL AND PROSTHETIC GUIDE
PAG. 27
Clinical Procedure n.2 - Dental Office
1. Remove the healing abutment;2. Place the restoration on the implant and tighten the connection screw to 32 Ncm;3. After checking carefully the validity of the aesthetic and functional outcome, close the access hole of the abutment screw with a resinous material, cement the prosthesis and remove the overflowing with great care. Note: the presence of residual cement is one of the main causes of periimplantitis.
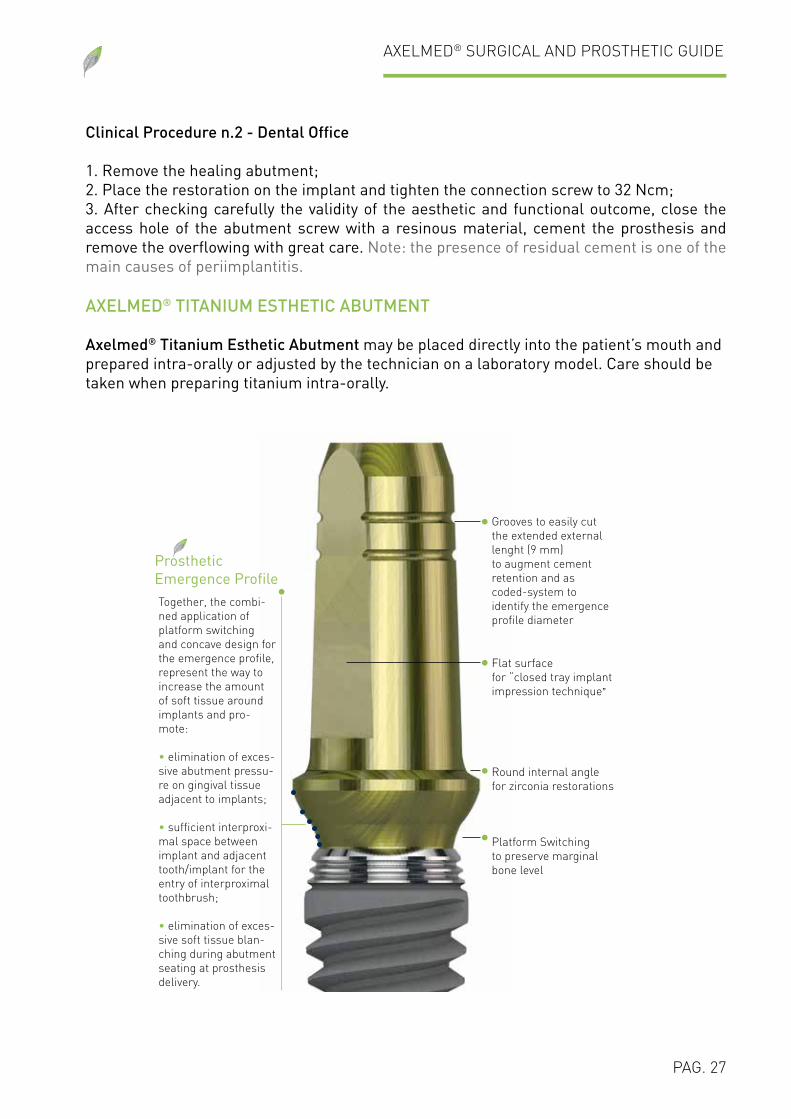
AXELMED® TITANIUM ESTHETIC ABUTMENT
Axelmed® Titanium Esthetic Abutment may be placed directly into the patient’s mouth andprepared intra-orally or adjusted by the technician on a laboratory model. Care should betaken when preparing titanium intra-orally.
Together, the combi-ned application of platform switching and concave design for the emergence profile, represent the way to increase the amount of soft tissue around implants and pro-mote:
• elimination of exces-sive abutment pressu-re on gingival tissue adjacent to implants;
• sufficient interproxi-mal space between implant and adjacent tooth/implant for the entry of interproximal toothbrush;
• elimination of exces-sive soft tissue blan-ching during abutment seating at prosthesis delivery.
Grooves to easily cut the extended external lenght (9 mm) to augment cement retention and as coded-system toidentify the emergence profile diameter
Flat surfacefor “closed tray implant impression technique”
ProstheticEmergence Profile
Round internal anglefor zirconia restorations
Platform Switching to preserve marginal bone level
AXELMED® SURGICAL AND PROSTHETIC GUIDE
PAG. 28
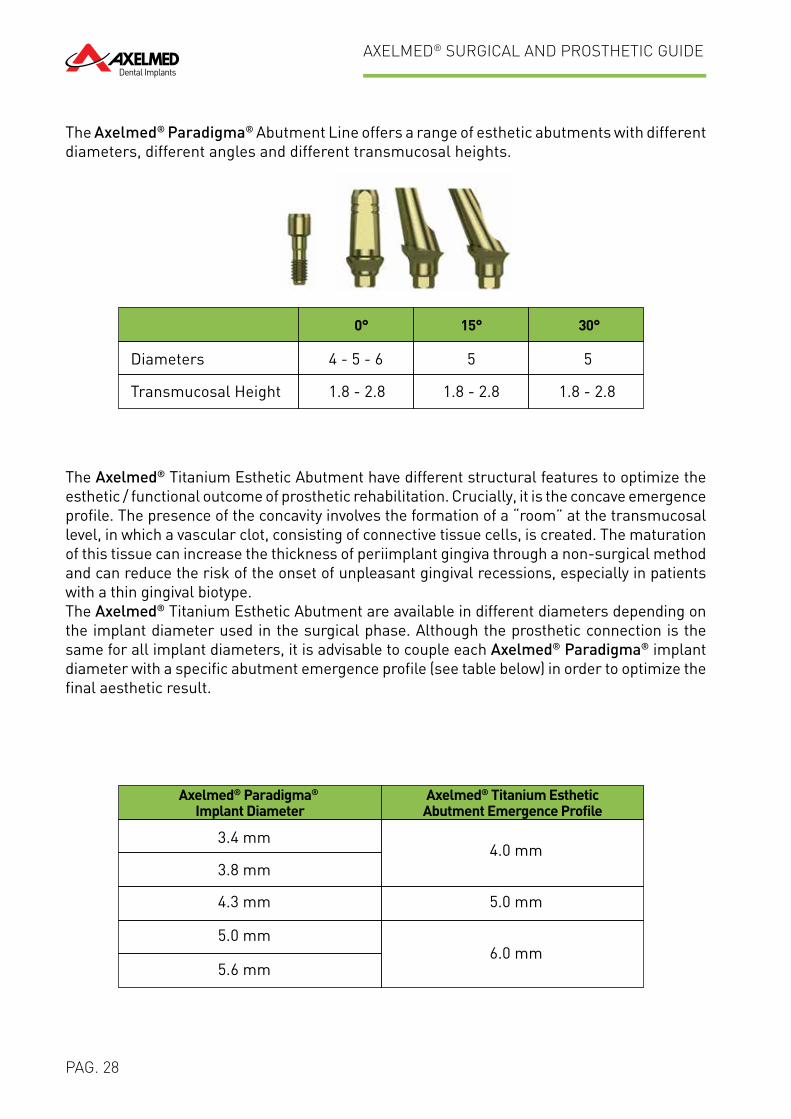
The Axelmed® Paradigma® Abutment Line offers a range of esthetic abutments with different diameters, different angles and different transmucosal heights.
The Axelmed® Titanium Esthetic Abutment have different structural features to optimize the esthetic / functional outcome of prosthetic rehabilitation. Crucially, it is the concave emergence profile. The presence of the concavity involves the formation of a “room” at the transmucosal level, in which a vascular clot, consisting of connective tissue cells, is created. The maturation of this tissue can increase the thickness of periimplant gingiva through a non-surgical method and can reduce the risk of the onset of unpleasant gingival recessions, especially in patients with a thin gingival biotype. The Axelmed® Titanium Esthetic Abutment are available in different diameters depending on the implant diameter used in the surgical phase. Although the prosthetic connection is the same for all implant diameters, it is advisable to couple each Axelmed® Paradigma® implant diameter with a specific abutment emergence profile (see table below) in order to optimize the final aesthetic result.
Diameters
Transmucosal Height
4 - 5 - 6
1.8 - 2.8 1.8 - 2.8 1.8 - 2.8
5 5
15° 30°0°
3.4 mm
3.8 mm
4.3 mm
5.0 mm
5.6 mm
4.0 mm
5.0 mm
6.0 mm
Axelmed® Titanium EstheticAbutment Emergence Profile
Axelmed® Paradigma® Implant Diameter
AXELMED® SURGICAL AND PROSTHETIC GUIDE
PAG. 29
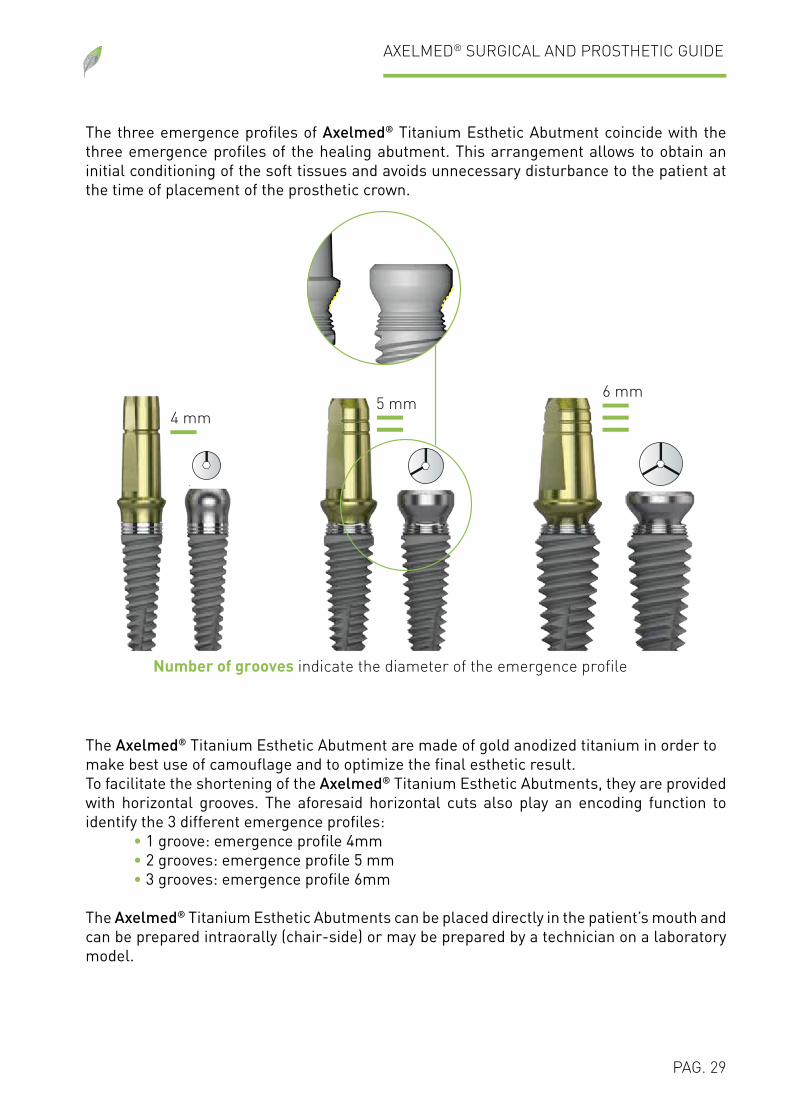
The three emergence profiles of Axelmed® Titanium Esthetic Abutment coincide with the three emergence profiles of the healing abutment. This arrangement allows to obtain an initial conditioning of the soft tissues and avoids unnecessary disturbance to the patient at the time of placement of the prosthetic crown.
The Axelmed® Titanium Esthetic Abutment are made of gold anodized titanium in order tomake best use of camouflage and to optimize the final esthetic result.To facilitate the shortening of the Axelmed® Titanium Esthetic Abutments, they are provided with horizontal grooves. The aforesaid horizontal cuts also play an encoding function to identify the 3 different emergence profiles: • 1 groove: emergence profile 4mm • 2 grooves: emergence profile 5 mm • 3 grooves: emergence profile 6mm
The Axelmed® Titanium Esthetic Abutments can be placed directly in the patient’s mouth and can be prepared intraorally (chair-side) or may be prepared by a technician on a laboratory model.
Number of grooves indicate the diameter of the emergence profile
4 mm5 mm
6 mm
Ø 4mm Ø 5mm Ø 6mmØ 4mm Ø 5mm Ø 6mmØ 4mm Ø 5mm Ø 6mm
AXELMED® SURGICAL AND PROSTHETIC GUIDE
PAG. 30
Axelmed® Titanium Esthetic Abutment - Chair-side preparation of the abutment
Clinical Procedure n.1 - Dental Office
1. Remove the healing screw and expose the implant platform;2. Select the most appropriate Axelmed® Titanium Esthetic Abutment. The selection should be made according to the implant diameter and to the available mesiodistal and buccolingual spaces. Note: Inside the All-in-One kit the correct Axelmed® Titanium Esthetic Abutment is already provided;3. The abutment may be modified using either diamond or tungsten carbide bur, intra orally or extra orally;4. Once the ideal contour has been obtained and the correct seating of the abutment to the implant has been verified, tighten the abutment screw to 32 Ncm;5. Close the access hole of the abutment screw and make the impression;6. Make a temporary resin prosthesis by direct relining;7. Contour the margins, polish and cement the temporary crown using a temporary cement. Note: the presence of residual cement is one of major causes of periimplantitis;8. Send the impression to the laboratory for the construction of the prosthetic device.
Laboratory procedure n.1 - Dental Laboratory
1. Pour model in the usual manner and allow to set;2. Remove impression from the model and proceed to the construction of the prosthesis using conventional laboratory techniques;3. Send the prosthetic device to the dental office for delivery to the patient.
Clinical Procedure n.2 - Dental Office
1. Remove the temporary prosthesis and clean the abutment of any debris and residual cement;2. After checking carefully the validity of the aesthetic and functional outcome, close the access hole of the abutment screw with a resinous material, cement the prosthesis and remove the overflowing with great care. Note: the presence of residual cement is one of the main causes of periimplantitis.
AXELMED® SURGICAL AND PROSTHETIC GUIDE
PAG. 31
Axelmed® Titanium Esthetic Abutment - Laboratory preparation of the abutment
Clinical Procedure n.1 - Dental Office
1. Take the impression at the implant level using the Open or the Closed tray technique and send it to the dental laboratory.
Laboratory procedure n.1 - Dental Laboratory
1. Screw the analogue and pour model in the usual manner and allow to set;2. Select the most appropriate Axelmed® Titanium Esthetic Abutment. The selection should be made according to the implant diameter and to the available mesiodistal and buccolingual spaces. Note: Inside the All-in-One kit the correct Axelmed® Titanium Esthetic Abutment is already provided;3. Screw the Axelmed® Titanium Esthetic Abutment directly on the laboratory model using the appropriate abutment screw;4. The Abutment may be modified using either diamond or tungsten carbide bur;5. Construct the prosthesis using conventional laboratory techniques for the creation of a screw-retained or cement-retained device. Note: the abutment surface can be roughened or sandblasted to increase the retention of the restorative material.6. Send the prosthetic device to the dental office for delivery to the patient.
Clinical Procedure n.2 - Dental Office
Screw-retained rehabilitation1. Remove the healing abutment;2. Place the restoration on the implant and tighten the connection screw to 32 Ncm;3. After checking carefully the validity of the aesthetic and functional outcome, close the access hole of the abutment fixing screw with a resinous material.
Cement-retained rehabilitation1. Remove the healing abutment;2. Place the restoration on the implant and tighten the connection screw to 32 Ncm;3. After checking carefully the validity of the aesthetic and functional outcome, close the access hole of the abutment fixing screw with a resinous material, cement the prosthesis and remove the overflowing with great care. Note: the presence of residual cement is one of the main causes of periimplantitis.
AXELMED® SURGICAL AND PROSTHETIC GUIDE
PAG. 32
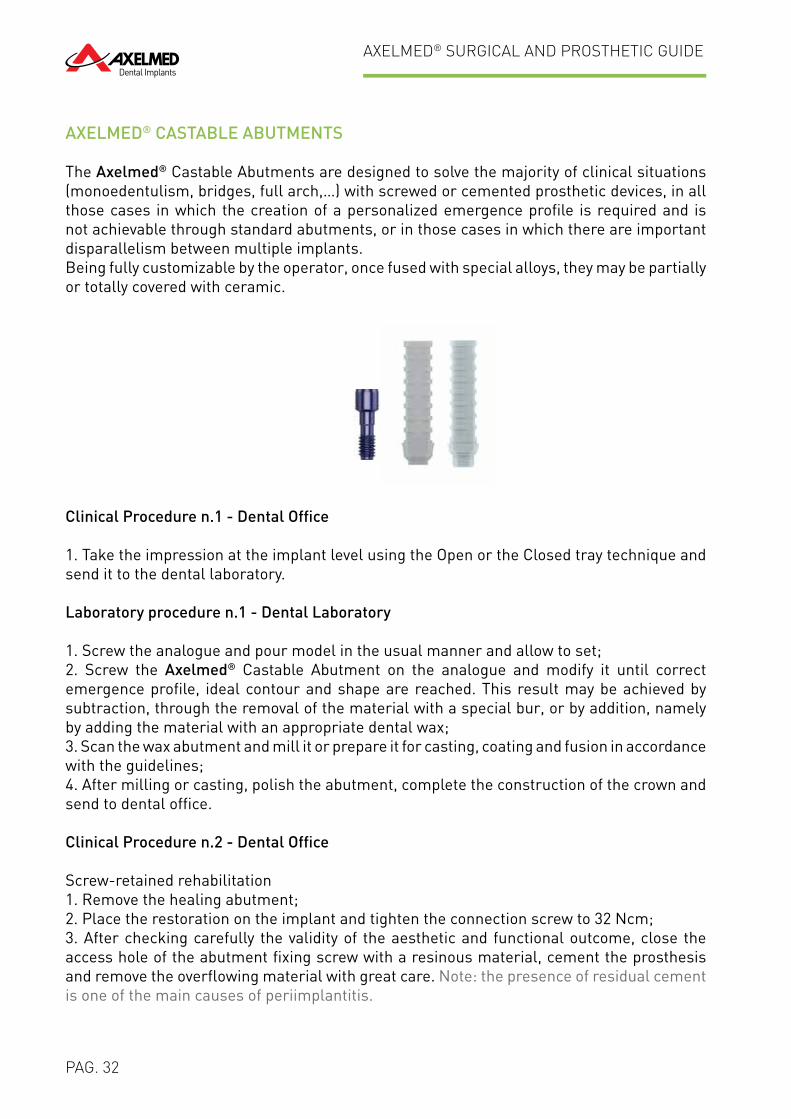
AXELMED® CASTABLE ABUTMENTS
The Axelmed® Castable Abutments are designed to solve the majority of clinical situations (monoedentulism, bridges, full arch,…) with screwed or cemented prosthetic devices, in all those cases in which the creation of a personalized emergence profile is required and is not achievable through standard abutments, or in those cases in which there are important disparallelism between multiple implants. Being fully customizable by the operator, once fused with special alloys, they may be partially or totally covered with ceramic.
Clinical Procedure n.1 - Dental Office
1. Take the impression at the implant level using the Open or the Closed tray technique and send it to the dental laboratory.
Laboratory procedure n.1 - Dental Laboratory
1. Screw the analogue and pour model in the usual manner and allow to set;2. Screw the Axelmed® Castable Abutment on the analogue and modify it until correct emergence profile, ideal contour and shape are reached. This result may be achieved by subtraction, through the removal of the material with a special bur, or by addition, namely by adding the material with an appropriate dental wax;3. Scan the wax abutment and mill it or prepare it for casting, coating and fusion in accordance with the guidelines;4. After milling or casting, polish the abutment, complete the construction of the crown and send to dental office.
Clinical Procedure n.2 - Dental Office
Screw-retained rehabilitation1. Remove the healing abutment;2. Place the restoration on the implant and tighten the connection screw to 32 Ncm;3. After checking carefully the validity of the aesthetic and functional outcome, close the access hole of the abutment fixing screw with a resinous material, cement the prosthesis and remove the overflowing material with great care. Note: the presence of residual cement is one of the main causes of periimplantitis.
AXELMED® SURGICAL AND PROSTHETIC GUIDE
PAG. 33
Cement-retained rehabilitation1. Remove the healing abutment;2. Place the restoration on the implant and tighten the connection screw to 32 Ncm;3. After checking carefully the validity of the aesthetic and functional outcome, close the access hole of the abutment fixing screw with a resinous material, cement the prosthesis and remove the overflowing with great care. Note: the presence of residual cement is one of the main causes of periimplantitis.
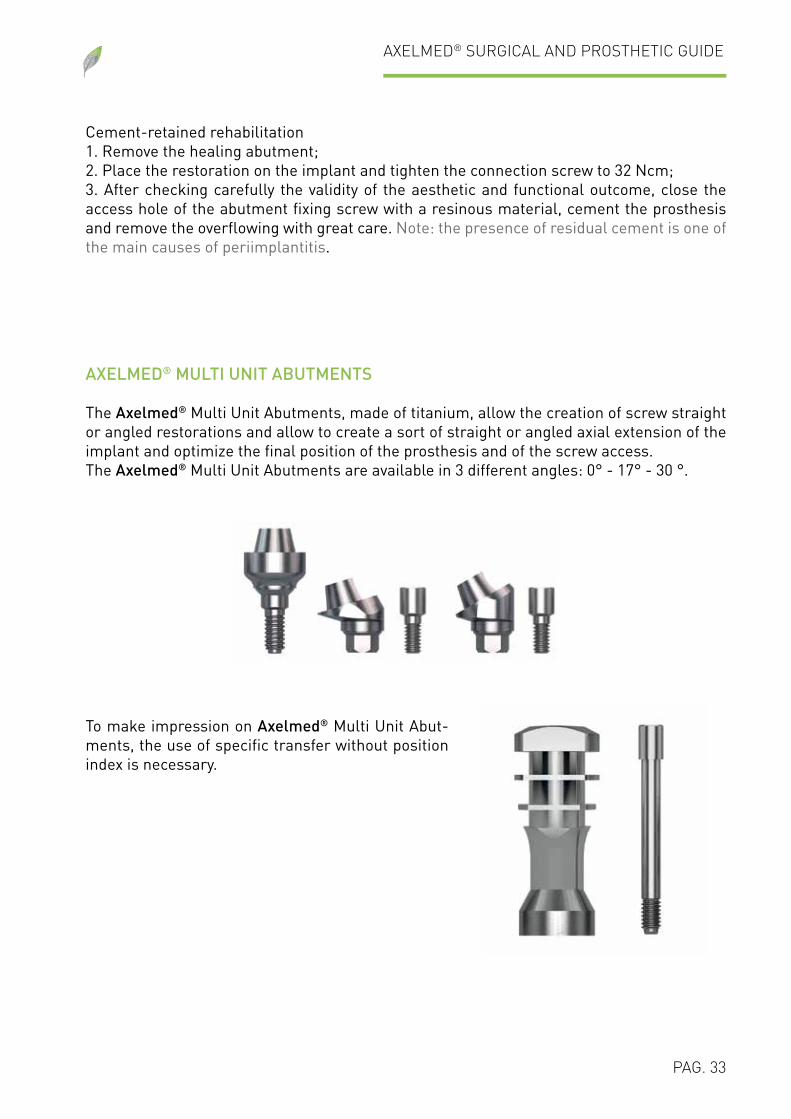
AXELMED® MULTI UNIT ABUTMENTS
The Axelmed® Multi Unit Abutments, made of titanium, allow the creation of screw straight or angled restorations and allow to create a sort of straight or angled axial extension of the implant and optimize the final position of the prosthesis and of the screw access.The Axelmed® Multi Unit Abutments are available in 3 different angles: 0° - 17° - 30 °.
To make impression on Axelmed® Multi Unit Abut-ments, the use of specific transfer without position index is necessary.
AXELMED® SURGICAL AND PROSTHETIC GUIDE
PAG. 34
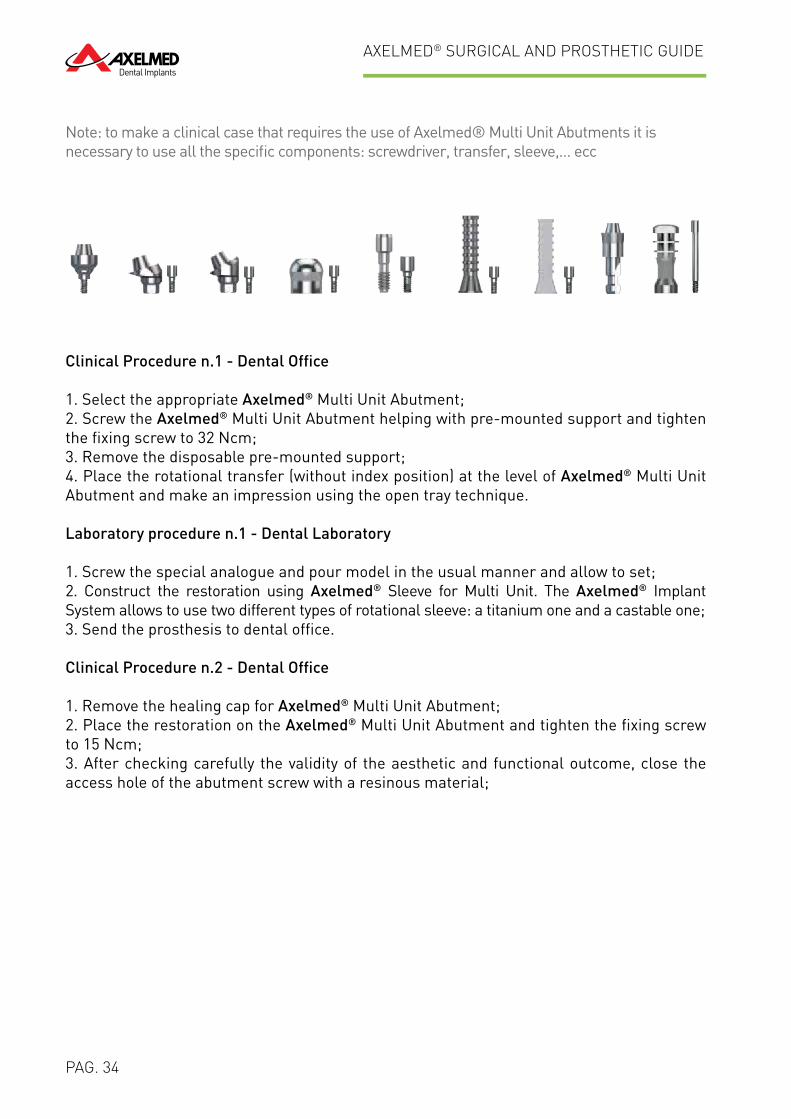
Note: to make a clinical case that requires the use of Axelmed® Multi Unit Abutments it isnecessary to use all the specific components: screwdriver, transfer, sleeve,… ecc
Clinical Procedure n.1 - Dental Office
1. Select the appropriate Axelmed® Multi Unit Abutment;2. Screw the Axelmed® Multi Unit Abutment helping with pre-mounted support and tighten the fixing screw to 32 Ncm; 3. Remove the disposable pre-mounted support; 4. Place the rotational transfer (without index position) at the level of Axelmed® Multi Unit Abutment and make an impression using the open tray technique.
Laboratory procedure n.1 - Dental Laboratory
1. Screw the special analogue and pour model in the usual manner and allow to set;2. Construct the restoration using Axelmed® Sleeve for Multi Unit. The Axelmed® Implant System allows to use two different types of rotational sleeve: a titanium one and a castable one;3. Send the prosthesis to dental office.
Clinical Procedure n.2 - Dental Office
1. Remove the healing cap for Axelmed® Multi Unit Abutment;2. Place the restoration on the Axelmed® Multi Unit Abutment and tighten the fixing screw to 15 Ncm;3. After checking carefully the validity of the aesthetic and functional outcome, close the access hole of the abutment screw with a resinous material;
AXELMED® SURGICAL AND PROSTHETIC GUIDE
PAG. 35
OVERDENTURE SOLUTIONS
The overdenture solution is a good, rapid and low cost resolution of the upper or lower complete edentulism. In the Axelmed® Implant System the Overdenture stability is provided by ball abutments or through the construction, by casting, of metal bars allowing anchorage to counter bars fitted in the prosthesis.
Note: to make a clinical case that requires the use of Axelmed® Ball Abutments, it is necessary to use all the specific components: screwdriver, elastic cap, metal container,…ecc
Axelmed® Ball Abutments - Direct Technique
Clinical Procedure n.1 - Dental Office
1. Select the Axelmed® Ball Abutment according to the transmucosal soft tissue thickness and screw it using the screwdriver to 32 Ncm. Note: the abutment collar should extend approximately 1 mm above the gingival tissue;2. Place the space maintainer or a piece of dental dam over the abutment and prepare an area inside the prosthesis to allow the future housing of the metal container and the ball itself;3. Put the elastic cap into the metal container and lock it on the ball abutment with manual pressure, fill the previously hollowed area with an appropriate self-curing resin and house the prothesis asking the patient to close the arches until resinous material is set;4. Remove the denture from the mouth of the patient, refine it, polish it and deliver it to the patient.
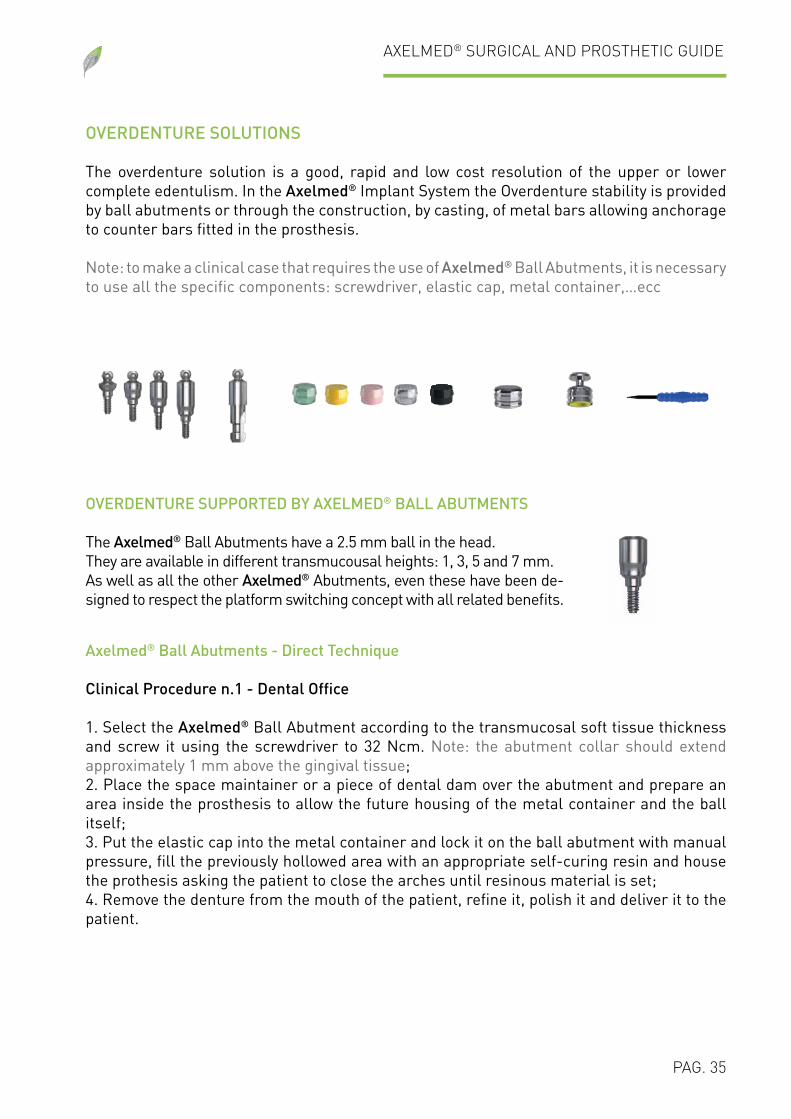
OVERDENTURE SUPPORTED BY AXELMED® BALL ABUTMENTS
The Axelmed® Ball Abutments have a 2.5 mm ball in the head. They are available in different transmucousal heights: 1, 3, 5 and 7 mm.As well as all the other Axelmed® Abutments, even these have been de-signed to respect the platform switching concept with all related benefits.
AXELMED® SURGICAL AND PROSTHETIC GUIDE
PAG. 36
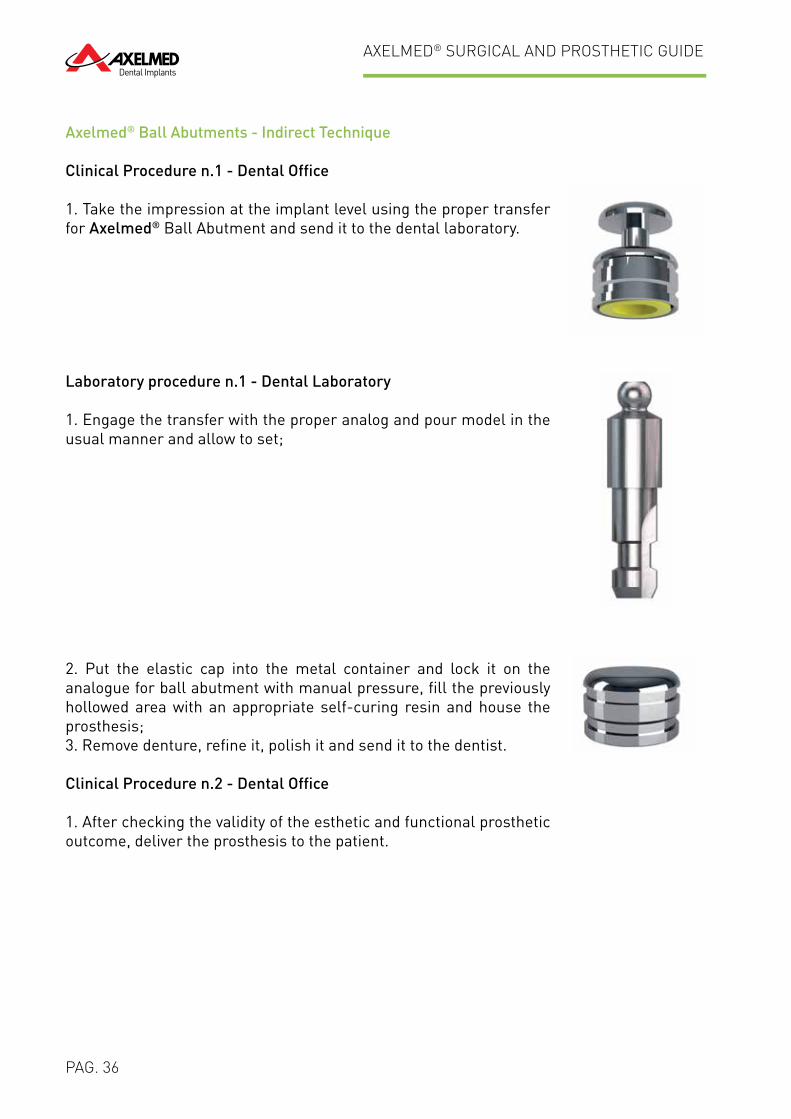
Axelmed® Ball Abutments - Indirect Technique
Clinical Procedure n.1 - Dental Office
1. Take the impression at the implant level using the proper transfer for Axelmed® Ball Abutment and send it to the dental laboratory.
Laboratory procedure n.1 - Dental Laboratory
1. Engage the transfer with the proper analog and pour model in the usual manner and allow to set;
2. Put the elastic cap into the metal container and lock it on the analogue for ball abutment with manual pressure, fill the previously hollowed area with an appropriate self-curing resin and house the prosthesis;3. Remove denture, refine it, polish it and send it to the dentist.
Clinical Procedure n.2 - Dental Office
1. After checking the validity of the esthetic and functional prosthetic outcome, deliver the prosthesis to the patient.
AXELMED® SURGICAL AND PROSTHETIC GUIDE
PAG. 37
OVERDENTURE SUPPORTED BY BAR
The Axelmed® Implant System does not provide for the use of pre-formed bars, but opts for the manufacturing of custom bars through the use of Axelmed® Castable Abutment.
Clinical Procedure n.1 - Dental Office
1. Take the impression at the implant level using the Open or the Closed tray technique and send it to the dental laboratory.
Laboratory procedure n.1 - Dental Laboratory
1. Screw the analog and pour model in the usual manner and allow to set;2. Screw the Axelmed® Castable Abutments on the analog and modify it until the correct emergence profile, the ideal contour and shape are reached. It is possible to achieve this result by subtraction, removing the material with a special bur, or by addition, adding the material with an appropriate dental wax;3. Join the abutments through bar segments available on the market and prepare the structure for casting in accordance with the guidelines;4. Polish the structure and send it to the dentist for intraoral examination.
Clinical Procedure n.2 - Dental Office
1. Remove the healing abutments;2. Try the bar using the special fixing screws. Note 1: The screws must be brought to the limit gradually to prevent the structure from tipping. Note 2: To avoid any tension the structure can be separated and welded at a later time.3. Send the bar back to the laboratory to proceed with next prosthesis manufacturing steps.
AXELMED® SURGICAL AND PROSTHETIC GUIDE
PAG. 38
ALL-in-ONE
Axelmed® ALL-in-ONE is a solution that allows dentist and dental technician to solve a clinical case completely with a huge advantage in terms of communication and organization. It is, a kit, designed to simplify prosthetic procedures in dental office and laboratory. It containsthree vials as follows:
GREAT VIAL WITH WHITE CAP1 Axelmed® Paradigma® Implant1 Axelmed® Healing Abutment1 Axelmed® Closure Cap
SMALL VIAL WITH WHITE CAP1 Axelmed® Titanium Esthetic Abutment1 Fixing screw (gold) for Axelmed® Titanium Esthetic Abutment1 Plastic Transfer for impression (closed tray technique)
VIAL WITH BLUE CAP1 Axelmed® Castable Abutment1 Fixing screw (blue colour) for Axelmed® Castable Abutment1 Laboratory analog
AXELMED® SURGICAL AND PROSTHETIC GUIDE
PAG. 39
Communication benefits between dentist and dental technicianOnce the surgery procedure for Axelmed® Paradigma® implant placement is finished, the dentist only needs to retain the little white cap vial in the dental office and to send the blue cap vial to the dental laboratory. Note: the withdrawal of the Abutment from the little white cap vial and its remittance to the laboratory along with the other components present in the blue cap vial is only necessary if you prefer to prepare the Axelmed® Titanium Esthetic Abutment in the laboratory.
Efficiencies benefitsThe ALL-in-ONE kit contains nine components for a total of five product codes. It is easy to understand the time saving advantages that could be gained by making a purchase order with of one single product code (the ALL-in-ONE kit code) instead of five. Why not try to wi-den the issue in the optic of the purchase a large number of dental implants? The advantage in terms of organization becomes immediately clear. As already extensively argued in the Axelmed® Surgical and Prosthetic Guide, it is preferable to associate each implant diameter with prosthetic components with specific emergence profile. Within the ALL-in-ONE kit, all the components are already selected in order to respect this philosophy.
paradigma
SGM
• V
er. E
N 1
.0 •
11/
2016
®
®
AXELMED S.R.L. Via della Liberazione, 5820098 S. Giuliano, Milan | Italy
eMail: [email protected]: www.axelmed.com
Phone +39 02 9828 2694Call Free 800 144 347Fax +39 02 9828 5327


