PandA Instructor’s Manual - Kyoto U
38
Institute for Information Management and Communication, Kyoto University PandA Instructor’s Manual 2014/3.20 Edition, IIMC Notice: Most of screen shots are copied from Japanese edition, and they are taken in Japanese Mode
Transcript of PandA Instructor’s Manual - Kyoto U
Institute for Information Management and Communication,
Kyoto University
PandA Instructor’s Manual
2014/3.20 Edition, IIMC
Notice: Most of screen shots are copied from Japanese edition,
and they are taken in Japanese Mode
PandA Instructor’s Manual
Table of Contents
1. On PandA
2. On User’s Environment (Recommended Web Browsers)
3. Login/Logout
3.1 Login
3.2 Logout
4. My Workspace
4.1 Account
4.2 Setting Language Preferance
5. Opening Course Worksite
5.1 What’s Course Worksite?
5.2 Coordination of KULASIS and PandA
5.3 Opening Course Worksite
5.4 Registering participants to Course Worksite
5.4.1 Automatic Registration
5.4.2 Manual Registration of Kyoto University members
5.4.3 Manual Registration of Students of Other Institutions
6. Using Course Worksite
6.1 Site Information
6.1.1 Edit Site Information
6.1.2 Select Tools
6.1.3 Ordering of Navigation Menu
6.1.4 Management of Access Rights
6.2 Resources Tool
7. Using Assignments Tool
7.1 Adding a New Assignment
7.2 Grading, Returning and Asking Resubmission
7.3 Bulk Downloading of the Submitted Assignments
8. Using Tests & Quizzes Tool
9. Using Mail Tool
10. Using Gradebook Tool
10.1 Using as an Instructor Role
10.2 Using as a Student Role
11. Contact Us


1. On PandA
As a course management system (CMS), the Institute of Information Management and
Communication had operated Blackboard Learning System (WebCT) CE8. In 2013
academic year, we renewed the CMS, and started to operate a new CMS which uses
open source CMS Sakai CLE, and named it “People and Academe (PandA)”.
This manual is for instructors who want to start to use PandA. While PandA has many
functions to support course activities, this manual focuses on the workflow to start to
use PandA, and its basic functions.
2. On User’s Environment (Recommended Web Browsers)
The following browsers are recommended (cited from the online manual). While we are
continuously improving Japanese function (or internationalization) of the system, some
malfunctions may remain.
Windows
Firefox 2.0 to 3.6.16
Internet Explorer 7.0 and 8.0
With Internet Explorer, some pages may not been displayed correctly, and it may be
improved by choosing the “Compatibility View” mode of the browser.
Mac
Firefox 2.0 to 3.6.16
Other platform
Firefox 2.0 to 3.6.16

3. Login/Logout
3.1 Login
The URL of the PandA is
https://panda.ecs.kyoto-u.ac.jp/portal
Accessing the above site, you see the following page.
By pressing the “login” button on the right top of the page, the login dialog will be
displayed as follows.
So as to login to PandA, enter your ID and password:
Faculty member and staff, use your SPS-ID and password. You may have both

SPS-ID and ECS-ID. Inside the PandA, login user with SPS-ID and that with
ECS-ID are treated as separate users. Use SPS-ID if you don’t have special needs.
Students, use your ECS-ID.
If you want someone outside Kyoto University for e.g., a student of a joint class with
other university ask to use PandA, we can issue e-mail address based ID’s to such
users. Refer to “Section 5. Opening Course Worksite.”
In case of first login to PandA, you see the following tutorial.
3.2 Logout
So as to logout from PandA, press the “logout” button on the right top of the page. So as
to enter PandA again, click “ここ(here)” in the message of the dialog.

4. My Workspace
Once you logged into PandA, “My Workspace” is displayed. In the page of “My
Workspace,” several tools are displayed as blocks, and you see the summary of the all
courses you have membership.
In PandA, pages used for each course or project are called “Site.” If you are a member of
other sites, you see such courses as “tabs” of the top of the pages. You can arrange tabs
of the courses by yourself. If you are a member of many sites, other sites that are not
displayed as tabs can be seen by choosing “Other Sites” tab.
4.1 Account
Select “Account(アカウント)” from the navigation menu. If you use SPS-ID or ECS-ID
for login to PandA, you will find your name and e-mail address provided by the
university.
4.2 Setting Language Preference
Select “Preferences (設定)” from the navigation menu. By pressing “Language(言語)”
button in the page, you will move to the page to choose your language preference. Select
(英語(アメリカ合衆国)) from the list to switch language preference to English.


5. Opening Course Worksite
5.1 What’s Course Worksite?
In PandA, pages used for class activities of a course are called “Course Worksite.” For
distribution of course material, gathering assignments, or to carrying out tests &
quizzes, you need to open your course worksite for each course.
5.2 Coordination of KULASIS and PandA
In PandA, through coordination with KULASIS, courses of liberal arts and sciences
program and courses of the undergraduate and graduate programs approved by
corresponding schools, data of the courses are sent from KULASIS to PandA, and each
instructor can create a course worksite of his/her class.
Except several undergraduate and graduate programs, rosters of the courses are also
sent to PandA.
Without explicit operation of making course worksite on PandA, course worksites are
not created on PandA while the course information from KULASIS is received by PandA.
Even for courses in the programs that KULASIS-PandA coordination is not approved,
you can use course worksite. Please contact Educational Computing Service Group of
IIMC (mailto: [email protected]) with the course title.
5.3 Opening Course Worksite
* From Academic Year 2014, we changed the procedure to open course worksites.
Now “Worksite Setup tool” is unable to use to open course worksites, and they can be
created using the instructors page of the student information system KULASIS
https://www.k.kyoto-u.ac.jp/teacher .

1. Login to KULASIS, and click “担当授業 (courses you teach)” to show your course
list.
2. Select the course you want to open a course worksite, and click “授業サポート
(Support your class)”.
3. From the page of “授業サポート”, click “授業支援システム PandA (情報環境機構)
(Course Management System PandA, IIMC).” Several undergraduate and
graduate programs don’t introduce this function. In such case, please ask
Educational Computing Service Group of IIMC (mailto:
[email protected]) to open your course worksite.
4. If you don’t logged into PandA from the same PC, login page of the PandA will be
shown. Login to PandA with your SPS-ID.
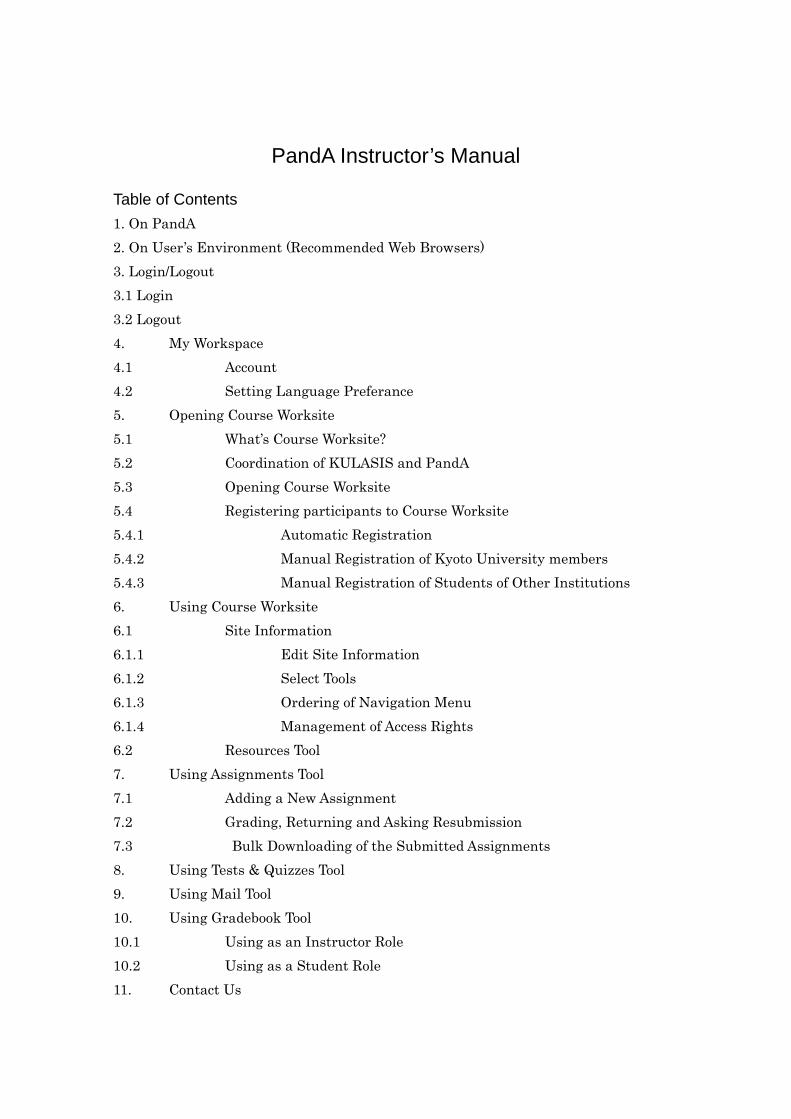
5. If the course worksite hasn’t been created, a dialog to confirm creation of the course
worksite will be displayed, press “OK” to create the worksite.
6. The course worksite is created, and the “Dashboard” of the course worksite is
displayed
7. In the navigation menu, tools of the course worksite is displayed. Setting of the
site and editing of the tools can be done with “Site Info” tool.
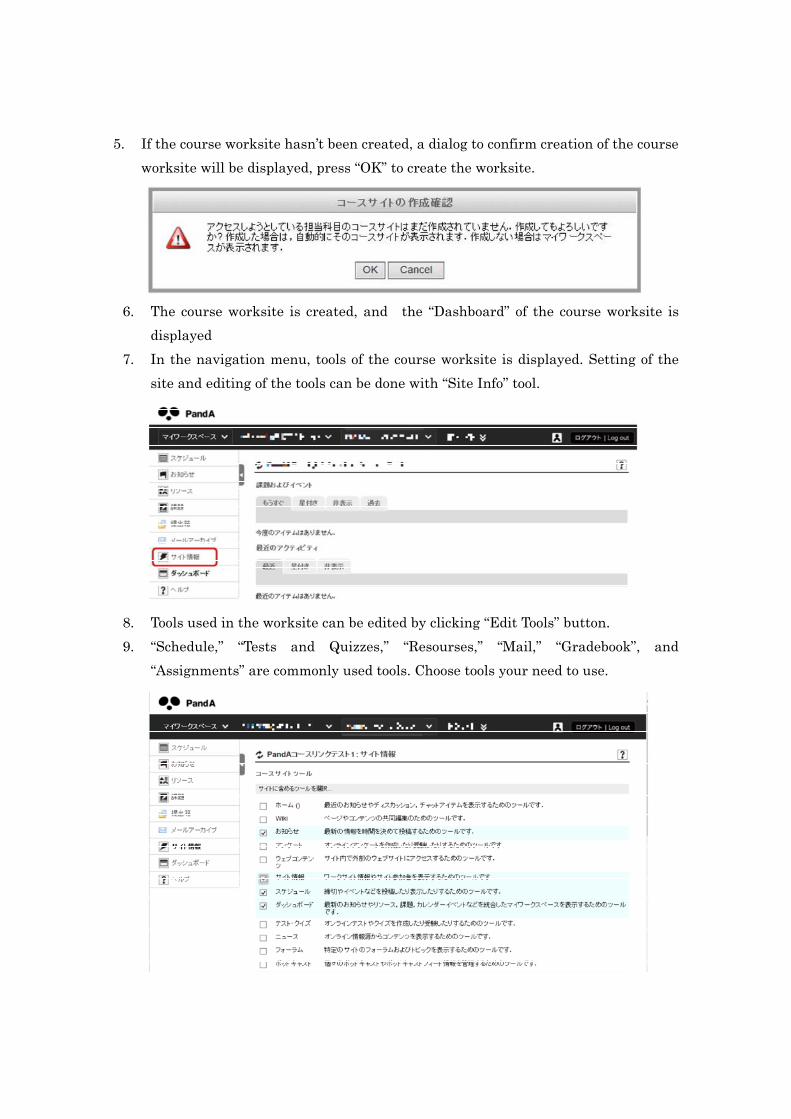
8. Tools used in the worksite can be edited by clicking “Edit Tools” button.
9. “Schedule,” “Tests and Quizzes,” “Resourses,” “Mail,” “Gradebook”, and
“Assignments” are commonly used tools. Choose tools your need to use.

5.4 Registering participants to Course Worksite
To register the participants to the course worksite, there are 3 way:
1. Automatic Registration
2. Manual Registration of Students and Staff of Kyoto University
3. Manual Registration of Students of Other Institutions
5.4.1 Automatic Registration
As for courses of the Liberal Arts and Sciences Program, (tentative) rosters on
KULASIS are automatically fed to the corresponding course worksites on PandA, and
registered students can participate the sites.
As for courses given by undergraduate programs and graduate programs, it depends on
approvals of the schools, and each instructor may need to register students manually.
5.4.2 Manual Registration of Students and Staff of Kyoto University
As for students and staff of Kyoto University, an instructor using his/her course
worksite can register them by setting the following information of participants.
Faculty Members and Staff
Staff ID numbers (8 digits, not SPS-ID)
E-mail addresses of KUMail
Students
Student’s ID numbers (10 digits, not ECS-ID)
E-mail addresses of Student Mail provided by Kyoto University
So as to register the participants to the course worksite, the instructor has to collect the
above information from the participants.
For registration, take the following procedure:
1. Select “Site Info (サイト情報)” from the navigation menu of the course worksite.
2. Choose “Add Participants”
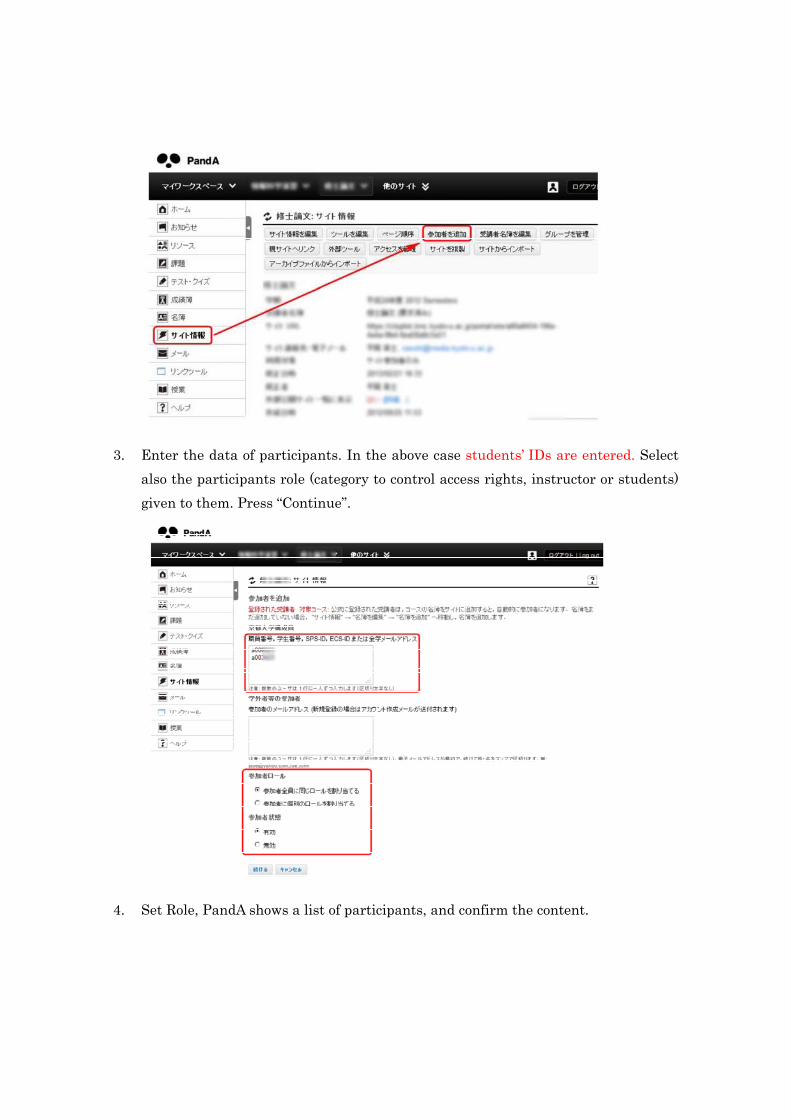
3. Enter the data of participants. In the above case students’ IDs are entered. Select
also the participants role (category to control access rights, instructor or students)
given to them. Press “Continue”.
4. Set Role, PandA shows a list of participants, and confirm the content.

5. Choose an option to contact them.
6. Confirm the set information, and click “Register”.

5.4.3 Manual Registration of Students of Other Institutions
So as to register participants outside Kyoto University for e.g., joint class with other
institutions, you can register them by using their e-mail addresses as ID to login to
PandA. Passwords for such users are automatically generated by PandA and send them
to the corresponding users by e-mail.

6. Using Course Worksite
6.1 Site Information
With “Site Info”, you can e.g., edit site information, select tools used in the site, edit the
navigation menu for the site, add/delete participants, edit the roster, group the
participants, and alter the access rights of the participants. Here basic 4 functions are
explained.
6.1.1 Edit Site Information
You can edit explanation of the site displayed on the site’s homepage, select a language
for the site, information to contact the site. If default setting is sufficient, you don’t need
to edit them. Site title is fixed by that provided by KULASIS, and you can’t change it.

6.1.2 Select Tools
You can select tools used in the course worksite. While PandA has many available tools,
we recommend you to start with basic tools introduced in this manual. We are also
preparing tools not displayed in the menu, and if you have some special requirements,
please contact us.

6.1.3 Ordering of Navigation Menu
The Order of the tools and their names displayed in the navigation menu on the left side
of the site page can be modified. Order can be edited in a drag-and-drop manner. So as
to remove tools form the menu, click “X” icon.

6.1.4 Management of Access Rights
The instructor can make the site visible/invisible to participants. Site can be also made
accessible to all the users having valid account of PandA. To participate such sites, user
can register him/her to the site using “Membership” tool shown in his/her My
Workspace.

6.2 Resources Tool
Resource tool is a tool to distribute course material to the participants. With this tool,
the instructor of the course can upload files to be distributed from his/her computer to
the PandA server. The instructor can also specify the date and other conditions of
making files downloadable to the participants.
Uploading files
Select “Resources” tool from the navigation menu shown on the left of the page, and
click “add” button. Select “Upload Files” from the displayed list.
Select a file to be unloaded, and specify a name given to the file displayed on PandA.
Maximum 500 Mbytes file can be uploaded once.
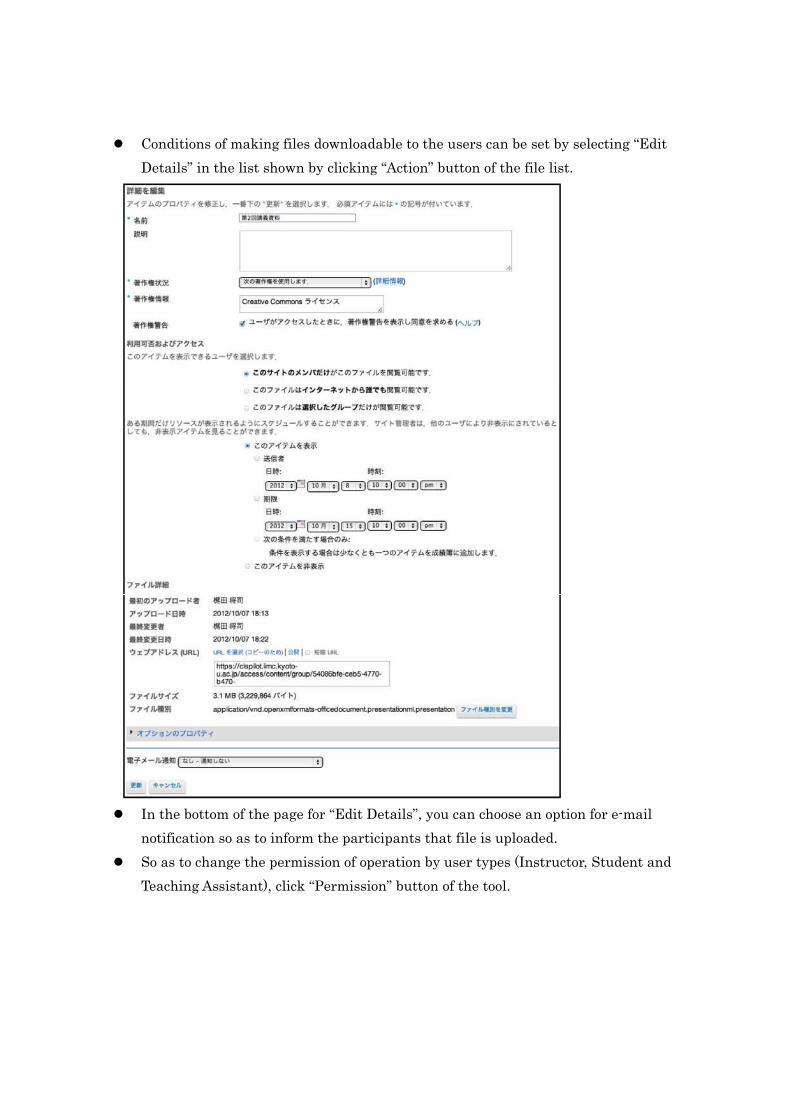
Conditions of making files downloadable to the users can be set by selecting “Edit
Details” in the list shown by clicking “Action” button of the file list.
In the bottom of the page for “Edit Details”, you can choose an option for e-mail
notification so as to inform the participants that file is uploaded.
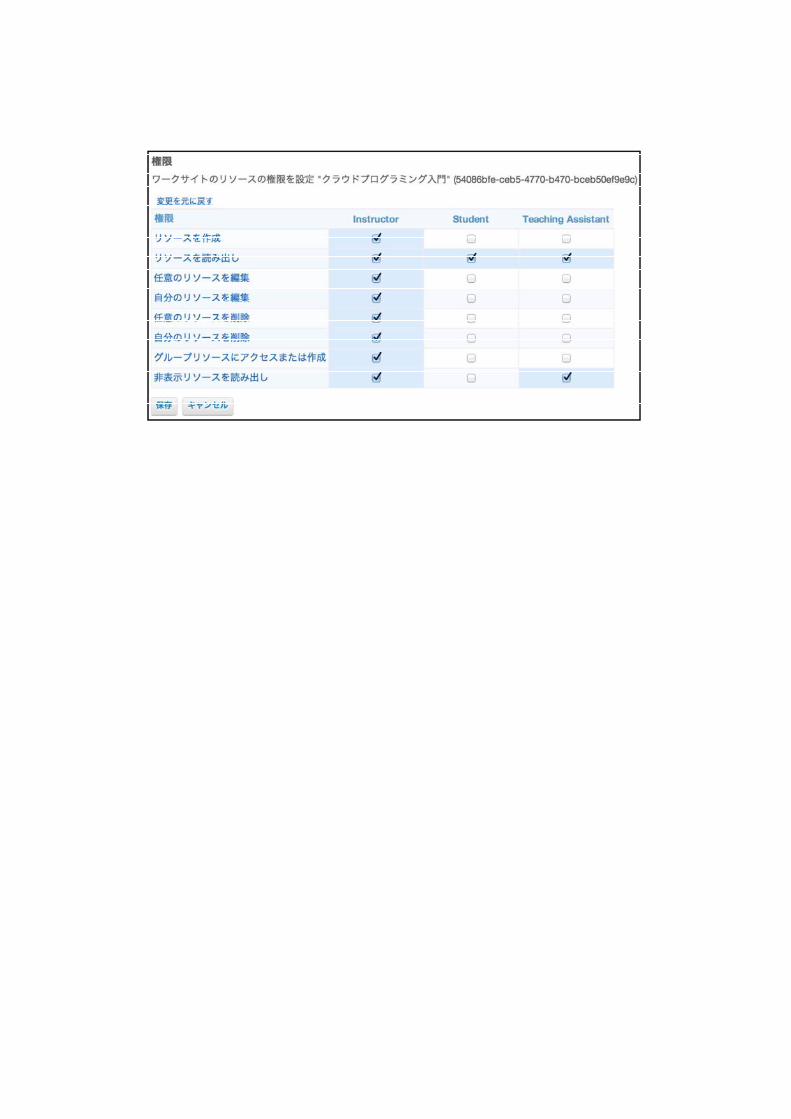
So as to change the permission of operation by user types (Instructor, Student and
Teaching Assistant), click “Permission” button of the tool.

7. Using Assignments Tool
“Assignments” tool support the following activities:
To add assignments such as descriptive tests and essays to the course,
To give grades and return submitted assignments, and to ask resubmission of the
assignment to students when the submitted ones are not enough to give grades.
To set open date, due date, and absolute limit of acceptance to the assignment
The grade scales such as points, pass/fail, letter grade and ungraded can be
selected.
7.1 Adding a New Assignment
1. Select course worksite from the tab, and click “Assignments” tool in the navigation
menu and “Add” button of the appeared page.
2. Specify the title, open date, due date, accept until and grade scale. Then describe
the assignment instructions to the form.
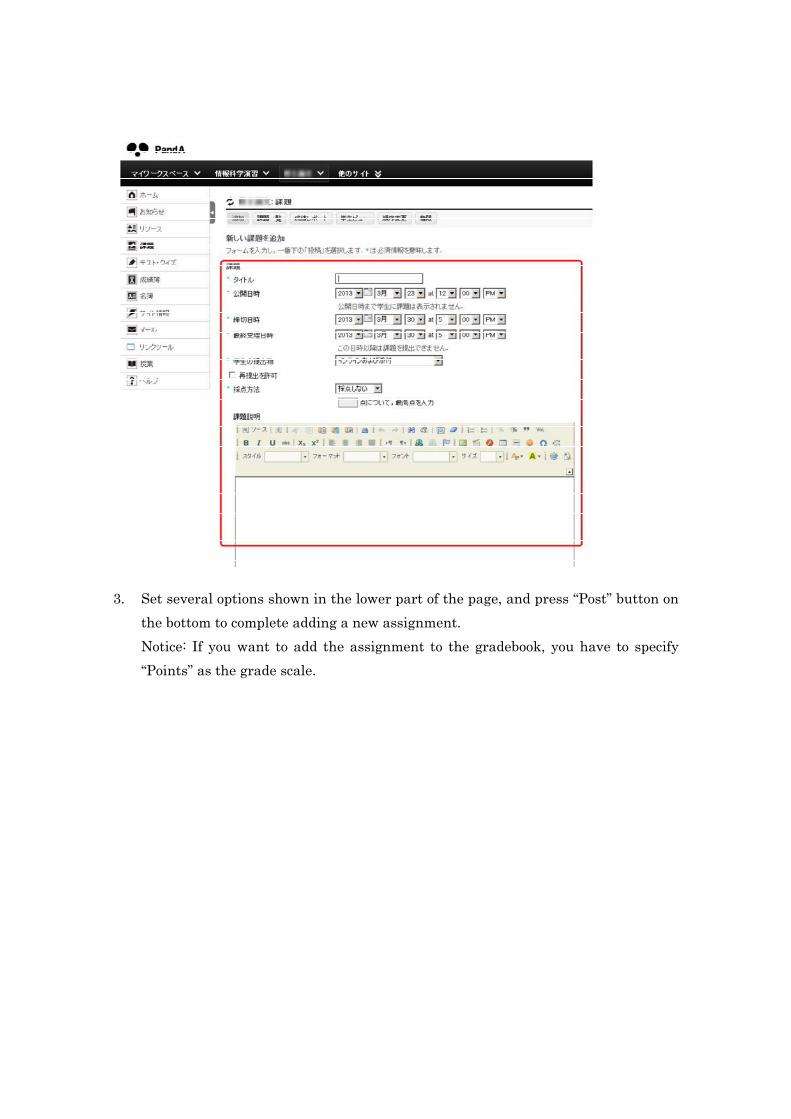
3. Set several options shown in the lower part of the page, and press “Post” button on
the bottom to complete adding a new assignment.
Notice: If you want to add the assignment to the gradebook, you have to specify
“Points” as the grade scale.

4. The created assignment will be displayed in the assignment list.
7.2 Grading and Returning Assignments and Asking Resubmittion
This section explains how to give grades to the submitted assignments and return

them to the students.
Instructors can set permission of re-submission (possible number of resubmission,
and due date).
1. Select an assignment you want to grade in the list of assignments, and click
“Grade”.
2. Click “Grade” in the line of the student you want to grade,.
3. Examine the submission by the student, and grade it.
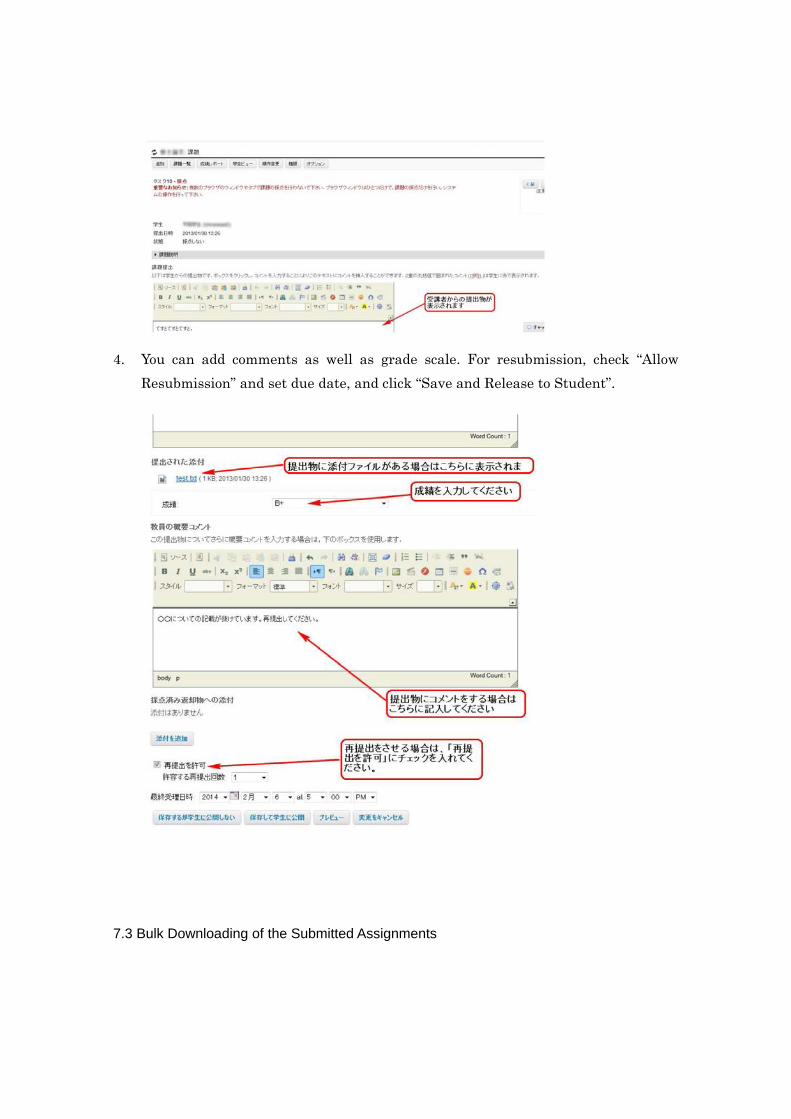
4. You can add comments as well as grade scale. For resubmission, check “Allow
Resubmission” and set due date, and click “Save and Release to Student”.
7.3 Bulk Downloading of the Submitted Assignments

Instructors can download all the submission as whole.
Select “Assignments” tool from the navigation menu in the left of the page, and click
“Grade” of the assignments you want to download submissions.
Click “Dawnload All”
Check the contents you want to download, and click “Download.” So as to download all
the files, check the top option “All.”

Files are archived and named as “Bulk_download.zip.”
Extract files from the downloaded archive with appropriate archiving software.
In the folder of the extracted files, there are csv file for grading and folders of students
names.

Submitted assignments are stored in the students’ folders.

8. Using Tests & Quizzes Tool
With “Tests and Quizzes” tool, you can create tests taken on PandA. Tests/quizzes of
types “multiple choice”, “true false”, “fill in blank” etc. can be used.
1. Select a course worksite with tab, and choose “Tests and Quizzes” in the navigation
menu. Then put title of a test, and press “Create” button.
2. Choosing a question type, an appropriate edit page will appear.
3. Explanation of how to enter tests will be displayed. Following the instruction, to
create a test.
After entering needed inputs, press “Save” button.
4. Then, the created test will be displayed. If you want to make it open to students,
press “Publish” button.
With “Print” button, you can see a page fit to printing the tests.

With “Preview” button, you can confirm the test shown to the students.
5. You can setup notification that the test released to students with e-mail. You can
also edit the messages sent to students.
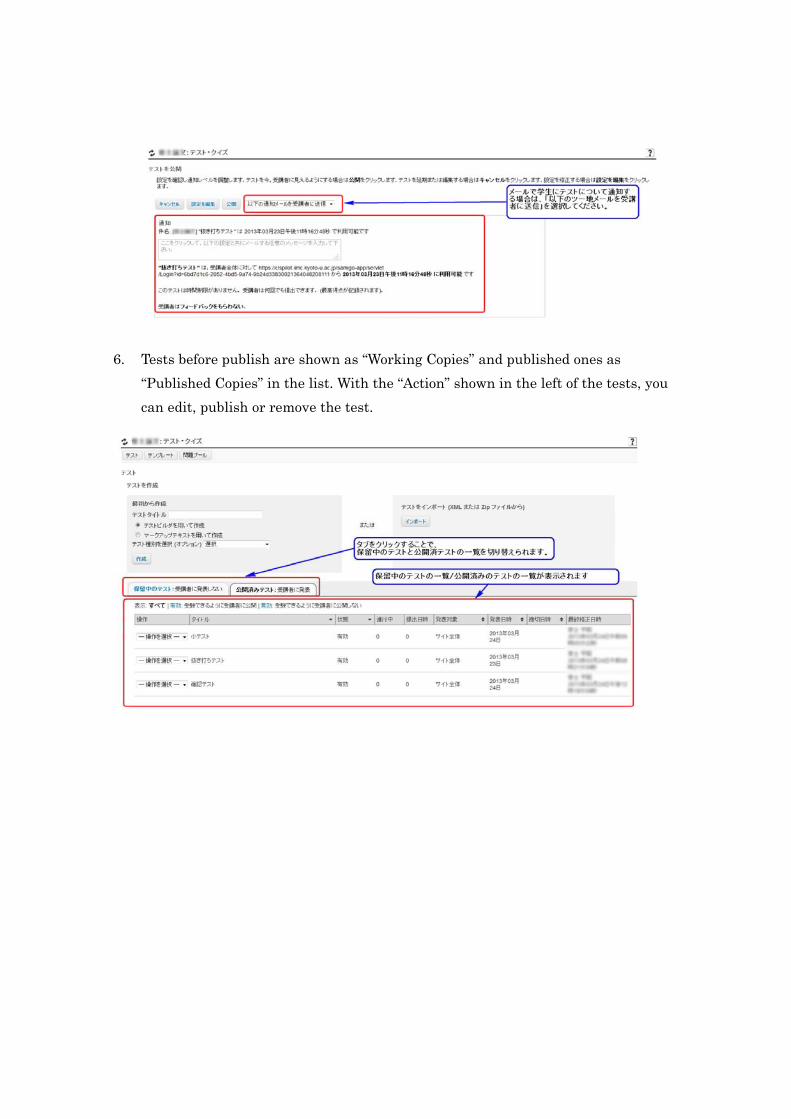
6. Tests before publish are shown as “Working Copies” and published ones as
“Published Copies” in the list. With the “Action” shown in the left of the tests, you
can edit, publish or remove the test.

9. Using Mail Tool
E-mail address of the instructors, teaching assistants and enrolled students are
already set in the Mail tool. You can send mail messages to the users by their roles
such as instructors, teaching assistants and students.
As well as common mailer softs, you can send mail by specifying recipients. For that,
use e-mail addresses as recipients.
10. Using Gradebook Tool
Gradebook tool is a tool for grading using grades imported from Tests & Quizzes Tool or
manually inputted grades.
10.1 Using as an Instructor Role
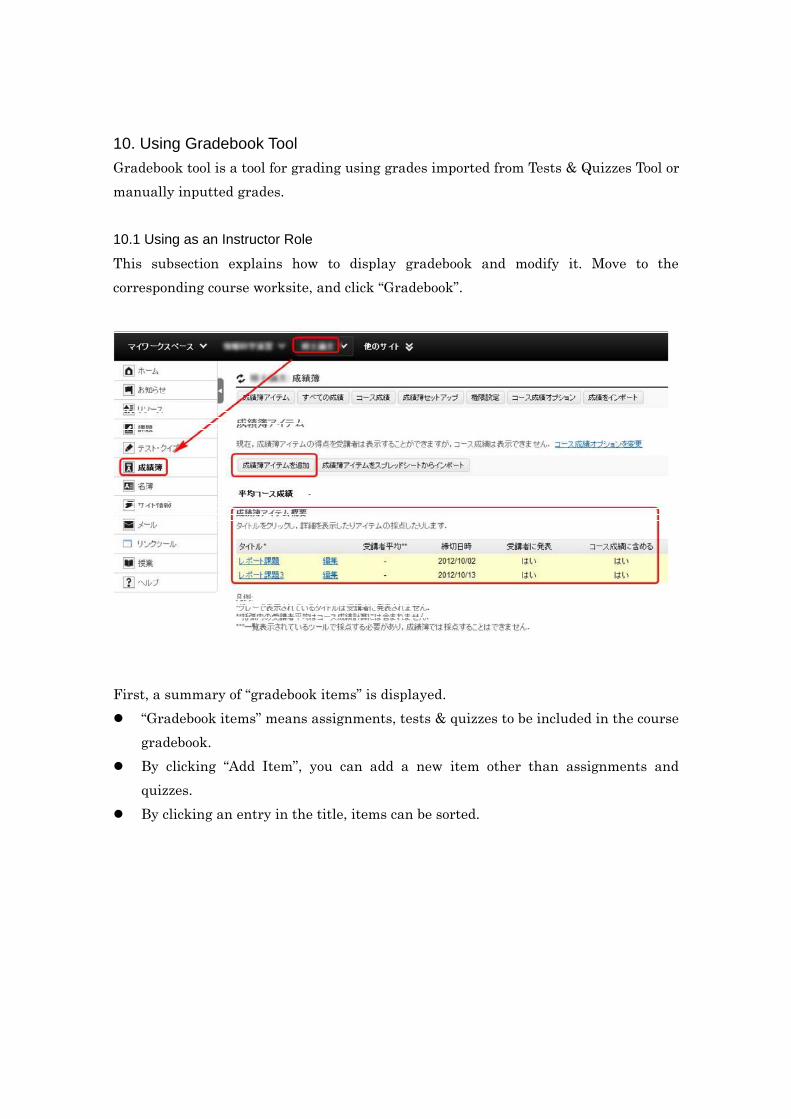
This subsection explains how to display gradebook and modify it. Move to the
corresponding course worksite, and click “Gradebook”.
First, a summary of “gradebook items” is displayed.
“Gradebook items” means assignments, tests & quizzes to be included in the course
gradebook.
By clicking “Add Item”, you can add a new item other than assignments and
quizzes.
By clicking an entry in the title, items can be sorted.

By clicking “All grades,” course grades and their details are displayed.
By clicking the heading of any column, data are sorted with respect to the item of
selected column.
By clicking “detail” button, you can see the statistics of the selected gradebook item
or edit it.
By clicking the name of the student of whose score you want to correct or input
manually, you can edit the grade of the student.
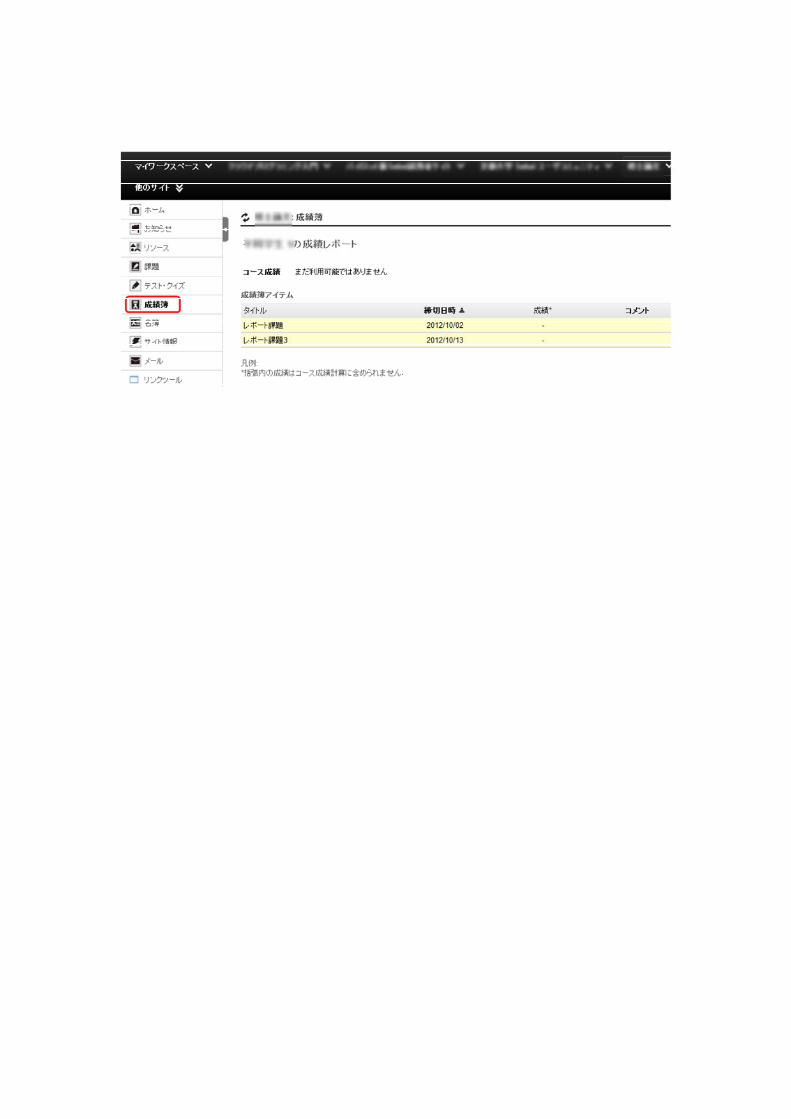
10.2 Using as a Student Role
By clicking “Gradebook” tool, you can see you score.

11. Contact Us
For any inquiries on PandA, please contact to Educational Computing Service Group of
IIMC,
mailto: [email protected]