PALLONI AUTOCLAVABILI IN SILICONE SILICONE … · 15 Product description and intended use GIMA...
14
M34244-M-Rev.3.11.16 Gima S.p.A. - Via Marconi, 1 - 20060 Gessate (MI) Italy Italia: tel. 199 400 401 - fax 199 400 403 Export: tel. +39 02 953854209/221/225 fax +39 02 95380056 [email protected] - [email protected] www.gimaitaly.com PALLONI AUTOCLAVABILI IN SILICONE SILICONE AUTOCLAVABLE RESUSCITATORS INSUFFLATEURS EN SILICONE AUTOCLAVABLES BOLSAS AUTOCLAVABLES DE SILICONA BALÕES DE SILICONE AUTOCLAVÁVEIS 34244 - 34245 - 34246 - 34247 Fabbricante Manufacturer Gima S.p.A. Via Marconi, 1 20060 Gessate (MI) Italy Made in Taiwan MANUALE D’USO E MANUTENZIONE USE AND MAINTENANCE BOOK INSTRUCTIONS DE FONCIONNEMENT ET ENTRETIEN MANUAL DE USO Y MANTENIMIENTO MANUAL DE USO E MANUTENÇÃO ATTENZIONE: Gli operatori devono leggere e capire completamente questo manuale prima di utilizzare il prodotto. ATTENTION: The operators must carefully read and completely understand the present manual before using the product. AVIS: Les opérateurs doivent lire et bien comprendre ce manuel avant d’utiliser le produit. ATENCIÓN: Los operadores tienen que leer y entender completamente este manual antes de utilizar el producto. ATENÇÃO: Os operadores devem ler e entender completamente este manual antes de usar o produto. 0476
Transcript of PALLONI AUTOCLAVABILI IN SILICONE SILICONE … · 15 Product description and intended use GIMA...

M34
244-
M-R
ev.3
.11.
16Gima S.p.A. - Via Marconi, 1 - 20060 Gessate (MI) ItalyItalia: tel. 199 400 401 - fax 199 400 403Export: tel. +39 02 953854209/221/225 fax +39 02 95380056 [email protected] - [email protected]
PALLONI AUTOCLAVABILI IN SILICONESILICONE AUTOCLAVABLE RESUSCITATORSINSUFFLATEURS EN SILICONE AUTOCLAVABLESBOLSAS AUTOCLAVABLES DE SILICONABALÕES DE SILICONE AUTOCLAVÁVEIS
34244 - 34245 - 34246 - 34247
FabbricanteManufacturer
Gima S.p.A. Via Marconi, 1 20060Gessate (MI) ItalyMade in Taiwan
MANUALE D’USO E MANUTENZIONEUSE AND MAINTENANCE BOOK
INSTRUCTIONS DE FONCIONNEMENT ET ENTRETIENMANUAL DE USO Y MANTENIMIENTO
MANUAL DE USO E MANUTENÇÃO
ATTENZIONE: Gli operatori devono leggere e capire completamente questo manuale prima di utilizzare il prodotto.ATTENTION: The operators must carefully read and completely understand the present manual before using the product.AVIS: Les opérateurs doivent lire et bien comprendre ce manuel avant d’utiliser le produit.ATENCIÓN: Los operadores tienen que leer y entender completamente este manual antes de utilizar el producto.ATENÇÃO: Os operadores devem ler e entender completamente este manual antes de usar o produto.
0476

15
Product description and intended useGIMA Manual Resuscitator is designed for use as an adjunct to artificial respiration and cardiopulmonary resuscitation. The Resuscitator can be used to ventilate the apnoeic patient and to augment ventilation and for oxygen delivery to the spontaneously breathing patient. The designs are also different according to Adult, Child or Infant by using different compressing frequency, they also come with different sizes to meet all patients’ need for oxygen.
The adult size has a Pressure Relief Valve design (as an option). When the pressure inside the bag exceeds 60 cmH20, and 40 cmH20 for infant bag, the Pressure Relief Valve will automatically vent the delivered breath tn the atmosphere to protect the lung from injuring by the high pressure.
This product is intended for use by qualified medical or emergency personnel trained in pulmonary ventilation and advanced cardiac life support techniques. This manual provides all section assembly drawings, numbers for all construction parts. some cautions. and cleaning methods. Please carefully read all cautions in this manual before use to accomplish the best effect, and pay attention to all safety warnings.
GIMA Silicone ResuscitatorIt is manufactured by using supreme rated Silicone, with high flexibility, stable material, can resist high temperature (to a maximum of 134°C).
Warning & Caution
WARNINGS1. Do not use the Manual Resuscitator in toxic atmospheres.2. Remove the oxygen reservoir and reservoir valve if supplemental oxygen is not being administered. Failure to do so will affect the refill rate and maximum frequency capabilities. 3. Do not administer supplemental oxygen in the presence of open flames. 4. Do not use oil, grease or other hydrocarbon-based substances on any part of the manual Resuscitator Supplemental oxygen, supplied under pressure, can combine with hydrocarbons and cause explosions. 5. This device is intended for use by qualified medical and emergency personnel trained in pulmonary ventilation and advanced cardiac life support techniques. 6. Proficiency in the assembly, disassembly and use of this device should be demonstrated before use on a patient. 7. Always test the device in accordance with this manual after cleaning and sterilization or replacement of parts. 8. Always monitor airway pressure with a manometer when ventilating a patient. 9. Only qualified personnel trained in the use of positive end expiratory pressure (PEEP) should administer PEEP with this device. 10. Always verify PEEP level and the function of the resuscitator before use on a patient. 11. Monitor airway pressure with a manometer when ventilating a patient.
CAUTIONS1. If overriding the pressure relief valve, great caution must be taken not to allow the pressure in the patients airways became too high. 2. Do not attempt to disassemble the pressure relief valve assembly. Disassembly will damage the component. 3. Before use, clean and sterilize the entire Manual Resuscitator to your individual institution’s validated procedure for cleaning and sterilizing such equipment. After the Manual Resuscitator has been cleaned and sterilized, test the Manual Resuscitator as directed in this manual.
ENGLISH

16
Principles of operation
Assembly View (A)GIMA Resuscitator is composed in 4 components (A) Non-rebreathing (duckbill) Valve (B) Silicone Bag (C) Reservoir Valve (D) Oxygen Reservoir The Reservoir Valve and the Oxygen Reservoir should be removed if supplemental oxygen is not to be supplied.
Assembly View (A)
Principle Drawing (B) - InspirationWhen compressing down the Resuscitator, it create the positive pressure and close the Intake Valve (G), the air inside the bag pushes the Duckbill Valve (E) downward, and block the expiration port (F), and deliver the air into the Silicone Bag then to the patient through the center of the Duckbill Valve, if the Oxygen is in use, it should be connected by (H) part, then the Oxygen will fill up the Reservoir through the Reservoir Valve, and installs in the Silicone Bag through the recovery inhale motion, then send directly into the patient’s body by compressing the silicone bag.
Principle Drawing (B) - Inspiration
Principle Drawing (C) - Exhalation When releasing the Silicone Bag (B), push upward the Duckbill Valve and keep it in close position, so to release the exhale air through the Exhale Valve (F).
Principle Drawing (C) - Exhalation
At the same time, the Inhale Valve (G) is opened by the expiratory pressure created by releasing the bag, and send the air into the bag through the top of the Reservoir Valve, and at the same time, send the Oxygen into the bag from the Oxygen Reservoir till the bag returns to the original shape before compressing.To avoid excessive Oxygen flow rate and low compressing frequency causing too high pressure inside the bag and the Reservoir, the Reservoir Valve (I) is specially designed to release the excessive air, to keep a low rate Oxygen supply and ensure the patient’s safety.
ENGLISH

17
Principle Drawing (D)GIMA Infant and Child Resuscitator are both equipped with Pressure Relief Valves, automatically provide and adjust the pressure in the lung, and keep it within 40 cmH2O +/- 5 cmH2O, any pressure exceed this standard will cause the Pressure Relief Valve to jump off and push the pressure out to ensure the patient’s safety.
Pressure Relief Valve
Pressure Relief Valve Motion
Should higher inspiratory pressure be required the pressure relief valve may be overridden by placing the thumb ever the valve as show as follows.
Overriding the Pressure Relief Valve
Assembly View
ENGLISH

18
Replacement Parts
Resuscitator Parts
Name Part Number1600ML Silicone Adult Resuscitator 34245
550ML Silicone Child Resuscitator 34246
280ML Silicone Infant Resuscitator 34247
1500ML Silicone Adult Resuscitator PN-0412-1
CAP for inhale air valve connector PN-0434
Base for inhale vale PN-0432
Plate for inhale vale PN-0430
O Ring for exhale exit PN-0411
Extension Tube PN-0450
Base for Reservoir 34279
Oxygen Reservoir 34275
Oxygen Reservoir PN-0440
Non-reberathing Valve unit PN-0401
Non-rebreathing Valve unit (about 60 cmH2O) 34259
Non-rebreathing Valve unit (about 40 cmH2O) PN-0403
Durable Peep Valves 2-10 PN-0042
Durable Peep Valves 5-20 34227
Base for pressure valve PN-0050
Silicone Mask #0 34220
Silicone Mask #1 34221
Silicone Mask #2 34222
Silicone Mask #3 34223
Silicone Mask #4 34224
Silicone Mask #5 34225
Duckbill Valve PN-0409
NRV Down Stream Housing PN-0406
Exhalation Disc Membrane PN-0410
ENGLISH

19
Operating Instruction
1. Place the patient on back, pull his chin upward as possible to keep the airway and the mouth cavity in alliance line, so the patient can breathe smoothly.
2. Clean all visible foreign material inside the mouth and the throat.
3. Insert the oropharyngeal tube, keep the patient’s mouth open to prevent tongue from occluding the airway. (Can use a mouth opener to open his mouth) The oropharyngeal tube can be selected according to the patient‘s mouth cavity size.
4. The emergency personnel should stay behind the patient’s head, extend the head back and pull his chin upwards and towards the emergency personnel.
Remark: If the patient already has an airway inner tube inserted, or has been through an airway excise resect operation, then please remove the mask, connect the Non-rebreathing Valve connector with the airway inner tube, then following the standard operating instruction.
5. Cover the patient’s mouth and nose with the mask, and press palm against the mask to keep it close to the patient’s face.
6. Use the other hand to press on the Resuscitator, regularly compress sending with sufficient inhale/exhale frequency. (Adult: 12-16 times, Child: 14-20 times, Infant: 35-40 times)
7. The emergency personnel should check: to ensure that the patient is ventilating properly.• Observe rise and fall of the patient’s chest (accordingly with the
pressing on the Resuscitator).• Check the patients lips and face color through the transparent
part of the mask.• Check that the patient valve is working properly through the
transparent housing.• During exhalation, check that the interior of the mask is being
fogged.
ENGLISH
20
Cleaning, Disinfection and Sterilization
Notes for cleaning, disinfection and sterilization process: • For cleaning, disinfection and sterilization process, the resuscitator must be disassembled as
shown in the figures. See the assembly View and table for disassembling the resuscitator set. Do not disassemble the parts further as shown.
• When and parts for cleaning-disinfection-sterilization: For parts exposed to expiratory gases (non-rebreathing valve) do cleaning-disinfection-sterilization after each patient. For parts not exposed to patient expiratory gases (resuscitator body, oxygen valve, oxygen reservoir, mask) do cleaning-disinfection-sterilization regularly as needed to remove dust etc. If the resuscitator was used for patients/environments with infectious diseases do the cleaning-disinfection-sterilization for the whole set of the resuscitator.
The cleaning-disinfection-sterilization process The following steps are generally recommended. Select proper methods for the resuscitator parts in question according to the table.
Cleaning methods• Disassemble the resuscitator following the assembly view and order. Do not disassemble the pressure
relief valve spring, just rinse it directly. • Wash the components thoroughly by a soft brush in warm clean tap water containing a mild detergent
(Follow manufacturer’s instruction for concentration and exposure time). Ensure that the detergent is suitable for the component materials to avoid causing damage. See the material specifications at the end of the instructions. After washing, rinse the parts thoroughly in clean water to remove any residues of detergent.
• An automatic washing machine with a programme designed for washing anaesthesia accessories can be used according to the manufacturer’s instructions.
Disinfection methods• Washing machines-heat disinfecting program: Automatic washing machines designed for medical
accessories usually also offer cycles for disinfection by heating, which you can use for the resuscitator set. • Boiling: Immerse the parts in clean tap water, heat to boiling and keep for eg. 10 minutes for
disinfection. • Aldehyde or other chemical liquid (Ex.: Cidex, chemical with sodium hypochloride,..etc.): Can be
used on all parts of the resuscitator.• Follow the instructions of the manufacturer of the chemical disinfectant for dilution and exposure time.
After exposing the resuscitator parts to the chemical disinfectant. rinse all parts of the resuscitator set thoroughly in clean water to remove the residues.
Notes• Numerous brands of detergents and chemical disinfectants are available. Use only brands that are
compatible with the resuscitator materials to avoid reduction in the lifetime of the materials. See list of materials. Follow the instructions of the manufacturer of the detergent or chemical disinfectant for dilution and exposure time.
• Substances containing phenol should be avoided. Phenol will cause premature wear and degradation of the materials or reduce the time use of the product.
• Promptly remove all residue of cleaning materials from the resuscitator. Residues may cause premature wear or reduce the time use of the product.
• Because it is very difficult to thoroughly rinse it afterwards it is not recommended to immerse the oxygen reservoir in chemical disinfectants.
ENGLISH

21
Sterilization methods
Note for sterilizing timing: When first use of the new resuscitator and when user changed do sterilization for the resuscitator. Also when the resuscitator was used for more than 48 hours do sterilization for the resuscitator.
• Autoclaved sterilization max (134°C): Can be used on all parts of the resuscitator, except PVC material products. Follow the recommendations given by the steam autoclaving manufacturer. All steam autoclave cycles used for porous items are acceptable provided that the maximum temperature does not exceed 273°F or 134°C. If plastic housing made by polycarbonate the maximum temperature does not exceed 121°C (244°F).
• Ethylene oxide sterilization: Can be used on all parts of the resuscitator. Follow ethylene oxide chamber manufacturer’s instruction.
• Gamma radiation sterilization: Can be used on all parts of the resuscitator. Follow gamma radiation sterilization manufacturer’s instruction.
Visual inspection through package assembly1. After cleaning-inspection-sterilization process, let the resuscitator parts stay at room temperature to dry (air dry). Wait until all parts are dry. No drying agent is needed.2. After cleaning-disinfection-sterilization carefully inspect all parts for damage or excessive wear and replace them if necessary. Some methods may cause discolouration of rubber parts but will not affect their lifetime. In case of material deterioration, eg. cracking. the parts should be replaced. Contact your distributor for part replacement. 3. Assemble the parts following the Assembly View. 4. After assembling the resuscitator, a label should be put on to indicate the handling date.
Storage• Far compact storage, e.g. in an emergency case, the inlet end can be pushed halfway into the bag.• Never store the resuscitator in a compressed folded state.• Never excessively squeeze the bag during storage. When the resuscitator is ready for use it should
not be kept in direct sunlight or in a heated environment.• Storage temperature: -40°C to 70°C (-40°F to 158°F) • For long-term storage or transportation the resuscitator should be kept in closed packing in a cool
place away from direct sunlight.
ApplicableMethods
Cleaning (Washing)
Disinfecting Autoclaving
PartsManual washing
Washing machine
(WM)
WM disinfecting
Boiling Chemicals 121°C (244°F) Polycarbonate
134°C (273°F) Polysulfone
A: Non-rebreathing valvePolycarbonate Polysulfone
B: Resuscitator body
C: Reservoir valvePolycarbonate Polysulfone
D: Oxygen reservoir Silicone: PVC:
Silicone: PVC:
Silicone: PVC:
Silicone: PVC:
Silicone: PVC:
Silicone: PVC:
Silicone: PVC:
E: Oxygen tubing
F: Mask Silicone: PVC:
Silicone: PVC:
Silicone: PVC:
Silicone: PVC:
Silicone: PVC:
Silicone: PVC:
Silicone: PVC:
: applicable : not applicable
ENGLISH

22
Testing the Resuscitator
The GIMA Manual Resuscitator should be tested as follows: • When first using the new Resuscitator • After cleaning and sterilizing• After any new parts have been fitted • Monthly, if the Resuscitator is not frequently used. Equipment required: Test lung, 0-100 cmH2O manometer (for Infant and Child resuscitators only), flow meter, regulated gas supply, gas supply tubing.
Testing the silicone bag1. Remove the non-rebreathing valve and the oxygen reservoir and valve (if fitted).2. Compress the silicone bag and occlude (block) the non-rebreathing valve outlet.3. Release the bag. The bag should expand immediately and refill. If not, check that the intake valve at the base of the silicone bag is correctly assembled. 4. While keeping the non-rebreathing valve outlet blocked, compress the bag again. The bag should not compress easily. If this occurs, check that you are blocking the valve sufficiently, and that the intake valve at the base of the silicone bag is correctly assembled.
Testing non-rebreathing valve1. Connect the non-rebreathing valve to the silicone bag. Connect the test lung to the outlet on the non-rebreathing valve. 2. Compress and hold the bag. The non-rebreathing (duckbill) valve inside the non-rebreathing valve should open and the test lung should fill. If not, check the connection between the Resuscitator and the test lung, and check that the non-rebreathing valve is correctly assembled. 3. Release the bag. The non-rebreathing (duckbill) valve should close and as the test lung deflates, gas should flow through the expiratory ports in the non-rebreathing valve. If not, check that the non-rebreathing valve is correctly assembled. 4. Ventilate the test lung for a minimum often cycles to ensure that the Resuscitator is functioning correctly. Inspiration must occur when the silicone bag is compressed and exhalation when the bag is released. If not, check that the non-rebreathing valve is correctly assembled.
To check the function of the pressure relief valve (Infant and Child Resuscitators) Connect a 0-100 cmH2O manometer to the patient outlet of the non-rebreathing valve. Compress the bag. When the pressure relief valve activates, the manometer should read 35-45 cmH2O. If not, check that the non-rebreathing valve is correctly assembled and does not leak. If the pressure relief valve fails a further test, it must be replaced. Do not attempt to repair the pressure relief valve.
Testing Oxygen Reservoir / Reservoir Valve 1. Attach the reservoir to the reservoir valve assembly. Attach the silicone bag.2. Inflate the reservoir and block the reservoir port. 3. Compress the reservoir bag. Gas should escape through the safety outlet valve on the reservoir valve. If not check that the reservoir valve is correctly assembled.4. Connect the reservoir and reservoir valve assembly to a Resuscitator. 5. Cycle the Resuscitator through several ventilations. The safety inlet valve on the reservoir valve should open during each refill to allow room air to enter the silicone bag. If not, check that the reservoir valve is correctly assembled.
Note: If supplemental oxygen is not connected, the silicone bag will refill more slowly if the reservoir is still attached.
Overall Resuscitator function 1. Fully assemble the Resuscitator (non-rebreathing valve, silicone bag, reservoir valve and oxygen reservoir). Connect the Resuscitator to a supplemental gas source and connect a test lung to the patient outlet on the non-rebreathing valve.
ENGLISH

23
2. Set the supplemental gas flow to 15 liters per minute for the adult and child models; and to 10 l/m for the infant model. 3. Cycle the Resuscitator through several ventilations. The test lung should inflate during inspiration and deflate during exhalation. Check for leakage at all joints and connections. Ensure that the Resuscitator refills promptly and properly and that all valves are operating correctly. If not, repeat the tests above to find where the problem lies.
Specification & Performance
Storage Temperature: -40°C (-10°F) to 60°C (140°F)Operating Temperature: -18°C (0°F) to 50°C (122°F)
MaterialsSilicone rubber Polycarbonatesilicone bag nonrebreathing valve housingduckbill valve bag intake valve housingflapper valves reservoir valve housingrelief valve seal reservoir bag connectorinfant mask adult mask shellchild mask pressure relief valve housingadult mask bladder pressure relief valve stem mask grommetmask retainers
Epichlorohydrin PolyvinylchiorideO-ring (bag neck) oxygen reservoir bag
Stainless Steelpressure relief valve spring
Connectorspatient port 15 mm I.D.(F) / 22 mm O.D.(M)SILICONE BAG INLET 23 mm I.D.(M)reservoir valve 23 mm I.D.(F) (to silicone bag inlet) 25 mm O.D.(M) (to oxygen reservoir)supplemental gas inlet 6mm O.D.(M)
ENGLISH

24
Specifiche tecniche e caratteristiche prestazionali del dispositivo
Dead Space Pressure Relief Valvenonrebreathing valve 7 mL Child and infant 40±5 cmH2Oadult mask 150 mL Adult 60±10 cmH2Ochild mask 95 mLinfant mask 28 mL
Bag volume Stroke volume Reservoir volume Suitable body weightAdult model 1600 mL 700 mL 2500 mL >30 kg
Child model 500 mL 300 mL 2500 mL 7-30 kg
Infant model 280 mL 150 mL 500 mL <7 kg
Stroke volume of 1350 mL can be achieved using two hands
Minimum Cycle Rate Oxygen ConcentrationAdult - 20 breaths/min with reservoir 99%Child - 20 breaths/min without reservoir 45% (adult and child models)Infant - 40 breaths/min 90% (infant model)
The performance characteristics for Manual Resuscitators will vary from user to user depending on a variety of factors: ambient temperature, patient lung compliance, ventilatory frequency, size of operator’s hands.
Maximum Ventilatory Rates
Temperature-18°C(0°F) Cycle Rate
22°C(72°F) Cycle Rate
50°C(122°F) Cycle Rate
Adult 20 20 20
Child A 30 30 30
Child B 20 20 20
Infant A 60 60 60
Infant B 40 40 40
The results were obtained under the following conditions: Adult: VT-600mL, Compliance 0.02L/cmH2O, Resistance 20 cmH2O/L/sChild A: VT-70mL, Compliance 0.01L/cmH2O, Resistance 20 cmH2O/L/sChild B: :VT-300mL, Compliance 0.01L/cmH2O, Resistance 20 cmH2O/L/sInfant A: :VT-20mL, Compliance 0.001L/cmH2O, Resistance 400 cmH2O/L/s Infant B: :VT-70mL, Compliance 0.01L/cmH2O, Resistance 20 cmH2O/L/s
The correct ventilation frequency may vary, please follow current ventilation frequencies as recommended by AHA.
Range of delivery pressureAdult: 60±10 cmH2O maximum (can be overridden by operator) Child and Infant: 40±5 cmH2O maximum (can be overridden by operator}
ENGLISH

25
Stroke Volume Range
Using one hand Using two handsAdult 700 ml 900 ml
Child 300 ml 350 ml
Infant 150 ml 225 ml
Oxygen concentration for Adult modelValues in brackets are without an oxygen reservoir.Tidal Volume (ml) x Ventilation Rate with Reservoir [without Reservoir]
Oxygen Flow (LPM) 600x12 600x20 700x12 700x20 800x12 800x205 90 [45] 80 [44] 85 [44] 75 [42] 80 [41] 75 [40]
10 95 [48] 88 [46] 90 [45] 82 [43] 88 [45] 85 [43]
15 97 [55] 98 [51] 98 [52] 96 [50] 96 [50] 95 [50]
Conditions: Compliance 0.2 (l/k/Pa), I : E ratio : 1 : 2 Temperature: 25°C Resistance 20 cmH2O/L/s
Oxygen concentration for Child modelValues in brackets are without an oxygen reservoir.Tidal Volume (ml) x Ventilation Rate with Reservoir [without Reservoir]
Oxygen Flow (LPM) 150x15 150x25 250x15 250x25 300x15 300x252 95 [55] 91 [50] 87 [50] 83 [45] 82 [45] 80 [45]
6 96 [60] 93 [54] 90 [52] 85 [47] 85 [48] 85 [46]
10 98 [70] 96 [60] 93 [55] 88 [50] 90 [50] 88 [48]
Conditions: Compliance 0.2 (l/k/Pa), I : E ratio : 1 : 2 Temperature: 25°C Resistance 20 cmH2O/L/s
Oxygen concentration for Infant modelValues in brackets are without an oxygen reservoir.Tidal Volume (ml) x Ventilation Rate with Reservoir [without Reservoir]
Oxygen Flow (LPM) 30x15 30x30 60x15 60x30 100x15 100x302 97 [78] 98 [75] 98 [70] 95 [65] 93 [60] 92 [55]
6 99 [82] 98 [80] 98 [75] 96 [70] 94 [66] 94 [63]
10 99 [85] 99 [82] 99 [77] 98 [74] 98 [70] 98 [65]
Conditions: Compliance 0.2 (l/k/Pa), I : E ratio : 1 : 2 Temperature: 25°C Resistance 20 cmH2O/L/s
Inspiratory resistance
Flow rate
Res
ista
nce
Expiratory resistance
Flow rate
Res
ista
nce
ENGLISH
26
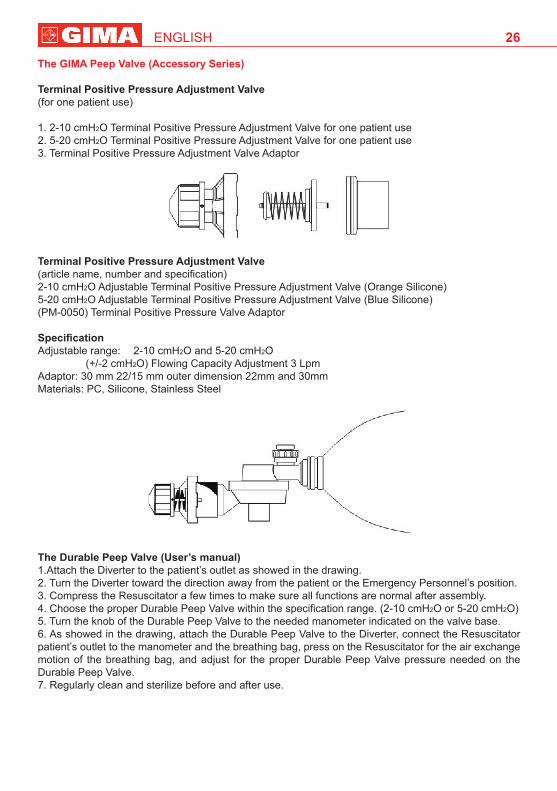
The GIMA Peep Valve (Accessory Series)
Terminal Positive Pressure Adjustment Valve(for one patient use)
1. 2-10 cmH2O Terminal Positive Pressure Adjustment Valve for one patient use 2. 5-20 cmH2O Terminal Positive Pressure Adjustment Valve for one patient use 3. Terminal Positive Pressure Adjustment Valve Adaptor
Terminal Positive Pressure Adjustment Valve(article name, number and specification)2-10 cmH2O Adjustable Terminal Positive Pressure Adjustment Valve (Orange Silicone)5-20 cmH2O Adjustable Terminal Positive Pressure Adjustment Valve (Blue Silicone) (PM-0050) Terminal Positive Pressure Valve Adaptor
SpecificationAdjustable range: 2-10 cmH2O and 5-20 cmH2O (+/-2 cmH2O) Flowing Capacity Adjustment 3 LpmAdaptor: 30 mm 22/15 mm outer dimension 22mm and 30mmMaterials: PC, Silicone, Stainless Steel
The Durable Peep Valve (User’s manual)1.Attach the Diverter to the patient’s outlet as showed in the drawing. 2. Turn the Diverter toward the direction away from the patient or the Emergency Personnel’s position.3. Compress the Resuscitator a few times to make sure all functions are normal after assembly. 4. Choose the proper Durable Peep Valve within the specification range. (2-10 cmH2O or 5-20 cmH2O)5. Turn the knob of the Durable Peep Valve to the needed manometer indicated on the valve base.6. As showed in the drawing, attach the Durable Peep Valve to the Diverter, connect the Resuscitator patient’s outlet to the manometer and the breathing bag, press on the Resuscitator for the air exchange motion of the breathing bag, and adjust for the proper Durable Peep Valve pressure needed on the Durable Peep Valve.7. Regularly clean and sterilize before and after use.
ENGLISH

27
GIMA WARRANTY CONDITIONSCongratulations for purchasing a GIMA product. This product meets high qualitative standards both as regards the material and the production. The warranty is valid for 12 months from the date of supply of GIMA.During the period of validity of the warranty, GIMA will repair and/or replace free of charge all the defected parts due to production reasons. Labor costs and personnel traveling expenses and packaging not included. All components subject to wear are not included in the warranty. The repair or replacement performed during the warranty period shall not extend the warranty.The warranty is void in the following cases: repairs performed by unauthorized personnel or with non-original spare parts, defects caused by negligence or incorrect use. GIMA cannot be held responsible for malfunctioning on electronic devices or software due to outside agents such as: voltage changes, electro-magnetic fields, radio interferences, etc. The warranty is void if the above regulations are not observed and if the serial code (if available) has been removed, cancelled or changed. The defected products must be returned only to the dealer the product was purchased from. Products sent to GIMA will be rejected.
ENGLISH