Page 1 of 5 How to fix an EGT sensor for good - AudiWorld ... · PDF fileHow to fix an EGT...
46
Forums myAudiworld Features News Archive Resources Marketplace Videos About Us Search AudiWorld Forums» Technical Discussion» Motors» 2.7T V6 Discussion How to fix an EGT sensor for good Sign in using an external account User Name User Name Remember Me? Password Log in Register Forgot Password? Register Albums Classifieds FAQ Members Today's Posts Search Vendors Used Cars Garage TSB & Recalls Welcome to AudiWorld! Welcome to AudiWorld.com. You are currently viewing our forum as a guest, which gives you limited access to view most discussions and access our other features. By joining our community, at no cost, you will have access to post topics, communicate privately with other members (PM), respond to polls, upload content and access many other special features. Registration is free, fast and simple, join AudiWorld.com today! Notices For full post editing rights, please reply to this thread. Thanks! For tips on using the forums please visit the following page: Forum Tips Be sure to check out Threaded View!!! We've gotten complaints about spam/virus Private Messages. Any such messages are completely bogus, and should be ignored completely. Read more here. Discussion Forums: 2.7T V6 Discussion Go Thread Tools Search this Thread Display Modes 07- 19- 2013, 06:33 AM sb_gli Audiworld Junior Member 2003 Audi allroad Join Date: Jul 2013 Posts: 45 How to fix an EGT sensor for good I recently purchased a 2003 allroad that was throwing codes for the egt sensors. I searched around a bit and found that some people have been able to succ by resoldering the 5 solder points inside of the sensor. While this seems to have worked well for one of my sensors, it did not work for the other. I still receiv immediately after clearing it: 17861 - Exhaust Gas Sensor 1 (G235) P1453 - 35-10 - Open or Short to Plus - Intermittent So, I figured I was going to have to fork over the $250 to buy a new EGT sensor, which by reports, would probably have a similar fate a couple years down t searching and found a thread where a guy replaced board (pcb) of the egt. The intent was so he could have a real time reading of his egts in cabin readouts here, but just want to fix my egt sensor, and slap my car out of limp . So, with a little more searching, I found a guy in Poland who makes a r sensors. I was able to contact him through email, sent a paypal for $45, and received the new egt pcb in the a week later. Great service, fast shipping, hope is a permanent solution. Time for a mini DIY: First, it's best to remove the senor from the car completely. For the driver's side, it might be better to get do this all with the probe attached to the exhaust, remove. Open the box of EGT sensor. There's a bunch of slimy silicone that was used to protect the board. Remove all of this junk. I used a toothbrush to remove wh Once you've removed as much crap as you can, you'll need to remove the board from the box completely. You can use a solder gun to melt the solder one. After the pcb has been removed, get the rest of the box as clean as possible. I used some engine cleaner and let it sit for a few minutes to break down the re Temp the circuit mode mail circuit Page 1 of 5 How to fix an EGT sensor for good - AudiWorld Forums 10/4/2013 http://forums.audiworld.com/showthread.php?t=2850845
Transcript of Page 1 of 5 How to fix an EGT sensor for good - AudiWorld ... · PDF fileHow to fix an EGT...
Forums myAudiworld Features News Archive Resources Marketplace Videos About Us
Search
AudiWorld Forums» Technical Discussion» Motors» 2.7T V6 Discussion
How to fix an EGT sensor for good
Sign in using an external account User Name User Name Remember Me?
Password Log in
Register Forgot Password?
Register Albums Classifieds FAQ Members Today's Posts Search Vendors Used Cars Garage TSB & Recalls
Welcome to AudiWorld!
Welcome to AudiWorld.com.
You are currently viewing our forum as a guest, which gives you limited access
to view most discussions and access our other features. By joining our
community, at no cost, you will have access to post topics, communicate
privately with other members (PM), respond to polls, upload content and
access many other special features. Registration is free, fast and simple, join
AudiWorld.com today!
Notices
For full post editing rights, please reply to this thread. Thanks!
For tips on using the forums please visit the following page: Forum Tips Be sure to check out Threaded View!!!
We've gotten complaints about spam/virus Private Messages. Any such messages are completely bogus, and should be ignored completely. Read more here.
Discussion Forums:
2.7T V6 Discussion Go
Thread Tools Search this Thread Display Modes
07-
19-
2013,
06:33
AM
sb_gli
Audiworld
Junior
Member
2003
Audi
allroad
Join
Date: Jul
2013
Posts: 45
How to fix an EGT sensor for good
I recently purchased a 2003 allroad that was throwing codes for the egt sensors. I searched around a bit and found that some people have been able to successfully repair their egt sensors
by resoldering the 5 solder points inside of the sensor. While this seems to have worked well for one of my sensors, it did not work for the other. I still received the following code,
immediately after clearing it:
17861 - Exhaust Gas Sensor 1 (G235)
P1453 - 35-10 - Open or Short to Plus - Intermittent
So, I figured I was going to have to fork over the $250 to buy a new EGT sensor, which by reports, would probably have a similar fate a couple years down the road.
searching and found a thread where a guy replaced board (pcb) of the egt. The intent was so he could have a real time reading of his egts in cabin.
readouts here, but just want to fix my egt sensor, and slap my car out of limp . So, with a little more searching, I found a guy in Poland who makes a replacement boards
sensors. I was able to contact him through email, sent a paypal for $45, and received the new egt pcb in the a week later. Great service, fast shipping, and a cheap price for what I
hope is a permanent solution.
Time for a mini DIY:
First, it's best to remove the senor from the car completely. For the driver's side, it might be better to get do this all with the probe attached to the exhaust, since it's a real bugger to
remove.
Open the box of EGT sensor. There's a bunch of slimy silicone that was used to protect the board. Remove all of this junk. I used a toothbrush to remove what I could.
Once you've removed as much crap as you can, you'll need to remove the board from the box completely. You can use a solder gun to melt the solder and remove
one.
After the pcb has been removed, get the rest of the box as clean as possible. I used some engine cleaner and let it sit for a few minutes to break down the rest of the
Temp
the circuit
mode
circuit
Page 1 of 5How to fix an EGT sensor for good - AudiWorld Forums
10/4/2013http://forums.audiworld.com/showthread.php?t=2850845
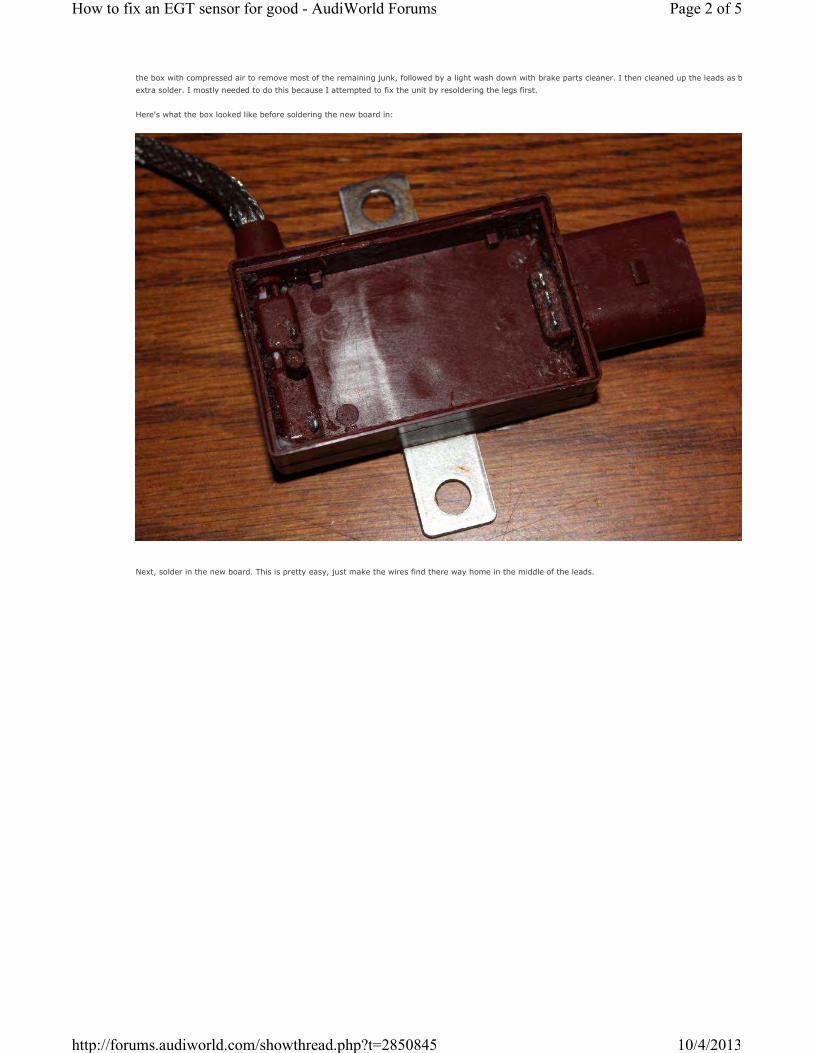
the box with compressed air to remove most of the remaining junk, followed by a light wash down with brake parts cleaner. I then cleaned up the leads as best as I could to
extra solder. I mostly needed to do this because I attempted to fix the unit by resoldering the legs first.
Here's what the box looked like before soldering the new board in:
Next, solder in the new board. This is pretty easy, just make the wires find there way home in the middle of the leads.
Page 2 of 5How to fix an EGT sensor for good - AudiWorld Forums
10/4/2013http://forums.audiworld.com/showthread.php?t=2850845

Use something to the board to the box, double sided tape, dab of rtv, whatever. I used rtv silicone to seal the box shut again, and held it together for an hour or so with a clamp,
and reinstalled. Note: I did not encase the pcb with silicone like it was from the factory.
I started up the car, cleared , and to my pleasure, the codes did not return!!!! SUCCESS!!! WOOHOO!! I also took some logs with vagcom, and where the ECU was only ever
requesting 6-7lbs of boost before with the egt codes, it now is requesting 10-12lbs and my car has lost the sluggishness it most surely gained when the egts
And finally, here's all the information you need to know about how to order the new .
I was able to contact him via these emails:
secure
the codes
circuit boards
Page 3 of 5How to fix an EGT sensor for good - AudiWorld Forums
10/4/2013http://forums.audiworld.com/showthread.php?t=2850845

Forget about buying stupid oem replacement egts for > $250 a pop that will probably fail again in the near future. Spend $45 to get a new board or $84 for both boards shipped to your
door. I still am amazed by how fast they got it shipped over here.
http://ad.doubleclick.net/N2922/jump/audiworld.tmus/category;kw=firstpost;category=Technical_Discussion__Motors__27T_V6_Discussion;topic=How%20fix
20for%
20good;sz=300x250;ord=123456789http://ad.doubleclick.net/N2922/ad/audiworld.tmus/category;kw=firstpost;category=Technical_Discussion__Motors__27T
20fix%20an%20EGT%20sensor%20for%20good;sz=300x250;ord=123456789
07-19-2013, 01:14 PM #2
ddillenger
AudiWorld Member
Garage is empty, add now
Join Date: Oct 2012
Posts: 245
Very cool.
07-21-2013, 12:30 PM #3
sb_gli
Audiworld Junior Member
2003 Audi allroad
Join Date: Jul 2013
Posts: 45
Credit must be given to this audizine thread
07-30-2013, 04:56 AM #4
mtnsearch
Audiworld Junior Member
Garage is empty, add now
Join Date: Nov 2010
Posts: 14
Good write up and post!
07-30-2013, 04:56 AM
AudiWorld
Audi R8
Page 4 of 5How to fix an EGT sensor for good - AudiWorld Forums
10/4/2013http://forums.audiworld.com/showthread.php?t=2850845
Search Audizine
User Name Log In Remember me
Forum Main Model-Line Discussion B5 S4/RS4
Repurposing the CenterSun Visor! EGTs PCB with LED, Wideband , STE-PPD install.
Like Sign Up to see what your friends like.
Hello and welcome to the Audizine Forums!
As a guest, you are welcome to poke around and view the majority of the content that we have to offer, but in order to
post, search, contact members, and get full use out of the website you will need to Register for an Account. It's free
and it's easy, so don't hesitate to join the Audizine Family today!
If you're new to forums in general, be sure to check out the Forum FAQ. To start viewing posts, select the forum section
that you want to visit from the selection below.
Thread: Repurposing the CenterSun Visor! EGTs PCB with LED, Wideband , STE-PPD install.
Results 1 to 40 of 54 Page 1 of 2 1 2 Last
Thread Tools Display
04-25-2013 09:57 PM
Guest-only advertisement. Register or Log In now!
Repurposing the CenterSun Visor! EGTs PCB with LED, Wideband ,
STE-PPD install.
Here is part one of the EGTs PCB with LED,
Wideband , STE-PPD install.
After not liking the results from integrating
EGT sensor displays into my rear view mirror ( to distracting when using the mirror) I was looking for other
places to mount the displays I came up with this idea. It functions great and the sun visor
can still be flipped up to move the LEDs out of the line of Vision. I was even able to get the LEDs to dim automatically when the headlights are on. They tilt to the view of the driver. They are wired to the STE-PPD so hopefully I will be able to log the exhaust gas temperatures automatically with a future firmware update. I just
have to find some red film to overlay as the red is just a bit lighter that the Stock colors.
#1
Join Date:
AZ Member #:
Location:
Jun 07 2012
94826
North of the
49th parallel
Established Member
Three Rings
My Photo Gallery: 0
My Classifieds: 0
Page 1 of 42Repurposing the CenterSun Visor! EGTs PCB with LED, Wideband , STE-PPD install.
10/4/2013http://www.audizine.com/forum/showthread.php/537525-Repurposing-the-CenterSun-Vis...

Wish i would have thought of this before I wasted a mirror.
Click this bar to view the full image.
Reply With Quote
04-25-2013 10:23 PM
Amazing...so many ideas just came to mind.
+ 1000 reps.
#2
Join Date:
AZ Member #:
My Garage:
Location:
Sep 16 2010
64156
S6 Avant X
TWO! and 67' Speed buggy
Central Wash
Senior Member
Four Rings
My Photo Gallery: 0
My Classifieds: 0
Page 2 of 42Repurposing the CenterSun Visor! EGTs PCB with LED, Wideband , STE-PPD install.
10/4/2013http://www.audizine.com/forum/showthread.php/537525-Repurposing-the-CenterSun-Vis...

foley803 : What does an electrical surge sound like? Barking dogs?
Watermelons?
Reply With Quote
04-25-2013 10:26 PM
that is a great idea... good job
#3
Join Date:
AZ Member #:
Location:
May 23 2008
29118
birth place of
land speed reco
Senior Member
Two Rings
My Photo Gallery: 0
My Classifieds: 0
Reply With Quote
04-25-2013 10:27 PM
Nothing like some fresh ideas. Nice work!
#4
Join Date:
AZ Member #:
Location:
May 16 2008
28851
WA
Veteran Member
Four Rings
My Photo Gallery: 0
My Classifieds: 0
>>The OTHER reason Lambo Doors Suck<<
Reply With Quote
04-25-2013 10:29 PM
Re: Repurposing the CenterSun Visor! EGTs PCB with LED,
Wideband , STE-PPD install.
This is amazing
Sent from my SCH-I535 using Tapatalk 2
#5
Join Date:
AZ Member #:
Location:
Oct 16 2011
82652
Levittown, NY
Established Member
Four Rings
My Photo Gallery: 0
My Classifieds: 0
2001 A6 2.7T - JHM Lightweight Flywheel, Stage 3 clutch, B7 RS4 PP, 3" SRM
Downpipes, SRM bi-pipes, Magnaflow exhaust, 3" piping
2004 S4 4.2 - Black, 6 speed, Milltek exhaust - (NY plate NIIICEEE) Sold
2/11/13
2001 A6 2.7T - Cashmere Grey, 6 speed, Stage 2+ ST coilovers, FMIC...(NY
plate WAHH PSH) - RIP 8/24/12
Page 3 of 42Repurposing the CenterSun Visor! EGTs PCB with LED, Wideband , STE-PPD install.
10/4/2013http://www.audizine.com/forum/showthread.php/537525-Repurposing-the-CenterSun-Vis...
Reply With Quote
04-26-2013 12:04 AM
Awesome....two questions:
1. Did you also wire in a switch to turn them off when they are flipped up?
2. Where's the DIY?!
#6
Join Date:
AZ Member #:
Location:
Sep 03 2009
47282
Indianapolis, IN
Veteran Member
Four Rings
My Photo Gallery: 0
My Classifieds: 1
ESPN FFL "Audizine's Best" Team Schweddy Balls
"Amy" 2003 A4 1.8TQM - Amulet Red
MY BUILD
440cc Green Giants | Motoza 1+ | ER FMIC | Magnaflow 16601 | TT DP | 034
HFC
H&R Sports | Koni yellows | VMR 19ET38 708s | Goodyear Eagle GTs
Reply With Quote
04-26-2013 12:36 AM
That's pretty cool!
#7
Join Date:
AZ Member #:
My Garage:
Location:
Jan 09 2009
37259
B5 S4 Avant
Florida
Veteran Member
Four Rings
My Photo Gallery: 0
My Classifieds: 0
Niiick
|og.gcc|
instagrams - niiickname
Reply With Quote
04-26-2013 07:15 AM
very inventive, I like it!
#8
Join Date:
AZ Member #:
Location:
Sep 11 2009
47633
NE
Veteran Member
Four Rings
My Photo Gallery: 0
My Classifieds: 0
Page 4 of 42Repurposing the CenterSun Visor! EGTs PCB with LED, Wideband , STE-PPD install.
10/4/2013http://www.audizine.com/forum/showthread.php/537525-Repurposing-the-CenterSun-Vis...

Reply With Quote
04-26-2013 07:18 AM
Nice work! Add this with my meth controller in the Homelink and everything's got a home!
#9
Join Date:
AZ Member #:
My Garage:
Location:
Dec 10 2006
14085
2001.5 Nogaro
Sport Avant, 2001 Passat
Wagon 4-Motion
Milwaukee
s
Veteran Member
Four Rings
My Photo Gallery: 0
My Classifieds: 0
PM me if you have for sale:
RS4 Y-Pipe
RS4 bi- pipes aka "Pancake pipes"
Sunroofless avant headliner
Reply With Quote
04-26-2013 07:35 AM
Subscribed for the DIY.
S vier, there is a guy on Ebay right now selling a whole RS4 kit in Chicago,
might be worth checking out.
#10
Join Date:
AZ Member #:
My Garage:
Location:
Oct 07 2010
65402
01' Sliver S4
Chicago, IL
Senior Member
Three Rings
My Photo Gallery: 0
My Classifieds: 0
WTB:
2003-04 RS6 wheels (9-spoke 18x8.5)
APR BiPipe (unmolested)
Reply With Quote
04-26-2013 07:47 AM
nice! i was worried the backside would look shitty when viewing from outside the car but looks like some clean work
#11
Senior Member
Three Rings
Page 5 of 42Repurposing the CenterSun Visor! EGTs PCB with LED, Wideband , STE-PPD install.
10/4/2013http://www.audizine.com/forum/showthread.php/537525-Repurposing-the-CenterSun-Vis...
Join Date:
AZ Member #:
Location:
Jan 17 2010
53521
Boston, MA
My Photo Gallery: 0
My Classifieds: 0
B5 S4 Brilliant Black
ProjectB5 | RS6X | PSS9 | StopTech | Podi | Innovate
B5 S4 Avant: Imola Yellow (retired)
Reply With Quote
04-26-2013 08:10 AM
Looks awesome!!
#12
Join Date:
AZ Member #:
Location:
Apr 18 2007
17386
NYC
Veteran MemberFour Rings
My Photo Gallery: 0
My Classifieds: 0
6 Speed--EPL--034--SPEC--ER--AquaMist--Forge--RS4--RS6--K04 --RNS-E--DTS--PSS9'sFull STG 3 Build Complete
GregC5UNION
Reply With Quote
04-26-2013 08:17 AM
I believe I am buying that tomorrow. Thanks!
#13
Join Date:
AZ Member #:
My Garage:
Location:
Dec 10 2006
14085
2001.5 Nogaro Sport Avant, 2001 Passat Wagon 4-Motion
Milwaukee
s
Veteran MemberFour Rings
My Photo Gallery: 0
My Classifieds: 0
Originally Posted by SAUDI01.5
Subscribed for the DIY.
S vier, there is a guy on Ebay right now selling a whole RS4 kit in Chicago, might be worth checking out.
PM me if you have for sale:
RS4 Y-PipeRS4 bi- pipes aka "Pancake pipes"Sunroofless avant headliner
Page 6 of 42Repurposing the CenterSun Visor! EGTs PCB with LED, Wideband , STE-PPD install.
10/4/2013http://www.audizine.com/forum/showthread.php/537525-Repurposing-the-CenterSun-Vis...

Reply With Quote
04-26-2013 08:44 AM
damn, very cool/functional mounting solution!
#14
Join Date:
AZ Member #:
Location:
Sep 14 2009
47766
s.e. mass
Registered MemberThree Rings
My Photo Gallery: 0
My Classifieds: 5
LAST
PROJECT:B5-I'm here for the advancement of the B5 platform, not the AZ highschool drama... ITEMS FOR SALE
Reply With Quote
04-26-2013 09:19 AM
1. There is no switch but the visor functions like stock so when you tilt it back up the displays are out of view.2. I will be putting up more DIY images and instructions later tonight or over the weekend.
#15
Join Date:
AZ Member #:
Location:
Jun 07 2012
94826
North of the 49th parallel
Established MemberThree Rings
My Photo Gallery: 0
My Classifieds: 0
Originally Posted by sa_seahawker
Awesome....two questions:
1. Did you also wire in a switch to turn them off when they are flipped up?2. Where's the DIY?!
Reply With Quote
04-26-2013 09:25 AM
I covered the back with thin matte black neoprene and it really does not look any different than the stock visor other than the wire harness coming out the back. But there was a molding hole there already so almost like it was meant to be.
#16
Join Date:
AZ Member #:
Location:
Jun 07 2012
94826
North of the 49th parallel
Established MemberThree Rings
My Photo Gallery: 0
My Classifieds: 0
Originally Posted by zdriver
nice! i was worried the backside would look shitty when viewing from outside the car but looks like some clean work
Reply With Quote
04-26-2013 09:32 AM
very nice!
#17
Page 7 of 42Repurposing the CenterSun Visor! EGTs PCB with LED, Wideband , STE-PPD install.
10/4/2013http://www.audizine.com/forum/showthread.php/537525-Repurposing-the-CenterSun-Vis...

Join Date:
AZ Member #:
Location:
Feb 13 2004
465
S Ã C, CÃ*
Veteran MemberFour Rings
My Photo Gallery: 0
My Classifieds: 0
There are 10 kinds of people in this world, those who know binary and those who don't.
Reply With Quote
04-26-2013 09:36 AM
Thanks Guys,
The added bonus of all of this is that I now not only can I see the EGTs now the ECU sees two functioning EGTs. I will be able to code back in the EGTs to have that fail safe again.
#18
Join Date:
AZ Member #:
Location:
Jun 07 2012
94826
North of the 49th parallel
Established MemberThree Rings
My Photo Gallery: 0
My Classifieds: 0
Reply With Quote
04-26-2013 01:06 PM
If I wanted to run something like this where do you get the LCD display and what do you wire them to?
#19
Join Date:
AZ Member #:
Location:
Mar 18 2012
90150
BPT
Established MemberThree Rings
My Photo Gallery: 0
My Classifieds: 0
2000 S4RS4 K04 Housings with K24 compressor and RS6 turbine from SRM-JHM FMIC-
034 Soild Mounts
Reply With Quote
04-26-2013 08:03 PM #20
Page 8 of 42Repurposing the CenterSun Visor! EGTs PCB with LED, Wideband , STE-PPD install.
10/4/2013http://www.audizine.com/forum/showthread.php/537525-Repurposing-the-CenterSun-Vis...

Part One - warning long
Here is part one of EGTs PCB with LED, Wideband , STE-PPD install plus re-purposing the center visor . With tips some might find handy. Warning long and lots of images.
Click this bar to view the full image.
Click this bar to view the full image.
Join Date:
AZ Member #:
Location:
Jun 07 2012
94826
North of the 49th parallel
Established MemberThree Rings
My Photo Gallery: 0
My Classifieds: 0
Page 9 of 42Repurposing the CenterSun Visor! EGTs PCB with LED, Wideband , STE-PPD install.
10/4/2013http://www.audizine.com/forum/showthread.php/537525-Repurposing-the-CenterSun-Vis...

Remove all covers as it will make it easier to solder in the engine bay and you won't crack anything by leaning on them.
Page 10 of 42Repurposing the CenterSun Visor! EGTs PCB with LED, Wideband , STE-PPD install.
10/4/2013http://www.audizine.com/forum/showthread.php/537525-Repurposing-the-CenterSun-Vis...

Remove intake, y-pipe and un-attach the coolant overflow tank and flip it out of the way.
Click this bar to view the full image.
the EGTs are bolted to the back of the manifold. Remove the harnesses and weave the cases out so you can place them on top of the manifold. We will be
soldering them in place so there is no need to remove the thermocoupler from the manifolds.
Click this bar to view the full image.
Page 11 of 42Repurposing the CenterSun Visor! EGTs PCB with LED, Wideband , STE-PPD install.
10/4/2013http://www.audizine.com/forum/showthread.php/537525-Repurposing-the-CenterSun-Vis...

Click this bar to view the full image.
Page 12 of 42Repurposing the CenterSun Visor! EGTs PCB with LED, Wideband , STE-PPD install.
10/4/2013http://www.audizine.com/forum/showthread.php/537525-Repurposing-the-CenterSun-Vis...

This is where you need to insert a screw driver to crack open the case. It is farly brittle so take your time we will need this intact.
Click this bar to view the full image.
Page 13 of 42Repurposing the CenterSun Visor! EGTs PCB with LED, Wideband , STE-PPD install.
10/4/2013http://www.audizine.com/forum/showthread.php/537525-Repurposing-the-CenterSun-Vis...

Interesting to note the OEM PCBs. The one on the left is not working and you can see the areas where there is corrosion on the soldered leads and on the
PCB itself. The board on the right is functioning and notice that there is no corrosion and all solder points are clean and shiny. I have tried to re-solder EGTs in the past with marginal success. I am sure the reason for that is the flaws in some go further than just the main connections. Good thing we are
replacing the boards entirely.
Click this bar to view the full image.
Page 14 of 42Repurposing the CenterSun Visor! EGTs PCB with LED, Wideband , STE-PPD install.
10/4/2013http://www.audizine.com/forum/showthread.php/537525-Repurposing-the-CenterSun-Vis...

Now it is time to remove the Gel and the OEM PCBs from the sensor housings. This shit is a nightmare.
Click this bar to view the full image.
Page 15 of 42Repurposing the CenterSun Visor! EGTs PCB with LED, Wideband , STE-PPD install.
10/4/2013http://www.audizine.com/forum/showthread.php/537525-Repurposing-the-CenterSun-Vis...
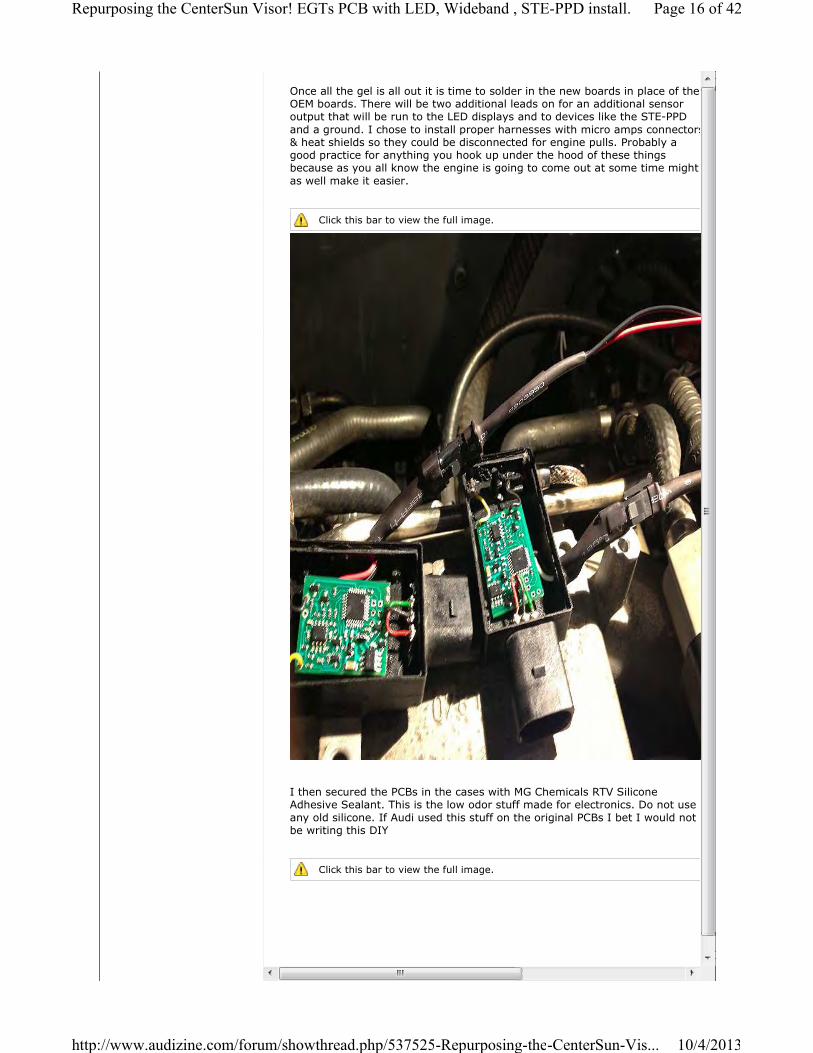
Once all the gel is all out it is time to solder in the new boards in place of the OEM boards. There will be two additional leads on for an additional sensor output that will be run to the LED displays and to devices like the STE-PPD
and a ground. I chose to install proper harnesses with micro amps connectors & heat shields so they could be disconnected for engine pulls. Probably a good practice for anything you hook up under the hood of these things because as you all know the engine is going to come out at some time might
as well make it easier.
Click this bar to view the full image.
I then secured the PCBs in the cases with MG Chemicals RTV Silicone Adhesive Sealant. This is the low odor stuff made for electronics. Do not use
any old silicone. If Audi used this stuff on the original PCBs I bet I would not be writing this DIY
Click this bar to view the full image.
Page 16 of 42Repurposing the CenterSun Visor! EGTs PCB with LED, Wideband , STE-PPD install.
10/4/2013http://www.audizine.com/forum/showthread.php/537525-Repurposing-the-CenterSun-Vis...

Now while the silicone is setting up its time for some takeout.
Click this bar to view the full image.
Page 17 of 42Repurposing the CenterSun Visor! EGTs PCB with LED, Wideband , STE-PPD install.
10/4/2013http://www.audizine.com/forum/showthread.php/537525-Repurposing-the-CenterSun-Vis...

I adopted to run another harness for the addition of the STE-PPD Boost Controller. It is a good idea to run as much of the wiring as you can think of
because it is much easier once everything is all opened up. Pulling one wire is as hard as pulling 10.
Click this bar to view the full image.
Page 18 of 42Repurposing the CenterSun Visor! EGTs PCB with LED, Wideband , STE-PPD install.
10/4/2013http://www.audizine.com/forum/showthread.php/537525-Repurposing-the-CenterSun-Vis...

Now it is time to cut the grommet on the firewall and cut the grommet on the main wiring harness as it enters the ECU weatherproof container. The ECU
grommet has four spaces right above the wire bundle that with a little working can be made to accommodate the three harnesses the vacuum line and the wideband cable.
Click this bar to view the full image.
Page 19 of 42Repurposing the CenterSun Visor! EGTs PCB with LED, Wideband , STE-PPD install.
10/4/2013http://www.audizine.com/forum/showthread.php/537525-Repurposing-the-CenterSun-Vis...

Click this bar to view the full image.
Page 20 of 42Repurposing the CenterSun Visor! EGTs PCB with LED, Wideband , STE-PPD install.
10/4/2013http://www.audizine.com/forum/showthread.php/537525-Repurposing-the-CenterSun-Vis...

Click this bar to view the full image.
Page 21 of 42Repurposing the CenterSun Visor! EGTs PCB with LED, Wideband , STE-PPD install.
10/4/2013http://www.audizine.com/forum/showthread.php/537525-Repurposing-the-CenterSun-Vis...

Once all the wiring is through the ECU box you feed it through the back into the cabin. This is after you remove the kick panel under the steering column.
Lots of info on this if you have never done it. Just search hear or Google it.
Click this bar to view the full image.
Page 22 of 42Repurposing the CenterSun Visor! EGTs PCB with LED, Wideband , STE-PPD install.
10/4/2013http://www.audizine.com/forum/showthread.php/537525-Repurposing-the-CenterSun-Vis...

As this is a three part DIY there is one common harness used by all three components. I made up this harness out of the harness from STE for the Wide
band port on the PPD, the harness for the Zeitronix ZT-3 controller and a fused harness that will provide ground and switched 12v for the ZT-3, the two LED displays and the wide band O2.
Click this bar to view the full image.
Page 23 of 42Repurposing the CenterSun Visor! EGTs PCB with LED, Wideband , STE-PPD install.
10/4/2013http://www.audizine.com/forum/showthread.php/537525-Repurposing-the-CenterSun-Vis...

I then tested the displays by temporarily wiring them up inside the cabin. Everything OK.
Click this bar to view the full image.
Page 24 of 42Repurposing the CenterSun Visor! EGTs PCB with LED, Wideband , STE-PPD install.
10/4/2013http://www.audizine.com/forum/showthread.php/537525-Repurposing-the-CenterSun-Vis...

Now for finding out where to put the LEDs. Along with sensor output from the Left and right banks there was ground, 12v switched power and a light switch controlled power to aid in the dimming function. I initially attempted to put it
in the rear view mirror but i didn't like the distraction the LEDs caused. This method is doable for any variety of displays but that is for another DIY. I opted to try putting them in the middle visor.
I cut the fronts with a sharp Exacto knife to the exact size of the displays. I positioned them tilted to the drivers view. They were then hot glued into place. The backs were cut to alow for the LEDs to protrude out the back and be soldered in place.
Click this bar to view the full image.
Page 25 of 42Repurposing the CenterSun Visor! EGTs PCB with LED, Wideband , STE-PPD install.
10/4/2013http://www.audizine.com/forum/showthread.php/537525-Repurposing-the-CenterSun-Vis...
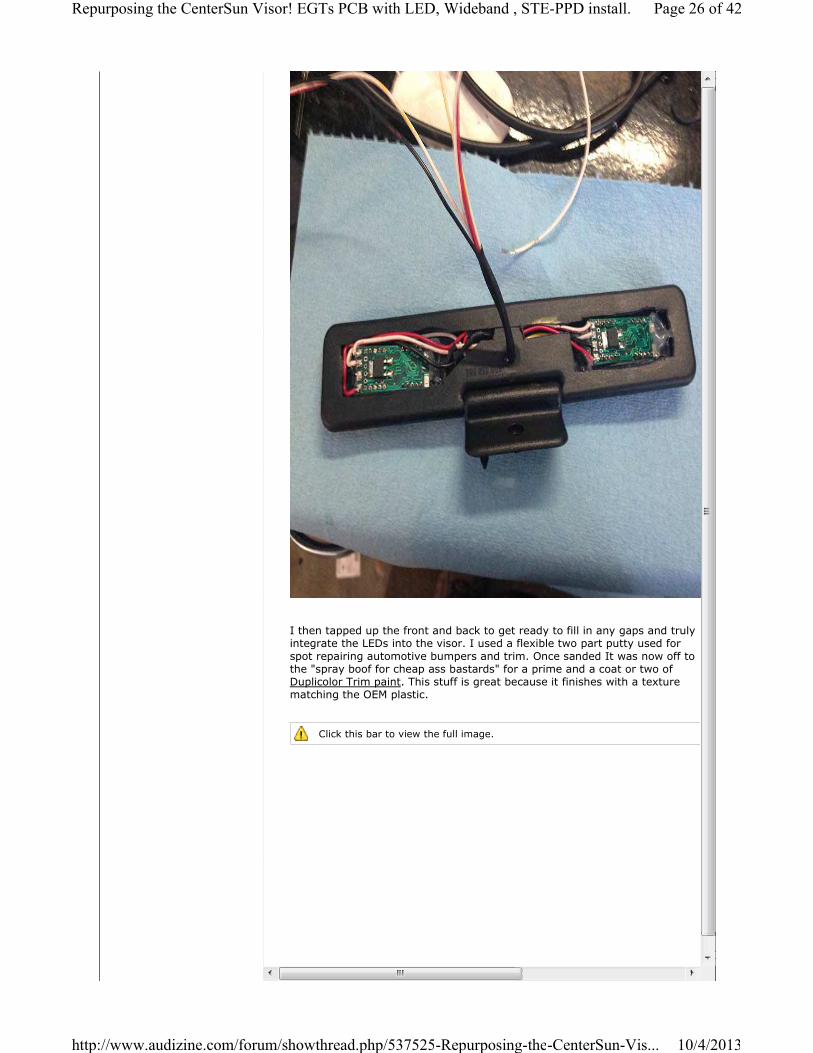
I then tapped up the front and back to get ready to fill in any gaps and truly integrate the LEDs into the visor. I used a flexible two part putty used for
spot repairing automotive bumpers and trim. Once sanded It was now off to the "spray boof for cheap ass bastards" for a prime and a coat or two of Duplicolor Trim paint. This stuff is great because it finishes with a texture matching the OEM plastic.
Click this bar to view the full image.
Page 26 of 42Repurposing the CenterSun Visor! EGTs PCB with LED, Wideband , STE-PPD install.
10/4/2013http://www.audizine.com/forum/showthread.php/537525-Repurposing-the-CenterSun-Vis...

Page 27 of 42Repurposing the CenterSun Visor! EGTs PCB with LED, Wideband , STE-PPD install.
10/4/2013http://www.audizine.com/forum/showthread.php/537525-Repurposing-the-CenterSun-Vis...

Back from the Boof. I covered the back with a thin neoprene in flat black. I used double sided tape to fix the neoprene.
Click this bar to view the full image.
Page 28 of 42Repurposing the CenterSun Visor! EGTs PCB with LED, Wideband , STE-PPD install.
10/4/2013http://www.audizine.com/forum/showthread.php/537525-Repurposing-the-CenterSun-Vis...

Click this bar to view the full image.
Page 29 of 42Repurposing the CenterSun Visor! EGTs PCB with LED, Wideband , STE-PPD install.
10/4/2013http://www.audizine.com/forum/showthread.php/537525-Repurposing-the-CenterSun-Vis...

I then removed the air bag cover button on the driver side column to reveal the one torx screw that with two clips are the only things holding the cover in
place. Just gently pull the cover away. Keep in mind there is an airbag in there. Its best to take off your Corduroy pants if you have Alcantara seats. No Sparks! Feed the 5 wires up through the pillar, zip tie it as you go. tuck it along the headliner and attach the leads to the visor. Once again I used AMP
style micro connectors. Screw the visor back in.
Click this bar to view the full image.
Page 30 of 42Repurposing the CenterSun Visor! EGTs PCB with LED, Wideband , STE-PPD install.
10/4/2013http://www.audizine.com/forum/showthread.php/537525-Repurposing-the-CenterSun-Vis...

The last thing was finding a tap for the light switch controlled power to control the dimming function of the LEDs. Another key function that is available when
this is hooked in is that by turning on and off the lights 3 times puts the displays into configuration mode. This allows for the changing of the brightness of the displays and set the alarm threshold of the buzzer if you choose to install one. The default is set to 1000 degrees.
I chose to wire the lights controlled power to the drivers side vent wheel as it is the closest source to the all of the other wiring.
Click this bar to view the full image.
Page 31 of 42Repurposing the CenterSun Visor! EGTs PCB with LED, Wideband , STE-PPD install.
10/4/2013http://www.audizine.com/forum/showthread.php/537525-Repurposing-the-CenterSun-Vis...

Now just button all the panels back on the kick pad and fuse panel and you are done part one of this three part install.
Click this bar to view the full image.
Page 32 of 42Repurposing the CenterSun Visor! EGTs PCB with LED, Wideband , STE-PPD install.
10/4/2013http://www.audizine.com/forum/showthread.php/537525-Repurposing-the-CenterSun-Vis...
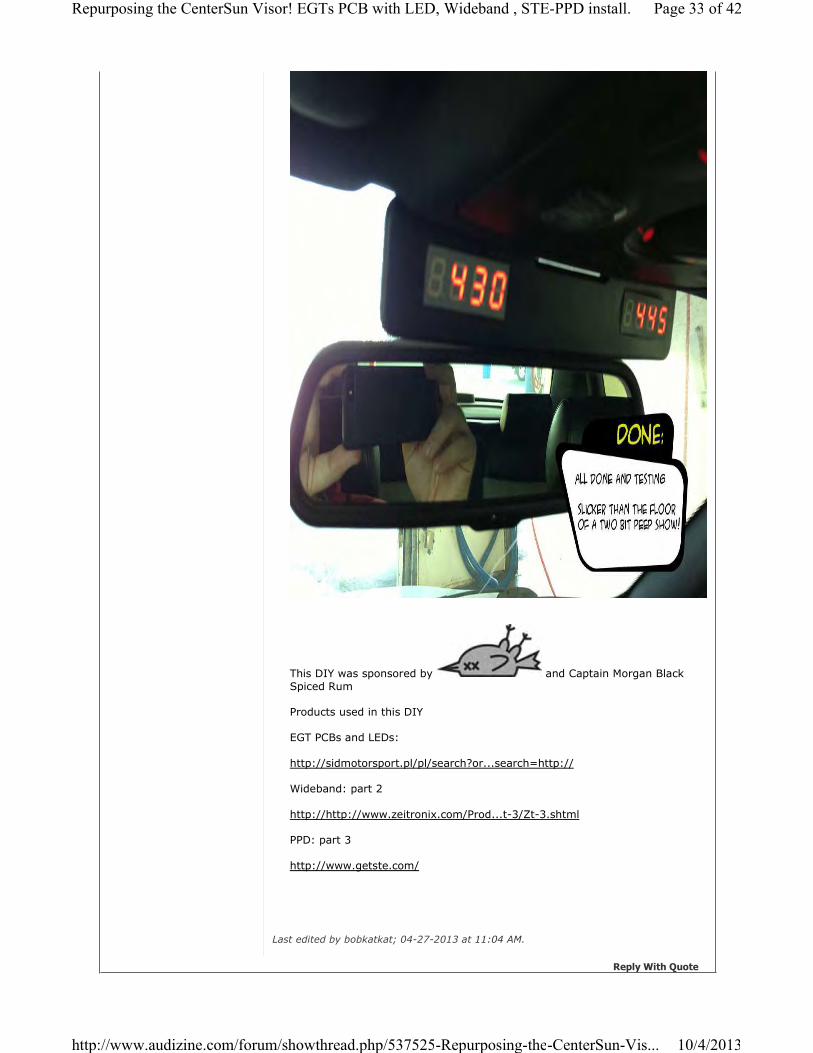
This DIY was sponsored by and Captain Morgan Black
Spiced Rum
Products used in this DIY
EGT PCBs and LEDs:
http://sidmotorsport.pl/pl/search?or...search=http://
Wideband: part 2
http://http://www.zeitronix.com/Prod...t-3/Zt-3.shtml
PPD: part 3
http://www.getste.com/
Last edited by bobkatkat; 04-27-2013 at 11:04 AM.
Reply With Quote
Page 33 of 42Repurposing the CenterSun Visor! EGTs PCB with LED, Wideband , STE-PPD install.
10/4/2013http://www.audizine.com/forum/showthread.php/537525-Repurposing-the-CenterSun-Vis...

04-26-2013 08:23 PM
Fucking want now!!!
#21
Join Date:
AZ Member #:
My Garage:
Location:
Nov 03 2011
83403
Bulletproof
Powerstroke F250 - work
truck
94561
Established Member
Four Rings
My Photo Gallery: 0
My Classifieds: 0
"Basically the B7 is the girl you bring home to mom, and the B5 is her slutty
sister."
I can help you fix your car, PM me if you're in the East Bay Area.
B5 S4 Avant 6MT - Daily driver (Dillenger Stg.2, FSI Coils, Piggies, Borla, 710N,
Podi)
Reply With Quote
04-27-2013 08:39 AM
Awesome work, thanks for keeping the mod list going.....
#22
Join Date:
AZ Member #:
My Garage:
Location:
Feb 05 2005
5137
2001.5 pearl
Avant
Alton Bay, NH
Veteran Member
Three Rings
My Photo Gallery: 0
My Classifieds: 4
2001.5 EPL/Tial 770 Pearl Avant///93 Corrado SLC///11 2500 Duramax beast
Recaro:Dunlop:ChampionMotorsport:HSport:AWE:EPL:Vi sa:Mastercard
Reply With Quote
04-27-2013 08:41 AM
Nice! Love the comic panel.
#23
Veteran Member
Three Rings
Page 34 of 42Repurposing the CenterSun Visor! EGTs PCB with LED, Wideband , STE-PPD install.
10/4/2013http://www.audizine.com/forum/showthread.php/537525-Repurposing-the-CenterSun-Vis...

Join Date:
AZ Member #:
My Garage:
Location:
Jan 20 2009
37672
B9 RS5
NYC
My Photo Gallery: 0
My Classifieds: 0
Reply With Quote
04-27-2013 09:02 AM
Best spray booth I have ever seen
#24
Join Date:
AZ Member #:
Location:
Apr 18 2007
17386
NYC
Veteran Member
Four Rings
My Photo Gallery: 0
My Classifieds: 0
6 Speed--EPL--034--SPEC--ER--AquaMist--Forge--RS4--RS6--K04 --RNS-E--DTS--PSS9's
Full STG 3 Build Complete
GregC5UNION
Reply With Quote
04-27-2013 09:12 AM
great job!
#25
Join Date:
AZ Member #:
My Garage:
Location:
Dec 06 2008
36039
2.0L 058
LI
Veteran Member
Three Rings
My Photo Gallery: 0
My Classifieds: 0
✱✱✱✱✱✱✱✱✱✱✱✱
2008cc - Holset HX35 - Lugtronic - ID1000s - IECVA1s
--> first start <--
✱✱✱✱✱✱✱✱✱✱✱✱
FS: GM coolant temp sensor + IE billet adapter
WTB: Belly Pan
Reply With Quote
Page 35 of 42Repurposing the CenterSun Visor! EGTs PCB with LED, Wideband , STE-PPD install.
10/4/2013http://www.audizine.com/forum/showthread.php/537525-Repurposing-the-CenterSun-Vis...

04-27-2013 09:27 AM
Clearly your spray booth isn't ventilated enough....how else do you explain
your altered state of mind!
Join Date:
AZ Member #:
Location:
Aug 05 2011
79311
Memphis, TN for
now!
Senior Member
Four Rings
My Photo Gallery: 0
My Classifieds: 0
Reply With Quote
04-27-2013 09:28 AM
This is awesome!
#27
Join Date:
AZ Member #:
My Garage:
Location:
Mar 06 2010
55634
01.5 s4 avant
CT
Established Member
Two Rings
My Photo Gallery: 0
My Classifieds: 0
AWE Twin 1 | VEI | 034 |ECS | Privat|H&R
Reply With Quote
04-27-2013 10:20 AM
Wow . Great job ! Were did you get the boards and led displays from ?
#28
Join Date:
AZ Member #:
Location:
Oct 05 2005
8236
richmond va
Senior Member
Two Rings
My Photo Gallery: 0
My Classifieds: 0
01.5 s4 built bottom with pauter rods , BW rs6 turbos , MTM manifolds , ER
intercoolers , 044 fuel pump, EV14 injectors , 90mm maf , vast tune for now ,
X1 intake , ported intake manifold , ASP 3inch down pipes and true duel cat
back .
Reply With Quote
04-27-2013 10:24 AM
That's fuckin' cool!
#29
S4 00
Senior Member
Four Rings
Page 36 of 42Repurposing the CenterSun Visor! EGTs PCB with LED, Wideband , STE-PPD install.
10/4/2013http://www.audizine.com/forum/showthread.php/537525-Repurposing-the-CenterSun-Vis...

Join Date:
AZ Member #:
Location:
May 13 2011
75420
Los Angeles
My Photo
Gallery: 0
My
Classifieds:
0
APR | Autospeed | tt downpipes | UUC | JHM | ST | 034 sway bar/ end links
2003 Z06 blk/blk (Sold)
Wicked
Reply With Quote
04-27-2013 10:29 AM
What is all this suppose to do?
#30
Join Date:
AZ Member #:
My Garage:
Location:
Feb 23 2013
110125
2006 G35X,
1976 chevy 4X4,
Kansas City MO
Active Member
Two Rings
My Photo Gallery: 0
My Classifieds: 0
Reply With Quote
04-27-2013 10:58 AM
Over Proof Rum.
Sorry forgot to put that in the DIY. I will update it.
there is a fair bit going on here.
1. Permanently repair falty Exhaust Gas Temperature Sensors (EGTs)2. Potentially be able to log Exhaust Gas Temperatures through STE's PPD
#31
Join Date:
AZ Member #:
Location:
Jun 07 2012
94826
North of the
49th parallel
Established Member
Three Rings
My Photo Gallery: 0
My Classifieds: 0
Originally Posted by airjawed
Clearly your spray booth isn't ventilated enough....how else do you explain your altered state of mind!
Originally Posted by richmonds4
Wow . Great job ! Were did you get the boards and led displays from ?
Originally Posted by
What is all this suppose to do?
Page 37 of 42Repurposing the CenterSun Visor! EGTs PCB with LED, Wideband , STE-PPD install.
10/4/2013http://www.audizine.com/forum/showthread.php/537525-Repurposing-the-CenterSun-Vis...

3. Have dual Exhaust Gas Temperature Gauges4. A kewl new use for the Center Sun Visor.
Reply With Quote
04-27-2013 11:36 AM
You my good sir are a Badass
#32
Join Date:
AZ Member #:
My Garage:
Location:
Aug 25 2011
80318
2011 Jetta SE
(wifes sweet daily)///1965
Honda CB160
wichita ks
Established Member
Two Rings
My Photo Gallery: 0
My Classifieds: 0
Reply With Quote
04-27-2013 12:41 PM
WOWOWOWOW!!!!!!!!!! This is such a clean install. My hat is off to you sir. Great write up too. So detailed Im too intimidated to even start haha.
#33
Join Date:
AZ Member #:
My Garage:
Location:
Jun 14 2012
95240
2000 Jeep
Wrangler TJ
Tampa, FL
Active Member
Two Rings
My Photo Gallery: 0
My Classifieds: 1
Reply With Quote
04-27-2013 01:39 PM
Don't be intimidated by this DIY. All three parts can be done on a Sat or Sunday. That is the Zeitronix ZT-3, STE-PPD with Options and the EGT repair with LED readouts. This is a huge amount of data display, data logging,
tuning information logging and display and EGT failsafe, bang for the buck and time spent.
#34
Join Date:
AZ Member #:
Location:
Jun 07 2012
94826
North of the
49th parallel
Established Member
Three Rings
My Photo Gallery: 0
My Classifieds: 0
Originally Posted by InglisLeslie
WOWOWOWOW!!!!!!!!!! This is such a clean install. My hat is off to you sir. Great write up too. So detailed Im too intimidated to even start haha.
Reply With Quote
04-27-2013 01:55 PM #35
Page 38 of 42Repurposing the CenterSun Visor! EGTs PCB with LED, Wideband , STE-PPD install.
10/4/2013http://www.audizine.com/forum/showthread.php/537525-Repurposing-the-CenterSun-Vis...

This is great! Plenty of extra space, too. Hmm... Boost, AFR...
Join Date:
AZ Member #:
My Garage:
Location:
Dec 05 2010
67863
2001.5 S4
Avant 6mt Santorin
St. Louis, MO
Established Member
Two Rings
My Photo Gallery: 0
My Classifieds: 0
trichard3000
--
Better living through chemistry: 25/2 O2 + C8H18 -> 8 CO2 + 9 H2O
Reply With Quote
04-27-2013 01:58 PM
Very cool.
#36
Join Date:
AZ Member #:
Location:
Oct 17 2011
82682
Illinois
Established Member
Three Rings
My Photo Gallery: 0
My Classifieds: 1
2000 Nogaro S4 Six-Speed Stage 3 Frankenturboed
Totaled 2002 Santorin S4 Six-Speed Stage II+
Reply With Quote
04-27-2013 02:33 PM
Boost and AFR are already in the STE-PPD, along with a bunch of other stuff.
But I am already thinking about putting some USB ports and charge plug for radar detector. Be nice not to have wires all over the place for Smartphone-Nav and radar.
#37
Join Date:
AZ Member #:
Location:
Jun 07 2012
94826
North of the
49th parallel
Established Member
Three Rings
My Photo Gallery: 0
My Classifieds: 0
Originally Posted by trichard3000
This is great! Plenty of extra space, too. Hmm... Boost, AFR...
Reply With Quote
Page 39 of 42Repurposing the CenterSun Visor! EGTs PCB with LED, Wideband , STE-PPD install.
10/4/2013http://www.audizine.com/forum/showthread.php/537525-Repurposing-the-CenterSun-Vis...

04-27-2013 10:46 PM
haha, awesome DIY!
#38
Join Date:
AZ Member #:
Location:
Jul 04 2010
61030
Norway
Senior Member
Three Rings
My Photo Gallery: 0
My Classifieds: 0
Reply With Quote
04-29-2013 12:30 PM
Well done. It looks great.
#39
Join Date:
AZ Member #:
My Garage:
Location:
Mar 19 2008
26616
S4 B5 430PS
POLAND
Active Member
One Ring
My Photo Gallery: 0
My Classifieds: 0
www.sidmotorsport.pl
Reply With Quote
04-29-2013 01:17 PM
This picture was extremely helpful for someone electrically challenged such as
myself. Question though, is it necessary to have the fuse and did you tap into 75X for power? Also, what is that connector for connecting the WB 5V out to the PPD wire?
Click this bar to view the full image.
#40
Join Date:
AZ Member #:
My Garage:
Location:
Mar 14 2012
89920
2001 S4 &
Camaro SS
DE
Established Member
Three Rings
My Photo Gallery: 0
My Classifieds: 0
Page 40 of 42Repurposing the CenterSun Visor! EGTs PCB with LED, Wideband , STE-PPD install.
10/4/2013http://www.audizine.com/forum/showthread.php/537525-Repurposing-the-CenterSun-Vis...

«Previous Thread | Next Thread»
Reply With Quote
Page 1 of 2 1 2 Last
Quick Navigation B5 S4/RS4 Return Top
Digg
del.icio.us
StumbleUpon
Bookmarks
You may not post new
threads
You may not post replies
You may not post
attachments
You may not edit your posts
Posting Permissions
BB code is On
Smilies are On
[IMG] code is On
[VIDEO] code is On
HTML code is Off
Forum Rules
Page 41 of 42Repurposing the CenterSun Visor! EGTs PCB with LED, Wideband , STE-PPD install.
10/4/2013http://www.audizine.com/forum/showthread.php/537525-Repurposing-the-CenterSun-Vis...

Contact Us Forum Home Archive Top
All times are GMT -7. The time now is 07:26 AM.
© 2001-2013 Audizine, Audizine.com, and Driverzines.com
Audizine is an independently owned and operated automotive enthusiast community and news website.
Audi and the Audi logo(s) are copyright/trademark Audi AG. Audizine is not endorsed by or affiliated with Audi AG.
Page 42 of 42Repurposing the CenterSun Visor! EGTs PCB with LED, Wideband , STE-PPD install.
10/4/2013http://www.audizine.com/forum/showthread.php/537525-Repurposing-the-CenterSun-Vis...