Package Contents - Megatech · Package Contents. 4 ... The Mast and Boom Next, locate the mast and...
20
Transcript of Package Contents - Megatech · Package Contents. 4 ... The Mast and Boom Next, locate the mast and...

If you have questions about operating or installing your new Megatech product, or if you are missing parts... Please Call Megatech First!
DO NOT RETURN THIS PRODUCT TO THE STORECall our Customer Service Department at:
(201) 662-280010:00am - 5:00pm, EST Monday through Friday (except holidays)
Technical assistance is also available on-line at www.megatech.comor by e-mail to [email protected]
Congratulations. You have just purchased a radio controlled regatta-ready racing sloop that has been designed from the keel up to handle like a full-scale racing yacht. Your new Megatech® Nirvana 2 features a low-drag composite hull design, removable racing keel with bal-last bulb, deep-water rudder, super-ridged carbon fiber main mast and fully-proportional sail control. All of this technology combines to make the Nirvana 2 incredibly stable and one of the best R/C sail-boats in the world. Plus, it comes 95% pre-assembled, so it’s less than an hour from the box to the water (no glue required).
Please read this entire manual carefully before you attempt to build or sail your Nirvana 2.
If you experience any problems, DO NOT take your Nirvana 2 back to the store! Call one of our MegaTechnicians at 1-888-MEGA-911 or send an e-mail to: [email protected]
10:00am - 5:00pm, EST Monday through Friday (except holidays)
DO NOT RETURN THIS PRODUCT TO THE STORETABLE OF CONTENTS
Getting Acquainted with your Nirvana 2.......................................................3Assembling your Nirvana 2 .........................................................................4Adjusting the Sails .....................................................................................7Installing Batteries .....................................................................................8Sailing Basics ............................................................................................9Racing Your Nirvana 2 ..............................................................................12The Race Course ...................................................................................17Obtaining Spare Parts ............................................................................18 Troubleshooting ......................................................................................18Limited Warranty .....................................................................................19
2Ta
ble
of C
onte
nts

Getting Acquainted with Your Nirvana 2
Important! Before you begin, please read the warnings listed on the following page. Failure to comply with the following recommendations could result in loss or damage to your boat. The Megatech Nirvana 2 is not intended for those under 18 years of age without proper adult supervision.
PACKAGE CONTENTSUnpack your new Nirvana 2. Carefully disconnect the sails from the foam packaging, being careful not to wrinkle them. Take all of the parts out of the box. Before going any further, please check that your Nirvana 2 package contains all of the following items, using the following picture as a guide:
A. Jib SailB. Main Sail C. Hull D. Keel E. RudderF. Mast and Boom SetG. Radio ControlH. Stand I. Number Sheet (Not pictured)
If any of these items are missing from your package, please contact Megatech.
AB
C
D
E
FG
H
3P
ackage Contents

4 Assembling Your Nirvana
The KeelSlide the keel through the slot on the bottom of the hull. Make sure the rounded side is facing the bow (front) of the boat.
Once fully inserted, turn the locking lever 90 degrees to secure the keel into place. You should now place your boat upright in the stand.
The Rudder Locate the rudder tube at the stern (back) of the boat. Insert the rudder shaft into the rudder tube as shown, so that the flat side of the rudder is facing the bow of the boat.
Slide the rudder collar onto the rudder shaft, making sure it is at a 90 degree angle to the rudder blade and that the screw is aligned with the flat section of the shaft. Now tighten the collar into place using a Philips head screwdriver.
Ass
embl
ing
the
Nir
vana

5The Mast and BoomNext, locate the mast and boom section. Insert the mast into the sleeve of the main sail. Before you completely insert the mast, slide the boom through loop 1 and then slide O-ring 2 onto the boom. Then connect the bottom half of the mast to the top half of the mast which is already inside the sleeve of the sail (Fit E to E). Make sure the gooseneck on top of the boom is pointing back and the jib hoist is pointing forward. Now connect hook 3 to the loop on the bottom of the boom.
Find your jib sail. Attach the jib hoist, atop of the jib sail, to the jib hoist about ¼ way down the mast (Fit F to F). Don’t be concerned, the jib sail will hang loosely until assembly is complete.
The M
ast and Sails

6 Attaching the MastGently slide the mast butt into the hole in the deck (Fit G to G).
Connect the jib takedown hook to the takedown
bracket toward the bow of the boat
(Fit A to A).
Hook the side shrouds to the side shroud takedown brackets (Fit B to B and Fit C to C).
Using the bowsies (small plastic slide tensioners connected to the lines), gently tighten the side shrouds and the backstay lines.
Hook the backstay to the backstay bracket at the stern of the boat (Fit D to D).
Att
achi
ng t
he M
ast
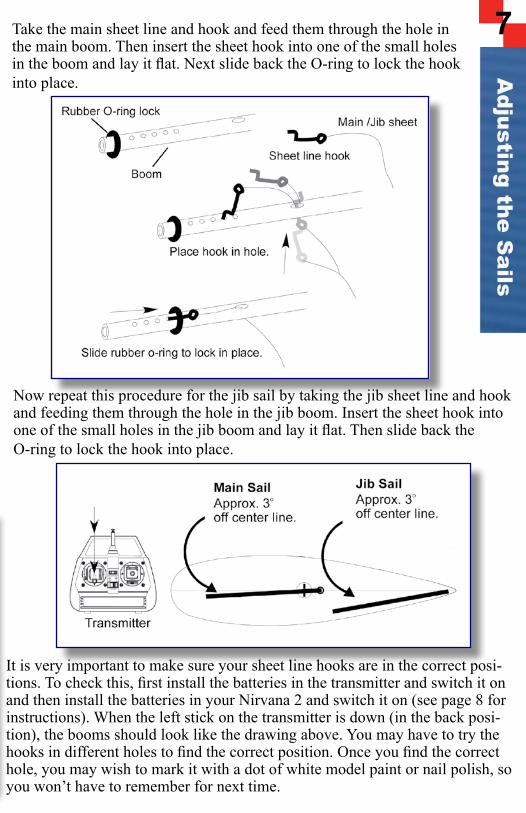
7Take the main sheet line and hook and feed them through the hole in the main boom. Then insert the sheet hook into one of the small holes in the boom and lay it flat. Next slide back the O-ring to lock the hook into place.
Now repeat this procedure for the jib sail by taking the jib sheet line and hook and feeding them through the hole in the jib boom. Insert the sheet hook into one of the small holes in the jib boom and lay it flat. Then slide back the O-ring to lock the hook into place.
It is very important to make sure your sheet line hooks are in the correct posi-tions. To check this, first install the batteries in the transmitter and switch it on and then install the batteries in your Nirvana 2 and switch it on (see page 8 for instructions). When the left stick on the transmitter is down (in the back posi-tion), the booms should look like the drawing above. You may have to try the hooks in different holes to find the correct position. Once you find the correct hole, you may wish to mark it with a dot of white model paint or nail polish, so you won’t have to remember for next time.
Adjusting the S
ails

8Because your Nirvana 2 is controlled by a radio link, it is very impor-tant to always use fresh alkaline batteries, especially in the transmit-ter. To be safe, you should insert fresh batteries into the boat after a few hours of use. We recommend Megatech’s® Golden Power series, designed for R/C products.
The Radio ControlOpen the hatch on the rear of the radio control. Install 8 AA alkaline batteries. Be sure the batteries are properly arranged or your controller will not function. Reattach the battery hatch.
Installing the BatteriesIn
stal
ling
Bat
teri
es
The Boat The hatch cover and hatch seal protect the batteries and servo. Gently pull up on the lip at the rear of the hatch cover to remove it and then lift off the hatch seal. Next, carefully pull out the battery holder and insert 4 AA alkaline batteries. Take care to insert the batteries in the correct direction. Carefully reinsert the battery holder into the boat, put the hatch seal on, making sure that it seals snugly and then snap the hatch cover back into place. Make sure the tiller arm and antenna cord come through the slot at the rear of the hatch cover.
WARNINGALWAYS SWITCH ON THE TRANSMITTER FIRST… THEN
SWITCH ON THE BOAT.Failure to do so may result in damage to the Nirvana 2’s servos. Always turn
on the transmitter and then it’s safe to switch on the boat.
Now it’s time to go sailing!

9Wind is the only source of propulsion for your Nirvana 2. The sails use the wind to propel your boat through the water. Your sail pivots off the mast allowing it to catch the wind at a variety of different angles, making it possible to sail in many directions, including against the wind. Technically, the sail acts as an airfoil, like the wings of an air-plane, when the wind hits it. The air moving along the inside of the sail is forced to move more slowly than the air on the outer side of the sail. This creates a pocket of low pressure on the forward side of the sail, which pulls the boat through the water. While that is scientifically accurate, when learning to sail, it is easier to simply imagine that the boat is pushed by the wind.
Sailing Basics
Steering While your sails drive the boat forward, your rudder is used to steer the boat. Pushing the rudder control to the left turns your rudder to the left. Moving it to the right turns the rudder to the right. Remember, you can only steer a sailboat when it is moving, so it is very important to learn to use your sails and rudder together.
LeftTurn
RightTurn
Sailing B
asics

10 When sailing upwind or downwind, your boat’s performance will depend upon the angle of your sail, also known as your sail trim. To pull the sails in, move the sail stick down. To ease the sails out, move the sail stick up. A good way to find the right trim is to ease the sails out until they begin to luff (flap like a flag in the breeze). Then simply trim back in just enough to stop the luffing.
Sailing with the wind is easy. You just let the sails trim all the way out (as in the illustration to the far right) and let the wind push you along. This is called “running.”
It’s when you want to go in a different direction than the wind that things get tricky. Sailboats cannot sail directly into the wind. If a boat is pointed directly into the wind, the sail will luff. So, how does the boat move to a point directly upwind? It zigzags, or tacks its way into the direction of the wind. Sailboats can only sail at angles to the wind. The closest angle is approximately 30 degrees, although 45 degrees is recommended. To tack, you must change the boat’s direction so that the bow comes through the eye of the wind (point directly into the wind).
Because 45 degrees is an easy angle for a boat to sail into the wind, this tack requires a turn of 90 degrees. As the boat turns and the bow comes through the eye of the wind, the sails will move across to the opposite side of the boat. Your main sail will then refill on this side, you can straighten your rudder, and the boat will assume the new heading.
Tack
ing

11Jibing is the turning maneuver when travelling downwind. When you Jibe, you take the stern of the boat through the eye of the wind. As your boat turns and the stern comes through the eye of the wind, the sails will come across to the opposite side of the boat. Jibing should be executed carefully! If there is much wind as the boat is turned, the boom can pass over the boat with incredible force and your rig could be damaged in an uncontrolled situation. You can prevent mishap simply by pulling in the mainsheet and easing it out again as the boom passes from side to side.
As you practice, it will get easier. As you’re learning, remember that when your sailboat comes close to the wind, you should pull the sails in tight. As you point further away from the wind, you can ease your sails out.
You should consider tying a small ribbon or flag to the gooseneck on top of the mast. This will act as a telltale to help you see the direction of the wind while you are sailing.
Use this simple guideline for trimming your sail properly: No matter what course you are sailing, ease the sail out until it begins to luff (flap), then pull it back in until the luffing stops.
Jibing
12
Racing Your Nirvana 2
Choosing a Sailing AreaGenerally, look for a space approximately the size of two regulation-sized basketball courts. Make sure the body of water is calm, free from debris, at least 15 inches deep, and has an easy area to launch your boat.
We suggest that you begin sailing your Nirvana 2 in a quiet lake or pond as you become acquainted with the controls. We do not recom-mend running your boat in salt water, as this will cause corrosion and premature failure.
Choosing a DayUntil you become comfortable with sailing the Nirvana 2, it is best to choose a day with light, but steady wind. We strongly recommend that you avoid sailing on days with strong gusty winds.
Radio Transmitter ControlsTo pull the sail in and sail a close-hauled course, move the sail stick down. To ease the sail out to reach or run, move the sail stick up. When you move the rudder stick on the transmitter to the right, your Nirvana 2 will turn to the right. When you move the rudder stick to the left, the boat will turn left.
Sailboat racing is a lot of fun. If you are already familiar with yacht racing rules, those may be used when racing your Nirvana 2. The following are five basic rules that will allow you to compete with experienced sailors.
Five Basic Rules of Racing
1. Port Tack/Starboard Tack RulePort refers to the left side of the boat when facing the bow from the stern. Starboard refers to the right side. A boat in motion is either on port tack or starboard tack. When the boom is left of the center of the boat and the wind is coming across the starboard side, the boat is sailing on starboard tack. When the boom is to the right and the wind is coming across the port side, the boat is sailing on port tack.RULE: When sailing on a collision course, boats sailing on starboard tack have the “right of way” over boats sailing on port tack. Boats on port tack MUST yield to boats on starboard tack.
Rac
ing
Your
Nir
vana

13
2. Buoy Room RuleThe buoy room rule applies when boats are rounding or passing a buoy or an obstruction on a race course. You should imagine a circle around a buoy – the radius of the circle is four boat lengths (See Figure A). When your boat’s bow enters this circle (See Figure B), you have the right of way (See Figure C), unless the bow of another boat from behind you overlaps the stern of your boat on the inside of the turn. If there is a boat that has crossed this line on the inside of the turn and there is an overlap (See Figure D), then your boat must yield to that boat.
Buoy R
oom R
ule

14 3. Contact with Buoys Rule A boat that makes contact with a buoy must sail away from the fleet, out of the way of other boats, and do a 360-degree penalty turn (See Figure E). After the penalty turn, the boat may resume racing. If the boat hits the buoy on the wrong side of the buoy, it must re-round the buoy on the correct side before doing the 360-degree penalty turn (see Figure E1).
Con
tact
wit
h B
uoys
Rul
e

154. LuffingRightsRuleThis rule applies when you are passing another boat at close proximity. The figure below indicates the windward and leeward sides of the boat. On the starboard tack, the starboard side of the boat is the windward side. On port tack, the port side of the boat is the windward side.
RULE: When two boats are sailing on the same tack (starboard tack for these examples) at close proximity (See the illustration below), the leeward boat (#1) has the right of way over the windward boat (#2). If you are a windward boat on the offensive, you must pass with enough room to avoid the leeward boat. If you cannot avoid the leeward boat, you must steer away to avoid a collision.
It the windward boat (#2) tries to pass the leeward boat (#1), the lee-ward boat (#1) can “luff up” the windward boat (#2) by steering into the wind, causing #2’s sail to luff (See below). When a boat’s sail luffs, it loses power and speed. Luffing up is mostly used as a defensive maneuver.
Luffing Rights R
ule
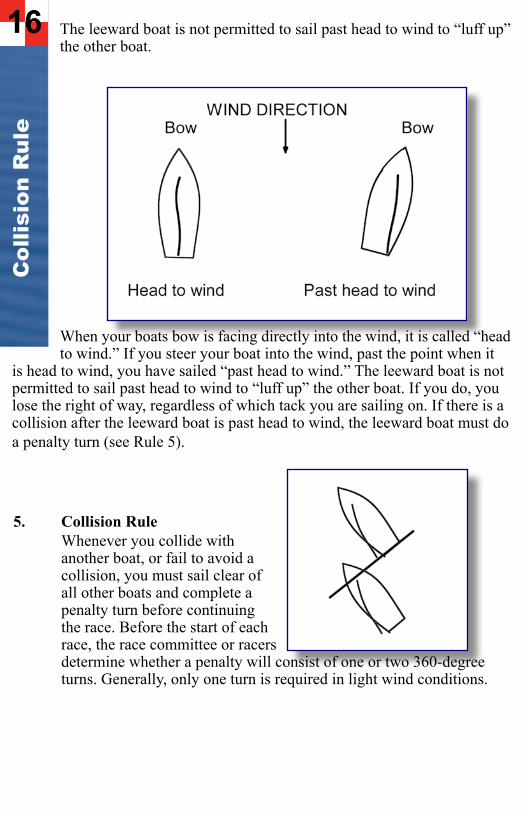
16 The leeward boat is not permitted to sail past head to wind to “luff up” the other boat.
When your boats bow is facing directly into the wind, it is called “head to wind.” If you steer your boat into the wind, past the point when it is head to wind, you have sailed “past head to wind.” The leeward boat is not permitted to sail past head to wind to “luff up” the other boat. If you do, you lose the right of way, regardless of which tack you are sailing on. If there is a collision after the leeward boat is past head to wind, the leeward boat must do a penalty turn (see Rule 5).
5. Collision RuleWhenever you collide with another boat, or fail to avoid a collision, you must sail clear of all other boats and complete a penalty turn before continuing the race. Before the start of each race, the race committee or racers determine whether a penalty will consist of one or two 360-degree turns. Generally, only one turn is required in light wind conditions.
Col
lisio
n R
ule

17There is an infinite number of possible race courses you can sail. The only limit is your imagination. The most common course is the Modified Olympic course.
The Race Course
Jockey for the best position during a one-minute countdown. Sail two laps around the course, not rounding the wing buoy on the second lap.
The R
ace Course

18PROBLEM CAUSE RECOMMENDATIONNo power to radio 1. Power switch is 1. Move switch to the control transmitter. in the “off” position. “on” position. 2. Batteries are 2. Make sure batteries incorrectly installed. are installed correctly. 3. Batteries are 3. Replace the batteries exhausted. with new alkaline batteries.Nirvana 2 is not 1. Radio control 1. Slide the switch to theunder control. transmitter is not “on” position. turned on. 2. Transmitter 2. Fully extend the antenna is not fully antenna. extended. 3. Transmitter 3. Replace the batteries batteries are with new alkaline exhausted. batteries. 4. Boats batteries 4. Replace the batteries are exhausted. with new alkaline batteries. 5. You have sailed 5. Be careful not to let out of range. your Nirvana 2 sail too far away from you. 6. Seaweed has 6. Get it to shore and clear wrapped around away any obstruction. your rudder.
Troubleshooting
Obtaining Spare Parts
Spare, repair and replacement parts are readily available for your Nirvana 2. Should you need parts, visit your local hobby dealer first. If unavailable, you may order directly from Megatech. Use this list as a guide.Spare Parts ListPart Numbers & Descriptions690101.....Complete Hull690110.....Mast & Gooseneck690104.....Rudder And Tiller Arm 690105.....Sail Set690106.....Stainless Steel Side Stays w/ Connectors690107.....Battery Box W/ On/Off Switch690108.....Keel With Lead Weight
Part Numbers & Descriptions 690109.....Complete Decal Set 202...........High Torque Metal Gear Servo

19
Part Numbers & Descriptions 690109.....Complete Decal Set 202...........High Torque Metal Gear Servo
Megatech® International guarantees this item to be free from defects for a period of 90 days from date of purchase. If any component of this product fails to function properly due to defects in materials or manufacturing process during this 90 day period, the manufacturer’s obligations are limited and manufacturer can choose to either repair or replace the item.This warranty is void if the product in question has been altered or repaired by anyone other than Megatech® International or an authorized agent.Under no circumstances will Megatech® International or any of its representatives be held liable for injury to persons or property damage resulting from assembly or use of the product. Megatech® is not liable if any outside radio frequencies interfere with the product’s frequency causing loss of control. Megatech® International will not be held liable for any injury to persons or property damage resulting from an out-of-control model caused by use or misuse of the product. Megatech® International expressly excludes any and all express warranties not specifically stated here and all implied warranties of merchantability and fitness for a particular purpose. There are no warranties which extend beyond the description of the warranties contained herein.Contact the Megatech® International Service Department before returning any item that is defective according to the limitations listed above. Please be sure to pack the returned item(s) carefully. The customer must return the product along with proof of purchase, a letter describing the problem and the customer’s address and telephone number. At this point in time we will either repair the defective part or replace it and return it to the customer. Return shipping and handling in the 48 contiguous states is $12.99. Shipping outside of the 48 states will be quoted by location.This warranty does not cover any damage caused by use, misuse, alteration, accident, or neglect, nor does it cover normal wear and tear of the product. Product returned to us which falls under this category will be submitted to our service department for repair. We reserve the right to charge any service and parts fees incurred when repairing the item.
Megatech® International8300 Tonnelle Avenue
North Bergen, NJ 07047(201) 662-2800
www.megatech.com
Limited WarrantyTroubleshooting

Megatech International8300 Tonnelle Avenue
North Bergen, NJ 07047(201) 662-2800
MTC6902CARIBBEAN CRUISER ELECTRIC TWIN-MOTOR R/C RACER
MTC7701H2O ELECTRIC MINI R/C SPEEDBOAT
LOOK FOR THESE OTHER FINE MEGATECH PRODUCTS
MTC7702OCEAN EXPLORER 1 R/C SUBMARINE