PA600 Rugged Enterprise PDA - Download · el manejo básico del lápiz, configurar la zona horaria...
41
Copyright 2006 Unitech Electronics Co., Ltd. All rights reserved. Unitech is a registered trademark of Unitech Electronics Co., Ltd. PA600 Rugged Enterprise PDA Quick Reference Guide 400507G Rev. A
Transcript of PA600 Rugged Enterprise PDA - Download · el manejo básico del lápiz, configurar la zona horaria...
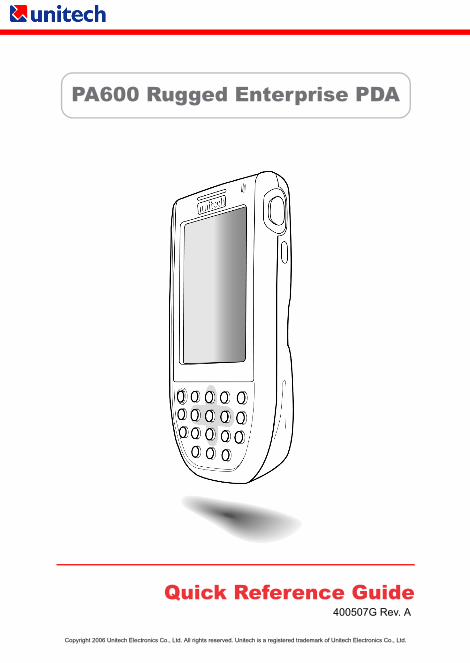
PA600 Rugged Enterprise PDA
Quick Reference Guide400507G Rev. A
Copyright 2006 Unitech Electronics Co., Ltd. All rights reserved. Unitech is a registered trademark of Unitech Electronics Co., Ltd.

English
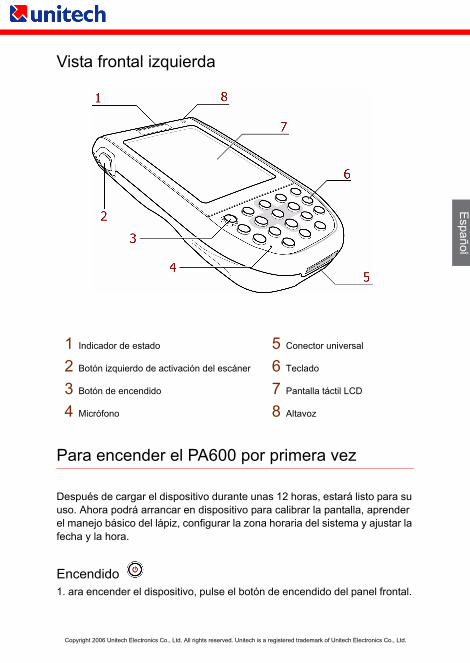
Front Left View
Turning the PA600 on for the First Time
After you have initially charged your device for about 12 hours, the device is ready to be used. You can now start up your device where you’ll calibrate the display, learn some basic stylus usage, and set up the system time zone, date and time.
Powering On 1. Turn on your device by pressing the power button on the front panel.
1 Status indicator 5 Universal connector
2 Left scanner trigger button 6 Keypad
3 Power button 7 LCD Touch screen
4 Microphone 8 Speaker
Copyright 2006 Unitech Electronics Co., Ltd. All rights reserved. Unitech is a registered trademark of Unitech Electronics Co., Ltd.

English
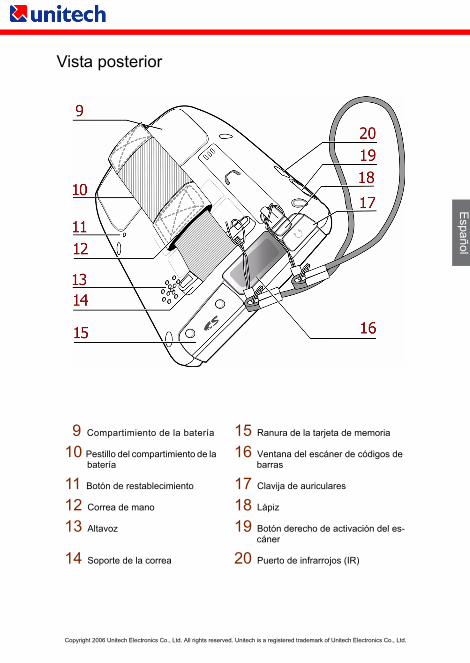
Back View
9 Battery compartment 15 Memory card slot
10 Battery Compartment release latch 16 Barcode scanner window
11 Reset button 17 Earphone jack
12 Handstrap 18 Stylus
13 Speaker 19 Right scanner trigger button
14 Strap holder 20 Infrared (IR) port
Copyright 2006 Unitech Electronics Co., Ltd. All rights reserved. Unitech is a registered trademark of Unitech Electronics Co., Ltd.

English
Installing the Battery
1 Open the battery compartment by pushing the latch in the direction of the arrow and lifting up.
2 Position the battery pack, making sure the battery contacts are aligned with the contacts in the com-partment and the battery is placed on top of the plastic tab, as shown in the following illustration.
3 Slide the battery pack into the battery bay while simultaneously pulling the plastic tab and securing clip until the battery clicks into place.
4 Replace the battery compartment cover.
The battery compartment is displayed:
Compartment contactsPlastic battery tabBattery securing clip
Plastic tabSecuring clip
Copyright 2006 Unitech Electronics Co., Ltd. All rights reserved. Unitech is a registered trademark of Unitech Electronics Co., Ltd.
English
Charging the Battery
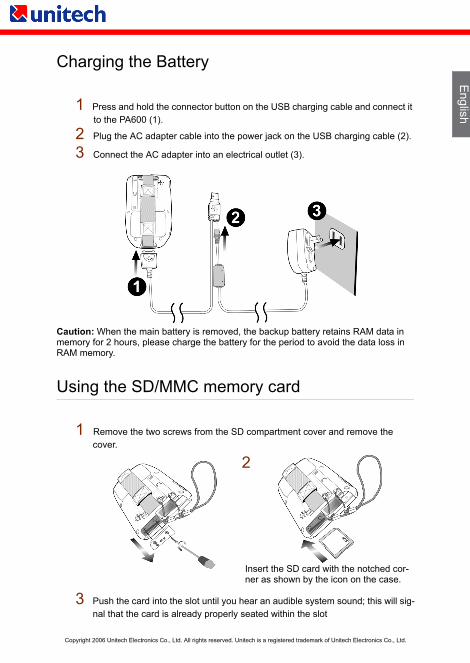
1 Press and hold the connector button on the USB charging cable and connect it to the PA600 (1).
2 Plug the AC adapter cable into the power jack on the USB charging cable (2).
3 Connect the AC adapter into an electrical outlet (3).
Caution: When the main battery is removed, the backup battery retains RAM data in memory for 2 hours, please charge the battery for the period to avoid the data loss in RAM memory.
Using the SD/MMC memory card
1 Remove the two screws from the SD compartment cover and remove the cover.
3 Push the card into the slot until you hear an audible system sound; this will sig-nal that the card is already properly seated within the slot
2
Insert the SD card with the notched cor-ner as shown by the icon on the case.
Copyright 2006 Unitech Electronics Co., Ltd. All rights reserved. Unitech is a registered trademark of Unitech Electronics Co., Ltd.

English
Keypads and Function Buttons
When the Function button is pressed, an icon appears in the operating system:
Function activated iconn
Turns the PA600 on and off.
Number 1, Left soft key
Alphanumeric 2, a, b, c , Up key
Alphanumeric 3, d, e, f, Right soft key
Enter key, OK
Back space, Escape key
Alphanumeric 4, g, h, i, Left key
Alphanumeric 5, j, k, l
Alphanumeric 6, m, n, o , Right key
function keys
Tab , Windows key opens
Alphanumeric 7, p, q, r, s , brightness -
Alphanumeric 8, t, u, v , Down key
Alphanumeric 9, w, x, y, z, brightness +
Alpha
Asterisk, Illuminates keypad
Number 0, space
Period , Pound
Copyright 2006 Unitech Electronics Co., Ltd. All rights reserved. Unitech is a registered trademark of Unitech Electronics Co., Ltd.

Deutsch
Frontansicht links
Den PA600 das erste Mal anschalten
Das Gerät muss vor dem ersten Einsatz ca. 12 Stunden lang geladen wer-den. Danach ist es einsatzbereit und Sie können es nun anschalten, das Display kalibrieren, die grundlegende Verwendung des Griffels erlernen und die Zeitzone, das Datum und die Uhrzeit des Systems einrichten.
Einschalten 1. Schalten Sie das Gerät an der Netztaste an der Vorderseite ein.
1 Statusanzeige 5 Universalanschluss
2 Linke Scan-Taste 6 Tastatur
3 Netztaste 7 LCD-Touchscreen
4 Mikrofon 8 Lautsprecher
Copyright 2006 Unitech Electronics Co., Ltd. All rights reserved. Unitech is a registered trademark of Unitech Electronics Co., Ltd.

Deutsch
Rückansicht
9 Akkufach 15 Steckplatz für Speicherkarte
10 Akkufach-Verriegelung 16 Lesefenster
11 Reset-Taste 17 Buchse für Ohrhörer
12 Handschlaufe 18 Griffel
13 Lautsprecher 19 Rechte Scan-Taste
14 Schlaufenöse 20 Infrarot (IR)-Port
Copyright 2006 Unitech Electronics Co., Ltd. All rights reserved. Unitech is a registered trademark of Unitech Electronics Co., Ltd.

Deutsch
Einlegen des Akkus
1 Öffnen Sie das Akkufach, indem Sie die Verriegelung in Pfeilrichtung drücken und den Deckel abheben.
2 Nehmen Sie den Akku in die Hand, richten Sie die Kontakte am Akku mit den Kontakten im Akku-fach aus und setzen Sie den Akku so ein, dass sich die Plastiklasche unter dem Akku befindet (siehe Abbildung).
3 Schieben Sie den Akku in das Akku-fach hinein, während Sie gle-ichzeitig an der Plastiklasche und am Sicherung-sclip ziehen, bis der Akku ein-rastet.
4 Schließen Sie das Akkufach.
KontaktePlastiklascheSicherungsclip
Abbildung des Akkufachs:
SicherungsclipPlastiklasche
Copyright 2006 Unitech Electronics Co., Ltd. All rights reserved. Unitech is a registered trademark of Unitech Electronics Co., Ltd.

Deutsch
Aufladen des Akkus
1 Halten Sie den Knopf am USB-Ladekabel gedrückt und schließen Sie es an den PA600 (1) an.
2 Stecken Sie das Netzkabel in die entsprechende Buchse am USB-Ladekabel (2).
3 Schließen Sie den Netzadapter an einer Steckdose an (3).
Achtung: Wenn die Hauptbatterie entfernt wird, behalt die Backup-Batterie RAM-Daten zwei Stunden lang im Speicher. Bitte laden Sie die Batterie fur diese Zeitdauer, um den Verlust von Daten im RAM-Speicher zu vermeiden.
Gebrauch der SD/MMC-Speicherkarte
1 Entfernen Sie die beiden Schrauben vom SD-Kartenfach und nehmen Sie den Deckel ab.
3 Drücken Sie die Karte hinein, bis ein akustisches Signal Ihnen anzeigt, dass die Karte richtig eingesteckt ist.
2
Drücken Sie die Karte hinein, bis ein akustisches Signal Ihnen anzeigt, dass die Karte richtig eingesteckt ist.
Copyright 2006 Unitech Electronics Co., Ltd. All rights reserved. Unitech is a registered trademark of Unitech Electronics Co., Ltd.

Deutsch
Tastatur und Funktionstasten
Wenn die Funktionstaste gedrückt wird, erscheint im Display das Symbol:
Symbol Funktionstaste
Schaltet das PA600 ein oder aus.
Ziffer 1, linke Softtaste
Alphanumerisch 2, a, b, c , Auf
Alphanumerisch 3, d, e, f, rechte Softtaste
Eingabe, OK
Zurück, Escape
Alphanumerisch 4, g, h, i, Links
Alphanumerisch 5, j, k, l
Alphanumerisch 6, m, n, o, Rechts
Funktionstasten
Tab, Windows-Tasten
Alphanumerisch 7, p, q, r, s, Helligkeit -
Alphanumerisch 8, t, u, v , Ab
Alphanumerisch 9, w, x, y, z, Helligkeit +
Alpha
Sternchen, Tastaturbeleuchtung
Ziffer 0, Leertaste
Punkt, Pfund
Copyright 2006 Unitech Electronics Co., Ltd. All rights reserved. Unitech is a registered trademark of Unitech Electronics Co., Ltd.
Español
Vista frontal izquierda
Para encender el PA600 por primera vez
Después de cargar el dispositivo durante unas 12 horas, estará listo para su uso. Ahora podrá arrancar en dispositivo para calibrar la pantalla, aprender el manejo básico del lápiz, configurar la zona horaria del sistema y ajustar la fecha y la hora.
Encendido 1. ara encender el dispositivo, pulse el botón de encendido del panel frontal.
1 Indicador de estado 5 Conector universal
2 Botón izquierdo de activación del escáner 6 Teclado
3 Botón de encendido 7 Pantalla táctil LCD
4 Micrófono 8 Altavoz
Copyright 2006 Unitech Electronics Co., Ltd. All rights reserved. Unitech is a registered trademark of Unitech Electronics Co., Ltd.
Español
Vista posterior
9 Compartimiento de la batería 15 Ranura de la tarjeta de memoria
10 Pestillo del compartimiento de la batería
16 Ventana del escáner de códigos de barras
11 Botón de restablecimiento 17 Clavija de auriculares
12 Correa de mano 18 Lápiz
13 Altavoz 19 Botón derecho de activación del es-cáner
14 Soporte de la correa 20 Puerto de infrarrojos (IR)
Copyright 2006 Unitech Electronics Co., Ltd. All rights reserved. Unitech is a registered trademark of Unitech Electronics Co., Ltd.

Español
Instalación de la batería
1 Abra el compartimiento de la batería pulsando el pestillo en la dirección de la flecha y levantándolo.
2 Coloque las baterías, asegurándose de que los contactos estén alinea-dos con los contactos del compartimiento y la bat-ería esté colocada sobre la lengüeta de plástico, como se muestra en la siguiente ilustración.
3 Deslice la bat-ería en su com-partimiento al tiempo que tira de la lengüeta de plástico y de la pinza de fijación hasta que la batería quede colocada en su sitio.
4 Vuelva a colocar la tapa del compartimiento de la batería.
Contactos del compartimientoLengüeta de plástico de la bateríaPinza de sujeción de la batería
Se muestra el compartimiento de la batería:
Pinza de sujeciónLengüeta de plástico
Copyright 2006 Unitech Electronics Co., Ltd. All rights reserved. Unitech is a registered trademark of Unitech Electronics Co., Ltd.
Español
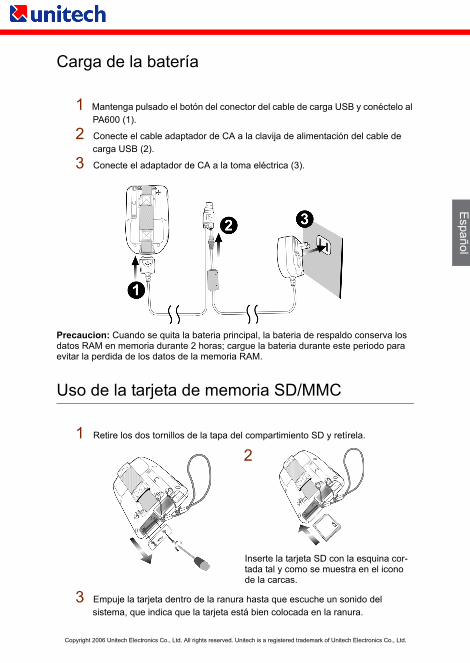
Carga de la batería
1 Mantenga pulsado el botón del conector del cable de carga USB y conéctelo al PA600 (1).
2 Conecte el cable adaptador de CA a la clavija de alimentación del cable de carga USB (2).
3 Conecte el adaptador de CA a la toma eléctrica (3).
Precaucion: Cuando se quita la bateria principal, la bateria de respaldo conserva los datos RAM en memoria durante 2 horas; cargue la bateria durante este periodo para evitar la perdida de los datos de la memoria RAM.
Uso de la tarjeta de memoria SD/MMC
1 Retire los dos tornillos de la tapa del compartimiento SD y retírela.
3 Empuje la tarjeta dentro de la ranura hasta que escuche un sonido del sistema, que indica que la tarjeta está bien colocada en la ranura.
2
Inserte la tarjeta SD con la esquina cor-tada tal y como se muestra en el icono de la carcas.
Copyright 2006 Unitech Electronics Co., Ltd. All rights reserved. Unitech is a registered trademark of Unitech Electronics Co., Ltd.

Español
Botones del teclado y de función
Cuando se pulsa el botón Función, aparece un icono en el sistema operativo:
Icono de función activada
Enciende y apaga el PA600.
Numérico 1, tecla de software izquierda
Alfanumérico 2, a, b, c, tecla Arriba
Alfanumérico 3, d, e, f, tecla de software derecha
Tecla Intro, Aceptar
Retroceso, tecla Escape
Alfanumérico 4, a, b, c, tecla Izquierda
Alfanumérico 5, j, k, l
Alfanumérico 6, m, n, o, tecla Derecha
teclas de función
Tab, tecla Windows
Alfanumérico 7, p, q, r, s , brillo -
Alfanumérico 8, t, u, v, tecla Abajo
Alfanumérico 9, w, x, y, z, brillo +
Alpha
Asterisco, ilumina el teclado
Número 0, espacio
Punto, libra
Copyright 2006 Unitech Electronics Co., Ltd. All rights reserved. Unitech is a registered trademark of Unitech Electronics Co., Ltd.

Français
Vue avant gauche
Premier démarrage du PA600
Après avoir préalablement chargé votre appareil pendant environ 12 heures, vous êtes prêt à l'utiliser. Vous pouvez maintenant démarrer votre appareil et étalonner votre écran, apprendre l'utilisation de base du stylet et configurer le fuseau horaire, la date et l'heure du système.
Démarrage 1. Démarrez votre appareil en appuyant sur le bouton Marche/Arrêt qui se
trouve sur le panneau avant.
1 Indicateur d'état 5 Connecteur universel
2 Bouton gauche de déclenchement du lecteur 6 Clavier
3 Bouton Marche/Arrêt 7 Écran tactile ACL
4 Microphone 8 Haut-parleur
Copyright 2006 Unitech Electronics Co., Ltd. All rights reserved. Unitech is a registered trademark of Unitech Electronics Co., Ltd.

Français
Vue arrière
9 Compartiment de pile 15 Port pour carte mémoire
10 Loquet de blocage du compartiment de pile
16 Fenêtre de lecteur de codes à barres
11 Bouton de réinitialisation 17 Prise des écouteurs
12 Dragonne 18 Stylet
13 Haut-parleur 19 Bouton droit de déclenchement du lecteur
14 Support de courroie 20 Port infrarouge (IR)
Copyright 2006 Unitech Electronics Co., Ltd. All rights reserved. Unitech is a registered trademark of Unitech Electronics Co., Ltd.

Français
Installation de la pile
1 Ouvrez le compartiment de pile en poussant le loquet dans le sens de la flèche et en le soulevant.
2 Mettez en place le bloc de piles en vous assurant que les contacts sont alignés par rapport aux contacts du comparti-ment et que la pile se trouve sur la languette de plastique, tel qu'illustré sur l'image.
3 Glissez le bloc de piles dans compartiment de pile tout en tirant simultanément la languette de plastique et la fixation de sécu-rité jusqu'à ce que la pile émette un clic.
4 Remettez nouvellement le couvercle du compartiment de pile.
Contacts du compartimentLanguette de plastique de la pileFixation de sécurité de la pile
Le compartiment de pile est visible :
Fixation de sécuritéLanguette de plastique
Copyright 2006 Unitech Electronics Co., Ltd. All rights reserved. Unitech is a registered trademark of Unitech Electronics Co., Ltd.

Français
Chargement de la batterie
1 Appuyez et maintenez enfoncé le bouton du connecteur qui se trouve sur le câble de chargement et branchez-le au PA600 (1).
2 Branchez le câble du chargeur-adaptateur c.a.dans la prise d'alimentation du câble de chargement USB (2).
3 Connectez le chargeur-adaptateur c.a. dans une prise électrique (3).
Avertissement : Lorsque la batterie principale est retiree, la batterie de secours con-serve des donnees RAM dans la memoire pendant 2 heures. Veuillez charger la batte-rie durant cette periode afin d'eviter une perte de donnees dans la memoire RAM.
Utilisation de la carte mémoire SD/MMC
1 Retirez les deux vis du couvercle du compartiment SD et enlevez-le.
3 Enfoncez la carte dans le port jusqu'à ce que vous entendiez un son du système, ceci indiquera que la carte est installée correctement dans le port.
2
Insérez une carte SD en prenant soin de placer l'encoche de la manière illustrée par l'icône sur le boîtier.
Copyright 2006 Unitech Electronics Co., Ltd. All rights reserved. Unitech is a registered trademark of Unitech Electronics Co., Ltd.

Français
Clavier et boutons de fonction
Lorsque vous appuyez sur le bouton Fonction, une icône s'affiche dans le système d'exploitation :
Icône de Fonction activée
Permet de mettre en marche et d'éteindre le PA600.
Numéro 1, touche programmable gauche
Caractère alphanumérique 2, a, b, c, touche Haut
Caractère alphanumérique 3, d, e, f, touche programmable droite
Touche Entrée, OK
Touche de retour arrière, d'échappement
Caractère alphanumérique 4, g, h i, touche Gauche
Caractère alphanumérique 5, j, k, l
Caractère alphanumérique 6, m, n, o, touche Droite
Touches de fonction
Tab, touche Windows s'ouvre
Caractère alphanumérique 7, p, q, r, s, luminosité -
Caractère alphanumérique 8, t, u, v, touche Bas
Caractère alphanumérique 9, w, x, y, z, luminosité +
Alpha
Astérisque, illumine le clavier
Numéro 0, espace
Point, Livre
Copyright 2006 Unitech Electronics Co., Ltd. All rights reserved. Unitech is a registered trademark of Unitech Electronics Co., Ltd.
简体中文
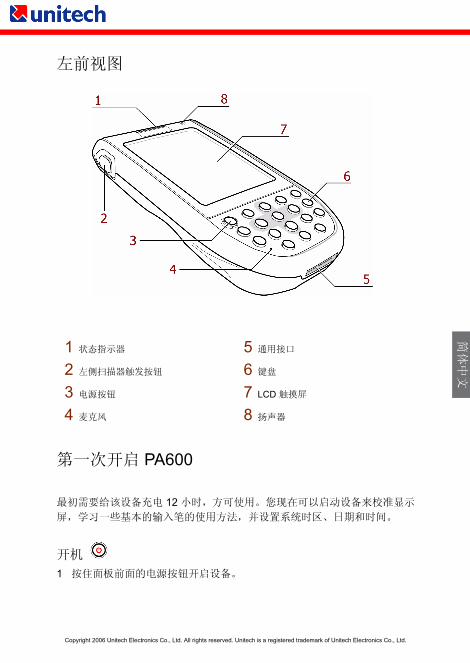
左前视图
第一次开启 PA600
最初需要给该设备充电 12 小时,方可使用。 您现在可以启动设备来校准显示
屏,学习一些基本的输入笔的使用方法,并设置系统时区、日期和时间。
开机 1 按住面板前面的电源按钮开启设备。
1 状态指示器 5 通用接口
2 左侧扫描器触发按钮 6 键盘
3 电源按钮 7 LCD 触摸屏
4 麦克风 8 扬声器
Copyright 2006 Unitech Electronics Co., Ltd. All rights reserved. Unitech is a registered trademark of Unitech Electronics Co., Ltd.
简体中文
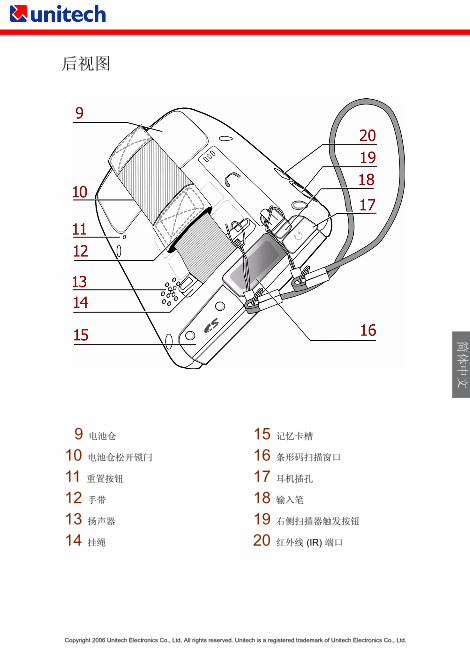
后视图
9 电池仓 15 记忆卡槽
10 电池仓松开锁闩 16 条形码扫描窗口
11 重置按钮 17 耳机插孔
12 手带 18 输入笔
13 扬声器 19 右侧扫描器触发按钮
14 挂绳 20 红外线 (IR) 端口
Copyright 2006 Unitech Electronics Co., Ltd. All rights reserved. Unitech is a registered trademark of Unitech Electronics Co., Ltd.

简体中文
安装电池
1 按箭头所示方向推动并提起锁闩以打开电池仓。
2 将电池组正确放置,确保
电池触头和电池仓触头一致, 电池放置在塑料调整
片上面,如下图所示。
3 将电池组滑入电池槽,同
时拉动塑料调整片并固定好夹子直到电池发出喀哒声进入正确的位置。
4 重新安装好电池仓盖。
电池仓触头
塑料电池调整片
电池固定夹
电池仓如下所示:
固定夹塑料调整片
Copyright 2006 Unitech Electronics Co., Ltd. All rights reserved. Unitech is a registered trademark of Unitech Electronics Co., Ltd.

简体中文
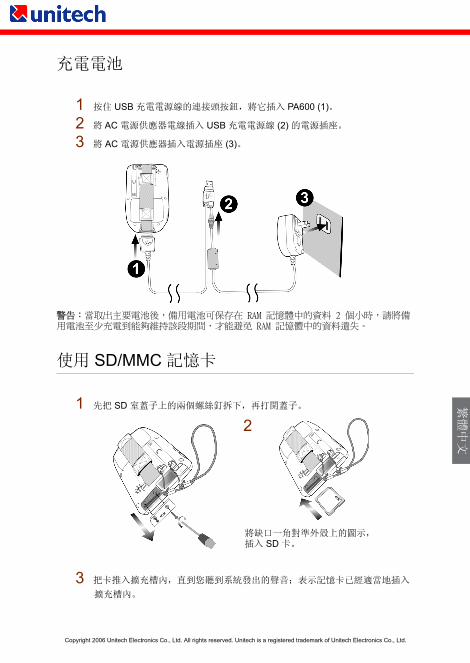
电池充电
1 按下并按住 USB 充电电缆上的连接器按钮,并将其连接到 PA600 (1)。
2 将 AC 适配器电缆插入 USB 充电电缆上的电源插孔 (2)。
3 将 AC 适配器连接到电源插座 (3)。
注意: 取下主电池时,备用电池会在存储器中保持 RAM 数据两个小时,请在此段时间
内为电池充电,以免 RAM 存储器中的数据丢失。
使用 SD/MMC 存储卡
1 将 SD 仓盖上的两个螺钉拆下并取下仓盖。
3 将卡推入狭槽直到发出一个明显的系统声音,这表示卡已正确安装到狭槽内。
2
将 SD 卡按机壳上图标所示的有倒角的
一端插入。
Copyright 2006 Unitech Electronics Co., Ltd. All rights reserved. Unitech is a registered trademark of Unitech Electronics Co., Ltd.

简体中文
按键和功能按钮
当按下 “功能按钮”后,操
作系统中将显示一个图标:功能激活图标
开启和关闭 PA600。
数字 1、左键
字母数字 2、 a、 b、 c、上键
字母数字 3、 d、 e、 f、右键
输入键、确定
退格键、退出键
字母数字 4、 g、 h、 I、左键
字母数字 5、 j、 k、 l
字母数字 6、 m、 n、 o、右键
功能键
Tab,打开 Windows 键
字母数字键 7、 p、 q、 r、 s、亮度 -
字母数字 8、 t、 u、 v、下键
字母数字 9、 w、 x、 y、 z、亮度 +
Alpha
星号,键盘照明
数字 0、空格
句号、井号
Copyright 2006 Unitech Electronics Co., Ltd. All rights reserved. Unitech is a registered trademark of Unitech Electronics Co., Ltd.

繁體中文
快速參考指南
第一次開啟使用 PA600
在您初步將裝置充電大約 12 小時之後,裝置就準備好可供使用。您現在可以
啟動裝置,調整校準顯示螢幕,學習一些基本輸入筆的使用方法,並且設定
系統時區、日期和時間。
開啟電源 1. 按一下前面板上的電源按鈕,開啟裝置的電源。
1 狀態顯示燈 5 通用連接器
2 左側掃瞄器觸發按鈕 6 按鍵盤
3 電源按鈕 7 LCD 觸控式螢幕
4 麥克風 8 喇叭
Copyright 2006 Unitech Electronics Co., Ltd. All rights reserved. Unitech is a registered trademark of Unitech Electronics Co., Ltd.

繁體中文
背視圖
9 電池室 15 記憶卡插槽
10 電池室卡閂 16 條碼掃描器視窗
11 重設按鈕 17 耳機插孔
12 手腕帶 18 輸入筆
13 喇叭 19 右側掃瞄器觸發按鈕
14 腕帶固定架 20 紅外線 (IR) 連接埠
Copyright 2006 Unitech Electronics Co., Ltd. All rights reserved. Unitech is a registered trademark of Unitech Electronics Co., Ltd.

繁體中文
安裝電池
1 按照箭頭方向推動卡閂,向上打開蓋子,就可開啟電池室。
2 放入電池組,確定電池組
的接點對齊電池室中的接點, 電池放置在塑膠調整
片的上方,如下列的說明。
3 將電池組滑放入電池組間
隔內,同時向上拉塑膠製的調整片並且拉緊,直到電池組卡入定位。
4 將電池室的蓋子蓋回。
電池室接點
塑膠製電池調整片
電池安全卡夾
顯示電池室內部:
安全卡夾
塑膠製調整片
Copyright 2006 Unitech Electronics Co., Ltd. All rights reserved. Unitech is a registered trademark of Unitech Electronics Co., Ltd.
繁體中文
充電電池
1 按住 USB 充電電源線的連接頭按鈕,將它插入 PA600 (1)。
2 將 AC 電源供應器電線插入 USB 充電電源線 (2) 的電源插座。
3 將 AC 電源供應器插入電源插座 (3)。
警告:當取出主要電池後,備用電池可保存在 RAM 記憶體中的資料 2 個小時,請將備用電池至少充電到能夠維持該段期間,才能避免 RAM 記憶體中的資料遺失。
使用 SD/MMC 記憶卡
1 先把 SD 室蓋子上的兩個螺絲釘拆下,再打開蓋子。
3 把卡推入擴充槽內,直到您聽到系統發出的聲音;表示記憶卡已經適當地插入
擴充槽內。
2
將缺口一角對準外殼上的圖示,插入 SD 卡。
Copyright 2006 Unitech Electronics Co., Ltd. All rights reserved. Unitech is a registered trademark of Unitech Electronics Co., Ltd.

繁體中文
按鍵盤和功能按鈕
當按下功能按鈕的時候,會
在作業系統中出現圖示:功能啟動圖示
開啟和關閉 PA600 電源
數字 1,左側軟體鍵
文數字 2, a, b, c,向上鍵
文數字 3, d, e, f,右側軟體鍵
輸入鍵, OK 鍵
退格鍵, ESC 退出鍵
文數字 4, g, h, I,向左鍵
文數字 5, j, k, l
文數字 6, m, n, o,向右鍵
功能鍵
定位鍵, Windows 開始鍵
文數字 7, p, q, r, s,亮度 -
文數字 8, t, u, v,向下鍵
文數字 9, w, x, y, z,亮度 +
Alpha 鍵
星號,照亮鍵盤
數字 0,空白鍵
句點鍵,井字鍵
Copyright 2006 Unitech Electronics Co., Ltd. All rights reserved. Unitech is a registered trademark of Unitech Electronics Co., Ltd.

日本
語
前面および左側面
はじめて PA600 を使用する場合
デバイスを最初に使用するには、12 時間デバイスを充電する必要がありま
す。デバイスを起動してディスプレイの調整、ペンの使用方法の学習、およ
びシステムのタイムゾーン、日付、および時刻を設定することができます。
電源を入れる 1. 前面パネルの電源ボタンを押してデバイスをオンにします。
1 ステータスインジケータ 5 汎用コネクタ
2 左スキャナー実行ボタン 6 キーパッド
3 電源ボタン 7 LCD タッチ画面
4 マイク 8 スピーカー
Copyright 2006 Unitech Electronics Co., Ltd. All rights reserved. Unitech is a registered trademark of Unitech Electronics Co., Ltd.
日本語
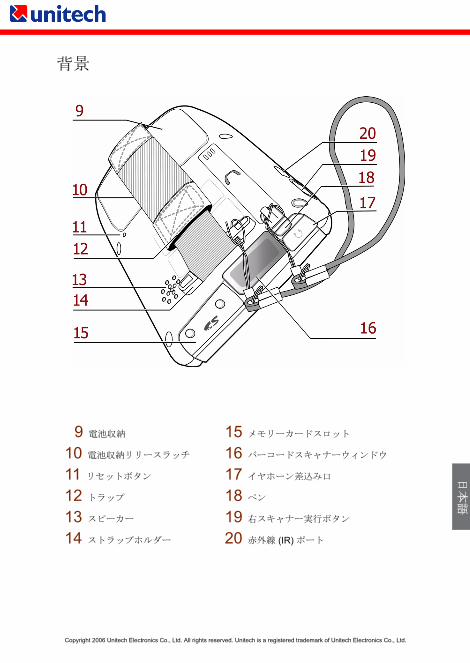
背景
9 電池収納 15 メモリーカードスロット
10 電池収納リリースラッチ 16 バーコードスキャナーウィンドウ
11 リセットボタン 17 イヤホーン差込み口
12 トラップ 18 ペン
13 スピーカー 19 右スキャナー実行ボタン
14 ストラップホルダー 20 赤外線 (IR) ポート
Copyright 2006 Unitech Electronics Co., Ltd. All rights reserved. Unitech is a registered trademark of Unitech Electronics Co., Ltd.
日本語
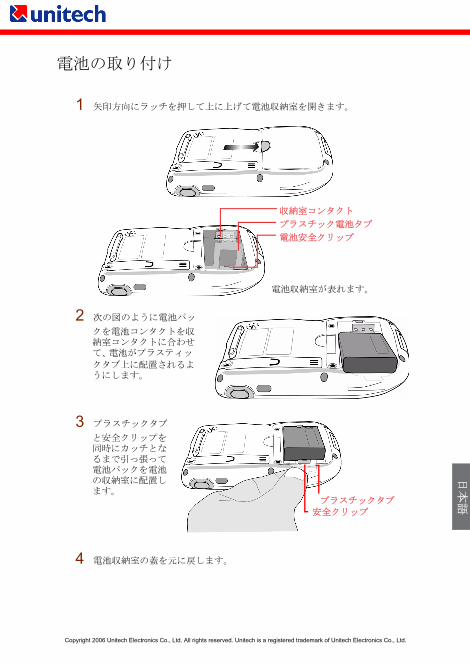
電池の取り付け
1 矢印方向にラッチを押して上に上げて電池収納室を開きます。
2 次の図のように電池パッ
クを電池コンタクトを収納室コンタクトに合わせて、 電池がプラスティッ
クタブ上に配置されるようにします。
3 プラスチックタブ
と安全クリップを同時にカッチとなるまで引っ張って電池パックを電池の収納室に配置します。
4 電池収納室の蓋を元に戻します。
収納室コンタクト
プラスチック電池タブ
電池安全クリップ
電池収納室が表れます。
安全クリッププラスチックタブ
Copyright 2006 Unitech Electronics Co., Ltd. All rights reserved. Unitech is a registered trademark of Unitech Electronics Co., Ltd.

日本語
電池の充電
1 USB 充電ケーブルの接続ボタンを押したまま PA600 に接続します (1) 。
2 USB 充電ケーブルの電源差込み口に AC アダプタケーブルを差し込みます (2) 。
3 AC アダプタをコンセントに接続します (3)。
注意 : メインの電池が取り外されるとバックアップ電池が 2 時間メモリーに RAMデータを保管します。その期間に電池を充電しないと RAM メモリーのデータが失わ
れることになりますので注意してください。
SD/MMC メモリーカードの使用
1 SD 収納室の蓋の 2 つのネジを取り外して蓋を取ります。
3 システム音が聞こえるまでカードをスロットに押し込みます。システム音は
カードがスロットの適切な位置に配置された確認の信号です。
2
ケースにアイコンで表示されているような角がギザギザになった SD カード
を挿入します。
Copyright 2006 Unitech Electronics Co., Ltd. All rights reserved. Unitech is a registered trademark of Unitech Electronics Co., Ltd.

日本語
キーパッドと機能ボタン
機能ボタンが押されると、
アイコンがオペレーティン
グシステムに表示されます。
使用可能な機能アイコン
PA600 のオン / オフにします。
番号 1、左ソフトキー
英数字 2、a、b、c、Up キー
英数字 3、d、e、f、右ソフトキー
Enter キー、OK
Back space、Escape キー
英数字 4、g、h、i、左キー
英数字 5、j、k、l
英数字 6、m、n、o、右キー
機能キー
タブ、Windows キーを開く
英数字 7、p、q、r、s、輝度 -
英数字 8、t、u、v、Down キー
英数字 9、w、x、y、z、輝度 +
アルファ記号
アスタリスク、照明キーパッド
数字 0、スペース
ピリオド、シャープ記号
Copyright 2006 Unitech Electronics Co., Ltd. All rights reserved. Unitech is a registered trademark of Unitech Electronics Co., Ltd.
한국어
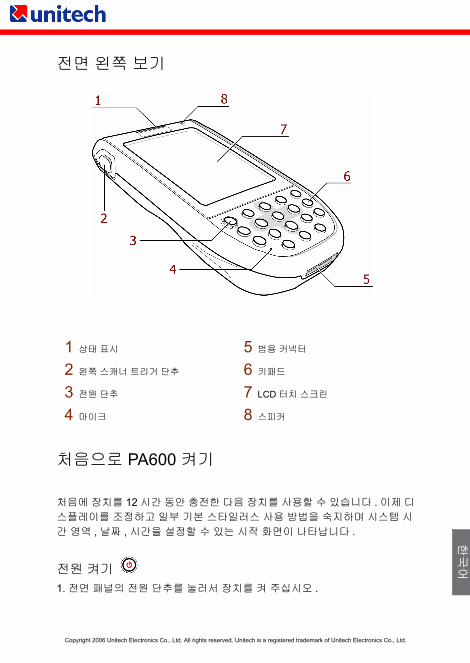
전면 왼쪽 보기
처음으로 PA600 켜기
처음에 장치를 12 시간 동안 충전한 다음 장치를 사용할 수 있습니다 . 이제 디스플레이를 조정하고 일부 기본 스타일러스 사용 방법을 숙지하며 시스템 시간 영역 , 날짜 , 시간을 설정할 수 있는 시작 화면이 나타납니다 .
전원 켜기 1. 전면 패널의 전원 단추를 눌러서 장치를 켜 주십시오 .
1 상태 표시 5 범용 커넥터
2 왼쪽 스캐너 트리거 단추 6 키패드
3 전원 단추 7 LCD 터치 스크린
4 마이크 8 스피커
Copyright 2006 Unitech Electronics Co., Ltd. All rights reserved. Unitech is a registered trademark of Unitech Electronics Co., Ltd.

한국어
후면 보기
9 배터리 격납부 15 메모리 카드 슬롯
10 배터리 격납부 방출 래치 16 바코드 스캐너 창
11 재설정 단추 17 이어폰 잭
12 핸드스트랩 18 스타일러스
13 스피커 19 오른쪽 스캐너 트리거 단추
14 스트랩 홀더 20 적외선 (IR) 포트
Copyright 2006 Unitech Electronics Co., Ltd. All rights reserved. Unitech is a registered trademark of Unitech Electronics Co., Ltd.
한국어
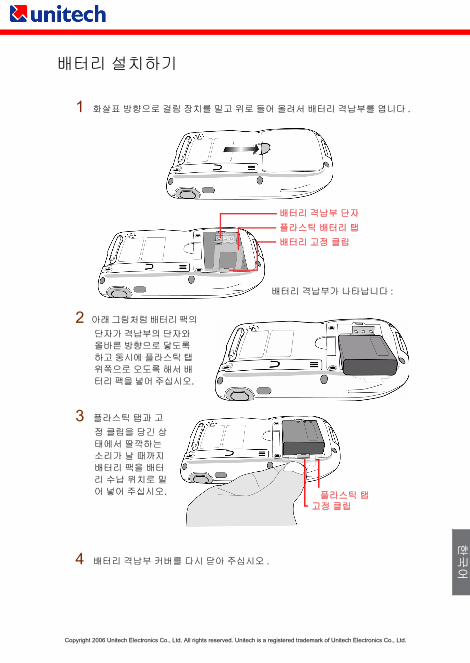
배터리 설치하기
1 화살표 방향으로 걸림 장치를 밀고 위로 들어 올려서 배터리 격납부를 엽니다 .
2 아래 그림처럼 배터리 팩의 단자가 격납부의 단자와 올바른 방향으로 닿도록 하고 동시에 플라스틱 탭 위쪽으로 오도록 해서 배터리 팩을 넣어 주십시오.
3 플라스틱 탭과 고정 클립을 당긴 상태에서 딸깍하는 소리가 날 때까지 배터리 팩을 배터리 수납 위치로 밀어 넣어 주십시오.
4 배터리 격납부 커버를 다시 닫아 주십시오 .
배터리 격납부 단자플라스틱 배터리 탭배터리 고정 클립
배터리 격납부가 나타납니다 :
고정 클립플라스틱 탭
Copyright 2006 Unitech Electronics Co., Ltd. All rights reserved. Unitech is a registered trademark of Unitech Electronics Co., Ltd.

한국어
배터리 충전하기
1 USB 충전 케이블의 커넥터 위의 단추를 계속 누른 상태에서 PA600에 연결해 주십시오 (1).
2 AC 어댑터 케이블을 USB 충전 케이블의 전원 잭에 연결하십시오 (2).
3 AC 어댑터를 전기 컨센트에 연결하십시오 (3).
주의 : 메인 배터리가 제거되었을 때 백업 배터리는 메모리 내의 RAM 데이터를 2시간 동안 유지시킵니다 . RAM 메모리 내의 데이터 손실을 방지하기 위해서 이 시간 내에 배터리를 교체해 주십시오 .
SD/MMC 메모리 카드 사용하기
1 SD 격납부 커버에서 나사 두 개를 푼 다음 커버를 제거합니다 .
3 시스템에서 소리가 출력될 때까지 카드를 슬롯 쪽으로 밀어 주십시오 . 이 소리는 카드가 슬롯 내에 올바로 위치했다는 신호입니다 .
2
케이스에 표시된 아이콘 로 SD 카드를 바른 방향으로 삽입합니다 .
Copyright 2006 Unitech Electronics Co., Ltd. All rights reserved. Unitech is a registered trademark of Unitech Electronics Co., Ltd.
한국어
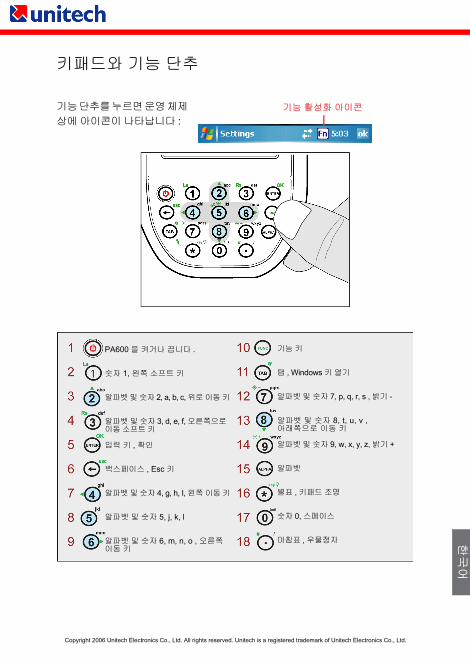
키패드와 기능 단추
기능 단추를 누르면 운영 체제 상에 아이콘이 나타납니다 :
기능 활성화 아이콘
PA600을 켜거나 끕니다 .
숫자 1, 왼쪽 소프트 키
알파벳 및 숫자 2, a, b, c, 위로 이동 키
알파벳 및 숫자 3, d, e, f, 오른쪽으로 이동 소프트 키
입력 키 , 확인
백스페이스 , Esc 키
알파벳 및 숫자 4, g, h, I, 왼쪽 이동 키
알파벳 및 숫자 5, j, k, l
알파벳 및 숫자 6, m, n, o , 오른쪽 이동 키
기능 키
탭 , Windows 키 열기
알파벳 및 숫자 7, p, q, r, s , 밝기 -
알파벳 및 숫자 8, t, u, v , 아래쪽으로 이동 키
알파벳 및 숫자 9, w, x, y, z, 밝기 +
알파벳
별표 , 키패드 조명
숫자 0, 스페이스
마침표 , 우물정자
Copyright 2006 Unitech Electronics Co., Ltd. All rights reserved. Unitech is a registered trademark of Unitech Electronics Co., Ltd.