P8-P8 A1 OM (DE-EN) 986 450 1f.0111 P8 ... -...
41
Transcript of P8-P8 A1 OM (DE-EN) 986 450 1f.0111 P8 ... -...

WARNING!
This manual does not consider warnings in respect to US-product liability.
For use in USA please order an User Manual from:
Heckler & Koch Inc.5675 Transport BoulevardColumbus, Georgia 31907Tel. (706) 568-1906

m Vor Gebrauch der Pistole Sicherheits -hinweise lesen!
m Before handling the pistol, read andmind the safety instructions!
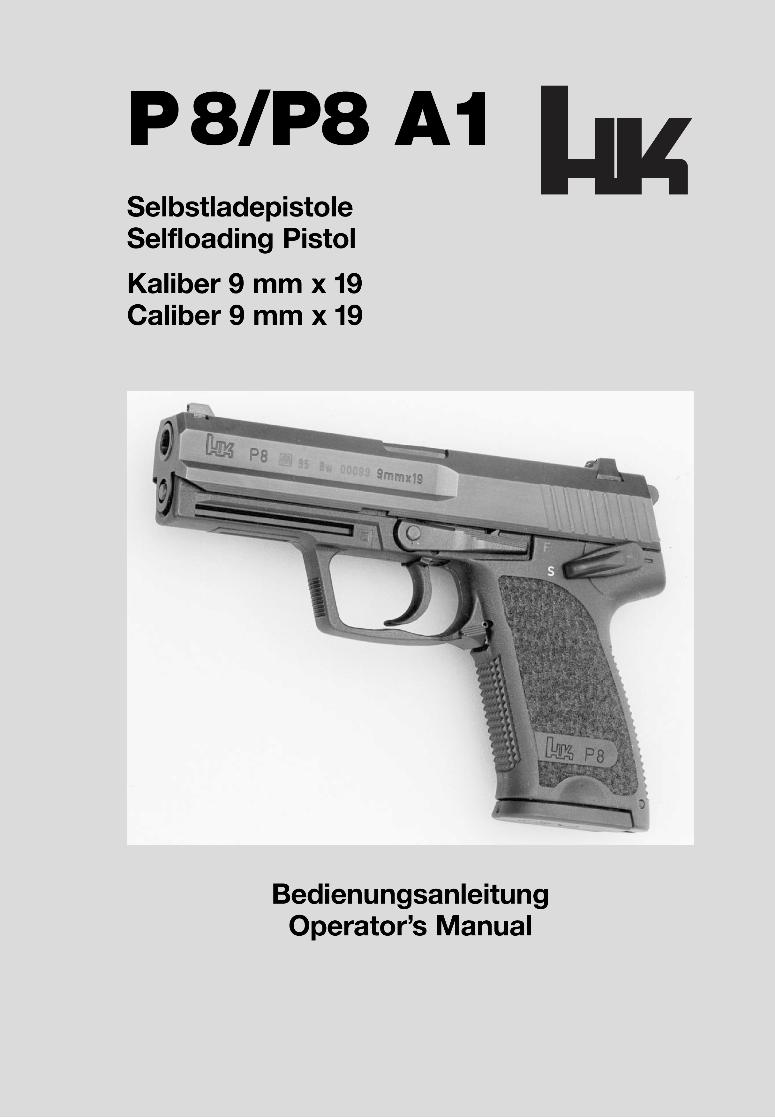
Selbstladepistole P8/P8 A1 Selfloading Pistol P8/P8 A1
Kaliber 9 mm x 19Caliber 9 mm x 19
1

Inhaltsverzeichnis . . . . . . . . Seitem Sicherheitshinweise zum Umgang mit Pistolen . . . . . . . . . . . . . 3
Vorbemerkung. . . . . . . . . . . . . . . . . . . . 7
Allgemeines. . . . . . . . . . . . . . . . . . . . . . 9
Technische Daten . . . . . . . . . . . . . . . . 11
Baugruppenübersicht . . . . . . . . . . . . . 12
Bedienelemente, Bezeichnungen . . . 13
Funktion . . . . . . . . . . . . . . . . . . . . . . . 14
Prüfungen . . . . . . . . . . . . . . . . . . . . . . 15
Prüfen vor und nach Gebrauch . . . . . 15
Funktionsprüfung Verschlussmit Griffstück . . . . . . . . . . . . . . . . . . . 15
Funktionsprüfung Abzugs- und Sicherungseinrichtung . . . . . . . . . . . . 15
Prüfung des Schlagbolzens auf Gängigkeit. . . . . . . . . . . . . . . . . . . 15
Handhabung und Bedienung . . . . . . . 17
Grundsätze der Handhabung und Bedienung . . . . . . . 17
Vorbereiten zum Schießen . . . . . . . . . 17
Laden . . . . . . . . . . . . . . . . . . . . . . . . . 17
Schießen mit Normalabzug (Single Action) . . . . . . . . . . . . . . . . . . . 17
Entspannen . . . . . . . . . . . . . . . . . . . . 19
Schießen mit Spannabzug (Double Action) . . . . . . . . . . . . . . . . . . 19
Erneutes Laden bei leergeschossenem Magazin . . . . . . . . 19
Entladen der Pistole . . . . . . . . . . . . . . 21
Füllen und Entleeren des Magazines . 21
Pflege . . . . . . . . . . . . . . . . . . . . . . . . . 22
Pflegemittel und Gerät . . . . . . . . . . . . 22
Pflegearbeiten. . . . . . . . . . . . . . . . . . . 22
Visierung, Justierung . . . . . . . . . . . . . 24
Zerlegen der Pistole . . . . . . . . . . . . . . 25
Zusammensetzen der Pistole . . . . . . . 27
Störungen und Fehler, Ursachen, Beseitigung . . . . . . . . . . . . 29
Teileliste . . . . . . . . . . . . . . . . . . . . . . . 32
Contents . . . . . . . . . . . . . . . . Pagem Safety notes for the handling of pistols . . . . . . . . . . . . . . . 5
Preliminary note . . . . . . . . . . . . . . . . . . 8
General . . . . . . . . . . . . . . . . . . . . . . . . 10
Technical data. . . . . . . . . . . . . . . . . . . 11
Component overview . . . . . . . . . . . . . 12
Operating controls, designation . . . . . 13
Function . . . . . . . . . . . . . . . . . . . . . . . 14
Checking. . . . . . . . . . . . . . . . . . . . . . . 16
Checking before and after use . . . . . . . . . . . . . . . . . . . . . . . 16
Functional tests of slide with grip . . . . . . . . . . . . . . . . . . . . . . . 16
Functional tests of the trigger and the safety lever . . . . . . . . . . . . . . 16
Testing the smooth operation ofthe safety and of the firing pin . . . . . . 16
Handling and operation . . . . . . . . . . . 18
Principles of handlingand operation . . . . . . . . . . . . . . . . . . . 18
Preparation for firing . . . . . . . . . . . . . . 18
Loading . . . . . . . . . . . . . . . . . . . . . . . . 18
Firing in single action mode . . . . . . . . 18
Decocking . . . . . . . . . . . . . . . . . . . . . . 20
Firing in double action mode . . . . . . . 20
Reloading when magazine is empty . . . . . . . . . . . . . . . . . . . . . . . 20
Unloading the pistol . . . . . . . . . . . . . . 21
Filling and emptying of the magazine . . . . . . . . . . . . . . . . . . . 21
Cleaning and Maintenance . . . . . . . . . 23
Cleaning materials and kits . . . . . . . . 23
Cleaning work . . . . . . . . . . . . . . . . . . . 23
Sighting, adjustment. . . . . . . . . . . . . . 24
Disassembly of the pistol . . . . . . . . . . 26
Assembly of the pistol . . . . . . . . . . . . 28
Trouble shooting chart . . . . . . . . . . . . 30
List of parts. . . . . . . . . . . . . . . . . . . . . 36
2
– Beim Umgang mit Pistolen ist be-sondere Vorsicht notwendig, daLage und Richtung der Pistolesehr leicht verändert werden kön-nen.
– Lesen Sie diese Anleitung vor Be-nutzung der Pistole gründlichdurch. Benutzen Sie die Pistoleerst dann, wenn Sie die Anleitungverstanden haben.
– Beachten Sie alle Hinweise zurHandhabung und Bedienung.Nichtbeachtung kann Gefahr fürLeib und Leben verursachen.
– Unterlassen Sie den Umgang mitder Pistole, sofern Sie zuvor Alko-hol, Drogen oder Medikamente zusich genommen haben oder sichkörperlich unwohl fühlen.
– Vor der Benutzung, bei Störungenund vor dem Reinigen ist zuprüfen, ob
– die Pistole entladen ist– (Patronenlager frei),– das Rohr frei ist von Fremd-– körpern und– das Magazin leer ist.
– Bei der Übergabe oder Übernah-me der Pistole muss der Ver-schluss immer geöffnet sein.
– Die Pistole ist grundsätzlich so zubehandeln, als sei sie geladenund feuerbereit.
– Zielen Sie beim Hantieren oderÜben mit der Pistole nie auf Per-sonen. Pistole stets in eine siche-re Richtung halten.
– Berühren Sie beim Laden undEntladen, beim Ziehen und sonsti-gem Handhaben niemals den Ab -zug. Der Abzugsfinger ist grund -sätzlich am Abzugsbügel außenanzulegen. Der Abzug darf nurbe tätigt werden, wenn die Pistolezum Ziel zeigt.
– Beim Handhaben, Zerlegen, Rei-nigen und Zusammensetzen darfkeine Gewalt angewendet wer-den.
– Zerlegen Sie die Pistole nur so-weit, wie in dieser Anleitung be-schrieben.
– Tragen Sie beim Schießen immereine Schutzbrille. Beim Schießensind Ihre Augen durch Splitteroder ausgeworfene sowie vonWänden zurückprallende Patro-nenhülsen gefährdet.
– Tragen Sie beim Schießen immereinen Gehörschutz.
– Verwenden Sie nur fachgerechtlaborierte und unbeschädigte Pa-tronen mit dem richtigen Kaliber.
– Beachten Sie, dass beim Schie -ßen der Verschluss der Pistole mithoher Geschwindigkeit zurück-läuft. Halten Sie deshalb beimSchießen die Pistole so, dass sichIhre Hände nicht im Bereich desVerschlussweges befinden, umVerletzungen zu vermeiden.
– Achtung! Halten Sie beim Schie -ßen immer den Mündungsbereichfrei.
m Sicherheitshinweise zum Umgang mit Pistolen
3
– Verwahren Sie die Pistole ge trenntvon der Munition. Unbefugte (ins-besondere Kinder) dürfen keinenZugriff zur Pistole erhalten.
– Die ausgereifte Konstruktion derPistole bietet größtmöglicheHandhabungssicherheit.
– Die Pistole besitzt eine Fallsiche-rung, die den Zweck hat, eine un-beabsichtigte Schussauslösungbei Stoß und Fall zu verhindern.Dadurch ist ein Höchstmaß anFallsicherheit geboten. Eine abso-lute Fallsicherheit ist nicht erreich-bar.
– Außergewöhnliche Belastungen,wie harte Stöße oder Fallbean-spruchung können die Sicherheitbeeinträchtigen. Nach solchaußergewöhnlichen Vorkommnis-sen ist die Pistole vom Herstellerzu überprüfen.
– Heckler & Koch übernimmt keineHaftung für Vorfälle, die auf Nicht -beachtung dieser Anleitung,falsche Handhabung, Fahrlässig-keit, unsachgemäße Behandlung,unbefugten Teileaustausch odersonstige Eingriffe in die Pistolezurückzuführen sind.
– Diese Bedienungsanleitung ist Teilder Pistole und muss bei der Wei-tergabe der Pistole immer mitge-geben werden.
Zubehör
– Achten Sie bei der Verwendungvon Holstern darauf, dass sichdas Holster nach der Beschaffen-heit der Pistole zu richten hat undnicht umgekehrt die Pistole nachdem Holster.
– Die Führungsbahn des verwende-ten Holsters muss so beschaffensein, dass weder beim Hinein-stecken noch beim Herausziehender Pistole ein unbeabsichtigtesUmlegen des Sicherungshebelsmöglich ist.
– Achten Sie darauf, dass die Pisto-le im Holster jederzeit so gehaltenund gesichert wird, dass ein Her-ausfallen der Pistole ausgeschlos-sen ist.
– Unterziehen Sie Ihr Holster einerständigen Kontrolle, da sowohldas Alter, Waffenöl sowie Körper-wärme und längerer Gebrauchdes Holsters dessen Eigenschaf-ten negativ beeinflussen können.
– Bei schnellen und unkontrolliertenBewegungen, im Laufschritt so-wie bei allen Bewegungen, bei de-nen die Pistole im Holster einestarke Beschleunigung erfährt, istvom Träger der Pistole die Handschützend auf die im Holster be-findliche Pistole zu halten, da diePistole im Verhältnis zum Holstereine verhältnismäßig große spezi-fische Masse aufweist.
4

– When handling pistols specialcaution is necessary as positionand direction of the pistol can bechanged easily.
– Carefully read this operation ma-nual before handling the pistol.Only use the pistol if you have un-derstood the manual.
– Observe all notes regardinghandling and operation. Disregarding can cause dangerto life and limb.
– Do not handle the pistol in caseyou have consumed alcohol,drugs or medications, or if youfeel physically unwell.
– Before handling, in case of trou -bles and before cleaning it has tobe checked wether:
– the pistol is unloaded– (cartridge chamber free),– the barrel is free of– obstructions and– the magazine is empty.
– When giving or taking the pistolthe slide must always be open.
– Always treat the pistol as if it is lo-aded and ready to fire.
– Never point the pistol at anyonewhile handling or practise. Alwayspoint in a safe direction.
– Keep your finger off the triggerwhile loading, unloading, drawingor otherwise handling the pistol.Always place the trigger fingeragainst the trigger guard.
– The trigger may only be pulled ifyour sights are aligned on the tar-get.
– Never use force when handling,dis assembling, cleaning and as -sem bling the pistol.
– Disassemble the pistol only as faras described in this manual.
– Always wear eye protection whenusing the pistol. When firing, youreyes are endangered by ejectedcartridge cases or cartridge casesbounced off walls.
– Always wear hearing protectionwhen using the pistol.
– Only use factory loaded and un -damaged cartridges of the correctcaliber.
– Mind that during firing the pistol’sslide moves back with high veloci-ty. Hold the pistol in such a waythat your hands are away from therearward moving slide, in order toavoid injuries.
– Do not grasp over the muzzle andmind that the muzzle area is freewhen firing.
– Store the pistol separately fromam munition and beyond the reachof unauthorized persons (espe -cial ly children).
– The proven P8/P8 A1 design en-sures maximum possible safetyfor the shooter.
– The P8/P8 A1 pistol is equippedwith a drop safety in order to pre-vent accidental shots in case ofshocks or drops. This provides anutmost possible degree of dropsafety. An absolute drop safetycannot be achieved.
m Safety notes for the handling of pistols
5

– Extraordinary conditions as e.g.bad shocks or heavy drops mayadversely affect the safety. Aftersuch events the pistol must bechecked by the manufacturer.
– Heckler & Koch do not assumeany liability for events due to dis-regarding this manual, wronghandling, negligence, impropertreatment, unauthorized part ex -change and other manipulationsin, with or at the pistol.
– This operator’s manual is includedin the scope of supply of the pistoland always has to be passed onalong with the pistol.
Accessories
– If you use holsters, mind that theholster must suit the pistol andnot vice versa.
– The holster’s pistol guide ele-ments must be configured in sucha way that an accidental actuationof the safety lever is preventedwhen the pistol is drawn from orinserted into the holster.
– Always check your holster, as ag-eing material, gun oil, body tem-perature or extended use of theholster may adversely affect itscharacteristics.
– Always secure the pistol in theholster with your hand when youhave to run or in case you carryout fast and uncontrolled move-ments. The pistol’s mass is relati-vely high as compared to the hol-ster mass which may cause thepistol to drop out of the holster insuch cases.
6
Vorbemerkung
1. Einwandfreie Funktion und langeLebensdauer der Pistole P8/P8 A1können nur durch ordnungsgemäßeHandhabung, Bedienung und Pfle-ge unter Beachtung der in dieserAnleitung enthaltenen Anweisungensichergestellt werden.
2. Die Angaben „rechts“, „links“,„vorn“ und „hinten“ sind bezogenauf die Lage der Pistole in Schuss -richtung gesehen.
3. Jede Beschreibung von Waffen-teilen und jede Arbeit ist im allge-meinen nur einmal aufgeführt. Jenach Umfang wird deshalb ggf. aufbereits vorhandene Beschreibungvon Pistolenteilen und Arbeiten inanderen Abschnitten hingewiesen.
4. Soweit keine besonderen Ein-bauhinweise gegeben werden, er-folgt das Zusammenbauen in um-gekehrter Reihenfolge des Zerle-gens.
5. Bitte teilen Sie Änderungs- bzw.Ergänzungsvorschläge zu dieserBeschreibung der Firma Heckler &Koch GmbH mit.
6. Verwenden Sie nur OriginalHK- Ersatzteile.
Bei Verwendung anderer Teile er -lischt die Gewährleistung. Bei Be -stellung von Ersatzteilen geben Siebitte Positions- und Identnummersowie die Benennung der erforderli-chen Teile an.
7

Preliminary note
1. A perfect function and long life ofthe pistol P8/P8 A1 can only be en-sured by a correct handling, opera-tion and maintenance subject to theinstructions of this manual.
2. The indications “right”, “left”, “atthe front” and “at the back” are re-late to the shooter s point of viewwhen he holds the pistol in hishands and looks as it as when fi-ring.
3. Each description of weapon partsand each work is only specifiedonce. Therefore, according to theextend, there is a reference to already existing descriptions ofweapon parts and works in othersections.
4. Unless there are no particular assembly notes, assembly takesplace in reverse order than the dis -assembly.
5. Please inform Heckler & KochGmbH about all desirable modifica-tions respectively supplementarysuggestions to this manual.
6. Use only original HK-SpareParts.
Otherwise the manufacturer liabilitywill be no longer valid.
When ordering spare parts pleaseaddress position and identificationnumbers as well as the designation.
8
Allgemeines
Die Pistole P8/P8 A1, Kal. 9 mm x19, ist eine Selbstladepistole mitverriegeltem und gepuffertemVerschluss system. Griffstück undMagazin sind aus hochwertigem,faserverstärktem Kunststoff gefer-tigt.
Die Pistole hat Normal- und Spann-abzug (SA/DA).
Das Magazin fasst 15 Patronen.
Durch die unter dem Rohr liegendemechanische Puffereinrichtung wirddie Impulsübertragung auf dasGriffstück gedämpft. Daraus resul-tiert eine außergewöhnlich hohe Lebensdauer der Pistolenteile. DiePuffereinrichtung verringert dieKraft spitzen beim Entriegeln desRoh res und bei der Verschlussum-kehr und vermindert somit dasStoßempfinden an der Hand desSchützen.
Der Magazinhalter ist beidseitig bedienbar. Im Griffstück ist eineMontageschiene zur Aufnahme vonZielgeräten integriert. Die Visierungmit Kontrastpunkten ermöglichteine schnelle und genaue Zielerfas-sung. Die ergonomisch gestalteteAußenform und die griffgünstig an-gebrachten Bedienelemente lassenden Schützen schnell mit der Pisto-le vertraut werden.
Die Pistole P8/P8 A1 läßt sich zurReinigung und Pflege ohne Werk-zeug leicht in die Hauptbaugruppenzerlegen.
Die Pistole P8/P8 A1 Combat hatanstelle des kombinierten Siche-rungs-/Entspannhebels nur einenEntspannhebel ohne Sicherungs-funktion.
Alle anderen Bedienteile sind iden-tisch mit der Pistole P8/P8 A1.
Die Abbildungen in der Beschrei-bung zeigen die Pistole P8 mitNormal- und Spannabzug (SA/DA)und kombiniertem Sicherungs-/Entspannhebel an der linken Griff-seite.
9
General
The P8/P8 A1-pistol, caliber 9 mmx 19, is a selfloading pistol withlocked and buffered breech system.The grip and magazine is made ofhigh- grade fiber-reinforced plastic.
The pistol is provided with a Single-and Double Action Trigger (SA/DA).
It has a magazine capacity of 15 cartridges.
By the mechanical recoil reductionsystem, located below the barrel,the recoil force to the grip is re -duced, thus greatly extending thelife expectancy of the weaponparts. The recoil reduction systemdampens the impact of the barreland slide on the grip during un -locking and when the slide reachesit’s most rearward position. This reduces the recoil forces, the felt recoil to the shooter’s hand and theload on the weapon parts.
The magazine release can be ac -tuated ambidextrous. A mountinggroove for fitting targeting devicesis incorporated into the grip.Sighting with dots allows a quickand precise target acquisition. Dueto the ergonomically designed outerform and the operating controls, lo-cated easily to actuate, the shooterwill become familiar with the weap -on soon.
The pistol P8/P8 A1 can be easilydis assembled into the main compo-nents for cleaning and maintenancewithout any tool.
The P8/P8 A1 Combat-pistol is avariant which features a decockinglever only instead of the conventio-nal decocking safety lever.
The illustrations in the manualshow the Pistol P8 with SingleAction and Double Action Trigger(SA/DA) and combined safety/ -decocking lever on the left side ofthe grip.
10

Technische DatenMaße:Kaliber . . . . . . . . . . . . . . . . . . . . . . . . . . . . . . . . . . . . . . . . . . . . . 9 mm x 19Gesamtlänge . . . . . . . . . . . . . . . . . . . . . . . . . . . . . . . . . . . . . . . . . . 194 mmRohrlänge. . . . . . . . . . . . . . . . . . . . . . . . . . . . . . . . . . . . . . . . . . . . . 108 mmVisierlinie . . . . . . . . . . . . . . . . . . . . . . . . . . . . . . . . . . . . . . . . . . . . . 158 mmDrallänge . . . . . . . . . . . . . . . . . . . . . . . . . . . . . . . . . . . . . . . . . . . . . 250 mm Gesamthöhe. . . . . . . . . . . . . . . . . . . . . . . . . . . . . . . . . . . . . . . . . . . 136 mmVerschlussbreite . . . . . . . . . . . . . . . . . . . . . . . . . . . . . . . . . . . . . . . . 29 mmGriffstückbreite mit Sicherungshebel . . . . . . . . . . . . . . . . . . . . . . . 32 mm
Gewichte:Pistole ohne Magazin 720 gMagazin, leer 50 g
Sonstige Daten:Abzugskraft Normalabzug (Single Action) . . . . . . . . . . . . . . . . . . . ca. 20 NAbzugskraft Spannabzug (Double Action) . . . . . . . . . . . . . . . . . . . ca. 50 NAbzugsweg Normalabzug (Single Action) . . . . . . . . . . . . . . . . . . ca. 6 mmAbzugsweg Spannabzug (Double Action) . . . . . . . . . . . . . . . . . ca. 11 mmMagazinkapazität . . . . . . . . . . . . . . . . . . . . . . . . . . . . . . . . . . . 15 PatronenVisier . . . . . . . . . . . . . . . . . . . . . . Offenes Balkenvisier mit Kontrastpunkten
Technical dataDimensions:Caliber . . . . . . . . . . . . . . . . . . . . . . . . . . . . . . . . . . . . . . . . . . . . . 9 mm x 19Total Length . . . . . . . . . . . . . . . . . . . . . . . . . . . . . . . . . . . . . . . . . . . 194 mmBarrel Length . . . . . . . . . . . . . . . . . . . . . . . . . . . . . . . . . . . . . . . . . . 108 mmSight Radius. . . . . . . . . . . . . . . . . . . . . . . . . . . . . . . . . . . . . . . . . . . 158 mmTwist Length. . . . . . . . . . . . . . . . . . . . . . . . . . . . . . . . . . . . . . . . . . . 250 mmTotal Height . . . . . . . . . . . . . . . . . . . . . . . . . . . . . . . . . . . . . . . . . . . 136 mmWidth of Slide . . . . . . . . . . . . . . . . . . . . . . . . . . . . . . . . . . . . . . . . . . 29 mmWidth of Grip . . . . . . . . . . . . . . . . . . . . . . . . . . . . . . . . . . . . . . . . . . . 32 mm
Weights:Weight without magazine. . . . . . . . . . . . . . . . . . . . . . . . . . . . . . . . . . . 720 gMagazine empty. . . . . . . . . . . . . . . . . . . . . . . . . . . . . . . . . . . . . . . . . . . 50 g
Other DataTrigger Pull, Single Action . . . . . . . . . . . . . . . . . . . . . . . . . . . . approx. 20 NTrigger Pull, Double Action . . . . . . . . . . . . . . . . . . . . . . . . . . . approx. 50 NTrigger Travel, Single Action. . . . . . . . . . . . . . . . . . . . . . . . . . approx. 6 mmTrigger Travel, Double Action . . . . . . . . . . . . . . . . . . . . . . . . approx. 11 mmMagazine capacity . . . . . . . . . . . . . . . . . . . . . . . . . . . . . . . . . . 15 cartridgesSight . . . . . . . . . . . . . . . . . . . . . . . . . . . . . . . . . Open Post Sight with dots
11
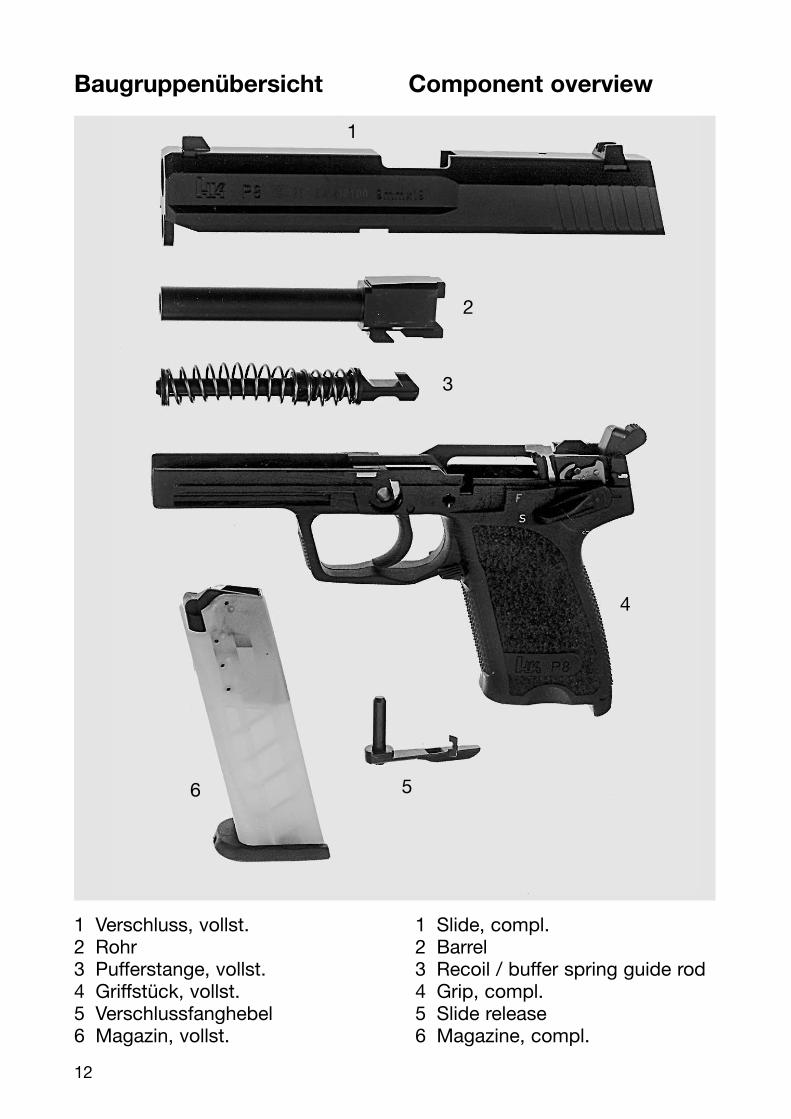
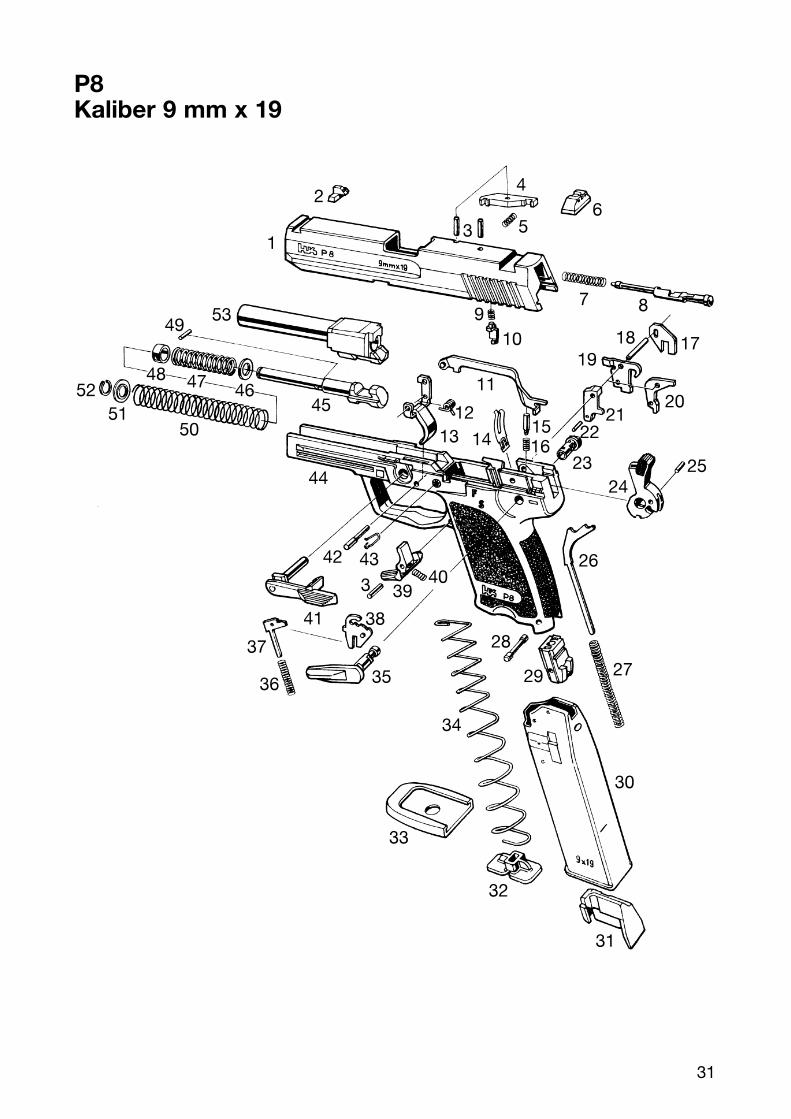
Baugruppenübersicht Component overview
1
2
3
4
56
1 Verschluss, vollst. 1 Slide, compl.2 Rohr 2 Barrel3 Pufferstange, vollst. 3 Recoil / buffer spring guide rod4 Griffstück, vollst. 4 Grip, compl.5 Verschlussfanghebel 5 Slide release 6 Magazin, vollst. 6 Magazine, compl.
12
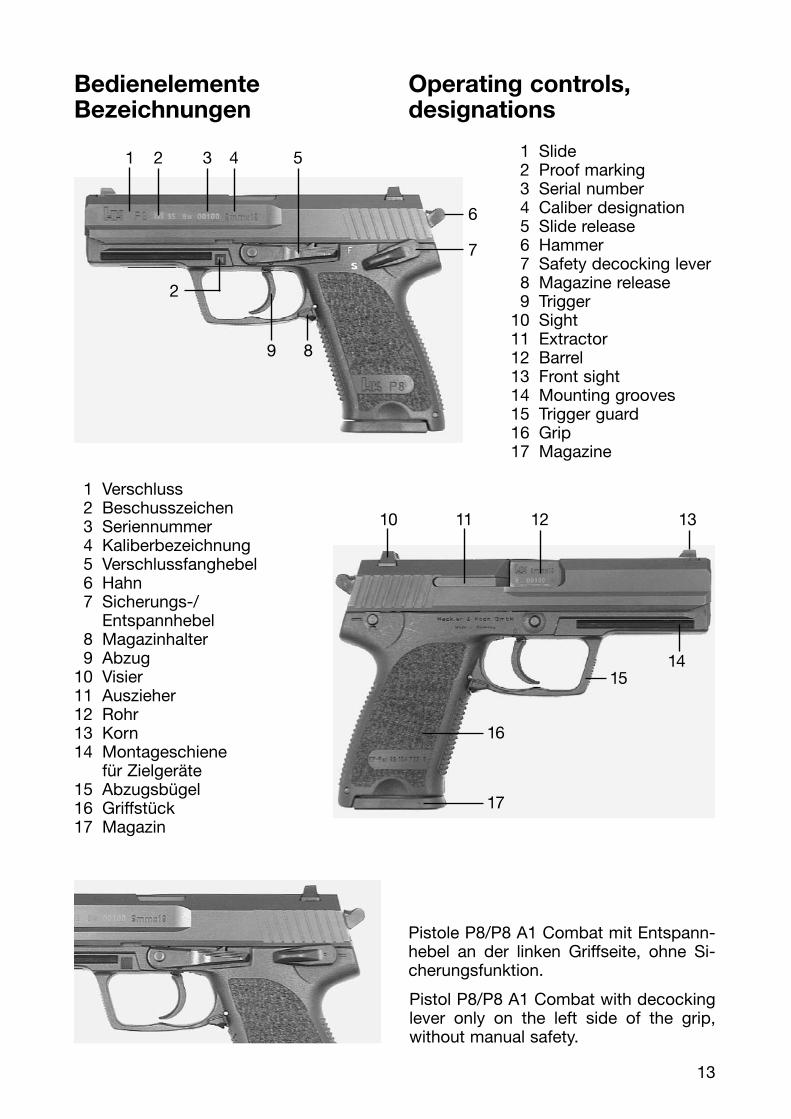
Bedienelemente Operating controls,Bezeichnungen designations
1 Slide2 Proof marking3 Serial number4 Caliber designation5 Slide release6 Hammer7 Safety decocking lever8 Magazine release9 Trigger
10 Sight11 Extractor12 Barrel13 Front sight14 Mounting grooves15 Trigger guard16 Grip17 Magazine
1 Verschluss2 Beschusszeichen3 Seriennummer4 Kaliberbezeichnung5 Verschlussfanghebel6 Hahn7 Sicherungs-/
Entspannhebel8 Magazinhalter9 Abzug
10 Visier11 Auszieher12 Rohr13 Korn14 Montageschiene
für Zielgeräte15 Abzugsbügel16 Griffstück17 Magazin
Pistole P8/P8 A1 Combat mit Entspann-hebel an der linken Griffseite, ohne Si-cherungsfunktion.
Pistol P8/P8 A1 Combat with decockinglever only on the left side of the grip,without manual safety.
1 2 3 4 5
6
7
2
9 8
10 11 12 13
1415
16
17
13

Funktion
Nach dem Zünden der Patrone erhältdie formschlüssig verriegelte Rohr-/Ver -schluss gruppe als Reaktion auf die Ge-schossbewegung einen Impuls und be-wegt sich nach hinten. Nach kurzemRücklauf wird das Rohr am Verriegelungs-block nach unten gezogen und entriegelt.Der Verschluss läuft weiter zurück, ziehtund wirft die Patronenhülse aus undspannt den Hahn. Die gespannteSchließfeder drückt den Verschluss wie-der nach vorn. Dabei wird eine Patroneaus dem Magazin mitgenommen.Kurz vor Ende des Verschlussvorlaufeswird das Rohr wieder nach oben ge -drückt und verriegelt.Die mechanische Puffereinrichtung wirktzweifach: Der Entriegelungsstoß wird abgedämpftund der zurücklaufende Verschluss wirdam Umkehrpunkt abgebremst.Dabei werden die Kraftspitzen verringert,das Rückstoßempfinden an der Handdes Schützen wird vermindert und dieBelastung der Pistolenteile erheblich re-duziert.
Function
After ignition of the cartridge, the pres -sure developed by the propellant gasesforces the slide and the barrel assemblyto the rear. After removing the lockingblock is moved down wards and disen -gaged.The slide continues rearward, the slideextracts and ejects the fired cartridgecase and cocks the hammer. The com-pressed recoil spring pushes the slideforward taking along a cartridge from themagazine.During of forward movement the barrel ispushed upwards and locked.The mechanical recoil reduction systemhas two effects:It dampens the impact of the barrel andslide on the grip during unlocking andwhen the slide reaches it’s most rear-ward position.This reduces the recoil forces, the felt re-coil to the shooter’s hand and the loadon the pistol parts.
Pistole geladen, entspannt und gesichertPistol loaded, decocked and put on safe
14
Prüfungen
Prüfen vor GebrauchStellen Sie sicher, dass die Pistole vorGebrauch – gesichert ist– entladen ist (Patronenlager frei)– das Rohr frei ist von Fremdkörpern.
Prüfen Sie die Pistole vor Gebrauch aufGängigkeit und Funktion.
Prüfen nach GebrauchStellen Sie sicher, dass die Pistole nachGebrauch– gesichert ist– entladen ist (Patronenlager frei)– das Rohr frei ist von Fremdkörpern,– das Magazin leer ist.
Funktionsprüfung Verschluss mitGriffstück– Magazin entnehmen
– Verschluss bis zum Anschlag zurück-ziehen. Nach Loslassen des Verschlus-ses muss er durch die Schließfeder wie-der in seine vordere Stellung gebrachtwerden.
– Sicherungshebel nach unten drücken.Der Hahn muss sich aus der gespanntenStellung lösen und entspannen.
– Leeres Magazin einsetzen.
– Verschluss bis zum Anschlag zurück-ziehen. Der Verschluss muss in hintererStellung gehalten werden.
– Magazin entnehmen.
– Verschluss etwas zurückziehen. NachLoslassen des Verschlusses muss erdurch die Schließfeder wieder in seinevordere Stellung gebracht werden.
– Leeres Magazin einsetzen.
– Verschluss bis zum Anschlag zurück-ziehen. Der Verschluss muss in hintererStellung gehalten werden.
– Verschlussfanghebel nach unten drü -cken. Der Verschluss muss durch dieSchließfeder wieder in seine vordereStel lung gebracht werden.
Funktionsprüfung Abzugs- undSicherungseinrichtung– Hahn bis zum Anschlag spannen.Der Hahn muss in hinterster Stellung ge - halten werden.– Pistole entsichern und Abzug betäti-gen. Der Hahn muss auslösen und nachvorne schnellen.– Pistole sichern. Hahn bis zum Anschlagspannen. Bei gesicherter Pistole Abzugbis zum Anschlag zurückziehen.Dabei darf der Abzug den Hahn nichtaus lösen. – Pistole mittels Sicherungs-/Entspann-hebel entspannen. Hahn nach vorne drü -cken, dabei muss der Hahn vor Erreichendes Schlagbolzens gesperrt werden.– Pistole entsichern. Abzug betätigenund gleichzeitig Hahn nach vorne drü -cken. Der Hahn muss frei sein und denSchlagbolzen eindrücken können.
Prüfung des Schlagbolzens aufGängigkeit und Sicherung– Verschluss abnehmen wie auf Seite 25beschrieben.– Schlagbolzensicherung (Teileliste Pos.10) ganz eindrü cken, dann Schlagbolzenmittels Putzstange ganz nach vornedrücken. Der Schlagbolzenvorstand sollte dabeimin destens 1,55 mm betragen. Schlagbolzen und Schlagbolzensiche-rung müssen anschlie ßend leichtgängigin ihre Ausgangslage zurückfedern. Der Schlagbolzen darf bei nicht einge-drückter Schlagbolzensicherung nicht inZündposition kommen.Ist der Schlagbolzenvorstand zu geringoder der Schlagbolzen schwergängig, somuss die Schlagbolzenführung gereinigtwerden.
15
Checking
Checking before useMake sure that before use the pistol is– put on safety– unloaded (cartridge chamber free) and– that the barrel is free of obstructions.Check the pistol for proper condition andtroublefree functioning.
Checking after usageMake sure that after usage the pistol is– set at safe– unloaded (cartridge chamber free) and– that the barrel is free of obstructions– that the magazine is empty.
Functional tests of slide with grip– Remove magazine.– Retract the slide until stop. After releas -ing it has to be positioned in its front position by the recoil spring.– Push safety lever further downwards.The hammer has to be released from itscocked position and decocked.– Insert an empty magazine.– Retract the slide until stop. The slidehas to be kept in rear position.– Remove magazine.– Fully retract the slide. After releasingthe slide the recoil spring must fully moveit to its forward position.– Insert an empty magazine.– Retract the slide until stop. The slidehas to be kept in rear position.– Push slide release downwards. The re-coil spring must fully move the slide to itsforward position.
Functional tests of the triggerand the safety lever– Cock the hammer. The hammer muststay in its cocked position.– Set the safety lever at “Fire” and pullthe trigger. The hammer has to releaseand snap forward.– Set the safety lever at “Safe”. Cock thehammer and pull the trigger. It must notbe possible to entirely pull the trigger andthe hammer has to remain cocked.– Uncock the hammer by pressing downthe decocking lever. Push the hammerforward. It has to be locked beforereach ing the firing pin.– Set the safety lever at “Fire”. Pull thetrigger and at the same time push thehammer forward. The hammer must befree and depress the firing pin.
Testing the smooth operation ofthe safety and of the firing pin – Remove the slide as described onpage 26.– Entirely depress the firing pin safety,(Fig. 10), then push the firing pin entirelyforward by means of the cleaning rod.The firing pin protrusion should be min.1.55 mm. Afterwards the firing pin and firing pin safety must smoothly springback into the initial position.Tip of the firing pin should not be visibleon the face of the slide when firing pinsafety is not activated.If the firing pin protrusion is too small orthe firing pin is sluggish, the firing pinhole in the slide must be cleaned.
16
Handhabung und Bedienung
Grundsätze der Handhabung undBedienungDie Pistole ist immer so zu handhaben,als sei sie geladen und feuerbereit.
Verboten ist insbesondere:– Spielerisches Handhaben mit der Pi-stole, besonders das Zielen auf Perso-nen.– Anwendung von Gewalt beim Hantie-ren, beim Zerlegen und Reinigen.– Nach außergewöhnlichen Belastungenwie Stoß- oder Fallbeanspruchungen istdie Pistole vom Hersteller zu überprüfen.Hinweis: Die Pistole P8/P8 A1, Kal. 9mm x 19 ist für alle Munitionstypen ent-sprechend SAAMI und C.I.P. freigege-ben.
Vorbereiten zum Schießen– Pistole sichern.– Rohr mit trockenem Reinigungsdocht(handelsübliches Reinigungsgerät) ent-ölen und prüfen, ob es frei von Fremd-körpern ist.– Verschluss und Sicherung auf Funktionprüfen.– Magazin auf richtiges Einrasten prüfen.
Laden– Pistole sichern.– Gefülltes Magazin in das Griffstück ein-führen, bis der Magazinhalter einrastet.Die Pistole ist teilgeladen.– Verschluss bis zum Anschlag zurück-ziehen und wieder vorschnellen lassen. Die Pistole ist geladen, gespannt undgesichert.
Schießen mit Normalabzug(Single Action)Die Pistole ist geladen, gespannt und ge-sichert.
Zum Schießen – Sicherungshebel nach oben auf „F“schwenken (entsichern).– Abzug betätigen. Der gespannte Hahnwird freigegeben und die im Patronenla-ger befindliche Patrone wird durch denSchlagbolzen gezündet.
Hinweis:Die Pistole P8/P8 A1 Combat hat kei-ne aussenliegende Sicherung. Des-halb entfällt das Sichern und Entsi-chern von Hand.
17
Handling and operation
Principles of handling and operationAlways handle the pistol as if it is loadedand ready to fire.
In particular the following is forbidden:– playing with the pistol, especially aim -ing at anyone– using force while handling, disassem -bling and cleaning.– The pistol must be checked by the ma-nufacturer in case it has been subjectedto extraordinary conditions like e.g.shocks or heavy drops.Note: The P8/P8 A1 pistol, caliber 9 mmx 19 is approved for all ammunition typesac cord ing to SAAMI and C.I.P.
Preparation for firing– Set the safety lever at “Safe”.– Remove the oil from the barrel by usinga dry cleaning rag (commercial cleaningmaterial) and check that it is free of ob-structions.– Check the pistol for proper conditionand troublefree functioning.– Check magazine for correct engage-ment.
Loading– Set the safety lever at “Safe”.– Insert the filled magazine into the gripuntil the magazine release is engaged.The pistol is partially loaded.– Retract the slide until stop and releaseit.The pistol is loaded, cocked and thesafety lever is set at “Safe”.
Firing in Single Action ModeThe pistol is loaded, cocked and thesafe ty lever is set at “Safe”.
For firing– Move the safety lever upward to “Fire”(disengaging).– Pull the trigger. The cocked hammer isreleased and the cartridge in the cham-ber is ignited by the firing pin.
Note:The P8/P8 A1 Combat-pistol is withoutexternal safety which is why it doesnot require the manual setting/unset-ting of the safety.
18
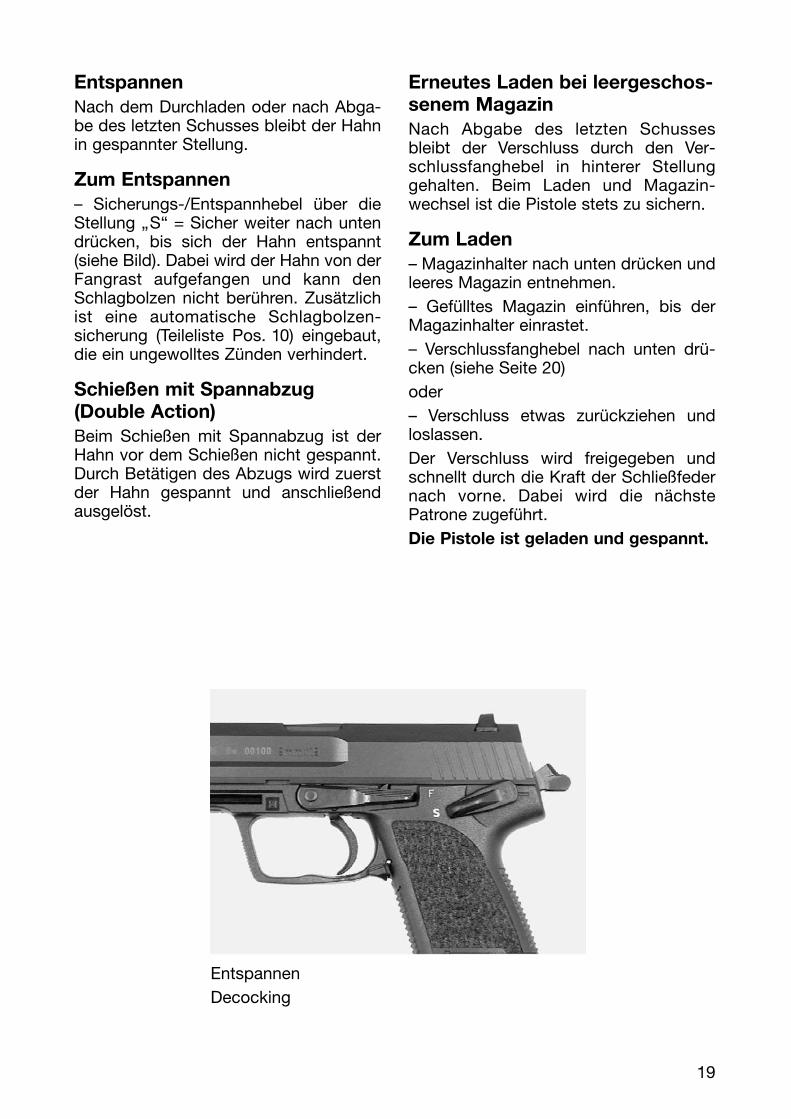
EntspannenNach dem Durchladen oder nach Abga-be des letzten Schusses bleibt der Hahnin gespannter Stellung.
Zum Entspannen– Sicherungs-/Entspannhebel über dieStellung „S“ = Sicher weiter nach untendrücken, bis sich der Hahn entspannt(siehe Bild). Dabei wird der Hahn von derFangrast aufgefangen und kann denSchlagbolzen nicht berühren. Zusätzlichist eine automatische Schlagbolzen -sicherung (Teileliste Pos. 10) eingebaut,die ein ungewolltes Zünden verhindert.
Schießen mit Spannabzug(Double Action)Beim Schießen mit Spannabzug ist derHahn vor dem Schießen nicht gespannt.Durch Betätigen des Abzugs wird zuerstder Hahn gespannt und anschließendausgelöst.
EntspannenDecocking
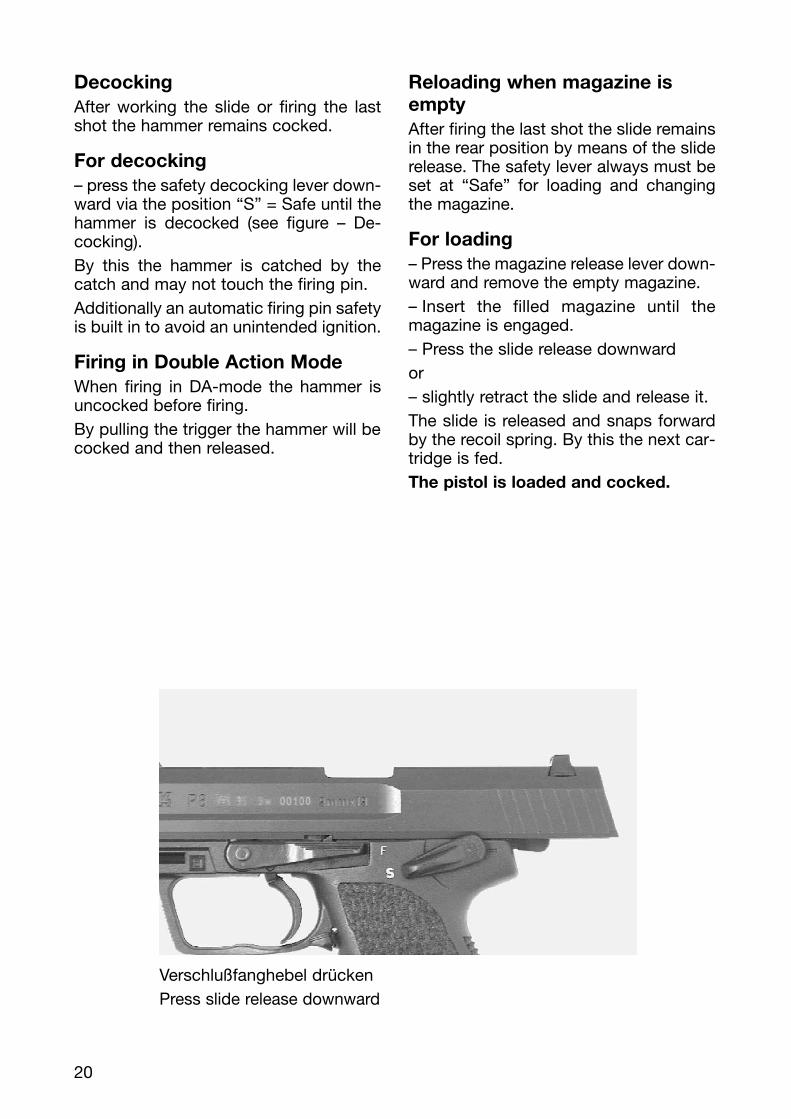
Erneutes Laden bei leergeschos-senem MagazinNach Abgabe des letzten Schussesbleibt der Verschluss durch den Ver-schlussfanghebel in hinterer Stellung gehalten. Beim Laden und Magazin-wechsel ist die Pistole stets zu sichern.
Zum Laden– Magazinhalter nach unten drücken undleeres Magazin entnehmen.– Gefülltes Magazin einführen, bis derMagazinhalter einrastet.– Verschlussfanghebel nach unten drü -cken (siehe Seite 20)oder– Verschluss etwas zurückziehen undlos lassen.Der Verschluss wird freigegeben undschnellt durch die Kraft der Schließfedernach vorne. Dabei wird die nächste Patrone zugeführt.Die Pistole ist geladen und gespannt.
19
Decocking After working the slide or firing the lastshot the hammer remains cocked.
For decocking– press the safety decocking lever down-ward via the position “S” = Safe until thehammer is decocked (see figure – De-cocking). By this the hammer is catched by thecatch and may not touch the firing pin.Additionally an automatic firing pin safetyis built in to avoid an unintended ignition.
Firing in Double Action ModeWhen firing in DA-mode the hammer isuncocked before firing. By pulling the trigger the hammer will becocked and then released.
Verschlußfanghebel drückenPress slide release downward
Reloading when magazine isemptyAfter firing the last shot the slide remainsin the rear position by means of the sliderelease. The safety lever always must beset at “Safe” for loading and changingthe magazine.
For loading– Press the magazine release lever down - ward and remove the empty magazine.– Insert the filled magazine until themaga zine is engaged.– Press the slide release downwardor– slightly retract the slide and release it.The slide is released and snaps forwardby the recoil spring. By this the next car-tridge is fed.The pistol is loaded and cocked.
20
Entladen der Pistole– Pistole sichern!– Magazinhalter nach unten drücken undMagazin entnehmen.– Verschluss bis zum Anschlag nach hin-ten ziehen und Verschlussfanghebelnach oben drücken.– Überzeugen, dass sich keine Patronemehr im Patronenlager befindet.– Verschluss durch Niederdrücken desVerschlussfanghebels oder durch Zu -rückziehen freigeben und vorschnellenlassen.
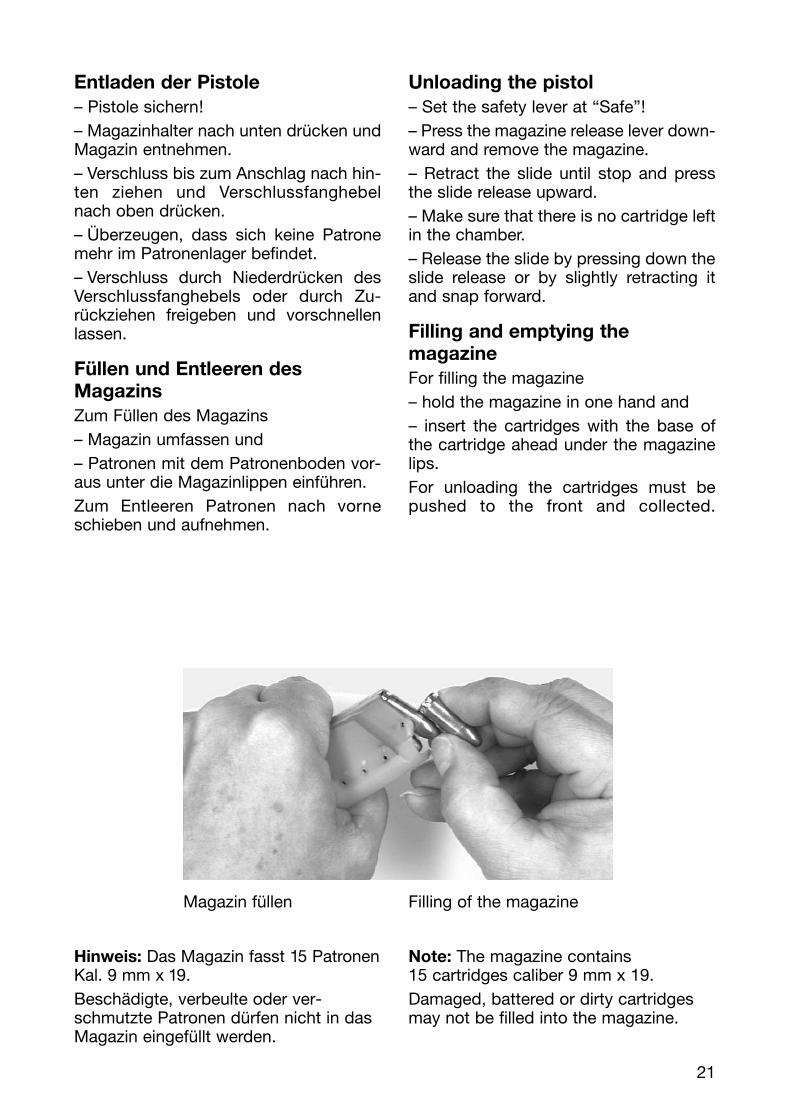
Füllen und Entleeren des MagazinsZum Füllen des Magazins– Magazin umfassen und – Patronen mit dem Patronenboden vor-aus unter die Magazinlippen einführen.Zum Entleeren Patronen nach vorneschie ben und aufnehmen.
Magazin füllen
Hinweis: Das Magazin fasst 15 PatronenKal. 9 mm x 19.Beschädigte, verbeulte oder ver-schmutzte Patronen dürfen nicht in dasMagazin eingefüllt werden.
Unloading the pistol– Set the safety lever at “Safe”!– Press the magazine release lever down-ward and remove the magazine.– Retract the slide until stop and pressthe slide release upward.– Make sure that there is no cartridge leftin the chamber.– Release the slide by pressing down theslide release or by slightly retracting itand snap forward.
Filling and emptying the magazineFor filling the magazine– hold the magazine in one hand and– insert the cartridges with the base ofthe cartridge ahead under the magazinelips.For unloading the cartridges must bepushed to the front and collected.
Filling of the magazine
Note: The magazine contains 15 cartridges caliber 9 mm x 19.Damaged, battered or dirty cartridgesmay not be filled into the magazine.
21
Pflege
Pflegemittel und GeräteZum Reinigen und Pflegen der Pistolewerden verwendet:– handelsübliches Waffenreinigungsgerätfür Kal. 9 mm.– Reinigungsdochte und Putzlappen,– chlor- und säurefreie Reinigungs- undKonservierungsmittel.Reinigen Sie nicht mit – Metallgegenständen,– Kunststoffen, z. B. Nylon, Perlon o. ä.,– Wasser.
PflegearbeitenHinweis: Regelmäßige Reinigung undPflege sowie Inspektion erhalten dieFunktionssicherheit der Pistole und er-höhen die Lebensdauer.
NormalreinigungDie Normalreinigung ist nach jedemSchießen durchzuführen.– Pistole sichern und prüfen, ob das Pa-tronenlager frei ist.– Pistole zerlegen wie auf Seite 25 be -schrieben.– Verschmutzte Teile und Flächen anGriffstück und Verschluss mit Reini-gungsbürste und Putzlappen reinigenund anschließend leicht einölen.– Rohr mit ölgetränkter Reinigungsbürstemehrfach durchziehen, danach mit sau-beren Reinigungsdochten durchziehenund anschließend innen und außen leichteinölen.– Magazinlippen und Zubringer reinigenund leicht einölen.– Pistole wieder zusammensetzen wieauf Seite 27 beschrieben.– Nach dem Reinigen und Zusammen-bauen Pistole auf Gängigkeit und ein-wandfreie Funktion prüfen.
HauptreinigungDie Hauptreinigung sollte nach ca.1000 Schuss oder einmal pro Jahrdurchgeführt werden.– Normalreinigung durchführen.
Zusätzlich– Magazin zerlegen und Magazingehäu-se innen sowie Außenflächen des Zubrin-gers reinigen und leicht einölen. Zum Zerlegen des Magazins Einsatz imMagazinboden eindrücken, Magazinbo-den nach vorne abziehen und Magazin-teile entnehmen.– Schlagbolzen auf Gängigkeit prüfen(siehe Seite 15) und ggf. Schlagbolzen-führung reinigen.– Pistole und Magazin wiederzusammensetzen.– Nach dem Reinigen und Zusammen-bauen Pistole auf Gängigkeit und ein-wandfreie Funktion prüfen.
22

Cleaning and Maintenance
Cleaning materials and kitsFor cleaning and maintenance of the pis -tol the following is necessary:– commercial weapon cleaning kit for caliber 9 mm,– cleaning pull-throughs and rags,– cleaning solvent and conserving agentswithout chlorine or acids.Do not clean with– objects made of metal,– plastics, e.g. Nylon, Perlon or some-thing similar,– water.
Cleaning workNote: A regular checking, cleaning andmaintenance keeps the functional safetyof the pistol and increases the servicelife.
Normal cleaningThe normal cleaning should be perfor-med after each firing.– Set the pistol at safe and make surethat it is unloaded (no cartridge in thechamber).– Disassemble the pistol as described onpage 26.– Clean fouled parts and surfaces on thegrip and the slide with a cleaning brushand rags and then lubricate them lightly.– Moisten a cleaning brush with oil andrepeatedly pass it through the barrel,then pass pure cleaning pull-throughsthrough and subsequently lubricate theexterior and interior of the barrel.– Clean the magazine lips and followerand slightly lubricate them.– Reassemble the pistol as described onpage 28.– After cleaning and assembly check thepistol for proper condition and trouble-free functioning.
Major cleaningThe major cleaning should be per -formed after approx. 1000 rounds oronce every twelve months.– Perform the normal cleaning.
Additionally– Disassemble the magazine. For dis -assembling press magazine locking platedown through the hole of the magazinefloor plate and push magazine floor plateforward with your thumb. Remove maga-zine components.Clean and lubricate slightly the magazinehousing inside and the external surfacesof the follower.– Check the firing pin for smooth opera-tion (see page 16) and clean firing pinhole inside the slide.– Reassemble the pistol and the maga-zine.After cleaning and assembly check thepistol for proper condition and trouble-free functioning.
23

Visierung, Justierung
Die Visierung besteht aus Visier und Korn.Sie ist mit dauerhaften Kontrastpunktenversehen und ermöglicht dem Schützeneine schnelle Zielerfassung auch unterungünstigen Lichtverhältnissen.
Justieren nach der Seite Die Justierung nach der Seite erfolgtdurch seitliches Verschieben des Visiersund/oder des Korns mittels leichtemHammer und Holzstück oder Kunst-stoffbolzen.
Justieren nach der Höhe Die Justierung nach der Höhe erfolgtdurch Auswechseln des Korns mit ver-schiedenen Kornhöhen.Die jeweilige Kornhöhe ist auf der Unter-seite des Korns eingraviert.
Sighting, adjustment
The sighting consists of the rear sightand the front sight.It is equipped with durable dots and ena -bles the shooter a fast target acquisi tioneven under unfavourable lighting condi -tions.
Horizontal adjustmentThe horizontal adjustment takes place byshifting the rear sight and/or the frontsight to the side by means of a light ham-mer and a wooden piece or plastic bolts.
Vertical adjustment For the vertical adjustment the front sightis replaced. There are different heights ofthe front sight available. The height of the front sight is indicatedon the underside.
24
Zerlegen der Pistole
Zum Reinigen wird die Pistole zerlegt.
m Vor dem Zerlegen ist sicherzu-stellen, dass das Magazin leerund das Patronenlager frei ist.
Die Pistole wird ohne Werkzeug zerlegtund zusammengebaut. Jede Gewaltan-wendung ist zu vermeiden.Die Pistole darf nicht weiter zerlegtwerden als nachfolgend beschrieben.
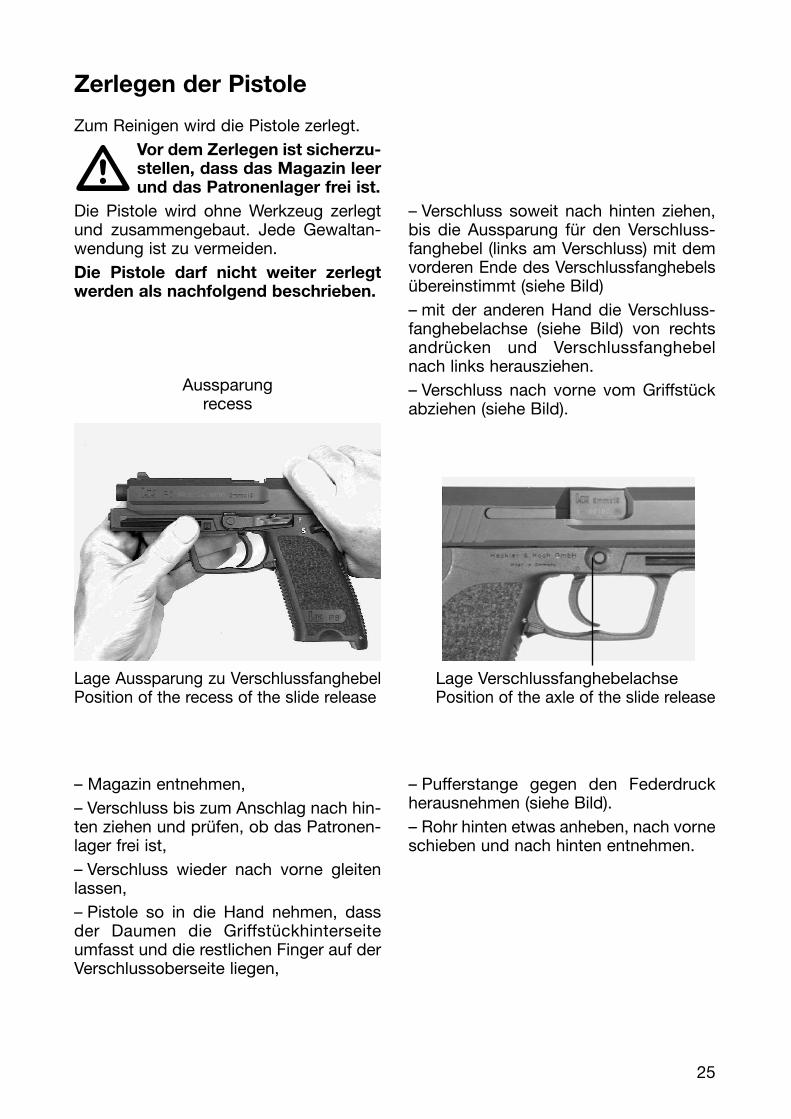
Aussparungrecess
Lage Aussparung zu VerschlussfanghebelPosition of the recess of the slide release
– Magazin entnehmen, – Verschluss bis zum Anschlag nach hin-ten ziehen und prüfen, ob das Patronen-lager frei ist,– Verschluss wieder nach vorne gleitenlassen,– Pistole so in die Hand nehmen, dassder Daumen die Griffstückhinterseiteumfasst und die restlichen Finger auf derVerschlussoberseite liegen,
– Verschluss soweit nach hinten ziehen,bis die Aussparung für den Verschluss -fanghebel (links am Verschluss) mit demvorderen Ende des Verschlussfanghebelsübereinstimmt (siehe Bild)– mit der anderen Hand die Verschluss -fanghebelachse (siehe Bild) von rechtsandrücken und Verschlussfanghebelnach links herausziehen.– Verschluss nach vorne vom Griffstückabziehen (siehe Bild).
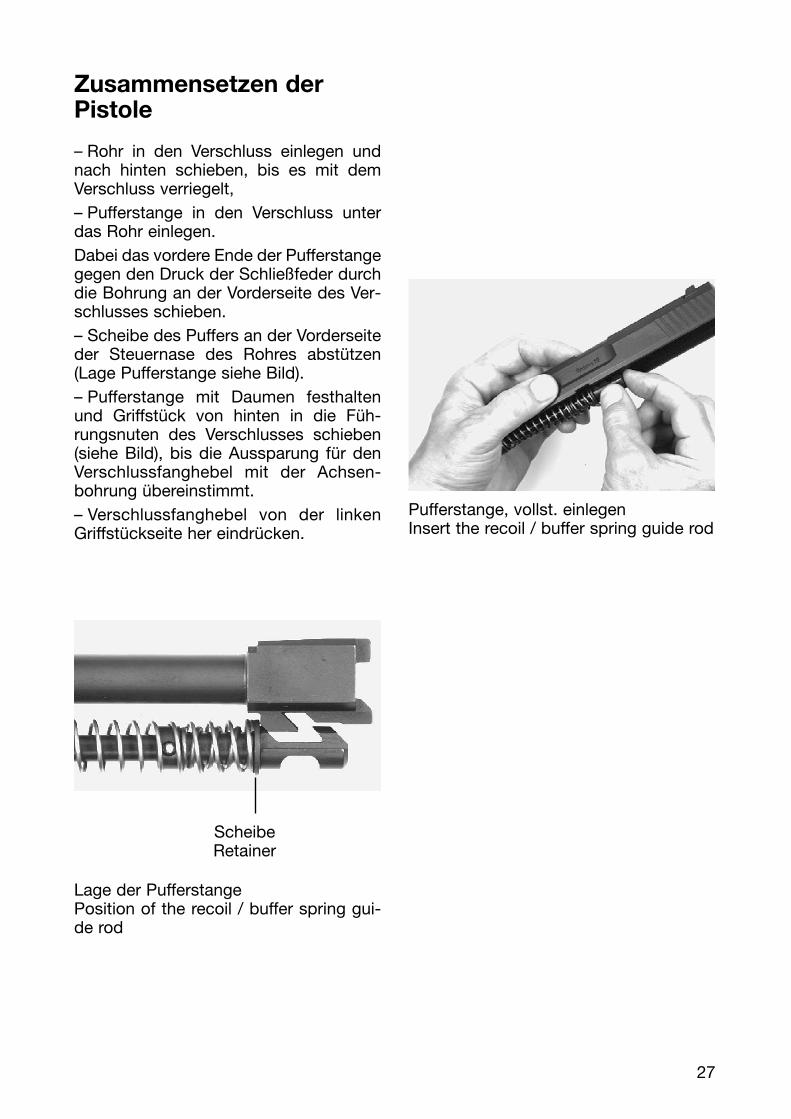
Lage VerschlussfanghebelachsePosition of the axle of the slide release
– Pufferstange gegen den Federdruckherausnehmen (siehe Bild).– Rohr hinten etwas anheben, nach vorneschieben und nach hinten entnehmen.
25

Disassembly of the pistol
For cleaning the pistol is disassembled.
m Before disassembly make surethat the magazine is emptyand that the chamber is clearof any ammunition.
The pistol is disassembled and assem -bled without any tool. Do not use any force.The pistol must not be disassembledfurther than described below.
Verschluss abziehenRemove the slide
– Remove the magazine,– retract the slide until stop and checkthat the chamber is free of any ammuni-tion.– Then let the slide pass forward again,– hold the pistol so that the thumb graspsthe rear side of the grip and the remainingfingers lay on the upper side of the slide,– retract the slide backward until the recess for the slide release on the leftside of the slide aligns with the front endof the slide release (see figure)
– With the other hand press in the axle ofthe slide release from the right and pullout the slide release to the left.– Remove the slide by sliding it forwardoff the grip (see illustration).– Remove the recoil / buffer spring guiderod downward against the spring tension(see illustration).– Slightly lift the barrel up at the back,push it forwards and remove it back-ward.
Pufferstange herausnehmenRemove the recoil / buffer spring guiderod
26
Zusammensetzen der Pistole
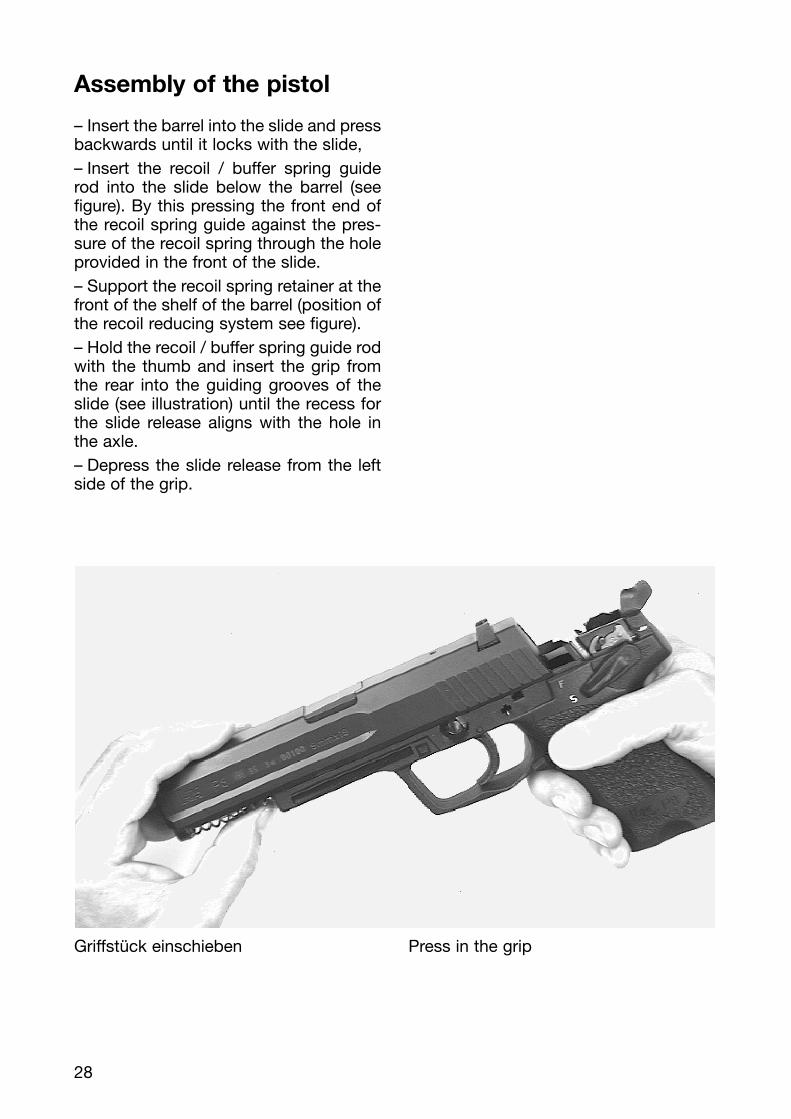
– Rohr in den Verschluss einlegen undnach hinten schieben, bis es mit demVerschluss verriegelt,– Pufferstange in den Verschluss unterdas Rohr einlegen. Dabei das vordere Ende der Pufferstangegegen den Druck der Schließfeder durchdie Bohrung an der Vorderseite des Ver-schlusses schieben.– Scheibe des Puffers an der Vorderseiteder Steuernase des Rohres abstützen(Lage Pufferstange siehe Bild).– Pufferstange mit Daumen festhaltenund Griffstück von hinten in die Füh -rungsnuten des Verschlusses schieben(siehe Bild), bis die Aussparung für denVerschlussfanghebel mit der Achsen-bohrung übereinstimmt.– Verschlussfanghebel von der linkenGriffstückseite her eindrücken.
ScheibeRetainer
Lage der PufferstangePosition of the recoil / buffer spring gui-de rod
Pufferstange, vollst. einlegenInsert the recoil / buffer spring guide rod
27
Assembly of the pistol
– Insert the barrel into the slide and pressbackwards until it locks with the slide,– Insert the recoil / buffer spring guiderod into the slide below the barrel (see figure). By this pressing the front end ofthe recoil spring guide against the pres-sure of the recoil spring through the holeprovided in the front of the slide.– Support the recoil spring retainer at thefront of the shelf of the barrel (position ofthe recoil reducing system see figure).– Hold the recoil / buffer spring guide rodwith the thumb and insert the grip fromthe rear into the guiding grooves of theslide (see illustration) until the recess forthe slide release aligns with the hole inthe axle.– Depress the slide release from the leftside of the grip.
Griffstück einschieben Press in the grip
28
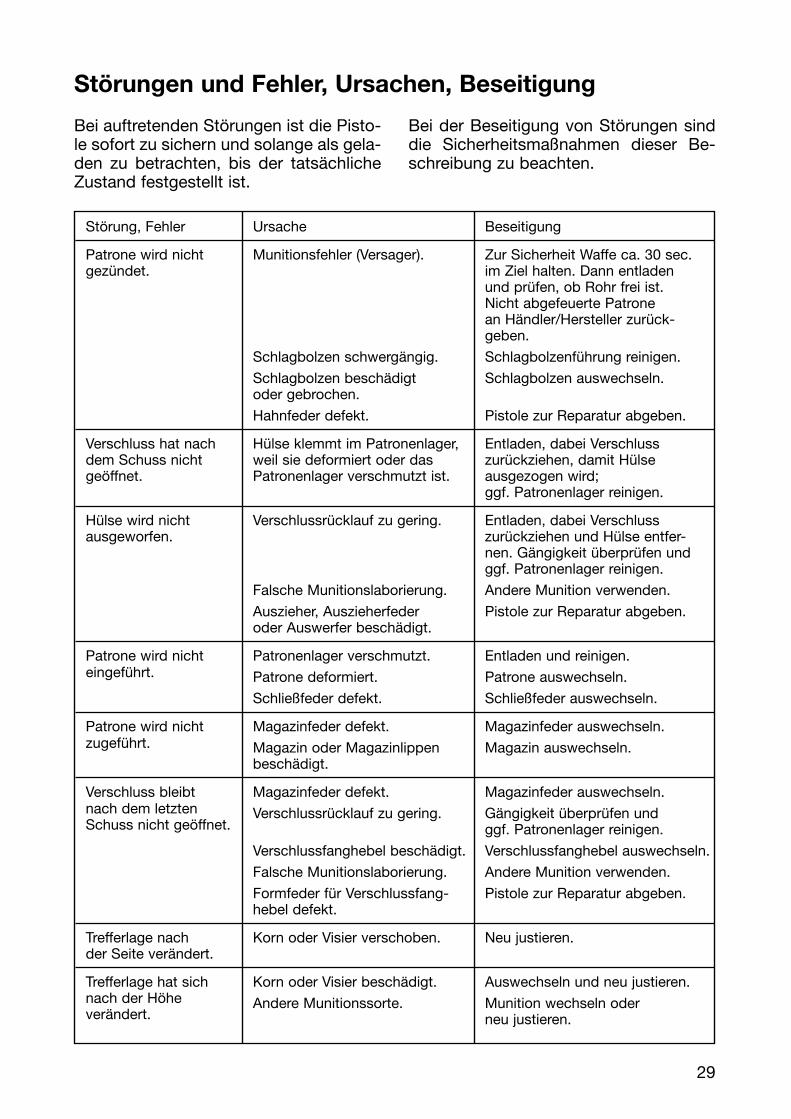
Störungen und Fehler, Ursachen, Beseitigung
Bei auftretenden Störungen ist die Pisto-le sofort zu sichern und solange als gela-den zu betrachten, bis der tatsächlicheZustand festgestellt ist.
Bei der Beseitigung von Störungen sinddie Sicherheitsmaßnahmen dieser Be-schreibung zu beachten.
Störung, Fehler Ursache Beseitigung
Patrone wird nicht Munitionsfehler (Versager). Zur Sicherheit Waffe ca. 30 sec. gezündet. im Ziel halten. Dann entladen
und prüfen, ob Rohr frei ist. Nicht abgefeuerte Patrone an Händler/Hersteller zurück-geben.
Schlagbolzen schwergängig. Schlagbolzenführung reinigen.
Schlagbolzen beschädigt Schlagbolzen auswechseln.oder gebrochen.
Hahnfeder defekt. Pistole zur Reparatur abgeben.
Verschluss hat nach Hülse klemmt im Patronenlager, Entladen, dabei Verschluss dem Schuss nicht weil sie deformiert oder das zurückziehen, damit Hülse geöffnet. Patronenlager verschmutzt ist. ausgezogen wird;
ggf. Patronenlager reinigen.
Hülse wird nicht Verschlussrücklauf zu gering. Entladen, dabei Verschluss ausgeworfen. zurückziehen und Hülse entfer-
nen. Gängigkeit überprüfen und ggf. Patronenlager reinigen.
Falsche Munitionslaborierung. Andere Munition verwenden.
Auszieher, Auszieherfeder Pistole zur Reparatur abgeben.oder Auswerfer beschädigt.
Patrone wird nicht Patronenlager verschmutzt. Entladen und reinigen.eingeführt. Patrone deformiert. Patrone auswechseln.
Schließfeder defekt. Schließfeder auswechseln.
Patrone wird nicht Magazinfeder defekt. Magazinfeder auswechseln.zugeführt. Magazin oder Magazinlippen Magazin auswechseln.
beschädigt.
Verschluss bleibt Magazinfeder defekt. Magazinfeder auswechseln.nach dem letzten Verschlussrücklauf zu gering. Gängigkeit überprüfen und Schuss nicht geöffnet. ggf. Patronenlager reinigen.
Verschlussfanghebel beschädigt. Verschlussfanghebel auswechseln.
Falsche Munitionslaborierung. Andere Munition verwenden.
Formfeder für Verschlussfang- Pistole zur Reparatur abgeben.hebel defekt.
Trefferlage nach Korn oder Visier verschoben. Neu justieren.der Seite verändert.
Trefferlage hat sich Korn oder Visier beschädigt. Auswechseln und neu justieren.nach der Höhe Andere Munitionssorte. Munition wechseln oderverändert. neu justieren.
29
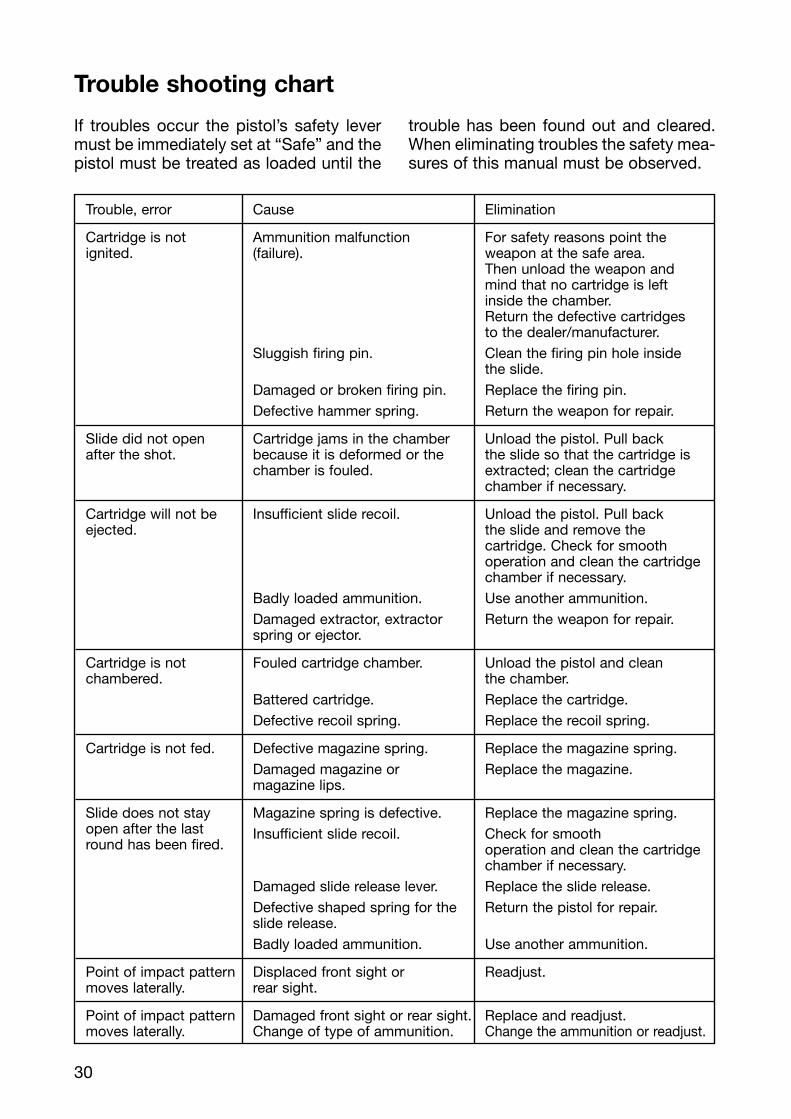
Trouble shooting chart
If troubles occur the pistol’s safety levermust be immediately set at “Safe” and thepistol must be treated as loaded until the
trouble has been found out and cleared.When eliminating troubles the safety mea-sures of this manual must be observed.
Trouble, error Cause Elimination
Cartridge is not Ammunition malfunction For safety reasons point theignited. (failure). weapon at the safe area.
Then unload the weapon and mind that no cartridge is left inside the chamber. Return the defective cartridges to the dealer/manufacturer.
Sluggish firing pin. Clean the firing pin hole inside the slide.
Damaged or broken firing pin. Replace the firing pin.Defective hammer spring. Return the weapon for repair.
Slide did not open Cartridge jams in the chamber Unload the pistol. Pull back after the shot. because it is deformed or the the slide so that the cartridge is
chamber is fouled. extracted; clean the cartridge chamber if necessary.
Cartridge will not be Insufficient slide recoil. Unload the pistol. Pull back ejected. the slide and remove the
cartridge. Check for smooth operation and clean the cartridgechamber if necessary.
Badly loaded ammunition. Use another ammunition.Damaged extractor, extractor Return the weapon for repair.spring or ejector.
Cartridge is not Fouled cartridge chamber. Unload the pistol and clean chambered. the chamber.
Battered cartridge. Replace the cartridge.Defective recoil spring. Replace the recoil spring.
Cartridge is not fed. Defective magazine spring. Replace the magazine spring.Damaged magazine or Replace the magazine.magazine lips.
Slide does not stay Magazine spring is defective. Replace the magazine spring.open after the last Insufficient slide recoil. Check for smooth round has been fired. operation and clean the cartridge
chamber if necessary.Damaged slide release lever. Replace the slide release.Defective shaped spring for the Return the pistol for repair.slide release.Badly loaded ammunition. Use another ammunition.
Point of impact pattern Displaced front sight or Readjust.moves laterally. rear sight.
Point of impact pattern Damaged front sight or rear sight. Replace and readjust.moves laterally. Change of type of ammunition. Change the ammunition or readjust.
30
31
P8Kaliber 9 mm x 19
32
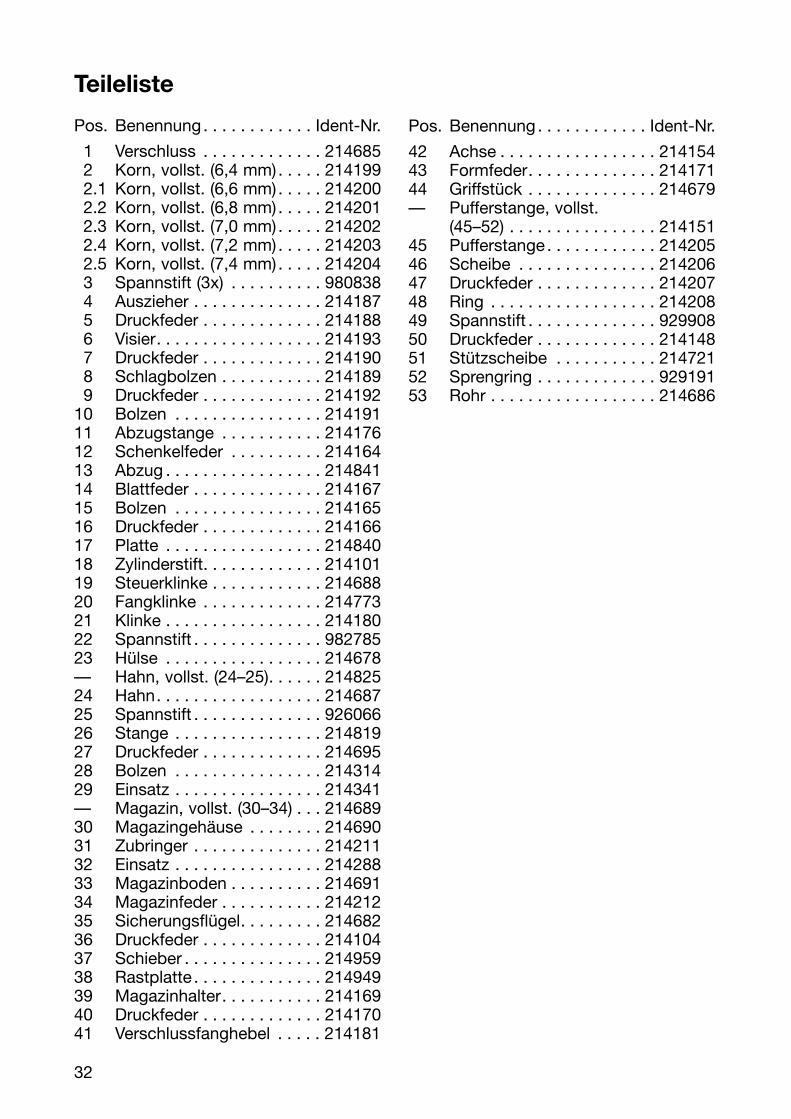
Teileliste
Pos. Benennung. . . . . . . . . . . . Ident-Nr.
1 Verschluss . . . . . . . . . . . . . 2146852 Korn, vollst. (6,4 mm). . . . . 2141992.1 Korn, vollst. (6,6 mm). . . . . 2142002.2 Korn, vollst. (6,8 mm). . . . . 2142012.3 Korn, vollst. (7,0 mm). . . . . 2142022.4 Korn, vollst. (7,2 mm). . . . . 2142032.5 Korn, vollst. (7,4 mm). . . . . 2142043 Spannstift (3x) . . . . . . . . . . 9808384 Auszieher . . . . . . . . . . . . . . 2141875 Druckfeder . . . . . . . . . . . . . 2141886 Visier. . . . . . . . . . . . . . . . . . 2141937 Druckfeder . . . . . . . . . . . . . 2141908 Schlagbolzen . . . . . . . . . . . 2141899 Druckfeder . . . . . . . . . . . . . 214192
10 Bolzen . . . . . . . . . . . . . . . . 21419111 Abzugstange . . . . . . . . . . . 21417612 Schenkelfeder . . . . . . . . . . 21416413 Abzug . . . . . . . . . . . . . . . . . 21484114 Blattfeder . . . . . . . . . . . . . . 21416715 Bolzen . . . . . . . . . . . . . . . . 21416516 Druckfeder . . . . . . . . . . . . . 21416617 Platte . . . . . . . . . . . . . . . . . 21484018 Zylinderstift. . . . . . . . . . . . . 21410119 Steuerklinke . . . . . . . . . . . . 21468820 Fangklinke . . . . . . . . . . . . . 21477321 Klinke . . . . . . . . . . . . . . . . . 21418022 Spannstift . . . . . . . . . . . . . . 98278523 Hülse . . . . . . . . . . . . . . . . . 214678— Hahn, vollst. (24–25). . . . . . 21482524 Hahn. . . . . . . . . . . . . . . . . . 21468725 Spannstift . . . . . . . . . . . . . . 92606626 Stange . . . . . . . . . . . . . . . . 21481927 Druckfeder . . . . . . . . . . . . . 21469528 Bolzen . . . . . . . . . . . . . . . . 21431429 Einsatz . . . . . . . . . . . . . . . . 214341— Magazin, vollst. (30–34) . . . 21468930 Magazingehäuse . . . . . . . . 21469031 Zubringer . . . . . . . . . . . . . . 21421132 Einsatz . . . . . . . . . . . . . . . . 21428833 Magazinboden . . . . . . . . . . 21469134 Magazinfeder . . . . . . . . . . . 21421235 Sicherungsflügel. . . . . . . . . 21468236 Druckfeder . . . . . . . . . . . . . 21410437 Schieber . . . . . . . . . . . . . . . 21495938 Rastplatte . . . . . . . . . . . . . . 21494939 Magazinhalter. . . . . . . . . . . 21416940 Druckfeder . . . . . . . . . . . . . 21417041 Verschlussfanghebel . . . . . 214181
Pos. Benennung. . . . . . . . . . . . Ident-Nr.
42 Achse . . . . . . . . . . . . . . . . . 21415443 Formfeder. . . . . . . . . . . . . . 21417144 Griffstück . . . . . . . . . . . . . . 214679— Pufferstange, vollst.
(45–52) . . . . . . . . . . . . . . . . 21415145 Pufferstange . . . . . . . . . . . . 21420546 Scheibe . . . . . . . . . . . . . . . 21420647 Druckfeder . . . . . . . . . . . . . 21420748 Ring . . . . . . . . . . . . . . . . . . 21420849 Spannstift . . . . . . . . . . . . . . 92990850 Druckfeder . . . . . . . . . . . . . 21414851 Stützscheibe . . . . . . . . . . . 21472152 Sprengring . . . . . . . . . . . . . 92919153 Rohr . . . . . . . . . . . . . . . . . . 214686

33
Ersatzteile P8 A1 Combat
Pos. Benennung. . . . . . . . . . . . Ident-Nr.
— Spannstift . . . . . . . . . . . . . . 988891— Verschluss . . . . . . . . . . . . . 229822— Korn, vollst. (6,0 mm). . . . . 223147— Korn, vollst. (6,2 mm). . . . . 223148— Korn, vollst. (6,4 mm). . . . . 223149— Korn, vollst. (6,6 mm). . . . . 223150— Korn, vollst. (6,8 mm). . . . . 223151— Korn, vollst. (7,0 mm). . . . . 223152— Korn, vollst. (7,2 mm). . . . . 223153— Korn, vollst. (7,4 mm). . . . . 223154— Visier. . . . . . . . . . . . . . . . . . 223155— Steuerklinke . . . . . . . . . . . . 214817— Hülse . . . . . . . . . . . . . . . . . 214774— Sicherungsflügel. . . . . . . . . 214352— Rastplatte . . . . . . . . . . . . . . 214254— Griffstück . . . . . . . . . . . . . . 223204— Rohr . . . . . . . . . . . . . . . . . . 223123
Ersatzteile P8 A1
Pos. Benennung. . . . . . . . . . . . Ident-Nr.
— Verschluss . . . . . . . . . . . . . 229822— Korn, vollst. (6,0 mm). . . . . 223147— Korn, vollst. (6,2 mm). . . . . 223148— Korn, vollst. (6,4 mm). . . . . 223149— Korn, vollst. (6,6 mm). . . . . 223150— Korn, vollst. (6,8 mm). . . . . 223151— Korn, vollst. (7,0 mm). . . . . 223152— Korn, vollst. (7,2 mm). . . . . 223153— Korn, vollst. (7,4 mm). . . . . 223154— Visier. . . . . . . . . . . . . . . . . . 223155— Spannstift . . . . . . . . . . . . . . 988891— Griffstück . . . . . . . . . . . . . . 229820— Rohr . . . . . . . . . . . . . . . . . . 223123
Ersatzteile P8 Combat
Pos. Benennung. . . . . . . . . . . . Ident-Nr.
— Steuerklinke . . . . . . . . . . . . 214817— Hülse . . . . . . . . . . . . . . . . . 214774— Sicherungsflügel. . . . . . . . . 214352— Rastplatte . . . . . . . . . . . . . . 214254— Griffstück . . . . . . . . . . . . . . 214820

34

35
P8Caliber 9 mm x 19
36
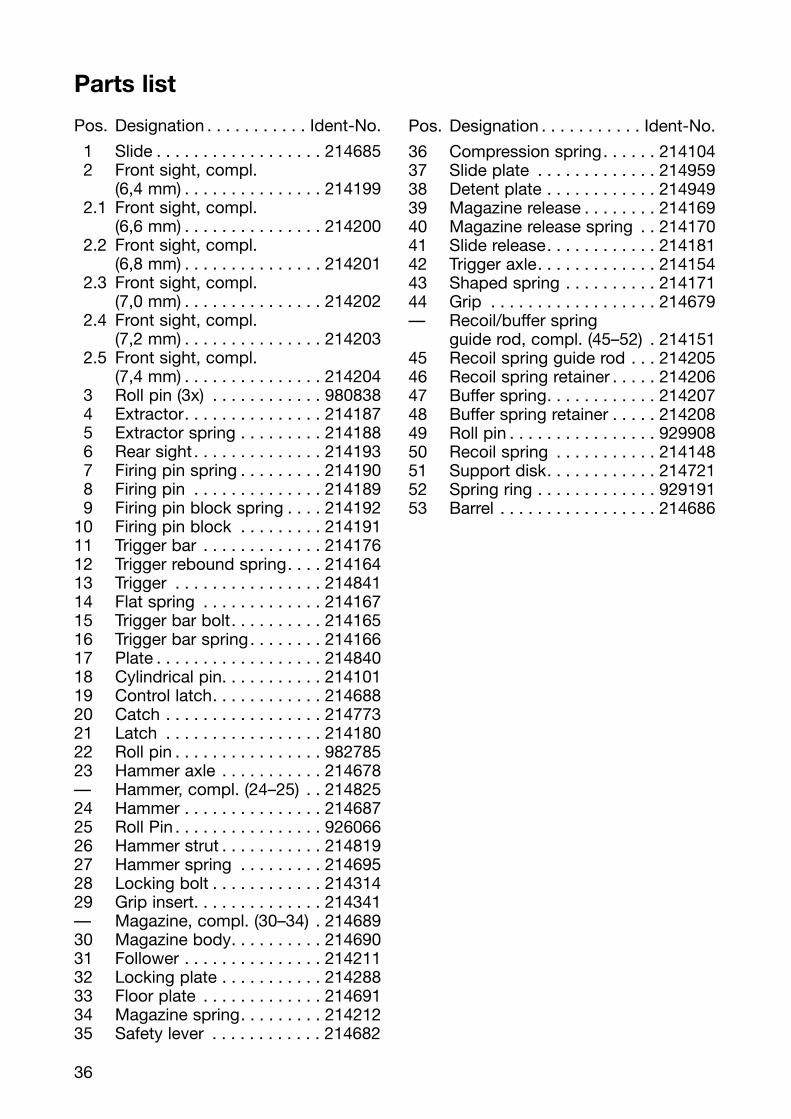
Parts list
Pos. Designation . . . . . . . . . . . Ident-No.
1 Slide . . . . . . . . . . . . . . . . . . 2146852 Front sight, compl.
(6,4 mm) . . . . . . . . . . . . . . . 2141992.1 Front sight, compl.
(6,6 mm) . . . . . . . . . . . . . . . 2142002.2 Front sight, compl.
(6,8 mm) . . . . . . . . . . . . . . . 2142012.3 Front sight, compl.
(7,0 mm) . . . . . . . . . . . . . . . 2142022.4 Front sight, compl.
(7,2 mm) . . . . . . . . . . . . . . . 2142032.5 Front sight, compl.
(7,4 mm) . . . . . . . . . . . . . . . 2142043 Roll pin (3x) . . . . . . . . . . . . 9808384 Extractor. . . . . . . . . . . . . . . 2141875 Extractor spring . . . . . . . . . 2141886 Rear sight . . . . . . . . . . . . . . 2141937 Firing pin spring . . . . . . . . . 2141908 Firing pin . . . . . . . . . . . . . . 2141899 Firing pin block spring . . . . 214192
10 Firing pin block . . . . . . . . . 21419111 Trigger bar . . . . . . . . . . . . . 21417612 Trigger rebound spring. . . . 21416413 Trigger . . . . . . . . . . . . . . . . 21484114 Flat spring . . . . . . . . . . . . . 21416715 Trigger bar bolt. . . . . . . . . . 21416516 Trigger bar spring. . . . . . . . 21416617 Plate . . . . . . . . . . . . . . . . . . 21484018 Cylindrical pin. . . . . . . . . . . 21410119 Control latch. . . . . . . . . . . . 21468820 Catch . . . . . . . . . . . . . . . . . 21477321 Latch . . . . . . . . . . . . . . . . . 21418022 Roll pin . . . . . . . . . . . . . . . . 98278523 Hammer axle . . . . . . . . . . . 214678— Hammer, compl. (24–25) . . 21482524 Hammer . . . . . . . . . . . . . . . 21468725 Roll Pin . . . . . . . . . . . . . . . . 92606626 Hammer strut . . . . . . . . . . . 21481927 Hammer spring . . . . . . . . . 21469528 Locking bolt . . . . . . . . . . . . 21431429 Grip insert. . . . . . . . . . . . . . 214341— Magazine, compl. (30–34) . 21468930 Magazine body. . . . . . . . . . 21469031 Follower . . . . . . . . . . . . . . . 21421132 Locking plate . . . . . . . . . . . 21428833 Floor plate . . . . . . . . . . . . . 21469134 Magazine spring. . . . . . . . . 21421235 Safety lever . . . . . . . . . . . . 214682
Pos. Designation . . . . . . . . . . . Ident-No.
36 Compression spring. . . . . . 21410437 Slide plate . . . . . . . . . . . . . 21495938 Detent plate . . . . . . . . . . . . 21494939 Magazine release . . . . . . . . 21416940 Magazine release spring . . 21417041 Slide release. . . . . . . . . . . . 21418142 Trigger axle. . . . . . . . . . . . . 21415443 Shaped spring . . . . . . . . . . 21417144 Grip . . . . . . . . . . . . . . . . . . 214679— Recoil/buffer spring
guide rod, compl. (45–52) . 21415145 Recoil spring guide rod . . . 21420546 Recoil spring retainer . . . . . 21420647 Buffer spring. . . . . . . . . . . . 21420748 Buffer spring retainer . . . . . 21420849 Roll pin . . . . . . . . . . . . . . . . 92990850 Recoil spring . . . . . . . . . . . 21414851 Support disk. . . . . . . . . . . . 21472152 Spring ring . . . . . . . . . . . . . 92919153 Barrel . . . . . . . . . . . . . . . . . 214686

3737
Spare parts P8 A1 Combat
Pos. Designation . . . . . . . . . . . Ident-No.
— Slide . . . . . . . . . . . . . . . . . . 229822— Front sight, compl.
(6,0 mm) . . . . . . . . . . . . . . . 223147— Front sight, compl.
(6,2 mm) . . . . . . . . . . . . . . . 223148— Front sight, compl.
(6,4 mm) . . . . . . . . . . . . . . . 223149— Front sight, compl.
(6,6 mm) . . . . . . . . . . . . . . . 223150— Front sight, compl.
(6,8 mm) . . . . . . . . . . . . . . . 223151— Front sight, compl.
(7,0 mm) . . . . . . . . . . . . . . . 223152— Front sight, compl.
(7,2 mm) . . . . . . . . . . . . . . . 223153— Front sight, compl.
(7,4 mm) . . . . . . . . . . . . . . . 223154— Rear sight . . . . . . . . . . . . . . 223155— Roll pin . . . . . . . . . . . . . . . . 988891— Control latch. . . . . . . . . . . . 214817— Hammer axle . . . . . . . . . . . 214774— Safety lever . . . . . . . . . . . . 214352— Detent plate . . . . . . . . . . . . 214254— Grip . . . . . . . . . . . . . . . . . . 223204— Barrel . . . . . . . . . . . . . . . . . 223123
Spare parts P8 A1
Pos. Designation . . . . . . . . . . . Ident-No.
— Slide . . . . . . . . . . . . . . . . . . 229822— Front sight, compl.
(6,0 mm) . . . . . . . . . . . . . . . 223147— Front sight, compl.
(6,2 mm) . . . . . . . . . . . . . . . 223148— Front sight, compl.
(6,4 mm) . . . . . . . . . . . . . . . 223149— Front sight, compl.
(6,6 mm) . . . . . . . . . . . . . . . 223150— Front sight, compl.
(6,8 mm) . . . . . . . . . . . . . . . 223151— Front sight, compl.
(7,0 mm) . . . . . . . . . . . . . . . 223152— Front sight, compl.
(7,2 mm) . . . . . . . . . . . . . . . 223153— Front sight, compl.
(7,4 mm) . . . . . . . . . . . . . . . 223154— Rear sight . . . . . . . . . . . . . . 223155— Roll pin . . . . . . . . . . . . . . . . 988891— Grip . . . . . . . . . . . . . . . . . . 229820— Barrel . . . . . . . . . . . . . . . . . 223123
Spare parts P8 Combat
Pos. Designation . . . . . . . . . . . Ident-No.
— Control latch. . . . . . . . . . . . 214817— Hammer axle . . . . . . . . . . . 214774— Safety lever . . . . . . . . . . . . 214352— Detent plate . . . . . . . . . . . . 214254— Grip . . . . . . . . . . . . . . . . . . 214820

WARNING!
This manual does not consider warnings in respect to US-product liability.
For use in USA please order an User Manual from:
Heckler & Koch Inc.5675 Transport BoulevardColumbus, Georgia 31907Tel. (706) 568-1906