Owner’sMa with Installation Instructionsnual PN 96772 v.8.0 Banks Billet Torque Converter...
16
06/13/16 PN 96772 v.8.0 Banks Billet ™ Torque Converter 1995-2003 Ford Power Stroke 7.3L Turbo-Diesel Pickups Equipped with E4OD or 4R100 Transmissions THIS MANUAL IS FOR USE WITH KITS 72521 Gale Banks Engineering 546 Duggan Avenue • Azusa, CA 91702 (626) 969-9600 • Fax (626) 334-1743 Product Information & Sales: (888) 635-4565 Customer Support: (888) 839-5600 Installation Support: (888) 839-2700 bankspower.com ©2016 Gale Banks Engineering Owner’sManual with Installation Instructions
Transcript of Owner’sMa with Installation Instructionsnual PN 96772 v.8.0 Banks Billet Torque Converter...

06/13/16 PN 96772 v.8.0
Banks Billet™
Torque Converter 1995-2003 Ford Power Stroke 7.3LTurbo-Diesel PickupsEquipped with E4OD or 4R100 Transmissions THIS MANUAL IS FOR USE WITH KITS 72521
Gale Banks Engineering 546 Duggan Avenue • Azusa, CA 91702 (626) 969-9600 • Fax (626) 334-1743
Product Information & Sales: (888) 635-4565 Customer Support: (888) 839-5600 Installation Support: (888) 839-2700
bankspower.com
©2016 Gale Banks Engineering
Owner’sManualwith Installation Instructions

Banks Monster® Exhaust SystemSingle (P/N 46296-46299)
- Increases exhaust flow, cuts backpressure, lowers exhaust gas temperatures (EGTs) and increases power.
Banks Techni-Cooler® System(P/N 25970)
- Provides increased air flow to the engine by increasing air density for more increased power, lower EGTs and improved fuel economy.
Banks Billet Torque Converter94-03 (P/N 72521)
- Higher torque capacity over stock- Lockup clutch is slip-resistant so transmission fluids stay cooler and transmission life is prolonged.
Banks Diesel Tuner94-03 Big Hoss (P/N 66505)
- Adds power safely to your vehicle
- Engine and transmission safeguards
- Change power levels on-the-fly
Thermocouple- Add a temperature limiting function to your Diesel Tuner
Banks QuickTurbo(P/N 24450)
- More boost through the powerband
- Does not over-boost- Turbo-diesel efficiency
Also Available from Banks Powerfor ‘94-97 Ford 7.3L
‘94-97 Ford 7.3L
2

Banks TransCommand(P/N 62560)
- Produces smooth, firm, light throttle shifts and solid, decisive heavy-load shifts.
- Eliminates excessive clutchslippage
Banks Git-Kit Systems(P/N 48550)Contains:
- Monster Exhaust- Big Hoss Module
Banks Stinger SystemsContains:
- Ram-Air Intake Filter- Monster Exhaust - Big Hoss Module- TransCommand
Banks Stinger-Plus Systems(P/N 48553-48554, 48559-48560)Contains:
- Ram-Air Intake Filter- Monster Exhaust - Big Hoss Module- TransCommand- Quick Turbo Assembly
Banks PowerPack SystemsContains:
- Ram-Air Intake Filter- Monster Exhaust - Big Hoss Module- TransCommand- Quick Turbo Assembly- Techni-Cooler
96772 v.8.0 3
For More Information please call (800) 438-7693or Visit us online @ www.bankspower.com

Banks Power Elbow (P/N 48651-48652, 48661-48663)
- Reduces stock outlet and pipe backpressure
Banks Monster® Exhaust SystemSport (P/N 48789)Single and Dual (P/N 48653-48660, 47391-47399)
- Increases exhaust flow, cuts backpressure, lowers exhaust gas temperatures (EGTs) and increases power.
Banks Ram-Air Intake System(P/N 96885)
- Increases your airflow over stock. - Adds power, improves fuel economy, lowers EGTs and reduces smoke.
Banks QuickTurbo(P/N 24456-24457)
- More boost through the powerband- Does not over-boost- Turbo-diesel efficiency
Banks Brake(P/N 55202-55207)
- Increases the stopping power of your truck and extends the service life of your brakes
Banks Techni-Cooler® System(P/N 25971-25973)
- Provides increased air flow to the engine by increasing air density for more increased power, lower EGTs and improved fuel economy.
Banks Billet Torque Converter94-03 (P/N 72521)
- Higher torque capacity over stock- Lockup clutch is slip-resistant so transmission fluids stay cooler and transmission life is prolonged.
Banks Diesel TunerSix-Gun (P/N 66513-66515)94-03 Big Hoss (P/N 66505)
- Adds power safely to your vehicle- Engine and transmission safeguards- Change power levels on-the-fly
Thermocouple- Add a temperature limiting function
to your Diesel Tuner
Also Available from Banks Powerfor ‘99-03 Ford 7.3L ‘99-03 Ford 7.3L
4 96772 v.8.0

For More Information please call (800) 438-7693or Visit us online @ www.bankspower.com
Banks SmartLock(P/N 55266)
- Reduces wear on transmission- Locks Torque Converter and raisestrans-line pressure
- Works with Banks Exhaust Brake
Banks TransCommand(P/N 62570)
- Produces smooth, firm, light-throttle shifts and solid, decisive heavy-load shifts.
- Eliminates excessive clutch slippage
OttoMind Programmer(P/N 66064)
- Contains Banks tunes that boost your vehicles HP, Torque and MPG.
- Displays a host of critical engine functions
- Provides “service technician” diagnostic capabilities
- Has upgradeable functionality, so it will never be out of date
Banks Git-Kit Systems(P/N 47401, 47511-47514)Contains:
- Monster Exhaust- Big Hoss Module
Banks Stinger SystemsContains:
- Ram-Air IntakeFilter- Monster Exhaust - Big Hoss Module- Big Head Wastegate Actuator
Banks PowerPack SystemsContains:
- Ram-Air Intake Filter- Monster Exhaust- Quick-Turbo - TransCommand- Techni-Cooler System- Big Head Wastegate Actuator
Banks Six-Gun Bundle(P/N 46594-46613)Contains:
- Ram-Air Intake Filter- Monster Exhaust- Six-Gun Tuner- TransCommand- Big Head Wastegate Actuator
Banks Big Hoss Bundle(P/N 46623-46643)Contains:
- Ram-Air Intake Filter- Monster Exhaust- Six-Gun Tuner- TransCommand- Big Head Wastegate Actuator- Techni-Cooler System- Big Hoss Module- Power Elbow
Banks Power Combo 1Contains:
- Big Hoss Module- TransCommand- Big Head Wastegate Actuator
Banks Power Combo 2Contains:
- Six-Gun Tuner- TransCommand- Big Head Wastegate Actuator
Banks Power Combo 3Contains:
- Big Hoss Module- Monster Exhaust
Banks Power Combo 4Contains:
- Big Hoss Module- TransCommand- Big Head Wastegate Actuator- Six-Gun Tuner
96772 v.8.0 5

Dear Customer,
If you have any questions concerning the installation of your Banks Billet™ Torque Converter, please contact our Technical Service Hotline at (888) 839-7200 between 7:00 am and 5:00 pm (PST). If you have any questions related to shipping or billing, please contact our Customer Service Department at (888) 839-5600.
Thank you.
1. Familiarize yourself with the installation procedure by reading the installation manual before starting work.
2. Throughout this manual, the left side of the vehicle refers to the driver’s side, and the right side refers to the passenger’s side.
3. Disconnect the negative (ground) cable from the battery (or batteries, if there are two) before beginning work.
4. Route and tie wires and hoses a minimum of 6 inches away from exhaust heat, moving parts and sharp edges. Clearance of 8 inches or more is recommended where possible.
5. During installation, keep your work area and tools clean to avoid possible entry of dirt into the drivetrain components.
6. When raising the vehicle, support it on properly weight-rated safety stands, ramps or a commercial hoist. Follow the manufacturer’s safety precautions. Take care to balance the vehicle to prevent it from slipping or falling. When using ramps, be sure the front wheels are centered squarely on the topsides. When raising the front of
the vehicle, set the parking brake and block the rear wheels. When raising the back of the vehicle, be sure the vehicle is on level ground and the front wheels are securely blocked. Caution! Do not use floor jacks to support the vehicle while working under it. Do not support the vehicle using concrete blocks, masonry or any other item not intended specifically for this use.
7. Installing the Banks Torque Converter requires removal of the transmission from the vehicle. Heavy tooling such as a transmission jack and an automotive hoist or ample-height jack stands are required. Professional installation by a properly equipped shop is recommended. Failure to follow all installation instructions during Torque Converter install can result in bodily injury and/or expensive damage to the transmission and surrounding components.
8. The transmission and torque converter must be removed as an assembly to avoid damage to the converter drive plate, pump bushing and oil seal.
9. Before installing the Banks Torque Converter, verify that your transmission is in good operating condition. Transmission problems such as harsh or delayed engagement when shifting into Drive or Reverse, no Drive or Reverse range, erratic shifting, grating or scraping noises, or lack of up and/or downshifting can lead to torque converter damage. If necessary, have your transmission repaired or overhauled before installing the converter.
10. If your transmission has just been rebuilt, make sure to flush all old fluid from the vehicle’s transmission cooler and connecting lines before reinstalling your transmission.
General Installation Practices
4 96772 v.8.0

Tools Required:
• 3⁄8” and 1⁄2” drive ratchets with metric sockets including 1⁄2” and 3⁄8” drive extension
• Metric box-end wrenches
• Standard and Phillips head screwdrivers
• T45 Torx bit
• Standard and needle-nose pliers
• Clean shop towels or rags
• Transmission hoist
• Floor jack
• Drain pan
• 320-400 grit sandpaper
• Measuring ruler
• Pry bar or channel lock pliers
• Grease pen
• Foot-pound torque wrenches
• Multipurpose Grease
Highly recommended tools and supplies:
• Flywheel rotating tool
• Penetrating oil or light lubricant spray
• For 4x4 models: Second transmission hoist
• Transmission hoist adapter
• Torque converter holding tool
• Transmission fluid filter
• Transmission pan gasket
Notice To Installer: 1. In order for the Banks Torque Converter to function as designed, the transmission must be re-calibrated to increase transmission line pressure and adjust shift timing. Banks highly recommends installing the Banks Transcommand in conjunction with the Banks Torque Converter. Failure to re-calibrate the transmission may lead to excess lock-up clutch wear and poor shift performance. Banks Transcommand (E4OD, P.N. 62560; 4R100, P.N. 62570) is available from Gale Banks Engineering or through authorized Banks dealers.
2. Banks also recommends replacing your transmission fluid, transmission fluid filter, and transmission pan gasket. Failure to service transmission fluid may result in torque converter damage.
Banks Billet Torque Converter is designed for a 6-stud, Ford 7.3L diesel applicationsYou can verify the number of studs on your existing torque converter by removing the inspection cover on the lower-front of the transmission and counting the studs on the torque converter (see Step 13 in installation procedure).
96772 v.8.0 5

1. Disconnect the negative (ground) cable from the battery (if there is more than one battery, disconnect both negative cables). Secure the cable so it cannot accidentally come in contact with the post.
2. Raise the vehicle high enough to remove the transmission and support it securely with properly weight-rated safety stands, ramps or a commercial hoist. Take care to balance the vehicle to prevent it from slipping or falling. When using ramps, be sure the wheels are centered squarely on the topsides. Set the parking brake and securely block the wheels that are on the ground. CAUTION: DO NOT WORK UNDER ANY VEHICLE SUPPORTED ONLY BY A JACK. SEVERE INJURY MAY RESULT.
3. For Excursions, remove the six (6) retaining bolts around the belly pan and retain for reassembly. Remove the belly pan from the vehicle.
4. Remove the 14mm bolt located on the bell housing of the passenger side of the transmission that secures the transmission oil filler tube. Remove the oil filler tube.
5. A drain pan should be positioned under the working area. Disconnect the transmission fluid cooler tubes located on the right side of the transmission and allow them to drain into the drain pan.
6. Mark the rear axle, driveshaft, and transmission / transfer case output flange (if so equipped) for re-alignment during reassembly. Disconnect the driveshaft from the rear axle flange (some models require either a T-45 torx bit or a 12mm 12-point socket / box-end wrench). (See Figure 1).
Note: On models using strap-type (vs. flange) attachment for the U-joint to the rear axle yoke, take care to keep the bearing caps on the U-joint when
Installation Procedure
Figure 1
6 96772 v.8.0

removing the driveshaft – wrapping the bearing caps with electrical tape or a similar material will keep the bearing caps from separating from the spider.
7. Support the driveshaft, either from below with a stand or above with a length of wire from the chassis. For four-wheel drive vehicles, disconnect the rear driveshaft from the transfer case or transmission. For two (2) piece driveshaft models, remove the two (2) 9⁄16” bolts on the drive shaft bearing support mount linking the two driveshaft halves.
8. Taking care to not let the slip yoke in the driveshaft extend too far and separate, lower the driveshaft assembly and slide it rearward off of the transmission. Position the drain pan below the transmission/transfer case output shaft to contain any fluid that may drain once the driveshaft is removed.
9. For 4x4 models, the transfer case will need to be removed.
A) Mark and disconnect the front driveshaft from the transfer case.
B) Remove the manual shift linkage.
C) Disconnect the three (3) position switch harness connector and gear motor encoder harness connectors.
D) Position a transmission jack or equivalent under the transfer case and slightly lift the transfer case to release tension on the retaining bolts.
E) Remove the six (6) mounting bolts connecting the transfer case to the extension housing and retain for reassembly. Remove the transfer case from the vehicle.
10. If equipped, remove the transmission mounted parking brake assembly and power take-off unit (PTO).
11. Remove the transmission range (TR) sensor by:
A) Disconnect the shift cable from the manual lever.
B) Disconnect the cable housing from the bracket. (see Figure 2).
12. Disconnect all connectors on the transmission including digital transmission range, solenoid body connector, turbine shaft speed (TSS) and output shaft speed (OSS) sensors.
13. To access the converter-to-flexplate nuts, remove and retain the bolts mounting the inspection cover and remove the inspection cover. Rotate the flywheel until the converter-to-flexplate nuts are accessible. Remove each of the nuts - a flywheel rotating tool or pry bar may assist with the flexplate nuts removal (see Figure 3).
14. Raise the transmission hoist under the transmission (if necessary, mount the E4OD transmission adapter onto the transmission hoist). Remove and retain the transmission crossmember bolts from the frame rails. Remove the transmission crossmember (see Figure 4).
15. If necessary, remove the exhaust components surrounding the transmission.
16. Remove the six (6) transmission mounting bolts from the transmission flange and retain for reassembly. Rock the transmission to disengage it from the locator dowels.
17. Remove the transmission and the Torque Converter together from the engine. If available, install a torque converter holding tool.
CAUTION: When removing the transmission, use care to avoid obstructions. If equipped, do not use the cooler bypass valve (CBV) as a handle or support for the hoist
96772 v.8.0 7
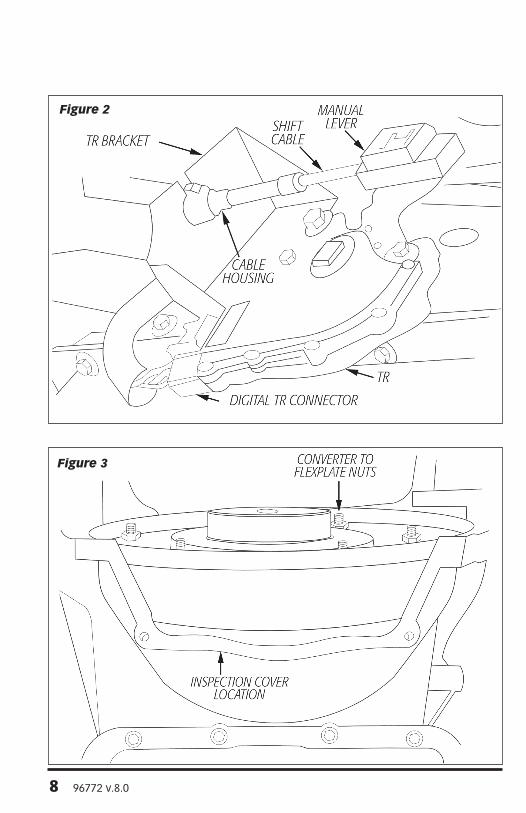
Figure 2
Figure 3
8 96772 v.8.0

strap. Be sure the torque converter is stable inside the transmission.
18. Place a suitable drain pan under the front of the transmission.
CAUTION: Verify that the transmission is secured to the lifting device. When the torque converter is removed, the transmission’s center of gravity will shift and the transmission may become unstable.
19. If previously used, remove the torque converter holding tool. Evenly pull on the torque converter to remove it – avoid wiggling or cocking the converter sideways as much as possible to prevent damage to the transmission input shaft and seals.
Note: Inspect the oil seal on the front pump of the transmission. If there are signs of leakage or damage, the seal
should be replaced prior to installing the new torque converter.
20. Carefully remove the Banks Billet Torque Converter from the shipping container. Be careful not to damage the shipping container, as it will be used to return the factory torque converter to Gale Banks Engineering.
21. To avoid pump seal damage during converter installation, inspect the Banks Billet Torque Converter hub and hub drive notches for sharp edges, burrs, scratches or nicks. It may be necessary to polish hub and/or notches with 320⁄400 grit sandpaper and crocus cloth – clean the converter afterwards to remove any foreign particles as necessary.
22. Position the Banks Billet Torque Converter with the drive hub up and pour one (1) quart of the
Figure 4
96772 v.8.0 9

manufacturer’s specified transmission fluid into the drive hub. Use a small amount to coat the splines of the input shaft protruding from the transmission.
CAUTION: When installing the Banks Billet Torque Converter, be careful to not damage the pump gear O-ring or hub seal.
23. Lift the Banks Billet Torque Converter and position it in front of the transmission input shaft. Turn the torque converter as needed to index properly and engage the transmission input shaft splines, then carefully work the torque converter onto the transmission input shaft until it is recessed behind the front transmission mounting flange. Use a straightedge to verify there is a gap between the converter pilot hub face and housing (see Figure 5). This ensures that the Torque Converter is fully engaged to the input shaft and the drive hub is sealed properly.
24. Retain the torque converter with the converter holding tool, if available.
25. Before installing the transmission into the vehicle, Gale Banks Engineering recommends flushing and thoroughly cleaning the transmission cooler, lines, and cooler bypass valve. Lubricating the converter pilot hub with multipurpose grease is also recommended.
26. Position the transmission near the engine and remove the converter holding tool, if used. Align the converter studs with the engine flexplate. Install the transmission to the engine.
27. Reinstall the six (6) transmission mounting bolts through the transmission mounting flange and into the engine. Torque evenly to 45 ft-lbs.
28. If previously removed, reinstall any disconnected exhaust system
components.
29. Reinstall the transmission crossmember onto the frame rails. Reinstall and torque the crossmember bolts to 60 ft-lbs (see Figure 4).
30. Rotate the torque converter and install the NEW (supplied) converter-to-flexplate 3⁄8”-24 nuts. Evenly torque the nuts to 30 ft-lbs (see Figure 3).
31. Reinstall the inspection cover and torque the bolts to 15 ft-lbs.
32. Verify the transmission is secured to the crossmember and remove the transmission hoist.
Note: The transmission fluid, transmission fluid filter and pan gasket should be serviced at this time. Follow the instructions in the vehicles owner’s manual for servicing the transmission.
33. For 4x4 models, reinstall the transfer case.
A) Hoist the transfer case to the extension housing. Reinstall the six (6) mounting bolts and torque to 37 ft-lbs.
B) Reconnect the three (3) position switch harness connector and gearmotor encoder harness connectors.
C) Align and reinstall the front driveshaft to the transfer case.
D) Reinstall the manual shift linkage and remove the transfer case hoist.
34. Re-align and re-attach the front of the rear driveshaft to the transmission or transfer case output shaft / flange.
On flanged models, only tighten the attachment bolts finger-tight at this time.
For models equipped with a two (2) piece driveshaft, re-install the center bearing support and hand-tighten the mounting bolts.
10 96772 v.8.0

Figure 5
96772 v.8.0 11

CAUTION – On models using a mounting flange for driveshaft attachment, the driveshaft yokes fit tightly onto the flange pilots. To make sure that the yoke seats squarely onto the flange, evenly tighten the bolts in a cross pattern.
35. Tighten the driveshaft-to-transmission bolts to 76 ft-lbs (if so equipped).
36. For models with strap-type rear axle pinion yokes, remove the electrical tape retaining the bearing caps (if used) on the rear of the driveshaft and re-attach it to the rear axle. Tighten the fasteners to 26 ft-lbs.
37. For models with flange-type rear axle pinion mounts, reinstall the fasteners and torque to 82 ft-lbs.
38. Tighten the driveshaft center support bearing bolts to 47 ft-lbs (if so equipped).
39. If applicable, reinstall the transmission mounted parking brake assembly and power take-off unit (PTO).
40. Reconnect all connectors to the transmission including the solenoid body connector, turbine shaft speed (TSS) and output shaft speed (OSS) sensors. Reconnect the transmission range (TR) sensor by:
A) Reconnect the cable housing to the mounting bracket.
B) Reconnect the shift cable to the manual lever. (see Figure 2)
41. Reinstall the transmission cooler lines to the transmission.
42. Verify that all previously removed components are reconnected, all tools used are accounted for and all bolts are tightened to manufacturer’s specifications.
43. Fill the transmission with the manufacturer’s specified transmission fluid.
CAUTION: Do not overfill transmission fluid. Check the fluid level periodically during refilling.
Note: To recalibrate your transmission, the Banks TransCommand should be installed at this time, or another method of increasing transmission line pressure must be used. Failure to install the Banks TransCommand may result in excessive clutch wear.
44. Reconnect the battery cable(s).
45. Start the vehicle and allow engine to reach normal operating temperatures. With the vehicle lightly loaded, accelerate gently and allow the torque converter to lock and unlock a minimum of fifteen (15) times. This can be achieved by lightly accelerating from 20 MPH to 50 MPH multiple times. If possible, monitor transmission fluid temperature to verify proper torque converter and transmission operation - fluid temperatures much higher than normal can be indicative of a malfunctioning transmission and / or torque converter. Check transmission fluid level and add the manufacturer’s specified type of fluid as needed.
46. Locate the serial number sticker included in the torque converter installation kit. This sticker is provided as a means of allowing Banks Technical Support to rapidly identify your individual torque converter should the need arise. Gale Banks Engineering recommends permanently affixing it to a safe location on the vehicle, such as the inside of the glove box lid or door jamb, where it can be quickly located and read. Installation of the Banks Billet Torque Converter is now complete.
12 96772 v.8.0

1. You will notice that you have been charged a $250.00 refundable core charge for your Banks Billet Torque Converter. In order to receive a refund on the core charge you must send us a good rebuildable core. Please follow these important instructions.
2. Do not discard or destroy the shipping container that your new torque converter came in.
3. After installation of your new torque converter, DRAIN ALL FLUID from your old torque converter by allowing it to sit upside-down in a suitable drain pain or container overnight.
CAUTION: Failure to properly drain the converter may result in shipping refusal or other consequences related to shipping hazardous material.
4. Install supplied plug on old torque converter input hub and wrap it in the supplied plastic bag.
5. Pack the torque converter into the Banks shipping container. If applicable, place the foam insulation around the torque converter to prevent damage during shipping.
6. Reseal the shipping container. Verify that the Torque Converter is secure in the shipping container.
7. Locate the return shipping label included in the Banks Billet Torque Converter package and affix it to the outside of the shipping container so that it completely covers the previous shipping label.
8. Call Gale Banks Engineering customer service line (888) 839-5600 with your original invoice number to receive an RMA number. Write the RMA number on the label in the space provided.
9. Ship the core to the address shown on the label.
NOTE: Any charges incurred to return the core are the responsibility of the customer. If your return-shipping label is missing or damaged, ship the packaged torque converter to:
GALE BANKS ENGINEERING
1800 N 30th Avenue
Melrose Park IL 60160
Thank you for your cooperation with the core return process, and for choosing Gale Banks Engineering.
To receive a core charge refund, complete the following steps.
96772 v.8.0 13

Gale Banks Engineering 546 Duggan Avenue • Azusa, CA 91702 (626) 969-9600 • Fax (626) 334-1743
Product Information & Sales: (888) 635-4565Customer Support: (888) 839-5600 Installation Support: (888) 839-2700
bankspower.com