OWNER’S MANUAL AIR CONDITIONER - The Home Depot · PDF fileOWNER’S MANUAL AIR...
46
OWNER’S MANUAL AIR CONDITIONER Please read this manual carefully before operating your air conditioner and retain it for future reference. www.lgappliances.com TYPE PORTABLE AIR CONDITIONER MODEL LP1013WNR
-
Upload
truongdien -
Category
Documents
-
view
215 -
download
0
Transcript of OWNER’S MANUAL AIR CONDITIONER - The Home Depot · PDF fileOWNER’S MANUAL AIR...

OWNER’S MANUAL
AIR CONDITIONER Please read this manual carefully before operating your air conditioner and retain it for future reference.
www.lgappliances.com
TYPE PORTABLE AIR CONDITIONER
MODEL LP1013WNR

I N T R O D U C T I O N
IMPORTANT SAFETY INSTRUCTIONSBasic Safety Precautions . . . . . . . . . . . . . . . . . . . 3, 4Electrical Safety
CARE AND CLEANING
Before Calling for Service TROUBLESHOOTING
Product Registration Information
Water Drainage
Storing the Air Conditioner
WARRANTY
Window Vent Panel and ExtensionsInstallation in Vertical Sliding WindowsInstallation in Casement Windows . . . . . . . . . . . 16,17
INSTALLATION INSTRUCTIONS
Selection of Installation Location Attaching the Hose and Diffuser
PARTS AND FEATURESKey Parts and Components . . . . . . . . . . . . . . . . . . . 6
. . . . . . . . . . . . . . . . . . . . 20
Cleaning the Case. . . . . . . . . . . . . . . . . . . . . . . . . . 19Cleaning the Air Filter . . . . . . . . . . . . . . . . . . . . . . . 19
HOW TO USEBefore Using Your Air Conditioner Control Panel and Remote . . . . . . . . . . . . . . . . . 9,10
Preparing for Installation
. . . . . . . . . . . . . . . 12 . . . . . . . . . . . . . . . 12
. . . . . . . . . . . . 13
. . . . . . . . . . . . . . . . . 21,22
. . . . . . . . . . . . . . .23
2
Congratulations on your purchase
and welcome to the LG family.
Your new LG Air Conditioner
combines high-eff iciency operation
with portable convenience.
If you follow the operating and care
instructions in this manual, your air
conditioner will provide you with
many years of reliable service.
THANK YOU!
. . . . . . . . . . . . . 7, 8
. . . . . . . . . . . . . . . . . . . . . . . . . . . 4, 5
. . . . . . . . . . . . . . . . . . . . . 11
. . . . . . . 14,15
. . . . . . . . . . . . . . . . . . . . . . . . . . . .18
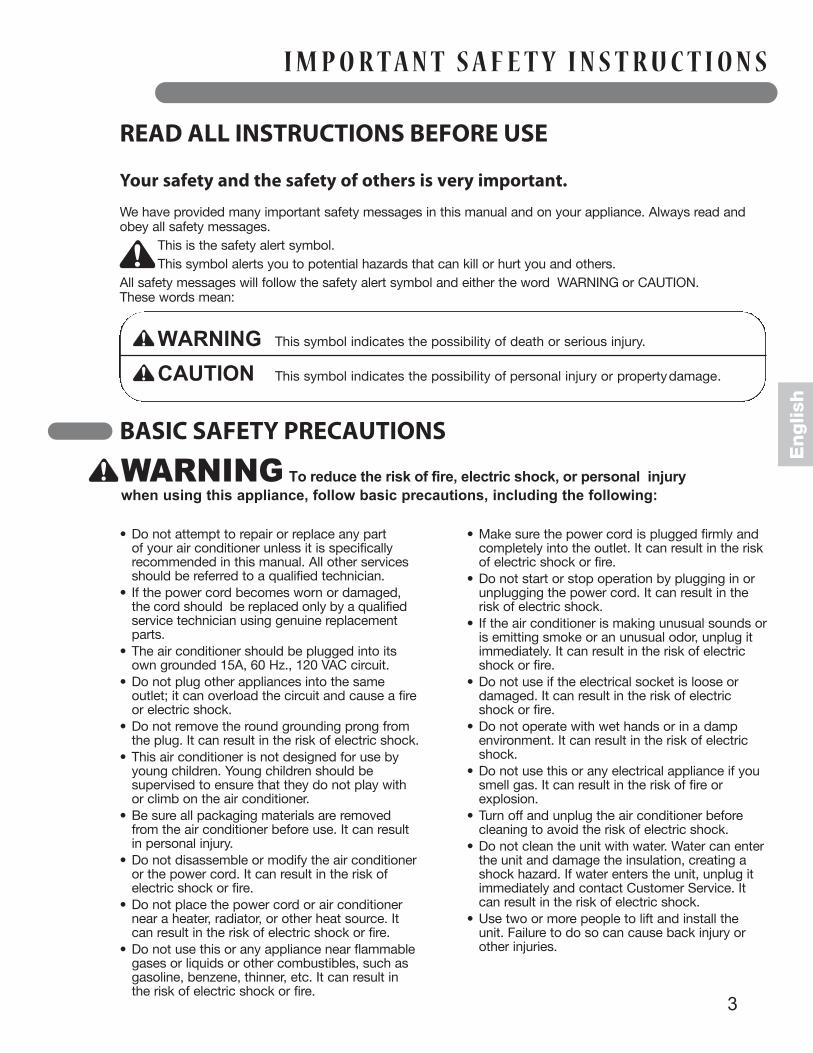
I M P O R T A N T S A F E T Y I N S T R U C T I O N S
READ ALL INSTRUCTIONS BEFORE USE
3
WARNING This symbol indicates the possibility of death or serious injury.
CAUTION This symbol indicates the possibility of personal injury or property damage.
Your safety and the safety of others is very important.
We have provided many important safety messages in this manual and on your appliance. Always read andobey all safety messages.
This is the safety alert symbol. This symbol alerts you to potential hazards that can kill or hurt you and others.
All safety messages will follow the safety alert symbol and either the word WARNING or CAUTION. These words mean:
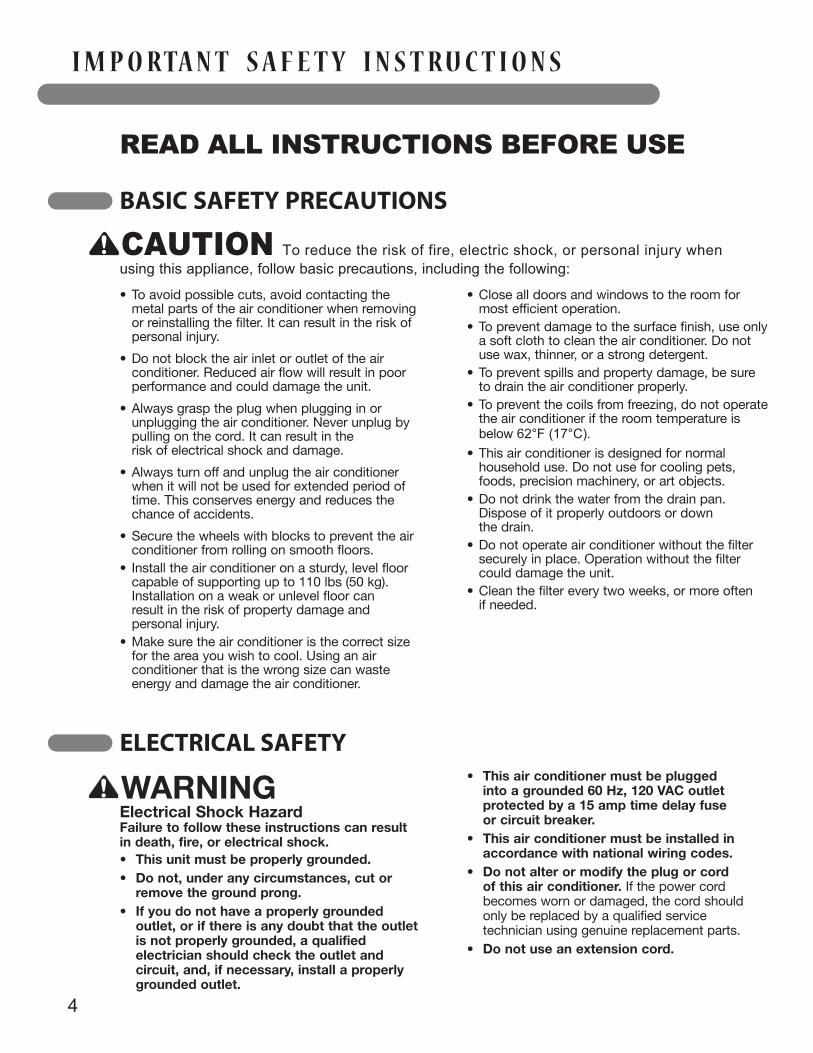
WARNING To reduce the risk of fire, electric shock, or personal injury when using this appliance, follow basic precautions, including the following:
• Do not attempt to repair or replace any part of your air conditioner unless it is specificallyrecommended in this manual. All other servicesshould be referred to a qualified technician.
• If the power cord becomes worn or damaged,the cord should be replaced only by a qualifiedservice technician using genuine replacementparts.
• The air conditioner should be plugged into itsown grounded 15A, 60 Hz., 120 VAC circuit.
• Do not plug other appliances into the sameoutlet; it can overload the circuit and cause a fireor electric shock.
• Do not remove the round grounding prong fromthe plug. It can result in the risk of electric shock.
• This air conditioner is not designed for use byyoung children. Young children should besupervised to ensure that they do not play withor climb on the air conditioner.
• Be sure all packaging materials are removedfrom the air conditioner before use. It can resultin personal injury.
• Do not disassemble or modify the air conditioneror the power cord. It can result in the risk ofelectric shock or fire.
• Do not place the power cord or air conditionernear a heater, radiator, or other heat source. Itcan result in the risk of electric shock or fire.
• Do not use this or any appliance near flammablegases or liquids or other combustibles, such asgasoline, benzene, thinner, etc. It can result inthe risk of electric shock or fire.
• Make sure the power cord is plugged firmly andcompletely into the outlet. It can result in the riskof electric shock or fire.
• Do not start or stop operation by plugging in orunplugging the power cord. It can result in therisk of electric shock.
• If the air conditioner is making unusual sounds oris emitting smoke or an unusual odor, unplug itimmediately. It can result in the risk of electricshock or fire.
• Do not use if the electrical socket is loose ordamaged. It can result in the risk of electricshock or fire.
• Do not operate with wet hands or in a dampenvironment. It can result in the risk of electricshock.
• Do not use this or any electrical appliance if yousmell gas. It can result in the risk of fire orexplosion.
• Turn off and unplug the air conditioner beforecleaning to avoid the risk of electric shock.
• Do not clean the unit with water. Water can enterthe unit and damage the insulation, creating ashock hazard. If water enters the unit, unplug itimmediately and contact Customer Service. Itcan result in the risk of electric shock.
• Use two or more people to lift and install theunit. Failure to do so can cause back injury orother injuries.
BASIC SAFETY PRECAUTIONS
Englis
h
4
I M P O RTA N T S A F E T Y I N S T R U C T I O N S
READ ALL INSTRUCTIONS BEFORE USE
• To avoid possible cuts, avoid contacting themetal parts of the air conditioner when removingor reinstalling the filter. It can result in the risk ofpersonal injury.
• Do not block the air inlet or outlet of the airconditioner. Reduced air flow will result in poorperformance and could damage the unit.
• Always grasp the plug when plugging in orunplugging the air conditioner. Never unplug bypulling on the cord. It can result in therisk of electrical shock and damage.
• Always turn off and unplug the air conditionerwhen it will not be used for extended period oftime. This conserves energy and reduces thechance of accidents.
• Secure the wheels with blocks to prevent the airconditioner from rolling on smooth floors.
• Install the air conditioner on a sturdy, level floorcapable of supporting up to 110 lbs (50 kg).Installation on a weak or unlevel floor can result in the risk of property damage andpersonal injury.
• Make sure the air conditioner is the correct sizefor the area you wish to cool. Using an airconditioner that is the wrong size can wasteenergy and damage the air conditioner.
• Close all doors and windows to the room formost efficient operation.
• To prevent damage to the surface finish, use onlya soft cloth to clean the air conditioner. Do notuse wax, thinner, or a strong detergent.
• To prevent spills and property damage, be sureto drain the air conditioner properly.
• To prevent the coils from freezing, do not operatethe air conditioner if the room temperature is
• This air conditioner is designed for normalhousehold use. Do not use for cooling pets,foods, precision machinery, or art objects.
• Do not drink the water from the drain pan.Dispose of it properly outdoors or down the drain.
• Do not operate air conditioner without the filtersecurely in place. Operation without the filtercould damage the unit.
• Clean the filter every two weeks, or more often if needed.
BASIC SAFETY PRECAUTIONS
below 62°F (17°C).
CAUTION To reduce the risk of fire, electric shock, or personal injury whenusing this appliance, follow basic precautions, including the following:
ELECTRICAL SAFETY
WARNING Electrical Shock HazardFailure to follow these instructions can resultin death, fire, or electrical shock.• This unit must be properly grounded.• Do not, under any circumstances, cut or
remove the ground prong.• If you do not have a properly grounded
outlet, or if there is any doubt that the outletis not properly grounded, a qualifiedelectrician should check the outlet andcircuit, and, if necessary, install a properlygrounded outlet.
• This air conditioner must be plugged into a grounded 60 Hz, 120 VAC outletprotected by a 15 amp time delay fuse or circuit breaker.
• This air conditioner must be installed inaccordance with national wiring codes.
• Do not alter or modify the plug or cord of this air conditioner. If the power cordbecomes worn or damaged, the cord shouldonly be replaced by a qualified servicetechnician using genuine replacement parts.
• Do not use an extension cord.
5
Engl
ish
I M P O R T A N T S A F E T Y I N S T R U C T I O N S
READ ALL INSTRUCTIONS BEFORE USE
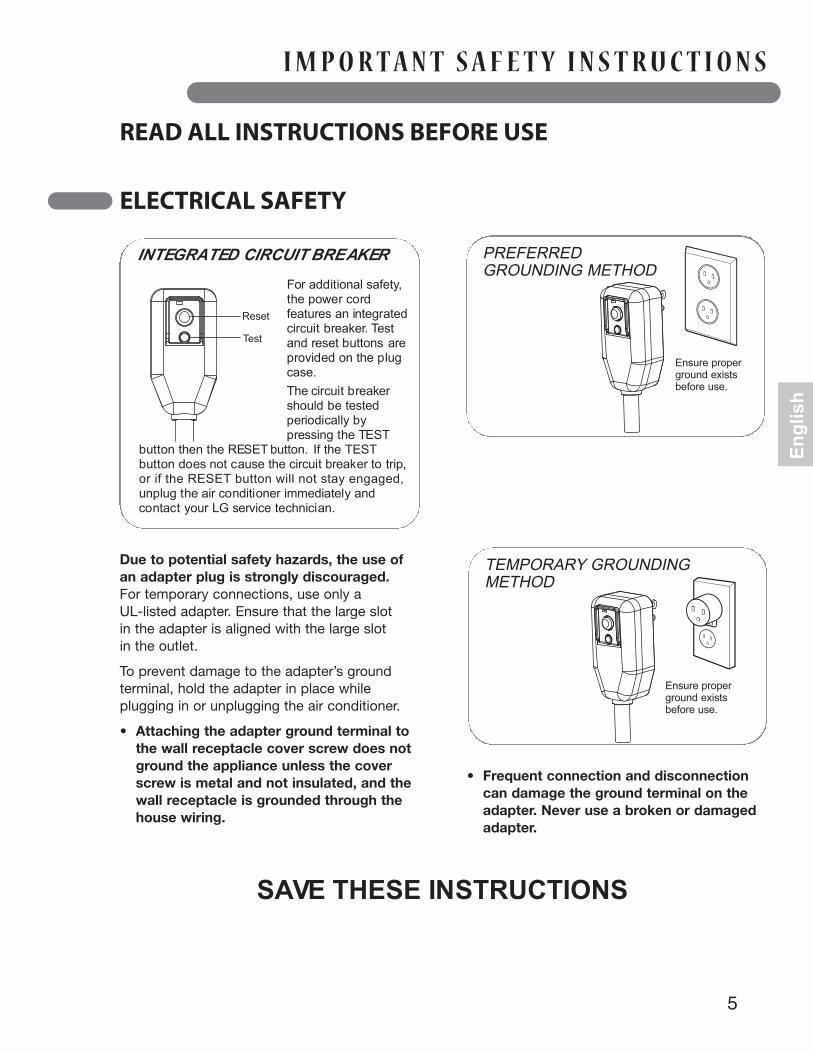
For additional safety,the power cordfeatures an integratedcircuit breaker. Testand reset buttons areprovided on the plugcase. The circuit breakershould be testedperiodically bypressing the TEST
button then the RESET button. If the TESTbutton does not cause the circuit breaker to trip,or if the RESET button will not stay engaged,unplug the air conditioner immediately andcontact your LG service technician.
INTEGRATED CIRCUIT BREAKER
Test
Reset
ELECTRICAL SAFETY
Due to potential safety hazards, the use ofan adapter plug is strongly discouraged.For temporary connections, use only a UL-listed adapter. Ensure that the large slot in the adapter is aligned with the large slot in the outlet.
To prevent damage to the adapter’s groundterminal, hold the adapter in place whileplugging in or unplugging the air conditioner.
• Attaching the adapter ground terminal tothe wall receptacle cover screw does notground the appliance unless the coverscrew is metal and not insulated, and thewall receptacle is grounded through thehouse wiring.
• Frequent connection and disconnectioncan damage the ground terminal on theadapter. Never use a broken or damagedadapter.
SAVE THESE INSTRUCTIONS
PREFERREDGROUNDING METHOD
Ensure properground existsbefore use.
TEMPORARY GROUNDINGMETHOD
Ensure properground existsbefore use.

6
P A R T S A N D F E A T U R E S
KEY PARTS AND COMPONENTS
8
1
2
3
5
SWIVELING CASTERS
INFRARED REMOTE CONTROLLER
Swiveling casters allow you to move the air conditioner easilyon most floor surfaces.
The remote controller allows you to adjust the temperature and operate most functions of the air conditioner from across the room.
AIR DISCHARGE
HOSEUse the di
AND DIFFUSERUse the diffuser and hose to connect the air conditioner to the window installation kit to vent exhaust air outside.
CONTROL PANEL AND DISPLAYEasy-to-read digital display shows the set temperature and indicator lights show the operating mode. Simple push buttons make changing settings quick and easy.
The direction of air can be controlled wherever you want to coolby adjusting the horizontal louver.
8
6 BOTTOM DRAIN PORTBefore moving the air conditioner, drain the internal waterin the collection tank completely by using bottom drain port.
7 AIR FILTER
The horizontal direction is adjusted by moving the lever to the left or right.Touching the horizontal louvers adjusts the air direction up or down.
2
14
3
5
Dry
4 INTEGRATED HANDLESIntegrated handles provide a convenient grip when lifting the air conditioner.
7
6

Refer to the Installation Instructions included inthis manual before using the air conditioner.Once the air conditioner has been properlyassembled and installed:
Plug the power cord into its own dedicatedproperly grounded outlet. Do not plug otherit could overload the outlet and create a
e hazard.Make sure the air conditioner and cord ispositioned where it does not create atripping hazard and will receive adequateventilation. Do not place it directly next tofurniture or objects that could block thevent openings.Make sure that any items that could beblown over or damaged by the airflow fromthe fan are out of the airflow path.
PREPARING FOR OPERATION
1
2
appliances into the same outlet;
fire
3
• Do not remain in the direct airflow from the airconditioner for extended periods of time.
• When used at the same time as stoves,fireplaces, and other combustion devices,make sure there is a sufficient flow of fresh airinto the room. Do not use in tightly enclosedspaces with these types of devices.
• This air conditioner is intended for householduse as a consumer comfort appliance. Do notuse it as a precision climate control system,or for purposes such as cooling precisionequipment, food, pets, plants, artwork, etc.Such items could be damaged.
• Do not bend the hose downward whenwindow installation kit is not applied. It maycause failure of air conditioner or performancedeterioration.
IMPORTANT:
Remove and store packing materials for reuse.Remove any shipping tape before using theair conditioner. If the tape leaves behind anyadhesive, rub a small amount of liquid dishsoap onto it and wipe with a damp cloth. DoNOT use sharp instruments, alcohol, thinners,or abrasive cleaners to remove adhesive.They could damage the finish.
UNPACKING THE AIR CONDITIONER
BEFORE USING YOUR AIR CONDITIONER
H O W T O U S E
7
Engl
ish

BEFORE USING YOUR AIR CONDITIONER
INSERTING BATTERIES IN THE REMOTEBefore using your remote, install the providedAAA batteries.
Press and glide the battery cover on the back of the remote, then you can remove the cover.
Insert two new alkaline AAA batteries into the battery compartment, being sure to note the proper polarity.
Reattach the battery cover.
NOTE : Use only alkaline batteries. Do not use rechargeable batteries.When replacing batteries, always replace bothbatteries with new batteries. Do not mix oldand new batteries.If the air conditioner will not be used for anextended period of time, remove the batteriesfrom the remote.
H O W T O U S E
8
Be sure to noteproper polarity!
1
2
3
Engl
ish
CAUTION• Iftheliquidfromthebatteriesgetsontoyourskinorclothes,washitwellwithcleanwater.
Do not use the remote if the batteries have leaked.
• Ifyoueattheliquidfromthebatteries,brushyourteethandseedoctor.
The chemicals in batteries could cause burns or other health hazards.

CONTROL PANEL AND REMOTE
POWERPress the POWER button to turn the air conditionerON or OFF. Any control settings such as Cool, Dry,Fan, and Fan Speed will be retained in memory when the power is off. When turned on after being unplugged, the air conditioner will automatically reset. Any settings will need to be re-entered.
MODEPress this button to select the operating mode suchas Cool, Dry (Dehumidify), or Fan for the air conditioner. And you can see the active mode through the indicator lights.The default setting is Cool. Press the MODE button to change to Dry (Dehumidify), press again to change to Fan, and again to change to Cool.
FANAdjusts the circulation fan speed between High andLow fan speed. The selected fan speed will be shown through the indicator lights. The function can be used in Cool and Fan modes. When changing fan speeds, there is a brief delay before the fan motor changes speed.
Operation of functions is the same when using the remote or the control panel, unless otherwise stated.
9
NOTE:The remote sensor is located under the LED display. Point the remote anywhere at the sensor. The remote may not work if the sensor is in bright light or if there is not a clear path between the remote and the sensor.
TIMER4When the TIMER function is selected, you can setthe air conditioner to either automatically turnOFF or turn ON after a delay of up to 24 hours. The display will show 0. Use the buttons to adjust the delay time from 1 to 24 hours, in onehour increments.To set an automatic off delay, press the TIMERbutton while the air conditioner is running anduse the buttons to adjust the delay time.air conditioner will automatically turn off after theset delay.To set an automatic on delay, press the TIMERbutton while the air conditioner is off and use the buttons to adjust the delay time.The display will show the number of hoursremaining until the unit is set to come on. Theair conditioner will automatically turn on afterthe set delay.If you want to know how many hours you havesetted, press the TIMER button and then youcan see the time through the LED display.If you want to change the set timer, press theTIMER button and adjust the time when thenumber is flickering.To cancel the Timer function, press the
TIMER button and adjust the number to 0 when the number is flickering, then the function will be canceled in a few seconds.Another better method is press the TIMERbutton and press this button again when thenumber is still flickering.
1
2
8
H O W T O U S E
COOL Compressor runs and cools the room. Use the / and FAN buttons to set the desired
temperature and circulation fan speed.
FAN Fan circulates air but compressor does not run. Use the FAN button to set the desired fan speed.
DRY Dry mode is used to remove humidity from the room without additional cooling. Fan speed is pre-set and cannot be adjusted.
Mode Features
Engl
ish
3
124 3 5
6
Dry 3
4
7
5
2
188
1
3
9
47
Dry

CONTROL PANEL AND REMOTE
18
Engl
ish
10
5
Increases the temperature by 1 °F every 2 hoursto allow a more comforable adjustment for the user.
7 SLEEP
8 °C/°F(CELSIUS AND FAHRENHEIT EXCHANGE BUTTON)
°C/°F function can be activated only with theremote. When the displayed temperature is °C (or °F), you can press this button to switch to °F (or °C).
124 3 5
6
Dry
5
2
188
1
3
9
47
Dry
9 CONTINUOUSAfter setting continuous, the unit will keep running no matter what temperature is selected.
Operation of functions is the same when using the remote or the control panel, unless otherwise stated.NOTE:The remote sensor is located under the LED display.Point the remote anywhere at the sensor. The remote may not work if the sensor is in bright light or if there is not a clear path between the remote and the sensor.
In COOL and DRY modes, the buttons adjust the set temperature up to 86°F or down to 60°F, in one degree increments. The temperaturecan be switched between degrees Fahrenheit and degrees Celsius, pressing the button and button at the same time, or pressing °F /°C button on the remote.When the TIMER function is selected, use the buttons to adjust the delay time from 1 to 24 hours, in one hour increments.If you press and hold the buttons, the settemperature or time will change automatically after a few seconds.NOTE: The displayed temperature is the SETtemperature, not the room temperature. In COOL orDRY mode, the thermostat in the air conditioner will run the compressor until the set temperature is reached, then cycle the compressor on and off to maintain the set temperature.
/ (TEMP/TIMER)
LED Display6
LED display shows the set temperature, fan speed, or the selected TIMER delay. Indicators will light to show active mode and additional settings. The LED display will showthe FL to indicate when the internal water drain tank needs to be emptied.
H O W T O U S E
11
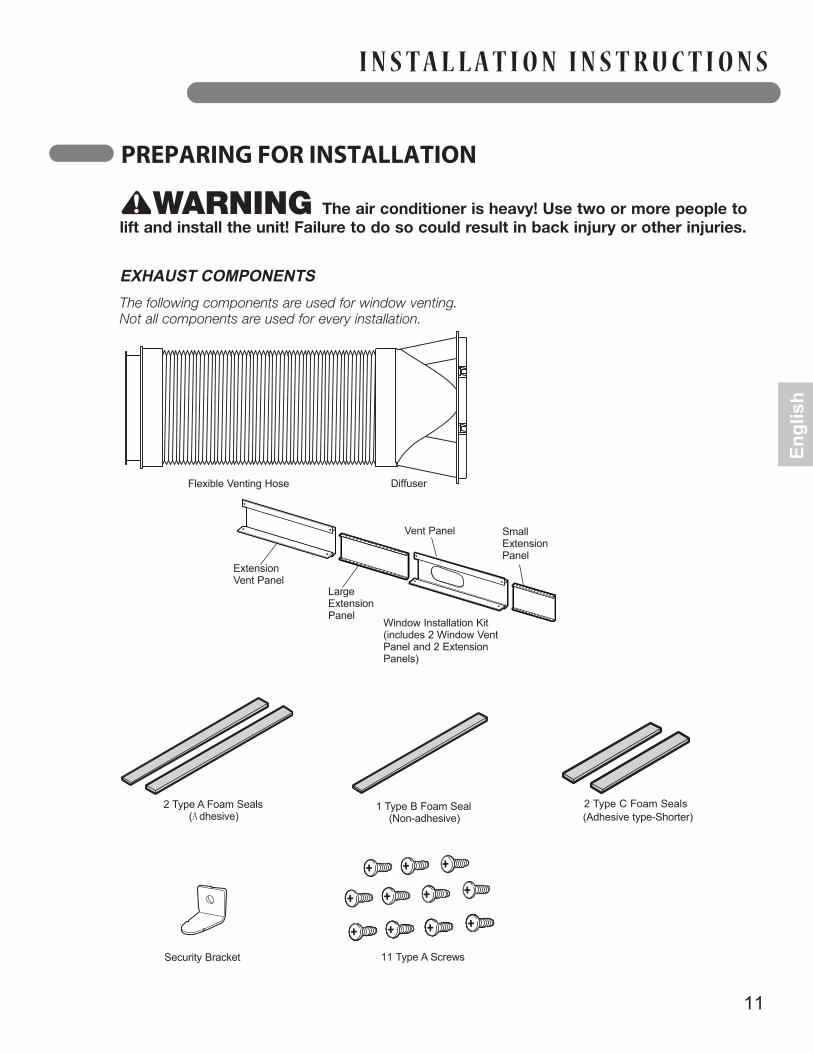
11 Type A Screws
The following components are used for window venting. Not all components are used for every installation.
EXHAUST COMPONENTS
Window Installation Kit(includes 2 Window VentPanel and 2 ExtensionPanels)
Flexible Venting Hose
2 Type A Foam Seals (Adhesive)
Vent Panel
LargeExtensionPanel
ExtensionVent Panel
SmallExtensionPanel
Diffuser
Security Bracket
1 Type B Foam Seal (Non-adhesive)
2 Type C Foam Seals(Adhesive type-Shorter)
Engl
ish
I N S T A L L A T I O N I N S T R U C T I O N S
PREPARING FOR INSTALLATION
WARNING The air conditioner is heavy! Use two or more people tolift and install the unit! Failure to do so could result in back injury or other injuries.

I N S T A L L A T I O N I N S T R U C T I O N S
SELECTION OF INSTALLATION LOCATION
Place the unit on a level floor.
For best performance,allow at least 20 in of air space on all sides of the unit for good air circulation.
1
2
The length of the exhaust hose is specially designed according to the specification of this product. Do not replace or extend it with your own private hose as this could cause malfunction.
WARNING
12
Place the unit near a window. The hose and diffuser will be used to connect the air conditioner to the window installation kit to vent exhaust air outside.
3
ATTACHING THE HOSE AND DIFFUSER
LOCKUNLOCK
Insert the vent hose into the hole on the back ofthe air conditioner and rotate counter clockwise.
20 in20 in

I N S T A L L A T I O N I N S T R U C T I O N S
WINDOW VENT PANEL AND EXTENSIONSThe window installation kit allows you to install the air conditioner in most vertical-sliding windows
18" to 48" wide, or casement-style windows from 18" to 48 " highPlease refence the below table first.
For an 18" window opening, use the windowvent panel by itself.
For window openings from 181⁄4" to 28", use the window vent panel and the smallextension panel.
use the window vent panel and the largeextension panel.
For window openings from 34 1/4" to 48", use thewindow vent panel and both extension panels.
Vent Panel
Smallextensionpanel
VentPanel
18"
18"
Vent Panel
181⁄4" − 28"
181⁄4" − 28"
Small extensionpanel
VentPanel
Largeextensionpanel
Vent Panel
Large extensionpanel
VentPanel
Largeextensionpanel
Vent Panel
Large extensionpanel
VentPanel
Smallextensionpanel
Smallextensionpanel
Engl
ish
Fig “a” Fig “b”
28 1/4"−34"
Fig “c” Fig “d”
For window openings from 28 1/4" to 34",
34 1/4"−48"
34 1/4"−48"
Window Installation Kit(includes 2 Window VentPanel and 2 ExtensionPanels)
Vent Panel
LargeExtensionPanel
ExtensionVent Panel
SmallExtensionPanel
(D)
(C)
(A) (B)A B C D
18" 12" 18" 16"18" √ a
18 1/4"−28" √ √ √ b28 1/4"−34" √ √ √ c34 1/4"−48" √ d
FigType
Window Length
13

NOTE: The window installation kit can be used with vertical sliding windows between18" and 48" wide.
I N S T A L L A T I O N I N S T R U C T I O N S
INSTALLATION IN VERTICAL SLIDING WINDOWS
14
Foam seal A(Adhesive type)
Foam seal C(Adhesive type-shorter)
Sellante de espuma A(Tipo adhesivo)
Tipo C de sellado con espuma(tipo adhesivo-más corto).
Joints en Mousse A(Adhesive type)
Joints en Mousse C(Plus court de type adhésif)
1 Cut the foam seal A (adhesive type) &C (adhesive type-shorter) to the properlength, and attach it to the window sash and frame.
2 Insert the vent panel assembly, includingextension panels, if needed, into the windowopening. Extend the extension panels, ifused.
Foam seal B(Non-adhesive type)
4 Cut the foam seal B (Non-adhesive type) tothe window width. Stuff the foam seal Bbetween the glass and the window toprevent air and insects from getting into theroom.
3 Carefully lower the window. Secure the ventpanel in place with 4 type A screws, plusone screw for each extension.Vent panel only: 4 type A screwsVent panel and one extension: 5 type A screwsVent panel and two extensions: 6 type A screwsTwo vent panels and two extensions: 10 type A screws
Type A screws
Extension panel(if required)
Vent Panel

INSTALLATION IN VERTICAL SLIDING WINDOWS
5 Install the security bracket with a type Ascrew, as shown.
Type Ascrew
Security Bracket
I N S T A L L A T I O N I N S T R U C T I O N S
15
Engl
ish
6 Insert the oval end of the diffuser into thewindow installation kit until the locking tabsengage.
7 Insert fully and move to the small gap.
Small gap
First
Second

16
Foam seal A(Adhesive type)
Foam seal C(Adhesive type-shorter)
1 Cut the foam seal A (adhesive type) &C (adhesive type-shorter) to the properlength, and attach it to the window sash andframe.
2 Insert the vent panel assembly, includingextension panels, if needed, into the windowopening. Extend the extension panels, ifused.
Foam seal B(Non-adhesive type)
4 Cut the foam seal B (Non-adhesive type) tothe window height. Stuff the foam seal Bbetween the glass and the window toprevent air and insects from getting into theroom.
3
Vent Panel
Type A screws
Carefully close the window. Secure the ventpanel in place with 4 type A screws, plusone screw for each extension.Vent panel only: 4 type A screwsVent panel and one extension: 5 type A screwsVent panel and two extensions: 6 type A screwsTwo vent panels andtwo extensions: 10 type A screws
INSTALLATION IN CASEMENT STYLE WINDOWSNOTE: The window installation kit can be used with casement windows between 18″and 48″tall.
I N S TA L L A T I O N I N S T R U C T I O N S
Extension panel(if required)
Joints enMousse C(plus court detype adhésif)
Sellado con espuma A(tipo adhesivo)
Sellado con espuma C(tipo adhesivo-más corto)
Sellado con espuma B(tipo adhesivo)
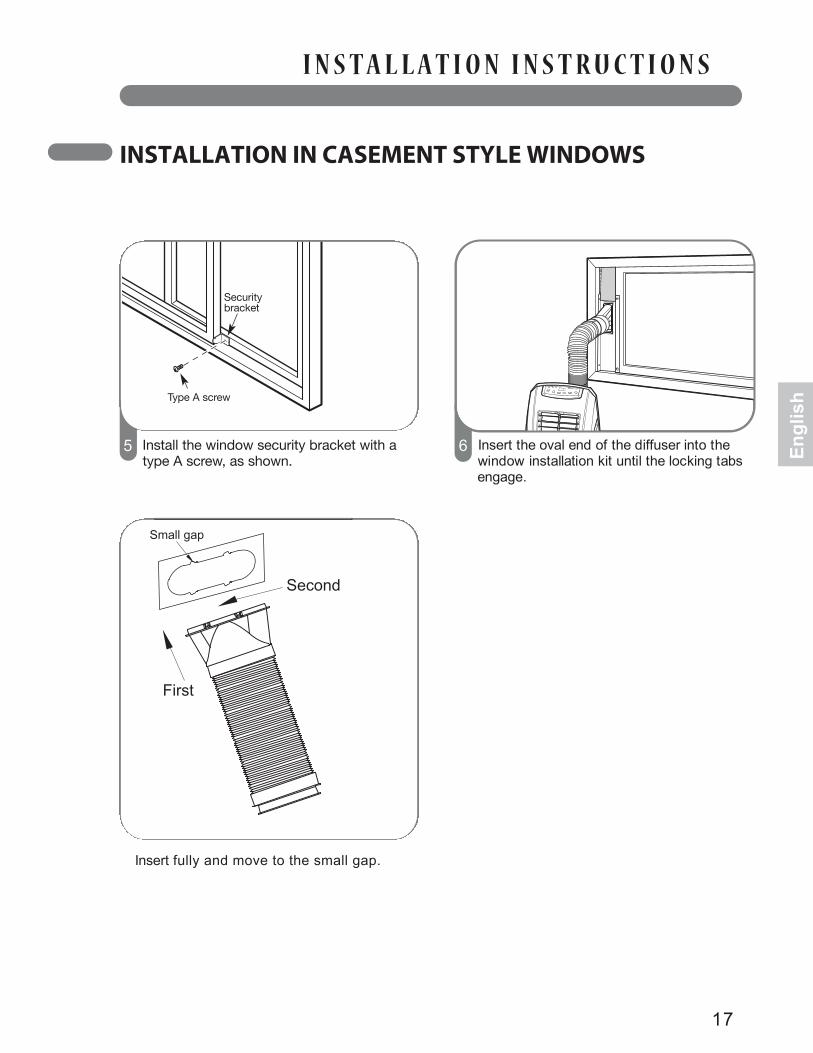
5 Install the window security bracket with atype A screw, as shown.
Type A screw
Securitybracket
INSTALLATION IN CASEMENT STYLE WINDOWS
I N S T A L L A T I O N I N S T R U C T I O N S
17
Engl
ish
Insert the oval end of the diffuser into thewindow installation kit until the locking tabsengage.
6
7 Insert fully and move to the small gap.
Small gap
First
Second

C A R E A N D C L E A N I N G
Your air conditioner is designed for year-roundoperation with only minimal cleaning andmaintenance.
For maximum efficiency, it is recommendedthat you have the cooling coils inspected andcleaned annually. Your local LG AuthorizedService Center can provide this inspection and cleaning service for a nominal fee. WARNING
• Unplug the air conditioner before cleaning or performing any maintenance or servicing.• Be careful when cleaning coils or removing or reinstalling the filter—the cooling fins are
sharp!Failure to follow the above precautions could result in electrical shock or personal injury.
WATER DRAINAGE A
Using the Upper Drain Port (Dry Mode Only)
This product has a self-evaporative system. The condensing water will be recycled to cool thecondenser. This can not only improve cooling efficiency, but also save energy for you.
• This can be used when you need dehumidification in high humidity. • Under the Cool or Fan mode, there’s no need of using the upper drain port.• During DRY(dehumidifying) mode, remove the drain plug and the exhaust hose from the back of the unit.• Install a drain hose (12mm [1/2"] inside diameter) and place the open end of the hose at a suitable drain location or outdoors.
• Unplug the air conditioner, disconnect the exhaust hose from the back, and move the air conditioner to a suitable drain location or outdoors. You may also place a pan under the drain that will hold up to 2 pintsof water.
When the internal water collection tank is full , the LED display will show FL and the air conditioner will turn off until the tank is emptied.
• Remove the drain cap from the drain outlet.• Once the water collection tank is drained, reinstall the
drain cap, making sure it is on securely.• Place the air conditioner in the desired location,
reconnect the exhaust hose, and plug in the air conditioner.
18
Using the Bottom Drain Port

C A R E A N D C L E A N I N G
19
CLEANING THE CASEWipe the case with a slightly damp cloth, then wipe dry with a dry cloth or towel.
CLEANING THE AIR FILTERThe air filter should be cleaned every two weeks; depending on indoor air quality, more frequent cleaning may be needed. A dirty air filter will decrease airflow and reduce efficiency. Do not operate the air conditioner withoutthe air filter in place.
Pull out the air filter by the handle.1
Use a vacuum cleaner to clean the filter. If the filter is heavily soiled, it can be washed in warm water using a mild detergent.
Do not use harsh cleaners or very hot water.Do not wash in a dishwasher.
Allow the filter to dry completely before reinstalling.
Reinsert the filter.
2
3
4
Engl
ish
1
• To prevent damage to the finish, do not use gasoline,benzene, thinner, etc., or any abrasive cleansers to clean the air conditioner; they may damage the finish.• Never pour water onto or into the air conditioner. It could damage internal components and create a shock and fire hazard.

1
2
3
1
2
3
4
4
STORING THE AIR CONDITIONERIf the air conditioner will not be used for anextened period of time:
Drain the water collection tank completelyand leave the bottom drain cap off longenough to allow any residual water to drainout. Once the tank is completely drainedand no more water flows out, reinstall the cap.
Remove and clean the filter, allow it to drycompletely, then reinstall it.
Store the air conditioner in a cool,drylocation, away from direct sunlight, extremetemperatures, and excessive dust.
Remove the batteries from the remote.
Before using the air conditioner again:
Make sure the filter and drain cap are in place
Check the cord to make sure it is in goodcondition, with no cracks or damage.
Place new batteries in the remote.
Install the air conditioner as described in theInstallation Instructions.
C A R E A N D C L E A N I N G
20

BEFORE CALLING FOR SERVICE
T R O U B L E S H O O T I N G
Before you call for service, review this list. It may save you time and expense. This list includes common occurrences that are not the result of a defect in workmanship or materials.
Air conditionerdoes not start
The air conditioner is unplugged.
Make sure the air conditioner plug is pushed completely into the outlet.
The fuse is blown/circuit breaker is tripped.
Check the house fuse/circuit breaker box and replace the fuse or reset the breaker.
Power failure. If power failure occurs, turn the mode controlto Off. When power is restored, wait 3 minutesto restart the air conditioner to prevent tripping of the compressor overload.
The current interrupter device is tripped.
Press the RESET button located on the powercord plug. If the RESET button will not stay engaged, discontinue use of the air conditioner and contact a qualified service technician.
Air conditionerdoes not coolas it should
Airflow is restricted.
The room may have been hot.
The cooling coils are iced over.
The air filter is dirty.
Make sure there are no curtains, blinds, or furniture blocking the front of the air conditioner.
In COOL model,press the DECREASE pad.
Clean the filter at least every 2 weeks.See the Care and Cleaning section.
When the air conditioner is first turned on, you need to allow time for the room to cool down.
Ice may block the air flow and obstruct the air conditioner from properly cooling the room. Set the mode control at High Fan or High Cool.
The temp control may notbe set correctly.
FL appears in the display. The water collection tank is full. Drain the tankand reset your settings.
Room temperature is less than the set temperature.
This is normal. The air conditioner automaticallyshuts off when the room equals or is less than the set temperature. Adjust the temperature setting, if needed.
Air conditioner runs too often or too long
Area to be cooled is too large for the air conditioner.
Doors or windows are open.
Consult your dealer for the air conditioner capacity necessary to cool the desired area.
Make sure doors and windows are closed.
21
Air conditioner freezing up
Engl
ish

T R O U B L E S H O O T I N G
BEFORE CALLING FOR SERVICE
Code appears inthe display.
The water collection tank is full.
Empty the water collection tank. See the Care and Cleaning section.
FL
Short or open circuit in theindoor air thermostat.
Unplug the air conditioner and contact yourauthorized LG service center.
E1
Short or open circuit in theindoor pipe thermostat.
Unplug the air conditioner and contact yourauthorized LG service center.
E2
E4
22
The coil sensor temperature is low, the unit will stop and display E4 to defrost.
After defrost, the unit will re-start.

WARRANTY
LG PORTABLE AIR CONDITIONER LIMITED WARRANTY - USA
WHAT THIS WARRANTY COVERS:LG Electronics U.S.A., Inc. (“LG”) warrants your LG Portable Air Conditioner ("product") against defect in materials or workmanshipunder normal household use, during the warranty period set forth below, LG will, at its option, repair or replace the product. This limited warranty is valid only to the original retail purchaser of the product, is not assignable or transferrable to any subsequent purchaser or user, and applies only when the product is purchased through an LG authorized dealer or distributor and used withinthe United States (“U.S.”) including U.S. Territories.
Note: Replacement products and repair parts may be new or factory-remanufactured and are warranted for the remaining portion of the original unit’s warranty period or ninety (90) days, whichever is longer. Please retain dated receipt or delivery ticket as evidence of the Date of Purchase for proof of warranty (you may be required to submit a copy to LG or authorized representative).
WARRANTY PERIOD: 1 year from the Date of Purchase: Any internal/ functional Parts and Labor.
HOW SERVICE IS HANDLED: In-Home Service In-home service will be provided during the warranty period subject to availability within the United States. In-home service maynot be available in all areas. To receive in-home service, the product must be unobstructed and accessible to service personnel. If during in-home service repair cannot be completed, it may be necessary to remove, repair and return the product. If in-home service is unavailable, LG may elect, at our option, to provide for transportation of our choice to and from a LG authorized servicecenter.
THIS LIMITED WARRANTY DOES NOT COVER:1. Service trips to deliver, pick up, or install the product or
for instruction on product use. 2. Replacing house fuses or resetting of circuit breakers,
correction of house wiring or plumbing, or correction of product installation.
3. Damage or failure caused by leaky/ broken/ frozen water pipes, restricted drain lines, inadequate or interrupted water supply or inadequate supply of air.
4. Damage or failure caused by accidents, pests and vermin, lightning, wind, fire, floods or acts of God.
5. Damage or failure resulting from misuse, abuse, improper installation, repair or maintenance. Improper repair includes use of parts not approved or specified by LG.
6. Damage or failure caused by unauthorized modification or alteration to the product.
7. Damage or failure caused by incorrect electrical current, voltage, or plumbing codes.
8. Cosmetic damage, including scratches, dents, chips or other damage to the finish of the product, unless such damage results from defects in materials or workmanship and is reported to LG within seven (7) calendar days from the date of delivery.
9. Damage or missing items to any display, open box, discounted, or refurbished product. 10. Product where the original factory serial numbers have been removed, defaced or changed in any way. 11. Repairs when product is used in other than normal and usual household use (e.g. rental, commercial use, offices, or recreational facilities) or contrary to the instructions outlined in the owner’s manual. 12. The removal and reinstallation of the Product if it is
installed in an inaccessible location.
THIS WARRANTY IS IN LIEU OF ANY OTHER WARRANTY, EXPRESS OR IMPLIED, INCLUDING AND WITHOUT LIMITATION TO, ANY WARRANTY OF MERCHANTABILITY OR FITNESS FOR A PARTICULAR PURPOSE. TO THE EXTENT ANY IMPLIED WARRANTY IS REQUIRED BY LAW, THIS WARRANTY IS LIMITED IN DURATION TO THE TERM PERIOD EXPRESSED ABOVE. REPAIR OR REPLACEMENT AS PROVIDED UNDER THIS WARRANTY IS THE EXCLUSIVE REMEDY FOR THE CUSTOMER. NEITHER THE MANUFACTURER NOR ITS U.S. DISTRIBUTOR SHALL BE LIABLE FOR ANY INCIDENTAL, CONSEQUENTIAL, INDIRECT, SPECIAL, OR PUNITIVE DAMAGES OF ANY NATURE, INCLUDING AND WITHOUT LIMITATION TO, LOST REVENUES OR PROFITS, OR ANY OTHER DAMAGE, WHETHER BASED IN CONTRACT, TORT, OR OTHERWISE.
SOME STATES DO NOT ALLOW THE EXCLUSION OR LIMITATION OF INCIDENTAL OR CONSEQUENTIAL DAMAGES OR LIMITATIONS ON HOW LONG AN IMPLIED WARRANTY LASTS, SO THE ABOVE EXCLUSION OR LIMITATION MAY NOT APPLY TO YOU. THIS WARRANTY GIVES YOU SPECIFIC LEGAL RIGHTS AND YOU MAY ALSO HAVE OTHER RIGHTS THAT VARY FROM STATE TO STATE.
HOW TO OBTAIN WARRANTY SERVICE & ADDITIONAL INFORMATION: Call 1-800-243-0000 or visit our website at www.lg.com.Mail to: LG Customer Information Center (ATTN: CIC) 201 James Record Road, Huntsville, AL 35824

24
Felicitaciones por su compra y
bienvenido a la familia de LG.
Su nuevo acondicionador de aire
LG combina un funcionamiento
de alta eficiencia con la comodidad
de la portabilidad.
Siguiendo las instrucciones de
funcionamiento y cuidados de este
manual, su acondicionador de aire
le brindará muchos años de
servicio confiable.
¡GRACIAS!
INSTRUCCIONES DE SEGURIDADIMPORTANTESPrecauciones básicas de seguridad . . . . . . . . . .25,26Seguridad eléctrica . . . . . . . . . . . . . . . . . . . . . . .26,27
PIEZAS Y CARACTERÍSTICASPiezas y componentes clave . . . . . . . . . . . . . . . . . .28
INSTRUCCIONESDEINSTALACIÓN
43 . . . . . . . . nóicalatsni al arap nóicacibu ed nóiccelEPreparación para la instalación
Paneldeventilaciónyextensionesdelaventana. . . . . . . . . . . . . . . . . . . . . . . . . . . . . . 35InstalaciónenventanasdedeslizamientoverticalInstalaciónenventanasdedeslizamientohorizontal
DETECCIÓN DE PROBLEMASAntes de llamar al servicio técnico
GARANTÍAInformación sobre registro de producto. . . . . . . . . . 45
CÓMO UTILIZAR EL ARTEFACTOAntes de utilizar su acondicionador de aire Panel de control y control remoto
CUIDADO Y LIMPIEZADrinaje de agua. . . . . . . . . . . . . . . . . . . . . . . . . . . . 40Cómo limpiar el filtro de aire. . . . . . . . . . . . . . . . . . . 41 Cómo limpiar la cubiertaCómo guardar el acondicionador de aire. . . . . . . . . 42
I N T R O D U C C I Ó N
. . . . . . . . . . . . 31,32 . . . . 29,30
. . . . . . . . . . . . . . . . 33
. . . . . . . . . . . . . . . . . . 36,37
. . . . . . . . . . . . . . . . 38,39
. . . . . . . . . . . . . . . . . . . . 41
. . . . . . . . . . . 43,44
Cómo conectar la manguera y el difusor . . . . . . . . . 34

LEA TODAS LAS INSTRUCCIONES ANTES DE USAR
ADVERTENCIA Este símbolo indica la posibilidad de muerte o lesiones graves.
PRECAUCIÓN Este símbolo indica la posibilidad de lesiones o daños a la propiedad.
Su seguridad y la seguridad de otros son muy importantes. Hemos incluido muchos mensajes de seguridad importantes en este manual y en su artefacto. Siempre lea yobedezca todos los mensajes de seguridad.
Este es el símbolo de alerta de seguridad. Este símbolo lo alerta sobre peligros potenciales que pueden matarlo a lastimarlo a usted o a otros.
Todos los mensajes de seguridad se encontrarán después de los símbolos de alerta de seguridad y de laspalabras "ADVERTENCIA" O "PRECAUCIÓN". Estas palabras significan:
ADVERTENCIA
• No intente reparar o cambiar ninguna pieza de su acondicionador de aire a menos que estéespecíficamente recomendado en este manual.Cualquier otro servicio debe realizarlo un técnicocalificado.
• Si el cable de energía se gasta o daña, sólo untécnico calificado puede cambiarlo, utilizando piezas de repuesto genuinas.
• El aire acondicionado debe enchufarse en su propio circuito de 15A, 60 Hz., 120 VAC conconexión a tierra.
• No enchufe otros artefactos en el mismotomacorriente ya que puede sobrecargar el circuitoy provocar un incendio o descarga eléctrica.
• No quite la pata redonda de conexión a tierra delenchufe. Puede provocar un riesgo de descargaeléctrica.
• El acondicionador de aire no está diseñado paraque lo usen niños pequeños. Los niños pequeñosdeben estar siempre bajo control para asegurarque no jueguen o se cuelguen del acondicionadorde aire.
• Asegúrese de quitar todos los materiales deempaque del acondicionador de aire antes deusarlo. Puede provocar lesiones personales.
• No desarme o modifique el acondicionador de aireo el cable de energía. Puede provocar un riesgo dedescarga eléctrica o incendio.
• No coloque el cable de energía o acondicionadorde aire cerca de un calentador, radiador, u otrafuente de calor. Puede provocar un riesgo dedescarga eléctrica o incendio.
• No use este u otro artefacto cerca de gases olíquidos inflamables u otros combustibles, talescomo gasolina, benceno, solvente, etc. Puedeprovocar un riesgo de descarga eléctrica oincendio.
• Verifique que el cable de energía esté enchufadofirmemente y por completo en el tomacorriente.Puede provocar un riesgo de descarga eléctrica o incendio.
• No inicie o detenga el funcionamiento enchufandoo desenchufando el cable de energía. Puedeprovocar un riesgo de descarga eléctrica.
• Si el acondicionador de aire está haciendo sonidosinusuales o está emitiendo humo u olor pococomún, desenchúfelo de inmediato. Puedeprovocar un riesgo de descarga eléctrica oincendio.
• No lo use si el tomacorriente está suelto o dañado.Puede provocar un riesgo de descarga eléctrica oincendio.
• No lo opere con manos mojadas o en un mediohúmedo. Puede provocar un riesgo de descargaeléctrica.
• No utilice este u otro artefacto eléctrico si huelegas. Puede provocar un riesgo de incendio oexplosión.
• Apague y desenchufe el acondicionador de aireantes de limpiarlo para evitar el riesgo de unadescarga eléctrica.
• No limpie la unidad con agua. El agua puedeingresar a la unidad y dañar la aislación, creandoasí un peligro de descarga eléctrica. Si ingresaagua a la unidad, desenchúfela de inmediato ycomuníquese con el Servicio de atención al cliente.Puede provocar un riesgo de descarga eléctrica.
• Utilice dos o más personas para levantar e instalarla unidad. No hacerlo puede provocar lesiones enla espalda u otras lesiones.
PRECAUCIONES BÁSICAS DE SEGURIDAD
I N S T R U C C I O N E S D E S E G U R I D A D I M P O R T A N T E S
Para reducir el riesgo de incendio, descarga eléctrica olesiones personales al usar este artefacto, siga las precauciones básicas, incluyendo las siguientes:
25
Esp
añ
ol

• Para evitar posibles cortes, evite el contacto con laspiezas metálicas del acondicionador de aire cuandoquite o vuelva a instalar el filtro. Puede provocar unriesgo de lesiones personales.
• No bloquee la toma o salida de aire del acondicionadorde aire. Una corriente de aire reducida provocará undesempeño pobre y podría dañar la unidad.
• Siempre tome el enchufe cuando enchufe o desenchufeel acondicionador de aire. Nunca desenchufe tirando delcable. Puede provocar un riesgo de descarga eléctrica ydaños.
• Siempre apague y desenchufe el acondicionador de airecuando no vaya a utilizarlo por períodos extensos. Estoconserva la energía y reduce la posibilidad de accidentes
.
• Ajuste las ruedas con trabas para evitar queacondicionador de aire se deslice en pisos lisos.
• Instale el acondicionador de aire sobre un piso resistentey nivelado que pueda soportar hasta 110 lbs (50 kg). Lainstalación sobre un piso débil o desparejo puedeprovocar un riesgo para la propiedad y lesionespersonales.
• Verifique que el acondicionador de aire sea del tamañoadecuado para el área que desea enfriar. Usar unacondicionador de aire de un tamaño incorrecto puedemalgastar energía y dañar el artefacto.
• Cierre todas las puertas y ventanas de la habitación parauna operación más efectiva.
• Para evitar daños al acabado de la superficie, utilice sóloun paño suave para limpiar el acondicionador de aire. Noutilice cera, solvente, o un detergente fuerte.
• Para evitar derrames y daños a la propiedad, asegúresede drenar el acondicionador de aire correctamente.
• Para evitar que las serpentinas se congelen, no opere elacondicionador de aire si la temperatura de la habitaciónse encuentra por debajo de 62°F (17°C).
• Este acondicionador de aire está diseñado para un usodoméstico normal. No lo use para enfriar mascotas,alimentos, maquinaria de precisión u objetos de arte.
• No beba el agua del depósito de drenaje. Elimínela en elexterior o en el desagüe.
• No opere el acondicionador de aire sin el filtro en sulugar. El funcionamiento sin el filtro puede dañar launidad.
• Limpie el filtro cada dos semanas, o más a menudo sihiciera falta.
PRECAUCIONES BÁSICAS DE SEGURIDADPRECAUCIÓN
SEGURIDAD ELÉCTRICA
LEA TODAS LAS INSTRUCCIONES ANTES DE USAR
I N S T R U C C I O N E S D E S E G U R I D A D I M P O R T A N T E S
Para reducir el riesgo de incendio, descarga eléctrica olesiones personales al usar este artefacto, siga las precauciones básicas, incluyendo las siguientes:
ADVERTENCIA Peligro de descarga eléctricaNo seguir estas instrucciones puede provocarla muerte, un incendio o una descargaeléctrica.• Esta unidad debe contar con una adecuada
conexión a tierra.• Bajo ninguna circunstancia corte o quite la
pata de conexión a tierra.• Si no cuenta con un tomacorriente con una
adecuada conexión, o si existe alguna dudasobre el mismo, un electricista calificadodebe verificar el tomacorriente o el circuito, ysi fuese necesario, instalar un tomacorrientecon adecuada conexión.
• Este acondicionador de aire debe conectarseen un tomacorriente con conexión a tierra de60 Hz, 120 VAC protegido por una fusible deacción retardada de 15 amperes o undisyuntor.
• Este acondicionador de aire debe instalarsede acuerdo con los códigos nacionales decableado.
• No altere o modifique el enchufe o cable de este acondicionador de aire. Si el cable de energía se gasta o daña, sólo un técnicocalificado puede cambiarlo utilizando piezas de repuesto genuinas.
• No utilice un cable de extensión.
26

27
DISYUNTOR INTEGRADO
Test
Reset
SEGURIDAD ELÉCTRICA
Para seguridad adicional, el cable de energía
El disyuntor debe probarse en forma
o
si el botón RESET (reconfiguración) no queda trabado,desenchufe el acondicionador de aire deinmediato y comuníquese con un técnico de LG.
cuenta con un disyuntor integrado. Los botonesde prueba y de reconfiguración
encuentran se
en el enchufe.
periódica presionando el botón TEST (prueba) y
luego el botón RESET (reconfiguración). Si el botón TEST (prueba) no hacen saltar el disyuntor,
MÉTODO DE CONEXIÓN A TIERRATEMPORAL
MÉTODO DE CONEXIÓNA TIERRA PREFERIDO
Verifique quehaya unaconexión a tierraadecuada antesdel uso.
Debido a peligros de seguridad potenciales,recomendamos enfáticamente no utilizar unenchufe adaptador.
• Conectar la terminal de la conexión atierra del adaptador al tornillo de la tapadel tomacorriente de pared no conectaráel artefacto a tierra a menos que eltornillo sea de metal y no aislado, y eltomacorriente de pared esté conectado atierra a través del cableado doméstico.
• Una conexión y desconexión frecuentepueden dañar la terminal de tierra deladaptador. Nunca utilice un adaptadorroto o dañado.
GUARDE ESTAS INSTRUCCIONES
Para conexiones temporales, use solo unadaptador listado UL. Verifique que la ranuragrande del adaptador esté alineada con laranura grande del tomacorriente.
Para evitar daños a la terminal de la conexión atierra del adaptador, sostenga el adaptador ensu lugar mientras enchufa o desenchufa elacondicionador de aire.
LEA TODAS LAS INSTRUCCIONES ANTES DE USAR
I N S T R U C C I O N E S D E S E G U R I D A D I M P O R T A N T E S
Verifique quehaya unaconexión a tierraadecuada antesdel uso.
Esp
añ
ol

8
28
PIEZAS Y COMPONENTES CLAVE1
2
3
4
RUEDAS GIRATORIAS
CONTROL REMOTO INFRARROJO
5 SOPORTE DEL CABLE DE ALIMENTACIÓN
Las ruedas giratorias le permiten desplazar el acondicionador de aire fácilmente sobre la mayoría de las superficies.
El control remoto le permite ajustar la temperatura ymanejar la mayoría de las funciones del acondicionador deaire desde lejos.
La Transpiración del Aire
MANGUERA Y DIFUSORUtilice el difusor y la manguera para conectar el acondicionador de aire al equipo de instalación de la ventana para enviar el aire de salida hacia fuera.
PANEL DE CONTROL Y PANTALLALa pantalla digital de fácil lectura muestra la temperaturaconfigurada y las luces indicadoras indican el modo defuncionamiento. Los simples botones de presión facilitan y aceleran los cambios de configuración.
La dirección del aire se puede controlar adondequeiera que ustednecesite frescar por adjustar la lumbrera horizontal.Ajustar arriba y abajo la lumbrera horizontal va a cambiar elfluido vertical.
8
6 PUERTO INFERIOR DE DRENAJEAntes de desplazar la unidad, drene completamente eldepósito interno de recogida de agua mediante el puertoinferior de drenaje.
7 FILTRO DE AIRE
Enrolle el cable de alimentación alrededor del soporte, parasu comodidad.
P I E Z A S Y C A R A C T E R Í S T I C A S
8
2
14
3
5
Dry
7
6

Lea las Instrucciones de instalación incluidas eneste manual antes de usar el acondicionador deaire. Una vez que el acondicionador de aire se hamontado e instalado correctamente:
Conecte el cable en su propia fuente de alimentación bien colocada en el suelo. No conecte otros aparatos en la misma fuente, si no, podría causar una sobrecarga de la toma de corriente y crear un peligro de incendio.Asegúrese de que el acondicionador de aire y el cable estén ubicados en un lugar dondenadie pueda tropezarse y donde reciban unaventilación adecuada. No lo coloquedirectamente al lado de muebles u objetos quepodría bloquear las aberturas de ventilación. Verifique que los elementos que podríanvolarse o dañarse por la corriente de aireproveniente del ventilador no se encuentren en el camino de la corriente.
ANTES DE UTILIZAR EL ACONDICIONADOR DE AIRE
PREPARACIÓN PARA LA OPERACIÓN
1
2
3
• No permanezca frente a la corriente de aire delacondicionador de aire por períodos largos.
• Para evitar el daño o lesión a mascotas oplantas, constate que no estén expuestos a lacorriente directa del acondicionador de aire.
• Cuando lo use al mismo tiempo con cocinas,chimeneas, u otros dispositivos de combustión,asegúrese de que haya una suficiente corrientede aire fresco en la habitación. lo use enespacios muy cerrados con esta clase dedispositivos.
• Este acondicionador de aire es para usodoméstico como un artefacto de confort para el consumidor. lo use como un sistema de control preciso de clima, o para enfriarequipamientos de precisión, alimentos,mascotas, plantas, obras de arte, etc. Dichoselementos podrían dañarse.
• No doble el tubo flexible hacia abajo si nodispone del conjunto de instalación de laventana. Se puede dañar el sistema de aireacondicionado o se puede deteriorar sufuncionamiento.
IMPORTANTE:
Quite y guarde los materiales de empaque paravolverlos a usar. Quite la cinta de embalaje antes de usar elacondicionador de aire. Si la cinta deja restos deadhesivo, frote una pequeña cantidad de jabónlíquido y limpie con un paño húmedo. NO USEinstrumentos afilados, alcohol, solventes, olimpiadores abrasivos para quitar el adhesivo.Podrían arruinar el acabado.
CÓMO DESEMPACAR ELACONDICIONADOR DE AIRE
29
C Ó M O U T I L I Z A R E L A R T E F A C T O
NO
NO
Esp
añ
ol

30
��� ���
1
2
3
Antes de usar el control remoto, instale las baterías AAAprovistas:
Presione la lengüeta de bloqueo de la tapa de lasbaterías en la parte trasera del control remoto y quitela tapa.
Introduzca dos baterías alcalinas nuevas AAA en elcompartimento de las baterías, asegurando de utilizarla polaridad correcta.
odnacifirev ,saíretab sal ed apat al racoloc a avleuV que la lengüeta queda trabada en su lugar.
• Sólo use baterías alcalinas. No utilice bateríasrecargables.
• Al cambiar las baterías, siempre reemplácelas con unidades nuevas. No mezcle baterías usadas connuevas.
• Si el acondicionador de aire no será utilizado por un período prolongado, quite las baterías del controlremoto.
CÓMO COLOCAR LAS BATERÍAS EN EL CONTROL REMOTO.
1
2
3
ANTES DE UTILIZAR EL ACONDICIONADOR DE AIRE
C Ó M O U T I L I Z A R E L A R T E F A C T O
NOTAS:
PRECAUCIÓN • Si entra líquido de las pilas en contacto con la piel o ropa, lávela inmediatamente con agua.
No utilice el control remoto si las pilas tienen fugas.
• Si el líquido de las pilas alcanzara su boca, cepille sus dientes y consulte a un médico.
Los productos químicos de las pilas podrían causar quemaduras u otros perjuicios a la salud.

PANEL DE CONTROL Y CONTROL REMOTO
POWER (Encendido)Presione el botón POWER para encender (ON) o apagar (OFF) el acondicionador de aire.Cuando se apague el acondicionador de aire, las configuraciones del control tales como Modo,COOL(REFRIGERACIÓN), DRY (SECADO), FAN (VENTILADOR),se conservarán en la memoria.Cuando se encienda después de estardesenchufado, el acondicionador de aire volverá a configurarse en el Modo COOL(REFRIGERACIÓN).Cualquier clase de configuración deberá volver a ingresarse.
MODE (Modo)Apriete el botón MODO para elegir el modo de funcionamiento COOL(REFRIGERACIÓN), DRY (SECADO), FAN (VENTILADOR)por el aire acondicionado.Y usted puede ver el modo activo a través de la Pantalla .El valor pre-establecido es REFRIGERACIÓN. Marque elbotón MODO para cambiar al modo de DRY (SECADO), y hagalo una otra vez para cambiar al FAN (VENTILADOR)una vez más para cambiar al COOL(REFRIGERACIÓN).
FAN(Ventilador)Presionando el botón FAN SPEED la velocidad delventilador de circulación pasa de baja a alta En la pantalla podrá verse la velocidad de ventilador seleccionada. La función puede utilizarse en los modosCOOL(REFRIGERACIÓN) o FAN (VENTILADOR) . Cuando se cambian las velocidades del ventilador, se produce una pequeña demora antes de que el motor lasmodifique.
El uso de funciones es el mismo cuando utilice el control remoto o el panel de control, a menos que se indique lo contrario.
1
2
8
3
31
NOTE:El sensor remoto se encuentra debajo de la descarga de aire y de arriba del panel frontal.Siempre apunte el control remoto alsensor.El control remoto puede no funcionar si el sensor se encuentra cerca de luces brillantes o si el camino entre el control remoto y el sensor está bloqueado.
TIMER(Temporizador)4Cuando se elige la función TIMER (temporizador),se puede configurar el acondicionador de aire paraque se encienda o apague automáticamente después de un tiempo de espera de hasta 24 horas. En la pantalla podrá verse 0. Utilice los botones paraajustar el tiempo de espera de 1 a 24 horas, en incrementos de una hora.Para establecer un modo del apagado de retraso,apriete el botón TIMER (temporizador) cuando el aire acondicionado está trabajando y marque los botones para ajustar la demora. El air acondicionado se ap agará automáticamente después de estar establecida ésta.Para establecer un retraso automático, apriete el botón TIMER (temporizador) cuando el aire acondicionado está apagado y use los botones para ajustar el tiempo de retraso.La pantalla va a mostrar cuántas horas quedan hasta que la unidad se vaya a encender. El aire acondicionadova a encender automaticamente después de la demora establecida.Si quiere usted conocer cuántas horas haestablecida, apriete el botónTIMER (temporizador) y entonces puedever el tiempo mostrado en la pantalla LED. Siquiere cambiar el tiempo establecido, marque el botón TIMER (temporizador) y ajustelo cuando el número está centellando.Para cancelar la función Temporizador, es una manera apretar el botón TIMER (temporizador) y ajustar el número hasta 0 cuando el número está entrellando, y la misma función va a cancelarse en unos segundos. Una mejor manera es apretar el botón TIMER (temporizador) y hacerlo de nuevo cuando el número está aún entrellando.
C Ó M O U T I L I Z A R E L A R T E F A C T O
124 3 5
6
Dry
5
2
188
1
3
9
47
Dry
Esp
añ
ol

PANEL DE CONTROL Y CONTROL REMOTO
TEMP/TIMER (temperatura/temporizador)En los modos COOL(REFRIGERACIÓN), y DRY(SECADO), los botones modifican la temperatura desde 86°F hasta 60°F, en incrementos de un grado. La temperatura semide en grados Fahrenheit. No puede cambiarse a grados Celsius.TIMER (temporizador), utilice los botones para ajustar el tiempo de demora de 1 a 24 horas, en incrementos de una hora. Si presiona y sostiene los botones , la temperatura configurada o tiempo se modificarán automáticamente después de unos segundos.NOTA: La temperatura de la pantalla es la CONFIGURADA, no la temperatura de la habitación. En los modos COOL(REFRIGERACIÓN) o DRY(SECADO) el termostato del acondicionador de aire hará funcionar al compresor hasta alcanzar la temperatura configurada, luego encenderá o apagará el compresor para mantener la temperatura configurada.
El uso de funciones es el mismo cuando utilice el control remoto o el panel de control, a menos que se indique lo contrario.
5
8
32
NOTE:El sensor remoto se encuentra debajo de la descarga de aire y de arriba del panel frontal.Siempre apunte el control remoto alsensor.El control remoto puede no funcionar si el sensor se encuentra cerca de luces brillantes o si el camino entre el control remoto y el sensor está bloqueado.
C Ó M O U T I L I Z A R E L A R T E F A C T O
/
/
/
/
MODO DE SUSPENSIÓN7Al establecer el modo de suspención, la temperatura va a subir 1 °F después de 2 horas, y otras 2 horas después, 1 °F más.
°C/°F(BOTÓN DE CAMBIO ENTRE CELSIU Y FAHRENHEIT
8
°C/°F función sólo se activa con el control remoto. Cuando la temperatura mostrada es °C (o °F), puedeapretar el botón para cambiar el °F(o °C) .
PANTALLA LED6La pantalla digital muestra la temperatura configuradaen grados Fahrenheit, la velocidad del ventilador, o la programación de temporizador (TIMER) seleccionada. Los indicadores se encenderán para mostrar el modo activado y las configuraciones adicionales. El indicador WATER FULL (lleno de agua) se encenderá para indicar que el tanque interno de drenaje de agua debe vaciarse.
124 3 5
6
Dry
CONTINUO9
Después de estabalecer el modo de poderío, la unidad va a seguir funcionando sin importar qué temperatura se ajuste.
5
2
188
1
3
9
47
Dry
��� ���
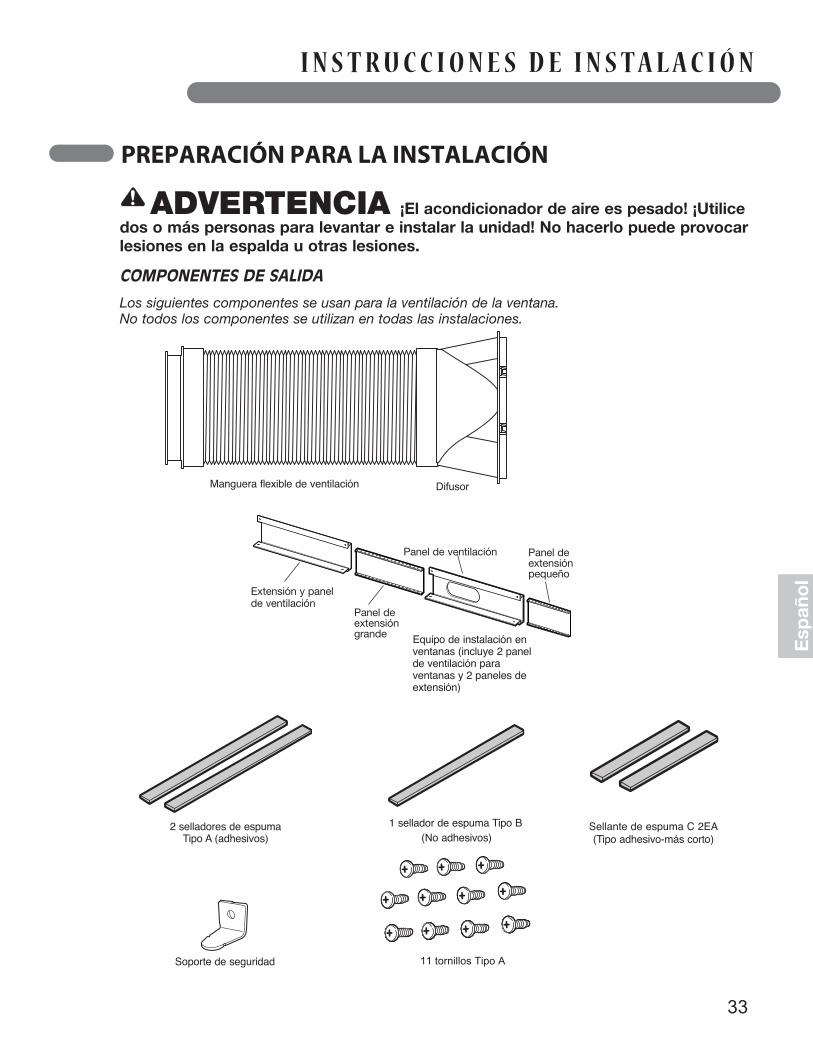
PREPARACIÓN PARA LA INSTALACIÓN
I N S T R U C C I O N E S D E I N S T A L A C I Ó N
ADVERTENCIA ¡El acondicionador de aire es pesado! ¡Utilicedos o más personas para levantar e instalar la unidad! No hacerlo puede provocarlesiones en la espalda u otras lesiones.
Los siguientes componentes se usan para la ventilación de la ventana.No todos los componentes se utilizan en todas las instalaciones.
COMPONENTES DE SALIDA
Equipo de instalación enventanas (incluye 2 panelde ventilación paraventanas y 2 paneles deextensión)
Manguera flexible de ventilación
11 tornillos Tipo ASoporte de seguridad
1 sellador de espuma Tipo B
(No adhesivos)2 selladores de espuma
Tipo A (adhesivos)
Panel de ventilación
Panel deextensióngrande
Panel deextensiónpequeño
Sellante de espuma C 2EA
(Tipo adhesivo-más corto)
Extensión y panelde ventilación
Difusor
��� ���
33
Esp
añ
ol

34
La longitud del tubo de escape es designado especialmente de acuerdo a las especificaciones del producto. No lo sustituya ni prolongue con su manguera privada ya que esto podría causar mal funcionamiento.
ADVERTENCIA
ELECCIÓN DE UbICACIÓN PARA LA INSTALACIÓN
Instale la unidad sobre un sitio plano y seco.
Para lograr un mejor rendimiento, deje al menos 20 in de espacio a todos los lados de la unidad para una buena circulación de aire.
1
2
I N S T R U C C I O N E S D E I N S T A L A C I Ó N
CÓMO CONECTAR LA MANGUERA Y EL DIFUSOR
Coloque la unidad cerca de una ventana. La manguera y el difusor se utiliza para conectar el acondicionador de aire para el kit de instalación de la ventana para ventilar fuera de escape de aire.
3
20 in20 in
LOCKUNLOCK
Introduzca el extremo grande del adaptadorde la manguera dentro del orificio ubicadoen la parte trasera del acondicionador deaire.
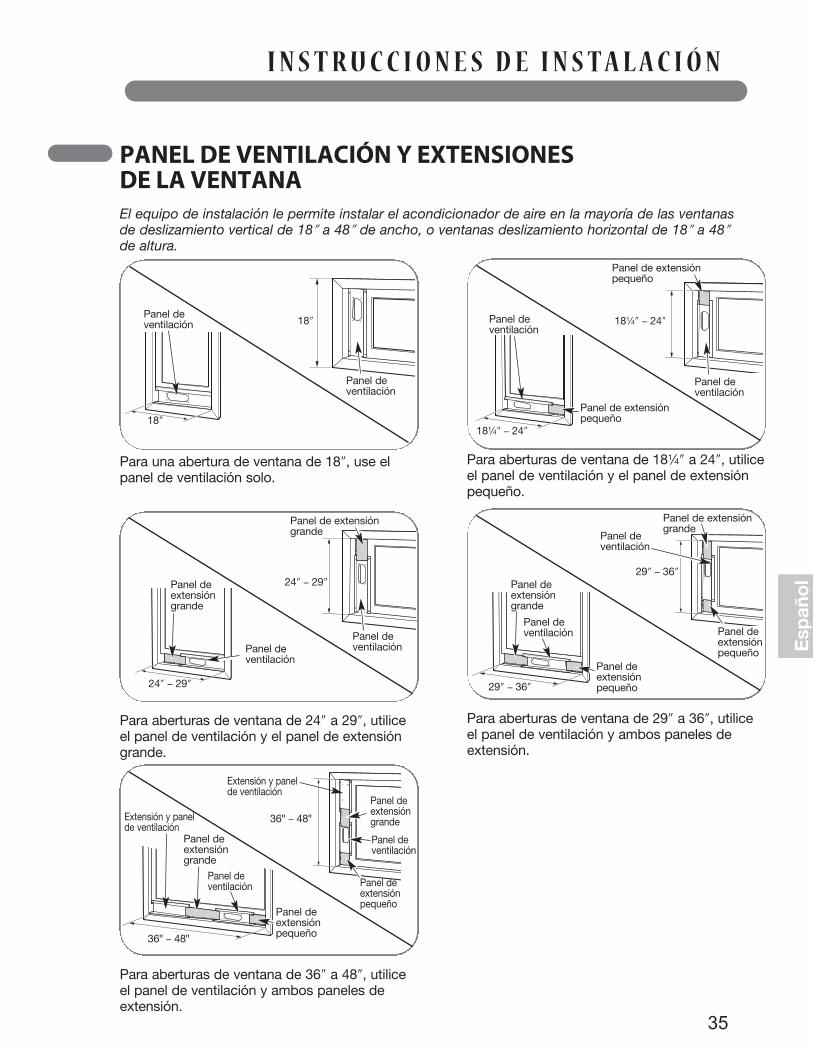
PANEL DE VENTILACIÓN Y EXTENSIONES DE LA VENTANA
I N S T R U C C I O N E S D E I N S T A L A C I Ó N
35
El equipo de instalación le permite instalar el acondicionador de aire en la mayoría de las ventanas de deslizamiento vertical de 18ʺ a 48ʺ de ancho, o ventanas deslizamiento horizontal de 18ʺ a 48ʺde altura.
Para una abertura de ventana de 18ʺ, use elpanel de ventilación solo.
Para aberturas de ventana de 181⁄4ʺ a 24ʺ, utiliceel panel de ventilación y el panel de extensiónpequeño.
Para aberturas de ventana de 24ʺ a 29ʺ, utiliceel panel de ventilación y el panel de extensióngrande.
Para aberturas de ventana de 29ʺ a 36ʺ, utiliceel panel de ventilación y ambos paneles deextensión.
Panel deventilación
Panel de extensiónpequeño
Panel deventilación
18ʺ
18ʺ
181⁄4ʺ − 24ʺ
181⁄4ʺ − 24ʺ
Panel de extensiónpequeño
Panel deextensióngrande
Panel deventilación
24ʺ − 29ʺ
Panel de extensióngrande
24ʺ − 29ʺ Panel deextensióngrande
Panel deventilación
29ʺ − 36ʺ
Panel de extensióngrande
Panel deventilación
29ʺ − 36ʺ
Panel deextensiónpequeño
Panel deextensiónpequeño
Panel deventilación
Panel deventilación
Panel deventilación
Para aberturas de ventana de 36ʺ a 48ʺ, utiliceel panel de ventilación y ambos paneles deextensión.
Panel deextensióngrande
Panel deventilación
36" − 48"
Panel deextensióngrande
Panel deventilación
36" − 48"
Panel deextensiónpequeño
Panel deextensiónpequeño
Extensión y panelde ventilación
Extensión y panelde ventilación
Esp
añ
ol

36
INSTALACIÓN EN VENTANAS DE DESLIZAMIENTO VERTICAL
Sellado con espuma B(tipo no adhesivo)
4 Corte la espuma B (tipo no adhesivo) segúnel ancho de la ventana. Rellene con laespuma B la separación existente entre elcristal y la ventana a fin de prevenir laentrada de aire o insectos en la habitación.
3 Baje la ventana con cuidado. Ajuste el panelde ventilación en su lugar con 4 tornillos tipoA, más un tornillo por cada extensión.Sólo panel de ventilación: 4 tornillos Tipo APanel de ventilación y una extensión: 5 tornillos Tipo APanel de ventilación y dos extensiones: 6 tornillos Tipo ADos paneles de ventilación y dos extensiones: 9 tornillos Tipo A
Tornillos Tipo A
I N S T R U C C I O N E S D E I N S T A L A C I Ó N
Sellante de espuma A(Tipo adhesivo)
Tipo C de sellado con espuma(tipo adhesivo-más corto).
J
NOTA: El equipo de instalación en ventanas puede utilizarse con ventanas de deslizamiento vertical deun ancho de entre 18ʺ y 48ʺ.
1 Corte la espuma A (tipo adhesivo) y C (tipoadhesivo-más corto) según la longitudadecuada, y colóquelo en la hoja y el marcode la ventana.
2 Introduzca el montaje de panel deventilación, incluyendo los paneles deextensión, si fueran necesarios, en laabertura de la ventana. Extienda los panelesde extensión, si los está utilizando.
Panel deextensión (si fueranecesario)
Panel deventilación
37
INSTALACIÓN EN VENTANAS DE DESLIZAMIENTO VERTICAL
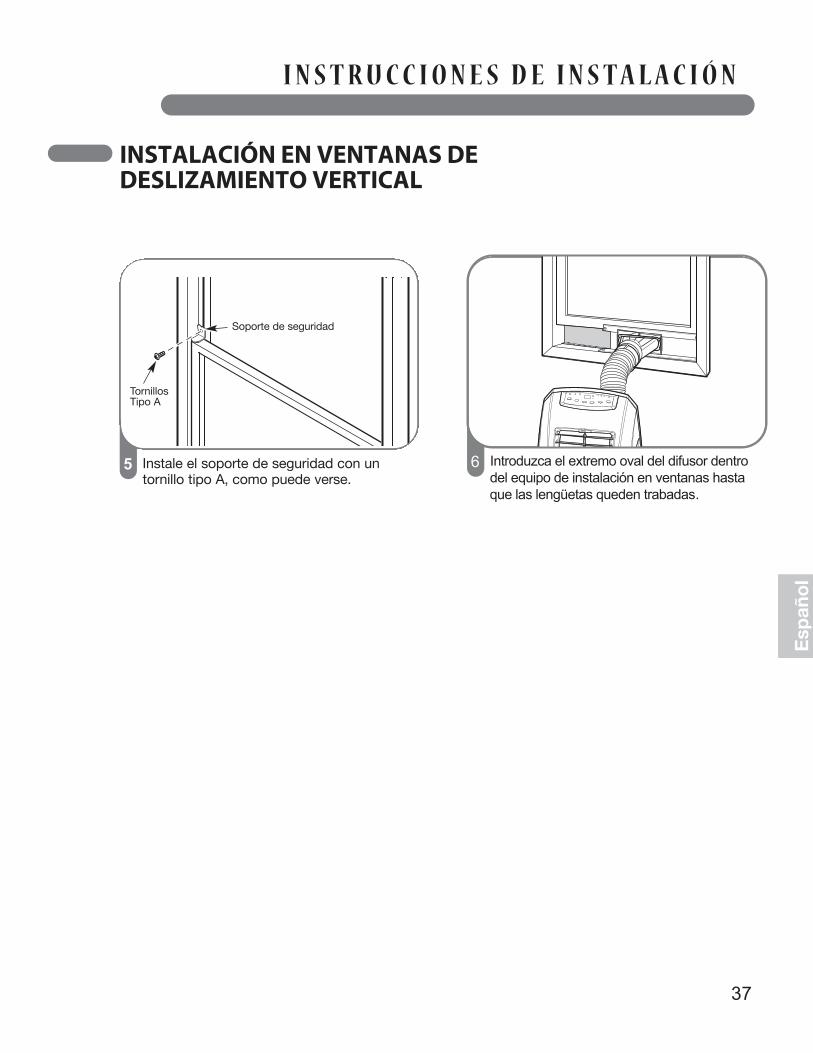
5 Instale el soporte de seguridad con untornillo tipo A, como puede verse.
TornillosTipo A
Soporte de seguridad
Introduzca el extremo oval del difusor dentrodel equipo de instalación en ventanas hastaque las lengüetas queden trabadas.
I N S T R U C C I O N E S D E I N S T A L A C I Ó N
6
Esp
añ
ol

38
INSTALACIÓN EN VENTANAS DE DESLIZAMIENTO HORIZONTAL
3
Panel de extensión (si fuera necesario)
I N S T R U C C I O N E S D E I N S T A L A C I Ó N
Tornillos Tipo A
Sellado con espuma B(tipo adhesivo)
4 Corte la espuma B (tipo no adhesivo) segúnel ancho de la ventana. Rellene con laespuma B la separación existente entre elcristal y la ventana a fin de prevenir laentrada de aire o insectos en la habitación.
Cierre la ventana con cuidado. Ajuste elpanel de ventilación en su lugar con 4tornillos tipo A, más un tornillo por cada extensión.Sólo panel de ventilación: 4 tornillos Tipo APanel de ventilación y una extensión: 5 tornillos Tipo APanel de ventilación y dos extensiones: 6 tornillos Tipo ADos paneles de ventilación y dos extensiones: 9 tornillos Tipo A
3
NOTA: El equipo de instalación de ventanas puede usarse con ventanas con bisagras con una alturade 18ʺ a 48ʺ.
Sellado con espuma A(tipo adhesivo)
Sellado con espuma C(tipo adhesivo-más corto)
1 Corte la espuma A (tipo adhesivo) y C (tipoadhesivo-más corto) según la longitudadecuada, y colóquelo en la hoja y el marcode la ventana.
2 Introduzca el montaje de panel de ventilación,incluyendo los paneles de extensión, si fuerannecesarios, en la abertura de la ventana.Extienda los paneles de extensión, si los estáutilizando.
Panel deventilación

39
5 Instale el soporte de seguridad con untornillo tipo A, como puede verse.
Introduzca el extremo oval del difusordentro del equipo de instalación en ventanashasta que las lengüetas queden trabadas.
Tornillo Tipo A
Soporte deseguridad
INSTALACIÓN EN VENTANAS DE DESLIZAMIENTO HORIZONTAL
I N S T R U C C I O N E S D E I N S T A L A C I Ó N
6
Esp
añ
ol
Drinaje de agua
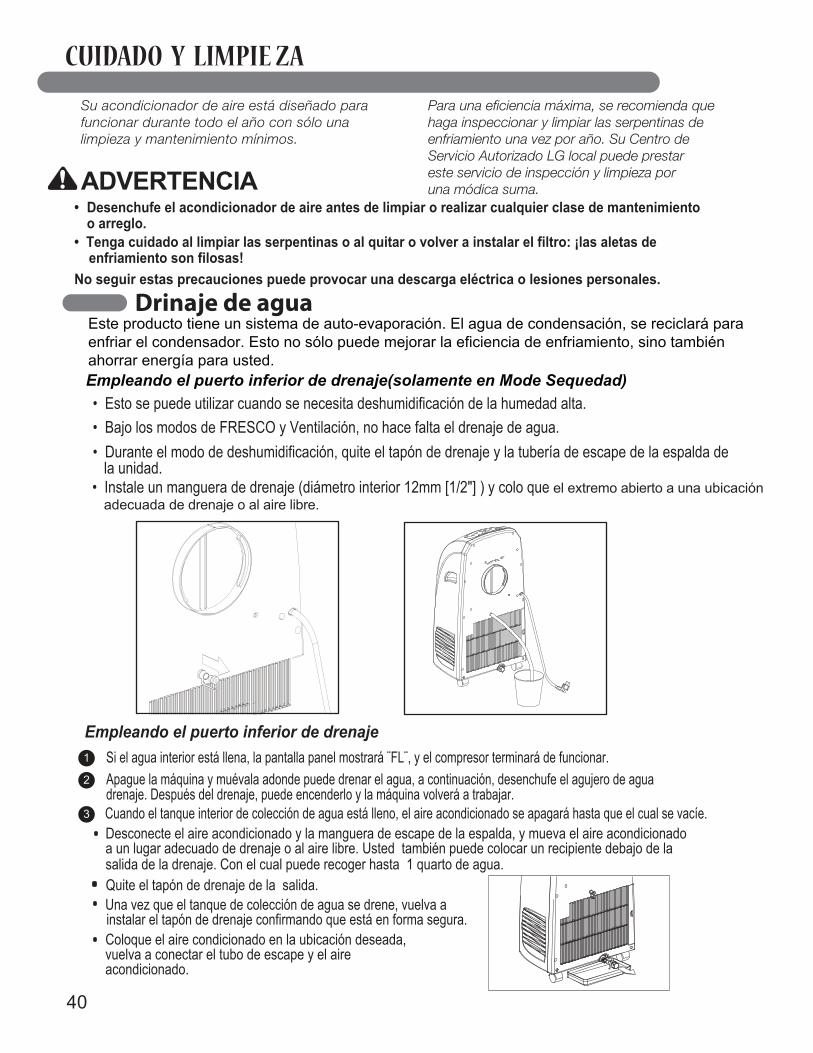
· Si el agua interior está llena, la pantalla panel mostrará ¨FL¨, y el compresor terminará de funcionar.Apague la máquina y muévala adonde puede drenar el agua, a continuación, desenchufe el agujero de agua drenaje. Después del drenaje, puede encenderlo y la máquina volverá a trabajar.
Desconecte el aire acondicionado y la manguera de escape de la espalda, y mueva el aire acondicionado a un lugar adecuado de drenaje o al aire libre. Usted también puede colocar un recipiente debajo de la salida de la drenaje. Con el cual puede recoger hasta 1 quarto de agua.
Cuando el tanque interior de colección de agua está lleno, el aire acondicionado se apagará hasta que el cual se vacíe.
Quite el tapón de drenaje de la salida. Una vez que el tanque de colección de agua se drene, vuelva a instalar el tapón de drenaje confirmando que está en forma segura.
Coloque el aire condicionado en la ubicación deseada, vuelva a conectar el tubo de escape y el aire acondicionado.
1
2
3
40
CUIDADO Y LIMPIE ZA
ADVERTENCIA • Desenchufe el acondicionador de aire antes de limpiar o realizar cualquier clase de mantenimiento
o arreglo.• Tenga cuidado al limpiar las serpentinas o al quitar o volver a instalar el filtro: ¡las aletas de enfriamiento son filosas!No seguir estas precauciones puede provocar una descarga eléctrica o lesiones personales.
Su acondicionador de aire está diseñado parafuncionar durante todo el año con sólo unalimpieza y mantenimiento mínimos.
Para una eficiencia máxima, se recomienda quehaga inspeccionar y limpiar las serpentinas deenfriamiento una vez por año. Su Centro deServicio Autorizado LG local puede prestareste servicio de inspección y limpieza poruna módica suma.
Empleando el puerto inferior de drenaje(solamente en Mode Sequedad)
Este producto tiene un sistema de auto-evaporación. El agua de condensación, se reciclará paraenfriar el condensador. Esto no sólo puede mejorar la eficiencia de enfriamiento, sino tambiénahorrar energía para usted.
• Esto se puede utilizar cuando se necesita deshumidificación de la humedad alta.• Bajo los modos de FRESCO y Ventilación, no hace falta el drenaje de agua.• Durante el modo de deshumidificación, quite el tapón de drenaje y la tubería de escape de la espalda de la unidad.• Instale un manguera de drenaje (diámetro interior 12mm [1/2"] ) y colo que el extremo abierto a una ubicación adecuada de drenaje o al aire libre.
Empleando el puerto inferior de drenaje
41
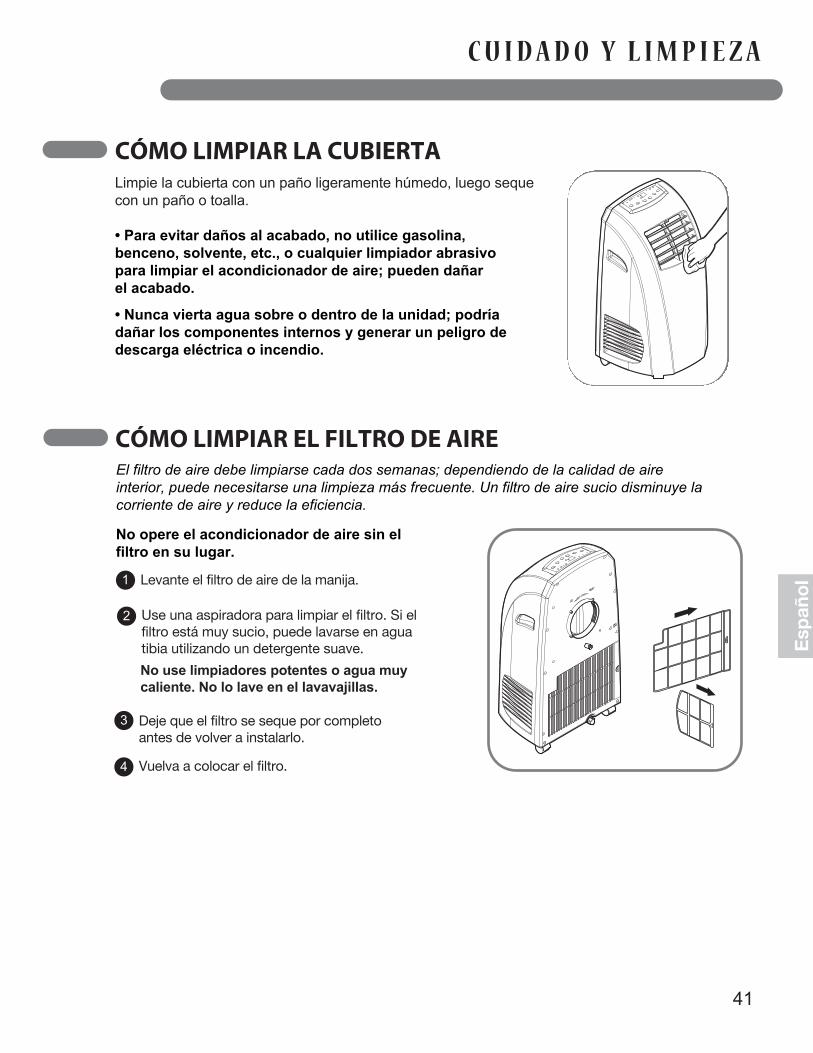
CÓMO LIMPIAR LA CUBIERTALimpie la cubierta con un paño ligeramente húmedo, luego sequecon un paño o toalla.
CÓMO LIMPIAR EL FILTRO DE AIREEl filtro de aire debe limpiarse cada dos semanas; dependiendo de la calidad de aireinterior, puede necesitarse una limpieza más frecuente. Un filtro de aire sucio disminuye lacorriente de aire y reduce la eficiencia.
No opere el acondicionador de aire sin elfiltro en su lugar.
Levante el filtro de aire de la manija.1
Use una aspiradora para limpiar el filtro. Si elfiltro está muy sucio, puede lavarse en aguatibia utilizando un detergente suave.
No use limpiadores potentes o agua muycaliente. No lo lave en el lavavajillas.
Deje que el filtro se seque por completoantes de volver a instalarlo.
Vuelva a colocar el filtro.
2
3
4
• Para evitar daños al acabado, no utilice gasolina, benceno, solvente, etc., o cualquier limpiador abrasivopara limpiar el acondicionador de aire; pueden dañarel acabado.
• Nunca vierta agua sobre o dentro de la unidad; podríadañar los componentes internos y generar un peligro de descarga eléctrica o incendio.
C U I D A D O Y L I M P I E Z A
Esp
añ
ol
1

42
CU IDADO Y L IMP I E Z A
CÓMO GUARDAR EL ACONDICIONADOR DE AIRESi no va a usar el acondicionador de aire duranteun período prolongado:
Drene el tanque de recolección de aguacompletamente y deje el pico de drenajedestapado el tiempo suficiente para eliminarel agua residual. Una vez que el tanque sehaya drenado por completo y no salga másagua, vuelva a colocar la tapa.
Quite y limpie el filtro, deje que se seque porcompleto y vuelva a instalarlo.
Quite las baterías del control remoto.
Guarde el acondicionador de aire en un lugarfrío y seco, lejos de luz solar directa,temperaturas extremas, y polvillo excesivo.
Antes de volver a usar el acondicionador de aire:
Verifique que el filtro y la tapa de drenaje esténen su lugar.Verifique el cable para asegurar que esté enbuenas condiciones, sin grietas o daños. Coloque baterías nuevas en el control remoto.
Instale el acondicionador de aire como seindica en las Instrucciones de instalación.
1
2
3
1
2
3
4
4
C U I D A D O Y L I M P I E Z A

ANTES DE LLAMAR AL SERVICIO TÉCNICO
D E T E C C I Ó N D E P R O B L E M A S
Antes de llamar al servicio técnico, examine esta lista. Puede ahorrarle tiempo y dinero. La lista incluyesituaciones comunes que no son el resultado de mano de obra o materiales defectuosos del artefacto.
43
El dispositivo interruptor de corriente esta desconectado.
El acondicionador de aire funciona muy a menudo o durant mucho tiempo
El aire acondiciona do no enciende
El aire acondicionado esta desconectado.
Asegurese que ei aire acondicionado esta conectadocompletamente a la fuente de energia.
El fusible esta quemado/el interruptor de energia se habloqueado.
Cheque los fusibles/interruptor de la casa y reemplacelos fuslbles o reestablezca el interruptor de energia.
Falta de energia. Cuando la energia se reestablezca,espere 3 minutos para encender de nuevo el aire acondicionado.Con esto evitara que se produzca una sobrecarga en
Presione el boton RESET situado en el enchufe del cablede alimentacion Si el boton RESET no p ermanece activo,suspenda el uso del aure acondicionado y pongase en contacto con un tecnico de servicio cualificado.
El aire acondiciona do no enfr’a corno debiera
El flujo de aire esta restringido. Asegurese que no haya cortinas,persianas o mueblesbloqueando el frente del aire acondicionado.
Coloque el control de TEMPERATURA en un numero mas alto.
Ajustar el control de temperatura a un numero mas bajo.
Limipe el filtro pro lo menos cada dos semanas.Vea laseccion de instrucciones de operacion.
El cuarto aun esta caliente. Cuando usted enciende el aire acondicionado debe esperarun momento para que la habitacion se enftre.
El aire acondiciona do enfria dernasiado
El hielo bloquea el flujo de aire y detiene el enfriamiento del cuarto.
Elija el modo alto del ventilador High Fan o enfriado alto High Cool .
El área a enfriar es demasiado grande para el artefacto.
Consulte a su vendedor sobre la capacidad necesaria para enfriar el área deseada.
el compresor.
Aparece FL en la pantalla. El tanque de recolección de a gua está lleno. Drene el tanque y vuelva a configurar.
La temperatura de la habitación esmenor a la temperatura programada.
Esto es normal. El acondicionador de aire se apaga automáticamente cuando la temperatura de la habitación es igual o menor a la configurada.Si hace falta, ajuste la configuración de temperatura.
Hay puertas o ventanas abiertas. Asegúrese de que puertas y ventanas estén cerradas.
El filtro de aire está sucio.
44
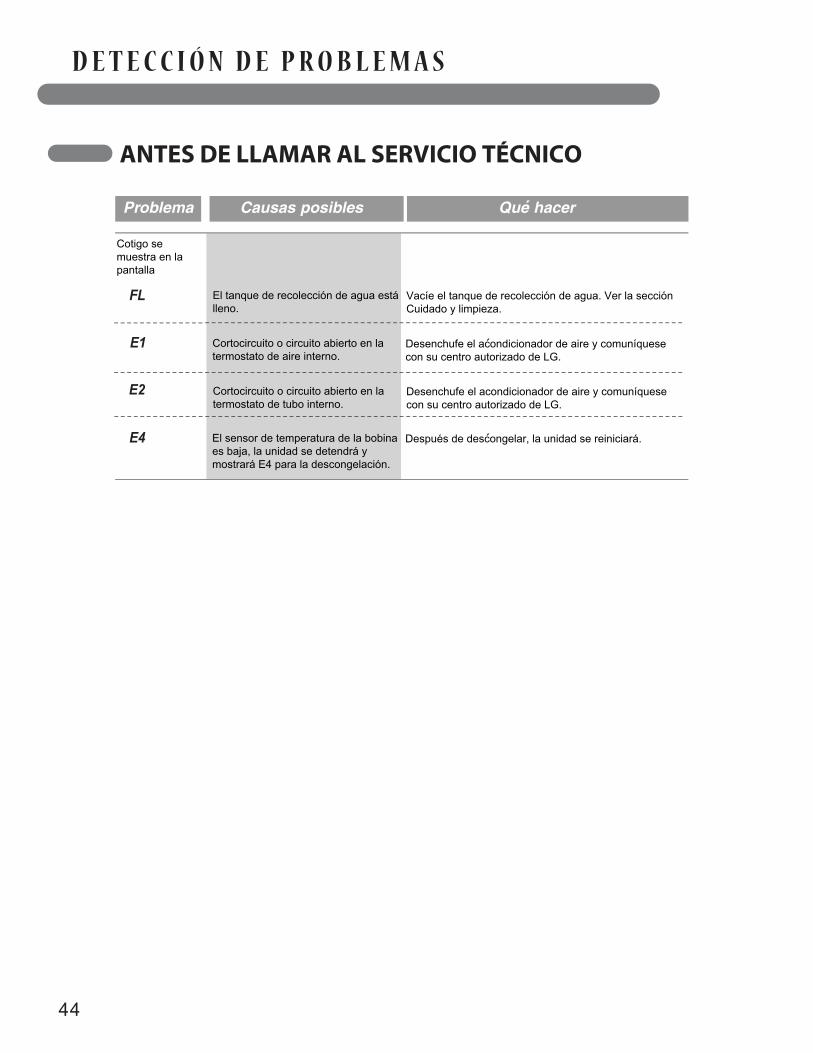
ANTES DE LLAMAR AL SERVICIO TÉCNICO
D E T E C C I Ó N D E P R O B L E M A S
Cortocircuito o circuito abierto en la termostato de tubo interno.
Cotigo se muestra en la pantalla
El tanque de recolección de agua estálleno.
Vacíe el tanque de recolección de agua. Ver la sección Cuidado y limpieza.
Cortocircuito o circuito abierto en la termostato de aire interno.
Desenchufe el acondicionador de aire y comuníquesecon su centro autorizado de LG.
FL
E1
E2
E4
Desenchufe el acondicionador de aire y comuníquesecon su centro autorizado de LG.
El sensor de temperatura de la bobinaes baja, la unidad se detendrá y mostrará E4 para la descongelación.
Después de descongelar, la unidad se reiniciará.

Garantía
GARANTÍA LIMITADA DEL AIRE ACONDICIONADO LG - EE.UU.
COBERTURA DE LA GARANTÍA:LG Electronics Inc. (“LG”) garantiza que reparará o sustituirá, gratuitamente, su producto si resulta defectuoso en materiales o mano de obra bajo condiciones normales de uso durante el periodo de garantía mencionado más abajo, efectivo a partir de la fecha de compra del producto original por parte del consumidor. Esta garantía limitada sólo es válida para el comprador original del producto y no es asignable ni transferible a ningún otro comprador o usuario final subsecuentes, y efectiva únicamente cuando el producto se compra a través doe un distribuidor autorizado de LG y se utiliza en los Estados Unidos ("EE UU") o en cualquiera de sus territorios.
Nota: Los recambios y piezas de repuesto pueden ser nuevos o estar reconstruidos de fábrica y están garantizados durante el tiempo restante del periodo de garantía de la unidad original o noventa días (90), el periodo de los dos que sea más largo. Porfavor, guarde el recibo de compra o la nota de entrega como prueba de la fecha de compra como comprobante de garantía (se le puede pedir que presente una copia a LG o a su representante autorizado).
PERIODO DE GARANTÍA: 1 año desde la fecha de compra: Cualquier repuesto interno/funcional y mano de obra
PROCESO DE SERVICIO: Servicio a domicilio Los servicios a domicilio se prestarán durante el periodo de garantía sujeto a disponibilidad en los Estados Unidos. El servicio a domicilio puede no estar disponible en todas las áreas. Para recibir asistencia técnica a domicilio, el producto debe estar en unentorno despejado y accesible al personal técnico. Si durante el servicio a domicilio la reparación no se puede llevar a cabo, es posible que sea necesario desplazarlo a nuestras instalaciones, repararlo y devolverlo a su hogar. Si este fuera el caso, LG puedeoptar, a petición nuestra, a utilizar el transporte de nuestra elección para desplazar la unidad al y del centro de servicio autorizado de LG.
ESTA GARANTÍA LIMITADA NO SE APLICA A: 1. Las visitas de Asistencia a domicilio para entregar, recoger y/o instalar el producto, instruir o sustituir fusibles. 2. Sustitución de fusibles de la casa o reajuste de interruptores de circuito, la corrección del cableado de la casa o de la tubería, o la corrección de la instalación del producto. 3. Los daños o averías causados por fugas / roturas/ congelación de tuberías de agua, líneas de drenaje restringido, suministro insuficiente de agua o interrumpido, o suministro insuficiente de aire. 4. Los daños o averías causados por accidentes, plagas e insectos, rayos, viento, fuego, inundaciones o actos de Dios. 5. Los daños o fallos ocasionados por el mal uso, abuso, instalación inadecuada, reparación o mantenimiento. Se considera reparación inadecuada aquella en que se hayan utilizado piezas no aprobadas o especificadas por LG. 6. Los daños o averías causados por modificaciones no autorizadas o alteraciones del producto. 7. Los daños o averías causados por la utilización de una corriente eléctrica, tensión o código de plomería incorrectos.
8. Daños estéticos, incluyendo arañazos, abolladuras, desportilladuras u otros daños en el acabado del producto, a menos que dichos daños sean el resultado de defectos en los materiales o mano de obra y se informe a LG en el plazo de siete días naturales (7) a partir de la fecha de entrega. 9. Los daños o la pérdida de componentes de cualquier producto cuya caja haya sido abierta, haya sido objeto de un descuento o se haya restaurado. 10. Los productos cuyos números de serie de fábrica originales hayan sido quitandos, borrados o cambiados de ninguna manera. 11. Las reparaciones cuando el producto se utiliza para cualquier cosa fuera de lo normal y del uso doméstico habitual (por ejemplo su alquiler, uso comercial, en oficinas o en instalaciones de ocio) o en contra de la instrucciones que se indican en el manual del propietario. 12. La extracción y reinstalación del producto si está instalado en un lugar inaccesible.
ESTA GARANTÍA SE OTORGA EN SUSTITUCIÓN O EXCLUSIÓN DE TODA OTRA GARANTÍA, EXPRESA O IMPLÍCITA, INCLUYENDO SIN LIMITAR CUALQUIER GARANTÍA DE CALIDAD O IDONEIDAD CON UN PROPÓSITO CONCRETO. EN LA MEDIDA EN QUE CUALQUIER GARANTÍA IMPLÍCITA ES OBLIGADA POR LA LEY, ESTÁ LIMITADA EN DURACIÓN AL PERIODO DE GARANTÍA YA MENCIONADO. LA REPARACIÓN O REEMPLAZO DE PIEZAS, SEGÚN LO ESTABLECIDO EN ESTA GARANTÍA, ES EL ÚNICO QUE PUEDE RECLAMAR EL CLIENTE. NI EL FABRICANTE NI SU DISTRIBUIDOR EN LOS EE.UU. SE HACE RESPONSABLE DE CUALQUIER DAÑO (DERIVADO, INDIRECTO, ESPECIAL O PENAL) DE CUALQUIER NATURALEZA, INCLUYENDO, SIN LIMITACION, LA PÉRDIDA DE INGRESOS O BENEFICIOS O CUALQUIER OTRO TIPO DE DAÑO, AÚN BASADO EN UN CONTRATO, SEA UN AGRAVIO O DE CUALQUIER OTRA MANERA.
ALGUNOS ESTADOS NO PERMITEN LA EXCLUSIÓN O LIMITACIÓN DE DAÑOS IMPREVISTOS O RESULTANTES, O LIMITACIONES A LA DURACIÓN DE LAS GARANTÍAS IMPLÍCITAS, POR LO QUE LA EXCLUSIÓN O LIMITACIÓN MENCIONADA ANTERIORMENTE NO SERÁ APLICABLE AL USUARIO. ESTA GARANTÍA LE OTORGA DERECHOS LEGALES ESPECÍFICOS Y TAMBIÉN PUEDE TENER OTROS QUE VARIARÁN DE UN ESTADO A OTRO.
COMO OBTENER EL SERVICIO DE ESTA GARANTÍA E INFORMACIÓN ADICIONAL: Llame al 1-800-243-0000 o visite nuestra página web: www.lg.com.Dirección de correo ordinario: LG Customer Information Center (ATTN: CIC) 201 James Record Road, Huntsville, AL 35824
Esp
añ
ol

1-800-243-0000
LG Customer Information Center
Register your product Online!
www.lgappliances.comLG ELECTRONICS,INC.1000 Sylvan Ave.,Englewood Cliffs,NJ 07632