
OWNER’S GUIDEproductload.johnsonfit.com/inc/.../owners_guide/... · ongratulations on choosing a...
60
OWNER’S GUIDE Premier TREADMILLS
Transcript of OWNER’S GUIDEproductload.johnsonfit.com/inc/.../owners_guide/... · ongratulations on choosing a...

OWNER’S GUID
E
PremierTREADMILLS


ongratulations on choosing a VISION FITNESS Treadmill. You’ve takenan important step in developing and sustaining an exercise program! YourTreadmill is a tremendously effective tool for achieving your personal fitness goals. Regular use of your Treadmill can improve the quality of yourlife in so many ways…
Here are just a few of the health benefits of aerobic exercise:
• Weight Loss • A Healthier Heart• Improved Muscle Tone• Increased Daily Energy Levels• Reduced Stress• Help In Countering Anxiety and Depression• An Improved Self Image
The key to reaping these benefits is to develop the exercise habit. Yournew Treadmill will help you eliminate the obstacles that prevent you fromgetting in your exercise time. Snow and rain and darkness won't interfere with your workout when you have your Treadmill in the comfort ofyour home. This Owner’s Guide provides you with basic information onstarting an exercise program. A more complete knowledge of your newTreadmill will assist you in realizing your goal of a healthy lifestyle.
Service to your Treadmill should only be performed by your VISION FITNESS retailer. Please contact your authorized VISION FITNESSretailer should service be required. If a question or problem arises whichcannot be handled by your VISION FITNESS retailer, please contact us:
VISION FITNESS500 South CP AvenueP.O. Box 280Lake Mills, WI 53551Ph: 1.800.335.4348Fax: 1.920.648.3373www.visionfitness.com
C

ALL MODELS
PLATFORM
FOLDIN
GPREM
IERGEN
ERAL
Table of Contents
SAFETY INSTRUCTIONS . . . . . . . . . . . . . . . . 2GROUNDING INSTRUCTIONS,POWER REQUIREMENTS . . . . . . . . . . . . . . . 3OTHER SAFETY TIPS . . . . . . . . . . . . . . . . . . 4ASSEMBLY & PLACEMENT . . . . . . . . . . . . . . 5POWER SWITCH & SAFETY MAGNET KEY . . . 8QUICK SPEED & ELEVATION KEYS . . . . . . . . . 7CONTACT HEART RATE . . . . . . . . . . . . . . . . . 8
USER ENGINEERING MODE . . . . . . . . . . . . 34COMMON QUESTIONS . . . . . . . . . . . . . . . 36TROUBLESHOOTING:TREADMILL . . . . . . . . . . . . . . . . . . . . . . . 37HEART RATE MONITOR . . . . . . . . . . . . . . . . 38TENSIONING THE BELT . . . . . . . . . . . . . . . 39PREVENTIVE MAINTENANCE . . . . . . . . . . . . 40HOME WARRANTY . . . . . . . . . . . . . . . . . . 42DEVELOPING A FITNESS PROGRAM . . . . . . . 44EXERCISE GUIDELINES . . . . . . . . . . . . . . . . 45BALANCED FITNESS . . . . . . . . . . . . . . . . . 46STRETCHING . . . . . . . . . . . . . . . . . . . . . . 47WEEKLY WORKOUT LOGS . . . . . . . . . . . . . 50MONTHLY WORKOUT LOGS . . . . . . . . . . . . 52
A L L M O D E L S
CONSOLE OVERVIEW . . . . . . . . . . . . . . . . 15WELCOME SCREEN, LOG IN AS GUEST, SET USER AGE OR WEIGHT . . . . . . . . . . . . 16LOG IN, ADDING USERS . . . . . . . . . . . . . . . 17BASIC NAVIGATION . . . . . . . . . . . . . . . . . . 18TRAINING CALENDAR . . . . . . . . . . . . . . . . 20PROGRAM OVERVIEWS . . . . . . . . . . . . . . . 22PLACES TO GO . . . . . . . . . . . . . . . . . . . . . 23FITNESS TEST . . . . . . . . . . . . . . . . . . . . . . 24GOAL PROGRAMS . . . . . . . . . . . . . . . . . . . 25HRT PROGRAMS . . . . . . . . . . . . . . . . . . . . 26NOTES ON HEART RATE TRAINING . . . . . . . . 28CHEST TRANSMITTER . . . . . . . . . . . . . . . . 29ABOUT HEART RATE TRAINING . . . . . . . . . . 30USING THE SPRINT 8 PROGRAM . . . . . . . . . 31CUSTOM PROGRAMS . . . . . . . . . . . . . . . . 32AUDIO/VIDEO CAPABILITIES . . . . . . . . . . . . 33
G E N E R A L
P R E M I E R CONSOLE
OVERVIEW . . . . . . . . . . . . . . . . . . . . . . . . . 9MOVING & LEVELING . . . . . . . . . . . . . . . . 10
TREADMILLSP L A T F O R M
OVERVIEW . . . . . . . . . . . . . . . . . . . . . . . . 11TRANSPORT WHEEL LOCK & UNLOCK . . . . . 12FOLDING & UNFOLDING . . . . . . . . . . . . . . 13MOVING & LEVELING . . . . . . . . . . . . . . . . 14
TREADMILLSF O L D I N G

2
ALL
MOD
ELS IMPORTANT SAFETY INSTRUCTIONS
This Treadmill is intended for household use only. When using this Treadmill,basic precautions should always be followed, including the following:
Read all instructions before using this Treadmill:
To reduce the risk of electric shock:
• Always unplug the Treadmill from the electrical outlet immediately after using andbefore cleaning.
To reduce the risk of burns, fire, electric shock, or injuryto persons:
• Do not remove the Treadmill motor covers or roller covers. Service should beperformed only by an authorized VISION FITNESS retailer.
• Connect this Treadmill to a properly grounded outlet only. See GroundingInstructions.
• The Treadmill should never be left unattended when plugged in. Unplug fromoutlet when not in use, and before putting on or taking off parts.
• Do not operate under blanket or pillow. Excessive heating can occur and causefire, electric shock, or injury to persons.
• Close supervision is necessary when this Treadmill is used by, on, or nearchildren, invalids, or disabled persons.
• Use this Treadmill only for its intended use as described in this manual. Do notuse attachments not recommended by the manufacturer.
• Never operate this Treadmill if it has a damaged cord or plug, if it is not workingproperly, if it has been dropped or damaged, or dropped into water. Return theTreadmill to a service center for examination and repair.
• Do not carry this Treadmill by supply cord or use cord as a handle.• Keep the cord away from heated surfaces.• Never operate the Treadmill with the air openings blocked. Keep the air
openings free of lint, hair, and the like.• Never drop or insert any object into any opening.• Do not use outdoors.• Do not operate where aerosol (spray) products are being used or where oxygen
is being administered.• To disconnect, turn all controls to the off position, then remove plug from outlet.• Never place the power cord under carpeting or place any object on top of the
power cord, which may pinch and damage it.• Unplug your VISION FITNESS Treadmill before moving it.
DANGER –
SAVE THESE INSTRUCTIONS
WARNING –

3
ALL MODELS
GROUNDING INSTRUCTIONSThis Treadmill must be grounded. If it should malfunction or breakdown,grounding provides a path of least resistance for electric current to reducethe risk of electric shock. This Treadmill is equipped with a cord having anequipment-grounding conductor and a grounding plug. The plug must beplugged into an appropriate outlet that is properly installed and grounded inaccordance with all local codes and ordinances.
Improper connection of the equipment-groundingconductor can result in a risk of electric shock. Check with
a qualified electrician or serviceman if you are in doubt as to whether theTreadmill is properly grounded. Do not modify the plug provided with theTreadmill – if it will not fit the outlet, have a proper outlet installed by a qualifiedelectrician.
POWER REQUIREMENTSThis Treadmill is rated for more than 15 amperes and is for use on a circuithaving a nominal rating of 120 volts and is factory-equipped with a specificelectric cord and plug to permit connection to a proper electric circuit. Makesure that the Treadmill is connected to an outlet having the sameconfiguration as the plug. No adapters, extension cords, or surgeprotectors should be used with this product. If the Treadmill must bereconnected for use on a different type of electric circuit, the reconnectionshould be made by qualified service personnel. Also, a GFI protectedreceptacle should not be used. It is recommended to use a 20 ampdedicated circuit.
DANGER –

4
ALL
MOD
ELS OTHER SAFETY TIPS FOR YOUR VISION FITNESS TREADMILL
CAUTION – RISK OF INJURY TO PERSONS – To avoid injury, stand on the siderailsbefore starting Treadmill. Read Instruction Manual before using.
CAUTION!: If you experience chest pains, nausea, dizziness or shortness ofbreath, stop exercising immediately and consult your physician before continuing.• Do not wear clothing that might catch on any part of the Treadmill.• Read this Owner’s Guide before operating this Treadmill.

5
ALL MODELS
ASSEMBLYVISION FITNESS recommends this Treadmill be assembled and deliveredby qualified personnel. If you have elected to assemble this Treadmill yourself, for your safety please read and follow each of the steps in theenclosed Assembly Guide. It is recommended, when possible, that assembly be performed by an authorized VISION FITNESS retailer. If youhave any questions regarding any part or function of your Treadmill, contact your VISION FITNESS retailer.
PLACEMENT IN YOUR HOMEIt is important that you place your Treadmill in a comfortable and invitingroom. Your Treadmill is designed to use minimal floor space. Many people will place their Treadmills facing the TV or a picture window. If atall possible, avoid putting your Treadmill in an unfinished basement. Tomake exercise a desirable daily activity for you, the Treadmill should be inan attractive setting.NOTE: If you place your Treadmill facing out from a wall, you should leavethree feet between the wall and the Treadmill to ensure safe operation.

6
ALL
MOD
ELS POWER SWITCH
Ensure that your Treadmill is properly connected to a poweroutlet, then turn on the Powerswitch, located at the front of themain frame.
SAFETY MAGNET KEY & CLIPYour VISION FITNESS Treadmillwill not start unless the SafetyMagnet Key is inserted into thecircle in the front of the console.You should attach the clip end toyour clothing. If at any time youneed to stop the Treadmill quickly,simply pull the Safety Magnet Keyoff the console. This will cut allpower to the Treadmill, and it willcome to a complete stop. Toresume your workout, place theSafety Magnet Key back in place.This will send you back to the start-up mode.

7
ALL MODELS
QUICK SPEED AND QUICK ELEVATION KEYSUse the QUICK SPEED and QUICK ELEVATION keys as an option toincrease and decrease the speed and elevation to your desired setting. Firstpress the QUICK SPEED or QUICK ELEVATION key, then press the numberedkeys (0-9).
QUICK SPEED*Examples of the QUICK SPEED key operation: to change the speed to 4.0mph/kph, press QUICK SPEED, then 4. To change the speed to 4.5mph/kph, press QUICK SPEED, then 4, then 5. The Quick Speed keysadjust the speed in 0.1 mph/kph increments. The maximum speed using theQuick Speed keys is 9.9 mph/kph.
QUICK ELEVATION*Examples of the QUICK ELEVATION key operation: to change to 6%elevation, press QUICK ELEVATION, then 6. To go to 10% elevation, pressQUICK ELEVATION then 1, then 0. The Quick Elevation keys adjust theelevation in 1% increments.
* May operate differently outside North America.
8
ALL
MOD
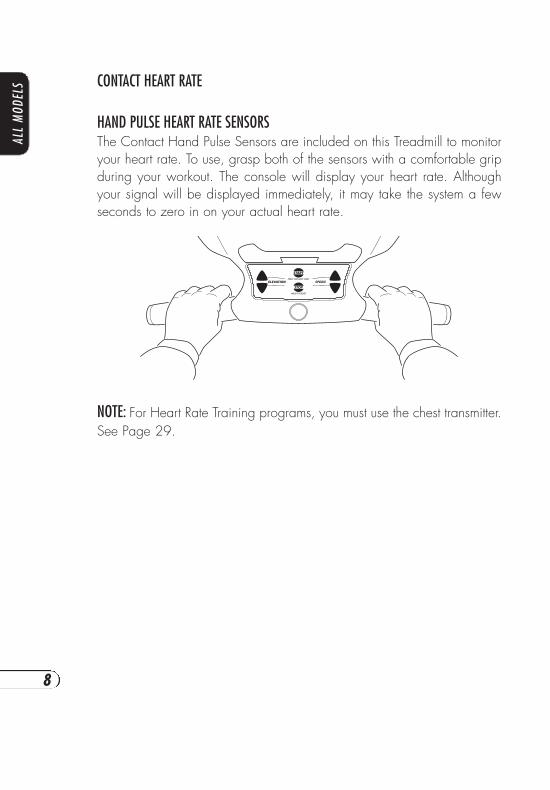
ELS CONTACT HEART RATE
HAND PULSE HEART RATE SENSORSThe Contact Hand Pulse Sensors are included on this Treadmill to monitoryour heart rate. To use, grasp both of the sensors with a comfortable gripduring your workout. The console will display your heart rate. Althoughyour signal will be displayed immediately, it may take the system a fewseconds to zero in on your actual heart rate.
NOTE: For Heart Rate Training programs, you must use the chest transmitter.See Page 29.

9
PLATFORM
P R E M I E R
P L AT F O R M T R E A D M I L L
TRANSPORT WHEELS
CONSOLE
HANDLEBARS
SIDE RAILS
MOTORCOVER
LEVELERS
RUNNINGBELT

10
PLAT
FORM
PLATFORM TREADMILLS ONLY
MOVING YOUR VISION FITNESS PLATFORM TREADMILLYour VISION FITNESS Treadmill has a pair of transport wheels built into the front legs. To move, firmly grasp the back end of the frame, carefully lift and roll.
CAUTION: Our Treadmills are well-built and heavy, weighing up to 300 pounds! Use care and additional help if necessary.
LEVELINGYour Treadmill should be level for optimum use. Once you have placedyour Treadmill where you intend to use it, raise or lower one or both of theadjustable levelers located on the back of the Treadmill frame. A carpenter’slevel is recommended. If your Treadmill is not level, the running belt maynot track properly. Once you have leveled your Treadmill, lock the levelersin place by tightening the nuts against the frame.

11
FOLDIN
G
F O L D I N G T R E A D M I L LP R E M I E R
CONSOLE
MOTORCOVER
TRANSPORTWHEELS
SIDERAILS
HANDLEBARS
RUNNINGBELT

12
FOLD
ING
TRANSPORT WHEEL LOCKYour folding Treadmill comes withtransport wheels on the front and back of the bottom frame thatshould be locked when theTreadmill is in use. Simply pressdown on the bottom latch withyour foot on all four transportwheels.
TRANSPORT WHEEL UNLOCKTo move your Treadmill, you willneed to unlock the transportwheels. With the Treadmill folded,simply press down the top latchwith your foot on all four transportwheels. This will release thelocking mechanism on the wheels.
FOLDING TREADMILLS ONLY

13
FOLDIN
G
UNFOLDINGTo unfold your Treadmill from theupright position, simply lift thelever on the left side vertical rail.Guide the deck about half waydown to the floor with both hands.You may then let go of the deck,and the shock spring will guide thedeck down to the floor.
CAUTION: Our Treadmills are well-built and heavy, weighing up to 300 pounds! Use care andadditional help if necessary.
FOLDINGTo fold your Treadmill in the uprightposition, first make sure theElevation is set to 0; if it is not,lower the Elevation to 0 (if you donot set the Elevation to 0 theTreadmill will not fold and lock).Next, make sure the four transportwheels are locked. Then, simplylift the back end of the Treadmillwith both hands and push it up.The Treadmill has a built-in lockingmechanism that will automaticallyengage and click into place whenyou reach a vertical point.

14
FOLD
ING
LEVELINGThe Treadmill should be level for optimum use. If the Treadmill is on an un-level surface, raise or lower one or both of the adjustable levelerslocated on the front frame. A carpenter’s level is recommended. If yourTreadmill is not level, the running belt may not track properly.
MOVING YOUR VISION FITNESS FOLDING TREADMILLYour VISION FITNESS Treadmill has four transport wheels built into the rear frame. Make sure the transport wheels are unlocked beforemoving the treadmill. To move, fold the Treadmill into the upright position,firmly grasp the frame by the handlebars, then carefully roll.

15
PREMIER
ELEVATION SPEED
HOLD TO RESET
STOP
PRESS FOR EASY START
START
PREMIER CONSOLE OVERVIEW
A B
C
D
EF
G H
A. Quick Elevation Key B. Quick Speed KeyC. Number Keys D. Screen KeysE. Speed Arrows F. Elevation ArrowsG. Start Key H. Stop Key

16
PREM
IER
WELCOME SCREENThe welcome screen will take youthrough the log in process as a firsttime user or return user. TheQUICK START function is alsoaccessible from this screen.
LOG IN AS A GUESTTo log in as a GUEST selectGUEST and enter your age andweight.
SET USER AGE OR WEIGHTTo set user age use the numberkeys and select CONTINUE whenfinished.

17
PREMIER
LOG IN OPERATIONOnce you have selected LOG INon the Welcome Screen press anykey next to a User Profile Icon thatis not filled in. From there enter auser name, set age and weightand you are set to go. To edit aUser Profile select EDIT USER.
ADDING USERS:
SET USER AGE OR WEIGHTTo set user age use the numberkeys and select CONTINUE whenfinished.
ENTER NAMETo enter a user name select theblue scrolling arrows to highlight aletter. To choose that letter selectADD LETTER. Select DELETE LETTERto delete. When finished selectCONTINUE to progress to thenext screen. To go back to theprevious screen select BACK.

18
PREM
IER
BASIC NAVIGATION
ATM STYLE KEYSThe Premier console is set up like aATM machine with function keysnext to icons on the screen formodifying screen data. To select afunction or modify screen datasimply press the key next to theicon you wish to choose.
RUN SCENESThere are 4 scenes available asbackgrounds during any of theconsole programs. To scrollthrough the available screensselect the ‘Camera’ icons to scrollforward or back.
FOREST
MOUNTAIN
CITY
BEACH
YELLOW ARROWSThe yellow arrows next the screenkeys indicate that key may beused to change a screen item orenter a function.

19
PREMIER
TRACKFollow the colored dot around thequarter mile track and watch thelaps count up during your workout.
HEART RATE SCREENOnly available for HRT programs.The colored graph shows targetand current heart rate as well asthe percent of your maximum heartrate.
PROFILEView your workout as a bar graphwhere the purple bars indicatespeed and the yellow flagselevation. At the bottom of theprofile screen is the segmentprogress bar indicating time left forthe current segment. Available forSPRINT 8, Places to Go, MuscleToner, Fat Burner, Speed Intervals,and Custom Programs.
SEGMENT PROGRESS BAR

20
PREM
IER
TRAINING CALENDARTo view your Training Calendarlog in as yourself and press thekey next to the Training Calendar.From there you can select daily,weekly or monthly stats. Any day,week or month with an activity willbe a lighter shade of green on thecalendar.
DAILY STATSTo view daily stats select DAILYSTATS then choose the day youwould like to view by selectingNEXT DAY or PREVIOUS DAY andthen selecting CONTINUE. Yourstats for that day will be displayedon the screen. From this screen youmay go to the next or previouscalendar day by selecting NEXTDAY or PREVIOUS DAY. To getback to the calendar select BACK.
WEEKLY STATSTo view your stats for a givenweek select WEEKLY STATS thenchoose a week you would like toview by selecting NEXT WEEK orPREVIOUS WEEK and thenselecting CONTINUE. Your statsfor that week will be displayed onthe screen. From this screen youmay go to the next or previousweek by selecting NEXT WEEK orPREVIOUS WEEK. To get back tothe calendar select BACK.

21
PREMIER
MONTHLY STATSTo view your stats for a givenmonth select MONTHLY STATSthen choose a month you wouldlike to view by selecting NEXTMONTH or PREVIOUS MONTHand then selecting CONTINUE.Your stats for that month will bedisplayed on the screen. From thisscreen you may go to the next orprevious month by selecting NEXTMONTH or PREVIOUS MONTHTo get back to the calendar selectBACK.

SPRINT 8Exclusive to Vision Fitness. This is an anaerobic workoutthat includes 8, 30 second sprint intervals followed by90 second recovery intervals. The speed and elevationwill change during the sprint intervals. Designed to burnfat, tone muscle, increase energy, and more! Choosefrom 17 different levels. See Page 31 for SPRINT 8program details.
22
PREM
IER
PROGRAM OVERVIEWSFor all programs follow the instructions given on the display. For additionalinformation select INFORMATION/HELP.
MUSCLE TONERThis is a great program to tone leg muscles. Thisprogram will alternate intervals of high and lowelevation. Choose from 10 different levels.
FAT BURNERMakes changes to speed and elevation to help youburn fat. Choose from 10 different levels.
PACERThis is a race against the console. Set your distanceand the Pacer speed and the race is on!
SPEED INTERVALSA great program to increase your speed andendurance; it will alternate intervals at higher and lowerspeed. Choose from 10 different levels.

23
PREMIER
PLACES TO GO
5K/10K/15K PROGRAMSThese consistent effort programs improve your cardiovascular fitness bysimulating a 5K, 10K or 15K run with hills; no preset time with speed andelevation changes to keep intensity the same (i.e. elevation increases andspeed decreases.)
CHOOSE YOUR BACKGROUND
CHOOSE YOUR DISTANCE
CHOOSE YOUR LEVEL*(*Level 0 follows elevation profilewith user determined speed)

24
PREM
IER
FITNESS TESTThis program requires you to wear a heart ratetransmitter. The program is a 5 minute test that will giveyou an evaluation based on age, gender, and heartrate.
ESTIMATED V02 MAX (ML/KG/MIN)PER AGE CATEGORY
RATING
M E N
POOR
< 42
< 38
< 34
< 30
< 25
< 21
FAIR
48 – 51
38 – 43
34 – 39
30 – 35
25 – 31
21 – 26
AGE
15 – 19
20 – 29
30 – 39
40 – 49
50 – 59
60 +
AVERAGE
52 – 57
44 – 51
40 – 47
36 – 43
32 – 39
27 – 35
GOOD
56 – 61
52 – 57
48 – 51
44 – 48
40 – 44
36 – 40
EXCELLENT
> 61
> 57
> 51
> 48
> 44
> 40
ESTIMATED V02 MAX (ML/KG/MIN)PER AGE CATEGORY
RATING
W O M E N
POOR
< 30
< 28
< 27
< 25
< 21
< 17
FAIR
30 – 36
28 – 34
27 – 33
25 – 31
21 – 27
17 – 23
AGE
15 – 19
20 – 29
30 – 39
40 – 49
50 – 59
60 +
AVERAGE
37 – 45
35 – 43
34 – 41
32 – 40
28 – 36
24 – 31
GOOD
46 – 52
44 – 50
42 – 46
41 – 46
37 – 42
32 – 37
EXCELLENT
> 52
> 50
> 46
> 46
> 42
> 37
FITNESS TEST RESULT:

25
PREMIER
GOAL PROGRAMS
CALORIE GOALSelect the number of calories you would like to burn.The treadmill will keep going until you reach your goal.A cool down starts once the goal is achieved.
TIME GOALSelect the time you would like to workout. The treadmillwill keep going until you reach your goal. A cool downstarts once the goal is achieved.
DISTANCE GOALSelect the Distance you would like to go. The treadmillwill keep going until you reach your goal. A cool downstarts once the goal is achieved.

HRT ENDURANCEWarm up to your target heart rate, then the treadmillcontrols the speed and elevation to keep you at yourtarget heart rate. After the program time runs out thereis a cool down. Default heart rate is 65% of yourmaximum heart rate (+/– 3BPM).
26
PREM
IER
HRT PROGRAMS
HRT WEIGHT LOSSAfter a 3 minute warm up the treadmill will adjust theelevation to keep you at 65% of your maximum heartrate (+/– 3BPM). After the program time runs out there isa cool down.
HRT CARDIOAfter a 5 minute warm up the treadmill will adjust theelevation to maintain you at 80% of your maximumheart rate (+/– 3BPM). After the program time runs outthere is a cool down.
Once you have selected an HRTprogram a recommended TargetHR will be shown. Either select thisHR or use the number orSpeed/Elevation arrows tochange the Target HR.

27
PREMIER
HRT INTERVALAfter a 5 minute warm up the treadmill will increasespeed to your preset work interval rate for 1 minute.After the 1 minute interval the speed is reduced to 60%of your work interval rate. When your heart rate comesback down to your recovery target the next 1 minuteinterval will begin. This repeats for the duration of theprogram. After the time runs out there is a cool down.Default recovery heart rate is 70% of your maximumheart rate.
HRT RUN SCREEN

28
PREM
IER
NOTES FOR YOUR HEART RATE TRAINING PROGRAM
• If there is no heart rate detected, the Treadmill will not adjust speed orelevation.
• If the heart rate detected is higher than the target zone by 10 BPM, theconsole will “beep” and the screen will display a warning message.
• If the heart rate detected is higher than the target zone by 15 BPM, theconsole will “beep” and display a warning message. This process willrepeat until heart rate has been reduced.
• If the user’s heart rate is 20 beats over their target zone, the Treadmillwill “beep” and shut down.
NOTE: At all times, the speed and elevation keys are operative for the user.

29
PREMIER
WIRELESS CHEST TRANSMITTERPrior to wearing the strap on your chest, moisten the two rubber contact pads with several drops of water and spread with your fingers.
TRANSMITTER STRAP PLACEMENTCenter the Transmitter Strap justbelow the breast or pectoral muscles, directly over your sternumwith the logo facing out.Adjust the elastic strap length toavoid bouncing or sliding.
GENERAL HEART RATE TRAINING RECOMMENDATIONSTo use the Heart Rate Training program, it is important to determine yourtarget heart rate zone, using the chart on Page 30. After determining yourtarget zone, you should use the Treadmill in MANUAL mode to see if thetarget zone you have selected is correct. This will give you a good baseto start your Heart Rate Training. If you feel your target zone is too low ortoo high, keep using the Treadmill in the MANUAL mode until you feelcomfortable during your workout; then you can begin using the Heart RateTraining program.

30
PREM
IER
TARGET HEART RATETarget Heart Rate is a percentage of your maximum heart rate. TargetHeart Rate will vary for each individual, depending on age, current levelof conditioning, and personal fitness goals. Exercise heart rate shouldrange from 55% to 85% of your maximum heart rate. As a point ofreference, we use the predicted maximum heart rate formula of (220minus age) to determine your heart rate training zone. Please use thefollowing chart to determine your predicted Target Heart Rate.
EXAMPLE:If you are a 30-year-old, your predicted maximum heart rate is 190 basedon the (220 minus age) formula.
220 – 30 = 190Based on the chart above, your heart rate training zone is 104 to 161,which is 55%–85% of 190.

31
PREMIER
USING THE SPRINT 8 PROGRAMThe SPRINT 8 program is an anaerobic interval program designed tobuild muscle, improve speed, and naturally increase the release of HumanGrowth Hormone (HGH) in your body. Producing HGH through exerciseand a proper diet has been shown as an effective way to burn fat andbuild lean muscle mass according to Phil Campbell, author of Ready, Set,Go! Synergy Fitness. Please go to Mr. Campbell’s website,www.readysetgofitness.com, for more details about this radical newapproach to fitness.
The SPRINT 8 program features intense sprint intervals followed byrecovery intervals. The program includes the following phases:
1. WARM-UP (3:00) should gradually increase your heart rate andincrease respiration and blood flow to working muscles. The warm-up is controlled by the user to meet your specific needs.
2. INTERVAL TRAINING (14:30) starts immediately after the warm-upwith a 30-second sprint interval; changing both speed and elevation. Seven recovery intervals of one minute and 30 secondswill alternate with the eight 30-second sprint intervals. The sprintswill increase speed and elevation at the 3rd and 5th interval. Therecovery speed is about 2–3 mph slower than your sprint and therecovery elevation is 0. You can alter your speed using the SpeedQuick Keys or SPEED UP and DOWN arrows. To adjust the elevation; simply use the Elevation Quick Keys or ELEVATION UPand DOWN arrows.
3. COOL-DOWN (2:30) helps return your body’s systems to resting levels. Less demand is placed on your heart during recovery if anappropriate cool-down is used following the exercise.
In order to keep track of each segment/interval, the segment time is counted down in the timer. It takes only 20 minutes to complete the SPRINT 8 workout.

32
PREM
IER
CUSTOM PROGRAM OPERATIONSSet up your own course byprogramming time, speed, andelevation for each segment in aprogram. Once you are satisfiedwith your program selectPROGRAM COMPLETE and thenSAVE to save the program. Anasterisk should appear next to theprogram icon to show the customprogram is filled. To use yourcustom program select thatprogram and go. Program up to25 segments.
CUSTOM USER PROGRAMSThe Premier console gives you theoption of creating a programbefore you start (Custom Program)or saving a program you have justcompleted (Custom User Program).
Select the Custom User Programand run the program makingspeed and elevation changes asyou wish. When you are finishedwith your program press STOPtwice and your program will besaved.

33
PREMIER
PREMIER CONSOLE AUDIO/VIDEO CAPABILITIESThe Premier console has a port on its underside that contains RCAconnectors for use with A/V equipment (DVD, CD, VCR, etc.). Simplyremove the port cover by unscrewing the screw under the console to revealthe RCA connectors and plug in your A/V device and select the DVDfunction (3rd key down on the right side) while the treadmill is in use.Headphones can be plugged directly into the console face for sound.
A
B
C
D
E
F
A. Volume Up B. Volume DownC. Display Adjustment D. Return to Run ScreenE. Display Adjustment Up F. Display Adjustment Down
CORD MANAGEMENT CLIP: Use the included clip to attach the dvd cordto the console mast to keep the cord from
interfering with your workout.*A/V CORD NOT INCLUDED
A/V CONNECTORS ON BACK OF CONSOLE
KEY FUNCTIONS IN DVD MODE

34
GEN
ERAL
USER ENGINEERING
ENGINEERING MODE SCREEN To enter user engineering mode, pressand hold the SPEED UP and SPEEDDOWN arrows simultaneously.
CONFIGURATION SCREENFrom this screen you can adjustprogram defaults, checkaccumulated time, change thelanguage or change the unit ofmeasure.
UNIT SELECTIONTo change the unit of measure selectMI or KM and check to see yourdesired unit of measure is displayedunder UNITS and select BACK toreturn to the previous screen.

35
GENERAL
USER ENGINEERING (continued)
SETTING PROGRAM DEFAULTSTo set program defaults select thesetting you would like to change,make the necessary change andselect BACK to return to theprevious screen. Continue selectingBACK to return to main userengineering screen.
SETTING DATE/TIMESelect DATE/TIME when in theCONFIGURATION screen. Selectthe information that needs to bechanged (YEAR, MONTH, DAY,HOUR, MIN, SECOND) and usethe arrow keys to modify. SelectSAVE when the date and time areset and BACK to return to theCONFIGURATION screen.
36
GEN
ERAL
COMMON TREADMILL QUESTIONS
Q: Are the sounds my Treadmill makes normal?A: All Treadmills make a certain type of thumping noise due to the belt riding over the rollers. This noise will diminish over time, although it mightnot totally go away. With use, the belt will stretch, causing the belt to ridemore smoothly over the rollers. It might appear that one Treadmill is louder than another. There are many reasons for this and may not be dueto a defect.
Q: Why is the Treadmill I had delivered louder than the one at the store?A: All fitness products seem quieter in a large store showroom becausethere is generally more background noise than in your home. This is dueto many acoustic differences. A number of precautions can be taken toreduce noise. For instance, a heavy rubber mat can help reduce reverberation through the floor. And, finally, if a fitness product is placedclose to a wall, there will be more reflected noise.
Q: When should I be worried about a noise?A: As long as the sounds your Treadmill makes are no louder than a normal conversational tone of voice, it is considered normal noise. If yourTreadmill is louder than this, you may want to call your service technician.Sometimes an initial diagnosis can be made over the phone.

37
GENERAL
TROUBLESHOOTING YOUR TREADMILL
Our Treadmills are designed to be reliable and easy to use. If, however,you have a problem, these troubleshooting steps may indicate the cause.
PROBLEM: The console does not light up.SOLUTION: Check to make sure the Treadmill is connected to a functioning outlet and that the Treadmill is turned on.
PROBLEM: The Treadmill’s built-in circuit breaker trips repeatedly, shutting off for no apparent reason.SOLUTION: The lubricating wax coating on the deck is wearing downand needs to be replenished; contact your VISION FITNESS retailer.
PROBLEM: The Treadmill shuts off when elevated.SOLUTION: Check to make sure that the power cord is not stretched sotight that when the Treadmill is elevated the cord is pulled out of the walloutlet.
PROBLEM: The running belt does not stay in the center of the Treadmillwhen you are running on it.SOLUTION: Check to make sure the Treadmill is level. SOLUTION: The running belt is loose and needs to be properly tensioned(see Page 39 for proper procedure).
PROBLEM: The belt moves within 1/4” of -- but does not touch -- the side rail.SOLUTION: There is nothing wrong, this is normal and will not cause anydamage.
PROBLEM: An error message appears. An error message is designated bythe letter “E” and a number, (ex. “E5”).SOLUTION: Contact your VISION FITNESS retailer.
NOTE: If the above steps do not remedy the problem, discontinue use, turnthe power off and contact your VISION FITNESS retailer.

38
GEN
ERAL
TROUBLESHOOTING YOUR HEART RATE MONITOR CHEST STRAP
PROBLEM: No pulse reading appears.SOLUTION: There may be a poor connection between the contactpads and skin; remoisten the electrode pads.SOLUTION: Transmitter is not properly positioned. Reposition the chest strap.SOLUTION: Verify that the distance between transmitter and receiver is notbeyond the recommended range of 36 inches.
PROBLEM: There is an erratic pulse rate.SOLUTION: Chest strap is too loose; readjust according to directions.
NOTE: It is possible that heart rate monitors will not function properly onsome people due to a variety of reasons. It may be necessary to experiment with the fit and position of the chest strap. Outside interference sources such as computers, motors, etc., are also a majorsource of problems for heart rate monitors.

39
GENERAL
TENSIONING THE BELTIf the running belt slips when used, use the supplied 8mm Allen wrench toturn the left and right tension bolts clockwise 1/4-turn at a time until the beltno longer slips.
CENTERING THE BELTRun the treadmill at 2.0 mph. If the running belt is too far to the right side,use the supplied 8mm Allen wrench to turn the right tension bolt clockwise1/4-turn at a time until the belt remains centered during use.If the running belt is too far to the left side, turn the left tension bolt clockwise 1/4-turn at a time until the belt remains centered during use.
40
GEN
ERAL
PREVENTIVE MAINTENANCEFollowing are several tips on taking care of your VISION FITNESSTreadmill. The location of your Treadmill is important in maintaining itproperly. Find a location that does not accumulate dust and dirt easily. Aclean environment can help to prolong the life and improve theperformance of your Treadmill.
CLEANING TREADMILLIMPORTANT: Before cleaning, be sure to turn off and unplug the Treadmill.
• After each use, wipe the perspiration off the console andTreadmill surfaces.
• Every week, clean the Treadmill surfaces including the console,motor cover and side rails using a damp cloth. Do not use solventsas they may cause damage to the Treadmill.
• Each week vacuum around and under the Treadmill.
QUARTERLY INSPECTION
• Every three months, check the tightness of the assembly bolts toensure they are properly tightened.
• Every three months, check the power cord.
DECK WAXINGVISION FITNESS treadmills feature a wax lubricated phenolic deck, whichmay never require any maintenance. However, the deck is a wearablecomponent and, under heavier use or in some environments, the waxlubricant can wear out. To maximize treadmill life, the decks can easilyhave wax reapplied.
No waxing is required for the first year of use. After one year, it isrecommended to wax the deck once every six months. This will enhancethe performance and life of the Treadmill. Weight can have an affect onhow the wax wears on the deck. A heavier user (Example: 250 poundsand above) may need to wax more frequently. Also, running wears outwax faster than walking. Ask your VISION FITNESS retailer for informationabout treadmill maintenance.

41
GENERAL

42
GEN
ERAL
LIMITED HOME USE WARRANTY*
VISION FITNESS extends the following exclusive, limited warranty, which shallapply only to the use of the device in the home, for residential, non-commercialpurposes only. Any other use of the device shall void this warranty.
VISION FITNESS hereby extends the following limited warranties for the followingcomponents of the device, for the time period indicated:
FRAME - LIFETIME VISION FITNESS warrants the Frame against defects in workmanship and materials for the life of the product, so long as it remains in thepossession of the original owner.
MOTOR - LIFETIME VISION FITNESS warrants the Motor against defects inworkmanship and materials for the life of the Product, so long as the deviceremains in the possession of the original owner.
ELECTRONICS & PARTS - FIVE YEARS VISION FITNESS warrants the Electroniccomponents and all original Parts (other than the Motor) against defects in workmanship and materials for a period of five years from the date of original purchase, so long as the device remains in the possession of the original owner.
LABOR - ONE YEAR VISION FITNESS shall cover the Labor cost for the repair ofthe device for a period of one year from the date of original purchase, so long asthe device remains in the possession of the original owner.
*Limited Home-Use Warranty valid only in North America.

43
GENERAL
LIMITED HOME USE WARRANTY (continued)
EXCLUSIVE REMEDYThe exclusive remedy for any of the above warranties shall be repair or replacement of defective Parts, or the supply of Labor to cure any defect, provided that Labor shall be limited to one year. All Labor shall be supplied by thelocal Retailer who sold the Product and the Product must be located within thatRetailer’s service area. Products located outside the Retailer’s service area will notbe covered by the Labor warranty.
EXCLUSIONS AND LIMITATIONSThis warranty applies only to the original owner and is not transferable. This warranty is expressly limited to the repair or replacement of a defective Frame,Electronic component, or defective Part and is the sole remedy of the warranty. Thewarranty does not cover normal wear and tear, improper assembly or maintenance, or installation of parts or accessories not originally intended or compatible with the Fitness Product as sold. The warranty does not cover failure tofollow instructions and warnings in the Owner’s Guide or failure to providereasonable and necessary maintenance. The warranty does not apply to damage or failure due to accident, abuse, corrosion, discoloration of paint or plastic, or neglect. VISION FITNESS shall not be responsible for incidental or consequential damages. Parts and Electronic components reconditioned to AsNew Condition by VISION FITNESS or its vendors may sometimes be supplied aswarranty replacement parts and constitute fulfillment of warranty terms. Any warranty replacement parts shall be warranted for the remainder of the originalwarranty term.
VISION FITNESS expressly disclaims all other warranties, express or implied,including but not limited to all warranties of fitness for a particular purpose or ofmerchantability. This warranty gives you specific legal rights and your rights mayvary from state to state.
WARRANTY REGISTRATIONYour warranty card must be completed and sent to VISION FITNESS before a warranty claim can be processed. You may also register via our website atwww.visionfitness.com. Inside the enclosed warranty card you will find a customer survey. Your care in completing the survey will be of value to us in serving you in the future. Comments and suggestions are always welcome. Weare certain you will enjoy your new Treadmill. Thank you for selecting a VISION FITNESS product.

44
GEN
ERAL
DEVELOPING A FITNESS PROGRAM
By purchasing this piece of VISION FITNESS exercise equipment, youhave made a commitment to exercise and now have the convenience ofexercising in your own home. Your new equipment offers the flexibility toexercise at whatever time suits you best. It will be easier to maintain aconsistent exercise program that will help you achieve your fitness goals.
ACHIEVING YOUR FITNESS GOALS An important step in developing a long-term fitness program is todetermine your goals. Is your primary goal to lose weight? Improve muscletone? Relieve stress? Prepare for the spring racing schedule? Knowingwhat your goals are will help you develop a more successful exerciseprogram. If possible, try to define your personal goals in precise,measurable terms over specific periods of time. Examples of these goalsmight include:
• Decrease your waistline by two inches over the next two months.• Run the local 5K race this summer.• Lose 10 pounds in the next three months.• Get 30 minutes of cardiovascular exercise at least five days per week.• Improve your race time by two minutes over the next year.• Move from walking a mile to jogging a mile within the next three months.
The more specific the goal, the easier it will be to track your progress. Ifyour goals are long-term, divide them into monthly and weekly segments.Long-term goals can lose some of the motivational benefits. Short-termgoals are easier to achieve and will allow you to see the progress you aremaking. Every time you reach a goal, it is important to set a new goal.This will lead to a healthier lifestyle and will provide the motivation thatyou will need to move forward.
TRACK YOUR PROGRESSNow that you have set your exercise goals, it is time to write them down andmake an exercise schedule that will help you achieve them. By keeping a fitnessdiary, you will stay motivated and know where you are in terms of reaching yourgoals. As time goes on, you will be able to look back with pride to see howfar you’ve come. See the end of this section for weekly and annual exerciselogs. Copy these logs to keep your own fitness diary.

45
GENERAL
EXERCISE GUIDELINES
WARM-UPA warm-up activity should be a progressive aerobic activity that utilizes themuscles you will be using during the workout. There is no set warm-upintensity. A typical warm-up will produce a small amount of perspiration,but not leave you feeling fatigued. Intensity and fitness level will affect theduration of your warm-up, but 5-10 minutes is usually recommended.
EXERCISE DURATIONA common question asked is, “how much exercise do I need?” Werecommend following the guidelines set up by the American College ofSports Medicine (ACSM) for healthy aerobic activity.
• Exercise three to five days per week.• Warm up for five to 10 minutes before aerobic activity.• Maintain your exercise activity for 30 to 45 minutes.• Gradually decrease the intensity of your workout, then stretch to
cool down during the last five to 10 minutes.
If weight loss is a major goal, participate in your aerobic activity at least30 minutes for five days each week.
EXERCISE INTENSITYThe next question asked is, “how hard do I need to workout?” To reap themost cardiovascular benefits from your workout, it is necessary to exercisewithin a recommended intensity range. We recommend monitoring yourexercise heart rate to measure exercise intensity. Please see Page 30 forthe Target Heart Rate Chart.

46
GEN
ERAL
BALANCED FITNESSWhile cardiovascular exercise has been the primary method of fitness formany programs over the years, it should not be the only method. StrengthTraining and Flexibility Training have become more popular as exercisehas developed. Incorporating Strength and Flexibility Training into yourcurrent exercise program will give you the balance you need to improveyour athletic performance, reduce susceptibility to injury, increasemetabolic rate, increase bone density, and reach your goals faster.
STRENGTH TRAININGStrength Training was once known as an activity performed by youngmales only. That has changed with the advances in scientific research onStrength Training over the last 20 years or so. Research has proven that,after age 30, we begin to lose muscle mass if we do not incorporateStrength Training into our exercise program. With this decrease in musclemass, our ability to burn calories decreases, our physical ability to dowork decreases and our susceptibility to injuries increases. The good newsis that, with a proper Strength Training program, we can maintain or evenbuild muscle as we age. A proper Strength Training program will work themuscle groups of the upper and lower body. There are now many optionsavailable for Strength Training including: yoga, Pilates, selectorizedmachines, free weights, stability balls or medicine balls, exercise tubingand body weight exercises, just to name a few.
Recommendations for a minimum Strength Training program include:FREQUENCY: Two to three days per weekVOLUME: One to three sets consisting of eight to 12 repetitions.

47
GENERAL
STRETCHINGFlexibility Training is not associated with fitness as often as cardiovascularexercise or Strength Training, even though it is just as important. A goodstretching program will help to maintain flexibility of the hips and lowerback. A flexible person will be less likely to injure themselves in commonactivities, such as reaching, twisting and turning, or in uncommon activitiessuch as the annual softball tournament.
Before stretching, take a few minutes to warm up the muscles becausestretching a cold muscle can cause injury. Start your stretch slowly,exhaling as you gently stretch the muscle. Try to hold each stretch 15 to30 seconds. Don’t bounce when you stretch. Holding a stretch offers lesschance of injury. Don’t strain or push a muscle too far. If it hurts, ease up.Here are a few stretches you can incorporate into your exercise program:
SEATED TOE TOUCHSit on the floor with your legstogether and straight out in front ofyou. Do not lock your knees.Extend your fingers toward yourtoes, exhaling as you go. Hold for15 to 30 seconds. Return to thestart position, and repeat asnecessary.

48
GEN
ERAL
STANDING QUADRICEPS STRETCHUsing a wall to provide balance,grasp your left ankle with your lefthand and hold to stretch. Yourknee should be pointing towardthe floor. Hold the stretch for 15 to30 seconds. Repeat with yourright leg, and continue to alternateas necessary.
STANDING CALF STRETCHStanding about three to four feetfrom the wall, take one stepforward with your right foot. Placeyour hands on the wall in front ofyou. Bend your right leg slowly,using your movement to control theamount of stretch in the left calf.Your left heel should remain on theground. Slowly bring yourselfback to the starting position andswitch legs. Repeat as necessary.

49
GENERAL

50
GEN
ERAL

51
GENERAL

52
GEN
ERAL

53
GENERAL

54
GEN
ERAL


s t a r t s
v i s i o nw i t h a
i t a l l
si
mp
le
re
li
ab
le
cu
st
om
iz
ab
le
500 South CP Avenue • P.O. Box 280 • Lake Mills, WI 53551
toll free 800.335.4348 • phone 920.648.4090 • fax 920.648.3373
www.visionfitness.com
©2008 Vision Fitness. All Rights Reserved. Advanced Smart-Matrix, Cambridge Motor Works, Cool-Weave, HRT, Smart-Matrix, and SPRINT 8 are Trademarks of Vision Fitness.
May be covered by one or more patents or patents pending: US 6273843, US 7104930, TW 586429, CN 03206094.7
9.08 OM18.71PRD
REV1


