
Owner s Manual - Northern Tool. Capacity Jumbo Wagon Owner’s Manual WARNING: Read carefully and...
8
1400-Lb. Capacity Jumbo Wagon Owner ’ s Manual WARNING: Read carefully and understand all INSTRUCTIONS before operating. Failure to follow the safety rules and other basic safety precautions may result in a serious personal injury. Item #46438
Transcript of Owner s Manual - Northern Tool. Capacity Jumbo Wagon Owner’s Manual WARNING: Read carefully and...
1400-Lb. Capacity Jumbo Wagon
Owner’s Manual
WARNING:
Read carefully and understand all INSTRUCTIONS before operating. Failure to follow the safety rules and other basic safety precautions may result in a serious personal injury.
Item #46438
Page 1 of 7
Thank you very much for choosing a Strongway™ product! For future reference, please complete the
owner’s record below:
Model: _______________ Purchase Date: _______________
Save the receipt, warranty and these instructions. It is important that you read the entire manual to
become familiar with this product before you begin using it.
This machine is designed for certain applications only. The distributor strongly recommends that you do
not modify or use this wagon for any application other than that for which it was designed. If you have any
questions relative to a particular application, DO NOT use the wagon until you have first contacted the
distributor to determine if it can or should be performed on or with this product.
For technical questions and replacement parts, please call 1-800-222-5381.
INTENDED USE
Strongway’s Industrial-grade Jumbo Wagon handles heavy loads up to 1400 lb. It’s perfect for hauling
patio blocks, firewood, gardening supplies, and much more. The front, rear, and side panels fold away or
detach completely for easy loading and unloading.
SPECIFICATIONS
Item# 46438
Capacity 1,400 lb.
Frame Material Steel
Wheel Type Pneumatic
Dimensions L x W x H (inches) 50 x 247/32 x 263/4
GENERAL SAFETY REGULATIONS
WARNING: Read and understand all instructions. Failure to follow all instructions listed below may
Page 2 of 7
result in serious bodily injury or death and/or property damage.
WARNING: The warnings, cautions, and instructions discussed in this instruction manual cannot
cover all possible conditions or situations that could occur. It must be understood by the operator that
common sense and caution are factors that cannot be built into this product but must be supplied by the
operator.
• Inspect work area. Ensure your work area is free and clear of any electrical, chemical, or environmental
hazards.
• Keep children away from work area. Do not allow children to handle this product.
• Always wear ANSI-approved safety glasses and heavy-duty work gloves during assembly and use.
Do not wear loose clothing or jewelry, which can get caught in moving parts.
• Store idle equipment. When not in use, tools and equipment should be stored in a dry location to inhibit
rust. Always lock up tools and equipment, and keep out of the reach of children.
• Use the right tool for the job. Do not attempt to force small equipment to do the work of larger industrial
equipment. There are certain applications for which this equipment was designed. It will do a better job
and more safely at the capacity for which it was intended. Do not modify this equipment, and do not use
this equipment for a purpose for which it was not intended.
• Check for damaged parts. Before using this wagon, carefully check that it will operate properly and
perform its intended function. Check for damaged parts and any other conditions that may affect the
operation of this wagon. Replace damaged or worn parts immediately.
• Do not overreach. Keep proper footing and balance at all times to prevent tripping, falling, back injury,
etc.
• DO NOT use the equipment when tired or under the influence of drugs, alcohol, or medication. A
moment of inattention while operating this equipment may result in serious personal injury.
• Industrial applications must follow OSHA requirements.
GUIDE TO SAFE OPERATION
WARNING: The wagon must only be used to carry goods. Do not use the wagon as personal
transportation.
• MAX LOAD: 1400 LB. NEVER OVERLOAD THIS WAGON.
• DO NOT inflate tires to more than 40 psi.
• DO NOT operate if any part is damaged or loose.
• Lower the fence rails when loading large items onto cart.
• Distribute the load evenly in the wagon’s bed.
• When loading and unloading the wagon, be careful of the balance of the wagon. Always be careful
of the handle, which can tip and fall from the upright position.
• Always block the four wheels when loading or unloading the wagon.
• Do not allow children to use this wagon. It is not a toy.
• Ensure that the load is securely fastened within the bed of the wagon.

Page 3 of 7
ASSEMBLY INSTRUCTIONS
Before assembling, be sure all parts and hardware mentioned in this manual are included in the
package. See Fig. 1.
NOTE: Do not completely tighten screws until the assembly is complete. For easier assembly, we
recommend using two people to assemble this product.
All Parts Hardware Bag
After Assembly
Fig. 1
Page 4 of 7
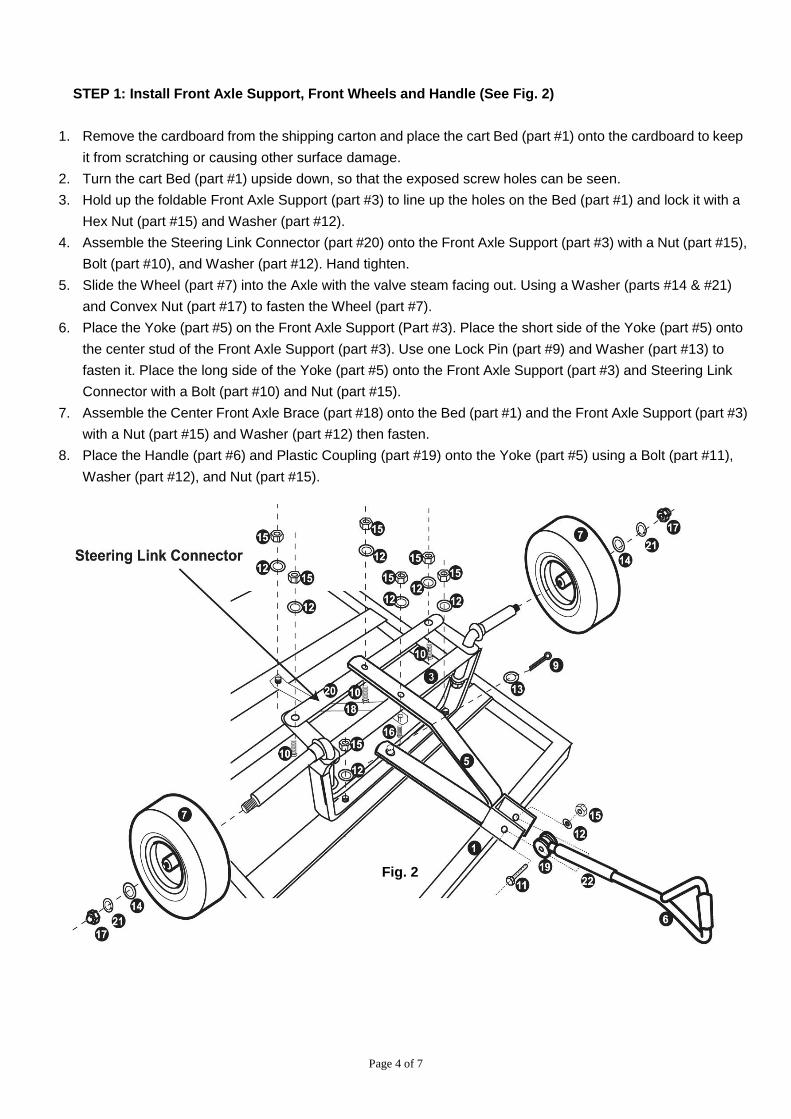
STEP 1: Install Front Axle Support, Front Wheels and Handle (See Fig. 2)
1. Remove the cardboard from the shipping carton and place the cart Bed (part #1) onto the cardboard to keep
it from scratching or causing other surface damage.
2. Turn the cart Bed (part #1) upside down, so that the exposed screw holes can be seen.
3. Hold up the foldable Front Axle Support (part #3) to line up the holes on the Bed (part #1) and lock it with a
Hex Nut (part #15) and Washer (part #12).
4. Assemble the Steering Link Connector (part #20) onto the Front Axle Support (part #3) with a Nut (part #15),
Bolt (part #10), and Washer (part #12). Hand tighten.
5. Slide the Wheel (part #7) into the Axle with the valve steam facing out. Using a Washer (parts #14 & #21)
and Convex Nut (part #17) to fasten the Wheel (part #7).
6. Place the Yoke (part #5) on the Front Axle Support (Part #3). Place the short side of the Yoke (part #5) onto
the center stud of the Front Axle Support (part #3). Use one Lock Pin (part #9) and Washer (part #13) to
fasten it. Place the long side of the Yoke (part #5) onto the Front Axle Support (part #3) and Steering Link
Connector with a Bolt (part #10) and Nut (part #15).
7. Assemble the Center Front Axle Brace (part #18) onto the Bed (part #1) and the Front Axle Support (part #3)
with a Nut (part #15) and Washer (part #12) then fasten.
8. Place the Handle (part #6) and Plastic Coupling (part #19) onto the Yoke (part #5) using a Bolt (part #11),
Washer (part #12), and Nut (part #15).
Fig. 2
Page 5 of 7
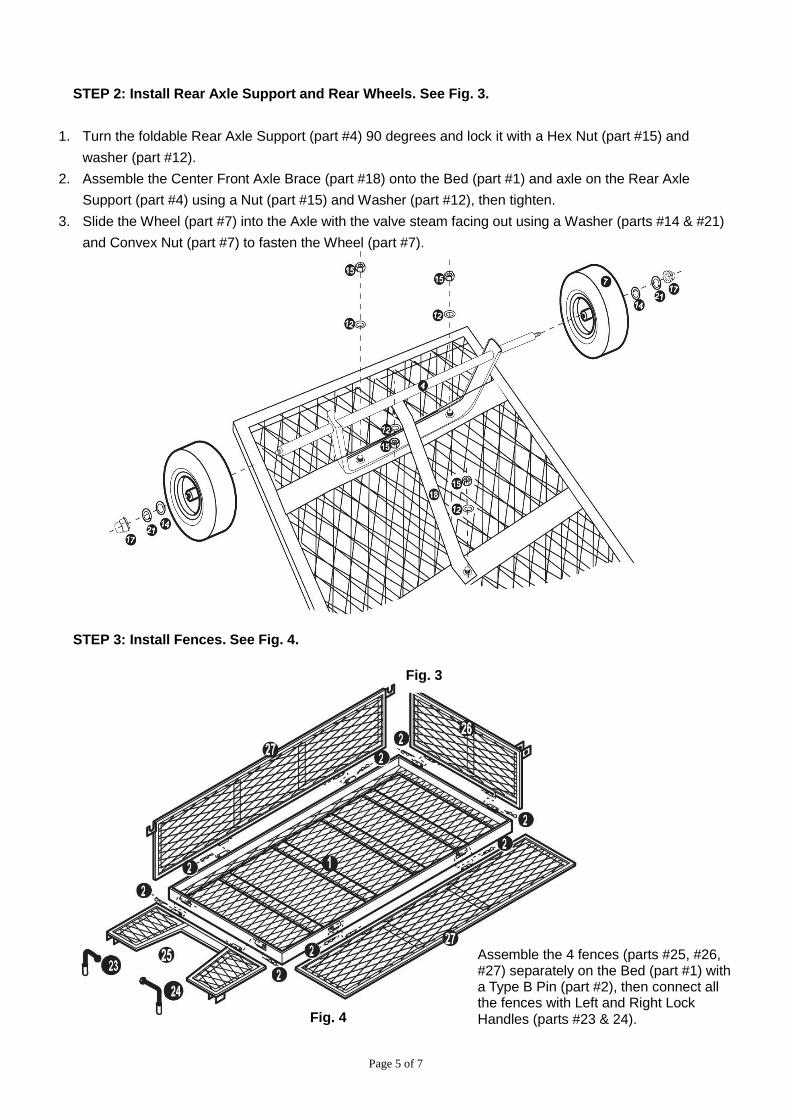
STEP 2: Install Rear Axle Support and Rear Wheels. See Fig. 3.
1. Turn the foldable Rear Axle Support (part #4) 90 degrees and lock it with a Hex Nut (part #15) and
washer (part #12).
2. Assemble the Center Front Axle Brace (part #18) onto the Bed (part #1) and axle on the Rear Axle
Support (part #4) using a Nut (part #15) and Washer (part #12), then tighten.
3. Slide the Wheel (part #7) into the Axle with the valve steam facing out using a Washer (parts #14 & #21)
and Convex Nut (part #7) to fasten the Wheel (part #7).
STEP 3: Install Fences. See Fig. 4.
Fig. 3
Assemble the 4 fences (parts #25, #26, #27) separately on the Bed (part #1) with a Type B Pin (part #2), then connect all the fences with Left and Right Lock Handles (parts #23 & 24). Fig. 4
Page 6 of 7
MAINTENANCE
1. Lubricate the steering handles before use for easy operation. 2. When not in use, store the wagon in a dry place, out of direct sunlight. 3. Periodically check the tire pressure. The tire pressure should be no more than 40 psi. 4. Periodically check the hardware. Retighten if any hardware is loose.
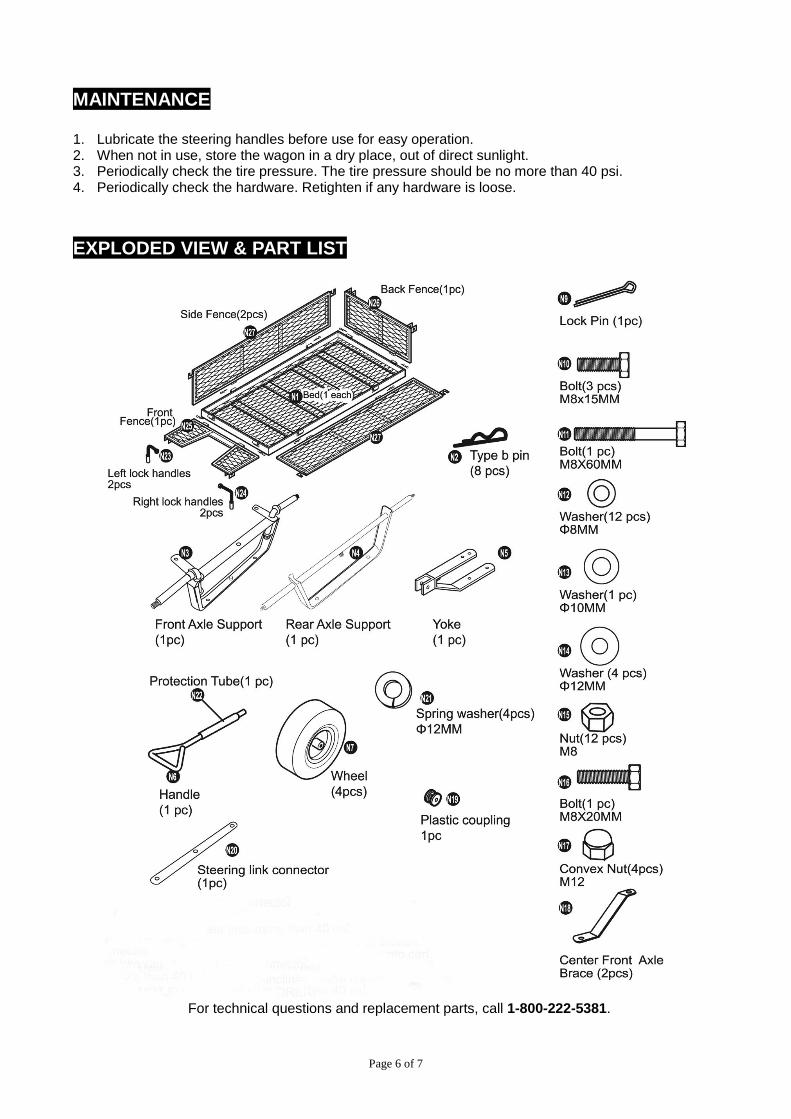
EXPLODED VIEW & PART LIST
For technical questions and replacement parts, call 1-800-222-5381.
Page 7 of 7
WARRANTY
One-Year Limited Warranty
Distributed by:
Northern Tool + Equipment Co., Inc. Burnsville, MN 53306-6936
www.NorthernTool.com Made in China