Overview of Adobe Photoshop CS5...
10
Adobe Photoshop CS5 Extended Activity 1.5 guide © 2010 Adobe Systems Incorporated Overview of Adobe Photoshop CS5 workspace 1 Overview of Adobe Photoshop CS5 workspace Starting to work in Adobe Photoshop The Adobe Photoshop workspace includes the command menus at the top of your screen and a variety of tools and panels for editing and adding elements to your image. You can also add commands and filters to the menus by installing third-party software known as plug-in modules. Photoshop works with bitmapped, digitized images (that is, continuous-tone images that have been converted into a series of small squares, or picture elements, called pixels). You can also work with vector graphics, which are drawings made of smooth lines that retain their crispness when scaled. You can create original artwork in Photoshop, and you can import images into the program from many sources, such as: • Photographs from a digital camera • Commercial CDs of digital images • Scans of photographs, transparencies, negatives, graphics, or other documents • Captured video images • Artwork created in drawing programs For information on the kinds of files you can use with Adobe Photoshop CS5, see “About file formats” in Photoshop Help. In this guide, you’ll learn your way around the Adobe Photoshop CS5 workspace, how to create custom workspaces, how to open images, create new Photoshop documents, and use basic pan and zoom tools. Exploring the Photoshop workspace You can customize the layout and functionality of the Photoshop workspace by using the workspace switcher. To open Photoshop and explore the workspace: 1. Start Adobe Photoshop. If you don’t see the Photoshop icon, choose Start > All Programs > Adobe Photoshop CS5 (Windows) or look in either the Applications folder or the Dock (Mac OS). 2. From the workspace switcher menu, confirm the option is set to Essentials. Choose Reset Essentials to restore the default workspace (Figure 1). The Photoshop workspace appears as shown in the following illustration. Figure 1 Workspace switcher menu
Transcript of Overview of Adobe Photoshop CS5...
Adobe Photoshop CS5 Extended Activity 1.5 guide
© 2010 Adobe Systems Incorporated Overview of Adobe Photoshop CS5 workspace 1
Overview of Adobe Photoshop CS5 workspace
Starting to work in Adobe Photoshop
The Adobe Photoshop workspace includes the command menus at the top of your screen and a variety of tools and panels for editing and adding elements to your image. You can also add commands and filters to the menus by installing third-party software known as plug-in modules.
Photoshop works with bitmapped, digitized images (that is, continuous-tone images that have been converted into a series of small squares, or picture elements, called pixels). You can also work with vector graphics, which are drawings made of smooth lines that retain their crispness when scaled. You can create original artwork in Photoshop, and you can import images into the program from many sources, such as:
• Photographs from a digital camera
• Commercial CDs of digital images
• Scans of photographs, transparencies, negatives, graphics, or other documents
• Captured video images
• Artwork created in drawing programs
For information on the kinds of files you can use with Adobe Photoshop CS5, see “About file formats” in Photoshop Help.
In this guide, you’ll learn your way around the Adobe Photoshop CS5 workspace, how to create custom workspaces, how to open images, create new Photoshop documents, and use basic pan and zoom tools.
Exploring the Photoshop workspace
You can customize the layout and functionality of the Photoshop workspace by using the workspace switcher.
To open Photoshop and explore the workspace:
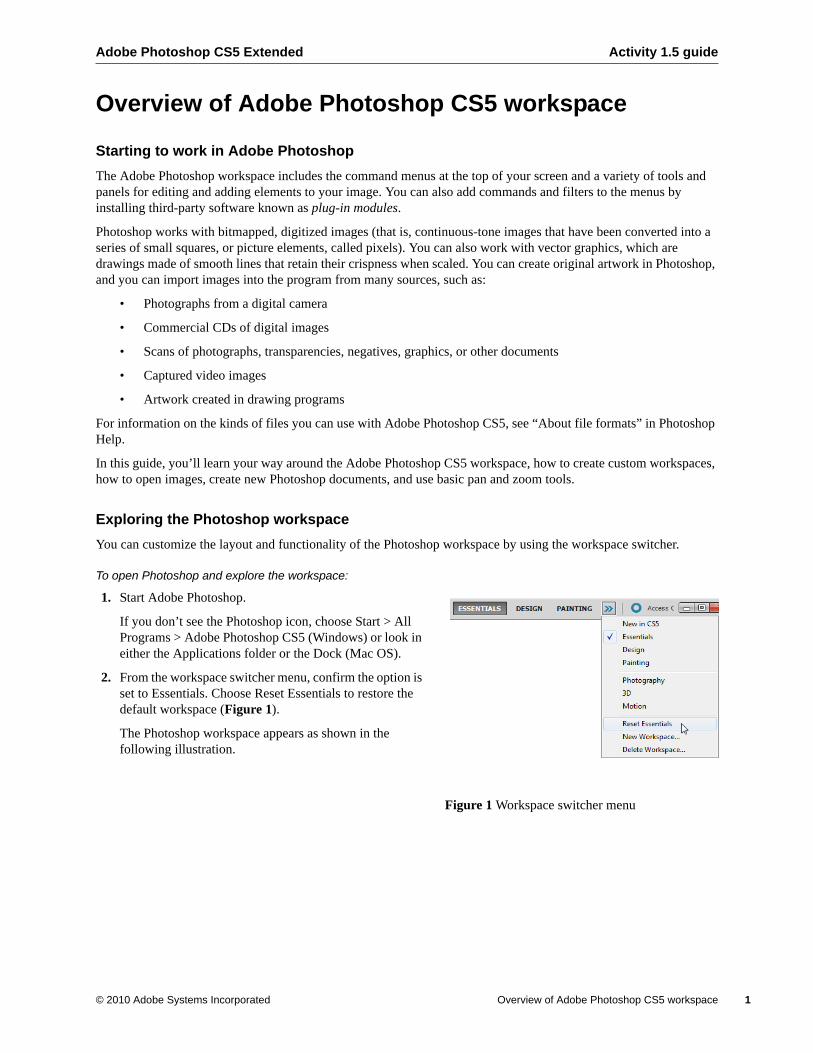
1. Start Adobe Photoshop.
If you don’t see the Photoshop icon, choose Start > All Programs > Adobe Photoshop CS5 (Windows) or look in either the Applications folder or the Dock (Mac OS).
2. From the workspace switcher menu, confirm the option is set to Essentials. Choose Reset Essentials to restore the default workspace (Figure 1).
The Photoshop workspace appears as shown in the following illustration.
Figure 1 Workspace switcher menu

Activity 1.5 guide Adobe Photoshop CS5 Extended
2 Overview of Adobe Photoshop CS5 workspace © 2010 Adobe Systems Incorporated
3. The default Essentails workspace in Photoshop (Figure 2) displays an Application bar at the top of the screen. In the Application bar are the Photoshop application icon, the main menu (Windows only), application controls, View controls, the workspace switcher, and a button to access CS Live. Below the Application bar is the Options bar, with the Tools panel on the left, panels, and one or more document windows that are opened separately.
The main menu across the bottom of the Application bar organizes commands in individual menus.
The Options bar displays options for the currently selected tool.
The document window displays the file you’re working on.
The Tools panel contains tools for creating and editing images, artwork, page elements, and so on. Related tools are grouped together.
Panels help you monitor and modify your work. An example is the Layers panel.
Certain panels are displayed by default, but you can add any panel by selecting it from the Window menu. Many panels have menus with panel-specific options. You can separate, group, stack, and dock panels into your preferred layout.
Figure 2 Adobe Photoshop CS5 interface
Workspace switcher menu
Application bar
Adobe Bridge button
Main menu
Options bar
Document window
Tools panel
Panels
Access CS Live button
Layers
Navigator
Adobe Photoshop CS5 Extended Activity 1.5 guide
© 2010 Adobe Systems Incorporated Overview of Adobe Photoshop CS5 workspace 3
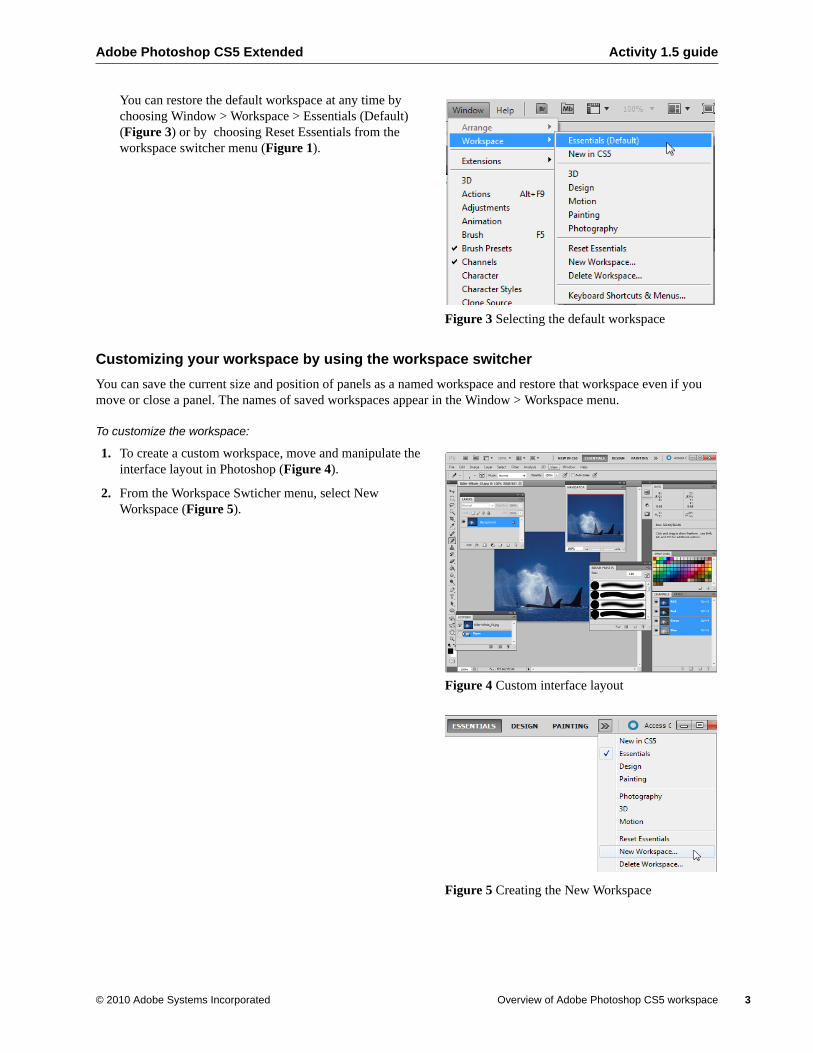
You can restore the default workspace at any time by choosing Window > Workspace > Essentials (Default) (Figure 3) or by choosing Reset Essentials from the workspace switcher menu (Figure 1).
Figure 3 Selecting the default workspace
Customizing your workspace by using the workspace switcher
You can save the current size and position of panels as a named workspace and restore that workspace even if you move or close a panel. The names of saved workspaces appear in the Window > Workspace menu.
To customize the workspace:
1. To create a custom workspace, move and manipulate the interface layout in Photoshop (Figure 4).
2. From the Workspace Swticher menu, select New Workspace (Figure 5).
Figure 4 Custom interface layout
Figure 5 Creating the New Workspace
Activity 1.5 guide Adobe Photoshop CS5 Extended
4 Overview of Adobe Photoshop CS5 workspace © 2010 Adobe Systems Incorporated
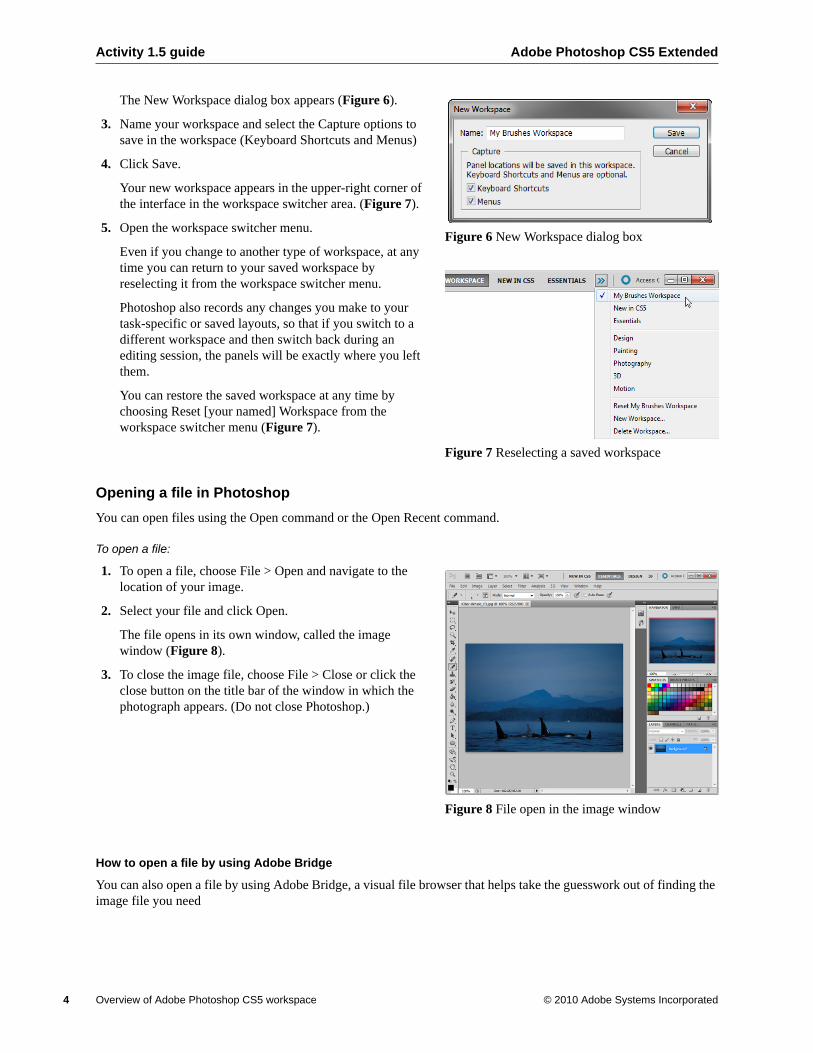
The New Workspace dialog box appears (Figure 6).
3. Name your workspace and select the Capture options to save in the workspace (Keyboard Shortcuts and Menus)
4. Click Save.
Your new workspace appears in the upper-right corner of the interface in the workspace switcher area. (Figure 7).
5. Open the workspace switcher menu.
Even if you change to another type of workspace, at any time you can return to your saved workspace by reselecting it from the workspace switcher menu.
Photoshop also records any changes you make to your task-specific or saved layouts, so that if you switch to a different workspace and then switch back during an editing session, the panels will be exactly where you left them.
You can restore the saved workspace at any time by choosing Reset [your named] Workspace from the workspace switcher menu (Figure 7).
Figure 6 New Workspace dialog box
Figure 7 Reselecting a saved workspace
Opening a file in Photoshop
You can open files using the Open command or the Open Recent command.
To open a file:
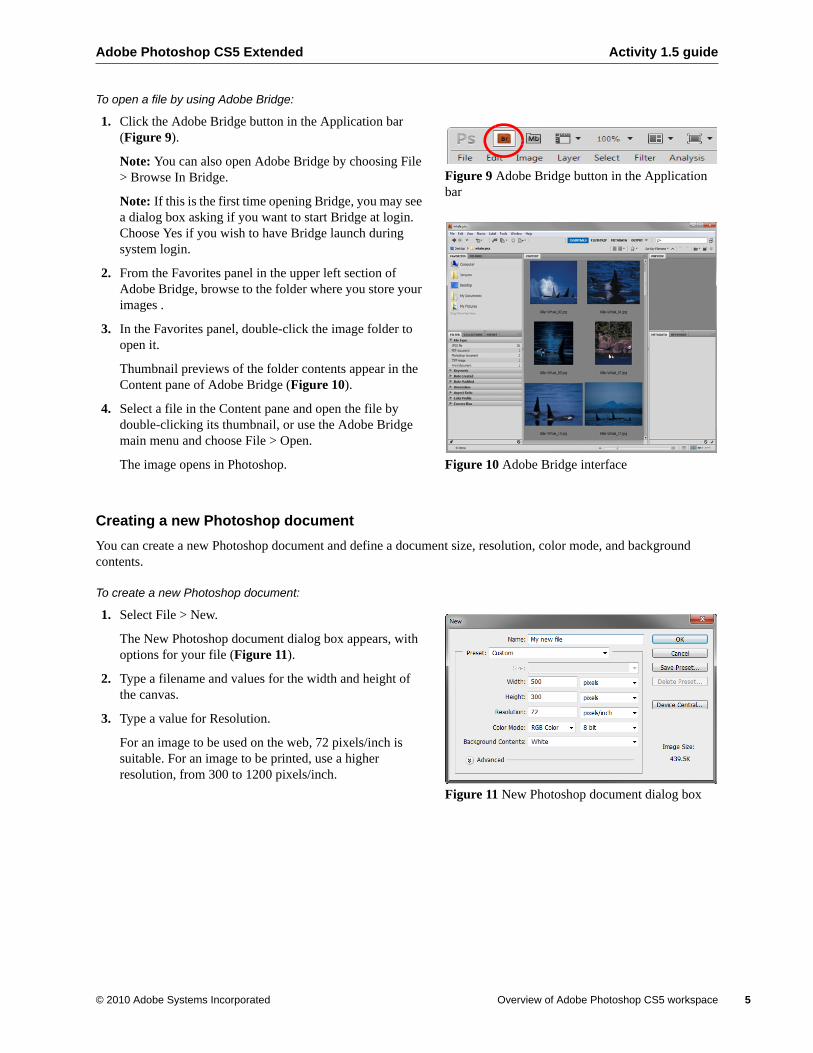
1. To open a file, choose File > Open and navigate to the location of your image.
2. Select your file and click Open.
The file opens in its own window, called the image window (Figure 8).
3. To close the image file, choose File > Close or click the close button on the title bar of the window in which the photograph appears. (Do not close Photoshop.)
Figure 8 File open in the image window
How to open a file by using Adobe Bridge
You can also open a file by using Adobe Bridge, a visual file browser that helps take the guesswork out of finding the image file you need
Adobe Photoshop CS5 Extended Activity 1.5 guide
© 2010 Adobe Systems Incorporated Overview of Adobe Photoshop CS5 workspace 5
To open a file by using Adobe Bridge:
1. Click the Adobe Bridge button in the Application bar (Figure 9).
Note: You can also open Adobe Bridge by choosing File > Browse In Bridge.
Note: If this is the first time opening Bridge, you may see a dialog box asking if you want to start Bridge at login. Choose Yes if you wish to have Bridge launch during system login.
2. From the Favorites panel in the upper left section of Adobe Bridge, browse to the folder where you store your images .
3. In the Favorites panel, double-click the image folder to open it.
Thumbnail previews of the folder contents appear in the Content pane of Adobe Bridge (Figure 10).
4. Select a file in the Content pane and open the file by double-clicking its thumbnail, or use the Adobe Bridge main menu and choose File > Open.
The image opens in Photoshop.
Figure 9 Adobe Bridge button in the Application bar
Figure 10 Adobe Bridge interface
Creating a new Photoshop document
You can create a new Photoshop document and define a document size, resolution, color mode, and background contents.
To create a new Photoshop document:
1. Select File > New.
The New Photoshop document dialog box appears, with options for your file (Figure 11).
2. Type a filename and values for the width and height of the canvas.
3. Type a value for Resolution.
For an image to be used on the web, 72 pixels/inch is suitable. For an image to be printed, use a higher resolution, from 300 to 1200 pixels/inch.
Figure 11 New Photoshop document dialog box
Activity 1.5 guide Adobe Photoshop CS5 Extended
6 Overview of Adobe Photoshop CS5 workspace © 2010 Adobe Systems Incorporated
4. Choose a setting for Color Mode.
Color Mode determines which color method is used to display and print the image you’re working on. Photoshop bases its color modes on the color models that are useful for images used in publishing. Choose from RGB (Red, Green, Blue), CMYK (Cyan, Magenta, Yellow, Black), Lab Color (based on CIE L* a* b*), and Grayscale.
5. Choose a setting for Background Contents.
You can choose to use a white, transparent, or specific color background behind your image.
In the lower-right corner, notice that the file size information changes as you adjust the settings for the new file.
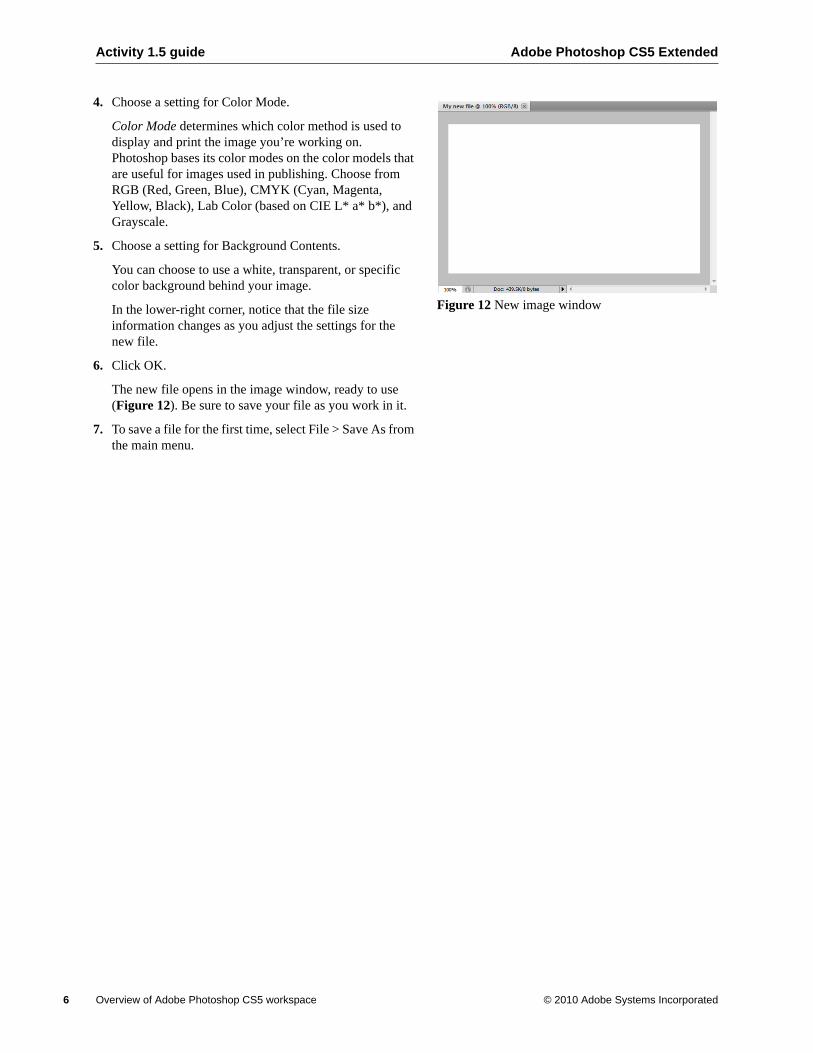
6. Click OK.
The new file opens in the image window, ready to use (Figure 12). Be sure to save your file as you work in it.
7. To save a file for the first time, select File > Save As from the main menu.
Figure 12 New image window
Adobe Photoshop CS5 Extended Activity 1.5 guide
© 2010 Adobe Systems Incorporated Overview of Adobe Photoshop CS5 workspace 7
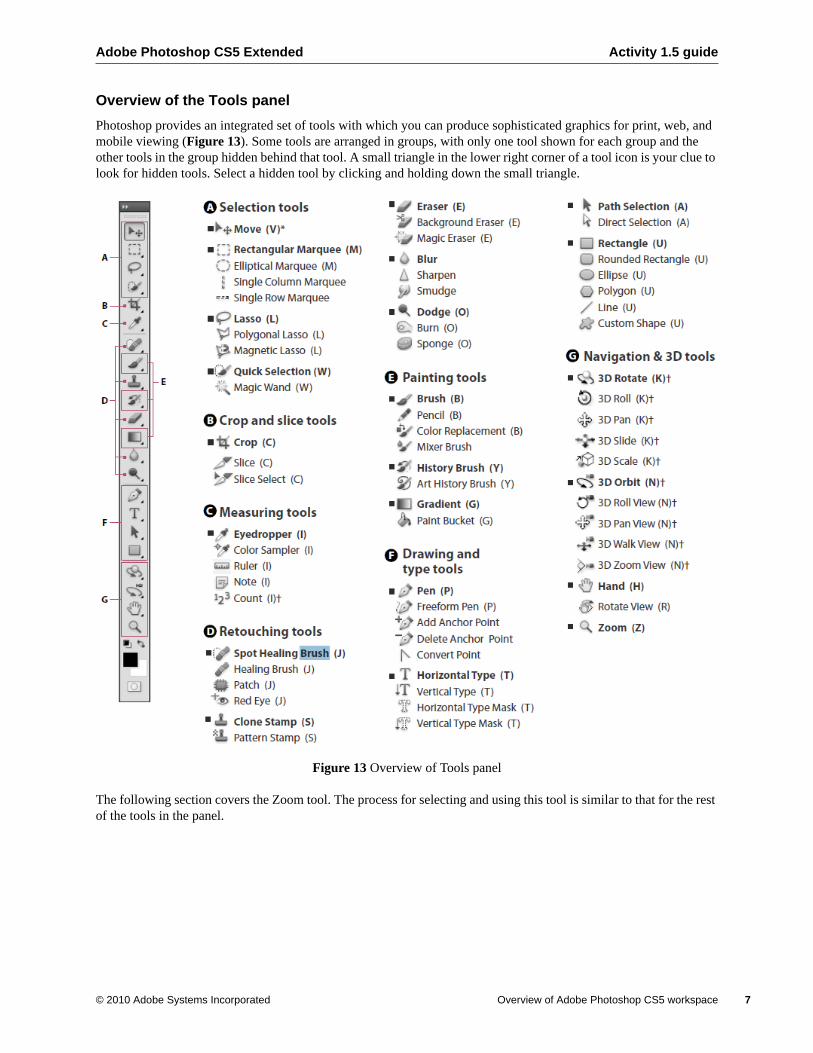
Overview of the Tools panel
Photoshop provides an integrated set of tools with which you can produce sophisticated graphics for print, web, and mobile viewing (Figure 13). Some tools are arranged in groups, with only one tool shown for each group and the other tools in the group hidden behind that tool. A small triangle in the lower right corner of a tool icon is your clue to look for hidden tools. Select a hidden tool by clicking and holding down the small triangle.
Figure 13 Overview of Tools panel
The following section covers the Zoom tool. The process for selecting and using this tool is similar to that for the rest of the tools in the panel.
Activity 1.5 guide Adobe Photoshop CS5 Extended
8 Overview of Adobe Photoshop CS5 workspace © 2010 Adobe Systems Incorporated
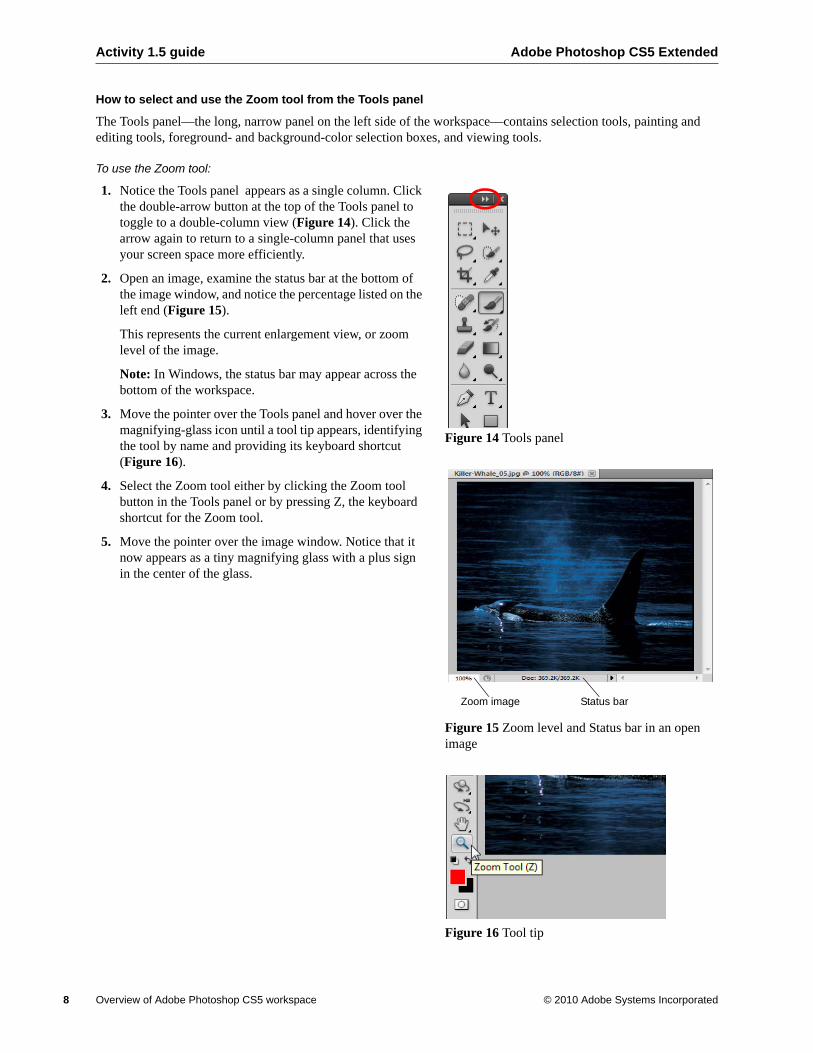
How to select and use the Zoom tool from the Tools panel
The Tools panel—the long, narrow panel on the left side of the workspace—contains selection tools, painting and editing tools, foreground- and background-color selection boxes, and viewing tools.
To use the Zoom tool:
1. Notice the Tools panel appears as a single column. Click the double-arrow button at the top of the Tools panel to toggle to a double-column view (Figure 14). Click the arrow again to return to a single-column panel that uses your screen space more efficiently.
2. Open an image, examine the status bar at the bottom of the image window, and notice the percentage listed on the left end (Figure 15).
This represents the current enlargement view, or zoom level of the image.
Note: In Windows, the status bar may appear across the bottom of the workspace.
3. Move the pointer over the Tools panel and hover over the magnifying-glass icon until a tool tip appears, identifying the tool by name and providing its keyboard shortcut (Figure 16).
4. Select the Zoom tool either by clicking the Zoom tool button in the Tools panel or by pressing Z, the keyboard shortcut for the Zoom tool.
5. Move the pointer over the image window. Notice that it now appears as a tiny magnifying glass with a plus sign in the center of the glass.
Figure 14 Tools panel
Figure 15 Zoom level and Status bar in an open image
Figure 16 Tool tip
Status barZoom image
Adobe Photoshop CS5 Extended Activity 1.5 guide
© 2010 Adobe Systems Incorporated Overview of Adobe Photoshop CS5 workspace 9
6. Click anywhere in the image window.
The image zooms in according to a preset percentage level, which replaces the previous value in the status bar. The location you clicked when you used the Zoom tool becomes the center of the enlarged view. If you click again, the zoom advances to the next preset level, up to a maximum of 3200%.
The Navigator panel displays a red box around the zoomed area (Figure 17).
7. Hold down the Alt key (Windows) or Option key (Mac OS) so that the Zoom tool pointer appears with a minus sign in the center of the magnifying glass (Figure 18), and then click anywhere in the image. Then release the Alt or Option key.
Now the view zooms out to a lower preset magnification.
Note: You can also hold the Alt key (Windows) or Option key (Mac OS) and use the mouse scroll wheel to zoom in and out of an image.
Figure 17 Navigator panel showing zoom area
Figure 18 Using the Zoom tool with a minus sign
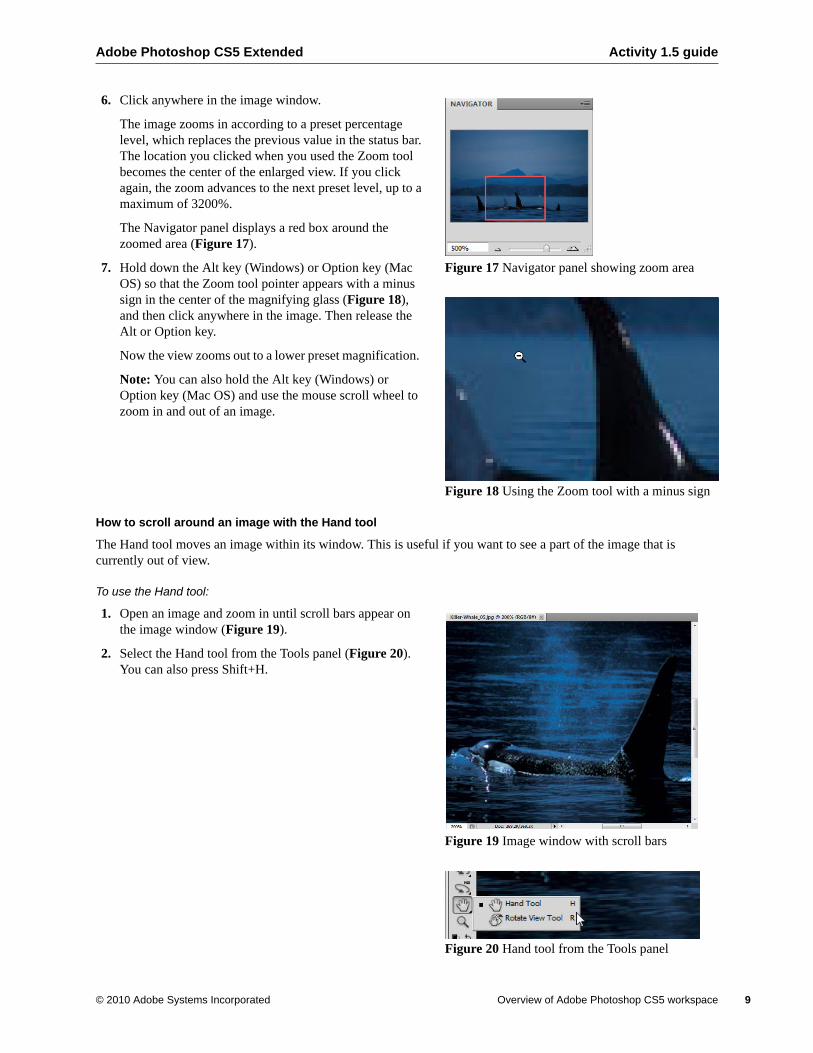
How to scroll around an image with the Hand tool
The Hand tool moves an image within its window. This is useful if you want to see a part of the image that is currently out of view.
To use the Hand tool:
1. Open an image and zoom in until scroll bars appear on the image window (Figure 19).
2. Select the Hand tool from the Tools panel (Figure 20). You can also press Shift+H.
Figure 19 Image window with scroll bars
Figure 20 Hand tool from the Tools panel
Activity 1.5 guide Adobe Photoshop CS5 Extended
10 Overview of Adobe Photoshop CS5 workspace © 2010 Adobe Systems Incorporated
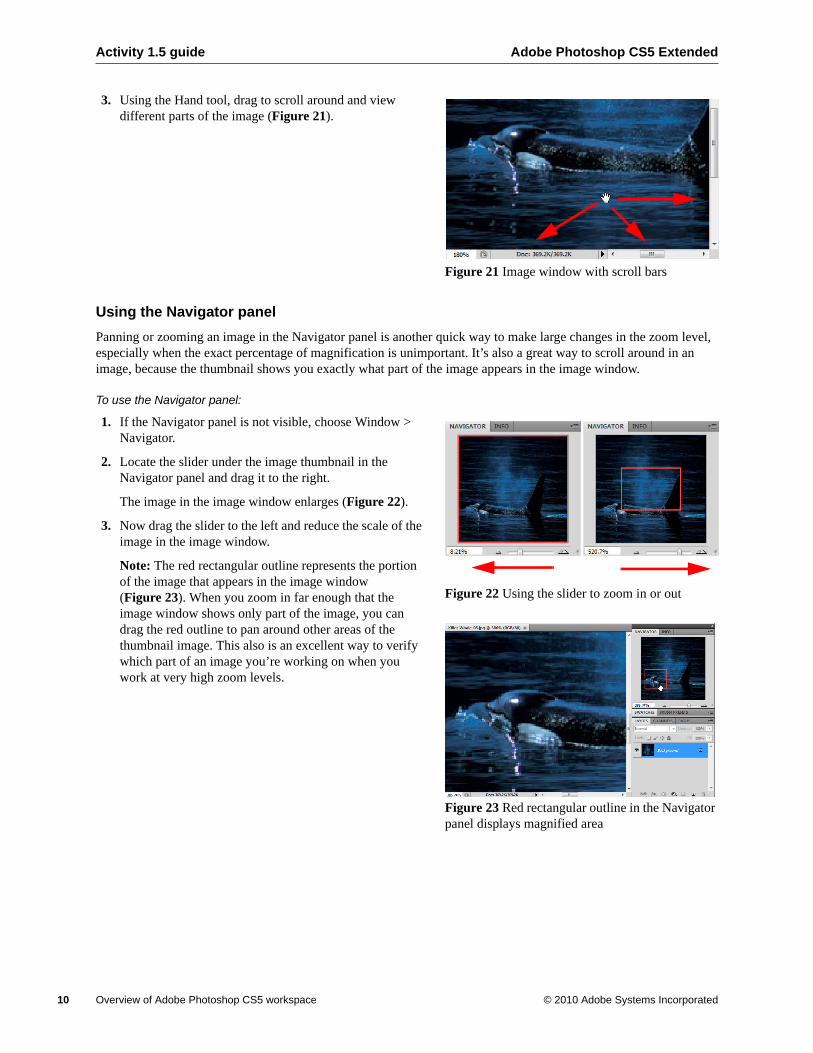
3. Using the Hand tool, drag to scroll around and view different parts of the image (Figure 21).
Figure 21 Image window with scroll bars
Using the Navigator panel
Panning or zooming an image in the Navigator panel is another quick way to make large changes in the zoom level, especially when the exact percentage of magnification is unimportant. It’s also a great way to scroll around in an image, because the thumbnail shows you exactly what part of the image appears in the image window.
To use the Navigator panel:
1. If the Navigator panel is not visible, choose Window > Navigator.
2. Locate the slider under the image thumbnail in the Navigator panel and drag it to the right.
The image in the image window enlarges (Figure 22).
3. Now drag the slider to the left and reduce the scale of the image in the image window.
Note: The red rectangular outline represents the portion of the image that appears in the image window (Figure 23). When you zoom in far enough that the image window shows only part of the image, you can drag the red outline to pan around other areas of the thumbnail image. This also is an excellent way to verify which part of an image you’re working on when you work at very high zoom levels.
Figure 22 Using the slider to zoom in or out
Figure 23 Red rectangular outline in the Navigator panel displays magnified area