Overview - Integrated DesigNZ Ltdidesignz.org/DigiLiteZL_PC-live/digiliteZL_cookbock.pdf ·...
19
Digilite-ZL Live Transmission Cookbook Overview DigiLiteZL is a DVB-S transmitter device designed to be used for digital amateur television (DATV) transmissions, nominally in the 1.2GHz amateur band. It receives an MPEG-2 transport stream from a PC via a USB connection, performs various coding operations according to the DVB-S specification, and generates a QPSK-modulated output waveform. This document describes one of the solutions to generate the live MPEG-2 transport stream to feed Digilite-ZL equipped with his DE0-nano FPGA board . The proposed solution is based on a pc or laptop running linux Ubuntu 12.04 LTS with additional multimedia utilities and a video capture card from Hauppauge. The installation process described below has been tested starting with an empty disk on which ubuntu has been installed. Hardware The main hardware, in addition of course to the Digilite-ZL and a PC, is a video capture card from Hauppauge that uses a MPEG-2 Connexant compression chip. There are a number of different models that you can use: 1. Hauppauge PVR150, PVR250 and PVR350 PCI video capture cards (pc) 2. Hauppauge WinTV PVR USB2 and HVR-1900 external devices (laptops) Please remember that you need two USB port if you implement the solution on a laptop. One for the Digilite-ZL and one for the Hauppauge box. The setup described in this document uses the WinTV PVR USB2 external device and a a no- name laptop Intel Core Duo CPU 2.66 GHz CPU and 2 Gb RAM. HB9DUG – 20120822 V3.1 1/19
-
Upload
truongdieu -
Category
Documents
-
view
225 -
download
0
Transcript of Overview - Integrated DesigNZ Ltdidesignz.org/DigiLiteZL_PC-live/digiliteZL_cookbock.pdf ·...

Digilite-ZLLive Transmission Cookbook
OverviewDigiLiteZL is a DVB-S transmitter device designed to be used for digital amateur television (DATV) transmissions, nominally in the 1.2GHz amateur band. It receives an MPEG-2 transport stream from a PC via a USB connection, performs various coding operations according to the DVB-S specification, and generates a QPSK-modulated output waveform.
This document describes one of the solutions to generate the live MPEG-2 transport stream to feed Digilite-ZL equipped with his DE0-nano FPGA board . The proposed solution is based on a pc or laptop running linux Ubuntu 12.04 LTS with additional multimedia utilities and a video capture card from Hauppauge.
The installation process described below has been tested starting with an empty disk on which ubuntu has been installed.
HardwareThe main hardware, in addition of course to the Digilite-ZL and a PC, is a video capture card from Hauppauge that uses a MPEG-2 Connexant compression chip.
There are a number of different models that you can use:
1. Hauppauge PVR150, PVR250 and PVR350 PCI video capture cards (pc)2. Hauppauge WinTV PVR USB2 and HVR-1900 external devices (laptops)
Please remember that you need two USB port if you implement the solution on a laptop. One for the Digilite-ZL and one for the Hauppauge box.
The setup described in this document uses the WinTV PVR USB2 external device and a a no-name laptop Intel Core Duo CPU 2.66 GHz CPU and 2 Gb RAM.
HB9DUG – 20120822 V3.1 1/19

Digilite-ZLLive Transmission Cookbook
Software installationThe proposed solution to generate the live MPEG-2 transport stream is implemented on linux operating system with multimedia toolsbox available from the linux community.
This comprises: linux Ubuntu 12-04, v4L2-utils utilities, FFmpeg tools and Opencaster 3.1.4-
Ubuntu 12.04 installation
The software can be downloaded from http://www.ubuntu.com/download
With the CD generated, you can try Ubuntu without affecting your current system. If Ubuntu load and run without problem from the CD, you can install it automatically from the CD. If you have windows installed on you pc, the installer will detect this automatically and make a second partition for Ubuntu as well as the dual boot configuration.
V4l2 installation
v4l-utils is a collection of various video4linux (V4L) and DVB utilities. These utilities are used to configure the Hauppauge video capture card.
The commands (CMD) are to be typed on a terminal window that you can open with CTRL-ALT-T
1. Checking if the v4l2 utilities are installed on ubuntu
Type the CMD: v4l2-ctl -D
If you get the the above message go to the next step otherwise jump to step 3.
2. Installing the v4l2 utilities
First, we need to update the local package index with the latest changes made in
HB9DUG – 20120822 V3.1 2/19

Digilite-ZLLive Transmission Cookbook
repositories available on the Internet with the CMD:
sudo apt-get update.
Then we download and install the v4l2 utilities with the CMD:
sudo apt-get install v4l-utils
3. Checking that v4l2 utilities are installed
Run the CMD: v4l2-ctl –list-devices.
HB9DUG – 20120822 V3.1 3/19
Digilite-ZLLive Transmission Cookbook
If you see your Hauppauge device, you have successfully installed the tools.
Please note the device name (in the screen dump above video1). You will need this information later on.
FFmpeg tools installation
FFmpeg is a complete, cross-platform solution to record, convert and stream audio and video.
The commands (CMD) are to be typed on a terminal window that you can open with CTRL-ALT-T
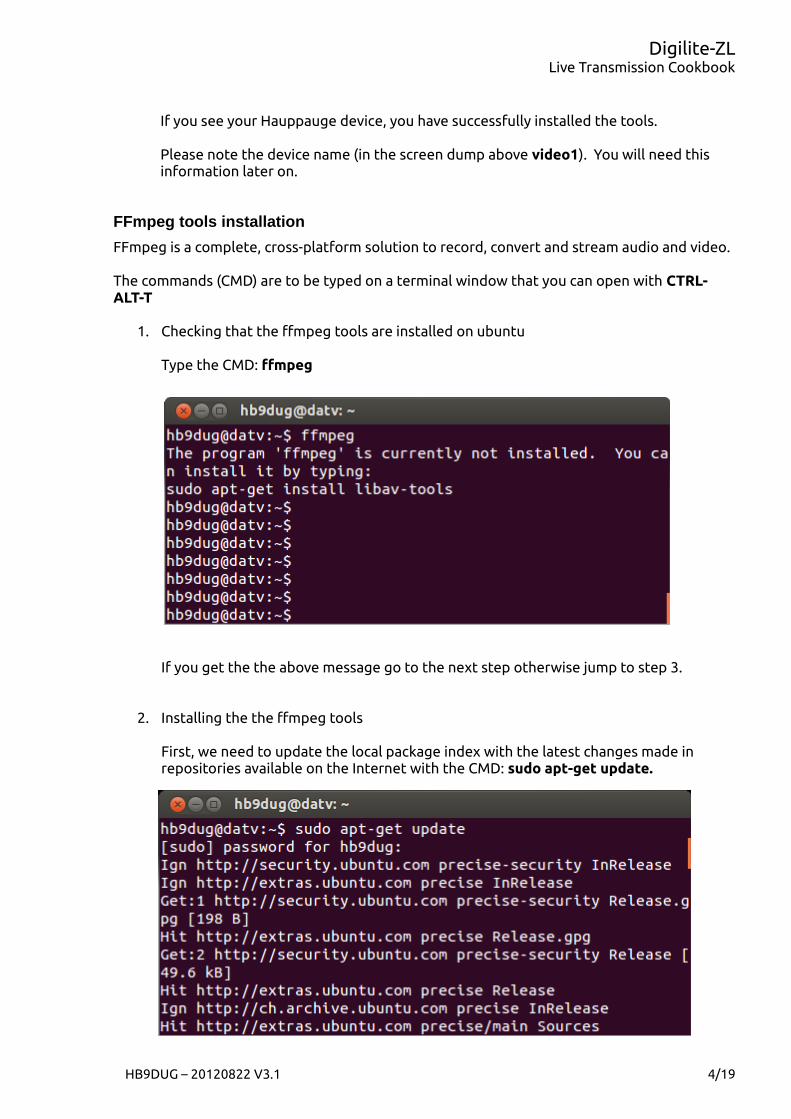
1. Checking that the ffmpeg tools are installed on ubuntu
Type the CMD: ffmpeg
If you get the the above message go to the next step otherwise jump to step 3.
2. Installing the the ffmpeg tools
First, we need to update the local package index with the latest changes made in repositories available on the Internet with the CMD: sudo apt-get update.
HB9DUG – 20120822 V3.1 4/19
Digilite-ZLLive Transmission Cookbook
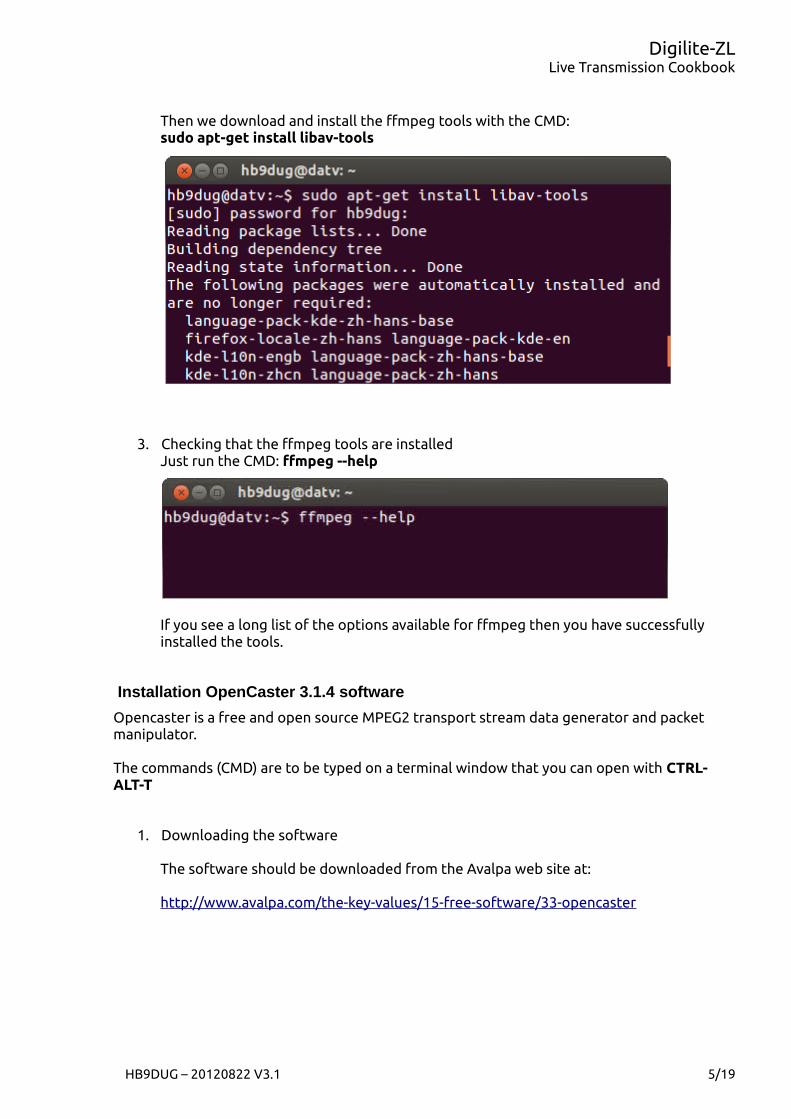
Then we download and install the ffmpeg tools with the CMD:sudo apt-get install libav-tools
3. Checking that the ffmpeg tools are installedJust run the CMD: ffmpeg --help
If you see a long list of the options available for ffmpeg then you have successfullyinstalled the tools.
Installation OpenCaster 3.1.4 software
Opencaster is a free and open source MPEG2 transport stream data generator and packet manipulator.
The commands (CMD) are to be typed on a terminal window that you can open with CTRL-ALT-T
1. Downloading the software
The software should be downloaded from the Avalpa web site at:
http://www.avalpa.com/the-key-values/15-free-software/33-opencaster
HB9DUG – 20120822 V3.1 5/19

Digilite-ZLLive Transmission Cookbook
Once on the web site, click on “complete package” to download the software.
On the pop-up window from Firefox, select the option: Open with Archive Manager (default) and then click on OK
On the pop-up window from the Archive Manager, just click on Extract. A directory will be created in the Home directory with the source files needed to compile OpenCaster.
HB9DUG – 20120822 V3.1 6/19

Digilite-ZLLive Transmission Cookbook
2. Compiling and installing
OpenCaster is downloaded in source code so it needs to be compiled into executable files before it can be used. It also needs other source code packages to be able to compile successfully.
With a fresh installation of Ubuntu 12.04 LTS, only the “python2.7-dev” package needs to be installed.
For more details consult the INSTALL file in the OpenCaster3.1.4 directory.
To install the “python2.7-dev” package, run in a terminal window the following CMD:sudo apt-get updatesudo apt-get install python2.7-dev
Lorenzo Pallara from Avalpa has kindly provided us with an additional OpenCaster tool called 'pesdemux' to demultiplex the Program Stream coming from the Hauppauge card. The tool can replace ffmpeg command in the application script file (see the software section).
The source code for pesdemux is not included in the package you have downloaded. Before you can compile and install OpenCaster3.1.4, you need to copy the source code for it in the right place in the OpenCaster3.1.4 directory with the following procedure:
Step 1:From the digilite-zl directory, copy the directory 'pesdemux' in the OpenCaster3.1.4/tools directory with the following CMD:cp -r pesdemux $HOME/OpenCaster3.1.4/tools
HB9DUG – 20120822 V3.1 7/19

Digilite-ZLLive Transmission Cookbook
If successful, you should see a directory called 'pesdemux' with 2 files in it.
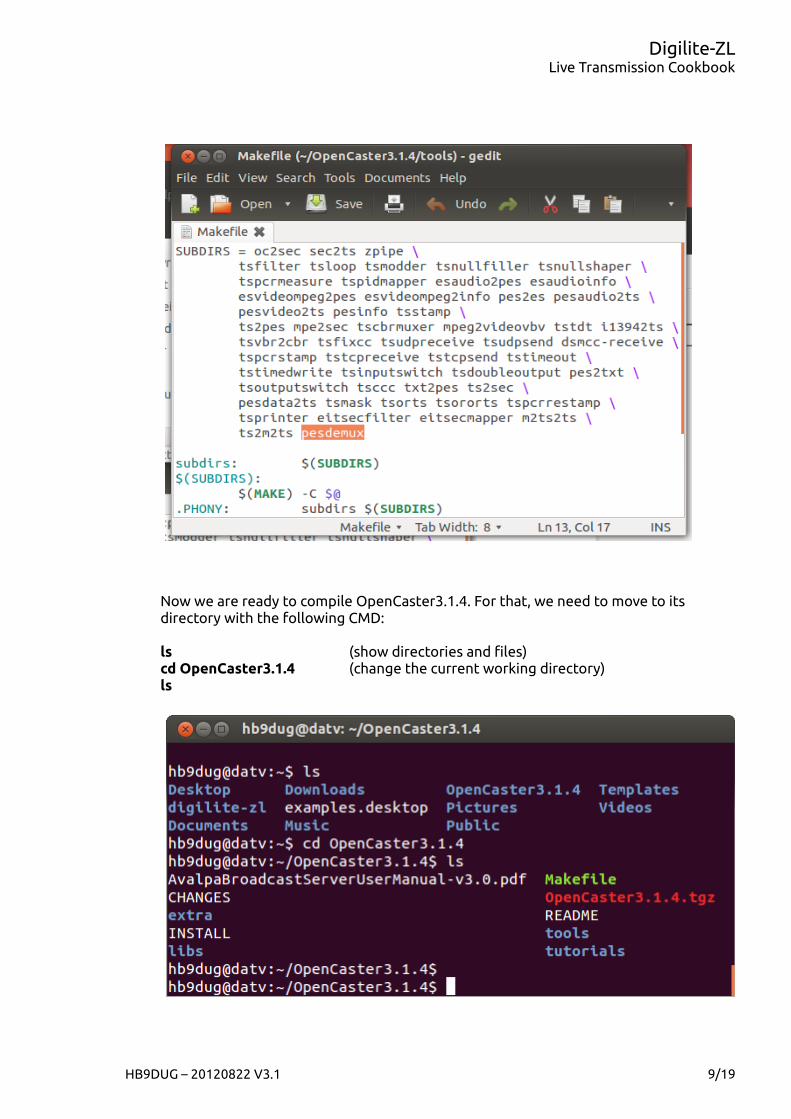
Step 2:From the OpenCaster3.1.4/tools edits the 'MakeFile' file to add the subdirectory 'pesdemux' in the SUBDIRS variable with the following CMD:
– double-click on the file 'MakeFile'– on the pop-up window click 'Display'– add the word 'pesdemux' at this end of the SUBDIRS variable– click 'Save'
HB9DUG – 20120822 V3.1 8/19
Digilite-ZLLive Transmission Cookbook
Now we are ready to compile OpenCaster3.1.4. For that, we need to move to its directory with the following CMD:
ls (show directories and files)cd OpenCaster3.1.4 (change the current working directory)ls
HB9DUG – 20120822 V3.1 9/19

Digilite-ZLLive Transmission Cookbook
To compile OpenCaster, execute the following CMD: make
A successful make CMD should report no error messages as above.
To install OpenCaster, execute the following CMD:sudo make install
A successful sudo make install CMD should also report no error messages.
You can check that the programs have been installed in the following directory: /usr/local/bin
Check you see the programs listed below. They are needed by our application:esaudio2pes, esvideompeg2pes, pesaudio2ts, pesvideo2ts, tscbrmuxer, tstdt and pesdemux.
This end the installation of the softwares needed to produce a live TS stream to feed Digilite-ZL.
HB9DUG – 20120822 V3.1 10/19

Digilite-ZLLive Transmission Cookbook
Software configurationThe configuration of the different modules will be done through a script file, which at time of execution, will send a live TS to the Digilite-ZL module.
The block diagram below shows the interaction between the different modules.
Presently the solution has been tested with a clean installation of Ubuntu version 12.04 LTS, v4l-utils version 0.8.6-1ubuntu2, FFmpeg version 0.8.3-4:0.8.3-0ubuntu0.12.04.1 and OpenCaster3.1.4. If you use others softwares version and issues arise, you should revert to the versions above.
The script file is made of different modules as illustrated in the above block diagram. We will describe briefly each of the modules.
Hauppauge PVR USB2 configuration block
To configure the card, we use v4l2 utilities to set:
– audio bit-rate (x kbps), audio mode (stereo)
– stream type (MPEG-2 Program Stream)
– video bit-rate ( x kbps)
– video bit-rate mode (constant bit rate)
– video aspect ratio (4:3)
– resolution (720x576)
– card input (composite, s-video)
HB9DUG – 20120822 V3.1 11/19

Digilite-ZLLive Transmission Cookbook
This translate in the following v4l2 commands:
v4l2-ctl -d /dev/videoX -c audio_layer_ii_bitrate=9 # 192Kbps
v4l2-ctl -d /dev/videoX -c audio_stereo_mode=0 # stereo
v4l2-ctl -d /dev/videoX -c stream_type=0 # MPEG-2 Program Stream=0
v4l2-ctl -d /dev/videoX -c video_bitrate=2300000 #
v4l2-ctl -d /dev/videoX -c video_bitrate_mode=1 # Constant Bit-rate = 1
v4l2-ctl -d /dev/videoX -c video_aspect=1 # 4:3
v4l2-ctl -d /dev/video1 - -set-fmt-video=width=720,height=576
v4l2-ctl -d /dev/video1 - -set-input=1 # composite = 1
Please note that you should adjust the “X” of the video device according to the video device you see for your USB Hauppauge card when you run the CMD: v4l2-ctl –list-devices.
ffmpeg block or pesdemux
Ffmpeg split the MPEG-2 Program Stream coming from the Hauppauge card into separate elementary streams, re-encode audio to lower bitrate (128k), stream the results in an audio buffer (audio.es) and a video buffer (video.es).
This is done with the CMD:
ffmpeg -v -10 -i /dev/video1 -acodec mp2 -ab 128k -f mp2 -y /tmp/audio.es -vcodec copy -f mpeg2video -y /tmp/video.es
If you went more details on ffmpeg, run the CMD: man ffmpeg
The CMD provided by Avalpa does the same but leaving the audio bitrate at 192 kbs:
pesdemux /dev/video1 /tmp/audio.es /tmp/video.es
HB9DUG – 20120822 V3.1 12/19
Digilite-ZLLive Transmission Cookbook
Esaudio2pes and esvideompeg2pes blocks
esaudio2pes and esvideompeg2pes convert the elementary streams into program streams. The results are streamed in an audio buffer (audio.pes) and video buffer (video.pes).
This is done with the CMD:
esaudio2pes /tmp/audio.es 1152 48000 384 0 > /tmp/audio.pes
esvideompeg2pes /tmp/video.es > /tmp/video.pes
If you went more details, please consult the Avalpa Broadcast Server Manual.
pesaudio2ts and pesvideo2ts blocks
pesaudio2ts and pesvideo2t convert the program streams into transport program streams. PIDs are added, well as bit-rates for the audio and video. The results are streamed in an audio buffer (audio.ts) and video buffer (video.ts).
This is done with the CMD:
pesaudio2ts 257 1152 48000 384 0 /tmp/audio.pes > /tmp/audio.ts
pesvideo2ts 256 25 64 3200000 0 /tmp/video.pes > /tmp/video.ts
If you went more details, please consult the Avalpa Broadcast Server Manual.
Service information generation block
With the previous steps, we have generated blank transport streams to which we need to add the service information tables to make it into a DVB transport stream.
This process is done with OpenCaster suite using a script. The script file will generate separate .ts files with each of the parts of the DVB stream data. The files are PAT.ts, PMT.ts, SDT.ts, NIT.ts, EIT.ts, TDT.ts
You can change this script to add your own details like Channel name, Provider name and set the current program information for a channel.
To change the parameters, follow the procedure below:
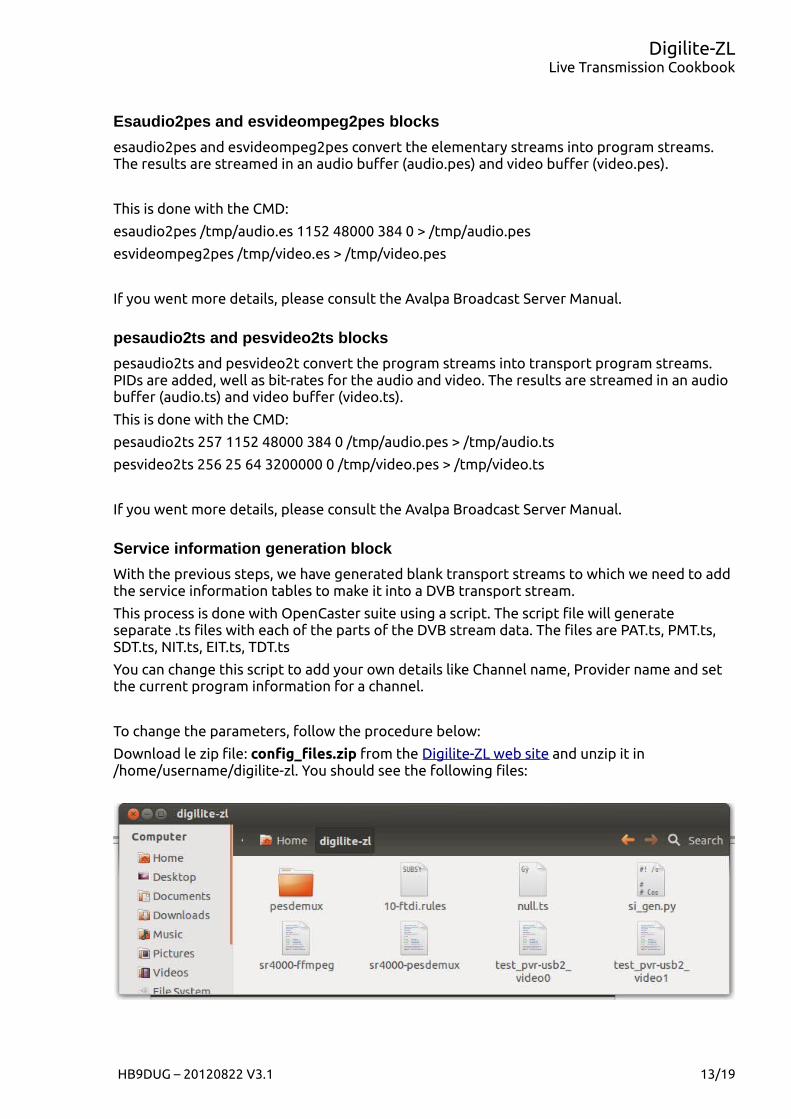
Download le zip file: config_files.zip from the Digilite-ZL web site and unzip it in /home/username/digilite-zl. You should see the following files:
HB9DUG – 20120822 V3.1 13/19

Digilite-ZLLive Transmission Cookbook
Open the script file si_gen by double-clicking on it.
Confirm editing by selecting “Display” on the above window.
Now you can modify the network_name, service_provider_name and service_name.
Click “Save” to save and close the file.
Once you have done your changes, you need to run the script by double-clicking on the file and confirm running the script by selecting “Run in Terminal”
On the /home/username/digilite-zl, now you should see the following additional TS files.
If you went more details, please consult the Avalpa Broadcast Server Manual.
Maybe for the first time you try this process, just run the script and leave the editing for the next time...
tscbrmuxer and tstdt blocks
The final step is to generate the DVB Transport Stream by muxing together the audio, video and service information transport streams with the CMD tscbrmuxer. and finally insert the current date and time with the CMD tstdt.
HB9DUG – 20120822 V3.1 14/19
Digilite-ZLLive Transmission Cookbook
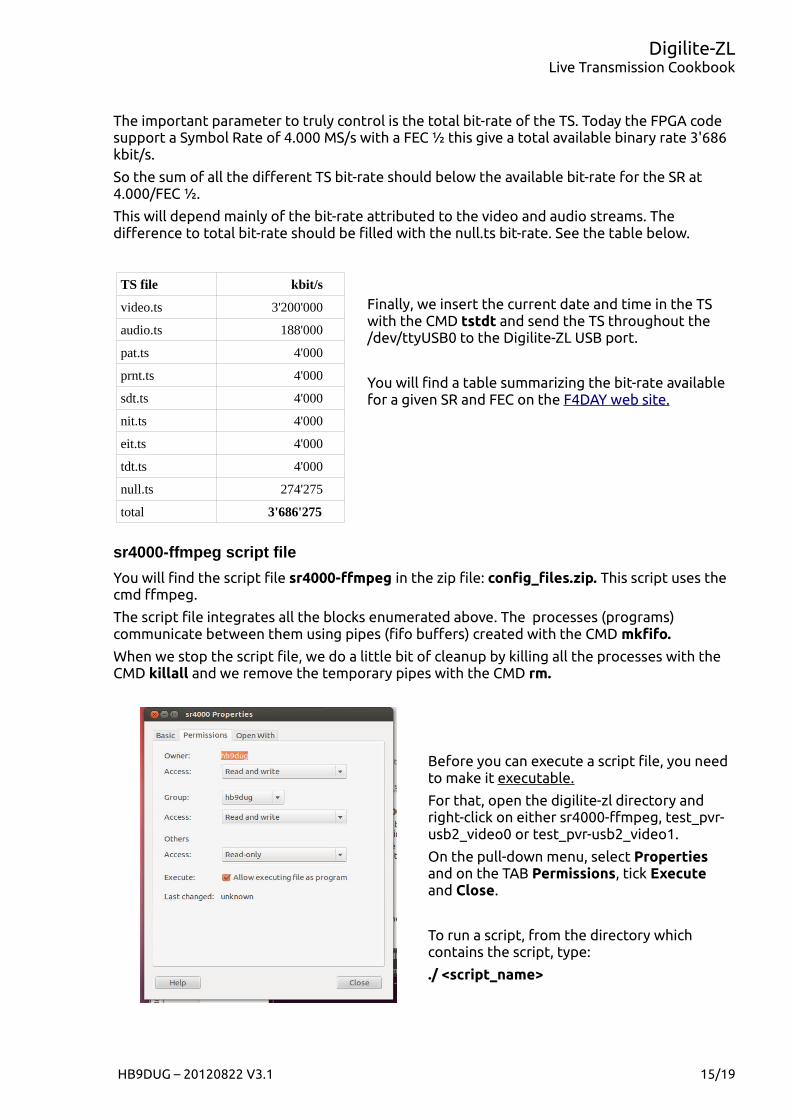
The important parameter to truly control is the total bit-rate of the TS. Today the FPGA code support a Symbol Rate of 4.000 MS/s with a FEC ½ this give a total available binary rate 3'686 kbit/s.
So the sum of all the different TS bit-rate should below the available bit-rate for the SR at 4.000/FEC ½.
This will depend mainly of the bit-rate attributed to the video and audio streams. The difference to total bit-rate should be filled with the null.ts bit-rate. See the table below.
TS file kbit/s
video.ts 3'200'000
audio.ts 188'000
pat.ts 4'000
prnt.ts 4'000
sdt.ts 4'000
nit.ts 4'000
eit.ts 4'000
tdt.ts 4'000
null.ts 274'275
total 3'686'275
Finally, we insert the current date and time in the TS with the CMD tstdt and send the TS throughout the /dev/ttyUSB0 to the Digilite-ZL USB port.
You will find a table summarizing the bit-rate available for a given SR and FEC on the F4DAY web site.
sr4000-ffmpeg script file
You will find the script file sr4000-ffmpeg in the zip file: config_files.zip. This script uses the cmd ffmpeg.
The script file integrates all the blocks enumerated above. The processes (programs) communicate between them using pipes (fifo buffers) created with the CMD mkfifo.
When we stop the script file, we do a little bit of cleanup by killing all the processes with the CMD killall and we remove the temporary pipes with the CMD rm.
Before you can execute a script file, you need to make it executable.
For that, open the digilite-zl directory and right-click on either sr4000-ffmpeg, test_pvr-usb2_video0 or test_pvr-usb2_video1.
On the pull-down menu, select Properties and on the TAB Permissions, tick Execute and Close.
To run a script, from the directory which contains the script, type:
./ <script_name>
HB9DUG – 20120822 V3.1 15/19
Digilite-ZLLive Transmission Cookbook
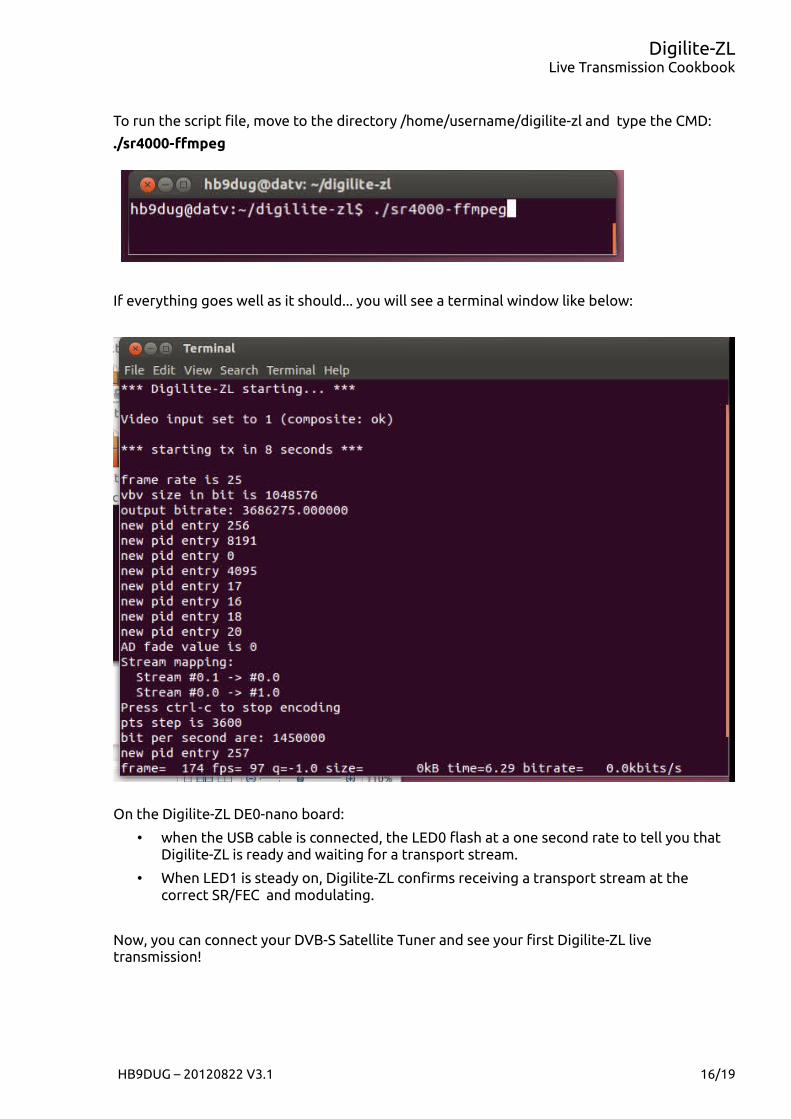
To run the script file, move to the directory /home/username/digilite-zl and type the CMD:
./sr4000-ffmpeg
If everything goes well as it should... you will see a terminal window like below:
On the Digilite-ZL DE0-nano board:
• when the USB cable is connected, the LED0 flash at a one second rate to tell you that Digilite-ZL is ready and waiting for a transport stream.
• When LED1 is steady on, Digilite-ZL confirms receiving a transport stream at the correct SR/FEC and modulating.
Now, you can connect your DVB-S Satellite Tuner and see your first Digilite-ZL live transmission!
HB9DUG – 20120822 V3.1 16/19

Digilite-ZLLive Transmission Cookbook
sr4000-pesdemux script file
You will find the script file sr4000-pesdemux in the zip file: config_files.zip. This script uses the cmd pesdemux. From OpenCaster3.1.4.
To run the script file, move to the directory /home/username/digilite-zl and type the CMD:
./sr4000-ffmpeg
How to allow non-root access to /ttyUSB0
In the standard ubuntu configuration, only root has access to the USB interface so when you will execute the script sr4000-ffmpeg or sr4000-pesdemux, you will get an error message like “permission denied”.
The quick fix, you run the script with root privilege: sudo ./sr4000-ffmpeg or ./sr4000-pesdemux
The correct fix... Copy the file 10-ftdi.rules in the directory /etc/udev/rules.d. Move to the digilite-zl directory and execute in a terminal window the following CMD:
sudo cp 10-ftdi.rules /etc/udev/rules.dsudo chmod 644 /etc/udev//rules.d/10-ftdi.rules
and restart your computer.
Intermediate tests, just in case...
If you face issues getting out your transport stream to the Digilite-ZL hardware, you should first check that the Hauppauge card is running correctly.
1. Check the video device name for your Hauppauge card with the CMD: v4l2-ctl --list-devices
HB9DUG – 20120822 V3.1 17/19

Digilite-ZLLive Transmission Cookbook
2. Run the script file test_pvr-usb2_video0 or test_pvr-usb2_video1 according to the video device name for your card.
This script will only configure the Hauppauge card for the video composite input.
Finally, run the CMD: ffplay /dev/video0 or ffplay /dev/video1 in a terminal window.
The window will show you the parameters configured for the card and in a second window you will see the images of your camera as well as the sound.
HB9DUG – 20120822 V3.1 18/19
Digilite-ZLLive Transmission Cookbook
Credits and disclaimers...
The solution described in this document and implemented is totally based on the work of Christian F1FAU, Rob M0DTS and Charles G4GUO. Without theirs in deep descriptions on generating a live MPEG-2 transport stream with Linux tools and Hauppauge hardware, I wouldn't have succeeded in this project.
Please note that the author is not a Linux expert and is therefore asking for your understanding if the description and script files are very basic.
The author is a member of the swissATV, a swiss association dedicated to ham television and HB9TV who operates a network of ATV/DATV relays.
HB9DUG Michel
HB9DUG – 20120822 V3.1 19/19