Overview - Colorado State Universityatrc.colostate.edu/files/quickstarts/Creating Universally...
19
Creating Universally Designed PowerPoint 2013 Presentations Overview A universally designed PowerPoint presentation takes into account the various needs of the audience, whether they are reading the document on a computer screen, listening to it with text-to-speech software, using a screen reader, or viewing the presentation on a projector screen. Definition: A screen reader is software that is used by people with visual impairments, allowing them to hear and navigate whatever is on the computer screen and to listen to websites and documents. Keeping each of these situations in mind and preparing for them from the start will help a wide range of users find the content of your presentation more accessible. This Quick Start Guide outlines the most important steps you can take to make a PowerPoint document accessible. Save Slides in the Newest Format If you are editing a presentation that was created in an older version of PowerPoint, it will open in Compatibility Mode. Make sure to convert the presentation into the newest format so that you can access all the features of version 2013. 1. Click on File > Convert (Compatibility Mode) Assistive Technology Resource Center Allison Kidd Colorado State University August 2015 http://atrc.colostate.edu http://accessibility.colostate.edu 1
Transcript of Overview - Colorado State Universityatrc.colostate.edu/files/quickstarts/Creating Universally...
Creating Universally Designed PowerPoint 2013 Presentations
OverviewA universally designed PowerPoint presentation takes into account the various needs of the audience, whether they are reading the document on a computer screen, listening to it with text-to-speech software, using a screen reader, or viewing the presentation on a projector screen.
Definition: A screen reader is software that is used by people with visual impairments, allowing them to hear and navigate whatever is on the computer screen and to listen to websites and documents.
Keeping each of these situations in mind and preparing for them from the start will help a wide range of users find the content of your presentation more accessible. This Quick Start Guide outlines the most important steps you can take to make a PowerPoint document accessible.
Save Slides in the Newest FormatIf you are editing a presentation that was created in an older version of PowerPoint, it will open in Compatibility Mode. Make sure to convert the presentation into the newest format so that you can access all the features of version 2013.
1. Click on File > Convert (Compatibility Mode)
2. A warning message will pop up about losing features from the old version. Click OK.
Assistive Technology Resource Center Allison KiddColorado State University August 2015
http://atrc.colostate.eduhttp://accessibility.colostate.edu
1

Formatting Slides
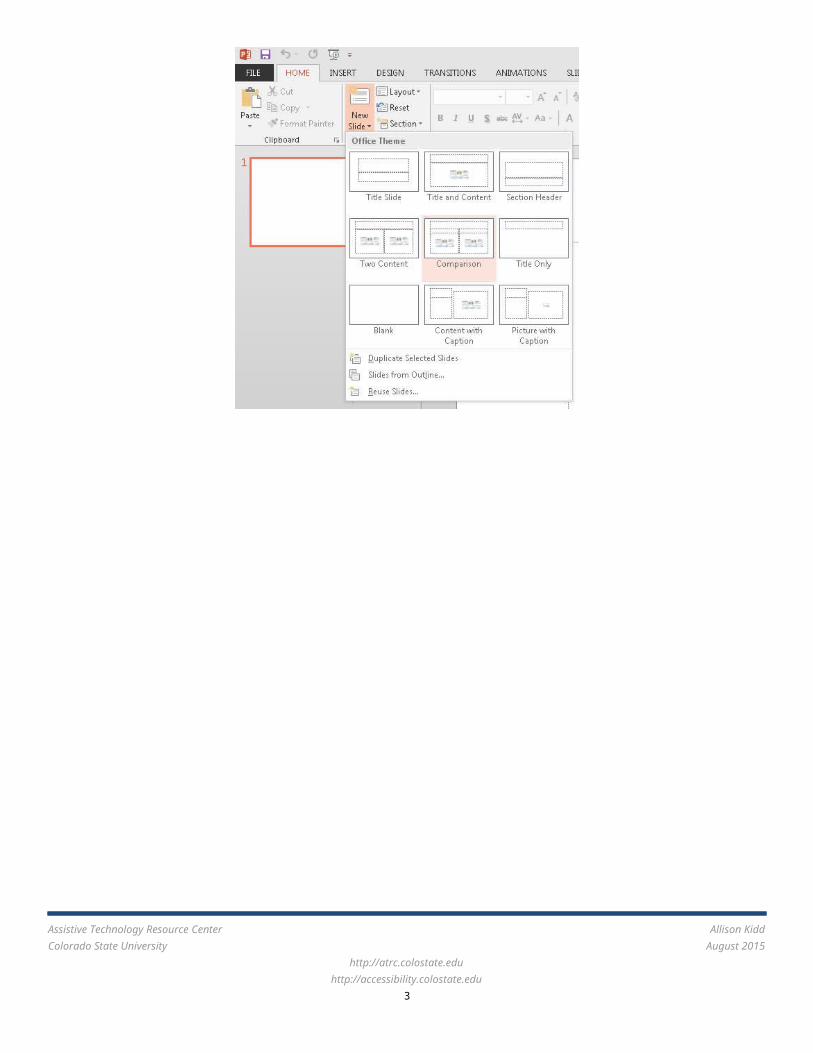
Always Use Slide LayoutsMicrosoft’s built-in slide layouts provide structure that screen reading software can detect and help to build a presentation outline or Table of Contents. Use layouts instead of drawing text boxes manually – the contents of text boxes will be ignored by software such as screen readers.
1. Choose a slide layout from Home > New Slide
2. Select the layout that fits best with your content, and avoid drawing new text boxes on the slide:
Assistive Technology Resource Center Allison KiddColorado State University August 2015
http://atrc.colostate.eduhttp://accessibility.colostate.edu
2
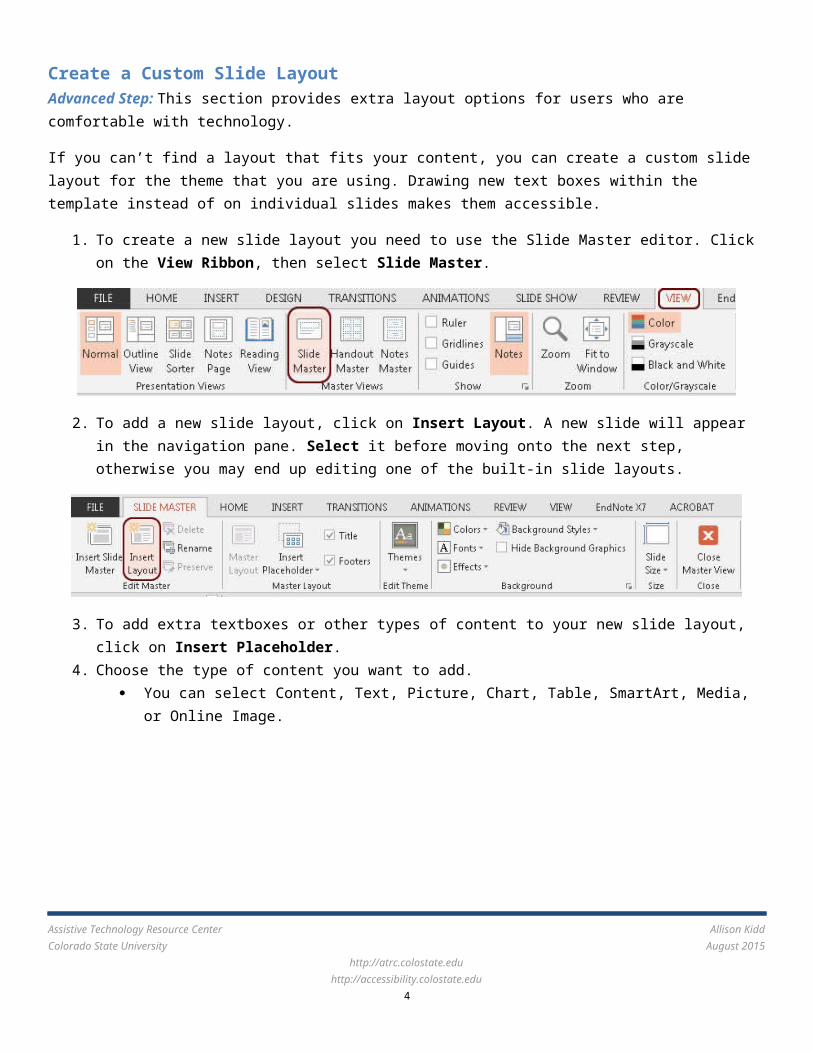
Create a Custom Slide LayoutAdvanced Step: This section provides extra layout options for users who are comfortable with technology.
If you can’t find a layout that fits your content, you can create a custom slide layout for the theme that you are using. Drawing new text boxes within the template instead of on individual slides makes them accessible.
1. To create a new slide layout you need to use the Slide Master editor. Click on the View Ribbon, then select Slide Master.
2. To add a new slide layout, click on Insert Layout. A new slide will appear in the navigation pane. Select it before moving onto the next step, otherwise you may end up editing one of the built-in slide layouts.
3. To add extra textboxes or other types of content to your new slide layout, click on Insert Placeholder. 4. Choose the type of content you want to add.
You can select Content, Text, Picture, Chart, Table, SmartArt, Media, or Online Image.
Add whatever you need to make a layout that works for your content.
Assistive Technology Resource Center Allison KiddColorado State University August 2015
http://atrc.colostate.eduhttp://accessibility.colostate.edu
3
You can add more than one item. Caution: The order in which you add each content type will be the reading order of the slide. But, you
can use the Selection Pane to fix the reading order in the template. (See the Check Slide Reading Order section.)
5. Once your layout is ready, click on Close Master View on the Slide Master Ribbon to return to your presentation.
6. When you click on the menu to select a layout, you should now be able to select the Custom Layout that you just created.
The Custom Layout will be saved with the file, but will only be available in the current file unless you also save the theme as a template (see the section at the end of this guide on Customizing Themes).
Adding Content to Slides
Use the Fields Provided Use only the fields included in the slide layout. Avoid drawing your own text boxes to add more content. They will be completely ignored by some software,
including screen readers. It’s OK to leave fields unused, except for the title field.
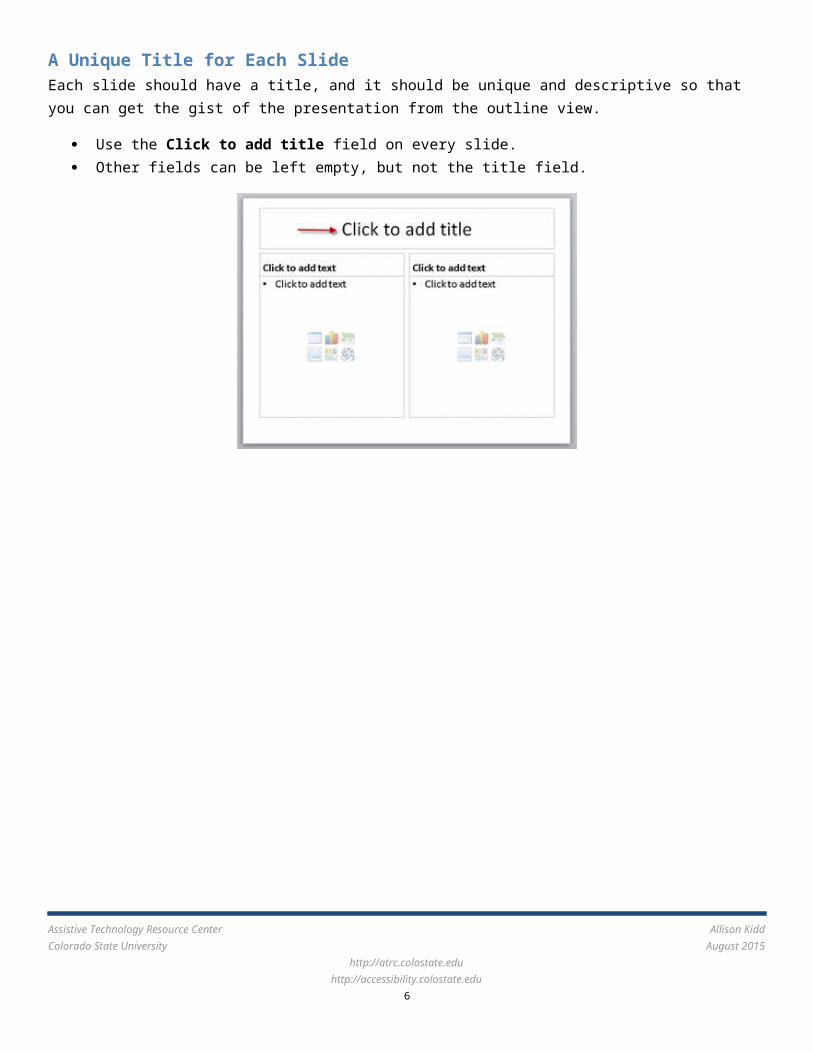
A Unique Title for Each SlideEach slide should have a title, and it should be unique and descriptive so that you can get the gist of the presentation from the outline view.
Use the Click to add title field on every slide. Other fields can be left empty, but not the title field.
Assistive Technology Resource Center Allison KiddColorado State University August 2015
http://atrc.colostate.eduhttp://accessibility.colostate.edu
4

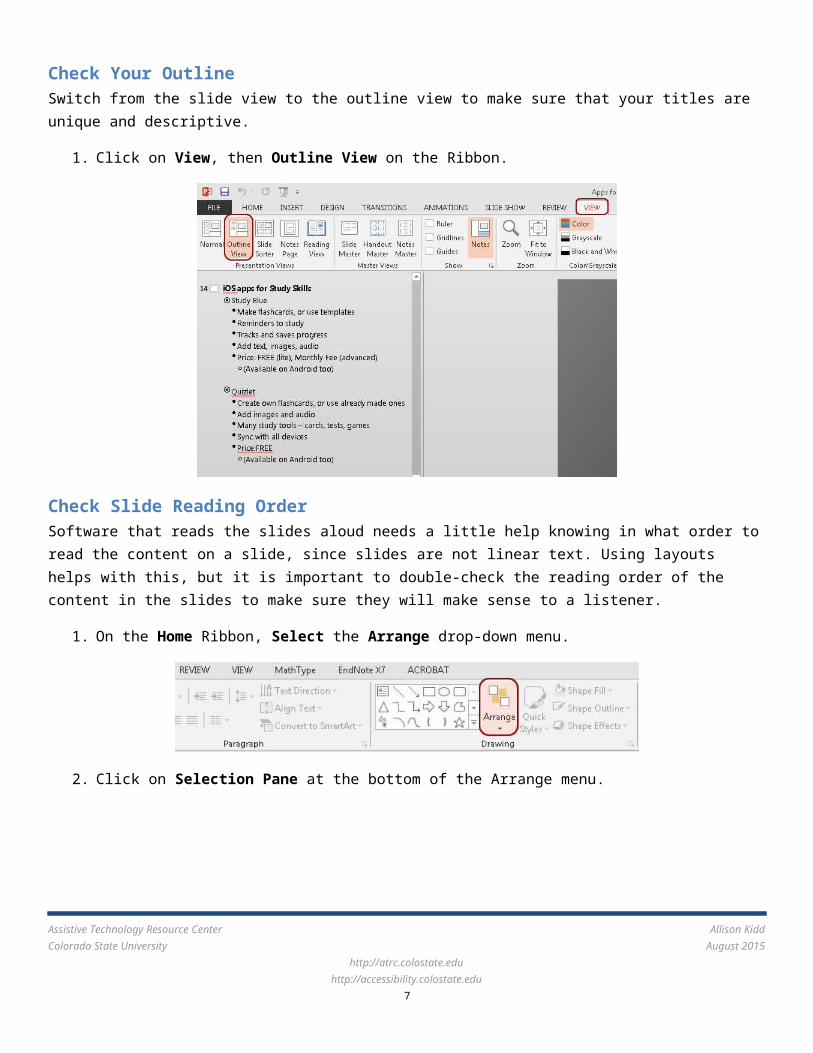
Check Your OutlineSwitch from the slide view to the outline view to make sure that your titles are unique and descriptive.
1. Click on View, then Outline View on the Ribbon.
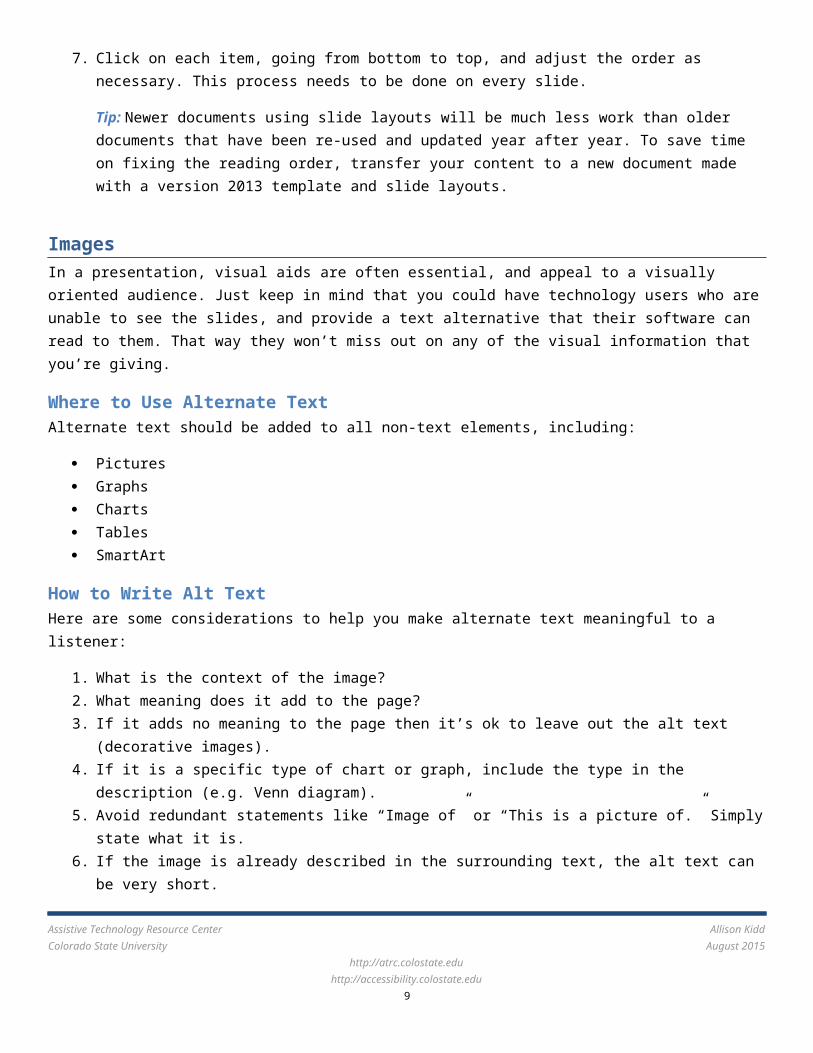
Check Slide Reading OrderSoftware that reads the slides aloud needs a little help knowing in what order to read the content on a slide, since slides are not linear text. Using layouts helps with this, but it is important to double-check the reading order of the content in the slides to make sure they will make sense to a listener.
1. On the Home Ribbon, Select the Arrange drop-down menu.
2. Click on Selection Pane at the bottom of the Arrange menu.
Assistive Technology Resource Center Allison KiddColorado State University August 2015
http://atrc.colostate.eduhttp://accessibility.colostate.edu
5
3. The Selection Pane will appear on the right side of the document. This lists each element on the slide and the order in which it will be read.
Important! The reading order starts at the bottom and moves upwards.
4. Click on an element in the Selection Pane to see the corresponding element highlighted in the slide.5. In the following screenshot, the Title will not be read first, since it is not at the bottom of the list. Content
Placeholder 2 will be read first.
6. To fix the reading order, Select Title 1 and Click the down arrow at the top right corner of the Selection pane to move it down to the bottom of the list.
7. Click on each item, going from bottom to top, and adjust the order as necessary. This process needs to be done on every slide.
Assistive Technology Resource Center Allison KiddColorado State University August 2015
http://atrc.colostate.eduhttp://accessibility.colostate.edu
6
Tip: Newer documents using slide layouts will be much less work than older documents that have been re-used and updated year after year. To save time on fixing the reading order, transfer your content to a new document made with a version 2013 template and slide layouts.
ImagesIn a presentation, visual aids are often essential, and appeal to a visually oriented audience. Just keep in mind that you could have technology users who are unable to see the slides, and provide a text alternative that their software can read to them. That way they won’t miss out on any of the visual information that you’re giving.
Where to Use Alternate TextAlternate text should be added to all non-text elements, including:
Pictures Graphs Charts Tables SmartArt
How to Write Alt TextHere are some considerations to help you make alternate text meaningful to a listener:
1. What is the context of the image? 2. What meaning does it add to the page? 3. If it adds no meaning to the page then it’s ok to leave out the alt text (decorative images).4. If it is a specific type of chart or graph, include the type in the description (e.g. Venn diagram).5. Avoid redundant statements like “Image of” or “This is a picture of.” Simply state what it is.6. If the image is already described in the surrounding text, the alt text can be very short.7. Be concise.
Note: Sometimes images that are downloaded from the web have “junk” alternate text (usually a long file name). Make sure to check every image and replace the junk with something helpful.
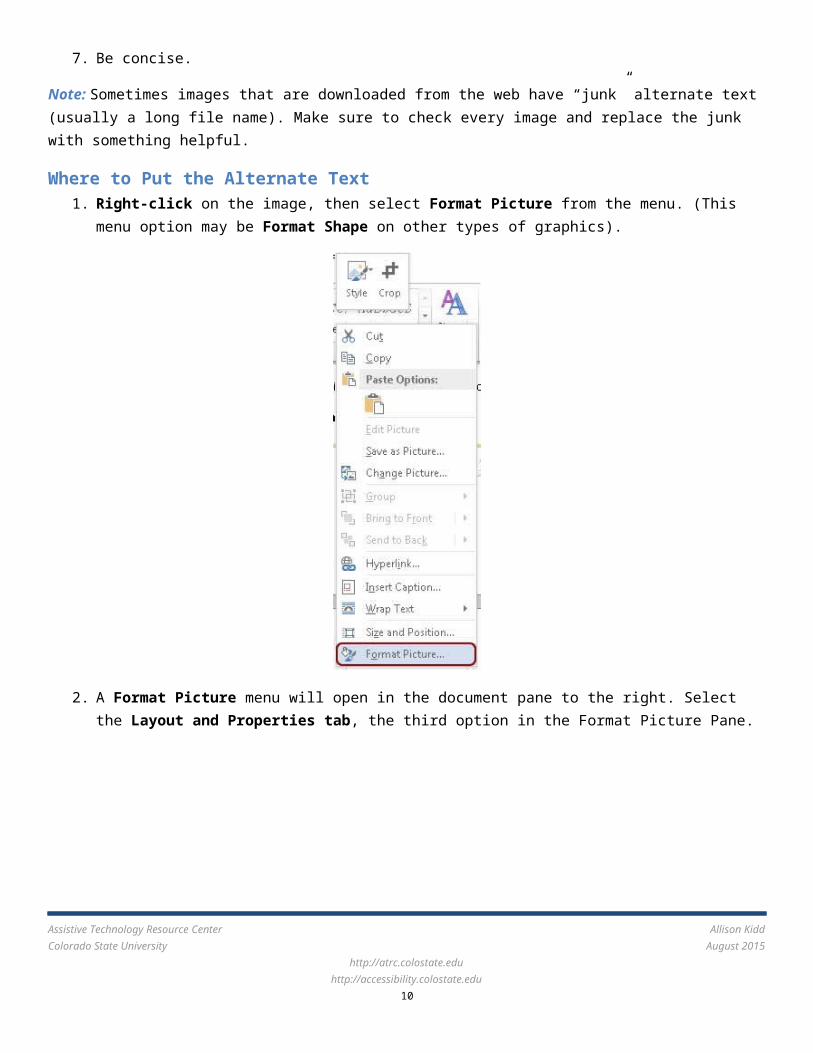
Where to Put the Alternate Text1. Right-click on the image, then select Format Picture from the menu. (This menu option may be Format Shape
on other types of graphics).
Assistive Technology Resource Center Allison KiddColorado State University August 2015
http://atrc.colostate.eduhttp://accessibility.colostate.edu
7

2. A Format Picture menu will open in the document pane to the right. Select the Layout and Properties tab, the third option in the Format Picture Pane.
3. If it is not expanded already, open the Alt Text menu by clicking on the arrow. 4. Type the alt text in the Description box. Ignore the “Title” since it will not be read by a screen reader.
Assistive Technology Resource Center Allison KiddColorado State University August 2015
http://atrc.colostate.eduhttp://accessibility.colostate.edu
8
Assistive Technology Resource Center Allison KiddColorado State University August 2015
http://atrc.colostate.eduhttp://accessibility.colostate.edu
9
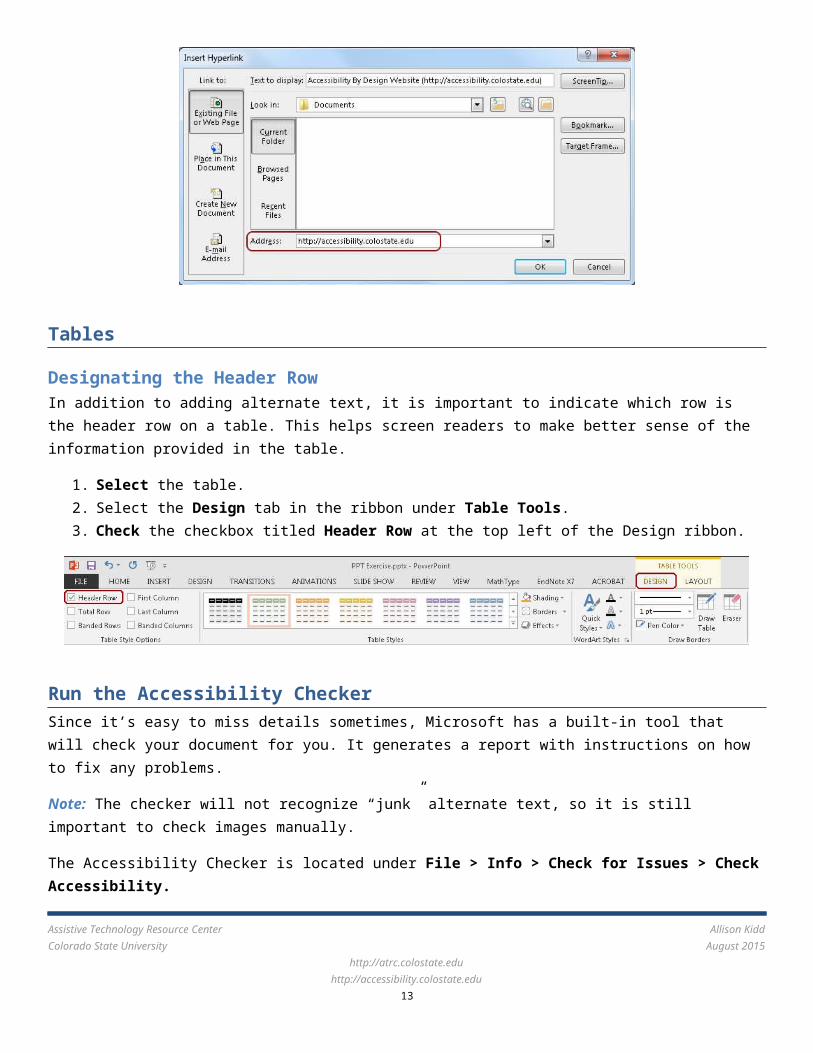
Formatting LinksLinks can sound confusing to a listener, especially if there are a lot of random characters in the address. You can make links more meaningful to listeners by providing a short description along with the address. This way the address will still be visible for readers who have a printed handout.
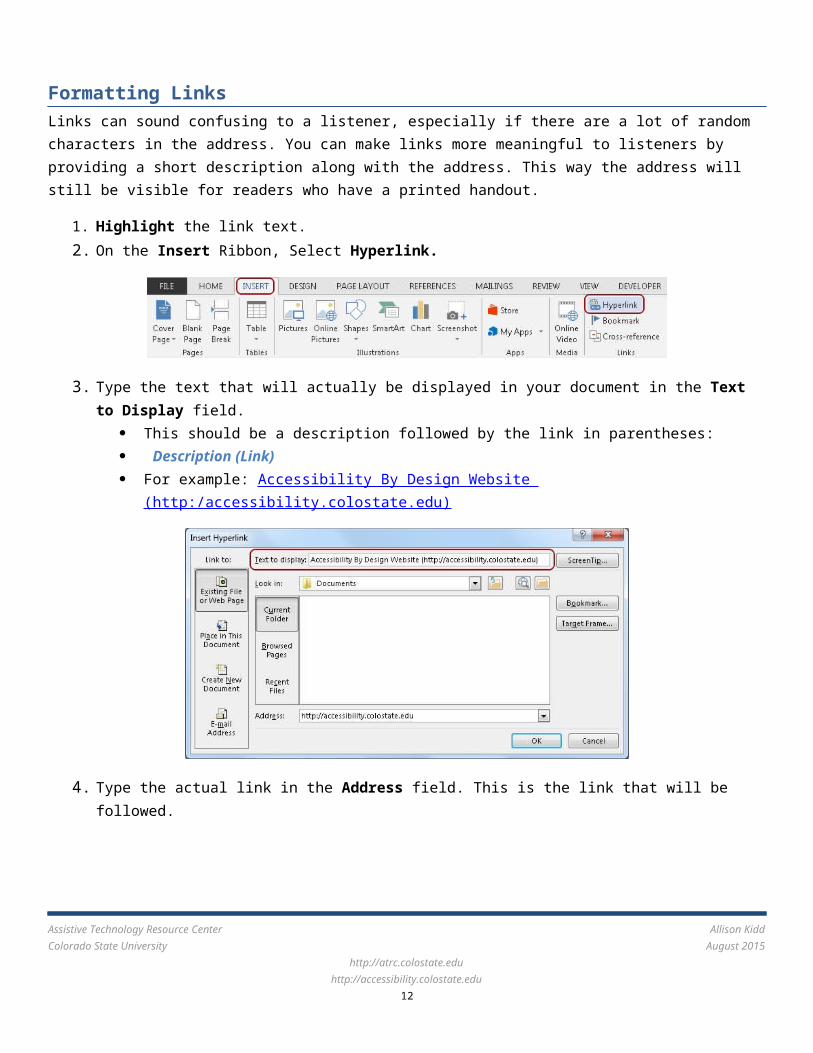
1. Highlight the link text. 2. On the Insert Ribbon, Select Hyperlink.
3. Type the text that will actually be displayed in your document in the Text to Display field. This should be a description followed by the link in parentheses: Description (Link) For example: Accessibility By Design Website (http:/accessibility.colostate.edu)
4. Type the actual link in the Address field. This is the link that will be followed.
Assistive Technology Resource Center Allison KiddColorado State University August 2015
http://atrc.colostate.eduhttp://accessibility.colostate.edu
10

Tables
Designating the Header RowIn addition to adding alternate text, it is important to indicate which row is the header row on a table. This helps screen readers to make better sense of the information provided in the table.
1. Select the table.2. Select the Design tab in the ribbon under Table Tools.3. Check the checkbox titled Header Row at the top left of the Design ribbon.
Run the Accessibility CheckerSince it’s easy to miss details sometimes, Microsoft has a built-in tool that will check your document for you. It generates a report with instructions on how to fix any problems.
Note: The checker will not recognize “junk” alternate text, so it is still important to check images manually.
The Accessibility Checker is located under File > Info > Check for Issues > Check Accessibility.
Assistive Technology Resource Center Allison KiddColorado State University August 2015
http://atrc.colostate.eduhttp://accessibility.colostate.edu
11
Assistive Technology Resource Center Allison KiddColorado State University August 2015
http://atrc.colostate.eduhttp://accessibility.colostate.edu
12
Setting the Theme
Choose a ThemeChoose a built-in theme from the Design menu on the Ribbon. Hover over the designs to preview how it will change your document.
Color MattersWhen you’re choosing a theme, it’s important to consider color. Contrast is very important for people with low vision or color blindness.
Choose a color scheme that provides adequate contrast between the text and the background. If you have a dark background, the text should be light, and vice versa. Avoid using green and red together, as people who are color blind cannot distinguish between the two. Avoid using orange because it does not contrast well with other colors. Textures and gradients can cause contrast problems as backgrounds.
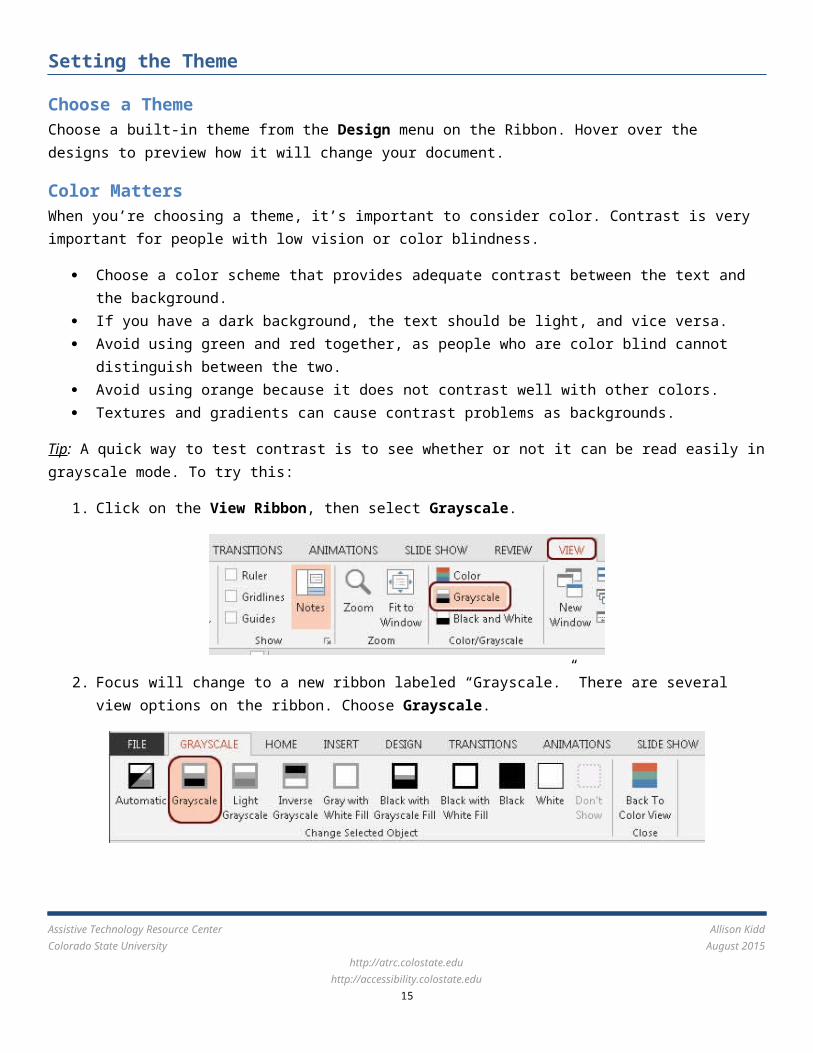
Tip: A quick way to test contrast is to see whether or not it can be read easily in grayscale mode. To try this:
1. Click on the View Ribbon, then select Grayscale.
2. Focus will change to a new ribbon labeled “Grayscale.” There are several view options on the ribbon. Choose Grayscale.
In the following example, an orange title is set against a green background. Viewed in grayscale mode, you can see that it is difficult to read the title.
Assistive Technology Resource Center Allison KiddColorado State University August 2015
http://atrc.colostate.eduhttp://accessibility.colostate.edu
13

Easy FixesClick on Back to Color View so that you can change the template. There are two easy ways to fix contrast problems:
1. Choose a different built-in theme that has better contrast and uses fonts that are easy to read.2. Choose your own colors and manually change the text color on each slide.
You will need to go back into grayscale view to make sure your changes did improve the contrast.
Advanced Fix: Customize a ThemeIf you are comfortable with technology, it will save a lot of time to customize your theme and save a template rather than changing each line of text manually. This is for more advanced users.
To change the colors for all slides in your theme, you need to use the Master Slide editor.
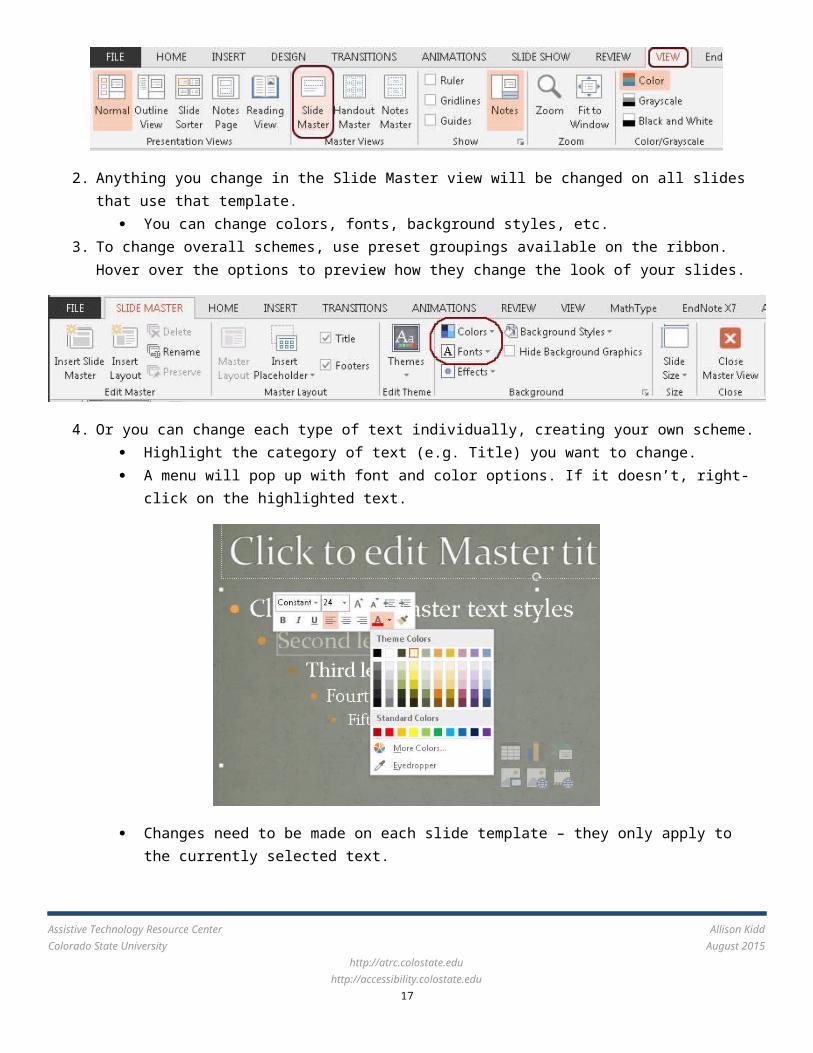
1. Click on the View Ribbon, and select Slide Master.
2. Anything you change in the Slide Master view will be changed on all slides that use that template. You can change colors, fonts, background styles, etc.
3. To change overall schemes, use preset groupings available on the ribbon. Hover over the options to preview how they change the look of your slides.
Assistive Technology Resource Center Allison KiddColorado State University August 2015
http://atrc.colostate.eduhttp://accessibility.colostate.edu
14
4. Or you can change each type of text individually, creating your own scheme. Highlight the category of text (e.g. Title) you want to change. A menu will pop up with font and color options. If it doesn’t, right-click on the highlighted text.
Changes need to be made on each slide template – they only apply to the currently selected text.5. Make as many changes as you need to, and then click on the ribbon to Close Master View.
Note: These changes will be saved for this document only. To make the template available for other documents, you have to save the theme.
6. To save the theme, Click on the Design Ribbon, then select the dropdown menu arrow for More.
Assistive Technology Resource Center Allison KiddColorado State University August 2015
http://atrc.colostate.eduhttp://accessibility.colostate.edu
15

7. Click on Save Current Theme. Give the file a name that is easy to recognize.
8. Once you save the theme, it will show up under Custom themes in the future. You can now apply this to other PowerPoint presentations you have already created, as well as to new documents.
SummaryTo recap the most important steps to add to your workflow for universally designed Word documents:
Save documents in the newest format. Use slide layouts and templates to format your text. Add descriptive alternate text to images. Add descriptive text to hyperlinks. Designate a Header row in tables. Use the Accessibility Checker to look for issues you may have missed. Customize your theme if you need more layout options and for color contrast issues.
Further ResourcesAccessibility By Design (http://accessibility.colostate.edu)
WebAIM Tutorials (http://webaim.org/)
Assistive Technology Resource Center Allison KiddColorado State University August 2015
http://atrc.colostate.eduhttp://accessibility.colostate.edu
16
Assistive Technology Resource Center Allison KiddColorado State University August 2015
http://atrc.colostate.eduhttp://accessibility.colostate.edu
17