Outlaw Model 1050 Receiver Owner’s Manualpdf.outlawaudio.com/outlaw/docs/1050manual.pdf · Outlaw...
45
Outlaw Audio Inc., 18 Denbow Road Durham, NH 03824 Tel. (800) 392-1393, Fax (603) 868-6634 www.outlawaudio.com Outlaw Model 1050 Receiver Owner’s Manual Version 1.0
Transcript of Outlaw Model 1050 Receiver Owner’s Manualpdf.outlawaudio.com/outlaw/docs/1050manual.pdf · Outlaw...

Outlaw Audio Inc., 18 Denbow RoadDurham, NH 03824
Tel. (800) 392-1393, Fax (603) 868-6634www.outlawaudio.com
Outlaw Model 1050 Receiver Owner’s Manual
Version 1.0
The Outlaw 1050 Instruction Manual2
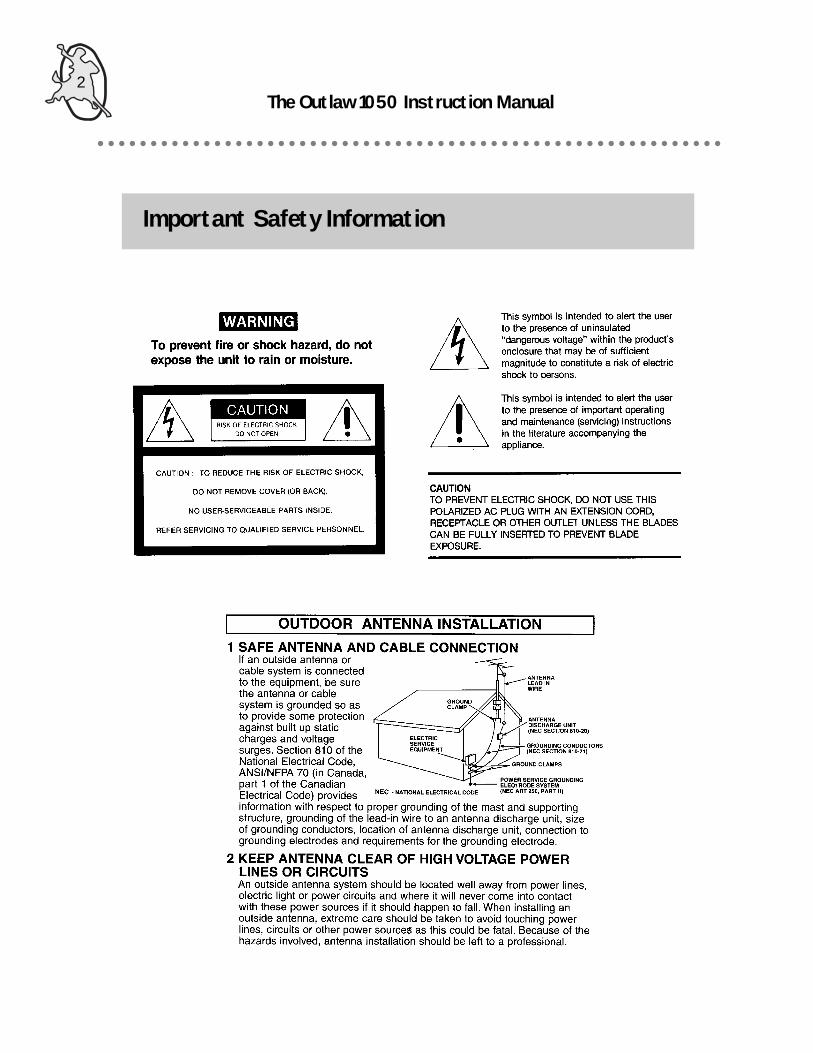
Important Safety Information
The Outlaw 1050 Instruction Manual3
As the owner of an Outlaw Audio Model 1050 Receiver, you are in possession of a uniqueproduct. We hope that your new Outlaw 1050 will bring many years of enjoyable listening toyour music or home theater system.
In order to receive the maximum enjoyment from your new receiver, please take a few minutesto read this manual. This important information will help you to make certain that the receiver isproperly configured for operation with the rest of the equipment in your system. This briefinvestment of time will provide major dividends by making certain that your receiver is properlyinstalled and optimized for the specifics of your installation.
If you have any questions about this product, its installation or operation, please contact us viae-mail at [email protected] or via telephone at 800-392-1393.

The Outlaw 1050 Instruction Manual4
Contents Copyright 2000, Outlaw Audio, Inc. All Rights Reserved, Version 1.0
Important Safety Information ---------------------------------------------------------------- Page 2
Before You Install Your 1050 ---------------------------------------------------------------- Page 5
Front Panel Functions ------------------------------------------------------------------------ Page 8
Fluorescent Display --------------------------------------------------------------------------- Page 10
Rear Panel Connections ---------------------------------------------------------------------- Page 12
Remote Control Functions ------------------------------------------------------------------- Page 14
Installation ---------------------------------------------------------------------------------------- Page 17
Set-up and Configuration --------------------------------------------------------------------- Page 21
Operation ----------------------------------------------------------------------------------------- Page 25
Programming The Remote ------------------------------------------------------------------ Page 31
Specifications ------------------------------------------------------------------------------------ Page 41
Limited Warranty -------------------------------------------------------------------------------- Page 43
Table Of Contents

The Outlaw 1050 Instruction Manual5
Contents Of The Outlaw 1050 Receiver Shipping Container
Verify Line Voltage Before UseYour 1050 Receiver has been designed for use with120-volt AC current. Connection to a line voltageother than that for which it is intended can create asafety and fire hazard and may damage the unit. Ifyou have any questions about the voltagerequirements for your specific model, or about theline voltage in your area, contact your selling dealerbefore plugging the unit into a wall outlet.
Do Not Use Extension CordsTo avoid safety hazards, use only the power cordattached to your unit. We do not recommend thatextension cords be used with this product. As with
all electrical devices, do not run power cords underrugs or carpets or place heavy objects on them.Damaged power cords should be replacedimmediately with cords meeting factoryspecifications.
Handle the AC Power Cord GentlyWhen disconnecting the power cord from an ACoutlet, always pull the plug, never pull the cord. Ifyou do not intend to use the unit for anyconsiderable length of time, disconnect the plugfrom the AC outlet.
Before You Install Your 1050

The Outlaw 1050 Instruction Manual6
Do Not Open the CabinetThere are no user-serviceable components insidethis product. Opening the cabinet may present ashock hazard, and any modification to the productwill void your guarantee. If water or any metalobject such as a paper clip, wire or a stapleaccidentally falls inside the unit, disconnect it fromthe AC power source immediately, and consult anauthorized service station.
CATV or Antenna Grounding . If an outsideantenna or cable system is connected to thisproduct, be certain that it is grounded so as toprovide some protection against voltage surges andstatic charges.
Section 810 of the National Electrical Code,ANSI/NFPA No. 70-1984, provides information withrespect to proper grounding of the mast andsupporting structure, grounding of the lead-in wireto an antenna discharge unit, size of groundingconductors, location of antenna discharge unit,connection to grounding electrodes andrequirements of the grounding electrode.
NOTE TO CATV SYSTEM INSTALLER: Thisreminder is provided to call the CATV (Cable TV)system installer’s attention to article 820- 40 of theNEC that provides guidelines for proper groundingand, in particular, specifies that the cable groundshall be connected to the grounding system of thebuilding, as close to the point of cable entry aspossible
Installation LocationTo assure proper operation and to avoid thepotential for safety hazards, place the unit on a firmand level surface. When placing the unit on a shelf,be certain that the shelf and any mountinghardware can support the weight of the product.Make certain that proper space is provided bothabove and below the unit for ventilation. If thisproduct will be installed in a cabinet or otherenclosed area, make certain that there is sufficientair movement within the cabinet. Under somecircumstances a fan may be required.
• Do not place the unit directly on a carpetedsurface.
• Avoid installation in extremely hot or cold
locations, or an area that is exposed to directsunlight or heating equipment.
• Avoid moist or humid locations.
• Do not obstruct the ventilation slots on thetop of the unit, or place objects directlyover them.
CleaningWhen the unit gets dirty, wipe it with a clean, soft,dry cloth. If necessary, wipe it with a soft clothdampened with mild soapy water, then a fresh clothwith clean water. Wipe dry immediately with a drycloth. NEVER use benzene, aerosol cleaners,thinner, alcohol or any other volatile cleaning agent.Do not use abrasive cleaners, as they may damagethe finish of metal parts. Avoid spraying insecticidenear the unit.
Moving the UnitBefore moving the unit, be certain to disconnectany interconnection cords with other components,and make certain that you disconnect the unit fromthe AC outlet.
Important Information for the UserThis equipment has been tested and found tocomply with the limits for a Class-B digital device,pursuant to Part 15 of the FCC Rules. The limitsare designed to provide reasonable protectionagainst harmful interference in a residentialinstallation. This equipment generates, uses andcan radiate radio-frequency energy and, if notinstalled and used in accordance with theinstructions, may cause harmful interference toradio communication. However, there is noguarantee that harmful interference will not occur ina particular installation. If this equipment doescause harmful interference to radio or televisionreception, which can be determined by turning theequipment off and on, the user is encouraged to tryto correct the interference by one or more of thefollowing measures:
• Re-orient or relocate the receiving antenna.
• Increase the separation between the equipmentand receiver.

The Outlaw 1050 Instruction Manual7
• Connect the equipment into an outlet on a circuitdifferent from that to which the receiver isconnected.
• Consult the dealer or an experienced radio/TVtechnician for help.
This device complies with Part 15 of the FCCRules. Operation is subject to the following twoconditions: (1) this device may not cause harmfulinterference, and (2) this device must acceptinterference received, including interferencethat may cause undesired operation.
UnpackingThe carton and shipping materials used to protectyour new receiver during shipment were speciallydesigned to cushion it from shock and vibration. Wesuggest that you save the carton and packing
materials for use in shipping if you move, or shouldthe unit ever need repair.
To minimize the size of the carton in storage, youmay wish to flatten it. This is done by carefullyslitting the tape seams on the bottom andcollapsing the carton. Other cardboard inserts maybe stored in the same manner. Packing materialsthat cannot be collapsed should be saved alongwith the carton in a plastic bag. If you do not wishto save the packaging materials, please note thatthe carton and other sections of the shippingprotection are recyclable. Please respect theenvironment and discard those materials at a localrecycling center.

The Outlaw 1050 Instruction Manual8
TEST
DELAY X OVER
SUB TRIMSURR TRIMCTR TRIM
V
V
DTSPCMNIGHT MODEDOWN MIX
SPEAKERCONFIG
TREBLE
BALANCE
BASS
V
V V
V
V
V PRESET
TUNE
PRESETSCAN
DIGITALSELECT
FM MODEFM/AM
NIGHTSURR OFF
SURR MODE
Receiver
PHONES
SOURCEV
V
MUTE
5.1CHDIRECT SURR 6.1
DIGITAL
1 2 34
1314
16 18 19
222123
2524
27
610
115 8 912
26
7
Model 1050
13 1617
2023
1514
2028
1. POWER ON / OFFThe POWER button switches the unit ON/OFF.
2. STANDBY/MUTE LED indicatorThis yellow LED indicator will illuminate when 1050 is switched off via the remote control or the front panel Power On/Off button. The indicator will flash if the MUTE function is selected via the button on the remote control or the front panel.
3. 5.1 CH DIRECTUse for selecting the 5.1 direct inputs.
4. PHONESHeadphones can be plugged into this jack. Rotate the master volume knob to adjust the sound level.
5. SURR MODEPress this button to cycle through the different surround modes. See the Operations section for more details.
6. SURR OFFPress this button to turn the center and surround channels off and switch the unit into stereo mode.
7. NIGHT MODE Press to select night mode, then press ADJ(<) or ADJ (>) to adjust. See the Operations section for more details.
8. SURR 6. 1This button turns the 6.1 surround mode on/off.6.1 surround mode is only available with Dolby Digital 5.1 signals.
9. FM/AMPress this button to toggle between the AM andFM tuners.
10. DIGITAL SELECTPress to toggle through the digital inputs -optical 1, optical 2, coaxial, analog. See the Operations manual for more details.
Front Panel Functions

The Outlaw 1050 Instruction Manual9
11. FM MODEPress to toggle between STEREO/MONO mode when receiving FM broadcasts.
12. PRESET SCAN This button scans the local AM/FM stations andstores them into memory.
13. TUNING (UP/DOWN)Press the up/down button to tune radio stations.
14 PRESETIn TUNER mode, press preset up/down button to select the preset stations.
15. BASSPress this button to select bass adjust mode. Press ADJ (<) or ADJ (>) button to adjust the bass level.
16. BALANCEPress this button to select the balance adjust mode. Press (<) or (>) button to adjust the sound level coming from the front left and right speakers.
17. TREBLEPress this button to select treble adjust mode. Press ADJ (<) or ADJ (>) button to adjust the treble level.
18. VOLUMERotate the volume knob to adjust the volume level up or down.
19. MUTEPress to decrease the sound level. Press againto return the sound to its previous level. The STANDBY/MUTE indicator will flash when it is in MUTE mode.
20. SOURCE UP/DOWNPress to select the input source. The unit will cycle through DVD/Video 1/Video 2/Video 3/FM/AM/CD/Tape/Aux.
21. SUB TRIMPress this button to trim the subwoofer speaker’s volume level. Using the ADJ (<) or ADJ (>) buttons, you can trim the center speaker volume -10dB to +10dB.
22. X OVERPress this button to select the frequency point at which the lower frequencies are shunted to the subwoofer output jack. Use the ADJ (<) or ADJ (>) button to cycle through 60/80/100/120/150/200 Hz. Please see the set-up and Configuration section for more details.
23. ADJ </>Press (< ) or (>) to adjust TREBLE, BASS, BALANCE, CENTER, SURROUND, SUBWOOFER, or DELAY TIME levels.
24. DELAYPress this button to select the AC-3 center delay, AC-3 surround delay or Dolby surround delay.
• In AC-3 center mode, press (<) or (>) button to adjust delay time of the center speaker: 0mS, 1mS, 2mS, 3mS, 4mS, or 5mS.• In AC-3 surround mode, press (<) or (>) button to adjust delay time of the surround speakers: 0mS, 5mS, 10mS, or 15mS.• In Dolby surround mode, press (<) or (>)to adjust delay time of the surround speaker: 15mS, 20mS, 25mS, 30mS.
25. TESTWhen pressed, this button cycles a test tone through all the connected speakers. You can adjust the levels of each speaker with the remote control as the test tone cycles.
26. CTR TRIMPress this button to trim the center speaker’s volume level. Using the ADJ (<) or ADJ (>) buttons, you can trim the center speaker volume -10dB to +10dB.
27. SPEAKER CONFIGThis function is used to set the speakers on “Small or Large”. See the operations section fordetails.
28. SURR TRIMPress this button to trim the surround speaker’svolume level. Using the ADJ (<) or ADJ (>) buttons, you can trim the volume -10dB to +10dB.

The Outlaw 1050 Instruction Manual10
62 43 5 7 8
9101112131415
1
1. 5.1 DIRECTIlluminates when the 5.1CH DIRECT mode is selected.
2. OPT1Illuminates when the Optical Digital Input Number One is selected.
3. OPT2Illuminates when the Optical Digital Input Number Two is selected.
4. COAXIlluminates when then the Coax Digital Input is selected.
5. MEMORYIlluminates if station has been stored to a TUNER memory in TUNER mode.
6. FM ST.Illuminates when an FM broadcast is being received in stereo.
7. MONOIlluminates if you select the mono function in TUNER mode.
8. SLEEPIlluminates if you select the sleep timer function.
9. DSPIlluminates when a DSP Mode is selected.
10. DOLBY 3-channel STEREOIlluminates when the Dolby 3-channel Stereo decoding mode is selected.
11. DOLBY PRO-LOGICIlluminates when the Dolby-Prologic mode is selected.
12. SURROUND - 6.1Illuminates when the Surround 6.1 mode is selected.
Fluorescent Display

The Outlaw 1050 Instruction Manual11
13. DOLBY DIGITALIlluminates when the Dolby Digital decoding mode is selected.
14. DTSIlluminates when the DTS decoding mode is selected.
15. SPEAKER INDICATORSIllustrates which speaker channels are active inthe various decoding modes and in test mode. See the illustration below for speaker positions.
16. DOLBY DIGITALIlluminates when a Dolby Digital bitstream is detected.
17. DTS Illuminates when a DTS bitstream is detected.
18. PCMIlluminates when a PCM bitstream is detected.
19. NIGHT MODEIlluminates when Night Mode is selected
20. DOWN MIXIlluminates when the Down Mix mode is selected.
21. MHzDisplays the frequency of the tuned FM radio station.
22. KHzDisplays the frequency of the tuned AM radio station.
2122
1617
1819
20
DIGITALDTSPCMNIGHT MODEDOWN MIX
Left FrontSpeaker
Right FrontSpeaker
Front CenterSpeaker
Left RearSpeaker
Right RearSpeakerRear Center
Speaker
SubWoofer(LFE)
FluorescentDisplaySpeaker
Locations

The Outlaw 1050 Instruction Manual12
FM75
AM
COAXIALOPTICAL 2OPTICAL 1
VIDEO
OUTREC
INPLAY
INPLAY
INPLAY
INPLAY
OUTREC
VIDEO 2VIDEO 1DVD DVDVIDEO 3VIDEO 2VIDEO 1
5.1CH INPUT
OUTREC
OUTREC
INPLAY
INPLAY
INPLAY
INPLAY
INPLAY
INPLAY
INPLAYDVDVIDEO 3VIDEO 2VIDEO 1TAPEAUXCD
AUDIO PREAMP OUT
S VIDEO
DOLBY DIGITAL / PCM IN
IRTOUT
TRIGGER
ANTENNA
AM / FM
OUT
SUB/LFE
AC 120V ~ 60Hz
AC FUSE
OUT
MONITOR
OUT
MONITOR
INPLAY
INPLAY
INPLAY
POWER
ONOFFSET BEFORE POWER ON
IMPEDANCE SELECTOR
84
/ RL /LS
RS / CSC/ R
L/ SUBC/ RS
LS
L
R
SPEAKERS
SURROUNDCENTER
CENTER
SURROUNDLEFT
LEFT
SURROUNDRIGHT
RIGHT
1
3
2
567
4
8911121314151617 1018
1. IMPEDANCE SELECTOR (4/8ohm)Use this switch to optimize the 1050 for the characteristic impedance of your speaker system. Note: Position this switch only when the unit is turned off.
2. AC 120V/60HzPower cord.
3. CENTER SPEAKER CONNECTIONConnect the center front speaker here.
4. LEFT SPEAKER CONNECTIONConnect the left front speaker here.
5 LEFT SURROUND SPEAKER CONNECTIONConnect the left surround speaker here.
6. CENTER SURROUND SPEAKER CONNECTIONConnect the center surround speaker here.
7. RIGHT SURROUND SPEAKER CONNECTIONConnect the right surround speaker here.
8. RIGHT SPEAKER CONNECTIONConnect the right front speaker here.
9. SUB/LFE SPEAKER CONNECTION Connect the powered subwoofer speaker here.
10. PRE-AMP OUTPUTSConnect external amplifier(s) here.
11. 5.1 CHANNEL AUDIO INPUTConnect external 5.1 audio sources here.
12. DVD AUDIO INPUTConnect your DVD player’s audio cable here.
13. VIDEO 3 AUDIO INPUTConnect an audio source here.
14. VIDEO 2 AUDIO INPUTConnect an audio source here.
15. VIDEO 1 AUDIO INPUT / REC OUTConnect a VCR here. Connect the IN jacks of the 1050 to the Play/Out jacks of the VCR and the OUT jacks to the REC/IN of the VCR.
Rear Panel Connections

The Outlaw 1050 Instruction Manual13
FM75
AM
COAXIALOPTICAL 2OPTICAL 1
VIDEO
OUTREC
INPLAY
INPLAY
INPLAY
INPLAY
OUTREC
VIDEO 2VIDEO 1DVD DVDVIDEO 3VIDEO 2VIDEO 1
5.1CH INPUT
OUTREC
OUTREC
INPLAY
INPLAY
INPLAY
INPLAY
INPLAY
INPLAY
INPLAYDVDVIDEO 3VIDEO 2VIDEO 1TAPEAUXCD
AUDIO PREAMP OUT
S VIDEO
DOLBY DIGITAL / PCM IN
IRTOUT
TRIGGER
ANTENNA
AM / FM
OUT
SUB/LFE
AC 120V ~ 60Hz
AC FUSE
OUT
MONITOR
OUT
MONITOR
INPLAY
INPLAY
INPLAY
POWER
ONOFFSET BEFORE POWER ON
IMPEDANCE SELECTOR
84
/ RL /LS
RS / CSC/ R
L/ SUBC/ RS
LS
L
R
SPEAKERS
SURROUND
CENTER
CENTER
SURROUND
LEFT
LEFT
SURROUND
RIGHT
RIGHT
33
29
282726252423222119 20 30
31 32
16. TAPE MONITOR LOOPConnect tape deck or other audio equipment here.
17. AUX PLAY INConnect any audio source here.
18. CD PLAY INConnect CD Players here.
19. AM/FM ANTENNA CONNECTIONSAM - connect the AM loop antenna FM 75 ohm - connect a 75 ohm FM antenna.
20. TRIGGER OUTOutputs a 12VDC signal to trigger other devices on.
21. IRTRemote signal output to control other devices.
22. VIDEO 1 (PLAY IN/REC OUT)Connect your VCR, DVD or LD here. The <OUT> is for record.
23. VIDEO 2 INPUTConnect your VCR, DVD or LD here.
24. VIDEO 3 INPUTConnect your VCR, DVD or LD here.
25. DVD VIDEO INPUTConnect your DVD Player here.
26. S-VIDEO INPUT 1Connect an S-Video source here.
27. S-VIDEO INPUT 2Connect an S-Video source here.
28. S-VIDEO DVD INPUTConnect an S-Video source here.
29. S-VIDEO OUTPUTLoops through S-Video signals from the Video 1, Video 2 or DVD inputs
30. OPTICAL DIGITAL AUDIO INPUT #1Connect the optical digital output from yourA/V source here.
31. OPTICAL DIGITAL AUDIO INPUT #2Connect the optical digital output from yourA/V source here.
32. COAXIAL DIGITAL AUDIO INPUTConnect the coax digital output from your A/V source here.
33. MASTER POWERMaster power on/off switch

The Outlaw 1050 Instruction Manual14
Your Model 1050 remote control will not onlyoperate your receiver, but will also operate mostbrands of infrared remote-controlled audio and
video equipment.
Installing Batteries
On the back of the remote, push the tab and lift off thebattery cover. Obtain two (2) fully charged AA alkalinebatteries (Included). Match the + and - marks on thebatteries to the + and - marks in the battery case, theninsert the new batteries. Press the battery cover backinto place. The tab should click when the cover islocked. Test the unit by pressing PWR and any modekey (e.g. AUX, CBL, VCR, etc.). If the batteries areinserted correctly, the LED will blink once.
NOTE: When batteries need replacement, the remotewill blink twice with every key press. Simply replacethem and the remote control will be restored to its fullfunctionality, including favorite settings.
Using Your Remote Control
Note: Be sure to first press the <TNR> button whenoperating your receiver with the remote. The remotecontrol will remain tuned to the <TNR> (or Receiver)mode until another mode is chosen. Be sure to point theremote control toward the remote sensor on the front ofthe Receiver.
Button 1 PWR -PowerPress to turn the Receiver ON or OFF.
2-8 Equipment Select - These buttons are used to switch the remote into the mode selected
9 TNR button - use this button to put the remote into the receiver control mode
10-18, 20NUMBER buttons - When the remote is in the TNR mode, use these buttons to select a radio station preset. When the remote control is in the TV, VCR, or CABLE mode, use these buttons to select a TV channel.
Remote Control Functions

The Outlaw 1050 Instruction Manual15
19 MUTEPress to turn the sound off. Press again to return the sound to its previous level.
21 ENTER - Use this button to enter selections
22,23 VOL - Volume up/downPress to adjust the sound level up and down.
24 X OVER - Selects the subwoofer crossover mode. Press ADJ (<) or (>) button to adjust.
25 SLEEP - Selects the sleep mode.
26 DIGITAL- Selects the digital inputs.
27, 28 CHANNEL - Preset Channel Selection Up/Down.Press to select AM /FM stations in <TNR> mode.
29 TEST - Selects the test mode. Use to adjustoutput level of the front, center, surround and subwoofer speakers.
30 SPKR - Speakers, use this button to select speakers connected for setting bass redirection.
31, 32 SELECT UP/DOWN- Function keys for selecting different options.
33, 34 SELECT LEFT/RIGHT- Function keys for selecting different options.
35 SELECT - Press to select options.
36 MODE - Press to turn center and surround off.
37 MONO - In tuner FM mode,you are able to switch to the mono mode.
38 PRESET DWN - In tuner mode, press preset down button to select the required preset station.
39 P. SCAN - Press Preset Scan for 5 seconds to memorize radio stations
SETUP
1
2 3 4 5
6 7 98
10 11 12
13 14 15
16 17 18
19 20 21
29
30
36
37
38 39 40
41 42 43
44 45 46 47
48 49 50 51
52 53 54 55
35
31
32
33 34
24
25
22
23
27
2826
IMPORTANT NOTE: Always select the desired mode first by pressing the MODE SELECT (TNR, TV,VCR, CABLE, or AUX) button. Then, press the desired feature buttton (PLAY, SEARCH,etc.). The
remote control will remain tuned to the selected mode until another mode is chosen.
Press TNR to control the Receiver, Press TV to control theTV, Press VCR to control the VCR, Press CABLE to control the Cable Controller Box, Press AUX to control your CD Player or LD Player.

The Outlaw 1050 Instruction Manual16
40 PRESET UP - In TUNER mode, press preset up button to select the required preset station.
41 DELAY - Press this button to select delay time mode: Dolby Digital center delay, Dolby Digital surround delay or Dolby surround delay.
• In Dolby Digital center mode, press (right) or (left) button to adjust delay time of the center speaker: 0mS, 1mS, 2mS, 3mS, 4mS,or 5mS.• In Dolby Digital surround mode, press (right) or (left)button to adjust delay time of the surround speakers: 0mS, 5mS, 10mS,or 15mS.• In Dolby surround mode, press (right) or (left) to adjust delay time of the surround speaker: 15mS, 20mS, 25mS, 30mS.
42 FM/AM - Cycles between AM/FM mode.
43 MEMORY - Press to enter AM/FM stations into memory.
44 VID 1 - Selects Video Input number one.
45 VID 2 - Selects Video Input number two.
46 VID 3 - Selects Video Input number three.
47 DVD - Selects DVD Video input.
48 CD - Selects CD Audio input.
49 AUX - Selects Aux Audio input.
50 TAPE - Selects Tape Audio input.
51 6 CH - Selects 5.1 Direct Audio input.
52 SURR 6.1 - Press this to toggle the 6.1 surround mode on or off.
53 CTR TRIM - Press this button to trim the level of the center speaker. Press ADJ (<) or ADJ (>) button to adjust the level.
54 SUR TRIM - Press this button to trim the level of the surround speakers. Press ADJ (<) or ADJ (>) button to adjust the level.
55 SUB TRIM - Press this button to trim the level of the subwoofer output. Press ADJ (<) or ADJ (>) button to adjust the level.
SETUP
1
2 3 4 5
6 7 98
10 11 12
13 14 15
16 17 18
19 20 21
29
30
36
37
38 39 40
41 42 43
44 45 46 47
48 49 50 51
52 53 54 55
35
31
32
33 34
24
25
22
23
27
2826

The Outlaw 1050 Instruction Manual17
To get the best possible performance from yournew Model 1050 receiver, it is important todetermine the proper placement of your
loudspeakers. In a typical surround-sound systemthere are five main speakers: left, center, and rightspeakers in front of the viewing/listening area, andtwo surround speakers at the sides or back. Today,most systems also have a dedicated bass speaker,known as a subwoofer, to handle very low-frequency sounds. And, if you take advantage ofthe Model 1050's Surround 6.1 mode, you will needa third surround speaker directly behind theviewing/listening area.
The center speaker should go directly above orbelow your television screen. (If you are using adirect-view television, make sure the center speakeris magnetically shielded to prevent picturedistortion.) The other two front speakers should beplaced equal distances to the left and right of thescreen. A good way to start, if practical in yourroom, is to place the left and right speakers so thatthey form the base of an equilateral triangle, with
your listening position at the apex. You canexperiment later with moving the speakers closertogether and farther apart, to see what gives youthe best overall sound. You may also wish to anglethe speakers slightly so that they point towards thelistening position, or move them slightly forward. Tryto place the front speakers so that their tweetersare not too far above or below seated ear height.And, though it is not critical that the center speakerbe at exactly the same height as the left and rightfronts, you should do what you can to minimize anydiscrepancy.
Though often called “rear” speakers, the leftand right surround speakers usually will work best ifplaced directly to the sides of the listening area orslightly back of it along the side walls. (You shoulddefinitely place the surround speakers this way ifthey are dipole or THX types.) They can be placedbehind the listening area if necessary, however. Forbest results, the surround speakers should belocated above seated ear height but not so highthat they are up against the ceiling. Again, don’t
Installation
RIGHTSURROUND
CENTERLEFTFRONT
SUBWOOFER
RIGHTFRONT
6:54 PM
VCR
1050 RECEIVER
LEFTSURROUND
6:54 PM
DVD/LD
CENTERSURROUND
TYPICAL 6.1 CHANNEL HOME THEATER SYSTEM SPEAKER PLACEMENT
The Outlaw 1050 Instruction Manual18
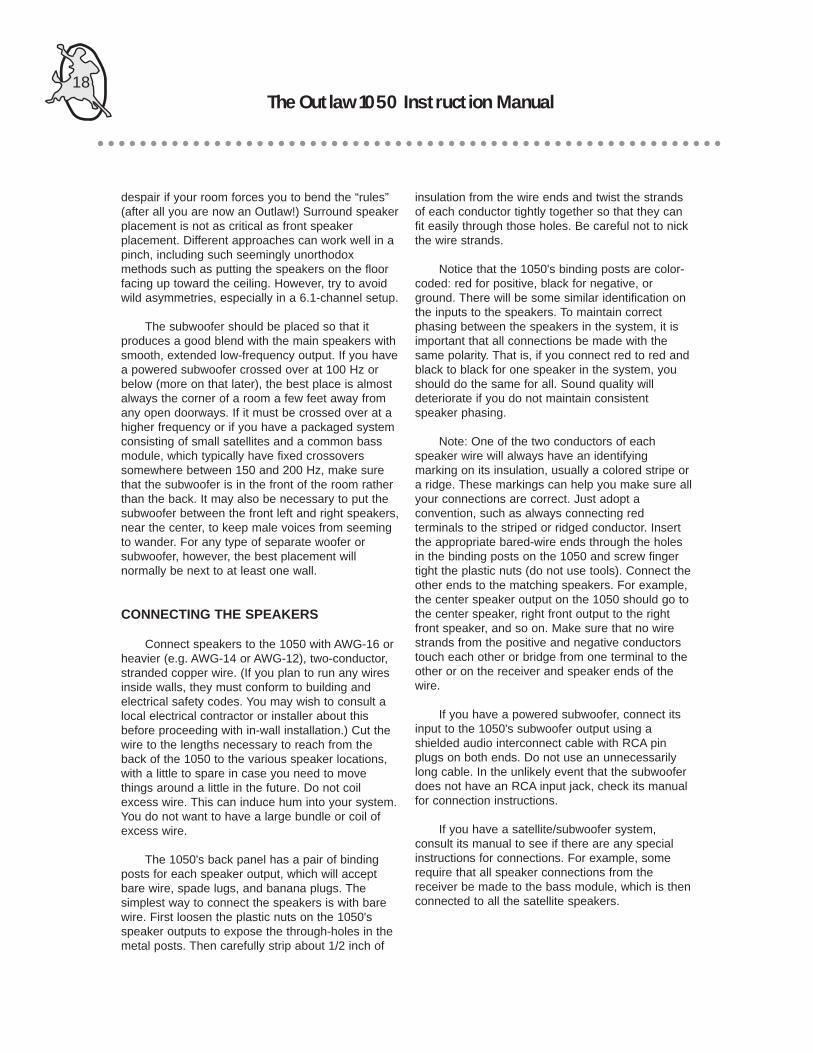
despair if your room forces you to bend the “rules”(after all you are now an Outlaw!) Surround speakerplacement is not as critical as front speakerplacement. Different approaches can work well in apinch, including such seemingly unorthodoxmethods such as putting the speakers on the floorfacing up toward the ceiling. However, try to avoidwild asymmetries, especially in a 6.1-channel setup.
The subwoofer should be placed so that itproduces a good blend with the main speakers withsmooth, extended low-frequency output. If you havea powered subwoofer crossed over at 100 Hz orbelow (more on that later), the best place is almostalways the corner of a room a few feet away fromany open doorways. If it must be crossed over at ahigher frequency or if you have a packaged systemconsisting of small satellites and a common bassmodule, which typically have fixed crossoverssomewhere between 150 and 200 Hz, make surethat the subwoofer is in the front of the room ratherthan the back. It may also be necessary to put thesubwoofer between the front left and right speakers,near the center, to keep male voices from seemingto wander. For any type of separate woofer orsubwoofer, however, the best placement willnormally be next to at least one wall.
CONNECTING THE SPEAKERS
Connect speakers to the 1050 with AWG-16 orheavier (e.g. AWG-14 or AWG-12), two-conductor,stranded copper wire. (If you plan to run any wiresinside walls, they must conform to building andelectrical safety codes. You may wish to consult alocal electrical contractor or installer about thisbefore proceeding with in-wall installation.) Cut thewire to the lengths necessary to reach from theback of the 1050 to the various speaker locations,with a little to spare in case you need to movethings around a little in the future. Do not coilexcess wire. This can induce hum into your system.You do not want to have a large bundle or coil ofexcess wire.
The 1050's back panel has a pair of bindingposts for each speaker output, which will acceptbare wire, spade lugs, and banana plugs. Thesimplest way to connect the speakers is with barewire. First loosen the plastic nuts on the 1050'sspeaker outputs to expose the through-holes in themetal posts. Then carefully strip about 1/2 inch of
insulation from the wire ends and twist the strandsof each conductor tightly together so that they canfit easily through those holes. Be careful not to nickthe wire strands.
Notice that the 1050's binding posts are color-coded: red for positive, black for negative, orground. There will be some similar identification onthe inputs to the speakers. To maintain correctphasing between the speakers in the system, it isimportant that all connections be made with thesame polarity. That is, if you connect red to red andblack to black for one speaker in the system, youshould do the same for all. Sound quality willdeteriorate if you do not maintain consistentspeaker phasing.
Note: One of the two conductors of eachspeaker wire will always have an identifyingmarking on its insulation, usually a colored stripe ora ridge. These markings can help you make sure allyour connections are correct. Just adopt aconvention, such as always connecting redterminals to the striped or ridged conductor. Insertthe appropriate bared-wire ends through the holesin the binding posts on the 1050 and screw fingertight the plastic nuts (do not use tools). Connect theother ends to the matching speakers. For example,the center speaker output on the 1050 should go tothe center speaker, right front output to the rightfront speaker, and so on. Make sure that no wirestrands from the positive and negative conductorstouch each other or bridge from one terminal to theother or on the receiver and speaker ends of thewire.
If you have a powered subwoofer, connect itsinput to the 1050's subwoofer output using ashielded audio interconnect cable with RCA pinplugs on both ends. Do not use an unnecessarilylong cable. In the unlikely event that the subwooferdoes not have an RCA input jack, check its manualfor connection instructions.
If you have a satellite/subwoofer system,consult its manual to see if there are any specialinstructions for connections. For example, somerequire that all speaker connections from thereceiver be made to the bass module, which is thenconnected to all the satellite speakers.

The Outlaw 1050 Instruction Manual19
AUDIO CONNECTIONS
You are now ready to connect the othercomponents of your system to your Model 1050.Looking at the back of the receiver, you will see anarray of signal input and output jacks to the left ofthe speaker terminals. At the top are the threedigital audio inputs. Below them are the video jacks,and along the bottom are the analog audio jacks.
Analog audio connections. Using shielded audiocables with RCA pin plugs at each end, connect theleft and right output jacks on source componentssuch as a DVD player, CD player, and VCR, to thecorresponding Play jacks on the back of the 1050.(If you want to record from a source such as a DVDplayer, make an analog connection, in addition tothe digital link, even if you use one of the digitalinputs for most listening.) Any device used for audiorecording, such as a cassette, MiniDisc, or CD-Rdeck, should be connected to the Tape input, andany device used for video recording, such as aVCR, should be connected to the Video 1 input.These inputs are flanked by Record Out jacks thatshould be connected to the audio Rec In inputs onthe recorders. Again, always take care to connectleft to left and right to right. Interconnect cablesusually have a standard color coding of red for rightand white for left.
5.1-Channel External Processor Connection.In addition to the standard stereo audio inputs, the1050 has a six-channel analog input designed toaccept the output from a product with a built-insurround decoder. Since the 1050 does anexcellent job of decoding all current A/V surroundformats, this input is intended primarily as a meansof accommodating emerging multichannel musicformats, such as DVD-Audio and Super Audio CD(SACD). It can also be used to accept themultichannel output from a DVD player or HDTVconverter that has built-in 5.1-channel Dolby Digitalor DTS decoding. However, you will get betterresults making a digital connection from the playerand allowing the 1050 to handle Dolby Digital andDTS decoding internally. For those who wish to usethe 5.1 channel input as a “CD direct” input, simplyconnect the left and right outputs of the sourcedevice to the left and right jacks of the six-channelanalog input. This allows one to bypass the 1050’sDSP modes with the result that the sound signalsare affected only by the pre-amp and volumecontrols
If you use this multichannel input, note that inall modes, except 6.1, it bypasses the 1050's bassmanagement and crossovers. This makes it a goodoption for use with the analog outputs of a CDplayer or phono pre-amp where you wish to listen tothe source directly.
Digital Audio Connections. The 1050 has twoToslink optical digital inputs and one coaxial digitalinput. Connect the digital outputs from digital audiosources here. You must make a digital connectionfrom your DVD player in order for the 1050 todecode Dolby Digital or DTS soundtracks. (Thereceiver will automatically determine what type ofdigital signal it is receiving-Dolby Digital, DTS, orordinary stereo PCM.) You may also connect a CDplayer this way or a satellite TV receiver if it has aPCM digital audio output.
It does not matter which digital input you usefor which component, as long as the inputs andoutputs match, optical to optical and coaxial tocoaxial. Once you have connected a sourcecomponent to a digital input, you can assign it tothe appropriate selector button so that every timeyou choose that source it will automatically go tothe correct digital input. First, select the source, say,DVD, Press the Digital Input button until the legendfor digital input you have connected that source to(Optical 1, Optical 2, or Coaxial) appears on thefront panel display. That digital input will now “stick”to that source selector button until you specificallychoose otherwise.
Although the coaxial digital input jacks areidentical to those used for analog audio, you shouldnot use ordinary audio interconnects. Make coaxialdigital connections with shielded 75-ohm cables,which normally will be labeled for video. Opticalconnections require special Toslink fiber-opticcables.
Preamp Outputs. The six-channel preamp outputscarry the same signals that feed the Outlaw 1050'sinternal power amplifiers. You can use these to feedexternal power amplifiers. A common configurationis to use the Outlaw Model 750 power amplifier inconjunction with the 1050 receiver. Typically theright front, center front, left front, right surround andleft surround speakers are powered by the 750receiver (165 watts per channel). The rear centerchannel is powered by the 1050 which produces 90watts of power in this configuration (90 watts, onechannel driven.).
The Outlaw 1050 Instruction Manual20
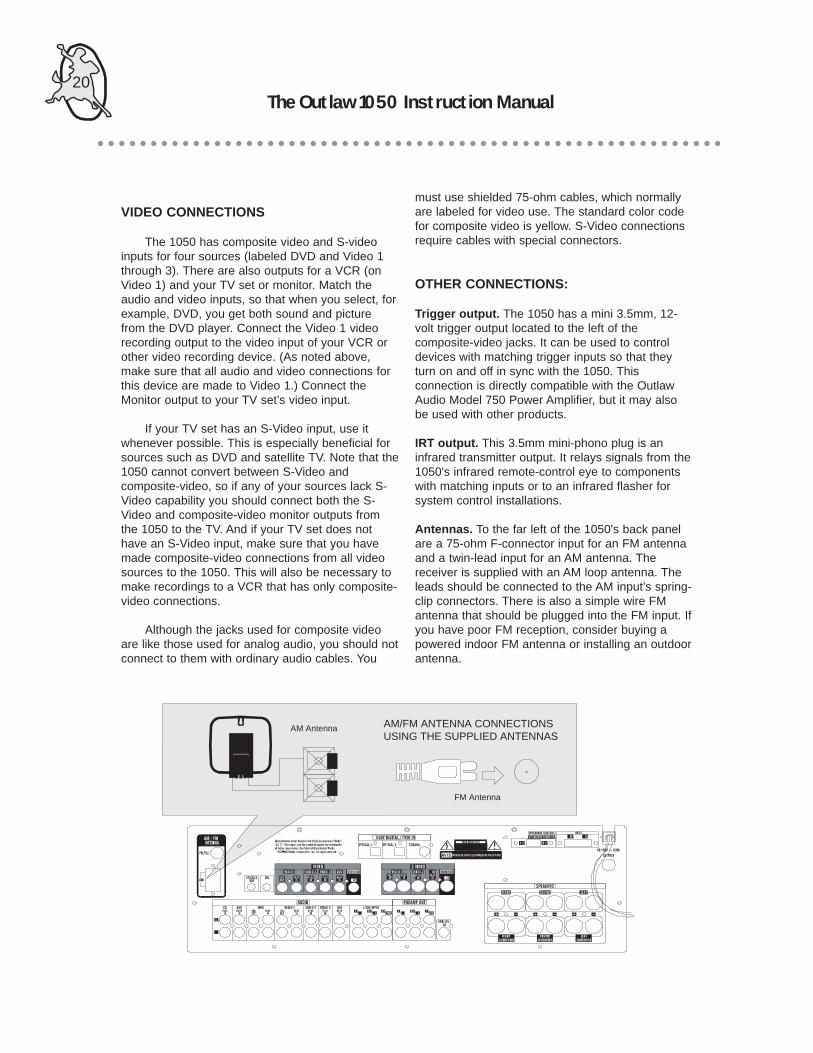
VIDEO CONNECTIONS
The 1050 has composite video and S-videoinputs for four sources (labeled DVD and Video 1through 3). There are also outputs for a VCR (onVideo 1) and your TV set or monitor. Match theaudio and video inputs, so that when you select, forexample, DVD, you get both sound and picturefrom the DVD player. Connect the Video 1 videorecording output to the video input of your VCR orother video recording device. (As noted above,make sure that all audio and video connections forthis device are made to Video 1.) Connect theMonitor output to your TV set’s video input.
If your TV set has an S-Video input, use itwhenever possible. This is especially beneficial forsources such as DVD and satellite TV. Note that the1050 cannot convert between S-Video andcomposite-video, so if any of your sources lack S-Video capability you should connect both the S-Video and composite-video monitor outputs fromthe 1050 to the TV. And if your TV set does nothave an S-Video input, make sure that you havemade composite-video connections from all videosources to the 1050. This will also be necessary tomake recordings to a VCR that has only composite-video connections.
Although the jacks used for composite videoare like those used for analog audio, you should notconnect to them with ordinary audio cables. You
must use shielded 75-ohm cables, which normallyare labeled for video use. The standard color codefor composite video is yellow. S-Video connectionsrequire cables with special connectors.
OTHER CONNECTIONS:
Trigger output. The 1050 has a mini 3.5mm, 12-volt trigger output located to the left of thecomposite-video jacks. It can be used to controldevices with matching trigger inputs so that theyturn on and off in sync with the 1050. Thisconnection is directly compatible with the OutlawAudio Model 750 Power Amplifier, but it may alsobe used with other products.
IRT output. This 3.5mm mini-phono plug is aninfrared transmitter output. It relays signals from the1050's infrared remote-control eye to componentswith matching inputs or to an infrared flasher forsystem control installations.
Antennas. To the far left of the 1050's back panelare a 75-ohm F-connector input for an FM antennaand a twin-lead input for an AM antenna. Thereceiver is supplied with an AM loop antenna. Theleads should be connected to the AM input’s spring-clip connectors. There is also a simple wire FMantenna that should be plugged into the FM input. Ifyou have poor FM reception, consider buying apowered indoor FM antenna or installing an outdoorantenna.
AM Antenna
FM Antenna
AM/FM ANTENNA CONNECTIONS USING THE SUPPLIED ANTENNAS

The Outlaw 1050 Instruction Manual21
Setup and Configuration
Once you have the Outlaw 1050 connected tothe rest of your system you are ready toconfigure it for operation. To get the best
performance and sound quality your system candeliver, follow these insructions carefully.
SETTING THE SPEAKER IMPEDANCESWITCH
Looking at the back panel, you will see, just tothe left of the master power switch, a red, two-position slide switch labeled IMPEDANCESELECTOR. This switch optimizes the 1050’spower supply for the impedance of the attachedspeakers. Before proceeding, make sure that thereceiver is turned off. Never adjust the impedanceswitch when the receiver is on.
The speakers’ nominal impedance should beprinted somewhere on the back panel or in theOwner’s Manual. If all of the speakers are listed as6 ohms or higher, push the switch to the right, tothe 8-ohm setting. If the speakers are listed as 4ohms (lower is unlikely), push it to the left, to the 4-ohm position.
What about a system in which only some of thespeakers are 6 ohms or higher? In that case, makeyour decision based on the impedances of the frontspeakers, which are the ones that do the bulk of thework (the center speaker, especially). If any of thefront speakers have a 4-ohm or lower impedance,set the switch to 4 ohms. Otherwise, set the switchto 8 ohms.
After you have set the impedance switch, turnthe master power switch on. You are now ready forspeaker configuration.
SPEAKER CONFIGURATION
For an A/V receiver to function properly, it mustknow some things about the speakers that areconnected to it. In this section we’ll explain the keyadjustments and how to make them.
Bass management . It is rare to have five or sixlarge, full-range loudspeakers in one room.Consequently, most home theater installations userelatively small speakers, particularly for the centerand surround channels. Unfortunately, getting high-level, deep bass (common in modern moviesoundtracks) from small speakers is impractical.This is particularly regrettable in the case of thecenter channel, as it is the main channel for mostsurround soundtracks and often carries largeamounts of low-frequency energy.
The good news is that in the bass frequencies,below 100 Hz or so, our ears pretty much lose theirability to tell which direction a sound is comingfrom. This means that you can move lowfrequencies from channels whose speakers can’treproduce them adequately to channels whosespeakers can. This is known as bass management.
The Outlaw 1050 handles the bassmanagement for your system automatically, onceyou have told it which channels have speakers thatcan handle low bass (designated “Large”), whichhave speakers that can’t (designated “Small”), andwhether there is a subwoofer in the system.
Configuring speaker size. To set speaker sizes,look at the front-panel display. At the left you willsee an iconic representation of a speaker array witha listener in the center. Push the SPEAKERCONFIG button on the front panel or SPKR on theremote control once, and all the speakers exceptthe front left and right will disappear. You can nowuse the left and right arrow buttons on the frontpanel, or on the remote, to switch between the twopossible settings: Large or Small.
Press SPEAKER CONFIG again to move tothe center speaker and adjust its setting. (For theCenter Channel you have the additional optionchoice of None, which tells the receiver there is nospeaker connected to that output.) Repeat thisprocess for the center channel, the left and rightsurround outputs (which have the same options asthe center), the subwoofer output (On or Off), then

The Outlaw 1050 Instruction Manual22
back to the front channels. After you are done, waita few seconds and the display will return to normaloperation.
How do you decide which setting to choose foreach channel (apart from the obvious Off or Nonewhen no speaker is connected)? The answer is thatno speaker should be configured as Large unless itis capable of extended low-frequency response atreasonably high levels without obvious distortion. Ingeneral, the only speakers that meet this criterionare subwoofers, floor-standing models, or largebookshelf designs with woofers that are 12 inchesor longer in diameter. In most systems, the onlypossible options for a Large setting will be the frontleft and right speakers. More often than not, thebest arrangement will be to set all speakers toSmall and let a good subwoofer handle the bassfrom all channels.
Important note: If you have a satellite/subwoofersystem consisting of small satellite speakersconnected to the receiver through a common bassmodule, consult its owner’s manual for any specialconfiguration instructions. In this situation younormally will need to tell the receiver that there isno subwoofer connected (unless you have aseparate powered subwoofer attached to the 1050'ssubwoofer output) and that all speakers are Large.The crossovers within the speaker system will directthe signals appropriately.
Setting crossover frequency. When there is asubwoofer in your system, it will receive the signalfrom the low-frequency effects (LFE, or .1) channelas well as bass from any channels whose speakersyou have designated as Small. The crossoverfrequency is the frequency where this transitionoccurs. The 1050 gives you a choice of sixcrossover frequencies: 60, 80, 100, 120, 150, and200 Hz.
To set the crossover frequency, press theXOVER button on the front panel or on the remotecontrol. The front-panel display will show “LPF” (ForLow Pass Filter) followed by one of the six availablefrequencies. Use the left and right arrow keys toselect the frequency you want.
About the only tricky part of this entireprocedure is deciding which crossover frequency touse. This is determined by the low-frequencycapabilities of the speakers in your system. Check
the frequency-response specifications for yourspeakers (listed in the owner’s manual, or on thespeaker manufacturer’s Web site), looking for thefrequency at which the response is approximately 3dB down in the bass. For example, it might say -3dB at 55 Hz or 45 Hz to 20 kHz ±3 dB. Normallyyou should start by setting the crossover to thefrequency closest to the 3-dB point for the least-capable speaker in the system. For example, if yourfront speakers are listed as being 3 dB down (3 dB)at 60 Hz and the surrounds at 85 Hz, start with 80Hz. A potential problem is that virtually all poweredsubwoofers have their own internal crossovercircuits. More and more they enable you to disableor bypass their own crossovers, and you should dothat if the option is available. It is better to let the1050 handle the chore. But if you can’t, you haveessentially two options. One is to set the crossoverfrequency in the subwoofer itself as close aspossible to the one you are using in the receiver.This may work pretty well in some cases; if itdoesn’t, you probably will hear some odd responseholes and bumps near the crossover frequency. Theother option is to set the subwoofer’s internalcrossover to the highest possible frequency, to get itout of the way.
After you have finished the remaining steps inthis chapter, you may want to go back andexperiment with the crossover setting, to see ifgoing a step up or down delivers a better overallresult. The desired effect is to reproduce high-levelbass sounds without distortion while maintaining asmooth transition between the main speakers andthe subwoofer. At the same time, you do not wantthe subwoofer to become a localizable soundsource, which can become a problem if thecrossover is set too high. It is therefore desirable tokeep the crossover frequency at 100 Hz or below ifpractical; 80 Hz is often just about ideal, provided,again, that all the speakers in the system canoperate comfortably down to that level.
The Center Surround Channel. DolbyLaboratories recently developed an extension to theDolby Digital 5.1 surround standard, which is knownas Dolby Digital Surround EX® in theaters andSurround EX® in the home. It encodes a third,center surround channel into the discrete signals forthe left and right surrounds. Surround EX cinemasoundtracks are therefore fully compatible withstandard 5.1-channel playback systems, but withthe appropriate decoding circuits and a third

The Outlaw 1050 Instruction Manual23
surround speaker directly behind you, you canextract and reproduce the center surround channel.This third surround channel allows soundtrackmixers to create a more seamless surroundenvironment and more exciting special effects.
The 1050 uses Outlaw’s proprietary Surround6.1 mode to decode the Surround EX centersurround channel, and an amplifier channel to drivethe sixth speaker. There are a number of goodways to set up the speakers for this. The main thingto remember: Just as the center speaker’s tonalcharacter should match that of the front left andright speakers, and the character of the left andright surrounds should be a close match to that ofthe fronts, the center surround speakers shouldmatch well to the left and right surrounds. Often, thebest way to do this will be to use the same modelspeaker for all three surrounds.
Single center surround speaker. The easiest setup for Surround 6.1 is a single speaker directlybehind the listening area. Placement shouldotherwise be similar to that for the other twosurround speakers.
Dual center surround speakers . Some peopleprefer the sound created by a pair of speakers forthe center surround channel, especially when theleft and right surround speakers are directly to thesides of the listening area. For this method, wire apair of identical speakers, in parallel, to the centersurround speaker output on the 1050 and spacethem apart on the back wall of the room so thatthere is about the same distance from eachsurround speaker to the next.
There are two easy ways to wire the speakersin parallel. One is to run wires for each speakerdirectly back to the output terminals on the receiver,so that both are connected directly to the centersurround output. The other is to make a direct runfrom the amplifier to one of the speakers. Thenconnect wires from the positive (red) terminal onthat speaker to the matching terminal on the otherand from the negative (black) terminal to its mateon the second speaker. Because running twospeakers in parallel will halve the impedance seenby the amplifier channel driving them, you will needto set the Impedance Selector switch on the backpanel to 4 ohms. (The receiver must be turned offwhen you do this.)
SETTING CHANNEL DELAYS
Because rooms differ in size and in layout,speaker arrangements differ as well. The 1050allows you to set delays for the center and surroundchannels, to ensure that sounds from the variousspeakers arrive at your ears with the correct relativetiming.
Before you begin adjusting the delays, get outa tape measure and determine how many feet eachspeaker is from your main listening position. Soundtravels approximately 1 foot per millisecond, so it iseasy once you have this information to figure outthe correct delays.
Separate adjustments are required for thedigital 5.1 (Dolby Digital® and DTS®) and DolbyPro Logic® modes. Start with the digital bypressing the DIGITAL INPUT button (DIGITALSELECT on the front panel) until the red double-DDolby Digital legend appears in the front-paneldisplay. Now check the mode. The receiver must bein a Surround mode to adjust surround-channeldelay, and it must be in either Surround or Dolby 3Stereo mode to adjust center-channel delay. PressSURR MODE (MODE on the remote) until thedisplay shows the desired setting.
Next, press the DELAY button on the remote orfront panel. In the iconic representation of thespeaker array at the left of the display, all the iconsexcept for the listener and the left and rightsurround speakers will disappear; directly to theright will be a readout of the surround-channeldelay. Use the left and right arrow keys to stepbetween settings, which are in 5-millisecond (mS)increments from 0 to 15 mS.
The correct setting is based on the differencebetween the distance from your listening position tothe front left and right speakers (which should bethe same) and the distance from your listeningposition to the left and right surround speakers.Subtract the distance to the surround speakers, infeet, from the distance to the front speakers. Setthe delay as close as you can to that number ofmilliseconds. (When the difference is close tohalfway between two settings, round up.) If thedifference is zero or negative, set the delay to 0mS.
Press DELAY again to switch to the center

The Outlaw 1050 Instruction Manual24
delay mode. In this case, subtract the distance fromthe listening position to the center speaker (in feet)from the distance to the left and right speakers. Usethe left and right arrow keys to adjust the delaybetween 0 and 5 mS in 1-mS increments. Set thenumber of milliseconds of delay as close aspossible to the calculated difference in feet. If thedifference is zero or negative, set the delay to 0mS.
The adjustment for Dolby Pro Logic is onlyslightly different. Begin by pressing DIGITALSELECT on the front panel or DIGITAL INPUT onthe remote until the blue Pro Logic legend lights upin the display. Again make sure that the receiver isin Surround mode; if it is not, press SURR MODE(MODE on the remote) until it is. Press DELAY. Inthis mode, only the surround-channel delay isadjustable, in 5-millisecond increments from 15 to30 mS. Take the number you used for surround-channel delay in Dolby Digital and add 15 to it. Usethe left and right arrow keys to adjust as close tothat number of milliseconds as you can, roundingup as necessary.
SETTING CHANNEL OUTPUT LEVELS
The final configuration step is also one of themost critical to achieving good surround sound. Youmust adjust the gain of the center and surroundchannels so that a given input level to any channelwill produce the same output level from its speakeras that input level would produce from any otherspeaker in the system when applied to its channel.Incorrect balance between the front left/rightchannels and the center channel may cause you tolose stereo spread or dialogue intelligibility. Inaddition, if the surround channels are too softrelative to the fronts you will not hear a realisticallyenveloping sound field. Conversely, if they are toostrong, the surround speakers may jump out at youdistractingly as obviously discrete sound sources.
Calibration by ear. The Outlaw 1050 incorporatesa built in test-signal generator for output leveladjustments. Make this adjustment when thelistening room is quiet. Begin by making sure thatthe red double-D Dolby Digital logo is illuminated inthe display. If it isn’t, press DIGITAL SELECT orDIGITAL INPUT until it comes on. If you have acenter surround speaker in your system, you shouldsee “Surround 6.1” following the Dolby Digital logo.If you don’t, press SURR 6.1 to make it come on.
Also check to be sure the receiver is in Surroundmode; press SURR MODE (MODE on the remote)until it is. All the speakers in the system should nowbe showing in the iconic representation to the left ofthe display.
Turn the volume control all the way down to “0”and press the TEST button. Next, increase thevolume control until you hear the test tone at acomfortably loud level coming from one of thespeakers. This signal will circulate clockwise aroundthe main speakers in your system, starting with theleft front, and finally to the subwoofer.
Adjust the levels of the center and surroundspeakers and the subwoofer relative to the level ofthe front left/right speakers. Listen to the entiresignal cycle a few times before you do anything, toget a feel for the relative volumes of the speaker.While the signal is coming out of a speaker, use theleft and right arrows to adjust its volume. Repeatthis procedure until each speaker has same volumelevel.
Calibration with a sound-level meter. Althoughyou can do a pretty good job of channel balancingby ear, you can do even better with a sound-level(SPL) meter.
When using an SPL Meter, set it to Slow modewith C weighting. Sit in your normal listeningposition, holding the meter in front of you at aboutear level with its microphone pointed toward theceiling. Now proceed exactly as described abovefor calibration by ear. Set the receiver’s volumecontrol so that the reading on the meter when thesignal is coming from the left or right front speakeris about 75 dB. Now, adjust all the other channelsto be as close to that as possible. (The meter doesnot have perfectly flat low-frequency response, soyou may want to fine-tune the subwoofer setting byear using music recordings that have substantiallow-bass content.)
The channel trim controls. On the front panel andthe remote are trim controls for the levels of thecenter, surround, and subwoofer channels (CTRTRIM, SUR TRIM, and SUB TRIM). These arehandy for making on-the-fly adjustments to yourpersonal taste while listening to music or watchinga movie. Just make a note of the original settings,right after calibration, so that you can easily returnto them. (See page 45).

The Outlaw 1050 Instruction Manual25
Operation
We designed the Outlaw 1050 to be bothexceptionally capable and exceptionallyeasy to use -a rare combination in the
realm of contemporary A/V receivers. Here you’llfind everything you need to know to get the mostout of it.
THE BASICS
Master Power Switch. Next to the AC line cord onthe back panel is a rocker switch labeled MASTERPOWER. Turning it off completely disconnects the1050 from the power line. Normally you will want toleave this switch turned on unless you are going tobe away for an extended time (such as onvacation). Otherwise, leave it on and use the biggreen button on the front panel or the PWR buttonon the remote control instead to switch the receiverin and out of standby mode.
Standby Switch. When the back-panel MASTERPOWER switch is on, you can still turn most of the1050's electronic circuitry on and off from either thefront panel or the remote control. Toggle betweenfull-on and standby using either the big greenbutton at the lower left of the front panel or thePWR button at the top right of the remote control.(If you use PWR on the remote, first press TNR, atthe end of the second row of small buttons justbelow, to make sure the remote is set to control thereceiver and not some other component in thesystem.) In standby mode, the receiver is asleep,with its amplifiers and other power-hungry circuitsshut down; a yellow LED will light below the greenfront-panel on/off button when the receiver is in thisstate. The LED goes off when the receiver turns onand flashes when it is on with the sound muted.
Volume control and muting. Adjust volume withthe large knob at the right of the front panel or withthe VOLUME + and - buttons on the left side of theremote control. A numerical volume indicator willappear in the front-panel display as you adjust thelevel. Press MUTE to instantly silence the receiverand again to restore output. The MUTE button is
located just below the VOLUME knob on the frontpanel and just above the VOLUME buttons on theremote control. When the 1050 is muted, anyadjustment of the volume, either on the front panelor on the remote, will cancel the mute mode.
Balance control. You can adjust the relative levelsof the left and right front speakers with the balancecontrol. This is useful if there is a slight levelmismatch between the speakers to begin with or ifa stereo recording is slightly out of balance. PressBALANCE on the front panel or SELECT (once) onthe remote control. Then use the left and rightarrow keys to shift the sound in the direction youwant. The front-panel display will show the directionand magnitude of the change.
Tone controls. The 1050 has bass and treblecontrols for the front left and right channels, whichyou can use to adjust the tonal balance of stereorecordings. Press BASS or TREBLE on the frontpanel; then use the left and right arrow keys to cutor boost the sound in the selected range.
Headphone jack. The 1050's front panel has astandard stereo phone jack for headphones. Whenyou insert a plug in this jack, the receiver mutes thespeakers and “EARPHONE” appears in the display.(If your headphones have the smaller miniplugtermination, you can still use them with the aid of aminiplug-to-phone-plug adaptor.) For properreproduction over headphones, use the SURRMODE button on the front panel or the MODE keyon the remote to set the 1050's audio mode toStereo (see below).
INPUT SELECTION
When source components are connectedcorrectly to the 1050, it will switch audio and videotogether. You can also attach each digital input to asource selector so that choosing that sourceautomatically chooses that digital input as well.
Front-panel input selection. Use the up and down

The Outlaw 1050 Instruction Manual26
arrow keys, labeled SOURCE, to switch betweensources. These buttons cycle from input to input inround-robin fashion.
Remote input selection. The remote controlenables direct selection of any input with the ovalAM/FM button near the bottom of the remote andthe two rows of small, circular buttons just below it.Just press the button for the input you want tochoose. Note that the first press of AM/FM willselect the tuner with the band (AM or FM) andstation last listened to; a second press will switch tothe other band.
Digital input selection and attachment. The firsttime you use a digital input for a source, you mustselect it by means of the front-panel DIGITALSELECT button or the remote control’s DIGITALINPUT key. Pressing these keys cycles through thethree digital inputs in round-robin fashion.
It is easy to assign digital inputs to the regularsource selectors, so that digital inputs are switchedautomatically along with the analog audio and videoinputs. For example, suppose you have attachedthe digital audio output on your DVD player to theOutlaw 1050's second optical digital input. Choosethe DVD player with the source selector on the frontpanel or with the remote control. Now pressDIGITAL SELECT or DIGITAL INPUT until the red“OPT 2” legend appears at the top left of the front-panel display. Simple as that. Now, whenever youselect the DVD input, the Optical 2 digital input willbe selected as well. You can change theseassignments any time you like.
5.1 Channel Direct input. To select input from the1050's six-channel analog input, press 5.1 CHDIRECT on the front panel or 6 CH on the remote.Although intended primarily to support emergingmultichannel music formats such as DVD-Audioand Super Audio CD (SACD), the 5.1 ChannelDirect input has other possible uses. For example,since this input normally bypasses all processing inthe receiver, it can be used as a straight-throughinput for any source (such as a CD player) that youwant untouched by the DSP.
Note, however, that bypassing the DSP alsomeans bypassing the 1050's bass management. Ifyou select Surround 6.1, the DSP and bassmanagement will be active for the 5.1 ChannelDirect input.
MODE SELECTION
The Outlaw 1050 supports essentially allcurrent surround encoding formats, whether digitalor analog, as well as ordinary two-channel stereoand multichannel DSP enhancement of stereorecordings. Selection and characteristics of thevarious formats and modes are detailed below.
Supported audio formats. It is easier tounderstand the 1050's operation if we make thedistinction between audio formats and audioprocessing modes. An audio format is a way ofconveying or encoding an audio signal; an audioprocessing mode is a method of reproducing anaudio signal. These concepts overlap a little, butlet’s begin with a table of what we’re calling audioformats.
Format: AnalogCharacteristics: One channel (mono) or two(stereo). This is what we’ve been getting for yearsfrom records, tapes, radio, and TV. Dolby Surroundencoding can be used to fold two additionalchannels, center and surround, into a two-channelsignal. Dolby Surround recordings can be playedback in mono or stereo, but with Dolby Pro Logicdecoding, the center and surround channel can beextracted, restoring the original four channels. (Thesurround channel, though mono, is normallyreproduced through two speakers.)Modes: Stereo, Surround (Dolby Pro Logic), 3Stereo, Phantom, Natural, Jazz, Hall, and Stadium
Format: PCM DigitalCharacteristics: Currently two-channel stereo withthe option of Dolby Surround encoding (see above).Mono is achieved by putting the same informationin both channels. This format is used on CD,laserdisc, DAT, and some DVDs of musicalprograms.Modes: Stereo, Surround (Dolby Pro Logic), 3Stereo, Phantom, Natural, Jazz, Hall, and Stadium
Format: Dolby DigitalCharacteristics: Carries one to six (5.1) discretechannels of high-quality audio at data rates muchlower than possible when using PCM. Used onDVD, most recent laserdiscs, some digital satelliteTV transmissions, and the North American digitaltelevision (DTV) system. Most DVDs use DolbyDigital for all soundtracks, whether mono, Dolby

The Outlaw 1050 Instruction Manual27
Surround encoded stereo, or discrete multichannel(4.0, 5.0, or 5.1). A recent extension to Dolby Digital5.1, called Dolby Digital Surround EX, uses DolbySurround techniques to fold a third surroundchannel into the two surround channels of a 5.1soundtrack. Outlaw handles Surround EX with itsproprietary Surround 6.1 processing mode.Stereo, Surround (standard discrete, Surround 6.1,or Dolby Pro Logic), 3 Stereo, and Phantom.
Format: DTSCharacteristics: Carries six (5.1) discrete channelsof high-quality audio at data rates lower thanpossible using PCM. Available on specialmultichannel DTS CDs (DTS decoding required)and on some laserdiscs and DVDs. DTS is anoptional audio format on DVD, so a DVD with aDTS soundtracks must also have a PCM or DolbyDigital track. DTS has introduced a process similarto Surround EX, called DTS ES. The Outlaw 1050does not directly support DTS ES decoding, butthose soundtracks will play normally as DTS 5.1.Modes: Stereo, Surround , 3 Stereo, and Phantom.
If presented with an analog and a digital inputfrom the same source (such as a DVD or CDplayer), the 1050 will automatically choose thedigital signal. It will also automatically detect whatsort of digital signal is present (PCM, Dolby Digital,or DTS) and adjust itself accordingly. When a digitalinput is selected, small red arrows at the extremeright of the display will indicate the type of digitalsignal that is being received (Dolby Digital, DTS, orPCM) and whether the Downmix or Night mode isactivated (see below for details). If a digital input isselected but no digital signal is present, the arrownext to the Dolby Digital legend will flash.
AUDIO MODES
The Outlaw 1050 can also auto-select the audiomode for each input, based on your preferencesand the type of signal presented. You can overridethose preferences and select the mode you wantdirectly. The available modes and their features aredescribed as follows.
Mode: StereoCharacteristics: Two-channel reproduction throughthe front left and right speakers. The 1050 will
intelligently downmix discrete multichannel DolbyDigital sources as necessary. You can togglebetween surround and stereo reproduction with theSURR OFF button on the front panel.Available With: Dolby Digital, PCM, and analoginputs.
Mode: SurroundCharacteristics: DTS input: discrete multichannelsurround.Dolby Digital input: discrete multichannel except forDolby Surround encoded two-channel soundtracks,which receive digital Dolby Pro Logic decoding.Surround 6.1 processing available.Dolby Surround encoded stereo (PCM or analog)input: Dolby Pro Logic.Available With: Stereo (PCM or analog) input:Dolby Pro Logic.
Mode: 3 StereoCharacteristics: Dolby 3 Stereo. Surroundchannels are intelligently downmixed into the frontleft and right channels. Useful mainly in systemsthat lack surround speakers.Available With: Multichannel Dolby Digital or DolbySurround encoded (PCM, Dolby Digital, or analog)signals.
Mode: PhantomCharacteristics: Splits the center channel of asurround soundtrack equally to the left and rightfront speakers. Useful mainly for reproducingsurround music recordings when the center speakeris noticeably inferior to the front left and rightspeakers.Available With: Multichannel Dolby Digital or DolbySurround encoded (PCM, Dolby Digital, or analog)signals.
Mode: NaturalCharacteristics: Uses DSP (digital signalprocessing) to simulate the acousticalcharacteristics of a large, open space.Available With: Stereo signals (analog or digital).
Mode: JazzCharacteristics: Uses DSP to simulate theacoustical characteristics of a small club.Available With: Stereo signals (analog or digital).
Mode: HallCharacteristics: Uses DSP to simulate theacoustical characteristics of a concert hall.

The Outlaw 1050 Instruction Manual28
Available With: Stereo signals (analog or digital).
Mode: StadiumCharacteristics: Uses DSP to simulate theacoustical characteristics of a stadium.Available With: Stereo signals (analog or digital).
SELECTING AUDIO MODES
You can switch through the available audioprocessing modes by pressing SURR MODE on thefront panel or MODE on the remote control. Whenyou select a source, the 1050 will automaticallyswitch to the last mode selected for that input.
Surround 6.1. Outlaw Audio’s proprietary Surround6.1 mode is designed to extract the center surroundchannel from Surround EX soundtracks. If you toldthe receiver during setup that a center surroundspeaker is present in your system, the 1050 willautomatically activate the Surround 6.1 mode whenit is in Surround mode and detects the Surround EXflag in a Dolby Digital input signal. However, earlySurround EX DVDs lack the autodetect flag; forthose you will have to select Surround 6.1 manually,with the SURR 6.1 button on the front panel or theremote.
In fact, you can manually invoke Surround 6.1for any multichannel Dolby Digital input or for the5.1 Channel Direct analog inputs. Because theprocessing is a type of matrix decoding, it willextract a center surround signal from the surroundchannels in those signals even if one has not beenspecifically encoded. The quality of the result willvary on non-encoded material, however. In somecases it can be quite nice, like the “magic surround”sometimes obtained when Dolby Pro Logic isapplied to an ordinary stereo signal. At other timesyou will be better off without it. For example, evensome nominally 5.1-channel soundtracks havemono surrounds, and on those , the Surround 6.1will direct all of the surround information to thecenter surround speaker.
Note also that Surround 6.1 does not decodethe center surround channel from DTS ES datastreams. It will work on signals entering through the5.1 Channel Direct inputs, however. This meansthat it can extract the DTS-ES center surround if the5.1-channel DTS decoding is performed externally,with the analog output fed to the 1050 via its six-
channel analog input. As noted above, be careful toavoid Surround 6.1 processing of inputs with monosurround channels, which on the 5.1 Channel Directinput could include output from Dolby Pro Logicdecoding.
Surround Off. Pressing SURR OFF on the frontpanel turns processing off and on. Essentially, it is aquick way to toggle between Stereo (surround off)and whatever processing mode has been selected(such as Surround). This can be fun forinvestigating how surround is (or isn’t) used invarious soundtracks.
Channel level trims. You can use the CTR TRIM,SUR TRIM, and SUB TRIM buttons, together withthe left and right arrow keys, to alter channelbalance. This is handy for making on-the-flyadjustments to taste while listening to music orwatching a movie. Just make a note of the original,calibrated settings so that you can easily return tothem.
Night mode . In Dolby Digital playback, you canactivate Night mode, which reduces the dynamicrange of the program. (Dynamic range is theloudness difference between the softest and loudestsounds.) This is useful if you want to be able tohear dialogue and other relatively soft sounds in asoundtrack clearly without loud parts, such asexplosions in an action film, becoming disturbinglyloud. Turn this feature on and off by pressingNIGHT on the front panel. When it is on, a redarrow will light next to the Night Mode legend at thefar right of the front-panel display.
TUNER SECTION
The Outlaw 1050 includes a very capableAM/FM tuner section. Here’s how to use it.
Tuning. Select the tuner and the desired radio bandby pressing FM/AM on the front panel or AM/FM onthe remote control. Once the tuner is selected,repeated presses will toggle between bands.
To tune stations, press the TUNE up/downarrow buttons on the front panel or the CHANNEL+/- keys on the remote control. Quick presses willstep the tuned frequency in increments of 10 kHzon the AM band and 100 kHz (0.1 MHz) on the FMband. Note that in North America, FM stations are

The Outlaw 1050 Instruction Manual29
spaced a minimum of 200 kHz apart at the odd-numbered frequencies (90.1 MHz, 90.3 MHz, etc.).
If you press, briefly hold, and then release oneof the tuning buttons, the 1050 will seek in thatdirection for a receivable station and stop when itfinds one.
FM modes. Pressing FM Mode on the front panelor MONO or on the remote control toggles the FMtuner between stereo and mono reception. Themono mode is useful for getting acceptable soundfrom weak stations that are excessively noisy instereo.
Entering station presets. The 1050 can hold asmany as 32 station frequency presets in memoryfor instant recall. To store a station frequency inmemory, first select the desired band and tune tothe station. Then press and hold the MEMORYbutton on the remote control until a preset number(P followed by two digits) is blinking in the display.Use the PRESET UP and DWN buttons to selectthe desired preset number. Immediately press theMEMORY button again and hold it until the displaystops flashing. The tuned station is now assigned tothe selected preset.
Recalling station presets. There are three ways toselect stations using the presets.
Direct: Enter the desired preset on the numeric padnear the top of the remote control.
Preset Tuning: Press the PRESET UP/DWNbuttons on the front panel or the remote control tostep through the station presets.
Preset Scan: Press PRESET SCAN on the frontpanel or P. SCAN on the remote control. The tuner
will advance through the preset stations, pausingbriefly on each one. When it reaches the one youwant, press the button again to stop the scan.
RECORDING
You can record from the selected source to anyrecording device connected to the TAPE REC OUTor VIDEO 1 REC OUT jacks on the Outlaw 1050'sback panel. The TAPE REC OUT jacks are audioonly; the VIDEO 1 REC OUT jacks support bothaudio and video if both connections are made. Youcan not record from the digital inputs, however.
SLEEP TIMER
You can set the 1050 to turn itself offautomatically after a specified period of time, to amaximum of 90 minutes. Press SLEEP on theremote control, and it will show 90 minutes on thefront-panel display. Each additional press of thebutton will reduce the time by 10 minutes. Whenyou’ve reached the setting you want for the timer,stop. After a few seconds the display will revert tonormal. The receiver will shut itself off after thespecified number of minutes later.
TIPS AND TRICKS
While preparing this manual, we came up witha couple of new ideas for how to use certain of theOutlaw 1050's features. We probably will come upwith more as time goes on, so be sure to check outour Tips & Tricks page periodically, atwww.outlawaudio.com.

The Outlaw 1050 Instruction Manual30
1050 Receiver Troubleshooting
NO POWER Make sure the power cord is inserted fully into a 120V/60Hz outlet.Check to be sure outlet is not controlled by a wall switch.Unplug the power cord, wait 1 minute, then reinsert the plug and push the POWER button.
NO VOLUME Check the VOLUME knob on the unit.Make sure the correct feature has been selected.Make sure the speakers are properly connected.Make sure speaker wires are not shorted together.If headphones are plugged in, disconnect them.
REMOTE CONTROL Check, and if necessary, replace batteries.DOESN'T WORK Make sure the remote control is pointed head-first at the Receiver.
Make sure the Receiver is plugged into an operating wall outlet.The remote control may be either too far away from the Receiver or not in front of the Receiver.Make sure the function selected is same as the input source.
CAN'T TUNE Repeat channel selection.RADIO STATIONS Make sure the antennas are properly connected.
NOTE: Electrostatic discharge can cause unexpected problems. For example,the unit may fail to react to operation of the buttons. In that event, you should
reset the unit by disconnecting it from the household wall outlet.

The Outlaw 1050 Instruction Manual31
Programming The Remote
SETUP
1
2 3 4 5
6 7 98
10 11 12
13 14 15
16 17 18
19 20 21
29
30
36
37
38 39 40
41 42 43
44 45 46 47
48 49 50 51
52 53 54 55
35
31
32
33 34
24
25
22
23
27
2826
The Outlaw 1050's wireless remote can be set upto control as many as seven other audio andvideo components from practically any
manufacturer of consumer electronics equipment,provided that the products have infrared remote-controlcapability. And the programming procedure is verysimple. Just enter the appropriate codes, as describedbelow, from the list that follows this chapter.
BASIC PROGRAMMING
The buttons used to select the component to becontrolled are in two rows of four just below the top ofthe remote. The one at the far right of the lower row,with a white ring around it and labeled TNR, is reservedfor the 1050 itself. You can program the remainingseven buttons to operate other components in yoursystem. They are assigned as follows: TV for televisionsets, VCR for VCRs, CBL for cable-TV boxes, SAT forsatellite-TV boxes, CD for CD players, AMP foramplifiers, and AUX for other types of devices (such asDVD players, tape decks, and so forth). Except for theTV, VCR, and AUX buttons, these assignments arefixed. That is, you can't program the CD key to operatea VCR or a cassette deck. For instructions on how toremap the TV, VCR, and AUX buttons, see the SpecialFunctions section.
Step by step. To program a component key, performthe following steps:
1) Go to the list of codes following this chapter of themanual. Find the listings for the type of component youwant to control, and then find the name of themanufacturer. There will be one or more four-digit codesnext to the manufacturer name.
2) Press the component key you want to program (TV,for example). The keys on the remote should light up,and the LED at the top should blink once.
3) Press and hold SETUP (at the top left of the remote)until the LED blinks twice, then release it.
4) Use the remote's numeric keypad to enter the four-digit code you've selected from the list. Shortly after, the

The Outlaw 1050 Instruction Manual32
LED on the remote should blink twice insuccession. If it doesn't, the remote has notaccepted the code and you should try again.
5) Test by pressing the appropriate component key,pointing the remote toward the component, andpressing the PWR key. (For components that don'tsupport remote power on/off you will have to tryanother function, such as play. Turn the componenton, load any disc or tape that might be necessaryfor it to function, and press the play key on theremote.)
If the remote accepts a code but won't operate thecomponent, check to see if the list contains multiplecodes for that product category and manufacturer. Ifso, repeat the programming steps above with theother codes, one by one, until you find one thatworks. In the event that none of them works, try thecode search procedure described later on.
PROGRAMMING COMBINATION TV/VCRS
When setting the remote up for a combinationTV/VCR, you must program the TV and VCR keysseparately.
SEARCHING FOR A CODE
If you can't get any of the codes listed for yourbrand of a particular component to work with it, or ifyour brand is not listed for that type of device, trysearching for the correct code. Here's theprocedure:
1) Press the appropriate component button on theremote (TV, for example).
2) Press and hold SETUP until the LED at the topof the remote blinks twice in succession, thenrelease the button.
3) On the numeric keypad, enter 9 - 9 - 1. The LEDwill blink twice.
4) Turn the device to be controlled on and aim theremote at it. Alternate slowly between pressingPWR and the component button you areprogramming until the component turns off.
5) Press SETUP once to lock in the code.The remote should now work with that component.
READING OUT A PROGRAMMED CODE
You can query the remote for the code programmedinto any component key. It is a good idea to do thisafter you have used the code-search proceduredescribed above, so that you can write down thecode for future reference. Here's how to do it.
1) Press the component key you want to query(VCR, for example).
2) Press and hold SETUP until the LED at the topof the remote blinks twice in succession, thenrelease it.
3) On the numeric keypad, enter 9 - 9 - 0. The LEDwill blink twice.
4) To find out the first digit of the code, press 1once on the numeric keypad and wait 3 seconds.Count the number of times the LED blinks and writeit down. That is the first digit of the code. (If the digitis 0, the LED will not blink.)
5) Repeat the above step using the 2, 3, and 4 keyson the numeric keypad. That will get you thesecond, third, and fourth digits of the code,respectively.
KEY FUNCTIONS FOR PROGRAMMEDCOMPONENTS
The primary labeling on the remote-controlkeys is for the Outlaw 1050. Many of these keys willwork differently, or not at all, for other componentsoperated from the remote. There is enough diversityin how A/V equipment functions that you may haveto experiment a little to figure out all the keymappings for some products. But here are sometypical assignments:
Pwr. Turn power on and off.
Numeric keypad. Any function involving directnumeric input, such as direct channel or frequency

The Outlaw 1050 Instruction Manual33
selection, cueing to a specific track on a CD, etc.
Enter. Send a number sequence after it has beenentered.
Mute. Silence or reduce audio output.
Last. Return to the previously selected channel.
Volume +/-. Turn volume up or down.
Channel +/-. Step up or down channels orfrequencies.
Guide. Bring up channel guide.
Exit. Exit from a menu.
Info. Display some set of information, such astuned channel and time.
Menu. Bring up a menu, such as for setup oradjustment.
Select (and surrounding arrow keys) . Menunavigation.
Cluster of six oval transport function keys.Transport functions on CD and DVD players, tapedecks, etc.
VID 1. Turn picture-in-picture (PIP) on and off.
SPECIAL FUNCTIONS
The 1050's remote can be programmed tochange the functions of the TV, VCR, and AUXcomponent keys and to change which componentcontrols the volume when TV, VCR, CBL, or SAT isselected.
Reassigning component keys. If you have, forexample, two VCRs or two CD players in yoursystem, you may want to reassign a component keyto work with it. The TV, VCR, and AUX keys can bereassigned to any of the other seven componenttypes. Here's how to do it.
1) On the remote, press and hold SETUP until theLED blinks twice, then release the button.
2) On the numeric keypad, enter 9 - 9 - 2. The LEDwill blink twice.
3) Press the key for the device type you want toassign followed by the key to which you want toassign it. For example, to turn the AUX key into asecond VCR key, you would press VCR followed byAUX. To turn it into a CD key, you would press CDfollowed by AUX. And so forth. To return a key to itsoriginal function, you would simply press it twice(for example, 9 - 9 - 2 -AUX - AUX).
When you have completed reassignment, the LEDwill blink twice. You will then need to program thekey for the device you want it to control.
Remember: Only the TV, VCR, and AUX keyscan be reassigned.
Changing volume lock. When TNR, AMP, or CD isselected, the 1050's remote will control volumethrough that component. When TV, VCR, CBL, orSAT is selected, however, the remote normally willcontrol volume via the TV set. But if you don't wantvolume control for these devices to be locked to theTV, you can lock it to another component (the 1050itself, for example). Here's how to do it:
1) On the remote, press and hold SETUP until theLED at the top blinks twice, then release.
2) On the numeric keypad, enter 9 - 9 - 3. Thenpress the key for the component you want to use tocontrol volume (such as TNR). The LED will blinktwice.
To lock volume control to the TV again, perform theabove procedure again, pressing TV at the end ofthe second step.

The Outlaw 1050 Instruction Manual34
1050 Remote Troubleshooting
Problem: LED does not blink when you press a key.Solution: Replace the remote's batteries with two new AA alkaline cells.
Problem: LED blinks when you press a key, but the target component does not respond.Solution: Make sure the remote is aimed at the component and no more than 15 feet
away from it.
Problem: Remote does not control target component, or commands do not work properly.
Solution: Try all codes listed for the brand in the component category; make sure the component can be operated with an infrared remote control.
Problem: VOLUME doesn't work on a second TV set.Solution: Follow the instructions in the section on changing volume lock, page TK.
Problem: CHANNEL +/- and LAST keys do not work for your RCA TV set.Solution: For certain RCA television sets made between 1983 and 1987, only the
original remote control will work.
Problem: Cannot use direct entry to change channels.Solution: If original remote requires you to press ENTER after keying the channel
number, press ENTER on the 1050 remote after keying the channel number.
Problem: Could not find a working code for a component, even after using the search method.
Solution: Clear the component key and repeat the search procedure. To clear the key, press and hold ENTER until the LED at the top of the remote blinks twice in succession. On the numeric keypad, enter 9 - 9 - 2. Then press the componentkey to be cleared twice.
Problem: PWR key does not turn on a Sharp or Sony combination TV/VCR.Solution: Make sure you have programmed the TV key as well as the VCR key. For
Sharp, use TV code 0093 and VCR code 0048; for Sony, use TV code 0000 and VCR code 0032.
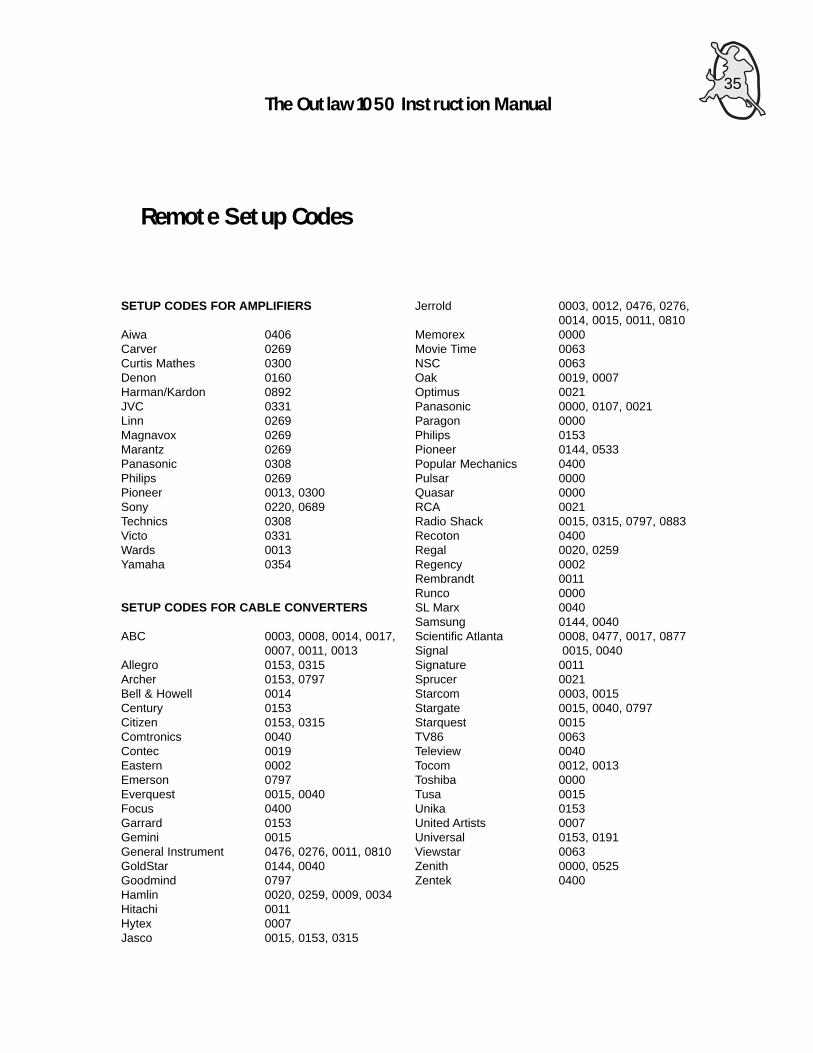
The Outlaw 1050 Instruction Manual35
SETUP CODES FOR AMPLIFIERS
Aiwa 0406Carver 0269Curtis Mathes 0300Denon 0160Harman/Kardon 0892JVC 0331Linn 0269Magnavox 0269Marantz 0269Panasonic 0308Philips 0269Pioneer 0013, 0300Sony 0220, 0689Technics 0308Victo 0331Wards 0013Yamaha 0354
SETUP CODES FOR CABLE CONVERTERS
ABC 0003, 0008, 0014, 0017,0007, 0011, 0013
Allegro 0153, 0315Archer 0153, 0797Bell & Howell 0014Century 0153Citizen 0153, 0315Comtronics 0040Contec 0019Eastern 0002Emerson 0797Everquest 0015, 0040Focus 0400Garrard 0153Gemini 0015General Instrument 0476, 0276, 0011, 0810GoldStar 0144, 0040Goodmind 0797Hamlin 0020, 0259, 0009, 0034Hitachi 0011Hytex 0007Jasco 0015, 0153, 0315
Jerrold 0003, 0012, 0476, 0276,0014, 0015, 0011, 0810
Memorex 0000Movie Time 0063NSC 0063Oak 0019, 0007Optimus 0021Panasonic 0000, 0107, 0021Paragon 0000Philips 0153Pioneer 0144, 0533Popular Mechanics 0400Pulsar 0000Quasar 0000RCA 0021Radio Shack 0015, 0315, 0797, 0883Recoton 0400Regal 0020, 0259Regency 0002Rembrandt 0011Runco 0000SL Marx 0040Samsung 0144, 0040Scientific Atlanta 0008, 0477, 0017, 0877Signal 0015, 0040Signature 0011Sprucer 0021Starcom 0003, 0015Stargate 0015, 0040, 0797Starquest 0015TV86 0063Teleview 0040Tocom 0012, 0013Toshiba 0000Tusa 0015Unika 0153United Artists 0007Universal 0153, 0191Viewstar 0063Zenith 0000, 0525Zentek 0400
Remote Setup Codes

The Outlaw 1050 Instruction Manual36
SETUP CODES FOR CD PLAYERS
Aiwa 0157, 0124Burmester 0420California Audio Lab 0029Carver 0157, 0179, 0437DKK 0000Denon 0003, 0873Emerson 0305Fisher 0179, 0174Garrard 0420, 0393Genexxa 0032, 0305Harman/Kardon 0173Hitachi 0032JVC 0072Kenwood 0028, 0037, 0190, 0681,
0826Krell 0157LXI 0305Linn 0157MCS 0029MTC 0420Magnavox 0157, 0305Marantz 0029, 0157, 0180Mission 0157NSM 0157Nikko 0174Onkyo 0101, 0868Optimus 0000, 0032, 0179, 0305,
0037, 0420, 0145, 0468,0437
Panasonic 0029, 0303Parasound 0420Philips 0157, 0626Pioneer 0032, 0305, 0468, 0244Proton 0157QED 0157Quasar 0029RCA 0179, 0305, 0053, 0764Realistic 0179, 0420, 0180Rotel 0157, 0420SAE 0157Sansui 0157, 0305Sanyo 0179Scott 0305Sears 0305Sharp 0037, 0180, 0861Sherwood 0180Sony 0000, 0185, 0490Soundesign 0145Tascam 0420Teac 0420, 0393, 0174, 0180Technics 0029, 0303
Victor 0072Wards 0157, 0053Yamaha 0036, 0187Yorx 0461
SETUP CODES FOR HOME AUTOMATION
GE 0240Lutron 0597One For All 0167Radio Shack 0240Security System 0167Universal X10 0167X10 0167
SETUP CODES FOR CASSETTE PLAYERS
Aiwa 0029, 0197Carver 0029Denon 0076Harman/Kardon 0182JVC 0244, 0273Kenwood 0070Magnavox 0029Marantz 0029Onkyo 0135, 0282Optimus 0027, 0220Panasonic 0229Philips 0029Pioneer 0027, 0220, 0099Sansui 0029Sony 0243, 0170, 0291Technics 0229Victor 0273Wards 0027Yamaha 0097, 0094
SETUP CODES FOR LASER DISC PLAYERS
Denon 0059Mitsubishi 0059NAD 0059Pioneer 0059Sony 0193, 0201
SETUP CODES FOR MISC AUDIO
Aiwa 0010, 0159, 0404Fisher 0052
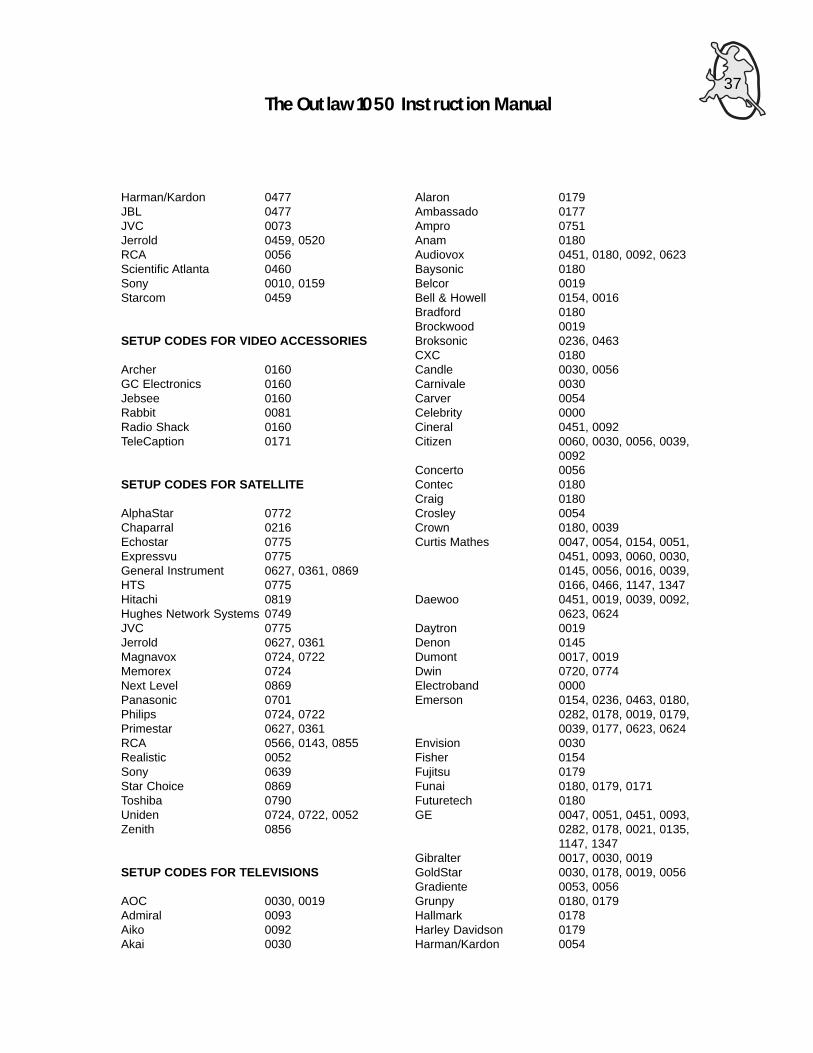
The Outlaw 1050 Instruction Manual37
Harman/Kardon 0477JBL 0477JVC 0073Jerrold 0459, 0520RCA 0056Scientific Atlanta 0460Sony 0010, 0159Starcom 0459
SETUP CODES FOR VIDEO ACCESSORIES
Archer 0160GC Electronics 0160Jebsee 0160Rabbit 0081Radio Shack 0160TeleCaption 0171
SETUP CODES FOR SATELLITE
AlphaStar 0772Chaparral 0216Echostar 0775Expressvu 0775General Instrument 0627, 0361, 0869HTS 0775Hitachi 0819Hughes Network Systems 0749JVC 0775Jerrold 0627, 0361Magnavox 0724, 0722Memorex 0724Next Level 0869Panasonic 0701Philips 0724, 0722Primestar 0627, 0361RCA 0566, 0143, 0855Realistic 0052Sony 0639Star Choice 0869Toshiba 0790Uniden 0724, 0722, 0052Zenith 0856
SETUP CODES FOR TELEVISIONS
AOC 0030, 0019Admiral 0093Aiko 0092Akai 0030
Alaron 0179Ambassado 0177Ampro 0751Anam 0180Audiovox 0451, 0180, 0092, 0623Baysonic 0180Belcor 0019Bell & Howell 0154, 0016Bradford 0180Brockwood 0019Broksonic 0236, 0463CXC 0180Candle 0030, 0056Carnivale 0030Carver 0054Celebrity 0000Cineral 0451, 0092Citizen 0060, 0030, 0056, 0039,
0092Concerto 0056Contec 0180Craig 0180Crosley 0054Crown 0180, 0039Curtis Mathes 0047, 0054, 0154, 0051,
0451, 0093, 0060, 0030,0145, 0056, 0016, 0039,0166, 0466, 1147, 1347
Daewoo 0451, 0019, 0039, 0092,0623, 0624
Daytron 0019Denon 0145Dumont 0017, 0019Dwin 0720, 0774Electroband 0000Emerson 0154, 0236, 0463, 0180,
0282, 0178, 0019, 0179,0039, 0177, 0623, 0624
Envision 0030Fisher 0154Fujitsu 0179Funai 0180, 0179, 0171Futuretech 0180GE 0047, 0051, 0451, 0093,
0282, 0178, 0021, 0135,1147, 1347
Gibralter 0017, 0030, 0019GoldStar 0030, 0178, 0019, 0056Gradiente 0053, 0056Grunpy 0180, 0179Hallmark 0178Harley Davidson 0179Harman/Kardon 0054

The Outlaw 1050 Instruction Manual38
Harvard 0180Hitachi 0145, 0056, 0151Infinity 0054Inteq 0017JBL 0054JCB 0000JVC 0053KEC 0180KTV 0180, 0030, 0039Kenwood 0030, 0019LG 0056LXI 0047, 0054, 0154, 0156,
0178Logik 0016Luxman 0056MGA 0150, 0030, 0178, 0019MTC 0060, 0030, 0019, 0056Magnavox 0054, 0030, 0179Majestic 0016Marantz 0054, 0030Matsushita 0250Megatron 0178, 0145Memorex 0154, 0250, 0150, 0178,
0056, 0016Midland 0047, 0017, 0051, 0039,
0135Minutz 0021Mitsubishi 0093, 0150, 0178, 0019Motorola 0093Multitech 0180NAD 0156, 0178, 0166NEC 0030, 0019, 0056NTC 0092Nikko 0030, 0178, 0092Onwa 0180Optimus 0154, 0250, 0166Optonica 0093, 0165Orion 0236, 0463, 0179Panasonic 0051, 0250Penney 0047, 0156, 0051, 0060,
0030, 0178, 0021, 0019,0056, 0039, 0135, 1347
Philco 0054, 0463, 0030, 0145,0019
Philips 0054Pilot 0030, 0019, 0039Pioneer 0166Portland 0019, 0039, 0092Prism 0051Proscan 0047Proton 0178, 0466Pulsar 0017, 0019Quasar 0051, 0250, 0165
RCA 0047, 0051, 0093, 0019,0090, 0135, 1047, 1147,1247, 1347
Radio Shack 0047, 0154, 0165, 0180,0030, 0178, 0019, 0056,0039
Realistic 0154, 0165, 0180, 0030,0178, 0019, 0056, 0039
Runco 0017, 0030, 0603SSS 0180, 0019Sampo 0030, 0039Samsung 0060, 0030, 0178, 0019,
0056Samsux 0039Sansei 0451Sansui 0463Sanyo 0154Scimitsu 0019Scotch 0178Scott 0236, 0180, 0178,
0019, 0179Sears 0047, 0054, 0154, 0156,
0178, 0179, 0056, 0171Semivox 0180Semp 0156Sharp 0093, 0165, 0039Shogun 0019Signature 0016Sony 0000Soundesign 0180, 0178, 0179Squareview 0171Starlite 0180Supreme 0000Sylvania 0054, 0030Symphonic 0171TMK 0178, 0056, 0177Tandy 0093Technics 0051, 0250Technol Ace 0179Techwood 0051, 0056Teknika 0054, 0180, 0150, 0060,
0019, 0179, 0056, 0016,0039, 0092
Telefunken 0056Toshiba 0154, 0156, 0060Totevision 0039Vector Research 0030Victor 0053Vidikron 0054Vidtech 0178, 0019Wards 0054, 0165, 0030, 0178,
0021, 0019, 0179, 0056,0016
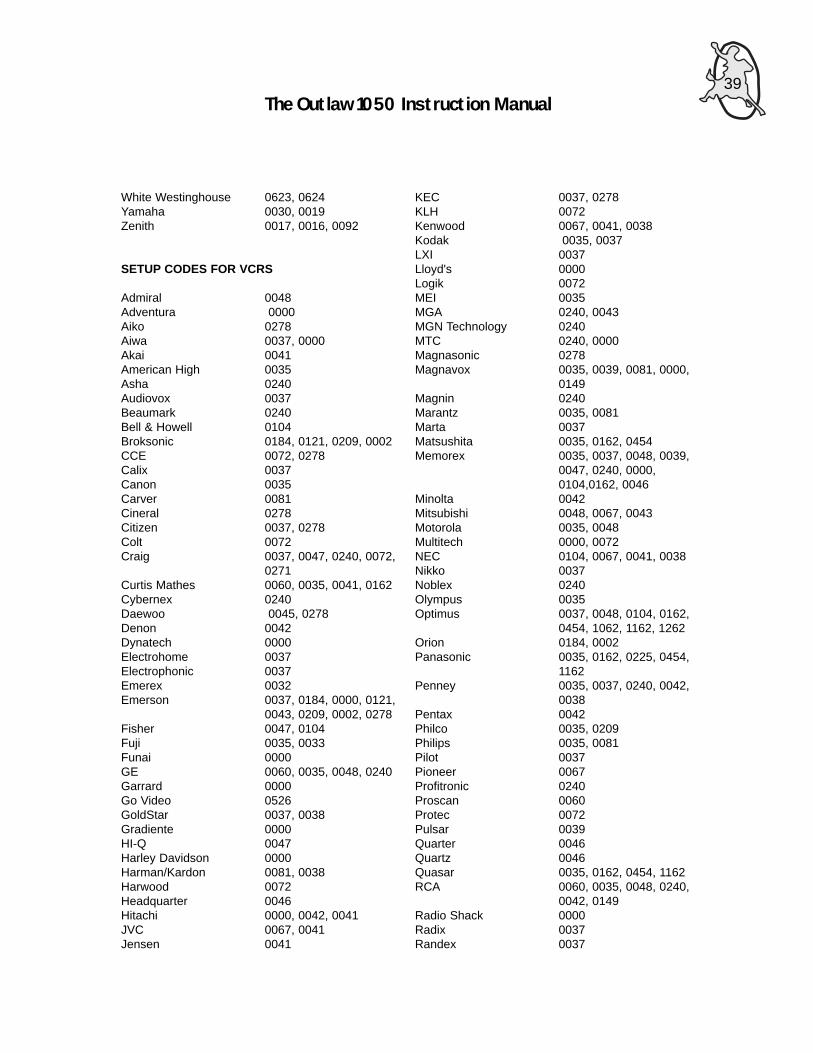
The Outlaw 1050 Instruction Manual39
White Westinghouse 0623, 0624Yamaha 0030, 0019Zenith 0017, 0016, 0092
SETUP CODES FOR VCRS
Admiral 0048Adventura 0000Aiko 0278Aiwa 0037, 0000Akai 0041American High 0035Asha 0240Audiovox 0037Beaumark 0240Bell & Howell 0104Broksonic 0184, 0121, 0209, 0002CCE 0072, 0278Calix 0037Canon 0035Carver 0081Cineral 0278Citizen 0037, 0278Colt 0072Craig 0037, 0047, 0240, 0072,
0271Curtis Mathes 0060, 0035, 0041, 0162Cybernex 0240Daewoo 0045, 0278Denon 0042Dynatech 0000Electrohome 0037Electrophonic 0037Emerex 0032Emerson 0037, 0184, 0000, 0121,
0043, 0209, 0002, 0278Fisher 0047, 0104Fuji 0035, 0033Funai 0000GE 0060, 0035, 0048, 0240Garrard 0000Go Video 0526GoldStar 0037, 0038Gradiente 0000HI-Q 0047Harley Davidson 0000Harman/Kardon 0081, 0038Harwood 0072Headquarter 0046Hitachi 0000, 0042, 0041JVC 0067, 0041Jensen 0041
KEC 0037, 0278KLH 0072Kenwood 0067, 0041, 0038Kodak 0035, 0037LXI 0037Lloyd's 0000Logik 0072MEI 0035MGA 0240, 0043MGN Technology 0240MTC 0240, 0000Magnasonic 0278Magnavox 0035, 0039, 0081, 0000,
0149Magnin 0240Marantz 0035, 0081Marta 0037Matsushita 0035, 0162, 0454Memorex 0035, 0037, 0048, 0039,
0047, 0240, 0000, 0104,0162, 0046
Minolta 0042Mitsubishi 0048, 0067, 0043Motorola 0035, 0048Multitech 0000, 0072NEC 0104, 0067, 0041, 0038Nikko 0037Noblex 0240Olympus 0035Optimus 0037, 0048, 0104, 0162,
0454, 1062, 1162, 1262Orion 0184, 0002Panasonic 0035, 0162, 0225, 0454,
1162Penney 0035, 0037, 0240, 0042,
0038Pentax 0042Philco 0035, 0209Philips 0035, 0081Pilot 0037Pioneer 0067Profitronic 0240Proscan 0060Protec 0072Pulsar 0039Quarter 0046Quartz 0046Quasar 0035, 0162, 0454, 1162RCA 0060, 0035, 0048, 0240,
0042, 0149Radio Shack 0000Radix 0037Randex 0037

The Outlaw 1050 Instruction Manual40
Realistic 0035, 0037, 0048, 0047, 0000, 0104, 0046
Runco 0039STS 0042Samsung 0240, 0045Sanky 0048, 0039Sansui 0000, 0067, 0041, 0271Sanyo 0047, 0240, 0104, 0046Scott 0184, 0045, 0121, 0043Sears 0035, 0037, 0047, 0000,
0042, 0104, 0046Semp 0045Sharp 0048Shintom 0072Shogun 0240Singe 0072Sony 0035, 0032, 0000, 0033Sylvania 0035, 0081, 0000, 0043Symphonic 0000TMK 0240Tatung 0041Teac 0000, 0041Technics 0035, 0162Teknika 0035, 0037, 0000Thomas 0000Toshiba 0045, 0043Totevision 0037, 0240Unitech 0240Vector 0045Vector Research 0038Video Concepts 0045Videosonic 0240Wards 0060, 0035, 0048, 0047,
0081, 0240, 0000, 0042,0072, 0149
White Westinghouse 0278XR-1000 0035, 0000, 0072Yamaha 0038Zenith 0039, 0000, 0033
SETUP CODES FOR DVD PLAYERS
Harman/Kardon 0582JVC 0558Kenwood 0534Magnavox 0503Mitsubishi 0521Onkyo 0503Optimus 0525Panasonic 0490Philips 0503, 0539Pioneer 0525, 0571Proscan 0522RCA 0522Samsung 0573Sony 0533Technics 0490Toshiba 0503Yamaha 0490, 0545Zenith 0503, 0591
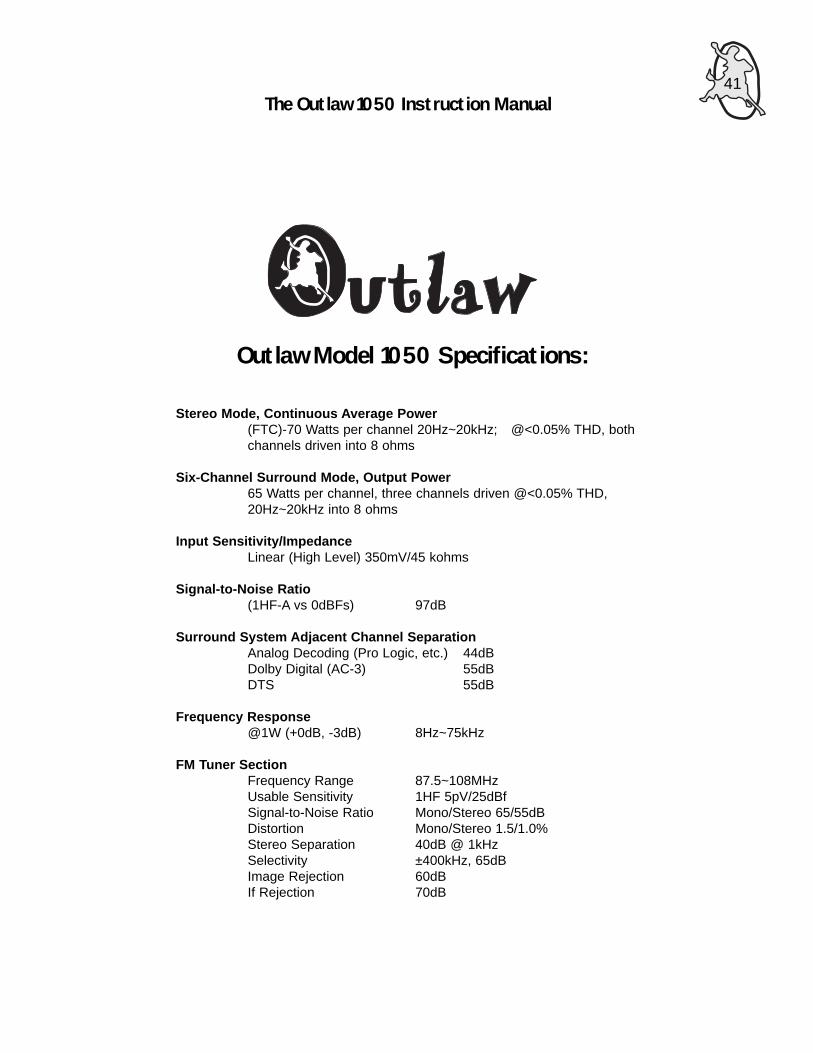
The Outlaw 1050 Instruction Manual41
Outlaw Model 1050 Specifications:
Stereo Mode, Continuous Average Power (FTC)-70 Watts per channel 20Hz~20kHz; @<0.05% THD, both channels driven into 8 ohms
Six-Channel Surround Mode, Output Power65 Watts per channel, three channels driven @<0.05% THD, 20Hz~20kHz into 8 ohms
Input Sensitivity/ImpedanceLinear (High Level) 350mV/45 kohms
Signal-to-Noise Ratio(1HF-A vs 0dBFs) 97dB
Surround System Adjacent Channel SeparationAnalog Decoding (Pro Logic, etc.) 44dBDolby Digital (AC-3) 55dBDTS 55dB
Frequency Response@1W (+0dB, -3dB) 8Hz~75kHz
FM Tuner SectionFrequency Range 87.5~108MHzUsable Sensitivity 1HF 5pV/25dBfSignal-to-Noise Ratio Mono/Stereo 65/55dBDistortion Mono/Stereo 1.5/1.0%Stereo Separation 40dB @ 1kHzSelectivity ±400kHz, 65dBImage Rejection 60dBIf Rejection 70dB

The Outlaw 1050 Instruction Manual42
AM Tuner SectionFrequency Range 520~1710kHzSignal-to-Noise Ratio 45dBUsable Sensitivity Loop 500uVDistortion 1kHz, 50% Mod 1.0%Selectivity ±10kHz, 25dB
Video SectionVideo Format NTSCInput Level/Impedance 1Vp-p/75ohmsOutput Level/Impedance 1Vp-p/75ohmsVideo Frequency Response 10Hz~8MHz (-3db)
Power RequirementAC 120V/60Hz
Power Consumption3.7W standby, 57W idle 425Wmax. (3 channels driven)
Dimensions (Max)Width 17.2 inches (437 mm)Height 6.1 inches (156 mm)Depth 14.3 inches (464 mm)Weight 36.3 lbs. (16.5 kg)
Note: All specifications subject to change without notice
“Outlaw Audio” and the Outlaw Audio logo are registered trademarks.
“Dolby”, “Pro Logic”, “AC-3”, “Dolby Digital”, “Surround EX” and the Double-D symbol aretrademarks of Dolby Laboratories.
“DTS” and “DTS-ES” are trademarks of Digital Theater Systems, Inc.

The Outlaw 1050 Instruction Manual43
Outlaw Model 1050 Limited Warranty
This warranty protects the owner of the Outlaw 1050 Receiver (the PRODUCT) for TWO (2)years from the date of purchase.
This warranty covers all defects in material and workmanship with the following specificexceptions. These are:
• Damage caused by improper installation or adjustment• Damage caused by accident, unreasonable use or neglect• Damage from failure to follow instructions contained in this Owner’s Manual• Damage from the performance of repairs by someone not authorized by Outlaw Audio• Any unit on which the serial number has been effaced, modified, or removed• Damage occurring during shipment• Units which have been altered or modified in design, appearance or construction
This warranty covers only the actual defects within the PRODUCT itself. IT DOES NOTcover costs of installation in (or removal from) a fixed installation, or normal set-up, claimsbased on any misrepresentation by the seller, or performance variations resulting frominstallation related circumstances such as signal quality, AC power or incompatibilities withspeakers and/or other system components.
During the warranty period, Outlaw Audio will, at its option, either repair the defect, orreplace the defective product, or the defective parts, or components thereof at no charge tothe owner for parts and labor covered by this warranty. If necessary repairs are not coveredby this warranty, or if a unit is examined which is not in need of repair, you will be chargedfor the repairs and/or the examination. If non-warrantied repairs are needed, we will notifyyou of the estimated cost and ask for your authorization to perform said repairs.
You must pay shipping charges incurred in getting your Product to the factory. We will paythe return shipping charges if the repairs are covered by the warranty. Please save theoriginal shipping cartons as the unit MUST be returned in the original carton and packing.(Replacement cartons are available at a modest charge.)

The Outlaw 1050 Instruction Manual44
If your product needs service, please notify us at:
Outlaw Audio Inc.18 Denbow Road
Durham, NH 03824Tel. (603) 868-5557Fax (603) 868-6634
ATTN: Service Department
You will need to present the original bill of sale to establish the date of purchase. In theevent that the proof of purchase cannot be established with the original receipt, the warrantyperiod shall be determined by the earliest date of manufacture shown on the unit, providedthat the serial number label has not been altered in any manner, or by our records relating tothat serial number.
In the event that you wish to return your Outlaw Model 1050 receiver back to us, for anyreason, please call to arrange for a Return Authorization Number. This will insure that yourproblem is discussed with a service technician who will determine if there is a quick solutionto your problem.
Outlaw Audio shall not be liable for, or in any way responsible for, any incidental orconsequential damages of any kind. Some states do not allow limitations on how long animplied warranty lasts and/or do not allow the exclusion of incidental or consequentialdamages, therefore, the limitations and exclusions stated herein may not apply to you. Thiswarranty gives you specific legal rights, and you may also have other rights which vary fromstate to state.
THERE ARE NO WARRANTIES GIVEN BY OUTLAW AUDIO WHICH EXTEND BEYONDTHE DESCRIPTION GIVEN HEREIN. ANY IMPLIED WARRANTIES OF FITNESS FORPURPOSE SOLD, MERCHANTABILITY, DESCRIPTION, QUALITY OR ANY OTHERMATTERS ARE LIMITED TO THE TERMS OF THE EXPRESSED LIMITED WARRANTYSTATED HEREIN.
Products are sold on the basis of specifications applicable at the time of sales. Outlaw Audioshall have no obligation to modify products once they have been sold.
This warranty is applicable only in the United States. For applicability in other countries, please call Outlaw Audio, Inc.

The Outlaw 1050 Instruction Manual45
1050 ReceiverInstallation
Notes