OTS DORMITORY TRAINING MANUAL - Air Force Journey€¦ · OTS DORMITORY TRAINING MANUAL Dormitory...
31
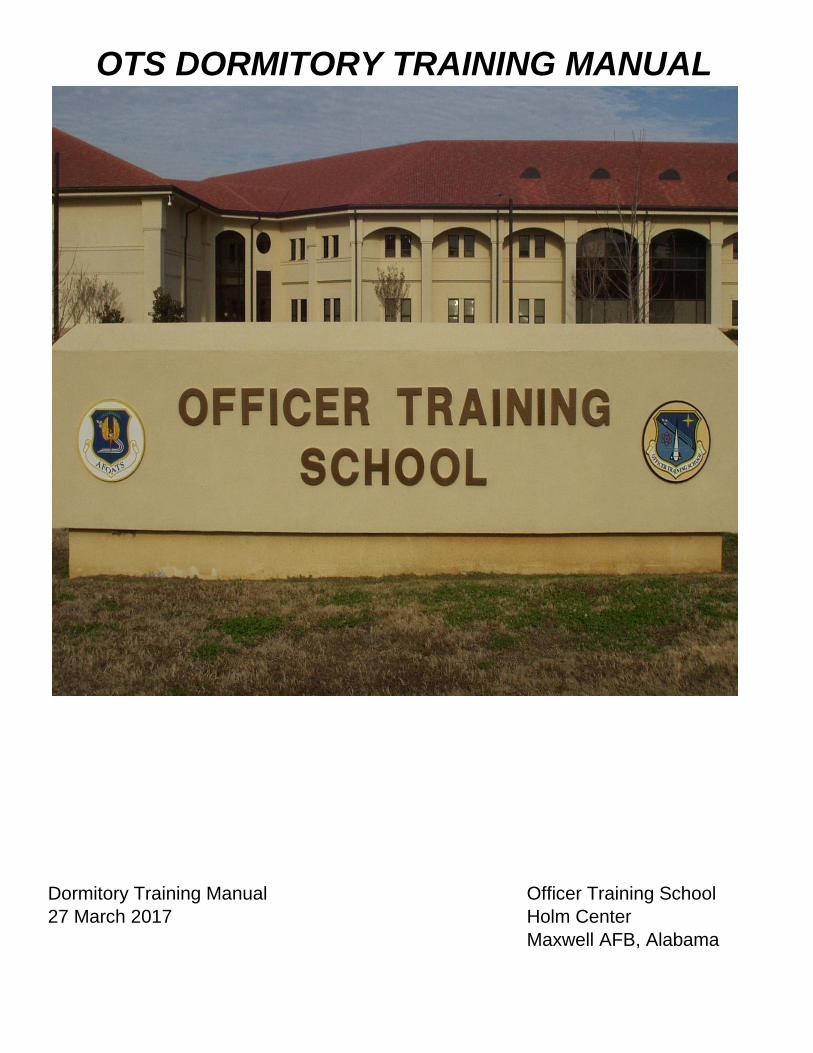
OTS DORMITORY TRAINING MANUAL Dormitory Training Manual Officer Training School 27 March 2017 Holm Center Maxwell AFB, Alabama
Transcript of OTS DORMITORY TRAINING MANUAL - Air Force Journey€¦ · OTS DORMITORY TRAINING MANUAL Dormitory...
OTS DORMITORY TRAINING MANUAL
Dormitory Training Manual Officer Training School
27 March 2017 Holm Center
Maxwell AFB, Alabama
DORMITORY TRAINING MANUAL TABLE OF CONTENTS
Chapter Page
1. Dormitory Introduction…………………………………………………………………………..1
2. General Dormitory Maintenance……………………………………………………………….2
3. Common/Personal Areas…………………………………………………………………….....3
4. Closets...……………………………………………………………….……….……….………..8
5. Beds………………..……………………………………………..………………………………15
6. Bed Unit Drawers….…………………………………………………………………………….18
7. Five Drawer Dresser………….…………………………………………….…………………...22
8. Desk……………………………………………………………………………………………….27

1
CHAPTER 1
DORMITORY INTRODUCTION
This manual contains information you will need to successfully complete dorm arrangement. Your
Military Training Instructor (MTI) will teach you the basics of this manual.
DO NOT WRITE OR MARK IN THIS MANUAL.
Occupant Locations
For all programs (23 TRS, 24 TRS, Det 12), occupant one is assigned the bottom bunk and all
furnishings closest the room entrance door. Each program maintains different dorm room layouts
and different occupant capacities; therefore, it is important you review the occupant assignment
pictures of chapter 3 for your specific program and number of occupants.
Furniture Placement All furniture should be two inches from the walls. Desk will be evenly spaced and centered from wall
to wall. Exception: Beds will be grounded to the five drawer dressers.
Inspection/Routine Order During the hours of 0800-1700 Monday through Friday and 0800-1300 on Saturday, your room is
required to be in inspection order as outlined by the standards in this manual. At all other times,
your room will be in routine order, meaning neat and clean.
During inspection order, doors must remain closed unless you are in your room. Windows, blinds
and drapes will be down and closed to conserve energy. Closet, bathroom, and shower doors will
be open.
During routine order, doors may be closed unless a member of the opposite gender is in the room
(Refer to OTS Manual 36-2604). During lights out, the door will be closed and locked and windows,
blinds and drapes will be down and closed.
Responsibilities Your MTI is your primary point of contact (POC) for all dormitory issues. Route all dormitory related
issues using your chain of command through your Standardization Officer (Stand-O). All dormitory
discrepancies will be reported to your designated Civil Engineering (CE) Officer.
The Cadet Wing Commander or Officer Trainee Group Commander is responsible for ensuring no
offensive or demeaning items are displayed in the dormitories. All squadron awards must be in
good taste. Hanging items on doors, door jambs, and walls is not authorized.
2
CHAPTER 2
GENERAL DORMITORY MAINTENANCE
General Instructions During inspection order (0800-1700) and lights out, all wastebaskets must be empty. All surrounding
dormitory grounds will be free of debris and trash. It is everyone’s responsibility to pick up trash.
Missing or broken light bulbs will be replaced. Report all broken or defective equipment through the
CW chain of command to the CE Officer. A work order log is kept by CQ, CE officer will report
discrepancies to the facility manager. All occupants of a room are responsible for cleaning the
common areas as described in Chapter 3 of a room.
Stairwells/Hallways
Stairwells, landings, and hallways must be dusted, swept and mopped.
Utility Closet Utility closets must be swept, mopped and dusted. All equipment and cleaning supplies will be neatly
arranged. Authorized chemical items stored in the utility closet will be labeled. These items will be
listed in the MSDS book. Inspect all equipment for safety hazards and report discrepancies.
Dayroom/Day area Dayroom must be dusted, swept, and mopped. Ensure all furnishings are free of safety hazards.
Ensure only authorized items (TV, DVD player, remote, educational/reading materials). Food
may only be stored in the dayroom area, NOT IN DORM ROOM.
CQ Office Office must be vacuumed and dusted. Ensure all furnishings are free of safety hazards, e.g. frayed
cords and holes. Ensure all books and furnishings are arranged in an orderly fashion. Ensure only
authorized items are stored in CQ, it is not a storage for excess items. Empty all trash at the end of
your shift.
Laundry Rooms Laundry rooms must be dusted, swept, and mopped. Washer lids remain open when not in use.
Inspect all equipment for safety hazards. Empty the trash and dryer lint traps. The door to the
laundry room must stay closed. No clothes are to be left in machines overnight or during duty day.
Any items must be laundry-related and should be marked with name/flight or “common use”.
Common Use Latrine Room must be wiped down, dusted, swept, and mopped. Clean sink and toilet. Toilet seat stays up.
Remove spots from mirror. Empty the trash. Restock soap, toilet paper, paper towels etc.
Bulletin Board Display All items will have each corner fastened to the bulletin board with a thumbtack/staple. All items must
be professional in nature. Remove items when expired or no longer needed.
3
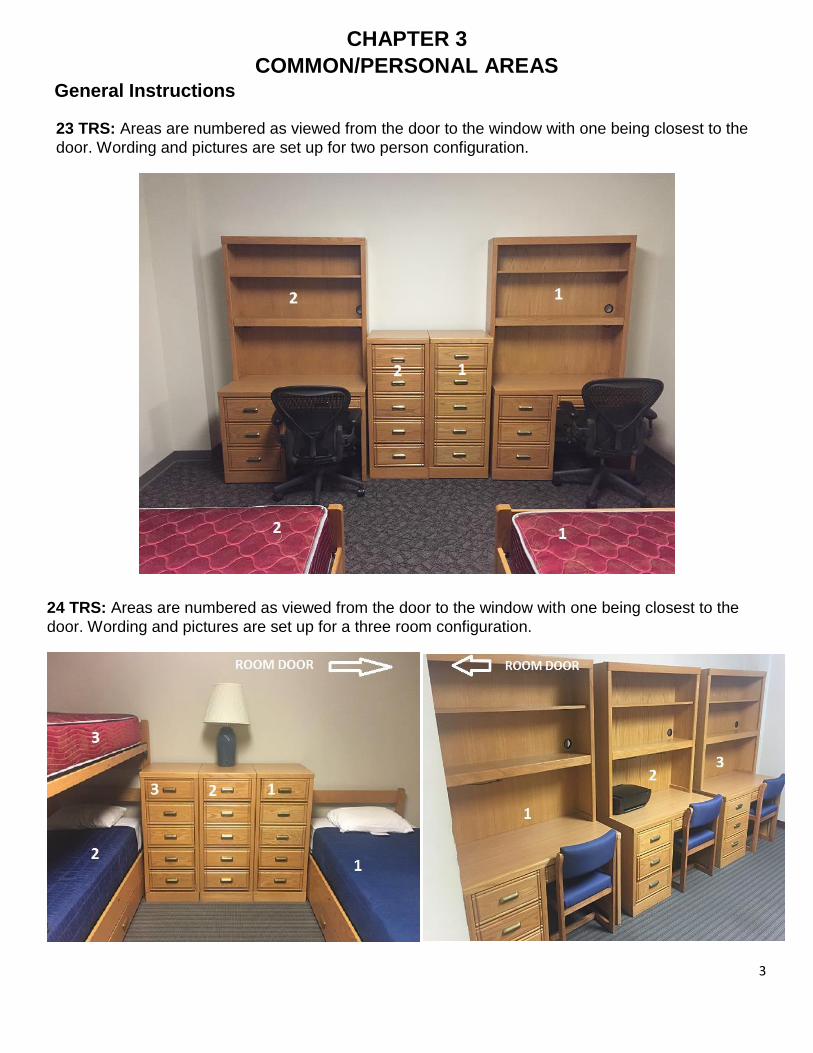
CHAPTER 3
COMMON/PERSONAL AREAS General Instructions
23 TRS: Areas are numbered as viewed from the door to the window with one being closest to the
door. Wording and pictures are set up for two person configuration.
24 TRS: Areas are numbered as viewed from the door to the window with one being closest to the
door. Wording and pictures are set up for a three room configuration.
4
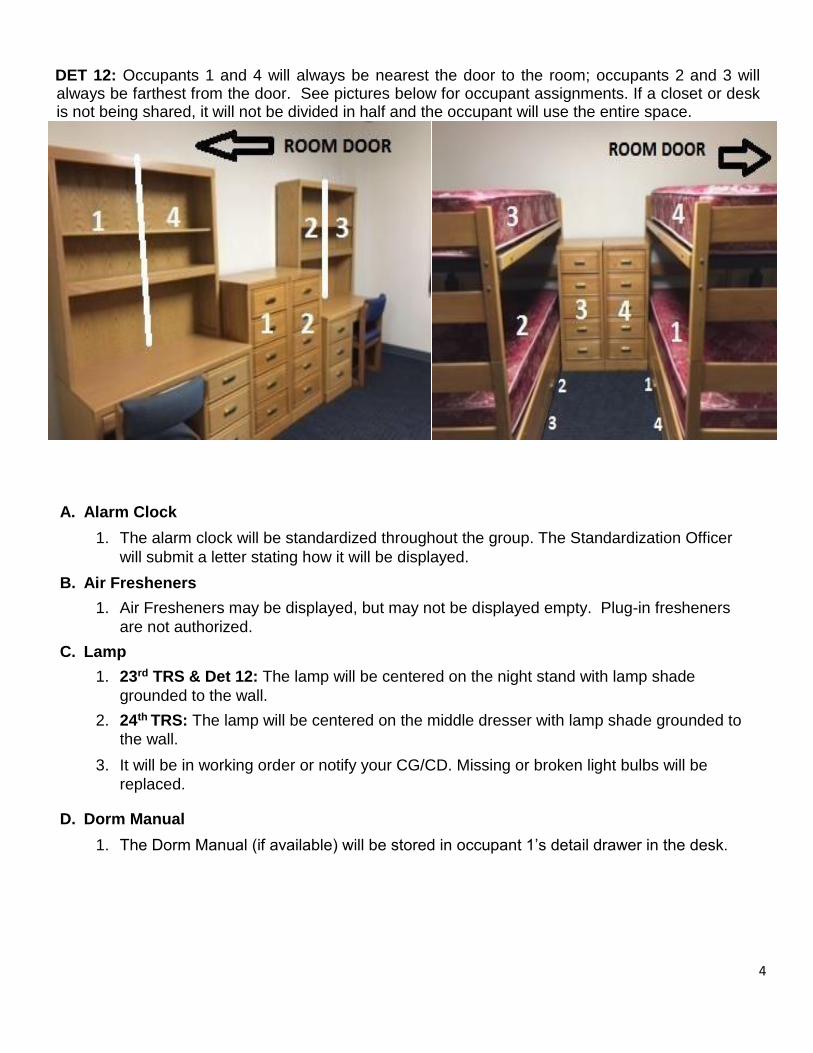
DET 12: Occupants 1 and 4 will always be nearest the door to the room; occupants 2 and 3 will always be farthest from the door. See pictures below for occupant assignments. If a closet or desk is not being shared, it will not be divided in half and the occupant will use the entire space.
A. Alarm Clock
1. The alarm clock will be standardized throughout the group. The Standardization Officer
will submit a letter stating how it will be displayed.
B. Air Fresheners
1. Air Fresheners may be displayed, but may not be displayed empty. Plug-in fresheners
are not authorized.
C. Lamp
1. 23rd TRS & Det 12: The lamp will be centered on the night stand with lamp shade
grounded to the wall.
2. 24th TRS: The lamp will be centered on the middle dresser with lamp shade grounded to
the wall.
3. It will be in working order or notify your CG/CD. Missing or broken light bulbs will be
replaced.
D. Dorm Manual
1. The Dorm Manual (if available) will be stored in occupant 1’s detail drawer in the desk.
5
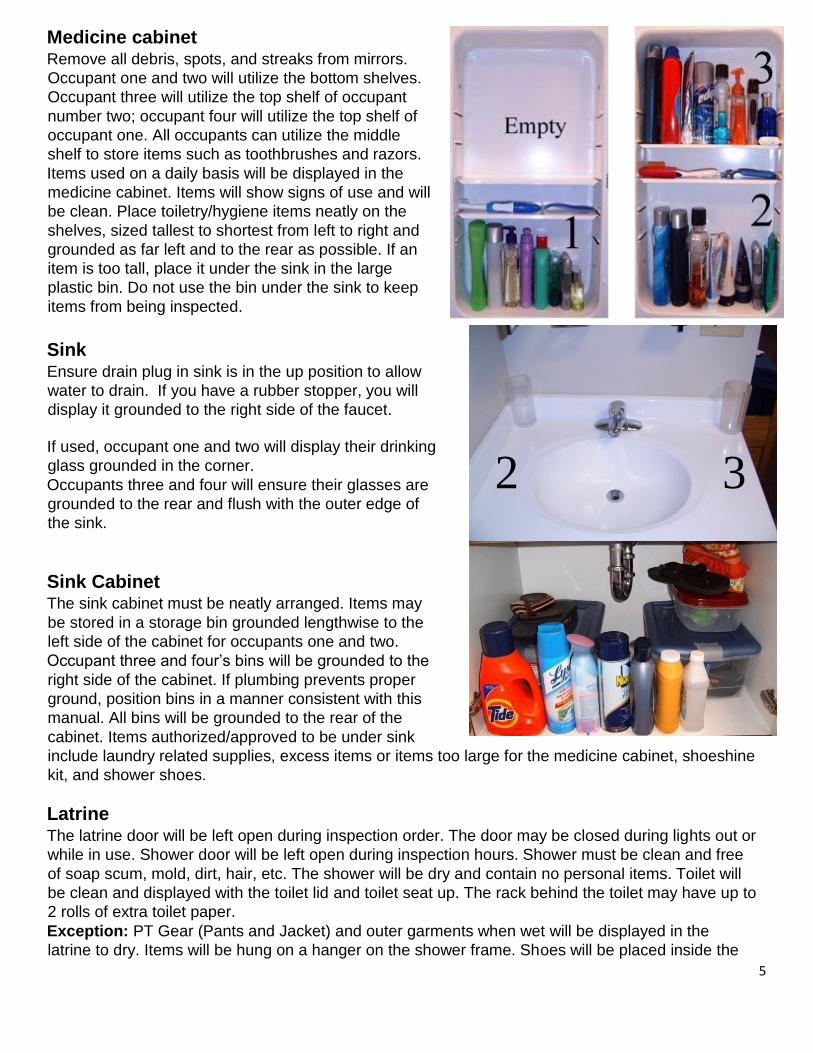
Medicine cabinet Remove all debris, spots, and streaks from mirrors.
Occupant one and two will utilize the bottom shelves.
Occupant three will utilize the top shelf of occupant
number two; occupant four will utilize the top shelf of
occupant one. All occupants can utilize the middle
shelf to store items such as toothbrushes and razors.
Items used on a daily basis will be displayed in the
medicine cabinet. Items will show signs of use and will
be clean. Place toiletry/hygiene items neatly on the
shelves, sized tallest to shortest from left to right and
grounded as far left and to the rear as possible. If an
item is too tall, place it under the sink in the large
plastic bin. Do not use the bin under the sink to keep
items from being inspected.
Sink Ensure drain plug in sink is in the up position to allow
water to drain. If you have a rubber stopper, you will
display it grounded to the right side of the faucet.
If used, occupant one and two will display their drinking
glass grounded in the corner.
Occupants three and four will ensure their glasses are
grounded to the rear and flush with the outer edge of
the sink.
Sink Cabinet The sink cabinet must be neatly arranged. Items may
be stored in a storage bin grounded lengthwise to the
left side of the cabinet for occupants one and two.
Occupant three and four’s bins will be grounded to the
right side of the cabinet. If plumbing prevents proper
ground, position bins in a manner consistent with this
manual. All bins will be grounded to the rear of the
cabinet. Items authorized/approved to be under sink
include laundry related supplies, excess items or items too large for the medicine cabinet, shoeshine
kit, and shower shoes.
Latrine The latrine door will be left open during inspection order. The door may be closed during lights out or
while in use. Shower door will be left open during inspection hours. Shower must be clean and free
of soap scum, mold, dirt, hair, etc. The shower will be dry and contain no personal items. Toilet will
be clean and displayed with the toilet lid and toilet seat up. The rack behind the toilet may have up to
2 rolls of extra toilet paper.
Exception: PT Gear (Pants and Jacket) and outer garments when wet will be displayed in the
latrine to dry. Items will be hung on a hanger on the shower frame. Shoes will be placed inside the
2 3
6
shower. Gloves will be hung over the opposite side of the bar that the towel is hung on. All other
gear (shirt, shorts, underwear and socks) will be properly displayed in the laundry bag. All items will
be properly displayed prior to the next duty day.
Feminine hygiene cans are in rooms occupied by females only and are displayed to the left of the
toilet (as viewed facing the toilet), grounded to the rear and left walls. The feminine hygiene can
must be lined with a trash bag and must be empty during inspection order (0800-1700).
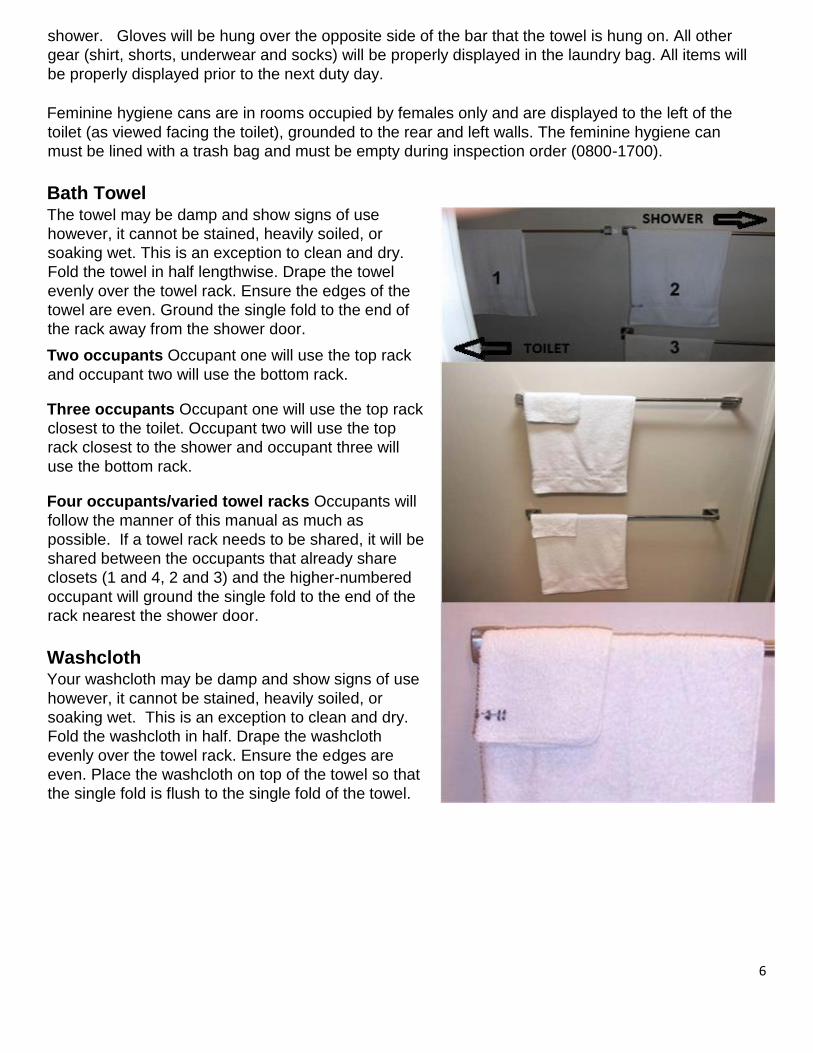
Bath Towel The towel may be damp and show signs of use
however, it cannot be stained, heavily soiled, or
soaking wet. This is an exception to clean and dry.
Fold the towel in half lengthwise. Drape the towel
evenly over the towel rack. Ensure the edges of the
towel are even. Ground the single fold to the end of
the rack away from the shower door.
Two occupants Occupant one will use the top rack
and occupant two will use the bottom rack.
Three occupants Occupant one will use the top rack
closest to the toilet. Occupant two will use the top
rack closest to the shower and occupant three will
use the bottom rack.
Four occupants/varied towel racks Occupants will
follow the manner of this manual as much as
possible. If a towel rack needs to be shared, it will be
shared between the occupants that already share
closets (1 and 4, 2 and 3) and the higher-numbered
occupant will ground the single fold to the end of the
rack nearest the shower door.
Washcloth Your washcloth may be damp and show signs of use
however, it cannot be stained, heavily soiled, or
soaking wet. This is an exception to clean and dry.
Fold the washcloth in half. Drape the washcloth
evenly over the towel rack. Ensure the edges are
even. Place the washcloth on top of the towel so that
the single fold is flush to the single fold of the towel.
7
Hand Towel (Optional)
Ground the single fold to the side closest to the
bathroom door with the edges even. Occupants
three and four will ground the single fold closest the
mirror. Your towel may show signs of use however,
it cannot be heavily stained, soiled or soaking wet.
This is an exception to clean and dry. Use the towel
rack by your sink. Drape the towel evenly over the
towel rack, folded in half. You will not display a full
size towel.
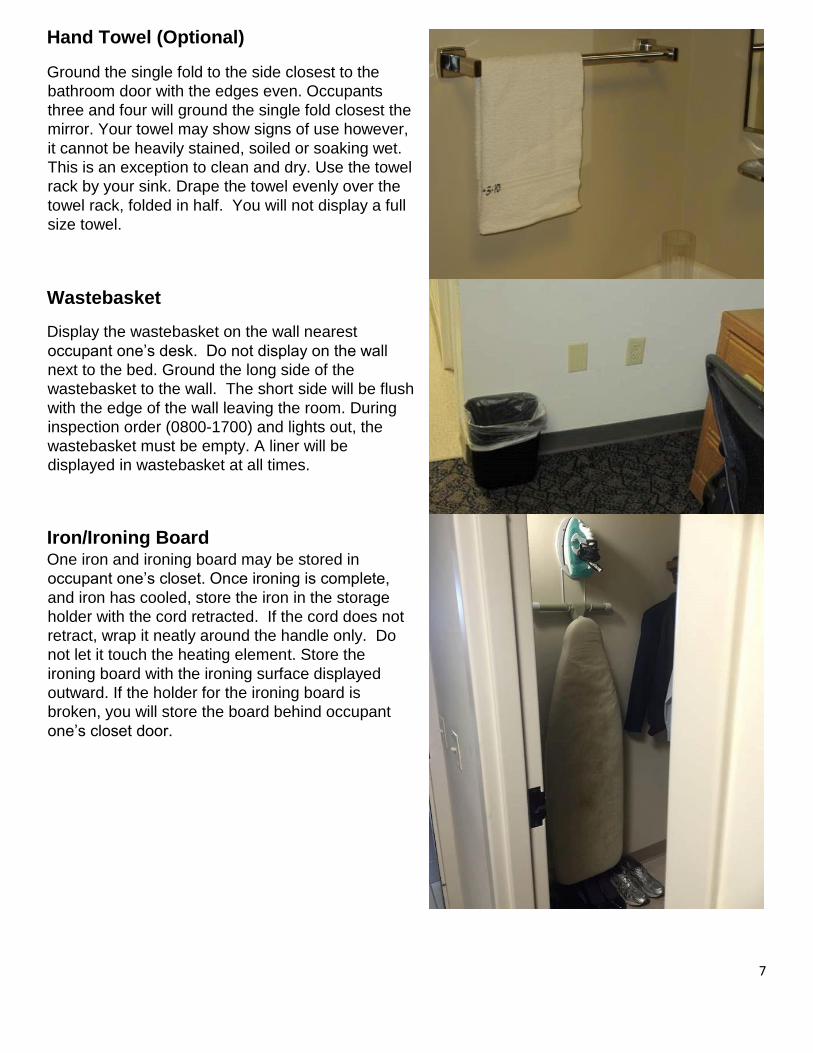
Wastebasket
Display the wastebasket on the wall nearest
occupant one’s desk. Do not display on the wall
next to the bed. Ground the long side of the
wastebasket to the wall. The short side will be flush
with the edge of the wall leaving the room. During
inspection order (0800-1700) and lights out, the
wastebasket must be empty. A liner will be
displayed in wastebasket at all times.
Iron/Ironing Board One iron and ironing board may be stored in
occupant one’s closet. Once ironing is complete,
and iron has cooled, store the iron in the storage
holder with the cord retracted. If the cord does not
retract, wrap it neatly around the handle only. Do
not let it touch the heating element. Store the
ironing board with the ironing surface displayed
outward. If the holder for the ironing board is
broken, you will store the board behind occupant
one’s closet door.
8
CHAPTER 4 CLOSET
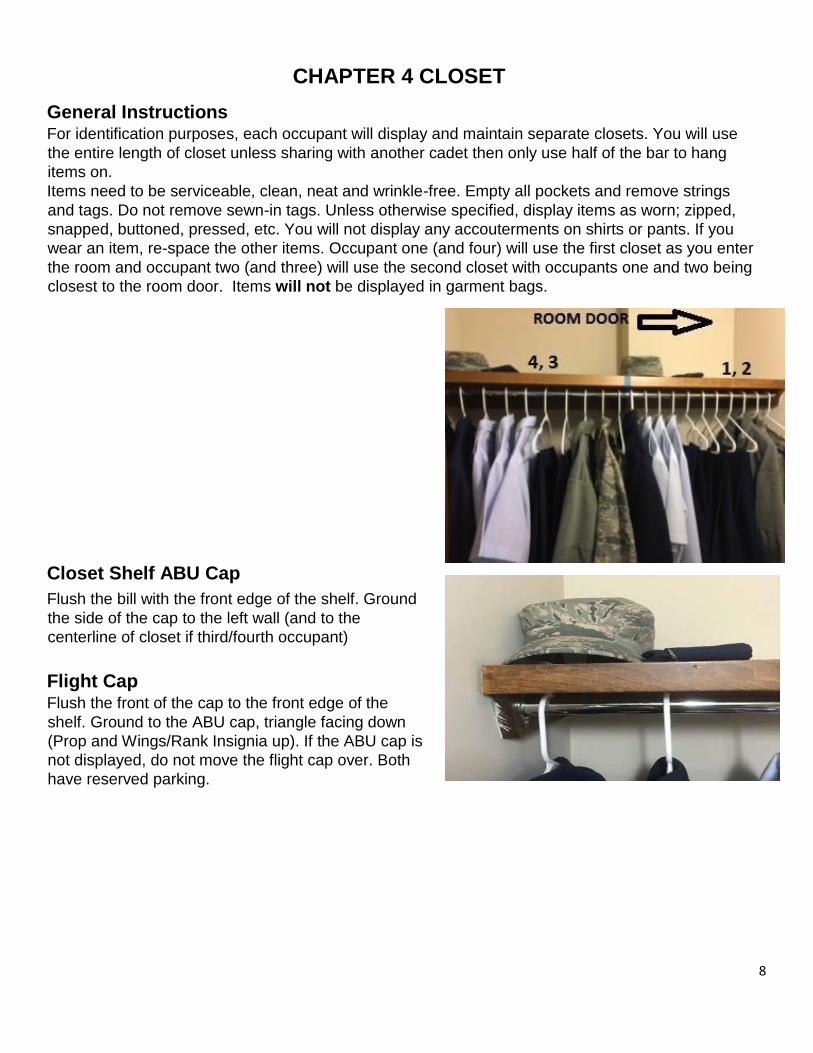
General Instructions For identification purposes, each occupant will display and maintain separate closets. You will use
the entire length of closet unless sharing with another cadet then only use half of the bar to hang
items on.
Items need to be serviceable, clean, neat and wrinkle-free. Empty all pockets and remove strings
and tags. Do not remove sewn-in tags. Unless otherwise specified, display items as worn; zipped,
snapped, buttoned, pressed, etc. You will not display any accouterments on shirts or pants. If you
wear an item, re-space the other items. Occupant one (and four) will use the first closet as you enter
the room and occupant two (and three) will use the second closet with occupants one and two being
closest to the room door. Items will not be displayed in garment bags.
Closet Shelf ABU Cap
Flush the bill with the front edge of the shelf. Ground
the side of the cap to the left wall (and to the
centerline of closet if third/fourth occupant)
Flight Cap Flush the front of the cap to the front edge of the
shelf. Ground to the ABU cap, triangle facing down
(Prop and Wings/Rank Insignia up). If the ABU cap is
not displayed, do not move the flight cap over. Both
have reserved parking.
9
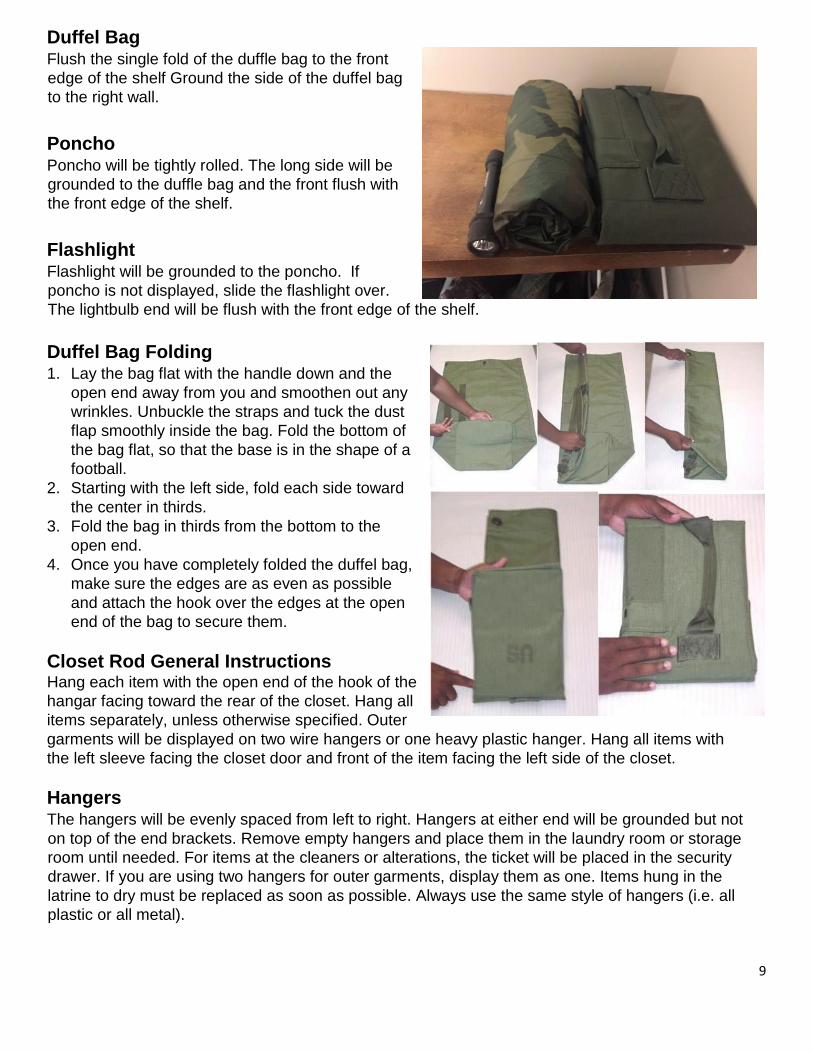
Duffel Bag Flush the single fold of the duffle bag to the front
edge of the shelf Ground the side of the duffel bag
to the right wall.
Poncho Poncho will be tightly rolled. The long side will be
grounded to the duffle bag and the front flush with
the front edge of the shelf.
Flashlight Flashlight will be grounded to the poncho. If
poncho is not displayed, slide the flashlight over.
The lightbulb end will be flush with the front edge of the shelf.
Duffel Bag Folding 1. Lay the bag flat with the handle down and the
open end away from you and smoothen out any
wrinkles. Unbuckle the straps and tuck the dust
flap smoothly inside the bag. Fold the bottom of
the bag flat, so that the base is in the shape of a
football.
2. Starting with the left side, fold each side toward
the center in thirds.
3. Fold the bag in thirds from the bottom to the
open end.
4. Once you have completely folded the duffel bag,
make sure the edges are as even as possible
and attach the hook over the edges at the open
end of the bag to secure them.
Closet Rod General Instructions Hang each item with the open end of the hook of the
hangar facing toward the rear of the closet. Hang all
items separately, unless otherwise specified. Outer
garments will be displayed on two wire hangers or one heavy plastic hanger. Hang all items with
the left sleeve facing the closet door and front of the item facing the left side of the closet.
Hangers The hangers will be evenly spaced from left to right. Hangers at either end will be grounded but not
on top of the end brackets. Remove empty hangers and place them in the laundry room or storage
room until needed. For items at the cleaners or alterations, the ticket will be placed in the security
drawer. If you are using two hangers for outer garments, display them as one. Items hung in the
latrine to dry must be replaced as soon as possible. Always use the same style of hangers (i.e. all
plastic or all metal).
10
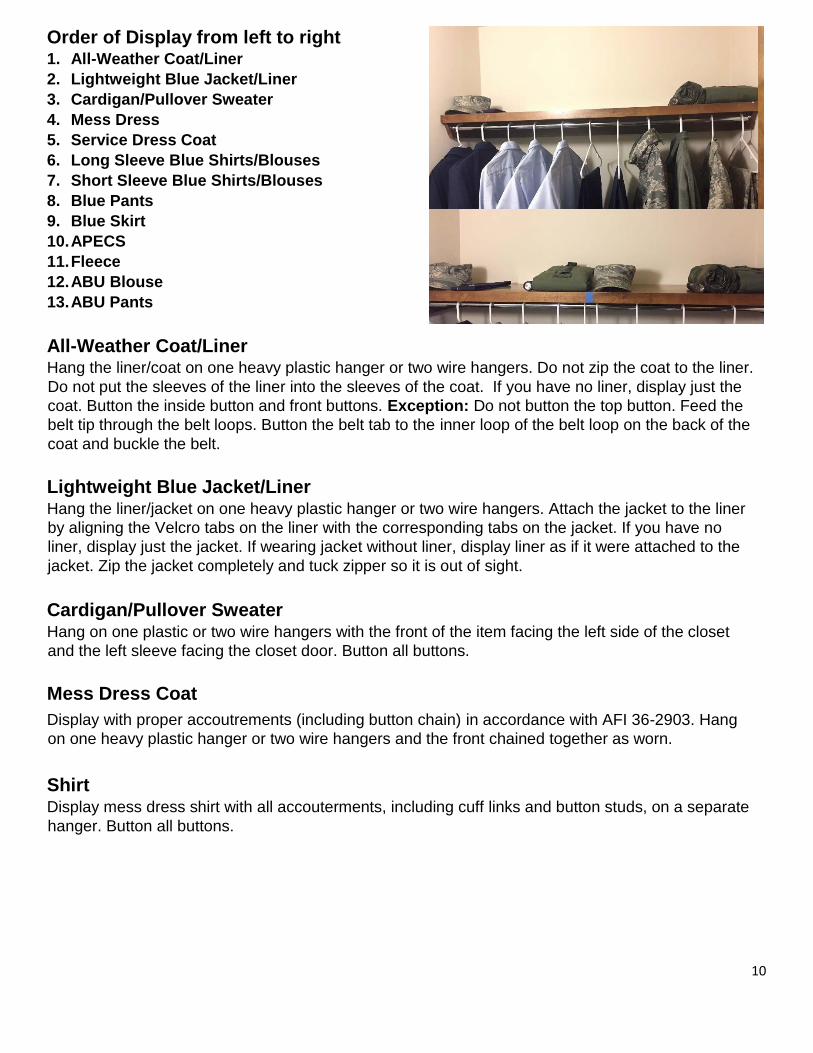
Order of Display from left to right 1. All-Weather Coat/Liner
2. Lightweight Blue Jacket/Liner
3. Cardigan/Pullover Sweater
4. Mess Dress
5. Service Dress Coat
6. Long Sleeve Blue Shirts/Blouses
7. Short Sleeve Blue Shirts/Blouses
8. Blue Pants
9. Blue Skirt
10. APECS
11. Fleece
12. ABU Blouse
13. ABU Pants
All-Weather Coat/Liner Hang the liner/coat on one heavy plastic hanger or two wire hangers. Do not zip the coat to the liner.
Do not put the sleeves of the liner into the sleeves of the coat. If you have no liner, display just the
coat. Button the inside button and front buttons. Exception: Do not button the top button. Feed the
belt tip through the belt loops. Button the belt tab to the inner loop of the belt loop on the back of the
coat and buckle the belt.
Lightweight Blue Jacket/Liner Hang the liner/jacket on one heavy plastic hanger or two wire hangers. Attach the jacket to the liner
by aligning the Velcro tabs on the liner with the corresponding tabs on the jacket. If you have no
liner, display just the jacket. If wearing jacket without liner, display liner as if it were attached to the
jacket. Zip the jacket completely and tuck zipper so it is out of sight.
Cardigan/Pullover Sweater Hang on one plastic or two wire hangers with the front of the item facing the left side of the closet
and the left sleeve facing the closet door. Button all buttons.
Mess Dress Coat
Display with proper accoutrements (including button chain) in accordance with AFI 36-2903. Hang
on one heavy plastic hanger or two wire hangers and the front chained together as worn.
Shirt Display mess dress shirt with all accouterments, including cuff links and button studs, on a separate
hanger. Button all buttons.

11
Trousers Display mess dress trousers on a separate hanger. Button all buttons, zip the fly and fasten the
clasp. Place the legs inseam to inseam and drape over the hanger bar, with the cuffs and waistband
as even as possible. Hang with the fly facing the closet door. Waistband hangs on the left side of the
hanger, legs to the right. Display all pants next to each other.
Skirts Display mess dress skirt on a separate hanger. Button and zip skirt. Attach the skirt to the left side of
the hanger shoulders, with two safety pins or clothes pins. Hang the skirt so the front faces the left
side of the closet. The side slit will face the closet door. Display all skirts next to each other.
Service Dress Coat Display completely buttoned with proper accouterments on coat (brushed silver name tag, U.S. insignias, ribbons, and functional badge. These items will be displayed IAW AFI 36-2903). Student rank will not be displayed while coat is in closet. Exception: Commissioned Officers will display rank on coat in accordance with AFI 36-2903.
Long Sleeve Blue Shirts/Blouses Button all buttons. Display all long sleeve shirts/blouses next to each other.
Short Sleeve Blue Shirts/Blouses Button all buttons except the top button. Display all short sleeve shirts/blouses next to each other.
Blue Pants Button all buttons, (inside button for males) zip the fly and fasten the clasp. Place the legs inseam to
inseam and drape over the hanger bar, with the cuffs and waistband as even as possible. Hang with
the fly facing closet door. Waistband hangs on the left side of the hanger, legs to the right.
Blue Skirts Button and zip skirt. Attach the skirt to the left side of the hanger shoulders, with two safety pins or
clothes pins. Hang the skirt so the front faces the left side of the closet. The zipper in the back will
face to the right.
APECS Hang the APECS jacket on one heavy plastic hanger or two wire hangers. Adjust the drawstrings so
they do not hang below the bottom of the jacket. Zip all the way to the top. Tuck the zipper string
under the material out of sight. Fasten all hook and loop fasteners, on the back of the collar and on
cuffs. Snap all snaps except the top snap. Ensure pockets, if applicable, are empty and snapped.
Exception: 23d TRS will display APECS with appropriate rank insignia as worn.
12
Fleece Hang the Fleece on one plastic hanger or two wire hangers. Zip all the way to the top. Ensure
pockets are empty. No items will be displayed on fleece. Tapes will be stored in accoutrement
drawer.
Exception: 23d TRS will display name/US Air Force tapes and appropriate rank insignia as worn.
ABU Blouse Button all buttons except the top button, this includes the buttons on the sleeves. Display all ABU
blouses next to each other with sleeves down, not rolled.
ABU Pants Button all buttons. Place the legs inseam to inseam and drape over the hanger bar, with the cuffs
and waistband as even as possible. Hang with the fly facing the closet
door. Waistband hangs on the left side of the hanger, legs to the right.
Display all pants next to each other.
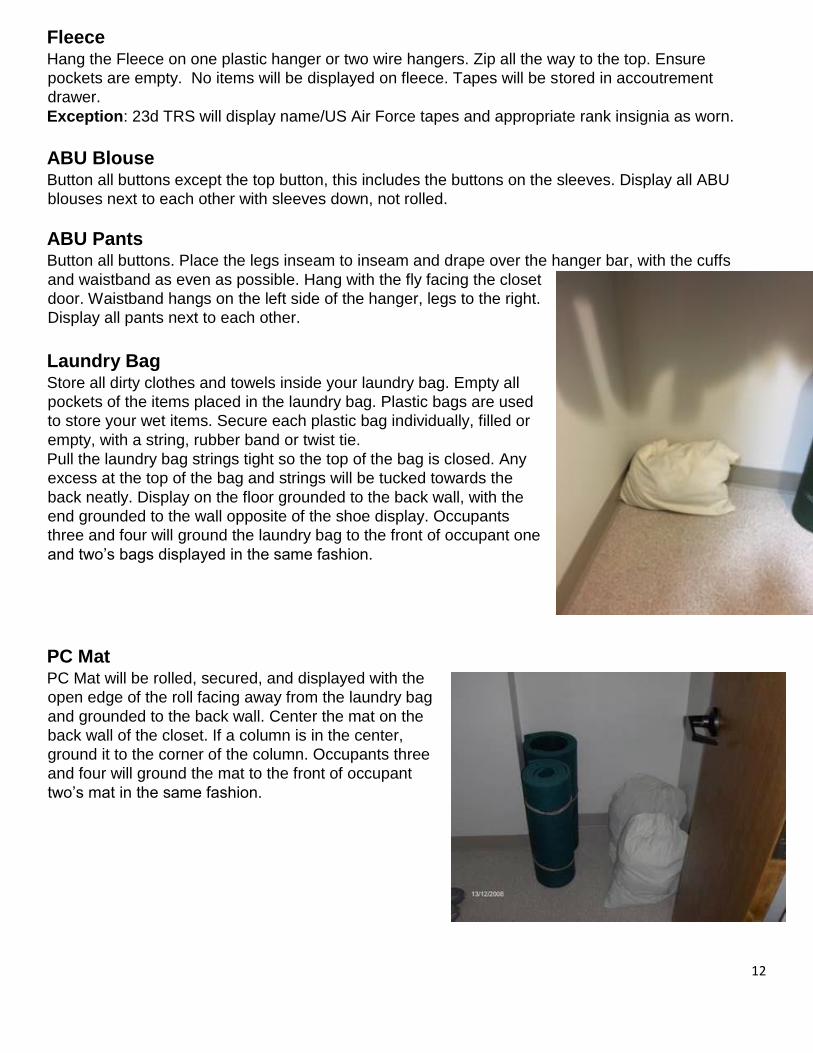
Laundry Bag Store all dirty clothes and towels inside your laundry bag. Empty all
pockets of the items placed in the laundry bag. Plastic bags are used
to store your wet items. Secure each plastic bag individually, filled or
empty, with a string, rubber band or twist tie.
Pull the laundry bag strings tight so the top of the bag is closed. Any
excess at the top of the bag and strings will be tucked towards the
back neatly. Display on the floor grounded to the back wall, with the
end grounded to the wall opposite of the shoe display. Occupants
three and four will ground the laundry bag to the front of occupant one
and two’s bags displayed in the same fashion.
PC Mat PC Mat will be rolled, secured, and displayed with the
open edge of the roll facing away from the laundry bag
and grounded to the back wall. Center the mat on the
back wall of the closet. If a column is in the center,
ground it to the corner of the column. Occupants three
and four will ground the mat to the front of occupant
two’s mat in the same fashion.
13
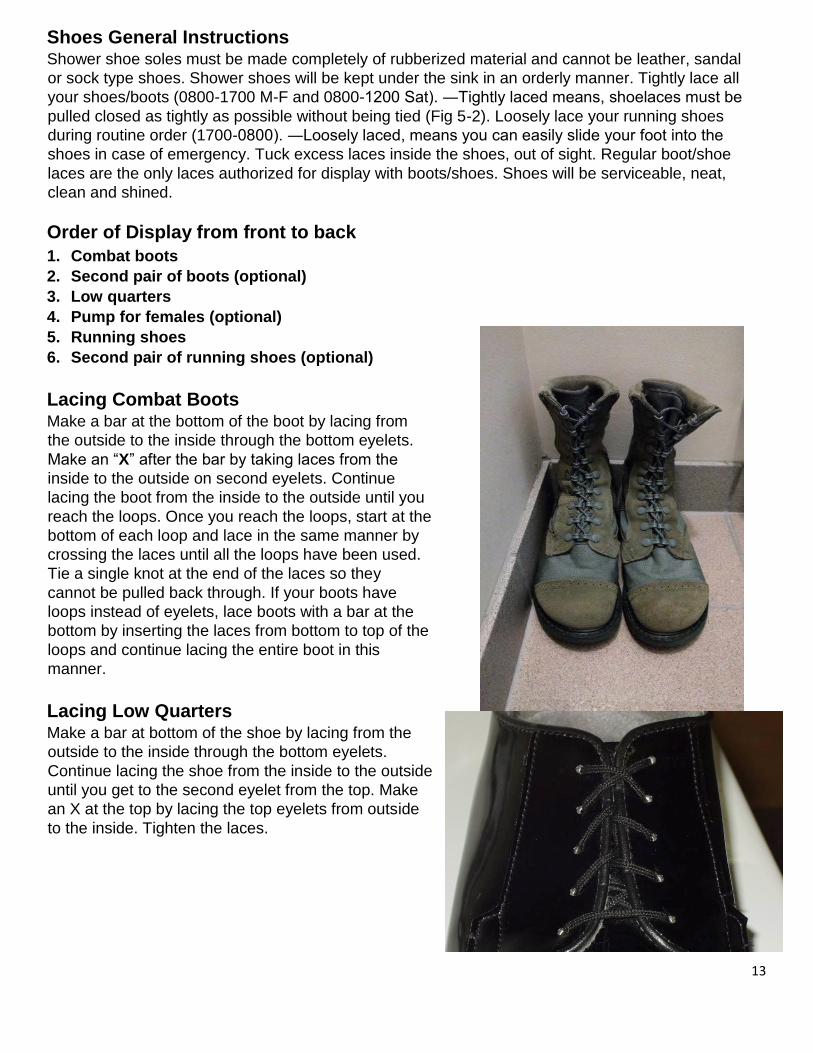
Shoes General Instructions Shower shoe soles must be made completely of rubberized material and cannot be leather, sandal
or sock type shoes. Shower shoes will be kept under the sink in an orderly manner. Tightly lace all
your shoes/boots (0800-1700 M-F and 0800-1200 Sat). ―Tightly laced means, shoelaces must be
pulled closed as tightly as possible without being tied (Fig 5-2). Loosely lace your running shoes
during routine order (1700-0800). ―Loosely laced, means you can easily slide your foot into the
shoes in case of emergency. Tuck excess laces inside the shoes, out of sight. Regular boot/shoe
laces are the only laces authorized for display with boots/shoes. Shoes will be serviceable, neat,
clean and shined.
Order of Display from front to back
1. Combat boots
2. Second pair of boots (optional)
3. Low quarters
4. Pump for females (optional)
5. Running shoes
6. Second pair of running shoes (optional)
Lacing Combat Boots Make a bar at the bottom of the boot by lacing from
the outside to the inside through the bottom eyelets.
Make an “X” after the bar by taking laces from the
inside to the outside on second eyelets. Continue
lacing the boot from the inside to the outside until you
reach the loops. Once you reach the loops, start at the
bottom of each loop and lace in the same manner by
crossing the laces until all the loops have been used.
Tie a single knot at the end of the laces so they
cannot be pulled back through. If your boots have
loops instead of eyelets, lace boots with a bar at the
bottom by inserting the laces from bottom to top of the
loops and continue lacing the entire boot in this
manner.
Lacing Low Quarters Make a bar at bottom of the shoe by lacing from the
outside to the inside through the bottom eyelets.
Continue lacing the shoe from the inside to the outside
until you get to the second eyelet from the top. Make
an X at the top by lacing the top eyelets from outside
to the inside. Tighten the laces.
14
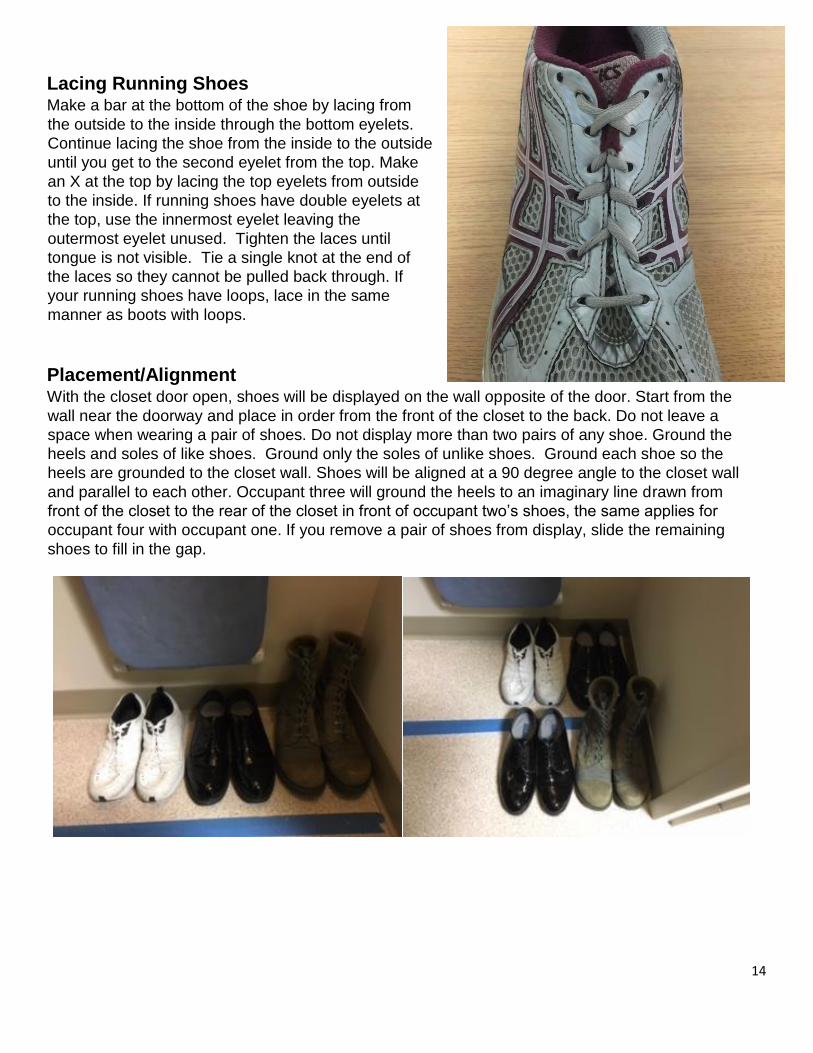
Lacing Running Shoes Make a bar at the bottom of the shoe by lacing from
the outside to the inside through the bottom eyelets.
Continue lacing the shoe from the inside to the outside
until you get to the second eyelet from the top. Make
an X at the top by lacing the top eyelets from outside
to the inside. If running shoes have double eyelets at
the top, use the innermost eyelet leaving the
outermost eyelet unused. Tighten the laces until
tongue is not visible. Tie a single knot at the end of
the laces so they cannot be pulled back through. If
your running shoes have loops, lace in the same
manner as boots with loops.
Placement/Alignment With the closet door open, shoes will be displayed on the wall opposite of the door. Start from the
wall near the doorway and place in order from the front of the closet to the back. Do not leave a
space when wearing a pair of shoes. Do not display more than two pairs of any shoe. Ground the
heels and soles of like shoes. Ground only the soles of unlike shoes. Ground each shoe so the
heels are grounded to the closet wall. Shoes will be aligned at a 90 degree angle to the closet wall
and parallel to each other. Occupant three will ground the heels to an imaginary line drawn from
front of the closet to the rear of the closet in front of occupant two’s shoes, the same applies for
occupant four with occupant one. If you remove a pair of shoes from display, slide the remaining
shoes to fill in the gap.
15
CHAPTER 5
BEDS
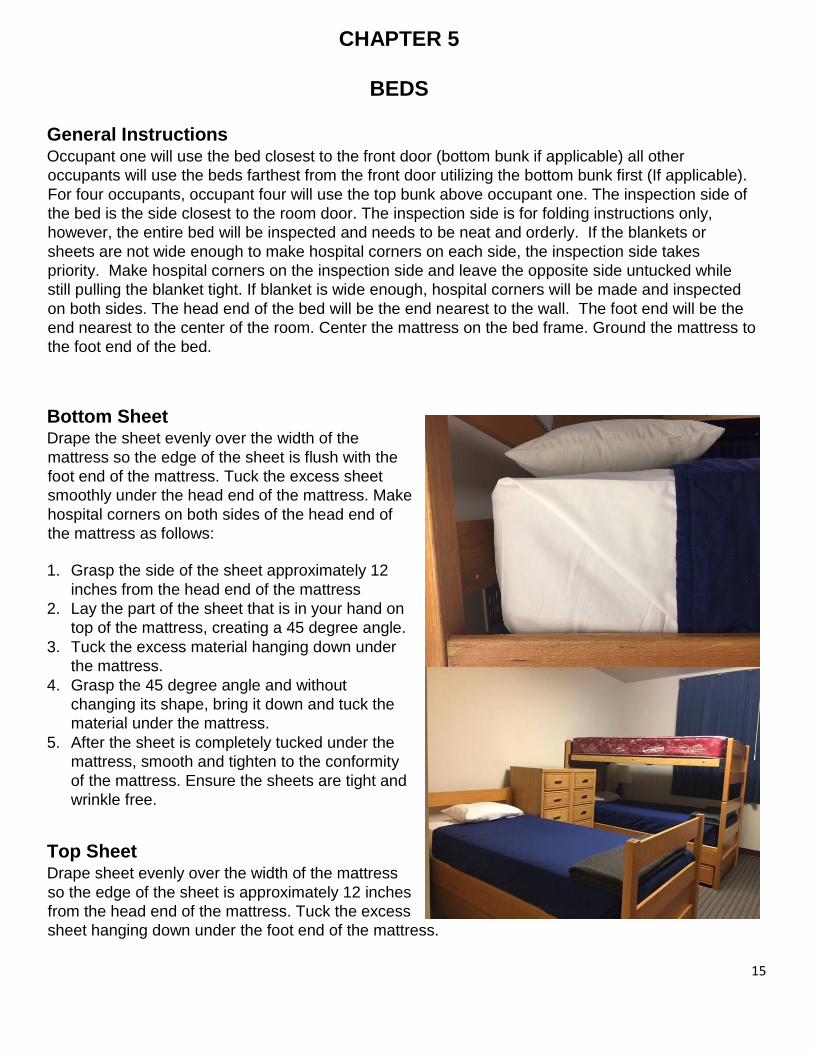
General Instructions Occupant one will use the bed closest to the front door (bottom bunk if applicable) all other
occupants will use the beds farthest from the front door utilizing the bottom bunk first (If applicable).
For four occupants, occupant four will use the top bunk above occupant one. The inspection side of
the bed is the side closest to the room door. The inspection side is for folding instructions only,
however, the entire bed will be inspected and needs to be neat and orderly. If the blankets or
sheets are not wide enough to make hospital corners on each side, the inspection side takes
priority. Make hospital corners on the inspection side and leave the opposite side untucked while
still pulling the blanket tight. If blanket is wide enough, hospital corners will be made and inspected
on both sides. The head end of the bed will be the end nearest to the wall. The foot end will be the
end nearest to the center of the room. Center the mattress on the bed frame. Ground the mattress to
the foot end of the bed.
Bottom Sheet Drape the sheet evenly over the width of the
mattress so the edge of the sheet is flush with the
foot end of the mattress. Tuck the excess sheet
smoothly under the head end of the mattress. Make
hospital corners on both sides of the head end of
the mattress as follows:
1. Grasp the side of the sheet approximately 12
inches from the head end of the mattress
2. Lay the part of the sheet that is in your hand on
top of the mattress, creating a 45 degree angle.
3. Tuck the excess material hanging down under
the mattress.
4. Grasp the 45 degree angle and without
changing its shape, bring it down and tuck the
material under the mattress.
5. After the sheet is completely tucked under the
mattress, smooth and tighten to the conformity
of the mattress. Ensure the sheets are tight and
wrinkle free.
Top Sheet Drape sheet evenly over the width of the mattress
so the edge of the sheet is approximately 12 inches
from the head end of the mattress. Tuck the excess
sheet hanging down under the foot end of the mattress.
16
Blanket
Place the blanket evenly over the width of the mattress so the edge of the blanket is approximately
12 inches from the head end of the mattress. Tuck the excess blanket under the foot end of
mattress. Make hospital corners in the sheet and blanket at the same time using the same
procedures you used for the bottom sheet.
Exception: If the blanket is not wide enough to make hospital corners on each side, only make a
hospital corner on the inspection side. Leave the opposite side untucked. After the blanket is
completely tucked, smooth and tighten to the conformity of the mattress.
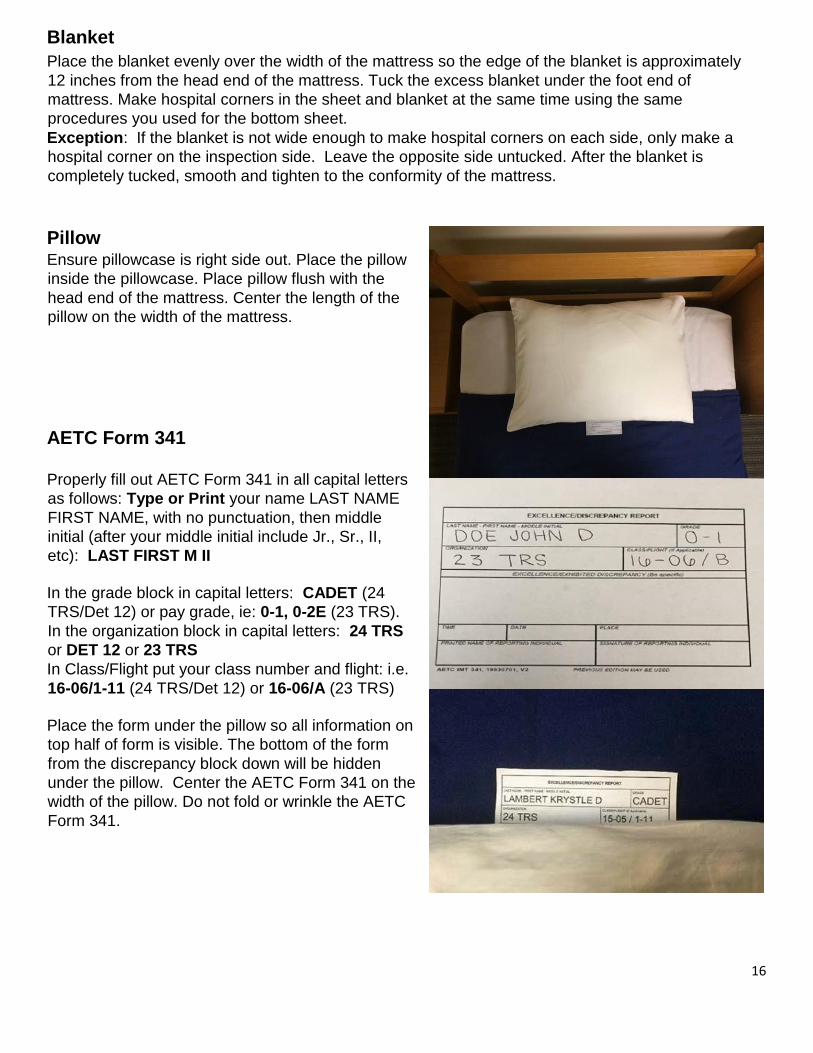
Pillow Ensure pillowcase is right side out. Place the pillow
inside the pillowcase. Place pillow flush with the
head end of the mattress. Center the length of the
pillow on the width of the mattress.
AETC Form 341
Properly fill out AETC Form 341 in all capital letters
as follows: Type or Print your name LAST NAME
FIRST NAME, with no punctuation, then middle
initial (after your middle initial include Jr., Sr., II,
etc): LAST FIRST M II
In the grade block in capital letters: CADET (24
TRS/Det 12) or pay grade, ie: 0-1, 0-2E (23 TRS).
In the organization block in capital letters: 24 TRS
or DET 12 or 23 TRS
In Class/Flight put your class number and flight: i.e.
16-06/1-11 (24 TRS/Det 12) or 16-06/A (23 TRS)
Place the form under the pillow so all information on
top half of form is visible. The bottom of the form
from the discrepancy block down will be hidden
under the pillow. Center the AETC Form 341 on the
width of the pillow. Do not fold or wrinkle the AETC
Form 341.
17
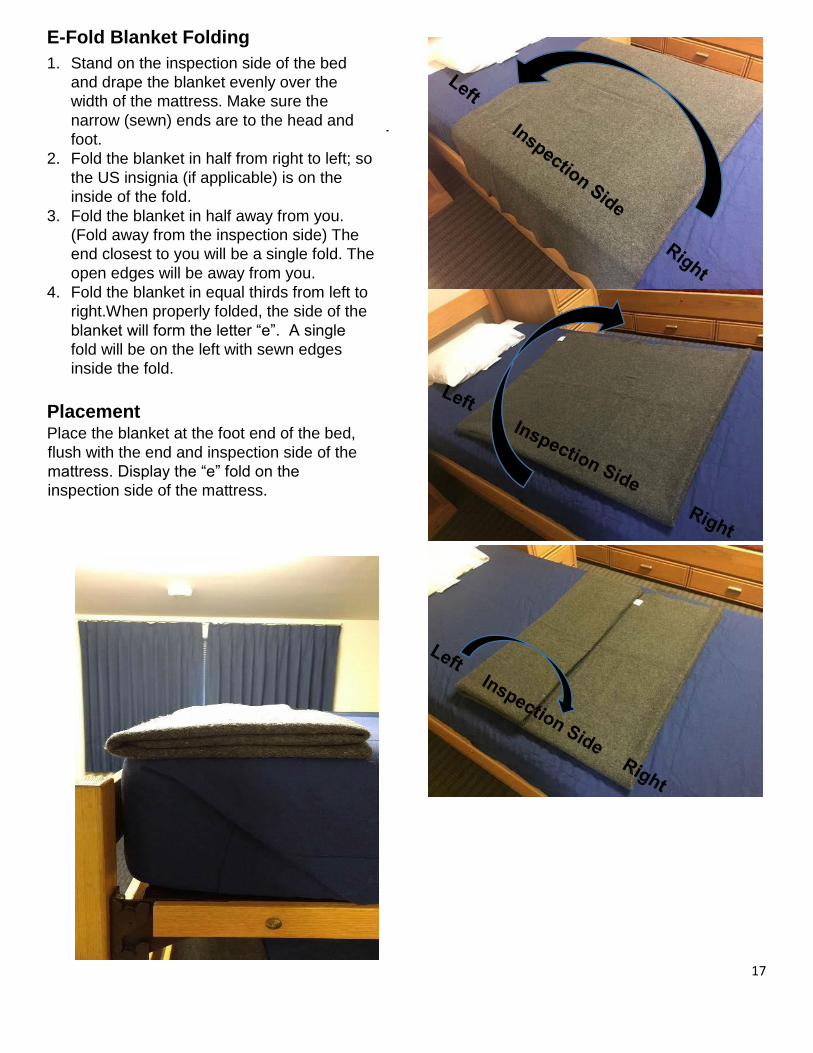
E-Fold Blanket Folding
1. Stand on the inspection side of the bed
and drape the blanket evenly over the
width of the mattress. Make sure the
narrow (sewn) ends are to the head and
foot.
2. Fold the blanket in half from right to left; so
the US insignia (if applicable) is on the
inside of the fold.
3. Fold the blanket in half away from you.
(Fold away from the inspection side) The
end closest to you will be a single fold. The
open edges will be away from you.
4. Fold the blanket in equal thirds from left to
right.When properly folded, the side of the
blanket will form the letter “e”. A single
fold will be on the left with sewn edges
inside the fold.
Placement Place the blanket at the foot end of the bed,
flush with the end and inspection side of the
mattress. Display the “e” fold on the
inspection side of the mattress.
18
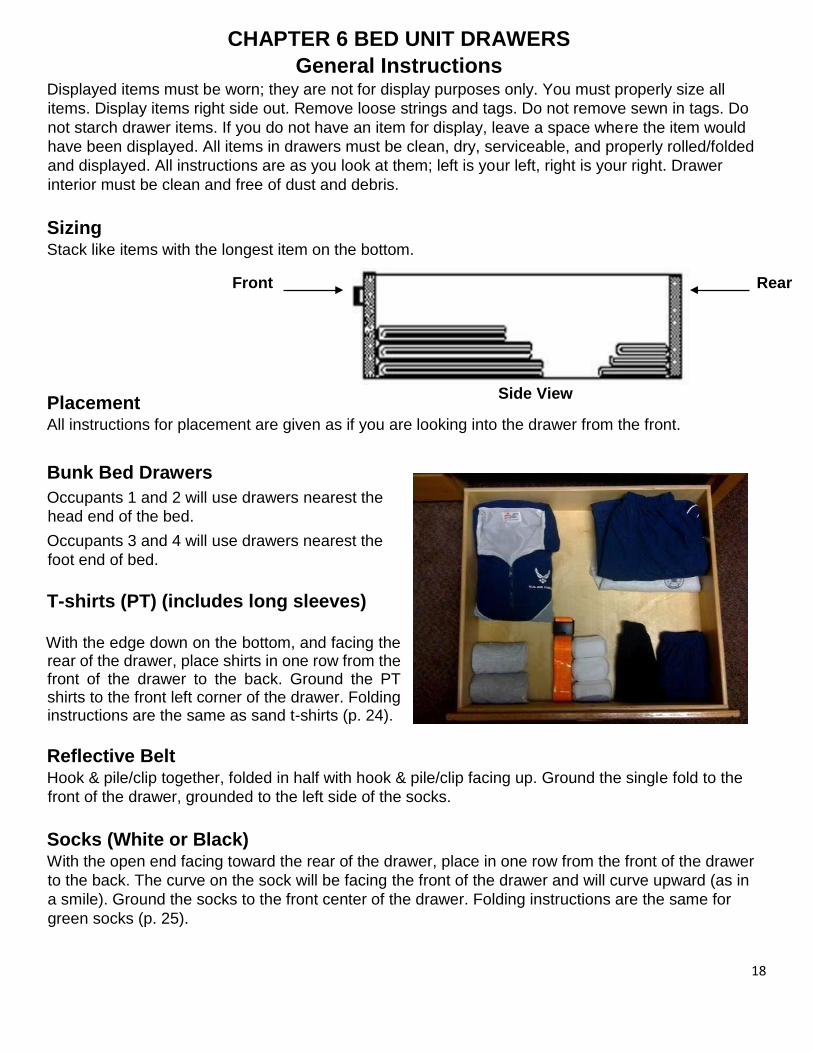
CHAPTER 6 BED UNIT DRAWERS
General Instructions Displayed items must be worn; they are not for display purposes only. You must properly size all
items. Display items right side out. Remove loose strings and tags. Do not remove sewn in tags. Do
not starch drawer items. If you do not have an item for display, leave a space where the item would
have been displayed. All items in drawers must be clean, dry, serviceable, and properly rolled/folded
and displayed. All instructions are as you look at them; left is your left, right is your right. Drawer
interior must be clean and free of dust and debris.
Sizing Stack like items with the longest item on the bottom.
Placement All instructions for placement are given as if you are looking into the drawer from the front.
Bunk Bed Drawers
Occupants 1 and 2 will use drawers nearest the
head end of the bed.
Occupants 3 and 4 will use drawers nearest the
foot end of bed.
T-shirts (PT) (includes long sleeves)
With the edge down on the bottom, and facing the rear of the drawer, place shirts in one row from the front of the drawer to the back. Ground the PT shirts to the front left corner of the drawer. Folding instructions are the same as sand t-shirts (p. 24).
Reflective Belt Hook & pile/clip together, folded in half with hook & pile/clip facing up. Ground the single fold to the
front of the drawer, grounded to the left side of the socks.
Socks (White or Black) With the open end facing toward the rear of the drawer, place in one row from the front of the drawer
to the back. The curve on the sock will be facing the front of the drawer and will curve upward (as in
a smile). Ground the socks to the front center of the drawer. Folding instructions are the same for
green socks (p. 25).
Fr ont Rear
Side View
19
Watch Cap (seasonal) Fold in half left to right. Ground the open end to the front of the drawer with the single fold facing to
the left and right side grounded to the PT shorts.
PT Shorts Stack with front facing up and waistband facing toward the rear of the drawer. The single fold will be
to the left. Folding instructions are the same as for underwear (p. 26)
AF PT Jacket Display with the front of the jacket facing up and the collar to the rear with the single fold to the front.
AF emblem will be visible. Ground the jacket to the back left corner of the drawer.
AF PT Pants Display with the waistband facing up and to the rear with the single fold to the front. Ground the
pants to the back right corner of the drawer.
Thermal Underwear (seasonal) Display the thermal underwear shirt underneath the sweatshirt, grounded in the same manner.
Display the thermal underwear pants underneath the sweatpants, grounded in the same manner.
Fold in the same manner as the PT Jacket/Pants.
Sweatshirt/pants Fold neatly and place sweatshirt under the AF PT Jacket and sweatpants under the AF PT Pants.
Morale Shirts/Shorts Fold neatly and place under the AF PT Jacket and on top of the sweatshirt.
Compression Shorts Fold neatly and place under the AF PT Pants.
NOTE: PT Gear (AF Pants, Jacket, shoes and gloves) when wet will be displayed in the latrine to
dry. AF Jacket/Pants will be hung on a hanger on the shower frame. Shoes will be placed inside the
shower. Gloves will be hung over the opposite side of the bar that the towel is hung on. All other
gear (shirt, shorts, underwear and socks) will be properly in the laundry bag. All items will be
properly displayed prior to the next duty day.
20
Folding Instructions (All instructions are as you
look at them; left is your left, right is your right.)
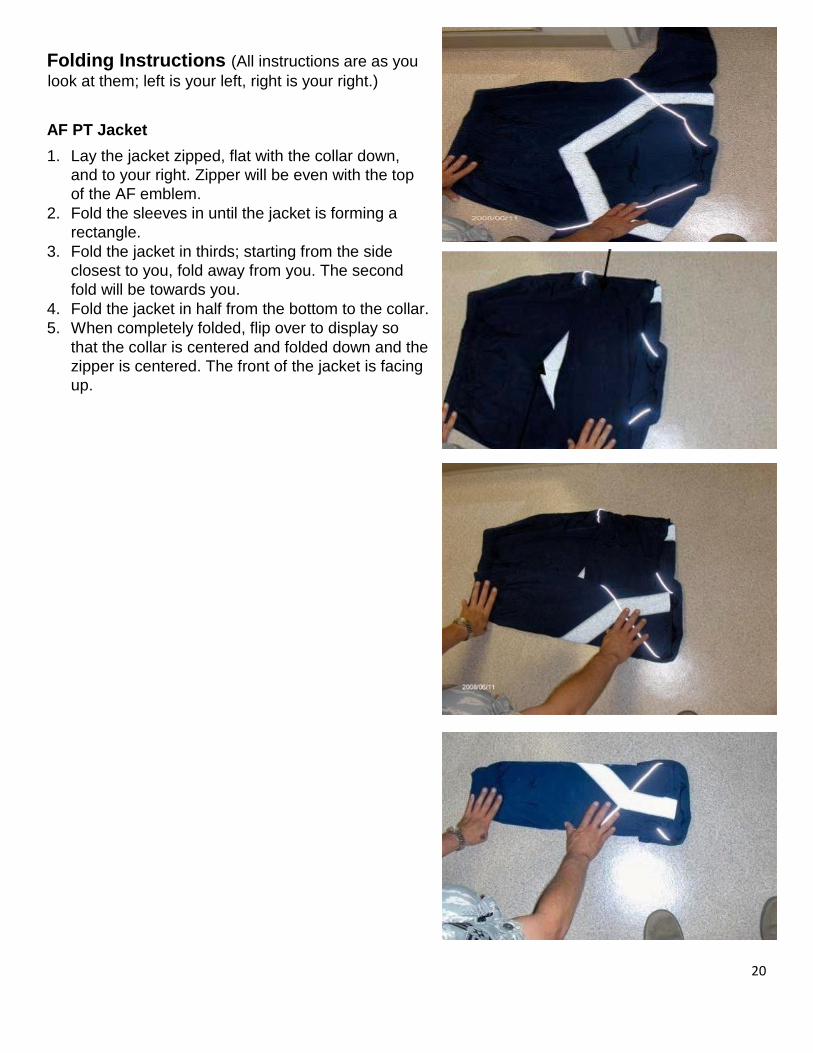
AF PT Jacket
1. Lay the jacket zipped, flat with the collar down,
and to your right. Zipper will be even with the top
of the AF emblem.
2. Fold the sleeves in until the jacket is forming a
rectangle.
3. Fold the jacket in thirds; starting from the side
closest to you, fold away from you. The second
fold will be towards you.
4. Fold the jacket in half from the bottom to the collar.
5. When completely folded, flip over to display so
that the collar is centered and folded down and the
zipper is centered. The front of the jacket is facing
up.
21
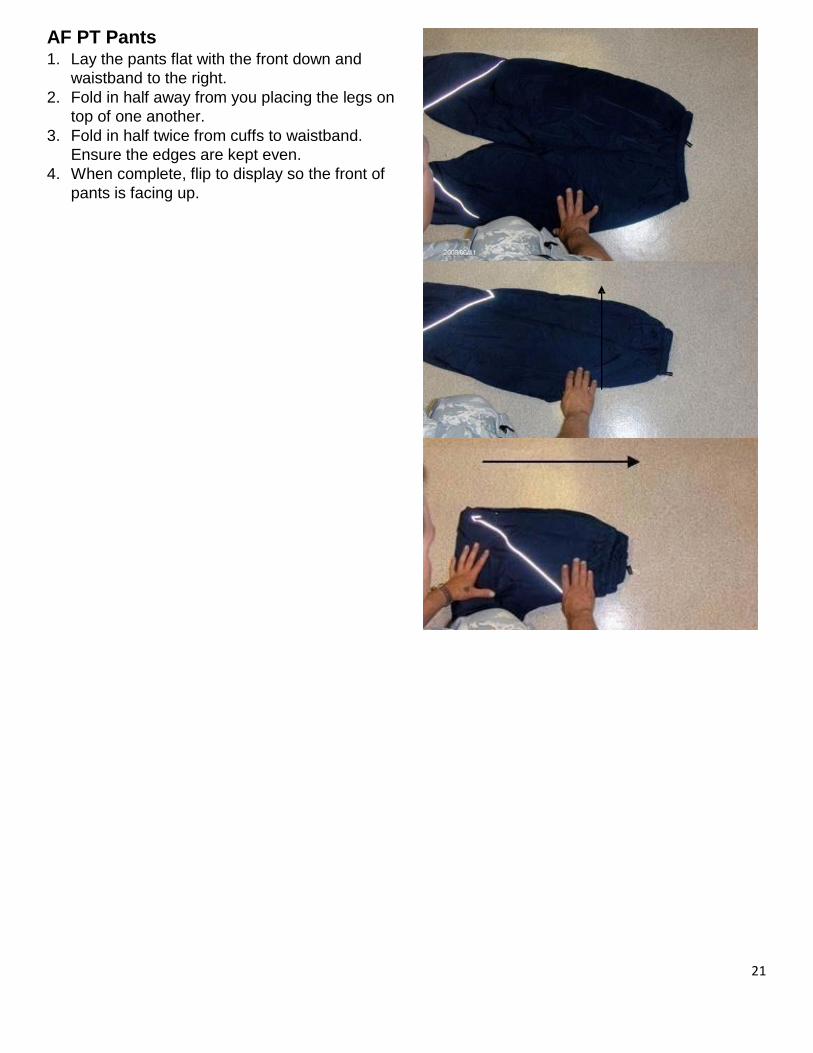
AF PT Pants 1. Lay the pants flat with the front down and
waistband to the right.
2. Fold in half away from you placing the legs on
top of one another.
3. Fold in half twice from cuffs to waistband.
Ensure the edges are kept even.
4. When complete, flip to display so the front of
pants is facing up.
22
CHAPTER 7
FIVE DRAWER DRESSER
General Instructions Secure excessive amounts of personal items in civilian luggage. When cadets are not in their rooms,
the security drawer must be locked. Displayed items must be worn; they are not for display purposes
only. You must properly size all items. Remove loose strings and tags. Do not remove sewn in tags.
Do not starch drawer items. If you do not have an item for display, leave a space where the item
would have been displayed. Religious under garments can be stored in the security drawer. Refer to
pages 3-4 of this manual for occupant assignment.
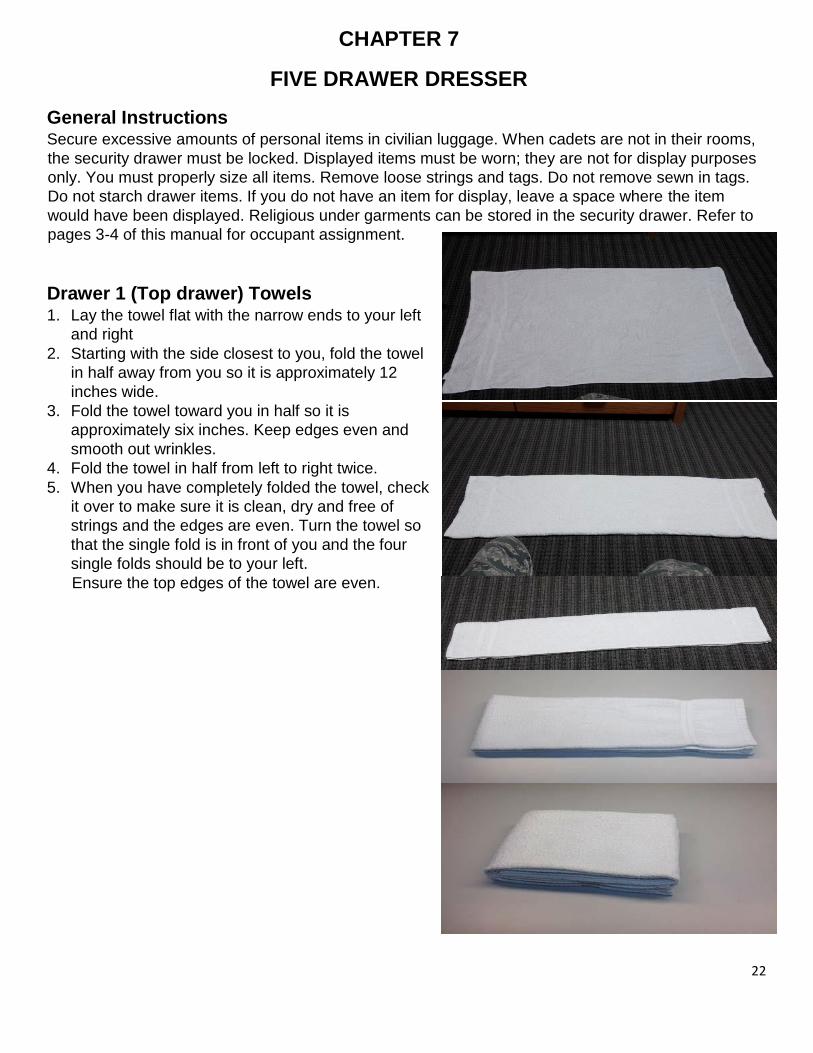
Drawer 1 (Top drawer) Towels 1. Lay the towel flat with the narrow ends to your left
and right
2. Starting with the side closest to you, fold the towel
in half away from you so it is approximately 12
inches wide.
3. Fold the towel toward you in half so it is
approximately six inches. Keep edges even and
smooth out wrinkles.
4. Fold the towel in half from left to right twice.
5. When you have completely folded the towel, check
it over to make sure it is clean, dry and free of
strings and the edges are even. Turn the towel so
that the single fold is in front of you and the four
single folds should be to your left.
Ensure the top edges of the towel are even.
23
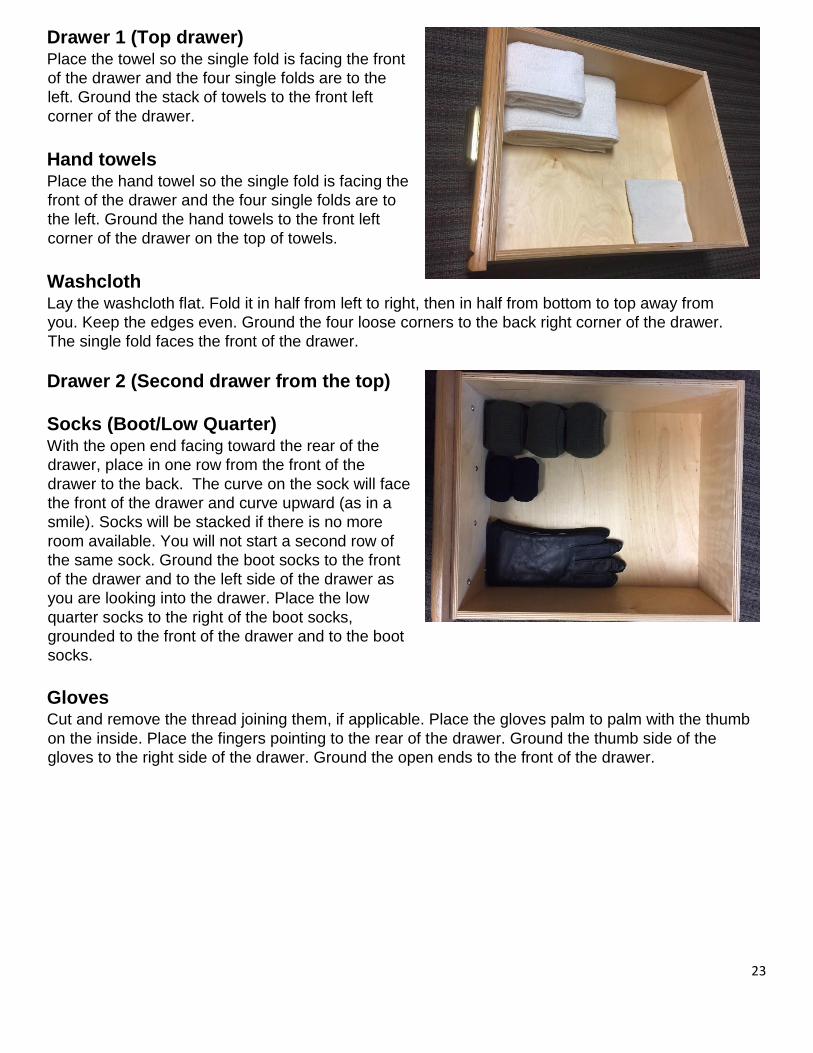
Drawer 1 (Top drawer) Place the towel so the single fold is facing the front
of the drawer and the four single folds are to the
left. Ground the stack of towels to the front left
corner of the drawer.
Hand towels Place the hand towel so the single fold is facing the
front of the drawer and the four single folds are to
the left. Ground the hand towels to the front left
corner of the drawer on the top of towels.
Washcloth Lay the washcloth flat. Fold it in half from left to right, then in half from bottom to top away from
you. Keep the edges even. Ground the four loose corners to the back right corner of the drawer.
The single fold faces the front of the drawer.
Drawer 2 (Second drawer from the top) Socks (Boot/Low Quarter) With the open end facing toward the rear of the
drawer, place in one row from the front of the
drawer to the back. The curve on the sock will face
the front of the drawer and curve upward (as in a
smile). Socks will be stacked if there is no more
room available. You will not start a second row of
the same sock. Ground the boot socks to the front
of the drawer and to the left side of the drawer as
you are looking into the drawer. Place the low
quarter socks to the right of the boot socks,
grounded to the front of the drawer and to the boot
socks.
Gloves Cut and remove the thread joining them, if applicable. Place the gloves palm to palm with the thumb
on the inside. Place the fingers pointing to the rear of the drawer. Ground the thumb side of the
gloves to the right side of the drawer. Ground the open ends to the front of the drawer.
24
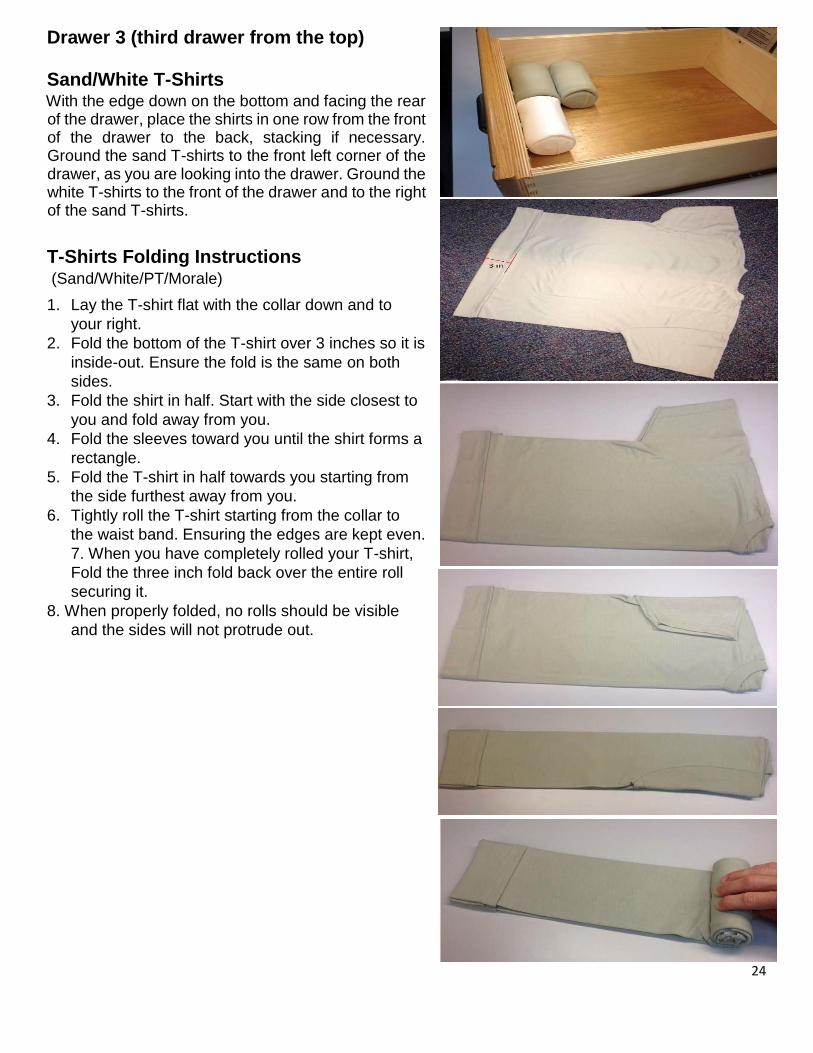
Drawer 3 (third drawer from the top) Sand/White T-Shirts With the edge down on the bottom and facing the rear of the drawer, place the shirts in one row from the front of the drawer to the back, stacking if necessary. Ground the sand T-shirts to the front left corner of the drawer, as you are looking into the drawer. Ground the white T-shirts to the front of the drawer and to the right of the sand T-shirts.
T-Shirts Folding Instructions (Sand/White/PT/Morale)
1. Lay the T-shirt flat with the collar down and to
your right.
2. Fold the bottom of the T-shirt over 3 inches so it is
inside-out. Ensure the fold is the same on both
sides.
3. Fold the shirt in half. Start with the side closest to
you and fold away from you.
4. Fold the sleeves toward you until the shirt forms a
rectangle.
5. Fold the T-shirt in half towards you starting from
the side furthest away from you.
6. Tightly roll the T-shirt starting from the collar to
the waist band. Ensuring the edges are kept even.
7. When you have completely rolled your T-shirt,
Fold the three inch fold back over the entire roll
securing it.
8. When properly folded, no rolls should be visible
and the sides will not protrude out.
25
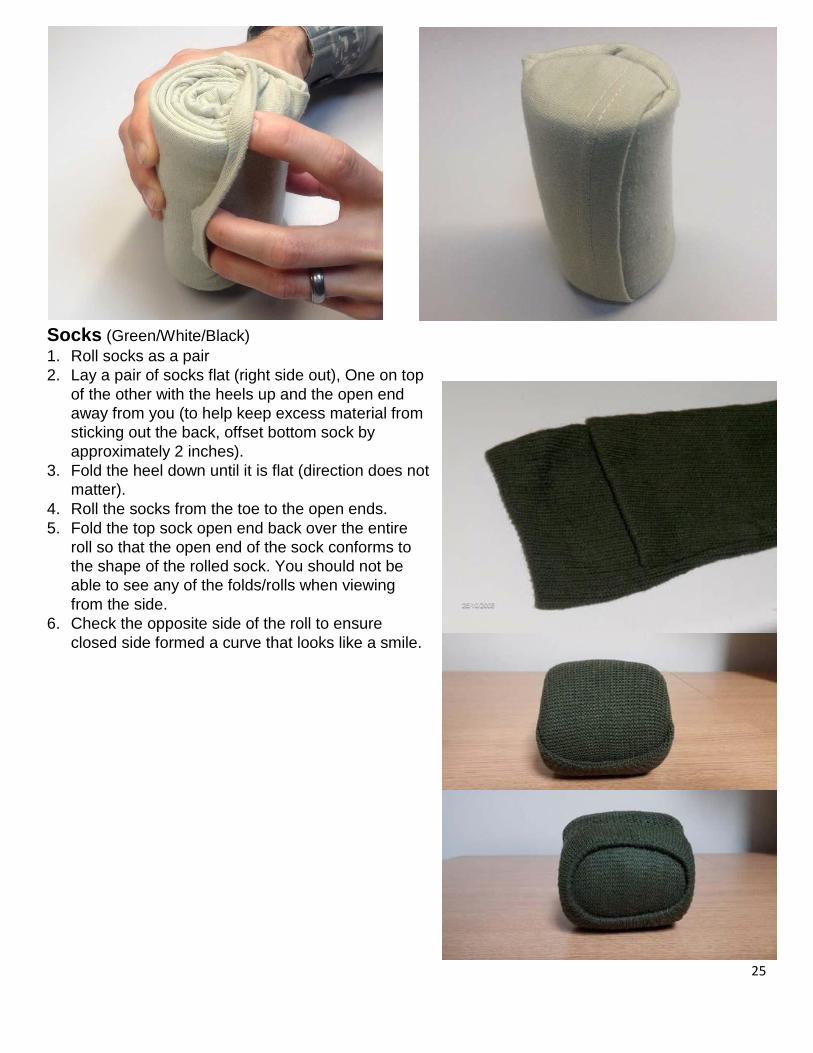
Socks (Green/White/Black)
1. Roll socks as a pair
2. Lay a pair of socks flat (right side out), One on top
of the other with the heels up and the open end
away from you (to help keep excess material from
sticking out the back, offset bottom sock by
approximately 2 inches).
3. Fold the heel down until it is flat (direction does not
matter).
4. Roll the socks from the toe to the open ends.
5. Fold the top sock open end back over the entire
roll so that the open end of the sock conforms to
the shape of the rolled sock. You should not be
able to see any of the folds/rolls when viewing
from the side.
6. Check the opposite side of the roll to ensure
closed side formed a curve that looks like a smile.
26
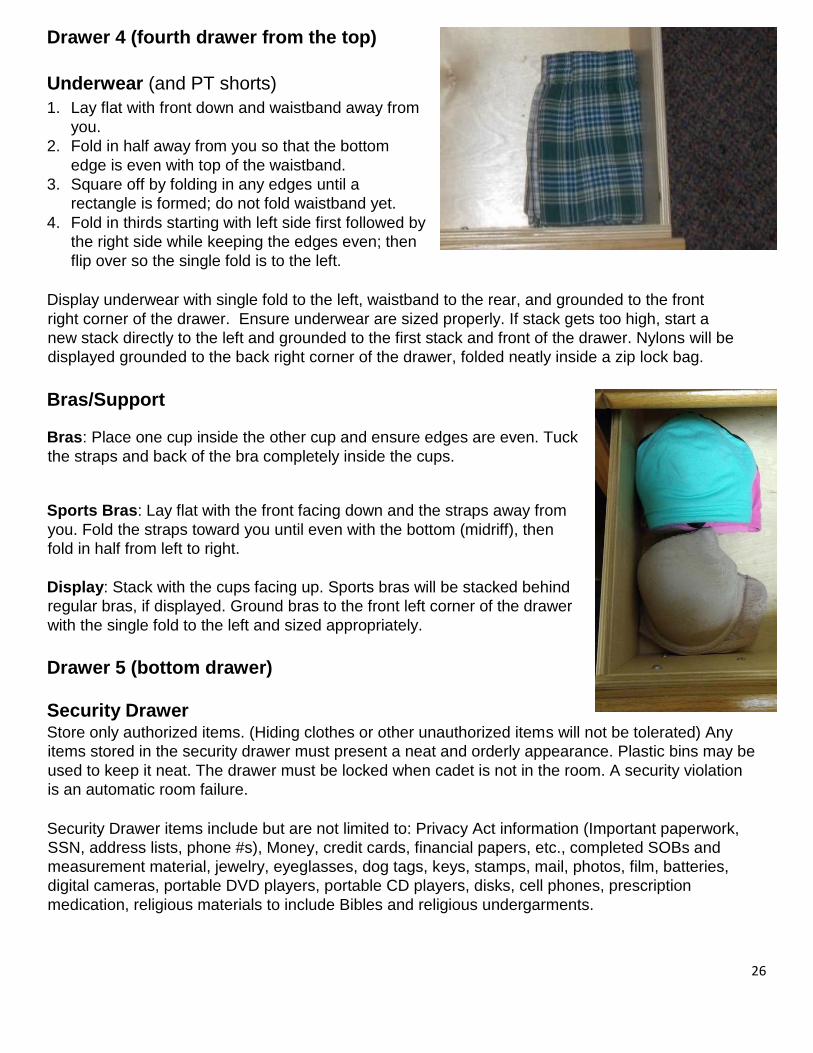
Drawer 4 (fourth drawer from the top)
Underwear (and PT shorts)
1. Lay flat with front down and waistband away from
you.
2. Fold in half away from you so that the bottom
edge is even with top of the waistband.
3. Square off by folding in any edges until a
rectangle is formed; do not fold waistband yet.
4. Fold in thirds starting with left side first followed by
the right side while keeping the edges even; then
flip over so the single fold is to the left.
Display underwear with single fold to the left, waistband to the rear, and grounded to the front
right corner of the drawer. Ensure underwear are sized properly. If stack gets too high, start a
new stack directly to the left and grounded to the first stack and front of the drawer. Nylons will be
displayed grounded to the back right corner of the drawer, folded neatly inside a zip lock bag.
Bras/Support
Bras: Place one cup inside the other cup and ensure edges are even. Tuck
the straps and back of the bra completely inside the cups.
Sports Bras: Lay flat with the front facing down and the straps away from
you. Fold the straps toward you until even with the bottom (midriff), then
fold in half from left to right.
Display: Stack with the cups facing up. Sports bras will be stacked behind
regular bras, if displayed. Ground bras to the front left corner of the drawer
with the single fold to the left and sized appropriately.
Drawer 5 (bottom drawer)
Security Drawer Store only authorized items. (Hiding clothes or other unauthorized items will not be tolerated) Any
items stored in the security drawer must present a neat and orderly appearance. Plastic bins may be
used to keep it neat. The drawer must be locked when cadet is not in the room. A security violation
is an automatic room failure.
Security Drawer items include but are not limited to: Privacy Act information (Important paperwork,
SSN, address lists, phone #s), Money, credit cards, financial papers, etc., completed SOBs and
measurement material, jewelry, eyeglasses, dog tags, keys, stamps, mail, photos, film, batteries,
digital cameras, portable DVD players, portable CD players, disks, cell phones, prescription
medication, religious materials to include Bibles and religious undergarments.
27
CHAPTER 8
DESK
General Instructions You must properly size all items on shelves. Stack similar items with the longest item on the
bottom. Stand similar items with the tallest to the left. Chair will be pushed in and grounded
when not in use. Ensure the desk is free of dust and debris. If desk is being shared between two
occupants, shelves are divided by drawing an imaginary line down the center as indicated on
pages 3-4 of this manual. Shared desks will revert the order for the higher numbered occupant
(occupant two grounds items to left, while occupant three grounds items to the right) to keep
items separate and for ease of use; this will apply in drawers where both occupants have items
in the same drawers as well.
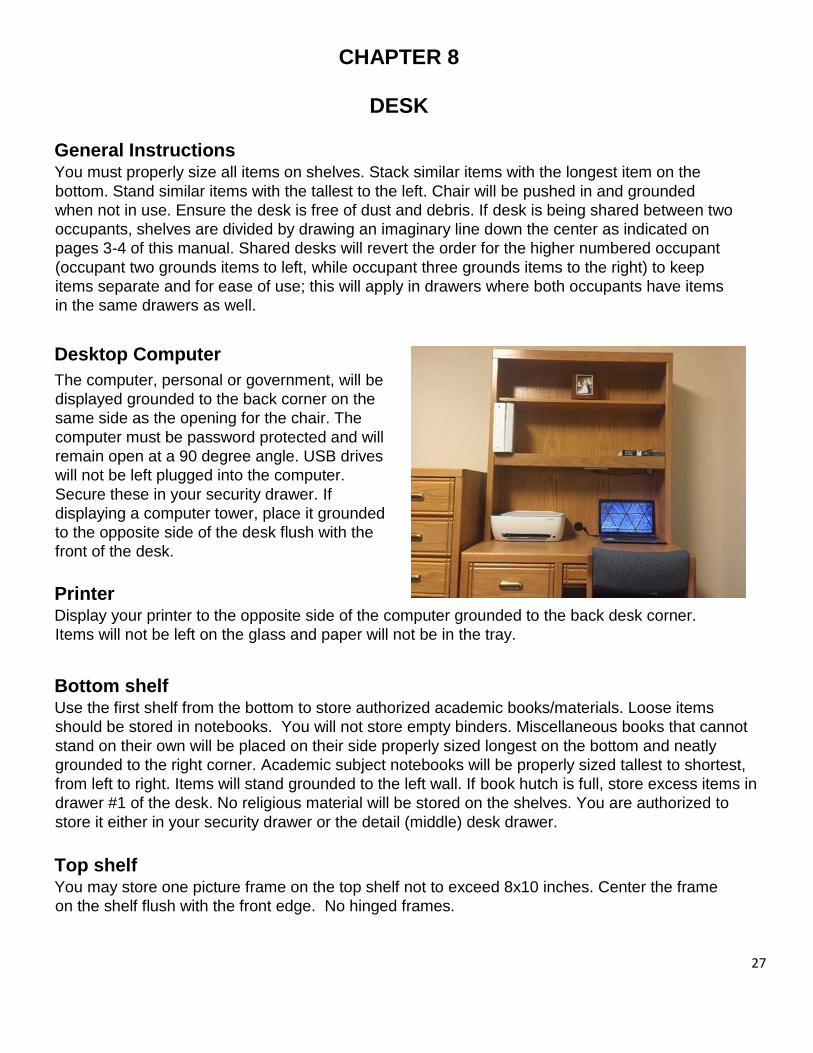
Desktop Computer
The computer, personal or government, will be
displayed grounded to the back corner on the
same side as the opening for the chair. The
computer must be password protected and will
remain open at a 90 degree angle. USB drives
will not be left plugged into the computer.
Secure these in your security drawer. If
displaying a computer tower, place it grounded
to the opposite side of the desk flush with the
front of the desk.
Printer Display your printer to the opposite side of the computer grounded to the back desk corner.
Items will not be left on the glass and paper will not be in the tray.
Bottom shelf Use the first shelf from the bottom to store authorized academic books/materials. Loose items
should be stored in notebooks. You will not store empty binders. Miscellaneous books that cannot
stand on their own will be placed on their side properly sized longest on the bottom and neatly
grounded to the right corner. Academic subject notebooks will be properly sized tallest to shortest,
from left to right. Items will stand grounded to the left wall. If book hutch is full, store excess items in
drawer #1 of the desk. No religious material will be stored on the shelves. You are authorized to
store it either in your security drawer or the detail (middle) desk drawer.
Top shelf You may store one picture frame on the top shelf not to exceed 8x10 inches. Center the frame
on the shelf flush with the front edge. No hinged frames.
28
Desk Drawers Academic Drawer (Top drawer) Neatly store academic paperwork, folders, lessons, notebooks and extra paper. Ground them to the
front left corner. Properly size materials with the longest items on the bottom.
Detail Drawer (Middle drawer) Neatly store detail/duty related materials ground to the front left corner. Items will be labeled
with the title of your detail. (Stand-O, JFC, AJFC, etc.)
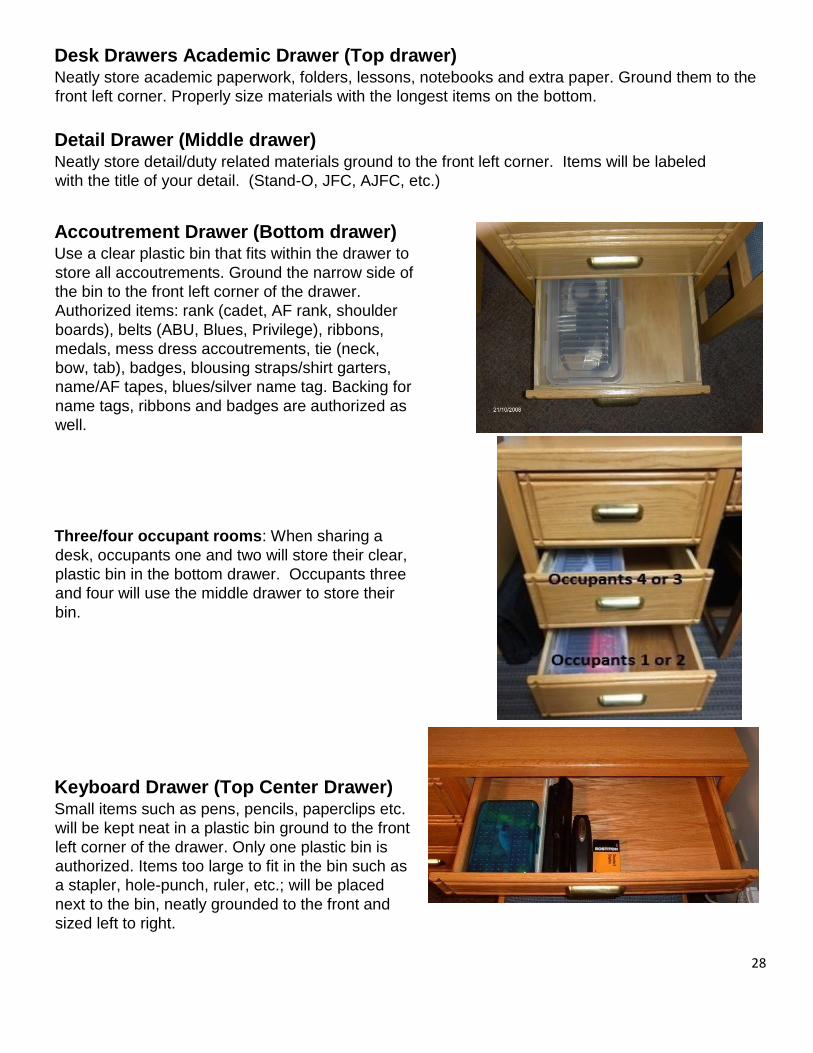
Accoutrement Drawer (Bottom drawer) Use a clear plastic bin that fits within the drawer to
store all accoutrements. Ground the narrow side of
the bin to the front left corner of the drawer.
Authorized items: rank (cadet, AF rank, shoulder
boards), belts (ABU, Blues, Privilege), ribbons,
medals, mess dress accoutrements, tie (neck,
bow, tab), badges, blousing straps/shirt garters,
name/AF tapes, blues/silver name tag. Backing for
name tags, ribbons and badges are authorized as
well.
Three/four occupant rooms: When sharing a
desk, occupants one and two will store their clear,
plastic bin in the bottom drawer. Occupants three
and four will use the middle drawer to store their
bin.
Keyboard Drawer (Top Center Drawer) Small items such as pens, pencils, paperclips etc.
will be kept neat in a plastic bin ground to the front
left corner of the drawer. Only one plastic bin is
authorized. Items too large to fit in the bin such as
a stapler, hole-punch, ruler, etc.; will be placed
next to the bin, neatly grounded to the front and
sized left to right.
29
Attaché The attaché will be grounded to the right side of the desk (occupants one and two), flush with the
front of the desk. When not in use, the attaché will be zipped and clips clipped together. The attaché
may contain only authorized items such as: Academic materials, medication (1 day supply), personal
hygiene items, unused tissue, and important paperwork needed during the duty day. Occupants
three and four will ground to the left side of the desk.
Hydration System The hydration system or backpack will be draped over the back of the chair. When on display in
the room, it will contain water only. Zippers and hook and pile, if applicable, will be closed.
Backpacks will be draped over hydration systems if both are used. If sharing desks and no more
chairs are available, the hydration system and backpack may be placed on top of that
occupant’s dresser.