Oscommerce Administration Manual
20
OSCommerce Administration Manual By Michael Sasek OSCdox This guide details the osCommerce administration script. Each section and its functions are detailed here. • Configuration :: This section details the main configuration settings of osCommerce • Catalog :: This section covers how to administer the catalog, set up categories, products and attributes • Modules :: This section covers any addon modules, and particularly the standard payment and shipping modules bundled with osCommerce Admin Configuration osCommerce Admin :: Configuration section • My Store :: This section is where you enter in custom store information that osCommerce uses. These options need to be set to your custom information in order for the store to display your correct information, send emails to the correct destinations, and to set how you want osCommerce to function. • Store Name :: Enter the name of your store here • Store Owner :: Enter the name of the store owner here • E-Mail Address :: Enter the e-mail address of the store owner here • E-Mail From :: Enter the address you want to appear in the 'From' field of emails sent by osCommerce • Country :: Enter the country that your store is based in • Zone :: Enter the zone your store is in. This is needed for proper tax setup
Transcript of Oscommerce Administration Manual

OSCommerce Administration Manual
By Michael Sasek
OSCdox
This guide details the osCommerce administration script. Each section and its
functions are detailed here.
• Configuration :: This section details the main configuration settings of osCommerce
• Catalog :: This section covers how to administer the catalog, set up categories, products and attributes
• Modules :: This section covers any addon modules, and particularly the standard payment and shipping modules bundled with osCommerce
Admin Configuration
osCommerce Admin :: Configuration section
• My Store :: This section is where you enter in custom store information that osCommerce uses. These options need to be set to your custom information in order for the store to display your correct information, send emails to the correct destinations, and to set how you want osCommerce to function.
• Store Name :: Enter the name of your store here • Store Owner :: Enter the name of the store owner here • E-Mail Address :: Enter the e-mail address of the store owner here • E-Mail From :: Enter the address you want to appear in the 'From' field of
emails sent by osCommerce • Country :: Enter the country that your store is based in • Zone :: Enter the zone your store is in. This is needed for proper tax setup

• Expected sort order :: Set this to descending or ascending. This sets whether products are sorted from higher to lower or lower to higher
• Expected Sort Field :: The field to sort expected products by • Switch To Default Language Currency :: This sets oscommerce to
switch currencies to match the selected language, if you have set mutliple currencies.
• Send Extra Order Emails To :: Enter any emails that you would like an extra copy of the order to be sent to. Use the format User Name <[email protected]>
• Use Search-Engine Safe Urls :: This option changes the URL format used by oscommerce to be search engine friendly. Not quite working correctly.
• Display Cart After Adding Product :: When set to true, the customer is taken to the shopping cart page after each item is placed in the shopping cart. When set to false, the customer remains on the product page after the item is added.
• Allow Guest To Tell A Friend :: When enabled, this will allow any user to send email to their friends about any of your products using the 'Tell a friend' box. When disabled, only logged in members can 'Tell a friend' This option Does NOT disable the option, nor does it disable or remove the box. In order to do that, you must edit column_right.php
• Default Search Operator :: Allows you to change the default search operator, AND or OR. Experiment with this to see which operator gives you more accurate search results.
• Store Address and Phone :: The information here will be seen by the customer if you allow the Check/Money order option during checkout. This info will also be used in the invoices and packing slips in the admin section.
• Show Category Counts :: This option turns category counts on/off in the category box in the catalog. It actually shows the quantity of products in a category when enabled. If you have a large database with many products or a very busy site, this should be turned OFF as it will slow your site down considerably.
• Tax Decimal Places :: How many decimal places you want to have in your tax percentage.
• Display Prices with Tax :: When on, this will automatically display all items prices with the tax included. When off, tax will only be shown during checkout.
• Minimum Values :: This section sets some key values needed to properly configure your store. These options all set the field size or value used by oscommerce in different areas. These options are mainly for customer information and validation on signup. These values come pre-set, but you can change them to customize the function of your store.

• First Name :: Minimum length of first name field • Last Name :: Minimum length of last name field • Date of Birth :: Minimum length of date of birth field • E-Mail Address :: Minimum length of e-mail address field • Street Address :: Minimum length of street address field • Company :: Minimum length of company name field • Post Code :: Minimum length of post code field • City :: Minimum length of city field • State :: Minimum length of state field • Telephone Number :: Minimum length of telephone number field • Password :: Minimum length of password field • Credit Card Owner Name :: Minimum length of credit card owners
name • Credit Card Number :: Minimum length of credit card numbers • Review Text :: Minimum character count for review text. Reviews must
be longer than this amount. • Best Sellers :: Minimum number of bestsellers to display. • Also Purchased :: Minimum number of products to display in the 'This
Customer Also Purchased' box
• Maximum Values :: This section sets many default maximums used by oscommerce. Each is described in the admin section, but we have also listed the descriptions here.
• Address Book Entries :: Maximum address book entries a customer is allowed to have
• Search Results :: Amount of products to list per page in search results, and when a product category is clicked.
• Page Links :: Number of 'number' links use for page-sets if your product listings span multiple pages. If set to 5, there will be five links numbered 1 to 5 and a link that says Next>>
• Special Products :: Maximum number of products on special to display • New Products Module :: Maximum number of new products to display in
a category. • Products Expected :: Maximum number of products expected to display • Manufacturers List :: When the number of manufacturers exceeds this
number, a drop-down list will be displayed instead of the default list in the manufacturers box.
• Manufacturers Select Size :: When this value is '1' the classic drop-down list will be used for the manufacturers box. Otherwise, a list-box with the specified number of rows will be displayed.
• Length of Manufacturers Name :: Maximum length of manufacturers name to display in the manufacturers box.
• New Reviews :: Maximum number of new reviews to display

• Selection of Random Reviews :: How many records to select from to choose one random product review.
• Selection of Random New Products :: How many records to select from to choose one random new product to display.
• Selection of Products on Special :: How many records to select from to choose one random product special to display.
• Categories To List Per Row :: How many categories to list per row. • New Products Listing :: Maximum number of new products to display in
new products page. • Best Sellers :: Maximum number of best sellers to display. • Also Purchased :: Maximum number of products to display in the 'This
Customer Also Purchased' box. • Customer Order History Box :: Maximum number of products to display
in the customer order history box. • Order History :: Maximum number of orders to display in the order
history page.
• Images :: This section is important for setting your image sizes. This is an area that seems to cause many headaches for people. Some things to note about images: If you set only one of the dimensions, either width or height, the other will fall proportionally if you also have calculate image size set to On. These settings do not Resample the images, so no matter what size they are set to, they will consume the full sized image bandwidth.
• Small Image Width :: The pixel width of small images that are displayed in product listings.
• Small Image Height :: The pixel height of small images that are displayed in product listings.
• Heading Image Width :: The pixel width of heading images displayed in the heading of the center of each page.
• Heading Image Height :: The pixel height of heading images displayed in the heading of the center of each page.
• Subcategory Image Width :: The pixel width of subcategory images displayed on main category pages.
• Subcategory Image Height :: The pixel height of subcategory images displayed on main category pages.
• Calculate Image Size :: This setting tells osCommerce to calculate image sizes if enabled. This is needed if you want oscommerce to automatically keep your thumbnails proportional. If this is on, it is recommended that you only set one of the values for your image sizes, either width or height, but not both. Leave one of the values blank (Note, blank does not mean 0. If you set a value to 0, it will not display).

• Image Required :: Enable this to display broken images. Good for development. If you do not want broken images to display, set this to false.
• Customer Details :: This section allows you to enable or disable fields used in the new customer signup page. You can control only the fields below from the admin.
• Gender :: • Date of Birth :: • Company :: • Suburb :: • State ::
• Shipping/Packaging :: This is where you set the base shipping information needed by most of the shipping modules. If your shipping modules are not working correctly or giving strange results, make sure the values below are set correctly.
• Country Code :: Enter the "ISO 3166" Country Code of the Store to be used in shipping quotes. To find your country code, visit the ISO 3166 Maintenance Agency. If you need to find your country code, the official list of country codes is Here
• Postal Code :: Enter the Postal Code (ZIP) of the Store to be used in shipping quotes.
• Enter the Maximum Package Weight you will ship :: Carriers have a max weight limit for a single package. This is a common one for all.
• Package Tare Weight :: What is the weight of typical packaging of small to medium packages?
• Larger packages - percentage increase :: What is the extra amount you will charge for larger package. For 10% enter 10
• Product Listing :: All the settings here control how the product listings display, and what information is displayed. You control the order they are displayed by adding numbers in sequence. The option with '1' will display first, '2' second, '3' third, and so on. To disable any option from displaying, set it to '0'
• Display Product Image :: Enable to display the product image. • Display Product Manufacturer Name :: Enable to display the Product
Manufacturer Name.

• Display Product Model :: Enable to display the Product Model Number. • Display Product Name :: Enable to display the Product Name. • Display Product Price :: Enable to display the Product Price. • Display Product Quantity :: Enable to display the Product Quantity. • Display Product Weight :: Enable to display the Product Weight. • Display Buy Now column :: Enable to display the 'Buy Now' button. • Display Category/Manufacturer Filter (0=disable; 1=enable) :: Enable
to display the category/manufacturer filter. This allows to filter the display by category or manufacturer.
• Location of Prev/Next Navigation Bar (1-top, 2-bottom, 3-both) :: This option controls where the navigation links appear on the page.
• Stock :: This section contols the level of inventory tracking and how inventory affects checkout.
• Check Stock Level :: Enable to check to see if sufficent stock is available. • Subtract Stock :: Enable to subtract product in stock by quantity in
product orders. • Allow Checkout:: Enable to allow a customer to checkout even if there is
insufficient stock. • Mark product out of stock :: Set this to display something on screen so
customer can see which product has insufficient stock. • Stock Re-order level :: Define when stock needs to be re-ordered.
• Logging :: This section allows you to set several logging options in oscommerce that are handy for debugging and tracking.
• Store Page Parse Time :: Store the time it takes to parse a page. • Log Destination :: Directory and filename of the page parse time log. • Log Date Format :: The date format in the log. • Display The Page Parse Time :: Display the page parse time (store page
parse time must be enabled). • Store Database Queries :: Store the database queries in the page parse
time log (PHP4 only).
• Cache :: osCommerce has built it page cacheing that can be used to significantly lower server load and increase the speed of the cart when used. If you make changes to your site, you will have to delete the cache in order to see the changes.
• Use Cache :: Set this to 'True' to enable cacheing.

• Cache Directory :: Set the path to the cache directory. The directory you set must be writable.
• E-Mail Options :: This section is where you set how osCommerce handles email. If your email is not working correctly, make sure these settings are correctly configured.
• E-Mail Transport Method :: Defines if your server uses a local connection to sendmail or uses an SMTP connection via TCP/IP. Servers running on Windows and MacOS should change this setting to SMTP.
• E-Mail Linefeeds :: The character sequence used to separate mail headers, either LF or CRLF.
• Use MIME HTML When Sending Emails :: Setting this to 'True' enables HTML formatted email.
• Verify E-Mail Addresses Through DNS :: Setting this to 'True' verfies customers e-mail address through a DNS server.
• Send E-Mails :: Enables or Disables the entire email system in osCommerce.
• Download :: This section controls the 'Product Download' options of osCommerce. If you sell downloadable products, this is where you configure how osCommerce handles the process.
• Enable download :: Enable the products download functions. • Download by redirect :: Use browser redirection for download. Disable
on non-Unix systems. • Expiry delay (days) :: Set number of days before the download link
expires. 0 means no limit. • Maximum number of downloads :: Set the maximum number of
downloads. 0 means no download authorized.
• GZip Compression : If the server you are on supports GZip compression, you can enable this option to significantly reduce your bandwidth requirements. GZip compression compresses php output server side, prior to sending to the visitor.
• Enable GZip Compression :: This turns GZip compression on or off. • Compression Level :: This sets the level of compression that is used. The
higher the number, more compression and slower output. The range is from 0 to 9.

Admin Catalog
The Catalog section of the administration is where you control your categories,
products and product attributes. This section is very powerful and gives you a
great deal of flexibility when creating and managing your inventory.
Categories/Products
This is where you add your categories and products to the catalog. There are
several things you can do, but first, you need to create a category. In the middle
window of the page, you will see a folder listing. Each folder is a category. These
folders are clickable, so that you can navigate into the categories, to see
products in those categories and possible subcategories.
Each category has 3 main options, Edit, Delete, and Move. Each option is fairly
straightforward. Below, the edit options are explained in the Adding a New
Category section.
Adding a New Category
In the main categories/products window, to add a new category, click the New
Category button. When you click the New Category button, the New Category
right column will appear. The following fields need to be filled out:
• Category Name :: Enter the name of your new category. If you have multiple languages enabled, you will see a field corresponding to each language.
• Category Image :: Enter the local path to your image or hit the browse button to locate the image on your computer. A common mistake is to pre-upload the images to the server. Do not do this, or the image will not be added.
• Sort Order :: This is how you control the display order of your categories. Enter a number here.

After you have entered in the appropriate information click the Save button. Your
new category has been added. To add a subcategory, click on a main category,
and then click the New Category button.
Adding a New Product
To add a new product, click the New Product button. Add the required info and
you are on your way to populating your catalog. The following fields will need to
be filled out:
• Product Status :: Mark whether this is in or out of stock. • Date available :: Select the date this product will be available. • Products Manufacturer :: Select the products manufacturer from the dropdown
list if you are using manufacturers. • Products Name :: Enter the product name. There will be a field for each language
you have enabled in your store. • Products Description :: Enter the description of your product. You can use
HTML in this field which allows you to be very flexible in how you create your product pages. You can add images to the description, tables, hyperlinks, just about all HTML (I have not fully tested all tags, so experiment with this).
• Products Quantity :: If you are using inventory/stock tracking, enter how many are in stock.
• Products Model :: Enter the model or catalog number of your product. • Products Image :: Enter the path to the image on your local computer, or click
the browse button to look for it. This image will be uploaded to the server when you complete this process.
• Products URL :: If you have a link to the products manufacturers website, or other link with more product info, you can add that link here.
• Products Price :: Set the products price here. • Tax Class :: Set whether the item is taxable or not. • Products Weight :: Set the weight of the product. Do not leave this blank unless
it is a download. If you leave it blank, your shipping modules will not work correctly on checkout.
• Preview :: Click this button to preview your product. On the next page, you click the Insert button to enter the new product into the database.
To quickly navigate through your categories, there is a search box and a Go To
box located in this section, on the far right, just below the page header. Use
these to make your editing easier.

Products Attributes
This area of the catalog configuration is where you customize the attributes of
your products. If you need to have different sizes, options, colors, and have
different prices for each option, you have the ability to set this here.
When you first look at the Products Attributes section, it can look a bit
complicated. The base osCommerce installation includes sample data, including
pre set attributes. You should study how these attributes are constructed. Then, it
is suggested that you create a sample product, and your own attributes to see
how the different options function.
On the main attributes page, you will see 3 sections, Product Options, Option
Values, and Products Attributes. Below, each section is described to help you
begin setting up your products attributes.
• Product Options :: This section is where you create the options that you will need available for your products. This can be whatever you need, size, color, model, version, or whatever else you need. Creating options is very easy, just type the name of the option in the text box and click the 'insert' button. This creates a master options list, but does not assign values to those options. That is done in the next step.
• Option Values :: This section is the place to actually assign values to your options. This is a simple process as well. You will see a dropdown box with the options you created. Select the option you want from the dropdown, then type the value you want to assign in the text box next to it, and click 'insert.' That creates a value that is assigned to that particular option. Repeat this for all values that you will need.
• Products Attributes :: This section is where you actually assign the options that you have created, to your products. You will see a series of dropdown boxes. The first box contains all your products in your store. Select the product that you would like to set attributes for. The next box contains all the options that you have set, so select the option you want to add to the product. Then, in the next dropdown, select the value that you want to assign to the option. The next box is not a dropdown, but a text box. Enter the monetary value of the option, and in the
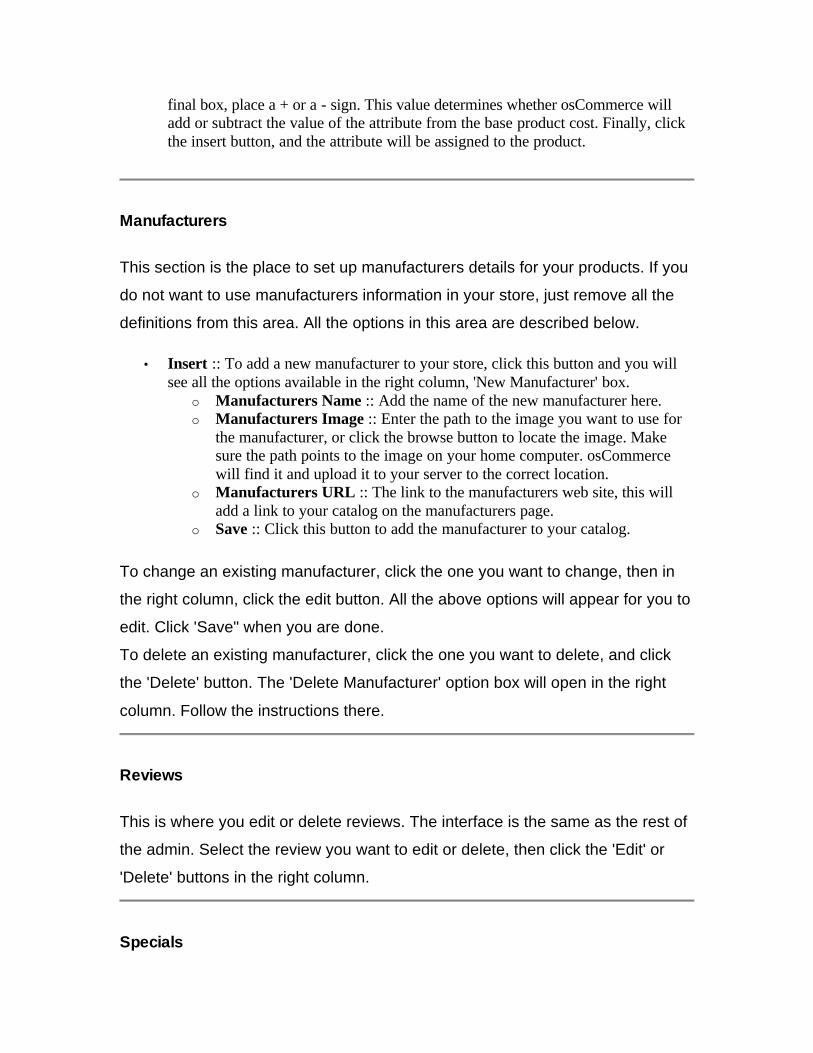
final box, place a + or a - sign. This value determines whether osCommerce will add or subtract the value of the attribute from the base product cost. Finally, click the insert button, and the attribute will be assigned to the product.
Manufacturers
This section is the place to set up manufacturers details for your products. If you
do not want to use manufacturers information in your store, just remove all the
definitions from this area. All the options in this area are described below.
• Insert :: To add a new manufacturer to your store, click this button and you will see all the options available in the right column, 'New Manufacturer' box.
o Manufacturers Name :: Add the name of the new manufacturer here. o Manufacturers Image :: Enter the path to the image you want to use for
the manufacturer, or click the browse button to locate the image. Make sure the path points to the image on your home computer. osCommerce will find it and upload it to your server to the correct location.
o Manufacturers URL :: The link to the manufacturers web site, this will add a link to your catalog on the manufacturers page.
o Save :: Click this button to add the manufacturer to your catalog.
To change an existing manufacturer, click the one you want to change, then in
the right column, click the edit button. All the above options will appear for you to
edit. Click 'Save" when you are done.
To delete an existing manufacturer, click the one you want to delete, and click
the 'Delete' button. The 'Delete Manufacturer' option box will open in the right
column. Follow the instructions there.
Reviews
This is where you edit or delete reviews. The interface is the same as the rest of
the admin. Select the review you want to edit or delete, then click the 'Edit' or
'Delete' buttons in the right column.
Specials

This section is where you add items on 'Special' and set the properties for those
items. The 'Specials' interface is the standard admin interface with the added
option of an 'On/Off' button. If you click the green icon, the special is active. If you
click the red icon , the special is inactive. This is nice so you can re-use specials
and turn them on or off when you need to. The options for specials are below:
• New Product :: This is the button you use to add a new item on special. It will take you to the 'Add New Special' page. This page is easy to use, just follow the instructions.
If you click on a special, you will get the option to edit or delete it in the right
column.
Products Expected
This section will list any products with a future date of availability. You have the
option on this page to edit any product that is listed here. If you do not have any
products that have a future date of availability, this section will be empty.
Admin Modules
Modules
osCommerce comes standard with several payment and shipping modules. This
section of the administration tool allows you to enable, disable, and configure
your modules. This is where you select what payment methods you will have at
your store, and what shipping options are available.

If you would like an option that is not available, there are dozens of other options
available in the contributions section at osCommerce.com .
Payment
This is the main payment module section. On this page, you will see a list of all
currently installed payment modules in your store. Next to the module name, you
will see a green icon and a red icon. To activate a module, click the green icon
next to it. To deactivate a module, click the red icon next to it.
Once a payment module is active, you may have to configure that module with
certain required information. If this is needed, click the payment module, then
click the 'edit' button in the right column. Now, you will see all the available
options for that module. we have taken the time to detail the options for each
payment module below.
Standard Payment Modules
• Authorize.net :: This module allows you to use Authorize.Net as your payment gateway for real-time credit card processing in osCommerce. The following options must be filled out properly in order for this module to work.
o Do you want to accept Authorize.net payments? :: Set this option to 'True'
o Login Username :: Your Authorize.net username o Transaction Key :: The transaction key you set in Authorize.net admin. o Transaction Mode :: Set this to 'Test' or 'Production' depending on
whether you are processing live transactions or still testing. o Transaction Method :: Set this to eCheck or Credit Card depending on
the method you use. o Customer Notifications :: When enabled Authorize.Net will e-mail a
receipt to the customer in addition to osCommerce. o Payment Zone :: Allows you to limit the use of Authorize.net to a single
zone. o Set Order Status :: You can set the default order status to the store
default, or set it to one of these: Delivered, Pending, Processing o Sort order of display :: This is where you set the order of the payment
modules display on the checkout_payment.php page. Set this to a NON ZERO amount.
• Credit Card :: This is the basic offline credit card processor included in osCommerce. This is good for TESTING ONLY. It is not secure, and stores

parts of credit card numbers in plain text in the database. It sends other parts of credit card numbers in plain text via non-encrypted email. Please do not use this for any other than testing options. If you are using the Authorize.Net module, disable this module. There are several other options for offline credit card processing that use GPG or PGP encryption that can be found HERE. Those should be used instead. To configure this module, see below:
o Enable Credit Card Module :: Set to 'True' to enable. o Split Credit Card E-Mail Address :: Enter an email address here to
enable the minimal security on this module. It will split the CC#, and send part to the listed email, and store the other part in the database. DO NOT MISTAKE THIS FOR SECURITY- IT IS NOT SECURE.
o Payment Zone :: Allows you to limit the use of this module to a single zone.
o Set Order Status :: You can set the default order status to the store default, or set it to one of these: Delivered, Pending, Processing
o Sort order of display :: This is where you set the order of the payment modules display on the checkout_payment.php page. Set this to a NON ZERO number.
• Cash on Delivery :: This is the basic COD payment module if you want to use this type of payment option. This is also good for testing your store. Configuration options are below:
o Enable Cash On Delivery Module :: Set to 'True' to enable. o Payment Zone :: Allows you to limit the use of this module to a single
zone. o Set Order Status :: You can set the default order status to the store
default, or set it to one of these: Delivered, Pending, Processing o Sort order of display :: This is where you set the order of the payment
modules display on the checkout_payment.php page. Set this to a NON ZERO number.
• iPayment :: This module allows osCommerce to connect to iPayment to process orders. See the configuration info below:
o Enable iPayment Module :: Set this option to 'True' o Account Number :: Your iPayment account number o User ID :: Your iPayment user ID o User Password :: Your iPayment password. o Transaction Currency :: Set this to the currency you will be using. There
are 4 options and you must pick one: § Always EUR § Always USD § Either EUR or USD, else EUR § Either EUR or USD, else USD
o Payment Zone :: Allows you to limit the use of Authorize.net to a single zone.

o Set Order Status :: You can set the default order status to the store default, or set it to one of these: Delivered, Pending, Processing
o Sort order of display :: This is where you set the order of the payment modules display on the checkout_payment.php page. Set this to a NON ZERO amount.
• Check/Money Order :: If you would like to accept checks and money orders via snail mail, enable this module. This module gets the address information from the adress configured under 'My Store' in the Configuration section of the admin. The configuration options for this module are below:
o Enable Check/Money Order Module :: Set to 'True' to enable. o Payment Zone :: Allows you to limit the use of this module to a single
zone. o Set Order Status :: You can set the default order status to the store
default, or set it to one of these: Delivered, Pending, Processing o Sort order of display :: This is where you set the order of the payment
modules display on the checkout_payment.php page. Set this to a NON ZERO number.
o Make Payable To :: Enter the name that checks should be made out to
• NOCHEX :: Enable this module to accept payment through NOCHEX. This module requires the GBP currency. Learn more about this at the NOCHEX website. Below are the configuration options for this module:
o Enable NOCHEX module :: Set to 'True' to enable. o E-Mail Address :: The e-mail address to use for the NOCHEX service o Payment Zone :: Allows you to limit the use of this module to a single
zone. o Set Order Status :: You can set the default order status to the store
default, or set it to one of these: Delivered, Pending, Processing o Sort order of display :: This is where you set the order of the payment
modules display on the checkout_payment.php page. Set this to a NON ZERO number.
• PayPal :: Enable this module to accept payments using PayPal. Learn more about this at the PayPal website. Below are the configuration options for this module:
o Enable PayPal module :: Set to 'True' to enable. o E-Mail Address :: The e-mail address to use for the PayPal service. o Transaction Currency :: The currency to use for credit card transactions.
The following curencies are supported: § Selected Currency :: The current selected currency in the catalog § Only USD § Only CAD § Only EUR § Only GBP § Only JPY

o Payment Zone :: Allows you to limit the use of this module to a single zone.
o Set Order Status :: You can set the default order status to the store default, or set it to one of these: Delivered, Pending, Processing
o Sort order of display :: This is where you set the order of the payment modules display on the checkout_payment.php page. Set this to a NON ZERO number.
• 2CheckOut :: Enable this module to accept payments using 2CheckOut. Learn more about this payment method at the 2CheckOut web site. Below are the configuration options for this module:
o Enable 2CheckOut Module :: Set to 'True' to enable. o Login/Store Number :: Login/Store Number used for the 2CheckOut
service o Transaction Mode :: Transaction mode used for the 2Checkout service.
This can be set to Test or Production. o Merchant Notifications :: Should 2CheckOut e-mail a receipt to the store
owner? This can be set to True or False. o Payment Zone :: Allows you to limit the use of this module to a single
zone. o Set Order Status :: You can set the default order status to the store
default, or set it to one of these: Delivered, Pending, Processing o Sort order of display :: This is where you set the order of the payment
modules display on the checkout_payment.php page. Set this to a NON ZERO number.
• PSiGate :: Enable this module to accept payments using PSiGate merchant account. Learn more about this method of accepting payments at the PSiGate web site. Below are the configuration options for this module:
o Enable PSiGate Module :: Set to 'True' to enable. o Merchant ID :: Merchant ID used for the PSiGate service o Transaction Mode :: Transaction mode to use for the PSiGate service.
You have the following options when setting this: § Production :: Use this setting when your site is live and accepting
orders. § Always Good :: This is a test mode § Always Duplicate :: This is a test mode § Always Decline :: This is a test mode
o Transaction Type :: Transaction type to use for the PSiGate service. You have three options, Sale, PreAuth, PostAuth. See the PSiGate docs for explanation of these options.
o Credit Card Collection :: Set whether the credit card details should be collected locally or remotely at PSiGate. This can be set to local or remote.
o Transaction Currency :: The currency to use for credit card transactions. This can be set to CAD or USD.

o Payment Zone :: Allows you to limit the use of this module to a single zone.
o Set Order Status :: You can set the default order status to the store default, or set it to one of these: Delivered, Pending, Processing
o Sort order of display :: This is where you set the order of the payment modules display on the checkout_payment.php page. Set this to a NON ZERO number.
• SECPay :: Enable this module to accept payments using SECPay. To learn more about this payment option, go to the SECPay Website. Below are the configuration options for this module:
o Enable SECPay Module :: Set to 'True' to enable. o Merchant ID :: Merchant ID to use for the SECPay service. o Transaction Currency :: The currency to use for credit card transactions.
You can set this to Any Currency or Default Currency. o Transaction Mode :: Transaction mode to use for the SECPay service.
This can be set to Always Successful, Always Fail, or Production. o Payment Zone :: Allows you to limit the use of this module to a single
zone. o Set Order Status :: You can set the default order status to the store
default, or set it to one of these: Delivered, Pending, Processing o Sort order of display :: This is where you set the order of the payment
modules display on the checkout_payment.php page. Set this to a NON ZERO number.
Shipping
This is the main shipping module section. On this page, you will see a list of all
currently installed shipping modules in your store. Next to the module name, you
will see a green icon and a red icon. To activate a module, click the green icon
next to it. To deactivate a module, click the red icon next to it.
Once a shipping module is active, you may have to configure that module with
certain required information. If this is needed, click the shipping module, then
click the 'edit' button in the right column. Now, you will see all the available
options for that module. we have taken the time to detail the options for each
shipping module below.
• Flat Rate :: Use this module if you want to use a flat rate shippng rate per order. The following configuration options must be set:
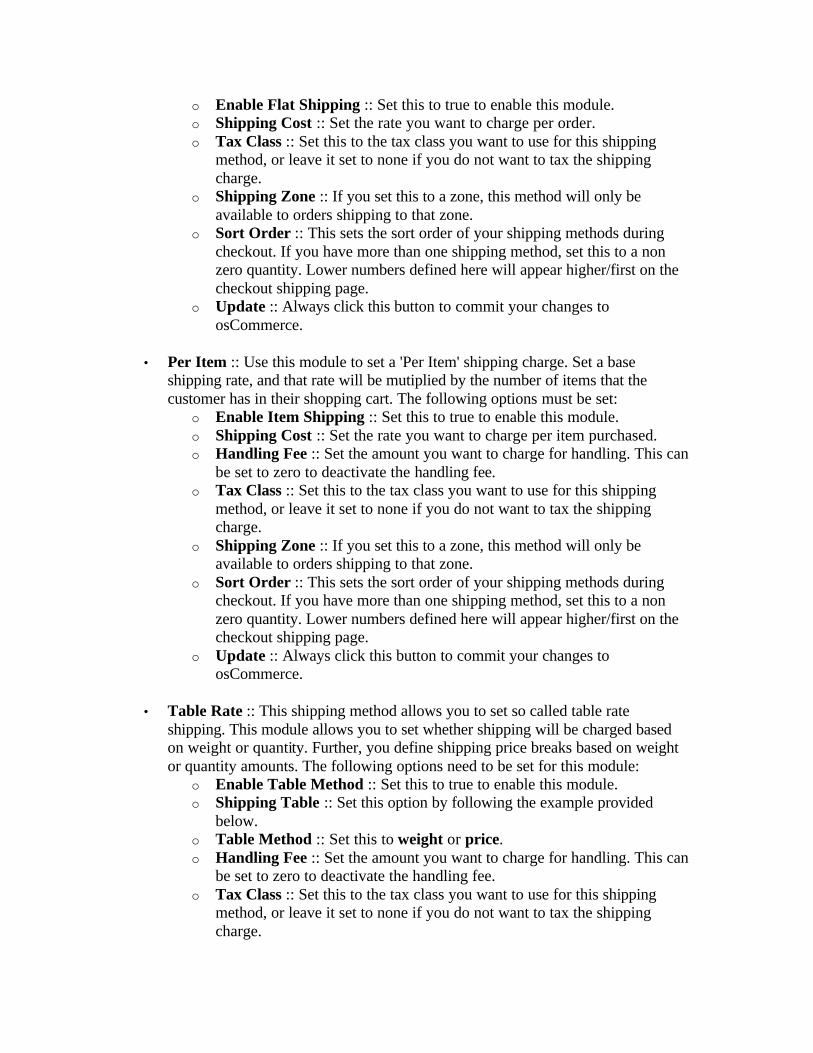
o Enable Flat Shipping :: Set this to true to enable this module. o Shipping Cost :: Set the rate you want to charge per order. o Tax Class :: Set this to the tax class you want to use for this shipping
method, or leave it set to none if you do not want to tax the shipping charge.
o Shipping Zone :: If you set this to a zone, this method will only be available to orders shipping to that zone.
o Sort Order :: This sets the sort order of your shipping methods during checkout. If you have more than one shipping method, set this to a non zero quantity. Lower numbers defined here will appear higher/first on the checkout shipping page.
o Update :: Always click this button to commit your changes to osCommerce.
• Per Item :: Use this module to set a 'Per Item' shipping charge. Set a base shipping rate, and that rate will be mutiplied by the number of items that the customer has in their shopping cart. The following options must be set:
o Enable Item Shipping :: Set this to true to enable this module. o Shipping Cost :: Set the rate you want to charge per item purchased. o Handling Fee :: Set the amount you want to charge for handling. This can
be set to zero to deactivate the handling fee. o Tax Class :: Set this to the tax class you want to use for this shipping
method, or leave it set to none if you do not want to tax the shipping charge.
o Shipping Zone :: If you set this to a zone, this method will only be available to orders shipping to that zone.
o Sort Order :: This sets the sort order of your shipping methods during checkout. If you have more than one shipping method, set this to a non zero quantity. Lower numbers defined here will appear higher/first on the checkout shipping page.
o Update :: Always click this button to commit your changes to osCommerce.
• Table Rate :: This shipping method allows you to set so called table rate shipping. This module allows you to set whether shipping will be charged based on weight or quantity. Further, you define shipping price breaks based on weight or quantity amounts. The following options need to be set for this module:
o Enable Table Method :: Set this to true to enable this module. o Shipping Table :: Set this option by following the example provided
below. o Table Method :: Set this to weight or price. o Handling Fee :: Set the amount you want to charge for handling. This can
be set to zero to deactivate the handling fee. o Tax Class :: Set this to the tax class you want to use for this shipping
method, or leave it set to none if you do not want to tax the shipping charge.

o Shipping Zone :: If you set this to a zone, this method will only be available to orders shipping to that zone.
o Sort Order :: This sets the sort order of your shipping methods during checkout. If you have more than one shipping method, set this to a non zero quantity. Lower numbers defined here will appear higher/first on the checkout shipping page.
o Update :: Always click this button to commit your changes to osCommerce.
EXAMPLE for Table Rate ShippingA store owner wants to charge $10 for orders
weighing up to 20 lbs. Any orders over 20 lbs, but under 40 lbs are charged $18.
To set this up using the table rate shipping method, the following must be
entered into the 'Shipping Table' field of this module: 25:10.00,40:18.00
• United Parcel Service :: If you want to ship using UPS, enable this module. It is also important to note that in order for shipping calculations to be done correctly, you must set the zip/postal code of your store corectly in the configuration section of osCommerce. The following options must be set:
o Enable UPS Shipping :: Set this to true to enable this module. o UPS Pickup Method :: This should be set to however your UPS packages
are picked up. Your options are : CC - Customer Counter, RDP - Daily Pickup, OTP - One Time Pickup, LC - Letter Center, OCA - On Call Air
o UPS Packaging :: Set this to the UPS Packaging method that you use. The following options are available : CP - Your Packaging, ULE - UPS Letter, UT - UPS Tube, UBE - UPS Express Box
o Residential Delivery :: Set this to either RES or COM to have the module quote a residential or commercial shipping rate.
o Handling Fee :: Set the amount you want to charge for handling. This can be set to zero to deactivate the handling fee.
o Tax Class :: Set this to the tax class you want to use for this shipping method, or leave it set to none if you do not want to tax the shipping charge.
o Shipping Zone :: If you set this to a zone, this method will only be available to orders shipping to that zone.
o Sort Order :: This sets the sort order of your shipping methods during checkout. If you have more than one shipping method, set this to a non zero quantity. Lower numbers defined here will appear higher/first on the checkout shipping page.
o Update :: Always click this button to commit your changes to osCommerce.

• United States Postal Service :: To use USPS module, you first need an account with the USPS. If you do not have an account, you cannot use this module. The following options must be configured:
o Enable USPS Shipping :: Set this to true to enable this module. o Enter the USPS User ID :: This should be set to your USPS user ID o Enter the USPS Password :: This should be set to your USPS password o Which server to use :: Set this to either 'test' or 'production' o Handling Fee :: Set the amount you want to charge for handling. This can
be set to zero to deactivate the handling fee. o Tax Class :: Set this to the tax class you want to use for this shipping
method, or leave it set to none if you do not want to tax the shipping charge.
o Shipping Zone :: If you set this to a zone, this method will only be available to orders shipping to that zone.
o Sort Order :: This sets the sort order of your shipping methods during checkout. If you have more than one shipping method, set this to a non zero quantity. Lower numbers defined here will appear higher/first on the checkout shipping page.
o Update :: Always click this button to commit your changes to osCommerce.
• Zone Rates ::
Order Total
• Low Order Fee ::
• Shipping ::
• Sub-Total ::
• Tax ::
• Total ::