
Organizational socialization practices and organizational ...

OrgPublisher What-If Organizational Planning

OrgPublisher What-If Organizational Planning Table of Contents
Copyright 2015, PeopleFluent. All rights reserved. Proprietary and confidential. PeopleFluent and the PeopleFluent and OrgPublisher logos are trademarks or registered trademarks of PeopleFluent. All other brand and product names are trademarks or registered trademarks of their respective holders. 11/20/2015 2
Table of Contents
Creating and Accessing What-If Organizational Planning Charts ............................. 4
Changing the Location of the What-If Organizational Planning Charts ................ 5
Securing EChart What-If Organizational Planning Charts ................................. 6
PluginX ................................................................................................... 7
Returning to a What-If Organizational Planning Chart ..................................... 7
Deleting a What-If Organizational Planning Chart ........................................... 7
Functions Offered by Buttons and Menus .......................................................... 8
Inserting Function and Feedback .................................................................. 9
Inserting Function – Direct Report.............................................................. 9
Inserting Function – Peer Box .................................................................. 10
Inserting Function – Person and Open Position .......................................... 11
Inserting Function – Job ......................................................................... 11
Inserting Function – Assistant Box ........................................................... 12
Inserting Function – Partner Box .............................................................. 12
Modifying Information in the Chart Box .......................................................... 13
Modifying Existing Job and Box Titles .......................................................... 13
Changing the Position Type for a Person ...................................................... 13
Modifying or Inserting Data ....................................................................... 14
Moving a Box – Cut and Paste .................................................................... 14
Moving a Box – Drag and Drop ................................................................... 15
Moving an Organization – Cut and Paste ..................................................... 16
Moving an Organization – Drag and Drop .................................................... 17
Deleting a Box or an Organization .............................................................. 18
Deleting a Person ..................................................................................... 19
Moving a Person to a Different Position ....................................................... 20
Moving a Person to an Open Position – Cut and Paste ................................. 20
Moving a Person to an open Position – Drag and Drop ................................ 21
Showing Multiple People Holding a Single Position ........................................ 22
Adding a Person to a Filled Position – Cut and Paste ................................... 22
Adding a Person to a Filled Position – Drag and Drop .................................. 23
Changing the Order of Display – Multiple People Filling a Position ................. 24
Using Undo .............................................................................................. 24
Showing Change Icons .............................................................................. 25
OrgPublisher What-If Organizational Planning Table of Contents
Copyright 2015, PeopleFluent. All rights reserved. Proprietary and confidential. PeopleFluent and the PeopleFluent and OrgPublisher logos are trademarks or registered trademarks of PeopleFluent. All other brand and product names are trademarks or registered trademarks of their respective holders. 11/20/2015 3
Viewing Changes Made in a Chart box ...................................................... 25
Using the Views Toolbar ............................................................................... 26
Using the Organizational Planning Change Report and Export ........................... 27
General Summary – Chart ......................................................................... 27
General Summary – Manager ..................................................................... 29
Position Modifications ................................................................................ 29
Exporting Change Data ............................................................................. 30
Distributing Charts and Change Reports ......................................................... 31
Sending the Chart and Change Report ........................................................ 31
OrgPublisher What-If Organizational Planning
Copyright 2015, PeopleFluent. All rights reserved. Proprietary and confidential. PeopleFluent and the PeopleFluent and OrgPublisher logos are trademarks or registered trademarks of PeopleFluent. All other brand and product names are trademarks or registered trademarks of their respective holders. 11/20/2015 4
Creating and Accessing What-If Organizational Planning Charts When the chart is published, the viewer sees one of the following buttons, based on the administrator’s selection when publishing the planning-enabled chart.
- What-If Organizational Planning only
- What-If Succession Planning only
- Organizational and Succession Planning
If only one option is available, the planner is taken to the appropriate dialog to open the chart. If both options are available, the planner is prompted to select the type of planning chart to open.
Figure 1.
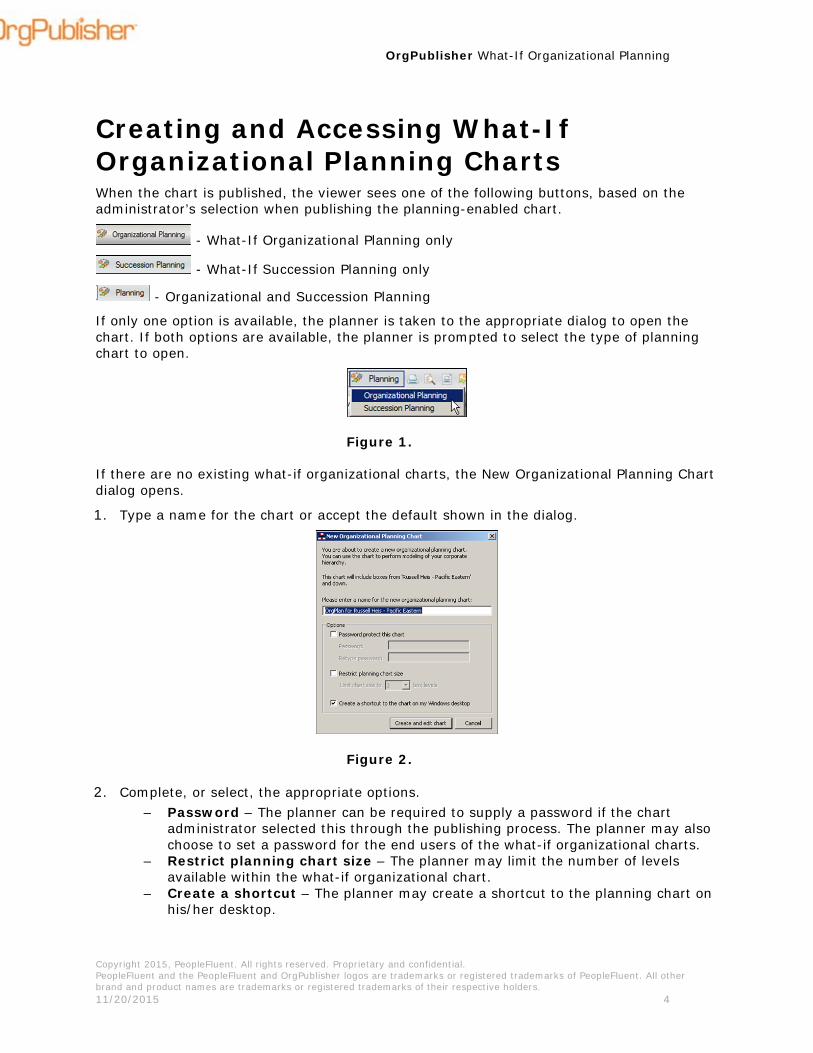
If there are no existing what-if organizational charts, the New Organizational Planning Chart dialog opens.
1. Type a name for the chart or accept the default shown in the dialog.
Figure 2.
2. Complete, or select, the appropriate options. – Password – The planner can be required to supply a password if the chart
administrator selected this through the publishing process. The planner may also choose to set a password for the end users of the what-if organizational charts.
– Restrict planning chart size – The planner may limit the number of levels available within the what-if organizational chart.
– Create a shortcut – The planner may create a shortcut to the planning chart on his/her desktop.
OrgPublisher What-If Organizational Planning
Copyright 2015, PeopleFluent. All rights reserved. Proprietary and confidential. PeopleFluent and the PeopleFluent and OrgPublisher logos are trademarks or registered trademarks of PeopleFluent. All other brand and product names are trademarks or registered trademarks of their respective holders. 11/20/2015 5
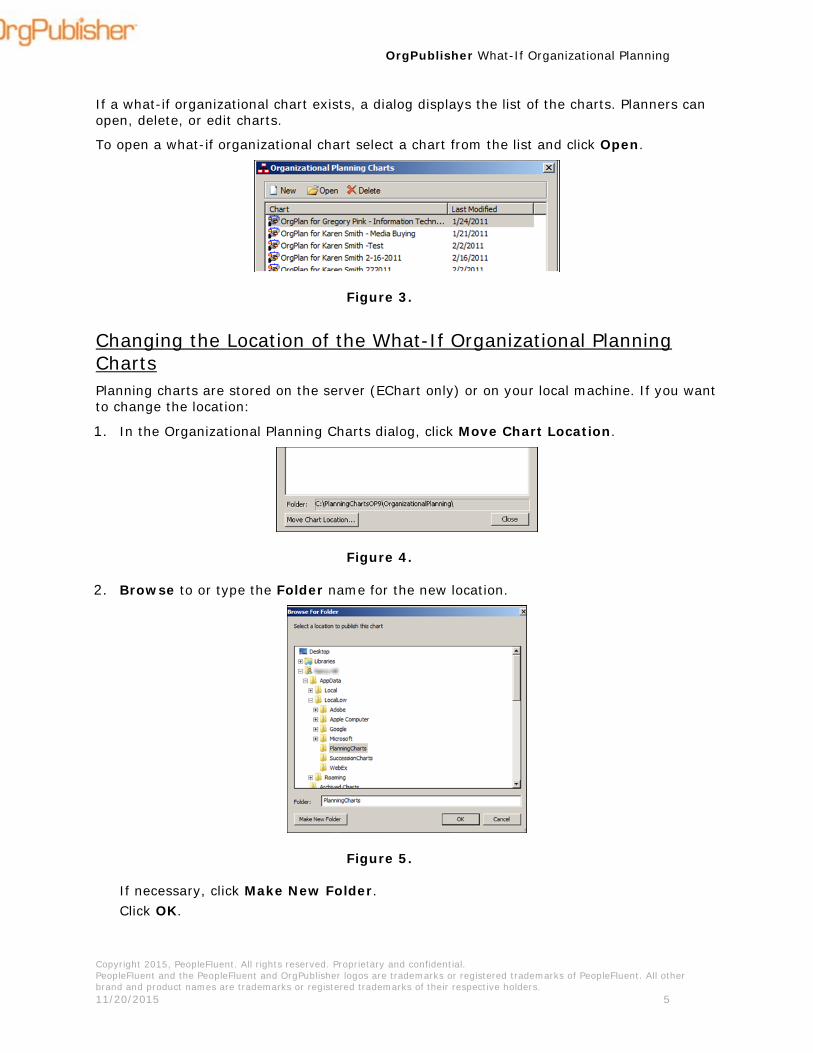
If a what-if organizational chart exists, a dialog displays the list of the charts. Planners can open, delete, or edit charts.
To open a what-if organizational chart select a chart from the list and click Open.
Figure 3.
Changing the Location of the What-If Organizational Planning Charts Planning charts are stored on the server (EChart only) or on your local machine. If you want to change the location:
1. In the Organizational Planning Charts dialog, click Move Chart Location.
Figure 4.
2. Browse to or type the Folder name for the new location.
Figure 5.
If necessary, click Make New Folder. Click OK.
OrgPublisher What-If Organizational Planning
Copyright 2015, PeopleFluent. All rights reserved. Proprietary and confidential. PeopleFluent and the PeopleFluent and OrgPublisher logos are trademarks or registered trademarks of PeopleFluent. All other brand and product names are trademarks or registered trademarks of their respective holders. 11/20/2015 6
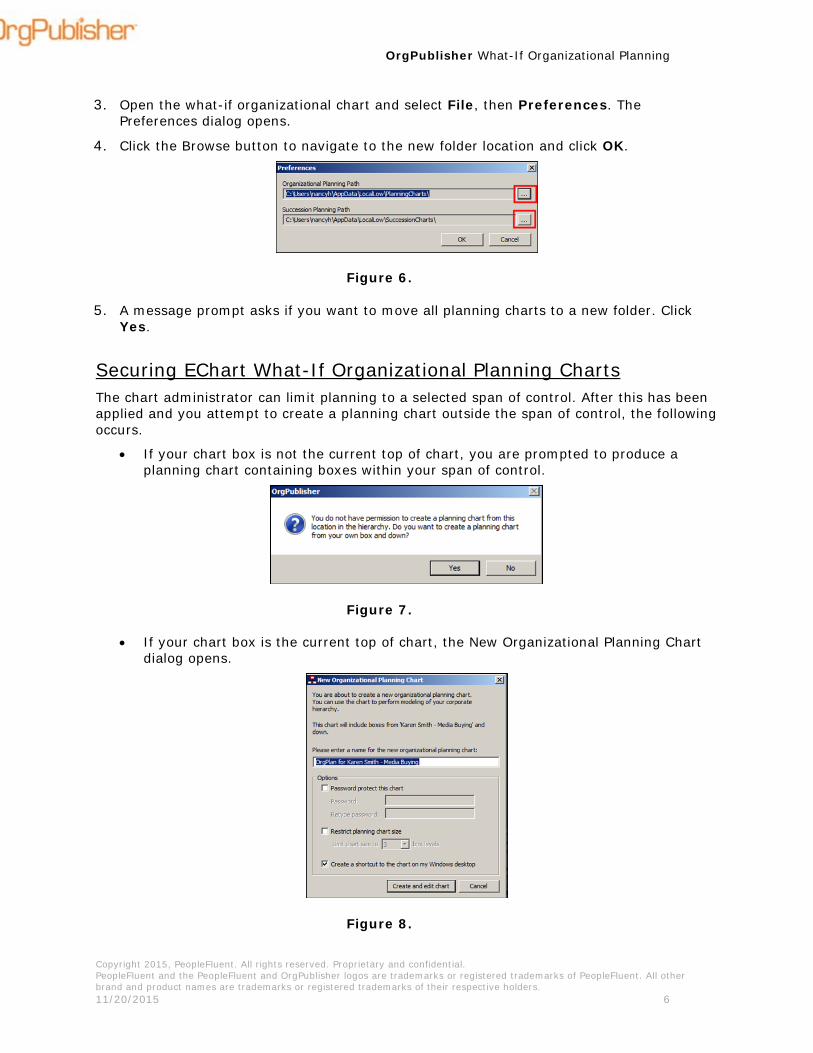
3. Open the what-if organizational chart and select File, then Preferences. The Preferences dialog opens.
4. Click the Browse button to navigate to the new folder location and click OK.
Figure 6.
5. A message prompt asks if you want to move all planning charts to a new folder. Click Yes.
Securing EChart What-If Organizational Planning Charts The chart administrator can limit planning to a selected span of control. After this has been applied and you attempt to create a planning chart outside the span of control, the following occurs.
• If your chart box is not the current top of chart, you are prompted to produce a planning chart containing boxes within your span of control.
Figure 7.
• If your chart box is the current top of chart, the New Organizational Planning Chart dialog opens.
Figure 8.

OrgPublisher What-If Organizational Planning
Copyright 2015, PeopleFluent. All rights reserved. Proprietary and confidential. PeopleFluent and the PeopleFluent and OrgPublisher logos are trademarks or registered trademarks of PeopleFluent. All other brand and product names are trademarks or registered trademarks of their respective holders. 11/20/2015 7
• Some planning chart users may be given the option to plan from any span of control. In this case, the current top of chart box is the span of control included in the planning chart.
PluginX When working with a published PluginX organizational planning chart, the current top of chart box is the span of control included in the planning chart.
Returning to a What-If Organizational Planning Chart 1. Open the published chart on your intranet.
2. Click the planning button in the toolbar.
3. In the Organizational Planning Charts dialog, select the planning you need and click Open.
Figure 9.
If a desktop shortcut was created for your planning chart, you can choose to double-click the icon to open the chart.
Figure 10.
Deleting a What-If Organizational Planning Chart 1. Open the published chart on your intranet.
2. Click the planning button in the toolbar.
3. In the Organizational Planning Charts dialog, select the planning you need and click Delete.
Figure 11.
4. Confirm you want to delete the chart and, if applicable, the shortcut icon. You are notified that the deletion is complete.
OrgPublisher What-If Organizational Planning
Copyright 2015, PeopleFluent. All rights reserved. Proprietary and confidential. PeopleFluent and the PeopleFluent and OrgPublisher logos are trademarks or registered trademarks of PeopleFluent. All other brand and product names are trademarks or registered trademarks of their respective holders. 11/20/2015 8
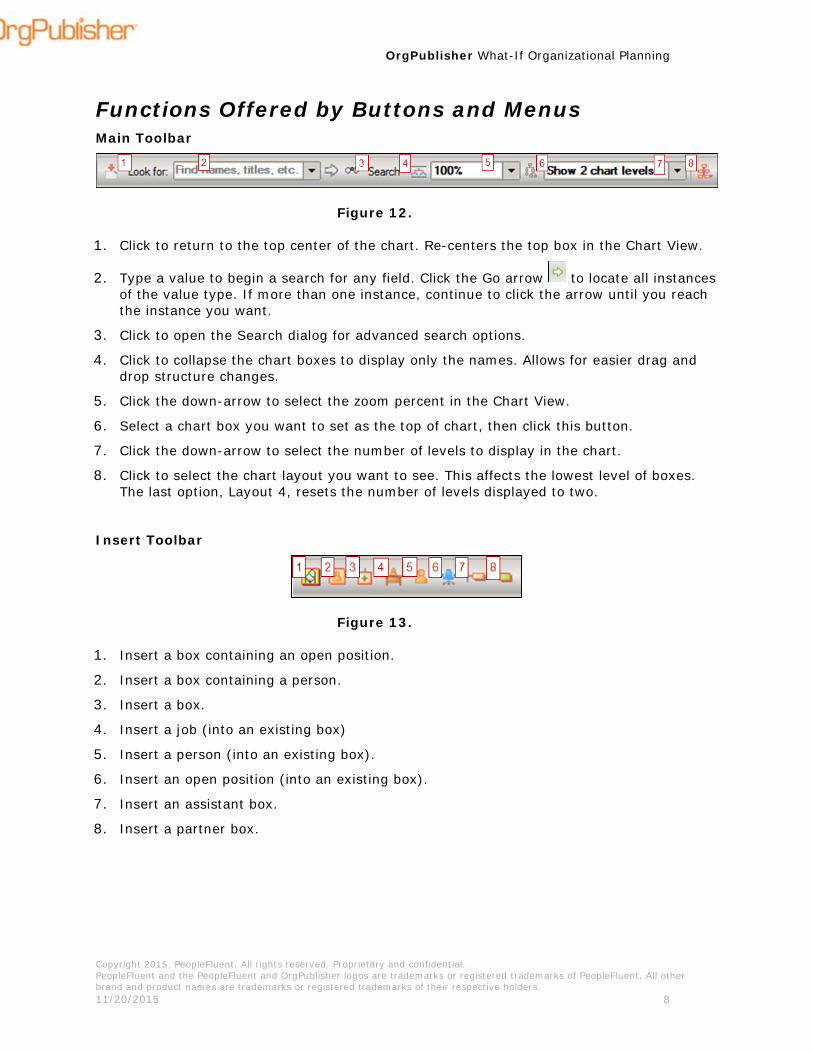
Functions Offered by Buttons and Menus Main Toolbar
Figure 12.
1. Click to return to the top center of the chart. Re-centers the top box in the Chart View.
2. Type a value to begin a search for any field. Click the Go arrow to locate all instances of the value type. If more than one instance, continue to click the arrow until you reach the instance you want.
3. Click to open the Search dialog for advanced search options.
4. Click to collapse the chart boxes to display only the names. Allows for easier drag and drop structure changes.
5. Click the down-arrow to select the zoom percent in the Chart View.
6. Select a chart box you want to set as the top of chart, then click this button.
7. Click the down-arrow to select the number of levels to display in the chart.
8. Click to select the chart layout you want to see. This affects the lowest level of boxes. The last option, Layout 4, resets the number of levels displayed to two.
Insert Toolbar
Figure 13.
1. Insert a box containing an open position.
2. Insert a box containing a person.
3. Insert a box.
4. Insert a job (into an existing box)
5. Insert a person (into an existing box).
6. Insert an open position (into an existing box).
7. Insert an assistant box.
8. Insert a partner box.

OrgPublisher What-If Organizational Planning
Copyright 2015, PeopleFluent. All rights reserved. Proprietary and confidential. PeopleFluent and the PeopleFluent and OrgPublisher logos are trademarks or registered trademarks of PeopleFluent. All other brand and product names are trademarks or registered trademarks of their respective holders. 11/20/2015 9
Inserting Function and Feedback When you select an insert button, OrgPlan indicates where the insertion will occur by providing feedback. Examples follow.
Inserting Function – Direct Report
Figure 14.
• In this example, the mouse pointer hovers over the manager/supervisor box on the left.
• The box is outlined in red.
• Releasing the mouse adds a Direct Report relationship, noted on the right in the red circle.
• This action can also be performed using the Compact View, as noted on the lower left.
Figure 15.

OrgPublisher What-If Organizational Planning
Copyright 2015, PeopleFluent. All rights reserved. Proprietary and confidential. PeopleFluent and the PeopleFluent and OrgPublisher logos are trademarks or registered trademarks of PeopleFluent. All other brand and product names are trademarks or registered trademarks of their respective holders. 11/20/2015 10
Inserting Function – Peer Box • In this example, the mouse pointer hovers between two peer boxes on the left. The
top-left example indicates that a box will be added between the two peers.
• Releasing the mouse drops a new box between the two existing peer boxes.
Figure 16.
• In the figure above, the lower-left graphic indicates that a peer box will be added to the left of the selected box.
• The lower-right graphic indicates that a peer box will be added to the right of the selected box.
When inserting a box or job, a prompt appear. Select a previously used box title or job title or type a new title.

OrgPublisher What-If Organizational Planning
Copyright 2015, PeopleFluent. All rights reserved. Proprietary and confidential. PeopleFluent and the PeopleFluent and OrgPublisher logos are trademarks or registered trademarks of PeopleFluent. All other brand and product names are trademarks or registered trademarks of their respective holders. 11/20/2015 11
Inserting Function – Person and Open Position
Figure 17.
• The graphic on the left shows the mouse pointer over an existing name. Releasing the pointer adds the open position or person below the existing name.
• The graphic on the right shows the person or open position added above the existing name or open position holding the job title.
Figure 18.
Inserting Function – Job
Figure 19.
• Placing the Insert Job mouse pointer over an existing job title and releasing it adds a new job below the existing job, show on the left in the figure below.
• Placing the Insert Job mouse pointer over the box title, on the right in the figure below, adds a new job above the existing job. In this instance, the job is added with a Manager position type, and all custom fields associated with the Manager position type are shown.
Figure 20.

OrgPublisher What-If Organizational Planning
Copyright 2015, PeopleFluent. All rights reserved. Proprietary and confidential. PeopleFluent and the PeopleFluent and OrgPublisher logos are trademarks or registered trademarks of PeopleFluent. All other brand and product names are trademarks or registered trademarks of their respective holders. 11/20/2015 12
Inserting Function – Assistant Box
Figure 21.
• Placing the Insert Assistant Box pointer on a box adds an assistant box below and to the right of the box, as shown in the top in the figure below.
• Placing the Insert Assistant Box pointer between two boxes, as shown at the bottom of the figure below, adds the assistant box below and to the right of the associated report-to box.
Figure 22.
Inserting Function – Partner Box
Figure 23.
• Placing the Insert Partner Box pointer on a box, as shown at the top in the figure below, adds a partner box to the right of the selected box.
• Placing the Insert Partner Box between two boxes, as shown at the bottom in the figure below, adds the partner box to the right of the associated report-to box.
Figure 24.

OrgPublisher What-If Organizational Planning
Copyright 2015, PeopleFluent. All rights reserved. Proprietary and confidential. PeopleFluent and the PeopleFluent and OrgPublisher logos are trademarks or registered trademarks of PeopleFluent. All other brand and product names are trademarks or registered trademarks of their respective holders. 11/20/2015 13
Modifying Information in the Chart Box This section contains general information about modifying chart box information in the what-if organizational chart.
Modifying Existing Job and Box Titles 1. Double-click to select the data you want to modify.
2. Type the new data or click the drop-down arrow to select an item from the options list.
Figure 25.
Changing the Position Type for a Person 1. Double-click on a person’s name to select it.
2. In the Update Person dialog, select the new position type you want to assign and click OK.
Figure 26.
Note: You cannot modify names already assigned to positions in the what-if organizational chart.

OrgPublisher What-If Organizational Planning
Copyright 2015, PeopleFluent. All rights reserved. Proprietary and confidential. PeopleFluent and the PeopleFluent and OrgPublisher logos are trademarks or registered trademarks of PeopleFluent. All other brand and product names are trademarks or registered trademarks of their respective holders. 11/20/2015 14
Modifying or Inserting Data 1. Double-click on the data or placeholder to select it.
2. Type the new data.
Figure 27.
Moving a Box – Cut and Paste To move a box to another report-to box:
1. Move the cursor over the top of the box until you see the “Move” cursor, then right-click on the top text to select the box.
Figure 28.
2. Click Cut in the toolbar.
3. Navigate to where you can see the new report-to box and click Paste in the toolbar.
4. Move the mouse pointer on top of the new report-to box to get the red outline around the box and click to paste the cut box to the new location under the report-to box.
Figure 29.

OrgPublisher What-If Organizational Planning
Copyright 2015, PeopleFluent. All rights reserved. Proprietary and confidential. PeopleFluent and the PeopleFluent and OrgPublisher logos are trademarks or registered trademarks of PeopleFluent. All other brand and product names are trademarks or registered trademarks of their respective holders. 11/20/2015 15
Moving a Box – Drag and Drop You can use drag and drop when both the original box location and the new destination box location are visible in the Chart View.
1. Hover the mouse pointer over the top edge of the chart box you want to move until you see the cursor change to the “Move” icon.
Figure 30.
2. Hold the left mouse button down while you drag the cursor to the new report-to box.
3. Release the mouse button when you see the red outline of the box.
Figure 31.
The original box now appears below the new report-to box.
Figure 32.

OrgPublisher What-If Organizational Planning
Copyright 2015, PeopleFluent. All rights reserved. Proprietary and confidential. PeopleFluent and the PeopleFluent and OrgPublisher logos are trademarks or registered trademarks of PeopleFluent. All other brand and product names are trademarks or registered trademarks of their respective holders. 11/20/2015 16
Moving an Organization – Cut and Paste 1. Hover the mouse cursor over the top edge of the box you want to cut until you see the
cursor change to the “Move” icon. Click to select the box and all direct report boxes.
Figure 33.
2. Click Cut in the toolbar.
3. Navigate so that you can see the new report-to box and click Paste in the toolbar.
4. Move the mouse pointer on top of the new report-to box until you see a red outline around the box. Click to paste the selected box and all direct report boxes below the new report-to box.
Figure 34.

OrgPublisher What-If Organizational Planning
Copyright 2015, PeopleFluent. All rights reserved. Proprietary and confidential. PeopleFluent and the PeopleFluent and OrgPublisher logos are trademarks or registered trademarks of PeopleFluent. All other brand and product names are trademarks or registered trademarks of their respective holders. 11/20/2015 17
Moving an Organization – Drag and Drop You can use drag and drop when both the original box location and the new destination box location are visible in the Chart View.
1. Hover the mouse pointer over the top edge of the chart box you want to move until you see the cursor change to the “Move” icon. Click to select the box and all direct report boxes.
Figure 35.
2. Hold the left mouse button down while you drag the cursor to the new report-to box.
3. Release the mouse button when you see the red outline of the box. The box and all direct reports boxes are added below the new report-to box.
Figure 36.

OrgPublisher What-If Organizational Planning
Copyright 2015, PeopleFluent. All rights reserved. Proprietary and confidential. PeopleFluent and the PeopleFluent and OrgPublisher logos are trademarks or registered trademarks of PeopleFluent. All other brand and product names are trademarks or registered trademarks of their respective holders. 11/20/2015 18
Deleting a Box or an Organization 1. Hover the mouse pointer over the top edge of the chart box you want to delete, or the
top box in a selected hierarchy you want to delete, until you see the cursor change to the “Move” icon.
Figure 37.
2. Press Delete to remove the box or organization.
Figure 38.

OrgPublisher What-If Organizational Planning
Copyright 2015, PeopleFluent. All rights reserved. Proprietary and confidential. PeopleFluent and the PeopleFluent and OrgPublisher logos are trademarks or registered trademarks of PeopleFluent. All other brand and product names are trademarks or registered trademarks of their respective holders. 11/20/2015 19
Deleting a Person 1. Move the mouse pointer to the name of the person you want to delete and click to
select.
Figure 39.
2. Press Delete. A message appears verifying that you want to delete the selected person.
Figure 40.
The name and personal data are removed from the chart box. This makes the job and open position.
Figure 41.
OrgPublisher What-If Organizational Planning
Copyright 2015, PeopleFluent. All rights reserved. Proprietary and confidential. PeopleFluent and the PeopleFluent and OrgPublisher logos are trademarks or registered trademarks of PeopleFluent. All other brand and product names are trademarks or registered trademarks of their respective holders. 11/20/2015 20
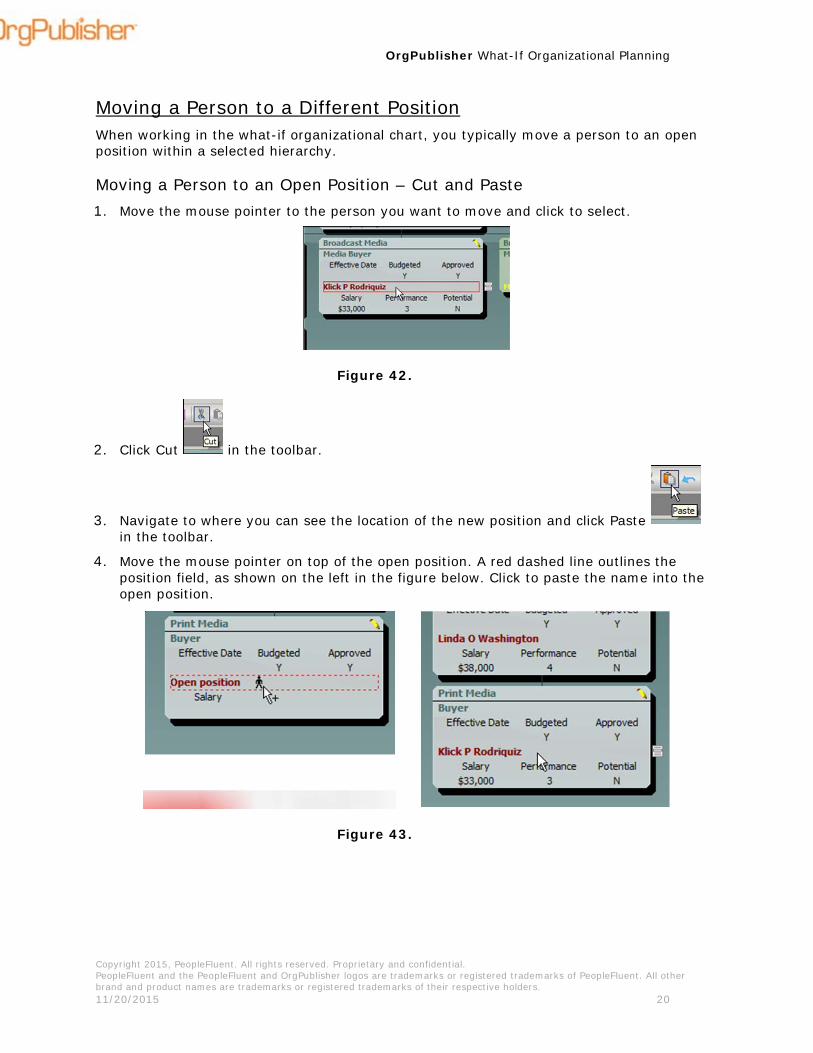
Moving a Person to a Different Position When working in the what-if organizational chart, you typically move a person to an open position within a selected hierarchy.
Moving a Person to an Open Position – Cut and Paste 1. Move the mouse pointer to the person you want to move and click to select.
Figure 42.
2. Click Cut in the toolbar.
3. Navigate to where you can see the location of the new position and click Paste in the toolbar.
4. Move the mouse pointer on top of the open position. A red dashed line outlines the position field, as shown on the left in the figure below. Click to paste the name into the open position.
Figure 43.

OrgPublisher What-If Organizational Planning
Copyright 2015, PeopleFluent. All rights reserved. Proprietary and confidential. PeopleFluent and the PeopleFluent and OrgPublisher logos are trademarks or registered trademarks of PeopleFluent. All other brand and product names are trademarks or registered trademarks of their respective holders. 11/20/2015 21
Moving a Person to an open Position – Drag and Drop 1. Move the mouse pointer to the person you want to move and click to select.
Figure 44.
2. Hold the left mouse button down while you drag the cursor to the open position.
3. Release the mouse button when you see the dotted red outline around the open position field.
Figure 45.
The person now fills the position.
Figure 46.
OrgPublisher What-If Organizational Planning
Copyright 2015, PeopleFluent. All rights reserved. Proprietary and confidential. PeopleFluent and the PeopleFluent and OrgPublisher logos are trademarks or registered trademarks of PeopleFluent. All other brand and product names are trademarks or registered trademarks of their respective holders. 11/20/2015 22
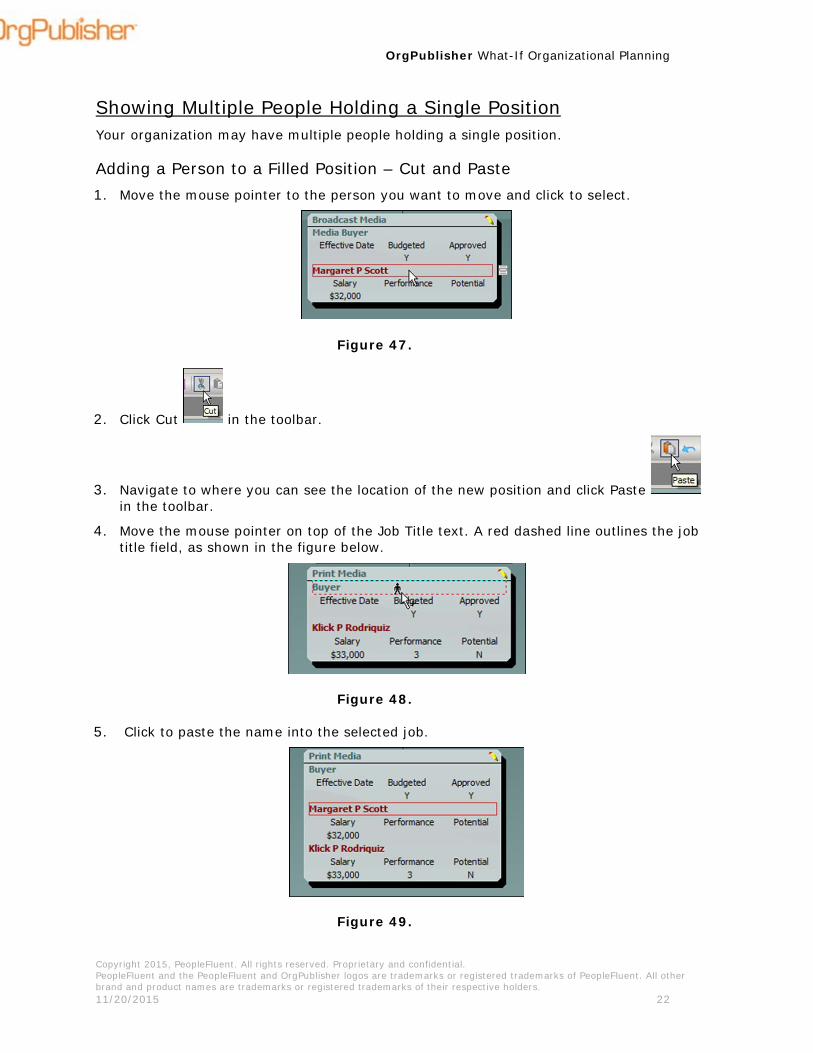
Showing Multiple People Holding a Single Position Your organization may have multiple people holding a single position.
Adding a Person to a Filled Position – Cut and Paste 1. Move the mouse pointer to the person you want to move and click to select.
Figure 47.
2. Click Cut in the toolbar.
3. Navigate to where you can see the location of the new position and click Paste in the toolbar.
4. Move the mouse pointer on top of the Job Title text. A red dashed line outlines the job title field, as shown in the figure below.
Figure 48.
5. Click to paste the name into the selected job.
Figure 49.

OrgPublisher What-If Organizational Planning
Copyright 2015, PeopleFluent. All rights reserved. Proprietary and confidential. PeopleFluent and the PeopleFluent and OrgPublisher logos are trademarks or registered trademarks of PeopleFluent. All other brand and product names are trademarks or registered trademarks of their respective holders. 11/20/2015 23
Adding a Person to a Filled Position – Drag and Drop 1. Move the mouse pointer to the person you want to move and click to select.
Figure 50.
2. Hold the left mouse button down while you drag the cursor to the new job title. A red dashed border appears around the job title field.
Figure 51.
3. Release the mouse button when you see the dotted red outline around the open position field. The person is added to the job.
Figure 52.

OrgPublisher What-If Organizational Planning
Copyright 2015, PeopleFluent. All rights reserved. Proprietary and confidential. PeopleFluent and the PeopleFluent and OrgPublisher logos are trademarks or registered trademarks of PeopleFluent. All other brand and product names are trademarks or registered trademarks of their respective holders. 11/20/2015 24
Changing the Order of Display – Multiple People Filling a Position The simplest method for changing the display order of people holding position is to use drag and drop. You drag and drop individuals’ names on the job title in the order you want them to display.
In the following example, Margaret P Scott is the 2nd person in the list. To move her ahead of Klick Rodriquiz:
1. Move the mouse pointer to Margaret P Scott and click to select.
2. Drag the mouse pointer on top of the Job Title text.
Figure 53.
3. Release the mouse pointer to drop the name at the top of the list.
Figure 54.
Using Undo You can reverse, or “undo” the last move made. Click the Undo button in the toolbar.
Figure 55.
Note: This action only affects people or box moves. It does not undo any field data changes.

OrgPublisher What-If Organizational Planning
Copyright 2015, PeopleFluent. All rights reserved. Proprietary and confidential. PeopleFluent and the PeopleFluent and OrgPublisher logos are trademarks or registered trademarks of PeopleFluent. All other brand and product names are trademarks or registered trademarks of their respective holders. 11/20/2015 25
Showing Change Icons The show change icon is a visual indicator that change has occurred in the what-if organizational planning chart. The chart administrator determines if this feature is enabled. Planners can determine if the icons are displayed in the what-if organizational chart.
Click View in the main menu and select Show Change Icons from the options list.
Figure 56.
Viewing Changes Made in a Chart box Planners may want to view the changes that have been made in the chart boxes.
1. Place the mouse pointer on top of the mouse cursor.
Figure 57.
2. Click the icon to display the list of changes. In the following example. Jerome Smith has a new manager and has had a salary increase.
Figure 58.
OrgPublisher What-If Organizational Planning
Copyright 2015, PeopleFluent. All rights reserved. Proprietary and confidential. PeopleFluent and the PeopleFluent and OrgPublisher logos are trademarks or registered trademarks of PeopleFluent. All other brand and product names are trademarks or registered trademarks of their respective holders. 11/20/2015 26
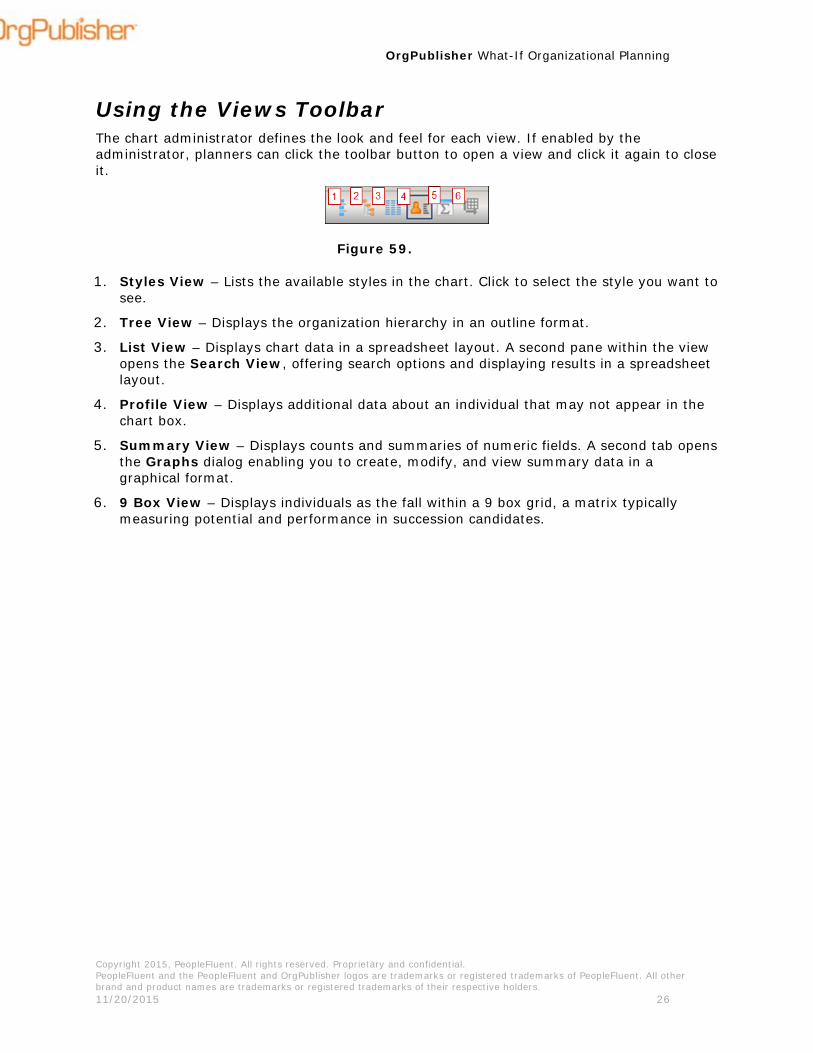
Using the Views Toolbar The chart administrator defines the look and feel for each view. If enabled by the administrator, planners can click the toolbar button to open a view and click it again to close it.
Figure 59.
1. Styles View – Lists the available styles in the chart. Click to select the style you want to see.
2. Tree View – Displays the organization hierarchy in an outline format.
3. List View – Displays chart data in a spreadsheet layout. A second pane within the view opens the Search View, offering search options and displaying results in a spreadsheet layout.
4. Profile View – Displays additional data about an individual that may not appear in the chart box.
5. Summary View – Displays counts and summaries of numeric fields. A second tab opens the Graphs dialog enabling you to create, modify, and view summary data in a graphical format.
6. 9 Box View – Displays individuals as the fall within a 9 box grid, a matrix typically measuring potential and performance in succession candidates.
OrgPublisher What-If Organizational Planning
Copyright 2015, PeopleFluent. All rights reserved. Proprietary and confidential. PeopleFluent and the PeopleFluent and OrgPublisher logos are trademarks or registered trademarks of PeopleFluent. All other brand and product names are trademarks or registered trademarks of their respective holders. 11/20/2015 27
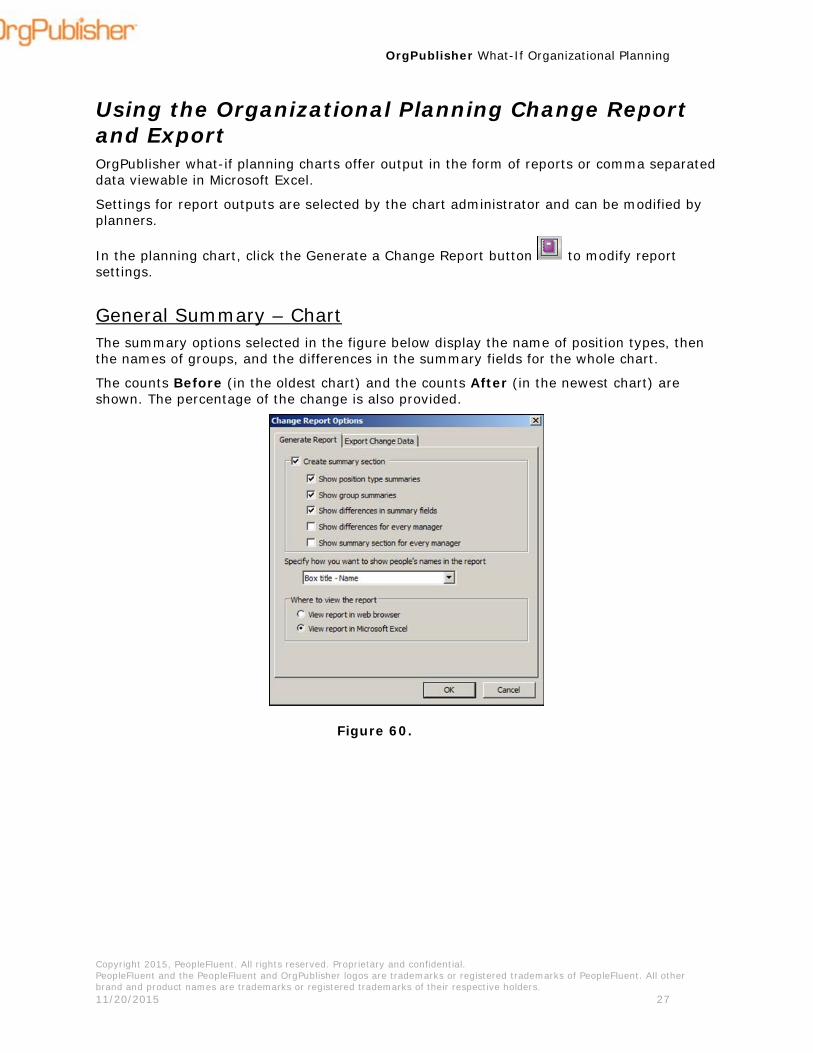
Using the Organizational Planning Change Report and Export OrgPublisher what-if planning charts offer output in the form of reports or comma separated data viewable in Microsoft Excel.
Settings for report outputs are selected by the chart administrator and can be modified by planners.
In the planning chart, click the Generate a Change Report button to modify report settings.
General Summary – Chart The summary options selected in the figure below display the name of position types, then the names of groups, and the differences in the summary fields for the whole chart.
The counts Before (in the oldest chart) and the counts After (in the newest chart) are shown. The percentage of the change is also provided.
Figure 60.

OrgPublisher What-If Organizational Planning
Copyright 2015, PeopleFluent. All rights reserved. Proprietary and confidential. PeopleFluent and the PeopleFluent and OrgPublisher logos are trademarks or registered trademarks of PeopleFluent. All other brand and product names are trademarks or registered trademarks of their respective holders. 11/20/2015 28
A summary of changes for each box is also provided in this report.
Figure 61.
OrgPublisher What-If Organizational Planning
Copyright 2015, PeopleFluent. All rights reserved. Proprietary and confidential. PeopleFluent and the PeopleFluent and OrgPublisher logos are trademarks or registered trademarks of PeopleFluent. All other brand and product names are trademarks or registered trademarks of their respective holders. 11/20/2015 29
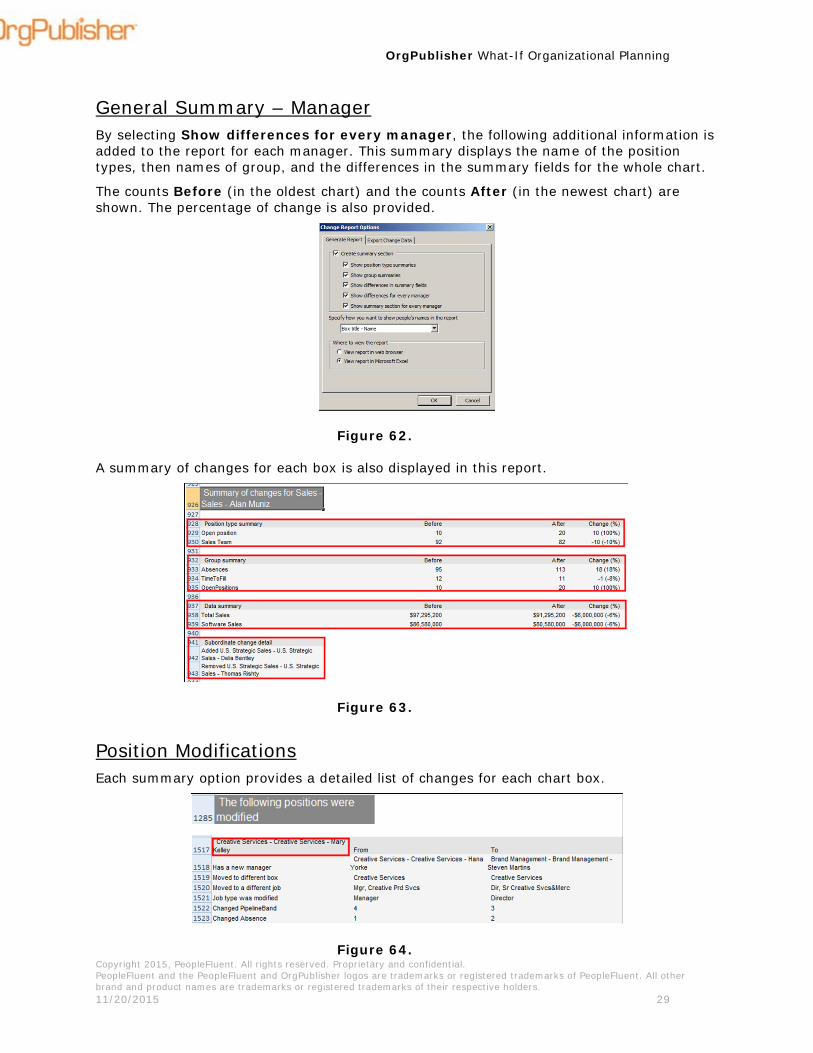
General Summary – Manager By selecting Show differences for every manager, the following additional information is added to the report for each manager. This summary displays the name of the position types, then names of group, and the differences in the summary fields for the whole chart.
The counts Before (in the oldest chart) and the counts After (in the newest chart) are shown. The percentage of change is also provided.
Figure 62.
A summary of changes for each box is also displayed in this report.
Figure 63.
Position Modifications Each summary option provides a detailed list of changes for each chart box.
Figure 64.

OrgPublisher What-If Organizational Planning
Copyright 2015, PeopleFluent. All rights reserved. Proprietary and confidential. PeopleFluent and the PeopleFluent and OrgPublisher logos are trademarks or registered trademarks of PeopleFluent. All other brand and product names are trademarks or registered trademarks of their respective holders. 11/20/2015 30
Exporting Change Data Responding to client requests, you can create a comma separated file reflecting changes that can be used to upload into a source HR system. Planners select the required fields within the what-if planning charts.
The resulting Microsoft Excel file contains three tabbed worksheets:
• Added position data records
• Removed position data records
• Edited data records (field data modified or movement in the chart)
Figure 65.

OrgPublisher What-If Organizational Planning
Copyright 2015, PeopleFluent. All rights reserved. Proprietary and confidential. PeopleFluent and the PeopleFluent and OrgPublisher logos are trademarks or registered trademarks of PeopleFluent. All other brand and product names are trademarks or registered trademarks of their respective holders. 11/20/2015 31
To format the spreadsheet output:
1. Click the Generate a Change Report button in the what-if planning chart.
2. Select the Export Change Data tab in the Change Report Options dialog.
Figure 66.
3. Select the associated check box for each field you want to include.
4. Click Generate to produce the Excel file with the selected fields. Excel opens the spreadsheet with three tabs.
Distributing Charts and Change Reports OrgPublisher what-if organizational planning charts and change reports are distributed by the planner. The change report can be sent to Excel and then printed or emailed to another person.
You can find more information in the OrgPublisher Print and PowerPoint document.
Sending the Chart and Change Report 1. Click the Send chart to another user button in the planning chart.
Figure 67.
Note: Parent Box ID must be one of the selected fields in order to see the current and previous Parent Box ID data for a changed report.

OrgPublisher What-If Organizational Planning
Copyright 2015, PeopleFluent. All rights reserved. Proprietary and confidential. PeopleFluent and the PeopleFluent and OrgPublisher logos are trademarks or registered trademarks of PeopleFluent. All other brand and product names are trademarks or registered trademarks of their respective holders. 11/20/2015 32
2. In the Email OrgPlan dialog, select the items you want to send and click OK.
Figure 68.
3. The files are attached and directions on how to view them are added in the email message. Type the email address and click Send.
Figure 69.