
OREGON PROVIDER DIRECTORY (OPD) TRAINING MATERIALSOregon Health Information Technology (HIT)...
54
Oregon Health Information Technology (HIT) Portfolio Project i OREGON PROVIDER DIRECTORY (OPD) TRAINING MATERIALS FOR OREGON HEALTH INFORMATION TECHNOLOGY (HIT) PORTFOLIO 5 AUGUST 2019 Prepared by: for the Oregon Health Authority, Office of Health Information and Technology
Transcript of OREGON PROVIDER DIRECTORY (OPD) TRAINING MATERIALSOregon Health Information Technology (HIT)...

Oregon Health Information Technology (HIT) Portfolio Project
i
OREGON PROVIDER DIRECTORY (OPD)
TRAINING MATERIALS
FOR
OREGON HEALTH INFORMATION
TECHNOLOGY (HIT) PORTFOLIO
5 AUGUST 2019
Prepared by:
for the
Oregon Health Authority, Office of Health Information and Technology
Oregon Health Information Technology (HIT) Portfolio Project
TABLE OF CONTENTS
List of Figures List of Tables ii 1.1 Background ......................................................................................................................... 1 1.2 Recommended Web Browsers ............................................................................................ 2 1.3 OneHealthPort Training Material ....................................................................................... 3 1.4 OneHealthPort Roles for the Provider Directory ................................................................ 3 1.5 Online Registration Process and OneHealthPort Onboarding ............................................ 4 1.6 Administrator Written Training Material ............................................................................ 4 1.7 Legal Agreements ............................................................................................................... 4
End User Written Training Material .............................................................................. 5 2.1 Basic Functionality ............................................................................................................. 5 2.1.1 Screen Layout & Navigation .............................................................................................. 5 2.1.2 My Profile Page .................................................................................................................. 6 2.2 Searching Records .............................................................................................................. 8 2.2.1 Searching from Home Page ................................................................................................ 8 2.2.2 Basic Search ........................................................................................................................ 8 2.2.3 Advanced Search ................................................................................................................ 9 2.2.4 Searching from My Records Tab ...................................................................................... 11 2.3 Viewing Records ............................................................................................................... 13 2.3.1 Viewing Organization Master Records ............................................................................. 13 2.3.2 Viewing Staff Records ...................................................................................................... 15 2.3.3 Viewing Provider Master Records .................................................................................... 16 2.3.4 Programs ........................................................................................................................... 18 2.4 Reports .............................................................................................................................. 19 2.4.1 Viewing Reports ............................................................................................................... 19 2.4.2 Creating Reports ............................................................................................................... 24 2.5 Loading Data through the File Uploader .......................................................................... 33 2.6 Reporting an Inaccuracy ................................................................................................... 39 2.7 Requesting Additional Permissions .................................................................................. 41 2.8 Understanding Data Source Contribution and Record Scoring ........................................ 43 2.8.1 Completeness Score .......................................................................................................... 44 2.8.2 Reliability Score ............................................................................................................... 44 2.9 Utilizing ‘My Records’ Tab .............................................................................................. 46 2.10 Use of Data Attestation Buttons ....................................................................................... 47
Continuous Improvement .............................................................................................. 49 3.1 Help Desk Tickets ............................................................................................................. 49
LIST OF FIGURES
Figure Title Page
Figure 1: Provider Directory Concept ........................................................................................................... 1 Figure 2: Standard End User Permissions within Provider Directory .......................................................... 4 Figure 3: Provider Directory Home Page ..................................................................................................... 5 Figure 4: User Profile Navigation List .......................................................................................................... 6

Oregon Health Information Technology (HIT) Portfolio Project
i
Figure 5: My Profile ...................................................................................................................................... 7 Figure 6: My Settings .................................................................................................................................... 7 Figure 7: Find a Provider and Find an Organization..................................................................................... 8 Figure 8: Search Bar Results ......................................................................................................................... 9 Figure 9: Advanced Provider Search .......................................................................................................... 10 Figure 10: Advanced Organization Search ................................................................................................. 11 Figure 11: My Records - Provider Source Record ...................................................................................... 12 Figure 12: Provider Source Record ............................................................................................................. 12 Figure 13: Organization Master Record ...................................................................................................... 14 Figure 14: Organization Endpoints ............................................................................................................. 15 Figure 15: Staff Records ............................................................................................................................. 16 Figure 16: Provider Master Record ............................................................................................................. 17 Figure 17: Provider Endpoints .................................................................................................................... 18 Figure 18: Program Record ......................................................................................................................... 19 Figure 19: View Reports ............................................................................................................................. 20 Figure 20: Provider Program Participation Report .................................................................................... 21 Figure 21: Report Export ............................................................................................................................ 21 Figure 22: Save Report ............................................................................................................................... 22 Figure 23: Subscribe to Report ................................................................................................................... 22 Figure 24: Report Subscription Notification ............................................................................................... 23 Figure 25: Scheduled Report Email Sample ............................................................................................... 24 Figure 26: Reports Header .......................................................................................................................... 24 Figure 27: Launch Report Builder .............................................................................................................. 25 Figure 28: Report Builder Launched .......................................................................................................... 25 Figure 29: Report Builder Training Assistance .......................................................................................... 26 Figure 30: Guided Tour .............................................................................................................................. 27 Figure 31: Start Tour ................................................................................................................................... 27 Figure 32: Find the Right Data ................................................................................................................... 27 Figure 33: Refine Report Scope .................................................................................................................. 28 Figure 34: Add a Chart ............................................................................................................................... 28 Figure 35: Additional Training Information ............................................................................................... 29 Figure 36: Salesforce Documentation on Report Building ......................................................................... 29 Figure 37: Saving a Report ......................................................................................................................... 30 Figure 38: Naming, Describing, and Assigning Report Folder .................................................................. 31 Figure 39: TEST Custom Report ................................................................................................................ 32 Figure 40: Report Saved in Folder .............................................................................................................. 32 Figure 41: Drag and Drop to Shared Reports Folder .................................................................................. 33 Figure 42: File Uploader Tab ...................................................................................................................... 34 Figure 43: Data Loading Specification Cover Sheet................................................................................... 34 Figure 44: Data Specifications- Providers Spec Tab .................................................................................. 35 Figure 45: Data Specifications- Providers Sample Tab .............................................................................. 35 Figure 46: Data Specification- Validation Rules ........................................................................................ 37 Figure 47: File Uploader PHI Acknowledgement ...................................................................................... 37 Figure 48: File Uploader Instructions ......................................................................................................... 38 Figure 49: File Upload Submission Page .................................................................................................... 38 Figure 50: File Uploader Final Step ............................................................................................................ 39 Figure 51: File Uploader Status .................................................................................................................. 39 Figure 52: Report Inaccuracy ...................................................................................................................... 40 Figure 53: Report Data Inaccuracy Form ................................................................................................... 40 Figure 54: Request Additional Permissions ................................................................................................ 42 Figure 55: Request Additional Permissions Ticket Form ........................................................................... 43

Oregon Health Information Technology (HIT) Portfolio Project
ii
Figure 56: Provider Master Record ............................................................................................................. 45 Figure 57: Source Records Tab on Organization Master Record ............................................................... 45 Figure 58: My Source Records ................................................................................................................... 46 Figure 59: My Records – Full Provider Source Records ............................................................................ 46 Figure 60: New Provider Source Record Form .......................................................................................... 47 Figure 61: Data Attestation ......................................................................................................................... 48 Figure 62: Provider Source Record Form ................................................................................................... 48 Figure 63: My Open Tickets ....................................................................................................................... 49 Figure 64: Submit a Ticket Through the Help Desk ................................................................................... 49
LIST OF TABLES
Table Title Page
Table 1: OneHealthPort Roles for Standard Users within Provider Directory ......................................... 3

Oregon Health Information Technology (HIT) Portfolio Project
1
1.1 BACKGROUND
The Oregon Provider Directory (OPD) architecture lies on the Salesforce platform to deliver a
scalable cloud-based technology. User registration and access to the OPD is provided via
OneHealthPort Single Sign-on (SSO) capability. The OPD system provides the authorization to
access data and functionality according to the assigned role (see Figure 2: Standard End User
Permissions within Provider Directory).
The OPD is a resource for Practitioner and Organization information including demographics,
addresses, affiliations to clinics, etc. The OPD is intended to achieve administrative efficiencies
and facilitate efforts by OHA and health systems, health plans, and other organizations to serve
operational, analytic, and health information exchange needs.
Figure 1: Provider Directory Concept
The OPD serves the following functions:
• Be the trusted source of Practitioner and Organization’s general data such as name, address,
phone, National Provider Identifier (NPI), specialty, etc.
• Identify relationships between individual practitioners and their affiliated organizations,
such as clinics, hospitals and health systems, health plans, etc.
• Identify provider information needed to facilitate exchange of patient health information,
including Direct Secure Messaging (DSM) addresses and other information to facilitate
exchange.
• Store master Practitioner and Organization information to allow other directories to
improve their data.

Oregon Health Information Technology (HIT) Portfolio Project
2
• Provide Data Steward/Data Curation to ensure OPD data is updated and maintained, so that
directory provides reliable, validated, up-to-date Practitioner and Organization
information.
• Determine quality of practitioner data associated to the same Practitioner or Organization
from multiple data sources and assign a quality metric.
• Enhance care coordination across disparate providers and around transitions of care by
providing information needed to facilitate access to Practitioner and Organization
information.
• Support community, Coordinated Care Organization (CCO), OHA and health plan
analytics that rely on attributing Practitioners and Organizations.
• Create efficiencies for operations, analytics, oversight, and quality reporting for Medicaid
and OHA programs, as well as for CCOs, local health plans, health systems and
Practitioners and Organizations.
1.2 RECOMMENDED WEB BROWSERS
The OPD system requires a modern browser and standard internet connectivity. The user must
have a modern web browser that supports Content Security Policy (CSP) (e.g. Edge, Chrome,
Firefox, and Safari) running TLS 1.2 or higher. The OPD application runs on any computer with
an internet connection and supports the following browsers1:
• Google Chrome™, most recent stable version. Chrome applies updates automatically.
Salesforce makes every effort to test and support the most recent version. There are no
configuration recommendations for Chrome.
• Mozilla® Firefox®, most recent stable version. Salesforce makes every effort to test and
support the most recent version of Firefox.
• Microsoft Edge®, most recent stable version. Edge applies updates automatically.
Salesforce makes every effort to test and support the most recent version. There are no
configuration recommendations for Edge.
• Apple® Safari® versions 5.x, 6.x and 7.x on Mac OS X. There are no configuration
recommendations for Safari.
Note: Microsoft Internet Explorer (IE) browser is supported within the Oregon Provider Directory
System, but users may see slower processing or performance responses. Additionally, users of IE
will be more susceptible to security vulnerabilities when using the browser to access secure sites
such as the Oregon Provider Directory. Microsoft Edge is the replacement browser recommended
1 Salesforce Supported Browsers for Lightning Experience, Copyright 2017,
https://help.salesforce.com/articleView?id=getstart_browsers_sfx.htm&type=5
Oregon Health Information Technology (HIT) Portfolio Project
3
by Microsoft for best performance and security protection while using the Oregon Provider
Directory. Microsoft Edge is the replacement browser recommended for use by UAT Testers.
1.3 ONEHEALTHPORT TRAINING MATERIAL
To access the OPD, users must first have a Single Sign On (SSO) account within OneHealthPort.
All users will login through OneHealthPort whenever they wish to access the OPD.
The following sections will describe how to register an Organization within OneHealthPort and
then create Subscriber accounts associated to the Organization (See section 1.6 Online Registration
Process and OneHealthPort Onboarding) as well as other administrator functions available to any
user set up as an administrator account within OneHealthPort. Once a user’s OneHealthPort
account has been created and an appropriate role has been added, the user may access the Oregon
Provider Directory.
In addition to the written material, the following general instructional videos will be available to
users for all HIT Portfolio projects (PD and CQMR):
• How to Register an Organization
• How to Affiliate Providers
1.4 ONEHEALTHPORT ROLES FOR THE PROVIDER DIRECTORY
OneHealthPort offers many roles to their user community that are applicable to the OPD system
and will grant the user a basic set of permissions to access and utilize standard features of the OPD.
These applicable OneHealthPort roles are captured in Table 1. Additionally, elevated permissions
on an existing account may be requested and granted within the OPD system as described in section
2.7.
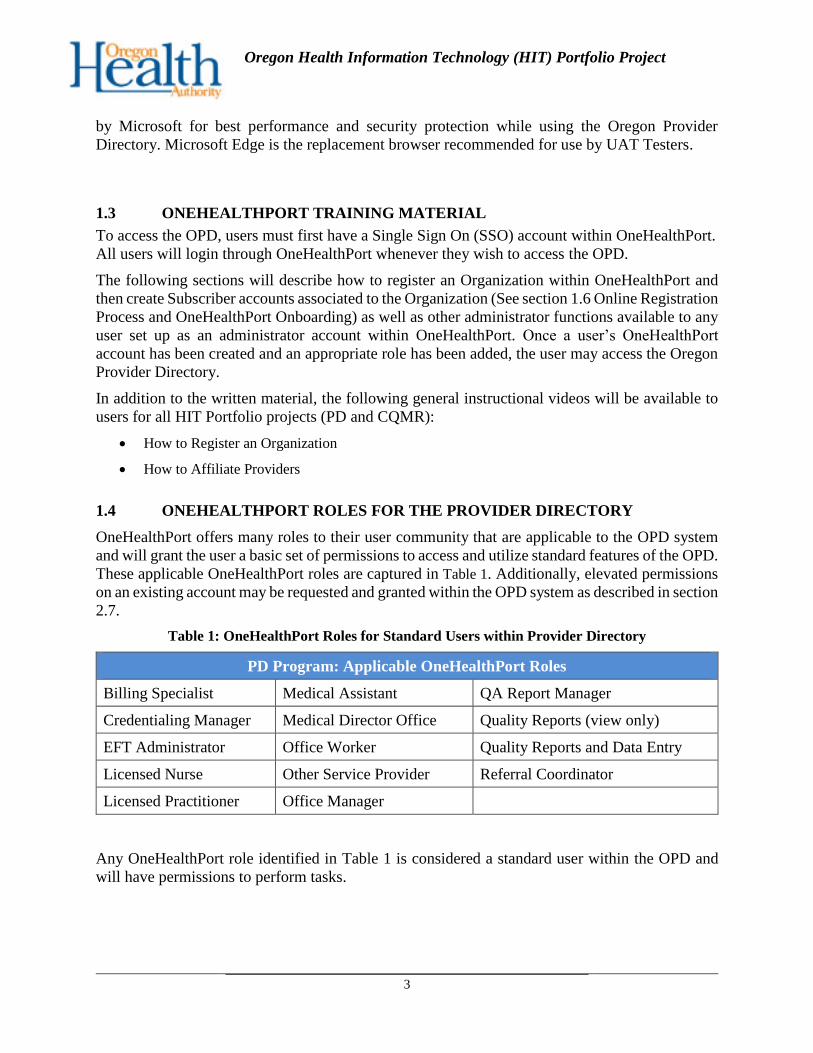
Table 1: OneHealthPort Roles for Standard Users within Provider Directory
PD Program: Applicable OneHealthPort Roles
Billing Specialist Medical Assistant QA Report Manager
Credentialing Manager Medical Director Office Quality Reports (view only)
EFT Administrator Office Worker Quality Reports and Data Entry
Licensed Nurse Other Service Provider Referral Coordinator
Licensed Practitioner Office Manager
Any OneHealthPort role identified in Table 1 is considered a standard user within the OPD and
will have permissions to perform tasks.

Oregon Health Information Technology (HIT) Portfolio Project
4
Basic Rights
Log in via OneHealthPort
Provider Directory
Figure 2: Standard End User Permissions within Provider Directory
1.5 ONLINE REGISTRATION PROCESS AND ONEHEALTHPORT
ONBOARDING
OneHealthPort has provided the attached step-by-step setup guide to create subscriber accounts
within OneHealthPort as applicable to the OPD program. This guide will be available within the
OneHealthPort website (http://www.onehealthport.com).
Step by step guide:
https://www.oregon.gov/oha/HPA/OHIT/Documents/OHP_StepByStep_Guide_PD.pdf
1.6 ADMINISTRATOR WRITTEN TRAINING MATERIAL
OneHealthPort also offers many training guides, SSO instructional content, and FAQs for their
community of users. Attached is the administrator guide offered by OneHealthPort. Each
organization must designate at least one administrator within OneHealthPort who will have the
ability to add, manage, and update subscriber accounts within OneHealthPort.
1.7 LEGAL AGREEMENTS
All users must first be affiliated to an organization that has executed legal agreements with OHA.
For the latest organizational participation agreement, visit the OPD information page at:
https://www.oregon.gov/oha/HPA/OHIT/Pages/PD-Onboarding.aspx.
Before an end user can access the OPD, OHA will determine if the user’s organization qualifies
as a Medicaid entity and execute all legal agreements with the organization.

Oregon Health Information Technology (HIT) Portfolio Project
5
END USER WRITTEN TRAINING MATERIAL
The following sections will describe OPD functionality for standard end users. All of the following
sections assume the user has already received a OneHealthPort account, their Organization has
executed all necessary legal agreements, and the user has successfully logged into the OPD
through OneHealthPort.
2.1 BASIC FUNCTIONALITY
The basic functionality training material will describe an overview of the OPD application,
including screen layout, tabs, navigation, and viewing user account information.
2.1.1 Screen Layout & Navigation
After logging in through OneHealthPort using an appropriate role, the OPD user will land at the
following Home Page (see Figure 3) with a series of tabs across the top header.
Figure 3: Provider Directory Home Page
The following list describes the Home Page tabs:
a. Home Icon: brings users back to the main landing page. Users may use the back button
in the web browser to navigate to previous pages if needed.
b. My Records: displays records for which the user is the data source
c. Advanced Search: allows user to conduct a Provider or Organization search using
various criteria
Oregon Health Information Technology (HIT) Portfolio Project
6
d. View Reports: allows a user to view the Standard Reports, Shared Reports, and My
Reports
e. Support: provides ability to submit support tickets if needing assistance, to view open
tickets and to view tutorials; provides an alternative method for creating a new provider
or organization record
f. File Uploader: visible only if user has Batch Data Contributor permission; provides
ability to submit provider and organization data by uploading a file
g. Release Notes: provides updates to the latest OPD release compared to previous release
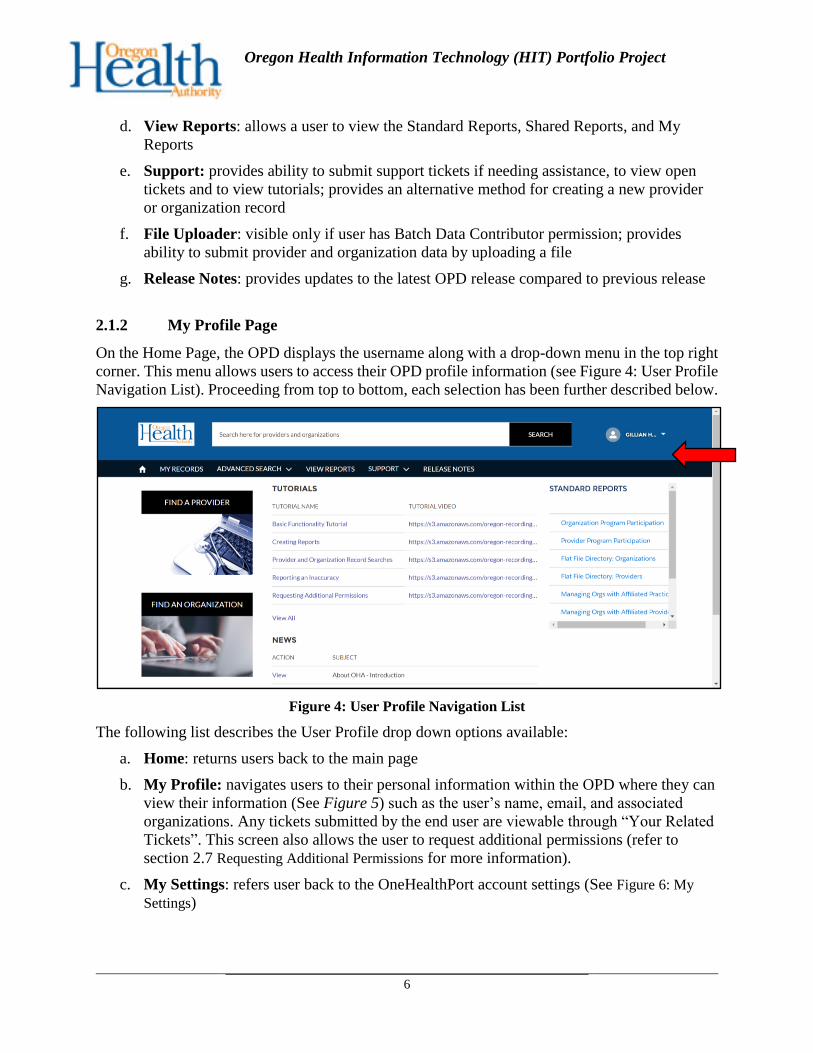
2.1.2 My Profile Page
On the Home Page, the OPD displays the username along with a drop-down menu in the top right
corner. This menu allows users to access their OPD profile information (see Figure 4: User Profile
Navigation List). Proceeding from top to bottom, each selection has been further described below.
Figure 4: User Profile Navigation List
The following list describes the User Profile drop down options available:
a. Home: returns users back to the main page
b. My Profile: navigates users to their personal information within the OPD where they can
view their information (See Figure 5) such as the user’s name, email, and associated
organizations. Any tickets submitted by the end user are viewable through “Your Related
Tickets”. This screen also allows the user to request additional permissions (refer to
section 2.7 Requesting Additional Permissions for more information).
c. My Settings: refers user back to the OneHealthPort account settings (See Figure 6: My
Settings)

Oregon Health Information Technology (HIT) Portfolio Project
7
d. Contact Support: provides Help Desk contact information and an option to submit a
ticket
e. Logout: signs users out of the OPD and returns to the OneHealthPort Single Sign-on
page
Figure 5: My Profile
Figure 6: My Settings

Oregon Health Information Technology (HIT) Portfolio Project
8
2.2 SEARCHING RECORDS
The OPD offers multiple strategies for on-demand searches. The first strategy includes both a basic
or advanced option to search for all entities within the directory. The second strategy utilizes the
tabs (My Records and Advanced Search) to limit the search by entity type.
2.2.1 Searching from Home Page
Clicking the Home Icon will navigate the end user to the home page with two search buttons: “Find
a Provider” and “Find an Organization.” (see Figure 7: Find a Provider and Find an Organization)
Clicking the “Find a Provider” button will yield an Advanced Provider Search field for use.
Clicking the “Find an Organization” button will yield an Advanced Organization Search for use.
Figure 7: Find a Provider and Find an Organization
2.2.2 Basic Search
The basic general search is accomplished through the search bar that spans across the top of the
OPD home page. This search bar can be utilized to find information on any OPD object by simply
typing the associated name and clicking the ‘Search’ button.

Oregon Health Information Technology (HIT) Portfolio Project
9
The search will return any related items as illustrated in the following example (see Figure 8:
Search Bar Results) when the search criteria was entered as ‘pediatric’. The search bar can be used
to locate names, identifiers, addresses, specialties, and other unique data elements.
Figure 8: Search Bar Results
2.2.3 Advanced Search
In addition to the basic search option, a user can also complete an Advanced Search for Providers
and Organizations to narrow down the search with additional search criteria.
Users can access the Advanced Search features by clicking the “Advanced Search” button which
appears once a basic search is conducted
Once the button is selected, the user can specify extra search criteria as displayed in Figure 9 and
Figure 10: Advanced Organization Search.
Users can also access the Advanced Search features by clicking the “Advanced Search” tab on the
black ribbon across the Home Page or the search buttons on the Home Page (see red arrows in
Figure 7: Find a Provider and Find an Organization).
The advantage of the advanced search option over the basic search option is the ability to
incorporate multiple data fields (e.g., NPI and last name) into the search to find the desired record.
Partial searches are also allowed in the advanced search option to find the desired record.
Note that search results from ‘Advanced Search’ in the user interface and FHIR API queries may
differ. FHIR API queries are deterministic and only finds records that contain an exact match,
while ‘Advanced Search’ is broader and finds all the records containing similar terms. For
example, a search for ‘Derek Shepherd’ in the Advanced Search will yield all results containing
‘Derek’ or ‘Shepherd.’ A search for ‘Derek Shepherd’ using FHIR API will only yield results that
are an exact match.

Oregon Health Information Technology (HIT) Portfolio Project
10
Figure 9: Advanced Provider Search

Oregon Health Information Technology (HIT) Portfolio Project
11
Figure 10: Advanced Organization Search
2.2.4 Searching from My Records Tab
In addition to searching for data from the ‘Search Bar’ (basic search) or using the advanced search
tool, users can also navigate and search the OPD via the My Records tab found in the black ribbon
across the Home Page.
The My Records tab initially opens to the My Provider Source Records page (see Figure 11: My
Records - Provider Source Record). Users have the option of navigating to the Providers,
Organizations, Provider to Org Affiliations, or Org to Org Affiliations Source Record pages by
selecting the appropriate sub-section listed underneath the black ribbon.

Oregon Health Information Technology (HIT) Portfolio Project
12
Figure 11: My Records - Provider Source Record
All the records presented within the My Records tab will be for Source Records where the user is
the Primary Data Source.
If the user clicks on any of the column headers, the records will be sorted in ascending or
descending order, accordingly. This is useful when the user is not sure of specifics and wants to
navigate by unique fields, for example, First Name, Last Name or NPI.
The record formatting and filter capabilities remain the same across all the My Records sub
sections (Providers, Organizations, Affiliations and Organization Affiliations).
By selecting a record, users can view additional details as in Figure 12: Provider Source Record.
Figure 12: Provider Source Record

Oregon Health Information Technology (HIT) Portfolio Project
13
2.3 VIEWING RECORDS
2.3.1 Viewing Organization Master Records
One or more Organization source records roll up to create an Organization master record. The top
card that appears on the master record is the result of an algorithm that considers the number of
source records available and the trust preferences of each source as determined by OHA on a field-
by-field basis. The top card presents a quick synapsis of the most valuable information about the
organization.
Organization Master Record Top Card displays:
• Organization primary address: street, city, county, state, zip
• Organization type: such as Practice/Clinic
• Website: organization’s primary email address
• Contact information: phone and fax number
• HIE Endpoint address: primary endpoint address for the organization
• MR Reliability score: level of reliability for a particular master record
Organization Master Record Tabs displays:
• General:
o Organization Name
o Organization Identifiers (NPI, OID, MMIS)
o Organization Type and Specialty
o Accessibility
o Physical/Service Location
o Mailing Address
o Billing Information
o Legal Address
o Hours of Operation
o Licenses
o EHR: organization electronic health record information
o System Fields
• Affiliated Organizations: practice locations, and affiliation status reports
• Providers: a listing of practicing providers for the organization
• Staff: organization staff member’s role and contact information

Oregon Health Information Technology (HIT) Portfolio Project
14
• Endpoints: a hyperlink, type name and address to specified electronic endpoints
• Source Records: data sources, a source hyper-link, and last updated and last validated
time/date stamps
More information about Master Records is available in section 2.3.3 Viewing Provider Master
Records.
Figure 13: Organization Master Record
Organization Endpoints display:
• Record Link: link to source record
• Endpoint: a hyperlink, type name and address to specified electronic endpoints
• Endpoint Type: such as IHE endpoint, Direct Secure Address, etc.
• Primary: whether the endpoint is a primary contact or not
• Address: endpoint address
• Data Source: where/who the data was contributed from/by

Oregon Health Information Technology (HIT) Portfolio Project
15
Figure 14: Organization Endpoints
2.3.2 Viewing Staff Records
From the Organization master record, users can navigate to the staff records as well. Non-clinical
staff will be matched by email address since they do not have an NPI or license number.
Staff displays:
• Record Link: link to source record
• First Name: non-clinical staff first name
• Last Name: non-clinical staff last name
• Status: whether the staff member is active or not
• Role at Organization: non-clinical staff title or role

Oregon Health Information Technology (HIT) Portfolio Project
16
Figure 15: Staff Records
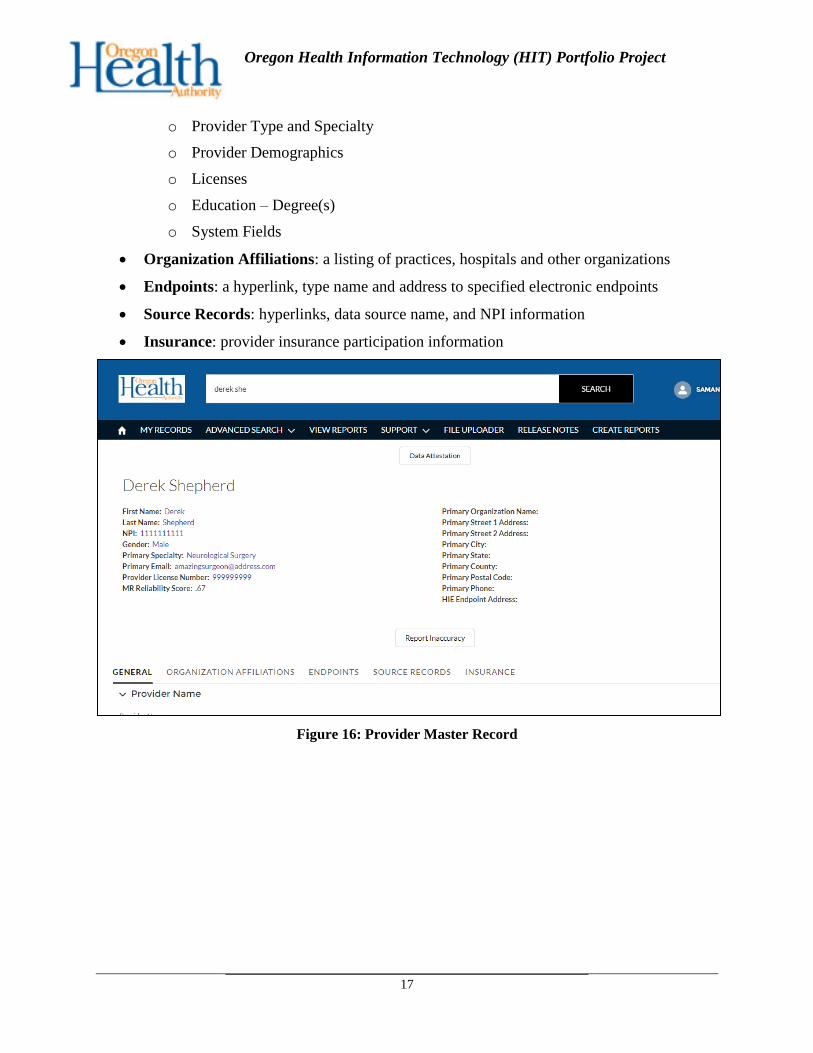
2.3.3 Viewing Provider Master Records
Similar to Organizations, when a user selects a Provider the master record is presented with a “top
card”. The top card presents a quick synopsis of the most valuable information about the provider.
The user can additionally click on any of the data fields presented as a hyperlink to view the data
source(s) that contributed to the specific data field.
Provider Top Card displays:
• Identifiers: First name, last name, NPI
• Provider characteristics: primary specialty, gender, provider license number
• MR Reliability score: level of reliability for particular master record
• Provider primary organization: Organization name, street, city, county, state, zip
• Primary contact information: email address, phone, and Direct Address
• HIE Endpoint address: primary endpoint address for the organization
Provider Master Record Tab displays:
• General:
o Provider Name
o Provider Identifiers (NPI, MMIS etc.),
o Contact Information
Oregon Health Information Technology (HIT) Portfolio Project
17
o Provider Type and Specialty
o Provider Demographics
o Licenses
o Education – Degree(s)
o System Fields
• Organization Affiliations: a listing of practices, hospitals and other organizations
• Endpoints: a hyperlink, type name and address to specified electronic endpoints
• Source Records: hyperlinks, data source name, and NPI information
• Insurance: provider insurance participation information
Figure 16: Provider Master Record

Oregon Health Information Technology (HIT) Portfolio Project
18
Figure 17: Provider Endpoints
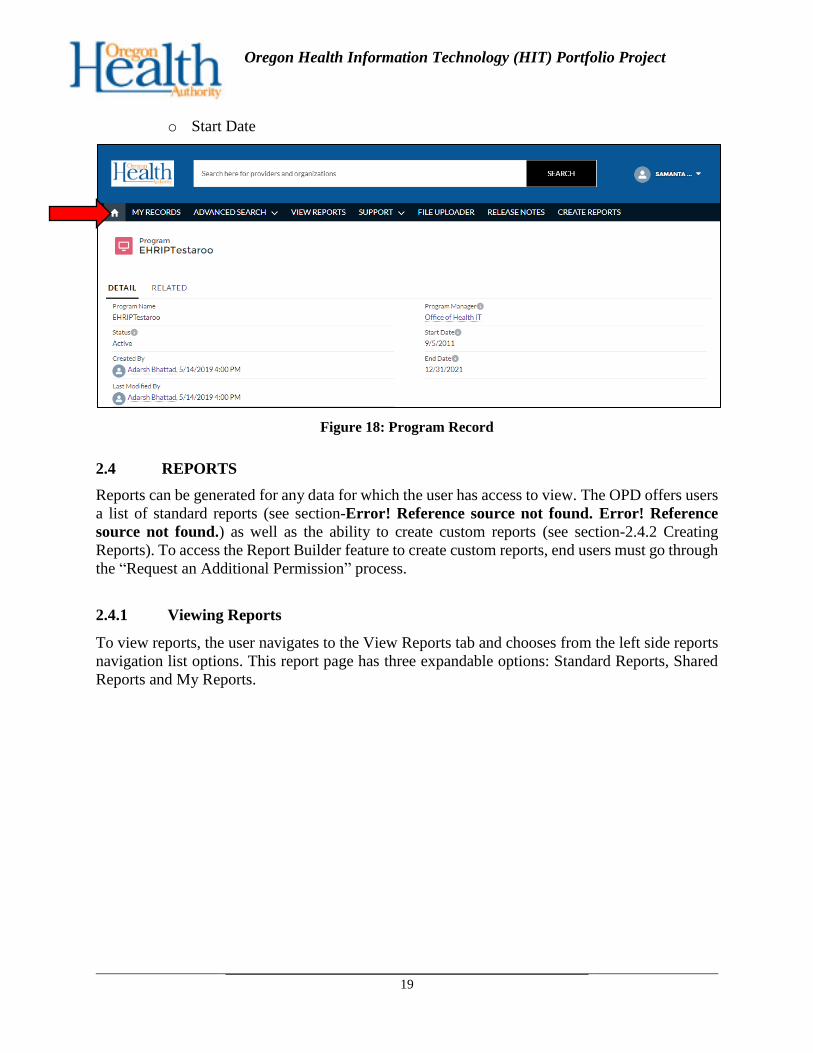
2.3.4 Programs
Programs data to be submitted to the OPD must be provided by the program itself, such as the
Patient Centered Primary Care Home (PCPCH) program. The program point of contact can
become a batch data contributor through the OPD user interface to begin the data source
onboarding process. The program can choose a transport mechanism and frequency for data
submissions. Programs do not have the option to use file uploader for data quality purposes
regarding other file uploader users. Since only programs can enter program information as the
source of truth.
Programs display:
• Detail
o Program Name
o Program Manager
o Status
o Start Date
o End Date
o Created By
o Last Modified By
• Related
o Program Participation Name
o Participation Name
o Participant
o Program Year
Oregon Health Information Technology (HIT) Portfolio Project
19
o Start Date
Figure 18: Program Record
2.4 REPORTS
Reports can be generated for any data for which the user has access to view. The OPD offers users
a list of standard reports (see section-Error! Reference source not found. Error! Reference
source not found.) as well as the ability to create custom reports (see section-2.4.2 Creating
Reports). To access the Report Builder feature to create custom reports, end users must go through
the “Request an Additional Permission” process.
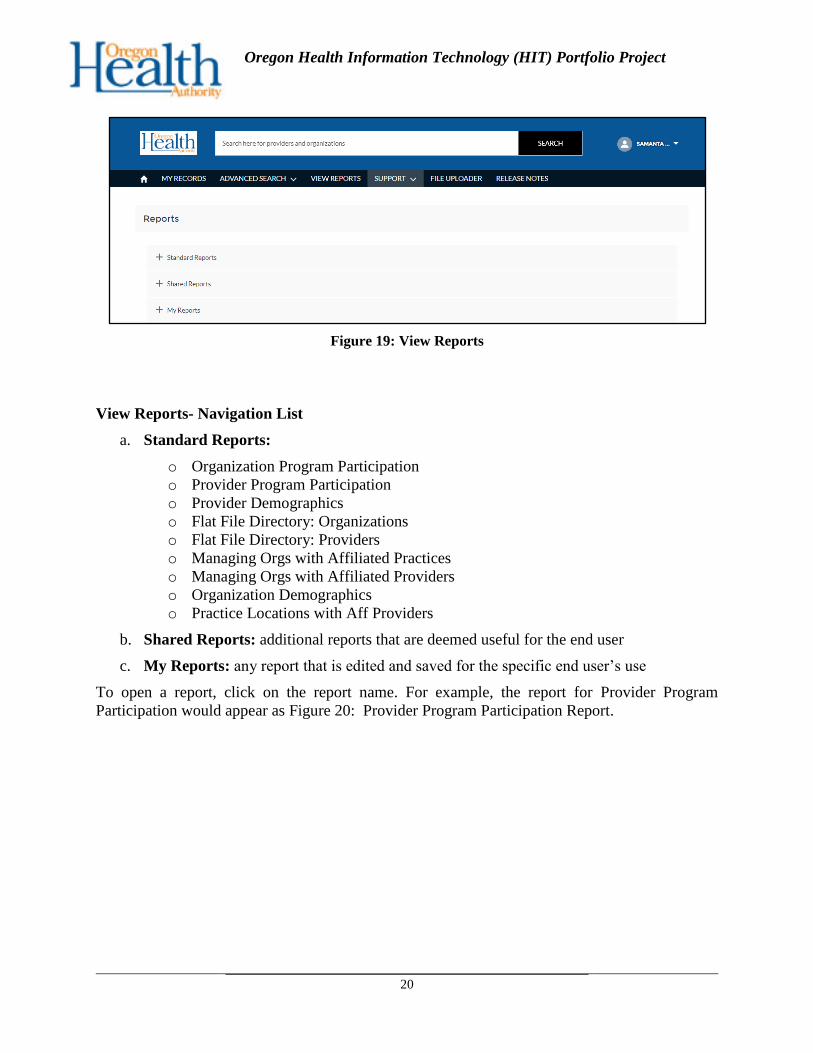
2.4.1 Viewing Reports
To view reports, the user navigates to the View Reports tab and chooses from the left side reports
navigation list options. This report page has three expandable options: Standard Reports, Shared
Reports and My Reports.
Oregon Health Information Technology (HIT) Portfolio Project
20
Figure 19: View Reports
View Reports- Navigation List
a. Standard Reports:
o Organization Program Participation
o Provider Program Participation
o Provider Demographics
o Flat File Directory: Organizations
o Flat File Directory: Providers
o Managing Orgs with Affiliated Practices
o Managing Orgs with Affiliated Providers
o Organization Demographics
o Practice Locations with Aff Providers
b. Shared Reports: additional reports that are deemed useful for the end user
c. My Reports: any report that is edited and saved for the specific end user’s use
To open a report, click on the report name. For example, the report for Provider Program
Participation would appear as Figure 20: Provider Program Participation Report.

Oregon Health Information Technology (HIT) Portfolio Project
21
Figure 20: Provider Program Participation Report
Towards the top right, there is a ‘Save As’ button with an accompanying drop-down. The drop-
down arrow allows users to select the report in Excel or CSV format and click Export to save
onto their local device as depicted below.
Figure 21: Report Export
The ‘Save As’ button (Figure 22: Save Report) creates a copy of the report that gives the user two
options: ‘Make Private’ – only the user can find and run this report or ‘Move into Folder’ where
anyone with access to the folder can run the report.

Oregon Health Information Technology (HIT) Portfolio Project
22
Figure 22: Save Report
If users are interested in routinely receiving the report they can click the ‘Subscribe to Report’
button available towards the top left on any report page illustrated below:
Figure 23: Subscribe to Report
Subscribing to a report sends a request to the appropriate OPD administrator to add the user to the
distribution list that is automatically emailed at the chosen interval (daily, weekly, or monthly).
There are several advantages to subscribing to a report, including but not limited to:
• Continue internal processes – if an OPD user has job duties that directly relate to specific
information found within the OPD.
• Convenience – If an OPD user would like to view the same report on a regular basis
without having to log into the system and navigate to the report each time.

Oregon Health Information Technology (HIT) Portfolio Project
23
• Knowledge – If an OPD user would like to remain up to date on current information
within the PPD.
Once clicked the following message will appear confirming the user’s subscription (See Figure
24: Report Subscription Notification):
Figure 24: Report Subscription Notification
Users who subscribe to a report will be placed in a group to receive that specific report as their
preference indicated. Users will receive reports they have subscribed to via email with the
information in an embedded table, as illustrated below:

Oregon Health Information Technology (HIT) Portfolio Project
24
Figure 25: Scheduled Report Email Sample
2.4.2 Creating Reports
If a user has reviewed the available standard reports and any other report available through the
‘View Reports’ tool, and determines a new report is needed, the OPD offers the ability to create
custom reports. To access the Report Builder feature to create custom reports, end users must go
through the Request an Additional Permission process (see section 2.7 Requesting Additional
Permissions).
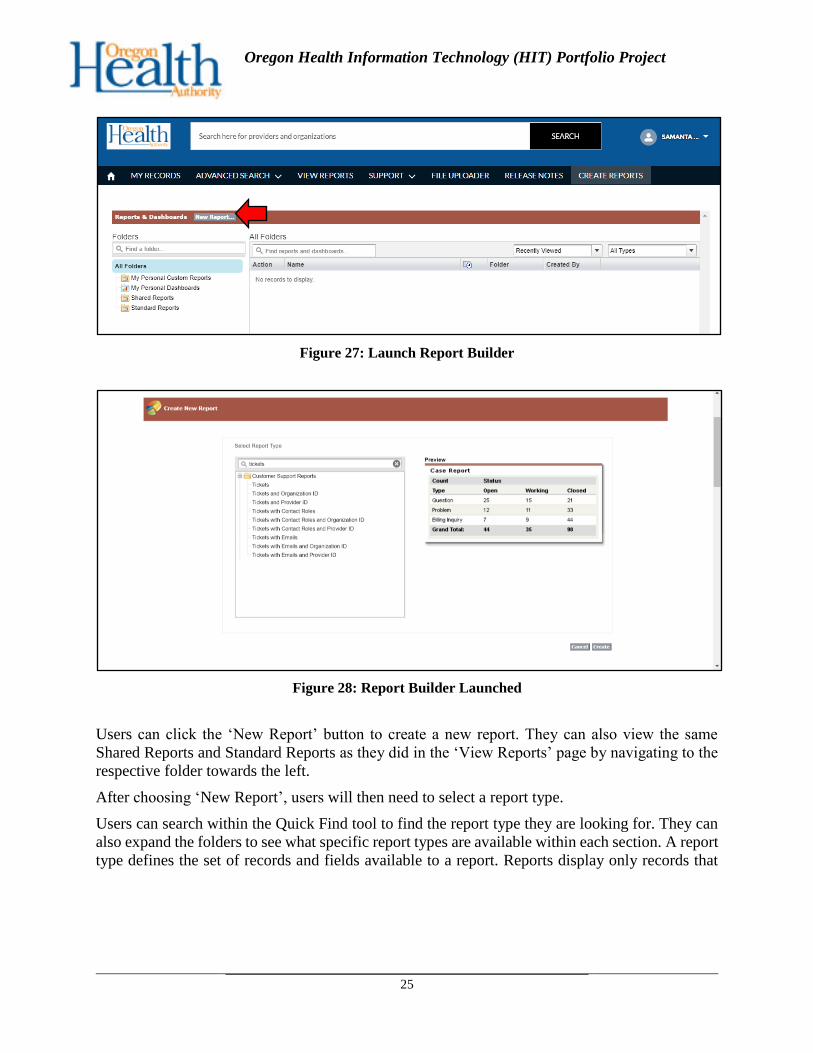
To create a report, navigate to the Create Reports tab.
Figure 26: Reports Header
The following page will open for the Report Builder:
Oregon Health Information Technology (HIT) Portfolio Project
25
Figure 27: Launch Report Builder
Figure 28: Report Builder Launched
Users can click the ‘New Report’ button to create a new report. They can also view the same
Shared Reports and Standard Reports as they did in the ‘View Reports’ page by navigating to the
respective folder towards the left.
After choosing ‘New Report’, users will then need to select a report type.
Users can search within the Quick Find tool to find the report type they are looking for. They can
also expand the folders to see what specific report types are available within each section. A report
type defines the set of records and fields available to a report. Reports display only records that
Oregon Health Information Technology (HIT) Portfolio Project
26
meet the criteria defined in the report type.2 After users choose a report type, they will need to
click the ‘Create’ button to proceed to the next step.
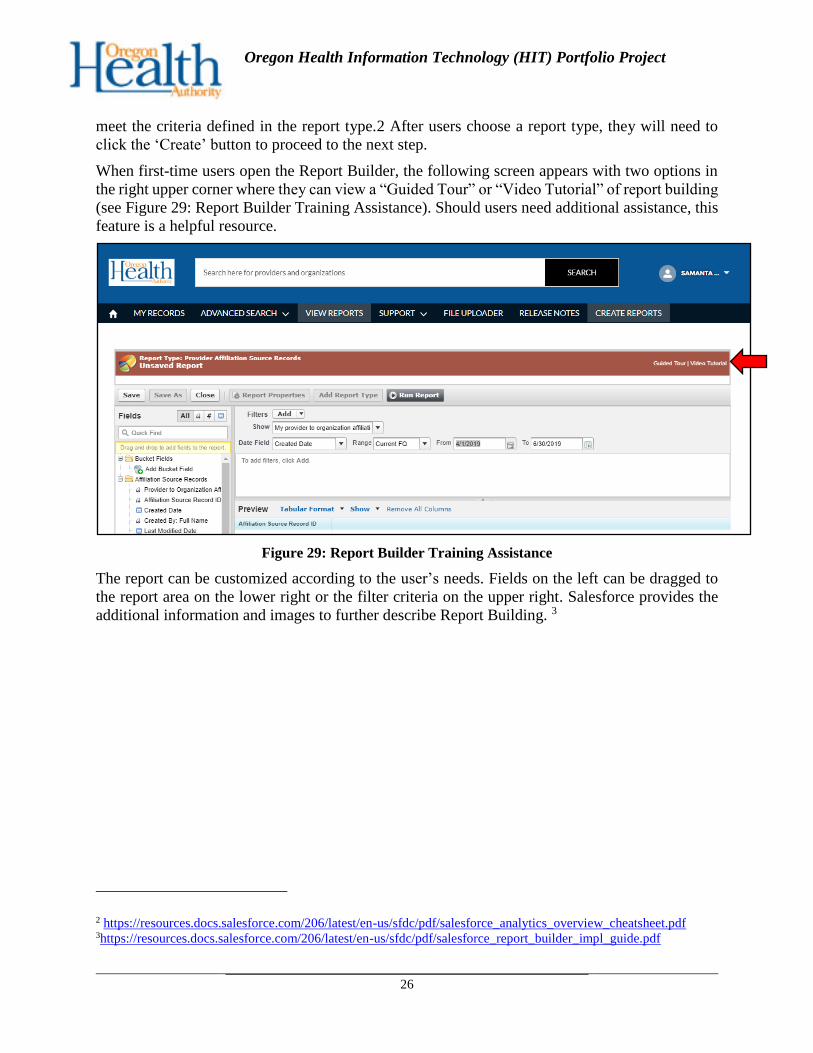
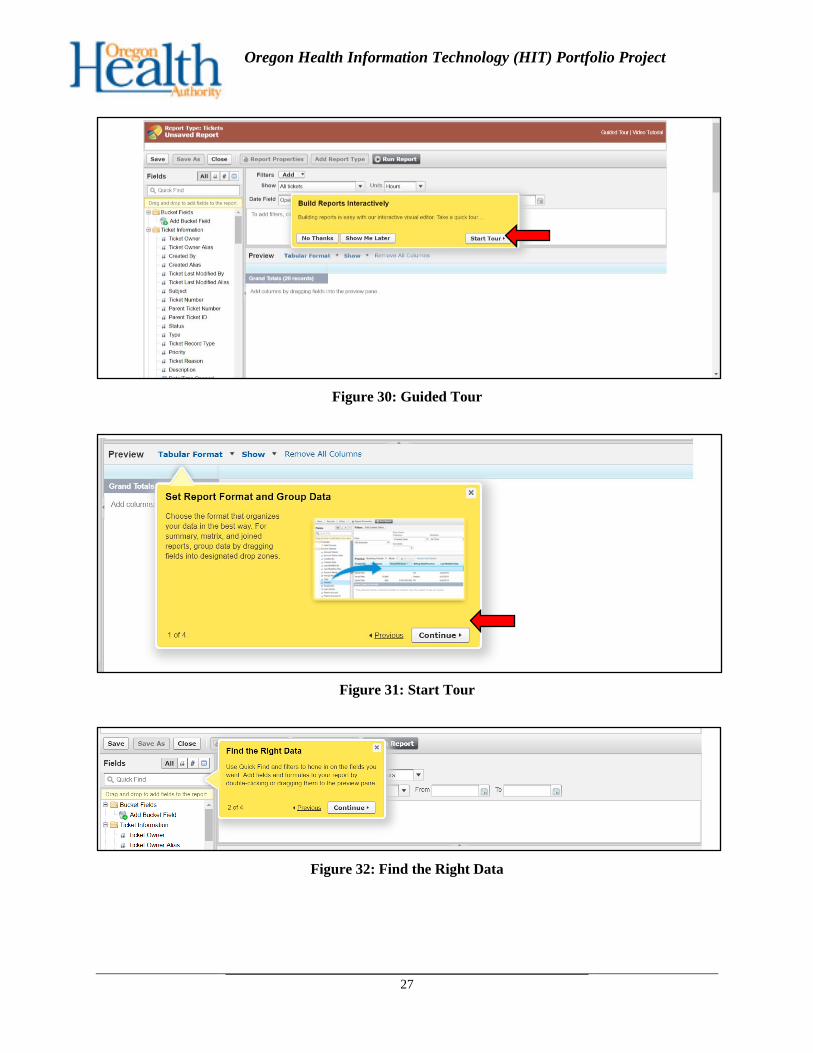
When first-time users open the Report Builder, the following screen appears with two options in
the right upper corner where they can view a “Guided Tour” or “Video Tutorial” of report building
(see Figure 29: Report Builder Training Assistance). Should users need additional assistance, this
feature is a helpful resource.
Figure 29: Report Builder Training Assistance
The report can be customized according to the user’s needs. Fields on the left can be dragged to
the report area on the lower right or the filter criteria on the upper right. Salesforce provides the
additional information and images to further describe Report Building. 3
2 https://resources.docs.salesforce.com/206/latest/en-us/sfdc/pdf/salesforce_analytics_overview_cheatsheet.pdf 3https://resources.docs.salesforce.com/206/latest/en-us/sfdc/pdf/salesforce_report_builder_impl_guide.pdf
Oregon Health Information Technology (HIT) Portfolio Project
27
Figure 30: Guided Tour
Figure 31: Start Tour
Figure 32: Find the Right Data

Oregon Health Information Technology (HIT) Portfolio Project
28
Figure 33: Refine Report Scope
Figure 34: Add a Chart

Oregon Health Information Technology (HIT) Portfolio Project
29
Figure 35: Additional Training Information
Figure 36: Salesforce Documentation on Report Building
• Fields Pane (top left): The Fields pane displays fields from the selected report type,
organized by folder. Find the fields you want using the Quick Find search box and field
type filters, then drag them into the Preview pane to add them to the report. Create, view,
edit, and delete custom views and fields in the Fields pane as well. In the joined report
format, the Fields pane displays fields from all report types added to the report, organized
by report type.

Oregon Health Information Technology (HIT) Portfolio Project
30
• Filters Pane (top middle): Set the view, time frame, and custom filters to limit the data
shown in the report.
• Preview Pane (bottom middle): The dynamic preview allows users to preview and further
customize the report. Drag and drop items to add, reorder, and remove columns, summary
fields, formulas, groupings, and blocks. Change the report format and display options or
add a chart. The preview shows only a limited number of records. Run the report to see all
your results.
To save a Custom Report, navigate to the ‘Save’ button on the top left (see Figure 37: Saving a
Report).
Figure 37: Saving a Report
After the ‘Saved’ button is clicked, the following window will appear (see Figure 38: Naming,
Describing, and Assigning Report Folder).

Oregon Health Information Technology (HIT) Portfolio Project
31
Figure 38: Naming, Describing, and Assigning Report Folder
Users can then add a Report Name, a Report Description, and assign the Report Folder in which
they want the report to save. Once the required information is populated, the user will have to click
the ‘Save’ button again.

Oregon Health Information Technology (HIT) Portfolio Project
32
The user will be automatically redirected back to the report. To ensure the report saved
successfully, check that the name created for the report is displayed in the upper left corner (see
Figure 39: TEST Custom Report).
Figure 39: TEST Custom Report
To retrieve custom reports, users will navigate to the Report Builder and choose the folder in which
they saved the report. In the example shown above, the user created the custom report: TEST
Custom Report. TEST Custom report is saved and can be accessed the Report Folder: My Personal
Customer Reports, as shown below (see Figure 40: Report Saved in Folder).
Figure 40: Report Saved in Folder
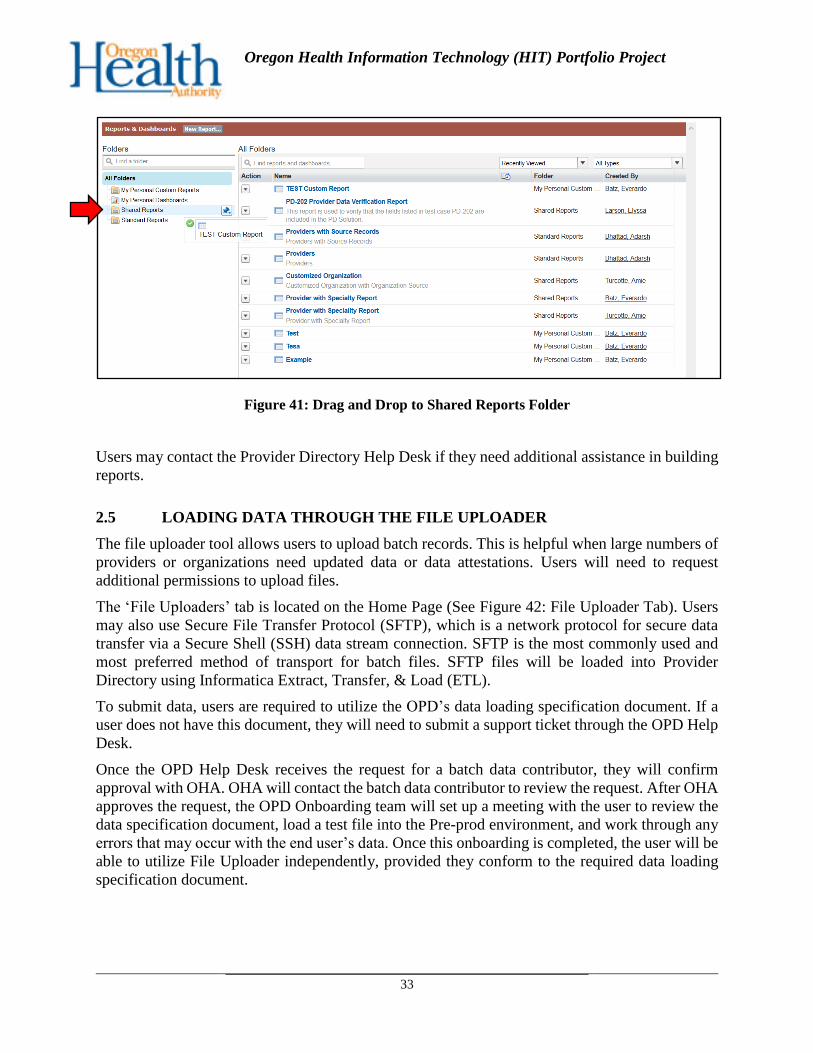
To share a custom report with other users, users can simply drag and drop the report to the Shared
Reports folder, as shown below.
Oregon Health Information Technology (HIT) Portfolio Project
33
Figure 41: Drag and Drop to Shared Reports Folder
Users may contact the Provider Directory Help Desk if they need additional assistance in building
reports.
2.5 LOADING DATA THROUGH THE FILE UPLOADER
The file uploader tool allows users to upload batch records. This is helpful when large numbers of
providers or organizations need updated data or data attestations. Users will need to request
additional permissions to upload files.
The ‘File Uploaders’ tab is located on the Home Page (See Figure 42: File Uploader Tab). Users
may also use Secure File Transfer Protocol (SFTP), which is a network protocol for secure data
transfer via a Secure Shell (SSH) data stream connection. SFTP is the most commonly used and
most preferred method of transport for batch files. SFTP files will be loaded into Provider
Directory using Informatica Extract, Transfer, & Load (ETL).
To submit data, users are required to utilize the OPD’s data loading specification document. If a
user does not have this document, they will need to submit a support ticket through the OPD Help
Desk.
Once the OPD Help Desk receives the request for a batch data contributor, they will confirm
approval with OHA. OHA will contact the batch data contributor to review the request. After OHA
approves the request, the OPD Onboarding team will set up a meeting with the user to review the
data specification document, load a test file into the Pre-prod environment, and work through any
errors that may occur with the end user’s data. Once this onboarding is completed, the user will be
able to utilize File Uploader independently, provided they conform to the required data loading
specification document.

Oregon Health Information Technology (HIT) Portfolio Project
34
Figure 42: File Uploader Tab
To better understand the file upload process, the user must understand the necessary data loading
specification in which new files should be submitted. The full data loading specification document
is captured in section Error! Reference source not found., and described in detail in the following
figures and section.
Figure 43: Data Loading Specification Cover Sheet
The data specification document initially displays a Cover Sheet, which provides further
information about the file submission process for users to review). There are multiple data loading
specifications including: Organizations, Providers, Provider to Organization Affiliations
(relationship between provider and organization), and Organization to Organization Affiliations

Oregon Health Information Technology (HIT) Portfolio Project
35
(relationship between two different organizations). Each tab contains a list of various fields for
which data can be populated by the data source and eventually updated within the OPD.
For example, when the Provider tab is selected, the user can view a long column which describes
multiple fields and exactly how those fields need to be populated by the data source. While only
required fields are needed for validation, providing additional data allows for a more robust
provider directory.
Figure 44: Data Specifications- Providers Spec Tab
Figure 45: Data Specifications- Providers Sample Tab
Only Batch Data Contributor end users in the Oregon Provider Directory have the permission to
submit batch data files. Batch data files may be submitted through any of the transport mechanisms
outlined in the Implementation Guide, including the user interface File Uploader feature, through
Secure File Transfer Protocol (SFTP), Direct Secure Messaging, or API (FHIR, REST, SOAP).
Batch data files must be submitted using the PD Data Loading Specifications.

Oregon Health Information Technology (HIT) Portfolio Project
36
The file must be submitted as a comma separated value file (CSV). All data is double quoted, and
comma separated. If the value has a double quote, then another double quote is used to escape it.
For example: “Name”,” Age” = "a""b,c",”12”. The person's name registers as a"b,c - and their age
as 12 because there is no comma in between a and b. The two quotation marks on their own are
not field separators and therefore need the separating commas to correctly provide the data. Unless
specified on a specific field, there is one entry per cell.
The Sample file tab is provided for reference. When submitting a file, all other tabs should be
deleted leaving only the tab with the data in the exact 'sample file' format.
The Spec tab describes the specifications for each possible data element. Unless specified on a
specific field, there is one entry per cell.
• Field Name: This is the label displayed in the PD user interface for that data element.
• Field API Name: This is a hidden column that should be un-altered. It is used for internal
mapping.
• Required/Optional: This indicates whether that specific field is required or not. If the field
is required, the file must include a data entry for that column on each row line item. If the
required fields are not populated, then the file will be rejected, and no data will be
submitted.
• Help Text: This is the help text that displays on the field in the user interface.
• Example/ Accepted Values: This column describes an example of the data element, and/or
the accepted values for that field.
• Formatting condition: This describes the exact formatting required for that field's data
element being submitted.
• Validation Rule: This describes the necessary data element format for validation
requirements. If the validation requirement is not met, the file will be rejected.
• Length (Max number of characters): This displays the maximum quantity of characters
allowed within the field.
Other tabs may be included in some Data Loading Specifications to denote the specific accepted
values for fields with lists.

Oregon Health Information Technology (HIT) Portfolio Project
37
Figure 46: Data Specification- Validation Rules
Files must be saved in Common Separated Value (.csv), format rather than Excel (.xlsx), to ensure
successful upload.
Additionally, adding details within the description field for the file is recommended for internal
tracking. These steps will ensure there is no confusion during audits or in audit reports.
The interface allows users to drag and drop the file or click ‘+ Add files’ to upload the file.
Figure 47: File Uploader PHI Acknowledgement
Oregon Health Information Technology (HIT) Portfolio Project
38
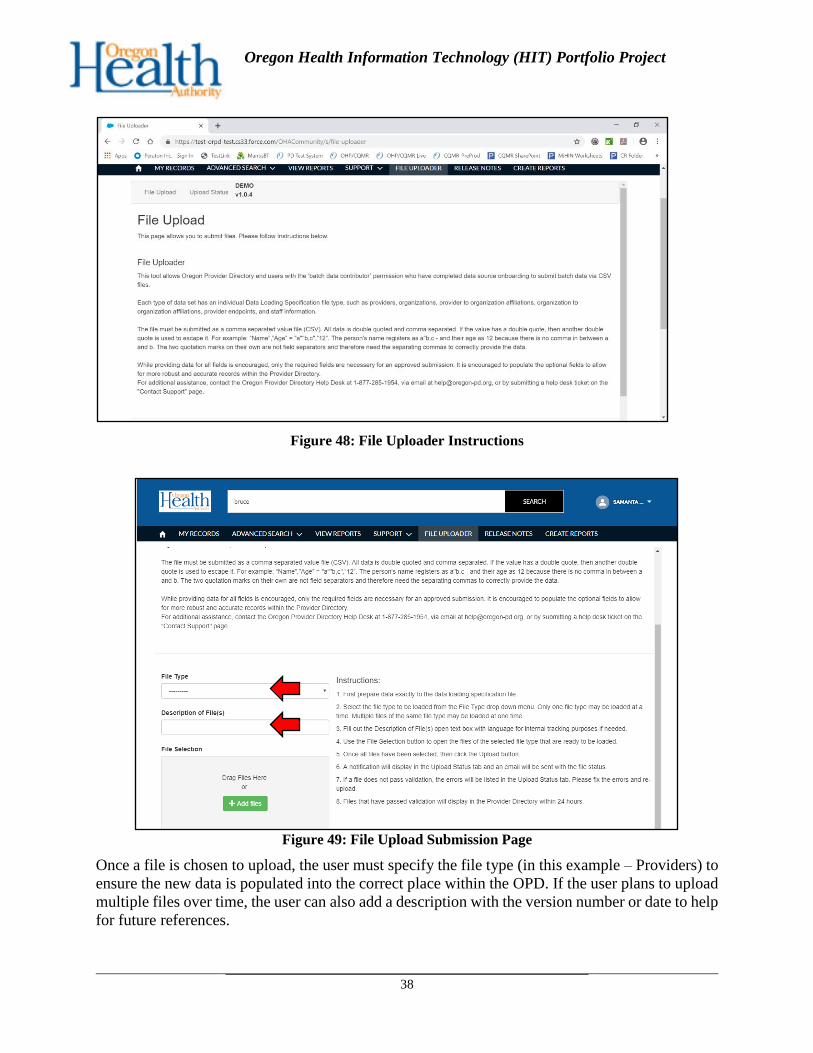
Figure 48: File Uploader Instructions
Figure 49: File Upload Submission Page
Once a file is chosen to upload, the user must specify the file type (in this example – Providers) to
ensure the new data is populated into the correct place within the OPD. If the user plans to upload
multiple files over time, the user can also add a description with the version number or date to help
for future references.
Oregon Health Information Technology (HIT) Portfolio Project
39
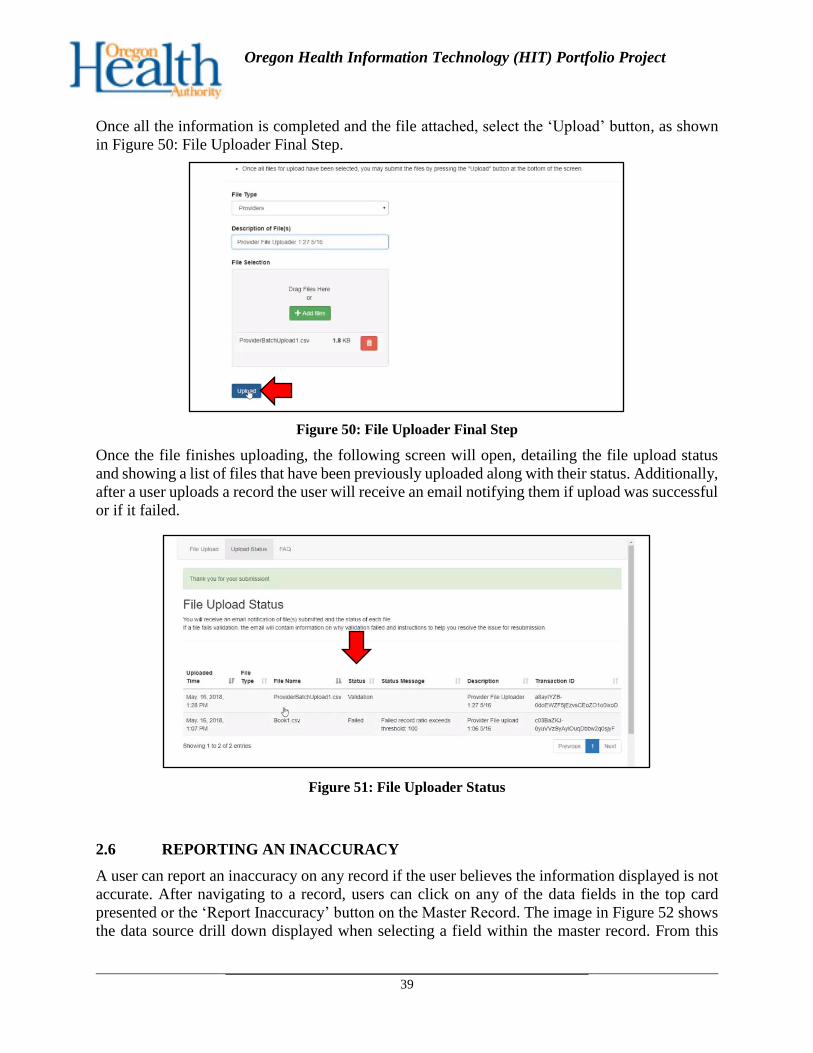
Once all the information is completed and the file attached, select the ‘Upload’ button, as shown
in Figure 50: File Uploader Final Step.
Figure 50: File Uploader Final Step
Once the file finishes uploading, the following screen will open, detailing the file upload status
and showing a list of files that have been previously uploaded along with their status. Additionally,
after a user uploads a record the user will receive an email notifying them if upload was successful
or if it failed.
Figure 51: File Uploader Status
2.6 REPORTING AN INACCURACY
A user can report an inaccuracy on any record if the user believes the information displayed is not
accurate. After navigating to a record, users can click on any of the data fields in the top card
presented or the ‘Report Inaccuracy’ button on the Master Record. The image in Figure 52 shows
the data source drill down displayed when selecting a field within the master record. From this
Oregon Health Information Technology (HIT) Portfolio Project
40
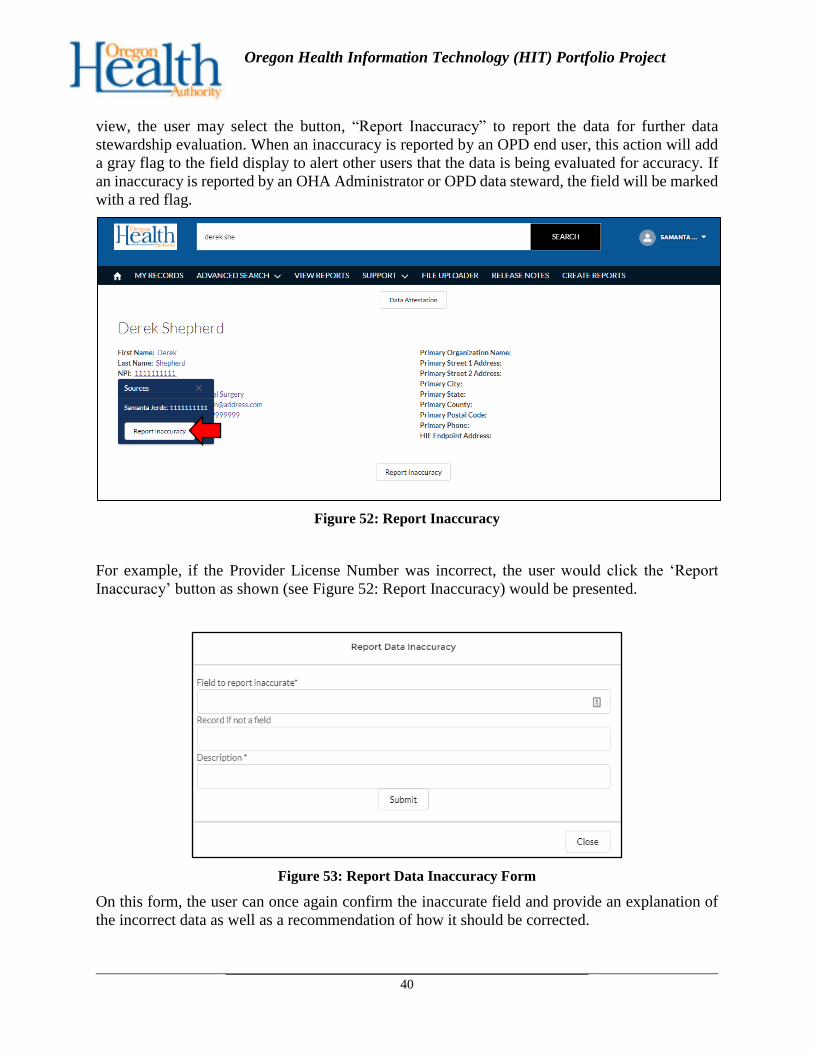
view, the user may select the button, “Report Inaccuracy” to report the data for further data
stewardship evaluation. When an inaccuracy is reported by an OPD end user, this action will add
a gray flag to the field display to alert other users that the data is being evaluated for accuracy. If
an inaccuracy is reported by an OHA Administrator or OPD data steward, the field will be marked
with a red flag.
Figure 52: Report Inaccuracy
For example, if the Provider License Number was incorrect, the user would click the ‘Report
Inaccuracy’ button as shown (see Figure 52: Report Inaccuracy) would be presented.
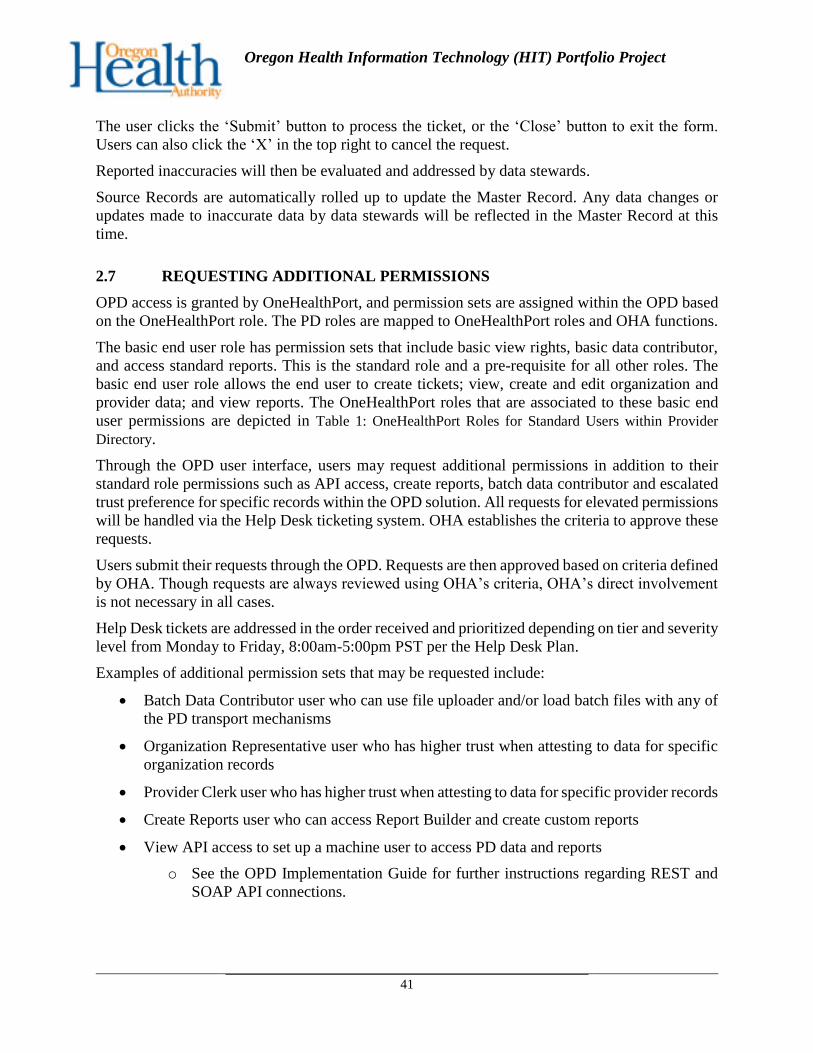
Figure 53: Report Data Inaccuracy Form
On this form, the user can once again confirm the inaccurate field and provide an explanation of
the incorrect data as well as a recommendation of how it should be corrected.
Oregon Health Information Technology (HIT) Portfolio Project
41
The user clicks the ‘Submit’ button to process the ticket, or the ‘Close’ button to exit the form.
Users can also click the ‘X’ in the top right to cancel the request.
Reported inaccuracies will then be evaluated and addressed by data stewards.
Source Records are automatically rolled up to update the Master Record. Any data changes or
updates made to inaccurate data by data stewards will be reflected in the Master Record at this
time.
2.7 REQUESTING ADDITIONAL PERMISSIONS
OPD access is granted by OneHealthPort, and permission sets are assigned within the OPD based
on the OneHealthPort role. The PD roles are mapped to OneHealthPort roles and OHA functions.
The basic end user role has permission sets that include basic view rights, basic data contributor,
and access standard reports. This is the standard role and a pre-requisite for all other roles. The
basic end user role allows the end user to create tickets; view, create and edit organization and
provider data; and view reports. The OneHealthPort roles that are associated to these basic end
user permissions are depicted in Table 1: OneHealthPort Roles for Standard Users within Provider
Directory.
Through the OPD user interface, users may request additional permissions in addition to their
standard role permissions such as API access, create reports, batch data contributor and escalated
trust preference for specific records within the OPD solution. All requests for elevated permissions
will be handled via the Help Desk ticketing system. OHA establishes the criteria to approve these
requests.
Users submit their requests through the OPD. Requests are then approved based on criteria defined
by OHA. Though requests are always reviewed using OHA’s criteria, OHA’s direct involvement
is not necessary in all cases.
Help Desk tickets are addressed in the order received and prioritized depending on tier and severity
level from Monday to Friday, 8:00am-5:00pm PST per the Help Desk Plan.
Examples of additional permission sets that may be requested include:
• Batch Data Contributor user who can use file uploader and/or load batch files with any of
the PD transport mechanisms
• Organization Representative user who has higher trust when attesting to data for specific
organization records
• Provider Clerk user who has higher trust when attesting to data for specific provider records
• Create Reports user who can access Report Builder and create custom reports
• View API access to set up a machine user to access PD data and reports
o See the OPD Implementation Guide for further instructions regarding REST and
SOAP API connections.

Oregon Health Information Technology (HIT) Portfolio Project
42
To submit a ‘Request Additional Permissions’ ticket, navigate from the Home Screen to the drop-
down menu that appears under your name and select the “My Profile’ tab and the following page
should appear.
Figure 54: Request Additional Permissions
Oregon Health Information Technology (HIT) Portfolio Project
43
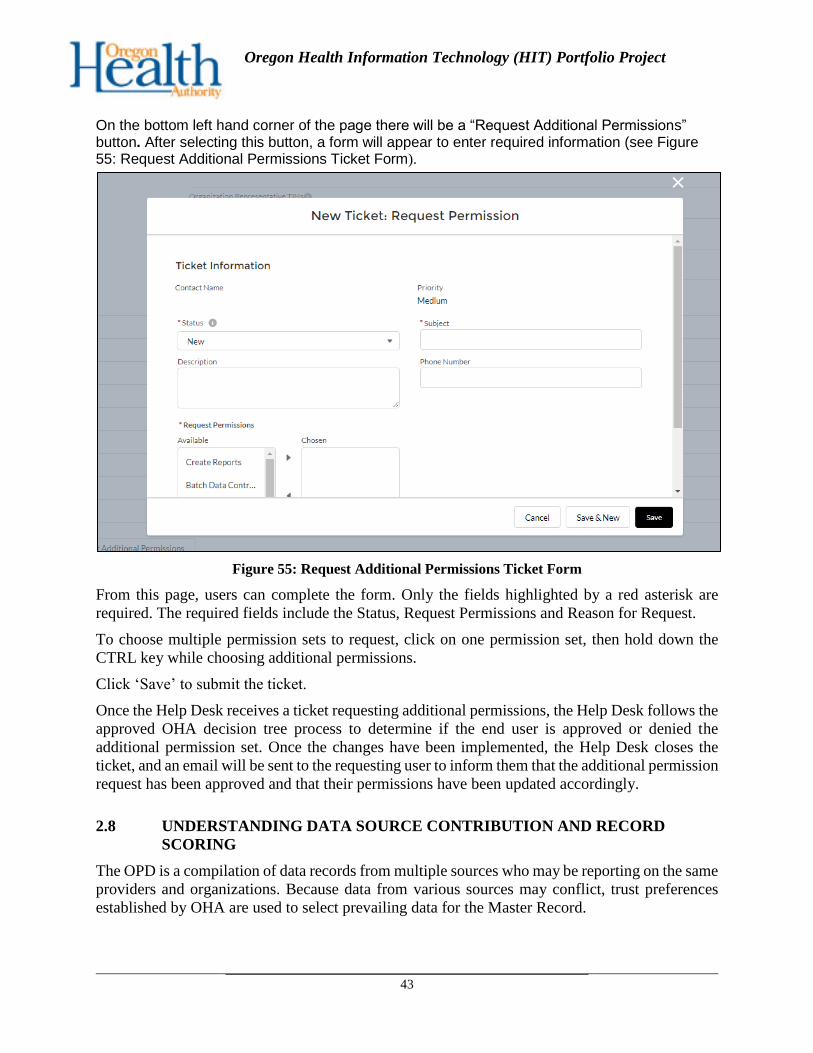
On the bottom left hand corner of the page there will be a “Request Additional Permissions” button. After selecting this button, a form will appear to enter required information (see Figure 55: Request Additional Permissions Ticket Form).
Figure 55: Request Additional Permissions Ticket Form
From this page, users can complete the form. Only the fields highlighted by a red asterisk are
required. The required fields include the Status, Request Permissions and Reason for Request.
To choose multiple permission sets to request, click on one permission set, then hold down the
CTRL key while choosing additional permissions.
Click ‘Save’ to submit the ticket.
Once the Help Desk receives a ticket requesting additional permissions, the Help Desk follows the
approved OHA decision tree process to determine if the end user is approved or denied the
additional permission set. Once the changes have been implemented, the Help Desk closes the
ticket, and an email will be sent to the requesting user to inform them that the additional permission
request has been approved and that their permissions have been updated accordingly.
2.8 UNDERSTANDING DATA SOURCE CONTRIBUTION AND RECORD
SCORING
The OPD is a compilation of data records from multiple sources who may be reporting on the same
providers and organizations. Because data from various sources may conflict, trust preferences
established by OHA are used to select prevailing data for the Master Record.

Oregon Health Information Technology (HIT) Portfolio Project
44
Trust preferences identify which data sources are most reliable on a per field basis based on the
data contributor. In addition to identifying trustworthy data by field, source records are scored
based on conformance to OHA business rules.
Above all other users, OPD data stewards maintain the highest level of trust. Any source record
that they edit will be considered the highest record. If two users have the same escalated trust
preferences, they will be trusted the same, and whatever data is most recent between them will roll
up to the master record.
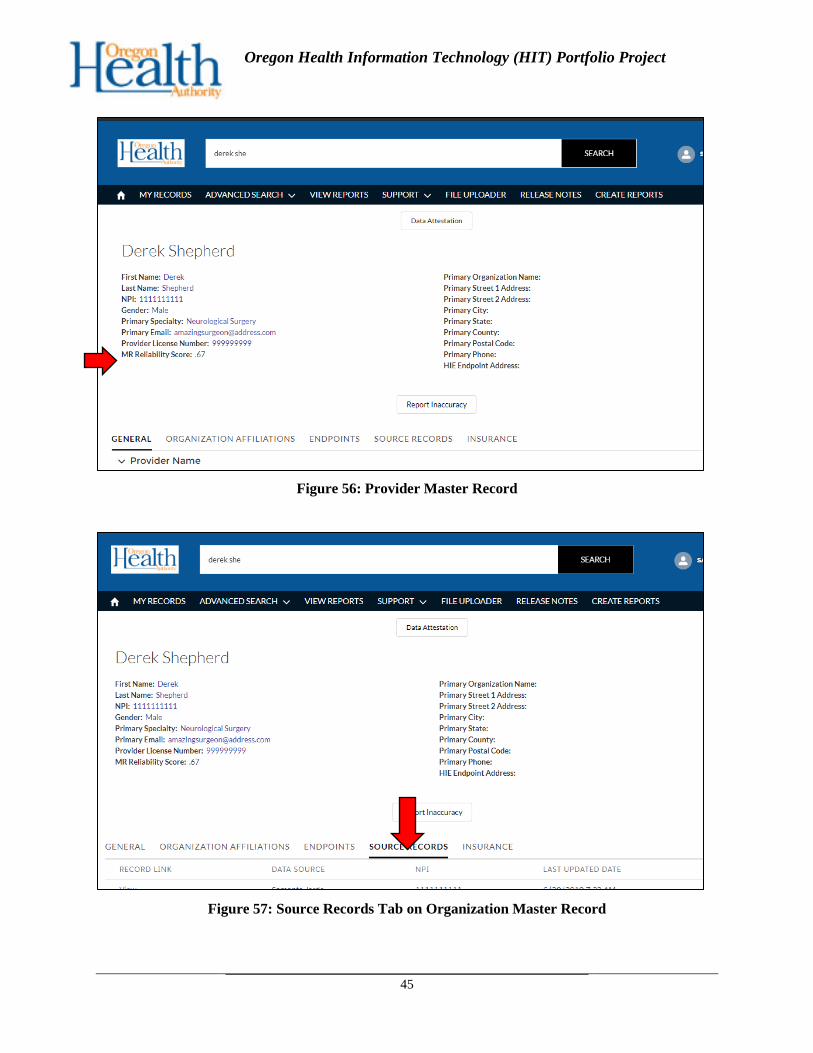
The Master Record displays the reliability score. Source records display both the reliability score
and the completeness score. Record scores are available for users to view and are used for data
stewardship.
2.8.1 Completeness Score
The completeness score is only displayed on the source records of providers and organizations.
The score is calculated based on a percentage of fields populated that OHA has identified per data
source divided by the total number of fields that the data source has potential to provide. This score
calculates the fields that are populated along with the importance of the populated field.
2.8.2 Reliability Score
The reliability score is displayed on source records and master records of providers and
organizations. A series of algorithms and calculations generate the reliability score to provide a
rating based on the decay rate of data elements, trust preferences by fields by data source, level of
agreement with other data sources and business rules defined by OHA.
The algorithm compares multiple source records from contributing data sources and rolls up data
per field to the single “Master” record for providers and organizations. The data is parsed, selected,
and scored based on the most trusted data source on the specific record in the OPD.
Oregon Health Information Technology (HIT) Portfolio Project
45
Figure 56: Provider Master Record
Figure 57: Source Records Tab on Organization Master Record
Oregon Health Information Technology (HIT) Portfolio Project
46
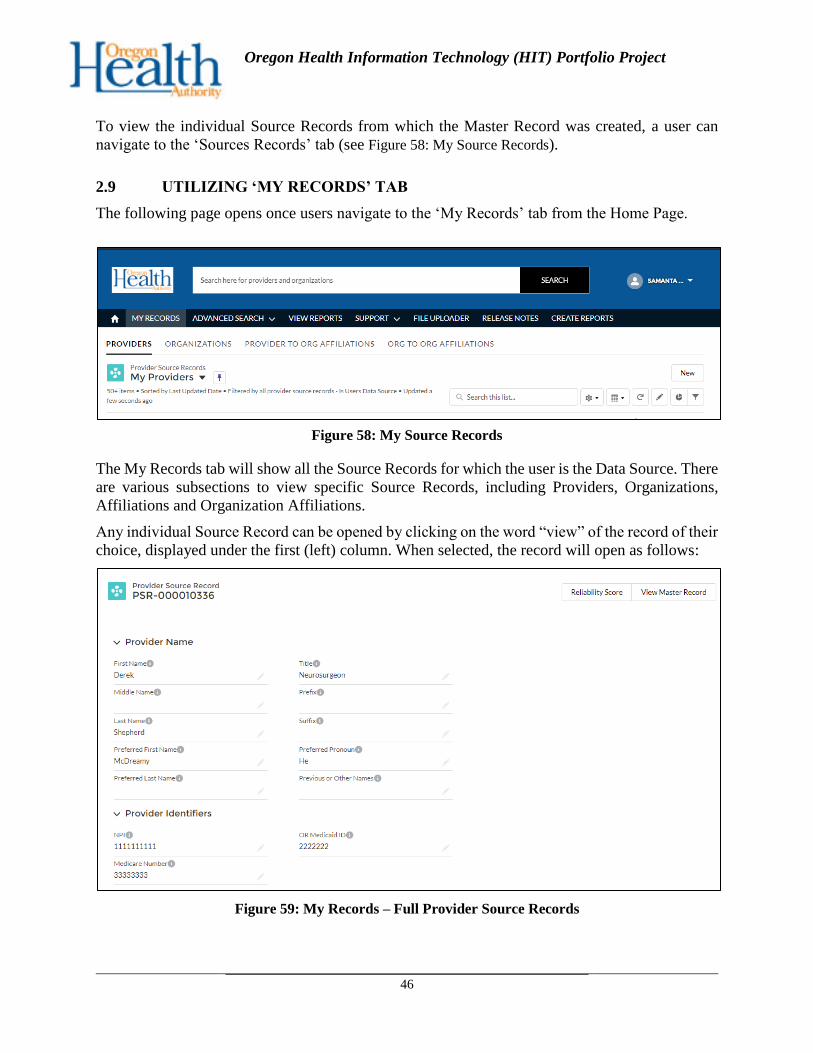
To view the individual Source Records from which the Master Record was created, a user can
navigate to the ‘Sources Records’ tab (see Figure 58: My Source Records).
2.9 UTILIZING ‘MY RECORDS’ TAB
The following page opens once users navigate to the ‘My Records’ tab from the Home Page.
Figure 58: My Source Records
The My Records tab will show all the Source Records for which the user is the Data Source. There
are various subsections to view specific Source Records, including Providers, Organizations,
Affiliations and Organization Affiliations.
Any individual Source Record can be opened by clicking on the word “view” of the record of their
choice, displayed under the first (left) column. When selected, the record will open as follows:
Figure 59: My Records – Full Provider Source Records
Oregon Health Information Technology (HIT) Portfolio Project
47
Under the ‘Details’ Section, the individual Source Record provides more information for that
record. Some of these details include: Provider Name, Provider Identifiers, Contact Information,
Provider Type and Specialty, Provider Demographics, Licenses, Education – Degree(s), and
system fields.
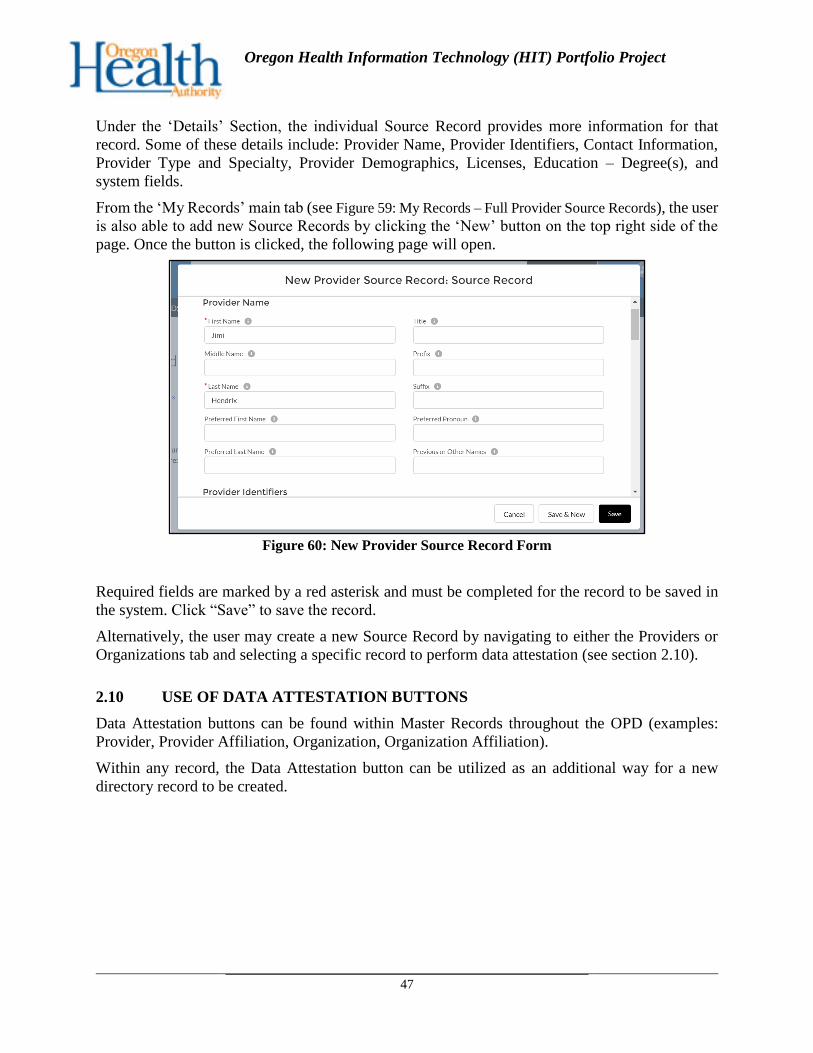
From the ‘My Records’ main tab (see Figure 59: My Records – Full Provider Source Records), the user
is also able to add new Source Records by clicking the ‘New’ button on the top right side of the
page. Once the button is clicked, the following page will open.
Figure 60: New Provider Source Record Form
Required fields are marked by a red asterisk and must be completed for the record to be saved in
the system. Click “Save” to save the record.
Alternatively, the user may create a new Source Record by navigating to either the Providers or
Organizations tab and selecting a specific record to perform data attestation (see section 2.10).
2.10 USE OF DATA ATTESTATION BUTTONS
Data Attestation buttons can be found within Master Records throughout the OPD (examples:
Provider, Provider Affiliation, Organization, Organization Affiliation).
Within any record, the Data Attestation button can be utilized as an additional way for a new
directory record to be created.

Oregon Health Information Technology (HIT) Portfolio Project
48
Figure 61: Data Attestation
Clicking “Data Attestation” will open the following window. Required fields are marked by a red
asterisk and must be completed for the record to be saved in the system.
Figure 62: Provider Source Record Form
Click “Save” to save the record. This is an alternate method of creating a Source Record.
Oregon Health Information Technology (HIT) Portfolio Project
49
CONTINUOUS IMPROVEMENT
The following sections capture methods to improve the operations and user experience of the
Oregon Provider Directory services.
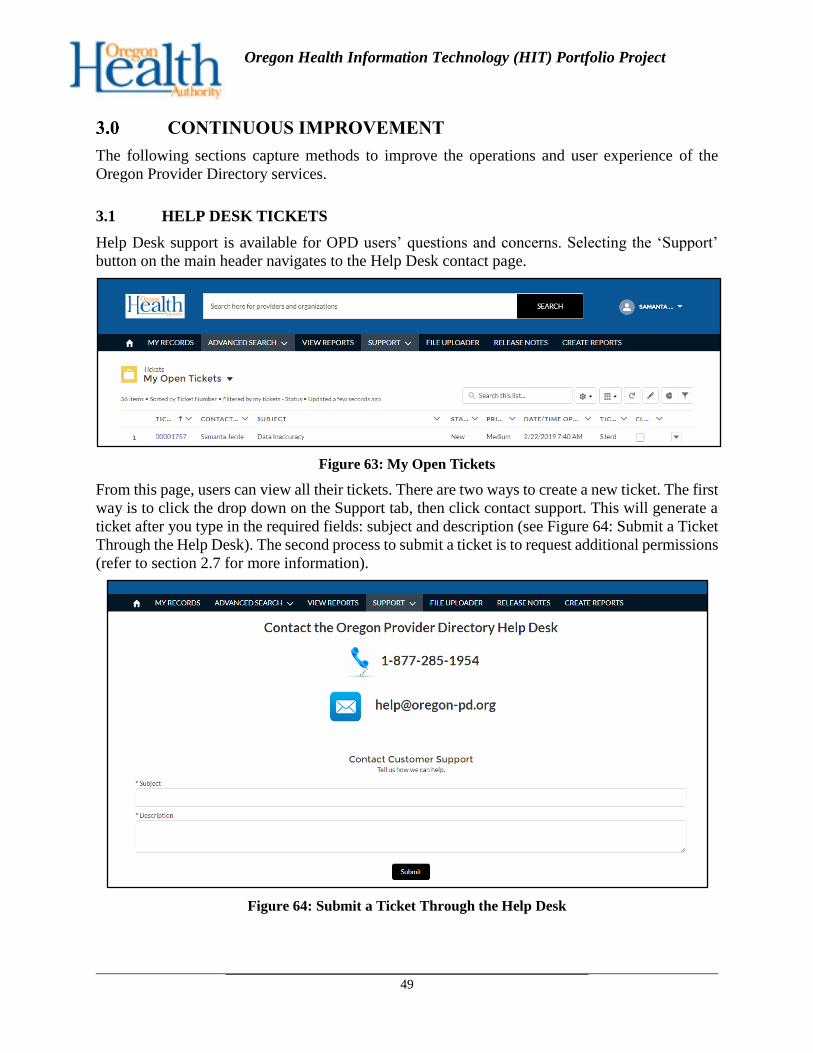
3.1 HELP DESK TICKETS
Help Desk support is available for OPD users’ questions and concerns. Selecting the ‘Support’
button on the main header navigates to the Help Desk contact page.
Figure 63: My Open Tickets
From this page, users can view all their tickets. There are two ways to create a new ticket. The first
way is to click the drop down on the Support tab, then click contact support. This will generate a
ticket after you type in the required fields: subject and description (see Figure 64: Submit a Ticket
Through the Help Desk). The second process to submit a ticket is to request additional permissions
(refer to section 2.7 for more information).
Figure 64: Submit a Ticket Through the Help Desk

Oregon Health Information Technology (HIT) Portfolio Project
50


