Oral Examination Component
342
NATIONAL HEALTH AND NUTRITION EXAMINATION SURVEY III ORAL EXAMINATION COMPONENT Prepared by: Westat, Inc. 1650 Research Boulevard Rockville, MD 20850 Revised March 1992
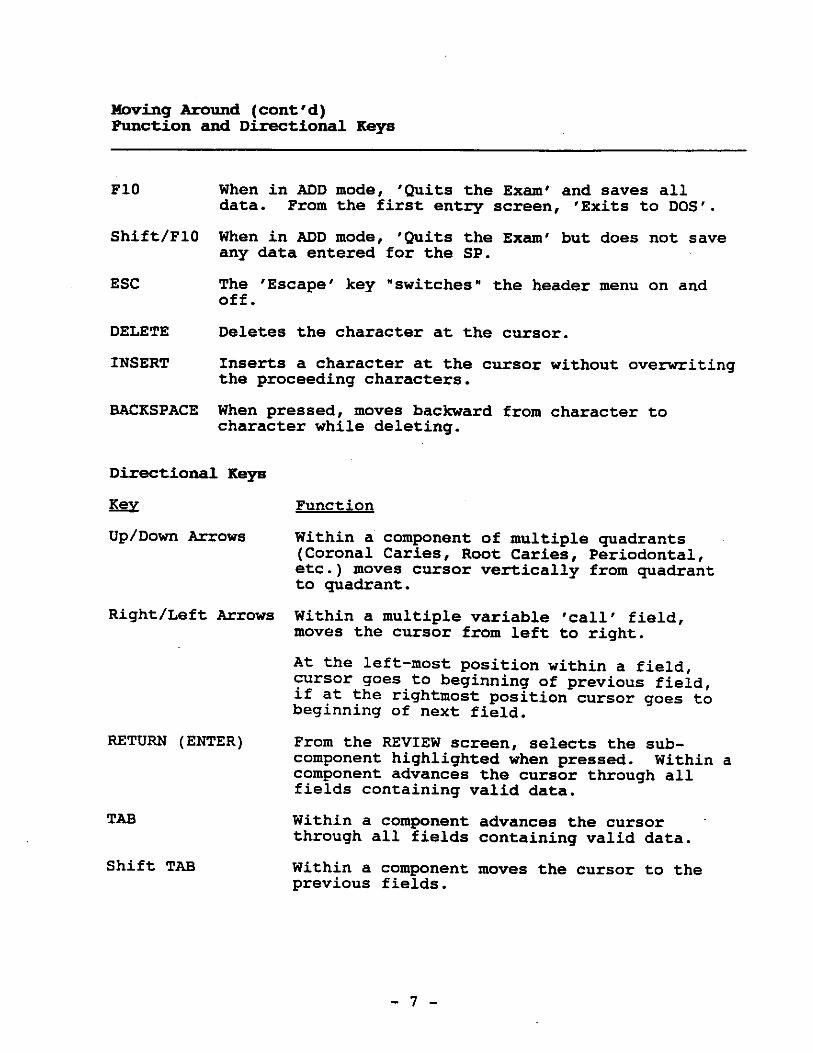
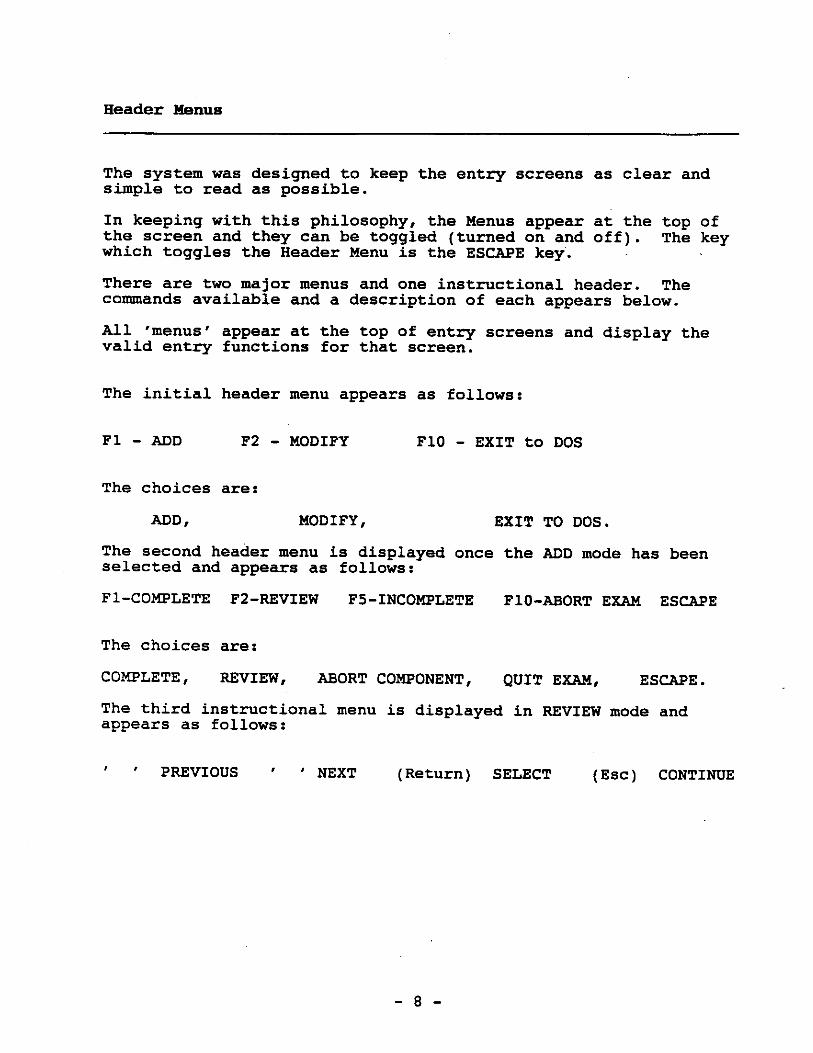
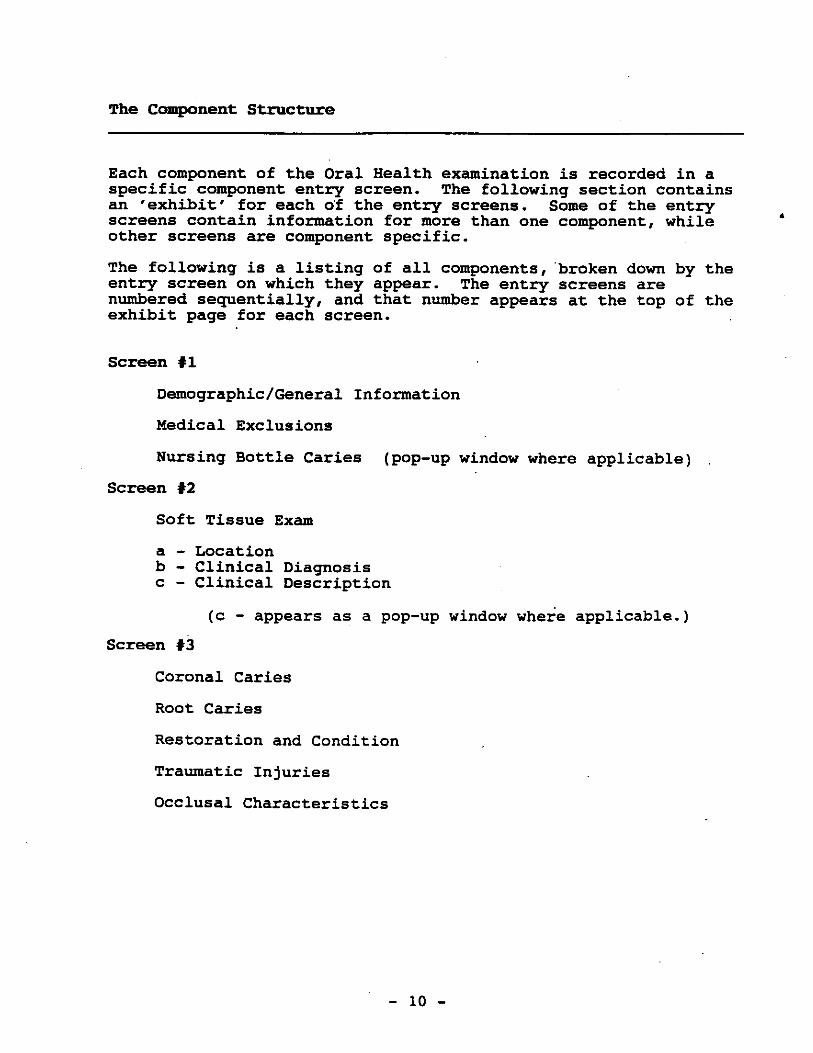
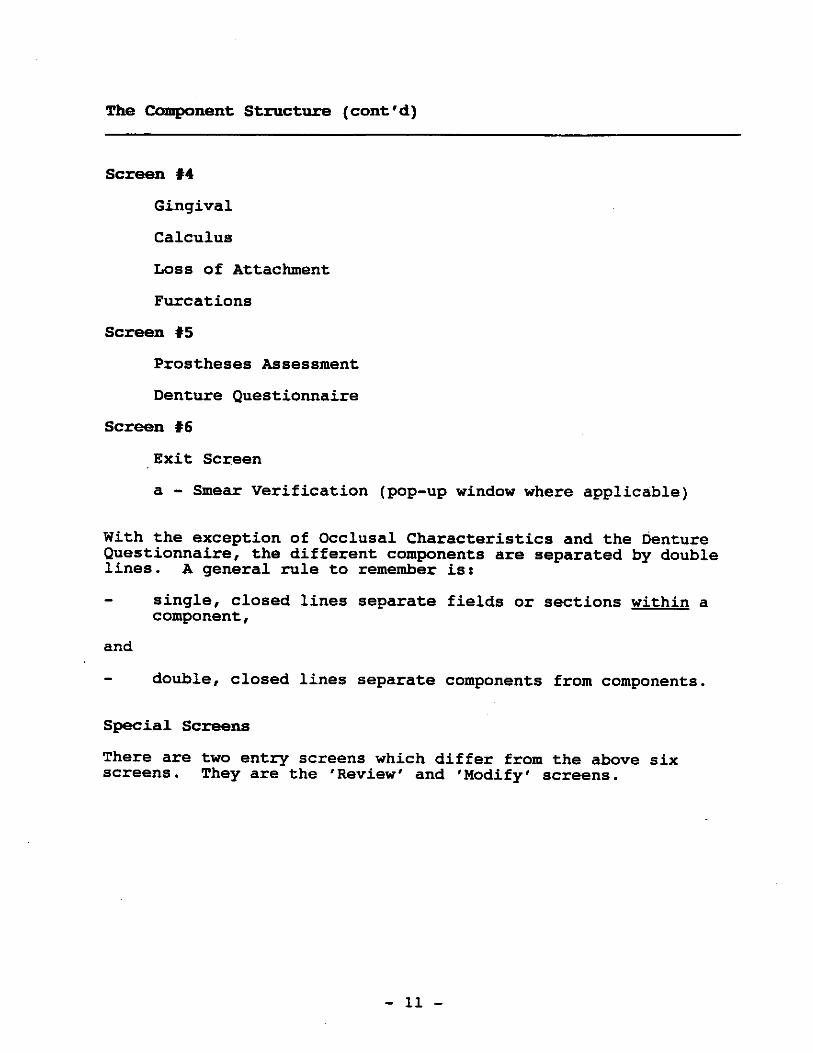
Transcript of Oral Examination Component
NATIONAL HEALTH AND NUTRITION EXAMINATION SURVEY III
ORAL EXAMINATION COMPONENT
Prepared by:
Westat, Inc.1650 Research Boulevard
Rockville, MD 20850
Revised March 1992
iii
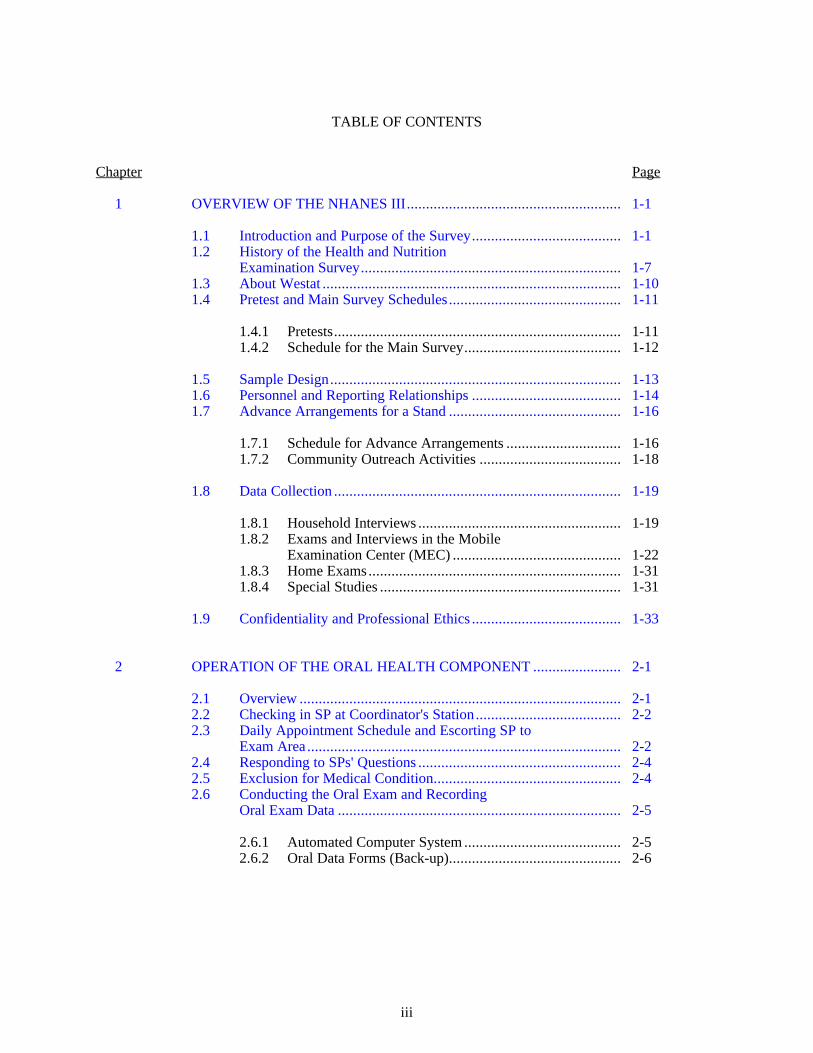
TABLE OF CONTENTS
Chapter Page
1 OVERVIEW OF THE NHANES III........................................................ 1-1
1.1 Introduction and Purpose of the Survey....................................... 1-11.2 History of the Health and Nutrition
Examination Survey.................................................................... 1-71.3 About Westat .............................................................................. 1-101.4 Pretest and Main Survey Schedules............................................. 1-11
1.4.1 Pretests........................................................................... 1-111.4.2 Schedule for the Main Survey......................................... 1-12
1.5 Sample Design............................................................................ 1-131.6 Personnel and Reporting Relationships ....................................... 1-141.7 Advance Arrangements for a Stand ............................................. 1-16
1.7.1 Schedule for Advance Arrangements .............................. 1-161.7.2 Community Outreach Activities ..................................... 1-18
1.8 Data Collection ........................................................................... 1-19
1.8.1 Household Interviews ..................................................... 1-191.8.2 Exams and Interviews in the Mobile
Examination Center (MEC) ............................................ 1-221.8.3 Home Exams.................................................................. 1-311.8.4 Special Studies ............................................................... 1-31
1.9 Confidentiality and Professional Ethics ....................................... 1-33
2 OPERATION OF THE ORAL HEALTH COMPONENT ....................... 2-1
2.1 Overview .................................................................................... 2-12.2 Checking in SP at Coordinator's Station...................................... 2-22.3 Daily Appointment Schedule and Escorting SP to
Exam Area .................................................................................. 2-22.4 Responding to SPs' Questions ..................................................... 2-42.5 Exclusion for Medical Condition................................................. 2-42.6 Conducting the Oral Exam and Recording
Oral Exam Data .......................................................................... 2-5
2.6.1 Automated Computer System ......................................... 2-52.6.2 Oral Data Forms (Back-up)............................................. 2-6
iv
TABLE OF CONTENTS (continued)
Chapter Page
2.7 Editing and Quality Control ........................................................ 2-62.8 Documenting Omitted Examinations and Recording Reasons
that Portions of an Examination Were Not Done ......................... 2-62.9 Dental Exam Daily Log .............................................................. 2-82.10 Report of Dental Exam Findings and Referral Letters
(If Applicable) ............................................................................ 2-82.11 Returning SP to Coordinator's Area............................................. 2-82.12 Packing and Sending Forms to Westat at the End
of a Stand.................................................................................... 2-8
3 EQUIPMENT AND SUPPLIES .............................................................. 3-1
3.1 Dental Exam Area in MEC ......................................................... 3-13.2 Description of Equipment and Supplies....................................... 3-13.3 Assembling and Maintaining Equipment..................................... 3-1
3.3.1 Porta-Chair..................................................................... 3-53.3.2 Dental Stool ................................................................... 3-53.3.3 Rolux Light .................................................................... 3-53.3.4 Gomco Air Compressor.................................................. 3-8
3.4 Infection Control Procedures....................................................... 3-11
3.4.1 Examination Environment .............................................. 3-123.4.2 Chemiclave .................................................................... 3-143.4.3 Spore Tests..................................................................... 3-19
3.5 Replacing Instruments................................................................. 3-203.6 Packing Equipment and Supplies at End of a Stand..................... 3-213.7 Setting Up Equipment and Maintaining the
Examination Environment........................................................... 3-22
4 INTRODUCTION TO THE MEC AUTOMATION SYSTEM ................ 4-1
4.1 Background................................................................................. 4-1
4.1.1 The MEC Automation System Hardware........................ 4-14.1.2 MEC System Software ................................................... 4-8
4.2 Sequence of a Session at the Terminal......................................... 4-9
4.2.1 Logging On To the Dental System.................................. 4-94.2.2 Logging Off the Dental System ...................................... 4-104.2.3 Using the Dental Exam System ...................................... 4-11
v
TABLE OF CONTENTS (continued)
Chapter Page
5 ORAL EXAMINATION METHODS AND DATA FORMS................... 5-1
5.1 Sequence of Oral Exam Procedures............................................. 5-15.2 Dental Questionnaire: Medical Exclusion................................... 5-45.3 Dental Questionnaire: Denture Questions ................................... 5-45.4 Selecting Random Quadrants for Periodontal
Assessment ................................................................................. 5-75.5 Oral Mucosal Tissue Assessment ................................................ 5-8
5.5.1 Introduction.................................................................... 5-85.5.2 Oral Mucosal Tissue Examination Procedure.................. 5-115.5.3 Guide to NHANES III Oral Soft Tissue Lesions
Recording Form ............................................................. 5-125.5.4 NHANES III - Oral Mucosal Lesions and Conditions:
Guide to Referral, Followup, and Smears ....................... 5-175.5.5 Procedures for the Smearing of Suspected
Candidal Lesions ............................................................ 5-195.5.6 NHANES III Oral Mucosal Lesions and Conditions ....... 5-205.5.7 Oral Mucosal Tissue Lesion Data Forms ........................ 5-43
5.6 Dental Caries Assessment Methods............................................. 5-48
5.6.1 Introduction.................................................................... 5-485.6.2 Dental Caries Examination Procedures ........................... 5-495.6.3 Coronal Surface Caries Assessment
Diagnostic Criteria ......................................................... 5-505.6.4 Root Surface Caries Assessment
Diagnostic Criteria ......................................................... 5-555.6.5 Nursing Bottle Caries (Baby Bottle Tooth Decay)
Assessment..................................................................... 5-705.6.6 Caries Recording Procedures .......................................... 5-70
5.7 Assessment of the Presence of Third Molars ............................... 5-77
5.7.1 Examination Procedure................................................... 5-775.7.2 Recording Procedure ...................................................... 5-77
5.8 Traumatic Injuries Assessment.................................................... 5-79
5.8.1 Introduction.................................................................... 5-795.8.2 Traumatic Injuries Examination Procedures.................... 5-805.8.3 Traumatic Injuries Data Recording Procedures .............. 5-84
vi
TABLE OF CONTENTS (continued)
Chapter Page
5.9 Occlusal Characteristics Assessment ........................................... 5-86
5.9.1 Introduction.................................................................... 5-865.9.2 Diagnostic Procedures .................................................... 5-875.9.3 Occlusal Recording Procedures....................................... 5-97
5.10 Periodontal Disease Assessment.................................................. 5-97
5.10.1 Introduction.................................................................... 5-975.10.2 Selecting Random Quadrants for Periodontal
Assessment..................................................................... 5-995.10.3 Gingival Assessment ...................................................... 5-1005.10.4 Calculus Assessment ...................................................... 5-1055.10.5 Periodontal Destruction .................................................. 5-1085.10.6 Periodontal Assessment Data Form and
Recording Procedures..................................................... 5-116
5.11 Restorations, Tooth Conditions, and Prostheses Assessment ....... 5-120
5.11.1 Introduction.................................................................... 5-1205.11.2 Examination Sequence Overview.................................... 5-121
5.12 Recording Information on the OPSCAN DentalData Forms ................................................................................. 5-133
6 ORAL EXAM-RELATED FORMS AND PROCEDURES ..................... 6-1
6.1 Dental Exam Daily Log .............................................................. 6-16.2 Completing the Recommendations for Dental Care ..................... 6-36.3 Making Referrals for Dental Care - Completing the Notification
of Dental Examination Findings, and Dental Referral Log........... 6-3
6.3.1 Contacting the SP's Personal Dentist by Telephone......... 6-36.3.2 Completing the Notification of Dental Examination
Findings ......................................................................... 6-56.3.3 Completing the Dental Examination Referral Log........... 6-76.3.4 Criteria for Referral ........................................................ 6-9
6.4 Shipping Oral Mucosal Slides ..................................................... 6-106.5 Dental Sterilization Log .............................................................. 6-126.6 Equipment Maintenance Log....................................................... 6-156.7 Specific Beginning and End-of-Stand Procedures for Packing
up the Dental Room, Shipping, and Miscellaneous Tasks............ 6-15
6.7.1 Setup - Beginning of the Stand ....................................... 6-15
vii
TABLE OF CONTENTS (continued)
Chapter Page
6.7.2 Miscellaneous Daily Tasks ............................................. 6-196.7.3 Miscellaneous Weekly Tasks.......................................... 6-206.7.4 Miscellaneous Tasks - Every Two Weeks ....................... 6-206.7.5 Miscellaneous Monthly Tasks ........................................ 6-216.7.6 End-of-Stand Pack-Up.................................................... 6-216.7.7 Shipping - End of Stand ................................................. 6-22
7 QUALITY CONTROL PROCEDURES.................................................. 7-1
7.1 Response Rates ........................................................................... 7-17.2 Data Quality................................................................................ 7-2
7.2.1 Training and Calibration................................................. 7-27.2.2 Monitoring and Recalibration ......................................... 7-3
Attachments
A Recommended Infection-Control Practices for Dentistry ......................... A-1
B Dental Terms........................................................................................... B-1
C Recorder's Guide to Direct Data Entry .................................................... C-1
List of Tables
Table
5-1 Diagnostic criteria for oral mucosal lesions and conditions ...................... 5-23
List of Figures
Figure
4-1 MEC automation system configuration.................................................... 4-2
4-2 VT320 terminal ....................................................................................... 4-3
4-3 VAXmate terminal .................................................................................. 4-4
4-4 The terminal keyboard............................................................................. 4-6
4-5 Keys of the terminal keyboard ................................................................. 4-7

viii
TABLE OF CONTENTS (continued)
List of Exhibits
Exhibit Page
1-1 Reporting relationships............................................................................ 1-15
1-2 Stand schedule......................................................................................... 1-17
1-3 Floor plan of MEC .................................................................................. 1-23
1-4 Examination components by age groups .................................................. 1-27
1-4a NHANES III Examination Components .................................................. 1-28
1-5 Estimated number of minutes for each exam component.......................... 1-29
1-6 Home exam for NHANES III .................................................................. 1-32
2-1 Daily appointment schedule..................................................................... 2-3
3-1 Equipment and supplies for dental component ......................................... 3-2
3-2 Porta-Chair Instructions........................................................................... 3-6
3-3 Illustration of Gomco air compressor....................................................... 3-9
3-4 Chemipurge unit setup............................................................................. 3-15
5-1 Oral examination procedures, including ages of SPs, and forms............... 5-2
5-2 Guide to dental examination sequence ..................................................... 5-3
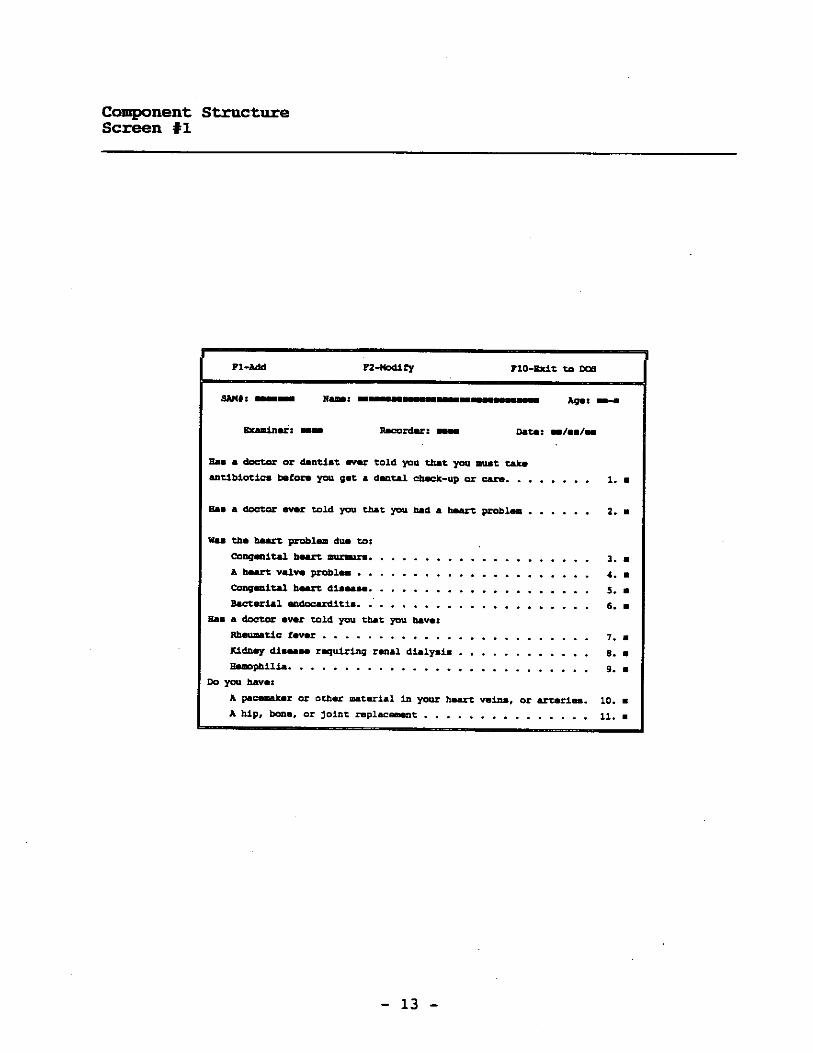
5-3 Dental questionnaire - Part A................................................................... 5-5
5-4 Dental questionnaire - Part B ................................................................... 5-6
5-5 Dental examination form - page 3............................................................ 5-13
5-6 Candidiasis Smears Transmittal Sheet ..................................................... 5-21
5-7 Dental Examination Form - page 1 .......................................................... 5-44
5-8 Dental Examination Form - page 3 ......................................................... 5-45
5-9 Coronal caries code sheet......................................................................... 5-56
5-10 Root Surface Caries code sheet ................................................................ 5-64
ix
TABLE OF CONTENTS (continued)
List of Exhibits (continued)
Exhibit Page
5-11 Dental Examination Form - page 1 .......................................................... 5-71
5-12 Dental Examination Form - page 1 .......................................................... 5-78
5-13 Dental Examination Form - page 1 .......................................................... 5-85
5-14 Dental Examination Form - page 1 .......................................................... 5-98
5-15 Dental Examination Form - page 2 .......................................................... 5-117
5-16 Classification criteria for restorations and tooth conditions ...................... 5-122
5-17 Restoration and tooth assessment code sheet............................................ 5-124
5-18 Examination procedure and classification criteria for prostheses .............. 5-126
5-19 Complete denture/partial denture assessment code sheet .......................... 5-128
5-20 Dental data form marking instructions ..................................................... 5-134
6-1 National Health and Nutrition Examination Survey III Dental Log .......... 6-2
6-2 Recommendations for dental care ............................................................ 6-3
6-3 Notification of Dental Examinations Findings ......................................... 6-6
6-4 Positive Findings/Dental Contact Log ..................................................... 6-8
6-5 Guidelines for Dental Referral ................................................................. 6-11
6-6 Candidiasis Smears Transmittal Sheet ..................................................... 6-13
6-7 Dental Sterilization Log........................................................................... 6-14
6-8 Dental Equipment Maintenance Log........................................................ 6-16
6-9 Dental Exam Room Packup ..................................................................... 6-23
1. OVERVIEW OF THE NHANES III
1.1 Introduction and Purpose of the Survey
The Third National Health and Nutrition Examination Survey (NHANES III) is being conducted
by the National Center for Health Statistics (NCHS) of the United States Public Health Service. Data
collection began in September 1988 and will continue for approximately 6 years (two 3-year rounds) at
88 locations across the U.S. The main survey was preceded by three pretests which were held between
September 1987 and March 1988 in Los Angeles, California, Washington, D.C. and Tampa, Florida.
Another pretest called the "Dress Rehearsal" was conducted in October 1988, just prior to the start of the
main survey.
Approximately 40,000 individuals two months of age and older will be randomly selected from
households across the U.S. to participate in the survey. Selected persons will be invited to take part in
the survey by completing interviews in their homes and by receiving examinations at the Mobile
Examination Center (MEC). The detailed interview includes demographic, socioeconomic, dietary, and
health-related questions. Upon completion of the interview, respondents will be asked to voluntarily
participate in additional interviews, extensive physical and dental examinations and biochemical tests, all
conducted by highly trained medical personnel in a mobile examination center (MEC).
The purpose of NHANES III is to assess the health and nutritional status of adults and children
in the United States. NCHS will use the data collected in this survey to define the normative distribution
of:
Specifically-defined diseases and other conditions of ill health;
Nutritional disorders;
Potential risk factors; and
Normative health-related measurements, such as height, weight, and blood pressure.
1-1
At the conclusion of the study, prevalence rates will be computed for blacks, Mexican-
Americans, Puerto Ricans, and other groups including whites, by age, sex, and income level. To assist in
obtaining these rates, the survey will oversample blacks, Hispanics, the elderly and children.
The diseases and other medical conditions to be studied include, but are not limited to, the
following:
Cardiovascular disease (heart disease);
Cancer;
Chronic obstructive lung disease, including:
- Asthma;
- Chronic bronchitis; and
- Emphysema;
Diabetes;
Kidney disease and other urologic disorders;
Gallbladder disease;
Osteoporosis;
Arthritis and related musculoskeletal conditions, including:
- Rheumatoid arthritis; and
- Osteoarthritis;
Infectious diseases, including:
- Immunization to childhood diseases;
- Exposure to hepatitis A or B;
- Exposure to human immunodeficiency virus (HIV); and
- Exposure to sexually transmitted diseases, such as herpes simplex 1 and 2;
1-2
Oral health problems, such as:
- Caries;
- Periodontal disease;
- Tooth loss;
- Soft-tissue lesions;
- Trauma assessment;
- Occlusal and dentofacial characteristics; and
- Tooth restoration and prosthesis conditions;
Allergies to:
- Certain foods, animals, insects and molds;
Mental health conditions, for example:
- Depression;
Hearing loss;
Retinal Disease; and
Nutritional disorders, such as vitamin and mineral deficiencies.
Risk factors are those aspects of a person’s lifestyle, constitution, heredity or environmental
exposures which may increase his/her chances of developing a certain disease or condition. Some of the
risk factors to be included in this study are:
Tobacco usage;
Alcohol consumption;
Physical activity;
Sexual practices;
Occupational exposures;
1-3
Reproductive health, such as oral contraceptive use and breastfeeding practices;
Weight;
Dietary intake; and
Stress.
The results of this survey will benefit the American people in two important ways. First, data
on the distribution of health problems and potential risk factors in the population provide researchers with
important clues to the causes of disease development. This survey will provide the data researchers need
to establish hypotheses of disease causation which can be tested in future epidemiologic and clinical
research studies. Secondly, information collected from this survey will be compared to information
collected in previous HANES surveys and future HANES surveys in which study participants will be
asked to be examined and interviewed again sometime in the future. This will allow researchers to
determine the extent to which various health problems and risk factors have changed in the U.S.
population over time. By identifying the health care needs of the population, agencies of the government
and private sector can establish policies and plan research, education, and health-promotion programs
which will help improve the current health status of the population and prevent future health problems.
By computing prevalence rates for the population as a whole and for specific age-race-sex
groups (e.g., 30-35 year old white females), researchers can determine which subgroups of the population
would benefit most from specific programs and policies. For example, information collected in this survey
will help FDA decide whether to implement calcium fortification regulations for the nation’s food supply
and how best to implement the fortification program, if needed. Data from this survey will be used to
revise the growth charts which are used widely by pediatricians to monitor the growth of children.
Study participants are first interviewed at their homes and asked detailed demographic,
socioeconomic, and health-related questions. Extensive physical examinations by highly trained medical
personnel, additional health interviews, dietary interviews, and biochemical tests on biological specimens
are then conducted in specially equipped mobile examination centers (MECs). Persons who cannot or will
not come to the MEC for the full-scale examination are asked to undergo certain parts of the exam at their
homes.
1-4

In addition to using these data as a baseline for future follow-up studies and analysis, some
blood and urine specimens collected in this survey will be stored. Biological specimen banking will be
of value in the future as new techniques are developed to measure exposure to environmental contaminants
or disease agents or when new health problems are recognized. Biological specimen banking will be used
to permit future laboratory analyses for:
Estimating the prevalence of factors of current interest but for which acceptable testingprotocols do not yet exist (e.g., pesticides);
Estimating the prevalence of factors of emerging importance (e.g., chlamydia subtypes,various types of non-A, non-B hepatitis); and
Conducting studies to look for the specific causes of diseases (e.g., bacteria, viruses, toxicmaterials).
Four areas have been selected for special emphasis in NHANES III: child health; health of
older Americans; occupational health; and environmental health.
Child Health . NHANES III will help researchers assess the physical and emotional health
status of children in the U.S. Communicable diseases, such as influenza, measles, and chickenpox, are
not the only causes of illness and disability in the young. The focus of the childhood component of
NHANES III will be on:
Chronic diseases (heart and lung diseases);
Allergic conditions;
Immunity to various infectious diseases;
Nutritional status;
Cognitive functioning (ability to function in the activities of daily life);
Physical growth;
Disorders of hearing and dentition; and
Blood lead levels.
1-5
Older Americans. The U.S. has experienced dramatic growth in the number of older people
during this century. These demographic changes have major implications related to health care needs,
public policy, and changing research priorities associated with older Americans. Recognizing this, NCHS
is working with a consortium of public health service agencies to improve information on the health of
the elderly. NHANES III is designed to fill many of the gaps in our knowledge of the health of older
people. The survey component for older persons focuses on physical health status and aspects of
functional health status. The key components for this part of the survey are:
Osteoporosis and the evaluation of lower extremity function, including risk of falls andfractures;
Musculoskeletal function, focusing on osteoarthritis, as a major cause of disability in olderpersons;
Nutrition, including the evaluation of obesity;
Cardiopulmonary diseases, which are major causes of illness and death in older persons;
Physical function (individual’s capacity for self-care);
Cognitive function (ability to function in the activities of daily life); and
Social function (ability to live independently).
Occupational Health. This component of the survey will focus on exposures in the workplace,
such as noise, chemicals, and dust, which may be associated with specific health problems, such as
neurological problems, lung disease, and musculoskeletal injuries.
Environmental Health. The environmental health research topic for NHANES III focuses
primarily on studying exposure to toxic metals and chemicals, such as pesticides, by examining blood
specimens for levels of various metals and chemicals in the blood.
Westat is a survey research firm which has been awarded a contract by NCHS to carry out data
collection activities for the survey. Westat is responsible for selecting the survey sample, scheduling and
1-6

planning study procedures, developing the survey materials, such as manuals and forms, hiring and training
field personnel, making advance arrangements for each stand, conducting community outreach activities,
setting up and maintaining field offices and Mobile Examination Centers (MECs), scheduling and
conducting screening interviews and extended interviews in the household, conducting interviews and
physical examinations in the MECs, designing and carrying out quality control procedures, transmitting
data to NCHS, and shipping biological specimens to various laboratories in the U.S. The examination and
interview components of this survey have been designed in close collaboration with the Federal agencies
which will use the resulting data for program planning and regulatory and research purposes. The
following agencies have been involved in designing NHANES III:
Agencies of the National Institutes of Health, Public Health Service
- National Heart, Lung and Blood Institute (NHLBI);
- National Cancer Institute (NCI);
- National Institute of Child Health and Human Development (NICHD);
- National Institute of Diabetes and Digestive and Kidney Diseases (NIDDK);
- National Institute of Arthritis and Musculoskeletal and Skin Diseases (NIAMSD);
- National Institute of Dental Research (NIDR);
- National Institute of Mental Health (NIMH);
- National Institute of Neurological and Communicative Disorders and Stroke(NINCDS); and
- National Institute on Aging (NIA).
1-7
Other Federal Agencies
- Environmental Protection Agency (EPA);
- Food and Drug Administration (FDA);
- National Institute of Occupational Safety and Health (NIOSH); and
- National Institute of Environmental Health and Safety (NIEHS).
1.2 History of the Health and Nutrition Examination Survey
The National Health Survey Act, passed in 1956, provided the legislative authorization for a
continuing survey to collect statistical data on the amount, distribution, and effects of illness and disability
in the United States. In order to fulfill the purposes of this Act, it was recognized that data collection
would involve at least three sources: the people themselves by direct interview; clinical tests,
measurements, and physical examinations on sample persons interviewed; and places where persons
received medical care such as hospitals, clinics, and doctors’ offices.
To collect data by interview and physical exam, NCHS conducted four separate examinations
surveys between 1959 and 1976. The first Health Examination Survey (HES I) focused mainly on selected
chronic diseases of adults aged 18 - 79. HES II and HES III, conducted between 1963 and 1970, focused
primarily on the growth and development of children.
The fourth survey introduced a new emphasis: the study of nutrition and its relationship to
health status. This had become increasingly important as researchers began to discover links between
dietary habit and disease. In response to this concern, under a directive from the Secretary of the
Department of Health, Education and Welfare, the National Nutritional Surveillance System was
undertaken by NCHS. The purpose of this system was to measure changes in nutritional patterns over
time. However, a special task force recommended that the continuing surveillance system be expanded
to include clinical observation and professional assessment as well as the recording of dietary intake
patterns. Thus, the National Nutritional Surveillance System was combined with the Health Examination
Survey to form the National Health and Nutrition Examination Survey, NHANES.
1-8
NHANES I, the first cycle of the NHANES studies, was conducted between 1971 and 1974.
This survey obtained a national sample of about 21,000 persons between the ages of 1 and 74 years of
age. Extensive data on health nutrition were collected by interview, physical examination, and a battery
of clinical measurements and tests from all members of the sample.
The planning process for NHANES II was carried out in 1974 and 1975 in collaboration with
other Federal agencies. Throughout the planning stage there was continual awareness of the necessity of
making the data collection for NHANES II comparable to the first NHANES survey so that NHANES I
data could serve the purpose of providing a baseline for assessing changes overtime. This means that
many of the same measurements had to be taken the same way on the same age segment of the U.S.
population in both surveys. The NHANES II survey began examinations in February 1976 with the goal
of interviewing and examining 21,000 persons between the ages of 6 months and 74 years. This survey
was completed in 1980.
In addition to NHANES I and NHANES II, a special survey of the U.S. Hispanic population,
HHANES, was undertaken to provide information on the health and nutrition status of Hispanics
comparable to that obtained for the general U.S. population. The survey was completed in 1984. A fourth
NHANES project, the NHANES Epidemiologic Followup Survey, was recently completed. This study
was an effort to conduct followup interviews with the sample population, now aged 35-84, who were
interviewed and examined in NHANES I between 1970 and 1974.
NHANES III is the third cycle in the NCHS series of surveys to collect data on the health and
nutrition of the people of the United States through interviews and physical examinations. As in previous
NHANES cycles, the survey’s primary purpose will be to produce descriptive statistics that can be used
to measure and monitor the health and nutritional status of the civilian, noninstitutionalized U.S.
populations.
The plan is to administer a household interview and a 4-hour examination consisting of medical
procedures, biochemical tests, and questionnaires to 40,000 sample persons aged 2 months and older over
a period of approximately 6 years. The survey will be conducted in 2 rounds of about 3 years each in
approximately 88 locations across the country.
1-9
NHANES III will serve to collect public health data for use in evaluating the health status of
the U.S. population and determining how health status is affected by social and economic conditions. The
wide range of statistics produced will be valuable for:
Estimating the prevalence of selected diseases and conditions;
Assessing health and nutritional status;
Determining needs for health care;
Analyzing relationships between health measures and risk factors; and
Evaluating aspects of health and nutrition.
A number of longitudinal studies which use NHANES III data as baseline data are planned.
These studies will follow the sample persons interviewed and examined during NHANES III over a period
of years to attain measures of changes in health status and to study human growth and development in
detail.
1.3 About Westat
Westat is an employee-owned research firm founded in 1961 and located in the Metropolitan
Washington, DC area (Rockville, Maryland). Westat is recognized as one of the leading research firms
engaged in survey research, program evaluation, mathematical and statistical analysis, and computer
applications. Although primarily involved in conducting surveys for agencies of the Federal Government,
the company has also served local government agencies, universities, professional societies, nonprofit
institutions, and commercial enterprises.
The professional staff of more than 450 includes statisticians, epidemiologists, psychologists,
sociologists, survey managers, market research analysts, economists, and computer systems analysts with
specialized knowledge in health, labor, housing, and education. A highly trained nationwide field staff
of supervisors, interviewers, and survey assistants provides additional support to the organization.
1-10
A large number of the studies Westat manages are concerned with the health of various
subgroups of the population. The success of these projects can be attributed in part to the company’s
ability to enlist the cooperation of individuals and groups in the communities where the studies are
conducted. For instance, it may be necessary to obtain cooperation from state or local government
officials, professional associations, hospital administrators, citizen groups, and individuals.
Many of Westat’s studies in the area of health involve nationwide data collection efforts in
hundreds of different communities. For example, in 1979-80, Westat enlisted 38,000 U.S. school children
in a study to estimate the prevalence of dental caries (cavities) and other oral health problems in that
population. A second dental survey conducted in 1986-87 involved 45,000 school children. Fourteen
teams, each with a dentist, a data recorder, and 2 coordinators, traveled to schools across the U.S. to
collect data from students via dental examinations and interviews.
1.4 Pretest and Main Survey Schedules
1.4.1 Pretests
1.4.1.1 Purpose of the Pretests
Before any large-scale data collection effort is started on a survey, one or more pretests are
conducted. During a pretest, field procedures and data collection instruments are tested and evaluated,
then refined by the researchers. Field procedures are carried out just as they would be in the main study,
but during the pretest a much smaller group of sample persons is selected. After the completion of a
pretest, a series of meetings is held and suggestions for improving the field procedures and data collection
instruments are incorporated into the plans for the main study. In this way, potential problems are
resolved before the main survey begins, although it is inevitable that some unanticipated problems will
arise as the study progresses.
1-11
1.4.1.2 Summary of the Pretests
Since NHANES III is so large and complex, four pretests were scheduled from September 1987
through December 1988. The first three pretests were conducted at different sites to evaluate the
performance of the field procedures in various locations. The fourth pretest, or "Dress Rehearsal" was
conducted in October 1988 and was intended to provide a final practice of all procedures before the main
survey was initiated. Following is a summary of the pretests, the locations, the number of sampled
persons (SPs), and the procedures tested.
Pretest I
LOCATION: Los Angeles, CaliforniaDATE: October 1987DURATION: Six weeksNUMBER OF SPs: 450Questionnaires and interviewer field procedures were tested and evaluated.
Pretest II
LOCATION: Washington, D.C.DATE: October - December 1987DURATION: 9 weeksNUMBER OF SPs: 600MEC procedures and examinations tested.
Pretest III
LOCATION: Tampa, FloridaDATE: February - March 1988DURATION: Six weeksNUMBER OF SPs: 500All office, interviewing and MEC procedures tested.
Pretest IV ("Dress Rehearsal")
LOCATION: College Park, MarylandDATE: October 1988DURATION: 6 weeksNUMBER OF SPs: 450Final testing of all procedures
1-12
1.4.2 Schedule for the Main Survey
Data collection for the main survey of 40,000 sample persons (SPs) began in September l988
and will be conducted in 2 cycles of approximately 3 years in length. Field office staff, interviewers, and
2 examination teams will travel to approximately 44 locations throughout the U.S. in each cycle. The
average stand size will be about 450 SPs (within a range of 300-600 SPs). At any given time during the
survey, examinations will be conducted at two stands simultaneously for 10 1/2 months of the year. There
will be breaks of about 2 weeks around Christmas and about 2 weeks during the summer.
1.5 Sample Design
A sample is defined as a representative part of a larger group. Surveys involve studying a
sample of persons rather than conducting an expensive and time-consuming census whereby every person
in the population of interest is studied. Since it is impossible to interview and examine everyone in the
U.S. for NHANES III, a representative sample is taken of the nation’s population. At the conclusion of
the study, estimates will be made of the prevalence of various health conditions and risk factors for the
entire U.S. population, based on what is learned from the sample of people studied in the survey. By
studying a representative sample of the population, it is assumed that the findings would not have been
too different had every person in the U.S. been studied. Because generalizations about the population will
be made, it is extremely important that the sample be selected in such a way that it accurately represents
the whole population. Statisticians must calculate the size of the sample needed and take into
consideration the geographic distribution and demographic characteristics of the population such as age,
sex, race, and income.
After a decision has been made on the size and characteristics of the sample, the next step is
to determine the method of drawing the sample. For NHANES III, a multi-stage approach is being used.
1-13
Stage 1: Sampling PSU’s.
The U.S. is divided into geographic regions called Primary Sampling Units(PSU’s). Each PSU is a county or small group of contiguous counties. At thehome office, Westat statisticians randomly select 88 PSU’s to be included in thisstudy. The probability (likelihood) of a PSU being selected depends on its size(i.e., the more people who live in the PSU, the more likely it will be sampled).Each PSU that is selected is called astand. Exam teams will travel to each ofthe 88 stands to conduct exams and interviews in the MECs.
Stage 2: Sampling BG/ED’s.
Each selected PSU is comprised of block groups (BGs), defined by the CensusBureau, or enumeration districts (ED’s). The home office randomly selectsBG/ED’s to be included in the study. Similar to Stage 1, the probability of aBG/ED being selected depends on its size.
Stage 3: Sampling segments.
Each BG/ED is comprised ofsegmentswhich are clusters of homes. Segmentsare randomly selected to be included in the study. The larger the segment themore likely it is to be selected. Project staff called listers go to each segmentand, using special forms, list the addresses of all dwelling units (houses,apartments, mobile homes) in that area.
Stage 4: Sampling households from the field listing.
Not all households in a stand are selected for the study. Home office project staffrandomly select households from the field listings.
Stage 5: Selecting eligible persons (screening).
Field interviewers go to each sampled household identified in Stage 4. Theinterviewer administers a 10-minute screening questionnaire (Household ScreenerQuestionnaire) to determine the household composition and sex/race/age/ethnicitycharacteristics of the household members. Depending on the characteristics of thehousehold, only certain households are selected for the final sample. Interviewershave written instructions from the home office on how to conduct this stage ofsampling.
Stage 6: Choosing Sample Persons in the selected households.
Following the screener sampling instructions, in a typical household 2-3 personswill be selected. However, in some households we may select none and in othersas many as 10. Each individual selected for the study is called aSample Person(SP).
1-14
1.6 Personnel and Reporting Relationships
There are two different organizations conducting NHANES III. The National Center for Health
Statistics (NCHS) is the government agency sponsoring, and ultimately responsible for, the survey. NCHS
has contracted with Westat to conduct the field operations for the survey. NCHS staff and consultants
from both NCHS and Westat participate in staff training programs and pretest activities, and periodically
visit the field operations during the main survey.
As a member of the exam team staff, you are an employee of Westat and will report directly
to Catherine Novak, Director of MEC operations for the Westat staff. Exhibit 1-1 shows the formal
reporting relationships for the project. Renee Slobasky serves as the NHANES project director for the
Westat home office. Dr. Carla Maffeo, technical director for examinations at Westat’s home office, is
responsible for technical issues, such as how an exam procedure or biochemical test should be done.
Exam or personnel matters should be discussed with the Director of MEC operations. The MEC manager,
who is responsible for day-to-day activities of the MEC at the stand, should be consulted for such
questions regarding the automated system, equipment, supplies, data collection, sterilization of instruments,
storage and shipment of data and specimens, and administrative issues.
1-15
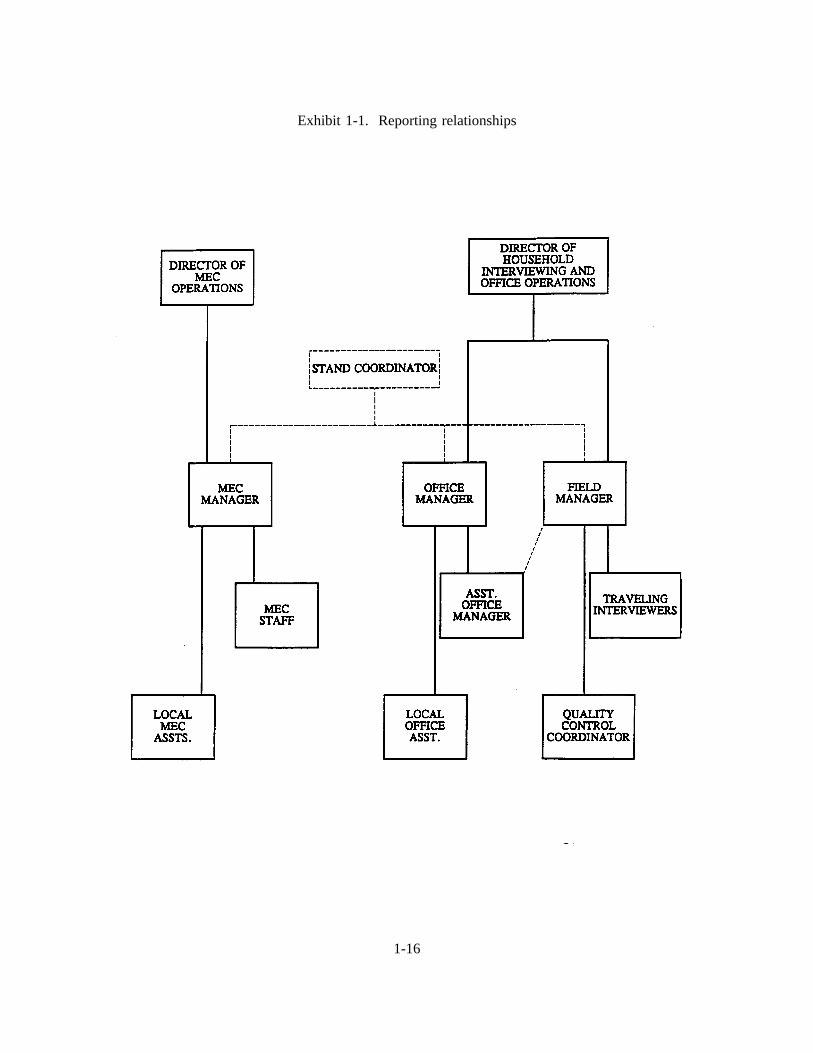
Exhibit 1-1. Reporting relationships
1-16
A Stand Coordinator is also designated for each stand and will be responsible for coordinating
stand activities with the other on-site managers.
1.7 Advance Arrangements for a Stand
1.7.1 Schedule for Advance Arrangements
Exhibit 1-2 summarizes the schedule for a stand. Advance arrangements begin in Westat’s
home office at least 10 weeks prior to the start of interviewing at a stand. Members of the advance
arrangements team study maps and familiarize themselves with the layout of a stand, location of sampled
segments, major highways and arteries, public transportation, and sites that appear appropriate for location
of the MEC. Once they have a basic knowledge of the layout of the area, they contact local officials
identified by our outreach program as prospective knowledgeable informants and make arrangements to
visit the prospective stand.
The field office is opened at least 1 week prior to the start of household screening and
interviewing. During that week the rental furniture and office equipment arrive, supplies shipped to the
site from the home office are unpacked, telephones are installed, and computer systems are tested. A
member of the advance arrangements team is at the stand during this period.
At least 1 week before examinations begin, the MEC is delivered to the prearranged site. The
MEC manager will be on hand to receive the trailers and direct their location and leveling by the shipping
firm, to oversee the hookup of electricity and plumbing lines by local contractors, and to verify the
presence of the previously arranged security. After the trailers are set up, examination staff members
unpack, calibrate and test the equipment. Medical and laboratory supplies delivered to the MEC are
unpacked and stored. These preparations are scheduled and managed so that the MEC is ready for its dry
run prior to the first scheduled examinations.
1-17
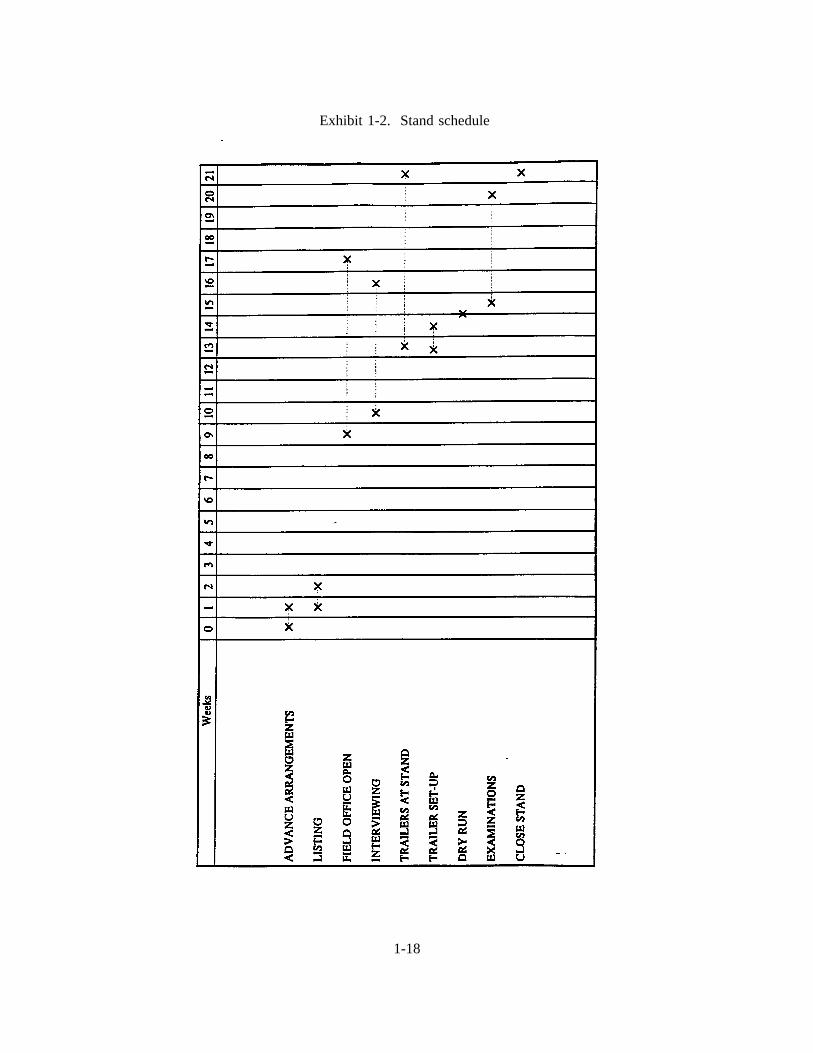
Exhibit 1-2. Stand schedule
1-18
1.7.2 Community Outreach Activities
Westat and NCHS have developed a comprehensive and effective outreach program. This
program is directed from the Westat home office under the supervision of the Director of Advance
Arrangements, Jack Powers. Outreach activities are initiated prior to entering a stand and continue
throughout the period of interviewing and examinations.
The purpose of the outreach activities is to inform public officials and potential participants
about NHANES III. In informing public officials, regardless of whether their active support is sought,
it is hoped that by providing information the study will be recognized as a legitimate and important
research effort. The goal of outreach programs directed to potential sample persons is not only to provide
information, but to encourage them to take part in an important study.
Westat directs the outreach program to audiences at the national, regional, state and local levels.
Through Westat, public officials receive a letter from NCHS describing the survey, a fact sheet explaining
technical aspects of the study, and a brochure.
It is important to establish a positive relationship with local health officials and other
community representatives as their active support will help legitimize the survey. These persons can also
assist during advance work by providing an introduction to other community officials whose cooperation
may be important to the survey.
Westat has developed a community outreach program to be activated in each stand
incorporating various types of media. The goal is to reach as many of the target populations as possible
via radio, television and newspapers in each community. Posters and flyers, in English and Spanish, will
be distributed and posted in highly frequented areas, such as churches and community centers, shopping
centers and high-rise apartment buildings.
Another purpose of the outreach program is to identify local physician’s and dentist’s offices
or clinics to which the examination reports of findings may be sent for those SPs who are referred for
immediate medical or dental care but who report no regular source of health care.
1-19

1.8 Data Collection
Data for NHANES III are collected in two phases:
Household interviews in which SPs are asked detailed demographic, socioeconomic, andhealth-related questions; and
Extensive physical examinations, dental examinations, health and dietary interviews, andlaboratory tests on biological specimens conducted in mobile examination centers (MECs).
The household component and MEC component are discussed in more detail in the following
section.
1.8.1 The Automation System
An automated system has been developed for survey control and capture of interview and
examination data in the field. In the MEC, this system will collect, record, account for and transmit
examination and interview data. In addition, the computerized flow system will process examinees
through the MEC. A more detailed explanation of the MEC Automation System is given in The
NHANES III Laboratory Automation System Manual.
1.8.2 Household Interviews
The field interviewers conduct all household interviews and schedule appointments for
examinations in the MEC.
1.8.2.1 Advance Letter
As mentioned in Section 1.5, certain households are sampled for the survey. Before an
interviewer contacts a household, the Westat home office mails an advance letter to the household.
1-20
The advance letter is an important tool for introducing and legitimizing the study. The letter
clearly states the purpose and importance of the study, a respondent’s rights as a participant, including the
confidentiality of information given and the voluntary nature of participation, and indicates that an
interviewer will be coming to the household in the near future.
1.8.2.2 Household Screening Interview
Upon arriving at a home, interviewers are instructed to show the advance letter at the door (if
the respondent has not seen or does not remember the letter), the screener brochure, and his/her survey
I.D. badge.
The Household Screener Questionnaireis administered to one eligible respondent livingin the selected dwelling unit who is at least 17 years of age and preferably the head ofthe household. It includes an introduction, a household enumeration section (includinga series of questions identifying secondary families), and an eligibility criteria sectioncollecting information on age, sex, and race or ethnic background. The Screener takesabout ten minutes to administer. Once the interviewer has determined that at least oneperson in the household is eligible to participate in the survey, he/she attempts toadminister the family questionnaire, the medical history interview and make anexamination appointment. During this process, each selected respondent receives a sampleperson brochure.
The screener brochurecontains a brief description of the study and provides answers totypical questions a respondent might have during initial contact.
The sample person brochurecontains more detailed information on the extendedinterview and examination component of the study. The interviewer distributes thisbrochure to eligible respondents upon completion of the screening. The brochuredescribes the examination to be conducted in the MEC and, like the screener brochure andadvance letter, emphasizes the purpose and importance of the study, voluntaryparticipation and confidentiality of the information provided. It also includes the InformedConsent Form.
1-21
1.8.2.3 Informed Consent
Consent form. The last page of the Sample Person Brochure contains the consent form.The SP must sign the form as an indication of his/her willingness to participate in thestudy. If the SP does not wish to sign the consent form at that time, he/she may bringthe signed form to the MEC at his/her scheduled exam time, or may have additionalquestions answered at the MEC before signing the form. A refusal to sign the consentform is considered a refusal to participate in the examination phase of the study.Examinations will not be conducted on sample persons who do not return a signedconsent form. To participate in the household interviews, an SP only needs to give verbalconsent.
For minors the signature of a parent or guardian is required on the consent form. Minors over
the age of 12 years are also asked to sign the form as an indication of agreement to participate.
By signing a consent form, a person gives permission for the SP to have the extensive physical
exam in the MEC (or the home health examination). A copy of the Home Health Exam Fact Sheet will
be given to each SP who is offered the home examination option.
1.8.2.4 Extended Household Interviews
The Family Questionnaire is administered to one eligible respondent in each family whois at least 17 years of age and preferably the head of the household. Information iscollected on family relationships, demographics, health insurance, housing, and income.It also contains instructions for within household sampling.
The Sample Person Questionnaireis administered to each sample person or an eligibleproxy. A detailed health history is collected on each sample person. The extendedinterviews require about 40 minutes for each SP. There are two versions of the SPQuestionnaire, one for adults and one for youths. Information about SPs who are 2months to 16 years old is obtained through direct interviews with a proxy, such as thechild’s parent.
1-22
1.8.2.5 Exam Appointments
Interviewers make appointments for SPs to receive physical examinations at the MEC. The
interviewer calls the field office to obtain an exam appointment time. If the SP agrees to the time, the
information is entered into the field office Automated Survey Management System.
1.8.2.6 English and Spanish Study Materials
The advance letter, brochures, consent form, and household questionnaires are printed in both
English and Spanish. Bilingual interviewers use the language with which the respondent feels most
comfortable.
1.8.3 Exams and Interviews in the Mobile Examination Center (MEC)
1.8.3.1 The MEC
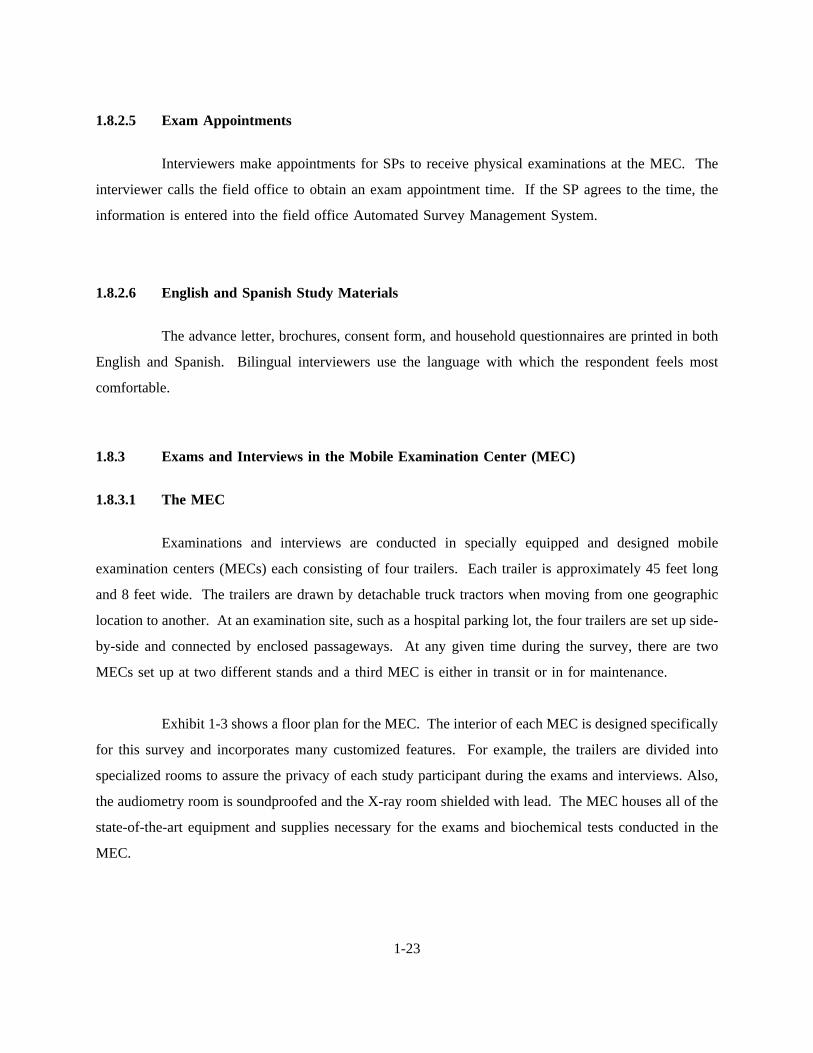
Examinations and interviews are conducted in specially equipped and designed mobile
examination centers (MECs) each consisting of four trailers. Each trailer is approximately 45 feet long
and 8 feet wide. The trailers are drawn by detachable truck tractors when moving from one geographic
location to another. At an examination site, such as a hospital parking lot, the four trailers are set up side-
by-side and connected by enclosed passageways. At any given time during the survey, there are two
MECs set up at two different stands and a third MEC is either in transit or in for maintenance.
Exhibit 1-3 shows a floor plan for the MEC. The interior of each MEC is designed specifically
for this survey and incorporates many customized features. For example, the trailers are divided into
specialized rooms to assure the privacy of each study participant during the exams and interviews. Also,
the audiometry room is soundproofed and the X-ray room shielded with lead. The MEC houses all of the
state-of-the-art equipment and supplies necessary for the exams and biochemical tests conducted in the
MEC.
1-23

1.8.3.2 Exam Sessions
The MEC remains at a stand for approximately 6 weeks (range 4-8 weeks). During that period,
the MEC operates 5 days a week including weekday, evening and weekend sessions. Two 4-hour sessions
are scheduled each day with 10 examinees per session.
1-24
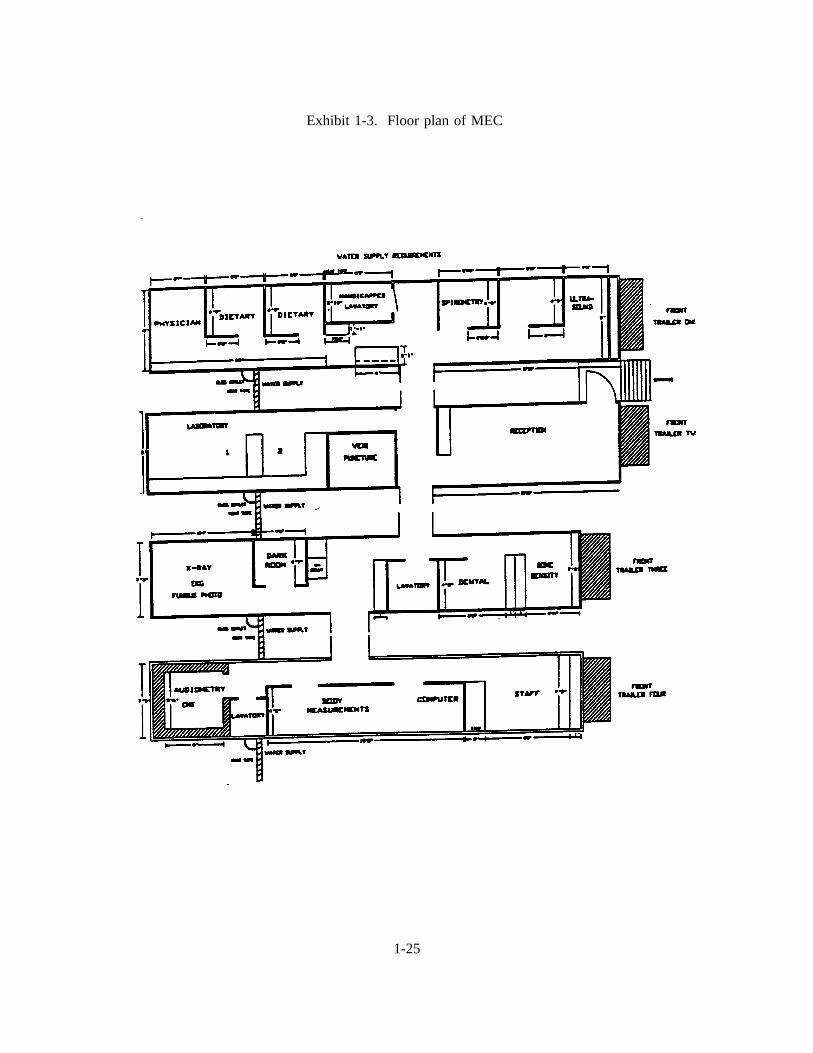
Exhibit 1-3. Floor plan of MEC
1-25
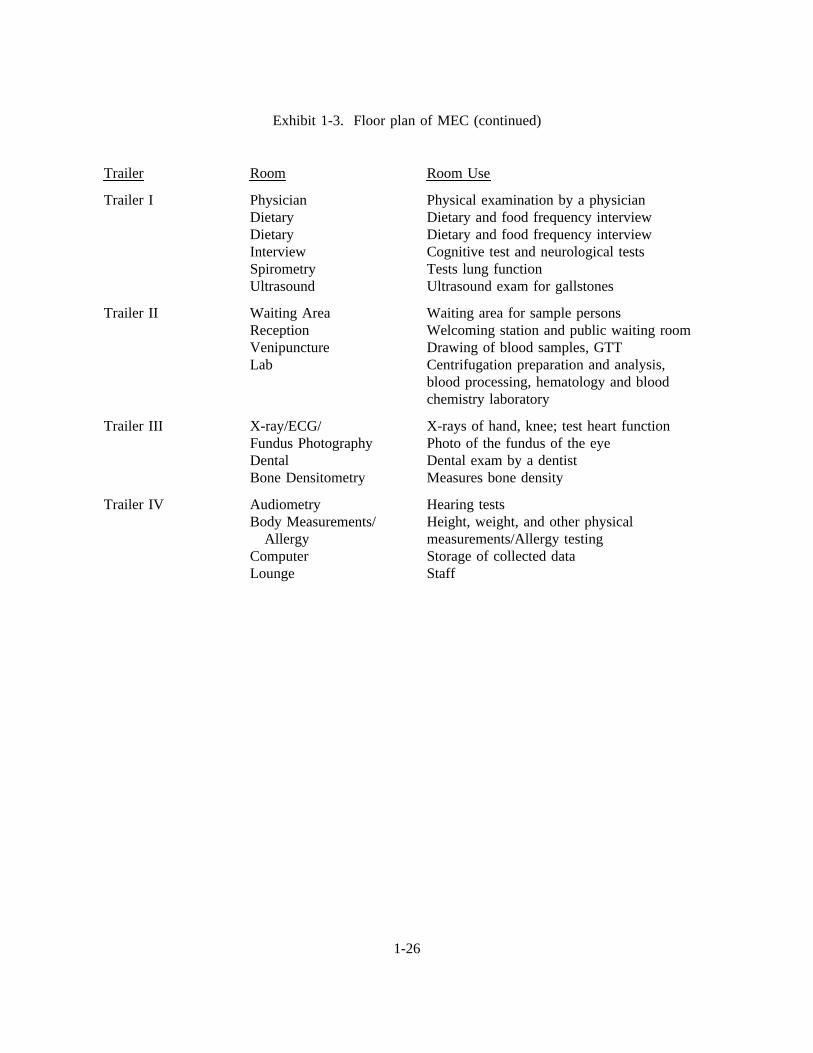
Exhibit 1-3. Floor plan of MEC (continued)
Trailer Room Room Use
Trailer I PhysicianDietaryDietaryInterviewSpirometryUltrasound
Physical examination by a physicianDietary and food frequency interviewDietary and food frequency interviewCognitive test and neurological testsTests lung functionUltrasound exam for gallstones
Trailer II Waiting AreaReceptionVenipunctureLab
Waiting area for sample personsWelcoming station and public waiting roomDrawing of blood samples, GTTCentrifugation preparation and analysis,blood processing, hematology and bloodchemistry laboratory
Trailer III X-ray/ECG/Fundus PhotographyDentalBone Densitometry
X-rays of hand, knee; test heart functionPhoto of the fundus of the eyeDental exam by a dentistMeasures bone density
Trailer IV AudiometryBody Measurements/
AllergyComputerLounge
Hearing testsHeight, weight, and other physicalmeasurements/Allergy testingStorage of collected dataStaff
1-26
1.8.3.3 Exam Team Responsibilities
The two exam teams travel from stand to stand to conduct the exams and interviews in the
MECs. There are 16 individuals on each traveling team. In addition, a local assistant will be recruited,
trained, and employed at each stand to assist the exam staff. The duties of the exam team members are
summarized below.
One coordinator directs the flow of SPs through the MEC examination process. Thecoordinator manages all SP appointments, prepares the SP examination folders, andverifies that all exam components have been conducted and recorded before the SP leavesthe MEC.
One physician reviews the SP’s medical history, conducts the medical examination, andrecords the results of the exam. The physician also reviews the X-rays, the results of theblood test (CBC) and the ECG.
One dentist conducts the dental exam and "calls" the results to a health technician whorecords the dentist’s exam findings.
One health interviewer administers questionnaires for cognitive and neurological tests andrecords the results.
Two dietary interviewers administer the SP dietary questionnaire. During the interviewthe interviewer records (a) a 24-hour dietary recall of the types and amounts of all foodsand beverages consumed by the SP in the last 24 hours and, on selected SPs, (b) foodfrequency information regarding how often certain types of foods were consumed by theSP in the past month.
Four certified radiologic health technologists take and record body measurements, X-rays,bone densitometry, pulmonary function tests (spirometry), ECGs, photos of the fundus ofthe eye, administer audiometry and allergy exams, and record the dental exam findings.The duties of the health technicians are assigned on a rotating basis.
One certified ultrasonographer performs sonography of the gallbladder, and also assistshealth technicians in performing selected other tests such as allergy, audiometry,spirometry and body measurements.
Three certified medical technicians/technologists conduct clinical laboratory tests on bloodand urine specimens, record the results of tests, and prepare and ship specimens to variouslaboratories.
One certified phlebotomist administers the phlebotomy questionnaire, draws blood fromSPs, and administers Trutol for the glucose tolerance test (GTT).
1-27

One home health technician conducts home exams, and works as a health technologist anda laboratory technologist when there are no home exams scheduled.
Each MEC staff member is part of a team of professional persons with specific assignments
that must be completed in order to accomplish the overall objective of the National Health and Nutrition
Examination Survey. Each individual must be aware of and respect the job demands placed upon other
staff members, maintain an attitude of tolerance and consideration for fellow members of the team, and
willingly perform any extra tasks that may be assigned to support other staff members in the performance
of their duties. MEC staff members may be requested to perform tasks not directly related to their specific
professional skills in order to implement the overall data collection plan. Team members will rotate
periodically to prevent the introduction of bias into the exam results due to "team effects" .
1.8.3.4 Exam Components
Each SP exam takes up to 4 hours. The actual length of time depends on the age of the SP,
as some exam components are only done on certain age groups (adult SPs tend to receive more extensive
exams). Exhibits 1-4 and 1-4a present lists of exam components for each age group. Exhibit 1-5 presents
an estimate of the number of minutes for each exam component.
Some blood specimens are analyzed in the MEC by the medical technologists while other
specimens are sent to various laboratories in the U.S., such as the Centers for Disease Control (CDC), and
have special storage and shipping specifications.
1.8.3.5 Sample Person Remuneration
SPs who complete all or part of the exam in the MEC are given a monetary token of
appreciation for their time and effort. This remuneration is in addition to the payment for transportation
expenses. Adult examinees will receive $30 or $50, depending on whether they accept an appointment
at a particular time. Also adults who receive special components, such as the volatile toxicants study, will
receive additional remuneration. Children will receive $30.00.
1-28
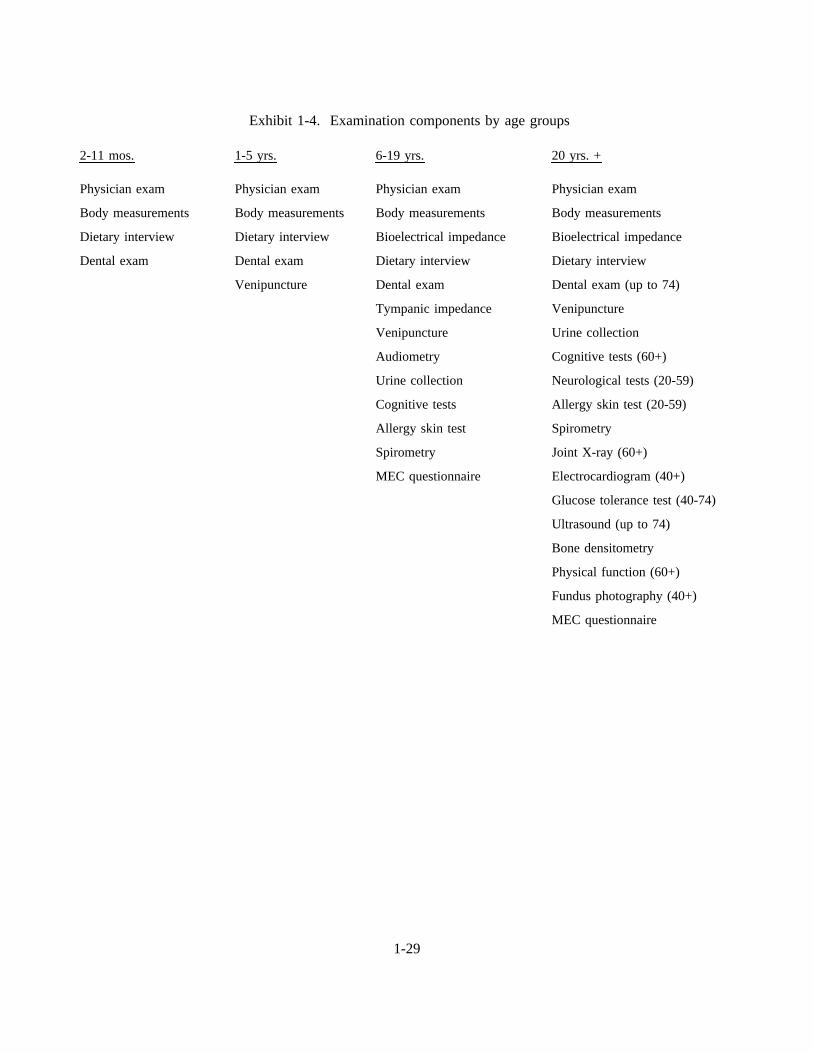
Exhibit 1-4. Examination components by age groups
2-11 mos. 1-5 yrs. 6-19 yrs. 20 yrs. +
Physician exam
Body measurements
Dietary interview
Dental exam
Physician exam
Body measurements
Dietary interview
Dental exam
Venipuncture
Physician exam
Body measurements
Bioelectrical impedance
Dietary interview
Dental exam
Tympanic impedance
Venipuncture
Audiometry
Urine collection
Cognitive tests
Allergy skin test
Spirometry
MEC questionnaire
Physician exam
Body measurements
Bioelectrical impedance
Dietary interview
Dental exam (up to 74)
Venipuncture
Urine collection
Cognitive tests (60+)
Neurological tests (20-59)
Allergy skin test (20-59)
Spirometry
Joint X-ray (60+)
Electrocardiogram (40+)
Glucose tolerance test (40-74)
Ultrasound (up to 74)
Bone densitometry
Physical function (60+)
Fundus photography (40+)
MEC questionnaire
1-29
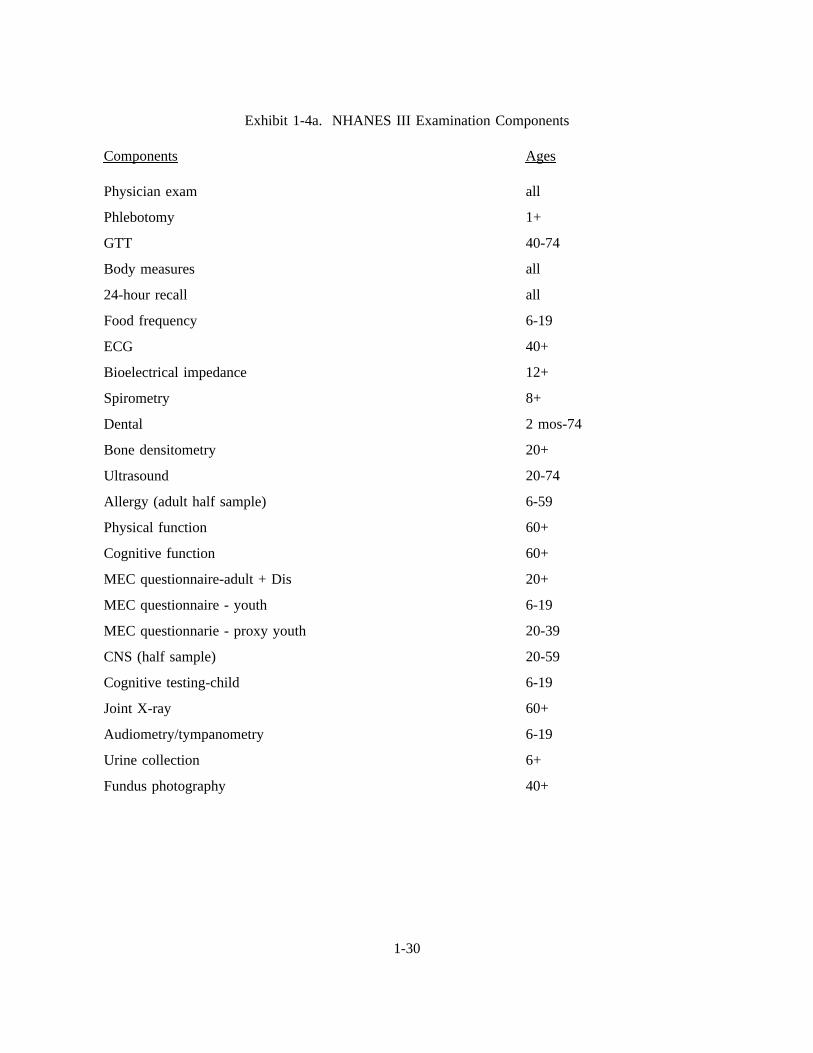
Exhibit 1-4a. NHANES III Examination Components
Components Ages
Physician exam
Phlebotomy
GTT
Body measures
24-hour recall
Food frequency
ECG
Bioelectrical impedance
Spirometry
Dental
Bone densitometry
Ultrasound
Allergy (adult half sample)
Physical function
Cognitive function
MEC questionnaire-adult + Dis
MEC questionnaire - youth
MEC questionnarie - proxy youth
CNS (half sample)
Cognitive testing-child
Joint X-ray
Audiometry/tympanometry
Urine collection
Fundus photography
all
1+
40-74
all
all
6-19
40+
12+
8+
2 mos-74
20+
20-74
6-59
60+
60+
20+
6-19
20-39
20-59
6-19
60+
6-19
6+
40+
1-30
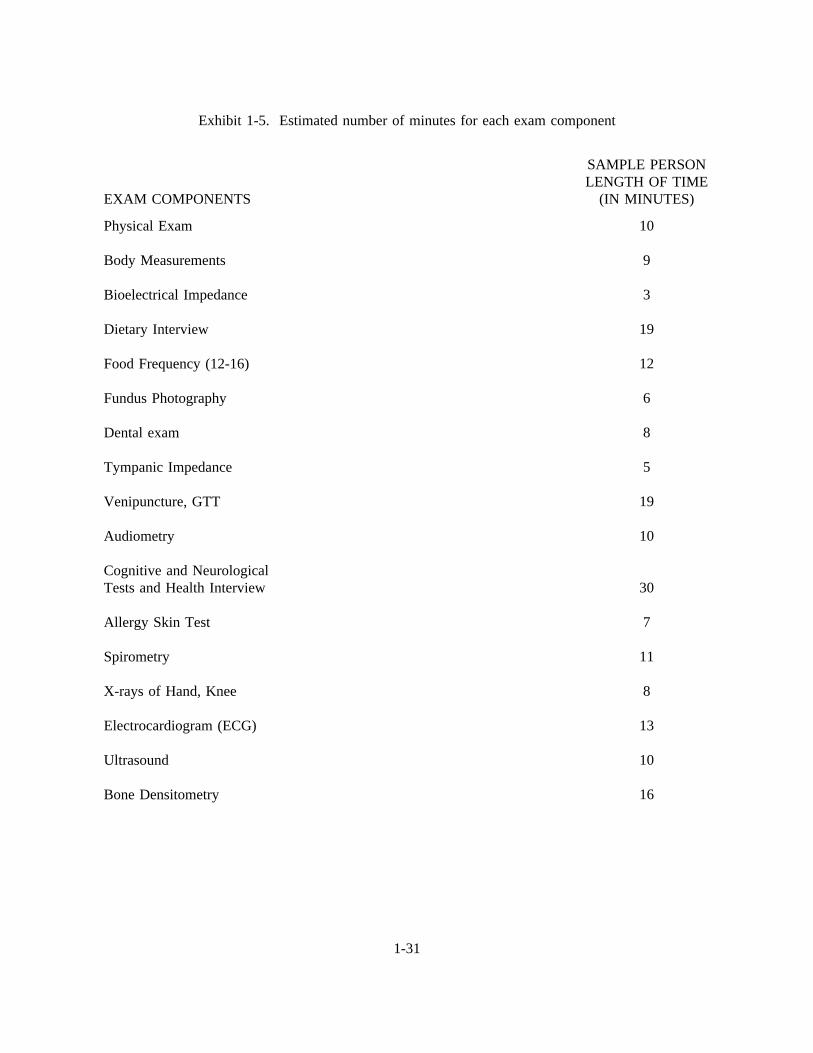
Exhibit 1-5. Estimated number of minutes for each exam component
EXAM COMPONENTS
SAMPLE PERSONLENGTH OF TIME
(IN MINUTES)
Physical Exam
Body Measurements
Bioelectrical Impedance
Dietary Interview
Food Frequency (12-16)
Fundus Photography
Dental exam
Tympanic Impedance
Venipuncture, GTT
Audiometry
Cognitive and NeurologicalTests and Health Interview
Allergy Skin Test
Spirometry
X-rays of Hand, Knee
Electrocardiogram (ECG)
Ultrasound
Bone Densitometry
10
9
3
19
12
6
8
5
19
10
30
7
11
8
13
10
16
1-31
1.8.3.6 Report of Exam Findings
For each SP examined in the MEC, the routine blood pressure and dental findings will be
reported to the examinee prior to his/her leaving the MEC. A report of all other findings will be generated
by the automated system at NCHS summarizing the findings of the physical exam and biochemical tests.
This Report of Findings form will be producedafter the stand is closed, andmailed to the SP. The
dentist completes a report of the dental exam findings which is alsogiven to all SPs. Additionally, for SPs
who are referred for immediate medical or dental care, a report is sent to the SP’s personal physician,
dentist or clinic. If the SP does not have a personal physician, dentist or clinic, a list of community clinics
will be shown to the SP by the MEC coordinator who will encourage the SP to choose one; the report of
the physician’s/dentist’s findings is then sent to that clinic. If the SP refuses to choose a health care
provider, the report of the physician or dentist’s findings is given to the SP.
In the MEC, in those instances when the physician or dentist finds a condition that warrants
immediate attention from the ECG, hematology, X-ray, dental, or blood pressure results, or from an
unexpected incident, the physician or dentist will contact the SP’s health care provider by telephone.
1.8.3.7 Dry Run
At the beginning of each stand, members of the MEC staff will devote one-half day to
calibrating instruments and practicing MEC procedures. Since the MEC will be moving from one stand
to another, it is important to check the equipment before exams begin to make sure everything is working
properly. If there are problems with any of the equipment, including the automated system, the stand
manager must be informed so that malfunctions can be repaired before the real exams begin. In addition
to calibrating instruments, the dry run will give MEC staff an opportunity to practice their assigned duties,
including setting up equipment and supplies, verifying instrument quality control results, sterilizing
instruments, processing examinees through the MEC, interacting with other MEC staff members and
examinees, performing exam procedures, recording exam results on the automated system, completing
required forms, and shipping data and specimens to Westat and various laboratories. All procedures in
the dry run will be completed as though the actual study were being conducted. The only difference is
that in the dry run the examinees will be volunteers who are not part of the actual sample for the main
1-32
study or pretests. To solicit volunteers from the community, someone from the field office may post an
advertisement at a local grocery store. Other volunteers may include local officials who want to see first-
hand the type of exams to be conducted, field office staff, field interviewers, and MEC staff.
Problems identified during the dry run will be discussed by the MEC manager and MEC staff.
Based on the results of the dry run, certain procedures may need to be modified or additional quality
control procedures may be instituted by the home office in order to overcome or alleviate identified
problems.
1.8.4 Home Exams
An examination in the home will be available for selected SPs who are wheelchair or bed-
bound or unable or unwilling to go to the MEC for an examination. The household interviewers will
determine when an SP should be offered the home exam, and the field office will schedule the
appointment. If the SP is reluctant to participate in a MEC exam, every attempt will be made to persuade
the SP to agree to an exam, either at the MEC or in his/her home. Because of equipment and staffing
considerations, only certain exam components can be conducted in the home. For instance, any equipment
required for the home exams must be portable and relatively compact when packed. Exhibit 1-6 lists the
exam components which are conducted in the homes of SPs. As with the full-scale MEC exam, the
components of the exam depend on the SP’s age.
The home examiner conducts the examination of SPs in the home. All tests are completed on-
site with the exception of the blood tests, which are prepared and shipped from the MEC. After
completing an SP exam, the home examiner will return to the MEC with the blood tubes and enter the
results of the home examination phlebotomy into the automated system in the laboratory. The blood is
processed and shipped with the blood collected in the MEC.
SPs who complete the home exam are given $15 as a token of appreciation for their time and
effort. This is less than the remuneration for the MEC exam because the home exam is less extensive.
1-33
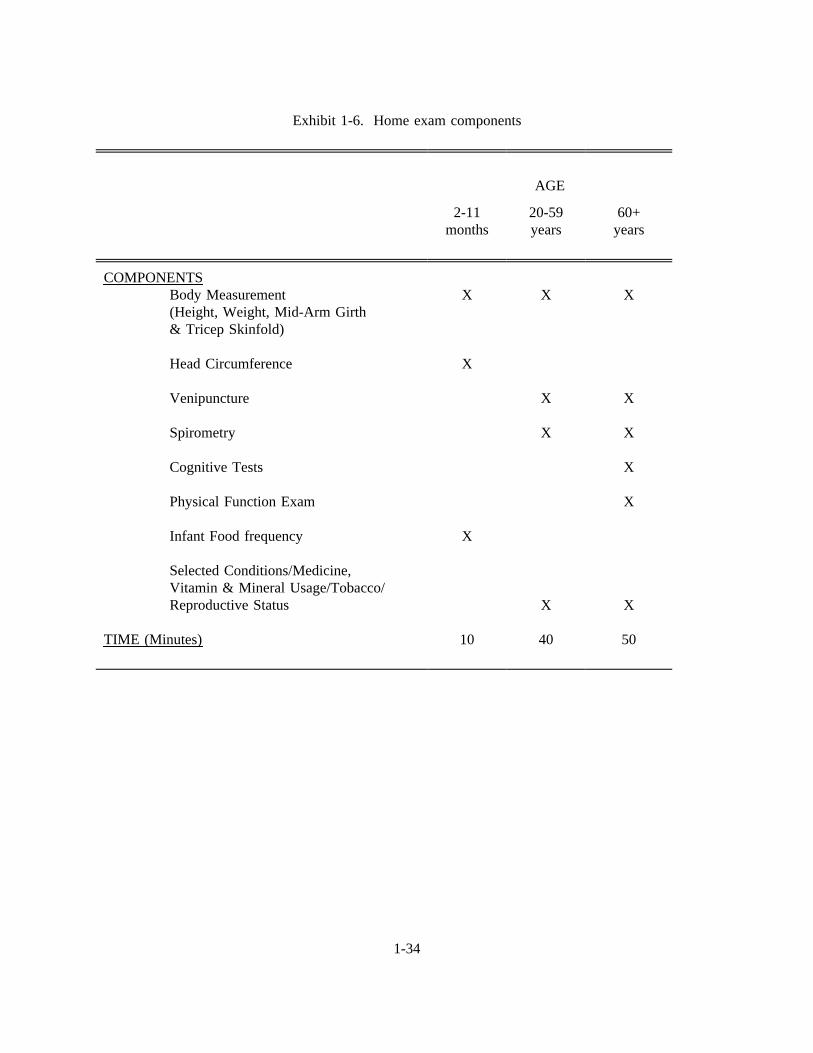
Exhibit 1-6. Home exam components
AGE
2-11months
20-59years
60+years
COMPONENTSBody Measurement(Height, Weight, Mid-Arm Girth& Tricep Skinfold)
Head Circumference
Venipuncture
Spirometry
Cognitive Tests
Physical Function Exam
Infant Food frequency
Selected Conditions/Medicine,Vitamin & Mineral Usage/Tobacco/Reproductive Status
TIME (Minutes)
X
X
X
10
X
X
X
X
40
X
X
X
X
X
X
50
1-34
1.8.5 Special Studies
At times during the study, special projects may be implemented to obtain information about
a specific area of interest, as NHANES III provides an unusual opportunity to capture large amounts of
data in an efficient manner. The volatile toxicant study is one such special study.
1.8.5.1 Volatile Toxicants Study
The volatile toxicant study is being sponsored by the toxicology branch of the CDC as an
additional component of NHANES III. Extra blood and urine samples are to be collected from 45
volunteers at each stand and analyzed by CDC for selected variables. Volunteers are paid $10 for
participating in the study.
Recruitment for the study will begin on the first day of exams at each stand and continue until
45 sample persons have volunteered. Only sample persons between the ages of 20 and 59 are eligible
for the study. The phlebotomist is responsible for recruiting sample persons at the time of the first
venipuncture. Because the MEC itself may be a source of some of the chemicals CDC is measuring in
this study, the blood and urine samples must be collected as soon as possible after the sample person
enters the MEC.
If a sample person agrees to participate in the study, one 10 ml gray top tube and one 10 ml
non-silicone coated red top tube are obtained on the first draw. If this is not possible, the sample person
will be asked if a second stick can be performed. If the SP is over the age of 40 years and will have a
second venipuncture for the glucose tolerance test, the additional blood may be drawn at that time.
The required 45 ml of urine is obtained from the urine specimen which is collected when the
sample person first enters the MEC, assuming that the first specimen is of sufficient volume to allow this.
If the required amount of urine cannot be obtained from the initial sample, a second urine specimen will
be collected.
1-35
The sample person is also asked to complete a self administered questionnaire as part of the
volatile toxicants study. The phlebotomist collects the questionnaires from the coordinator at the end of
the session and mails the questionnaire with the urine samples to CDC.
1.9 Confidentiality and Professional Ethics
All information collected for this study must be kept strictly confidential except as required by
law. Since this study is being conducted under a contract with the National Center for Health Statistics,
the privacy of all information collected is protected by two public laws: Section 308(d) of the Public
Health Service Act (42 U.S.C. 242m) and the Privacy Act of 1974 (5 U.S.C. 552a).
Each person working on the study must be continuously aware of the responsibility to safeguard
the rights of all the individuals participating in the study. Each study participant should be treated
courteously, not as a sample number. Never divulge names or any other information about study
participants except to the research team. Refrain from any discussions about study participants, in or out
of the MEC, which might be overheard by people not on the survey staff. All of the members of the
research team are under the same legal, moral and ethical obligations to protect the privacy of the SPs
participating in the study.
When the study is finished, all of the collected information will be summarized by NCHS in
a report. No participant names will be included in any reported results. Neither NCHS nor Westat is
allowed to release information that would identify study participants without the consent of the
participants.
Cooperation from the public is essential to the success of survey research. Westat expends a
great deal of effort in obtaining cooperation from national, regional, state, and local officials and the
general public. It is the responsibility of each person working for Westat to build on the company’s
reputation of integrity so that we can continue to have access to study participants during current and
future studies; therefore, professional conduct both on and off the job is very important.
1-36
As you travel across the country for this study, you may find yourself to be very much in the
public eye, particularly in the smaller towns where your presence is easily recognized. Each staff member
has a responsibility to the Public Health Service and to Westat for promoting good public relations. The
Public Health Service and Westat will be judged by the actions of the staff both on and off duty;
consequently, you must be discreet in speech and actions. Your personal appearance and behavior must
be governed by these same considerations. Be aware of the customs of the area and avoid any actions
which might be interpreted unfavorably by the public, for example, parking a Westat vehicle in a
questionable location. Please be aware of your "audience" at all times and try to avoid statements or
actions that could shed an unfavorable light on Westat, the Public Health Service, or the survey.
You will be asked to sign a pledge of confidentiality before the survey begins. This pledge
states that you understand that you are prohibited by law from disclosing any information obtained while
working on the study to anyone except authorized staff of NCHS and Westat and that you agree to abide
by the Assurance of Confidentiality.
This chapter of the manual was designed to provide you with general information about the
study, including the advance work that Westat and NCHS completed prior to your joining the study staff.
The remainder of this manual explains in detail your responsibilities in this study.
1-37
2. OPERATION OF THE ORAL HEALTH COMPONENT
2.1 Overview
This section summarizes the responsibilities of the dental examiner and dental recorder,
before, during, and after the dental exams. Details will be provided throughout the remainder of this
chapter and in subsequent chapters.
The sequence of events in the MEC will be:
The dental examiner arrives at the MEC about 5 minutes before the exams arescheduled to begin. During that time he/she sets up his/her work area, equipment,and supplies.
The coordinator checks in the SP at the reception area.
The coordinator assembles an SP exam folder for each SP and distributes dailyappointment schedules to all exam rooms.
The examiner checks the daily appointment schedule and goes to the coordinator’sstation to meet the SP. The examiner brings the SP to the dental exam area.
The recorder records the following information:
- On the Control Record: The time the SP arrived at the dental exam area.
- On the Dental Exam Log: The SP’s name and ID and time of arrival at thedental exam area.
The examiner asks the SP (or responsible adult) questions regarding medicalexclusion, and responds to the SP’s questions regarding medical exclusion.
The examiner completes the visual tactile exam of the SP, as described in Chapter5 and the recorder records the examiner’s observations on the automated system orDental Data Forms.
If smears of mucosal lesions are taken, the examiner prepares the slides forshipping.
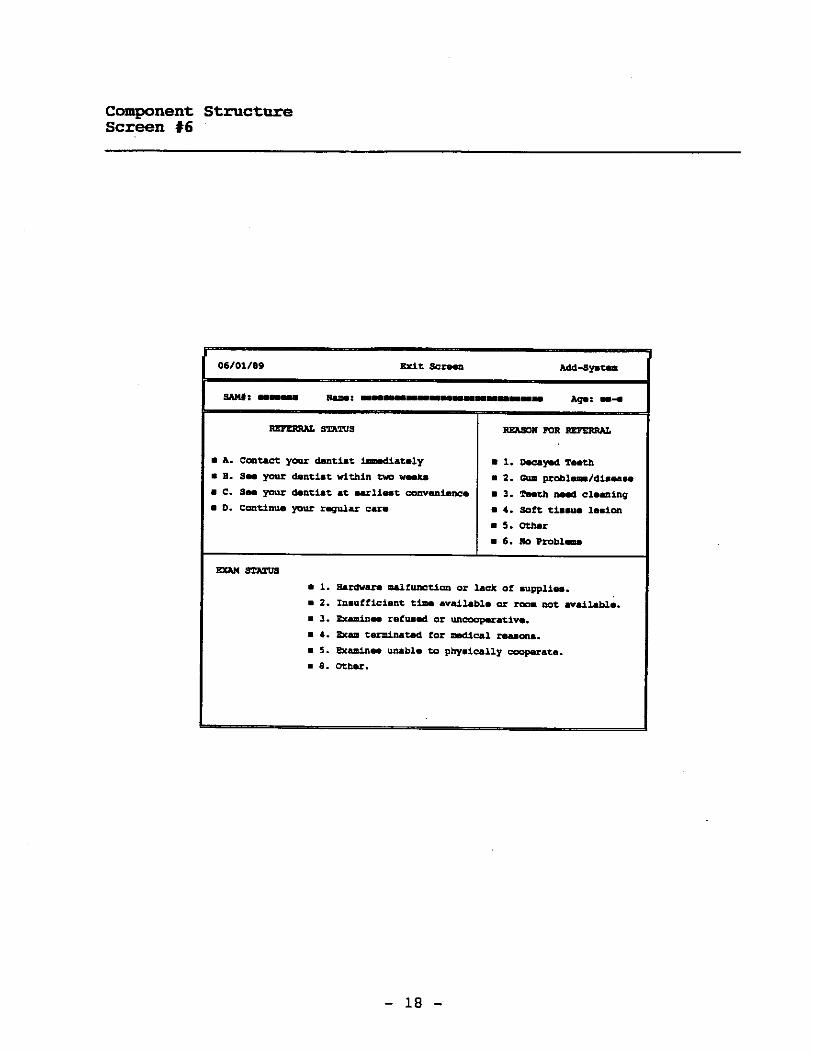
The examiner completes the Report of Dental Exam Findings based on theexaminer’s decision as to when the SP should seek dental care.
2-1
The recorder, with the help of the examiner, completes the appropriate sections ofthe Control Record and Dental Exam Log.
The examiner or recorder escorts the SP back to the coordinator’s station.
The examiner and recorder edit recorded data.
Each day after the examinations have been completed, the examiner cleans thedental exam work area and organizes supplies.
When the exams are completed at a stand, the examiner inventories all supplies,and packs all equipment and supplies.
The examiner mails appropriate reports and forms to Westat and/or NCHS.
2.2 Checking in SP at Coordinator’s Station
Upon arrival at the MEC, each SP will check in with the coordinator whose work station
will be just inside the MEC entrance. The coordinator will assemble an SP Exam Folder for each SP.
The forms that will be placed inside the folder which pertain to the dental exam team include:
A Control Record, clipped to the front cover of the folder.
Labels for use on the Dental Log, Slide Transmittal Form, slides, hard copy formsand all referral letters.
2.3 Daily Appointment Schedule and Escorting SP to Exam Area
The dental examiner and recorder should check the Daily Appointment Schedule (Exhibit
2-1) which will provide information about the SP (name, ID, age, sex, race/ethnicity). The schedule
will be hard copy (paper) and will be distributed by the coordinator before the exam session begins.
The dental examiner is responsible for letting the coordinator know that he/she is free to perform an
exam. The dental examiner or recorder should go to the coordinator’s station and meet the SP. The
coordinator will give the appropriate SP Examination Folder to the dental examiner. The examiner
should make sure s/he has the correct folder. The recorder or dentist should help the SP into the
dental chair, and say a few words to the SP to put him/her at ease.
2-3
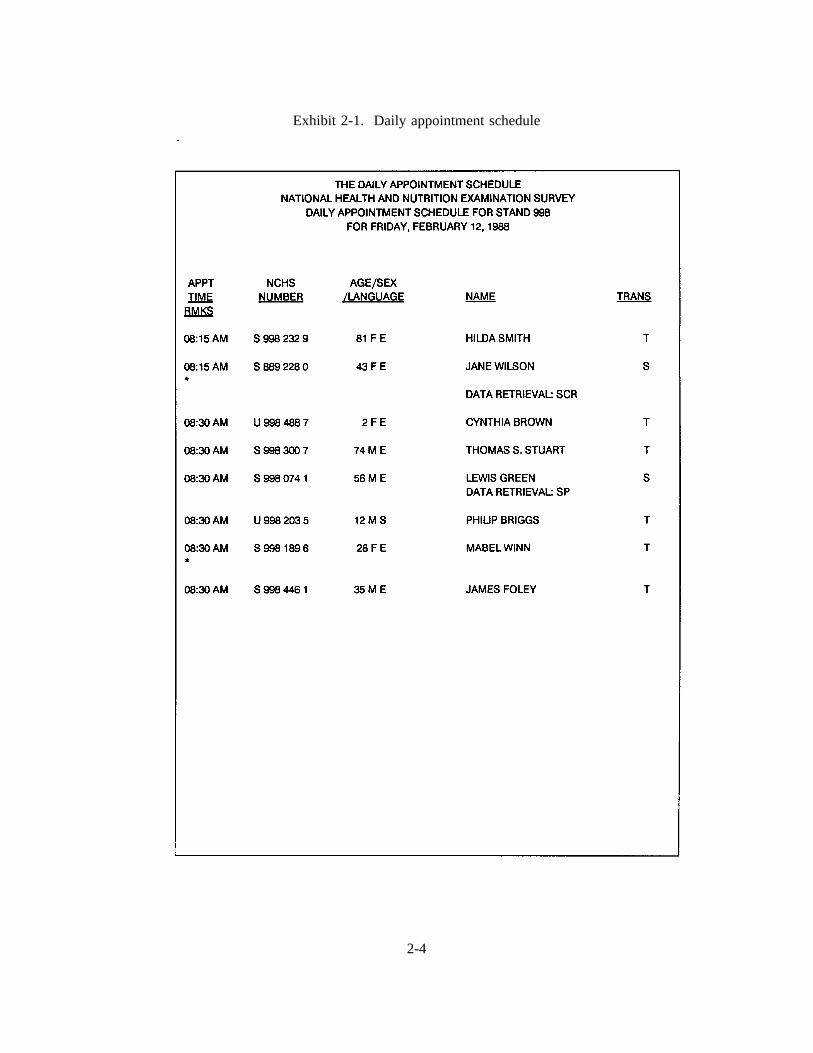
Exhibit 2-1. Daily appointment schedule
2-4
Certain information must be recorded by the recorder.
On the Control Record, enter the time the SP arrived at the dental exam area.
On the Dental Exam Log, enter the SP’s name and ID and time of arrival at thedental exam area.
The Control Record will be discussed in detail in Attachment B, NHANES III Standard
MEC Operations. The Dental Exam Log is described in Section 6.0, Oral Exam-related Forms and
Procedures. Remember, all information will be recorded on the automated system, but hard copies for
these two forms will also be used.
2.4 Responding to SPs’ Questions
It is very important that the dental examiner answer questions raised by the SP’s. Some
of their concerns about the dental exam might be:
Treatment. If the SP asks, assure him/her that the exam will not includetreatment, x-rays, a drill, or anesthesia. The dentist will use only a mirror anddental hand instruments to examine the mouth.
Qualifications of the examiner. The examiner is a licensed dentist.
Existing dental work. The exam will not interfere with any existing dental worksuch as fillings, bridges, sealants, or orthodontic bands.
AIDS (Acquired Immune Deficiency Syndrome). The Centers for DiseaseControl, part of the Public Health Service, has set up standard practices (universalprecautions) for dentists to use to prevent the spread of diseases, viruses, andbacteria, and these procedures are strictly observed by the dentists on this study.The dentist will wear sterile gloves and a mask, and the dental instruments will besterilized before examinations are preformed. The precautions used in the surveyare the same as those maintained in dental offices.
2-5
2.5 Exclusion for Medical Condition
SP’s with certain medical conditions will not be permitted to participate in some
components of the dental exam. The examiner must ask each SP or the SP’s parent/guardian if the SP
has any of the conditions listed on the automated system screens or the Medical Exclusion
Questionnaire (to be used if the computer system is down). The responses to the medical exclusion
questions determine which of the dental exam components can be performed.
Medical exclusion questions should be asked only of SPs aged 18 years or older. A
responsible adult must answer the exclusion questions for SPs under 18 years of age. SPs between the
ages of 12 and 17 years may provide answers to questions other than medical exclusion questions. A
responsible adult must provide answers to all exam-related questions for SPs under 12 years of age.
The dental team then completes those components as specified in Chapter 5.
2.6 Conducting the Oral Exam and Recording Oral Exam Data
Procedures for conducting the oral exam and recording data are described in Chapter 5 of
this manual. After determining what age-specific portions of the exam the SP can receive (that is,
those portions not excluded for medical reasons), the dentist conducts the dental exam and the recorder
enters data into the automated system.
2.6.1 Automated Computer System
In addition to all of the specialized medical and dental equipment needed for the physical
and dental exams, the MEC contains an automated computer system. The automated system is used
to:
Direct the flow of SP’s through the MEC, keeping track of which parts of the examand interview have been completed.
Record interview and exam data.
2-6

Perform edits on collected data.
The dental examiner "calls" his/her observations (codes for oral health indices) during the
oral exam, and the recorder records the information on the automated system. Even though the data
are entered into the computer system, there is still paperwork to complete, such as the Report of Oral
Exam Findings. A complete description of the automated system can be found in Chapter 4 and
Attachment C of this manual.
2.6.2 Oral Data Forms (Back-up)
If the automated system malfunctions or fails, the recorder should record all of the exam
findings on the Oral Data Forms. These forms, discussed in detail in Chapter 5, are used until the
automated system problem is corrected. At that time, the dental examiner enters the data from the
Data Forms into the automated system.
2.7 Editing and Quality Control
The dentist and recorder are both required to edit hard copy recording forms before the
SP leaves the dental exam room. Editing includes checking forms for missing information, errors, and
illegible writing. If information is missing, the dentist may need to reexamine an area of the mouth.
The automated system has range and consistency checks built into the computer software so there is
less need for editing of these data by the dentist.
2.8 Documenting Omitted Examinations and Recording Reasons That Portions of an
Examination Were Not Done
If a scheduled exam is not done, the reason must be recorded on the Control Record, the
Dental Exam Daily Log, and the Oral Health Exam Log called the Dental Questionnaire. This is also
the case for partially completed examinations.
2-7
The NHANES III Dental Examination is a complex examination with many
subcomponents. Not every SP receives every part. Usually, the main determinants of whether or not
a person receives certain subcomponents are age and medical exclusion status. However, there are
occasions when the SP in the MEC is prevented from receiving a dental exam, and occasions when the
dental exam on an SP begins but must be terminated. Both medical exclusions, and these
circumstances, are to be recorded on the Dentist’s Exam form or in the automated system. Medical
exclusions are recorded by a "yes" response to any of the medical conditions or circumstances on the
Dentist’s Exam form or the medical exclusions screen in the automated system.
Other reasons for terminating the exam or a subcomponent of the exam are to be recorded
on the Dentist’s Exam item 25 on the 2nd page of the form or on one of the final screens of the
automated system. The exam could be terminated for one of the following reasons: a hardware
problem or lack of supplies, insufficient time available, a room not available, examinee refused or
uncooperative, for medical reasons, examinee unable to cooperate or "other" reasons. "Medical
reasons" here means a circumstance where the examinee’s safety or medical condition is of concern to
the examiner. Examples include pain, fainting, seizure, bleeding. For example, if an SP has been
excluded from subcomponents because of a medical exclusion, but has otherwise gone through the
exam normally, this circumstance would be counted as a completed exam (and not a termination for
medical reasons).
However, if the same SP experienced pain or fainted and the examiner elected not to
complete certain exam portions, this would be treated as an aborted exam and "termination for medical
reasons" would be checked. Examinees excluded from certain components due to age, but who
otherwise have completed the examination procedures are considered to have complete exams, and
item 25 need not be filled out. An "uncooperative" SP is one who is unwilling to cooperate, e.g., an
infant or small child who cannot be persuaded to get through the exam. An examinee who is "unable
to cooperate" is one who is willing but faces a physical or other barrier in complying with the
protocol, e.g., a person who cannot sit in a position conducive to conducting the exam.
2-8
2.9 Dental Exam Daily Log
The Dental Daily Log is used to record the SPs examined in each session, and allows the
examiner to record pertinent comments about the SP or exam. The logs are maintained by the
examiner, and at the end of a stand are sent to Westat. A description of the log, and its use, and an
exhibit of the log are provided in Section 6.1.
2.10 Report of Dental Exam Findings and Referral Letters (If Applicable)
Immediately after the exam, the dentist will complete a Report of Oral Exam Findings.
This report will be handed to the SP and will indicate whether the SP should continue his/her usual
dental care, see a dentist at his/her earliest convenience, see a dentist within two weeks, or see a
dentist immediately. The report and related procedures will be discussed in depth in Chapter 6.
If it is necessary for an SP to see his/her dentist immediately or within two weeks, the
dentist will have to prepare a referral letter to be sent to the SP’s dentist and complete the dental
contact log. These forms and procedures are discussed in Chapter 6 of the manual.
2.11 Returning SP to Coordinator’s Area
After the exam data have been recorded and the dentist completes the Report of Dental
Exam Findings, the examiner or recorder should return the SP to the coordinator’s station and give the
SP’s Exam Folder to the coordinator. The examiner should check with the coordinator to see if
another SP is waiting for the dental exam.
2.12 Packing and Sending Forms to Westat at the End of a Stand
Follow standard MEC procedures for packing and sending forms and data diskettes to
Westat and NCHS. These procedures are discussed in Chapter 6 and in Attachment B to this manual.
2-9
3. EQUIPMENT AND SUPPLIES
3.1 Dental Exam Area in MEC
One room of the MEC has been designated for dental exams and contains all of the
equipment and supplies needed for that component. The room is 4’ 8" by 6’ 10" and includes cabinets
for storage, a counter top, and a sink with running water.
3.2 Description of Equipment and Supplies
Exhibit 3-1 shows a list of equipment and supplies, and the anticipated quantities for each
of these items.
Before leaving for the field, the MEC will be loaded with all of the equipment necessary
to perform the examinations for the study and the supplies needed for the first two stands. Westat will
ship supplies to the field for later stands.
The dental examiner should inform the stand managerimmediately if there is a problem
with any dental equipment or supplies. Westat will arrange to have the equipment repaired or
replaced, if necessary. The dentist musttake an inventory of supplies at the beginning of each stand
adding newly shipped items to the inventory list, and at the end of each stand, using the form
generated by the computerized inventory system. These inventories are used to re-supply the dental
exam room. If they are not done correctly, you will not have the necessary supplies for exams. The
shipping of supplies will be coordinated with the MEC travel schedule.
3.3 Assembling and Maintaining Equipment
The next several pages provide detailed instructions for setting up the dental equipment.
The directions may seem complicated at first, but they will be reviewed, demonstrated and practiced
during the training sessions. The examiner has primary responsibility for setting up and taking down
the dental equipment and supplies.
3-1
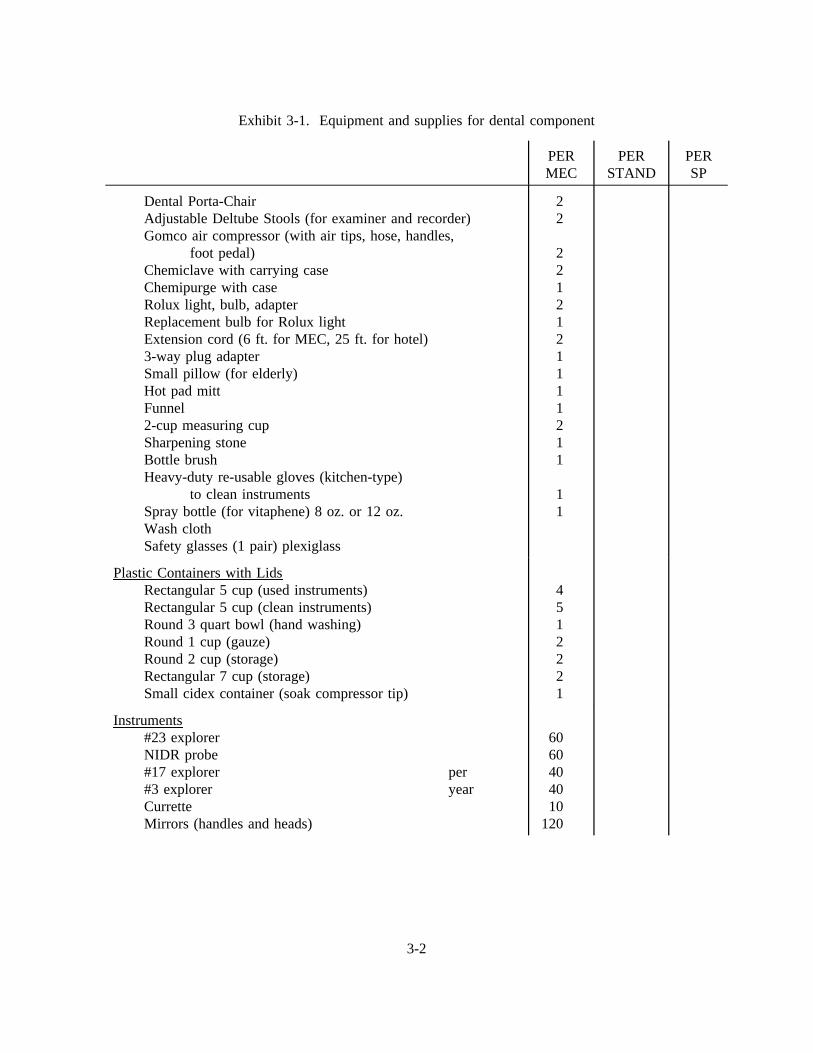
Exhibit 3-1. Equipment and supplies for dental component
PERMEC
PERSTAND
PERSP
Dental Porta-ChairAdjustable Deltube Stools (for examiner and recorder)Gomco air compressor (with air tips, hose, handles,
foot pedal)Chemiclave with carrying caseChemipurge with caseRolux light, bulb, adapterReplacement bulb for Rolux lightExtension cord (6 ft. for MEC, 25 ft. for hotel)3-way plug adapterSmall pillow (for elderly)Hot pad mittFunnel2-cup measuring cupSharpening stoneBottle brushHeavy-duty re-usable gloves (kitchen-type)
to clean instrumentsSpray bottle (for vitaphene) 8 oz. or 12 oz.Wash clothSafety glasses (1 pair) plexiglass
22
2212121111211
11
Plastic Containers with LidsRectangular 5 cup (used instruments)Rectangular 5 cup (clean instruments)Round 3 quart bowl (hand washing)Round 1 cup (gauze)Round 2 cup (storage)Rectangular 7 cup (storage)Small cidex container (soak compressor tip)
4512221
Instruments#23 explorerNIDR probe#17 explorer per#3 explorer yearCurretteMirrors (handles and heads)
6060404010
120
3-2
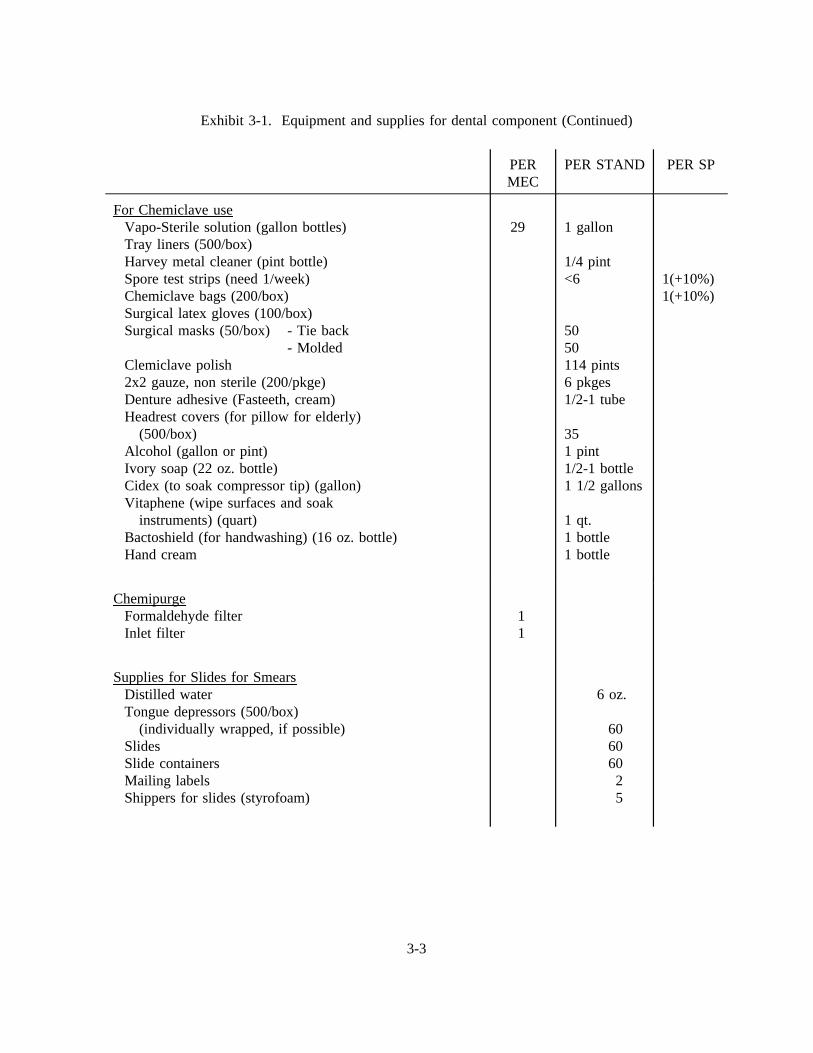
Exhibit 3-1. Equipment and supplies for dental component (Continued)
PERMEC
PER STAND PER SP
For Chemiclave useVapo-Sterile solution (gallon bottles)Tray liners (500/box)Harvey metal cleaner (pint bottle)Spore test strips (need 1/week)Chemiclave bags (200/box)Surgical latex gloves (100/box)Surgical masks (50/box) - Tie back
- MoldedClemiclave polish2x2 gauze, non sterile (200/pkge)Denture adhesive (Fasteeth, cream)Headrest covers (for pillow for elderly)
(500/box)Alcohol (gallon or pint)Ivory soap (22 oz. bottle)Cidex (to soak compressor tip) (gallon)Vitaphene (wipe surfaces and soak
instruments) (quart)Bactoshield (for handwashing) (16 oz. bottle)Hand cream
29 1 gallon
1/4 pint<6
5050114 pints6 pkges1/2-1 tube
351 pint1/2-1 bottle1 1/2 gallons
1 qt.1 bottle1 bottle
1(+10%)1(+10%)
ChemipurgeFormaldehyde filterInlet filter
11
Supplies for Slides for SmearsDistilled waterTongue depressors (500/box)
(individually wrapped, if possible)SlidesSlide containersMailing labelsShippers for slides (styrofoam)
6 oz.
60606025
3-3
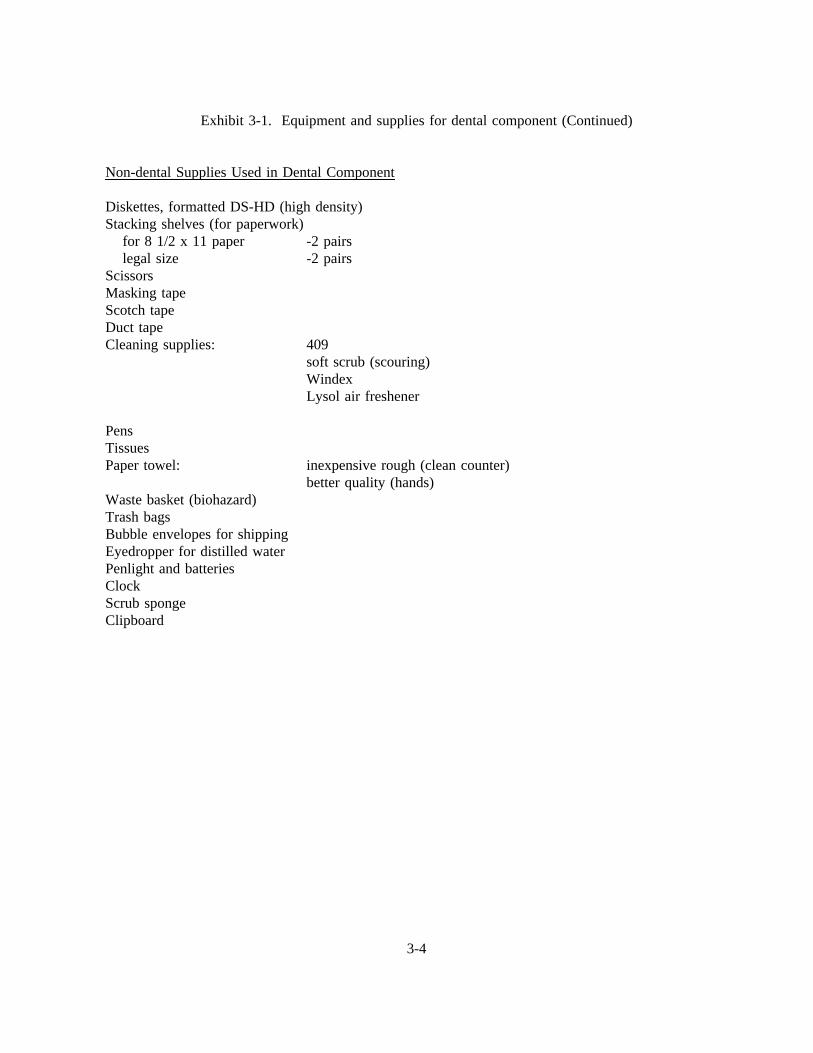
Exhibit 3-1. Equipment and supplies for dental component (Continued)
Non-dental Supplies Used in Dental Component
Diskettes, formatted DS-HD (high density)Stacking shelves (for paperwork)
for 8 1/2 x 11 paper -2 pairslegal size -2 pairs
ScissorsMasking tapeScotch tapeDuct tapeCleaning supplies: 409
soft scrub (scouring)WindexLysol air freshener
PensTissuesPaper towel: inexpensive rough (clean counter)
better quality (hands)Waste basket (biohazard)Trash bagsBubble envelopes for shippingEyedropper for distilled waterPenlight and batteriesClockScrub spongeClipboard
3-4
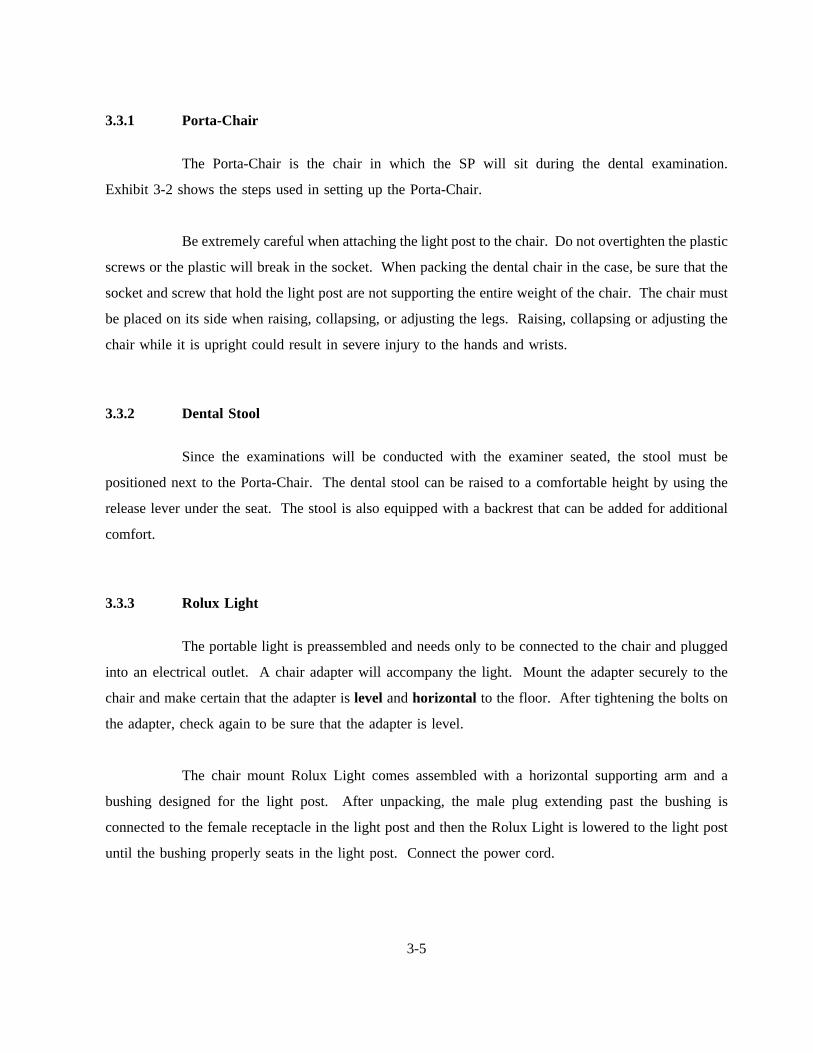
3.3.1 Porta-Chair
The Porta-Chair is the chair in which the SP will sit during the dental examination.
Exhibit 3-2 shows the steps used in setting up the Porta-Chair.
Be extremely careful when attaching the light post to the chair. Do not overtighten the plastic
screws or the plastic will break in the socket. When packing the dental chair in the case, be sure that the
socket and screw that hold the light post are not supporting the entire weight of the chair. The chair must
be placed on its side when raising, collapsing, or adjusting the legs. Raising, collapsing or adjusting the
chair while it is upright could result in severe injury to the hands and wrists.
3.3.2 Dental Stool
Since the examinations will be conducted with the examiner seated, the stool must be
positioned next to the Porta-Chair. The dental stool can be raised to a comfortable height by using the
release lever under the seat. The stool is also equipped with a backrest that can be added for additional
comfort.
3.3.3 Rolux Light
The portable light is preassembled and needs only to be connected to the chair and plugged
into an electrical outlet. A chair adapter will accompany the light. Mount the adapter securely to the
chair and make certain that the adapter islevel andhorizontal to the floor. After tightening the bolts on
the adapter, check again to be sure that the adapter is level.
The chair mount Rolux Light comes assembled with a horizontal supporting arm and a
bushing designed for the light post. After unpacking, the male plug extending past the bushing is
connected to the female receptacle in the light post and then the Rolux Light is lowered to the light post
until the bushing properly seats in the light post. Connect the power cord.
3-5
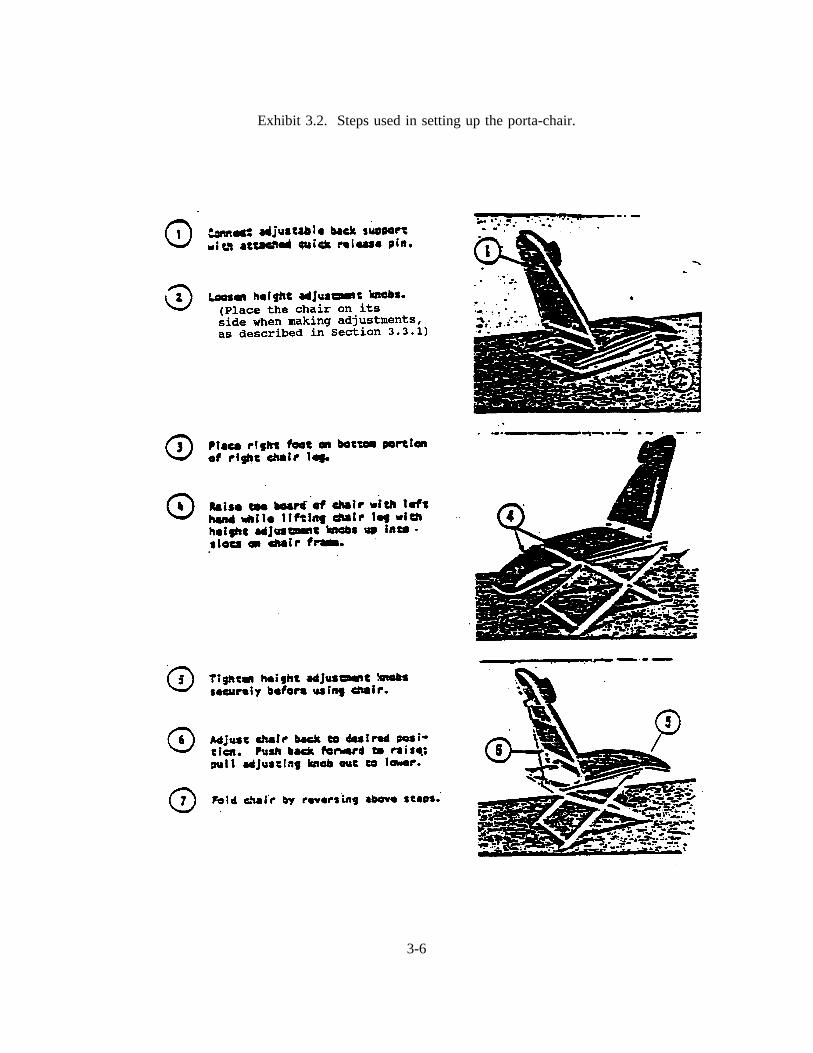
Exhibit 3.2. Steps used in setting up the porta-chair.
3-6
The Rolux Light is equipped with two intensity control systems. The infinitely variable
selection switch regulates intensity from off to maximum illumination. The lens system located at the end
of the arm regulates focus from a wider to a narrower light beam. As the beam is narrowed, the light
energy is concentrated for greater illumination. A few minutes of experimentation will establish the
optimum intensity and focus for each operator. To ensure maximum lamp life, the minimum intensity
position should not be left on all day but used only for short durations when needed during an exam.
The Rolux light is designed to minimize the need to reposition patients for the dental
procedures. The light is equipped with a fully flexible arm which may be moved freely to eliminate
shadows and to illuminate areas impossible to illuminate with conventional lights. The optimum distance
from the light lens to the operating area is 8-12 inches. Certain dental procedures may require higher light
intensity which can be accomplished, in part, by moving the light lens to within four inches of the
operating area.
Correct adjustment is accomplished when all arm angles are about equal.Do not bend the
arm more than 90o at any flexible joint , or broken glass fibers may result in reduction of light
transmission.
To replace the high-intensity light bulb, turn the light off, remove the cover by loosening the
two thumb screws, and slide the cover off. To remove the bulb, push the lever on the lamp socket
forward, and the bulb will eject. Place a new light bulb in the socket slots and push all the way to the
bottom of the slots for proper electrical contact. Replace the cover and tighten the thumb screws.
Remember: The arm of the light is made of glass fibers which transmit the light. If the
fibers are broken, there will be less light transmission. For this reason, care must be taken with the light.
Be sure to keep the original Rolux light box and the packing materials. At the end of a stand, the light
must be packed in the special Rolux light cardboard box, and the arm must be wrapped in styrofoam.
Each MEC will have an extra Rolux light and extra light bulbs.
3-7

3.3.4 Gomco Air Compressor
Exhibit 3-3 shows diagrams of the Gomco Air Compressor.
Operating Principle
The negative and positive pressures of a diaphragm pump are developed by thereciprocating motion of the diaphragm inside the pump head. These pressures aremaintained by the motion of the diaphragm and the pressure and suction flappervalves. On the up stroke, the pressure valve will open to allow air to flow through tothe exhaust or pressure port. On the down stroke, the pressure valve closes and thesuction valve opens which draws a vacuum or creates a negative pressure at thesuction side.
Assembly
The Gomco Air Compressor is used only for air drying the mouth and not for suction,therefore only three assembly items are applicable.
1. The black cord tubing for blowing air will already be attached to the airpressure valve and does not need to be removed when moving the equipment.
2. Check all tubing to make sure that connections are secure.
3. Plug the electrical cord into a three-pronged outlet. If the outlet is two-pronged,use a three-pronged adapter.
Safety Overflow Valve
The valve operates on the principle that a chamois disc permits the flow of air throughit when dry. Any fluid striking and saturating the chamois causes the pores to swelland, thereby, stops the passage of air. When the chamois becomes moist (restrictingthe air flow), the vacuum of the pump causes the chamois to push against the formedspring which shuts off the air flow through the pump. The unit may be used withouta chamois disc in emergencies, but there will be no overflow protection.
When the valve closes, the pump should immediately be shut off and the felt filter andchamois disc replaced.
The felt filter is replaced into the head of the safety overflow valve to collect anymoisture droplets that may get drawn into the intake tube.
3-8
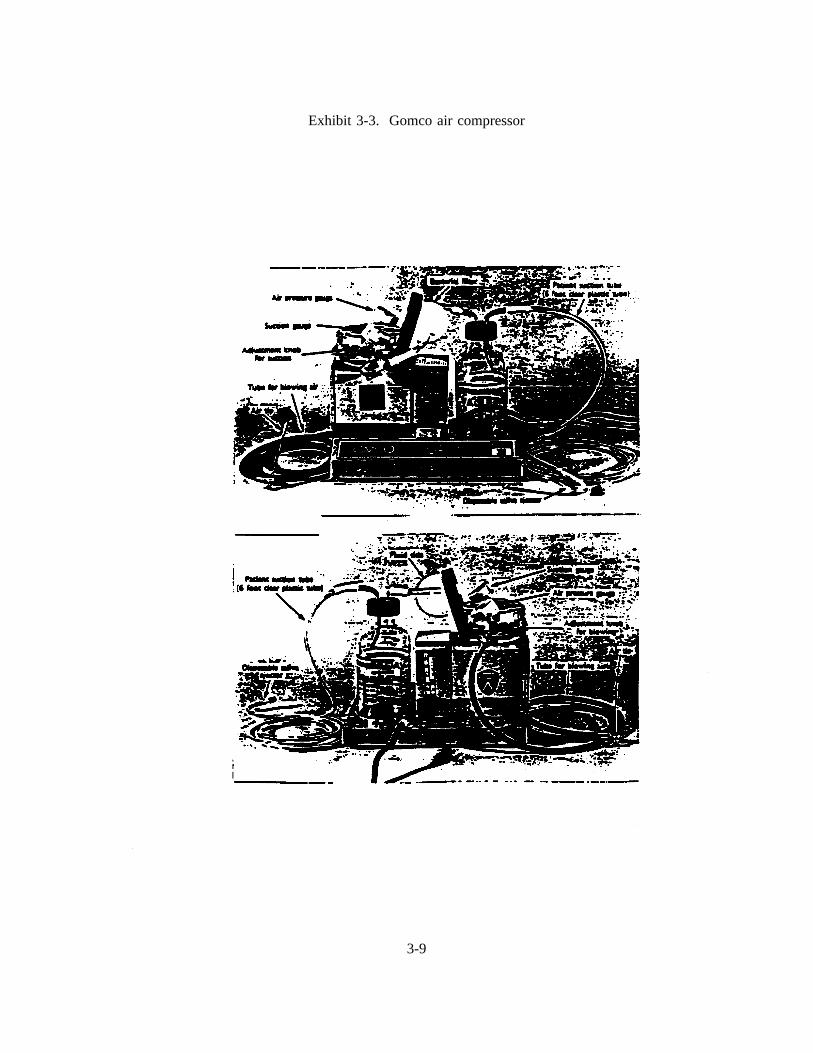
Exhibit 3-3. Gomco air compressor
3-9
To Replace the Felt Filter
1. Shut off pump.
2. Remove cover on valve back.
3. Take out three screws and filter window.
4. Remove gasket.
5. Remove felt filter and discard.
6. Wipe clean and dry all parts.
7. Put in new filter and attach gasket and window making sure that thewindow is tight.
To Replace Chamois Disc
1. Remove cover of valve while pump is running.
2. With chamois removed and spring in closed position, wipe out themoisture from valve back.
3. Shut off pump and note that the spring releases from valve back.
4. Press spring to back of valve and remove any moisture in lower portionof valve back.
5. Start pump and note that the spring will remain open permitting air toenter pump.
6. Gently insert new chamois in place of the old one with pump running andfasten on overflow valve cover.
7. Remove moisture from vacuum regulating valve and tubing attached tooverflow valve.
8. Attach tubing from short bottle tube to valve and check to make suresuction is present. NOTE: The valve function should be checked in thecollection bottle and in the vacuum system or premature shutoff mayoccur.
3-10
If the valve closes after reassembly when the motor is running, this is anindication that moisture may be reaching the chamois disc. The valveshould be disassembled and dried more thoroughly or replaced. Replacechamois disc. There is a chance that the valve may close by itself if thetubing is compressed and released suddenly--stop the pump for threeseconds and it will reopen.
If no moisture is reaching the valve and it still closes, the difficulty maybe that the spring has been bent in a convex condition or the legs of thespring may have been bent too flat. Should this condition occur, thespring must be replaced. Refer servicing to qualified personnel.
CAUTION : If flooding occurs, do not attempt to operate the pump.Refer servicing to qualified personnel. Do not at any time lubricate anyof the parts with oil, grease, or petroleum products. The pump and motorare permanently lubricated and require no oiling or greasing.
3.4 Infection Control Procedures
All mirrors, explorers, probes, and scalers must be sterilized after being used and kept
sterilized prior to usage. When the home office sends new instruments, they must be sterilized prior to
their first use. Having a sufficient number of sterilized instruments available for each examination session
is the responsibility of the dental examiner. The dentist must wear heavy duty household gloves whenever
handling used instruments. The recorder will not help with cleaning, sterilizing, or handling used
instruments.
Used instruments will be sterilized with a portable Chemiclave, which includes a Chemipurge
unit, in the MEC. Instruments can be sterilized before or after the exam sessions. If the Chemiclave is
not working properly, the dentist must inform the stand manager immediately and, if necessary, Westat
will ship a replacement Chemiclave to the field. Since each MEC is supplied with two Chemiclaves, one
should always be operational. However, in the event an emergency arises, the examiner can use the Cidex
solution for cold sterilization of the instruments, following the instructions on the Cidex bottle.
The infection control procedures described in this section for handling and sterilizing
instruments and maintaining a safe examination environment are in compliance with regulations and
recommendations of the Centers for Disease Control, U.S. Public Health Service and National Institute
3-11
of Occupational Safety an Health.
3.4.1 Examination Environment
The dentist sets up and organizes the dental equipment at the beginning of each stand.
Instruments and supplies must be prepared and arranged for examinations daily.
General guidelines for maintaining safety and efficiency in the dental examination room:
1. Equipment is arranged so that SPs can move easily and safely into and out of theroom.
2. Electric cords must be under or behind the dental chair.
3. Chemiclave and Chemipurge are set up so as not to interfere with dental examinations.
4. Disinfecting solutions and other liquids must be covered and out of reach from curiousSPs, particularly children.
5. The dental examination room must be kept clean and well ventilated.
6. The instrument sterilization packets are impervious to fluids, and therefore should beopened and placed in such a position that the packet becomes the instrument tray forthe SP on which they are used.
7. Used instrument containers (one for mirrors and one for other instruments) are placedin an area away from the immediate examination area.
8. The hazardous waste container lid must always be in down position except whendepositing wastes.
Attachment "A" presents infection control practices recommended for dentistry by the Public
Health Service. The dentist is responsible for ensuring proper infection control practices in the dental
examination room.
3-12
Counter tops must be disinfected with an appropriate solution before arranging the instruments
and supplies for daily use. (Refer to Attachment "A".)* The examiner must wear a face mask and a new
pair of sterile gloves for each SP examination. If the examiner adjusts the dental stool or the mask or
touches any object, other than one that has been disinfected during an examination, s/he must rescrub and
put on a new pair of gloves. Examiners and recorders must wear neat and clean lab jackets or gowns in
the MEC. Only properly sterilized instruments are to be used for dental examinations (refer to Section
3.4).
Sequence of procedures for maintaining infection control between SP examinations is as
follows:
1. After completing an examination, used instruments must be deposited in usedinstrument containers partially filled with a 1:32 solution of Vitaphene.*
2. The instrument sterilization packet that was used as an instrument tray should befolded and thrown in the hazardous waste container with the paper towels from thecounter top.
3. Gloves should be turned inside out as they are removed, and thrown into the hazardouswaste container.
4. Clean the headrest area of the chair and then use an appropriate disinfecting solutionon the Rolux light. If the air tip is used during the examination, a high leveldisinfection method must be used. Disinfect the counter top again before placing newinstruments on it (Refer to Attachment "A.").*
5. Hands must be washed with soap and water or an appropriate hand washingpreparation, and regloved.
6. Place fresh paper towels on the counter top and open a new instrument packet. Foldthe clear waterproof cover under the backing of the packet, and place it in such aposition that it can be used as a tray for the instruments it contained. After usinginstruments either return them to the instrument packet tray or place them in the usedinstrument container.
3.4.2 Chemiclave
*The dentist may use his/her professional judgment in choosing appropriate substitutes for solutions suggested in Attachment "A."
3-13
The following instructions for operating and caring for the Chemiclave are directed toward
the dentist.
I. Storage and Handling of Used Instruments
A. Used instruments should be handled carefully to prevent transfer of microorganisms fromthe patient to the dental professional.
B. Immediately after instruments have been used, place them in a plastic container containing1:32 Vitaphene solution. Keep the instruments in solution until you are ready to sterilizethem.
C. Instruments must be rinsed and completely driedbefore they are placed in the Chemiclave;otherwise, the instruments will be damaged during the sterilization process.
II. Set up Chemipurge Unit
The Chemipurge contains motor and switch units that are encased in a sponge insulated box and
fitted into the lower left corner of the cabinet. Printed instructions for the use of the Chemipurge have
been placed in the front of the motor unit.
In the far corner of the counter a hole has been created to route the electrical cord and plastic
tubing for the units. A quick release has been installed in the tubing to connect it to the Chemiclave. An
electrical outlet is located behind the Chemiclave.
The filter box attaches to the outlet vent tube on the lower left side of the Chemiclave. It can
either be placed on the counter with the short tube on the floor or on the floor with the larger tubing. If
the longer tube is used, the condensation fluid will accumulate in the bottom of the vent box and will need
to be removed regularly. The manufacturer recommends use of the shorter tube to prevent formation of
condensation but since counter space is limited the floor placement and longer tube has been adopted.
The unit set up is shown in Exhibit 3-4.
3-14
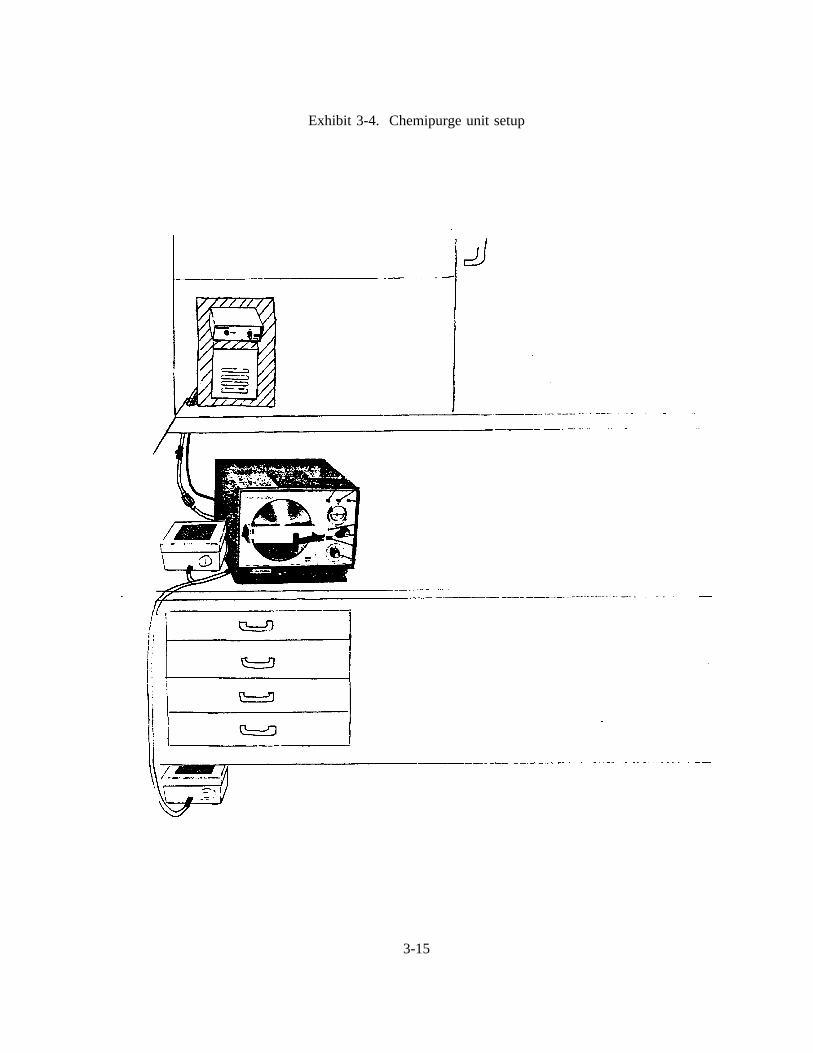
Exhibit 3-4. Chemipurge unit setup
3-15
Both the formaldehyde and inlet filters need to be replaced every year. The date of replacement
should be marked with a magic marker on each filter. It is important that the inlet filter be installed
between the quick release and the Chemiclave.
III. Activate Chemiclave
A. Connect Chemiclave to 115 volt outlet.
B. Close door but do not lock.
C. Turn power switch to "on" position.
IV. Check Solution Level
A. The solution light will come on if inadequate solution is in the reservoir to complete acycle.
B. If solution light is on, remove the dust cover and add Vapo-Sterile Solution with thefurnished measuring cup until the solution light goes out. Replace dust cover.
C. Do Not use anything other than fresh, undiluted Vapo-Sterile Solution in the reservoir.
D. If the solution light comes on during the sterilizing process, additional solution should beadded to the reservoir.
V. Prepare Instruments for Sterilization
A. Remove the instruments from the Vitaphene solution and scrub with a brush and dish soapto remove any remaining blood or debris. Be careful to prevent cutting your hands whilescrubbing contaminated instruments.
B. Rinse instruments thoroughly to remove all foreign debris and soap.
C. Dry instruments. Instruments must becompletelydry to ensure proper sterilization and toprevent rust or corrosion. (If instruments are not dry when placed in chamber, water vaporwill increase the relative humidity in the chamber which in turn will increase the pressure.As a result of the increased pressure, the relief valve will open. If the relief valve opens,allow all pressure to dissipate by turning the control knob to "Depressurize", dry theinstruments and begin cycle again.)
3-16
D. Place instruments in Chemiclave.
Self-seal paper bags for sterilizing the instruments in the Chemiclave will be used. Placeone set of instruments per bag and be sure to place the mirror at opposite end of the bagso that pointed instruments will not scratch the mirror head. The dentist should be awareof the schedule each day and prepare exam packets accordingly. By using this procedureyou will keep sets of instruments sterile and can open bags of instruments as needed for thenext day’s examinations. Gloves must be worn when handling sterilized instruments.
E. Fill Instrument Tray
A. Place paper tray liner on tray.Do Not use paper towels instead of tray liners.
B. Several bags of instruments are going to be sterilized at once. Place bags on thetray. The paper bag changes color from blue to green to indicate that thesterilization process has been completed.
VI. Sterilize
The Chemiclave mustnever be left unattended while sterilization is in progress.
A. When the "temperature" light goes out initially the Chemiclave is ready for use.
B. Place lined tray and instruments in instrument bags in chamber.
C. Close and latch door. (If the gasket should become stretched so that the door does notclose tightly, use the wrench end of the tray handle to give the nut on the door handle a1/4" turn clockwise.
D. Turn control knob to "Pressurize" by moving dial from a 2 o’clock to a 10 o’clock position.
E. The timer will automatically begin when the chamber reaches 20 psi.
F. After 20 minutes of 20 psi a buzzer will sound for 10 seconds and the "sterile" light willcome on.
G. Immediately after the buzzer sounds and the "sterile" light comes on, turn the control knobto "Depressurize." Wait until the pressure gauge indicates "0" pressure.
H. Proceed with Chemipurge operations.
3-17
VII. Chemipurge Operation
The Chemipurge purges the Chemiclave chamber of substantially all residual chemical vapors
following the sterilization cycle. Perform the following steps carefully, and do not operate the
Chemipurge when the Chemiclave is under pressure:
1. Operate the Chemiclave through the normal sterilization cycle. (See Section VI, steps A-H.)
2. Make sure the Chemiclave is depressurized and the gauge indicates "0".
3. Turn on the Chemipurge control switch and let it run for five minutesas specified for theChemiclave 5000 in the Chemiclave Operations Manual.
4. After five minutes, turn off the Chemipurge Control Switch and wait until the pressuregauge again indicates "0" pressure.
5. The Chemipurge cycle is complete and instruments may be removed.
Chemipurge operation instructions are posted on the motor unit.
VIII. Complete the Cycle
A. Open door partially for 15 seconds, then open fully.
B. Remove contents using tray handle and hot pad mitt to prevent burns.
C. Do Not leave instrument or tray in chamber after sterilization is complete to prevent paperfrom smoldering.
IX. Maintenance
A. Turn unit on for about two minutes to allow chamber to get warm. Use Harvey MetalCleaner on a plastic sponge to clean the interior of the chamber, chamber door, andinstrument tray at least once per week. Wipe these areas dry with a towel. Use a smallamount of vapo solution on a piece of cloth to go over all areas where Harvey MetalCleaner was used in order to remove any residue. Clean chamber and tray more often ifdebris or stainsbegin to form. Be certain that the portion of the chamber door whichoccludes with the gasket is clean at all times to permit proper seal. Clean exterior of
3-18
Chemiclave using water and dish soap as needed.
B. Drain the Chemiclave system once per week by attaching the plastic tubing to thecondensate valve. Turn the eccentric knob to open the valve and allow the solution to draininto a cup for disposal. (If the Chemiclave is not drained weekly, solution will leak outthrough the escape valve.)
C. Tighten chamber door, as needed, by turning the nut on the door handle a 1/4" turnclockwise.
D. Transport with door closed but not locked.
X. Repair
A. If the Chemiclave needs repair, inform the MEC manager immediately.
3.4.3 Spore Tests
The dental examiner must check the Chemiclaveweekly using spore test strips. The dentist will
be supplied with envelopes, each of which contain three spore test strips and a card. The following
procedures are addressed to the dentist.
Remove two spore strips from the envelope and place them in the Chemiclave chamberalong with the instrument bags. Leave the third spore strip with the envelope; this is thecontrol.
After the Chemiclave cycle has run, place the two spore strips in the envelope with thecontrol strip.
Each spore test envelope contains a card which should be filled out to let the laboratoryknow where to send the results of the spore test analysis. On the card, write the followingname and address where the results should be sent:
Ms. Catherine NovakWestat, Inc.1650 Research Blvd.Rockville, MD 20850
Make certain the Chemiclave Serial Number is entered.
3-19

The examiner’s name should be listed as the operator.
The account number is Westat’s telephone number 301/251-1500.
On the outside back of the envelope, write the examiner’s ID number which will beassigned during trainingand the identification number which is on the Chemiclave.
Mail the envelopes. The envelopes are self-addressed and will be sent directly to a lab foranalysis.
3.5 Replacing Instruments
Each MEC will be equipped with 50 sets of instruments. The examiner will use about 20 sets
each day for 20 SP exams.
Since mirrors become scratched and explorers and probes become worn over time, defective
instruments will be replaced regularly during the field period. Number 17 explorers, Number 3 explorers,
scalers and mirror handles are not replaced during the study unless the need arises. Number 23 explorers
and mirror heads are replaced every 15 weeks. Perioprobes are replaced every 30 weeks.
Stands will operate for a duration of 6-8 weeks, and the dentist may be in a different MEC for
the next stand. For these reasons all MEC dentists must follow procedures for keeping track of instrument
replacement dates. The procedures are as follows:
1. Dentists in the first stands will receive new instruments. Calendars will also be providedwith the dental supplies. The dentists in the first stands must calculate the date 15 weeksin advance of the first MEC operating day and circle the replacement date on the calendar.At the end of the first stand, the calendar will be packed in the box with the instruments.The dentists at the second stand will then know the replacement date for the instruments.Additionally, the MEC manager will be giving dentists an inventory list to be filled out atthe end of each stand. The next replacement date for the instruments must also be recordedon the inventory lists.
2. The calendar and instruments will remain in the dental examination room as the MEC ismoved from stand to stand. Dentists at the second, third, etc., stands must note the circleddate on the calendar and make sure that old instruments are thrown away and replaced withnew ones on that date. Although provisions will be made to automatically ship the newinstruments to you before the fifteenth week, DO NOT THROW AWAY THE OLD
3-20
INSTRUMENTS UNTIL YOU HAVE RECEIVED AND UNPACKED THE NEWSHIPMENT OF INSTRUMENTS. If you have not received the new shipment by fiveworking days before the circled date, inform the MEC manager.
Examiners should inspect instruments, equipment, and supplies daily. Unusable instruments and
supplies, such as scratched mirrors, should be discarded. Instruments must be sterilized and the pointed
edges carefully wrapped prior to disposal.
If any instruments need to be replaced between the automatic shipment dates, new instruments can
be ordered by using standard MEC procedures. When the automatic shipment of new instruments arrives,
the replacement instruments that were being used in the interim must still be discarded with the old
instruments.
3.6 Packing Equipment and Supplies at End of a Stand
Equipment and supplies must be packed at the end of examinations at the completed stand before
the MEC moves to the next stand. Since the MEC will be moving both short and long distances, you
must become accustomed to packing and securing the equipment. Even if the MEC is moving only a
relatively short distance, all of the equipment and supplies must be packed as if the MEC were moving
a long distance.
The light bulb must be removed from the Rolux light, and the Rolux light must be removed from
the dental chair and packed in the carrying case. The mirrors must be packed carefully so that they do
not shift and break during the move. Instruments should be kept in the Chemiclave bags and the bags
should be wrapped carefully before packing them in a box. In the same box with the instruments, be sure
to pack the calendar showing the replacement date for instruments. Use newspapers to fill up empty space
in the boxes so that items will not shift in the boxes. Nothing should be left in the cabinets during the
move.
When packing for travel, do not stack boxes on top of one another because they may shift and
fall over during the move. The Chemiclave and Chemipurge must be placed in a corner on the floor of
the MEC to prevent sliding during the move.
3-21
3.7 Setting up Equipment and Maintaining the Examination Environment
The dentist arrives at the MEC several days before SP examinations are scheduled to begin. These
days are spent unpacking, setting up, organizing equipment and supplies, and participating in the dry run
to make sure the equipment is working properly.
Each day, the dentist should arrive at the MEC 5 minutes before the dental examinations are
scheduled to begin. The examiner should stop by the coordinator’s station to notify him/her of arrival.
Follow these guidelines when setting up the dental work area:
Set up the dental chair and the equipment so that an electrical outlet is accessible.
Set up the Chemiclave and Chemipurge so they are not in the way during the exams.
Set up the equipment and supplies in a manner that is reasonably efficient and safe, using the
following guidelines:
Set up the equipment so that people can easily move into and out of the room.
Keep Cidex, Vitaphene, Biocide bottles, and used instruments out of the reach of curiousSPs, particularly children.
The examiner should swing the Rolux light to the side before the SP gets out of the dentalchair so that the SP will not bump the light.
Supplies, such as sterilized packets of instruments, 2x2 gauze, disinfecting solutions, and paper
towels, must also be set up before examinations begin each day. These items should be arranged so that
they are easily accessible to the examiner. After disinfecting the countertop/table, the sterilized
instruments, gauze and towels should be arranged for maximum efficiency and safety. Instrument packets
for each SP must be opened and placed in such a position that the packet becomes the instrument tray for
the SP on which the instruments are used. Used instruments are never placed in any area of the exam
environment other than the opened packet from which they were taken. Two plastic containers in which
3-22
to put the used instruments must be placed out of the examination environment. Used mirrors should be
placed in one plastic container and used explorers, probes, and scalers in the other container. Other
instruments must not be placed with the mirrors because they may scratch the mirrors. A waste basket
with a biohazardous waste liner must be available for used gauze, tissues, and paper towels. The
handwashing basin with a solution of chlorhexidine-gluchonate should be placed so that no one can bump
it when getting into or out of the dental chair.
The sequence for maintaining infection control between SPs is as follows:
1. After completing an examination, used instruments are placed in used instrument containers.The used containers should be partly filled with a 1:32 dilution of Vitaphene.
2. The tray cover is folded and thrown into waste.
3. The gloves used in the previous exam are turned inside-out as they are removed, andthrown into biohazardous waste container.
4. The headrest cover is removed and/or the headrest is cleaned. The Rolux light isdisinfected using gauze soaked in Biocide.** If the air tip is used during the examination,a high level disinfection method should be used to clean the air tip.
5. The hands are washed in a handwashing solution of chlorhexidine (or soap and gluconatewater in the exam room sink) and regloved.
6. The new instrument packet is opened, the waterproof clear cover of the packet is foldedunder the backing of the packet and it is placed on the countertop in such a position thatit can serve as a tray for the instruments it contained. After use, instruments are eitherreturned to the tray or put into the used instrument container.
*The dentist may use his/her professional judgment in choosing a substitute for the clorox solution. (Refer to Attachment A,Infection Control).
3-23
4. INTRODUCTION TO THE MEC AUTOMATION SYSTEM
4.1 Background
The purpose of the MEC Automation System is to provide a means for entering the data
collected for NHANES III with the primary goal of improving the timeliness and quality of the data. The
system has been designed to make data collection and manipulation an easy and reliable process.
The system is composed of hardware, which are tangible pieces of equipment, and software,
which are the communication systems and management systems that run on the hardware.
4.1.1 The MEC Automation System Hardware
The MEC automation system hardware is provided and serviced by Digital Equipment
Corporation (DEC), and consists of two industrial MicroVAX computers running VMS (a DEC operating
system) and ORACLE, VAXmates running MS-DOS and DECNET-DOS, and VT320 terminals and
printers connected to the MicroVAX computers through terminal servers and an Ethernet network. Figure
4-1 illustrates the MEC automation system configuration. As you can see from Figure 4-1, the oral health
exam is only one component of the automated system.
The Data Terminal. Two types of data terminals are used on the MEC, the VT320 which
is known as a "dumb" terminal and the VAXmate that is known as a "smart" terminal. The VT320
(Figure 4-2) has two components: a cathode ray tube (CRT), commonly called a video screen or monitor,
and a keyboard. It is connected to the MicroVAX through a computer that is called a terminal server. The
VAXmate (Figure 4-3) has a monitor, a keyboard, and a floppy disk drive. It is a personal computer that
is directly connected to the MicroVAX. The main difference between the two types of terminals is that
the VAXmate is a computer that can function and run software programs independently of the MicroVAX,
including a program that directs the VAXmate to emulate (function like) a VT320. The program for the
oral health component runs on a VAXmate in the dentist’s room on the MEC.
4-1
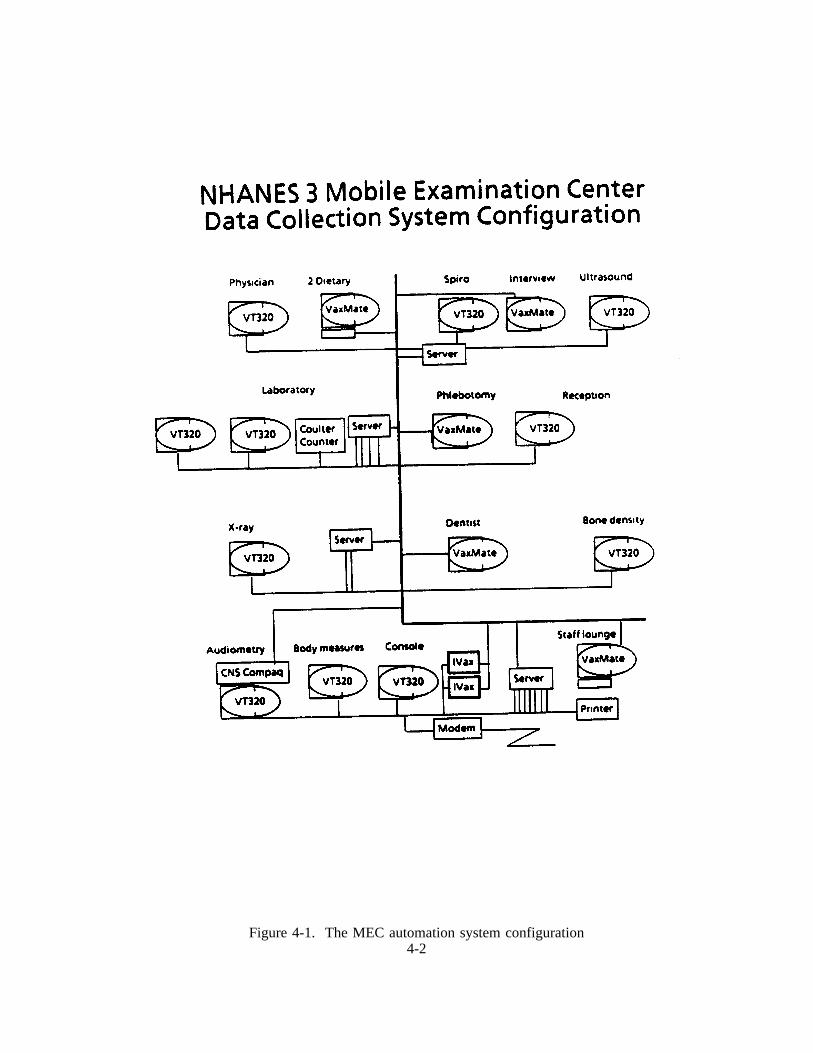
Figure 4-1. The MEC automation system configuration4-2

Figure 4-2. The VT320 terminal
4-3
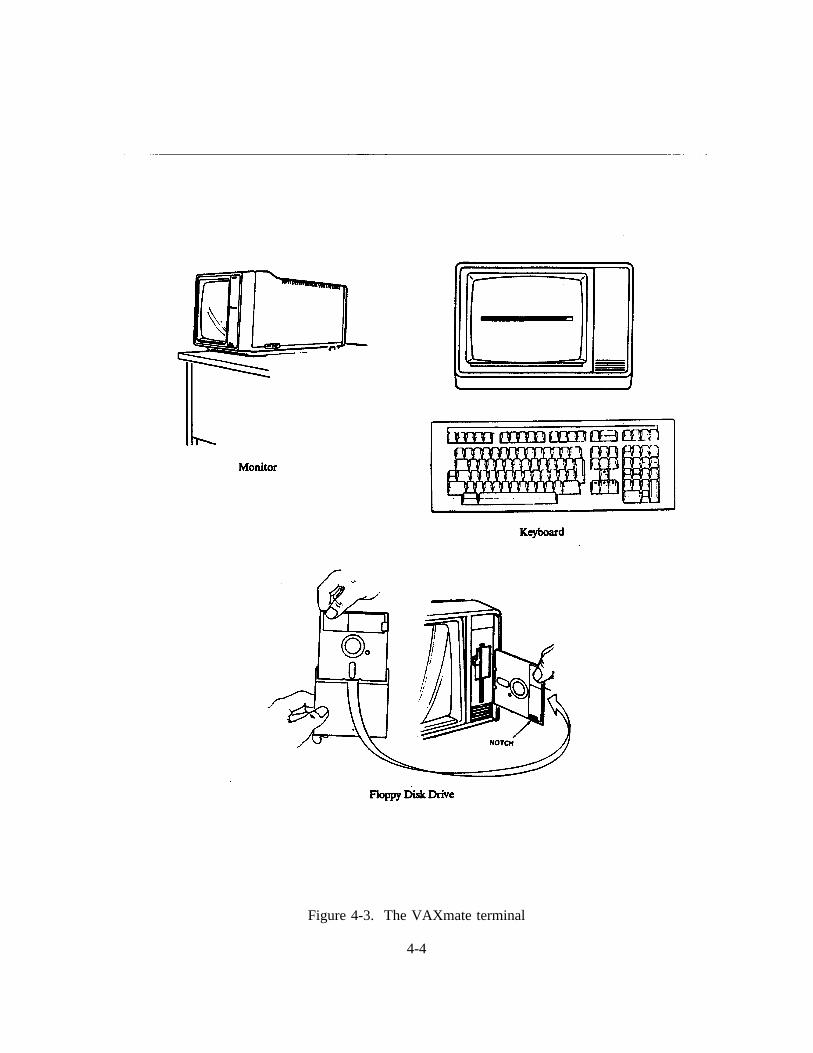
Figure 4-3. The VAXmate terminal
4-4

Description of the Keyboard. The keyboard (Figure 4-4) for the data terminal has four
groups of keys, four indicator lights, and two audible indicators. The keys are grouped by function (see
Figure 4-5).
Main keypad,
Editing keypad,
Numeric keypad, and
Top-row function keys.
Throughout this manual, references to specific keys are enclosed in angle brackets (< >).
The main keypad is similar to a standard typewriter keyboard. The alpha and numeric keys
are used to type letters and numbers. The editing keypad has six editing keys and four arrow keys.
Pressing an arrow key moves the cursor in the direction of the arrow. The keys of the numeric keypad
are used to enter any numeric data, such as coded questionnaire responses or examination results or an
examinee’s identification number or age.
Every stroke of a terminal key creates a specific electronic signal to be transmitted to the
computer. For this reason, alpha and numeric keys cannot be used interchangeably and a space cannot
be used indiscriminately. For example, the USER cannot type "l" (the letter l) in place of "1" (one) and
vice versa. If a key is inadvertently pressed which sends an invalid signal to the system, the system is
programmed to reject the signal and to display an error message on the terminal screen.
The keyboard has four indicator lights (see Figure 4-4), which should always be off. If <Hold
Screen> is inadvertently pressed during a session at the terminal, the Hold Screen indicator light turns on
and the display on the screen is frozen. Pressing <Hold Screen> again releases the screen and turns off
the Hold Screen indicator light.
The keyboard has two audible indicators, a key click and a bell. The key click is the clicking
sound that is heard when a key is pressed. The warning bell sounds whenever the USER receives an error
message.
4-5
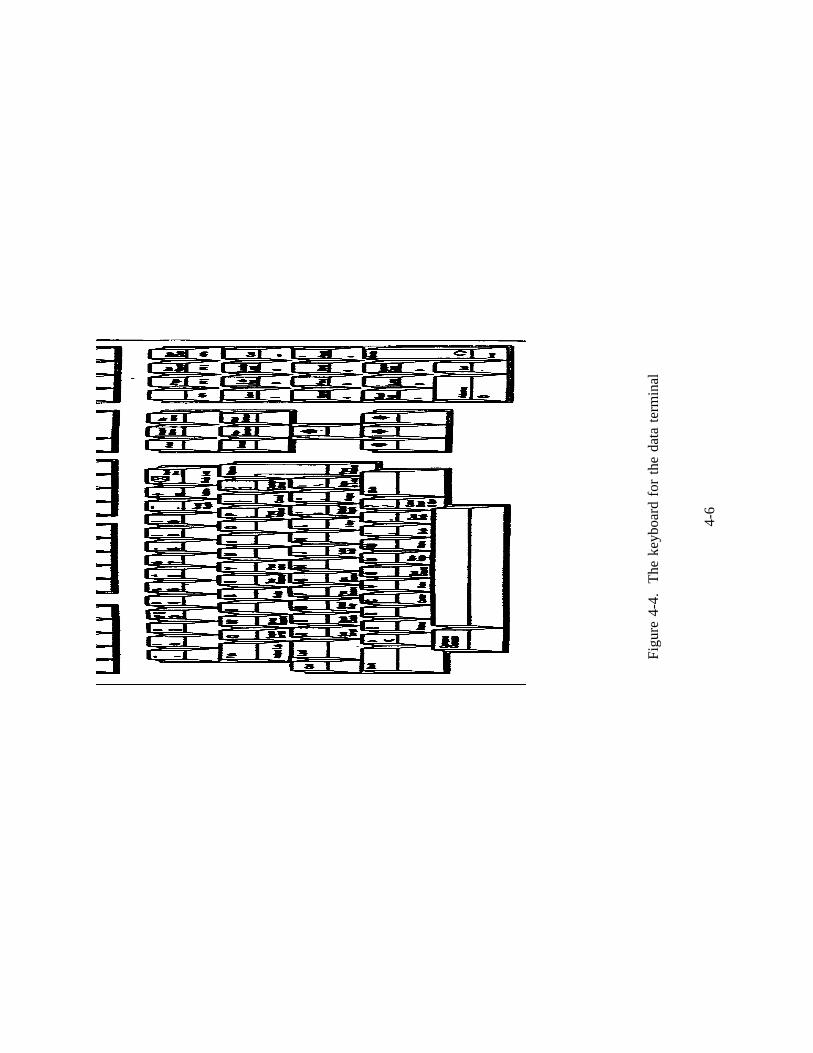
Fig
ure
4-4.
The
keyb
oard
for
the
data
term
inal
4-6
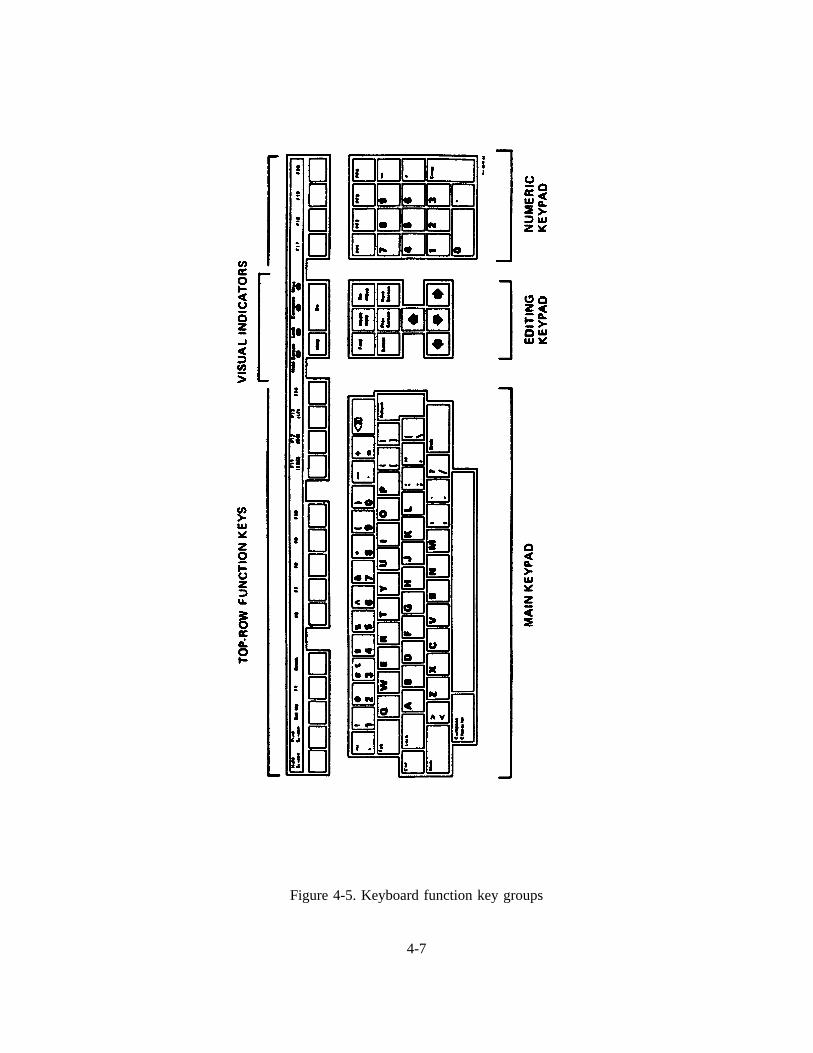
Figure 4-5. Keyboard function key groups
4-7
4.1.2 MEC System Software
The MEC system software functions on several levels: (1) the VMS operating system; (2) the
database management system, ORACLE; and, (3) the USER interface.
VMS Operating System. VMS is an operating system for the VAX similar to DOS on a
microcomputer. It controls the communication between the MicroVAX systems hardware. DECNET,
which is part of the VMS operating system, controls the communication between the two MicroVAX
computers, the MicroVAX and the VAXMate, and the MicroVAX computers and the terminal servers.
The USER (dentist, health technician, or laboratory technician) interfaces with the VMS system during
the Log On and Log Off procedures.
ORACLE. Oracle is a relational database management system with special applications for
programming data entry procedures. As a relational database management system, ORACLE manages the
MEC database by organizing the data in two dimensional tables and providing a language, SQL (Structure
Query Language), and several facilities by which programmers may communicate with ORACLE to enter,
modify and retrieve the data.
The USER Interface System.There are three types of user interface programs: (1) the MEC
Coordinator system; (2) the Examination Component System; and (3) special component systems such as
the Dental Exam, Dietary Interview, and MEC Interview. USER interface programs have been written
by NCHS and NIDR consultant programmers using special applications of ORACLE and other
programming languages.
Both the coordination system and the examination component system use a MENU system to
allow the USERS to quickly choose one of several programs in each system. The Dental Program also
uses a MENU system that contains two options.
The programs for the coordination system are used to check sample persons (SP’s) into the
MEC, to build a list of required exam components, to schedule SP’s, MEC examination stations and MEC
staff to complete required components, and to check SP’s out of the MEC. In addition, the coordination
system monitors Glucose Tolerance Test times, alerts the phlebotomist to deadlines, accounts for payment
4-8
of SP’s and generates a session summary status for the field office following each exam session.
Programs written for the examination component system enable USERS (health and lab
technicians) to enter, modify, and delete data, to print reports, logs, worksheets or shipping transmittals,
and to transmit data from a component instrument to the MicroVAX and from the MicroVAX to a floppy
diskette.
The data entry programs have been written so that the information presented on the screen
appears as a written record on a physical form, that is, as though it were a page of a questionnaire or a
log.
4.2 Sequence of a Session at the Terminal
Currently the dental exam system is structured so that the user (dentist or recorder) enters the
data directly into the VAX in the MEC. The user begins an exam session by logging on the VAXmate.
At the end of the session the user logs off the system.
4.2.1 Logging On To The Dental System
To log on to the system:
1. Turn the VAXmate on by pressing the power switch to on. The switch is located on theleft, at the bottom of the terminal.
2. A MENU will appear on the screen. It contains eight items.
1. "Record Dental Examination"2. "Start New Data File"3. "Use Old Data File"4. "Save Current Data File"5. "Use Most Recent File"6. "List Data Files with Date"
4-9
7. "Change Default Dentist I.D.#"8. "Exit Menu System"
Choice #1 allows the dentist/recorder to enter the dental data.
Choice #2 allows a new data file to be created and an old file closed out in thecomputer.
Choice #3 allows replacement of current database with any previous database.
Choice #4 stress current database in its proper sequence according to date.
Choice #5 replaces current database with most recent previous database.
Choice #6 lists all databases in sequence according to date.
Choice #7 allows change of current dentist default ID number.
Choice #0 returns system to DOS (to return to data entry program, type "menu").
3. The cursor will be positioned at "choice __". Type 1 to choose the option "Record DentalExamination". It takes a minute to bring up the first screen in the dental examination dataentry program. When it appears on the screen, the system is ready for dental data to beentered.
4.2.2 Logging Off the Dental System
When all exams have been entered for a particular session, press the F10 key to leave the
dental data entry program and return to the MENU. Select choice #2 to start a new file for the next day.
4.2.3 Using the Dental Exam System
Attachment C is the user’s guide for the Dental Exam System, prepared by David Waldrop,
a consultant to NIDR. The text explains how to enter data into the system, modify data, and move back
and forth from screen to screen and within screens. It also provides definitions for terms used in the
system.
4-10

5. ORAL EXAMINATION METHODS AND DATA FORMS
The oral examination component in the MEC consists of a questionnaire and multiple
examination subcomponents. The dentist examiner and dental recorder work as a team in executing this
component for each SP. This chapter details the examination procedures and methods to be employed.
It is not necessarily organized according to the usual sequence of the subcomponents.
Data will be entered by keyboard directly into computer terminals at the examination sites.
Opscan data forms are provided as a backup system for recording data if the computer system fails to
function properly. Display screens on the computer terminal are patterned after the opscan forms that are
described in this chapter. Procedures for recording on hard copy forms are discussed in this chapter.
Direct data entry was described in Chapter 4 of this manual.
5.1 Sequence of Oral Exam Procedures
Exhibit 5-1 lists the oral examination components. Included on the table are the ages of the
SP for each examination component and the page number of the Dental Examination Forms on which the
data are recorded. The examination methods and the recording forms will be discussed in the following
sections.
Exhibit 5-2 is a guide to the examining team which lists the components in sequence, and
identifies the examination components and forms for each age group of SP’s. In addition, the instruments
to be used for each age group are specified.
Before the SP arrives at the dental exam area, the recorder will have completed the following
items on the Dental Log and Dental Questionnaire.
Name. The SP’s first name (first) and last name (second).
ID Number. The SP’s ID number.
Age. The SP’s age on the designated line and the box for months or years checked.
5-1
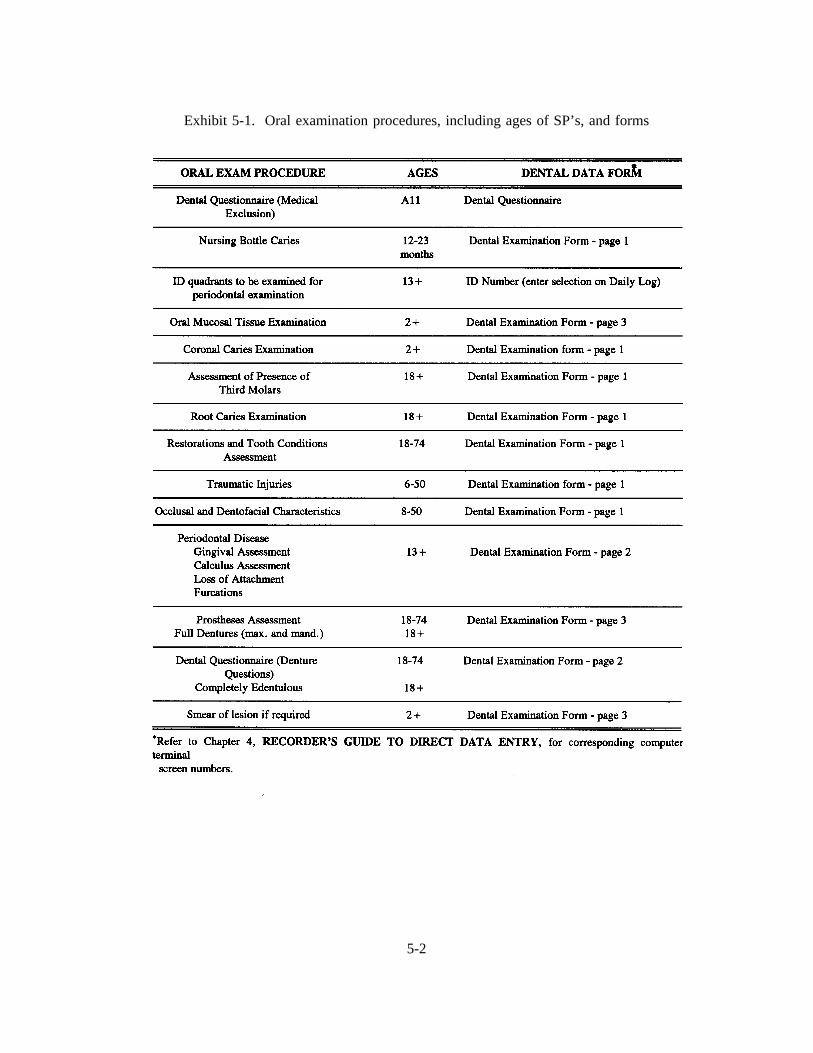
Exhibit 5-1. Oral examination procedures, including ages of SP’s, and forms
5-2
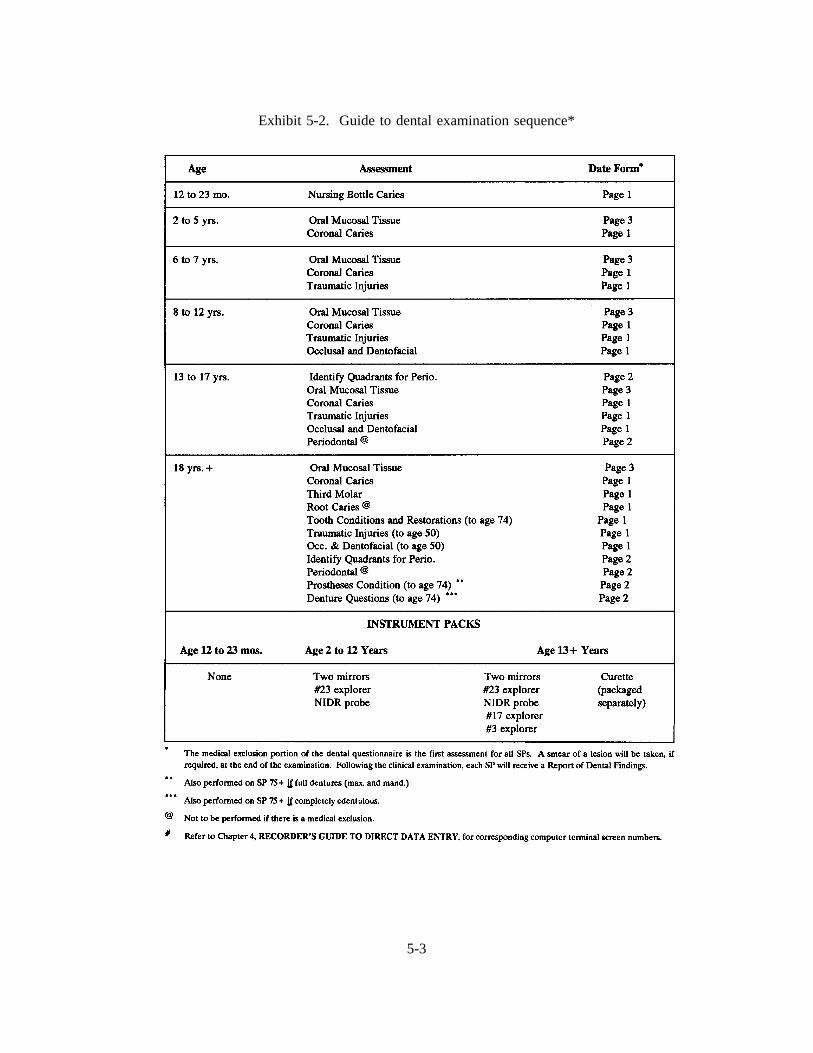
Exhibit 5-2. Guide to dental examination sequence*
5-3
Example: If the SP is 5 years old, 5 is written on the line, and a check mark is placed in thebox labelled "Yrs."
Sex. Mark "M" for male or "F" for female.
Examiner. The identification number assigned to the dental examiner should be recordedon the designated line. Each examiner will receive his/her ID number at training.
Recorder. The identification number assigned to the dental recorder should be recorded onthe designated line. Each recorder will receive his/her ID number at training.
Date. The date the SP came to be examined should be recorded on the designated line.
5.2 Dental Questionnaire: Medical Exclusion
The examiner asks the SP about conditions which may preclude him/her from having some
components of the oral exam. On the first page of the Dental Questionnaire (Exhibit 5-3), the examiner
reads the questions and marks the appropriate "yes" or "no" boxes. Once you receive a "yes" to a question
that leads to a medical exclusion (e.g., the first yes, except Q.2 "A heart problem"), you do not continue
to ask the rest of the questions.
If only "no" boxes were checked on the first page of the form, there are no medical
exclusions for the SP, and all assessments for SPs in that age category should be performed. However,
if any "yes" box(es), which are marked medical exclusion, were checked, this indicates there is a medical
exclusion for the SP. In these cases, all the assessments should be performed except root caries and the
four periodontal assessments.
5.3 Dental Questionnaire: Denture Questions
The dentist asks these questions (Exhibit 5-4) of SP’s 18-74 years old who are edentulous
in one or both arches, and the recorder records the SP’s answers. These questions are asked after the
periodontal assessment.
5-4
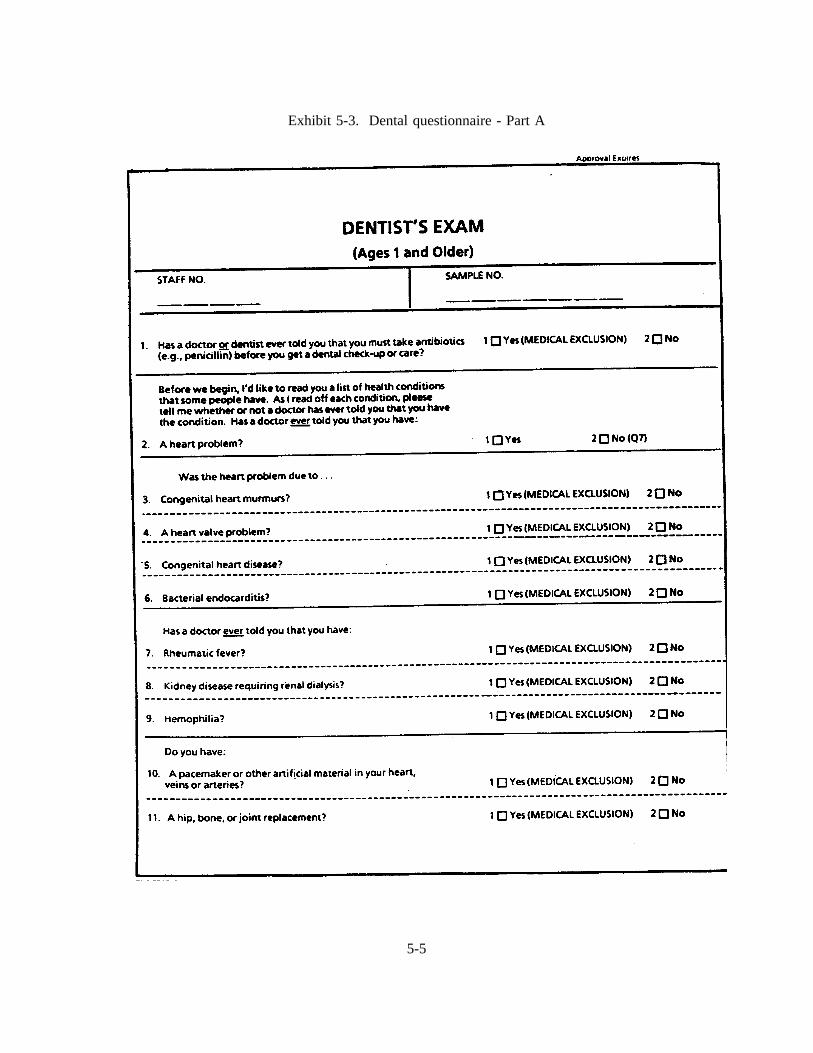
Exhibit 5-3. Dental questionnaire - Part A
5-5
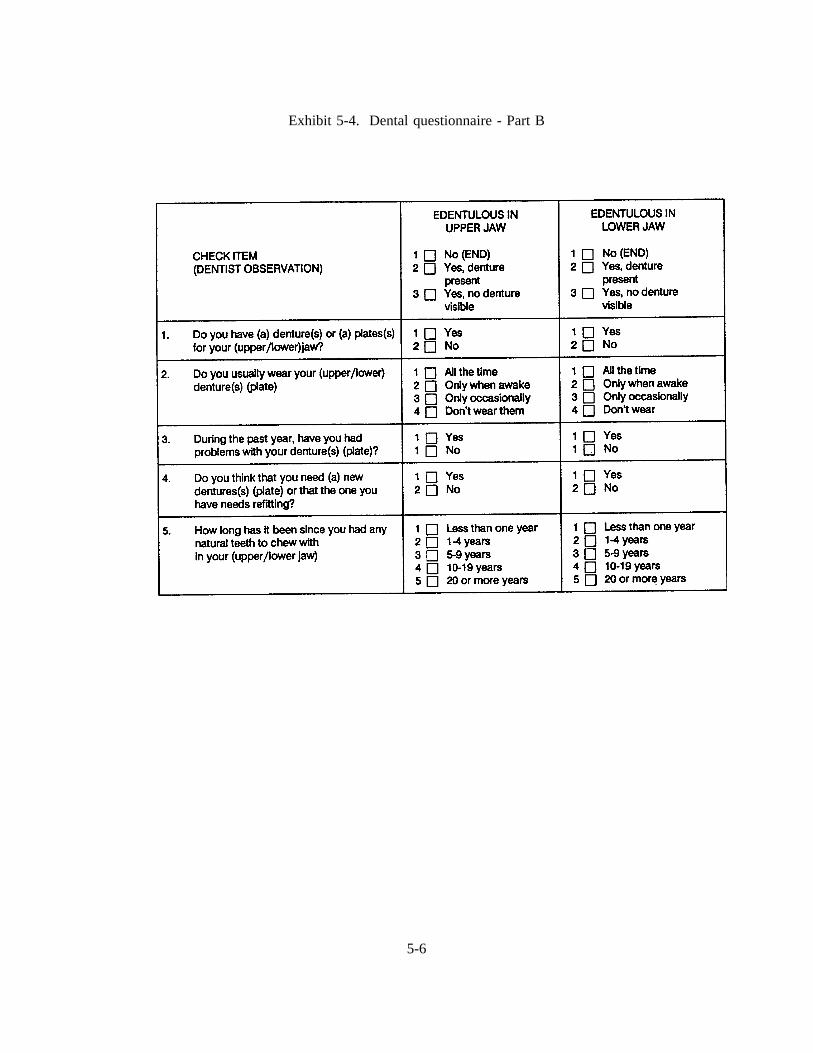
Exhibit 5-4. Dental questionnaire - Part B
5-6
5.4 Selecting Random Quadrants for Periodontal Assessment
The computer program selects and indicates random quadrants for periodontal assessment.
However, if the computer program fails to function properly, the fifth and sixth digits of the SP’s ID
number will be used to select random quadrants as follows:
The fifth digit of the ID number will be used to select the upper quadrant. If this number
is even, the right side will be used. If this number is odd, the left side will be used.
Similarly, the sixth digit of the SP’s ID number will be used to select the lower quadrant for
the periodontal examination. If this number is even, the right side will be used. If this number is odd,
the left side will be used.
The quadrant selected will then be indicated in the upper right-hand side of page 2 of the
dental examination form, above the Periodontal Exam area.
For example, if the SP’s ID number is 123456, this would represent a left upper and right
lower designation for the SP.
1 2 3 4 5 6 - 7left rightupper lower
5-7

5.5 Oral Mucosal Tissue Assessment
5.5.1 Introduction
The objectives of the oral soft tissue component of the survey are to:
Determine the prevalence of selected pathological conditions affecting the oral softtissues in a national sample;
Provide a basis for comparison with future surveys;
Provide baseline data for possible followup of selected subsamples;
Provide a basis for the future development of estimates of treatment needs; and
Study the association between oral mucosal pathologies and selected risk factors.
Findings from the NHANES III can also be compared with national data of the prevalence
of oral mucosal pathologies found in children, which were collected in the 1986-87 NIDR National Survey
of Oral Health in School Children. In addition, findings of smokeless tobacco-associated lesions can be
compared with data from some U.S. state and local studies.
Because the range of oral mucosal pathologies is broad and varies widely with age of the
population and other variables, it is not possible to assess the prevalence of these conditions by use of a
single epidemiologic index. Rather, the examiners must be trained to recognize the clinical characteristics
of each condition of interest, as well as other conditions that may present problems in differential
diagnosis. Lesions or conditions of specific interest in this survey have been carefully selected on the
basis of their anticipated frequency of occurrence, their clinical significance, and their ability to be
diagnosed by clinical methods alone.
For children and adolescents, special consideration has been given to the detection of mucosal
pathology resulting from the use of smokeless tobacco. While these lesions are the central focus in this
age group, the examiners also must be able to recognize a number of other mucosal lesions likely to occur
in children. This helps not only with differential diagnosis of the tobacco-associated lesions, but also
5-8
permits the recording of information on the prevalence of these other conditions, which may themselves
be of some interest. For adults, the focus will be on cancer, pre-cancer, and conditions that predispose
to cancer, as well as pathologies related to denture wearing and tobacco use. As an adjunct to the clinical
examination, a questionnaire will be used in the household to collect information about risk factors, such
as the use of smokeless tobacco, smoking tobacco, and alcohol.
Training for this module consists of a procedure for conducting the soft tissue examination,
an explanation of the diagnostic criteria for the selected lesions of interest, and instruction in the use of
the data collection form. Because representative oral lesions are somewhat rare, it will not be possible
to arrange for patients with typical pathologies to be examined as part of the training session. Training
for the diagnostic criteria will thus consist of a presentation of the written criteria along with color
photographs to illustrate the characteristic features of each lesion or condition.
The data collection form has been designed so that lesions for which a diagnosis can easily
be made can simply be checked off or written in. The form is also designed to permit the examiner to
enter a clinical description of the pathology. A mechanism is provided to permit the referral of patients
for treatment when necessary; guidelines for referral are also provided.
Training Material
The training material consists of the following:
1. A description of the examination procedure;
2. The data collection form and instructions for its use;
3. A guide to referral, followup, and smears;
4. Procedures for the smearing of suspected candidal lesions; and
5. A series of slides with narratives highlighting diagnostic criteria for selected orallesions.
5-9
Referral
For most of the conditions of interest in the survey, subjects should be referred for further
evaluation by a dentist or dental specialist. Lesions that need not be referred are noted in the Guide to
Referral, Follow-up, and Smears, which accompanies this section of the manual. Lesions considered to
have malignant potential are identified as requiring follow-up referral. For the remaining lesions the SP
should see a dentist at his/her earliest convenience.
Bibliography
The following are selected references used in the development of this section:
Axell, T.: A prevalence study of oral mucosal lesions in an adult Swedish population.Odontol. Revy. 1976:27:Suppl. 36.
Axell, T., Mornstad, H., and Sundstrom, B. The relation of the clinical picture to the histo-pathology of snuff dippers’ lesions in a Swedish population.J. Oral Pathol. 1976:5:229-236.
Bouquot, J.E.: Common oral lesions found during a mass screening examination.J. Am.Dent. Assoc. 1986:112:50-57.
Greer, R.O., Jr., and Poulson, T.C.: Oral tissue alterations associated with the use ofsmokeless tobacco by teen-agers.Oral Surg. 1983:56:275-284.
Hand, J.S. and Whitehill, J.M.: The prevalence of oral mucosal lesions in an elderlypopulation. J. Am. Dent. Assoc. 1986:112:73-76.
Pindborg, J.J.: Atlas of Diseases of the Oral Mucosa, Fourth Edition, Munksgaard,Copenhagen, 1985.
World Health Organization: Guide to epidemiology and diagnosis of oral mucosal diseasesand conditions.Community Dent. Oral Epidemiol. 1980:8:1-26.
5-10

5.5.2 Oral Mucosal Tissue Examination Procedure
Equipment and Supplies
2 mouth mirrors2 2x2 gauze squares
Procedures:**
The examination procedure follows a systematic assessment of the lips; labial mucosa and
sulcus; commissures, buccal mucosa and sulcus; gingiva and alveolar ridges, tongue; floor of the mouth;
and hard and soft palate.
1. Begin examination by observing the lipswith the mouth both closed and open. Notethe color, texture and any surface abnormalities of the upper and lower vermilionborders.
2. With the mouth partially open, visually examine the labial mucosa and sulcusof:
a. the maxillary vestibule and frenulum, andb. the mandibular vestibule.
Observe the color and any swelling or other abnormalities of the vestibular mucosa andgingiva.
3. Using the two mouth mirrors as retractors and with the mouth open wide, examine firstthe right, then the left buccal mucosaextending from the labial commissuresand backto the anterior tonsillar pillar. Note any change in pigmentation, color, texture,mobility and other abnormalities of the mucosa, make sure that the commissures areexamined carefully and are not covered by the mouth mirrors during retraction of thecheek.
4. Next, examine the gingivaand alveolar ridges(processes).
a. Buccal and Labial Aspects
Start with the right maxillaryposterior gingiva and alveolar ridge and move around thearch to the left posterior gingiva. Continue with the left mandibularposterior gingivaand alveolar ridge and move around the arch to the right posterior gingiva.
** Abstracted from the World Health Organization’s Guide to Epidemiology and Diagnosis of Oral Mucosal Diseasesand Conditions (reprinted from Community Dentistry and Oral Epidemiology, 1980;8:1-26).
5-11
b. Palatal and Lingual Aspects
Same as above except on the palatalfor the maxillary (right to left) examination andon the lingualfor the mandibular (left to right) examination.
5. With the tongue at rest, and mouth partially open, inspect the dorsumof the tonguefor any swelling, ulceration, coating or variation in size, color or texture. Also noteany change in the pattern of the papillae covering the surface of the tongue andexamine the top and the tip of the tongue. The subject should then protrude thetongue, and the examiner should note any abnormality of mobility. With the aid ofmouth mirrors, inspect the marginsof the tongue. Grasping the tip of the tongue witha piece of gauze will assist full protrusion and will aid examination of the margins.Then observe the ventralsurface.
6. With the tongue still elevated, inspect the floor of the mouth for swellings or otherabnormalities.
7. With the mouth wide open and the subject’s head tilted backwards, gently depress thebase of the tongue with a mouth mirror. First inspect the hard, and then the softpalate.
Mucosal or facial tissues that seem to be abnormal should be palpated.
5.5.3 Guide to NHANES III Oral Soft Tissue Lesions Recording Form(Dental Examination Form - page 3)
Each form can be used for only one lesion or condition per subject. If more than one
condition is found, additional forms should be used. For suspected smokeless tobacco lesions, each
individual lesion in an SP should be treated as a separate lesion and recorded on separate forms.
The form has three major components: an oral cavity diagram for specifying location; a
section for the identification of a clinical diagnosis; and a section to clinically describe the lesion(s). In
addition, there is a space to indicate whether the lesion has been smeared. (See Exhibit 5-5 for a copy
of the form.)
5-12
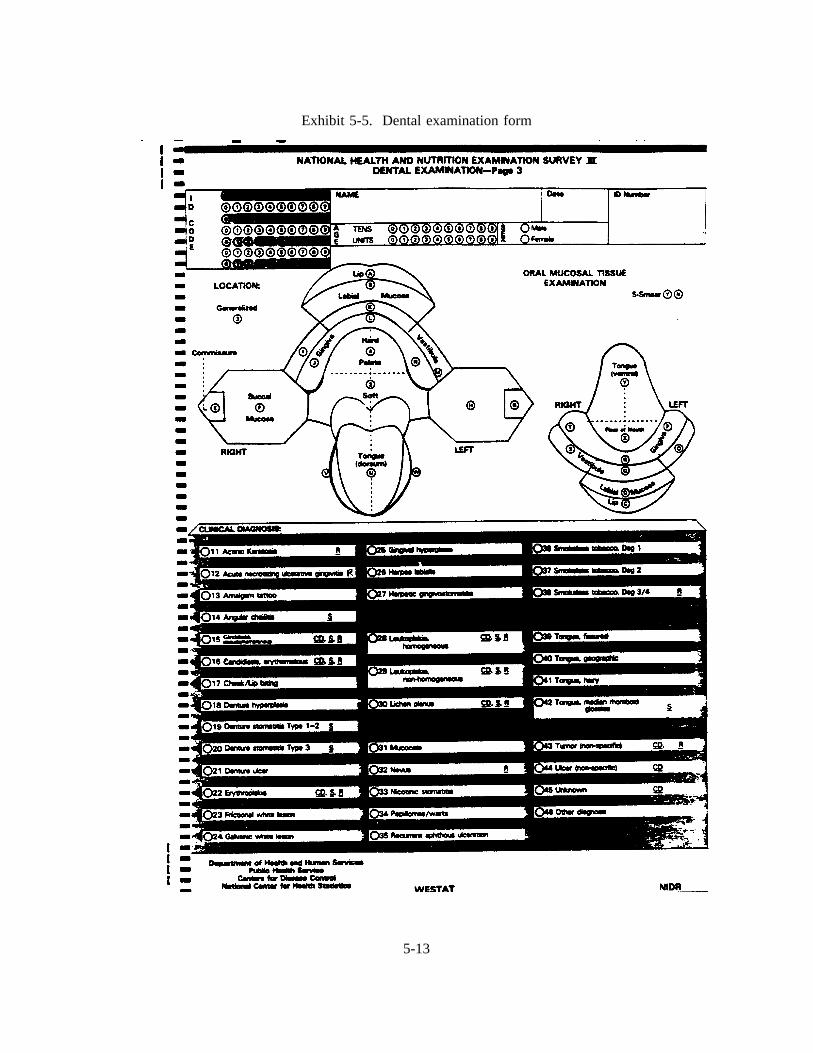
Exhibit 5-5. Dental examination form
5-13
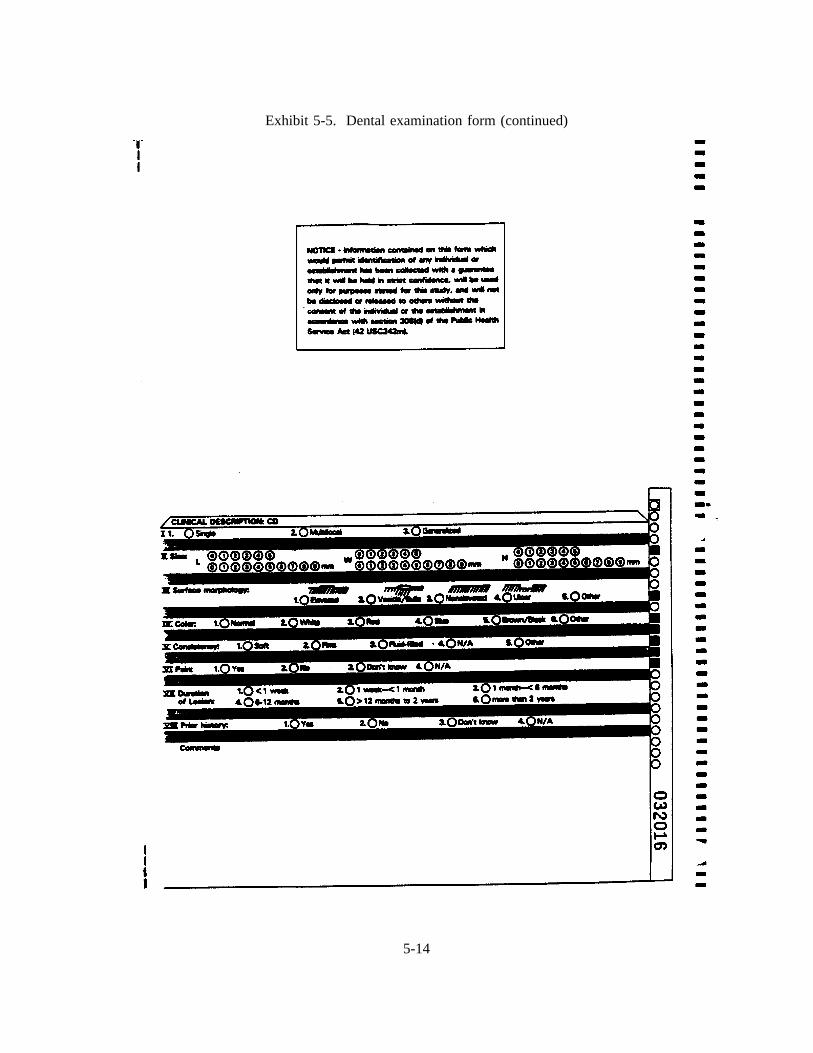
Exhibit 5-5. Dental examination form (continued)
5-14
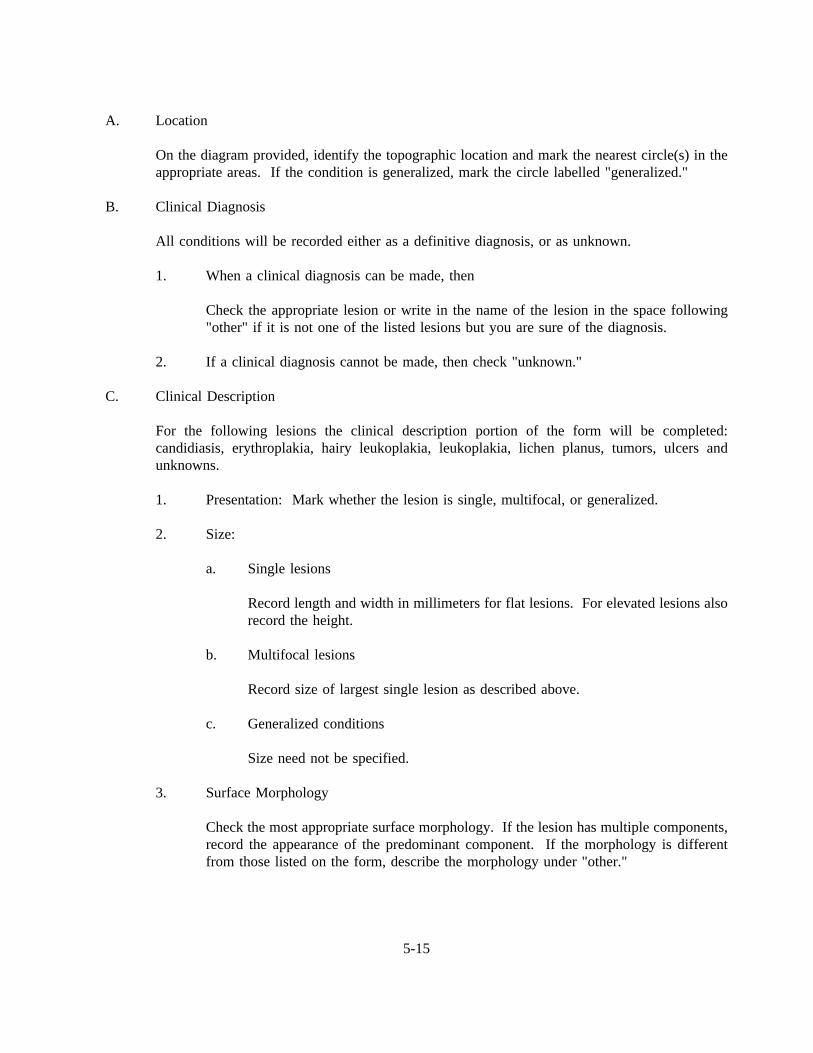
A. Location
On the diagram provided, identify the topographic location and mark the nearest circle(s) in theappropriate areas. If the condition is generalized, mark the circle labelled "generalized."
B. Clinical Diagnosis
All conditions will be recorded either as a definitive diagnosis, or as unknown.
1. When a clinical diagnosis can be made, then
Check the appropriate lesion or write in the name of the lesion in the space following"other" if it is not one of the listed lesions but you are sure of the diagnosis.
2. If a clinical diagnosis cannot be made, then check "unknown."
C. Clinical Description
For the following lesions the clinical description portion of the form will be completed:candidiasis, erythroplakia, hairy leukoplakia, leukoplakia, lichen planus, tumors, ulcers andunknowns.
1. Presentation: Mark whether the lesion is single, multifocal, or generalized.
2. Size:
a. Single lesions
Record length and width in millimeters for flat lesions. For elevated lesions alsorecord the height.
b. Multifocal lesions
Record size of largest single lesion as described above.
c. Generalized conditions
Size need not be specified.
3. Surface Morphology
Check the most appropriate surface morphology. If the lesion has multiple components,record the appearance of the predominant component. If the morphology is differentfrom those listed on the form, describe the morphology under "other."
5-15
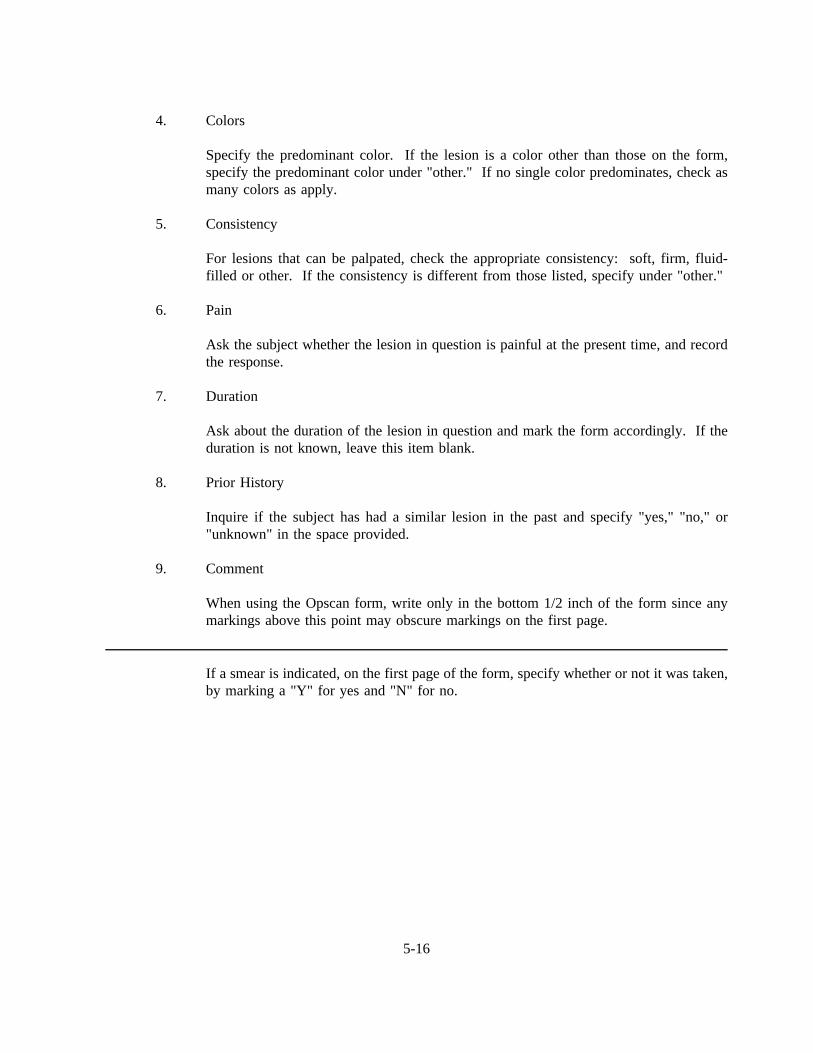
4. Colors
Specify the predominant color. If the lesion is a color other than those on the form,specify the predominant color under "other." If no single color predominates, check asmany colors as apply.
5. Consistency
For lesions that can be palpated, check the appropriate consistency: soft, firm, fluid-filled or other. If the consistency is different from those listed, specify under "other."
6. Pain
Ask the subject whether the lesion in question is painful at the present time, and recordthe response.
7. Duration
Ask about the duration of the lesion in question and mark the form accordingly. If theduration is not known, leave this item blank.
8. Prior History
Inquire if the subject has had a similar lesion in the past and specify "yes," "no," or"unknown" in the space provided.
9. Comment
When using the Opscan form, write only in the bottom 1/2 inch of the form since anymarkings above this point may obscure markings on the first page.
If a smear is indicated, on the first page of the form, specify whether or not it was taken,by marking a "Y" for yes and "N" for no.
5-16

5.5.4 NHANES III - Oral Mucosal Lesions and Conditions:
Guide to Referral, Followup, and Smears
5-17
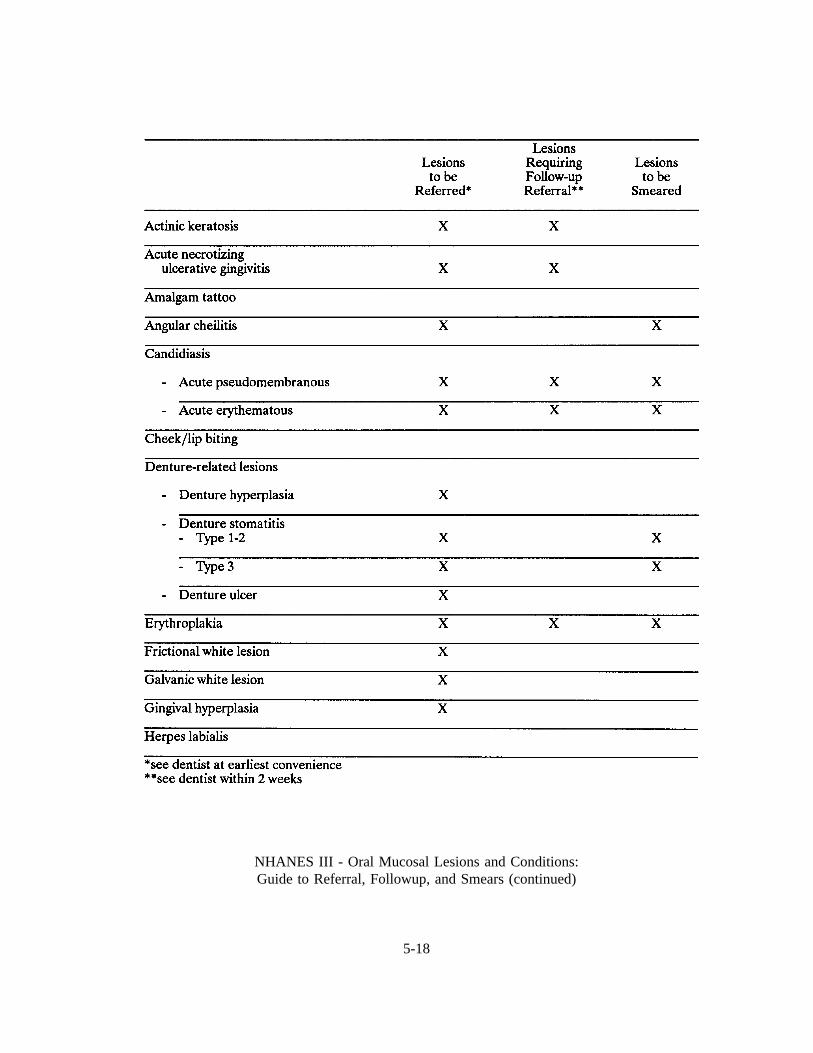
NHANES III - Oral Mucosal Lesions and Conditions:Guide to Referral, Followup, and Smears (continued)
5-18
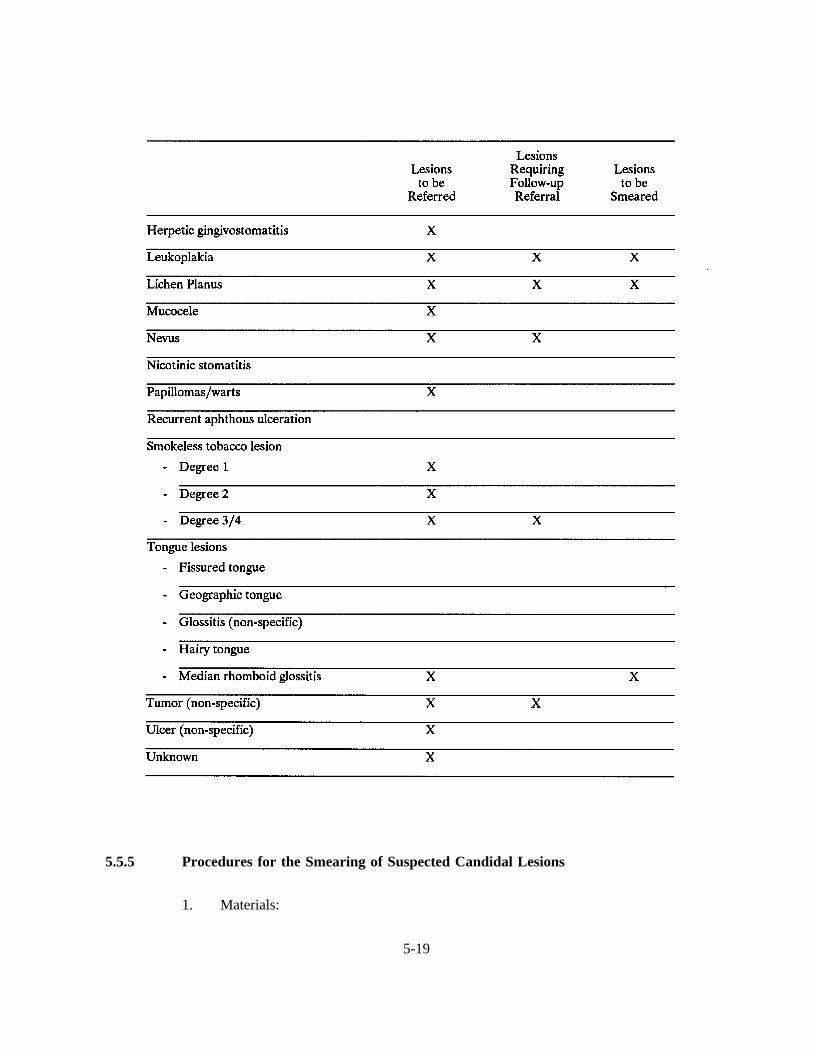
5.5.5 Procedures for the Smearing of Suspected Candidal Lesions
1. Materials:
5-19
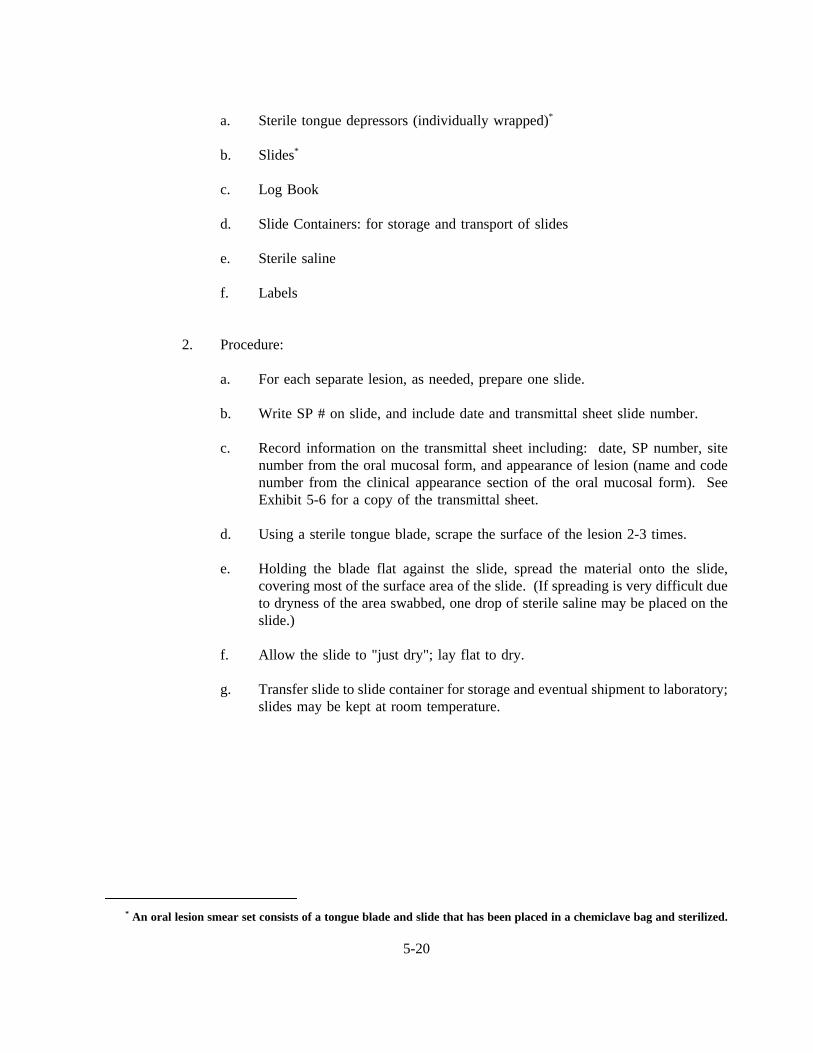
a. Sterile tongue depressors (individually wrapped)*
b. Slides*
c. Log Book
d. Slide Containers: for storage and transport of slides
e. Sterile saline
f. Labels
2. Procedure:
a. For each separate lesion, as needed, prepare one slide.
b. Write SP # on slide, and include date and transmittal sheet slide number.
c. Record information on the transmittal sheet including: date, SP number, sitenumber from the oral mucosal form, and appearance of lesion (name and codenumber from the clinical appearance section of the oral mucosal form). SeeExhibit 5-6 for a copy of the transmittal sheet.
d. Using a sterile tongue blade, scrape the surface of the lesion 2-3 times.
e. Holding the blade flat against the slide, spread the material onto the slide,covering most of the surface area of the slide. (If spreading is very difficult dueto dryness of the area swabbed, one drop of sterile saline may be placed on theslide.)
f. Allow the slide to "just dry"; lay flat to dry.
g. Transfer slide to slide container for storage and eventual shipment to laboratory;slides may be kept at room temperature.
* An oral lesion smear set consists of a tongue blade and slide that has been placed in a chemiclave bag and sterilized.
5-20
3. Shipping:
Mail slides at the end of the week to the contractor who will be doing analyses ofslides, using transmittal procedures in place for non-questionnaire, non-laboratory items(e.g., ECG, tracings, X-rays). A Candidiasis Smears Transmittal Sheet appears asExhibit 5-6. This form will have to be completed to document the fact that you haveshipped slides. Procedures for shipping slides are discussed in Chapter 6, ExamRelated Forms and Procedures.
5-21

Exhibit 5-6. Candidiasis smears transmittal sheet
5-22

5.5.6 NHANES III Oral Mucosal Lesions and Conditions
The diagnostic criteria for oral mucosal lesions and conditions to be followed for the
NHANES dental exam are described in Table 5-1. The order of the slides and diagnostic criteria by color,
topography and/or morphology are provided below.
Order of Slides and Diagnostic Criteria by Color, Topography, and/or Morphology
1. White Non-adherentlesions Candidiasis, acute pseudomembranousAspirin burn
2. White or White/Red AdherentLesions Local etiology present/suspected:Smokeless tobacco lesionsNicotinic stomatitisFrictional white lesionGalvanic white lesionCheek/lip biting
Local etiology not present:LeukoplakiaLichen planusCandidiasis, chronic hyperplastic
3. Red Lesions Candidiasis, acute atrophicErythroplakia
4. Denture-related Lesions Denture stomatitisDenture hyperplasiaDenture ulcer
5. Perioral Conditions Actinic keratosisAngular cheilitis
6. Tongue Lesions Fissured tongueGeographic tongueHairy tongueMedian Rhomboid Glossitis
7. Ulcers ANUGHerpetic gingivostomatitisHerpes labialisRecurrent aphthous ulcerationUlcer (non-specific)
5-23
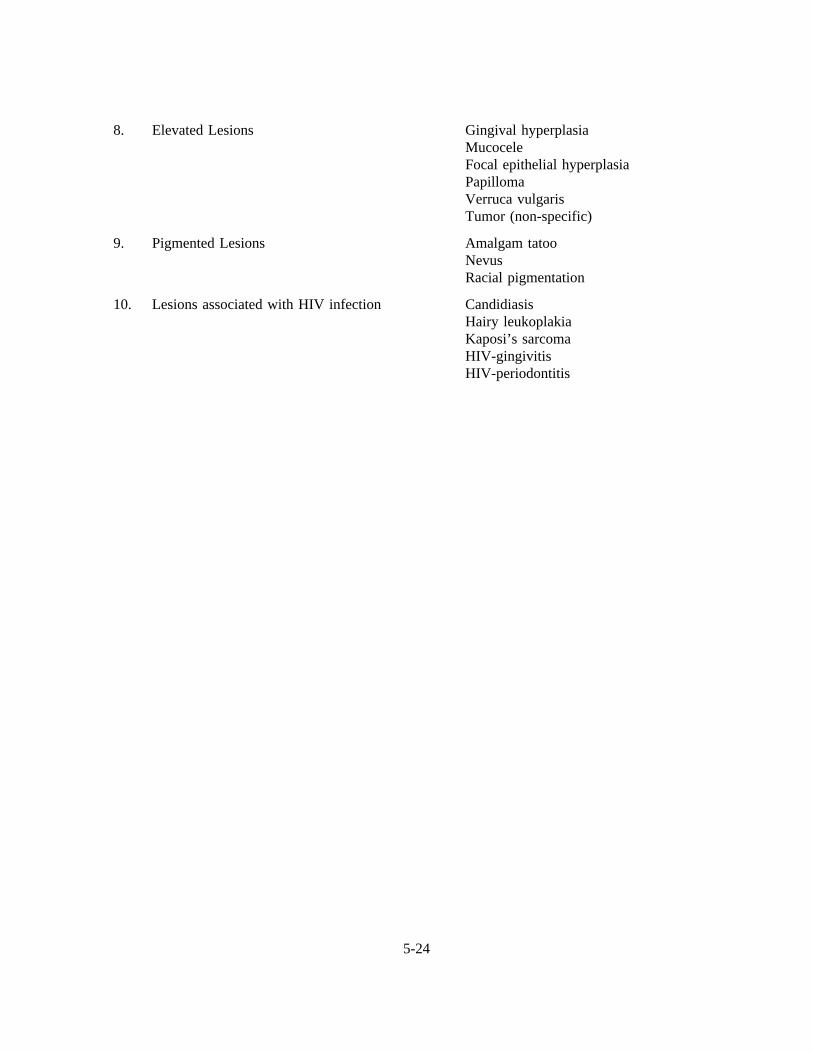
8. Elevated Lesions Gingival hyperplasiaMucoceleFocal epithelial hyperplasiaPapillomaVerruca vulgarisTumor (non-specific)
9. Pigmented Lesions Amalgam tatooNevusRacial pigmentation
10. Lesions associated with HIV infection CandidiasisHairy leukoplakiaKaposi’s sarcomaHIV-gingivitisHIV-periodontitis
5-24
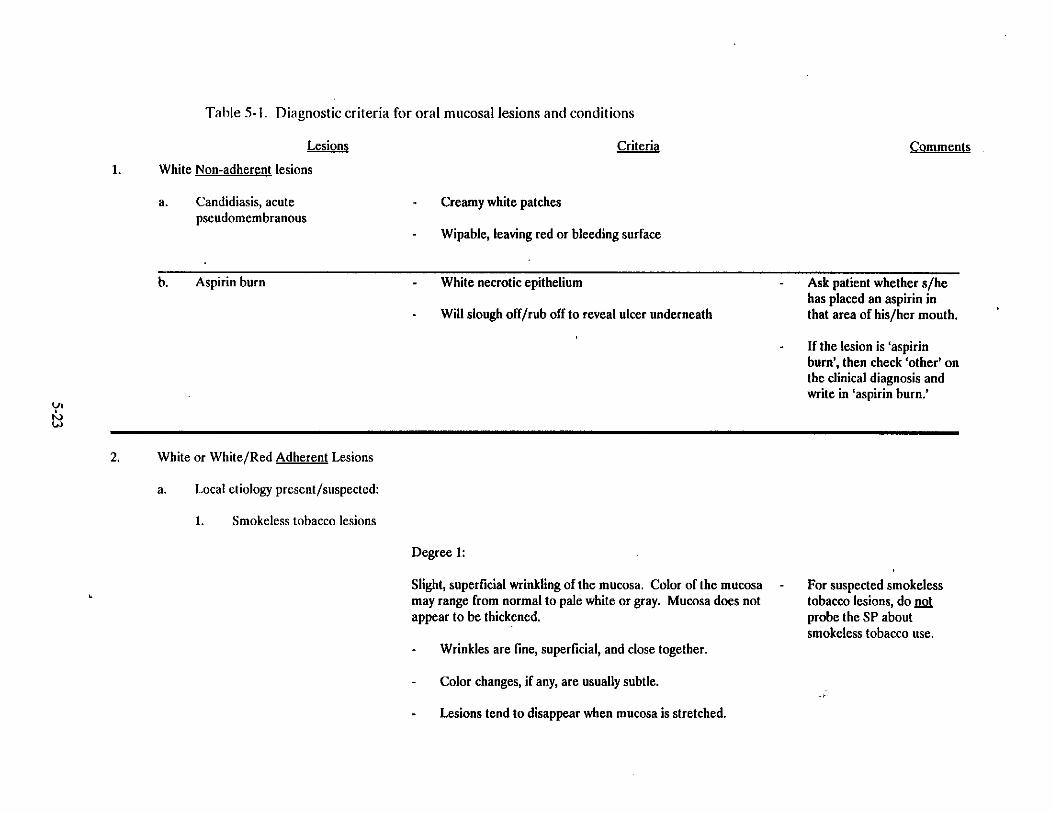
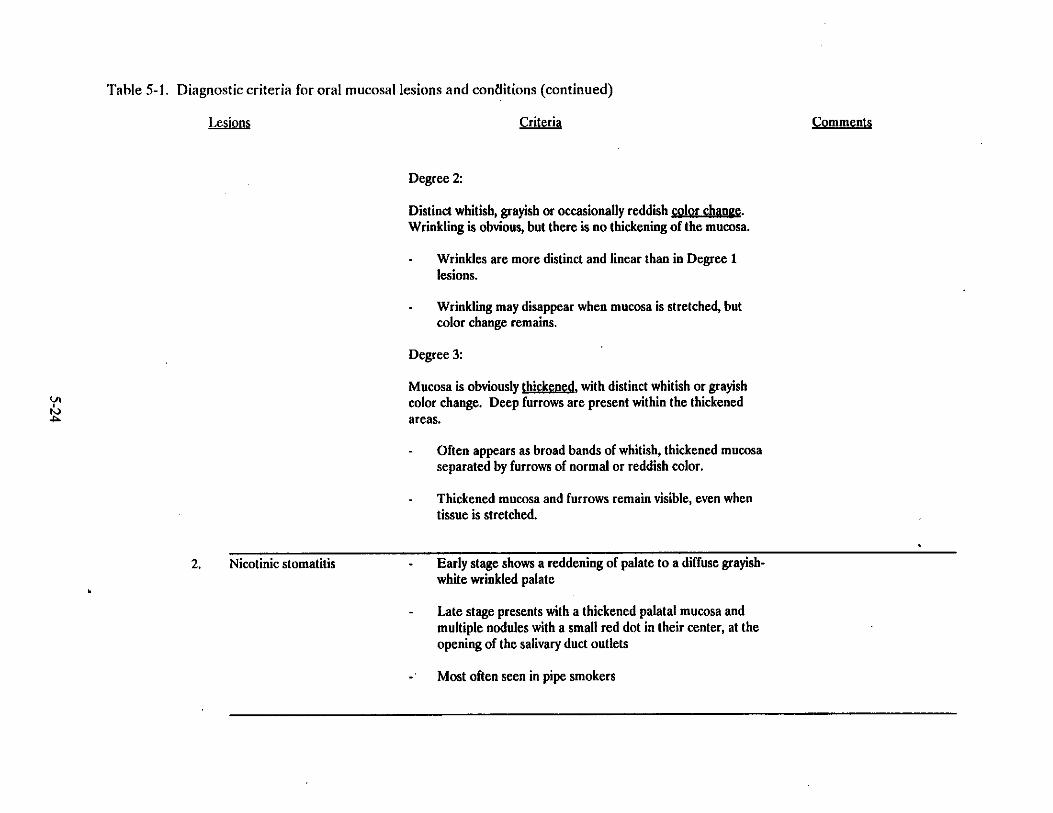
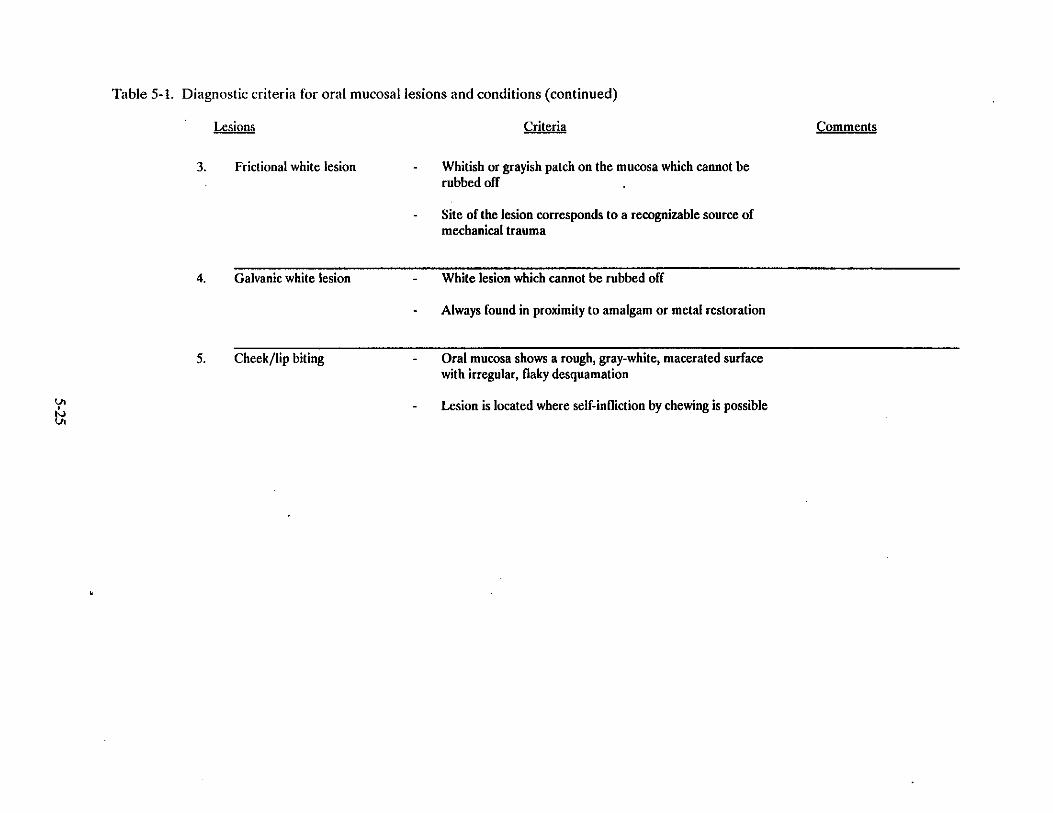

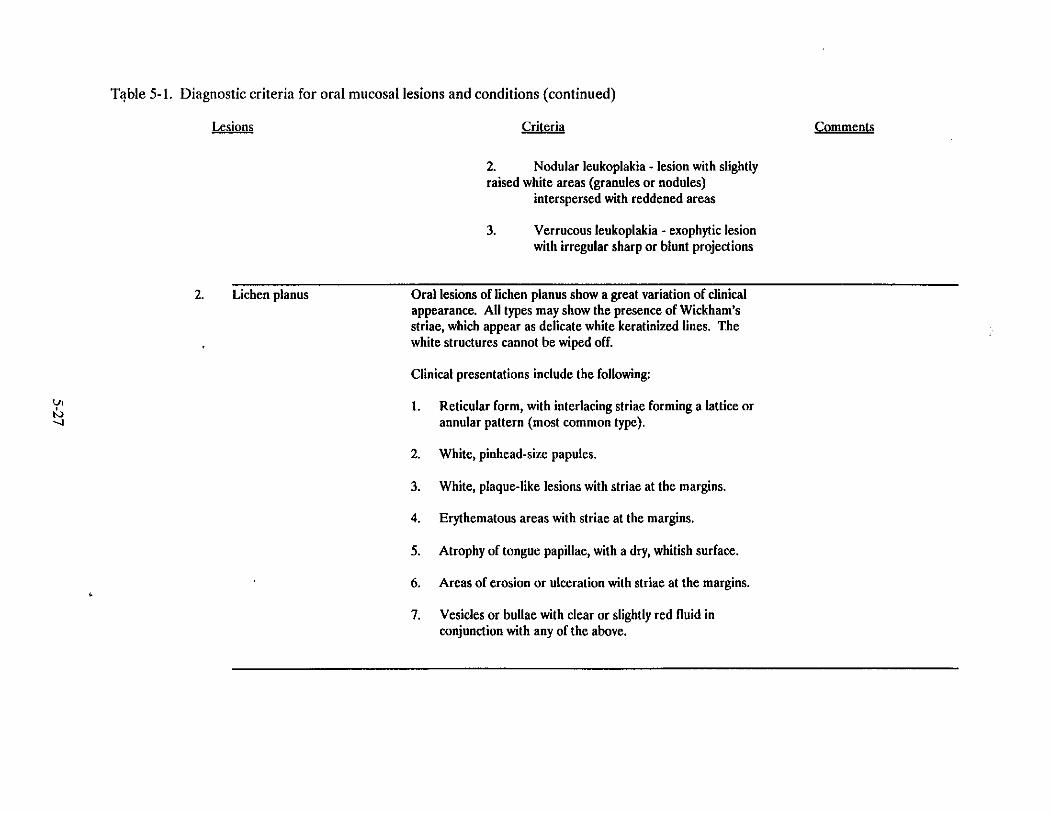
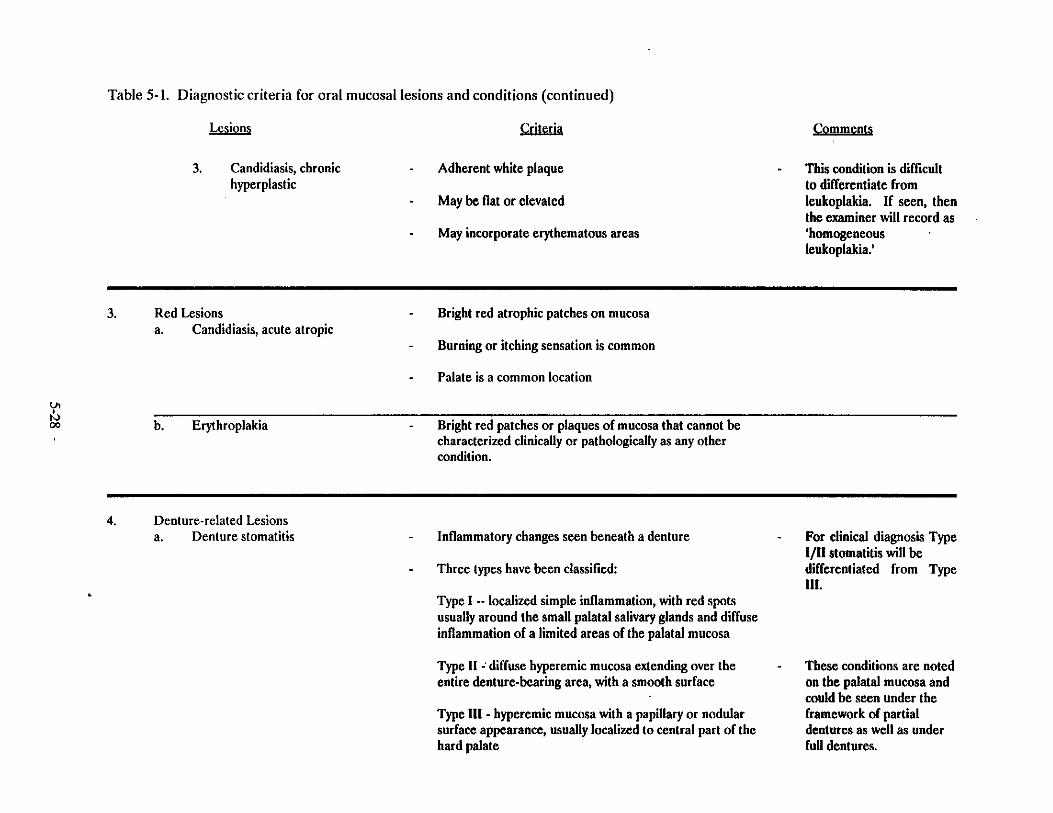
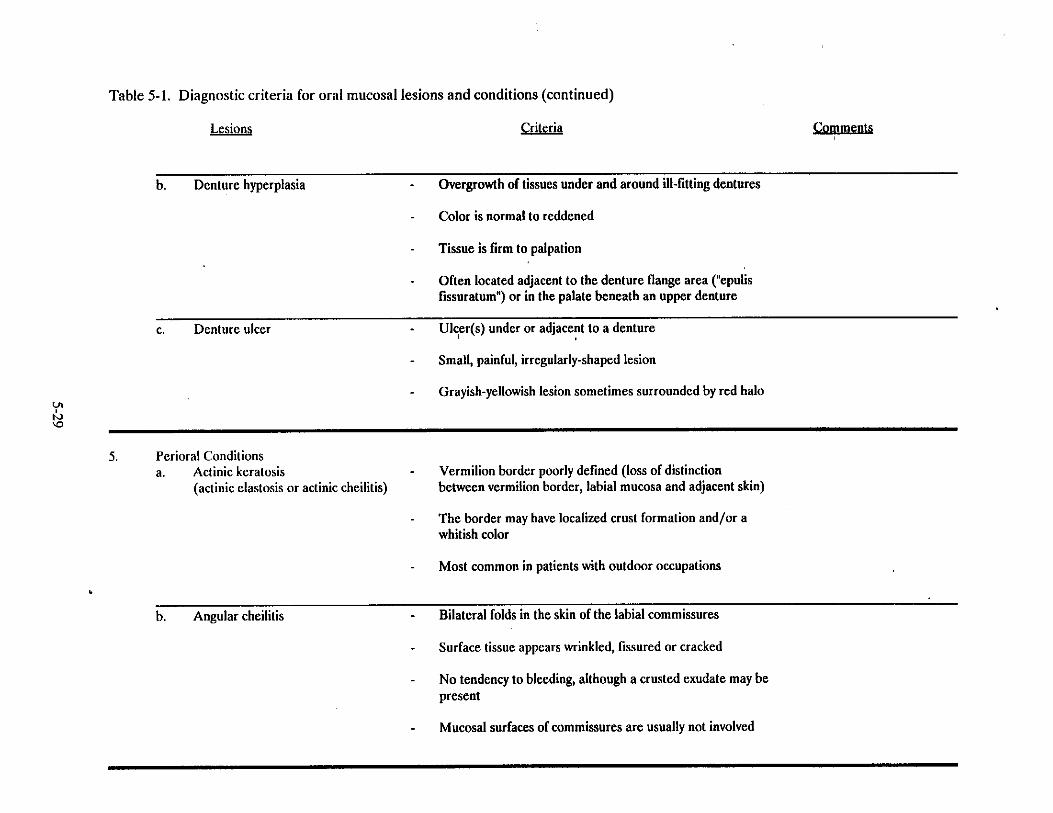
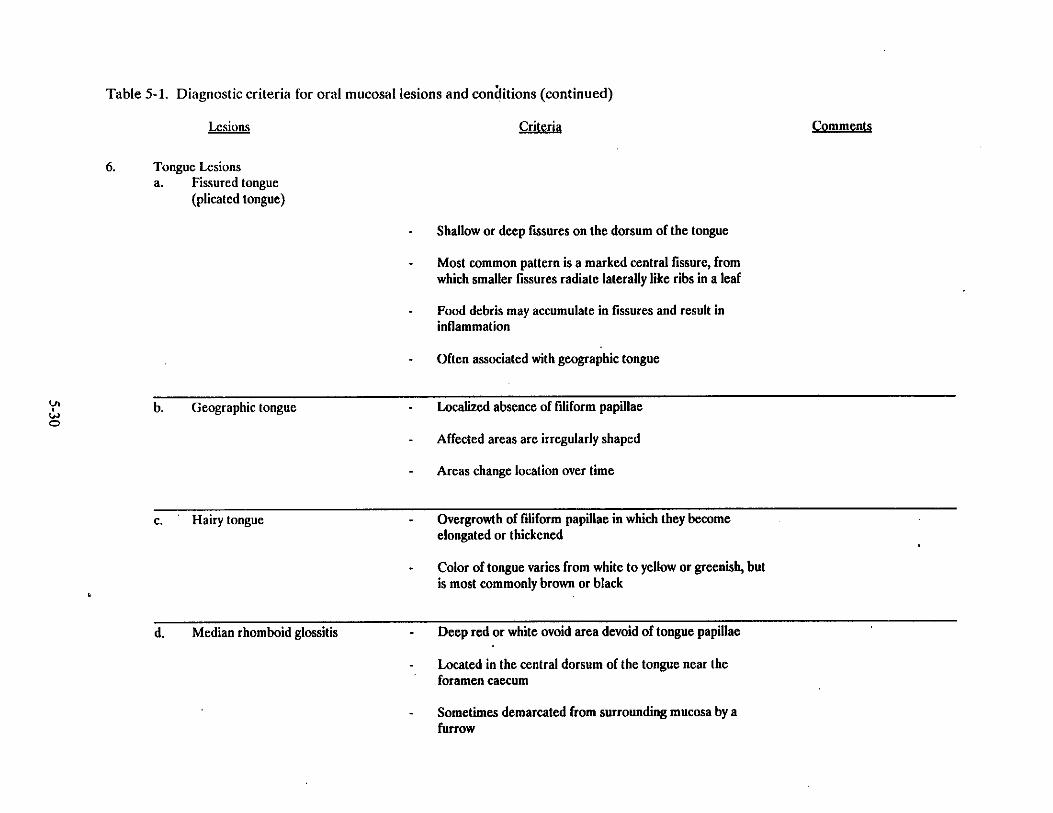
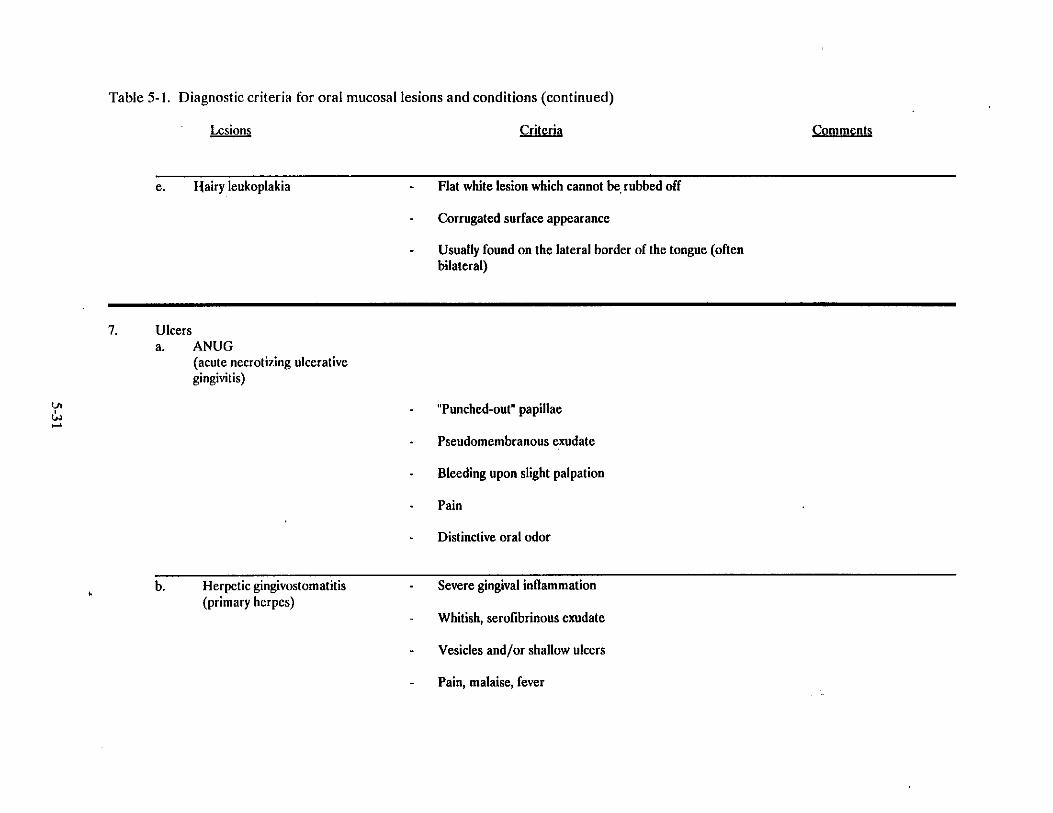
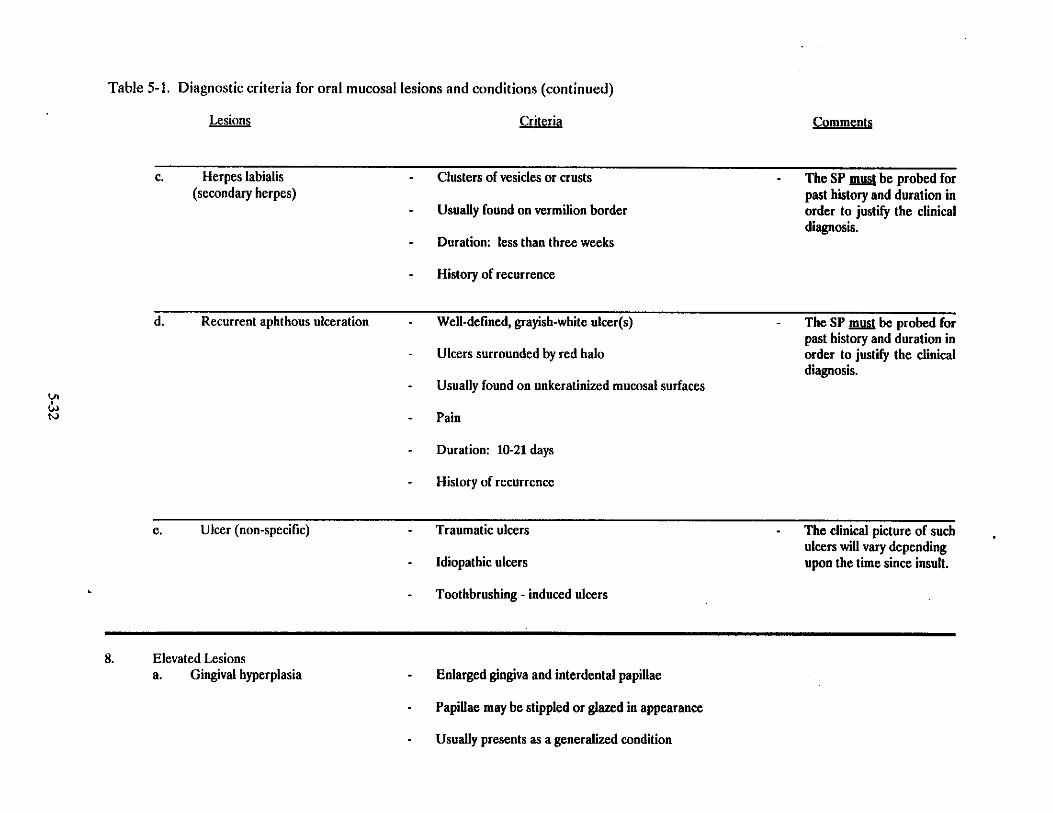
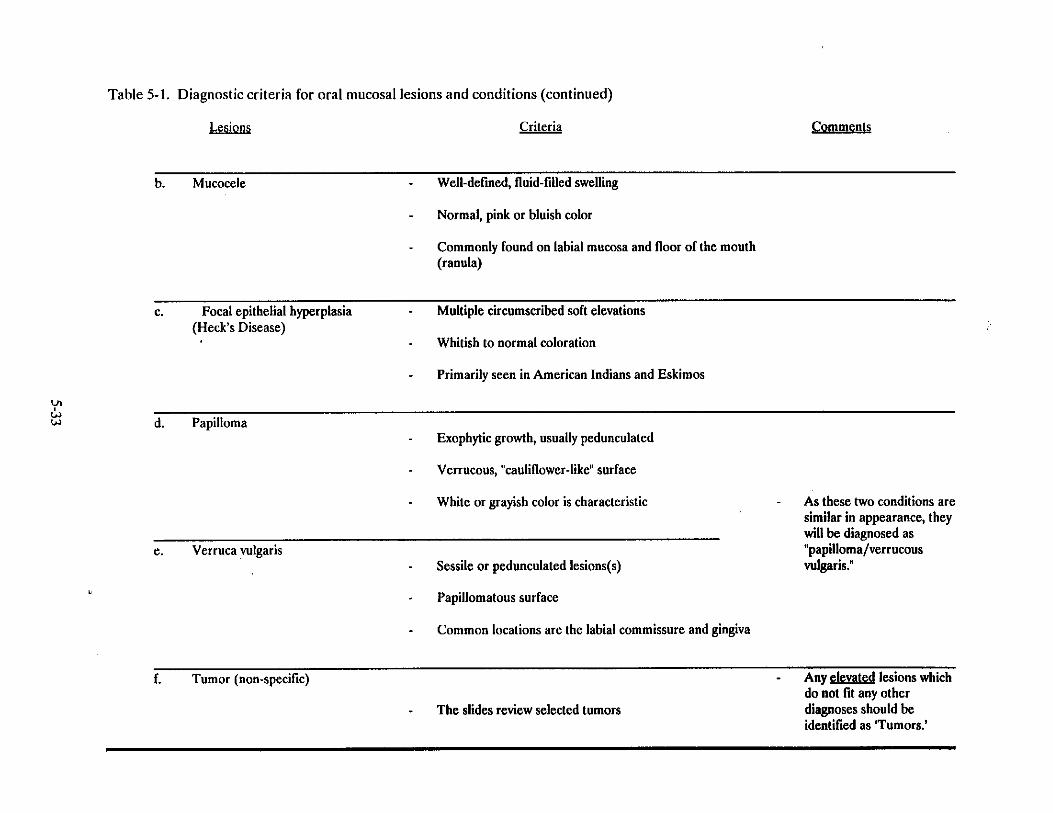
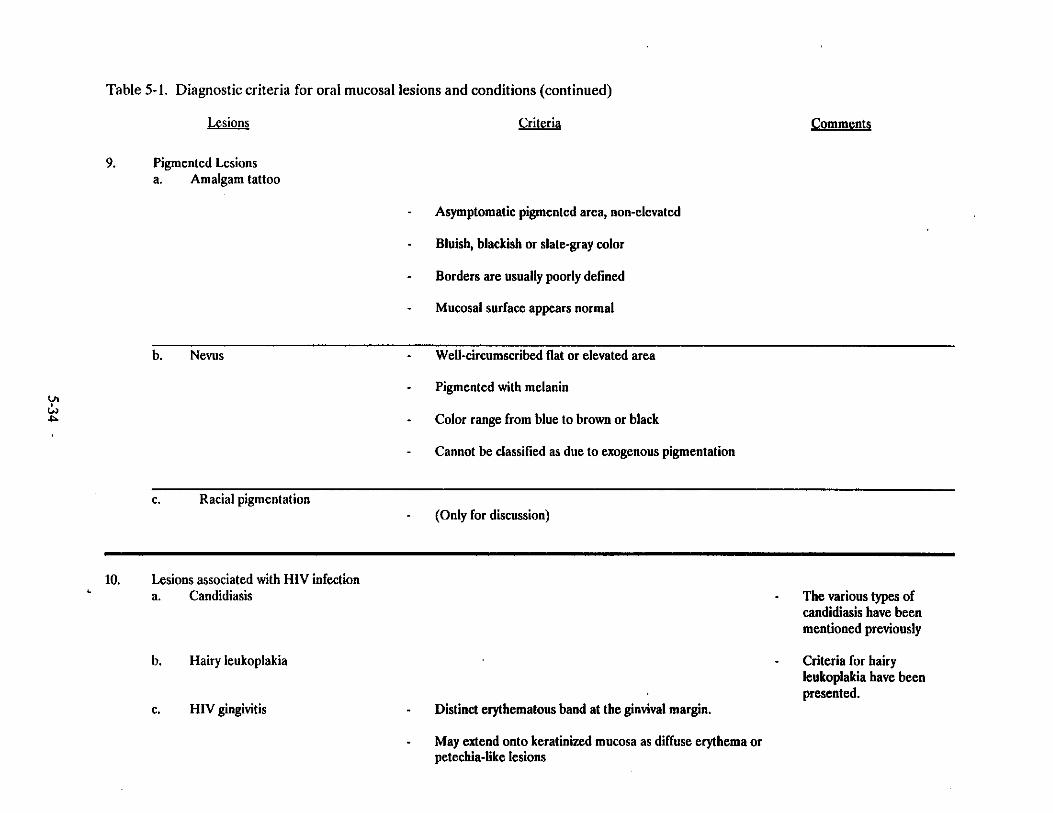
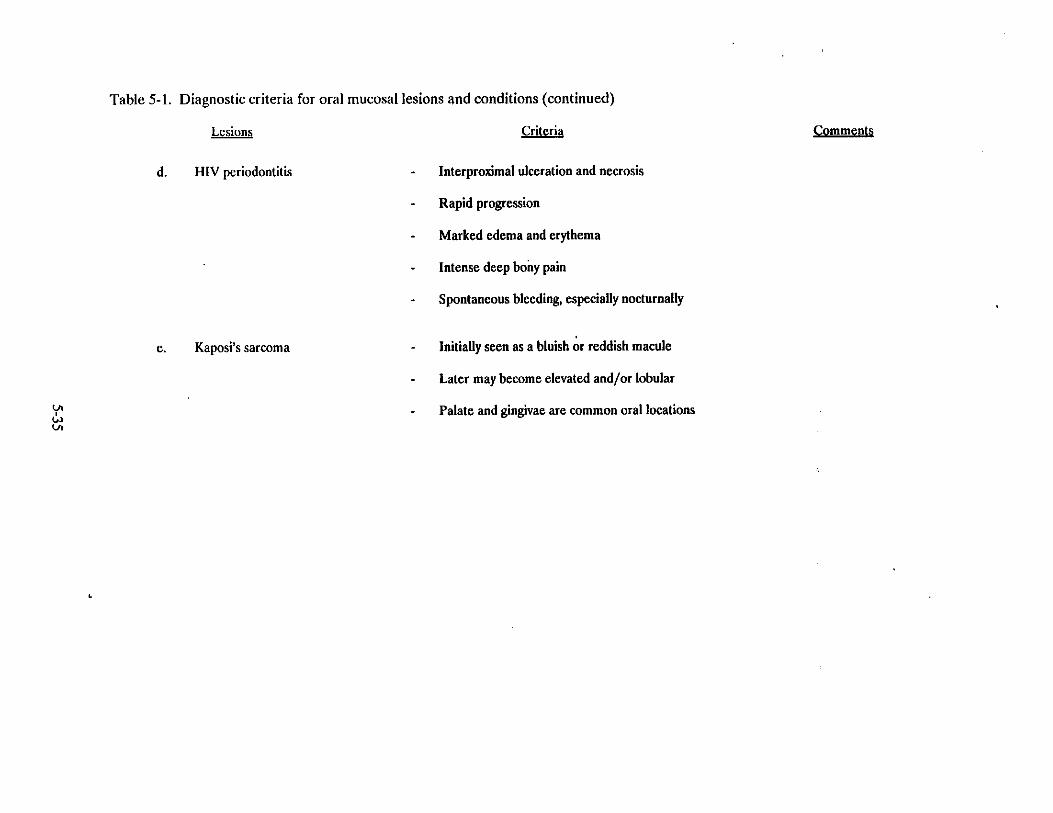
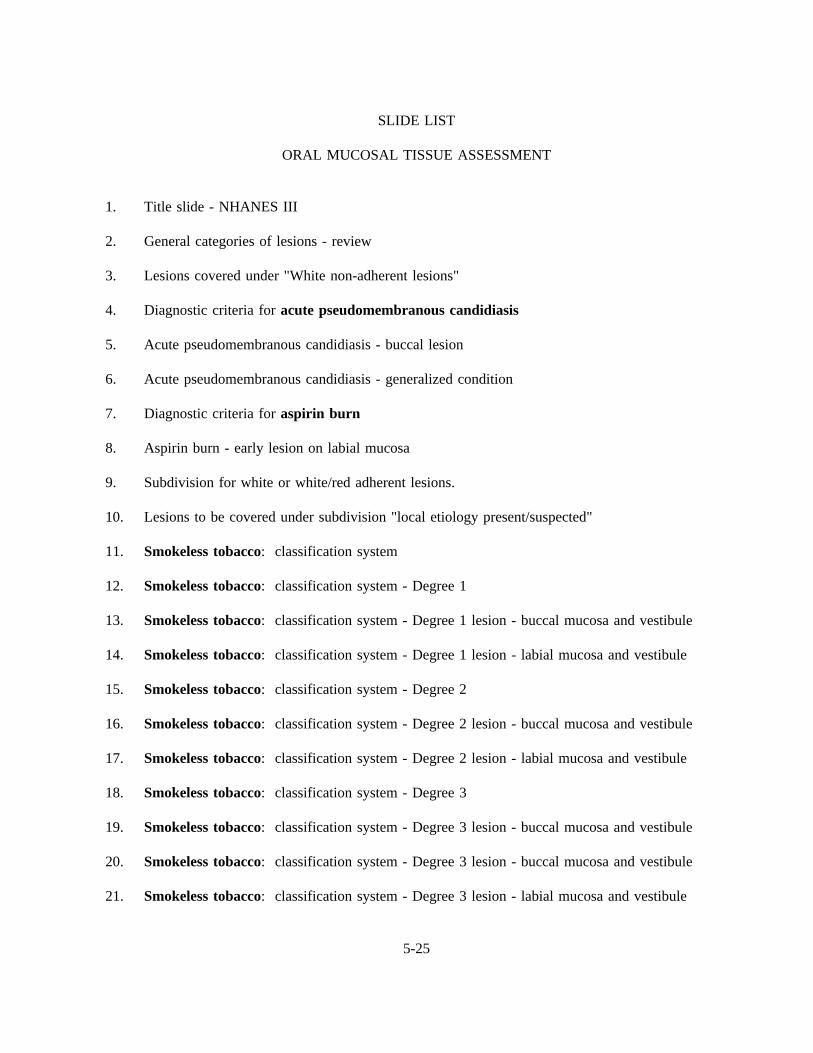
SLIDE LIST
ORAL MUCOSAL TISSUE ASSESSMENT
1. Title slide - NHANES III
2. General categories of lesions - review
3. Lesions covered under "White non-adherent lesions"
4. Diagnostic criteria foracute pseudomembranous candidiasis
5. Acute pseudomembranous candidiasis - buccal lesion
6. Acute pseudomembranous candidiasis - generalized condition
7. Diagnostic criteria foraspirin burn
8. Aspirin burn - early lesion on labial mucosa
9. Subdivision for white or white/red adherent lesions.
10. Lesions to be covered under subdivision "local etiology present/suspected"
11. Smokeless tobacco: classification system
12. Smokeless tobacco: classification system - Degree 1
13. Smokeless tobacco: classification system - Degree 1 lesion - buccal mucosa and vestibule
14. Smokeless tobacco: classification system - Degree 1 lesion - labial mucosa and vestibule
15. Smokeless tobacco: classification system - Degree 2
16. Smokeless tobacco: classification system - Degree 2 lesion - buccal mucosa and vestibule
17. Smokeless tobacco: classification system - Degree 2 lesion - labial mucosa and vestibule
18. Smokeless tobacco: classification system - Degree 3
19. Smokeless tobacco: classification system - Degree 3 lesion - buccal mucosa and vestibule
20. Smokeless tobacco: classification system - Degree 3 lesion - buccal mucosa and vestibule
21. Smokeless tobacco: classification system - Degree 3 lesion - labial mucosa and vestibule
5-25
SLIDE LIST
ORAL MUCOSAL TISSUE ASSESSMENT (continued)
22. Smokeless tobacco: classification system - Degree 3 lesion - labial mucosa and vestibule
23. Diagnostic criteria fornicotinic stomatitis
24. Nicotinic stomatitis - hard and soft plate
25. Nicotinic stomatitis - soft plate
26. Diagnostic criteria forfrictional white lesion
27. Frictional white lesion - palatal lesion
28. Diagnostic criteria forgalvanic white lesion
29. Galvanic white lesion - buccal mucosa
30. Diagnostic criteria forcheek/lip biting lesion
31. Lip biting lesion
32. Cheek biting lesion
33. Lesions to be covered under subdivision "local etiology not present"
34. Diagnostic criteria forleukoplakia
35. Diagnostic criteria for leukoplakia (continued)
36. Diagnostic criteria for leukoplakia (continued)
37. Diagnostic criteria for leukoplakia (continued)
38. Leukoplakia - homogeneous
39. Leukoplakia - homogeneous
40. Leukoplakia - homogeneous
41. Leukoplakia - non-homogeneous
42. Leukoplakia - homogeneous
5-26
SLIDE LIST
ORAL MUCOSAL TISSUE ASSESSMENT (continued)
43. Leukoplakia - non-homogeneous
44. Leukoplakia - non-homogeneous
45. Leukoplakia - non-homogeneous
46. Leukoplakia - non-homogeneous
47. Diagnostic criteria forlichen planus
48. Diagnostic criteria for lichen planus (continued)
49. Diagnostic criteria for lichen planus (continued)
50. Lichen planus - reticular
51. Lichen planus - reticular
52. Lichen planus - reticular
53. Lichen planus - reticular
54. Lichen planus - reticular
55. Lichen planus - plaque-like with striae
56. Lichen planus - tongue lesion
57. Lichen planus - erosive/ulcerative type
58. Lichen planus - erosive/ulcerative type
59. Lichen planus - bullous type
60. Diagnostic criteria forchronic hyperplastic candidiasis
61. Chronic hyperplastic candidiasis - tongue lesion (median rhomboid glossitis)
62. Chronic hyperplastic candidiasis - tongue lesion
63. Lesions covered under "red lesions"
5-27
SLIDE LIST
ORAL MUCOSAL TISSUE ASSESSMENT (continued)
64. Diagnostic criteria foracute atrophic candidiasis
65. Acute atrophic candidiasis - palatal lesion
66. Diagnostic criteria forerythroplakia
67. Erythroplakia - buccal mucosa and vestibule
68. Erythroplakia - buccal mucosa and vestibule
69. Erythroplakia - for purposes of this survey, this clinical presentation will be referred to aserythroplakia
70. Lesions covered under "denture-related lesions"
71. Diagnostic criteria fordenture stomatitis
72. Denture stomatitis - Type 1
73. Denture stomatitis - Type 2
74. Denture stomatitis - Type 3
75. Diagnostic criteria fordenture hyperplasia
76. Denture hyperplasia - without denture
77. Denture hyperplasia - with denture in place
78. Diagnostic criteria for denture ulcer
79. * Denture ulcer
80. Lesions covered under "perioral/other conditions"
81. Diagnostic criteria foractinic keratosis
82. Actinic keratosis
* Slide missing
5-28
SLIDE LIST
ORAL MUCOSAL TISSUE ASSESSMENT (continued)
83. Actinic keratosis
84. Actinic keratosis - possible epidermoid carcinoma
85. Diagnostic criteria forangular cheilitis
86. Angular cheilitis
87. Angular cheilitis
88. Lesions covered under "tongue lesions"
89. Diagnostic criteria forfissured tongue
90. Fissured tongue
91. Diagnostic criteria forgeographic tongue
92. Geographic tongue
93. Geographic tongue
94. Diagnostic criteria forhairy tongue
95. Hairy tongue
96. Diagnostic criteria formedian rhomboid glossitis
97. Median rhomboid glossitis
98. Lesions covered under "ulcerative conditions"
99. Diagnostic criteria foracute necrotizing ulcerative gingivitis (ANUG)
100. ANUG
101. ANUG
102. Diagnostic criteria forherpetic gingivostomatitis
103. Herpetic gingivostomatitis
104. Herpetic gingivostomatitis - note vesicles
5-29
SLIDE LIST
ORAL MUCOSAL TISSUE ASSESSMENT (continued)
105. Diagnostic criteria forherpes labialis
106. Herpes labialis
107. Herpes labialis
108. Diagnostic criteria forrecurrent aphthous ulcerations (RAU)
109. RAU
110. RAU
111. RAU
112. Types of lesions that may fall undernon-specific ulcers
113. Trauma-induced ulcer
114. Trauma-induced healing ulcer
115. Tooth-brushing induced ulceration
116. Lesions to be covered under "elevated lesions"
117. Diagnostic criteria forgingival hyperplasia
118. Gingival hyperplasia - hydantoin
119. Gingival hyperplasia - cyclosporin
120. Gingival hyperplasia - cyclosporin
121. Diagnostic criteria formucocele
122. Mucocele
123. Ranula
124. Diagnostic criteria forfocal epithelial hyperplasia (FEH)
125. FEH - buccal mucosa
126. FEH - tongue
5-30

SLIDE LIST
ORAL MUCOSAL TISSUE ASSESSMENT (continued)
127. Diagnostic criteria forpapilloma
128. Papilloma - palate
129. Papilloma - palate
130. Diagnostic criteria forverruca vulgaris
131. Verruca vulgaris - commissure
132. Types of elevated/tumor-like lesions - all to be diagnosed as tumor (non-specific)
133. Fibroma
134. Fibroma
135. Peripheral giant cell granuloma
136. Lymphangioma
137. Lymphangioma
138. Hemangioma
139. Hemangioma
140. Lesions covered under "pigmented lesions"
141. Diagnostic criteria foramalgam tattoo
142. Amalgam tattoo - between bicuspids
143. Amalgam tattoo - between bicuspids
144. Diagnostic criteria fornevi
145. Nevus
5-31

MUCOSA
SLIDES
HERE
5-32
5.5.7 Oral Mucosal Tissue Lesion Data Forms(Dental Examination Form - page 3)
Each SP two years and older receives an oral mucosal tissue examination. The dental
examiner asks the recorder to indicate yes (Y) or no (N) for the examination on the top part of the Dental
Examination Form - page 1. (See Exhibit 5-7.) If the examiner identifies one or more oral lesions or
conditions in the SP’s mouth, the examiner will tell the recorder to fill in the number "1," "2," or "3 or
more" under "Forms" in the same box, on the top of the Dental Examination Form - page 1 and then turn
to the Oral Mucosal Tissue Form (Dental Examination Form - page 3. See Exhibit 5-8). Each Oral
Mucosal Tissue Form can be used for only one lesion/condition; if more than one lesion/condition is
identified, additional forms must be used. The SP’s name, ID number, age, sex, and date of exam must
be recorded on each soft-tissue form.
The following sections must be completed by the recorder.
Top of the form: Record the SP’s first and last names, SP ID number, and the date(month, day, and year). Fill in the appropriate circles for the SP’s ID number, age,and sex.
Location: An oral cavity diagram for specifying the location of the lesion orcondition.
Clinical diagnosis.
Clinical description: This section is completed only if the examiner could not makea specific clinical diagnosis based on the brief examination of the SP’s mouth or if anyof the following conditions (marked "CD") are found: candidiasis, erythroplakia,leukoplakia, lichen planus, tumors, ulcers, and unknown lesions.
The Location, Clinical Diagnosis, and Clinical Description Sections are described in more
detail below.
Location of Lesion/Condition. The examiner tells the recorder where thelesion/condition is located in the SP’s mouth. The recorder fills in the circle(s) in thearea(s) which is/are closest to where the examiner identified the lesion. At least onelocation must be marked, and it is possible to mark more than one location.
5-33
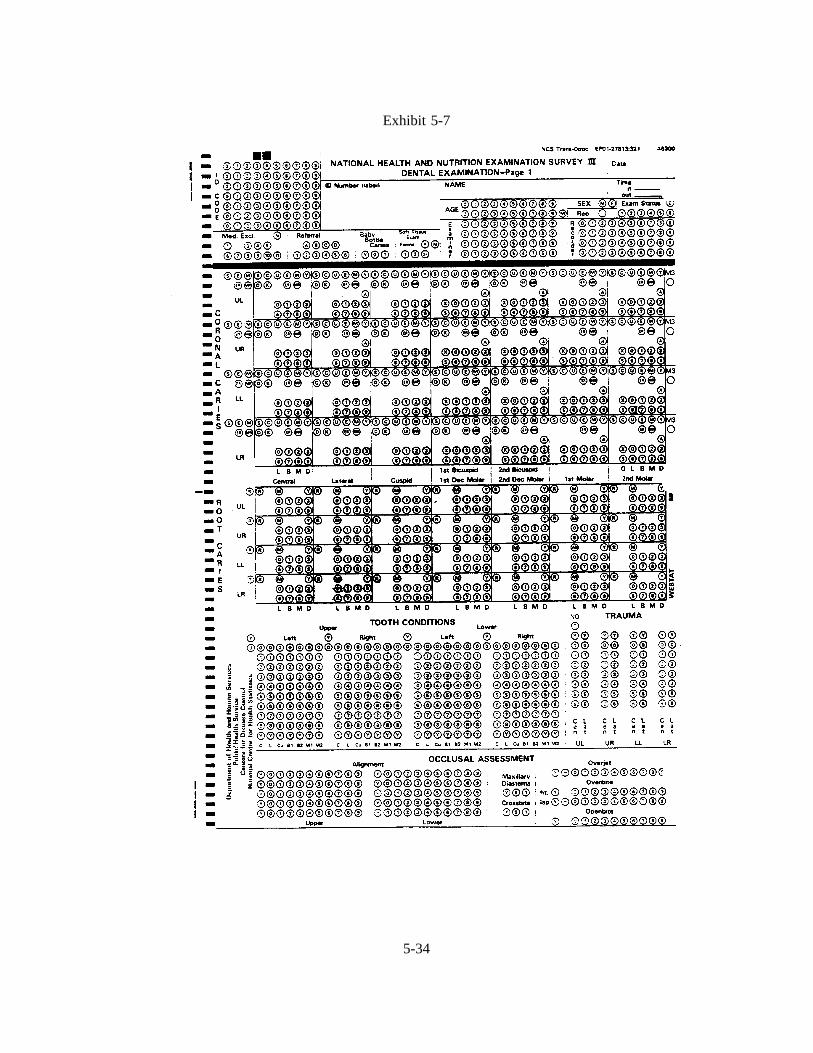
Exhibit 5-7
5-34

Exhibit 5-8
5-35
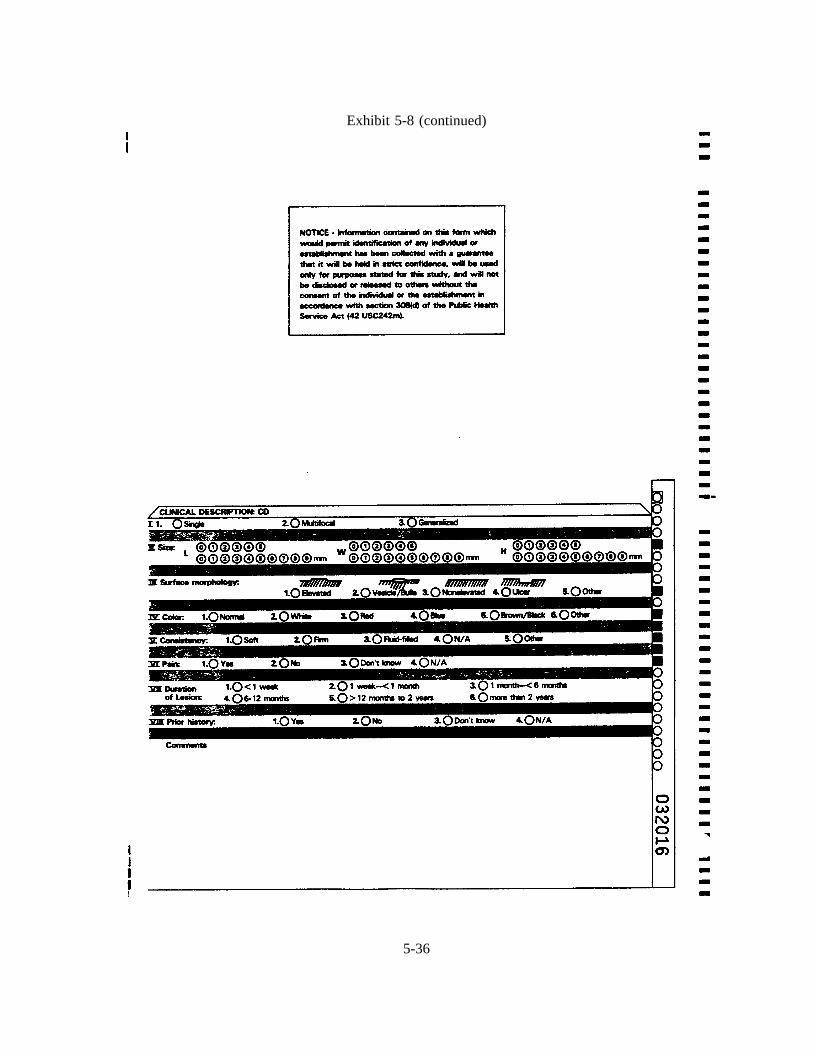
Exhibit 5-8 (continued)
5-36
Clinical Diagnosis. The examiner tells the recorder which clinical diagnosis to mark,and the recorder marks the appropriate circle. At least one circle must be marked, andonly one diagnosis can be marked on a form. If the examiner tells the recorder acondition which is not one of the conditions listed, the recorder fills in the circle for"Other" and writes the name of the condition on the designated line. (Many dentalterms are very technical; therefore if the recorder is unsure of the spelling of thecondition, s/he should be sure to ask the examiner). When a clinical diagnosis cannotbe made, the recorder marks the circle for "Unknown" and completes the ClinicalDescription portion on the back of the form according to the examiner’s directions.The Clinical Description section must only be completed if a diagnosis could not bemade or if it is one of the conditions mentioned earlier.
Clinical Description. The examiner indicates which condition to check for each lineof the Clinical Description. The examiner may wish to look at the form directly andcall off the number of the circle to be marked. Otherwise, the recorder may promptwith the category of each line. Only one mark per line is possible. Spaces after"Other" should be filled as necessary.
Comments. If the examiner wants the recorder to record additional information, itshould be recorded in the comments section. Only the lower 1/2 inch of the secondpage should be used to write comments.
Smears. The following lesions identified by an Sunder Clinical Diagnosis are to besmeared for candidiasis. At the top of page 3 under smear, mark "Y" or "N" toindicate whether or not the smear was taken. The recorder completes the TransmittalSheet for any smears taken.
Angular cheilitisCandidiasisDenture stomatitisErythroplakiaLeukoplakiaLichen PlanusMedian Rhomboid glossitus
Referral
5-37
5.6 Dental Caries Assessment Methods
5.6.1 Introduction
The objectives of the dental caries component of the survey are to:
Establish age-specific data for the prevalence of dental caries in a national sample;
Provide a basis for comparisons with past and future national dental caries surveys;
Provide baseline data for possible followup of selected subsamples;
Provide a basis for the development of estimates of treatment needs; and to
Provide a basis for studying the association between dental caries prevalence and riskfactors.
There are three parts to the dental caries examination: coronal caries, root surface caries and
baby bottle tooth decay.
(a) Coronal Caries: Diagnostic Criteria
With certain exceptions, diagnostic criteria for the coronal caries examinations are those
developed by Radike, et al., as published in the Proceedings of the Conference on Clinical Testing of
Cariostatic Agents, sponsored by the American Dental Association in 1968.
With minor modifications, the diagnostic criteria for coronal caries have been used in several
state-wide surveys and in the following national surveys:
NHANES I (1970-74);
NIDR National Dental Caries Prevalence Survey in U.S. School Children (1979-80);
Hispanic HANES Survey;
NIDR National Survey of Oral Health in U.S. Employed Adults and Seniors (1985-86); and
5-38
NIDR National Survey of Oral Health in School Children (1986-87).
(b) Root Caries: Diagnostic Criteria
The diagnostic criteria for root caries were used in the NIDR National Survey of Oral Health
in U.S. Employed Adults and Seniors (1985-86).
(c) Nursing Bottle Tooth Decay: Diagnostic Criteria
Nursing bottle tooth decay has not been addressed in previous national surveys. For children
ages 12-24 months, the presence of dental caries on the four maxillary incisors will be noted. For all age
groups 2-6 years, the presence of baby bottle tooth decay will be determined from the coronal caries
examination findings for deciduous teeth.
5.6.2 Dental Caries Examination Procedures
In conducting the examinations, an effort should be made to examine each subject in the same
manner. An examiner should avoid the temptation to examine more thoroughly a subject who appears
to be highly susceptible to caries, or less thoroughly a person who appears less susceptible. The caries
examination sequence should follow the sequence shown on the data forms. The forms are arranged by
quadrants; the examiner starts with the upper left central incisor and continues distally through the second
molar in the same quadrant. The same sequence is followed for the upper right, lower left, and lower
right quadrants. At the end of each quadrant the examiner notes the presence or absence of the third
molar for that quadrant. Tooth surfaces are examined in the following order: lingual, labial, mesial, and
distal for anterior teeth, and occlusal, lingual, buccal, mesial, and distal for posterior teeth. It is not
advisable to call out individual surface codes as each tooth surface is examined, as this can be confusing
to the recorder. It is better for the examiner to mentally accumulate surface calls for a given tooth until
all surfaces have been examined before dictating the calls to the recorder.
5-39
5.6.3 Coronal Surface Caries Assessment Diagnostic Criteria
Decayed Tooth Surfaces (The D Component of the Index).Frank lesions are detected as
gross cavitation and thus present few problems in diagnosis. Incipient lesions, on the other hand, are more
difficult to diagnose consistently. Incipient lesions may be subdivided into three categories according to
location, each with the following special diagnostic considerations:
1. Pits and fissures on occlusal, buccal and lingual surfaces: These areas are diagnosedas carious when the explorer catches after insertion with moderate, firm pressure andwhen the catch is accompanied by one or bothof the following signs of caries:
a. Softness at the base of the area.
b. Opacity adjacent to the area providing evidence of undermining ordemineralization.
In other words, a deep pit or fissure in which the explorer catches is not in itselfsufficient evidence of decay; it must be accompanied by at least one of the abovesigns.
2. Smooth areas on buccal (labial) or lingual surfaces: These areas are carious if they aredecalcified or if there is a white spot as evidence of subsurface demineralization andif the area is found to be soft by:
a. Penetration with the explorer, or
b. Scraping away the enamel with the explorer.
These areas should be diagnosed as sound when there is only visual evidence ofdemineralization.
3. Proximal surfaces: For areas accessible to direct visual and tactile examination, aswhen there is no adjacent tooth, the criteria are the same as those for smooth areas onfacial or lingual surfaces. For areas not available to direct examination, other criteriamust be applied. In anterior teeth only, transillumination can serve as a useful aid indiscovering proximal lesions. Transillumination is achieved by placing a mirrorlingually and positioning the examining light so that it passes through the teeth andreflects into the mirror. If a characteristic shadow or loss of translucency is seen onthe proximal surface, then this is indicative of caries on the surface. Ideally, the actualdiagnosis should be confirmed by detecting a break in the enamel surface with theexplorer; however, clear visualization of a lesion by transillumination can justify apositive diagnosis. In posterior teeth, however, visual evidence alone, such asundermining under a marginal ridge, is not sufficient proof for diagnosing a proximal
5-41
lesion. A positive diagnosis is made only if a break in the enamel surface can bedetected with the explorer.
Missing Teeth (the M and E Component of the Index). This component traditionally
represents those permanent teeth that have been extracted only as a result of caries. However, because
of the difficulty of correctly distinguishing between teeth extracted due to caries and those extracted for
periodontal reasons, no attempt will be made at the time of the examination to differentiate between these
two causes of tooth loss. It is essential, however, to distinguish between teeth extracted because of caries
or periodontal disease and those extracted or missing for other reasons. The code "E" will be used to
indicate teeth extracted because of caries or periodontal disease, and a different code, "M", will be used
for teeth missing due to trauma, orthodontic treatment, or other non-disease related causes. In order to
determine whether an "E" or "M" is called, the SP should be asked about the reason for tooth loss.
Unerupted or congenitally missing teeth (code "U") must also be correctly identified.
When a missing tooth has been replaced by a fixed or removable prosthesis, the "E" or "M"
score will be supplemented with the letter "R" (for "replaced"), creating the scores "ER" and "MR." A
fixed or removable prosthetic replacement is considered to exist when it is visible in the mouth. In the
case of removable appliances not being worn at the time of examination, the replacement is considered
to exist when the examinee reports the existence of an appliance which the SP upon questioning states that
he/she wears (however infrequently).
When a replacement exists, the examiner will not consider its condition or adequacy when
making the call. When a replacement does not exist, the examiner will not attempt a clinical judgment
of the need or adequacy of space for a replacement, even if the space has been closed by tooth movement.
When more than one tooth has been replaced by a single pontic, each tooth space will be
scored as replaced.
Note: The "R" designator is used only in conjunction with the "E" and "M" scores, and consequently does
not apply to the deciduous dentition, or to unerupted teeth (code "U").
5-42
Filled Tooth Surfaces (the F Component of the Index). The F component represents a
tooth surface that has been filled with either a permanent or a temporary restoration as a result of caries
involvement. Here also it is necessary to distinguish between surfaces restored for caries and those
restored for other reasons, such as trauma, hypoplasia, malformation, or bridge abutment.
Guidelines for Scoring. The following conventions have been adopted in the interest of
achieving diagnostic consistency:
1. Incisal edges of anterior teeth are not considered to be separate surfaces. If a lesionor restoration is confined solely to the incisal edge its score should be assigned to thenearest adjacent surface. Thus, anterior teeth have only four scorable surfaces (mesial,distal, labial, and lingual). The inclusion of the occlusal surface for posterior teethgives those teeth five surfaces.
2. When a caries lesion extends beyond the line angle onto another surface, that surfaceis also scored as carious.
For restorations, however, the following rules apply:
On anterior teeth, a proximal filling is not considered to involve the adjacent labial orlingual surface unless it extends at least one-third of the distance to the oppositeproximal surface. The reason for this criterion is that tooth structure on labial orlingual surfaces of anterior teeth must often be removed to provide access for theproximal restoration.
On posterior teeth, to guard against a similar possibility of overcalling, a proximalrestoration should extend more than a millimeter past the line angle before it isconsidered to involve the adjacent buccal or lingual surface.
3. If a permanent tooth has a full crown restoration placed because of caries, the toothwill be coded as C, which represents the maximum number of surfaces for the toothtype, i.e., four surfaces on anterior teeth and five surfaces on posterior teeth. Byconvention, all full crowns on posterior teeth, including abutment teeth for fixed orremovable prostheses, are considered to have been placed as a result of caries. Onanterior teeth, however, the examiner should make a determination of the reason forcrown placement. If it can be determined that the crown was placed solely for areason other than caries, such as fracture, malformation or bridge abutment, the toothis coded Y.
5-41
For three-quarter crowns, the following rules apply:
In general, if a tooth has been restored with less than full coverage, each surface isexamined and scored in the usual manner. However, when the crown coverageextends onto the buccal (labial) or lingual surface for cusp protection, the surface isnot scored as restored unless the coverage extends more than two millimeterscervically from the cusp tip or incisal edge.
For three-quarter crowns used as abutment teeth, all surfaces are scored in the usualmanner if the abutment is a posterior tooth. On anterior teeth, if it can be determinedthat the crown was placed solely for purposes of abutment and not for caries, therestoration will not be scored, but surfaces without crown coverage will be examinedand scored in the usual manner.
4. Teeth that are banded or bracketed for orthodontic treatment are examined in the usualmanner and all visible surfaces are scored.
5. Certain teeth, notably first bicuspids, may have been extracted as part of orthodontictreatment. These teeth are coded M and will be excluded from the DMFS analysis.The examiner must make the determination that the teeth were in fact extracted fororthodontic reasons, although this is not usually difficult because of the typicallysymmetric pattern of these extractions. For the sake of uniformity, all orthodonticallyextracted bicuspids are scored as first bicuspids. Teeth other than bicuspids may alsobe extracted for orthodontic reasons. In many cases the subject will have good recallof the reason for the extractions, and can help in making the correct determination.
6. Non-vital teeth are scored in the same manner as vital teeth. If, however, a restorationon a non-vital tooth was placed solely to seal a root canal and not for caries, thatrestoration will not be scored. If no other lesions or restorations are present, the toothwill be called sound (S).
7. Hypoplastic teeth are scored in the usual manner. However, if it can be determinedthat a restoration on such a tooth was placed solely for esthetic reasons and not forcaries, that restoration will not be scored. If a hypoplastic tooth is restored with a fullcrown, it is to be coded Y.
8. Malformed teeth are scored in the usual manner except when they have been restoredwith a full crown for esthetic reasons, in which case they are coded Y.
9. When the tooth crown is destroyed by caries and only the roots remain, score allsurfaces carious (X, 0, 1, 2, 3 on posterior teeth and 0, 1, 2, 3 on anteriors).
10. When the same tooth surface is both carious and filled, only the caries is scored.
5-42
11. Fractured or missing restorations are scored as if the restoration were intact unlesscaries is found to be present. In that case, the involved surface is scored as cariousrather than restored.
12. In the case of supernumerary teeth, only one tooth is scored for the tooth space. Theexaminer must decide which tooth is the "legitimate" occupant of the space.
13. If both a deciduous and a permanent tooth occupy the same tooth space, only thepermanent tooth is scored.
14. Third molars are not scored. When examining second molars it is important to notethat a drifted third molar may occupy the space of a missing second molar. In suchcases, the diagnosis and score must relate to the status of the missing second molar,not the third molar. If the second molar, for example, was extracted due to caries andthe space is now occupied by a sound third molar, the second molar is scored asextracted (E) and the third molar is not scored.
15. A tooth is considered to be in eruption when any part of its crown projects through thegum. This criterion is easier to standardize than one based on a more advanced stageof eruption.
16. Stain and pigmentation alone should not be regarded as evidence of caries as either canoccur on sound teeth.
Scoring Deciduous Teeth. Decayed or filled surfaces of deciduous teeth are scored in the
same manner as permanent teeth, using the same diagnostic criteria. However, because this survey is
concerned with both deciduous and permanent teeth, it will be necessary to call sound deciduous teeth
with a "deciduous" score (D) to distinguish them from sound permanent teeth. The K code will be used
for deciduous teeth with restorations or caries and will precede any other legitimate diagnostic call for
decayed or filled surfaces. For example, if a deciduous molar has occlusal caries and is otherwise sound,
the K code would be combined with the code for occlusal caries (i.e., K, X). If the deciduous tooth is
sound, the D code is used alone.
Missing deciduous teeth present potential problems in scoring because it is often not possible
to distinguish exfoliated teeth from those extracted due to caries, especially during the period of mixed
dentition. To avoid this problem, at the time of examination, all missing deciduous teeth are scored as
unerupted permanent teeth (U). When data are analyzed, the age of the subjects can be used to determine
the most likely reason for tooth loss.
5-43
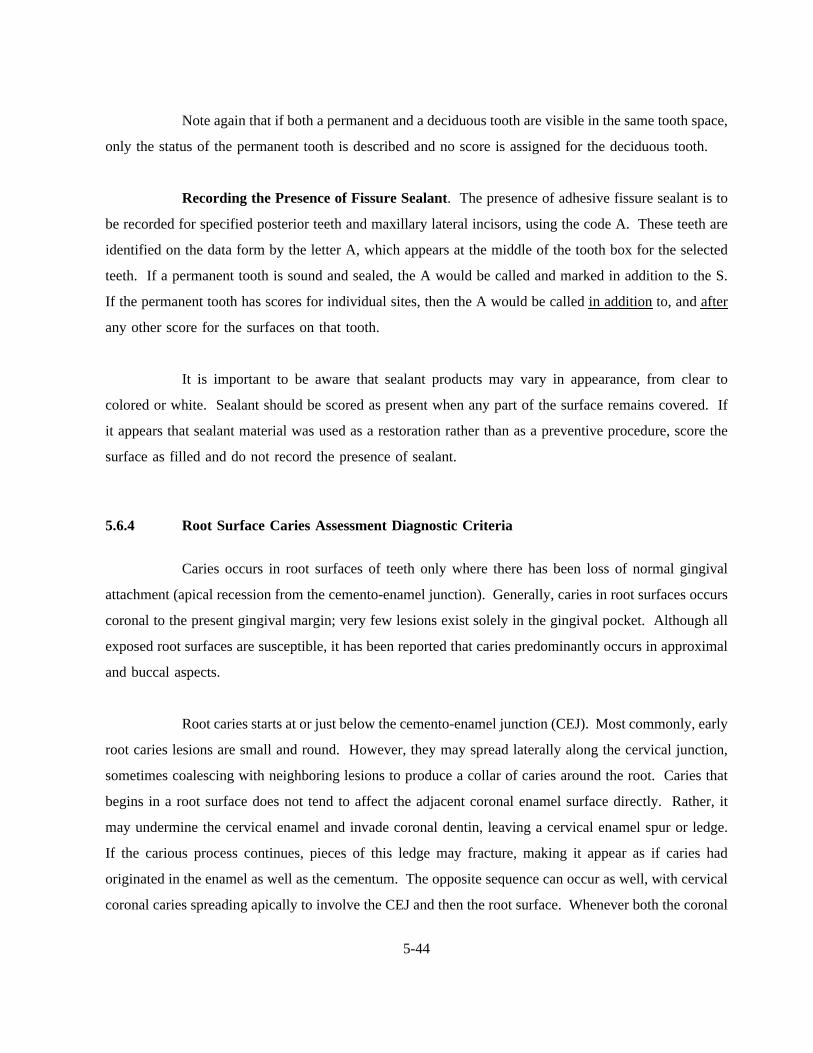
Note again that if both a permanent and a deciduous tooth are visible in the same tooth space,
only the status of the permanent tooth is described and no score is assigned for the deciduous tooth.
Recording the Presence of Fissure Sealant. The presence of adhesive fissure sealant is to
be recorded for specified posterior teeth and maxillary lateral incisors, using the code A. These teeth are
identified on the data form by the letter A, which appears at the middle of the tooth box for the selected
teeth. If a permanent tooth is sound and sealed, the A would be called and marked in addition to the S.
If the permanent tooth has scores for individual sites, then the A would be called in additionto, and after
any other score for the surfaces on that tooth.
It is important to be aware that sealant products may vary in appearance, from clear to
colored or white. Sealant should be scored as present when any part of the surface remains covered. If
it appears that sealant material was used as a restoration rather than as a preventive procedure, score the
surface as filled and do not record the presence of sealant.
5.6.4 Root Surface Caries Assessment Diagnostic Criteria
Caries occurs in root surfaces of teeth only where there has been loss of normal gingival
attachment (apical recession from the cemento-enamel junction). Generally, caries in root surfaces occurs
coronal to the present gingival margin; very few lesions exist solely in the gingival pocket. Although all
exposed root surfaces are susceptible, it has been reported that caries predominantly occurs in approximal
and buccal aspects.
Root caries starts at or just below the cemento-enamel junction (CEJ). Most commonly, early
root caries lesions are small and round. However, they may spread laterally along the cervical junction,
sometimes coalescing with neighboring lesions to produce a collar of caries around the root. Caries that
begins in a root surface does not tend to affect the adjacent coronal enamel surface directly. Rather, it
may undermine the cervical enamel and invade coronal dentin, leaving a cervical enamel spur or ledge.
If the carious process continues, pieces of this ledge may fracture, making it appear as if caries had
originated in the enamel as well as the cementum. The opposite sequence can occur as well, with cervical
coronal caries spreading apically to involve the CEJ and then the root surface. Whenever both the coronal
5-44
and root surfaces are affected by a single caries lesion that extends at least 1 mm past the CEJ in both
incisal and apical directions, both surfaces should be scored as decayed. However, for a lesion affecting
both crown and root surfaces that extends less than 1 mm in either direction, the surface on the side of
the CEJ that involves more than 50 percent of the area of the lesion should be scored. When it is
impossible to apply the ">50% rule," i.e., both coronal and root surfaces appear equally affected, both
surfaces should be scored "decayed." For restorations, the same rules apply. See Exhibit 5-9 for coronal
caries code sheet.
5-45
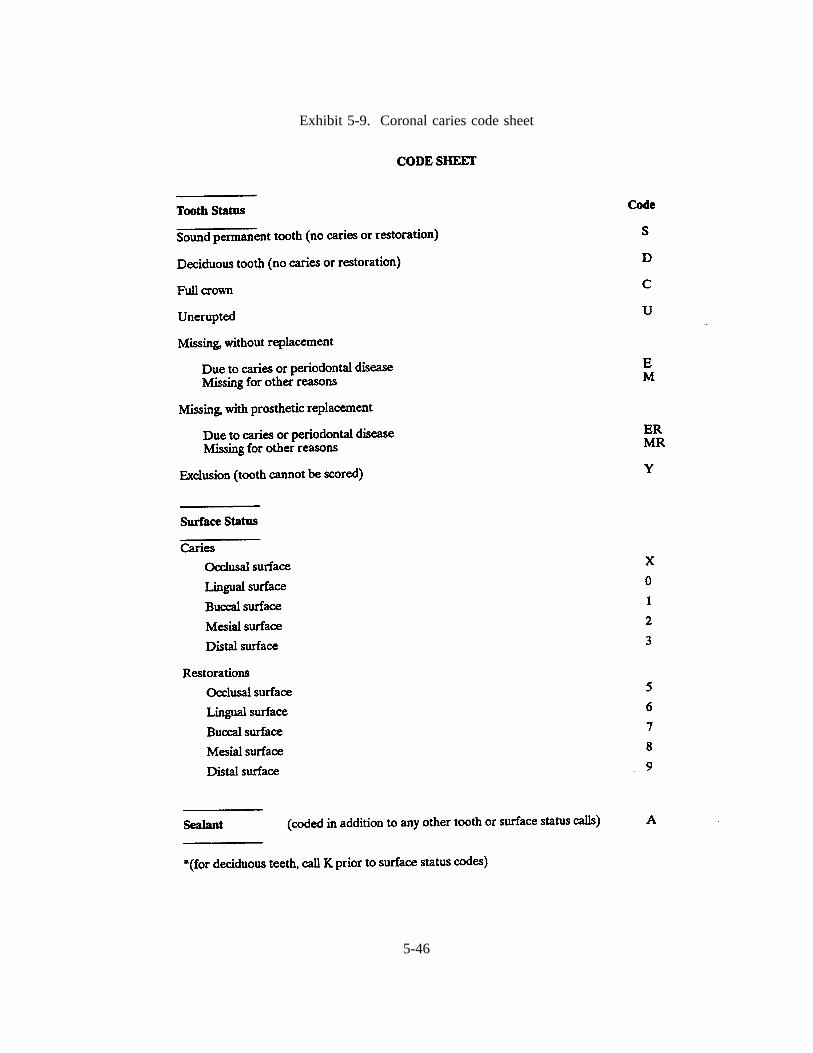
Exhibit 5-9. Coronal caries code sheet
5-46
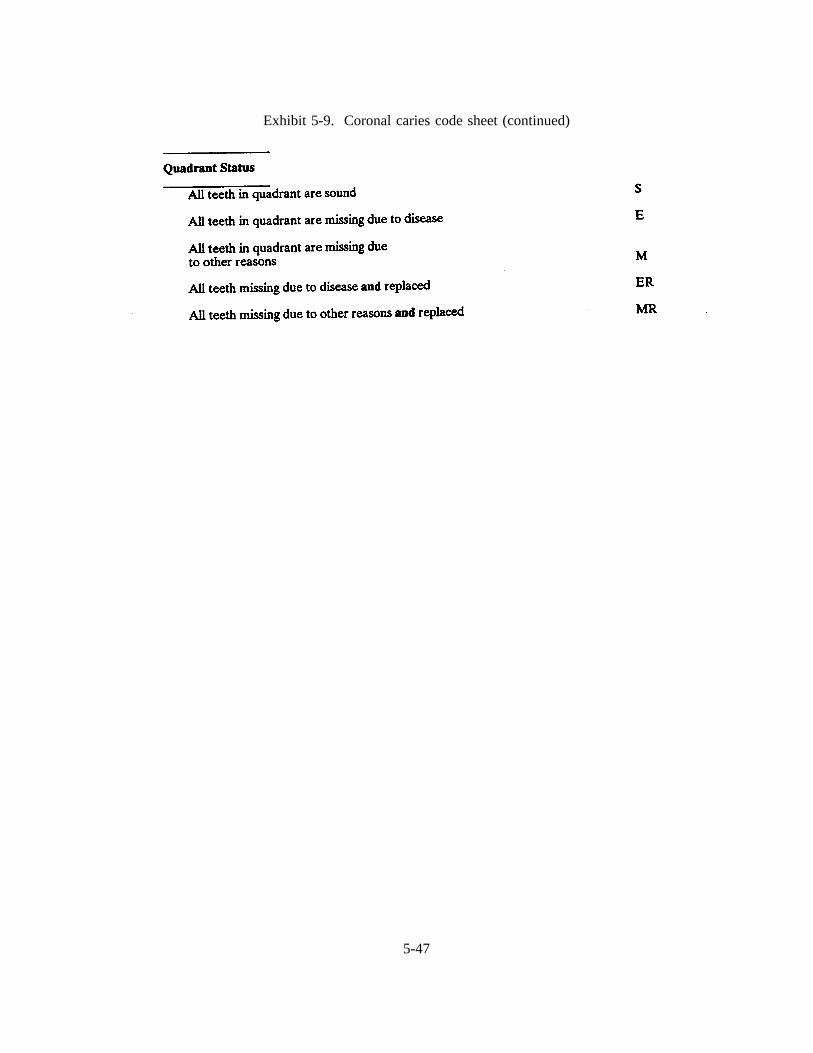
Exhibit 5-9. Coronal caries code sheet (continued)
5-47

NHANES III ORAL HEALTH SURVEY METHODS
SLIDES ILLUSTRATING
DMFS ASSESSMENT FOR CORONAL CARIES
1. Subjects should be examined with a sharp, #23, sickle-shaped explorer and unmarred, non-magnifying, front surface mirror. Ideally the teeth should be dried before examining each quadrant.
2. The recorder should be positioned within easy hearing distance of the examiner. The portable chairshould be set at a height that is comfortable and compatible with the height of the stool. Instrumentsand other necessary materials are placed on a table within easy reach of the examiner.
3. If the light is properly placed, subtle adjustments of the mouth mirror should allow fortransillumination of approximal surfaces of anterior teeth from the lingual. This technique is usedonly on anterior teeth.
4. Caries is present in the pits and fissures of the occlusal surfaces of the molar and the bicuspid. Eachof these teeth would receive a score of X. The buccal surface of the molar would be scored as a1 if caries is confirmed with the explorer. It appears that undermining is present on the mesialsurface of the first molar, however, the status of this surface must be confirmed with the explorerbefore assigning a score.
5. The second bicuspid has a large caries lesion that extends beyond the line angle onto the buccalsurface. The tooth would be scored as X, 1, 3 to indicate involvement of the occlusal, buccal anddistal surfaces.
6. Stained pits and fissures, per se, do not constitute a positive diagnosis for caries. However, if cariesis confirmed by the explorer on the buccal and occlusal surfaces of the lower molar, a score of X,1 would be assigned. The bicuspids appear to be sound, and would be assigned a score of S.
7. The lateral incisor has labial caries associated with hypoplastic pits. A score of 1 would be givento indicate the location of the lesion.
8. If the lingual pits in the lateral incisors were found to be carious with the explorer, those surfaceswould be assigned a score of 0.
9. Decalcification and possible caries are present on the labial surface of the lateral incisors. No scorewould be given for decalcification or white spot lesions, in the absence of softness. However, if theenamel shows softness or can be scraped away with an explorer, a score of 1 would be given tothese surfaces.
10. The interproximal lesion on the mesial of the lateral incisor would be scored a 2. On anterior teeth,clear visualization of a lesion by transillumination can justify a positive diagnosis.
11. Only the roots are remaining for the first bicuspid and first permanent molar. A shell of the second
5-48

NHANES III ORAL HEALTH SURVEY METHODS
SLIDES ILLUSTRATING
DMFS ASSESSMENT FOR CORONAL CARIES (continued)
bicuspid is present. These teeth would be scored as all surfaces carious (X, 0, 1, 2, 3).
12. The distal and occlusal surfaces of the first bicuspid and the occlusal surface of the first molar havebeen restored. The first bicuspid would be scored 5, 9 and the first molar would be scored 5. Thesecond bicuspid would be scored S, indicating that all surfaces are sound.
13. Composite restorations can be noted on the upper lateral and cuspid. The mesial and distal of thelateral would be scored 8 and 9, respectively, and the mesial of the cuspid would be scored 8. Thelabial surfaces are not scored because the restoration does not extend one-third of the distance acrossthe surface.
14. If the restoration on the central incisor had been placed because of caries, it would be scored as 6,7, 8 indicating involvement of the lingual, labial and mesial surfaces. (There is no score for incisalsurfaces.) If it had been placed only to restore a fracture, the filling would be ignored and the toothscored as sound (S).
15. The upper first molar has a large restoration involving the occlusal, lingual, buccal and mesialsurfaces (5, 6, 7, 8). Even though two restorations are present on the buccal surface of the lowermolar, a single call of 7 would be given, unless obvious caries exists. Then, the caries would takeprecedence and the surface would be scored a 1.
16. Fractured amalgams are present in the first and second molars. If caries were not detected, eachtooth would be scored 5, 8, as though the restorations were still intact and present. If caries werefound in the approximal areas where the restorations are missing, the teeth would be scored as 2,5.
17. A distal-occlusal restoration with a hairline fracture is present in the bicuspid. This tooth would bescored 5, 9 as if no fracture were present, unless obvious caries was detected.
18. The mesial surfaces of both bicuspids have restorations as well as obvious caries. The caries wouldtake precedence and these surfaces would be given a score of 2.
19. The reason for the crown on the central incisor must be determined. If it were placed because ofcaries, the tooth would be scored a C. A score of Y would be assigned if the crown were placedto restore a fracture, or for other non-disease related reasons.
5-49
NHANES III ORAL HEALTH SURVEY METHODS
SLIDES ILLUSTRATING
DMFS ASSESSMENT FOR CORONAL CARIES (continued)
20. Each of the crowned molars would receive a score of C. For the three-quarter crowns on thebicuspids, all surfaces except the buccal would be scored as filled (5, 6, 8, 9). The buccal surfacewould not be scored as affected unless crown coverage extended more than 2 mm onto the surface.
21. The lower molar was extracted because of caries and would receive a score of E. If the tooth hadbeen extracted for a non-disease related reason, a score of M would be given.
22. The missing teeth were extracted because of periodontal disease. They would be scored the sameas for caries (E).
23. Hypoplastic teeth are scored as sound (S) unless caries or a restoration is present. However, ajudgment must be made as to whether a restoration was placed because of caries or for estheticreasons. In the latter case, the restoration would not be scored.
24. Temporary restorations are scored in the same manner as permanent restorations.
25. Composite restorations, or sealants used as filling material, are scored in the same manner as anyother restoration.
26. In the absence of caries or restorations, a surface containing a dental sealant would be scored assound (S). The sealant would be assigned a code of A.
27. A score of C is given to all full crowns placed on posterior teeth, including abutments. On anteriorteeth, the score could be either a C or a Y,depending on the reason the crowns were placed.
28. Orthodontically banded teeth are scored as usual on all surfaces visible. If the upper lateral incisorsare thought to be congenitally missing, they are scored as unerupted permanent teeth (U).
29. Unrestored fractured teeth are scored as usual on all surfaces. If a full crown had been placed torestore the fracture, the tooth would be scored as a Y. If only the fractured area had been restored,the restoration would be ignored and all other visible areas would be scored as usual.
30. The first primary molar would be scored as K 5, 8, 9 to account for the three-surface restoration.In the second primary molar, the occlusal restoration would be ignored and the tooth would bescored a K X, indicating the presence of occlusal caries.
5-50

CORONAL
SLIDES
HERE
5-51
Defective margins of fillings with suspicious carious areas should be checked with an explorer
for recurrent decay and the criteria for scoring "decayed and filled" root surfaces should be the same as
for coronal surfaces, that is, decay takes precedence over a filling. Full crown coverage is considered to
be placed for coronal caries even if the margin of the crown extends on to the root surface. Thus, a root
surface with a crown margin free of recurrent decay should be scored sound or "R" (no caries or
restorations).
Areas of abrasion or erosion in root surfaces rarely become carious because they are generally
kept clean and are free of plaque. Root caries frequently occurs beneath plaque, but rarely beneath
calculus. Accumulations of plaque which obstruct the examination procedure should be removed.
Surfaces covered entirely by calculus are considered sound.
Active caries lesions in root surfaces are yellow/orange, tan or light brown in color. Lesions
in remission tend to be darker, sometimes almost black. When root caries is covered by small amounts
of plaque, the discoloration of the lesions usually shows through.
In some incipient lesions the carious area of the root surface may merely be discolored
without cavitation, but the area will be soft to exploration. Cavitation with jagged margins and a
roughened, but soft floor or base usually occurs in advanced lesions. Normal cementum is softer than
enamel, and frequently will yield to pressure from the tip of an explorer. Areas of root caries, however,
are softer than surrounding cementum; therefore, it is possible to differentiate sound cementum from
carious cementum based on tactile sense. In the presence of root caries, an explorer penetrates the tissue
but usually can be removed easily. However, if the explorer penetrates but resists withdrawal or "sticks,"
the surface is usually sound cementum. With experience and training, it is possible to develop a tactile
sense to differentiate sound from carious cementum. Note that for areas without gross cavitation, visual
criteria related to location, shape and discoloration of the suspected area do not, in themselves, define root
caries. The tactile criteria of softness to an explorer tip must be met for a definitive diagnosis of root
caries to be made.
For assessing gingival recession and root caries, each tooth is considered to have four surfaces
(aspects), irrespective of the number of its roots. These surfaces are: lingual, buccal (labial), mesial, and
5-52

distal. Because of the constricted anatomy of the root surfaces of lower incisors, few lesions will be
confined solely to the lingual surface -- only small lesions at the midpoint. Most lingual lesions will also
affect the adjacent mesial and/or distal root surfaces. However, lesions of the mesial and distal surfaces
which extend lingually but do not reach the midline are only scored as interproximal lesions. On all other
teeth, when root caries appears to wrap around the line angle of the root, the more involved surface is
considered the primary site of the lesion and is scored carious, whereas the adjoining surface is only
scored as carious when the lesion clearly extends at least 1 mm past the line angle. The tooth and surface
codes for the root caries assessment are identical to coronal caries with the exception of the "R" score
which is equivalent to the "S" score indicating a tooth for which all root surfaces are sound.
All exposed portions of a tooth’s root surface should be carefully examined. The most
difficult areas to examine are approximal surfaces in posterior teeth, particularly those that contain
approximal restorations. Subgingival inspection is not recommended because few lesions are confined
subgingivally and it may produce bleeding. See Exhibit 5-10, root surface caries code sheet.
5-53

Exhibit 5-10. Root surface caries code sheet
5-54
SLIDES ILLUSTRATING DMFS
ASSESSMENT OF ROOT CARIES
1. Instrumentation
Subjects will be examined with the same instruments used for the DMFS assessment of coronalcaries -- the #23 explorer and the non-magnifying, front surface mirror. Ideally, the teeth shouldbe dried before examining each quadrant.
2. No Apparent Recession
Each tooth in the quadrant, excluding third molars, will be checked for root caries in the samesequence that was utilized for coronal caries. If no recession were found on the root surfaces of atooth, a call of "R" would be made indicating a sound root. Knowledge of the curvature of the CEJfor each tooth type is essential for the determination of recession. (See Appendix A.)
3. Presence of Plaque and Soft Accumulations
Soft debris is visible on the upper and lower anterior teeth. Because root caries is often found underplaque, the examiner should remove any soft debris that hinders the visual and tactile examinationof the root surface. Soft debris should be removed with a gauze square.
4. Presence of Calculus
Calculus is present at the cervical area of the lower cuspid and bicuspid. Because root caries seldomoccurs beneath calculus, the underlying surface is presumed to be sound.
5. Mild Recession
Even with minimal recession of the gingival tissues, the cementum of root surfaces becomessusceptible to caries. All surfaces, therefore, with any exposed cementum should carefully beexamined. The labial surfaces of the cuspid and first bicuspid show mild recession. If no carieswere detected in these teeth, they would each be scored "R."
6. Advanced Recession
Recession is present on the labial and mesial of the lower central incisors. Calculus is also present.If no caries were detected, each of the incisors would be scored "R."
5-55
SLIDES ILLUSTRATING DMFS
ASSESSMENT OF ROOT CARIES (continued)
7. Abrasion and Recession
The labial surfaces of the anterior teeth and the buccal surface of the bicuspid both show abrasionand recession. Even though the areas of abrasion are usually caries free, the examiner shouldcarefully check such areas. If no caries or restorations were present on these teeth, each would bescored "R."
8. Initial Root Lesion
A small round discoloration can be observed in the cervical area of the buccal surface of the lowercuspid. If upon exploration, the area is determined to be carious, a score of "1" would be made.
9. Initial Root Lesions
Note the pinpoint lacy effect of the discolorations along the CEJ of the labial surfaces of thepatient’s upper right central and lateral incisors. If these areas are found to be carious and if thelesions continue on to the mesial and distal surfaces, a call of "1, 2 and 3" would be made for eachof these teeth.
10. Small Root Lesions
Three stages of lesions can be noted on the rotated second bicuspid: a questionable white spot, asmall pinpoint lesion, and a more advanced black lesion. Even if the examiner were to determinethat all three areas were carious, a single call of "3" would be made to indicate caries present on thedistal surface.
11. Small Root Lesions
Small lesions can be observed at the CEJ of the patient’s upper right cuspid and upper left centralincisor. Both crown and root surfaces are involved but neither as much as 1 mm past the CEJ. Iffor each lesion both crown and root surfaces appear equally involved, i.e., the greater than 50percent rule is difficult to apply, then both crown and root surfaces would be scored a "1" for eachtooth.
12. Advanced Root Lesions
More advanced lesions can be observed on the upper lateral incisors and lower cuspids. Becausethe lesions extend 1 mm or more past the CEJ onto both crown and root surfaces, both crown androot surfaces of each tooth should be scored "1."
5-56
SLIDES ILLUSTRATING DMFS
ASSESSMENT OF ROOT CARIES (continued)
13. Advanced Root Lesions
Several stages of the development of root lesions are shown. The irregular progressive destructionof advanced root lesions often affects the crown, causing cervical undermining of the enamel.However, only the crowns of the patient’s right cuspid and left first bicuspid are clearly involved.Black lesions usually indicate a remission in caries activity. Small circular brown lesions havedeveloped apically next to the receding gingiva. All visible root surfaces would be scored ascarious, "1, 2, and 3."
14. Root Restorations
Several teeth with gold foil cervical restorations can be observed. In order to make the appropriatecalls for these teeth, it is necessary to locate the CEJ. Restorations that extend 1 mm or more bothincisally and apically past the CEJ would be scored as involving both crown and root surfaces.Accordingly, for all restorations with the exception of those in the patient’s upper left central andlateral incisors the crown and root surfaces would each be called a "7." Because the crown portionof the restorations on the patient’s upper left central and lateral incisors do not extend incisally 1mm past the CEJ and do not involve more than 50 percent of the area of the restoration only theroot surface is called a "7."
15. Root Restorations
Crowns are considered to be placed for coronal caries even if the crown extends onto a root surface.Exposed root surface adjacent to the crowns on the abutment teeth should be examined. If nolesions or restorations are present, the tooth would be called an "R."
16. Surface-specific Scoring
This extracted molar shows caries (red dye) on the lingual surface. Irrespective of the number ofroots, the tooth is considered to have four surfaces. The mesial and distal surfaces are not involved.A single score of "0" would be made.
17. Surface-specific Scoring
Caries is present on the lingual surface of the central incisor. If the lesion were judged to clearlyextend past the line angle by more than 1 mm then the distal surface would also be called, or a "0,3."
5-57
SLIDES ILLUSTRATING DMFS
ASSESSMENT OF ROOT CARIES (continued)
18. Surface-specific Scoring
Caries is present on the distal of an anterior tooth. A score of "3" would be given for this surface.Note the pronounced curvature of the CEJ. (The curvature of the CEJ usually is even greater onthe mesial.)
19. Surface-specific Scoring
Several interproximal and cervical lesions can be observed. On the lower anterior teeth, mesial anddistal lesions which extend lingually but do not reach the midline are scored only as interproximallesions. Thus, the lower left cuspid is scored as lingual decay "0," the lateral incisor as distal decay"3," and the central incisor is scored as mesial and distal decay "2, 3." The area on the distal of thelower right central incisor would receive a "3" if determined to be carious.
20. Surface-specific Scoring
The same dentition as in 19 can be seen after restoration. The patient’s left cuspid would be scoredas a "6," the left lateral and central would both be scored as "8, 9." The right central would bescored "R" if no decay is detected.
21. Recurrent Decay
Recurrent caries is present on this extracted upper molar. A single call of "2" should be made.(Decay takes precedence over a restoration.) If the examiner finds that the new decay is separatefrom the restoration, a call of "2" would still be made. Further, if two restorations were present onthe mesial surface, a single score of "8" would be called or if two new lesions were present, a singlecall of "2" would be made.
22. Recurrent Decay
Note the two areas of recurrent decay associated with the cervical restoration on the buccal surfaceof the upper cuspid. Because both recurrent lesions and restoration appear to be confined to thecrown, the root would be called an "R" and the buccal surface scored as "1."
23. Recurrent Decay
The patient’s upper left, distally rotated, central incisor also has two areas of recurrent decayassociated with a cervical restoration. The labial root surface is scored a "1" because the margin ofthe restoration on the root has recurrent decay. The labial crown surface is scored a "7." On themesial surface, more than 50 percent of the recurrent decay appears to involve the root and thereforethe root is called a "2" and the crown an "8."
5-58
SLIDES ILLUSTRATING DMFS
ASSESSMENT OF ROOT CARIES (continued)
24. Recurrent Decay
The restoration on the patient’s upper right lateral incisor appears to have recurrent decay confinedto the root surface. If the discolored area is found to be carious, the labial root surface would becalled a "2" and the labial crown surface a "7." (Even if the recurrent decay was found to slightlyoverlap the CEJ onto the crown, more than 50 percent of the lesion would involve the root and thescoring of the labial root and crown surface would still be "1" and "7," respectively.) Distally, itappears that the restoration involves both crown and root (based on 1 mm past CEJ rule) and eachsurface would be called a "9."
5-59

ROOT CARIES
SLIDES
HERE
5-60

5.6.5 Nursing Bottle Caries (Baby Bottle Tooth Decay) Assessment
For children older than two years of age, estimates of the prevalence of baby bottle tooth
decay will be made from the coronal caries scores for deciduous teeth; a separate examination for this
condition will not be necessary. For children from 12 to 24 months of age, however, a visual examination
of the maxillary incisors will be conducted and the presence of caries noted.
Nursing Bottle Examination Procedure. Retract the upper lip of the child to provide visual
access to the maxillary anterior teeth. Examine all maxillary incisors present for visual evidence of dental
caries on labial or approximal surfaces. Tactile criteria should not be applied, and the explorer should not
be used in the examination.
Scoring for Nursing Bottle Caries. Maxillary incisors are scored as a group -- individual
teeth or tooth surfaces are not scored. For each subject, a score of 0 or 1 will be assigned as follows:
0 No visible evidence of caries or restoration was seen on the labial orapproximal surfaces of any of the maxillary incisors.
1 At least one maxillary incisor showed visual evidence of caries orrestoration on a labial or approximal surface.
Y Subject could not be examined.
5.6.6 Caries Recording Procedures
The Dental Examination Form - page 1 (Exhibit 5-7) is used for recording coronal caries,
sealants, and root caries and nursing bottle caries. A maximum of 28 permanent teeth will be scored for
an SP (third molars (wisdom teeth) are not scored for dental caries). A maximum of 20 deciduous teeth
("baby teeth") are scored for young SP’s. Some SP’s will have mixed dentition (permanent and deciduous
teeth in the mouth).
Coronal Caries Recording Procedures. The caries area of page 1 is divided horizontally
into 4 parts. These 4 parts correspond to the 4 quadrants of the mouth: Upper left, upper right, lower
5-61

Exhibit 5-11
5-62
left, lower right. These quadrants are labelled in the extreme left column of the page.
The examiner conducts the entire coronal assessment beginning with the central incisor in
the upper left quadrant, working toward the back of the mouth and ending with the 2nd molar in the upper
left quadrant. The examiner then repeats the procedure for the upper right, lower left, and lower right
quadrants, always starting with the central incisor and ending with the second molar. The examiner then
notes the presence or absence of the third molar at the end of each quadrant. The examiner calls out the
code for each tooth, and the recorder marks the circle or circles containing the code. The examiner
proceeds to "call" the status of each tooth surface for each of the permanent teeth, excluding "wisdom
teeth" (third molars). The recorder records the examiner’s calls, beginning with the first box on the left
hand side of the caries area of page 1 and proceeding across the row. Each of the boxes on the caries area
represents a tooth. Within each box there is space to record information about the condition of each
surface on the tooth. The names of the teeth are at the bottom of the area:
Central incisor,
Lateral incisor,
Cuspid,
1st Bicuspid/1st Deciduous Molar,
2nd Bicuspid/2nd Deciduous Molar,
1st Molar, and
2nd Molar.
The top two rows in a box are marked:
S = Sound (no decay or filling on any surface),C = Full crown coverage,U = Unerupted tooth,E = Missing (caries/periodontal disease),M = Missing (orthodontic or nondisease),Y = Exclusion (tooth cannot be examined),D = Sound deciduous or "baby tooth",K = Deciduous tooth with surface call(s),ER = Missing (caries/periodontal disease), andMR = Missing (orthodontic or nondisease).
5-63

The above codes characterize a whole tooth condition and are referred to as "tooth calls."
If the tooth is permanent with no decay or filling on any surface, the examiner calls "S." The
recorder fills in the appropriate space on the top row of the first box. If the tooth is characterized by one
of the other "tooth calls," the dentist calls out the appropriate letter, and the recorder fills the appropriate
circle in the top row of the box.
The "D" on the second row must be marked for all sound deciduous calls, and the K in the
2nd row is marked if the deciduous call is followed by a surface condition (caries, filled, sealant). For
permanent teeth, the "S" is marked only if the tooth is present and all surfaces are sound.
Below this top line there are two rows of numbers. With the exception of the incisors and
cuspids which do not have occlusal surfaces, each tooth has five surfaces. These surfaces are:
O Occlusal - top or biting surface,
L Lingual - surface toward the tongue,
B Buccal - surface outside, toward the facial surface,
M Mesial - surface between teeth (side surfacetoward front of mouth),
D Distal - the side surface of the tooth facing awayfrom the front of the mouth,
The first row of numbers (X), 0, 1, 2, 3 is used to record decay on one of the tooth surfaces.
The second row of numbers (5), 6, 7, 8, 9 is used to record filled surfaces of a tooth.
For caries:
X = Occlusal0 = Lingual1 = Buccal2 = Mesial3 = Distal
5-64
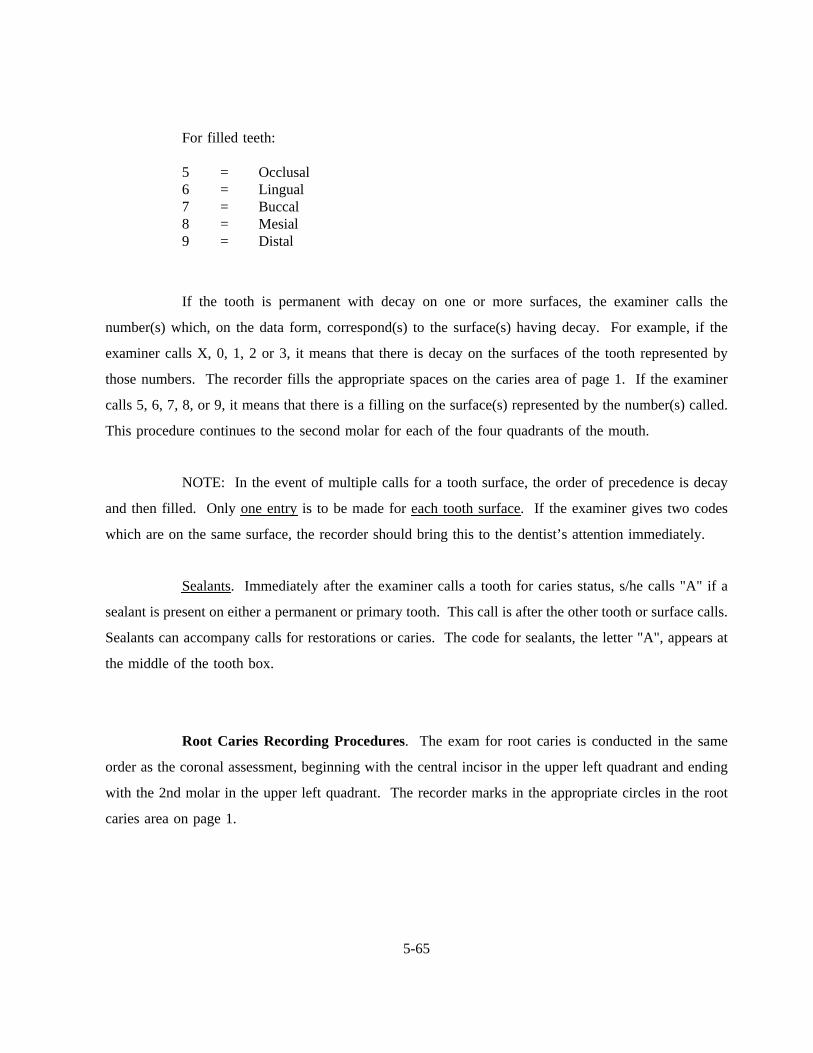
For filled teeth:
5 = Occlusal6 = Lingual7 = Buccal8 = Mesial9 = Distal
If the tooth is permanent with decay on one or more surfaces, the examiner calls the
number(s) which, on the data form, correspond(s) to the surface(s) having decay. For example, if the
examiner calls X, 0, 1, 2 or 3, it means that there is decay on the surfaces of the tooth represented by
those numbers. The recorder fills the appropriate spaces on the caries area of page 1. If the examiner
calls 5, 6, 7, 8, or 9, it means that there is a filling on the surface(s) represented by the number(s) called.
This procedure continues to the second molar for each of the four quadrants of the mouth.
NOTE: In the event of multiple calls for a tooth surface, the order of precedence is decay
and then filled. Only one entryis to be made for each tooth surface. If the examiner gives two codes
which are on the same surface, the recorder should bring this to the dentist’s attention immediately.
Sealants. Immediately after the examiner calls a tooth for caries status, s/he calls "A" if a
sealant is present on either a permanent or primary tooth. This call is after the other tooth or surface calls.
Sealants can accompany calls for restorations or caries. The code for sealants, the letter "A", appears at
the middle of the tooth box.
Root Caries Recording Procedures. The exam for root caries is conducted in the same
order as the coronal assessment, beginning with the central incisor in the upper left quadrant and ending
with the 2nd molar in the upper left quadrant. The recorder marks in the appropriate circles in the root
caries area on page 1.
5-65
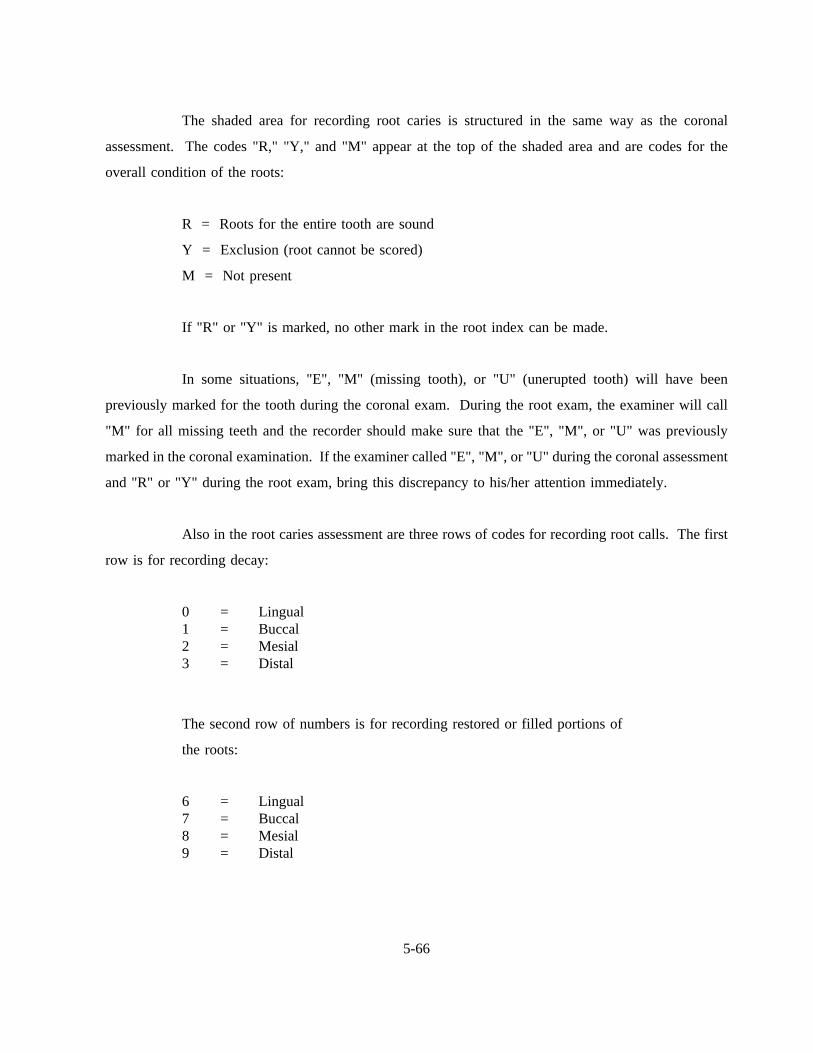
The shaded area for recording root caries is structured in the same way as the coronal
assessment. The codes "R," "Y," and "M" appear at the top of the shaded area and are codes for the
overall condition of the roots:
R = Roots for the entire tooth are sound
Y = Exclusion (root cannot be scored)
M = Not present
If "R" or "Y" is marked, no other mark in the root index can be made.
In some situations, "E", "M" (missing tooth), or "U" (unerupted tooth) will have been
previously marked for the tooth during the coronal exam. During the root exam, the examiner will call
"M" for all missing teeth and the recorder should make sure that the "E", "M", or "U" was previously
marked in the coronal examination. If the examiner called "E", "M", or "U" during the coronal assessment
and "R" or "Y" during the root exam, bring this discrepancy to his/her attention immediately.
Also in the root caries assessment are three rows of codes for recording root calls. The first
row is for recording decay:
0 = Lingual1 = Buccal2 = Mesial3 = Distal
The second row of numbers is for recording restored or filled portions of
the roots:
6 = Lingual7 = Buccal8 = Mesial9 = Distal
5-66
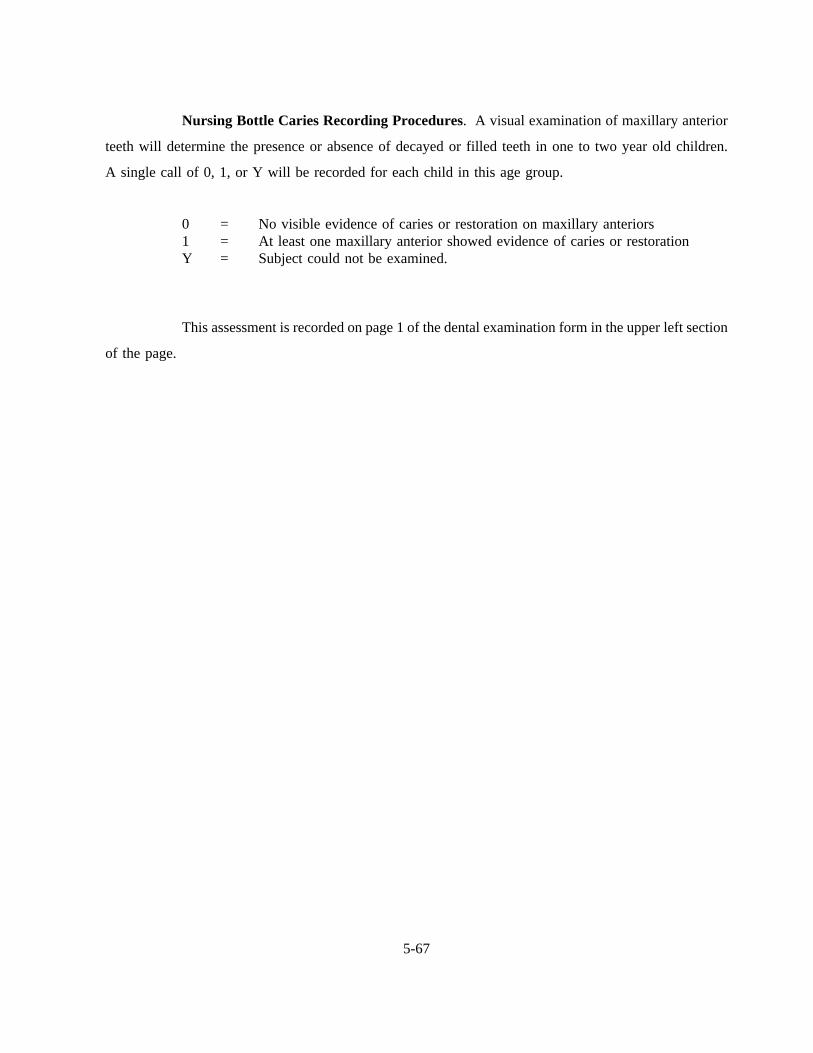
Nursing Bottle Caries Recording Procedures. A visual examination of maxillary anterior
teeth will determine the presence or absence of decayed or filled teeth in one to two year old children.
A single call of 0, 1, or Y will be recorded for each child in this age group.
0 = No visible evidence of caries or restoration on maxillary anteriors1 = At least one maxillary anterior showed evidence of caries or restorationY = Subject could not be examined.
This assessment is recorded on page 1 of the dental examination form in the upper left section
of the page.
5-67
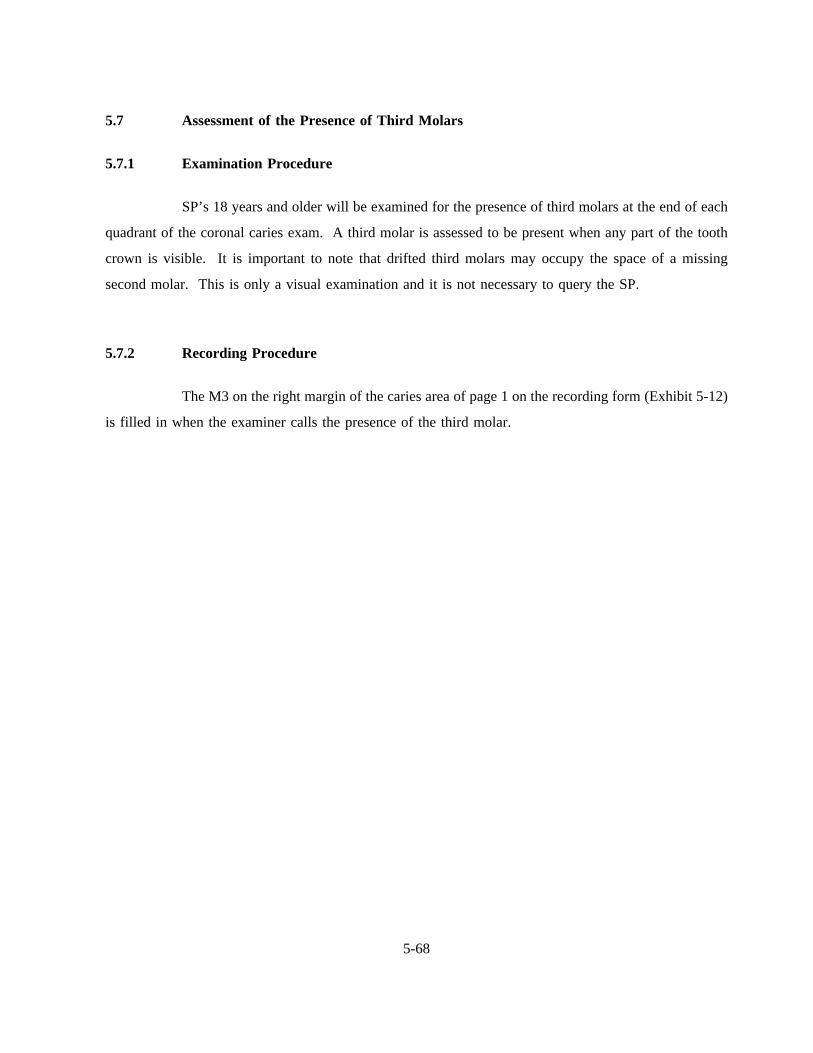
5.7 Assessment of the Presence of Third Molars
5.7.1 Examination Procedure
SP’s 18 years and older will be examined for the presence of third molars at the end of each
quadrant of the coronal caries exam. A third molar is assessed to be present when any part of the tooth
crown is visible. It is important to note that drifted third molars may occupy the space of a missing
second molar. This is only a visual examination and it is not necessary to query the SP.
5.7.2 Recording Procedure
The M3 on the right margin of the caries area of page 1 on the recording form (Exhibit 5-12)
is filled in when the examiner calls the presence of the third molar.
5-68
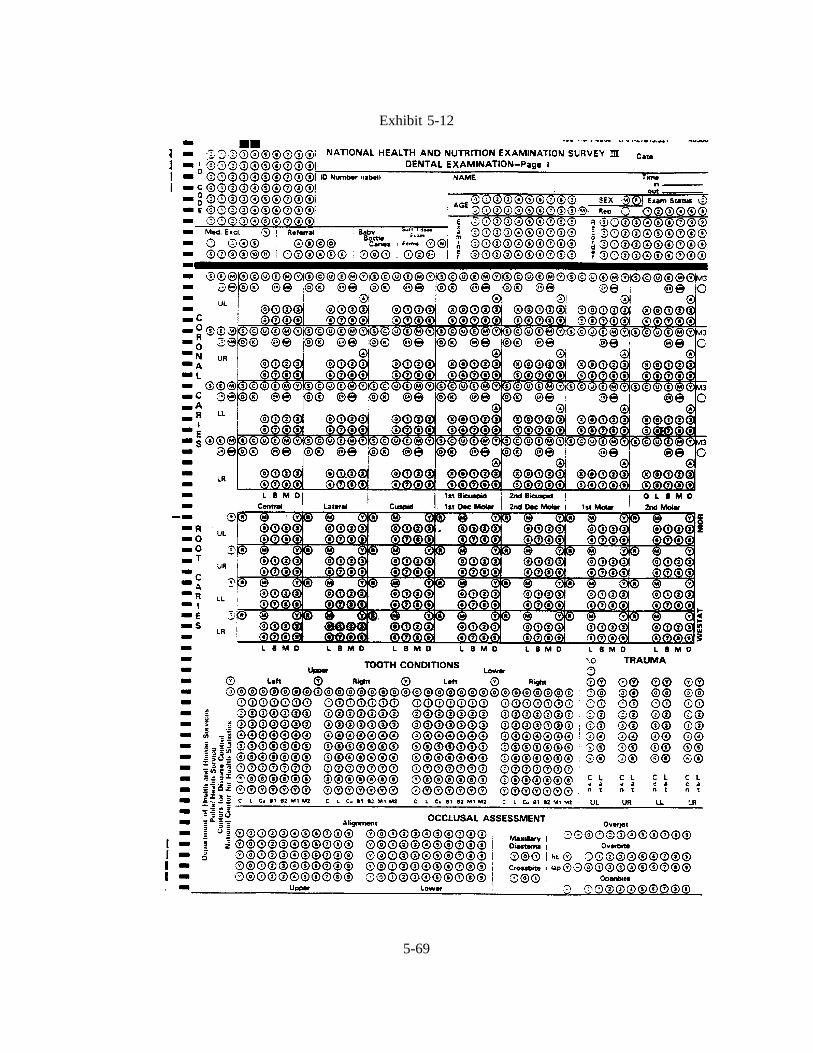
Exhibit 5-12
5-69
5.8 Traumatic Injuries Assessment
5.8.1 Introduction
The objectives of the traumatic injuries component of the survey are to:
Determine the prevalence of traumatic injuries to permanent incisor teeth in a nationalsample of children and adults;
Provide a basis for comparing with future surveys;
Provide a basis for development of estimates of treatment needs; and
Provide a basis for developing strategies for the prevention of traumatic injuries toteeth.
References
Andreason, J.O.:Traumatic Injuries to Teeth , St. Louis, C.V. Mosby, 1972.
Basrani, E.: Fractures of the Teeth, Philadelphia, Lea & Febiger, 1985.
Ferguson, F.S., and Ripa, L.W.: Prevalence and type of traumatic injuries in the anteriorteeth of preschool children.J. Pedodont4(1): 3-8, Fall, 1979.
5-70
5.8.2 Traumatic Injuries Examination Procedures
The clinical assessment is conducted as follows: First ask the SP the following question:
"Have you ever had an injury to your front teeth?" This is for your information only. Regardless of the
answer, proceed to examine the SP.
The four upper and four lowerpermanent incisors should be carefully examined for evidence
of traumatic injury. The teeth should be examined in the same sequence as for the dental caries
examination. A positive history of trauma is required for codes 1 through 6. One of the following scores
is to be assigned for each incisor tooth:
0. A score of 0 indicates that a tooth has no evidence of traumatic injury.
1. A score of 1 indicates that an unrestored enamel fracture is present that does notinvolve the dentine.
2. A score of 2 indicates an unrestored fracture which involves the dentine.
3. A score of 3 indicates untreated damage as evidenced by one of the following: (a)dark discoloration, as compared to other teeth -- a discoloration of one tooth oradjacent teeth, which are otherwise healthy is considered a sign of injury or (b)presence of a swelling and/or fistula in the labial or lingual vestibule adjacent to anotherwise healthy tooth.
4. A score of 4 indicates that a fracture has been restored, either with a full crown or aless extensive restoration. It may be necessary to question the subject to determine thereason for the restoration.
5. A score of 5 indicates the presence of a lingual restoration as a sign of endodontictherapy, anda positive history from the subject of root-canal treatment followingtraumatic injury.
6. A score of 6 indicates a tooth that is missing due to trauma.
Y. A score of Y is to be assigned to any tooth or space that does not fall within thepreceding categories; for example; a missing tooth due to reasons other than trauma,or a full crown restoration of a carious tooth.
If there is no clinical presence of trauma for all teeth, then a "No Trauma" call can be made
to summarize with one call.
5-71
SLIDES ILLUSTRATING TRAUMATIC INJURIES ASSESSMENT
1. This slide shows chipping of enamel at the incisal edges of both the upper central and lateralincisors. A score of 1 is indicated here for each tooth.
2. This slide shows fractures of both upper central incisors. One tooth has a more extensive fractureof the incisal edge which involves the dentine. This tooth should be assigned a score of 2. Theother tooth has a slight chipping of only the enamel at the incisal edge and should be scored as1.
3. This slide shows an upper central and a lateral incisor with fractures. The fracture of the centralincisor involves both the enamel and dentine and a score of 2 is appropriate for this tooth. Thelateral incisor, however, has a fracture of the enamel at the incisal edge which does not extend intothe dentine and a score of 1 is indicated for this tooth.
4. The upper central incisor in this slide has a fracture involving both the enamel and dentine anda score of 2 is indicated here.
5. This slide shows recent fractures of both upper central incisors. One tooth has an extensivefracture of the incisal third of the crown. Examination showed untreated involvement. This toothshould be scored as 3. The incisal edge of the other tooth has a fracture which extends into thedentine and this tooth should be scored as 2.
6. This slide shows a recent fracture of both upper central incisors. Both the fractures extend intothe dentine and a score of 2 is appropriate for each tooth.
7. A central incisor in this slide has what appears to be a fracture at the incisal edge involving theenamel only. A careful history, however, elicited the information that the patient had a habit ofholding bobby pins between the teeth. As there is no other evidence of accidental injury this toothis to be assigned a score of 0.
8. This slide shows an incisal edge restoration in a central incisor. It is necessary to obtain a positivehistory of trauma and fracture of the tooth if we are to assign a score of 4 for this tooth. If thereis no history of trauma and the restoration was done because of caries a score of 0 is assigned.It should be noted, however, that some restorations with composite resins are hard to detect. Oneway to detect these would be to pass the point of the explorer over the crown of the suspectedteeth. The tip of the explorer would not glide as smoothly as over enamel.
9. The item of interest on this slide is the full crown on the upper central incisor. Please ignore theprobe! This tooth is to be scored a 4 only if there is a positive history of trauma to the tooth. Ifthe restoration was placed because of caries with no history of trauma the tooth should be scoredas 0.
5-72

SLIDES ILLUSTRATING TRAUMATIC INJURIES ASSESSMENT (continued)
10. This slide shows a missing central incisor replaced by a removable partial denture. If there is apositive history of trauma and subsequent extraction of that tooth a score of 6 is to be assigned.If the extraction was due to reasons other than trauma a score of Y should be assigned.
11. This slide shows recent fractures of several teeth. An upper central incisor has a fracture whichextends into the dentine and was found to involve the pulp. A score of 3 is indicated for thistooth. The other upper central incisor has a chipping of the incisal edge that does not extendbeyond the enamel and a score of 1 is appropriate. A lower central incisor also has a fracturewhich, however, extends into the dentine and a score of 2 is indicated for this tooth.
12. This slide shows a fractured primary upper central incisor with a chronic periapical abscess. Thereis a positive history of trauma to the tooth and if this tooth were a permanent incisor it would beassigned a score of 3. For the purpose of the present survey, however, primary teeth are excludedand hence this tooth would be scored as a Y.
13. This slide shows a primary upper central incisor which is discolored. There is a history of traumaand if this were a permanent tooth it would receive a score of 3. As mentioned earlier,traumatized primary teeth are excluded from this survey and hence this tooth should be scored asa Y.
14. This slide shows a lower incisor with a lingual pit filling indicating endodontic therapy. If thepatient gives a positive history of trauma which occurred prior to the endodontic therapy the toothis to be assigned a score of 5; otherwise assign a score of 0.
15. This slide shows heavily abraded upper anterior teeth with what appear to be vertical fracture lineson the upper central incisors and a cuspid. There is no history of trauma to these teeth. Thereforeeach of these teeth are to be scored as 0.
5-73

TRAUMA
SLIDES
HERE
5-74
5.8.3 Traumatic Injuries Data Recording Procedures
Space is provided for recording traumatic injuries on the lower right hand area of page 1
(Exhibit 5-13) of the dental examination form. If there is no physical indication trauma in any of the eight
incisors, the examiner will call "No T," and the recorder should fill in the "T" circle in the upper section
of the trauma area.
5-75

Exhibit 5-13
5-76

5.9 Occlusal Characteristics Assessment
5.9.1 Introduction
The objectives of the occlusal and dentofacial characteristics component of the survey are to:
Determine the prevalence of selected occlusal and dentofacial characteristics in anational sample;
Provide a basis for comparing with future surveys;
Provide baseline data for possible follow-up of selected sub-samples; and
Provide a basis for future development of estimates of treatment needs.
The occlusal characteristics are similar to those used in the previous HANES surveys of 1963-
65, and 1967-69, and based on the Grainger’s Treatment Priority Index (TPI). In the TPI method, six
occlusal characteristics are scored separately, and a weighted regression formula is used to calculate a
single summary number that is supposed to represent treatment need. Subsequent experience with these
data has shown that the disaggregated information of components of occlusion like overjet and overbite
are quite useful. While there is no summary TPI number to compare with the previous HANES surveys,
it is possible to compare several of the occlusal characteristics, for which data collection methods are
similar, if not identical.
References
Ackerman, J.L., and Proffit, W.R.: The characteristics of malocclusion: A modern approachto classification and diagnosis.Am. J. Orthod . 56(5): 443-54, Nov. 1969.
Fields, H.W. and Vann, W.F.: Prediction and skeletal relationships from facial profiles inpreschool children.Pediatric Dent. 1: 7-15, 1979.
Fields, H.W., Vann, W.F., and Vig, K.W.L.: Reliability of soft tissue profile analysis inchildren. Angle Orthod. 52: 159-65, 1982.
Fields, H.W., Proffit, W.R., Nixon, W.L., Phillips, C., and Stanek, E.: Facial patterndifferences in long-face children and adults.Am. J. Orthod . 85: 217-33, 1984.
Little, R.M.: The irregularity Index: A quantitative score of mandibular alignment.Am.J. Orthod. 68: 554-:63, 1975.
5-77
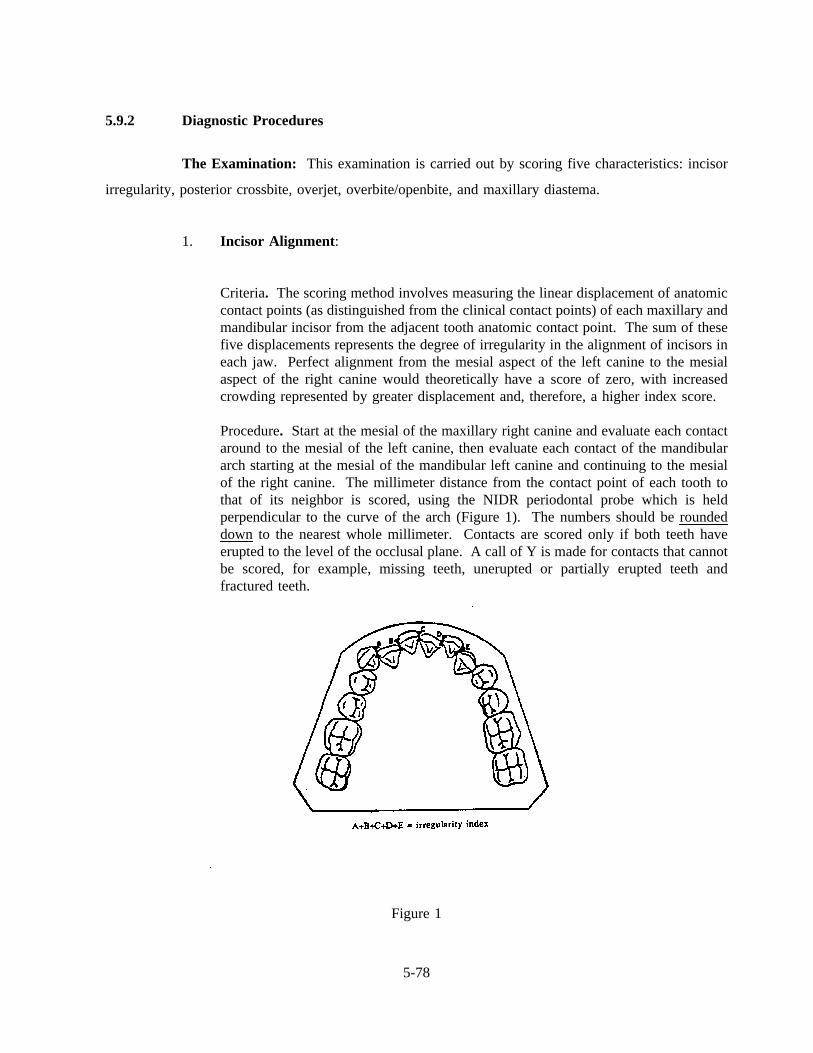
5.9.2 Diagnostic Procedures
The Examination: This examination is carried out by scoring five characteristics: incisor
irregularity, posterior crossbite, overjet, overbite/openbite, and maxillary diastema.
1. Incisor Alignment :
Criteria. The scoring method involves measuring the linear displacement of anatomiccontact points (as distinguished from the clinical contact points) of each maxillary andmandibular incisor from the adjacent tooth anatomic contact point. The sum of thesefive displacements represents the degree of irregularity in the alignment of incisors ineach jaw. Perfect alignment from the mesial aspect of the left canine to the mesialaspect of the right canine would theoretically have a score of zero, with increasedcrowding represented by greater displacement and, therefore, a higher index score.
Procedure. Start at the mesial of the maxillary right canine and evaluate each contactaround to the mesial of the left canine, then evaluate each contact of the mandibulararch starting at the mesial of the mandibular left canine and continuing to the mesialof the right canine. The millimeter distance from the contact point of each tooth tothat of its neighbor is scored, using the NIDR periodontal probe which is heldperpendicular to the curve of the arch (Figure 1). The numbers should be roundeddown to the nearest whole millimeter. Contacts are scored only if both teeth haveerupted to the level of the occlusal plane. A call of Y is made for contacts that cannotbe scored, for example, missing teeth, unerupted or partially erupted teeth andfractured teeth.
Figure 1
5-78
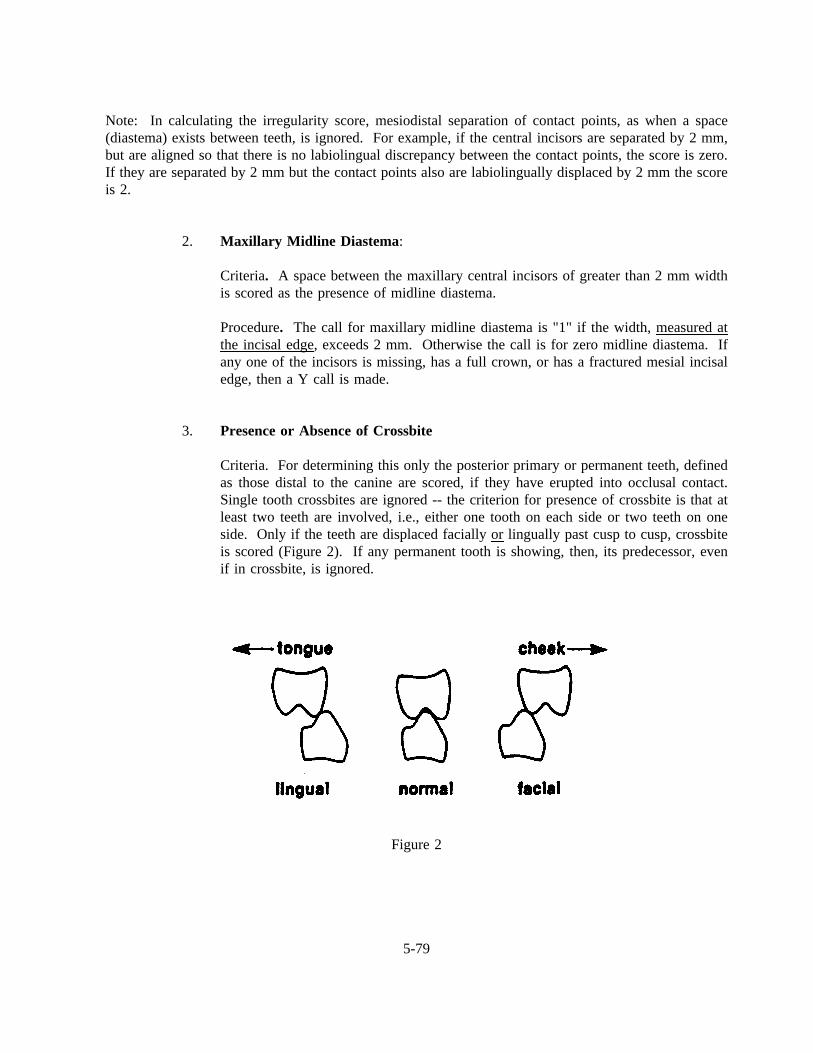
Note: In calculating the irregularity score, mesiodistal separation of contact points, as when a space(diastema) exists between teeth, is ignored. For example, if the central incisors are separated by 2 mm,but are aligned so that there is no labiolingual discrepancy between the contact points, the score is zero.If they are separated by 2 mm but the contact points also are labiolingually displaced by 2 mm the scoreis 2.
2. Maxillary Midline Diastema :
Criteria. A space between the maxillary central incisors of greater than 2 mm widthis scored as the presence of midline diastema.
Procedure. The call for maxillary midline diastema is "1" if the width, measured atthe incisal edge, exceeds 2 mm. Otherwise the call is for zero midline diastema. Ifany one of the incisors is missing, has a full crown, or has a fractured mesial incisaledge, then a Y call is made.
3. Presence or Absence of Crossbite
Criteria. For determining this only the posterior primary or permanent teeth, definedas those distal to the canine are scored, if they have erupted into occlusal contact.Single tooth crossbites are ignored -- the criterion for presence of crossbite is that atleast two teeth are involved, i.e., either one tooth on each side or two teeth on oneside. Only if the teeth are displaced facially orlingually past cusp to cusp, crossbiteis scored (Figure 2). If any permanent tooth is showing, then, its predecessor, evenif in crossbite, is ignored.
Figure 2
5-79
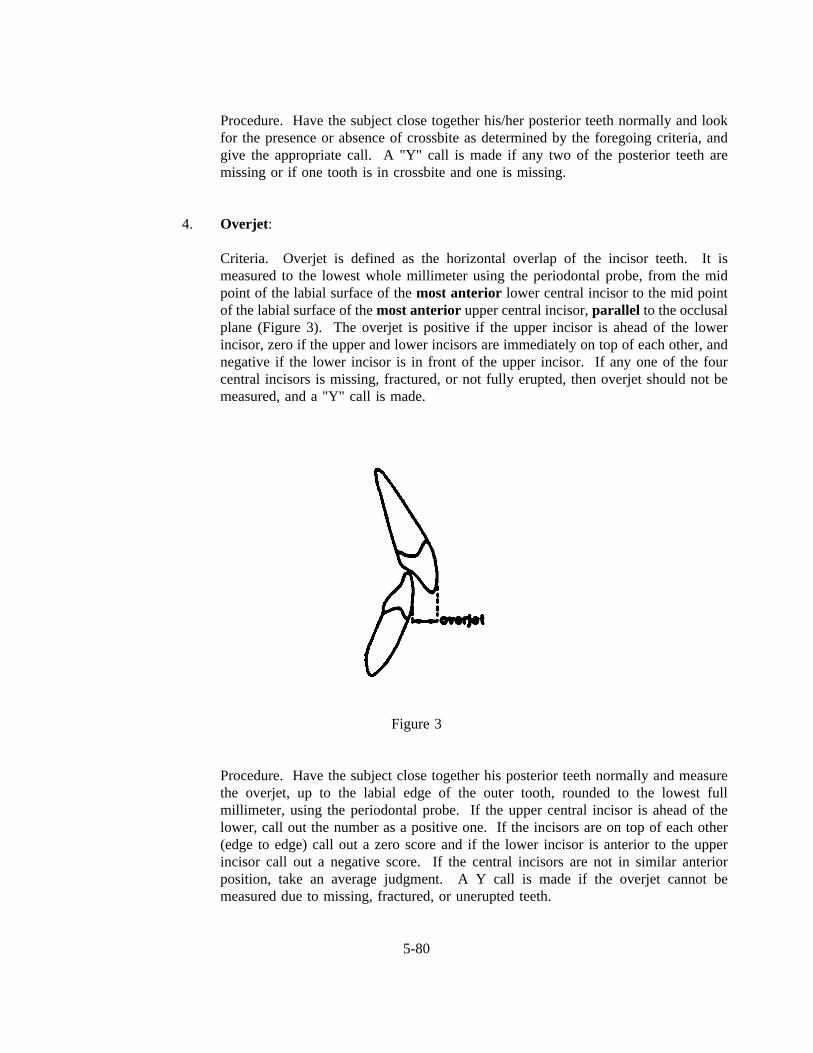
Procedure. Have the subject close together his/her posterior teeth normally and lookfor the presence or absence of crossbite as determined by the foregoing criteria, andgive the appropriate call. A "Y" call is made if any two of the posterior teeth aremissing or if one tooth is in crossbite and one is missing.
4. Overjet:
Criteria. Overjet is defined as the horizontal overlap of the incisor teeth. It ismeasured to the lowest whole millimeter using the periodontal probe, from the midpoint of the labial surface of themost anterior lower central incisor to the mid pointof the labial surface of themost anterior upper central incisor,parallel to the occlusalplane (Figure 3). The overjet is positive if the upper incisor is ahead of the lowerincisor, zero if the upper and lower incisors are immediately on top of each other, andnegative if the lower incisor is in front of the upper incisor. If any one of the fourcentral incisors is missing, fractured, or not fully erupted, then overjet should not bemeasured, and a "Y" call is made.
Figure 3
Procedure. Have the subject close together his posterior teeth normally and measurethe overjet, up to the labial edge of the outer tooth, rounded to the lowest fullmillimeter, using the periodontal probe. If the upper central incisor is ahead of thelower, call out the number as a positive one. If the incisors are on top of each other(edge to edge) call out a zero score and if the lower incisor is anterior to the upperincisor call out a negative score. If the central incisors are not in similar anteriorposition, take an average judgment. A Y call is made if the overjet cannot bemeasured due to missing, fractured, or unerupted teeth.
5-80
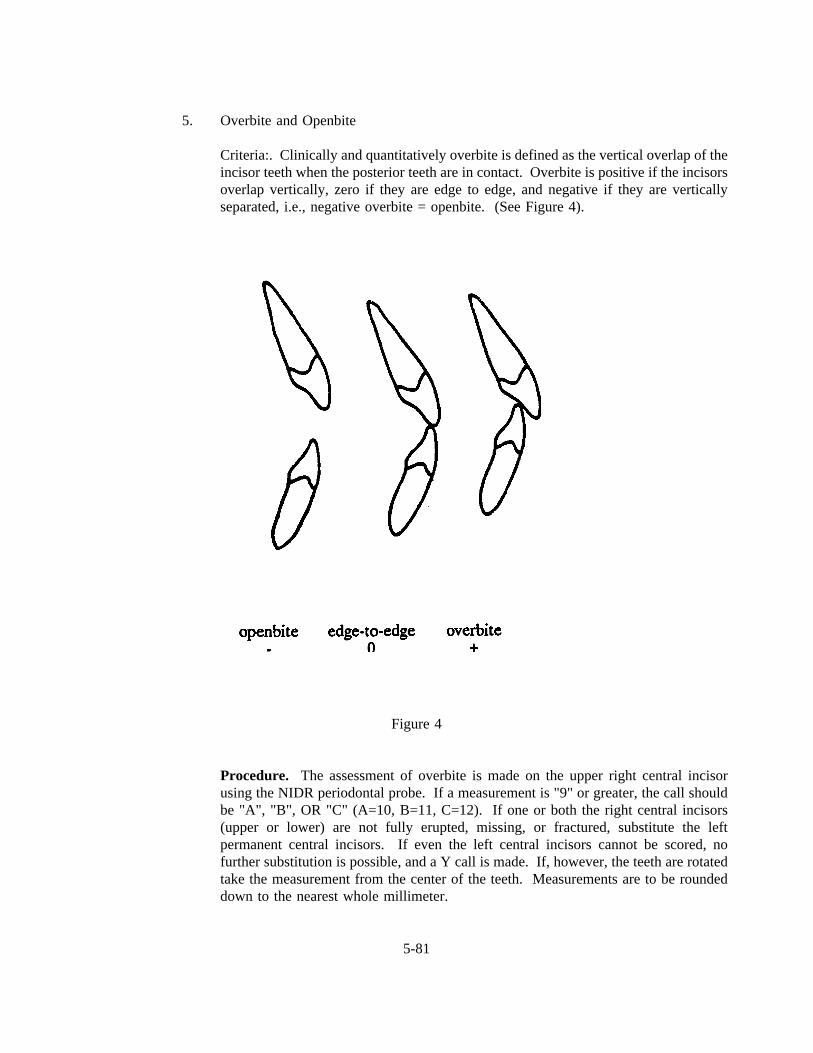
5. Overbite and Openbite
Criteria:. Clinically and quantitatively overbite is defined as the vertical overlap of theincisor teeth when the posterior teeth are in contact. Overbite is positive if the incisorsoverlap vertically, zero if they are edge to edge, and negative if they are verticallyseparated, i.e., negative overbite = openbite. (See Figure 4).
Figure 4
Procedure. The assessment of overbite is made on the upper right central incisorusing the NIDR periodontal probe. If a measurement is "9" or greater, the call shouldbe "A", "B", OR "C" (A=10, B=11, C=12). If one or both the right central incisors(upper or lower) are not fully erupted, missing, or fractured, substitute the leftpermanent central incisors. If even the left central incisors cannot be scored, nofurther substitution is possible, and a Y call is made. If, however, the teeth are rotatedtake the measurement from the center of the teeth. Measurements are to be roundeddown to the nearest whole millimeter.
5-81
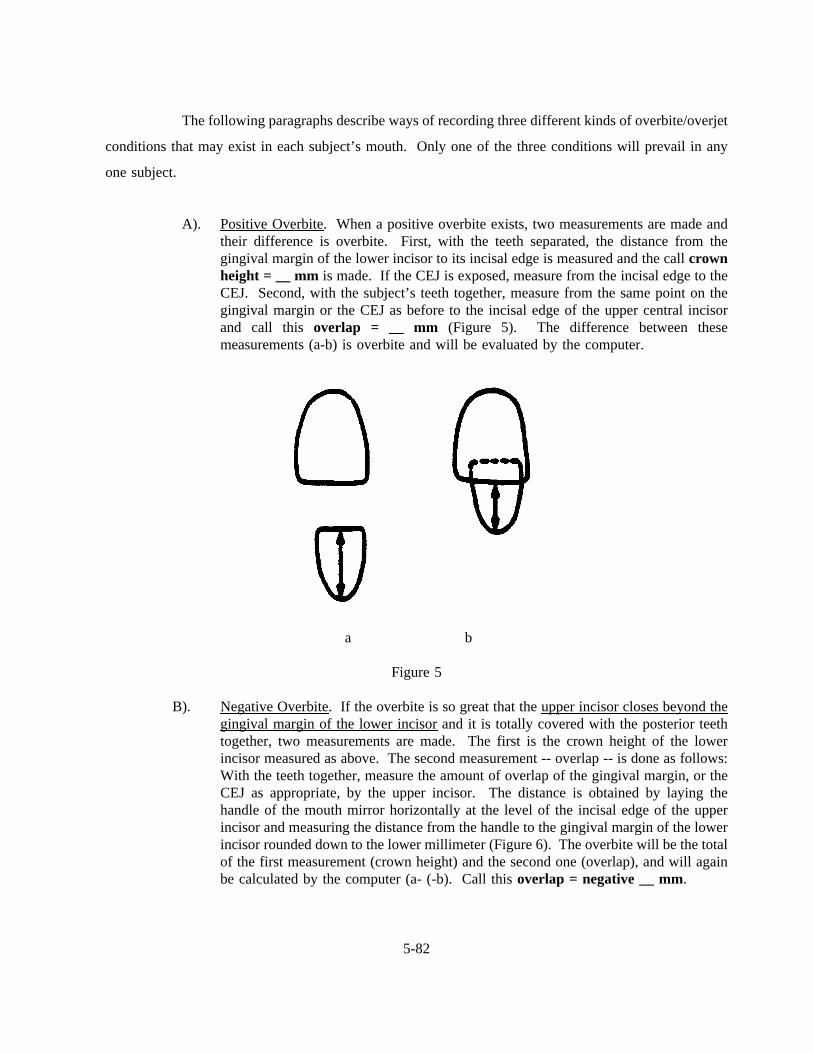
The following paragraphs describe ways of recording three different kinds of overbite/overjet
conditions that may exist in each subject’s mouth. Only one of the three conditions will prevail in any
one subject.
A). Positive Overbite. When a positive overbite exists, two measurements are made andtheir difference is overbite. First, with the teeth separated, the distance from thegingival margin of the lower incisor to its incisal edge is measured and the callcrownheight = __ mm is made. If the CEJ is exposed, measure from the incisal edge to theCEJ. Second, with the subject’s teeth together, measure from the same point on thegingival margin or the CEJ as before to the incisal edge of the upper central incisorand call this overlap = __ mm (Figure 5). The difference between thesemeasurements (a-b) is overbite and will be evaluated by the computer.
a b
Figure 5
B). Negative Overbite. If the overbite is so great that the upper incisor closes beyond thegingival margin of the lower incisorand it is totally covered with the posterior teethtogether, two measurements are made. The first is the crown height of the lowerincisor measured as above. The second measurement -- overlap -- is done as follows:With the teeth together, measure the amount of overlap of the gingival margin, or theCEJ as appropriate, by the upper incisor. The distance is obtained by laying thehandle of the mouth mirror horizontally at the level of the incisal edge of the upperincisor and measuring the distance from the handle to the gingival margin of the lowerincisor rounded down to the lower millimeter (Figure 6). The overbite will be the totalof the first measurement (crown height) and the second one (overlap), and will againbe calculated by the computer (a- (-b). Call thisoverlap = negative __ mm.
5-82
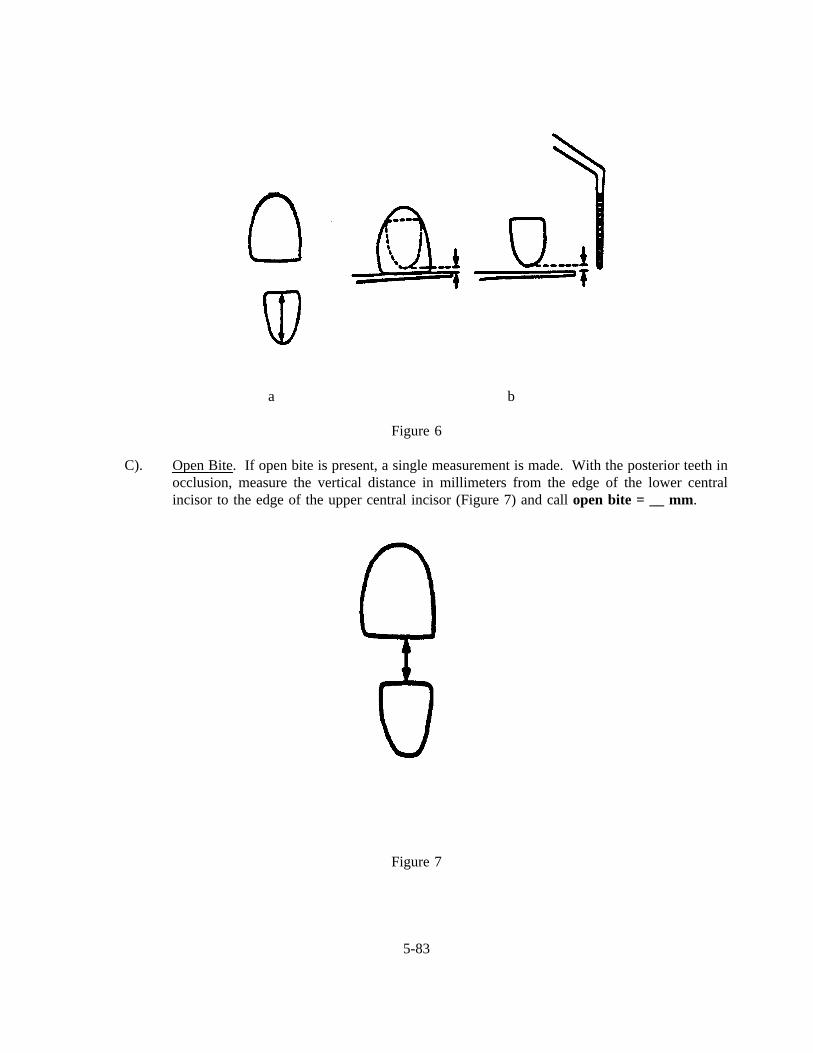
a b
Figure 6
C). Open Bite. If open bite is present, a single measurement is made. With the posterior teeth inocclusion, measure the vertical distance in millimeters from the edge of the lower centralincisor to the edge of the upper central incisor (Figure 7) and callopen bite = __ mm.
Figure 7
5-83
SLIDES ILLUSTRATING OCCLUSAL VARIABLES
1. Incisor irregularity is measured as a sum of the displacement of the five contacts between the anteriorteeth. Details of these measurements are given in the manual.
2. This demonstrates that a low incisor irregularity score generally is found with reasonably goodalignment. This case demonstrates 1.8 mm irregularity.
3. This demonstrates a higher incisor irregularity score and worse alignment. This case shows 3.8 mmirregularity.
4. An irregularity score of 8.7 mm demonstrates poor alignment.
5. Several periodontal probes can be used to make these measurements. Usually periodontal probesthat have colored segments make it easier to make successful judgments.
6. The periodontal probe on the left is preferred because it has evenly marked increments throughoutthe range of usual measurements made in the occlusal variable analysis.
7. This slide demonstrates the intraoral technique used to measure contact displacement.
8. This also demonstrates the clinical technique for measurement from the middle of the contact pointto the middle of the adjacent contact point.
9. This slide demonstrates a midline diastema that would be classified as present (greater than 2 mm)when measured at the incisal edge.
10. This slide demonstrates the distinctions for posterior crossbite. It should be noted that posteriorcrossbites are considered as being present if there are deviations past cusp-to-cusp as is demonstratedfor both the lingual and facial displacement.
11. The easiest way to determine if a posterior crossbite is present is to have the patient bite in centricocclusion and retract the cheek first on one side ...
12. and then while the patient is still biting, retract the cheek and view the other side of the dentition.
13. In this situation, it is apparent that none of the posterior teeth are in crossbite. The cusp-to-cusprelationship with the primary canine would be ignored because it is not a posterior tooth.
14. In this situation, crossbite would be counted as present because more than one posterior tooth is incrossbite on one side of the arch. Again, the canines would be ignored.
15. In this situation, posterior crossbite would be counted as present because multiple posterior teeth arein crossbite.
5-84
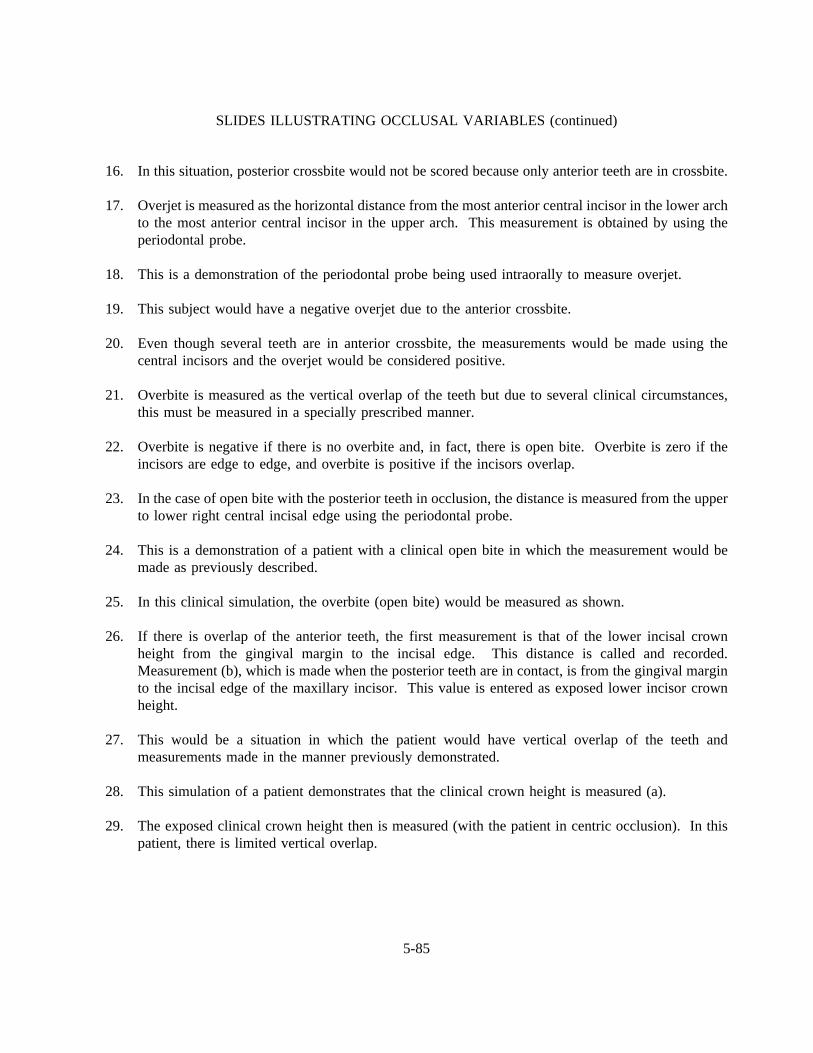
SLIDES ILLUSTRATING OCCLUSAL VARIABLES (continued)
16. In this situation, posterior crossbite would not be scored because only anterior teeth are in crossbite.
17. Overjet is measured as the horizontal distance from the most anterior central incisor in the lower archto the most anterior central incisor in the upper arch. This measurement is obtained by using theperiodontal probe.
18. This is a demonstration of the periodontal probe being used intraorally to measure overjet.
19. This subject would have a negative overjet due to the anterior crossbite.
20. Even though several teeth are in anterior crossbite, the measurements would be made using thecentral incisors and the overjet would be considered positive.
21. Overbite is measured as the vertical overlap of the teeth but due to several clinical circumstances,this must be measured in a specially prescribed manner.
22. Overbite is negative if there is no overbite and, in fact, there is open bite. Overbite is zero if theincisors are edge to edge, and overbite is positive if the incisors overlap.
23. In the case of open bite with the posterior teeth in occlusion, the distance is measured from the upperto lower right central incisal edge using the periodontal probe.
24. This is a demonstration of a patient with a clinical open bite in which the measurement would bemade as previously described.
25. In this clinical simulation, the overbite (open bite) would be measured as shown.
26. If there is overlap of the anterior teeth, the first measurement is that of the lower incisal crownheight from the gingival margin to the incisal edge. This distance is called and recorded.Measurement (b), which is made when the posterior teeth are in contact, is from the gingival marginto the incisal edge of the maxillary incisor. This value is entered as exposed lower incisor crownheight.
27. This would be a situation in which the patient would have vertical overlap of the teeth andmeasurements made in the manner previously demonstrated.
28. This simulation of a patient demonstrates that the clinical crown height is measured (a).
29. The exposed clinical crown height then is measured (with the patient in centric occlusion). In thispatient, there is limited vertical overlap.
5-85
SLIDES ILLUSTRATING OCCLUSAL VARIABLES (continued)
30. In some cases, there will be complete overlap of the lower incisor by the upper incisor. Therefore,the technique needs to be modified. In these situations, the first measurement (a) is again the lowerincisor crown height. The next step is to have the patient bite in centric occlusion and place thehandle of the mouth mirror at the level of the upper incisal edge. When the patient opens,measurement (b) is estimated from the level of the mirror handle to the gingival margin and thismeasurement is recorded as gingival overlap.
31. This slide demonstrates a patient in which the previous procedure must be used to determine theamount of vertical overlap.
32. In these situations, the lower crown height would be measured,
33. And if this patient had complete overlap, the overlap would be marked by laying the probehorizontally and then an estimation made of the distance from the probe to the lower incisal gingivalmargin.
5-86

OCCLUSAL
SLIDES
HERE
5-87
5.9.3 Occlusal Recording Procedures
Occlusal characteristics are recorded on page 1 of the Dental Examination Form (Exhibit 5-
14), below the Tooth Condition and Traumatic Injuries area. For alignment, the examiner will call 5
measurements for the upper jaw and 5 measurements for the lower jaw. These will range from zero to
9, or a "Y" (if a score cannot be made). For maxillary midline diastema, the calls are zero, "1," or "Y."
For posterior crossbite, the calls are zero, "1," or "Y." For overjet, the measurements range from zero to
9+ or "Y." If this measurement is negative, the minus sign needs to be marked. Each SP will have either
an overbite or openbitemeasurement, but not both. For an overbite, two measurements are made: height
(zero to 9, "A", "B", "C" or "Y"), and overlap (zero to 9, "A", "B", "C" or "Y"), which could be a
negative number (needing a minus sign). An openbite requires only one measurement (zero to 9, "A",
"B", "C" or "Y").
5.10 Periodontal Disease Assessment
5.10.1 Introduction
The objectives of the periodontal diseases component of the survey are to:
Establish age-specific data for the prevalence of periodontal diseases in a nationalsample;
Provide a basis for comparisons with past and future national periodontal diseasessurveys;
Provide baseline data for possible followup of selected subsamples;
Provide a basis for the future development of estimates of treatment needs; and
Provide a basis for studying the association between periodontal diseases prevalenceand risk factors.
This section includes three parts: periodontal destruction assessment (including furcation
involvement), gingival assessment, and the calculus assessment.
5-88
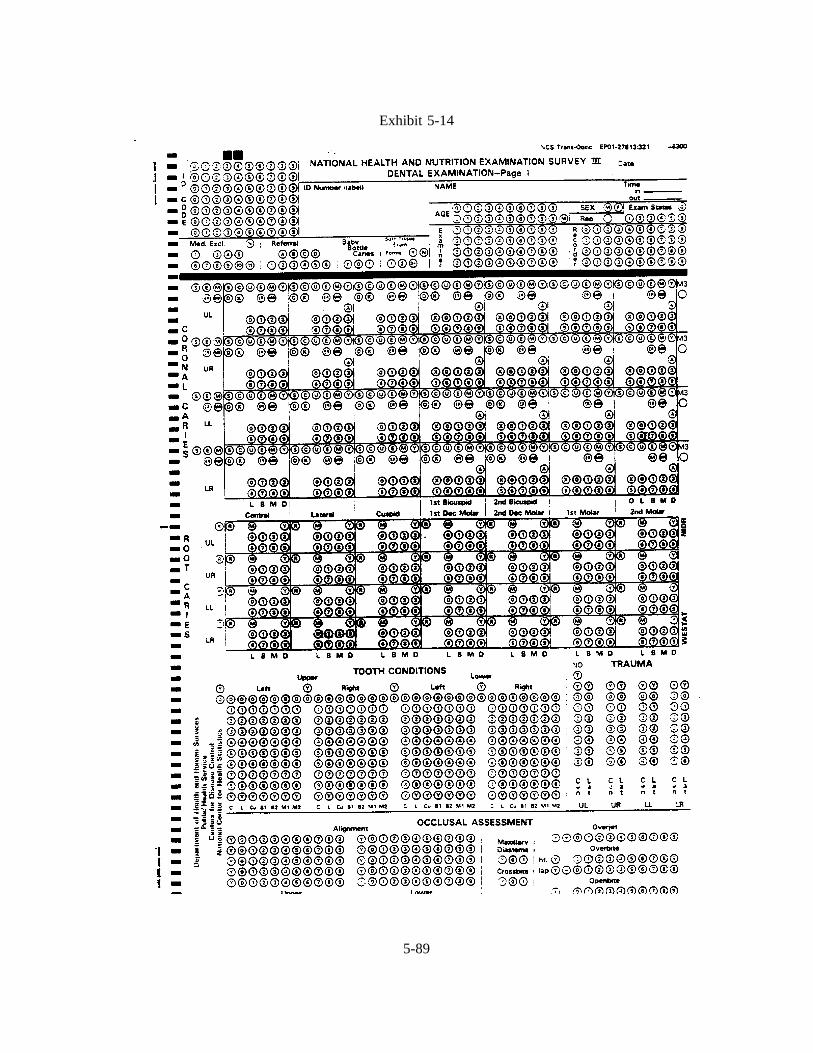
Exhibit 5-14
5-89
The diagnostic criteria used for this section have been developed utilizing the following
references as a basis:
Löe, H. and Silness, J.: Periodontal disease in pregnancy. I. Prevalence and severity.ActaOdont. Scand., 21:533, 1963.
Ramfjord, S.P.: Periodontal disease index (PDI).J Periodont., 38:585, 1967.
Ramfjord, S.P. and Ash, M.N.:Periodontology and Periodontics. W.B. Saunders Co.Philadelphia, 1979.
Glickman, J.: Bifurcation involvement in periodontal disease.J. Am. Dent. Assn., 40:528,1950.
With minor modifications, these diagnostic criteria have been used in the NIDR National
Survey of Oral Health in U.S. Employed Adults and Seniors (1985-86) and the NIDR National Survey
of Oral Health in School Children (1986-87) and in several state-wide surveys.
The examination of the two randomly selected quadrants will follow the sequence on the data
forms. The examiner will examine the maxillary quadrant first, then proceed to the mandibular quadrant,
beginning with the second molar and moving forward through each quadrant. The sequence of the
examination includes the gingival assessment, calculus assessment, periodontal destruction assessment, and
the furcation assessment. Only permanent teeth in full eruption will be scored for periodontal assessments.
5.10.2 Selecting Random Quadrants for Periodontal Assessment
The computer program will identify the random quadrants selected for the periodontal
assessment, which is performed on SP’s 13 years of age and older. If the computer fails to function
properly, the dental examiner will select one random upper quadrant and one random lower quadrant for
the periodontal assessment. In order to do this, s/he will use the 5th and 6th digits of the SP’s ID number,
as follows:
5-90
The fifth digit of the ID number will be used to select the upper quadrant. If this number
is even, the right side will be used. If this number is odd, the left side will be used.
Similarly, the sixth digit of the SP’s ID number will be used to select the lower quadrant for
the periodontal examination. If this number is even, the right side will be used. If this number is odd,
the left side will be used.
The quadrant selected will then be indicated in the upper left-hand corner of the periodontal
examination form.
For example, if the SP’s ID number is 123456-7, this would represent a left upper and right
lower designation for the SP.
1 2 3 4 5 6 7
left rightupper lower
The correct quadrant should then be recorded on the upper right section of page 2 of the
Dental Examination Form and under ’Comments’ on the Daily Log Form.
5.10.3 Gingival Assessment
The following approach will be applied to two surfaces of each tooth. Buccal and
mesiobuccal sites of two quadrants will be assessed. A score of 0 or 1 will be assigned for each
permanent tooth site:
0 = No bleeding,
1 = Bleeding, and
Y = Cannot be assessed.
5-91
The teeth should be dried with air from the buccal aspect before beginning each quadrant.
To examine the gingiva adjacent to each tooth the NIDR probe will be inserted no more than 2 mm into
the gingival sulcus, starting just distal to the midpoint of the buccal surface and then moved gently into
the mesial interproximal area. After all sites from the facial or buccal aspect of a single quadrant are
examined in this fashion, the bleeding points are scored. A call of 0 or 1 is made for each buccal and
mesial site beginning with the second molar and continuing to the central incisor.
If the tooth is missing or cannot be assessed, a single "Y" call is made. Partially erupted
teeth or deciduous teeth will also be coded as "Y". If the entire quadrant cannot be scored the single code
of "NS" (no score) will be called.
5-92
SLIDES ILLUSTRATING GINGIVAL ASSESSMENT
1. Instruments for the Gingival Assessment
The NIDR probe will be the primary instrument used for the gingival assessment. The probe willbe placed in the gingival sulcus at the midpoint of the buccal surface for all posterior and anteriorteeth at a depth not to exceed 2mm (the beginning of the first yellow band on the NIDR probe).
2. Drying of Quadrant
Buccal aspects of each quadrant should be carefully dried prior to the beginning of the gingivalassessment prior to the beginning of each aspect.
3. Sequence of Examination
For the gingival assessment, the examiner will begin with the most posterior tooth excluding thethird molar. Buccal and mesial surfaces in a quadrant will be scored.
4. Placement of the Probe in the Buccal Site
In this slide the probe is placed at the midpoint of the buccal surface. In this mouth it was possibleto place the probe almost 2mm into the sulcus. In some subjects only the tip of the probe will beinserted into the sulcus.
5. Movement of Probe into Mesial Site
After the probe is placed in the sulcus at the buccal site, the probe is carefully swept into the mesialinterproximal area. During this procedure the probe is gently placed against the tissue rather thanagainst the tooth surface.
6. Scoring the Bleeding Points
When all teeth in the quadrant from a buccal or facial approach have been examined, the examinerwill observe the buccal and mesial sites of each tooth and make the appropriate call. Using thecentral incisor again for a point of reference, the examiner would call two zeros (0,0) since nobleeding is evident at the buccal or mesial sites.
7-9. Demonstration on Cuspid
On the next slides, the assessment will be repeated for an anterior tooth, the maxillary cuspid. Theprobe is placed in the buccal sulcus and moved gently into the mesial interproximal area. Aftercompletion of the quadrant the examiner would make two calls for each tooth from the facial aspect-- the first call for the buccal site and the second call for the mesial site. For the cuspid that yousee in this slide, the first call would be 0 and the second call 0. For the lateral incisor,
5-93
SLIDES ILLUSTRATING GINGIVAL ASSESSMENT (continued)
the calls would be 0 and 1. For the central incisor, the bleeding points can be observed at both sitesand calls of 1,1 would be made. When bleeding points merge or when the bleeding from the buccalor mesial site extends more than half way, the tooth would be scored as 1,1.
10. Chronic Destruction
On this slide the subject has chronic periodontal destruction. The examiner should be aware thatbleeding points may not always be present with advanced disease.
11. Advanced Destruction (discussion slide)
On this slide several periodontal conditions can be noted including severe inflammation. Althoughthe examiner may be tempted to use the "no score" code for this dentition, the examiner shouldproceed in the usual manner and if necessary use the "Y" code for individual teeth that cannot beassessed.
5-94

GINGIVA
SLIDES
HERE
5-95
5.10.4 Calculus Assessment
As with the gingival assessment, the following criteria will be applied to both the mesiobuccal
and buccal aspects of each tooth. A score will be assigned for each tooth site, i.e., mesiobuccal and
buccal. Also, only a periodontal probe will be used for this assessment.
A single score will be assigned for each buccal and mesiobuccal surface according to the
following codes:
0 = Absence of calculus,
1 = Supragingival calculus but no subgingival calculus present,*
2 = Supragingival and subgingival calculus, or subgingival calculus only, and
Y = Cannot be assessed
The assessment for calculus should be made after the teeth are dried with air. The examiner
should dry the buccal aspect of the teeth with air and then observe the buccal and mesiobuccal aspects
of each tooth to determine the presence of supragingival calculus and probe for subgingival calculus using
the NIDR probe.
If the surface is missing or cannot be assessed, a single "Y" call is made. Partially erupted
teeth or deciduous teeth will also be coded as "Y". If the entire quadrant cannot be scored, the single code
of "NS" (no score) will be called.
* Supragingival calculus includes calculus located on the exposed crown and root of the tooth and extends up to 1 mmbelow the free gingival margin (FGM).
5-96
SLIDES ILLUSTRATING CALCULUS ASSESSMENT
1-2. Drying of Teeth
The assessment for calculus should be made after the quadrant is dried with air. The examinershould observe the buccal and mesial aspects of each tooth beginning with the most posterior toothexcluding third molars. The first slide depicts a quadrant prior to drying, and the second is after thequadrant has been dried.
3. Scoring for Calculus
On this slide supragingival calculus may be observed on the buccal surfaces of the cuspid and the1st mandibular bicuspid, and subgingival calculus is detected on these same teeth using the NIDRprobe. The examiner would make a call of 2 for both of these buccal surfaces.
4. Calculus Assessment Call When Recession Present
Supragingival calculus includes calculus located on the exposed crown and root of the tooth andextends up to 1 mm below the free gingival margin (FGM). On this slide the calculus that can beviewed on the root and coronal portions of the teeth would be scored as a "1" unless subgingivalcalculus were also detected.
5. On this slide a well maintained dentition can be observed in a subject with advanced destruction.The examiner should not be tempted to call this a "0" for each tooth site in the quadrant until furtherexploration is performed with the NIDR probe.
5-97

CALCULUS
SLIDES
HERE
5-98
5.10.5 Periodontal Destruction
The periodontal destruction examination includes both an assessment of loss of attachment
and furcation involvement. For loss of attachment, criteria will be applied to two sites per tooth: the
buccal and the mesiobuccal sites. For furcation involvement the maxillary 1st and 2nd molars, 1st
bicuspids, and mandibular 1st and 2nd molars will be examined. The analysis of these data will permit
reporting of loss of attachment, gingival recession, periodontal pocket depth, and furcation involvement.
The assessment for periodontal destruction will be made for two quadrants. Only permanent teeth in full
eruption are to be measured.
Loss of Attachment. Clinically and quantitatively the loss of attachment is the distance in
millimeters (mm) from the cementoenamel junction (CEJ) to bottom of the pocket. Loss of attachment
will be calculated by the computer program. The examiner will take two measurements per site for use
in this calculation.
The NIDR periodontal probe will be used to measure the buccal (B) and mesiobuccal (M)
sites. For each site, first, the distance from the free gingival margin (FGM) to the CEJ, and second, the
distance from the FGM to the bottom of the pocket will be measured and called. Where the gingival
margin is subject to recession and the CEJ is exposed, the distance from the CEJ to the gingival margin
is called a negative value.
The NIDR probe is color coded and graduated at 2, 4, 6, 8, 10, and 12 millimeters. The
periodontal probe is to be held with a light grasp not to exceed 25 grams and pointed toward the apex of
the tooth. Each measurement is rounded to the lowest whole millimeter. The probe is inserted from the
buccal aspect to measure both buccal and mesial sites.
For the interproximal site (M) the examiner should keep the probe parallel to the long axis
of the tooth even if the adjacent tooth is missing. For the upper and lower molars the buccal assessments
are always made at the midpoint of the mesial root, keeping the probe parallel to the long axis of the
tooth.
5-99
Furcation Involvement. When probing attachment distance and pocket depth measurements
have been completed in the two designated quadrants exploration for furcation involvement will be carried
out with a #17 explorer for maxillary 1st and 2nd molars and the 1st bicuspid. The cowhorn explorer (#3)
will be used to enter the 1st and 2nd mandibular molars. The extent of furcation involvement recorded
for the distal, buccal, and mesial sites for maxillary molars, distal and mesial sites for 1st bicuspids, and
buccal and lingual sites for mandibular molars will be classified according to the following criteria:
0 - No involvement
1 - Partial involvement, not passing through the furcation. Specifically, when a #3or #17 explorer definitely can be placed into the furcation and cannot be movedcoronally by pulling in the direction of the long axis of the tooth. The probecannot be passed through the furcation.
2 - Comprises the through and through involvement in which an explorer probe canbe passed between the roots through the entire furcation to indicate a throughand through bifurcation and trifurcation involvement.
NOTE: For maxillary molars the examiner should approach the assessment from thedistolingual and then the mesiolingual aspects first. Then proceed to buccalsites. After all tooth sites are examined, the scores for the maxillary molars willbe called in the order of the distal, buccal, then mesial sites.
Special Considerations for Both Loss of Attachment and Furcation Involvement
Assessments:
1. Calculus at mesiobuccal or buccal sites that obscures the CEJ or interferes with thecorrect placement of the probe is removed using a scaler.
2. When the margin of a restoration is below the CEJ, the position of the CEJ will beestimated using adjacent landmarks and dental anatomy.
3. When the CEJ cannot be estimated, the examiner will code Y to exclude the site.
4. When the natural tooth is missing, (i.e., space maintainers, implants, partial denture,or pontics), the tooth sites are scored Y. (On the recording form, the missing toothposition should be the same for both the periodontal and caries assessments.)
5-100
5. Mobile teeth should be examined with care. The CEJ should be estimated if possible.
6. Orthodontically banded teeth, splinted teeth, and hemisected teeth will be consideredon an individual basis and should be examined if possible.
7. Partially erupted teeth are excluded from all periodontal assessments. Retained rootsare also excluded if the CEJ and part of the clinical crown are not present. The codeof Y should be used for mesiobuccal and buccal sites of the excluded tooth. If theentire quadrant cannot be scored, the single code of "NS" (no score) should be called.
5-101
SLIDES ILLUSTRATING DIAGNOSTIC CRITERIAFOR PERIODONTAL DESTRUCTION
1. Loss of Attachment
Measurement with the NIDR probe will be made from a fixed point, the cementoenamel junction(B). The distance from the free gingival margin (A) to the CEJ (B) and the distance from the freegingival margin (A) to the bottom of the gingival crevice or pocket (C) will be measured at themesial and buccal sites of each tooth examined. The distance from the CEJ to the bottom of thepocket (BC), the distance which represents a loss of attachment, will be determined by subtractingthe first measurement (AB) from the second (AC) by a computer program.
2. Gingival Recession
In this diagram of the cuspid the gingival margin is on the cementum (left). The distance from thecementoenamel junction to the gingival margin (a) is called by the examiner as a negative value.The distance from the free gingival margin to the bottom of the sulcus (b) represents pocket depthand is also measured.
3. The Level of Attachment (Discussion slide)
In this slide the level of attachment is demonstrated in normal and diseased sites. The attachmentis at the cementoenamel junction in the diagram on the left. The distance from the free gingivalmargin to the CEJ (Y) is called 2, and the distance from the FGM to bottom of sulcus (X) is alsocalled 2. The loss of attachment (X-Y), or the difference between the two observations, equals 0.The diagram in the middle of the slide depicts the derivation of loss of attachment when the FGMis coronal to the CEJ (8-3=5 mm). In the diagram on the right the FGM is apical to CEJ (6-(-1)=7mm). In the field the examiners will be making the calls for X and Y only. The loss of attachment(Z) will be calculated by computer program.
For the purposes of this survey, Y represents the attachment distance (FGM/CEJ), and X representsthe probing depth (FGM/pocket).
4-5. NIDR Periodontal Probe
The NIDR periodontal probe is color coded with a point diameter of .38 mm. The thickness of theperiodontal probes has been standardized. The probe is graduated at 2, 4, 6, 8, 10 and 12millimeters. The yellow bands represent 2 mm increments. The examiner will round eachmeasurement to the lowest whole millimeter.
6. Probe Grasp
The periodontal probe is to be held with a light grasp not to exceed 25 grams and pointed towardthe apex of the tooth. The supervising dentist should be able to remove the probe from theexaminer’s hand without resistance.
5-102

SLIDES ILLUSTRATING DIAGNOSTIC CRITERIAFOR PERIODONTAL DESTRUCTION (continued)
7. Location of the Cementoenamel Junction
The first goal in the periodontal destruction assessment is to determine the location ofcementoenamel junction (CEJ). In this slide the probe is being used to search for the CEJ. Whenthe FGM is at the CEJ, the examiner would call zero (0) for the FGM/CEJ call.
8. Probe Position--Buccal Surface
The tip of the probe is placed in contact with the buccal surface of the central incisor. The buccalprobing depth = 1 mm. (Note color on probe.)
9. Probe Position--Mesial Surface
This slide illustrates the correct probe position for the mesial surface of the central incisor when anadjacent tooth is present. The probing depth = 2 mm. (Note color on probe.)
10. Probe Position--Diastema
In this slide there is a diastema between the central incisors. The examiner would place the probetip in contact with the mesial surface of the central incisor, parallel to this long axis of the tooth, andas close to the estimated contact point as possible. The probing depth = 3 mm. (Note color onprobe.)
11. Probe Position--Maxillary Molar
In this slide the probe is positioned parallel to the long axis of tooth on the mesial surface of a 1stmaxillary molar. The probe is placed close to the contact area between the distal surface of the 2ndbicuspid and the mesial surface of the 1st maxillary molar. The probing depth = 2 mm. (Note coloron probe.)
12. Probe Position--Adjacent Tooth Missing
The 1st bicuspid is missing in this quadrant. The probe is inserted on the mesial surface of the 2ndbicuspid as close to the contact area as possible. The probing depth = 3 mm. (Note color on probe.)
13. Buccal Assessment--Maxillary Molars
The buccal measurements for maxillary molars will be made at the midpoint of the mesiobuccal root.
5-103
SLIDES ILLUSTRATING DIAGNOSTIC CRITERIAFOR PERIODONTAL DESTRUCTION (continued)
14. Gingival Recession--Attachment Distance
In this slide the FGM is on the cementum and the probe is positioned at the midpoint of themesiobuccal root of the first maxillary molar. The distance from the cementoenamel junction to thefree gingival margin is 2 mm. The examiner would call a minus two (-2) for the first call.
15. Gingival Recession--Probing Depth
The probe is placed at the midpoint of the mesiobuccal root of the 1st maxillary molar. The probingdepth is 1 mm. The examiner would call 1 for the second call.
16. Probe Position--Mandibular Molar
In this slide the probe is positioned at the midpoint of the mesial root of the 1st mandibular molar.The free gingival margin (FGM) is at the CEJ. The FGM/CEJ=0 for the first call, and the probingdepth is 1 mm for the second call.
17. Probe Position--Gingival Recession
In this slide the free gingival margin is on the cementum. The probe is placed at the midpoint ofthe buccal surface of a mandibular 2nd bicuspid. The distance from the CEJ to the FGM is called(-2) for the first call.
18. Removal of Subgingival Calculus (Discussion slide)
In this slide subgingival calculus obscures the CEJ at the mesial surface of the right lateral incisorand should be removed using a Columbia curette #13 or #14. The examiner will rarely have toremove calculus in order to detect the CEJ.
19. Insertion and Placement of Curette
In this slide the Columbia curette is inserted in the mesial interproximal area of the maxillary rightcuspid for gross scaling and limited debridement in order to identify the CEJ.
20. Supragingival Calculus Removal
In this slide supragingival calculus obscures the CEJ at the buccal and mesial surfaces of themandibular left lateral incisor and should be removed before attachment distance measurements canbe made.
5-104
SLIDES ILLUSTRATING DIAGNOSTIC CRITERIAFOR PERIODONTAL DESTRUCTION (continued)
21. Estimation of the CEJ
In this slide several points can be noted. The location of CEJ at the buccal and mesial surfaces ofthe maxillary central incisor is obscured because of the crown preparation and the composite andamalgam restorations hinder identification of the CEJ on other teeth. On an individual site basis thelocation of the CEJ will be approximated.
22. Probe Assessments--Temporary Splints
On the mandibular lateral and central incisors a temporary splint with a wire acrylic combination hasbeen placed. The examiner will measure the attachment distance and probing depth for buccal andmesial surfaces in the usual manner.
23. Probing Assessment--Root Amputation
In this slide the distobuccal root of the maxillary molar has been amputated. The attachmentdistance and probing depth measurements can still be made for the mesiobuccal root. Mesial anddistal approaches should be evaluated with a #17 explorer for extent of furca involvement.
24. Probing Assessment--Hemisections
In this slide mesial and distal roots of a mandibular molar have been retained following hemisection.Attachment distance and probing assessments will be made for the mesial root in the customarymanner on the buccal and mesial aspects. Furcation calls on the buccal and lingual would be Ys.
25. Orthodontic Banding
In this slide bands are present on the 2nd molars and all anterior teeth of the lower arch. Theexaminer will use clinical judgment in deciding which sites can be properly assessed. The Y callis made only for those sites that cannot be measured.
26. Mixed Dentition
In this slide the mixed dentition is present. The examiner will not probe primary molars. However,as a space holder, "Y" is called for the buccal and mesial sites of the 1st and 2nd permanentbicuspids.
27. Gingival Hyperplasia
In this slide gingival hyperplasia is present on the upper teeth. The examiner should proceed withthe assessment in the usual manner.
28. Crowded Anterior Teeth
5-105
SLIDES ILLUSTRATING DIAGNOSTIC CRITERIAFOR PERIODONTAL DESTRUCTION (continued)
In this slide illustrating crowded anterior teeth, the examiner would estimate the mesial sites on thelateral incisors and cuspids.
29. Decalcification and Gingival Inflammation
In the last slide, decalcification on the bicuspids and molars is evident. If the presence of debrisobscures the CEJ the examiner should remove the debris with gauze and proceed gently with theprobing measurements. A "Y" can be utilized for an individual site if necessary.
5-106

PERIODONTAL
LOSS OF ATTACHMENT
SLIDES
HERE
5-107

5.10.6 Periodontal Assessment Data Form and Recording Procedures
Page 2 of the Dental Examination Form (Exhibit 5-15) includes gingival assessment, calculus
assessment, measurements for loss of attachment and a furcation assessment for two randomly selected
quadrants. If the examiner indicates that the periodontal exam cannot be conducted on the participant, the
recorder fills in the "Exam Inc" circle in the upper right corner of the Loss of Attachment area of the
form.
Gingival Assessment Data Recording Codes. The examiner begins the periodontal exam
by conducting the gingival assessment of all teeth, excluding third molars. The circles for scoring gingival
assessment are located in the upper left portion of page 2 of the form. Names of teeth are listed in the
middle of that section (2nd molar, 1st molar, 2nd bicuspid, 1st bicuspid, cuspid, lateral, central). Unlike
the caries exams which started with the central incisor and ended with the 2nd molar, the periodontal
exams begin at the back of the quadrant with the 2nd molar and ends in the front with the central incisor.
The codes are as follows:
Y = A gingival assessment for a particular tooth site cannot be scored,
0 = No bleeding, and
1 = Bleeding.
One score must be called for each tooth surface and only a "Y" or a "0" or a "1" may be
called. The examiner begins the gingival assessment with the second molar in the upper quadrant.
Examine the buccal and mesiobuccal sites of that quadrant, and then assign scores.
The recorder marks the circle containing the code. When the examiner has completed the
exam for the designated upper quadrant, s/he examines the designated lower quadrant.
There is a circle labeled "NS" for "no score" at the top of the gingival assessment section for
each quadrant. In cases where the gingival assessment cannot be made for one or more quadrants, the
examiner calls "No Score for upper quadrant" and/or "No score for lower quadrant." The recorder fills
in the "NS" circle(s). If "NS" is marked, all other circles for the quadrant must be left blank.
5-108
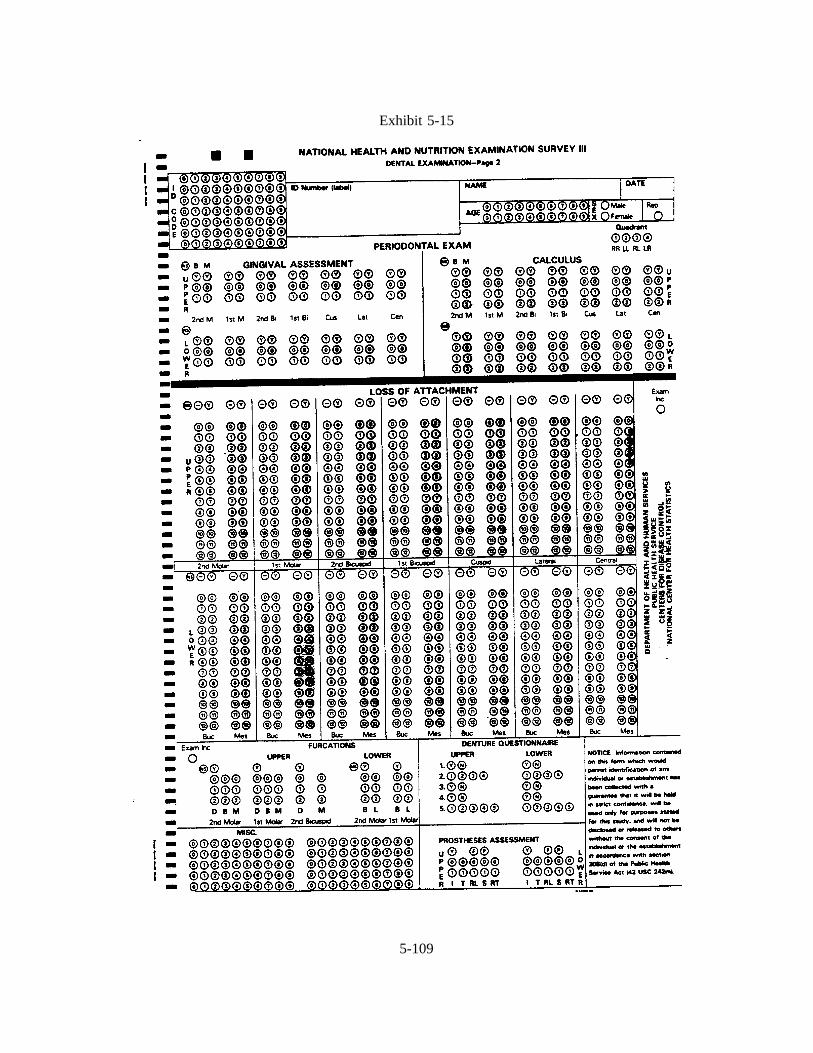
Exhibit 5-15
5-109
Calculus Assessment Data Recording Codes. The circles for scoring the calculus
assessment are located in the upper right section on page 2 of the Dental Examination Form. The buccal
and mesiobuccal sites of each tooth are examined. The examiner conducts the calculus assessment in the
same order as the gingival assessment.
The recorder fills in the circles containing the codes that are called. The codes are as follows:
Y = Cannot be assessed,
0 = Absence of calculus,
1 = Supragingival calculus but no subgingival calculus present, and
2 = Supragingival and subgingival calculus or subgingival calculus only.
There are also "NS" (no score) circles for each quadrant to mark if the quadrant cannot be
assessed for calculus. If "NS" is marked, all other circles for a quadrant must be left blank.
Loss of Attachment Data Recording Codes. The area for scoring loss of attachment is
located on the middle portion of page 2 of the Dental Examination Form. The names of the teeth in a
quadrant are listed at the middle of the section beginning with the 2nd molar and ending with the central
incisor. First scores for the teeth in the selected upper quadrant are recorded, followed by scores for the
teeth in the selected lower quadrant.
Buccal and mesiobuccal sites of each tooth are examined. Scores are assigned for both tooth
sites.
There are "No Score" circles at the top left portion of the form to indicate the quadrant(s)
which cannot be assessed. If an entire quadrant cannot be examined for loss of attachment, the examiner
calls out "no score" for the quadrant and the recorder marks in the "No Score" circle corresponding to that
quadrant:
UL = Upper left quadrant,
5-110
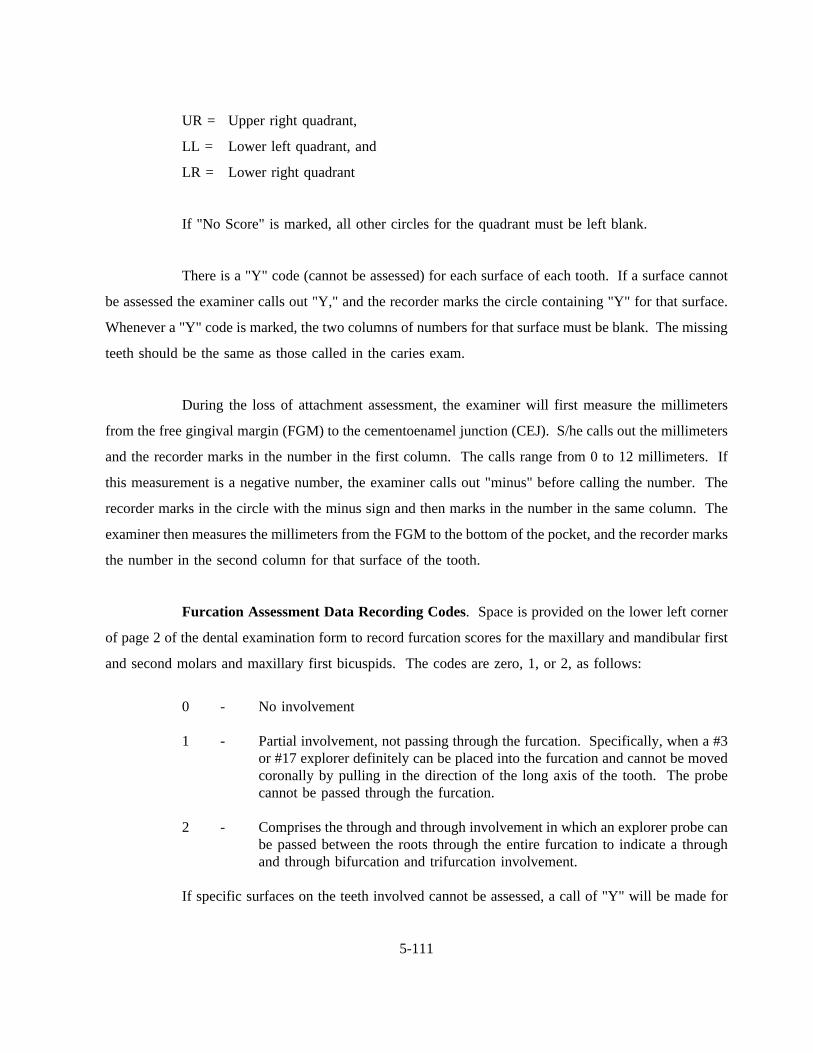
UR = Upper right quadrant,
LL = Lower left quadrant, and
LR = Lower right quadrant
If "No Score" is marked, all other circles for the quadrant must be left blank.
There is a "Y" code (cannot be assessed) for each surface of each tooth. If a surface cannot
be assessed the examiner calls out "Y," and the recorder marks the circle containing "Y" for that surface.
Whenever a "Y" code is marked, the two columns of numbers for that surface must be blank. The missing
teeth should be the same as those called in the caries exam.
During the loss of attachment assessment, the examiner will first measure the millimeters
from the free gingival margin (FGM) to the cementoenamel junction (CEJ). S/he calls out the millimeters
and the recorder marks in the number in the first column. The calls range from 0 to 12 millimeters. If
this measurement is a negative number, the examiner calls out "minus" before calling the number. The
recorder marks in the circle with the minus sign and then marks in the number in the same column. The
examiner then measures the millimeters from the FGM to the bottom of the pocket, and the recorder marks
the number in the second column for that surface of the tooth.
Furcation Assessment Data Recording Codes. Space is provided on the lower left corner
of page 2 of the dental examination form to record furcation scores for the maxillary and mandibular first
and second molars and maxillary first bicuspids. The codes are zero, 1, or 2, as follows:
0 - No involvement
1 - Partial involvement, not passing through the furcation. Specifically, when a #3or #17 explorer definitely can be placed into the furcation and cannot be movedcoronally by pulling in the direction of the long axis of the tooth. The probecannot be passed through the furcation.
2 - Comprises the through and through involvement in which an explorer probe canbe passed between the roots through the entire furcation to indicate a throughand through bifurcation and trifurcation involvement.
If specific surfaces on the teeth involved cannot be assessed, a call of "Y" will be made for
5-111
the identified surface and the recorder will leave that surface space blank on the form. If a tooth is
missing, "Y" should be called for all sites on that tooth.
5.11 Restorations, Tooth Conditions, and Prostheses Assessment
5.11.1 Introduction
The objectives of this component of the survey are:
To determine the prevalence and extent of selected disaggregated physical andbiological oral conditions during a dental examination as part of NHANES III.
To provide a basis for comparisons of dental conditions with future nationalepidemiological surveys.
To provide a basis for determining estimates of restorative treatment needs.
To provide baseline data for possible follow-up of selected population subsamples.
For purposes of this assessment, a dental condition is defined as a physical and biological
state that compromises structural integrity or causes dysfunction or disease and that can be corrected with
existing dental knowledge. Dental conditions such as fractured restorations, recurrent decay, and retained
roots compromise the structural integrity of the dentition, frequently impair oral function, and can result
in pulpal disease. Replacement of existing restorations and prostheses represents a noteworthy proportion
of treatment currently provided to patients and is likely to increase in importance in the future.
Examiners will examine restorations, tooth structure, and prostheses, assessing the condition
of defective restorations, defective crowns and bridges, gross loss of tooth structure, gross pulpal
involvement, and defective prostheses according to specific criteria. The data from the national survey
will provide the first information on the prevalence and extent of these conditions in the U.S. population,
and will be useful as a baseline for comparison with future surveys. In addition, the data will be valuable
as information to provide a basis for estimating the amount of dental services needed to treat these
conditions.
5-112
The diagnostic criteria for this section have been developed using the following references
as a basis:
Finkelstein, M.J., Douglass, C.W., and Chauncey, H.H.: Cumulative incidence of need forrestorative dental treatment.J. Dent. Ed., 49:757, 1985.
Hunt, R., Srisilapanan, P., and Beck, J.: Denture related problems and prosthodontictreatment needs in the elderly.Gerodontics, 1:226, 1985.
Maryniuk, G.A. and Kaplan, S.H.: Longevity of restorations: survey results of dentist’sestimates and attitudes.J. Am. Dent. Assn., 112:39, 1986.
Maryniuk, G.A.: In search of treatment longevity -- a 30-year perspective.J. Am. Dent.Assn., 109:739, 1984.
Mjor, I.: Placement and replacement of restorations.Oper. Dent., 6:49, 1981.
Ryge, G. and Snyder, M.: Evaluating the clinical quality of restorations.J. Am. Dent.Assn., 87:369, 1973.
5.11.2 Examination Sequence Overview
This examination is conducted in three steps. The first step is carried out immediately after
the root caries examination. It consists of tooth by tooth assessments for all permanent tooth spaces
(Exhibits 5-16 and 5-17). The second and third steps are carried out after the periodontal assessments.
The second consists simply of noting the presence or absence of prostheses, and the third consists of
evaluating for the integrity; excessive wear of posterior teeth; the presence or absence of a patient-applied
reline material or professionally-applied tissue conditioner or the presence of a denture adhesive; stability;
and retention is made. Individuals 18-74 years of age will be examined for all these assessments.
5-113
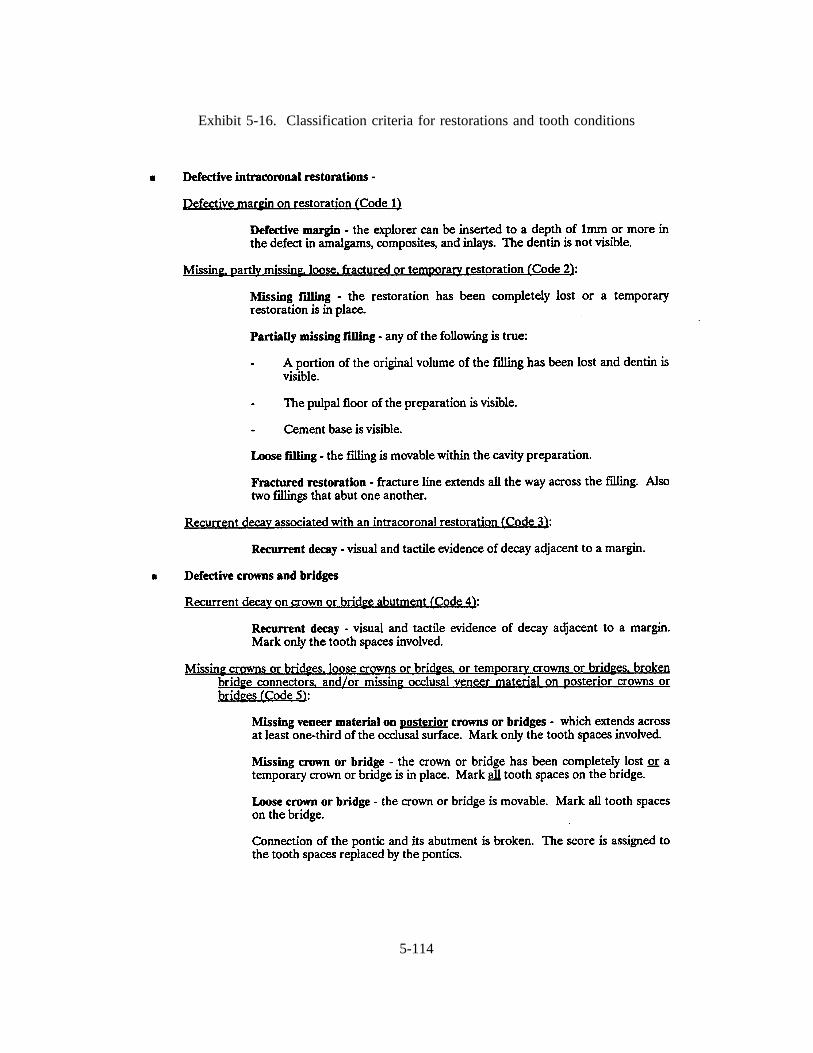
Exhibit 5-16. Classification criteria for restorations and tooth conditions
5-114
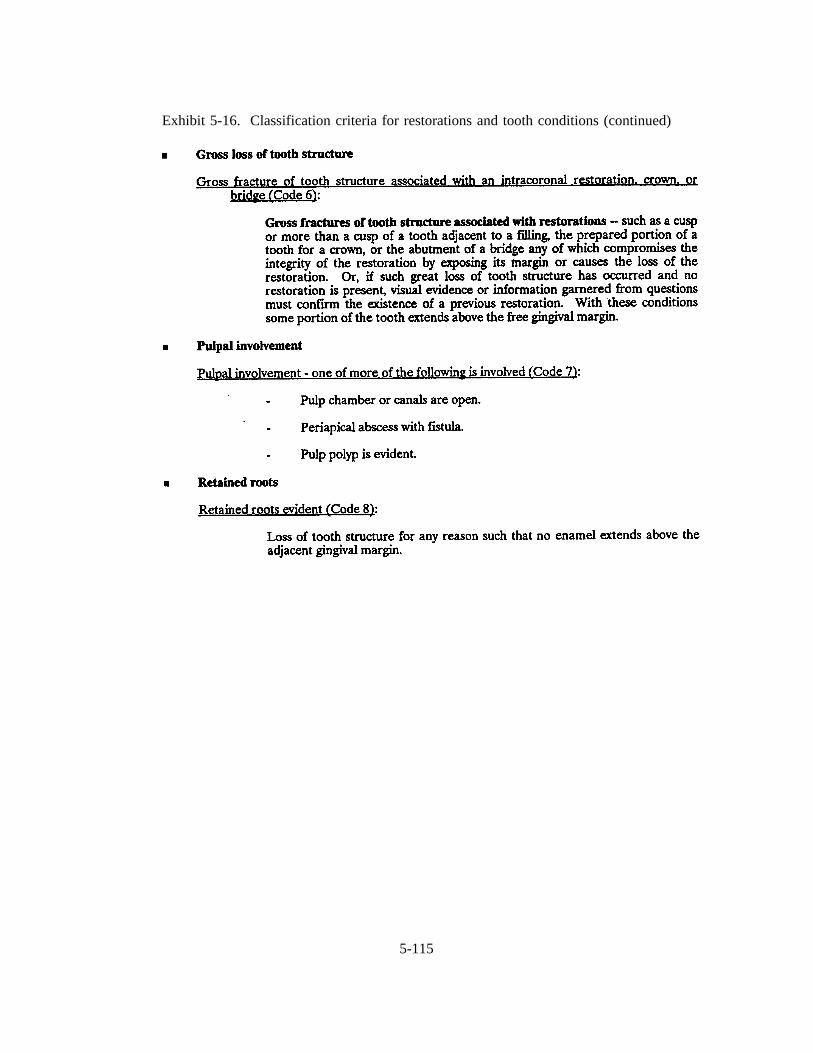
Exhibit 5-16. Classification criteria for restorations and tooth conditions (continued)
5-115
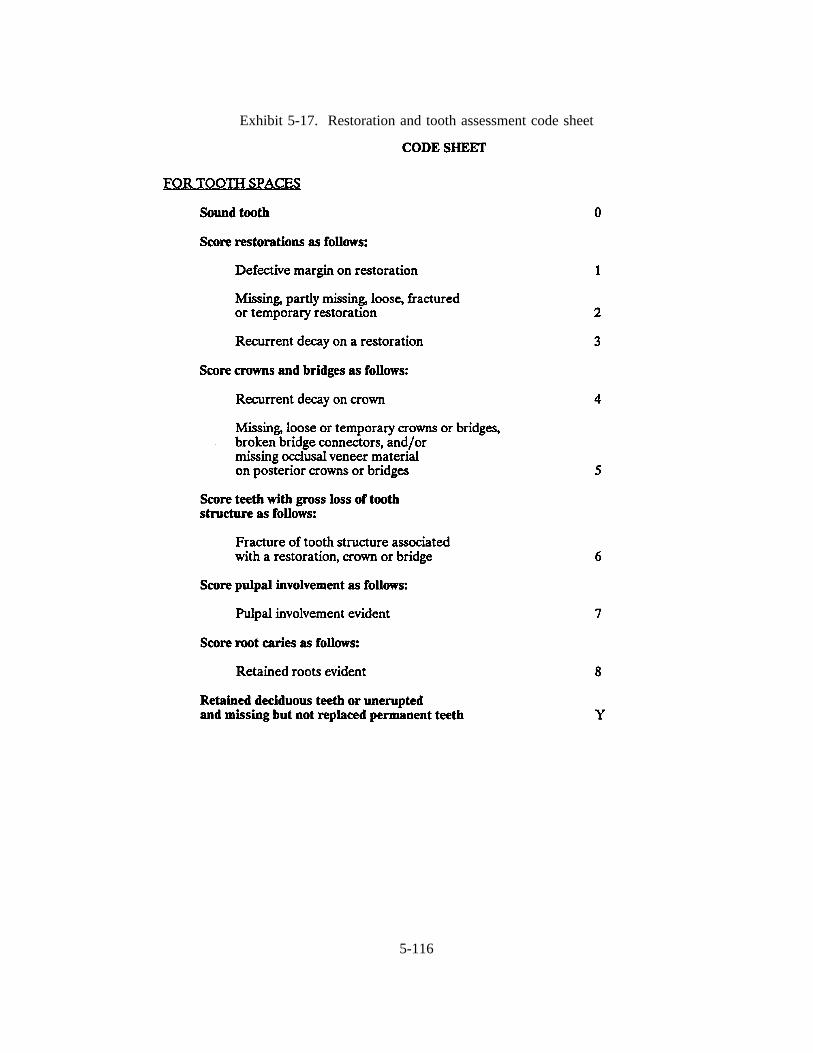
Exhibit 5-17. Restoration and tooth assessment code sheet
5-116
Individuals over age 74 who have both full maxillary and mandibular dentures will receive
a prostheses examination.
Tooth Assessments. The assessment of teeth is limited to the permanent dentition and is
accomplished in the same order as the caries exam. Retained deciduous teeth, unerupted, and missing
permanent teeth which are not replaced or are replaced with a removable prosthesis are scored "Y." Teeth
with none of the following defects are scored "0." If a tooth meets more than one of the criteria, then the
highest numbered code is used. All tooth spaces are scored whether the space is closed or not. For
crowns or for bridges with a pontic which replaces more than one tooth space, give both spaces the same
score. To save time, quadrants may be scored as a group, all "0’s" or all "Y’s." These "O’s" and "Y’s"
are at the beginning of each quadrant.
This examination entails the use of a mirror and #23 explorer. The use of the explorer is only
for light tactile assessment to confirm visual impressions. However, in the assessment of defective
margins, the explorer is used to determine whether the marginal defect is equal to or greater than 1 mm
or more in depth. The criteria for recurrent decay are the same as those used for coronal and root caries.
Complete Denture/Partial Denture Assessment. This assessment includes an evaluation
of: (1) integrity; (2) evidence of excessive wear of posterior teeth; (3) the presence of patient-applied
reline material or professionally-applied tissue conditioner, or the presence of a denture adhesive; and an
assessment of (4) stability and (5) retention. The first three of the preceding are accomplished extraorally
by the examiner. The last two assessments are made in the patient’s mouth. If two partials are present
in one arch, evaluate the one replacing the most teeth or if of equal spans, then choose the one on the
right. For fully tooth-supported partial dentures, score the two categories -- excessive tooth wear and
reline material, conditioner, or denture adhesive-both as 0. Exclude temporary partial dentures, so-called
flippers, that are totally tissue-borne all-resin prostheses. Full dentures associated with implants are scored
as full dentures. Exhibits 5-18 and 5-19 are guidelines for the examinations, classification criteria, and
coding.
5-117
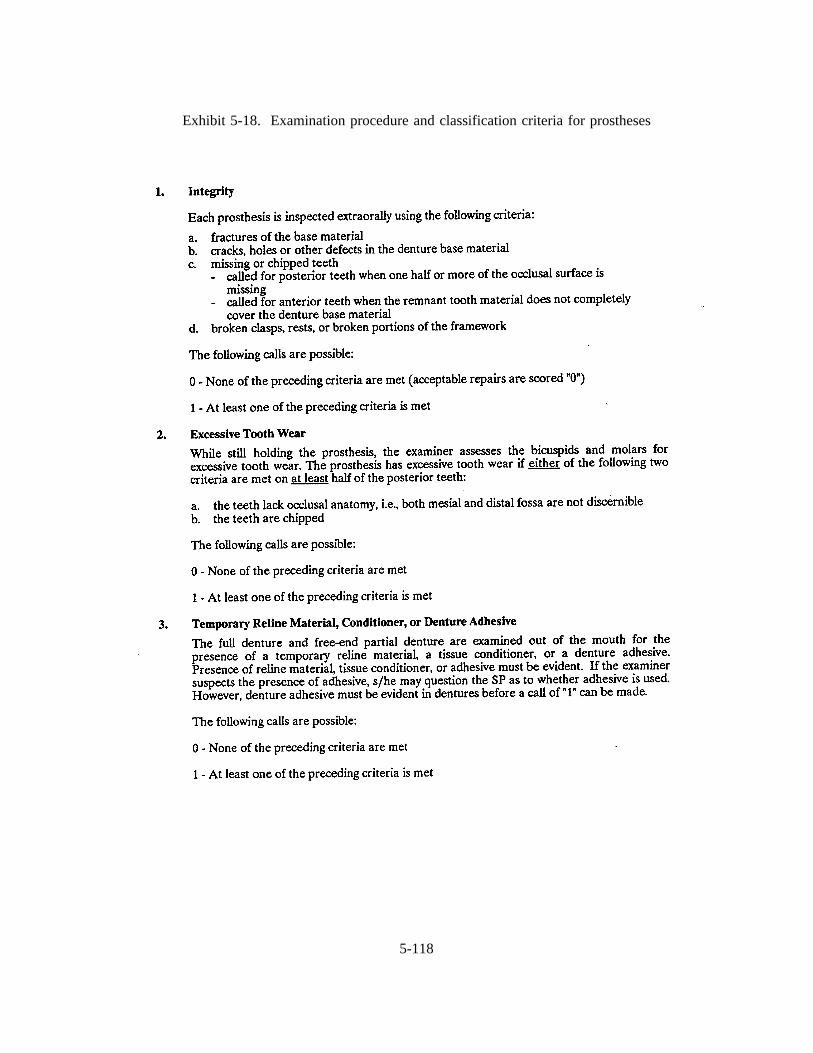
Exhibit 5-18. Examination procedure and classification criteria for prostheses
5-118
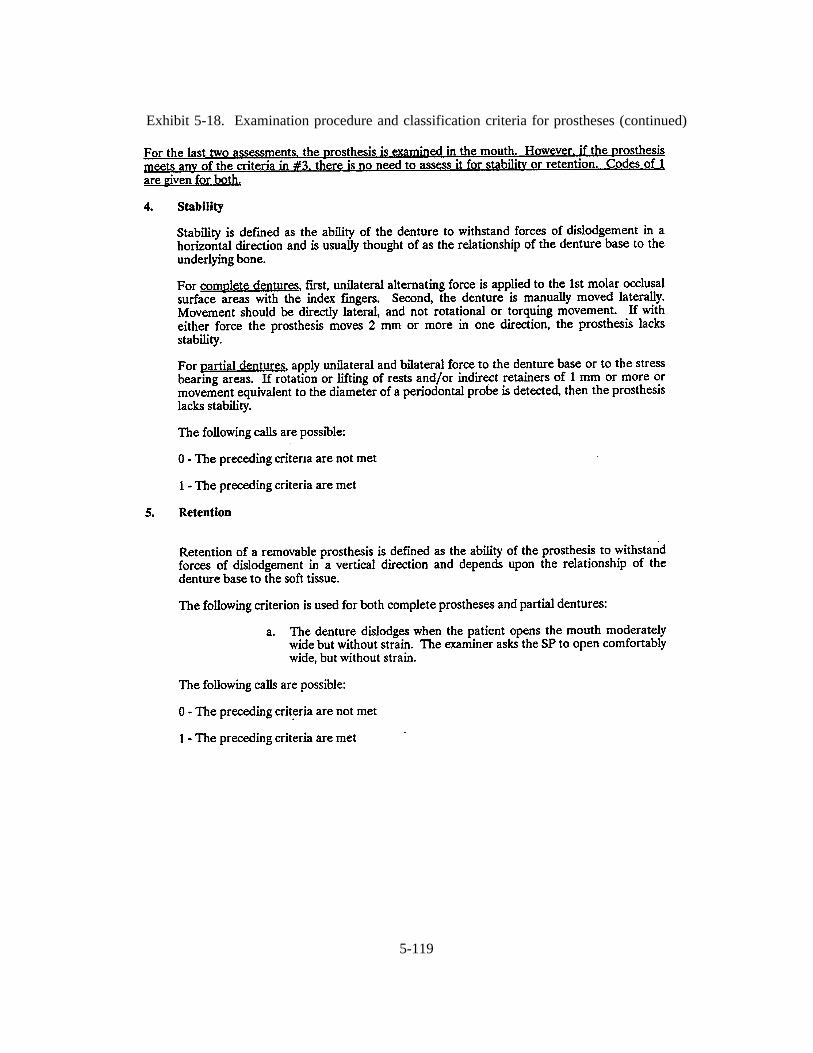
Exhibit 5-18. Examination procedure and classification criteria for prostheses (continued)
5-119

Exhibit 5-19. Complete denture/partial denture assessment code sheet
5-120

SLIDES ILLUSTRATING CONDITIONS
1. Defective Margin of Amalgam
Several tooth conditions are evident in this slide. Focusing on the lingual surface of the tooth withthe restoration and adjacent to the cusp, a defect exists in the restoration. Assuming that the defectis 1 mm or more and dentin is not visible, a score of 1 is called.
2. Partially Missing Filling
This molar has a portion of the MOD filling on the proximal that is missing. Score 2.
3. Fractured Restoration
This lower molar has a fractured amalgam all the way across the occlusal surface. Score 2.
4. Recurrent Decay
This slide shows recurrent caries on the mesial surface of the upper first bicuspid.Score 3.
5. Recurrent Decay
A restoration is missing in this slide; however, recurrent decay is evident and takes precedence.Score 3.
6. Recurrent Decay - Crowns
This slide shows recurrent caries at the buccal crown margins of the lower first and second molars.Score 4.
7. Broken Connection of Pontic and Abutment
This slide shows a fractured bridge connector between the upper central and lateral incisors. Score5.
8. Fractured Cusp Exposing Filling
This slide shows fractured lingual cusps adjacent to an amalgam restoration of a lower first molar.Score 6.
9. Periapical Abscess
This slide shows a fistula resulting from a periapical abscess of a molar abutment. Score 7.
5-121
SLIDES ILLUSTRATING CONDITIONS (continued)
10. Pulp Polyp
On this slide, a pulp polyp is evident in the lower first molar. Score 7.
11. Retained Roots
This slide shows the retained roots of three maxillary teeth. Score 8.
12. This slide illustrates a fracture of a partial denture, a defect in the integrity of the prosthesis.
13. This slide illustrates a crack in a maxillary denture, a defect in integrity.
14. Hole in Denture Base
This slide illustrates a hole in the denture base material, a defect in integrity.
15. This slide illustrates chipped porcelain teeth in a denture, but less than one-half of the occlusalsurface is missing. The call is 0.
16. Missing Occlusal Rest
This slide presents an example of a partial denture with a missing occlusal rest on the mesial clasp,a defect in integrity.
17. This slide illustrates a failed professionally applied silicone liner, a defect in integrity.
18. This slide also illustrates a failed professionally applied silicone liner, a defect in integrity.
19. Excessive Prosthetic Tooth Wear
This slide shows varying degrees of excessive wear on the posterior teeth of a denture. If one halfor more than 1/2 of the teeth meet the criteria, the call should be #1.
20. Excessive Prosthetic Tooth Wear
This slide illustrates varying degrees of excessive wear on posterior teeth of a denture. If one halfor more than 1/2 of the teeth meet the criteria, the call should be "1".
21. Excessive Prosthetic Tooth Wear
This slide illustrates varying degrees of excessive wear on posterior teeth of a denture. If one halfor more than 1/2 of the teeth meet the criteria, the call should be "1".
5-122
SLIDES ILLUSTRATING CONDITIONS (continued)
22. Excessive Prosthetic Tooth Wear
This slide illustrates excessive wear on posterior teeth of a denture, an excessive tooth wear call of1.
23. Denture Conditioner
This slide shows a professionally-applied tissue conditioner on a prosthesis.
24. Patient Applied Reline Material
This slide illustrates a patient applied denture reline material.
25. Permanent Processed Reline Material
This slide illustrates a processed permanent resilient liner. This would not meetthe criteria for atemporary reline material.
26. Inadequate Stability
This slide presents an example of inadequate stability. Notice that unilateral pressure on the denturearea caused lifting of the framework and rests on the opposing side. The call is 1.
27. This slide illustrates a swinglock removable partial denture. If the partial denture unlocks withpressure on the edentulous area and/or the retentive fingers move 1 mm or more incisally, the partialdenture is unstable.
5-123

RESTORATIONS,
TOOTH CONDITIONS,
PROSTHESES
SLIDES
HERE
5-124

5.12 Recording Information on the OPSCAN Dental Data Forms
As mentioned earlier, hard copy data forms will be used if there is a problem with the
automated system. The dental examiner examines each SP and "calls" the exam findings to the dental
recorder who records the examiner’s observations on the appropriate Dental Data Forms. The recorder
should never guess at a call or try to remember it and fill it in later. The recorder should not hesitate to
ask the examiner to go slower or to repeat a call. Accuracy is very important. All of the recording
procedures explained in the previous sections are done by the recorder, but the dentist is expected to help
edit the forms.
Data that are recorded on hard copy forms will have to be entered into the automated system
by the dentist. Health technicians (recorders) will be busy entering data from other components. The
MEC Manager will schedule a time when the data are to be entered because he/she will have to prepare
the MEC system (set the session, etc.) for the data entry and all exam components will have to be entered
at the same time. It is important that hard copy forms are completed clearly and carefully.
Exhibit 5-20 shows the correct and incorrect ways to mark the circles.
Editing the Dental Data Forms. After the examination, the recorder and examiner must edit
the hard copy Data Forms while the SP is still in the dental chair. The automated system will
automatically edit data as they are being entered. The purpose of the manual edit is to make certain that
we have the most accurate information possible. If data are missing or inconsistent, or if the forms are
incorrectly filled out, the estimate of the prevalence of oral health problems in the U.S. will be inaccurate.
After the edit has been completed, the recorder should immediately file the completed Data Forms in a
temporary file to avoid damage to the forms.
5-125
Exhibit 5-20. Dental data form marking instructions
MARKING INSTRUCTIONS
Use # 2 black lead pencil.
Do not use ink, ballpoint or felt tip pen.
Make black marks that fill the circle.
Erase cleanly any changes you make.
Make no stray marks on the form.
5-126
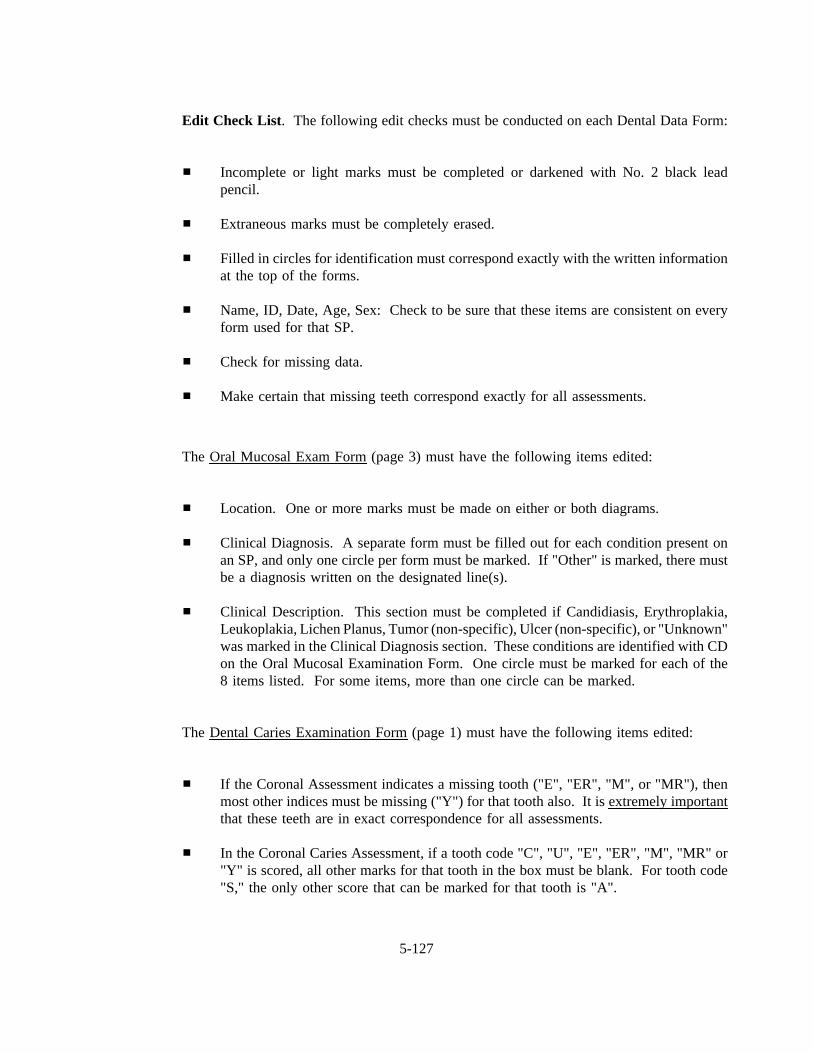
Edit Check List . The following edit checks must be conducted on each Dental Data Form:
Incomplete or light marks must be completed or darkened with No. 2 black leadpencil.
Extraneous marks must be completely erased.
Filled in circles for identification must correspond exactly with the written informationat the top of the forms.
Name, ID, Date, Age, Sex: Check to be sure that these items are consistent on everyform used for that SP.
Check for missing data.
Make certain that missing teeth correspond exactly for all assessments.
The Oral Mucosal Exam Form(page 3) must have the following items edited:
Location. One or more marks must be made on either or both diagrams.
Clinical Diagnosis. A separate form must be filled out for each condition present onan SP, and only one circle per form must be marked. If "Other" is marked, there mustbe a diagnosis written on the designated line(s).
Clinical Description. This section must be completed if Candidiasis, Erythroplakia,Leukoplakia, Lichen Planus, Tumor (non-specific), Ulcer (non-specific), or "Unknown"was marked in the Clinical Diagnosis section. These conditions are identified with CDon the Oral Mucosal Examination Form. One circle must be marked for each of the8 items listed. For some items, more than one circle can be marked.
The Dental Caries Examination Form(page 1) must have the following items edited:
If the Coronal Assessment indicates a missing tooth ("E", "ER", "M", or "MR"), thenmost other indices must be missing ("Y") for that tooth also. It is extremely importantthat these teeth are in exact correspondence for all assessments.
In the Coronal Caries Assessment, if a tooth code "C", "U", "E", "ER", "M", "MR" or"Y" is scored, all other marks for that tooth in the box must be blank. For tooth code"S," the only other score that can be marked for that tooth is "A".
5-127
Dental Caries Assessment. Check for multiple marks on the same linein the first rowof the tooth box and each columnof surface codes. There should be none.
The Periodontal Exam Form(page 2) must have the following items edited:
Missing teeth: If "U," "E," "ER", "M", or "MR" is marked for any tooth on the cariesform, a "Y" must be entered for that tooth on all periodontal assessments.
Loss of Attachment: If "Y" is scored for a surface in a periodontal assessment, noother mark can be made for the surface of the tooth in that assessment.
5-128

6. ORAL EXAM-RELATED FORMS AND PROCEDURES
This chapter describes exam-related forms and procedures that the dentist is responsible for
completing. These procedures include completing a report of findings that is provided to SP’s, making
referrals to the SP’s dentist if necessary, completing the referral contact log, and shipping oral mucosa
slides.
Shipping of data diskettes and data forms and other exam-related forms; dental exam room
setup at the start of a stand; dental exam room packup at the end of a stand; completing an inventory of
the dental room supplies; reconciling SP’s listed on the dental log with SP data that appear in the
automated system or on hard copy; and completing the control record and dental room log are also the
responsibility of the dentist. Basic information on inventory procedures, packup, teardown, shipment of
data and forms and the Control Record is provided in Attachment B, NHANES III Standard MEC
Operations.
6.1 Dental Exam Daily Log
The daily log must be completed for each session of the work week. A copy of the log is
shown in Exhibit 6-1. At the top of the form, enter the Stand Number, Location of Stand, your examiner
I.D. number, the session date, and indicate the time of the session.
For each SP examined, enter the SP number or attach a barcoded label with the SP number,
age of SP, the Recorder I.D. #, time exam started, time exam ended (when SP left room), random quadrant
selection for each SP will be recorded under "comments." Usually the recorder will enter most of the
information but the dentist must make sure all portions of the forms are accurately completed. Any
unusual occurrences or observations should be noted in the comments column.
The original set of logs should be returned to Westat at the end of the stand.
6-129
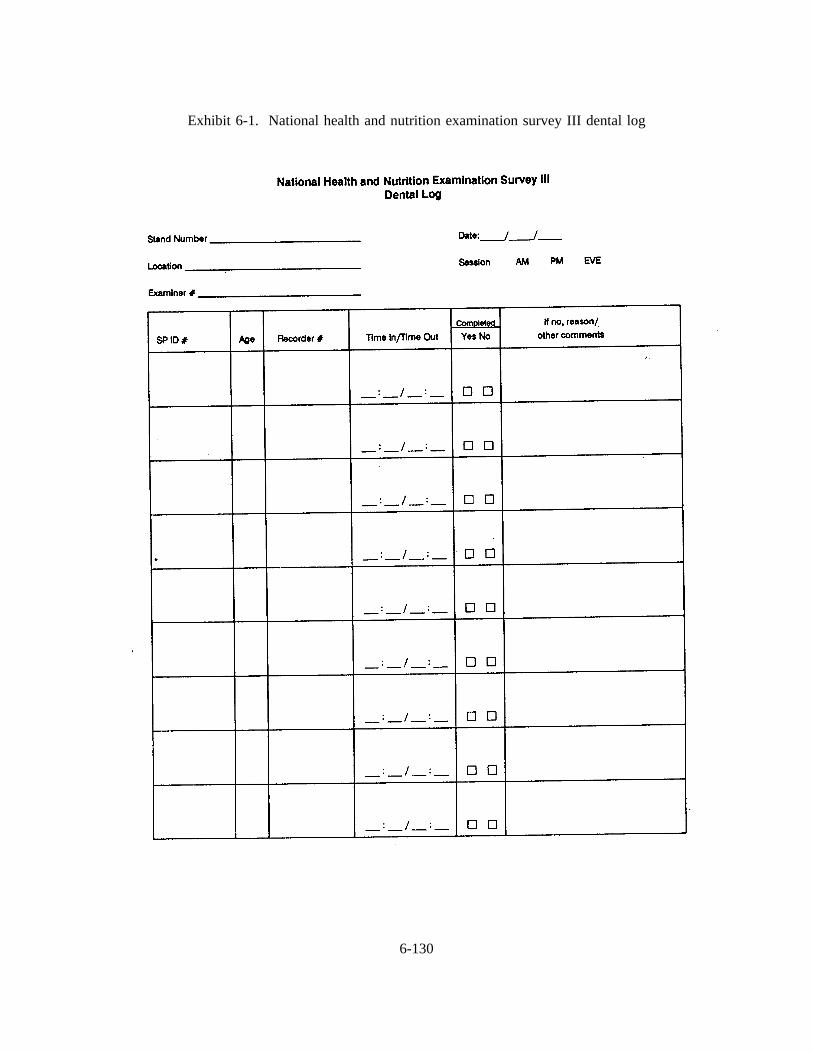
Exhibit 6-1. National health and nutrition examination survey III dental log
6-130

6.2 Completing the Recommendations for Dental Care
The oral examination included in this survey does not take the place of a dental checkup,
treatment by one’s own dentist, or routine dental care since no radiographs are taken and the SP’s history
is not available to you. Rather the exam is designed to achieve the research objectives. Therefore, NIDR,
NCHS, and Dr. Ley have attempted to develop a procedure for alerting SP’s to the need for followup care
or the need to continue regular dental care that takes the limits of the exam into consideration.
The report of dental findings called Recommendations for Dental Care (see Exhibit 6-2)
should be completed for each SP. This report makes recommendations about the need for dental care.
At the conclusion of the examination the examiner will tell the recorder which of four boxes to check on
the Recommendations for Dental Care, indicating whether the SP should (a) see a dentist immediately;
(b) see his/her dentist within 2 weeks; (c) see his/her dentist at the earliest convenience; or (d) continue
his/her usual dental care. The report will be on 3-part paper. One copy should be placed in the SP’s
folder for the coordinator to give to the SP; one copy is sent to Westat; and one copy goes to NCHS.
6.3 Making Referrals for Dental Care - Completing the Notification of Dental
Examination Findings, and Dental Referral Log
If you determine that an SP must see his/her dentist for dental care immediately or within
the next two weeks, you will be expected to (1) contact the SP’s personal dentist by telephone to explain
the SP’s condition and need for immediate care; (2) complete a Notification of Dental Examination
Findings form to mail to the SP’s personal dentist as a followup to the phone call; and (3) complete the
Dental Referral Log.
6-131
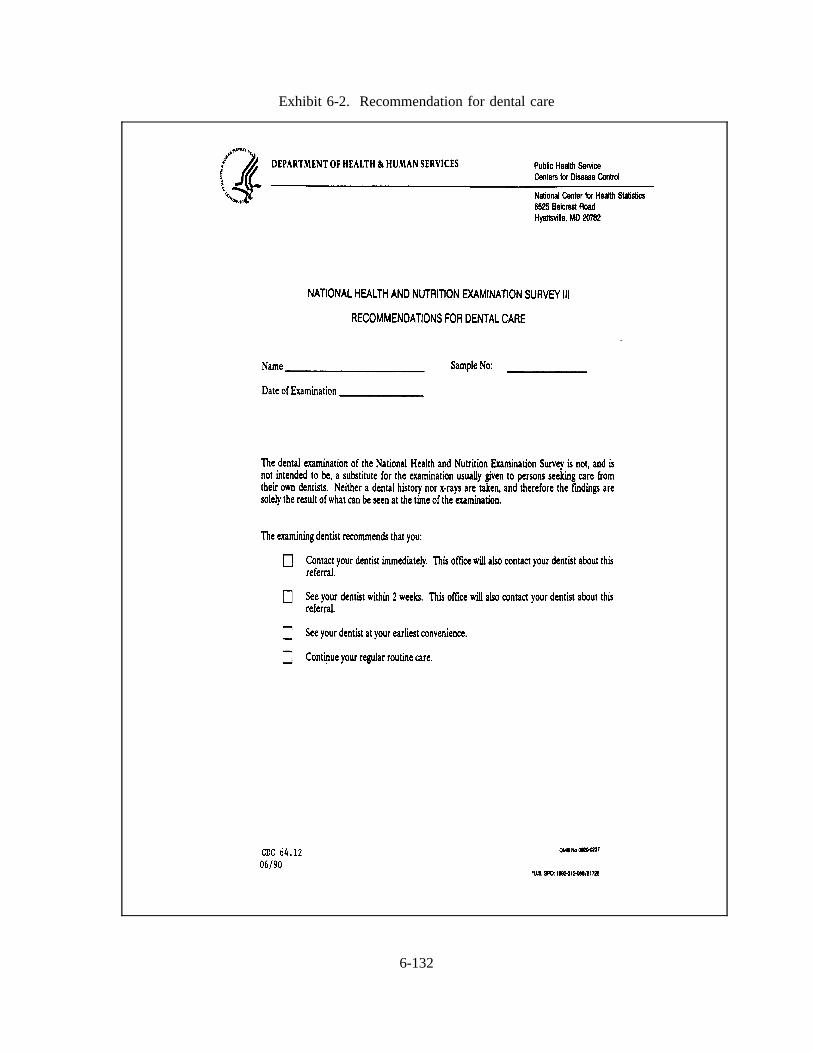
Exhibit 6-2. Recommendation for dental care
6-132
6.3.1 Contacting the SP’s Personal Dentist by Telephone
Arrangements will be made at each stand to have available the name and address of a public
health or community clinic to which SP’s who do not have their own dentist can be referred. The
coordinator, dentist and physician will receive a memo with this information at each stand.
If an SP requires immediate care, or care within the next two weeks ask the SP if you may
contact his/her dentist or the public health clinic about the problem. If the SP agrees, obtain the address
and telephone number of the SP’s dentist from the SP and call the SP’s dentist or dental clinic. If the SP
refuses, you may not contact the SP’s dentist by telephone or in writing. The following procedures should
be used when making the call:
Without making a diagnosis, explain the SP’s condition.
Express your concern about what you observed and emphasize that it is very importantthat the SP see his/her dentist immediately.
Explain that you did not do a full-scale examination (that was not the intent of thestudy), no x-rays were taken, you are not familiar with the SP’s dental history; andthat your findings may differ from a more thorough evaluation by the SP’s dentist.
Explain that in the next few days you will be sending a letter to the dentist whichdocuments what you found.
There may be occasions when you cannot reach the SP’s dentist by telephone. In this case,
document on the Dental Referral Log the fact that you tried to call but were unsuccessful.
6.3.2 Completing the Notification of Dental Examination Findings
When the SP requires immediate care or care within the next two weeks, you will be
completing the Notification of Dental Examination Findings to sent to the SP’s dentist. You must have
the permission of the SP to send this letter, which will serve to document the problem you found and to
reinforce tot he SP’s dentist the serious nature of the problem you may have identified. Exhibit 6-3 is a
copy of the notification form. Check the main reason for the referral. For all recommendations other than
"continue your current care" include a brief written comment on the form because of the
6-133
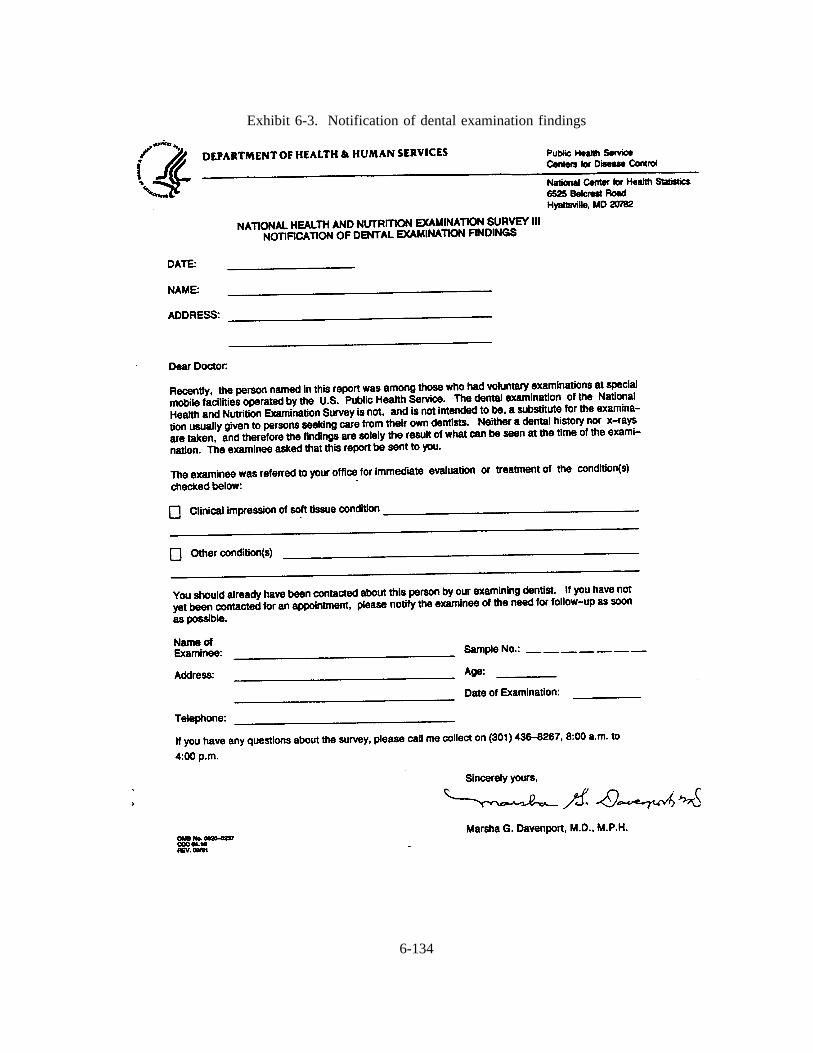
Exhibit 6-3. Notification of dental examination findings
6-134
seriousness of the condition. Comments should be limited to the following approved descriptions:
Decayed teeth
Gum condition
Oral hygiene problem
Problem with filling
Problem with denture
Oral soft tissue lesion
This description should not provide a detailed diagnosis. Avoid descriptions which are
references to specific tooth surface, specific treatment needs or statements indicating a specific diagnostic
classification.
The letter will be presigned by the NCHS NHANES III physician and is produced on 3-part
paper. Please give the original to the SP and send one copy to NCHS, and one copy to Westat. The
NCHS copy should be sent promptly to:
Receipt and Control, Survey Operations BranchDivision of Health Examination StatisticsNational Center for Health Statistics3700 East-West Highway, Room 1-43Hyattsville, MD 20782
This will ensure that the Chief Medical Officer for the survey at NCHS is informed about
each SP requiring immediate dental care. The Westat copies of the notification can be sent to Westat at
the end of the stand.
6.3.3 Completing the Dental Examination Referral Log
Any time you identify an SP who requires a referral for care (either immediately or within
two weeks), you must complete the referral log. This log should be completed even if the SP refuses to
6-135
allow you to call his/her dentist, or if you are unsuccessful in reaching the referral dentist by phone. The
log provides a means for documenting your actions with respect to informing the SP about his/her
condition and your attempts to direct the SP to care.
Exhibit 6-4 is a copy of the referral log. The log should contain the following information
for each SP who requires referral:
1. SP ID and Name - Use the ID label in column 1 and write in the SP name.
2. Date Examined - Self evident.
3. Reason for Referral - Be sure to indicate the level of referral (1 = immediate care, 2= within 2 weeks) as well as a brief description of the problem.
4. Statement of What the SP Was Told - Self evident.
5. SP’s Response - Indicate whether the SP seemed to understand the seriousness of theproblem.
6. Consent to Contact MD/DDS - If the SP refuses to allow you to contact his/her dentist,indicate this and have the SP initial the log.
7. Telephone Number of Contact - Self evident.
8. Name of Contact and/or Facility - Self evident.
9. Position of Contact - Indicate whether your final conversation took place with adentist, facility administrator, nurse, hygienist, receptionist.
10. Letter Sent - Indicate whether you sent the Notification of Dental Findings.
6.3.4 Criteria for Referral
This section is provided to help the examiner choose the appropriate box (Box A, B, C, or
D) of the "Recommendations for Dental Care" form (Exhibit 6-2).
6-136

Exhibit 6-4. Positive findings/dental contact log
6-137

It is widely recognized by the American public that susceptibility to plaque-induced carious
and/or periodontal lesions is both universal and continuous throughout the life of the dentition and that
a periodic examination by a professional is an effective means of averting the serious sequelae which may
develop due to failure to treat these lesions at the appropriate time. It is, therefore, justified, following
examination, to advise that the examinee "continue regular routine dental checkups." Since a considerable
proportion of our population does not, for a variety of reasons, receive appropriate treatment at an
appropriate time, it is the examiner’s ethical responsibility to advise examinees to "see the dentist at their
earliest convenience" when such advice is warranted. There will be a small number of SP’s who should
seek treatment immediately, and it is the examiner’s responsibility to inform the appropriate individuals
about the urgency of the situation.
The choice of referral for "routine care" or "within 2 weeks" or "at the earliest convenience"
or "immediate care" requires careful consideration based first on the examinee’s welfare but tempered by
the realities of dental practice. For example, it is inappropriate to refer examinees for care at "the earliest
convenience" for decayed primary teeth if it is likely that those teeth will exfoliate before developing into
sources of pain or infection. An inquiry about current or pending treatment status should be made to
avoid the inappropriate referral of examinees currently under care or scheduled for examination in the near
future.
You should not identify the specific teeth or surfaces about which you are concerned, nor is
it necessary to list the specific condition listed on the guidelines on the Recommendations for Dental Care
form. By doing so you may inadvertently misdirect the SP’s dentist’s attention away from another
problem. Since the NHANES III exam is not diagnostic, you do not want to discourage the SP’s dentist
from making an independent evaluation.
Recommendations for care for young children should be based on the recommendations of
the American Dental Association and other organizations. These organizations recommend that children
have their first dental visit by age 2. Children over 2 who have never had a check-up should be
encouraged to have one; children with no problems who have seen a dentist should be encouraged to
"continue regular care."
6-138
If you feel the situation warrants it, you may ask the MEC physician to assume responsibility
for the SP. This would be especially appropriate when you discover an oral condition with significant
medical ramifications (e.g., hairy cell leukoplakia).
The guidelines in Exhibit 6-5 are offered to assist examiners with their choice of the
appropriate box. As mentioned above, the realities of dental practice must be kept in mind in making the
final choice.
6.4 Shipping Oral Mucosal Slides
As mentioned in Chapter 5, the candidiasis specimen is obtained by scraping the lesion with
a sterile tongue blade and placing the specimen on a slide. We suggest that you prepare and sterilize
several oral lesion simmer sets and have them ready at the time of exam. An oral lesion smear set
consists of a tongue blade and slide placed in a Chemiclave bag for sterilization and storage.
If you need to add a drop of water to the slide (for example for angular cheilitis), you should
ask the recorder to do this for you. The dropper bottle of H20 is on the shelf over the computer or in the
second drawer. The lab has distilled H20 to fill the large red H20 bottle under the sink.
Take two SP labels from the SP’s chart. One is placed on the Candidiasis Transmittal form,
one is placed on the slide. In pencil write the slide number, the date, the diagnosis number, and the SP
number on the frosted portion of the slide. The slides should be numbered consecutively within each
stand. Place the slide in a polyform box (located in drawer #2) for shipping. Tape the box closed before
shipping. Ship the slides once each week.
Complete the Candidiasis Smears Transmittal sheet (see Exhibit 6-6). Write in the slide
number (this must correspond to the number on the slide), place an SP ID label in the appropriate space,
write in the Recorder ID number, the date the slide was made, a brief description of your clinical
impressions, and the location numbers of the lesions.
6-139
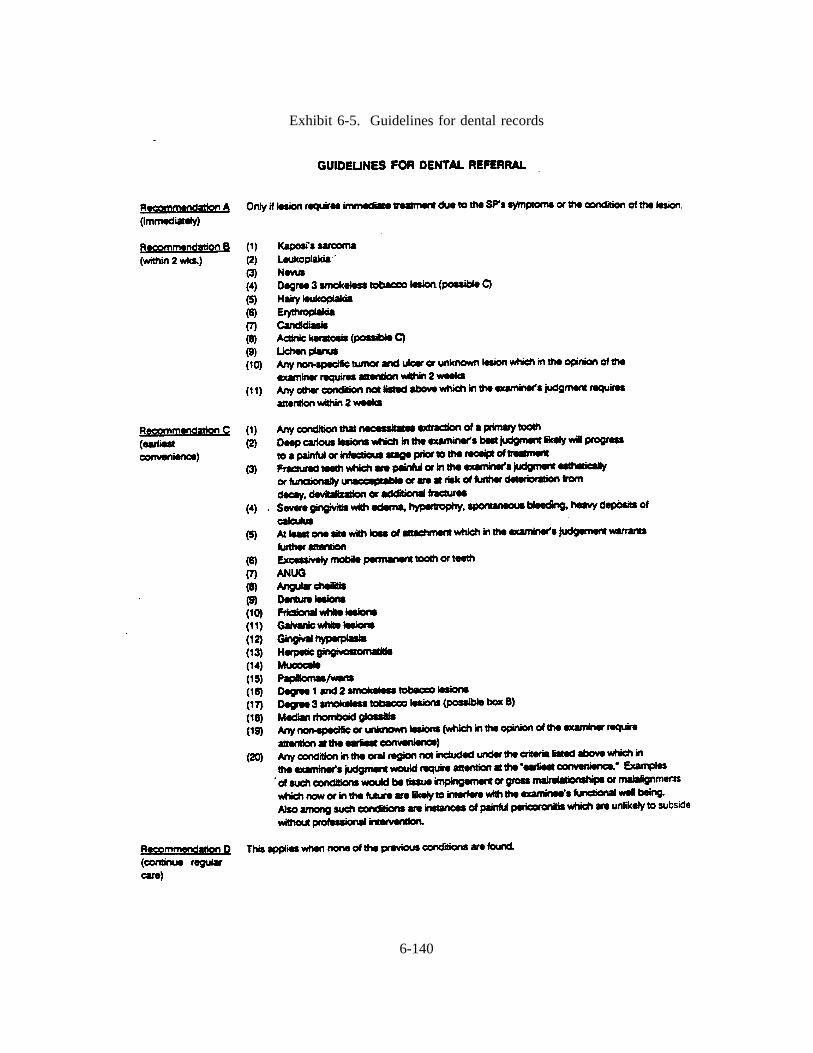
Exhibit 6-5. Guidelines for dental records
6-140

Exhibit 6-6. Candidiasis smears transmittal sheet
6-141
Each week oral mucosal slides should be shipped to the contract laboratory at the following
address:
Maryland Medical Laboratory1901 Sulphur Spring RoadBaltimore, MD 21227
Place the polyform box(es) in a large, padded manilla shipper (envelope). Ask the MEC
Manager for shippers. Also place a copy of the Candidiasis Transmittal form in the shipper with the
slides. The original transmittal form is sent to NCHS at the time of shipping; a copy is sent to Westat
at the end of the stand. Tape and staple the shipper closed. Place a mailing label on the shipper. (These
are located in drawer #3). The MEC Manager can arrange to have the shipper mailed.
6.5 Dental Sterilization Log
The Dental Sterilization Log should be used to track and document cleaning and sterilization
of used instruments, cleaning of the Chemiclaves and results of spore tests. A copy of this log appears
in Exhibit 6-7.
Some spore test results frequently will not return by the end of the stand so test results are
sent to the Director of MEC Operations at Westat, and then forwarded to the appropriate MEC to be
recorded.
At the end of the stand, one copy of the log should be sent to NCHS, and one copy to
Westat. The original log should be kept in the field in the Dental Examination Room.
6.6 Equipment Maintenance Log
The Dental Equipment Maintenance Log (Exhibit 6-8) should be completed whenever
maintenance or repair of dental instruments or equipment is required. Replacement of dental instruments
should also be noted on this log.
6-142
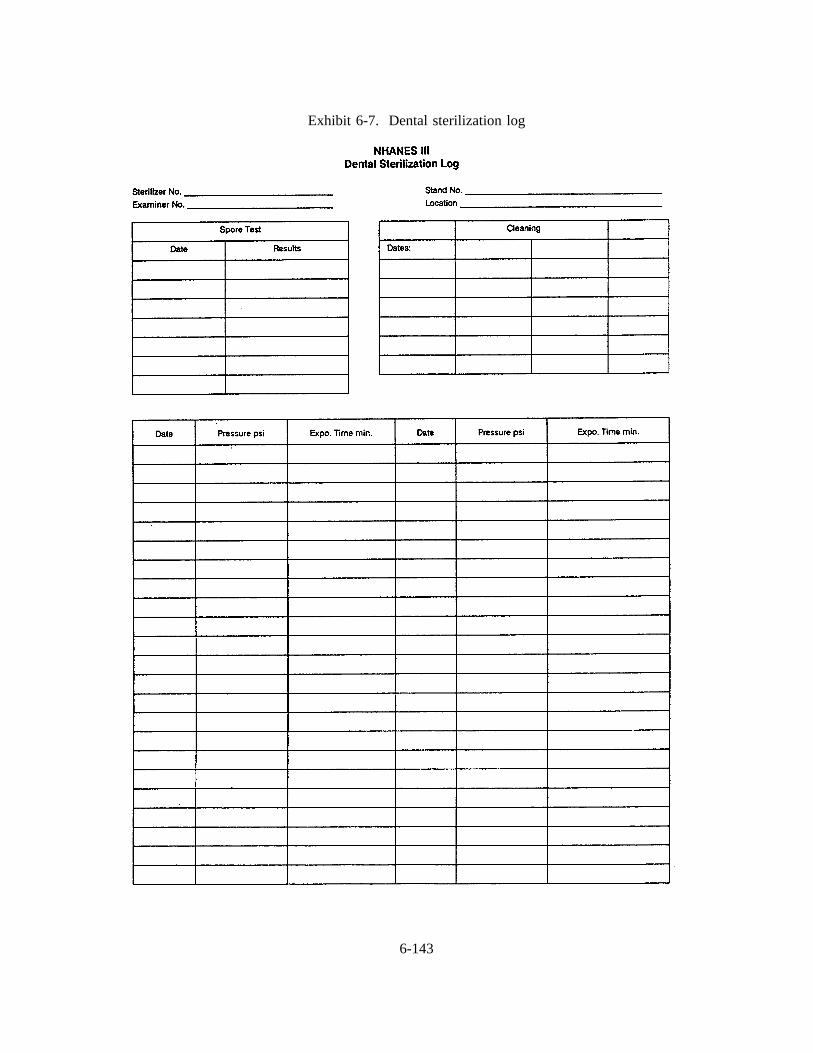
Exhibit 6-7. Dental sterilization log
6-143

Exhibit 6-8. Dental equipment maintenance log
6-144

6.7 Specific Beginning and End-of-Stand Procedures for Packing up the Dental Room,Shipping, and Miscellaneous Tasks
Although general procedures for MEC setup, pack-up, and end-of-stand shipping are provided
to you in Attachment B, NHANES III Standard MEC Operations, there are a number of tasks that are
specific to the dental exam that the dentist must complete at each stand. These are outlined below.
You will note that a great deal of detail is provided. This is necessary since you will not
always be working in the same MEC. If all dentists do not store things in the same places, you will not
be able to find anything when you arrive at the MEC.
6.7.1 Setup - Beginning of the Stand
Inventory the dental exam room and belly compartment. Add newly shipped items tothe existing list before taking inventory.
Clean cabinet shelves and doors, drawers, counter tops, walls, shelves, and computer.Wipe down chairs, light, and compressor. Wash any containers that are not clean.
Wipe down biohazard waste container and insert a biohazardous waste bag from thelab.
Place trash bag in the wastebasket; clean if necessary. Trash bags are in the closet inthe staff room. (This is done during the stand by the cleaning service.)
Remove 3 stack shelves from the cabinet and set them on the shelf over the computer.Stock with the three types of hard copy forms. Recorder pencils, erasers,and plasticclips belong on this shelf along with the small distilled H20 bottle for the slides. Thereis a small round container for the clips and erasers.
6-145
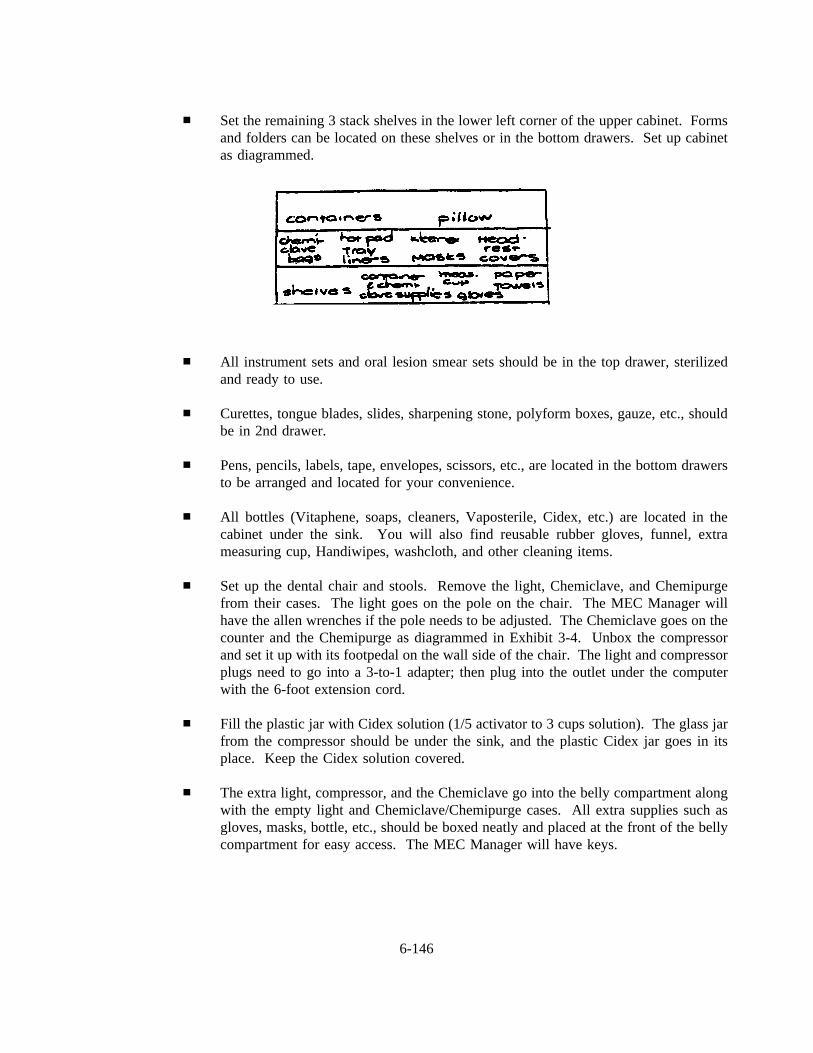
Set the remaining 3 stack shelves in the lower left corner of the upper cabinet. Formsand folders can be located on these shelves or in the bottom drawers. Set up cabinetas diagrammed.
All instrument sets and oral lesion smear sets should be in the top drawer, sterilizedand ready to use.
Curettes, tongue blades, slides, sharpening stone, polyform boxes, gauze, etc., shouldbe in 2nd drawer.
Pens, pencils, labels, tape, envelopes, scissors, etc., are located in the bottom drawersto be arranged and located for your convenience.
All bottles (Vitaphene, soaps, cleaners, Vaposterile, Cidex, etc.) are located in thecabinet under the sink. You will also find reusable rubber gloves, funnel, extrameasuring cup, Handiwipes, washcloth, and other cleaning items.
Set up the dental chair and stools. Remove the light, Chemiclave, and Chemipurgefrom their cases. The light goes on the pole on the chair. The MEC Manager willhave the allen wrenches if the pole needs to be adjusted. The Chemiclave goes on thecounter and the Chemipurge as diagrammed in Exhibit 3-4. Unbox the compressorand set it up with its footpedal on the wall side of the chair. The light and compressorplugs need to go into a 3-to-1 adapter; then plug into the outlet under the computerwith the 6-foot extension cord.
Fill the plastic jar with Cidex solution (1/5 activator to 3 cups solution). The glass jarfrom the compressor should be under the sink, and the plastic Cidex jar goes in itsplace. Keep the Cidex solution covered.
The extra light, compressor, and the Chemiclave go into the belly compartment alongwith the empty light and Chemiclave/Chemipurge cases. All extra supplies such asgloves, masks, bottle, etc., should be boxed neatly and placed at the front of the bellycompartment for easy access. The MEC Manager will have keys.
6-146
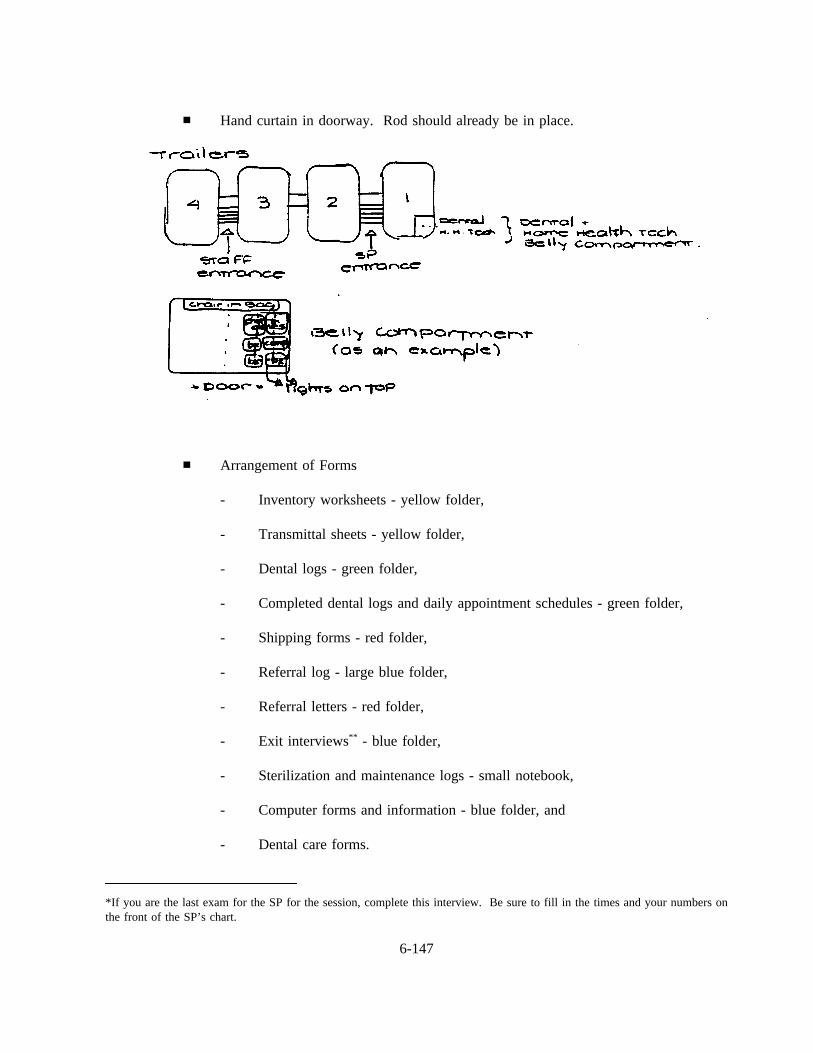
Hand curtain in doorway. Rod should already be in place.
Arrangement of Forms
- Inventory worksheets - yellow folder,
- Transmittal sheets - yellow folder,
- Dental logs - green folder,
- Completed dental logs and daily appointment schedules - green folder,
- Shipping forms - red folder,
- Referral log - large blue folder,
- Referral letters - red folder,
- Exit interviews** - blue folder,
- Sterilization and maintenance logs - small notebook,
- Computer forms and information - blue folder, and
- Dental care forms.
*If you are the last exam for the SP for the session, complete this interview. Be sure to fill in the times and your numbers onthe front of the SP’s chart.
6-147
Complete Dental Care Form for each SP at the end of the exam. Give the form to the SP
or place it in the SP’s chart for the coordinator to give to the SP at the time of exit.
6.7.2 Miscellaneous Daily Tasks
Setup
Fill instrument containers with a 1:32 solution of Vitaphene--one container for mirrorsand one container for all other instruments.
1/4 oz. Vitaphene to 1 cup H202 cups solution per 1 quart rectangular container
A 2-cup measuring cup and a 4-oz. measuring cup come with the Vitaphene.Vitaphene is under the sink.
Gloves, paper towels, two small round containers (one with gauze and one forVitaphene soaked gauze), and a measuring cup are in the upper cabinet. Extra suppliesare in the cabinet, the drawers, or in the belly compartment. If you can’t find whatyou need, ask the MEC Manager.
Sterilized instruments are in the top drawer.
Tongue blades and slides are in the second drawer. Prepared tongue blade and slidepackages and curettes are in the top drawer.
6-148
Between SP’s
Place the used instruments and mirrors into their Vitaphene solutions.
Throw all used disposable items into the biohazardous waste container.
Wipe counter top, light head, air tip, chair head, etc., with Vitaphene.
Change headrest covers on the pillow if it was used; use 2 covers.
Closing
Wrap the air tip and light head with Vitaphene-soaked gauze.
Scrub the instruments with the brush and Ivory liquid. Dry with paper towels. Throwthe towels into the biohazardous waste container. Wipe the mirror heads and the #3explorers right away because of H20 spots and rust. Instruments need to be completelydry before packaging for sterilization. Do not leave the instruments in Vitapheneovernight, but you can air dry them overnight. The soap, brush and reusable rubbergloves are under the sink. A red bucket is provided to store the brush, used glovesand other contaminated materials.
Put away all containers, gloves, etc.
Wipe down the chairs with 409, clean the sink with Soft Scrub, and use Vitaphene thecounter tops.
Put the dental logs and daily appointment schedule into their folders.
6.7.3 Miscellaneous Weekly Tasks
Clean the inside of the Chemiclave with metal cleaner and plastic scrub sponge andthen wipe out with Vaposterile. There is a Handiwipe for the Vaposterile in thehandle of the bottle. It is recommended that you warm the Chemiclave for 2 minuteswith the door closed before cleaning. Clean the outside with Chemiclave polish. Thecleaner, polish and scrub sponge are under the sink. Drain the reservoir and fill withVaposterile.
Double bag the biohazardous waste and replace with a clean bag. Check with the labon the bags and dates of pickup.
6-149
Dust, clean, etc., any counter tops (e.g., under the Chemiclave), computer, screenwalls, shelves, etc., that need it. The bottle/instrument brush can be soaked in theCidex jar.
6.7.4 Miscellaneous Tasks - Every Two Weeks
Change the Cidex in the jar in the compressor. The Cidex is under the sink. Theactivator should be divided into fifths. Add Cidex solution (1/5 activator to 3 cups ofthe solution) to the jar.
6.7.5 Miscellaneous Monthly Tasks
Check the Chemiclave with the spore test strips. They are kept in the freezer in thelab. Place the two strips in the blue packages in with a normal load of instrumentsand sterilize as usual. Return these strips to the envelope. Fill out the envelope andmail to MDT. Use Westat’s address; Cathy Novak is the contact person; you are thetechnician.
6.7.6 End-of-Stand Pack-Up
Inventory the dental room and belly compartment. The MEC Manager will have theinventory sheets. An inventory worksheet developed for the dental component isavailable to assist and track the stand inventories.
Empty, rinse, and dry Cidex jar and lid.
Clean Chemiclave and empty reservoir. Place in its case (which is in the bellycompartment) along with its cup, tube, fork, cleaner and polish samples, etc., (whichare in the plastic bowl in the cabinet).
Place all forms in the bottom two drawers along with all pens, pencils, clips, etc.
All stack shelves go into the cabinet.
All bottles go under the sink.
6-150
Gloves, headrest covers (used as pillow cases), paper towels, Kleenex, Chemiclavebags, tray liner, hot pad mitt, plastic containers, etc., can remain in the cabinet. Itemsshould be moved to the bottom shelves to prevent movement during travel. Anythingthat is not too heavy, not too small, or easily spilled can be left in the cabinet.Containers with the gauze do not need to be emptied. Put the lids on all containers.
Instruments should be packaged, sterilized, and placed in the top drawer. The lids donot need to be used on these containers.
Pens, pencils, clips, tape, cords, etc., go into the last two drawers. Rubber bandpencils and pens if they are loose. Clips, etc., can go into containers or Ziplock bags.
Pack the cabinets and drawers in such a way that there will be a minimum amount ofmovement. Especially pack the bottles in the lower cabinet; add the wastebasket toprevent movement and spilling.
Chemiclaves, Chemipurge and lights go into their cases from the belly compartment.Compressors go into boxes. The extra compressor is already boxed in the bellycompartment.
Tongue blades, curettes, polyform boxes, slides, gauze, sharpening stone, etc., canremain in the 2nd drawer.
Everything is brought up from the belly compartment except the dental chair and thehome health tech supplies that share the compartment. Arrange all boxes and chairsin such a way that it creates a wedge, preventing movement. You may need to repackthe boxes with the extra supplies.
The keyboard can remain fastened with Velcro to its sliding shelf under the computer.Make sure it is pushed in all the way so it catches the lock. Unplug the computer.
Lock all cabinet drawers. There is a vertical bar lock on the inside of the upper leftcabinet door that needs to be in the lock position. There is a Velcro strip int he thirddrawer that is to be looped through the upper cabinet handles. If the strip is notavailable, tape can be used. The MEC Manager will have the keys.
Detach Chemipurge units from the Chemiclave and pack into case.
Fold curtain neatly so it is not too wrinkled for the next stand. Place curtain in thecabinet but leave the rod in the doorway.
6-151
Items that remain in the dental exam room during transport should be arrangedcarefully to prevent movement or breakage. A suggested arrangement of items isshown in Exhibit 6-9, Dental Exam Room Packup.
6.7.7 Shipping - End of Stand
Send candidiasis slides and forms as usual.
Put all logs, etc., in order.
Original candidiasis transmittals should have been sent directly to the NHANES IIIReceipt and Control at NCHS. Copies of these logs should be shipped to Westat.
The original referral forms/letters should already have been sent to NHANES IIIReceipt and Control at NCHS. At this time send the original referral log directly toNCHS Receipt and Control. A copy of the referral letters, and referral log should beshipped to Westat.
The original dental logs should now be shipped to Westat.
When the computer is down, you will need to use the hard copy forms. If it is notpossible to enter these forms into the computer during the stand, notify Westat andNCHS and take the forms with you to the next stand. Enter them in the computer andcomplete the shipping procedure. Mark on each form when it was entered and anyother pertinent information. These hard copy forms need to be shipped to NCHS atthis time.
Each hard copy form (Form 1 - green, Form 2 - blue, and Form 3 - red) will need atransmittal sheet. (See Attachment B.) Fill out the form and circle the numberscorresponding to each SP number. For example, SP # 108201 3, use the numbers inthe underscored position. Check for these forms in the yellow folder; if more areneeded the techs or the MEC Manager will know where the transmittal forms arelocated. This is a 3-part form. The white copy stays with the dental hard copies; thepink copy goes to NCHS; the yellow copy goes to Cathy Novak at Westat.
The Record of Data Transmittal accompanies all shipping. Two of these white formsmust be completed -- 1 for Westat and 1 for NCHS. Fill out each form and list allitems that are being shipped to that destination. The MEC managers will haveseparate boxes for NCHS and Westat; make sure the forms are packed into the correctboxes.
6-152
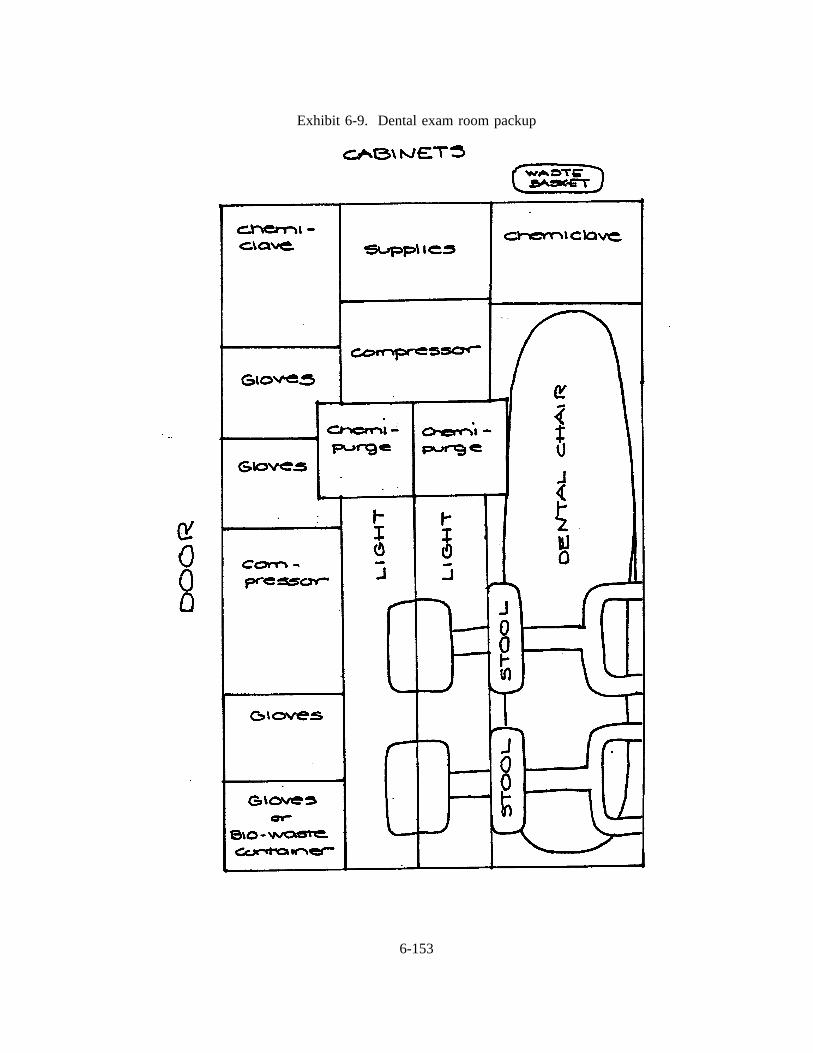
Exhibit 6-9. Dental exam room packup
6-153
Instruments or supplies that are broken, defective, or no longer used can be shippedback to the NHANES Warehouse Manager at Westat. Often they can be included inthe Westat box with the forms. Place the instruments in an envelope and label withWarehouse Manager’s name or ask the MEC Manager to ship directly to thewarehouse.
Ship to Westat
Original dental logs,
Copies of the referral log and letters,
Copies of the candidiasis logs,
Yellow copies of the transmittal forms, and
Record of Data Transmittal.
Ship to NCHS
White copies of the transmittal forms,
Dental hard copy forms, pages 1 (green), 2 (blue), and 3 (red) with their accompanyingpink copy of the transmittal forms, and
Record of Data Transmittal, and
Pink copies of Recommendations for Dental Care forms with the pink copy of thecompleted Transmittal Form.
6-154
7. QUALITY CONTROL PROCEDURES
Two primary concerns in all epidemiological surveys are to protect the survey from errors
that may compromise the representativeness of the sample, and errors in measurement of the phenomena
being studied. Dental teams and support staff in NHANES III are responsible for protecting the accuracy
and precision of the dental component of this survey by promoting maximum response rates and assuring
the quality of data collected from the sample.
This section of the manual presents a brief summary of quality control procedures for which
the dental team and support staff will be accountable.
7.1 Response Rates
The precision of the sample design in this survey is based on a very small number of persons
selected to represent very large numbers of people. Therefore, the examination team’s responsibility to
achieve the maximum possible examination response rate is a very important one. The examination
response rate is actually a product of response rates achieved at three stages: (1) the screener response
rate, (2) the interview response rate, and (3) the examination response rate.
Obviously, the dental team is directly involved in only the third stage of developing high
examination response rates. Appearance, demeanor, and attitude of professional personnel shape SPs’
feelings about the survey and help determine the degree to which they will be cooperative during the
examination. SPs’ feelings toward project personnel also affect what they say about the survey after they
leave the MEC and interact with other people in the community. Individual members of the dental team
and support staff are to treat all SP’s with respect and courtesy. Special attention must be devoted toward
relieving fear in children and apprehensive adults. In addition to being pleasant and displaying a caring
attitude toward the SP’s, examiners must exercise great care in performing the assessments so that the SP’s
are comfortable during the examination.
Although it is only the third stage of response rate development in which the dental team is
directly involved, every effort should be made to cooperate with advance arrangement teams and interview
7-1
teams to assist them in developing high response rates. Examiners must be willing to provide them with
information and advice on how to alleviate fear that the examination may be painful or embarrassing so
they can deal with apprehension among SP’s who are reluctant to make an appointment for examination.
7.2 Data Quality
Each individual staff member is the first and best guarantor of the quality of the data being
collected. Data quality is affected by every step of the survey including non-exam procedures leading to
the examination, and non-exam procedures following the examination. The quality of data in this survey
is controlled by (1) an intense training period for the dental teams with calibration of dental examiners
prior to the beginning of the survey, (2) periodic monitoring and recalibration of dental examiners, and
(3) periodic retraining of dental teams.
7.2.1 Training and Calibration
Training is divided into three phases as follows:
1. An instructional phase in which examination team members are familiarized withresearch examination procedures and criteria for research assessments.
2. A standardization phase in which they are trained to use standard procedures and applystandard criteria for the oral health assessments.
3. A calibration phase in which the degree of correlation among the examiners and thestandard examiner is measured.
Instruction . The instructional phase of the training sequence is conducted by research
scientists from NIDR with support and assistance from Gene Ley, the standard examiner. NIDR research
scientists present lectures on criteria for each of the oral health assessments to be used in the survey.
Lectures are accompanied by slide series depicting a wide variety of possible observations and illustrating
application of assessment criteria to those observations. The lecture-slide presentations on each assessment
are followed by instructions on data recording and editing for that assessment. Although the instructional
7-2
phase consists primarily of lectures and slide presentations, some demonstrations of examination technique
and equipment use are conducted.
Standardization. The second phase of training is devoted to standardization. During this
phase of training, the standard examiner reviews examination procedures and techniques and the criteria
for each assessment, stressing the importance of consistency and uniformity among all examiners and the
standard examiner in performing the examination and in applying the criteria to observations. Rationale
for differences between a research examination and a diagnostic examination are discussed, and
professional ethics of research examinations reviewed. A demonstration of the examination by the
standard examiner and practice examinations by the examiners being trained are among the salient features
of this phase. Standardization of all examiners is achieved by using replicate examinations with detailed
discussion of observations. NIDR scientists, project consultants, and the standard examiner monitor and
referee examinations and discussion of observations during these sessions.
Calibration . The reliability of the assessments is measured by determining the degree to
which examiners can produce uniform and consistent results when performing independent replicate
examinations without discussion. In this phase of training, the standard examiner and all examiners in
training perform the entire examination on a specified number of SP’s while NIDR examiners monitor the
calibration session without discussing observations with any of the examiners or the standard examiner.
Data from the calibration sessions are analyzed by NIDR computer programs to measure correlation
between each examiner and the standard examiner. If correlations between each of the examiners and the
standard examiner are not within acceptable ranges, additional training sessions will be scheduled.
7.2.2 Monitoring and Recalibration
Continual gathering of clean, reliable data in a consistent and uniform manner is the primary
objective of the survey. Several quality control procedures will be carried out periodically to assure
continuing quality of data gathered by the dental teams throughout the duration of the survey.
Complete Replicates. Intraexaminer reliability will be monitored by scheduling 20 SP’s per
MEC stand to come back for a second complete examination. Data from the first examination will be
7-3
compared to data from the second examination to determine the level of uniformity over time for each
examiner. If data show that an examiner is not remaining within acceptable limits of uniformity and
consistency in performing the dental assessments, he/she will be retrained prior to the regularly scheduled
retraining session.
Expert Replication and Monitoring Field Operations. During the field operations,
examiners and recorders should periodically review their Training Manuals to prevent deviation, "drift",
from the standards achieved during the training period. Particular attention should be devoted to uniform
adherence to the criteria for making correct decisions about observations. Strict compliance with infection
control procedures is another important consideration for dental teams. In order to help the dental teams
maintain their standards, NIDR scientists and various other project personnel will make periodic visits to
field personnel to observe their performance and offer feedback on the results of their examinations.
The standard examiner, Dr. Gene Ley, will visit each team twice per year to observe field
operations and to replicate 20 to 25 dental examinations during each visit. The purpose of these so called
"expert replications" is to determine whether the examiners are maintaining the examination standards
achieved during training, and to measure the degree of deviation, if any, from those standards. If
correlation between the standard examiner and the field examiner is not within acceptable limits, retraining
will be conducted on site.
Annual Retraining . The long duration of the study (6 years) mandates the need for regularly
scheduled retraining periods. In addition to the regularly scheduled recalibration sessions with the standard
examiner, there will be an annual retraining session for each dental examiner, also conducted by the
standard examiner, Gene Ley.
7-4
APPENDIX A
RECOMMENDED INFECTION-CONTROL PRACTICES FOR DENISTRY
7-5
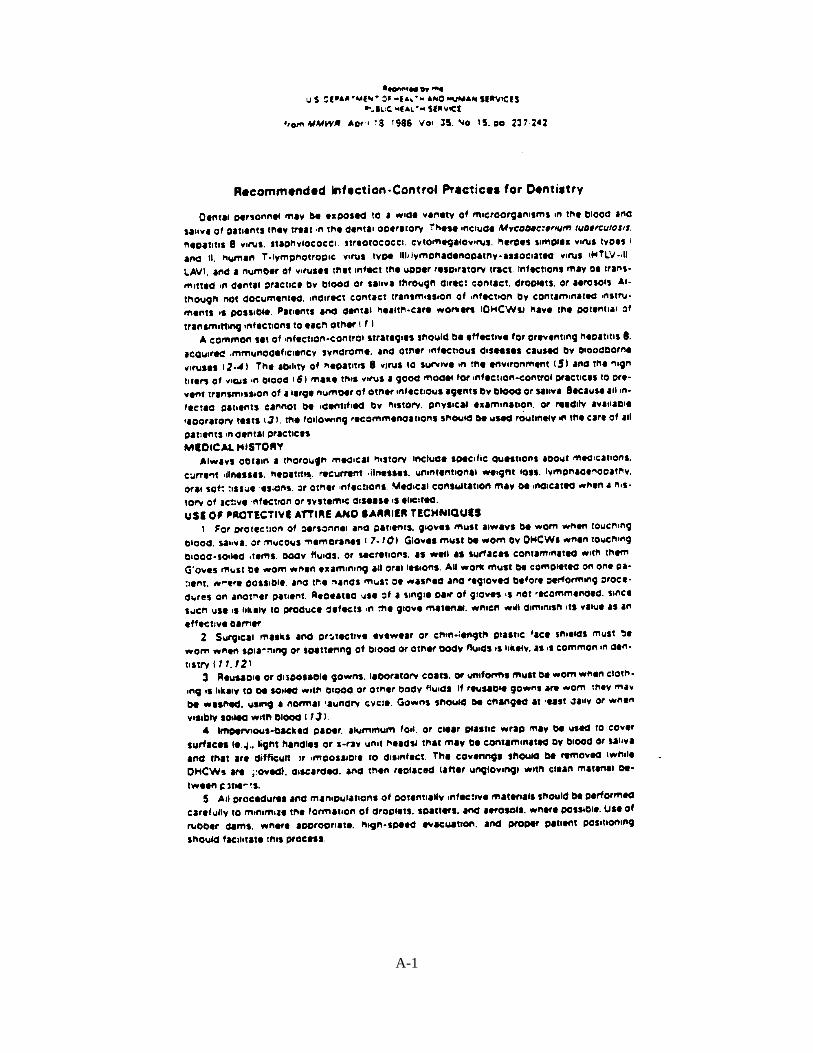
A-1
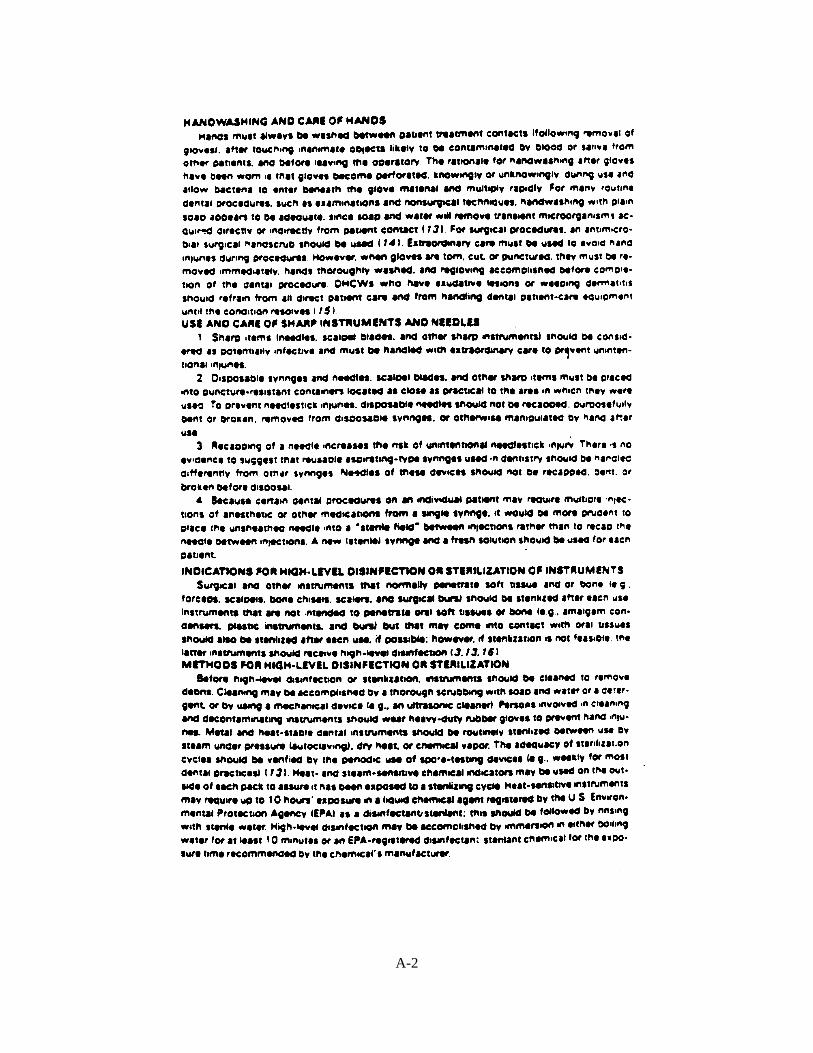
A-2
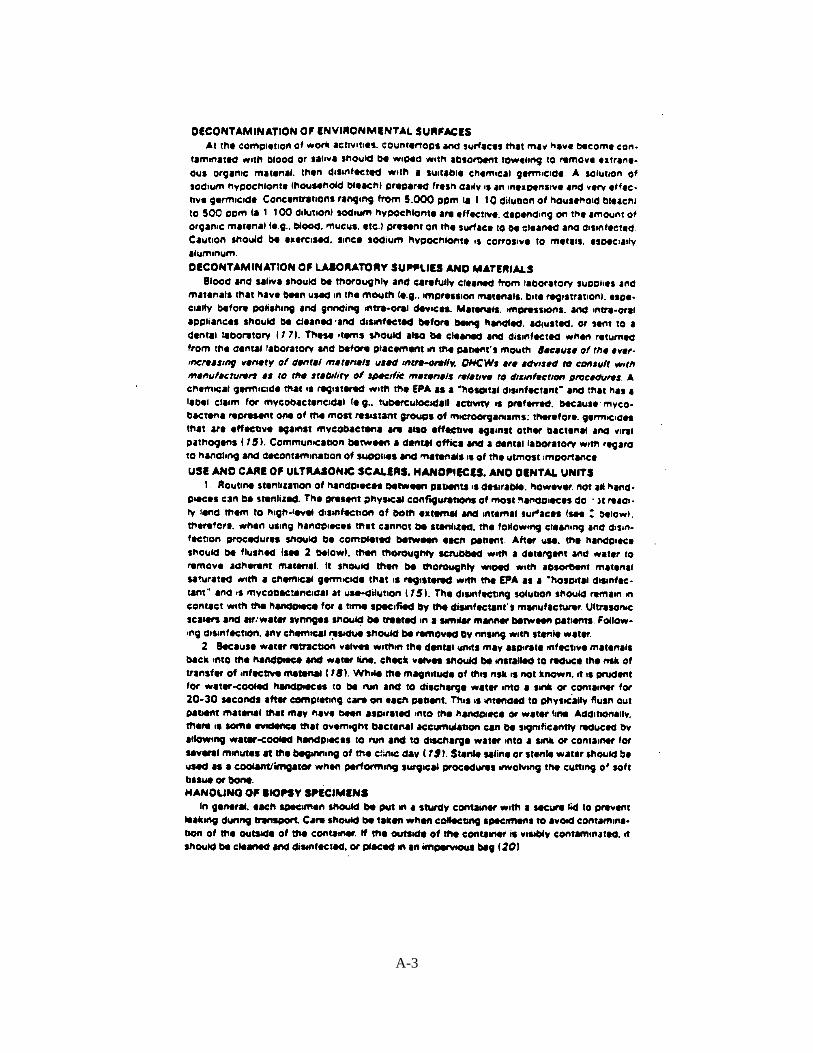
A-3
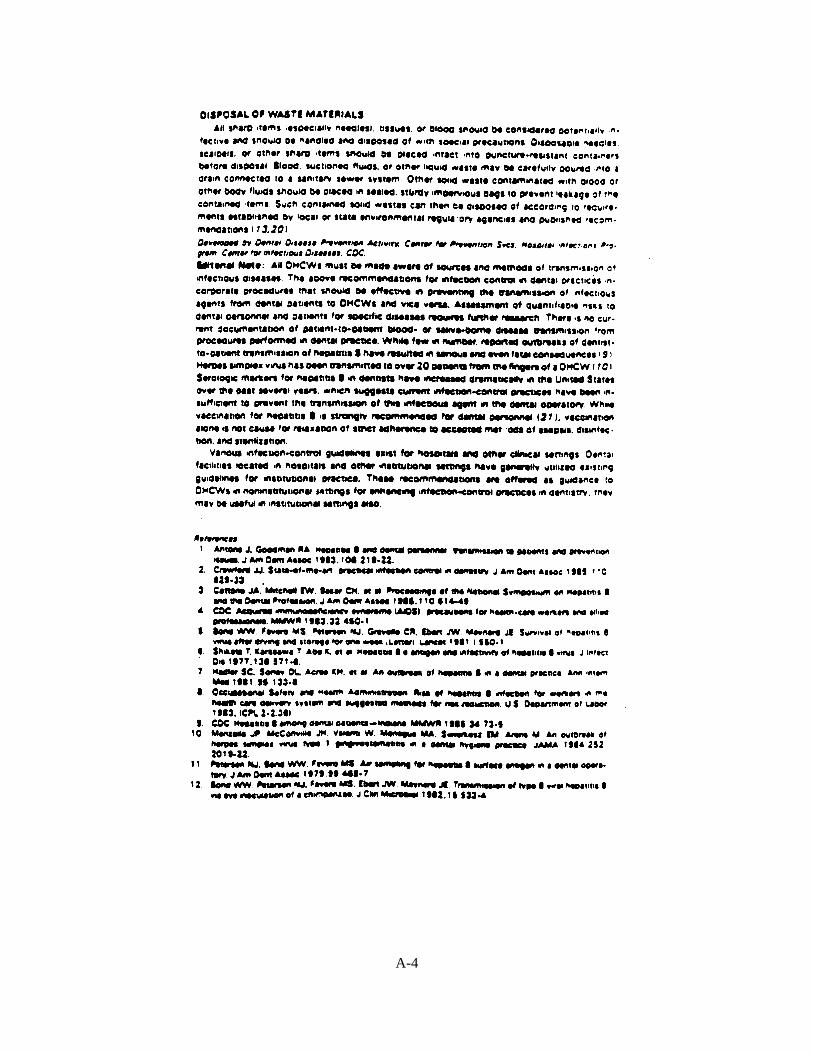
A-4
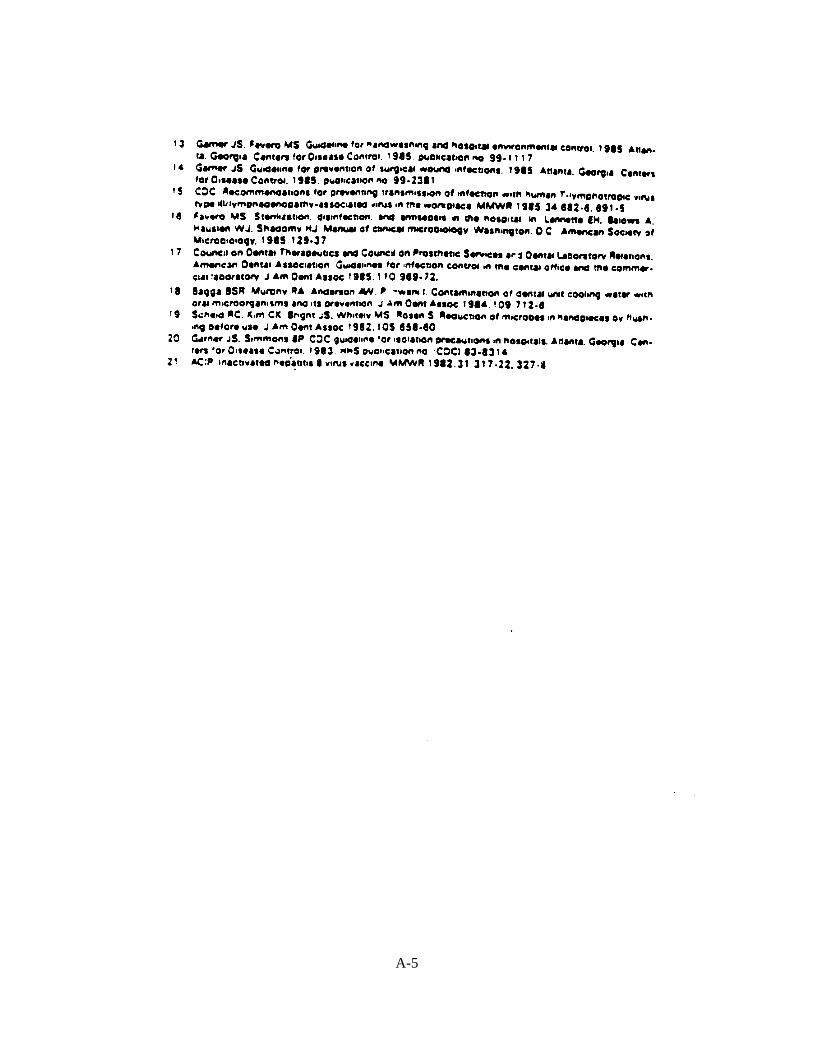
A-5

APPENDIX B
DENTAL TERMINOLOGY
A-6
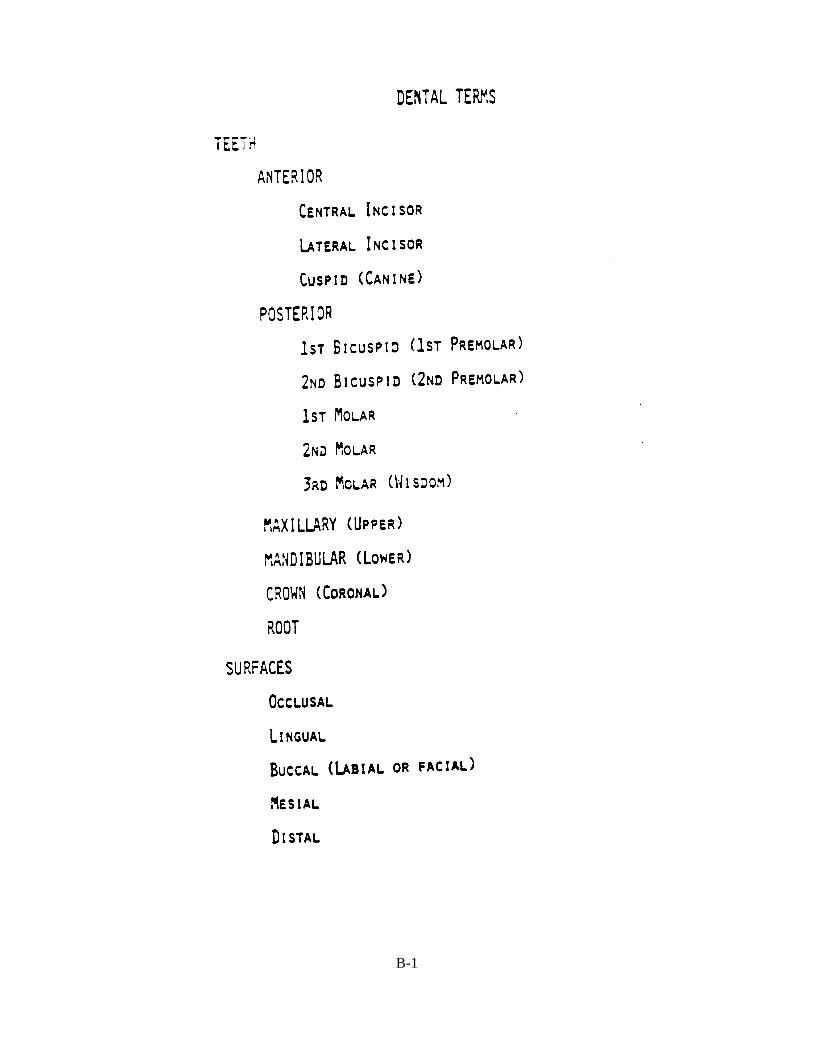
B-1
B-2
B-3
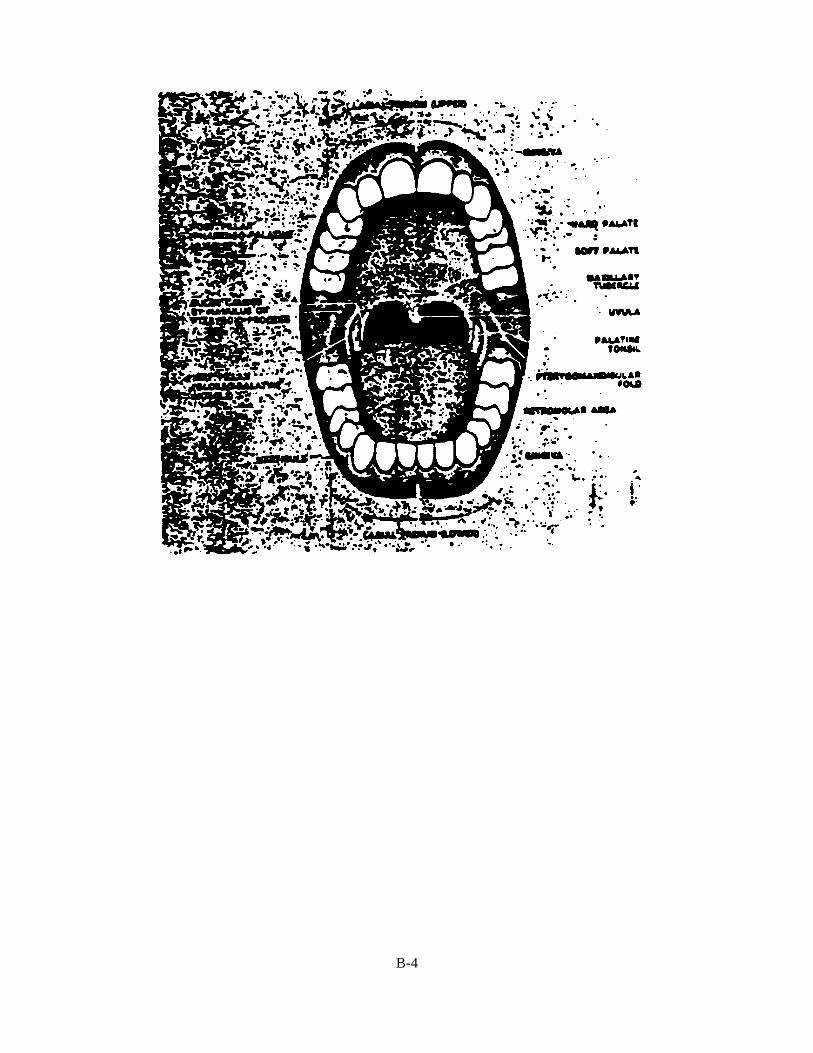
B-4
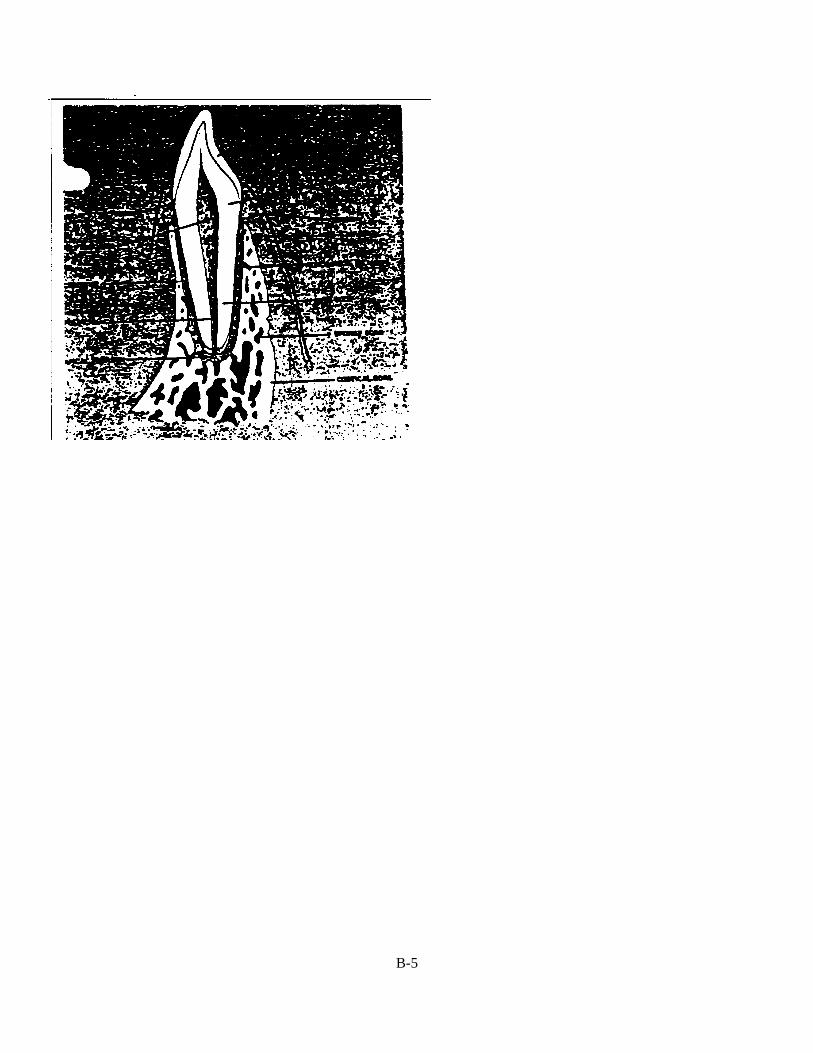
B-5
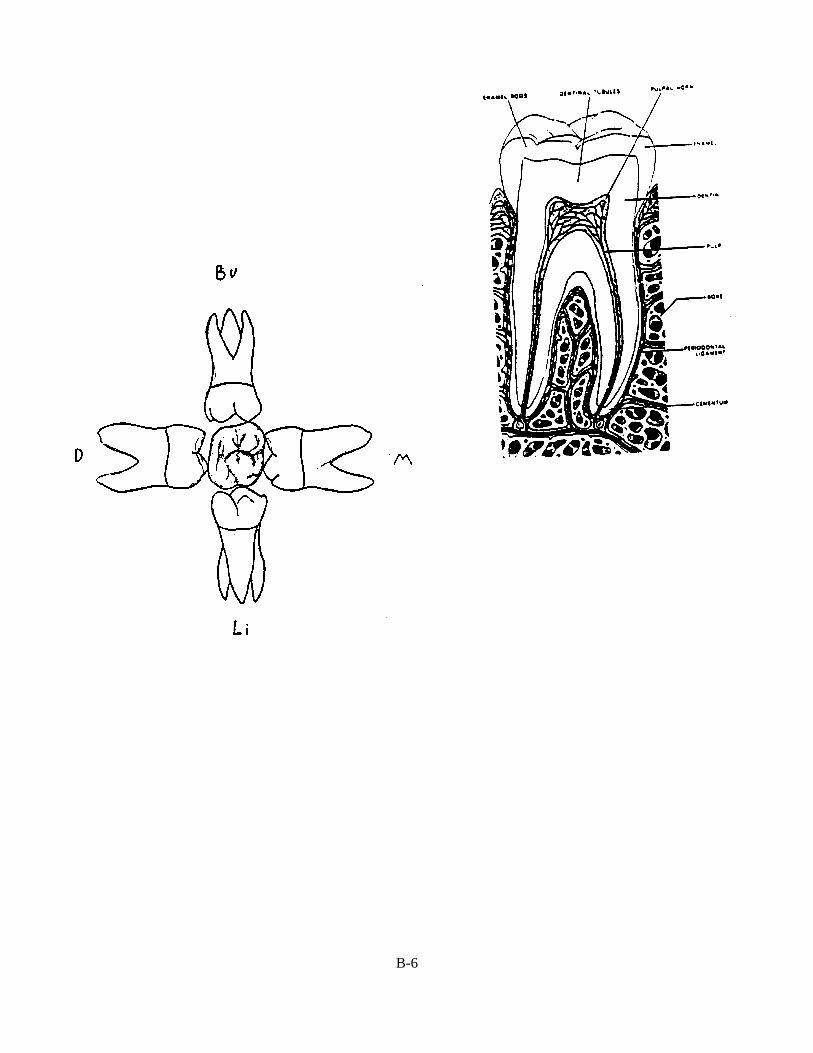
B-6

B-7