
Oracle Fusion Middleware · 2018-05-08 · Oracle® Fusion Middleware Patching with OPatch 12c...
50
Oracle ® Fusion Middleware Patching with OPatch 12c (12.2.1.1) E71242-01 June 2016 Documentation for administrators that describes how to use OPatch in an Oracle Fusion Middleware environment.
Transcript of Oracle Fusion Middleware · 2018-05-08 · Oracle® Fusion Middleware Patching with OPatch 12c...

Oracle® Fusion MiddlewarePatching with OPatch
12c (12.2.1.1)
E71242-01
June 2016
Documentation for administrators that describes how to useOPatch in an Oracle Fusion Middleware environment.

Oracle Fusion Middleware Patching with OPatch, 12c (12.2.1.1)
E71242-01
Copyright © 2015, 2016, Oracle and/or its affiliates. All rights reserved.
Primary Author: Phil Stubbs
Contributing Authors: Tim Misner, Anantha Bhat, Russell Genna, Peter LaQuerre
This software and related documentation are provided under a license agreement containing restrictions onuse and disclosure and are protected by intellectual property laws. Except as expressly permitted in yourlicense agreement or allowed by law, you may not use, copy, reproduce, translate, broadcast, modify, license,transmit, distribute, exhibit, perform, publish, or display any part, in any form, or by any means. Reverseengineering, disassembly, or decompilation of this software, unless required by law for interoperability, isprohibited.
The information contained herein is subject to change without notice and is not warranted to be error-free. Ifyou find any errors, please report them to us in writing.
If this is software or related documentation that is delivered to the U.S. Government or anyone licensing it onbehalf of the U.S. Government, then the following notice is applicable:
U.S. GOVERNMENT END USERS: Oracle programs, including any operating system, integrated software,any programs installed on the hardware, and/or documentation, delivered to U.S. Government end users are"commercial computer software" pursuant to the applicable Federal Acquisition Regulation and agency-specific supplemental regulations. As such, use, duplication, disclosure, modification, and adaptation of theprograms, including any operating system, integrated software, any programs installed on the hardware,and/or documentation, shall be subject to license terms and license restrictions applicable to the programs.No other rights are granted to the U.S. Government.
This software or hardware is developed for general use in a variety of information management applications.It is not developed or intended for use in any inherently dangerous applications, including applications thatmay create a risk of personal injury. If you use this software or hardware in dangerous applications, then youshall be responsible to take all appropriate fail-safe, backup, redundancy, and other measures to ensure itssafe use. Oracle Corporation and its affiliates disclaim any liability for any damages caused by use of thissoftware or hardware in dangerous applications.
Oracle and Java are registered trademarks of Oracle and/or its affiliates. Other names may be trademarks oftheir respective owners.
Intel and Intel Xeon are trademarks or registered trademarks of Intel Corporation. All SPARC trademarks areused under license and are trademarks or registered trademarks of SPARC International, Inc. AMD, Opteron,the AMD logo, and the AMD Opteron logo are trademarks or registered trademarks of Advanced MicroDevices. UNIX is a registered trademark of The Open Group.
This software or hardware and documentation may provide access to or information about content, products,and services from third parties. Oracle Corporation and its affiliates are not responsible for and expresslydisclaim all warranties of any kind with respect to third-party content, products, and services unlessotherwise set forth in an applicable agreement between you and Oracle. Oracle Corporation and its affiliateswill not be responsible for any loss, costs, or damages incurred due to your access to or use of third-partycontent, products, or services, except as set forth in an applicable agreement between you and Oracle.

Contents
Preface ................................................................................................................................................................. v
Audience ........................................................................................................................................................ v
Documentation Accessibility ...................................................................................................................... v
Conventions................................................................................................................................................... v
1 Patching Your Environment Using OPatch
1.1 About OPatch ................................................................................................................................... 1-1
1.1.1 Type of Patches Used with OPatch.................................................................................... 1-2
1.1.2 Information for Oracle WebLogic Server Smart Update Users ..................................... 1-3
1.2 Preparing to Use OPatch................................................................................................................. 1-3
1.2.1 Locating and Obtaining the Latest Version of OPatch ................................................... 1-4
1.2.2 Obtaining Patches Required for Your Installation .......................................................... 1-5
1.2.3 OPatch Environment Variables for Fusion Middleware ................................................ 1-5
1.2.4 Backup and Recovery Considerations for Patching........................................................ 1-5
1.3 Using OPatch to Patch Oracle Fusion Middleware .................................................................... 1-6
1.3.1 Summary of the Steps For Using OPatch in a Fusion Middleware Environment ...... 1-6
1.3.2 Common OPatch Commands When Patching an Oracle Fusion Middleware
Oracle Home................................................................................................................................ 1-7
1.3.3 Examples of Applying and Rolling Back Patches Using OPatch .................................. 1-8
1.3.4 Troubleshooting a Patch by Viewing the OPatch Log File .......................................... 1-13
1.3.5 Using the OPatch lsinventory Command to Verify the Patches Applied to an
Oracle Home.............................................................................................................................. 1-14
1.3.6 Verifying Your Installation After Applying a Patch ..................................................... 1-14
2 Patching Your Environment Using OPatchAuto
2.1 About Zero Downtime Patching with OPatchAuto ................................................................... 2-2
2.1.1 What is a Zero Downtime Patch?....................................................................................... 2-2
2.1.2 Identifying a Zero Downtime Patch .................................................................................. 2-2
2.1.3 About the Available Patch Plans........................................................................................ 2-3
2.2 Preparing to Use OPatchAuto ....................................................................................................... 2-4
2.2.1 Locating and Obtaining the Latest Version of OPatch and OPatchAuto .................... 2-5
2.2.2 Obtaining Patches Required For Your Installation ......................................................... 2-7
iii

2.2.3 Directory Variables Used in the Examples ....................................................................... 2-7
2.2.4 Creating a Wallet .................................................................................................................. 2-7
2.2.5 Configuring Node Manager to Support Start and Stop Operations............................. 2-9
2.2.6 Remote Host Patching on Windows.................................................................................. 2-9
2.2.7 Backup and Recovery Considerations for Patching...................................................... 2-10
2.3 Using OPatchAuto to Patch Oracle Fusion Middleware ......................................................... 2-10
2.3.1 Summary of the Steps For Using OPatchAuto in a Fusion Middleware
Environment .............................................................................................................................. 2-11
2.3.2 Applying a Patch on a Single Host Using OPatchAuto................................................ 2-13
2.3.3 Applying a Patch on Multiple Hosts Using OPatchAuto............................................. 2-15
2.3.4 Troubleshooting a Patch by Viewing the OPatchAuto Log File ................................. 2-19
2.3.5 Using the OPatch lsinventory Command to Verify the Patches Applied to an
Oracle Home.............................................................................................................................. 2-19
2.3.6 Using the listDomainPatchInventory.sh Command to Verify the Patches Applied
to a Domain................................................................................................................................ 2-20
2.3.7 Verifying Your Installation After Applying a Patch ..................................................... 2-20
2.4 Example: Creating A Topology File Using FMW Composer .................................................. 2-21
2.4.1 Starting FMW Composer................................................................................................... 2-22
2.4.2 Creating a New Topology File ......................................................................................... 2-23
2.4.3 Assigning or Creating a Wallet File................................................................................. 2-23
2.4.4 Adding the Hosts ............................................................................................................... 2-24
2.4.5 Adding the Oracle Home .................................................................................................. 2-24
2.4.6 Adding the Domain ........................................................................................................... 2-25
2.4.7 Adding the Administration Server .................................................................................. 2-26
2.4.8 Adding the Cluster............................................................................................................. 2-26
2.4.9 Adding the Managed Servers........................................................................................... 2-26
2.4.10 Adding the Node Managers ........................................................................................... 2-27
2.4.11 Saving the Topology File................................................................................................. 2-28
iv

Preface
This document describes how to use OPatch to patch an Oracle Fusion Middlewareenvironment.
Audience
Documentation Accessibility
Conventions
AudienceThis document is intended for administrators who are responsible for patching OracleFusion Middleware.
Documentation AccessibilityFor information about Oracle's commitment to accessibility, visit the OracleAccessibility Program website at http://www.oracle.com/pls/topic/lookup?ctx=acc&id=docacc.
Access to Oracle Support
Oracle customers that have purchased support have access to electronic supportthrough My Oracle Support. For information, visit http://www.oracle.com/pls/topic/lookup?ctx=acc&id=info or visit http://www.oracle.com/pls/topic/lookup?ctx=acc&id=trs if you are hearing impaired.
ConventionsThe following text conventions are used in this document:
Convention Meaning
boldface Boldface type indicates graphical user interface elements associated with an action, orterms defined in text or the glossary.
italic Italic type indicates book titles, emphasis, or placeholder variables for which yousupply particular values.
monospace Monospace type indicates commands within a paragraph, URLs, code in examples,text that appears on the screen, or text that you enter.
v


1Patching Your Environment Using OPatch
The OPatch utility provides several commands that you can use to apply and roll backpatches to Oracle software in your Oracle Fusion Middleware environment.
For more information about using OPatch commands in an Oracle Fusion Middlewareenvironment, see the following topics:
About OPatchOPatch is a Java-based utility that runs on all supported operatingsystems and requires installation of the Oracle Universal Installer. It isused to apply patches to Oracle software.
Preparing to Use OPatchTo ensure successful patching, there are several prerequisites you shouldcomplete to prepare your environment for running OPatch, such asobtaining the latest version of OPatch, obtaining required patches fromMy Oracle Support, and backing up the Oracle home.
Using OPatch to Patch Oracle Fusion MiddlewareUse OPatch to perform the necessary steps for applying a patch to anOracle home.
1.1 About OPatchOPatch is a Java-based utility that runs on all supported operating systems andrequires installation of the Oracle Universal Installer. It is used to apply patches toOracle software.
The following topics provide more information about OPatch for Oracle FusionMiddleware:
Type of Patches Used with OPatchOracle provides several types of patches that you can use to patch yourOracle software with OPatch.
Information for Oracle WebLogic Server Smart Update UsersSmart Update is a standalone Java application that you use to upgradethe software installations quickly and easily with maintenance patches
Patching Your Environment Using OPatch 1-1

and maintenance packs. For Oracle Fusion Middleware 12c, SmartUpdate is no longer supported.
1.1.1 Type of Patches Used with OPatchOracle provides several types of patches that you can use to patch your Oraclesoftware with OPatch.
Note:
Oracle has recently implemented a new patch nomenclature for Oracleproducts. The new patch names, as well as the previous Oracle FusionMiddleware 11g names, are provided for reference.
Table 1-1 Patches that can be used with OPatch
New Name Previously Used Name(s) Description
Interim Patch PSE
MLR
Exception release
One-Off
x-fix
Hotfix
Security One-Off
A patch containing one or more fixesmade available to customers whocannot wait until the next patch setor new product release to get a fix.
Bundle Patch Maintenance Pack
Service Pack
MLRs
Cumulative Patch
Update Release
Bundle Patch
An iterative, cumulative patch that isissued between patch sets. Bundlepatches usually include only fixes,but some products may includeminor enhancements. Examples arethe Database Windows Bundles andSOA Bundle Patches.
Security Patch Update (SPU) Critical Patch Updates
CPUs
An iterative, cumulative patchconsisting of security fixes. Formerlyknown as Critical Patch Update.
Note: The program name whichdelivers SPUs will still be calledCritical Patch Update, as definedbelow:
Critical Patch Update: Oracle'sprogram for quarterly release ofsecurity fixes. Patches released aspart of this program may be PatchSet Updates, Security Patch Updates,and Bundle Patches. Regardless ofthe patch type, the patches arecumulative.
About OPatch
1-2 Patching with OPatch

Table 1-1 (Cont.) Patches that can be used with OPatch
New Name Previously Used Name(s) Description
Patch Set Updates (PSU) Patch Set Updates are used to patchOracle WebLogic Server only. PatchSet Updates are released on aquarterly basis, following the sameschedule as the Critical PatchUpdates (CPUs). These come out theclosest Tuesday to the 15th of themonths of January, April, July andOctober. Patch Set Update content isintended to address the top fiftycritical bugs affecting the broadcustomer base.
1.1.2 Information for Oracle WebLogic Server Smart Update UsersSmart Update is a standalone Java application that you use to upgrade the softwareinstallations quickly and easily with maintenance patches and maintenance packs. ForOracle Fusion Middleware 12c, Smart Update is no longer supported.
In previous releases of Oracle WebLogic Server, you could patch your OracleWebLogic Server software using a utility called Smart Update. In Oracle FusionMiddleware 12c, Oracle WebLogic Server users can use OPatch to apply patches forboth Oracle WebLogic Server and for Oracle Fusion Middleware.
OPatch offers many of the same features as Smart Update, but it has a different set ofcommands and command options. Oracle WebLogic Server users who are familiarwith Smart Update should use this guide to get familiar with OPatch.
1.2 Preparing to Use OPatchTo ensure successful patching, there are several prerequisites you should complete toprepare your environment for running OPatch, such as obtaining the latest version ofOPatch, obtaining required patches from My Oracle Support, and backing up theOracle home.
For more information on preparing your environment, see the following topics:
Preparing to Use OPatch
Patching Your Environment Using OPatch 1-3

Locating and Obtaining the Latest Version of OPatchBefore you run OPatch, find the OPatch utility in the Oracle home, andverify that you have the latest version.
Obtaining Patches Required for Your InstallationYou can search for and download the patches required for yourinstallation from My Oracle Support.
OPatch Environment Variables for Fusion MiddlewareBefore you run OPatch, ensure that you set the ORACLE_HOMEenvironment variable.
Backup and Recovery Considerations for PatchingIt is highly recommended that you back up the Oracle home before anypatch operation. You can back up the Oracle home using your preferredmethod.
1.2.1 Locating and Obtaining the Latest Version of OPatchBefore you run OPatch, find the OPatch utility in the Oracle home, and verify that youhave the latest version.
For more information, see the following topics:
Locating and Running OPatch in the Oracle Fusion Middleware Oracle HomeYou can find and run the OPatch utility in the ORACLE_HOME/OPatchdirectory after you install any Oracle Fusion Middleware product.
Identifying the Version of OPatch Included with Oracle Fusion Middleware 12cOracle Fusion Middleware 12c (12.2.1.1) includes OPatch version13.9.0.0.0. This version includes new features and capabilities that aredesigned to improve the experience of patching an Oracle FusionMiddleware 12c Oracle home.
1.2.1.1 Locating and Running OPatch in the Oracle Fusion Middleware Oracle HomeYou can find and run the OPatch utility in the ORACLE_HOME/OPatch directory afteryou install any Oracle Fusion Middleware product.
To run OPatch, simply run the opatch command in this directory.
For example, to view the list of commands available for OPatch on a Unix system,enter the following:
./opatch -help
On Windows systems, use the following command:
opatch.bat -help
1.2.1.2 Identifying the Version of OPatch Included with Oracle Fusion Middleware 12cOracle Fusion Middleware 12c (12.2.1.1) includes OPatch version 13.9.0.0.0. Thisversion includes new features and capabilities that are designed to improve theexperience of patching an Oracle Fusion Middleware 12c Oracle home.
In general, there is a version of OPatch available for each version of the OracleUniversal Installer software.
To identify the version of OPatch:
Preparing to Use OPatch
1-4 Patching with OPatch

1. Change directory to the following directory:
cd ORACLE_HOME/OPatch/
2. Run the following command:
./opatch version
For example:
./opatch versionOPatch Version: 13.9.0.0.0
OPatch succeeded.
1.2.2 Obtaining Patches Required for Your InstallationYou can search for and download the patches required for your installation from MyOracle Support.
You can check for the latest patches available for your Oracle Fusion Middlewareproduct or component by registering and logging in to My Oracle Support at:
http://support.oracle.com
After you log in to My Oracle Support, click the Patches & Updates tab, whichprovides various tools that allow you to quickly locate the patches most important toyour Oracle software installation.
Note:
It important that you review the README file that is included with eachpatch. The README file includes important information about therequirements and procedures for applying the patch.
1.2.3 OPatch Environment Variables for Fusion MiddlewareBefore you run OPatch, ensure that you set the ORACLE_HOME environmentvariable.
OPatch uses the ORACLE_HOME environment variable to identify the Oracle homeyou are planning to patch.
1.2.4 Backup and Recovery Considerations for PatchingIt is highly recommended that you back up the Oracle home before any patchoperation. You can back up the Oracle home using your preferred method.
You can use any method such as zip, cp -r, tar, and cpio to compress the Oraclehome.
If the Oracle home does not appear when you execute the opatch lsinventory -detail command, the Oracle home might be missing from the Central Inventory, orthe Central Inventory itself could be missing or corrupted.
If the Oracle home is listed when you execute the opatch lsinventory -detailcommand, but the products and components within the Oracle home are not listed,the inventory within the Oracle home (local inventory) might be missing or corrupted.
Preparing to Use OPatch
Patching Your Environment Using OPatch 1-5

If the local inventory is corrupted or lost for some reason, you must restore the entireOracle home if it was backed up. If a backup does not exist, you may have to reinstallthe software.
1.3 Using OPatch to Patch Oracle Fusion MiddlewareUse OPatch to perform the necessary steps for applying a patch to an Oracle home.
The following topics describe how to use OPatch to patch Oracle Fusion Middleware:
Summary of the Steps For Using OPatch in a Fusion Middleware EnvironmentApplying a patch with OPatch involves a series of steps that must beperformed to ensure successful patching.
Common OPatch Commands When Patching an Oracle Fusion MiddlewareOracle Home
OPatch provides several commands that you can use to apply, roll back,and verify a patch for an Oracle home. You can use OPatch to apply androll back a single patch or apply and roll back multiple patches.
Examples of Applying and Rolling Back Patches Using OPatchAfter you obtain the patches required for your installation, use theappropriate OPatch commands to verify any patch prerequisites, apply apatch to an Oracle home, and if necessary, roll back the application of apatch.
Troubleshooting a Patch by Viewing the OPatch Log FileTo understand how a patch is applied and to troubleshoot any problemswith the application of a patch, you should review the log file for theOPatch session.
Using the OPatch lsinventory Command to Verify the Patches Applied to anOracle Home
To verify what patches have been applied to an Oracle home, or to findout additional information about the Oracle home, use the opatchlsinventory command.
Verifying Your Installation After Applying a PatchAfter you apply one or more patches successfully, use the WebLogicAdministration Console, Fusion Middleware Control, and yourorganization’s application testing to verify that your system is currentlyrunning successfully.
1.3.1 Summary of the Steps For Using OPatch in a Fusion Middleware EnvironmentApplying a patch with OPatch involves a series of steps that must be performed toensure successful patching.
The following table summarizes the typical steps required to patch your existingFusion Middleware environment using OPatch.
Table 1-2 Using OPatch with Oracle Fusion Middleware
Task Description Documentation
Acquire patchesrequired for yourinstallation
Log in, search for, and download the patchesrequired for your specific installation.
Obtaining Patches Required for YourInstallation
Using OPatch to Patch Oracle Fusion Middleware
1-6 Patching with OPatch

Table 1-2 (Cont.) Using OPatch with Oracle Fusion Middleware
Task Description Documentation
Review theREADME.txt file forthe patch.
Each patch archive includes a README filethat contains important information andinstructions that must be followed prior toapplying your patch. It is important toreview the README file because it providesany unique steps or other informationspecific to the patch.
The README.txt file that is packagedwithin the patch archive
Check for patchprerequisites.
The OPatch apply -report command willidentify that the prerequisites for the patchhave been met.
Verifying the Prerequisites for a Patch
Apply the patch. After you determine the Oracle home towhich you need to apply the patch, and youhave read the README file, then you shouldapply the patch with the opatch applycommand.
Examples of Applying and Rolling BackPatches Using OPatch
Verify the patch wasapplied to the Oraclehome successfully.
The OPatch lsinventory command will showwhat patches have been applied to theOracle home. Use this command to verify theapplication of the patch.
Using the OPatch lsinventoryCommand to Verify the PatchesApplied to an Oracle Home
Verify that yoursoftware runs properlyafter you apply thepatch.
After the patching is complete and yourservers are restarted, you should check yourproduct software to verify that the issue hasbeen resolved.
Verifying Your Installation AfterApplying a Patch
Troubleshoot theapplication of a patch.
If there are problems applying a patch, yourfirst troubleshooting task is to review the logfile for the OPatch session.
Troubleshooting a Patch by Viewing theOPatch Log File
Roll back theapplication of a patch.
If for some reason the result is notsatisfactory, you can use the opatchrollback command to remove the patchfrom the Oracle home.
If additional assistance is required, go to MyOracle Support (formerly OracleMetaLink).
Rolling Back a Patch You Have Applied
1.3.2 Common OPatch Commands When Patching an Oracle Fusion Middleware OracleHome
OPatch provides several commands that you can use to apply, roll back, and verify apatch for an Oracle home. You can use OPatch to apply and roll back a single patch orapply and roll back multiple patches.
Table 1-3 Common OPatch Commands Used When Patching an Oracle Fusion MiddlewareEnvironment
Using OPatch to Patch Oracle Fusion Middleware
Patching Your Environment Using OPatch 1-7

Table 1-3 (Cont.) Common OPatch Commands Used When Patching an Oracle Fusion MiddlewareEnvironment
Command Description Example
opatch apply This command applies an interim patch to anOracle home from the current directory. TheORACLE_HOME environment variablemust be set to the Oracle home to bepatched.
Verifying the Prerequisites for a Patch
Applying a Single Patch Using theApply Command
opatch napply This command applies multiple patches. Applying Multiple Patches Using theOPatch napply Command
opatch lsinventory This command lists the inventory for aparticular Oracle home, or displays allinstallations that can be found. Thiscommand does not have any requiredoptions.
Using the OPatch lsinventoryCommand to Verify the PatchesApplied to an Oracle Home
opatch rollback This command removes an existing one-offpatch from the appropriate Oracle homedirectory indicated by the reference ID.
Rolling Back a Patch You Have Applied
opatch nrollback This command rolls back multiple interimpatches at the same time.
Rolling Back Multiple Patches You HaveApplied
1.3.3 Examples of Applying and Rolling Back Patches Using OPatchAfter you obtain the patches required for your installation, use the appropriate OPatchcommands to verify any patch prerequisites, apply a patch to an Oracle home, and ifnecessary, roll back the application of a patch.
The following topics provide some examples of using OPatch to patch an OracleFusion Middleware installation:
Using OPatch to Patch Oracle Fusion Middleware
1-8 Patching with OPatch
Verifying the Prerequisites for a PatchTo verify that a patch can be applied to a specific Oracle home, use the —report argument to the opatch apply command.
Applying a Single Patch Using the Apply CommandTo apply a single patch to an Oracle Fusion Middleware Oracle home,use the opatch apply command.
Applying Multiple Patches Using the OPatch napply CommandTo apply multiple patches to an Oracle Fusion Middleware Oracle home,use the opatch napply command.
Rolling Back a Patch You Have AppliedTo roll back a patch that was applied to an Oracle Fusion MiddlewareOracle home, use the opatch rollback command.
Rolling Back Multiple Patches You Have AppliedTo roll back multiple patches that were previously applied to an OracleFusion Middleware Oracle home, use the opatch nrollbackcommand.
1.3.3.1 Verifying the Prerequisites for a PatchTo verify that a patch can be applied to a specific Oracle home, use the —reportargument to the opatch apply command.
For example:
opatch apply <path_to_patch_directory> -report
This command displays the actions that will be taken by the patch, but does notactually apply the patch. As a result, it allows you to verify that the prerequisites forthe patch have been met.
1.3.3.2 Applying a Single Patch Using the Apply CommandTo apply a single patch to an Oracle Fusion Middleware Oracle home, use the opatchapply command.
Example 1-1 shows how to use the opatch apply command to apply a patch to anOracle Fusion Middleware Oracle home.
This example assumes that:
• The patch you have downloaded has been saved to a directory that is named forthe patch number in My Oracle Support. In this case, the patch number is 15941858.
• The user changes directory to the patch directory and then runs the OPatch applycommand. Alternatively, you can run the OPatch command from theORACLE_HOME/OPatch directory and include the location of the patch as anargument to the command. For example:
opatch apply /opt/patches/15941858/
• The OPatch directory is already included in the PATH variable on the hostcomputer.
Example 1-1 Using the OPatch apply Command to Apply a Patch to an OracleFusion Middleware Oracle Home
> cd /opt/patches/15941858> opatch apply
Using OPatch to Patch Oracle Fusion Middleware
Patching Your Environment Using OPatch 1-9

Oracle Interim Patch Installer version 13.9.0.0.0Copyright (c) 2013, Oracle Corporation. All rights reserved.
Oracle Home : /opt/Oracle/products/fmw12cCentral Inventory : /opt/Oracle/oraInventory from : /var/opt/Oracle/oraInst.locOPatch version : 13.9.0.0.0OUI version : 13.9.0.0.0Log file location : /opt/Oracle/products/fmw12c/cfgtoollogs/opatch/15941858_Jun_10_2013_12_35_24/apply2013-06-10_12-35-15PM_1.log
OPatch detects the Middleware Home as "/opt/Oracle/products/fmw12c"
Applying interim patch '15941858' to OH '/opt/Oracle/products/fmw12c'Verifying environment and performing prerequisite checks...All checks passed.
Please shutdown Oracle instances running out of this ORACLE_HOME on the local system.(Oracle Home = '/opt/Oracle/products/fmw12c')
Is the local system ready for patching? [y|n] yUser Responded with: YBacking up files...
Patching component oracle.wls.core.app.server 12.2.1.1.0...
Verifying the update...Patch 15941858 successfully appliedLog file location: /opt/Oracle/products/fmw12c/cfgtoollogs/opatch/15941858_Jun_10_2013_12_35_24/apply2013-06-10_12-35-15PM_1.log
--------------------------------------------------------------------------------
There are no Interim patches installed in this Oracle Home.
--------------------------------------------------------------------------------
OPatch succeeded.
1.3.3.3 Applying Multiple Patches Using the OPatch napply CommandTo apply multiple patches to an Oracle Fusion Middleware Oracle home, use theopatch napply command.
Example 1-2 shows how to use the opatch napply command to apply multiplepatches to an Oracle Fusion Middleware Oracle home.
This example assumes that the patches you have downloaded have been saved to astaging directory, such as:
/opt/patches
It also assumes you have changed directory to the staging directory and the stagingdirectory contains a directory for each patch. For example:
/opt/patches/15941858/opt/patches/15955138
Using OPatch to Patch Oracle Fusion Middleware
1-10 Patching with OPatch

Example 1-2 Using the OPatch napply Command to Apply Multiple Patches to anOracle Fusion Middleware Oracle Home
> /opt/Oracle/products/fmw12c/OPatch/opatch napply -id 15941858,15955138Oracle Interim Patch Installer version 13.9.0.0.0Copyright (c) 2013, Oracle Corporation. All rights reserved.
Oracle Home : /opt/Oracle/products/fmw12cCentral Inventory : /opt/Oracle/oraInventory from : /var/opt/Oracle/oraInst.locOPatch version : 13.9.0.0.0OUI version : 13.9.0.0.0Log file location : /opt/Oracle/products/fmw12c/cfgtoollogs/opatch/opatch2013-06-11_07-36-40AM_1.log
OPatch detects the Middleware Home as "/opt/Oracle/products/fmw12c"
Verifying environment and performing prerequisite checks...OPatch continues with these patches: 15941858 15955138
Do you want to proceed? [y|n]yUser Responded with: YAll checks passed.
Please shutdown Oracle instances running out of this ORACLE_HOME on the local system.(Oracle Home = '/opt/Oracle/products/fmw12c')
Is the local system ready for patching? [y|n]yUser Responded with: YBacking up files...Applying interim patch '15941858' to OH '/opt/Oracle/products/fmw12c'
Patching component oracle.wls.core.app.server,12.2.1.1.0...
Verifying the update...Applying interim patch '15955138' to OH '/opt/Oracle/products/fmw12c'
Patching component oracle.wls.core.app.server,12.2.1.1.0...
Verifying the update...Patches 15941858,15955138 successfully applied.Log file location: /opt/Oracle/products/fmw12c/cfgtoollogs/opatch/opatch2013-06-11_07-36-40AM_1.log
OPatch succeeded.
1.3.3.4 Rolling Back a Patch You Have AppliedTo roll back a patch that was applied to an Oracle Fusion Middleware Oracle home,use the opatch rollback command.
Example 1-3 shows how to use the opatch rollback command to roll back a patchthat was applied to an Oracle Fusion Middleware Oracle home.
This example assumes that the OPatch directory is already included in the PATHvariable on the host computer.
Using OPatch to Patch Oracle Fusion Middleware
Patching Your Environment Using OPatch 1-11

Example 1-3 Using the OPatch rollback Command to Roll Back a Patch
> opatch rollback -id 15941858Oracle Interim Patch Installer version 13.9.0.0.0Copyright (c) 2013, Oracle Corporation. All rights reserved.
Oracle Home : /opt/Oracle/products/fmw12cCentral Inventory : /opt/Oracle/oraInventory from : /var/opt/Oracle/oraInst.locOPatch version : 13.9.0.0.0OUI version : 13.9.0.0.0Log file location : /opt/Oracle/products/fmw12c/cfgtoollogs/opatch/15941858_Jun_10_2013_13_12_20/rollback2013-06-10_13-12-10PM_1.log
OPatch detects the Middleware Home as "/opt/Oracle/products/fmw12c"
RollbackSession rolling back interim patch '15941858' from OH '/opt/Oracle/products/fmw12c'
Please shutdown Oracle instances running out of this ORACLE_HOME on the local system.(Oracle Home = '/opt/Oracle/products/fmw12c')
Is the local system ready for patching? [y|n]yUser Responded with: Y
Patching component oracle.wls.core.app.server, 12.2.1.1.0...RollbackSession removing interim patch '15941858' from inventoryLog file location: /opt/Oracle/products/fmw12c/cfgtoollogs/opatch/15941858_Jun_10_2013_13_12_20/rollback2013-06-10_13-12-10PM_1.log
OPatch succeeded.
1.3.3.5 Rolling Back Multiple Patches You Have AppliedTo roll back multiple patches that were previously applied to an Oracle FusionMiddleware Oracle home, use the opatch nrollback command.
Example 1-4 shows how to use the opatch nrollback command to roll backmultiple patches that were previously applied to an Oracle Fusion Middleware Oraclehome.
This example assumes that the patches you applied were patch numbers 15941858 and15955138.
Example 1-4 Using the OPatch nrollback Command to Roll Back Multiple Patches
> /opt/Oracle/products/fmw12c/OPatch/opatch nrollback -id 15941858,15955138Oracle Interim Patch Installer version 13.9.0.0.0Copyright (c) 2013, Oracle Corporation. All rights reserved.
Oracle Home : /opt/Oracle/products/fmw12cCentral Inventory : /opt/Oracle/oraInventory from : /var/opt/Oracle/oraInst.locOPatch version : 13.9.0.0.0OUI version : 13.9.0.0.0Log file location : /opt/Oracle/products/fmw12c/cfgtoollogs/opatch/opatch2013-06-10_14-24-54PM_1.log
OPatch detects the Middleware Home as "/opt/Oracle/products/fmw12c"
Patches will be rolled back in the following order:
Using OPatch to Patch Oracle Fusion Middleware
1-12 Patching with OPatch

15941858 15955138The following patch(es) will be rolled back: 15941858 15955138
Please shutdown Oracle instances running out of this ORACLE_HOME on the local system.(Oracle Home = '/opt/Oracle/products/fmw12c')
Is the local system ready for patching? [y|n]yUser Responded with: Y
Rolling back patch 15941858...
RollbackSession rolling back interim patch '15941858' from OH '/opt/Oracle/products/fmw12c'
Patching component oracle.wls.core.app.server, 12.2.1.1.0..RollbackSession removing interim patch '15941858' from inventory
Rolling back patch 15955138...
RollbackSession rolling back interim patch '15955138' from OH '/opt/Oracle/products/fmw12c'
Patching component oracle.wls.core.app.server, 12.2.1.1.0...RollbackSession removing interim patch '15955138' from inventoryLog file location: /opt/Oracle/products/fmw12c/cfgtoollogs/opatch/opatch2013-06-10_14-24-54PM_1.log
OPatch succeeded.
1.3.4 Troubleshooting a Patch by Viewing the OPatch Log FileTo understand how a patch is applied and to troubleshoot any problems with theapplication of a patch, you should review the log file for the OPatch session.
The log file location is usually saved to the following directory or a subdirectorywithin this location:
ORACLE_HOME/cfgtoollogs/opatch/
Subdirectories within this location are identified by the patch number or by thecommand you ran (such as lsinv).
The file name for each log file identifies the date and time it was executed. Forexample:
opatch2013-06-10_14-24-54PM_1.log
You can also locate the log file by viewing the output of the opatch command. The logfile name and location is included in the output of the command. For example:
Log file location: /opt/Oracle/products/fmw12c/cfgtoollogs/opatch/opatch2013-06-10_14-24-54PM_1.log
Using OPatch to Patch Oracle Fusion Middleware
Patching Your Environment Using OPatch 1-13

1.3.5 Using the OPatch lsinventory Command to Verify the Patches Applied to anOracle Home
To verify what patches have been applied to an Oracle home, or to find out additionalinformation about the Oracle home, use the opatch lsinventory command.
The following example shows sample output of the lsinventory command, whichindicates that a specific interim patch has been applied.
Example 1-5 Running the opatch lsinventory Command to Obtain the Oracle HomeInformation
> opatch lsinventoryOracle Interim Patch Installer version 13.9.0.0.0Copyright (c) 2016, Oracle Corporation. All rights reserved.
Oracle Home : /opt/Oracle/products/fmw12cCentral Inventory : /opt/Oracle/oraInventory from : /var/opt/Oracle/oraInst.locOPatch version : 13.9.0.0.0OUI version : 13.9.0.0.0Log file location : /opt/Oracle/products/fmw12c/cfgtoollogs/opatch/opatch2013-06-10_12-32-37PM_1.log
OPatch detects the Middleware Home as "/opt/Oracle/products/fmw12c"
Lsinventory Output file location :/opt/Oracle/products/fmw12c/cfgtoollogs/opatch/lsinv/lsinventory2013-06-10_12-32-37PM.txt
--------------------------------------------------------------------------------Local Machine Information::Hostname:ARU platform id: 226ARU platform description:: Linux x86-64Interim patches (1) :
Patch 15941858 : applied on Mon Jun 10 12:39:07 PDT 2013Unique Patch ID: 150220Patch description: "TEST PATCH FOR WLS 12.2.1.1.0 - JAVA CLASSES PATCH" Created on 17 May 2013, 11:54:20 hrs PST8PDT Bugs fixed: 783169, 15941850
--------------------------------------------------------------------------------
OPatch succeeded.
1.3.6 Verifying Your Installation After Applying a PatchAfter you apply one or more patches successfully, use the WebLogic AdministrationConsole, Fusion Middleware Control, and your organization’s application testing toverify that your system is currently running successfully.
To verify your installations in an Oracle Fusion Middleware 12c environment:
1. Start all the servers in all the domains associated with the Oracle home you justpatched.
2. Open the WebLogic Server Administration Console for each domain to verify theAdministration Server and to view the status of the components in the domain.
Using OPatch to Patch Oracle Fusion Middleware
1-14 Patching with OPatch
• Also, in any Oracle Fusion Middleware domain (where the Oracle FusionMiddleware Infrastructure is installed), open the Oracle Enterprise ManagerFusion Middleware Control console to view the status of the components in thedomain.
From either console, you can verify that the servers and applications are up andrunning correctly. For more information, see the following topics in AdministeringOracle Fusion Middleware:
• Starting and Stopping Oracle Fusion Middleware
• Overview of Oracle Fusion Middleware Administration Tools
If the software does not work as expected, follow the roll back instructions in RollingBack a Patch You Have Applied.
Using OPatch to Patch Oracle Fusion Middleware
Patching Your Environment Using OPatch 1-15

Using OPatch to Patch Oracle Fusion Middleware
1-16 Patching with OPatch

2Patching Your Environment Using
OPatchAuto
OPatchAuto, which is automatically installed with the OPatch utility as a part of yourinstallation, provides several commands that you can use to automate the applicationand roll back of a patch for a single host or multi-host environment.
For more information about patching with OPatchAuto, see the following topics:
About Zero Downtime Patching with OPatchAutoIf you are patching a multi-host topology, one of the first steps afterdownloading a patch is to identify whether the patch is suitable for ZeroDowntime (ZDT) patching. If it is, you can use one of two methods toapply the patch with OPatchAuto.
Preparing to Use OPatchAutoTo ensure successful patching, there are several prerequisites you shouldcomplete to prepare your environment for running OPatchAuto, such asobtaining the latest version of OPatch, obtaining required patches fromMy Oracle Support, and backing up the environment.
Using OPatchAuto to Patch Oracle Fusion MiddlewareUse OPatchAuto to automate the necessary steps for applying a patch ona single host or multi-host environment.
Example: Creating A Topology File Using FMW ComposerFor multi-host patching, a prerequisite is to define the elements of yourtopology in a topology file. You use FMW Composer to create this fileand provide information about your environment to OPatchAuto, which
Patching Your Environment Using OPatchAuto 2-1

allows OPatchAuto to automatically perform the patching steps withoutmanual intervention.
2.1 About Zero Downtime Patching with OPatchAutoIf you are patching a multi-host topology, one of the first steps after downloading apatch is to identify whether the patch is suitable for Zero Downtime (ZDT) patching. Ifit is, you can use one of two methods to apply the patch with OPatchAuto.
What is a Zero Downtime Patch?Zero Downtime (ZDT) patching provides a process and mechanism forrolling out a patch across a domain while allowing applications tocontinue to service requests.
Identifying a Zero Downtime PatchYou can identify a Zero Downtime (ZDT) patch by the value of the patchuptime option in the patch metadata.
About the Available Patch PlansAfter you identify whether a patch is suitable for ZDT patching, it isimportant that you review and understand the characteristics andlimitations of the patch plans available for applying a patch.
2.1.1 What is a Zero Downtime Patch?Zero Downtime (ZDT) patching provides a process and mechanism for rolling out apatch across a domain while allowing applications to continue to service requests.
You can apply a ZDT patch using OPatchAuto, which rolls out the change to one nodeat a time and allows a load balancer (typically, Oracle Traffic Director (OTD)) toredirect incoming traffic to the remaining nodes until the change is complete.
The recommended way to identify whether a patch is suitable for ZDT patching is todetermine the value of the patch uptime option in the metadata of the patch. Toidentify a ZDT patch, see Identifying a Zero Downtime Patch.
2.1.2 Identifying a Zero Downtime PatchYou can identify a Zero Downtime (ZDT) patch by the value of the patch uptimeoption in the patch metadata.
After you download a patch, open up patchdeploy.xml in the PATCH_HOME/etc/config directory, where PATCH_HOME is the location of the patch directory thatcontains the patch.
If the value of patch-uptime-option is FMW_ROLLING_ORACLE_HOME, as shownin the following example:
<patch-uptime-option>FMW_ROLLING_ORACLE_HOME<patch-uptime-option>
OR the value is FMW_ROLLING_SESSION:
<patch-uptime-option>FMW_ROLLING_SESSION<patch-uptime-option>
Then, the patch is suitable for ZDT patching.
If FMW_ROLLING_ORACLE_HOME or FMW_ROLLING_SESSION does not appear in thepatch metadata, then you know that the patch is not suitable for ZDT patching, and asa result, not compatible with a ZDT patch plan. The value of the patch uptime option
About Zero Downtime Patching with OPatchAuto
2-2 Patching with OPatch

will help you select the appropriate patch plan for applying the patch. For informationon selecting a patch plan, see About the Available Patch Plans.
2.1.3 About the Available Patch PlansAfter you identify whether a patch is suitable for ZDT patching, it is important thatyou review and understand the characteristics and limitations of the patch plansavailable for applying a patch.
A patch plan describes the sequence of steps to execute in order to deploy a patch. Toexecute a plan, you specify the plan name on the command line using the -planoption. For more information, see Patch Plans in Oracle OPatch User’s Guide forWindows and UNIX.
To discover the plans available in an Oracle home, use the opatchauto lsplanscommand. The following example shows sample output of this command, which listsand describes the available plans:
cd ORACLE_HOME/OPatch./opatchauto lsplans
Oracle OPatchAuto Version 13.9.0.0.0Copyright (c) 2015, Oracle Corporation. All rights reserved.
OPatchAuto available patch plan information:
Product Name: OPatchAuto Core Patch Plan Name: rolling (Default) Description: Process patch targets on a per-home basis and tries to minimize downtime. Patch Plan Name: parallel Description: Process patch targets in parallel and does not attempt to minimize downtime.
Product Name: Oracle Fusion Middleware Patch Plan Name: wls-zdt-rollout Description: Performs full WLS ZDT rollout. Patch Plan Name: wls-push-image Description: Performs only image push portion of WLS ZDT rollout.
After identifying whether the patch is a ZDT patch (see Identifying a Zero DowntimePatch), consider the following information when choosing a plan:
• If a patch is not a ZDT patch, you should use the parallel patch plan to apply thepatch, as shown in Applying a non-ZDT Patch on Multiple Hosts Using the ApplyCommand.
• If a patch is a ZDT patch, there are two available plans, rolling and wls-zdt-rollout.
– Use the rolling option if the patch is a FMW_ROLLING_ORACLE_HOME patch.This option uses a pure OPatchAuto approach, where OPatchAuto is used toperform all patching operations. This is the recommended method for FusionMiddleware.
With this approach, you can perform both image based and non-image basedpatching. You can also use this approach to perform what is known asconfiguration patching (or patching operations performed on a domain).However, this method has no session management features, such as migrating asession to another server when a server is shutdown.
About Zero Downtime Patching with OPatchAuto
Patching Your Environment Using OPatchAuto 2-3

For information on how to apply a ZDT patch with the rolling plan, see Applying a ZDT Patch on Multiple Hosts Using the Apply Command.
– Use the wls-zdt-rollout option if the patch is a FMW_ROLLING_SESSION patch.You also use OPatchAuto for this option, but certain lifecycle operations aredelegated to WebLogic Server components, such as WLST or the WebLogicServer Administration Console. This is recommended for WebLogic Serveronly.
This approach only supports image based patching and does not supportconfiguration patching. But, it does provide support for migrating a sessionwhen an instance is shutdown.
This document does not cover the steps to apply a ZDT patch using this option.For more information, see Introduction to Zero Downtime Patching inAdministering Zero Downtime Patching Workflows.
2.2 Preparing to Use OPatchAutoTo ensure successful patching, there are several prerequisites you should complete toprepare your environment for running OPatchAuto, such as obtaining the latestversion of OPatch, obtaining required patches from My Oracle Support, and backingup the environment.
For more information on preparing your environment, see the following topics:
Preparing to Use OPatchAuto
2-4 Patching with OPatch

Locating and Obtaining the Latest Version of OPatch and OPatchAutoBefore you run OPatchAuto, find the OPatchAuto utility in the Oraclehome and verify that you have the latest version. If you have the latestversion of OPatchAuto, you have the latest version of OPatch.
Obtaining Patches Required For Your InstallationYou can search for and download the latest patches for your installationfrom My Oracle Support.
Directory Variables Used in the ExamplesThe examples in this guide show sample commands for runningOPatchAuto. These example commands use variables to reference keydirectories.
Creating a WalletTo successfully run OPatchAuto, you must provide a wallet on thecommand line that contains the necessary password credentials, such asthe SSH credentials for each host.
Configuring Node Manager to Support Start and Stop OperationsTo ensure that OPatchAuto can properly stop and start your systemduring patching, you must configure the Node Manager(s) to supportthe start and stop operations.
Remote Host Patching on WindowsFor patching on Windows machines, ensure that Cygwin SSH server isinstalled and set up. OPatchAuto does not support other SSH servers atthis time.
Backup and Recovery Considerations for PatchingIt is highly recommended that you back up the Oracle home before anypatch operation. You can back up the Oracle home using your preferredmethod.
2.2.1 Locating and Obtaining the Latest Version of OPatch and OPatchAutoBefore you run OPatchAuto, find the OPatchAuto utility in the Oracle home andverify that you have the latest version. If you have the latest version of OPatchAuto,you have the latest version of OPatch.
For more information, see the following topics:
Preparing to Use OPatchAuto
Patching Your Environment Using OPatchAuto 2-5

Locating and Running OPatchAuto in the Oracle Fusion Middleware OracleHome
You can find and run the OPatchAuto utility in the ORACLE_HOME/OPatch directory after you install any Oracle Fusion Middlewareproduct.
Identifying the Version of OPatchAuto Included with Oracle Fusion Middleware12c
Oracle Fusion Middleware 12c (12.2.1.1) includes OPatchAuto version13.9.0.0.0. Use the opatchauto version command to verify that youhave this version.
2.2.1.1 Locating and Running OPatchAuto in the Oracle Fusion Middleware OracleHomeYou can find and run the OPatchAuto utility in the ORACLE_HOME/OPatch directoryafter you install any Oracle Fusion Middleware product.
To run OPatchAuto, simply run the opatchauto command in this directory.
For example, to view the list of commands available for OPatchAuto on a Unix system,enter the following:
./opatchauto -help
2.2.1.2 Identifying the Version of OPatchAuto Included with Oracle FusionMiddleware 12cOracle Fusion Middleware 12c (12.2.1.1) includes OPatchAuto version 13.9.0.0.0. Usethe opatchauto version command to verify that you have this version.
In general, there is a version of OPatch and OPatchAuto available for each version ofthe Oracle Universal Installer software.
To identify the version of OPatchAuto:
1. Change directory to the following directory:
cd ORACLE_HOME/OPatch/
2. Run the following command:
./opatchauto version
For example:
./opatchauto versionOracle OPatchAuto Version 13.9.0.0.0Copyright (c) 2015, Oracle Corporation. All rights reserved.
1. OPatchAuto version 13.9.0.0.0
If you have the latest version of OPatchAuto, you have the latest version of OPatch. Ifyou do not have the latest version, OPatch can be downloaded using patch 6880880.You should always use the latest download designated for your installation. ForOracle Fusion Middleware 12c (12.2.1.1), select OUI NextGen 13.9 for the version andplatform, and then click Download to download OUI NextGen OPatch 13.9.
Preparing to Use OPatchAuto
2-6 Patching with OPatch

2.2.2 Obtaining Patches Required For Your InstallationYou can search for and download the latest patches for your installation from MyOracle Support.
You can check for the latest patches available for your Oracle Fusion Middlewareproduct or component by registering and logging in to My Oracle Support at:
http://support.oracle.com
After you log in to My Oracle Support, click the Patches & Updates tab, whichprovides various tools that allow you to quickly locate the patches most important toyour Oracle software installation.
Note:
It is important that you review the README file that is included with eachpatch. The README file includes important information about therequirements and procedures for applying the patch.
2.2.3 Directory Variables Used in the ExamplesThe examples in this guide show sample commands for running OPatchAuto. Theseexample commands use variables to reference key directories.
The following directory variables are used in this guide:
• ORACLE_HOME, which is used to reference the location of the Oracle homedirectory.
• PATCH_HOME, which is used to reference the location of the patch directory thatcontains the patches to be applied to the Oracle home.
• DOMAIN_HOME, which is used to reference the location of the domain homedirectory
2.2.4 Creating a WalletTo successfully run OPatchAuto, you must provide a wallet on the command line thatcontains the necessary password credentials, such as the SSH credentials for each host.
To create a wallet, you can use one of the following tools:
Preparing to Use OPatchAuto
Patching Your Environment Using OPatchAuto 2-7

Creating a Wallet Using the patchingWallet ToolYou can use the patchingWallet.sh tool in the ORACLE_HOME/OPatch/auto/core/bin directory to create a wallet file.
Creating a Wallet Using FMW ComposerIf you are patching a multi-host topology, you could also use FMWComposer in ORACLE_HOME/oracle_common/bin to create a walletwhen you create the topology file.
2.2.4.1 Creating a Wallet Using the patchingWallet ToolYou can use the patchingWallet.sh tool in the ORACLE_HOME/OPatch/auto/core/bin directory to create a wallet file.
When you create a wallet:
• SSH credentials should be defined for each host using the format“user:hostname:ssh”
• WebLogic administrator credentials should be defined using the format“adminuser:adminhost:wls”. The wls credential is required if you are usingthe wls-zdt-rollout option to apply a zero downtime (ZDT) patch.
For multi-host patching, you will need to create a topology file using FMW Composer.This requires the following additional credentials:
• Node Manager credentials should be defined using the format“adminuser:domain_name/NM”
• Domain administrator credentials should be defined using the format“adminuser:domain_name/ADMIN”
Note that domain_name/NM and domain_name/ADMIN are the default wallet aliasesused by FMW Composer for the Node Manager and Administration Server,respectively. You can use different values. But, when you create a topology file usingFMW Composer, you need to make sure the credential values specified in theCredential fields in Composer match the aliases in the wallet.
The following shows an example of how to create a wallet and add the credentials tothe wallet:
./patchingWallet.sh –create -walletDir wallet_location "user:adminhost:ssh" "user:host1:ssh" "user:host2:ssh" "adminuser:domain_name/ADMIN" "adminuser:domain_name/NM"
For example:
./patchingWallet.sh –create -walletDir /tmp/samplewallet "oracle:adminhost:ssh" "oracle:host1:ssh" "oracle:host2:ssh" "weblogic:zdtDomain/ADMIN" "weblogic:zdtDomain/NM"
The tool will prompt you to enter and confirm the password for each credential:
oracle:adminhost:ssh:Confirm oracle:adminhost:ssh:oracle:host1:ssh:Confirm oracle:host1:ssh:oracle:host2:ssh:Confirm oracle:host2:ssh:weblogic:zdtDomain/ADMIN:Confirm weblogic:zdtDomain/ADMIN:
Preparing to Use OPatchAuto
2-8 Patching with OPatch

weblogic:zdtDomain/NM:Confirm weblogic:zdtDomain/NM:
2.2.4.2 Creating a Wallet Using FMW ComposerIf you are patching a multi-host topology, you could also use FMW Composer inORACLE_HOME/oracle_common/bin to create a wallet when you create thetopology file.
This tool provides a graphical user interface to assign or edit an existing wallet orcreate one from scratch. Assigning or Creating a Wallet File provides an example ofhow to assign or create a wallet for a topology.
2.2.5 Configuring Node Manager to Support Start and Stop OperationsTo ensure that OPatchAuto can properly stop and start your system during patching,you must configure the Node Manager(s) to support the start and stop operations.
To do this, set the QuitEnabled and CrashRecoveryEnabled properties in thenodemanager.properties file as follows:
QuitEnabled=trueCrashRecoveryEnabled=false
Note that the default value for CrashRecoveryEnabled is false.
By default, this file is created in the Node Manager home directory, where the NodeManager home is typically DOMAIN_HOME/nodemanager.
Note:
For Zero Downtime (ZDT) patching:
• QuitEnabled=true is only required if you are using the rolling planto apply a ZDT patch. This is not required if you are using the wls-zdt-rollout plan, as described in Administering Zero Downtime PatchingWorkflows.
• If you are using the wls-zdt-rollout plan, then you should setCrashRecoveryEnabled to true.
After updating these properties, restart the Node Manager(s).
For more information about the nodemanager.properties file, see Reviewingnodemanager.properties in Administering Node Manager for Oracle WebLogic Server
2.2.6 Remote Host Patching on WindowsFor patching on Windows machines, ensure that Cygwin SSH server is installed andset up. OPatchAuto does not support other SSH servers at this time.
For more information, see Remote Host Execution Using SSH in the Oracle OPatchUser’s Guide for Windows and UNIX.
Preparing to Use OPatchAuto
Patching Your Environment Using OPatchAuto 2-9

2.2.7 Backup and Recovery Considerations for PatchingIt is highly recommended that you back up the Oracle home before any patchoperation. You can back up the Oracle home using your preferred method.
You can use any method such as zip, cp -r, tar, and cpio to compress the Oraclehome.
If the Oracle home does not appear when you execute the opatch lsinventory -detail command, the Oracle home might be missing from the Central Inventory, orthe Central Inventory itself could be missing or corrupted.
If the Oracle home is listed when you execute the opatch lsinventory -detailcommand, but the products and components within the Oracle home are not listed,the inventory within the Oracle home (local inventory) might be missing or corrupted.
If the local inventory is corrupted or lost for some reason, you must restore the entireOracle home if it was backed up. If a backup does not exist, you may have to reinstallthe software.
2.3 Using OPatchAuto to Patch Oracle Fusion MiddlewareUse OPatchAuto to automate the necessary steps for applying a patch on a single hostor multi-host environment.
The following topics describe how to use OPatchAuto to patch Oracle FusionMiddleware.
Summary of the Steps For Using OPatchAuto in a Fusion MiddlewareEnvironment
Applying a patch with OPatchAuto involves a series of steps that mustbe performed to ensure successful patching.
Applying a Patch on a Single Host Using OPatchAutoAfter you obtain the patches required for your installation, use theopatchauto apply —analyze command to verify prerequisites, andthen use opatchauto apply to apply a patch on a single host. Ifneeded, you can use opatchauto rollback to roll back a patch.
Applying a Patch on Multiple Hosts Using OPatchAutoAfter you obtain the necessary patches, use the opatchauto apply —analyze command to verify prerequisites, and then use opatchauto
Using OPatchAuto to Patch Oracle Fusion Middleware
2-10 Patching with OPatch

apply to apply a patch on multiple hosts. If needed, you can useopatchauto rollback to roll back a patch.
Troubleshooting a Patch by Viewing the OPatchAuto Log FileTo understand how a patch is applied and to troubleshoot any problemswith the application of a patch, you should review the log file for theOPatchAuto session.
Using the OPatch lsinventory Command to Verify the Patches Applied to anOracle Home
To verify what patches have been applied to an Oracle home, or to findout additional information about the Oracle home, use the opatchlsinventory command.
Using the listDomainPatchInventory.sh Command to Verify the Patches Appliedto a Domain
To verify what patches have been applied to a domain, use thelistDomainPatchInventory.sh command. Use this command withthe OPatch lsinventory command to verify that the patch has beenapplied successfully.
Verifying Your Installation After Applying a PatchAfter you apply one or more patches successfully, use the WebLogicAdministration Console, Fusion Middleware Control, and yourorganization’s application testing to verify that your system is currentlyrunning successfully.
2.3.1 Summary of the Steps For Using OPatchAuto in a Fusion Middleware EnvironmentApplying a patch with OPatchAuto involves a series of steps that must be performedto ensure successful patching.
The following table summarizes the typical steps required to patch your existingFusion Middleware environment using OPatchAuto.
Table 2-1 Using OPatchAuto with Oracle Fusion Middleware
Task Description Documentation
Acquire patchesrequired for yourinstallation
Log in, search for, and download the patchesrequired for your specific installation.
You do not need to worry about whetherOPatchAuto supports a particular patchtype. If OPatchAuto does not support aparticular patch type, you will be notifiedwhen you run the tool.
Obtaining Patches Required For YourInstallation
Review theREADME.txt file forthe patch.
Each patch archive includes a README filethat contains important information andinstructions that must be followed prior toapplying your patch. It is important toreview the README file because it providesany unique steps or other informationspecific to the patch.
The README.txt file that is packagedwithin the patch archive
Using OPatchAuto to Patch Oracle Fusion Middleware
Patching Your Environment Using OPatchAuto 2-11

Table 2-1 (Cont.) Using OPatchAuto with Oracle Fusion Middleware
Task Description Documentation
For a multi-hostenvironment, identifywhether the patch is aZero Downtime (ZDT)patch.
Determine the patch uptime option inpatchdeploy.xml to identify whether thepatch is a ZDT patch, and as a result, identifythe patch plan to use to apply the patch.
Identifying a Zero Downtime Patch
About the Available Patch Plans
For a multi-hostenvironment, defineyour topology(configuration) usingFMW Composer.
To apply a patch on multiple hosts, youmust create a topology file, which can be aXML or JSON file and should be createdusing FMW Composer. This file containsinformation about your configuration.
The topology file provides a way forOPatchAuto to obtain information from yourenvironment so it can automate theapplication of the patch.
Example: Creating A Topology FileUsing FMW Composer
Check for patchprerequisites.
The OPatchAuto apply -analyzecommand will identify that the prerequisitesfor the patch have been met.
If you are patching a single hostenvironment, see Verifying thePrerequisites for Applying a Patch on aSingle Host.
If you are patching a multi-hostenvironment, see Verifying thePrerequisites for Applying a Patch onMultiple Hosts.
Apply the patch. After you determine the Oracle home towhich you need to apply the patch, and youhave read the README file, then you shouldapply the patch with the opatchautoapply command.
If you are patching a single-hostenvironment, see Applying a Patch on aSingle Host Using the Apply Command.
If you are patching a multi-hostenvironment, see one of the following,depending on whether the patch issuitable for ZDT patching:• Applying a non-ZDT Patch on
Multiple Hosts Using the ApplyCommand
• Applying a ZDT Patch on MultipleHosts Using the Apply Command
Verify the patch wasapplied to the Oraclehome successfully.
The OPatch lsinventory command willshow what patches have been applied to theOracle home. ThelistDomainPatchInventory.shcommand will show the patches applied tothe domain. Use these commands together toverify the application of the patch.
Using the OPatch lsinventoryCommand to Verify the PatchesApplied to an Oracle Home
Using the listDomainPatchInventory.shCommand to Verify the PatchesApplied to a Domain
Verify that yoursoftware runs properlyafter you apply thepatch.
After the patching is complete and yourservers are restarted, you should check yourproduct software to verify that the issue hasbeen resolved.
Verifying Your Installation AfterApplying a Patch
Troubleshoot theapplication of a patch.
If there are problems applying a patch, yourfirst troubleshooting task is to review the logfile for the OPatchAuto session.
Troubleshooting a Patch by Viewing theOPatchAuto Log File
Using OPatchAuto to Patch Oracle Fusion Middleware
2-12 Patching with OPatch

Table 2-1 (Cont.) Using OPatchAuto with Oracle Fusion Middleware
Task Description Documentation
Roll back theapplication of a patch.
If for some reason the result is notsatisfactory, you can use the opatchautorollback command to remove the patchfrom the Oracle home.
If additional assistance is required, go to MyOracle Support (formerly OracleMetaLink).
For a single host environment, see Rolling Back a Patch You Have Appliedon a Single Host.
For a multi-host environment, see Rolling Back a Patch You Have Appliedon Multiple Hosts.
2.3.2 Applying a Patch on a Single Host Using OPatchAutoAfter you obtain the patches required for your installation, use the opatchautoapply —analyze command to verify prerequisites, and then use opatchautoapply to apply a patch on a single host. If needed, you can use opatchautorollback to roll back a patch.
Patching a single host environment with OPatchAuto involves the following tasks:
Verifying the Prerequisites for Applying a Patch on a Single HostTo verify that a patch can be applied on a single host, use the —analyzeargument to the OPatchAuto apply command. For single host patching,you must also provide the domain location using the —instanceargument.
Applying a Patch on a Single Host Using the Apply CommandTo apply a patch on a single host, use the opatchauto applycommand. This is the same command as opatchauto apply —analyze, except you remove the —analyze argument when you areready to apply the patch.
Rolling Back a Patch You Have Applied on a Single HostIf you apply a patch and the results are not satisfactory, use theopatchauto rollback command to roll back the application of thepatch. This is the same command as opatchauto rollback –analyze, except you remove the -analyze argument when you areready to roll back the patch.
2.3.2.1 Verifying the Prerequisites for Applying a Patch on a Single HostTo verify that a patch can be applied on a single host, use the —analyze argument tothe OPatchAuto apply command. For single host patching, you must also provide thedomain location using the —instance argument.
The following command shows how to verify the prerequisites for applying a patch ona single host:
opatchauto apply PATCH_HOME -analyze -instance DOMAIN_HOME -wallet wallet_location -walletPassword password_ifneeded -wls-admin-host weblogic_adminserver_host:port
For example:
opatchauto apply /home/oracle/patches/15941858 -analyze -instance /home/oracle/config/domains/exampledomain -wallet /tmp/samplewallet -wls-admin-host examplehost.exampledomain.com:7001
Using OPatchAuto to Patch Oracle Fusion Middleware
Patching Your Environment Using OPatchAuto 2-13

If you want to apply multiple patches in one session, use the –phBaseDir option.
This command analyzes and displays the actions that will be taken by the patch, butdoes not actually apply the patch. As a result, it allows you to verify that theprerequisites for the patch have been met.
If any prerequisite checks fail, refer to the output and log file to fix the issues beforecontinuing. For example, a common failure is the detection of patch conflicts. If anypatch conflicts occur, follow the instructions in the log file for how to obtain a mergepatch from Oracle Support.
2.3.2.2 Applying a Patch on a Single Host Using the Apply CommandTo apply a patch on a single host, use the opatchauto apply command. This is thesame command as opatchauto apply —analyze, except you remove the —analyze argument when you are ready to apply the patch.
The following example shows how to use the opatchauto apply command toapply a patch to an Oracle Fusion Middleware environment on a single host.
This example assumes that:
• The patch you have downloaded has been saved to a directory that is named forthe patch number in My Oracle Support. In this case, the patch number is 15941858.
• The user runs the OPatchAuto command from the ORACLE_HOME/OPatchdirectory and includes the location of the patch (PATCH_HOME) as an argumentto the command.
Note:
When you run the opatchauto apply command, make a note of the sessionid (for example, EKZR) in the command output. This will simplify the rollbackprocess if you decide to roll back the patch later.
opatchauto apply PATCH_HOME -instance DOMAIN_HOME -wallet wallet_location -walletPassword password_ifneeded -wls-admin-host weblogic_adminserver_host:port
For example:
opatchauto apply /home/oracle/patches/15941858 -instance /home/oracle/config/domains/exampledomain -wallet /tmp/samplewallet -walletPassword password -wls-admin-host examplehost.exampledomain.com:7001
2.3.2.3 Rolling Back a Patch You Have Applied on a Single HostIf you apply a patch and the results are not satisfactory, use the opatchautorollback command to roll back the application of the patch. This is the samecommand as opatchauto rollback –analyze, except you remove the -analyzeargument when you are ready to roll back the patch.
The following example shows how to use the opatchauto rollback command toroll back a patch that was applied to an Oracle Fusion Middleware environment on asingle host.
To do a roll back, you follow the same process for when you applied the patch. That is,you first do a test run of the opatchauto rollback command:
Using OPatchAuto to Patch Oracle Fusion Middleware
2-14 Patching with OPatch

Note:
You can simplify the command if you provide the session id (for example,EKZR) that was used to apply the patch. Then, OPatchAuto can derive all thenecessary command line parameters.
opatchauto rollback –session session_id -analyze –wallet wallet_location -walletPassword password_ifneeded -wls-admin-host weblogic_adminserver_host:port
For example:
opatchauto rollback –session EKZR -analyze –wallet /tmp/samplewallet -walletPassword password -wls-admin-host examplehost.exampledomain.com:7001
When the test run successfully passes, perform the actual roll back of the patch:
opatchauto rollback –session session_id –wallet wallet_location -walletPassword password_ifneeded -wls-admin-host weblogic_adminserver_host:port
For example:
opatchauto rollback –session EKZR –wallet /tmp/samplewallet -walletPassword password -wls-admin-host examplehost.exampledomain.com:7001
Alternatively, you can roll back the patch by pointing OPatchAuto to a copy of theunzipped patch as follows:
opatchauto rollback unzipped_patch_location -instance DOMAIN_HOME –wallet wallet_location -walletPassword password_ifneeded -wls-admin-host weblogic_adminserver_host:port
2.3.3 Applying a Patch on Multiple Hosts Using OPatchAutoAfter you obtain the necessary patches, use the opatchauto apply —analyzecommand to verify prerequisites, and then use opatchauto apply to apply a patchon multiple hosts. If needed, you can use opatchauto rollback to roll back apatch.
Note:
Before applying a patch on multiple hosts, ensure that you have created atopology file using FMW Composer. You must supply this file, which can beeither a XML or JSON file, on the command line using the -topology optionwhen you run OPatchAuto. OPatchAuto uses this file to obtain informationabout the environment that you want to patch. For an example on how tocreate a topology file, see Example: Creating A Topology File Using FMWComposer.
Patching a multi-host environment with OPatchAuto involves the following tasks:
Using OPatchAuto to Patch Oracle Fusion Middleware
Patching Your Environment Using OPatchAuto 2-15
Verifying the Prerequisites for Applying a Patch on Multiple HostsTo ensure successful patching, use the opatchauto apply —analyzecommand to check for any prerequisites before applying a patch.
Applying a non-ZDT Patch on Multiple Hosts Using the Apply CommandTo apply a non-ZDT patch, use the opatchauto apply command withthe parallel patch plan. This is the same command as opatchautoapply -analyze, except you remove the -analyze argument whenyou are ready to apply the patch.
Applying a ZDT Patch on Multiple Hosts Using the Apply CommandTo apply a Zero Downtime (ZDT) patch, use the opatchauto applycommand with the rolling patch plan. This is the same command asopatchauto apply -analyze, except you remove the -analyzeargument when you are ready to apply the patch.
Rolling Back a Patch You Have Applied on Multiple HostsIf you apply a patch and the results are not satisfactory, use theopatchauto rollback command to roll back the application of apatch. This is the same command as opatchauto rollback –analyze, except you remove the -analyze argument when you areready to roll back the patch.
2.3.3.1 Verifying the Prerequisites for Applying a Patch on Multiple HostsTo ensure successful patching, use the opatchauto apply —analyze command tocheck for any prerequisites before applying a patch.
To verify that a patch can be applied to a specific Oracle home (ORACLE_HOME) anddomain location (DOMAIN_HOME) on multiple hosts, use the —analyze argumentto the OPatchAuto apply command.
opatchauto apply PATCH_HOME -analyze -plan patch_plan -topology path_to_topology_file -wallet wallet_location -walletPassword password_ifneeded
For example:
opatchauto apply /home/oracle/patches/15941858 -analyze -plan rolling -topology /home/oracle/topologies/topology.xml -wallet /tmp/samplewallet -walletPassword password
If you want to apply multiple patches in one session, use the –phBaseDir option.
Note that rolling is the default patch plan if no plan is specified on the commandline. For information on identifying the available plans, see About the Available PatchPlans.
This command displays the actions that will be taken by the patch, but does notactually apply the patch. As a result, it allows you to verify that the prerequisites forthe patch have been met.
If any prerequisite checks fail, refer to the command output and log file to fix anyissues before continuing. For example, a common failure is the detection of patchconflicts. If any patch conflicts occur, follow the instructions in the log file for how toobtain a merge patch from Oracle Support.
2.3.3.2 Applying a non-ZDT Patch on Multiple Hosts Using the Apply CommandTo apply a non-ZDT patch, use the opatchauto apply command with theparallel patch plan. This is the same command as opatchauto apply -
Using OPatchAuto to Patch Oracle Fusion Middleware
2-16 Patching with OPatch
analyze, except you remove the -analyze argument when you are ready to applythe patch.
The following example shows how to use the opatchauto apply command toapply a non-ZDT patch to an Oracle Fusion Middleware environment on multiplehosts.
This example assumes that:
• The patch you have downloaded has been saved to a directory that is named forthe patch number in My Oracle Support. In this case, the patch number is 15941858.
• The user runs the OPatchAuto command from the ORACLE_HOME/OPatchdirectory and includes the location of the patch (PATCH_HOME) as an argumentto the command.
Note:
When you run the opatchauto apply command, make a note of the sessionid (for example, EKZR) in the command output. This will simplify the rollbackprocess if you decide to roll back the patch later.
opatchauto apply PATCH_HOME -plan parallel -topology path_to_topology_file -wallet wallet_location -walletPassword password_ifneeded
For example:
opatchauto apply /home/oracle/patches/15941858 -plan parallel -topology /home/oracle/topologies/topology.xml -wallet /tmp/samplewallet -walletPassword password
2.3.3.3 Applying a ZDT Patch on Multiple Hosts Using the Apply CommandTo apply a Zero Downtime (ZDT) patch, use the opatchauto apply command withthe rolling patch plan. This is the same command as opatchauto apply -analyze, except you remove the -analyze argument when you are ready to applythe patch.
The following example shows how to use the opatchauto apply command toapply a ZDT patch to an Oracle Fusion Middleware environment on multiple hosts.
This example assumes that:
• The patch you have downloaded has been saved to a directory that is named forthe patch number in My Oracle Support. In this case, the patch number is 15941858.
• The user runs the OPatchAuto command from the ORACLE_HOME/OPatchdirectory and includes the location of the patch (PATCH_HOME) as an argumentto the command.
Note:
• When you run the opatchauto apply command, make a note of thesession id (for example, EKZR) in the command output. This will simplifythe rollback process if you decide to roll back the patch later.
• rolling is the default patch plan if no plan is specified on the commandline.
Using OPatchAuto to Patch Oracle Fusion Middleware
Patching Your Environment Using OPatchAuto 2-17

opatchauto apply PATCH_HOME -plan rolling -topology path_to_topology_file -wallet wallet_location -walletPassword password_ifneeded
For example:
opatchauto apply /home/oracle/patches/15941858 -plan rolling -topology /home/oracle/topologies/topology.xml -wallet /tmp/samplewallet -walletPassword password
2.3.3.4 Rolling Back a Patch You Have Applied on Multiple HostsIf you apply a patch and the results are not satisfactory, use the opatchautorollback command to roll back the application of a patch. This is the same commandas opatchauto rollback –analyze, except you remove the -analyze argumentwhen you are ready to roll back the patch.
The following example shows how to use the opatchauto rollback command toroll back a patch that was applied to an Oracle Fusion Middleware environment onmultiple hosts.
To do a roll back, you follow the same process for when you applied the patch. That is,you first do a test run of the opatchauto rollback command:
Note:
You can simplify the command if you provide the session id (for example,EKZR) that was used to apply the patch. Then, OPatchAuto can derive all thenecessary command line parameters.
opatchauto rollback –session session_id -analyze -walletPassword password_ifneeded
For example:
opatchauto rollback –session EKZR -analyze -walletPassword password
When the test run successfully passes, perform the actual roll back of the patch:
opatchauto rollback –session session_id -walletPassword password_ifneeded
For example:
opatchauto rollback –session EKZR -walletPassword password
Alternatively, you can roll back the patch by pointing OPatchAuto to a copy of theunzipped patch as follows:
opatchauto rollback unzipped_patch_location -topology path_to_topology_file –wallet wallet_location -walletPassword password_ifneeded
Or, you can specify the patch id using the -id option without specifying the locationof the patch directory, as shown in the following example:
opatchauto rollback -id 12345 -wallet /tmp/samplewallet -topology /home/oracle/topologies/topology.json
Using OPatchAuto to Patch Oracle Fusion Middleware
2-18 Patching with OPatch

2.3.4 Troubleshooting a Patch by Viewing the OPatchAuto Log FileTo understand how a patch is applied and to troubleshoot any problems with theapplication of a patch, you should review the log file for the OPatchAuto session.
The log file location is usually saved to the following directory or a subdirectorywithin this location:
ORACLE_HOME/cfgtoollogs/opatchauto/
Subdirectories within this location are identified by the patch number or by thecommand you ran.
The file name for each log file identifies the date and time it was executed. Forexample:
opatchauto2015-09-28_11-47-13AM.log
You can also locate the log file by viewing the output of the opatchauto command.The log file name and location is included in the output of the command. For example:
Session log file is /home/Oracle/products/fmw12c/cfgtoollogs/opatchauto/opatchauto2015-09-28_11-47-13AM.log
2.3.5 Using the OPatch lsinventory Command to Verify the Patches Applied to anOracle Home
To verify what patches have been applied to an Oracle home, or to find out additionalinformation about the Oracle home, use the opatch lsinventory command.
The following example shows sample output of the lsinventory command, whichindicates that a specific interim patch has been applied.
Example 2-1 Running the opatch lsinventory Command to Obtain the Oracle HomeInformation
> opatch lsinventoryOracle Interim Patch Installer version 13.9.0.0.0Copyright (c) 2016, Oracle Corporation. All rights reserved.
Oracle Home : /opt/Oracle/products/fmw12cCentral Inventory : /opt/Oracle/oraInventory from : /var/opt/Oracle/oraInst.locOPatch version : 13.9.0.0.0OUI version : 13.9.0.0.0Log file location : /opt/Oracle/products/fmw12c/cfgtoollogs/opatch/opatch2013-06-10_12-32-37PM_1.log
OPatch detects the Middleware Home as "/opt/Oracle/products/fmw12c"
Lsinventory Output file location :/opt/Oracle/products/fmw12c/cfgtoollogs/opatch/lsinv/lsinventory2013-06-10_12-32-37PM.txt
--------------------------------------------------------------------------------Local Machine Information::Hostname:ARU platform id: 226ARU platform description:: Linux x86-64Interim patches (1) :
Patch 15941858 : applied on Mon Jun 10 12:39:07 PDT 2013
Using OPatchAuto to Patch Oracle Fusion Middleware
Patching Your Environment Using OPatchAuto 2-19

Unique Patch ID: 150220Patch description: "TEST PATCH FOR WLS 12.2.1.1.0 - JAVA CLASSES PATCH" Created on 17 May 2013, 11:54:20 hrs PST8PDT Bugs fixed: 783169, 15941850
--------------------------------------------------------------------------------
OPatch succeeded.
2.3.6 Using the listDomainPatchInventory.sh Command to Verify the Patches Applied toa Domain
To verify what patches have been applied to a domain, use thelistDomainPatchInventory.sh command. Use this command with the OPatchlsinventory command to verify that the patch has been applied successfully.
For example:
cd ORACLE_HOME/OPatch/bin./listDomainPatchInventory.sh DOMAIN_HOME
This command indicates that a specific interim patch has been applied.
You should see the same list of patches in both the domain inventory and in theinventory for each Oracle home. If not, re-apply the patch. When you re-apply thepatch, only the missing steps will be executed. The tasks that have already beenperformed will be skipped.
2.3.7 Verifying Your Installation After Applying a PatchAfter you apply one or more patches successfully, use the WebLogic AdministrationConsole, Fusion Middleware Control, and your organization’s application testing toverify that your system is currently running successfully.
To verify your installations in an Oracle Fusion Middleware 12c environment:
1. Ensure that all the servers in all the domains associated with the Oracle home youjust patched are up and running.
Note:
If the servers were up and running before patching, it is not necessary tomanually restart the servers. OPatchAuto restarts the servers for you oncepatching is complete.
2. Open the WebLogic Server Administration Console for each domain to verify theAdministration Server and to view the status of the components in the domain.
• Also, in any Oracle Fusion Middleware domain (where the Oracle FusionMiddleware Infrastructure is installed), open the Oracle Enterprise ManagerFusion Middleware Control console to view the status of the components in thedomain.
From either console, you can verify that the servers and applications are up andrunning correctly. For more information, see the following topics in AdministeringOracle Fusion Middleware:
Using OPatchAuto to Patch Oracle Fusion Middleware
2-20 Patching with OPatch

• Starting and Stopping Oracle Fusion Middleware
• Overview of Oracle Fusion Middleware Administration Tools
If the software does not work as expected, follow the rollback instructions to roll backthe application of the patch.
2.4 Example: Creating A Topology File Using FMW ComposerFor multi-host patching, a prerequisite is to define the elements of your topology in atopology file. You use FMW Composer to create this file and provide informationabout your environment to OPatchAuto, which allows OPatchAuto to automaticallyperform the patching steps without manual intervention.
This example shows you the typical steps to create a topology file for a multi-hosttopology. Specifically, this example provides step-by-step instructions to create atopology file for the sample topology shown in the following diagram. This topologyrepresents a standard WebLogic Server domain that contains an AdministrationServer and a cluster containing two Managed Servers.
The following steps show how to create a topology file for this example topology:
Example: Creating A Topology File Using FMW Composer
Patching Your Environment Using OPatchAuto 2-21

Starting FMW ComposerStart FMW Composer from the ORACLE_HOME/oracle_common/bindirectory.
Creating a New Topology FileAfter you start FMW Composer, open a new topology file. This is whereyou will add and define each element of your topology.
Assigning or Creating a Wallet FileUse the FMW Composer Settings page to assign and edit an existingwallet file or create a new one for your topology.
Adding the HostsNext, add the hosts to the topology and then define the host informationin the host panel on the right side of the screen.
Adding the Oracle HomeAfter you add the hosts, add the Oracle home to the hosts and provideinformation about the Oracle home on the right side of the screen.
Adding the DomainAdd the domain to the topology and provide information about thedomain, such as the directory path of the domain home, theAdministration Server credentials, and the Administration Server URL.
Adding the Administration ServerAfter adding the domain element to the topology, specify informationabout the domain’s Administration Server.
Adding the ClusterAdd the cluster to the domain and specify information about the clusterwhere the Managed Servers are running.
Adding the Managed ServersNext, add the Managed Servers to the cluster in the domain.
Adding the Node ManagersFinally, if you have Node Managers being used in the environment, eachNode Manager has to be defined in the topology file.
Saving the Topology FileAfter defining the elements of your topology, select File and then Saveto save the topology to a topology file, which can be a XML or JSON file.
2.4.1 Starting FMW ComposerStart FMW Composer from the ORACLE_HOME/oracle_common/bin directory.
1. Set the JAVA_HOME environment variable to the path of a certified JDK.
For example:
export JAVA_HOME=/home/Oracle/products/1.8.0_77
2. Change directory to the ORACLE_HOME/oracle_common/bin directory.
cd ORACLE_HOME/oracle_common/bin
3. Start FMW Composer (fmw-composer.sh).
./fmw-composer.sh
Example: Creating A Topology File Using FMW Composer
2-22 Patching with OPatch

2.4.2 Creating a New Topology FileAfter you start FMW Composer, open a new topology file. This is where you will addand define each element of your topology.
1. Select File, New, and then Topology to open a new, blank topology file.
2. Click anywhere inside the Model tab to display the Topology Properties panel onthe right side of the screen.
3. In the ID field, enter a name for the topology file. For example, sample-topology.
4. In the Version field, enter 1.0 (default value).
This property allows you to create different versions of a topology and distinguishthem from one another.
5. Select File and then Save As... to save the file as either a XML or JSON file.
The file should be saved to a directory named topologies.
The name of the file should match the ID property and should include thesuffix .json or .xml. For example, sample-topology.xml.
2.4.3 Assigning or Creating a Wallet FileUse the FMW Composer Settings page to assign and edit an existing wallet file orcreate a new one for your topology.
1. From the File menu, select Settings... to open the Composer Settings page.
2. On the Settings page, click change next to Wallet.
3. In the Change wallet dialog box, select one of the following options:
• Select Select an existing wallet to assign an existing wallet to the topology.
• Select Create a new wallet to create a wallet that does not require a password.
• Select Create a new encrypted wallet to create a password-protected wallet.
An additional dialog box appears that prompts you to identify the wallet location.
4. Provide the wallet location and click Open.
5. If the wallet requires a password, you will be prompted to enter a password for thewallet.
6. After you create or identify a wallet, click edit to add the required credentials to thewallet.
The wallet must contain the following credentials:
• SSH credentials should be defined for each host using the alias formathostname:ssh
• Administration Server credentials should be defined using the alias formatdomain_name/ADMIN
Example: Creating A Topology File Using FMW Composer
Patching Your Environment Using OPatchAuto 2-23

• Node Manager credentials should be defined using the alias formatdomain_name/NM
7. After the wallet is created and contains the required credentials, click OK todismiss the Settings page.
2.4.4 Adding the HostsNext, add the hosts to the topology and then define the host information in the hostpanel on the right side of the screen.
1. Inside the left pane of the Model tab, right-click and select Add New Host.
A new host element (host1) appears on the left side of the screen.
2. Select the host element, and then specify the following information in the fields onthe right side of the screen.
Field Description
ID A unique name for the host. Keep the default value, host1.
Address Enter the primary IP address for the host.
Credential The credentials (username and password) from the wallet file that willbe used to connect to the host.
Click select to select the credential for the host from the wallet file.When you click select, a dialog box will appear with a list ofcredentials to choose from only if you have provided the path to awallet on the Composer Settings page (located in the File menu).
• If the credential already exists in the wallet, select the appropriatecredential from the list and click OK
• If the credential does not exist in the wallet, click New to add thehost credential to the wallet.
3. Repeat this process to add and define a second host (host2).
2.4.5 Adding the Oracle HomeAfter you add the hosts, add the Oracle home to the hosts and provide informationabout the Oracle home on the right side of the screen.
1. Right-click the Host: host1 element and select Assign New Oracle Home to Host‘host1’.
An Oracle home element (home1) appears inside host1 .
2. Select the Oracle home: home1 element, and then specify the followinginformation about the Oracle home in the fields on the right side of the screen.
Field Description
ID A unique name for the Oracle home. Keep the default value, home1.
Example: Creating A Topology File Using FMW Composer
2-24 Patching with OPatch

Field Description
Type Select shared to indicate that the Oracle home is on shared storage. Ifyour Oracle home is on local storage, select local.
If there are copies of the Oracle home on multiple hosts, each Oraclehome should be defined individually, and the Type attribute shouldbe local for each one. Use shared if the Oracle home is on shared diskthat is mounted on more than one host.
Path Enter the full path to the Oracle home that is being patched.
3. Right-click the Host: host2 element and select Assign Existing Oracle Homes toHost ‘host2’ to add home1 to Host: host2.
2.4.6 Adding the DomainAdd the domain to the topology and provide information about the domain, such asthe directory path of the domain home, the Administration Server credentials, and theAdministration Server URL.
1. Inside Host: host1, right-click the Oracle home: home1 element and select AddNew Domain To Host ‘host1’ (home1).
A domain element (domain1) appears inside the Host:host1 element.
2. Select the Domain: domain1 element, and then specify the following informationabout the domain in the fields on the right side of the screen.
Field Description
ID A unique name for the domain. Keep the default value, domain1.
Name Enter the name of the domain. This should match the name providedduring domain configuration.
Type Select shared to indicate that the domain is on shared storage. If yourdomain is on local storage, select local.
Path Enter the full path to the Domain home.
AdminCredential
The administrative credentials from the wallet file that will be used toconnect to the domain’s Administration Server.
Click select to select the credential for the Administration Server fromthe wallet file. When you click select, a dialog box will appear with alist of credentials to choose from only if you have provided the path toa wallet on the Composer Settings page (located in the File menu).
• If the credential already exists in the wallet, select the appropriatecredential from the list and click OK.
• If the credential does not exist in the wallet, click New to add theAdministration Server credential to the wallet.
Admin ServerUrl
Enter the URL that is used to connect to the WebLogic AdministrationServer. For example, http://adminserver_host:adminserver_port.
3. Inside Host: host2, right-click the Oracle home: home1 element and select AssignExisting Domains to Host ‘host2’ (home1) to add the domain (domain1) to host2.
Example: Creating A Topology File Using FMW Composer
Patching Your Environment Using OPatchAuto 2-25

2.4.7 Adding the Administration ServerAfter adding the domain element to the topology, specify information about thedomain’s Administration Server.
1. Inside Host: host1, right-click the Domain: domain1 element and select Add NewServer for Domain ‘domain1’ to Host ‘host1’ (home1) to add a server (server1) tohost1.
A new server (server1) appears inside the domain on host1.
2. Select the Server: server1 element, and then specify the following informationabout the Administration Server in the fields on the right side of the screen.
Field Description
ID A unique name for the server in the domain. Keep the default value,server1.
Is Admin Server Select the Is Admin Server check box to identify this server as theAdministration Server.
Name Enter a name for the Administration Server. For example,AdminServer.
Listen Address Enter the listen address of the Administration Server.
Listen Port Enter the listen port of the Administration Server. For example, 7001.
2.4.8 Adding the ClusterAdd the cluster to the domain and specify information about the cluster where theManaged Servers are running.
1. Inside Host: host1, right-click the Domain: domain1 element and select Add NewCluster to Domain ‘domain1’ to add a cluster to the domain.
A new cluster (cluster1) appears in the domain.
2. Select the Cluster: cluster1 element, and then specify the following informationabout the cluster in the fields on the right side of the screen.
Field Description
ID A unique name for the cluster in the domain. Keep the default value,cluster1.
Name Enter the name of the cluster.
2.4.9 Adding the Managed ServersNext, add the Managed Servers to the cluster in the domain.
1. Inside Host: host1, right-click the Cluster: cluster1 element and select Add NewServer to Cluster ‘cluster1’ to add a new server (server2) to the cluster on host1.
A new server (server2) appears in the cluster on host1.
Example: Creating A Topology File Using FMW Composer
2-26 Patching with OPatch

2. Select the Server: server2 element, and then specify the following informationabout the Managed Server in the fields on the right side of the screen.
Field Description
ID A unique name for the server in this domain. Keep the default value,server2.
Name Enter a name for the Managed Server. For example,managed_server_1.
Listen Address Enter the listen address of the Managed Server.
Listen Port Enter the listen port of the Managed Server.
3. Repeat this process to add a second Managed Server, server3, to the cluster onhost2.
2.4.10 Adding the Node ManagersFinally, if you have Node Managers being used in the environment, each NodeManager has to be defined in the topology file.
1. Inside Host: host1, right-click the Domain: domain1 element and select AssignNew Node Manager to Domain ‘domain1’.
A Node Manager (nm1) appears in the domain on host1.
2. Select the Node Manager: nm1 element, and then specify the following informationabout the Node Manager in the fields on the right side of the screen.
Field Description
ID A unique name for the Node Manager. Keep the default value, nm1.
Name Enter the name of the Node Manager. This should match the nameprovided during domain configuration.
Credential The credentials from the wallet file that will be used to connect to theNode Manager.
Click select to select the credential for the Node Manager from thewallet file. When you click select, a dialog box will appear with a listof credentials to choose from only if you have provided the path to awallet on the Composer Settings page (located in the File menu).
• If the credential already exists in the wallet, select the appropriatecredential from the list and click OK.
• If the credential does not exist in the wallet, click New to add thecredential to the wallet.
NmAddress Under Tuning Parameter Settings, click to add a value for theNode Manager listen address parameter (NmAddress).
When you click this icon, a dialog box appears. For Name, selectNmAddress from the drop-down menu, and then enter the NodeManager listen address in the Value field.
Example: Creating A Topology File Using FMW Composer
Patching Your Environment Using OPatchAuto 2-27
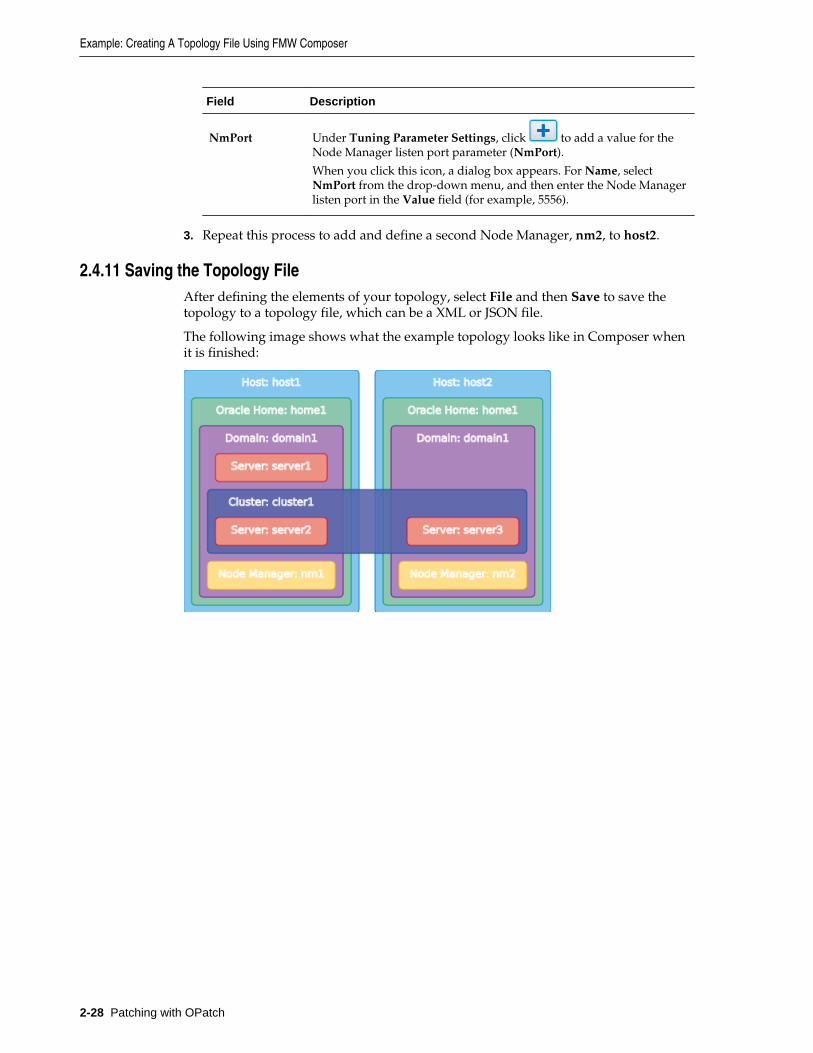
Field Description
NmPort Under Tuning Parameter Settings, click to add a value for theNode Manager listen port parameter (NmPort).
When you click this icon, a dialog box appears. For Name, selectNmPort from the drop-down menu, and then enter the Node Managerlisten port in the Value field (for example, 5556).
3. Repeat this process to add and define a second Node Manager, nm2, to host2.
2.4.11 Saving the Topology FileAfter defining the elements of your topology, select File and then Save to save thetopology to a topology file, which can be a XML or JSON file.
The following image shows what the example topology looks like in Composer whenit is finished:
Example: Creating A Topology File Using FMW Composer
2-28 Patching with OPatch


![Oracle Fusion Middleware Upgrading Oracle Forms … · [1]Oracle® Fusion Middleware Upgrading Oracle Forms 6i to Oracle Forms 12c 12c (12.2.1.1) E71740-01 June 2016 This document](https://static.fdocuments.net/doc/165x107/5b733ad57f8b9a58028e3c96/oracle-fusion-middleware-upgrading-oracle-forms-1oracle-fusion-middleware.jpg)


![Oracle Fusion Middleware Knowledge Module Developer’s ... · [1]Oracle® Fusion Middleware Developing Knowledge Modules with Oracle Data Integrator 12c (12.2.1.1) E69420-01 May](https://static.fdocuments.net/doc/165x107/5fd917916d05a6310e7cb459/oracle-fusion-middleware-knowledge-module-developeras-1oracle-fusion-middleware.jpg)


