Oracle FS1-2 Flash Storage System Installation …Contents List of Figures 6 List of Tables 9
144
Oracle FS1-2 Flash Storage System Installation Guide (Racked) Part Number E63124-01 Oracle FS1-2 Flash Storage System release 6.2 2015 June
Transcript of Oracle FS1-2 Flash Storage System Installation …Contents List of Figures 6 List of Tables 9

Oracle FS1-2 Flash Storage System
Installation Guide (Racked)
Part Number E63124-01Oracle FS1-2 Flash Storage System release 6.2
2015 June

Copyright © 2005, 2015, Oracle and/or its affiliates. All rights reserved.
This software and related documentation are provided under a license agreement containing restrictions onuse and disclosure and are protected by intellectual property laws. Except as expressly permitted in yourlicense agreement or allowed by law, you may not use, copy, reproduce, translate, broadcast, modify,license, transmit, distribute, exhibit, perform, publish, or display any part, in any form, or by any means.Reverse engineering, disassembly, or decompilation of this software, unless required by law forinteroperability, is prohibited.
The information contained herein is subject to change without notice and is not warranted to be error-free. Ifyou find any errors, please report them to us in writing.
If this is software or related documentation that is delivered to the U.S. Government or anyone licensing it onbehalf of the U.S. Government, then the following notice is applicable:
U.S. GOVERNMENT END USERS: Oracle programs, including any operating system, integrated software,any programs installed on the hardware, and/or documentation, delivered to U.S. Government end users are"commercial computer software" pursuant to the applicable Federal Acquisition Regulation and agency-specific supplemental regulations. As such, use, duplication, disclosure, modification, and adaptation of theprograms, including any operating system, integrated software, any programs installed on the hardware,and/or documentation, shall be subject to license terms and license restrictions applicable to the programs.No other rights are granted to the U.S. Government.
This software or hardware is developed for general use in a variety of information management applications.It is not developed or intended for use in any inherently dangerous applications, including applications thatmay create a risk of personal injury. If you use this software or hardware in dangerous applications, then youshall be responsible to take all appropriate fail-safe, backup, redundancy, and other measures to ensure itssafe use. Oracle Corporation and its affiliates disclaim any liability for any damages caused by use of thissoftware or hardware in dangerous applications.
Oracle and Java are registered trademarks of Oracle and/or its affiliates. Other names may be trademarks oftheir respective owners.
Intel and Intel Xeon are trademarks or registered trademarks of Intel Corporation. All SPARC trademarks areused under license and are trademarks or registered trademarks of SPARC International, Inc. AMD,Opteron, the AMD logo, and the AMD Opteron logo are trademarks or registered trademarks of AdvancedMicro Devices. UNIX is a registered trademark of The Open Group.
This software or hardware and documentation may provide access to or information about content, products,and services from third parties. Oracle Corporation and its affiliates are not responsible for and expresslydisclaim all warranties of any kind with respect to third-party content, products, and services unlessotherwise set forth in an applicable agreement between you and Oracle. Oracle Corporation and its affiliateswill not be responsible for any loss, costs, or damages incurred due to your access to or use of third-partycontent, products, or services, except as set forth in an applicable agreement between you and Oracle.
Documentation Accessibility
For information about Oracle's commitment to accessibility, visit the Oracle Accessibility Program website at http://www.oracle.com/pls/topic/lookup?ctx=acc&id=docacc.
Access to Oracle Support
Oracle customers that have purchased support have access to electronic support through My OracleSupport. For information, visit http://www.oracle.com/pls/topic/lookup?ctx=acc&id=info or visit http://www.oracle.com/pls/topic/lookup?ctx=acc&id=trs if you are hearing impaired.

ContentsList of Figures..............................................................................................................................6
List of Tables ...............................................................................................................................9
Preface ......................................................................................................................................11Related Documentation .......................................................................................................11Oracle Resources ................................................................................................................11
Chapter 1: Oracle FS Systems: Installation Overview ..............................................................12Racked Systems ..................................................................................................................12Installation Overview............................................................................................................13Planning for System Installation...........................................................................................15System Components............................................................................................................16Component Chassis Hardware Specifications ....................................................................18System Power Requirements ..............................................................................................21PDU Hardware Specifications..............................................................................................21Site Preparation Checklist....................................................................................................25Unpacking Systems .............................................................................................................28Required Tools.....................................................................................................................31Warnings and Cautions........................................................................................................31Electrostatic Discharge Precautions ....................................................................................32Multiple Rack Systems.........................................................................................................32WWnN and System Serial Number Labels ..........................................................................33
Chapter 2: Oracle FS Systems: Cabling Overview ...................................................................35Cabling an Oracle FS System..............................................................................................35Cabling Workflow .................................................................................................................36Oracle FS System Configurations........................................................................................38Pilot Cabling.........................................................................................................................38Controller Cabling ................................................................................................................39Drive Enclosure Cabling ......................................................................................................40Build Map for Your Oracle FS System .................................................................................42
Chapter 3: Oracle FS System Cables .......................................................................................44Types of External Cables.....................................................................................................44Types of Internal Cables ......................................................................................................45Cable Labels ........................................................................................................................51Handling and Care of Fiber Optic Cables ............................................................................51Routing Cables ....................................................................................................................52
Chapter 4: System Power .........................................................................................................55Power Distribution Units.......................................................................................................55PDU Outlet Amperage Ratings ............................................................................................55Connect the Power Cables to the Power Supply .................................................................56Single-Phase PDU Cabling..................................................................................................57
3

Wiring Diagram: Single-Phase PDU ....................................................................................59Three-Phase PDU Cabling ..................................................................................................61Wiring Diagram: Three-Phase PDU.....................................................................................62Power On the System ..........................................................................................................63
Chapter 5: Configure and Connect to the Customer Management Network.............................66Workflow for Customer Management Network ....................................................................66Ping 10.0.0.2........................................................................................................................67Download Oracle FS System Manager to a Laptop.............................................................67Configure the Management IP Addresses ...........................................................................68Connect to the Customer Management Network.................................................................69Download Oracle FS System Manager to Workstations......................................................70Download Oracle FS Command Line Interface ...................................................................71Verify the Controller Service Type .......................................................................................71Update the Oracle FS System Software and Firmware .......................................................72
Download Software and Firmware Updates ...................................................................72Upload the Software and Firmware Package .................................................................73Update the Oracle FS System Software.........................................................................74Update the Drive Firmware.............................................................................................75
Chapter 6: Configure Global Settings........................................................................................77Create an Additional Administrator 1 Account .....................................................................77Configure Email for Administrator Accounts ........................................................................78Configure the Email Server ..................................................................................................78Test Administrator Password Recovery...............................................................................79Configure DNS Settings.......................................................................................................79Configure NTP Servers ........................................................................................................80Auto Service Requests ........................................................................................................80ASR Activation Overview .....................................................................................................81Settings for ASR (Call-Home) ..............................................................................................82Configure Call-Home for ASR..............................................................................................84Activate ASR (Test Call-Home)............................................................................................85ASR Activation (Call-Home) Troubleshooting......................................................................86
Chapter 7: Connect to the Customer Data Network..................................................................88Connections to the Customer Data Network........................................................................88Provision the Controller Ports ..............................................................................................88Connect to the Customer Data Network ..............................................................................89
Chapter 8: Complete the Installation .........................................................................................91Perform a Controller Failover Test .......................................................................................91
Generate IO on the System............................................................................................92Failover a Controller Using the CLI ................................................................................92Bring the Controller Online Using the CLI ......................................................................92Clear the Controller Failure History Using the CLI .........................................................93Failover a Controller Using the ILOM .............................................................................93Bring a Controller Online Using the ILOM ......................................................................94Failover and Bring Controller Online Using the Power Button........................................94
Perform a Drive Failure Test ................................................................................................94
Contents
4

System Status Verification ...................................................................................................96Verify System Status Using the Oracle FS Portal ................................................................97Verify System Status Using the FS System Manager..........................................................98
Appendix A: Wiring Diagrams .................................................................................................102Pilot Management Interface Wiring Diagram .....................................................................102Controller Wiring Diagrams................................................................................................103Drive Enclosure Wiring Diagrams ......................................................................................107
Appendix B: Oracle FS System Data ......................................................................................117System Packaging and Transportation ..............................................................................117System Environmentals .....................................................................................................117
Appendix C: Oracle FS System LED Status ...........................................................................118Oracle FS System LEDs ....................................................................................................118Controller LED Indicators ...................................................................................................118
Controller Power Supply LED Indicators ......................................................................125Controller Fan LED Indicators ......................................................................................125Controller ESM LED Indicators.....................................................................................126
Drive Enclosure LED Indicators .........................................................................................127Power Cooling Module LED Indicators.........................................................................129I/O Module LED Indicators ...........................................................................................130Drive LED Indicators.....................................................................................................131
Pilot LED Indicators ...........................................................................................................133Pilot Drive LED Indicators.............................................................................................136Pilot Fan LED Indicators ...............................................................................................137Pilot Port LED Indicators ..............................................................................................137Pilot Motherboard LED Indicators.................................................................................138Pilot Power Supply LED Indicators...............................................................................139
Index........................................................................................................................................140
Contents
5

List of FiguresFigure 1: Racked Oracle FS System.........................................................................................12
Figure 2: Racked system: Installation overview........................................................................14
Figure 3: Cable trough location in the Oracle FS System.........................................................30
Figure 4: Controller-to-Drive Enclosure cabling between two racks..........................................33
Figure 5: WWnN label...............................................................................................................33
Figure 6: SSN label...................................................................................................................34
Figure 7: Cabling workflow........................................................................................................37
Figure 8: Pilot port for external cabling......................................................................................38
Figure 9: Pilot ports for internal cabling.....................................................................................39
Figure 10: Controller ports for external cabling.........................................................................39
Figure 11: Controller ports for internal cabling..........................................................................40
Figure 12: SAS ports for Drive Enclosure cabling (DE2-24P)...................................................41
Figure 13: SAS ports for Drive Enclosure cabling (DE2-24C)...................................................41
Figure 14: Build map.................................................................................................................43
Figure 15: Example of mini-SAS HD to mini-SAS HD cable connectors...................................47
Figure 16: Example of mini-SAS to mini-SAS HD cable connectors.........................................48
Figure 17: Example of mini-SAS to mini-SAS cable connectors...............................................49
Figure 18: Example of a power cord with C13 to C14 angled connectors.................................50
Figure 19: Example of a cable label for an internal Ethernet cable...........................................51
Figure 20: Controller cables routed through the CMA...............................................................53
Figure 21: Pilot cables routed through the CMA........................................................................53
Figure 22: Single phase PDU outlet groups..............................................................................58
Figure 23: Wiring Diagram: Single-phase PDU cabling.............................................................60
Figure 24: Three-phase PDU outlet groups...............................................................................62
Figure 25: Wiring Diagram: Three-phase PDU cabling.............................................................63
Figure 26: Power switches on the Drive Enclosures.................................................................64
6

Figure 27: PDU circuit breakers (example)...............................................................................65
Figure 28: Workflow configure and connect to management network.......................................66
Figure 29: The NET 3 ports on the Pilots .................................................................................70
Figure 30: SAN HBA connections to the customer data network .............................................89
Figure 31: Controller CMA ........................................................................................................90
Figure 32: Pilot management interface main screen.................................................................97
Figure 33: Oracle FS System Login screen...............................................................................98
Figure 34: Oracle FS System Manager login screen.................................................................99
Figure 35: Pilot wiring diagram (management connectivity)....................................................102
Figure 36: Controller wiring diagram (management connectivity)...........................................103
Figure 37: Controller wiring diagram (customer data network)................................................104
Figure 38: SAS wiring diagram (Controller to Controller)........................................................105
Figure 39: SAS wiring diagram for Controllers to Drive Enclosures (base).............................106
Figure 40: SAS wiring diagram for Controllers to Drive Enclosures (performance)................107
Figure 41: SAS wiring diagram for one string with one Drive Enclosure.................................112
Figure 42: SAS wiring diagram for one string with two Drive Enclosures................................113
Figure 43: SAS wiring diagram for one string with three Drive Enclosures.............................114
Figure 44: SAS wiring diagram for one string with four Drive Enclosures...............................115
Figure 45: SAS wiring diagram for one string with five Drive Enclosures................................116
Figure 46: LED alarm assembly front display..........................................................................119
Figure 47: Controller back LEDs.............................................................................................121
Figure 48: Controller drive LEDs.............................................................................................126
Figure 49: Operator panel LEDs (DE2-24P Drive Enclosure).................................................128
Figure 50: Operator panel LEDs (DE2-24C Drive Enclosure).................................................128
Figure 51: Power cooling module LEDs..................................................................................129
Figure 52: I/O module LEDs....................................................................................................131
Figure 53: Drive LEDs (DE2-24P Drive Enclosure).................................................................132
Figure 54: Drive LEDs (DE2-24C Drive Enclosure).................................................................132
List of Figures
7

Figure 55: LEDs at the front of the Pilot..................................................................................133
Figure 56: LEDs at the back of the Pilot..................................................................................134
List of Figures
8

List of TablesTable 1: Oracle resources.........................................................................................................11
Table 2: Oracle FS System component descriptions................................................................16
Table 3: Pilot dimensions and weight .......................................................................................18
Table 4: Controller dimensions and weight...............................................................................18
Table 5: DE2-24P Drive Enclosure dimensions and weight......................................................19
Table 6: DE2-24C Drive Enclosure dimensions and weight......................................................19
Table 7: Pilot power characteristics...........................................................................................19
Table 8: Controller power characteristics .................................................................................20
Table 9: Drive Enclosure power characteristics........................................................................21
Table 10: Low voltage dual phase PDU for Oracle Flash Storage Systems.............................22
Table 11: Low voltage three-phase PDU for Oracle Flash Storage Systems............................23
Table 12: High voltage single phase PDU for Oracle Flash Storage Systems..........................24
Table 13: High voltage three-phase PDU for Oracle Flash Storage Systems...........................24
Table 14: Site preparation checklist..........................................................................................25
Table 15: Required tools...........................................................................................................31
Table 16: Oracle FS System configurations..............................................................................38
Table 17: SAN HBA...................................................................................................................44
Table 18: HBA options with SFPs.............................................................................................44
Table 19: Cable length limits for FC configurations...................................................................45
Table 20: Private management network cables........................................................................46
Table 21: Mini-SAS HD cables..................................................................................................47
Table 22: Mini-SAS to mini-SAS HD cables .............................................................................48
Table 23: Mini-SAS to mini-SAS cables ...................................................................................49
Table 24: Power cords and PDU connections...........................................................................50
Table 25: Single-phase PDUs ..................................................................................................57
Table 26: Three-phase PDUs ...................................................................................................61
9

Table 27: One SAS HBA per Controller..................................................................................108
Table 28: Two SAS HBAs per Controller.................................................................................109
Table 29: Three SAS HBAs per Controller..............................................................................110
Table 30: System altitude specifications.................................................................................117
Table 31: System temperature and humidity specifications....................................................117
Table 32: Controller LED status and description (front panel).................................................119
Table 33: Controller LED status and description (back panel)................................................122
Table 34: Controller power supply LED status and description ..............................................125
Table 35: Controller fan LED status and description ..............................................................125
Table 36: Controller ESM LED status and description ...........................................................127
Table 37: Drive Enclosure LED status and description (operator panel).................................129
Table 38: Drive Enclosure LED status and description (power cooling module).....................130
Table 39: Drive Enclosure LED status and description (I/O module)......................................131
Table 40: Drive Enclosure LED status and description (drives)..............................................132
Table 41: Pilot LED status and description .............................................................................134
Table 42: Pilot drive LED status and description ....................................................................136
Table 43: Pilot fan LED status and description .......................................................................137
Table 44: Network management port LED status and description .........................................137
Table 45: Ethernet port LED status and description ...............................................................138
Table 46: Motherboard LED status and description ...............................................................138
Table 47: Pilot Drive LED status and description ...................................................................139
List of Tables
10

Preface
Related Documentation• Oracle Flash Storage System Glossary
• Oracle FS1-2 Flash Storage System Customer Service Guide
• Oracle Flash Storage System Administrator’s Guide
• Oracle FS1-2 Flash Storage System Release Notes
Oracle ResourcesImportant: For the latest version of this document, visit the SAN Storage – OracleFlash Storage System section at the Oracle Help Center (http://www.oracle.com/goto/fssystems/docs).
Table 1: Oracle resourcesFor help with... Contact...Support http://www.oracle.com/support
(www.oracle.com/support)
Training https://education.oracle.com(https://education.oracle.com)
Documentation • Oracle Help Center:(http://www.oracle.com/goto/fssystems/docs)
• From Oracle FS System Manager (GUI):Help > Documentation
• From Oracle FS System HTTP access:(http://system-name-ip/documentation.phpwhere system-name-ip is the name or the publicIP address of your system)
Documentationfeedback
http://www.oracle.com/goto/docfeedback(http://www.oracle.com/goto/docfeedback)
Contact Oracle http://www.oracle.com/us/corporate/contact/index.html(http://www.oracle.com/us/corporate/contact/index.html)
11

CHAPTER 1
Oracle FS Systems: Installation Overview
Racked SystemsWhen requesting racked Oracle FS Systems, customers order all of thecomponents for the system. The system is mounted and cabled inside the rack atthe factory. The manufacturing team then ships the fully-assembled system to thecustomer site. Racked systems can weigh up to 1800 pounds due to theadditional weight of the components, cables, and the pallet.
The following figure shows an example of a racked Oracle FS System:
Figure 1: Racked Oracle FS System
Legend 1 Controllers
2 Pilots
3 MaxRep Replication Engines (optional)
4 DE2-24P Drive Enclosure (locations may vary)
12

5 DE2-24C Drive Enclosure (locations may vary)
Related LinksPlanning for System InstallationUnpacking SystemsSystem ComponentsInstallation Overview
Installation OverviewBecause a racked Oracle FS System is mounted into the rack and cabled at thefactory, the layout of the components inside the rack follows the Oraclerecommended rack placement and cabling guidelines.
Note: Ensure that all site-preparation steps have been taken at the data centerbefore starting the installation.
CAUTION: To avoid damage to the system, use the fork lift only on thedesignated side of the shipping pallet while moving the container with theracked system to the data center.
The following flowchart shows the sequence of tasks to install a racked Oracle FSSystem.
Oracle FS Systems: Installation Overview
13

Figure 2: Racked system: Installation overview
CAUTION: Do not turn on any power circuits until the installation is completeand all internal cables are in place. Turning on the power to the systemprematurely can prevent the system from starting up correctly.
Tip: Review the information on Oracle FS System power requirements in thisguide.
Note: If the source of the main is from the ceiling, then care must be taken to re-anchor and re-route the main power cables properly.
Note: Depending on the Oracle FS System configuration, the system startup cantake 30 minutes or longer. The process of starting up the Oracle FS System mightbe initiated multiple times as the Controller ports are provisioned before theports are connected to the customer fabric.
Oracle FS Systems: Installation Overview
14

Related LinksUnpacking SystemsPlanning for System InstallationRacked SystemsSite Preparation ChecklistPDU Hardware SpecificationsSystem Power RequirementsComponent Chassis Hardware SpecificationsSystem Components
Planning for System InstallationFollowing items are a part of the planning and site preparation before theinstallation of a racked Oracle FS System:
• System weight
• Physical dimensions
• Power requirements
• Rack specifications
• Hardware specifications
• Unpacking requirements
Note: To ensure that all planning requirements have been met and the site isready for an Oracle FS System racked installation, follow the site preparationchecklist.
Tip: When moving a heavy racked systems to the installation site, use steel tracksto guide the system on to the floor. We recommend that a minimum of threepeople are used to move the rack, with one person pushing from the front andone person pulling at the back to help guide the rack.
Tip: When transporting configured racks from one location to the other, movethem at a speed of 2.13 feet for each second (0.65 meters for each second) orslower. Carefully examine the transportation path and avoid obstacles, such asdoorways or elevator thresholds that can cause abrupt stops or shocks. Useramps or lifts to avoid obstacles and to enable a smooth transport.
Related LinksElectrostatic Discharge PrecautionsWarnings and CautionsRequired ToolsPDU Hardware SpecificationsSystem Power RequirementsComponent Chassis Hardware SpecificationsSite Preparation Checklist
Oracle FS Systems: Installation Overview
15

System ComponentsAn Oracle Flash Storage System consists of Pilots, Controllers, and DriveEnclosures. Replication Engines can also be added to the system for replicationpurposes.
The following table summarizes the components that comprise the Oracle FSSystem along with their model name, quantity, and description.
Table 2: Oracle FS System component descriptions
Componentname
Model Quantity and description
Pilot (X2) 1U An Oracle FS System supports two Pilotmanagement controllers.
The Pilot nodes are designated as Pilot-1 andPilot-2. One Pilot node actively performsmanagement functions while the other Pilotnode is in standby mode. The Pilot in anOracle FS System operates separately from theuser data and the command paths and thusprovides out-of-band management.
Controllers 2U An Oracle FS1-2 supports two storageControllers. The Controllers are designated asController-1 and Controller-2. Both Controllersactively process I/O on the data path.
Note: Controllers are identified in the CLI asCONTROLLER-01, CONTROLLER-02 and inthe Oracle FS System Manager asCONTROLLER 01, CONTROLLER 02.
DriveEnclosures
• DE2-24P (2U),24 SFF, 2.5inches (6.35centimeters)SAS-2 drivesor 7, 13, 19SSDs for eachDriveEnclosure
• DE2-24C (4U),24 LFF, 3.5inches (8.89centimeters)SAS-2 drives
An Oracle FS1-2 supports between 1- 30 DriveEnclosures. Both DE2-24P and DE2-24C cancoexist in the same system.
Oracle FS Systems: Installation Overview
16

Table 2: Oracle FS System component descriptions (continued)
Componentname
Model Quantity and description
MaxRepReplicationEngines(optional)
2U An Oracle FS System supports a total of eightReplication Engines. The number of ReplicationEngines depends on customer requirementsand the type of replication. While a singleengine is sufficient for replication, Oraclerecommends having at least two engines forredundancy purposes.
Filler panels(optional)
• 1U• 2U
The number of filler panels depends on howmany empty rack unit (RU) slots exist in therack.
Powerdistributionunits(PDUs)
Unless using OraclePDUs, PDUs are theresponsibility of thecustomer or thirdparty rack vendor.
Oracle PDUs are integrated into the rack. Non-Oracle PDUs might or might not be integratedinto the rack.
Racks Standard four-postracks (42U).
The number of racks depends on the numberand the distribution of the hardwarecomponents. A minimum of 1 rack and amaximum of 4 racks can be used.
The PDUs used in a not-racked Oracle FS System installation must provideredundancy for both external AC power source and internal AC powerdistribution to the components. The PDUs must provide sufficient current tomeet the sum of the requirements for the Oracle FS System components.
Oracle PDUs might be purchased for use with non-Oracle racks. The Oracle FSSystem component power cords have been designed to work with vertical styleOracle or third party PDUs. Non-Oracle PDUs must be compatible with Oraclecomponent power cord lengths and plug types. Non-Oracle PDUs must bemounted in a manner such that the power cords provided by Oracle might beused and the PDUs do not obstruct the ability to replace field replaceable units(FRUs) and customer serviceable units (CRUs).
While planning rack-space, ensure that adequate space is also allocated for thePDUs, if using non-Oracle PDUs.
Note: Typically, enterprise class products like the Oracle FS System do not use aUPS and rely on generator backed power supply in the data centers. However, ifyou use a UPS, it must be based on the maximum wattage requirements of thesum total of all the Oracle FS System components. The UPS, if used, shouldconform to the APC PowerNet MIB specifications so that it can send SNMP trapsto the Oracle FS System to indicate that it is operating in battery mode or innormal mode and that the Oracle FS System should be configured to receive the
Oracle FS Systems: Installation Overview
17

traps. For more information about managing APC products that can bemonitored and configured with SNMP, see the Schneider Electric MIB ReferenceGuide (http://www.apcmedia.com/salestools/JGAY-83UPH9/JGAY-83UPH9_R0_EN.pdf). In short, a UPS system must be based on themaximum wattage requirements of the sum total of all the Oracle FS Systemcomponents.
Related LinksUnpacking SystemsPlanning for System InstallationRacked SystemsPDU Hardware SpecificationsSystem Power RequirementsComponent Chassis Hardware Specifications
Component Chassis Hardware SpecificationsThe following tables provide information on the hardware specifications and thepower characteristics of the Pilot, Controller, and Drive Enclosures.
Dimensions and Weight
Table 3: Pilot dimensions and weight
Attribute Value
Height 1.68 in (4.26 cm)
Width Server chassis (not including ears): 17.19 in (43.65 cm)
Server chassis (with bezel): 18.9 in (48.24 cm)
Depth (notincluding powersupply handles)
29.0 in (73.7 cm)
Weight 40 lb (18.1437 kg): Weight of one Pilot.
Table 4: Controller dimensions and weight
Attribute Value
Height 3.45 in (8.76 cm)
Width 17.52 in (44.55 cm)
Depth 20.25 in (51.435 cm)
Weight 41 lb (18.59 kg)
Oracle FS Systems: Installation Overview
18

Table 5: DE2-24P Drive Enclosure dimensions and weight
Attribute Value
Height 3.46 in (8.79 cm); 2U
Weight (withdrives)
55 lb (24.9 kg)
Width Width across mounting flange: 19 in (48.26 cm)
Width across body of enclosure: 17.44 in (44.29 cm)
Depth 24.8 in (62.99 cm)
Table 6: DE2-24C Drive Enclosure dimensions and weight
Attribute Value
Height 6.92 in (17.57 cm); 4U
Weight (withdrives)
110 lb (49.89 kg)
Width Width across mounting flange: 19 in (48.26 cm)
Width across body of enclosure: 17.44 in (44.29 cm)
Depth 24.8 in (62.99 cm)
Power Characteristics
Table 7: Pilot power characteristics
Powercharacteristic
Value
Frequency 50–60Hz
AC voltage 100–240V
Maximumpowerconsumption forboth nodes
314 VA
Current drawfor both nodes
1.42A, 208V
Oracle FS Systems: Installation Overview
19

Table 7: Pilot power characteristics (continued)
Powercharacteristic
Value
Maximum heatdissipation
1102 BTU/hr
AC receptacletype
IEC 60320 C14 inlet
Table 8: Controller power characteristics
Powercharacteristic
Value
Frequency(nominal)
50–60 Hz (47–63 Hz range)
Voltage(nominal)
100 to 127/200 to 240 Volts AC
Input current(maximum) forboth nodes
13.6 A at 100–120 Volts AC (approximately)
8 A at 200–240 Volts AC (approximately)
Maximumpowerconsumption forboth nodes
874 VA (power at maximum FS1 Controller configuration)
Maximum heatdissipation
2830 BTU/hr
AC receptacletype
IEC 60320 C14 inlet
Oracle FS Systems: Installation Overview
20

Table 9: Drive Enclosure power characteristics
Powercharacteristic
Value
Maximumoutput power
Maximum power consumption depends on the type of DriveEnclosure (DE2-24P or DE2-24C), its size (2U/4U), andconfiguration.
• 4U HDD= 376VA (4TB HDD)
• 2U SFF = 260VA (900GB SFF HDD)
• 2U SSD = 307VA (19 x 1.6TB SSD)
Frequency 50–60 Hz
Voltage range 100–240 Volts AC rated
Maximum rangeselection
47–63 Hz
Maximuminrush current
20A
Power factorcorrection
95% or less at nominal input voltage
Harmonics Meets EN61000-3-2
Operatingtemperature
5° –40° Celsius (41° —104° Fahrenheit)
System Power RequirementsThe total power consumed by the Oracle FS1 Flash Storage System is dependenton the configuration of the system. To determine the system electrical inputratings for Oracle Flash Storage Systems that use the Oracle supported PDUs,refer to the PDU information provided for Oracle Flash Storage Systems.
Oracle Flash Storage Systems require redundant input power feeds for properfault tolerant operation.
Note: Ensure that you have the exact power load and current requirements foryour specific Oracle FS System at hand.
If non-Oracle PDUs are used, you must determine the electrical input ratings ofthe Oracle FS System configuration.
PDU Hardware SpecificationsThe PDUs used in a not-racked Oracle FS System installation must provideredundancy for both external AC power source and internal AC power
Oracle FS Systems: Installation Overview
21

distribution to the components. The PDUs must provide sufficient current tomeet the sum of the requirements for the Oracle FS System components.
Oracle PDUs might be purchased for use with non-Oracle racks. The Oracle FSSystem component power cords have been designed to work with vertical styleOracle or third party PDUs. Non-Oracle PDUs must be compatible with Oraclecomponent power cord lengths and plug types. Non-Oracle PDUs must bemounted in a manner such that the power cords provided by Oracle might beused and the PDUs do not obstruct the ability to replace field replaceable units(FRUs) and customer serviceable units (CRUs).
While planning rack-space, ensure that adequate space is also allocated for thePDUs, if using non-Oracle PDUs.
The following tables provide information on the various PDUs for the Oracle FSSystems, with the assumption that there are two PDUs in each rack.
Note: The term “Ph” stands for “phase” in the above tables.
Table 10: Low voltage dual phase PDU for Oracle Flash Storage Systems
Low Voltage 2Ph (2W + ground)
kVA size 10 kVA
Marketing part number 7104982
Manufacturing part number 7051798
Phase 1 Phase
No grounded neutral conductors areprovided in the two input cords.
Voltage input 2x [2Ph (2W+ground)], 208Vac, 50/60 Hz,maximum. 24A per phase
Can be connected to input sources in therange of 200V – 240V AC (nominal)
Number of input cords and plug type 2x NEMA L6-30P
Number of data center receptacles andtype
2x NEMA L6-30R
Maximum input current for each cord 24A
Outlet receptacles (number/type) 42/C13 (seven for each outlet group)
6/C19 (one for each outlet group)
Oracle FS Systems: Installation Overview
22

Table 10: Low voltage dual phase PDU for Oracle Flash Storage Systems(continued)
Low Voltage 2Ph (2W + ground)
Outlet groups for each PDU 6
PDU power cord length 2 meters (6.6 feet)
PDU power cords are 4 m (13 ft) long, butonly 2 m (6.6 ft) are usable outside of thecabinet.
Table 11: Low voltage three-phase PDU for Oracle Flash Storage Systems
Low Voltage 3Ph (3W + ground)
kVA size 15 kVA
Marketing part number 7104979
Manufacturing part number 7051909
Phase 3
No grounded neutral conductors areprovided in the input cords.
Voltage input 3Ph [(3W+ground)] 208Vac, 50/60 Hz,maximum. 40A per phase
Can be connected to Ph-Ph input sources inthe range of 190V – 220V AC (nominal)
Number of input cords and plug type 1x IEC 309, 60A (Hubbell C460P9W orequivalent)
Number of data center receptacles andtype
1x IEC 309, 60A (Hubbell 460R9S orequivalent)
Maximum input current for each cord 40A
Outlet receptacles (number/type) 42/C13 (seven for each outlet group)
6/C19 (one for each outlet group)
Outlet groups for each PDU 6
PDU power cord length 2 meters (6.6 feet)
PDU power cords are 4 meters (13 feet)long, but sections are connected for internalrouting in the rack.
Oracle FS Systems: Installation Overview
23

Table 12: High voltage single phase PDU for Oracle Flash Storage Systems
High Voltage 1Ph (2W + ground)
kVA size 10 kVA
Marketing part number 7104983
Manufacturing part number 7051801
Phase 1
Voltage input 2x [2Ph. (2W+ground)] 230Vac, 50 Hz,maximum. 25A per phase
Can be connected to Ph-N input sources inthe range of 220V – 240V AC (nominal)
Number of input cords and plug type 2x IEC 309, 32A (Hubbell 332P6S orequivalent)
Number of data center receptacles andtype
2x IEC 309, 32A (Hubbell 332R6S orequivalent)
Maximum input current for each cord 25A
Outlet receptacles (number/type) 42/C13 (seven for each outlet group)
6/C19 (one for each outlet group)
Outlet groups for each PDU 6
PDU power cord length 2 meters (6.6 feet)
PDU power cords are 4 meters (13 feet)long, but sections are connected for internalrouting in the rack.
Table 13: High voltage three-phase PDU for Oracle Flash Storage Systems
High Voltage 3Ph (5W + ground)
kVA size 15 kVA
Marketing part number 7104980
Manufacturing part number 7051915
Phase 3
Oracle FS Systems: Installation Overview
24

Table 13: High voltage three-phase PDU for Oracle Flash Storage Systems(continued)
High Voltage 3Ph (5W + ground)
Voltage input [3Ph. (4W+ground)] 230/400Vac, 50/60 Hz,maximum. 25A per phase
Can be connected to Ph-N input sources inthe range of 220V – 240V AC (nominal)
Number of input cords and plug type 1x IEC 309, 32A (Hubbell 532P6S orequivalent)
Number of data center receptacles andtype
1x IEC 309, 32A (Hubbell 532R6S orequivalent)
Maximum input current for each cord 25A
Outlet receptacles (number/type) 42/C13 (seven for each outlet group)
6/C19 (one for each outlet group)
Outlet groups for each PDU 6
PDU power cord length 2 meters (6.6 feet)
PDU power cords are 4 meters (13 feet)long, but sections are connected for internalrouting in the rack.
Site Preparation ChecklistBefore system installation, complete the tasks outlined in the pre-installationchecklist as part of the site preparation and installation planning. Your OracleSales team can arrange for site audit and installation services.
Table 14: Site preparation checklist
Check Site preparation or pre-installation planning items
Site audit: Prior to system delivery, a site audit must be conducted.
❑ Determine the suitability of access routes to the installation location, suchas carpet, doors, elevators, floor strengths, and ramps.
❑ Determine the load capacity of the floor where the system is to beinstalled.
❑ Verify the cleanliness of the installation site in preparation of theinstallation.
Oracle FS Systems: Installation Overview
25

Table 14: Site preparation checklist (continued)
Check Site preparation or pre-installation planning items
❑ Note any problems or peculiarities at the site that require specialequipment.
❑ Determine if the power circuits are in place with adequate capacity andappropriate power outlet and cord connector types.
❑ Determine if there will be raised floors, where the cabling will be underthe floor. For raised floors, cutout tiles with protected edges will be neededprior to installation.
❑ Determine the environmental conditions at the installation site, includingtemperature and humidity. The operating environment must remainbetween the operating temperatures of 5º— 35º Celsius (41ºF — 95ºF) andthe relative humidity must remain between 10% and 90% non-condensing.Operational altitude is from -200 to 10,000 feet.
❑ Ensure that the installation site provides adequate air conditioning. Tobring the room to the appropriate temperature, operate the airconditioning system for 48 hours prior to the scheduled installation.
Unpacking logistics
❑ Ensure that there is a clear space of 21 feet (6.7 meters) for safely rollingthe racks off the pallet using the supplied ramps.
❑ Determine if there is a standard loading dock or if a truck with a lift gate isrequired. Trucks with a proper lift gate might require special scheduleconsiderations.
Grounding requirements
❑ Determine if all powered racked equipment are properly grounded forproper operation and safety. All power distribution units, branch wiring,and receptacles must be listed as grounding-type devices. Connect eachcomponent and power distribution unit into reliably grounded outlets.
CAUTION: To reduce the risk of electric shock or damage to installedequipment, never disable the grounding plug on any power cord.
Documentation requirements
❑ Check the Oracle FS1-2 Flash Storage System Release Notes and MyOracleSupport (MOS) (https://support.oracle.com/) portal to see if any softwareupdates are available.
Oracle FS Systems: Installation Overview
26

Table 14: Site preparation checklist (continued)
Check Site preparation or pre-installation planning items
❑ Check the Oracle Technology Network (OTN) (http://www.oracle.com/technetwork/documentation/oracle-unified-ss-193371.html) for all relevantdocumentation:
• For instructions on system unpacking, installation, and initialconfiguration, refer to this guide.
• For instructions on installing software updates, refer to theOracle FS1-2 Flash Storage System Release Notes and to theOracle Flash Storage System Administrator’s Guide.
• For instructions on configuring the system, refer to the OracleFlash Storage System Administrator’s Guide.
• For instruction on servicing the replaceable units within thesystem, refer to the Oracle FS1-2 Flash Storage System FieldService Guide.
Data path interface requirements
❑ Ensure that data path interfaces or connectors meet Oracle specificationsand speed requirements.
Network connectivity requirements
❑ Two 1 Gb or 10 Gb Ethernet network cables, one for each Pilot to enablePilot connectivity to the management network.
❑ Obtain three IP addresses for the Pilot management interfaces. The sharedIP address may be assigned using DHCP. The address for each Pilot maynot be assigned using DHCP. DNS hostnames for the Pilot managementinterfaces are optional, but recommended. The standard Pilotconfiguration or the Oracle FS System factory default IP addresses are asfollows:
• Shared IP: 10.0.0.2• Pilot–1: 10.0.0.3• Pilot–2: 10.0.0.4• Gateway: 10.0.0.1• Netmask: 255.255.255.0
Note: If the installer gets three replacement IP addresses, then thosereplacement IP addresses must be used instead of the factory default IPaddresses.
Global system parameters
Oracle FS Systems: Installation Overview
27

Table 14: Site preparation checklist (continued)
Check Site preparation or pre-installation planning items
❑ The Oracle FS System defaults to the correct Call-Home connectionparameters and IP addresses, if it uses a direct connection to the Oracleservers. If you are using a Proxy server, the information on the Call-Homeconnection parameters and IP addresses comes from the local network andfirewall administrators. Get the Call-Home configuration modes from thesite network and/or firewall administrators.
❑ Get the operating mode of the management Ethernet: auto-negotiation, ormanual speed and duplex.
❑ Configure the DNS server and backup DNS server for Call-Home.
❑ Set the IP address of your primary NTP server for synchronizing systemtime. This is recommended for SAN and required for NAS.
❑ Configure an email server for password recovery and optionally forsending e-mail notifications.
❑ Configure SNMP servers for traps and monitoring.
Oracle FS System Manager GUI access
❑ Ensure that you have the default customer login and the default supportlogin.
❑ Download and install the GUI or the command line interface (CLI) or bothfrom http://system-name-ip, where system-name-ip is the name or thepublic IP address of your system.
❑ If a UPS is being used, get the IP address of the UPS device and the UPSSNMP community string.
SAN storage parameters
❑ Understand enough about SANs to specify capacity, type of redundancy,priority over other volumes, random or sequential file access, read or writeI/O bias, and Clone LUN space requirements.
Unpacking SystemsRacked Oracle FS Systems are shipped to the customer site with all components(Controllers, Pilots, and Drive Enclosures) and internal cables fully assembledand integrated into the rack. A fork lift must be used to move the shipping palletto the specified site in the data center.
The shipping pallet is designed so that the rack can only be unloaded in onedirection. Orient the shipping container so that the label RAMPS ATTACH THISSIDE is off-loaded from the pallet. When you roll the rack off the shipping pallet,
Oracle FS Systems: Installation Overview
28

you will need a total distance of at least 15 feet or 4.5 meters for safemaneuvering.
Note: The fork lift must only be used on the specified side of the shipping palletto avoid causing damage to the system.
You can unpack the contents of the pallet following the rack unpackinginstructions that is located in the packaging. Unpack the cartons carefully anddispose the packaging materials. Remove the system record, packing list, andother instructional documents from the cartons and keep them aside forreference.
The following tools are included in the shipping pallet:
• 13 mm and 17 mm combination open end wrench
• 19 mm open end wrench
Oracle FS Systems that use the X5-2 Pilots and have a gap of one rack unit (RU)or more, will have a 1 RU cable trough (PN: 7098533) installed directly below thebottom Pilot. The cable trough provides support to the bottom Pilot duringtransportation to the customer’s facility and can be removed or left in place afterthe racked system is installed at the customer data center.
The following diagram shows an Oracle FS System configuration with a cabletrough that is located at RU 20 in the rack.
Oracle FS Systems: Installation Overview
29

Figure 3: Cable trough location in the Oracle FS System
Legend 1 Cable trough long lip that is secured underthe bottom Pilot
3 Trough section that facesthe back of the rack
2 M6 cage nuts and M6 Phillips screws thatsecure the cable trough
4 Cable trough
The cable trough device is installed on the rear vertical rails with the long lipbelow the Pilot. The shorter trough section faces the back of the rack. A 1U fillerpanel is installed in the front of the rack in the same RU location as the cabletrough. To remove the cable trough from the rack, unscrew the four M6 cage nutsand the four M6 Phillips screws that secure the cable trough to the rear verticalrails of the Pilot.
Note: Make sure that you verify all the components against the packing list thatis pasted on the container.
Oracle FS Systems: Installation Overview
30

Tip: Check the packing materials to verify that you have retrieved all the smallparts before recycling.
CAUTION: The maximum weight of the racked storage system is 1970 lb (894 kg).Three people are required to off-load the rack: two at the front and one at theback.
Related LinksRacked SystemsElectrostatic Discharge PrecautionsWarnings and CautionsRequired Tools
Required ToolsBefore starting the installation of an Oracle Flash Storage System, be sure youhave the required equipment and tools available.
Table 15: Required toolsTool Purpose IllustrationNumber 1 and Number 2Phillips-head screwdrivers
Remove and secure OracleFlash Storage Systemhardware components.
Offset box wrench, 13/32inches
Work with adjustablemounting rail assemblies.
Torx® T20 screwdriver Attach rail assemblies andsecure hardwarecomponents to the rails.
Torx® T30 screwdriver Connect two racks.
Wire cutters Cut cable wraps on thepower cords.
Cable management rings(included)
Route cables.
Warnings and CautionsHazard signal words conform to the American National Standards Institute(ANSI) Z535.4-2002 meanings.
CAUTION: Indicates a potentially hazardous situation that, if not avoided, mayresult in minor or moderate injury.
Oracle FS Systems: Installation Overview
31

DANGER: Indicates an imminently hazardous situation that, if not avoided, willresult in death or serious injury.
Tip: To indicate best practices for a process.
Important: To emphasize a point, to remind you of something, or to indicatepotential problems in the outcome of the in-process task.
Electrostatic Discharge PrecautionsCAUTION: Before you handle a component, make sure that you have takenelectrostatic discharge (ESD) precautions:
• The minimum requirement is an anti-static wrist strap connected to a hardground. Remove components from their packaging and place them on anESD-qualified table that is equipped with ground points for wrist straps.
• Static charges can build up rapidly on rolling carts. If you transport ahardware component by cart, ground the cart with a drag chain on an ESDfloor. If there is no ESD cart available or ESD floor, ground yourself beforeyou touch a component that has been transported on a cart.
Multiple Rack SystemsMultiple-rack systems might require removal of the side panels between theadjacent racks to allow cables to be routed between the racks. Refer to the rackvendor’s documentation for more information.
Use a mini-SAS to mini-SAS HD cable (19.69 feet/6m) to connect a Controller inone rack to a Drive Enclosure in another rack.
Use a mini-SAS to mini-SAS cable (19.69 feet/6m) to connect a Drive Enclosure inone rack to a Drive Enclosure of the same string in another rack.
The following figure shows a wiring diagram for cabling a Controller in one rackto a Drive Enclosure in another rack.
Oracle FS Systems: Installation Overview
32

Figure 4: Controller-to-Drive Enclosure cabling between two racks
Legend 1 Back of a rack 3 Cable Management Arm (CMA)
2 Controller 4 Drive Enclosure
WWnN and System Serial Number LabelsThe system serial number (SSN) labels and the Controller World Wide NodeNumber (WWnN) labels are on the Oracle FS System to facilitate systemidentification.
Figure 5: WWnN label
Following is a representation of the SSN label that contains the system serialnumber and the Oracle part number of the Oracle FS System.
Oracle FS Systems: Installation Overview
33

Figure 6: SSN label
Oracle FS Systems: Installation Overview
34

CHAPTER 2
Oracle FS Systems: Cabling Overview
Cabling an Oracle FS SystemThe modular design of an Oracle FS System provides a highly scalable storagefacility. You achieve scalability by deploying a collection of specializedsubsystems that are connected by external cables and internal cables to create asystem.
External cablingExternal cabling involves the following types of cabling:
• External Ethernet cabling connects the Pilots to the customer’smanagement network.
• Fibre channel (FC) cabling connects the Controllers to the customer’s SAN-based data paths.
• Power cables provide the AC power feed between the main power supplyand the Oracle FS System.
Internal cablingInternal cabling of a system is completed during the manufacturing process.
Internal cabling involves the following types of cabling:
• Ethernet cabling between the Pilot nodes and the Controller nodesprovides the private management interface (PMI) messaging.
• Serial cross-connect cabling between the Pilot nodes provides a backupheartbeat path.
• SAS cabling between the Controller nodes provides the paths for cachemirroring and redundant SAS data paths through the partner Controller tothe Drive Enclosures.
• SAS cabling from the Controller nodes to the Drive Enclosures supportsthe Backend SAS Interconnect.
• SAS cabling among the Drive Enclosures extends the internal fabric to theDrive Enclosures.
• Power cords from the hardware components to the power distributionunits (PDUs) provide load balancing among the outlet groups.
35

Multiple rack cablingFor multiple rack systems, SAS cabling connects the hardware componentsacross the multiple racks.
System expansion cablingFor system expansion, SAS cabling connects the added Drive Enclosures to thesystem.
Related LinksConnections to the Customer Data NetworkMultiple Rack SystemsBuild Map for Your Oracle FS SystemTypes of External Cables
Cabling WorkflowA high-level workflow helps guide the process of cabling an Oracle FS System.
Note: Do not connect the system to the customer network until the initialconfiguration of the management interface is completed.
After the system is unpacked and mechanically setup, cable it. The followingfigure shows a high-level workflow sequence for cabling a system:
Oracle FS Systems: Cabling Overview
36
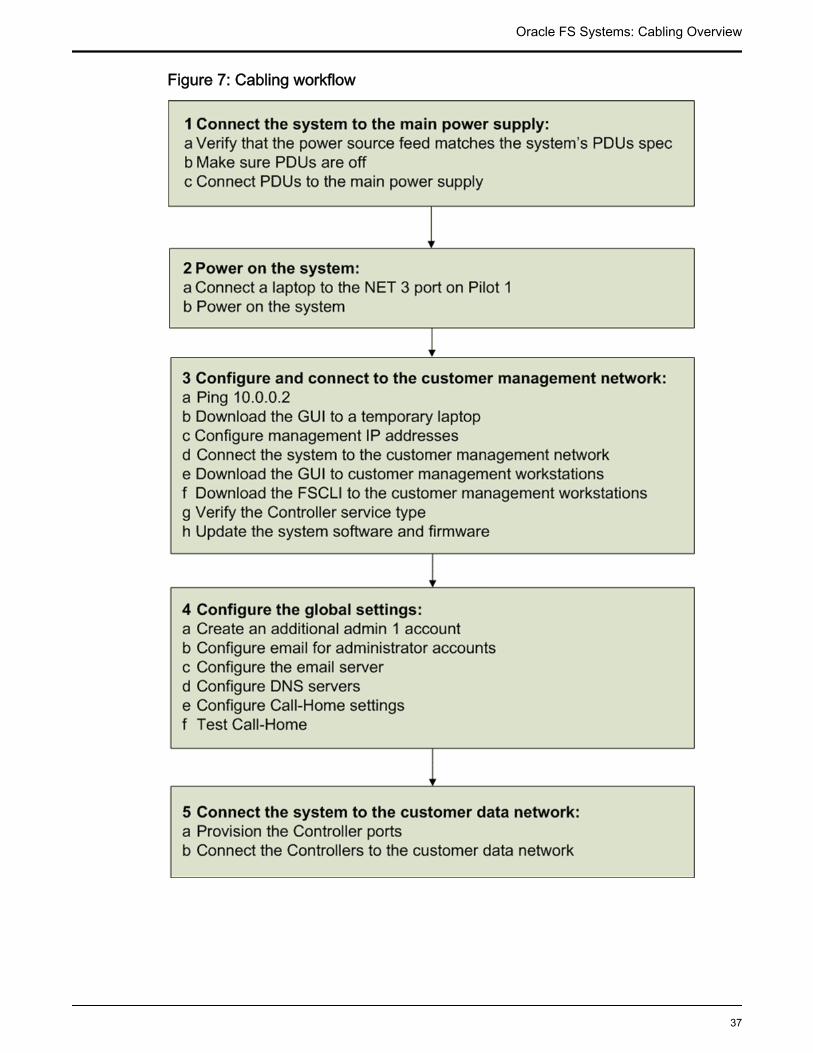
Figure 7: Cabling workflow
Oracle FS Systems: Cabling Overview
37

Related LinksConnections to the Customer Data NetworkPower On the SystemConfigure the Management IP AddressesConfigure Global Settings
Oracle FS System ConfigurationsAn Oracle FS System can be configured as a base system or as a performancesystem.
The following table summarizes the Oracle FS System configurations.
Table 16: Oracle FS System configurationsConfiguration SAS HBAs Number of Drive
Enclosures
Base Factory configuration of one SASHBA for each Controller. The SASHBA is installed in PCIe slot 3.
Maximum of 10 DriveEnclosures assigned to oneor two strings.
Base Factory configuration of two SASHBAs for each Controller. The SASHBAs are installed in PCIe slot 3and PCIe slot 6.
Maximum of 20 DriveEnclosures assigned to oneto four strings.
Performance Factory configuration of three SASHBAs for each Controller. The SASHBAs are installed in PCIe slots 3, 6,and 2.
Maximum of 30 DriveEnclosures assigned to oneto six strings.
Pilot CablingExternal cabling of the Pilot nodes connects the Oracle FS System to the customermanagement network. Internal cabling provides the private managementinterface (PMI) to support the internal private management protocol used for theinternal functioning of the system.
Pilot Port for External CablingThe following figure shows the external Ethernet port.
Figure 8: Pilot port for external cabling
Oracle FS Systems: Cabling Overview
38

Legend 1 NET 3 port connects the Pilot nodes to the customer managementnetwork (Ethernet).
Pilot Ports for Internal CablingThe following figure shows the internal Ethernet ports and the serial port.
Figure 9: Pilot ports for internal cabling
Legend 1 NET MGT port connects to theNET 2 port on the partner Pilotnode (Ethernet).
4 NET 1 port connects to the NET 3port on the Controller node (Ethernet).
2 SER MGT port connects the SERMGT port on the partner Pilotnode (serial).
5 NET 0 port connects to the NET 0port on the partner Pilot node(Ethernet).
3 NET 2 port connects to the NETMGT port on the partner Pilotnode (Ethernet).
Controller CablingExternal cabling for the Controllers provides the interface to the customer datanetwork. Internal cabling supports the private management interface (PMI) andthe Backend SAS Interconnect.
Controller Ports for External CablingThe following figure shows the SAN HBA ports.
Figure 10: Controller ports for external cabling
Oracle FS Systems: Cabling Overview
39

Legend 1 SAN HBA ports connect the system to the customer data network (FConly)
Controller Ports for Internal CablingThe following figure shows the internal Ethernet ports and the SAS ports.
Figure 11: Controller ports for internal cabling
Legend 1 NET MGT port connectsto the cluster interconnectport on the partnerController (Ethernet).
4 NET 2 port connects to the NET 2 port onthe partner Controller(Ethernet).
2 Cluster interconnectnetwork port connects tothe NET MGT port on thepartner Controller(Ethernet). The clusterinterconnect network port islabeled as <- - ->.
5 SAS HBA ports connect between theControllers and connect the Controllers tothe Drive Enclosures (SAS).
3 NET 3 port connects to theNET 1 port on the Pilotnode (Ethernet).
Drive Enclosure CablingEach I/O module on a Drive Enclosure has three SAS ports. The SAS portsprovide the interconnection between the Drive Enclosures and the Controllers.The SAS ports also provide the interconnections between Drive Enclosures.
DE2-24P Drive EnclosuresThe following figure shows the SAS ports of a DE2-24P Drive Enclosure. Notethe position of the SAS ports and the reverse orientation of the two I/O modules.
Oracle FS Systems: Cabling Overview
40

Remember the orientation of the I/O modules and the location of the SAS portsas you cable the system.
Figure 12: SAS ports for Drive Enclosure cabling (DE2-24P)
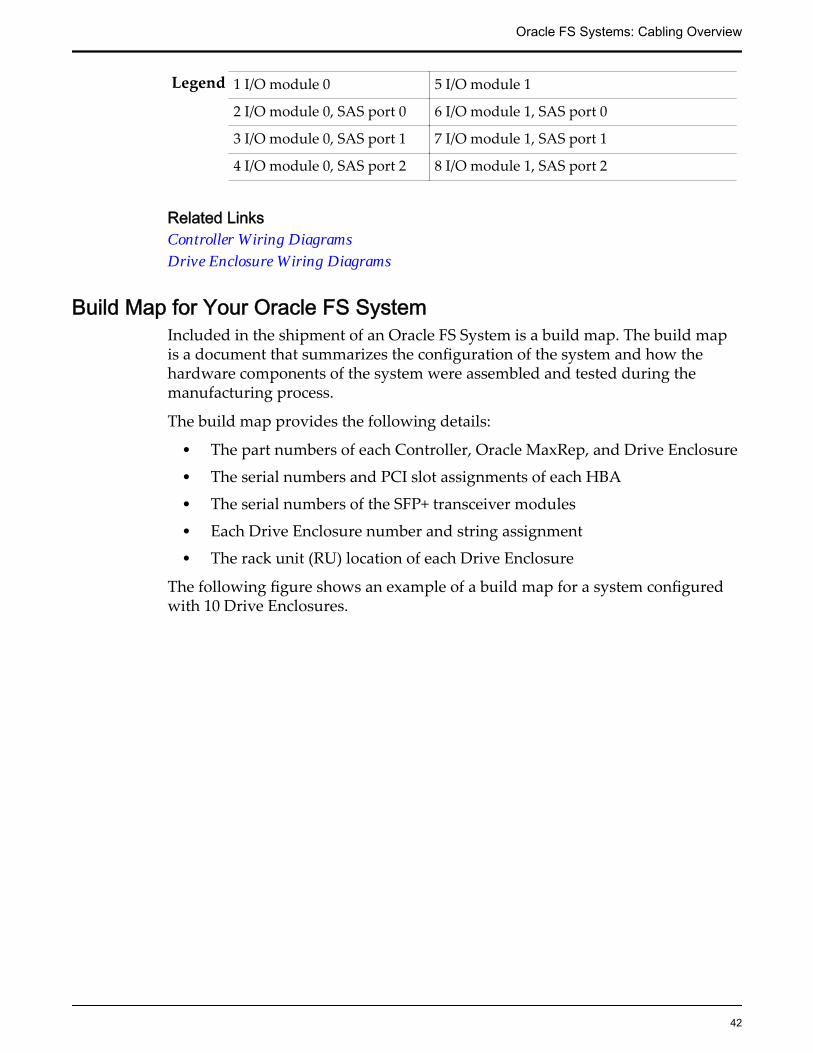
Legend 1 I/O module 0 5 I/O module 1
2 I/O module 0, SAS port 0 6 I/O module 1, SAS port 0
3 I/O module 0, SAS port 1 7 I/O module 1, SAS port 1
4 I/O module 0, SAS port 2 8 I/O module 1, SAS port 2
DE2-24C Drive EnclosuresThe following figure shows the SAS ports of a DE2-24C Drive Enclosure. Notethe position of the SAS ports and the identical orientation of the two I/Omodules. Remember the orientation of the I/O modules and the location of theSAS ports as you cable the system.
Figure 13: SAS ports for Drive Enclosure cabling (DE2-24C)
Oracle FS Systems: Cabling Overview
41
Legend 1 I/O module 0 5 I/O module 1
2 I/O module 0, SAS port 0 6 I/O module 1, SAS port 0
3 I/O module 0, SAS port 1 7 I/O module 1, SAS port 1
4 I/O module 0, SAS port 2 8 I/O module 1, SAS port 2
Related LinksController Wiring DiagramsDrive Enclosure Wiring Diagrams
Build Map for Your Oracle FS SystemIncluded in the shipment of an Oracle FS System is a build map. The build mapis a document that summarizes the configuration of the system and how thehardware components of the system were assembled and tested during themanufacturing process.
The build map provides the following details:
• The part numbers of each Controller, Oracle MaxRep, and Drive Enclosure
• The serial numbers and PCI slot assignments of each HBA
• The serial numbers of the SFP+ transceiver modules
• Each Drive Enclosure number and string assignment
• The rack unit (RU) location of each Drive Enclosure
The following figure shows an example of a build map for a system configuredwith 10 Drive Enclosures.
Oracle FS Systems: Cabling Overview
42

Figure 14: Build map
Oracle FS Systems: Cabling Overview
43

CHAPTER 3
Oracle FS System Cables
Types of External CablesCustomers must supply their own Ethernet cables for connecting the Pilots to thecustomer management network and for connecting the Controllers to thecustomer data network. Oracle has no cable color requirements for connectingthe Oracle FS System to the customer network.
Pilot External CablesPilot external cables provide the management connections. Ethernet CAT6acables connect from the NET 3 ports on the Pilot nodes to the customermanagement network. The connections to the customer management networkmust be to a highly available switch.
Controller External CablesController external cables provide the connections for the host data path. Opticalcables connect the SAN HBA ports on the Controller to the customer datanetwork. Each connection requires an HBA and a specific SFP to provide theinterface option.
The following table provides the part number and description of the SAN HBAs.
Table 17: SAN HBA
Part number Description
7101673 Sun Storage 16Gb Fibre Channel PCIe Universal HBA,Qlogic, factory configure
The following table lists the SFP options.
Table 18: HBA options with SFPs
SFP option SFP manufacturing partnumber
Description
16Gbs FC Optic SR 7023325 Used for fibre channelnetworks (includes one pairof SFPs)
44

The SAN HBA ports on the Controller connect to SAN switches using opticalcables (FC) of specified lengths.
The following table summarizes the length limits for the optical cables thatconnect to the Controller SAN ports:
Table 19: Cable length limits for FC configurations
Speed OM1 OM2 OM3 OM4
8 Gb/s 68.89 feet (21meters)
164.042 feet (50meters)
492.126 feet (150meters)
623.36 feet (190meters)
16 Gb/s 49.21 feet (15meters)
114 .89 feet (35meters)
328.084 feet (100meters)
410.105 feet (125meters)
Related LinksConnections to the Customer Data NetworkConnect to the Customer Management NetworkConnect to the Customer Data NetworkHandling and Care of Fiber Optic Cables
Types of Internal CablesThe types of internal cables for the Oracle FS System are summarized in thesections below.
Note: If you require additional internal cables, you can order them from Oracle.To find the cable part numbers for ordering purposes, open Oracle SystemHandbook (https://support.oracle.com/handbook_partner/index.html) and go tothe Oracle FS1 Flash Storage System components list. Part numbers are listed inthe components list.
Private Management Network CablesThe following table lists the types of internal cables and the cable lengths that areused for the Private Management Network.
Oracle FS System Cables
45

Table 20: Private management network cables
Cable Color Cable path Cablelength
Quantity Example
EthernetCAT6a
Blue Connects the Pilot 1NET 0 port to the Pilot2 NET 0 port
Connects the Pilot 1NET 2 port to the Pilot2 NET MGT port
Connects the Pilot 1NET MGT port to thePilot 2 NET 2 port
9.84 feet
(3 m)
Three
SerialRJ45rollover
Black Connects the Pilot 1SER MGT port to thePilot 2 SER MGT port
6.6 feet
(2 m)
One
EthernetCAT6a
Red Connects the NET 1ports of the Pilots tothe NET 3 ports of theControllers
9.84 feet
(3 m)
Two
EthernetCAT6a
Green Connects theController 1 NET 2port to the Controller 2NET 2 port
Connects theController 1 NET MGTport to the clusterinterconnect (< - - - >)port of Controller 2
Connects the clusterinterconnect (<- - ->) port of Controller 1to the Controller 2NET MGT port
9.84 feet
(3 m)
Three
Oracle FS System Cables
46

SAS Cables for Connecting the ControllersThe following table lists the type of mini-SAS high density (HD) cable and cablelength used to cross-connect the Controllers.
Table 21: Mini-SAS HD cables
Cable Color Cable path Quantity Cable length
Mini-SAS HD tomini-SAS HD
Black Connects Controller1 to Controller 2
Two for a basesystem with oneSAS HBA installed
Four for a basesystem with twoSAS HBAsinstalled
Six for aperformancesystem
9.84 feet
(3 m)
The following figure shows an example of mini-SAS HD to mini-SAS HD cableconnectors.
Figure 15: Example of mini-SAS HD to mini-SAS HD cable connectors
SAS Cables for Drive Enclosure-to-Controller ConnectionsThe following table lists the types of mini-SAS to mini-SAS HD cables and thelengths of the cables used to connect Drive Enclosures to Controllers.
Oracle FS System Cables
47

Table 22: Mini-SAS to mini-SAS HD cables
Cable Color Cable path Quantity Cablelength
Mini-SAS tomini-SAS HD
Black Connects aController to a DriveEnclosure in thesame rack
Varies based on theconfiguration of thesystem
9.84 feet
(3 m)
Mini-SAS tomini-SAS HD
Black Connects aController to a DriveEnclosure that is in aseparate rack
Varies based on theconfiguration of thesystem
19.69feet
(6 m)
The following figure shows an example of mini-SAS to mini-SAS HD cableconnectors. The mini-SAS connector on one end of the cable connects to theDrive Enclosure. The mini-SAS HD connector on the other end of the cableconnects to the Controller.
Figure 16: Example of mini-SAS to mini-SAS HD cable connectors
Legend 1 Mini-SAS connector 2 Mini-SAS HD connector
SAS Cables for Drive Enclosure-to-Drive Enclosure ConnectionsThe following table lists the types of mini-SAS cables and the lengths used tocross connect Drive Enclosures.
Oracle FS System Cables
48

Table 23: Mini-SAS to mini-SAS cables
Cable Color Cable path Quantity Cablelength
Mini-SAS tomini-SAS
Black Connects a DriveEnclosure to anotherDrive Enclosure of thesame string in the samerack
Varies based ontheconfiguration ofthe system
9.84 feet
(3 m)
Mini-SAS tomini-SAS
Black Connects a DriveEnclosure to anotherDrive Enclosure of thesame string in separateracks
Varies based ontheconfiguration ofthe system
19.69
(6 m)
The following figure shows an example of mini-SAS to mini-SAS cableconnectors.
Figure 17: Example of mini-SAS to mini-SAS cable connectors
Internal Power CordsThe following table lists the types of power cords and lengths of power cordsthat connect the hardware components to the power distribution units (PDUs).
Note: The references to PDU 1 and PDU 2 in the following table indicate that theconnections are to be made to separate PDUs connected to separate externalpower sources for system redundancy. The actual number of PDUs in a systemcan vary.
Oracle FS System Cables
49

Table 24: Power cords and PDU connections
Cable Color Cable path Quantity Cablelength
Power (C13to C14 angledconnector)
Black Connects power coolingmodule 1 of a DriveEnclosure to PDU 1
Connects power coolingmodule 2 of a DriveEnclosure to PDU 2
Varies based onthe configurationof the system
3.28 feet
(1 m)
Power (C13to C14straightconnectors)
Black Connects power supply 1of a Pilot to PDU 1
Connects power supply 2of a Pilot to PDU 2
Connects power supply 1of a Controller to PDU 1
Connects power supply 2of a Controller to PDU 2
Connects power supply 1of a MaxRep ReplicationEngine to PDU 1
Connects power supply 2of a MaxRep ReplicationEngine to PDU 2
Varies based onthe configurationof the system
9.84 feet
(3 m)
Figure 18: Example of a power cord with C13 to C14 angled connectors
Related LinksMultiple Rack Systems
Oracle FS System Cables
50

Cable LabelsThe SAS cables and the internal Ethernet cables provided with the Oracle FSSystem have labels attached at both ends. The labels designate the hardwarecomponent and the corresponding port to which the cable connects.
The following figure provides an example of a label attached to an internalEthernet cable. One end of the cable connects to the cluster interconnect networkport (<- - - >) on Controller 1. The other end of the cable connects to the NETMGT port on Controller 2.
Figure 19: Example of a cable label for an internal Ethernet cable
Legend 1 Controller 1 3 Controller 2
2 Cluster interconnect networkport (labeled as < - - - >)
4 NET MGT port
Handling and Care of Fiber Optic CablesFiber optic cables are delicate and can easily be damaged when you disconnectthe cables from the connectors. Fiber optic cables are also sensitive to dirt and tocontaminants.
Follow these tips when handling fiber optic cables:
• Do not bend the fiber optic cable beyond its minimum bend radius (MBR).The MBR can be expressed by multiplying 10 by the diameter of the fiberoptic cable with the cable not in tension.
• Do not use force or rock the connector from side-to-side or up and down toremove the connector because this action can damage the socket.
• Do not pull the cables using a mechanical device. If you need to pull acable, pull the cable manually.
• Do not pull the cables tight when dressing the cables. Leave some slack inthe cables.
• Do not use tie wraps or any other crimping style of wrap on high speedcables (optical or copper) because they can crimp the cable insulation andcause data transmission problems. Only use Velcro strips to tie cables.
• Do not push or step on a fiber optic cable or fiber optic connector.
• Do not set any hardware components or other objects on top of the cables.
Oracle FS System Cables
51

• Do not let the cables get pinched by closed doors or by door lockhardware.
• Do not twist the cable to secure the ends.
• Do not wrap the fiber optic cables around your hands, your arms, or yourshoulders, which can cause sharp bends or a small coiling radius.
• Use the cable management arms (CMAs) so that the cables do not blockaccess for replacing Oracle FS System components.
• Use both hands to disconnect the connector in a module. Do not disturb ordeflect other plugs or cables during the removal operation.
CAUTION: To disconnect the cables from the SFP connectors, carefully grasp thecable connector and, while pushing the connector gently into the socket, pressthe latch on the bottom of the connector to unlatch it. Then, gently pull theconnector straight out to release the connector with the cable
Follow these tips to clean fiber optic cables.
• Keep the end caps of the plugs installed whenever the plug is not installed.
• Have a fiber optic cable cleaning kit available while handling fiber opticcables.
A fiber optic cable cleaning kit includes the following items:
• Lint-free wipes
• Isopropyl alcohol (IPA)
• Special fiber optic cleaning swabs
• Canned pressurized air
Routing CablesProper routing of cables allows for maintenance of the Oracle FS System withoutthe need to remove the cables. Routing cables properly also helps preventdamage to the Oracle FS System components during maintenance.
All of the Pilot and the Controller cables, as well as the power cords, routethrough the cable management arms (CMAs). Routing cables through the CMAshelps assure clear access to all of the replaceable units inside of the chassis afterthe cover is removed.
Each CMA has Velcro straps and three latching bails that secure the cables. Routecables through the CMAs so that the chassis can be extended into the serviceposition without interference from the cables. If you cannot extend the chassisinto the service position, you will not be able to access the field replaceable units(FRUs) and customer replaceable units (CRUs) inside of the chassis. Additionally,if the cables become snagged while a chassis is extended into the service position,damage to the motherboard can occur.
Oracle FS System Cables
52

The following figure shows an example of the cables routed through a ControllerCMA.
Figure 20: Controller cables routed through the CMA
Legend 1 Back of a Controller 3 CMA
2 Controller cables
The following figure shows an example of the cables routed through a PilotCMA.
Figure 21: Pilot cables routed through the CMA
Oracle FS System Cables
53

Legend 1 Back of a Pilot 3 CMA
2 Pilot cables
Oracle FS System Cables
54

CHAPTER 4
System Power
Power Distribution UnitsThe standard oracle 42 unit (RU) rack uses pre-installed vertical powerdistribution units (PDUs).
Vertical PDUs allow the 42 RU space in the rack to be used for installing systemcomponents. PDUs are always used in pairs. Each power distribution unit (PDU)must be attached to a dedicated facility circuit. Each Oracle FS Systemcomponent (Pilots, Controllers, and Drive Enclosures) must have its powersupplies connected to separate PDU circuits to ensure complete redundancy ofpower.
Related LinksPDU Outlet Amperage Ratings
PDU Outlet Amperage RatingsPlug in the Oracle FS System components (Pilots, Controllers, and DriveEnclosures), into the PDUs so that they do not exceed the amperage rating of anyoutlet group. Exceeding the amperage rating, can trip the circuit breakers.
The requirements of Underwriters Laboratories (UL) limit the power draw toapproximately 80% of the circuit breaker rating. For example: In the UnitedStates where the voltage supply is at 240V, the power in a 30A circuit is 24A.Thus the power available for use is 80% of the total amperage rating of thecircuit. The International Electrotechnical Commission (IEC) uses a system wherethe exact available power is listed as the circuit breaker rating. For example: InEurope, where the voltage supply is at 230V, the power in a 24A circuit is 24A.
For data centers with an input main power of 208V (single-phase from thebuilding), the amperes drawn increases by roughly 15% over a 240V service.
All PDUs have a remote monitoring capability that allows monitoring the currentconsumption locally using an operator accessible meter and function switch orremotely through a network connection. The monitor measures consumption oneach phase or inlet circuit attached to the PDU.
Note: The LED display on the PDU is powered by power input 0. The LEDdisplay on the PDU might not power up if only one power input is used becausethe PDU might use the connector on input 1.
55

Alternately, you can use a voltmeter to verify the voltage of the available power.The Oracle vertical PDUs support multiple ranges of voltage, and the currentrating on the PDU circuit breakers vary with the external available power. Theexternal available power determines the number of Oracle FS Systemcomponents that can be connected to the PDU port groups or circuit breakers(CB). If the voltage of the input power into the PDU is lower than the nominalrating of the PDU, the current rating on the circuit breakers is decreased tocompensate for the lower voltage of the available power.
Important: Oracle strongly recommends that you use vertical PDUs pre-installedin Oracle racks. If you install non-Oracle PDUs, they must meet the PDUspecification described in the hardware specifications appendix.
Connect the Power Cables to the Power SupplyOracle racks have pre-installed vertical PDUs. Also, power cables that connect tothe main power supply are shipped with Oracle racks.
Before connecting the power cables, evaluate the following conditions at yourdata center:
• Verify whether the power supply source is located overhead or through thefloor below. The location of the main power source determines the routingof the power cables in the rack.
• Review the Oracle FS System power requirements.
In an Oracle rack, the main power cables are secured at the two lower anchorpoints in the PDU at the factory and the excess cabling is spooled in the bottomof the rack to enable access to the components. The final routing of the mainpower cables is based on whether the source of the main power supply at thedata center is overhead or through the floor.
If the main power supply is overhead, disconnect the main power cable from theanchor points in the back of the rack. Instead, route the power cables up over theracks and behind the PDUs using the anchor points in the middle of the rack.
Tip: Neatly secure the main power cables with strong tie wraps and cablemanagement hooks. Ensure that there is no interference with any other Oracle FSSystem cable or component. Arrange the excess power cables in the cable troughsabove the rack.
Note: If the main power supply is through the data center floor, spool the excesscable at the base of the rack or on the floor. If the main power supply is overhead,spool the excess cable in the troughs above the system. The main power cablesmust never hang in front of the components.
CAUTION: Be sure to maintain reliable grounding of racked equipment. Giveparticular attention to supply connections other than direct connections to thebranch circuit, such as connections to power strips.
System Power
56

1 Review the Oracle FS System power requirements.
2 Review the information about power cabling and verify that your PDUsmeet the electrical requirements.
3 Disconnect the power cable from the factory designated anchor point andsecure it to an anchor point behind the PDU, midway in the rack.
4 Route the power cables securely. Routing and securing power cableswithin the rack is essential to prevent damage due to loose or overhangingcables. Routing the cables is also required for easy access and servicing ofthe Oracle FS System components (Pilots, Controllers, and DriveEnclosures).
Note: The power cables connecting the Oracle FS System to the mainpower supply in the data center are routed based on whether the source ofthe main power supply in the data center is located overhead or located atthe floor level.
5 Secure the power cables to the rack such that they do not restrict theremoval of any other component.
Important: Do not turn on any power circuits until the installation iscomplete and all network cables are in place.
CAUTION: Apply power to the Pilot only after all appropriate Ethernetcables and the CAT6a Ethernet cables are connected between the twoPilots.
Single-Phase PDU CablingThe following table lists the specifications for single-phase power distributionunits (PDUs) in various countries:
Table 25: Single-phase PDUsSingle-phasePDUs
North America, South America,Japan, and Taiwan
EMEA
Rack locationVertical rack-mounted PDUs thatoccupy no rack unit (RU) space.
Vertical rack-mounted PDUsthat occupy no rack unit (RU)space.
Inlet circuits Each PDU has two 30A (de-ratedto 24A) inlet circuits. The inletplug style is NEMA L6-30.
Each PDU has two 25A inletcircuits. The inlet plug style isIEC309.
AC voltage Each PDU supports AC voltagelevels 200 – 240VAC at 50/60Hz.
Each PDU supports AC voltagelevels from 200 – 240VAC at50/60Hz.
Power Each PDU can supply 10KW ofpower when both power cablesare connected.
Each PDU can supply 10KW ofpower when both power cablesare connected.
System Power
57

Table 25: Single-phase PDUs (continued)Single-phasePDUs
North America, South America,Japan, and Taiwan
EMEA
Outlet groups All PDUs have 42 outlets arrangedin six groups of seven outlets.
All PDUs have 42 outletsarranged in six groups of sevenoutlets.
Receptacles All 42 outlets are IEC60320 C13style receptacles. The C13receptacle can supply 10A.
Note: If two outlets are configuredto draw 10A each, the remainingfive outlets in the group cannot beused.
All 42 outlets are IEC60320 C13style receptacles. The C13receptacle can supply 10A.
Note: If two outlets areconfigured to draw 10A each,the remaining five outlets in thegroup cannot be used.
Circuit breaker Each group of seven outlets have a20A rated circuit breaker that canbe re-set.
Each group of seven outlets havea 20A rated circuit breaker thatcan be re-set.
The following figure shows the outlet groups for single-phase PDUs.
Figure 22: Single phase PDU outlet groups
Legend 1 AC inlet circuit P1 supplies groups 0,1, and 2
2 AC inlet circuit P2 supplies groups 3,4, and 5
3 Current is monitored across both AC inlet circuits
System Power
58

4 Group of seven outlets has its own 20 A circuit breaker that can be re-set
Related LinksWiring Diagram: Single-Phase PDU
Wiring Diagram: Single-Phase PDUThe wiring diagram for cabling a single-phase power distribution unit (PDU)shows power cord connections between the PDUs and the Oracle FS Systemcomponents that are load balanced between the PDU outlet groups.
The wiring diagrams for PDU cabling and the current load shown isrepresentative and includes Drive Enclosures, two Controllers, and two Pilots.Different component configurations within an Oracle FS System providedifferent results. For example, Drive Enclosures with SSDs have a lower powerusage than Drive Enclosures with HDDs.
The wiring diagram illustrates the cabling of a single PDU. The secondredundant PDU must be cabled identically. Cable connections to the PDU mustbe managed so that no outlet group exceeds 20A. The PDU groupings arereversed from one side to the other. From the back of the system, the PDU on theright are grouped 0 to 5 from the top of the rack to the bottom. The PDUs on theleft are grouped 5 to 0 from the top of the rack to the bottom.
System Power
59

Figure 23: Wiring Diagram: Single-phase PDU cabling
Related LinksSingle-Phase PDU Cabling
System Power
60

Three-Phase PDU CablingThe following table lists the specifications for three-phase power distributionsunits (PDUs) in various countries.
Table 26: Three-phase PDUsThree-phasePDUs
North America, South America,Japan, and Taiwan
EMEA
Rack locationVertical rack-mounted PDUs thatoccupy no rack unit (RU) space.
Vertical rack-mounted PDUs thatoccupy no RU space.
Inlet circuits Each PDU has one 60 A inletcircuit. Each phase supplies amaximum of 40 A. Output is 23 A(maximum) for each phase.
Each PDU must have one 60 Ainlet circuit. Each phase suppliesa maximum of 40 A. Output is 23A (maximum) for each phase.
AC voltage The PDU supports AC inputvoltage levels from 200 to 240VAC. The domestic PDU is usedwith 60 A 208 V three-phase Wyeservice.
The PDU supports AC inputvoltages from 200 to 240 VAC.The European PDU is used with25 A 380 VAC three-phase Wyeservice.
Power Each PDU can supply 14.4KW ofpower. The inlet cable has a plugstyle that is an IEC309 60A 4 Pin.
Each PDU can supply 14.4 KW ofpower. The inlet cable has a plugstyle that is an IEC309 32A 5 Pin.
Outlet groups All PDUs have 42 outlets arrangedin six groups of seven. Each phasedrives two groups on the PDU.Phase 1 supplies power to group 0and 3. Phase 2 supplies power togroup 1 and 4. Phase 3 suppliespower to groups 2 and 5.
All PDUs have 42 outletsarranged in six groups of seven.Each phase drives two groups onthe PDU. Phase 1 supplies powerto group 0 and 3. Phase 2 suppliespower to group 1 and 4. Phase 3supplies power to groups 2 and 5.
Receptacles All 42 outlets are IEC60320 C13style receptacles. The C13receptacle can supply 10A.
Note: If two outlets are configuredto draw 10 A each, the remainingfive outlets in the group cannot beused.
All 42 outlets are IEC60320 C13style receptacles. The C13receptacle can supply 10A.
Note: If two outlets areconfigured to draw 10A each, theremaining five outlets in thegroup cannot be used.
Circuitbreaker
Each group of seven outlets have a20 A rated circuit breaker that canbe re-set.
Each group of seven outlets havea 20 A rated circuit breaker thatcan be re-set.
The following figure shows the outlet groups for three-phase PDUs.
System Power
61

Figure 24: Three-phase PDU outlet groups
Legend 1 AC inlet circuit P1 supplies groups 0 and 3
2 AC inlet circuit P2 supplies groups 1 and 4
3 AC inlet circuit P3 supplies groups 3 and 5
4 Amps are monitored across both AC inputs
5 Group of seven outlets has its own 20 A circuit breaker that can be re-set
Related LinksWiring Diagram: Three-Phase PDU
Wiring Diagram: Three-Phase PDUThe wiring diagram for cabling a three-phase power distribution unit (PDU)shows power cable connections between the PDUs and the Oracle FS Systemcomponents that are load balanced between the PDU outlet groups.
The wiring diagrams for PDU cabling and the current load shown isrepresentative and includes a DE2-24C Drive Enclosure (4U), a DE2-24P DriveEnclosure (2U), two Controllers, and two Pilots. Different componentconfigurations within an Oracle FS System provide different results. Forexample: Drive Enclosures with SSD drives have a lower power usage than anyDrive Enclosure with SAS HDDs.
The wiring diagram illustrates the cabling of a single PDU. The secondredundant PDU must be cabled identically. Cable connections to the PDU must
System Power
62

be managed so that no outlet group exceeds 20 A. For cabling three-phase PDUs,the load must be balanced between the three phases. The PDU groupings arereversed from one side to the other. From the back of the system, the PDUgrouping to the right is 0 - 5 from top down. The PDU grouping to the left side is5 - 0 from top down.
Figure 25: Wiring Diagram: Three-phase PDU cabling
Legend 1 AC lines in
2 Three-phase pre-installed PDU
3 Representative Oracle FS System
Related LinksThree-Phase PDU Cabling
Power On the SystemSet up a separate circuit and power outlet for each power distribution unit (PDU)as part of your site planning. These outlets must be located within reach of thePDU power cables.
System Power
63

CAUTION: Do not turn on any power circuits until the installation of all orderedhardware is complete and all internal cables are in place. Turning on the powerto the system prematurely can prevent the system from starting up correctly.
1 Ensure that the PDU circuit breaker switches are in the “OFF” or “O”position.
2 Connect the PDUs to the power source at the data center.
If the main circuit breakers at the data center are powered off, turn them onto supply power to the PDUs.
3 Ensure that the power switches on the Drive Enclosures are switched on.
Figure 26: Power switches on the Drive Enclosures
Legend 1 The power switches on theDE2-24P Drive Enclosure
2 The power switches on theDE2-24C Drive Enclosure
4 Configure the settings for the Ethernet interface on a laptop.
Valid settings:
Address 10.0.0.10Gateway 10.0.0.1Netmask 255.255.255.0
Note: You use the laptop to configure the management IP addresses for thePilots.
5 Connect the laptop to the NET 3 port on Pilot 1.
System Power
64

Connecting a laptop to the NET 3 port on Pilot 1 ensures that Pilot 1becomes the active Pilot when the system powers up.
Note: Both of the Pilots are clearly labeled as Pilot 1 and Pilot 2. In astandard configuration, Pilot 1 is the bottom Pilot in the rack. Pilot 2 is thetop Pilot in the rack.
6 Ensure that all of the power cables plugged into the PDU are seatedproperly in their sockets.Improperly seated power cables can cause the amber LEDs to flash whenthe system is powered on. The flashing amber LEDs can be mistaken for afaulted power supply.
7 Power on the PDU circuit breakers to apply power to the system.
Figure 27: PDU circuit breakers (example)
Legend 1 Rack
2 Example of PDU circuit breakers
3 Toggle switch
Note: The Controllers and the Pilots automatically power on when youapply power to the system.
8 As the system powers up, verify that the Link LEDs display as steady onthe NET 3 port on Pilot 1 and on the Ethernet port on the laptop.
Related LinksConnect the Power Cables to the Power Supply
System Power
65

CHAPTER 5
Configure and Connect to the CustomerManagement Network
Workflow for Customer Management NetworkA high-level workflow helps guide the process of configuring and connecting theOracle FS System to the customer management network.
Figure 28: Workflow configure and connect to management network
66

Ping 10.0.0.2Ping 10.0.0.2 to verify the network connections between the laptop and Pilot 1.
Prerequisites: • A laptop is connected to the NET 3 port on Pilot 1, and thelaptop was connected to the NET 3 port when theOracle FS System was powered on.
• The system is powered on.
1 Verify that the laptop is securely connected to the NET 3 port on Pilot 1.A label on the chassis clearly identifies Pilot 1.
2 Using the laptop that is connected to the NET 3 port on Pilot 1, ping10.0.0.2.
A ping response indicates that the connections are valid and you canproceed with configuring and connecting the system to the customermanagement network.
If the ping response fails, double check that the cables are securelyconnected on the laptop and Pilot 1. Additionally, verify that the TCP/IPconfiguration of the laptop is set to the following values:
Address 10.0.0.10Gateway 10.0.0.1Netmask 255.255.255
Try to ping 10.0.0.2 again. If the ping response fails, connect the laptop tothe NET 3 port on Pilot 2 and ping 10.0.0.2. If Pilot 2 responds to the ping,continue with the network configuration process using Pilot 2. If the pingresponse fails, reconnect the laptop to the NET 3 port on Pilot 1 and powercycle Pilot 1. Ping 10.0.0.2. If the ping response fails, contact OracleCustomer Support.
Download Oracle FS System Manager to a LaptopUse Oracle FS System Manager (GUI) to configure the management IP addressesfor the Pilots. You install the GUI on the laptop that is connected to the NET 3port on Pilot 1.
Prerequisites: • Pilot 1 has completed the start up cycle.• Pilot 1 responds to a ping.
1 From the laptop that is connected to Pilot 1, open a web browser and enterhttp://10.0.0.2.
2 Click Management Software.
3 Select the link for the version of the GUI installer that you want todownload, and save the file.
4 Run the installer to install the software.
Configure and Connect to the Customer Management Network
67

Configure the Management IP AddressesPrior to connecting the Oracle FS System to the customer management network,configure the settings for the Pilot management interface using the default IPaddresses on the Pilots.
Prerequisites: • The customer-supplied Ethernet cables are connected tothe NET 3 ports on the Pilots.
• A laptop is connected to the NET 3 port on Pilot 1 and youcan successfully ping 10.0.0.2.
• The customer-supplied Ethernet cables are not connectedto the customer management network.
• The system is powered on and has a status of Normal. Donot continue if the system status is not Normal.Configuration updates fail if the system does not have astatus of Normal.
• The software for Oracle FS System Manager (GUI) isinstalled on a laptop, and the laptop is connected to theNET 3 port on Pilot 1.
1 From the laptop that is connected to the NET 3 port on Pilot 1, log into theGUI using the administrator account.The default password is pillar.Use the default IP address of the Pilot (10.0.0.2) in the Oracle FS Namefield to connect to the Oracle FS System.
When you first log in to the GUI, you might receive a notice that theadministrator password has expired. Enter a new password and set apassword expiration that allows sufficient time to complete the installationand the configuration of the system, such as 10 days.
Important: When you complete the installation and configuration, give thenew password to the person who is responsible for managing the system.
2 Navigate to Global Settings > Networking.3 Select Actions > Modify.4 Update the default IP addresses, netmask, and the gateway to match the
customer’s network environment.5 If the customer management network requires auto-negotiation to be
disabled, make sure that the interface speed and duplex setting of the Pilotare set exactly the same as the settings on the switches that connect thesystem to the customer management network.
Important: Auto-negotiation is strongly recommended. If the customer’sEthernet switch supports 1 GbE or 10 GbE, do not disable auto-negotiation.Disabling auto-negotiation should be avoided.
6 Verify that you entered the correct settings for the IP address, netmask, andgateway.
Configure and Connect to the Customer Management Network
68

CAUTION: Do not proceed to the next step until after you have verified thenew settings for the IP address, netmask, and gateway.
7 Click OK.With the updated IP address, your laptop will lose connectivity to theactive Pilot.
8 To reconnect the laptop to the active Pilot, update the TCP/IP configurationof the laptop to match the Pilot’s newly configured IP address, netmask,and gateway.
9 From the laptop, verify that you can log into the GUI using the updated IPaddress.
Connect to the Customer Management NetworkTo enable the customer to manage the Oracle FS System, connect the Pilots to thecustomer management network.
Prerequisites: • The IP addresses of the Pilot management interface mustbe configured before you connect the system to thecustomer management network.
• Ensure that the IP address of the customer managementnetwork and the IP addresses of the Pilots respond to aping
• The customer’s firewalls allow the following TCP ports bi-directional access between the management workstationsand the IP addresses configured for the Pilots:
• TCP Port 80 for downloading the managementsoftware
• TCP Port 26012 for access to the GUI and FSCLI
To ensure that Pilot 1 remains as the active Pilot, the laptop must be connected tothe NET 3 port on Pilot 1 until you are ready to connect the Pilots to the customermanagement network. To avoid a fail over from Pilot 1, connect the Pilots to thecustomer management network within five minutes of disconnecting the laptopfrom Pilot 1.
If the laptop is disconnected from Pilot 1 and not connected to the customermanagement network within five minutes, Pilot 1 will fail over to Pilot 2. Pilot 2then becomes the active Pilot. Power cycle both of the Pilots to make Pilot 1active again.
Note: If you power cycle the Pilots prior to connecting to the customermanagement network, it might take up to 10 minutes for the Pilot IP addresses torespond to the ping. It might take an additional five minutes for the IP addressfor the customer management network to respond to the ping.
1 Disconnect the laptop from the NET 3 port on Pilot 1.
Configure and Connect to the Customer Management Network
69

Note: Do not disconnect the Ethernet cables from the NET 3 ports on thePilots.
2 Connect the Ethernet cables from the NET 3 ports on the Pilots to thecustomer management network.
The following figure shows the NET 3 ports on the Pilots.
Figure 29: The NET 3 ports on the Pilots
Legend 1 Customer management network from the NET 3 ports on the Pilots
3 From a workstation on the customer management network, ping the IPaddresses for the customer management network, Pilot 1, and Pilot 2.Issue the ping from a workstation on the same subnet as the three IPaddresses.
Related LinksCabling WorkflowDownload Oracle FS System Manager to a LaptopConfigure the Management IP AddressesTypes of External Cables
Download Oracle FS System Manager to WorkstationsAfter connecting the Oracle FS System to the customer management network,download and install Oracle FS System Manager (GUI) to the customer’s
Configure and Connect to the Customer Management Network
70

management workstations. The customer uses the GUI for long-termmanagement and monitoring of the Oracle FS System.
Prerequisites: • Management workstations must be on a network that canaccess the management IP addresses of the Pilot on port 80or port 8080.
• Workstations using the Oracle FS System Manager (GUI)or the Oracle FS Command Line Interface (FSCLI) tomanage or monitor the system must be on a networkconfigured to permit that workstation to reach the Pilotmanagement IP Ethernet interfaces on port 26012.
• The system is powered on.• The IP addresses are set on the Pilots.• For JAVA Archive (JAR) installers, Java 1.7 or higher must
be installed on the workstations.
Note: The Windows MSI installers do not require Java to beinstalled on the workstation.
1 From the customer’s management workstation, open a web browser andenter the IP address or the hostname of the customer managementnetwork.
2 Click Management Software.3 Select the link for the version of the GUI installer that you want to
download, and save the file.4 Run the installer to install the software.
Download Oracle FS Command Line InterfaceYou can use Oracle FS Command Line Interface (FSCLI) to configure and managethe Oracle FS System. To install FSCLI, download the software from the Pilot andinstall the software on the customer’s management workstations.
Prerequisite: The system is powered on.
1 From the customer’s management workstation, open a web browser andenter the IP address or the hostname of the customer managementnetwork.
2 Click Management Software.3 Select the link for the version of the CLI installer that you want to
download and save the file to the workstation.4 Run the installer to install the software.
Verify the Controller Service TypeSet at the factory during the configuration of an Oracle FS System, the Controllerservice type defines how the Controller resources are allocated for the supported
Configure and Connect to the Customer Management Network
71

service types. Verify that the Controller service type was set correctly for yoursystem.
Refer to the Release Notes for the most current list of supported service types.
1 Navigate to System > Hardware > Controllers.
2 Select a Controller.
3 Select Actions > Modify Controller Service Type.
4 From the Desired Service Type field, verify that the setting is correct foryour system.If necessary, update the setting. The system restarts if you update theService Type setting.
5 Click OK.
Related LinksCabling WorkflowConnections to the Customer Data NetworkConnect to the Customer Data Network
Update the Oracle FS System Software and FirmwareThe Oracle FS System software and firmware are updated on a regular basis. Toensure that your system has the latest versions available, update the softwareand firmware.
Download Software and Firmware UpdatesDownload the latest software and firmware updates from My Oracle Support(MOS) to ensure that your Oracle FS System is up to date. You can downloadgeneral availability releases, as well as patches specific to your system, fromMOS.
Prerequisite: Log into MOS to check for the latest firmware and softwareupdates.
1 Using your registered username and password, log in to My Oracle Support(https://support.oracle.com).For more information about all the features and functionality of MOS,including information about patches and updates, see My Oracle SupportDocumentation (http://docs.oracle.com/cd/E25290_01/index.htm).
2 In the menu bar, select Patches and Updates.
3 In the Patch Search pane, choose one of the following search methods:
Number/Name or BugNumber (Simple)
Search for the patch name, the patch number, orthe platform.
Configure and Connect to the Customer Management Network
72

Product or Family(Advanced)
Search for the product, the release, and theplatform, as well as other criteria.
Note: The product you want to search for is OracleFS1-2 Flash Storage System.
Recommended PatchAdvisor
Search for recommended patches for products,releases, and platforms.
4 Complete all the fields necessary to perform your search.5 Click Search.6 On the Patch Search window, review all patch information.
Check the file size of the download and ensure that your workstation hassufficient space for the download.
7 Click the row of the patch that you want to download, and then click ReadMe.
Important: Always review the Read Me file before downloading the patchor update to ensure that you are downloading the correct version. Note ifthere are any special installation requirements.
8 To download the software and firmware package, click Download.The system displays a dialog box that displays the software package to bedownloaded. A single patch or software update might contain multiplefiles. Review the ReadMe file to determine the correct files to download.
Tip: If your browser window displays an information bar that states thatthe download is blocked, click the appropriate options to allow thedownload to proceed.
9 On the File Download screen, click Show Digest Details to display theSHA-1 and MD5 checksums for each of the ZIP files.
10 To begin the download, click the filename of the selected file.11 To save the software package on your workstation, click Save.
After you successfully download the software update package, close theoriginal dialog box.
12 Using the Digest Information from the Patch Download screen, verify theintegrity of the downloaded files before proceeding.
13 Extract the ZIP files.
Important: You cannot stage the ZIP file. You must stage the RPM PackageManager (.rpm) file.
Upload (stage) the extracted software or firmware RPM Package Manager (.rpm)file to the Oracle FS System.
Upload the Software and Firmware PackageAfter downloading a software and firmware update package from My OracleSupport (MOS), and extracting the RPM files from the ZIP archive, you can stage
Configure and Connect to the Customer Management Network
73

the RPM files on the Pilot to prepare the system for the software and firmwareupdate.
Prerequisite: • Place the update package on a workstation or client locatedon the same network as the Pilot or on a workstation locatedon a network that has a LAN connection speed to the Pilotof at least 100 Mb/s. The workstation must support eitherOracle FS System Manager or Oracle FS CLI.
• If the above recommendation is not possible, modify thesession time-out period in the security settings of theOracle FS System Manager to a time-out of at least 90minutes before staging the software. At the very minimum,the end-to-end connection speed should be 5 Mb/s, at whichspeed it will take approximately an hour to upload thesoftware. Do not attempt to stage the software onconnections that are not at least 5 Mb/s end-to-end.
1 Navigate to Support > Software and Firmware.2 From the Software and Firmware page, click Upload Software Package.3 From the Upload Software Package dialog, click the browse button […].4 In the Upload Software Package dialog, navigate to the software package
you downloaded, highlight it, and click Open.5 Click OK.
The software package is placed onto the Pilot. When the upload iscomplete, the update package displays in the Staged Software andFirmware panel.
Tip: Click Tasks on the Software and Firmware screen to view the stagingprogress in Oracle FS System Manager. The staging task only appears onthe screen after the RPM file has been uploaded.
After staging is complete, verify that the software or firmware module and theversion number of a software or firmware module match what you intended toupload.
Update the Oracle FS System SoftwareAfter staging the software package on the Pilot, update the system software.
Note: Use the primary administrator account to perform the update operation.The default password is pillar.
1 Navigate to Support > Software and Firmware.The summary page displays the software and firmware packages currentlyinstalled on the Drive Enclosures, Drives, Pilots, and Controllers, as well asany staged software and firmware packages.
2 Select Actions > Update Software.3 Select Restart and update software (disrupts data access).4 Select the options in the Software Update Options pane.
Configure and Connect to the Customer Management Network
74

Valid options:
ShutdownController
Select this option.
Ignore CurrentRequests
Select this option.
Ignore compatibility Select this option only if the Patch Readme orRelease Notes instructs you to do so.
Ignore hardwarestatus
Select this option if there is a minor condition, suchas a single failed hard drive. For a more seriouserror, attempt to resolve the condition. If you areunable to resolve the condition, contact OracleCustomer Support.
Ignore system alerts Select this option if there are system alerts for failedemail, failed call-home, or a failure to connect to anNTP server.
IgnoreCompatibilityOverride failedsoftware update
Select these two options if the software update failsbut the system returns to a Normal status with onlya compatibility error. If a second attempt toupgrade the software fails, contact Oracle CustomerSupport.
5 Click OK.
6 Click Yes.When prompted to confirm the software override options, continue to clickYes until the upgrade starts.
7 After the upgrade completes, check that the software versions are correctand that the system status is Normal.
Update the Drive FirmwareDuring the initial installation of an Oracle FS System, make sure the drivefirmware for all of the drives is current. Installing the updates of the drivefirmware is a separate process from the software updates.
Note: Updating the drive firmware is a disruptive process and requires restartingthe system.
Note: Use the primary administrator account to perform the update operation.The default password is pillar.
1 Navigate to Support > Software and Firmware.The summary page displays the software and firmware packages currentlyinstalled on the Drive Enclosures, Drives, Pilots, and Controllers, as well asany staged software and firmware packages.
2 Compare the version numbers of the drive firmware displayed in InstalledSoftware and Firmware with the version numbers of the drive firmwaredisplayed in Staged Software and Firmware.
Configure and Connect to the Customer Management Network
75

If the version numbers of the drive firmware displayed in Staged Softwareand Firmware are higher than the version numbers of the drive firmwaredisplayed in Installed Software and Firmware, proceed with the followingsteps.
3 Select Actions > Update Drive Firmware.
4 Select the Install? checkboxes for each of the drive types with a currentversion of firmware that is lower than the pending version of firmware.
5 Click OK.
The system restarts. The drive firmware is installed as the system restarts.
Note: Depending on the number of Drive Enclosures and the number ofdrives in the system, the update to the drive firmware can be timeconsuming.
6 After the upgrade completes, check that the version numbers of drivefirmware are correct and that the system status is Normal.
Configure and Connect to the Customer Management Network
76

CHAPTER 6
Configure Global Settings
Create an Additional Administrator 1 AccountThe Administrator 1 account has full privileges to perform all administrative,configuration, and recovery tasks for the Oracle FS System. Create an additionalAdministrator 1 account for your system to ensure that you have an additionalaccount that can be used for password recovery.
1 From Oracle FS System Manager (GUI), navigate to System > GlobalSettings > Administrator Accounts.
2 Select Actions > Create.
3 Enter the name of the account in the Login Name field.
4 From the Role list, select Administrator 1.
5 Enter the remaining information about the account owner.Required information:
• Full Name• Email Address• Phone Number• Password• Confirm Password
Note: If you do not enter an email address for an administrator account,administrators cannot reset their own passwords using the Resetpassword feature in Oracle FS System Manager.
6 (Optional) To disable the account, select the Disable Account option.Use the Disable Account option when you want to create accounts thatyou want to enable the option later.
7 Click OK.
Related LinksCabling WorkflowConnections to the Customer Data NetworkConnect to the Customer Data Network
77

Configure Email for Administrator AccountsConfiguring email for the administrator accounts is critical for account passwordrecovery and ensures that the administrators receive the email messages that aregenerated by the Oracle FS System.
1 Navigate to System > Global Settings > Administrator Accounts.
2 Select an account name from the list of login names.
3 Select Actions > Modify.
4 Verify that the email address is valid for the administrator account.If necessary, modify the email address.
5 Clear the Disable Account checkbox.
6 Click OK.
Note: If you do not configure an email address for the primaryadministrator account to allow password recovery, the system sends asystem alert at every subsequent login.
Related LinksCabling WorkflowConnections to the Customer Data NetworkConnect to the Customer Data NetworkTest Administrator Password Recovery
Configure the Email ServerConfiguring the email server enables the Oracle FS System to send notificationsto selected individuals. The email server is also used for recovery of accountpasswords.
1 Navigate to System > Global Settings > Networking.
2 Select Actions > Modify.
3 Click the Notification tab.
4 To be notified by email of selected system events, select Enable EmailNotification.
5 Enter the configuration settings for the email server.
6 Click OK.
Related LinksCabling WorkflowConnections to the Customer Data NetworkConnect to the Customer Data Network
Configure Global Settings
78

Test Administrator Password RecoveryTest the process of recovering the administrator password to ensure that theadministrator’s password can be recovered in the event that the password is lostor forgotten.
Prerequisites: • A configured email server• A configured email address for the administrator account• Access to the administrator’s email account
1 If you are currently logged into Oracle FS System Manager (GUI), log off.
2 From the Oracle FS System Manager login dialog, enter administrator inthe Login name field.
Note: Do not enter a password.
3 Click Forgot password.
The system sends an email containing the password recovery instructionsand a token to the email address configured for the administrator account.
4 Verify whether the administrator’s email account received the emailcontaining the password recovery instructions and the token.
If the administrator’s email account did not receive the email, log into theGUI and verify that the email address is configured correctly for theadministrator account.
If the administrator’s email account received the email, delete the email.Proceed to log in to the GUI.
Related LinksConfigure Email for Administrator AccountsConfigure the Email Server
Configure DNS SettingsDNS servers are used by the Pilot to resolve the address of the Oracle AutoService Request (ASR) server and to locate mail servers for sending passwordrecovery instructions.
You can set the primary and secondary DNS server to resolve host names to IPaddresses, for example. Also, the DNS settings allow the Oracle FS System tosend Call‑Home information, password recovery instructions, and eventnotifications to designated email recipients.
1 Navigate to System > Global Settings > Networking.
2 Select Actions > Modify.
3 From the Interfaces tab, enter the Primary DNS Server IP address.
Configure Global Settings
79

4 Enter the Secondary DNS Server IP address.5 Click OK.
Configure NTP ServersConfigure the Oracle FS System time so that event timestamps and loggingtimestamps are accurate and so that time-dependent applications work properly.
1 Navigate to System > Global Settings > System Time.2 Select Actions > Modify.3 Select the option for configuring the system time.4 Depending on which option you select, enter the NTP server details for up
to three NTP servers, or choose the system time using the date and timedialog.
Note: Using system time is not recommended.
Important: If either option that you choose changes the time to be prior tothe current time, the Pilot restarts to implement the new time.
5 Click OK.
After approximately 15 minutes, ensure that there are no Oracle FS System alertsand events indicating that the NTP sync has failed.
Note: Microsoft Windows systems can be used for NTP servers only if a thirdparty UNIX-compatible NTP application is installed on them.
Related LinksCabling WorkflowConnections to the Customer Data NetworkConnect to the Customer Data Network
Auto Service RequestsOracle Auto Service Request (ASR) is a feature of Oracle hardware warranty andOracle Premier Support for Systems. The ASR feature automatically generates aservice request for specific Oracle FS System software and hardware events. Thisautomated feature securely expedites system diagnostics, prioritizes your servicerequests, and dispatches parts, if needed.
The ASR feature performs the following activities automatically:
• Generates a service request (SR) when needed
• Handles service requests according to priority
• Dispatches parts when needed
• Attaches Call‑Home logs and log bundles to the SR
My Oracle Support (MOS) allows you, or a customer user administrator (CUA),to associate your Oracle FS System with a customer support identifier (CSI),
Configure Global Settings
80

which indicates that your system is licensed for Oracle Customer Support. TheCSI information includes the Oracle FS System serial number, organization, andthe level of support. The CUA is typically a technical representative from yourorganization.
The ASR feature relies on the Call‑Home feature of the Oracle FS System tocommunicate system events to MOS. After you configure and activate the ASR inMOS, your system is ready to notify Oracle Customer Support of certain systemevents.
For additional ASR support information, refer to Oracle Auto Service Request(http://www.oracle.com/us/support/auto-service-request/index.html) on theOracle Support website.
Related LinksASR Activation OverviewSettings for ASR (Call-Home)
ASR Activation OverviewThe process to activate the Auto Service Request (ASR) feature consists of threemain activities. Two of the activities require access to the Oracle FS SystemManager (GUI), and the third activity requires access to My Oracle Support(MOS).
Enable ASR Enabling the ASR feature requires the initial configurationand test of the Call‑Home feature. Call‑Home provides asecure network connection between the Oracle FS Systemand MOS. If your network does not have direct access to theInternet, you can enter the necessary proxy serverinformation.The following options enable the ASR feature for yoursystem:
Call‑HomeTriggering
The Call‑Home configuration pagecontains options for when Call‑Hometriggers notifications to MOS.
Oracle Server The default setting for the Call‑Homeserver connects directly to MOS.Make sure that you do not change theHTTPS name of the Oracle server.
Send anActivationRequest
When you use the Test Call‑Home action for the first time,the system sends an ASR activation request to MOS. MOS,then, sends an email to the customer user administrator(CUA) with instructions for completing the activationprocess. Depending on your network connection, MOSshould receive your activation request in a few minutes, butno more than 60 minutes.
Configure Global Settings
81

The activation request sets the ASR feature to “pending”.The pending state means that the ASR activation requesthas been received by MOS, but the ASR feature is notactivated to receive and to respond to event notifications.
Activate the ASRAsset
The ASR asset is the Oracle FS System that has a validservice contract in MOS. After activation, MOS shows theASR asset as “active”. Activating the ASR asset allows MOSto receive system event notifications for automatedprocessing.
Note: The CUA should not ignore the ASR activation notice.MOS continues to send notices to the CUA until the CUAresponds to the notice.
For information that describes how to complete theactivation process, login to My Oracle Support (https://support.oracle.com/). Search for the article titled “How tocomplete Auto Service Request (ASR) asset activation usingMy Oracle Support.”
After the initial Call‑Home configuration, and the activation of the ASR asset inMOS, the Oracle FS System sends daily and weekly system heartbeats to MOS.The heartbeats keep the ASR feature in an active state. If MOS does not receivethese heartbeat events, MOS opens a service request for the heartbeat loss.
Related LinksAuto Service RequestsSettings for ASR (Call-Home)Configure Call-Home for ASRActivate ASR (Test Call-Home)
Settings for ASR (Call-Home)Call‑Home is a feature that, when enabled, works with the Auto Service Request(ASR) feature to send all notifications and associated logs about specificOracle FS System events to My Oracle Support (MOS). Configure the Call‑Homesettings correctly to ensure that the MOS system properly manages the events.
Note: No customer data is sent in a Call‑Home transmission.
The Oracle FS System sends log bundles that contain information about thesystem event. The log bundles assist Oracle Customer Support to diagnose thesystem event. The collection of the log bundles is initiated by one of thefollowing methods:
Manual The administrator has requested a log bundle collection.You can manually send the logs to MOS and associate thelogs with an existing SR number.
Configure Global Settings
82

Event-triggered When a system event occurs, the Oracle FS System triggersthe following activities:
• Collects log bundles that contain information aboutthe event
• Uploads the logs to MOS
If necessary, MOS creates an SR for the system event andthen dispatches replacement parts, if appropriate.
Periodic The system sends a notification as scheduled in Oracle FSSystem Manager (GUI) configuration.After the ASR feature is activated, MOS expects to receivean event, known as a heartbeat, each day from the Oracle FSSystem. The daily heartbeat keeps the ASR feature in anactive state. The following options ensure that MOS receivesdaily and weekly heartbeat event notifications:
• Standard periodic Call‑Home• Larger periodic Call‑Home
For both options, do not change the option schedules.If the daily heartbeats are not received, MOS creates an SRindicating that the periodic heartbeat is overdue. MOS thendispatches the SR to Oracle Customer Support forresolution.
The Oracle FS System maintains a directory of log collections, each of whichrepresents an event or a manual log bundle. You can select a log bundle file, arange of log bundle files, or a group of log bundle files to download or transmitto MOS. The name of each log bundle indicates the reason, date, and time (GMT)that the bundle was created, as well as the reason, date, and time the previousbundle was created.
Oracle Customer Support might request that you send multiple log bundles toMOS. When you create a manual log bundle, you can add an SR number in theNotes field. MOS then automatically associates that log bundle with your activeSR.
You can send the log bundles to a local server, if necessary. However, sending logbundles to the local server disables all ASR functionality.
Related LinksAuto Service RequestsConfigure Call-Home for ASRCreate a Log Bundle
Configure Global Settings
83

Configure Call-Home for ASRConfigure the Call‑Home options to ensure that the Oracle FS System sendsspecific event notifications to My Oracle Support (MOS). MOS then receivesthese notifications and, if necessary, initiates a service request (SR).
Prerequisites • If the Oracle FS System is configured for Call‑Homeoptions and Auto Service Request (ASR), and theconnection to the Call‑Home server is direct, withouta proxy, then all firewalls must allow all three Pilot IPaddresses to make outbound connections on TCP Port443 to the Call‑Home server at Oracle.
• If the Oracle FS System is configured for Call‑Homeoptions and ASR, but is configured to use a proxy,then the proxy must be configured to acceptconnections from all three Pilot IP addresses andallow them to connect from the proxy to the OracleCall‑Home server on port 443.
• Any firewalls between the Pilots and the proxy mustallow the TCP port configured for the Pilot to theproxy connections to pass through firewalls for allthree Pilot IP addresses.
You also configure Call‑Home options that keep the ASR feature active. MOSexpects to receive an event, known as a heartbeat, each day from the Oracle FSSystem. This heartbeat is controlled by the Enable standard periodic Call-Homeoption.
1 Navigate to System > Global Settings > Networking.2 Select Actions > Modify.3 Click the Notification tab.4 Select the Enable event triggered Call-Home option.5 Select the Enable standard periodic Call-Home option.
Note: Accept the default daily periodic interval. The ASR feature expects adaily Call‑Home notification.
6 Select the Enable larger periodic Call-Home option.Accept the default weekly periodic interval.
7 Verify that the Use Oracle Server option is selected.8 Accept the default settings for the Use Oracle Server option.
Note: Do not alter the server name of the HTTP Server address.
Note: If your environment does not use a proxy, you must configure atleast one DNS server. Ensure that the DNS server resolves to the host nameof the Oracle server: callhome.support.pillardata.com.
9 (Optional) Select Use Proxy and enter the proxy server address, portnumber, and protocol type as provided by your proxy administrator.
Configure Global Settings
84

Note: Ensure that the proxy server, if used, resolves the host name of theOracle server: callhome.support.pillardata.com.
10 Select Enable large file transfers.
Note: This option ensures that Oracle Customer Support receives thedetailed logs that are created for an event.
11 Accept the default value for the Number of recent events to send inheader option.
Note: An Oracle Customer Support professional might request that youchange this value for a specific purpose.
12 Click OK.
You can test the Call‑Home settings from the Networking overview page of theSystem tab.
Related LinksAuto Service RequestsSettings for ASR (Call-Home)Activate ASR (Test Call-Home)
Activate ASR (Test Call-Home)After you have configured Call‑Home for the Auto Service Request (ASR)feature, send an ASR activation request to My Oracle Support (MOS).
Prerequisites: • Call‑Home is configured to access the ASR functionsin MOS.
• Event triggering and periodic triggering forCall‑Home are enabled and, the parameters are set tothe default settings.
• Administrator privileges exist to the ASR asset that isregistered in MOS.
1 Navigate to System > Global Settings > Networking.2 To send the ASR activation request, select Actions > Test Call‑Home.3 Confirm that you want to send test Call‑Home information, and click OK.
The Call‑Home test is an ASR activation request in MOS. MOS shouldreceive your request in a few minutes, but no longer than 60 minutes.
Note: You can repeat the activation request again, as necessary.You or the customer user administrator (CUA) performs the following steps toverify that the ASR activation request was successful.
4 Verify the receipt of an email from MOS with instructions to complete theASR activation process.For information that describes how to complete the activation process,login to My Oracle Support (https://support.oracle.com/). Search for the
Configure Global Settings
85

article titled “How to complete Auto Service Request (ASR) asset activationusing My Oracle Support.”
5 Log in to MOS and verify that the ASR asset status shows “pending”.An “inactive” state means that MOS has not received your activationrequest.
If you did not receive an email from MOS, or if the ASR asset in MOS is“inactive”, then perform the detailed ASR activation (Call‑Home)troubleshooting.
Note: Do not contact Oracle Customer Support until you have completed thetroubleshooting checks.
Related LinksAuto Service RequestsSettings for ASR (Call-Home)ASR Activation (Call-Home) TroubleshootingConfigure Call-Home for ASR
ASR Activation (Call-Home) TroubleshootingYou might need to troubleshoot the Oracle Auto Service Request (ASR) activationrequest when you have not received an email from My Oracle Support (MOS) inresponse to an activation request.
You can check the following resources to troubleshoot where the ASR activationrequest communications might be failing.
Call-HomeSucceeded
A Call‑Home Succeeded Event Log message means that theOracle FS System has successfully sent the Call‑Home eventor activation request.If you see the Call‑Home Succeeded Event Log message,check the following items:
• Receipt of an email notification from MOS within 60minutes
• ASR asset in MOS has a “pending” status
If either of these checks fail, and your system has a proxyconfigured, then check the proxy logs to determine if theconnection to the Oracle server was successful. If the proxylogged an error, correct the proxy settings in your networkor correct the Oracle FS System proxy configuration. Verifyyour updates by running the ASR activation request again.
Call-HomeFailed
A Call‑Home Failed event creates a System Alert and anEvent Log records the system fault.View the properties of the event. If you received the errorEventParameters.Callhome.error.
Configure Global Settings
86

1:HTTPS_UNKNOWN_HOST, then Call‑Home failed to locate aserver.Verify the following criteria:
• The Oracle FS System can contact the configured DNSservers.
• The DNS servers can resolve the host name of theOracle server, callhome.support.pillardata.com.
If another error message is present, save the event messageby using the Copy to Clipboard option from the EventProperties dialog. Contact Oracle Customer Support, iffurther assistance is required.
Related LinksSettings for ASR (Call-Home)Activate ASR (Test Call-Home)Display the Event PropertiesManage the System Alerts
Configure Global Settings
87

CHAPTER 7
Connect to the Customer Data Network
Connections to the Customer Data NetworkTo enable the Controller to serve the customer data stored in the Oracle FSSystem, connect the Controller to the customer data network.
SAN HBA cards connect using FC cables to the SAN hosts for SAN connectivity.The connectors on the SAN HBA are SFP+ or SFP++ and can be provisioned withthe following setting: FC 8-16 Gbs with the appropriate SFPs for optical cables.
CAUTION: Route the customer data cables through the existing Controller cablemanagement arm (CMA) and secure the cables within the CMA using theexisting velcro straps. If the cables become snagged while the Controller chassisis extended to the service position, damage to the system motherboard mightoccur.
Related LinksCabling WorkflowProvision the Controller PortsConnect to the Customer Data NetworkTypes of External Cables
Provision the Controller PortsThe Controller ports are provisioned during the manufacturing process. Prior toconnecting the Oracle FS System to the customer data network, verify that theController ports are provisioned to meet the requirements of your installation.
1 From Oracle FS System Manager (GUI), navigate to System > GlobalSettings > Controller Ports
2 Select a Controller.
3 Select Actions > Modify Port Settings.
4 If necessary, modify the protocol properties.
Note: Refer to the Release Notes for a list of the supported protocols foryour release.
5 Click OK.Any changes that you make are mirrored to the partner Controller, and thesystem restarts.
88

Note: During startup, if the SFP detected does not match the portprovisioning, the system generates an “Incorrect SFP” event.
Related LinksCabling WorkflowConnections to the Customer Data NetworkConnect to the Customer Data Network
Connect to the Customer Data NetworkSAN data paths require FC connections. Single-mode and multi-mode opticalfiber connections are supported on PCIe cards.
Prerequisite: The fibre channel (FC) data paths require 8 GbE or 16 GbE opticalFC connections.
Note: The type of connection (Ethernet or FC) was defined when the Oracle FSSystem was ordered.
CAUTION: Use only the Oracle-supplied SFP modules for the external cabling.
The following figure shows the SAN HBA connections from the Controllers tothe customer data network.
Figure 30: SAN HBA connections to the customer data network
Legend 1 PCIe slot 1, HBA ports for SANconnectivity (FC only)
3 PCIe slot 5, HBA ports forSAN connectivity (FC only)
Connect to the Customer Data Network
89

2 PCIe slot 4, HBA ports for SANconnectivity (FC only)
1 For SAN FC connections, connect the FC cables from the SAN FC ports onthe Controllers to the customer’s SAN environment.
2 Route the cables through the Controller cable management arm (CMA).
Figure 31: Controller CMA
Legend 1 Controller back 3 CMA
2 Controller data cables
Related LinksCabling WorkflowProvision the Controller PortsTypes of External Cables
Connect to the Customer Data Network
90
CHAPTER 8
Complete the Installation
Perform a Controller Failover TestVerify that the Controller failover functionality is operational prior to approvingthe Oracle FS System for production. Controller failover is performed by theinstallation engineer or the customer.
Prerequisites: • SAN hosts with multipath fibre channel (FC) connectivityto the Oracle FS System.
• SAN hosts zoned to communicate with the Oracle FSSystem.
• SAN hosts with a supported operating system (OS) toenable the use of an Iometer, which is a free utility togenerate IOPs on the Oracle FS System.
• PuTTY or similar terminal emulation program.• Client workstation with connectivity to the Oracle FS
System Manager• A LUN created on Controller-01.• A LUN created on Controller-02.• Both the newly created LUNs on the Controllers must be
mapped to the SAN hosts on which the Iometer is used.
Note: While the I/O is performed on both Controller, monitor the IOPs using theIometer interface and the Oracle FS System Manager.
You can failover a Controller using one of the following methods:
• Command Line Interface (CLI)
• Controller power button
• ILOM interface
91

Generate IO on the SystemGenerate Input Output operations per second (IOPs) on the Oracle FS Systemfrom the SAN host to verify that the Controller failover functionality isoperational.
1 Install the Oracle FS System Manager on the client workstation to ensurethat all prerequisites to verify the Controller failover are met and to ensuremulti-pathing is installed and configured.
2 Using PuTTY or a terminal emulation program, connect the clientworkstation to the SAN host.
3 Use the Iometer to generate the IOPs on the Oracle FS System from theSAN hosts that are connected to the Oracle FS System.
4 Monitor the IOPs using the Iometer interface.5 Monitor the IOPs using the Oracle FS System Manager for each of the
LUNs located under: SAN > Statistics and Trending > LUNs.
Failover a Controller Using the CLIYou can failover the Controller to the alternate or buddy Controller using theCLI.
1 Log in to the FSCLI using the support account.2 Obtain a list of the Controllers by executing the following command:
./fscli controller -list/CONTROLLER-01/CONTROLLER-02
3 Run the following command:./fscli controller -forceFailure -controller[controller_name]Command Succeeded
4 Verify the Controller failure using the Oracle FS System Manager under:System > Alerts and Events > Status Summary.
5 Verify that the LUN and its resources are failed over to the alternate orbuddy Controller and monitor the IOPs being generated from the LUNsand the SAN host using the Iometer interface.
Important: The LUN should never lose connectivity to the Oracle FSSystem.
Note: The Controller will automatically restart after the failover.
Bring the Controller Online Using the CLIBring the Controller online after testing that the Controller can failover to thealternate or buddy Controller.
1 Log in to the FSCLI using the primary administrator account.2 Run the following command:
Complete the Installation
92

./fscli controller -reenable -controller[controller_name]Command Succeeded
3 Verify the Controller is back online using the Oracle FS System Managerunder: System > Alerts and Events > Status Summary.
Clear the Controller Failure History Using the CLIAfter testing the Controller failover to the alternate or buddy Controller, clear thefailure history using the Command Line Interface (CLI).
1 Log in to the FSCLI using the support account.
2 Run the following command:./fscli controller -reenable -controller[controller_name]Command Succeeded
3 Monitor the Oracle FS System Manager to verify that all the Controllers arein a healthy state under: System > Alerts and Events > Status Summary.
Failover a Controller Using the ILOMYou can use the Oracle Integrated Lights Out Manager (ILOM) to failover aController.
1 Log in to the Oracle FS System using the fscli with the primaryadministrator account.
2 Run the following command to enable secure shell (SSH) access:fscli system -modify -enableSsh [number of minutes]
3 Connect to the Pilot using SSH with the shared IP address of the Oracle FSSystem and log in using root / [root_password].
4 Connect to the Controller using SSH by running the following commandon the Pilot:[root@pilot1 ~] cat /etc/nodenames172.30.80.2 WN2008fffffffffff2 WN2008000101000000 mgmtnode172.30.80.129 WN508002000158bb61 WN2008000101000001172.30.80.3 WN2009fffffffffffa172.30.80.128 WN508002000158bb60Note: You can connect to the Controller using SSH using either of the twoIP addresses: 172.30.80.128 or 172.30.80.128
5 Fail over the Controller by running the following command to shut downthe Controller host:ipmitool chassis power offChassis Power Control: Down/Off
6 Verify the Controller failure using the Oracle FS System Manager under:System > Alerts and Events > Status Summary.
Complete the Installation
93

Note: Verify that the LUN and its resources are failed over to the alternateor buddy Controller and monitor the IOPs being generated from the LUNsand the SAN host using the Iometer interface.
Bring a Controller Online Using the ILOMYou can use the Oracle Integrated Lights Out Manager (ILOM) to bring aController online after testing the failover process works smoothly.
1 From the Pilot, connect to the alternate or buddy Controller using secureshell (SSH).
2 Identify the alternate Controller by running the following command fromthe Pilot:cat /etc/nodenames
3 On the alternate Controller, run the following command:ipmitool -H 169.254.2.9 -U root -P changeme chassis power onThis brings the failed Controller online.
4 Monitor the Oracle FS System Manager to verify that the Controller is backonline under: System > Alerts and Events > Status Summary
5 Clear the failure history by logging in to the Oracle FS System using theprimary administrator account and running the following command:./fscli controller -reenable -controller [controller_name]Command Succeeded
Failover and Bring Controller Online Using the Power ButtonYou can failover the Controller to the alternate or buddy Controller using thepower button on the Controller.
1 Manually press and hold the power button on the Oracle FSSystemController for several seconds until the red LED is illuminated.
2 Bring the Controller back online after verifying that I/O is being performedby manually pressing the power button for several seconds until the greenLED is illuminated on the Controller.
Perform a Drive Failure TestPrior to copying production data to the Oracle FS System, perform a drive failuretest. A drive failure test verifies that the system is using the spare drive and thatthe system can successfully rebuild a failed drive.
1 Using the Administrator account, log in to Oracle FS System Manager(GUI), and navigate to System > Hardware > Drive Enclosure.
2 Select Actions > Drive Enclosure Console.3 Click Next.4 From the Drive Enclosure list, select a Drive Enclosure.
Complete the Installation
94

Note: You can select any Drive Enclosure from the list. To ensure expedientrebuild times, perform a drive failure test on the highest-tier DriveEnclosure in the system.
5 From the I/O Module list, select 0 or 1, and click Next.
A large amount of data displays in the Drive Enclosure Console. Toconfirm that the console commands succeed, copy and paste theinformation into a text editor and review the information in the text editor.
6 From the View Drive Enclosure Console command field, type SCSI andclick Send.
7 Type CHK and click Send.
The console displays a list of the drives installed on the Drive Enclosure.The following example shows a list of drives displayed in the console.
Note: If any of the drives are offline, select a different Drive Enclosure.8 Type ATA and click Send.9 Type FPOFF XX, where XX is the number from the Drv column for one of
the drives displayed in the console output.10 Click Send.
The drive fails from both nodes. Use the GUI to confirm the status of thedrive.
11 To bring the drive back online, type FPON XX, where XX is the number fromthe Drv column for the drive displayed in the console, and click Send.
The drive returns online. Use the GUI to confirm the status of the drive.
Complete the Installation
95

12 Type SCSI and click Send.
13 Type CHK and click Send.
The list of the drives installed on the Drive Enclosure is displayed in theconsole. Verify that the drive is back online.
14 Clear the drive failure history.
a) Log in to the Oracle FS System Command Line Interface (fscli).
b) Issue the following command:fscli enclosure -clearDriveHistory -enclosure[enclosure-id-or-fqn] -driveSlot XThe enclosure-id-or-fqn is the fully qualified name (FQN) or theunique identifier (ID) of the Drive Enclosure. The FQN includes thechassis ID, which is displayed on the front of the Drive Enclosure.
Note: The driveSlot value is derived from the HEX value listed inthe Drv column from the results of the SCSI CHK command.
After the command completes, the system returns a success message.
System Status VerificationThe status of the installation of the Oracle FS System can be verified using theOracle Flash Storage Portal web interface or the Oracle FS System Manager (GUI)or the FSCLI.
To verify system status on the Oracle Flash Storage Portal, use a web browser ona computer, tablet, or mobile device that has access to the customer managementnetwork. In the browser, enter the IP address of the Oracle FS System or, if thesystem name is resolvable, enter the name of the system. To verify system statuson the Oracle FS System Manager (GUI), download and install the GUI client ona client workstation with access to the Pilot. Alternatively, you can download andinstall the fscli on a workstation with access to the Pilot.
To verify the wiring topology using the fscli, use the following commands:
• fscli topology -list —enclosure <output-text-filename1.txt>For example: fscli topology -list —enclosure <sas-encl-list.txt>
• fscli topology –download –topomap <output-text-filename2.txt>For example: fscli topology –download –topomap <sas-conn-map.txt>
The topology -list -enclosure command generates an output file containingthe list of Drive Enclosures with their world wide names (WWN) and chassis IDvalues. The topology -download -topomap command generates an output filecontaining the SAS connection map. Evaluate the output files to determine thenecessary corrections.
Complete the Installation
96

Other fscli topology commands to verify system status include:
• To identify the overall status of the system: fscli system -list• To verify that no system alerts exist: fscli system_alert -list• To verify the system topology: fscli topology -list
Related LinksVerify System Status Using the FS System ManagerVerify System Status Using the Oracle FS Portal
Verify System Status Using the Oracle FS PortalYou can verify the status of an Oracle FS System by using the Oracle FlashStorage Portal web interface on a computer, tablet, or a mobile device that hasaccess to the customer management network.
Note: The Oracle FS System configuration cannot be changed using the OracleFlash Storage Portal.
1 Enter the IP address of the Pilot management interface.
Figure 32: Pilot management interface main screen
The Pilot management interface main screen appears.
2 Click Information and Status tab to see the status of the system.The login prompt appears.
3 Log in to the Oracle FS System using a username and password.
Complete the Installation
97

Figure 33: Oracle FS System Login screen
Note: You can set the username and password using the Oracle FS SystemManager (GUI).
4 Review the system status summary.The system name, the model number, the serial number, the system status,and the version of the installed software are displayed after logging in tothe GUI.
5 Verify if there are any alerts or recent events for the Oracle FS System byclicking on the Alerts and Events tab.Current system alerts are displayed at the top of the Alerts and EventsOverview page.
Note: If any system alerts are displayed, use the Oracle FS System Manager(GUI) to gather more information about the alerts and to manage the alerts.
Verify System Status Using the FS System ManagerYou can verify the status of an Oracle FS System, by using the Oracle FS SystemManager (GUI).
1 Start the GUI,
The GUI client should have been downloaded on the Pilot while setting upCall-Home.The login screen appears.
2 For Oracle FS name, specify the Oracle FS System to which you want toconnect.
Valid values:
• IP address of the Pilot management controller
• Name of the Oracle FS System as configured in your site namingservices for the Pilot.
3 Log in as the primary administrator.
Valid values:
Complete the Installation
98

• Login name: administrator or another administrator or supportaccount
• Default password: pillar or the current password if it has beenchanged.
Note: If the Oracle FS System was upgraded during the installation, youwill receive a warning message after entering the login information if yourGUI client does not match the installed software version. You might theneither download the new version of the client or indicate that you wish tocontinue with your current client version.
Figure 34: Oracle FS System Manager login screen
4 Click Login.
Note: If any system alerts exist during login, the dashboard screen directsyour to the alerts.
5 (optional) When prompted, enter a new password .
Note: You can log in to the Oracle FS System Manager with the defaultpassword even when the prompt to change the password appears.
Note: Verify that there is a valid e-mail address for the primaryadministrator account after the installation of the Oracle FS System. Alsoverify that a valid email server is configured to allow password recovery.
Note: Obtain the password from the Site Preparation Checklist or use thedefault passwords for the system. Oracle recommends that the customerchange the default passwords for security purposes. Be sure that theprimary system administrator also obtains this password. Keep thepassword secure.
Note: Oracle recommends that you set up an additional Type 1Administrator account when you install the Oracle FS System. A Type 1
Complete the Installation
99

Administrator can modify account passwords without knowing theprevious password for any accounts.
6 Verify the system status by navigating to System > System Information.
A summary of the system status is displayed along with a system statusicon displayed in the bottom left corner of the status bar. The overall statusis displayed by a green, red, or yellow icon. The round green icon indicatesthat all hardware components in the Oracle FS System have successfullystarted and are operating normally.
If the System Status icon is a yellow triangle (which indicates a warningcondition) or a red circle (which indicates a critical condition), clickSystem > Hardware > Controllers/ > Pilots/ > Drive Enclosures and notewhich components do not display a green icon and do not have a Normalstatus. Clicking on the status icon, provides the Hardware status summaryfrom which you can select individual hardware types.
7 Verify the system summary by navigating to System > Alerts and Events >Status Summary.
Note: If the overall system status is a yellow triangle, selecting the yellowtriangle displays all system alerts along with a timestamp that indicates thetime of the most recent system alert. If there is a system alert, you willautomatically be directed to the system dashboard screen that displays allexisting alerts. Click on the flashing yellow triangle to go to the dashboardthat shows recent alerts and events.
All the system components and their hardware and software status iconsare displayed. Detailed information for any system component is availableby selecting any of the icons.
Note: Selecting the Oracle FS System hardware status image displays thehardware status. The hardware status summary screen displays thehardware types and the summary status for each hardware type. Clickingon any of the hardware icons displays the complete list for each hardwaretype and the status of each hardware item.
8 Verify the system events by navigating to System > Alerts and Events >Event Log.
CAUTION: Setting a filter does not display any events that do not matchthe filter options. Clear the filter if checking for a particular event class sothat others with the same login can also see the event log.
9 Verify the installed version of the software, as well as any other stagedsoftware on the system by navigating to Support > Software andFirmware.
If the combination of software and firmware versions that are installed onthe various widgets of the Oracle FS System are invalid, the systemdisplays a warning message and generates an alert.
10 Confirm that all of the system components are powered on and that all ofthe cables are correctly and securely connected.
Complete the Installation
100

If a cabling problem exists, the Oracle FS System might show the affectedsystem components with a warning status and a topology alert.
If a flashing inverted triangle appears in the lower left corner of the statusbar, click the triangle to view the system alerts.
If there is a connection error, verify that the cables are fully seated andproperly connected. If the error persists, contact Oracle Customer Support.
Note: The Hardware Overview screen helps you identify the error through thefollowing icons for the following items:
• Private management interface (PMI) links
• Backend SAS Interconnect cabling errors
• Oracle FS System components
Complete the Installation
101

APPENDIX A
Wiring Diagrams
Pilot Management Interface Wiring DiagramCabling the Pilot management interface involves connecting the two Pilot nodes,connecting the Pilots to the Controllers, and connecting the Pilots to the customermanagement network.
The following figure illustrates the cabling of the Pilot management interface.
Note: The colors of the cables that are shown in the figure are for illustrationpurposes and do not reflect the actual colors of the cables that are used to cablethe Oracle FS System.
Figure 35: Pilot wiring diagram (management connectivity)
Legend 1 NET 3 port to customer managementnetwork
4 NET 0 port to NET 0 port
2 NET MGT port to NET 2 port 5 NET 1 port to Controller NET3 port
3 SER MGT port to SER MGT port
102

Controller Wiring DiagramsThe following figure illustrates the cabling of the Controller managementinterface.
Note: The colors of the cables that are shown in the figure are for illustrationpurposes and do not reflect the actual colors of the cables that are used to cablethe Oracle FS System.
Figure 36: Controller wiring diagram (management connectivity)
Legend 1 NET 3 port to the PilotNET 1 port
3 NET 2 port to NET 2 port
2 Cluster interconnectnetwork port (labeled as <-- - >) to NET MGT port
The following figure illustrates the cabling for SAN connectivity to the customerdata network.
Note: The colors of the cables that are shown in the figure are for illustrationpurposes and do not reflect the actual colors of the cables that are used to cablethe Oracle FS System.
Wiring Diagrams
103

Figure 37: Controller wiring diagram (customer data network)
Legend 1 PCIe3 slot 1, HBA forSAN connectivity (FConly)
3 PCIe3 slot 5, HBA for SAN connectivity (FConly)
2 PCIe3 slot 4, HBA forSAN connectivity (FConly)
SAS Wiring Diagrams (Controller to Controller)Complete back-end data path redundancy is accomplished by providingController 1 and Controller 2 access to the data path channels for I/O module 0and I/O module 1 at all times during normal operations:
• The SAS connections between the Controller HBAs provide access to thedata path channels through HBA port 2 and port 3.
• Controller 1 accesses the data path channels for I/O module 0 throughdirect SAS connections to the Drive Enclosure strings through HBA port 1and port 2.
• Controller 1 accesses the data path channels for I/O module 1 throughController 2, HBA port 2 and port 3.
• Controller 2 accesses the data path channel for I/O module 1 through directSAS connections to the Drive Enclosure strings through HBA port 1 andport 2.
• Controller 2 accesses the data path channels for I/O module 0 throughController 1, HBA port 2 and port 3.
Wiring Diagrams
104

The following figure illustrates the SAS cabling between the Controllers.
Note: The colors of the cables that are shown in the figure are for illustrationpurposes and do not reflect the actual colors of the cables that are used to cablethe Oracle FS System.
Figure 38: SAS wiring diagram (Controller to Controller)
Legend 1 PCIe3 slot 3, SAS HBAport 2 and port 3
3 PCIe3 slot 2, SAS HBA port 2 and port 3
2 PCIe3 slot 6, SAS HBAport 2 and port 3
SAS Wiring Diagrams (Controllers to Drive Enclosures)All of the SAS cables that connect Controller 1 to the Drive Enclosures attach to I/O module 0, port 0 on the Drive Enclosures. All of the SAS cables that connectController 2 to the Drive Enclosures attach to I/O module 1, port 0 on the DriveEnclosures
The following figure illustrates the SAS cabling of the Controllers in a basesystem that is configured with two Drive Enclosure strings.
Note: The colors of the cables that are shown in the figure are for illustrationpurposes and do not reflect the actual colors of the cables that are used to cablethe Oracle FS System.
Wiring Diagrams
105

Figure 39: SAS wiring diagram for Controllers to Drive Enclosures (base)
Legend 1 PCIe3 slot 3, SAS HBAsport 2 and port 3 connectthe Controllers
3 PCIe3 slot 3, SAS HBAs port 1 connects toDrive Enclosure string 2
2 PCIe3 slot 3, SAS HBAsport 0 connects to DriveEnclosure string 1
The following figure illustrates the SAS cabling of the Controllers in aperformance system configured with six Drive Enclosure strings.
Note: The colors of the cables that are shown in the figure are for illustrationpurposes and do not reflect the actual colors of the cables that are used to cablethe Oracle FS System.
Wiring Diagrams
106

Figure 40: SAS wiring diagram for Controllers to Drive Enclosures (performance)
Legend 1 PCIe3 slot 2, SAS HBAs port 0connects to Drive Enclosurestring 3
6 PCIe3 slot 6, SAS HBAs port 1 connectsto Drive Enclosure string 5
2 PCIe3 slot 2, SAS HBAs port 1connects to Drive Enclosurestring 6
7 PCIe3 slot 2, SAS HBAs port 2 and port3 connect the Controllers
3 PCIe3 slot 6, SAS HBAs port 0connects to Drive Enclosurestring 2
8 PCIe3 slot 6, SAS HBAs port 2 and port3 connect the Controllers
4 PCIe3 slot 3, SAS HBAs port 0connects to Drive Enclosurestring 1
9 PCIe3 slot 3, SAS HBAs port 2 and port3 connect the Controllers
5 PCIe3 slot 3, SAS HBAs port 1connects to Drive Enclosurestring 4
Drive Enclosure Wiring DiagramsSAS cables establish the Backend SAS Interconnect of an Oracle FS System. SAScables connect Drive Enclosures to Drive Enclosures and the Controller SAS HBAports to the Drive Enclosure strings.
Usage Conventions for Cabling Drive EnclosureThe following usage conventions summarize how the ports are used whencabling Drive Enclosures:
Wiring Diagrams
107

• Controller 1 HBA ports 0 and ports 1 connect to the first Drive Enclosure (I/O module 0, port 0) in a string.
• Controller 2 HBA ports 0 and ports 1 connect to the third Drive Enclosure(I/O module 1, port 0) in strings that support three or more DriveEnclosures.
• Controller 2 HBA ports 0 and ports 1 connect to the second DriveEnclosure (I/O module 1, port 0) or to the first Drive Enclosure (I/O module1, port 0) in strings that support less than three Drive Enclosures.
• I/O module 0, port 1 connects to the second Drive Enclosure (I/O module 0,port 0) and to the third Drive Enclosure (I/O module 0, port 0) in a string.
• I/O module 1, port 2 connects to the fourth Drive Enclosure (I/O module 1,port 0) and to the fifth Drive Enclosure (I/O module 1, port 0) in a string.
Note: The Oracle FS System supports three hops from the HBAs.
Drive Enclosure String DistributionDrive Enclosures are distributed among the strings so that all of the availableSAS HBA ports designated for Drive Enclosures are used as equally as possible.The sequence of distributing strings is based on the performance capabilities ofthe drives installed in the Drive Enclosures.
For optimal performance, first distribute the Drive Enclosures with the highestperformance drives across the strings and then continue sequentially until all ofthe Drive Enclosures are distributed to the strings. The number of DriveEnclosures on the shortest string should not differ from the number DriveEnclosures on the longest string by more than one Drive Enclosure.
The following table summarizes the string distribution for systems with one SASHBA per Controller. A system with one SAS HBA per Controller can have one to10 Drive Enclosures distributed across two strings.
Table 27: One SAS HBA per Controller
DE Add Order Stringnumber
SAS HBA PCIslot
Port on SASHBA
DE number withinstring
1 1 Slot 3 0 1
2 2 Slot 3 1 1
3 1 Slot 3 0 2
4 2 Slot 3 1 2
5 1 Slot 3 0 3
6 2 Slot 3 1 3
Wiring Diagrams
108

Table 27: One SAS HBA per Controller (continued)
DE Add Order Stringnumber
SAS HBA PCIslot
Port on SASHBA
DE number withinstring
7 1 Slot 3 0 4
8 2 Slot 3 1 4
9 1 Slot 3 0 5
10 2 Slot 3 1 5
The following table summarizes the string distribution for systems with two SASHBAs per Controller. A system with two SAS HBAs per Controller can have oneto 20 Drive Enclosures distributed across four strings.
Table 28: Two SAS HBAs per Controller
DE Add Order Stringnumber
SAS HBA PCIslot
Port on SASHBA
DE number withinstring
1 1 Slot 3 0 1
2 2 Slot 6 0 1
3 3 Slot 3 1 1
4 4 Slot 6 1 1
5 1 Slot 3 0 2
6 2 Slot 6 0 2
7 3 Slot 3 1 2
8 4 Slot 6 1 2
9 1 Slot 3 0 3
10 2 Slot 6 0 3
11 3 Slot 3 1 3
12 4 Slot 6 1 3
13 1 Slot 3 0 4
14 2 Slot 6 0 4
15 3 Slot 3 1 4
Wiring Diagrams
109

Table 28: Two SAS HBAs per Controller (continued)
DE Add Order Stringnumber
SAS HBA PCIslot
Port on SASHBA
DE number withinstring
16 4 Slot 6 1 4
17 1 Slot 3 0 5
18 2 Slot 6 0 5
19 3 Slot 3 1 5
20 4 Slot 6 1 5
The following table summarizes the string distribution for systems with threeSAS HBAs per Controller. A system with three SAS HBAs per Controller canhave one to 30 Drive Enclosures distributed across six strings.
Table 29: Three SAS HBAs per Controller
DE Add Order Stringnumber
SAS HBA PCIslot
Port on SASHBA
DE number withinstring
1 1 Slot 3 0 1
2 2 Slot 6 0 1
3 3 Slot 2 0 1
4 4 Slot 3 1 1
5 5 Slot 6 1 1
6 6 Slot 2 1 1
7 1 Slot 3 0 2
8 2 Slot 6 0 2
9 3 Slot 2 0 2
10 4 Slot 3 1 2
11 5 Slot 6 1 2
12 6 Slot 2 1 2
13 1 Slot 3 0 3
14 2 Slot 6 0 3
Wiring Diagrams
110

Table 29: Three SAS HBAs per Controller (continued)
DE Add Order Stringnumber
SAS HBA PCIslot
Port on SASHBA
DE number withinstring
15 3 Slot 2 0 3
16 4 Slot 3 1 3
17 5 Slot 6 1 3
18 6 Slot 2 1 3
19 1 Slot 3 0 4
20 2 Slot 6 0 4
21 3 Slot 2 0 4
22 4 Slot 3 1 4
23 5 Slot 6 1 4
24 6 Slot 2 1 4
25 1 Slot 3 0 5
26 2 Slot 6 0 5
27 3 Slot 2 0 5
28 4 Slot 3 1 5
29 5 Slot 6 1 5
30 6 Slot 2 1 5
Drive Enclosure SAS Wiring DiagramsThe following wiring diagrams show the cabling of Drive Enclosures for onecomplete string in a system. The same cabling pattern applies to all of the stringsin a system. Remember to distribute Drive Enclosures among the strings so thatall of the available SAS HBA ports designated for Drive Enclosures are used asequally as possible.
Note: The following wiring diagrams show DE2-24P Drive Enclosures. Note theposition of the SAS ports and the reverse orientation of the two I/O modules onthe DE2-24P Drive Enclosures. Conversely, the two I/O modules on the DE2-24CDrive Enclosures have an identical orientation. Remember the orientation of theI/O modules and the location of the SAS ports as you cable the system.
Wiring Diagrams
111

The following figure illustrates the SAS cabling for one Drive Enclosure stringcontaining one Drive Enclosure.
Figure 41: SAS wiring diagram for one string with one Drive Enclosure
The following figure illustrates the SAS cabling in a system that is configuredwith one Drive Enclosure string containing two Drive Enclosures. The samecabling pattern applies to all of the strings in a system. Remember to distributeDrive Enclosures among the strings so that all of the available SAS HBA portsdesignated for Drive Enclosures are used as equally as possible.
Wiring Diagrams
112

Figure 42: SAS wiring diagram for one string with two Drive Enclosures
The following figure illustrates the SAS cabling in a system that is configuredwith one Drive Enclosure string containing three Drive Enclosures. The samecabling pattern applies to all of the strings in a system. Remember to distributeDrive Enclosures among the strings so that all of the available SAS HBA portsdesignated for Drive Enclosures are used as equally as possible.
Wiring Diagrams
113

Figure 43: SAS wiring diagram for one string with three Drive Enclosures
The following figure illustrates the SAS cabling in a system that is configuredwith one Drive Enclosure string containing four Drive Enclosures. The samecabling pattern applies to all of the strings in a system. Remember to distributeDrive Enclosures among the strings so that all of the available SAS HBA portsdesignated for Drive Enclosures are used as equally as possible.
Wiring Diagrams
114

Figure 44: SAS wiring diagram for one string with four Drive Enclosures
The following figure illustrates the SAS cabling in a system that is configuredwith one Drive Enclosure string containing five Drive Enclosures. The samecabling pattern applies to all of the strings in a system. Remember to distributeDrive Enclosures among the strings so that all of the available SAS HBA portsdesignated for Drive Enclosures are used as equally as possible.
Wiring Diagrams
115

Figure 45: SAS wiring diagram for one string with five Drive Enclosures
Wiring Diagrams
116

APPENDIX B
Oracle FS System Data
System Packaging and TransportationAll packaging and transportation are tested in accordance with Oracle ShippingPackage Test, Doc. No. 950-1291-01.
System EnvironmentalsTable 30: System altitude specifications
Mode Elevation
Operational –196 to 10498.7 feet (–60 to 3,200 meters)
Non-operational
–196 to 40026.2 feet (–60 to 12,200 meters)
Table 31: System temperature and humidity specifications
Mode Ambienttemperature
Non-condensinghumidity
Max wet bulbtemperature
Gradient
Operational Up to 7000–feetelevation:+41 to 104°F(+5 to 40°C)
Up to 10,000–feet elevation:+41 to 95°F(+5 to 35°C)
10–85%
10%/hr gradient
86°F
(30°C)
36°F/hr
(20°C/hr)
Non-operational
-45.4 to 154.4 °F
(-43 °C to 68 °C)
5–95%
10%/hr gradient
104°F
(40°C)
54°F/hr
(30°C/hr)
117

APPENDIX C
Oracle FS System LED Status
Oracle FS System LEDsAn Oracle FS System includes LEDs to indicate the status of the hardwarecomponents. To restore reliability to the Oracle FS System, locate the specificfailed component so that you can replace it. Hardware LED configuration helpsyou identify the failed component.
Important: If you cannot locate the hardware component that must be replaced,contact Oracle Customer Support.
The Guided Maintenance feature of the Oracle FS System Manager triggers thechassis with the failed component to blink, or it triggers all of the other chassis toblink, except for the one with the failed component. This blinking pattern helpsyou to identify component status.
Note: LED interpretations in this appendix apply to a system after it has beenpowered on.
Related LinksPilot LED IndicatorsDrive Enclosure LED IndicatorsController LED Indicators
Controller LED IndicatorsThe LED alarm assembly is a high-level status indicator of the Controller andController components. Use these diagnostic LEDs to determine if a componenthas failed in the Controller. The LED alarm assembly also includes a powerbutton to power on the Controller. Besides, the LED alarm assembly there is theController Identification Display (CID) that identifies the Controller by itsnumeric identifier.
The following figure shows the front display panel of the LED alarm assemblyon the Controller:
118

Figure 46: LED alarm assembly front display
Legend 1 Chassis identification LED or LocatorLED
5 Service processor LEDs
2 Service Action Required LED orCaution or Fault LED
6 Back power supply LED
3 Motherboard or Power or OK LED 7 Fault or Alarm LEDs (Critical,Major, Minor)
4 Power switch 8 User Alarm LED
The following table provides status information on the LEDs on the front displaypanel of the LED alarm assembly on the Controller:
Table 32: Controller LED status and description (front panel)No. LED LED color Status1 Chassis
identificationLED
or
Locator LEDbutton
White The Locator LED can be turned onto identify a particular system.When on, the LED blinks rapidly.Pressing and holding the Locatorbutton for 5 seconds initiates a testof all LEDs in the LED assembly.
2 ServiceActionRequiredLED
Amber Indicates that service is required.Under some fault conditions,individual component fault LEDsare turned on in addition to theService Required LED.
Oracle FS System LED Status
119

Table 32: Controller LED status and description (front panel) (continued)No. LED LED color Status3 Power or OK
LEDGreen Indicates these conditions:
• Off – Indicates that thesystem is not running in itsnormal state. System powermight be off. The SP mightbe running.
• Steady on – Indicates thatthe system is powered onand is running in its normaloperating state. No serviceactions are required.
• Fast blink: Indicates that thesystem is running instandby mode and can bequickly returned to fullfunction.
• Slow blink: Indicates thata normal but transitoryactivity is taking place.Slow blinking mightindicate that systemdiagnostics are runningor that the system isbooting.
5 ServiceprocessorLED
Green Indicates the state of the serviceprocessor:
• Flashing: Indicates the SPis booting.
• Steady: Indicates a steadystate, no service action isrequired.
6 Back powersupply LED
Amber Indicates the state of the powersupplies:
• Off – Indicates a steadystate, no service action isrequired.
• On – Indicates a faultwith one of the powersupplies.
Oracle FS System LED Status
120

Table 32: Controller LED status and description (front panel) (continued)No. LED LED color Status7 Fault or
Alarm LEDs
(Critical,Major,Minor)
• Critical AlarmLED : Red
• Major AlarmLED: Red
• Minor AlarmLED: Amber
Note: The alarm indicators appearon the front panel of the Controllerbut are not applicable for theOracle FS System.
8 User AlarmLED
Amber Indicates a user alarm condition.
Note: The alarm indicators appearon the front panel of the Controllerbut are not applicable for theOracle FS System.
The following figure shows the LEDs at the back of the Controller:
Figure 47: Controller back LEDs
Legend 1 Power supply status LEDs
2 Chassis Status LEDs
3 Network management LED
4 Net0 to Net3 status LEDs
The following table provides information on the LEDS at the back of theController:
Oracle FS System LED Status
121

Table 33: Controller LED status and description (back panel)No. LED LED color Status1 Power
supplystatus LEDs:
• (Top)OutputPower OKLED: Green
• (Middle)ServiceActionRequiredLED:Amber
• (Bottom)AC or DCInput PowerOK LED:Green
• Output Power OK LED:Indicates that output power iswithout fault.
• Service Action Required LED:Indicates that service for thepower supply is required.
• AC or DC Input Power OKLED: Indicates that inputpower is without fault.
2 ChassisStatus LEDs
• (Left)LocatorLED andbutton:White
• (Center)ServiceActionRequiredLED:Amber
• (Right)Main PowerOK LED:Green
• Locator LED and button: TheLocator LED can be turned onto identify a particular system.
• Service Action Required LED:Indicates that service isrequired. Under some faultconditions, individualcomponent fault LEDs areturned on in addition to theService Required LED.
• Main Power OK LED: Indicatesthese conditions:
• Off – System is notrunning in its normalstate. System powermight be off. The SPmight be running.
• Steady on – System ispowered on and isrunning in its normaloperating state. Noservice actions arerequired.
• Fast blink – System isrunning in standby mode
Oracle FS System LED Status
122

Table 33: Controller LED status and description (back panel) (continued)No. LED LED color Status
and can be quicklyreturned to full function.
• Slow blink – A normalbut transitory activity istaking place. Slowblinking might indicatethat system diagnosticsare running or that thesystem is booting.
Oracle FS System LED Status
123

Table 33: Controller LED status and description (back panel) (continued)No. LED LED color Status3 Network
managementLED
• (Left) Linkand ActivityLED: Green
• (Right)Speed LED:Green,amber, orOFF
Indicates these conditions:
• Link and Activity LED:• On or blinking – A link is
established.• Off – No link is
established.• Speed LED:
• On or blinking – The linkis operating as a 100-Mbps connection.
• Off – The link isoperating as a 10-Mbpsconnection.
4 Net0 to Net3status LEDs
• (Left) Linkand ActivityLED: Green
• (Right)Speed LED:Amber
Indicates the state of the serviceprocessor:
• Link and Activity LED:• On or blinking – A link is
established.• Off – No link is
established.• Speed LED:
• Amber – The link isoperating as a Gigabitconnection (1000-Mbps).
• Green – The link isoperating as a 100-Mbpsconnection.
• Off – The link isoperating as a 10-Mbpsconnection or there is nolink.
Oracle FS System LED Status
124

Controller Power Supply LED IndicatorsThe LED indicators on the power supplies are at the left of the fan of each powersupply and provide power activity status.
Table 34: Controller power supply LED status and descriptionIcon Location Name Color Status and meaning
Top OK Green • On – Power supply isfunctional without fault.
• Off – Power supply is off orinitializing.
• Flashing – No function.
Middle AttentionServiceRequired
Amber • On – Normal fault detected.• Off – No faults detected.• Flashing – No function.
Bottom AC or DC Green • On – Input power presentand good.
• Off – Input power notpresent.
• Flashing – No function.
Controller Fan LED IndicatorsA single bi-color LED represents the status of each fan module. The LEDs are onthe motherboard near each fan module, and are visible from the back panel ofthe Controller when you look through the grill below the risers.
Table 35: Controller fan LED status and descriptionColor Status and meaning
Green The fan module is functional without fault.
Amber The fan module has experienced a fault.
Note: There are two LEDs near the status LED for the third fan module. Do notconfuse the FPGA Good and FPGA Diagnostic LEDs with the status LED for thethird fan module.
Oracle FS System LED Status
125

Controller ESM LED IndicatorsThree LEDs represent the status of each energy storage module (ESM). The LEDsare above the release button of each drive.
Figure 48: Controller drive LEDs
Legend 1 Ready to Remove LED
2 Attention Service Required LED
3 OK/Activity LED
This following table describes the functionality of the ESM LEDs:
Oracle FS System LED Status
126

Table 36: Controller ESM LED status and descriptionIcon Location Name Color Status and meaning
Top Ready to Remove Blue • On – ESM can beremoved as ahot-swapoperation.
• Off – Do notremove the ESM.
• Flashing – ESMis initializing.
Middle Attention ServiceRequired
Amber • On – Normalfault is detected.
• Off – No faultsare detected.
• Flashing – Nofunction.
Bottom OK/Activity Green • On – ESM isfunctionalwithout fault.
• Off – ESM is offor initializing.
• Flashing – ESMread and writeactivity.
Drive Enclosure LED IndicatorsThe LED indicators on the operator panel of the Drive Enclosures provide systemstatus. The LED display identifies the Drive Enclosure by its numeric identifier.
The following figures show the operator panel LEDs for both types of DriveEnclosure.
Oracle FS System LED Status
127

Figure 49: Operator panel LEDs (DE2-24P Drive Enclosure)
Legend 1 System power indicator 3 Locate indicator and logical faultindicator
2 Module fault indicator 4 Chassis ID
Figure 50: Operator panel LEDs (DE2-24C Drive Enclosure)
Legend 1 System power indicator 3 Locate indicator and logical faultindicator
2 Module fault indicator 4 Chassis ID
The following table provides status information on the operator panel LEDs.
Oracle FS System LED Status
128

Table 37: Drive Enclosure LED status and description (operator panel)
LED LED color Status
System powerindicator
Green The status is normal.
Module faultindicator
Amber A module fault is present.
Locate indicator White The DE is located.
LED display Green number between 01and 30
The numeric identifier of a DE isdisplayed.
Power Cooling Module LED IndicatorsThe LED indicators on the power cooling modules provide power activity status,fan and temperature fault conditions, and firmware upgrade status.
The following figure shows the power cooling module LEDs.
Figure 51: Power cooling module LEDs
Legend 1 Status indicator 3 Fan fail indicator
2 AC fail indicator 4 DC output fail indicator
The following table provides status information on the power cooling moduleLEDs.
Oracle FS System LED Status
129

Table 38: Drive Enclosure LED status and description (power cooling module)
Status Status indicator(green)
Fan failindicator(amber)
AC fail indicator(amber)
DC failindicator(amber)
AC power is notavailable on eitherpower coolingmodule.
Off Off Off Off
AC power is notavailable on thispower coolingmodule.
Off Off On On
AC power ispresent, and thestatus of the powercooling module isnormal.
On Off Off Off
The power coolingmodule fan isoutside ofacceptable limits.
Off On Off Off
The power coolingmodule fan failed.
Off On Off Off
A fault is present(over temperature,over volts, overcurrent).
Off On On On
The power coolingmodule is instandby mode.
Flashing Off Off Off
The power coolingmodule isdownloadingfirmware.
Off Flashing Flashing Flashing
I/O Module LED IndicatorsThe LED indicators on the I/O modules provide power activity status, locateindicators, fault conditions, and host port activity.
The following figure shows the I/O module LEDs.
Oracle FS System LED Status
130

Figure 52: I/O module LEDs
Legend 1 Fault and locate indicator 3 Host port activity indicator
2 Power and OK indicator
The following table provides status information on the I/O module LEDs.
Table 39: Drive Enclosure LED status and description (I/O module)
Status Fault and locateindicator (amber)
Power and OKindicator (green)
Host port activity(green)
The status isnormal.
Off On Not applicable
An I/O modulefault is present.
On Off Not applicable
The I/O module islocated.
Flash On Not applicable
A vital productdata (VPD) error ispresent.
Not applicable Flash Not applicable
The host port is notconnected.
Not applicable Not applicable Off
The host port is notactive.
Not applicable Not applicable On
The host portactivity is normal.
Not applicable Not applicable Flashing
Drive LED IndicatorsThe LED indicators on the Drive Enclosure drives provide power activity status,locate indicators, and fault conditions of each drive.
The following figures show the drive LEDs for both types of Drive Enclosure.
Oracle FS System LED Status
131

Figure 53: Drive LEDs (DE2-24P Drive Enclosure)
Legend 1 Power and activity indicator 2 Drive fault indicator
Figure 54: Drive LEDs (DE2-24C Drive Enclosure)
Legend 1 Power and activity indicator 2 Drive fault indicator
The following table provides status information on the drive LEDs.
Table 40: Drive Enclosure LED status and description (drives)
Status Power/Activity Indicator(green)
Drive Fault indicator(amber)
Drive is installedand operational.
On and blinking with startupor activity
Off
The drive is located. On Flash one second on and onesecond off
A drive fault ispresent.
On On
In addition to the continuousamber light on the Drive FaultLED, the Locate LED on theoperator panel is also acontinuous amber light.
Oracle FS System LED Status
132

Table 40: Drive Enclosure LED status and description (drives) (continued)
Status Power/Activity Indicator(green)
Drive Fault indicator(amber)
A failure occurredin the power controlcircuit.
Off On
In addition to the continuousamber light on the Drive FaultLED, the Module Fault LED onthe operator panel is also acontinuous amber light.
A failure occurredin the disk array.
On Flash three seconds on and onesecond off.
In addition to the flashingamber light on the Drive FaultLED, the Locate LED on theoperator panel is also acontinuous amber light.
Pilot LED IndicatorsThe Pilot LEDs are on the front panel of the Pilot. Use these diagnostic LEDs todetermine if a component has failed in the Pilot.
The following figure shows the LEDs at the front of the Pilot:
Figure 55: LEDs at the front of the Pilot
Legend 1 Locator LED / Locator button: white 5 Power button
2 Service Action Required LED or Caution orFault LED: Amber
6 Fan fault LED: amber
3 OK LED: green 7 Power supply fault LED:amber
4 Service processor LED: green
The following figure shows the LEDs at the back of the Pilot:
Oracle FS System LED Status
133

Figure 56: LEDs at the back of the Pilot
Legend 1 Poser supply 0 (PS0) 5 Locator LED: white
2 Power supply LEDs: Service Required LED(amber) and AC OK LED (green)
6 Service Required LED:amber
3 Power supply 1 (PS1) 7 Power or OK LED:green
4 Power supply LEDs: Service Required LED(amber) and AC OK LED (green)
There are six, system-level status indicators (LEDs), that are on the Pilot frontpanel and the Pilot back panel. The following table provides status informationon these Pilot LEDs:
Table 41: Pilot LED status and descriptionLED Icon LED color Status
LocatorLED button
White • OFF – Pilot is operating normally• FAST BLINK – To locate a particular
system quickly and easily.• Pressing the Locate button toggles
the LED fast blink on or off.
ServiceActionRequiredLED
Amber • OFF – Normal operation• STEADY ON – Fault present on the
Pilot. This LED lights whenever afault indicator lights for a Pilotreplaceable component.
Note: When this indicator lights up, there is asystem console message that includes arecommended service action.
Oracle FS System LED Status
134

Table 41: Pilot LED status and description (continued)LED Icon LED color Status
Power orOK LED
Green Indicates the operational state of the chassis.This indicator can be in the following states:
• OFF – AC power is not present.
• STEADY BLINK – Standby power is on,but the chassis power is off.
• SLOW BLINK – Startup sequence hasbeen initiated on the host. Thispattern begins soon after you poweron the Pilot. This status indicateseither: (1) POST code checkpoint testsare running on the Pilot host system,or (2) the host is transitioning fromthe powered-on state to the standbystate on shutdown.
• STEADY ON – The Pilot is poweredon, and all host POST codecheckpoint tests are complete. ThePilot is in one of the following states:
• 1) The Pilot host is booting theoperating system (OS).
• 2) The Pilot host is running theOS.
ServiceProcessorLED
Green • OFF – Service processor (SP) is notrunning.
• SLOW BLINK – SP is booting.• STEADY ON – SP is fully
operational.
Top Fan,Processor,MemoryFailure LED
Amber Indicates that one or more of the internal fanmodules, processors, or memory DIMMs havefailed.
• OFF – Indicates steady state; noservice is required.
• STEADY ON – Indicates servicerequired; service the fan modules,processors, or memory DIMMs.
Oracle FS System LED Status
135

Table 41: Pilot LED status and description (continued)LED Icon LED color Status
Rear PowerSupplyFailure LED
Amber Indicates that one of the Pilot power supplieshas failed.
• OFF – Indicates steady state; noservice is required.
• STEADY ON – Indicates servicerequired; service the power supply.
OverTemperature WarningLED
Amber • OFF – Normal operation; no serviceis required.
• STEADY ON – The system isexperiencing an over-temperaturewarning condition.
Note: This is a warning indication, not a fatalover temperature. Might result in the systemoverheating and shutting down unexpectedly.
Pilot Drive LED IndicatorsThere are three LEDs on each Pilot drive. There is only one drive in each Pilot.
Table 42: Pilot drive LED status and descriptionLED Icon LED
colorStatus
OK toRemove
Blue The storage drive can be removed safely during a hot-swap operation.
ServiceRequired
Amber • OFF – Normal operation.• STEADY ON – The system has detected a
fault with the storage drive.
OK/Activity
Green • OFF – Power is off or the system does notrecognize the installed drive.
• STEADY ON – The drive is engaged and isreceiving power.
• STEADY BLINK – There is disk activity.Indicator blinks on and off to indicateactivity
Oracle FS System LED Status
136

Pilot Fan LED IndicatorsEach Pilot fan module has one bicolored LED. These LEDs are on the Pilot sidewall next to the fan modules and are visible when the top cover fan door is open.
Table 43: Pilot fan LED status and descriptionLED Icon LED color Status
FanStatusLED
NONE Bicolored:Amber/Green
• Amber – There is a fan fault.• Green – Fan is properly installed and
operating correctly. No fan errors detected.
Pilot Port LED IndicatorsThe Pilot has LED indicators for Network Management ports and the Ethernetports.
Network Management Port Status LEDsThe Pilot has one 10/100BASE-T Ethernet management domain interface, labeledNET MGT. There are two LEDs on this port. These indicators are visible from theback of the Pilot.
Table 44: Network management port LED status and descriptionLED Location LED
colorStatus
Linkspeed
Top left AmberorGreen
• Amber on - 10BASE-T link• Green on - 100BASE-T link• Off - No link or link down• Flashing - No function
Activity Topright
Green • On - No function• Off - No activity• Flashing - Packet activity
Ethernet Port Status LEDsThe Pilot has four Ethernet ports (NET 3, NET 2, NET 1, NET 0). There are twoLEDs on each port. These LEDs are visible from the back of the Pilot.
Oracle FS System LED Status
137

Table 45: Ethernet port LED status and descriptionLED Location LED color Status
Linkspeed
Top left Green • On - No function.• Off - No activity• Flashing - Packet activity
Activity Topright
Amber orGreen
• Amber on - 100BASE-T link• Green on - 1000/10GBBASE-T link• Off - No link or link down• Flashing - No function
Pilot Motherboard LED IndicatorsThe Pilot motherboard and modules that are installed on the motherboardcontain several LEDs.
Table 46: Motherboard LED status and descriptionLED Description
DDR3DIMM FaultLED
Each of the 16 DDR3 DIMM slots on the motherboard has an amberfault LED associated with it. If a DIMM is faulty, pressing the FaultRemind button on the motherboard signals the service processor tolight the fault LEDs associated with the faulted DIMMs.
ProcessorFault LED
The motherboard includes a fault status indicator (LED) next to each ofthe two processor (CPU) sockets.
These LEDs indicate when a processor is faulty. For example, if onreboot the BIOS detects that there are uncorrectable processor errorsrecorded in the machine check architecture (MCA) registers apparentlyleft over from the previous boot, then the BIOS records and diagnosesthese errors.
If it is determined that a processor is faulty, pressing the Fault Remindbutton on the motherboard signals the service processor to light thefault LED associated with the faulted processor.
Oracle FS System LED Status
138

Table 46: Motherboard LED status and description (continued)LED Description
FaultRemindPower LED
This LED is located next to the Fault Remind button and is poweredfrom the super capacitor that powers the fault LEDs on themotherboard. This LED lights to indicate that the fault remind circuitryis working properly in cases where no components have failed and, as aresult, none of the component fault LEDs illuminate.
StandbyPower GoodLED
The service instructions for all internal components require that all ACpower is removed from the power supplies before the top cover of thePilot is removed.
This green LED is labeled STBY PWRGD and is located on the back ofthe Pilot near PCIe slot 2.
This LED lights to inform a service technician that the motherboard isreceiving standby power from at least one of the power supplies. ThisLED is provided to help prevent service actions on the Pilot’s internalcomponents while the AC power cords are installed and power is beingsupplied to the Pilot.
Pilot Power Supply LED IndicatorsThere are two LEDs on each power supply. These LEDs are visible from the backof the Pilot.
Table 47: Pilot Drive LED status and descriptionLED Icon LED
colorStatus
AC OK/DC OK
Green • OFF – No AC power is present.• SLOW BLINK – Normal operation. Input
power is within specification. DC outputvoltage is not enabled.
• STEADY ON – Normal operation. Input ACpower and DC output voltage are withinspecification.
ServiceRequired
Amber
• OFF – Normal operation; no service required.• STEADY ON – The power supply (PS) has
detected a PS fan failure, PS over-temperature, PS over current, or PS over orunder voltage.
Oracle FS System LED Status
139

IndexAactivate
Auto Service Request feature 81additional resources 11administrator 1 accounts
configure email 78create 77
altitude specifications 117ASR, see Auto Service Request (ASR) featureAuto Service Request (ASR) feature
Call-Home server settings 82customer support identifiers (CSI) 80default Call-Home settings 84description 80how to
activate 85used with
Call‑Home feature 81My Oracle Support (MOS) 80
Auto Service Request featureactivating 81configuring 81enabling process overview 81
Bbuild map 42
Ccable management arms
routing cables 52cables
cable lengthsEthernet 45, 47–49FC 44power cords 45, 47–49SAS 45, 47–49
customer data network 44customer management network 44, 69fiber optic care 51handling tips 51labels 51optical 44private management network 45, 47–49routing cables 52SFPs 44types of
Ethernet 44external cables 44internal cables 45, 47–49optical 44
types of (continued)types of (continued)power cords 45, 47–49SAS 45, 47–49SFPs 44
cablingbuild map 42Controllers 89customer management network 66, 69Drive Enclosures 107, 108, 111how to
connect to customer data network 88, 89connect to customer management network 69
multiple racks 32Oracle FS System 35, 36Pilots 69types of external cables 44wiring diagrams
Controllers 103–105Drive Enclosures 107, 108, 111Pilots 102
workflowcustomer management network 66Oracle FS System 36
Cablingconfiguration 38
Call-Home featureAuto Service Request (ASR) feature 82diagnostics
Call‑Home Failed 86Call‑Home Succeeded 86DNS failure 86proxy failure 86
how toconfigure 84configure event triggers 84test 85
log bundle uses 83log bundles created 82managing settings 82service request uses 83used with local server 83
Caution signal words 31checklist
Oracle FS system 25pre-installation 25site preparation 25
circuit breakers, PDUoutlets, PDU power
groupings 57, 61CLI, see Oracle FS Command Line InterfaceCMAs, see cable management arms
140

Command Line Interface, see Oracle FS Command LineInterfacecomponents, Oracle FS system hardware 16configure
Auto Service Requests (ASR) feature 80Call-Home settings 84Call-Home triggering 84
connectpower cables 56
contact information 11contacts, Oracle 11Controller
bring online using CLI 92bring online using ILOM 94clear failure history 93failover 91failover using CLI 92failover using ILOM 93failover using power button 91, 94generate IOPs 92
Controller clear failure history 93Controller failover 91–94Controller IO 92Controller online 92, 94Controllers
how tochange service type 71connect customer data network 88, 89provision ports 88route cables 52verify service type 71
ports 39, 40wiring diagrams 103–105
CSI, see customer support identifiers (CSI)CUA, see customer user administratorscustomer data network
cables 44cabling 88, 89connect the Controllers 89wiring diagrams 103–105
customer management networkcables 44cabling 69cabling workflow 66download
Oracle FS Command Line Interface 71Oracle FS System Manager 70
Ethernet cables 69how to
configure IP addresses 68connect the Pilots 69
pingPilots 67verify connections 67
wiring diagrams 102customer support 11customer support identifiers (CSI)
customer support identifiers (CSI) (continued)description 80
customer user administrators (CUA)description 80responsibilities 80
DDanger signal words 31diagnostics
Call-Home Failed 86Call-Home feature 86Call-Home logs 82Call‑Home Succeeded 86DNS failure 86Oracle Auto Service Request (ASR) activation 86proxy server failure 86
DNS, see Domain Name Servers (DNS)documentation
conventionsCaution, Warning, and Danger signal words 31
feedback 11related to cabling procedures 11related to installation procedures 11
Domain Name Servers (DNS)how to
configure IP addresses 79Drive Enclosures
cabling 107, 108, 111ports 40, 41string distribution 107, 108, 111wiring diagrams 107, 108, 111
drive firmwarehow to
download the updates 72
Eeducation programs 11electrostatic discharge (ESD)
precautions 32email server
configure 78environment, data center
Oracle FS system requirements 117Ethernet
cable labels 51cables 45, 47–49Pilots
customer management network 69event logs
how totest the Call-Home feature 85
Ffeedback, documentation 11
Index
141
firmware updateshow to
download firmware packages 72update the drive firmware 75
FSCLI, see Oracle FS Command Line Interface
Gglobal settings
configureadministrator 1 accounts 77administrator email accounts 78Domain Name Servers (DNS) 79email server 78NTP servers 80password recover 79
ground strapspersonal ESD 32
Hhardware specifications
altitude 117humidity 117PDU 21temperature 117
hardware, Oracle FS systemsupported components 16
hazard signal wordsin English 31
how tocomplete installation 96connect
Controllers 89Pilots 69power cables 56
power on system 63route
power cables 56verify system status
using FS portal 97using the GUI 98
humidity specifications 117
Iinstallation
flowchart 13tools required 31
installation flowchartracked system 13
installation proceduresbuild map 42tools, required 31
IP addressesconfigure
Pilots 68
configure (continued)configure Pilots 67Domain Name Servers (DNS) 79Oracle FS System Manager 67, 70
Llabels
Ethernet cables 51SAS cables 51system serial number (SSN) 33World Wide node Number (WWnN) 33
LED status 118log bundles
associate with service requests 83uses for 83
Mmanagement IP addresses
configure Pilots 68MOS, see My Oracle Supportmultiple racks
how tocable 32route cables 52
My Oracle Supporthow to
download patches 72download software updates 72
My Oracle Support (MOS)Auto Service Requests (ASR) feature 80
Nnetwork connections, customer
cables 44how to
configure IP addresses 68connect the Pilots 69connect the system 69
IP addresses 68ping
Pilots 67verify connections 67
Network Time Protocol, see NTP serversnotice conventions, safety 31NTP servers
how toconfigure 80
Oonline help 11Oracle documentation 11Oracle FS Command Line Interface
configurecustomer workstations 71
Index
142

download (continued)download
customer workstations 71Oracle FS system
power on 63racked 12racked installation planning 15required tools 31
Oracle FS Systembuild map 42cabling 35, 36cabling workflow 36configure IP addresses 68how to
configure NTP servers 80connect to the customer data network 89connect to the customer management network 69download patches 72download software updates 72stage software updates 73update the drive firmware 75update the software 74verify service type 71
LED status indicators 118My Oracle Support 72ping the Pilots 67software updates 72updates
firmware 72software 72
Oracle FS System Managerconfigure
customer workstations 70IP addresses on the Pilots 67
downloadcustomer workstations 70temporary laptop 67
verify system status 98Oracle FS Systems
configure Auto Service Request (ASR) feature 80configure Auto Service Request feature 81
Oracle Help Center (OHC) 11Oracle rack
PDUs 55outlets, PDU power
single-phase 57three-phase 61
Ppasswords
test administrator password recovery 79patches
how todownload patches 72
My Oracle Support 72PDU circuit breakers 63
PDUsamperage ratings 55cabling 59, 62circuit breakers 57, 61hardware specifications 21power ratings 57, 61
Pilotsconfigure
IP addresses 67management IP addresses 68
downloadOracle FS Command Line Interface 71Oracle FS System Manager 70
how toconnect customer management network 69ping 67route cables 52upload software updates 73verify connection to a laptop 67
ports 38, 39wiring diagrams 102
pingconfigure
management IP addresses 68Pilots 68
Pilots 67set up a laptop 67verify network connections 67
planningracked Oracle FS system 15
portsControllers 39, 40Drive Enclosures 40, 41how to
provision Controller ports 88Pilots 38, 39
powerfeed requirements of the system 21
power cables 56power cabling 59, 62power distribution units (PDUs) 55pre-installation
Oracle FS system 25pre-installed PDUs 55product support 11
Rracked Oracle FS system 12racked system
installation 13racked systems
unpacking 28related books 11required tools
Oracle FS system 31route
Index
143

route (continued)power cables 56
routing cablescable management arms 52Controllers 52multiple racks 32Pilots 52racks 52two racks 52
Ssafety
notice conventions 31sales information 11SAS
cable labels 51cables 45, 47–49cabling 107, 108, 111ports 40, 41string distribution 107, 108, 111wiring diagrams 107, 108, 111
service requestsassociate with log bundles 83automatic 80see also Auto Service Request (ASR) feature
service typeverify Controllers 71
settingsglobal 77
signal words 31site preparation
racked Oracle FS system 15software
updates 72software updates
how todownload software packages 72stage the update package 73update the Oracle FS System 74
Support portal 11
Ttemperature specifications 117test
Call-Home feature 85training programs 11
Uunpacking
racked systems 28
Vverify system status 96–98vertical PDUs 55
WWarning signal words 31wiring diagram
single-phase PDU 59three-phase PDU 62
wiring diagramsControllers 103–105Drive Enclosures 107, 108, 111management connectivity 102–105Pilots 102SAS connections 107, 108, 111
workflowcabling
customer management network 66Oracle FS System 36
Index
144