Oracle CRM Technology Foundation · This Oracle CRM Technology Foundation Concepts and Procedures...
166
Oracle£ CRM Technology Foundation Concepts and Procedures Release 11i October 2001 Part No. A95278-01 A guide to understanding and using the System Administrator Console, which is the Web-based interface to the CRM Technology Foundation.
Transcript of Oracle CRM Technology Foundation · This Oracle CRM Technology Foundation Concepts and Procedures...

Oracle� CRM Technology Foundation
Concepts and Procedures
Release 11i
October 2001
Part No. A95278-01
A guide to understanding and using the System Administrator Console, whichis the Web-based interface to the CRM Technology Foundation.

Oracle CRM Technology Foundation Concepts and Procedures, Release 11i
Part No. A95278-01
Copyright © 1996, 2001, Oracle Corporation. All rights reserved.
Primary Author: Michelle Cheng
The Programs (which include both the software and documentation) contain proprietary information ofOracle Corporation; they are provided under a license agreement containing restrictions on use anddisclosure and are also protected by copyright, patent, and other intellectual and industrial propertylaws. Reverse engineering, disassembly, or decompilation of the Programs is prohibited.
The information contained in this document is subject to change without notice. If you find any problemsin the documentation, please report them to us in writing. Oracle Corporation does not warrant that thisdocument is error free. Except as may be expressly permitted in your license agreement for thesePrograms, no part of these Programs may be reproduced or transmitted in any form or by any means,electronic or mechanical, for any purpose, without the express written permission of Oracle Corporation.
If the Programs are delivered to the U.S. Government or anyone licensing or using the programs onbehalf of the U.S. Government, the following notice is applicable:
Restricted Rights Notice Programs delivered subject to the DOD FAR Supplement are "commercialcomputer software" and use, duplication, and disclosure of the Programs, including documentation,shall be subject to the licensing restrictions set forth in the applicable Oracle license agreement.Otherwise, Programs delivered subject to the Federal Acquisition Regulations are "restricted computersoftware" and use, duplication, and disclosure of the Programs shall be subject to the restrictions in FAR52.227-19, Commercial Computer Software - Restricted Rights (June, 1987). Oracle Corporation, 500Oracle Parkway, Redwood City, CA 94065.
The Programs are not intended for use in any nuclear, aviation, mass transit, medical, or other inherentlydangerous applications. It shall be the licensee's responsibility to take all appropriate fail-safe, backup,redundancy, and other measures to ensure the safe use of such applications if the Programs are used forsuch purposes, and Oracle Corporation disclaims liability for any damages caused by such use of thePrograms.
Oracle is a registered trademark of Oracle Corporation. Other names may be trademarks of theirrespective owners.

Contents
Send Us Your Comments ................................................................................................................... ix
Preface............................................................................................................................................................ xi
Intended Audience ................................................................................................................................ xiStructure .................................................................................................................................................. xiRelated Documents............................................................................................................................... xiiOther Sources of Information.............................................................................................................. xii
1 Understanding the System Administrator Console
1.1 System Administrator Console Overview......................................................................... 1-11.2 Understanding User Management ..................................................................................... 1-21.3 User Management Overview............................................................................................... 1-21.4 What’s New in This Release ................................................................................................ 1-41.5 Terms and Definitions .......................................................................................................... 1-51.6 User Management Registration Process Flow................................................................... 1-81.7 Understanding Security...................................................................................................... 1-151.8 Understanding Site Preferences ........................................................................................ 1-151.9 Understanding the System Subtab ................................................................................... 1-161.10 Understanding Configuration ........................................................................................... 1-181.11 Understanding Diagnostics ............................................................................................... 1-191.12 Understanding Cache ......................................................................................................... 1-201.13 Understanding XML Services............................................................................................ 1-211.14 Understanding Declarative Page Flows........................................................................... 1-221.15 Understanding Declarative Components ........................................................................ 1-24
iii

2 Using the System Administrator Console
2.1 Administering User Management ...................................................................................... 2-12.2 Logging into User Management.......................................................................................... 2-32.3 Approving Pending User Requests .................................................................................... 2-42.4 Viewing Your Notifications ................................................................................................. 2-52.5 Approving Requests from the Notification Window....................................................... 2-52.6 Viewing All Users.................................................................................................................. 2-72.7 Searching for a User .............................................................................................................. 2-82.8 Creating a New User............................................................................................................. 2-92.9 Editing a User's Details....................................................................................................... 2-102.10 Deleting a User..................................................................................................................... 2-112.11 Defining a User’s Roles....................................................................................................... 2-122.12 Defining a User’s Account.................................................................................................. 2-132.13 Defining a User’s Enrollment ............................................................................................ 2-142.14 Creating a New Approval Type ........................................................................................ 2-162.15 Removing an Approval Type ............................................................................................ 2-182.16 Searching for an Approval Type ....................................................................................... 2-192.17 Editing an Approval Type's Details.................................................................................. 2-202.18 Enabling and Disabling Approval Types......................................................................... 2-212.19 Searching for an Organization........................................................................................... 2-222.20 Viewing Approval Preferences.......................................................................................... 2-232.21 Updating Approval Preferences........................................................................................ 2-242.22 Creating an Enrollment ...................................................................................................... 2-262.23 Removing an Enrollment.................................................................................................... 2-272.24 Enabling and Disabling Enrollments................................................................................ 2-282.25 Editing an Enrollment's Details ......................................................................................... 2-292.26 Creating a User Type .......................................................................................................... 2-302.27 Removing a User Type ....................................................................................................... 2-332.28 Activating and Deactivating User Types ......................................................................... 2-342.29 Searching for a User Type .................................................................................................. 2-342.30 Editing a User Type's Details............................................................................................. 2-352.31 Creating a Template ............................................................................................................ 2-372.32 Removing a Template ......................................................................................................... 2-392.33 Enabling and Disabling Templates ................................................................................... 2-392.34 Editing a Template's Details .............................................................................................. 2-40
iv

2.35 Searching for a Template.................................................................................................... 2-412.36 Managing Security .............................................................................................................. 2-422.37 Managing Roles ................................................................................................................... 2-432.38 Creating Roles ...................................................................................................................... 2-432.39 Mapping Permissions to a Role......................................................................................... 2-442.40 Managing Permissions ....................................................................................................... 2-452.41 Creating Permissions .......................................................................................................... 2-462.42 Assigning a Permission to Roles ....................................................................................... 2-462.43 Using Site Preferences ........................................................................................................ 2-472.44 Setting Up Navigation Groups.......................................................................................... 2-472.45 Editing Navigation Group Details .................................................................................... 2-482.46 Using the System Subtab.................................................................................................... 2-492.47 Setting Up the Self Service User ........................................................................................ 2-492.48 Setting Up Branding............................................................................................................ 2-502.49 Setting Up Cookies.............................................................................................................. 2-512.50 Setting Up Sessions ............................................................................................................. 2-512.51 Setting Up Logging Trails .................................................................................................. 2-522.52 Setting Up Property Categories......................................................................................... 2-532.53 Managing Properties........................................................................................................... 2-532.54 Editing the Details of Keys................................................................................................. 2-542.55 Setting Up Password Expiration ....................................................................................... 2-552.56 Managing Configuration.................................................................................................... 2-552.57 Setting Up Hosts.................................................................................................................. 2-562.58 Editing Host Details ............................................................................................................ 2-562.59 Editing Resource Settings................................................................................................... 2-582.60 Viewing System Alerts ....................................................................................................... 2-582.61 Viewing Jserv Statistics....................................................................................................... 2-592.62 Using Diagnostics................................................................................................................ 2-602.63 Running Test Groups.......................................................................................................... 2-602.64 Running All Test Groups ................................................................................................... 2-612.65 Running One Test Group ................................................................................................... 2-612.66 Running Tests ...................................................................................................................... 2-622.67 Managing Test Groups ....................................................................................................... 2-622.68 Creating Test Groups.......................................................................................................... 2-632.69 Updating Test Groups ........................................................................................................ 2-64
v

2.70 Managing Tests .................................................................................................................... 2-642.71 Registering Tests.................................................................................................................. 2-652.72 Setting Default Test Input Values ..................................................................................... 2-662.73 Managing Applications ...................................................................................................... 2-662.74 Registering Applications .................................................................................................... 2-672.75 Editing Application Prerequisites ..................................................................................... 2-672.76 Using Cache.......................................................................................................................... 2-682.77 Managing Cache Policies.................................................................................................... 2-682.78 Editing Cache Policy Details .............................................................................................. 2-692.79 Managing Cache Filters ...................................................................................................... 2-702.80 Viewing Cache Filter Details.............................................................................................. 2-712.81 Creating and Editing Cache Filters ................................................................................... 2-712.82 Step 1: Editing Basic Information ...................................................................................... 2-722.83 Step 2: Choosing Responsibilities...................................................................................... 2-722.84 Step 3: Choosing Languages .............................................................................................. 2-732.85 Managing Component Caches .......................................................................................... 2-732.86 Editing Component Cache Details.................................................................................... 2-742.87 Viewing Cache Statistics..................................................................................................... 2-762.88 Using XML Services ............................................................................................................ 2-762.89 Managing Service Groups .................................................................................................. 2-772.90 Editing the General Settings of New Service Groups .................................................... 2-782.91 Editing the Services of New Service Groups ................................................................... 2-792.92 Editing the Type Mappings of New Service Groups ..................................................... 2-802.93 Updating the General Settings of Service Groups .......................................................... 2-802.94 Updating the Services of Service Groups......................................................................... 2-812.95 Updating the Type Mappings of Service Groups ........................................................... 2-822.96 Managing Invocations ........................................................................................................ 2-822.97 Creating Invocations ........................................................................................................... 2-832.98 Updating Invocations.......................................................................................................... 2-852.99 Managing Authentication Profiles .................................................................................... 2-872.100 Creating Authentication Profiles....................................................................................... 2-872.101 Updating Authentication Profiles ..................................................................................... 2-882.102 Managing Events ................................................................................................................. 2-892.103 Creating Events.................................................................................................................... 2-902.104 Updating Events .................................................................................................................. 2-91
vi

2.105 Using Declarative Page Flows ........................................................................................... 2-912.106 Managing Physical Pages................................................................................................... 2-922.107 Editing Physical Page Details ............................................................................................ 2-932.108 Managing Logical Pages..................................................................................................... 2-942.109 Editing Logical Page Details .............................................................................................. 2-952.110 Managing Rules ................................................................................................................... 2-962.111 Editing Rule Details ............................................................................................................ 2-972.112 Managing Business Flows.................................................................................................. 2-982.113 Editing Business Flow Details ........................................................................................... 2-992.114 Creating a New Business Flow........................................................................................ 2-1002.115 Updating an Existing Business Flow.............................................................................. 2-1012.116 Mapping Business Flows.................................................................................................. 2-1022.117 Cloning Business Flows.................................................................................................... 2-1032.118 Viewing Flow Families ..................................................................................................... 2-1032.119 Using Declarative Components ...................................................................................... 2-1042.120 Managing Components .................................................................................................... 2-1052.121 Previewing Components .................................................................................................. 2-1062.122 Registering Components .................................................................................................. 2-1062.123 Editing Component Metadata ......................................................................................... 2-1082.124 Defining Bin or Report Columns .................................................................................... 2-1112.125 Editing Bin or Report Column Details ........................................................................... 2-1112.126 Managing LOV Columns ................................................................................................. 2-1132.127 Editing LOV Column Details........................................................................................... 2-1142.128 Defining Graph Metadata ................................................................................................ 2-1152.129 Managing Graph Columns .............................................................................................. 2-1182.130 Editing Graph Column Details........................................................................................ 2-1182.131 Managing Parameters ....................................................................................................... 2-1192.132 Editing Parameter Metadata............................................................................................ 2-1202.133 Managing Component Security ...................................................................................... 2-1222.134 Assigning a Component to Responsibilities.................................................................. 2-1222.135 Selecting Responsibilities ................................................................................................. 2-1232.136 Assigning a Responsibility to Components .................................................................. 2-1232.137 Selecting Components ...................................................................................................... 2-1242.138 Setting Navigation Preferences ....................................................................................... 2-1242.139 Setting Display Preferences ............................................................................................. 2-125
vii

2.140 Setting Up the Quick Menu.............................................................................................. 2-1262.141 Changing Your Password ................................................................................................ 2-1262.142 Setting Personal Information ........................................................................................... 2-1272.143 Setting Address Information............................................................................................ 2-127
viii

Send Us Your Comments
Oracle CRM Technology Foundation Concepts and Procedures, Release 11i
Part No. A95278-01
Oracle Corporation welcomes your comments and suggestions on the quality and usefulness of thisdocument. Your input is an important part of the information used for revision.
■ Did you find any errors?■ Is the information clearly presented?■ Do you need more information? If so, where?■ Are the examples correct? Do you need more examples?■ What features did you like most?
If you find any errors or have any other suggestions for improvement, please indicate the documenttitle and part number, and the chapter, section, and page number (if available). You can send com-ments to us in the following ways:
■ Electronic mail: [email protected]■ FAX: (650) 654-6238 Attn: Oracle CRM Technology Foundation■ Postal service:
Oracle CorporationOracle CRM Technology Foundation Documentation500 Oracle Parkway, M/S 6op9Redwood Shores, California 94065USA
If you would like a reply, please give your name, address, telephone number, and (optionally) elec-tronic mail address.
If you have problems with the software, please contact your local Oracle Support Services.
ix

x

Preface
Welcome to the Oracle Customer Relationship Management, Release 11i, suite ofapplications. This documentation is intended to accompany the 11.5.6 code release.
This Oracle CRM Technology Foundation Concepts and Procedures guide providesinformation and instructions to help you work effectively with the SystemAdministrator Console, which is the Web-based interface to the CRM TechnologyFoundation.
This preface explains how the guide is organized and introduces other sources ofinformation that can help you.
Intended AudienceThis guide is aimed at the following users:
■ System Administrators
■ Customer Service Representatives
■ Implementation Engineers
StructureThis guide is a compilation of the topics in the online help for the Oracle CRMTechnology Foundation. It contains the following topic sections:
"Understanding" topics provide overviews of the application and its components,explanations of key concepts, features, and functions, as well as the application’srelationships to other Oracle or third-party applications.
xi

"Using" topics provide process-oriented, task-based procedures for using theapplication to perform essential business tasks.
Related DocumentsFor more information on the Oracle CRM Technology Foundation, see the OracleCRM Technology Foundation Implementation Guide.
Other Sources of InformationFor additional information regarding the Oracle E-Business Suite, consult thefollowing:
■ Oracle Applications Product Update Notes
■ Installing Oracle Applications
■ Oracle Applications Supplemental CRM Installation Steps
■ Oracle Application Concepts
■ Oracle Applications System Administrator’s Guide
xii

Understanding the System Administrator Co
1
Understanding the System AdministratorConsole
This topic group provides overviews of the System Administrator Console and itscomponents as well as explanations of key concepts, features, and functions.
1.1 System Administrator Console OverviewThe System Administrator Console is a Web-based interface that allows you to usethe components of the CRM Technology Foundation. In it, you run diagnostics,design page flows, customize UI components, manage security, and perform otheradministrative tasks.
The System Administrator Console has an organizational structure consisting oftabs, subtabs, and links in the left navigation bar. Additionally, you can click theglobal navigation buttons at the top right of each screen to access online help, signout, or set profile options.
See the following help topics for overviews of the features of the SystemAdministrator Console:
Understanding User Management
Understanding Security
Understanding Site Preferences
Understanding the System Subtab
Understanding Configuration
Understanding Diagnostics
Understanding Cache
nsole 1-1

Understanding User Management
Understanding XML Services
Understanding Declarative Page Flows
Understanding Declarative Components
1.2 Understanding User ManagementThis section covers the following topics:
■ User Management Overview
– What is an Approval Definition?
– Who Can Be an Approver?
– What are Responsibilities?
– What are Roles?
■ What’s New in This Release
■ Terms and Definitions
■ User Management Process Flow
1.3 User Management OverviewUser Management is the process of registering a user and thereafter maintaining theuser in the system by granting or revoking privileges, accounts, customer profileinformation, and party relationships based on a set of business requirementsset-forth by the organization where the process is deployed.
With User Management, you can register new users, modify existing users, approveor reject user approval requests, and assign users to business accounts. You can alsocustomize the user registration process by configuring templates, enrollments, usertypes, and approval processes.
1.3.1 What is an Approval Definition?The User Management Approval definition uses workflow to track and route therequest to the approvers. An approval definition can deliver an e-mail notice to theapprovers. Both user types and enrollments can share the same approval definition.The e-mail notifies what types of requests are being requested (user type orenrollment) and what action the approver needs to take.
1-2 Oracle CRM Technology Foundation Concepts and Procedures

User Management Overview
If the approval definition has more than one approver, the e-mail notification is sentto the next approver when the previous approver has approved. For the user to begranted access, all approvers in the chain need to approve the request. The requestis granted after the last approver from the list accepts it. Whereas to reject, only onerejection is needed from an approver. A request times out if it is left in an approversqueue for a specified amount of time.
If the order of the approvers change, all pending requests are transferred back to thetop of the new approver list. If the user type or enrollment is changed to useanother approval definition, all pending request's workflow processes end and youcreate and launch a new workflow process. If a user type or enrollment is modifiedso it no longer needs approval, then all pending requests are automaticallyapproved.
1.3.2 Who Can Be an Approver?Approvers are application user, who one of the following permission:
■ JTF_REG_APPROVAL or JTF_SECURITY_ASSIGN_ROLE (SystemAdministrator) permission
■ JTF_APPROVER (Request Owner) permission
■ JTF_PRIMARY_USER_SUMMARY permission (Primary user).
The Primary user must also have the JTF_PRIMARY_USER responsibility to accessthe approval page. The system administrator can define a global or default list ofapprovers for each user type and enrollment. Any approver can be overridden atthe organization level by the system administrator.
For business users, account assignment is provided with the approval process. Newaccounts can be created for an organization and assigned to the user during theapproval process. Individual users may not require approval to register. If noapproval is necessary for this type of user, new accounts are created and assignedautomatically. If a customer determines that individual users require an approval,then they should the auto account creation for this user. Primary users requireapproval. However, a merchant administrator can disable this prerequisite.Merchant Administrators have the option of requiring registration approval for alluser types.
When a Primary User register’s a company for the first time, the approver mustcreate a new account and associates that account with the user. If approval is notrequired, then a new account is automatically created for the user’s organizationand associated with the first user to register for that company. If they are not the
Understanding the System Administrator Console 1-3

What’s New in This Release
first person to register for the organization, then it is up to the primary user toassign the newly created account to that new user.
1.3.3 What are Responsibilities?Responsibilities refer to application user responsibilities which are a representationof the menu hierarchy available to a particular user type. During the registrationprocess, users are granted access to one or more responsibilities depending on theservices they enroll in and the merchant policy. Typically, individual users are givenaccess only to one responsibility.
1.3.4 What are Roles?Roles are groupings of permissions, which are page level or function level granularprivileges used to maintain application security. A single user can be grantedseveral roles and each separately determines access rights to UI details, ability toperform certain transactions and ability to access certain data sets. During theregistration process users are granted the appropriate set of roles that maps to theirjob function.
1.4 What’s New in This ReleaseThis release of the 11.5.6 Oracle E-Business Suite has the following new features andfunctions for User Management:
■ HTML user interface
■ Primary user type
■ Customizing enrollment
■ Self-service enrollment
■ Account administration for Business to Business (B2B) and Business toCustomer (B2C) users
■ User disablement
■ User profile windows
■ User maintenance windows
1-4 Oracle CRM Technology Foundation Concepts and Procedures

Terms and Definitions
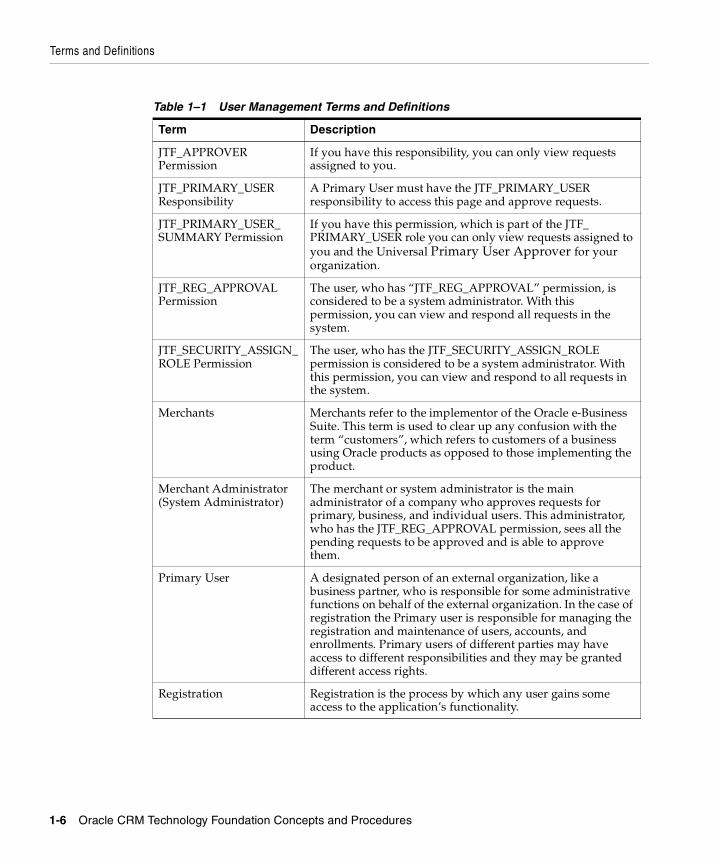
1.5 Terms and DefinitionsThe following table describes terms and definitions associated with UserManagement.
Table 1–1 User Management Terms and Definitions
Term Description
Approval An optional feature where approvers can reject or approvenew user accounts. In the User tab, the System AdministratorConsole provides windows so you can view, create, modify,delete, enable, and disable approvals, including those forspecific organizations.
Approval Flow The approval flow is a predefined flow of steps required toapprove user registration or service enrollment requests.
Business User A business user is a typical B2B user, associated with anorganization. Generally, the Primary user(s) of the sameorganization approves these users.
Customer Customers are typically primary users, B2B users, and B2C(individual) users.
Enrollment Enrollment is a set of add-on services that you can receiveduring or after registration. One enrollment corresponds tozero or one responsibility, zero or one template, zero or oneapproval and zero or more roles. Enrollments are applicationspecific and can be tied to user types.
Explicit Enrollment These are enrollments that you manually register for duringthe registration process from the "Register Here" link.
Implicit Enrollment These are enrollments that a user is automatically signed upfor during the registration process from the "Register Here"link. The user is not asked to register for these enrollments.Instead, they are automatically attached to the user uponregistration.
Individual User An individual user is an individual with no relationship toan organization. Generally, no approval is required for thistype of user.
JSP Java server pages are an extension to the Java servlettechnology that was developed by Sun as an alternative toMicrosoft's ASPs (Active Server Pages). JSPs have dynamicscripting capability that works in tandem with HTML code,separating the page logic from the static elements -- theactual design and display of the page.
Understanding the System Administrator Console 1-5
Terms and Definitions
JTF_APPROVERPermission
If you have this responsibility, you can only view requestsassigned to you.
JTF_PRIMARY_USERResponsibility
A Primary User must have the JTF_PRIMARY_USERresponsibility to access this page and approve requests.
JTF_PRIMARY_USER_SUMMARY Permission
If you have this permission, which is part of the JTF_PRIMARY_USER role you can only view requests assigned toyou and the Universal Primary User Approver for yourorganization.
JTF_REG_APPROVALPermission
The user, who has “JTF_REG_APPROVAL” permission, isconsidered to be a system administrator. With thispermission, you can view and respond all requests in thesystem.
JTF_SECURITY_ASSIGN_ROLE Permission
The user, who has the JTF_SECURITY_ASSIGN_ROLEpermission is considered to be a system administrator. Withthis permission, you can view and respond to all requests inthe system.
Merchants Merchants refer to the implementor of the Oracle e-BusinessSuite. This term is used to clear up any confusion with theterm “customers”, which refers to customers of a businessusing Oracle products as opposed to those implementing theproduct.
Merchant Administrator(System Administrator)
The merchant or system administrator is the mainadministrator of a company who approves requests forprimary, business, and individual users. This administrator,who has the JTF_REG_APPROVAL permission, sees all thepending requests to be approved and is able to approvethem.
Primary User A designated person of an external organization, like abusiness partner, who is responsible for some administrativefunctions on behalf of the external organization. In the case ofregistration the Primary user is responsible for managing theregistration and maintenance of users, accounts, andenrollments. Primary users of different parties may haveaccess to different responsibilities and they may be granteddifferent access rights.
Registration Registration is the process by which any user gains someaccess to the application’s functionality.
Table 1–1 User Management Terms and Definitions
Term Description
1-6 Oracle CRM Technology Foundation Concepts and Procedures

Terms and Definitions
Registration Self-serviceAdministration UI
The Registration Self-service Admin UI is used by systemadministrators, and at times Primary users, to maintainexternal organization or internal group, users, parties, andaccounts.
Registration Self-serviceuser UI
The Registration Self-service user UI is used by the Primary,Individual, or Business users to register themselves.
Registration Templates Applications require varying pieces of information to registerdifferent types of users. Registration Templates refer to JSPfiles that are used to capture the registration information thatis special to a particular User Type or Enrollment.
Request Owner The request owner is the current approver based on theapprover list and current state of workflow defined for givenapproval. The request owner is only able to approve therequests which they currently own. This user should have“JTF_APPROVER” permission. The request owner is tied tothe JTF_UM_APPROVAL_OWNER profile option.
Responsibilities Responsibilities are groupings of application menus thatdetermine the user interface accessible to a particular user.
Roles Roles are groupings of permissions, which are page level andfunction level granular privileges used to maintainapplication security.
Self-service Registration Rather than asking an administrator to register usersmanually, users can register themselves through a self-serviceUI. Self-service registration includes that UI and thebackground processes used to complete the registrationprocess. This involves assigning users the correct data and UIaccess privileges.
Template Handler Template handlers refers to how the data flow built by otherapplication teams occur among registration and how they areassociated with enrollments and user types in the UserManagement framework.
Universal Primary UserApprover
Create a Universal Primary User Approver if you wantto have multiple primary users.
User A user is any person who needs access to any application,including various types of customers, partners, suppliers,and employees.
Table 1–1 User Management Terms and Definitions
Term Description
Understanding the System Administrator Console 1-7

User Management Registration Process Flow
1.6 User Management Registration Process FlowThere are three different types of users currently available in User Management:
■ Business User
■ Individual User
■ Primary User
When a user registers, depending on the user type, an approval task is generatedand assigned to an approver. The approver is notified through Workflow that thereare pending requests in the queue. The request is reviewed and possibly modified,
User Profile User Profiles, which are associated with responsibilities, areset of user interfaces that give users access to their personaldata and preferences.
User Profile Menus User Profile menus are groupings of user profile pages(options), which are relevant to a particular responsibility.User Profiles are user interfaces to user’s personal data andpreferences. A number of responsibilities can share the sameUser Profile menu.
User Type A User Type is a category of users that caters to the specificneeds of an application’s business requirements. User typesallow flexible and extensible ways for defining, categorizingand implementing behavior of users. A user type isassociated to only one template, one responsibility, zero orone approval and zero or more roles.
Workflow Oracle Workflow automates and continuously improvesbusiness processes, routing information of any typeaccording to business rules you can change. Oracle Workflowmanages business processes according to rules that youdefine. The rules, which we call a workflow processdefinition, include the activities that occur in the process andthe relationship between those activities. An activity in aprocess definition can be an automated function defined by:
■ a PL/SQL stored procedure or an external function
■ a notification to a user or role that they may request aresponse
■ a business event
■ a subflow that itself is made up of many activities.
Table 1–1 User Management Terms and Definitions
Term Description
1-8 Oracle CRM Technology Foundation Concepts and Procedures

User Management Registration Process Flow
and either rejected or approved. Upon approval, the request is forwarded to thenext approver. Once all approvals are granted, the user is notified through e-mailand given access to the system.
Business UserA business user is a typical B2B user, associated with an organization. Generally, thePrimary user of an organization approves these users. The following table describesthe process flow of a Business User in User Management.
Table 1–2 Business User Approval Process Flow
Steps Description Required Performed By
Click the RegisterHere link
This link accesses the User Registrationwindow.
Yes All Users
Select the BusinessUser option button
Select this option if you are a currentcustomer and B2B user.
Yes All Users
Enter yourcompany’sorganizationnumber
This number is assigned to your companywhen it is registered as a customer. ThePrimary User of a company has access to thisinformation.
Yes All Users
Enter your personalinformation
Enter your personal information in theassociating text field.
Yes All Users
Select enrollmentsfor your registration
Register for any available enrollments thatinterest you.
Optional All Users
Fill out anytemplates associatedwith the enrollmentthat you selected
Some enrollments may have separatewindows to capture key information aboutthe enrollment that you selected.
Yes All Users
Review andmaintain yourconfirmationinformation
This window gives you detailed informationabout your registration including:
■ A confirmation number
■ The date the registration began
■ Your name
■ The user type
■ Your organization number
■ Your username
■ Any enrollment information
Optional All Users
Understanding the System Administrator Console 1-9

User Management Registration Process Flow
Individual UserAn individual user is an individual person having no relationship to anorganization. Generally, no approval is required for this type of user. The followingtable describes the process flow of a Individual User in User Management.
An email/workflownotification is sent
The workflow sends out a notification to theapprover. If the workflow mailer is set up, theapprover also receives an email.
Yes Workflow
Approver signs inand goes to thepending approvalwindow
The approver must have the followingresponsibilities and permissions to approverequests:
■ JTF_APPROVER (permission)
■ JTF_PRIMARY_USER (permission)
■ JTF_PRIMARY_USER (responsibility)
Yes System Administrator orPrimary User
Approver clicks onthe Username link
This link accesses the User Details windowwhere the approver can review the user’spersonal information. This step is required ifthe user request must be approved.
Optional System Administrator orPrimary User
Assign an accountor creates a newaccount and assignit to the user
All users must have an account associatedwith them in order to access their company’sor individual information and create financialtransactions.This step is required if the userrequest must be approved.
Optional System Administrator orPrimary User
Enter a comment forthe user
Enter a comment about the users approval orenter a reason why you accepted or rejectedtheir request.
Optional System Administrator orPrimary User
Click accept toapprove the requestor reject to refuse it
Whether or not the request is accepted orrejected, the user receives a notification.
Yes System Administrator orPrimary User
Notification is sentto the requestor
The requestor receives a notification, as wellas an email (workflow mailer is set up),confirming or rejecting their approval.
Yes Workflow
Login with yournew username andpassword
Depending on your user type and pendingapproval, you are logged in. What you see isassociated with the roles and responsibilitiesthe approver assigned to you, which dependson the user type and enrollment selections.
Optional All Users
Table 1–2 Business User Approval Process Flow
Steps Description Required Performed By
1-10 Oracle CRM Technology Foundation Concepts and Procedures

User Management Registration Process Flow
Table 1–3 Individual User Approval Process Flow
Steps Description Required Performed By
Click the RegisterHere link
This link accesses the User Registrationwindow.
Yes All Users
Select the IndividualUser option button
Select this option if you a new or existingstore user.
Yes All Users
Enter your personalinformation
Enter your personal information in theassociating text field.
Yes All Users
Select enrollmentsfor your registration
Register for any available enrollments thatinterest you.
Optional All Users
Fill out anytemplates associatedwith the enrollmentthat you selected
Some enrollments may have separatewindows to capture key information aboutthe enrollment that you selected.
Yes All Users
Review andmaintain yourconfirmationinformation
This window gives you detailed informationabout your registration including:
■ A confirmation number
■ The date the registration began
■ Your name
■ The user type
■ Your username
■ Any enrollment information
Optional All Users
Approver clicks onthe Username link
This link accesses the User Details windowwhere the approver can review the user’spersonal information.
Yes System Administrator orPrimary User
Assign an accountor creates a newaccount and assignit to the user
All users must have an account associatedwith them in order to access their company’sor individual information and create financialtransactions.
Yes System Administrator orPrimary User
Enter a comment forthe user
Enter a comment about the users approval orenter a reason why you accepted or rejectedtheir request.
Optional System Administrator orPrimary User
Understanding the System Administrator Console 1-11

User Management Registration Process Flow
Primary UserA Primary user is also known as the customer administrator and is responsible formanaging all users of the same organization. Generally, the system or merchantadministrator approves these users. Your organization can have multiple PrimaryUsers. The following table describes the process flow of a Primary user in UserManagement.
Click accept toapprove the requestor reject to refuse it
Whether or not the request is accepted orrejected, the user receives a workflownotification.
Yes System Administrator orPrimary User
Notification is sentto the requestor
The requestor receives a workflownotification, as well as an email (if the emailworkflow is set up), confirming or rejectingtheir approval.
Yes System Administrator orPrimary User
Login with yournew username andpassword
Depending on your user type and pendingapproval, you are logged in. What you see isassociated with the roles and responsibilitiesthe approver assigned to you.
Optional All Users
Table 1–3 Individual User Approval Process Flow
Steps Description Required Performed By
1-12 Oracle CRM Technology Foundation Concepts and Procedures

User Management Registration Process Flow
Table 1–4 Primary User Approval Process Flow
Steps Description Required Performed By
Click the RegisterHere link
This link accesses the User Registrationwindow.
Yes All Users
Select the PrimaryUser option button
Select this option if you are Registering yourcompany here. Primary Users are Point ofContacts for Customers.
As a Primary User, your permissions andresponsibility are almost identical to BusinessUsers except that your are responsible forvalidating and approving Business Users foryour company.
Yes All Users
If you are anexisting customer,select the firstoption button andenter yourcompany’sorganizationnumber
If you are a newcustomer registeringas the first primaryuser for yourorganization, selectthe second optionbutton and enteryour company’sinformation
This number is assigned to your companywhen it is registered as a customer.
Yes All Users
Enter your personalinformation
Enter your personal information in theassociating text field.
Yes All Users
Select enrollmentsfor your registration
Register for any available enrollments thatinterest you.
Optional All Users
Fill out anytemplates associatedwith the enrollmentthat you selected
Some enrollments may have separatewindows to capture key information aboutthe enrollment that you selected.
Yes All Users
Understanding the System Administrator Console 1-13

User Management Registration Process Flow
Review andmaintain yourconfirmationinformation
This window gives you detailed informationabout your registration including:
■ A confirmation number
■ The date the registration began
■ Your name
■ The user type
■ Your organization number
■ Your username
■ Any enrollment information
Optional All Users
Approver signs inand goes to thepending approvalwindow
The approver must have the followingresponsibilities and permissions to approverequests:
■ JTF_APPROVER (permission)
■ JTF_PRIMARY_USER (permission)
■ JTF_PRIMARY_USER (responsibility)
Yes System Administrator orPrimary User
Approver clicks onthe Username link
This link accesses the User Details windowwhere the approver can review the user’spersonal information.
Yes System Administrator orPrimary User
Assign an accountor creates a newaccount and assignsit to the user
All users must have an account associatedwith them in order to access their company’sor individual information and create financialtransactions.
Yes System Administrator orPrimary User
Enter a comment forthe user
Enter a comment about the users approval orenter a reason why you accepted or rejectedtheir request.
Optional System Administrator orPrimary User
Click accept toapprove the requestor reject to refuse it
Whether or not the request is accepted orrejected, the user receives a workflownotification.
Yes System Administrator orPrimary User
Notification is sentto the requestor
The requestor receives a workflownotification, as well as an email (if theworkflow mailer is set up), confirming orrejecting their approval.
Yes Workflow
Login with yournew username andpassword
Depending on your user type and pendingapproval, you are logged in. What you see isassociated with the roles and responsibilitiesthe approver assigned to you.
Optional All Users
Table 1–4 Primary User Approval Process Flow
Steps Description Required Performed By
1-14 Oracle CRM Technology Foundation Concepts and Procedures
Understanding Site Preferences
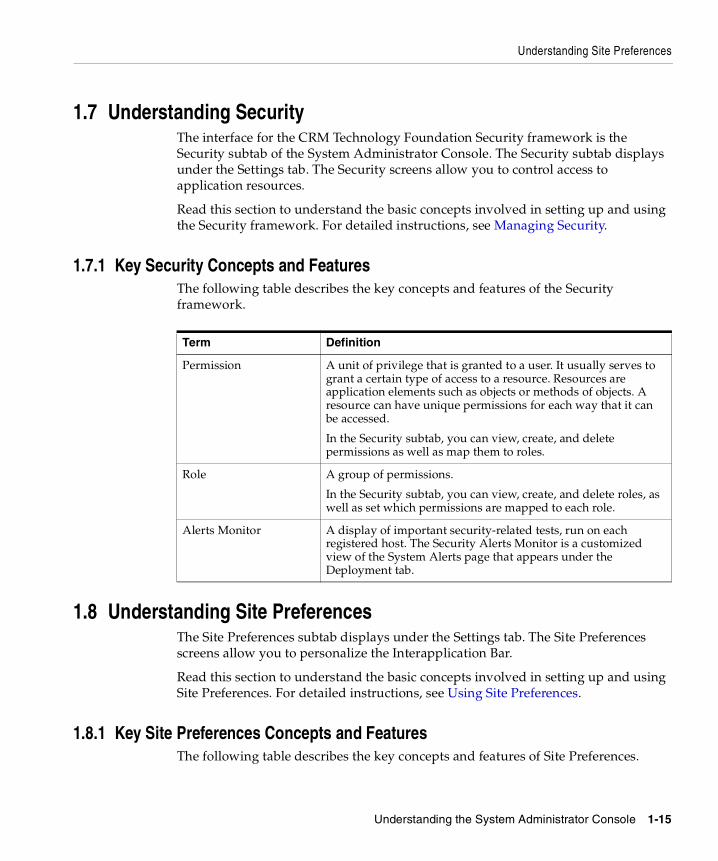
1.7 Understanding SecurityThe interface for the CRM Technology Foundation Security framework is theSecurity subtab of the System Administrator Console. The Security subtab displaysunder the Settings tab. The Security screens allow you to control access toapplication resources.
Read this section to understand the basic concepts involved in setting up and usingthe Security framework. For detailed instructions, see Managing Security.
1.7.1 Key Security Concepts and FeaturesThe following table describes the key concepts and features of the Securityframework.
1.8 Understanding Site PreferencesThe Site Preferences subtab displays under the Settings tab. The Site Preferencesscreens allow you to personalize the Interapplication Bar.
Read this section to understand the basic concepts involved in setting up and usingSite Preferences. For detailed instructions, see Using Site Preferences.
1.8.1 Key Site Preferences Concepts and FeaturesThe following table describes the key concepts and features of Site Preferences.
Term Definition
Permission A unit of privilege that is granted to a user. It usually serves togrant a certain type of access to a resource. Resources areapplication elements such as objects or methods of objects. Aresource can have unique permissions for each way that it canbe accessed.
In the Security subtab, you can view, create, and deletepermissions as well as map them to roles.
Role A group of permissions.
In the Security subtab, you can view, create, and delete roles, aswell as set which permissions are mapped to each role.
Alerts Monitor A display of important security-related tests, run on eachregistered host. The Security Alerts Monitor is a customizedview of the System Alerts page that appears under theDeployment tab.
Understanding the System Administrator Console 1-15

Understanding the System Subtab
1.9 Understanding the System SubtabThe System subtab displays under the Settings tab. The System screens allow you toconfigure the system level properties that you need to set up during thedeployment process: the self service user (AKA guest user), branding, cookies,sessions, loggings, property categories, and properties.
Read this section to understand the basic concepts involved in setting up and usingsystem level properties. For detailed instructions, see Using the System Subtab.
1.9.1 Key System Subtab Concepts and FeaturesThe following table describes the key concepts and features of the System Subtab.
Term Definition
Interapplication Bar A group of customizable links that displays at the top of everypage in HTML-based CRM applications.
Navigation Group A customizable set of applications with defined responsibilities.
In the Site Preferences subtab, you can map CRM applicationsinto Navigation Groups. Additionally, from the NavigationGroup Setup screen, you can create, delete, activate, anddeactivate Navigation Groups.
Term Definition
Sessions A system property that carries user identity and credentialsthroughout the duration of a user’s activity.
In the System subtab, you can set up both User Sessions andSticky Sessions.
When using Sticky Sessions, all requests from the same usersession will attempt to go to the same JVM, regardless ofwhether the application is in stateless mode or stateful mode.Sticky Sessions allow for several performance enhancements. Inparticular, the hit ratio of middle tier caching is improvedbecause all cached data for a particular user resides on a singleJVM rather than being scattered across different JVM instances.In addition, session attributes and resources will not have to berecreated and duplicated across different JVMs, but can bereused in the JVM associated with the session.
1-16 Oracle CRM Technology Foundation Concepts and Procedures

Understanding the System Subtab
Cookies A system property that stores information about users andsystems as users log in to applications.
In the System subtab, you can define cookie names, types,encryption, and expiration times.
Branding The wording that displays at the top left of every page,depending upon responsibility.
The branding can be defined at both application level andresponsibility level. A responsibility can only belong to oneapplication and an application can have multipleresponsibilities. If the branding for a particular responsibility isnot set, the branding for all responsibilities within theapplication (application level) will be used. If the branding for aparticular responsibility is set, the branding will takeprecedence and override the branding set at application level.
In the System subtab, you can personalize and previewBranding.
Self Service User Also known as Guest User. An internal user who is grantedcertain responsibilities and permissions so that the selfregistration process offers new users the appropriateresponsibilities and permissions.
In the System subtab, you can set up the name and password ofthe Self Service User.
Logging Trails A system property that helps you debug system-related codes.
In the System subtab, you can configure both FrameworkLogging Options and Service Logging Options.
Framework Logging is used by the CRM TechnologyFoundation, while Service Logging is used by all applications.
Property CategoriesSetup
In the System subtab, you can set up the applications that youwant to register in the system properties framework. A propertyis a key/value pair that is application-specific.
Password Expiration In the System subtab, you can specify the time interval forwhich a password is valid.
Advanced In the System subtab, you can view, create, modify, delete, andcopy properties (application-specific key/value pairs). A key iswhat is used by an application to retrieve data. Keys are unique,but can have multiple values. Values are the content or data thatbinds to a particular key.
Term Definition
Understanding the System Administrator Console 1-17

Understanding Configuration
1.10 Understanding ConfigurationThe Configuration subtab displays under the Deployment tab. The Configurationscreens allow you to manage a system’s hosts and resource settings.
Read this section to understand the basic concepts involved in using theConfiguration screens. For detailed instructions, see Managing Configuration.
1.10.1 Key Configuration Concepts and FeaturesThe following table describes the key concepts and features of the Configurationsubtab.
Term Definition
Host Synonym for computer, machine, box, or node. For example, ageneric host name is computer_name.company_name.com.
In the Configuration subtab, you can view, register, modify, andremove the hosts in your system.
Resource Settings Settings that allocate system resources in order to optimizeapplication performance.
Cache A data structure that holds frequently used Java objects. It iscomposed of component caches. Component caches hold theobjects of application modules that pertain to specificapplication functionality.
In the Resource Settings subtab, you can set the maximum sizeof the cache (in megabytes). This is used to prevent the JVMmemory from bloating because of caching. When the JVM’smemory usage reaches this limit, the cache stops growing insize.
Elsewhere, in the Cache subtab, you can manage cache policies,manage component caches, and view cache statistics.
For more information, see Understanding Cache.
Concurrent Occurring at the same time.
In the Resource Settings subtab, you can set the maximumnumber of concurrent users.
Load Balancer The host that manages user requests across all the mid-tierhosts.
1-18 Oracle CRM Technology Foundation Concepts and Procedures

Understanding Diagnostics
1.11 Understanding DiagnosticsThe interface for the Oracle CRM Technology Foundation Diagnostics framework islaunched when you click the Diagnostics tab of the System Administrator Console.It allows you to troubleshoot any setup and installation problems of the technologyfoundation and certain participating applications. Additionally, it allows you toregister and employ new diagnostic tests. The Diagnostics screens allow you to runtest groups, run individual tests, manage test groups, manage tests, set default testinput values, and register applications.
Read this section to understand the basic concepts involved in setting up and usingthe Diagnostics framework. For detailed instructions, see Using Diagnostics.
1.11.1 Key Diagnostics Concepts and FeaturesThe following table describes the key concepts and features of the Diagnosticsframework.
Note: The following URL can also be used to access theDiagnostics screens:
http://<hostname>:<portnumber>/OA_HTML/jtfqalgn.htm
Term Definition
Applications You must register the applications that you want to run tests on.
In the Diagnostics screens, you can register applications and ifnecessary, define application prerequisites.
Test A Java test that verifies the correct behavior of a particularfeature or function.
In the Diagnostics screens, you can run, register, delete, and setdefault input values for tests.
Test Group A set of related tests. A test group may have other test groupsdefined as prerequisites.
In the Diagnostics screens, you can run, create, modify, andremove test groups.
Understanding the System Administrator Console 1-19

Understanding Cache
1.12 Understanding CacheThe interface for the CRM Technology Foundation Java Objects Cache is the Cachesubtab of the System Administrator Console. The Cache subtab displays under thePerformance tab. The Cache screens allow you to clear or reload the Cache, manageCache Policies, manage Component Caches, and view Cache statistics.
Read this section to understand the basic concepts involved in setting up and usingthe Cache. For detailed instructions, see Using Cache.
1.12.1 Key Cache Concepts and FeaturesThe following table describes the key concepts and features of the Cache.
Prerequisite A concept that applies to both applications and test groups.Setting prerequisites is sometimes necessary for procedures toexecute correctly.
For example, the DBConnections test group has theEnvironment Setup test group set as its prerequisite, because theEnvironment Setup test group contains the DBC Parameter testwhich checks the DBC file. If the DBC Parameter test fails, notests in the DBConnections test group will be successful.
In addition, the CRM Technology Foundation application hasthe HTML Platform application set as its prerequisite. If sometests in the CRM Technology Foundation fail, it is likely due toan error in the HTML Platform. Therefore you can run theHTML Platform tests to trace the problem.
The Diagnostics interface offers screens that allow you to defineprerequisites for applications as well as test groups.
Term Definition
Cache A data structure that holds frequently used Java objects. It iscomposed of Component Caches. A Component Cache holds allthe Java objects belonging to an application component. Anapplication component pertains to specific applicationfunctionality.
In the Cache subtab, you can clear or reload the Cache, manageCache Policies, manage Component Caches, and view Cachestatistics. Elsewhere in the Resource Settings subtab, you can setthe maximum size of the Cache.
Term Definition
1-20 Oracle CRM Technology Foundation Concepts and Procedures

Understanding XML Services
1.13 Understanding XML ServicesThe interface for CRM Technology Foundation XML Services is the XML Servicessubtab of the System Administrator Console. The XML Services subtab displaysunder the Integration tab. The XML Services screens allow you to manage ServiceGroups, Authentication Profiles, Invocations, and Events.
Read this section to understand the basic concepts involved in setting up and usingXML Services. For detailed instructions, see Using XML Services.
1.13.1 Key XML Services Concepts and FeaturesThe following table describes the key concepts and features of XML Services.
Policy A setting that applies to an application running on a host. Thepolicy types are Cache Only, Cache and Priming, Disabled, andCustom.
In the Cache subtab, you can set Cache Policies.
Filter An application-specific component that indicates whatresponsibility IDs and language codes to prime for.
Component Cache A data structure that holds the Java objects of an applicationmodule pertaining to a specific application functionality. Forexample, Catalog and MenuRenderer are components that havecomponent caches.
In the Cache subtab, you can view, create, modify, and removeComponent Caches.
Statistics A display of Component Cache performance metrics.
Term Definition
XML Services A framework that allows you to manage interapplication Webservice sharing. In other words, you can use XML Services tosend and receive business logic over the Internet from oneapplication to another.
In the XML Services subtab, you can manage Service Groups,Authentications, Invocations, and Events.
Term Definition
Understanding the System Administrator Console 1-21

Understanding Declarative Page Flows
1.14 Understanding Declarative Page FlowsThe interface for the CRM Technology Foundation Declarative Page Flowsframework is the Declarative Flows subtab of the System Administrator Console.The Declarative Flows subtab displays under the Design tab. The Declarative Flowsscreens allow you to manage Physical Pages, Rules, Logical Pages, and BusinessFlows.
Read this section to understand the basic concepts involved in setting up and usingDeclarative Page Flows. For detailed instructions, see Using Declarative PageFlows.
Services The logical names of function calls with defined inputs andoutputs. They are implemented as methods of Java classes.Services are application specific and usually represent a unit ofbusiness logic.
In the XML Services subtab, you can enable and disable Serviceswithin Service Groups.
Service Group The logical name of a Java class that contains methods exposedas services.
In the XML Services subtab, you can view, create, modify, anddelete Service Groups.
Authentication Profile Tells an invocation what host, user name, and password to use.
In the XML Services subtab, you can view, create, modify, anddelete Authentication Profiles.
Invocation The logical name of a connection that calls a service on a remotehost.
In the XML Services subtab, you can view, create, modify, anddelete Invocations.
Event Outputs an object of a predefined input type to a set ofsubscribers.
In the XML Services subtab, you can view, create, modify, anddelete Events.
Event Subscribers Invocations that are registered to an event.
In the XML Services subtab, you can set the Event Subscribersfor an Event.
Term Definition
1-22 Oracle CRM Technology Foundation Concepts and Procedures

Understanding Declarative Page Flows
1.14.1 Declarative Page Flows OverviewThe Declarative Page Flows framework enables you to customize, upgrade, andtroubleshoot the content and flow of JSPs within an application without making anymodifications to actual code. The Declarative Page Flows framework is based on theabstraction of JSPs into named logical entities. Consequently, you can achieveefficient management of content and flows by utilizing the screens provided in theSystem Administrator Console.
1.14.2 Key Declarative Page Flows Concepts and FeaturesThe following table describes the key concepts and features of Declarative PageFlows.
Term Definition
Physical Page The name of a JavaServer Page (JSP).
In the Declarative Flows subtab, you can view, register, andmodify Physical Pages.
Rule A rule is defined by parameters and conditions and determineswhich Physical Page needs to be rendered or which LogicalPage needs to display next. Rules evaluate to true when all oftheir conditions evaluate to true.
In the Declarative Flows subtab, you can view, create, andmodify Rules.
Logical Page A named logical entity that has one or more Physical Pagesmapped to it. Usually, each Logical Page represents a nodewithin a Business Flow.
In the Declarative Flows subtab, you can view, create, andmodify Logical Pages.
Business Flow A sequential set of linked Logical Pages that usuallycorresponds to a business task. Business Flows can be linear ornonlinear, depending on whether or not there arecontext-sensitive conditions. Branching conditions are evaluatedat each node.
In the Declarative Flows subtab, you can view, create, modify,clone, and preview Business Flows.
Understanding the System Administrator Console 1-23

Understanding Declarative Components
1.15 Understanding Declarative ComponentsThe interface for the CRM Technology Foundation Declarative Componentsframework is the Declarative Components subtab of the System AdministratorConsole. The Declarative Components subtab displays under the Design tab. TheDeclarative Components screens allow you to create and manage components (Bins,Graphs, Reports, Graph/Report combinations, and LOVs) as well as componentsecurity settings.
Read this section to understand the basic concepts involved in setting up and usingDeclarative Components. For detailed instructions, see Using DeclarativeComponents.
1.15.1 Declarative Components OverviewThe Declarative Components framework allows you to quickly build UIcomponents that display application-specific data in personalizable Bins, Graphs,Reports, Graph/Reports, or LOVs. The coding requirements are minimal tononexistent and the components can be published on Oracle applications.
1.15.2 Key Declarative Components Concepts and FeaturesThe following table describes the key concepts and features of DeclarativeComponents.
Flow Cloning In order to facilitate the easy upgrade of business flows whichhave been customized by a customer, a business flow can becloned, thus creating a Flow Family of related business flows.
In the Declarative Flows subtab, the Clone Flow screen allowsyou to generate duplicates of a given flow.
Flow Families A flow family consists of an original business flow, a clone ofthe original business flow, and any customized clones whichhave been made.
In the Declarative Flows subtab, the Flow Families screen allowsyou to view the contents of a Flow Family and select which flowis active.
Term Definition
1-24 Oracle CRM Technology Foundation Concepts and Procedures

Understanding Declarative Components
Term Definition
Metadata The Declarative Components framework relies on the accuratedefinition of metadata. The framework uses the metadata tocapture information about component headers, footers,columns, and other attributes.
In the Declarative Components subtab, you can define themetadata for bins, reports, graphs, graph/report combinations,LOVs, and parameters.
Bin Bins are small reports which display high level summaryinformation in a tabular format. They generally displayinformation regarding a single metric, such as "time period." Ifenabled and the appropriate security features are assigned, youcan choose which bins to display on the home page and alsochoose the order in which multiple bins are displayed.
In the Declarative Components subtab, you can view, create,modify, and remove Bins.
Report Reports are similar to bins. They display information in atabular format.
In the Declarative Components subtab, you can view, create,modify, and remove Reports. Optionally, you can do the samefor Report/Graph combinations.
Graph A graph is a diagram that represents data pictorially.
In the Declarative Components subtab, you can view, create,modify, and remove Graphs. Optionally, you can do the samefor Report/Graph combinations.
LOV The LOVs that you create can be used across applications.
LOV means "list of values." It is a UI component that facilitatesthe completion of a text entry field when there are numerousvalues that may be assigned. LOVs are a useful alternative todrop-down lists, particularly in cases where displaying a longlist of selections in a drop-down list would require excessivescrolling.
In short, when using a LOV to complete a text entry field, youtype a query into the field and then click a button labeled "Go."This opens a screen where you view a list of values that matchthe query you submitted. You can then select the value that youdesire and return to the original screen, where what youselected will populate the original text entry field.
In the Declarative Components subtab, you can view, create,modify, and remove LOVs.
Understanding the System Administrator Console 1-25

Understanding Declarative Components
1-26 Oracle CRM Technology Foundation Concepts and Procedures

Using the System Administrator Co
2
Using the System Administrator ConsoleThis topic group provides process-oriented, task-based procedures for using theSystem Administrator Console.
The following tabs and subtabs are described in this topic group:
■ Administering User Management
■ Managing Security
■ Using Site Preferences
■ Using the System Subtab
■ Managing Configuration
■ Using Diagnostics
■ Using Cache
■ Using XML Services
■ Using Declarative Page Flows
■ Using Declarative Components
For information on User Management, please see CRM Foundation Concepts andProcedures.
2.1 Administering User ManagementThis topic group provides task-based procedures required for ongoing systemmaintenance and includes information on administration tools and utilities. Thissection covers the following topics:
■ Logging into User Management
nsole 2-1

Administering User Management
■ Approving Pending User Requests
■ Viewing Your Notifications
■ Approving Requests from the Notification Window
■ User Maintenance
– Viewing All Users
– Searching for a User
– Creating a New User
– Editing a User’s Details
– Deleting a User
– Defining a User’s Roles
– Defining a User’s Account
– Defining a User’s Enrollment
■ Setting up Approval Types
– Creating a New Approval Type
– Removing an Approval Type
– Searching for an Approval Type
– Editing an Approval Type’s Details
– Enabling and Disabling Approval Types
– Searching for an Organization
– Viewing Approval Preferences
– Updating Approval Preferences
■ Setting up Enrollments
– Creating an Enrollment
– Removing an Enrollment
– Enabling and Disabling Enrollments
– Editing an Enrollment’s Details
■ Setting up User Types
– Creating a User Type
2-2 Oracle CRM Technology Foundation Concepts and Procedures

Logging into User Management
– Removing a User Type
– Activating and Deactivating User Types
– Searching for a User Type
– Editing a User Type’s Details
■ Setting up Templates
– Creating a Template
– Removing a Template
– Enabling and Disabling Templates
– Editing a Template’s Details
– Searching for a Template
2.2 Logging into User ManagementThe following modules use User Management to register users:
■ Oracle iStore
■ Oracle iSupport
■ Oracle Partners Online
Perform the following steps to log into the System Administrator Console.
Prerequisites■ You must have a valid username and password.
■ You must have the CRM HTML Administration responsibility.
Steps1. Navigate to the Login window.
2. Enter your username.
3. Enter your password and click Go.
Note: All fields marked with an asterisk are required.
Using the System Administrator Console 2-3
Approving Pending User Requests
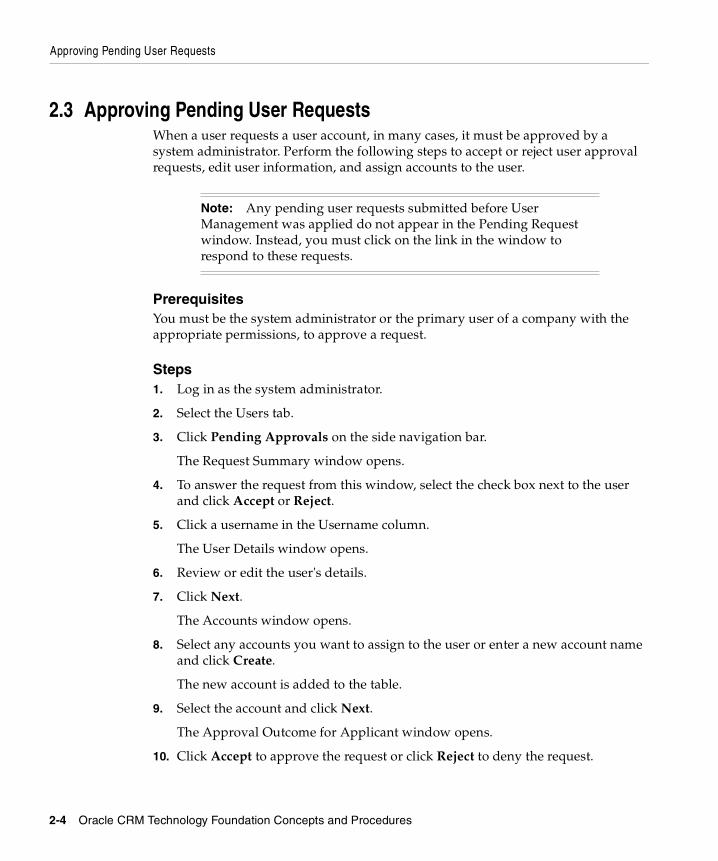
2.3 Approving Pending User RequestsWhen a user requests a user account, in many cases, it must be approved by asystem administrator. Perform the following steps to accept or reject user approvalrequests, edit user information, and assign accounts to the user.
PrerequisitesYou must be the system administrator or the primary user of a company with theappropriate permissions, to approve a request.
Steps1. Log in as the system administrator.
2. Select the Users tab.
3. Click Pending Approvals on the side navigation bar.
The Request Summary window opens.
4. To answer the request from this window, select the check box next to the userand click Accept or Reject.
5. Click a username in the Username column.
The User Details window opens.
6. Review or edit the user's details.
7. Click Next.
The Accounts window opens.
8. Select any accounts you want to assign to the user or enter a new account nameand click Create.
The new account is added to the table.
9. Select the account and click Next.
The Approval Outcome for Applicant window opens.
10. Click Accept to approve the request or click Reject to deny the request.
Note: Any pending user requests submitted before UserManagement was applied do not appear in the Pending Requestwindow. Instead, you must click on the link in the window torespond to these requests.
2-4 Oracle CRM Technology Foundation Concepts and Procedures

Approving Requests from the Notification Window
A notification is sent to the user when the last approver from the approvaldefinition approves it.
2.4 Viewing Your NotificationsA merchant administrator, system administrator, or a primary user for anorganization can approve or reject a users request. Whether the request is grantedor rejected, the user receives a notification. Perform the following steps to view youruser requests.
PrerequisitesYou must set up your Personal Home Page (PHP) and have the workflow and selfservice responsibilities to receive notifications.
Steps
1. Log in as the System Administrator.
2. Set up your Personal Homepage (PHP) to show workflow notifications.
3. Select the Main Menu tab.
4. Click Workflow.
5. Click View Notifications.
Your notifications appear in the Worklist window.
See Also■ Approving Requests from the Notification Window
2.5 Approving Requests from the Notification Window
Note: When an approver receives a registration request in theirNotifications, they have the option to reassign it. However, it is theapprovers responsibility to confirm that the person you arereassigning the request to has the correct approver responsibilitiesand permissions. The list provided includes application users thatmay or may not have the appropriate responsibilities to approveuser requests.
Using the System Administrator Console 2-5

Approving Requests from the Notification Window
For user types, the system administrator receives a URL in their notifications. Theapprover follows the URL to approve or reject the request. Perform the followingsteps to approve or reject a user requests.
PrerequisitesYou must set up your Personal Home Page (PHP) and have the workflow and selfservice responsibilities to receive notifications.
Steps
1. Log in as the System Administrator.
2. Set up your Personal Homepage (PHP) to show workflow notifications.
3. Select the Main Menu tab.
4. Click Workflow.
5. Click View Notifications.
Your notifications appear in the Worklist window.
6. Click the link to respond to the request.
The Notification Details window opens.
7. Review the users details and click Approve to accept the request or click Rejectto deny the request.
8. To reassign the request:
a. Click Reassign.
b. Enter the Approvers name or click the Up arrow icon to search for anapprover.
You are responsible for verifying
c. Select the Delegate Authority for responding to this notification optionbutton to send the request to an approver w to Transfer Ownership of thisnotification
d. Enter any comments you want the new approver to view.
e. Click OK.
The request is Reassigned.
2-6 Oracle CRM Technology Foundation Concepts and Procedures

Viewing All Users
See Also■ Viewing Your Notifications
2.6 Viewing All UsersPerform the following steps to view all users in the system.
PrerequisitesYou must be the merchant administrator, system administrator, or the primary userof a company with the appropriate permissions, to view all users.
Steps1. Log in to the CRM System Administrator Console as a system administrator.
2. Select the Users tab.
3. Click User Maintenance on the side navigation bar.
The Users window opens.
4. Enter a minimum of three characters into to the search field.
The "%" and "_" (underscore) symbols are wildcards.
5. Click Go.
A list of all users displays.
See Also■ Searching for a User
■ Creating a User
■ Editing a User’s Details
■ Deleting a User
■ Defining a User’s Roles
■ Defining a User’s Account
■ Defining a User’s Enrollment
Note: If you are the Primary user for your organization, you willonly be able to view users for your company.
Using the System Administrator Console 2-7

Searching for a User
2.7 Searching for a UserPerform the following steps to search for a user.
PrerequisitesYou must be the system administrator or the primary user of a company with theappropriate permissions to search for a user.
Steps1. Log in to the CRM System Administrator Console as a system administrator.
2. Select the Users tab.
3. Click User Maintenance on the side navigation bar.
The Users window opens.
4. Select Last Name, First Name, or Username from the Enter Search Criteriondrop-down list.
5. Enter a minimum of three characters into to the search field.
The "%" and "_" (underscore) symbols are wildcards.
6. Click Go.
A list of search results appears in the window.
See Also■ Viewing All Users
■ Creating a User
■ Editing a User’s Details
■ Deleting a User
■ Defining a User’s Roles
Note: If you are the Primary user for your organization, you areonly able to query users for your company.
Note: To search for all users in the system, enter three spacesfollowed by "%". This search may take a long time.
2-8 Oracle CRM Technology Foundation Concepts and Procedures

Creating a New User
■ Defining a User’s Account
■ Defining a User’s
2.8 Creating a New UserCertain types of users may only be created by a system administrator. For example,a system administrator creates primary users or other system administrators.Perform the following steps to create a new user.
PrerequisitesYou must be the system administrator or the primary user of a company with theappropriate permissions to create a new user.
Steps1. Log in to the CRM System Administrator Console as a system administrator.
2. Select the Users tab.
3. Click User Maintenance on the side navigation bar.
The Users window opens.
4. Click Create.
The User Registration window opens.
5. Select the type of user you want to create. Options include: Business User,Individual User, or Primary User.
6. Enter the user's information into the fields provided and click Next.
7. Select available enrollments as appropriate.
8. (Optional) Click Clear to clear the fields.
9. Click Submit to save.
See Also■ Viewing All Users
■ Searching for a User
■ Editing a User’s Details
■ Deleting a User
Using the System Administrator Console 2-9

Editing a User's Details
■ Defining a User’s Roles
■ Defining a User’s Account
■ Defining a User’s Enrollment
2.9 Editing a User's DetailsPerform the following steps to edit a user's information.
PrerequisitesYou must be the system administrator or the primary user of a company with theappropriate permissions to edit a user’s details.
Steps1. Log in to the CRM System Administrator Console as a system administrator.
2. Select the Users tab.
3. Click User Maintenance on the side navigation bar.
The Users window opens.
4. If you do not need to search for the user, then skip to step 6.
5. If you need to search for the user, then:
a. Select Last Name, First Name, or Username from the Enter Search Criteriondrop-down list.
b. Enter a minimum of three characters into to the search field.
The "%" and "_" (underscore) symbols are wildcards.
c. Click Go.
A list of search results appear in the window.
6. Click the username
The User Details window opens.
7. Edit fields as desire.
Fields marked with an asterisk are mandatory.
8. View the following links for information regarding:
■ Defining a User’s Roles
2-10 Oracle CRM Technology Foundation Concepts and Procedures

Deleting a User
■ Defining a User’s Account
■ Defining a User’s Enrollment
9. Edit the information in the window and click Update to modify the informationor click Restore to reset the original values in the window.
See Also■ Viewing All Users
■ Searching for a User
■ Creating a User
■ Deleting a User
2.10 Deleting a UserPerform the following steps to delete a user.
PrerequisitesYou must be the system administrator or the primary user of a company with theappropriate permissions to delete a user.
Steps1. Log in to the CRM System Administrator Console as a system administrator.
2. Select the Users tab.
3. Click User Maintenance on the side navigation bar.
The Users window opens.
4. If you do not need to search for the user, then skip to step 6.
5. If you need to search for the user, then:
a. Select Last Name, First Name, or Username from the Enter Search Criteriondrop-down list.
b. Enter a minimum of three characters into to the search field.
The "%" and "_" (underscore) symbols are wildcards.
c. Click Go.
A list of search results appear in the window.
Using the System Administrator Console 2-11

Defining a User’s Roles
6. Select the check box which corresponds to the user you want to delete.
7. Click Delete User.
The Delete User window opens.
8. Click Delete.
The user is deleted from the system.
See Also■ Viewing All Users
■ Searching for a User
■ Creating a User
■ Editing a User’s Details
■ Defining a User’s Roles
■ Defining a User’s Account
■ Defining a User’s Enrollment
2.11 Defining a User’s RolesPerform the following steps to define a user's role information.
PrerequisitesYou must be the merchant administrator or a system administrator, of a companywith the JTF_SECURITY_ASSIGN_ROLE permission to define a user’s roles.
Steps1. Log in to the CRM System Administrator Console as a system administrator.
2. Select the Users tab.
3. Click User Maintenance on the side navigation bar.
The Users window opens.
4. Find the user who’s role you want to define.
Note: If you are the primary user of an organization, you are notable to define their role from this window.
2-12 Oracle CRM Technology Foundation Concepts and Procedures

Defining a User’s Account
5. Click the username.
The User Details window opens.
6. Click Roles to edit the user’s role information.
The User- Role Mapping window opens.
7. Select the name of a role in one list and click > or < to move it to the other list.You can hold down the [CTRL] key and use your mouse to select multiple roles.
The administrator can only assign roles that they are assigned themselves.
8. Repeat step 11 as desired.
9. If you want to move all Available Roles to the Assigned Roles list, then click >>or to move all Assigned Roles to the Available Roles list, then click <<.
10. Click Update to modify the information or click Restore to reset the originalvalues in the window.
See Also■ Viewing All Users
■ Searching for a User
■ Creating a User
■ Editing a User’s Details
■ Deleting a User
■ Defining a User’s Account
■ Defining a User’s Enrollment
2.12 Defining a User’s AccountPerform the following steps to define a user's account information.
Note: If the user is not defined as a user type in the usermanagement framework, you are not able to define their accountfrom this window.
Using the System Administrator Console 2-13

Defining a User’s Enrollment
PrerequisitesYou must be the system administrator or the primary user of a company with theappropriate permissions to define a user’s account.
Steps1. Log in to the CRM System Administrator Console as a system administrator.
2. Select the Users tab.
3. Click User Maintenance on the side navigation bar.
The Users window opens.
4. Find the user who’s role you want to define.
5. Click the username.
The User Details window opens.
6. Click Assign Account to edit the user’s account information.
The Accounts window opens.
7. Select any accounts you want to assign to the user or enter a new account namein the account description field and click Create.
The new account is added to the table.
8. Select the account and click Update.
See Also■ Viewing All Users
■ Searching for a User
■ Creating a User
■ Editing a User’s Details
■ Deleting a User
■ Defining a User’s Roles
■ Defining a User’s Enrollment
2.13 Defining a User’s EnrollmentPerform the following steps to define a user’s enrollment.
2-14 Oracle CRM Technology Foundation Concepts and Procedures

Defining a User’s Enrollment
PrerequisitesYou must be the system administrator or the primary user of a company with theappropriate permissions to define a user’s enrollment.
Steps1. Log in to the CRM System Administrator Console as a system administrator.
2. Select the Users tab.
3. Click User Maintenance on the side navigation bar.
The Users window opens.
4. Find the user who’s role you want to define.
5. Click the username.
The User Details window opens.
6. To edit the user's enrollments, click Enrollments.
The User Enrollment Details window opens.
7. Select from the list of available enrollments and click Enroll. Only an individualuser can sign up for enrollments. The administrator can only remove a user’senrollments.
The enrollment appears in the enrollment column.
8. To unenroll, select from the list of enrollments and click Unenroll.
See Also■ Viewing All Users
■ Searching for a User
Note: If the user is not defined as a user type in the usermanagement framework you are not able to define theirenrollments from this window.
Note: If you are viewing your own enrollments, you have accessto available enrollments, that you can register for, depending onyour roles and responsibilities.
Using the System Administrator Console 2-15

Creating a New Approval Type
■ Creating a User
■ Editing a User’s Details
■ Deleting a User
■ Defining a User’s Roles
■ Defining a User’s Account
2.14 Creating a New Approval TypeAn approval type is an optional component of the user registration process. Performthe following steps to create a new approval process.
PrerequisitesYou must be the system administrator with the appropriate permissions to create anew approval type.
Steps1. Log in to the CRM System Administrator Console as a system administrator.
2. Select the Users tab.
3. Click Setup on the main navigation bar.
4. Click Approval Setup.
The Available Approvals window opens.
5. Click Create New Approval.
The Create Approval window opens.
6. Enter the approval information.
a. Enter an Approval Key.
b. Enter a name for the approval.
WARNING: The Use Pending Request Page check box shouldonly be unchecked if your organization does not plan to use ourpending approval window and intends to respond to allapprovals through e-mails and the workflow notificationwindow.
2-16 Oracle CRM Technology Foundation Concepts and Procedures

Creating a New Approval Type
c. (Optional) Enter a description for the approval type.
d. Select a Workflow Item Type from the drop-down list. This list contains allworkflows in the system, however, only those workflows coded to ourstandards will work with User Management.
e. Select an Application from the drop-down list.
f. (Optional) Select the Use Pending Request Page check box if you want theapproval type to display during the registration process from the "RegisterHere" link.
g. Click Next.
The Approver Selection Order window opens.
7. Enter the Approver Selection information.
a. Enter a number to define the order that each approver gets the request.
b. Enter the name of the first approver into the Approver1 field or click Go tosearch for an approvers name.
A look up window opens.
c. Enter your search criteria and click Go.
The Search Results appear in the window.
d. Select the option button for the user that you want to be the approver.
e. Click Add User.
The user’s name appears in the text field.
f. (Optional) Enter the name of additional approvers into the other Approverfields (repeat steps a-e).
g. (Optional) Click Cancel to clear the fields.
h. (Optional) Click add 5 more rows to add five empty approver fields.
8. Click Submit to save.
See Also■ Removing an Approval Type
■ Searching for an Approval Type
■ Editing an Approval Type’s Details
Using the System Administrator Console 2-17

Removing an Approval Type
■ Enabling and Disabling Approval Types
■ Searching for an Organization
■ Viewing Approval Preferences
■ Updating Approval Preferences
2.15 Removing an Approval Type
PrerequisitesYou must be the system administrator with the appropriate permissions to removean approval type.
Steps1. Log in to the CRM System Administrator Console as a system administrator.
2. Select the Users tab.
3. Click Setup on the main navigation bar.
4. Click Approval Setup in the side navigation bar.
The Available Approvals window opens.
5. Select the check box in the Remove column that corresponds to the Approvalthat you plan to delete.
6. Click Update to delete the Approval or click Restore to reset the original valuesin the window.
A confirmation window opens.
7. Click Confirm and Update Now to delete the Approval or click Cancel tocancel the deletion.
See Also■ Creating a New Approval Type
■ Searching for an Approval Type
■ Editing an Approval Type’s Details
■ Enabling and Disabling Approval Types
■ Searching for an Organization
2-18 Oracle CRM Technology Foundation Concepts and Procedures

Searching for an Approval Type
■ Viewing Approval Preferences
■ Updating Approval Preferences
2.16 Searching for an Approval TypeAn approval type is an optional component of the user registration process. Performthe following steps to search for an approval type.
PrerequisitesYou must be the system administrator with the appropriate permissions to searchfor an approval type.
Steps1. Log in to the CRM System Administrator Console as a system administrator.
2. Select the Users tab.
3. Click Setup on the main navigation bar.
4. Click Approval Setup.
The Available Approvals window opens.
5. If you want to search by approval name, then:
a. Select Approval Name from the drop-down list in the Search Approvalarea.
b. Enter your search phrase into the text input field.
c. Click Go.
d. View your search results.
6. If you want to search by approval key, then:
a. Select Approval Key from the drop-down list in the Search Approval area.
b. Enter your search phrase into the text input field.
c. Click Go.
d. View your search results.
See Also■ Creating a New Approval Type
Using the System Administrator Console 2-19

Editing an Approval Type's Details
■ Removing an Approval Type
■ Editing an Approval Type’s Details
■ Enabling and Disabling Approval Types
■ Searching for an Organization
■ Viewing Approval Preferences
■ Updating Approval Preferences
2.17 Editing an Approval Type's DetailsAn approval type is an optional component of the user registration process. Performthe following steps to edit an approval type's details.
PrerequisitesYou must be the system administrator or the primary user with the appropriatepermissions to edit an approval type’s details.
Steps1. Log in to the CRM System Administrator Console as a system administrator.
2. Select the Users tab.
3. Click Setup on the main navigation bar.
4. Click Approval Setup.
The Available Approvals window opens.
5. Click the name of the approval in the Approval Name column.
The Update Approval window opens.
6. Edit the fields as desired and click Next.
7. Edit the information in the Update Approval window and click Next.
8. Edit the information in the approver selection order window and click Submit.
The information is updated.
See Also■ Creating a New Approval Type
■ Removing an Approval Type
2-20 Oracle CRM Technology Foundation Concepts and Procedures

Enabling and Disabling Approval Types
■ Searching for an Approval Type
■ Enabling and Disabling Approval Types
■ Searching for an Organization
■ Viewing Approval Preferences
■ Updating Approval Preferences
2.18 Enabling and Disabling Approval TypesApproval Types can be enabled or disabled at any time. Perform the following stepsto enable or disable an approval.
PrerequisitesYou must be the system administrator of a company with the appropriatepermissions to change to status of an approval type.
Steps1. Log in to the CRM System Administrator Console as a system administrator.
2. Select the Users tab.
3. Click Setup on the main navigation bar.
4. Click Approval Setup.
The Available Approvals window opens.
5. If you want to enable an approval, select Enabled from the drop-down list inthe corresponding Status column.
6. If you want to disable an approval, select Disabled from the drop-down list inthe corresponding Status column.
7. Click Update to modify the status of the approval type or click Restore to resetthe original values in the window.
A confirmation window opens.
8. Click Confirm and Update All to modify the status.
See Also■ Creating a New Approval Type
Using the System Administrator Console 2-21

Searching for an Organization
■ Removing an Approval Type
■ Searching for an Approval Type
■ Editing an Approval Type’s Details
■ Searching for an Organization
■ Viewing Approval Preferences
■ Updating Approval Preferences
2.19 Searching for an OrganizationPerform the following steps to search for an organization.
PrerequisitesYou must be the system administrator with the appropriate permissions to searchfor an organization.
Steps1. Log in to the CRM System Administrator Console as a system administrator.
2. Select the Users tab.
3. Click Setup on the main navigation bar.
4. Click Approval Setup.
The Available Approvals window opens.
5. Click Organization in the side navigation bar.
The Organization window opens.
6. Select Organization Name, Company Number, or DUNS Number from theEnter Search Criterion drop-down list.
7. Enter a minimum of three characters into to the search field.
The "%" and "_" (underscore) symbols are wildcards.
8. Click Go.
A list of search results appears in the window.
9. Click the column heading to sort the row.
2-22 Oracle CRM Technology Foundation Concepts and Procedures

Viewing Approval Preferences
See Also■ Creating a New Approval Type
■ Removing an Approval Type
■ Searching for an Approval Type
■ Editing an Approval Type’s Details
■ Enabling and Disabling Approval Types
■ Viewing Approval Preferences
■ Updating Approval Preferences
2.20 Viewing Approval PreferencesUse the approval preferences window to define an approval list for a specificorganization. Perform the following steps to enable or disable an approval.
PrerequisitesYou must be the system administrator with the appropriate permissions to viewapproval preferences.
Steps1. Log in to the CRM System Administrator Console as a system administrator.
2. Select the Users tab.
3. Click Setup on the main navigation bar.
4. Click Approval Setup.
The Available Approvals window opens.
5. Click Organization in the side navigation bar.
The Organization window opens.
6. Search for an organization.
a. Select Organization Name, Company Number, or DUNS Number from theEnter Search Criterion drop-down list.
b. Enter a minimum of three characters into to the search field.
The "%" and "_" (underscore) symbols are wildcards.
Using the System Administrator Console 2-23
Updating Approval Preferences
c. Click Go.
A list of search results appears in the window.
7. Click the Organization Name.
The Approval Preferences window opens with a list of approval definitions forthe specified organization.
See Also■ Creating a New Approval Type
■ Removing an Approval Type
■ Searching for an Approval Type
■ Editing an Approval Type’s Details
■ Enabling and Disabling Approval Types
■ Searching for an Organization
■ Updating Approval Preferences
2.21 Updating Approval PreferencesPerform the following steps to update the organization’s approval list.
PrerequisitesYou must be the system administrator or the primary user with the appropriatepermissions to update approval preferences for an organization.
Steps1. Log in to the CRM System Administrator Console as a system administrator.
2. Select the Users tab.
3. Click Setup on the main navigation bar.
4. Click Approval Setup.
The Available Approvals window opens.
5. Click Organization in the side navigation bar.
The Organization window opens.
6. Search for an organization.
2-24 Oracle CRM Technology Foundation Concepts and Procedures

Updating Approval Preferences
a. Select Organization Name, Company Number, or DUNS Number from theEnter Search Criterion drop-down list.
b. Enter a minimum of three characters into to the search field.
The "%" and "_" (underscore) symbols are wildcards.
c. Click Go.
A list of search results appear in the window.
7. Click the Organization Name.
The Approval Preferences window opens.
8. Click the approval list that you want to update.
The Approver Selection Order window for the organization opens.
9. Enter the Approver Selection information.
a. Enter a number to define the order that each approver gets the request.
b. Enter the name of the first approver into the Approver1 field or click Go tosearch for an approvers name.
c. Enter your search criteria and click Go.
The Search Results appear in the window.
d. Select the option button for the user that you want to be the approver.
e. Click Add User.
The user’s name appears in the text field.
f. (Optional) Enter the name of additional approvers into the other Approverfields (repeat steps a-e).
g. (Optional) Click Cancel to clear the fields.
h. (Optional) Click add 5 more rows to add five empty approver fields.
10. Click Submit to save.
See Also■ Creating a New Approval Type
■ Removing an Approval Type
■ Searching for an Approval Type
Using the System Administrator Console 2-25

Creating an Enrollment
■ Editing an Approval Type’s Details
■ Enabling and Disabling Approval Types
■ Searching for an Organization
■ Viewing Approval Preferences
2.22 Creating an EnrollmentAn enrollment is an optional step in the user registration process. From the CreateEnrollment window, you can define enrollments and approvals for enrollments.Each enrollment may or may not have a role associated with it. Perform thefollowing steps to create an enrollment.
PrerequisitesYou must be the system administrator or the primary user with the appropriatepermissions to create an enrollment.
Steps1. Log in to the CRM System Administrator Console as a system administrator.
2. Select the Users tab.
3. Click Setup on the main navigation bar.
4. Click Enrollments in the side navigation bar.
The Available Enrollments window opens.
5. Click Create New Enrollment.
The Create Enrollment window opens.
6. Define the following information:
a. Enter an Enrollment Key.
b. Enter a name for the new enrollment.
c. (Optional) Enter a description for the new enrollment. This description caninclude HTML tags for style. There is a 2000 character limit in the field thatincludes all HTML tags.
7. Select roles and responsibilities.
a. Select a responsibility from the Responsibility drop-down list. If noresponsibility is required, choose No Responsibility is Required.
2-26 Oracle CRM Technology Foundation Concepts and Procedures

Removing an Enrollment
b. Select the name of a role in the Available list and click > to move it to theAssigned list. You can hold down the [CTRL] key and use your mouse toselect multiple roles.
c. Repeat the previous step to add more roles to the list.
d. To move all Available Roles to the Assigned Roles list, then click >> or tomove all Assigned Roles to the Available Roles list, then click <<.
e. Select an application from the drop-down list.
f. Select an approval from the drop-down list. If no approvals are required forthe user to subscribe to the service, choose No Approval Required.
g. Select an enrollment template from the drop-down list.
8. (Optional) Click Reset to clear the fields.
9. Click Create to save your changes.
A confirmation appears stating the enrollment was created successfully.
See Also■ Defining a User’s Enrollment
■ Removing an Enrollment
■ Enabling and Disabling Enrollments
■ Editing an Enrollment’s Details
2.23 Removing an EnrollmentPerform the following steps to delete an enrollment.
PrerequisitesYou must be the system administrator with the appropriate permissions to delete anenrollment.
Steps1. Log in to the CRM System Administrator Console as a system administrator.
2. Select the Users tab.
3. Click Setup on the main navigation bar.
Using the System Administrator Console 2-27

Enabling and Disabling Enrollments
4. Click Enrollments in the side navigation bar.
The Available Enrollments window opens.
5. Select the check box in the Remove column that corresponds to the enrollmentthat you plan to delete.
6. Click Update to remove the enrollment or click Restore to reset the originalvalues in the window.
A confirmation window opens.
7. If you are sure you want to delete the enrollment, click Confirm and UpdateNow.
See Also■ Defining a User’s Enrollment
■ Creating an Enrollment
■ Enabling and Disabling Enrollments
■ Editing an Enrollment’s Details
2.24 Enabling and Disabling EnrollmentsAn enrollment is an optional step in the user registration process. Perform thefollowing steps to enable or disable an enrollment.
PrerequisitesYou must be the system administrator with the appropriate permissions to modifythe status of an enrollment.
Steps1. Log in to the CRM System Administrator Console as a system administrator.
2. Select the Users tab.
3. Click Setup on the main navigation bar.
4. Click Enrollments in the side navigation bar.
The Available Enrollments window opens.
5. If you want to enable an enrollment, select Enabled from the drop-down list inthe corresponding Status column.
2-28 Oracle CRM Technology Foundation Concepts and Procedures

Editing an Enrollment's Details
6. If you want to disable an enrollment, select Disabled from the drop-down listin the corresponding Status column.
7. Click Update to modify the information or click Restore to reset the originalvalues in the window.
A confirmation window opens.
8. Click Confirmed and Update Now.
The enrollment status is modified.
See Also■ Defining a User’s Enrollment
■ Creating an Enrollment
■ Removing an Enrollment
■ Editing an Enrollment’s Details
2.25 Editing an Enrollment's DetailsAn enrollment is an optional step in the user registration process. Perform thefollowing steps to edit an enrollment's details.
PrerequisitesYou must be the system administrator with the appropriate permissions to edit anenrollment’s details.
Steps1. Log in to the CRM System Administrator Console as a system administrator.
2. Select the Users tab.
3. Click Setup on the main navigation bar.
4. Click Enrollments in the side navigation bar.
The Available Enrollments window opens.
5. Click the name of the enrollment.
The Update Enrollment window opens.
6. Edit the fields as desired and click Next.
Using the System Administrator Console 2-29

Creating a User Type
7. Select the Assign the changed role to existing users of this Enrollment checkbox if you want previously registered users to be granted the specified role.
8. Assign new roles as needed.
9. Select the Assign the changed responsibility to existing users of thisEnrollment check box if you want previously registered users to be granted thespecified responsibility.
10. (Optional) Click Reset to reset the fields to their original settings or clickUpdate to save your changes.
A confirmation window opens.
See Also■ Defining a User’s Enrollment
■ Creating an Enrollment
■ Removing an Enrollment
■ Enabling and Disabling Enrollments
2.26 Creating a User TypeA user type is a category of users based on common responsibilities and roles.Oracle is shipping predefined user types in the 11.5.6 release (Primary, Business,and Individual users) and defined enrollments attached to these user typesout-of-the-box. These enrollments include different roles and responsibilities. If youare a legacy user uptaking the new user management framework, you no longerhave access to the default roles and responsibilities windows. The user typedefinition replaces these windows. Roles and responsibilities defined at the userlevel are the default. Perform the following steps to create a new user type.
PrerequisitesYou must be the system administrator with the appropriate permissions to create anew user type.
2-30 Oracle CRM Technology Foundation Concepts and Procedures

Creating a User Type
Steps1. Log in to the CRM System Administrator Console as a system administrator.
2. Select the Users tab.
3. Click Setup on the main navigation bar.
4. Click User Types in the side navigation bar.
The Available User Types window opens.
5. Click Create New User Type.
The User Type Details window opens.
6. Define the following information:
a. Enter a user type name.
b. Enter a user type key.
c. (Optional) Enter a description into the Description field. This descriptioncan include HTML tags for style. There is a 2000 character limit in the fieldthat includes all HTML tags.
d. (Optional) Select Enable Self-service Registration to display the new usertype during the registration process from the "Register Here" link.
e. Use the drop-down list to select the registration template default. Optionsinclude: Business, Individual, or Primary user.
f. Use the drop-down list to select the approval by information. For example,JTF User Approval or No approval is required.
7. Click Next to save and go on to the next form.
The Roles and Responsibilities window opens.
8. Define the following information:
Note: If you deselect the Enabled Self-service Registration checkbox when you create a new user type, the user type does not appearin the self-service registration window when you click the "RegisterHere" link unless the user has the JTF_SECURITY_ASSIGN_ROLEpermission. At runtime, the system validates that the user has thispermission, if not, it confirms if the check box is selected and onlyshow the user types that are available for self-service.
Using the System Administrator Console 2-31

Creating a User Type
a. Use the drop-down list to select a user type responsibility.
b. (Optional) Select the Assign the changed responsibility to existing usersof this user type check box if you want other users registered under thisuser type to be granted the responsibility specified. If no change is made tothe responsibility, no update occurs.
c. To assign roles, select the name of a role in one list and then click > or < tomove it to the other list. Repeat this step for as many roles you want toassign.
d. If you want to move all Available Roles to the Assigned Roles list, then click>>.
e. If you want to move all Assigned Roles to the Available Roles list, then click<<.
f. (Optional) Select the Assign the changed role to existing users of this usertype check box if you want other users registered under this user type to begranted the role specified. If no change is made to the roles, no updateoccurs.
9. Click Next to save and go on to the next form or click Restore to revert back tothe original values in the window.
The Enrollments window opens.
10. Define the following information:
a. If you want to activate an enrollment for a user type, select Yes from thedrop-down list in the Enroll column.
b. If you do not want to enroll the user type in an enrollment, select No fromthe drop-down list in the Enroll column.
c. Select Implicit or Explicit from the drop-down lists to define the activationmode.
d. Enter a number into the fields in the Order column to set enrollment order.
e. If you want to edit an enrollment's details, then click the name of theenrollment.
11. Click Next to save and go on to the next form or click Restore to revert back tothe original values in the window.
The User Types window opens with the newly created user type added to thetable.
2-32 Oracle CRM Technology Foundation Concepts and Procedures

Removing a User Type
See Also■ Removing a User Type
■ Activating and Deactivating User Types
■ Searching for a User Type
■ Editing a User Type’s Details
2.27 Removing a User TypeA user type is a category of users based on common responsibilities and roles. Auser type can be removed as long as it is not enabled (in use). Perform the followingsteps to remove a user type.
PrerequisitesYou must be the system administrator with the appropriate permissions to remove auser type.
Steps1. Log in to the CRM System Administrator Console as a system administrator.
2. Select the Users tab.
3. Click Setup on the main navigation bar.
4. Click User Types in the side navigation bar.
The Available User Types window opens.
5. Select the check box in the Remove column that corresponds to the user typethat you want to delete.
6. Click Update to delete the User Type or click Restore to reset the original valuesin the window.
A confirmation window opens.
7. Click Confirm to delete the User Type or click Cancel to cancel the deletion.
See Also■ Creating a User Type
■ Activating and Deactivating User Types
■ Searching for a User Type
Using the System Administrator Console 2-33

Activating and Deactivating User Types
■ Editing a User Type’s Details
2.28 Activating and Deactivating User TypesA user type is a category of users based on common responsibilities and roles.Perform the following steps to activate or deactivate a user type.
PrerequisitesYou must be the system administrator with the appropriate permissions to modifythe status of a user type.
Steps1. Log in to the CRM System Administrator Console as a system administrator.
2. Select the Users tab.
3. Click Setup on the main navigation bar.
4. Click User Types in the side navigation bar.
The Available User Types window opens.
5. If you want to activate an enrollment, select Active from the drop-down list inthe corresponding Status column.
6. If you want to deactivate an enrollment, select Inactive from the drop-down listin the corresponding Status column.
7. Click Update to modify the status of the user type or click Restore to reset theoriginal values in the window.
See Also■ Creating a User Type
■ Removing a User Type
■ Searching for a User Type
■ Editing a User Type’s Details
2.29 Searching for a User TypeA user type is a category of users based on common responsibilities and roles.Perform the following steps to search for a user type.
2-34 Oracle CRM Technology Foundation Concepts and Procedures

Editing a User Type's Details
PrerequisitesYou must be the system administrator with the appropriate permissions to searchfor a new user type.
Steps1. Log in to the CRM System Administrator Console as a system administrator.
2. Select the Users tab.
3. Click Setup on the main navigation bar.
4. Click User Types in the side navigation bar.
The Available User Types window opens.
5. If you want to search by the User Type Name, then:
a. Enter your search phrase into the text input field.
b. Click Go.
The results appear in the window.
6. If you want to search by the User Type Key, then:
a. Enter your search phrase into the text input field.
b. Click Go.
The results appear in the window.
See Also■ Creating a User Type
■ Removing a User Type
■ Activating and Deactivating User Types
■ Editing a User Type’s Details
2.30 Editing a User Type's DetailsA user type is a category of users based on common responsibilities and roles.Perform the following steps to edit a user type's details.
Using the System Administrator Console 2-35

Editing a User Type's Details
PrerequisitesYou must be the system administrator with the appropriate permissions to modifythe user type’s details.
Steps1. Log in to the CRM System Administrator Console as a system administrator.
2. Select the Users tab.
3. Click Setup on the main navigation bar.
4. Click User Types in the side navigation bar.
The Available User Types window opens.
5. Click the name of the user type in the User Type Name column.
The User Type Details window opens.
6. Edit the fields as desired.
7. (Optional) Click Clear to reset the fields to their original settings.
8. Click Next to save and go on to the next form.
The Roles and Responsibilities window opens.
9. Edit the information as needed.
a. Use the drop-down list to select a user type responsibility.
b. (Optional) Select the Assign the changed responsibility to existing usersof this user type check box if you want other users registered under thisuser type to be granted the responsibility specified.
c. To assign roles, select the name of a role in one list and then click > or < tomove it to the other list. Repeat this step for as many roles you want toassign.
d. If you want to move all Available Roles to the Assigned Roles list, then click>>.
e. If you want to move all Assigned Roles to the Available Roles list, then click<<.
f. (Optional) Select the Assign the changed role to existing users of this usertype check box if you want other users registered under this user type to begranted the role specified.
2-36 Oracle CRM Technology Foundation Concepts and Procedures

Creating a Template
10. Click Next to save and go on to the next form or click Restore to revert back tothe original values in the window.
The Enrollments window opens.
11. Edit the information as needed.
a. If you want to enroll the user type in an enrollment, select Yes from thedrop-down list in the Enroll column.
b. If you do not want to enroll the user type in an enrollment, select No fromthe drop-down list in the Enroll column.
c. Select Implicit or Explicit from the drop-down lists to define the type.
d. Enter a number into the fields in the Order column to set enrollment order.
e. If you want to edit an enrollment's details, then click the name of theenrollment.
12. Click Next to save and go on to the next form or click Restore to revert back tothe original values in the window.
The User Types window opens with the newly updated user type information.
See Also■ Creating a User Type
■ Removing a User Type
■ Activating and Deactivating User Types
■ Searching for a User Type
2.31 Creating a TemplateA template is an application-specific set of JSPs that you can use to customize theuser registration process. There are two template categories, user types andenrollments. Perform the following steps to create a template.
PrerequisitesYou must be the system administrator with the appropriate permissions to create anew template.
Using the System Administrator Console 2-37

Creating a Template
Steps1. Log in to the CRM System Administrator Console as a system administrator.
2. Select the Users tab.
3. Click Setup on the main navigation bar.
4. Click Templates on the side navigation bar.
The Available Templates window opens.
5. Click Create New Template.
The Create Template window opens.
6. Enter the following required information.
a. Enter the template key.
b. Enter a name for the template.
c. (Optional) Enter a description for the template.
d. Select a template type from the drop-down list. Options include user typetemplate or enrollment template.
e. Enter the name of the template handler. The template handler is a java classimplemented by the application to handle the registration data at runtime.
f. Enter the name of JSP page that is the first window of the template flowinto the Page Name field. The extension of the window must be ".jsp".
g. Select an application from the drop-down list.
7. (Optional) Click Reset to clear the fields.
8. Click Create to save your information.
See Also■ Removing a Template
■ Enabling and Disabling Templates
■ Editing a Template’s Details
■ Searching for a Template
2-38 Oracle CRM Technology Foundation Concepts and Procedures

Enabling and Disabling Templates
2.32 Removing a TemplateA template is an application-specific set of JSPs that you can use to customize theuser registration process. Perform the following steps to delete a template.
PrerequisitesYou must be the system administrator with the appropriate permissions to remove atemplate.
Steps1. Log in to the CRM System Administrator Console as a system administrator.
2. Select the Users tab.
3. Click Setup on the main navigation bar.
4. Click Templates on the side navigation bar.
The Available Templates window opens.
5. Select the check box in the Remove column that corresponds to the templatethat you want to delete.
6. Click Update to delete the template or click Restore to reset the original valuesin the window.
A confirmation window opens.
7. Click Confirm Update to delete the template or click Cancel to return to theAvailable Templates window.
See Also■ Creating a Template
■ Enabling and Disabling Templates
■ Editing a Template’s Details
■ Searching for a Template
2.33 Enabling and Disabling TemplatesA template is an application-specific set of JSPs that you can use to customize theuser registration process. A template can be assigned to many enrollments and usertypes. Perform the following steps to enable or disable a template.
Using the System Administrator Console 2-39

Editing a Template's Details
PrerequisitesYou must be the system administrator with the appropriate permissions to modifythe status of a template.
Steps1. Log in to the CRM System Administrator Console as a system administrator.
2. Select the Users tab.
3. Click Setup on the main navigation bar.
4. Click Templates on the side navigation bar.
The Available Templates window opens.
5. If you want to enable a template, select Enabled from the drop-down list in thecorresponding Status column.
6. If you want to disable a template, select Disabled from the drop-down list inthe corresponding Status column.
7. Click Update to modify the template’s status or click Restore to reset theoriginal values in the window.
A confirmation window opens.
8. Click Confirm Update to modify the template’s status or click Cancel to returnto the Available Templates window.
See Also■ Creating a Template
■ Removing a Template
■ Editing a Template’s Details
■ Searching for a Template
2.34 Editing a Template's DetailsA template is an application-specific set of JSPs that you can use to customize theuser registration process. Perform the following steps to edit a template's details.
2-40 Oracle CRM Technology Foundation Concepts and Procedures

Searching for a Template
PrerequisitesYou must be the system administrator with the appropriate permissions to modify atemplate’s details.
Steps1. Log in to the CRM System Administrator Console as a system administrator.
2. Select the Users tab.
3. Click Setup on the main navigation bar.
4. Click Templates on the side navigation bar.
The Available Templates window opens.
5. Click the name of the template in the Template Name column.
The User Management: Update Template window opens.
6. Edit the fields as desired.
7. (Optional) Click Clear to reset the fields to their original settings.
8. Click Update to save your changes.
See Also■ Creating a Template
■ Removing a Template
■ Enabling and Disabling Templates
■ Searching for a Template
2.35 Searching for a TemplateA template is an application-specific set of JSPs that you can use to customize theuser registration process. Perform the following steps to search for a template.
PrerequisitesYou must be the system administrator with the appropriate permissions to searchfor a template.
Steps1. Log in to the CRM System Administrator Console as a system administrator.
Using the System Administrator Console 2-41

Managing Security
2. Select the Users tab.
3. Click Setup on the main navigation bar.
4. Click Templates on the side navigation bar.
The Available Templates window opens.
5. Select how you want to search for the template. Options include TemplateName or Template Key from the drop-down list.
6. Enter your search criteria into the text field.
7. Click Go.
Your search results appear in the window.
See Also■ Creating a Template
■ Removing a Template
■ Enabling and Disabling Templates
■ Editing a Template’s Details
2.36 Managing SecurityYou can perform the following tasks from the Security subtab:
■ Viewing Security Alerts
■ Managing Roles
– Creating Roles
– Mapping Permissions to a Role
■ Managing Permissions
– Creating Permissions
– Assigning a Permission to Roles
For information on Security concepts, see Understanding Security.
2-42 Oracle CRM Technology Foundation Concepts and Procedures
Creating Roles
2.37 Managing RolesA role is a grouping of one or more permissions. Use this procedure to manageroles.
Prerequisites■ Read Understanding Security
■ Navigate to Settings > Security > Access Controls > Roles
Steps1. If you want to create a new role, then click Create.
This opens the page where you edit the details of a new role.
2. If you want to use the search for a role, then:
a. Type your search phrase into the Find Roles field.
b. Click Go.
The search results display.
3. Optionally, click First, Previous, Next, Last, or an option from the drop-downlist to navigate within the table.
4. If you want to map permissions to a particular role, then click the name of a rolein the Role column of the table.
This opens the page where you map permissions to a role.
5. If you want to delete a role, then:
a. Select the appropriate check box in the Remove column of the table. If thecheck box is disabled, then you cannot remove the role.
b. Optionally, click Restore to reset the fields to their original settings.
c. A new screen displays, asking you to confirm that you want to delete therole. To cancel, click Cancel. To delete the role, click Update.
The role is removed and revoked from all users who are assigned to therole.
2.38 Creating RolesUse this procedure to create a new role.
Using the System Administrator Console 2-43

Mapping Permissions to a Role
Prerequisites■ Read Understanding Security
■ Navigate to Settings > Security > Access Controls > Roles, then click Create
Steps1. Type a new role name into the Name field.
The first two or three letters of a role name correspond to the module shortcode.Role names can be similar but not identical.
2. Type a description of the role into the Description field.
3. Select the Data check box, if applicable.
4. Optionally, click Clear to clear the content of the fields.
5. Optionally, click Back to Summary Page to return to the main Roles page.
6. Click Update to save.
The new role is filed in alphabetical order.
2.39 Mapping Permissions to a RoleA role is a grouping of one or more permissions. Use this procedure to mappermissions to a role.
Prerequisites■ Read Understanding Security
■ Navigate to Settings > Security > Access Controls > Roles, then click the nameof a role in the table
Steps1. Choose the name of a permission in one list and click > or < to move it to the
other list.
2. Repeat step 1 as desired.
3. If you want to move all Available Permissions to the Assigned Permissions list,then click >>.
4. If you want to move all Assigned Permissions to the Available Permissions list,then click <<.
2-44 Oracle CRM Technology Foundation Concepts and Procedures

Managing Permissions
5. Optionally, click Restore to reset the fields to their original values.
6. Click Update to save.
2.40 Managing PermissionsA permission has a name and a description. Use this procedure to managepermissions.
Prerequisites■ Read Understanding Security
■ Navigate to Settings > Security > Access Controls > Permissions
Steps1. If you want to create a new permission, then click Create.
This opens the page where you edit the details of a new permission.
2. If you want to search for a permission, then:
a. Type your search phrase into the text input field.
b. Click Go.
The search results display.
3. Optionally, click First, Previous, Next, Last, or an option from the drop-downlist to navigate within the table.
4. If you want to assign a permission to roles, then click the name of a permissionin the table.
This opens the page where you assign a permission to roles.
5. If you want to delete a permission, then:
a. Select the appropriate check box in the Remove column of the table.
WARNING! Do not remove the pre-defined permissions that arebuilt into the System Administrator Console. These pre-definedpermissions are essential for stable and reliable performance ofall Oracle CRM modules. Removal of these permissions couldcause serious or fatal performance problems.
Using the System Administrator Console 2-45

Creating Permissions
b. Optionally, click Restore to reset the fields to their original settings.
c. Click Update to save.
The permission is removed.
2.41 Creating PermissionsUse this procedure to create a new permission.
Prerequisites■ Read Understanding Security
■ Navigate to Settings > Security > Access Controls > Permissions, then clickCreate
Steps1. Type a new permission name into the Name field.
The first two or three letters of a role name correspond to the module shortcode.Role names can be similar but not identical.
2. Type a description of the permission into the Description field.
3. Select the Data check box, if applicable.
4. Optionally, click Clear to clear the content of the fields.
5. Optionally, click Back to Summary Page to return to the main Permissionspage.
6. Click Update to save.
The new permission is filed in alphabetical order.
2.42 Assigning a Permission to RolesUse this procedure to assign a permission to roles.
Prerequisites■ Read Understanding Security
■ Navigate to Settings > Security > Access Controls > Permissions, then clickthe name of a permission in the table
2-46 Oracle CRM Technology Foundation Concepts and Procedures

Setting Up Navigation Groups
Steps1. Choose the name of a role in one list and click > or < to move it to the other list.
2. Repeat step 1 as desired.
3. If you want to move all Available Roles to the Assigned Roles list, then click >>.
4. If you want to move all Assigned Roles to the Available Roles list, then click <<.
5. Optionally, click Restore to reset the fields to their original values.
6. Click Update to save.
2.43 Using Site PreferencesSite Preferences are features that allow you to personalize your deployment of CRMapplications.
You can perform the following tasks from the Site Preferences subtab:
■ Setting Up Navigation Groups
■ Editing Navigation Group Details
For information on Site Preferences concepts, see Understanding Site Preferences.
2.44 Setting Up Navigation GroupsUse the following procedure to set up Navigation Groups, which are the links in theInterapplication Bar that represent customizable sets of applications with definedresponsibility settings. The Interapplication Bar is the group of links that display atthe top of every page in HTML-based CRM applications.
Prerequisites■ Read Understanding Site Preferences
■ Navigate to Settings > Site Preferences > Interapplication Bar > NavigationGroup Setup
Steps1. Type Navigation Group names and descriptions into the Group Name and
Description fields.
2. For each Navigation Group, choose Active or Inactive from the drop-down listin the Status column.
Using the System Administrator Console 2-47
Editing Navigation Group Details
Only active groups display on the Interapplication Bar.
3. Type numbers into the Display Order fields to set the order of the NavigationGroups within the Interapplication Bar (from left to right).
4. Optionally, click the icon in the Detail column.
This opens the page where you map CRM applications to a Navigation Group.
5. If you want to remove an application group, then select the appropriate checkbox in the Remove column of the table.
6. Click Update to save.
2.45 Editing Navigation Group DetailsUse this procedure to map CRM applications to Navigation Groups. A NavigationGroup is a customizable set of applications with defined responsibility settings thatis launched when you click its link in the Interapplication Bar. The InterapplicationBar displays at the top of every page in HTML-based CRM applications.
Prerequisites■ Read Understanding Site Preferences.
■ Navigate to Settings > Site Preferences > Interapplication Bar > NavigationGroup Details
Steps1. Choose a Navigation Group from the drop-down list.
The page refreshes to display additional fields.
2. Choose the name of an application in one list and click > or < to move it to theother list.
3. Repeat step 2 as desired.
4. If you want to move all Available Applications to the Selected Applications list,then click >>.
5. If you want to move all Assigned Applications to the Selected Applications list,then click <<.
6. Optionally, click Restore to reset the fields to their original values.
7. Click Update to save.
2-48 Oracle CRM Technology Foundation Concepts and Procedures

Setting Up the Self Service User
2.46 Using the System SubtabIn the System subtab, you can define the system level properties that you need toset up during deployment. You can reconfigure the properties later as necessary.
You can perform the following tasks from the System subtab:
■ Setting Up the Self Service User
■ Setting Up Branding
■ Setting Up Cookies
■ Setting Up Sessions
■ Setting Up Logging Trails
■ Setting Up Categories
■ Managing Properties
■ Editing the Details of Keys
■ Setting Up Password Expiration
For information on System subtab concepts, see Understanding the System Subtab.
2.47 Setting Up the Self Service UserYou must set up a self service user (guest user) after deploying applications. Thisprocedure allows you to grant privileges to new users during self registration. Usethe following procedure to set up the self service user.
Prerequisites■ Read Understanding the System Subtab
■ Navigate to Settings > System > Properties > Self Service User
Steps1. Type a name into the Name field.
2. Type a password with at least six characters into the Password field.
3. Confirm the password by retyping it into the Retype Password field.
4. Optionally, click Restore to reset the fields to their original settings.
5. Click Update to save.
Using the System Administrator Console 2-49

Setting Up Branding
2.48 Setting Up BrandingBranding is the wording that displays at the top left of every application page. Youcan customize the branding once the application has been deployed at a customersite.
The branding can be defined at both application level and responsibility level. Aresponsibility can only belong to one application and an application can havemultiple responsibilities. If the branding for a particular responsibility is not set, thebranding for all responsibilities within the application (application level) will beused. If the branding for a particular responsibility is set, the branding will takeprecedence and override the branding set at application level.
For example, for the application CRM Foundation, you could set the branding to"Admin Console" at application level (the default for all responsibilities). Given twoCRM Foundation users, one with the CRM Administrator responsibility and theother with the HTML Foundation User responsibility, when they log in, both willsee "Admin Console."
However, if you customize the branding for the HTML Foundation Userresponsibility to "HTML User," then when those users log in they will see "HTMLUser." Users having the responsibility CRM Administrator will still see "AdminConsole."
Use this procedure to set up branding.
Prerequisites■ Read Understanding the System Subtab
■ Navigate to Settings > System > Properties > Branding
Steps1. Choose an application from the Application Name drop-down list.
2. Choose which responsibility applies to the branding from the ResponsibilityName drop-down list. In some cases, you may only have one option, DefaultBranding for this Application.
3. Type into the Branding Name field to set the branding.
4. Optionally, click Restore to reset the fields to their original settings.
5. Click Update to save.
The page refreshes to display a preview of the new branding.
2-50 Oracle CRM Technology Foundation Concepts and Procedures
Setting Up Sessions
2.49 Setting Up CookiesCookies store information about users and systems as users log in to applications.Use this procedure to set up cookies.
Prerequisites■ Read Understanding the System Subtab
■ Navigate to Settings > System > Properties > Cookies
Steps1. Type the name of the cookie into the Name field.
The name will be given the database ID as a prefix.
2. Choose browser or URL from the Type drop-down list.
This sets whether browser cookies or URL rewriting is used.
3. Type the encryption key into the Encryption Key field.
4. Type a number into the Expiration Time field.
This is the number of expiration units (time intervals) that pass before thecookie expires. Set the expiration unit below.
5. Choose Day, Hour, or Minute from the Expiration Unit drop-down list.
6. Optionally, click Restore to reset the fields to their original settings.
7. Click Update to save.
2.50 Setting Up SessionsSessions are system properties that track the activity of users and whether or notusers have left the domain. Use this procedure to set up sessions.
Prerequisites■ Read Understanding the System Subtab
■ Navigate to Settings > System > Properties > Sessions
Steps1. Complete the Applications Sessions section.
Using the System Administrator Console 2-51
Setting Up Logging Trails
a. Type a number of hours into the ICX Time Limit field.
b. Type a maximum number of requests into the ICX Connection Limit field.
c. Type a number of minutes into the Inactive Session Timeout field.
2. Complete the Sticky Sessions section.
When using Sticky Sessions, all requests from the same user session willattempt to go to the same JVM, regardless of whether the application is instateless mode or stateful mode. Sticky Sessions allow for several performanceenhancements. In particular, the hit ratio of middle tier caching is improvedbecause all cached data for a particular user resides on a single JVM rather thanbeing scattered across different JVM instances. In addition, session attributesand resources will not have to be recreated and duplicated across differentJVMs, but can be reused in the JVM associated with the session.
a. Choose True or False from the Sticky Session Flag drop-down list.
b. Type a number of milliseconds into the Cleanup Time Interval field.
c. Type a number of minutes into the Session Context Inactive Time Limitfield.
d. Choose True or False from the Connection Reuse Flag drop-down list.
3. Optionally, click Restore to reset the fields to their original settings.
4. Click Update to save.
2.51 Setting Up Logging TrailsLoggings are system properties that you set up to debug any system-related codes.Framework Logging is used by the CRM Technology Foundation, while Service Logging isused by all applications. They are particularly useful during early deployment. Usethis procedure to set up loggings.
Prerequisites■ Read Understanding the System Subtab
■ Navigate to Settings > System > Properties > Logging Trails
Steps1. Complete the Framework Logging Options section.
a. Type the name of the file to be used for logging into the File Name field.
2-52 Oracle CRM Technology Foundation Concepts and Procedures
Managing Properties
b. Choose Debug, Fatal, or None from the Level drop-down list.
2. Complete the Service Logging Options section.
a. Type the name of the file to be used for logging into the File Name field.
b. Choose Debug, Fatal, or None from the Level drop-down list.
c. Choose File from the Mode field.
d. Choose FIFO or LIFO from the Pool field.
3. Optionally, click Restore to reset the fields to their original settings.
4. Click Update to save.
2.52 Setting Up Property CategoriesUse this procedure to set up applications in the system properties frameworkduring the development phase.
Prerequisites■ Read Understanding the System Subtab
■ Navigate to Settings > System > Properties > Category
Steps1. Choose an application from the Application Name drop-down list.
2. Choose Read or Update from the READ/UPDATE drop-down list.
3. Optionally, click Restore to reset the fields to their original settings.
4. Click Next.
This opens the page where you can map this permission to one or more roles.
2.53 Managing PropertiesA property is a key/value pair that is application-specific. A key is what is used byan application to retrieve data. Keys are unique, but can have multiple values.Values are the content or data that binds to a particular key. Use this procedure tocreate and manage properties.
Using the System Administrator Console 2-53

Editing the Details of Keys
Prerequisites■ Read Understanding the System Subtab
■ Navigate to Settings > System > Properties > Advanced
Steps1. Choose a module shortcode from the View drop-down list.
The page refreshes to display the properties registered for that module.
2. If you want to create a key, then click Create.
This opens the page where you specify the details of a new key.
3. Optionally, click First, Previous, Next, and Last to navigate within the table.
4. If you want to view or modify the details of a key, then click a key name in thetable.
This opens the page where you view or edit the details of an existing key.
5. If you want to remove a key, then select the appropriate check box in theRemove column of the table.
6. Optionally, click Restore to reset the fields to their original settings.
7. Click Update to save.
2.54 Editing the Details of KeysA property is a key/value pair that is application-specific. A key is what is used byan application to retrieve data. Keys are unique, but can have multiple values.Values are the content or data that binds to a particular key. Use this procedure toedit the details of new or existing keys.
Prerequisites■ Read Understanding the System Subtab
■ Navigate to Settings > System > Properties > Advanced, then either clickCreate or click the name of a key in the table.
Steps1. Type a key name into the Key field.
2. Edit the table.
2-54 Oracle CRM Technology Foundation Concepts and Procedures

Managing Configuration
a. Type values into the Value fields as desired.
b. Type sequence numbers into the Sequence fields as desired.
c. If you want to remove a value, then select the appropriate check box in theRemove column.
d. Optionally, click More Rows to add empty rows to the table.
3. If you want to resequence the key, then click Resequence.
4. If you want to copy the key, then click Copy Key.
5. If you are creating a new key and want to clear the fields, then click Clear.
6. If you are editing an existing key and want to restore the fields to their originalsettings, then click Restore.
7. Click Update to save.
2.55 Setting Up Password ExpirationUse this procedure to define for how many days a password is valid.
PrerequisitesNone
Steps1. Type a non-negative integer into the field. This is the number of days after
which passwords will expire.
2. Optionally, click Restore to reset the field to its original setting.
3. Click Update to save. Upon saving, the value saved is only effective forpasswords created or updated from this moment on.
2.56 Managing ConfigurationYou can perform the following tasks from the Configuration subtab:
■ Setting Up Hosts
■ Editing Host Details
■ Editing Resource Settings
For information on Configuration concepts, see Understanding Configuration.
Using the System Administrator Console 2-55

Setting Up Hosts
2.57 Setting Up HostsThe Hosts Setup page is the starting point for viewing, creating, updating, andremoving hosts. Use this procedure to manage hosts.
Prerequisites■ Read Understanding Configuration
■ Navigate to Deployment > Configuration > Hosts
Steps1. If you want to register a host, then click Create.
This opens the page where you edit the details of a new host. You must registerall mid-tier hosts.
2. If you want to modify the attributes of a host, then click a name in the HostName column.
This opens the page where you edit the details of an existing host.
3. If you want to remove a host, then:
a. Select a check box in the Remove column.
b. Optionally, click Restore to reset the fields to their original settings.
c. Click Update to save.
2.58 Editing Host DetailsUse this procedure to edit the details of new or existing hosts.
Prerequisites■ Read Understanding Configuration
■ Navigate to Deployment > Configuration > Hosts, then either click Create orclick the name of a host in the table
Steps1. Edit the Hostname field:
a. If you are creating a new host, then type the name of the mid-tier URL intothe Hostname field.
2-56 Oracle CRM Technology Foundation Concepts and Procedures
Editing Host Details
For example, "computer.us.oracle.com."
b. If you are updating an existing host, then you cannot edit this field.
2. Type a description into the Description field.
3. Ignore the Utilize Look-ahead Cache check box.
4. Edit port numbers:
a. Type the port number where the Apache in this mid-tier host runs into thefirst Port field.
For example, "9999"
b. If there are multiple Apache instances running on the same mid-tier host,then type additional port numbers into the Port column.
For example, "9999" and "8080"
c. If you want to remove a port, then select the appropriate check box in theRemove column.
5. Edit application deployment:
This information is used by the caching framework to cache and prime only thedata for the configured set of applications.
a. Choose the name of an application in one list and click > or < to move it tothe other list.
b. Repeat step a as desired.
c. If you want to move all Available Applications to the DeployedApplications list, then click >>.
d. If you want to move all Deployed Applications to the AvailableApplications list, then click <<.
6. Optionally, if you are creating a new host and want to clear the fields, then clickClear.
7. Optionally, if you are updating an existing host and want to reset the fields totheir original settings, then click Restore.
8. If you are creating a new host, then click Create to save.
9. If you are updating an existing host, then click Update to save.
Using the System Administrator Console 2-57

Editing Resource Settings
2.59 Editing Resource SettingsUse this procedure to manage resource settings for the cache.
Prerequisites■ Read Understanding Configuration
■ Navigate to Deployment > Configuration > Resource Settings
Steps1. Define cache resource settings:
a. Type a number of megabytes into the Disable Cache if Total MemoryExceeds field.
Typically this represents a percentage of the maximum memory of the JVM.
2. Ignore the Define Look-ahead Cache Resource Settings section.
3. Optionally, click Restore to reset the fields to their original settings.
4. Click Update to save.
2.60 Viewing System AlertsThe System Alerts page displays statistics regarding the health of a deployedsystem. It complements the Diagnostics framework to guide you whentroubleshooting failures or misconfigurations. Use this procedure to view systemdiagnostics data.
Prerequisites■ Navigate to Deployment > System Statistics > System Alerts, or to see
Security-related alerts, navigate to Settings > Security > Alerts Monitor
Steps1. If you are in the Deployment tab, then:
a. Choose "All Applications" or a specific application from the Applicationdrop-down list.
b. Choose "All Nodes" or a specific node (host) from the Node drop-down list.
c. Choose which statuses you want to display (All Status, Succeeded, Failed,or Warning) from the Status drop-down list. Click Go to run the filter.
2-58 Oracle CRM Technology Foundation Concepts and Procedures

Viewing Jserv Statistics
d. Optionally, click the calendar icons next to the From and To fields to select adate range. Click Go to run the filter.
e. View the data displayed on the Monitor board.
2. If you are in the Settings tab, then you see only security-related tests:
a. If you want to run the test group on a specific host, then choose the hostname from the drop-down list.
The page refreshes to display an additional drop-down list.
b. Choose a launch type from the second drop-down list.
c. Click Launch to run the tests.
d. View the results in the colored table below.
2.61 Viewing Jserv StatisticsUse this procedure to view the Jserv statistics of a particular host.
Prerequisites■ Navigate to Deployment > System Statistics > Jserv Statistics
■ Have the full host name ready to type in (for example,computer.companyname.oracle.com:8888)
■ Optionally, have the Jserv ID ready to type in (for example, test.js1)
Steps1. Type a host name into the Hostname field.
2. Optionally, type a Jserv ID into the Jserv ID field.
3. Click Submit.
A new page displays.
4. View memory, thread, connection pool, session, and services statistics.
5. Optionally, click Back to go to the previous page.
Using the System Administrator Console 2-59

Using Diagnostics
2.62 Using Diagnostics
You can perform the following tasks from CRM Diagnostics:
Running Test Groups
In the Basic tab, you can run groups of tests either all at once or individually.
Running Tests
In the Advanced tab, you can run tests one at a time. If desired, you can specifyinput values that are different from the defaults.
Managing Test Groups
Creating Test Groups
Updating Test Groups
Managing Tests
Registering Tests
Setting Default Test Input Values
Managing Applications
In the Configuration tab, you can set up the applications, test groups, and teststhat are used in Diagnostics.
For information on Diagnostics framework concepts, see UnderstandingDiagnostics.
2.63 Running Test GroupsYou can perform the following tasks from the Basic tab:
Running All Test Groups
Running One Test Group
Note: You can also navigate to the CRM Diagnostics page bytyping the following URL into a Web browser:http://hostname:portnumber/OA_HTML/jtfqalgn.htm
This is particularly useful if the deployment is having startupproblems.
2-60 Oracle CRM Technology Foundation Concepts and Procedures

Running One Test Group
For information on Diagnostics framework concepts, see UnderstandingDiagnostics.
2.64 Running All Test GroupsTest groups are logical sets of one or more related tests. Tests verify the correctbehavior of a particular feature or function. Use this procedure to run all test groupson an application.
Prerequisites for This Procedure■ Read Understanding Diagnostics
■ Navigate to the Basic tab
Steps1. Choose an application from the Application drop-down list.
2. Click Run All Groups.
3. View the test results.
4. If you want to view a detailed summary of a test, then click the icon in theReport column.
2.65 Running One Test GroupTest groups are logical sets of one or more related tests. Tests verify the correctbehavior of a particular feature or function. A group can have one or more othergroups as prerequisites. Use this procedure to run a specific test group on anapplication.
Prerequisites for This Procedure■ Read Understanding Diagnostics
■ Navigate to the Basic tab
Steps1. Choose an application from the Application drop-down list.
2. Click the name of the test group.
Using the System Administrator Console 2-61

Running Tests
3. If you want to run the test group’s prerequisite group or groups, then click RunWith Prerequisite.
You can view the names of the prerequisite group or groups in the Prerequisitesdrop-down list.
4. If you want to run the test group alone, then click Run Without Prerequisite.
5. View the test results.
6. If you want to view a detailed summary of a test, then click the icon in theReport column.
2.66 Running TestsTests verify the correct behavior of a particular feature or function. Use thisprocedure to run a test on an application.
Prerequisites for This Procedure■ Read Understanding Diagnostics
■ Navigate to the Advanced tab
Steps1. Choose an application from the Application drop-down list.
2. Click the name of the test.
3. If you want to specify your own input values, then type them into theappropriate fields. Otherwise, the test runs using default values.
4. Click Run Test.
5. View the test results.
6. If you want to view a detailed summary of a test, then click either the icon inthe Report column or View Report.
2.67 Managing Test GroupsThe main page for test groups is the starting point for viewing, creating, updating,prioritizing, and removing test groups. Test groups are logical sets of one or morerelated tests. Tests verify the correct behavior of a particular feature or function. Usethis procedure to manage test groups. This procedure is not applicable to theapplication "HTML Platform."
2-62 Oracle CRM Technology Foundation Concepts and Procedures

Creating Test Groups
Prerequisites for This Procedure■ Read Understanding Diagnostics
■ Navigate to the Configuration tab, choose an application from the drop-downlist, then choose Groups.
Steps1. If you want to create a new test group, then click Create.
This opens the page where you edit the details of a new test group.
2. If you want to update an existing test group, then click the Group Name.
This opens the page where you edit the details of an existing test group.
3. If you want to change the test group sequence, then choose the appropriatenumbers from the drop-down lists in the Sequence column.
4. If you want to remove a test group, then select the appropriate check box in theRemove column.
5. Optionally, click Restore to reset the fields to their original settings.
6. Click Update to save.
2.68 Creating Test GroupsTest groups are logical sets of one or more related tests. Tests verify the correctbehavior of a particular feature or function. A test group can have one or more othergroups as prerequisites. Use this procedure to create test groups. This procedure isnot applicable to the application "HTML Platform."
Prerequisites for This Procedure■ Read Understanding Diagnostics
■ Navigate to the Configuration tab, choose an application from the drop-downlist, choose Groups, then click Create
Steps1. Type the name of the test group into the Group Name field.
2. If you want to set Group Prerequisites, then choose from the drop-down lists inthe Group Name column.
3. Optionally, click More Prerequisites to add more rows to the table.
Using the System Administrator Console 2-63

Updating Test Groups
4. Optionally, click Restore to reset the fields to their original settings.
5. Click Create to save.
2.69 Updating Test GroupsTest groups are logical sets of one or more related tests. Tests verify the correctbehavior of a particular feature or function. A test group can have one or more othertest groups as prerequisites. Use this procedure to view or edit the name andprerequisites of an existing test group. This procedure is not applicable to theapplication "HTML Platform."
Prerequisites for This Procedure■ Read Understanding Diagnostics
■ Navigate to the Configuration tab, choose an application from the drop-downlist, choose Groups, then click the name of a group in the table
Steps1. If you want to rename the group, then type into the Group Name field.
2. If you want to remove a prerequisite, then select the appropriate check box inthe Remove column.
3. If you want to add a prerequisite, then choose from the drop-down lists in theGroup Name column.
4. If you want to view the individual tests that belong to that test group, then clickView Tests.
This opens the page where you manage how tests are organized into testgroups.
5. Optionally, click Restore to reset the fields to their original settings.
6. Click Update to save.
2.70 Managing TestsThe Tests Administration page is the starting point for viewing, creating, updating,prioritizing, and removing individual tests. Tests verify the correct behavior of aparticular feature or function. Use this procedure to manage tests. This procedure isnot applicable to the application "HTML Platform."
2-64 Oracle CRM Technology Foundation Concepts and Procedures

Registering Tests
Prerequisites for This Procedure■ Read Understanding Diagnostics
■ Navigate to the Configuration tab, choose an application from the drop-downlist, then choose Tests
Steps1. Choose a group from the Group drop-down list.
2. View test names and class names display in the table.
3. If you want to create a test, then click Create.
This opens the page where you specify the details of a new test.
4. If you want to change the test sequence, then choose the appropriate numbersfrom the drop-down lists in the Sequence column.
5. If you want to remove a test, then select the check box in the Remove column.
6. Optionally, click Restore to reset the fields to their original settings.
7. Click Update to save.
2.71 Registering TestsTests verify the correct behavior of a particular feature or function. Use thisprocedure to register a test.
Prerequisites for This Procedure■ Read Understanding Diagnostics
■ Navigate to the Configuration tab, choose an application from the drop-downlist, choose Tests, then click Create
Steps1. Type the fully qualified name of the Java class into the Test Class Name field.
2. View the class names of any existing tests in the Existing Tests field.
3. Choose a sequence number from the Sequence drop-down list.
4. Optionally, click Restore to reset the fields to their original settings.
5. Click Create to save.
Using the System Administrator Console 2-65

Setting Default Test Input Values
2.72 Setting Default Test Input ValuesTests verify the correct behavior of a particular feature or function. Use thisprocedure to set the default input values for a test. This procedure is not applicableto the application "HTML Platform."
Prerequisites for This Procedure■ Read Understanding Diagnostics
■ Navigate to the Configuration tab, choose an application from the drop-downlist, then choose Inputs
Steps1. Click the name of a test.
2. Type default input values into the appropriate fields.
3. Click Update to save.
4. Optionally, type an additional set of default values and click Update.
5. Repeat step 4 as desired.
6. Optionally, click Restore to reset the fields to their original values.
7. If you want to delete an input value, then select the check box in the Removecolumn and click Update.
2.73 Managing ApplicationsApplications must be registered to be included in CRM Diagnostics. Applicationscan have other applications as prerequisites.
You can perform the following tasks to manage applications:
Registering Applications
Editing Application Prerequisites
For information on Diagnostics framework concepts, see UnderstandingDiagnostics
2-66 Oracle CRM Technology Foundation Concepts and Procedures
Editing Application Prerequisites
2.74 Registering Applications
Prerequisites for This Procedure■ Read Understanding Diagnostics
■ Navigate to Configuration > Applications, then click Create
Steps1. Choose an application from the Choose an Application drop-down list.
2. If you want to set Application Prerequisites, then choose from the drop-downlists in the Application Name column.
3. Optionally, click Restore to clear the Application Prerequisites fields.
4. Click Register to register the application.
5. View the new application display in the Application drop-down list at the topof the page.
2.75 Editing Application PrerequisitesApplications can have other applications as prerequisites. Use this procedure to editapplication prerequisites.
Prerequisites for This Procedure■ Read Understanding Diagnostics
■ Navigate to Configuration > Applications
Steps1. Choose an application from the Application drop-down list.
2. If you want to remove an Application Prerequisite, then select the appropriatecheck box in the Remove column.
3. If you want to add an Application Prerequisite, then choose from thedrop-down lists in the Application Name column.
4. Optionally, click Restore to reset the fields to their original settings.
5. Click Update to save.
Using the System Administrator Console 2-67

Using Cache
6. If you want to register an application to include it in CRM Diagnostics, thenclick Create.
This opens the page where you register a new application and its prerequisites.
2.76 Using CacheYou can perform the following tasks from the Cache subtab:
■ Managing Cache Policies
– Editing Cache Policy Details
■ Managing Cache Filters
– Viewing Cache Filter Details
– Creating and Editing Cache Filters
■ Managing Component Cache
– Editing Component Cache Details
■ Viewing Cache Statistics
For information on Cache concepts, see Understanding Cache.
2.77 Managing Cache PoliciesThe Cache Policies table lists the Cache Policy of each application on each host. Usethis procedure to manage Cache Policies.
Prerequisites■ Read Understanding Cache
■ Navigate to Performance > Cache > Applications > Policies
Steps1. Choose a host name or All Hosts from the drop-down list labeled View to
choose which Cache Policies display in the table.
2. If you want to sort the table alphabetically by host name or application, thenclick the appropriate link in the top row of the table.
3. If you want to edit the details of a Cache Policy, then click a policy name in thetable.
2-68 Oracle CRM Technology Foundation Concepts and Procedures

Editing Cache Policy Details
This opens the page where you edit the details of a Cache Policy.
4. If you want to modify a row in the table, then select the check box in the Selectcolumn.
5. If you want to set a Cache Policy, then choose Cache Only, Cache and Priming,Disabled, or Custom from the drop-down lists in the Policy column.
If you enable caching, then all components of the application use the caching. Ifyou enable priming, then the components read some initial cache data when theJserv process begins. Priming can improve the performance for the first set ofusers because the data that they need is already available in the cache.However, priming can increase the size of the Java Virtual Machine. Disable thecache if the size of the Java Virtual Machine grows too large.
6. If you want to set filters, then choose Enabled, Disabled or Custom from thedrop-down lists in the Filters column.
7. If you want to clear a cache, then click Clear Cache.
8. If you want to reload a cache, then click Reload Cache.
9. Optionally, click Restore to reset the fields to their original settings.
10. Click Update to save.
2.78 Editing Cache Policy DetailsThe Cache Policy Detail page displays the cache policy types for components ofapplications running on a particular host. It also displays cache filters. Use thisprocedure to edit the details of cache policies and cache filters.
Prerequisites■ Read Understanding Cache
■ Navigate to Performance > Cache > Applications > Policies, then click thename of a policy in the table
Steps1. Edit the Component Cache Policy section:
a. If you want to modify a policy, then select the check box in the appropriaterow in the table.
Using the System Administrator Console 2-69

Managing Cache Filters
b. If you want to modify a cache policy, then choose Cache Only, Cache andPriming, or Disabled from the drop-down list in the Policy column of thetable.
c. If you want to reload a cache, then choose it by selecting the appropriatecheck box and then click Reload Cache.
d. If you want to clear a cache, then choose it by selecting the appropriatecheck box and then click Clear Cache.
e. Optionally, click Restore to reset the fields to their original settings.
f. Click Update to save.
2. Edit the Cache Filters section:
a. Select or deselect check boxes in the Enabled column as desired.
b. Optionally, click Restore to reset the fields to their original settings.
c. Click Update to save.
2.79 Managing Cache FiltersThe main page for cache filters is the starting point for viewing, creating, updatingand removing cache filters. Cache filters are application-specific components thatindicate the responsibility IDs and language codes for priming. Use this procedureto manage cache filters.
Prerequisites■ Read Understanding Cache
■ Navigate to Performance > Cache > Applications > Filters
Steps1. Choose an application name from the drop-down list labeled View to choose
which Cache Filters display in the table.
2. Optionally, click First, Previous, Next, Last, or an option from the drop-downlist to navigate within the table.
3. If you want to create a new Cache Filter, then click Create.
This opens the page where you begin editing the details of a new Cache Filter.
4. If you want to view the details of a Cache Filter, then click a filter name in thetable.
2-70 Oracle CRM Technology Foundation Concepts and Procedures

Creating and Editing Cache Filters
This opens the page where you view the details of a Cache Filter.
5. If you want to remove a filter, then:
a. Select the appropriate check box in the Remove column.
b. Optionally, click Restore to reset the fields to their original settings.
c. Click Update.
This removes the filter from the table.
2.80 Viewing Cache Filter DetailsUse this procedure to view the details of a Cache Filter.
Prerequisites■ Read Understanding Cache
■ Navigate to Performance > Cache >Applications > Filters, then click a filtername in the table.
Steps1. View the information displayed on the page.
2. If you want to edit the details of the Cache Filter, then click Edit.
This opens the page where you edit the details of an existing Cache Filter.
2.81 Creating and Editing Cache FiltersWhen you create a new Cache Filter or modify an existing Cache Filter, youcomplete three different screens. The following procedures guide you through eachscreen:
Step 1: Editing Basic Information
Step 2: Choosing Responsibilities
Step 3: Choosing Languages
After you finish creating or editing a Cache Filter, you return to the main CacheFilters page.
For information on related concepts, see Understanding Cache.
Using the System Administrator Console 2-71
Step 1: Editing Basic Information
2.82 Step 1: Editing Basic InformationUse this procedure to enter basic information about a Cache Filter.
Prerequisites■ Read Understanding Cache
■ Navigate to Performance > Cache >Applications > Filters. If you are creating anew filter, then click Create. If you are modifying an existing filter, then click apolicy name in the table and click Edit after the new page displays.
Steps1. Type a filter name into the Filter Name field.
2. Type a description into the Description field.
3. Choose an application from the Application drop-down list.
4. Optionally, if you are creating a new Cache Filter and want to clear the fields,then click Clear.
5. Optionally, if you are editing an existing Cache Filter and want to reset thefields to their original settings, then click Restore.
6. Click Continue to save and move on to the next screen.
2.83 Step 2: Choosing ResponsibilitiesUse this procedure to choose which responsibilities apply to a particular CacheFilter.
Prerequisites■ Read Understanding Cache
Steps1. Select the name of a responsibility in one list and click > or < to move it to the
other list.
2. Repeat step 1 as desired.
3. If you want to move all Available Responsibilities to the ConfiguredResponsibilities list, then click >>.
2-72 Oracle CRM Technology Foundation Concepts and Procedures
Managing Component Caches
4. If you want to move all Configured Responsibilities to the AvailableResponsibilities list, then click <<.
5. Optionally, if you are creating a new Cache Filter and want to clear the fields,then click Clear.
6. Optionally, if you are updating an existing Cache Filter and want to reset thefields to their original settings, then click Restore.
7. Click Continue to save and move on to the next page.
2.84 Step 3: Choosing LanguagesUse this procedure to choose which languages apply to a particular Cache Filter.
Prerequisites■ Read Understanding Cache
Steps1. Select a language in one list and click > or < to move it to the other list.
2. Repeat step 1 as desired.
3. If you want to move all Available Languages to the Configured Languages list,then click >>.
4. If you want to move all Configured Languages to the Available Languages list,then click <<.
5. Optionally, if you are creating a new Cache Filter and want to clear the fields,then click Clear.
6. Optionally, if you are updating an existing Cache Filter and want to reset thefields to their original settings, then click Restore.
7. If you are creating a new Cache Filter, then click Create to save.
8. If you are updating an existing Cache Filter, then click Update to save.
2.85 Managing Component CachesThe main page for component caches is the starting point for viewing, creating,updating, and removing component caches. Each application uses one or morecomponent caches. Use this procedure to manage component caches.
Using the System Administrator Console 2-73

Editing Component Cache Details
Prerequisites■ Read Understanding Cache
■ Navigate to Performance > Cache > Components
■ Modify the corresponding code before modifying a component cache
Steps1. Choose an application from the drop-down list labeled View to choose which
component caches display.
2. If you want to create a component cache, then click Create.
This opens the page where you edit the details of a new component cache.
3. If you want to update a component cache, then click its name.
This opens the page where you edit the details of an existing component cache.
4. If you want to remove a component cache, then select the check box in theRemove column.
5. Optionally, click Restore to reset the fields to their original settings.
6. Click Update to save.
2.86 Editing Component Cache DetailsUse this procedure to edit the details of new or existing component caches.
Prerequisites■ Read Understanding Cache
■ Navigate to Performance > Cache > Components, then either click Create orclick the name of a component cache in the table
■ Modify the corresponding code before modifying a component cache
Steps1. If you are creating a new component cache, then choose an application from the
Application drop-down list.
If you are updating an existing component cache, then you cannot edit thisfield.
2-74 Oracle CRM Technology Foundation Concepts and Procedures

Editing Component Cache Details
2. If you are creating a new component cache, then type a component identifierinto the Component Identifier field.
The component identifier should start with the appropriate applicationshortcode.
If you are updating an existing component cache, then you cannot edit thisfield.
3. Type a component name into the Component Name field.
4. Type a description into the Description field.
5. Type into a loader class name into the Loader Class Name field.
Each component cache has an associated loader class that is used by the cachingframework to load the corresponding object into the cache, if it is not already inthe cache.
6. Choose Time to Live or Idle Time from the drop-down list.
The Time to Live is the maximum length of time for a cache to be consideredvalid. The Idle Time is the maximum length of time for an object to go unusedbefore it is flushed from the cache.
a. Type a number of seconds, minutes, or hours into the text input field to editthe Time to Live or Idle Time.
b. Choose seconds, minutes, or hours from the drop-down list.
7. If you are creating a new component cache, then select or deselect the check boxlabeled Enable Security Group ID.
The Security Group ID is used in the hosting environments.
If you are updating an existing component cache, then you cannot edit thisfield.
8. Select or deselect the check box labeled Enable Statistics Collection.
Enabling statistics collection can slow the cache down. Use it if there areproblems with using the cache or if you need to check the cache efficiency.
9. Select or deselect the check box labeled Distributed Mode.
Distributed Mode means that object updates are propagated across computersand across Java VMs.
10. Select or deselect the check box labeled HTML Platform Component.
Using the System Administrator Console 2-75

Viewing Cache Statistics
HTML Platform Components are generic caches that are common to allapplications. Usually, you only select this check box for JTF component caches.It is merely a logical grouping that does not change the assigned application.
11. Optionally, if you are creating a new component cache and want to clear thefields, then click Clear.
12. Optionally, if you are updating an existing component cache and want to resetthe fields to their original settings, then click Restore.
13. If you are creating a new component cache, then click Create to save.
14. If you are updating an existing component cache, then click Update to save.
2.87 Viewing Cache StatisticsUse this procedure to view statistics about caches.
Prerequisites■ Read Understanding Cache
■ Navigate to Performance > Cache > Statistics
Steps1. Choose from the drop-down lists next labeled View to select which hosts and
applications have data about them displayed below.
2. View the data.
You can use these statistics to configure the component caches based on howeach component cache is performing. You can interpret the data to decide howeffective the component caches are and whether or not they should be disabled.For example, if the cache has a high hit ratio, then the cache is useful andshould not be disabled.
2.88 Using XML ServicesIn the XML Services subtab, you manage inter-application Web service sharing. Youcan perform the following tasks from the XML Services subtab:
■ Managing Service Groups
– Editing the General Settings of New Service Groups
– Editing the Services of New Service Groups
2-76 Oracle CRM Technology Foundation Concepts and Procedures

Managing Service Groups
– Editing the Type Mappings of New Service Groups
– Updating the General Settings of Service Groups
– Updating the Services of Service Groups
– Updating the Type Mappings of Service Groups
■ Managing Invocations
– Creating Invocations
– Updating Invocations
■ Managing Authentication Profiles
– Creating Authentication Profiles
– Updating Authentication Profiles
■ Managing Events
– Creating Events
– Updating Events
For information on XML Services concepts, see Understanding XML Services.
2.89 Managing Service GroupsThe main page for Service Groups is the starting point for viewing, creating,updating, and removing service groups. A Service Group is the logical name for aJava class that contains functions for loading services into a system. Services arefunction calls with defined inputs and outputs that are implemented as methods ofthe Java class. Use this procedure to manage service groups.
Prerequisites■ Read Understanding XML Services
■ Navigate to Integration > XML Services > Services
Steps1. If you want to modify the service group prefix, then:
a. Type into the Service Group Prefix field at the top of the page.
Using the System Administrator Console 2-77

Editing the General Settings of New Service Groups
The service group prefix is the first part of a service group full name. Theformat of service group full names is the following: <service groupprefix>.<application shortname>.<service group name>
b. Optionally, click Restore to reset the field to its original setting.
c. Click Update to save.
2. If you want to create a new service group, then click Create.
This opens the page where you start to edit the details of a new service group.
3. If you want to view the service groups of a particular application, then choosean application name from the drop-down list at the top of the table. Optionally,choose ALL to view all service groups.
The page refreshes to display the choice that you made.
4. Optionally, click First, Previous, Next, Last, or an option from the drop-downlist to navigate within the table.
5. If you want to update a service group, then click its name in the table.
This opens the page where you start to edit the details of an existing servicegroup.
6. If you want to remove a service group, then:
a. Select the corresponding check box in the Remove column of the table.
b. Optionally, click Restore to reset the fields to their original settings.
c. Click Update to save.
2.90 Editing the General Settings of New Service GroupsA Service Group is the logical name for a Java class that contains methods that areexposed as services. Services are function calls with defined inputs and outputs thatare implemented as methods of the Java class. Creating a new service grouprequires completing three screens. Use this procedure to complete the first screen.
Prerequisites■ Read Understanding XML Services
■ Navigate to Integration > XML Services > Services, then click Create
■ Have the Java Class name of the service group ready.
2-78 Oracle CRM Technology Foundation Concepts and Procedures

Editing the Services of New Service Groups
Steps1. Choose an application from the drop-down list.
2. Type the Service Group name into the Service Group field.
If you type "TestService" as your service group name while your prefix is"oracle.apps" and your application short name is "JTF," then the service group’sfull name is oracle.apps.JTF.TestService
3. Type the Java Class name into the Java Class field.
For example, "samples.test.TestServiceGroup"
4. Optionally, type a description into the Description field.
5. Optionally, click Clear to clear the fields.
6. Click Continue.
The page automatically navigates to the second step of the procedure, EditingServices.
2.91 Editing the Services of New Service GroupsA Service Group is the logical name for a Java class that contains methods that areexposed as services. Services are function calls with defined inputs and outputs thatare implemented as methods of the Java class. Creating a new service grouprequires completing three screens. Use this procedure to complete the secondscreen.
Prerequisites■ Read Understanding XML Services
Steps1. View a table that lists the services defined in the class that you set up on the
previous screen.
2. Select check boxes in the Enable column to enable services, or click Enable Allto enable all services.
3. Optionally, type descriptions into the Description column.
4. Optionally, click Clear to clear the fields.
5. Optionally, click Back to go back to the previous screen without saving changes.
Using the System Administrator Console 2-79

Editing the Type Mappings of New Service Groups
6. Click Continue.
The page automatically navigates to the third and final step of the procedure,Editing Type Mappings.
2.92 Editing the Type Mappings of New Service GroupsA Service Group is the logical name for a Java class that contains methods that areexposed as services. Services are function calls with defined inputs and outputs thatare implemented as methods of the Java class. Creating a new service grouprequires completing three screens. Use this procedure to complete the third screen.
Prerequisites■ Read Understanding XML Services
Steps1. If you want to use your own settings, then type them into the Data Type,
Encoding, Namespace, Serializer, and Deserializer columns.
2. If you want to use default settings, then select the check box in the Use Defaultcolumn.
3. Optionally, click Clear to clear the fields.
4. Optionally, click Back to go back to the previous screen without saving changes.
5. Click Create to save the new service group.
2.93 Updating the General Settings of Service GroupsA Service Group is the logical name for a Java class that contains methods that areexposed as services. Services are function calls with defined inputs and outputs thatare implemented as methods of the Java class. Updating an existing service grouprequires completing three screens. Use this procedure to complete the first screen.
Prerequisites■ Read Understanding XML Services
■ Navigate to Integration > XML Services > Services, then click a service groupname in the table
2-80 Oracle CRM Technology Foundation Concepts and Procedures

Updating the Services of Service Groups
Steps1. Optionally, type into the Description field to edit the service group description.
2. Optionally, click Clear to clear the field.
3. Click Continue.
The page automatically navigates to the second step of the procedure, EditingServices.
2.94 Updating the Services of Service GroupsA Service Group is the logical name for a Java class that contains methods that areexposed as services. Services are function calls with defined inputs and outputs thatare implemented as methods of the Java class. Updating an existing service grouprequires completing three screens. Use this procedure to complete the secondscreen.
Prerequisites■ Read Understanding XML Services
Steps1. Edit the Previously Existing Services section:
a. Select or deselect the check boxes in the Enable column as desired.
b. Optionally, click Disable All to disable all previously existing services.
c. Optionally, type descriptions into the Description fields.
2. Edit the Added Services section:
If there are no added services for this service group, the fields will be empty.
a. Select or deselect the check boxes in the Enable column as desired.
b. Optionally, click Disable All to disable all added services.
c. Optionally, type descriptions into the Description fields.
3. Optionally, click Restore to reset the fields to their original settings.
4. Optionally, click Back to go back to the previous screen without saving changes.
5. Click Continue.
Using the System Administrator Console 2-81

Updating the Type Mappings of Service Groups
The page automatically navigates to the third and final step of the procedure,Editing Type Mappings.
2.95 Updating the Type Mappings of Service GroupsA Service Group is the logical name for a Java class that contains methods that areexposed as services. Services are function calls with defined inputs and outputs thatare implemented as methods of the Java class. Updating an existing service grouprequires completing three screens. Use this procedure to complete the third screen
Prerequisites■ Read Understanding XML Services
Steps1. If you want to use your own settings, then type them into the Data Type,
Encoding, Namespace, Serializer, and Deserializer columns.
2. If you want to use default settings, then select the check box in the Use Defaultcolumn.
3. If you want to remove a type mapping, then select the appropriate check box inthe Remove column of the table.
4. Optionally, click Restore to reset the fields to their original settings.
5. Optionally, click Back to go back to the previous screen without saving changes.
6. Click Update to save.
2.96 Managing InvocationsThe main page for invocations is the starting point for viewing, creating, updating,and removing invocations. An invocation is the logical name for a record thatcontains all information about a service on a remote machine. Use this procedure tomanage invocations.
Prerequisites■ Read Understanding XML Services
■ Navigate to Integration > XML Services > Invocations
2-82 Oracle CRM Technology Foundation Concepts and Procedures
Creating Invocations
Steps1. If you want to create a new invocation, then click Create.
This opens the page where you edit the details of a new invocation.
2. If you want to view the invocations of a particular application, then choose anapplication name from the drop-down list at the top of the table. Optionally,choose ALL to view all invocations.
3. Optionally, click First, Previous, Next, Last, or an option from the drop-downlist to navigate within the table.
4. If you want to update the details of a particular invocation, then click its namein the table.
This opens the page where you edit the details of an existing invocation.
5. If you want to remove an invocation, then:
a. Select the corresponding check box in the Remove column of the table.
b. Click Update to save.
2.97 Creating InvocationsAn invocation is the logical name for a record that contains all information about aservice on a remote machine. Use this procedure to create invocations.
Prerequisites■ Read Understanding XML Services
■ Navigate to Integration > XML Services > Invocations, then click Create
■ Confirm that the following are true:
– Service group is created
– Service in service croup is enabled
– Authentication is created
Steps1. Complete the General Settings section.
a. Choose an application from the drop-down list.
b. Type an invocation name into the Invocation Name field.
Using the System Administrator Console 2-83

Creating Invocations
c. Optionally, type a description into the Description field.
d. Type the full name of the service group into the Service Group Full Namefield.
For example, "oracle.apps.JTF.TestService"
e. Type the name of the service into the Service field.
This is a Java method.
f. Type a number into the Timeout field.
This is the number of milliseconds to wait before a response. A timeout ofzero means it will wait forever.
2. Complete the Authentication Profile section.
a. Choose a URL from the URL drop-down list.
b. Choose a User from the User drop-down list. If you are not setting a user,then choose No_Authentication.
You can change the list of available users by editing the authenticationprofile.
3. Complete the Target Service Signature section.
This is the format of the method that you are calling.
a. Type a data type into the Return Data Type field.
If the data type is a string, then you must type java.lang.string
b. If you want to set your own return data type encoding, then type it into theEncoding field.
c. If you want to use the default return data type encoding, then select the UseDefault check box.
d. Type a parameter name into the Parameter Name column.
e. Type a data type into the Data Type column.
Instead of using primitive object types like java.lang.Integer, enter theactual primitive, such as "int" or "float."
f. If you want to use the default encoding, then select the Use Default checkbox.
g. If you want to set your own encoding, then type it into the Encoding field.
2-84 Oracle CRM Technology Foundation Concepts and Procedures

Updating Invocations
4. Complete the Type Mappings section.
This section is for user defined types.
a. Type the name of a fully qualified Java class into the Data Type column.
b. If you want to set your own parameters, then type them into the Encoding,Name Space, Serializer and Deserializer columns.
c. If you want to use defaults (recommended), then select the Use Defaultcheck box.
5. Optionally, click Clear to clear the fields.
6. Click Create to save.
2.98 Updating InvocationsAn invocation is the logical name for a a record that contains all information about aservice on a remote machine. Use this procedure to modify the details of existinginvocations.
Prerequisites■ Read Understanding XML Services
■ Navigate to Integration > XML Services > Invocations, then click an invocationname in the table
Steps1. Edit the General Settings section.
a. Optionally, type a description into the Description field.
b. Type the full name of the service group into the Service Group Full Namefield.
For example, "oracle.apps.JTF.TestService"
c. Type the name of the service into the Service field.
This is a Java method.
d. Type a number into the Timeout field.
This is the number of milliseconds to wait before a response. A timeout ofzero means it will wait forever.
Using the System Administrator Console 2-85

Updating Invocations
2. Complete the Authentication Profile section.
a. Choose a URL from the URL drop-down list.
b. Choose a User from the User drop-down list. If you are not setting a user,then choose No_Authentication.
You can change the list of available users by editing the authenticationprofile.
3. Complete the Target Service Signature section.
This is the format of the method that you are calling.
a. Type a data type into the Return Data Type field.
If the data type is a string, then you must type java.lang.string
b. If you want to set your own return data type encoding, then type it into theEncoding field.
c. If you want to use the default return data type encoding, then select the UseDefault check box.
d. Type a parameter name into the Parameter Name column.
e. Type a data type into the Data Type column.
Instead of using primitive object types like java.lang.Integer, enter theactual primitive, such as "int" or "float."
f. If you want to set your own encoding, then type it into the Encoding field.
g. If you want to use the default encoding, then select the Use Default checkbox.
h. If you want to delete an entry in the table, then select the appropriateRemove check box.
4. Complete the Type Mappings section.
This section is for user defined types.
a. Type the name of a fully qualified Java class into the Data Type column.
b. If you want to set your own parameters, then type them into the Encoding,Name Space, Serializer and Deserializer columns.
c. If you want to use defaults (recommended), then select the Use Defaultcheck box.
2-86 Oracle CRM Technology Foundation Concepts and Procedures

Creating Authentication Profiles
d. If you want to delete an entry in the table, then select the appropriateRemove check box.
5. Optionally, click Restore to reset the fields to their original settings.
6. Click Update to save.
2.99 Managing Authentication ProfilesThe main page for authentication profiles is the starting point for viewing, creating,updating, and removing authentication profiles. Authentication profiles tell aninvocation what machine, user name and password to use. Use this procedure tomanage authentication profiles.
Prerequisites■ Read Understanding XML Services
■ Navigate to Integration > XML Services > Authentications
Steps1. If you want to create a new authentication profile, then click Create.
This opens the page where you edit the details of a new authentication profile.
2. If you want to update an authentication profile, then click its name in the table.
This opens the page where you edit the details of an existing authenticationprofile.
3. Optionally, click First, Previous, Next, and Last to navigate within the table.
4. If you want to remove an authentication profile, then:
a. Select the corresponding check box in the Remove column of the table.
b. Click Update to save.
2.100 Creating Authentication ProfilesAuthentications tell an invocation what machine, user name and password to use.Use this procedure to create authentications.
Prerequisites■ Read Understanding XML Services
Using the System Administrator Console 2-87

Updating Authentication Profiles
■ Navigate to Integration > XML Services > Authentications, then click Create
■ Have the URL of the SOAP server of the target machine ready
Steps1. Type the URL of the SOAP server of the target machine into the URL field.
2. If you want to enter a username and password combination, then:
a. Type a username into the Username column.
b. Type a password into the Password column.
c. Retype the password into the Retype Password column.
3. Repeat step 2 as desired.
4. Optionally, click Clear to clear the fields.
5. Click Create to save.
2.101 Updating Authentication ProfilesAuthentications tell an invocation what machine, user name and password to use.Use this procedure to view or modify the details of an authentication.
Prerequisites■ Read Understanding XML Services
■ Navigate to Integration > XML Services > Authentications, then click a URL inthe table
Steps1. If you want to modify the URL of the target machine, then:
a. Type the URL of the SOAP server of the target machine into the URL field.
b. Optionally, click Restore to reset the field to its original setting.
c. Click Update to save.
2. If you want to reset a password, then:
a. Type a password into the Password column.
b. Retype the password into the Retype Password column.
3. If you want to add a username and password combination, then:
2-88 Oracle CRM Technology Foundation Concepts and Procedures

Managing Events
a. Type a username into the Username column.
b. Type a password into the Password column.
c. Retype the password into the Retype Password column.
4. If you want to remove a username and password combination, then select theappropriate check box in the Remove column.
5. Click Update to save.
2.102 Managing EventsThe main page for events is the starting point for viewing, creating, updating, andremoving events. An event outputs an object of a pre-defined type to a set ofsubscribers. Subscribers are invocations that share an input type. Use this procedureto manage events.
Prerequisites■ Read Understanding XML Services
■ Navigate to Integration > XML Services > Events
Steps1. If you want to create a new event, then click Create.
This opens the page where you edit the details of a new event.
2. If you want to view the events of a particular application, then choose anapplication name from the drop-down list. Optionally, choose ALL to view allevents.
3. Optionally, click First, Previous, Next, Last, or an option from the drop-downlist to navigate within the table.
4. If you want to update details of an event, then click its name in the table.
This opens the page where you edit the details of an existing event.
5. If you want to remove an event, then:
a. Select the corresponding check box in the Remove column of the table.
b. Click Update to save.
Using the System Administrator Console 2-89

Creating Events
2.103 Creating EventsAn event outputs an object of a pre-defined type to a set of subscribers. Subscribersare invocations that share an input type. Creating an event requires you to completetwo screens, both of which are described below. Use this procedure to create events.
Prerequisites■ Read Understanding XML Services
■ Navigate to Integration > XML Services > Events, then click Create
■ Confirm that the relevant invocations are created
Steps1. Edit the General Settings page:
a. Choose an application from the drop-down list.
b. Type an event name into the Event Name field.
c. Type the relevant object type into the Object Type field.
d. Optionally, type a description into the Description field.
e. Optionally, click Clear to clear the fields.
f. Click Continue to move on to the next page, where you set up eventsubscribers.
2. Edit the Event Subscribers page:
a. Choose the name of a subscriber in one list and click > or < to move it to theother list.
b. Repeat step a as desired.
c. If you want to move all Available Subscribers to the Assigned Subscriberslist, then click >>.
d. If you want to move all Assigned Subscribers to the Available Subscriberslist, then click <<.
e. Optionally, click the up and down arrows to change the sequence ofsubscribers.
f. Optionally, click Back to go back to the previous page without savingchanges.
g. Click Create to save.
2-90 Oracle CRM Technology Foundation Concepts and Procedures

Using Declarative Page Flows
2.104 Updating EventsAn event outputs an object of a predefined type to a set of subscribers. Subscribersare invocations that share an input type. Use this procedure to view or modify thedetails of existing events.
Prerequisites■ Read Understanding XML Services
■ Navigate to Integration > XML Services > Events, then click an event name inthe table
Steps1. Optionally, type a description into the Description field.
2. Set event subscribers.
a. Choose the name of a subscriber in one list and click > or < to move it to theother list.
b. Repeat step a as desired.
c. If you want to move all Available Subscribers to the Assigned Subscriberslist, then click >>.
d. If you want to move all Assigned Subscribers to the Available Subscriberslist, then click <<.
e. Optionally, click the up and down arrows to change the sequence ofsubscribers.
3. Optionally, click Restore to reset the fields to their original settings.
Click Update to save.
2.105 Using Declarative Page FlowsThe Introduction page for Declarative Flows is the starting point for usingDeclarative Flows. You can use Declarative Flows to set up and manage the flow ofpages within an application. A key benefit of Declarative Flows is that theprocedures for linking pages to each other do not require changing the code ofJavaServer Pages. The key concepts of Declarative Flows are Rules, Physical Pages,Logical Pages and Business Flows.
You can perform the following tasks from the Declarative Page Flows subtab:
Using the System Administrator Console 2-91
Managing Physical Pages
■ Managing Physical Pages
– Editing Physical Page Details
■ Managing Logical Pages
– Editing Logical Page Details
■ Managing Rules
– Editing Rule Details
■ Managing Business Flows
– Editing Business Flow Details
– Mapping Flows
– Cloning Flows
– Viewing Flow Families
For information on Declarative Page Flows concepts, see UnderstandingDeclarative Page Flows.
2.106 Managing Physical PagesThe main page for Physical Pages is the starting point for viewing, registering, andupdating Physical Pages. Physical Pages are JavaServer Pages (JSPs). Use thisprocedure to manage Physical Pages.
Prerequisites■ Read Understanding Declarative Page Flows
■ Navigate to Design > Declarative Page Flows > Physical Pages
Steps1. If you want to change which Physical Pages display in the table, then:
a. If you want Physical Pages from all applications to display in the table, thenchoose All from the drop-down list at the top of the table.
b. If you want to filter the table by application, then choose a module prefixfrom the drop-down list at the top of the table.
c. If you want to search the table of Physical Pages, then type the name of aPhysical Page or part of the name of a Physical Page into the text inputfield.
2-92 Oracle CRM Technology Foundation Concepts and Procedures

Editing Physical Page Details
Optionally, use the percent sign (%) as a wild card in your search phrase.For example, the search phrase "sales%" returns the Physical Pages whosenames begin with "sales." Alternatively, the search phrase "%sales" returnsthe Physical Pages whose names end with "sales." The search phrase "sales"returns the Physical Page named "sales."
d. Click Go.
The results display in the table.
2. If you want to register a Physical Page, then click Create.
This opens the page where you edit the details of a new Physical Page.
3. If you want to update an existing Physical Page, then click its name in the table.
This opens the page where you edit the details of an existing Physical Page.
2.107 Editing Physical Page DetailsOn the details page for Physical Pages, you complete the procedures of eitherregistering or updating Physical Pages. Use this procedure to edit the details of newor existing Physical Pages.
Prerequisites■ Read Understanding Declarative Page Flows
■ Navigate to Design > Declarative Page Flows > Physical Pages, then eitherclick Create to register a new page or click the name of a JSP to modify itsdetails
Steps1. Type into the Name field to edit the name of the Physical Page.
2. Type into the Description field to edit the description of the Physical Page.
This field is optional.
3. If you are registering a new Physical Page, then choose an application from theApplication drop-down list.
If you are updating an existing Physical Page, then you cannot edit this field. Itis permanently set when you create the Physical Page.
4. Optionally, if you are registering a new Physical Page and want to clear thefields, then click Clear.
Using the System Administrator Console 2-93

Managing Logical Pages
5. Optionally, if you are updating an existing Physical Page and want to reset thefields to their original settings, then click Restore.
6. If you are registering a new Physical Page, then click Create to save.
7. If you are updating an existing Physical Page, then click Update to save.
2.108 Managing Logical PagesThe main page for Logical Pages is the starting point for viewing, creating, andupdating Logical Pages. Logical Pages can be utilized either stand-alone or torepresent nodes in a Business Flow. One or more Physical Pages map to eachLogical Page. Use this procedure to manage Logical Pages.
Prerequisites■ Read Understanding Declarative Page Flows
■ Navigate to Design > Declarative Page Flows > Logical Pages
Steps1. If you want to change which Logical Pages display in the table, then:
a. If you want to allow Physical Pages from all applications to display in thetable, then choose All from the drop-down list at the top of the table.
b. If you want to filter the table by application, then choose a module prefixfrom the drop-down list at the top of the table.
c. If you want to search the table of Physical Pages, then type the name of aPhysical Page or part of the name of a Physical Page into the text inputfield.
Optionally, use the percent sign (%) as a wild card in your search phrase.For example, the search phrase "sales%" returns the Physical Pages whosenames begin with "sales." Alternatively, the search phrase "%sales" returnsthe Physical Pages whose names end with "sales." The search phrase "sales"returns the Physical Page named "sales."
d. Click Go.
The results display in the table.
2. If you want to alphabetize the table by Logical Page name, then click LogicalNames.
3. If you want to alphabetize the table by description, then click Description.
2-94 Oracle CRM Technology Foundation Concepts and Procedures

Editing Logical Page Details
4. If you want to create a Logical Page, then click Create.
This opens the page where you edit the details of a new Logical Page.
5. If you want to update an existing Logical Page, then click its name in the table.
This opens the page where you edit the details of an existing Logical Page.
2.109 Editing Logical Page DetailsOn the details page for Logical Pages, you complete the procedures of eithercreating or updating Logical Pages. Use this procedure to edit the details of new orexisting Logical Pages.
Prerequisites■ Read Understanding Declarative Page Flows
■ Navigate to Design > Declarative Page Flows > Logical Pages, then either clickCreate or click a page name in the table
Steps1. Type into the Name field to edit the name of the Logical Page.
2. Type into the Description field to edit the description of the Logical Page.
This field is optional.
3. If you are creating a new Logical Page, then choose an application from theApplication drop-down list.
If you are updating an existing Logical Page, then you cannot edit this field. It ispermanently set when you create the Rule.
4. Type into the Page Controller field to edit the name of the Page Controller.
This is the fully qualified name of a Java class. The class implements the LogicalPage Controller interface and provides values to evaluate Rules.
5. Type into the Default Physical Page field to edit the name of the Physical Pagethat displays when none of the Rules evaluate to true. Optionally, click Go tochoose from a list of values.
6. Edit the Page Display Rules table.
One row in the table represents one Rule.
Using the System Administrator Console 2-95

Managing Rules
a. Type into the Sequence column to edit the order in which the Rules areevaluated.
b. Type into the Rule Name column to edit the name of the Rule. Optionally,click Go to choose from a list of values.
c. Type into the Description column to edit the description of the Rule.
d. Type into the Physical column to edit the name of the Physical Page that isassociated with the Rule. Optionally, click Go to choose from a list ofvalues.
7. Repeat step 6 as desired.
8. Optionally, click Add Rows to add empty rows to the table.
9. Optionally, if you are creating a new Logical Page and want to clear the fields,then click Clear.
10. Optionally, if you are updating an existing Logical Page and want to reset thefields to their original settings, then click Restore.
11. If you are creating a new Logical Page, then click Create to save.
12. If you are updating an existing Logical Page, then click Update to save.
2.110 Managing RulesThe main page for Rules is the starting point for viewing, creating, and updatingRules. In the context of a Logical Page, Rules determine either what Physical Pageneeds to be rendered or what Logical Page displays next. Use this procedure tomanage Rules.
Prerequisites■ Read Understanding Declarative Page Flows
■ Navigate to Design > Declarative Page Flows > Rules
Steps1. If you want to change which Rules display in the table, then:
a. If you want Rules from all applications to display in the table, then chooseAll from the drop-down list at the top of the table.
b. If you want to filter the table by application, then choose a module prefixfrom the drop-down list at the top of the table.
2-96 Oracle CRM Technology Foundation Concepts and Procedures

Editing Rule Details
c. If you want to search the table of Rules, then type the name of a Rule orpart of the name of a Rule into the text input field.
Optionally, use the percent sign (%) as a wild card in your search phrase.For example, the search phrase "sales%" returns the Rules whose namesbegin with "sales." Alternatively, the search phrase "%sales" returns theRules whose names end with "sales." The search phrase "sales" returns theRule named "sales."
d. Click Go.
The results display in the table.
2. If you want to create a Physical Page, then click Create.
This opens the page where you edit the details of a new Rule.
3. If you want to update an existing Rule, then click its name in the table.
This opens the page where you edit the details of an existing Rule.
2.111 Editing Rule DetailsOn the details page for Rules, you complete the procedures of either creating orupdating Rules. Use this procedure to edit the details of new or existing Rules.
Prerequisites■ Read Understanding Declarative Page Flows
■ Navigate to Design > Declarative Page Flows > Rules, then either click Createor click a Rule name in the table
Steps1. Type into the Name field to edit the name of the Rule.
2. Type into the Description field to edit the description of the Rule.
This field is optional.
3. If you are creating a new Rule, then choose an application from the Applicationdrop-down list.
If you are updating an existing Rule, then you cannot edit this field. It ispermanently set when you create the Rule.
4. Edit the Rule Conditions table.
Using the System Administrator Console 2-97

Managing Business Flows
One row in the table represents one Rule Condition.
a. Type a parameter into the Parameter column.
b. Choose an operator from the drop-down list in the Condition column.
c. Type a value into the Value column.
5. Repeat step 4 as desired.
6. Optionally, click Add Rows to add empty rows to the table.
7. Optionally, if you are creating a new Rule and want to clear the fields, then clickClear.
8. Optionally, if you are updating an existing Rule and want to reset the fields totheir original settings, then click Restore.
9. If you are creating a new Rule, then click Create to save.
10. If you are updating an existing Rule, then click Update to save.
2.112 Managing Business FlowsThe main page for Business Flows is the starting point for viewing, creating,updating, previewing, and cloning Business Flows. Business Flows are page displaysequences that address specific business processes. For example, you can create aBusiness Flow for the process of purchasing an item from an online store, or youcan create a Business Flow for the process of resolving a user’s service request.Business Flows can be either linear or branched in structure. Use this procedure tomanage Business Flows.
Prerequisites■ Read Understanding Declarative Page Flows
■ Navigate to Design > Declarative Page Flows > Business Flows
Steps1. If you want to change which Business Flows display in the table, then:
a. If you want Business Flows from all applications to display in the table,then choose All from the drop-down list at the top of the table.
b. If you want to filter the table by application, then choose a module prefixfrom the drop-down list at the top of the table.
2-98 Oracle CRM Technology Foundation Concepts and Procedures

Editing Business Flow Details
c. If you want to search the table of Business Flows, then type the name of aBusiness Flow or part of the name of a Business Flow into the text inputfield.
Optionally, use the percent sign (%) as a wild card in your search phrase.For example, the search phrase "sales%" returns the Business Flows whosenames begin with "sales." Alternatively, the search phrase "%sales" returnsthe Business Flows whose names end with "sales." The search phrase "sales"returns the Business Flow named "sales."
d. Click Go.
The results display in the table.
2. If you want to update an existing Business Flow, then click its name in the table.
This opens the page where you edit the details of an existing Business Flow.
3. If you want to preview an existing Business Flow, then click the icon in thePreview column.
This opens the page where you preview a Business Flow.
4. If you want to view the Flow Family of a flow, then click the icon in the FlowFamily column.
This opens the page where you view a flow’s Flow Family.
5. If you want to create a Business Flow, then click Create Flow.
This opens the page where you edit the details of a new Business Flow.
6. If you want to create a duplicate of a flow, then click Clone Flow.
This opens the page where you clone a flow.
2.113 Editing Business Flow DetailsOn the details page for Business Flows, you can edit the basic settings of new orexisting Business Flows. After using this page, you can open the Map Flows page todefine the conditional branches in the Business Flow. Use one of the followingprocedures:
Creating a New Business Flow
Updating an Existing Business Flow
For information on Declarative Page Flows concepts, see UnderstandingDeclarative Page Flows.
Using the System Administrator Console 2-99

Creating a New Business Flow
2.114 Creating a New Business FlowUse this procedure to edit the basic settings of a new business flow.
Prerequisites■ Read Understanding Declarative Page Flows
■ Navigate to Design > Declarative Page Flows > Business Flows, then clickCreate
Steps1. Type a flow name into the Name field.
2. Choose an application from the Application drop-down list.
3. Optionally, type a description into the Description field.
4. Optionally, select the Secure check box if the flow is to use HTTPS.
5. Type the name of the Finalization Class into the Finalization Class field.
This is the name of a Java class. The class implements the FlowFinalizerinterface and executes at the end of the Business Flow.
6. Type the name of the Logical Page that should be invoked after the completionof the flow into the Return to Logical field. Optionally, click Go to choose froma list of values.
7. Type the name of the first Logical Page in the flow into the Root Logical field.Optionally, click Go to choose from a list of values.
8. Optionally, edit the Default Flow Sequence table:
If the flow you are creating is linear, then complete this table. If the flow you arecreating has conditional branches, then proceed to step 9.
a. Type numbers into the Sequence fields to indicate the page order within theflow.
b. Click Go to choose a Logical Page to set as the Next Logical.
When you make your choice, the Next Logical and Description fields willautomatically fill.
c. Repeat step b as desired. If needed, click Add Rows to add additional rowsto the table.
9. Click Create to save.
2-100 Oracle CRM Technology Foundation Concepts and Procedures

Updating an Existing Business Flow
10. Click Map Flow.
This opens the page where you define the conditional branches of a nonlinearflow.
11. Optionally, click Clear to clear the content of the fields on the page.
12. Optionally, click View Flow Family.
This opens the page where you view the flow family of a particular flow.
2.115 Updating an Existing Business FlowUse this procedure to edit the basic settings of an existing business flow.
Prerequisites■ Read Understanding Declarative Page Flows
■ Navigate to Design > Declarative Page Flows > Business Flows, then click aflow name in the table
Steps1. Optionally, type a flow description into the Description field.
2. Optionally, select the Secure check box if the flow is to use HTTPS.
3. Type the name of the Finalization Class into the Finalization Class field.
This is the name of a Java class. The class implements the FlowFinalizerinterface and executes at the end of the Business Flow.
4. Type the name of the Logical Page that should be invoked after the completionof the flow into the Return to Logical field. Optionally, click Go to choose froma list of values.
5. Type the name of the first Logical Page in the flow into the Root Logical field.Optionally, click Go to choose from a list of values.
6. Click Update to save.
7. Click Map Flow.
This opens the page where you define the conditional branches of a nonlinearflow.
8. Optionally, click Restore to reset the fields to their original settings.
Using the System Administrator Console 2-101
Mapping Business Flows
9. Optionally, click View Flow Family.
This opens the page where you view the flow family of a particular flow.
2.116 Mapping Business FlowsBusiness Flows are page display sequences that address specific business processes.The Map Flow page allows you to define conditional branches within nonlinearbusiness flows. Use this procedure to set the sequences of Logical Pages withinBusiness Flows.
Prerequisites■ Read Understanding Declarative Page Flows
Steps1. Choose a Logical Page from the Current Logical Page drop-down list.
The Current Logical Page is the name of the Logical Page that you are settingup on this screen. After you save your work, you can repeat this entireprocedure with another Logical Page within the Business Flow.
2. In the Default Next Logical field, type the name of the Logical Page thatdisplays if there are no Rules in the table below, or if none of the Rules in thetable below evaluate to "true." Optionally, click Go to choose from a list ofvalues.
3. Edit the table.
a. Type numbers into the Sequence fields to set the order in which the Rulesare evaluated.
b. In the Next Logical fields, type the name of the Logical Page that you wantto display after the Current Logical Page, only if the Rule in the nextcolumn evaluates to "true." Optionally, click Go to choose from a list ofvalues.
c. In the Rule Name fields, type name of the Rule that controls whether or notthe Logical Page in the previous column displays. Optionally, click Go tochoose from a list of values.
4. Optionally, click Add Rows to add empty rows to the table.
5. Optionally, if you are creating a new Current Logical Page setup and want toclear the fields, then click Clear.
2-102 Oracle CRM Technology Foundation Concepts and Procedures

Viewing Flow Families
6. Optionally, if you are updating an existing Current Logical Page setup andwant to reset the fields to their original settings, then click Restore.
7. If you are creating a new Current Logical Page setup, then click Create to save.
This opens another Map Flow page where you can repeat this entire procedurewith another Current Logical Page.
8. If you are updating an existing Current Logical Page setup, then click Update tosave.
This opens another Map Flow page where you can repeat this entire procedurewith another Current Logical Page.
9. If you have no more Current Logical Pages to set up, then click Finish.
This completes the procedures of either creating or updating Business Flows.
2.117 Cloning Business FlowsUse this procedure to clone business flows.
Prerequisites■ Read Understanding Declarative Page Flows
■ Navigate to Design > Declarative Page Flows > Business Flows, then clickClone Flow
Steps1. Click Go to choose the flow from a list of values. Edit the name of the flow if
desired.
2. Optionally, click Restore to reset the fields to their original settings.
3. Click Clone to generate a duplicate of the flow.
The Flow Details page automatically opens, where you can edit the details ofthe cloned flow.
2.118 Viewing Flow FamiliesUse this procedure to view flow families.
Using the System Administrator Console 2-103

Using Declarative Components
Prerequisites■ Read Understanding Declarative Page Flows
Steps1. Choose one of the flows to be active by selecting the appropriate radio button in
the table.
2. Optionally, click Restore to reset the fields to their original settings.
3. Click Update to save.
4. Optionally, click a flow name in the table.
This opens the page where you can edit the basic details of an existing flow.
2.119 Using Declarative ComponentsThe Declarative Components framework enables you to quickly develop bins,graphs, reports, graph/report combinations, and LOVs that can be personalized byend users. Key features of the Declarative Components framework include theuniform look and feel of all UI components, compatibility with multiple datasources, and built in security.
You can perform the following tasks from the Declarative Components subtab:
■ Managing Components
– Previewing Components
– Registering Components
* Editing Component Metadata
■ Defining Bin or Report Columns
– Editing Bin or Report Column Details
■ Managing LOV Columns
– Editing LOV Column Details
■ Defining Graph Metadata
– Managing Graph Columns
* Editing Graph Column Details
■ Managing Parameters
2-104 Oracle CRM Technology Foundation Concepts and Procedures

Managing Components
– Editing Parameter Metadata
■ Managing Component Security
– Assigning a Responsibility to Components
* Selecting Components
– Assigning a Component to Responsibilities
* Selecting Responsibilities
For information on Declarative Components concepts, see UnderstandingDeclarative Components.
2.120 Managing ComponentsThe main page for Declarative Components is the starting point for viewing,creating, modifying, and previewing bins, graphs, reports, graph/reportcombinations and LOVs. Use this procedure to manage Declarative Components.
Prerequisites■ Read Understanding Declarative Components
■ Navigate to Design > Declarative Components > Components
Steps1. If you want to create a component, then click Create.
This opens the page where you register a new component.
2. If you want to preview a component, then click Preview.
This opens the page where you preview a component.
3. If you want to change the contents of the table, then:
a. If you want to filter the table by application, then choose an applicationfrom the Application drop-down list at the top of the page.
The page refreshes to display the components that belong to thatapplication.
b. If you want to filter the table by component type, then choose All or acomponent type from the drop-down list at the top of the page.
Using the System Administrator Console 2-105

Previewing Components
The page refreshes to display the components belonging to the componenttype that you selected.
c. If you want to search by component code, then type the component codeinto the text entry field and click Go.
The wild card character (%) is allowed. The search is case sensitive.
d. Click First, Previous, Next, and Last to navigate within the table.
4. If you want to update or modify a component, then click its component code inthe table.
This opens the page where you update the registration of a component.
5. If you want to set the status of a component, then:
a. In the Action column, choose Remove, Enabled, or Disabled.
Removing a component deletes it. You cannot delete a LOV component if itis being used by other components. Enabling a component makes itavailable for display. Disabling a component makes it unavailable fordisplay or for selection from the homepage.
b. Click Update to save.
2.121 Previewing ComponentsUse this procedure to preview a declarative component.
■ Read Understanding Declarative Components
■ Navigate to Design > Declarative Components > Components, then clickPreview
Steps1. View the preview.
In the case of a LOV component, the Preview does not have validations. Use thewildcard character (%) in the text entry field.
2. When you are finished, click OK to return to the main components page.
2.122 Registering ComponentsUse this procedure to edit the registration details of a new or existing component.
2-106 Oracle CRM Technology Foundation Concepts and Procedures

Registering Components
Prerequisites■ Read Understanding Declarative Components
■ Navigate to Design > Declarative Components > Components, then eitherclick Create or click a component code in the table
Steps1. If you are creating a new component, then choose an application from the
Application drop-down list at the top of the page. If you are updating anexisting component, then this field is not editable.
2. If you are creating a new component, then choose Bin, Report, Graph, GraphReport, or LOV from the drop-down list. If you are updating an existingcomponent, then this field is not editable.
3. If you are creating a new component, then type a component code into theComponent Code field. If you are updating an existing component, then thisfield is not editable.
The maximum length of a component code is 26 characters. A component codemust be unique and it cannot contain any spaces or nonalphanumericcharacters except underscore (_). It is recommended to prefix the componentcode with the application short name. For example, "JTF_component_code"
4. Type a descriptive component name into the Component Name field.
5. Optionally, type a description into the Description field.
6. If you want to enable the component, then select the Enable check box. If youwant to disable the component, then deselect the Enable check box.
7. If you want to allow the component to be a candidate for display as a Portlet inOracle Portal, then select the Show as Portal check box. If you deselect thischeck box, then the component will not be shown in the list of availablecomponents for Portlet enabling.
8. Optionally, type an image filename into the Image Filename field.
If defined, this image is displayed with the Bin Title. The image that you specifymust exist in the image file location (/OA_MEDIA/).
9. Ignore the Metadata Source section.
The only choice for the Type field is AK.
The Declarative Components framework uses the AK Runtime Dictionary tostore metadata.
Using the System Administrator Console 2-107

Editing Component Metadata
10. Optionally, click Restore to restore the fields to their original settings.
11. Click Update to save.
12. Click Next.
This opens the page where you can begin editing the metadata associated withthis component.
2.123 Editing Component MetadataUse this procedure to edit the Pre-Process type, Data Source, Title, and other generalsettings (such as headers and footers) of a new or existing Declarative Component.
Prerequisites■ Read Understanding Declarative Components
■ Complete the Registering Components procedure
Steps1. Edit the Pre-Process section:
a. If you want to execute a PL/SQL procedure or Java method before theDeclarative Components framework extracts the data content for thiscomponent, then choose Java Class Name or PL/SQL Procedure from theType drop-down list.
If you do not require a preprocessing event, then leave this field blank andskip to step 2.
b. Type the preprocessing PL/SQL procedure or Java method into the Namefield. The procedure name should be of the format procedure_name.package_name, where the package name is the fully qualified package name.
2. Edit the Data Source Provider section:
a. If you are editing a Bin, Report, Graph, or Graph Report, then chooseHTML, Class Name or SQL Query from the Type drop-down list.
If you are editing a LOV component, then choose Class Name or SQLQuery from the drop-down list, as the valid data source types for LOVcomponents are Java and SQL.
b. Type HTML code, a SQL query, or the name of a Java class that implementsthe DataSource interface into the Name field. If you use a SQL query, thenthe SELECT statement must not end with a semicolon (;).
2-108 Oracle CRM Technology Foundation Concepts and Procedures

Editing Component Metadata
3. If you are editing a Bin, Report, Graph, or Graph Report, then edit the CustomEdit link section. This feature is not available for LOVs.
a. If you do not want a Custom Edit Link, then leave this section blank andskip to step 4. This generates the default Edit link that navigates you to thePersonalization and Runtime Parameter section.
b. If you want the Custom Edit Link to have a constant value, then chooseConstant from the Type drop-down list.
If you want the Custom Edit Link to be dynamically generated by aPL/SQL procedure or Java method, then choose PL/SQL or Java from theType drop-down list.
c. If the Custom Edit Link is constant, then type the name of the JSP file intothe Name field. If the Custom Edit Link is dynamically generated, then typethe name of the PL/SQL package.procedure or Java Class.method into theName field.
The PL/SQL procedure must take in a single DEFAULT NULL VARCHAR2argument and return a VARCHAR2. The Java method should take in aParameterList and return a String.
d. If you do not want the Edit link to be generated, then choose Constant fromin the Type drop-down list and leave the Name field blank.
4. Edit the Title section:
a. If you want the component title to have a constant value, then chooseConstant from the Type drop-down list.
If you want the component title to be dynamically generated by a PL/SQLprocedure or Java method, then choose PL/SQL or Java from the Typedrop-down list.
b. If the component title is constant, then type the title text into the Namefield. If the component title is dynamically generated, then type the name ofthe PL/SQL procedure or Java method into the Name field.
The PL/SQL procedure must return a value of the type VARCHAR2.
c. Choose Left, Right, or Center from the Alignment drop-down list to sethow the component title is aligned.
d. If you are editing a Bin, Report, Graph, or Graph Report and want to allowthe end user to personalize the component title, then select the check boxlabeled Personalizable.
Using the System Administrator Console 2-109

Editing Component Metadata
5. If you are editing a Bin, Report, Graph, or Graph Report, then edit the Headersection. This feature is not available for LOVs.
a. If you want the header to have a constant value, then choose Constant fromthe Type drop-down list.
If you want the header to be dynamically generated by a PL/SQLprocedure or Java method, then choose PL/SQL or Java from the Typedrop-down list.
b. If the header is constant, then type the text into the Name field. If theheader is dynamically generated, then type the name of the PL/SQLprocedure or Java method into the Name field.
The PL/SQL procedure must return a value of the type VARCHAR2.
c. Choose Left, Right, or Center from the Alignment drop-down list to sethow the header is aligned.
d. If you want to allow the end user to personalize the header, then select thecheck box labeled Personalizable.
6. If you are editing a Bin, Report, Graph, or Graph Report, then edit the Footersection. This feature is not available for LOVs:
a. If you want the footer to have a constant value, then choose Constant fromthe Type drop-down list.
If you want the footer to be dynamically generated by a PL/SQL procedureor Java method, then choose PL/SQL or Java from the Type drop-down list.
b. If the footer is constant, then type the text into the Name field. If the footeris dynamically generated, then type the name of the PL/SQL procedure orJava method into the Name field.
The PL/SQL procedure must return a value of the type VARCHAR2.
c. Choose Left, Right, or Center from the Alignment drop-down list to sethow the footer is aligned.
d. If you want to allow the end user to personalize the footer, then select thecheck box labeled Personalizable.
7. Click Update to save.
8. Optionally, click Next to save and move on to screens where you can furtherdefine the columns and settings of the component.
2-110 Oracle CRM Technology Foundation Concepts and Procedures

Editing Bin or Report Column Details
2.124 Defining Bin or Report ColumnsUse this procedure to manage the columns in a new or existing bin or reportcomponent. This does not apply to components with a HTML Data Source Type.
Prerequisites■ Read Understanding Declarative Components
■ Complete the Editing Component Metadata procedure.
Steps1. Select or deselect the check box labeled Number Of Rows to enable or disable
allowing the end user to personalize the number of rows displayed.
2. Select or deselect the check box labeled Number Of Columns to enable ordisable allowing the end user to personalize the number of columns displayed.
3. Optionally, click First, Previous, Next, and Last to navigate within the table.
4. If you want to set the status of a column, then choose Enabled or Disabledfrom the Action column.
Enabling a component makes it available for display. Disabling a componentmakes it unavailable for display.
5. Type integers into the Display Order column to set the display order (from leftto right) of the columns in the Bin or Report. Make sure that the values of thisfield are sequential.
6. Click Update to save.
7. Optionally, click Next.
This opens the page where you manage the parameters of the component.
8. If you want to edit the details of a column, then click its name in the table.
This opens the page where you edit the details of a column.
2.125 Editing Bin or Report Column DetailsUse this procedure to edit the details of columns in bin or report components.
Prerequisites■ Read Understanding Declarative Components
Using the System Administrator Console 2-111

Editing Bin or Report Column Details
■ Complete the Defining Bin or Report Columns procedure
Steps1. Optionally, type a brief description of the column into the Description field.
2. Type an integer into the Display Order field to set the display order of thecolumn.
3. Edit the Label section:
a. If you want the column label to have a constant value, then chooseConstant from the Type drop-down list.
If you want the column label to be dynamically generated by a PL/SQLprocedure or Java method, then choose PL/SQL or Java from the Typedrop-down list.
b. If the column label is constant, then type the text into the Method field. Ifthe column label is dynamically generated, then type the name of thePL/SQL procedure or Java method into the Method field.
The PL/SQL procedure must return a value of the type VARCHAR2. TheJava method must be of the format ClassName.MethodName.
c. Choose Left, Right, or Center from the Horizontal Alignment drop-downlist to set how the column label is aligned.
d. Select the check box labeled Hyperlink if you want to display the column asa hyperlink.
e. If you selected the Hyperlink check box, then type the appropriate URL intothe URL field.
f. Choose the name of the ID column associated with the hyperlink from theID column drop-down list.
g. Type a value into the Low Watermark field.
When the component is displayed, any values below the Low Watermarkvalue will display in a negative color.
h. Type a value into the High Watermark field.
When the component is displayed, any values above the High Watermarkvalue will display in a positive color.
4. Click Update to save.
2-112 Oracle CRM Technology Foundation Concepts and Procedures

Managing LOV Columns
5. Click Component Columns to return to the page that lists the component’scolumns.
2.126 Managing LOV ColumnsUse this procedure to manage the columns in a new or existing LOV component.The LOVs that you create can be used across applications. LOV means "list ofvalues." It is a UI component that facilitates the completion of a text entry fieldwhen there are numerous values that may be assigned. LOVs are a usefulalternative to drop-down lists, particularly in cases where displaying a long list ofselections in a drop-down list would require excessive scrolling.
In short, when using a LOV to complete a text entry field, you type a query into thefield and then click a button labeled "Go." This opens a screen where you view a listof values that match the query you submitted. You can then select the value thatyou desire and return to the original screen, where what you selected will populatethe original text entry field.
Prerequisites■ Read Understanding Declarative Components
■ Complete the Editing Component Metadata procedure.
Steps1. Select a radio button in the Select column of the table to specify that column as
searchable.
2. Choose Enabled or Disabled from the Action column in the table to make thecolumn available or unavailable for display.
3. Type an integer into the Display Order field to set the display order of thecolumn. Make sure that the values of this field are sequential.
4. Click Update to save.
Note that you do not define parameters for LOV components.
5. If you want to edit the details of a column, then click its name in the table.
This opens the page where you edit the details of a column.
Using the System Administrator Console 2-113

Editing LOV Column Details
2.127 Editing LOV Column DetailsUse this procedure to edit the details of columns in a new or existing LOVcomponent. The LOVs that you create can be used across applications. LOV means"list of values." It is a UI component that facilitates the completion of a text entryfield when there are numerous values that may be assigned. LOVs are a usefulalternative to drop-down lists, particularly in cases where displaying a long list ofselections in a drop-down list would require excessive scrolling.
In short, when using a LOV to complete a text entry field, you type a query into thefield and then click a button labeled "Go." This opens a screen where you view a listof values that match the query you submitted. You can then select the value thatyou desire and return to the original screen, where what you selected will populatethe original text entry field.
Prerequisites■ Read Understanding Declarative Components
■ Complete the Managing LOV Columns procedure.
Steps1. Optionally, type a brief description of the column into the Description field.
2. Type an integer into the Display Order field to set the display order of thecolumn.
3. Choose a column type of Date, Number, or Varchar2 from the Column Typedrop-down list.
4. If the column is searchable on the main LOV columns page, then the check boxfields for Display and Carry Over are automatically selected and cannot bedeselected. If the column is not searchable on the main LOV columns page, thenyou can select or deselect these two check boxes.
5. Edit the Label section:
a. If you want the column label to have a constant value, then chooseConstant from the Type drop-down list.
If you want the column label to be dynamically generated by a PL/SQLprocedure or Java method, then choose PL/SQL or Java from the Typedrop-down list.
2-114 Oracle CRM Technology Foundation Concepts and Procedures

Defining Graph Metadata
b. If the column label is constant, then type the text into the Method field. Ifthe column label is dynamically generated, then type the name of thePL/SQL procedure or Java method into the Method field.
The PL/SQL procedure must return a value of the type VARCHAR2. TheJava method must be of the format ClassName.MethodName.
6. If the column is searchable on the main LOV columns page, then you will see asection for Validation Rules. If the column is not searchable on the main LOVcolumns page, then this feature is not available.
a. If you want to choose a Javascript Validation Type, then select Error orWarning from the drop-down list. Otherwise, leave the field blank.
b. In the Min. Characters field, type an integer representing the minimumnumber of characters the user is required to submit when using the LOVcomponent.
c. In the Min. Characters before % field, type an integer representing theminimum number of characters the user is required to submit before thewildcard character (%) when using the LOV component.
d. Select or deselect the Auto Append % check box to choose whether or not toautomatically append any queries submitted by the user with the wildcardcharacter (%).
e. If you want to specify the case of the value when it populates the originaltext entry field, then choose Lowercase or Uppercase from the Change Casedrop-down list.
7. Click Update to save.
Note that you do not define parameters for LOV components.
8. Optionally, click LOV Column List to return to the page that lists thecomponent’s columns.
2.128 Defining Graph MetadataUse this procedure to edit the X-axis, Y-axis, and other basic settings of a new orexisting graph component.
Prerequisites■ Read Understanding Declarative Components
■ Complete the Editing Component Metadata procedure.
Using the System Administrator Console 2-115
Defining Graph Metadata
Steps1. Optionally, type a description of the graph into the Description field.
2. If you want the graph title to have a constant value, then choose Constant fromthe Type drop-down list.
If you want the graph title to be dynamically generated by a PL/SQL procedureor Java method, then choose PL/SQL or Java from the Type drop-down list.
3. If the graph title is constant, then type the text into the Method field. If thecolumn label is dynamically generated, then type the name of the PL/SQLprocedure or Java method into the Method field.
The PL/SQL procedure must return a value of the type VARCHAR2. The Javamethod must be of the format ClassName.MethodName.
4. Choose a graph type from the Graph Type drop-down list. The options are:
■ Absolute Area
■ Horizontal Clustered Bar
■ Horizontal Stacked Bar
■ Vertical Clustered Bar
■ Vertical Stacked Bar
■ Absolute Line
■ Pie Graph
■ 3-D Bar
5. If you want to allow the end user to personalize the graph type, then select thecheck box labeled Personalizable.
6. Type pixel values for the X and Y axes of the graph into the XY Size fields.
7. If you want a legend to display with the graph, then select the check boxlabeled Show Legend.
8. Edit the X-axis section:
a. If you want the X-axis label to have a constant value, then choose ConstantValue from the Label Type drop-down list.
If you want the X-axis label to be dynamically generated by a PL/SQLprocedure or Java method, then choose PL/SQL or Java from the Label Typedrop-down list.
2-116 Oracle CRM Technology Foundation Concepts and Procedures

Defining Graph Metadata
b. If the X-axis label is constant, then type the text into the Method field. If theX-axis label is dynamically generated, then type the name of the PL/SQLprocedure or Java method into the Method field.
The PL/SQL procedure must return a value of the type VARCHAR2. TheJava method must be of the format ClassName.MethodName.
c. Choose Vertical, Horizontal or Slanting from the Tick Label Orientationdrop-down list.
Vertical orientation tilts the tick label 90 degrees. Horizontal orientation tiltsthe tick label 180 degrees. Slanted orientation tilts the tick label 270 degrees.
9. Edit the Y-axis section:
a. If you want the Y-axis label to have a constant value, then choose ConstantValue from the Label Type drop-down list.
If you want the Y-axis label to be dynamically generated by a PL/SQLprocedure or Java method, then choose PL/SQL or Java from the Label Typedrop-down list.
b. If the Y-axis label is constant, then type the text into the Method field. If theY-axis label is dynamically generated, then type the name of the PL/SQLprocedure or Java method into the Method field.
The PL/SQL procedure must return a value of the type VARCHAR2. Javamethod must be of the format ClassName.MethodName.
c. Choose Vertical, Horizontal or Slanting from the Tick Label Orientationdrop-down list.
Vertical orientation tilts the tick label 90 degrees. Horizontal orientation tiltsthe tick label 180 degrees. Slanted orientation tilts the tick label 270 degrees.
d. Choose Yes or No from the Auto Scale drop-down list.
If you choose Yes, then the minimum and maximum values displayed onthe Y-axis are determined by BI Beans, depending on the graph data. If youchoose No, then the minimum and maximum values displayed on theY-axis are specified manually.
e. If you chose No in step d, then type an integer into the Tick Size field tospecify the interval on the Y-axis scale.
f. If you chose No in step d, then enter integers into the Min. Scale and Max.Scale fields.
10. Click Update to save.
Using the System Administrator Console 2-117

Managing Graph Columns
11. Click Next to open the page where you manage the columns of the graphcomponent.
2.129 Managing Graph ColumnsUse this procedure to view, update, and remove columns in a graph component.
Prerequisites■ Read Understanding Declarative Components
■ Complete the Defining Graph Metadata procedure.
Steps1. If you want to set the status of a column, then choose Enabled or Disabled
from the Action column.
Enabling a component makes it available for display. Disabling a componentmakes it unavailable for display.
2. For each column, choose X-axis, Y-axis, or SubX-axis from the Axis drop-downlist.
3. Type integers into the Sequence fields to set the sequence of the columns.
4. Click Update to save.
5. Optionally, click Next.
This opens the page where you manage the parameters of the component.
6. If you want to edit the details of a column, then click its name in the table.
This opens the page where you edit the details of a column.
2.130 Editing Graph Column DetailsUse this procedure to edit the details of new or existing columns in graphcomponents.
Prerequisites■ Read Understanding Declarative Components
■ Complete the Managing Graph Columns procedure
2-118 Oracle CRM Technology Foundation Concepts and Procedures

Managing Parameters
Steps1. Optionally, type a description into the Description field.
2. Edit the Label section:
a. If you want the column label to have a constant value, then chooseConstant Value from the Type drop-down list.
If you want the column label to be dynamically generated by a PL/SQLprocedure or Java method, then choose PL/SQL or Java from the Typedrop-down list.
b. If the column label is constant, then type the text into the Method field. Ifthe column label is dynamically generated, then type the name of thePL/SQL procedure or Java method into the Method field.
The PL/SQL procedure must return a value of the type VARCHAR2. TheJava method must be of the format ClassName.MethodName.
3. Edit the Axis section:
a. Choose X-axis, Y-axis, or SubX-axis from the Plot drop-down list.
b. Type the appropriate integer into the Sequence field.
The sequence number is with respect to axis information. It is the indexinginformation for columns mapped on the same axis. For example, if COL1and COL3 are plotted on the Y-axis, then they should have the sequencenumbers 1 and 2, respectively. COL2 plotted on the X-axis should have thesequence number 1.
4. Click Update to save.
5. Click Graph Columns to return to the page that lists the component’s columns.
2.131 Managing ParametersUse this procedure to create, update, and remove component parameters. You candefine date pickers (calendars), text input fields, drop-down lists, multi-select lists,and hidden fields.
Prerequisites■ Read Understanding Declarative Components
Using the System Administrator Console 2-119

Editing Parameter Metadata
■ You reach this page by clicking Next from the column summary page of acomponent. See Defining Bin or Report Columns and Managing GraphColumns.
Steps1. Optionally, click First, Previous, Next, and Last to navigate within the table.
2. If you want to create a parameter, then click Create Parameter.
This opens the page where you edit the details of a new parameter.
3. If you want to delete a parameter, then select the appropriate check box in theRemove column of the table.
4. Type integers into the Sequence fields to set the order in which the parameterswill be rendered. This order is also used in parameter value resolution.
5. Click Update to save.
6. If you want to edit the details of a parameter, then click its name in the table.
This opens the page where you edit the details of an existing parameter.
2.132 Editing Parameter MetadataUse this procedure to edit the details of a new or existing component parameter.
Prerequisites■ Read Understanding Declarative Components
■ Complete the Managing Parameters procedure
Steps1. Type a unique parameter name into the Parameter Name field.
2. Optionally, type a brief description into the Description field.
3. If you want the parameter to be rendered on the parameter page, then select thecheck box labeled Enable.
4. If you want to allow the end user to personalize the parameter, then select thecheck box labeled Personalizable.
5. Choose VARCHAR2, Number, or Date from the Parameter Data Typedrop-down list.
2-120 Oracle CRM Technology Foundation Concepts and Procedures

Editing Parameter Metadata
6. Choose Calendar, Drop Down, Hidden, LOV, Multiselect, or Text from theItem Style drop-down list.
For drop-down lists, you are responsible for writing a well-tuned query thatwill return the number of rows as recommended by the UI team. For hiddenfields, the end user will not see the parameter, but you can use the value asneeded (for example, passing ID columns).
7. If you chose the Item Style Drop Down in step 6, then type the appropriatesource SQL query into the SQL for Dropdown field.
8. If you chose the Item Style LOV in step 6, then the screen refreshes to display asection about LOV details. This section includes fields for LOV App Id, LOVComponent Code, and Mapped LOV Column:
a. Choose an LOV App Id from the drop-down list. This is the application thatowns the LOV component. When you have chosen the application, thescreen refreshes to display a list of LOV components specific to thatapplication.
b. Choose a LOV component from the list of available choices. The screenrefreshes to display the list of searchable columns that can be mapped to thecurrent parameter.
c. Choose the Searchable LOV column and map it to this parameter.
d. You may need to create additional parameters if you want to carry over IDColumns.
9. If you chose the Item Style LOV in step 6 and there is a LOV parameter alreadydefined for this component, then the screen refreshes to display a drop-downlist called Related LOV Parameter. The drop-down list contains all the LOVparameters that have been defined for this component:
a. Choose a LOV parameter as the Related LOV parameter. The screenrefreshes to display a list of the Carried Over Column(s) of the chosen LOVparameter.
b. The Mapped LOV Column drop-down list displays the LOV Columns thathave been defined to be carried over. Therefore, you can use the value ofthis Mapped LOV Column, for example, in a Data Source Query.
10. Edit the Default Value Setting section:
a. Choose Constant, PL/SQL, or Java from the Type drop-down list.
b. If you chose Constant in step a, then type the text of the default value intothe Name field.
Using the System Administrator Console 2-121
Managing Component Security
If you chose PL/SQL in step a, then type the complete signature of aPL/SQL function, including any package name, into the Name field. Thisfunction must return a Varchar2. For example, My_Package.Get_Default_Value(?P_Context). Optionally, the function can take a p_context as anargument.
If you chose Java in step a, then type the signature of a Java method into theName field, in the format package_name.function_name. This method mustreturn a string.
11. Click Update to save.
12. Optionally, click Component Parameter to return to the page that lists thecomponent’s parameters.
2.133 Managing Component SecurityUse this procedure to manage component security assignments.
Prerequisites■ Read Understanding Declarative Components
■ Navigate to Design > Declarative Components > Component Security
Steps1. Choose a radio button, Component to Responsibilities or Responsibility to
Components.
2. Click Next.
This opens the page where you choose either the component that you will bemapping to responsibilities or the responsibility that you will be assigning tocomponents.
2.134 Assigning a Component to ResponsibilitiesUse this procedure to assign a component to one or more responsibilities.
Prerequisites■ Read Understanding Declarative Components
■ Navigate to Design > Declarative Components > Component Security, thenselect the radio button labeled Component to Responsibilities
2-122 Oracle CRM Technology Foundation Concepts and Procedures

Assigning a Responsibility to Components
Steps1. Choose an application from the Application Code drop-down list.
2. Choose a component code from the Component Code drop-down list.
3. Click Next to continue.
2.135 Selecting ResponsibilitiesUse this procedure to select which responsibilities will apply to the component thatyou have chosen.
Prerequisites■ Read Understanding Declarative Components
■ Complete the Assigning a Component to Responsibilities procedure
Steps1. Choose the name of a responsibility in one list and click > or < to move it to the
other list.
2. Repeat step 1 as desired.
3. If you want to move all Available Responsibilities to the SelectedResponsibilities list, then click >>.
4. If you want to move all Selected Responsibilities to the AvailableResponsibilities list, then click <<.
5. Optionally, choose an application short code from the Responsibility App Codedrop-down list.
6. Optionally, click Restore to reset the fields to their original settings.
7. Click Update to save.
2.136 Assigning a Responsibility to ComponentsUse this procedure to assign a responsibility to one or more components.
Prerequisites■ Read Understanding Declarative Components
Using the System Administrator Console 2-123

Selecting Components
■ Navigate to Design > Declarative Components > Component Security, thenselect the radio button labeled Responsibility to Components
Steps1. Choose an application from the Responsibility App Code drop-down list.
2. Choose a responsibility from the Responsibility drop-down list.
3. Click Next to continue.
2.137 Selecting ComponentsUse this procedure to select which components will apply to the responsibility thatyou have chosen.
Prerequisites■ Read Understanding Declarative Components
■ Complete the Assigning a Responsibility to Components procedure
Steps1. Choose the name of a component in one list and click > or < to move it to the
other list.
2. Repeat step 1 as desired.
3. If you want to move all Available Components to the Selected Components list,then click >>.
4. If you want to move all Selected Components to the Available Components list,then click <<.
5. Optionally, choose an application from the Component App Code drop-downlist.
6. Optionally, click Restore to reset the fields to their original settings.
7. Click Update to save.
2.138 Setting Navigation PreferencesUse this procedure to set navigation preferences.
2-124 Oracle CRM Technology Foundation Concepts and Procedures

Setting Display Preferences
Prerequisites■ Navigate to Profile > Navigation Preferences
Steps1. If you want to change your current responsibility, then choose an option from
the Current Responsibility drop-down list.
2. If you want to set default responsibilities for registered Navigation Groups,then choose from the drop-down lists in the Set Default Responsibility table.
For information on Navigation Groups, see Understanding Site Preferences andUsing Site Preferences.
3. Optionally, click Restore to reset the fields to their original settings.
4. Click Update to save.
2.139 Setting Display PreferencesUse this procedure to set display preferences.
Prerequisites■ Navigate to Profile > Display Preferences
Steps1. Choose options from the drop-down lists in the General Display section to
select language, currency, date format, and display style settings.
2. Choose numbers from the drop-down lists in the Table Display section to selecthow many table to display per page and how many blank rows to display perpage.
3. Choose the radio button that suits how you want the Quick Find to returnresult.
4. Optionally, click Restore to reset the fields to their original settings.
5. Click Update to save.
Using the System Administrator Console 2-125

Setting Up the Quick Menu
2.140 Setting Up the Quick MenuThe Quick Menu is a feature that allows you to display links to your mostfrequently visited pages on the Introduction pages of every subtab of the SystemAdministrator Console.
Use this procedure to choose which pages have links in the Quick Menu and alsoturn the Quick Menu on or off.
Prerequisites■ Navigate to Profile > Quick Menu
Steps1. Select the check box at the top of the page if you want to use the Quick Menu.
2. Choose the name of a menu in one list and click > or < to move it to the otherlist.
3. Repeat step 2 as desired.
4. If you want to move all Available Menus to the Favorite Menus list, then click>>.
5. If you want to move all Favorite Menus to the Available Menus list, then click<<.
6. Optionally, click the up and down arrows to change the sequence of menus inthe Favorite Menus list.
7. Optionally, click Restore to reset the fields to their original settings.
8. Click Update to save.
2.141 Changing Your PasswordUse this procedure to change your password.
Prerequisites■ Navigate to Profile > Change Password
Steps1. Type your current password into the Current Password field.
2. Type your new password into the New Password field.
2-126 Oracle CRM Technology Foundation Concepts and Procedures

Setting Address Information
Passwords must be at least six characters long.
3. Retype your new password into the Re-Enter New Password field.
4. Optionally, click Restore to reset the fields to their original settings.
5. Click Update to save.
2.142 Setting Personal InformationUse this procedure to edit your personal information.
Prerequisites■ Navigate to Profile > Personal Information
Steps1. Edit the fields as desired.
2. Optionally, click Restore to reset the fields to their original settings.
3. Click Update to save.
2.143 Setting Address InformationUse this procedure to edit your address information.
Prerequisites■ Navigate to Profile > Address Information
Steps1. Edit the fields as desired.
2. Optionally, click Restore to reset the fields to their original settings.
3. Click Update to save.
Using the System Administrator Console 2-127

Setting Address Information
2-128 Oracle CRM Technology Foundation Concepts and Procedures