Oracle Business Intelligence Infrastructure Installation and Configuration Guide
206
Oracle Business Intelligence Infrastructure Installation and Configuration Guide Version 10.1.3.2 December 2006
description
Oracle Business Intelligence Infrastructure Installation and Configuration Guide
Transcript of Oracle Business Intelligence Infrastructure Installation and Configuration Guide

Oracle Business Intelligence Infrastructure Installation and Configuration Guide
Version 10.1.3.2December 2006

Part Number: B31765-02
Copyright © 2006, Oracle. All rights reserved.
The Programs (which include both the software and documentation) contain proprietary information; they are provided under a license agreement containing restrictions on use and disclosure and are also protected by copyright, patent, and other intellectual and industrial property laws. Reverse engineering, disassembly, or decompilation of the Programs, except to the extent required to obtain interoperability with other independently created software or as specified by law, is prohibited.
The information contained in this document is subject to change without notice. If you find any problems in the documentation, please report them to us in writing. This document is not warranted to be error-free. Except as may be expressly permitted in your license agreement for these Programs, no part of these Programs may be reproduced or transmitted in any form or by any means, electronic or mechanical, for any purpose.
If the Programs are delivered to the United States Government or anyone licensing or using the Programs on behalf of the United States Government, the following notice is applicable:
U.S. GOVERNMENT RIGHTS. Programs, software, databases, and related documentation and technical data delivered to U.S. Government customers are "commercial computer software" or "commercial technical data" pursuant to the applicable Federal Acquisition Regulation and agency-specific supplemental regulations. As such, use, duplication, disclosure, modification, and adaptation of the Programs, including documentation and technical data, shall be subject to the licensing restrictions set forth in the applicable Oracle license agreement, and, to the extent applicable, the additional rights set forth in FAR 52.227-19, Commercial Computer Software--Restricted Rights (June 1987). Oracle USA, Inc., 500 Oracle Parkway, Redwood City, CA 94065.
The Programs are not intended for use in any nuclear, aviation, mass transit, medical, or other inherently dangerous applications. It shall be the licensee's responsibility to take all appropriate fail-safe, backup, redundancy and other measures to ensure the safe use of such applications if the Programs are used for such purposes, and we disclaim liability for any damages caused by such use of the Programs.
Oracle, JD Edwards, PeopleSoft, and Siebel are registered trademarks of Oracle Corporation and/or its affiliates. Other names may be trademarks of their respective owners.
The Programs may provide links to Web sites and access to content, products, and services from third parties. Oracle is not responsible for the availability of, or any content provided on, third-party Web sites. You bear all risks associated with the use of such content. If you choose to purchase any products or services from a third party, the relationship is directly between you and the third party. Oracle is not responsible for: (a) the quality of third-party products or services; or (b) fulfilling any of the terms of the agreement with the third party, including delivery of products or services and warranty obligations related to purchased products or services. Oracle is not responsible for any loss or damage of any sort that you may incur from dealing with any third party.

Oracle Business Intelligence Infrastructure Installation and ConfigurationGuide Version 10.1.3.2
3
Contents
Chapter 1: What’s New in This Release
Chapter 2: Oracle BI Infrastructure Installation and Configuration Topic Areas
Scope of Topic Areas for Oracle BI Installation and Configuration 12
Organization of Topic Areas for Installation and Configuration 14
About File Path and Command Conventions 15
Accessing Related Oracle Business Intelligence Documentation 16
Chapter 3: Oracle BI Infrastructure Installation OptionsOracle BI Component Installation Options 17
Additional Oracle BI Components 20About Re-Installing Oracle BI Components 21
Basic and Advanced Types of Oracle BI Installation 21
Deployment on Web Application Servers 23Deploying Oracle BI on Oracle Application Server 23Deploying Oracle BI on All Other Web Servers 23
Chapter 4: Preparing to Install Oracle Business Intelligence
Process of Planning the Installation 26
Roadmap for Installing Oracle BI Infrastructure Components 27
Roadmap for Configuring Oracle BI Infrastructure Components 27Diagram of Oracle BI Infrastructure Deployment 28
Oracle BI Installation Requirements 30
Obtaining Appropriate Permissions 30
Installing Third-Party Products 31
Installation Requirements for Windows 32Java Platform Version 32Changing the DEP Setting 32Installing the Microsoft Data Access Components for Windows 33

Oracle Business Intelligence Infrastructure Installation and Configuration Guide Version 10.1.3.2
Contents ■
4
Installation Requirements for Linux 35
Chapter 5: Installing Oracle BI EE InfrastructureProcess of Installing the Complete Oracle BI Infrastructure 37
Choosing Oracle BI Installer Options 38
Running the Oracle BI Installer Under Windows and Linux 39
Oracle BI Installer Screens and Prompts 40Screens and Prompts for a Complete Installation (Windows) in Graphics Mode 40Prompts for a Complete Oracle BI Installation (Linux) in Console Mode 48Prompts for a Complete Oracle BI Installation (Windows) in Console Mode 48
Installing Oracle BI Components on Different Machines 49
Initializing the Oracle Business Intelligence Installation 50
Initializing Oracle BI Under Windows 50
Starting Oracle BI Under Linux 50
Postinstallation Tests of Oracle BI Client and Server 51Testing the Oracle BI Server Installation 51Testing the Oracle BI Client Installation 52
Installing Oracle BI in Unattended or Silent Mode 54Installing in Silent Mode Under Windows 54Installing in Silent Mode Under Linux 57
Chapter 6: Installing Individual Oracle BI ComponentsInstalling Additional Oracle BI Components 60
Installing and Configuring Disconnected Client 61
Additional Oracle BI Server Requirements for Disconnected Client 61
Installing the Disconnected Client 62
Setting Up Disconnected Client to Run in Silent Mode 64
Installing Oracle BI Ancillary Client Programs 65
Installing Briefing Book Reader 66Restoring Permissions in Briefing Books 66
Installing Oracle BI Office Plug-In 68
Installing Oracle BI Open Intelligence Interface 70Open Intelligence Interface Installer Screens and Prompts 71
Installing Oracle BI Ancillary Server Programs 72Installing Oracle BI Publisher Desktop 72

Contents ■
Oracle Business Intelligence Infrastructure Installation and ConfigurationGuide Version 10.1.3.2
5
Starting Oracle BI Publisher Desktop 73
Uninstalling Oracle BI Components 74Backing Up Business Intelligence Folders and Files 74Uninstalling Oracle BI Under Windows 75Uninstalling Oracle BI Under Linux and UNIX 75
Chapter 7: Configuring Oracle BI ServersWorking with Oracle BI Servers 78
Starting, Stopping, or Restarting Oracle BI Servers 79Stopping Oracle BI Servers 79Starting or Restarting Oracle BI Servers 80
Scripts for Korn, Bourne, or Bash Shells 82
Using the OC4J Command Script 85Starting the OC4J Process 85Stopping the OC4J Process 86Restarting the OC4J Process 86
Updating Server Configuration Settings 87Updating the instanceconfig.xml File for Oracle BI Servers 87Editing the instanceconfig.xml File 88
Updating Configuration Settings Using Oracle Application Server Control or JConsole 89
Enabling Oracle Application Server Control 89Modifying Configuration Files Using Oracle Application Server Control 90Modifying Configuration Files Using JConsole 91
About Localizing Oracle BI Server 94
About Security in the Demonstration Oracle BI Repository 94
Chapter 8: Configuring the Data Sources for Oracle Business Intelligence
Process of Changing the Oracle BI Database Settings 96
About Locating the Database Setup Script Under Linux 97
Changing the Oracle BI Database Type 98
Changing the Oracle BI Database Connection Pool Settings 99About Starting the Application Repository File Default Database Type 99
About Configuring Initialization Blocks 100
Configuring Oracle Databases for the Oracle BI Server Under Windows 101

Oracle Business Intelligence Infrastructure Installation and Configuration Guide Version 10.1.3.2
Contents ■
6
Chapter 9: Configuring Oracle BI Presentation ServicesConfiguring HTTP Web Servers 105
Editing the web.xml File 106
Creating a WAR File for Oracle BI Presentation Services 107
Deploying a WAR File 108
Configuring the ISAPI Plug-In 109
Testing the Oracle BI Presentation Services 110
Configuring Oracle BI Presentation Services to Access Multiple Repositories 110
Configuring the Presentation Catalog for More Than 4000 Users 111
Configuring BI Publisher for Oracle BI Presentation Services 111
Chapter 10:Configuring Oracle Business Intelligence Scheduler
Oracle BI Scheduler Components and Functions 114About Oracle BI Scheduler Tables 115
Process of Configuring Oracle BI Scheduler 116
Creating Oracle BI Scheduler Databases and Tables 116Creating Oracle BI Scheduler Database and Tables for Specific Databases 116Configuring Databases for the Oracle BI Scheduler 118Changing Oracle BI Scheduler Table Names 119
Setting Oracle BI Scheduler Configuration Options 121About the Oracle BI Scheduler Administrator 121
Configuring Oracle BI Scheduler 122Configuring Oracle BI Scheduler Under Windows 123Configuring Oracle BI Scheduler Under Linux 123
Configuring Oracle BI Presentation Services to Communicate With Oracle BI Scheduler 124
Specifying the Scheduler Host and Port in Presentation Services Configuration File 124Adding Scheduler Administrator Credentials to Oracle BI Presentation Services Credential Store 126Configuring Oracle BI Presentation Services to Identify the Credential Store 128
Chapter 11:Configuring BI Publisher Reporting ToolRoadmap to Configuring BI Publisher 131
BI Publisher Requirements 133BI Publisher Components 133

Contents ■
Oracle Business Intelligence Infrastructure Installation and ConfigurationGuide Version 10.1.3.2
7
Oracle BI Publisher Desktop 133Memory Allocation for OC4J 134Deploying BI Publisher with Other J2EE Application Servers 134
Starting and Stopping BI Publisher 135
Configuring BI Publisher for XMLP Server 136
Embedding BI Publisher in Oracle BI 139Configuring BI Publisher Settings in the Configuration File for Presentation Services 139Adding Publisher Administrator Credentials to Oracle BI Presentation Services Credential Store 141Configuring Oracle BI Presentation Services to Identify the Credential Store 143
Configuring BI Publisher for Scheduler 145
Running the BI Publisher Demo Reports 146Configuring the Demo Files 147Configuring the Demo Data Source 147
Appendix A: NQSConfig.INI File ReferenceLocation of the Oracle BI Server Configuration Initialization File 149
Rules for Oracle BI Configuration File Parameters 150
Changing Oracle BI Configuration File Parameter Entries 151
Oracle BI Configuration File Parameters and Syntax 152
Repository Section Parameters in the Configuration File 153
Query Result Cache Section Parameters in the Configuration File 154
General Section Parameters in the Configuration File 158How the SIZE Parameters Affect Oracle Business Intelligence Performance 163
Security Section Parameters in the Configuration File 165
Server Section Parameters in the Configuration File 168
Dynamic Library Section Parameters in the Configuration File 176
User Log Section Parameters in the Configuration File 177
Usage Tracking Section Parameters in the Configuration File 178
Optimization Flags Section Parameters in the Configuration File 183
Cube Views Section Parameters in the Configuration File 184
MDX Member Name Cache Section Parameters in the Configuration File 186
Oracle Dimension Export Section Parameters in the Configuration File 186

Oracle Business Intelligence Infrastructure Installation and Configuration Guide Version 10.1.3.2
Contents ■
8
Appendix B: Localizing Oracle Business Intelligence Deployments
Localization of Oracle BI Server Components 190
Configuring Unicode Support for Oracle BI Charts 192
Converting Chart Fonts 193
Adding Converted Fonts to the Charting Image Server 194Adding a Font to the Chart Template Files 194Adding Additional Converted Fonts to the Charting Image Server 195
About Changing Localization Variables for Oracle BI 197
About Configuring Oracle BI and the Operational Application to Display the Same Language 197
Process of Maintaining Translation Tables for Oracle BI 199
Using the Externalize Strings Utility for Localization 200
About Translating Web Catalog Strings 201
About the WEBLANGUAGE Session Variable 201
Index

Oracle Business Intelligence Infrastructure Installation and ConfigurationGuide Version 10.1.3.2
9
1 What’s New in This Release
Oracle Business Intelligence Enterprise Edition consists of components that were formerly available from Siebel Systems as Siebel Business Analytics Platform, with a number of significant enhancements.
The Oracle Business Intelligence Infrastructure Installation and Configuration Guide is part of the documentation set for Oracle Business Intelligence Enterprise Edition.
NOTE: Throughout this guide, Oracle Business Intelligence Enterprise Edition is abbreviated as Oracle Business Intelligence EE, Oracle Business Intelligence, and Oracle BI.
This guide contains information on installing and configuring the infrastructure or platform components of Oracle Business Intelligence on approved operating system platforms and deployments. This guide also contains new material and material that was previously published under the title Siebel Analytics Platform Installation and Configuration Guide.
Oracle recommends reading the Oracle Business Intelligence Enterprise Edition Release Notes before installing, using, or upgrading the Oracle BI Infrastructure. The Oracle Business Intelligence Enterprise Edition Release Notes are available:
■ On the Oracle Business Intelligence Enterprise Edition CD-ROM.
■ On the Oracle Technology Network at http://www.oracle.com/technology/documentation/bi_ee.html (to register for a free account on the Oracle Technology Network, go to http://www.oracle.com/technology/about/index.html).

Oracle Business Intelligence Infrastructure Installation and Configuration Guide Version 10.1.3.2
What’s New in This Release ■
10
What’s New in Oracle Business Intelligence Infrastructure Installation and Configuration Guide, Version 10.1.3.2Table 1 lists changes described in this version of the documentation to support release Oracle Application Server 10g Release 3.
Table 1. New Product Features in Oracle Business Intelligence Infrastructure Installation and Configuration Guide, Version 10.1.3.2
Topic Description
■ “Installation Requirements for Linux” on page 35
■ “Running the Oracle BI Installer Under Windows and Linux” on page 39
■ “Screens and Prompts for a Complete Oracle BI Installation (Linux) in Graphics Mode” on page 44
■ “Prompts for a Complete Oracle BI Installation (Linux) in Console Mode” on page 48
Oracle Business Intelligence can now be installed on Linux platforms.
■ “Oracle BI Installer Screens and Prompts” on page 40
■ Chapter 11, “Configuring BI Publisher Reporting Tool”
The Oracle Business Intelligence installer now installs Oracle BI Publisher, which provides advanced reporting capabilities to Oracle Business Intelligence.
“Basic and Advanced Types of Oracle BI Installation” on page 21
The Oracle Business Intelligence Suite EE installer now can perform different installation types:
■ Basic
■ Advanced
“Accessing Related Oracle Business Intelligence Documentation” on page 16
There is a new web page, Welcome to Oracle Business Intelligence Enterprise Edition (10.1.3.2), installed to the same location where you installed the software. This web page provides links to more Oracle documentation relating to Oracle Business Intelligence.
Oracle Business Intelligence Infrastructure Installation and ConfigurationGuide Version 10.1.3.2
11
2 Oracle BI Infrastructure Installation and Configuration Topic Areas
This topic area contains topics relating to the scope of the Oracle Business Intelligence Infrastructure Installation and Configuration Guide:
■ Scope of Topic Areas for Oracle BI Installation and Configuration on page 12
The following topics relate to the use of this book:
■ Organization of Topic Areas for Installation and Configuration on page 14
■ About File Path and Command Conventions on page 15
The following topic relates to the general subject of Oracle Business Intelligence documentation:
■ Accessing Related Oracle Business Intelligence Documentation on page 16

Oracle Business Intelligence Infrastructure Installation and Configuration Guide Version 10.1.3.2
Oracle BI Infrastructure Installation and Configuration Topic Areas ■ Scope of Topic Areas for Oracle BI Installation and Configuration
12
Scope of Topic Areas for Oracle BI Installation and ConfigurationThe following general processes are described in this book:
■ Setting up your operating system for deploying Oracle Business Intelligence.
See the topic “Process of Planning the Installation,” especially the subtopic “Oracle BI Installation Requirements” on page 30.
■ Running the Oracle Business Intelligence installation wizard. See the following topic areas:
■ Roadmap for Installing Oracle BI Infrastructure Components on page 27
■ Process of Installing the Complete Oracle BI Infrastructure on page 37
■ Configuring the various Oracle Business Intelligence servers for your specific deployment. See the following topics or topic areas:
■ Roadmap for Configuring Oracle BI Infrastructure Components on page 27
■ Configuring Oracle BI Servers on page 77
■ Configuring the Data Sources for Oracle Business Intelligence on page 95
■ Configuring Oracle BI Presentation Services on page 103
■ Configuring Oracle Business Intelligence Scheduler on page 113
■ Optional platform configuration topics, such as special installations, reporting, and localization.
See the following topic areas:
■ Chapter 6, “Installing Individual Oracle BI Components”
■ Chapter 11, “Configuring BI Publisher Reporting Tool”
■ Appendix B, “Localizing Oracle Business Intelligence Deployments”
Out of Scope for the Oracle Business Intelligence Infrastructure Installation and Configuration GuideThe following processes are not described in this book:
■ Deploying Oracle Business Intelligence across a network using clustering, across a firewall.
See the Oracle Business Intelligence Enterprise Edition Deployment Guide.
■ Configuring the Oracle Business Intelligence repository
See the Oracle Business Intelligence Server Administration Guide.
■ Oracle Business Intelligence Presentation Services Web catalog.
See the Oracle Business Intelligence Presentation Services Administration Guide.
■ Configuring and administering the Data Warehouse, including security settings.
See the Oracle Business Intelligence Applications Installation and Administration Guide.

Oracle BI Infrastructure Installation and Configuration Topic Areas ■ Scope of TopicAreas for Oracle BI Installation and Configuration
Oracle Business Intelligence Infrastructure Installation and ConfigurationGuide Version 10.1.3.2
13
■ Configuring Oracle Business Intelligence to work with Oracle’s Siebel Customer Relationship Management applications, including security settings.
See the Oracle Business Intelligence Applications Installation and Administration Guide.
■ Upgrading Business Intelligence platform components.
See the Oracle Business Intelligence Infrastructure Upgrade Guide.
TIP: A list of all the books you may need for a full enterprise installation is shown in “Accessing Related Oracle Business Intelligence Documentation” on page 16.

Oracle Business Intelligence Infrastructure Installation and Configuration Guide Version 10.1.3.2
Oracle BI Infrastructure Installation and Configuration Topic Areas ■ Organization of Topic Areas for Installation and Configuration
14
Organization of Topic Areas for Installation and ConfigurationUse the roadmap and process topics in the “Preparing ...” and “Installing ...” chapters to guide you through the installation process. These topics provide a checklist of the steps required to complete an installation, in the order you must perform them. Each step includes a link to a topic that explains how to complete the step. The remaining chapters of the Oracle Business Intelligence Infrastructure Installation and Configuration Guide are organized according to the major components of the installation.
NOTE: Topics in the chapters may not follow the order you perform them during the installation.
The order of topics in a chapter is as follows:
■ A list of all the topics in the chapter.
■ Roadmap topic. A roadmap is a numbered list of processes.
For example, “Roadmap for Configuring Oracle BI Infrastructure Components” is a list of the processes required to install Oracle Business Intelligence, numbered in the order in which each process should occur.
■ Process topics. A process topic consists of a number of tasks with a common result.
For example, “Process of Installing the Complete Oracle BI Infrastructure” lists the tasks required to install Oracle Business Intelligence. Sometimes, not all tasks are necessary for a particular deployment. These topic headings frequently (but not always) begin with “Process of...”.
■ Task topics. Task topics explain how to do each step in an installation or configuration process, and typically include a procedure.
Task topics begin with a gerund. For example, “Configuring HTTP Web Servers.”
■ Concept topics. For an overview of how each part of the installation works, or for background material, read the concept topics.
These topic headings usually begin with “About...”. For example, “Scripts for Korn, Bourne, or Bash Shells.” Concept topic headings do not begin with a gerund, “Process of,” or “Roadmap for.”

Oracle BI Infrastructure Installation and Configuration Topic Areas ■ About File Pathand Command Conventions
Oracle Business Intelligence Infrastructure Installation and ConfigurationGuide Version 10.1.3.2
15
About File Path and Command ConventionsEnvironment variables and path placeholders for file paths are used throughout the Oracle Business Intelligence Infrastructure Installation and Configuration Guide.
Table 2 on page 15 shows the format conventions for paths, navigation, and command execution used in this Guide.
Table 2. Conventions Used in Oracle Business Intelligence Infrastructure Installation and Configuration Guide
Reference Category Windows Platforms
Paths OracleBI_HOME is the absolute path of the Oracle Business Intelligence Server installation directory. When you install Oracle Business Intelligence, the installation script queries for the drive and path to the installation directory. The script then installs the BI Servers on that drive and path.
OracleBIData_HOME is the absolute path of the data directory files.
For example, if you specified drive D: as the installation drive, then OracleBI_HOME is D:\OracleBI, andOracleBIData_HOME is D:\OracleBIData.
Path Navigation
(Procedural steps that ask you to navigate to a specified directory.)
Open a Command Prompt window and use the cd command to make the specified directory the current directory.
NOTE: Do not use the Windows File Explorer to navigate to the directory.
For help with the cd command, enter the word help in the Command Prompt window and click Enter.
Command Execution
(Procedural steps that ask you to execute a command, unless specified otherwise.)
In a Command Prompt window, verify the current directory is correct and enter the command.
Do not run the command by entering it in the Run window in the Start Menu.

Oracle Business Intelligence Infrastructure Installation and Configuration Guide Version 10.1.3.2
Oracle BI Infrastructure Installation and Configuration Topic Areas ■ Accessing Related Oracle Business Intelligence Documentation
16
Accessing Related Oracle Business Intelligence DocumentationThis topic lists the books that are cross-referenced from the Oracle Business Intelligence Infrastructure Installation and Configuration Guide. Books that apply in general to installation, configuration, and use of Oracle Enterprise Applications are listed on the Oracle Technology Network.
For an overview, suggestions, links, and tutorials on using this software, access the web page Welcome to Oracle Business Intelligence Enterprise Edition (10.1.3.2), available on the drive on which you installed the software:
OracleBI_HOME/index_bi_ee.html
Related Oracle Business Intelligence Enterprise Edition book titles:
■ Oracle Business Intelligence Server Administration Guide
■ Oracle Business Intelligence Presentation Services Administration Guide
■ Oracle Business Intelligence Scheduler Guide
■ Oracle Business Intelligence Answers, Delivers, and Interactive Dashboards User Guide
■ Oracle Business Intelligence Enterprise Edition Deployment Guide
Accessing Oracle Business Intelligence DocumentationThese books are available on Oracle Technology Network. The following procedure explains how to access Oracle documentation.
To access Oracle Business Intelligence documentation
1 Log onto Technology Network:
http://www.oracle.com/technology/index.html
2 Click the Documentation tab.
3 Under the heading Middleware, find the subheading Data Warehousing and Business Intelligence.
Under this subheading, click the link Oracle Business Intelligence.
4 On the Oracle Business Intelligence Documentation page, in the Part Number or Description column, find the applicable book you want, and then click the corresponding PDF or HTML link.
In addition, third-party documentation, such as that for Informatica, is provided on the Oracle's Siebel Business Applications Third-Party Bookshelf CD-ROM (shipped with the Siebel Bookshelf CD-ROM).

Oracle Business Intelligence Infrastructure Installation and ConfigurationGuide Version 10.1.3.2
17
3 Oracle BI Infrastructure Installation Options
Your particular deployment of Oracle Business Intelligence depends on several related product deployment considerations. These deployment options are described in the following topics:
■ “Oracle BI Component Installation Options” on page 17
■ “Additional Oracle BI Components” on page 20
TIP: If your deployment includes enterprise-wide security features, clustering, and load balancing, then also read the Oracle Business Intelligence Enterprise Edition Deployment Guide.
Oracle BI Component Installation OptionsThe Oracle Business Intelligence infrastructure consists of servers, programs, and tools used to build Oracle Business Intelligence applications.
The Oracle Business Intelligence Enterprise Edition product includes an installer program that can install the complete Oracle BI suite, or one or more Oracle BI product components.
NOTE: This Guide covers the installation of the Oracle Business Intelligence infrastructure components only. To install the Oracle Business Intelligence Applications components, see the Oracle Business Intelligence Applications Installation and Administration Guide.
The Oracle BI infrastructure components are shown in Table 3 on page 19, along with the Installer Wizard option that installs them.
NOTE: The installation options are called Setup Type in the installer.
Before beginning any installation, you should determine the configuration settings for each of the installation options. The configuration settings are on the CD, in the installation setup folders:
■ \Server\Oracle_Business_Intelligence\Config\OracleBI_HOME
■ \Server\Oracle_Business_Intelligence\Config\OracleBIData_HOME
For specific types of installation, there can also be additional topics in this Guide:
■ ODBC clients only on remotely-connected laptop computers
See also the following topics:
■ “Installing Oracle BI Open Intelligence Interface” on page 70
■ Deployment in languages other than English
See also Appendix B, “Localizing Oracle Business Intelligence Deployments.”

Oracle Business Intelligence Infrastructure Installation and Configuration Guide Version 10.1.3.2
Oracle BI Infrastructure Installation Options ■ Oracle BI Component Installation Options
18
■ Oracle BI Publisher Reporting Tool
Oracle BI Publisher is deployed in either standalone OC4J or Oracle Application Server, depending on your installer choices. However, you can also deploy BI Publisher on other J2EE application servers, such as Tomcat or Websphere. The xmlpserver.ear and xmlpserver.war files are provided on the Oracle BI EE installer CD-ROM or network, in the following locations:
■ Server_Ancillary\Oracle_Business_Intelligence_Publisher\generic\xmlpserver.war
■ Server_Ancillary\Oracle_Business_Intelligence_Publisher\oc4j\xmlpserver.ear
See also Chapter 11, “Configuring BI Publisher Reporting Tool.”
Finally, for deployments across a network or enterprise, see the Oracle Business Intelligence Enterprise Edition Deployment Guide.

Oracle BI Infrastructure Installation Options ■ Oracle BI Component InstallationOptions
Oracle Business Intelligence Infrastructure Installation and ConfigurationGuide Version 10.1.3.2
19
Table 3. Oracle BI Infrastructure Components and Their Setup Types
Setup Type Installs These Oracle BI Components
Complete ■ Oracle Business Intelligence Server
■ Oracle Business Intelligence Presentation Services
■ Oracle Business Intelligence Presentation Services Plug-in
■ Oracle Business Intelligence Scheduler
■ Oracle Business Intelligence Administration Tool
■ Oracle Business Intelligence Cluster Controller
■ Oracle Business Intelligence Client
■ Oracle Business Intelligence ODBC Driver
■ Oracle Business Intelligence JDBC Driver
■ Oracle Business Intelligence Systems Management
■ Oracle Business Intelligence Catalog Manager
■ Oracle Business Intelligence Job Manager
■ Oracle Business Intelligence Disconnected Client
■ Oracle Business Intelligence Publisher
Oracle Business Intelligence Server
■ Oracle Business Intelligence Server
■ Oracle Business Intelligence Scheduler
■ Oracle Business Intelligence Administration Tool
■ Oracle Business Intelligence Cluster Controller
■ Oracle Business Intelligence Job Manager
■ Oracle Business Intelligence Systems Management
■ Oracle Business Intelligence ODBC Driver
■ Oracle Business Intelligence JDBC Driver
■ Oracle Business Intelligence Client
Oracle Business Intelligence Presentation Services
■ Oracle Business Intelligence Catalog Manager
■ Oracle Business Intelligence Presentation Services
■ Oracle Business Intelligence Presentation Services Plug-in
■ Oracle Business Intelligence ODBC Driver
■ Oracle Business Intelligence Systems Management
■ Oracle Business Intelligence Client

Oracle Business Intelligence Infrastructure Installation and Configuration Guide Version 10.1.3.2
Oracle BI Infrastructure Installation Options ■ Additional Oracle BI Components
20
Additional Oracle BI ComponentsSome optional components, such as those listed in Table 4, are not part of the main Installer Wizard. The topic area for these components is “Installing Oracle BI Ancillary Client Programs” on page 65.
NOTE: Not all components can be deployed on all platforms. For specific platform support information, see System Requirements and Supported Platforms for Oracle Business Intelligence, located on the Oracle Technology Network. To download System Requirements and Supported Platforms for Oracle Business Intelligence, see the topic “Accessing Oracle Business Intelligence Documentation” on page 16.
Oracle Business Intelligence Client Tools
NOTE: The ODBC driver can be installed by itself.
■ Oracle Business Intelligence Administration Tool
■ Oracle Business Intelligence Client
■ Oracle Business Intelligence Job Manager
■ Oracle Business Intelligence Catalog Manager
■ Oracle Business Intelligence ODBC Driver
■ Oracle Business Intelligence JDBC Driver
Oracle Business Intelligence Disconnected Client
Oracle Business Intelligence Disconnected Client
Oracle Business Intelligence Publisher
Oracle Business Intelligence Publisher
Custom All the preceding components as individual options.
Table 4. Optional Oracle BI Components Not Installed by the Wizard
Feature Installation Note
Oracle BI Publisher Desktop
Windows-based design tool that allows you to create layouts for Oracle BI Publisher.
Oracle BI Open Intelligence Interface
ODBC interface only. This is similar to the ODBC interface installed through the main installer, but has a smaller footprint.
Oracle BI Office Plug-In The Oracle BI Office Plug-In is a Windows application under the Oracle BI Presentation Services. It requires a separate installer.
See the topic “Installing Oracle BI Office Plug-In” on page 68.
Table 3. Oracle BI Infrastructure Components and Their Setup Types
Setup Type Installs These Oracle BI Components

Oracle BI Infrastructure Installation Options ■ Basic and Advanced Types of Oracle BIInstallation
Oracle Business Intelligence Infrastructure Installation and ConfigurationGuide Version 10.1.3.2
21
About Re-Installing Oracle BI ComponentsIf you have an existing Oracle Business Intelligence installation, you are asked to choose between the following options:
■ Keep User Modified Configurations
■ Reset Configurations
Choose Keep User Modified Configurations.
Basic and Advanced Types of Oracle BI InstallationDuring the installation, you are asked to choose an Installation Type. The selection in the installer Installation Type screen is based on the type of web server on which Oracle BI is to be deployed.
NOTE: An application server is also required for deployment of the Systems Management component, which is installed along with Oracle BI components such as the Oracle BI Server. See the topic “Deployment on Web Application Servers” on page 23.
The choices are:
■ Basic Installation Type
Choose the Basic Installation type if one of the following is true:
■ You are evaluating the Oracle Business Intelligence product.
Oracle BI Briefing Book Reader
Windows application that provides a way to save static and linked dashboard content for review offline.
Oracle BI Disconnected Client
If you plan to install the Oracle BI Disconnected Client, it must be installed on a separate machine from the Oracle Business Intelligence Server installation.
See the information on setting up the Oracle BI Disconnected Client in Oracle Business Intelligence Disconnected Administration and Configuration Guide.
Table 4. Optional Oracle BI Components Not Installed by the Wizard
Feature Installation Note

Oracle Business Intelligence Infrastructure Installation and Configuration Guide Version 10.1.3.2
Oracle BI Infrastructure Installation Options ■ Basic and Advanced Types of Oracle BI Installation
22
■ The Web Server is either IIS or a J2EE Application Server other than Oracle Application Server.
The Basic Installation type deploys components in standalone Oracle Containers for J2EE (OC4J) or in Microsoft IIS.
The Basic installation type installs a demonstration application that includes a repository (paint.rpd), presentation catalog, and XML data source.
The Basic Installation type provides no security—the MINIMUM_PASSWORD_LENGTH parameter in the NQSConfig.INI file is set to 0.
The Basic installation type deploys Systems Management into Oracle Containers for J2EE (OC4J). See the topic “Deploying Oracle BI on All Other Web Servers” on page 23.
■ Advanced Installation Type
Choose the Advanced Installation type if you are deploying Oracle BI with Oracle Application Server 10.1.3.1 or later.
The Advanced Installation type is more secure—the MINIMUM_PASSWORD_LENGTH parameter in the NQSConfig.INI file is set to 8.
The Advanced Installation type deploys Systems Management into the Oracle Application Server. See the topic “Deploying Oracle BI on Oracle Application Server” on page 23.

Oracle BI Infrastructure Installation Options ■ Deployment on Web Application Servers
Oracle Business Intelligence Infrastructure Installation and ConfigurationGuide Version 10.1.3.2
23
Deployment on Web Application ServersSee also the topic “Basic and Advanced Types of Oracle BI Installation” on page 21.
Deploying Oracle BI on Oracle Application ServerIf you plan to perform an Advanced Installation, Oracle Application Server (version 10.1.3.1.0 or higher) must be installed before you run the Oracle Business Intelligence installer.
■ Choose Advanced installation type.
■ After you select the components to install, you are prompted to enter the location of the Oracle Application Server (ORACLE_HOME).
The following Oracle Application Server components are required:
■ Oracle HTTP Server
■ Oracle Containers for J2EE (OC4J)
■ Oracle Process Manager and Notification Server
NOTE: If you do not want to use Oracle HTTP Server after installing Oracle Business Intelligence Suite Enterprise Edition, then disable Oracle HTTP Server in Oracle Application Server after the installation.
Deploying Oracle BI on All Other Web ServersUse this topic if you are not using Oracle Application Server as a web server.
■ For Microsoft Internet Information Services (IIS), use the procedure “To deploy Oracle BI with Microsoft IIS” on page 23.
■ For J2EE Application Servers, use the procedure “To deploy Oracle BI with J2EE Application Servers” on page 23.
To deploy Oracle BI with Microsoft IIS
1 Choose Basic installation type.
2 After you select the components to install, you are prompted to select the application server.
Select IIS.
If you are installing the Presentation Services Plug-in, the ISAPI plug-in is installed in IIS.
3 The installer installs a stand-alone version of OC4J and deploys Oracle BI Systems Management in this container.
To deploy Oracle BI with J2EE Application Servers
1 Choose Basic installation type.

Oracle Business Intelligence Infrastructure Installation and Configuration Guide Version 10.1.3.2
Oracle BI Infrastructure Installation Options ■ Deployment on Web Application Servers
24
2 When prompted for the Application Server selection, choose OC4J.
3 The installer installs OC4J and deploys the appropriate components in this container.
The analytics.war or analytics.ear files are used to deploy the Oracle BI Presentation Services Plug-in (java servlet) in the J2EE Application server of your choice. The .war and .ear files are in the following locations:
■ Windows platform: OracleBI_HOME\web
■ Linux platform: OracleBI_HOME/web
See also Chapter 9, “Configuring Oracle BI Presentation Services.”

Oracle Business Intelligence Infrastructure Installation and ConfigurationGuide Version 10.1.3.2
25
4 Preparing to Install Oracle Business Intelligence
This topic area describes the steps to prepare a Windows environment to run the Oracle Business Intelligence Infrastructure installer. In addition, background topics give you information you need to know before you run the installer. The topic area is organized into the following topics:
■ “Process of Planning the Installation” on page 26
■ “Roadmap for Installing Oracle BI Infrastructure Components” on page 27
■ “Roadmap for Configuring Oracle BI Infrastructure Components” on page 27
■ “Diagram of Oracle BI Infrastructure Deployment” on page 28
■ “Oracle BI Installation Requirements” on page 30
TIP: Print out each of the preceding topics to use as checklists.
Oracle Business Intelligence Infrastructure Installation and Configuration Guide Version 10.1.3.2
Preparing to Install Oracle Business Intelligence ■ Process of Planning the Installation
26
Process of Planning the InstallationTo plan the installation, perform the following tasks:
1 Determine your Oracle BI Component Installation Options.
2 Oracle BI Installation Requirements on page 30
■ Obtaining Appropriate Permissions on page 30
■ Installing Third-Party Products on page 31
■ Installation Requirements for Windows on page 32
■ Deployment on Web Application Servers on page 23
■ Installation Requirements for Linux on page 35
3 If you have an earlier version of Siebel Analytics platform installed, you must uninstall it before you install Oracle Business Intelligence platform. See the section on uninstalling previous versions of Siebel Analytics in the Oracle Business Intelligence Infrastructure Upgrade Guide.
4 Back up configuration files. See “Backing Up Business Intelligence Folders and Files” on page 74.

Preparing to Install Oracle Business Intelligence ■ Roadmap for Installing Oracle BIInfrastructure Components
Oracle Business Intelligence Infrastructure Installation and ConfigurationGuide Version 10.1.3.2
27
Roadmap for Installing Oracle BI Infrastructure ComponentsThis is a roadmap. Complete the processes for installing Oracle Business Intelligence in the order shown:
1 Oracle BI Installation Requirements
2 Upgrading Oracle Business Intelligence Components
See the Oracle Business Intelligence Infrastructure Upgrade Guide.
3 Process of Installing the Complete Oracle BI Infrastructure
4 Initializing the Oracle Business Intelligence Installation
5 Installing Oracle BI Ancillary Client Programs
After installation is complete, there may be configuration required. Refer to the roadmap “Roadmap for Configuring Oracle BI Infrastructure Components” on page 27.
Roadmap for Configuring Oracle BI Infrastructure ComponentsThis is a roadmap. After Oracle Business Intelligence is installed, complete the processes for configuring Oracle Business Intelligence in the order shown:
1 Configuring Oracle BI Servers
2 Configuring the Data Sources for Oracle Business Intelligence
3 Configuring Oracle BI Presentation Services to Communicate With Oracle BI Scheduler
4 Configuring Oracle Business Intelligence Scheduler
5 Localizing Oracle Business Intelligence Deployments
6 Configuring BI Publisher for XMLP Server
Refer to “Diagram of Oracle BI Infrastructure Deployment” as necessary.

Oracle Business Intelligence Infrastructure Installation and Configuration Guide Version 10.1.3.2
Preparing to Install Oracle Business Intelligence ■ Roadmap for Configuring Oracle BI Infrastructure Components
28
Diagram of Oracle BI Infrastructure DeploymentThe diagram in this topic shows all the Oracle Business Intelligence product components and the connecting elements for deployment of the deployment only, including the Web and data components. This diagram is based on an out-of-the-box deployment and assumes no unusual configuration requirements.
NOTE: Your own deployment may differ from that shown in the diagram.
Figure 1 on page 29 shows the Oracle Business Intelligence product components and the connecting elements, including the Web and data components, required for deployment of the Oracle Business Intelligence Infrastructure.
The meaning of the colors, lines, and typefaces used in this diagram is shown in Table 5.
Table 5. Key to Oracle BI Infrastructure Deployment Diagram
Object Meaning
White Box (solid green border) Oracle Business Intelligence infrastructure components.
White Box (green-dashed border) Third-party product licensed as part of the Oracle Business Intelligence product.
Gray Box Third-party or generic network or web component.
Pink Area Data source components.
Black Line A connection between components. The connection is two-way unless the line terminates in an arrow (see Arrow).
Black Arrow A one-way connection.
Orange Line Basic cluster configuration. For more detail, see the Oracle Business Intelligence Enterprise Deployment Guide.
Blue Italicized name Name of the protocol used for the connection.
Blue Italicized number Port number for the connection, if defined.

Preparing to Install Oracle Business Intelligence ■ Roadmap for Configuring Oracle BIInfrastructure Components
Oracle Business Intelligence Infrastructure Installation and ConfigurationGuide Version 10.1.3.2
29
Figure 1. Deployment of Oracle BI Infrastructure Components

Oracle Business Intelligence Infrastructure Installation and Configuration Guide Version 10.1.3.2
Preparing to Install Oracle Business Intelligence ■ Oracle BI Installation Requirements
30
Oracle BI Installation RequirementsIn addition to the hardware and operating system requirements shown in System Requirements and Supported Platforms, you must have fulfilled the following requirements:
■ “Obtaining Appropriate Permissions” on page 30
■ “Installing Third-Party Products” on page 31
■ “Installation Requirements for Windows” on page 32
■ “Deploying Oracle BI on Oracle Application Server” on page 23
■ “Deploying Oracle BI on All Other Web Servers” on page 23
■ “Backing Up Business Intelligence Folders and Files” on page 74
■ “Installation Requirements for Linux” on page 35
Obtaining Appropriate PermissionsBefore you install Oracle Business Intelligence, you must have the appropriate permissions for installing and configuring on your company system, as shown in Table 6.
Table 6. System Component Permissions Required for Installing Oracle Business Intelligence
System Component Permission Type
Network Network Administrator
Windows Administrator for individual machines
Linux System administrator or root privileges
Database DBMS Administrator

Preparing to Install Oracle Business Intelligence ■ Installing Third-Party Products
Oracle Business Intelligence Infrastructure Installation and ConfigurationGuide Version 10.1.3.2
31
Installing Third-Party ProductsBefore you run the Oracle Business Intelligence installer, you should have completed the third-party software installations shown in Table 7. The number of third-party components required to be installed or configured depends on the details of your particular deployment. Third-party software documentation is available from the third-party vendor (such as Java from Sun Microsystems and MDAC from Microsoft Corporation). In some cases, such as Oracle Application Server 10g and application server components, the documentation is available from Oracle Technology Network.
Table 7. Third-Party Installations Required for Installing Oracle Business Intelligence
Component Installation Notes
Java SDK 1.5.0 or higher
CAUTION: Before you run the Oracle Business Intelligence installer using the Basic installation type, Java SDK must be installed. Otherwise, key components will fail to work.
Java must be installed on the same machine on which you are installing Oracle Business Intelligence.
NOTE: You need this information during the installation. Make a note of the directory where Java is installed. For example, /usr/j2sdk1.5.0_04.
Database connectivity software that Oracle BI servers use to connect to the database.
See the System Requirements and Supported Platforms for supported database connectivity software.
For example, If the Oracle BI Server is to access an Oracle Database, install the Oracle 10g client. If the Oracle BI Server is to access MS SQL Server database, install Microsoft Data Access Components (MDAC).
If MDAC is not on your system, install it using the procedure in the topic “Installing MDAC” on page 34.
Integration Web Server for Oracle BI Presentation Services
Depending on your requirements, you might need to install an integration Web server before you install Oracle BI Presentation Services.
If you are deploying on IIS, install IIS before running the Oracle BI Installer.

Oracle Business Intelligence Infrastructure Installation and Configuration Guide Version 10.1.3.2
Preparing to Install Oracle Business Intelligence ■ Installation Requirements for Windows
32
Installation Requirements for WindowsOperating System: Windows only.
This topic is part of a roadmap. See “Oracle BI Installation Requirements” on page 30.
Java Platform VersionJava 2 Platform, Standard Edition 5.0 (J2SE 5.0) is required for Oracle Business Intelligence.
NOTE: This version is also know as Java 2 Platform, Standard Edition 1.5.0 (J2SE Development Kit 1.5.0).
If you are installing the Basic option, JDK 1.5.0 must be installed before running the Oracle BI installer.
Changing the DEP SettingOperating Systems: Windows XP, Windows 2003.
Under Windows 2003 and Windows XP operating systems, DEP (Data Execution Prevention) is turned on by default for all Windows programs and services. Before you run the Oracle BI Infrastructure installer, turn off the Data Execution Prevention setting for all programs and set for only essential Windows programs and services in order for certain Oracle Business Intelligence components to install successfully. This procedure is necessary for the installer to complete.
When running the Oracle BI Installer on Windows 2003 or Windows XP operating systems, the installer will direct you to disable DEP. After the installation has completed, the Data Execution Prevention function can be changed back to the original setting.
To change the Data Execution Prevention setting (Windows 2003 and XP only)
1 Depending on your operating system settings, use one of the following methods:
■ Windows XP menu: Go to Start > Control Panel > System > Advanced > Performance (Settings) > Data Execution Prevention.
■ Windows Classic menu: Go to Start > Settings > Control Panel > System > Advanced > Performance > Data Execution Prevention.
2 Switch DEP to Turn on DEP for essential windows programs and services only.
3 Reboot the machine.
4 After reboot, start the Oracle BI installation.

Preparing to Install Oracle Business Intelligence ■ Installation Requirements forWindows
Oracle Business Intelligence Infrastructure Installation and ConfigurationGuide Version 10.1.3.2
33
Installing the Microsoft Data Access Components for WindowsOperating System: Windows only.
This topic is part of a roadmap. See the topic “Oracle BI Installation Requirements” on page 30.
If your DBMS is Microsoft SQL Server, and the version is prior to MS SQL 2005, this section may be applicable to you.
Earlier versions of SQL Server did not use connectivity software. Instead, it was necessary to configure an ODBC data source. The ODBC driver had to be installed on the machine on which you install the Oracle BI Server. Before you install Oracle BI Server components, you must have Microsoft Data Access Components (MDAC) installed on the Oracle BI Server machine where it connects to SQL Server database.
MDAC is considered a Windows system component and is included with many applications, so MDAC may already be installed. If you are installing the Oracle Business Intelligence Cluster Server feature, MDAC is not required on machines that host only Cluster Controllers.
TIP: If you do not need to install MDAC, proceed to the topic, “Configuring Oracle BI Presentation Services” on page 103.
Checking for an Existing Installation of MDACOperating System: Windows only.
Use the following procedure to determine if the appropriate version of MDAC is already installed. If it is not installed, complete the MDAC installation before beginning the Oracle BI software installation. For the appropriate version to use, see System Requirements and Supported Platforms for Oracle Business Intelligence on Oracle Technology Network.
NOTE: Oracle BI Server components are described in the topic “Oracle BI Component Installation Options” on page 17.
To check for an existing installation of Microsoft Data Access Components
1 Search for the files msdadc.dll and oledb32.dll (optional).
These files are generally located in the C:\Program Files\Common Files\System\OLE DB folder.
2 When you locate the files, right-click and select Properties from the context-sensitive menu.
The version information is shown on the Version tab.
If the version is not the one specified in System Requirements and Supported Platforms, you need to install MDAC according to the following procedure. Refer to the Microsoft Web site for further instructions or any problems during installation.

Oracle Business Intelligence Infrastructure Installation and Configuration Guide Version 10.1.3.2
Preparing to Install Oracle Business Intelligence ■ Installation Requirements for Windows
34
Installing MDACOperating System: Windows only.
If MDAC is not installed, install it using the following procedure.
To install Microsoft Data Access Components
1 Point your browser to the Microsoft Web site.
In the Search box, type the words MDAC download and press Enter.
2 Navigate to and select the MDAC type that conforms with the type specified in System Requirements and Supported Platforms.
Click Download.
3 After the program has downloaded, locate the file mdac_typ.exe and click it.
This starts the MDAC installer.
4 Follow the prompts to complete the MDAC installation.

Preparing to Install Oracle Business Intelligence ■ Installation Requirements for Linux
Oracle Business Intelligence Infrastructure Installation and ConfigurationGuide Version 10.1.3.2
35
Installation Requirements for LinuxOperating System: Linux only.
This topic is part of a roadmap. See “Oracle BI Installation Requirements” on page 30.
For successful Oracle BI Server operations under Linux operating systems, check the following factors:
■ If you are installing the Basic option, JDK 1.5.0 must be installed before Oracle BI.
■ If you are installing the Advanced option, Oracle Application Server 10.1.3.1.0 or greater must be installed before Oracle BI.
■ For running Oracle BI Server and Oracle BI Presentation Services, set the following parameters:
■ File handle limit: at least 10240
For example: ulimit -n 10240
■ File-descriptor: at least 10240
❏ To discover the file-descriptor settings, run the command ulimit -a
❏ Or set file-descriptor using the command ulimit -n 10240
NOTE: This requires root or administrator access.
■ For running Oracle BI Publisher, make sure to allocate enough memory.
See the topic “Memory Allocation for OC4J” on page 134.
■ Use Version 3.4.3 with the GNU Compiler Collection (GCC) C++ runtime version 3.4.3 or higher libraries installed before installing Oracle Business Intelligence.
■ The library name must be libstdc++.so.6.
The package name can be queried using the following command:
rpm -q libstdc++ -l
The output must include libstdc++.so.6
■ For Red Hat: Run X server locally on desktop with the display from Linux machine exported to that desktop.
■ For Red Hat: The version of Java at /usr/lib/java must be removed or renamed before installing Oracle BI, in order for the charting server to be installed successfully.
NOTE: This requires root or administrator access.

Oracle Business Intelligence Infrastructure Installation and Configuration Guide Version 10.1.3.2
Preparing to Install Oracle Business Intelligence ■ Installation Requirements for Linux
36

Oracle Business Intelligence Infrastructure Installation and ConfigurationGuide Version 10.1.3.2
37
5 Installing Oracle BI EE Infrastructure
This topic area describes the process of running the Oracle Business Intelligence installer, and is part of the Roadmap for Installing Oracle BI Infrastructure Components. The main topic is “Process of Installing the Complete Oracle BI Infrastructure.”
TIP: Before proceeding with this process, you must have finished reading the following topic areas:
■ Oracle BI Infrastructure Installation Options
■ Preparing to Install Oracle Business Intelligence
Process of Installing the Complete Oracle BI InfrastructureThis topic describes in general terms the overall process of installing the entire Oracle Business Intelligence Infrastructure.
A standard installation program is used. When you are finished with the tasks described in this topic
area, the Oracle BI components listed in Table 3 on page 19 are installed.
The process of installing the Oracle BI software consists of the following tasks:
1 Determining your deployment requirements.
See the topic “Choosing Oracle BI Installer Options” on page 38.
2 Running the setup command file. See one or more of the following topics:
■ “Running the Oracle BI Installer Under Windows and Linux” on page 39
■ “Installing Oracle BI Components on Different Machines” on page 49
3 Responding to installer wizard prompts.
See the topic “Oracle BI Installer Screens and Prompts” on page 40.
4 After the installer is finished, perform necessary post-installation configuration of Oracle Business Intelligence. See the following topics:
■ “Initializing the Oracle Business Intelligence Installation” on page 50
■ “Postinstallation Tests of Oracle BI Client and Server” on page 51
■ “Installing Oracle BI in Unattended or Silent Mode” on page 54
Also see the chapters on configuring each component.
Oracle Business Intelligence Infrastructure Installation and Configuration Guide Version 10.1.3.2
Installing Oracle BI EE Infrastructure ■ Choosing Oracle BI Installer Options
38
Choosing Oracle BI Installer OptionsThis task is part of the “Process of Installing the Complete Oracle BI Infrastructure.” The Oracle Business Intelligence installer can be used to install more than one type of Oracle BI component. The installation type depends on the number of components you are installing.
■ Table 3 on page 19 shows the Oracle BI components that are installed with each installation option.
■ See also the topic “Additional Oracle BI Components” on page 20, which describes the ancillary programs that maybe useful in your deployment of Oracle Business Intelligence.
For the purpose of this guide, it is assumed you are installing the complete suite of Oracle BI components. However, you can install one or more individual components without installing the entire suite. For example, if you are deploying with clustered servers, you can install only a specific server or server tool to that machine, or install only the ODBC client installation.
Chapter 6, “Installing Individual Oracle BI Components” discusses partial or incremental component installations, including the following topics:
■ “Installing Oracle BI in Unattended or Silent Mode” on page 54
■ “Installing and Configuring Disconnected Client” on page 61
■ “Installing Oracle BI Open Intelligence Interface” on page 70 covers the distribution of client connectivity to remote clients that cannot otherwise access Oracle BI.
■ “Installing Briefing Book Reader” on page 66
■ “Installing Oracle BI Office Plug-In” on page 68
■ “Installing Oracle BI Publisher Desktop” on page 72
NOTE: The Oracle Business Intelligence Enterprise Edition Deployment Guide covers the installation of components on clustered machines.

Installing Oracle BI EE Infrastructure ■ Running the Oracle BI Installer Under Windowsand Linux
Oracle Business Intelligence Infrastructure Installation and ConfigurationGuide Version 10.1.3.2
39
Running the Oracle BI Installer Under Windows and LinuxThis task is part of the “Process of Installing the Complete Oracle BI Infrastructure.”
To run the Oracle BI installer under Windows or Linux OS
1 Run the startup program for your operating system.
■ To run the Oracle BI Installer under Windows:
❏ Access the installation files.
❏ To run the installer in graphics mode, run the program setup.exe.
■ To run the Oracle BI Installer under Linux:
❏ Make sure that you have set the DISPLAY environment variable.
❏ Change directory to the installation directory.
❏ To run the installer in graphics mode, use the following command:
./setup.sh
2 The InstallShield window appears and prompts you through each screen.
NOTE: The particular screens or prompts that are visible are dependent on the installation type and the components you choose in the Setup Type screen.
The meanings and default for each screen and prompt for complete Oracle BI EE Infrastructure installation in graphics mode are listed in Table 8 on page 41 and in Table 9 on page 45.
The instructions for a console mode installation are in the topic “Prompts for a Complete Oracle BI Installation (Linux) in Console Mode” on page 48 and “Prompts for a Complete Oracle BI Installation (Windows) in Console Mode” on page 48.
3 Perform the following substeps:
■ Provide the requested input for each screen.
■ To continue to the next screen, click Next. To return to a previous screen, click Back.
■ To exit from the installer, click Cancel.
■ To view the help page for each screen, click Help.
4 Proceed to “Initializing the Oracle Business Intelligence Installation.”

Oracle Business Intelligence Infrastructure Installation and Configuration Guide Version 10.1.3.2
Installing Oracle BI EE Infrastructure ■ Oracle BI Installer Screens and Prompts
40
Oracle BI Installer Screens and PromptsThis topic is part of the “Process of Installing the Complete Oracle BI Infrastructure.”
■ The screens for the complete Oracle Business Intelligence infrastructure installation under Windows are listed in Table 8 on page 41.
■ The screens for the complete Oracle Business Intelligence infrastructure installation under Linux are listed in Table 9 on page 45.
■ Instructions for following the console mode text prompts for the complete Oracle Business Intelligence infrastructure installation are in “Prompts for a Complete Oracle BI Installation (Linux) in Console Mode” on page 48 and in “Prompts for a Complete Oracle BI Installation (Windows) in Console Mode” on page 48.
Screens and Prompts for a Complete Installation (Windows) in Graphics ModeFollow the directions in each screen listed in Table 8 on page 41, and then click Next.

Installing Oracle BI EE Infrastructure ■ Oracle BI Installer Screens and Prompts
Oracle Business Intelligence Infrastructure Installation and ConfigurationGuide Version 10.1.3.2
41
Table 8. Screens or Prompts for Installation of Oracle BI Under Windows
Screen Your Action Notes
Data Execution Prevention (DEP) Information
■ If this information applies to you, click Cancel and exit the installation.
■ Follow the steps shown to turn off DEP.
■ Reboot the machine and restart the installation.
■ If this information does not apply to you, or to proceed after restarting the installation, click Next.
TIP: After you have performed the steps to turn off DEP, and have restarted this installation, this screen continues to be displayed.
Oracle Business Intelligence Installation
■ Browse or type the path for the installation and data directories, or accept the default installation to the C:\ drive.The defaults are:
■ OracleBI
■ OracleBIData
■ Select the installation type:
■ Basic
■ Advanced
The default is Basic.
TIP: To change the default installation and data directories, click Browse and establish the installation path, then click Next.
Install Type refers to the application server instance under which Oracle Business Intelligence is to run. See the section “Basic and Advanced Types of Oracle BI Installation” on page 21.
NOTE: Before you choose Advanced, you must have installed Oracle Application Server 10.1.3.1 before
running the Oracle BI installer.
Setup Type The Custom option lets you select individual components for installation. Choose the Oracle BI components you want to install.
The default is Complete.
The setup type you choose affects the number and type of screens that subsequently appear. See the row “Complete” in Table 3 on page 19.
NOTE: For the purpose of this procedure, it is assumed that you have selected Complete Suite.
See also Chapter 6, “Installing Individual Oracle BI Components.”

Oracle Business Intelligence Infrastructure Installation and Configuration Guide Version 10.1.3.2
Installing Oracle BI EE Infrastructure ■ Oracle BI Installer Screens and Prompts
42
Application Server Selection [Basic]
TIP: If you selected the Basic installation type, this screen is displayed.
The application server instance that runs Oracle BI Presentation Services and the Oracle BI Presentation Services Plug-in. The choices given are:
■ Oracle Containers for J2EE (OC4J) version 10.1.3.1
■ Microsoft IIS
If you chose OC4J in the Oracle Business Intelligence Installation screen, then OC4J is the application server that is used to run Oracle BI Presentation Services and Plug-in.
If you selected Microsoft IIS, then IIS is used to run Oracle BI Presentation Services and the ISAP Plugin is installed. OC4J is used to deploy Systems Management components.
NOTE: Microsoft IIS must be installed before running the installer; otherwise, the installer does not show this screen.
Application Server Selection [Advanced]
TIP: If you selected the Advanced installation type, this screen is displayed.
The application server instance run by Oracle BI Presentation Services and Oracle BI Presentation Services Plug-in. The choices given are:
■ Oracle Application Server
■ Microsoft IIS
If you chose Advanced in the Oracle BI Installation screen, then Oracle Application Server is the application server that is used to run Oracle BI Presentation Services and Plug-in.
NOTE: Microsoft IIS must be installed before running the installer; otherwise, the installer does not show this screen.
Java Development Kit (JDK) Location
TIP: If you selected the Basic installation type, this screen is displayed.
■ Browse or type the path for the directory where Java is installed.
■ The Administrator password asked for is the OC4J password for the administrator user for the OC4J component.
■ The Administrator password must be minimum of 6 and a maximum of 30 alphanumeric characters and include at least one digit.
Java SDK 1.5 or higher must already be installed on your installation machine, otherwise the installation does not proceed.
TIP: The Sun release name was originally Java 2 Platform, Standard Edition 1.5.0 (J2SE Development Kit 1.5.0). The numbering system was changed to 5.0 (J2SE 5.0). Both 1.5.0 and 5.0 refer to the same Java platform and products.
Oracle Application Server Location
TIP: If you selected the Advanced installation type, this screen is displayed.
■ Browse or type the path for the directory where Oracle Application Server is installed.
■ The Administrator username must be assigned to the role oc4j-administrators.
■ Enter the password associated with the Administrator username.
NOTE: Oracle Application Server 10.1.3.1.0 or greater must already be installed on your installation machine, or the installation will not proceed further.
Table 8. Screens or Prompts for Installation of Oracle BI Under Windows
Screen Your Action Notes

Installing Oracle BI EE Infrastructure ■ Oracle BI Installer Screens and Prompts
Oracle Business Intelligence Infrastructure Installation and ConfigurationGuide Version 10.1.3.2
43
Oracle BI Services ■ Provide the Windows server account name and password.
Default: LocalSystem
If you are not running Oracle BI in a cluster for this deployment, leave the account and username default.
■ Choose the Startup Type for the following services:
■ Oracle BI Server
■ Oracle BI Scheduler
■ Oracle BI Cluster
■ Oracle BI Presentation Server
■ Oracle BI Java Host
Specify the Windows server account name under which each of the Oracle BI services that are listed should run. This account name should be the same on all Oracle BI clustered servers.
Accept the default or specify the account name (in the format domain\user) and the password.
The Services Startup Type set to Automatic means that the Oracle BI services starts automatically when the computer is rebooted.
NOTE: Overall system performance may be affected by this.
■ Oracle BI Server default: Automatic
■ Oracle BI Scheduler default: Manual
■ Oracle BI Cluster Controller default: Manual
■ Oracle BI Presentation Server default: Automatic
■ Oracle BI Java Host default: Automatic
Error Message Language Selection
The default is English. The error messages from the Oracle BI Server are in one language. Typically, these are server-side messages only. Choose the language to display these messages in.
Please Wait This screen appears while the installer accepts and sets all the choices you have made.
Pre-Installation Summary Information
TIP: This information shows the same components as Table 3 on page 19.
This is a list of all the components you have chosen, and the directory where they are to be installed.
Installing Click the Next button when it is no longer grayed out.
This is a placeholder that appears while the features you have selected are installed.
Table 8. Screens or Prompts for Installation of Oracle BI Under Windows
Screen Your Action Notes

Oracle Business Intelligence Infrastructure Installation and Configuration Guide Version 10.1.3.2
Installing Oracle BI EE Infrastructure ■ Oracle BI Installer Screens and Prompts
44
Screens and Prompts for a Complete Oracle BI Installation (Linux) in Graphics ModeOperating System: Linux only.
Table 9 on page 45 shows the screen prompts and their meanings for installing Oracle Business Intelligence under Linux systems in graphics mode.
Instructions for how to proceed when installing in console mode are shown in the topic “Prompts for a Complete Oracle BI Installation (Linux) in Console Mode” on page 48.
Restrictions on Installing Oracle BI Under Linux■ Using the Custom installation choice, only the following components available under Linux:
■ Oracle Business Intelligence JDBC Driver
■ Oracle Business Intelligence Systems Management
■ Oracle Business Intelligence Server
■ Oracle Business Intelligence Cluster Controller
■ Oracle Business Intelligence Scheduler
■ Oracle Business Intelligence Client
■ Oracle Business Intelligence Presentation Services
■ Oracle Business Intelligence Presentation Services Plug-in
■ Oracle Business Intelligence Publisher
■ The repository (.rpd) file can be created and modified only using the Oracle Business Intelligence Administration Tool, which is available only for Windows operating systems.
■ Use bash (Bourne-Again Shell) when running Oracle BI scripts under Linux.
■ For Red Hat Linux: The version of Java installed at /usr/bin/java must be removed or renamed before installing Oracle BI, in order for the charting server to be installed successfully.
Post-Installation Summary Information
Click Next after reading the summary information.
This screen indicates a successful Oracle BI installation.
Restart Computer Choose whether or not to immediately restart your computer.
If you attempt to run Oracle BI without restarting your computer, several services may fail to work correctly.
Click Finish.
■ If you click Yes, the computer shuts down and restarts.
■ If you click No, you need to restart the computer before you use Oracle BI.
Table 8. Screens or Prompts for Installation of Oracle BI Under Windows
Screen Your Action Notes

Installing Oracle BI EE Infrastructure ■ Oracle BI Installer Screens and Prompts
Oracle Business Intelligence Infrastructure Installation and ConfigurationGuide Version 10.1.3.2
45
Table 9 on page 45 lists the screens for a complete Oracle Business Intelligence infrastructure installation under Linux operating systems.
Table 9. Screens or Prompts for Installation of Oracle BI Under Linux (Graphics Mode)
Screen Your Action Notes
Oracle Business Intelligence Installation
Browse or type the path for the installation and data directories, or accept the defaults.
■ The defaults are:
■ OracleBI
■ OracleBIData
■ Select the installation type:
■ Basic
■ Advanced
The default is Basic.
TIP: To change the default installation and data directories, click Browse and establish the installation path, then click Next.
Installation type refers to the application server instance under which Oracle Business Intelligence is to run. See the section “Basic and Advanced Types of Oracle BI Installation” on page 21.
Advanced uses Oracle Application Server 10.1.3.1 or later.
NOTE: Before you choose Advanced, you must have installed a complete J2EE-compliant application server, such as Oracle Application Server 10.1.3.1.0 or greater, before running the Oracle BI installer.
Setup Type The Custom option lets you select individual components for installation. Choose the Oracle BI components you want to install.
The default is Complete.
The setup type you choose affects the number and type of screens that subsequently appear. See the row “Complete” in Table 3 on page 19.
NOTE: For the purpose of this procedure, it is assumed that you have selected Complete Suite.
See also Chapter 6, “Installing Individual Oracle BI Components.”

Oracle Business Intelligence Infrastructure Installation and Configuration Guide Version 10.1.3.2
Installing Oracle BI EE Infrastructure ■ Oracle BI Installer Screens and Prompts
46
Java Development Kit (JDK) Location
NOTE: If you selected the Basic installation type, this screen is displayed.
■ Browse or type the path for the directory where Java is installed.
■ The Administrator password must be a minimum of 6 and a maximum of 30 alphanumeric characters and include at least one digit.
Java SDK 1.5 or higher must already be installed on your installation machine, otherwise the installation will not proceed further.
TIP: The Sun release name was originally Java 2 Platform, Standard Edition 1.5.0 (J2SE Development Kit 1.5.0). The numbering system was changed to 5.0 (J2SE 5.0). Both 1.5.0 and 5.0 refer to the same platform and products.
Oracle Application Server Location
NOTE: If you selected the Advanced installation type, this screen is displayed.
■ Browse or type the path for the directory where Oracle Application Server is installed.
■ The Administrator username must be assigned to the roleoc4j-administrators.
■ Enter the password associated with the Administrator username.
Oracle Application Server 10.1.3.1.0 or greater must already be installed on your installation machine, otherwise the installation will not proceed further.
Error Message Language Selection
The default is English. The error messages from the Oracle BI Server are in one language. Typically, these are server-side messages only. Choose the language to display these messages in.
Please Wait This screen appears while the installer accepts and sets all the choices you have made.
Pre-Install Summary Information
This is a list of all the components you have chosen to install, and the directory where they are to be installed.
TIP: This information shows the same components as Table 3 on page 19.
Table 9. Screens or Prompts for Installation of Oracle BI Under Linux (Graphics Mode)
Screen Your Action Notes

Installing Oracle BI EE Infrastructure ■ Oracle BI Installer Screens and Prompts
Oracle Business Intelligence Infrastructure Installation and ConfigurationGuide Version 10.1.3.2
47
Installing Click the Next button when it is no longer grayed out.
This is a placeholder that appears while the features you have selected are installed.
The installation may take between twenty and thirty minutes.
Post-Install Summary Information
Click Next to exit installer after installing Oracle BI.
This screen indicates a successful Oracle BI installation.
Table 9. Screens or Prompts for Installation of Oracle BI Under Linux (Graphics Mode)
Screen Your Action Notes

Oracle Business Intelligence Infrastructure Installation and Configuration Guide Version 10.1.3.2
Installing Oracle BI EE Infrastructure ■ Oracle BI Installer Screens and Prompts
48
Prompts for a Complete Oracle BI Installation (Linux) in Console ModeIf you are performing a complete Oracle Business Intelligence infrastructure installation in Console mode, perform the following steps. Also refer to the Notes column in Table 8 on page 41 or in Table 9 on page 45.
To run the Oracle BI installer in console mode under Linux
1 Change directory to the installation directory.
2 To run the installer in console (or text) mode, use the following command:
./setup.sh -console
NOTE: In console (or text) mode installation, you enter input as plain text in the terminal window when prompted. You do not see dialog screens, and therefore you do not need to set the DISPLAY variable.
3 Perform the following substeps:
■ Provide the requested input for each prompt.
■ To continue to the next prompt, type 1.
■ To return to the previous prompt, type 2.
■ To exit from the installer, type 3.
Prompts for a Complete Oracle BI Installation (Windows) in Console ModeIf you are performing a complete Oracle Business Intelligence infrastructure installation in Console mode, perform the following steps. Also refer to the Notes column in Table 8 on page 41.
To run the Oracle BI installer in console mode under Windows
1 Access the installation files, and then run the program setup.exe.
2 To run the installer in console (or text) mode, run the command setup.exe -console.
NOTE: You do not see dialog screens in console installation mode. Instead, you enter input as plain text in the terminal window when prompted.
3 Perform the following substeps:
■ Provide the requested input for each prompt.
■ To continue to the next prompt, type 1.
■ To return to the previous prompt, type 2.
■ To exit from the installer, type 3.

Installing Oracle BI EE Infrastructure ■ Installing Oracle BI Components on DifferentMachines
Oracle Business Intelligence Infrastructure Installation and ConfigurationGuide Version 10.1.3.2
49
Installing Oracle BI Components on Different MachinesThis topic is part of the “Process of Installing the Complete Oracle BI Infrastructure.”
The Oracle Business Intelligence Presentation Services, Client Tools, and Oracle BI Server components can be installed to run on separate machines. If you are planning to install Oracle Business Intelligence Presentation Services and Oracle Business Intelligence Server on separate machines, run the installer the number of times necessary for each machine to have its own installation. For example:
■ On the Oracle Business Intelligence Presentation Services Machine:
Select the Oracle Business Intelligence Presentation Services installation option. This installs the ODBC driver, ODBC Client, Answers, and Delivers components.
If Oracle Business Intelligence Presentation Services is installed on a different machine than Oracle BI Server, configure the Oracle BI Presentation Services machine as shown in the topic Configuring Oracle BI Presentation Services to Communicate With Oracle BI Scheduler.
■ On the Oracle Business Intelligence Server machine:
Select the installation option Oracle Business Intelligence Server.
NOTE: The Custom Setup Type allows you to select individual components for installation.
Oracle Business Intelligence Infrastructure Installation and Configuration Guide Version 10.1.3.2
Installing Oracle BI EE Infrastructure ■ Initializing the Oracle Business Intelligence Installation
50
Initializing the Oracle Business Intelligence InstallationThis topic is part of the “Process of Installing the Complete Oracle BI Infrastructure.”
After the Oracle BI installer has completed your installation, there may be further tasks to initialize the business intelligence software. One or more of the following tasks may apply to your deployment.
■ “Initializing Oracle BI Under Windows” on page 50
■ “Starting Oracle BI Under Linux” on page 50
■ “Postinstallation Tests of Oracle BI Client and Server” on page 51
Initializing Oracle BI Under WindowsAfter the Installation Wizard has ended, you must restart your computer in order for the installation to take effect, before using the Oracle Business Intelligence software. If you did not select Yes at the installation prompt, you must restart the computer now.
NOTE: If you attempt to run Oracle Business Intelligence without restarting your computer, several services may fail to work correctly.
After the computer has been restarted, proceed with the configuration of data components. See the topic “Starting, Stopping, or Restarting Oracle BI Servers” on page 79.
Starting Oracle BI Under LinuxUnder Linux, no initialization process is necessary. Start the servers by running the shell scripts listed in “Scripts for Korn, Bourne, or Bash Shells” on page 82.
The order in which the services are stopped, then restarted, is important. Use the following sequence:
■ Oracle Business Intelligence Server service.
■ Oracle Business Intelligence Presentation Services service.
■ Oracle Business Intelligence Scheduler Server service.

Installing Oracle BI EE Infrastructure ■ Postinstallation Tests of Oracle BI Client andServer
Oracle Business Intelligence Infrastructure Installation and ConfigurationGuide Version 10.1.3.2
51
Postinstallation Tests of Oracle BI Client and ServerThis topic is part of the Roadmap for Configuring Oracle BI Infrastructure Components.
After installing Oracle BI, you should perform tests of the Oracle BI Server and Oracle BI Client installations, as detailed in the following topics:
■ “Testing the Oracle BI Server Installation” on page 51
■ “Testing the Oracle BI Client Installation” on page 52
While testing the Oracle Business Intelligence Server installation, you may need to change connection pool settings for items such as the name of the database, the user ID and password, and other settings for the several repositories bundled with applications versions of Oracle Business Intelligence. See the topic “Changing the Oracle BI Database Type” on page 98.
Testing the Oracle BI Server InstallationThis task is part of the process “Postinstallation Tests of Oracle BI Client and Server.”
By default, the Oracle BI Server starts automatically when the machine it is installed on is rebooted. If you selected the startup type Manual during the installation, the following procedure tests your
installation of the Oracle BI Server. Use the procedure that corresponds to your operating system to test the server setup.
Testing the Oracle BI Server Installation Under WindowsOperating System: Windows only.
The following procedure tests your installation of the Oracle BI Server on Windows machines.
To test the Oracle BI Server installation under Windows
1 Navigate to Start > Programs > Administrative Tools > Services.
2 Select the Oracle BI Server service.
3 Start the service.

Oracle Business Intelligence Infrastructure Installation and Configuration Guide Version 10.1.3.2
Installing Oracle BI EE Infrastructure ■ Postinstallation Tests of Oracle BI Client and Server
52
Testing the Oracle BI Server Installation Under LinuxOperating System: Linux only.
The following procedure tests your installation of the Oracle BI Server on Linux machines.
To test the Oracle BI Server installation under Linux■ Start the Oracle BI Server from the OracleBI_HOME/setup directory by running the following
shell command:
. /run-sa.sh start
Testing the Oracle BI Client InstallationThis topic is part of the process “Postinstallation Tests of Oracle BI Client and Server.”
To test the Oracle BI Client setup, use the procedure that corresponds to your operating system.
Testing the Oracle BI Client Installation Under WindowsThe following procedure tests your installation of the Oracle Business Intelligence client on Windows machines.
To test the Oracle BI Client under Windows
1 Navigate to Start > Programs > Oracle Business Intelligence.
2 Select Oracle Business Intelligence Presentation Services.
Testing the Oracle BI Client Installation Under LinuxThe following procedure tests your installation of the Oracle Business Intelligence client on Linux machines.
To test the Oracle BI Client under Linux
1 Run Oracle BI Client by opening another session.
From the setup directory OracleBI_HOME/setup, run the shell command:
. sa-cli.sh
To test the client/server connectivity, run the command:
nqcmd
2 If the test is successful, press the Enter key several times to quit nqcmd.
If the test is not successful, proceed to Step 3.

Installing Oracle BI EE Infrastructure ■ Postinstallation Tests of Oracle BI Client andServer
Oracle Business Intelligence Infrastructure Installation and ConfigurationGuide Version 10.1.3.2
53
3 Make sure all clients are disconnected from the Oracle Business Intelligence Server, and then stop the server by running the following shell command:
run-sa.sh stop

Oracle Business Intelligence Infrastructure Installation and Configuration Guide Version 10.1.3.2
Installing Oracle BI EE Infrastructure ■ Installing Oracle BI in Unattended or Silent Mode
54
Installing Oracle BI in Unattended or Silent ModeIn the so-called unattended or silent mode, Oracle Business Intelligence is installed across a network. The administrator performs the following general steps:
1 Perform a default Oracle BI installation on an administrator machine.
During this installation, all the installation options selected and settings created are written to a text file named response.txt.
2 Run a batch or shell program that uses the response.txt file to install the same Oracle BI components, with all the previously selected options and settings, to other servers and client workstations.
NOTE: Without being modified, the response.txt file is portable only to other installation computers having the identical Oracle Business Intelligence directory structure (including logical drives) as the initial installation computer.
The specific procedure to install Oracle BI in unattended mode is based on the operating system you are using. See the applicable topic:
■ “Installing in Silent Mode Under Windows” on page 54
■ “Installing in Silent Mode Under Linux” on page 57
Installing in Silent Mode Under WindowsFor Windows-based systems, perform an unattended installation by running two batch files:
■ createResponseFile.bat
■ installWithResponseFile.bat
These files are included in the Oracle BI installation directory containing setup.exe.
Running the createResponseFile.bat file performs a default installation on the administrator machine. See the topic “Running the createResponseFile File” on page 54.
CAUTION: You cannot use the createResponseFile.bat file to install a Custom Setup type of installation.
Running the installWithResponseFile.bat file uses the response.txt file to install the same Oracle BI components to other servers and client workstations. See the topic “Running the installWithResponseFile File” on page 55.
Running the createResponseFile FileThis file initiates an installation and creates an annotated response.txt file of all input during the installation.

Installing Oracle BI EE Infrastructure ■ Installing Oracle BI in Unattended or Silent Mode
Oracle Business Intelligence Infrastructure Installation and ConfigurationGuide Version 10.1.3.2
55
To create a response.txt file
1 Perform an installation that contains the required Oracle Business Intelligence components, using the file createResponseFile.bat.
2 The file response.txt is created in the same directory.
Response.txt has all the InstallShield required responses recorded during this installation.
3 Proceed to the topic “Running the installWithResponseFile File” on page 55.
Running the installWithResponseFile FileThe installWithResponseFile.bat file, when run from the command line, installs Oracle BI silently on other machines, using the responses created in response.txt.
There are two options for porting the response.txt to other computers. The procedure for distributing the silent installation depends on the porting option you deploy:
■ Installing Oracle BI silently from the target computer or computers.
Use the procedure described in “Installing From a Target Computer” on page 55.
■ Installing Oracle BI silently from a network-accessible computer.
Use the procedure described in “Installing From a Network-Accessible Computer” on page 56.
Installing From a Target ComputerThe entire Oracle BI installation image must be on the target computer.
To install Oracle BI silently from a target computer
1 The response.txt file created from the default installation must be copied to the Oracle BI installation root directory (in the same directory as the installWithResponseFile file on the target computer).
2 If the Oracle BI installation directories and Oracle BI installation image location on the target computer are configured exactly as the initial installation computer, proceed to Step 5.
3 If the Oracle BI installation root directory path differs from the root directory path for the default installation, modify the following response.txt parameter to point to the target root directory path:
-W LicenseFileLocPanelBean.FileName="<Logical Drive>:\OracleBI_HOME%\Licenses\ <Analytics license file>"
4 If the target directory paths for the Oracle BI installation differ from the directory paths for the default installation, modify the following response.txt parameter to reflect the target directory paths:
-W TempPanelBean.Destination="<Logical Drive>:\<target path>\OracleBI"
-W TempPanelBean.TempDir="<Logical Drive>:\<target path>\OracleBIData"

Oracle Business Intelligence Infrastructure Installation and Configuration Guide Version 10.1.3.2
Installing Oracle BI EE Infrastructure ■ Installing Oracle BI in Unattended or Silent Mode
56
5 Install Oracle BI using the file installWithResponseFile.
The installation is done when the command prompt returns.
NOTE: The installWithResponseFile file does not force a computer reboot. You must reboot manually after the installation completes.
Installing From a Network-Accessible ComputerThe entire Oracle BI installation image must reside on the network computer on a drive that is accessible to all computers that perform an Oracle BI installation.
To install Oracle BI silently from a network-accessible computer
1 Copy the response.txt file created from the master installation to this Oracle BI installation root directory (in the same directory as the file installWithResponseFile).
2 On each target installation computer, map a logical drive to the network computer Oracle BI installation image root directory.
NOTE: The drive letter for this map must be the same on all target installation computers.
3 On the network computer, modify the response.txt file as follows:
■ Change the following response.txt parameter to use the mapped logical drive common to all target installation computers:
-W LicenseFileLocPanelBean.FileName="<Logical Drive>:\<Oracle Business Intelligence installation root directory>\Licenses\<Oracle Business Intelligence license file>"
For example, -W LicenseFileLocPanelBean.FileName="s:\Licenses\<Oracle Business Intelligence license file>"
■ Change the following response.txt parameters to use the Oracle BI installation directory paths common to all target installation computers:
-W TempPanelBean.Destination="<Logical Drive>:\<target path>\OracleBI"
For example, d:\OracleBI
-W TempPanelBean.TempDir="<Logical Drive>:\<target path>\OracleBIData"
For example, d:\OracleBIData
4 Open a command line on the target installation computer and change directory to the mapped logical drive that points to the Oracle BI installation image directory on the network computer.
5 Run the file installWithResponseFile from the command line.
Installation is done when the command prompt returns.
NOTE: The installWithResponseFile file does not force a computer reboot. You must reboot manually after the installation completes.

Installing Oracle BI EE Infrastructure ■ Installing Oracle BI in Unattended or Silent Mode
Oracle Business Intelligence Infrastructure Installation and ConfigurationGuide Version 10.1.3.2
57
Installing in Silent Mode Under LinuxFor Linux-based systems, perform an unattended installation by running shell scripts to create text files.
To recreate a response file, use the following procedure.
To create a response file■ Run the following command:
/setup.sh -options-record response.txt
To install Oracle BI silently on other machines, use the file response.txt as shown in the following procedure.
To install Oracle BI silently on other machines■ On the target machines, run the following command:
./setup.sh -options <path_to_response.txt_file> -silent

Oracle Business Intelligence Infrastructure Installation and Configuration Guide Version 10.1.3.2
Installing Oracle BI EE Infrastructure ■ Installing Oracle BI in Unattended or Silent Mode
58

6 Installing Individual Oracle BI Components
In addition to the Complete installation of components described in Chapter 5, “Installing Oracle BI EE Infrastructure,” you can install one or more individual components without installing the entire suite. For example, you can have Oracle BI Server only installed, or you might also be installing different components on separate machines. (See also the topic “Installing Oracle BI Components on Different Machines” on page 49.)
■ Table 3 on page 19 shows the Oracle Business Intelligence components that are installed with each installation option.
■ See also the topic “Additional Oracle BI Components” on page 20, which describes the ancillary programs that maybe useful in your deployment of Oracle Business Intelligence.
This topic area discusses partial or incremental component installations, including the following topics:
■ “Installing Oracle BI Open Intelligence Interface” on page 70 covers the distribution of client connectivity to remote clients that cannot otherwise access Oracle Business Intelligence.
If you use third-party analytical tools such as spreadsheets and databases, you must install the Oracle BI Open Intelligence Interface to enable connectivity to the Oracle BI Server.
■ “Installing and Configuring Disconnected Client” on page 61 covers adding the Oracle BI Disconnected Client to several laptop machines.
■ “Installing Oracle BI Ancillary Client Programs” on page 65 covers the installation of Windows-based helper programs:
❏ “Installing Briefing Book Reader” on page 66
❏ “Installing Oracle BI Office Plug-In” on page 68
❏ “Installing Oracle BI Open Intelligence Interface” on page 70
■ “Installing Oracle BI Ancillary Server Programs” on page 72
❏ “Installing Oracle BI Publisher Desktop” on page 72
Oracle Business Intelligence Infrastructure Installation and ConfigurationGuide Version 10.1.3.2
59

Installing Individual Oracle BI Components ■ Installing Additional Oracle BI Components
Installing Additional Oracle BI ComponentsIf you run the installer again to install individual components, you see the following additional prompts or screens. You are asked to select one of the two following options.
■ Keep User Modified Configurations
Selecting the Keep... option refers to those configuration files listed in “Backing Up Business Intelligence Folders and Files” on page 74. These configurations are not changed.
■ Reset Configurations
Selecting the Reset option changes the configuration files back to the Oracle BI default (for example, C:\OracleBI).
Oracle Business Intelligence Infrastructure Installation and Configuration Guide Version 10.1.3.2
60

Installing Individual Oracle BI Components ■ Installing and Configuring DisconnectedClient
Installing and Configuring Disconnected ClientOperating System: Windows only.
This topic is part of “Installing Individual Oracle BI Components.”
You install the Oracle BI Disconnected Client on laptop computers. The Disconnected Client allows laptop users to access data and reports when not connected to the network-based Oracle Business Intelligence Server.
After the Disconnected Client installation, an online help file, Oracle Business Intelligence Disconnected Online Help, is available in OracleBI_HOME\server\Document\. See this online help for information about how laptop users typically use the Disconnected Client.
NOTE: Do not confuse Oracle BI Disconnected Client installation with the enterprise (Oracle Business Intelligence Server) installation. See also the information on setting up Disconnected Client in Oracle Business Intelligence Server Administration Guide.
The process of installing or configuring Disconnected Analytics Client is described in the following topics:
■ “Additional Oracle BI Server Requirements for Disconnected Client” on page 61
■ “Installing the Disconnected Client” on page 62
■ “Setting Up Disconnected Client to Run in Silent Mode” on page 64
Installation Restrictions for Disconnected ClientThe Disconnected Client installation has the following restrictions:
■ Install the Disconnected Client before or after you have installed the other Oracle Business Intelligence components.
■ Install the Disconnected Client application components on a different machine from the machine that runs the Oracle Business Intelligence Server.
Additional Oracle BI Server Requirements for Disconnected ClientThis topic is part of “Installing Individual Oracle BI Components.”
Oracle BI Disconnected Client requires the following additional Web server configuration in order to function properly:
■ Install the standard Oracle Business Intelligence Server on a network machine in order to work with Disconnected Client.
■ If the Web server is Sun ONE (formerly iPlanet) and it is running on Solaris, configure this server as shown in the topic on configuring Sun ONE Web server for Disconnected Client in the Disconnected Configuration and Administration Guide.
Oracle Business Intelligence Infrastructure Installation and ConfigurationGuide Version 10.1.3.2
61

Installing Individual Oracle BI Components ■ Installing the Disconnected Client
Installing the Disconnected ClientOperating System: Windows only.
This topic is part of “Installing Individual Oracle BI Components.”
To install the Disconnected Client
1 Access the installation files, and run the startup program setup.exe.
2 The InstallShield window appears and prompts you through each screen.
The meanings and default for each screen and prompt for the Disconnected Client component installation are listed in Table 10 on page 62.
3 Perform the following substeps:
■ Provide the requested input for each screen.
■ To continue to the next screen, click Next. To return to a previous screen, click Back.
■ To exit from the installer, click Cancel.
■ To view the help page for each screen, click Help.
4 Proceed to “Initializing the Oracle Business Intelligence Installation.”
Table 10. Screens and Prompts for Disconnected Client Installation
Screen Your Action Notes
Oracle Business Intelligence Installation
■ Browse or type the path for the installation and data directories, or accept the default installation to the C:\ drive.
The defaults are:
■ OracleBI
■ OracleBIData
■ Select the installation type:
■ Basic
The default is Basic.
NOTE: Disconnected Client installation does not use Oracle Application Server.
TIP: To change the default installation and data directories, click Browse and establish the installation path, then click Next.
Install Type refers to the application server instance under which Oracle Business Intelligence is to run. See the section “Basic and Advanced Types of Oracle BI Installation” on page 21.
Setup Type Select Oracle Business Intelligence Disconnected Client.
Oracle Business Intelligence Infrastructure Installation and Configuration Guide Version 10.1.3.2
62

Installing Individual Oracle BI Components ■ Installing the Disconnected Client
Java Development Kit (JDK) Location
■ Java SDK 1.5 or higher must already be installed on your installation machine, otherwise the installation does not proceed.
■ Browse or type the path for the directory where Java is installed.
■ The Administrator password must be minimum of 6 and a maximum of 30 alphanumeric characters and include at least one digit.
TIP: The Sun release name was originally Java 2 Platform, Standard Edition 1.5.0 (J2SE Development Kit 1.5.0). The numbering system was changed to 5.0 (J2SE 5.0). Both 1.5.0 and 5.0 refer to the same platform and products.
Error Message Language The default is English.
Pre-Installation Summary Click Next after reading the summary information.
The summary includes the following:
■ Oracle BI ODBC Driver
■ Oracle BI Server
■ Oracle BI Administration Tool
■ Oracle BI Client
■ Oracle BI Presentation Services
Installing Click the Next button when it is no longer grayed out.
This is a placeholder that appears while the features you have selected are installed.
Post-Installation Summary Information
Click Next after reading the summary information.
This screen indicates a successful Oracle BI installation.
Restart Computer Choose whether or not to immediately restart your computer.
If you attempt to run Oracle BI without restarting your computer, several services may fail to work correctly.
Click Finish.
■ If you click Yes, the computer shuts down and restarts.
■ If you click No, you need to restart the computer before you use Oracle BI.
Table 10. Screens and Prompts for Disconnected Client Installation
Screen Your Action Notes
Oracle Business Intelligence Infrastructure Installation and ConfigurationGuide Version 10.1.3.2
63

Installing Individual Oracle BI Components ■ Setting Up Disconnected Client to Run in Silent Mode
Setting Up Disconnected Client to Run in Silent ModeThis topic is part of “Installing the Disconnected Client.”
After you install Oracle BI Disconnected Client, you can make it run automatically in silent mode (in the background). In order to run Disconnected Client in silent mode easily, create a new Start menu shortcut, as shown in the following procedure.
To create a Start menu shortcut for Disconnected silent mode
1 Right-click Start and select Explore All Users. The directory Start Menu should be highlighted in the directory tree.
2 In the left pane, double-click Programs.
3 In the right pane, double-click Oracle Business Intelligence.
4 Right-click Oracle BI Disconnected and select Create Shortcut.
5 Rename the new shortcut to Oracle BI Disconnected Silent Mode.
6 Right-click Oracle BI Disconnected Silent Mode and select Properties.
■ In the Shortcut tab Target field, at the end of the existing command, add a space, then add the following, being sure to include a leading space before the slash:
/s
■ Click Apply, then click OK.
After you have created the shortcut, use it to start Disconnected Client, as shown in the following procedure.
To start Disconnected Client in silent mode■ Navigate to Start > Programs > Oracle Business Intelligence > Oracle BI Disconnected Silent
Mode.
Oracle Business Intelligence Infrastructure Installation and Configuration Guide Version 10.1.3.2
64

Installing Individual Oracle BI Components ■ Installing Oracle BI Ancillary ClientPrograms
Installing Oracle BI Ancillary Client ProgramsThe ancillary programs are Windows-only applications that are included on the Oracle Business Intelligence CD-ROM in the folder \Client_Ancillary. These programs are not part of the regular Oracle Business Intelligence installer.
NOTE: These programs are not installed by the Oracle Business Intelligence installer. You must use the installation procedures referred to in this section.
The Ancillary Client programs include the following:
■ Oracle Business Intelligence Open Intelligence Interface
This client program installation is included on the Oracle Business Intelligence CD-ROM in the folder Oracle_Business_Intelligence_Open_Intelligence_Interface. You can also install the Open Intelligence Interface as one of the options in the Oracle BI installer Setup Type. (See the topic “Installing Oracle BI Open Intelligence Interface” on page 70.)
■ Oracle Business Intelligence Briefing Book Reader
This ancillary client program installation is included on the Oracle Business Intelligence CD-ROM in Oracle_Business_Intelligence_Briefing_Book_Reader. See the topic “Installing Briefing Book Reader” on page 66.
■ Oracle Business Intelligence Office Plug-In
This ancillary client program installation is included on the Oracle Business Intelligence CD-ROM in the folder Oracle_Business_Intelligence_Office_Plug-In. See the topic “Installing Oracle BI Office Plug-In” on page 68.
Oracle Business Intelligence Infrastructure Installation and ConfigurationGuide Version 10.1.3.2
65

Installing Individual Oracle BI Components ■ Installing Briefing Book Reader
Installing Briefing Book ReaderOperating System: Windows only.
This topic is part of “Installing Oracle BI Ancillary Client Programs.”
Oracle Business Intelligence Briefing Book Reader can be installed on laptop computers. It is a Windows application that provides a way to save static and linked dashboard content for viewing offline. Users specify dashboard pages for immediate or scheduled download. Key reports and dashboards can be reviewed and evaluated while disconnected from the network.
The installation program for Briefing Book Reader is located on the Oracle Business Intelligence Windows installation CD-ROM.
To install the Oracle BI Briefing Book Reader under Windows
1 From the installation CD-ROM folder Client_Ancillary\Oracle_Business_Intelligence_Briefing_Book_Reader, or from the network location that contains the Briefing Book Reader files, run the program setup.exe.
2 The installation wizard Welcome window appears and prompts you through each screen.
To continue to the next screen, click Next. If you need to return to a previous screen, click Back.
Restoring Permissions in Briefing BooksThe Permissions icon in Manage Catalog > My Folder may disappear for non-administrative users. Only Administrators have access to the Permissions icon.
The following procedure resolve this behavior.
To allow non-administrator users to see the Permissions icon in Briefing Books
1 Log on to Oracle Business Intelligence as Administrator,
2 Click on Settings and select Administration > Manage Privileges.
Screen Your Action
Installation Directories
To accept the default installation (C:\Program Files\Oracle Business Intelligence\SABBReader), click Next.
To change the default (recommended), click browse and establish the installation path, then click Next.
Summary Information Shows the directory where Briefing Book Reader is to be installed, and information about the size of the installation. Click Next.
Installing Placeholder screen that appears while the installer installs the features you have selected.
When the installer is done, click Finish to exit the installation wizard.
Oracle Business Intelligence Infrastructure Installation and Configuration Guide Version 10.1.3.2
66

Installing Individual Oracle BI Components ■ Installing Briefing Book Reader
3 In the Admin: Catalog row, for Change Permissions, click on the link for the group.
Add Everyone to the group.
4 Click Finished, and then click Logout.
5 Log on as a non-administrative user and verify if the Permissions icon appear in Manage Catalog in Delivers.
For information on creating and using Briefing Books, see Oracle Business Intelligence Answers, Delivers, and Interactive Dashboards User Guide.
Oracle Business Intelligence Infrastructure Installation and ConfigurationGuide Version 10.1.3.2
67

Installing Individual Oracle BI Components ■ Installing Oracle BI Office Plug-In
Installing Oracle BI Office Plug-InOperating System: Windows only.
This topic is part of “Installing Oracle BI Ancillary Client Programs.”
Oracle Business Intelligence Office Plug-In is a Windows application that is an optional feature under the Oracle Business Intelligence Presentation Services. The Plug-In provides a way to browse the Analytics catalog, select a report, and then drop that report into Microsoft Word or Excel. This document may be saved and the data refreshed as needed. For information on how to use the Office Plug-In feature, see the Oracle Business Intelligence Answers, Delivers, and Interactive Dashboards User Guide.
The installation program for Office Plug-In is located on the Oracle Business Intelligence Windows installation CD-ROM.
Before installing this feature, the following programs must be installed on the client machines that run the Office Plug-In:
■ .NET Framework (the runtime must be running)
■ An appropriate version of Microsoft Office, containing Microsoft Word and Excel (see System Requirements and Supported Platforms)
To install the Oracle BI Office Plug-In under Windows
1 From the installation CD-ROM folder Oracle_Business_Intelligence_Office_Plug-In, or from the network location that contains the Office Plug-In files, run the program setup.exe.
2 The installation wizard Welcome window appears and prompts you through each screen.
To continue to the next screen, click Next. If you need to return to a previous screen, click Back.
Screen Your Action
Welcome Click Next.
Installation Directories To accept the default installation (C:\Program Files\Oracle Business Intelligence\OracleBI Office Plug-In), click Next.
To change the default (recommended), click browse and establish the installation path, then click Next.
Oracle BI Presentation Services URL
Oracle BI Office Plug-In requires an Oracle BI Presentation Services URL (that is, a Web location) to retrieve data from. The format should be as in the following example:
http://localhost:9704/analytics
Summary Information The directory where the Office Plug-In is to be installed and the installation size are shown. Click Next.
Oracle Business Intelligence Infrastructure Installation and Configuration Guide Version 10.1.3.2
68

Installing Individual Oracle BI Components ■ Installing Oracle BI Office Plug-In
Installing Placeholder screen that appears while the installer installs the Office Plug-In. When done, click Next.
Summary Information Choose whether or not to immediately restart your computer and click Finish.
■ If you click Yes ..., the computer shuts down and restarts.
■ If you click No..., you need to restart the computer before you use Oracle Business Intelligence.
Screen Your Action
Oracle Business Intelligence Infrastructure Installation and ConfigurationGuide Version 10.1.3.2
69

Installing Individual Oracle BI Components ■ Installing Oracle BI Open Intelligence Interface
Installing Oracle BI Open Intelligence InterfaceOperating System: Windows only.
This topic is part of “Installing Oracle BI Ancillary Client Programs.” This client program is included on the Oracle Business Intelligence CD-ROM in the folder Oracle_Business_Intelligence_Open_Intelligence_Interface.
This topic may apply if your deployment includes remote machine connection to Oracle BI Servers over a network.
Some sites use third-party analytical tools, such as spreadsheets and databases, which require connectivity to the Oracle BI Server. Some of these sites have client connections to the corporate network using a modem. The Oracle BI Open Intelligence Interface (ODBC) client connectivity and the client connectivity tools NQCMD.exe and NQClient.exe are a means of distributing client connectivity to these remote clients that cannot otherwise access Oracle BI.
Using the Oracle Business Intelligence installer, only the Open Intelligence Interface ODBC connectivity client and the NQClient.exe and NQCMD.exe utilities are installed. The latter two utilities are necessary for debugging and technical support issue identification. The installer includes a silent mode option to automatically install the Open Intelligence Interface ODBC client on the remote machine. This installer does not require a license key.
The Open Intelligence Interface installer installs the following components to remote client machines:
To install the Oracle Business Intelligence Open Intelligence Interface Ancillary Client
1 In the folder Client_Ancillary\Oracle_Business_Intelligence_Open_Intelligence_Interface, click setup.exe.
2 The meanings and default for each screen and prompt for the Oracle Business Intelligence Open Intelligence Interface installation under Windows are listed in Table 11 on page 71.
3 Provide the requested input for each screen. To continue to the next screen, click Next. To return to a previous screen, click Back.
Directory Folders
OracleBI\ server\Bin
server\Document
server\Locale
server\Log
uninstall\_jvm\bin\client
OracleBIData\ tmp (folder is empty)
Oracle Business Intelligence Infrastructure Installation and Configuration Guide Version 10.1.3.2
70

Installing Individual Oracle BI Components ■ Installing Oracle BI Open IntelligenceInterface
Open Intelligence Interface Installer Screens and PromptsThe screens for the Open Intelligence Interface ODBC client installation are listed in Table 11.
Table 11. Screens or Prompts for Installing Oracle BI Client and ODBC Driver
Screen Your Action Notes
Welcome Click Next.
Installation Locations Type the path for the installation directories, or keep the defaults. The defaults are:
■ C:\OracleBI
■ C:\OracleBIData
To change the default installation and data directories, click Browse and establish the installation path, then click Next.
Error Message Language The default is English. Choose another language from the dropdown list if the language is not English.
Java Development Kit (JDK) Location
Type the path for the directory where Java is installed.The Administrator password must be a minimum of 6 characters and include at least one digit.
NOTE: Java SDK 1.5 or higher must already be installed on your installation machine, otherwise the installation fails.
Preinstallation Summary Information
■ Oracle BI ODBC Driver
■ Oracle BI JDBC Driver
■ Oracle BI Client
Installing Click the Next button when it is no longer grayed out.
The installation may take between twenty and thirty minutes.
Postinstallation Summary Information
Click Next after reading the post-installation summary information.
This screen indicates a successful Oracle BI installation.
Finish Choose whether or not to immediately restart your computer.
■ If you click Yes, the computer shuts down and restarts.
■ If you click No, you need to restart the computer before you use Oracle Business Intelligence.
Click Finish.
NOTE: If you attempt to run Oracle BI without restarting your computer, several services may fail to work correctly.
Oracle Business Intelligence Infrastructure Installation and ConfigurationGuide Version 10.1.3.2
71
Installing Individual Oracle BI Components ■ Installing Oracle BI Ancillary Server Programs
Installing Oracle BI Ancillary Server ProgramsOperating System: Windows only.
The Oracle Business Intelligence installation CD-ROM includes a folder named Server_Ancillary. This folder includes the following programs you might find necessary for your deployment of Oracle BI:
■ IBM GSKit
The GSKit utility IkeyMan is used to create a key database file, and store it under the Oracle BI configuration directory. For information on when and how to use GSKit, see the Oracle Business Intelligence Enterprise Edition Deployment Guide.
NOTE: GSKit is not required for ADSI authentication.
The GSKit installation files are included on the Oracle Business Intelligence CD-ROM in the folder Server_Ancillary\IBM_GSK.
■ Oracle Business Intelligence Publisher Desktop
Oracle Business Intelligencee Publisher Desktop, a Windows application, is a design tool that allows you to create layouts for Oracle BI Publisher. The BI Publisher Desktop installation is included on the Oracle Business Intelligence CD-ROM in the folder Server_Ancillary\Oracle_Business_Intelligence_Publisher\BI_Publisher_Desktop.
NOTE: Oracle BI Publisher Desktop does not need to be installed for the XMLP server, nor does the XMLP server need to be installed for the Publisher Desktop. They are independent.
This guide primarily explains how to install BI Publisher on application servers such as OC4J or Oracle Application Server. However, you can also deploy BI Publisher on other J2EE application servers, such as Tomcat or Websphere. To deploy BI Publisher with other J2EE application servers, use the instructions in the file Install.pdf provided with the files for more information. See also the topic “Deploying BI Publisher with Other J2EE Application Servers” on page 134.
To install BI Publisher Desktop, see the topic “Installing Oracle BI Publisher Desktop” on page 72.
Installing Oracle BI Publisher DesktopThis topic is part of “Installing Oracle BI Ancillary Server Programs” on page 72, and shows how to install this program.
To install Publisher Desktop on a client computer
1 From the installation CD-ROM folder Server_Ancillary\Oracle_Business_Intelligence_Publisher\BI_Publisher_Desktop, or from the network location that contains the BI_Publisher_Desktop setup file, run the program BIPublisherDesktop.exe.
Oracle Business Intelligence Infrastructure Installation and Configuration Guide Version 10.1.3.2
72

Installing Individual Oracle BI Components ■ Installing Oracle BI Ancillary ServerPrograms
2 The installation wizard Welcome window appears and prompts you through each screen.
To continue to the next screen, click Next. If you need to return to a previous screen, click Back.
The meanings and default for each screen and prompt for the installation are listed in Table 12 on page 73.
Starting Oracle BI Publisher DesktopTo start the Oracle BI Publisher Desktop program, go to Windows Start > Programs > Oracle BI Publisher Desktop > Template Builder for Word.
Table 12. Oracle BI Publisher Desktop Screens and Prompts
Screen Your action
Choose Setup Language Select a language from the list, and then click Next.
Preparing Setup Placeholder screen that appears while the installer prepares to install the feature.
Welcome to the InstallShield Wizard for Oracle BI Publisher Desktop
Click Next.
Choose Destination Location To accept the default installation (C:\Program Files\Oracle\BI Publisher\BI Publisher Desktop), click Next.To change the location, click Browse.
Setup Status Placeholder screen that appears while the installer installs the features you have selected.When the installer is done, click Finish to exit the installation wizard.
Oracle Business Intelligence Infrastructure Installation and ConfigurationGuide Version 10.1.3.2
73

Installing Individual Oracle BI Components ■ Uninstalling Oracle BI Components
Uninstalling Oracle BI ComponentsIf you need to remove Oracle BI components for reasons not related to upgrading the software, use the following procedures.
Backing Up Business Intelligence Folders and FilesBefore uninstalling or upgrading any Oracle Business Intelligence software, it is recommended that backups of key configuration files be made, and the files moved to a temporary location. The following sections show the locations of the configuration files under all platforms.
Windows Operating SystemsThe installer automatically backs up the Windows files shown in Table 13. The backup files are saved to OracleBI_HOME\Install_Backup\<installation_date>. (For example, D:\OracleBI\Install_Backup\12.14.2006_15.55.20.)
Linux and UNIX Operating SystemsThe installer automatically backs up the files shown in Table 14. The backup files are saved to OracleBI_HOME/Install_Backup/<installation_date>. (For example, /usr/local/OracleBI/Install_Backup/08.13.2006_16.40.20.)
Table 13. Locations of Configuration Files Backed Up Under Windows
File or Folder Name Location
DBFeatures.INI file OracleBI_HOME\Server\Config
NQSConfig.INI file OracleBI_HOME\Server\Config
NQClusterConfig.INI file OracleBI_HOME\Server\Config
Instanceconfig.xml file OracleBIData_HOME\web\config
Repository (.rpd) file OracleBI_HOME\Server\Repository
Presentation Catalog files Oracle BI Presentation Services machine:
OracleBIData_HOME\web\catalog\default
Deliveries folder Oracle BI Presentation Services machine:
OracleBIData_HOME\web\catalog\Deliveries
NOTE: This folder contains temporary files.
Oracle Business Intelligence Infrastructure Installation and Configuration Guide Version 10.1.3.2
74

Installing Individual Oracle BI Components ■ Uninstalling Oracle BI Components
Uninstalling Oracle BI Under WindowsUse the following procedure to uninstall one or more Oracle BI components.
To uninstall Oracle BI under Windows operating systems
1 From the Start menu, navigate to Settings > Control Panel > Add or Remove Programs.
2 In Add or Remove Programs, select Oracle Business Intelligence and click Remove.
3 In the OC4J Administrator User Information window, enter the password, and then click Next.
4 Follow the uninstallation program prompts.
Uninstalling Oracle BI Under Linux and UNIXUse the following procedure to uninstall one or more Oracle BI components.
To uninstall Oracle BI under Linux or UNIX operating systems
1 Navigate to the directory OracleBI_HOME\uninstall.
2 Run the following command:
./setup.bin
3 When prompted, enter the OC4J Administrator password.
Table 14. Locations of Configuration Files Backed Up Under Linux and UNIX Systems
File or Folder Name Location
DBFeatures.INI file OracleBI_HOME/Server/Config
NQSConfig.INI file OracleBI_HOME/Server/Config
NQClusterConfig.INI file OracleBI_HOME/Server/Config
Instanceconfig.xml file OracleBIData_HOME//web/config
Repository (.rpd) file OracleBI_HOME/Server/Repository
user.sh file OracleBI_HOME/setup
Presentation Catalog files Oracle BI Presentation Services machine:
OracleBIData_HOME/web/catalog/default
Deliveries folder Oracle BI Presentation Services machine:
OracleBIData_HOME/web/catalog/Deliveries
NOTE: This folder contains temporary files.
Oracle Business Intelligence Infrastructure Installation and ConfigurationGuide Version 10.1.3.2
75

Installing Individual Oracle BI Components ■ Uninstalling Oracle BI Components
4 Follow the uninstallation program prompts.
Oracle Business Intelligence Infrastructure Installation and Configuration Guide Version 10.1.3.2
76

Oracle Business Intelligence Infrastructure Installation and ConfigurationGuide Version 10.1.3.2
77
7 Configuring Oracle BI Servers
After the Oracle BI Infrastructure installer is finished, there are a number of additional tasks you must complete in order to properly configure the Oracle Business Intelligence Server components. The Roadmap for Configuring Oracle BI Infrastructure Components on page 27 lists the processes for configuring Oracle Business Intelligence immediately after installation of the software.
This chapter contains the following topics:
■ “Working with Oracle BI Servers” on page 78
■ “Updating Server Configuration Settings” on page 87
■ “Updating Configuration Settings Using Oracle Application Server Control or JConsole” on page 89
■ “About Localizing Oracle BI Server” on page 94
■ “About Security in the Demonstration Oracle BI Repository” on page 94
NOTE: Almost all of the Oracle Business Intelligence Server configuration is through the Server Administration Tool. For how to use the Server Administration Tool, see the Oracle Business Intelligence Server Administration Guide.
The number of postinstallation configuration tasks you must complete depends on the following factors:
■ The number and types of operating systems you are using
■ The complexity of your network setup
■ The types of installation options you have chosen
■ Whether or not your deployment is localized
NOTE: This Roadmap assumes that the installation setup option chosen is Complete.

Oracle Business Intelligence Infrastructure Installation and Configuration Guide Version 10.1.3.2
Configuring Oracle BI Servers ■ Working with Oracle BI Servers
78
Working with Oracle BI ServersThe following tasks are used when configuring the Oracle BI server components.
■ “Starting or Restarting Oracle BI Servers” on page 80
■ “Scripts for Korn, Bourne, or Bash Shells” on page 82
■ “Using the OC4J Command Script” on page 85
■ “Updating Server Configuration Settings” on page 87
■ “Updating Configuration Settings Using Oracle Application Server Control or JConsole” on page 89
■ “About Localizing Oracle BI Server” on page 94

Configuring Oracle BI Servers ■ Starting, Stopping, or Restarting Oracle BI Servers
Oracle Business Intelligence Infrastructure Installation and ConfigurationGuide Version 10.1.3.2
79
Starting, Stopping, or Restarting Oracle BI ServersIf you want to make changes to the configuration (NQSConfig.INI) file, Web Catalog files, the repository (.rpd) file, and other files, you must first stop the Oracle Business Intelligence Server, then restart it, before those changes can take effect.
NOTE: The order in which the services are stopped, then restarted, is important. Use the following sequence.
Order of Stopping and Restarting Services1 Oracle Business Intelligence Server Service
2 Oracle Business Intelligence Presentation Services
3 Oracle Business Intelligence Scheduler Service
■ “Stopping Oracle BI Servers” on page 79
■ “Starting or Restarting Oracle BI Servers” on page 80
Stopping Oracle BI Servers■ Stopping Oracle BI servers under Windows involves stopping the related Windows Services.
■ Stopping Oracle BI servers under Linux involves running shell scripts.
Windows Operating SystemsOracle BI servers under Windows run as Windows Services. To run Windows Services, use of the following methods:
■ Run the command C:\WINDOWS\system32\services.msc
■ Navigate to Start > Programs > Administrative Tools > Services
To stop the servers under Windows
1 Stop the Oracle BI Presentation Services.
NOTE: This may take several minutes.
2 Stop the World Wide Web Publishing service.
3 Stop the Oracle BI Server service.
Linux Operating SystemsOracle BI servers under Linux run as shell scripts. To run Linux shell scripts, see Table 15 on page 82.

Oracle Business Intelligence Infrastructure Installation and Configuration Guide Version 10.1.3.2
Configuring Oracle BI Servers ■ Starting, Stopping, or Restarting Oracle BI Servers
80
Starting or Restarting Oracle BI ServersThe method of starting Oracle BI servers depends on the operating system being used. See the topic appropriate for your deployment:
■ “Starting Oracle BI Servers Under Windows” on page 80
■ “Starting Oracle BI Servers Under Linux” on page 81
Starting Oracle BI Servers Under WindowsStarting Oracle BI servers under Windows involves starting the following Windows Services:
■ Oracle BI Server
■ Oracle BI Presentation Services
■ Oracle BI Scheduler
■ Oracle BI Java Host
NOTE: Oracle Business Intelligence does not support more than one server instance on the same machine at one time.
To start the servers under Windows
1 Start the Oracle BI Server, which appears under Services.
The Oracle BI Server takes up to a minute to start.
NOTE: In the Microsoft Windows environment, the Services Manager returns a false error that it is unable to start the server. This is a known Microsoft Services Manager issue, which causes the Services Manager to time out after five minutes. However, the Oracle BI Server is still starting, as you can see after you refresh the Services window.
If the Oracle BI Server service fails to start, it logs an error in nqServer.log file in the Log directory.
2 Start the World Wide Web Publishing service.
3 In the ODBC Driver Manager, test that the DSN called AnalyticsWeb (of type Oracle BI Server) connects to the Oracle BI Server.
Use the user name Administrator and the password Administrator (case-sensitive). This is default administrator credential for the demonstration repository, paint.rpd.
NOTE: Be sure to change the default password before migrating to production.
4 Start the Oracle BI Presentation Services. This may take several minutes.

Configuring Oracle BI Servers ■ Starting, Stopping, or Restarting Oracle BI Servers
Oracle Business Intelligence Infrastructure Installation and ConfigurationGuide Version 10.1.3.2
81
Starting Oracle BI Servers Under LinuxStarting Oracle BI servers under Linux involves running shell scripts. The shell scripts are located in the folder OracleBI_HOME/OracleBI/setup.
To start the servers under Linux■ Execute the following scripts, supplying the stop or start parameter:
■ run-sa.sh { start | stop }
■ run-saw.sh { start | stop }
■ run-sch.sh { start | stop }
■ For the Scheduler stop command, there are parameters in addition to stop:
run-sch.sh -s <machine:port> -u <username> -p <password>
CAUTION: if you do not use the run-sa.sh shell script to start the server, you must make certain that the variables are set.
Restarting the Oracle BI Server After a Database CrashIf an Oracle BI Server database crashes and is restarted, the users who were connected at the time of the drop will be unable to refresh or proceed, because the connection is lost.
■ To fix this problem, log out and then log on again.
NOTE: If you are using Oracle Containers for Java, the Java process in the OC4J component cannot be restarted automatically after you restart your computer. If the computer running Oracle BI is restarted, you must restart the OC4J process manually.

Oracle Business Intelligence Infrastructure Installation and Configuration Guide Version 10.1.3.2
Configuring Oracle BI Servers ■ Scripts for Korn, Bourne, or Bash Shells
82
Scripts for Korn, Bourne, or Bash ShellsScripts are provided for basic Linux settings of Oracle BI Server These scripts are located in the directory OracleBI_HOME/setup. The Oracle BI scripts for Korn, Bourne, or bash shells are shown in Table 15 on page 82.
Table 15. Oracle BI Scripts for Korn, Bourne, or Bash Shells
Script Purpose
run-sa.sh Automatically calls user.sh and starts the Oracle BI Server.
sa.sh Sets up the environment for manual management. Run this under the current shell (source the script). Under this mode, you can run the Oracle BI Server manually.
NOTE: This file sets environment variables and must be executed appropriately for those variables to be exported to the current shell.
Usage:
run-sa.sh { start | stop | forcestop | autorestart [<poll every n seconds> <restart if down for n seconds>] }
run-sa.sh stop
Stops the Oracle BI Server.
run-sa.sh forcestop
Forcibly shuts down the Oracle BI Server.
run-sa.sh autorestart <poll_every_n_seconds> <restart_if_down_for_x_seconds>
Polls the Oracle BI Server status every n seconds and restarts BI Server if down for x seconds.
saw.sh Sets up the environment for manual management of Oracle BI Presentation Services. Run this under the current shell (source the script). Under this mode, you can run the Oracle BI Presentation Services manually.

Configuring Oracle BI Servers ■ Scripts for Korn, Bourne, or Bash Shells
Oracle Business Intelligence Infrastructure Installation and ConfigurationGuide Version 10.1.3.2
83
run-saw.sh Automatically calls saw.sh and starts the Oracle BI Presentation Services.
Usage:
run-saw.sh { start | stop | forcestop | autorestart [<poll every n seconds> <restart if down for n seconds>] }
run-saw.sh stop
Shuts down the Oracle BI Presentation Services.
run-saw.sh forcestop
Forcibly shuts down the Oracle BI Presentation Services.
run-saw.sh autorestart <poll_every_n_seconds> <restart_if_down_for_x_seconds>
Polls the Oracle BI Presentation Services status every n seconds and restarts Presentation Services if down for x seconds.
run-sch.sh Starts the Oracle BI Scheduler.
Usage:
run-sch.sh { start | stop | forcestop | autorestart [<poll every n seconds> <restart if down for n seconds>]
run-sch.sh stop
Shuts down the Oracle BI Scheduler.
run-sch.sh forcestop
Forcibly shuts down the Oracle BI Scheduler.
run-sch.sh autorestart <poll_every_n_seconds> <restart_if_down_for_x_seconds>
Polls the Oracle BI Scheduler status every n seconds and restarts the Scheduler if down for x seconds.
Table 15. Oracle BI Scripts for Korn, Bourne, or Bash Shells
Script Purpose

Oracle Business Intelligence Infrastructure Installation and Configuration Guide Version 10.1.3.2
Configuring Oracle BI Servers ■ Scripts for Korn, Bourne, or Bash Shells
84
run-ccs.sh Starts the Oracle BI Cluster Controller.
Usage:
run-ccs.sh { start | stop | forcestop | autorestart [<poll every n seconds> <restart if down for n seconds>] }
run-ccs.sh stop
Shuts down the Cluster Controller.
run-ccs.sh forcestop
Forcibly shuts down the Cluster Controller.
run-ccs.sh autorestart <poll_every_n_seconds> <restart_if_down_for_x_seconds>
Polls the Cluster Controller status every n seconds and restarts the Cluster Controller if down for x seconds.
sa-cli.sh Sets up the environment for running the Oracle BI Client. Run this under the current shell (source the script). If you are managing the server manually, you need to open a separate session to do this.
NOTE: This file sets environment variables and must be executed appropriately for those variables to be exported to the current shell.
Usage:
. sa-cli.sh
user.sh Sets up user-specific items such as the database. You do not need to run this script separately. It is called from run-sa.sh, run-sch.sh, and run-ccs.sh.
Table 15. Oracle BI Scripts for Korn, Bourne, or Bash Shells
Script Purpose

Configuring Oracle BI Servers ■ Using the OC4J Command Script
Oracle Business Intelligence Infrastructure Installation and ConfigurationGuide Version 10.1.3.2
85
Using the OC4J Command ScriptSelecting the Basic Installation Type installs Oracle Containers for Java component (OC4J). The Java process in the Oracle Containers for Java component (OC4J) restarts automatically after you restart your computer under Windows, and after the installation completes under Linux. However, you can also use the OC4J command script to start or restart the OC4J process.
NOTE: The OC4J command script is located under OracleBI_Home/oc4j_bi/bin.
The OC4J command script supports the following commands:
Usage: oc4j [Options]
Options:
-start: start OC4J
-shutdown -port <ORMI port> -password <password>: stop OC4J
TIP: Run this command if the RMI port number or the OC4J password have been changed.
Other methods for stopping and starting OC4J are shown the following topics:
■ “Starting the OC4J Process” on page 85
■ “Stopping the OC4J Process” on page 86
■ “Restarting the OC4J Process” on page 86
NOTE: For more information about starting and stopping OC4J, refer to the file Readme.txt, located at OracleBI_HOME\oc4j_bi.
Starting the OC4J ProcessStart OC4J as shown in the following procedure.
To start the OC4J Java process manuallyStart the OC4J component process using one of the following methods:
■ Under Linux, open a shell prompt.
■ Change directory to OracleBI_HOME/oc4j_bi/bin.
■ Run the following command:
./oc4j -start
■ Under Windows, open a DOS prompt
■ Change directory to OracleBI_HOME\oc4j_bi\bin.
■ Run the following command:
oc4j -start
■ In the Windows Start Menu, go to All Programs > Oracle Business Intelligence > Start OC4J.

Oracle Business Intelligence Infrastructure Installation and Configuration Guide Version 10.1.3.2
Configuring Oracle BI Servers ■ Using the OC4J Command Script
86
Stopping the OC4J ProcessStop the OC4J component process in the using one of the following methods:
■ In the Windows Start Menu, go to All Programs > Oracle Business Intelligence > Stop OC4J.
■ From within Oracle Application Server Control, use the Stop button.
■ Use the process termination command for the operating system in use (for example, kill on Linux). OC4J indicates on the console window that it is shutting down when it receives a shutdown signal.
■ In the MS-DOS window where the OC4J process was started, press the Ctrl+C key combination.
Restarting the OC4J ProcessRestarting the OC4J process manually is the same as starting it. See the topic “Starting the OC4J Process” on page 85.

Configuring Oracle BI Servers ■ Updating Server Configuration Settings
Oracle Business Intelligence Infrastructure Installation and ConfigurationGuide Version 10.1.3.2
87
Updating Server Configuration SettingsInitialization automatically updates the component configuration files after installation for the default, out of the box configuration. Upon startup, Oracle Business Intelligence uses an initialization file to set parameters. This initialization file is the NQSConfig.INI file. This file is in the installation folder OracleBI_HOME\server\Config (Windows operating systems) or OracleBI_HOME/server/Config (Linux operating systems). To edit NQSConfig.INI, see the topic “Changing Oracle BI Configuration File Parameter Entries” on page 151.
NOTE: For organizations that use Oracle Application Server, Oracle recommends that you use Oracle Application Server Control to modify configuration files. For organizations that use other application servers, Oracle recommends that you use JConsole. For more information, see “Updating Configuration Settings Using Oracle Application Server Control or JConsole” on page 89.
If you want to configure a new installation, or to reconfigure the settings with your changes, use the generic procedures in this section to help you. For example, you may need to change a configuration setting for the Oracle BI Presentation Services server, so that it can identify the credential store containing the Scheduler administrator credentials. The general plan to accomplish this is as follows:
■ First, go to “Configuring Oracle BI Presentation Services to Identify the Credential Store” on page 128 to understand which parameters in the Oracle BI Presentation Services instanceconfig.xml file must be set.
■ Then, use the procedure in the topic “Editing the instanceconfig.xml File,” below, to edit the file successfully.
If you make changes to the NQSConfig.INI file, the instanceconfig.xml file, Web Catalog files, or the repository file while the server is running, you need to shut down and then restart that server for the change to take effect. See the topic “Starting, Stopping, or Restarting Oracle BI Servers” on page 79.
Updating the instanceconfig.xml File for Oracle BI ServersBefore you edit a configuration file, always make a backup copy.
To update the Oracle BI server instanceconfig.xml settings
1 If necessary, stop the server. See the topic “Stopping Oracle BI Servers” on page 79.
2 On the server machine, locate the appropriate instanceconfig.xml file.
NOTE: The Oracle Business Intelligence Presentation Services and Oracle Business Intelligence Scheduler servers each uses its own instanceconfig.xml file for configuration. Make sure that you use the file associated with that server.
3 Open the file using an XML editor.
4 Make changes in the instanceconfig.xml file.

Oracle Business Intelligence Infrastructure Installation and Configuration Guide Version 10.1.3.2
Configuring Oracle BI Servers ■ Updating Server Configuration Settings
88
5 Save the changes to the instanceconfig.xml file.
6 Restart the server. See the topic “Starting or Restarting Oracle BI Servers” on page 80.
To update the Oracle BI Server configuration settings
1 Stop the servers. See the topic “Stopping Oracle BI Servers” on page 79.
2 Make changes in the instanceconfig.xml or NQSConfig.INI files.
NOTE: For organizations that use Oracle Application Server, Oracle recommends that you use Oracle Application Server Control to modify configuration files. For organizations that use other application servers, Oracle recommends that you use JConsole. For more information, see “Updating Configuration Settings Using Oracle Application Server Control or JConsole” on page 89.
3 Restart the servers. See the topic “Starting or Restarting Oracle BI Servers” on page 80.
For more information on changing the NQSConfig.INI file, see the topic “Changing Oracle BI Configuration File Parameter Entries” on page 151.
Editing the instanceconfig.xml FileConfiguration settings for the Oracle BI Presentation Services are located in the file instanceconfig.xml. You can customize the Presentation Server by modifying the entries in instanceconfig.xml and adding new entries to override internal default settings.
You need to make changes to instanceconfig.xml only if you want to change default parameters, such as the name of the Presentation Server Catalog, or override internal default settings, such as the time for client connections to expire.
■ Windows Operating Systems: OracleBIData_HOME\web\config
■ Linux Operating Systems: OracleBIData_HOME/web/config
For information about the entries you can make to customize Oracle Business Intelligence Presentation Services and general information about customizing the instanceconfig.xml file, see Oracle Business Intelligence Presentation Services Administration Guide.

Configuring Oracle BI Servers ■ Updating Configuration Settings Using Oracle ApplicationServer Control or JConsole
Oracle Business Intelligence Infrastructure Installation and ConfigurationGuide Version 10.1.3.2
89
Updating Configuration Settings Using Oracle Application Server Control or JConsoleThis section describes how to modify the Oracle BI configuration files when your Oracle BI deployment is installed into an existing Oracle Applications installation. In order to update configuration files using Oracle Application Server Control, you must make changes to the file opmn.xml. For more information on how to do this, see “Enabling Oracle Application Server Control” on page 89.
NOTE: If the middle tier installation is clustered across multiple machines, you must run Oracle AS Control or JConsole to make identical changes for each configuration file on each machine.
This section contains the following tasks:
■ “Enabling Oracle Application Server Control” on page 89
■ “Modifying Configuration Files Using Oracle Application Server Control” on page 90
■ “Modifying Configuration Files Using JConsole” on page 91
Enabling Oracle Application Server ControlThis task describes how to change settings in the Oracle Process Manager and Notification Server (OPMN) file, opmn.xml. This allows you to use Oracle Application Server Control.
NOTE: This task is only appropriate if you are installing Oracle BI into an existing Oracle Applications installation.
To change settings in opmn.xml to enable Oracle Application Server Control
1 Locate opmn.xml in the Oracle Applications installation directory. For example, in
OracleBI_HOME/opmn/conf
2 In a text editor, open the opmn.xml file.
3 Navigate to the <data-id=”java-options”> tag, located within the <category id=start-parameters> tag.
4 Enter new path settings for each of the following environment variables in opmn.xml:
■ -DSAROOTDIR: Set this environment variable to the value of the root directory path for the Oracle BI installation (OracleBI_HOME).
■ -DSADATADIR: Set this environment to the value of the data directory path for the Oracle BI installation (OracleBIData_HOME).
For example, for a Windows Oracle BI installation you can add the following settings shown in bold text:

Oracle Business Intelligence Infrastructure Installation and Configuration Guide Version 10.1.3.2
Configuring Oracle BI Servers ■ Updating Configuration Settings Using Oracle Application Server Control or JConsole
90
<data id="java-options" value="-DSAROOTDIR=D:\<USER>\OracleBI-DSADATADIR=D:\<USER>\OracleBIData -Xrs -server -Djava.security.policy=$ORACLE_HOME/j2ee/home/config/java2.policy -Djava.awt.headless=true -Dhttp.webdir.enable=false"/>
where <USER> represents the path in which Oracle BI is installed.
It is now possible to modify configuration files using Oracle Application Server Control.
Modifying Configuration Files Using Oracle Application Server ControlThis task describes how to change Oracle BI settings using Oracle Application Server Control.
To modify configuration files using Oracle Application Server Control
1 Display Oracle Application Server Control by starting a Web browser and entering the Application Server Control URL.
The URL must contain the fully qualified host name and domain of the Oracle BI OC4J instance that you want to configure. For example: http://<host.domain>:8888/em
TIP: To find out the URL for Oracle Application Server Control in your installation, ask your administrator.
If the Oracle Application Server Control OC4J instance is not running, perform the following steps:
■ For a Windows installation, display an MS-DOS window and enter the command to run OC4J.
If the path to the Oracle Application Server Control OC4J command file is not set for the machine, the command must contain the full path to its location in the OracleBI_HOME\oc4j-bi\bin directory. For example, you might enter the following command:
D:\OracleBI\oc4j-bi\bin\oc4j -start
This starts the Oracle Application Server Control OC4J instance.
■ Return to Step 1.
2 When prompted, enter an Application Server Control user name and password.
3 Click OK to display the Oracle Application Server Control OC4J Home page.
4 Click the Applications tab to display the J2EE applications, and application components deployed to the OC4J instance.
5 Click the icon in the Application Defined MBeans column for the Oracle BI Management row to display the Application MBeans page.

Configuring Oracle BI Servers ■ Updating Configuration Settings Using Oracle ApplicationServer Control or JConsole
Oracle Business Intelligence Infrastructure Installation and ConfigurationGuide Version 10.1.3.2
91
6 Click the plus (+) symbol in the left column to expand the navigation tree.
The navigation tree expands to display links for viewing or updating configuration attribute values. Each node in the navigation tree represents a configuration file as shown in the following table.
7 Click a link in the navigation tree to display the details for a group of configuration file attributes.
For example, click the Cache link under the Oracle BI configuration node to display the attributes that relate to the cache, including a description of each attribute, and its current value.
8 Update an attribute value in one of the following ways:
■ Using the current page:
❏ Enter a new attribute value into the Value field for the appropriate row.
❏ Click Apply to apply the changes.
■ Displaying a page to view or update the setting:
❏ Click the link in the Name column to display a new page.
❏ Enter a new attribute value in the Value field.
❏ Click Apply to apply the changes.
❏ Click Return to close the page and display the navigation tree.
9 Repeat the previous steps to view or update another configuration attribute value.
Modifying Configuration Files Using JConsoleThis task describes how to change Oracle BI settings using JConsole.
To modify configuration files using JConsole
1 Display an MS-DOS window and enter the command to run JConsole.
If the path to the JConsole executable file is not set for the machine, the command must contain the full path to its location in the JDK 1.5 home.
For example, you might enter the following command:
Node Name Component Name Configuration File
Analytics configuration Oracle BI Server NQSConfig.INI
Cluster configuration Oracle BI Cluster NQClusterConfig.INI
Isapi configuration ISAPI IsapiConfig.INI
Presentation Server Configuration
Oracle BI Presentation Services instanceconfig.xml

Oracle Business Intelligence Infrastructure Installation and Configuration Guide Version 10.1.3.2
Configuring Oracle BI Servers ■ Updating Configuration Settings Using Oracle Application Server Control or JConsole
92
D:\jdk1.5.0.6\bin\jconsole
JConsole displays the Local tab in the JConsole: Connect to Agent window.
NOTE: Oracle supports only the Local tab for connecting to JConsole.
2 If the JConsole:Connect to Agent window does not appear, complete this step.
■ Start a new MS-DOS window.
■ Change the directory to where Oracle Business Intelligence is installed.
For example, if Oracle BI is installed on the D: drive, change the directory by entering the following command:
Z:\>cd D:\OracleBI\systemmanagement
■ Enter the command to start the agent that enables JConsole to run.
For example, enter the following command:
D:\OracleBI\systemmanagement\>runagent
3 Display a new MS-DOS window and enter the command to run JConsole.
4 In the Local tab of the JConsole:Connect to Agent window, select the Class and Argument oracle.bi.analytics.management.StandardConsoleAgent, and then click Connect to display JConsole.
5 Display the MBeans page and the Attributes tab.
6 Expand the Oracle BI Management node in the navigation tree.
7 Click the Configuration node in left column to expand the navigation tree.
The navigation tree expands to display links for viewing or updating configuration attribute values. Each node in the navigation tree represents a configuration file as shown in the following table.
8 Click a node in the navigation tree, and click an item to display the details for a group of configuration file attributes in the Attributes tab.
For example, click the Cache item under the Analytics configuration node to display the attributes that relate to the cache, including a description of each attribute, and its current value.
9 Update an attribute value from the Attributes tab as follows:
■ Enter a new attribute value into the Value field for the appropriate row.
Node Name Component Name Configuration File
Analytics configuration Oracle BI Server NQSConfig.INI
Cluster configuration Oracle BI Cluster NQClusterConfig.INI
Isapi configuration ISAPI IsapiConfig.INI
Presentation Server Configuration
Oracle BI Presentation Services instanceconfig.xml

Configuring Oracle BI Servers ■ Updating Configuration Settings Using Oracle ApplicationServer Control or JConsole
Oracle Business Intelligence Infrastructure Installation and ConfigurationGuide Version 10.1.3.2
93
■ Click Refresh to apply the changes.
10 Repeat the preceding steps to view or update another configuration file attribute value.

Oracle Business Intelligence Infrastructure Installation and Configuration Guide Version 10.1.3.2
Configuring Oracle BI Servers ■ About Localizing Oracle BI Server
94
About Localizing Oracle BI ServerIf your deployment of Oracle BI Server is to be localized, see also the topics in Appendix B, “Localizing Oracle Business Intelligence Deployments”:
■ “About Changing Localization Variables for Oracle BI” on page 197
■ “Process of Maintaining Translation Tables for Oracle BI” on page 199
About Security in the Demonstration Oracle BI RepositoryThe default Oracle Business Intelligence infrastructure repository for Windows is paint.rpd. The paint.rpd demo repository is provided only when you perform a Basic installation. The demo repository is not installed when you perform an Advanced installation.
If you are upgrading from an earlier version of Oracle Business Intelligence, see the Oracle Business Intelligence Presentation Services Administration Guide before installing Oracle Business Intelligence.
When moving from a development to a production environment, be aware that Oracle BI accounts have been created with the users, roles, and passwords shown in Table 16 on page 94.
NOTE: The users in the paint.rpd provided with the Basic installation have their password expiry set to expire in 90 days. The 90 day period starts from the date on which the Oracle BI Server installation was performed. The Administrator user does not have their password set to expire.
Before deploying to a production environment, change or delete the user names and passwords to prevent security breaches.
Table 16. Default Repository Accounts Created by Oracle BI
User Type Role User Name Password
Administrator Administrator Administrator Administrator
Administrator, Oracle BI Demo Repository paint.rpd
Administrator Administrator Administrator
Administrator Administrator Administrator
Non-Administrator, Oracle BI Demo Repository paint.rpd
member of Administrators paint paint
member of Executive exec exec
member of Region Manager mgr mgr

Oracle Business Intelligence Infrastructure Installation and ConfigurationGuide Version 10.1.3.2
95
8 Configuring the Data Sources for Oracle Business Intelligence
You must configure your data sources to work with Oracle Business Intelligence. This process is part of the Roadmap for Configuring Oracle BI Infrastructure Components.
After the Oracle Business Intelligence installer is finished with the installation, there are a number of additional tasks you must complete in order to properly configure Oracle BI Server components. The number of postinstallation data source configuration tasks you must complete depends on the following factors:
■ The number and types of database platforms you are using
■ The complexity of your network setup
■ Whether or not your deployment is localized
For example, if you are installing only one DBMS on the Oracle Business Intelligence platform, you have fewer configuration tasks to perform than if you are installing Oracle BI to work with an operational application using an Oracle Business Analytics Warehouse, deploying several DBMS, or using one or more localized languages.
This chapter contains the following topics:
■ “Process of Changing the Oracle BI Database Settings” on page 96
■ “About Locating the Database Setup Script Under Linux” on page 97
■ “Changing the Oracle BI Database Type” on page 98
■ “Changing the Oracle BI Database Connection Pool Settings” on page 99
■ “About Starting the Application Repository File Default Database Type” on page 99
■ “About Configuring Initialization Blocks” on page 100
■ “Configuring Oracle Databases for the Oracle BI Server Under Windows” on page 101

Oracle Business Intelligence Infrastructure Installation and Configuration Guide Version 10.1.3.2
Configuring the Data Sources for Oracle Business Intelligence ■ Process of Changing the Oracle BI Database Settings
96
Process of Changing the Oracle BI Database SettingsThe database you use with Oracle Business Intelligence may require that you change the Oracle BI database type or database connections settings. If this is the case for your deployment, perform the following tasks:
■ Verify the database type and connection properties.
■ Physical database type.
See the topic “Changing the Oracle BI Database Type” on page 98. For more details, see the topics about setting up database objects in Oracle Business Intelligence Server Administration Guide.
■ Database connection properties.
Your operational application repository contains preconfigured database connections. You must reconfigure database connections to match your environment. See the following topics:
❏ “Changing the Oracle BI Database Connection Pool Settings” on page 99
For more details, see the topics about setting up and managing connection pools in Oracle Business Intelligence Server Administration Guide.
■ If your deployment utilizes Virtual Private Database (VPD), see the topics on VPD in the Oracle Business Intelligence Server Administration Guide.
■ If you use Oracle DBMS, you may need to perform the following tasks:
■ Configuring initialization blocks.
Typically, initialization blocks do not have to be reconfigured if you use one of the supported database platforms, including Oracle.
■ “Configuring Oracle Databases for the Oracle BI Server Under Windows” on page 101
■ If you use ODBC, you need to perform the following task:
■ Configuring an Oracle BI ODBC Data Source
■ Under Windows, configuring Oracle Business Intelligence ODBC Data Source Names is done through the Server Administration Tool. See the topic on configuring ODBC data source names in the Oracle Business Intelligence Server Administration Guide.
NOTE: For this release, the ODBC 3.5 interface is supported. The old ODBC driver has been renamed nqsodbc20.

Configuring the Data Sources for Oracle Business Intelligence ■ About Locating theDatabase Setup Script Under Linux
Oracle Business Intelligence Infrastructure Installation and ConfigurationGuide Version 10.1.3.2
97
About Locating the Database Setup Script Under LinuxOperating System: Linux
Databases: All databases.
You must verify the validity of the database setup script, because it is called from the Oracle Business Intelligence startup script. Edit the file to include the environment settings for the database client of your choice. Put your database-related setup script in the following file:
OracleBI_HOME/setup/user.sh
Examples of valid database setup scripts (excerpts from user.sh):
#!/bin/sh#set +u# For HPUX, Uncomment all the lines below:
# Oracle Parameters#---------------------------#ORACLE_HOME=/export/home/oracle/9.0.1#export ORACLE_HOME#TNS_ADMIN=$ORACLE_HOME/network/admin#export TNS_ADMIN#PATH=$ORACLE_HOME/bin:/opt/bin:$PATH#export PATH#SHLIB_PATH=$ORACLE_HOME/lib:$SHLIB_PATH:/opt/j2se/jre/lib/hp700
#---------------------------# DB2 Parameters#---------------------------#DB2_HOME=/opt/IBMdb2/V7.1#export DB2_HOME#export DB2DIR=/opt/IBMdb2/V7.1#export SQLLIB=$DB2DIR/sqllib#export DB2INSTANCE=an7u#if [ -f $SQLLIB/db2profile ]; then# . $SQLLIB/db2profile#fi#SHLIB_PATH=$DB2DIR/lib:$DB2_HOME/lib:$SHLIB_PATH:/opt/j2se/jre/lib/hp700#---------------------------#export SHLIB_PATH#set -u
NOTE: The shell script excerpts shown are examples only and are not recommendations for particular software platforms. See System Requirements and Supported Platforms.

Oracle Business Intelligence Infrastructure Installation and Configuration Guide Version 10.1.3.2
Configuring the Data Sources for Oracle Business Intelligence ■ Changing the Oracle BI Database Type
98
Changing the Oracle BI Database TypeThis topic is part of the Roadmap for Configuring Oracle BI Infrastructure Components.
If you are using other database types than the default types shipped with Oracle Business Intelligence, follow these steps to change the database type.
To change the database type
1 On a Windows computer, open the Server Administration Tool in offline mode.
NOTE: By default, the user name for the repository is Administrator, and the password for the repository is Administrator. However, your administrator may have changed the default password. For information on how to use the Server Administration Tool, see Oracle Business Intelligence Server Administration Guide.
2 In the Physical layer, double-click a database connection to open the Properties window.
3 Use the Data Source Definition drop-down list to choose the database type.
After making the database type change, click OK.
CAUTION: Be sure to change the default password before migrating to production.

Configuring the Data Sources for Oracle Business Intelligence ■ Changing the OracleBI Database Connection Pool Settings
Oracle Business Intelligence Infrastructure Installation and ConfigurationGuide Version 10.1.3.2
99
Changing the Oracle BI Database Connection Pool SettingsThis topic is part of the Roadmap for Configuring Oracle BI Infrastructure Components.
The database you use with Oracle Business Intelligence may require that you change the Oracle Business Intelligence database connection pool settings.
While testing the Oracle Business Intelligence Server installation, you may also need to change connection pool settings for items such as the name of the database, the user ID and password, and other settings for one or more repositories.
Manage database connections in the Server Administration Tool. See the Oracle Business Intelligence Server Administration Guide for the appropriate procedures.
NOTE: The Server Administration Tool is available only under Windows systems. For Linux or UNIX system deployments, make the changes on a Windows machine, and then copy the repository file to the Linux or UNIX machine using FTP.
About Starting the Application Repository File Default Database Type
The application repository file contains multiple, preconfigured database connections. By default the database type is IBM DB2. When you start the Oracle BI Server, you may receive linker errors in the NQServer.log, such as the following:
[54009] Unable to create connection pool Internal System Connection Pool in repository Star.ld.so.1: /t3fs4/AN1393/OracleBI/Bin/nqsserver.exe: fatal: libdb2.so.1: open failed: No such file or directory
[nQSError: 46029] Failed to load the DLL /t3fs4/AN1393/OracleBI/Bin/ libnqsdbgatewaydb2cli35.so. Check if 'DB2 CLI' database client is installed.
This behavior is expected.

Oracle Business Intelligence Infrastructure Installation and Configuration Guide Version 10.1.3.2
Configuring the Data Sources for Oracle Business Intelligence ■ About Configuring Initialization Blocks
100
About Configuring Initialization BlocksTypically, initialization blocks do not have to be reconfigured if you use one of the supported database platforms. The SQL for the applications repository initialization blocks and all selected tables are set for the Oracle Business Intelligence-supported database versions of the following DBMS:
■ Oracle
■ IBM DB2
■ Microsoft SQL Server
The SiebelAnalytics.rpd file uses initialization blocks that set dynamic session and repository variables. To prevent logon failures when running Oracle databases, make sure that all initialization blocks are configured to use the correct logon for Siebel operational applications.
For more information about variables, initialization blocks, and adding custom SQL in initialization blocks, see Oracle Business Intelligence Server Administration Guide.
NOTE: To test your installation, you may need to change connection pool settings for items such as the name of the database, user ID, and password.

Configuring the Data Sources for Oracle Business Intelligence ■ Configuring OracleDatabases for the Oracle BI Server Under Windows
Oracle Business Intelligence Infrastructure Installation and ConfigurationGuide Version 10.1.3.2
101
Configuring Oracle Databases for the Oracle BI Server Under WindowsOperating System: Windows only.
Databases: Oracle only.
This topic is part of the Roadmap for Configuring Oracle BI Infrastructure Components.
If your native database is Oracle, the following conditions must be true:
■ The machine running Oracle BI Server must use the Oracle Call Interface (OCI) to connect to the database.
■ In the tnsnames.ora file, the Oracle database alias (the defined entry name) must match the Data Source Name used in the repository connection pools of all physical Oracle databases.
■ In the repository file, the Oracle database alias used in the connection pools must also be the same as the Data Source Name.
For example, in the following example of a tnsnames.ora entry, the corresponding Oracle Business Intelligence repository connection pool Data Source Name is ITQA2.
ITQA2 =(DESCRIPTION =
(ADDRESS_LIST =(ADDRESS = (PROTOCOL = TCP)(HOST = ITQALAB2)(PORT = 1521))
(CONNECT_DATA =(SERVICE_NAME = ITQALAB2.corp))
)
The following procedure shows how to check repository connection pool settings against the Oracle tnsnames.ora settings.
To check that an Oracle database refers to the Oracle BI Server machine
1 Log on to the Server Administration Tool.
2 In the repository's Physical layer, double-click on the appropriate database cylinder icon. On the general tab, in the Data source definition Database field, select the appropriate Oracle database version from the drop down list. for your data source.
3 If the Connection Pool is not visible in the Physical layer, click on the (+) navigation control to the left of the appropriate database cylinder icon to expand it.
4 Double-click the appropriate Connection Pool to open the Connection pool window.
5 In the Connection Pool window, check that the following is true:
■ The Call Interface field displays the appropriate value for the release of Oracle database being used.

Oracle Business Intelligence Infrastructure Installation and Configuration Guide Version 10.1.3.2
Configuring the Data Sources for Oracle Business Intelligence ■ Configuring Oracle Databases for the Oracle BI Server Under Windows
102
■ The Data Source Name displays the Oracle database alias that you have defined in the tnsnames.ora entry.
NOTE: This Data Source Name is not the DSN name defined in Settings > Control Panel > Data Sources (ODBC).
6 In the Oracle folder, open the tnsnames.ora file.
7 Check that a valid entry name exists with the following characteristics:
■ Matches the Oracle BI repository's connection pool settings for the Data Source Name
■ Specifies the targeted Oracle physical database

Oracle Business Intelligence Infrastructure Installation and ConfigurationGuide Version 10.1.3.2
103
9 Configuring Oracle BI Presentation Services
This process is part of the Roadmap for Configuring Oracle BI Infrastructure Components.
This process describes the configuration of the components required to run the Oracle BI Presentation Services. If you included the Oracle BI Presentation Services component during the Oracle Business Intelligence Platform installation, you may be required to follow this process.
The Oracle BI Presentation Services functions as the connection between any user of Oracle Business Intelligence and the processes of the Oracle Business Intelligence Server. After the installer is finished with the Oracle BI infrastructure installation, depending on your particular deployment, there may be a number of additional tasks to complete in order to properly configure the Oracle BI Presentation Services components.
The Oracle BI Presentation Services is configured to specific default settings by the installer. The general default configuration of the Web server with the HTTP server is as follows:
1 A third-party Web integration server is configured.
■ “Configuring HTTP Web Servers” on page 105
■ “Testing the Oracle BI Presentation Services” on page 110
2 A link from the third-party Web server to the Oracle BI Presentation Services is created.
■ If Oracle BI Presentation Services is installed on a different machine than Oracle Business Intelligence Server, configure the Oracle BI Presentation Services machine as shown in the topic “Testing the Oracle BI Presentation Services” on page 110.
■ If you plan to use the Microsoft ISAPI Plug-in, and if the Microsoft IIS service and Oracle BI Presentation Services are to run on different machines, see the topic “Installing Oracle BI Components on Different Machines” on page 49.
You need to change this default configuration only if you plan to deploy the WAR file to an alternative third-party Web server. In this case, you change the following settings:
■ sawserver.Port
■ sawserver.Host
This topic area includes the following topics:
■ “Configuring HTTP Web Servers” on page 105
■ “Editing the web.xml File” on page 106
■ “Creating a WAR File for Oracle BI Presentation Services” on page 107
■ “Configuring the Presentation Catalog for More Than 4000 Users” on page 111
■ “Deploying a WAR File” on page 108
■ “Configuring the ISAPI Plug-In” on page 109
■ “Configuring Oracle BI Presentation Services to Access Multiple Repositories” on page 110

Oracle Business Intelligence Infrastructure Installation and Configuration Guide Version 10.1.3.2
Configuring Oracle BI Presentation Services ■
104
■ “Configuring Oracle BI Presentation Services to Access Multiple Repositories” on page 110
■ “Testing the Oracle BI Presentation Services” on page 110
About Oracle BI Presentation Services ComponentsThe Oracle Business Intelligence Web component consists of the Oracle BI Presentation Services and Oracle BI Presentation Services Plug-in running in the Web (or HTTP) integration server. The Presentation Services and Plug-in run as separate processes.
NOTE: The Oracle BI Presentation Services, Oracle BI Client, and Oracle BI Server components can be installed to run on separate machines.
■ The Oracle BI Presentation Services process hosts most of the business logic of the Web server and performs all the functions.
■ Under Windows, the process is sawserver.exe
■ Under Linux, the process is sawserver
■ The Oracle BI Presentation Services Plug-in consists of an ISAPI Plug-in for Microsoft IIS Web Servers and a Java Servlet for J2EE application servers. HTTP requests are redirected to Oracle BI Presentation Services. The servlet conforms to the Java Servlet 2.2 specification, and therefore any additional configuration must take this servlet into account.
The Oracle BI Presentation Services Plug-in communicates with Oracle BI Presentation Services using a proprietary TCP/IP based protocol. In this protocol the HTTP server acts as a client and initiates new connections, while the Oracle BI Presentation Services listens for incoming requests.
NOTE: Make sure that this special TCP/IP protocol is allowed by all firewalls or proxy servers in use. The default TCP/IP listening port for Oracle BI Presentation Services is 9710.

Configuring Oracle BI Presentation Services ■ Configuring HTTP Web Servers
Oracle Business Intelligence Infrastructure Installation and ConfigurationGuide Version 10.1.3.2
105
Configuring HTTP Web ServersThis topic is part of “Configuring Oracle BI Presentation Services.”
The basic methods of configuring a third-party Web integration (or HTTP) server to work with Oracle BI Presentation Services are the following:
Using a WebARchive (WAR) File. This is standard and supported by all J2EE application servers.
■ “Editing the web.xml File” on page 106
■ “Deploying a WAR File” on page 108
If you are deploying Web servers under Windows systems, you can either deploy the ISAPI extension or deploy the WAR file. If you are using the basic installation type with OC4J, the WAR file is automatically deployed into OC4J by the installer.

Oracle Business Intelligence Infrastructure Installation and Configuration Guide Version 10.1.3.2
Configuring Oracle BI Presentation Services ■ Editing the web.xml File
106
Editing the web.xml FileThis task is part of “Configuring Oracle BI Presentation Services.”
If you are configuring a third-party Web integration (or HTTP) server to work with Oracle BI Presentation Services, perform this task first, because the edited web.xml file is included in the generated analytics.war file.
You need to edit the web.xml file to reconfigure the Oracle BI Presentation Services location and listening port if one of the following conditions is true for your deployment:
■ The HTTP server and the Oracle BI Presentation Services are running on different machines
■ The Web server is configured to use a different TCP/IP port from the default (9710)
CAUTION: Make sure that XML syntax is strictly followed when editing this file. Any XML syntax errors may result in your virtual server failing to start.
In the web.xml file, the XML elements that configure the Java servlet are shown in the following excerpt:
<servlet><servlet-name>SAWBridge</servlet-name>
<servlet-class>com.siebel.analytics.web.SAWBridge</servlet-class><init-param>
<param-name>oracle.bi.presentation.sawserver.Host</param-name><param-value>localhost</param-value>
</init-param><init-param>
<param-name>oracle.bi.presentation.sawserver.Port</param-name><param-value>9710</param-value>
</init-param></servlet>
NOTE: Back up the web.xml file before changing it.
To edit the web.xml file
1 In the OracleBI_HOME/web/app/WEB-INF directory, locate the web.xml file.
2 Using an XML editor, open the web.xml file.
3 Change the values of the following <param-name> parameters to reflect the correct settings:
■ oracle.bi.presentation.sawserver.Host
■ oracle.bi.presentation.sawserver.Port
4 Save and close the web.xml file.

Configuring Oracle BI Presentation Services ■ Creating a WAR File for Oracle BIPresentation Services
Oracle Business Intelligence Infrastructure Installation and ConfigurationGuide Version 10.1.3.2
107
Creating a WAR File for Oracle BI Presentation ServicesNOTE: Perform the procedure “Editing the web.xml File” on page 106 before performing this procedure, because the edited web.xml file is included in the generated analytics.war file.
This task is part of “Configuring HTTP Web Servers.”
A default prepackaged WebARchive (WAR) file, analytics.war, is included with the Oracle BI Presentation Services installation, located as shown in the following table.
NOTE: Oracle Business Intelligence also provides a prepackaged Enterprise ARchive (EAR) file, analytics.ear.
However, if you modify the web.xml file (for example, to reconfigure the Web server location and listening port), then you should recreate the analytics.war file. This task uses the jar utility included in the Java JDK 1.5 package (found in the <JAVA_HOME>/bin directory).
NOTE: You may need to have access to a JDK (not just a JRE) for creating the WAR file. The location of JAVA_HOME is the same that was entered during the installation.
This procedure uses the following file locations and commands:
To create or recreate a WAR file
1 Navigate to the Oracle Business Intelligence installation directory shown in the preceding table.
2 To create the WAR file, run the jar command shown in the preceding table.
NOTE: You must include the period at the end of the command.
Windows Platform
Location of analytics.war file OracleBI_HOME\web
Jar command jar -cf analytics.war -C app .

Oracle Business Intelligence Infrastructure Installation and Configuration Guide Version 10.1.3.2
Configuring Oracle BI Presentation Services ■ Deploying a WAR File
108
Deploying a WAR FileThis task is part of “Configuring HTTP Web Servers.”
If you are configuring a third-party Web integration (or HTTP) server to work with Oracle BI Presentation Services using the method Creating a WAR File for Oracle BI Presentation Services, the specific WAR file you modify depends on the Web application server you are using. Consult your Web server documentation for product-specific instructions, and follow the following general steps.
NOTE: To configure the Oracle Business Intelligence Web ReportUI Portlet for WebSphere, see the Oracle Business Intelligence Presentation Services Administration Guide.
To deploy a WAR file for Oracle BI Presentation Services
1 Using HTTP Web server-specific tools, deploy the Web application contained in the analytics.war file.
2 Assign the URL /analytics to the analytics.war file.
NOTE: If you chose to use OC4J as the application server, this step is done by the installer.

Configuring Oracle BI Presentation Services ■ Configuring the ISAPI Plug-In
Oracle Business Intelligence Infrastructure Installation and ConfigurationGuide Version 10.1.3.2
109
Configuring the ISAPI Plug-InOperating System: Windows only.
This topic is part of the process “Configuring Oracle BI Presentation Services.”
If the Oracle BI Presentation Services and Microsoft IIS servers are to run on different machines, thus separating the HTTP Server components from the Oracle BI infrastructure components, this topic becomes a task in the process “Configuring HTTP Web Servers.”
The ability to separate the Web ISAPI plug-in and the Web service onto different machines provides control over network and resource allocation and partitioning when firewalls are used. The Presentation Services ISAPI Plug-in ties the IIS web server to Oracle BI Presentation Services. All of the settings can be configured through the isapiconfig.xml file, located in OracleBIData_HOME/web/config/. The isapiconfig.xml file contains the following default entries:
<?xml version="1.0" encoding="utf-8"?><WebConfig>
<ServerInstance><ServerConnectInfo address="localhost" port="9710"/>
</ServerInstance></WebConfig>
NOTE: Port 9710 is the default port on which the Oracle BI Presentation Services listens to remote procedure calls from one or more plug-ins.
To configure an ISAPI plug-in for Oracle BI Presentation Services
1 On the machine hosting the Oracle BI Presentation Services, open the isapiconfig.xml file.
2 Replace the following default values:
For example:
<?xml version="1.0" encoding="utf-8"?><WebConfig>
<ServerInstance><ServerConnectInfo address="sastest" port="9710"/>
</ServerInstance></WebConfig>
NOTE: Make sure that the fully-qualified domain name of the Oracle BI Presentation Services is set up as a host with its own IP address.
3 Save the file when you are done.
Default Value Replace With
ServerConnectInfo address Fully-qualified domain name of the Oracle BI Presentation Services, set up as a host with its own IP address
ServerConnectInfo port Oracle BI Presentation Services listening port

Oracle Business Intelligence Infrastructure Installation and Configuration Guide Version 10.1.3.2
Configuring Oracle BI Presentation Services ■ Testing the Oracle BI Presentation Services
110
Testing the Oracle BI Presentation ServicesThis task is part of “Configuring Oracle BI Presentation Services.”
After configuring the HTTP integration server, test the Oracle Business Intelligence Web server.
To test the Web server installation
1 Start the Oracle BI Presentation Services.
(See the topic “Starting or Restarting Oracle BI Servers” on page 80)
2 Start the integration server process being used for Oracle BI Presentation Services.
3 In the Windows Start menu, navigate to Programs > Oracle Business Intelligence > Presentation Services.
This opens a Web browser at http://<ServerName>:<port number>/analytics/saw.dll?Dashboard.
If you see a login page, you have successfully installed Oracle BI Presentation Services.
Configuring Oracle BI Presentation Services to Access Multiple RepositoriesAlthough users can have multiple repositories active on an Oracle BI Server machine, they can only access one repository per Oracle BI Presentation Services instance.
The following procedure shows how to configure Oracle BI Presentation Services to access multiple repositories.
To configure Presentation Services to access multiple repositories
1 Install the Oracle BI Presentation Services component on each machine that must serve as a web server.
2 Create a SAS NQSODBC driver on the Presentation Services machine to use the appropriate repository.
■ Configure a NQSODBC System DSN that points to the Presentation Services machine.
■ Within the ODBC configuration, check the box Change the default repository to.
■ Enter the repository to use for this Presentation Services machine (from the Logical Repository Name entry in the NQSConfig.INI REPOSITORY section).
3 In the instanceconfig.xml file on the Presentation Services machine, change the element <DSN> to be the name of the ODBC driver DSN defined in Step 2.
4 Start the Oracle BI Presentation Services.

Configuring Oracle BI Presentation Services ■ Configuring the Presentation Catalog forMore Than 4000 Users
Oracle Business Intelligence Infrastructure Installation and ConfigurationGuide Version 10.1.3.2
111
5 Control the repository to access from a client browser by substituting the appropriate web server machine name or IP address in the URL:
http://<machine_name_or_IP_address>/analytics/saw.dll?
Configuring the Presentation Catalog for More Than 4000 UsersThis topic is part of “Configuring Oracle BI Presentation Services.”
If your deployment of Oracle BI Presentation Services has more than 4000 Presentation Catalog users, or if you plan to have more than 4000 Presentation Catalog users in the future, you need to turn on the hashing of users’ home directories to take care of a file system limitation.
This element must be set immediately after installing Oracle BI Presentation Services to be effective.
For details, see the Oracle Business Intelligence Presentation Services Administration Guide.
Configuring BI Publisher for Oracle BI Presentation ServicesYour deployment may include Oracle BI Publisher, which can be configured from the Oracle BI Answers screen. For detailed instructions on configuring Oracle BI Publisher, see Chapter 11, “Configuring BI Publisher Reporting Tool.”

Oracle Business Intelligence Infrastructure Installation and Configuration Guide Version 10.1.3.2
Configuring Oracle BI Presentation Services ■ Configuring BI Publisher for Oracle BI Presentation Services
112

Oracle Business Intelligence Infrastructure Installation and ConfigurationGuide Version 10.1.3.2
113
10 Configuring Oracle Business Intelligence Scheduler
This topic area is part of the Roadmap for Configuring Oracle BI Infrastructure Components on page 27.
After the Oracle Business Intelligence installer is finished, there are a number of additional tasks you must complete in order to properly configure Oracle Business Intelligence Scheduler server components.
You must configure the Oracle BI Scheduler before running Oracle Business Intelligence. Otherwise, the Scheduler service fails to start and the Delivers component does not function.
TIP: If you are migrating an Oracle Business Intelligence environment to a new system, make sure that you also migrate the Oracle Business Intelligence Server repository file and the Scheduler tables. The Scheduler tables are required for Oracle Delivers iBots.
This topic area contains the following topics:
■ “Oracle BI Scheduler Components and Functions” on page 114
■ “About Oracle BI Scheduler Tables” on page 115
■ “Process of Configuring Oracle BI Scheduler” on page 116
■ “Creating Oracle BI Scheduler Databases and Tables” on page 116
■ “Creating Oracle BI Scheduler Database and Tables for Specific Databases” on page 116
■ “Configuring Databases for the Oracle BI Scheduler” on page 118
■ “Changing Oracle BI Scheduler Table Names” on page 119
■ “About the Oracle BI Scheduler Administrator” on page 121
■ “Setting Oracle BI Scheduler Configuration Options” on page 121
■ “Configuring Oracle BI Scheduler” on page 122
■ “Configuring Oracle BI Presentation Services to Communicate With Oracle BI Scheduler” on page 124
■ “Specifying the Scheduler Host and Port in Presentation Services Configuration File” on page 124
■ “Adding Scheduler Administrator Credentials to Oracle BI Presentation Services Credential Store” on page 126
■ “Configuring Oracle BI Presentation Services to Identify the Credential Store” on page 128

Oracle Business Intelligence Infrastructure Installation and Configuration Guide Version 10.1.3.2
Configuring Oracle Business Intelligence Scheduler ■ Oracle BI Scheduler Components and Functions
114
Oracle BI Scheduler Components and FunctionsThis section contains the following general topics:
■ “Oracle BI Scheduler Server Components” on page 114
■ “Oracle BI Scheduler Server Functions” on page 114
■ “About Oracle BI Scheduler Tables” on page 115
Oracle BI Scheduler Server ComponentsThe Scheduler components consist of:
■ Scheduler Job Manager
■ The Oracle BI Scheduler Service process:
■ Windows operating systems: nqscheduler.exe
■ Linux operating systems: nqscheduler
■ Scheduler Configuration (command line):
■ Windows operating systems: schconfig.exe
■ Linux operating systems: schconfig
■ Scheduler Configuration (command line):
■ Windows operating systems: saschinvoke.exe
■ Linux operating systems: saschinvoke
Oracle BI Scheduler Server FunctionsThe Scheduler uses a single commercial back-end database to store pertinent information about a job, its instances, and its parameters. The Scheduler works with all the supported databases for Oracle Business Intelligence. For the complete list of supported databases, see System Requirements and Supported Platforms.
The Scheduler service starts only if the back-end database satisfies the following conditions:
■ Configured. There is a one-to-one relationship between the back-end database and Oracle BI Scheduler. Do not configure multiple Oracle BI Scheduler applications to use a single back-end database.
■ Operational. For information about the specific back-end databases supported by Oracle BI Scheduler, see System Requirements and Supported Platforms on OTN.
■ Mixed Authentication Mode. For example, if the database is SQL Server, then the security mode should be set to allow both SQL Server and Windows Authentication for logon.
NOTE: Do not use operating system authentication for the back-end database login. If you do, the Scheduler service may not start.

Configuring Oracle Business Intelligence Scheduler ■ Oracle BI Scheduler Componentsand Functions
Oracle Business Intelligence Infrastructure Installation and ConfigurationGuide Version 10.1.3.2
115
About Oracle BI Scheduler TablesThis topic is part of the “Oracle BI Scheduler Components and Functions.”
Table 17 gives brief descriptions of the database tables used by Oracle BI Scheduler. The scripts are located in OracleBI_HOME\server\Schema.
If usage tracking is enabled in NQSConfig.INI, then the Oracle BI Server generates Usage Tracking data files. A sample JavaScript is provided, which extracts information from the Usage Tracking files and loads them to a table in the relational database. The S_NQ_ACCT table stores all the information regarding Accounting Data. (For information about usage tracking, see Oracle Business Intelligence Server Administration Guide.)
Table 17. Tables Used by Oracle Business Intelligence Scheduler
Table Name Table Description
S_NQ_JOB This table is used by Scheduler to store information about scheduled jobs.
S_NQ_INSTANCE The S_NQ_INSTANCE table stores information about scheduled job instances.
S_NQ_ERR_MSG This table stores error messages for Scheduler job instances that do not complete successfully.
S_NQ_JOB_PARAM This table holds information about Scheduler job parameters for scheduled jobs.

Oracle Business Intelligence Infrastructure Installation and Configuration Guide Version 10.1.3.2
Configuring Oracle Business Intelligence Scheduler ■ Process of Configuring Oracle BI Scheduler
116
Process of Configuring Oracle BI SchedulerThis topic is part of “Configuring Oracle Business Intelligence Scheduler.”
NOTE: If you are not using Scheduler, you do not need the information in this topic.
Depending upon your specific deployment, you may need to refer to one or more of the following Oracle BI Scheduler configuration topics:
■ “Creating Oracle BI Scheduler Databases and Tables” on page 116
■ “Creating Oracle BI Scheduler Database and Tables for Specific Databases” on page 116
■ “Configuring Oracle BI Presentation Services to Communicate With Oracle BI Scheduler” on page 124
For all other Scheduler Server configuration tasks involving the Job Manager or scripting, see the Oracle Business Intelligence Scheduler Guide, located under the Windows directory OracleBI_HOME\server\Document.
Creating Oracle BI Scheduler Databases and TablesThis task is part of the “Process of Configuring Oracle BI Scheduler.”
You can either use an existing database or create a new database in which to store the tables.
The following procedure shows how to create a generic database and tables.
To create a database and tables for use by Oracle BI Scheduler
1 Make sure that you have a valid database administrator account to create a database and tables.
2 Create the database, or use an existing database.
3 Create the Scheduler tables by executing SAJOBS.xxx.sql (where xxx is the database type).
Use the appropriate procedure for your back-end database, as shown in “Creating Oracle BI Scheduler Database and Tables for Specific Databases” on page 116.
4 If you are using usage statistics, create the table in SAACCT.xxx.sql.
Creating Oracle BI Scheduler Database and Tables for Specific DatabasesThis task is part of the process of “Creating Oracle BI Scheduler Databases and Tables.”
The following procedures describe how to create a database and tables for specific relational databases:
Configuring Oracle Business Intelligence Scheduler ■ Creating Oracle BI SchedulerDatabases and Tables
Oracle Business Intelligence Infrastructure Installation and ConfigurationGuide Version 10.1.3.2
117
■ Oracle Database Server
See the topic “Creating a Scheduler Database and Tables for Oracle Database Server” on page 117
■ Microsoft SQL Server
See the topic “Creating a Scheduler Database and Tables for SQL Server” on page 117.
NOTE: Teradata is not supported in this version of Scheduler.
Creating a Scheduler Database and Tables for Oracle Database ServerDatabases: Oracle only.
Use the following procedure to create a Scheduler database and tables for Oracle.
NOTE: For usage statistics, create the table in SAACCT.Oracle.sql.
To create a database and tables for Oracle
1 Proceed in one of the two following ways:
■ Create a new database named S_NQ_SCHED, and create a user named S_NQ_SCHED.
■ In one of your existing databases, create a user named S_NQ_SCHED.
2 Provide your own password to the user S_NQ_SCHED.
3 Using the Oracle Net configuration tool, create an Oracle Service to the current S_NQ_SCHED database with this user ID and password.
4 Using the SQL*Plus Worksheet or the SQL*Plus tool, open the file SAJOBS.Oracle.sql and execute it to create Oracle Business Intelligence Scheduler tables.
5 Open the file SAACCT.Oracle.sql and execute it to create the Accounting table.
Creating a Scheduler Database and Tables for SQL Server Databases: MS SQL Server only.
Use the following procedure to create a Scheduler database and tables for Microsoft SQL Server.
NOTE: For usage statistics, create the table in SAACCT.MSSQL.sql.
To create a database and tables for Microsoft SQL Server
1 Create a database named S_NQ_SCHED using SQL Server Enterprise Manager.
Make sure that you have enough free disk space to accommodate Oracle Business Intelligence Scheduler Tables (a minimum of 500 MB for Oracle Business Intelligence applications).
2 Using S_NQ_SCHED as the current database, use SQL Query Analyzer to open the file SAJOBS.MSSQL.sql and execute it to create the Oracle Business Intelligence Scheduler tables.
3 Open the file SAACCT.MSSQL.sql and execute it to create the Accounting table.

Oracle Business Intelligence Infrastructure Installation and Configuration Guide Version 10.1.3.2
Configuring Oracle Business Intelligence Scheduler ■ Creating Oracle BI Scheduler Databases and Tables
118
Configuring Databases for the Oracle BI SchedulerThis task is part of the “Process of Configuring Oracle BI Scheduler.”
The following procedures describe how to configure the back-end database and tables:
■ Oracle Database Server
See the topic “Configuring Oracle Server Databases for the Oracle BI Scheduler” on page 118
■ Microsoft SQL Server
See the topic “Configuring SQL Server Databases for the Oracle BI Scheduler” on page 118.
Configuring Oracle Server Databases for the Oracle BI SchedulerThe Data Source Name used in the Job Manager Scheduler configuration must match the Oracle database service alias created in Step 3 of “Creating a Scheduler Database and Tables for Oracle Database Server” on page 117.
To configure the Oracle database using Job Manager
1 From the Windows Start menu, select Programs > Oracle Business Intelligence > Job Manager.
2 In Job Manager, select File > Configuration Options.
3 In the Connection Pool section, enter the Oracle database service alias for the Data Source Name.
Select the appropriate Database Type from the drop down list (for example, Oracle 10g R1).
4 Enter the username and password for the user S_NQ_SCHED created in “Creating a Scheduler Database and Tables for Oracle Database Server” on page 117.
The Call Interface is updated automatically according to the Database Type chosen.
5 Exit the Job Manager.
6 Start the Oracle BI Scheduler Service from Windows Start Menu.
Configuring SQL Server Databases for the Oracle BI SchedulerThe Data Source Name used in the Job Manager Scheduler configuration must match an existing ODBC Data Source Name (DSN) for the SQL Server S_NQ_SCHED database used in “Creating a Scheduler Database and Tables for SQL Server” on page 117.
If you do not have a System DSN entry, create a new one as shown in the following procedure.
To configure the SQL Server database
1 From the Windows Start menu, select Settings > Control Panel > Administrative Tools > Data Sources (ODBC).
2 Start the ODBC Data Source Administrator.
3 Select the System DSN tab, and then click Add.

Configuring Oracle Business Intelligence Scheduler ■ Creating Oracle BI SchedulerDatabases and Tables
Oracle Business Intelligence Infrastructure Installation and ConfigurationGuide Version 10.1.3.2
119
4 Select the driver SQL Server, and then click Finish.
5 In the wizard Create a New Data Source to SQL Server, do the following:
a Enter a name and description for the data source.
b Select your SQL Server from the drop down Server list, and then click Next.
c For server verification of the login ID authenticity, select the appropriate authentication for the S_NQ_SCHED SQL Server database that was created in “Creating a Scheduler Database and Tables for SQL Server” on page 117. Click Next.
6 Select the tick box Change the default database to and select the S_NQ_SCHED database from the drop down list. Click Next.
7 Update any language or log file settings if appropriate, and then click Finish.
8 To verify your connection settings, click the Test Data Source button, and then click OK.
9 Click OK to exit ODBC Data Source Administrator.
Changing Oracle BI Scheduler Table NamesYou can change the names of the tables that Oracle BI Scheduler uses by adding settings to the Oracle BI Scheduler configuration file, instanceconfig.xml, located in the directory OracleBIData_HOME\scheduler\config.
NOTE: For organizations that use Oracle Application Server, Oracle recommends that you use Oracle Application Server Control to modify configuration files. For organizations that use other application servers, Oracle recommends that you use JConsole. For more information, see the topic “Updating Configuration Settings Using Oracle Application Server Control or JConsole” on page 89.
The following procedure shows how to change Oracle BI Scheduler table names. For this procedure, a new tag, DB Column Names, has been created as an example.
To change Oracle Business Intelligence Scheduler table names
1 Using an XML editor, open the instanceconfig.xml file.
2 Create a new tag named DB Column Names.

Oracle Business Intelligence Infrastructure Installation and Configuration Guide Version 10.1.3.2
Configuring Oracle Business Intelligence Scheduler ■ Creating Oracle BI Scheduler Databases and Tables
120
3 For each of the entries under the tag DB Column Names, add the parameter and string values shown in the following table. The values created in the data string become the values used for Oracle BI Scheduler table names.
NOTE: The data types for each column should remain true to the intent of the schema. For example, if the job ID is defined as an integer type, do not change it to a varchar type. However, increasing the number of characters in a varchar column is an acceptable change.
4 Restart the Oracle BI Scheduler server.
Parameter Name Type String Value
TABLE_JOBS REG_SA S_NQ_JOB
TABLE_INSTANCES REG_SA S_NQ_INSTANCE
TABLE_PARAMS REG_SA S_NQ_JOB_PARAM
TABLE_ERRMSGS REG_SA S_NQ_ERR_MSG
Configuring Oracle Business Intelligence Scheduler ■ Setting Oracle BI SchedulerConfiguration Options
Oracle Business Intelligence Infrastructure Installation and ConfigurationGuide Version 10.1.3.2
121
Setting Oracle BI Scheduler Configuration OptionsThis topic area describes the initial configuration tasks you must perform in the role of Scheduler Administrator. It contains the following topics:
■ “About the Oracle BI Scheduler Administrator” on page 121
■ “Configuring Oracle BI Scheduler” on page 122
■ “Configuring Oracle BI Presentation Services to Communicate With Oracle BI Scheduler.”
About the Oracle BI Scheduler AdministratorAs part of the process of setting Oracle BI Scheduler configuration options, you will need to specify a username and password for the Scheduler Administrator. The Scheduler administrator must be a user in the Oracle BI repository (.rpd file) and have the Administrator group membership assigned.
If you do not want to create a new administrator for Scheduler, you can set the Scheduler administrator credentials to those of the Oracle BI user, Administrator, that exists in the repository.
NOTE: The Scheduler Administrator is referred to in the following topics as the SchedulerAdmin.
For more information on the Administrator user in the repository, and on creating users and granting Group membership, see the Oracle Business Intelligence Server Administration Guide.
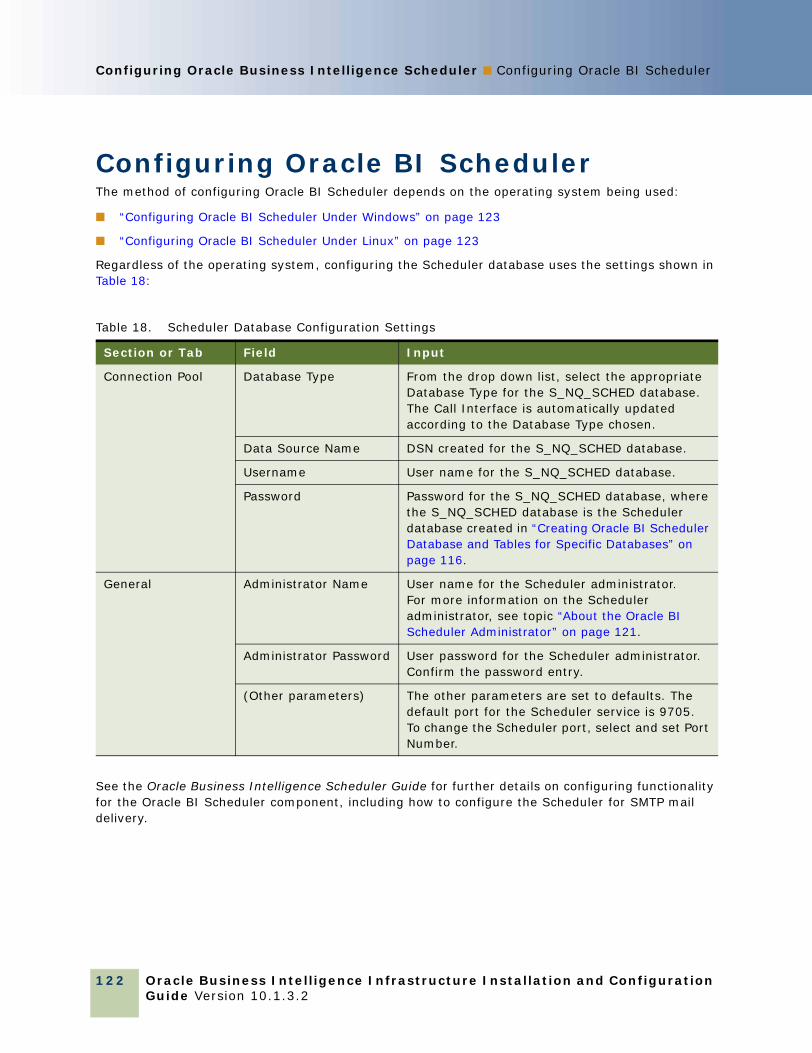
Oracle Business Intelligence Infrastructure Installation and Configuration Guide Version 10.1.3.2
Configuring Oracle Business Intelligence Scheduler ■ Configuring Oracle BI Scheduler
122
Configuring Oracle BI SchedulerThe method of configuring Oracle BI Scheduler depends on the operating system being used:
■ “Configuring Oracle BI Scheduler Under Windows” on page 123
■ “Configuring Oracle BI Scheduler Under Linux” on page 123
Regardless of the operating system, configuring the Scheduler database uses the settings shown in Table 18:
See the Oracle Business Intelligence Scheduler Guide for further details on configuring functionality for the Oracle BI Scheduler component, including how to configure the Scheduler for SMTP mail delivery.
Table 18. Scheduler Database Configuration Settings
Section or Tab Field Input
Connection Pool Database Type From the drop down list, select the appropriate Database Type for the S_NQ_SCHED database.The Call Interface is automatically updated according to the Database Type chosen.
Data Source Name DSN created for the S_NQ_SCHED database.
Username User name for the S_NQ_SCHED database.
Password Password for the S_NQ_SCHED database, where the S_NQ_SCHED database is the Scheduler database created in “Creating Oracle BI Scheduler Database and Tables for Specific Databases” on page 116.
General Administrator Name User name for the Scheduler administrator.For more information on the Scheduler administrator, see topic “About the Oracle BI Scheduler Administrator” on page 121.
Administrator Password User password for the Scheduler administrator. Confirm the password entry.
(Other parameters) The other parameters are set to defaults. The default port for the Scheduler service is 9705. To change the Scheduler port, select and set Port Number.
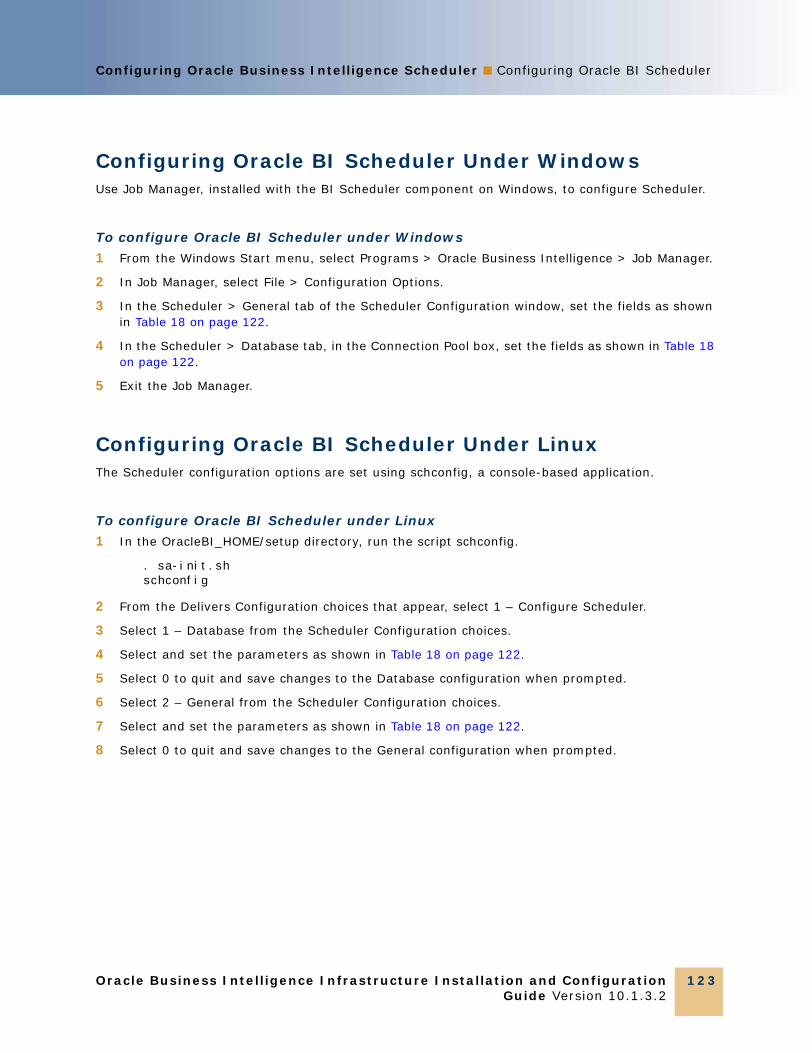
Configuring Oracle Business Intelligence Scheduler ■ Configuring Oracle BI Scheduler
Oracle Business Intelligence Infrastructure Installation and ConfigurationGuide Version 10.1.3.2
123
Configuring Oracle BI Scheduler Under WindowsUse Job Manager, installed with the BI Scheduler component on Windows, to configure Scheduler.
To configure Oracle BI Scheduler under Windows
1 From the Windows Start menu, select Programs > Oracle Business Intelligence > Job Manager.
2 In Job Manager, select File > Configuration Options.
3 In the Scheduler > General tab of the Scheduler Configuration window, set the fields as shown in Table 18 on page 122.
4 In the Scheduler > Database tab, in the Connection Pool box, set the fields as shown in Table 18 on page 122.
5 Exit the Job Manager.
Configuring Oracle BI Scheduler Under LinuxThe Scheduler configuration options are set using schconfig, a console-based application.
To configure Oracle BI Scheduler under Linux
1 In the OracleBI_HOME/setup directory, run the script schconfig.
. sa-init.shschconfig
2 From the Delivers Configuration choices that appear, select 1 – Configure Scheduler.
3 Select 1 – Database from the Scheduler Configuration choices.
4 Select and set the parameters as shown in Table 18 on page 122.
5 Select 0 to quit and save changes to the Database configuration when prompted.
6 Select 2 – General from the Scheduler Configuration choices.
7 Select and set the parameters as shown in Table 18 on page 122.
8 Select 0 to quit and save changes to the General configuration when prompted.

Oracle Business Intelligence Infrastructure Installation and Configuration Guide Version 10.1.3.2
Configuring Oracle Business Intelligence Scheduler ■ Configuring Oracle BI Presentation Services to Communicate With Oracle BI Scheduler
124
Configuring Oracle BI Presentation Services to Communicate With Oracle BI SchedulerThis topic is part of “Setting Oracle BI Scheduler Configuration Options.”
As shown by the “Diagram of Oracle BI Infrastructure Deployment” on page 28, the Oracle BI Scheduler and Oracle BI Presentation Services servers work together. This topic covers their configuration.
When the Oracle Business Intelligence Scheduler and the Oracle BI Presentation Services are not installed on the same machine, you must point the Oracle BI Presentation Services machine to the Scheduler machine address. See the topic “Specifying the Scheduler Host and Port in Presentation Services Configuration File” on page 124.
You must provide the Oracle BI Presentation Services machine with the credentials to use in order to establish a connection with the Scheduler. See the following topics:
■ “Adding Scheduler Administrator Credentials to Oracle BI Presentation Services Credential Store” on page 126
■ “Configuring Oracle BI Presentation Services to Identify the Credential Store” on page 128
Specifying the Scheduler Host and Port in Presentation Services Configuration FileThis topic is part of “Configuring Oracle BI Presentation Services to Communicate With Oracle BI Scheduler.”
The Scheduler host name and port are specified in the instanceconfig.xml file for Oracle BI Presentation Services. The Presentation Services instanceconfig.xml file is located in the directory OracleBIData_HOME\web\config on Windows, and in OracleBIData_HOME/web/config on Linux.
■ When Oracle BI Scheduler and Oracle BI Presentation Services components are installed together on the same machine, the installer sets the instanceconfig.xml setting to the local host and default Scheduler port of 9705.
If Oracle BI Scheduler and Oracle BI Presentation Services are installed on the same machine and Scheduler uses the default port 9705, proceed to topic “Adding Scheduler Administrator Credentials to Oracle BI Presentation Services Credential Store” on page 126.
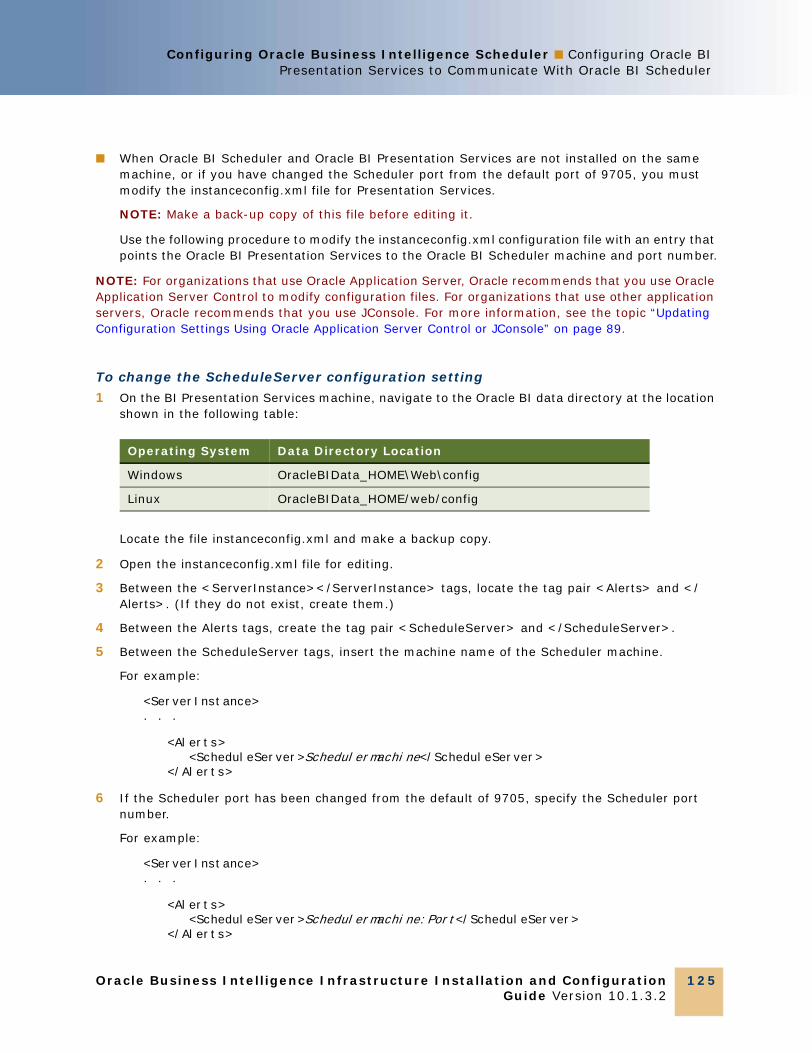
Configuring Oracle Business Intelligence Scheduler ■ Configuring Oracle BIPresentation Services to Communicate With Oracle BI Scheduler
Oracle Business Intelligence Infrastructure Installation and ConfigurationGuide Version 10.1.3.2
125
■ When Oracle BI Scheduler and Oracle BI Presentation Services are not installed on the same machine, or if you have changed the Scheduler port from the default port of 9705, you must modify the instanceconfig.xml file for Presentation Services.
NOTE: Make a back-up copy of this file before editing it.
Use the following procedure to modify the instanceconfig.xml configuration file with an entry that points the Oracle BI Presentation Services to the Oracle BI Scheduler machine and port number.
NOTE: For organizations that use Oracle Application Server, Oracle recommends that you use Oracle Application Server Control to modify configuration files. For organizations that use other application servers, Oracle recommends that you use JConsole. For more information, see the topic “Updating Configuration Settings Using Oracle Application Server Control or JConsole” on page 89.
To change the ScheduleServer configuration setting
1 On the BI Presentation Services machine, navigate to the Oracle BI data directory at the location shown in the following table:
Locate the file instanceconfig.xml and make a backup copy.
2 Open the instanceconfig.xml file for editing.
3 Between the <ServerInstance></ServerInstance> tags, locate the tag pair <Alerts> and </Alerts>. (If they do not exist, create them.)
4 Between the Alerts tags, create the tag pair <ScheduleServer> and </ScheduleServer>.
5 Between the ScheduleServer tags, insert the machine name of the Scheduler machine.
For example:
<ServerInstance>. . .
<Alerts><ScheduleServer>Schedulermachine</ScheduleServer>
</Alerts>
6 If the Scheduler port has been changed from the default of 9705, specify the Scheduler port number.
For example:
<ServerInstance>. . .
<Alerts><ScheduleServer>Schedulermachine:Port</ScheduleServer>
</Alerts>
Operating System Data Directory Location
Windows OracleBIData_HOME\Web\config
Linux OracleBIData_HOME/web/config

Oracle Business Intelligence Infrastructure Installation and Configuration Guide Version 10.1.3.2
Configuring Oracle Business Intelligence Scheduler ■ Configuring Oracle BI Presentation Services to Communicate With Oracle BI Scheduler
126
7 Save the file when you are done.
Your changes take effect when the Oracle BI Presentation Services service is restarted.
Adding Scheduler Administrator Credentials to Oracle BI Presentation Services Credential StoreThis topic is part of “Configuring Oracle BI Presentation Services to Communicate With Oracle BI Scheduler.”
Oracle BI Presentation Services must be able to identify the Scheduler administrator and obtain the credentials to establish a connection with the Scheduler. Presentation Services stores the credentials that it uses in a Presentation Services Credential Store. The Scheduler administrator credentials must be added to the credential store, under the alias admin. To obtain the Scheduler Administrator credentials, Oracle BI Presentation Services searches the credential store for a username-password credential with the alias admin. For more information on the Presentation Services Credential Store, refer to the Oracle Business Intelligence Enterprise Edition Deployment Guide.
Use the following procedure to add the Scheduler administrator credentials to the Presentation Services Credential Store with the admin alias. This procedure adds the Scheduler administrator credentials to a proprietary XML file credential store called credentialstore.xml. The default location of this file is OracleBIData_HOME\web\config on Windows and OracleBIData_HOME/web/config on Linux.
To add Scheduler administrator credentials to the credential store
1 Open a command prompt window or command shell on the machine where Oracle BI Presentation Services has been installed.
2 Navigate to the directory OracleBI_HOME\web\bin on Windows. On Linux, navigate to OracleBI_HOME/web/bin.
3 Execute the CryptoTools utility to add the Scheduler Administrator credentials to the Presentation Services Credential Store:
cryptotools credstore -add -infile OracleBIData_HOME/web/config/credentialstore.xml
For more information on the CryptoTools utility, its syntax and supported sub-commands, refer to the Oracle Business Intelligence Enterprise Edition Deployment Guide.
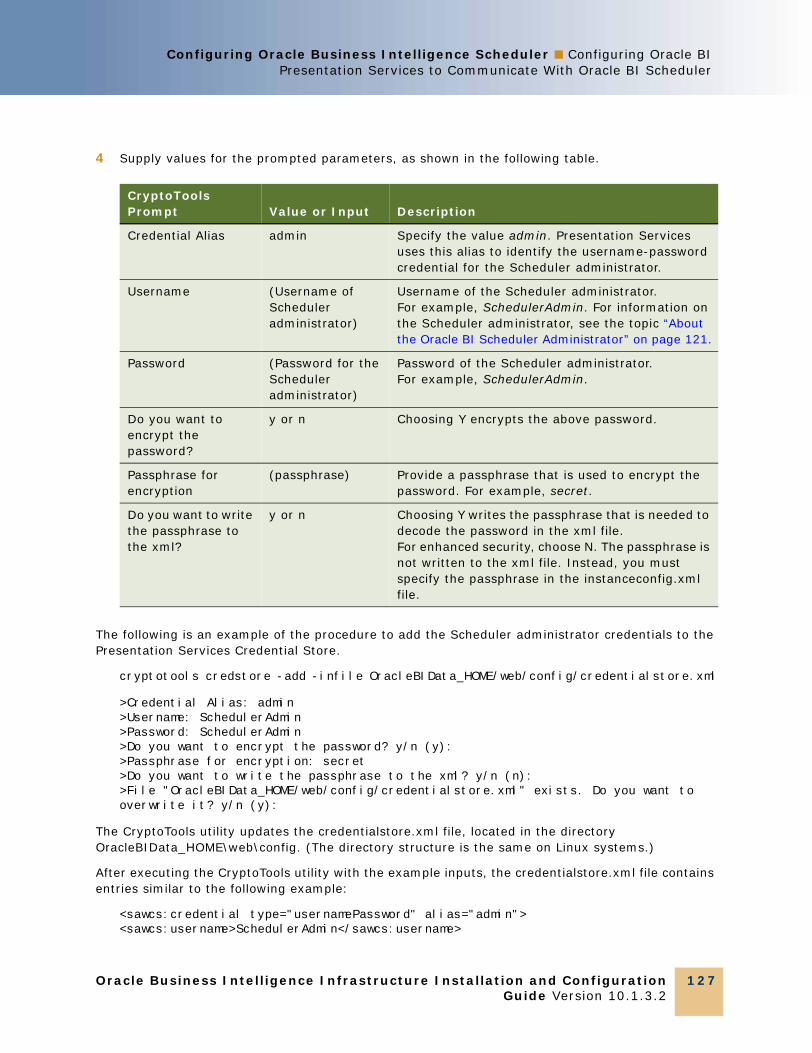
Configuring Oracle Business Intelligence Scheduler ■ Configuring Oracle BIPresentation Services to Communicate With Oracle BI Scheduler
Oracle Business Intelligence Infrastructure Installation and ConfigurationGuide Version 10.1.3.2
127
4 Supply values for the prompted parameters, as shown in the following table.
The following is an example of the procedure to add the Scheduler administrator credentials to the Presentation Services Credential Store.
cryptotools credstore -add -infile OracleBIData_HOME/web/config/credentialstore.xml
>Credential Alias: admin>Username: SchedulerAdmin>Password: SchedulerAdmin>Do you want to encrypt the password? y/n (y):>Passphrase for encryption: secret>Do you want to write the passphrase to the xml? y/n (n):>File "OracleBIData_HOME/web/config/credentialstore.xml" exists. Do you want to overwrite it? y/n (y):
The CryptoTools utility updates the credentialstore.xml file, located in the directory OracleBIData_HOME\web\config. (The directory structure is the same on Linux systems.)
After executing the CryptoTools utility with the example inputs, the credentialstore.xml file contains entries similar to the following example:
<sawcs:credential type="usernamePassword" alias="admin"><sawcs:username>SchedulerAdmin</sawcs:username>
CryptoTools Prompt Value or Input Description
Credential Alias admin Specify the value admin. Presentation Services uses this alias to identify the username-password credential for the Scheduler administrator.
Username (Username of Scheduler administrator)
Username of the Scheduler administrator. For example, SchedulerAdmin. For information on the Scheduler administrator, see the topic “About the Oracle BI Scheduler Administrator” on page 121.
Password (Password for the Scheduler administrator)
Password of the Scheduler administrator. For example, SchedulerAdmin.
Do you want to encrypt the password?
y or n Choosing Y encrypts the above password.
Passphrase for encryption
(passphrase) Provide a passphrase that is used to encrypt the password. For example, secret.
Do you want to write the passphrase to the xml?
y or n Choosing Y writes the passphrase that is needed to decode the password in the xml file.For enhanced security, choose N. The passphrase is not written to the xml file. Instead, you must specify the passphrase in the instanceconfig.xml file.

Oracle Business Intelligence Infrastructure Installation and Configuration Guide Version 10.1.3.2
Configuring Oracle Business Intelligence Scheduler ■ Configuring Oracle BI Presentation Services to Communicate With Oracle BI Scheduler
128
<sawcs:password passphrase="secret"><xenc:EncryptedData><xenc:EncryptionMethod Algorithm="http://www.rsasecurity.com/rsalabs/pkcs/schemas/pkcs-5#pbes2"><pkcs-5:PBES2-params Algorithm="http://www.rsasecurity.com/rsalabs/pkcs/schemas/pkcs-5#pbkdf2"><pkcs-5:KeyDerivationFunc>
<pkcs-5:Parameters><pkcs-5:IterationCount>1024</pkcs-5:IterationCount></pkcs-5:Parameters></pkcs-5:KeyDerivationFunc><pkcs-5:EncryptionScheme Algorithm="http://www.w3.org/2001/04/xmlenc#tripledes-cbc"/></pkcs-5:PBES2-params>
</xenc:EncryptionMethod><xenc:CipherData><xenc:CipherValue>jeThdk8ZklnTlyKIat8Dkw</xenc:CipherValue></xenc:CipherData></xenc:EncryptedData>
</sawcs:password>
</sawcs:credential>
Configuring Oracle BI Presentation Services to Identify the Credential StoreThis topic is part of “Configuring Oracle BI Presentation Services to Communicate With Oracle BI Scheduler.”
Oracle BI Presentation Services must be directed to the credential store that contains the Scheduler administrator credentials. This is done by setting parameters in the Oracle BI Presentation Services configuration file, instanceconfig.xml. In addition, if you have not stored the passphrase in the credential store, then the passphrase to decrypt the password credential must also be specified. In the above example, the passphrase was not stored in the credential store and needs to be specified in the instanceconfig.xml file.
To identify the credential store to be used by Oracle BI Presentation Services
1 Open the instanceconfig.xml file for editing. This file is located in the OracleBI_Data\web\config directory. This directory structure is the same on Linux platform.
2 Locate the <CredentialStore> node within this file.
3 Specify attribute values as shown in the following example. If the <CredentialStore> node does not exist, create this element with sub-elements and attributes.
<WebConfig><ServerInstance>
<!-- other settings ... -->

Configuring Oracle Business Intelligence Scheduler ■ Configuring Oracle BIPresentation Services to Communicate With Oracle BI Scheduler
Oracle Business Intelligence Infrastructure Installation and ConfigurationGuide Version 10.1.3.2
129
<CredentialStore><CredentialStorage type="file" path="<path to credentialstore.xml>"
passphrase="<passphrase>"/><!-- other settings ... -->
</CredentialStore><!-- other settings ... -->
</ServerInstance></WebConfig>
4 Restart Presentation Services to reflect the configuration changes.
After modification, the instanceconfig.xml contains entries as shown in the following example:
<?xml version="1.0"?>
<WebConfig><ServerInstance>
<!-- other settings ... --><CredentialStore>
<CredentialStorage type="file" path=""OracleBIData_HOME/web/config/credentialstore.xml" passphrase="secret"/>
<!-- other settings ... --></CredentialStore>
<!-- other settings ... --></ServerInstance>
</WebConfig>
CAUTION: Both the credentialstore.xml and instanceconfig.xml file must be protected. Their combination can reveal a privileged user password. (Neither file by itself has enough information to expose the password.)
For more information on the CredentialStore element and its subelements, refer to the Oracle Business Intelligence Enterprise Edition Deployment Guide.

Oracle Business Intelligence Infrastructure Installation and Configuration Guide Version 10.1.3.2
Configuring Oracle Business Intelligence Scheduler ■ Configuring Oracle BI Presentation Services to Communicate With Oracle BI Scheduler
130

Oracle Business Intelligence Infrastructure Installation and ConfigurationGuide Version 10.1.3.2
131
11 Configuring BI Publisher Reporting Tool
This topic area describes tasks for configuring Oracle Business Intelligence Publisher, Oracle’s application for creating highly formatted reports. The Oracle BI Publisher environment consists of the Oracle BI Publisher Enterprise server and Oracle BI Publisher Add-ins to Word, Excel, and Acrobat Professional.
Roadmap to Configuring BI PublisherOracle BI Publisher is installed with the main Oracle Business Intelligence Suite EE installer, as described in the topic “About the Oracle BI Installer and Oracle BI Publisher” on page 132.
The BI Publisher configuration process consists of the following high-level steps.
NOTE: More detailed descriptions follow this section.
Create a database user (for example, bipuser).
1
NOTE: The database configuration is required to send or schedule reports. This procedure uses Oracle 10g database as an example. The scheduler database also may be Microsoft SQL Server or IBM DB2.
2 After creating the database user, grant the user connection rights.
NOTE: The scheduler referenced for the Database component is not the Oracle Business Intelligence Scheduler. It is the scheduler used only by BI Publisher.
3 In the System Maintenance > Scheduler Configuration page of the BI Publisher Admin screen, change the settings to point to the database and the BI Publisher directory location.
4 In the Data Sources > JDBC Connection page of the BI Publisher Admin screen, add the Oracle BI users to BI Publisher.
5 Configure demo data.
The following topics describe the process of configuring the Oracle BI Publisher software to perform with Oracle Business Intelligence:
■ “BI Publisher Requirements” on page 133
■ “Memory Allocation for OC4J” on page 134
■ “Deploying BI Publisher with Other J2EE Application Servers” on page 134
■ “Starting and Stopping BI Publisher” on page 135
■ “Configuring BI Publisher for XMLP Server” on page 136
■ “Embedding BI Publisher in Oracle BI” on page 139

Oracle Business Intelligence Infrastructure Installation and Configuration Guide Version 10.1.3.2
Configuring BI Publisher Reporting Tool ■ Roadmap to Configuring BI Publisher
132
■ “Configuring BI Publisher for Scheduler” on page 145
■ “Running the BI Publisher Demo Reports” on page 146
About the Oracle BI Installer and Oracle BI Publisher■ The Oracle BI Publisher installation includes the following components:
■ BI Publisher Enterprise server application
■ Documentation: User's Guide, Javadocs, demos, and samples
■ The Oracle BI installer performs the following tasks automatically for BI Publisher:
■ Installs Oracle Containers for J2EE (OC4J) version 10.1.3.1 for the Basic installation type only.
■ Deploys an .ear file in the OC4J container (sets default and asks for port).
■ Copies fonts to the J2EE JRE directory (/jdk/jre/lib/fonts).
■ Installs the BI Publisher Reports folder.
■ Sets the BI Publisher folder in the following location:
❏ Under Windows:
OracleBI_HOME\xmlp\XMLP\Admin\Configuration\xmlp-server-config.xml
❏ Under Linux:
OracleBI_HOME/oc4j_bi/j2ee/home/applications/xmlpserver/xmlpserver/WEB-INF/xmlp-server-config.xml
NOTE: If Oracle BI is being deployed with Oracle Application Server, the BI Publisher folder is set to IAS_HOME rather than OracleBI_HOME.
■ Sets up BI Server as a JDBC data source.
In the BI Publisher interface, you can build queries directly against the Subject Areas defined in the BI Server semantic layer.
■ Sets up the integration with BI Presentation Services.
Answers Requests can be used as a data source for BI Publisher reports.

Configuring BI Publisher Reporting Tool ■ BI Publisher Requirements
Oracle Business Intelligence Infrastructure Installation and ConfigurationGuide Version 10.1.3.2
133
BI Publisher RequirementsThe Oracle Business Intelligence installation uses OC4J to run the BI Publisher Enterprise server.
BI Publisher ComponentsThe additional components that are required to run BI Publisher are shown in Table 19 on page 133.
Oracle BI Publisher DesktopOracle Business Intelligence Publisher Desktop is a Windows-based design tool that allows you to create layouts for Oracle BI Publisher. The BI Publisher Desktop contains the Template Builder for Word, the Template Viewer, documentation, demos and samples.
■ The Template Builder for Word is an Add-In to Microsoft Word that facilitates the development of RTF layout templates.
■ The Template Viewer facilitates testing and viewing of any template types (RTF, PDF and eText).
■ The Excel Analyzer is installed on demand when an Excel Analyzer document is downloaded.
See the topic “Installing Oracle BI Publisher Desktop” on page 72.
Table 19. Additional Components Required to Run BI Publisher
Component Version or Example
J2EE-based application server ■ Oracle OC4J version 10.1.3.1
NOTE: If you plan to use this, choose the Basic installation.
■ Another J2EE application server
NOTE: If you plan to use your own J2EE server, choose the Advanced installation.
Web browser ■ Microsoft Internet Explorer 6.0
■ Mozilla Firefox 1.0 or later
Database
(Optional, but required for the scheduler database.)
■ Oracle Database 10g
■ Microsoft SQL Server
■ IBM DB2 UDB
■ Sybase Adaptive Server
■ MySQL

Oracle Business Intelligence Infrastructure Installation and Configuration Guide Version 10.1.3.2
Configuring BI Publisher Reporting Tool ■ Oracle BI Publisher Desktop
134
Memory Allocation for OC4JAllocate enough memory in Oracle Containers for Java (OC4J) for running Oracle BI Publisher.
To allocate additional memory for OC4J
1 Stop the BI Publisher server, using the command shown in “Starting and Stopping BI Publisher” on page 135.
2 Navigate to OracleBI_HOME/oc4j_bi/bin.
3 Edit the oc4j.cmd file to start OC4J with more memory.
NOTE: Allocate a minimum of 256 MB of memory by increasing the permanent generation memory to 128m in addition to the regular heap size.
■ Find the following line:
set JVMARGS=-Djava.library.path=D:\OracleBI\server\Bin;D:\OracleBI\web\bin -DSAROOTDIR=D:\OracleBI -DSADATADIR=D:\OracleBIData %OC4J_JVM_ARGS%
■ In this line, between the variables -DSADATADIR=D:\OracleBIData and %OC4J_JVM_ARGS%, add the following text:
-XX:MaxPermSize=128m -Xmx512m
4 Save oc4j.cmd.
Deploying BI Publisher with Other J2EE Application ServersThis guide primarily explains how to install BI Publisher on application servers such as OC4J or Oracle Application Server. However, you can also deploy BI Publisher on other J2EE application servers, such as Tomcat or Websphere. To deploy BI Publisher with other J2EE application servers, use the instructions in the file Install.pdf, in the section on Apache Tomcat 5.0 deployment.
■ The Install.pdf file is located on the same network or CD-ROM location as the Oracle BI EE installer, in the subfolder Server_Ancillary\Oracle_Business_Intelligence_Publisher.
■ The .war and .ear files are in the following locations:
■ Server_Ancillary\Oracle_Business_Intelligence_Publisher\generic\xmlpserver.war
■ Server_Ancillary\Oracle_Business_Intelligence_Publisher\oc4j\xmlpserver.ear

Configuring BI Publisher Reporting Tool ■ Starting and Stopping BI Publisher
Oracle Business Intelligence Infrastructure Installation and ConfigurationGuide Version 10.1.3.2
135
Starting and Stopping BI PublisherStart or stop the BI Publisher server using the command oc4j.cmd. Navigate to the folder OracleBI_HOME/oc4j_bi/bin/.
To start the BI Publisher server■ In the command line, type
oc4j –start
To stop the BI Publisher server■ In the command line, type
oc4j –stop

Oracle Business Intelligence Infrastructure Installation and Configuration Guide Version 10.1.3.2
Configuring BI Publisher Reporting Tool ■ Configuring BI Publisher for XMLP Server
136
Configuring BI Publisher for XMLP ServerYou configure BI Publisher while running an instance of Oracle BI as an administrator, in the BI Publisher Admin screen.
NOTE: This section lists only those configuration settings that refer to Oracle BI Publisher. See the Oracle Business Intelligence Publisher User’s Guide for further details of XMLP server configuration. See the Oracle Database Administrator Guide for complete details of database deployment.
To configure the XMLP Server in Oracle BI Publisher
1 Open your browser to the login page. For example:
http://localhost:9704/xmlpserver
2 Log in using the user name and password Administrator.
3 In the Admin tab, review the following sections and links, and perform or verify the necessary configurations as necessary, as shown in the following table.
Admin Tab Section Links to Configuration Screens
Data Sources ■ JDBC Connection
■ JNDI Connection
■ File
Security Center ■ Security Configuration
■ Roles and Permissions
NOTE: Create users, including the Oracle BI Administrator user, here.
Delivery ■ Delivery Configuration
■ Printer
■ Fax
■ WebDAV
■ FTP
■ CUPS Server

Configuring BI Publisher Reporting Tool ■ Configuring BI Publisher for XMLP Server
Oracle Business Intelligence Infrastructure Installation and ConfigurationGuide Version 10.1.3.2
137
4 If necessary, change the default configuration of Oracle BI as a data source.
■ In the Oracle BI Publisher screen, click the Admin tab.
■ Select JDBC > Update Data Source.
■ Change the fields as shown in the following example:
NOTE: The JDBC connection string example shows Oracle BI deployed without clustering or SSL. For a clustered or more secure deployment of Oracle BI using SSL, see the Oracle Business Intelligence Enterprise Edition Deployment Guide.
5 Make modifications in the Integration > Oracle BI Presentation Services section of the BI Publisher screen’s Admin Tab:
■ Make sure that the Admin Username and Admin Password are the administrator credentials for Oracle Business Intelligence.
■ Make sure that the Server and Port fields point to Oracle BI.
System Maintenance ■ Server Configuration
■ Scheduler Configuration
NOTE: The scheduler referenced for the Database component is not the Oracle Business Intelligence Scheduler. It is the scheduler used only by BI Publisher.
■ Refresh Metadata
Runtime Configuration ■ Properties
■ Font Mappings
Integration Oracle BI Presentation Services
NOTE: The Admin Username and Admin Password entered in this screen are the administrator credentials for Oracle Business Intelligence, not for BI Publisher.
Data Source Name Oracle BI EE
JDBC Connection String jdbc:oraclebi://BIServer_machine.domain:9703 ;
NOTE: The default connection string is jdbc:oraclebi://host:port/. The port number is set by the parameter RPC_SERVICE_OR_PORT in the NQSConfig.INI file. Modify the connection string for the JDBC data source named Oracle BI EE to point to the target Oracle BI Server.
Username/Password NOTE: This is the administrator credential for Oracle BI.
Database Driver Class oracle.bi.jdbc.AnaJdbcDriver
Use Proxy Authentication No
Allowed Roles XMLP users
Admin Tab Section Links to Configuration Screens

Oracle Business Intelligence Infrastructure Installation and Configuration Guide Version 10.1.3.2
Configuring BI Publisher Reporting Tool ■ Configuring BI Publisher for XMLP Server
138
■ The XMLP URL suffix is set to analytics/saw.dll during installation. When you enable Single Sign-on, change this URL to the application you define. For example: analyticsSOAP/saw.dll. For details, see the Oracle Business Intelligence Enterprise Edition Deployment Guide.
6 Click Apply to save your changes.
7 Restart the BI Publisher server as described in “Starting and Stopping BI Publisher” on page 135.

Configuring BI Publisher Reporting Tool ■ Embedding BI Publisher in Oracle BI
Oracle Business Intelligence Infrastructure Installation and ConfigurationGuide Version 10.1.3.2
139
Embedding BI Publisher in Oracle BISites that deploy Oracle BI Presentation Services and Oracle BI Publisher must configure a number of settings between these two components. This section describes how to embed BI Publisher in Oracle Business Intelligence for advanced reporting capability:
■ Oracle BI Presentation Services must be configured to identify the Publisher administrator and obtain the credentials.
See the topic “Adding Publisher Administrator Credentials to Oracle BI Presentation Services Credential Store” on page 141.
■ Oracle BI Presentation Services must be configured to access the credential store that contains the Publisher administrator credentials.
See the topic “Configuring Oracle BI Presentation Services to Identify the Credential Store” on page 143.
NOTE: An Oracle BI user accesses BI Publisher from the link More Products > BI Publisher, in order to view and generate highly formatted reports.
Configuring BI Publisher Settings in the Configuration File for Presentation ServicesThe Publisher URLs are specified in instanceconfig.xml file, the configuration file for Oracle BI Presentation Services. When BI Publisher and BI Presentation Services components are installed together on the same machine and BI Publisher has been deployed in the OC4J container, the installer sets the instanceconfig.xml setting to the appropriate Publisher URLs.
Table 20 on page 139 shows the instanceconfig.xml file settings for deployment of BI Publisher. The instanceconfig.xml file is located in the directory.
■ OracleBIData_HOME\web\config
■ OracleBIData_HOME/web/config
Table 20. BI Publisher <AdvancedReporting> Tag Settings in instanceconfig.xml
Key Default Value Notes
ReportingEngine Xmlp Points to BI Publisher as the reporting tool
Volume Xmlp
ServerURL http://<MachineName>:9704/xmlpserver/service
Points to the XMLP server for Web service.
WebURL http://<MachineName>:9704/xmlpserver
The URL for the XMLP front-end. Use this for rendering XMLP content in iframes on dashboard pages.
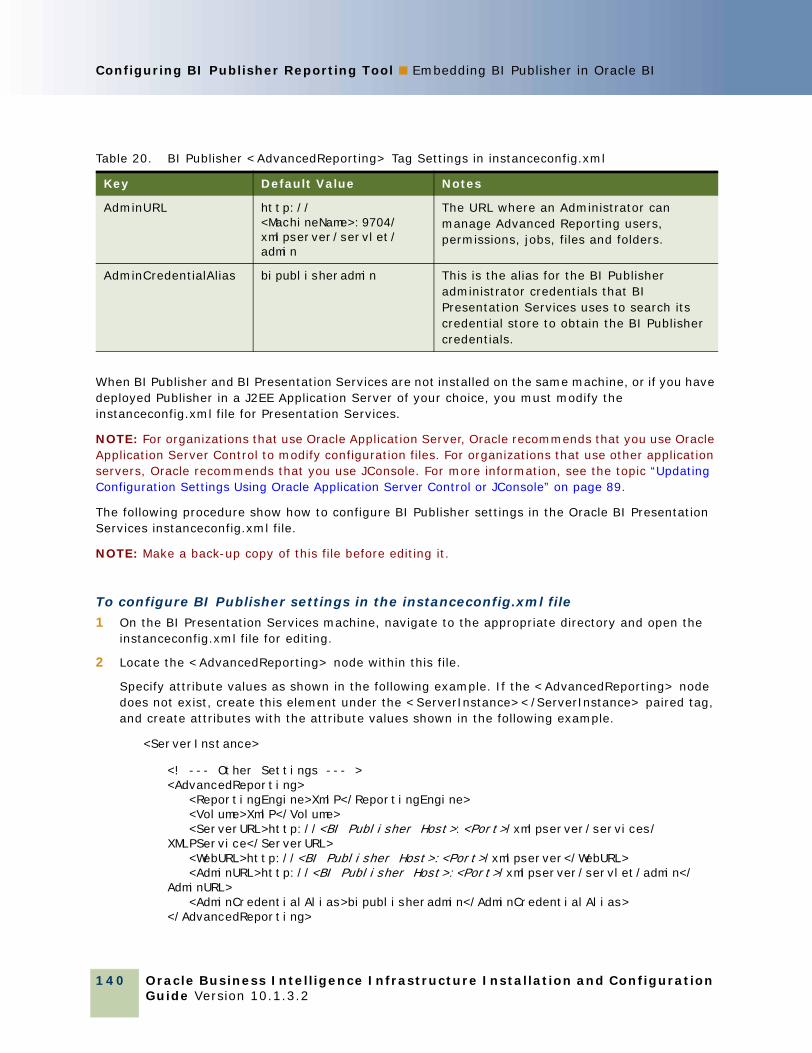
Oracle Business Intelligence Infrastructure Installation and Configuration Guide Version 10.1.3.2
Configuring BI Publisher Reporting Tool ■ Embedding BI Publisher in Oracle BI
140
When BI Publisher and BI Presentation Services are not installed on the same machine, or if you have deployed Publisher in a J2EE Application Server of your choice, you must modify the instanceconfig.xml file for Presentation Services.
NOTE: For organizations that use Oracle Application Server, Oracle recommends that you use Oracle Application Server Control to modify configuration files. For organizations that use other application servers, Oracle recommends that you use JConsole. For more information, see the topic “Updating Configuration Settings Using Oracle Application Server Control or JConsole” on page 89.
The following procedure show how to configure BI Publisher settings in the Oracle BI Presentation Services instanceconfig.xml file.
NOTE: Make a back-up copy of this file before editing it.
To configure BI Publisher settings in the instanceconfig.xml file
1 On the BI Presentation Services machine, navigate to the appropriate directory and open the instanceconfig.xml file for editing.
2 Locate the <AdvancedReporting> node within this file.
Specify attribute values as shown in the following example. If the <AdvancedReporting> node does not exist, create this element under the <ServerInstance></ServerInstance> paired tag, and create attributes with the attribute values shown in the following example.
<ServerInstance>
<! --- Other Settings --- ><AdvancedReporting>
<ReportingEngine>XmlP</ReportingEngine><Volume>XmlP</Volume><ServerURL>http://<BI Publisher Host>:<Port>/xmlpserver/services/
XMLPService</ServerURL><WebURL>http://<BI Publisher Host>:<Port>/xmlpserver</WebURL><AdminURL>http://<BI Publisher Host>:<Port>/xmlpserver/servlet/admin</
AdminURL><AdminCredentialAlias>bipublisheradmin</AdminCredentialAlias>
</AdvancedReporting>
AdminURL http://<MachineName>:9704/xmlpserver/servlet/admin
The URL where an Administrator can manage Advanced Reporting users, permissions, jobs, files and folders.
AdminCredentialAlias bipublisheradmin This is the alias for the BI Publisher administrator credentials that BI Presentation Services uses to search its credential store to obtain the BI Publisher credentials.
Table 20. BI Publisher <AdvancedReporting> Tag Settings in instanceconfig.xml
Key Default Value Notes

Configuring BI Publisher Reporting Tool ■ Embedding BI Publisher in Oracle BI
Oracle Business Intelligence Infrastructure Installation and ConfigurationGuide Version 10.1.3.2
141
<! --- Other Settings --- >
</ServerInstance>
Refer to the Notes column in Table 20 on page 139 for a description of the AdvancedReporting attributes.
NOTE: An additional attribute is AuthIdExpiry. This sets the value in minutes for the period of expiration of the authentication credentials from XMLP server. It must be less than the XMLP time out. The default value is 5. It is not necessary to explicitly specify this attribute if the default of 5 is satisfactory.
3 Save the file when you are done.
Your changes take effect when the Oracle Business Intelligence Presentation Services service is restarted.
Adding Publisher Administrator Credentials to Oracle BI Presentation Services Credential StoreOracle BI Presentation Services must be able to identify the Publisher administrator and obtain the credentials to successfully authenticate in BI Publisher. The Presentation Services server stores the credentials that it uses in a Presentation Services Credential Store file. The Publisher administrator credentials must be added to the credential store. These credentials are stored under an alias called bipublisheradmin. To obtain the Publisher administrator credentials, Presentation Services searches the credential store for a username-password credential with an alias of bipublisheradmin.
For more information on the Presentation Services Credential Store, refer to the Oracle Business Intelligence Enterprise Edition Deployment Guide.
Use the following procedure to add the Publisher administrator credentials to the Presentation Services Credential Store with an alias of bipublisherdmin. This procedure adds the Publisher administrator credentials to the Presentation Services proprietary XML file credential store called credentialstore.xml. The default location of this file is in the following location:
■ Windows. OracleBIData_HOME\web\config
■ Linux. OracleBIData_HOME/web/config
To add the Publisher administrator credentials to the Credential Store
1 Open a command prompt window or command shell on the machine where Presentation Services has been installed.
2 Navigate to the appropriate directory containing the CryptoTools utility.
3 Execute the CryptoTools utility:
cryptotools credstore -add -infile OracleBIData_HOME/web/config/credentialstore.xml
For more information on the CryptoTools utility, its syntax and supported sub-commands, see the Oracle Business Intelligence Enterprise Edition Deployment Guide.

Oracle Business Intelligence Infrastructure Installation and Configuration Guide Version 10.1.3.2
Configuring BI Publisher Reporting Tool ■ Embedding BI Publisher in Oracle BI
142
4 Supply values for the prompted parameters, as shown in Table 21 on page 142.
An example of the preceding procedure follows:
cryptotools credstore -add -infile OracleBIData_HOME/web/config/credentialstore.xml>Credential Alias: bipublisheradmin>Username: Administrator>Password: Administrator>Do you want to encrypt the password? y/n (y):>Passphrase for encryption: secret>Do you want to write the passphrase to the xml? y/n (n): >File "OracleBIData_HOME/web/config/credentialstore.xml" exists. Do you want to overwrite it? y/n (y):
The CryptoTools utility updates the credentialstore.xml file. This file is located in the directory
■ OracleBIData_HOME\web\config
NOTE: This directory structure is the same on Linux platforms.
After executing the CryptoTools utility with inputs as specified above, the credentialstore.xml file contains entries similar to the following example:
Table 21. Publisher Administrator Credentialstore Parameters
Parameter or Prompt Value or Input Description
Credential Alias bipublisheradmin Specify the value bipublisheradmin. Presentation Services searches for this alias in order to identify the username-password credential for Publisher administrator.
Username Administrator Username of the Publisher administrator.The initial default is Administrator.For information on the Publisher administrator, see “Configuring BI Publisher for XMLP Server” on page 136
Password Administrator Password of the Publisher administrator. The initial default is Administrator.
Do you want to encrypt the password?
y or n Y encrypt the above password.
Passphrase for encryption <passphrase> Provide a passphrase to be used to encrypt the password. For example, secret.
Do you want to write the passphrase to the xml?
y or n ■ Y writes the passphrase that is needed to decode the password in the xml file.
■ For enhanced security, use N. The passphrase is not written to the xml file.Instead, specify the passphrase in the instanceconfig.xml file.

Configuring BI Publisher Reporting Tool ■ Embedding BI Publisher in Oracle BI
Oracle Business Intelligence Infrastructure Installation and ConfigurationGuide Version 10.1.3.2
143
<sawcs:credential type="usernamePassword" alias="bipublisheradmin"><sawcs:username>Administrator</sawcs:username><sawcs:password passphrase="secret">
<xenc:EncryptedData><xenc:EncryptionMethod Algorithm="http://www.rsasecurity.com/rsalabs/pkcs/
schemas/pkcs-5#pbes2"><pkcs-5:PBES2-params Algorithm="http://www.rsasecurity.com/rsalabs/pkcs/
schemas/pkcs-5#pbkdf2"><pkcs-5:KeyDerivationFunc>
<pkcs-5:Parameters><pkcs-5:IterationCount>1024</pkcs-5:IterationCount>
</pkcs-5:Parameters></pkcs-5:KeyDerivationFunc>
<pkcs-5:EncryptionScheme Algorithm="http://www.w3.org/2001/04/xmlenc#tripledes-cbc"/>
</pkcs-5:PBES2-params></xenc:EncryptionMethod><xenc:CipherData>
<xenc:CipherValue>jeThdk8ZklnTlyKIat8Dkw</xenc:CipherValue></xenc:CipherData></xenc:EncryptedData>
</sawcs:password></sawcs:credential>
Configuring Oracle BI Presentation Services to Identify the Credential StoreOracle BI Presentation Services must be directed to the credential store that contains the Publisher administrator credentials. This is done by setting parameters in the Presentation Services configuration file, instanceconfig.xml. In addition, if you have not stored the passphrase in the credential store, then the passphrase to decrypt the password credential must also be specified. In the example in the topic “Configuring Oracle BI Presentation Services to Identify the Credential Store” on page 143, the passphrase was not stored in the credential store and needs to be specified in the instanceconfig.xml file.
To specify the Credential Store for Oracle BI Presentation Services
1 In the directory OracleBI_Data\web\config, open the instanceconfig.xml file for editing.
2 Locate the <CredentialStore> node within this file.
Specify attribute values as shown in the following example. If the <CredentialStore> node does not exist, create this element with sub-elements and attributes with attribute values as shown the following example.
<WebConfig>
<ServerInstance><!-- other settings ... -->

Oracle Business Intelligence Infrastructure Installation and Configuration Guide Version 10.1.3.2
Configuring BI Publisher Reporting Tool ■ Embedding BI Publisher in Oracle BI
144
<CredentialStore><CredentialStorage type="file" path="<path to credentialstore.xml>"
passphrase="<passphrase>"/><!-- other settings ... --></CredentialStore>
<!-- other settings ... -->
</ServerInstance>
</WebConfig>
For more information on the CredentialStore element and its sub elements, see the Oracle Business Intelligence Enterprise Edition Deployment Guide.
After modification as described in the preceding procedure, the instanceconfig.xml contains entries as shown in the following example:
<?xml version="1.0"?><WebConfig>
<ServerInstance><!-- other settings ... -->
<CredentialStore>
<CredentialStorage type="file" path="OracleBIData_HOME/web/config/credentialstore.xml" passphrase="secret"/>
<!-- other settings ... --></CredentialStore>
<!-- other settings ... --></ServerInstance>
</WebConfig>
CAUTION: Both the credentialstore.xml and instanceconfig.xml file must be protected. Their combination can reveal a privileged user password. Neither file by itself has enough information to expose the password.
3 Restart Presentation Services to reflect the configuration changes.

Configuring BI Publisher Reporting Tool ■ Configuring BI Publisher for Scheduler
Oracle Business Intelligence Infrastructure Installation and ConfigurationGuide Version 10.1.3.2
145
Configuring BI Publisher for SchedulerThis procedure is performed in the Oracle BI Publisher screen’s Admin tab.
NOTE: The scheduler mentioned here is not the Oracle Business Intelligence Scheduler. It is the scheduler used only by BI Publisher.
To configure the BI Publisher for the scheduler
1 Where you want to store the scheduler schema, create a database user.
Assign the user the privileges to open a session and create database objects.
2 Go to the BI Publisher page Admin tab and click on Scheduler Configuration.
3 Enter the database and created user information, as shown in the following example:
4 Click on Test Connection to verify the validity.
5 Click on Install Schema button and wait for confirmation.
6 If you have multiple servers connecting to the same repository and scheduler schema, check the Clustering box.
Database Type Oracle 10g
Connection String jdbc:oracle:thin:@machine01.domain:1521:ora102
Username XMLPSCH2
Database Driver Class oracle.jdbc.driver.OracleDriver

Oracle Business Intelligence Infrastructure Installation and Configuration Guide Version 10.1.3.2
Configuring BI Publisher Reporting Tool ■ Running the BI Publisher Demo Reports
146
Figure 2 shows the relationship between Oracle BI Enterprise Edition and BI Publisher.
To access BI Publisher under Windows■ Navigate to Start > Programs > Oracle Business Intelligence > Oracle BI Publisher.
The browser pointing to http://localhost:9704/xmlpserver opens.
Running the BI Publisher Demo ReportsThis topic describes how to test your BI Publisher installation by running Demo Reports.
NOTE: The data source demo needs to be connected to an Oracle Database with the sample schemas and users HR and OE unlocked.
The sample reports require the following general configuration steps:
1 “Configuring the Demo Files” on page 147.
Figure 2. Diagram of the relationship between Oracle BI Enterprise Edition and BI Publisher

Configuring BI Publisher Reporting Tool ■ Running the BI Publisher Demo Reports
Oracle Business Intelligence Infrastructure Installation and ConfigurationGuide Version 10.1.3.2
147
2 “Configuring the Demo Data Source” on page 147.
3 Navigate to the Reports tab and view the demo reports.
Configuring the Demo FilesThis procedure is performed in the Oracle BI Publisher screen’s Admin tab.
To set up the demo files folder
1 Click the Admin tab.
2 In the Data Sources section, click the File link.
3 Click the data source with the name demo files.
4 Change the path to the DemoFiles folder under the XMLP directory.
For example, C:\OracleBI\xmlp\XMLP\DemoFiles
5 Click Apply to save the changes.
Configuring the Demo Data SourceThis procedure is performed in the Oracle BI Publisher screen’s Admin tab.
To configure the demo data source
1 Click the Admin tab.
2 In the Data Sources section, click the JDBC Connection link.
3 In the Data Source Name column, click the DSN demo.
4 In the Update Data Source screen, change the connection string to point to an Oracle 10g database with unlocked oe user.
5 Click the Test Connection button to confirm that XML Publisher can access the database.
6 Click Apply to save the changes.
For additional information, see the Oracle Business Intelligence Publisher User’s Guide.

Oracle Business Intelligence Infrastructure Installation and Configuration Guide Version 10.1.3.2
Configuring BI Publisher Reporting Tool ■ Running the BI Publisher Demo Reports
148

Oracle Business Intelligence Infrastructure Installation and ConfigurationGuide Version 10.1.3.2
149
A NQSConfig.INI File Reference
The Oracle Business Intelligence Server software uses an initialization file to set parameters upon startup. This initialization file, the NQSConfig.INI file, includes parameters to customize behavior based on the requirements of each individual installation. This topic area lists the rules for using the file and provides the definitions and syntax of each parameter, under the following topics:
■ “Location of the Oracle BI Server Configuration Initialization File” on page 149
■ “Rules for Oracle BI Configuration File Parameters” on page 150
■ “Changing Oracle BI Configuration File Parameter Entries” on page 151
■ “Oracle BI Configuration File Parameters and Syntax” on page 152
NOTE: For more information about clustering, see the Oracle Business Intelligence Enterprise Edition Deployment Guide.
Location of the Oracle BI Server Configuration Initialization FileThe NQSConfig.INI file is located on Windows systems in the subdirectory OracleBI_HOME\server\Config.
CAUTION: Do not change the name of the file or its location.
To review your own NQSConfig.INI file, navigate to the Config subdirectory and open the file.
For detailed explanations of the parameters, see the topic “Oracle BI Configuration File Parameters and Syntax” on page 152. All parameter explanations are targeted towards the Windows environment.
Oracle Business Intelligence Infrastructure Installation and Configuration Guide Version 10.1.3.2
NQSConfig.INI File Reference ■ Rules for Oracle BI Configuration File Parameters
150
Rules for Oracle BI Configuration File ParametersOperating Systems: All.
Observe the following rules for entries in the NQSConfig.INI file:
■ Each parameter entry in the NQSConfig.INI file must be within the section to which the parameter belongs (Repository, Cache, General, and so on).
■ Each entry needs to be terminated with semicolon ( ; ).
■ The Oracle Business Intelligence Server reads the initialization file each time it is started.
NQSConfig.INI File ErrorsSome notes about syntax errors in the NQSConfig.INI file:
■ Any syntax errors prevent the Oracle Business Intelligence Server from starting up. The errors are logged to the NQServer.log file, located in the subdirectory OracleBI_HOME\server\Log.
There may also be a summary message in the system log relating to the error.
■ You need to correct the error and start the Oracle Business Intelligence Server again. Repeat this process until the server starts with no errors.
NQSConfig.INI File Reference ■ Changing Oracle BI Configuration File Parameter Entries
Oracle Business Intelligence Infrastructure Installation and ConfigurationGuide Version 10.1.3.2
151
Changing Oracle BI Configuration File Parameter EntriesParameter entries are read when the Oracle Business Intelligence Server starts up. When you change an entry when the server is running, you need to shut down and then restart the server for the change to take effect.
NOTE: For organizations that use Oracle Application Server, Oracle recommends that you use Oracle Application Server Control to modify configuration files. For organizations that use other application servers, Oracle recommends that you use JConsole. For more information, see the topic “Updating Configuration Settings Using Oracle Application Server Control or JConsole” on page 89.
To edit the NQSConfig.INI initialization file
1 Use a text editor to edit this file.
NOTE: The examples in this appendix assume you are editing a Windows version of this file, so make the necessary substitutions in terms of UNIX and Linux file system paths and conventions.
2 Save and close the NQSConfig.INI file.
Adding Comments to the Configuration FileOperating Systems: All.
You can add comments anywhere in the NQSConfig.INI file. Comments need to begin with either of the following:
#
//
Any text following these comment characters up to the end of the line is ignored when the Oracle Business Intelligence Server reads the initialization file.

Oracle Business Intelligence Infrastructure Installation and Configuration Guide Version 10.1.3.2
NQSConfig.INI File Reference ■ Oracle BI Configuration File Parameters and Syntax
152
Oracle BI Configuration File Parameters and SyntaxThis topic lists the NQSConfig.INI file parameters and gives a brief description and any required syntax for each parameter. The parameters are generally listed in the order they appear in the configuration file.
The parameters are grouped into the following sections:
■ “Repository Section Parameters in the Configuration File” on page 153
■ “Query Result Cache Section Parameters in the Configuration File” on page 154
■ “General Section Parameters in the Configuration File” on page 158
■ “Security Section Parameters in the Configuration File” on page 165
■ “Server Section Parameters in the Configuration File” on page 168
■ “Dynamic Library Section Parameters in the Configuration File” on page 176
■ “User Log Section Parameters in the Configuration File” on page 177
■ “Usage Tracking Section Parameters in the Configuration File” on page 178
■ “Optimization Flags Section Parameters in the Configuration File” on page 183
■ “Cube Views Section Parameters in the Configuration File” on page 184

NQSConfig.INI File Reference ■ Repository Section Parameters in the Configuration File
Oracle Business Intelligence Infrastructure Installation and ConfigurationGuide Version 10.1.3.2
153
Repository Section Parameters in the Configuration FileThe Repository section contains one entry for every repository that is loaded when the server starts up.
Syntax: <logical_name> = <repository_name.rpd> ;
Optional syntax: <logical_name> = <repository_name.rpd>, DEFAULT ;
where:
When DEFAULT is specified for a repository, connections that do not specify a logical repository name in the DSN connect to the default repository.
Example: Star = paint.rpd, DEFAULT ;
logical_name A logical name for the repositories. Client tools use this name to configure the ODBC data sources that connect to the repository. If you want to use a reserved keyword, such as OCI7 or OCI8, for the name, enclose it in single quotes.
repository_name.rpd The file name of the repository. The file name needs to have the .rpd file extension, and the file needs to reside in the Repository subdirectory in OracleBI_HOME.
The demonstration repository file, paint.rpd, is installed with the Basic installation type,

Oracle Business Intelligence Infrastructure Installation and Configuration Guide Version 10.1.3.2
NQSConfig.INI File Reference ■ Query Result Cache Section Parameters in the Configuration File
154
Query Result Cache Section Parameters in the Configuration FileThe parameters in the Query Result Cache Section provide configuration information for Oracle Business Intelligence Server caching. The parameters that control query caching are described in this section.
■ For information about caching in Oracle BI, see the chapter on query caching in Oracle Business Intelligence Server Administration Guide.
■ For information about how to use Delivers to seed the Oracle BI ServerCache, refer to the Oracle Business Intelligence Presentation Services Administration Guide.
ENABLESpecifies whether the cache system is enabled.
When set to NO, caching is disabled. When set to YES, caching is enabled.
Example: ENABLE = NO ;
DATA_STORAGE_PATHSSpecifies one or more directory paths for where the cached query results data is stored and are accessed when a cache hit occurs. The maximum capacity in bytes, kilobytes, megabytes or gigabytes. The maximum capacity for each path is 4 GB. For optimal performance, the directories specified should be on high performance storage systems.
NOTE: An Oracle Business Intelligence Server defined as a clustered server does not share cached data. The DATA_STORAGE_PATHS entry needs be unique for each server defined as a cluster participant.
Each directory listed needs to be an existing, fully-qualified, writable directory pathname, with double quotes ( " ) surrounding the pathname. Specify mapped directories only. UNC path names and network mapped drives are allowed only if the service runs under a qualified user account. To change the account under which the service is running, see the corresponding topic in the Oracle Business Intelligence Enterprise Edition Deployment Guide.
Specify multiple directories with a comma separated list. When you specify more than one directory, they should reside on different physical drives. (If you have multiple cache directory paths that all resolve to the same physical disk, both available and used space may be double-counted.)
Syntax: DATA_STORAGE_PATHS = “<full_directory_path_1>” sz[, “<full_directory_path_2>” sz{, “<full_directory_path_n>” sz}] ;
Example: DATA_STORAGE_PATHS = "d:\OracleBI\cache" 256MB, "f:\OracleBI\cache" 200MB ;
NOTE: Specifying more than one directory per drive does not improve performance, because file input and output (I/O) takes place through the same I/O controller. In general, specify only one directory per disk drive. Specifying multiple directories on different drives may improve the overall I/O throughput of the Oracle Business Intelligence Server internally by distributing I/O across multiple devices.

NQSConfig.INI File Reference ■ Query Result Cache Section Parameters in theConfiguration File
Oracle Business Intelligence Infrastructure Installation and ConfigurationGuide Version 10.1.3.2
155
The disk space requirement for the cached data depends on the number of queries that produce cached entries and the size of the result sets for those queries. The query result set size is calculated as row size (or the sum of the maximum lengths of all columns in the result set) times the result set cardinality (that is, the number of rows in the result set). The expected maximum should be the guideline for the space needed.
This calculation gives the high-end estimate, not the average size of all records in the cached result set. Therefore, if a result set's size is dominated by variable length character strings and if those strings' lengths have a normal distribution, you would expect the average record size to be about half of the maximum record size.
NOTE: It is a best practice to use a value that is less than 4 GB, otherwise the value may exceed the maximum allowable value for an unsigned 32 bit integer.
MAX_ROWS_PER_CACHE_ENTRYSpecifies the maximum number of rows in a query result set to qualify for storage in the query cache. Limiting the number of rows is a useful way to avoid using up the cache space with runaway queries that return large numbers of rows. If the number of rows a query returns is greater than the value specified in the MAX_ROWS_PER_CACHE_ENTRY parameter, the query is not cached.
When set to 0, there is no limit to the number of rows per cache entry.
Example: MAX_ROWS_PER_CACHE_ENTRY = 100000 ;
MAX_CACHE_ENTRY_SIZESpecifies the maximum size for a cache entry. Potential entries that exceed this size are not cached. The default size is 1 MB.
Specify GB for gigabytes, KB for kilobytes, MB for megabytes, and no units for bytes.
Example: MAX_CACHE_ENTRY_SIZE = 1 MB ;
MAX_CACHE_ENTRIESSpecifies the maximum number of cache entries allowed in the query cache. Limiting the total number of cache entries provides another parameter with which to manage your cache storage. The actual limit of cache entries might vary slightly depending on the number of concurrent queries. The default value is 1000.
Example: MAX_CACHE_ENTRIES = 1000 ;

Oracle Business Intelligence Infrastructure Installation and Configuration Guide Version 10.1.3.2
NQSConfig.INI File Reference ■ Query Result Cache Section Parameters in the Configuration File
156
POPULATE_AGGREGATE_ROLLUP_HITSSpecifies whether to aggregate data from an earlier cached query result set and create a new entry in the query cache for rollup cache hits. The default value is NO.
Typically, if a query gets a cache hit from a previously executed query, then the new query is not added to the cache. A user may have a cached result set containing information at a particular level of detail (for example, sales revenue by ZIP Code). A second query may ask for this same information, but at a higher level of detail (for example, sales revenue by state). The POPULATE_AGGREGATE_ROLLUP_HITS parameter overrides this default when the cache hit occurs by rolling up an aggregate from a previously executed query, in this example, by aggregating data from the first result set stored in the cache. That is, Oracle BI sales revenue for all ZIP Codes in a particular state can be added to obtain the sales revenue by state. This is referred to as a rollup cache hit.
Normally, a new cache entry is not created for queries that result in cache hits. You can override this behavior specifically for cache rollup hits by setting POPULATE_AGGREGATE_ROLLUP_HITS to YES. Nonrollup cache hits are not affected by this flag. If a query result is satisfied by the cache—that is, the query gets a cache hit—then this query is not added to the cache. When this parameter is set to YES, then when a query gets an aggregate rollup hit (for example, "sales by region" is answered from "sales by district, region") then the result is put into the cache. Setting this parameter to TRUE may result in better performance, but results in more entries being added to the cache.
Example: POPULATE_AGGREGATE_ROLLUP_HITS = NO ;
USE_ADVANCED_HIT_DETECTIONWhen caching is enabled, each query is evaluated to determine whether it qualifies for a cache hit. A cache hit means that the server was able to use cache to answer the query and did not go to the database at all.
The Oracle BI Server can use query cache to answer queries at the same or higher level of aggregation.
Reasons Why a Query is Not Added to the CacheCustomers who rely on query result caching in the Oracle BI Server to meet their performance KPIs can use caching parameters to help determine why a cache hit did not occur. Logging facilities can help to diagnose common reasons for getting a cache miss, where the logical SQL query that was supposed to seed the cache did not get inserted into the cache. The following describes some of the situations when this might occur.
■ Non-cacheable SQL element. If a SQL request contains Current_Timestamp, Current_Time, Rand, Populate, or a parameter marker then it is not added to the cache.
■ Non-cacheable table. Physical tables in the Oracle BI Server repository can be marked 'non-cacheable'. If a query references any non-cacheable table then the query results will not be added to the cache.
■ Cache hit. In general, if the query gets a cache hit on a previously cached query, then the results of the current query are not added to the cache.
NOTE: The exception is query hits that are aggregate roll-up hits. These are added to the cache if the NQSConfig.INI parameter POPULATE_AGGREGATE_ROLLUP_HITS has been set to Yes.

NQSConfig.INI File Reference ■ Query Result Cache Section Parameters in theConfiguration File
Oracle Business Intelligence Infrastructure Installation and ConfigurationGuide Version 10.1.3.2
157
■ Result set is too big.
■ Query is cancelled. This can happen by explicit cancellation from Oracle BI Presentation Services or the Administration Tool, or implicitly through timeout.
■ Oracle BI Server is clustered. Queries that fall into the ‘cache seeding’ family are propagated throughout the cluster. Other queries continue to be stored locally. Therefore, even though a query may be put into the cache on Oracle BI Server node 1, it may not be on Oracle BI Server node 2.
Level 4 of query logging is the best tool to diagnose whether the Oracle BI Server compiler intended to add the entry into the query result cache.
MAX_SUBEXPR_SEARCH_DEPTHMAX_SUBEXPR_SEARCH_DEPTH = 7;
GLOBAL_CACHE_STORAGE_PATHFor the cluster-aware caching feature,
Example: GLOBAL_CACHE_STORAGE_PATH = "<directory name>" SIZE;
MAX_GLOBAL_CACHE_ENTRIESFor the cluster-aware caching feature,
Example: MAX_GLOBAL_CACHE_ENTRIES = 1000;
CACHE_POLL_SECONDSFor the cluster-aware caching feature,
Example: CACHE_POLL_SECONDS = 300;
CLUSTER_AWARE_CACHE_LOGGINGFor the cluster-aware caching feature,
Example: CLUSTER_AWARE_CACHE_LOGGING = NO;
Oracle Business Intelligence Infrastructure Installation and Configuration Guide Version 10.1.3.2
NQSConfig.INI File Reference ■ General Section Parameters in the Configuration File
158
General Section Parameters in the Configuration FileThe parameters in the General section contains general server default parameters, including localization and internationalization, temporary space and memory allocation, and other default parameters used to determine how data is returned from the Oracle Business Intelligence Server to a client.
NOTE: The settings for the parameters LOCALE, SORT_ORDER_LOCALE, SORT_TYPE and CASE_SENSITIVE_CHARACTER_COMPARISON, described in the following topics, are interrelated. They help determine how the Oracle Business Intelligence Server sorts data.
LOCALESpecifies the locale in which data is returned from the server. This parameter also determines the localized names of days and months.
See also the topic area Appendix B, “Localizing Oracle Business Intelligence Deployments.”
For more information about Oracle BI Catalog Manager and language extensions, see Oracle Business Intelligence Presentation Services Administration Guide.
SORT_ORDER_LOCALEUsed to help determine whether the Oracle Business Intelligence Server can function-ship an ORDER BY clause (used in sorting) to an relational database.
Every database defined in the Physical Layer in the Server Administration Tool has a features table associated with it. If you want to override the default value in the Features table for a particular type of relational database, you need to do it for all occurrences of it in the Physical Layer.
In the Server Administration Tool, the Database dialog > Features tab > Features table specifies the features and functions that the relational database supports. The settings for SORT_ORDER_LOCALE in the Features table and in the NQSConfig.INI file should match only if the database and the Oracle Business Intelligence Server sort data in the same way.
For the relational database and the Oracle Business Intelligence Server to sort data the same way, they must be in agreement on the parameters shown in Table 22 on page 158.
Table 22. Critical SORT_ORDER_LOCALE Parameters
Functional Category Specific Parameters
Base language LOCALE
SORT_ORDER_LOCALE
NOTE: The default value for SORT_ORDER_LOCALE in both the Features table and in the NQSConfig.INI file is english-usa.If the Oracle Business Intelligence Server and the database sort data differently, the Features table entry SORT_ORDER_LOCALE for the database needs to be set to a different value than english-usa.

NQSConfig.INI File Reference ■ General Section Parameters in the Configuration File
Oracle Business Intelligence Infrastructure Installation and ConfigurationGuide Version 10.1.3.2
159
The SORT_ORDER_LOCALE entries in the Features table and in the NQSConfig.INI file match only if the database and the Oracle Business Intelligence Server have matching settings in these areas. If the settings do not match, wrong answers can result when using multidatabase joins, or errors can result when using the Union, Intersect and Except operators, which all rely on consistent sorting between the back-end server and the Oracle Business Intelligence Server.
Example: SORT_ORDER_LOCALE = "english-usa" ;
SORT_TYPESpecifies the type of sort to perform. The default value is BINARY. Binary sorts are faster than nonbinary sorts.
Valid values are BINARY and DEFAULT. If you specify DEFAULT, a nonbinary sort is performed; this yields better sort results for data that contains accented characters.
Example: SORT_TYPE = "BINARY" ;
CASE_SENSITIVE_CHARACTER_COMPARISONSpecifies whether the Oracle Business Intelligence Server differentiates between uppercase and lowercase characters when performing comparison operations.
Valid values are ON and OFF. When set to OFF, case is ignored. When set to ON, case is considered for comparisons. For binary sorts, case sensitivity for the server and for the relational database should set the same way.
This setting only applies to the Oracle Business Intelligence Server’s internal comparisons for caching and for aggregation. Case sensitivity is a function of database operations and is set at the database level. The CASE_SENSITIVE_CHARACTER_COMPARISON parameter allows the Oracle BI Server to match the back-end database's functions. The following operators are affected:
■ Order By
■ Group By
■ Distinct
■ Join
■ comparisons (<, >, =, <=, >=, <>)
For example, consider the following three terms:
■ ACME
Case CASE_SENSITIVE_CHARACTER_COMPARISON
Binary versus linguistic comparison
SORT_TYPE
Table 22. Critical SORT_ORDER_LOCALE Parameters
Functional Category Specific Parameters

Oracle Business Intelligence Infrastructure Installation and Configuration Guide Version 10.1.3.2
NQSConfig.INI File Reference ■ General Section Parameters in the Configuration File
160
■ DELTA
■ acme
An Order By with CASE_SENSITIVE_CHARACTER_COMPARISON set ON results in rows in the order shown in the preceding example. An Order By with case-insensitive setting results in ACME and acme being adjacent.
If the term is case-sensitive and you perform a duplicate remove (Distinct), the result is three rows. If the term is not case-sensitive, then the Distinct result is two rows.
CASE_SENSITIVE_CHARACTER_COMPARISON should be set to correspond with how the back-end database deals with case. For example, if the back-end database is case-insensitive, then Oracle Business Intelligence Server should be configured to be case-insensitive. If Oracle Business Intelligence Server and the back-end database are not similarly case-sensitive, some subtle problems can result.
For an example of CASE_SENSITIVE_CHARACTER_COMPARISON applied to aggregation, a case-sensitive database has the following tuples:
Region UnitsWEST 1west 1West 1
With CASE_SENSITIVE_CHARACTER_COMPARISON set to ON, the data is returned to the client the with the same results shown in the preceding table.
With CASE_SENSITIVE_CHARACTER_COMPARISON set to OFF, the data is again returned to the client the with the same results shown in the preceding table. There is no change because the Oracle BI Server has not done any character comparisons.
However, if SUM_SUPPORTED is set to OFF in the features table, the Oracle BI Server is forced to do a character comparison. The results of the query in this case are as follows:
Region UnitsWEST 3
The reason for these results is that the Oracle BI Server has case-sensitive character comparison turned off, so it now treats the three tuples as the same value and aggregates them. In this case WEST = West = west. However, if you filter on the Region column, you would still see the regions WEST, West, and west; CASE_SENSITIVE_CHARACTER_COMPARISON does not affect filtering on a back-end database. The logic shown in the aggregation example applies to caching as well.
Since CASE_SENSITIVE_CHARACTER_COMPARISON is set in the NQSConfig.INI file, the parameter applies to all back-end databases in a repository. Therefore it should be set to match the case sensitivity of the repository’s dominant back-end database.
Example: CASE_SENSITIVE_CHARACTER_COMPARISON = OFF ;

NQSConfig.INI File Reference ■ General Section Parameters in the Configuration File
Oracle Business Intelligence Infrastructure Installation and ConfigurationGuide Version 10.1.3.2
161
NULL_VALUES_SORT_FIRSTSpecifies if NULL values sort before other values (ON) or after (OFF). ON and OFF are the only valid values. The value of NULL_VALUES_SORT_FIRST should conform to the underlying database. If there are multiple underlying databases that sort NULL values differently, set the value to correspond to the database that is used the most in queries.
Example: NULL_VALUES_SORT_FIRST = OFF ;
DATE_TIME_DISPLAY_FORMATSpecifies the format for how date/time stamps are input to and output from the Oracle Business Intelligence Server.
Example: DATE_TIME_DISPLAY_FORMAT = "yyyy/mm/dd hh:mi:ss" ;
DATE_DISPLAY_FORMATSpecifies the format for how dates are input to and output from the Oracle Business Intelligence Server.
NOTE: Specify the year as either 2-digit (yy) or 4-digit (yyyy). Separators can be any character except y, m, or d.
Example: DATE_DISPLAY_FORMAT = "yyyy/mm/dd" ;
TIME_DISPLAY_FORMATSpecifies the format for how times are input to and output from the Oracle Business Intelligence Server.
Example: TIME_DISPLAY_FORMAT = "hh:mi:ss" ;
WORK_DIRECTORY_PATHSSpecifies one or more directories for temporary space.
Each directory listed needs to be an existing fully-qualified, writable directory pathname, with double quotes ( " ) surrounding the pathname. Specify mapped directories only. UNC path names and network mapped drives are allowed only if the service runs under a qualified user account. To change the account under which the service is running, see the corresponding topic in the Oracle Business Intelligence Enterprise Edition Deployment Guide.
Specify multiple directories with a comma separated list. Valid values are any fully qualified pathname to an existing, writable directory.
Oracle Business Intelligence Infrastructure Installation and Configuration Guide Version 10.1.3.2
NQSConfig.INI File Reference ■ General Section Parameters in the Configuration File
162
For optimum performance, temporary directories should reside on high performance storage devices. If you specify more than one directory, they should reside on different drives.
Syntax: WORK_DIRECTORY_PATHS = "<full_directory_path_1>" [, "<full_directory_path_2>"{, "<full_directory_path_n>"}] ;
Example 1: WORK_DIRECTORY_PATHS = "C:\Temp" ;
Example 2: WORK_DIRECTORY_PATHS = "D:\temp", "F:\temp" ;
NOTE: Specifying more than one directory per drive does not improve performance because file I/O takes place through the same I/O controller. In general, specify only one directory per disk drive. Specifying multiple directories on different drives improves the overall I/O throughput of the Oracle Business Intelligence Server because internally, the processing files are allocated using a round-robin algorithm that balances the I/O load across the given disk drives.
SORT_MEMORY_SIZESpecifies the maximum amount of memory to be used for each sort operation. Multiple operations can each use memory up to the value specified. The limit for SORT_MEMORY_SIZE is determined by the physical memory of the server machine and on the number of sort operations that might occur simultaneously. Specify KB for kilobytes, MB for megabytes, and no units for bytes.
Example: SORT_MEMORY_SIZE = 4 MB ;
Related TopicSee the topic How the SIZE Parameters Affect Oracle Business Intelligence Performance on page 163.
SORT_BUFFER_INCREMENT_SIZESpecifies the increment that the sort memory size is increased by as more memory is needed. As more memory is required, the size increases by the value specified until it reaches the value of SORT_MEMORY_SIZE.
Example: SORT_BUFFER_INCREMENT_SIZE = 256 KB ;
Related TopicSee the topic How the SIZE Parameters Affect Oracle Business Intelligence Performance on page 163.
VIRTUAL_TABLE_PAGE_SIZESpecifies the size of a memory page for the Oracle Business Intelligence Server internal processing. A higher value reduces I/O but increases memory usage, especially in a multiuser environment.
Example: VIRTUAL_TABLE_PAGE_SIZE = 128 KB ;
Related TopicSee the topic How the SIZE Parameters Affect Oracle Business Intelligence Performance on page 163.

NQSConfig.INI File Reference ■ General Section Parameters in the Configuration File
Oracle Business Intelligence Infrastructure Installation and ConfigurationGuide Version 10.1.3.2
163
How the SIZE Parameters Affect Oracle Business Intelligence PerformanceThis topic explains the interrelationships among the SIZE parameters and how they affect the performance of Oracle Business Intelligence.
■ SORT_MEMORY_SIZE
The size specified by SORT_MEMORY_SIZE sets the upper limit on how large the sorting buffer can be in the Oracle Business Intelligence Server. When this limit is exceeded, data is sorted in allotments of the size set by SORT_MEMORY_SIZE and the sorted sets are merged together. For example, suppose SORT_MEMORY_SIZE is set to 4 MB and the size of the data to be sorted is 32 MB. The server performs the sort once per each 4 MB of data, for a total of eight sort operations, and then merge the results into a single result set. This technique allows the Oracle Business Intelligence Server to sort data of indefinite size.
The merge process itself is generally not costly in terms of resources, but it does include a read and write of each result set in a temporary file. To reduce the time this takes, increase the SORT_MEMORY_SIZE. This parameter can be tuned over time by taking into consideration the data size of the query and the number of concurrent users.
■ SORT_BUFFER_INCREMENT_SIZE
This parameter defines the increment by which SORT_MEMORY_SIZE should be reached. For example, suppose SORT_MEMORY_SIZE is set to 4 MB and the data to be sorted is just one megabyte. As data is fed into the sort routine, the size of the sort buffer increases only by the increment size, rather than the full size allowed by SORT_MEMORY_SIZE. This mechanism allows the Oracle Business Intelligence Server to sort smaller result sets efficiently without wasting memory.
■ VIRTUAL_TABLE_PAGE_SIZE
Several operations—sort, join, union and database fetch—can require memory resources beyond those available to the Oracle Business Intelligence Server. To manage this condition, the server uses a virtual table management mechanism that provides a buffering scheme for processing these operations. When the amount of data exceeds the VIRTUAL_TABLE_PAGE_SIZE, the remaining data is buffered in a temporary file and placed in the virtual table as processing continues. This mechanism supports dynamic memory sizes and ensures that any row can be obtained dynamically for processing queries.
When VIRTUAL_TABLE_PAGE_SIZE is increased, I/O operations are reduced. Complex queries may use 20 to 30 virtual tables, while simple queries may not even require virtual tables. The default size of 128 KB is a reasonable size when one considers that the size for virtual paging in Windows NT is 64 KB. This parameter can be tuned depending on the number of concurrent users and the average query complexity. In general, setting the size higher than 256 KB does not yield a corresponding increase in throughput due to the 64 KB size limit of Windows NT system buffers, as each I/O still goes through the system buffers.
Related TopicsThe topic SORT_MEMORY_SIZE on page 162 describes a parameter that affects performance in the manner described in this topic.

Oracle Business Intelligence Infrastructure Installation and Configuration Guide Version 10.1.3.2
NQSConfig.INI File Reference ■ General Section Parameters in the Configuration File
164
The topic SORT_BUFFER_INCREMENT_SIZE on page 162 describes a parameter that affects performance in the manner described in this topic.
The topic VIRTUAL_TABLE_PAGE_SIZE on page 162 describes a parameter that affects performance in the manner described in this topic.
USE_LONG_MONTH_NAMESSpecifies whether month names are returned as full names, such as JANUARY and FEBRUARY, or as three-letter abbreviations, such as JAN and FEB. Valid values are YES and NO. Specify YES to have month names returned as full names or NO to have months names returned as three-letter abbreviations. The default value is NO.
Example: USE_LONG_MONTH_NAMES = NO ;
USE_LONG_DAY_NAMESSpecifies whether day names are returned as full names, such as MONDAY and TUESDAY, or as three-letter abbreviations, such as MON and TUE. Valid values are YES and NO. Specify YES to have day names returned as full names or NO to have day names returned as three-letter abbreviations. The default value is NO.
Example: USE_LONG_DAY_NAMES = NO ;
UPPERCASE_USERNAME_FOR_INITBLOCKSpecifies whether the users are authenticated with case sensitivity. The default value is NO (or false internally). When it is set to YES, then all user names are changed to uppercase for authentication purposes in the SiebelAnalytics.rpd file. Otherwise, case is maintained.
Example: UPPERCASE_USERNAME_FOR_INITBLOCK = NO ;
AGGREGATE_PREFIXSpecifies the Domain Server Name for Aggregate Persistence. The prefix must be between 1 and 8 characters long and should not have any special characters (‘_’ is allowed).
Example: AGGREGATE_PREFIX = “SA_” ;

NQSConfig.INI File Reference ■ Security Section Parameters in the Configuration File
Oracle Business Intelligence Infrastructure Installation and ConfigurationGuide Version 10.1.3.2
165
Security Section Parameters in the Configuration FileThe security parameters specify default values for the Oracle Business Intelligence Server security features. For more information about security, see the chapter on security in Oracle Business Intelligence Server Administration Guide and sections (such as the section on setting up LDAP authentication) in the Oracle Business Intelligence Server Administration Guide.
DEFAULT_PRIVILEGESSpecifies the values users and groups are assigned when they are initially created.
Valid values are NONE and READ. The default value is READ.
Example: DEFAULT_PRIVILEGES = READ ;
PROJECT_INACCESSIBLE_COLUMN_AS_NULLThe default value for PROJECT_INACCESSIBLE_COLUMN_AS_NULL changes based on the type of install. If you are running the Oracle BI platform only, the value is NO.
The flag PROJECT_INACCESSIBLE_COLUMN_AS_NULL must be set to TRUE to enable the SQL command CHOOSE.
The SQL command
CHOOSE(expr1, expr2, .... exprn)
selects the first valid expression from a list of expressions. A valid expression here is an expression in which all referenced columns are accessible by the current query user.
MINIMUM_PASSWORD_LENGTHA security measure used to enforce strong passwords. The minimum length is enforced when a user logs in. For example, if MINIMUM_PASSWORD_LENGTH is set to 8, then any user's password is rejected unless it has at least 8 characters.
The default value is zero if you install using the Basic install type, and 8 if you install using the Advanced type.
Example: MINIMUM_PASSWORD_LENGTH = 8 ;
SSLThe following parameters are for enabling Secure Socket Layer (SSL) communication with the Oracle BI Cluster (NQClusterConfig) and Oracle BI Server (NQSConfig). If you plan to enable SSL communication with these components, the SSL parameter are uncommented and set to YES and the SSL_CERTIFICATION_FILE is set to the path of the certification file. For more information on SSL and certification files, see the Oracle Business Intelligence Enterprise Edition Deployment Guide.

Oracle Business Intelligence Infrastructure Installation and Configuration Guide Version 10.1.3.2
NQSConfig.INI File Reference ■ Security Section Parameters in the Configuration File
166
Default settings:
#SSL=NO;
#SSL_CERTIFICATE_FILE="servercert.pem";
#SSL_PRIVATE_KEY_FILE="serverkey.pem";
#SSL_PK_PASSPHRASE_FILE="serverpwd.txt";
#SSL_PK_PASSPHRASE_PROGRAM="sitepwd.exe";
#SSL_VERIFY_PEER=NO;
#SSL_CA_CERTIFICATE_DIR="CACertDIR";
#SSL_CA_CERTIFICATE_FILE="CACertFile";
#SSL_TRUSTED_PEER_DNS="";
#SSL_CERT_VERIFICATION_DEPTH=9;
#SSL_CIPHER_LIST="";
SSL_CERTIFICATE_FILEExample: SSL_CERTIFICATE_FILE = "servercert.pem" ;
SSL_PRIVATE_KEY_FILEExample: SSL_PRIVATE_KEY_FILE = "serverkey.pem" ;
SSL_PK_PASSPHRASE_FILEExample: SSL_PK_PASSPHRASE_FILE = "serverpwd.txt" ;
SSL_PK_PASSPHRASE_PROGRAMExample: SSL_PK_PASSPHRASE_PROGRAM = "sitepwd.exe" ;
SSL_VERIFY_PEERExample: SSL_VERIFY_PEER = NO ;
SSL_CA_CERTIFICATE_DIRExample: SSL_CA_CERTIFICATE_DIR = "CACertDIR" ;
SSL_CA_CERTIFICATE_FILEExample: SSL_CA_CERTIFICATE_FILE = "CACertFile" ;
SSL_TRUSTED_PEER_DNSExample: SSL_TRUSTED_PEER_DNS = "" ;

NQSConfig.INI File Reference ■ Security Section Parameters in the Configuration File
Oracle Business Intelligence Infrastructure Installation and ConfigurationGuide Version 10.1.3.2
167
SSL_CERT_VERIFICATION_DEPTHExample: SSL_CERT_VERIFICATION_DEPTH = 9 ;
SSL_CIPHER_LISTExample: SSL_CIPHER_LIST = "" ;
AUTHENTICATION_TYPESpecifies the type of authentication the Oracle Business Intelligence Server uses to authenticate the Oracle Business Intelligence Server users.
Valid values are NQS, DATABASE, and BYPASS_NQS. The default authentication mechanism is NQS.
The consequences of each authentication type is shown in Table 23.
Example 1: AUTHENTICATION_TYPE = NQS ;
Example 2: DATABASE = "Goldmine" ;
Table 23. Oracle Business Intelligence Server Authentication Types
Type Description
NQS Authentication is done by the Oracle Business Intelligence Server.
NOTE: For Oracle BI applications, the Oracle Business Intelligence Server in turn can be set up to authenticate using Microsoft ADSI, an LDAP server, or a database. See the Oracle Business Intelligence Enterprise Edition Deployment Guide.
DATABASE Specify the database name in the Physical Layer of the repository to be used for database authentication. The first connection pool for this database is used for authentication.
When the user logs into the Oracle Business Intelligence Server, the submitted logon name and password is used to connect to the database. If this connection succeeds, the user is considered to be successfully authenticated.
BYPASS_NQS Authentication is against the database to which user queries are sent, using the submitted user name and password.
For example, if a user runs a query tool against the Oracle Business Intelligence Server with the user name of “Test” and a password of “Test,” this user name and password are used to connect to the underlying database server. If this represents a valid user to the underlying database server, the user is considered authenticated. The user’s privileges are enforced by the underlying database server based upon the user name used to log in, as appropriate.

Oracle Business Intelligence Infrastructure Installation and Configuration Guide Version 10.1.3.2
NQSConfig.INI File Reference ■ Server Section Parameters in the Configuration File
168
Server Section Parameters in the Configuration FileThe parameters in the Server section define defaults and limits for the Oracle Business Intelligence Server.
SERVER_NAMEA logical name identifying the Oracle Business Intelligence Server.
About the SERVER_THREAD_RANGE and MAX_SESSION_LIMIT ParametersThe size of the connection pool determines the number of available Oracle Business Intelligence Server connections and the number of available threads for processing physical queries. A logical query may generate multiple physical queries, each of which could go to different connections.
Oracle Business Intelligence Server creates a number of server threads up to the specified maximum using the parameter SERVER_THREAD_RANGE. All the threads available at any time are used to process queries from one or more sessions as needed.
Typically, the number of sessions specified by MAX_SESSION_LIMIT is higher than the number of available threads specified by SERVER_THREAD_RANGE.
In summary:
■ MAX_SESSION_LIMIT specifies the number of sessions that can be connected to Oracle Business Intelligence Server even if inactive. The sessions and the corresponding queries are queued to the threads for processing as they become available.
■ Connection pool size specifies the number of threads and connections that process physical queries.
■ SERVER_THREAD_RANGE specifies the number of threads that process the logical queries—the number of queries that can be active in Oracle Business Intelligence Server at any time.
READ_ONLY_MODEPermits or forbids changing the Oracle BI repository (.rpd) file in Online mode.
The default is NO, meaning that repositories can be edited online.
When this parameter is set to YES, it prevents the Oracle Business Intelligence Administration Tool in Online mode from making any changes to the repository. When the Administration Tool connects in Online mode, a message informs the user that the repository is read-only. If this parameter is set to NO, the online Administration Tool can make changes to the repository.
The Oracle BI Server must be stopped and restarted in order for changes in this parameter to take effect.

NQSConfig.INI File Reference ■ Server Section Parameters in the Configuration File
Oracle Business Intelligence Infrastructure Installation and ConfigurationGuide Version 10.1.3.2
169
MAX_SESSION_LIMITSpecifies the maximum number of connections allowed by the server. When this number is exceeded, the server refuses the connection request.
The limit is 65,535 connections.
Example: MAX_SESSION_LIMIT = 2000 ;
MAX_REQUEST_PER_SESSION_LIMITSpecifies the maximum number of logical requests per session. This is how many open requests there are, per session, at the same time.
The limit is 65,535 logical requests per session.
NOTE: Usually, individual users have only one open request per session at the same time. Application programs and Oracle BI Presentation Services, however, typically have more than one request open at the same time. In general, the default value of 500 should be sufficient for most environments, but this parameter should be tuned based on the application environment and the client tools in use.
Example: MAX_REQUEST_PER_SESSION_LIMIT = 500 ;
SERVER_THREAD_RANGEFor each Oracle Business Intelligence Server request, SERVER_THREAD_RANGE specifies configuration information for thread allocation. The lower number in the range specifies the number of threads initially allocated, and the higher number in the range specifies the maximum number of threads to be allocated. The thread pool grows and shrinks in 5 thread increments until the upper or lower bound is reached. If there are fewer threads than sessions, sessions share the available number of threads on a first come-first served basis.
Set both values the same to maximize the benefits of thread pooling.
Example: SERVER_THREAD_RANGE = 100-100 ;
SERVER_THREAD_STACK_SIZESpecifies the memory stack size allocated for each server thread. The value of 0 sets the stack size as 256 KB per server thread.
The default is 256 KB.
Example: SERVER_THREAD_STACK_SIZE = 256 ;
DB_GATEWAY_THREAD_RANGESpecifies the minimum and maximum number of threads in the Oracle Business Intelligence ServerDatabase Gateway thread pool, as per SERVER_THREAD_RANGE.
Default is 40-200.
Example: DB_GATEWAY_THREAD_RANGE = 40-200

Oracle Business Intelligence Infrastructure Installation and Configuration Guide Version 10.1.3.2
NQSConfig.INI File Reference ■ Server Section Parameters in the Configuration File
170
DB_GATEWAY_THREAD_STACK_SIZESpecifies the memory stack size allocated for each Oracle Business Intelligence Server Database Gateway thread. The value of 0 sets the stack size as 256 KB per server thread.
The default is 256 KB.
Example: DB_GATEWAY_THREAD_STACK_SIZE = 0 ;
MAX_EXPANDED_SUBQUERY_PREDICATESControls the maximum number of values that may be in an IN value list populated by a subquery. The default is 8,192 values.
Example: MAX_EXPANDED_SUBQUERY_PREDICATES = 8192;
NOTE: The default values are set to 1024 by default for the following parameters:MAX_QUERY_PLAN_CACHE_ENTRIESMAX_DRILLDOWN_INFO_CACHE_ENTRIESMAX_DRILLDOWN_QUERY_CACHE_ENTRIES
These values should not be raised without consulting Oracle Support.
MAX_QUERY_PLAN_CACHE_ENTRIESControls the number of cached logical query plans. The query plan cache is an internal performance feature that increases the speed of the query compilation process by caching plans for the most recently used queries.
Example: MAX_QUERY_PLAN_CACHE_ENTRIES = 1024 ;
MAX_DRILLDOWN_INFO_CACHE_ENTRIESControls the number of cached Action Link drill down information entries per repository. This increases the speed of computing Action Link information by caching the Action Link information for the most recently used queries.
Example: MAX_DRILLDOWN_INFO_CACHE_ENTRIES = 1024 ;
MAX_DRILLDOWN_QUERY_CACHE_ENTRIESControls the number of cached Action Link query entries per repository. This increases the speed of drilling down by caching the Action Link drill down results for the most recently used queries.
Example: MAX_DRILLDOWN_QUERY_CACHE_ENTRIES = 1024 ;

NQSConfig.INI File Reference ■ Server Section Parameters in the Configuration File
Oracle Business Intelligence Infrastructure Installation and ConfigurationGuide Version 10.1.3.2
171
INIT_BLOCK_CACHE_ENTRIESControls the number of initialization block result sets that are cached with respect to row-wise initialization. The cache key is the fully instantiated initialization block SQL.
The default value is 20. Because this parameter affects internal operations for localized versions of the Oracle BI software, it is recommended that you do not change this value unless instructed to do so.
Example: INIT_BLOCK_CACHE_ENTRIES = 20 ;
CLIENT_MGMT_THREADS_MAXSpecifies the number of management threads to allocate for managing Oracle Business Intelligence Server client/server communications. The default client/server communication method for Oracle Business Intelligence Server is TCP/IP.
The default value of 5 is sufficient for server communications with the Server Administration Tool and when Oracle BI Presentation Services is the only main client process.
To support this method, a Port field has been added to the Enter Logon Information screen in Oracle Business Intelligence ODBC Wizard. (Oracle BI D/COM support is limited; it is recommended that you use TCP/IP by default.)
Each client process consumes a management thread. If you plan to run multiple Oracle BI Presentation Services client instances or multiple third-party client instances, increase the number of management threads to match the number of client instances. When the number of running client instances exceeds the number of management threads allocated, worker threads are consumed.
Example: CLIENT_MGMT_THREADS_MAX = 10 ;
RPC_SERVICE_OR_PORTSpecifies the Remote Procedure Call (RPC) Service or TCP/IP port the Oracle Business Intelligence Server should use for client/server communications.
The default is 9703.
NOTE: Do not disable the RPC Service. If you attempt to start Oracle Business Intelligence Server on a machine where the RPC services or processes are not running, the application does not start and a log is not generated.
When using the Oracle BI ODBC Installer to set up ODBC data sources for the Oracle Business Intelligence Server, the port number specified in the Port field on the Enter Logon Information screen should match the port number specified here. If you change the port number in the configuration file, remember to reconfigure any affected ODBC data sources to use the new port number.
Example: RPC_SERVICE_OR_PORT = 9703 ;
SERVER_HOSTNAME_OR_IP_ADDRESSESThe value of this parameter is the name or IP of the location on which the Cluster Controller is running. The default value is ALLNICS. The parameter SERVER_HOSTNAME_OR_IP_ADDRESSES is related to the parameter RPC_SERVICE_OR_PORT field and to the environment variable NQUIRE_PORT.

Oracle Business Intelligence Infrastructure Installation and Configuration Guide Version 10.1.3.2
NQSConfig.INI File Reference ■ Server Section Parameters in the Configuration File
172
There are two conditions under which you need to specify a value for SERVER_HOSTNAME_OR_IP_ADDRESSES:
■ If you decide to use an IP address instead of a hostname.
■ If the hostname for the machine is a fully-qualified hostname.domain.
The hostname or IP can be specified with or without a port number.
■ If a port number is specified, the server listens to the specified port number, overriding the settings in RPC_SERVICE_OR_PORT field and in the NQUIRE_PORT environment variable.
■ If a port number is not specified, take the port number from RPC_SERVICE_OR_PORT field or from the NQUIRE_PORT environment variable.
If the client specifies the hostname of the server (in odbc.ini on UNIX platforms or in instanceconfig.xml on Windows platforms), make sure that the BI Server is listening to the hostname or IP address bound to the hostname.
The following table shows the relationship between the value for RPC_SERVICE_OR_PORT and the value for SERVER_HOSTNAME_OR_IP_ADDRESSES.
The following table shows the relationships between the Oracle BI Server listening method and the client communication methods.
Examples:
■ SERVER_HOSTNAME_OR_IP_ADDRESSES = “hostname.domain” ;
Listen to all NICs.
SERVER_HOSTNAME_OR_IP_ADDRESSES ■ When a port number is specified here, it overrides the one specified by the field RPC_SERVICE_OR_PORT.
■ If a port is not specified with a host name or IP, the port number specified by the field RPC_SERVICE_OR_PORT is used.
RPC_SERVICE_OR_PORT This port number will not be used if a port number is specified by the field SERVER_HOSTNAME_OR_IP_ADDRESSES.
BI Server listens on hostname or set of hostnames
Client can send request using hostname
Client can send a request using an IP that is bound to the hostname of the server, in DNS
BI Server listens to a particular IP or set of IP addresses
Client can send a request using the same IP
Client can send a request using server hostname that has the IP bound to it

NQSConfig.INI File Reference ■ Server Section Parameters in the Configuration File
Oracle Business Intelligence Infrastructure Installation and ConfigurationGuide Version 10.1.3.2
173
■ SERVER_HOSTNAME_OR_IP_ADDRESSES = “hostname.domain”:9715 ;
Listen to all NICs on port 9715.
■ SERVER_HOSTNAME_OR_IP_ADDRESSES = “IP1”,”IP2”:port 9715;
Listen to IP1 and IP2 on port 9715.
■ SERVER_HOSTNAME_OR_IP_ADDRESSES = “hostname.domain”:9715,”IP”:9717 ;
Listen to hostname on port 9715 and IP address on port 9717. If the hostname is equivalent to the IP address, then the server listens on both ports.
ENABLE_DB_HINTSEnables optional hints to be passed along with an SQL statement to an Oracle database. Database hints are discussed in Oracle Business Intelligence Server Administration Guide.
The default is YES.
PREVENT_DIVIDE_BY_ZEROControls the behavior for when a division by zero occurs. When set to YES, then a NULL value is returned. When set to NO, then the query is terminated and an appropriate error is returned to the user.
CLUSTER_PARTICIPANTSpecifies whether the Oracle Business Intelligence Server that is using this configuration file is a member of an Oracle Business Intelligence Server cluster.
Valid values are YES and NO. The default value is NO.
If the server is to be a member of an Oracle Business Intelligence Server cluster, uncomment the parameters “REPOSITORY_PUBLISHING_DIRECTORY” on page 173 and “REQUIRE_PUBLISHING_DIRECTORY” on page 174, and supply valid values for them.
When CLUSTER_PARTICIPANT is set to YES, this server must have a valid, configured NQClusterConfig.INI file in the subdirectory OracleBI_HOME\server\Config. For more information, see the NQClusterConfig.INI File Reference in the Oracle Business Intelligence Enterprise Edition Deployment Guide.
Example: CLUSTER_PARTICIPANT = YES;
REPOSITORY_PUBLISHING_DIRECTORYWhen the parameter CLUSTER_PARTICIPANT is set to YES, REPOSITORY_PUBLISHING_DIRECTORY specifies the location of the repository publishing directory shared by all Oracle Business Intelligence Servers participating in the cluster. There is no default value for this parameter.
When a repository is updated in online mode, it is published to this location. All clustered servers examine this location upon startup for any repository changes. This needs to be a valid location visible to all servers in the cluster even if you anticipate that no repositories are updated in online mode.

Oracle Business Intelligence Infrastructure Installation and Configuration Guide Version 10.1.3.2
NQSConfig.INI File Reference ■ Server Section Parameters in the Configuration File
174
The directory should reside on a shared file system. The directory needs to be a valid fully-qualified directory pathname, with double quotes ( " ) surrounding the pathname. Both UNC and mapped directories are supported. Do not specify a relative path name, or the Repository subdirectory (located in the Oracle BI software installation directory) as the location of the repository publishing directory.
This REPOSITORY_PUBLISHING_DIRECTORY parameter is required on every Oracle Business Intelligence Server that is to participate in the cluster. The Oracle Business Intelligence Server designated as the master server for online repository changes (from the MASTER_SERVER parameter in the NQClusterConfig.INI file) needs to have read and write access to this directory. The Oracle Business Intelligence Servers in the cluster (from the SERVERS parameter in the NQClusterConfig.INI file) need to have read and write access to this directory as well. All entries need to reference the same actual directory, although different names can be specified to accommodate differences in drive mappings.
These are examples:
REPOSITORY_PUBLISHING_DIRECTORY = “z:\OracleBI\Publish” ;REPOSITORY_PUBLISHING_DIRECTORY = “\\ClusterSrv\Publish” ;
REQUIRE_PUBLISHING_DIRECTORYWhen the parameter CLUSTER_PARTICIPANT is set to YES, REQUIRE_PUBLISHING_DIRECTORY specifies that the repository publishing directory (from the parameter REPOSITORY_PUBLISHING_DIRECTORY) needs to be available in order for this Oracle Business Intelligence Server to start up and join the cluster.
This parameter is commented out by default.
When set to YES, if the publishing directory is not available at startup or if an error is encountered while the server is reading any of the files in the directory, an error message is logged in the NQServer.log file and the server shuts down.
To allow this Oracle Business Intelligence Server to start up and join the cluster even if the publishing directory is not available, set this value to NO. When set to NO, the server joins the cluster and a warning message is logged in the NQServer.log file. Any online repository updates are not reflected in the server’s Repository directory (located in the Oracle BI software installation directory). This could result in request failures, wrong answers, and other problems. However, this could be useful in situations where online repository editing is done infrequently and the goal is to keep the cluster operational even if some servers have stale repositories.
Example: REQUIRE_PUBLISHING_DIRECTORY = YES;
DISCONNECTEDWhen Oracle Business Intelligence Server is being run as part of Oracle BI Disconnected Client, the DISCONNECTED parameter must be set to YES. The default is NO.
When DISCONNECTED is set to YES, only Mobile Clients running on the same machine as the Mobile Oracle Business Intelligence Server are able to connect to it. Any Mobile Client running on a different machine is unable to connect to the Disconnected Oracle BI Server.
Example: DISCONNECTED = NO ;

NQSConfig.INI File Reference ■ Server Section Parameters in the Configuration File
Oracle Business Intelligence Infrastructure Installation and ConfigurationGuide Version 10.1.3.2
175
AUTOMATIC_RESTARTSpecifies whether the Oracle Business Intelligence Server should be automatically restarted after a crash. Automatic restart is applies only to an Oracle Business Intelligence Server platform; it does not apply to a clustered Oracle BI Server environment, or to an Oracle BI Disconnected server. The default is YES.
Example: AUTOMATIC_RESTART = YES ;

Oracle Business Intelligence Infrastructure Installation and Configuration Guide Version 10.1.3.2
NQSConfig.INI File Reference ■ Dynamic Library Section Parameters in the Configuration File
176
Dynamic Library Section Parameters in the Configuration FileThis section contains one entry for each dynamic link library (DLL) used to make connections to the Oracle Business Intelligence Server:
Syntax: <logical_name> = <dynamic_library> ;
where:
CAUTION: Do not make any changes to this section unless instructed to do so by Oracle Support.
The following are the dynamic link libraries shipped with this release:
■ ODBC200 = nqsdbgatewayodbc ;
■ ODBC350 = nqsdbgatewayodbc35 ;
■ OCI7 = nqsdbgatewayoci7 ;
■ OCI8 = nqsdbgatewayoci8 ;
■ OCI8i = nqsdbgatewayoci8i ;
■ OCI10g = nqsdbgatewayoci10g ;
■ DB2CLI = nqsdbgatewaydb2cli ;
■ DB2CLI35 = nqsdbgatewaydb2cli35 ;
■ NQSXML = nqsdbgatewayodbc ;
■ XMLA = nqsdbgatewayodbc ;
NOTE: If you are upgrading from an earlier version of Siebel Analytics, you may need to contact Oracle Support for more information.
logical_name A logical name for the dynamic link library. These logical names also appear in the Connection Pool dialog.
dynamic_library The name of the associated dynamic library. These are located in the Bin subdirectory in the Oracle BI software installation directory.

NQSConfig.INI File Reference ■ User Log Section Parameters in the Configuration File
Oracle Business Intelligence Infrastructure Installation and ConfigurationGuide Version 10.1.3.2
177
User Log Section Parameters in the Configuration FileThe user log NQQuery.log is located in the OracleBI_HOME\server\Log directory (together with the NQServer.log file). It logs activity about queries when enabled for a user. Entries can be viewed using a text editor or the nQLogViewer executable.
For more information about the NQQuery.log file, see the chapter on administering the query environment in Oracle Business Intelligence Server Administration Guide.
NOTE: The NQServer.log file automatically logs activity about the Oracle Business Intelligence Server, including information about server startup failures and queries that result in time limits or row limits being exceeded when the Status Max Time or Status Max Rows option is set to Warn. The install.log file logs activity automatically about installation activities. You can view these log files using a text editor such as Windows Notepad.
USER_LOG_FILE_SIZESpecifies the size to which the NQQuery.log file is allowed to grow. The default size is 10 MB. When this limit is reached, the log file closes, the log file is renamed to NQQuery.log.old, and logging resumes to a newly created NQQuery.log file.
Example: USER_LOG_FILE_SIZE = 10 MB ;
CODE_PAGESpecifies the type of code page being used. The default is UTF8. Other values include any valid code page, such as ANSI, 1252, and so on. Enclose the value in double quotes.
Example: CODE_PAGE = "UTF8" ;

Oracle Business Intelligence Infrastructure Installation and Configuration Guide Version 10.1.3.2
NQSConfig.INI File Reference ■ Usage Tracking Section Parameters in the Configuration File
178
Usage Tracking Section Parameters in the Configuration FileThe usage tracking parameters define default values for collection of usage tracking statistics on each logical query submitted to the Oracle Business Intelligence Server.
The following table shows the names and descriptions of columns that are added to the usage tracking table and to the stand-alone usage tracking repository.
For more information about usage tracking, see the chapter on administering the query environment in Oracle Business Intelligence Server Administration Guide.
ENABLEEnables or disables collection of usage tracking statistics.
Valid values are YES and NO. The default value is NO. When set to NO, statistics are not accumulated. When set to YES, statistics are accumulated for each logical query.
Example: ENABLE = NO ;
DIRECT_INSERTSpecifies whether statistics are inserted directly into a database table or written to a local file.
■ When DIRECT_INSERT is set to NO, data is written to a flat file.
■ When DIRECT_INSERT is set to YES, data is inserted into a table.
NOTE: This parameter is operative only if ENABLE = YES.
Direct insertion into a database table is recommended, therefore the default value is YES.
Name Data type Description Notes
SAW_DASHBOARD_PG Varchar(150) Page within Oracle BI Presentation Services dashboard
Null if not a dashboard request.
PRESENTATION_NAME Varchar(128) Presentation catalog within Oracle BI Server
ERROR_TEXT Varchar(250) Error flag and reason text for queries that do not generate a cache entry, from back-end databases
Only applicable if SUCCESS_FLG is non-zero. Concatenates multiple messages; the application must parse the column contents.
RUNAS_USER_NAME Varchar(128) Impersonated User (the Proxy User that executed the query)
Null if the request is not run as an impersonated user.

NQSConfig.INI File Reference ■ Usage Tracking Section Parameters in the ConfigurationFile
Oracle Business Intelligence Infrastructure Installation and ConfigurationGuide Version 10.1.3.2
179
Certain other parameters become valid, depending whether DIRECT_INSERT is set to YES or to NO. These parameters are summarized in Table 24 on page 179, and described following the table.
STORAGE_DIRECTORYSpecifies the full path to the directory used to store usage tracking log files. The directory listed needs to be a valid fully-qualified, writable directory pathname, with double quotes ( " ) surrounding the pathname. Specify mapped directories only. UNC path names and network mapped drives are allowed only if the service runs under a qualified user account. To change the account under which the service is running, see the corresponding topic in the Oracle Business Intelligence Enterprise Edition Deployment Guide.
Valid values are any fully qualified pathname to an existing, writable directory.
The parameter STORAGE_DIRECTORY is valid only if the parameter DIRECT_INSERT is set to NO. When usage tracking is enabled, but no storage directory is specified, the files are written to the subdirectory OracleBI_HOME\server\Log.
Example: STORAGE_DIRECTORY = "C:\Temp\UsageTracking" ;
CHECKPOINT_INTERVAL_MINUTESSpecifies how often the usage tracking data is flushed to disk. Setting this interval higher increases the amount of data that may be lost in the event of an abnormal server shutdown. Setting this interval lower incurs additional overhead.
Table 24. Valid Parameters for DIRECT_INSERT Settings
DIRECT_INSERT Setting Parameters Used Parameter Setting
NO STORAGE_DIRECTORY "<full directory path>"
CHECKPOINT_INTERVAL_MINUTES 5
FILE_ROLLOVER_INTERVAL_MINUTES 30
CODE_PAGE "ANSI"
YES PHYSICAL_TABLE_NAME "<Database>"."<Catalog>"."<Schema>"."<Table>" or "<Database>"."<Schema>"."<Table>"
CONNECTION_POOL "<Database>"."<Connection Pool>"
BUFFER_SIZE 10 MB
BUFFER_TIME_LIMIT_SECONDS 5
NUM_INSERT_THREADS 5
MAX_INSERTS_PER_TRANSACTION 1

Oracle Business Intelligence Infrastructure Installation and Configuration Guide Version 10.1.3.2
NQSConfig.INI File Reference ■ Usage Tracking Section Parameters in the Configuration File
180
The default is 5 minutes.
NOTE: When the interval is set to 0, the Oracle Business Intelligence Server attempts to write usage tracking data to disk with minimal time between attempts. This can negatively affect server performance, and is strongly discouraged.
Example: CHECKPOINT_INTERVAL_MINUTES = 5 ;
FILE_ROLLOVER_INTERVAL_MINUTESSpecifies the time, in minutes, before the current usage tracking log file is closed and a new file created. For example, if this entry is set to 60 minutes, then 24 usage tracking log files are created each day.
The default is 30 minutes.
When the checkpoint interval equals or exceeds the rollover interval, only the rollover occurs explicitly; the checkpoint only occurs implicitly when the old usage tracking log file is closed.
NOTE: When the checkpoint interval is set to 0, the Oracle Business Intelligence Server attempts to close current usage tracking log files and open new log files with minimal time between attempts. This can negatively affect server performance and result in a large number of usage tracking log files in the storage directory. Setting this interval to 0 is strongly discouraged.
Example: FILE_ROLLOVER_INTERVAL_MINUTES = 240;
CODE_PAGEFor multilingual repositories, this specifies the type of output code page to use when writing statistics to disk. Valid values include any valid code page number (such as 1252), and other globally recognized output code page types.
The default value is ANSI. The type depends upon the database loader being used. For example, to support multilingual repositories for database loaders used by Oracle and DB2, specify UTF8. Enclose the value in double quotes. USC-2 is currently not supported.
Example: CODE_PAGE = "ANSI";
PHYSICAL_TABLE_NAMESpecifies the table in which to insert records corresponding to the query statistics. The table name is the fully qualified name as it appears in the physical layer of the Server Administration Tool.
The general structure of this parameter depends on the type of database being used:
■ For SQL Server databases, use the following general structure:
PHYSICAL_TABLE_NAME = "<Database>"."<Catalog>"."<Schema>"."<Table>" ;
Example:
PHYSICAL_TABLE_NAME = "OracleBI Usage"."Catalog"."dbo"."S_NQ_ACCT" ;
In the preceding example, the structure is as follows:
❏ “Oracle BI Usage” represents the database component

NQSConfig.INI File Reference ■ Usage Tracking Section Parameters in the ConfigurationFile
Oracle Business Intelligence Infrastructure Installation and ConfigurationGuide Version 10.1.3.2
181
❏ “Catalog” represents the catalog component
❏ “dbo” represents the schema component
❏ “S_NQ_ACCT” represents the table name
■ For Oracle databases, use the following general structure:
PHYSICAL_TABLE_NAME = "<Database>"."<Schema>"."<Table>" ;
Examples:
PHYSICAL_TABLE_NAME = "OracleBI Usage"."S_NQ_SCHED"."S_NQ_ACCT" ;
In the preceding example, the structure is as follows:
❏ “Oracle BI Usage” represents the database component
❏ "S_NQ_SCHED" represents the schema component
❏ “S_NQ_ACCT” represents the table name
CONNECTION_POOLSpecifies the connection pool to use for inserting records into the usage tracking table. This is the fully qualified name as it appears in the physical layer of the Server Administration Tool.
Example: CONNECTION_POOL = "OracleBI Usage"."Connection Pool" ;
BUFFER_SIZESpecifies the amount of memory used to temporarily store insert statements. The buffer allows the insert statements to be issued to the usage tracking table independently of the query that produced the statistics to be inserted. When the buffer fills up, then subsequent queries’ statistics are discarded until the insert threads service the buffer entries.
Example: BUFFER_SIZE = 10 MB ;
BUFFER_TIME_LIMIT_SECONDSSpecifies the maximum amount of time that an insert statement remains in the buffer before it is issued to the usage tracking table. This time limit ensures that the Oracle Business Intelligence Server issues the insert statements in a timely manner even during periods of extended quiescence.
Example: BUFFER_TIME_LIMIT_SECONDS = 5 ;
NUM_INSERT_THREADSSpecifies the number of threads that remove insert statements from the buffer and issue them to the usage tracking table. The number of threads should not exceed the total number of threads assigned to the connection pool.
Example: NUM_INSERT_THREADS = 5 ;

Oracle Business Intelligence Infrastructure Installation and Configuration Guide Version 10.1.3.2
NQSConfig.INI File Reference ■ Usage Tracking Section Parameters in the Configuration File
182
MAX_INSERTS_PER_TRANSACTIONSpecifies the number of records to group together as a single transaction when inserting into the usage tracking table. Increasing the number may slightly increase performance but also increases the possibility of inserts being rejected due to deadlocks in the database.
Example: MAX_INSERTS_PER_TRANSACTION = 1 ;

NQSConfig.INI File Reference ■ Optimization Flags Section Parameters in theConfiguration File
Oracle Business Intelligence Infrastructure Installation and ConfigurationGuide Version 10.1.3.2
183
Optimization Flags Section Parameters in the Configuration FileThere is one parameter in the Optimization Flags section. It is a special parameter to override the behavior of the Oracle Business Intelligence Server in certain situations.
STRONG_DATETIME_TYPE_CHECKINGUse this parameter to relax strong type checking to prevent some date/time data type incompatibilities in queries from being rejected. For example, a query of the form “date/time op string-literal” technically contains a date/time data type incompatibility and would normally be rejected by the Oracle Business Intelligence Server.
Valid values are ON and OFF. The default value is ON, which means that strong type checking is enabled and queries containing date/time data type incompatibilities are rejected. This is the recommended setting.
To relax the strong type checking, set the value to NO. Note that invalid queries or queries with severe date/time incompatibilities are still rejected. Note also that the query could still fail, for example, if the relational database implements a similar strong type checking.
Example: STRONG_DATETIME_TYPE_CHECKING = ON ;

Oracle Business Intelligence Infrastructure Installation and Configuration Guide Version 10.1.3.2
NQSConfig.INI File Reference ■ Cube Views Section Parameters in the Configuration File
184
Cube Views Section Parameters in the Configuration FileOracle Business Intelligence CubeViews Generator is a feature that enhances the OLAP functionality of a database, allowing the database to store metadata about the logical relationships of the data residing in the database, and optimizing queries made against that database. The CubeViews Generator parses the logical layer of a repository, extracts the table sources, and converts the metadata into Cube Models for DB2 DBMS.
NOTE: The term IBM DB2 Cube Views is a registered trademark of IBM.
The Cube Views optimizer generates scripts to create Materialized Query Tables (MQT), which can enhance the performance of queries. The CubeViews Generator functions like a metadata bridge that converts the Oracle BI proprietary metadata into an XML format that can be used by IBM DB2 Cube Views.
If you have an Oracle Database, then use Oracle Database Metadata Generator, as described in Oracle Dimension Export Section Parameters in the Configuration File on page 186.
The Cube Views section of the configuration file sets the following initial values for this feature.
DISTINCT_COUNT_SUPPORTEDThe recommended setting and default value is NO. When set to YES, allows measure containing the DISTINCT_COUNT aggregation to be exported.
Example:
DISTINCT_COUNT_SUPPORTED = NO ;
STATISTICAL_FUNCTIONS_SUPPORTEDThe recommended setting and default value is NO. When set to YES, allows measures containing the aggregation STDDEV to be exported.
USE_SCHEMA_NAMEThe default value is YES.
When set to YES, the Cube Views metadata attributes has columns from tables under a schema name, which are then specified in the parameters . When set to NO, the schema names for these tables are empty.
USE_SCHEMA_NAME_FROM_RPDThe default value is YES. When set to YES, the table schema names are used as they are used in the repository.
DEFAULT_SCHEMA_NAMEThis name is used as the table schema name, if either of the following is true:

NQSConfig.INI File Reference ■ Cube Views Section Parameters in the Configuration File
Oracle Business Intelligence Infrastructure Installation and ConfigurationGuide Version 10.1.3.2
185
■ The repository schema name cannot be determined
■ The value of USE_SCHEMA_NAME_FROM_RPD is set to NO
Example:
"ORACLE" ;
CUBE_VIEWS_SCHEMA_NAMEThe Cube Views metadata is created under this schema.
Example:
"ORACLE" ;
LOG_FAILURESWhen set to YES, the log file lists the metadata that was invalidated under a certain rule. The default value is YES.
LOG_SUCCESSWhen set to YES, the log file lists the metadata which has checked under each rule and has passed the check. The default value is NO.
LOG_FILE_NAMEA valid path needs to be provided, otherwise an error is thrown.
Example:
LOG_FILE_NAME = "C:\OracleBI\server\Log\CubeViews.Log" ;

Oracle Business Intelligence Infrastructure Installation and Configuration Guide Version 10.1.3.2
NQSConfig.INI File Reference ■ MDX Member Name Cache Section Parameters in the Configuration File
186
MDX Member Name Cache Section Parameters in the Configuration FileThis is a cache subsystem that maps between a unique name and the captions of members of all SAP/BW cubes in the repository.
ENABLEThis parameter indicates if the feature is enabled or not.
The default it is NO because this only applies to SAP/BW cubes.
DATA_STORAGE_PATHThe path to the location where the cache will be persisted. The applies only to a single location.
The number at the end of the entry indicates the capacity of the storage. When the feature is enabled, the string “<full directory path>” needs to be replaced with a valid path.
Example: DATA_STORAGE_PATH = "C:\OracleBI\server\Data\Temp\Cache" 500 MB ;
MAX_SIZE_PER_USERMaximum disk space allowed for each user
Example: MAX_SIZE_PER_USER = 100 MB ;
MAX_MEMBER_PER_LEVELMaximum number of members in a level will be able to be persisted to disk.
Example: MAX_MEMBER_PER_LEVEL = 1000 ;
MAX_CACHE_SIZEMaximum size for each individual cache entry size.
Example: MAX_CACHE_SIZE = 100 MB ;
Oracle Dimension Export Section Parameters in the Configuration FileOracle Database Metadata Generator is a feature that enhances the OLAP functionality of a database, allowing the database to store metadata about the logical relationships of the data residing in the database, and optimizing queries made against that database. Oracle Database Metadata Generator parses the logical layer of a repository, extracts the table sources, and converts the metadata into materialized views in the Oracle Database, which can enhance the performance of queries.
The ORA_DIM_EXPORT section of the configuration file sets the following initial values for this feature.

NQSConfig.INI File Reference ■ Oracle Dimension Export Section Parameters in theConfiguration File
Oracle Business Intelligence Infrastructure Installation and ConfigurationGuide Version 10.1.3.2
187
Oracle Database Metadata Generator functions like a metadata bridge that converts the Oracle BI proprietary metadata into a SQL format that can be used by Oracle materialized views. If you have an IBM DB2 Database, then use Oracle Business Intelligence CubeViews Generator, as described in Cube Views Section Parameters in the Configuration File on page 184.
USE_SCHEMA_NAME_FROM_RPDThe default value is YES. When set to YES, the table schema names are used as they are used in the repository.
DEFAULT_SCHEMA_NAMEThis name is used as the table schema name, if either of the following is true:
■ The repository schema name cannot be determined.
■ The value of USE_SCHEMA_NAME_FROM_RPD is set to NO.
Example:
"ORACLE" ;
ORA_DIM_SCHEMA_NAMEThe metadata from Oracle Database Metadata Generator is created under this schema.
Example:
"ORACLE" ;
LOGGINGIndicates whether to keep a log of the metadata export process. The default is ON; other values are OFF and DEBUG.
LOG_FILE_NAMEA valid path needs to be provided, otherwise an error is thrown.
Example:
LOG_FILE_NAME = "C:\OracleBI\server\Log\OraDimExp.Log" ;

Oracle Business Intelligence Infrastructure Installation and Configuration Guide Version 10.1.3.2
NQSConfig.INI File Reference ■ Oracle Dimension Export Section Parameters in the Configuration File
188
Oracle Business Intelligence Infrastructure Installation and ConfigurationGuide Version 10.1.3.2
189
B Localizing Oracle Business Intelligence Deployments
Oracle Business Intelligence is designed to allow users to dynamically change their preferred language and locale preferences. This topic area contains topics on how to configure Oracle Business Intelligence for deployment in one or more language environments besides English.
In order to support multiple languages, the Oracle Business Intelligence Server must be set up appropriately. The NQSConfig.INI file—General section contains those parameters required for localization, internationalization and other default parameters used to determine how data is returned from the Oracle BI Server to a client.
The following topics describe some of the tasks necessary to localize the Oracle Business Intelligence Server for all types of installation:
■ “Localizing Oracle Business Intelligence Deployments” on page 189
■ “Configuring Unicode Support for Oracle BI Charts” on page 192
■ “About Changing Localization Variables for Oracle BI” on page 197
■ “About Configuring Oracle BI and the Operational Application to Display the Same Language” on page 197
■ “Process of Maintaining Translation Tables for Oracle BI” on page 199
Oracle Business Intelligence Infrastructure Installation and Configuration Guide Version 10.1.3.2
Localizing Oracle Business Intelligence Deployments ■ Localization of Oracle BI Server Components
190
Localization of Oracle BI Server ComponentsThe Oracle Business Intelligence Presentation Services user interface works in different languages, with a default Error Message language of English. Any error or warning messages appear in English. To receive localized Oracle BI Server messages (such as error, warning and information messages), you must set the locale during the platform installation, in the Error Message Language screen, as described in “Oracle BI Installer Screens and Prompts” on page 40.
The primary mechanism for displaying localized table and column names is Externalize Metadata Strings. To determine which table and column names are localized, see the topic “Using the Externalize Strings Utility for Localization” on page 200.
Localized Oracle BI Components■ Web interface
■ Oracle BI Presentation Services messages:
■ error
■ warning
■ information
■ Oracle BI Server functions:
■ DayName
■ MonthName
NOTE: If a query is issued using the DayName or MonthName function, but the function is not shipped to a back-end database, then the day or month name is returned in the localized language but the column name remains in English (or may be affected by other localization controls). As an example of this situation, if the LOCALE parameter is set for German, the MonthName query returns the string “Mai” but the column header remains "Name of Month."
■ Oracle BI Server and Scheduler messages:
■ error
■ warning
■ information
■ Log files:
■ nQServer.log for Oracle BI Server
■ nqQuery.log for Oracle BI Server
■ If Clustering is enabled, nQCluster.log for Oracle BI Server Cluster
■ Metadata:
■ Oracle BI Presentation Services dashboards and reports (Oracle BI Catalog)
■ Presentation table and column names (.rpd file)

Localizing Oracle Business Intelligence Deployments ■ Localization of Oracle BI ServerComponents
Oracle Business Intelligence Infrastructure Installation and ConfigurationGuide Version 10.1.3.2
191
■ Informatica (ENU and JPN locales only)
■ Disconnected Client interface
Unlocalized Oracle BI Components■ Server Administration Tool interface
■ Scheduler Job Manager interface
■ ODBC client tools:
■ nqcmd.exe (UNIX)
■ nQCmd.exe (Windows)
■ nQClient.exe (Windows)
■ Installer
■ ODBC setup

Oracle Business Intelligence Infrastructure Installation and Configuration Guide Version 10.1.3.2
Localizing Oracle Business Intelligence Deployments ■ Configuring Unicode Support for Oracle BI Charts
192
Configuring Unicode Support for Oracle BI ChartsThis process is part of “Localizing Oracle Business Intelligence Deployments.”
Oracle Business Intelligence itself supports Unicode. However, some third-party products and platforms may not fully support Unicode. For example, the charting image server for displaying charts in Oracle Business Intelligence Presentation Services is unable to show East-Asian characters in its standard mode. Before you can see Asian characters in the Oracle BI Presentation Services charts, you must configure some charting templates and convert fonts.
These tasks are described in the following topics:
■ “Converting Chart Fonts” on page 193
■ “Adding Converted Fonts to the Charting Image Server” on page 194

Localizing Oracle Business Intelligence Deployments ■ Converting Chart Fonts
Oracle Business Intelligence Infrastructure Installation and ConfigurationGuide Version 10.1.3.2
193
Converting Chart FontsThis topic is part of the process “Configuring Unicode Support for Oracle BI Charts.”
This task shows how to convert Unicode font for use with the charting image server. You use the charting server Font Converter 5.0 to convert the desired TrueType font (TTF) to a Corda .fsd file.
To convert a font using the Corda Font Converter
1 Run CordaFontConverter.exe.
NOTE: This converter is in the Windows folder OracleBI_HOME\Corda50\bin.
2 From the Fonts window, select the font you want to convert. Select the conversion options, and accept the default display name or create your own.
For example, Arial.
NOTE: The display name selected is the one you specify in the task “Adding Converted Fonts to the Charting Image Server” on page 194.
3 Click convert.
The conversion may take a few minutes.
4 Click Exit.
To continue with the process of configuring the Web chart image server to display Asian fonts, see the topic “Adding Converted Fonts to the Charting Image Server” on page 194.

Oracle Business Intelligence Infrastructure Installation and Configuration Guide Version 10.1.3.2
Localizing Oracle Business Intelligence Deployments ■ Adding Converted Fonts to the Charting Image Server
194
Adding Converted Fonts to the Charting Image ServerThis topic is part of the process “Configuring Unicode Support for Oracle BI Charts.”
This topic shows how to add fonts to the charting image server. The following tasks are necessary if you are going to use charts with additional converted fonts in localized deployments of Oracle Business Intelligence:
■ “Adding a Font to the Chart Template Files” on page 194
■ “Adding Additional Converted Fonts to the Charting Image Server” on page 195
Adding a Font to the Chart Template FilesCorda chart template (pcxml) files describe various chart types. In these files, by default, a font name is not referenced but font size is. You edit a pcxml file to refer to the font newly converted during the task “Converting Chart Fonts” on page 193. Any text editor can be used to edit the pcxml files.
Corda chart template files are located in the Windows directories containing the chart server files:
■ OracleBI_HOME\web\app\res\s_oracle10\popbin
■ OracleBI_HOME\web\app\res\s_Siebel77\PopBin
CAUTION: Back up these directories before editing any pcxml files.
To add a font to image server templates
1 Open the pcxml file in the text editor (for example, pie.pcxml).
2 In the file, search for the word Font.
3 Add the display name of the font that was specified during the font conversion.
For example, to add the Arial font to pie.pcxml, search for the word Font:
<Properties TransparentFill='True' BorderType='None' Font='Size:11; Style:Bold;'/>
Add the font display name attribute so that the line reads:
<Properties TransparentFill='True' BorderType='None' Font=’Name:Arial; Size:11; Style:Bold;'/>
4 Save and close the pcxml file.
NOTE: Perform Steps 1 through 4 for each pcxml file.
5 Stop and restart the Oracle BI Presentation Services and the Oracle BI Java Host services in order to see the changes.

Localizing Oracle Business Intelligence Deployments ■ Adding Converted Fonts to theCharting Image Server
Oracle Business Intelligence Infrastructure Installation and ConfigurationGuide Version 10.1.3.2
195
Adding Additional Converted Fonts to the Charting Image ServerThis task shows how to enable additional fonts for charting.
The file OracleBI_HOME\web\config\chartfontmapping.xml specifies the name of a charting font to choose for any specified locale. The structure of this file is as follows:
<fontMapping name="[display name]"><choose>
<when locale="en*"><font name="[font name]"/></when></choose>
</fontMapping>
The parameters in the chartfontmapping.xml file are defined as follows:
■ Locale (in quote marks). The locale code (see the topic “LOCALE” on page 158).
■ Font name. The name given during the procedure “To convert a font using the Corda Font Converter.”
■ fontMapping name. The display name of the font Family; for example: Arial.
The following examples show how this file can be used:
<fontMapping name="Arial"><choose>
<when locale="en*"><font name="Helvetica"/></when></choose>
</fontMapping>
<fontMapping name="Courier New"><choose>
<when locale="en*"><font name="Courier"/></when></choose>
</fontMapping>
<fontMapping name="Garamond"><choose>
<when locale="en*"><font name="Lucida Bright"/></when></choose></fontMapping>

Oracle Business Intelligence Infrastructure Installation and Configuration Guide Version 10.1.3.2
Localizing Oracle Business Intelligence Deployments ■ Adding Converted Fonts to the Charting Image Server
196
Wildcards can be used to specify more than one fontMapping name or locale, as shown in this example:
<fontMapping name="*"><choose>
<when locale="en*"><font name="Helvetica"/></when><when locale="zh-tw"><font name="Albany WT TC"/></when><when locale="zh*"><font name="Albany WT SC"/></when><when locale="ja*"><font name="Albany WT J"/></when><when locale="ko*"><font name="Albany WT K"/></when><when locale="*"><font name="Albany WT"/></when>
</choose></fontMapping>
The preceding example means that for any fontMapping name, the given fonts defaults when the locale is one of the first five locales listed; for all other locales, the default font is Albany WT.
Another example of specifying a particular font for a specific locale is the following:
<fontMapping name="*"> <choose>
<when locale="en*"><font name="Helvetica"/></when> <when locale="ja"><font name="JPNFont"/></when> <when locale="*"><font name="Unicode"/></when>
</choose></fontMapping>
The following procedure shows how to modify the chartfontmapping.xml to add specific charting fonts for specified locales.
To add a converted font to the image server
1 In a text or XML editor, open the chartfontmapping.xml file.
2 Add the locale code, font name, and font mapping name as shown in the preceding examples.
3 Save and close the chartfontmapping.xml file.
4 Stop and restart the Oracle BI Presentation Services and the Oracle BI Java Host services in order to see the changes.

Localizing Oracle Business Intelligence Deployments ■ About Changing LocalizationVariables for Oracle BI
Oracle Business Intelligence Infrastructure Installation and ConfigurationGuide Version 10.1.3.2
197
About Changing Localization Variables for Oracle BIThis topic is part of “Localizing Oracle Business Intelligence Deployments.”
If you have localized Oracle Business Intelligence for one or more languages other than English, you must also configure these localizations in the Oracle BI Presentation Catalog.
■ See the topics on using variables to display values in Dashboards and iBots in the Oracle Business Intelligence Answers, Delivers, and Interactive Dashboards User Guide.
■ See the topic on localizing Presentation Catalog captions in the Oracle Business Intelligence Presentation Services Administration Guide.
NLS Locale Not Supported Error MessageIf you do not have the proper locale installed, the Oracle BI Server does not start, and the NQSServer.log file contains the following error:
[47013] NLS locale xxx is not supported by the operating system.
In this error message, xxx is the locale specified in the NQSConfig.INI file for the SORT_ORDER_LOCALE parameter. The responses to this error are as follows:
■ Windows. Add the corresponding language pack using the Regional Settings dialog box.
About Configuring Oracle BI and the Operational Application to Display the Same LanguageOracle BI supports multiple languages for the application’s user interface. Changing the language normally requires manual user intervention by choosing the language on the Oracle BI Presentation Services logon page or changing the language in the My Account page after logging on.
For consistent language display in an integrated Oracle BI implementation, you must define a URL parameter as a profile attribute. Doing so dynamically sets the language of the Oracle BI Presentation Services Dashboards and reports to be consistent with the operational application’s language setting.
The operational application uses symbolic URLs to embed Oracle BI Dashboards and reports in the integrated environment. For the Oracle BI Presentation Services, the URL parameter Lang designates the language that the Web page renders.
The Lang parameter can be included in the symbolic URL defined in the operational application to connect to Oracle BI. The Lang parameter is defined as a profile attribute, but when the symbolic URL is constructed in runtime, the value is set as the profile attribute LanguageCode. The following table shows an example of the parameter settings in the Symbolic URL parameters applet, including Lang.
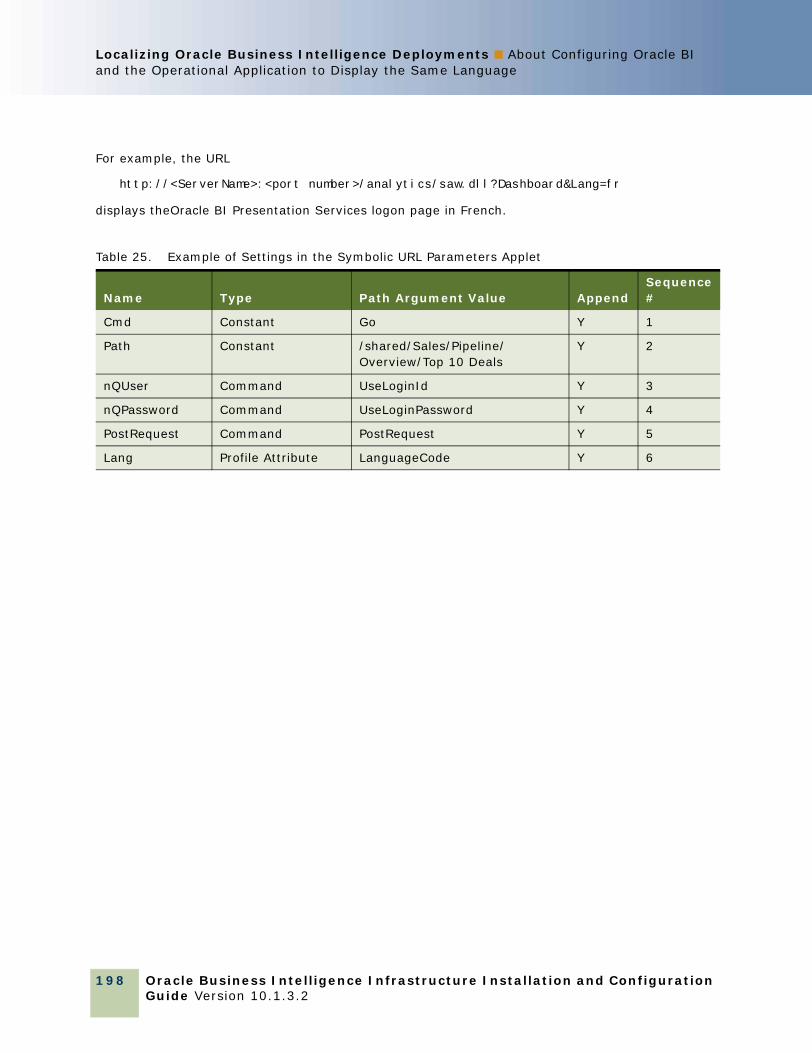
Oracle Business Intelligence Infrastructure Installation and Configuration Guide Version 10.1.3.2
Localizing Oracle Business Intelligence Deployments ■ About Configuring Oracle BI and the Operational Application to Display the Same Language
198
For example, the URL
http://<ServerName>:<port number>/analytics/saw.dll?Dashboard&Lang=fr
displays theOracle BI Presentation Services logon page in French.
Table 25. Example of Settings in the Symbolic URL Parameters Applet
Name Type Path Argument Value Append Sequence #
Cmd Constant Go Y 1
Path Constant /shared/Sales/Pipeline/Overview/Top 10 Deals
Y 2
nQUser Command UseLoginId Y 3
nQPassword Command UseLoginPassword Y 4
PostRequest Command PostRequest Y 5
Lang Profile Attribute LanguageCode Y 6
Localizing Oracle Business Intelligence Deployments ■ Process of MaintainingTranslation Tables for Oracle BI
Oracle Business Intelligence Infrastructure Installation and ConfigurationGuide Version 10.1.3.2
199
Process of Maintaining Translation Tables for Oracle BIThis process is part of “Localizing Oracle Business Intelligence Deployments.”
The presentation layer of the Oracle Business Intelligence Server Administration Tool supports multiple translations for any column name. When working with Oracle Answers or rendering a dashboard, English-speaking and French-speaking users see their local language strings in their reports. For example, there are two kinds of application strings requiring translation in Oracle BI:
■ Metadata
Metadata strings are Oracle BI-created objects in the Oracle Business Intelligence repository such as Subject Area, Metrics, and Dimensions. If your deployment includes a CRM application, you need to perform further tasks for localization. See the Oracle Business Intelligence Applications Installation and Administration Guide section on localization.
■ Web Catalog
Web Catalog objects are end-user created objects such as Reports, Dashboards, and Pages. Translations for Web Catalog strings are stored in the directory OracleBIData_HOME\web\catalog. For more information on accessing these strings and changing the translations, see Oracle Business Intelligence Presentation Services Administration Guide.
This process includes the following task for Stand-Alone deployments of Oracle Business Intelligence:
■ “Using the Externalize Strings Utility for Localization” on page 200

Oracle Business Intelligence Infrastructure Installation and Configuration Guide Version 10.1.3.2
Localizing Oracle Business Intelligence Deployments ■ Using the Externalize Strings Utility for Localization
200
Using the Externalize Strings Utility for LocalizationThis task is part of the “Process of Maintaining Translation Tables for Oracle BI.”
The Server Administration Tool’s Externalize Strings utility is primarily for use by translators or by the Oracle Business Intelligence repository administrator. If you use a language other than English (US), you must use Externalize Strings to see the names of catalogs, tables and columns, and their descriptions if present, in their own language.
NOTE: Before using the Externalize Strings utility, translators should consult Oracle’s Siebel Technical Support.
To perform the string translation process using Externalize Strings
1 Using the Oracle BI Administration tool, open the repository file.
2 In the repository presentation layer, right-click a Catalog Folder.
3 Select the options Externalize Display Names and Externalize Descriptions.
4 From the Toolbar, choose Tools > Utilities > Externalize Strings and click the Execute button.
5 Click on the Catalog Folders in the left pane.
In the right pane, the translated values and the original strings (names) appear. These translated values are placed in session variables for use by Oracle BI Presentation Services.
6 Click the Save button to save the strings in the format you want.
7 Click the Close button to end the utility.

Localizing Oracle Business Intelligence Deployments ■ About Translating Web CatalogStrings
Oracle Business Intelligence Infrastructure Installation and ConfigurationGuide Version 10.1.3.2
201
About Translating Web Catalog StringsOperating Systems: All.
This topic gives more information on the subject of localizing Oracle BI deployments.
The translations for such Web Catalog objects as report and page names are embedded in the directory OracleBIData_HOME\web\catalog. In multiple language deployment mode, if you add any additional Web Catalog objects, such as reports and new dashboard pages, you also need to add the appropriate translations. Add these translations using the Catalog Manager tool. For more information on using this utility, see Oracle Business Intelligence Presentation Services Administration Guide.
About the WEBLANGUAGE Session VariableThis topic gives more information on the subject of localizing Oracle BI deployments.
The session variable WEBLANGUAGE is passed from Oracle BI Presentation Services to the Oracle BI Server. In an integrated Oracle BI application environment, the value of the WEBLANGUAGE variable is what determines the value of the LOCALE variable for externalized display names.
WEBLANGUAGE is set to the language of the user’s browser when a user first logs on to an integrated Oracle BI application. For example, if a user with a browser language set to French logs on to Answers for the first time, the value for WEBLANGUAGE is French, and the metadata is translated to French.
In the Oracle Business Intelligence infrastructure, WEBLANGUAGE is set by the user choosing a language on the logon window. After the first logon, WEBLANGUAGE is reset or changed in the My Account page of Oracle BI Presentation Services.

Oracle Business Intelligence Infrastructure Installation and Configuration Guide Version 10.1.3.2
Localizing Oracle Business Intelligence Deployments ■ About the WEBLANGUAGE Session Variable
202

Oracle Business Intelligence Infrastructure Installation and ConfigurationGuide Version 10.1.3.2
203
Index
BBriefing Book Reader
about 131
Cconfiguration
Roadmap for planning 27Cube Views section parameters
(NQSConfig.INI file)Cube Views parameters, about 184CUBE_VIEWS_SCHEMA_NAME 185DEFAULT_SCHEMA_NAME 184DISTINCT_COUNT_SUPPORTED 184LOG_FAILURES 185LOG_FILE_NAME 185LOG_SUCCESS 185STATISTICAL_FUNCTIONS_SUPPORTED 1
84USE_SCHEMA_NAME 184USE_SCHEMA_NAME_FROM_RPD 184
DDDL
Dynamic Library section parameters, about 176
deploying WebARchive file 108Disconnected Client
about 131silent mode, running in 64
documentation, additional, list of 16Dynamic Library section (NQSConfig.INI
file)parameters, about 176
Ffonts
charting image server, adding converted fonts 194
GGeneral section parameters (NQSConfig.INI
file)about 158AGGREGATE_PREFIX 164CASE_SENSITIVE_CHARACTER_COMPARISO
N 159DATE_DISPLAY_FORMAT 161DATE_TIME_DISPLAY_FORMAT 161LOCALE 158NULL_VALUES_SORT_FIRST 161SORT_BUFFER_INCREMENT_SIZE 162SORT_MEMORY_SIZE 162SORT_ORDER_LOCALE 158SORT_TYPE 159TIME_DISPLAY_FORMAT 161UPPERCASE_USERNAME_FOR_INITBLOCK
164VIRTUAL_TABLE_PAGE_SIZE 162WORK_DIRECTORY_PATHS 161
IIIS (web server)
deploying Oracle BI on 23installation
obtaining permissions 30requirements, determining 30Roadmap for planning 27third-party software 31
installation prerequisitesLinux 35
installation typemeaning of in Oracle BI installer 21
installerrunning under Linux 39running under Windows 39
instanceconfig.xmlconfiguration 88
ISAPI Web extension, configuring 109ISAPI Web extension, using 103
JJ2EE application server
deploying Oracle BI on 23
LLinux
database setup script, locating 97installation prerequisites 35installing 39Korn, Bourne, and bash shell scripts 79,
82

Oracle Business Intelligence Infrastructure Installation and Configuration Guide Version 10.1.3.2
Index ■ M
204
Oracle BI scripts 79, 82
MMDAC
See Microsoft Data Access ComponentsMDX Member Name Cache section
parameters (NQSConfig.INI file)DATA_STORAGE_PATH 186ENABLE 186MAX_MEMBER_PER_LEVEL 186MAX_SIZE_PER_USER 186
Microsoft Data Access ComponentsWindows, installing on 33
Nnew configuration, updating 88new configuration, updating opmn.xml 89NQClusterConfig.INI file
SSL_CA_CERTIFICATE_DIR 166SSL_CA_CERTIFICATE_FILE 166SSL_CERT_VERIFICATION_DEPTH 167SSL_CERTIFICATE_FILE 166SSL_CIPHER_LIST 167SSL_PK_PASSPHRASE_FILE 166SSL_PK_PASSPHRASE_PROGRAM 166SSL_PK_VERIFY_PEER 166SSL_PRIVATE_KEY_FILE 166SSL_TRUSTED_PEER_DNS 166
NQConfig.INI fileSERVER_HOSTNAME_OR_IP_ADDRESSES
171NQSConfig.INI file
about 149comments, adding 151configuration file parameter entries,
changing 151configuration file parameter entries, rules
for 150Cube Views section parameters 184Dynamic Library section parameters 176General section, about 158Optimization Flags section parameters 183parameters and syntax, about 152parsing rules 150Query Result Cache section,
parameters 154Repository section, parameters 153security section parameters 165Server section parameters 168SIZE parameters, how affects
performance 163Usage Tracking section parameters 178User Log section parameters 177
OOptimization Flags section parameters
(NQSConfig.INI file)parameters, about 183STRONG_DATETIME_TYPE_CHECKING 18
3Oracle Application Server
deploying Oracle BI on 23Oracle BI
deploying on Oracle Application Server 23deploying on other web servers 23silent mode, running in 54
Oracle BI Disconnected Clientadditional configuration requirements 61installing 62
Oracle BI installation typeAdvanced 22Basic 21
Oracle BI installation wizardLinux installation prompts 44Linux installation prompts (console
mode) 48Windows installation prompts 40
Oracle BI installerchoosing an Installation Type 21installation options 38running under Linux 39running under Windows 39
Oracle BI Office Plug-Ininstalling 68
Oracle BI Open Intelligence Interfaceinstalling 70
Oracle BI platform, uninstalling 26, 74Oracle BI Presentation Services
about configuring 88Web Application Archive file, deploying on web
server 108Oracle BI Publisher
configuring 131Oracle BI Publisher Desktop
installing 72Oracle BI Server
Linux, starting or restarting 81Linux, stopping 79Windows, starting or restarting 80Windows, stopping 79
Oracle BI, configuringrestarting Oracle BI server 79starting Oracle BI server 79stopping Oracle BI server 79
Oracle BI, uninstalling 74backing up files 74Linux OS 75

Index ■ Q
Oracle Business Intelligence Infrastructure Installation and ConfigurationGuide Version 10.1.3.2
205
UNIX OS 75Windows OS 75
Oracle Business Intelligence Infrastructureabout 17
Oracle Business Intelligence installercomponent installation options 17
Oracle databaseWindows, creating database and
tables 117Oracle Dimension Export section parameters
(NQSConfig.INI file)DEFAULT_SCHEMA_NAME 187LOG_FILE_NAME 187LOGGING 187MAX_CACHE_SIZE 186ORA_DIM_SCHEMA_NAME 187USE_SCHEMA_NAME_FROM_RPD 187
QQuery Result Cache section parameters
(NQSConfig.INI file) 154CACHE_POLL_SECONDS 157CLUSTER_AWARE_CACHE_LOGGING 157DATA_STORAGE_PATHS 154ENABLE 154GLOBAL_CACHE_STORAGE_PATH 157MAX_CACHE_ENTRIES 155MAX_CACHE_ENTRY_SIZE 155MAX_GLOBAL_CACHE_ENTRIES 157MAX_ROWS_PER_CACHE_ENTRY 155MAX_SUBEXPR_SEARCH_DEPTH 157POPULATE_AGGREGATE_ROLLUP_HITS 1
56USE_ADVANCED_HIT_DETECTION 156
Rrelational database
databases and tables, creating for 116repository
Oracle BI Server, restarting 79Oracle BI Server, starting 79Oracle BI Server, stopping 79
Repository section parameters (NQSConfig.INI file)
about 153
SScheduler
creating database and tables for 116Scheduler tables, about database
support 114Scheduler tables
about 114
database and tables creating for 116scripts
Korn, Bourne, and bash shell scripts 79, 82
Security section parameters (NQSConfig.INI file)
SSL 165SSL_CA_CERTIFICATE_DIR 166SSL_CA_CERTIFICATE_FILE 166SSL_CERT_VERIFICATION_DEPTH 167SSL_CERTIFICATE_FILE 166SSL_CIPHER_LIST 167SSL_PK_PASSPHRASE_FILE 166SSL_PK_PASSPHRASE_PROGRAM 166SSL_PK_VERIFY_PEER 166SSL_PRIVATE_KEY_FILE 166SSL_TRUSTED_PEER_DNS 166
security section parameters (NQSConfig.INI file)
AUTHENTICATION_TYPE 167DEFAULT_PRIVILEGES 165MINIMUM_PASSWORD_LENGTH 165parameters, about 165PROJECT_INACCESSIBLE_COLUMN_AS_NULL
165Server section parameters (NQConfig.INI
file)SERVER_HOSTNAME_OR_IP_ADDRESSES
171Server section parameters (NQSConfig.INI
file)AUTOMATIC_RESTART 175CLIENT_MGMT_THREADS_MAX 171CLUSTER_PARTICIPANT 173DB_GATEWAY_THREAD_RANGE 169DB_GATEWAY_THREAD_STACK_SIZE 170DISCONNECTED 174ENABLE_DB_HINTS 173INIT_BLOCK_CACHE_ENTRIES 171MAX_DRILLDOWN_INFO_CACHE_ENTRIES
170MAX_DRILLDOWN_QUERY_CACHE_ENTRIES
170MAX_EXPANDED_SUBQUERY_PREDICATES
170MAX_QUERY_PLAN_CACHE_ENTRIES 170MAX_REQUEST_PER_SESSION_LIMIT 169MAX_SESSION_LIMIT 169parameters, about 168PREVENT_DIVIDE_BY_ZERO 173REPOSITORY_PUBLISHING_DIRECTORY 1
73REQUIRE_PUBLISHING_DIRECTORY 174RPC_SERVICE_OR_PORT 171

Oracle Business Intelligence Infrastructure Installation and Configuration Guide Version 10.1.3.2
Index ■ U
206
SERVER_NAME 168SERVER_THREAD_RANGE 169SERVER_THREAD_STACK_SIZE 169
silent moderunning Disconnected Client in 64running Oracle BI in 54
SIZE parameters (NQSConfig.INI file)performance, and 163USE_LONG_DAY_NAMES 164USE_LONG_MONTH_NAMES 164
Uuninstalling
backing up files 74Oracle BI 74See Oracle Business Intelligence
Infrastructure Upgrade GuideUsage Tracking section parameters
(NQSConfig.INI file)BUFFER_SIZE 181BUFFER_TIME_LIMIT_SECONDS 181CHECKPOINT_INTERVAL_MINUTES 179CODE_PAGE 180CONNECTION_POOL 181DIRECT_INSERT 178ENABLE 178
FILE_ROLLOVER_INTERVAL_MINUTES 180
MAX_INSERTS_PER_TRANSACTION 182NUM_INSERT_THREADS 181parameters, about 178PHYSICAL_TABLE_NAME 180STORAGE_DIRECTORY 179
User Log section parameters (NQSConfig.INI file)
CODE_PAGE 177parameters, about 177USER_LOG_FILE_SIZE 177
WWeb Application Archive file,
deploying 108Windows
Microsoft Data Access Components, installing 33
Oracle database, creating database and tables 117
relation database, creating database and tables for 116
Scheduler tables, about 114Scheduler, about database support 114