Oracle Blocking Queries -...
31
Oracle Blocking Queries 0. Detecting Blocking Sessions in RAC and non-RAC select INST_ID, SID, TYPE, ID1, ID2, LMODE, REQUEST, CTIME, BLOCK from gv$lock where (ID1,ID2,TYPE) in (select ID1,ID2,TYPE from gv$lock where request>0); 1.This script provides medium detail locking information /* Formatted on 2013/03/05 12:30 (Formatter Plus v4.8.8) */ SELECT l.SID, s.serial#, s.username, s.terminal, DECODE (l.TYPE, ‘RW’, ‘RW – Row Wait Enqueue’, ‘TM’, ‘TM – DML Enqueue’, ‘TX’, ‘TX – Trans Enqueue’, ‘UL’, ‘UL – User’, l.TYPE || ‘System’ ) res, SUBSTR (t.NAME, 1, 10) tab, u.NAME owner, l.id1, l.id2, DECODE (l.lmode, 1, ‘No Lock’, 2, ‘Row Share’, 3, ‘Row Exclusive’, 4, ‘Share’, 5, ‘Shr Row Excl’, 6, ‘Exclusive’, NULL ) lmode, DECODE (l.request, 1, ‘No Lock’, 2, ‘Row Share’, 3, ‘Row Excl’, 4, ‘Share’, 5, ‘Shr Row Excl’, 6, ‘Exclusive’, NULL ) request FROM v$lock l, v$session s, SYS.user$ u, SYS.obj$ t WHERE l.SID = s.SID AND s.TYPE != ‘BACKGROUND’ Alok'blog Follow Alok'blog | Alok Kumar Dwivedi https://alokdba.wordpress.com/ 1 of 31 9/9/2015 3:35 PM
Transcript of Oracle Blocking Queries -...

Oracle Blocking Queries
0. Detecting Blocking Sessions in RAC and non-RAC
select INST_ID, SID, TYPE, ID1, ID2, LMODE, REQUEST, CTIME, BLOCK
from gv$lock where (ID1,ID2,TYPE) in
(select ID1,ID2,TYPE from gv$lock where request>0);
1.This script provides medium detail locking information
/* Formatted on 2013/03/05 12:30 (Formatter Plus v4.8.8) */
SELECT l.SID, s.serial#, s.username, s.terminal,
DECODE (l.TYPE,
‘RW’, ‘RW – Row Wait Enqueue’,
‘TM’, ‘TM – DML Enqueue’,
‘TX’, ‘TX – Trans Enqueue’,
‘UL’, ‘UL – User’,
l.TYPE || ‘System’
) res,
SUBSTR (t.NAME, 1, 10) tab, u.NAME owner, l.id1, l.id2,
DECODE (l.lmode,
1, ‘No Lock’,
2, ‘Row Share’,
3, ‘Row Exclusive’,
4, ‘Share’,
5, ‘Shr Row Excl’,
6, ‘Exclusive’,
NULL
) lmode,
DECODE (l.request,
1, ‘No Lock’,
2, ‘Row Share’,
3, ‘Row Excl’,
4, ‘Share’,
5, ‘Shr Row Excl’,
6, ‘Exclusive’,
NULL
) request
FROM v$lock l, v$session s, SYS.user$ u, SYS.obj$ t
WHERE l.SID = s.SID
AND s.TYPE != ‘BACKGROUND’
Alok'blog
Follow
Alok'blog | Alok Kumar Dwivedi https://alokdba.wordpress.com/
1 of 31 9/9/2015 3:35 PM

AND t.obj# = l.id1
AND u.user# = t.owner#
2.This script provides low complexity locking information.
/* Formatted on 2013/03/05 12:30 (Formatter Plus v4.8.8) */
SELECT NVL (s.username, ‘Internal’) username,
DECODE (command,
0, ‘None’,
DECODE (l.id2,
0, u1.NAME || ‘.’ || SUBSTR (t1.NAME, 1, 20),
‘Rollback Segment’
)
) tab,
DECODE (l.lmode,
1, ‘NoLk’,
2, ‘ RS ‘,
3, ‘ RX ‘,
4, ‘ S ‘,
5, ‘ SRX’,
6, ‘ X ‘,
‘NONE’
) lmode,
DECODE (l.request,
1, ‘NoLk’,
2, ‘ RSh ‘,
3, ‘ RX ‘,
4, ‘ S ‘,
5, ‘ SRX’,
6, ‘ X ‘,
‘NONE’
) request,
l.id1 || ‘-‘ || l.id2 laddr, l.TYPE lockt
FROM v$lock l, v$session s, SYS.user$ u1, SYS.obj$ t1
WHERE l.SID = s.SID
AND t1.obj# = DECODE (l.id2, 0, l.id1, 1)
AND u1.user# = t1.owner#
AND s.TYPE != ‘BACKGROUND’
ORDER BY 1, 2, 5
/
3.FULLY DECODED LOCKING
/* Formatted on 2013/03/05 12:31 (Formatter Plus v4.8.8) */
SELECT NVL (s.username, ‘Internal’) username, l.SID,
NVL (s.terminal, ‘None’) terminal,
DECODE (command,
Follow
Alok'blog | Alok Kumar Dwivedi https://alokdba.wordpress.com/
2 of 31 9/9/2015 3:35 PM

0, ‘None’,
DECODE (l.id2,
0, u1.NAME || ‘.’ || SUBSTR (t1.NAME, 1, 20),
‘None’
)
) tab,
DECODE (command,
0, ‘BACKGROUND’,
1, ‘Create Table’,
2, ‘INSERT’,
3, ‘SELECT’,
4, ‘CREATE CLUSTER’,
5, ‘ALTER CLUSTER’,
6, ‘UPDATE’,
7, ‘DELETE’,
8, ‘DROP’,
9, ‘CREATE INDEX’,
10, ‘DROP INDEX’,
11, ‘ALTER INDEX’,
12, ‘DROP TABLE’,
13, ‘CREATE SEQUENCE’,
14, ‘ALTER SEQUENCE’,
15, ‘ALTER TABLE’,
16, ‘DROP SEQUENCE’,
17, ‘GRANT’,
18, ‘REVOKE’,
19, ‘CREATE SYNONYM’,
20, ‘DROP SYNONYM’,
21, ‘CREATE VIEW’,
22, ‘DROP VIEW’,
23, ‘VALIDATE INDEX’,
24, ‘CREATE PROCEDURE’,
25, ‘ALTER PROCEDURE’,
26, ‘LOCK TABLE’,
27, ‘NO OPERATION’,
28, ‘RENAME’,
29, ‘COMMENT’,
30, ‘AUDIT’,
31, ‘NOAUDIT’,
32, ‘CREATE EXTERNAL DATABASE’,
33, ‘DROP EXTERNAL DATABASE’,
34, ‘CREATE DATABASE’,
35, ‘ALTER DATABASE’,
36, ‘CREATE ROLLBACK SEGMENT’,Follow
Alok'blog | Alok Kumar Dwivedi https://alokdba.wordpress.com/
3 of 31 9/9/2015 3:35 PM

37, ‘ALTER ROLLBACK SEGMENT’,
38, ‘DROP ROLLBACK SEGMENT’,
39, ‘CREATE TABLESPACE’,
40, ‘ALTER TABLESPACE’,
41, ‘DROP TABLESPACE’,
42, ‘ALTER SESSION’,
43, ‘ALTER USER’,
44, ‘COMMIT’,
45, ‘ROLLBACK’,
46, ‘SAVEPOINT’,
47, ‘PL/SQL EXECUTE’,
48, ‘SET TRANSACTION’,
49, ‘ALTER SYSTEM SWITCH LOG’,
50, ‘EXPLAIN’,
51, ‘CREATE USER’,
52, ‘CREATE ROLE’,
53, ‘DROP USER’,
54, ‘DROP ROLE’,
55, ‘SET ROLE’,
56, ‘CREATE SCHEMA’,
57, ‘CREATE CONTROL FILE’,
58, ‘ALTER TRACING’,
59, ‘CREATE TRIGGER’,
60, ‘ALTER TRIGGER’,
61, ‘DROP TRIGGER’,
62, ‘ANALYZE TABLE’,
63, ‘ANALYZE INDEX’,
64, ‘ANALYZE CLUSTER’,
65, ‘CREATE PROFILE’,
66, ‘DROP PROFILE’,
67, ‘ALTER PROFILE’,
68, ‘DROP PROCEDURE’,
69, ‘DROP PROCEDURE’,
70, ‘ALTER RESOURCE COST’,
71, ‘CREATE SNAPSHOT LOG’,
72, ‘ALTER SNAPSHOT LOG’,
73, ‘DROP SNAPSHOT LOG’,
74, ‘CREATE SNAPSHOT’,
75, ‘ALTER SNAPSHOT’,
76, ‘DROP SNAPSHOT’,
79, ‘ALTER ROLE’,
85, ‘TRUNCATE TABLE’,
86, ‘TRUNCATE CLUSTER’,
87, ‘-‘,Follow
Alok'blog | Alok Kumar Dwivedi https://alokdba.wordpress.com/
4 of 31 9/9/2015 3:35 PM
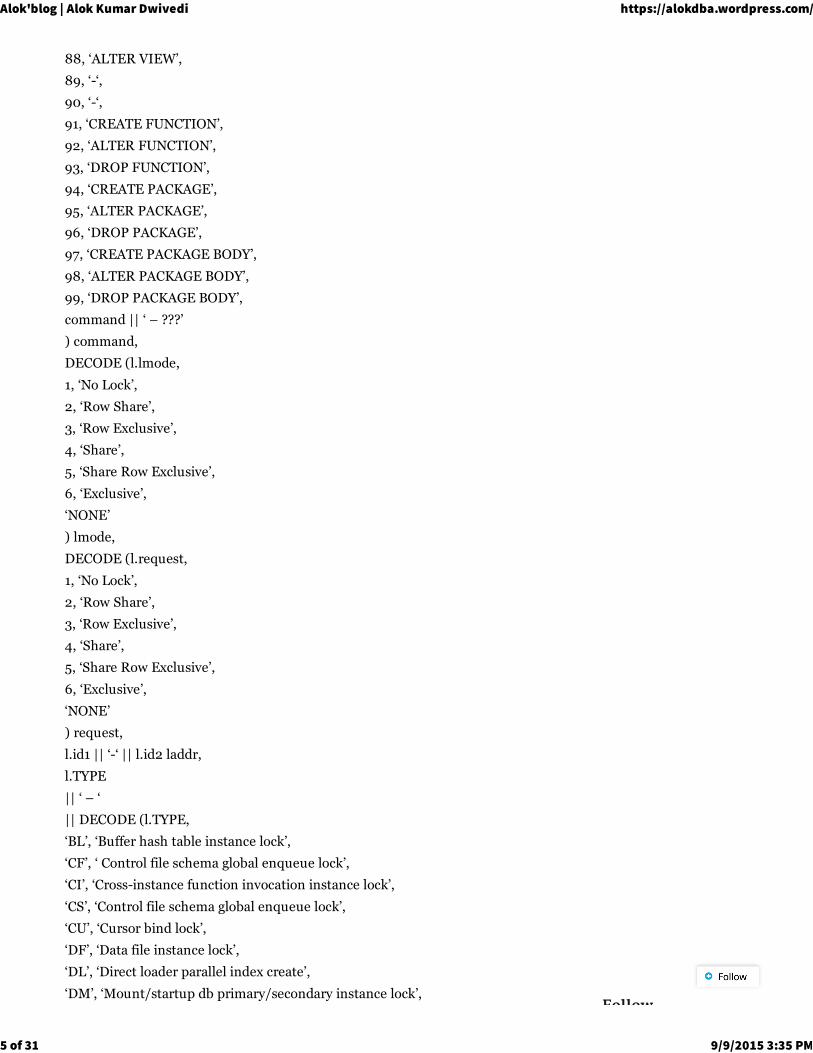
88, ‘ALTER VIEW’,
89, ‘-‘,
90, ‘-‘,
91, ‘CREATE FUNCTION’,
92, ‘ALTER FUNCTION’,
93, ‘DROP FUNCTION’,
94, ‘CREATE PACKAGE’,
95, ‘ALTER PACKAGE’,
96, ‘DROP PACKAGE’,
97, ‘CREATE PACKAGE BODY’,
98, ‘ALTER PACKAGE BODY’,
99, ‘DROP PACKAGE BODY’,
command || ‘ – ???’
) command,
DECODE (l.lmode,
1, ‘No Lock’,
2, ‘Row Share’,
3, ‘Row Exclusive’,
4, ‘Share’,
5, ‘Share Row Exclusive’,
6, ‘Exclusive’,
‘NONE’
) lmode,
DECODE (l.request,
1, ‘No Lock’,
2, ‘Row Share’,
3, ‘Row Exclusive’,
4, ‘Share’,
5, ‘Share Row Exclusive’,
6, ‘Exclusive’,
‘NONE’
) request,
l.id1 || ‘-‘ || l.id2 laddr,
l.TYPE
|| ‘ – ‘
|| DECODE (l.TYPE,
‘BL’, ‘Buffer hash table instance lock’,
‘CF’, ‘ Control file schema global enqueue lock’,
‘CI’, ‘Cross-instance function invocation instance lock’,
‘CS’, ‘Control file schema global enqueue lock’,
‘CU’, ‘Cursor bind lock’,
‘DF’, ‘Data file instance lock’,
‘DL’, ‘Direct loader parallel index create’,
‘DM’, ‘Mount/startup db primary/secondary instance lock’,Follow
Alok'blog | Alok Kumar Dwivedi https://alokdba.wordpress.com/
5 of 31 9/9/2015 3:35 PM

‘DR’, ‘Distributed recovery process lock’,
‘DX’, ‘Distributed transaction entry lock’,
‘FI’, ‘SGA open-file information lock’,
‘FS’, ‘File set lock’,
‘HW’, ‘Space management operations on a specific segment lock’,
‘IN’, ‘Instance number lock’,
‘IR’, ‘Instance recovery serialization global enqueue lock’,
‘IS’, ‘Instance state lock’,
‘IV’, ‘Library cache invalidation instance lock’,
‘JQ’, ‘Job queue lock’,
‘KK’, ‘Thread kick lock’,
‘MB’, ‘Master buffer hash table instance lock’,
‘MM’, ‘Mount definition gloabal enqueue lock’,
‘MR’, ‘Media recovery lock’,
‘PF’, ‘Password file lock’,
‘PI’, ‘Parallel operation lock’,
‘PR’, ‘Process startup lock’,
‘PS’, ‘Parallel operation lock’,
‘RE’, ‘USE_ROW_ENQUEUE enforcement lock’,
‘RT’, ‘Redo thread global enqueue lock’,
‘RW’, ‘Row wait enqueue lock’,
‘SC’, ‘System commit number instance lock’,
‘SH’, ‘System commit number high water mark enqueue lock’,
‘SM’, ‘SMON lock’,
‘SN’, ‘Sequence number instance lock’,
‘SQ’, ‘Sequence number enqueue lock’,
‘SS’, ‘Sort segment lock’,
‘ST’, ‘Space transaction enqueue lock’,
‘SV’, ‘Sequence number value lock’,
‘TA’, ‘Generic enqueue lock’,
‘TD’, ‘DDL enqueue lock’,
‘TE’, ‘Extend-segment enqueue lock’,
‘TM’, ‘DML enqueue lock’,
‘TO’, ‘Temporary Table Object Enqueue’,
‘TT’, ‘Temporary table enqueue lock’,
‘TX’, ‘Transaction enqueue lock’,
‘UL’, ‘User supplied lock’,
‘UN’, ‘User name lock’,
‘US’, ‘Undo segment DDL lock’,
‘WL’, ‘Being-written redo log instance lock’,
‘WS’, ‘Write-atomic-log-switch global enqueue lock’,
‘TS’, DECODE (l.id2,
0, ‘Temporary segment enqueue lock (ID2=0)’,
‘New block allocation enqueue lock (ID2=1)’Follow
Alok'blog | Alok Kumar Dwivedi https://alokdba.wordpress.com/
6 of 31 9/9/2015 3:35 PM

),
‘LA’, ‘Library cache lock instance lock (A=namespace)’,
‘LB’, ‘Library cache lock instance lock (B=namespace)’,
‘LC’, ‘Library cache lock instance lock (C=namespace)’,
‘LD’, ‘Library cache lock instance lock (D=namespace)’,
‘LE’, ‘Library cache lock instance lock (E=namespace)’,
‘LF’, ‘Library cache lock instance lock (F=namespace)’,
‘LG’, ‘Library cache lock instance lock (G=namespace)’,
‘LH’, ‘Library cache lock instance lock (H=namespace)’,
‘LI’, ‘Library cache lock instance lock (I=namespace)’,
‘LJ’, ‘Library cache lock instance lock (J=namespace)’,
‘LK’, ‘Library cache lock instance lock (K=namespace)’,
‘LL’, ‘Library cache lock instance lock (L=namespace)’,
‘LM’, ‘Library cache lock instance lock (M=namespace)’,
‘LN’, ‘Library cache lock instance lock (N=namespace)’,
‘LO’, ‘Library cache lock instance lock (O=namespace)’,
‘LP’, ‘Library cache lock instance lock (P=namespace)’,
‘LS’, ‘Log start/log switch enqueue lock’,
‘PA’, ‘Library cache pin instance lock (A=namespace)’,
‘PB’, ‘Library cache pin instance lock (B=namespace)’,
‘PC’, ‘Library cache pin instance lock (C=namespace)’,
‘PD’, ‘Library cache pin instance lock (D=namespace)’,
‘PE’, ‘Library cache pin instance lock (E=namespace)’,
‘PF’, ‘Library cache pin instance lock (F=namespace)’,
‘PG’, ‘Library cache pin instance lock (G=namespace)’,
‘PH’, ‘Library cache pin instance lock (H=namespace)’,
‘PI’, ‘Library cache pin instance lock (I=namespace)’,
‘PJ’, ‘Library cache pin instance lock (J=namespace)’,
‘PL’, ‘Library cache pin instance lock (K=namespace)’,
‘PK’, ‘Library cache pin instance lock (L=namespace)’,
‘PM’, ‘Library cache pin instance lock (M=namespace)’,
‘PN’, ‘Library cache pin instance lock (N=namespace)’,
‘PO’, ‘Library cache pin instance lock (O=namespace)’,
‘PP’, ‘Library cache pin instance lock (P=namespace)’,
‘PQ’, ‘Library cache pin instance lock (Q=namespace)’,
‘PR’, ‘Library cache pin instance lock (R=namespace)’,
‘PS’, ‘Library cache pin instance lock (S=namespace)’,
‘PT’, ‘Library cache pin instance lock (T=namespace)’,
‘PU’, ‘Library cache pin instance lock (U=namespace)’,
‘PV’, ‘Library cache pin instance lock (V=namespace)’,
‘PW’, ‘Library cache pin instance lock (W=namespace)’,
‘PX’, ‘Library cache pin instance lock (X=namespace)’,
‘PY’, ‘Library cache pin instance lock (Y=namespace)’,
‘PZ’, ‘Library cache pin instance lock (Z=namespace)’,Follow
Alok'blog | Alok Kumar Dwivedi https://alokdba.wordpress.com/
7 of 31 9/9/2015 3:35 PM

‘QA’, ‘Row cache instance lock (A=cache)’,
‘QB’, ‘Row cache instance lock (B=cache)’,
‘QC’, ‘Row cache instance lock (C=cache)’,
‘QD’, ‘Row cache instance lock (D=cache)’,
‘QE’, ‘Row cache instance lock (E=cache)’,
‘QF’, ‘Row cache instance lock (F=cache)’,
‘QG’, ‘Row cache instance lock (G=cache)’,
‘QH’, ‘Row cache instance lock (H=cache)’,
‘QI’, ‘Row cache instance lock (I=cache)’,
‘QJ’, ‘Row cache instance lock (J=cache)’,
‘QL’, ‘Row cache instance lock (K=cache)’,
‘QK’, ‘Row cache instance lock (L=cache)’,
‘QM’, ‘Row cache instance lock (M=cache)’,
‘QN’, ‘Row cache instance lock (N=cache)’,
‘QO’, ‘Row cache instance lock (O=cache)’,
‘QP’, ‘Row cache instance lock (P=cache)’,
‘QQ’, ‘Row cache instance lock (Q=cache)’,
‘QR’, ‘Row cache instance lock (R=cache)’,
‘QS’, ‘Row cache instance lock (S=cache)’,
‘QT’, ‘Row cache instance lock (T=cache)’,
‘QU’, ‘Row cache instance lock (U=cache)’,
‘QV’, ‘Row cache instance lock (V=cache)’,
‘QW’, ‘Row cache instance lock (W=cache)’,
‘QX’, ‘Row cache instance lock (X=cache)’,
‘QY’, ‘Row cache instance lock (Y=cache)’,
‘QZ’, ‘Row cache instance lock (Z=cache)’,
‘????’
) lockt
FROM v$lock l, v$session s, SYS.user$ u1, SYS.obj$ t1
WHERE l.SID = s.SID
AND t1.obj# = DECODE (l.id2, 0, l.id1, 1)
AND u1.user# = t1.owner#
AND s.TYPE != ‘BACKGROUND’
ORDER BY 1, 2, 5
/
4.Display SQL text from Locked Transactions
/* Formatted on 2013/03/05 12:31 (Formatter Plus v4.8.8) */
/* Formatted on 2013/03/05 12:35 (Formatter Plus v4.8.8) */
SELECT s.username username, a.SID SID, a.owner || ‘.’ || a.OBJECT OBJECT,
s.lockwait, t.sql_text SQL
FROM v$sqltext t, v$session s, v$access a
WHERE t.address = s.sql_address
AND t.hash_value = s.sql_hash_value
AND s.SID = a.SIDFollow
Alok'blog | Alok Kumar Dwivedi https://alokdba.wordpress.com/
8 of 31 9/9/2015 3:35 PM

AND a.owner != ‘SYS’
AND UPPER (SUBSTR (a.OBJECT, 1, 2)) != ‘V$’
/
5.To display Locks and give the SID and Serial# of the Session to Kill
/* Formatted on 2013/03/05 12:35 (Formatter Plus v4.8.8) */
SELECT NVL (s.username, ‘Internal’) username,
NVL (s.terminal, ‘None’) terminal, l.SID || ‘,’ || s.serial# KILL,
u1.NAME || ‘.’ || SUBSTR (t1.NAME, 1, 20) tab,
DECODE (l.lmode,
1, ‘No Lock’,
2, ‘Row Share’,
3, ‘Row Exclusive’,
4, ‘Share’,
5, ‘Share Row Exclusive’,
6, ‘Exclusive’,
NULL
) lmode,
DECODE (l.request,
1, ‘No Lock’,
2, ‘Row Share’,
3, ‘Row Exclusive’,
4, ‘Share’,
5, ‘Share Row Exclusive’,
6, ‘Exclusive’,
NULL
) request,
l.ctime
FROM v$lock l, v$session s, SYS.user$ u1, SYS.obj$ t1
WHERE l.SID = s.SID
AND t1.obj# = DECODE (l.id2, 0, l.id1, l.id2)
AND u1.user# = t1.owner#
AND s.TYPE != ‘BACKGROUND’
ORDER BY 1, 2, 5
/
6. Display User Lock Information
/* Formatted on 2013/03/05 12:35 (Formatter Plus v4.8.8) */
SELECT b.SID, c.username, c.osuser, c.terminal,
DECODE (b.id2,
0, a.object_name,
‘Trans-‘ || TO_CHAR (b.id1)
) object_name,
Follow
Alok'blog | Alok Kumar Dwivedi https://alokdba.wordpress.com/
9 of 31 9/9/2015 3:35 PM

b.TYPE,
DECODE (b.lmode,
0, ‘–Waiting–‘,
1, ‘Null’,
2, ‘Row Share’,
3, ‘Row Excl’,
4, ‘Share’,
5, ‘Sha Row Exc’,
6, ‘Exclusive’,
‘Other’
) “Lock Mode”,
DECODE (b.request,
0, ‘ ‘,
1, ‘Null’,
2, ‘Row Share’,
3, ‘Row Excl’,
4, ‘Share’,
5, ‘Sha Row Exc’,
6, ‘Exclusive’,
‘Other’
) “Req Mode”
FROM dba_objects a, v$lock b, v$session c
WHERE a.object_id(+) = b.id1 AND b.SID = c.SID AND c.username IS NOT NULL
ORDER BY b.SID, b.id2;
7. Report sessions waiting for Locks
/* Formatted on 2013/03/05 12:35 (Formatter Plus v4.8.8) */
SELECT sn.username, m.SID, m.TYPE,
DECODE (m.lmode,
0, ‘None’,
1, ‘Null’,
2, ‘Row Share’,
3, ‘Row Excl.’,
4, ‘Share’,
5, ‘S/Row Excl.’,
6, ‘Exclusive’,
lmode, LTRIM (TO_CHAR (lmode, ‘990’))
) lmode,
DECODE (m.request,
0, ‘None’,
1, ‘Null’,
2, ‘Row Share’,
3, ‘Row Excl.’,
4, ‘Share’,
Follow
Alok'blog | Alok Kumar Dwivedi https://alokdba.wordpress.com/
10 of 31 9/9/2015 3:35 PM

5, ‘S/Row Excl.’,
6, ‘Exclusive’,
request, LTRIM (TO_CHAR (m.request, ‘990’))
) request,
m.id1, m.id2
FROM v$session sn, v$lock m
WHERE (sn.SID = m.SID AND m.request != 0)
OR ( sn.SID = m.SID
AND m.request = 0
AND lmode != 4
AND (id1, id2) IN (
SELECT s.id1, s.id2
FROM v$lock s
WHERE request != 0 AND s.id1 = m.id1
AND s.id2 = m.id2)
)
ORDER BY id1, id2, m.request;
8. Detecting blocking Locks in 10.2 and above
SELECT DISTINCT a.sid “waiting sid” ,
a.event ,
c.sql_text “SQL from blocked session” ,
b.sid “blocking sid” ,
b.event ,
b.sql_id ,
b.prev_sql_id ,
d.sql_text “SQL from blocking session”
FROM v$session a,
v$session b,
v$sql c ,
v$sql d
WHERE a.event =’enq: TX – row lock contention’
AND a.blocking_session=b.sid
AND c.sql_id =a.sql_id
AND d.sql_id =NVL(b.sql_id,b.prev_sql_id)
Information from V$ACTIVE_SESSION_HISTORY may give information on all the sql statements
run by the blocking process provided the information was collected in
V$ACTIVE_SESSION_HISTORY. However keep in mind, that not all information is collected in
this view.
/* Formatted on 2013/03/05 12:35 (Formatter Plus v4.8.8) */
SELECT DISTINCT a.SID “waiting sid”, a.event,
c.sql_text “SQL from blocked session”, b.SID “blocking sid”,
Follow
Alok'blog | Alok Kumar Dwivedi https://alokdba.wordpress.com/
11 of 31 9/9/2015 3:35 PM

b.event, b.sql_id, b.prev_sql_id,
d.sql_text “SQL from blocking session”
FROM v$session a, v$session b, v$sql c, v$sql d
WHERE a.event = ‘enq: TX – row lock contention’
AND a.blocking_session = b.SID
AND c.sql_id = a.sql_id
AND d.sql_id = NVL (b.sql_id, b.prev_sql_id)
Share this:
2 Responses to Oracle Blocking Queries
Cross Platform Database Migration Guide Using Import and Export Utility
A Complete Cross Platform Database Migration Guide Using Import and Export Utility
Data Pump Export and Import
Prior to oracle 10G, the logical backup was taken through EXP/IMP utility, which was the basic export/import
utility till oracle 9i. Oracle has come with more powerful logical backup tool in oracle 10G. As we know about
datapump export/import utility.
Data Pump takes the old export and import utilities one step further, you can have total control over the job
running (stop it, pause it, check it, restart it). Data pump is a server side technology and it can transfer large
amounts of data very quickly using parallel streams to achieve maximum throughput, they can be 15-45% faster
than the older import/export utilities.
Advantages of using data pump
1. ability to estimate jobs times
2. ability to restart failed jobs
One blogger likes this.
szybkie opony says:
January 9, 2014 at 9:37 pm
There’s definately a lot to know about this subject. I really like all
the points you made.
Reply
alokdba says:
January 15, 2014 at 2:15 pm
Thanks..
Reply
Follow
Alok'blog | Alok Kumar Dwivedi https://alokdba.wordpress.com/
12 of 31 9/9/2015 3:35 PM

3. perform fine-grained object selection
4. monitor running jobs
5. directly load a database from a remote instance via the network
6. remapping capabilities
7. improved performance using parallel executions
Uses of Data Pump Utility
1. migrating databases
2. copying databases
3. transferring oracle databases between different operating systems
4. backing up important tables before you change them
5. moving database objects from one tablespace to another
6. transporting tablespace’s between databases
7. reorganizing fragmented table data
8. extracting the DDL for tables and other objects such as stored procedures and packages
Data pump working procedure
Example:Import a procedure
impdp directory=test11 dumpfile=SMSUDB_03_09_2012.dmp logfile=imp_proc.log SCHEMAS=SMSUADMIN
INCLUDE=PROCEDURE:\”like \’DWH_SEND_MAIL_ALOK%\’\” CONTENT=METADATA_ONLY
The Master Control Process (MCP), has the process name DMnn, only one master job runs per job
which controls the whole Data Pump job, it performs the following
1. create jobs and controls them
2. creates and manages the worker processes
3. monitors the jobs and logs the process
4. maintains the job state and restart information in the master table (create in the users schema running the
job)
5. manages the necessary files including the dump file set
The master process creates a master table which contains job details (state, restart info), this table is created in
the users schema who is running the Data Pump job. Once the job has finished it dumps the table contents into
the data pump file and deletes the table. When you import the data pump file it re-creates the table and reads it
to verify the correct sequence in which it should import the various database objects.
A Complete Cross Platform Database Migration Guide Using Import and Export Utility
The worker process is named DWnn and is the process that actually performs the work, you can have a number
of worker process running on the same job (parallelism). The work process updates the master table with the
various job statuses.
The shadow process is created when the client logs in to the oracle server it services data pump API requests, it
creates the job consisting of the master table and the master process.
The client processes are the expdp and impdp commands
Steps for export the data Export data from the source machine
Connect to the database
1. Login as oracle user on the source machine
2. Export the environment variables like ORACLE_HOME, ORACLE_SID, PATH appropriately.
Follow
Alok'blog | Alok Kumar Dwivedi https://alokdba.wordpress.com/
13 of 31 9/9/2015 3:35 PM

$ export ORACLE_HOME=/u02/product/11.1.0/db_1
$ export ORACLE_SID=sample
$ export PATH=$PATH:$ORACLE_HOME/bin
3. Login to oracle as dba user
$ sqlplus / as sysdba
4. Start the database
SQL> startup
5. Find the required space needed for creating the database and importing the data in the target machine using
the following query.
SQL> select a.data_size+b.temp_size+c.redo_size+d.controlfile_size “total_size in MB” from ( select
sum(bytes)/1024/1024 data_size
from dba_data_files ) a,
( select nvl(sum(bytes),0)/1024/1024 temp_size
from dba_temp_files ) b,
( select sum(bytes)/1024/1024 redo_size
from sys.v_$log ) c,
( select sum(BLOCK_SIZE*FILE_SIZE_BLKS)/1024/1024 controlfile_size
from v$controlfile) d;
6. Exit from the database
SQL> exit
7. Check the availability of free space on the disks, t hold the data that will be exported.
$ bdf
8. Now create a folder ‘backup’ in the disk that have sufficient space and store the backup files.
Note: Here we have the directory ‘/u02’ with sufficient space to store the exported data. Hence we have created a
folder ‘backup’ in /u02 owned by oracle
A Complete Cross Platform Database Migration Guide Using Import and Export Utility
Login as root and create the folder and give the permission and ownership appropriately
$ su – root
# mkdir /u02/backup
# chmod 700 /u02/backup
# chown oracle:dba /u02/backup
Setup the export database directory
1. Login to oracle as dba user
$ sqlplus / as sysdba
2. Create a directory in the source database
SQL> create directory expdp_dir as ‘/u02/backup’;
3. Grant permission to that directory
SQL> grant read, write on directory expdp_dir to system;
4. Exit the Database
There are four sets of files/values that need to be extracted to ease the migration procedure. They are,
1. Datadump file
2. Configuration parameter file
3. Initialization Parameters file
Follow
Alok'blog | Alok Kumar Dwivedi https://alokdba.wordpress.com/
14 of 31 9/9/2015 3:35 PM

expdp/impdp utilities
These utilities are used to transfer data from one oracle database to another oracle database. The Export tool is
used to export data from source database to a data dump file and the Import tool is used to load data into the
target database from the data dump file.
The exported data dump file contains objects in the following order:
1. Type definitions
2. Table definitions
3. Table data
4. Table indexes
5. Integrity constraints, views, procedures, and triggers
6. Bitmap, function-based, and domain indexes
Obtaining data dump file
The data dump file can be obtained at three levels based on the requirement.
1. Full database level export
2. Schema level export
3. Table level export
In this document we are going to concentrate only full database export method.
Full database export
Full database export extracts all the object definitions and data from a complete database. Import may then
reload a complete database or selectively load objects or sets of objects from the full database export file.
A Complete Cross Platform Database Migration Guide Using Import and Export Utility
A full export is specified using the FULL parameter. In a full database export, the entire database is unloaded.
This mode requires that you have the EXP_FULL_DATABASE role or DBA
privileges $ cd $ORACLE_HOME/bin
$ ./expdp system/system DIRECTORY=expdp_dir
DUMPFILE=data.dmp logfile=data.log full=y
Result:
Job “SYSTEM”.”SYS_EXPORT_FULL_01″ successfully completed
In some cases where the Database is in Terabytes the above command will not feasible since the dump file size
will be larger than the operating system limit, and hence export will fail. In this situation you can create multiple
dump files by using the following command
$ ./expdp system/sys DIRECTORY=expdp_dir DUMPFILE=expdp_dir:data%U.dmp parallel=4 filesize=40M
logfile=expnew.log full=y
This will create multiple dump files named data01.dmp, data02.dmp, data03.dmp and so on. The FILESIZE
parameter specifies how much larger the dump file should be.
%U is used when the one of the files reached its specified size, oracle creates another dumpfile in the file system,
provided you have enough disk space.
%U specified along with the PARALLEL parameter, then one file for each is initially created. More files are
created as they are needed based on how much data is being exported and how many parallel processes are given
work to perform during the job.
The FILESIZE parameter has a maximum value equal to the maximum value that can be stored in 64 bits.
The maximum size of the FILESIZE value is listed here.
Operating System Release of Oracle Server Maximum Size
Follow
Alok'blog | Alok Kumar Dwivedi https://alokdba.wordpress.com/
15 of 31 9/9/2015 3:35 PM

Any
Prior to 8.1.5
2 gigabytes
32-bit
8.1.5
2 gigabytes
64-bit
8.1.5 and later
Unlimited
32-bit with 32-bit files
Any
2 gigabytes
32-bit with 32-bit files
8.1.5 and later
Unlimited
Note:
The maximum value that can be stored in a file is dependent on your operating system. You should verify this
maximum value in your Oracle operating system-specific documentation before specifying FILESIZE. You
should also ensure that the file size you specify for Export is supported on the system on which Import will run
Collect the required Configuration parameters
A few configuration parameters need to be collected from the source machine database to create
the database on the target.
The required configuration parameters are
1. Characterset
2. List of tablespaces,
3. Size of tablespaces,
4. Default tablespaces,
5. DB block size,
6. Undo management,
7. Undo tablespaces,
A Complete Cross Platform Database Migration Guide Using Import and Export Utility8. Users info,
9. Profile details,
10. Temporary tablespaces
Given below are the set of queries to collect the configuration parameters and store them on a file
configuration.txt under /u02/backup.
SQL> spool /u02/backup/configuration.txt
SQL> select value from NLS_DATABASE_PARAMETERS
where parameter = ‘NLS_CHARACTERSET’;
SQL> select * from v$tablespace
SQL> select BLOCK_SIZE from dba_tablespaces where
tablespace_name = ‘tablespacename’
SQL> select PROPERTY_VALUE from database_properties
where property_name = ‘DEFAULT_PERMANENT_TABLESPACE’
SQL> select value from v$parameter where name =Follow
Alok'blog | Alok Kumar Dwivedi https://alokdba.wordpress.com/
16 of 31 9/9/2015 3:35 PM

‘db_block_size’
SQL> select value from v$parameter where name =
‘undo_management’
SQL> select value from v$parameter where name =
‘undo_tablespace’
SQL> select BLOCK_SIZE from dba_tablespaces where
tablespace_name = ‘undo_tspacename’
SQL> select FILE_NAME, BYTES, AUTOEXTENSIBLE, MAXBYTES,
INCREMENT_BY from dba_data_files where tablespace_name=’undo_tspace name’
SQL> select TABLESPACE_NAME, INITIAL_EXTENT, NEXT_EXTENT,
MIN_EXTENTS, MAX_EXTENTS, PCT_INCREASE, MIN_EXTLEN, STATUS, CONTENTS, LOGGING,
EXTENT_MANAGEMENT, ALLOCATION_TYPE, BLOCK_SIZE, FORCE_LOGGING,
SEGMENT_SPACE_MANAGEMENT from dba_tablespaces
SQL> select USERNAME, USER_ID, PASSWORD, ACCOUNT_STATUS,
LOCK_DATE, EXPIRY_DATE, DEFAULT_TABLESPACE, TEMPORARY_TABLESPACE, CREATED, PROFILE,
INITIAL_RSRC_CONSUMER_GROUP, EXTERNAL_NAME INITIAL_RSRC_CONSUMER_GROUP from
dba_users
SQL> select PROFILE from dba_profiles group by profile
SQL> select RESOURCE_NAME, RESOURCE_TYPE, LIMIT from
dba_profiles where profile=’profile_name from above query’
SQL>spool off
Copy the initialization parameters
The default location of the oracle initialization parameter files is $ORACLE_HOME/dbs . Copy the required
parameter file to the backup directory on the source machine.
$ cp $ORACLE_HOME/dbs/initSAMPLE.ora ~/u02/backup
A Complete Cross Platform Database Migration Guide Using Import and Export Utility
Import data on the target machine
Transfer backup directory to target
Copy the backup directory (~/u02/backup) from source machine to target over the network or removable media
using the following steps.
1. Login as oracle user on the target machine.
2. Inorder to restore the backup of the database taken, check for the availability of free space on the disks using
the below command.
$ df
3. Now create a folder ‘backup’ in the disk that have sufficient space and store the backup file.
Note: Here we have the directory ‘/u02’ with sufficient space to store the exported data. Hence we have created a
folder ‘backup’ in /u02 owned by oracle. In order to avoid confusion in restoring the database, use the same
directory names as in the source machine.
Login as root and create the folder and give the permission and ownership appropriately
$ su – root
# mkdir /u02/backup
# chmod 700 /u02/backup
# chown oracle:dba /u02/backup
Follow
Alok'blog | Alok Kumar Dwivedi https://alokdba.wordpress.com/
17 of 31 9/9/2015 3:35 PM

4. Copy the source backup directory files (~/u02/backup) to the target directory /u02/backup.
Modify the Initialization parameter file
Copy the oracle initialization parameter file initSAMPLE.ora from the backup directory that was copied from the
source machine(/u02/backup) to a file named initSAMPLE.ora in the $ORACLE_HOME/dbs/ directory on
target machine and modify the required directives based on the source database. The correct values are available
on the configuration.txt file on the /u02/backup directory
initSAMPLE.ora file
db_cache_size=281018368
java_pool_size=20971520
large_pool_size=4194304
pga_aggregate_target=209715200
sga_target=637534208 shared_pool_size=314572800
streams_pool_size=8388608
*.audit_file_dest=’/u02/admin/SAMPLE/adump’
*.audit_trail=’db’
*.compatible=’11.1.0.0.0′
*.control_files=’/u02/data/SAMPLE/control1.ctl’,’/u02/data/SAMPLE/control2.ctl’,’/u02/data/SAMPLE1
/control3.ctl’
*.db_block_size=8192 *.db_domain=”
*.db_name=’SAMPLE’
*.diagnostic_dest=’/u02/data’
*.dispatchers='(PROTOCOL=TCP) (SERVICE=RANXDB)’
*.memory_target=845152256
*.open_cursors=300
*.processes=150
A Complete Cross Platform Database Migration Guide Using Import and Export Utility
Create the Database
Steps to create a database:
1. Export the environment variables like ORACLE_HOME, ORACLE_SID, PATH appropriately.
$ ORACLE_HOME=/u02/product/11.1.0/db_1
$ ORACLE_SID=SAMPLE
$ PATH=$PATH:$ORACLE_HOME/bin
$ export ORACLE_HOME ORACLE_SID PATH
$ cd $ORACLE_HOME/bin
$ sqlplus /nolog SQL> create spfile from
pfile=‘/u02/product/11.1.0/db_1/dbs/initSAMPLE.ora’
SQL> startup nomount
2. Create a database using following sql statement
SQL> CREATE DATABASE SAMPLE USER SYS IDENTIFIED BY sys USER
SYSTEM IDENTIFIED BY system LOGFILE GROUP 1 (‘/u02/data/SAMPLE/redo01.log’)SIZE 100M, GROUP 2
(‘/u02/data/SAMPLE/redo02.log’)SIZE 100M, GROUP 3 (‘/u02/data/SAMPLE/redo03.log’)SIZE 100M
MAXLOGFILES 5 MAXLOGMEMBERS 5 MAXLOGHISTORY 1 MAXDATAFILES 100 MAXINSTANCES 1
CHARACTER SET US7ASCII NATIONAL CHARACTER SET AL16UTF16 DATAFILE ‘/u02/data/SAMPLE
Follow
Alok'blog | Alok Kumar Dwivedi https://alokdba.wordpress.com/
18 of 31 9/9/2015 3:35 PM
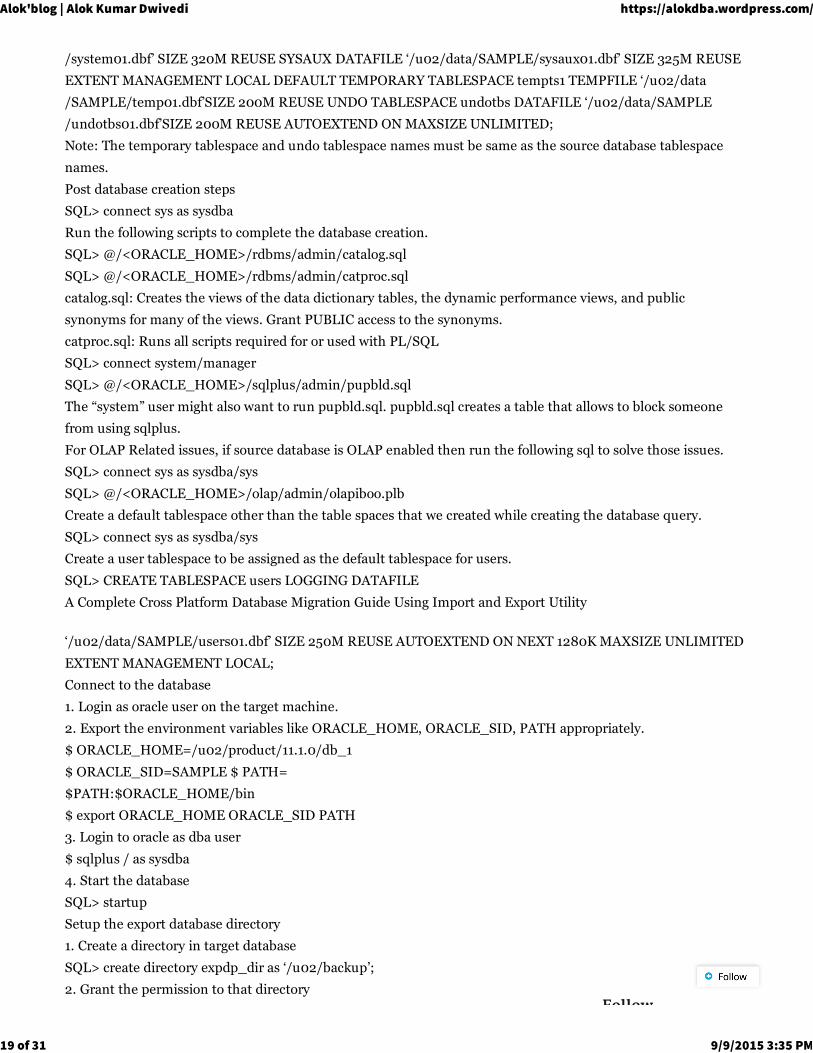
/system01.dbf’ SIZE 320M REUSE SYSAUX DATAFILE ‘/u02/data/SAMPLE/sysaux01.dbf’ SIZE 325M REUSE
EXTENT MANAGEMENT LOCAL DEFAULT TEMPORARY TABLESPACE tempts1 TEMPFILE ‘/u02/data
/SAMPLE/temp01.dbf’SIZE 200M REUSE UNDO TABLESPACE undotbs DATAFILE ‘/u02/data/SAMPLE
/undotbs01.dbf’SIZE 200M REUSE AUTOEXTEND ON MAXSIZE UNLIMITED;
Note: The temporary tablespace and undo tablespace names must be same as the source database tablespace
names.
Post database creation steps
SQL> connect sys as sysdba
Run the following scripts to complete the database creation.
SQL> @/<ORACLE_HOME>/rdbms/admin/catalog.sql
SQL> @/<ORACLE_HOME>/rdbms/admin/catproc.sql
catalog.sql: Creates the views of the data dictionary tables, the dynamic performance views, and public
synonyms for many of the views. Grant PUBLIC access to the synonyms.
catproc.sql: Runs all scripts required for or used with PL/SQL
SQL> connect system/manager
SQL> @/<ORACLE_HOME>/sqlplus/admin/pupbld.sql
The “system” user might also want to run pupbld.sql. pupbld.sql creates a table that allows to block someone
from using sqlplus.
For OLAP Related issues, if source database is OLAP enabled then run the following sql to solve those issues.
SQL> connect sys as sysdba/sys
SQL> @/<ORACLE_HOME>/olap/admin/olapiboo.plb
Create a default tablespace other than the table spaces that we created while creating the database query.
SQL> connect sys as sysdba/sys
Create a user tablespace to be assigned as the default tablespace for users.
SQL> CREATE TABLESPACE users LOGGING DATAFILE
A Complete Cross Platform Database Migration Guide Using Import and Export Utility
‘/u02/data/SAMPLE/users01.dbf’ SIZE 250M REUSE AUTOEXTEND ON NEXT 1280K MAXSIZE UNLIMITED
EXTENT MANAGEMENT LOCAL;
Connect to the database
1. Login as oracle user on the target machine.
2. Export the environment variables like ORACLE_HOME, ORACLE_SID, PATH appropriately.
$ ORACLE_HOME=/u02/product/11.1.0/db_1
$ ORACLE_SID=SAMPLE $ PATH=
$PATH:$ORACLE_HOME/bin
$ export ORACLE_HOME ORACLE_SID PATH
3. Login to oracle as dba user
$ sqlplus / as sysdba
4. Start the database
SQL> startup
Setup the export database directory
1. Create a directory in target database
SQL> create directory expdp_dir as ‘/u02/backup’;
2. Grant the permission to that directory
Follow
Alok'blog | Alok Kumar Dwivedi https://alokdba.wordpress.com/
19 of 31 9/9/2015 3:35 PM

SQL> grant read, write on directory expdp_dir to system;
Steps for Import the data
Full database import
The full import mode loads the entire contents of the source (export) dump file to the target database. However,
you must have been granted the IMP_FULL_DATABASE role on the target database. The data pump import is
invoked using the impdp command in the command line with the FULL parameter specified in the same
command line.
$ cd $ORACLE_HOME/bin
$ ./impdp system/system DIRECTORY=expdp_dir
DUMPFILE=data.dmp logfile=data.log full=y
Result:
Job “SYSTEM”.”SYS_IMPORT_FULL_01″ successfully completed
In some cases where the Database is in Terabytes and we exported the data as multiple dump files , then you can
import the multiple dump files using the following command
$ ./impdp system/sys DIRECTORY=expdp_dir DUMPFILE=expdp_dir:data%U.dmp parallel=4
logfile=expnew.log full=y
This will import multiple dump files in to the database.
A Complete Cross Platform Database Migration Guide Using Import and Export Utility
Verification
Verify the target database whether the data imported or not. Use bellow queries to check the exported data and
imported data in both source and target database.
SQL> select count(*) from dba_users;
SQL> select count(*) from dba_objects;
SQL> select count(*) from user_tables;
SQL> select a.data_size+b.temp_size+c.redo_size+d.controlfile_size “total_size in MB” from ( select
sum(bytes)/1024/1024 data_size
from dba_data_files ) a,
( select nvl(sum(bytes),0)/1024/1024 temp_size
from dba_temp_files ) b,
( select sum(bytes)/1024/1024 redo_size
from sys.v_$log )
c, ( select sum(BLOCK_SIZE*FILE_SIZE_BLKS)/1024/1024 controlfile_size from v$controlfile) d;
These queries will display the list of users, objects and size of the database.
Things to Lookout for
1. Volume-Time Relationship
The time required to extract the data is dependent on the size of the data. Extracting and reinserting high
volumes of data can take more time for large databases.
2. Ongoing Transactions
Ongoing changes are not captured by Export, nor is there a way to demarcate the boundaries that allow the
incremental data to be re-exported. This effectively implies application downtime during the export/import
process.
3. Recoverability
Failures during export and/or import are not easy to recover.
Follow
Alok'blog | Alok Kumar Dwivedi https://alokdba.wordpress.com/
20 of 31 9/9/2015 3:35 PM

A Complete Cross Platform Database Migration Guide Using Import and Export Utility
Conclusion
Data migration is a routine part of IT operations in today’s business environment. Even so, it often causes major
disruptions as a result of downtime or application performance problems, and it can severely impact budgets. To
prevent these problems, organizations need a consistent and reliable methodology that enables them to plan,
design, migrate and validate the migration. Further, they need migration procedures that support their specific
migration requirements, including operating systems, storage platforms and performance. In addition, migration
products that maintain continuous data availability during the migration without affecting performance are
desirable.
The migration procedures mentioned in this document provide a server-side infrastructure and new high-speed,
parallel Export and Import utilities for highly efficient bulk data and metadata movement between databases.
We can now move data and metadata between databases between different platforms faster and easier than ever
before, and this methodology helps you meet your various organization needs.
Share this:
EXPDP DATAPUMP
DATAPUMP
Examples
1> Simple export and import using DATAPUMP
2> Performing a table mode export
3> Estimating how much disk space will be consumed in a schema mode export
4> Performing a schema mode export
5> Performing a full database export using four parallel processes
6> Attaching to and stopping an existing job
7> Attaching to and restarting a stopped job
8> Performing a data-only table mode import
9> Performing a schema mode import
10>Using DBMS_DATAPUMP
11> Import data via a network link in Oracle 10g
12> Reorganize tablespaces using Oracle 10g Data Pump
13> Moving data between versions
14> Monitor DataPump jobs
Example 1
Simple export and import using DATAPUMP
1. Create a copy of the employees table under the HR schema
2. Create a DIRECTORY
3. Create directory at the OS Level
Be the first to like this.
Follow
Alok'blog | Alok Kumar Dwivedi https://alokdba.wordpress.com/
21 of 31 9/9/2015 3:35 PM

4. Export the EMP2 table from the HR user
5. Logon and drop the EMP2 table
6. Verify that a .DMP file and a .LOG file exists in the DATDUMP
directory.
7. Examine the .LOG file with any text editor
8. Import the .DMP file back into the HR user.
9. Verify that the emp2 table is re-created and re-loaded with data.
$ sqlplus hr/hr
SQL> CREATE TABLE EMP2 AS SELECT * FROM EMPLOYEES;
$ sqlplus / as sysdba
SQL> CREATE DIRECTORY testdir AS ‘/home/oracle10g/datapump’;
SQL> GRANT READ ON DIRECTORY testdir TO hr;
SQL> GRANT WRITE ON DIRECTORY testdir TO hr;
$ cd
$ mkdir datadump
$ expdp hr/hr directory=TESTDIR tables=hr.emp2
$ sqlplus hr/hr
SQL> Drop table emp2 purge;
SQL> EXIT
$ impdp hr/hr directory=testdir tables=emp2
$ sqlplus hr/hr
Sql> select * from emp2;
Example 2
Performing a table mode export
DROP DIRECTORY datadir1;
DROP DIRECTORY datadir2;
CREATE DIRECTORY datadir1 AS ‘c:\data_pump1’;
CREATE DIRECTORY datadir2 AS ‘c:\data_pump2′;
GRANT READ,WRITE ON DIRECTORY datadir1 TO sh;
GRANT READ,WRITE ON DIRECTORY datadir2 TO sh;
expdp system/ TABLES=sh.costs,sh.sales DUMPFILE=datadir2:table.dmp
NOLOGFILE=y
Example 3
Estimating How Much Disk Space Will Be Consumed in a Schema Mode Export
The ESTIMATE_ONLY parameter estimates the space that would be consumed in a
schema export, but stops without actually performing the export operation. The estimate
is printed in the log file and displayed on the client’s standard output device. The estimate
is for table row data only; it does not include metadata.
The INCLUDE parameter allows you to filter the metadata that is exported by specifying
objects and object types for the current export mode. The specified objects and all their
dependent objects are exported. Grants on these objects are also exported.
expdp sh/sh INCLUDE=table:\”IN \( \’SALES\’,\’PRODUCTS\’,\’COSTS\’\) \”
DIRECTORY=datadir2 ESTIMATE_ONLY=y
Example 4Follow
Alok'blog | Alok Kumar Dwivedi https://alokdba.wordpress.com/
22 of 31 9/9/2015 3:35 PM
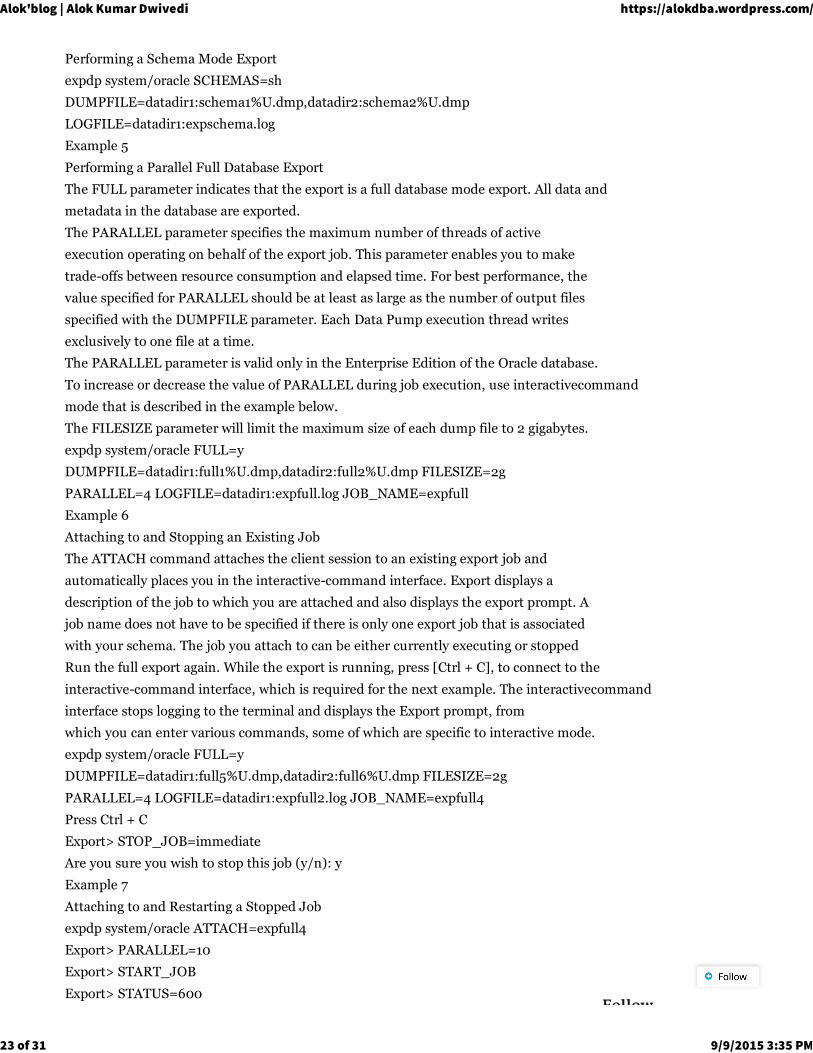
Performing a Schema Mode Export
expdp system/oracle SCHEMAS=sh
DUMPFILE=datadir1:schema1%U.dmp,datadir2:schema2%U.dmp
LOGFILE=datadir1:expschema.log
Example 5
Performing a Parallel Full Database Export
The FULL parameter indicates that the export is a full database mode export. All data and
metadata in the database are exported.
The PARALLEL parameter specifies the maximum number of threads of active
execution operating on behalf of the export job. This parameter enables you to make
trade-offs between resource consumption and elapsed time. For best performance, the
value specified for PARALLEL should be at least as large as the number of output files
specified with the DUMPFILE parameter. Each Data Pump execution thread writes
exclusively to one file at a time.
The PARALLEL parameter is valid only in the Enterprise Edition of the Oracle database.
To increase or decrease the value of PARALLEL during job execution, use interactivecommand
mode that is described in the example below.
The FILESIZE parameter will limit the maximum size of each dump file to 2 gigabytes.
expdp system/oracle FULL=y
DUMPFILE=datadir1:full1%U.dmp,datadir2:full2%U.dmp FILESIZE=2g
PARALLEL=4 LOGFILE=datadir1:expfull.log JOB_NAME=expfull
Example 6
Attaching to and Stopping an Existing Job
The ATTACH command attaches the client session to an existing export job and
automatically places you in the interactive-command interface. Export displays a
description of the job to which you are attached and also displays the export prompt. A
job name does not have to be specified if there is only one export job that is associated
with your schema. The job you attach to can be either currently executing or stopped
Run the full export again. While the export is running, press [Ctrl + C], to connect to the
interactive-command interface, which is required for the next example. The interactivecommand
interface stops logging to the terminal and displays the Export prompt, from
which you can enter various commands, some of which are specific to interactive mode.
expdp system/oracle FULL=y
DUMPFILE=datadir1:full5%U.dmp,datadir2:full6%U.dmp FILESIZE=2g
PARALLEL=4 LOGFILE=datadir1:expfull2.log JOB_NAME=expfull4
Press Ctrl + C
Export> STOP_JOB=immediate
Are you sure you wish to stop this job (y/n): y
Example 7
Attaching to and Restarting a Stopped Job
expdp system/oracle ATTACH=expfull4
Export> PARALLEL=10
Export> START_JOB
Export> STATUS=600Follow
Alok'blog | Alok Kumar Dwivedi https://alokdba.wordpress.com/
23 of 31 9/9/2015 3:35 PM

Export> CONTINUE_CLIENT
Example 8
Performing a data-only table mode import
The CONTENT parameter enables you to filter the data and metadata that Import loads.
The DATA_ONLY value loads only table row data; no database object definitions
(metadata) are re-created.
impdp system/oracle TABLES=sh.costs CONTENT=data_only
DUMPFILE=datadir2:table.dmp NOLOGFILE=y
Example 9
Performing a Schema Mode Import
The EXCLUDE parameter enables you to filter the metadata that is imported by
specifying database objects that you want to exclude from the import job. For the given
mode of import, all the objects contained within the source, and all their dependent
objects, are included except those specified in an EXCLUDE statement. If an object is
excluded, all of its dependent objects are also excluded.
TABLE_EXISTS_ACTION instructs import about what to do if the table it is trying to
create already exists. When TABLE_EXISTS_ACTION=REPLACE is specified, the
import drops the existing table and then re-creates and loads it using the source database
contents.
From your terminal window, issue the following import command to perform a schema
import that excludes constraints, referential constraints, indexes, and materialized views
using the dump file set created by the schema mode export in the Export section.
impdp system/oracle \
SCHEMAS=sh \
REMAP_SCHEMA=sh:sh2 \
DUMPFILE=datadir1:schema1%U.dmp,datadir2:schema2%U.dmp \
EXCLUDE=constraint, ref_constraint, index,materialized_view \
TABLE_EXISTS_ACTION=replace \
logfile=datadir1:impschema.log
Example 10
Not only is the Data Pump running inside the database, but also, most of the commandline
features are exposed from inside the database through a PL/SQL api,
DBMS_DATAPUMP. For example, you can start the export job from a PL/SQL package
with the following PL/SQL code:
declare
handle number;
begin
handle := dbms_datapump.open(‘EXPORT’,’SCHEMA’);
dbms_datapump.add_file(handle,’SCOTT3.DMP’,’DUMPDIR’);
dbms_datapump.metadata_filter(handle,’SCHEMA_EXPR’,’= ”SCOTT”’);
dbms_datapump.set_parallel(handle,4);
dbms_datapump.start_job(handle);
dbms_datapump.detach(handle);
end;Follow
Alok'blog | Alok Kumar Dwivedi https://alokdba.wordpress.com/
24 of 31 9/9/2015 3:35 PM

/
Example 11
Import data via a network link in Oracle 10g
In Oracle 10g, the Data Pump version of import can eliminate the dump file entirely by
importing directly from another database instance.
The first step is to define a database link object to identify the source database and
provide login credentials. For example, a source database in Chicago might be identified
by the Oracle network service name CHI. A user in that instance, ADMIN1, logs in using
the password WINDY and has the correct privileges to access the data to be imported.
The following CREATE DATABASE LINK command, then, could be used to define the
source database:
CREATE DATABASE LINK chicago
CONNECT TO admin1 IDENTIFIED BY windy
USING ‘CHI’;
The Data Pump import command, impdp, can now use this database link to directly
access remote data. The command line parameter NETWORK_LINK points to the source
database via its database link. On the local database instance in Seattle, user ADMIN2
executes the following command (all one line):
impdp admin2/market TABLES=customers,sales DIRECTORY=dpump1
NETWORK_LINK=chicago
Example 12
Reorganize tablespaces using Oracle 10g Data Pump
Export tablespaces as a unit
In the past, the export (exp) and import (imp) utilities had three modes: You could export
a single table and its dependent objects such as indexes; you could export all objects
owned by a specific user; or you could export the entire database. But tablespaces were a
problem. Objects owned by many different users could be stored in a given tablespace,
but some of their objects might be stored in other tablespaces. So, the only solution was
to query the data dictionary to find the exact list of tables and their owners and use tablemode
export to export the objects individually.
In Oracle 10g, the Data Pump version of export (expdp) lets you directly export all the
objects in a tablespace. The TABLESPACES parameter lets you specify which
tablespace(s) you want to export.
TABLESPACES=name [,…]
This is particularly useful if you’ve inherited a database with a lot of dictionary-based
tablespaces, and you want to reduce fragmentation by recreating the tablespaces as
locally managed, and then re-import the contents.
Rename datafile names during import
When migrating a database from one platform to another prior to 10g, the DBA was
required to pre-create the tablespaces and their datafiles before importing. Why? Because
the dump file created by export contained datafile pathnames in the format of the original
database’s operating system. These pathnames would cause errors if used with a different
operating system on import.
In the 10g Data Pump version of import (impdp), the REMAP_DATAFILE parameterFollow
Alok'blog | Alok Kumar Dwivedi https://alokdba.wordpress.com/
25 of 31 9/9/2015 3:35 PM

can be used to rename these datafiles on the fly. The format is:
REMAP_DATAFILE=source_datafile:target_datafile
This option is used with FULL imports only, and the userID you specify must have the
IMP_FULL_DATABASE role.
This is a very useful feature when you move databases
between platforms that have different file naming conventions. This parameter
changes the source datafile name to the target datafile name in all SQL
statements where the source datafile is referenced. Because the
REMAP_DATAFILE value uses quotation marks, it’s best to specify the
parameter within a parameter file.
Example:
The parameter file, payroll.par, has the following content:
DIRECTORY=dpump_dir1
FULL=Y
DUMPFILE=db_full.dmp
REMAP_DATAFILE=”’C:\DB1\HRDATA\PAYROLL\tbs6.dbf’:’/db1/hrdata/payroll/t
bs6.dbf’”
You can then issue the following command:
> impdp username/password PARFILE=payroll.par
Change tablespace names during import
The impdp utility also lets you load objects into different tablespaces than they came
from originally. Before 10g, the way to do this was complex. First, you had to remove
your quota on the original tablespace so that you had no privileges to write there. Then,
you set your default tablespace to the desired one. During the import, objects that were in
the original tablespace would be stored in the default tablespace for the user. Then you
had to remember to set everything back again when you were done.
In 10g import, the REMAP_TABLESPACE parameter makes this a lot easier. You still
need to have quota on the destination tablespace, but no other preparation is required.
Simply add the parameter:
REMAP_TABLESPACE=source_tablespace:target_tablespace
Objects will be automatically sent to the new tablespace.
Example 13
Moving data between versions
The Data Pump method for moving data between different database versions is different
from the method used by original Export and Import. With original Export, you had to run
an older version of Export to produce a dump file that was compatible with an older
database version. With Data Pump, you use the current Export version and simply use
the VERSION parameter to specify the target database version. You cannot specify
versions earlier than Oracle Database 10g (since Data Pump did not exist before 10g).
Example:
> expdp username/password TABLES=hr.employees VERSION=10.1
DIRECTORY=dpump_dir1 DUMPFILE=emp.dmp
14> Monitor DataPump jobs
In interactive mode, you can get a lot of detail through the STATUS command. InFollow
Alok'blog | Alok Kumar Dwivedi https://alokdba.wordpress.com/
26 of 31 9/9/2015 3:35 PM

SQL, you can query the following views:
– DBA_DATAPUMP_JOBS – all active Data Pump jobs and the state of each
job
− USER_DATAPUMP_JOBS – summary of the user’s active Data Pump jobs
− DBA_DATAPUMP_SESSIONS – all active user sessions that are attached to
a Data Pump job
− V$SESSION_LONGOPS – shows all progress on each active Data Pump job
Reference:
http://www.nyoug.org/Presentations/2006/September_NYC_Metro_Meet
ing/200609Nanda_Data%20Pump.pdf
http://articles.techrepublic.com.com/5100-10878_11-
6111806.html?tag=rbxccnbtr1
http://www.oracle.com/technology/obe/obe10gdb/integrate/datapump/dat
apump.htm
http://www.voug.org/handouts/10gNewFeatures_Anderson.pdf
http://www.appsdba.info/docs/DBA/DATAPUMP/Data_Pump_examples.pdf
Share this:
GENERATING STATSPACK REPORTS
GENERATING STATSPACK REPORTS
1) Connect to the db as sys user and check out for the value of the parameter timed_statistics (it should be set to
true).
sys/sys as sysdba
SQL> show parameter timed_statistics; if it is false,set it to true
SQL> alter system set timed_statistics=true scope=both;
2) Check whether the user perfstat user already exists. If the user is frequently used, don’t drop it.
SQL>select username from dba_users;
3) Otherwise run the script spdrop ($ORACLE_HOME/rdbms/admin/spdrop.sql) to drop the existing perfstat
user. SQL>@?/rdbms/admin/spdrop.sql
4) Run the script spcreate($ORACLE_HOME/rdbms/admin/spcreate.sql) to create the perfstat user.It will ask
for the user’s password(give perfstat as pwd),the default tablespace(tools or users) and the temporary
Be the first to like this.
Follow
Alok'blog | Alok Kumar Dwivedi https://alokdba.wordpress.com/
27 of 31 9/9/2015 3:35 PM

tablespace(temp). SQL>@?/rdbms/admin/sqpcreate.sql
5) Connect to the d/b as the perfstat user (SQL>conn perfstat/perfstat ).
6) Run the PL/SQL procedure: SQL>execute statspack.snap
7) Wait for 20 min’s before taking the second snapshot ie step-6 again.
8) Finally run the script spreport ($ORACLE_HOME/rdbms/admin/spreport.sql) to generate the report, where
it will be asking for the snapshot ids (choose the appropriate ids and create the report). SQL>@?/rdbms
/admin/spreport.sql
Share this:
Cloning from Oracle EBS r12 RAC to non-RAC
Cloning from Oracle EBS r12 RAC to non-RAC
This document explains the full steps for how to clone an RAC instance to non-RAC using oracle
10g RMAN duplicate database command, and backup is stored on the file system.
The below are the details steps which can be used to implement this solution:
Step 1) Run Preclone script on both Dbtier and AppsTier on the SOURCE system.
Step 2) Create backup on SOURCE Databases to FILESYSTEM (è /backup)
run {
allocate channel d1 type disk;
backup format ‘/backup/df_t%t_s%s_p%p’ database;
sql ‘alter system archive log current’;
backup format ‘/backup/al_t%t_s%s_p%p’ archivelog all;
release channel d1;
Be the first to like this.
Follow
Alok'blog | Alok Kumar Dwivedi https://alokdba.wordpress.com/
28 of 31 9/9/2015 3:35 PM
}
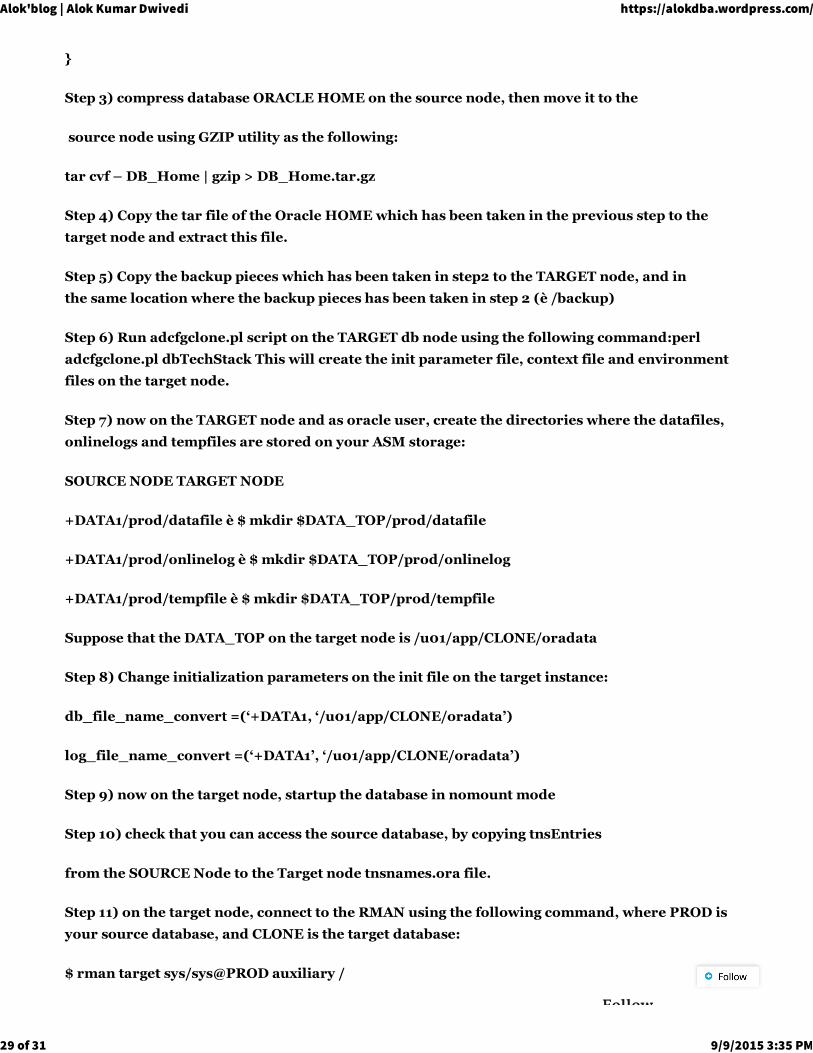
Step 3) compress database ORACLE HOME on the source node, then move it to the
source node using GZIP utility as the following:
tar cvf – DB_Home | gzip > DB_Home.tar.gz
Step 4) Copy the tar file of the Oracle HOME which has been taken in the previous step to the
target node and extract this file.
Step 5) Copy the backup pieces which has been taken in step2 to the TARGET node, and in
the same location where the backup pieces has been taken in step 2 (è /backup)
Step 6) Run adcfgclone.pl script on the TARGET db node using the following command:perl
adcfgclone.pl dbTechStack This will create the init parameter file, context file and environment
files on the target node.
Step 7) now on the TARGET node and as oracle user, create the directories where the datafiles,
onlinelogs and tempfiles are stored on your ASM storage:
SOURCE NODE TARGET NODE
+DATA1/prod/datafile è $ mkdir $DATA_TOP/prod/datafile
+DATA1/prod/onlinelog è $ mkdir $DATA_TOP/prod/onlinelog
+DATA1/prod/tempfile è $ mkdir $DATA_TOP/prod/tempfile
Suppose that the DATA_TOP on the target node is /u01/app/CLONE/oradata
Step 8) Change initialization parameters on the init file on the target instance:
db_file_name_convert =(‘+DATA1, ‘/u01/app/CLONE/oradata’)
log_file_name_convert =(‘+DATA1’, ‘/u01/app/CLONE/oradata’)
Step 9) now on the target node, startup the database in nomount mode
Step 10) check that you can access the source database, by copying tnsEntries
from the SOURCE Node to the Target node tnsnames.ora file.
Step 11) on the target node, connect to the RMAN using the following command, where PROD is
your source database, and CLONE is the target database:
$ rman target sys/sys@PROD auxiliary /
Follow
Alok'blog | Alok Kumar Dwivedi https://alokdba.wordpress.com/
29 of 31 9/9/2015 3:35 PM

RMAN>
run {
allocate auxiliary channel ch1 type disk;
duplicate target database to CLONE;
release channel ch1;
}
Step 12) After the RMAN command completed successfully, shutdown the database,
then change the following database initialization parameters, i
n init parameter file:
_no_recovery_through_resetlogs=TRUE
undo_management to =MANUAL
undo_tablespace=UNDOTBS1
Now open the database with RESETLOGS option;
Step 13) Create APPS_UNDOTS1 tablespace using the following statements:
CREATE UNDO TABLESPACE APPS_UNDOTS1 DATAFILE ‘/u01/app/CLONE/oradata
/prod/datafile/undo01.dbf’ SIZE 4000M AUTOEXTEND
ON NEXT 100M MAXSIZE 7000M ONLINE RETENTION NOGUARANTEE BLOCKSIZE
8K FLASHBACK ON;
Step 14) now edit the init parameter file, and change the following initialization parameters
undo_management to =AUTO
undo_tablespace= APPS_UNDOTS1
and remove the added initialization arameter_no_recovery_through_resetlogs=TRUE
Drop all unused undo tablespaces
Step 15) Disable database archive on the TARGET database, and start the database in open mode
Step 16) On the target database, run the library update script against the database
Follow
Alok'blog | Alok Kumar Dwivedi https://alokdba.wordpress.com/
30 of 31 9/9/2015 3:35 PM

$ cd [RDBMS ORACLE_HOME]/appsutil/install/[CONTEXT NAME]
$ sqlplus “/ as sysdba” @adupdlib.sql [libext]
Where [libext] should be set to ‘sl’ for HP-UX, ‘so’ for any other UNIX platform, or ‘dll’ for
Windows.
Step 17) Configure the target database, the database must be running and open before performing
this step.
$ cd [RDBMS ORACLE_HOME]/appsutil/clone/bin
$ perl adcfgclone.pl dbconfig [Database target context file]
Where Database target context file is: [RDBMS ORACLE_HOME]/appsutil/[Target
CONTEXT_NAME].xml.
Step 18) Check the database links
References:
– Cloning Oracle Application 11i /R12 with Rapid Clone – Database (9i/10g/11g) Using Hot Backup
on Open Database [ID 760772.1]
Share this:
Alok'blog
Be the first to like this.
The Twenty Ten Theme. Blog at WordPress.com.
Follow
Alok'blog | Alok Kumar Dwivedi https://alokdba.wordpress.com/
31 of 31 9/9/2015 3:35 PM