Oracle Banking Digital Experience Manual...UPI Payments User Manual Oracle Banking Digital...
24
Oracle Banking Digital Experience Retail UPI Payments User Manual Release 18.3.0.0.0 Part No. F12056-01 December 2018
Transcript of Oracle Banking Digital Experience Manual...UPI Payments User Manual Oracle Banking Digital...
i
Oracle Banking Digital
Experience Retail UPI Payments User Manual
Release 18.3.0.0.0
Part No. F12056-01
December 2018
User Manual Oracle Banking Digital Experience Retail UPI Payments ii
Retail UPI Payments User Manual
December 2018
Oracle Financial Services Software Limited
Oracle Park
Off Western Express Highway
Goregaon (East)
Mumbai, Maharashtra 400 063
India
Worldwide Inquiries:
Phone: +91 22 6718 3000
Fax:+91 22 6718 3001 www.oracle.com/financialservices/
Copyright © 2018, Oracle and/or its affiliates. All rights reserved.
Oracle and Java are registered trademarks of Oracle and/or its affiliates. Other names may be trademarks of their respective owners.
U.S. GOVERNMENT END USERS: Oracle programs, including any operating system, integrated software, any programs installed on the hardware, and/or documentation, delivered to U.S. Government end users are “commercial computer software” pursuant to the applicable Federal Acquisition Regulation and agency-specific supplemental regulations. As such, use, duplication, disclosure, modification, and adaptation of the programs, including any operating system, integrated software, any programs installed on the hardware, and/or documentation, shall be subject to license terms and license restrictions applicable to the programs. No other rights are granted to the U.S. Government.
This software or hardware is developed for general use in a variety of information management applications. It is not developed or intended for use in any inherently dangerous applications, including applications that may create a risk of personal injury. If you use this software or hardware in dangerous applications, then you shall be responsible to take all appropriate failsafe, backup, redundancy, and other measures to ensure its safe use. Oracle Corporation and its affiliates disclaim any liability for any damages caused by use of this software or hardware in dangerous applications.
This software and related documentation are provided under a license agreement containing restrictions on use and disclosure and are protected by intellectual property laws. Except as expressly permitted in your license agreement or allowed by law, you may not use, copy, reproduce, translate, broadcast, modify, license, transmit, distribute, exhibit, perform, publish or display any part, in any form, or by any means. Reverse engineering, disassembly, or decompilation of this software, unless required by law for interoperability, is prohibited.
The information contained herein is subject to change without notice and is not warranted to be error-free. If you find any errors, please report them to us in writing.
This software or hardware and documentation may provide access to or information on content, products and services from third parties. Oracle Corporation and its affiliates are not responsible for and expressly disclaim all warranties of any kind with respect to third-party content, products, and services. Oracle Corporation and its affiliates will not be responsible for any loss, costs, or damages incurred due to your access to or use of third-party content, products, or services.
iii
User Manual Oracle Banking Digital Experience Retail UPI Payments iii
Table of Contents
1. Preface ................................................................................................................................................. 4
1.1 Intended Audience ........................................................................................................................ 4
1.2 Documentation Accessibility ......................................................................................................... 4
1.3 Access to Oracle Support ............................................................................................................. 4
1.4 Structure ........................................................................................................................................ 4
1.5 Related Information Sources......................................................................................................... 4
2. Transaction Host Integration Matrix ................................................................................................. 5
3. UPI Payments ...................................................................................................................................... 6
4. Manage VPA ........................................................................................................................................ 9
4.1 Create VPA ................................................................................................................................. 10
4.2 Edit VPA ...................................................................................................................................... 11
4.3 Delete VPA .................................................................................................................................. 13
5. UPI Transfers .................................................................................................................................... 14
5.1 Transfer Money ........................................................................................................................... 14
5.2 Adhoc Transfers .......................................................................................................................... 16
5.3 Add Payee – VPA ....................................................................................................................... 21
5.4 Add Payee – Domestic Account.................................................................................................. 22
Preface
User Manual Oracle Banking Digital Experience Retail UPI Payments 4
1. Preface
1.1 Intended Audience
This document is intended for the following audience:
Customers
Partners
1.2 Documentation Accessibility
For information about Oracle's commitment to accessibility, visit the Oracle Accessibility Program
website at http://www.oracle.com/pls/topic/lookup?ctx=acc&id=docacc.
1.3 Access to Oracle Support
Oracle customers have access to electronic support through My Oracle Support. For information, visit
http://www.oracle.com/pls/topic/lookup?ctx=acc&id=info or visit
http://www.oracle.com/pls/topic/lookup?ctx=acc&id=trs if you are hearing impaired.
1.4 Structure
This manual is organized into the following categories:
Preface gives information on the intended audience. It also describes the overall structure of the User Manual.
Introduction provides brief information on the overall functionality covered in the User Manual.
The subsequent chapters provide information on transactions covered in the User Manual.
Each transaction is explained in the following manner:
Introduction to the transaction
Screenshots of the transaction
The images of screens used in this user manual are for illustrative purpose only, to provide improved understanding of the functionality; actual screens that appear in the application may vary based on selected browser, theme, and mobile devices.
Procedure containing steps to complete the transaction- The mandatory and conditional fields of the transaction are explained in the procedure.
If a transaction contains multiple procedures, each procedure is explained. If some functionality is present in many transactions, this functionality is explained separately.
1.5 Related Information Sources
For more information on Oracle Banking Digital Experience Release 18.3.0.0.0, refer to the following documents:
Oracle Banking Digital Experience Licensing Guide
Oracle Banking Digital Experience Installation Manuals

Transaction Host Integration Matrix
User Manual Oracle Banking Digital Experience Retail UPI Payments 5
2. Transaction Host Integration Matrix
Legends
NH No Host Interface Required.
Pre integrated Host interface available.
Pre integrated Host interface not available.
Sr No
Transaction / Function Name
Oracle FLEXCUBE
Core Banking 11.7.0.0.0
Oracle FLEXCUBE Universal Banking 14.0.0.0.0
Oracle FLEXCUBE Universal Banking 14.0.0.0.0
(Oracle Banking
Payments)
Third Party System
1 Manage VPAs
Create VPA NH NH NH
Edit VPA NH NH NH
Delete VPA NH NH NH
2 UPI Transfers
Transfer to VPA Payee
NH NH NH
Transfer to Domestic Account Payee
NH NH NH
Adhoc Transfer to VPA
NH NH NH
Adhoc Transfer to Domestic Account
NH NH NH
UPI Transfers - VPA Payee Creation
NH NH NH
UPI Transfers – Domestic Account Payee Creation
NH NH NH
UPI Payments
User Manual Oracle Banking Digital Experience Retail UPI Payments 6
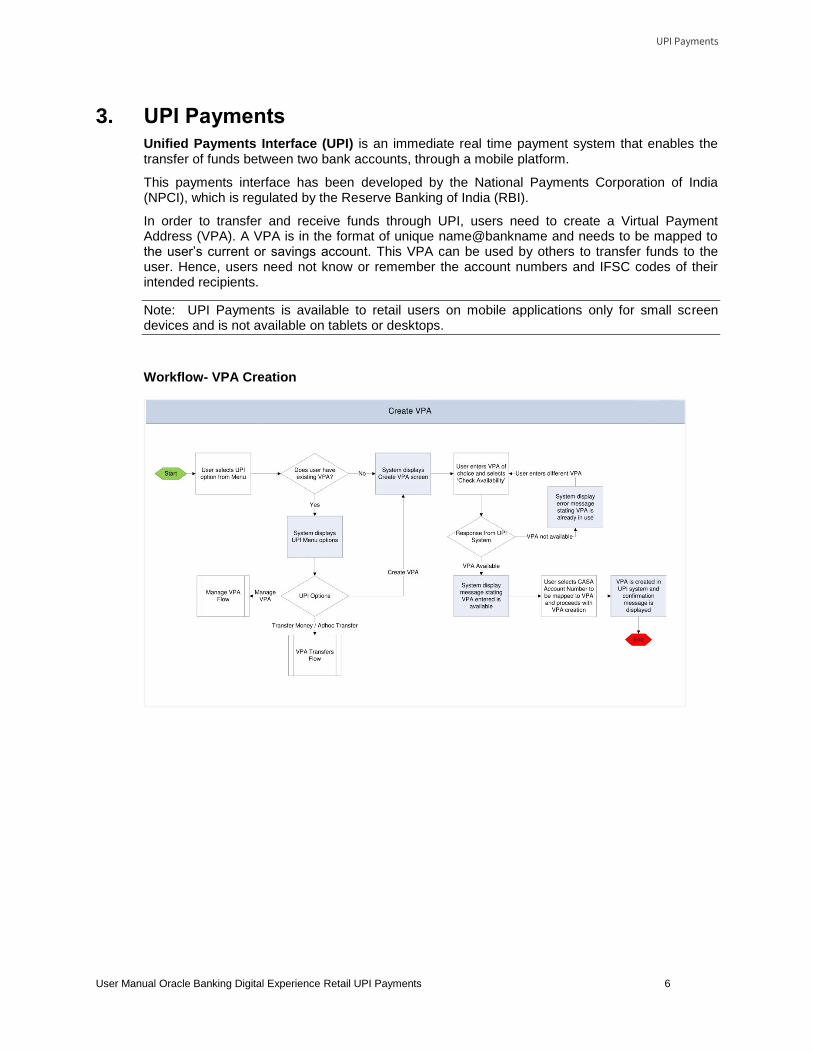
3. UPI Payments
Unified Payments Interface (UPI) is an immediate real time payment system that enables the transfer of funds between two bank accounts, through a mobile platform.
This payments interface has been developed by the National Payments Corporation of India (NPCI), which is regulated by the Reserve Banking of India (RBI).
In order to transfer and receive funds through UPI, users need to create a Virtual Payment Address (VPA). A VPA is in the format of unique name@bankname and needs to be mapped to the user’s current or savings account. This VPA can be used by others to transfer funds to the user. Hence, users need not know or remember the account numbers and IFSC codes of their intended recipients.
Note: UPI Payments is available to retail users on mobile applications only for small screen devices and is not available on tablets or desktops.
Workflow- VPA Creation
UPI Payments
User Manual Oracle Banking Digital Experience Retail UPI Payments 7
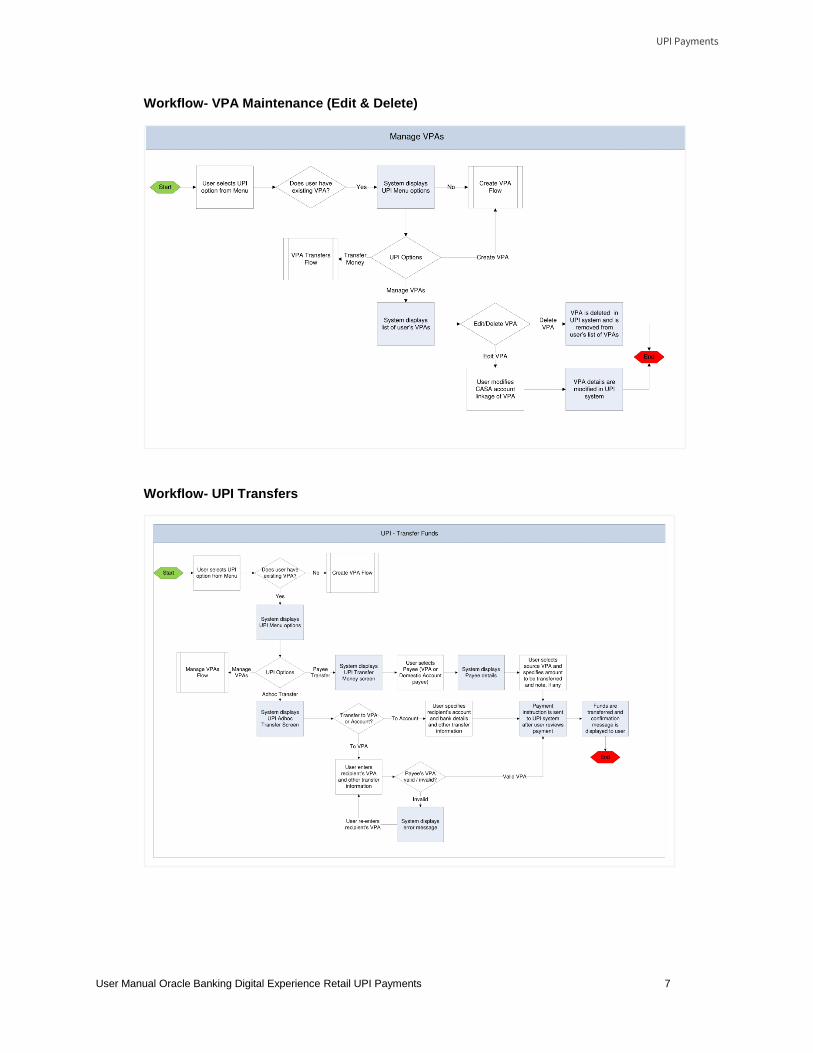
Workflow- VPA Maintenance (Edit & Delete)
Workflow- UPI Transfers
UPI Payments
User Manual Oracle Banking Digital Experience Retail UPI Payments 8
Features Supported in the Application
The following features are available as part of UPI Payments:
Manage VPA
Create VPA
Edit VPA
Delete VPA
Transfer Money
To existing VPA payees
To existing domestic account payees
Adhoc transfers to VPAs
Adhoc transfers to domestic accounts
Manage VPA
User Manual Oracle Banking Digital Experience Retail UPI Payments 9
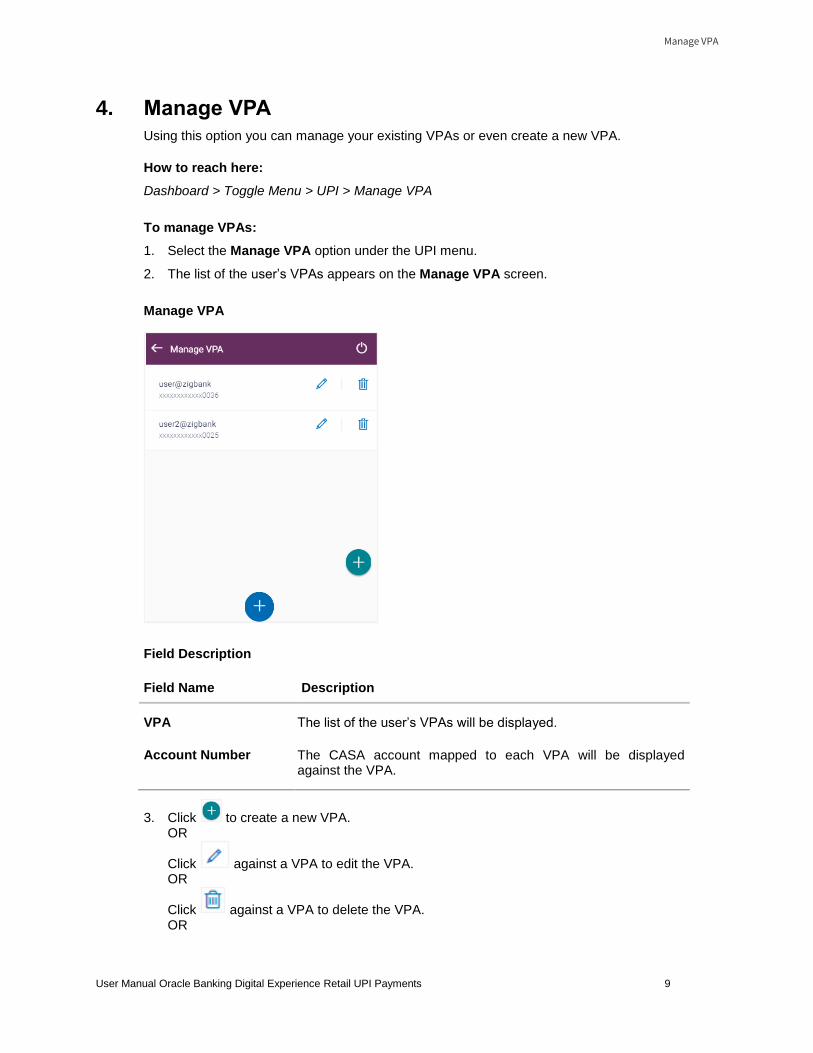
4. Manage VPA
Using this option you can manage your existing VPAs or even create a new VPA.
How to reach here:
Dashboard > Toggle Menu > UPI > Manage VPA
To manage VPAs:
1. Select the Manage VPA option under the UPI menu.
2. The list of the user’s VPAs appears on the Manage VPA screen.
Manage VPA
Field Description
Field Name Description
VPA The list of the user’s VPAs will be displayed.
Account Number The CASA account mapped to each VPA will be displayed against the VPA.
3. Click to create a new VPA. OR
Click against a VPA to edit the VPA. OR
Click against a VPA to delete the VPA. OR
Manage VPA
User Manual Oracle Banking Digital Experience Retail UPI Payments 10
Click to navigate back to the previous screen.
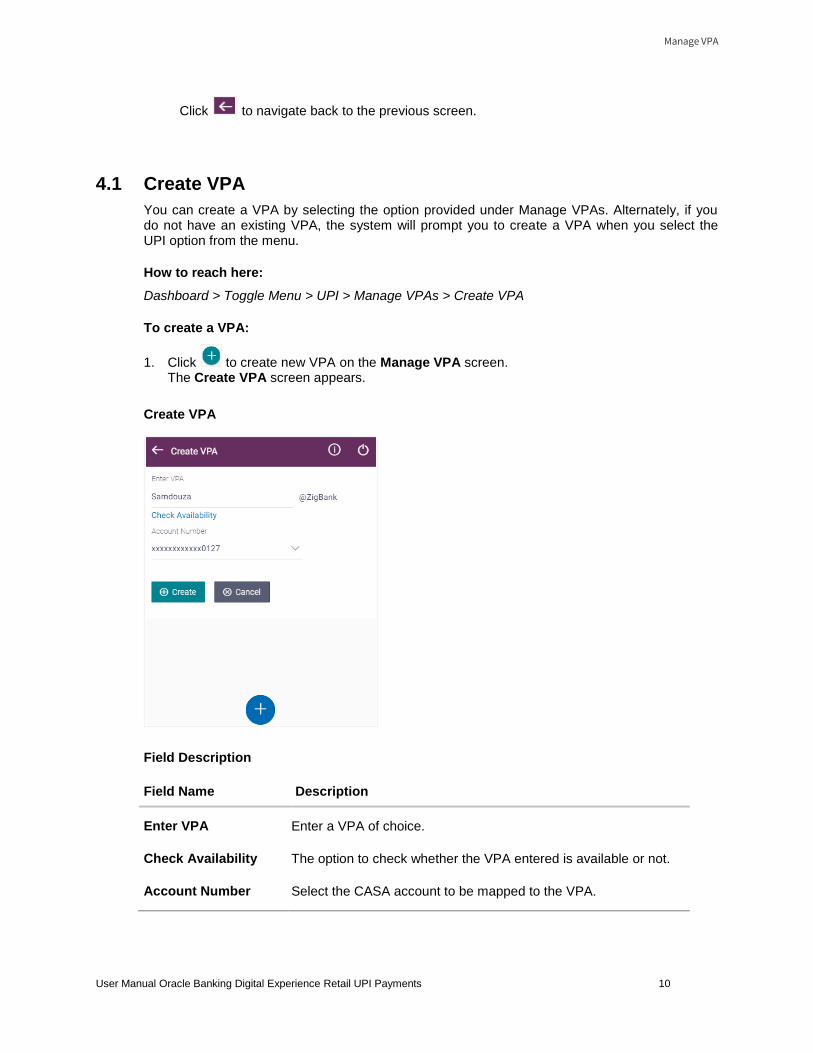
4.1 Create VPA
You can create a VPA by selecting the option provided under Manage VPAs. Alternately, if you do not have an existing VPA, the system will prompt you to create a VPA when you select the UPI option from the menu.
How to reach here:
Dashboard > Toggle Menu > UPI > Manage VPAs > Create VPA
To create a VPA:
1. Click to create new VPA on the Manage VPA screen. The Create VPA screen appears.
Create VPA
Field Description
Field Name Description
Enter VPA Enter a VPA of choice.
Check Availability The option to check whether the VPA entered is available or not.
Account Number Select the CASA account to be mapped to the VPA.
Manage VPA
User Manual Oracle Banking Digital Experience Retail UPI Payments 11
2. In the Enter VPA field, enter a VPA of choice.
3. From the Account Number list, select an account to be mapped to the VPA.
OR Click Create to create the VPA. OR Click Cancel to cancel the transaction. OR
Click to navigate back to the previous screen.
4. The Create VPA - Review screen appears. Verify the details, and click Confirm. OR Click Cancel to cancel the transaction.
5. A message confirming the creation of VPA appears. Click Go To Dashboard, to navigate to the dashboard. OR Click Transfer Money to initiate a UPI transfer.
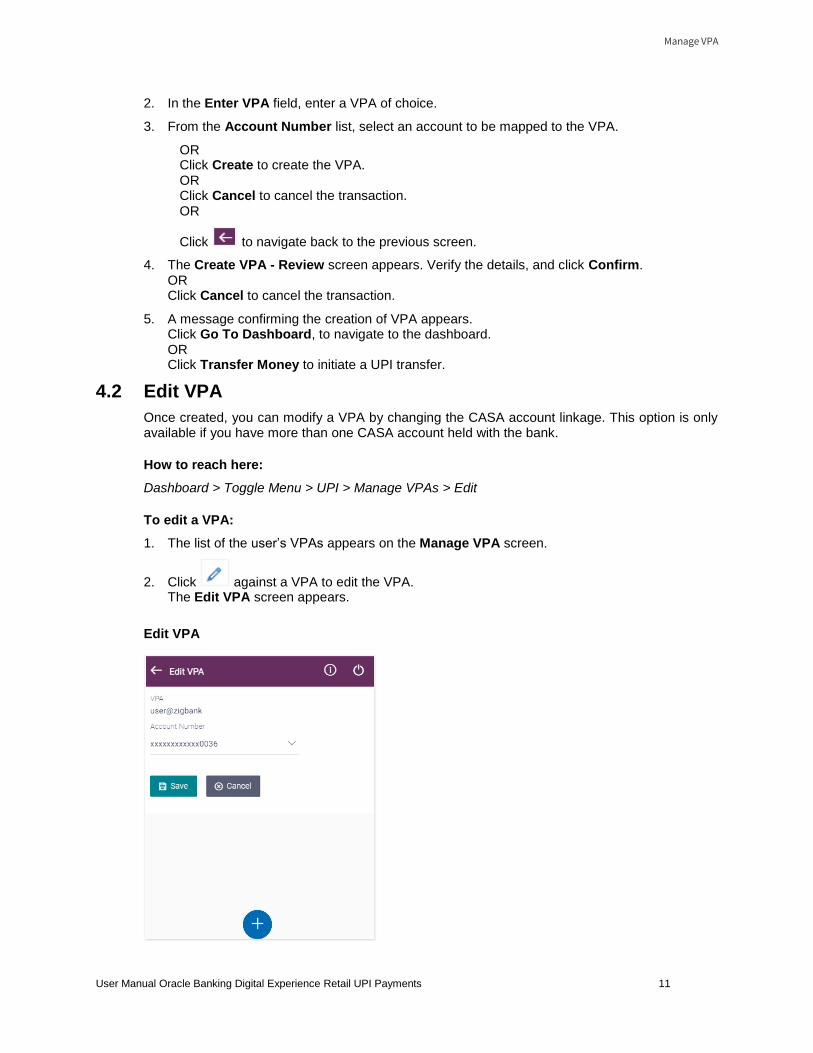
4.2 Edit VPA
Once created, you can modify a VPA by changing the CASA account linkage. This option is only available if you have more than one CASA account held with the bank.
How to reach here:
Dashboard > Toggle Menu > UPI > Manage VPAs > Edit
To edit a VPA:
1. The list of the user’s VPAs appears on the Manage VPA screen.
2. Click against a VPA to edit the VPA. The Edit VPA screen appears.
Edit VPA

Manage VPA
User Manual Oracle Banking Digital Experience Retail UPI Payments 12
Field Description
Field Name Description
VPA The VPA selected to be modified is displayed.
Account Number Change the CASA account mapping by selecting a different CASA account to be mapped to the VPA.
3. From the Account Number list, select an account to be mapped to the VPA. OR Click Save to update the VPA account mapping. OR Click Cancel to cancel the transaction. OR
Click to navigate back to previous screen.
4. The Edit VPA - Review screen appears. Verify the details, and click Confirm. OR Click Cancel to cancel the transaction.
5. A message confirming the modification of VPA appears. Click Go To Dashboard, to navigate to the dashboard. OR Click Transfer Money to initiate a UPI transfer.
Manage VPA
User Manual Oracle Banking Digital Experience Retail UPI Payments 13
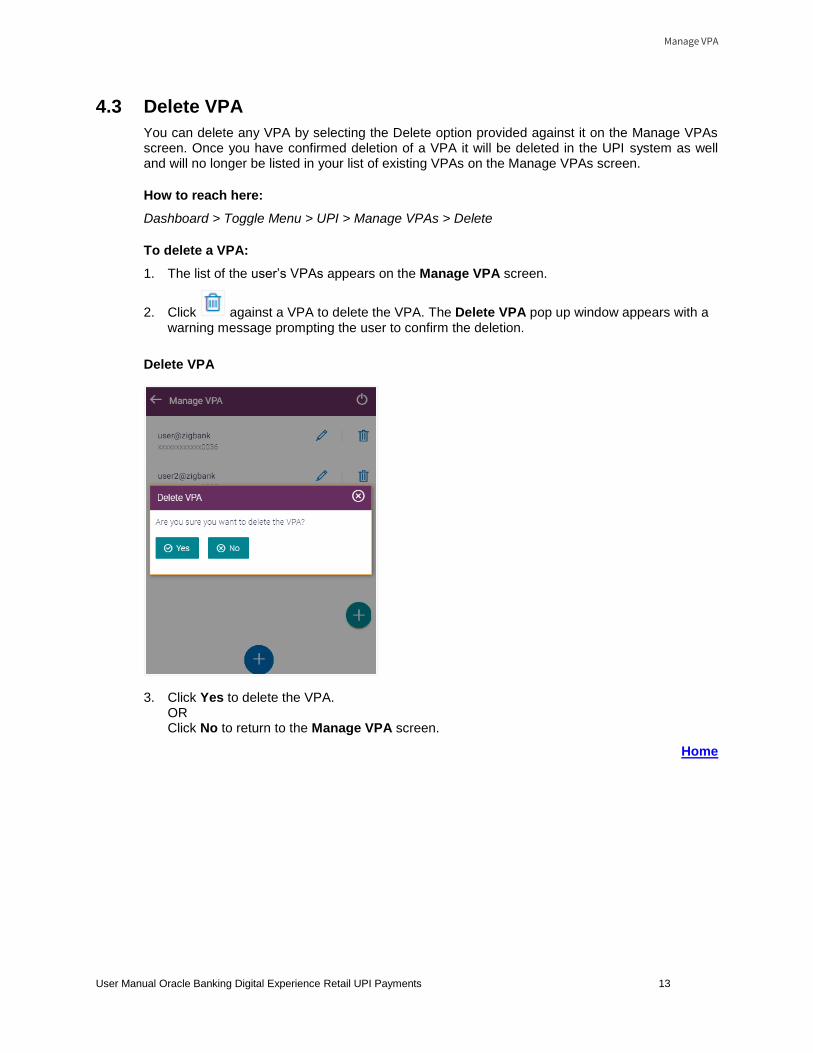
4.3 Delete VPA
You can delete any VPA by selecting the Delete option provided against it on the Manage VPAs screen. Once you have confirmed deletion of a VPA it will be deleted in the UPI system as well and will no longer be listed in your list of existing VPAs on the Manage VPAs screen.
How to reach here:
Dashboard > Toggle Menu > UPI > Manage VPAs > Delete
To delete a VPA:
1. The list of the user’s VPAs appears on the Manage VPA screen.
2. Click against a VPA to delete the VPA. The Delete VPA pop up window appears with a warning message prompting the user to confirm the deletion.
Delete VPA
3. Click Yes to delete the VPA. OR Click No to return to the Manage VPA screen.
Home
UPI Transfers
User Manual Oracle Banking Digital Experience Retail UPI Payments 14
5. UPI Transfers
Once you have created a VPA, you can use this VPA to transfer funds to people via their VPAs or even to accounts by specifying account numbers and IFSC codes. In addition to initiating adhoc transfers (to VPAs and accounts) you can also transfer funds to registered VPA and domestic account payees.
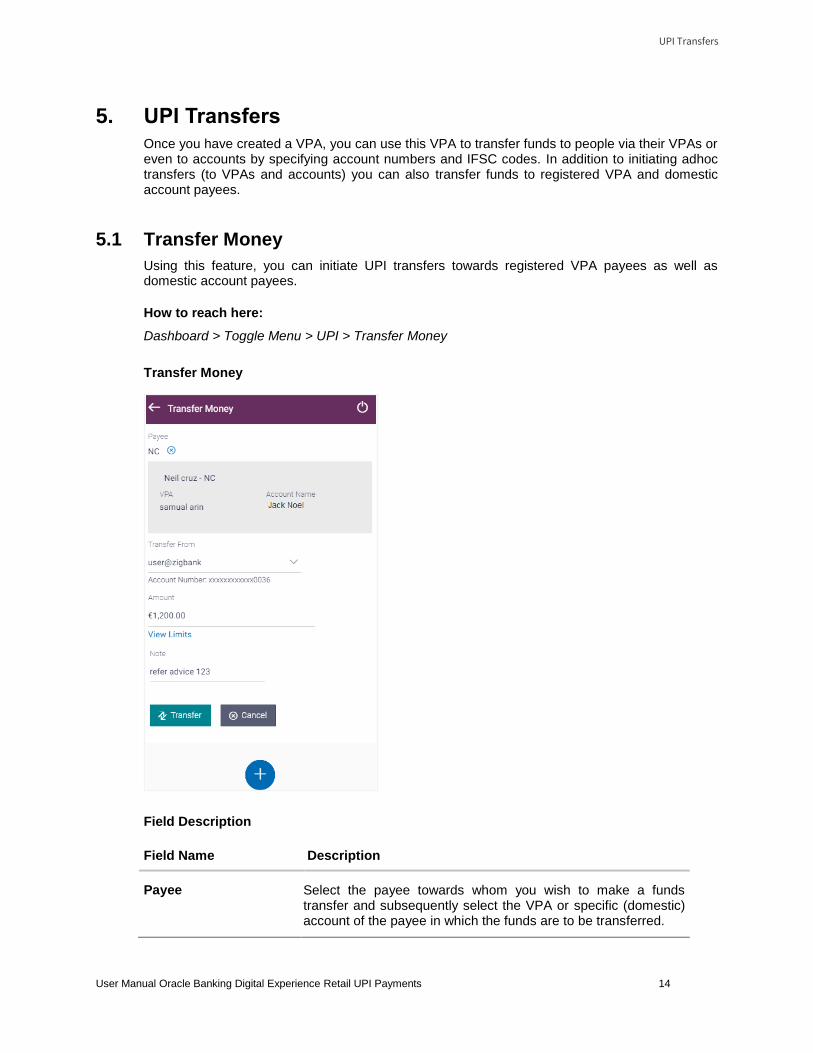
5.1 Transfer Money
Using this feature, you can initiate UPI transfers towards registered VPA payees as well as domestic account payees.
How to reach here:
Dashboard > Toggle Menu > UPI > Transfer Money
Transfer Money
Field Description
Field Name Description
Payee Select the payee towards whom you wish to make a funds transfer and subsequently select the VPA or specific (domestic) account of the payee in which the funds are to be transferred.

UPI Transfers
User Manual Oracle Banking Digital Experience Retail UPI Payments 15
Field Name Description
Payee Details The details of the selected payee appear.
If VPA has been selected, the payee’s VPA and account name appears.
If an account has been selected, the payee’s account and bank details appear.
Transfer From Select the VPA from which funds are to be transferred.
Account Number The account number mapped to the VPA appears once a VPA is selected in the Transfer From field.
Amount Enter the amount in INR that is to be transferred.
Note Enter a note or remarks if required.
To transfer money to existing payee:
1. From the Payee list, select a payee towards whom funds transfer is to be made.
The details of the selected payee appear. If the payee selected is a VPA payee, the Payee’s VPA and Account Name are displayed. If the payee selected is a domestic account payee, the payee’s account and bank details are displayed.
2. From the Transfer From account list, select the source VPA. The account number mapped to the selected VPA is displayed below the Transfer From field.
3. In the Amount field, enter the amount in currency INR.
4. In the Note field, enter a note or remarks, if any.
5. Click Transfer to initiate the payment. OR Click Cancel to cancel the operation and navigate back to ‘Dashboard’. OR
Click to navigate back to previous screen.
6. The Transfer Money – Review screen appears. Verify the details and click Confirm.
The Verification screen appears if the transaction is configured for Two Factor Authentication.
OR Click Cancel to cancel the operation and navigate back to ‘Dashboard’.
7. The success message appears, along with transfer details and the transfer reference number generated by the UPI system. Click Go to Dashboard, to navigate to the dashboard. OR Click Make another transfer to initiate another VPA transfer.
UPI Transfers
User Manual Oracle Banking Digital Experience Retail UPI Payments 16
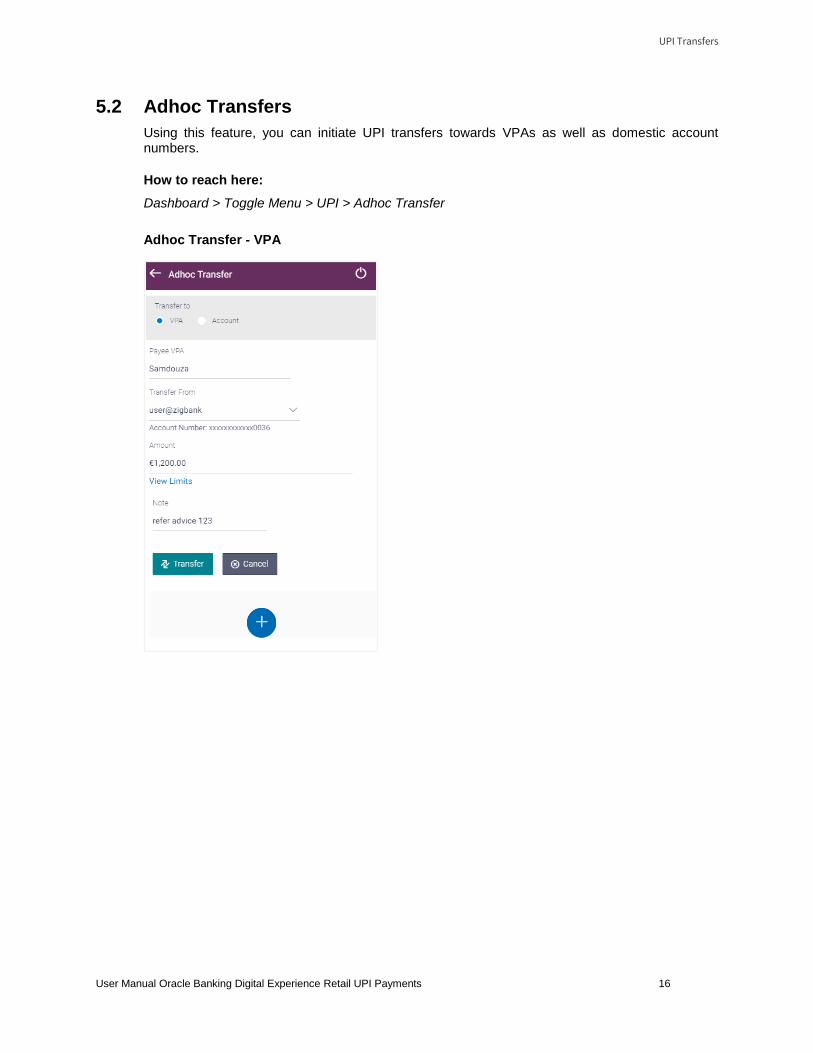
5.2 Adhoc Transfers
Using this feature, you can initiate UPI transfers towards VPAs as well as domestic account numbers.
How to reach here:
Dashboard > Toggle Menu > UPI > Adhoc Transfer
Adhoc Transfer - VPA
UPI Transfers
User Manual Oracle Banking Digital Experience Retail UPI Payments 17
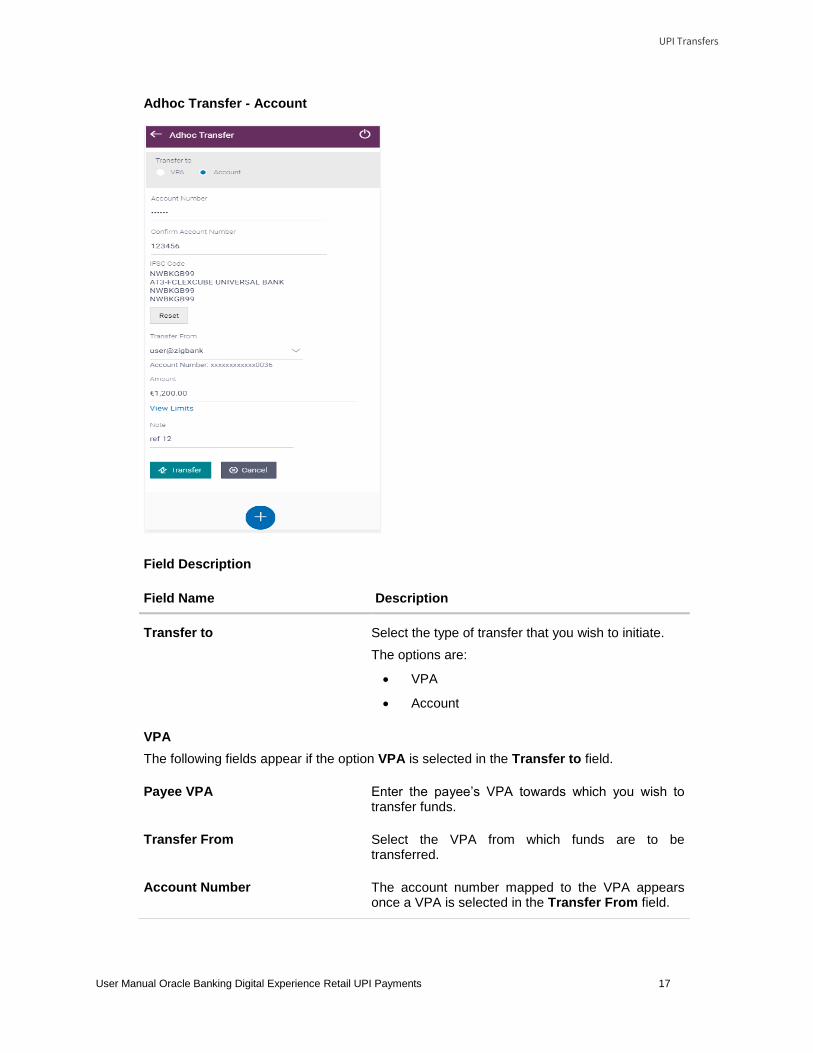
Adhoc Transfer - Account
Field Description
Field Name Description
Transfer to Select the type of transfer that you wish to initiate.
The options are:
VPA
Account
VPA
The following fields appear if the option VPA is selected in the Transfer to field.
Payee VPA Enter the payee’s VPA towards which you wish to transfer funds.
Transfer From Select the VPA from which funds are to be transferred.
Account Number The account number mapped to the VPA appears once a VPA is selected in the Transfer From field.
UPI Transfers
User Manual Oracle Banking Digital Experience Retail UPI Payments 18
To initiate an adhoc VPA transfer:
1. From the Transfer to field, select either VPA or Account to identify whether the transfer is to be made towards a VPA or an account number.
2. If VPA has been selected, enter Payee VPA in the Payee VPA field. OR If Account has been selected:
a. In the Payee Account Number field, enter the Payee’s Account Number.
b. In the Confirm Account Number field, confirm the Payee’s Account Number.
c. In the IFSC Code field, enter the IFSC Code or select it from the lookup.
d. Click Verify to verify the IFSC code.
e. Click Lookup IFSC Code to lookup the IFSC code.
3. From the Transfer From list, select the source VPA. The account number mapped to the selected VPA is displayed below the Transfer From field.
4. In the Amount field, enter the amount in currency INR.
5. In the Note field, enter a note or remarks, if any.
6. Click Transfer to initiate the payment. OR
Amount Enter the amount in INR that is to be transferred.
Note Enter a note or remarks if required.
Account
The following fields appear if the option Account is selected in the Transfer to field.
Payee Account Number Enter the account number towards which you wish to transfer funds.
Confirm Account Number Re-enter the payee’s account number so as to confirm the same.
IFSC Code Enter the IFSC code of payee’s bank.
Verify Select this option to verify the IFSC code entered.
Lookup IFSC Code Select this option to search for an IFSC code.
Transfer From Select the VPA from which funds are to be transferred.
Account Number The account number mapped to the VPA appears once a VPA is selected in the Transfer From field.
Amount Enter the amount in INR that is to be transferred.
Note Enter a note or remarks if required.
UPI Transfers
User Manual Oracle Banking Digital Experience Retail UPI Payments 19
Click Cancel to cancel the operation and navigate back to ‘Dashboard’. OR
Click to navigate back to previous screen.
7. The Adhoc Transfer – Review screen appears. Verify the details and click Confirm.
The Verification screen appears if the transaction is configured for Two Factor Authentication.
OR Click Cancel to cancel the operation and navigate back to ‘Dashboard’.
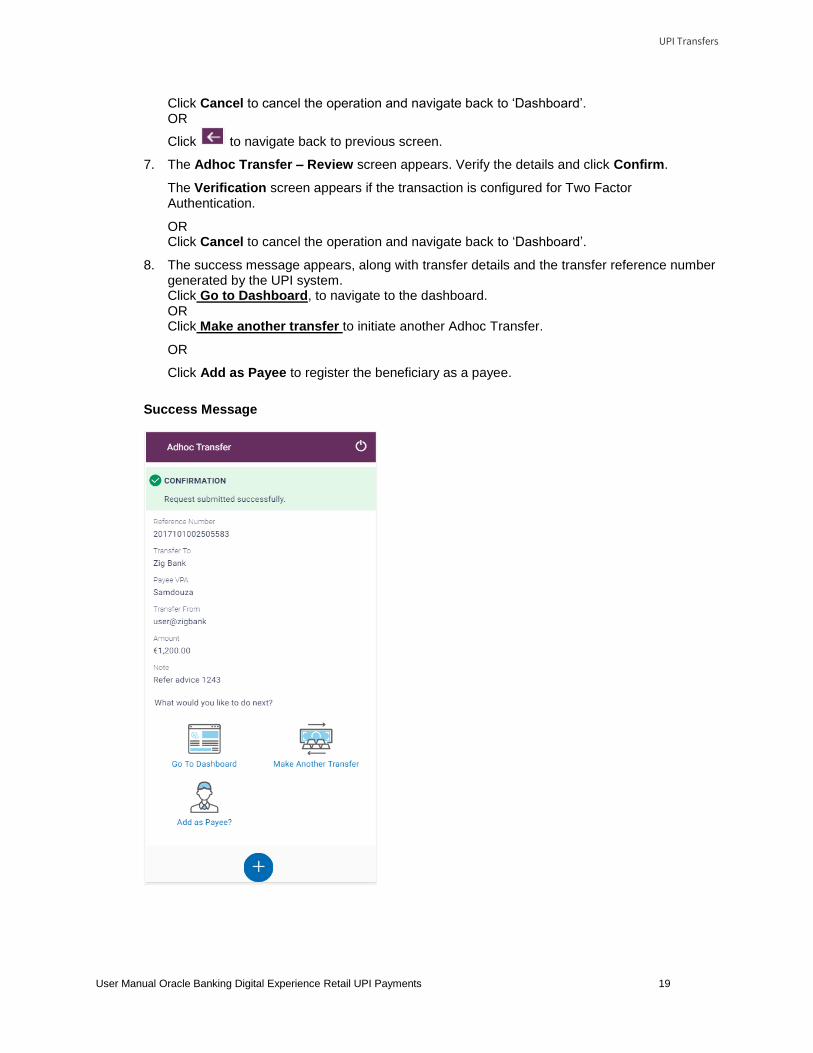
8. The success message appears, along with transfer details and the transfer reference number generated by the UPI system. Click Go to Dashboard, to navigate to the dashboard. OR Click Make another transfer to initiate another Adhoc Transfer.
OR
Click Add as Payee to register the beneficiary as a payee.
Success Message
UPI Transfers
User Manual Oracle Banking Digital Experience Retail UPI Payments 20
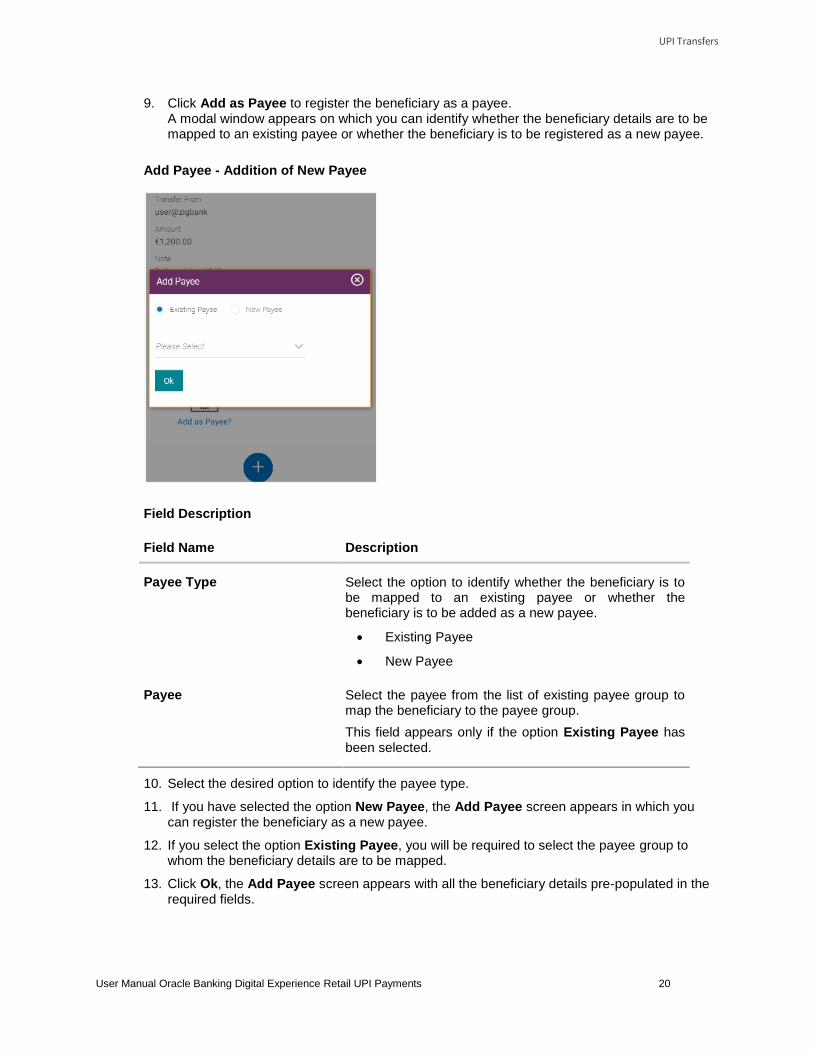
9. Click Add as Payee to register the beneficiary as a payee. A modal window appears on which you can identify whether the beneficiary details are to be mapped to an existing payee or whether the beneficiary is to be registered as a new payee.
Add Payee - Addition of New Payee
Field Description
Field Name Description
Payee Type Select the option to identify whether the beneficiary is to be mapped to an existing payee or whether the beneficiary is to be added as a new payee.
Existing Payee
New Payee
Payee Select the payee from the list of existing payee group to map the beneficiary to the payee group.
This field appears only if the option Existing Payee has been selected.
10. Select the desired option to identify the payee type.
11. If you have selected the option New Payee, the Add Payee screen appears in which you can register the beneficiary as a new payee.
12. If you select the option Existing Payee, you will be required to select the payee group to whom the beneficiary details are to be mapped.
13. Click Ok, the Add Payee screen appears with all the beneficiary details pre-populated in the required fields.
UPI Transfers
User Manual Oracle Banking Digital Experience Retail UPI Payments 21
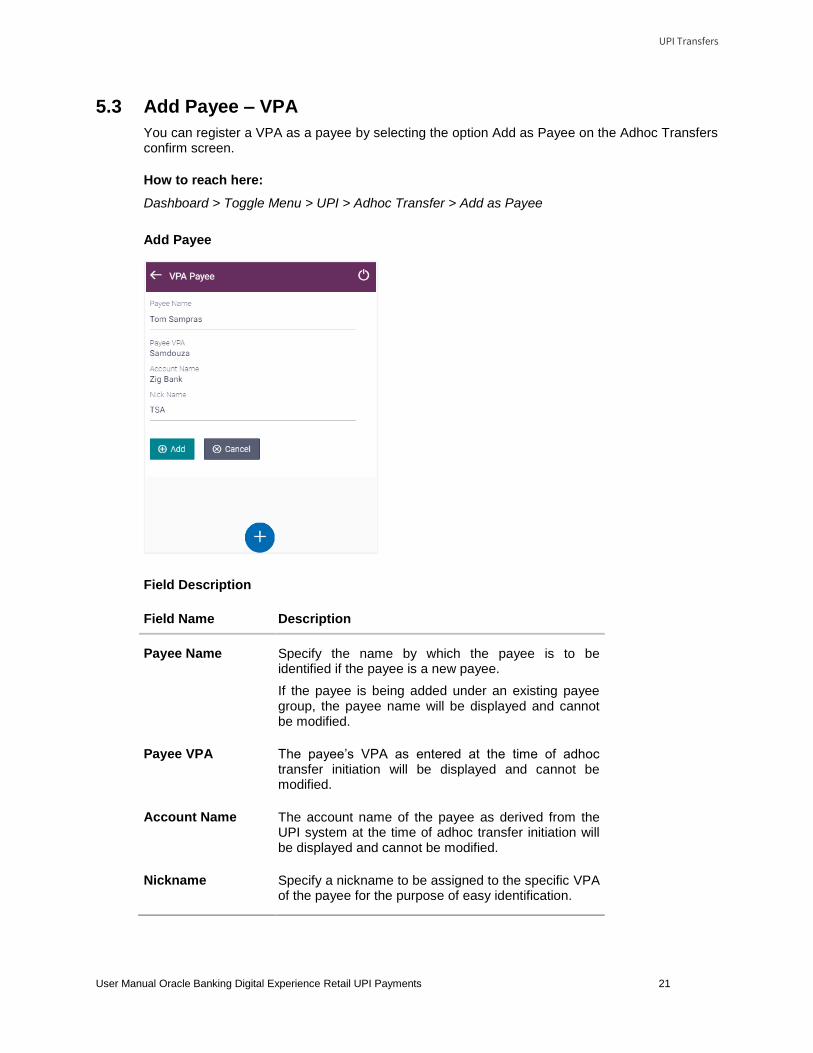
5.3 Add Payee – VPA
You can register a VPA as a payee by selecting the option Add as Payee on the Adhoc Transfers confirm screen.
How to reach here:
Dashboard > Toggle Menu > UPI > Adhoc Transfer > Add as Payee
Add Payee
Field Description
Field Name Description
Payee Name Specify the name by which the payee is to be identified if the payee is a new payee.
If the payee is being added under an existing payee group, the payee name will be displayed and cannot be modified.
Payee VPA The payee’s VPA as entered at the time of adhoc transfer initiation will be displayed and cannot be modified.
Account Name The account name of the payee as derived from the UPI system at the time of adhoc transfer initiation will be displayed and cannot be modified.
Nickname Specify a nickname to be assigned to the specific VPA of the payee for the purpose of easy identification.

UPI Transfers
User Manual Oracle Banking Digital Experience Retail UPI Payments 22
To create a VPA payee:
1. If payee is being registered as a new payee:
a. In the Payee Name field, enter the name of the payee for identification.
2. In the Nickname field, enter a nickname to be assigned to the specific VPA of the payee.
3. Click Add to add a payee. OR Click Cancel to cancel the transaction. OR
Click to navigate back to previous screen.
4. The Add Payee - Review screen appears. Verify the details, and click Confirm. OR Click Cancel to cancel the operation and navigate back to ‘Dashboard’.
5. The success message appears along with the account details. Click Go to Dashboard, to navigate to the dashboard. OR Click Make a transfer to initiate another transfer.
5.4 Add Payee – Domestic Account
You can register a domestic account payee by selecting the option Add as Payee on the Adhoc Transfers confirm screen.
How to reach here:
Dashboard > Toggle Menu > UPI > Adhoc Transfer > Add as Payee
Add Payee
UPI Transfers
User Manual Oracle Banking Digital Experience Retail UPI Payments 23
Field Description
Field Name Description
Payee Name Specify the name by which the payee is to be identified if the payee is a new payee.
If the payee is being added under an existing payee group, the payee name will be displayed and cannot be modified.
Account Type The field identifying that the account type of the payee is domestic will be displayed.
Account Number
The payee’s account number as entered at the time of adhoc transfer initiation will be displayed and cannot be modified.
Account Name
The payee’s name as registered with the payee’s bank will be displayed and cannot be changed.
IFSC Code The IFSC code of the payee’s bank as entered while initiating the transfer will be displayed and cannot be modified.
Nickname Specify a nickname to be assigned to the specific account of the payee for the purpose of easy identification.
To create a VPA payee:
1. If payee is being registered as a new payee:
a. In the Payee Name field, enter the name of the payee for identification.
2. In the Nickname field, enter a nickname to be assigned to the specific account of the payee.
3. Click Add to add a payee. OR Click Cancel to cancel the transaction. OR
Click to navigate back to previous screen.
4. The Add Payee - Review screen appears. Verify the details, and click Confirm. OR Click Cancel to cancel the operation and navigate back to ‘Dashboard’.
5. The success message appears along with the account details. Click Go to Dashboard, to navigate to the dashboard. OR Click Make a transfer to initiate another transfer.
Note: The Payee Account Type field is displayed if the payee is being added under an existing payee group.
Home
UPI Transfers
User Manual Oracle Banking Digital Experience Retail UPI Payments 24
FAQs
1. What is UPI?
Unified Payments Interface (UPI) is a real-time payment system developed by National Payments Corporation of India that facilitates inter-bank transactions. It is regulated by the Reserve Bank of India and works by instantly transferring funds between two bank accounts on a mobile platform.
2. What is a VPA?
A VPA or Virtual Payment Address, sometimes referred to as a UPI ID or UPI Address, is a unique ID that you are required to create in order to initiate UPI transfers and to receive funds via UPI. A VPA takes the form of abc@zigbank where ‘abc’ is a unique name that you can choose. This VPA is mapped to your CASA account and is an identifier used to pay and receive funds from and to your CASA account.
Home