Optimum broiler development - Cobb Vantress … · Optimum broiler development A practical guide to...
58
Optimum broiler development A practical guide to ensure correct early broiler performance
Transcript of Optimum broiler development - Cobb Vantress … · Optimum broiler development A practical guide to...
Optimum broilerdevelopment
A practical guide to ensure correctearly broiler performance
Contents
Introduction
Objectives
1. Hatchery1.1. Why focus on incubation?1.2. How to establish good chick quality?1.21. Cleanliness of hatch debris1.22. Color and strength1.23. Feathering1.24. Colibacillosis control
1.3. What to measure? Embryo temperatures1.31. Hatch window1.32. Chick yield %1.33. Cloaca temperatures1.34. Chick Quality Assessment
1.4. Summary
2. Chick transport2.1. Chick holding
3. Brooding3.1. Ventilation3.2. Relative humidity3.3. Temperature3.4. Feeding3.5. Water3.51. Flow rate
3.6. Lighting3.7. Chick check
4. Ultimate performance indicators4.1. 7-day mortality/weights
5. Glossary
The Optimum Broiler Development Guide is intended as a reference andsupplement to your own flock management skills so that you can apply yourknowledge and judgment to obtain consistently good results with the Cobbfamily of products.
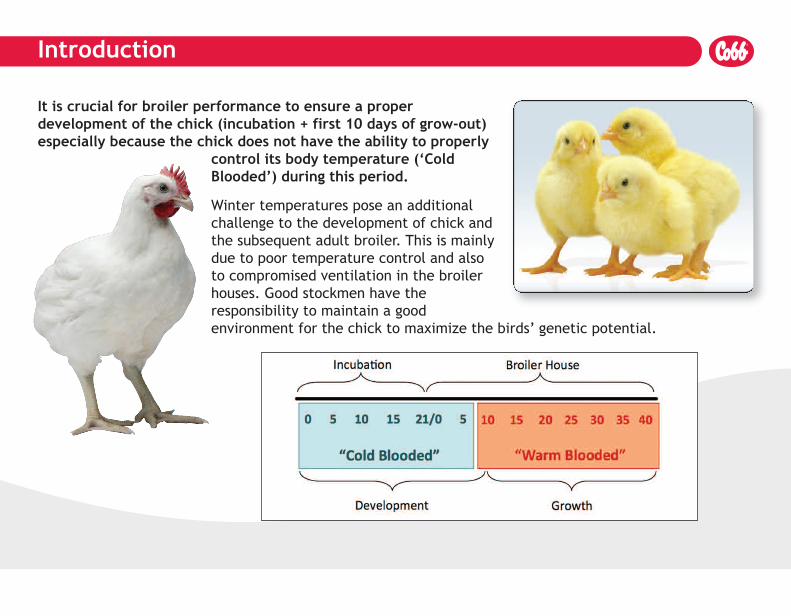
It is crucial for broiler performance to ensure a properdevelopment of the chick (incubation + first 10 days of grow-out)especially because the chick does not have the ability to properly
control its body temperature (‘ColdBlooded’) during this period.
Winter temperatures pose an additionalchallenge to the development of chick andthe subsequent adult broiler. This is mainlydue to poor temperature control and alsoto compromised ventilation in the broilerhouses. Good stockmen have theresponsibility to maintain a goodenvironment for the chick to maximize the birds’ genetic potential.
Introduction
Objectives
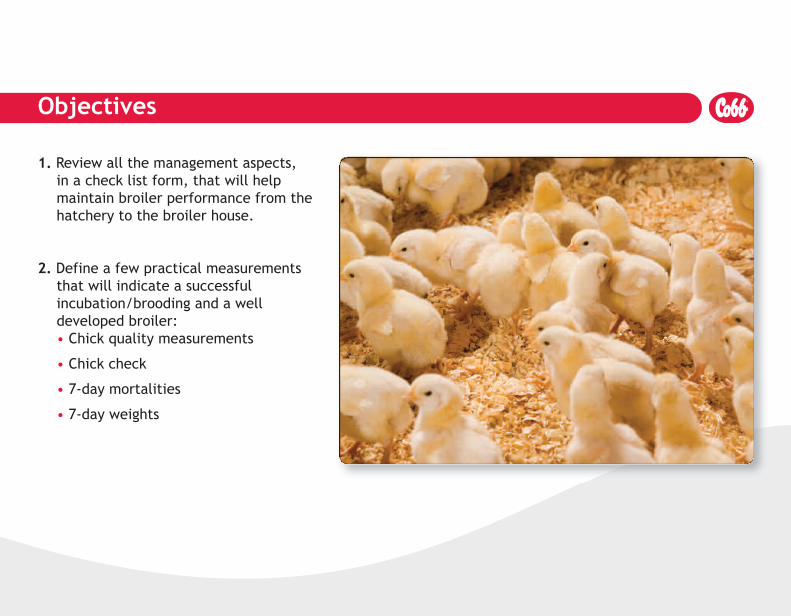
1. Review all the management aspects, in a check list form, that will help maintain broiler performance from the hatchery to the broiler house.
2. Define a few practical measurements that will indicate a successful incubation/brooding and a well developed broiler:• Chick quality measurements
• Chick check
• 7-day mortalities
• 7-day weights
1. Hatchery1.1. Why focus on incubation?
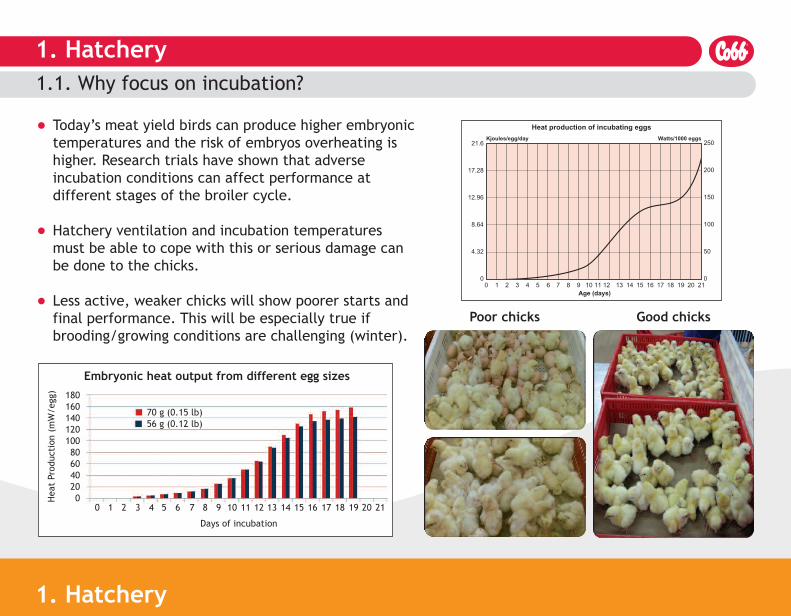
� Today’s meat yield birds can produce higher embryonictemperatures and the risk of embryos overheating ishigher. Research trials have shown that adverseincubation conditions can affect performance atdifferent stages of the broiler cycle.
� Hatchery ventilation and incubation temperaturesmust be able to cope with this or serious damage canbe done to the chicks.
� Less active, weaker chicks will show poorer starts andfinal performance. This will be especially true ifbrooding/growing conditions are challenging (winter).
1. Hatchery
Heat production of incubating eggs
Age (days)
21.6
17.28
12.96
8.64
4.32
0
250
200
150
100
50
00 1 2 3 4 5 6 7 8 9 10 11 12 13 14 15 16 17 18 19 20 21
Kjoules/egg/day Watts/1000 eggs
Poor chicks Good chicks
180160140120100806040200
Embryonic heat output from different egg sizes
Heat Production (mW/egg)
Days of incubation
0 1 2 3 4 5 6 7 8 9 10 11 12 13 14 15 16 17 18 19 20 21
70 g (0.15 lb)56 g (0.12 lb)
1. Hatchery1.2. How to establish good chick quality?
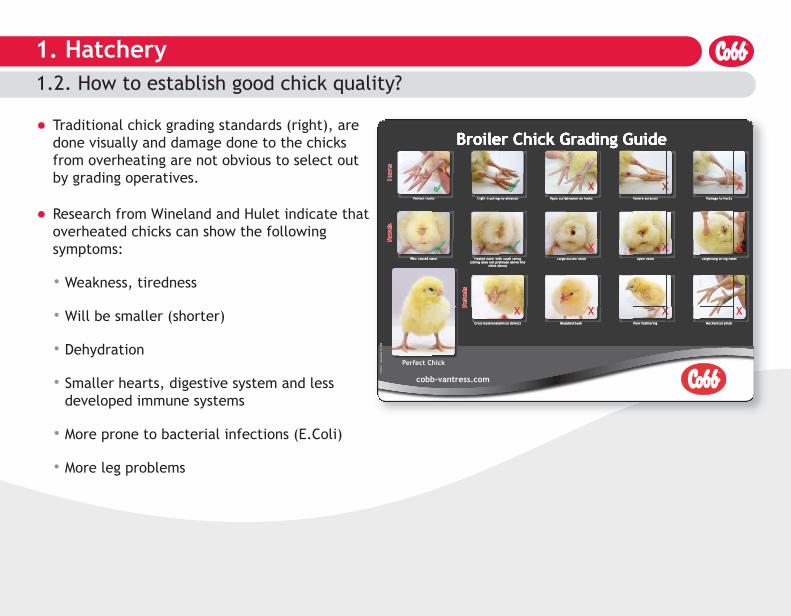
� Traditional chick grading standards (right), aredone visually and damage done to the chicksfrom overheating are not obvious to select outby grading operatives.
� Research from Wineland and Hulet indicate thatoverheated chicks can show the followingsymptoms:
• Weakness, tiredness
• Will be smaller (shorter)
• Dehydration
• Smaller hearts, digestive system and lessdeveloped immune systems
• More prone to bacterial infections (E.Coli)
• More leg problems
1. Hatchery1.21. How to establish good chick quality? – Cleanliness of hatch debris
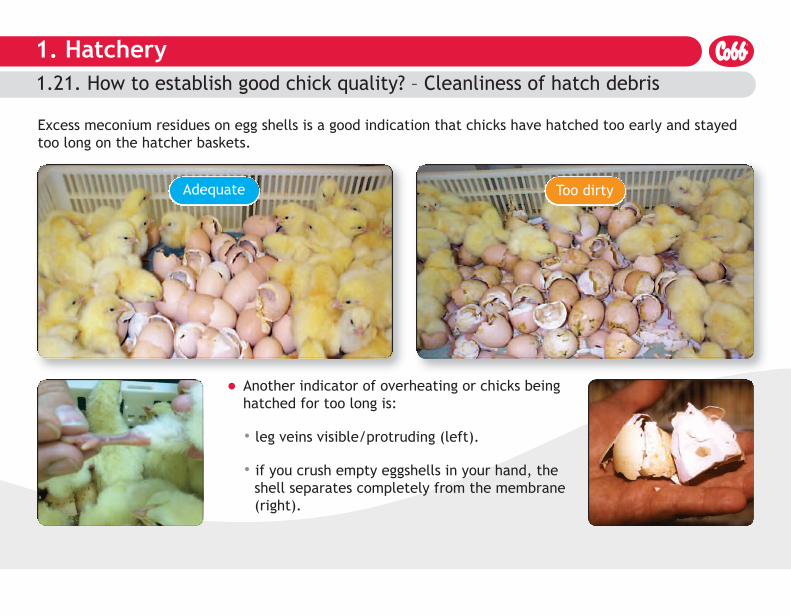
Excess meconium residues on egg shells is a good indication that chicks have hatched too early and stayedtoo long on the hatcher baskets.
Adequate Too dirty
� Another indicator of overheating or chicks beinghatched for too long is:
• leg veins visible/protruding (left).
• if you crush empty eggshells in your hand, the shell separates completely from the membrane (right).
1. Hatchery1.22. How to establish good chick quality? - Color and strength
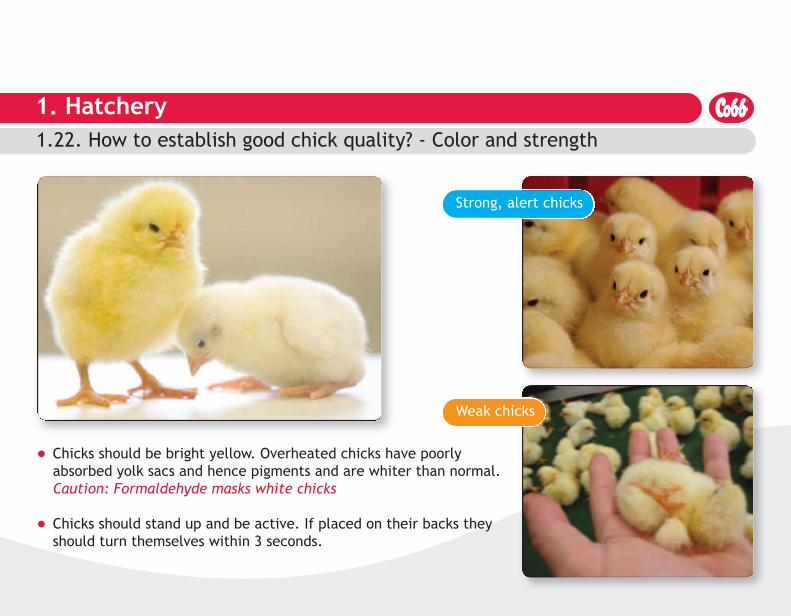
� Chicks should be bright yellow. Overheated chicks have poorly absorbed yolk sacs and hence pigments and are whiter than normal.Caution: Formaldehyde masks white chicks
� Chicks should stand up and be active. If placed on their backs they should turn themselves within 3 seconds.
Strong, alert chicks
Weak chicks

1. Hatchery1.23. How to establish good chick quality? - Feathering
� Good feather development is synonymous of good chick development during incubation (chicks must look fluffy!).
� However, excess development of the wing feathers does indicate early hatching (overheating) and excessive time in the hatcher baskets.
Well advanced (open), hatched too early
Correct development
1. Hatchery1.24. How to establish good chick quality? - Colibacillosis control
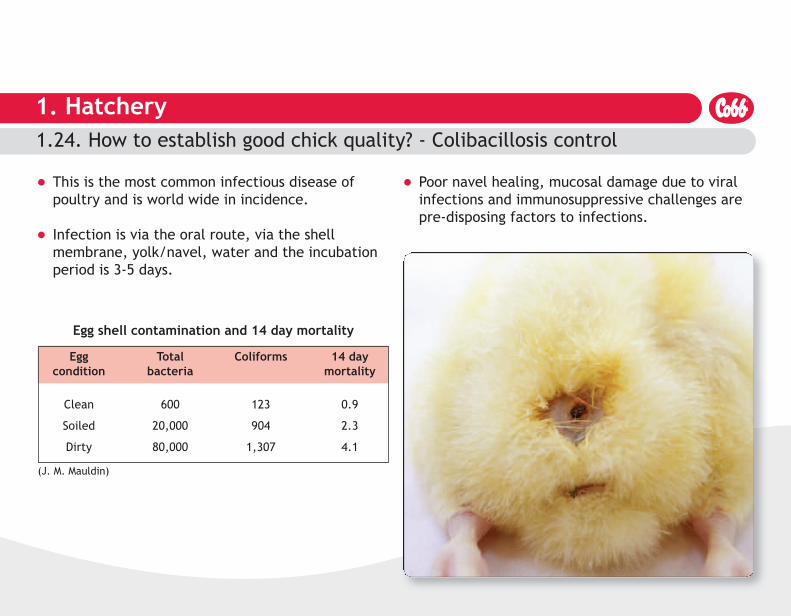
� This is the most common infectious disease of poultry and is world wide in incidence.
� Infection is via the oral route, via the shellmembrane, yolk/navel, water and the incubationperiod is 3-5 days.
� Poor navel healing, mucosal damage due to viralinfections and immunosuppressive challenges arepre-disposing factors to infections.
Egg shell contamination and 14 day mortality
Egg Total Coliforms 14 daycondition bacteria mortality
Clean 600 123 0.9
Soiled 20,000 904 2.3
Dirty 80,000 1,307 4.1
(J. M. Mauldin)
1. Hatchery1.24. How to establish good chick quality? - Colibacillosis control
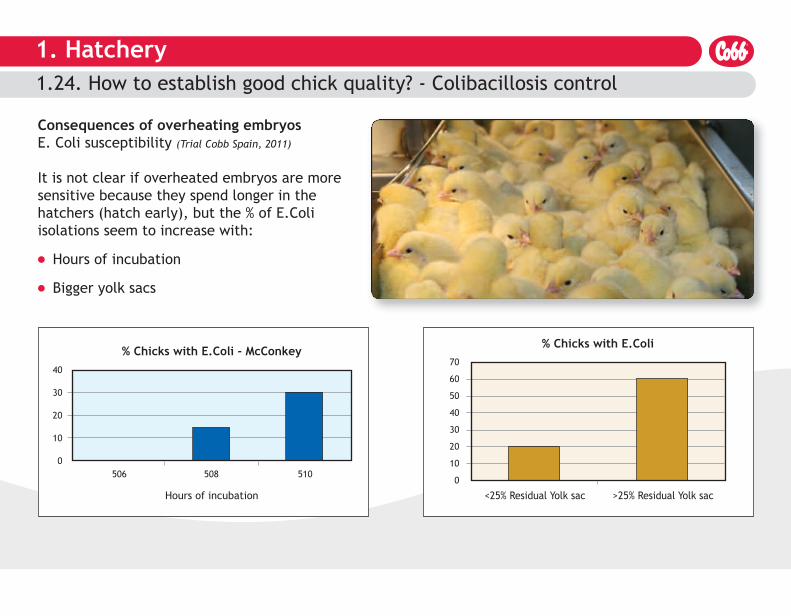
Consequences of overheating embryosE. Coli susceptibility (Trial Cobb Spain, 2011)
It is not clear if overheated embryos are moresensitive because they spend longer in thehatchers (hatch early), but the % of E.Coliisolations seem to increase with:
� Hours of incubation
� Bigger yolk sacs
40
30
20
10
0
70
60
50
40
30
20
10
0
Hours of incubation <25% Residual Yolk sac >25% Residual Yolk sac
% Chicks with E.Coli - McConkey% Chicks with E.Coli
506 508 510
1. Hatchery1.24. How to establish good chick quality? - Colibacillosis control
� Treatment is by antibiotic treatment and the type of product used depends on resistance of the bacteria isolated.
� Contaminated hatch debris and chick fluff in the hatchery are major sources of bacterial infection.
� Prevention includes good hygiene of hatching eggs and good hygiene in the hatchery.
� Good hygiene on the farm at depletion is also important because the bacteria are readily killed by disinfection.
� Water hygiene is also potentially important and chlorine at 3 ppm is a good option (water ph dependant (ph <7)).
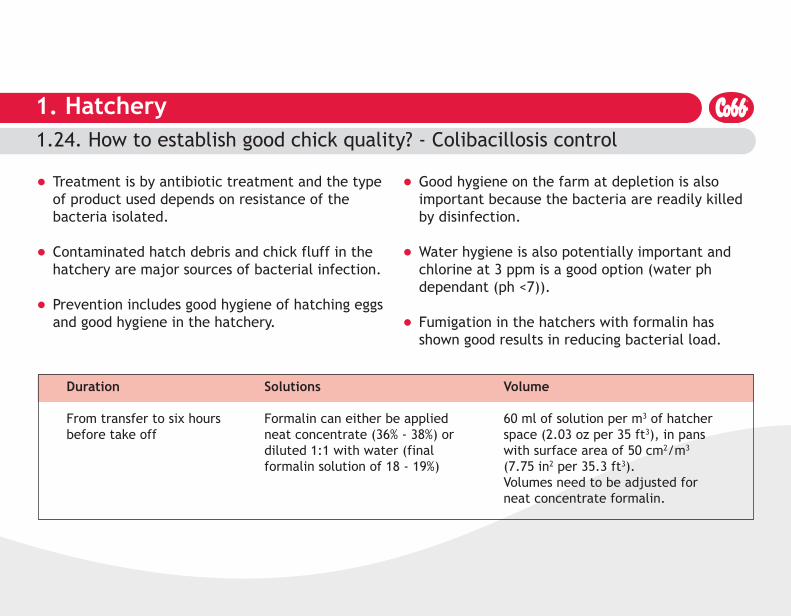
� Fumigation in the hatchers with formalin has shown good results in reducing bacterial load.
Duration
From transfer to six hoursbefore take off
Solutions
Formalin can either be appliedneat concentrate (36% - 38%) ordiluted 1:1 with water (finalformalin solution of 18 - 19%)
Volume
60 ml of solution per m3 of hatcherspace (2.03 oz per 35 ft3), in panswith surface area of 50 cm2/m3
(7.75 in2 per 35.3 ft3).Volumes need to be adjusted forneat concentrate formalin.

1. Hatchery1.3. What to measure? – Embryo temperatures
� Embryo temperatures - can be measuredaccurately by taking egg shell temperatures,on fertile eggs at the egg’s equator with athermoscan thermometer between 16 and 18days of incubation.
This will highlight how uniform thetemperature is inside the incubator andlocate any adverse ‘hot’ or ‘cold’ spots, asseen in the contour graph below.
Infertile eggs must not be measured as theyhave 0.5 -1.7°C (2 - 3°F) lower egg shelltemperatures than fertile eggs.
No
No
Yes
Embryo Temp Qualification Consequences
36.7 - 37.7°C (98.1 - 99.9°F) Too cold Slow hatch
37.8 - 38.1°C (100.0 - 100.6°F) Optimum Good hatch andchick quality
38.1 - 39.2°C (100.6 - 102.6°F) Too warm Good hatch, poorerchick quality
39.2 - 40.0°C (102.6 - 104.0°F) Too hot Poor hatch andchick quality
Measuringzone[
Contour graph showing variance of egg shell temperaturesin a multi-stage incubator between tray positions
Top
Middle
Bottom
37.78 - 38.89°C(100 - 102°F)
38.89 - 40°C(102 - 104°F)
40 - 41.11°C(104 - 106°F)
1 2 3 4 5 6 7 8 9 10 11 12
1. Hatchery1.3. What to measure? – Embryo temperatures
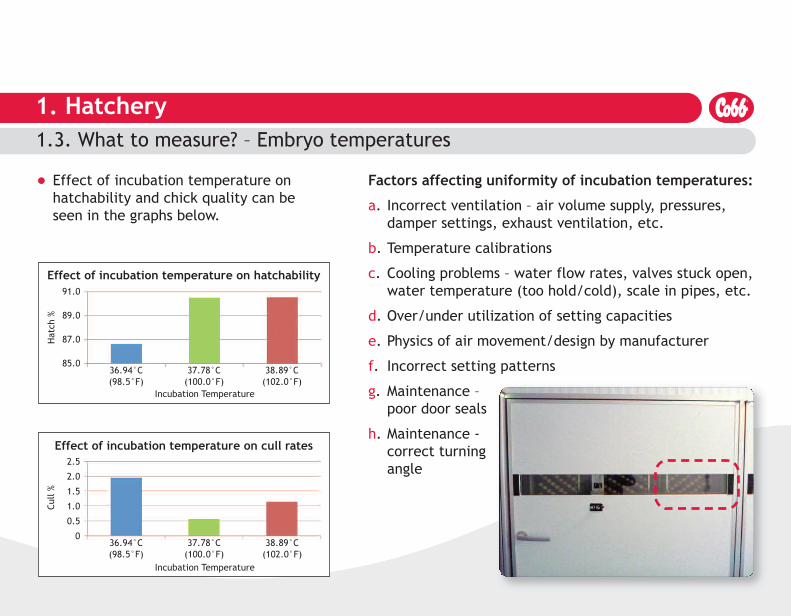
� Effect of incubation temperature onhatchability and chick quality can beseen in the graphs below.
Factors affecting uniformity of incubation temperatures:
a. Incorrect ventilation – air volume supply, pressures, damper settings, exhaust ventilation, etc.
b. Temperature calibrations
c. Cooling problems – water flow rates, valves stuck open,water temperature (too hold/cold), scale in pipes, etc.
d. Over/under utilization of setting capacities
e. Physics of air movement/design by manufacturer
f. Incorrect setting patterns
g. Maintenance – poor door seals
h. Maintenance - correct turning angle
91.0
89.0
87.0
85.0
Effect of incubation temperature on hatchability
Hatch %
Incubation Temperature
36.94°C(98.5°F)
37.78°C(100.0°F)
38.89°C(102.0°F)
Effect of incubation temperature on cull rates2.5
2.0
1.5
1.0
0.5
0
Cull %
Incubation Temperature
36.94°C(98.5°F)
37.78°C(100.0°F)
38.89°C(102.0°F)
1. Hatchery1.31. What to measure? - Hatch window
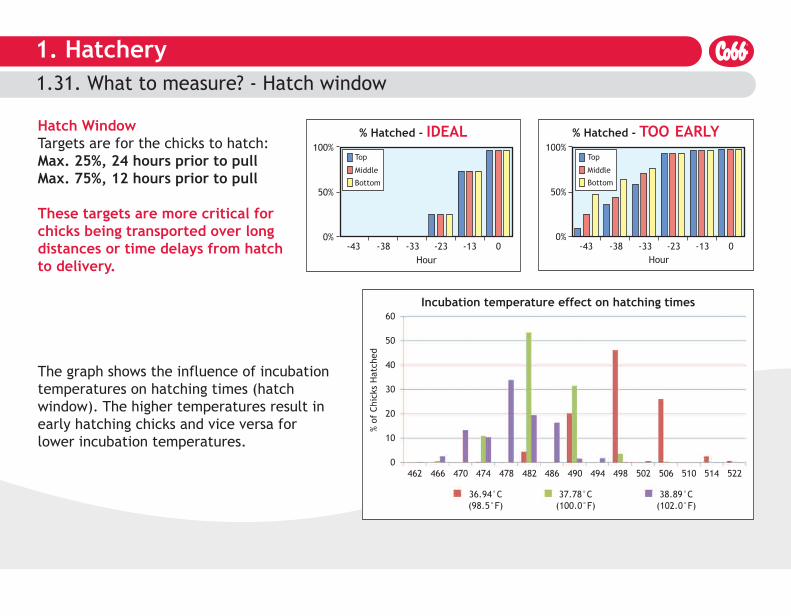
Hatch WindowTargets are for the chicks to hatch:Max. 25%, 24 hours prior to pull Max. 75%, 12 hours prior to pull
These targets are more critical for chicks being transported over longdistances or time delays from hatchto delivery.
The graph shows the influence of incubationtemperatures on hatching times (hatchwindow). The higher temperatures result inearly hatching chicks and vice versa forlower incubation temperatures.
% Hatched - IDEAL100%
50%
0%-43 -38 -33 -23 -13 0
Hour
Top
Middle
Bottom
% Hatched - TOO EARLY100%
50%
0%-43 -38 -33 -23 -13 0
Hour
Top
Middle
Bottom
60
50
40
30
20
10
0
Incubation temperature effect on hatching times
% of Chicks Hatched
462 466 470 474 478 482 486 490 494 498 502 506 510 514 522
36.94°C(98.5°F)
37.78°C(100.0°F)
38.89°C(102.0°F)
1. Hatchery1.31. What to measure? - Hatch window
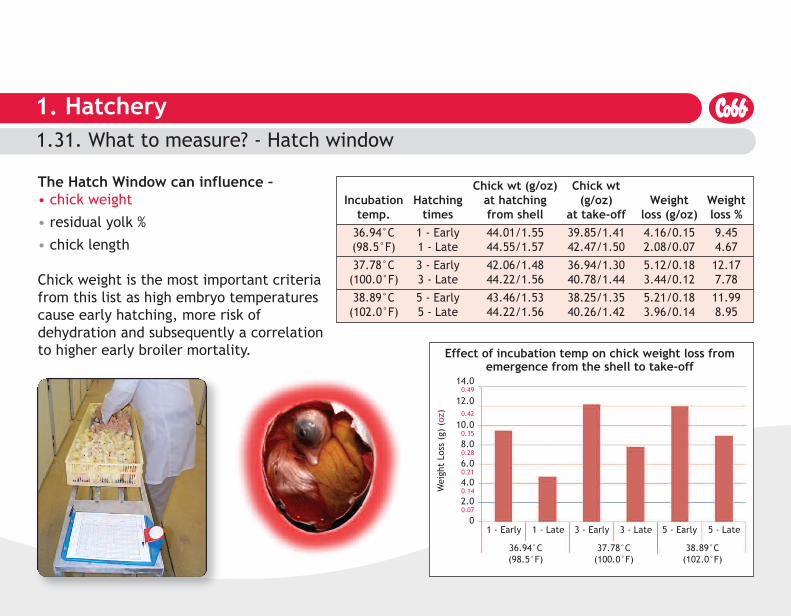
The Hatch Window can influence –• chick weight
• residual yolk %
• chick length
Chick weight is the most important criteriafrom this list as high embryo temperaturescause early hatching, more risk ofdehydration and subsequently a correlationto higher early broiler mortality. Effect of incubation temp on chick weight loss from
emergence from the shell to take-off14.00.49
12.00.42
10.00.35
8.00.28
6.00.21
4.00.14
2.00.07
0
Weight Loss (g) (oz)
36.94°C(98.5°F)
1 - Early 1 - Late 3 - Early 3 - Late 5 - Early 5 - Late
37.78°C(100.0°F)
38.89°C(102.0°F)
Chick wt (g/oz) Chick wtIncubation Hatching at hatching (g/oz) Weight Weighttemp. times from shell at take-off loss (g/oz) loss %36.94°C 1 - Early 44.01/1.55 39.85/1.41 4.16/0.15 9.45(98.5°F) 1 - Late 44.55/1.57 42.47/1.50 2.08/0.07 4.67
37.78°C 3 - Early 42.06/1.48 36.94/1.30 5.12/0.18 12.17(100.0°F) 3 - Late 44.22/1.56 40.78/1.44 3.44/0.12 7.78
38.89°C 5 - Early 43.46/1.53 38.25/1.35 5.21/0.18 11.99(102.0°F) 5 - Late 44.22/1.56 40.26/1.42 3.96/0.14 8.95
1. Hatchery1.32. What to measure? - Chick yield %
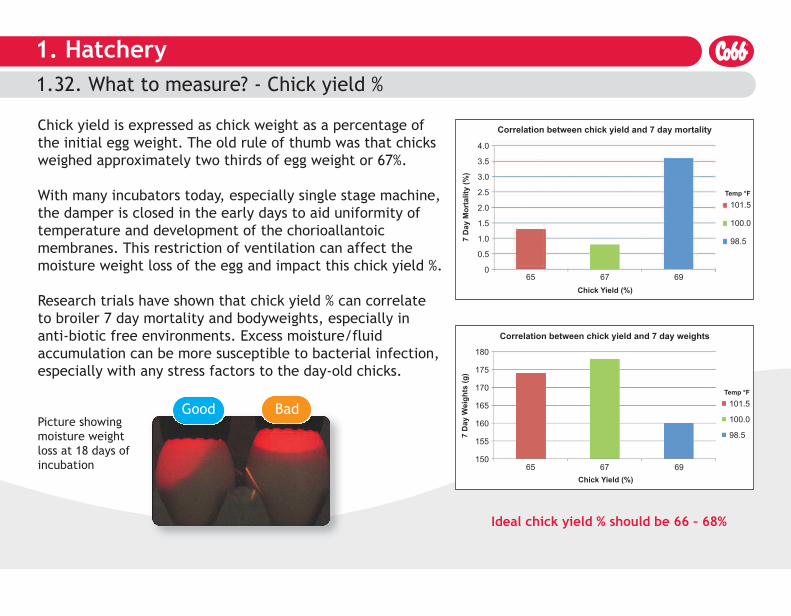
Chick yield is expressed as chick weight as a percentage ofthe initial egg weight. The old rule of thumb was that chicksweighed approximately two thirds of egg weight or 67%.
With many incubators today, especially single stage machine,the damper is closed in the early days to aid uniformity oftemperature and development of the chorioallantoicmembranes. This restriction of ventilation can affect themoisture weight loss of the egg and impact this chick yield %.
Research trials have shown that chick yield % can correlateto broiler 7 day mortality and bodyweights, especially inanti-biotic free environments. Excess moisture/fluidaccumulation can be more susceptible to bacterial infection,especially with any stress factors to the day-old chicks.
Ideal chick yield % should be 66 – 68%
Picture showingmoisture weightloss at 18 days ofincubation
Good Bad
Correlation between chick yield and 7 day mortality
7 D
ay M
orta
lity
(%)
Chick Yield (%)
Correlation between chick yield and 7 day weights
7 D
ay W
eigh
ts (g
)
4.0
3.5
3.0
2.5
2.0
1.5
1.0
0.5
0
101.5
100.0
98.5
65 67 69
180
175
170
165
160
155
150
101.5
100.0
98.5
Chick Yield (%)65 67 69
Temp °F
Temp °F
1. Hatchery1.33. What to measure? - Cloaca temperatures
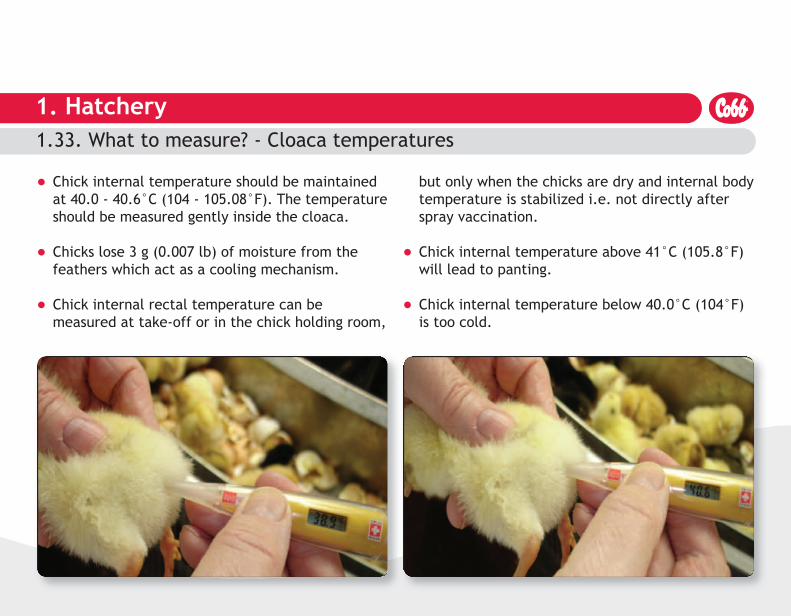
� Chick internal temperature should be maintained at 40.0 - 40.6°C (104 - 105.08°F). The temperatureshould be measured gently inside the cloaca.
� Chicks lose 3 g (0.007 lb) of moisture from the feathers which act as a cooling mechanism.
� Chick internal rectal temperature can be measured at take-off or in the chick holding room,
but only when the chicks are dry and internal bodytemperature is stabilized i.e. not directly after spray vaccination.
� Chick internal temperature above 41°C (105.8°F) will lead to panting.
� Chick internal temperature below 40.0°C (104°F) is too cold.
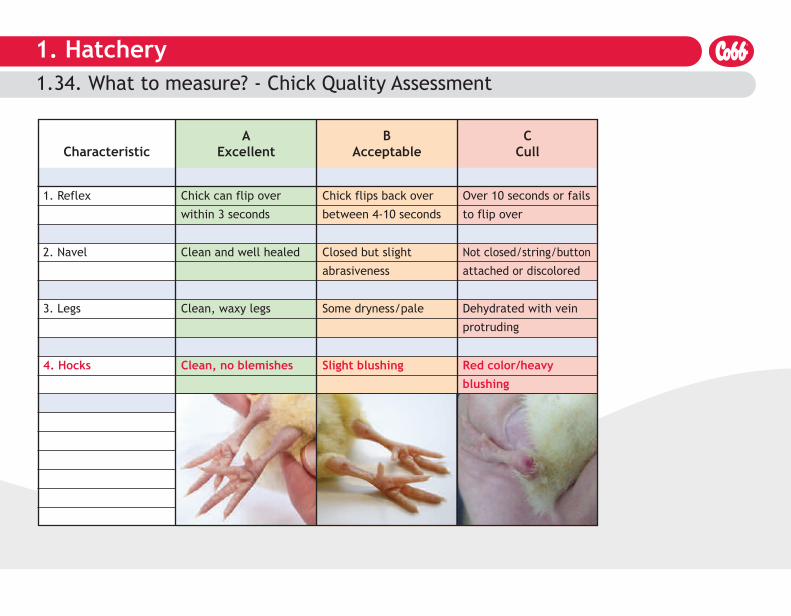
1. Hatchery1.34. What to measure? - Chick Quality Assessment
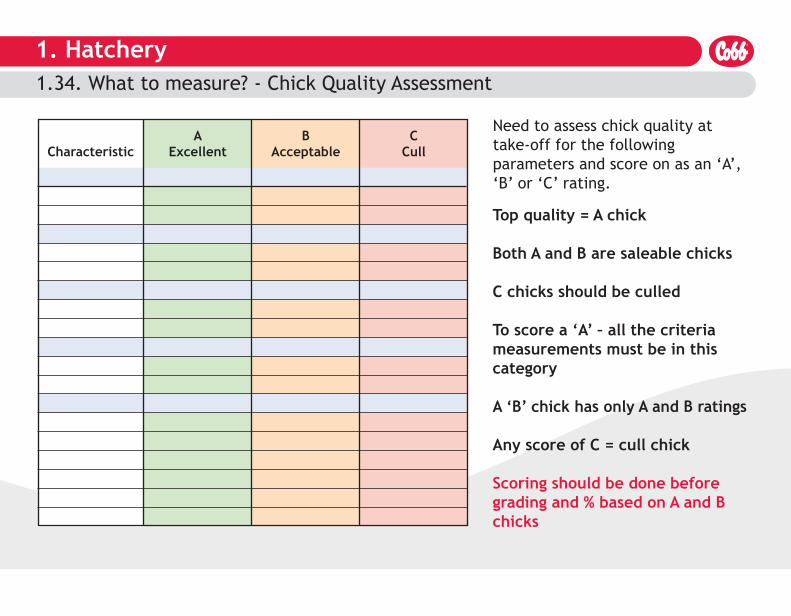
Need to assess chick quality attake-off for the followingparameters and score on as an ‘A’,‘B’ or ‘C’ rating.
Top quality = A chick
Both A and B are saleable chicks
C chicks should be culled
To score a ‘A’ – all the criteriameasurements must be in thiscategory
A ‘B’ chick has only A and B ratings
Any score of C = cull chick
Scoring should be done beforegrading and % based on A and Bchicks
AExcellent
BAcceptable
CCullCharacteristic
1. Hatchery1.34. What to measure? - Chick Quality Assessment
AExcellent
BAcceptable
CCullCharacteristic
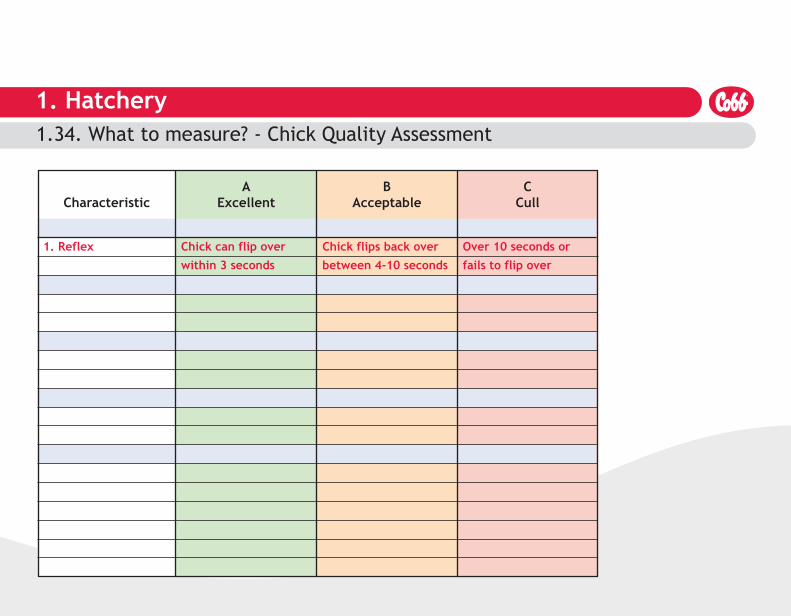
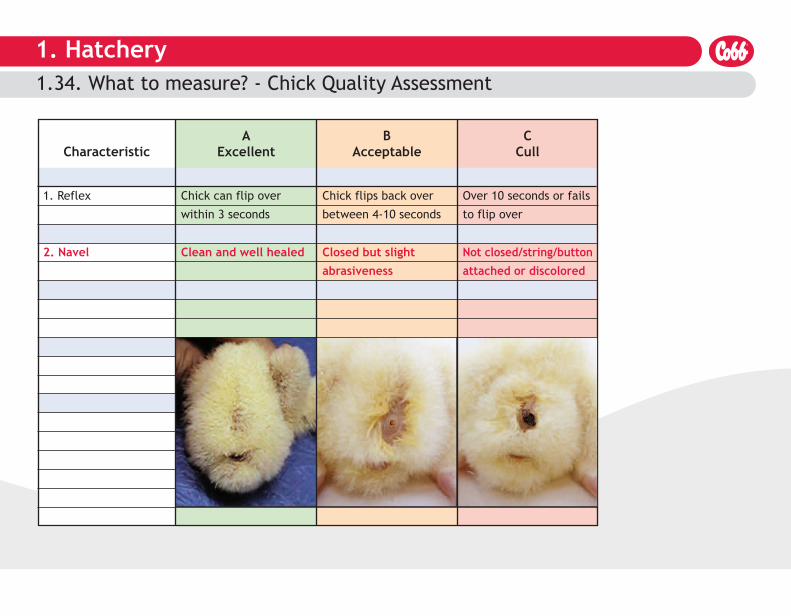
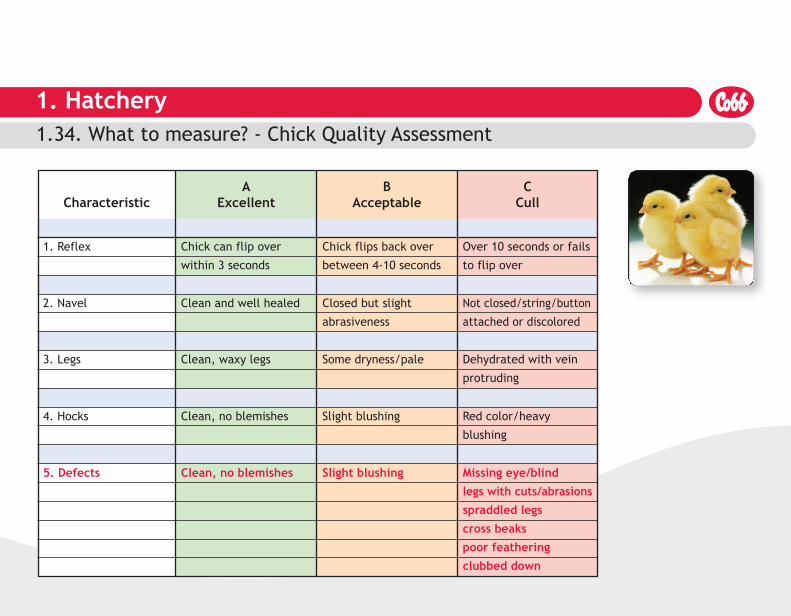
1. Reflex Chick can flip overwithin 3 seconds
Chick flips back overbetween 4-10 seconds
Over 10 seconds orfails to flip over
1. Hatchery1.34. What to measure? - Chick Quality Assessment
AExcellent
BAcceptable
CCullCharacteristic
1. Reflex Chick can flip over
within 3 seconds
Chick flips back over
between 4-10 seconds
Over 10 seconds or fails
to flip over
2. Navel Clean and well healed Not closed/string/buttonattached or discolored
Closed but slightabrasiveness
1. Hatchery1.34. What to measure? - Chick Quality Assessment
AExcellent
BAcceptable
CCullCharacteristic
1. Reflex Chick can flip over
within 3 seconds
Chick flips back over
between 4-10 seconds
Over 10 seconds or fails
to flip over
2. Navel Clean and well healed Closed but slight
abrasiveness
Not closed/string/button
attached or discolored
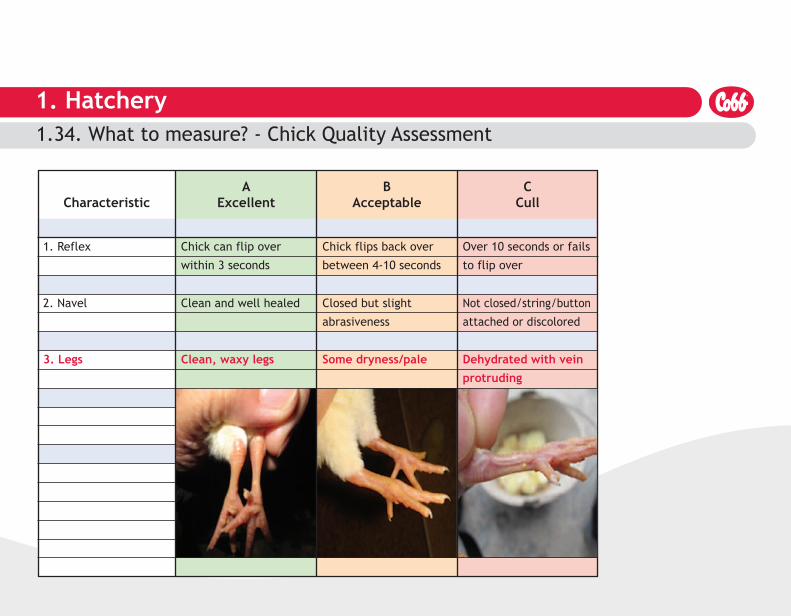
3. Legs Clean, waxy legs Some dryness/pale Dehydrated with veinprotruding
1. Hatchery1.34. What to measure? - Chick Quality Assessment
AExcellent
BAcceptable
CCullCharacteristic
1. Reflex Chick can flip over
within 3 seconds
Chick flips back over
between 4-10 seconds
Over 10 seconds or fails
to flip over
2. Navel Clean and well healed Closed but slight
abrasiveness
Not closed/string/button
attached or discolored
3. Legs Clean, waxy legs Some dryness/pale Dehydrated with vein
protruding
4. Hocks Clean, no blemishes Slight blushing Red color/heavyblushing
1. Hatchery1.34. What to measure? - Chick Quality Assessment
AExcellent
BAcceptable
CCullCharacteristic
1. Reflex Chick can flip over
within 3 seconds
Chick flips back over
between 4-10 seconds
Over 10 seconds or fails
to flip over
2. Navel Clean and well healed Closed but slight
abrasiveness
Not closed/string/button
attached or discolored
3. Legs Clean, waxy legs Some dryness/pale Dehydrated with vein
protruding
4. Hocks Clean, no blemishes Slight blushing Red color/heavy
blushing
5. Defects Clean, no blemishes Slight blushing Missing eye/blindlegs with cuts/abrasionsspraddled legscross beakspoor featheringclubbed down
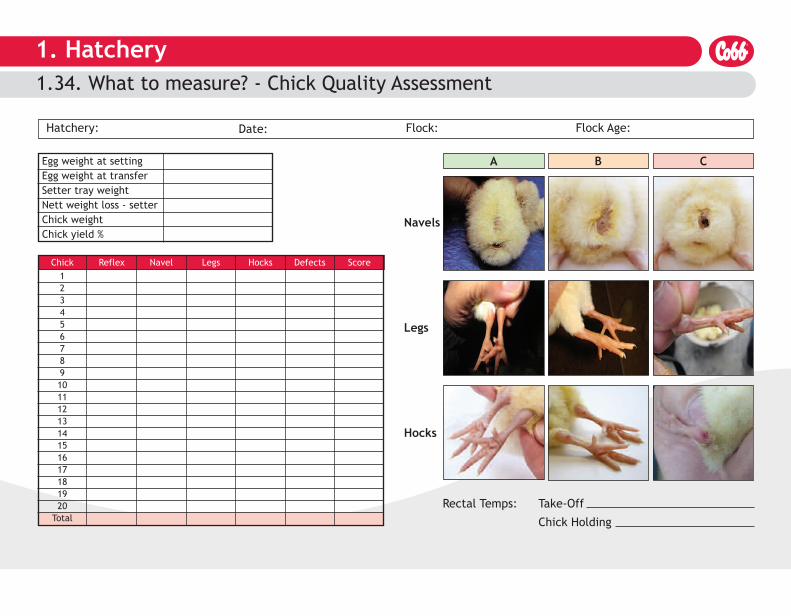
1. Hatchery1.34. What to measure? - Chick Quality Assessment
Hatchery: Date: Flock: Flock Age:
Rectal Temps: Take-Off
Chick Holding
Navels
Legs
Hocks
Egg weight at settingEgg weight at transferSetter tray weightNett weight loss - setterChick weightChick yield %
A B C
ScoreDefectsHocksLegsNavelReflexChick1234567891011121314151617181920Total
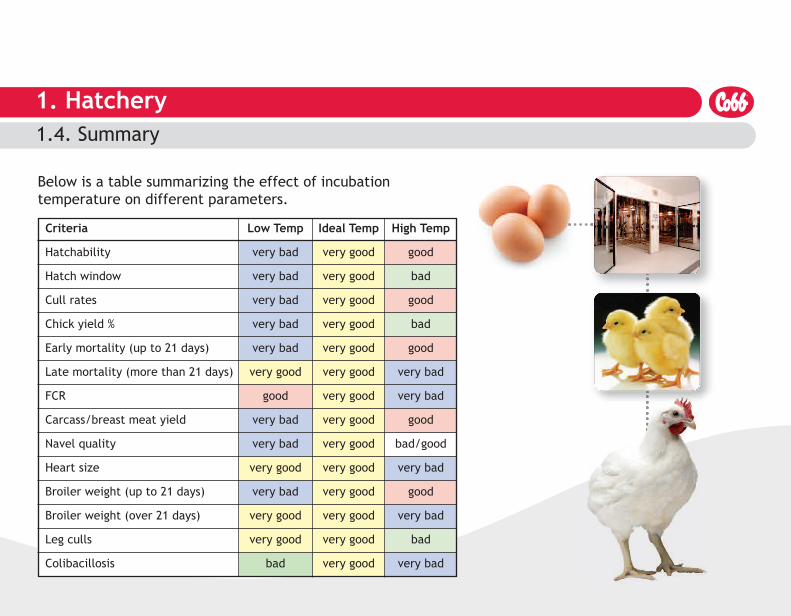
1. Hatchery1.4 . Summary
Below is a table summarizing the effect of incubationtemperature on different parameters.
Criteria Low Temp Ideal Temp High Temp
Hatchability very bad very good good
Hatch window very bad very good bad
Cull rates very bad very good good
Chick yield % very bad very good bad
Early mortality (up to 21 days) very bad very good good
Late mortality (more than 21 days) very good very good very bad
FCR good very good very bad
Carcass/breast meat yield very bad very good good
Navel quality very bad very good bad/good
Heart size very good very good very bad
Broiler weight (up to 21 days) very bad very good good
Broiler weight (over 21 days) very good very good very bad
Leg culls very good very good bad
Colibacillosis bad very good very bad
2.1. Chick holding
2. Chick transport
2. Chick transport
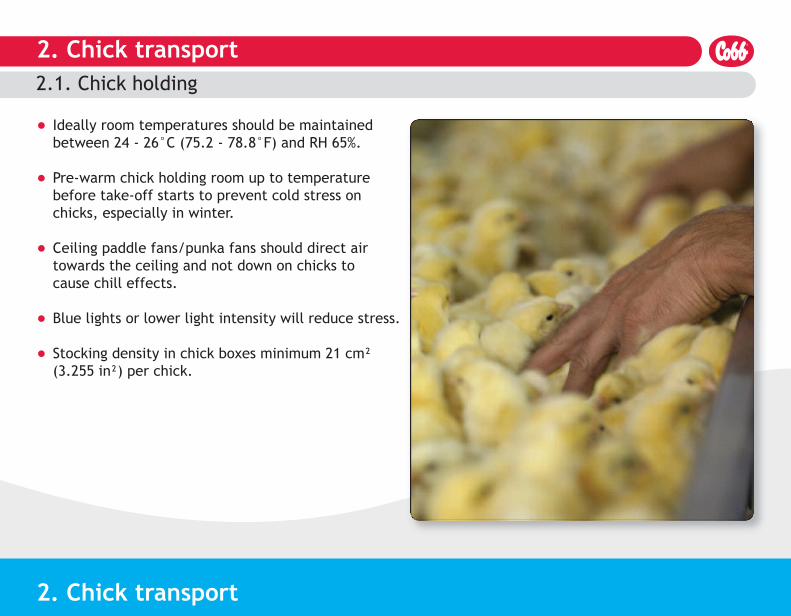
� Ideally room temperatures should be maintained between 24 - 26°C (75.2 - 78.8°F) and RH 65%.
� Pre-warm chick holding room up to temperature before take-off starts to prevent cold stress on chicks, especially in winter.
� Ceiling paddle fans/punka fans should direct air towards the ceiling and not down on chicks to cause chill effects.
� Blue lights or lower light intensity will reduce stress.
� Stocking density in chick boxes minimum 21 cm² (3.255 in²) per chick.
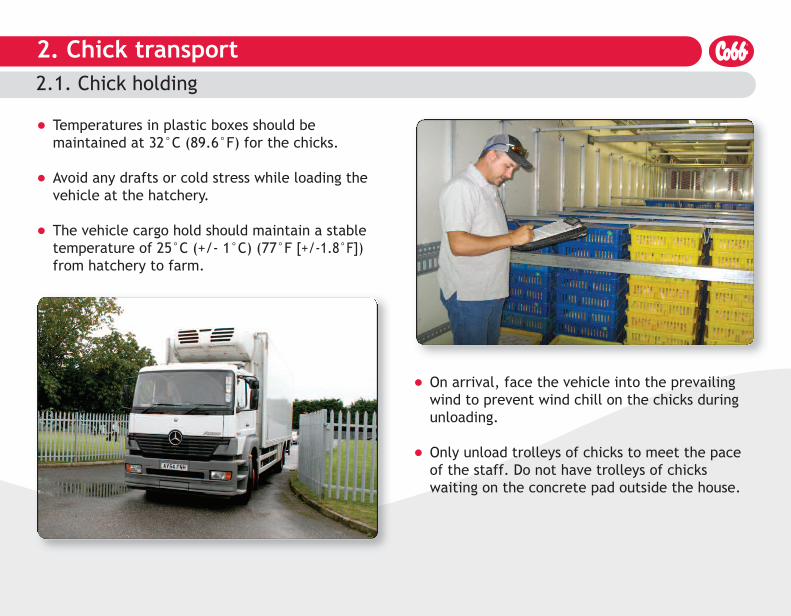
� Temperatures in plastic boxes should be maintained at 32°C (89.6°F) for the chicks.
� Avoid any drafts or cold stress while loading the vehicle at the hatchery.
� The vehicle cargo hold should maintain a stable temperature of 25°C (+/- 1°C) (77°F [+/-1.8°F])from hatchery to farm.
� On arrival, face the vehicle into the prevailing wind to prevent wind chill on the chicks during unloading.
� Only unload trolleys of chicks to meet the pace of the staff. Do not have trolleys of chicks waiting on the concrete pad outside the house.
2.1. Chick holding
2. Chick transport
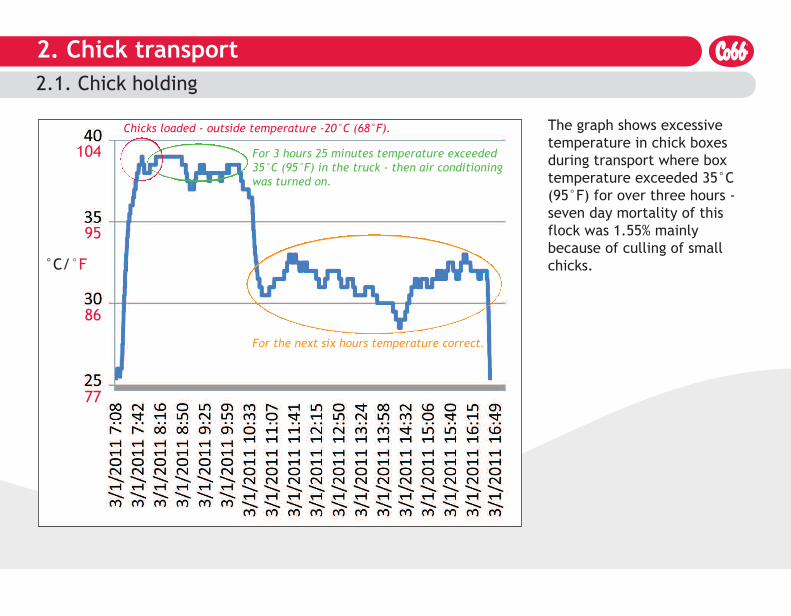
The graph shows excessivetemperature in chick boxesduring transport where boxtemperature exceeded 35°C(95°F) for over three hours -seven day mortality of thisflock was 1.55% mainlybecause of culling of smallchicks.°C/°F
Chicks loaded - outside temperature -20°C (68°F).
For the next six hours temperature correct.
For 3 hours 25 minutes temperature exceeded35°C (95°F) in the truck - then air conditioningwas turned on.
2.1. Chick holding
2. Chick transport
104
95
86
77
2. Chick transport
3. Brooding3.1. Ventilation
3. Brooding
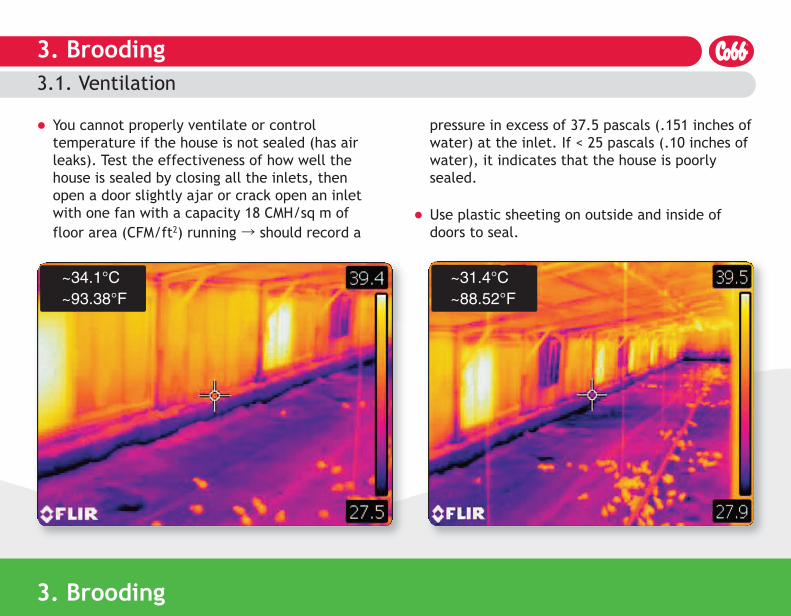
� You cannot properly ventilate or control temperature if the house is not sealed (has air leaks). Test the effectiveness of how well the house is sealed by closing all the inlets, then open a door slightly ajar or crack open an inlet with one fan with a capacity 18 CMH/sq m of floor area (CFM/ft2) running → should record a
pressure in excess of 37.5 pascals (.151 inches ofwater) at the inlet. If < 25 pascals (.10 inches of water), it indicates that the house is poorly sealed.
� Use plastic sheeting on outside and inside of doors to seal.
~34.1°C~93.38°F
~31.4°C~88.52°F
3. Brooding3.1. Ventilation
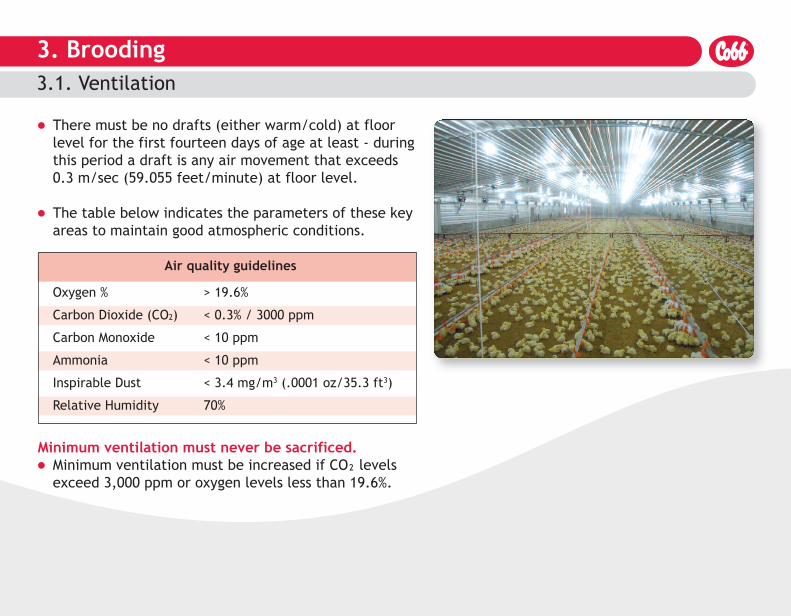
� There must be no drafts (either warm/cold) at floor level for the first fourteen days of age at least - duringthis period a draft is any air movement that exceeds 0.3 m/sec (59.055 feet/minute) at floor level.
� The table below indicates the parameters of these key areas to maintain good atmospheric conditions.
Air quality guidelines
Oxygen % > 19.6%
Carbon Dioxide (CO2) < 0.3% / 3000 ppm
Carbon Monoxide < 10 ppm
Ammonia < 10 ppm
Inspirable Dust < 3.4 mg/m3 (.0001 oz/35.3 ft3)
Relative Humidity 70%
Minimum ventilation must never be sacrificed.� Minimum ventilation must be increased if CO² levels exceed 3,000 ppm or oxygen levels less than 19.6%.
3. Brooding3.1. Ventilation
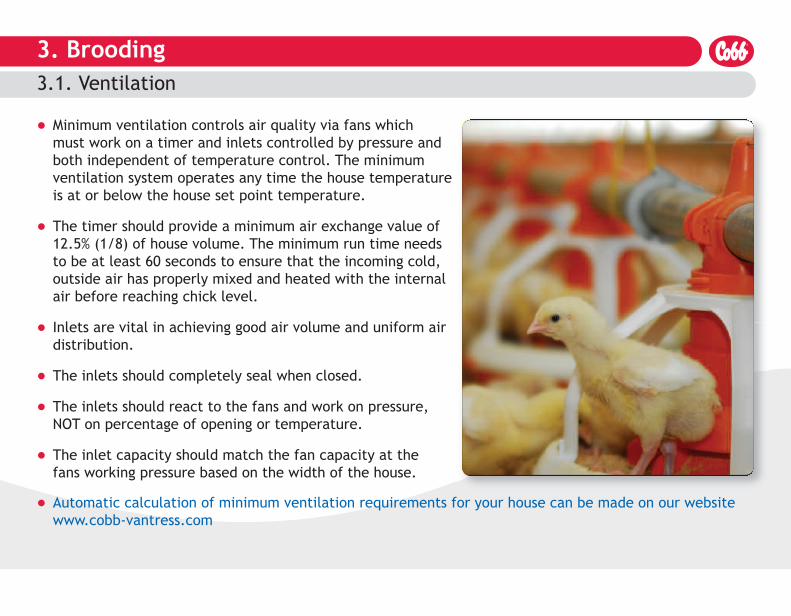
� Minimum ventilation controls air quality via fans which must work on a timer and inlets controlled by pressure and both independent of temperature control. The minimum ventilation system operates any time the house temperatureis at or below the house set point temperature.
� The timer should provide a minimum air exchange value of12.5% (1/8) of house volume. The minimum run time needs to be at least 60 seconds to ensure that the incoming cold, outside air has properly mixed and heated with the internal air before reaching chick level.
� Inlets are vital in achieving good air volume and uniform air distribution.
� The inlets should completely seal when closed.
� The inlets should react to the fans and work on pressure, NOT on percentage of opening or temperature.
� The inlet capacity should match the fan capacity at the fans working pressure based on the width of the house.
� Automatic calculation of minimum ventilation requirements for your house can be made on our websitewww.cobb-vantress.com
3. Brooding3.1. Ventilation
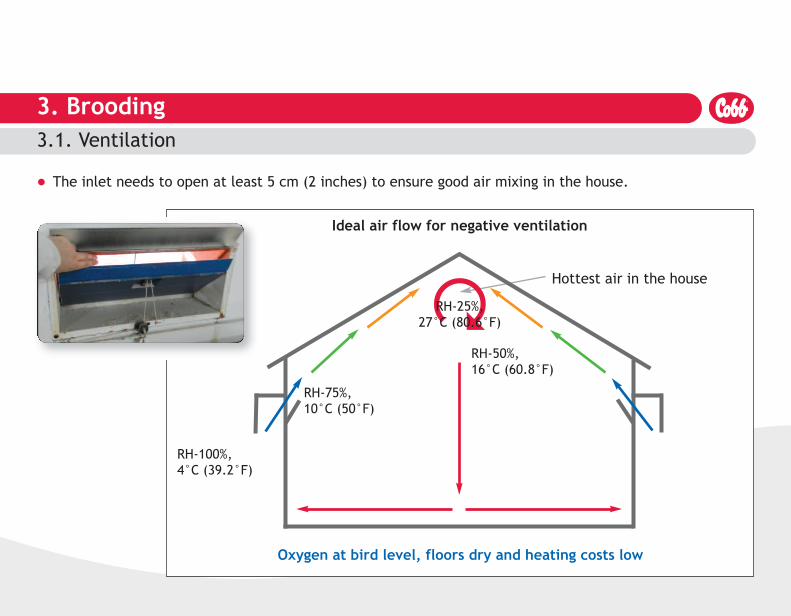
� The inlet needs to open at least 5 cm (2 inches) to ensure good air mixing in the house.
Oxygen at bird level, floors dry and heating costs low
Ideal air flow for negative ventilation
RH-50%,16°C (60.8°F)
RH-75%, 10°C (50°F)
RH-100%, 4°C (39.2°F)
Hottest air in the housePRH-25%,
27°C (80.6°F)
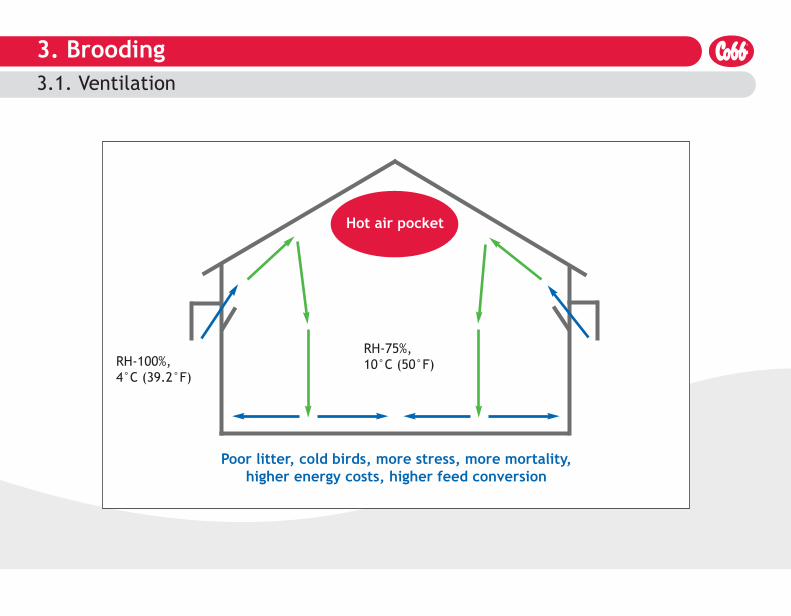
3. Brooding3.1. Ventilation
Poor litter, cold birds, more stress, more mortality, higher energy costs, higher feed conversion
RH-75%, 10°C (50°F)RH-100%,
4°C (39.2°F)
Hot air pocket
3. Brooding3.1. Ventilation
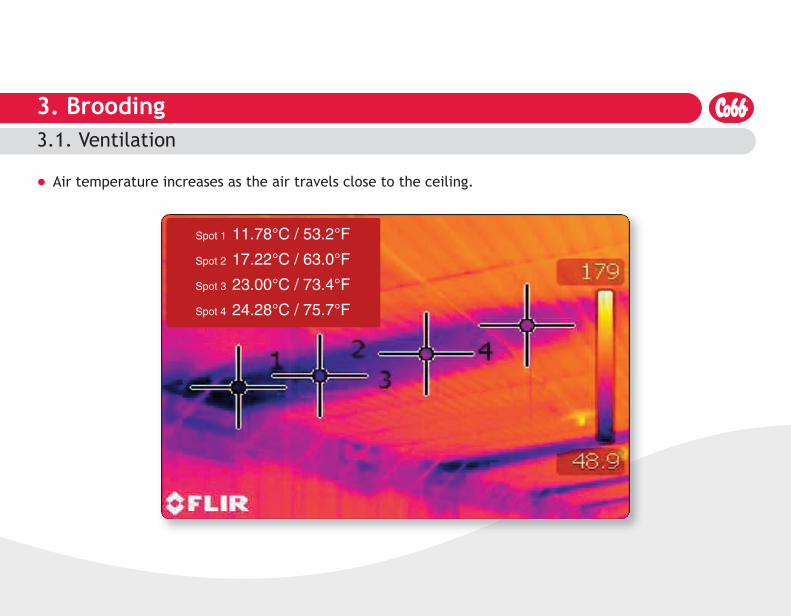
� Air temperature increases as the air travels close to the ceiling.
Spot 1 11.78°C / 53.2°F
Spot 2 17.22°C / 63.0°F
Spot 3 23.00°C / 73.4°F
Spot 4 24.28°C / 75.7°F
3. Brooding3.1. Ventilation
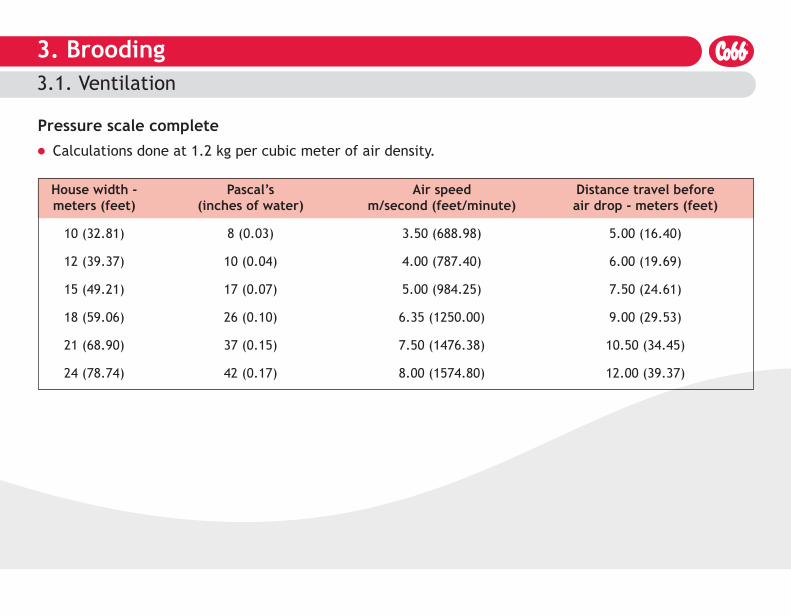
Pressure scale complete
House width - Pascal’s Air speed Distance travel before meters (feet) (inches of water) m/second (feet/minute) air drop - meters (feet)
10 (32.81) 8 (0.03) 3.50 (688.98) 5.00 (16.40)
12 (39.37) 10 (0.04) 4.00 (787.40) 6.00 (19.69)
15 (49.21) 17 (0.07) 5.00 (984.25) 7.50 (24.61)
18 (59.06) 26 (0.10) 6.35 (1250.00) 9.00 (29.53)
21 (68.90) 37 (0.15) 7.50 (1476.38) 10.50 (34.45)
24 (78.74) 42 (0.17) 8.00 (1574.80) 12.00 (39.37)
� Calculations done at 1.2 kg per cubic meter of air density.
3. Brooding3.2. Relative humidity
Controlling relative humidity
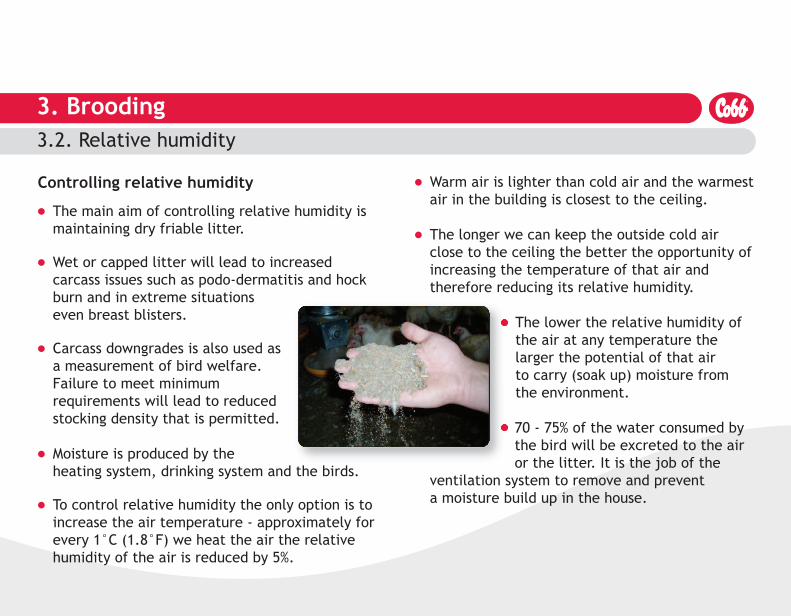
� The main aim of controlling relative humidity is maintaining dry friable litter.
� Wet or capped litter will lead to increased carcass issues such as podo-dermatitis and hock burn and in extreme situations even breast blisters.
� Carcass downgrades is also used as a measurement of bird welfare. Failure to meet minimum requirements will lead to reduced stocking density that is permitted.
� Moisture is produced by the heating system, drinking system and the birds.
� To control relative humidity the only option is to increase the air temperature - approximately forevery 1°C (1.8°F) we heat the air the relative humidity of the air is reduced by 5%.
� Warm air is lighter than cold air and the warmestair in the building is closest to the ceiling.
� The longer we can keep the outside cold air close to the ceiling the better the opportunity ofincreasing the temperature of that air and therefore reducing its relative humidity.
� The lower the relative humidity of the air at any temperature the larger the potential of that air to carry (soak up) moisture from the environment.
� 70 - 75% of the water consumed by the bird will be excreted to the air or the litter. It is the job of the
ventilation system to remove and prevent a moisture build up in the house.
3. Brooding3.2. Relative humidity
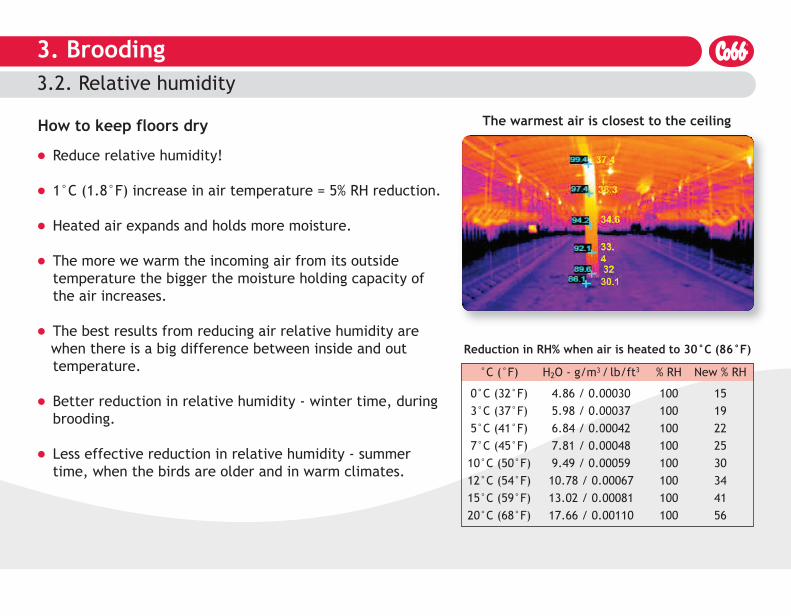
How to keep floors dry
� Reduce relative humidity!
� 1°C (1.8°F) increase in air temperature = 5% RH reduction.
� Heated air expands and holds more moisture.
� The more we warm the incoming air from its outside temperature the bigger the moisture holding capacity of the air increases.
� The best results from reducing air relative humidity arewhen there is a big difference between inside and outtemperature.
� Better reduction in relative humidity - winter time, during brooding.
� Less effective reduction in relative humidity - summer time, when the birds are older and in warm climates.
The warmest air is closest to the ceiling
Reduction in RH% when air is heated to 30°C (86°F)
°C (°F) H2O - g/m3/ lb/ft3 % RH New % RH
0°C (32°F) 4.86 / 0.00030 100 153°C (37°F) 5.98 / 0.00037 100 195°C (41°F) 6.84 / 0.00042 100 227°C (45°F) 7.81 / 0.00048 100 2510°C (50°F) 9.49 / 0.00059 100 3012°C (54°F) 10.78 / 0.00067 100 3415°C (59°F) 13.02 / 0.00081 100 4120°C (68°F) 17.66 / 0.00110 100 56
3. Brooding3.3. Temperature
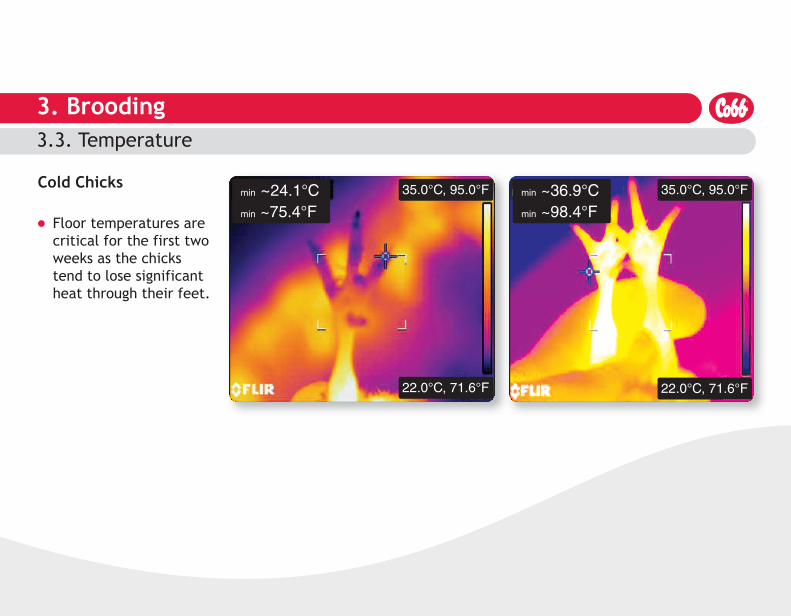
Cold Chicks
� Floor temperatures are critical for the first two weeks as the chicks tend to lose significant heat through their feet.
min ~24.1°Cmin ~75.4°F
35.0°C, 95.0°F 35.0°C, 95.0°F
22.0°C, 71.6°F 22.0°C, 71.6°F
min ~36.9°Cmin ~98.4°F
3. Brooding3.3. Temperature
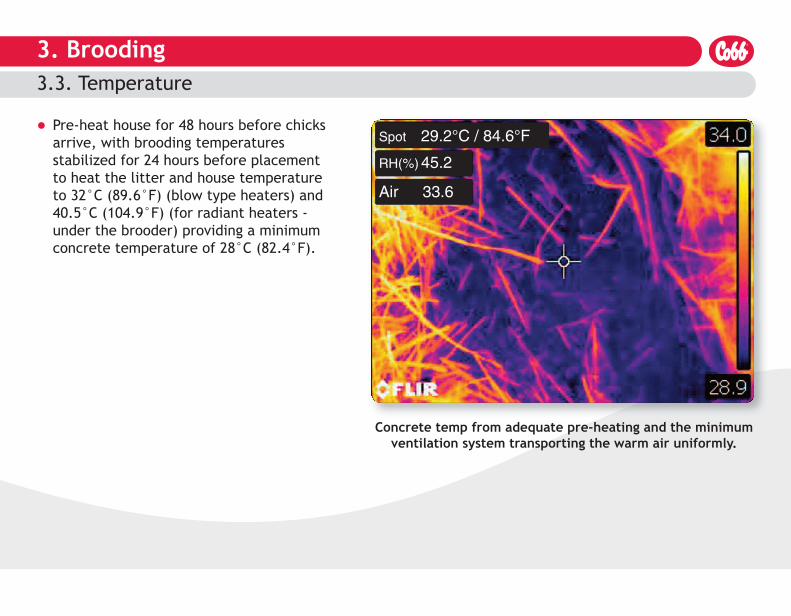
� Pre-heat house for 48 hours before chicks arrive, with brooding temperatures stabilized for 24 hours before placement to heat the litter and house temperature to 32°C (89.6°F) (blow type heaters) and 40.5°C (104.9°F) (for radiant heaters - under the brooder) providing a minimum concrete temperature of 28°C (82.4°F).
Concrete temp from adequate pre-heating and the minimumventilation system transporting the warm air uniformly.
Spot 29.2°C / 84.6°F
RH(%) 45.2
Air 33.6
3. Brooding3.3. Temperature
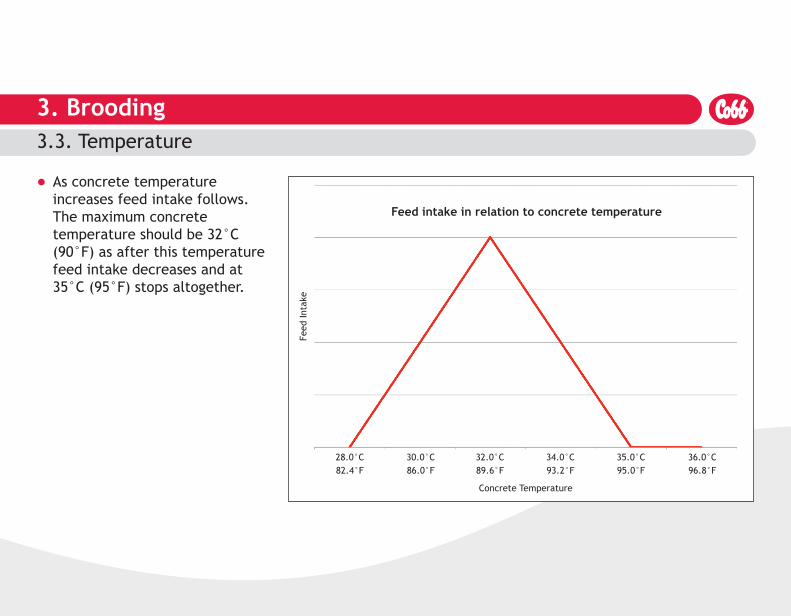
� As concrete temperature increases feed intake follows. The maximum concrete temperature should be 32°C (90°F) as after this temperature feed intake decreases and at 35°C (95°F) stops altogether.
Feed intake in relation to concrete temperature
Feed Intake
Concrete Temperature
82.4°F28.0°C
86.0°F30.0°C
89.6°F32.0°C
93.2°F34.0°C
95.0°F35.0°C
96.8°F36.0°C
3. Brooding3.3. Temperature
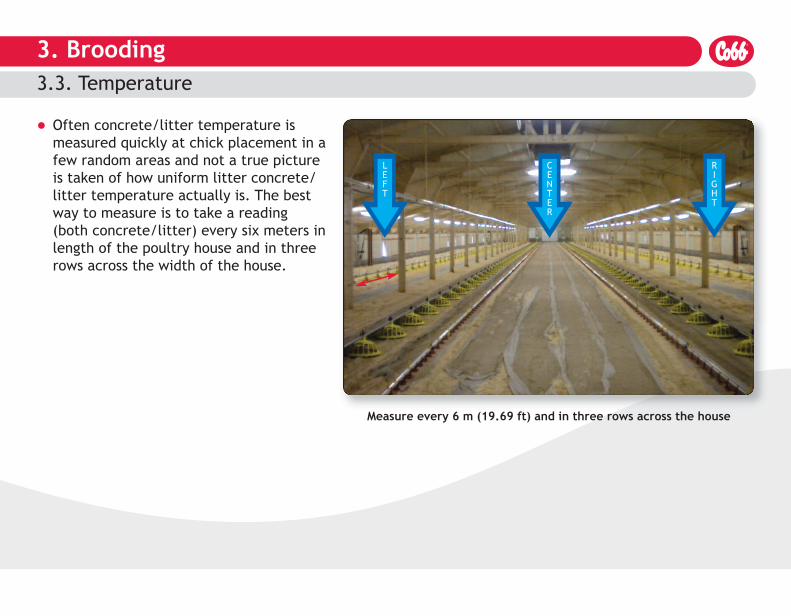
� Often concrete/litter temperature is measured quickly at chick placement in afew random areas and not a true picture is taken of how uniform litter concrete/ litter temperature actually is. The best way to measure is to take a reading (both concrete/litter) every six meters inlength of the poultry house and in three rows across the width of the house.
Measure every 6 m (19.69 ft) and in three rows across the house
CENTER
RIGHT
LEFT
3. Brooding3.3. Temperature
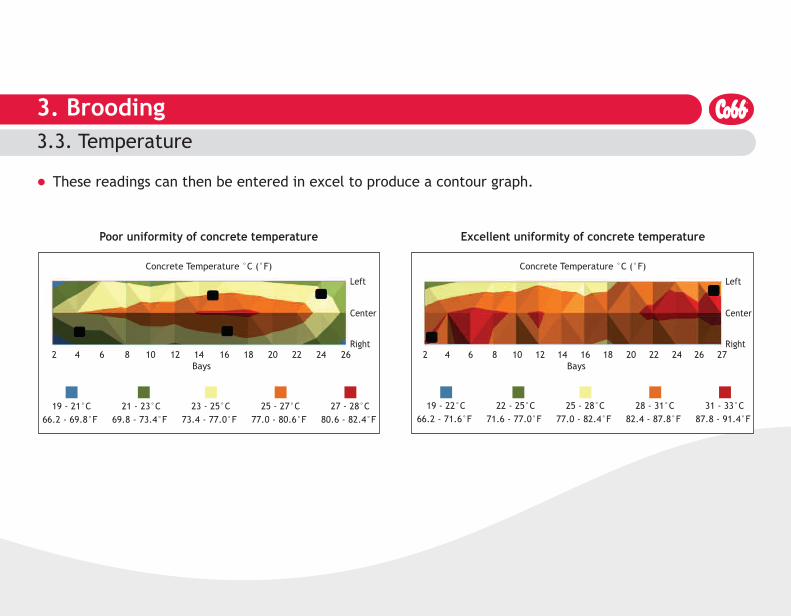
� These readings can then be entered in excel to produce a contour graph.
Poor uniformity of concrete temperature Excellent uniformity of concrete temperature
Left
Center
Concrete Temperature °C (°F) Concrete Temperature °C (°F)
Right
Left
Center
Right2 4 6 8 10 12 14 16 18 20 22 24 26
Bays
66.2 - 69.8°F19 - 21°C
69.8 - 73.4°F21 - 23°C
73.4 - 77.0°F23 - 25°C
77.0 - 80.6°F25 - 27°C
80.6 - 82.4°F27 - 28°C
66.2 - 71.6°F19 - 22°C
71.6 - 77.0°F22 - 25°C
77.0 - 82.4°F25 - 28°C
82.4 - 87.8°F28 - 31°C
87.8 - 91.4°F31 - 33°C
2 4 6 8 10 12 14 16 18 20 22 24 26 27Bays
3. Brooding3.3. Temperature
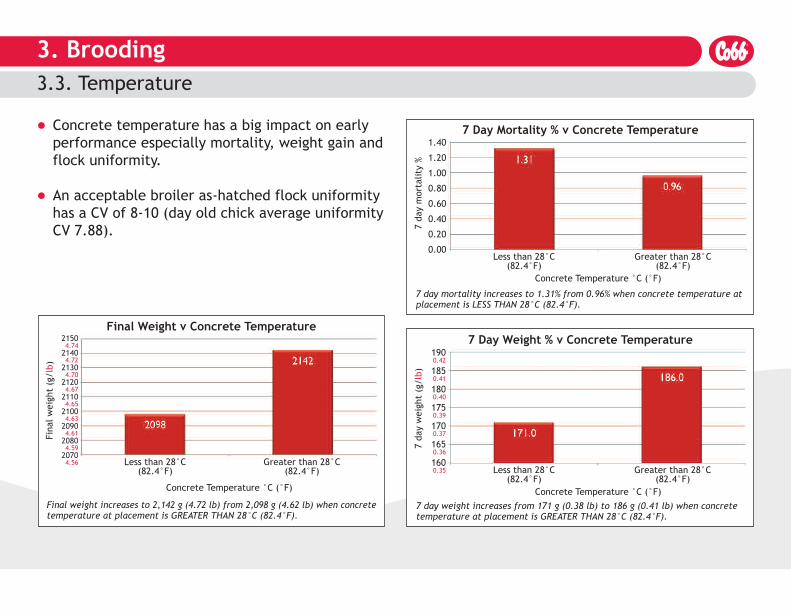
� Concrete temperature has a big impact on early performance especially mortality, weight gain andflock uniformity.
� An acceptable broiler as-hatched flock uniformity has a CV of 8-10 (day old chick average uniformityCV 7.88).
1.40
1.20
1.00
0.80
0.60
0.40
0.20
0.00
7 day mortality %
Less than 28°C(82.4°F)
Greater than 28°C(82.4°F)
Concrete Temperature °C (°F)
7 Day Mortality % v Concrete Temperature
1900.42
1850.41
1800.40
1750.39
1700.37
1650.36
1600.35
7 day weight (g/lb)
Less than 28°C(82.4°F)
Greater than 28°C(82.4°F)
Concrete Temperature °C (°F)
7 Day Weight % v Concrete Temperature21504.7421404.7221304.7021204.6721104.6521004.6320904.6120804.5920704.56
Final weight (g/lb)
Less than 28°C(82.4°F)
Greater than 28°C(82.4°F)
Concrete Temperature °C (°F)
7 day mortality increases to 1.31% from 0.96% when concrete temperature atplacement is LESS THAN 28°C (82.4°F).
7 day weight increases from 171 g (0.38 lb) to 186 g (0.41 lb) when concretetemperature at placement is GREATER THAN 28°C (82.4°F).
Final weight increases to 2,142 g (4.72 lb) from 2,098 g (4.62 lb) when concretetemperature at placement is GREATER THAN 28°C (82.4°F).
Final Weight v Concrete Temperature
3. Brooding3.3. Temperature
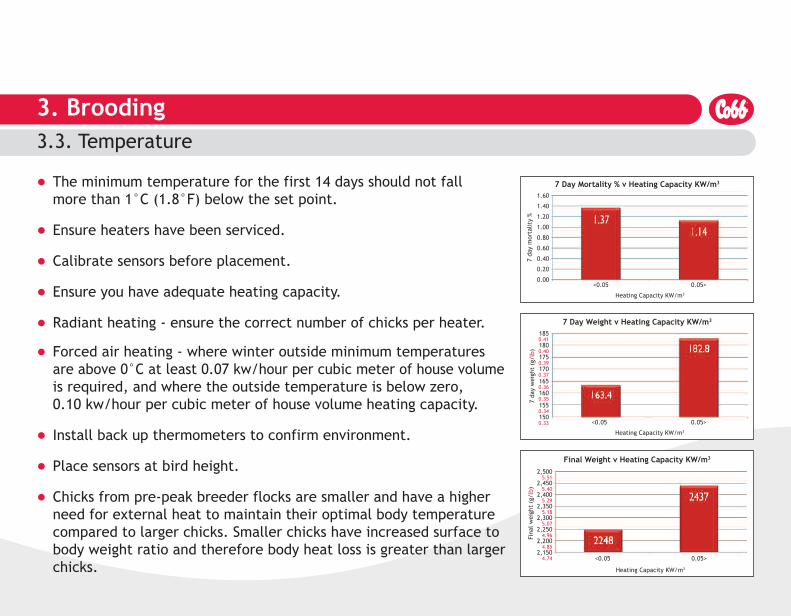
� The minimum temperature for the first 14 days should not fall more than 1°C (1.8°F) below the set point.
� Ensure heaters have been serviced.
� Calibrate sensors before placement.
� Ensure you have adequate heating capacity.
� Radiant heating - ensure the correct number of chicks per heater.
� Forced air heating - where winter outside minimum temperatures are above 0°C at least 0.07 kw/hour per cubic meter of house volumeis required, and where the outside temperature is below zero, 0.10 kw/hour per cubic meter of house volume heating capacity.
� Install back up thermometers to confirm environment.
� Place sensors at bird height.
� Chicks from pre-peak breeder flocks are smaller and have a higher need for external heat to maintain their optimal body temperature compared to larger chicks. Smaller chicks have increased surface to body weight ratio and therefore body heat loss is greater than larger chicks.
1850.411800.401750.391700.371650.361600.351550.341500.33
7 day weight (g/lb)
<0.05 0.05>
Heating Capacity KW/m3
7 Day Weight v Heating Capacity KW/m3
2,5005.51
2,4505.40
2,4005.29
2,3505.18
2,3005.07
2,2504.96
2,2004.85
2,1504.74
Final weight (g/lb)
<0.05 0.05>
Heating Capacity KW/m3
Final Weight v Heating Capacity KW/m3
1.60
1.40
1.20
1.00
0.80
0.60
0.40
0.20
0.00
7 day mortality %
<0.05 0.05>
Heating Capacity KW/m3
7 Day Mortality % v Heating Capacity KW/m3
3. Brooding3.3. Temperature
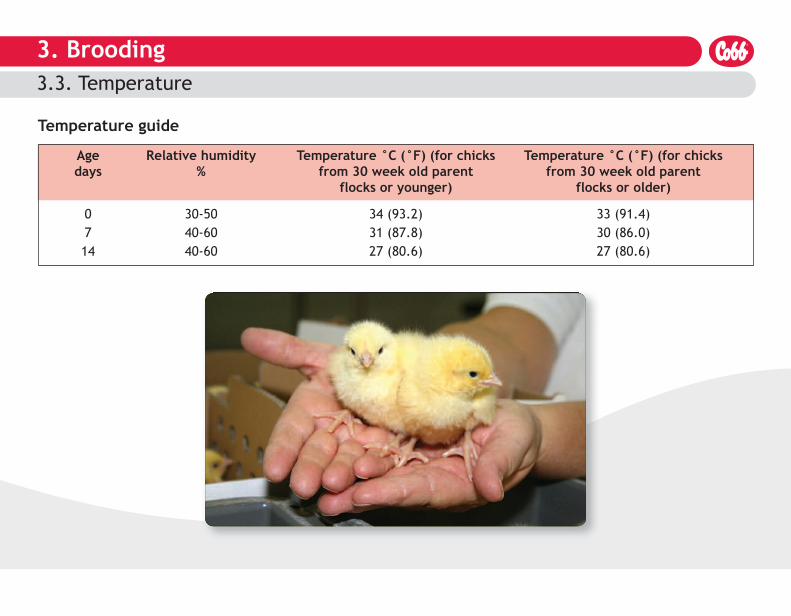
Temperature guide
Age Relative humidity Temperature °C (°F) (for chicks Temperature °C (°F) (for chicksdays % from 30 week old parent from 30 week old parent
flocks or younger) flocks or older)
0 30-50 34 (93.2) 33 (91.4)7 40-60 31 (87.8) 30 (86.0)14 40-60 27 (80.6) 27 (80.6)
3. Brooding3.4. Feeding
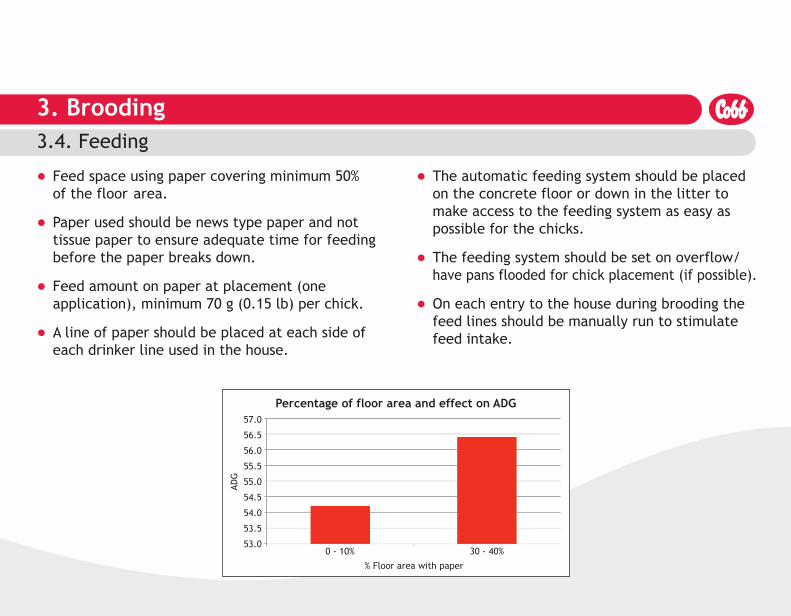
� Feed space using paper covering minimum 50% of the floor area.
� Paper used should be news type paper and not tissue paper to ensure adequate time for feedingbefore the paper breaks down.
� Feed amount on paper at placement (one application), minimum 70 g (0.15 lb) per chick.
� A line of paper should be placed at each side of each drinker line used in the house.
� The automatic feeding system should be placed on the concrete floor or down in the litter to make access to the feeding system as easy as possible for the chicks.
� The feeding system should be set on overflow/ have pans flooded for chick placement (if possible).
� On each entry to the house during brooding the feed lines should be manually run to stimulate feed intake.
57.0
56.5
56.0
55.5
55.0
54.5
54.0
53.5
53.0
ADG
0 - 10% 30 - 40%
% Floor area with paper
Percentage of floor area and effect on ADG
3. Brooding3.4. Feeding
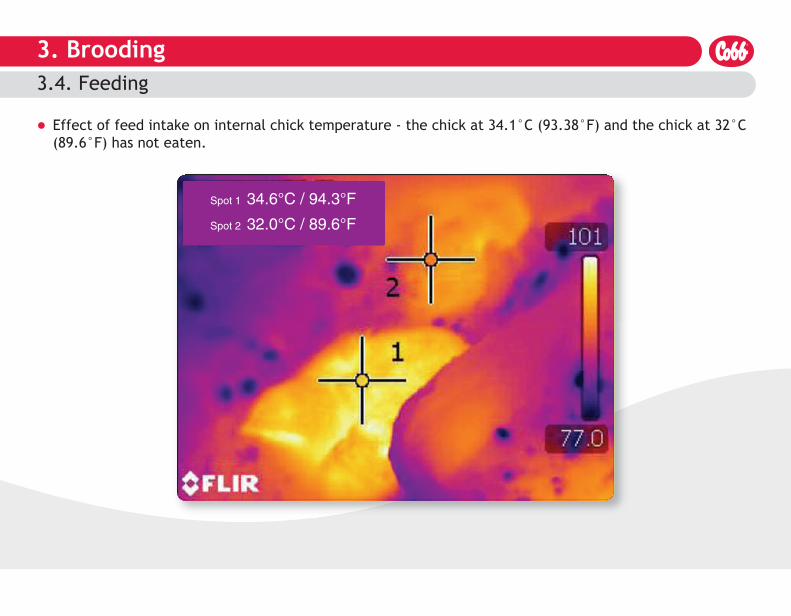
� Effect of feed intake on internal chick temperature - the chick at 34.1°C (93.38°F) and the chick at 32°C (89.6°F) has not eaten.
Spot 1 34.6°C / 94.3°F
Spot 2 32.0°C / 89.6°F
3. Brooding3.4. Feeding
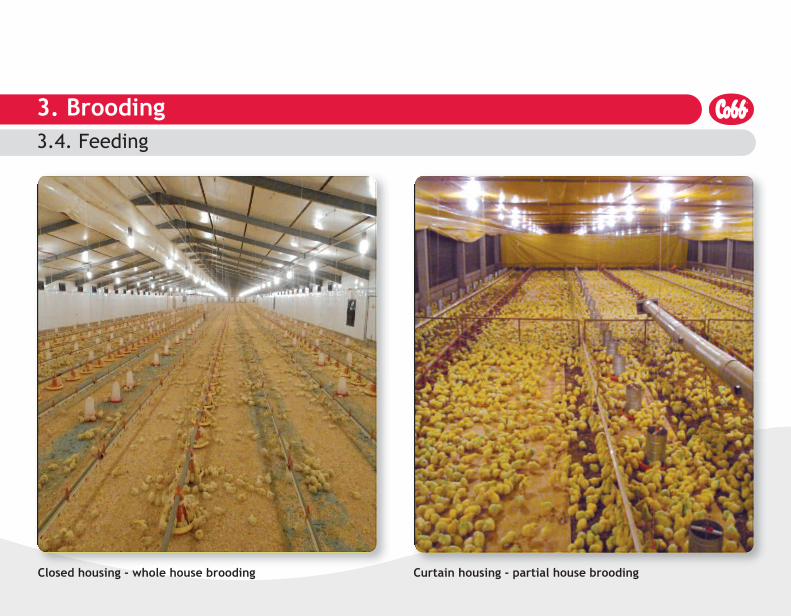
Closed housing - whole house brooding Curtain housing - partial house brooding
3. Brooding3.5. Water
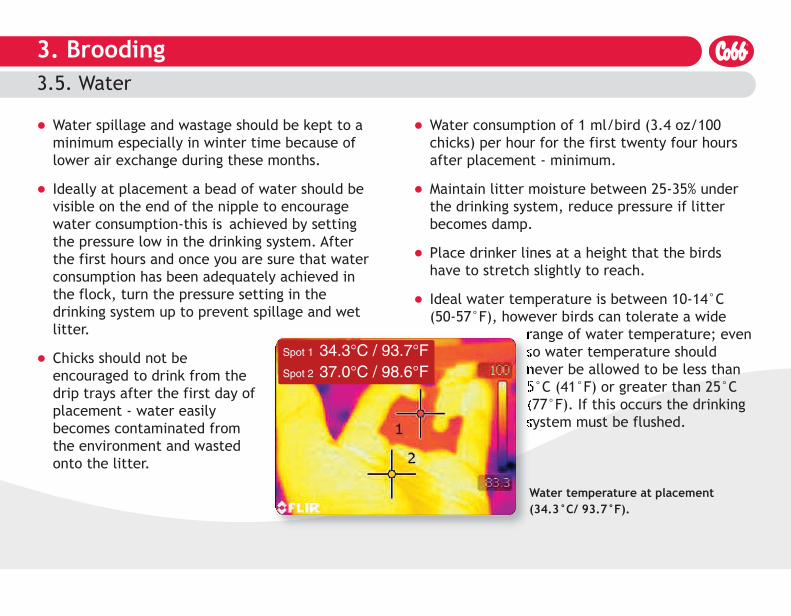
� Water spillage and wastage should be kept to a minimum especially in winter time because of lower air exchange during these months.
� Ideally at placement a bead of water should be visible on the end of the nipple to encourage water consumption-this is achieved by setting the pressure low in the drinking system. After the first hours and once you are sure that water consumption has been adequately achieved in the flock, turn the pressure setting in the drinking system up to prevent spillage and wet litter.
� Chicks should not be encouraged to drink from the drip trays after the first day of placement - water easily becomes contaminated from the environment and wasted onto the litter.
� Water consumption of 1 ml/bird (3.4 oz/100 chicks) per hour for the first twenty four hours after placement - minimum.
� Maintain litter moisture between 25-35% under the drinking system, reduce pressure if litter becomes damp.
� Place drinker lines at a height that the birds have to stretch slightly to reach.
� Ideal water temperature is between 10-14°C (50-57°F), however birds can tolerate a wide
range of water temperature; evenso water temperature shouldnever be allowed to be less than5°C (41°F) or greater than 25°C(77°F). If this occurs the drinkingsystem must be flushed.
Water temperature at placement(34.3°C/ 93.7°F).
Spot 1 34.3°C / 93.7°FSpot 2 37.0°C / 98.6°F
3. Brooding3.51. Water - Flow rate
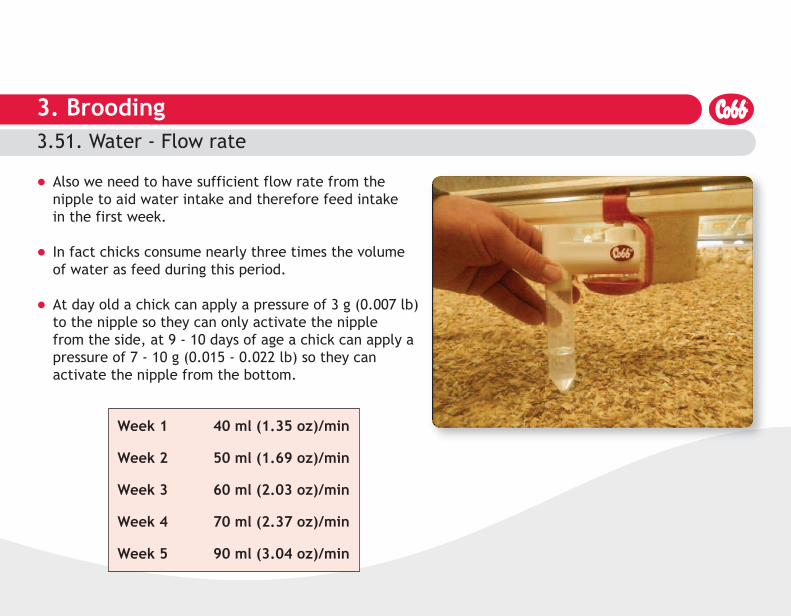
Week 1 40 ml (1.35 oz)/min
Week 2 50 ml (1.69 oz)/min
Week 3 60 ml (2.03 oz)/min
Week 4 70 ml (2.37 oz)/min
Week 5 90 ml (3.04 oz)/min
� Also we need to have sufficient flow rate from the nipple to aid water intake and therefore feed intake in the first week.
� In fact chicks consume nearly three times the volume of water as feed during this period.
� At day old a chick can apply a pressure of 3 g (0.007 lb)to the nipple so they can only activate the nipple from the side, at 9 - 10 days of age a chick can apply a pressure of 7 - 10 g (0.015 - 0.022 lb) so they can activate the nipple from the bottom.

3. Brooding3.6. Lighting
� Light intensity - at least 25 lux (2.32 foot candles)in the darkest place at floor level.
� Light intensity should not vary by more than 20% from brightest to darkest place at floor level.
� Fluorescent lights should be installed at a minimum of one watt/m2 (10.76 ft2) of floor area.
3. Brooding3.7. Chick check
Crop fill No. of chicks Full - PliableFeed & water
Full - HardOnly feed
Full - SoftOnly water
Empty
Evaluation
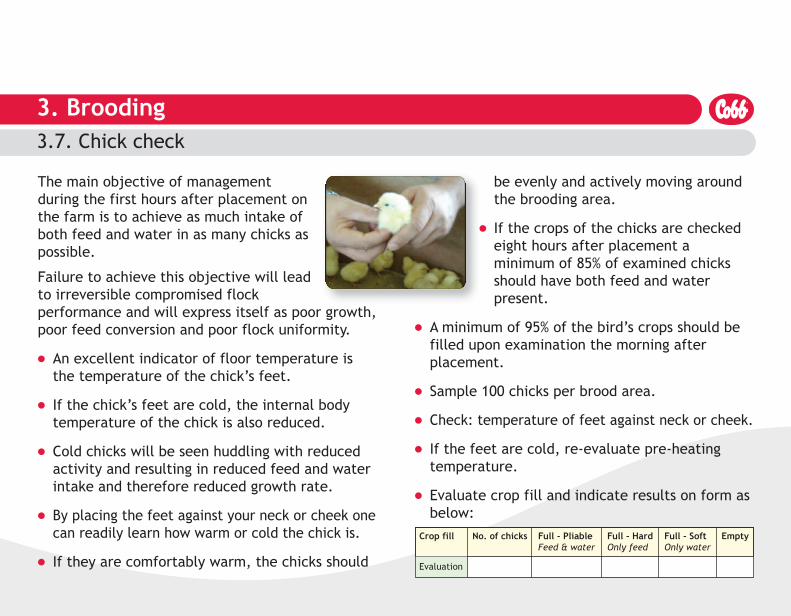
The main objective of managementduring the first hours after placement onthe farm is to achieve as much intake ofboth feed and water in as many chicks aspossible.
Failure to achieve this objective will leadto irreversible compromised flockperformance and will express itself as poor growth,poor feed conversion and poor flock uniformity.
� An excellent indicator of floor temperature is the temperature of the chick’s feet.
� If the chick’s feet are cold, the internal body temperature of the chick is also reduced.
� Cold chicks will be seen huddling with reduced activity and resulting in reduced feed and water intake and therefore reduced growth rate.
� By placing the feet against your neck or cheek onecan readily learn how warm or cold the chick is.
� If they are comfortably warm, the chicks should
be evenly and actively moving around the brooding area.
� If the crops of the chicks are checked eight hours after placement a minimum of 85% of examined chicks should have both feed and water present.
� A minimum of 95% of the bird’s crops should be filled upon examination the morning after placement.
� Sample 100 chicks per brood area.
� Check: temperature of feet against neck or cheek.
� If the feet are cold, re-evaluate pre-heating temperature.
� Evaluate crop fill and indicate results on form asbelow:
4. Ultimate performance indicators4.1. 7-day mortality/weights
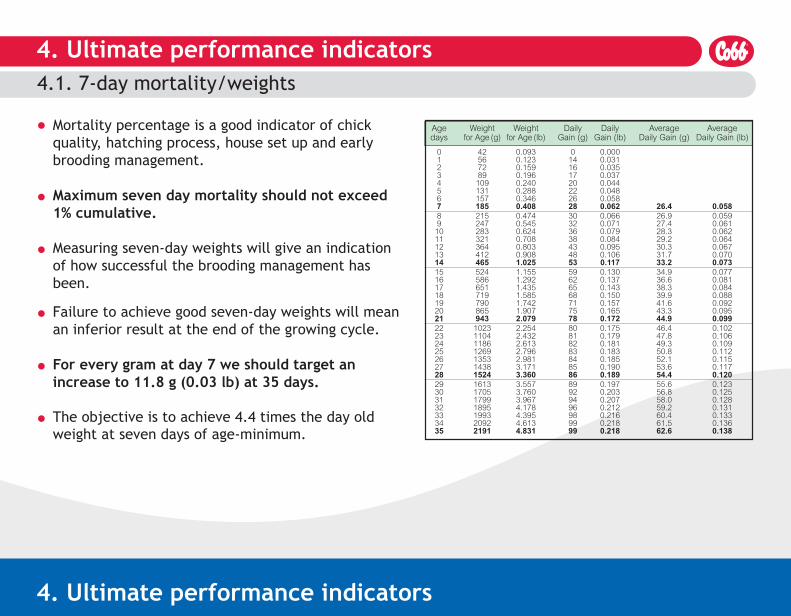
� Mortality percentage is a good indicator of chick quality, hatching process, house set up and early brooding management.
� Maximum seven day mortality should not exceed 1% cumulative.
� Measuring seven-day weights will give an indication of how successful the brooding management has been.
� Failure to achieve good seven-day weights will mean an inferior result at the end of the growing cycle.
� For every gram at day 7 we should target an increase to 11.8 g (0.03 lb) at 35 days.
� The objective is to achieve 4.4 times the day old weight at seven days of age-minimum.
4. Ultimate performance indicators
Age days
01234567891011121314151617181920212223242526272829303132333435
Weight for Age (g)
4256728910913115718521524728332136441246552458665171979086594310231104118612691353143815241613170517991895199320922191
Daily Gain (g)
01416172022262830323638434853596265687175788081828384858689929496989999
Average Daily Gain (lb)
0.0580.0590.0610.0620.0640.0670.0700.0730.0770.0810.0840.0880.0920.0950.0990.1020.1060.1090.1120.1150.1170.1200.1230.1250.1280.1310.1330.1360.138
Weight for Age (lb)
0.0930.1230.1590.1960.2400.2880.3460.4080.4740.5450.6240.7080.8030.9081.0251.1551.2921.4351.5851.7421.9072.0792.2542.4322.6132.7962.9813.1713.3603.5573.7603.9674.1784.3954.6134.831
Daily Gain (lb)
0.0000.0310.0350.0370.0440.0480.0580.0620.0660.0710.0790.0840.0950.1060.1170.1300.1370.1430.1500.1570.1650.1720.1750.1790.1810.1830.1850.1900.1890.1970.2030.2070.2120.2160.2180.218
Average Daily Gain (g)
26.426.927.428.329.230.331.733.234.936.638.339.941.643.344.946.447.849.350.852.153.654.455.656.858.059.260.461.562.6
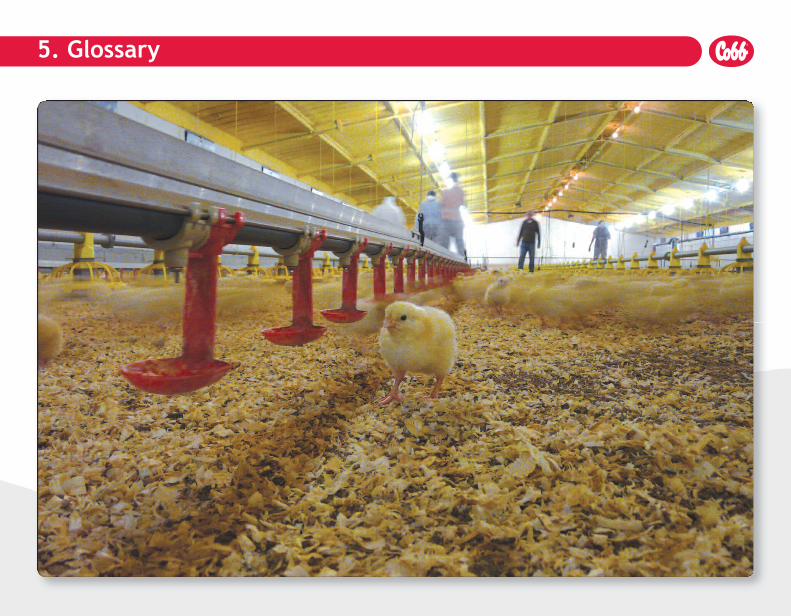
5. Glossary
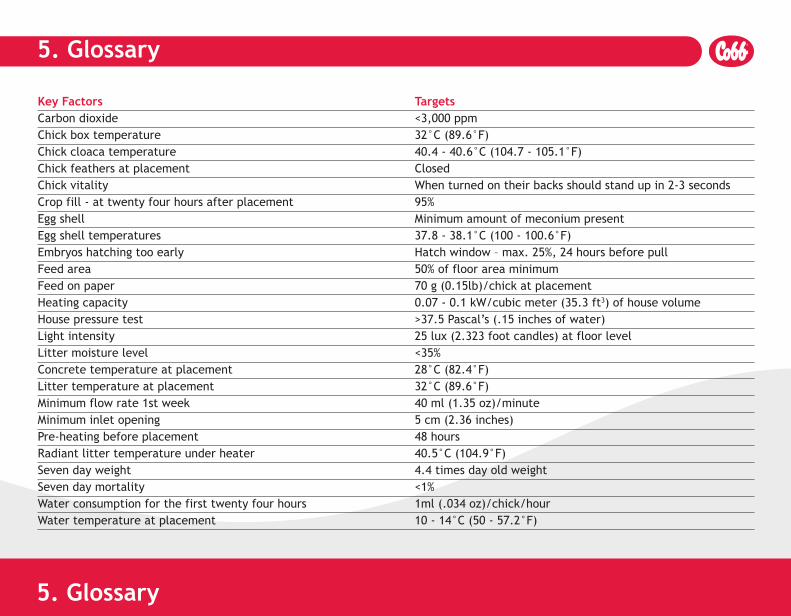
Key Factors TargetsCarbon dioxide <3,000 ppmChick box temperature 32°C (89.6°F)Chick cloaca temperature 40.4 - 40.6°C (104.7 - 105.1°F)Chick feathers at placement ClosedChick vitality When turned on their backs should stand up in 2-3 secondsCrop fill - at twenty four hours after placement 95%Egg shell Minimum amount of meconium present Egg shell temperatures 37.8 - 38.1°C (100 - 100.6°F)Embryos hatching too early Hatch window – max. 25%, 24 hours before pullFeed area 50% of floor area minimumFeed on paper 70 g (0.15lb)/chick at placementHeating capacity 0.07 - 0.1 kW/cubic meter (35.3 ft3) of house volumeHouse pressure test >37.5 Pascal’s (.15 inches of water)Light intensity 25 lux (2.323 foot candles) at floor levelLitter moisture level <35%Concrete temperature at placement 28°C (82.4°F)Litter temperature at placement 32°C (89.6°F)Minimum flow rate 1st week 40 ml (1.35 oz)/minuteMinimum inlet opening 5 cm (2.36 inches)Pre-heating before placement 48 hoursRadiant litter temperature under heater 40.5°C (104.9°F)Seven day weight 4.4 times day old weightSeven day mortality <1%Water consumption for the first twenty four hours 1ml (.034 oz)/chick/hourWater temperature at placement 10 - 14°C (50 - 57.2°F)
5. Glossary
5. Glossary
L-7011-03-ENNovember 19, 2015