Optical Disc Archive Drive Unit ODS-D55U ODS-D77U ODS ... · ODS-D55U/D77U/D77UA a) When connecting...
32
Optical Disc Archive Drive Unit ODS-D55U ODS-D77U ODS-D77UA ODS-D280U ODS-D380U OPERATION MANUAL [English] 3rd Edition (Revised 4)
Transcript of Optical Disc Archive Drive Unit ODS-D55U ODS-D77U ODS ... · ODS-D55U/D77U/D77UA a) When connecting...
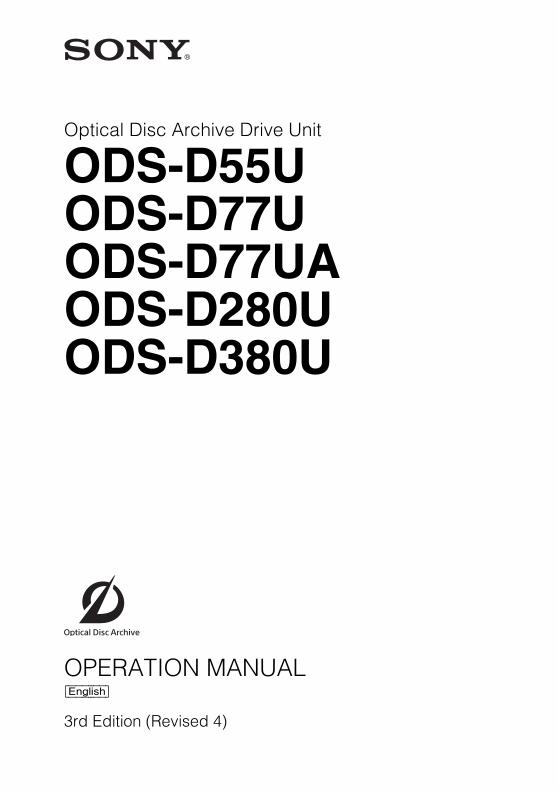
Optical Disc Archive Drive Unit
ODS-D55UODS-D77UODS-D77UAODS-D280UODS-D380U
OPERATION MANUAL[English]
3rd Edition (Revised 4)
2 Table of Contents
Table of Contents
Chapter 1 Overview
1-1 Features ...........................................................................41-2 Example of Use ...............................................................41-3 Recommended Software ................................................5
1-3-1 List of Software .......................................................51-3-2 System Requirements.............................................6
Chapter 2 Names and Functions of Parts
2-1 Front Panel ....................................................................112-2 Rear Panel......................................................................13
Chapter 3 Preparations
3-1 Setting Up the Unit........................................................153-2 Software Installation .....................................................15
3-2-1 Windows Installation .............................................163-2-2 Macintosh Installation ...........................................163-2-3 Linux Installation ...................................................16
3-3 Connections and Settings............................................173-3-1 Connecting to a Computer ...................................17
3-4 Power Preparations ......................................................173-5 Handling Media..............................................................18
3-5-1 Media Used for Reading and Writing ...................183-5-2 Notes on Handling................................................193-5-3 Cartridge Memory.................................................203-5-4 Write-Protecting Media .........................................203-5-5 Injecting or Ejecting a Cartridge...........................21
Chapter 4 Using the Software
4-1 Starting and Exiting the Utility Software.....................224-1-1 Starting/Displaying ...............................................224-1-2 Exiting/Closing the Console Window....................22
3 Table of Contents
4-2 Starting and Exiting the Optical Disc Archive Filer................................................................................234-2-1 Starting .................................................................234-2-2 Exiting ...................................................................24
AppendixImportant Notes on Operation .......................................... 25
Condensation.................................................................25About reducing the risk of knocking this unit.................25Shipping and transportation of the unit..........................25About the read time of files ............................................25About the write time of files............................................25Replacing the air filter (ODS-D280U/D380U) ................26Parts with limited service life..........................................26Long-term loading of cartridges ....................................26Attaching the USB cable clamper (ODS-D380U) ..........26
Specifications..................................................................... 28
Chapter1
4 1-1 Features / 1-2 Example of Use
Chapter 1 O
verview
Overview
1-1 Features
The features of the ODS-D55U/D77U/D77UA/D280U include the following.• Writable and readable the large
amount of data with one cartridge• Supported for both types of
cartridges, write-once and rewritable• IT-friendly system through USB
interface• Writable any user data as computer
data• Usable as an external device from a
computer• Check device and media
information, operate media, and make settings using the Utility Software
• File transfer and job management using the Optical Disc Archive Filer
• Intuitive management of content realized with Content Manager.
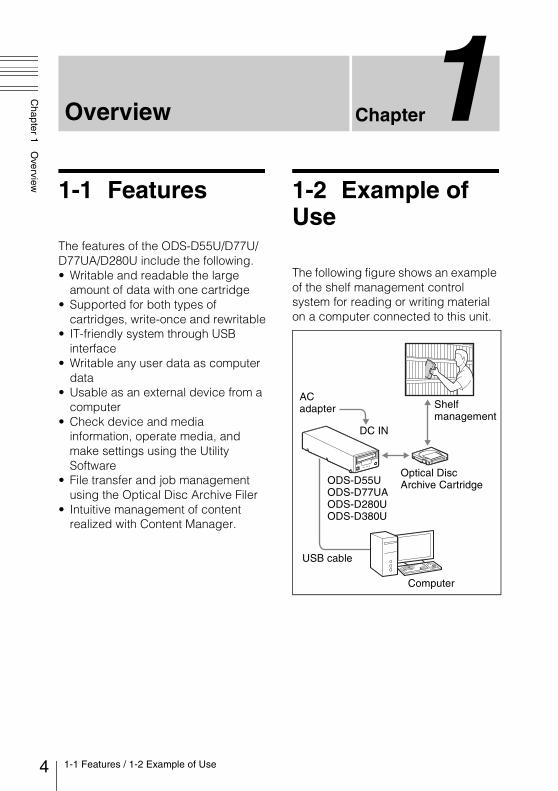
1-2 Example of Use
The following figure shows an example of the shelf management control system for reading or writing material on a computer connected to this unit.
DC IN
AC adapter
USB cable
ODS-D55UODS-D77UAODS-D280UODS-D380U
Computer
Shelf management
Optical Disc Archive Cartridge
51-3 Recommended Software
Chapter 1 O
verview
1-3 Recommended Software
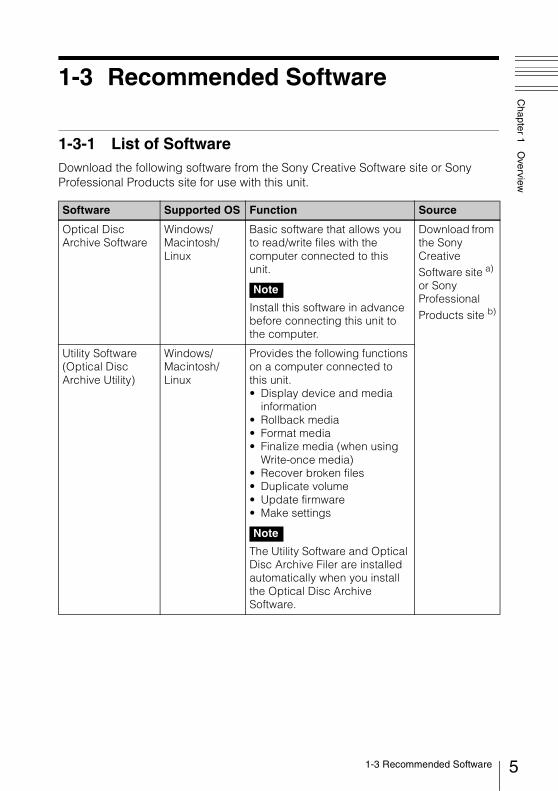
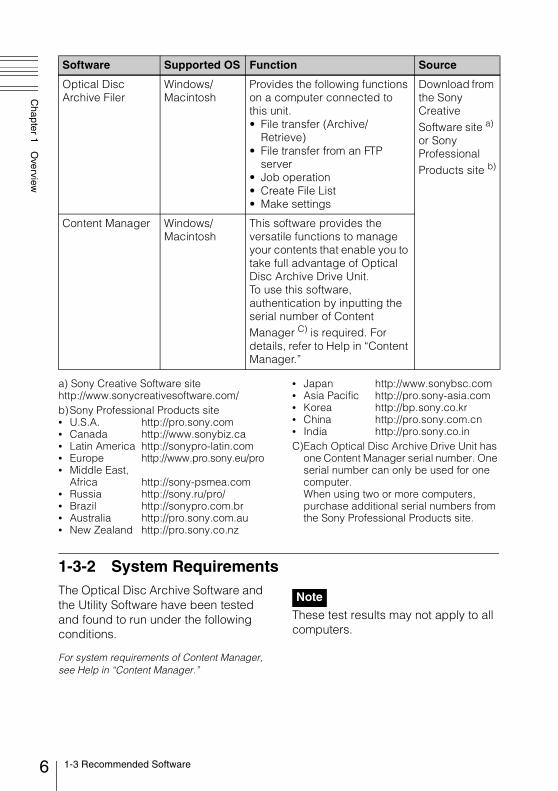
1-3-1 List of SoftwareDownload the following software from the Sony Creative Software site or Sony Professional Products site for use with this unit.
Software Supported OS Function Source
Optical Disc Archive Software
Windows/Macintosh/Linux
Basic software that allows you to read/write files with the computer connected to this unit.
Note
Install this software in advance before connecting this unit to the computer.
Download from the Sony Creative Software site a) or Sony Professional Products site b)
Utility Software (Optical Disc Archive Utility)
Windows/Macintosh/Linux
Provides the following functions on a computer connected to this unit.• Display device and media
information• Rollback media• Format media• Finalize media (when using
Write-once media)• Recover broken files• Duplicate volume• Update firmware• Make settings
Note
The Utility Software and Optical Disc Archive Filer are installed automatically when you install the Optical Disc Archive Software.
6 1-3 Recommended Software
Chapter 1 O
verview
a) Sony Creative Software sitehttp://www.sonycreativesoftware.com/b)Sony Professional Products site• U.S.A. http://pro.sony.com• Canada http://www.sonybiz.ca• Latin America http://sonypro-latin.com• Europe http://www.pro.sony.eu/pro• Middle East,
Africa http://sony-psmea.com• Russia http://sony.ru/pro/• Brazil http://sonypro.com.br• Australia http://pro.sony.com.au• New Zealand http://pro.sony.co.nz
• Japan http://www.sonybsc.com• Asia Pacific http://pro.sony-asia.com• Korea http://bp.sony.co.kr• China http://pro.sony.com.cn• India http://pro.sony.co.inC)Each Optical Disc Archive Drive Unit has
one Content Manager serial number. One serial number can only be used for one computer.When using two or more computers, purchase additional serial numbers from the Sony Professional Products site.
1-3-2 System RequirementsThe Optical Disc Archive Software and the Utility Software have been tested and found to run under the following conditions.
For system requirements of Content Manager, see Help in “Content Manager.”
These test results may not apply to all computers.
Optical Disc Archive Filer
Windows/Macintosh
Provides the following functions on a computer connected to this unit.• File transfer (Archive/
Retrieve)• File transfer from an FTP
server• Job operation• Create File List• Make settings
Download from the Sony Creative Software site a) or Sony Professional Products site b)
Content Manager Windows/Macintosh
This software provides the versatile functions to manage your contents that enable you to take full advantage of Optical Disc Archive Drive Unit.To use this software, authentication by inputting the serial number of Content Manager C) is required. For details, refer to Help in “Content Manager.”
Software Supported OS Function Source
Note
71-3 Recommended Software
Chapter 1 O
verview
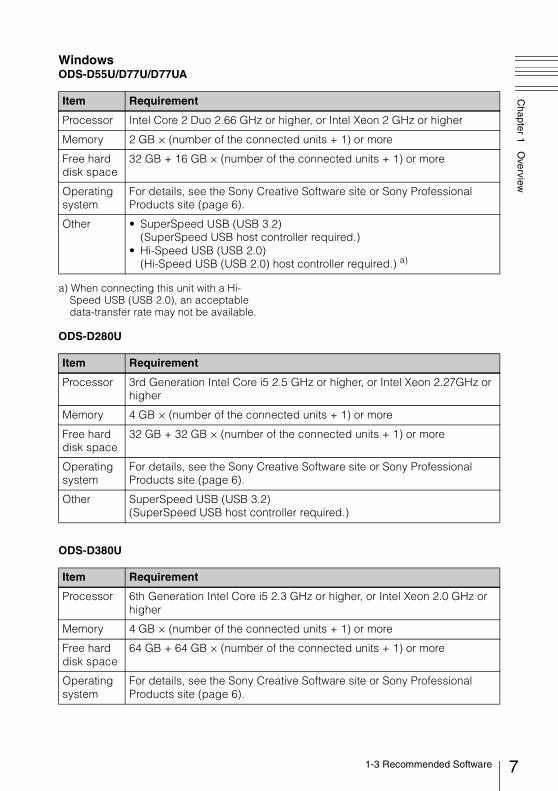
WindowsODS-D55U/D77U/D77UA
a) When connecting this unit with a Hi-Speed USB (USB 2.0), an acceptable data-transfer rate may not be available.
ODS-D280U
ODS-D380U
Item Requirement
Processor Intel Core 2 Duo 2.66 GHz or higher, or Intel Xeon 2 GHz or higher
Memory 2 GB × (number of the connected units + 1) or more
Free hard disk space
32 GB + 16 GB × (number of the connected units + 1) or more
Operating system
For details, see the Sony Creative Software site or Sony Professional Products site (page 6).
Other • SuperSpeed USB (USB 3.2)(SuperSpeed USB host controller required.)
• Hi-Speed USB (USB 2.0)(Hi-Speed USB (USB 2.0) host controller required.) a)
Item Requirement
Processor 3rd Generation Intel Core i5 2.5 GHz or higher, or Intel Xeon 2.27GHz or higher
Memory 4 GB × (number of the connected units + 1) or more
Free hard disk space
32 GB + 32 GB × (number of the connected units + 1) or more
Operating system
For details, see the Sony Creative Software site or Sony Professional Products site (page 6).
Other SuperSpeed USB (USB 3.2)(SuperSpeed USB host controller required.)
Item Requirement
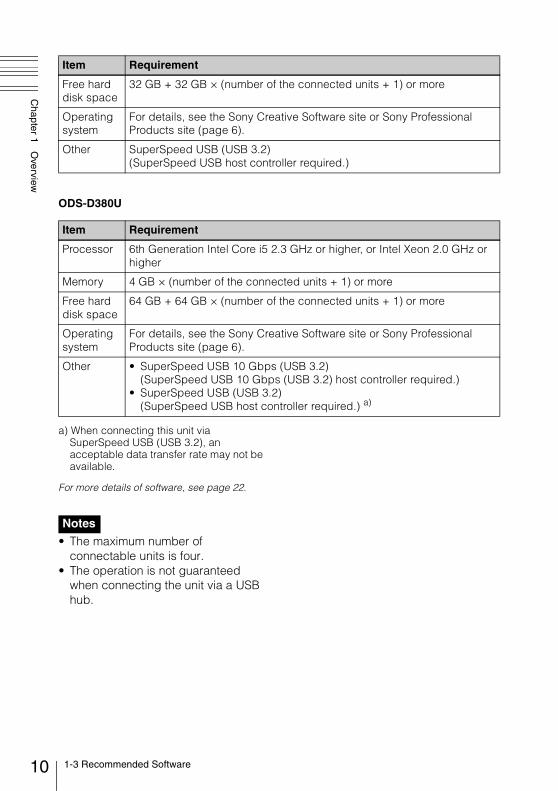
Processor 6th Generation Intel Core i5 2.3 GHz or higher, or Intel Xeon 2.0 GHz or higher
Memory 4 GB × (number of the connected units + 1) or more
Free hard disk space
64 GB + 64 GB × (number of the connected units + 1) or more
Operating system
For details, see the Sony Creative Software site or Sony Professional Products site (page 6).
8 1-3 Recommended Software
Chapter 1 O
verview
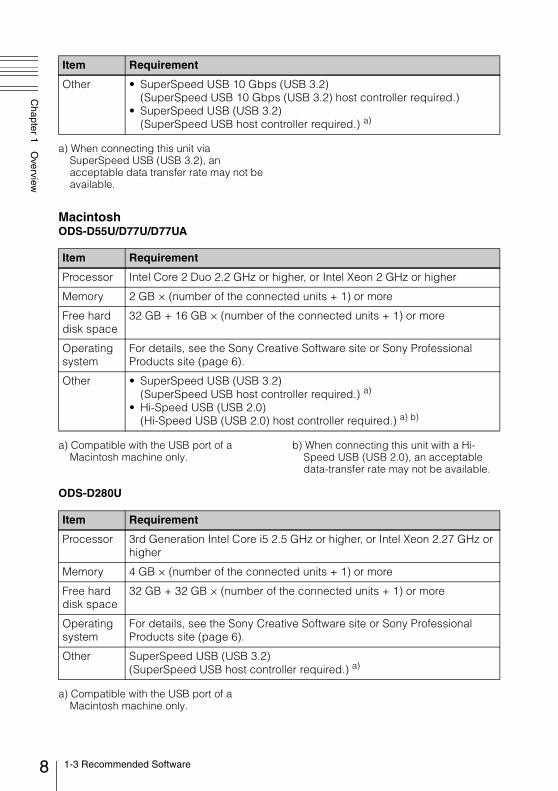
a) When connecting this unit via SuperSpeed USB (USB 3.2), an acceptable data transfer rate may not be available.
MacintoshODS-D55U/D77U/D77UA
a) Compatible with the USB port of a Macintosh machine only.
b) When connecting this unit with a Hi-Speed USB (USB 2.0), an acceptable data-transfer rate may not be available.
ODS-D280U
a) Compatible with the USB port of a Macintosh machine only.
Other • SuperSpeed USB 10 Gbps (USB 3.2)(SuperSpeed USB 10 Gbps (USB 3.2) host controller required.)
• SuperSpeed USB (USB 3.2)(SuperSpeed USB host controller required.) a)
Item Requirement
Item Requirement
Processor Intel Core 2 Duo 2.2 GHz or higher, or Intel Xeon 2 GHz or higher
Memory 2 GB × (number of the connected units + 1) or more
Free hard disk space
32 GB + 16 GB × (number of the connected units + 1) or more
Operating system
For details, see the Sony Creative Software site or Sony Professional Products site (page 6).
Other • SuperSpeed USB (USB 3.2)(SuperSpeed USB host controller required.) a)
• Hi-Speed USB (USB 2.0)(Hi-Speed USB (USB 2.0) host controller required.) a) b)
Item Requirement
Processor 3rd Generation Intel Core i5 2.5 GHz or higher, or Intel Xeon 2.27 GHz or higher
Memory 4 GB × (number of the connected units + 1) or more
Free hard disk space
32 GB + 32 GB × (number of the connected units + 1) or more
Operating system
For details, see the Sony Creative Software site or Sony Professional Products site (page 6).
Other SuperSpeed USB (USB 3.2)(SuperSpeed USB host controller required.) a)
91-3 Recommended Software
Chapter 1 O
verview
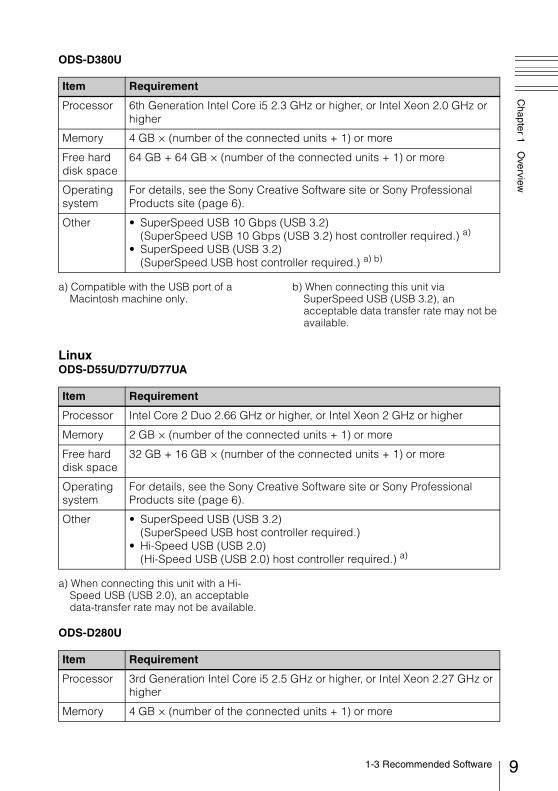
ODS-D380U
a) Compatible with the USB port of a Macintosh machine only.
b) When connecting this unit via SuperSpeed USB (USB 3.2), an acceptable data transfer rate may not be available.
LinuxODS-D55U/D77U/D77UA
a) When connecting this unit with a Hi-Speed USB (USB 2.0), an acceptable data-transfer rate may not be available.
ODS-D280U
Item Requirement
Processor 6th Generation Intel Core i5 2.3 GHz or higher, or Intel Xeon 2.0 GHz or higher
Memory 4 GB × (number of the connected units + 1) or more
Free hard disk space
64 GB + 64 GB × (number of the connected units + 1) or more
Operating system
For details, see the Sony Creative Software site or Sony Professional Products site (page 6).
Other • SuperSpeed USB 10 Gbps (USB 3.2)(SuperSpeed USB 10 Gbps (USB 3.2) host controller required.) a)
• SuperSpeed USB (USB 3.2)(SuperSpeed USB host controller required.) a) b)
Item Requirement
Processor Intel Core 2 Duo 2.66 GHz or higher, or Intel Xeon 2 GHz or higher
Memory 2 GB × (number of the connected units + 1) or more
Free hard disk space
32 GB + 16 GB × (number of the connected units + 1) or more
Operating system
For details, see the Sony Creative Software site or Sony Professional Products site (page 6).
Other • SuperSpeed USB (USB 3.2)(SuperSpeed USB host controller required.)
• Hi-Speed USB (USB 2.0)(Hi-Speed USB (USB 2.0) host controller required.) a)
Item Requirement
Processor 3rd Generation Intel Core i5 2.5 GHz or higher, or Intel Xeon 2.27 GHz or higher
Memory 4 GB × (number of the connected units + 1) or more
10 1-3 Recommended Software
Chapter 1 O
verview
ODS-D380U
a) When connecting this unit via SuperSpeed USB (USB 3.2), an acceptable data transfer rate may not be available.
For more details of software, see page 22.
• The maximum number of connectable units is four.
• The operation is not guaranteed when connecting the unit via a USB hub.
Free hard disk space
32 GB + 32 GB × (number of the connected units + 1) or more
Operating system
For details, see the Sony Creative Software site or Sony Professional Products site (page 6).
Other SuperSpeed USB (USB 3.2)(SuperSpeed USB host controller required.)
Item Requirement
Processor 6th Generation Intel Core i5 2.3 GHz or higher, or Intel Xeon 2.0 GHz or higher
Memory 4 GB × (number of the connected units + 1) or more
Free hard disk space
64 GB + 64 GB × (number of the connected units + 1) or more
Operating system
For details, see the Sony Creative Software site or Sony Professional Products site (page 6).
Other • SuperSpeed USB 10 Gbps (USB 3.2)(SuperSpeed USB 10 Gbps (USB 3.2) host controller required.)
• SuperSpeed USB (USB 3.2)(SuperSpeed USB host controller required.) a)
Item Requirement
Notes
Chapter2 C
hapter 2 Nam
es and Functions of P
arts
112-1 Front Panel
Names and Functions of Parts
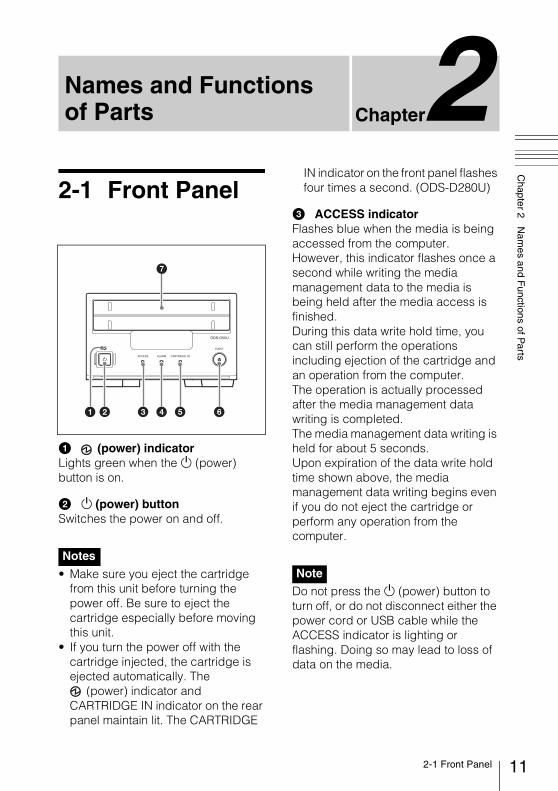
2-1 Front Panel
a (power) indicatorLights green when the 1 (power) button is on.
b 1 (power) buttonSwitches the power on and off.
• Make sure you eject the cartridge from this unit before turning the power off. Be sure to eject the cartridge especially before moving this unit.
• If you turn the power off with the cartridge injected, the cartridge is ejected automatically. The
(power) indicator and CARTRIDGE IN indicator on the rear panel maintain lit. The CARTRIDGE
IN indicator on the front panel flashes four times a second. (ODS-D280U)
c ACCESS indicatorFlashes blue when the media is being accessed from the computer.However, this indicator flashes once a second while writing the media management data to the media is being held after the media access is finished.During this data write hold time, you can still perform the operations including ejection of the cartridge and an operation from the computer. The operation is actually processed after the media management data writing is completed.The media management data writing is held for about 5 seconds.Upon expiration of the data write hold time shown above, the media management data writing begins even if you do not eject the cartridge or perform any operation from the computer.
Do not press the 1 (power) button to turn off, or do not disconnect either the power cord or USB cable while the ACCESS indicator is lighting or flashing. Doing so may lead to loss of data on the media.
NotesNote

12 2-1 Front Panel
Chapter 2 N
ames and F
unctions of Parts
d ALARM indicatorIf a fault occurs in the unit, this flashes red, as shown in the following table.
The indicator may flash only for five seconds depending on the alarm.
You can check alarms generated by this unit, using the alarm log of the utility software. For details, refer to Help in the Utility Software.
If the indicator is flashing four times a second, and it is not possible to check the alarm log, contact your Sony service representative.
When the error is eliminated, the indicator goes off.
e CARTRIDGE IN indicatorLights green when a cartridge is injected.Flashes green when a cartridge is ejected.
f EJECT buttonEjects a cartridge (see page 21).
• This button is disabled while the media is being accessed. Either stop accessing the media before ejecting, or eject by an operation from the computer.
• When this unit is connected to a Macintosh/Linux computer, this button is disabled.
g Cartridge slotWith the label facing up, inject the cartridge (see page 21).
Indicator Meaning
Flashing four times a second
An error occurred (principally a hardware default).
Flashing once a second
An alarm not listed above occurred.
Note
Notes
132-2 Rear Panel
Chapter 2 N
ames and F
unctions of Parts
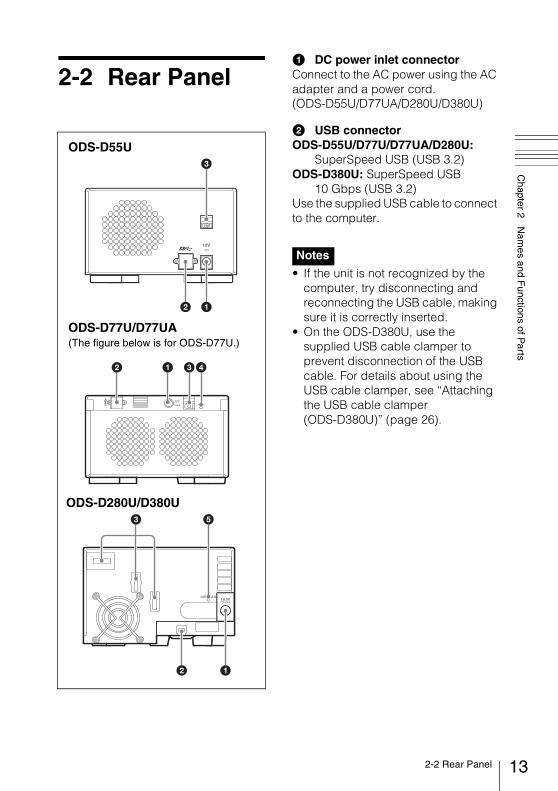
2-2 Rear Panela DC power inlet connectorConnect to the AC power using the AC adapter and a power cord.(ODS-D55U/D77UA/D280U/D380U)
b USB connectorODS-D55U/D77U/D77UA/D280U:
SuperSpeed USB (USB 3.2)ODS-D380U: SuperSpeed USB
10 Gbps (USB 3.2)Use the supplied USB cable to connect to the computer.
• If the unit is not recognized by the computer, try disconnecting and reconnecting the USB cable, making sure it is correctly inserted.
• On the ODS-D380U, use the supplied USB cable clamper to prevent disconnection of the USB cable. For details about using the USB cable clamper, see “Attaching the USB cable clamper (ODS-D380U)” (page 26).
ODS-D55U
ODS-D77U/D77UA(The figure below is for ODS-D77U.)
ODS-D280U/D380U
Notes
14 2-2 Rear Panel
Chapter 2 N
ames and F
unctions of Parts
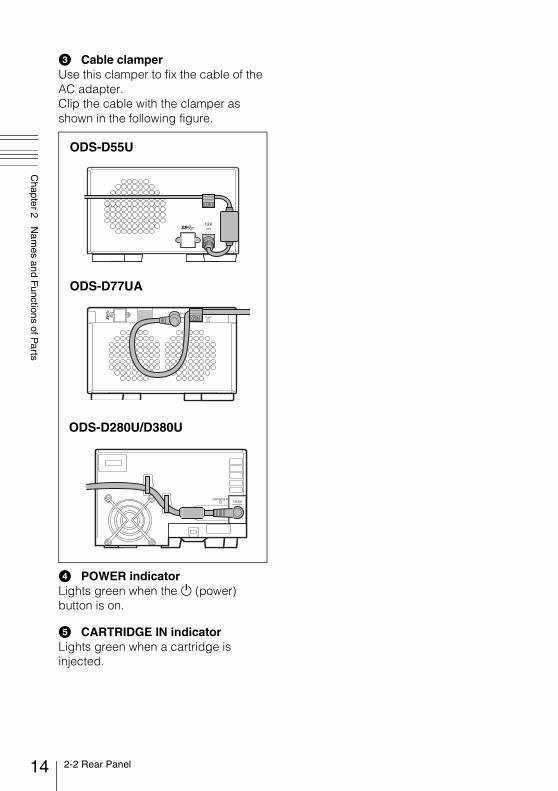
c Cable clamperUse this clamper to fix the cable of the AC adapter.Clip the cable with the clamper as shown in the following figure.
d POWER indicatorLights green when the 1 (power) button is on.
e CARTRIDGE IN indicatorLights green when a cartridge is injected.
ODS-D55U
ODS-D77UA
ODS-D280U/D380U
Chapter3 C
hapter 3 Preparations
153-1 Setting Up the Unit / 3-2 Software Installation
Preparations
3-1 Setting Up the Unit
Make sure the unit is in a horizontal position when setting it up.
• The unit cannot be set up in a vertical position or at an angle.
• If the unit is not sufficiently horizontal, an ALARM indicator may blink.
• If the ALARM indicator blinks, place the unit in a horizontal position, turn the power off, then turn the power on again.
3-2 Software Installation
To use this unit, the necessary software must first be installed on the computer to which it is connected.
Operation of Optical Disc Archive Software or the Utility Software may be unstable if installed on a computer with certain anti-virus software, anti-spyware tools or UDF 2.5 or UDF 2.6 file system drivers of a non-standard operating system.If operation is unstable, check the settings and possible conflict with the above mentioned software, then change the settings accordingly.
NotesNote
16 3-2 Software Installation
Chapter 3 P
reparations
3-2-1 Windows Installation
To install the Optical Disc Archive Software, Utility Software, and Optical Disc Archive FilerDownload the Optical Disc Archive Software from the Sony Creative Software site or Sony Professional Products site (page 6).
• If an old version of the Optical Disc Archive Software is already installed, it must be uninstalled before you install the new version. Use “Add or Remove Programs” on the Control Panel to remove the old version of the Sony Optical Disc Archive Software. After doing so, be sure to restart the computer.
• After installation, the previous settings return to their default values.
3-2-2 Macintosh Installation
To install the Optical Disc Archive Software, Utility Software, and Optical Disc Archive FilerDownload the Optical Disc Archive Software from the Sony Creative Software site or Sony Professional Products site (page 6).
Installing the Optical Disc Archive Software and utility software overwrites a previous installation.Settings are preserved after the new installation.
3-2-3 Linux Installation
To install the Optical Disc Archive Software and Utility SoftwareDownload the Optical Disc Archive Software from the Sony Creative Software site or Sony Professional Products site (page 6).
• If the Optical Disc Archive Software has not been installed to the computer, the computer may malfunction when connecting this unit. Install the Optical Disc Archive Software in advance before connecting this unit to the computer.If an error occurred with the computer, shut down the computer and disconnect the unit. Restart the computer and install the software. Then, connect this unit to the computer.
• Installing the Optical Disc Archive Software and utility software overwrites a previous installation. Settings from a previous installation are preserved for the new installation.
• If the Optical Disc Archive Software is uninstalled, the settings will have their default values when a new version of the Optical Disc Archive Software is installed.
Notes
Note
Notes
173-3 Connections and Settings / 3-4 Power Preparations
Chapter 3 P
reparations
3-3 Connections and Settings
3-3-1 Connecting to a ComputerBy connecting this unit to a computer, you can use the utility software, and the other software.
For a connection example, see 1-2 “Example of Use” (page 4).
For details about the recommended configurations of the computer to connect to this unit, check the technical note, which can be downloaded from the Sony Creative Software site (page 6).
• Install the Optical Disc Archive Software (see page 16) in advance.
• To disconnect the ODS-D55U/D77U/D77UA/D280U/D380U from a Windows computer, run the “Safely Remove Hardware” dialog, and then disconnect the cable.
• If you start a Windows computer with the cartridge injected, the computer may fail in normal operation or run sluggishly.
• The computer may not start properly if the unit’s power is on, depending on the computer to which it is connected. In this case, turn off the power of this unit, or disconnect the USB cable, and then start the computer.
3-4 Power Preparations
This unit can be powered by the AC adapter.Connect the AC adapter and a power cord to the DC power inlet connector (page 13) on the rear panel of the unit.(ODS-D55U/D77UA/D280U/D380U)
It is not possible to power this unit through a USB cable.
Notes
Note

18 3-5 Handling Media
Chapter 3 P
reparations
3-5 Handling Media
3-5-1 Media Used for Reading and WritingThis unit can use the following Optical Disc Archive Cartridges and similar media.
CartridgeMedia type
Read/write support No. of files
which can be created
ODS-D55UODS-D77U
ODS-D77UAODS-D280U ODS-D380U
ODC300RCapacity: 300 GB
Write-once Read/Write Read-only Read-only 60,000 or 240,000
ODC300RECapacity: 300 GB
Rewritable Read/Write Read-only Read-only 60,000 or 240,000
ODC600RCapacity: 600 GB
Write-once Read/Write Read-only Read-only 60,000 or 240,000
ODC600RECapacity: 600 GB
Rewritable Read/Write Read-only Read-only 60,000 or 240,000
ODC1200RECapacity: 1.2 TB
Rewritable Read/Write Read-only Read-only 60,000 or 240,000
ODC1500RCapacity: 1.5 TB
Write-once Read/Write Read-only Read-only 60,000 or 240,000
ODC3300RCapacity: 3.3 TB
Write-once Not supported
Read/Write Read/Write 480,000
ODC5500RCapacity: 5.5 TB
Write-once Not supported
Not supported
Read/Write 800,000
193-5 Handling Media
Chapter 3 P
reparations
• Deleting files from the media will not increase the available storage space for either write-once or rewritable type cartridges.
• In the case of write-once type cartridges, pay attention to the following points.- Reformatting the media will not
increase the available storage space.
- Repetitive file writing will consume the available writable space (for writing the media management data, etc.) on the media. If there is no available writable space on the media, file writing may be disabled, even if sufficient storage space remains.
- No file can be written after the media is finalized.
• For ODC5500R cartridges, the number of files that can be created is 800,000. For ODC3300R cartridges, the maximum number of files is 480,000.
• The cartridges other than ODC3300R/5500R allows you to select the number of files (60,000 or 240,000) which can be created during formatting.
• Rewritable media allows you to select the number of files that can be created during reformatting, while write-once media does not. The number of files (800,000 for ODC5500R, 480,000 for ODC3300R and 60,000 or 240,000 for the other cartridges) that can be created is retained when formatting for the first time.
• For the cartridges other than ODC3300R/5500R, if the media has been formatted when the number of files which can be created is 240,000, depending on the recover file functions, the recovery rate may
not be as good as the rate for 60,000 files.
• Do not inject ODC3300R/5500R into ODS-D55U/ODS-D77U/ODS-D77UA. If it is injected, this may cause damage to the unit.
• ODS-D280U/D380U is not available for formatting a cartridge that supports only reading.
3-5-2 Notes on HandlingHandlingThe Optical Disc Archive Cartridge houses multiple discs in a shell and is designed to allow handling free of risk from dust or fingerprints. However, if the cartridge is subjected to a severe shock, for example by dropping it, this can result in damage or scratching of the discs. If a disc is scratched, it may be impossible to write data, or to read the data written on the disc. The cartridge should be handled and stored carefully.• Do not remove any discs from the
cartridge.• Do not disassemble the cartridge.• If the disc order in a cartridge is
changed, or other discs are substituted, the cartridge will no longer be recognized by the unit and cannot be used.
• The supplied adhesive labels are recommended for indexing cartridges. Apply the label in the correct position.
Storage• Do not store cartridges where they
may be subjected to direct sunlight, or in other places where the temperature or humidity is high.
• Do not leave cartridges where dust may be able to gain ingress.
• Store cartridges in their cases.
Notes
20 3-5 Handling Media
Chapter 3 P
reparations
Care of the cartridge• Remove dust and dirt on the outside
of a cartridge using a soft dry cloth.• If condensation forms, allow ample
time to dry before use.
3-5-3 Cartridge MemoryThe Optical Disc Archive Cartridge includes the Cartridge Memory, which enables contactless communication with this unit.The basic information of a cartridge is written in the Cartridge Memory.Using the application software will enable the user-data to be written/read in the future.
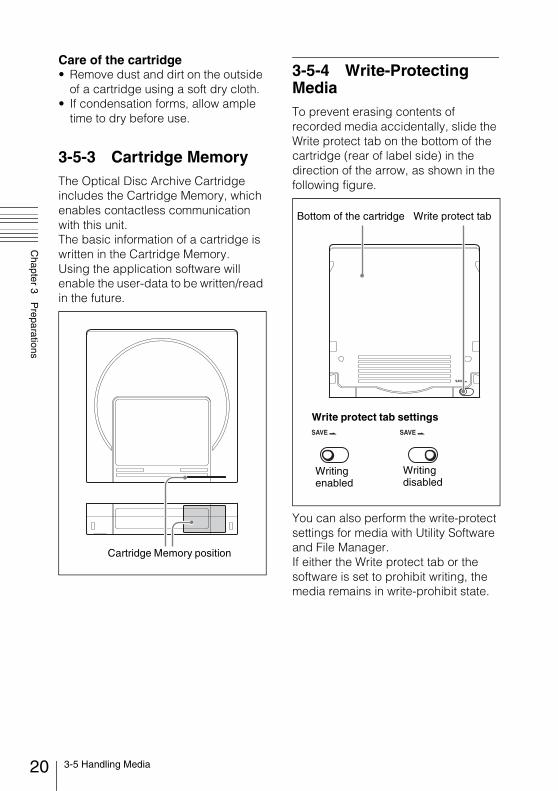
3-5-4 Write-Protecting MediaTo prevent erasing contents of recorded media accidentally, slide the Write protect tab on the bottom of the cartridge (rear of label side) in the direction of the arrow, as shown in the following figure.
You can also perform the write-protect settings for media with Utility Software and File Manager.If either the Write protect tab or the software is set to prohibit writing, the media remains in write-prohibit state.
Cartridge Memory position
Bottom of the cartridge Write protect tab
Write protect tab settings
Writing enabled
Writing disabled
213-5 Handling Media
Chapter 3 P
reparations
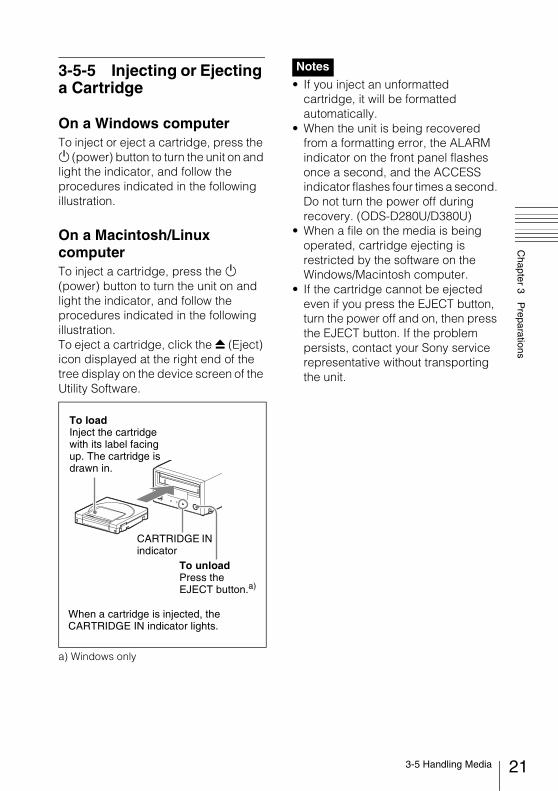
3-5-5 Injecting or Ejecting a Cartridge
On a Windows computerTo inject or eject a cartridge, press the 1 (power) button to turn the unit on and light the indicator, and follow the procedures indicated in the following illustration.
On a Macintosh/Linux computerTo inject a cartridge, press the 1 (power) button to turn the unit on and light the indicator, and follow the procedures indicated in the following illustration.To eject a cartridge, click the Z (Eject) icon displayed at the right end of the tree display on the device screen of the Utility Software.
a) Windows only
• If you inject an unformatted cartridge, it will be formatted automatically.
• When the unit is being recovered from a formatting error, the ALARM indicator on the front panel flashes once a second, and the ACCESS indicator flashes four times a second. Do not turn the power off during recovery. (ODS-D280U/D380U)
• When a file on the media is being operated, cartridge ejecting is restricted by the software on the Windows/Macintosh computer.
• If the cartridge cannot be ejected even if you press the EJECT button, turn the power off and on, then press the EJECT button. If the problem persists, contact your Sony service representative without transporting the unit.
CARTRIDGE IN indicator
To unloadPress the EJECT button.a)
To loadInject the cartridge with its label facing up. The cartridge is drawn in.
When a cartridge is injected, the CARTRIDGE IN indicator lights.
Notes
Chapter4
22 4-1 Starting and Exiting the Utility Software
Chapter 4 U
sing the Softw
are
Using the Software
4-1 Starting and Exiting the Utility Software
4-1-1 Starting/DisplayingFirst make sure that this unit is connected to the computer.
For connection details, see 3-3-1 “Connecting to a Computer” (page 17).
On a Windows computerWith the computer connected to this unit, carry out any of the following.• If you created a shortcut icon on the
desktop when you installed this software, double click the icon.
• Click the [Start] button on the computer and then select “Sony Optical Disc Archive Software”> “Optical Disc Archive Utility”.
On a Macintosh computerOpen the folder in which the Utility Software is installed, and then double click on the executable file of the Utility Software.
On a Linux computerWith the computer connected to this unit, carry out any of the following.
• Click the [Applications] menu on the computer and then select “Optical Disc Archive Utility” from “System tools”.
• Run “odautility” from the directory (/user/bin/odautility) where the Utility Software is installed.
This displays the home window of the Utility Software.
4-1-2 Exiting/Closing the Console WindowWith the computer connected to this unit, carry out any of the following.
On a Windows computer• Click the × (close) button in the top
right corner of the window.• Right click the title bar and select
“Close” from the context menu.• With this software activated, press Alt
+ F4 (press the F4 key while holding down the Alt key).
• Select “View”> “Close” from the menu bar.
On a Macintosh computer• Select “Quit Optical Disc Archive
Utility Software” from the Optical Disc Archive Utility menu.
• Click the title bar’s [Close] button.• With this software activated, press
Command + Q (press the Q key while holding down the Command key).
234-2 Starting and Exiting the Optical Disc Archive Filer
Chapter 4 U
sing the Softw
are
On a Linux computer• Click the × (close) button in the top
right corner of the window.• Right click the title bar and select
“Close (C)”.• With this software activated, press Alt
+ F4 (press the F4 key while holding down the Alt key).
• Select “View” > “Close” from the menu bar.
4-2 Starting and Exiting the Optical Disc Archive Filer
4-2-1 StartingTo start this software, carry out any of the following.
On a Windows computer• Click the [Start] button on the
computer and then select “Sony Optical Disc Archive Software” > “Optical Disc Archive Filer”.
• Open the folder in which the software is installed, and then double click ODAFiler.exe.
• If you created a shortcut icon on the desktop when you installed this software, double click the icon.
On a Macintosh computer• Select “Dock” > “Optical Disc
Archive Filer”.• Select Application folder > “Optical
Disc Archive Filer”.
The Optical Disc Archive Filer cannot be started when Content Manager or File Manager is in use.
Note

24 4-2 Starting and Exiting the Optical Disc Archive Filer
Chapter 4 U
sing the Softw
are
4-2-2 ExitingCarry out any of the following.
On a Windows computer• Click the × (close) button in the top
right corner of the window.• Right click the title bar and select
“Close” from the context menu.• With this software activated, press Alt
+ F4 (press the F4 key while holding down the Alt key).
• Select “File” > “Close” from the menu bar.
On a Macintosh computer• Click the × (close) button in the top
left corner of the window.• Click the menu bar and select
“Optical Disc Archive Filer” > “Quit Optical Disc Archive Filer” from the menu.
• With this software activated, press Command + Q (press the Q key while holding down the Command key).
Appendix
25 Important Notes on Operation
Appendix
Important Notes on Operation
CondensationWhen this unit and cartridges are moved from a cold place to a warmer place, or operated in high humidity, condensation may form on the optical pickup and discs. If the unit is operated in this state, correct reading and writing may be impossible.
About reducing the risk of knocking this unitDo not knock this unit. In addition, applying shock to the unit with a cartridge injected may cause damage to the discs.
Shipping and transportation of the unitAlways remove the cartridges when shipping or transporting the unit. If the unit is transported with the cartridges inserted, the unit or the disc may become damaged.Do not lift the unit with your hand inside in the cartridge insertion slot. Doing so may deform the lid, and adversely affect function and performance.
About the read time of files• When accessing multiple files at the
same time, disc swapping may occur frequently. This will reduce the data transfer rate and increase the total time of operation significantly.
• When accessing a single file, disc swapping may also occur, depending on the recording position in the cartridge. This will take time before starting to read the file.
About the write time of filesWhen writing small capacity files (less than 100 MB) numerously and continuously, it will take longer for the writing to finish. In this case, setting the operation mode “Synchronize management data to media immediately after completion of writing files” to off, will improve the writing performance and the utilization rate. However, if the malfunction (such as a power failure) occurs, the file recovery capability will be decreased.
26 Important Notes on Operation
Appendix
Replacing the air filter (ODS-D280U/D380U)If the air filter replacement alarm (3F-511) occurs, replace the air filter immediately.
• Continued use in this state may cause read/write errors and may lead to failure.
• The air filter replacement schedule will vary with the usage environment.
• Before replacing the air filter, always eject all cartridges from the unit and power off the unit.
For details about the air filter replacement procedure and actions after replacement, refer to the Installation Manual supplied with the replacement air filter.
For details about obtaining an air filter and air filter replacement, consult your local Sony service or sales representative.
Parts with limited service lifeThe drive units contain parts with a limited service life (optical block, motor, etc.).These parts may wear and deteriorate due to prolonged use.The service life of each part varies depending on the environment (high temperature) used and the usage frequency.If there is significant deterioration or wear, functionality may be impaired and replacement may be necessary to maintain product performance.
Long-term loading of cartridgesEject the cartridges from the unit if the unit will be connected to a computer for lengthy intervals without reading or writing data. The cartridges may be accessed, depending on the software installed on the computer, even if you do not intentionally read or write. This may lead to early replacement of the optical head or may adversely affect the media.
Attaching the USB cable clamper (ODS-D380U)Attach the USB cable clamper to prevent disconnection of the USB cable.
The supplied USB cable clamper supports the supplied USB cable only. It may not attach to commercially available USB cables.
1 Place the ODS-D380U upside down.
2 Insert the supplied USB cable all the way into the USB connector.
Notes
Note
USB connector (Type C)
27 Important Notes on Operation
Appendix
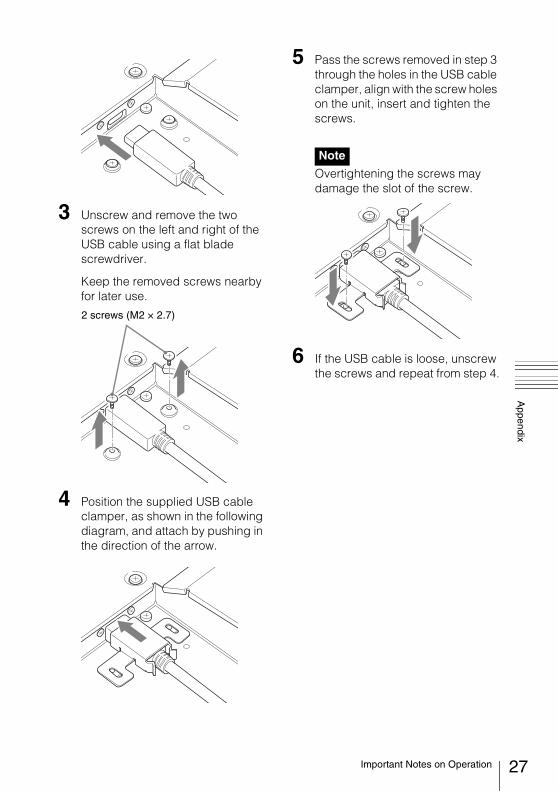
3 Unscrew and remove the two screws on the left and right of the USB cable using a flat blade screwdriver.
Keep the removed screws nearby for later use.
4 Position the supplied USB cable clamper, as shown in the following diagram, and attach by pushing in the direction of the arrow.
5 Pass the screws removed in step 3 through the holes in the USB cable clamper, align with the screw holes on the unit, insert and tighten the screws.
Overtightening the screws may damage the slot of the screw.
6 If the USB cable is loose, unscrew the screws and repeat from step 4.
2 screws (M2 × 2.7)
Note
28 Specifications
Appendix
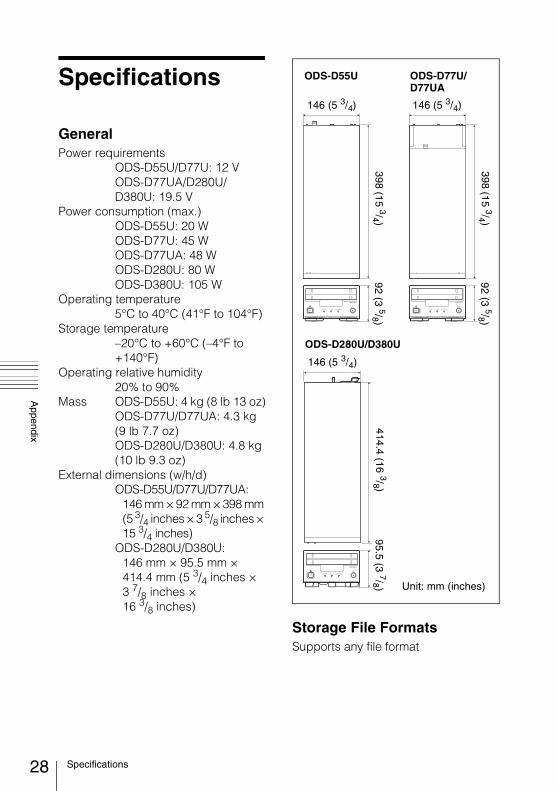
Specifications
GeneralPower requirements
ODS-D55U/D77U: 12 VODS-D77UA/D280U/D380U: 19.5 V
Power consumption (max.)ODS-D55U: 20 WODS-D77U: 45 WODS-D77UA: 48 WODS-D280U: 80 WODS-D380U: 105 W
Operating temperature5°C to 40°C (41°F to 104°F)
Storage temperature–20°C to +60°C (–4°F to +140°F)
Operating relative humidity20% to 90%
Mass ODS-D55U: 4 kg (8 lb 13 oz)ODS-D77U/D77UA: 4.3 kg (9 lb 7.7 oz)ODS-D280U/D380U: 4.8 kg (10 lb 9.3 oz)
External dimensions (w/h/d)ODS-D55U/D77U/D77UA:
146 mm × 92 mm × 398 mm (5 3/4 inches × 3 5/8 inches × 15 3/4 inches)
ODS-D280U/D380U: 146 mm × 95.5 mm × 414.4 mm (5 3/4 inches × 3 7/8 inches × 16 3/8 inches)
Storage File FormatsSupports any file format
Unit: mm (inches)
146 (5 3/4)
398 (15 3/4 )92 (3 5/8 )
146 (5 3/4)
398 (15 3/4 )92 (3 5/8 )
ODS-D55U ODS-D77U/D77UA
146 (5 3/4)
414.4 (16 3/8 )95.5 (3 7/8 )
ODS-D280U/D380U
29 Specifications
Appendix
Supported media for writing and readingODC300R: 300GB
Write-once, 60,000 or 240,000 files can be created
ODC300RE: 300GBRewritable, 60,000 or 240,000
files can be createdODC600R: 600GB
Write-once, 60,000 or 240,000 files can be created
ODC600RE: 600GBRewritable, 60,000 or 240,000
files can be createdODC1200RE: 1.2TB
Rewritable, 60,000 or 240,000 files can be created
ODC1500R: 1.5TBWrite-once, 60,000 or 240,000
files can be createdODC3300R: 3.3TB
Write-once, 480,000 files can be created
ODC5500R: 5.5 TBWrite-once, 800,000 files can be
createdAnd equivalences to above
Calculated based on 1 GB = 1,000,000,000 bytes. After formatting, the actual usable capacity will be smaller than the capacity shown above.The usable capacity may be reduced, depending on the situation; for example, recording a large number of files.The usable capacity may decrease, depending on recorded file size.
Output/input connectorUSB connector
ODS-D55U/D77U/D77UA/D280U:SuperSpeed USB (USB 3.2)
ODS-D380U:SuperSpeed USB 10 Gbps (USB 3.2)
Supplied accessoriesOperation Guide (1)Operation manual CD-ROM (1)Serial number (for authentication of
Content Manager) (1)AC adapter
ODS-D55U:Part No. 1-489-388-1x (1)
(except for U.S. and Canadian models)
ODS-D77UA:Part No. 1-493-004-3x (1)ODS-D280U/D380U:Part No. A-2165-887-x (1)
USB cableODS-D55U/D77U/D77UA/
D280U:Part No. 1-839-351-1x (1)
ODS-D380U:Part No. 1-005-566-1x (1) Type C–Type C1-912-358-1x (1) Type A–Type C
USB cable clamperODS-D380U:
Part No. 5-008-925-0x (1)
Optional accessoriesAC power cord
ODS-D55U/D77UA/D280U/D380U:
For the customers in the U.S.A. and CanadaPart No. 1-757-562-1x (125 V, 7 A, about 2.0 m)
Note
30 Specifications
Appendix
For the customers in European countriesPart No. 1-575-131-8x (250 V, 2.5 A, about 2.0 m)
Optical Disc Archive CartridgeODC300R (300 GB, write-once
type)ODC300RE (300 GB, rewritable
type)ODC600R (600 GB, write-once
type)ODC600RE (600 GB, rewritable
type)ODC1200RE (1.2 TB, rewritable
type)ODC1500R (1.5 TB, write-once
type)ODC3300R (3.3 TB, write-once
type)ODC5500R (5.5 TB, write-once
type)Additional serial numberAir filter
ODS-D280U/D380U:Part No. A-2181-544-x
Design and specifications are subject to change without notice.
USB-IF SuperSpeed USB Trident logo is a registered trademark of USB Implementers Forum, Inc.
Notes• Always make a test recording, and
verify that it was recorded successfully.SONY WILL NOT BE LIABLE FOR DAMAGES OF ANY KIND INCLUDING, BUT NOT LIMITED TO, COMPENSATION OR REIMBURSEMENT ON ACCOUNT OF FAILURE OF THIS UNIT OR ITS RECORDING MEDIA, EXTERNAL STORAGE SYSTEMS OR ANY OTHER MEDIA OR STORAGE SYSTEMS TO RECORD CONTENT OF ANY TYPE.
• Always verify that the unit is operating properly before use. SONY WILL NOT BE LIABLE FOR DAMAGES OF ANY KIND INCLUDING, BUT NOT LIMITED TO, COMPENSATION OR REIMBURSEMENT ON ACCOUNT OF THE LOSS OF PRESENT OR PROSPECTIVE PROFITS DUE TO FAILURE OF THIS UNIT, EITHER DURING THE WARRANTY PERIOD OR AFTER EXPIRATION OF THE WARRANTY, OR FOR ANY OTHER REASON WHATSOEVER.
• SONY WILL NOT BE LIABLE FOR CLAIMS OF ANY KIND MADE BY USERS OF THIS UNIT OR MADE BY THIRD PARTIES.
• SONY WILL NOT BE LIABLE FOR THE LOSS, REPAIR, OR REPRODUCTION OF ANY DATA RECORDED ON THE INTERNAL STORAGE SYSTEM, RECORDING MEDIA, EXTERNAL STORAGE SYSTEMS OR ANY OTHER MEDIA OR STORAGE SYSTEMS.
• SONY WILL NOT BE LIABLE FOR THE TERMINATION OR DISCONTINUATION OF ANY SERVICES RELATED TO THIS UNIT THAT MAY RESULT DUE TO CIRCUMSTANCES OF ANY KIND.
The material contained in this manual consists of information that is the property of Sony Corporation and is intended solely for use by the purchasers of the equipment described in this manual.Sony Corporation expressly prohibits the duplication of any portion of this manual or the use thereof for any purpose other than the operation or maintenance of the equipment described in this manual without the express written permission of Sony Corporation.

ODS-D55U/D77U/D77UA/D280U/D380U(SYM)4-734-861-12 (1)
Sony Corporation© 2013