Operator's Manual CRAFTSMA g - Sears Parts …s Manual CRAFTSMA 2,6 cu.in./42cc 2-Cycle GASOLINE...
19
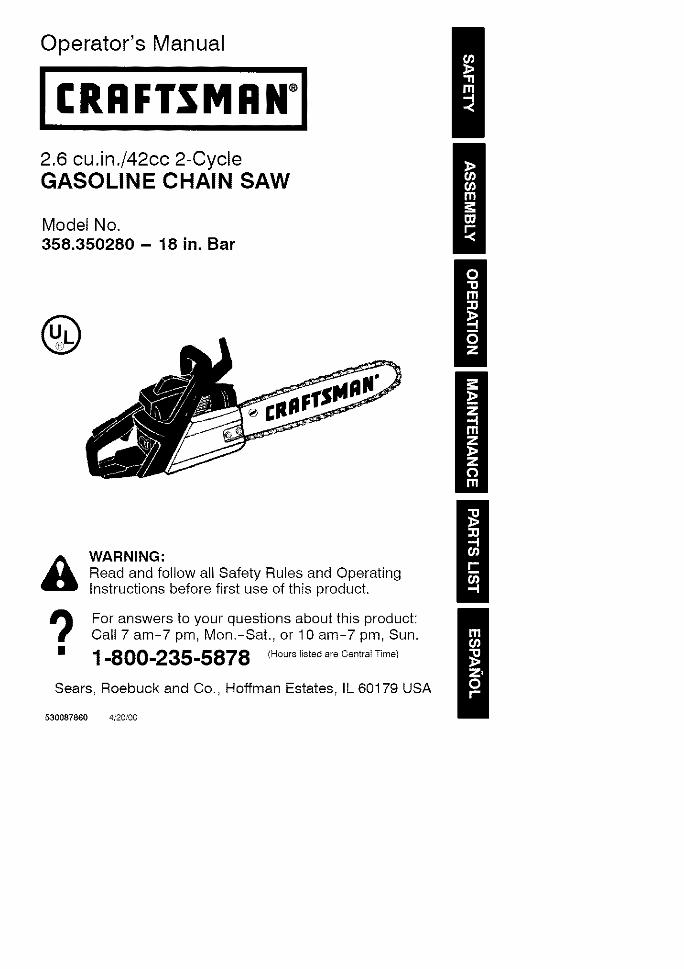
Operator's Manual CRAFTSMA 2,6 cu.in./42cc 2-Cycle GASOLINE CHAIN SAW Model No. 358.350280 - 18 in. Bar @ & WARNING: Read and follow all Safety Rules and Operating Instructions before first use of this product. For answers to your questions about this product: Call 7 am-7 pm, Mon.-Sat., or 10 am-7 pm, Sun. 1-800-235-5878 <Hoo,o ,,sted are Centra, Time) Sears, Roebuck and Co., Hoffman Estates, IL 60179 USA 530087860 8/20/00 g g e 0 0 g
Transcript of Operator's Manual CRAFTSMA g - Sears Parts …s Manual CRAFTSMA 2,6 cu.in./42cc 2-Cycle GASOLINE...
Operator's Manual
CRAFTSMA
2,6 cu.in./42cc 2-CycleGASOLINE CHAIN SAW
Model No.358.350280 - 18 in. Bar
@
& WARNING:
Read and follow all Safety Rules and OperatingInstructions before first use of this product.
For answers to your questions about this product:Call 7 am-7 pm, Mon.-Sat., or 10 am-7 pm, Sun.
1-800-235-5878 <Hoo,o ,,sted are Centra, Time)
Sears, Roebuck and Co., Hoffman Estates, IL 60179 USA
530087860 8/20/00
gge00g
Warranty 2 Storage 16Safety Rules 2 Trouble Shooting Chart 17Assembly 5 Emissions Statement 18Operation 6 Parts List 20Maintenance tl Spanish 23Service and Adjustments 14 Parts & Ordering Back
FULL ONE YEAR WARRANTY ON CRAFTSMAN GAS CHAIN SAW
For one year from the date of purchase, when this Craftsman Gas Chain Saw ismaintained, lubricated and tuned up according to the operator's manual, Searswilt repair, free of charge, any defect in material or workmanship.
This warranty excludes the bar, chain, spark plug and air filter, which areexpendable parts and become worn during normal use.
If this Gas Chain Saw is used for commercial or rental purposes, this warrantyapplies for 30 days from the date of purchase.WARRANTY SERVICE IS AVAILABLE BY RETURNING THIS CHAIN SAW TO THENEAREST SEARS SERVICE CENTER IN THE UNITED STATES.
This warranty gives you specific legal rights, and you may also have other rightswhich vary from state to state.
Sears, Roebuck and Co., D/817 WA, Hoffman Eotateo, IL 60179
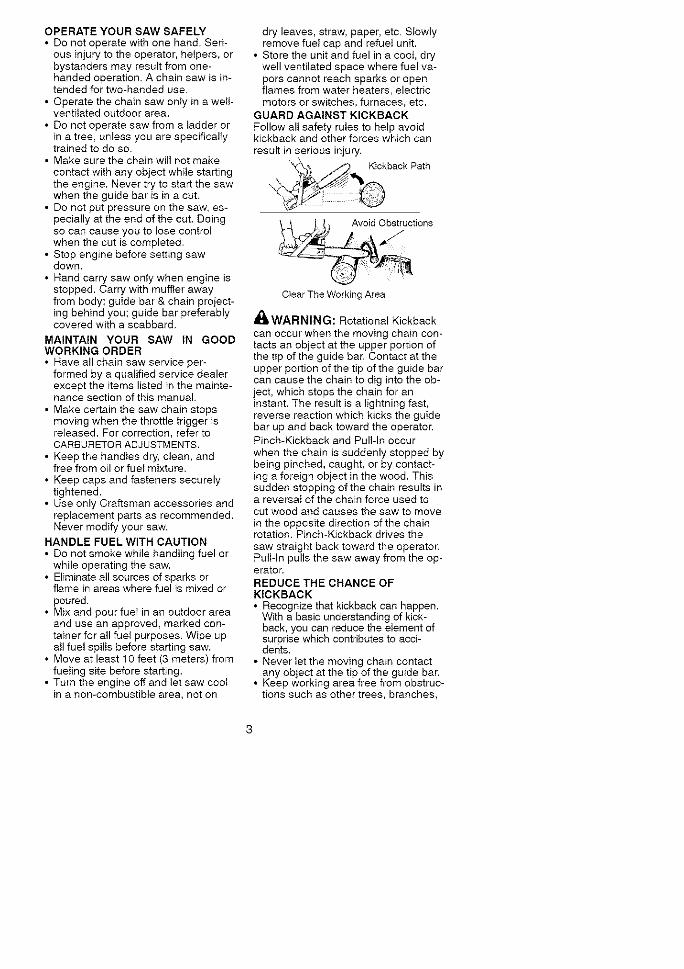
A_kWARNING: Always disconnectspark plug wire when making repairsexcept for carburetor adjustments. Be-cause a chain saw is a high-speedwoodcutting tool, careless or improperuse of this toot can cause seriousinjury.PLAN AHEAD• Restrict the use of your saw to adult
users who understand and can followthe safety rules, precautions, and op-erating instructions found in thismanual
Hearing A.,L/_ Safety HatProtection _ EyeSnug I q_'g I'_-_ Protection
Fitting _ Heavy Duty
Clothing _oves
SafetyShoes
%_m
• Wear protective gear. Always usesteel-toed safety footwear with non-slip soles; snug-fitting clothing;
heavy-duty, non-slip gloves; eye pro-tection such as non-fogging, ventedgoggles or face screen; an approvedsafety hard hat; and sound barriers(ear plugs or mufflers) to protect yourhearing. Regular users should havehearing checked regularly as chainsaw noise can damage hearing. Se-cure hair above shoulder length.
• Keep all parts of your body awayfrom the chain when the engine isrunning,
• Keep children, bystanders, and ani-mals at least 30 feet (10 meters)away from the work area when start-ing and using the saw.
• Do not handle or operate a chainsaw when you are fatigued, ill, or up-set, or if you have taken alcohol,drugs, or medication. You must be ingood physical condition and mentallyalert. If you have any condition thatmight be aggravated by strenuouswork, check with doctor before oper-ating.
• Do not start cutting until you have aclear work area, secure footing, andespecially if you are felling a tree, aretreat path.
2
OPERATEYOURSAWSAFELY• Do not operate with one hand. Seri-
ous injury to the operator, helpers, orbystanders may result from one-handed operation. A chain saw is in-tended for two-handed use.
• Operate the chain saw only in a welt-ventilated outdoor area.
• Do not operate saw from a ladder orin a tree, unless you are specificallytrained to do so.
• Make sure the chain will not makecontact with any object while startingthe engine. Never try to start the sawwhen the guide bar is in a cut.
• Do not put pressure on the saw, es-pecially at the end of the cut. Doingso can cause you to lose controlwhen the cut is completed,
• Stop engine before setting sawdown.
• Hand carry saw only when engine isstopped. Carry with muffler awayfrom body; guide bar & chain project-ing behind you; guide bar preferablycovered with a scabbard.
MAINTAIN YOUR SAW tN GOODWORKING ORDER• Have all chain saw service per-
formed by a quaIified service dealerexcept the items listed in the mainte-nance section of this manual.
• Make certain the saw chain stopsmoving when the throttle trigger isreleased. For correction, refer toCARBURETOR ADJUSTMENTS.
• Keep the handles dry, clean, andfree from oil or fuel mixture.
• Keep caps and fasteners securelytightened.
• Use only Craftsman accessories andreplacement parts as recommended.Never modify your saw.
HANDLE FUEL WITH CAUTION• Do not smoke while handIing fuel or
while operating the saw.• Eliminate all sources of sparks or
flame in areas where fuel is mixed orpoured.
• Mix and pour fueI in an outdoor areaand use an approved, marked con-tainer for all fuet purposes. Wipe upatl fuel spilis before starting saw.
• Move at least 10 feet (3 meters) fromfueiing site before starting.
• Turn the engine off and tet saw cootin a non-combustible area, not on
dry leaves, straw, paper, etc, Slowlyremove fuet cap and refuet unit.
• Store the unit and fuel in a coot, drywell ventilated space where fuel va-pors cannot reach sparks or openflames from water heaters, electricmotors or switches, furnaces, etc.
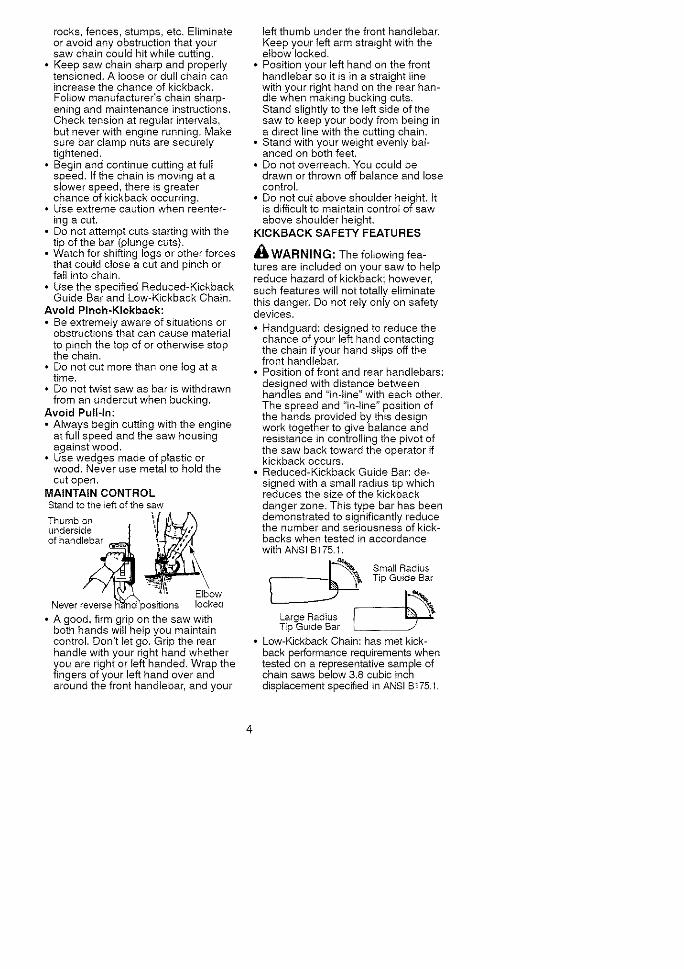
GUARD AGAINST KICKBACKFollow all safety rules to help avoidkickback and other forces which can
result in serious injury.
Clear The Working Area
A0&WARNING: Rotational Kickback
can occur when the moving chain con-tacts an object at the upper portion ofthe tip of the guide bar, Contact at theupper portion of the tip of the guide barcan cause the chain to dig into the ob-ject, which stops the chain for aninstant. The result is a lightning fast,reverse reaction which kicks the guidebar up and back toward the operator.Pinch-Kickback and Pull-In occur
when the chain is suddenly stopped bybeing pinched, caught, or by contact-ing a foreign object in the wood. Thissudden stopping of the chain results ina reversat of the chain force used tocut wood and causes the saw to movein the opposite direction of the chainrotation. Pinch-Kickback drives thesaw straight back toward the operator.Putt-In pulls the saw away from the op-erator.REDUCE THE CHANCE OFKICKBACK• Recognize that kickback can happen.
With a basic understanding of kick-back, you can reduce the element ofsurprise which contributes to acci-dents.
• Never tet the moving chain contact
• any object at the tip of the guide bar.Keep working area free from obstruc-tions such as other trees, branches,
rocks,fences,stumps,etc.Eliminateoravoidanyobstructionthatyoursawchaincouldhitwhilecutting.
• Keepsawchainsharpandproperlytensioned.Alooseordullchaincanincreasethechanceofkickback.Followmanufacturer'schainsharp-eningandmaintenanceinstructions.Checktensionatregularintervals,butneverwithenginerunning.Makesurebarclampnutsaresecurelytightened.
• Beginandcontinuecuttingatfuitspeed.Ifthechainismovingataslowerspeed,thereisgreaterchanceofkickbackoccurring.
• Useextremecautionwhenreenter-ingacut.
• Donotattemptcutsstartingwiththetipofthebar(ptungecuts),
• Watchforshiftinglogsorotherforcesthatcouldcloseacutandpinchorfallintochain.
• UsethespecifiedReduced-KickbackGuideBarandLow-KickbackChain.
Avoid Pinch-Kickback:• Be extremely aware of situations or
obstructions that can cause materialto pinch the top of or otherwise stopthe chain.
• Do not cut more than one tog at atime.
• Do not twist saw as bar is withdrawnfrom an undercut when bucking.
Avoid Pull-In:• Always begin cutting with the engine
at full speed and the saw housingagainst wood.
• Use wedges made of plastic orwood, Never use metal to hold thecut open.
MAINTAIN CONTROLStand to the left of the saw
Thumb on \[underside
of handlebar
Never reverse h'_nd'positions locked
• A good, firm grip on the saw withboth hands will help you maintaincontrol. Don't let go. Grip the rearhandle with your right hand whetheryou are right or left handed. Wrap thefingers of your left hand over andaround the front handlebar, and your
left thumb under the front handlebar.Keep your left arm straight with theelbow locked.
• Position your left hand on the fronthandlebar so it is in a straight linewith your right hand on the rear han-dle when making bucking cuts.Stand slightly to the left side of thesaw to keep your body from being ina direct line with the cutting chain.
• Stand with your weight evenly bal-anced on both feet.
• Do not overreach. You could bedrawn or thrown off balance and losecontrol.
• Do not cut above shoulder height. Itis difficult to maintain control of sawabove shoulder height.
KICKBACK SAFETY FEATURES
'_I'WARNING: The following fea-tures are included on your saw to helpreduce hazard of kickback; however,such features will not totally eliminatethis danger. Do not rely only on safetydevices.
• Handguard: designed to reduce thechance of your left hand contactingthe chain if your hand slips off thefront handlebar.
• Position of front and rear handlebars:designed with distance betweenhandles and "in-line" with each other.The spread and "in-line" position ofthe hands provided by this designwork together to give balance andresistance in controlling the pivot ofthe saw back toward the operator ifkickback occurs.
• Reduced-Kickback Guide Bar: de-signed with a small radius tip whichreduces the size of the kickbackdanger zone. This type bar has beendemonstrated to significantly reducethe number and seriousness of kick-backs when tested in accordancewith ANSI B175.1.
r_. Small Radius
Tip Guide Bar
Large RadiusTip Guide Bar [ /
• Low-Kickback Chain: has met kick-back performance requirements whentested on a representative sample ofchain saws below 3.8 cubic inchdisplacement specified in ANSI Bt75.1.
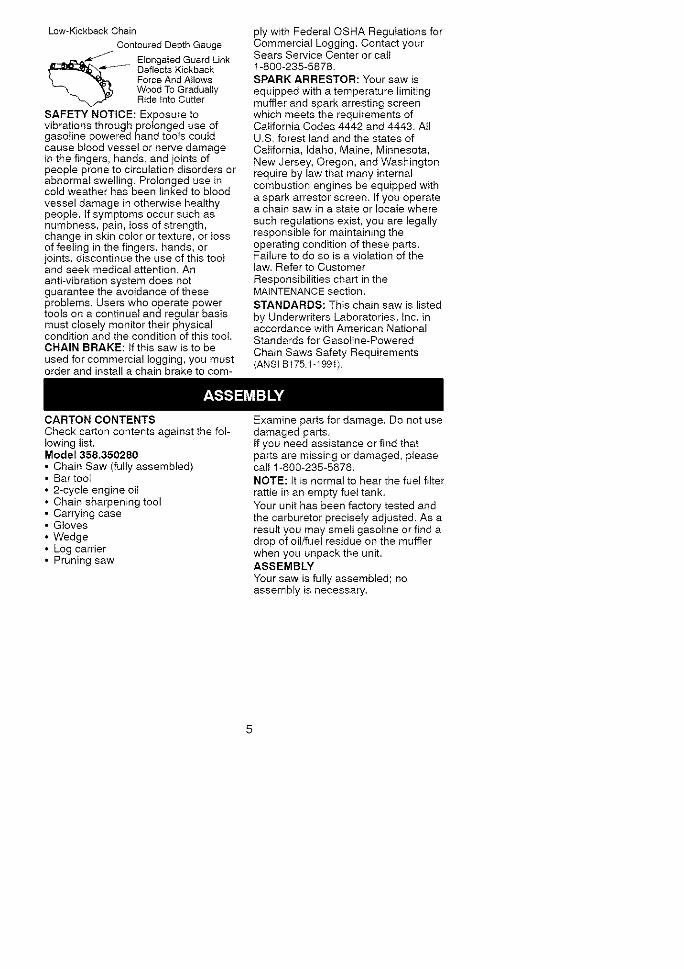
Low-KickbackChainContouredDepthGauge
_ IongatedGuardLinkDeflectsKickbackForceAndAllowsWoodToGraduallyRidekltoCutter
SAFETY NOTICE: Exposure tovibrations through prolonged use ofgasoline powered hand tools couldcause blood vessel or nerve damagein the fingers, hands, and joints ofpeople prone to circulation disorders orabnormal swelling. Prolonged use incotd weather has been linked to bloodvessel damage in otherwise healthypeople, tf symptoms occur such asnumbness, pain, toss of strength,change in skin color or texture, or lossof feeling in the fingers, hands, orjoints, discontinue the use of this tooland seek medical attention. Ananti-vibration system does notguarantee the avoidance of theseproblems. Users who operate powertools on a continual and regular basismust closely monitor their physicalcondition and the condition of this toot.CHAIN BRAKE: tf this saw is to beused for commercial logging, you mustorder and install a chain brake to com-
ply with Federal QSHA Regulations forCommercial Logging. Contact yourSears Service Center or catt1-800-235-5878.SPARK ARRESTOR: Your saw isequipped with a temperature limitingmuffler and spark arresting screenwhich meets the requirements ofCalifornia Codes 4442 and 4443. AtiU.S. forest land and the states ofCalifornia, Idaho, Maine, Minnesota,New Jersey, Oregon, and Washingtonrequire by law that many internalcombustion engines be equipped witha spark arrestor screen. If you operatea chain saw in a state or locale where
such regulations exist, you are legallyresponsible for maintaining theoperating condition of these parts.Failure to do so is a violation of thelaw. Refer to Customer
Responsibilities chart in theMAINTENANCE section.
STANDARDS: This chain saw is listedby Underwriters Laboratories, Inc. inaccordance with American NationalStandards for Gasoline-Powered
Chain Saws Safety Requirements(ANSI Bt 75.t-t 99t).
CARTON CONTENTSCheck carton contents against the fol-lowing list.Model 358.350280
Chain Saw (fully assembled)Bar toot2-cycle engine oilChain sharpening toolCarrying caseGlovesWedgeLog carrierPruning saw
Examine parts for damage. Do not usedamaged parts.If you need assistance or find thatparts are missing or damaged, pleasecall 1-800-235-5878.NOTE: It is normal to hear the fuel filterrattle in an empty fuel tank.Your unit has been factory tested andthe carburetor precisely adjusted. As aresult you may smell gasoline or find adrop of oil/fuet residue on the mufflerwhen you unpack the unit.ASSEMBLY
Your saw is fully assembled; noassembly is necessary.

KNOWYOURSAWREAD THIS OPERATOR'S MANUALAND SAFETY RULES BEFORE OPERATING YOURCHAIN SAW. Compare the illustrations with your unit to famiIiarize yourself with thelocation of the various controls and adjustments. Save this manual for future ref-erence,
Bar Tool(chain adjustment)
Muffler
Chain
CRAFTSMRN
Front HandleJ
Starter Rope
_j ON/STOP
witChpdmer
Bulb
Bar Oil Fill Cap Starter Fuel Mix Fill CapHousing
ThroffleLockout
RearHandle
Cylinder Cover
ChainDirectionof Travet
Throttle Choke Bar Clamp Chain Bar Clamp Nuts Guide BarTrigger Lever Catcher
ON/STOP SWITCHThe ON/STOP SWITCH is used to stopthe engine,
THROTTLE TRIGGERThe THROTq-LE TRIGGER controls en-
gine speed,
THROTTLE LOCKOUTThe THROTTLE LOCKOUT must be
pressed before you can squeeze thethrottle trigger, This feature preventsyou from accidentaIly squeezing thetrigger.
CHOKE/FAST IDLE LEVERThe choke and fast idte are set by pull-ing the CHOKE/FAST IDLE LEVER outfully for cotd or refueled starting, Thechoke provides additional fuel to theengine during cotd starting,PRIMER BULBThe PRIMER BULB circulates fuel to thecarburetor to provide quicker starting.
CHAIN TENSIONtt is normal for a new chain to stretchduring first 30 minutes of operation.You should check your chain tensionfrequentIy. See CHAIN TENSION underthe SERVICE AND ADJUSTMENTS sec-tion.
6
BEFORESTARTINGENGINE
4_WARNING: Be sure to read thefuel handling information in the safetyrules section of this manual before youbegin, tf you do not understand thefuel handling information do not at-tempt to fuel your unit. Seek help fromsomeone that does understand the in-formation or cati the customer assis-tance help line at 1-800-235-5878.
GUIDE BAR AND CHAIN OILThe chain oiler provides continuouslubrication to the chain and guide bar.Be sure to fitI the bar oil tank when youflit the fuet tank (Capacity = 6.8 ft. oz.).For maximum guide bar and chain life,we recommend you use Craftsmanchain saw bar oil. If Craftsman bar oit
is not available, you may use a goodgrade SAE 30 oil untit you are aMe toobtain Craftsman brand. The oil outputis automatically metered during opera-tion. Your saw will use approximatelyone tank of bar oil for every tank of fuelmix. Always fill the bar oit tank whenyou fill the fueI tank.
FUELING ENGINEThis engine is certified to operate onunIeaded gasoIine. Before operation,gasotine must be mixed with a goodquality 2-cycte air-cooled engine oil.We recommend Craftsman brand oilMix gasoline and oil at a ratio of 40:1(A 40:1 ratio is obtained by mixing 3.2ounces of oil with 1 gailon of unleadedgasoline). DO NOT USE automotive oilor boat oil These oils will cause
engine damage. When mixing fuelfollow the instructions printed on thecontainer.Once oiI is added to the gasoline,shake container momentarily to assurethat the fuel is thoroughly mixed.Always read and foltow the safety ruIesrelating to fuel before fueling your unit.
IMPORTANTExperience indicates that alcohoIblended fuels (catied gasohoI or usingethanol or methanoI) can attract mois-ture which leads to separation andformation of acids during storage. Acidicgas can damage the fuel system of anengine white in storage.To avoid engine problems, the fuel sys-tem should be emptied before storagefor 30 days or longer. Drain the gastank, start the engine and _etit run until
the fuel tines and carburetor are empty.Use fresh fuel next season. See STOR-AGE instructions for additional informa-tion.
Never use engine or carburetor clean-er products in the fuel tank or perma-nent damage may occur.See the STORAGE section for addition-al information.
mLWARNING: The chain must notmove when the engine runs at idlespeed, if the chain moves at idlespeed, refer to CARBURETOR ADJUST-MENTwithin this manual. Avoid con-tact with the muffler. A hot muffIer cancause serious burns.
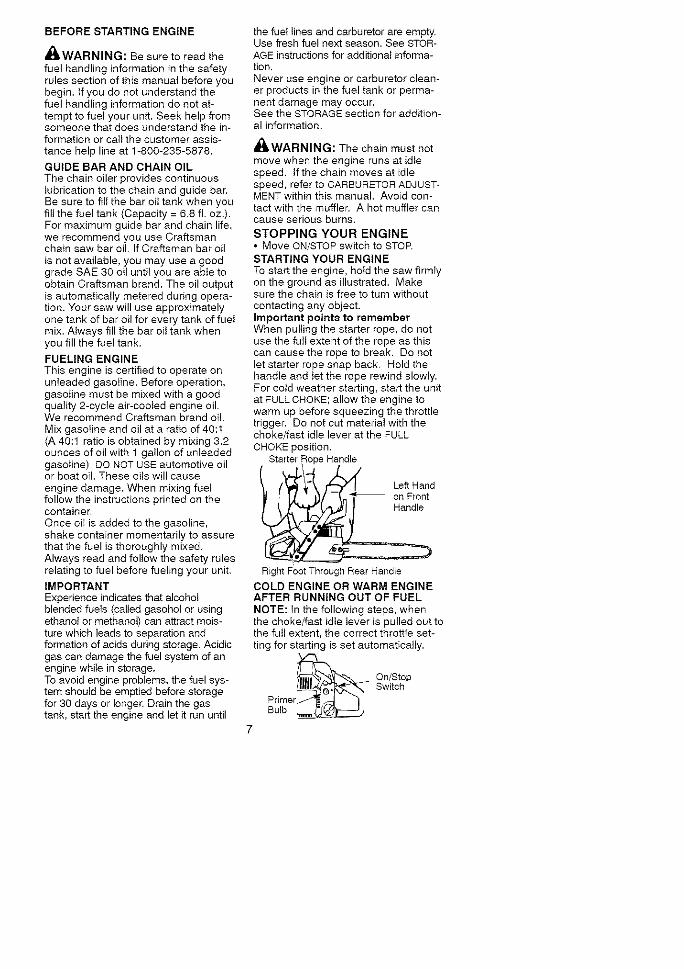
STOPPING YOUR ENGINE• Move ON/STOP switch to STOP.STARTING YOUR ENGINETo start the engine, hoid the saw firmlyon the ground as illustrated. Makesure the chain is free to turn withoutcontacting any object.Important point8 to rememberWhen pulting the starter rope, do notuse the fut[ extent of the rope as thiscan cause the rope to break. Do notlet starter rope snap back. Hold thehandle and [et the rope rewind slowly.For cold weather starting, start the unitat FULL CHOKE; allow the engine towarm up before squeezing the throttletrigger. Do not cut material with thechoke/fast idle lever at the FULLCHOKE position.
Starter Rope Handle
/ ('k_l_-_.k _ Lett Hand
_ _ on Front
Right Foot Through Rear HandleCOLD ENGINE OR WARM ENGINEAFTER RUNNING OUT OF FUELNOTE: tn the following steps, whenthe choke/fast idte lever is pulled out tothe fuit extent, the correct throttIe set-ting for starting is set automatically.
_ On/Stop
SwitchPrimerBulb
• MoveON/STOPswitchtoONposition.
Ch°keC°b
• Pulloutchoke/fastidletothefullex-tent.
• Slowlypressprimerbulb6times.• Pullthestarterropequicklywithyour
righthand5times;thenpushthechoke/fastidleleverincompletely(totheOFFCHOKEposition).
• Pullthestarterropequicklywithyourrighthanduntiltheenginestarts.
• Allowtheenginetorunforapproxi-matelyfiveseconds.Then,squeezeandreleasethrottletriggertoallowenginetoreturntoidlespeed.
STARTINGA WARM ENGINE• Pull the choke/fast idle lever out to
the full extent, then push the leverback in completely (to the OFFCHOKE position).
• Slowly press primer bulb 6 times.• Pull the starter rope quickly with your
right hand until the engine starts.• Squeeze and release throttle trigger,
allowing engine to idle.DIFFICULT STARTING ORSTARTING A FLOODED ENGINEThe engine may be flooded if it has notstarted after 10 pulls.Flooded engines can be cleared of ex-cess fuel by following the warm enginestarting procedure listed above, tnsurethe ignition switch is in the ON position.Starting could require pulling the start-er rope handle many pulls dependingon how badly the unit is flooded. If en-gine still fails to start, refer to theTROUBLESHOOTING CHART or call1-800-235-5878.
OPERATING TIPS• Check chain tension before first use
and after 1 minute of operation. SeeCHAIN TENSION in the MAINTENANCEsection.
• Cut wood only. Do not cut metal,plastics, masonry, non-wood buildingmaterials, etc.
• Stop the saw if the chain strikes aforeign object. Inspect the saw andrepair parts as necessary.
• Keep the chain out of dirt and sand.Even a small amount of dirt will
quickly dull a chain and increase thepossibility of kickback.
• Practice cutting a few small logs us-ing the following steps. This will helpyou get the '_feel" of using your sawbefore you begin a major sawing op-eration.• Squeeze the throttle trigger and al-
low the engine to reach fuIt speedbefore cutting.
• Begin cutting with the saw frameagainst the tog.
• Keep the engine at full speed theentire time you are cutting.
• Allow the chain to cut for you. Exertonly light downward pressure.
• Release the throttle trigger as soonas the cut is completed, allowingthe engine to idle. If you run thesaw at futt throttle without a cuttingload, unnecessary wear can occur.
• To avoid losing control when cut iscomplete, do not put pressure onsaw at end of cut.
• Stop engine before setting sawdown.
TREE FELLING TECHNIQUES
4HII,WARNING: Check for broken ordead branches which can fall while
cutting causing serious injury. Do notcut near buildings or electrical wires ifyou do not know the direction of treefall, nor cut at night since you wilt notbe able to see welt, nor during badweather such as rain, snow, or strongwinds, etc.• Carefully plan your sawing operation
in advance.• Clear the work area. You need a
clear area all around the tree so youcan have secure footing.
• Study the natural conditions that cancause the tree to fall in a particulardirection. These conditions include:
• The wind direction and speed.• The lean of the tree. The lean of a
tree might not be apparent due touneven or sloping terrain. Use aplumb or level to determine the di-rection of tree lean,
• Weight and branches on one side.• Surrounding trees and obstacles.
• Look for decay and rot. If the trunk isrotted, it can snap and fall toward theoperator.
• Make sure there is enough room forthe tree to fall. Maintain a distance of
2-1/2 tree lengths from the nearestperson or other objects. Enginenoise can drown out a warning call.
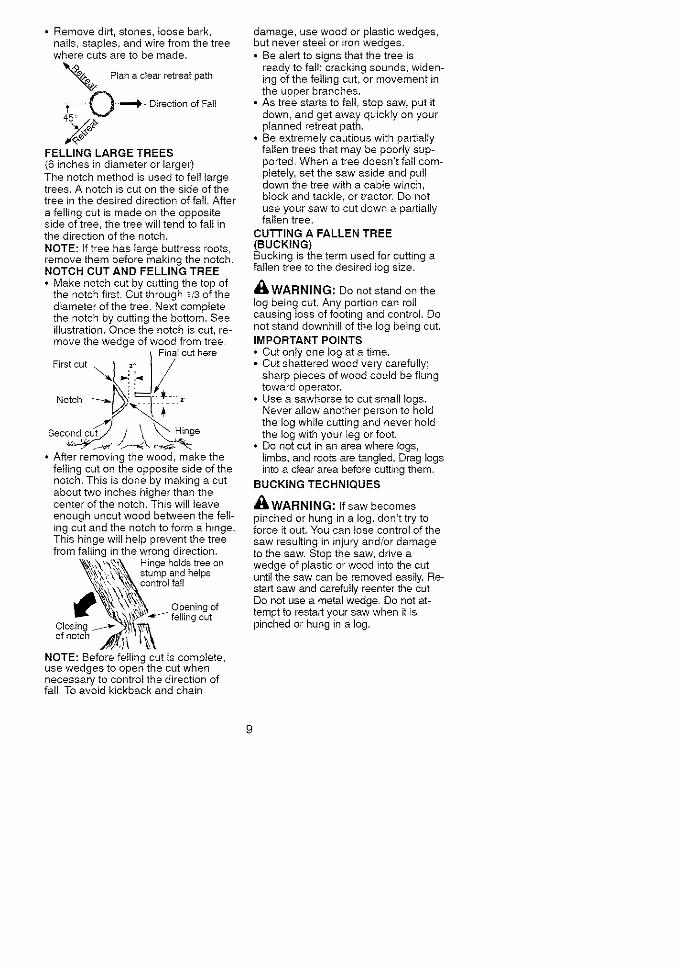
• Removedirt,stones,loosebark,nails,staples,andwirefromthetreewherecutsaretobemade.
_'9_bPlanaclearretreatpatht _ -_- Direction of Fall45 ._
FELLING LARGE TREES(6 inches in diameter or larger)The notch method is used to felI largetrees. A notch is cut on the side of thetree in the desired direction of fall. Aftera felling cut is made on the oppositeside of tree, the tree will tend to felt inthe direction of the notch.NOTE: if tree has targe buttress roots,remove them before making the notch.NOTCH CUT AND FELLING TREE• Make notch cut by cutting the top of
the notch first. Cut through t/3 of thediameter of the tree. Next completethe notch by cutting the bottom. Seeillustration. Once the notch is cut, re-move the wedge of wood from tree.
FinaI cut here
First cut _"_1
Notch
\ Hinge
• After removing the wood, make thefelling cut on the opposite side of thenotch. This is done by making a cutabout two inches higher than thecenter of the notch. This will leaveenough uncut wood between the fell-ing cut and the notch to form a hinge.This hinge wi_I hetp prevent the treefrom falling in the wrong direction.
Hinge holds tree onstump and helpscontrol fail
damage, use wood or plastic wedges,but never steeI or iron wedges.
• Be alert to signs that the tree isready to fall: cracking sounds, widen-ing of the felling cut, or movement inthe upper branches.
• As tree starts to fa}l, stop saw, put ftdown, and get away quickly on yourplanned retreat path.
• Be extremely cautious with partiallyfallen t_ees that may be poorly sup-ported. When e tree doesn't fall com-pletely, set the saw aside and puttdown the tree with a cable winch,bIock and tackle, or tractor Do not
use your saw to cut down a partiallyfatten tree.
CUTTING A FALLEN TREE(BUCKING)Bucking is the term used for cutting afallen tree to the desired tog size.
,_t, WARNING: Do not stand on the
log being cut. Any portion can rollcausing toss of footing and control. Donot stand downhill of the log being cut.
IMPORTANT POINTS• Cut onty one log at a time.• Cut shattered wood very carefully;
sharp pieces of wood could be flungtoward operator.
• Use a sawhorse to cut small logs.Never allow another person to holdthe log while cutting and never holdthe log with your leg or foot.
• Do not cut in an area where logs,limbs, and roots are tangled. Drag logsinto a clear area before cutting them.
BUCKING TECHNIQUES
_t, WARNING: If saw becomes
pinched or hung in a log, don't try toforce it out. You can lose control of thesaw _est_lting in in}ury a_d/or damageto the saw. Stop the saw, drive awedge of plastic or wood into the cutuntil the saw can be removed easily. Re-start saw and cs.refutly reenter the cut.Do not use a metal wedge. Do not at-tempt to restart your saw when it ispinched or hung in a log.
NOTE: Before felling cut is complete,use wedges to open the cut whennecessary to control the direction offall, To avoid kickback and chain

Turn saw OPF and use a plastic orwooden wedge to force cut open
Overcutting begins on the top side ofthe log with the bottom of the sawagainst the log. When overcutting uselight downward pressure.
Overcutting Undercutting
Undercutting involves cutting on theunderside of the log with top of sawagainst the tog. When undercuttinguse Iight upward pressure, Hold sawfirmly and maintain control The sawwilt tend to push back toward you.
_WARNING: Never turn saw up-side down to undercut. The saw can-not be controlled in this position,
Always make your first cut on thecompression side of the log.
First cut on compression side of log
Second cut
First cut on compression side of logBUCKING WITHOUT A SUPPORT• Overcut through 1/3 of the diameter
of the log,• Roll the tog over and finish with a
second overcut.• Watch for togs with a compression
side. See illustration above for cut-ting togs with a compression side.
Using a logfor support 2nd Cut ,_
_1 stCut
1st Cut
BUCKING USING A LOG ORSUPPORT STAND• Remember your first cut is atways on
the compression side of the log. (Re-fer to the illustration below for yourfirst and second cut).
• Your first cut should extend t/3 of thediameter of the log.
• Finish with your second cut.
2rid Cut __
LIMBING AND PRUNING
d_WARNING: Never climb into atree to limb or prune. Do not stand onladders, platforms, a log, or in any po-sition which can cause you to loseyour balance or controt of the saw.IMPORTANT POINTS• Watch out for springpoles.
Springpotes are small size limbswhich can whip toward you, or pultyou off balance. Use extreme cau-tion when cutting small size limbs.
• Be alert for springback. Watch out forbranches that are bent or underpressure. Avoid being struck by thebranch or the saw when the tensionin the wood fibers is released.
• Frequently clear branches out of theway to avoid tripping over them.
LIMBING• Limb a tree only after it is cut down.• Leave the larger limbs underneath the
felled tree to support the tree as youwork.
• Start at the base of the feIled tree and
work toward the top, cutting branchesand limbs. Remove small limbs withone cut.
10

• Keep the tree between you and thechain.
• Remove larger, supporting brancheswith the 1/3, 2/'3cutting techniques de-scribed in the bucking section.
• Always use an overcut to cut smalland freely hanging limbs. Undercuttingcould cause limbs to fall and pinch theSaW.
PRUNING
_iLWARNING: Limit pruning to limbs
shoulder height or below. Do not cut ifbranches are higher than your shoul-der. Get a professional to do the job.• Make your first cut t/3 of the way
CUSTOMER RESPONSIBILITIES
through the bottom of the limb.• Next make a second cut all the way
through the limb.• Finish the pruning operation by using
an overcut so that the stump of thetimb protrudes 1 to 2 inches from thetrunk of the tree.
Second cut
/
1/3 of way
_/'f_ 3rd cut t to 2infrom trunk of tree
Fitt in dates as you completeregular service
Check for damaged/worn parts
Check for loose fasteners/parts
Check chain tension
Check chain sharpness
Check guide bar
Clean unit & labels
Clean air filter
Clean/inspect spark arrestorscreen & inspect muffler
Replace spark plug
Replace air filterGENERAL RECOMMENDATIONS
The warranty on this unit does not cov-er items that have been subjected tooperator abuse or negligence. To re-ceive fult value from the warranty, theoperator must maintain unit as instruct-ed in this manual. Various adjustmentswitt need to be made periodically toproperly maintain your unit.• Once a year, replace the spark plug,
air filter element, and check guidebar and chain for wear. A new sparkplug and air filter element assuresproper air-fuel mixture and helpsyour engine run better and last long-er.
,11_WARNING: Disconnect the spark
plug before performing maintenanceexcept for carburetor adjustments.
Before
Use
v"
After Every EveryUse 5 hrs, 25 hrs.
ServiceYearly Dates
LUBRICATION
Bar Bar OiISprocket Fill Cap
CHECK FOR DAMAGED ORWORN PARTSReplacement of damaged/worn partsshould be referred to your Sears Ser-vice Center.NOTE: tt is normal for a smatl amountof oil to appear under the saw after en-gine stops. Do not confuse this with aleaking oil tank.• ON/STOP Switch - Ensure ON/STOP
switch functions properly by movingthe switch to the STOP position.
11
Make sure engine stops; then restartengine and continue.
• Fue_ Tank - Do not use saw if fuettank shows signs of damage orleaks.
• Oil Tank - Do not use saw if oil tankshows signs of damage or leaks.
CHECK FOR LOOSEFASTENERS AND PARTS
Bar Clamp NutChainMuffler
Cylinder ShieldAir FilterClutch Drum/SprocketHandle ScrewsVibration Mounts
Starter HousingHandguard
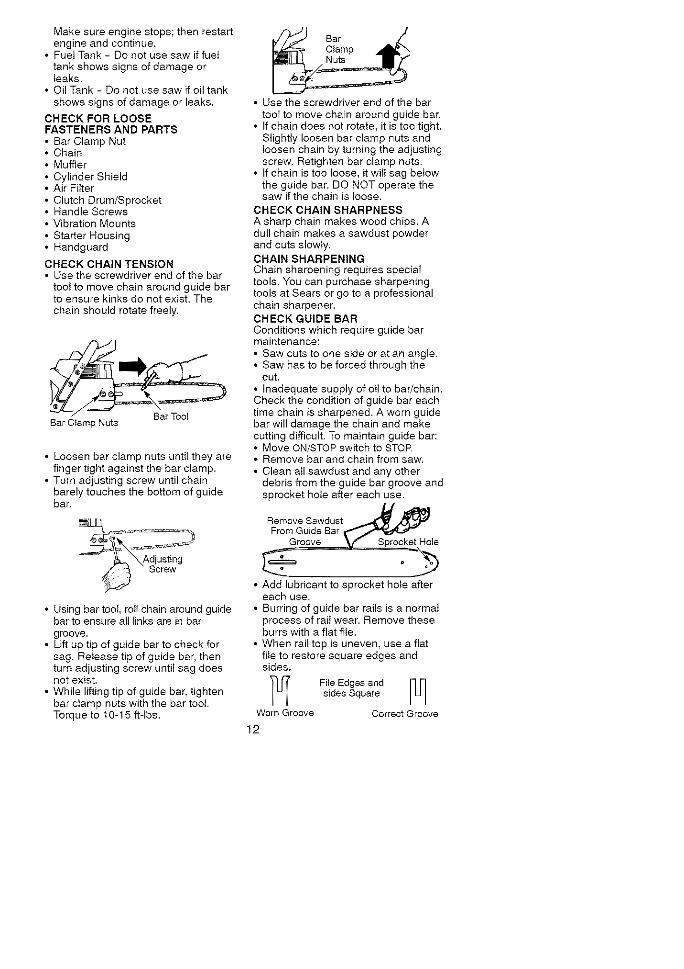
CHECK CHAIN TENSION• Use the screwdriver end of the bar
toot to move chain around guide barto ensure kinks do not exist. Thechain should rotate freely.
Bar Ctamp Nuts
• Loosen bar clamp nuts untit they arefinger tight against the bar clamp.
• Turn adjusting screw until chainbarely touches the bottom of guidebar.
• Using bar toot, roll chain around guidebar to ensure all links are in bar
groove.• Lift up tip of guide bar to check for
sag. Release tip of guide bar, thenturn adjusting screw until sag doesnot exist.
• While lifting tip of guide bar, tightenbar clamp nuts with the bar tool.Torque to 10-15 ft-lbs.
• Use the screwdriver end of the bar
toot to move chain around guide bar.• If chain does not rotate, it is too tight.
Slightly loosen bar clamp nuts andloosen chain by turning the adjustingscrew. Retighten bar clamp nuts.
• If chain is too loose, it wilt sag belowthe guide bar. DO NOT operate thesaw if the chain is loose.
CHECK CHAIN SHARPNESSA sharp chain makes wood chips. Adull chain makes a sawdust powderand cuts slowly.CHAIN SHARPENINGChain sharpening requires speciattools. You can purchase sharpeningtools at Sears or go to a professionalchain sharpener.CHECK GUIDE BARConditions which require guide barmaintenance:• Saw cuts to one side or at an angle.• Saw has to be forced through the
cut.• Inadequate supply of oil to bar/chain.Check the condition of guide bar eachtime chain is sharpened. A worn guidebar will damage the chain and makecutting difficult, To maintain guide bar:• Move ON/STOP switch to STOP• Remove bar and chain from saw.• Clean all sawdust and any other
debris from the guide bar groove andsprocket hole after each use.
Remove Sawdust__ 0From Guide BarGroove le
• Add lubricant to sprocket hole aftereach use.
• Burring of guide bar rails is a normatprocess of raii wear. Remove theseburrs with a flat file.
• When rail top is uneven, use a flatfile to restore square edges andsides.
]_r Fi_eEdges andsides Square [_]
Worn Groove Correct Groove
12
Replace guide bar when the groove isworn, the guide bar is bent or cracked,or when excess heating or burring of therails occurs, tf replacement is necessary,use only the guide bar specified for yoursaw in the repair parts list or on the de-cal located on the chain saw.
CLEAN UNIT & LABELS• Clean the unit using a damp cloth
with a mild detergent.• Wipe off unit with a clean dry cloth.
CLEAN AIR FILTERA dirty air filter decreases the life andperformance of the engine and in-creases fuel consumption and harmfutemissions. Always clean your air filterafter 15 tanks of fueI or 5 hours of op-eration, whichever comes first. Cieanmore frequently in dusty conditions. Aused air filter can never be completelycleaned. It is advisable to replace yourair filter with a new one after every 50hours of operation, or annually, which-ever comes first. To clean filter:• Loosen 3 screws on cylinder cover.• Remove cylinder cover.• Remove air filter.• Clean the air filter using hot soapy
water. Rinse with ctean coot water.Air dry completely before reinstalling.
• Lightly oil air filter before installing toimprove the efficiency of air filter.Use 2-cycle engine oil or motor oil(SAE 30), Squeeze excess oil fromfilter.
• Reinstall air filter.
• Reinstall cylinder cover and 3 screws(15-20 in-tbs.),
Air FiIter _ Cylinder Cover
S,,,,__ rews
over
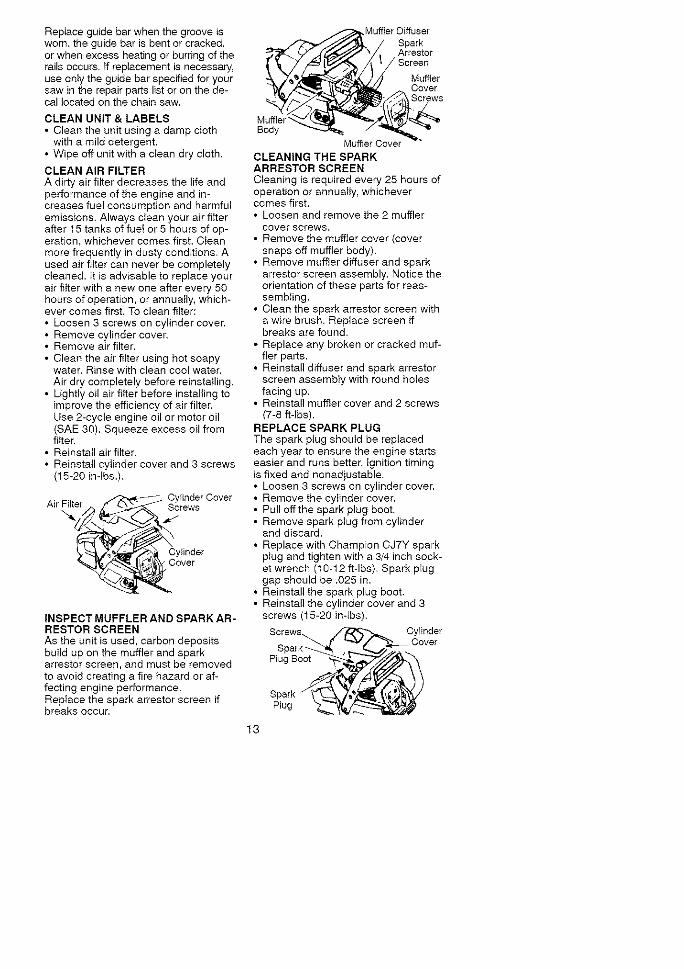
INSPECT MUFFLER AND SPARK AR-RESTOR SCREENAs the unit is used, carbon depositsbuild up on the muffler and sparkarrestor screen, and must be removedto avoid creating a fire hazard or af-fecting engine performance.Replace the spark arrestor screen ifbreaks occur.
Muffler Diffuser
/ Screen
CLEANING THE SPARKARRESTOR SCREENCleaning is required every 25 hours ofoperation or annually, whichevercomes first.• Loosen and remove the 2 muffler
cover screws.• Remove the muffIer cover (cover
snaps off muffler body).• Remove muffler diffuser and spark
arrestor screen assembly, Notice theorientation of these parts for reas-sembling.
• Clean the spark arrestor screen witha wire brush. Repiace screen ifbreaks are found.
• Replace any broken or cracked muf-tier parts.
• Reinstall diffuser and spark arrestorscreen assembty with round holesfacing up.
• Reinstall muffler cover and 2 screws(7-8 ff-tbs).
REPLACE SPARK PLUGThe spark plug should be replacedeach year to ensure the engine startseasier and runs better, tgnition timingis fixed and nonadjustable.• Loosen 3 screws on cylinder cover.• Remove the cylinder cover.• Pull offthe spark ptug boot.• Remove spark plug from cylinder
and discard.• Replace with Champion CJ7Y spark
plug and tighten with a 3/4 inch sock-et wrench (10-12 ff-lbs). Spark p_uggap should be .025 in.
• Reinstall the spark plug boot.• Reinstall the cylinder cover and 3
screws (15-20 in-tbs).
Screws Cylinder
Spark _ Cover
13
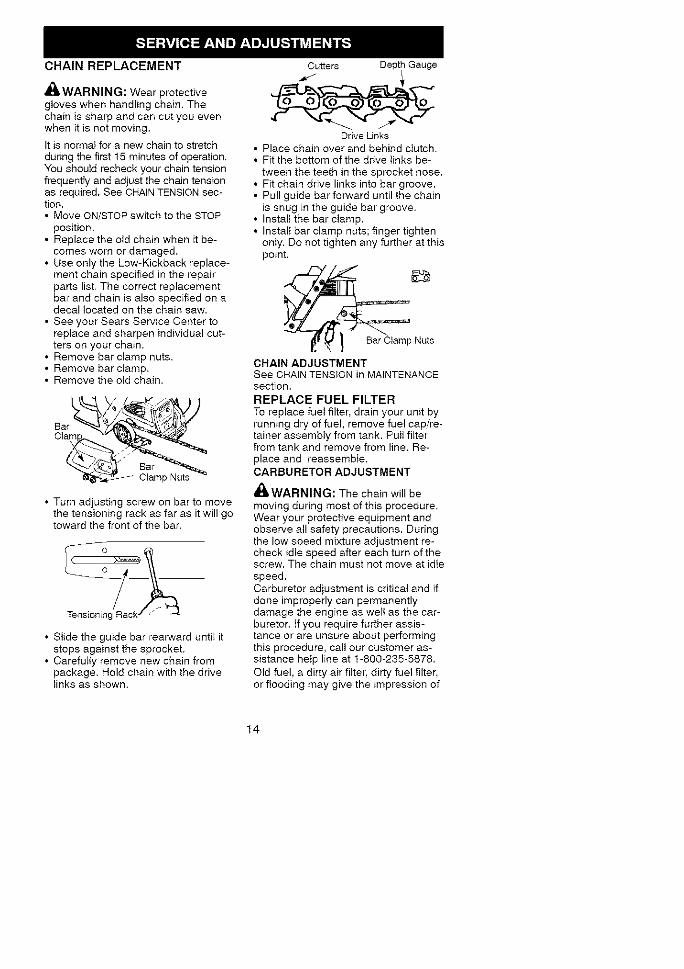
CHAIN REPLACEMENT
WARNING: Wear protectivegtoves when handling chain. Thechain is sharp and can cut you evenwhen it is not moving.
It is normal for a new chain to stretchduring the first 15 minutes of operation.You shoutd recheck your chain tensionfrequently and adjust the chain tensionas required. See CHAIN TENSION sec-tion.• Move ON/STOP switch to the STOP
position.• Replace the old chain when it be-
comes worn or damaged.• Use only the Low-Kickback replace-
ment chain specified in the repairparts list. The correct replacementbar and chain is also specified on adecal located on the chain saw.
• See your Sears Service Center toreplace and sharpen individual cut-ters on your chain.
• Remove bar clamp nuts.• Remove bar clamp.• Remove the oId chain.
/ ¸
• Turn adjusting screw on bar to movethe tensioning rack as far as it will gotoward the front of the bar.
TensioningR_ack_
• Slide the guide bar rearward until itstops against the sprocket,
• Carefully remove new chain frompackage, Hold chain with the drivefinks as shown.
Cutters Depth Gauge
Drive Links• Place chain over and behind clutch.• Fit the bottom of the drive links be-
tween the teeth in the sprocket nose.• Fit chain drive links into bar groove.• Pull guide bar forward until the chain
is snug in the guide bar groove.• Install the bar ctamp,• Install bar clamp nuts; finger tighten
only. Do not tighten any further at thispoint.
CHAIN ADJUSTMENTSee CHAIN TENSION in MAINTENANCEsection.
REPLACE FUEL FILTERTo replace fuel filter, drain your unit byrunning dry of fuei, remove fuel cap/re-tainer assembly from tank. Pull filterfrom tank and remove from line, Re-place and reassemble.CARBURETOR ADJUSTMENT
,_t, WARNING: The chain will be
moving during most of this procedure.Wear your protective equipment andobserve all safety precautions. Duringthe low speed mixture adjustment re-check idle speed after each turn of thescrew. The chain must not move at idle
speed.Carburetor adjustment is critical and ifdone improperly can permanentlydamage the engine as weIt as the car-buretor. If you require further assis-tance or are unsure about performingthis procedure, calt our customer as-sistance help line at 1-800-235-5878.Old fuel, a dirty air filter, dirty fuel filter,or flooding may give the impression of
14

an improperly adjusted carburetor.Check these conditions before adjust-ing the carburetor.The carburetor has been carefully setat the factory. Adjustments may benecessary if you notice any of the fol-lowing conditions:• Chain moves at idle. See IDLE
SPEED-T under adjusting procedure.• Saw wJtt not idle. See iDLE SPEED-T
and LOW SPEED MIXTURE-L underadjusting procedure.
• Engine dies or hesitates when itshould accelerate. See ACCELERA-TION CHECK under adjustingprocedure.
• Loss of cutting power. See HIGHSPEED MIXTURE-H under adjustingprocedure.
There are three adjustment screws onthe carburetor. They are tabeted H, L,and T. They are located in the area justabove the primer bulb.CARBURETOR PRESETSWhen making adjustments, do notforce the plastic timiter caps beyondthe stops or damage will occur.If carburetor presets are not needed,proceed to iDLE SPEED-T.• Turn both mixture screws counter-
clockwise until they stop,• Turn the idle speed screw clockwise
until it stops. Now turn counterclock-wise 4-1/2 full turns.
Start motor, let it run for 3 minutes, andproceed to the adjustment section, ifengine does not start, refer to TROU-BLESHOOTING CHART or cat_1-800-235-5878.If engine performance is acceptable atthe preset positions and there is nochain movement at idle, no further ad-justment is necessary.ADJUSTING PROCEDUREIdle Speed-TAllow engine to idle. Adjust speed untilengine runs without chain movement
or stalling.• Turn clockwise to increase engine
speed if engine stalls or dies.• Turn counterclockwise to decrease
speed.No further adjustments are necessaryif chain does not move at idle speedand if performance is satisfactory.Low Speed Mixture-LAllow engine to idle. Then acceleratethe engine and note performance. Ifengine hesitates, bogs down, orsmokes during acceleration, turn mix-ture screw clockwise in 1/16-turn incre-ments until performance is satisfactory.Repeat this procedure as necessaryfor proper adjustment. After completingadjustments, check for accelerationand chain movement at idle. Reset if
necessary.High Speed Mixture-HDO NOT operate engine at full throttlefor prolonged periods while making ad-justments, Damage to the engine canoccur. Make a test cut. Based on per-formance of the saw while cutting, ad-just the high speed mixture setting in1/16-turn increments as follows:• Clockwise until saw has good power
in the cut with no hesitation. Do notadjust by sound or speed, but judgeby how well the saw performs in thecut.
• Counterclockwise if the saw hasspeed, but dies in the cut or lackspower in the cut.
After completing adjustments, checkfor acceleration and chain movementat idle. Reset if necessary.Acceleration CheckIf the engine dies or hesitates instead ofaccelerating, turn the low speed mixtureadjustment counterclockwise until youhave smooth acceleration with no chain
movement at idle. Recheck and adjustas necessary for acceptable perfor-mance.
15
Prepare your unit for storage at theend of the season or if it wilt not beused for 30 days or more.
,i_ WARNING:
• Allow the engine to cool, and securethe unit before storing or transport-ing.
• Store chain saw and fuel in a well
ventilated area where fuel vaporscannot reach sparks or open flamesfrom water heaters, electric motors orswitches, furnaces, etc.
• Store chain saw with all guards inplace and position chain saw so thatany sharp object cannot accidentallycause injury.
• Store chain saw well out of the reachof children.
EXTERNAL SURFACESIf your chain saw is to be stored for aperiod of time, clean it thoroughly be-fore storage. Store in a clean dry area.• Lightly oil external metaI surfaces
and guide bar,• Oil the chain and wrap it in heavy pa-
per or cloth.FUEL SYSTEMUnder FUELING ENGINE in the OPERA-TION section of this manual, see mes-sage tabeIed IMPORTANT regardingthe use of gasohot in your chain saw.Fuel stabilizer is an acceptable a_ter-
native in minimizing the formation offuel gum deposits during storage. Addstabilizer to the gasoline in the fueItank or fuel storage container, Foltowthe mix instructions found on stabilizercontainers. Run engine at least 5 min-utes after adding stabilizer.
Craftsman 40:1,2-cycle engine oil (aircooled) is especially blended with fuelstabilizer. If you do not use this Searsoil, you can add a fuel stabilizer to yourfuel tank.
ENGINE• Remove spark plug and pour 1 tea-
spoon of 40:1,2-cycle engine oil (aircooled) through the spark plug open-ing. Slowly pull the starter rope 8 to10 times to distribute oil.
• Replace spark plug with new one ofrecommended type and heat range.
• Clean air filter.• Check entire unit for loose screws,
nuts, and bolts. Replace any dam-aged, broken, or worn parts,
• At the beginning of the next season,use onty fresh fuel having the propergasoline to oil ratio.
OTHER• Do not store gasoline from one sea-
son to another.• Replace your gasoline can if it starts
to rust.
16
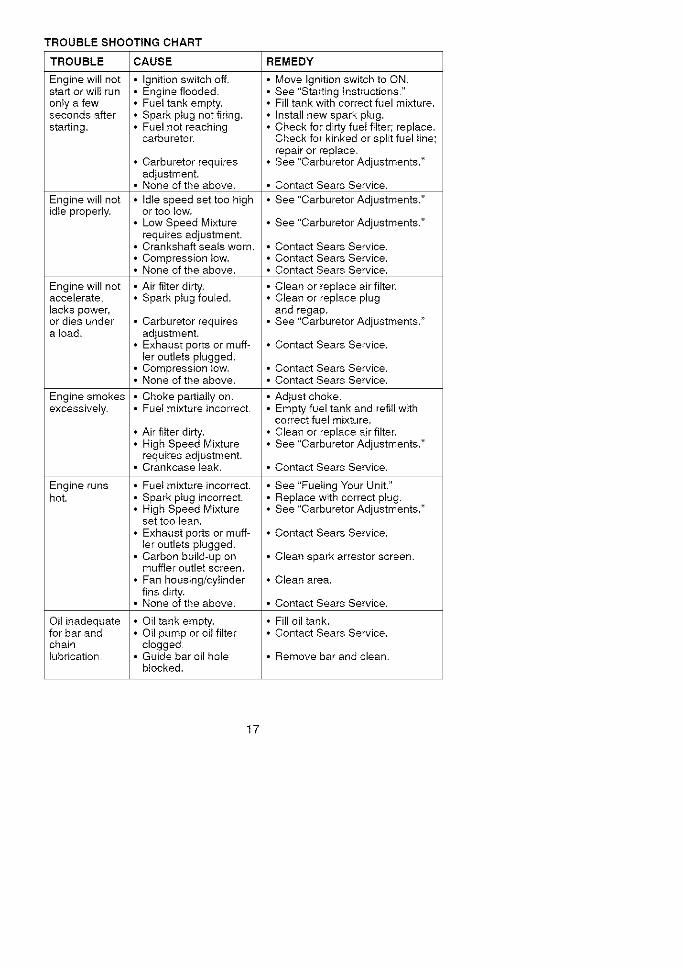
TROUBLE SHOOTING CHART
TROUBLE CAUSE REMEDY
Engine will notstart or will runonly a fewseconds afterstarting.
Engine will notidte property.
Engine will notaccelerate,lacks power,or dies undera load.
Engine smokesexcessively.
Engine runshot.
• Ignition switch off.• Engine flooded.• FueI tank empty.• Spark plug not firing.• FueI not reaching
carburetor.
• Carburetor requiresadjustment.
• None of the above.
• Idle speed set too highor too tow.
• Low Speed Mixturerequires adjustment.
• Crankshaft seals worn.• Compression tow.• None of the above.
• Air filter dirty,• Spark plug fouled.
• Carburetor requiresadjustment.
• Exhaust ports or muff-ter outlets plugged.
• Compression low.• None of the above.
• Choke partially on.• Fuet mixture incorrect.
• Air filter dirty.• High Speed Mixture
requires adjustment.• Crankcase leak.
• Fuet mixture incorrect.
• Spark plug incorrect.• High Speed Mixture
set too lean.• Exhaust ports or muff-
ter outlets plugged.• Carbon build-up on
muffler outlet screen.
• Fan housing/cylinderfins dirty.
• None of the above.
• Move Ignition switch to ON.• See "Starting Instructions."• Fill tank with correct fuel mixture.• Install new spark plug.• Check for dirty fuet filter; replace.
Check for kinked or split fuel line;repair or replace.
• See "Carburetor Adjustments."
• Contact Sears Service.
• See "Carburetor Adjustments."
• See "Carburetor Adjustments."
• Contact Sears Service.• Contact Sears Service.• Contact Sears Service.
• Clean or replace air filter.• Clean or replace plug
and regap.• See "Carburetor Adjustments."
• Contact Sears Service.
• Contact Sears Service.• Contact Sears Service.
• Adjust choke.• Empty fuel tank and refill with
correct fuel mixture.• Clean or replace air filter.• See "Carburetor Adjustments."
• Contact Sears Service.
• See "Fueling Your Unit."• Replace with correct plug.• See "Carburetor Adjustments."
• Contact Sears Service.
• Clean spark arrestor screen,
• Clean area.
• Contact Sears Service.
Oit inadequate • Oil tank empty, • Fill oil tank.for bar and • Oil pump or oil filter • Contact Sears Service.chain clogged.lubrication, • Guide bar oil hole • Remove bar and clean.
blocked,
17

TROUBLE SHOOTING CHART - Continued
TROUBLE CAUSE
Chain moves • Idle speed requiresat idle speed, adjustment.
• Clutch requires repair.
Chain does • Chain tension toonot move tight,when engine • Carburetor requiresis accelerated, adjustment.
• Guide bar railspinched.
• Clutch slipping,
Chain clatters • Chain tension incorrect.
or cuts roughly • Cutters damaged.• Chain worn.• Cutters dull, improperly
sharpened, or depthgauges too high.
REMEDY
• See "Carburetor Adjustments."
• Contact Sears Service.
• See "Chain Tension."
• See "Carburetor Adjustments."
• Repair or reptace.
• Contact Sears Service.
• See "Chain Tension."• Contact Sears Service.• Resharpen or replace chain.• See "Sharpening Chain."
• Sprocket worn. • Contact Sears Service.• Chain installed • install chain in right direction.
backwards.
Chain stops • Chain cutter tops not * See "Sharpening Chain,"within the cut. filed flat.
• Guide bar burred or * Repair or repiace guide bar.bent; rails uneven.
• Clutch slipping * Contact Sears Service.
Chain cuts at • Cutters damaged on * See "Sharpening Chain,"an angle, one side.
• Chain dutt on one side. * See "Sharpening Chain."• Guide bar bent or worn. * Replace guide bar.
tf situations occur which are not covered in this manual, use care and goodjudgement, if you need assistance, contact Sears Service or the CUSTOMERASSISTANCE HELPUNE at t-800-235-5878.
YOUR WARRANTY RIGHTS ANDOBLIGATIONS: The U. S. Environ-
mental Protection Agency and Sears,Roebuck and Co., U.S.A., are pieasedto explain the emissions controt sys-tem warranty on your lawn and gardenequipment engine. Ait new utility and]awn and garden equipment enginesmust be designed, built, and equippedto meet the stringent anti-smog stan-dards. Sears must warrant the emis-sion control system on your lawn andgarden equipment engine for the peri-ods of time ]isted below provided therehas been no abuse, neglect, or im-proper maintenance of your lawn andgarden equipment engine. Your emis-sion control system includes parts
such as the carburetor and the ignitionsystem. Where a warrantable conditionexits, Sears wilt repair your tawn andgarden equipment engine at no cost toyou. Expenses covered under warran-ty include diagnosis, parts and labor,MANUFACTURER'S WARRANTYCOVERAGE: If any emissions relatedpart on your engine (as listed underEmissions Control Warranty Parts List)is defective or a defect in the materialsor workmanship of the engine causesthe failure of such an emission related
part, the part will be repaired or re-placed by Sears. OWNER'S WAR-RANTY RESPONSIBILITIES: As the
lawn and garden equipment engineowner, you are responsible for the per-
18

formanceoftherequiredmaintenanceIistedinyourOwner'sManual.Searsrecommendsthatyouretainallre-ceiptscoveringmaintenanceonyourIawnandgardenequipmentengine,butSearscannotdenywarrantysolelyforthelackofreceiptsorforyourfail-uretoensuretheperformanceofattscheduledmaintenance,AstheIawnandgardenequipmentengineowner,youshouldbeawarethatSearsmaydenyyouwarrantycoverageifyourIawnandgardenequipmentengineorapartofithasfailedduetoabuse,ne-glect,impropermaintenance,unap-provedmodifications,ortheuseofpartsnotmadeorapprovedbytheoriginalequipmentmanufacturer.YouareresponsibleforpresentingyourIawnandgardenequipmentenginetoaSearsauthorizedrepaircenterassoonasaproblemexists.Warrantyrepairsshouldbecompletedinarea-sonableamountoftime,nottoexceed30days.Ifyouhaveanyquestionsregardingyourwarrantyrightsandre-sponsibilities,youshouldcontactyournearestauthorizedservicecenterorcattSearsat1-800-473-7247WAR-RANTY COMMENCEMENT DATE:The warranty period begins on thedate the lawn and garden equipmentengine is purchased, LENGTH OFCOVERAGE: This warranty shall befor a period of two years from the initialdate of purchase. WHAT IS COV-ERED: REPAIR OR REPLACEMENT
OF PARTS. Repair or replacement ofany warranted part wiil be performed atno charge to the owner at an approvedSears servicing center, tf you have anyquestions regarding your warrantyrights and responsibilities, you shouldcontact your nearest authorized ser-vice center or call Sears at1-800-473-7247. WARRANTY PE-
RIOD: Any warranted part which is notscheduled for replacement as requiredmaintenance, or which is scheduledonly for regular inspection to the effect
of "repair or replace as necessary"shalt be warranted for 2 years. Anywarranted part which is scheduled forreplacement as required maintenanceshall be warranted for the period oftime up to the first scheduled replace-ment point for that part. DIAGNOSIS:The owner shatt not be charged fordiagnostic labor which leads to the de-termination that a warranted part is de-fective if the diagnostic work is per-formed at an approved Sears servicingcenten CONSEQUENTIAL DAM-AGES: Sears may be liable for dam-ages to other engine componentscaused by the failure of a warrantedpart stilt under warranty. WHAT ISNOT COVERED: Ati failures caused
by abuse, neglect, or improper mainte-nance are not covered. ADD-ON ORMODIFIED PARTS: The use of add-onor modified parts can be grounds for dis-allowing a warranty claim. Sears is notliable to cover failures of warranted
parts caused by the use of add-on ormodified parts. HOW TO FILE ACLAIM: If you have any questions re-garding your warranty rights and re-sponsibilities, you shoutd contact yournearest authorized service center orcall Sears at 1-800-473-7247. WHERETO GET WARRANTY SERVICE: War-ranty services or repairs shall be pro-vided at at! Sears service centers, call:1-800-473-7247. MAINTENANCE, RE-PLACEMENT AND REPAIR OF EMIS-
SION RELATED PARTS: Any Searsapproved replacement part used in theperformance of any warranty mainte-nance or repair on emission relatedparts will be provided without charge tothe owner if the part is under warranty.EMISSION CONTROL WARRANTYPARTS LIST: Carburetor, Ignition Sys-tem: Spark Plug (covered up to main-tenance schedule), Ignition Module.MAINTENANCE STATEMENT: The
owner is responsible for the perfor-mance of all required maintenance asdefined in the owner's manual.
19

![itikhedbrahma.orgitikhedbrahma.org/Downloads/Mech_RAC.157115707.docx · Web viewsyllabus for the trade . of. mechanic (refrigeration & air-conditioner) [semester pattern] under. craftsma.](https://static.fdocuments.net/doc/165x107/5a6fb6137f8b9ac0538b53ed/docitikhedbrahmaorgitikhedbrahmaorgdownloadsmechrac157115707docxweb.jpg)