
Operator’s Manual Ride-On Trowel CRT 48...CRT V36-26A, CRT 36-24A, CRT 36-25, CRT 48-35V, CRT...
76
5000184387 07 0515 5 0 0 0 1 8 4 3 8 7 Operator’s Manual Ride-On Trowel CRT 48 EN
Transcript of Operator’s Manual Ride-On Trowel CRT 48...CRT V36-26A, CRT 36-24A, CRT 36-25, CRT 48-35V, CRT...

5000184387 07 0515
5 0 0 0 1 8 4 3 8 7
Operator’s Manual
Ride-On Trowel
CRT 48
EN
Copyright notice
© Copyright 2015 by Wacker Neuson Production Americas LLCAll rights, including copying and distribution rights, are reserved.This publication may be photocopied by the original purchaser of the machine. Any other type of reproduction is prohibited without express written permission from Wacker Neuson Production Americas LLC.Any type of reproduction or distribution not authorized by Wacker Neuson Production Americas LLC represents an infringement of valid copyrights. Violators will be prosecuted.
Trademarks All trademarks referenced in this manual are the property of their respective owners.
Manufacturer Wacker Neuson Production Americas LLCN92W15000 Anthony AvenueMenomonee Falls, WI 53051 U.S.A.Tel: (262) 255-0500 · Fax: (262) 255-0550 · Tel: (800) 770-0957www.wackerneuson.com
Original instructions
This Operator’s Manual presents the original instructions. The original language of this Operator’s Manual is American English.

CRT48 Foreword
wc_tx001539gb.fm 3
ForewordSAVE THESE INSTRUCTIONS—This manual contains important instructions for the machine models below. These instructions have been written expressly by Wacker Neuson Production Americas LLC and must be followed during installation, operation, and maintenance of the machines.
Machine documentation
From this point forward in this documentation, Wacker Neuson Production Americas LLC will be referred to as Wacker Neuson.Keep a copy of the Operator’s Manual with the machine at all times. Use the separate Parts Book supplied with the machine to order replacement parts. If you are missing either of these documents, please contact Wacker Neuson to order a replacement or visit www.wackerneuson.com. When ordering parts or requesting service information, be prepared to provide the machine model number, item number, revision number, and serial number.
Expectations for information in this manual
This manual provides information and procedures to safely operate and maintain the above Wacker Neuson model(s). For your own safety and to reduce the risk of injury, carefully read, understand, and observe all instructions described in this manual. Wacker Neuson expressly reserves the right to make technical modifications, even without notice, which improve the performance or safety standards of its machines.The information contained in this manual is based on machines manufactured up until the time of publication. Wacker Neuson reserves the right to change any portion of this information without notice.The illustrations, parts, and procedures in this manual refer to Wacker Neuson factory-installed components. Your machine may vary depending on the requirements of your specific region.
CALIFORNIA Proposition 65 Warning
Combustion exhaust, some of its constituents, and certain vehicle components contain or emit chemicals known to the State of California to cause cancer and birth defects or other reproductive harm.
Lawspertaining to spark arresters
NOTICE: State Health Safety Codes and Public Resources Codes specify that in certain locations spark arresters be used on internal combustion engines that use hydrocarbon fuels. A spark arrester is a device designed to prevent accidental discharge of sparks or flames from the engine exhaust. Spark arresters are qualified and rated by the United States Forest Service for this purpose. In order to comply with local laws regarding spark arresters, consult the engine distributor or the local Health and Safety Administrator.
Machine Item NumberCRT 48-35V 0620112, 0620807CRT 48-34V 0620075, 0620805CRT 48-35L 0620113, 0620806CRT 48-31V 0620476

Foreword CRT48
4 wc_tx001539gb.fm
Manufacturer’s approval
This manual contains references to approved parts, attachments, and modifications. The following definitions apply:
Approved parts or attachments are those either manufactured or provided by Wacker Neuson. Approved modifications are those performed by an authorized Wacker Neuson service center according to written instructions published by Wacker Neuson.Unapproved parts, attachments, and modifications are those that do not meet the approved criteria.
Unapproved parts, attachments, or modifications may have the following consequences:
Serious injury hazards to the operator and persons in the work areaPermanent damage to the machine which will not be covered under warranty
Contact your Wacker Neuson dealer immediately if you have questions about approved or unapproved parts, attachments, or modifications.

2015
-CE-
CR
T36-
CR
T48-
en.fm
EC Declaration of Conformity
ManufacturerWacker Neuson Production Americas LLC, N92W15000 Anthony Avenue, Menomonee Falls, Wisconsin 53051 USA
Product
Product
Product category
Product function
Item number
CRT V36-26A, CRT 36-24A, CRT 36-25, CRT 48-35V, CRT 48-35L, CRT 48-33K DF
Trowel
To smooth and finish semi-cured concrete
5200008546, 5000620803, 5000620804, 5000620806, 5000620807, 5000621001, 5000621002, 5200002354, 5200007687
Directives and StandardsWe hereby declare that this product meets and complies with the relevant regulations and requirements of the following directives and standards:2006/42/EC, 2004/108/EC, EN12649
Authorized Person for Technical DocumentsLeo Goeschka, Wacker Neuson Produktion GmbH & Co. KG, Preußenstraße 41, 80809 München
Menomonee Falls, WI, USA, 13.05.15
Scott V. GrahlManager, Product EngineeringFor Wacker Neuson
Keith HerrManaging DirectorFor Wacker Neuson
Dan DomanskiTechnical DirectorFor Wacker Neuson
Original Declaration of Conformity


Table of ContentsCRT 48
wc_bo5000184387_07TOC.fm 7
Foreword 3
EC Declaration of Conformity 5
1 Safety Information 9
1.1 Signal Words Used in this Manual ....................................................... 91.2 Machine Description and Intended Use ............................................. 101.3 Safety Guidelines for Operating the Machine ..................................... 111.4 Operator Safety while Using Internal Combustion Engines ............... 131.5 Service Safety .................................................................................... 141.6 Transport Safety ................................................................................. 15
2 Labels 16
2.1 Label Locations .................................................................................. 162.2 Label Meanings .................................................................................. 18
3 Lifting and Transporting 24
4 Operation 25
4.1 Preparing the Machine for First Use ................................................... 254.2 Position of the Operator ..................................................................... 254.3 Recommended Fuel (Vanguard) ........................................................ 254.4 Recommended Fuel (Kohler) ............................................................. 264.5 Refueling the Machine ........................................................................ 264.6 Features and Controls ........................................................................ 274.7 New Machines .................................................................................... 294.8 Before Starting ................................................................................... 294.9 Vanguard—Starting ............................................................................ 294.10 Kohler—Starting ................................................................................. 304.11 Stopping ............................................................................................. 304.12 Operation ............................................................................................ 304.13 Steering .............................................................................................. 314.14 Pitch Adjustment ................................................................................ 324.15 Emergency Shutdown Procedure ....................................................... 32
5 Maintenance 33
5.1 Maintaining the Emission Control System .......................................... 33

Table of Contents CRT 48
wc_bo5000184387_07TOC.fm8
5.2 Periodic Maintenance Schedule ..........................................................335.3 Trowel Gearboxes ...............................................................................345.4 Control Linkage Lubrication .................................................................355.5 Control Arm Adjustment (Forward or Backward) .................................355.6 Steering Assist System .......................................................................365.7 Right-hand Control Arm Adjustment (Right or Left) .............................365.8 Blade Arm Adjustment .........................................................................375.9 Mounting Float Pans ...........................................................................375.10 Drive Belt .............................................................................................385.11 Battery Jump Start Procedure .............................................................395.12 Vanguard—Spark Plug ........................................................................405.13 Servicing the Air Cleaner .....................................................................415.14 Vanguard—Engine Oil and Filter .........................................................425.15 Kohler—Engine Oil and Filter ..............................................................44
6 Troubleshooting 46
7 Technical Data 48
7.1 Engine .................................................................................................487.2 Machine ...............................................................................................497.3 Sound and Vibration Specifications .....................................................50
8 AEM Safety Manual 51
9 Emission Control Systems Information and Warranty—Gasoline 65
9.1 Emission Control System Background Information .............................659.2 Limited Defect Warranty for Exhaust Emission Control System .........669.3 Limited Defect Warranty for Wacker Neuson Evaporative
Emission Control Systems ..................................................................66
10 Schematics 69
10.1 CRT 48-35V—Electrical Schematic ....................................................6910.2 CRT 48-35V—Electrical Schematic Components ...............................7010.3 CRT 48-35L—Electrical Schematic .....................................................7110.4 CRT 48-35L—Electrical Schematic Components ...............................7210.5 CRT 48-34V and CRT 48-31V—Electrical Schematic ........................7310.6 CRT 48-34V and CRT 48-31V—Electrical Schematic Components ...74

wc_si000188gb.fm 9
CRT 48 Safety Information1 Safety Information
1.1 Signal Words Used in this ManualThis manual contains DANGER, WARNING, CAUTION, NOTICE, and NOTE signal words which must be followed to reduce the possibility of personal injury, damage to the equipment, or improper service.
NOTICE: Used without the safety alert symbol, NOTICE indicates a situation which, if not avoided, could result in property damage.
Note: A Note contains additional information important to a procedure.
This is the safety alert symbol. It is used to alert you to potential personal hazards.Obey all safety messages that follow this symbol.
DANGERDANGER indicates a hazardous situation which, if not avoided, will result in death or serious injury.
To avoid death or serious injury from this type of hazard, obey all safety messages that follow this signal word.
WARNINGWARNING indicates a hazardous situation which, if not avoided, could result in death or serious injury.
To avoid possible death or serious injury from this type of hazard, obey all safety messages that follow this signal word.
CAUTIONCAUTION indicates a hazardous situation which, if not avoided, could result in minor or moderate injury.
To avoid possible minor or moderate injury from this type of hazard, obey all safety messages that follow this signal word.

wc_si000188gb.fm10
Safety Information CRT 481.2 Machine Description and Intended Use
This machine is a ride-on concrete finishing trowel. The Wacker Neuson Ride-On Trowel consists of a frame onto which are mounted a gasoline or diesel engine, a fuel tank, a water tank, two gearboxes joined by a drive shaft, and an operator’s platform with controls and a seat. A set of metal blades is connected to each gearbox. A ring guard surrounds the blades. The engine rotates the blades via the gearboxes and a clutch mechanism. The rotating blades ride on the surface of curing concrete, creating a smooth finish. The operator, who sits on the operator’s platform, uses the controls and the throttle pedal to control speed and direction of the machine.
This machine is intended to be used for floating and burnishing curing concrete.
This machine has been designed and built strictly for the intended use described above. Using the machine for any other purpose could permanently damage the machine or seriously injure the operator or other persons in the area. Machine damage caused by misuse is not covered under warranty.
The following are some examples of misuse:Using the machine as a ladder, support, or work surfaceUsing the machine to carry or transport passengers or equipmentUsing the machine to finish inappropriate materials such as slurries, sealers, or epoxy finishesOperating the machine outside of factory specificationsOperating the machine in a manner inconsistent with all warnings found on the machine and in the Operator’s Manual
This machine has been designed and built in accordance with the latest global safety standards. It has been carefully engineered to eliminate hazards as far as practicable and to increase operator safety through protective guards and labeling. However, some risks may remain even after protective measures have been taken. They are called residual risks. On this machine, they may include exposure to:
Heat, noise, exhaust, and carbon monoxide from the engineChemical burns from the curing concreteFire hazards from improper refueling techniquesFuel and its fumes, fuel spillage from improper lifting techniquePersonal injury from improper lifting techniquesCutting hazards from sharp or worn blades
To protect yourself and others, make sure you thoroughly read and understand the safety information presented in this manual before operating the machine.

wc_si000188gb.fm 11
CRT 48 Safety Information1.3 Safety Guidelines for Operating the Machine
Operator qualifications
Only trained personnel are permitted to start, operate, and shut down the machine. They also must meet the following qualifications:
have received instruction on how to properly use the machineare familiar with required safety devices
The machine must not be accessed or operated by:childrenpeople impaired by alcohol or drugs
Personal Protective Equipment (PPE)
Wear the following Personal Protective Equipment (PPE) while operating this machine:
Close-fitting work clothes that do not hinder movementSafety glasses with side shieldsHearing protectionSafety-toed footwearNever operate this machine in applications for which it is not intended.Do not allow anyone to operate this equipment without proper training. People operating this equipment must be familiar with the risks and hazards associated with it.Do not touch the engine or muffler while the engine is on or immediately after it has been turned off. These areas get hot and may cause burns.Do not use accessories or attachments that are not recommended by Wacker Neuson. Damage to equipment and injury to the user may result.Do not operate the machine with the beltguard missing. Exposed drive belt and pulleys create potentially dangerous hazards that can cause serious injuries.Do not leave the machine running unattended.Do not run the machine indoors or in an enclosed area such as a deep trench unless adequate ventilation, through such items as exhaust fans or hoses, is provided. Engine exhaust contains carbon monoxide. This is a poison you cannot see or smell. Exposure to carbon monoxide can cause loss of consciousness and CAN KILL YOU IN MINUTES.ALWAYS remain aware of moving parts and keep hands, feet, and loose clothing away from the moving parts of the machine.Always wear protective clothing appropriate to the job site when operating the machine. Read, understand, and follow procedures in the Operator’s Manual before attempting to operate the machine.
WARNINGFamiliarity and proper training are required for the safe operation of the machine. Machines operated improperly or by untrained personnel can be hazardous. Read the operating instructions contained in this manual and the engine manual, and familiarize yourself with the location and proper use of all controls. Inexperienced operators should receive instruction from someone familiar with the machine before being allowed to operate it

wc_si000188gb.fm12
Safety Information CRT 48Be sure operator is familiar with proper safety precautions and operation techniques before using machine.Close fuel valve on engines equipped with one when machine is not being operated.Store the machine properly when it is not being used. The machine should be stored in a clean, dry location out of the reach of children.Always operate the machine with all safety devices and guards in place and in working order.Do not use a cellphone or send text messages while operating this machine.

wc_si000188gb.fm 13
CRT 48 Safety Information1.4 Operator Safety while Using Internal Combustion Engines
Operating safety
When running the engine:Keep the area around exhaust pipe free of flammable materials.Check the fuel lines and the fuel tank for leaks and cracks before starting the engine. Do not run the machine if fuel leaks are present or the fuel lines are loose.
When running the engine:Do not smoke while operating the machine.Do not run the engine near sparks or open flames.Do not touch the engine or muffler while the engine is running or immediately after it has been turned off.Do not operate a machine when its fuel cap is loose or missing. Do not start the engine if fuel has spilled or a fuel odor is present. Move the machine away from the spill and wipe the machine dry before starting.
Refueling safety
When refueling the engine:Clean up any spilled fuel immediately.Refill the fuel tank in a well-ventilated area.Re-install the fuel tank cap after refueling.Use suitable tools for refueling (for example, a fuel hose or funnel).
When refueling the engine:Do not smoke.Do not refuel a hot or running engine.Do not refuel the engine near sparks or open flames.
WARNINGInternal combustion engines present special hazards during operation and fueling. Failure to follow the warnings and safety standards could result in severe injury or death.
Read and follow the warning instructions in the engine owner’s manual and the safety guidelines below.
DANGERExhaust gas from the engine contains carbon monoxide, a deadly poison. Exposure to carbon monoxide can kill you in minutes.
NEVER operate the machine inside an enclosed area, such as a tunnel, unless adequate ventilation is provided through such items as exhaust fans or hoses.

wc_si000188gb.fm14
Safety Information CRT 481.5 Service Safety
PersonalProtectiveEquipment (PPE)
Wear the following Personal Protective Equipment (PPE) while servicing or maintaining this machine:
Close-fitting work clothes that do not hinder movementSafety glasses with side shieldsHearing protectionSafety-toed footwear
In addition, before servicing or maintaining the machine:Tie back long hair.Remove all jewelry (including rings).Do not attempt to clean or service the machine while it is running. Rotating parts can cause severe injury.Do not crank a flooded engine with the spark plug removed on gasoline-powered engines. Fuel trapped in the cylinder will squirt out the spark plug opening.Do not test for spark on gasoline-powered engines if the engine is flooded or the smell of gasoline is present. A stray spark could ignite the fumes.Do not use gasoline or other types of fuels or flammable solvents to clean parts, especially in enclosed areas. Fumes from fuels and solvents can become explosive.ALWAYS turn engine off and remove key from machine before performing maintenance or making repairs.Handle blades carefully. The blades can develop sharp edges which can cause serious cuts.Keep the area around the muffler free of debris such as leaves, paper, cartons, etc. A hot muffler could ignite the debris and start a fire.When replacement parts are required for this machine, use only Wacker Neuson replacement parts or those parts equivalent to the original in all types of specifications, such as physical dimensions, type, strength, and material.Disconnect the spark plug on machines equipped with gasoline engines, before servicing, to avoid accidental start-up.ALWAYS switch off the power supply at the battery disconnect before adjusting or maintaining the electrical equipment.Keep the machine clean and labels legible. Replace all missing and hard-to-read labels. Labels provide important operating instructions and warn of dangers and hazards.
WARNINGA poorly maintained machine can become a safety hazard! In order for the machine to operate safely and properly over a long period of time, periodic maintenance and occasional repairs are necessary.

wc_si000188gb.fm 15
CRT 48 Safety Information1.6 Transport Safety
Always engage the steering handle lock before lifting the machine.
WARNINGDO NOT lift the trowel by the guard rings or any part of the trowel other than the lifting fixture, as the component may fail, causing the trowel to fall, possibly injuring bystanders.

wc_si000513gb.fm16
Labels CRT 482 Labels
2.1 Label Locations
L
Q
I
I
M
MBB
BBZ
Z
Q
L CC
R
S
T
D
E
U
C
F
N
wc_gr003770

wc_si000513gb.fm 17
CRT 48 Labels
wc_gr003771
J
M
V
OG
AADD
K
BBBB M
W
HW
HA/B

wc_si000513gb.fm18
Labels CRT 482.2 Label Meanings
Wacker Neuson machines use international pictorial labels where needed. These labels are described below.
A DANGERAsphyxiation hazard
Engines emit carbon monoxide. Do not run the machine indoors or in an enclosed area unless adequate ventilation, through such items as exhaust fans or hoses, is provided. Read the Operator’s Manual. No sparks, flames, or burning objects near the machine. Stop the engine before refueling.
B DANGERAsphyxiation hazard
Engines emit carbon monoxide. Do not run the machine indoors or in an enclosed area unless adequate ventilation, through such items as exhaust fans or hoses, is provided. Read the Operator’s Manual. No sparks, flames, or burning objects near the machine. Stop the engine before refueling.
C Water tank fill. Use only clean water or water-based retardants.
D WARNINGAlways wear hearing and eye protection when operating this machine.
STOPSTOP
0178751
173440173440
STOPSTOP DIESELDIESEL
DANGERDANGERPELIGROPELIGRO DANGERDANGER
178752178752
STOPSTOP
178745178745

wc_si000513gb.fm 19
CRT 48 Labels
E Steering control. Refer to topic Steering.
F Read and understand the supplied Operator’s Manual before operating the machine. Failure to do so increases the risk of injury to yourself and others.
G WARNINGHot surface
H WARNINGCutting hazard. Always replace blade guard.
J WARNING Pressurized contents. Do not open when hot!
178713178713
178740178740
178711178711

wc_si000513gb.fm20
Labels CRT 48
K WARNINGHand injury if caught in moving belt.Always replace beltguard.
L NOTICELifting point
M Tie-down point
N Key switch, engine start:OffOnStart
O Operator’s Manual must be stored on machine. Replacement Operator’s Manual can be ordered through your local Wacker Neuson distributor.
P WARNINGRemove pan from trowel before lifting machine overhead. Pans can fall and cause death or serious injury if a person is hit. (Label is located on top side of float pan.)
178712178712
178709178709
������
� � � � � � � � � � � � � � � � � � � � � � � � � � � � � � � � � � �
� � � � � � � �
� � � � � � � � � � � � � � � � � � � � � � � � � � � � � � � � � � � � �
� � � � � � � � � � � �
� � � � � � � � � � � � � � � � � � � ! � � � � � � � � � � � � � �
� � � � � � ! � � � � � " � � � � # � � � � � � � � � � � � �
� � � � � � � � � � � � $ � � � � � � � � � � � � � � � % � � � � � & � �
� � � � ' � � � � � � � � � � � � � � � � � � � � � � � � � � � � � � � � �
( � � � � � � � � � � � � � � � � � � � � ) � � � � � � � � � � � � � �
� * + � � � � � � � � � � � � � � � � � � � � ) �
, � � � � � � � � � � � � - � � � � � � � � � � � � � � � � � � � �
� � � � � � � � � � � � � � � � � � + � � � � � � � � � � � � � � � � �
. � � � � � � � � � / � � � � � � � � � � 0 � � � � � � � � � � � � � 1 � � 2
3 � � � � � � � � + � � � � � � � � � � � � � � � � � � � � � � � � �
, � � � � + � � � � � � � � � � � � � � � � � � � � � � � � � � � � � 4 � �
� � � � � � � � � � � � � � � � � � � 1 � � � � � � � � �

wc_si000513gb.fm 21
CRT 48 Labels
Q Blade pitch control. Turn both controls inward to increase blade pitch. Refer to section Pitch Adjustment.
R CAUTION!Engine oil pressure is low! Stop the engine and check the oil level.
S CAUTION!Low voltage! Stop the engine and check the charging system.
T CAUTION!Coolant temperature is too high. Stop the engine and check the coolant level.
U CAUTION!Glow plugs activated. Do not start engine until light turns off.
V WARNINGPinching hazard. Rotating machinery.

wc_si000513gb.fm22
Labels CRT 48
W Use only Glygoyle 460 gear oil in gearbox.
X A nameplate listing the model number, item number, revision number, and serial number is attached to each unit. Please record the information found on this nameplate so it will be available should the nameplate become lost or damaged. When ordering parts or requesting service information, you will always be asked to specify the model number, item number, revision number, and serial number of the unit.
Y This machine may be covered by one or more patents.
Z Steering system components are under load. See Steering section or a trained service technician for adjustments.
WACKER NEUSON

wc_si000513gb.fm 23
CRT 48 Labels
AA CAUTION!Engage manual steering handle lock before lifting.
BB Fork lift pockets
CC Low sulfur fuel or ultra low sulfur fuel only
DD Emission Control InformationThis equipment meets U.S. EPA EVAP standards.Evaporative Family: CW1XNHEQCL2Exempt from tank permeation standards under 40 CFR 1054.145.

wc_tx001540gb.fm24
Lifting and Transporting CRT 483 Lifting and Transporting
To lift the trowel with a fork lift:Fork lift pockets (a) are provided on both the front and back of the machine. Carefully insert the lifting forks into each fork lift pocket.
To hoist the trowel:Attach a sling or chains through the lifting bars (b) on each side of the seat pedestal.
NOTICE: Make sure the lifting device has enough weight-bearing capacity to lift machine safely. Refer to Section Technical Data.
CAUTIONPossibility of injury or equipment damage. Unlocked steering handles can swing forward unexpectedly.
Engage manual steering handle lock before lifting.
WARNINGDO NOT lift the trowel by the guard rings or any part of the trowel other than the lifting fixture, as the component may fail, causing the trowel to fall, possibly injuring bystanders.
wc_gr003774

wc_tx000641gb.fm 25
CRT 48 Operation4 Operation
4.1 Preparing the Machine for First Use1. Make sure all loose packaging materials have been removed from the machine.
2. Check the machine and its components for damage. If there is visible damage, do not operate the machine! Contact your Wacker Neuson dealer immediately for assistance.
3. Take inventory of all items included with the machine and verify that all loose components and fasteners are accounted for.
4. Attach component parts not already attached.
5. Add fluids as needed and applicable, including fuel, engine oil, and battery acid.
6. Move the machine to its operating location.
4.2 Position of the OperatorSafe and efficient use of this machine is the operator’s responsibility. Full control of the machine is not possible unless the operator maintains the proper working position at all times.
While operating this machine the operator must:be seated in the operator’s seat facing forwardhave both feet on the control deckhave both hands on the controls
4.3 Recommended Fuel (Vanguard)The engine requires regular grade unleaded gasoline. Use only fresh, clean gasoline. Gasoline containing water or dirt will damage the fuel system. Consult the engine owner’s manual for complete fuel specifications.
Use of oxygenated fuels
Some conventional gasolines are blended with alcohol. These gasolines are collectively referred to as oxygenated fuels. If you use an oxygenated fuel, be sure it is unleaded and meets the minimum octane rating requirement.
Before using an oxygenated fuel, confirm the fuel’s contents. Some states and provinces require this information to be posted on the fuel pump.
The following is the Wacker Neuson approved percentage of oxygenates:
ETHANOL - (ethyl or grain alcohol) 10% by volume. You may use gasoline containing up to 10% ethanol by volume (commonly referred to as E10). Gasoline containing more than 10% ethanol (such as E15, E20, or E85) may not be used because it could damage the engine.
If you notice any undesirable operating symptoms, try another service station, or switch to another brand of gasoline.
Fuel system damage or performance problems resulting from the use of an oxygenated fuel containing more than the percentages of oxygenates mentioned above are not covered under warranty.

wc_tx000641gb.fm26
Operation CRT 484.4 Recommended Fuel (Kohler)
The engine requires No. 2 diesel fuel. Use only fresh, clean fuel. Fuel containing water or dirt will damage the fuel system. Consult the engine owner’s manual for complete fuel specifications.
4.5 Refueling the MachineRequirements Machine shut down
Engine coolMachine/fuel tank level with the groundFresh, clean fuel supply
Procedure Perform the procedure below to refuel the machine.
1. Remove the fuel cap (a).
2. Fill the fuel tank until the fuel level reaches level point (b) at the base of the fuel tank opening. An expansion cavity above level point (b) is provided for proper operation of the venting port (c).
3. Reinstall the fuel cap.
Result The procedure to refuel the machine is now complete.
WARNINGFire hazard. Fuel and its vapors are extremely flammable. Burning fuel can cause severe burns.
Keep all sources of ignition away from the machine while refueling.Refuel only when the machine is outdoors.Clean up spilled fuel immediately.
wc_gr008519
a
c
b
CAUTIONFire and health hazard. Fuel expands when heated. Expanding fuel in an over-filled tank can lead to spills and leaks.
Do not modify, bypass, or remove the venting port.

wc_tx000641gb.fm 27
CRT 48 Operation4.6 Features and Controls

wc_tx000641gb.fm28
Operation CRT 48
The Ride-On Trowel features a seat with an integrated “operator presence” system, which works in conjunction with a throttle mounted switch. This system allows the engine to remain running (idling) with no operator seated in the seat, as long as the throttle is not depressed. This system meets all safety requirements and eliminates the need for a foot-operated “kill switch”.
To familiarize a new operator with the Ride-On Trowel the following steps should be taken:
1. With the operator in the seat, show him or her the functions of the control arms(c) and how to start the machine.
2. Have the operator practice steering the trowel. A hard concrete slab slightly wetted with water is an ideal place for an operator to practice with the machine. For this practice, pitch the blades up approximately 6,35 mm (¼") on the leading edge. Start by making the machine hover in one spot, and then practice driving the machine in a straight line and making 180° turns. The best control is achieved at full rpm.
Ref. Description Ref. Descriptiona Right pitch control l Engine choke control (if equipped)
b Fuel tank m Work light switch
c Control arms n Glow plug indicator light (if equipped)
d Operator’s seat with “operator presence” switch
o Engine keyswitch
e Left pitch control p Hour meter
f Rear work light (one each side) q Water spray control
g Water tank r Oil pressure indicator light
h Work light (one each side) s Alternator charging indicator light
k Foot pedal (throttle control) t Coolant temperature indicator light

wc_tx000641gb.fm 29
CRT 48 Operation4.7 New Machines
1. To break in the gearboxes, run the engine at 50% of full throttle for the first 2–4 hours. This will prevent premature wear and extend gear life.
NOTICE: Running the engine at full throttle during the break-in period could result in premature gear failure.
2. Verify that the horizontal blade pitch links are properly assembled. When seated on the machine, the right rotor should have an “R” designation located towards the upper portion of the pitch link and the left rotor should have an “L”.
4.8 Before StartingBefore starting the trowel, check the following:
fuel leveloil level in the engine condition of the air filtercondition of trowel arms and blades
Grease the trowel arms daily.
4.9 Vanguard—StartingBefore starting the operator must know the location and function of all controls.
1. Turn and hold engine keyswitch until the engine starts. Note: If the engine is cold, pull out the choke control knob fully.
NOTICE: Cranking the engine for more than 5 seconds can cause starter damage. If the engine fails to start, release the keyswitch and wait 10 seconds before operating the starter again.
2. Allow the engine to warm up before operating the trowel.
wc_gr001252

wc_tx000641gb.fm30
Operation CRT 484.10 Kohler—Starting
Before starting the operator must know the location and function of all controls.
1. Turn the engine keyswitch to the run position.
2. When the glow plug indicator light turns off, turn keyswitch to start position and hold until the engine starts.
NOTICE: Cranking the engine for more than 5 seconds can cause starter damage. If the engine fails to start, release the keyswitch and wait 10 seconds before operating the starter again.
3. Allow the engine to warm up before operating the trowel.
4.11 StoppingTo stop trowel movement, return control levers to their neutral position and release pressure on the throttle foot pedal.
To stop the engine, turn the keyswitch to “O” (off).
4.12 OperationTo utilize your Wacker Neuson Ride-On Trowel to its fullest capacity, the machine should be driven in the direction that the operator is facing. This will finish the widest possible area, while giving the operator an excellent view of the slab surface about to be troweled. When the machine reaches the end of the slab, make a 180° U-turn, and repeat the straight line of direction to the other end of the slab. Note: During the break-in period, run the engine at 50% of full throttle. Refer to Section New Machines.
NOTICE: DO NOT use excessive pressure on the control levers. Excessive pressure does not improve the reaction time of the machine and can damage the steering controls.
NOTICE: Attempting to use the trowel too early in the curing stage of the concrete may result in an undesirable finish. Only experienced concrete finishers should operate the trowel.

wc_tx000641gb.fm 31
CRT 48 Operation4.13 Steering
Refer to the illustration for the necessary hand motions to move the trowel in the desired direction, described below.
1 - forward 2 - reverse3 - rotate clockwise4 - rotate counter-clockwise5 - left sideways6 - right sideways
� � � � � � � � �
� 5
6 7
8 �

wc_tx000641gb.fm32
Operation CRT 484.14 Pitch Adjustment
When changing or setting the pitch (angle) of the trowel blades, slow the machine, set the desired pitch on the left side of the machine, then adjust the right side to match.
To increase the pitch, turn the pitch control inward (a). Use the pitch indicator (b) to adjust pitch equally on both right and left trowel blades.
4.15 Emergency Shutdown ProcedureProcedure If a breakdown or accident occurs while the machine is operating, follow the
procedure below:
1. Stop the engine.
2. Close the fuel valve.
3. Remove the machine from the job site using the wheel kit.
4. Clean concrete from the blades and the machine.
5. Contact the rental yard or machine owner for further instructions.
Working Conditions of Concrete
Suggested Working Pitch
1. Wet surface working stage Flat (No Pitch)
2. Wet to plastic working stage Slight Pitch
3. Semi-hard working stage Additional Pitch
4. Hard finishing stage (burnishing)
Maximum Pitch
5-10º
15º
0°
25° 4321
wc_gr000147
a
b
20-25º

wc_tx000642gb.fm 33
CRT 48 Maintenance5 Maintenance
5.1 Maintaining the Emission Control SystemFor machines sold in North America:
Normal maintenance, replacement, or repair of emission control devices and systems may be performed by any repair establishment or individual; however, warranty repairs must be performed by a dealer/service center authorized by Wacker Neuson. The use of service parts that are not equivalent in performance and durability to authorized parts may impair the effectiveness of the emission control system and may have a bearing on the outcome of a warranty claim.
5.2 Periodic Maintenance ScheduleThe table below lists basic machine and engine maintenance. Tasks designated with check marks may be performed by the operator. Tasks designated with square bullet points require special training and equipment.
Refer to the engine owner’s manual for additional information.
Daily Every20
hrs.
Every50
hrs.
Every100hrs.
Every200hrs.
Every300hrs.
Grease trowel arms.
Check fuel level.
Check engine oil level.
Inspect air filter. Replace as needed.
Check external hardware.
Pressure wash all surfaces until free of concrete.
Check coolant level.
Check oil level in gearboxes.
Grease gearbox input shaft fitting
Grease control linkage.1
Check drive belt for wear.
Change engine oil.2, 3
Check fuel filter.
Clean and check spark plug.
Replace oil filter.2
Check fan belt.

wc_tx000642gb.fm34
Maintenance CRT 48
5.3 Trowel GearboxesCheck the gearboxes for the correct oil level after every 20 hours of operation. Change the gearbox oil every 300 hours.
To check the oil level:Each CRT gearbox is equipped with two oil fill plugs. Remove one gearbox oil fill plug (b). If the level is below the threads of the oil fill plug hole, add synthetic gear oil through the opening. DO NOT overfill. Wipe the threads dry on both the gearbox and the oil fill plug, apply Loctite 545 or equivalent to the oil fill plug threads, replace the oil fill plug and torque to 16–20 Nm (12–15 ft.lbs.).
NOTICE: DO NOT mix types of gear oil. DO NOT overfill the gearbox with oil. Damage to the gearbox may occur if oils are mixed, or if the gearbox is overfilled. See Technical Data for oil quantity and type.
To change gearbox oil:1. Place a container of sufficient capacity (approximately 3.8 l [1 gallon]) under
each gearbox.
2. Remove the gearbox oil drain plug (c) and allow the oil to drain out. It may be necessary to remove the gearbox oil fill plug(s) to facilitate draining. After most of the oil has drained out, tip the back of the trowel upwards to allow the remaining oil to drain out.
3. After all the oil has drained out, wipe the threads dry on both the gearbox and the oil drain plug, apply Loctite 545 or equivalent to the oil drain plug threads, and replace the gearbox oil drain plug.
Note: Dispose of used gear oil in accordance with environmental protection legislation.
4. With the trowel level, fill the gearbox with approximately 1.83 l (62 oz.) synthetic gear oil through the oil fill plug as described above.
5. Wipe the threads dry on both the gearbox and the oil fill plug, apply Loctite 545 or equivalent to the oil fill plug threads, replace the oil fill plug(s), and torque all plugs to 16-20 Nm (12–15 ft.lbs.).Each gearbox has a pressure relief valve (a) which can become clogged over time. Check or replace as needed. Failure to replace the valve can result in oil leakage from the gearbox shaft seals.
Replace spark plug.
Replace fuel filter.
Replace oil in gearboxes.
Change coolant.
1 Manual steering models only. 2 Perform initially after first 50 hours of operation.3 250 hours for diesel.
wc_tx000642gb.fm 35
CRT 48 Maintenance
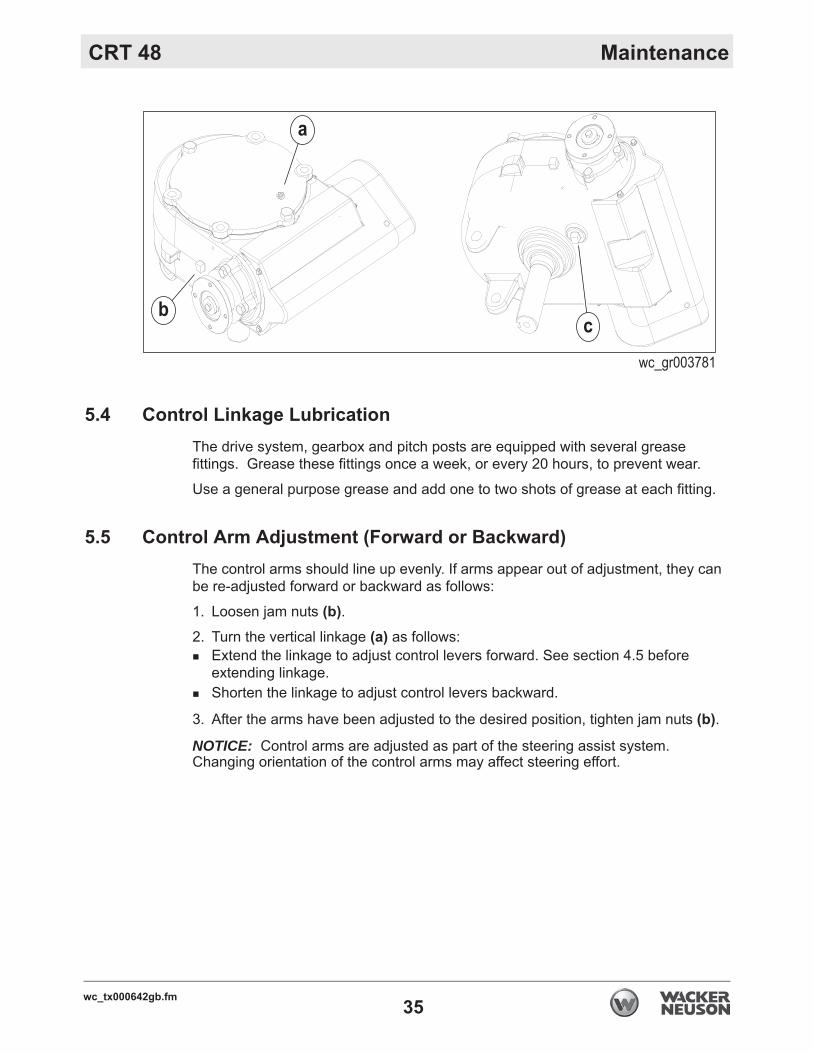
5.4 Control Linkage LubricationThe drive system, gearbox and pitch posts are equipped with several grease fittings. Grease these fittings once a week, or every 20 hours, to prevent wear.
Use a general purpose grease and add one to two shots of grease at each fitting.
5.5 Control Arm Adjustment (Forward or Backward)The control arms should line up evenly. If arms appear out of adjustment, they can be re-adjusted forward or backward as follows:
1. Loosen jam nuts (b).2. Turn the vertical linkage (a) as follows:
Extend the linkage to adjust control levers forward. See section 4.5 before extending linkage.Shorten the linkage to adjust control levers backward.
3. After the arms have been adjusted to the desired position, tighten jam nuts (b).
NOTICE: Control arms are adjusted as part of the steering assist system. Changing orientation of the control arms may affect steering effort.
wc_gr003781
b
a
c

wc_tx000642gb.fm36
Maintenance CRT 485.6 Steering Assist System
The steering assist system is comprised of the torsion lever (f), the torsion lever assembly (g), and the assist link (h). The system preload must be removed before any other steering components can be removed or separated. Remove the 1/2-20 x 3.5-inch bolts (i) to unload the system. To re-apply system preload, re-attach and tighten bolts (i) to the factory setting.
5.7 Right-hand Control Arm Adjustment (Right or Left)The arms should be set to be perfectly vertical. Should the arms come out of adjustment, adjust as follows:
1. Loosen the jam nuts (d).2. Drop the horizontal linkage (e) down to clear the bracket.
3. Shorten the linkage to move the control arms to the left.
4. Extend the linkage to move the control arms to the right.
5. After the control lever has been adjusted to the desired position, reassemble the nut and the bolt (c) and tighten the jam nuts (d).
g g
f
i
d
h
h
f
i

wc_tx000642gb.fm 37
CRT 48 Maintenance5.8 Blade Arm Adjustment
To eliminate wobble:
1. Pitch the blades flat.
2. Tighten lock nut located at the bottom of each pitch cable. Maximum cable play should be no more than 3.18 mm (.125 in.) or the width of the cable.
3. Set gap on all adjustable links to 4.58 mm (.180 in.).
5.9 Mounting Float PansOverview Certain applications may require the use of float pans (a). Optional float pans are
available from your Wacker Neuson dealer.
Procedure Follow the procedure below to mount the float pans.
1. Stop the engine.
2. Lift the trowel to access the blades. (See Lifting The Machine.)
3. Position each pan against the blades, and turn the pans either left or right to engage clip angles (b) as shown.
Note: Right-hand trowel blades turn counter-clockwise; left-hand trowel blades turn clockwise.
Mounting a smaller pan
The blade arms on the CRT 48 are designed to accommodate either a standard 48" lip-style float pan or an optional smaller 46” pan. An alternative set of blade mounting holes (c) is provided for mounting a 46” pan.
wc_gr000275
wc_gr007281
cd
e

wc_tx000642gb.fm38
Maintenance CRT 48Mounting a 46” pan
To mount a 46” pan:
1. Loosen and remove the bolts (d) that attach each blade (e).2. Move the blades inward to align with mounting holes (c).3. Replace and tighten the bolts in mounting holes (c).4. Attach the 46” pan to the blades.
5.10 Drive BeltTo replace the drive belt:1. Place the trowel on a flat, level surface with the blades pitched flat.
2. Disconnect battery.
3. Remove the beltguard.
4. Remove the 3 bolts (a) holding the universal joint to the drive pulley.
5. Remove the old belt and install a new one.
6. Reverse the procedure for assembly. Align the bearings and shaft as straight as possible. Adjust pulley offset and center distance to values as shown.
7. Torque the universal joint bolts (a) to 14 ±1,4 Nm (10±1 ft.lbs.).
wc_gr003775
ba

wc_tx000642gb.fm 39
CRT 48 Maintenance5.11 Battery Jump Start Procedure
Occasionally, it may be necessary to jump start a weak battery. If jump starting is necessary, the following procedure is recommended to prevent starter damage, battery damage, and personal injuries.
1. Disconnect engine load.
2. Use a battery of the same voltage (12V) as is used with your engine.
3. Attach one end of the positive booster cable (red) to the positive (+) terminal of the booster battery. Attach the other end to the positive terminal of your engine battery.
4. Attach one end of the negative booster cable (black) to the negative (–) terminal of the booster battery. Attach other end of negative cable to a solid chassis ground on your engine.
NOTICE: Jump starting in any other manner may result in damage to the battery or the electrical system.
5. Push down on the throttle foot pedal, turn the engine keyswitch and hold it until the engine starts.
NOTICE: Cranking the engine for more than 5 seconds can cause starter damage. If the engine fails to start, release the keyswitch and wait 10 seconds before operating the starter again.
NOTICE: When using lights or high amperage draw accessories, idle the engine for a period of 20 minutes to bring the battery to charge state.
DANGERJump starting a battery incorrectly can cause battery to explode, resulting in severe personal injury or death. Do not smoke or allow ignition sources near the battery, and do not jump start a frozen battery.
WARNINGElectrical arcing can cause severe personal injury. Do not allow positive and negative cable ends to touch.

wc_tx000642gb.fm40
Maintenance CRT 485.12 Vanguard—Spark Plug
Clean or replace spark plug as needed to ensure proper operation. Refer to the engine owner’s manual.Note: Refer to the Technical Data for the recommended spark plug type and the electrode gap setting.
1. Remove spark plug and inspect it.
2. Replace plug if the insulator is cracked or chipped. Clean spark plug electrodes with a wire brush.
3. Set the electrode gap.
4. Tighten spark plug securely.
NOTICE: A loose spark plug can become very hot and may cause engine damage.
WARNINGThe muffler and engine cylinder become very hot during operation and remain hot for a while after stopping the engine. Allow engine to cool before removing spark plug.

wc_tx000642gb.fm 41
CRT 48 Maintenance5.13 Servicing the Air Cleaner
1. Unlock clamps (a) and remove cover (b).2. Remove cartridge (c) from air cleaner body.The filter can be cleaned by blowing compressed air breadthways outside and inside the cartridge, at a pressure not greater than 4.9 bar (70 psi), or by knocking the front of the filter several times against a flat surface. Replace filter if it appears heavily soiled or damaged.
3. Carefully clean out air cleaner cover.
4. Install filter in body.
5. Install cover and lock clamps.
NOTICE: NEVER run engine without air cleaner. Severe engine damage will occur.
WARNINGNEVER use gasoline or other types of low flash point solvents for cleaning the air cleaner. A fire or explosion could result.

wc_tx000642gb.fm42
Maintenance CRT 485.14 Vanguard—Engine Oil and Filter
Change oil and oil filter (d) every 100 hours. On new machines, change oil after first 50 hours of operation. Drain oil while engine is still warm.Note: In the interests of environmental protection, place a plastic sheet and a container under the machine to collect any liquid which drains off. Dispose of this liquid in accordance with environmental protection legislation.
Drain oil while engine is still warm.
1. Remove oil fill cap (a) and drain plug (b) to drain oil.
2. Install drain plug and torque to 34.6 Nm (25.5 ft.lbs.).
3. Fill engine crankcase with recommended oil until the level is between “L” and “F” on the dipstick (c). See Technical Data for oil quantity and type.
4. Install oil fill cap.
5. To replace the oil filter (d), remove the installed oil filter after oil has been drained. Apply a thin coat of oil to the rubber gasket of the replacement oil filter. Screw the filter on until it just contacts the filter adapter, then turn it an additional ½ turn. Refill with oil as described above.
WARNINGMost used oil contains small amounts of materials that can cause cancer and other health problems if inhaled, ingested, or left in contact with skin for prolonged periods of time.
Take steps to avoid inhaling or ingesting used engine oil. Wash skin thoroughly after exposure to used engine oil.

wc_tx000642gb.fm 43
CRT 48 Maintenance
wc_gr003803
d
b
a
c
CRT 48-33V
CRT 48-34V

wc_tx000642gb.fm44
Maintenance CRT 485.15 Kohler—Engine Oil and Filter
Change oil every 125 hours and oil filter (b) every 250 hours. On new machines, change oil after first 50 hours of operation. Drain oil while engine is still warm.Note: In the interests of environmental protection, place plastic sheeting and a container under the machine to collect the liquid which drains off. Dispose of this liquid properly.
To change oil:
1. Remove oil filler cap (a) and oil drain plug (c). Drain oil into a suitable container.
2. Reinstall the drain plug and tighten.
3. Remove and replace oil filter (b).4. Remove oil filler cap (a) and fill engine crankcase with recommended oil. See
Technical Data for oil quantity and type.
5. Install oil filler cap.
WARNINGMost used oil contains small amounts of materials that can cause cancer and other health problems if inhaled, ingested, or left in contact with skin for prolonged periods of time.
Take steps to avoid inhaling or ingesting used engine oil. Wash skin thoroughly after exposure to used engine oil.

wc_tx000642gb.fm 45
CRT 48 MaintenanceNotes

Troubleshooting CRT 48
46 wc_tx001541gb.fm
6 Troubleshooting
Problem Reason RemedyMachine out of balance; wobbling excessively.
Operator is over-steering. The movement of each gearbox is controlled by “stops” to provide the correct relationship of the con-trol arm movement to machine movement. Excessive pressure on control arms in any direction will not improve reaction time and can damage steering controls causing machine to wobble.
Trowel arm(s) bent. Replace trowel arm(s).
Trowel blade(s) bent. Replace trowel blade(s).
Main shaft(s) bent due to machine being dropped.
Replace main shafts(s).
Poor handling; excessive range in control lever movement.
Worn bushings due to lack of lubrication.
Replace bushings and lubricate at least every 20 hours.
Control arm lever adjustment has moved or control arm has been bent.
Reset control arm lever.
Lower control arm(s) bent. This can be caused by dropping machine.
Replace lower control arm(s). Use lifting brackets and/or forklift pockets provided on machine for lifting.
Machine does not move. Drive belt broken. Replace drive belt.
Vacuum between bottom of blades and surface of concrete.
Change pitch on blades to break suction.
Key sheared in the main shaft. Replace damaged key.

CRT 48 Troubleshooting
wc_tx001541gb.fm 47
Machine does not respond cor-rectly to control lever movement.
Sheared key. Check all keys in drive system.
Trowel noisy. Trowel blades have become mis-aligned and are contacting each other during rotation.
Replace damaged blades. Align blades so that one set represents a (+) and the other an (x) when viewed from above.
Sheared key. Check all keys in drive system.
Loose clutch. Tighten clutch.
Engine does not start. Engine problem. Consult engine manufacturer’s service manual.
Problem Reason Remedy
wc_td000188gb.fm48
Technical Data CRT 487 Technical Data
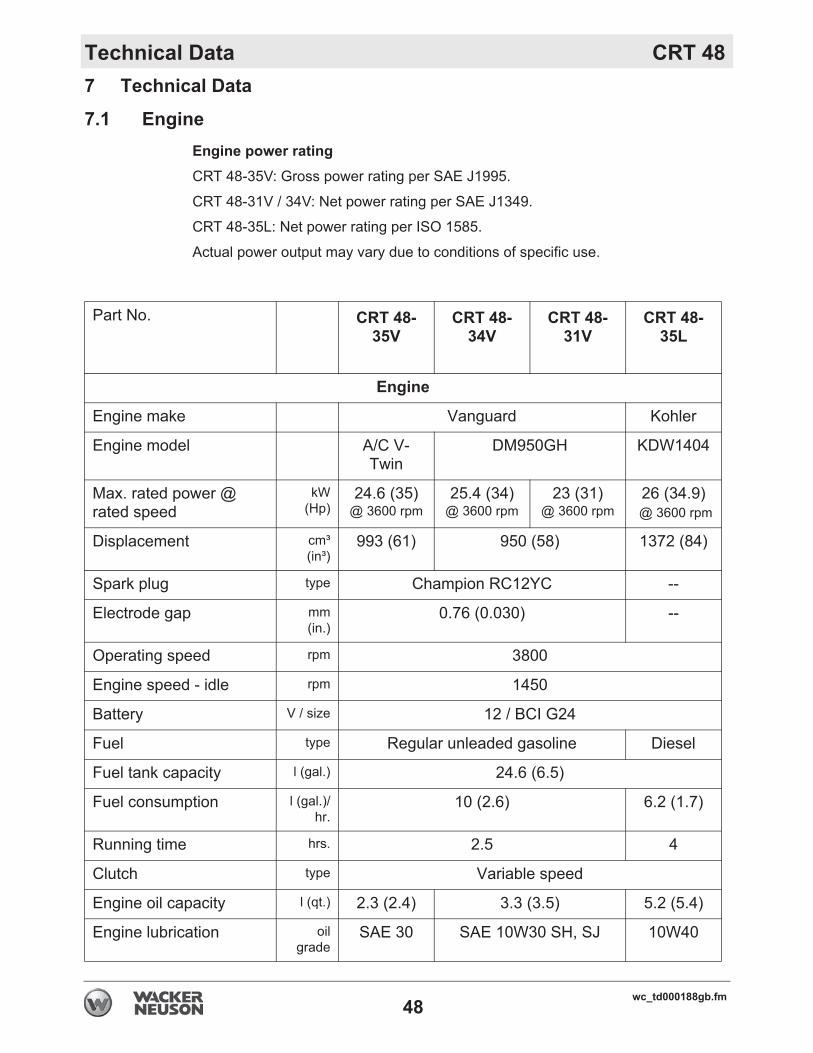
7.1 EngineEngine power ratingCRT 48-35V: Gross power rating per SAE J1995.
CRT 48-31V / 34V: Net power rating per SAE J1349.
CRT 48-35L: Net power rating per ISO 1585.
Actual power output may vary due to conditions of specific use.
Part No. CRT 48-35V
CRT 48-34V
CRT 48-31V
CRT 48-35L
Engine
Engine make Vanguard Kohler
Engine model A/C V-Twin
DM950GH KDW1404
Max. rated power @ rated speed
kW(Hp)
24.6 (35) @ 3600 rpm
25.4 (34) @ 3600 rpm
23 (31) @ 3600 rpm
26 (34.9)@ 3600 rpm
Displacement cm³(in³)
993 (61) 950 (58) 1372 (84)
Spark plug type Champion RC12YC --
Electrode gap mm(in.)
0.76 (0.030) --
Operating speed rpm 3800
Engine speed - idle rpm 1450
Battery V / size 12 / BCI G24
Fuel type Regular unleaded gasoline Diesel
Fuel tank capacity l (gal.) 24.6 (6.5)
Fuel consumption l (gal.)/hr.
10 (2.6) 6.2 (1.7)
Running time hrs. 2.5 4
Clutch type Variable speed
Engine oil capacity l (qt.) 2.3 (2.4) 3.3 (3.5) 5.2 (5.4)
Engine lubrication oilgrade
SAE 30 SAE 10W30 SH, SJ 10W40
wc_td000188gb.fm 49
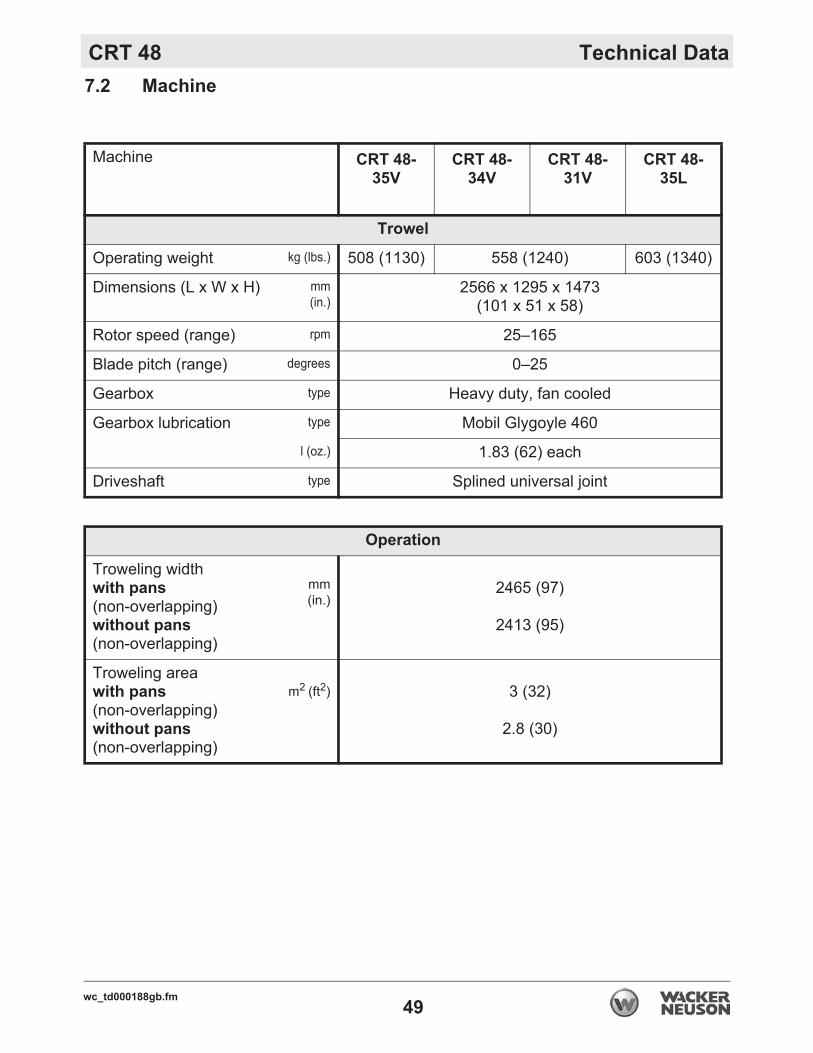
CRT 48 Technical Data7.2 Machine
Machine CRT 48-35V
CRT 48-34V
CRT 48-31V
CRT 48-35L
Trowel
Operating weight kg (lbs.) 508 (1130) 558 (1240) 603 (1340)
Dimensions (L x W x H) mm(in.)
2566 x 1295 x 1473(101 x 51 x 58)
Rotor speed (range) rpm 25–165
Blade pitch (range) degrees 0–25
Gearbox type Heavy duty, fan cooled
Gearbox lubrication type Mobil Glygoyle 460
l (oz.) 1.83 (62) each
Driveshaft type Splined universal joint
Operation
Troweling widthwith pans (non-overlapping)without pans(non-overlapping)
mm(in.)
2465 (97)
2413 (95)
Troweling areawith pans (non-overlapping)without pans(non-overlapping)
m2 (ft2) 3 (32)
2.8 (30)

wc_td000188gb.fm50
Technical Data CRT 487.3 Sound and Vibration Specifications
The required sound specifications, per Annex VIII, Directive 2000/14/EC of the EC-Machine Regulations, are:
-the sound pressure level at operator’s location (LpA):
91.1 dB(A) (CRT 48-35L)
93.5 dB(A) (CRT 48-35V)
96.3 dB(A) (CRT 48-34V and CRT 48-31V)
-the guaranteed sound power level (LWA):
110.2 dB(A) (CRT 48-35L and CRT 48-35V)
112.8 dB(A) (CRT 48-34V and CRT 48-31V)
These sound values were determined according to ISO 3744 for the sound power level (LWA) and ISO 11204 for the sound pressure level (LpA) at the operator’s location.
The weighted effective acceleration value, determined according to ISO 5349-1 and ISO 2631, is:
-for whole body:
0.274 m/s2 (CRT 48-35L)
0.381 m/s2 (CRT 48-35V)
0.208 m/s2 (CRT 48-34V and CRT 48-31V)
-for hand/arm:
1.37 m/s2 (CRT 48-35L)
1.54 m/s2 (CRT 48-35V)
1.31 m/s2 (CRT 48-34V and CRT 48-31V)
The sound and vibration specifications were obtained with the unit operating on fully cured, water wetted concrete at nominal engine speed.
Vibration Uncertainties
Hand-transmitted vibration was measured per ISO 5349-1. This measurement includes an uncertainty of 1.5 m/sec2.
Whole body vibration was measured per ISO 2631-1. This measurement includes an uncertainty of 0.3 m/sec2.


SAFETY ALERT SYMBOL
This Safety Alert Symbol means ATTENTION is required!
The Safety Alert Symbol identifies important safetymessages on machines, safety signs, in manualsor elsewhere. When you see this symbol, be alertto the possibility of personal injury or death. Followthe instructions in the safety message.
Why is SAFETY important to YOU?3 BIG REASONS• Accidents KILL or DISABLE• Accidents COST• Accidents CAN BE AVOIDED
1
NOTICE OF COPYRIGHT PROTECTIONAEM Safety Manuals are protected as a copyrighted work withownership duly registered with the Copyright Office,Washington, D.C. Any reproduction, translation, decompiling orother use of an AEM Safety Manual, or portion thereof, or the
creation of derivative works based on an AEM Safety Manual,without the prior written approval of AEM is expressly prohibited.Copyright infringement can result in civil and criminal sanctions,damages and other penalties being imposed.
Copyright © 2003 – Association of Equipment Manufacturers
!
U.S. Department of Labor publishes Safety andHealth Regulations and Standards under theauthority of the Occupational Safety and Health Actfor the General Construction and Mining Industries.Its address is: U.S. Department of Labor,Washington, DC 20210 (www.OSHA.gov andwww.MSHA.gov).ANSI – American National Standards Institute, c/oThe American Society of Mechanical Engineers,United Engineering Center, 345 East 47th Street,New York, NY 10017 (www.ANSI.org).
ISO – International Standards Organization, 1, rue de Varembe Case postale 56, CH-1211Geneva 20, Switzerland (www.ISO.ch).SAE – Society of Automotive Engineers, Inc., 400 Commonwealth Drive, Warrendale, PA 15096,publishes a list, “Operator Precautions” SAE J153MAY 87 (www.SAE.org).AEM – Association of Equipment Manufacturers,111 East Wisconsin Avenue, Milwaukee, WI 53202(www.AEM.org).
WORD OF EXPLANATION
2
The following is a partial list of reference material on safe operating practices:

3
TABLE OF CONTENTSPage
WORD OF EXPLANATION ................................................................2
FOREWORD........................................................................................4
A WORD TO THE USER ....................................................................5
FOLLOW A SAFETY PROGRAM ......................................................6
PREPARE FOR SAFE OPERATION ..................................................7
START SAFELY ................................................................................11
WORK SAFELY ................................................................................13
SHUT DOWN SAFELY ......................................................................15
LOAD AND UNLOAD SAFELY ........................................................16
PERFORM MAINTENANCE SAFELY ..............................................17
TEST YOUR KNOWLEDGE ..............................................................22
A FINAL WORD TO THE USER........................................................23
This safety manual is intended to point out some ofthe basic situations which may be encounteredduring the normal operation and maintenance ofyour walk-behind or ride-on concrete power troweland to suggest possible ways of dealing with theseconditions.Additional precautions may be necessary,depending on application and attachments usedand conditions at the work site or in themaintenance area.The trowel manufacturer has no direct control overmachine application, operation, inspection,lubrication, or maintenance. Therefore, it is yourresponsibility to use good safety practices in theseareas.Do not use the trowel for any purpose other than itsintended purposes or applications.The information provided in this manualsupplements the specific information about yourmachine and its application that is contained in themanufacturer’s manual(s).
Other information which may affect the safeoperation of your machine may be displayed onsafety signs, or in insurance requirements,employer’s safety programs, safety codes, local,state/provincial, and federal laws, rules, andregulations.If you do not understand any of this information, orif errors or contradictions seem to exist, consultwith your supervisor before operating your trowel!IMPORTANT: If you do not have themanufacturer’s manual(s) for your particularmachine, get a replacement manual from youremployer, equipment dealer, or manufacturer ofyour machine. Keep this safety manual and themanufacturer’s manual(s) accessible to theoperator and maintenance personnel.
FOREWORD
4

Remember that YOU are the key to safety. Goodsafety practices not only protect you but alsoprotect the people around you. It is yourresponsibility to study this manual and themanufacturer’s manual(s) for your specific machinebefore operating your machine. Make them aworking part of your safety program. Keep in mindthat this safety manual is written for concrete powertrowels only. Practice all other usual and customarysafe working precautions, and above all –
REMEMBER – SAFETY IS UP TO YOUYOU CAN PREVENT SERIOUS
INJURY OR DEATH
A WORD TO THE USER
5
EQUIPMENT/CLOTHINGConsult your supervisor for specific instructions ona job, and the personal safety equipment required.For instance, you may need:• Hard Hat• Heavy Gloves• Eye Protection• Ear Protectors• Safety Shoes• Dust Mask or Respirator
Do not wear loose clothing or any accessory –flopping cuffs, dangling neckties and scarves, orjewelry – that can catch in moving parts.
DUST PRECAUTIONSome dust created by construction activities maycause silicosis or respiratory harm.Your risk of exposure varies depending on howoften you do this type of work. To reduce your risk,work in a well ventilated area, use a dust controlsystem, and wear approved personal safetyequipment such as a dust/particle respiratordesigned to filter out microscopic particles.
FOLLOW A SAFETY PROGRAM
6

LEARN TO BE SAFE• Read the operator’s
manual. If one has notbeen provided, get one andstudy it before operatingthe equipment.
• Learn the location andunderstand the functions ofall controls beforeattempting to operate theequipment.
• Know the meaning of all identification symbols onthe controls and gauges.
• Check to determine that the manufacturer’sfurnished safety warning labels are securelyattached to the trowel and all warnings canclearly read. Replace labels and decals if theyare missing or become worn or unreadable.
• Know the location and type of emergency shut-down control the trowel is equipped with.
• Never start or operate the trowel withoutprotective guards and panels in place.
• Know the capabilities and limitations of thetrowel.
SAFETY DEVICESKnow what safety devices your trowel is equippedwith … and see that each item is securely in placeand in operating condition.For example:• Emergency stop switch or other “Shut-Down”
devices• Guards, Shields & Panels• Alarms or Warning Lamps• Drain Covers, Plugs, and Caps• Pressure Relief Devices• Lights
7
PREPARE FOR SAFE OPERATION
PRE-OPERATIONAL CHECKSWalk around the trowel. Carefully inspect forevidence of physical damage, such as cracks,bends, or deformation of plates and welds. Checkfor loose, broken or missing parts on the trowel,including brackets, vibration isolators, nuts andbolts. Hardware should be replaced with originalequipment manufacturer’s (OEM) parts, and shouldbe properly tightened to the manufacturer’srecommendations.Remove all trash and debris from the trowel. Makesure oily rags, leaves, or other flammable materialare removed and not stored on the trowel. Avoidpotential fire hazards!Clean all oil or greasefrom operator areas suchas control handles, footpedals, or platforms toprevent slipping.Check for fuel, oil, andhydraulic fluid leaks. Allleaks must be correctedbefore the trowel isoperated.
Inspect all hydraulic hoses for cracks or signs ofwear and replace if necessary. Secure all caps andfiller plugs for all systems.Always use a a flashlight or shielded trouble lightwhen checking for leaks – never use an openflame. Never check for hydraulic leaks with yourhand. Hydraulic systems are under high pressureand leaks in these systems can penetrate the skinwhich can result in serious injury or even death.Always use a piece of cardboard or wood whenlooking for hydraulic leaks.Be sure the trowel isproperly lubricated. Seethat the fuel, lubricating oil,coolant and hydraulicreservoirs are filled to theproper levels with thecorrect fluids according tothe manufacturer’sinstructions andrecommendations.
8
PREPARE FOR SAFE OPERATION

FIRE PREVENTIONAlways stop the engine and allow it to cool beforerefueling.Never refuel –• When engine is running• Near open flame or sparks• While smoking• In poorly ventilated areasNever overfill fuel tanks or fluid reservoirs. In theevent of a fuel spill, do not attempt to start theengine until the fuel residue has been completelywiped up, and the area surrounding the engine isdry. Replace fuel cap securely after refueling.
Inspect electrical wiring for damage or wear.Batteries produce explosive gas. Keep open flameor sparks away.In case of accident or fire, be ready to act quickly,yet calmly. Do not panic. Knowing ahead of timewhere to locate a first aid kit, fire extinguisher, or toget assistance will help should an emergencysituation come up.
CHECK THE WORK AREALearn – beforehand –as much about yourworking area aspossible.Be observant of otherworkers, bystandersand other machineryin the area. Keep allunauthorized,untrained people andchildren out of thearea while the trowelis in operation.
9
PREPARE FOR SAFE OPERATION
CHECK THE AREAThoroughly check the area for unusual ordangerous conditions, such as tools, or items thatmay damage the trowel or be propelled by thetrowels rotating blades. Note where pipes andforms are located. Locate and mark protrusions(rebar, anchor bolts, floor drains, etc.) in theconcrete.
GETTING ON AND OFF A RIDE-ON TROWELIf operating a ride-on trowel, mount and dismountcarefully. Use the steps and hand holds provided.Do not use control levers as hand holds and neveruse guard rings as steps. Watch for surfaces thatmay be slippery. Never jump off a ride-on trowel.
OPERATING ON AN ELEVATED DECK (MULTI-STORY OPERATION)Consult local/state regulations before you operateequipment on an elevated deck. If operating on anelevated deck, ensure perimeter safety cabling ofproper size and strength is in place. Do not operatethe trowel close to the edge of the deck.
TRANSPORTING THE TROWELNever transport the trowel with float pans attachedunless safety catches are used and are specificallycleared for such transport by the manufacturer.Under no circumstances hoist the trowel more thanthree feet off the ground with float pans attached.Always consult the manufacturer’s operationmanual for specific information on transporting thetrowel.
10
PREPARE FOR SAFE OPERATION

START CORRECTLY – START SAFELYBefore starting, check for proper functioning of alloperation and shutdown controls. Check allcontrols to be sure they are in the correct startupposition. Know the proper starting procedure foryour trowel. Follow the manufacturer’s operationalinstructions.
WALK-BEHIND TROWELS• Ensure that the operator is familiar with the
trowel and is trained on its operation.• Ensure the operator is well rested, not fatigued,
is alert, and not impaired in any way(medications, drugs, alcohol, etc.).
• Do not start or operate the trowel if the drive trainwill not disengage. Centrifugal force between thetrowel and surface when starting can causeuncontrolled handle movement that can causeserious injury. The handle must not move whilepulling the engine recoil starter.
• Visually check to be sure that the blades are freeof obstructions and the area is clear foroperation.
• For trowels that use this feature, ensure that theemergency stop switch is in the ON position.
• Move the throttle to the idle position.• Switch the engine ON/OFF switch to the ON
position.• Never place your foot on the ring guard when
starting the engine or severe injury can occur ifyour foot slips through the ring guard as theblades start to spin.
• While firmly holding the handle with one hand,start the engine following the guidelines in theengine manufacturer’s instruction manual.
• Hold the handle bar firmly with both hands whilethe trowel is “throttled-up”.
• If control of the trowel is lost, stay clear and donot attempt to regain control until the trowel hasstopped moving. Depending on the enginespeed, the trowel handle can swing aroundbefore it stops completely.
• You are ready to operate the trowel!
11
START SAFELY
RIDE-ON TROWELS• Ensure that the operator is familiar with the
trowel and is trained on its operation.• Ensure the operator is well rested and not
fatigued, is alert, and not impaired in any way(medications, drugs, alcohol, etc.).
• Adjust the seating if necessary and get into acomfortable position where all controls areaccessible.
• Visually check to be sure that the blades are freeof obstructions and the area is clear foroperation.
• Start the trowel following the instructions in theengine manufacturer’s operation manual. Fordiesel powered trowels, follow the instructions forglow plug and cold start operation.
• Observe any gauges and warning lights toensure they are functioning and their readingsare within the manufacturer’s normal operatingrange.
• Check operation of controls. Make certain theyoperate properly.
• You are ready to operate the trowel!
12
START SAFELY

SAFE WORKING PROCEDURES
DANGER – CARBON MONOXIDEExhaust from the engine containspoisonous carbon monoxide gasthat is not easily detected as it iscolorless and odorless. Exposureto carbon monoxide can causeloss of consciousness and maylead to death! Do not operateyour trowel indoors or in an enclosed area unlessadequate ventilation is provided. Ensure thatpermissible carbon monoxide levels are monitoredand not exceeded.
OTHER PRECAUTIONS• Never leave the trowel unattended while it is
running.• Always keep clear of rotating or moving parts.• Never use additional weights other than the
weights recommended by the manufacturer. Theuse of unauthorized weights could lead topersonal injury or damage to the trowel.
• Never fill the fuel tank while the engine isrunning. Turn the engine off and allow it to coolbefore refueling.
• The muffler, exhaust pipes andother engine parts will becomehot during operation and willremain hot for a while aftershutdown. Do not touch untilallowed to sufficiently cool. Donot allow debris, rags, paper, orleaves to accumulate aroundthese areas.
• Do not keep tools, buckets, loose materials onthe trowel while it is running and never allowanyone other than the operator on or near thetrowel while it is in operation.
• Do not use the trowel for any purpose other thanits intended purposes or applications.
13
WORK SAFELY
ELECTRICAL EQUIPMENTSome walk-behind trowels are powered by electricmotors. Electric motors and components presentspecial hazards during operation. Read theoperator’s manual.• Never operate a trowel with a damaged or worn
electrical cord. When using an extension cord, besure to use one heavy enough to carry thecurrent load. When trowel is used outdoors, useonly extension cords that are marked for outdooruse.
• Use only appropriateextension cords that havegrounding-type plugs andreceptacles that accept themachine’s plug.
• Keep all electrical cords away from rotatingelements, heat, oil, and sharp edges to avoiddamaging them.
• Avoid body contact with grounded surfaces suchas pipes, metal railings, radiators and metalductwork.
• Always check the power supply before runningthe trowel. Using the wrong voltage supply willdamage the motor.
• Always make sure the motor switch is OFF or inthe stop position before plugging the trowel intothe power supply.
• Do not operate an electric powered trowel in therain or snow. Keep the motor, switch, andelectrical cords dry.
• Never operate the trowel in areas exposed toflammable or explosive liquids or gases. Sparkscould ignite fumes.
14
WORK SAFELY

SHUT DOWN PROCEDURESNever disable or disconnect the safety devices!Always close fuel valves when the machine is notbeing used.Refer to the manufacturer’s manuals for specificshut down procedures.
15
SHUT DOWN SAFELY
PRECAUTIONS• Power trowels are heavy and awkward to move
around.• Do not attempt to lift the ride-on trowel by the
guard rings.• Use proper heavy lifting procedures.• Keep all non-essential personnel clear of the
area.• Never hoist the trowel over areas where people
are standing or working.• Remove tools and loose items before lifting.• Make sure the crossbars on the safety catches
are in good condition if so equipped.• Always consult your operator’s manual for the
best and proper lifting, loading, and unloadingmethods.
WALK-BEHIND TROWELSSome walk-behind trowels can be lifted or movedby two people utilizing lifting tubes or other specialattachments. Generally however, they must be
lifted using lifting bales (special lifting brackets), orother specific lifting points provided by themanufacturer, and cranes, hoists, or forklifts. Becertain any lifting devices used have adequatecapacity.
RIDE-ON TROWELSRide-on trowels are very heavy. They requireheavy-duty lifting devices such as cranes or heavy-duty hoists to lift them on and off the concrete slab.Be certain any lifting devices used have adequatecapacity. Some ride-on trowels are equipped withlifting bosses that are used with specializedapparatus to assist in moving the trowels around.Use extreme care when lifting or moving a ride-ontrowel.
STORAGEAlways store equipment properly when it is notbeing used. Equipment should be stored in a clean,dry location out of reach of children.
LOAD AND UNLOAD SAFELY
16

SERVICE AND MAINTENANCE SAFETYPoorly maintained equipmentcan become a safety hazard! Inorder for your trowel to operatesafely and properly over a longperiod of time, periodicmaintenance and occasionalrepairs are necessary.Do not attempt to clean,service, or perform adjustmentson the trowel while it is running.
GOODHOUSEKEEPINGKeep area cleanand dry if possible.Oily and wetsurfaces areslippery; greasyrags are a firehazard; wet spotsare dangerousaround electricalequipment.
GENERAL PROCEDURESDo not perform any work on the trowel unless youare authorized to do so.Standard maintenance procedures should alwaysbe observed. Read the manufacturer’s manual orfind assistance if you do not understand what youare doing.Maintenance can be dangerous unless performedproperly. Be certain that you have the necessaryskill and information, correct tools and equipmentto do the job correctly.Attach a Do Not Operate tag orsimilar warning tag to thecontrol panel (or handle onwalk-behind trowels), anddisconnect the battery(disconnect the spark plug wireon walk-behind trowels), beforeperforming maintenance on themachine.Disconnect the electric cord onelectrical machines.
PERFORM MAINTENANCE SAFELY
17
FORM GOOD DRESS HABITSLoose clothing and jewelry can catch in movingparts and cause serious injury.Keep hands – and clothing – away from movingparts.
GUARDS AND SAFETY DEVICESAfter performing maintenance make certain allguards and panels have been reinstalled and allsafety devices are functional.
BATTERY MAINTENANCEAlways wear eye and faceprotection.Batteries produce explosive gases.Keep open flame or sparks away.See the manufacturer’s instructionswhen servicing the batteries, whenusing jumper cables, or when usinga battery charger.
Use a flashlight to check batteryelectrolyte level. Always checkwith engine stopped.Battery electrolyte is poisonous.It is strong enough to burn yourskin, eat holes in clothing, andcan cause blindness if splashedinto eyes. Always wear eye andface protection.Flush any contacted area with water immediately.
PERFORM MAINTENANCE SAFELY
18

FIRE PREVENTIONAvoid fire hazards.Always stop the engine and allow it to cool beforeyou refuel the trowel. Do not refuel while smokingor near open flame or sparks. Never overfill fueltanks or fluid reservoirs.Remove all trash or debris. Make sure oily rags orother flammable materials are not stored on or inthe trowel.Check for fuel, oil, or hydraulic fluid leaks. Repairthe leaks and clean the machine before youoperate it.Inspect electrical wiring or worn or frayedinsulation. Install new wiring if wires are damaged.Do not weld or flame cut on pipes, tubes, or tanksthat contain flammable fluids or gases.Ether and starting fluid is flammable. Do not smokewhen using. Always follow the instructions on thecan and in the manufacturer’s manual for yourtrowel.Always use a safe, nonflammable solvent whenyou clean parts. Do not use flammable fluids orfluids that give off harmful vapors.
Store all flammable fluids and materials away fromyour work area.Whenever the sparkplug is removed, do not test forspark on gasoline powered engines if engine isflooded or the smell of gasoline is present. A strayspark could ignite fumes.Know where fire extinguishers are kept – how theyoperate – and for what type of fire they areintended!Check readiness of fire suppression systems andfire detectors (is so equipped).
PERFORM MAINTENANCE SAFELY
19
EXHAUST FUMESEngine exhaust fumes cancause sickness or death.When performingmaintenance, if it isnecessary to run an enginein an enclosed area, removethe exhaust fumes from thearea when an exhaust pipe extension. If you do nothave an exhaust pipe extension, make sure youopen the doors and get outside air into the area.Ensure that permissible carbon monoxide levelsare monitored and not exceeded.
FLUID SIPHONINGNever siphon gasoline or hydraulic fluid using ahose and suction by mouth. Ingestion of thesefluids even in small amounts will require immediatemedical attention and can cause death.
COOLING SYSTEMMaintain the cooling systemaccording to themanufacturer’s instructions.Hot coolant can spray outand you can be burned if youimproperly maintain orservice the cooling system.Remove filler cap only whencool.
PERFORM MAINTENANCE SAFELY
20

TROWEL BLADES AND PANS• Do not attempt to clean, service or perform
adjustments on the trowel while it is running.• Do not remove while the trowel is hanging
overhead. Always support the trowel securely ona flat, level surface before changing blades orpans.
• Always handle blades and pans carefully. Wornblades or pans may develop sharp edges thatcan cause serious cuts.
• Always replace worn or damaged parts withservice parts designated by the manufacturer.
• Replace blades and pans as a complete set –even if only one blade or pan is showing wear ordamage. They can wear differently depending ondifferent jobs, and a difference in blade size willdamage the finish of the slab surface.
HYDRAULIC SYSTEMSHydraulic fluid systems operate under highpressure. Even a small leak can have enough forceto penetrate the eyes or skin. If injury occurs, seekimmediate medical treatment by a physicianfamiliar with injuries that are caused by hydraulic oilescaping under pressure.Use a piece of wood or cardboard to find hydraulicoil leaks. Do not use your bare hands.Wear safety glasses to prevent injuries to the eyes.
PERFORM MAINTENANCE SAFELY
21
Do you understand this AEM manual and itemssuch as –• Your safety program?• Your trowel manufacturer’s manual(s)?• Proper clothing and personal safety equipment?• Your trowel’s controls, warning signs and
devices, and safety equipment?• Proper trowel lifting and moving procedures?• How to inspect and start your trowel?
• How to check your trowel for proper operation?• Proper working procedures?• Proper shut down procedures?• Your work area and any special hazards that
may exist?• Under what conditions you should not operate
your trowel?If you do not understand any of these items,consult with your supervisor before operating yourtrowel.
TEST YOUR KNOWLEDGE
22

Remember that YOU are the key to safety. Goodsafety practices not only protect you but protect thepeople around you.You have read this safety manual and themanufacturer’s manual(s) for your specific trowel.Make them a working part of your safety program.Keep in mind that this safety manual is written foronly this type of machine.Practice all other usual and customary safeworking precautions, and above all –
REMEMBER – SAFETY IS UP TO YOUYOU CAN PREVENT SERIOUS
INJURY OR DEATH
A FINAL WORD TO THE USER
23


Emission Control Systems Information and Warranty—Gasoline
wc_tx001754gb.fm 65
9 Emission Control Systems Information and Warranty—GasolineThe Emission Control Warranty and associated information is valid only for the U.S.A., its territories, and Canada.
9.1 Emission Control System Background InformationIntroductionWacker Neuson spark-ignited engines/equipment must conform with applicable Environmental Protection Agency (EPA) and the State of California emissions regulations. There are two types of emissions that fall under these regulations: 1) exhaust, and 2) evaporative. These regulations require that manufacturers warrant the emission control systems for defects in materials and workmanship.Furthermore, EPA and California regulations require all manufacturers to furnish written instructions describing how to operate and maintain the engines/equipment including the emission control systems. This information is provided with all Wacker Neuson engines/equipment at the time of purchase.
Exhaust EmissionsThe combustion process produces carbon monoxide, oxides of nitrogen, and hydrocarbons. Control of hydrocarbons and oxides of nitrogen is very important because, under certain conditions, they react to form photochemical smog when subjected to sunlight. Carbon monoxide does not react in the same way, but it is toxic.Wacker Neuson utilizes lean carburetor settings and other systems to reduce the emissions of carbon monoxide, oxides of nitrogen, and hydrocarbons.
Evaporative EmissionsEvaporative emissions are fuel emissions and generally include emissions that result from permeation of fuel through the fuel-system materials or from ventilation of the fuel system.Wacker Neuson utilizes low-permeation fuel lines and fuel tanks where applicable to reduce evaporative emissions.
Problems that may affect EmissionsIf any of the following symptoms arise, have the engine/equipment inspected and repaired by a Wacker Neuson dealer/service center.
Hard starting or stalling after startingRough idlingMisfiring or backfiring under loadAfterburning (backfiring)Presence of black exhaust smoke during operationHigh fuel consumption

Emission Control Systems Information and Warranty—Gasoline
66 wc_tx001754gb.fm
Tampering and AlteringTampering with or altering the emission control system may increase emissions beyond the legal limit. If evidence of tampering is found, Wacker Neuson may deny a warranty claim. Among those acts that constitute tampering are:
Removing or altering of any part of the air intake, fuel, or exhaust systems.Altering or defeating the speed-adjusting mechanism causing the engine to operate outside its design parameters.
9.2 Limited Defect Warranty for Exhaust Emission Control System See the supplied engine owner’s manual for the applicable emission warranty statement.
9.3 Limited Defect Warranty for Wacker Neuson Evaporative Emission Control Systems
The Emission Control Warranty is valid only for the U.S.A., its territories, and Canada. Wacker Neuson Sales Americas, LLC, N92 W15000 Anthony Avenue, Menomonee Falls, WI 53051, (hereinafter “Wacker Neuson”) warrants to the initial retail purchaser and each subsequent owner, that this engine/equipment, including all parts of its evaporative emission control system, have been designed, built, and equipped to conform at the time of initial sale to all applicable evaporative emission regulations of the U.S. Environmental Protection Agency (EPA), and that the engine/equipment is free of defects in materials and workmanship which would cause this engine/equipment to fail to conform to EPA regulations during its warranty period. Wacker Neuson is also liable for damages to other engine/equipment components caused by a failure of any warranted parts during the warranty period.
Limited Defect Warranty Period for Wacker Neuson Evaporative Emission Control SystemsThe warranty period for this engine/equipment begins on the date of sale to the initial purchaser and continues for a minimum of two (2) years. For the warranty terms for your specific engine/equipment, visit wackerneuson.com.Any implied warranties are limited to the duration of this written warranty.
What is covered Wacker Neuson recommends the use of genuine Wacker Neuson parts, or the equivalent, whenever maintenance is performed. The use of replacement parts not equivalent to the original parts may impair the effectiveness of the engine/equipment emission controls systems. If such a replacement part is used in the repair or maintenance of the engine/equipment, assure yourself that such part is warranted by its manufacturer to be equivalent to the parts offered by Wacker Neuson in performance and durability. Furthermore, if such a replacement part is

Emission Control Systems Information and Warranty—Gasoline
wc_tx001754gb.fm 67
used in the repair or maintenance of the engine/equipment, and an authorized Wacker Neuson dealer/service center determines it is defective or causes a failure of a warranted part, the claim for repair of the engine/equipment may be denied. If the part in question is not related to the reason the engine/equipment requires repair, the claim will not be denied.For the components listed in the following table, an authorized Wacker Neuson dealer/service center will, at no cost to you, make the necessary diagnosis, repair, or replacement necessary to ensure that the engine/equipment complies with the applicable EPA regulations. All defective parts replaced under this warranty become property of Wacker Neuson.
What is not coveredFailures other than those resulting from defects in material or workmanship.Any systems or parts which are affected or damaged by owner abuse, tampering, neglect, improper maintenance, misuse, improper fueling, improper storage, accident and/or collision; the incorporation of, or any use of, add-on or modified parts, or unsuitable attachments, or the alteration of any part.Replacement of expendable maintenance items made in connection with required maintenance services after the item’s first scheduled replacement as listed in the maintenance section of the engine/equipment operator’s manual, such as spark plugs and filters.Incidental or consequential damages such as loss of time or the use of the engine/equipment, or any commercial loss due to the failure of the engine/equipment.Diagnosis and inspection charges that do not result in warranty-eligible service being performed.Any non-authorized replacement part, or malfunction of authorized parts due to use of-non authorized parts.
Owner’s Warranty ResponsibilityThe engine/equipment owner, is responsible for the performance of the required maintenance listed in the Wacker Neuson engine/equipment operator’s manual.
System Covered ComponentsEvaporative emissions Fuel tank (if applicable)
Fuel tank cap (if applicable)Fuel line (if applicable)Fuel line fittings (if applicable)Clamps (if applicable)Carbon canister (if applicable)Purge port connector (if applicable)
Miscellaneous parts associated with the evaporative emission control system
ClampsGasketsMounting brackets

Emission Control Systems Information and Warranty—Gasoline
68 wc_tx001754gb.fm
Wacker Neuson recommends that all receipts covering maintenance on the engine/equipment be retained, but Wacker Neuson cannot deny warranty coverage solely for the lack of receipts or for the failure to ensure the performance of all scheduled maintenance.Normal maintenance, replacement, or repair of emission control devices and systems may be performed by any repair establishment or individual; however, warranty repairs must be performed by an authorized Wacker Neuson dealer/service center. The engine/equipment must be presented to an authorized Wacker Neuson dealer/service center as soon as a problem exists. Contact Wacker Neuson Product Support Department (1-800-770-0957) or visit wackerneuson.com to find a dealer/service center in your area, or to answer questions regarding warranty rights and responsibilities.
How to Make a ClaimIn the event that any emission-related part is found to be defective during the warranty period, you shall notify Wacker Neuson Product Support Department (1-800-770-0957, or [email protected], or wackerneuson.com), and you will be advised of the appropriate dealer/service center where warranty repair can be performed. All repairs qualifying under this limited warranty must be performed by an authorized Wacker Neuson dealer/service center.You must take your Wacker Neuson engine/equipment along with proof of original purchase date, at your expense, to the authorized Wacker Neuson dealer/service center during their normal business hours. For owners located more than 100 miles from an authorized dealer/service center (excluding the states with high-altitude areas as identified in 40 CFR Part 1068, Appendix III), Wacker Neuson will pay for pre-approved shipping costs to and from an authorized Wacker Neuson dealer/service center.Claims for repair or adjustment found to be caused solely by defects in material or workmanship will not be denied because the engine/equipment was not properly maintained and used.The warranty repairs should be completed in a reasonable amount of time, not to exceed 30 days.

wc_tx001542gb.fm 69
CRT 48 Schematics10 Schematics
10.1 CRT 48-35V—Electrical Schematic
wc_gr006759wc_gr006759
ENGINE GROUND ENGINE GROUND
--
TO IGNITION TO IGNITION
BRN #9 BRN #9GROUND GROUND
RED
#36
R
ED #
36
14AW
G 17
8MM
14AW
G 17
8MM
BLK #28 BLK #28IGNITION IGNITIONCOIL GROUND COIL GROUND
RED #32 14AWG RED #32 14AWG
RED
#38
RED
#38
PRPL
#37
PRPL
#37
WHT #16 WHT #16BRN #11 BRN #11
RED
#39
RED
#39
WHT
#17
WHT
#17
BRN #10 BRN #10WHT #15 WHT #15
1212 33
BROW
NBR
OWN
BROW
NBR
OWN
BROW
NBR
OWN
1313
995577
BROW
NBR
OWN
BROW
NBR
OWN
BROW
NBR
OWN
BROW
NBR
OWN
BROW
NBR
OWN
BROW
NBR
OWN
44 11111010
BROW
NBR
OWN
PACKARD WEATHERPACK PACKARD WEATHERPACK1212 4819 1212 4819
BRN #12 BRN #12
PACKARD WEATHERPACK PACKARD WEATHERPACK1212 4819 1212 4819
3030
8686
++
INTE
RNAL
INTE
RNAL
PNK #33 PNK #33
PRPL #35 PRPL #35
FUEL CUT OFF FUEL CUT OFF
OIL PRESSURE OIL PRESSURE
(30) (30)
PNK #33 (86) PNK #33 (86)
BLK #22 (30) BLK #22 (30)
RED#29 12AWG RED#29 12AWG
87a
87a
8585
8787
PNK
PNK
(87a
)(8
7a)
PNK
PNK
(87) (87)
(85)
(85)
BRN
BRN
BRN #13 BRN #13
12V
+ KE
Y RU
N12
V +
KEY
RUN
12V
+ PO
WER
IN12
V +
POW
ER IN
RED
#29
CAV
3 12
AWG
RED
#29
CAV
3 12
AWG
PNK
#18
CAV
1PN
K #1
8 CA
V 1
WHT #14 WHT #14BRN #7 BRN #7
WHT #13 WHT #13BRN #5 BRN #5
BLU #24 BLU #24
BRN #4 BRN #4
BRN 12 AWG BRN 12 AWG
8686
3030
87a 87a
8787
BRN (87a) BRN (87a)
PNK (86) PNK (86)
BLK (30) BLK (30)
BLU (85) BLU (85)
PACKARD WEATHERPACK PACKARD WEATHERPACK1212 4819 1212 4819
PACKARD WEATHERPACK PACKARD WEATHERPACK1212 4819 1212 4819
GROU
NDGR
OUND
POW
ERPO
WER
PRPL
#35
PRPL
#35
PNK
PNK12
V +
KEY
STAR
T12
V +
KEY
STAR
T
BRN #3 BRN #3
BLU #23 BLU #23
BRN
BRN
-- ++
BRN
BRN
RED
#30
CAV
5 14
AWG0
0620
RED
#30
CAV
5 14
AWG0
0620
PNK
#31
CAV
4PN
K #3
1 CA
V 4
BLK
#26
CAV
2BL
K #2
6 CA
V 2
NO
V
X
A
U
T S
Y
W
HJ
KL
M
PQ
R
B
C
D
D F G

wc_tx001542gb.fm70
Schematics CRT 4810.2 CRT 48-35V—Electrical Schematic Components
Ref. Description Ref. DescriptionA Battery U Spray pump motor
B Oil pressure switch (dual circuit) V Engine connector
C Fuel pump W Fuel cut-off solenoid
D Fuel pump relay X Starter motor
E Key switch Y Engine crank solenoid
F Hour meter Z Glow plug fuse
G Oil pressure indicator light AA Relay—safety system
H Operator presence switch(normally open)
BB Voltage regulator
J Throttle sense switch(normally closed)
CC Alternator
K Neutral relay DD Glow plug temperature sensors
L Right front light EE Glow plugs
M Right rear light FF Keyed power fuse
N Left rear light GG Temperature sensor
O Left front light HH Coils—ignition
P Fuse—spray system JJ Ignition module
Q Fuse—main KK Engine speed sensor
R Fuse—light circuit LL External voltage regulator (Honda engines only)
S Light switch MM Glow plug relay
T Spray pump switch — —

wc_tx001542gb.fm 71
CRT 48 Schematics10.3 CRT 48-35L—Electrical Schematic
wc_gr006760wc_gr006760
PNK #47 PNK #47 RED #3 14AWGRED #3 14AWG
ORG #44 CAV #1ORG #44 CAV #1
BLU #41 CAV #2BLU #41 CAV #2
85
85
87
87
86
86
30
30
BR
N #
6B
RN
#6
PN
K #
40
PN
K #
40
(86)
(86
)P
NK
#37 (8
7)
PN
K #
37 (8
7)
PN
K #
51
JU
MP
ER
18
AW
G (
87
)P
NK
#5
1
JU
MP
ER
18
AW
G (
87
)
BLU
#24 (8
5)
BLU
#24
(8
5)
PN
K #
32 3
50m
m (
30)
PN
K #
32 3
50m
m (
30)
GLOW PLUGGLOW PLUG LIGHT LIGHT
PN
K #
18
PN
K #
18
PN
K #
17
PN
K #
17
BR
N #
9
BR
N #
9
PA
CK
AR
D W
EA
TH
ER
PA
CK
PA
CK
AR
D W
EA
TH
ER
PA
CK
1212 4
819
12
12
48
19
PA
CK
AR
D W
EA
TH
ER
PA
CK
PA
CK
AR
D W
EA
TH
ER
PA
CK
1212 4
819
12
12
48
19
PN
K #
34
PN
K #
34
PR
PL
#3
6 O
IL P
RE
SS
UR
E L
IGH
TP
RP
L #
36
OIL
PR
ES
SU
RE
LIG
HT
YE
L #
43
AL
TE
RN
AT
OR
LIG
HT
YE
L #
43
AL
TE
RN
AT
OR
LIG
HT
OR
G #
44
CO
OL
AN
T T
EM
P L
IGH
TO
RG
#4
4 C
OO
LA
NT
TE
MP
LIG
HT
RE
D #
42
WO
RK
LIG
HT
S 1
2V
R
ED
#4
2 W
OR
K L
IGH
TS
12V
PN
K #
16
LIG
HT
SW
ITC
H O
UT
PU
TP
NK
#16 L
IGH
T S
WIT
CH
OU
TP
UT
CO
OL
AN
T T
EM
P L
IGH
TC
OO
LA
NT
TE
MP
LIG
HT
AL
TE
RN
AT
OR
LIG
HT
AL
TE
RN
AT
OR
LIG
HT
OIL
PR
ES
SU
RE
LIG
HT
OIL
PR
ES
SU
RE
LIG
HT
BR
N #
10
BR
N #
10
XX
XXX
X
XSTARTERSTARTER
RE
D #
49
8A
WG
RE
D #
49 8
AW
G
ST
AR
TE
R S
OL
EN
OID
ST
AR
TE
R S
OL
EN
OID
K
EY
SW
ITC
H
KE
Y S
WIT
CH
GL
OW
PL
UG
GL
OW
PLU
G
RED 6AWGRED 6AWG
LC
TE
RM
INA
LT
ER
MIN
AL
RIN
G #
10
RIN
G #
10
12V+12V+
COOLANTCOOLANTSENSORSENSOR
WH
T #
38
WH
T #
38
BR
N #
5B
RN
#5
BLK
#27 1
8A
WG
BLK
#2
7 1
8A
WG
BLK #26
BLK #26
14AWG
14AWG
14
AW
G1
4A
WG
BLU
#41 18A
WG
BLU
#41 18A
WG
PNK #21PNK #21
BR
N #
52
BR
N #
52
XX
INT
ER
NA
LIN
TE
RN
AL
RE
D #
48
8A
WG
RE
D #
48 8
AW
G
5252BROWNBROWNBROWNBROWN
67
89
10101111
13131212
BROWNBROWNBROWNBROWN
BROWNBROWNBROWNBROWN
BROWNBROWNBROWNBROWN
BROWNBROWN
BROWNBROWN
BROWNBROWN
5
-
TOTOSTARTERSTARTER
+
PRPL #36
PRPL #36
PN
K #
37
PN
K #
37
BR
N #
8B
RN
#8
BLU
#23
BL
U #
23
PN
K #
40
PN
K #
40
BLU
#22
BL
U #
22
B
RN
#7
BR
N #
7
RE
D #
39
RE
D #
39
PN
K #
20
PN
K #
20
BL
K #
25
1
4A
WG
BL
K #
25
14
AW
G
RE
D #
2
14
AW
GR
ED
#2
14A
WG
PN
K #
19
PN
K #
19
W
HT
#3
8
18
AW
GW
HT
#38
1
8 A
WG
BR
N #
11
BR
N #
11
12V
+C
AV
2
12V
+C
AV
2
AL
T B
+ C
AV
3
AL
T B
+ C
AV
3
ST
AR
T C
AV
5
ST
AR
T C
AV
5
#35
#35
12
VO
LT
+
12 V
OLT
+
GL
OW
PL
UG
LIG
HT
GL
OW
PL
UG
LIG
HT
GR
OU
ND
GR
OU
ND
12
V +
KE
Y12V
+ K
EY
KE
Y R
UN
KE
Y R
UN
PO
WE
R IN
PO
WE
R IN
PN
K #
15
PN
K #
15
BR
N #
12
BR
N #
12
PN
K #
14
PN
K #
14
BR
N #
13
BR
N #
13
PA
CK
AR
D W
EA
TH
ER
PA
CK
PA
CK
AR
D W
EA
TH
ER
PA
CK
12
12
48
19
12
12
48
19
PA
CK
AR
D W
EA
TH
ER
PA
CK
PA
CK
AR
D W
EA
TH
ER
PA
CK
12
12
48
19
12
12
48
19
GROUNDGROUND
N
CC
BB
DD
O
X
EE
MM
AA
NN
U
Z
A
T
Y
HJ
S
L M
BFF P R
W
E

wc_tx001542gb.fm72
Schematics CRT 4810.4 CRT 48-35L—Electrical Schematic Components
Ref. Description Ref. DescriptionA Battery U Spray pump motor
B Oil pressure switch (dual circuit) V Engine connector
C Fuel pump W Fuel cut-off solenoid
D Fuel pump relay X Starter motor
E Key switch Y Engine crank solenoid
F Hour meter Z Glow plug fuse
G Oil pressure indicator light AA Relay—safety system
H Operator presence switch(normally open)
BB Voltage regulator
J Throttle sense switch(normally closed)
CC Alternator
K Neutral relay DD Glow plug temperature sensors
L Right front light EE Glow plugs
M Right rear light FF Keyed power fuse
N Left rear light GG Temperature sensor
O Left front light HH Coils—ignition
P Fuse—spray system JJ Ignition module
Q Fuse—main KK Engine speed sensor
R Fuse—light circuit LL External voltage regulator (Honda engines only)
S Light switch MM Glow plug relay
T Spray pump switch — —

wc_tx001542gb.fm 73
CRT 48 Schematics10.5 CRT 48-34V and CRT 48-31V—Electrical Schematic
PNK
#23
FI
ELD
PNK
#23
FI
ELD
RED
12AW
G #1
3RE
D 12
AWG
#13
YEL
#44
VO
LTAG
E SW
ITCH
YEL
#44
VO
LTAG
E SW
ITCH
GRN
#41
GRN
#41
BLU
#42
BLU
#42
BLK 14AWG #43 BLK 14AWG #43
PNK #50 (87) PNK #50 (87)
RED #32 (87) RED #32 (87)BLU #29 (85) BLU #29 (85)
PNK #18 (30) PNK #18 (30)
BLK CAV 4 BLK CAV 4BLK CAV 2 BLK CAV 2BLK CAV 3 BLK CAV 3
PNK #38 PNK #38
PACKARD WEATHERPACK PACKARD WEATHERPACK1212 4819 1212 4819
PNK #37 PNK #37BRN #10 BRN #10
PACKARD WEATHERPACK PACKARD WEATHERPACK1212 4819 1212 4819
COOLANT TEMP LIGHT ORG #45 COOLANT TEMP LIGHT ORG #45OIL PRESSURE LIGHT PRPL #46 OIL PRESSURE LIGHT PRPL #46
BRN #11 BRN #11
66334411
(30) (30)
(86) (86)
(85) (85)
5522
WORK LIGHTS PNK #36 WORK LIGHTS PNK #36ALTERNATOR LIGHT YEL #44 ALTERNATOR LIGHT YEL #44
CONSOLE LIGHTS PNK #22 CONSOLE LIGHTS PNK #22
(87) (87)
(30) (30)
(86) (86)
(85) (85)
22 4411 33
(87) (87)
COOLANT TEMP SENSOR - ORG #45 COOLANT TEMP SENSOR - ORG #45
WORK LIGHT POWER PNK #40 WORK LIGHT POWER PNK #40
PNK #33 CAV 3 PNK #33 CAV 3BRN #8 CAV 2 BRN #8 CAV 2
GRN #41 CAV 6 GRN #41 CAV 6BLU #42 CAV 5 BLU #42 CAV 5
PNK #57 PNK #57BRN #6 BRN #6
4747 33 8866 1111
BRN #5 BRN #5BLU #27 BLU #27
PNK
#40
PNK
#40 PRPL #46 PRPL #46
BRN #6 BRN #6
BROW
NBR
OWN
55BR
OWN
BROW
NBR
OWN
BROW
N
77BR
OWN
BROW
NBR
OWN
BROW
N1010
BROW
NBR
OWN
BROW
NBR
OWN
BROW
NBR
OWN
BROW
NBR
OWN
BROW
NBR
OWN
22
TO B
ATTE
RYTO
BAT
TERY
--++
BRN #47 BRN #47
RED
8 AW
GRE
D 8
AWG
BLK
BLK
BLU #28 BLU #28BRN #7 BRN #7
BLU #39 BLU #39PNK #57 PNK #57
COIL #1 - BLK #52 COIL #1 - BLK #52COIL #2 - BLK #53 COIL #2 - BLK #53COIL #3 - BLK #54 COIL #3 - BLK #54
12V+ POWER IN 12V+ POWER IN
12V+ KEY RUN 12V+ KEY RUN
12V+ KEY START 12V+ KEY START
RED #30 RED #30
HOUR METER HOUR METER ++--
BRN #3 BRN #3PNK #35 PNK #35
BRN #2 BRN #2PNK #34 PNK #34
PACKARD WEATHERPACK PACKARD WEATHERPACK1212 4819 1212 4819
PACKARD WEATHERPACK PACKARD WEATHERPACK1212 4819 1212 4819
RED #31 RED #31
PNK #26 PNK #26
BLK #43 BLK #43
PNK #25 PNK #25
HOUR METER GROUND HOUR METER GROUND
RED #12 12 AWG RED #12 12 AWG
wc_gr006761
CC
BB
KK
X
NO
YH
HH
AA
AA
U
GG
W
A
Q
C
TJ
S
LM
E
B
FFP
R
F

wc_tx001542gb.fm74
Schematics CRT 4810.6 CRT 48-34V and CRT 48-31V—Electrical Schematic Components
Ref. Description Ref. DescriptionA Battery U Spray pump motor
B Oil pressure switch (dual circuit) V Engine connector
C Fuel pump W Fuel cut-off solenoid
D Fuel pump relay X Starter motor
E Key switch Y Engine crank solenoid
F Hour meter Z Glow plug fuse
G Oil pressure indicator light AA Relay—safety system
H Operator presence switch(normally open)
BB Voltage regulator
J Throttle sense switch(normally closed)
CC Alternator
K Neutral relay DD Glow plug temperature sensors
L Right front light EE Glow plugs
M Right rear light FF Keyed power fuse
N Left rear light GG Temperature sensor
O Left front light HH Coils—ignition
P Fuse—spray system JJ Ignition module
Q Fuse—main KK Engine speed sensor
R Fuse—light circuit LL External voltage regulator (Honda engines only)
S Light switch MM Glow plug relay
T Spray pump switch — —


Important: For spare parts information, please see your Wacker Neuson Dealer, or visit the Wacker Neuson website at http://www.wackerneuson.com/.Wichtig! Informationen über Ersatzteile erhalten Sie von Ihrem Wacker Neuson Händler oder besuchen Sie die Wacker Neuson Website unter http://www.wackerneuson.com/.Important : Pour des informations sur les pièces détachées, merci de consulter votre distributeur Wacker Neuson, ou de visiter le site Internet de Wacker Neuson sur http://www.wackerneuson.com/.Importante : Para saber más sobre las piezas de repuesto, póngase en contacto con su distribuidor de Wacker Neuson o acceda al sitio web de Wacker Neuson en http://www.wackerneuson.com/.Importante : Per informazioni sui pezzi di ricambio, contattare il rivenditore Wacker Neuson o visitare il sito di Wacker Neuson all’indirizzo www.wackerneuson.com.Viktigt : För information om reservdelar, kontakta din Wacker Neuson-leverantör eller besök Wacker Neusons webbplats på http://www.wackerneuson.com/.Tärkeää : Pyydä varaosatietoja Wacker Neusonin jälleenmyyjältä tai vieraile Wacker Neusonin web-sivustolla osoitteessa http://www.wackerneuson.com/Viktig : For informasjon om reservedeler, vennligst kontakt din Wacker Neuson-forhandler, eller besøk Wacker Neusons nettside på http://www.wackerneuson.com/.Vigtigt : Hvis du ønsker oplysninger om reservedele, bedes du kontakte din Wacker Neuson forhandler eller besøg Wacker Neuson websiden på http://www.wackerneuson.com/.Belangrijk! Neem contact op met uw Wacker Neuson dealer of bezoek de website van Wacker Neuson op http://www.wackerneuson.com/ voor meer informatie over reserveonderdelen.Importante : Para obter informações sobre as peças sobresselentes, consulte o seu fornecedor da Wacker Neuson ou aceda ao site Web da Wacker Neuson em http://www.wackerneuson.comWa ne : W celu uzyskania informacji na temat cz ci zamiennych skontaktuj si z przedstawicielem firmy Wacker Neuson lub skorzystaj z witryny internetowej http://wackerneuson.com/.D ležité upozorn ní! Pro informace o náhradních dílech, prosím, kontaktujte svého Wacker Neuson dealera, nebo navštivte webové stránky http://www.wackerneuson.com/.FONTOS: A pótalkatrészekre vonatkozó információkért kérjük, forduljon Wacker Neuson keresked jéhez vagy látogasson el a Wacker Neuson weboldalára a következ címen: http://www.wackerneuson.com/.
! , , Wacker Neuson -
http://www.wackerneuson.com/. : ,
Wacker Neuson, http://www.wackerneuson.com/.Važno : Za rezervne dijelove obratite se svom Wacker Neuson prodava u ili posjetite mrežne stranice tvrtke Wacker Neuson: http://www.wackerneuson.com/.Önemli : Yedek parça bilgileri için Wacker Neuson Bayinize bak n veya Wacker Neuson web sitesini ziyaret edin. http://www.wackerneuson.com/
Important : Pentru informa ii referitoare la piesele de schimb, v rug m s v adresa i distribuitorului Wacker Neuson sau s vizita i site-ul web Wacker Neuson la adresa http://www.wackerneuson.com/.
: , , Wacker Neuson Wacker Neuson
http://www.wackerneuson.com/.
Wacker Neuson Produktion GmbH & Co. KG, Preußenstraße 41, D-80809 München, Tel.: +49-(0)89-3 54 02-0 Fax: +49 - (0)89-3 54 02-390
Wacker Neuson Production Americas LLC, N92W15000 Anthony Ave., Menomonee Falls, WI. 53051Tel.: (262) 255-0500 Fax: (262) 255-0550 Tel.: (800) 770-0957
Wacker Neuson Limited - Room 1701–03 & 1717–20, 17/F. Tower 1, Grand Century Place, 193 Prince Edward Road West, Mongkok, Kowloon, Hongkong. Tel: (852) 3605 5360, Fax: (852) 2758 0032