Thermal Behaviour and Compensation of Rotary Axes in 5-Axis ...

Operations Manual for Machines Equipped with a Rotary Axis Supplement to the WinCNC Operations Manual 6/1/2015 Laguna Tools

TABLE OF CONTENTS
Overview .................................................................................................................................................................................................... 3
Safety Warning........................................................................................................................................................................................... 3
Preliminary Checks ..................................................................................................................................................................................... 4
Verify The A-axis is Parallel with the Y-axis ............................................................................................................................................ 4
Controller Overview ................................................................................................................................................................................... 5
Manual Jog Controls .............................................................................................................................................................................. 5
A-Axis Work Coordinates ....................................................................................................................................................................... 6
From Aspire to Cutting Tutorial ................................................................................................................................................................. 7
Step 1. Creating a New Wrapped Project in Aspire ............................................................................................................................... 7
Step 2. Design ........................................................................................................................................................................................ 8
Step 3. Toolpath the Project .................................................................................................................................................................. 8
Step 4. Mount the Work Piece into the Chuck....................................................................................................................................... 9
Step 5. Setting the Work Coordinates.................................................................................................................................................... 9
Setting Z0 Plane with the Center Line of the A-Axis ........................................................................... Error! Bookmark not defined.
Setting the X and Y Work Zeros .......................................................................................................... Error! Bookmark not defined.
Steps 6 and 7. Load and Run Program ................................................................................................................................................... 9

OVERVIEW
The terms rotational axis, rotary axis, 4th
axis, and A-axis are synonymous. All these
terms refer to a rotary axis that has been
integrated with a CNC machine. The
rotary axis is similar to a lathe or rotary
table such that it rotates the work piece
on its axis. But the 4th axis allows for
more functionality beyond continuous
machining. It can perform indexing, as
well as wrapping. The figure on the right is
a CNC machine equipped with a 4th axis.
Figure 1. Rotary axis overview.
SAFETY WARNING
It is imperative that the T-handle chuck key is
never left in the turner. Injury to the user and
damage to the machine can occur.
Figure 2. WARNING.

PRELIMINARY CHECKS
If the chuck and tail stock are not permanently fixed onto the CNC machine, it is important to verify that the
4th axis is aligned to the machine.
VERIFY THE A-AXIS IS PARALLEL WITH THE Y-AXIS
Whether the rotary axis is placed along the X-axis or Y-axis it is important to verify that the center line of the
rotary axis is parallel with the respective axis. In the figure below the rotary axis has been aligned to the Y-axis.
There are multiple techniques to verify whether or not the two axes are parallel.
One suggestion is to mount a dial indicator onto the spindle or Z plate. Run the dial indicator along the work
piece. Adjust the tail stock and chuck to correct for any deviation.
Of course, this is only one possibility, you are encouraged to develop your own techniques that suits your
work flow.
Figure 3. 4th axis alignment.

CONTROLLER OVERVIEW
Machines equipped with a 4th axis have an additional set of controls and functionality.
MANUAL JOG CONTROLS
Manually rotating the A-axis can be done by first selecting a continuous or incremental setting. Then either
the A-axis manual jog buttons on the control screen can be pressed or the keyboard hotkeys.
The hotkeys to manually rotate the A-axis are the "Home" and "End" keys.
Figure 4. Controller interface overview, highlighting additional 4th axis controls.

A-AXIS WORK COORDINATES
It will be necessary to specify a work zero for the A-axis when aligning a new stock. To declare a new A0
position press the "SetA" button. As shown in the command history window below a "G92A" command is
executed.
Figure 5. How to create and remove work coordinates for the A-axis.

FROM ASPIRE TO CUTTING TUTORIAL
This section captures the workflow for milling with the 4th axis. This tutorial will walk you through how to create a new wrapped project using the CAM software Aspire. And how to toolpath that project as well as preparing the CNC machine for 4th axis machining. Keep in mind that this is not the only methodology for a project. It depends on how the project is defined in the CAD software. For example, some variances will be the starting location and the position of the Z0 plane.
Figure 6. Workflow for 4th axis machining.
STEP 1. CREATING A NEW WRAPPED PROJECT IN ASPIRE
Open Aspire.
Follow the path Gadgets → Wrapping →Wrapped Job Setup.
Enter in the dimensions of the cylinder blank.
For consistency and accuracy, the center of cylinder should be selected as the Z0 plane.
Figure 7. Path to create a wrapped project in Aspire. Figure 8.Window to set job dimensions.

There are a few reasons to use the Center of the Cylinder, and they are listed below. o When rounding a blank, the surface is actually the surface of finished cylinder not the surface of
the blank. o There could be irregularities in the work piece o The work piece could be mounted with a small amount of error.
STEP 2. DESIGN
Vectric, who is the developer of Aspire, provides tutorials and documentation on their website. It is an excellent resource if you are new to Aspire.
STEP 3. TOOLPATH THE PROJECT
If you are creating a cylinder blank follow the toolpath o Gadgets --> Wrapping --> Create Rounding Toolpath
If you are toolpathing your design, then you create a toolpath the same way as a 2D-Drawing.
Once the toolpath is created, select which toolpath(s) to output.
Select the WinCNC Rotary Post Processor. Then click Save Toolspath(s).
Transfer the output file to the machine's PC.
Figure 7. Snapshot of Aspire's toolpath tab.
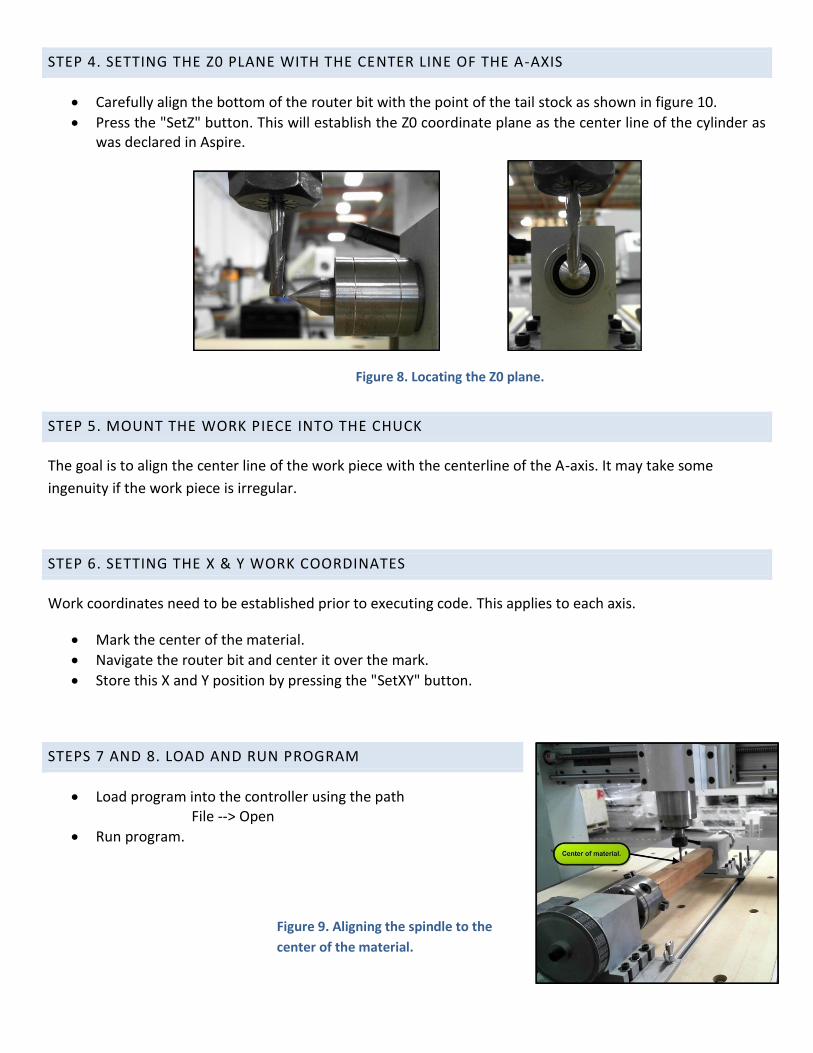
STEP 4. SETTING THE Z0 PLANE WITH THE CENTER LINE OF THE A-AXIS
Carefully align the bottom of the router bit with the point of the tail stock as shown in figure 10.
Press the "SetZ" button. This will establish the Z0 coordinate plane as the center line of the cylinder as was declared in Aspire.
STEP 5. MOUNT THE WORK PIECE INTO THE CHUCK
The goal is to align the center line of the work piece with the centerline of the A-axis. It may take some
ingenuity if the work piece is irregular.
STEP 6. SETTING THE X & Y WORK COORDINATES
Work coordinates need to be established prior to executing code. This applies to each axis.
Mark the center of the material.
Navigate the router bit and center it over the mark.
Store this X and Y position by pressing the "SetXY" button.
STEPS 7 AND 8. LOAD AND RUN PROGRAM
Load program into the controller using the path File --> Open
Run program.
Figure 8. Locating the Z0 plane.
Figure 9. Aligning the spindle to the
center of the material.