
OPERATIONS MANUAL FOR ENGLISH READERS Page 2 -...
20
FOR ENGLISH READERS PARA LECTORES EN ESPANOL UTILISATEURS FRANCAIS FUR DEUTSCHE LESER Page 2 - Page 6 Página 7 - Página 10 Page 11 - Page 14 Seite 15 - Seite 18 OPERATIONS MANUAL MANUAL DE INSTRUCCIONES MANUEL D’ INSTRUCTIONS BEDIENUNGSHANDBUCH
Transcript of OPERATIONS MANUAL FOR ENGLISH READERS Page 2 -...

FOR ENGLISH READERS PARA LECTORES EN ESPANOL UTILISATEURS FRANCAIS FUR DEUTSCHE LESER
Page 2 - Page 6Página 7 - Página 10Page 11 - Page 14Seite 15 - Seite 18
OPERATIONS MANUALMANUAL DE INSTRUCCIONESMANUEL D’ INSTRUCTIONSBEDIENUNGSHANDBUCH

CAUTION: This product satisfies FCC regulations when shielded cables and connectors are used to connect the unit to other equipment. To prevent electromagnetic interfer-ence with electric appliances such as radios and televisions, use shielded cables and connectors for connections.The exclamation point within an equilateral triangle is intended to alert the user to the presence of important operating and maintenance (servicing) instructions in the liter-ature accompanying the appliance.The lightening flash with arrowhead symbol, within an equilateral triangle, is intended to alert the user to the presence of uninsulated “dangerous voltage” within the prod-uct’s enclosure that may be of sufficient magnitude to constitute a risk of electric shock to persons.
READ INSTRUCTIONS: All the safety and operating instructions should be read before the product is operated.RETAIN INSTRUCTIONS: The safety and operating instructions should be retained for future reference.HEED WARNINGS: All warnings on the product and in the operating instructions should be adhered to.FOLLOW INSTRUCTIONS: All operating and use instructions should be followed.CLEANING: The product should be cleaned only with a polishing cloth or a soft dry cloth. Never clean with furniture wax, benzine, insecticides or other volatile liquids since
they may corrode the cabinet.ATTACHMENTS: Do not use attachments not recommended by the product manufacturer as they may cause hazards.WATER AND MOISTURE: Do not use this product near water, for example, near a bathtub, wash bowl, kitchen sink, or laundry tub; in a wet basement; or near a swimming
pool; and the like.ACCESSORIES: Do not place this product on an unstable cart, stand, tripod, bracket, or table. The product may fall, causing serious injury to a child or adult, and serious dam-
age to the product. Use only with a cart, stand, tripod, bracket, or table recommended by the manufacturer, or sold with the product. Any mounting of the product should fol-low the manufacturer’s instructions, and should use a mounting accessory recommended by the manufacturer.
CART: A product and cart combination should be moved with care. Quick stops, excessive force, and uneven surfaces may cause the product and cart combination to over-turn. See Figure A.
VENTILATION: Slots and openings in the cabinet are provided for ventilation and to ensure reliable operation of the product and to protect it from overheating, and these open-ings must not be blocked or covered. The openings should never be blocked by placing the product on a bed, sofa, rug, or other similar surface. This product should not beplaced in a built-in installation such as a bookcase or rack unless proper ventilation is provided or the manufacturer’s instructions have been adhered to.
POWER SOURCES: This product should be operated only from the type of power source indicated on the marking label. If you are not sure of the type of power supply to yourhome, consult your product dealer or local power company.
LOCATION: The appliance should be installed in a stable location.NON-USE PERIODS: The power cord of the appliance should be unplugged from the outlet when left unused for a long period of time.GROUNDING OR POLARIZATION:
• If this product is equipped with a polarized alternating current line plug (a plug having one blade wider than the other), it will fit into the out-let only one way. This is a safety feature. If you are unable to insert the plug fully into the outlet, try reversing the plug. If the plug should stillfail to fit, contact your electrician to replace your obsolete outlet. Do not defeat the safety purpose of the polarized plug.• If this product is equipped with a three-wire grounding type plug, a plug having a third (grounding) pin, it will only fit into a grounding typepower outlet. This is a safety feature. If you are unable to insert the plug into the outlet, contact your electrician to replace your obsolete out-let. Do not defeat the safety purpose of the grounding type plug.
POWER-CORD PROTECTION: Power-supply cords should be routed so that they are not likely to be walked on or pinched by items placed upon or against them, paying par-ticular attention to cords at plugs, convenience receptacles, and the point where they exit from the product.
OUTDOOR ANTENNA GROUNDING: If an outside antenna or cable system is connected to the product, be sure the antenna or cable system is grounded so as to providesome protection against voltage surges and built-up static charges. Article 810 of the National Electrical Code, ANSI/NFPA 70, provides information with regard to propergrounding of the mast and supporting structure, grounding of the lead-in wire to an antenna discharge unit, size of grounding conductors, location of antenna-discharge unit,connection to grounding electrodes, and requirements for the grounding electrode. See Figure B.
LIGHTNING: For added protection for this product during a lightening storm, or when it is left unattended and unused for long periods of time, unplug it from the wall outlet anddisconnect the antenna or cable system. This will prevent damage to the product due to lightening and power-line surges.
POWER LINES:An outside antenna system should not be located in the vicinity of overhead power lines or other electric light or power circuits,or where it can fall into such power lines or circuits. When installing an outside antenna system, extreme care should be taken to keep fromtouching such power lines or circuits as contact with them might be fatal.
OVERLOADING: Do not overload wall outlets, extension cords, or integral convenience receptacles as this can result in a risk of fire or electricshock.
OBJECT AND LIQUID ENTRY: Never push objects of any kind into this product through openings as they may touch dangerous voltage pointsor short-out parts that could result in a fire or electric shock. Never spill liquid of any kind on the product.
SERVICING: Do not attempt to service this product yourself as opening or removing covers may expose you to dangerous voltage or other haz-ards. Refer all servicing to qualified service personnel.
DAMAGE REQUIRING SERVICE: Unplug this product from the wall outlet and refer servicing to qualified service personnel under the following conditions:• When the power-supply cord or plug is damaged.• If liquid has been spilled, or objects have fallen into the product.• If the product has been exposed to rain or water.• If the product does not operate normally by following the operating instructions. Adjust only those controls that are covered by the operating instructions as an improperadjustment of other controls may result in damage and will often require extensive work by a qualified technician to restore the product to its normal operation.• If the product has been dropped or damaged in any way.• When the product exhibits a distinct change in performance, this indicates a need for service.
REPLACEMENT PARTS: When replacement parts are required, be sure the service technician has used replacement parts specified by the manufacturer or have the samecharacteristics as the original part. Unauthorized substitutions may result in fire, electric shock, or other hazards.
SAFETY CHECK: Upon completion of any service or repairs to this product, ask the service technician to perform safety checks to determine that the product is in proper op-erating condition.
WALL OR CEILING MOUNTING: The product should not be mounted to a wall or ceiling.HEAT: The product should be situated away from heat sources such as radiators, heat registers, stoves, or other products (including amplifiers) that produce heat.
PLEASE READ BEFORE USING APPLIANCEIMPORTANT WARNING AND SAFETY INSTRUCTIONS!
CAUTIONRISK OF ELECTRICSHOCK DO NOT
OPEN!
Fig. A
Fig. B
22
CDX-2250
3
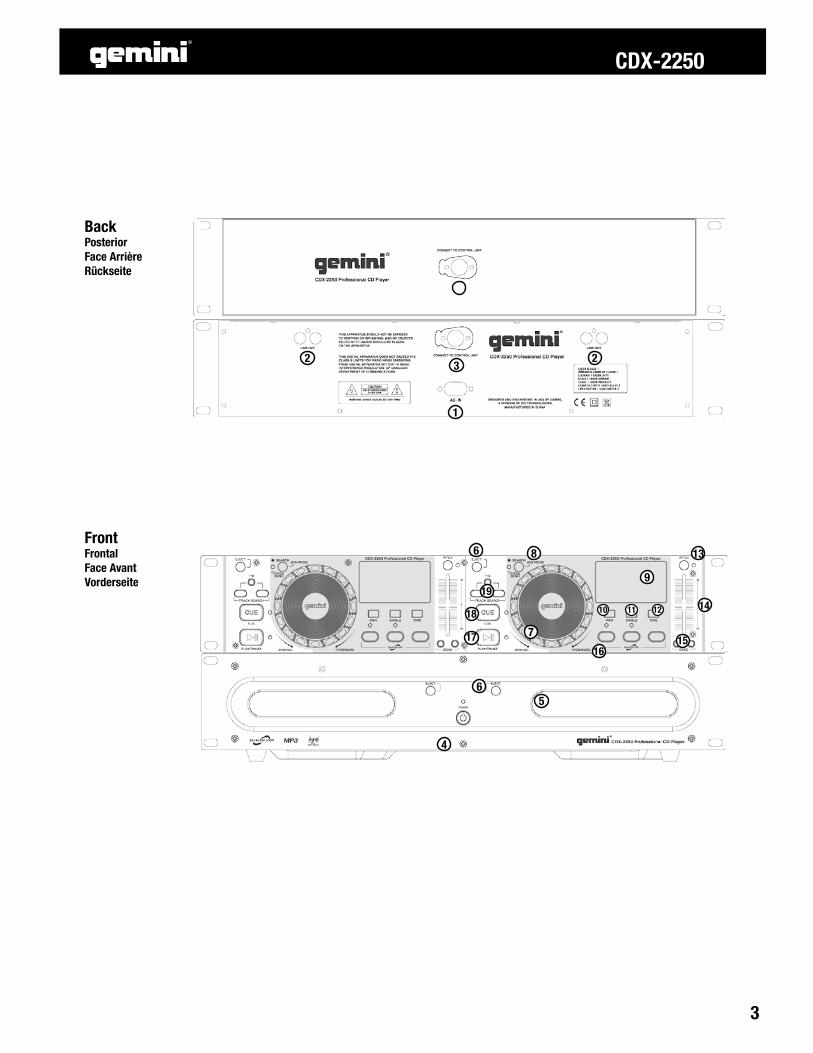
BackPosteriorFace ArrièreRückseite
Front FrontalFace AvantVorderseite
2
4
56
7
8
9
10
13
14
16
6
1211
1517
18
19
1
23

Congratulations on purchasing the Gemini CDX-2250 Profes-sional 2U Dual CD Player. This state of the art 2U professional MP3/CD Player is backed by a 1 year warranty*. Prior to use, we urge that you understand all the instructions.
- Audio CD & CD-R compatible - Anti-shock using RAM buffer memory- 2 Selectable Jog modes Search & Pitch Bend- Instant-start & cue with preview- Single & Continuous play modes- One seamless loop per side with reloop - Pitch bend via jog wheel or buttons +/- 16%- Three mode time selection- Frame accurate search - Rubber jog wheels with finger grips- Large blue backlit LCD display- Variable pitch control with a +/- 12% range- +10 track button for quick navigation- Fully programmable with repeat function
Laser Diode PropertiesMaterial: Ga - Al - AsWavelength: 755 - 815 nm (25° C)Laser Output: Continuous Wave, max. 0.5 mW
1. Do not use this CD player at temperatures below 41°F/5°C or higher than 95°F/35°C.2. The apparatus should not be exposed to dripping or splash-ing, and no objects filled with liquids such as vases should be placed on the apparatus.3. Place the unit in a clean and dry location.4. Do not place the unit in an unstable location.5. When disconnecting the power cord from the AC outlet, al-ways grasp by the plug. Never pull the power cord.6. To prevent electric shock, do not remove the cover or the bottom screws.7. There are NO USER SERVICEABLE PARTS INSIDE. Please refer to a qualified technician.
(IN THE USA ~ IF YOU EXPERIENCE PROBLEMS WITH THIS UNIT CALL GEMINI CUSTOMER SERVICE AT: 1(732) 346-0061. DO NOT ATTEMPT TO RETURN THIS EQUIPMENT TO YOUR DEALER)
8. Do not use chemical solvents to clean the unit.9. Keep the laser pickup clean by keeping the tray closed.10. Keep this manual in a safe place for future reference.
POWER: Plug in the power cord of the CDX-2250.
LINE OUTPUT JACKS: Plug one end of the included RCA cable into LINE OUTPUT JACKS on the rear panel. Plug the other end of the RCA connectors into any available line input jacks on your mixer. If you are connecting the CDX-2250 through a re-ceiver, you can plug the RCA connectors into the CD AUX INPUT JACKS on your receiver. If there are no CD or AUX INPUTS use any line level (not phono) inputs.
CONTROL CABLE: Plug the CONTROL CABLE into the CDX-2250. Be careful when plugging in these cables, never force the cable into its socket, making sure that the DIN connector at the end of the cable properly aligns with the drawing on the back of the CDX-2250.
POWER: Once you have connected all your cables, you can turn the CDX-2250’s POWER on by pressing the POWER button, pressing the button a second time will turn off the unit. DISC TRAY: The DISC TRAY is where the CD is held during load-ing, unloading and playback, and holds both 12 cm and 8 cm CD’s. (DO NOT FORCE THE CD TRAY TO CLOSE. EXCESSIVE FORCE WILL DAMAGE THE CD MECHANISM, USE THE OPEN AND CLOSE BUTTONS)
EJECT BUTTON: Pressing the EJECT BUTTON will open or close the DISC TRAY. The DISC TRAY will not eject in PLAY mode.
JOG WHEEL: In SEARCH MODE the JOG WHEEL can be used to search forward or backwards in the music track, as well as for fine adjustments to a CUE point in PAUSE mode. In PITCH BEND mode the JOG WHEEL will function the same as the PITCH BEND allowing you to speed up (FORWARD) or slow down (REWIND) the music clockwise being (FORWARD) and counter clockwise being (REWIND).
JOG MODE BUTTON: When the JOG MODE BUTTON is il-luminated it indicates the JOG WHEEL is in SEARCH MODE, and when not illuminated it indicates that the JOG WHEEL is in PITCH BEND MODE.
DISPLAY: The DISPLAY shows the track number, pitch value, pitch bend, single, play/pause modes, loop mode, reloop mode, PGM, the playback display bar, and three different time displays. These times displays are TIME ELAPSED on the track, TIME RE-MAINING on the disc and TIME REMAINING on the track. Time is measured in minutes, seconds and frames.
PGM: Allows you to create a set playlist. To program a set list into the CDX-2250 memory, begin by stopping the unit from play and pressing PGM to begin the set list. Select a track by using the track selection button to scan to the first track to be placed in the set list. When you have selected the proper track press PGM and
INTRODUCTION:
FEATURES:
SAFETY SPECIFICATIONS:
PRECAUTIONS:
CONNECTIONS:
FUNCTIONS:
4
CDX-2250
2
1
3
4
5
6
8
7
9
10

the CDX-2250 will be ready to set your next selection. Repeat the previous steps until you have completed your play list, then press play to begin the set list.
SINGLE: Pressing the SINGLE button engages SINGLE mode, in this mode the CDX-2250 will play one song and then stop. Pressing the SINGLE button again will then activate CONTINU-OUS mode causing the unit to play continuously (after the last track, the unit will return to the first track of the disc and con-tinue to play).
TIME: The TIME button switches the time display between three available sources, these three are TIME ELAPSED on the track, TOTAL REMAIN on the disc and REMAIN on the track. TIME ELAPSED indicates how much time has currently gone by since the play button was pressed, TIME REMAING ON DISC will count down the time remaining on the entire disc and TIME REMAINING ON TRACK counts down the time that is left before the end of the track.
PITCH: Press the PITCH button to activate the PITCH CON-TROL SLIDE. Pitch range that can be controlled through the use of the PITCH CONTROL SLIDER. Press the PITCH button again to deactivate this mode.
PITCH CONTROL SLIDE: Moving the PITCH CONTROL SLIDE up or down will change the pitch percentage +/ - 12%.
PITCH BEND: Pushing the PITCH BEND BUTTONS will auto-matically raise the pitch up to +16% or lower the pitch down to -16% from the existing pitch setting. Releasing the buttons will return the pitch to the original pitch setting. You can use this function to match the beat when mixing from one song to another.
LOOP SECTION: A LOOP repeats the section between the en-try point (LOOP IN) and the exit point (LOOP OUT).
A. To set a loop while the unit is playing, start by pressing the LOOP IN BUTTON (it will light up)B. When you reach the desired end loop point press the LOOP OUT BUTTON (it will also light up). The LOOP IN and LOOP OUT buttons will blink. The loop will continue playing until you press the LOOP OUT BUTTON again allowing the music to continue from that point on. C. To re-engage the loop you must press the RELOOP BUTTON. D. When you have released your loop the LOOP IN and LOOP OUT BUTTON buttons will turn OFF and the will re-main lit to indicate that your loop is stored in the CDX-2250 memory. E. Pressing the LOOP IN BUTTON again while the unit is playing will erase the previously saved loop while saving your new loop entry point. F. Press LOOP OUT to exit the loop and save a new com-plete loop. G. Press RELOOP to return to the beginning of the previ-
ously saved loop from normal play. Press RELOOP repeat-edly to cause the loop to stutter.
NOTE: THE FIRST LOOP WILL HAVE A PAUSE AT THE EXIT POINT, WHILE ALL OTHERS WILL BE SEAMLESS.
PLAY / PAUSE: Each press of the PLAY / PAUSE BUTTON causes the operation to change from PLAY to PAUSE or from PAUSE back to PLAY. The PLAY/PAUSE BUTTON remains lit when in PLAY mode, while it blinks in PAUSE mode.
CUE: To set a CUE point, press the PLAY / PAUSE BUTTON while a file is playing, and use the JOG WHEEL to adjust the file to a desired point in the track. Pressing the PLAY / PAUSE BUTTON will set a CUE point. While the unit is playing and after the cue point has been programmed, pressing CUE will cause the CD player to enter the PAUSE mode (PLAY/PAUSE BUTTON blinks) at the programmed cue point (the CUE LED is lit). Hold-ing down the CUE button changes the function to preview, and allows you to stutter start or play from the programmed CUE POINT. Releasing the CUE button will return the CD to the preset CUE point.
TRACK SEARCH: The TRACK SEARCH buttons let you select the track to play. +10 allows you to scan through the track selec-tion in increments of 10.
NOTE: ONCE YOU HAVE SKIPPED TO ANOTHER TRACK, YOU MAY NOT GO BACK TO YOUR PROGRAMMED CUE POINT. YOU MUST BEGIN YOUR CUE SELECTION OVER AGAIN, THE CUE WILL BE PRESET TO THE BEGINNING OF THE NEWLY SELECTED TRACK.
- If a disc will not play, check to see if the disc was loaded cor-rectly (label side up). Also check the disc for excessive dirt, scratches, etc.
- If the disc turns but there is no sound, check the cable connec-tions, if they are ok, check your amplifier or receiver.
-If the CD skips, check the CD for dirt or scratches. Do not as-sume that the CD player is defective. Many CD’s are recorded out of spec and will skip on most or all CD players. Before send-ing the unit for repair, try playing a CD that you are sure plays properly.
5
CDX-2250
TROUBLESHOOTING:
11
12
13
14
15
16
17
18
19

GENERAL:Type..................................................................Compact Disc PlayerDisc Type...........................Standard Compact discs (12 cm & 8 cm)Time Display..............Track Elapsed, Track Remain, or Total remainVariable Pitch...............................± 12% Slider with Resume SwitchPitch Bend...............................................................± 16% MaximumInstant Start........................................................Within 0.03 secondsInstallation.............................................................................19” eachDimensions........Main unit: 19” x 3.5” x 10” (482.6 x 88.9 x 254 mm)........................Controller: 19” x 3.5” x 2.75” (482.6 x 88.9 x 70 mm)Weight..........................................................Main unit: 8.8 lbs. (4 kg)................................................................Controller: 4.0 lbs. (1.5 kg)
AUDIO SECTION:Quantization...............................1 Bit Linear/Channel, 3 Beam LaserOversampling Rate................................................................8 TimesSampling Frequency.............................................................44.1 kHzFrequency Response................................................20 Hz to 20 kHzTotal Harmonic Distortion........................................Less Than 0.05%Signal to Noise Ratio.................................................................85 dBDynamic Range.........................................................................85 dBChannel Separation.....................................................85 dB (1 KHz)Output Level.........................................................2.0 +/- 0.2V R.M.S.Power Supply................................................AC 115/230V, 60/50 Hz
S P E C I F I C AT I O N S A N D D E S I G N A R E S U B J E C T T O C H A N G E
W I T H O U T N O T I C E F O R P U R P O S E O F I M P R O V E M E N T.
6
CDX-2250
SPECIFICATIONS:

ATENCIÓN: Este producto cumple con la normativa legal si se utilizan cables y conectores blindados para conectar la unidad a otro equipo. Para evitar interferencias electro-magnéticas con otros aparatos eléctricos, como radios y televisores, deben emplearse cables y conectores blindados.
Los signos de exclamación dentro de un triángulo que puedan aparecer en la documentación que acompaña a la unidad pretenden alertar al usuario de instrucciones de op-eración o mantenimiento importantes.
El signo de un rayo dentro de un triángulo pretende alertar al usuario de la presencia de "voltaje peligroso" no aislado en el inte-rior de la unidad, que podría ser de suficienteintensidad como para constituir riesgo de descarga eléctrica.
LEA LAS INSTRUCCIONES: Deben leerse todas las indicaciones de uso y seguridad antes de usar este producto.CONSERVE LAS INSTRUCCIONES: Las instrucciones de uso y seguridad deben conservarse para referencias futuras.ATIENDAA LAS ADVERTENCIAS: Deben seguirse todas las advertencias sobre este producto que figuran en el manual de instrucciones.SIGA LAS INSTRUCCIONES: Deben seguirse todas las instrucciones del manual.LIMPIEZA: Este producto debe limpiarse con una mopa suave o con un paño seco. Nunca utilice cera para muebles, gasolina, insecticidas u otros líquidos volátiles, ya quepodrían corroer la carcasa.COMPLEMENTOS: No utilice accesorios que no estén recomendados por el fabricante, pues podrían dañar la unidad.AGUA Y HUMEDAD: No use este producto cerca de medios acuáticos, como una bañera, un cubo de agua, un fregadero o un lavadero;tampoco en un sótano húmedo, ni cerca de una piscina o similar.ACCESORIOS: No coloque el producto sobre un carrito, soporte, trípode, brazo o mesa. Podría caer y causar graves daños a un niño oadulto, así como a la propia unidad. Úsese sólo con un carrito, soporte, trípode, brazo o mesa recomendado por el fabricante. Al montar launidad deben seguirse siempre las instrucciones y emplearse accesorios recomendados por el fabricante.CARRITO: Si el producto va sobre un carrito, debe moverse el conjunto con cuidado. Detenciones bruscas, una fuerza excesiva o superfi-cies inadecuadas pueden provocar la caída de todo el conjunto. Véase Figura A.VENTILACIÓN: Las aperturas y ranuras de la carcasa están diseñadas para la ventilación, aseguran un manejo fiable y lo protegen decualquier sobrecalentamiento, por tanto, nunca deben cubrirse ni bloquearse. Estas aperturas no deben taparse colocando el producto sobreun sofá, una cama, una alfombra o superficies similares. Nunca debe colocarse en una estructura prefabricada, como una caja o un rack, a menos que tengan la ventilaciónadecuada o lo permitan las instrucciones del fabricante.FUENTES DE ALIMENTACIÓN: Esta unidad debe utilizarse exclusivamente con el tipo de suministro eléctrico indicado en la etiqueta correspondiente. Consúltelo antes deenchufar el producto si no está seguro del tipo de suministro del lugar donde lo va a usar.UBICACIÓN: Este aparato debe colocarse en una ubicación estable.PERIODOS SIN USARLO: Si no se va a usar la unidad durante un tiempo prolongado, desenchúfelo de la corriente eléctrica.TOMA DE TIERRA O POLARIZACIÓN:- Si este producto lleva una clavija de corriente alterna polarizada (con un pivote más grueso que otro, tipo inglés), sólo entrará en una posición. Es una medida de seguri-dad. Si no puede introducir la cla-vija en el enchufe, gírela. En ningún caso debe forzarse. Si sigue sin entrar, un electricista debería cambiar el enchufe.- Si la unidad lleva una clavija con tres pivotes (el tercero corres-ponde a la toma de tierra), sólo entrará en un tipo de enchufe. Se trata de una medida de seguridad. Si elenchufe y la clavija no son compatibles, un electricista deberá cambiar el enchufe. En ningún caso deberá forzarse.PROTECCIÓN DEL CABLE DE CORRIENTE: Los cables de corriente deben protegerse para que nadie los pise ni corran el riesgo de pin-zarse por elementos colocados encima o que los aprisionen. Debe prestarse especial atención al cable, al enchufe, a los extensores de cabley al punto por donde el cable sale de la unidad.TIERRA DE LAANTENA EXTERIOR: Si el producto lleva conectada una antena exterior o sistema de cables, asegúrese de que cuenta con
la toma de tierra correspondiente, a fin de proteger la unidad de variaciones de voltaje y cargas de electricidad estática. Existe docu-mentación oficial acerca de la correcta utilización de la toma de tierra y de las medidas de seguridad pertinentes, conexión de los electrodosde descarga y sus requisitos. Véase Figura B.RAYOS: Como protección adicional del producto durante una tormenta eléctrica, o durante periodos prolongados sin usarlo, desenchúfelode la corriente y desconecte la antena o sistema de cables. De este modo se protegerá el producto de los daños que pueda producir la caídade un rayo o las fluctuaciones de la red eléctrica.LÍNEAS ELÉCTRICAS: Nunca debe situarse un sistema de antena cerca de líneas eléctricas u otros circuitos de corriente. Tampoco debecolocarse en lugares donde pueda caer sobre dichos circuitos eléctricos. Al instalar un sistema de antenización exterior, debe tomarse la extrema precaución de no tocardichas líneas eléctricas, pues el mas minimo contacto puede ser fatal.SOBRECARGA: No sobrecargue los enchufes de la pared con ladrones o instalando enchufes múltiples, pues correría el riesgo de electrocución o incendio.ENTRADA DE OBJETOS O LÍQUIDOS: Nunca introduzca objetos de ningún tipo en el interior del producto, pues podrían tocar una parte eléctrica y cortocircuitar elaparato, lo que resultaría en un incendio o descarga eléctrica. No verter nunca ningún líquido sobre el producto.REPARACIÓN: No intente reparar el producto por cuenta propia, ya que abrir o retirar la carcasa le expondría a un voltaje peligroso u otros peligros. Diríjase siempre a uncentro de servicio técnico autorizado.DAÑOS QUE REQUIEREN REPARACIÓN: Desenchufe el aparato de la corriente y diríjase a un servicio técnico autorizado si se da alguna de las siguientes situaciones:- El cable de alimentación o la clavija están dañados.- Se ha vertido líquido o ha caído algún objeto sobre la unidad.- El aparato se ha expuesto a la lluvia o a salpicaduras.- La unidad se ha caído al suelo o dañado de algún modo.- El aparato no funciona con normalidad, ni aun siguiendo las instrucciones. Ajuste sólo los mandos que se indican en las instrucciones, ja que la manipulación inadecuadade otros controles podría dañar la unidad y requeriría un mayor trabajo de un técnico para restablecer su funcionamiento normal.- Si el producto muestra anomalías en su funcionamiento, necesita revisión por parte de un servicio técnico autorizado.RECAMBIOS: Cuando se necesite alguna pieza de recambio, asegúrese de que el servicio técnico utilice piezas originales autori-zadas o que tengan las mismas característicasque las originales. Los reemplazos no autorizados pueden causar descargas eléctricas, incendios u otros daños.COMPROBACIÓN DE SEGURIDAD: Tras la reparación, solicite al técnico que efectúe las comprobaciones de seguridad necesarias para determinar que el producto se en-cuentra en las condiciones adecuadas para su funcionamiento.MONTAJE EN UNA PARED O TECHO: Este producto nunca debe montarse en una pared o en el techo.CALOR: Este producto debe alejarse de fuentes de calor, como radiadores, estufas u otros aparatos que irradien calor, incluyendo amplificadores.
POR FAVOR LEAANTES DE UTILIZAR, INSTRUCCIONESIMPORTANTES DE SEGURIDAD
CAUTIONRIESGO DE SHOCKELECTRICO - NO
ABRIR!
Fig. B
Fig. A
77

Lefelicitamos por haber adquirido el Reproductor doble de CD’s de 2U Gemini CDX-2250. Este reproductor de CD’s de última generación está amparado por un año de garantía*. An-tes de usar, le recomendamos comprenda todas las instruc-ciones y características.
- Compatible con Audio CD y CD-R - Memoria buffer RAM anti-shock - 2 Modos de Jog seleccionables Búsqueda y Pitch Bend- Arranque instantáneo y cue con pre-escucha- Modos reproducción Single y Continuos- Un seamless loop por cada lado con reloop- Pitch bend via jog wheel o botones +/- 16%- Tres modos de selección de tiempo - Búsqueda precisa de Frame- Jog wheels de goma con surcos para los dedos - Gran display LCD azul - Control de Pitch Variable con rango de +/- 12%- Botón +10 para navegación fácil- Totalmente programmable con function de repetición
Propiedades del Diodo LaserMaterial: Ga - Al - AsLongitud de Onda: 755 - 815 nm (25° C)Salida Laser: Onda Continua, max. 0.5 mW
1. No utilice este reproductor de CD a temperaturas por debajo de 41°F/5°C o superiores a 95°F/35°C.2. Este aparato no debe exponerse a chorros o salpicaduras y no deben colocarse objetos con líquidos como por ejemplo jarrones, encima del aparato.3. Coloque la unidad en un lugar limpio y seco.4. No colocar la unidad en una superficie inestable.5. Al desconectar el cable de corriente de la toma de pared, siempre cójalo por el conector. Nunca tire del cable.6. Para evitar shock eléctrico, no quite la tapa ni los tornillos inferiores.7. NO HAY PARTES REEMPLAZABLES POR EL USUARIO en el interior. Por favor acuda a un técnico cualificado si es nece-sario.
(EN USA ~ SI USTED TIENE PROBLEMAS CON ESTA UNI-DAD LLAME A ATENCION AL CLIENTE GEMINI AL TEL. : 1 (732) 346-0061. NO INTENTE DEVOLVER EL EQUIPO A SU DISTRIBUIDOR.)
8. No use disolventes químicos para limpiar la unidad.9. Mantenga el lector laser limpio manteniendo la bandeja cer-rada.
10. Guarde este manual en lugar seguro para futuras referencias.
ENCENDIDO: Enchufe el cable de alimentación del CDX-2250.
CONECTORES DE SALIDA DE LÍNEA: Conecte un extremo del cable RCA incluído en los conectores de salida de la parte trasera. Conecte el otro extremo de los RCA in cualquier entrada de línea disponible en su mezclador. Si está conectando el CDX-2250 a través de un pre-amplificador , puede conectar los RCA en la entrada CD AUX de su pre-amplificador. Si no hay entrada de CD o AUX entonces use cualquier entrada de nivel de línea (no phono).
CABLE DE CONTROL: Conecte el CABLE DE CONTROL en el CDX-2250. Tenga cuidado cuando conecte esos cables, nunca fuerce el cable en su conector, asegúrese que el conector DIN al final del cable se alinie correctamente con el dibujo que hay en la parte de atrás del CDX2200.
ENCENDIDO: Encienda el CDX-2250 presionando el botón POWER, presionando el botón POWER de su CDX-2250 una segunda vez la unidad se apagará. BANDEJA DE DISCO: La BANDEJA DE DISCO es donde el CD va alojado durante la carga, descarga y reproducción y permite discos de 12 cm y 8 cm. (NO FUERCE LA BANDEJA PARA CERRARLA YA QUE UNA FUERZA EXCESIVA DAÑARA EL MECANISMO DEL CD, USE SIEMPRE EL BOTON DE ABRIR / CERRAR)
BOTON EJECT: Pulsando el BOTON EJECT se abrirá o cerrará la BANDEJA DE DISCO. La BANDEJA DE DISCO no se abrirá durante el modo PLAY.
JOG WHEEL: En MODO BUSQUEDA el JOG WHEEL puede usarse para avanzar o retroceder en la pista, así como hacer ajustes finos de CUE en modo PAUSA. En modo PITCH BEND el JOG WHEEL funcionará como PITCH BEND permitiendo in-crementar la velocidad (ADELANTE) o disminuirla (ATRAS) de la música moviendo la rueda en el sentido del reloj (FORWARD) o a la inversa (REWIND).
BOTON MODO JOG: Cuando el BOTON MODO JOG está ilu-minado indica que el JOG WHEEL está en MODO BUSQUEDA y cuando no está iluminado indica que el JOG WHEEL está en MODO PITCH BEND.
DISPLAY: El DISPLAY muestra el número de pista, valor del pitch, pitch bend, single, modo play / pausa, modo loop, modo reloop, PGM, barra de reproducción y tres modos distintos de tiempo. Estos modos de tiempo son TIEMPO TRANSCURRIDO de pista,
INTRODUCCION:
CARACTERISTICAS:
ESPECIFICACIONES DE SEGURIDAD:
PRECAUCIONES:
CONEXIONES:
FUNCIONES:
8
CDX-2250
2
1
3
4
5
6
8
7
9

TIEMPO RESTANTE en el disco y TIEMPO RESTANTE en la pista. El tiempo se mide en minutos, segundos y frames.
PGM: Permite crear una lista de reproducción. Para programar una lista en la memoria del CDX-2250, primero pare la repro-ducción y pulse PGM para iniciar la lista. Seleccione una pista usando el selector de pistas para buscar la primera pista de la lista. Cuando haya seleccionado la pista correcta pulse PGM y el CDX-2250 estará listo para la próxima selección. Repita los pasos anteriores para completar la lista, luego pulse play para iniciar la reproducción de la lista fijada.
SINGLE: Pulsando el botón SINGLE se activa el modo SIN-GLE, en este modo el CDM-3610 reproducirá una canción y luego se para. Pulsando el botón SINGLE de nuevo se activará el modo CONTINUOS provocando que la unidad reproduzca de forma continua (después de la última canción, la unidad vuelve a la pista primera y sigue reproducción).
TIEMPO: Pulsando el botón TIEMPO conmuta el display de tiempo entre tres posibilidades, estas tres son TIEMPO TRANSCURRIDO de pista, TIEMPO RESTANTE de pista y TIEMPO RESTANTE DEL DISCO. TIEMPO TRANSCURRIDO indica cuanto tiempo lleva esta canción desde que se pulsó play, TIEMPO RESTANTE EN PISTA cuenta el tiempo que fal-ta para finalizar la pista el y TIEMPO RESTANTE DEL DISCO cuenta el tiempo que falta para finalizar el disco que suena.
PITCH: Mantenga pulsado el botón de PITCH para activar el CONTROL DESLIZANTE DE PITCH. El rango de Pitch puede ser controlado a través del CONTROL DESLIZANTE DE PITCH. Pulse el botón de Pitch de Nuevo para desactivar este modo. CONTROL DESLIZANTE DE PITCH: Moviendo el CONTROL DESLIZANTE DE PITCH arriba o abajo cambiará el porcentaje +/ - 12%.
PITCH BEND: Pulsando los botones PITCH BEND se aumen-tará automáticamente +16% o se disminuirá el pitch en -16% desde el ajuste existente. Soltando los botones se vuelve al nivel de pitch original. Se puede utilizar esta función para cuadrar el beat cuando se mezcla de una canción a otra.
SECCION LOOP: Un LOOP repite la sección entre el punto de entrada (IN) y el de salida (OUT).
A. Para fijar un loop mientras la unidad está reproduci-endo, pulse el botón IN (se iluminará)B. Cuando llegue al punto que desea finalizar el loop pulse el botón OUT (también se iluminará). El loop seguirá repro-duciéndose hasta que pulse el botón OUT de nuevo permi-tiendo que la música continúe desde ese punto.C. Para re-enganchar el loop debe pulsar el botón RE-LOOP. D. Cuando haya lanzado su loop el BOTON OUT se apagará OFF y el BOTON IN seguirá iluminado para indicar que su loop está guardado en la memoria del CDX-2250E. Pulsando el botón IN de nuevo mientras la unidad repro-
duce, se borrará el loop previo guardado al guardar su nuevo punto de entrada de loop. F. Pulse OUT para salir del loop y guardar un nuevo loop completo.G. Pulse RELOOP para volver al principio del loop guardado para reproducción normal. Pulse RELOOP repetidamente para tartamudeo.
NOTA: EL PRIMER LOOP TENDRA UNA PAUSA EN EL PUNTO DE SALIDA, MIENTRAS QUE TODOS LOS DEMAS SERAN SIN CORTE. PLAY / PAUSA: Cada pulsación del BOTON PLAY / PAUSA causa el cambio de función de PLAY a PAUSA o de PAUSA de nuevo a PLAY. El botón PLAY/PAUSA queda iluminado cuando es PLAY, mientras que parpadea durante PAUSA.
CUE: Cuando la unidad está reproduciendo y después de haber programado un punto CUE, pulsando CUE el reproductor de CD entrará en modo PAUSA (BOTON PLAY / PAUSE parpadea) en el punto CUE cue programado (el CUE LED se enciende). Manteniendo el botón CUE la función cambia a pre-escucha y permite hacer tartamudeo del punto CUE o reproducir desde ese punto CUE. Al soltar el botón de CUE la unidad vuelve al punto CUE prefijado.
SELECCIÓN DE PISTA: Los botones de SELECCIÓN DE PISTA (TRACK SEARCH) permiten seleccionar la canción para sonar. El botón +10 le permite ,cuando está en búsqueda, ir en Incre-mentos de 10.
NOTA: UNA VEZ SALTE A OTRA PISTA, NO PODRA VOLVER AL PUNTO CUE QUE TUVIERA PROGRAMADO. DEBERA EMPEZAR LA SELECCION DE CUE DE NUEVO, YA QUE EL CUE ESTARA PRE AJUSTADO EN EL INICIO DE LA SIGUIENTE CANCION.
- Si un disco no suena, compruebe si el disco se ha cargado correctamente (etiqueta hacia arriba). También compruebe que el disco no tenga excesiva suciedad, rayas ,etc.
- Si el disco gira pero no hay sonido, compruebe las conexiones, si están bien compruebe su etapa de potencia o amplificador.
- Si el CD salta, compruebe el CD de suciedad o rayas. No asu-ma que el reproductor de CD es defectuoso. Muchos cd’s están grabados fuera de norma y saltarán en la mayoría de reproduc-tores CD. Antes de enviar la unidad a reparar, pruebe con un CD que usted sepa con seguridad que funciona bien.
9
CDX-2250
RESOLUCION DE PROBLEMAS:
10
11
12
13
14
15
16
17
18
19

GENERAL:Tipo.........................................….............Reproductor Compact Disc Tipo Disco.......................Compact discs estándards (12 cm & 8 cm)Display Tiempo....................Tiempo Transcurrido, Tiempo Restante, o Total restantePitch Variable...........................± 12% Deslizante con botón ResumePitch Bend................................................................± 16% MaximumInstant Start........................................................entre 0.03 segundosInstalación...................................................……...................rack 19”Dimensiones....................................unidad principal: 19” x 3.5” x 10” (482.6 x 88.9 x 254 mm)......................................................unidad Remota: 19” x 3.5” x 2.75” (482.6 x 88.9 x 70 mm) Peso:...............................................unidad principal: 8.8 lbs. (4.0 kg).........................................................unidad Remota: 4.0 lbs. (1.5 kg)
SECCIÓN DE AUDIO:Quantización..................................1 Bit Lineai/Canal, 3 Beam LaserSobremuestreo.......................................................................8 vecesFrecuencia Sampling ...........................................................44.1 kHzRespuesta en Frecuencia..........................................20 Hz a 20 kHzDistorsión Harmónica Total .....................................menos de 0.05%Relación Señal Ruido................................................................85 dBRango Dinámico........................................................................85 dBSeparación de Canales................................................85 dB (1 KHz)Nivel de Salida.....................................................2.0 +/- 0.2V R.M.S.Fuente de Alimentación.................................AC 115/230V, 60/50 Hz
E S P E C I F I C A C I O N E S Y D I S E Ñ O E S TA N S U J E T O S A C A M B I O S
S I N AV I S O S PA R A F I N E S D E M E J O R A .
10
CDX-2250
ESPECIFICACIONES:
ATTENTION: Cet appareil répond aux certifications FCC lorsqu'il est connecté à d'autres appareils à l'aide de cordons blindés. Afin de prévenir tout risque de parasites élec-tromagnétiques avec un poste radio ou TV, veuillez utiliser des cordons blindés.Le point d'exclamation situé dans un triangle est destiné à attirer votre attention durant l'utilisation de votre appareil ou d'un entretien périodique de ce dernier. Vous en trou-verez plusieurs dans le mode d'emploi de l'appareil.LIRE LES INSTRUCTIONS: Toutes les instructions et consignes d'utilisation doivent être lues avant l'utilisation de l'appareil.CONSERVEZ LES INSTRUCTIONS: Nous vous recommandons de conserver les instructions et consignes d'utilisation en cas de nécessité ultérieure.RESPECT DES CONDITIONS D'UTILISATION: Nous vous recommandons de respecter les instructions d'utilisation.SUIVRE LES INSTRUCTIONS D'UTILISATION: Nous vous recommandons de respecter la chronologie des instructions d'utilisation.NETTOYAGE: L'appareil doit être nettoyé avec un chiffon légèrement humide. Ne pas utiliser de produits chimiques corrosifs & volatiles (cire, essence, insecticide…) afin dene pas endommager l'appareil.CORDON: Ne pas utiliser de cordons non préconisés par le fabricant afin de ne pas endommager l'appareil.EAU & HUMIDITE: Ne pas utiliser l'appareil à proximité d'une source d'eau (cuisine, salle de bain, lavabo…), ni dans un endroit sujet à l'humidité (piscine…).ACCESSOIRES: Ne pas installer cet appareil sur un support ou dans un endroit instable. L'appareil pourrait tomber au risque de blesser une personne et être endommagé.Veiller à utiliser des accessoires (Pied, support, crochet..) recommandés par le fournisseur ou vendu avec l'appareil. Tout montage ou installation doit respecter les instruc-tions du fabricant et utiliser des accessoires d'installation recommandés par le fabricant.TRANSPORT SUR CHARIOT: Tout produit installé sur un chariot doit être manipulé avec précaution. Un déplacement brusque ou trop rapidesur une surface non plane pourrait entraîner la chute de l'ensemble et endommager l'appareil. Voir Figure A.VENTILATION: Les ouvertures et ouïes d'aération situées sur l'appareil permettent une ventilation optimale de ce dernier afin d'éviter toutesurchauffe. Ces ouvertures ne doivent jamais être obstruées. Ne pas placer l'appareil sur un support souple risquant de bloquer les ouïesd'aération (Lit, sofa, canapé…). Si l'appareil est intégré dans une installation ou dans un rack, veillez à la ventilation et consultez le fabricantpour toute information complémentaire.ALIMENTATION: Veillez à respecter la tension d'alimentation située au dos de l'appareil. Si vous n'êtes pas certain de la tension d'utilisationdans votre pays, contactez votre revendeur.EMPLACEMENT: Veillez à installer l'appareil sur un support stable.PERIODE DE NON UTILISATION: Débranchez le cordon d'alimentation de l'appareil en cas de non utilisation prolongée.MISE A LA TERRE:- Si l'appareil est équipé d'une alimentation à courant alternatif (Prise possédant un contact plus large que l'autre), celle-ci se connectera correctement à la prise unique-ment si vous respectez le sens de branchement. Il s'agit là d'une mesure de sécurité. Si vous n'arrivez pas à insérer la fiche dans la prise, inversez la fiche. Si vous ne pou-vez toujours pas insérer cette dernière, contactez un électricien afin de remplacer votre prise électrique qui est obsolète. Veillez à respecter cette consigne.- Si l'appareil est équipé d'une fiche d'alimentation avec terre, veillez à la connecter à une prise électrique équipée d'une connexion à la terre. Il s'agit d'une mesure desécurité. Si vous ne pouvez insérer la fiche dans la prise électrique, contactez un électricien afin de remplacer votre prise électrique qui est obsolète. Il est important de re-specter cette mesure de sécurité.INSTALLATION DU CORDON D'ALIMENTATION: Les cordons d'alimentation doivent être déroulés et rangés proprement afin d'éviter de se prendre les pieds dedans, enparticulier les cordons reliés aux prises électriques.ANTENNE EXTERIEURE: Si vous reliez votre appareil à une antenne ou un câble extérieur, assurez-vous de la présence d'une connexion àla terre afin d'éviter les surtensions et les décharges d'électricité statique. L'article 810 du National Electrical Code, ANSI/NFPAS 70, précisetoutes les informations nécessaires afin d'effectuer correctement le branchement à la terre du pylône ou de la structure porteuse, la connex-ion du câble à l'antenne de décharge, dimensions des connecteurs de mise à la terre, connexions des électrodes, consignes de mise à laterre des électrodes. Voir Schéma B.ORAGE/FOUDRE: En cas d'orage et de non utilisation prolongée, débranchez le cordon d'alimentation, le câble d'antenne et les cordonsaudio. Ceci afin d'éviter les dégâts occasionnés par la foudre et les surcharges électriques.LIGNES ELECTRIQUES: Une antenne extérieure ne doit pas être située à proximité immédiate de lignes électriques et/ou d'un transforma-teur électrique, afin de ne pas tomber dessus en cas de chute. Lors de l'installation d'une antenne extérieure, veillez à éviter tout contact avecdes lignes électriques : tout contact peut être fatal.SURCHARGE: Ne surchargez pas les prises électriques, blocs multiprises & rallonges en y connectant trop d'appareils. Ceci afin d'éviter tout risque de surcharge électriqueou d'incendie (Surchauffe).INSERTION D'OBJET & DE LIQUIDE: N'insérez pas d'objets dans les fentes ou ouvertures de l'appareil afin d'éviter tout risque de choc électrique et d'incendie. Ne jamaisrenverser de liquide sur l'appareil.SERVICE APRES VENTE: N'essayez pas de réparer cet appareil ; en l'ouvrant ou en le démontant afin d'éviter tout risque de choc électrique. En cas de problème, veuillezprendre contact avec votre revendeur.PANNE/SITUATION NECESSITANT UN RETOUR EN SAV: Débranchez l'appareil de la prise électrique, remettez le dans son emballage d'origine et contactez votre reven-deur en tenant compte des situations suivantes :- Lorsque le cordon d'alimentation est endommagé.- Si un liquide a été renversé dessus.- Si l'appareil a été exposé à la pluie.- Si l'appareil ne fonctionne pas correctement malgré le respect des instructions d'utilisation. Ajustez uniquement les réglages préconisés dans le mode d'emploi, toute ma-nipulation ou réglage non conseillés dans ce dernier peut endommager l'appareil et procurer plus de travail en cas d'intervention SAV afin de remettre l'appareil en état demarche.PIECES DE RECHANGE: Lorsque vous avez besoin de remplacer des pièces de l'appareil, veillez à utiliser des pièces d'origine ou possédant des caractéristiques iden-tiques. L'utilisation de pièces non autorisées peut endommager l'appareil : surchauffe, court-circuit, choc électrique…CONTROLE DE SECURITE: Avant de récupérer votre appareil, assurez vous que le SAV a effectué tous les contrôles de sécurité nécessaires afin de vous restituer un ap-pareil en état de marche.INSTALLATION AU PLAFOND OU SUR UN MUR: Ce type d'installation est déconseillé.CHALEUR: Veillez à installer l'appareil loin de toute source de chaleur telle que radiateur, réchaud ou tout autre appareil produisant de la chaleur.recyclage: Cet appareil ne doit pas être considéré comme un déchet domestique à usage unique. Vous devez le déposer dans un point de collecte destiné au recyclage desappareils électroniques et électroménagers. AInsi vous préserverez l'environnement et éviterez les problêmes de santé publique vis à vis de conséquences négatives; liées àleur dépôt dans un endroit non approprié. Le recyclage contribue à préserver les ressources naturelles. Pour plus d'informations sur les conditions de recyclage de l'appareil,veuillez contacter les autorités de votre pays, les institutions locales ou votre revendeur.
AVANT TOUTE UTILISATION DE L'APPAREIL, MERCI DE PRENDRE CONNAISSANCE DES INSTRUCTIONSD'UTILISATION & DE SECURITE! RISQUE DE CHOC ÉLECTRIQUE, NE PAS OUVRIR!
ATTENTIONRISQUE DE CHOC
ÉLECTRIQUE
NE PAS OUVRIR!
Fig. A
Fig. B
1211

Félicitations concernant votre achat du Double Lecteur CD Pro-fessionnel Gemini CDX-2250. Ce Double Lecteur CD Profes-sionnel 2U est couvert par une garantie durant 1 an. Avant toute utilisation, nous vous recommandons de prendre con-naissance des instructions qui suivent.
- Compatible CD Audio & CD-R - Mémoire anti-choc (RAM)- Larges molettes de recherche (Search) et rattrapage (Pitch Bend) - Démarrage de lecture instantané & pré-écoute du point CUE - Fonction Arrêt automatique et/ou lecture continue - Boucle parfaite avec fonction de retour instantané à la boucle (Reloop) par côté - Touches de rattrapage +/- 16% & molette - 3 modes affichage temps: temps écoulé, temps restant, temps total restant - Lecture à la frame (1/75ème de seconde) - Molettes avec revêtement toucher Rubber - Larges écrans bleus LCD haute visibilité - Pitch réglable +/- 12% - Touche +10 pour accès rapide aux plages- Programmable avec fonction répétition
Propriétés Diode LaserGaz: Ga - Al - AsLongueur d’Onde: 755 - 815 nm (25° C)Niveau de Sortie: Signal Continu, max. 0.5 mW
1. Ne pas utiliser ce lecteur CD à des températures inférieures à 41°F/5°C et supérieures à 95°F/35°C.2. L’appareil ne doit pas être positionné à proximité de tout objet contenant un liquide (Exemple: vase...).3. Placez l’appareil dans un endroit propre, sec & ventilé.4. Placez l’appareil sur un support stable.5. Lorsque vous débranchez l’appareil de la prise électrique,utilisez la prise. Ne tirez jamais sur le cordon.6. Afin de prévenir tout accident électrique éventuel, veuillez ne pas démonter l’appareil.7. Il n’y a pas DE PIECES DETACHEES ACCESSIBLES ATOUT UTILISATEUR A L’INTERIEUR DE L’APPAREIL. En cas de problème, veuillez contacter votre revendeur ou un tech-nicien qualifié.
AUX USA ~ EN CAS DE PROBLEME AVEC L’APPAREIL, CON-TACTEZ LE SERVICE TECHNIQUE DE GEMINI AU: 1 (732) 346-0061. NE RENVOYEZ PAS L’APPAREIL A VOTRE REV-ENDEUR.
8. Veillez à ne pas utiliser de solvants chimiques pour nettoyer l’appareil.
9. Veillez à conserver les tiroirs en position fermée afin de proté-ger les blocs optiques des poussières.10. Conservez ce mode d’emploi dans un endroit sûr pour tout usage futur.
ALIMENTATION (POWER): branchez le cordon d’alimentation du CDX-2250.
SORTIE AUDIO: Utilisez les cordons RCA livrés avec l’appareil et branchez les sur les sorties LINE OUTPUT situées à l’arrière de l’appareil. Connectez l’autre extrémité à toute entrée ligne de votre mixer. Si vous utilisez le CDX-2250 avec un amplificateur hi-fi, utilisez les cordons RCA et les entrées CD ou AUX. Si votre amplificateur ne possède pas d’entrées CD ou AUX, utilisez n’importe quelle entrée de niveau ligne (Ne pas utiliser l’entrée phono).
CORDONS DE TELECOMMANDE: Branchez les COR-DONS DE TELECOMMANDE à chaque côté du CDX-2250. Ne forcez pas lors du branchement de ces cordons et vérifiez que les prises DIN soient connectées de façon à respecter le schéma situé à l’arrière du CDX-2250.
POWER: Lorsque vous avez effectué tous les branchements mettez le CDX-2250 sous tension en appuyant sur la touche POWER, pour éteindre l’appareil, appuyez sur la touche POWER une seconde fois.
TIROIR POUR CD: Permet le chargement, la lecture et le déchargement de tout CD (Compatible 12cm/8cm). (AFIN DE NE PAS ENDOMMAGER LES TIROIRS ET LEURS ME-CANISMES, UTILISEZ SYSTEMATIQUEMENT LES TOUCHES OPEN/CLOSE).
TOUCHE EJECTION (EJECT): En appuyant sur les touches EJECT, vous ouvrez & fermez les TIROIRS POUR CD. En cours de lecture, le CDX-2250 est équipé d’une protection permettant d’éviter une ouverture accidentelle des TIROIRS POUR CD.
MOLETTE (JOG WHEEL): En MODE SEARCH (RECHERCHE) la MOLETTE permet une recherche rapide avant & arrière, ainsi qu’une recherche précise afin de caler un point CUE en mode PAUSE. En MODE PITCH BEND la MOLETTE permettra un ajustement temporaire de la vitesse durant un calage. Dans le sens des aiguilles d’une montre (FORWARD) vous accélérez la vitesse, à l’inverse (REWIND), vous réduisez la vitesse de lecture.
TOUCHE JOG MODE: Lorsque la TOUCHE JOG MODE est illuminée, la MOLETTE est en MODE SEARCH (RECHER-CHE), à l’inverse (Touche éteinte), la MOLETTE est en MODE PITCH BEND.
ECRAN LCD: L’ECRAN LCD permet l’affichage du nombre de
INTRODUCTION:
CARACTERISTIQUES:
SPECIFICATIONS LASER:
CONNEXIONS:
FONCTIONS:
MISES EN GARDE:
12
CDX-2250
2
1
3
4
5
6
8
7
9

plages, la réglage de vitesse (Pitch), fonction pitch bend, lec-ture simple ou continue, mode play/pause, mode recherche avant/arrière, boucle (Loop), retour à la boucle (Reloop), PGM, mode répétition (Repeat), barre de progression & 3 modes affi-chages temps (TEMPS ECOULE, TEMPS RESTANT & TEMPS TOTAL RESTANT). L’affichage du temps s’effectue en minutes - secondes - frames.
PROGRAMME (PGM): Permet la création d’une playlist (Pro-gramme de lecture). Mettez le CDX-2250 à l’arrêt (Pas de lecture en cours), pressez la touche PGM afin de démarrer la création d’une playlist. Sélectionnez les morceaux à l’aide des touches de recherche de plage. Lorsque vous avez atteint la plage souhaitée, pressez la touche PGM & ainsi de suite. A l’issue de la sélection, appuyez sur la touche play (Lecture) afin de démarrer la lecture de votre playlist.
LECTURE SIMPLE (SINGLE): Appuyez sur le touche SINGLE afin d’activer le mode SINGLE, le CDX-2250 lira alors la plage une fois, puis s’arrêtera. Appuyez une seconde fois sur la touche SINGLE afin d’activer le mode CONTINUOUS (LEC-TURE CONTINUE): lorsque la dernière plage sera lue, l’appareil reprendra la lecture à partir de la première plage.
TEMPS (TIME): La touche TIME permet de modifier l’affichage temps. 3 types d’affichage sont disponibles: - TEMPS ECOULE - TEMPS RESTANT - TEMPS TOTAL RESTANT
REGLAGE DE VITESSE (PITCH): Appuyez sur la touche PITCH afin d’activer la fonction permettant de modifier la vitesse de lecture. Vous pouvez modifier celle-ci à concurrence de +/- 12%. Pour désactiver la fonction PITCH, appuyez une nou-velle sur cette touche.
POTENTIOMETRE DE REGLAGE DE VITESSE (PITCH CON-TROL SLIDE): Permet de modifier la vitesse de lecture à con-currence de +/- 12%
TOUCHES DE RATTRAPAGE (PITCH BEND): Les touches PITCH BEND permettent de modifier de façon instantanée & temporaire la vitesse de lecture de +/- 16% en fonction du réglage de vitesse en cours. Le fait de relâcher ces touches permet de revenir à la vitesse de lecture en cours. Cette fonc-tion permet le calage de 2 morceaux lors d’un mix.
SECTION BOUCLE (LOOP): Une boucle (LOOP) est une répé-tition de lecture d’un passage entre un point d’entrée (IN) & un point de sortie (OUT).
A. Pour créer une boucle, pressez la touche IN (Celle-ci s’allumera).B. Lorsque vous avez atteint le point de sortie désiré, pres-sez alors la touche OUT (Celle-ci s’allumera aussi). La bou-cle sera alors lue jusqu’à appuyer une nouvelle fois sur la touche OUT. La musique reprendra à partir de ce point de sortie.
C. Pour activer de nouveau la boucle enregistrée, appuyez sur la touche RELOOP.D. Lorsque vous sortez de la boucle, la touche OUT s’éteint & la touche IN reste allumée indiquant la présence d’une boucle dans la mémoire du CDX-2250.E. Appuyez de nouveau sur la touche IN afin d’effacer la bou-cle enregistrée & enregistrer un nouveau point d’entrée (IN).F. Appuyez sur la touche OUT pour enregistrer le point de sortie (OUT) & enregistrer la nouvelle boucle.G. Appuyez sur la touche RELOOP pour revenir au début
NOTE: LA PREMIERE BOUCLE MARQUERA UN TEMPSD’ARRET AU NIVEAU DU POINT DE SORTIE, ALORS QUE LES AUTRES SERONT PARFAITES (SEAMLESS).
PLAY/PAUSE: Chaque pression sur la touche PLAY/PAUSE per-met de démarrer ou de mettre en mode pause la LECTURE. La touche PLAY/PAUSE reste allumée durant la LECTURE et clignote en mode PAUSE.
CUE: Lorsque l’appareil est en mode lecture & après avoir en-registré un point cue, le fait d’appuyer sur la touche CUE mettra le lecteur CD en mode PAUSE (La touche PLAY/PAUSE clignote) au niveau du point cue mémorisé (La led CUE est alors allumée). Maintenez la touche CUE enfoncée afin de pré-écouter le point cue & créer un effet stutter permettant de démarrer la lecture à partir de ce point CUE. Relachez la touche CUE afin de revenir au point CUE enregistré.
SELECTION DE PLAGE (TRACK SELECTION): Les touches TRACK SELECTION permettent de sélectionner les plages que vous souhaitez lire. +10 permet d’accéder plus rapidement aux plages par saut de 10. Les touches TRACK SEARCH permettent d’accéder aux plages une par une.
NOTE : UNE FOIS QUE VOUS AVEZ ACCEDE A UNE AU-TRE PLAGE, VOUS NE POUVEZ PLUS ACCEDER AU POINT CUE ENREGISTRE. DEVEZ ALORS ENREGISTREZ UN AU-TRE POINT CUE, LE POINT CUE SERA ALORS AS SSOCIE A CETTE NOUVELLE PLAGE.
- Le CD n’est pas lu: vérifiez que celui-ci a correctement été chargé dans le tiroir (Le côté portant les inscriptions doit être lis-ible). Vérifiez aussi l’état de propreté et les éventuelles rayures...
- Le CD tourne, mais aucun son ne sort: vérifiez les connexions, l’amplificateur, la console de mixage.
- Le CD saute: Vérifiez l’état de propreté et les éventuelles ray-ures. Ne considérez pas que votre appareil est défectueux. Beaucoup de CDs sont fabriqués sans tenir compte des normes obligatoires en vigueur et ils fonctionneront incorrectement sur tout lecteur CD. Avant d’envoyer votre appareil en réparation, essayez avec un CD lu sur un autre lecteur
13
CDX-2250
DYSFONCTIONNEMENTS:
11
12
13
14
15
16
17
18
19
10

GENERALES: Type.............................................Lecteur CD Professionnel Disques Lus.....................................................CD Standards (12 cm & 8 cm) Affichage Temps...............................Temps écoulé, Temps restant & Temps total restant Réglage de vitesse (Potentiomètre linéaire)…........................± 12% Pitch Bend................................................................................± 16% Maximum Départ de Lecture......................................<0.03 seconde Installation............................................................................19” x 2U Dimensions.....................................Unité principale: 19” x 3.5” x 10” (482.6 x 88.9 x 254 mm) …................................................…Télécommande: 19” x 3.5” x 3.5” (482.6 x 88.9 x 88.9 mm) Poids par Elément...........................Unité principale: 8.8 lbs. (4 Kgs) …................................................Télécommande: 3.85 lbs.(1.74 Kg)
SECTION AUDIO: Quantification......................1 Bit Linéaire/Canal, 3 Faisceaux Laser Echantillonnage..............................................................................x8 Fréquence d’Echantillonnage..............................................44.1 kHz Bande Passante.......................................................20 Hz - 20 kHz Distortion Harmonique Totale.................................................<0.05%Rapport Signal/Bruit..................................................................85 dB Dynamique................................................................................85 dB Diaphonie....................................................................85 dB (1 KHz) Niveau de Sortie..................................................2.0 +/- 0.2V R.M.S. Alimentation Electrique.................................AC 115-230V, 60-50 Hz
L E S S P E C I F I C AT I O N S T E C H N I Q U E S E T L A C O N C E P T I O N P E U V E N T E T R E M O D I F I E E S S A N S P R E AV I S D A N S L E C A D R E D ’ U N S O U C I C O N S TA N T D ’ A M E L I O R AT I O N D E S P R O D U I T S .
CARACTERISTIQUES
14
CDX-2250

17
VORSICHT: Dieses Produkt erfüllt die FCC-Regeln, wenn Sie zum Anschluss abgeschirmte Kabel und Stecker verwenden, um es mit anderen Geräten zu verbinden. Auch um elektromagnetische Störungen anderer elektrischer Gerätewie Radios oder Fernseher zu vermeiden, benutzen Sie abgeschirmte Kabel und Stecker für die Verbindungen.Das Ausrufezeichen im gleichseitigen Dreieck weißt Sie in der Bedienungsanleitung auf wichtige Bedienungsanweisungen und Wartungs-/ Service anweisungen hin.Das Blitzsymbol im gleichseitigen Dreieck dient dazu, den Benutzer vor gefähr lichen Spannungen an nicht isolierten Stellen im Gehäuse zu warnen, die so groß sind, dass sie eine Gefahr für den Benutzer darstellen.
ANWEISUNGEN LESEN: Lesen Sie alle Sicherheits- und Bedienungsanweisungen, bevor Sie mit dem Produkt arbeiten.AUFBEWAHRUNGSHINWEIS: Bewahren Sie alle Sicherheits- und Bedienungs an weis ungen gut auf.WARNHINWEISE: Alle Warnhinweise für das Produkt und die Bedienungsan weis ungen müssen genau eingehalten werden.ANWEISUNGEN BEFOLGEN: Alle Anweisungen zum Betrieb des Produkts sollten be folgt werden.REINIGUNG: Das Produkt sollte nur mit einem Polier- oder einem weichen trockenen Tuch gereinigt werden. Benutzen Sie dazu niemals Möbelwachs, Benzine, In sekten mittel oder andere flüchtige Reinigungsmittel, denn Sie könnten zur
Korrosion des Gehäuses führen.ERWEITERUNGEN: Benutzen Sie keine Erweiterungen, die nicht vom Hersteller empfohlen sind, da sie zu Risiken führen könnten.WASSER&FEUCHTIGKEIT: Benutzen Sie dieses Produkt nicht in der Nähe von Was ser, z. B. in der Nähe einer Badewanne, einer Waschschüssel, eines Küchenspül beckens, eines Waschbeckens, in einem feuchten Keller, in der Nähe
eines Schwimmbeckens oder an ähnlichen Orten.ZUBEHÖR: Stellen Sie das Produkt nicht auf eine wackelige oder labile Unterlage. Das Produkt könnte herunterfallen und dabei Kinder oder Erwachsene verletzen, wie auch selber
beschädigt werden. Stellen Sie das Produkt nur auf vom Hersteller empfohlene oder verkaufte Unterlagen. Jede Befestigung und Montage des Produkts sollte nach den Anweisungen desHerstellers ausgeführt werden. Nutzen Sie dazu ein vom Hersteller empfohlenes Montageset.
MOBILE UNTERLAGEN: Bewegen Sie eine Kombination aus dem Produkt und einer mobilen Unterlage mit Vorsicht. Schnelles Anhalten, zu viel Schub oder unebene Böden können dazuführen, dass sich Produkt und mobile Unterlage überschlagen (SIEHE FIG. A).
BELÜFTUNG: Schlitze und Öffnungen im Gehäuse sind für die Belüftung vorgesehen. Sie stellen den zuverlässigen Betrieb des Produkts sicher und schützen es vor Überhitzung. Diese Öff-nungen dürfen nicht verschlossen, blockiert oder bedeckt werden.Stellen Sie deswegen das Produkt niemals auf ein Bett, ein Sofa, einen Teppich oder Stellen mit ähnlicher Oberfläche.Wenn Sie dieses Produkt in einer festen Installation wie z. B. in einem Regal oder einem Rack einbauen, sorgen Sie für ausreichende Belüftung oder sorgen Sie dafür, dass die Bestim-mungen des Herstellers genau ein ge halten werden.
STROMANSCHLUSS: Dieses Produkt darf nur mit dem auf dem Gerät angegebenen Strom betrieben werden. Wenn Sie sich nicht sicher sind, welche Stromart Sie bei sich zu Hause haben,fragen Sie den Verkäufer des Geräts oder Ihren Strom versorger.
AUFSTELLUNGSORT: Stellen Sie das Gerät an einem festen Ort auf.ZEITEN DES NICHTGEBRAUCHS: Ziehen Sie das Stromkabel aus dem Gerät heraus, wenn Sie es für eine längere Zeit nicht gebrauchen.ERDUNG ODER POLUNG: Wenn dieses Produkt mit einem gepolten Wechsel stromstecker (ein Stecker mit einem Kontakt mehr als andere Stecker) ausgestattet ist, passt dieser nur in einer bestimmten Richtung in die Steckdose und ist
ein besonderes Sicherheitsmerkmal. Sollten Sie den Stecker nicht komplett in die Steckdose stecken können, versuchen Sie ihn andersherum einzustecken. Sollte der Stecker auch dann noch nicht in die Steckdose passen, beauftra-gen Sie einen Elektriker, um diese veraltete Steckdose auszutauschen.Wenn dieses Produkt mit einem geerdeten dreipoligen Stecker ausgestattet ist, hat der Stecker einen dritten (Erdungs-)Kontakt und passt nur in eine Steckdose mit entsprechender Erdung. Auch das ist ein Sicherheitsmerkmal. Sollteder Stecker nicht in die Steckdose passen, beauftragen Sie einen Elektriker, um diese veraltete Steckdose auszutauschen.
SCHUTZ DES STROMKABELS: Stromkabel sollten so verlegt werden, dass man nicht auf sie treten kann, noch dass sie von darauf stehenden oder gegen sie stoßenden Gegenständen ge-quetscht werden. Achten Sie besonders auf Kanten, Sicherung, Stecker und Buchsen.
AUSSENANTENNENERDUNG: Wenn Sie eine Außenantenne oder ein Radio-/Fernsehkabelsignal an das Produkt anschließen, achten Sie darauf, dass die Antenne oder das Kabel geerdetsind, um dafür zu sorgen, dass Überspannungen und elektrostatische Aufladungen nicht auftreten können. Im Artikel 810 des National Electrical Code, ANSI/NFPA 70, finden Sie Infor-mationen über die richtige Erdung des Antennenmasts und weitere Informationen zu diesem Thema. (SIEHE AUCH FIG. B).
GEWITTER: Trennen Sie das Produkt während eines Gewitters oder wenn es unbeaufsichtigt ist oder wenn es für eine lange Zeit nicht benutzt wird, durch herausziehen des Stromkabels ausder Netzdose. Trennen Sie auch die Verbindung zu einer Antenne oder Radio-/Fernsehkabeln. Dadurch vermeiden Sie Beschädigungen des Produkts durch Blitze oder Überspannungen.
STROM- UND ÜBERLANDLEITUNGEN: Stellen Sie eine Außenantenne nicht in der Nähe von Überlandleitungen, elektrischen Licht- oder Stromkreisen oder an Stellen, wo sie in eine solcheLeitung fallen könnte, auf. Wenn Sie eine Außenantenne aufstellen, achten Sie besonders darauf, dass Sie auf keinen Fall irgendwelche Stromleitungen berührt. Das kann zugefährlichen Auswirkungen führen.
ÜBERLASTUNG: Überlasten Sie keine Steckdosen, Verlängerungskabel oder Sicherungen. Das kann zu Bränden oder elektrischen Schlägen führen.EINDRINGEN VON GEGENSTÄNDEN ODER FLÜSSIGKEIT: Führen Sie niemals irgendwelche Gegenstände durch Öffnungen in das Produkt ein. Sie könnten mit Strom führenden Stellen in Verbindung kommen oder Kurzschlüsse verur-
sachen, die zu Bränden oder elektrischen Schlägen führen können. Gießen Sie niemals irgendwelche Flüssigkeiten auf oder in das Produkt.SERVICE: Versuchen Sie nicht, das Produkt selber zu reparieren. Durch das Öffnen des Gehäuses oder Entfernen von Schrauben können Sie mit gefährlichen Spannungen oder anderen Risiken in Kontakt kommen. Beauftragen Sie im
Reparaturfall nur qualifiziertes Servicepersonal.WANN SERVICE NÖTIG IST: Unter den folgenden Bedingungen ziehen Sie auf jeden Fall das Stromkabel aus der Steckdose und beauftragen Sie für eine Reparatur nur qualifiziertes Servicepersonal:
- Wenn das Stromkabel defekt ist.- Wenn Flüssigkeit auf oder in das Produkt gelaufen ist oder Gegenstände in das Produkt gefallen sind.- Wenn das Produkt Regen oder Wasser ausgesetzt war.- Wenn das Produkt trotz Befolgen der Bedienungsanweisungen nicht normal arbeitet. Stellen Sie dabei das Produkt nur nach den Anweisungen der Bedienungsanleitung ein, andere Einstellungen können das Produkt beschädigenund den aufwändigen Einsatz von Technikern für die Wiederherstellung erfordern.- Wenn das Produkt hingefallen oder auf andere Art und Weise beschädigt ist.- Wenn das Produkt eine eindeutige Veränderung im Betrieb zeigt.
ERSATZTEILE: Wenn Ihr Produkt Ersatzteile benötigt, achten Sie darauf, dass der Servicetechniker nur vom Hersteller erlaubte Ersatzteile oder Ersatzteile, die die gleichen Eigenschaften wie die originalen Teile aufweisen, einsetzt. FalscheErsatzteile können zu Bränden, elektrischen Schlägen oder anderen Risiken führen.
SICHERHEITSTEST: Bevor der Service oder eine Reparatur für dieses Produkt beendet sind, beauftragen Sie den Servicetechniker, einen Servicetest durchzuführen, um sicher zu stellen, dass das Produkt einwandfrei funktioniert.WAND- ODER DECKENMONTAGE: Das Produkt sollte nicht an einer Wand oder der Decke montiert werden.HITZE: Stellen Sie das Produkt nicht in die Nähe von Wärmequellen wie Radiatoren, Wärmespeichern, Öfen oder anderen Produkten (auch Verstärker), die Hitze erzeugen.VERWERTEN SIE WIEDER: Dieses Produkt sollte nicht als Haushaltsmüll entsorgt werden. Entsorgen Sie das Produkt im Bedarfsfall bei einer zuständigen Entsorgungsstelle, die das Recycling der elektrischen und elektronischen Bauteile
übernimmt. Wenn Sie das Produkt dem gemäß entsorgen, schützen Sie die Umwelt und die menschliche Gesundheit. Bei nicht sachgemäßer Entsorgung gefährden Sie die Umwelt und die menschliche Gesundheit. Das Recyclingverschiedener Materialien hilft, die Natur und ihre Ressourcen zu schonen. Für nähere Informationen bezüglich der Entsorgung dieses Produkts nehmen Sie Kontakt auf mit Ihrer lokalen Stadtverwaltung, dem zuständigenEntsorgungsunternehmen oder dem Händler, bei dem Sie das Produkt gekauft haben.
VOR BENUTZUNG DES GERÄTS LESEN. WICHTIGE HINWEISE&SICHERHEITSBESTIMMUNGEN
Fig. A
Fig. B
ACHTUNGNICHT ÖFFNEN,
STROMSCHLAGGE-FAHR!
15

Herzlichen Glückwunsch zum Erwerb eines Gemini CDX-2250 professionellen 2HE Doppel-CD-Players. Dieser CD-Player basiert auf dem aktuellsten Stand der Technik und ist mit einer 1 Jahres* Garantie versehen. Stellen Sie vor Gebrauch sicher, dass Sie die Bedienhinweise verstanden haben.
- Spielt Audio-CDs & CD-Rs - Antishock RAM-Speicher- 2 wählbare Jog-Modi (Suche und Pitch Bend)- Sofort-Start & Cue mit Vorhören- Single & Continue Wiedergabemodi- Seamless Loop mit Reloop auf beiden Seiten - Pitch bend mit Jogwheel oder Tasten auf +/- 16%- 3 wählbare Zeitanzeigemodi- Frame genaue Suche - Gummierte Jogwheels mit Fingermulden - Große blau hintergrundbeleuchtete LCD-Displays- Pitch-Regelung im Bereich +/- 12% - +10 Titel Taste für schnelle Navigation- Voll programmierbar mit Repeat-Funktion
Laser Dioden EigenschaftenMaterial: Ga - Al - AsWellenlänge: 755 - 815 nm (25° C)Laserstrahl: Permanente Wellen, max. 0,5 mW
1. Setzen Sie diesen CD-Player keinen Temperaturen unterhalb 41°F/5°C und oberhalb von 95°F/35°C aus. 2. Das Produkt darf keinem Spritzwasser ausgesetzt werden und es dürfen keine Objekte gefüllt mit Flüssigkeit (etwa Vasen) auf dem Produkt platziert werden. 3. Stellen Sie das Produkt an einem sauberen und trockenen Ort auf. 4. Stellen Sie das Produkt nicht auf wackelige Oberflächen. 5. Wenn Sie das Netzkabel ziehen, halten Sie es stets am Stecker selbst und nicht am Kabel fest. 6. Um einem Stromschlag vorzubeugen öffnen Sie niemals das Gehäuse des Gerätes. 7. Im Gerät befinden sich KEINE VOM BENUTZER AUS-ZUTAUSCHENDEN TEILE. Bitte wenden Sie sich an einen qualifizierten Techniker.
(IN DEN USA ~ WENN SIE PROBLEME MIT DIESEM GERÄT HABEN SOLLTEN WENDEN SIE SICH AN DEN KUNDEN SUP-PORT UNTER 1(732) 346-0061. SCHICKEN SIE DAS GERÄT NICHT AN IHREN VERTRAGSHÄNDLER ZURÜCK)
8. Keine Sprühreiniger oder Schmieröl zur Reinigung des Gerätes benutzen. 9. Lassen Sie die CD-Schublade geschlossen, damit der Laser sauber bleibt
10. Verwahren Sie diese Anleitung gut auf für die Zukunft.
NETZBUCHSE: Stecken Sie hier das Netzkabel des CDX-2250 ein.
LINE AUSGANGSBUCHSEN: Stecken Sie ein Ende des CINCH-Kabels in die LINE AUSGANGSBUCHSEN auf der Rückseite des Gerätes. Stecken Sie das andere Ende in den Line-Eingang Ihres Mixers. Wenn Sie den Player an einen Hifi-Verstärker anschließen wollen dann können Sie CD/AUX EINGANGSBUCHSEN verwen-den. Stehen diese Eingänge nicht zur Verfügung dann können Sie jegliche LINE-Eingänge (nicht Phono-Eingänge) verwenden.
STEUERKABEL: Verbinden Sie das STEUERKABEL mit dem CDX-2250. Achten Sie beim Verbinden dieser Kabel darauf, dass die Form des Steckers mit dem Aufdruck auf der Rückseite des CDX-2250 übereinstimmt.
NETZSCHALTER: Wenn Sie alle Kabel verbunden haben können Sie den CDX-2250 mit der POWER-Taste einschalten. Erneutes Drücken des Schalters schaltet das Gerät aus. CD-SCHUBLADE: Im Laufwerk wird die CD während der Wie-dergabe gehalten. Es werden 12 cm und 8 cm CDs unterstüt-zt. (SCHLIESSEN SIE DIE SCHUBLADE NICHT MIT GEWALT, SONST KÖNNEN SIE DIE MECHANIK DES PLAYERS BESCHÄ-DIGEN, VERWENDEN SIE DIE OPEN/CLOSE TASTE)
CD-AUSWURF TASTE: Drücken Sie die EJECT TASTE um das Laufwerk zu öffnen. Im Wiedergabemodus müssen Sie zunächst die Wiedergabe beenden.
JOG WHEEL: Im SUCHMODUS kann das JogWheel zur Suche vorwärts oder rückwärts genutzt werden und zum genauen Ein-stellen des CUE-Punktes im Pause-Modus. Im PITCH BEND Modus übt das JogWheel dieselbe Funktion aus wie die PITCH BEND Tasten und Sie können die Wiedergabe kurz beschleuni-gen oder abbremsen.
JOG MODUS TASTE: Wenn die Anzeige JOG MODUS leuchtet zeigt dies an, dass das JogWheel im SUCH MODUS ist und wenn Sie nicht leuchtet, ist das Jog Wheel im PITCH BEND Mo-dus.
DISPLAY: Das DISPLAY zeigt neben Titelnummer, Pitchwert, Pitchbend, Wiedergabemodus, Play/Pause, Loop/Reloop, PGM und Repeat auch die Zeitanzeigeleiste und die drei Zeitanzeige-modi an. Diese sind ABGELAUFENE ZEIT, VERBLEIBENDE ZEIT des Titels und VERBLEIBENDE ZEIT der CD. Die Zeit wird in Minuten, Sekunden und Frames angezeigt.
EINLEITUNG:
EIGENSCHAFTEN:
SICHERHEITS INFORMATIONEN:
VORSICHTSMASSNAHMEN:
ANSCHLSSE:
BEDIENOBERFLÄCHE:
16
CDX-2250
2
1
3
4
5
6
8
7
9

PGM: Erlaubt, eigene Wiedergabelisten zu programmieren. Um eine Liste zu erstellen, halten Sie die Wiedergabe des Play-ers an und drücken die PGM Taste. Mittels Titelwahlschalter wählen Sie den ersten Titel für die Wiedergabe und drücken die Taste PGM erneut. Nun ist der CDX-2250 bereit für Ihre nächste Auswahl. Wiederholen Sie dies solange, bis Ihre Aus-wahl abgeschlossen ist. Dann drücken Sie die PLAY-Taste, um die Wiedergabe dieser Liste zu starten.
SINGLE: Mit Druck auf die SINGLE Taste wechseln Sie in den SINGLE Modus, in welchem der Player einen Titel spielt und dann stoppt. Mit erneutem Druck auf die Taste aktivieren Sie den CONTINUE Modus, in welchem der Player kontinuierlich die CD wiederholt (nach dem letzten Song beginnt die Wieder-gabe erneut beim ersten Song).
ZEITMODUSAUSWAHL: Mit der Taste TIME wechseln Sie zwischen den 3 Zeitanzeigemodi ABGELAUFENE ZEIT des Ti-tels (elapsed), VERBLEIBENDE ZEIT auf der CD (total remain) und VERBLEIBENDE ZEIT des Titels (remain). ABGELAUFENE ZEIT zeigt die Zeit an, die ab Beginn des Titel verstrichen ist, VERBLEINENDE ZEIT der CD zeigt die übrige Spielzeit auf der gesamten CD und VERBLEIBENDE ZEIT des Titels zeigt die verbleibende Dauer des aktuellen Titels an.
PITCH: Drücken der Taste PITCH aktiviert den PITCHFADER. Erneutes Drücken der Taste schaltet die Pitch-Funktion aus.
PITCHFADER: Bewegen Sie den PITCHFADER nach oben oder unten, um die Wiedergabegeschwindigkeit um +/- 16 % zu erhöhen oder vermindern.
PITCH BEND: Drücken der PITCH BEND Tasten erhöht au-tomatisch die Wiedergabegeschwindigkeit auf bis zu 16 % oder vermindert diese auf bis zu -16 %. Beim Loslassen kehrt der Player zum alten Pitch zurück. Dies dient dazu, zwei Titel aneinander anzugleichen.
LOOP SEKTION: Ein LOOP (Schleife) wiederholt den Abschnitt zwischen einem Anfangspunkt (Loop IN) und einem Endpunkt (Loop OUT).
A. Zum Setzen eines Loop während der Wiedergabe be-ginnen Sie mit einem Druck auf die Taste Loop IN (sie leuchte auf)B. Wenn Sie den gewünschten Endpunkt erreicht haben drücken Sie die Taste Loop OUT (auch sie leuchtet dann auf). Beide Tasten blinken nun und die Schleife wird sol-ange wiedergegeben, bis Sie mit einem Druck auf Loop OUT die Schleife verlassen und die normale Wiedergabe des Titels fortsetzen. C. Um die Wiedergabe der Schleife wieder aufzunehmen drücken Sie die Taste RELOOP.D. Wenn Sie die Schleife verlassen haben werden die und OUT Taste weiterhin leuchten und zeigen an, dass ein Loop gespeichert ist. E. Erneuter Druck auf die Loop IN Taste löscht die alte Schleife und erstellt eine neue mit Setzen des Anfang-
spunktes. F. Drücken Sie Loop OUT, um das Speichern eines ganz neuen Loops zu beenden. Erneutes Drücken verlässt die Wiedergabe der Schleife.G. Ein Druck auf RELOOP während der normalen Wieder-gabe startet jederzeit die Wiedergabe der Schleife ab dem Anfangspunkt. Wiederholtes Drücken der Taste RELOOP kann als Stottereffekt verwendet werden.
ACHTUNG: BEI DER ERSTEN WIEDERGABE DER SCHLEIFE IST EINE KURZE PAUSE HÖRBAR, JEDE WIETERE WIEDER-HOLUNG DER SCHLEIFE IST NAHTLOS.
PLAY/PAUSE: Jeder Druck auf diese Taste wechselt zwischen dem Play und Pause Modus. Im Wiedergabemodus ist die Play-Taste beleuchtet, im Pause Modus blinkt diese.
CUE: Um einen CUE-Punkt zu setzen drücken Sie während der Wiedergabe Play/Pause und stellen Sie mit dem Jogwheel den CUE-Punkt an der gewünschten Stelle ein. Erneutes Drücken der Play/Pause-Taste setzt den CUE-Punkt. Wenn der Player spielt und ein CUE Punkt gespeichert ist, wird der Player mit Druck auf CUE in den Pausemodus wechseln (PLAY/PAUSE TASTE blinkt) und am definierten CUE Punkt auf Sie warten (CUE LED leuchtet). Halten der CUE Taste bewirkt das Vorhören des Titels ab dem CUE Punkt und erlaubt Ihnen, den CUE Punkt zu stuttern oder von dort die Wiedergabe zu starten. Lassen Sie die Taste los, um zum CUE Punkt zurückzuspringen.
TRACK SEARCH: Die Tasten TRACK SEARCH (Titelsuche) di-enen der Wahl eines Titels für die Wiedergabe. +10 bietet Ihnen die Möglichkeit, in 10er-Schritten durch Ihre Titel zu suchen.
ACHTUNG: WENN SIE ZU EINEM ANDEREN TITEL WECH-SELN STEHT DER EINGESTELLTE CUE PUNKT NICHT MEHR ZUR VERFÜGUNG. SIE MÜSSEN DEN CUE-PUNKT ERNEUT SETZEN. STANDARDMÄßIG WIRD DER CUE-PUNKT AN DEN BEGINN DES AKTUELLEN TITELS GESETZT.
- Wenn eine CD nicht abgespielt wird prüfen Sie, ob sie mit dem Aufdruck nach oben zeigend eingelegt wurde und prüfen Sie sie auf übermäßigen Schmutz und viele Kratzer etc.
- Wenn die Wiedergabe läuft aber es ist kein Ton zu hören prüfen Sie, ob alle Kabelverbindungen in Ordnung sind und prüfen Sie Ihr Mischpult oder Ihren Verstärker.
- Wenn die Wiedergabe der CD springt prüfen Sie die CD auf Kratzer und Verschmutzungen. Gehen Sie nicht direkt davon aus, dass der Player nicht in Ordnung ist. Viele CDs sind schlecht aufgenommen worden und werden auf den meisten CD-Playern springen. Bevor Sie den CD-Player als Servicefall melden testen Sie ihn mit einer CD, welche sicher in Ordnung ist.
17
CDX-2250
FEHLERBESEITIGUNG:
11
12
13
14
15
16
17
18
19
10

ALLGEMEIN:Typ....................................................................Compact Disc PlayerDisc Typ...............................Standard Compact disc (12 cm & 8 cm)Zeitanzeige………..……..........…...abgel. Titel, verbl. Titel, verbl. CDPitch-Regelung..................................± 12% Fader mit Ein/Aus-TastePitch Bend................................................................± 16% MaximumSofortstart...................................................innerhalb 0,03 SekundenInstallation.................................................................................19” *2Abmessungen............................................... 482,6 x 88,9 x 254 mm.........................................................................482,6 x 88,9 x 70 mmGewicht..................................................................Hauptgerät: 4,0kg........................................................................Fernbedienung: 1,5 kg
AUDIO ABSCHNITT:Quantisierung……………...........…1 Bit Linear/Kanal, 3-Strahl-LaserOversampling Rate...................................................................8 fachSampling Frequenz..............................................................44,1 kHzFrequenzgang.........................................................20 Hz bis 20 kHzKlirrfaktor (THD)......................................................kleiner als 0,05%Rauschabstand.........................................................................85 dBDynamikumfang........................................................................85 dBKanaltrennung..............................................................85 dB (1 kHz)Ausgangspegel.........................................................2,0 +/- 0,2 VrmsStromversorgung...........................................AC 115/230V, 60/50 Hz
T E C H N I S C H E - U N D L AY O U T Ä N D E R U N G E N O H N E
V O R A N K Ü N D I G U N G V O R B E H A LT E N .
18
CDX-2250
TECHNISCHE DATEN:

19
E-mail Address: ___________________________________________________________________________________________________________________________________________________________________________________________________________________________________________________
Phone #:
Initial:
State: or
First Name: Last Name:
Province:
Address: (Number and Street)
City:
Apt #:
Country: Postal Code:
Model Number: (Example: CDT-05) Serial Number: (Located on back of most units)
Month Day YearDate of Purchase: Purchase Price: .00$
(EXCLUDING TAX)Dealer:
Zip Code:
Age:
City:
or
Month Day Year
Date of Birth
Save postage and register your product onlineat www.geminidj.com
EN FRANCEEn cas de panne, merci de contacter votrerevendeur. Tout appareil en panne doit y êtreretourné, accompagné de sa facture d'achat, deson emballage d'origine et d'un descriptif depanne. L'appareil sera expédié au SAV de GCITechnologies France. Tout produit reçu sans fac-ture sera réparé hors garantie. L’appareil seraensuite ré-expédié au revendeur.
IN SPAINEn caso de mal funcionamiento de estaunidad, por favor contacte con el Servi-cio de Atención al Cliente en el teléfono93 436 37 00 que le asesorará sobre elprocedimiento correcto para solu-cionarlo. En caso de ser necesario enviarla unidad para su reparación, el Serviciode Atención al Cliente le proveerá de unnúmero de incidencia, así como de la di-rección del Servicio de Asistencia Téc-nica más cercano a su residencia.
IN THE UNITED KINGDOMIn the event that you need service onyour Gemini product under warranty,simply write a letter describing the prob-lem, along with your contact informa-tion. Make sure to enclose a copy ofyour receipt for proof of warranty infor-mation. A return number is not re-quired. You will be responsible forshipping charges to Gemini UK, andGemini UK will pay to return the unit toyou if it is considered under warranty.
IN GERMANYDie allgemeinen gesetzlichenGewährleistungen bleiben von denHerstellergarantien unberührt. DerGarantieanspruch erlischt bei Eingriffendurch den Käufer oder durch Drittesowie bei unsachgemässer Behandlung.Gewährleistungsansprüche sind auss-chließlich gegenüberIhrem Fachhändler geltend zu machen.
WARRANT Y AND REPAIR:All Gemini products are designed and manufactured to the higheststandards in the industry. With proper care and maintenance, your product will pro-vide years of reliable service.
LIMITED WARRANT YA. Gemini warrants its products to be free from defects in materials and workman-ship for One (1) year from the original purchase date.Exceptions: Laser assemblies on CD Players, cartridges, and crossfaders arecovered for 90 days.
B. This limited warranty does not cover damage or failure caused by abuse, misuse,abnormal use, faulty installation, improper maintenance or any repairs other thanthose provided by an authorized Gemini Service Center.
C. There are no obligations of liability on the part of Gemini for consequential dam-ages arising out of or in connection with the use or performance of the product orother indirect damages with respect to loss of property, revenues, of profit, or costsof removal, installation, or reinstallation. All implied warranties for Gemini, includingimplied warranties for fitness, are limited in duration to One (1) year from the origi-nal date of purchase, unless otherwise mandated by local statutes.
RETURN/REPAIRA. In the U.S.A., please call our helpful Customer Service Representatives at(732)738-9003, and they will be happy to give you a Return Authorization Number(RA#) and the address of an authorized service center closest to you.B. After receiving an RA#, include a copy of the original sales receipt, with defec-tive product and a description of the defect. Send by insured freight to: GeminiSound Products Corp, and use the address provided by your customer service repre-sentative. Your RA# must be written on the outside of the package, or process-ing will be delayed indefinitely!C. Service covered under warranty will be paid for by Gemini and returned to you.For non-warrantied products, Gemini will repair your unit after payment is received.Repair charges do not include return freight. Freight charges will be added to the re-pair charges.D. On warranty service, you pay for shipping to Gemini, we pay for return ship-ping within the Continental United States. Alaska, Hawaii, Puerto Rico, Canada,Bahamas, and the Virgin Islands will be charged for freight.
E. Please allow 2-4 weeks for return of your product. Under normal circumstancesyour product will spend no more than 10 working days at Gemini. We are not re-sponsible for shipping times.
GCI Technologies1 Mayfield AveEdison, NJ 08837 USATel: (732) 346-0061Fax: (732) 346-0065
GCI Sound Products Unit 44 Brambles Enterprise Centre Waterlooville P07 7TH, UKTel: 087 087 00880 Fax: 087 087 00990
GCI Technologies S.A. Caspe, 172 - 1º A08013 Barcelona, SpainTel: 34 93 436 37 00 Fax: 34 93 347 69 61
GCI Technologies s.a.r.l 2bis, rue Léon Blum91120 Palaiseau, FranceTél: + 33 1 69 79 97 70 Fax: + 33 1 69 79 97 80
GCI Technologies GmbHLerchenstraße 1480995 München, GermanyTel: 089 - 319 019 8 - 0Fax: 089 - 319 019 8 - 18

IN THE USA: IF YOU ARE EXPERIENCING PROBLEMS WITH THIS UNIT CALL 1-732-346-0061 FOR GCI TECHNOLOGIES CUSTOMER SERVICE.
DO NO ATTEMPT TO RETURN THIS EQUIPMENT TO YOUR DEALER.
Parts of the design of this product may be protected by worldwide patents. Information in this manual is subject to changes without notice and does not represent a commitment on the part of the vendor. GCI Technologies Corp. shall not be liable for any loss or damage whatsoever arising from the use of information or any error contained in this manual. No part of this manual may be reproduced, stored in a retrieval system or transmitted, in any form or by any means, electronic, electrical, mechanical, optical, chemical, including photocopying and recording, for any purpose without the express written permission of GCI Technologies Corp. It is recommended that all maintenance and service on this product is performed by GCI Technologies. Corp or its authorized agents. GCI Technologies will not accept liability for loss or damage caused by maintenance or repair performed by unauthorized personnel.
Worldwide Headquarters • 1 Mayfield Ave, Edison, NJ 08837 • USATel: (732) 346-0061 • Fax: (732) 346-0065
Gemini Sound ProductsWorldwide Headquarters1 Mayfield AveEdison, NJ 08837 USATel: (732) 346-0061Fax: (732) 346-0065
Gemini Sound Products Unit 44 Brambles Enterprise Centre Waterlooville P07 7TH, UKTel: 087 087 00880 Fax: 087 087 00990
GCI Technologies S.A. Caspe, 172 - 1º A08013 Barcelona, SpainTel: 34 93 436 37 00 Fax: 34 93 347 69 61
GCI Technologies GmbHLerchenstraße 1480995 München, GermanyTel: 089 - 319 019 8 - 0Fax: 089 - 319 019 8 - 18
© GCI Technologies Corp. 2011 All Rights Reserved .


