OPERATION AND ASSEMBLY INSTRUCTIONS - … MO… · · 2012-09-19OPERATION AND ASSEMBLY...
10
1 BAE HAWK “THE RED ARROWS” SCALE RADIO CONTROLLED ELECTRIC POWERED DUCTED FAN JET - READY TO FLY - INJECTED FOAM OPERATION AND ASSEMBLY INSTRUCTIONS Includes Full Function 6 Ch. FM R/C System on Australian Approved 36Mhz. 12 Volt DC Balance Charger and Approved 12 Volt. Power Supply. Complete with all hardware, except 8 x AA batteries for the transmitter. Simple to assemble, factory painted Injection Moulded Foam. Replacement Parts Available. For More Information See- www.sapac.com.cn This model is not a toy. Please read carefully and follow instructions to ensure correct assembly of this model aircraft.
Transcript of OPERATION AND ASSEMBLY INSTRUCTIONS - … MO… · · 2012-09-19OPERATION AND ASSEMBLY...

1
BAE HAWK “THE RED ARROWS”
SCALE RADIO CONTROLLED ELECTRIC POWERED
DUCTED FAN JET - READY TO FLY - INJECTED FOAM
OPERATION AND ASSEMBLY INSTRUCTIONS
Includes Full Function 6 Ch. FM R/C System on Australian Approved 36Mhz. 12 Volt DC Balance Charger and Approved 12 Volt. Power Supply.
Complete with all hardware, except 8 x AA batteries for the transmitter. Simple to assemble, factory painted Injection Moulded Foam.
Replacement Parts Available. For More Information See- www.sapac.com.cn
This model is not a toy. Please read carefully and follow instructions
to ensure correct assembly of this model aircraft.

2
INDEX
OVERVIEW…………………………………..…… 1 PRODUCT SPECIFCATIONS……………..……. 2 MAIN PARTS………………………………….….. 3 MAIN ACCESSORIES……………………..………3 SAFETY PROCEDURES BEFORE FLIGHT….. 3 LIMITATION OF FLYING AREA…………..…… 4 ASSEMBLY OF AIRCRAFT……………….……. 4 SETTING UP OF TRANSMITTER………….….. 5 CORRECT USE OF CHARGER………………..7 BEFORE FLYING THE MODEL………………..8 FIRSTS FLIGHTS……………………………… 8 TIPS FROM THE PROS…………………….…9
INTRODUCTION The BAE HAWK “RED ARROWS” is a Scale Electric Ducted Fan Jet which was developed by the SAPAC company to represent the full sized jet flown by the Red Arrows aerobatic team. The design has incorporated style and functionality. Not only is the Hawk a great looking model it also has the shape and technology to allow for very low resistance, which makes the jet more aerodynamic. The combination of the B2830 out-runner brushless motor, the SAPAC ducted fan and the 3 cell 2200ma 15c Li-Po battery give ample power and flight duration. Assembly is simple, flight is stable and predictable, and maintenance is easy and convenient.
BASIC DIMENSIONS: Wingspan……………………………………950mm Fuselage total length…………………………1000mm Wing loading…………………………………36g sq.dm Wing area…………………………………….182 sq.dm Flying weight…………………………………620g

3
SPECIFICATIONS: Transmitter………………………………..6 channel Wfly with reverse, dual rate and mixers. Receiver………………………………………mini 6 channel Servo…………………………………………3x.8g servos ESC…………………………………………..25A Motor………………………………………...B2830 KV4000 Battery……………………………………….3S 2200MAH 15C rating Fan …………………………………………..6 vane 65mm dia.
PERFORMANCE:
Excellent flight simulation of the real BAE Hawk, with the Classic “Red Arrows” livery making it very easy to see in the sky! The Hawk is suited to intermediate and advanced pilots, with outstanding stability in both high and low speed flying. The plane is not upset by windy conditions that would normally ground similar machines. Its light wing loading and good power to weight ratio, makes for a stable glide and will easily perform loops, inverted flight, rolls and other aerobatic tricks.
CONTENTS:
SAFETY PROCEDURES BEFORE FLIGHT Before each flight check your transmitter and flight pack battery for proper charge levels to make sure you attain maximum flight time and safety. The transmitter will make a warning sound if the battery level is low. If you hear this – immediately land and replace the 8 AA transmitter batteries, or re-charge if using re-chargeable batteries.
Always switch on your transmitter first and move the right hand throttle stick to the low throttle position to avoid accidentally starting the motor. Then only connect the plane battery to the aircraft when you are going to fly. Match the red and black wires up correctly. When you have finished the flight, unplug the LiPo flight battery before turning off the transmitter. If the plane battery is connected without the transmitter being on, it can pick up signals from other radio transmitters and cause your plane to respond unintentionally, controls will start to move as well as the motor revving up! This is not a malfunction of the system, but a standard behaviour for all radio controlled models.
Before turning on your transmitter, make sure no other people are flying other aircraft on the same frequency you are using. This will cause interference and result in crashing the other pilot’s aircraft. The frequency of your model may be determined by looking at the small orange label attached to the module in the back of the transmitter. It will show a number, this the frequency of your radio in Mhz. make sure you do not operate the model when another model of any type, or R/C car is on this frequency.
After switching on your transmitter and plane check the positions of the control surfaces on your plane. Initially they all should be in a neutral position. Adjust to the correct position when needed by turning the “kwick link” connectors attached to the push rods which operate the control surfaces.
Check if the controls are moving in the correct direction for the directions the sticks are moved. Do this for ALL control surfaces! See transmitter setup below.
4
Avoid flying in bad weather conditions. Since you are flying a relatively light aircraft, it is not recommended to fly in high winds as the plane can travel downwind very quickly and become very difficult to retrieve!
Always keep the aircraft within visual range. It is very important that you can see which direction the plane is going. Also keep the plane away from people and objects.
If you notice that the plane is starting to loose power then it is suggested you land and recharge the LiPo pack. If you continue flying and the power is suddenly lost, it will be hard to control and land the plane in a controlled manner and could result in a crash and damage to the plane! The battery may also be damaged if it is over discharged.
You can only become a good pilot if you realise that it is most important to operate your aircraft in a secure and responsible manner. An out of control aircraft can cause damage to people and property!
LIMITATIONS OF FLYING AREA : Only fly your plane in areas that are suitable or selected for remote controlled aircraft. You must realise that certain public areas are not allowed to be used for flying remote controlled aircraft. Check with your local Council for approval before flying on sports ovals or parkland!
Keep your plane away from high power/ high voltage cables as they can cause interference of the radio control system. Interference can result in loosing control of your plane, ultimately leading to a crash.
Don’t fly over or towards spectators or their vehicles. Don’t fly over buildings or houses. Fly where there is enough space to safely land anywhere in the surrounding area. Don’t fly where there are lots of trees in the area. ( trees are magnets to model aeroplanes!)
Stay away from busy roads. Flying in these areas can distract drivers and lead to an accident.
Don’t fly within a 6 kilometre radius of any airport or where full sized aircraft are flying.
ASSEMBLING THE AIRCRAFT:
Before starting, cover your work top with something soft like a bath towel so that the fragile surface of the model does not get damaged while you are working on it. Additionally, if you obtain a polystyrene box from your greengrocer and cut a semi-circular hole in the opposite ends, it will make a useful stand on which to securely rest the model. CAUTION! To avoid damage, do not connect the battery before you finish the assembly. Install the stabiliser halves to the rear of the fuselage using the glue provided or a suitable epoxy adhesive. Remove painted surfaces with sandpaper to ensure a permanent bond.
Install the vertical stabiliser into the rear removable section with glue provided or preferably some Araldite or Foam safe Super Glue..
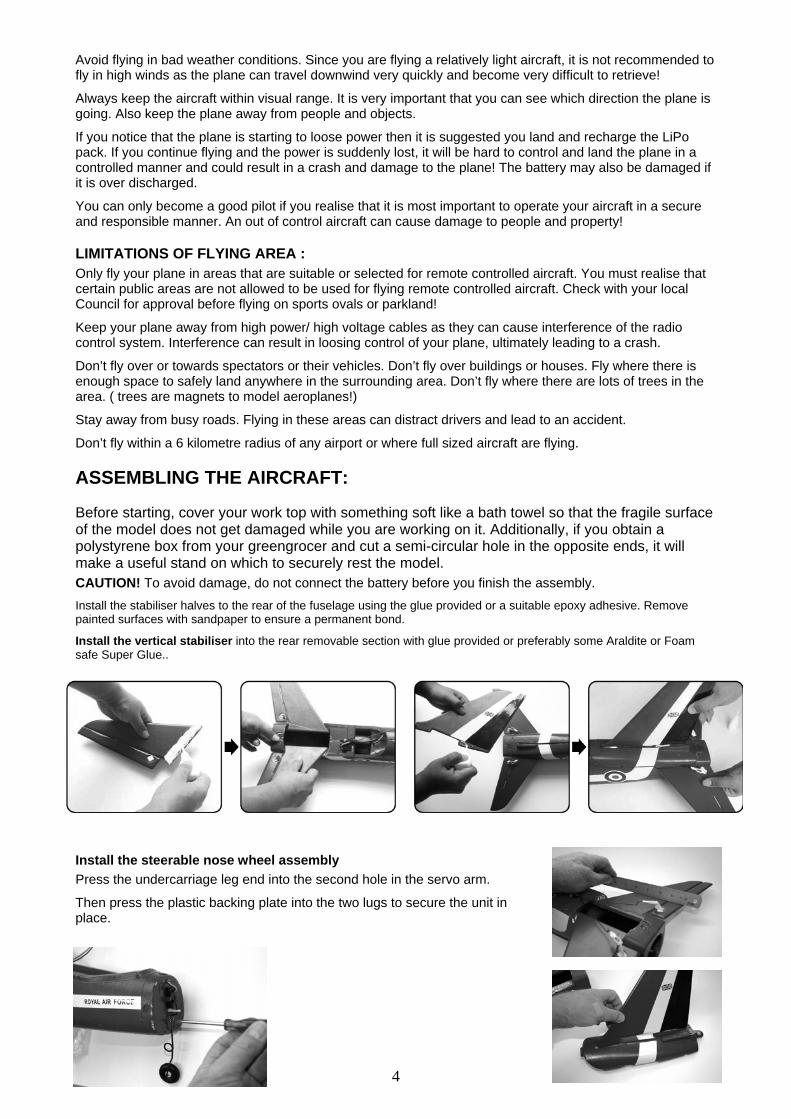
Install the steerable nose wheel assembly Press the undercarriage leg end into the second hole in the servo arm.
Then press the plastic backing plate into the two lugs to secure the unit in place.

5
Installing the Vac-formed nose cone.
Fit the cover in place, making sure the white stipes are lining up with the ones on the sides of the fuselage.
Mark the positions of the four mounting plates on the outside of the cover and then drill or punch 2mm holes in the cowl. Mount the nose cone with four 2mm screws provided.
Installation of the main wing
Install aileron control wires and adjust to even up each aileron in the neutral position in line with the trailing edge of the wing.
Fit the aileron servo lead into the receiver before screwing the wing into place using the 4mmx10 bolt
Install The Undercarriage Insert undercarriage wires into plastic recesses in each side of the wing.
Only fit wheels if you are flying from a hard surface!
The wheels will not like taking off and landing on grass surfaces! The BAE Hawk flies faster with the complete undercarriage removed.
Install the Canopy The canopy is held in place by small magnets fitted around its base.

6
SETTING UP THE TRANSMITTER The Transmitter, requires eight AA dry cells to be fitted into the compartment on the back of the transmitter, under the removable cover, being careful to observe correct polarity for each cell. ONLY use good quality ALKALINE batteries. Typically these batteries will last 8 hours of use. However when the “low battery” alarm sounds, replace them immediately. Rechargeable NICAD or NIMH cells may be substituted for the alkaline batteries
Your Transmitter is a standard Mode 1 version. Mode 1 – The left stick - 2, moved forward and back, gives down and up elevator, forward for dive and back for climb; moved left and right – 4 it gives left and right rudder. The right stick - 3, moved forward and back gives high and low throttle; 1 - moved left and right it controls the ailerons, giving left and right bank.
Inboard and below the sticks there are four sliders - these are the trims which are used to adjust three of the four functions (aileron, elevator and rudder) to the neutral position and the throttle to the full idle position; in flight they are used to trim the model. On the ground the surfaces are adjusted by means of the adjustable clevises on the control rods fitted to the control surfaces. At the bottom right-hand corner of the transmitter there is a panel of switches. The one marked “D/R” is the dual rate switch; in the upper position, the ailerons, elevator and rudder are moved over a greater range than when the switch is in the lower position.
The “A-Nor - MIX 1-2” switch is for use with a flying wing design where aileron and elevator are mixed – leave it in the lower position. The remaining four switches marked “AIL, ELE, THR and RUD” are the reversal switches to reverse the controls should it be necessary. Low battery warning light and buzzer. When the battery is lower than 8.8V, the power light will blink once every second, at the same time you will here a buzzing sound. When the battery voltage drops below 8.3 V, the power light will blink once every half a second and the buzzer will sound continuously. Checking Control Surfaces for Correct Direction of Travel – VERY IMPORTANT : The direction the model will go, depends on the direction the control surfaces move when you move the stick on the transmitter. Please check that the Ailerons ( wings ) and the Elevator ( Tail ) work in accordance with the following diagrams.

7
RANGE CHECKING BEFORE FLIGHT: The range of this radio set is about 300 to 400 metres. Before your first flight, it is a very good idea to check whether you will have the maximum range possible. This is achieved by getting a helper to hold the plane while you walk away from the plane while the set and plane both turned on and the aerial on the transmitter fully down. With everything set up correctly you should
be able to walk 20 to 30 paces away before the servos begin to twitch around. If you only achieve a short distance before erratic behaviour of the servos or motor then you must not fly and check out and rectify the problem before attempting to fly. Re-routing the aerial away from the battery and servo/ motor leads will often help!
Receiver instructions:
The FRP06 receiver is a six channel mini receiver. Each channel is marked with a number (1 to 6). Also polarity for the servos / ESC wires are shown on the receiver case. The minus sign (-) is used to show the black (sometimes brown) wire to. The plus sign(+) shows the connection for the red wire and the “^” sign is used for the orange signal wire(sometimes white). The receiver antenna is best fully extended and routed away from other wires where practical. Run the antenna out of the fuselage and up to the top of the fin for best results. Use some tape to hold in place.
DO NOT shorten, cut or roll up the antenna as this will reduce the range of control.
Charging the Battery :
The LiPo battery provides power for the receiver, the servos and the motor.
The model operates on a “LiPo” battery (similar to your mobile phone batt.). Do not discharge these batteries until “flat” - As soon as the model starts to loose power – Re charge the battery fully. Always charge the battery before storage. The battery is charged using the supplied “Balance Charger”. The individual cells are charged separately to correctly balance the battery cells – so plug the 4 wire connector into the purple charger. The battery will take around 1.5 hours to charge from flat. The RED light indicates all connections are correct and when the Green Charge light (Indicates charging is underway) goes OFF - you know the battery is fully charged.
The Charger operates on 12 Vlt DC. The included 240 to 12 Volt adapter may be used to power the charger from your home power points. Attach the GREEN plug from the selection and fit to the adapter lead. If the

8
polarity is wrong – the RED charger light will not illuminate – reverse the connection to rectify. Plug the adapter into the charger for charging. The charger may also be powered from a 12 Vlt. DC battery – like a car battery, to enable charging away from the home. Attach the lead with “alligator” clips to the DC battery ( RED to + BLACK to - ) Then plug into the Purple charger for charging. It is highly recommended to use a fireproof dish or bowl to contain the battery while charging - see photo – this is a safety precaution in case of a fire. Always Charge the battery outside if possible and never leave unattended. Disconnect the battery if it gets hot.
SAFETY PRECAUTIONS for LiPo Batteries • Never leave Lithium Polymer batteries unattended whilst charging. • Never charge Lithium Polymer batteries inside a model; hot batteries can cause fires. • Never charge Lithium Polymer batteries inside a motor vehicle. • Never charge Lithium Polymer batteries on any surface which can catch fire e.g. wooden benches. • Do not dispose of batteries in a fire. • Do not allow batteries to get wet. • Do not use the batteries with positive and negative terminals reversed. • Do not short circuit the battery. • Do not pierce the battery or subject it to heavy knocks or impacts. • Do not use or store the battery inside motor vehicles during hot weather. Doing so may cause the
battery to overheat, risking fire or explosion. • If your battery balloons in size, is punctured or is malformed, take precautions to get the battery to a non-
flammable area for at least one hour. IN CASE OF FIRE. After several hours place the battery in salt water.
Getting Ready to Fly:
Always ensure that the transmitter is switched on, that the antenna is extended fully , that the throttle lever is set at its lowest point ( stick to the bottom on the gymbal ) and the model is being held securely before connecting the battery, this will prevent unexpected start ups which could cause injury.
OK, so having done that, the battery can be placed in its compartment under the nose and its red plug connected to the socket inside. After a pause you will hear some “beeping” telling you that the battery, the electronic speed control and the motor are all in communication. When the beeping stops, slowly advancing the throttle will cause the motor to start and continue to speed up until full throttle is reached.
Having checked the motor, stop it by bringing the throttle lever back to full low and then, by moving the elevator, aileron and rudder sticks, check that all surfaces move in the correct direction and by the required amount. If any of these move in the wrong direction there are reversing switches on the front of the transmitter to correct the situation, With the trims, (they are the small sliders alongside the sticks), in the central position, check that the ailerons, rudder and elevator are properly aligned; if not, make adjustments to the appropriate clevises. Having the surfaces properly aligned with the trims in the central position will ensure that the model on its first flight will be near to being “in trim” and any minor out of trim condition will then be correctable by use of the trim sliders. You may wish to engage the assistance of a modeller with some R/C experience to guide you through this all important phase and also to cast his eye over the model to ensure all is correct.
The first task is to range check the radio equipment. Go to an area clear of trees and metal fences, like the middle of a sports field to ensure clear reception. Checking Radio Range The range of this radio set is about 300 to 400 metres. Before your first flight, it is a necessary to check whether you will have sufficient radio range to maintain control of the model. This is achieved by getting a helper to hold the plane while you walk away from the plane, with the radio control and plane both turned on and the aerial on the transmitter fully down. With everything set up correctly you should be able to walk 20 to 30 paces away before the servos begin to twitch around. If you only achieve a short distance before erratic behaviour of the servos or motor then you must not fly. Check out and rectify the problem before attempting to fly. Re-routing the aerial away from the battery and servo / motor leads will often help, or low batteries may be the course!

9
This can all be done on a day while you are waiting for the best weather and an experienced radio flyer is available to give you a hand. First Flights: It will be VERY helpful if you are able to obtain help from an experienced model pilot during your first flights. It is a very good idea to find a model club in your area or at least someone that can fly RC planes. They can help with the final setup and flight testing of your plane. Making sure it is an enjoyable experience and not a disaster!
Flying a radio controlled model aircraft is difficult, due to the good hand to eye co-ordination required. Good eyesight is needed to see what the model is doing and a basic knowledge of the theory of flight is useful. Practice – like anything worthwhile is required to master the skills for the hobby. Accidents DO occur and damage WILL be caused to the model when this happens. So if you are not prepared to accept this – do not attempt to fly this model. That is the bad news ! But the development of new and exciting skills and the enjoyment of seeing your own radio controlled model obeying your every command is well worth it !! This is a great hobby for all ages and abilities, so ENJOY !! Now, if the day has arrived when there is practically no breeze and you have found an area about the same size as a football oval with a smooth surface, place the model on the ground, facing directly into that slight breeze and have your helper hold it. After checking again that the control surfaces are moving in the correct direction, extend the transmitter antenna, give your helper the nod and start your take off by slowly advancing the throttle to full power, at the same time holding in some up elevator to prevent a nose-dive and being ready to apply aileron to correct any tendency to roll . Unless you have a long smooth surface to take off from – you are probably best to “hand launch” the model with the help of a friend. The model is not designed to take off from grass, only smooth hard surfaces. Hand launching is a good method to get your model airborne as there is less risk of getting caught up in holes Etc. in the runway. Have a helper fold the model above their head, gripping the fuselage around the middle, so it is evenly balanced. While facing into any wind, run forward and “push” the model forward and slightly down so the model can attain flying speed quickly. Do not “throw” the model as this can cause an unstable launch. Once airborne and at about 100 feet altitude, commence your first turn by the application of aileron ( Right hand stick ) and a small amount of up elevator ( pull back on the Left hand stick ) to hold the nose into the turn. If you find that the model is getting too high, reduce throttle, then continue making turns left and right to familiarise yourself with its flight characteristics, keeping the model within clear view at a distance of no more than 200 metres. After a few minutes you’ll be ready to land, so reduce the throttle setting to about 10% and prepare to land into the breeze at the end of a sweeping 180 degree approach, being ready to increase power if you are about to land short, or reduce it further if the model is about to overshoot.
TIPS FROM THE PRO’s If you have a computer flight simulator, it is a good idea to practice with it before actually flying the Red Arrow.
It is a good idea to taxi the plane around on the ground with a moderate amount of throttle. This will help you get use to the rudder ground controls.
You must learn to use only gentle movements of the controls. When using proportional radio control systems, only slight corrections are necessary to change the direction of the plane.
Do not push the joysticks to maximum deflection for more than three seconds. This will result in a crash!
It is a very good idea to find a model club in your area or at least someone that can fly RC planes. They can help with the final setup and flight testing of your plane. Making sure it is an enjoyable experience and not a disaster!
Take off and land into the wind. Always try to keep the model in front of you.
Extra motor batteries are available – so one can be charging while flying with the other. After market chargers are available to make charge times faster.

10
A complete range of spare parts are available from where you purchased this product. See the Instruction manual for a listing of part sets. Some parts may not be “in stock” at the time of enquiry. If a part of the airframe is damaged or broken – most times it may be repaired by using Epoxy – like Araldite or Foam Compatible Super glues like MERCURY foam safe – most other glues will melt the foam. The use of tape – like duct tape and packing tape - is also very effective in repairing broken parts. If the part is not repairable, then most parte parts are available separately. Warranty:- The SAPAC models have a 30 day warranty against faulty manufacture. This does not cover wear and tear from use or accidental damage. A repair and spare parts service is available. Please contact your local retailer or the Australian distributors – Tates Hobbies – Ph 03 52224201 E Mail [email protected] Spare Parts List- Order Number Part Description
Retail Price
23836 RA FUSELAGE SET NO CANOPY/ NOSE 89.99 23837 RA MAIN WING SET +DECALS+HORNS 44.99 23838 RA TAILPLANE SET-HORNS +DECALS 14.50 23839 RA FIN SET - RUDDER+HORN+DECAL 9.50 23842 RA UNDERCARRIAGE SET - R-ARROW 18.99 23840 RA CANOPY WITH MAGNET- R-ARROW 6.99 23841 RA NOSE COWL - RED ARROW 4.99 23844 RA BRUSHLESS MOTOR 2040 KV4500 39.99 23845 RA BRUSHLESS ESC 25A R-ARROW 49.99 23846 RA LIPO BATTERY 11.1V 2200MAH 79.99 23843 RA FAN ONLY - NO MOTOR R-ARROW 39.99
Other Models in the SAPAC range –
Wilga R/C Trainer / Fun Fly Wingspan = 1100mm Length = 888mm Weight = 550Gm. Brushless motor with Gearbox driving a 3-blade 8X6 prop 11.1 Vlt 1200 Mah LiPo – 18A ESC Optional Floats Available.
Extra 300 3D Extreme Wingspan = 960mm Length = 897mm Weight = 620Gm. 11X4.5 Prop = 1050Gm Thrust for 3D Hover. Brushless KV4000 motor – 8:1 Gearbox 11.1 Vlt 1500 Mah LiPo – 22A ESC