OPERATING THE VERDUN SEMI-AUTOMATIC KNITTING MACHINE · OPERATING THE VERDUN SEMI-AUTOMATIC...
9
1 OPERATING THE VERDUN SEMI-AUTOMATIC KNITTING MACHINE Having purchased a Verdun Semi-Automatic sock machine that needed a bit of work, it was sent to Jacquie Grant and now runs quite well though one part still needs to be replaced for optimum performance. Photos at right show the name plate with serial number and overall appearance of the completed machine. Pat Fly, Angora Valley Fibers, has posted on her web site the only available instructions which consist of an original sheet in French and the English translation. A comprehensive manual, parts list, and repair information do not seem to exist. The machine has only been in use for six months and only for making heels and toes. Jacquie Grant has advised not taking it apart as the additional 6- part cam set up for the semi-automatic is rather complex, especially for a novice at using this type of machine. The following are pictures of the interior of the cam shell with the cylinder removed
Transcript of OPERATING THE VERDUN SEMI-AUTOMATIC KNITTING MACHINE · OPERATING THE VERDUN SEMI-AUTOMATIC...

1
OPERATING THE VERDUN SEMI-AUTOMATIC KNITTING MACHINE
Having purchased a Verdun Semi-Automatic sock machine thatneeded a bit of work, it was sentto Jacquie Grant and now runsquite well though one part stillneeds to be replaced for optimumperformance. Photos at rightshow the name plate with serialnumber and overall appearanceof the completed machine.
Pat Fly, Angora Valley Fibers, has posted on her web site the onlyavailable instructions which consist of an original sheet in French and the English translation.
A comprehensive manual, parts list, and repair information do not seem to exist.
The machine has only been in use for six months and only formaking heels and toes.
Jacquie Grant has advised not taking it apart as the additional 6-part cam set up for the semi-automatic is rather complex, especiallyfor a novice at using this type of machine.
The following are pictures of the interior of the cam shell with the cylinder removed
2
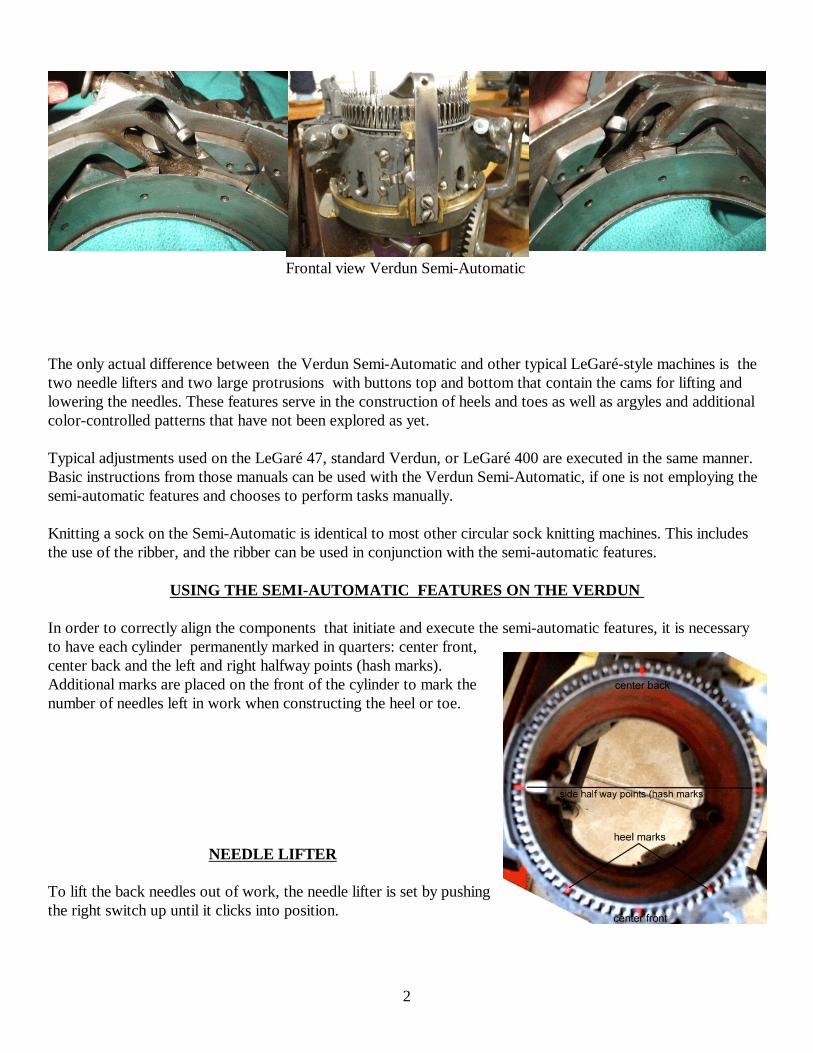
The only actual difference between the Verdun Semi-Automatic and other typical LeGaré-style machines is the two needle lifters and two large protrusions with buttons top and bottom that contain the cams for lifting andlowering the needles. These features serve in the construction of heels and toes as well as argyles and additionalcolor-controlled patterns that have not been explored as yet.
Typical adjustments used on the LeGaré 47, standard Verdun, or LeGaré 400 are executed in the same manner.Basic instructions from those manuals can be used with the Verdun Semi-Automatic, if one is not employing thesemi-automatic features and chooses to perform tasks manually.
Knitting a sock on the Semi-Automatic is identical to most other circular sock knitting machines. This includesthe use of the ribber, and the ribber can be used in conjunction with the semi-automatic features.
USING THE SEMI-AUTOMATIC FEATURES ON THE VERDUN
In order to correctly align the components that initiate and execute the semi-automatic features, it is necessaryto have each cylinder permanently marked in quarters: center front,center back and the left and right halfway points (hash marks). Additional marks are placed on the front of the cylinder to mark thenumber of needles left in work when constructing the heel or toe.
NEEDLE LIFTER
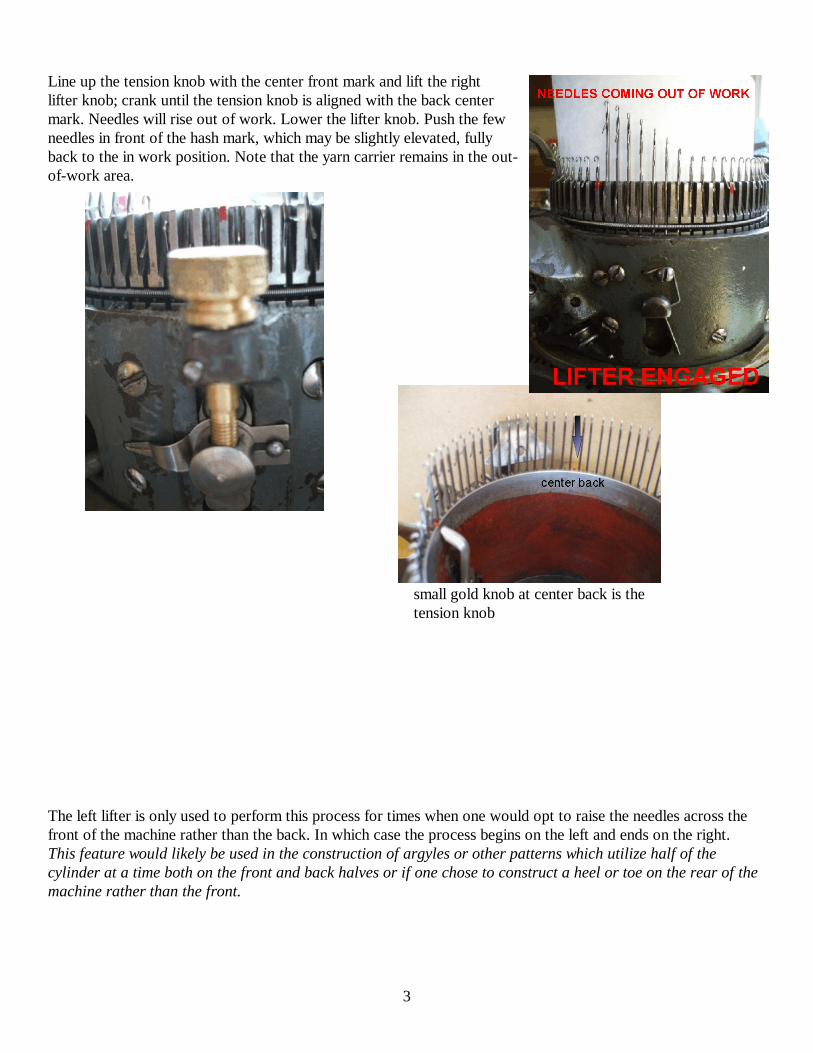
To lift the back needles out of work, the needle lifter is set by pushingthe right switch up until it clicks into position.
Frontal view Verdun Semi-Automatic
3
small gold knob at center back is thetension knob
Line up the tension knob with the center front mark and lift the rightlifter knob; crank until the tension knob is aligned with the back centermark. Needles will rise out of work. Lower the lifter knob. Push the fewneedles in front of the hash mark, which may be slightly elevated, fullyback to the in work position. Note that the yarn carrier remains in the out-of-work area.
The left lifter is only used to perform this process for times when one would opt to raise the needles across thefront of the machine rather than the back. In which case the process begins on the left and ends on the right. This feature would likely be used in the construction of argyles or other patterns which utilize half of thecylinder at a time both on the front and back halves or if one chose to construct a heel or toe on the rear of themachine rather than the front.
4
USING THE SEMI-AUTOMATIC FUNCTION
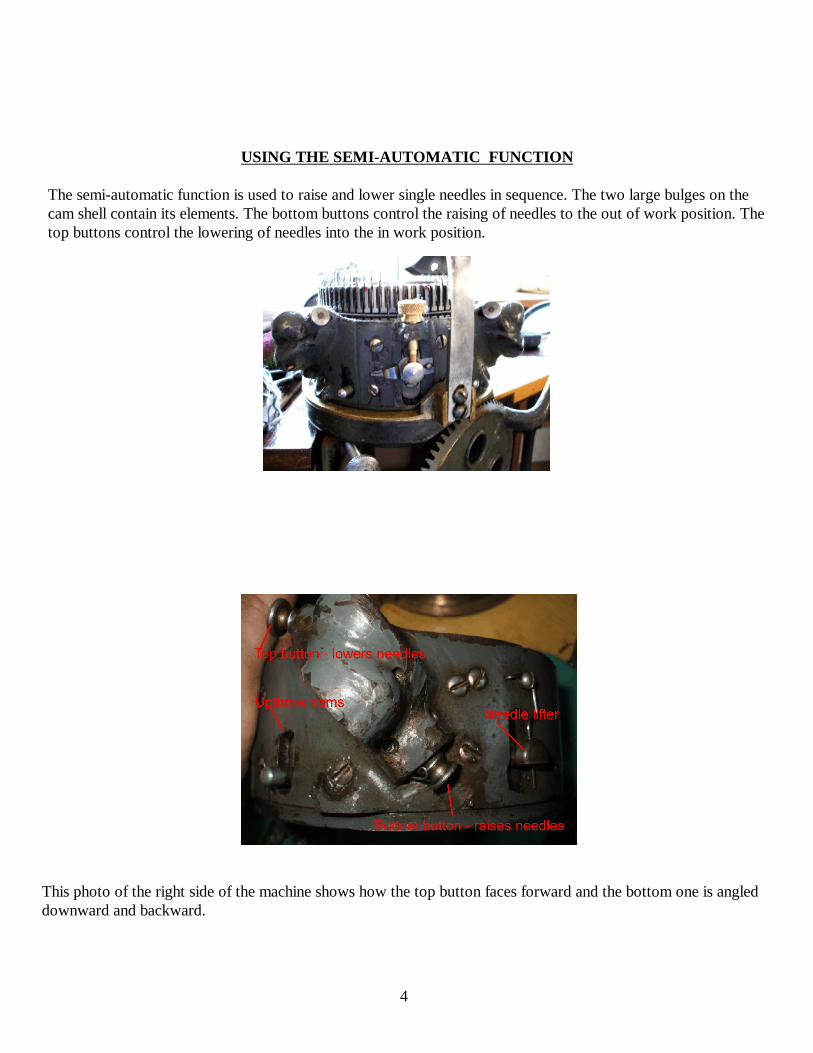
The semi-automatic function is used to raise and lower single needles in sequence. The two large bulges on thecam shell contain its elements. The bottom buttons control the raising of needles to the out of work position. Thetop buttons control the lowering of needles into the in work position.
This photo of the right side of the machine shows how the top button faces forward and the bottom one is angleddownward and backward.
5
MAKING A HEEL OR TOE ON THE VERDUN SEMI-AUTOMATIC MACHINE
Socks are knit on this machine, with the exception of the heel and toe, as you would on any typical machine suchas the Auto Knitter or standard LeGaré, including the use of the ribber.
To make the heel: Although other typical machines consider the ribbed-arch sock as the standard, thesemi-automatic appears to have been designed to speed up the heel and toe process by ending the ribbing at thepre-heel portion. This enables the machine to function most efficiently since it is necessary to have a needle inevery cylinder slot when making heels and toes, even if those needles are out of work. For the novice, that alsomeans that a mock-ribbed section is best terminated at the pre-heel as well. If real or mock ribbing is to becontinued at the point of the pre-heel, one is required to place an unused needle in the blank slots opposite theside of the machine on which the heel is being formed.A heel can be made on either the front or back of the cylinder. This manual shows it being constructed on thefront. To use the back instead, instructions for raising and lowering the knobs and needles is, of course, to bereversed.
When using the semi-automatic function, there MUST be a needle in every slot in the cylinder.
Whether the sock is knit with a ribber or not, you must put temporary needles in all empty cylinder slots whilemaking the heel/toe. Empty cylinder slots exist for mock ribbing technique and when using a ribber. Thetemporary needles do not knit, they just fill the slot and will be removedat the completion of the heel when continuing either mock rib or usingthe ribber in the remainder of the sock.
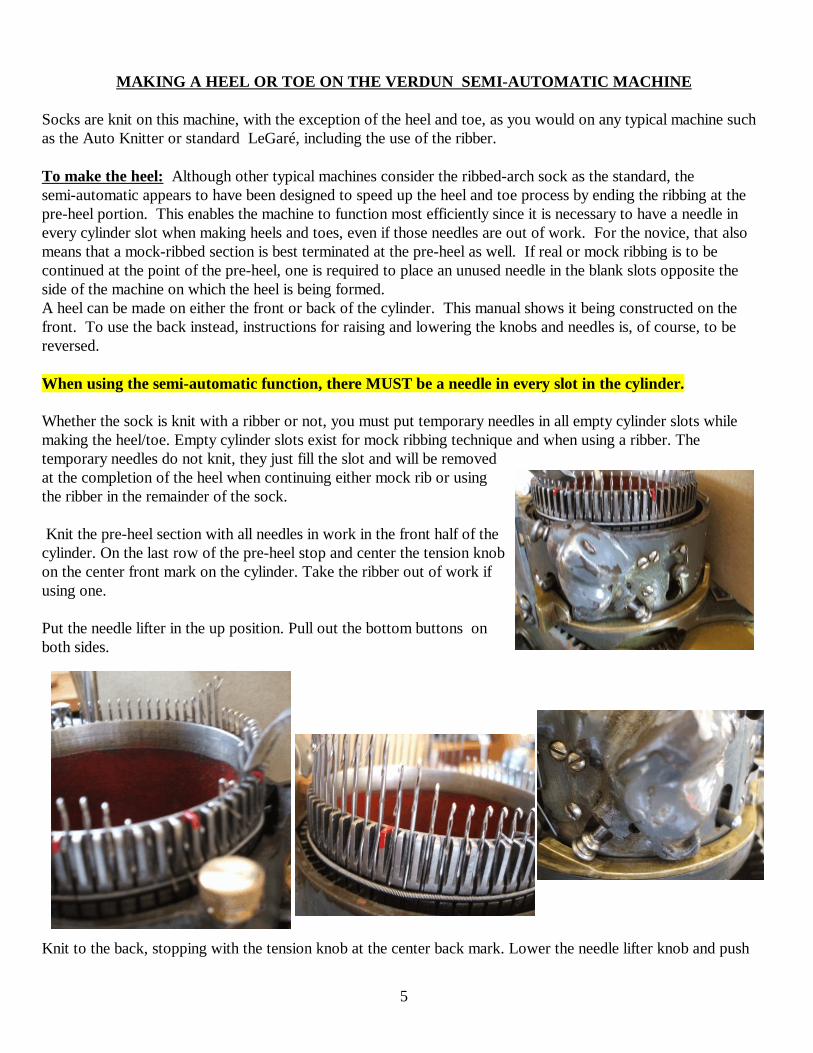
Knit the pre-heel section with all needles in work in the front half of thecylinder. On the last row of the pre-heel stop and center the tension knobon the center front mark on the cylinder. Take the ribber out of work ifusing one.
Put the needle lifter in the up position. Pull out the bottom buttons onboth sides.
Knit to the back, stopping with the tension knob at the center back mark. Lower the needle lifter knob and push
6
the needles in front of the left hash mark fully down if necessary. Engage the heel spring.
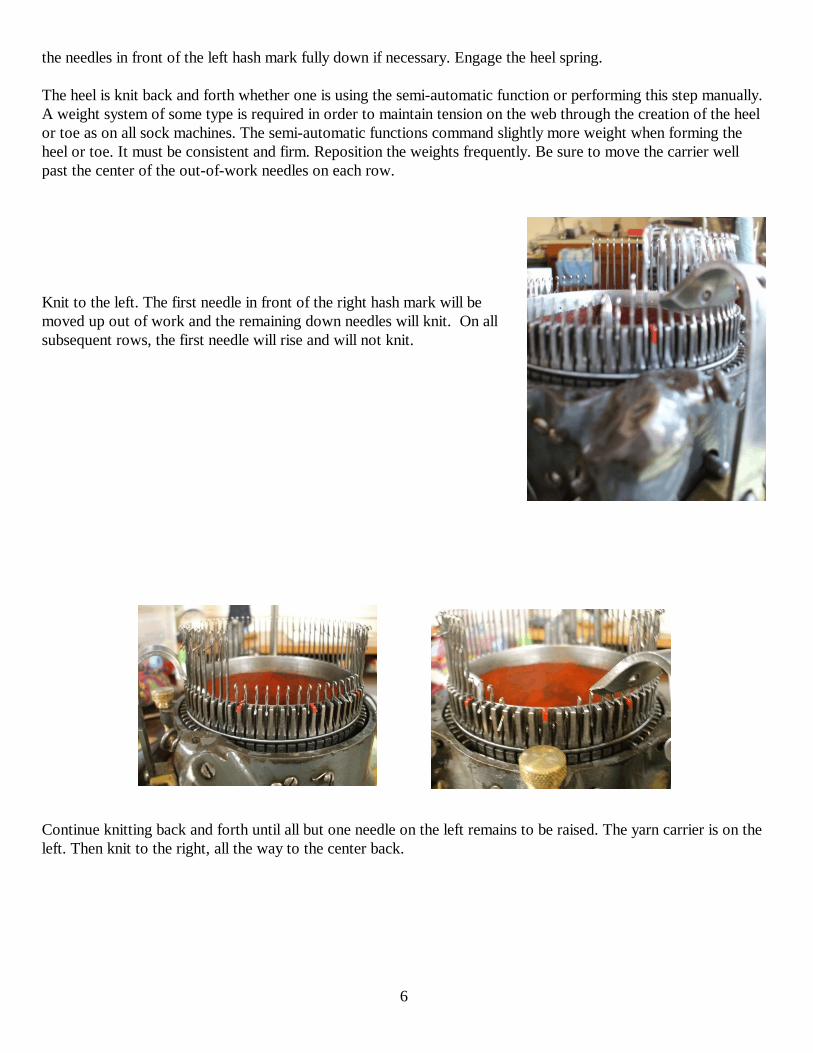
The heel is knit back and forth whether one is using the semi-automatic function or performing this step manually.A weight system of some type is required in order to maintain tension on the web through the creation of the heelor toe as on all sock machines. The semi-automatic functions command slightly more weight when forming theheel or toe. It must be consistent and firm. Reposition the weights frequently. Be sure to move the carrier wellpast the center of the out-of-work needles on each row.
Knit to the left. The first needle in front of the right hash mark will bemoved up out of work and the remaining down needles will knit. On allsubsequent rows, the first needle will rise and will not knit.
Continue knitting back and forth until all but one needle on the left remains to be raised. The yarn carrier is on theleft. Then knit to the right, all the way to the center back.

7
Push the bottom buttons up firmly until they click into the closed position. Pull the top buttons out.
Knit to the left. The first needle on the left is lowered and will knit on the next left to right pass.
Continue to knit back and forth. One needle will be lowered at the end of each row and will knit at the beginningof the next row. When all of the desired needles but the last one on the right in front of the hash marks arelowered, stop at the front. Push the top buttons in and manually put the remaining needles into work. Reactivatethe ribber if used, remove the temporary needles behind the hash marks, and remove the heel spring.
Continue knitting the foot.
On the last row of the foot, stop with the tension knob centered on the center front mark.
The toe is done in the same way, including the use of the temporary needles.
8
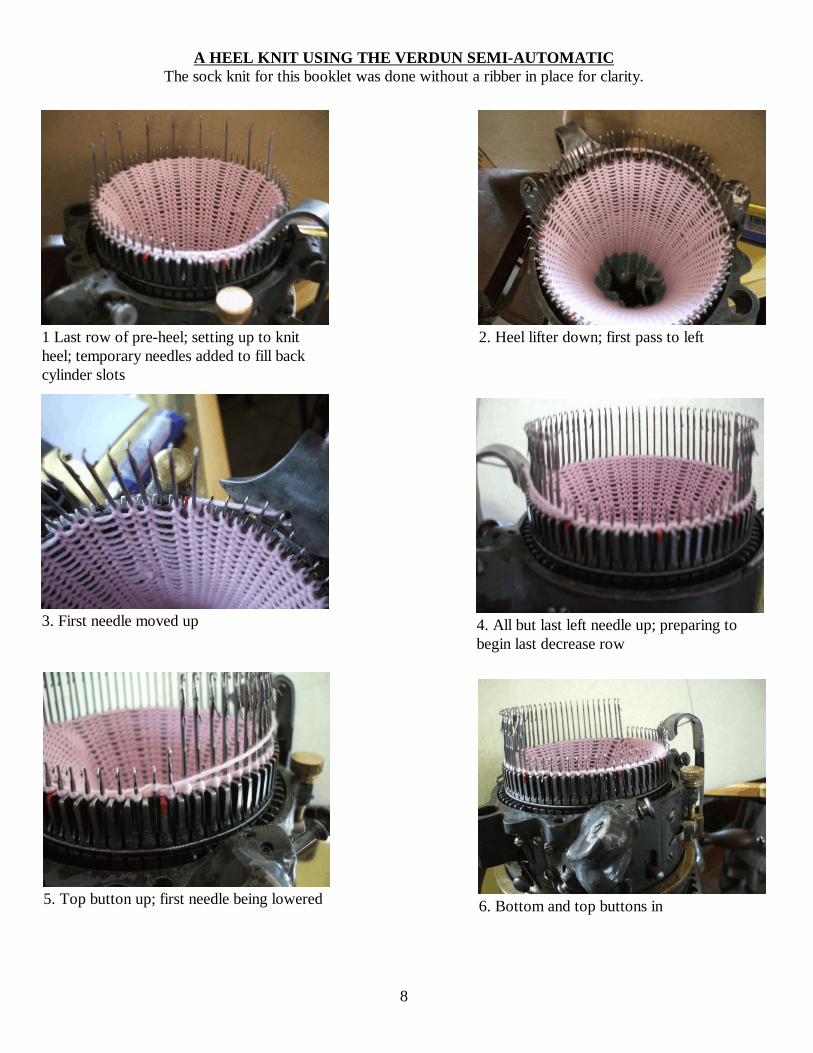
A HEEL KNIT USING THE VERDUN SEMI-AUTOMATICThe sock knit for this booklet was done without a ribber in place for clarity.
1 Last row of pre-heel; setting up to knitheel; temporary needles added to fill backcylinder slots
2. Heel lifter down; first pass to left
3. First needle moved up 4. All but last left needle up; preparing tobegin last decrease row
5. Top button up; first needle being lowered 6. Bottom and top buttons in

9
Angora Valley Fibers has a comprehensive collection of photos and manuals for many brands of sock machines.Find them at: www.angoravalley.com
This booklet was written to provide assistance in using the Verdun Semi-Automatic Knitting Machine. It is undercopyright and is published by Angora Valley Fibers with permission from the author.
Sharon Hilgers © 2009
7. Last stitch lowered, top buttons in;temporary needles removed
8. Completed heel
9. Detail of heel