
Operating Instructions Revox Joy App S232 · Operating manual. If you want to ... Symphony“. You...
34
Operating Instructions Revox Joy App S232 1
Transcript of Operating Instructions Revox Joy App S232 · Operating manual. If you want to ... Symphony“. You...

Operating Instructions Revox Joy App S232
1

Revox Joy S232 App Operating Instructions
2
D 1.0

Operating Instructions Revox Joy App S232
1
Welcome ..............................................2
Installation ................................................... 2 Requirements .............................................. 2 Number of clients ........................................ 2 Version number ........................................... 2
Operation .............................................3
Switching on through the App .................... 4 Source selection ......................................... 4 Last Music ................................................... 5 Queue ........................................................... 5
Creating a queue through lists ............. 6 Creating a queue through Player ......... 6 Managing the queue ............................. 7
My Music ................................................... 10 Add tracks to My Music ............................ 10 Edit My Music ............................................ 11 Deleting Lists ............................................. 12 Internet Radio ............................................ 12 FM Tuner / DAB+ ....................................... 14 Audio Server .............................................. 16 USB ............................................................ 18 iPod ............................................................ 18 Local Inputs ............................................... 19 Play view.................................................... 19
Settings .............................................. 20
Sound settings ........................................... 20 Alarm .......................................................... 21 Short-Timer ................................................ 22 Sleep-Timer ................................................ 22 Device info ................................................. 22 Basic settings ............................................. 23 Speaker setup ............................................ 23 FM Radio .................................................... 24 DAB+ Radio ................................................ 25 Local inputs ................................................ 26 Network ...................................................... 27
Network status ..................................... 27 Network name ...................................... 27 IP settings ............................................. 27
Wi-Fi settings ............................................. 28 Network restart .................................... 28
Software update ........................................ 29 Remote Access .......................................... 29 Clock ........................................................... 29 Auto Standby .............................................. 30 Language .................................................... 30
Display modes ...................................... 31 Special cases ....................................... 31

Revox Joy S232 App Operating Instructions
2
Welcome
With Version 2.3 of the S232 App, all of the control functions for Revox Joy products can be done through an iPod touch, iPhone or iPad (referred to here as iDevices). Installation
Download the S232 App onto your iDevice from the Apple App Store. Revox offers one App that works with an iPhone, an iPod touch and an iPad.
The App has been developed for iDevices running under iOS 5 or higher. iDevices that don't meet that requirement may experience functional limitations to a greater or a lesser degree. Requirements
For the S232 App with Version 2.3 the Joy software 1.10 is required. The Revox Joy must be in Quickstart mode, in order to be able start it using the App. You can configure this mode with the remote control under Basic settings - Network.
Alternatively, you can also call this mode using the "Start Up" button on the back of the device.
The Revox Joy can be started up from standby within 3 seconds, if the Quickstart mode is activated. This increases the power consumption compared to standby mode. You will find details about this in the Revox Joy Operating manual.
If you want to benefit from the reduced power consumption of the Revox Joy
standby mode and still want to operate the device with the S232 App, the Joy must be switched on using the S208 remote control first.
A reliable WLAN connection must exist between the iDevice and the Revox Joy to ensure stable communication between the App and the Revox Joy.
An interruption in the connection can usually be identified by the fact that the App no longer reacts. Number of clients
Only one iDevice at a time can access a Revox Joy. If an attempt is made to make a parallel access to the Revox Joy using a second iDevice, the message “The device is being externally controlled” appears. Problems may then result.
Version number
You will find an entry S232 under Settings on your device. Select this entry to see the S232 App version number.
Please be aware that this App requires certain software states to be installed on the Revox Joy for it to work without any problems.
You will find more about this on the Revox website www.revox.com.

Operating Instructions Revox Joy App S232
3
Operation
Start the App on your iDevice. After a short Welcome view, you will see a Device List, showing all the Revox Joy products found in the network.
In our example, a Joy S119 (MK2) and a S120 were found. It is however also possible to operate a Joy S118 or Symphony with the S232 App. You can restart the search for available devices manually by swiping your finger over the screen, from top to bottom. The picture on the right shows the corresponding screen.

Revox Joy S232 App Operating Instructions
4
Switching on through the App
The factory setting for the name that will be shown for a Revox Joy in the Device List is „S118, S119, S120 respectively Symphony“. You can modify this name under Basic settings - Network - Network name ID to meet your individual requirements, e.g. "Lounge".
There is a Power status icon shown next to each Revox Joy.
If the icon is green, that indicates that the Revox Joy is switched on. If the icon is red, that indicates that the Revox Joy is in standby mode.
Please be aware that the device cannot be operated through the App if it is in standby mode.
You can press on the icon with your finger and modify the Revox Joy Power status to your requirements.
An additional text is displayed during the startup or shutdown process, e.g. "Shutting down...".
If you call the Device List using the bottom lefthand button, it can take a few seconds until a search has been completed over the whole network.
This state is indicated by a greyed-out page.
Source selection
You will see a list of all the Revox Joy sources below the name of the device (in this example "S119"), starting with "Last Music". If the list is not displayed, tap on the name of the Revox Joy in the Device List. In the case of the inputs for the traditional sources (local inputs), you will see either the default name or if you have renamed the source under Local inputs - Rename inputs, you will see the corresponding alias.
You can use your finger to scroll through the list in the usual iDevice way. To select a source, tap on the corresponding name.
By tapping on the bottom left-hand button, you can always return to the Device List, in order to select a different Revox Joy or a new source to control.

Operating Instructions Revox Joy App S232
5
Last Music
The "Last Music" list contains the last 40 items to have been listened to on the Revox Joy. These can be Internet radio stations or also tracks from your music server.
Local sources are not listed here.
Navigation is done in the same way as with the "My Music" source. This means that you jump directly from the list to the Play view.
Delete lists
With the blue coloured waste basket button you can delete the list „Last Music“. .
Queue The queue represents a playlist that can be put together quickly and easily using the remote control or the Joy App. Similar to normal playlists, tracks are selected from the Audio Server or USB area and added to the list. The list is stored directly in the Joy Receiver and can contain up to 250 tracks. With the S232 Joy App, it is even possible to create and manage several queues. You can call the previously created playlist through the Queue option in the Main menu. Select the track where playback should start from. Start the queue playback with the OK button. Playback is only interrupted if another source is selected or when the last track in the queue finishes. The track that is currently being played is shown in blue.

Revox Joy S232 App Operating Instructions
6
Creating a queue through lists Navigate to the track selection (list) in the Music Server or USB source where the desired track is located. You can add the selected track, with several options, using the right-hand button :
append / and play adds the highlighted track at the end of the queue and then starts to play it append all / and play adds all the tracks from the selected album at the end of the queue and then starts to play them delete All tracks are deleted from the queue
Creating a queue through Player When you are in the Play view, you can add the track that is currently being played to a queue (or also to the MyMusic selection) using the button.
If you select a queue, a second dialogue screen appears when you can decide if a track should just be added to the end of the queue or whether it should then start to be played as well.

Operating Instructions Revox Joy App S232
7
Managing the queue You can edit a queue once it has been created. To do this, select the queue as source from the Home folder and tap on
. It is irrelevant whether a track from the queue is playing at the time or not.
You can select from the various options that then appear in the menu:
edit Individual entries can be deleted from the queue with the button. The deletion is actually carried out using the button .
delete Deletes all the contents of the queue. The deleted entries can only be restored by adding the titles again.

Revox Joy S232 App Operating Instructions
8
save as... In contrast to operation with the S208 Remote control, you can create and administer several queues with the S232 App. The queue that has currently been called can be stored under the same or a different name with the “save as...” option. The blue <new entry> field is used for the new name whereas saving using an existing name is done through the corresponding grey name field. The deletion of a complete queue is done through the “open...” option - see next section.
open... Several queues can be created with the S232 App but only one queue can be active at a time. By using the “open...” option, you can select which queue is currently active or should be used. You can create queues in advance to create different atmospheres or for different purposes, which can then simply be opened at the required time.
The function to delete a complete queue is also contained in the “open...” option. Tap on the button when the “open...” menu is open. Using the icon, complete queues can be deleted, i.e. not just the content but the queue itself.

Operating Instructions Revox Joy App S232
9
combine... This option allows you to add the complete contents of a queue to the queue that is currently opened.
The new version of the queue should then be saved with the “save as...” option. Cancel Ends queue administration and returns you to the Home menu.

Revox Joy S232 App Operating Instructions
10
My Music
You can store up to 18 entries on a Revox Joy in the "My Music" folder. These entries are your individual favourites that you can modify and change at any time.
When you select the "My Music" source, a list with 18 entries is displayed. If you select an entry from the list, the App jumps to the corresponding Play view. The switching process takes a few seconds.
Within the Play view, you can control the volume or return back to the "My Music" list through Archive, using the buttons described above.
Please be aware that depending on the current selection, skip commands are carried out within the "My Music" entry. If, for example, an entry is a series of podcasts from a radio station, the Skip commands initially switches between the different podcasts before a jump is made to the next "My Music" entry.
Add tracks to My Music
You can add entries to the "My Music" list from a Play view.
To do this, tap on the button in the top right-hand corner of the Play view
This opens a dialogue window where you can change the name of the entry.
As a rule, the name of the radio station or the name of the artist is suggested and once you are satisfied with the choice of name, you can confirm your selection by tapping on the "OK" button.
Then the "My Music" list opens and you can select a memory position from the

Operating Instructions Revox Joy App S232
11
list. The list is not displayed with the first entry. The entry is automatically assigned to position 1.
Edit My Music From the device list you can select the MyMusic folder
With the top right-hand button you can edit the “MyMusic” folder. Using the buttons you can mark an entry for deletion und by confirming your decision the entry will be deleted.
If you touch an entry you change into the „edit“ mode to change the name of the entry.

Revox Joy S232 App Operating Instructions
12
As soon as the editing has been completed, you need to confirm the changes by pushing the top right-hand
button again.
Deleting Lists
With the waste basket button you can delete the lists „MyMusic“ or „Last Music“.
Internet Radio
If you select the Internet Radio source, you will see the Internet Radio Service selection options as described in the Revox Joy Operating manual.
Navigate to find your favourite station by tapping on the corresponding menu item to open a further selection menu.
You can always jump back one menu level with the "Back" button in the top left-hand corner.
The "Home" button at the top right of the screen takes you directly back to the starting menu of the current source, in this case Internet Radio, whichever menu level you are currently at.
Irrespective of how long a list is, initially only the first 100 entries are loaded. If available, the radio station icons are shown as thumbnails.

Operating Instructions Revox Joy App S232
13
Once you have scrolled to the end of the list, by swiping your finger over the edge of the screen, the list is reloaded.
In the case of very long lists, a column is displayed on the right with the letters of the alphabet. When you tap on a letter, the App jumps to the corresponding selection. Depending on the length of the list, this search can take a few seconds.
If a radio station or a podcast is selected from the list, the App switches to the corresponding Play view.
Three text lines appear at the top of the Internet Radio Play view, showing the radio station, an additional information and the bitrate. Revox has no influence on this text as it is transmitted by the Internet Radio stations.
The radio station icon is shown underneath the text, assuming that the station puts out this information.
Beneath the icon, a time display shows how long the App has been accessing this station.
If you operate the volume buttons (l - r: mute, reduce volume, increase volume), a blue volume bar is displayed that then disappears again after a short time.

Revox Joy S232 App Operating Instructions
14
Using the Skip button, you can move from one station to the next within the last menu. If there is only one entry in a menu, no Skip can be carried out.
Using the Archive button in the Task bar or top left, you can always jump to the archive of the currently selected source, in order make a new selection from the current source.
FM Tuner / DAB+ The DAB+ and FM Tuner selection is only available if the optional Tuner module is installed. A DAB+/FM Tuner module can be retrofitted as an option to all Joy Receivers.
After the initial set-up, no stations are stored and the Station list is empty. Searching for and organising stations in the DAB+ and/or FM tuner area is described under Settings.
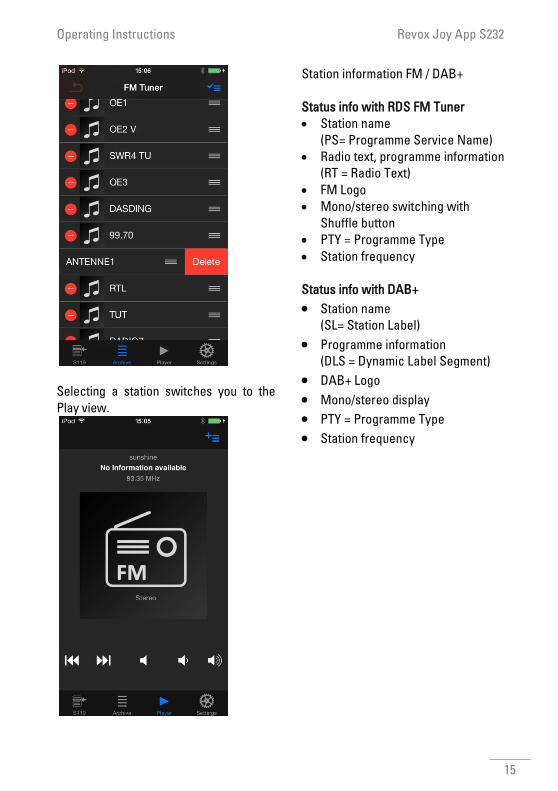
After the stations have been organised in the Basic settings and are in the Stations list, the desired station can be selected. Stations can be deleted or the station list can be sorted using the button. Individual stations can be deleted from the list with the button. The deletion is actually carried out using the button. When it comes to resorting the station list, press and hold the button and move it to the required position. The button returns you to the normal station list view.
Operating Instructions Revox Joy App S232
15
Selecting a station switches you to the Play view.
Station information FM / DAB+ Status info with RDS FM Tuner
• Station name (PS= Programme Service Name) • Radio text, programme information (RT = Radio Text) • FM Logo • Mono/stereo switching with
Shuffle button • PTY = Programme Type • Station frequency Status info with DAB+
• Station name (SL= Station Label) • Programme information (DLS = Dynamic Label Segment) • DAB+ Logo • Mono/stereo display • PTY = Programme Type • Station frequency

Revox Joy S232 App Operating Instructions
16
Audio Server
If you select Music server from the Source menu, you first see a menu of all the UPnP services found in the network.
Navigate to your music in the usual way by tapping on a menu entry.
In some lists, the album cover is shown in front of the text.
Whether a cover is displayed is entirely dependent on the UPnP service that you use to access your music collection and on whether a cover was stored during ripping.
Programmes exist where you can extend the metadata by adding cover images and you will find a lot of such applications in the Internet. Revox has had good experiences with the MP3 Tag program.
The text displays are also entirely dependent on the metadata and the UPnP service used.
You can scroll through the lists in the normal way. Large lists in the Music server have to be loaded in blocks like with the Internet Radio stations.
As with Internet Radio, the "Back" button takes you back a menu level and the "Home" button takes you back to the starting menu of the current source, in this case the Music server.
The Music server Play view is essentially very similar to that of the Internet Radio.
Operating Instructions Revox Joy App S232
17
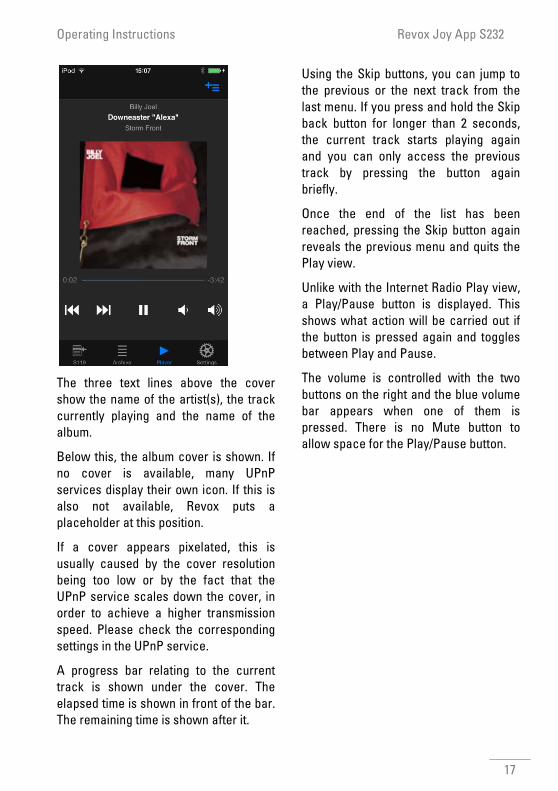
The three text lines above the cover show the name of the artist(s), the track currently playing and the name of the album.
Below this, the album cover is shown. If no cover is available, many UPnP services display their own icon. If this is also not available, Revox puts a placeholder at this position.
If a cover appears pixelated, this is usually caused by the cover resolution being too low or by the fact that the UPnP service scales down the cover, in order to achieve a higher transmission speed. Please check the corresponding settings in the UPnP service.
A progress bar relating to the current track is shown under the cover. The elapsed time is shown in front of the bar. The remaining time is shown after it.
Using the Skip buttons, you can jump to the previous or the next track from the last menu. If you press and hold the Skip back button for longer than 2 seconds, the current track starts playing again and you can only access the previous track by pressing the button again briefly.
Once the end of the list has been reached, pressing the Skip button again reveals the previous menu and quits the Play view.
Unlike with the Internet Radio Play view, a Play/Pause button is displayed. This shows what action will be carried out if the button is pressed again and toggles between Play and Pause.
The volume is controlled with the two buttons on the right and the blue volume bar appears when one of them is pressed. There is no Mute button to allow space for the Play/Pause button.

Revox Joy S232 App Operating Instructions
18
USB
Selecting the USB source gives you access to a USB storage medium. Unlike a NAS or PC with an installed UPnP service, a USB storage medium is just a collection of data.
When navigating through a USB storage medium, you see a file structure like the one you would see on a PC.
Control is the same as with the Music server.
iPod
If you select the iPod source, the music on an iDevice connected to a Revox Joy is accessed.
Operation and music selection are done in the same way as described in the Music server chapter.
The navigation menus are defined by the iDevice.
Please be aware that with iDevices, no cover can be transmitted because of the specification laid down by Apple.
Operating Instructions Revox Joy App S232
19
Local Inputs
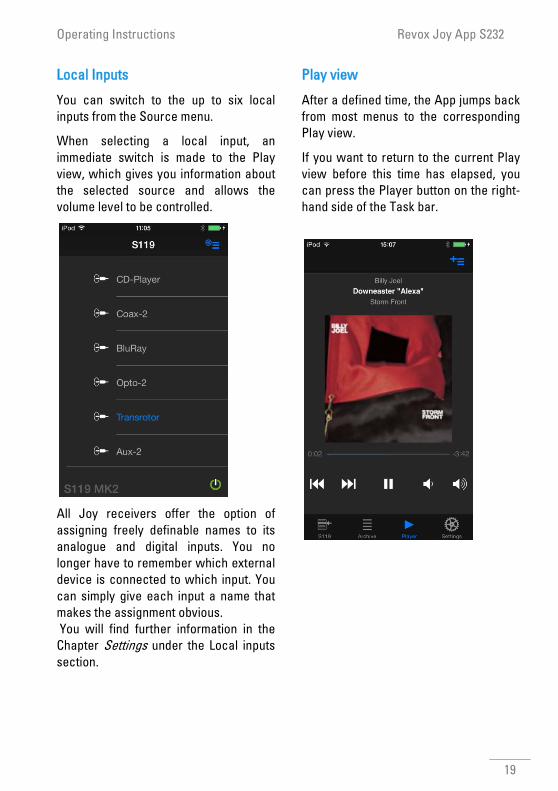
You can switch to the up to six local inputs from the Source menu.
When selecting a local input, an immediate switch is made to the Play view, which gives you information about the selected source and allows the volume level to be controlled.
All Joy receivers offer the option of assigning freely definable names to its analogue and digital inputs. You no longer have to remember which external device is connected to which input. You can simply give each input a name that makes the assignment obvious. You will find further information in the Chapter Settings under the Local inputs section.
Play view
After a defined time, the App jumps back from most menus to the corresponding Play view.
If you want to return to the current Play view before this time has elapsed, you can press the Player button on the right-hand side of the Task bar.

Revox Joy S232 App Operating Instructions
20
Settings
You will also find a "Settings" button in the Menu bar with the latest version of the S232 App. You can access all Joy product configuration menus through this button.
Note:
I f you want to integrate a Joy product over a Wi-Fi connection and operate it exclusively through the S232 App, a LAN connection is required the first time the Wi-Fi settings on the Joy are configured, as otherwise, the Joy cannot be reached through the Wi-Fi.
Sound settings
You can adjust the treble, bass and balance levels of the Joy product through Sound settings.
You can for example increase the bass or treble levels by moving the slider to the right and decrease them by sliding it to the left. Bass and treble levels can be returned to the neutral midpoint "0" with the "Linear" button.
The Balance can also be adjusted through this menu. It is not affected by the "Linear" function.

Operating Instructions Revox Joy App S232
21
Alarm
A Revox Joy has two alarm clocks. These offer the option of switching on a Joy product at preset times, with a particular source and at a selected volume.
You can configure the corresponding alarm settings with the two Alarm clock menus. The status of the alarm clock is shown in small grey letters underneath the menu entry.
The Switch-on time defines the timepoint when the Joy product should start up. The time is set using an Apple-like clock roller. Confirm your selection with "Apply". You return to the previous menu by tapping on the arrow in the top left-hand corner.
You can select the day(s) of the week when the alarm should be activated from the weekday list. If a day is shown in blue, the alarm is active on that day.
You select the source that should be activated through the Source field. You can choose from an alarm tone, the streaming sources and the 18 entries from the "My Music" list. Please ensure that the selected source will be available at the required time. If the source should not be available, the alarm tone is used instead.
The switch-on volume can be selected in the range from 0 to 40, through the volume slider. You can check whether the selected volume is suitable for your purposes with the "Test" button.
You can activate/deactivate the alarm clock function through the "On/Off"

Revox Joy S232 App Operating Instructions
22
button. The current status is displayed and "On" means that the alarm clock is activated.
Short-Timer
The Joy has a short-term timer function. Using the relative time, the system gives you a list of relative and wake-up times. Select the corresponding entry.
Tapping the "Start" button stores the wake-up time in the Joy. Then the Joy switches into stand-by mode.
Sleep-Timer
Using the Sleep timer, you can define a time period up to 120 minutes after which the Joy should go into stand-by mode.
Select the required time using the hour and minute rollers and confirm with the Start button.
The Sleep timer can be deactivated again using the Stop button.
You can check the Sleep timer setting at any time through the Settings menu.
Device info
This menu is purely an information menu where details about software versions can be read off for service purposes.

Operating Instructions Revox Joy App S232
23
Basic settings
Further Joy menu items can be called from the Basic settings menu item. As a rule, settings that don't have to be changed again are made through these menus.
But also, the App often shows important information below the corresponding entry, so that you can find this information out at a glance.
Speaker setup
The Revox Joy offers you the option of adjusting the frequency response in such a way as to optimise the interaction between the speakers. You can select the speaker type and location through lists.
In the case of the Revox Joy S118, you can activate the limiter from this menu.
The Revox Joy S119 and S120 offer a menu here for adjusting the subwoofer* output.
*Phase-linear behaviour Revox sends a phase-linear subwoofer signal to the speaker outputs. In order to achieve an optimum addition of subwoofer and speaker level in the transfer range, you should set the phase regulator at the subwoofer electronics to 0° and select a cut-off frequency of 120 Hz.

Revox Joy S232 App Operating Instructions
24
FM Radio If the optional DAB+/FM Tuner module is installed, this menu can be used for searching tuner stations.
The FM Tuner entry can be hidden in the Source list with the “Show FM radio" switch if, for example, only the DAB+ tuner is being used. The Automemory function searches for all receivable stations and then stores them in ascending order of their frequency. Automemory has been developed especially for cable reception as this offers many stations with optimum transmission performance. A maximum of 100 stations can be stored. Carrying out an automatic station search deletes all previously stored stations. The system advises of you this fact
before starting Automemory, in order to avoid accidental deletions. A progress bar shows you how much of the station search has been completed. The automatic station search cannot be interrupted. Manual station search Stations can be added manually using the < + > buttons. Start the process with the two arrow buttons. Searching automatically starts at the lower frequency band. “scanning...” appears in the display. When the first station is found, the scan process stops and the station is displayed and played. Now the station can be added to the Station list with the plus (+) button or the scan process can be restarted with the / buttons. The new station is added to the end of the Station list. Deleting and sorting the stations, whether that is through Automemory or through manual searching, is done in the List view of the FM Tuner source.

Operating Instructions Revox Joy App S232
25
DAB+ Radio If the optional DAB+/FM Tuner module is installed, this menu can be used for searching tuner stations.
The DAB+ entry can be hidden in the Source list with the “Show DAB+ radio" switch if, for example, only the FM tuner is being used.
The Automemory function searches for all receivable stations and then stores them in ascending order of their frequency. A maximum of 100 stations can be stored. Carrying out an automatic station search deletes all previously stored stations. The system advises of you this fact before starting Automemory, in order to avoid accidental deletions.
A progress bar shows you how much of the station search has been completed. The automatic station search cannot be interrupted Deleting and sorting the stations is done in the List view of the DAB+ source.

Revox Joy S232 App Operating Instructions
26
Local inputs
Revox Joys have up to six classic audio inputs. These can be given individual names using the S232 App.
When the menu is called, the S232 App shows a list of all the local inputs. If you want to change a name, swipe across the entry to the right.
Type the new name into the white field on the page that opens. You transfer the new name to the list with the "Done" key on the keypad or with "Accept".

Operating Instructions Revox Joy App S232
27
Network
One of the most important menus when configuring the Revox Joy is the menu for the Network settings.
The Joy is factory-set for Plug&Play recognition in the network using DHCP through the LAN.
Network status
Information about the network status of the Joy can be called up through this menu item. You will see whether the connection is done using LAN or Wi-Fi, along with the IP address, the Subnet mask, the Gateway and the MAC address.
Network name
Through this menu option, you can define the name the Joy device should have in the network. This could, for example, be the name of the room where it is located, e.g. "Lounge".
The entry can be updated with the "Done" key on the keypad or with "Apply". Please note that the App has to be restarted for the name to appear correctly in the Device list.
IP settings
This menu option allows you to choose between automatic and static IP address assignment. The recommendation from Revox is, if possible, to leave the setting at DHCP and not to assign a static IP address.
If you switch DHCP off using the slider, individual addresses can be defined. Please note that all entries, particularly the DNS addresses have to be set correctly.
The addresses are implemented with "Apply". Then a message is displayed telling you that the Joy will not be visible in the network for a time. Once this message has been confirmed, the network is restarted.
Once the new Device list appears, the Joy can be accessed under its new address.
An icon for hiding the keypad is located in the top right-hand corner of this menu.
Revox Joy S232 App Operating Instructions
28
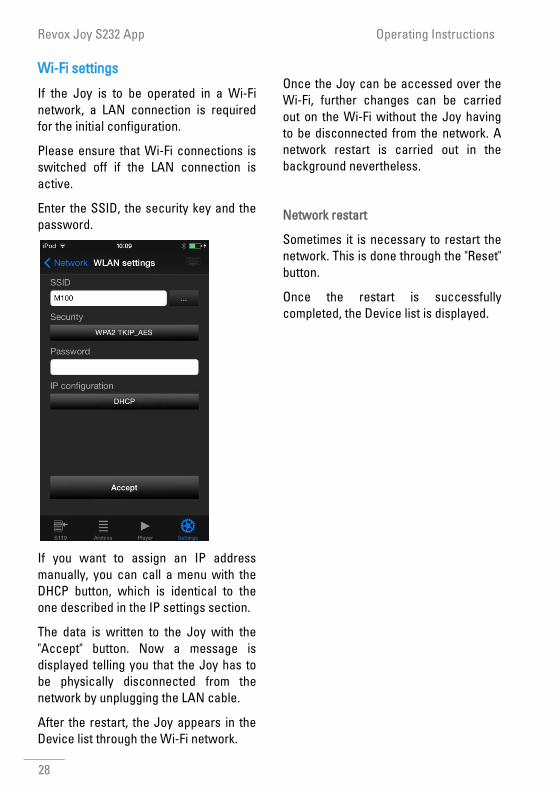
Wi-Fi settings
If the Joy is to be operated in a Wi-Fi network, a LAN connection is required for the initial configuration.
Please ensure that Wi-Fi connections is switched off if the LAN connection is active.
Enter the SSID, the security key and the password.
If you want to assign an IP address manually, you can call a menu with the DHCP button, which is identical to the one described in the IP settings section.
The data is written to the Joy with the "Accept" button. Now a message is displayed telling you that the Joy has to be physically disconnected from the network by unplugging the LAN cable.
After the restart, the Joy appears in the Device list through the Wi-Fi network.
Once the Joy can be accessed over the Wi-Fi, further changes can be carried out on the Wi-Fi without the Joy having to be disconnected from the network. A network restart is carried out in the background nevertheless.
Network restart
Sometimes it is necessary to restart the network. This is done through the "Reset" button.
Once the restart is successfully completed, the Device list is displayed.

Operating Instructions Revox Joy App S232
29
Software update
You can query the current software version of the Revox Joy though this menu. If required, the software can be updated through this page.
To do this, tap on the "Update" button. An information dialogue offers you the option of doing the update over a USB connection or through the Internet.
Note:
Revox strongly advises against carrying out a software update over Wi-Fi. Upload the update file from the Revox website onto a USB stick and then carry out the update from the stick.
Once the update has started, the progress of the process is shown in the App. Then the Joy disconnects from the App but the update is not yet complete. Please wait until the Joy has ended the update process, as shown by the LED flashing permanently on the front panel.
Remote Access
The Joy can be controlled through UPnP Control points. Remote access has to be activated for this to be possible.
Slide the switch to the "On" setting.
Clock
You can set Summer time, the offset to the World time and the current time through this menu.
Please note that the Joy gets its time from the Internet. If there is an Internet connection, you cannot adjust the time as the time from the Internet has a higher priority.

Revox Joy S232 App Operating Instructions
30
Auto Standby
When the Joy has reached the end of a playlist for example and is idling, it can switch automatically to the Standby state after 20 minutes if this option is activated.
Language
Finally, you can set the language of the Joy. Tap the button with the current language and you are presented with a list of the languages available on the Joy.
Select the desired language. Once you have made your choice, the Joy is restarted and is not available in the network for a short time.
Note:
If you should deploy the S208 Remote control and the App at the same time, it is important that same language is defined on both devices as otherwise conflicts can occur. The remote control S208 has the priority.

Operating Instructions Revox Joy App S232
31
Display modes
By turning the iDevice clockwise through 90°, a landscape view can be displayed instead of the default portrait view.
The functions are the same as with the portrait view. Only the layout of the screen is changed to fit the landscape format.
Special cases
If a source is not available, e.g. a USB stick is not plugged in or an iPod is not connected, the Music server source is shown as a rule.
If you are playing music from “MyMusic” or “Last Music” you will see the cover or station's logo in the Play view. If the source does not provide the logo, the app will show the “MyMusic” or “Last Music” icon and not “USB” or “iPod” icon.

32
Revox Joy S232 App Operating manual / Part no.: 10.30.3313


![Revox Center Köln GbR - o o [nap] E · o o [nap] E . Author: peter.serowski@revox-koeln.de Created Date: 5/8/2018 2:02:51 PM](https://static.fdocuments.net/doc/165x107/60cee1fc398f193b1213591b/revox-center-kln-gbr-o-o-nap-e-o-o-nap-e-author-peterserowskirevox-koelnde.jpg)