OPERATING INSTRUCTIONS - panasonic.capanasonic.ca/PCS/OperatingInstructions/CF35mk2.pdf2...
44
CF-35 Series OPERATING INSTRUCTIONS Personal Computer ® Appendix Windows 95 Setup Procedure ....................... 35 Setup Utility ................................................... 36 Specifications ................................................ 38 LIMITED USE LICENSE AGREEMENT ...... 40 Index ............................................................ 43 Troubleshooting Computer Diagnosis ..................................... 28 Dealing with Problems .................................. 29 Reinstalling Software .................................... 32 Operation Starting Up/Shutting Down .............................. 9 Computing On the Road ............................... 12 Using the Battery Pack .................................. 15 Security Measures ........................................ 17 Infrared Data Communications ..................... 21 Add-ons/Peripherals ...................................... 22 Usage, Carrying and Maintenance ............... 27 Getting Started Read Me First ................................................. 5 First-time Operation ........................................ 6 Contents CF-35 Quick Guide (On-line manual on the hard disk) Click on the screen. -Contents- CF-35 Readme Key Combinations Indicators
Transcript of OPERATING INSTRUCTIONS - panasonic.capanasonic.ca/PCS/OperatingInstructions/CF35mk2.pdf2...

CF-35 Series
OPERATING INSTRUCTIONS
Personal Computer
®
AppendixWindows 95 Setup Procedure ....................... 35Setup Utility ................................................... 36
Specifications ................................................ 38LIMITED USE LICENSE AGREEMENT ...... 40Index ............................................................ 43
TroubleshootingComputer Diagnosis ..................................... 28Dealing with Problems .................................. 29Reinstalling Software .................................... 32
OperationStarting Up/Shutting Down.............................. 9Computing On the Road ............................... 12Using the Battery Pack .................................. 15Security Measures ........................................ 17Infrared Data Communications ..................... 21Add-ons/Peripherals ...................................... 22Usage, Carrying and Maintenance ............... 27
Getting StartedRead Me First ................................................. 5First-time Operation ........................................ 6
Contents
CF-35 Quick Guide(On-line manual on the hard disk)
Click on the screen.
-Contents-
CF-35 ReadmeKey CombinationsIndicators

2
IntroductionThank you for purchasing the Panasonic CF-35 series computer. Please read the operating instructions thoroughly for proper opera-tion of your new computer.
Customer's Record
SerialNo.
or
DateofPurchase
ModelNo.
CodeNo.
Dealer'sName
Dealer'sAddress
NOTE : NOTE provides a useful fact or helpful information.
CAUTION : CAUTION indicates a condition that may result in minor or moderate injury.
WARNING : WARNING indicates a hazard that may result in moderate or serious injury, or even death.
[Start]-[Shut Down] : This illustration means to click [Start], then to click [Shut Down]
(For some applications, you may need to double-click.)
: This illustration means to press the [Enter] key.
+ : This illustration means to press [Fn], and while holding down on [Fn], to press [F2].
Your manual uses and for explanation purposes. However, some computers may have the and keys instead.
This manual covers several computer models. Items marked with the CF-35******* indication apply to the specifiedmodel(s) only.
Illustrations in this Manual
CopyrightThis manual is copyrighted by Matsushita Electric Industrial Co., Ltd. with all rights reserved. No part of this manual may bereproduced in any form without the prior written permission of Matsushita Electric Industrial Co., Ltd.No patent liability is assumed with respect to the use of the information contained herein.
©Matsushita Electric Industrial Co., Ltd. 1997. All Rights Reserved.
TrademarksPS/2™ is a trademark of International Business Machines Corporation.Microsoft®, MS-DOS® and Windows® are registered trademarks of Microsoft Corporation of the United States and/or other coun-tries.Pentium® is a registered trademark, and MMXTM is a trademark of Intel Corporation.TranXit™ is a trademark of Puma Technology. Inc.PhoenixCard ManagerTM is a trademark of Phoenix Technologies Ltd.Panasonic® is a registered trademark of Matsushita Electric Industrial Co., Ltd.
DisclaimerComputer specifications and manuals are subject to change without notice. Matsushita Electric Industrial Co., Ltd. assumes noliability for damage incurred directly or indirectly from errors, omissions or discrepancies between the computer and the manuals.

3
Lithium Battery!This computer contains a lithium battery to enable the date, time,and other data to be stored in it.Should only be exchanged by service personnel.Warning! Risk of explosion from incorrect installation or mis-application!
FOR YOUR SAFETY PLEASE READ THE FOLLO WINGTEXT CAREFULLY
This appliance is supplied with a moulded three pin mains plugfor your safety and convenience.A 3 amp fuse is fitted in this plug.Should the fuse need to be replaced please ensure that the re-placement fuse has a rating of 3 amps and that it is approved byASTA or BSI to BS 1362.
For U.S.A.
For U.K.Lithium Battery
Federal Communications Commission RadioFrequency Interference Statement
Check for the ASTA mark A S A or the BSI mark on the bodyof the fuse.
If the plug contains a removable fuse cover you must ensure thatit is refitted when the fuse is replaced.If you lose the fuse cover the plug must not be used until a re-placement cover is obtained.A replacement fuse cover can be purchased from your localPanasonic Dealer.IF THE FITTED MOULDED PLUG IS UNSUITABLE FORTHE SOCKET OUTLET IN YOUR HOME THEN THE FUSESHOULD BE REMOVED AND THE PLUG CUT OFF ANDDISPOSED OF SAFELY.THERE IS A DANGER OF SEVERE ELECTRICAL SHOCKIF THE CUT OFF PLUG IS INSERTED INTO ANY 13 AMPSOCKET.If a new plug is to be fitted please observe the wiring code asshown below.If in any doubt please consult a qualified electrician.
ImportantThe wires in this mains lead are coloured in accordance with thefollowing code:
As the colours of the wires in the mains lead of this apparatusmay not correspond with the coloured markings identifying theterminals in your plug, proceed as follows:
Note: This equipment has been tested and found to comply withthe limits for a Class B digital device, pursuant to Part 15 of theFCC Rules. These limits are designed to provide reasonableprotection against harmful interference in a residentialinstallation. This equipment generates, uses and can radiate radiofrequency energy and, if not installed and used in accordancewith the instructions may cause harmful interference to radiocommunications. However, there is no guarantee that interferencewill not occur in a particular installation. If this equipment doescause harmful interference to radio or television reception, whichcan be determined by turning the equipment off and on, the useris encouraged to try to correct the interference by one or moreof the following measures:
Reorient or relocate the receiving antenna.Increase the separation between the equipment and receiver.Connect the equipment into an outlet on a circuit differentfrom that to which the receiver is connected.Consult the Panasonic Service Center or an experienced ra-dio/TV technician for help.
WarningTo assure continued compliance, use only shielded interfacecables when connecting to a computer or peripheral. Also, anychanges or modifications not expressly approved by the partyresponsible for compliance could void the user's authority tooperate this equipment.
This device complies with Part 15 of the FCC Rules. Operationis subject to the following two conditions:(1) This device may not cause harmful interference, and(2) This device must accept any interference received, including
interference that may cause undesired operation.
Litium batteri!Denna dator innehåller ett lithium batteri som avänds för attlagra datum, tid och annan data.Bör endast bytas av servicepersonal. Explosionsfara vid felaktighantering.
Blue: NeutralBrown: Live
How to replace the fuseOpen the fuse compartment with ascrewdriver and replace the fuse.
The wire which is coloured Blue must be connected to the ter-minal which is marked with the letter N or coloured BLACK.The wire which is coloured Brown must be connected to theterminal which is marked with the letter L or coloured RED.Under no circumstances should either of these wires be connected tothe earth terminal of the three pin plug, marked with the letter E or the
Earth Symbol .
The mains plug on this equipment must be used to disconnectthe mains power.Please ensure that a socket outlet is available near the equip-ment and shall be easily accessible.

4
UsageAvoid Extreme Heat and ColdDo not store or use the computer in locationsexposed to heat, direct sunlight, or extreme cold.Avoid moving the computer between locationswith large temperature differences.Operation: 5 oC to 35 oC (41 oF to 95 oF)Storage: -20 oC to 60 oC (-4 oF to 140 oF)
Avoid Direct Sunlight on the LCD PanelThe LCD panel should not be exposed to directsunlight or ultraviolet light.
Handling
Avoid Excessive Force to the LCD PanelDo not apply excessive downward force on thedisplay when it is completely opened, especiallywhen plugs and/or cables are connected to therear of the computer.
Avoid Magnetic FieldsKeep the computer away from magnets.
Avoid Humidity Liquids and DustDo not store or use the computer in locationsexposed to high humidity, liquids (including rain)or dust.
Prevent ShockAvoid subjecting the computer to severevibrations or impact. Do not place the computerinside a car trunk.
Avoid Radio Frequency InterferenceDo not place the computer near a television orradio receiver.
For Germany
Precautions
Avoid StackingDo not place heavy objects on top of thecomputer.
Do Not Disassemble the ComputerDo not attempt to disassemble your computer.
Keep Small Objects AwayDo not insert paper clips or other small objectsinto the computer.
For France
CablesUse of an interface cable longer than 3 m (9.84 feet) is notrecommended.
Warnung bezüglich der LIthiumbatterie(Sicherungsbatterie)Lithiumbatterie!Dieser Computer enthält eine Lithiumbatterie zur Sicherung vonDatum und Uhrzeit der eingebauten Uhr sowie andererSystemdaten im Speicher bei einer Unterbrechung derHauptstromversorgung. Diese Sicherungsbatterie darf nur vonKundendienstpersonal ausgewechselt werden.Warnung! Bei falschem Gebrauch besteht Explosionsgefahr!Entsorgung gebrauchter Batterien nach Angaben des Herstellers.
Avertissement concernant la pile au lithium(pile de sauvegarde)Pile au lithium!Le micro-ordinateur renferme une pile au lithium qui permet desauvegarder certaines données comme la date et l'heurenotamment. Elle ne devra être remplacée que par un technicienqualifié.Avertissement! Risque d'explosion en cas de non respect de cettemise en garde!
WarningsThis equipment is not designed for connection to an IT powersystem.(An IT system is a system having no direct connections be-tween live parts and Earth; the exposed-conducive-parts of theelectrical installation are earthed.An IT system is not permitted where the computer is directlyconnected to public supply systems in the U.K.)
Disconnect the mains plug from the supply socket when thecomputer is not in use.
This equipment is produced to BS800/1983.

5
Read Me First
Do not expose your computer to shock.Please use care when handling your computer, shock maydamage your hard disk or make your software applicationsand data unusable.Do not power down your computer while software ap-plications are running or HDD indicator ( ) is on.Properly shut Windows* down to avoid problems ([Start]-[Shut Down]).Save all valuable data to floppy disks.Backing up data to floppy disks will limit damage shouldtrouble occur to your computer or should you inadvertentlychange or erase data.Use the security function for all important data.
page 17 - Security Measures
Saving Data on the Hard Disk
* This computer uses Microsoft® Windows® 95 Operating System.
Write Enable Write Disable
Write-protect Tab
Do not power down your computer or press the floppydisk drive eject button while the FDD indicator ( ) ison.Doing so may damage the data on the floppy disk and renderthe disk useless.Use care when handling floppy disks.To protect the data on your floppy disks or to prevent a floppydisk from becoming stuck in your computer, avoid the fol-lowing:• Sliding the shutter on the floppy disk manually.• Exposing the disk to a magnetic field.• Storing the disk in locations prone to high temperatures, low
pitched noise, dampness, or dust.• Applying more than one label on the disk.Confirm the contents of a floppy disk before formattingit.Confirm that no important data is on the disk, because alldata on the disk will be erased.Use the write-protect tab.This is a must for preserving important data. This preventsyour data from being erased or overwritten.
Saving Data on Floppy Disks
Users are advised to purchase the latest versions of vi-rus protection software and use them regularly.
Computer Viruses
We recommend you run the software:
• When booting your computer.• After receiving data.We recommend that you check data received on floppydisks or from external sources, such as data downloadedfrom the Internet, e-mail, etc. (For compressed files, pleaseuncompress them before running a check).
Disk Utilities not conforming to FAT32 should not beused in the computer.Running such programs may result in the incorrect dis-play of hard disk drive (HDD) content or damage to dataon the HDD. For more information, please read the "CF-35 Readme" in the "CF-35 series Quick Guide" (Click
).
Internet Explorer 4.0 places a tremendous load on the sys-tem in order to execute the wide variety of functions that itprovides. As a result, some unexpected faults may occur.If any of these faults occurs, try using the software withsome Internet Explorer 4.0 functions turned off. (See InternetExplorer Help for more details.)
It takes a long time to reboot or the computer locksup.Delete the check mark for [Internet Explorer Chan-nel Bar] in [Control Panel] - [Display] - [Web], thenpress .
The software cannot be upgraded (installed).At the [Welcome - Microsoft Internet Explorer] whichappears at startup, delete the check mark for [Showthis next time you log in] and restart the computer.
A system module error occurs.
Set [ (None)] for [Wallpaper] in [Control Panel] -[Display] - [Background].
Performing the above steps does not solve the prob-lem.Uninstall Internet Explorer 4.0 with the following step.Select [Microsoft Internet Explorer 4.0] in [Start] - [Set-tings] - [Control Panel] - [Add/Remove Programs] - [In-stall/Uninstall] and press [Add/Remove]. Follow the on-screen instructions.If a window with the message [Version Conflict] ap-pears during the installation process (network cardand application installation), select .
Proper operation may not be possible if is se-lected.
Internet Explorer 4.0
Do not add the check mark to [DMA] in [Start] -[Settings] - [Control Panel] - [System] - [Device Man-ager] - [Disk drives] - [GENERIC IDE DISK TYPE**]- [Settings].It may damage to data on the hard disk.
Only CF-35PJJ8C*M/CF-35PJJ8C*E comes with
Internet Explorer 4.0 already installed.

6
First-time Operation
It’s now time to get started. Please read the steps below to help you learn what parts are in-cluded, and to gain an understanding of some basic computer-related operations.
1 Confirm the inclusion of all partsMake sure the parts shown in the figure have been supplied. If any of them is missingor is not working properly, please consult your nearest Panasonic dealer.
CAUTION
Please prepare 8 2HD formatted floppy disks to create backup disks of the Panasonicand the other utilities ( page 8; step 6). These backup disks are to be used whenreinstallation of the Panasonic and the other utilities becomes necessary.
Accessory CatalogueRegistration Card
For use in place of your floppy drive( page 22)
CF-AA1526
Windows 95 System Pack .... 1
AC Cord ................................. 1
Operating Instructions ......... 1
TranXit ................................... 1
AC Adapter ............................ 1
Dummy FDD .......................... 1
(Microsoft Corporation)
CD-ROMCF-35PJJ8C*M/CF-35PJJ8C*E ... 2 discsFor all other models .................. 1 disc
Registration CardFirst-step Guide

7
Connect your computer to a power outlet1
3
2
CAUTION
Handling the AC adapterDo not twist or pull the AC power cord forcefully. Doing so may damage theconnections.Use only the specified AC adapter (factory control number: CF-AA1526) withyour computer. Using an AC adapter other than the one supplied might damagethe battery and/or the computer.When the DC plug is not connected to the computer, disconnect the AC cordfrom your AC wall outlet as well. If the cord is kept connected, a very low levelof power equivalent to approximately 1.1 watts* will be consumed.*When the battery pack is not recharging or fully charged
Problems such as sudden voltage drops/surges may arise during periods of thun-der and lightning. Since this could adversely affect your computer, theuninterruptible power source (UPS) is highly recommended.Please make sure that the ferrite core is always attached to the plug of the ACadapter and in its proper position.
1 The ferrite core can be removedby unlatching the clamps with apair of mini-pliers, etc.
2
2 When reattaching the ferritecore, match the end of the ferritecore to the third groove from thebottom of the plug (see diagram)before closing it.
Read the LIMITED USE LICENCE AGREEMENT ( page 34)
To open the display, slide the latch located at the front and lift open the display. Beforeremoving the seal covering the power switch, please read the LIMITED USE LICENSEAGREEMENT. Removal of this seal indicates agreement to the terms specified. Afteryou have agreed to the terms, you may turn your computer on.
Latch
CAUTION
Do not slide the power switch repeatedly.After you have turned your computer off, you must wait ten seconds before youcan turn it back on.
3
Move the power switchtoward the rear directionand hold one second un-til the power indicator( ) goes on before re-leasing it.
Clamps

8
4 Set Windows up
About the CF-35 series Quick Guide
This is available as an on-line guide which includes information on the key input com-mands, LED indicators and the “CF-35 Readme”. The “CF-35 Readme” also containsdetailed information.
For the Quick Guide, we recommend setting the Desktop area to "800 by 600 pixels" ormore, and the Color palette to "High Color (16 bits)" or more.
The [Windows 95 Setup] will run after the computer is turned on. Simply follow the on-screen instructions.
6
Label-side up
Label on the top surface, andinserting the shutter-sideheadfirst.
Ejecting a floppy disk
Inserting a floppy diskDouble-click (Panasonic Setup icon) on Windows
NOTE
Please read the supplemental “Windows 95 Setup Procedure” for a more detailedexplanation ( page 35).
Moving the cursor ( ) or clicking buttons can be done through the touch pad( page 10).If the display is dim or the sound quality is not right, you can adjust the brightness orcontrast (for DSTN display models only) and volume (page 39).
NOTE
Restarting the system may take some time.Please store the backup disks in a safe place. They will enable you to return yourcomputer to factory default settings should any problems occur.Do not remove the floppy disk while the FDD indicator ( ) is on, power downyour computer or use the suspend function ( page 10).
CAUTION
Firstaid FD ..................................................... 1 diskPanasonic Tools Disk ................................... 1 diskTranXit Disk (1, 2) .......................................... 2 disksDrivers Disk (1, 2) ......................................... 2 disksPhoenixCard Manager TM 95 Disk (1, 2) ........ 2 disks
Eject Button
First-time Operation
(To create the backup disks and setup the factory-set)
Eight 2HD formatted floppy disks need to be prepared. Simply follow the on-screen in-structions. The eight disks will contain the following (the check boxes are for you toconfirm copy of the disks).
This concludes the first-time use operation guidelines.
5 Close Internet Explorer 4.0At the [Welcome - Microsoft Internet Explorer], select at the upper right portion toclose the screen.
CF-35PJJ8C*M/CF-35PJJ8C*E only (For all other models, go to Step 6)
About Internet Explorer 4.0Please select the item that you want to open from the menu on the [Welcome - MicrosoftInternet Explorer].
CF-35PJJ8C*M/CF-35PJJ8C*E only

9
1 Open up the display
Starting Up/Shutting Down
Slide the latch as shown and lift open the display.
Starting Up
CAUTION
Do not slide the power switch repeatedly.After you have turned your computer off, you must wait ten seconds before youcan turn it back on.If the computer does not turn on when the power is switched on, the temperature ofthe CPU has exceeded its normal operating temperature. In this case, a functiondesigned to prevent it from overheating is triggered automatically and prevents thecomputer from turning on. Should this happen, allow the computer to cool downthen switch the power on again.If the computer still does not turn on, please consult your nearest Panasonic dealer.
Move the power switch toward the rear direction and hold one second until the powerindicator ( ) goes on before releasing it.
2 Turn your computer on
If is displayed,you must first enter your User Password (page 17).
* If you are starting from the suspend mode ( page 10), ifafter three attempts the correct password is not input, or if nopassword is entered for about a minute, the computer returnsto the suspend mode.
NOTE
When an application or file that was previously displayed ap-pears on your screen,this means the suspend or hibernation mode (page 10) has been set.
3 Select your applicationYou are able to start working on your computer.
Over three incorrect attempts,
If the correct password is input,Will Start
Will Not Start *(Power off)
If the display on the right appears,
the network password has been set.To read and write data to othercomputers, the correct passwordmust be entered.
Upon entering yourUser Password andpressing .
Latch
NOTEDo not turn on the computer with the LCD panel closed if an external monitor is notconnected. The computer will not power on.

10
Cursor
Use the touch pad to move the cursor on the display and perform normal computer operations. Itis not necessary to apply too much pressure on the work surface.
Work Surface
Moving the cursor
CAUTION
Leaving your finger on the touch pad for more than 15 seconds will put your computer inthe Calibration mode. In this mode, there are instances where even if you slide yourfinger on the work surface, the cursor will not move. In such cases, you have to lift yourfinger from the work surface and apply your finger to the work surface again.When using drawing applications like Paint, please try to draw in the center of thework surface. There are cases where lines drawn later appear to have been drawnincorrectly.
Using the Touch Pad
To shut down, save all data and select [Shut Down] from the[Start] menu
1
If you want to immediately start up and continue an application after shutting down your com-puter, you can do so by using the suspend or hibernation function.
Starting Up Your Computer Quickly
Restarting your computer (without shutting down)
Select [Restart] (or [Restart the computer?]), then press (or ).
NOTETo quickly resume computer operation after shutting down,
the suspend and hibernation functions are available. (below)
NOTE
Shutting Down (power off your computer)
From the keyboard,you may choose to press down on then select [Shut Down].
2 Confirm shutdownSelect [Shut down] (or [Shut down the computer?]), then press (or ).Your computer will power off automatically.(In the OFF state, if you are not recharging your battery pack or if the pack is fully charged, your computer andthe AC adapter consume approximately 1.1W.)
Differences between suspend function and hibernation functionFunction Where data is sa ved to Speed Requires power supplySuspend function Memory Fast Yes (if power is cut, all data is lost)Hibernation function Hard disk Somewhat slow Power not required to maintain data
Double-clicking Dragging Clicking
NOTE
While holdingdown the button,moving your fin-ger on the worksurface
or or or
To change the touch pad settings, select [Mouse] in [Start] - [Settings] - [ControlPanel]. Even if [Left-handed] is selected in the mouse settings, tapping the touchpad will have the same effect as clicking the left button of the touch pad.
One tapOne tap Two quick
tapsTwo quicktaps
Starting Up/Shutting Down
Two quick taps, but onthe second tap leav-ing your finger down(applying pressure)and moving it on thework surface. One tapwhen your finger will“drop” the object.
(The display varies depending on themodels.)

11
Shutting Down Using the suspend function
NOTEYou can use the suspend function by selecting [Suspend]* from [Start] menu.* [Suspend] is deleted from the [Start] menu by unchecking [Allow Windows to manage power use on
this computer.] in [Start] - [Settings] - [Control Panel] - [Power] or by unchecking [Show suspendcommand on Start menu] in [Advanced].
Power Switch
Using the hibernation functionIt is necessary to set the hibernation function using the Setup Utility.
1 Run the Setup Utility ( page 36)
+
Do not touch thepower switch whileyour computer is en-tering the hiberna-tion mode.
Power Switch
Suspend Mode
Hibernation Mode
2 Using and , select [Power Management] then press
3 Using and , select [Power Switch], set [Hibernation]with , then press
Close the Setup Utility ( page 36)4
Resuming Operation
When operation resumes, serial devices such as a mouse or modem, or your PC Cardsmay not work. In such cases, you will need to restart your computer or reinitialize theindividual devices.
If is displayed upon sliding the power switch, your password has been set (page 9).
CAUTION
Save all data before powering off your computer.When restarting from or shutting down to the suspend or hibernation mode, do nottouch the touch pad (or move the mouse (serial or PS/2 type) if one is connected).There are cases where these devices will fail to operate; you will have to restartyour computer using the keyboard (page 10).Do not power off during the following periods (you may corrupt your data or file):• While the FDD indicator ( ), HDD indicator ( ) or CD-ROM indicator ( )(CD-ROM drive is an optional part) is on.
• While playing/recording audio files.• While communications software is being used.Do not use the suspend or hibernation function when using an OS other than Win-dows 95, the diagnostics program (DIAG35), or the Setup Utility, or when experi-encing static electricity or noise.
If you hold down on the , or to enter the suspend or hibernation
mode, after resuming operation, you must press the same key. For example, if youhold down on the key while sliding the power switch, upon resuming, if you
do not press the key again, only capital letters will result from typing.If your computer locks up, press the reset button. All data is lost when this buttonis pressed.In the suspend mode, power is consumed. If PC cards (e.g., modem card) areinserted, more of that power is consumed. When all power has been consumed, alldata at shutdown is lost since it is retained in memory. We therefore recommendplugging in the AC adapter when using the suspend function.When the file in the external devices such as a CD-ROM drive, external hard disk,or ATA cards is opened, the suspend or hibernation function may not work. In suchcases, close the file.SCSI cards may not recover operation after entering the suspend or hibernationmode. If this occurs, restart the computer.
CAUTION

12
Computing On the Road
One of the main features of notebook-type computers is that you have the power of computingaway from your home or office. In the following, information is provided on how to maximizeuse of the battery pack which is necessary for such computing.
POINT 1 Four Important Points
POINT 2
Conserving Power
Adjust the brightness (dark) with + ( page 39)
Before stepping away from your computer, press + toput your computer in the standby modeThe standby mode helps you conserve power by cutting off power to the hard diskdrive’s motor and LCD. To resume, you may press any key.
Things to Remember
Be sure to charge your battery before and after use.
To get the maximum use of your battery, set the powermanagement mode.
POINT 3 Check to see that you have your AC adapter with you beforeleaving your home or office.Purchasing an extra battery (CF-VZS351) or the optional battery charger(CF-VCB251A) is highly recommended.
Always watch your battery level!POINT 4
In the power management mode, the setting of [Advanced] isrecommended ( page 13)With the Setup Utility, you can set the [Advanced] mode. This mode allows you tomaximize power save regardless of whether you are using only the battery pack or theAC adapter.
Leave your computer off when it is not in use ( page 10)
Setting the hibernation timeout ( page 13)The hibernation function ( page 10) allows you to save power by automatically cut-ting off power when the computer is idle or there is no access to individual devices for 4or 16 minutes. If [Advanced] or [Standard (Battery/AC adapter)] is selected for [PowerSaving], the hibernation timeout function will go into effect for both the battery packand the AC adapter. If, however, [Standard (Battery)] or [OFF] is selected for [PowerSaving], it will go into effect only during operation by the battery. The standby timeoutfunction is automatically set when [Advanced] or [Standard] is set. Note that the standbytimeout precedes the hibernation timeout.It should be noted that for some applications, the hibernation timeout will not workproperly.
NOTEIf you plan to use only the battery pack or set the power management, it is necessary tocheck [Allow Windows to manage power use on this computer] in [Start] - [Set-tings] - [Control Panel] - [Power]. If no check is added, the hibernation timeout willnot occur.

13
CPU Speed Change Mode : In this mode, the CPU is automatically stopped when thereare no operations.
HDD Motor Timeout : When the hard disk drive is not accessed for more than aminute, power to the motor is shut off.
Standby Timeout : When the computer is idle or a device is not accessed forone or two minutes, the computer enters the standby mode( page 12).
Power Management settings
* Enabled only when the battery itself is being used.
CPU Speed HDD Motor StandbyChange Mode Timeout Timeout
Advanced Enable 1 min 1 minStandard (Batter y/AC adapter) Enable 1 min 2 minStandard (Batter y)* Enable 1 min 2 minOFF Disable Never Never
PowerManagement
Functions automaticallyset
NOTE
If you would like to temporarily disable your power management settings, press +
. When pressed again, or when the computer is restarted (including suspend orhibernation function), the settings are enabled.
Close the Setup Utility ( page 36)6
1 Run the Setup Utility ( page 36)
3 Using and , select [Power Saving] then set [Advanced]with (To avoid setting the hibernation timeout, press and proceed on to step 6.)
4 Using and , select [Power Switch] then set [Hiberna-tion] with
5 Using and , select [Hibernation Timeout], set either [4min] or [16 min] with then press
2
CAUTION
When you need a network environment.Be sure to disable hibernation timeout settings in the Setup Utility .After resuming operation from the hibernation mode, the network connection may be severed or thecomputer will not work properly.
In communications when a device like a high-speed modem or ISDN terminal adapteris connected to the serial port, etc.
There are times when high-speed communication is adversely affected if the power managementfunction is enable. Please confirm that is displayed for a few seconds by pressing + todisable the power management function. After you have finished using a communication device, youcan enable the power management function by pressing + .
Key operation and music playbackWhen the power saving function is running, the keyboard and mouse operations may feel sluggish.Also, music may not play correctly when entering the standby mode during operation.
Setting Power Management(How to set [Advanced] and the hibernation timeout)
Using and , select [Power Management] then press

14
** When disabling the speakers with the Setup Utility (or pressing + ), the warning beep is alsodisabled.
Battery Status
Use the Battery Indicator ( ) to Check on the Battery Status
Battery Indicator Batte ry StatusChargingFully-chargedBattery charge is low (the charge is less than approx. 9% capacity)Battery pack or charger may not be working properly.Check your connections. If the problem persists, consult yournearest Panasonic dealer.Unable to recharge due to violation of temperature limits( page 15)
Orange*Green*RedBlinking red *
Bl ink ing orange f or 5seconds a f ter the ACadapter is connected*
* When the AC adapter is connected.
NOTE
Getting a detailed reading
When the Remaining Battery Charge Becomes Low
save your data and power off your computerPerform the following:
Plug in the AC adapter, and fully charge your battery. Use a spare battery if you have one. If you have neither the AC adapter nor an extra battery, power the computer off.
If the hibernation function is set
+
NOTE
When the battery indicator remains red (or a 99% reading is displayed) for anextended period of time, the actual remaining battery level and the displayedlevel may differ. Should this occur, charge the battery until the indicator is green,then completely discharge the battery.
When the battery pack is not in the computer, is displayed.
Computergoes off
(at approx. 0% capacity)
If the hibernation function is not set
(at approx. 9% capacity)
Red indicator lightsBeep sounds**
When using the optional CD-ROM pack:Recharging is temporarily stopped when the drive is being accessed. In this case,the battery indicator goes off temporarily.In addition, recharging is temporarily discontinued when the CD-ROM AutoPlayfunction is enabled. For more information, please read the operating instructionsthat are supplied with the CD-ROM pack.
(at approx. 9% capacity)
Red indicator lights Beep sounds(at approx. 4% capacity)
(at approx. 4% capacity)
Hibernation Mode
Computing On the Road

15
Care should be exercised with regard to the following in order to avoid the possibility ofliquid leakage, overheating, or bursting.• Do not throw the battery pack into a fire or expose it to heat.• Do not place the battery pack together with articles such as necklaces or hairpins whencarrying or storing.
• Do not insert sharp objects into the battery pack, expose it to bumps or shocks, deform,disassemble, or modify it.
• Do not short the positive (+) and negative (-) contacts.• The battery pack is a rechargeable battery intended for use with the CF-35 series or thespecified charger (CF-VCB251A). Do not use it with a computer other than the one forwhich it was designed.
• Do not charge, use or leave the battery pack for extended periods where it will be exposedto direct sunlight, in a hot place (in an automobile on a sunny day, for example), or in acold place.
Do not touch the terminals on the battery pack. The battery pack may no longer functionproperly if the contacts are dirty or damaged.Do not expose the battery to water, or allow it to become wet.Do not put the battery into a microwave oven or a pressurized chamber.This computer prevents overcharging of the battery by recharging only when the remain-ing power is less than approx. 95% of capacity.If the battery should leak and some of the fluid get into your eyes, do not rub your eyes.Immediately flush eyes with clear water and see a doctor for medical treatment as soon aspossible.Should the battery emit an abnormal odor, become hot to the touch, become discolored,change shape, or become in any way different from normal, remove it from the unit orcharger and discontinue use.If the battery pack will not be used for a long period of time (a month or more), charge thebattery pack until the remaining battery become 30% to 40% and store it in a cool, dryplace.
Using the Battery Pack
Precautions
NOTE
The battery pack may become warm during recharging or normal use. This is com-pletely normal.Recharging will not commence outside of the allowable temperature range (5 °C to 35°C (41°F to 95 °F)). To allow the battery to charge, adjustments have to be made to thetemperature. Once the allowable range requirement is satisfied, charging begins auto-matically. Note that the recharging time varies based on the usage conditions.If the temperature is low, the operating time is shortened. Therefore, please use thecomputer within the allowable temperature range.Although the battery has not begun to run down, the battery indicator may light up redor emit a beep. This indicates a significant rise in the temperature of the battery pack.This is typically caused by the fact that the battery pack has been delivering a high levelof power because the computer has been used with the display at the brightest settingand with the power-saving function off. In order to protect the battery pack from tem-perature rises, the computer's processing speed is automatically reduced and the batterytemperature is brought down. It is also a good idea to connect the AC adapter, set thepower-saving function, and turn down the brightness of the display. When the tempera-ture has dropped, the computer's regular processing speed will be restored.

16
When the charge provided by your battery pack is supplied for only a short period of time, evenafter fully charging according to the instructions, it may be time to replace your battery pack.The battery pack is a consumable item and therefore will require replacement (CF-VZS351).
Replacing the Battery Pack
Hook
NOTE
Besides the AC adapter (CF-AA1526) an optional batterycharger (CF-VCB251A) is available. This device is convenientin that it allows you to charge another battery pack while youare using the computer.
2 Remove the battery pack coverOpen your display. After pressing the hook on the bottom of the computer, slide toremove the cover.
Power off your computer ( page 10)Do not shut down using the suspend mode.
3 Taking out the battery packPull the tape on the battery pack and remove it from the computer.
1
Inserting a battery packPush the pack in until it is in place.
4 Reattach the battery pack coverSlide the cover in until it snaps into place.
CAUTION
In the suspend mode, do not remove/change the battery pack. Removing the packin the suspend mode will erase your data and may damage the computer.
Tape
CAUTION
The charging terminal of the battery pack is used for chargingusing the battery charger (CF-VCB251A), which is sold separately.Never connect anything to the charging terminal other than theexclusive adapter that is supplied with the battery charger.Doing so could damage the device connected to the battery pack, the cable, and thebattery pack itself, as well as resulting in overheating or bursting.
CAUTION
Make sure to properly remove and reattach the cover. Usingexcessive force (e.g., trying to snap it back into place) maycause the cover to break.An improperly attached cover may allow your battery packto fall out while you are carrying your computer.
Using the Battery Pack
Charging Terminal

17
Security Measures
Situation Function to use Ref erenceUser Password belowCoffee break Password page 18Prevent operation by using a floppy disk page 19Remove floppy disk drive page 22Supervisor Password page 19Use a security lock page 39
You do not want your computer to be used without permissionSame as above, but while you’re away temporarilyYou want to prevent theft or damage to data by using a floppy disk
You do not want your Supervisor Setup changed without permissionYou want to prevent theft of your computer
To prevent unauthorized access of your computer the various security measures are provided below.
12
Setting the user password (enabling, changing, disabling)
43
To disable your passwordUsing the and keys, select [Delete User Password] then press . Goto step 7.
CAUTION
Your password will not be displayed on the screen.Please limit your password to seven characters. Note that there is nodistinction between upper and lower case letters.White colored keys can be used. Note that space bar and function keyscannot be used.
Do not input your password while holding down on the or .
Use only the upper horizontal row of numeric keys to input user pass-words. The numeric keys combined with alphabet keys on the lower key-board cannot be used.Do not forget your password. If a password is forgotten you will beunable to use your computer.
Run the Setup Utility ( page 36)
Using and , select [System Setup] then press
Using and , select [User Password] then press
To enable or change your passwordEnter your password at the [Enter User Password], then press .
Set the User Password.Without the password, access to your computer is impossible.
When the User Password is set
If the correct pass-word is input,
Will Start
Over three incorrectattempts,
Will Not Start *(Power off)
* If you are starting from the suspend mode ( page 10), if after threeattempts the correct password is not input, or if no password is en-tered for about a minute, the computer returns to the suspend mode.
Upon entering your User Pass-word and pressing .
When you do not want your computer to be used without permission
5 Re-enter your password at the [Enter User Password Again](This is for confirmation purposes.)
Using and , select [Set User Password] then press 67 At the confirmation screen, press

18
9 Close the Setup Utility ( page 36)
You should set the “Coffee break Password” (Note that you must first set the User Password).When you input your selected key combination, the computer locks (key input, use of the touchpad and use of an external mouse are no longer possible).
+ +
Setting the Coffee break Password (enabling or disabling)
Do not leave your computer just after sensitive data had been shown on the screen.It is impossible to lock your computer from an external device, such as a mouseconnected through the serial port.
During the coffee break, is displayed on the screen. If the operations de-
scribed below are performed during the coffee break, the indication maydisappear. In order to quit the coffee break and begin using the computer, inputyour password.
If a different popup window is displayed by using the + or +
key combination.If the computer is returned from the standby mode.If the serial mouse is moved.
CAUTION
(Example of a selected key combination)
The computeris locked
When leaving your desk
When an incorrect password is inputted,
Operation resumes
Operation doesnot resume
You do not want your computer to be used without permission while away temporarily
Input the correct password used at startupand press .
8 Press to end the password setting procedure
CAUTION
To prevent the changing of your password without permission• When running the Setup Utility program, do not leave your computer even for ashort time.
• Set the User Password Protection option (page 20).
When the coffee break password is set
1 Set the User Password ( page 17 step 1 to 7), if it hasn’t already
2
To disable the Coffee break PasswordUsing and , select [Coffee break Password] then set [Disable] with .Go to step 4.
3 Using and keys, select [Key Combination for Coffeebreak] then set your combination of keys with
To enable the Coffee break PasswordUsing and , select [Coffee break Password] then set [Enable] with .
Security Measures
Close the Setup Utility ( page 36)
4 Press to end the password setting procedure
5

19
You may choose to protect the data on your computer from being accessed illegally or over-written accidentally by using a floppy disk. You can also set your computer to be unbootablefrom a floppy disk.
NOTE
To prevent the use of floppy disks altogether, you may also choose to remove the floppydisk drive ( page 22).
Preventing the use of a floppy disk
Even when one tries to access afloppy disk,
Procedure
1 Run the Setup Utility ( page 36)
This error message is displayed.
Using and , select [Supervisor Setup] then press 2Using and , select [Boot Up Drive] then set either [HDD
FDD] or [CDD FDD HDD] with 3
CAUTION
When changing to [HDD FDD] or [CDD FDD HDD] setting, tocontinue read/write operation from a floppy disk and to use the hard disk drive orCD-ROM to start, press and go to step 5.
4 Using the and , select [Floppy Operation], set [Disable]with then press
5When you do not want your Supervisor Setup changed without permission
Set the Supervisor Password. After it has been set, no changes can be made to the Supervisorsettings unless the password is entered.
When the supervisor password is setIn the Setup Utility ( page 36),
if is displayed,
NOTE
Supervisor Setup
May beOpened
Supervisor Setup
Can not beOpenedWhen the supervisor password is incorrect or when the
user password is entered, (Or, even when the correct su-pervisor password is entered. (page 31))
Input the correct supervisor password and press ,
You may wish to protect the User Password (page 20).
(There are cases in which the Supervisor Setup doesnot appear on the main screen (page 36)).
Close the Setup Utility ( page 36)
When you want to prevent theft of or damage to data by using a floppy disk

20
Setting the Supervisor Password(enabling, changing, disabling)
12
Run the Setup Utility ( page 36)
Using and , select [Supervisor Setup] then press
3 Using and , select [ Supervisor Password] then press
4 To enable or change your supervisor passwordEnter your password at the [Enter Supervisor Password], then press .
CAUTION
Your password will not be displayed on the screen.Please limit your password to seven characters. Note that there is no dis-tinction between upper and lower case letters.White colored keys can be used. Note that space bar and function keyscannot be used.
Do not input your password while holding down on the or .
Use only the upper horizontal row of numeric keys to input user pass-words. The numeric keys combined with alphabet keys on the lower key-board cannot be used.Do not forget your password. If a password is forgotten you will be un-able to use your computer.
5 Re-enter your password at the [Enter Supervisor PasswordAgain](This is for confirmation purposes.)
NOTE
Using and , select [Set Supervisor Password] then press6
At the confirmation screen, press 78 Press to end the password setting procedure
9 Close the Setup Utility ( page 36)
When you do not want the User Password enabled, changed, or disabledwithout permission,
use and to select [User Password Protection], then set [Enable] with
.
Using and , select [Delete Supervisor Password] then press . Go tostep 7.
To disable your supervisor password
Security Measures

21
Infrared Data Communications
Your computer is equipped with an infrared communications port enabling you to transferdata without a cable.
Preparations for Infrared Data Communications
Set the address of your infrared communications port to enable.Position your computer so that the port is face-to-face with the port of anothercomputer.
CAUTION
In the Setup Utility, select [IrDA] in the [Supervisor Setup] and set [Automatic (PnP)]or [2F8]. Setting [OFF] will make infrared data communications impossible.
Problems with infrared data communicationsAn object is located between both ports.There are other electronic devices nearby causing interference, such as, a television,VCR, wireless headphone, etc.Direct sunlight or white glowing light, such as fluorescent lighting; can cause inter-ference with communications between the ports.
Running TranXit TM
TranXit comes preinstalled and allows you to perform infrared data communications suchas transfer data and update information between two computers. Note that both computersneed to have TranXit installed and running.
Running the program
NOTE
Setting or changing the “Computer Name”It is necessary to assign a different “Computer Name” to each computer; select [Com-puter Name] in [Setup] to change the name.
CAUTION
Be sure the computers are not in directcontact with one another.A port-to-port distance of 20 to 50 cm(8 to 20 inches) is recommended.
Select [TranXit] from [Start] -[Programs] - [TranXit].
Online help is available on how to useTranXit. Click [TranXit Quick ReferenceGuide] in [Start] - [Programs] - [Panasonic].(Reinstalling TranXit; page 34)
In [Control Panel]-[Add New Hardware], if [Infrared] is added, TranXit can not beused. For TranXit to be operable, [Infrared] must not be set.Exit TranXit software before entering the suspend or hibernation mode. Start TranXitagain after the computer resumes.
Infrared CommunicationPort
22
Add-ons/Peripherals
Devices capable of being used by your computer are listed in the table below.
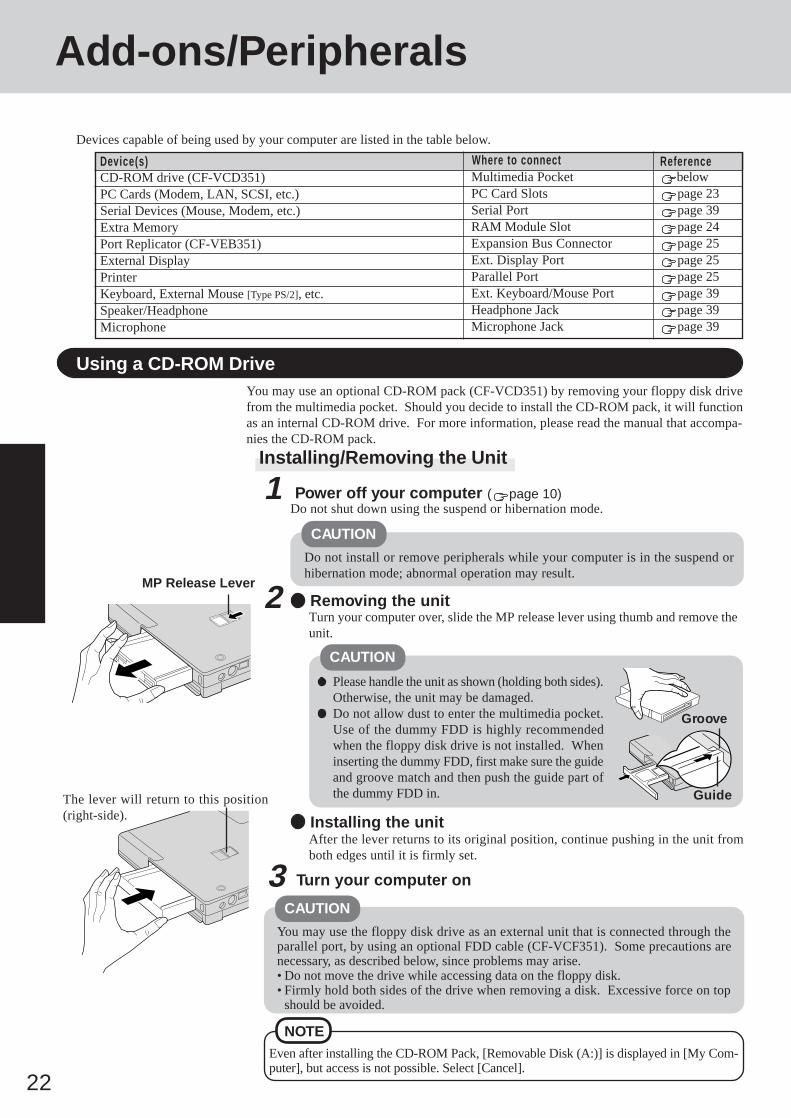
You may use an optional CD-ROM pack (CF-VCD351) by removing your floppy disk drivefrom the multimedia pocket. Should you decide to install the CD-ROM pack, it will functionas an internal CD-ROM drive. For more information, please read the manual that accompa-nies the CD-ROM pack.
1CAUTION
Do not shut down using the suspend or hibernation mode.
Do not install or remove peripherals while your computer is in the suspend orhibernation mode; abnormal operation may result.
Installing/Removing the Unit
CAUTION
Removing the unit2
Using a CD-ROM Drive
Please handle the unit as shown (holding both sides).Otherwise, the unit may be damaged.Do not allow dust to enter the multimedia pocket.Use of the dummy FDD is highly recommendedwhen the floppy disk drive is not installed. Wheninserting the dummy FDD, first make sure the guideand groove match and then push the guide part ofthe dummy FDD in.
Multimedia Pocket belowPC Card Slots page 23Serial Port page 39RAM Module Slot page 24Expansion Bus Connector page 25Ext. Display Port page 25Parallel Port page 25Ext. Keyboard/Mouse Port page 39Headphone Jack page 39Microphone Jack page 39
Device(s)CD-ROM drive (CF-VCD351)PC Cards (Modem, LAN, SCSI, etc.)Serial Devices (Mouse, Modem, etc.)Extra MemoryPort Replicator (CF-VEB351)External DisplayPrinterKeyboard, External Mouse [Type PS/2], etc.Speaker/HeadphoneMicrophone
ReferenceWhere to connect
Turn your computer over, slide the MP release lever using thumb and remove theunit.
MP Release Lever
Power off your computer ( page 10)
Groove
Guide
Installing the unitAfter the lever returns to its original position, continue pushing in the unit fromboth edges until it is firmly set.
Turn your computer on3CAUTION
You may use the floppy disk drive as an external unit that is connected through theparallel port, by using an optional FDD cable (CF-VCF351). Some precautions arenecessary, as described below, since problems may arise.• Do not move the drive while accessing data on the floppy disk.• Firmly hold both sides of the drive when removing a disk. Excessive force on topshould be avoided.
The lever will return to this position(right-side).
NOTEEven after installing the CD-ROM Pack, [Removable Disk (A:)] is displayed in [My Com-puter], but access is not possible. Select [Cancel].

23
Your computer has two PC Card slots. These slots conform to the PC Card Standard; there-fore, communications and SCSI devices may be utilized. The slot allows you to use two TypeI or Type II cards (or one Type I and one Type II), or one Type III card.
Using PC Cards
PC Card Slots
Button
1
2
Type I or IITwo cards can be used simultaneously.
Type IIIOne card can be used only in the bottom slot.
Bottom Slot
CAUTION
Please check the PC Cards’ specifications. Be sure the total operating current doesnot exceed the specified limit. Damage may result otherwise.Allowable Current (total for two slots) : 3.3 V: 400 mA, 5 V: 400 mA, 12 V: 120 mAThere are times when both a Type I card and a Type II card will not work at the same time.SRAM and FLASH ROM (except for ATA interface) cards are not supported.When using a CardBus type card, use only that card; do not insert any other PC Cards.
Only the bottom slot can support a Zoomed Video (ZV) card.
3 Turn your computer onThere are some PC Cards that require special or updated device driver be installed.Follow the instructions on the screen and read any related manuals on how to installthese device drivers.
Installing the PC CardSimply slide the PC Card in until it snaps into place.Please refer to the manual for each card on how to install the card (insertion istypically label-side up).
Label-side up
Removing the PC Card (or the dummy card)
NOTE
Pull the button out and then press it.
Dummy cards are provided at the time of purchase. They provide protectionfor the PC Card slots against such things as dust.
2
CAUTION
Power off your computer ( page 10)Do not shut down using the suspend or hibernation mode.
1
Do not install or remove peripherals while your computer is in the suspend orhibernation mode; abnormal operation may result.Before removing a PC Card, go to [Socket Status] (in [Start] - [Settings] - [ControlPanel] - [PC Card (PCMCIA)]), select the PC Card slot and press [Stop].
Installing/Removing the PC Card
You may need to install a driver from the Windows 95 CD-ROM (included) or a PC Card's floppy disk. Simply follow theon-screen instructions and read the PC Card's operation manual on how to install the driver.
NOTE
PhoenixCard Manager95:Follow the installation procedure below only if you will be using the ZV card. Otherwise, do not perform the installa-tion; abnormal operation may result.1 Set [Sound Chip] to [Automatic (PnP)] in the Setup Utility.2 Select [Start] - [Run] and type [c:\util\phoenix\disk1\setup.exe] press , and then follow the on-screen in-
structions.If PhoenixCard Manager95 has been reinstalled, follow the instructions in “Installing PhoenixCard Manager95" onpage 34.After PhoenixCard Manager95 has been installed, make sure to power off the computer before installing or removingthe card. Also, do not use the suspend or hibernation functions if the card is installed.

24
Adding Memory
Add-ons/Peripherals
2 Remove the memory cover after removing the screw holdingit in placeTurn your computer over and use a screwdriver to remove the screw.
3 Installing the RAM module
RAM module specifications144 pins, 60/70 ns, 3.3 V,SO-DIMM, EDO
1
CAUTIONRAM modules are extremely sensitive to static electricity. There are cases where staticelectricity generated by the human body has adversely affected such modules. In addi-tion, it is easy to damage the RAM modules or internal components of the computer.Therefore, when installing or removing a RAM module, handle the module with extremecare.
Installing/Removing the RAM Module
Do not shut down using the suspend or hibernation mode.1 Power off your computer ( page 10)
Do not install or remove peripherals while your computer is in the suspend orhibernation mode; abnormal operation may result.
CAUTION
CAUTION
Do not touch the terminals or internal components, insert objects other than themodule, or allow foreign particles to enter. Doing so has been known to causedamage, fire or electric shock.
Removing the RAM module
Put the cover back into place, then fasten the screw4
5 Turn your computer on
Open the left and right hooks.
Gently remove the RAM module from the slot.
2
RAM Module Slot
1
2
3
1
2
3
Slide the module in at an angle.
Snap the module into place by pushing it down.
1
2
1
2Hooks
2
1

25
A port replicator is available as an option (CF-VEB351). This device eliminates the hassles ofhaving you connect/disconnect the various cables when carrying your computer around andallows a variety of peripherals to be connected including a headphone or microphone, etc.
The port replicator connects to the expansion bus connector on the bottom of your computer.When your computer is not connected to the port replicator, be sure that the expansion busconnector on the bottom of the computer is covered.For more detailed information, please refer to the operation manual for the port replicator.
Connecting a Port Replicator
NOTESome printer cables may be difficult to connect, and may require removal of the rearcover. Take care not to lose the cover.
2
1
Connect the printer to your computer
CAUTION
Do not install or remove peripherals while your computer is in the suspend or hiber-nation mode; abnormal operation may result.
Do not shut down using the suspend or hibernation mode. Power off your computer ( page 10)
Turn on the printer, then turn on your computer3
Using a Printer
1CAUTION
Do not install or remove peripherals while your computer is in the suspend or hiber-nation mode; abnormal operation may result.
2 Connect the external display to your computer
Do not shut down using the suspend or hibernation mode. Power off your computer ( page 10)
NOTE
For more detailed information, please refer to the operation manual for the externaldisplay.
Run the Setup Utility ( page 36).
Using and , select [Display], set [Simultaneous] with then press
Using and , select [System Setup] then press
Close the Setup Utility ( page 36).
Turn on the display, then turn on your computer3 To display on both the LCD of your computer and the externaldisplay
Using an External Display
Parallel Port
Ext. Display Port
123
45 Select your external display
Set your external display for [Models] in [Start] - [Settings] - [Control Panel] -[Display] - [Settings] - [Advanced Properties] - [Monitor] - [Change] - [Show all
devices], then press .

26
Add-ons/Peripherals
Setting your printerGo to [My Computer] - [Printers]. Find your printer’s icon, double-click on it, and click[File] - [Set As Default]. If no icon is available, select [Add Printer] and install thedriver program.
NOTE
To change your hard disk, consult your nearest Panasonic Dealer or authorized Service Center
4
You may need to install a driver for your printer. Simply follow the on-screen instruc-tions and refer to the operation manual for the printer on how to install the driver.
3 Removing the hard diskPull the tape attached to the hard disk to disconnect the connector on the hard diskfrom the connector on the computer. Next, remove the hard disk from the pocket.
2 Loosen the screw, then take off the coverTurn your computer over. Then, loosen the screw with a screwdriver and with thedisplay slightly open, remove the cover.
1Do not shut down using the suspend or hibernation mode.
Power off your computer ( page 10)
Tape
Connector - hard disk
4 Put the cover back into place, then fasten the screw
Make sure the hard disk connector is located on the top side. Push the disk in sothat it connects firmly with the connector on the computer.
Installing the hard diskConnector - computer
CAUTION
Set the hard disk tape as shown so that it does not get inthe way when replacing the cover.
With the display slightly open, reattach the cover.
CAUTION
Do not install or remove peripherals while your computer is in the suspend orhibernation mode; abnormal operation may result.
CAUTION
To Customers:To change your hard disk, consult your nearest Panasonic dealer or authorized Ser-vice Center.Be sure to back up all important data before the change.
To Technicians (at a Panasonic dealer or authorized Service Center):Be careful when replacing the hard disk. The hard disk is extremely sensitive to shock.In addition, static electricity could later affect some internal components.
Installing/Removing the hard disk(For technicians at Panasonic dealer or authorized Service Center)
21
2
1

27
Usage, Carrying and Maintenance
EnvironmentPlace the computer on a flat stable surface.
In use: Temperature: 5 °C to 35 °C(41 °F to 95 °F)
Humidity: 30% to 80% RH(No condensation)
Not in use: Temperature: -20 °C to 60 °C(-4 °F to 140 °F)
Humidity: 30% to 90% RH(No condensation)
Usage Environment
Such areas may result in damage to the computer.
Areas exposed to direct sunlight
Areas with electronic equipmentThese areas may interfere with yourdisplay or cause your computer toproduce strange sounds.
Places not to use your computer
Areas with extremely high/low temperatures
Do not leave things near the computer that are sensi-tive to heat. During operation, the computer can be-come quite hot.
When oil accumulates on the surface of the touchpad, use a damp cloth with dish washing liquid towipe the surface, or a compact cassette headcleaner to remove the oil. The cursor may notmove well when the surface is not clean.
Maintenance
Do not use solutions such as benzene or thinner.A soft, dry cloth is recommended.
It is a good idea to make backup copies on floppy disks and carry them with you.Do not leave a floppy disk in the drive while transporting your computer.Do not carry your computer when it is ON.Remove all cables before transporting your computer. Having the optional Port Replicator( page 25) is very convenient.We recommend preparing a fully charged battery (and optional charger, if possible).When transporting spare batteries inside a package, briefcase, etc., it is recommended thatthe batteries be stored in a plastic bag.Do not carry the computer while the display is open, or carry it by gripping the display.Do not put anything (e.g., a piece of paper) between the display and keyboard.Do not drop or hit your computer against solid objects.If you have occasion to ship your computer, make absolutely sure that it is packed withadequate protection.
Carrying
When flyingAlways carry your computer with you. Never check it with luggage.
Do not use a dry/wet (with water) cloth to wipethe display. We recommend cleaning the displaywith a soft cloth applied with isopropyl alcohol orethyl alcohol. Please do not use other types ofchemicals.

28
Computer Diagnosis
List of Error Codes
062 Boot failure--default configuration used Default configuration in use101 System Board Failure Interrupt controller failure102 System Board Failure Timer 2 test failure106 System Board Failure Diskette controller failure114 Adapter ROM Error Adapter ROM checksum error151 System Board Failure Real-time clock failure161 Bad CMOS Battery Dead battery162 Configuration Change Has Occurred Configuration error162 Configuration Error CMOS checksum error163 Date and Time Incorrect Real-time clock is not updating173 Configuration Change Has Occurred ROM configuration has changed201 Memory Size Error Memory size/data error301 Keyboard Error Keyboard failure303 Keyboard Error Keyboard controller failure604 Diskette Drive Error Diskette drive 0 failure605 Diskette Drive Error Diskette unlocked problem1780 Hard Disk Error Fixed disk 0 failure1800 PCI Error No more IRQs available1801 PCI Error No more room for optional ROM1802 PCI Error No more I/O space available1803 PCI Error No more memory (above 1 MB) available1804 PCI Error No more memory (below 1 MB) available1805 PCI Error Checksum error or 0 size optional ROM1962 IPL Error An operating system could not be found8601 Pointing Device Error Pointing device failureI9990301 IPL Error Hard disk failureI9990305 IPL Error An operating system could not be found
Code Description
If a problem occurs with your hardware, [POST Start up Error(s)] is displayed along with theerror code(s), follow the on-screen instructions.
Setup : Setup Utility ( page 36) is started. Run [Load Default Settings (PnP)].Next the Setup Utility must be run again to input the appropriate operating environ-ment settings.
Exit : Ignore the error message(s), and restart the computer.
Follow the messages on the screen.
At the MS-DOS prompt (A:\WINDOWS\COMMAND>), input thefollowing:
diag35
When the display below is shown, select [1. Boot]1. Boot2. Restore HDD to factory default (For beginners)3. Restore HDD to factory default (For advanced users)
1 To run the program, insert the Firstaid FD you created into thefloppy disk drive, then turn your computer on
2
3
Using the Self-diagnosis Program
Follow the procedure below to check whether each part of your computer is operating properly.

29
Dealing with Problems
When a problem occurs, please refer to this page. If you think it has to do with the software application you are using, pleaseread the related manual. If for some reason you still cannot figure out the problem, please consult your nearest Panasonic dealer.
Starting Up
The power indicator ( ) orbattery indicator ( ) is notlit
is displayed
is not displayed(Once this icon is executed, it willnot be displayed later)
is not displayed
[Post Start Up Error(s)] isdisplayed
The pre-memory count,Windows startup, or anoperation is extremelyslow
The date and time areincorrect
Check the cable connection for the AC adapter ( page 7).Check to see if a fully charged battery is properly installed ( page 16).Pressing the reset button will solve the problem ( page 39).
Please input your password. If you have forgotten it, consult your nearest Panasonic dealer.
If before you double-click i t disappears, select [Start]-[Run], input
[c:\util\avapp\psetup.bat], and press . Follow the message on the screen.
Select [Start]-[Run], input [c:\util\avapp\manual\seticon.bat], and press .
page 28
Run [Load Default Settings (PnP)] in the Setup Utility. This will restore the Setup Utility'ssettings to their default values (except the password settings), then the Setup Utility must be runonce again for you to input the appropriate operating environment settings. (The processingspeed depends on the application software used, so this operation may not cause the processingspeed to increase.)
You can set the date and time through [Date/Time] in [Start] - [Settings] - [Control Panel].Another way is with the DATE and TIME commands in MS-DOS.If you continue to experience problems, the internal battery maintaining the clock mayneed to be replaced. Please consult your nearest Panasonic dealer.
The red battery indicatorlights or the beeps soundwhile the computer is in use.
The red indicator blinks
The red indicator lights foran extended period of time
After the AC adapter isconnected, the orange indi-cator blinks five times
The battery level is low. Connect the AC adapter or replace the battery pack with a fullycharged one. If you have neither the adapter nor an extra battery, save your data andpower off your computer.The temperature has risen due to a big load. Attach the AC adapter to take the load off thepack.The battery pack or recharging function may be defective. Quickly remove the batterypack and disconnect the AC adapter, then connect them again.If the problem persists, consult your nearest Panasonic dealer.
When the battery pack is fully charged, turn on your computer, unplug the AC adapter, andthen completely discharge the battery.
Unable to charge because of an improper temperature range ( page 15).
Battery Indicator

30
Dealing with Problems
No display after poweringon;
The power has not been cut,but after a certain period oftime, there is no display
An afterimage appears
The motion of a mousecursor is not smooth
The brightness can be adjusted with + .
For models with an DSTN display, you can adjust the contrast with + .When purchasing the computer, the display setting has been preset for an external display. Ifyou connect the external display, the screen is displayed on the external display.When there is no display to an external display,• Check your cable connection for an external display.• Confirm your display is on.If your computer is connected to an external display and the internal LCD has been set to"off", and the computer is placed in the hibernation or suspend mode, the internal LCDwill remain in the "off" mode if the external display is not connected when the computeris restarted. In this case, re-connect the external display and reboot the computer.
Has the computer been set to the power-saving mode?To resume operation of your computer, press any key.To save power, your computer may have automatically entered the hibernation mode.
If an image is displayed for a prolonged period of time, an afterimage may appear. This isnot a malfunction. The afterimage will disappear when a different screen is displayed.
[Start]-[Settings]-[Control Panel]-[Mouse]-[Motion] and check [Show pointer trails].
............Dark Bright
Display
Has the floppy disk been correctly inserted?Has the floppy disk been correctly formatted?Your floppy disk drive may not have been properly set in the multimedia pocket.Has the Setup Utility been used to set [Floppy Operation] to [Enable]?
Is the floppy disk write-protected?
Select [Format] in [My Computer] - [3 1/2 Floppy (A:)] - [File]. After confirming the diskvolume and format type, click .
Your drive or file may not have been properly set.Check to see if the hard disk is full.Your hard disk content may be corrupted. Consult your nearest Panasonic dealer.
Cannot read/write to afloppy disk
Unable to write to a floppydisk
How to format a floppy diskis unclear
Unable to read/write to thehard disk
Disk Operations
Character Input
Unable to input anythingbut numerals
Only capital letters arebeing input
How to input Europeancharacters (ß, à, ç) orsymbols is unclear
If and are on, the Numeric Key Pad is ON. To switch it OFF, press + .
If is on, the Caps Lock is ON. To switch it OFF, press .
Select [Start] - [Run], input [c:\windows\charmap.exe] and press . The CharacterMap will be displayed. Point to the desired font name and select it.

31
is displayed
[Supervisor Setup] is notdisplayed in the menu
[User Password] cannot beselected
[Coffee break Password]or [Key Combination forCoffee break] cannot beselected
[Supervisor Password]cannot be set
Enter the User Password or Supervisor Password. If you have forgotten it, consult yournearest Panasonic dealer.
At the start of the program when is displayed, you have to enter the Supervisor Pass-word.When both the User Password and Supervisor Password have been set, if you enter the UserPassword, [Supervisor Setup] will not be displayed ( page 36).If [Supervisor Setup] is not displayed even after entering the Supervisor Password, you haveto disable the User Password. Run the Setup Utility program again, and input the SupervisorPassword.
[User Password Protection] in [Supervisor Setup] may be enabled.
You need to set the User Password.
If the User Password has been set first, the Supervisor Password can not be the same as theUser Password. Another password needs to be entered.
Setup Utility
You need to use drivers conforming to Windows 95 Version 4.00.950B (OSR-2). Someearlier drivers will no longer work.For more information, please ask the manufacturer of the driver in question.
Check the computer-printer connection.Make sure the printer is on.Make sure the printer is in the online state.Make sure paper is in the printer tray and there is no paper jam.Has the Setup Utility been used to set [Parallel Port (Address)] to [Automatic (PnP)],[378] or [3BC]?
The Coffee break Password may be set.Check your mouse connections, then reboot the computer from the keyboard.From the keyboard, you may choose to press down on then select [Shut Down].
Check the connection.Confirm that the device driver for the serial port works. Please refer to the referencemanual for the device.Confirm that two mouse devices are not connected, one through the ext. keyboard/mouseport and the other through the serial port.Try setting the [Touch Pad] to Disable in the Setup Utility.Has the Setup Utility been used to set [Serial Port] to [Automatic (PnP)] or [3F8]?
Make sure the card is properly inserted.Confirm that the card conforms to the PC Card Standard.A driver for Windows 95 may need to be installed.Note that after a driver is installed, the computer must be rebooted.Check that the proper port settings have been made.Read the PC Card’s manual. Or, you may need to call the source of the PC Card.
page 24
Make sure the RAM module has been properly inserted.
Check the address map by going to [View Resources] in [Start] - [Settings] - [Control Panel]- [System] - [Device Manager] - [Computer] - [Properties].
Your peripheral does notwork (An error occurs whileinstalling the driver)
Unable to print
The cursor does not movefrom mouse operations
The device connected to theserial port does not work
A PC Card does not work
You do not know theavailable RAM module
The RAM module has notbeen recognized
The address map for IRQ,I/O port address, etc. isunclear
Connecting Peripherals

32
Reinstalling Software
Before Reinstallation
You will need the CD-ROM included in the Windows 95 System Pack and the following 8 backup disks you made earlier. Preparation
• Firstaid FD (1 disk)• Panasonic Tools Disk(1 disk)• Drivers Disk 1/2 (2 disks)• TranXit Disk (2 disks)• PhoenixCard Manager Disk
(2 disks)
If you have not created these disks, a message willappear at startup urging you to make backup cop-ies. If there is no message, backup copies have al-ready been created.
Reinstalling
5 At the [Finishing Setup], remove the floppy disk and press. Windows will restart after all the settings have
automatically been made.
6 At the [Date/Time Properties], press .
7 At the [Add Printer Wizard], press .
8 When the display appears indicating the establishmentof the system settings, press . The computerwill reboot. (When the welcome screen appears, press
.)
Two options are available, one for beginners and the otherfor advanced users.
For beginners: Returning to factory defaultcondition.
For advanced users:Returning the primary MS-DOS partition only to a condi-tion similar to the factory de-fault in cases where the harddisk has been divided into mul-tiple partitions.
CAUTION NOTE
With the exception of the instruction below, pleaseselect all default values displayed by the Setup Wiz-ard.Be sure to add the check mark to [Sound, MIDI, orVideo Capture Card] at the [Analyzing Your Computer].
Have a blank disk on hand to create a "Windows 95Startup Disk". Immediately after creating this disk,enter the Firstaid FD into the floppy disk drive andpress . (Note: A system error will result ifthe Firstaid FD is not inserted. If this occurs, insertthe Firstaid FD and press [Retry].
4 For beginners: select [2. Restore HDD to fac-tory default (For beginners)].
For advanced users:select [3. Restore HDD to fac-tory default (For advanced us-ers)].
At the confirmation message, press . Simply followthe on-screen instructions.
1 Insert the Firstaid FD, and turn the computer on, thenrun the Setup Utility. ( page 36)
2 Select [Load Default Settings (PnP)], then press .At the confirmation message, press .
3 Close the Setup Utility ( page 36); this screen shouldappear.
Important Save all important data. If reinstallation is carried out, all data existing prior to the installation will be lost. The reinstal-lation will return the computer to factory condition.
Be sure to remove all PC Cards and disconnect all peripherals (except for the CD-ROM pack and FDD cable) before thereinstallation procedure.
Be sure the AC adapter is connected until completing reinstallation.
If for some reason, youdo not have these disksor one of them is cor-rupted, please consultyour nearest Panasonicdealer.
The CD-ROM pack (CF-VCD351) and FDD cable (CF-VCF351) are required for the following reinstallation procedure.Mount the CD-ROM pack in the multimedia pocket and connect the FDD cable to the floppy disk drive. (Refer to theoperating instructions of the CD-ROM pack and FDD cable for details.)
Microsoft Windows 95 Startup Menu
1. Boot2. Restore HDD to factory default (For beginners)3. Restore HDD to factory default (For advanced users)
Enter a choice: 1
• Then, when the [Microsoft Windows 95 Startup Menu]appears, for beginners, select [2. Restore HDD to fac-tory default (For beginners)]. For advanced users, se-lect [3. Restore HDD to factory default (For advancedusers)].
• If the computer asks you to insert the Win95 SetupCD-ROM, please set the Windows 95 CD-ROM thatcomes with this computer. After inserting the Win-dows 95 CD-ROM, Windows setup will start auto-matically. (The whole process will take approximatelyone hour).
Windows 95 (HDD format)
If the hard disk has been compressed, first remove thedisk compression.

33
11 In [Start] - [Settings] - [Control Panel] - [System] - [DeviceManager] - [View devices by connection], select [PCI bus] in
[Plug and Play BIOS], press , then press .
• When the message appears to reboot your computer, press. Rebooting will be done automatically.
• If the computer asks you to insert the Windows 95 CD-ROM, please set the CD-ROM and press .
• At the [New Hardware Found], [L:\WIN95] is displayed.Rewrite this to [D:\WIN95].
• Then, when the [Version Conflict] appears, select .
12 Press at the [Update Device Driver Wizard of Intel
82371AB PCI Bus Master IDE Controller] and .• If [Update Device Driver Wizard of Intel 82371AB PCI
Bus Master IE Controller] is not displayed, please go tostep13 after step 11.
CAUTIONIn [Control Panel]-[Add New Hardware], if [Infra-red] is added, TranXit can not be used. For TranXitto be operable, [Infrared] must not be set.
9 In [Start] - [Run], input [c:\install.bat] then press .Rebooting will be done automatically.
10 In [Start] - [Programs] - [Windows Explorer], delete twofiles named [install] on the C: drive.
System setup
Device Manager 1
17 Delete the check mark for [When powered by AC power]and [When powered by batteries] in [Start] - [Settings] - [Con-trol Panel] - [Power] - [Disk Drives], then press .
18 Set [Mobile or docking system] in [Control Panel] - [Sys-tem] - [Performance] - [File System] - [Typical role of thismachine], and then press .
Power Management
19 Add the check mark for [Get IRQ table from PCIBIOS2.1 call] in [Device Manager] - [System devices] - [PCI bus]- [IRQ Steering], then press .
20 At the [System Properties], press . The display willask you to restart Windows. Remove the floppy disk and press
.
Device Manager 2
21 In [Control Panel] - [System] - [Device Manager],for each item in [Sound, Video and Game Con-
troller], press to delete it, then press to confirm the deletion.
• Select [PCMCIA socket] and if the [PCIC orcompatible PCMCIA controller] is displayed,perform a similar delete operation.
22 At the [System Properties], press .
23 In [Start] - [Shut Down], select [Restart the com-puter?] then press .
24 At the [Update Device Driver Wizard of UnknownDevices], press .
25 Select , type [c:\util\drivers\sound],then press .
26 At the [Update Device Driver Wizard ofYAMAHA OPL3-SAx Sound System], press
then press at the [Insert Disk].
27 At the [Copying Files], type [c:\util\drivers\sound]for the source then press .
28 In [Control Panel] - [Power] - [OPL3-SAx powermanagement], set [Non Power Save mode] thenpress [Apply]. Then press .
Sound Driver
29 Set [High Color (16 bit)] for [Color palette] in[Control Panel] - [Display] - [Settings]. Next, set[Super VGA 1024 X 768] for [Models] in [Ad-vanced Properties] - [Monitor] - [Change], thenpress .
30 After pressing , at the [Display Proper-ties] press .
31 In [Start] - [Run], type [c:\util\updates\rmm2upd.exe]then press . Simply follow the on-screeninstructions.
32 In [Control Panel] - [System] - [Device Manager]- [CDROM] - [MATSHITA UJDCD8710] - [Set-tings], delete the check mark for [Auto insertnotification], then set [L:] for [Reserved driveletters] then press .
33 At the [System Properties], press .When the message appears to reboot your com-puter, press . Rebooting will be doneautomatically.
Display
CD-ROM drive
13 Press at the [Update Device Driver Wizard of Stan-dard PCI Graphics Adapter (VGA)].
14 Select , input [c:\util\drivers\video], and
press . Then, press .
15 At the [Insert Disk], select .
16 At the [Copying Files], type [c:\util\drivers\video] and press.
The display will ask you to restart Windows, press .(at times, the message may appear a few times)
Video driver

34
If necessary, install TranXit with the following steps.
1 Insert TranXit Disk 1 into the drive and select [Start] -[Settings] - [Control Panel] - [Add/Remove Programs].
2 Select [Install/Uninstall] - [Install] and press .
3 Type “a:\install”, press , then follow the on-screeninstructions.
Installing TranXit
To return to factory condition:Set [Infrared] for [Connection Type] in [ConnectionSetup] and press [Setup Connection]. Next, set [COM2]for [Port] and [Panasonic Notebook Computer] for[Models] in [Infrared device]. Select default valuesfor all other settings.
Installing PhoenixCard Manager95
1 Insert PhoenixCard Manager95 Disk 1 into the drive andselect [Start] - [Settings] - [Control Panel] - [Add/RemovePrograms].
2 Select [Install/Uninstall] - [Install] and press .
3 Type [a:\setup], press , then follow the on-screeninstructions.
Installing Internet ExplorerReinstalling Windows 95 causes an older version of InternetExplorer to be installed.To return the computer to the state it was in when you pur-chased it, follow the steps below to install the newer versionInternet Explorer.
NOTE
NOTE
Some Windows applications differ in use from their fac-tory-set state. To add or delete items from the menu,select [Add/Remove Programs] in [Start] - [Settings] -[Control Panel].
1 Insert the Internet Explorer CD-ROM included in the Win-dows 95 System Pack into the drive and select [Start] -[Settings] - [Control Panel] - [Add/Remove Programs].
2 Select [Install/Uninstall] - [Install] and press .
3 Type [L:\setup.exe], press , then follow the on-screen instructions.
NOTE
At the time of purchase, the [CF-35 series Quick Guide]can be found under [Favorites] in the Internet Explorerprogram. If reinstallation is carried out for your com-puter, this file will no longer be available. You may re-install this file with following steps if necessary.1 Select [Internet Explorer].
2 At the [Address], type [file://c:\util\avapp\manual\manual.htm].
3 Once the page is displayed, select [Favorites] - [Addto favorites] and input the name. Then press .
CAUTION
If necessary, install PhoenixCard Manager95 with the follow-ing steps.
1 Insert the Windows 95 CD-ROM included in the Win-dows 95 System Pack into the drive and select [Start] -[Settings] - [Control Panel] - [Add/Remove Programs].
2 Select [Install/Uninstall] - [Install] and press .
3 Type [L:\other\ie302\msie302.exe], press , thenfollow the on-screen instructions.When the message appears to reboot your computer, press
. Rebooting will be done automatically.
4 Select [Add/Remove Programs] - [Install/Uninstall] -[Install] and press . Type
[c:\util\ie302\auth2all.exe], press , then followthe on-screen instructions.When the message appears to reboot your computer, press
. Rebooting will be done automatically.
Follow the installation procedure below only if you will beusing the ZV card. Otherwise, do not perform the installa-tion; abnormal operation may result.
CF-35PJJ8C*M/CF-35PJJ8C*E
For all other models
Reinstalling Software

35
Windows 95 Setup Procedure
1
This procedure explains step 4 on page 8 in more detail.
Select settings for your region, then press
2 Select your keyboard layout, then press (for U.S.A.: United States 101, for U.K.: British)
3 Enter your name and your company’s name, then press
The License Agreement will be displayed.
After reading the agreement, select [I accept the agreement]or [I don't accept the agreement] then press If the former is selected, the [Certificate of Authenticity] will appear. If the latter isselected, the Windows setup will be aborted.
4
Input the Product Number written on the “Certificate of Au-thenticity” located in the “Introducing Microsoft Windows 95book” that comes with this computer. After doing so, press
5
Press 6If the instruction to restart appears, press 7
8 Insert the correct time, date and time zone and click You can also complete these settings at a later time.
If you want to complete the printer settings, press Simply follow the on-screen instructions.
If not, press You can also complete these settings at a later time.
9

36
Setup Utility
pressTo run the Setup Utility, youneed to restart your computer.
NOTE
The Setup Utility will not be run if is not pressed soon after the computer restarts.In this case, you need to restart your computer again.
If is displayed, enter your password.
If both the [User Password] and [Supervisor Password] have been set, after entering theUser Password, [Supervisor Setup] will not be displayed on the main screen.To display the [Supervisor Setup]:
1 Use + Power Switch to turn your computer off.
2 Restart the computer and press when [Press F1 for Setup] is displayed.
3 When is displayed, enter the Supervisor Password.
For more details, on-line help is available; press .
Setup Uti l i ty
•System Setup•Power Management•Super visor Setup
Save SettingsRestore SettingsLoad Default Sett ings (PnP)Load Default Settings (Non-PnP)
Exit Setup
Set default settings.• (PnP) denotes “for Windows 95”.• (Non-PnP) denotes “for other than Windows 95”.• When the Supervisor Password has been set, input of
the password is necessary.
Return to the state existing at the time of Setup Utilitystartup, or to the settings saved with [Save Settings].
Program Completion• Hibernation settings ( page 11)• Power Management settings (page 13)• Security Settings ( page 17)• Add-ons/Peripherals Settings ( page 22)After you have completed all settings, you mayexit the Setup Utility program.
Closing the Program
Running the Setup Utility
Exit Setup
Settings w ere changed.Do you want to save them?
Yes, save and exit the Setup Util i ty.No, exit the Setup Util i ty without saving.No, return to the Setup Util i ty.
NOTE
If the User Password has been set, the passwordmust be entered before Windows can start.
(The display may be different if no changes to the settings are made.)
<Main Screen>
Key Operations
NOTE
: To display the correspond-ing “help” file.
: To make a selection.
: To display previous screen
(To exit the program at the
main screen).
: To move among the items.
: To move among the values ofeach item.
: To return to the setting before achange.
: To set the default values.
Press F1 for SetupUpon seeingthis message

37
Power Management
Power Saving [Standard (Battery)] CPU Speed Change Mode Enable HDD Motor Timeout 1 min Standby Timeout 2 min
Power Switch [Hibernation]
Hiber nation Timeout* 4 [4 min]
System Setup
NumLk [ON]Touch Pad [Enable]Speakers [Enable]Display [Exter nal Monitor]*1
• User PasswordCoffee break Password* 2 [Enable]Key Combination for Coffee break* 3[Alt+Ctr l+F9]
User Password
User Password Status Disable
Enter your new User Password twice.
Enter User Password [ ]Enter User Password Again [ ]
Set User PasswordDelete User Password
Supervisor Setup
Parallel Por t (Address) [Automatic (PnP)]Parallel Por t Mode [Bidirectional]Serial Por t [Automatic (PnP)]Sound Chip [Enable]
Sound Blaster Compatible I/O [Automatic (PnP)]WSS CODEC I/O [Automatic (PnP)]Sound IRQ-A [Automatic (PnP)]Sound IRQ-B [Automatic (PnP)]Sound DMA [Automatic (PnP)]
IrDA [Automatic (PnP)]Floppy Operation [Enable]Boot Up Drive [FDD HDD]
• Supervisor PasswordUser Password Protection [Disable]
Setting the User Password (page 17)(Unable to select when the User Password Protection has been set.)
*1 When no external display is connected, display will be through the LCD.*2 Can only be selected when the [User Password] has been set.*3 Can only be selected when the [Coffee break Password] has been set.*4 Can only be selected when the [Power Switch] has been set [Hibernation].
page 13
Sets the function of the power switch.
Able to set how long the interval will be until hibernation.
Sound DMA-A [Automatic (PnP)]Sound DMA-B [Automatic (PnP)]
Supervisor Password
Super visor Password Status Disable
Enter your new Super visor Password twice.
Enter Super visor Password [ ]Enter Supervisor Password Again [ ]
Set Super visor PasswordDelete Super visor Password
Setting Supervisor Password (page 20)
CF-35PJJ8C*M/CF-35PJJ8C*E
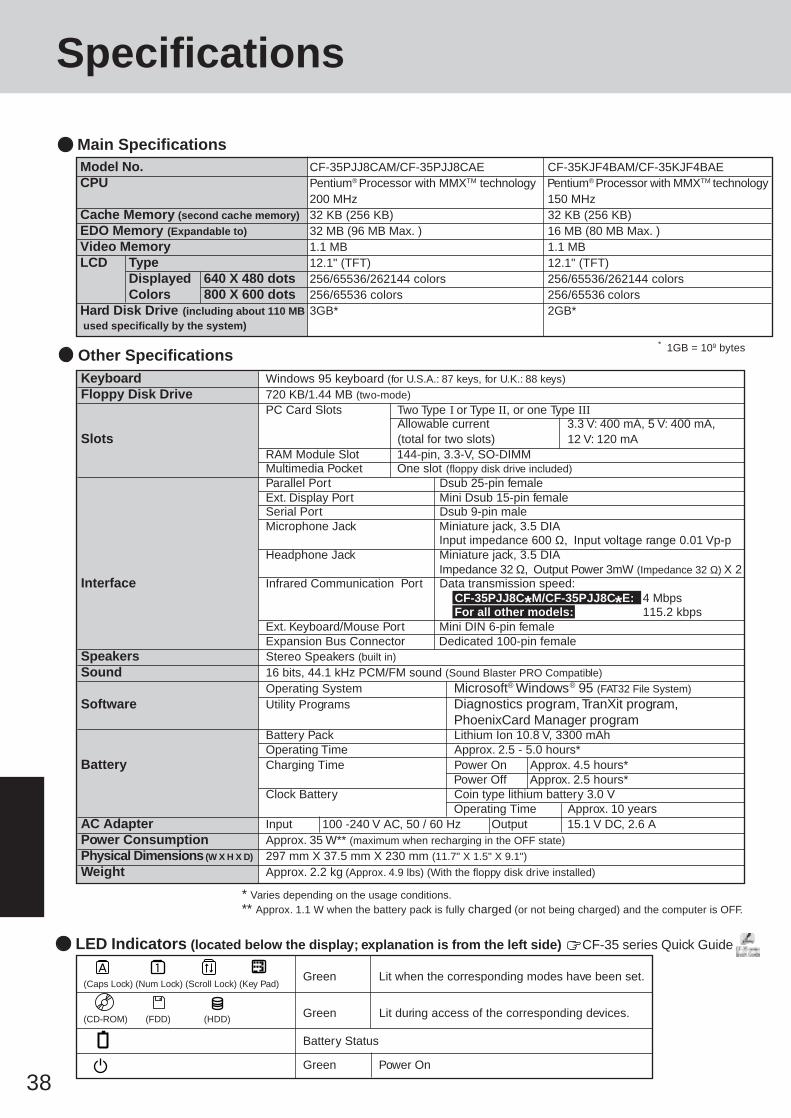
38
Keyboard Windows 95 keyboard (for U.S.A.: 87 keys, for U.K.: 88 keys)
Floppy Disk Drive 720 KB/1.44 MB (two-mode)PC Card Slots Two Type I or Type II , or one Type III
Allowable current 3.3 V: 400 mA, 5 V: 400 mA,Slots (total for two slots) 12 V: 120 mA
RAM Module Slot 144-pin, 3.3-V, SO-DIMMMultimedia Pocket One slot (floppy disk drive included)Parallel Port Dsub 25-pin femaleExt. Display Port Mini Dsub 15-pin femaleSerial Port Dsub 9-pin maleMicrophone Jack Miniature jack, 3.5 DIA
Input impedance 600 Ω, Input voltage range 0.01 Vp-pHeadphone Jack Miniature jack, 3.5 DIA
Impedance 32 Ω, Output Power 3mW (Impedance 32 Ω) X 2Interface Infrared Communication Port Data transmission speed:
CF-35PJJ8C*M/CF-35PJJ8C*E: 4 MbpsFor all other models: 115.2 kbps
Ext. Keyboard/Mouse Port Mini DIN 6-pin femaleExpansion Bus Connector Dedicated 100-pin female
Speakers Stereo Speakers (built in)
Sound 16 bits, 44.1 kHz PCM/FM sound (Sound Blaster PRO Compatible)
Operating System Microsoft® Windows® 95 (FAT32 File System)
Software Utility Programs Diagnostics program, TranXit program,PhoenixCard Manager program
Battery Pack Lithium Ion 10.8 V, 3300 mAhOperating Time Approx. 2.5 - 5.0 hours*
Battery Charging Time Power On Approx. 4.5 hours*Power Off Approx. 2.5 hours*
Clock Battery Coin type lithium battery 3.0 VOperating Time Approx. 10 years
AC Adapter Input 100 -240 V AC, 50 / 60 Hz Output 15.1 V DC, 2.6 APower Consumption Approx. 35 W** (maximum when recharging in the OFF state)
Physical Dimensions (W X H X D) 297 mm X 37.5 mm X 230 mm (11.7" X 1.5" X 9.1")
Weight Approx. 2.2 kg (Approx. 4.9 lbs) (With the floppy disk drive installed)
Main Specifications
Specifications
Model No. CF-35PJJ8CAM/CF-35PJJ8CAE CF-35KJF4BAM/CF-35KJF4BAECPU Pentium® Processor with MMXTM technology Pentium® Processor with MMXTM technology
200 MHz 150 MHzCache Memory (second cache memory) 32 KB (256 KB) 32 KB (256 KB)EDO Memory (Expandable to) 32 MB (96 MB Max. ) 16 MB (80 MB Max. )Video Memory 1.1 MB 1.1 MBLCD Type 12.1" (TFT) 12.1" (TFT)
Displayed 640 X 480 dots 256/65536/262144 colors 256/65536/262144 colorsColors 800 X 600 dots 256/65536 colors 256/65536 colors
Hard Disk Drive (including about 110 MB 3GB* 2GB* used specifically by the system)
* 1GB = 109 bytes Other Specifications
Green Lit when the corresponding modes have been set.
Green Lit during access of the corresponding devices.
Battery Status
Green Power On
(Caps Lock) (Num Lock) (Scroll Lock) (Key Pad)
(CD-ROM) (FDD) (HDD)
LED Indicators (located below the display; explanation is from the left side) CF-35 series Quick Guide
* Varies depending on the usage conditions.** Approx. 1.1 W when the battery pack is fully charged (or not being charged) and the computer is OFF.

39
........
+
+
+
LED Indicators
Names and Functions of PartsCF-35EJC4BAM/CF-35EJC4BAE CF-35EVC4BAMPentium® Processor 133 MHz Pentium® Processor 133 MHz
16 KB (256 KB) 16 KB16 MB (80 MB Max. ) 16 MB (80 MB Max. )1.1 MB 1.1 MB12.1" (TFT) 12.1" (DSTN)256/65536/262144 colors 256/65536/262144 colors256/65536 colors 256/65536 colors1.44GB* 1.44GB*
Darker contrast
Lighter contrast
Display
Brightness Adjustment
Contrast Adjustment(for DSTN display models only)
Dark Bright
A Kensington cable canbe connected to preventtheft of your computer.
Security Lock
Keyboard
Touch Pad
To adjust the volume*, select the on the task bar then [Volume Control].* You may also use the function keys to per-
form this operation ( + or ).
Speakers on/off : + (The beep sound comes out from the left speaker(and headphone). The sound level cannot bechanged.)
Battery Packpage 15
page 22Multimedia Pocket
Serial Port
DC-IN Jack
Infrared Communication Portpage 21
Reset Button
In some circumstances, if a PS/2 exter-nal mouse with a serial interface con-version function is connected to the port,it may not operate normally.
Ext. Keyboard/Mouse Port
page 25
Parallel Port
page 25
Ext. Display Port
Headphone JackUse this connector to con-nect headphones or ampli-fier-equipped speakers. Au-dio output from the internalspeaker is disabled whenheadphones or outsidespeakers are connected.
When resetting your computer, usea dull pointed object like a ball pointpen. Do not use a pencil. Pencil leadcan break off inside the computer anddamage the computer's circuit.
Power Switch
Speakers
Ventilation HoleThese holes allow heat to exit.
Do not block or place the computerin a location that may preventproper ventilation.
CAUTION
USB Port: No software is provided.
Microphone Jack
page 38
page 10
CAUTIONIf a problem occurs but yourcomputer does not lock, we rec-ommend not resetting the ma-chine. Pressing the reset but-ton will cause you to lose dataif an application is open.
CardBus Compatible(Confirmation with the dealer required beforehand.)
page 23
PC Card Slots
RAM module slotpage 24
Expansion Bus Connectorpage 25

40
YOU MAY NOT REVERSE ASSEMBLE, REVERSE COMPILE, OR MECHANICALLY OR ELECTRONICALLY TRACETHE PROGRAMS, OR ANY COPY THEREOF, IN WHOLE OR IN PART.
YOU MAY NOT USE, COPY, MODIFY, ALTER, OR TRANSFER THE PROGRAMS OR ANY COPY THEREOF, INWHOLE OR IN PART, EXCEPT AS EXPRESSLY PROVIDED IN THE LICENSE.
IF YOU TRANSFER POSSESSION OF ANY COPY OF ANY PROGRAM TO ANOTHER PARTY, EXCEPT AS PER-MITTED IN PARAGRAPH E ABOVE, YOUR LICENSE IS AUTOMATICALLY TERMINATED.
This license is effective only for so long as you own or lease the Product, unless earlier terminated. You may terminatethis license at any time by destroying, at your expense, the Programs and related documentation together with allcopies thereof in any form. This license will also terminate effective immediately upon occurrence of the conditionstherefor set forth elsewhere in this Agreement, or if you fail to comply with any term or condition contained herein. Uponany such termination, you agree to destroy, at your expense, the Programs and related documentation together with allcopies thereof in any form.
A. MEI hereby grants you a personal, non-transferable and non-exclusive right and license to use the Programs inaccordance with the terms and conditions stated in this Agreement. You acknowledge that you are receivingonly a LIMITED LICENSE TO USE the Programs and related documentation and that you shall obtain no title,ownership nor any other rights in or to the Programs and related documentation nor in or to the algorithms,concepts, designs and ideas represented by or incorporated in the Programs and related documentation, all ofwhich title, ownership and rights shall remain with MEI.
B. You may use the Programs only on the single Product which was accompanied by the Programs.
C. You and your employees and agents are required to protect the confidentiality of the Programs. You may notdistribute or otherwise make the Programs or related documentation available to any third party, by time-sharingor otherwise, without the prior written consent of MEI.
D. You may not copy or reproduce, or permit to be copied or reproduced, the Programs or related documentationfor any purpose, except that you may make one (1) copy of the Programs for backup purposes only in supportof your use of the Programs on the single Product which was accompanied by the Programs. You shall notmodify, or attempt to modify, the Programs.
E. You may transfer the Programs and license them to another party only in connection with your transfer of thesingle Product which was accompanied by the Programs to such other party. At the time of such a transfer, youmust also transfer all copies, whether in printed or machine readable form, of every Program, and the relateddocumentation, to the same party or destroy any such copies not so transferred.
F. You may not remove any copyright, trademark or other notice or product identification from the Programs andyou must reproduce and include any such notice or product identification on any copy of any Program.
LICENSE
TERM
YOU ACKNOWLEDGE THAT YOU HAVE READ THIS AGREEMENT, UNDERSTAND IT AND AGREE TO BE BOUNDBY ITS TERMS AND CONDITIONS. YOU FURTHER AGREE THAT IT IS THE COMPLETE AND EXCLUSIVE STATE-MENT OF THE AGREEMENT BETWEEN US, WHICH SUPERSEDES ANY PROPOSAL OR PRIOR AGREEMENT,ORAL OR WRITTEN, AND ANY OTHER COMMUNICATIONS BETWEEN US, RELATING TO THE SUBJECT MAT-TER OF THIS AGREEMENT.
THE SOFTWARE PROGRAM(S) ("PROGRAMS") FURNISHED WITH THIS PANASONIC® PRODUCT ("PRODUCT")ARE LICENSED ONLY TO THE END-USER ("YOU"), AND MAY BE USED BY YOU ONLY IN ACCORDANCE WITHTHE LICENSE TERMS DESCRIBED BELOW. YOUR USE OF THE PROGRAMS SHALL BE CONCLUSIVELY DEEMEDTO CONSTITUTE YOUR ACCEPTANCE OF THE TERMS OF THIS LICENSE.
Matsushita Electric Industrial Co., Ltd. ("MEI") has developed or otherwise obtained the Programs and hereby licensestheir use to you. You assume sole responsibility for the selection of the Product (including the associated Programs) toachieve your intended results, and for the installation, use and results obtained therefrom.
LIMITED USE LICENSE AGREEMENT

41
Das (die) mit diesem Panasonic®-Produkt (im weiteren als "Produkt" bezeichnet) gelieferte(n) Programm(e) (im weiterenals "Programme" bezeichnet) wird (werden) nur für den Gebrauch durch den Endnutzer (im weiteren als "der Käufer"bezeichnet ) lizenziert und darf (dürfen) ausschließlich gemäß den unten aufgeführten Lizenzbedingungen benutztwerden. Der Gebrauch der Programme durch den Käufer gilt als konkludente Zustimmung des Käufers zu denBestimmungen dieser Lizenz.
Die Programme wurden von Matsushita Electric Industrial Co., Ltd. (im weiteren als "MEI" bezeichnet) entwickelt odersie wurden auf andere Weise von MEI erworben, und MEI lizenziert die Programme hiermit für den Gebrauch desKäufers. Der Käufer übernimmt die alleinige Verantwortung dafür, daß die Wahl des Produkts (einschließlich derzugehörigen Programme) die beabsichtigten Zwecke erfüllt, sowie für die Installation, den Gebrauch und die damiterzielten Ergebnisse.
A. Hiermit erteilt MEI dem Käufer das persönliche, nicht übertragbare und nicht ausschließliche Recht und dieLizenz zur Nutzung der Programme gemäß den Bestimmungen und Bedingungen dieser Vereinbarung. DerKäufer bestätigt, daß er lediglich eine BESCHRÄNKTE LIZENZ ZUM GEBRAUCH der Programme und derdazugehörigen Dokumentation erhält und daß mit dieser Lizenz kein Rechtsanspruch, kein Besitzanspruch undkeine anderen Rechte verbunden sind, weder auf die Programme und die dazugehörige Dokumentation, nochauf die Algorithmen, Konzepte, Ausführungen und ldeen, die von den Programmen und der dazugehörigenDokumentation dargestellt werden oder in diese aufgenommen sind, und daß alle Rechte bei MEI verbleiben.
B. Der Käufer darf die Programme nur mit genau dem Produkt verwenden, zu dessen Lieferumfang die Programmegehören.
C. Der Käufer und seine Angestellten und Bevollmächtigten sind zum Schutz der Vertraulichkeit der Programmeverpflichtet. Der Käufer darf die Programme und die dazugehörige Dokumentation ohne vorherige schriftlicheGenehmigung von MEI nicht an Dritte weitergeben oder sie auf andere Weise, einschließlich von Time-Sharing,Dritten zugänglich machen.
D. Der Käufer darf die Programme und die dazugehörige Dokumentation zu keinerlei Zwecken kopieren oderreproduzieren und darf auch nicht zulassen, daß sie von anderen kopiert oder reproduziert werden, au ßer daßder Käufer eine (1) Kopie der Programme ausschließlich für Sicherungszwecke und nur zur Unterstützung derVerwendung der Programme mit genau dem Produkt erstellen darf, zu dessen Lieferumfang die Programmegehören. Der Käufer darf die Programme weder modifizieren noch solche Modifikationen versuchen.
E. Der Käufer darf die Programme und eine diesbezügliche Benutzerlizenz nur zusammen mit der Übergabe genaudes Produktes, zu dessen Lieferumfang die Programme gehören, an einen Dritten übergeben. Zur Zeitpunkteiner solchen Übergabe ist der Käufer verpflichtet, sämtliche von ihm erstellten Kopien, sowohl in gedruckter, alsauch in Maschinensprache abgefaßter Form, jedes einzelnen Programms und der dazugehörigen Dokumentationan die gleiche Person zu übergeben und alle nicht übergebenen Kopien zu zerstören.
F. Der Käufer darf kein Copyright, Warenzeichen oder keine andere Bekanntmachung oder Produktkennzeichnungvon den Programmen entfernen und muß jede solche Bekanntmachung oder Produktkennzeichnung auf jederKopie eines der Programme reproduzieren.
Lizenz
Der Käufer darf die Programme und davon erstellten Kopien, weder insgesamt noch teilweise, nicht im Reversierverfahrenassemblieren, kompilieren oder auf mechanischem bzw. elektronischen Wege abtasten. Der Käufer darf die Programmeund deren erstellte Kopien, weder insgesamt noch teilweise benutzen, kopieren, modifizieren, verändern oderweitergeben, es sei denn dies ist im Rahmen dieser Lizens gestattet.
Falls der Käufer eine Kopie eines der Programme, außer gemäß Absatz E, an Dritte weitergibt, wird diese Lizenzautomatisch außer Kraft gesetzt.
Laufzeit der LizenzDiese Lizenz ist nur so lange gültig, wie der Käufer das Produkt zu eigen hat oder im Leasing-Verfahren betreibt, fallssie nicht vorher widerrufen wird. Der Käufer darf diese Lizenz zu einem beliebigen Zeitpunkt aufheben, indem er dieProgramme und die dazugehörige Dokumentation zusammen mit allen davon in jeglicher Form erstellten Kopien aufeigene Kosten zerstört. Diese Lizenz wird außerdem mit sofortiger Wirkung aufgehoben, wenn eine der obenaufgeführten Bedingungen eintritt oder der Käufer irgenwelche Bestimmungen oder Bedingungen dieserLizenzvereinbarung verletzt. Der Käufer verpflichtet sich, nach einer solchen Aufhebung der Lizenz die Programmeund die dazugehörige Dokumentation zusammen mit allen davon in jeglicher Form erstellten Kopien auf eigene Kostenzu zerstören.
Der Käufer bestätigt, diese Vereinbarung gelesen und verstanden zu haben, und verpflichtet sich, ihre Bestimmungenund Bedingungen einzuhalten. Der Käufer bestätigt weiterhin, daß es sich bei der vorliegenden Vereinbarung umeine vollständige und ausschließliche Aufzeichnung der Vereinbarung zwischen dem Käufer und MEI handelt, diealle Vorschläge oder früheren Vereinbarungen, in mündlicher oder schriftlicher Form, sowie jegliche Unterredungenzwischen dem Käufer und MEI in Bezug auf die Gegenstände der vorliegenden Vereinbarung ablöst.
Beschränkte Benutz erlizenz-Vereinbarung

42
A. MEI vous octroie par les présentes le droit et la licence personnels, non cessibles et non exclusifs d'utiliser lesLogiciels conformément aux termes, clauses et conditions de ce Contrat. Vous reconnaissez ne recevoir qu'undroit limité d'utiliser les Logiciels et la documentation les accompagnant et vous vous engagez à n'obtenir aucundroit de titre, propriété ni aucun autre droit vis-à-vis des Logiciels et de la documentation les accompagnant nivis-à-vis des algorithmes, concepts, dessins, configurations et idées représentés par ou incorporés dans lesLogiciels et la documentation les accompagnant, dont les titres, propriété et droits resteront tous à MEI.
B. Vous ne pouvez utiliser les Logiciels que sur le Produit unique qui est accompagné par les Logiciels.
C. Vous et vos employés ou agents êtes requis de protéger la confidentialité des Logiciels. Vous ne pouvez nidistribuer ni mettre les Logiciels et la documentation les accompagnant à la disposition d'un tiers, par partage detemps ou de quelque autre manière que ce soit, sans l'autorisation écrite préalable de MEI.
D. Vous ne pouvez ni copier ni reproduire ni permettre la copie ni la reproduction des Logiciels ni de la documen-tation les accompagnant pour quelque fin que ce soit, à l'exception d'une (1) copie des Logiciels à des fins desauvegarde uniquement pour soutenir votre utilisation des Logiciels sur le Produit unique qui est accompagnépar les Logiciels. Vous ne pouvez ni modifier ni tenter de modifier les Logiciels.
E. Vous ne pouvez céder les Logiciels et en octroyer la licence à une autre partie qu'en rapport avec votre cessiondu Produit unique qui est accompagné par les Logiciels à cette autre partie. Au moment de cette cession, vousdevez céder également toutes les copies, que ce soit sous forme imprimée ou lisible par la machine, de tous lesLogiciels ainsi que de la documentation les accompagnant, à la même partie ou détruire les copies non cédées.
F. Vous ne pouvez retirer aucune marque de droits d'auteur, marque ou autre ni aucune identification de produitdes Logiciels et vous devez reproduire et inclure toutes ces notices ou identifications de produit sur toutes lescopies des Logiciels.
Vous ne pouvez assembler en sens inverse, compiler en sens inverse ni retracer les Logiciels ni aucune de leurscopies, de façon électronique ou mécanique, en tout ou en partie.
Vous ne pouvez utiliser, copier, modifier, altérer ni céder les Logiciels ni aucune de leurs copies, en tout ou en partie,à l'exception de ce qui est expressément stipulé dans ce contrat.
Si vous cédez la possession de toute copie ou de tout Logiciel à une autre partie, à l'exception de ce qui est autoriséau paragraphe E ci-dessus, votre licence est automatiquement résiliée.
Licence
Termes, clauses et conditionsCette licence n'est effective que pour la durée de possession ou de crédit-bail du Produit, à moins d'une résiliationantérieure. Vous pouvez résilier cette licence à tout moment en détruisant, à vos frais, les Logiciels et la documenta-tion les accompagnant avec toutes leurs copies, sous quelque forme que ce soit. Cette licence sera également résiliée,avec application immédiate, si les conditions de résiliation définies ailleurs dans ce contrat se sont réalisées ou si vousne respectez pas les termes, clauses et conditions qui y sont contenues. Au moment de la résiliation, vous acceptezde détruire, à vos frais, les Logiciels et la documentation les accompagnant avec toutes leurs copies, sous quelqueforme que ce soit.
Vous reconnaissez avoir lu ce contrat, en avoir compris toute la substance et avoir accepté de respecter ses termes,clauses et conditions. Vous reconnaissez en outre qu'ils sont la description complète et exclusive du contrat concluentre nous, contrat qui remplace et annule toute proposition ou contrat précédent, écrit ou oral, et toute autre commu-nication entre nous, relativement à l'objet du présent contrat.
Matsushita Electric Industrial Co., Ltd. ("MEI") a mis au point ou obtenu les Logiciels et vous en concède l'utilisation parles présentes. Vous assumez l'entière responsabilité du choix de ce Produit (y compris des Logiciels associés) pourobtenir les résultats escomptés, ainsi que de l'installation, de l'utilisation et des résultats obtenus.
Le(s) logiciel(s) (les "Logiciels") fournis avec ce produit Panasonic® (le "Produit") sont exclusivement concédés enlicence à l'utilisateur ultime ("vous"), et ils ne peuvent être utilisés que conformément aux clauses contractuelles ci-dessous. En utilisant les logiciels, vous vous engagez de manière définitive à respecter les termes, clauses et condi-tions des présentes.
Contrat de licence d'usage limité

43
Index
AAC adapter .................................................................. 6,7,38AC cord .............................................................................. 6
MMicrophone jack .......................................................... 38,39Multimedia pocket .................................................. 22,38,39
NNetwork password .............................................................. 9
P
LLED indicators ............................................................. 38,39Limited use license agreement .......................................... 40Load default settings ......................................................... 36
Panasonic Setup icon .......................................................... 8Parallel port ............................................................ 25,38,39PC Card ............................................................................ 23PC Card slots .......................................................... 23,38,39Peripherals ................................................................... 22,31Port replicator ................................................................... 25Power indicator ................................................................ 7,9Power switch ............................................................... 7,9,39Printer ............................................................................... 25
SSaving data ......................................................................... 5Security lock ..................................................................... 39Security measures ............................................................. 17Self-diagnosis program ..................................................... 28Serial port .................................................................... 38,39Setup utility .................................................................. 31,36Shutting down ...............................................................10,11Speakers ....................................................................... 38,39Standby mode ................................................................... 12Standby timeout ................................................................ 13Starting up...................................................................... 9,29Supervisor password .................................................... 19,20Supervisor setup ............................................................... 19Suspend function ..........................................................10,11
RRAM module .................................................................... 24RAM module slot ................................................... 24,38,39Reinstalling software ........................................................ 32Reset button ...................................................................... 39Restarting .......................................................................... 10
TTranXit ...................................................................... 6,21,34
UUser password................................................................... 17
VVentilation hole ................................................................. 39Volume .............................................................................. 39
WWindows 95 setup.......................................................... 8,35Write-protect tab ................................................................. 5
LED indicators.................................................... 38
............................................................................... 14,38
.............................................................................. 7,9,38
BBattery indicator .......................................................... 14,29Battery pack ....................................................... 15,16,38,39Battery status .................................................................... 14Brightness adjustment ....................................................... 39
CCD-ROM drive ................................................................. 22CF-35 series Quick Guide .................................................. 8CPU .................................................................................. 38CPU speed change mode .................................................. 13Clicking ............................................................................ 10Coffee break password ..................................................... 18Computer Viruses ............................................................... 5Conserving power ............................................................. 12Contrast adjustment .......................................................... 39
DDC-IN jack ....................................................................... 39DIAG35 ............................................................................ 28Display .................................................................... 25,30,39Displayed colors ............................................................... 38Double-clicking ................................................................ 10Dragging ........................................................................... 10
EError codes ....................................................................... 28Expansion bus connector ........................................ 25,38,39Ext. display port ...................................................... 25,38,39Ext. keyboard/mouse port ............................................ 38,39External display ................................................................ 25
FFDD cable ......................................................................... 22Firstaid FD ................................................................ 8,28,32Floppy disk ................................................................. 5,8,19Floppy disk drive ......................................................... 22,38Floppy operation ............................................................... 19Format ............................................................................... 30
HHard disk drive (HDD) ............................................. 5,26,38HDD motor timeout .......................................................... 13Headphone jack ........................................................... 38,39Hibernation function .....................................................10,11Hibernation timeout .......................................................... 12
II/O port address ................................................................ 31Infrared communication port .................................. 21,38,39Infrared data communications .......................................... 21IRQ ................................................................................... 31
KKeyboard ..................................................................... 38,39

The international ENERGY STAR Office Equipment Program is an international programthat promotes energy saving through the use of computers and other office equipment.The program backs the development and dissemination of products with functions thateffectively reduce energy consumption. It is an open system in which business proprietorscan participate voluntarily. The targeted products are office equipment such as computers,displays, printers, facsimiles, and copiers. Their standards and logos are uniform amongparticipating nations.
Outline of the International ENERGY STAR Office Equipment Program
As an ENERGY STAR Partner, Panasonic has determined that this productmeets the ENERGY STAR guidelines for energy efficiency.
FJ0597-2117DFQX2535YAPrinted in Japan