Operating Instructions (English) - panasonic.com · Status icons .....57 Notification icons ......
72
Operating Instructions Premium Design Phone with Touchscreen Model No. KX-PRX120AZ Thank you for purchasing a Panasonic product. Please read this document and save it for future reference. To use this unit in your country, first change the unit’s region setting to match your country (page 43). Please access our online customer survey: http://panasonic.net/pcc/tel/q
Transcript of Operating Instructions (English) - panasonic.com · Status icons .....57 Notification icons ......
Operating InstructionsPremium Design Phone with Touchscreen
Model No. KX-PRX120AZ
Thank you for purchasing a Panasonic product.
Please read this document and save it for future reference.To use this unit in your country, first change the unit’s region setting to matchyour country (page 43).
Please access our online customer survey: http://panasonic.net/pcc/tel/q
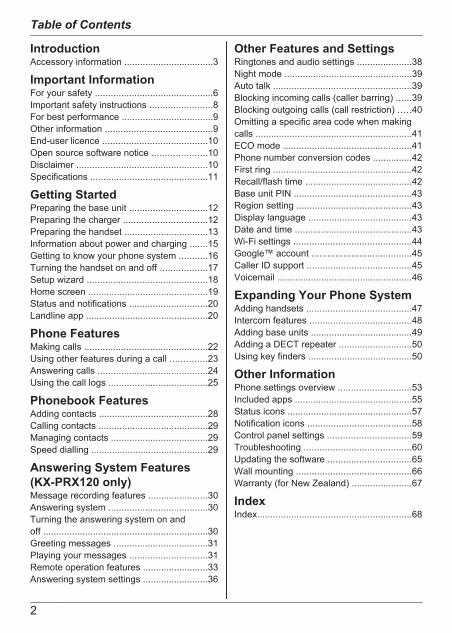
IntroductionAccessory information ..................................3
Important InformationFor your safety .............................................6Important safety instructions ........................8For best performance ...................................9Other information .........................................9End-user licence ........................................10Open source software notice .....................10Disclaimer ..................................................10Specifications .............................................11
Getting StartedPreparing the base unit ..............................12Preparing the charger ................................12Preparing the handset ................................13Information about power and charging .......15Getting to know your phone system ...........16Turning the handset on and off ..................17Setup wizard ..............................................18Home screen ..............................................19Status and notifications ..............................20Landline app ...............................................20
Phone FeaturesMaking calls ...............................................22Using other features during a call ..............23Answering calls ..........................................24Using the call logs ......................................25
Phonebook FeaturesAdding contacts ..........................................28Calling contacts ..........................................29Managing contacts .....................................29Speed dialling .............................................29
Answering System Features(KX-PRX120 only)Message recording features .......................30Answering system ......................................30Turning the answering system on andoff ...............................................................30Greeting messages ....................................31Playing your messages ..............................31Remote operation features .........................33Answering system settings .........................36
Other Features and SettingsRingtones and audio settings .....................38Night mode .................................................39Auto talk .....................................................39Blocking incoming calls (caller barring) ......39Blocking outgoing calls (call restriction) .....40Omitting a specific area code when makingcalls ............................................................41ECO mode .................................................41Phone number conversion codes ...............42First ring .....................................................42Recall/flash time .........................................42Base unit PIN .............................................43Region setting ............................................43Display language ........................................43Date and time .............................................43Wi-Fi settings .............................................44Google™ account ......................................45Caller ID support ........................................45Voicemail ....................................................46
Expanding Your Phone SystemAdding handsets ........................................47Intercom features .......................................48Adding base units .......................................49Adding a DECT repeater ............................50Using key finders ........................................50
Other InformationPhone settings overview ............................53Included apps .............................................55Status icons ................................................57Notification icons ........................................58Control panel settings ................................59Troubleshooting .........................................60Updating the software ................................65Wall mounting ............................................66Warranty (for New Zealand) .......................67
IndexIndex...........................................................68
2
Table of Contents
Accessory information
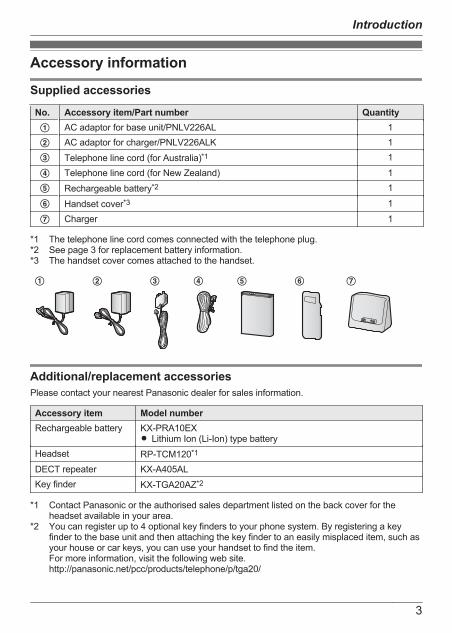
Supplied accessories
No. Accessory item/Part number QuantityA AC adaptor for base unit/PNLV226AL 1B AC adaptor for charger/PNLV226ALK 1C Telephone line cord (for Australia)*1 1
D Telephone line cord (for New Zealand) 1E Rechargeable battery*2 1
F Handset cover*3 1
G Charger 1
*1 The telephone line cord comes connected with the telephone plug.*2 See page 3 for replacement battery information.*3 The handset cover comes attached to the handset.
A B C D E F G
Additional/replacement accessoriesPlease contact your nearest Panasonic dealer for sales information.
Accessory item Model numberRechargeable battery KX-PRA10EX
R Lithium Ion (Li-Ion) type batteryHeadset RP-TCM120*1
DECT repeater KX-A405ALKey finder KX-TGA20AZ*2
*1 Contact Panasonic or the authorised sales department listed on the back cover for theheadset available in your area.
*2 You can register up to 4 optional key finders to your phone system. By registering a keyfinder to the base unit and then attaching the key finder to an easily misplaced item, such asyour house or car keys, you can use your handset to find the item.For more information, visit the following web site.http://panasonic.net/pcc/products/telephone/p/tga20/
3
Introduction
Expanding your phone system
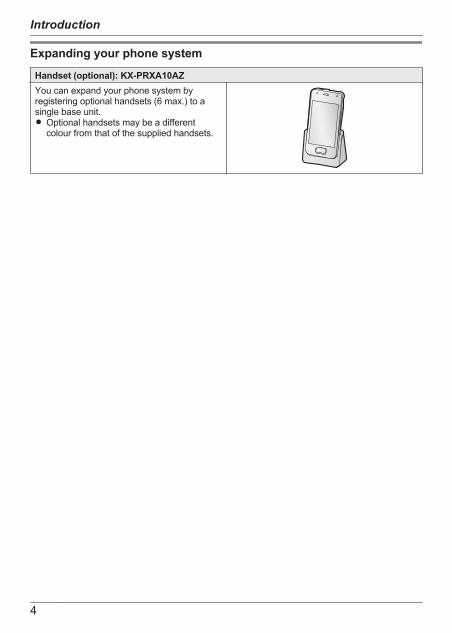
Handset (optional): KX-PRXA10AZYou can expand your phone system byregistering optional handsets (6 max.) to asingle base unit.R Optional handsets may be a different
colour from that of the supplied handsets.
4
Introduction
For your future referenceWe recommend keeping a record of the following information to assist with any repair underwarranty.
Serial No. Date of purchase(found on the rear of the base unit)Name and address of dealer
Attach your purchase receipt here.
TrademarksR Google, Android, Gmail, Google Maps, and Google Play are trademarks of Google Inc.R The Bluetooth® word mark and logos are owned by the Bluetooth SIG, Inc. and any use of
such marks by Panasonic Corporation is under license.R Wi-Fi® is a registered mark of the Wi-Fi Alliance.R microSDHC Logo is a trademark of SD-3C, LLC.R All other trademarks identified herein are the property of their respective owners.
NoticeR The term “apps” is used in this document to refer to programs that are installed on the handset.R The handset supports microSD and microSDHC memory cards. In this document, the term
“microSD card” is used as a generic term for any of the supported cards.R The illustrations and screenshots shown in this document are for reference only and may differ
from the appearance of the actual product.R The suffix is omitted from model numbers listed in this document.R Information in this document is subject to change without notice.
5
Introduction
For your safetyTo prevent severe injury and loss of life/property, read this section carefully beforeusing the product to ensure proper and safeoperation of your product.
WARNING
Power connectionR Use only the power source marked on the
product.R Do not overload power outlets and
extension cords. This can result in the riskof fire or electric shock.
R Completely insert the AC adaptor/powerplug into the power outlet. Failure to do somay cause electric shock and/or excessiveheat resulting in a fire.
R Regularly remove any dust, etc. from theAC adaptor/power plug by pulling it fromthe power outlet, then wiping with a drycloth. Accumulated dust may cause aninsulation defect from moisture, etc.resulting in a fire.
R Unplug the product from power outlets if itemits smoke, an abnormal smell, or makesan unusual noise. These conditions cancause fire or electric shock. Confirm thatsmoke has stopped emitting and contact anauthorised service centre.
R Unplug from power outlets and never touchthe inside of the product if its casing hasbeen broken open.
R Never touch the plug with wet hands.Danger of electric shock exists.
R The AC adaptor should only be usedindoors.
InstallationR This product is not water-resistant. To
prevent the risk of fire or electrical shock,do not expose the product to rain or anytype of moisture.
R Do not place or use this product nearautomatically controlled devices such asautomatic doors and fire alarms. Radiowaves emitted from this product may cause
such devices to malfunction resulting in anaccident.
R Do not allow the AC adaptor or telephoneline cord to be excessively pulled, bent orplaced under heavy objects.
R Keep all accessories, including themicroSD card, out of the reach of childrento prevent swallowing.
R It is advised not to use the equipment at arefuelling point. Users are reminded toobserve restrictions on the use of radioequipment in fuel depots, chemical plantsor where blasting operations are inprogress.
Operating safeguardsR Unplug the product from power outlets
before cleaning. Do not use liquid oraerosol cleaners.
R Do not disassemble the product.R Do not spill liquids (detergents, cleansers,
etc.) onto the telephone line cord plug, orallow it to become wet at all. This maycause a fire. If the telephone line cord plugbecomes wet, immediately pull it from thetelephone wall socket, and do not use.
R Do not leave this product near heat sources(such as radiators, cookers, etc.), in directsunlight, or in a car under blazing sun. Itshould not be placed in rooms where thetemperature is less than 0 °C or greaterthan 40 °C.
R To prevent possible hearing damage, donot listen at high volume levels for longperiods.
R Do not use this product at refuelling points.Observe restrictions on the use of radioequipment in fuel depots, chemical plantsor where blasting operations are inprogress.
R To avoid damage or malfunction, do notmodify the microSD card or touch thecard’s gold-coloured contacts.
R While driving, follow the traffic regulations inyour area regarding the use of this product.
R RF signals may affect electronic systems inmotor vehicles (such as fuel injection
6
Important Information
systems, air bag systems, etc.) that havebeen improperly installed or areinadequately shielded. For moreinformation, consult the manufacturer ofyour vehicle or its equipment.
R Turn the product off when boarding anaeroplane. Await instructions from flightstaff regarding the use of electronic devicesbefore turning the product on, and makesure you turn on the product’s aeroplanemode. Using this product in an aircraft maybe hazardous to the aircraft’s operation anddisrupt wireless communication, and mayalso be illegal.
R This product is capable of producing brightflashing lights, which may cause seizuresor blackouts.
R The earpiece of this device may retainmetallic items such as pins, care must betaken to avoid serious injury.
R To prevent serious damage to this product,avoid strong impacts and rough handling.
R The screen is made from glass. This glasscan break if the product is dropped on ahard surface or receives a substantialimpact.
R Do not expose the skin to this product for along period of time. Using this product withskin exposed to the heat generated by theproduct or AC adaptor for a long period oftime can cause low-temperature burns.
R Although the product features GPSfunctionality, it cannot be used asnavigation equipment for aircraft, vehiclesor people, or as a high-accuracy surveyingdevice. We do not take any responsibilityfor any loss resulting from the use of theGPS function for these purposes, orresulting from inaccurate readings orinformation caused by external factors suchas malfunction, operator error, or powerfailure (including battery shortage).
MedicalR Consult the manufacturer of any personal
medical devices, such as pacemakers orhearing aids, to determine if they areadequately shielded from external RF(radio frequency) energy.
DECT features operate between 1.88 GHzand 1.90 GHz with a peak transmissionpower of 250 mW.Wi-Fi features operate between 2.4 GHzand 2.4835 GHz with a peak transmissionpower of 80 mW.
R Wireless Technology Research (WTR)recommends a minimum separation of15.3 cm between a wireless device and animplanted medical device such aspacemaker or implanted cardioverterdefibrillator to avoid potential interferencewith the medical device. If you have anyreason to suspect that your phone isinterfering with a pacemaker or othermedical devices, turn off the phoneimmediately and contact the manufacture ofpacemaker or other medical devices.
R Turn off this product when in health carefacilities in accordance with any regulationsposted in the area. Hospitals or health carefacilities may be using equipment that couldbe sensitive to external RF energy.
CAUTION
Installation and locationR Never install telephone wiring during an
electrical storm.R Never install telephone line sockets in wet
locations unless the socket is specificallydesigned for wet locations.
R Never touch uninsulated telephone wires orterminals unless the telephone line hasbeen disconnected at the network interface.
R Use caution when installing or modifyingtelephone lines.
R The AC adaptor is used as the maindisconnect device. Ensure that the ACoutlet is installed near the product and iseasily accessible.
R This product is unable to make calls when:– the handset battery needs recharging or
has failed.– there is a power failure.
BatteryR Use only the specified battery.R Do not open or mutilate the battery.
Released electrolyte from the battery is
7
Important Information

corrosive and may cause burns or injury tothe eyes or skin. The electrolyte is toxic andmay be harmful if swallowed.
R Exercise care when handling the battery.Do not allow conductive materials such asrings, bracelets, or keys to touch thebattery, otherwise a short circuit may causethe battery and/or the conductive materialto overheat and cause burns.
R Charge the battery in accordance with theinstructions and limitations specified in thismanual.
R Only use a compatible charger to chargethe battery. Do not tamper with the charger.Failure to follow these instructions maycause the battery to swell or explode.
R Do not subject the battery to mechanicalshock.
R Keep the battery out of the reach ofchildren.
R Keep the battery clean and dry.R Wipe the battery terminals with a clean dry
cloth if they become dirty.R Do not continuously charge the battery for a
prolonged period of time.R Remove the battery from the product if the
product will not be used for a prolongedperiod of time.
General noticesR This equipment will be inoperable when
mains power fails.R When a failure occurs which results in the
internal parts becoming accessible,disconnect the power supply cordimmediately and return this unit to anauthorised service centre.
R To minimise the possibility of lightningdamage, when you know that athunderstorm is coming, we recommendthat you:– Unplug the telephone line cord from the
phone socket.– Unplug the AC adaptor from the AC
power outlet.R No calls, including “000” calls (for Australia)
and “111” calls (for New Zealand), can bemade from this device during a mainspower failure.
Important notice:R Under power failure conditions, this
telephone may not operate. Please ensurethat a separate telephone, not dependenton local power, is available for emergencyuse.
For New ZealandR Disconnect the telecom connection before
disconnecting the power connection prior torelocating the equipment, and reconnectthe power first.
R This equipment shall not be set to makeautomatic calls to the Telecom “111”Emergency Service.
R The unit’s answering system only respondsto Distinctive Alert cadence(s) DA1 andDA3.
R Not all telephones will respond to incomingringing when connected to the extensionsocket.
R This equipment may not provide for theeffective hand-over of a call to anotherdevice connected to the same line.
R The grant of a Telepermit for any item ofterminal equipment indicates only thatTelecom has accepted that the itemcomplies with minimum conditions forconnection to its network. It indicates noendorsement of the product by Telecom,nor does it provide any sort of warranty.Above all, it provides no assurance that anyitem will work correctly in all respects withanother item of Telepermitted equipment ofa different make or model, nor does it implythat any product is compatible with all ofTelecom’s network services.
Important safetyinstructionsWhen using your product, basic safetyprecautions should always be followed toreduce the risk of fire, electric shock, andinjury to persons, including the following:1. Do not use this product near water for
example, near a bathtub, washbowl,kitchen sink, or laundry tub, in a wetbasement or near a swimming pool.
2. Avoid using a telephone (including acordless type) during an electrical storm.
8
Important Information
There may be a remote risk of electricshock from lightning.
3. Do not use the telephone to report a gasleak in the vicinity of the leak.
4. Use only the power cord and batteriesindicated in this manual. Do not dispose ofbatteries in a fire. They may explode.Check with local codes for possible specialdisposal instructions.
SAVE THESE INSTRUCTIONS
For best performanceBase unit location/avoiding noiseThe base unit and other compatible Panasonicunits use radio waves to communicate witheach other.R For maximum coverage and noise-free
communications, place your base unit:– at a convenient, high, and central
location with no obstructions betweenthe handset and base unit in an indoorenvironment.
– away from electronic appliances such asTVs, radios, personal computers,wireless devices, or other phones.
– facing away from radio frequencytransmitters, such as external antennasof mobile phone cell stations. (Avoidputting the base unit on a bay window ornear a window.)
R Coverage and voice quality depends on thelocal environmental conditions.
R If the reception for a base unit location isnot satisfactory, move the base unit toanother location for better reception.
EnvironmentR Keep the product away from electrical noise
generating devices, such as fluorescentlamps and motors.
R The product should be kept free fromexcessive smoke, dust, high temperature,and vibration.
R Do not place heavy objects on top of theproduct.
R When you leave the product unused for along period of time, unplug the product fromthe power outlet.
R The maximum calling distance may beshortened when the product is used in thefollowing places: Near obstacles such ashills, tunnels, underground, near metalobjects such as wire fences, etc.
R Operating the product near electricalappliances may cause interference. Moveaway from the electrical appliances.
Routine careR Wipe the outer surface of the product
with a soft moist cloth.R Do not use benzine, thinner, or any
abrasive powder.
Other informationCAUTION: Risk of explosion if battery isreplaced by an incorrect type. Dispose of usedbatteries according to the instructions.
Notice for downloading software orupgrading the operating systemR Product functions and operating procedures
may change and certain applications maynot function any longer if the product’soperating system is upgraded.
R Confirm the safety and security of softwarebefore downloading or installing it on thisproduct. Installing malware or viruses cancause malfunction and the disclosure ofany private information stored in thisproduct, or may cause excessive soundvolume.
Notice for product disposal, transfer,or returnR This product can store your private/
confidential information. To protect yourprivacy/confidentiality, we recommend thatyou erase information such as phonebookor caller list entries from the memory beforeyou dispose of, transfer, or return theproduct.
9
Important Information
Information on Disposal in otherCountries outside the European Union
These symbols are only valid in the EuropeanUnion. If you wish to discard these items,please contact your local authorities or dealerand ask for the correct method of disposal.
End-user licenceThis is a legal agreement between you andPanasonic System Networks Co., Ltd.(“Panasonic”) with respect to the softwareinstalled in and/or delivered by the PanasonicPremium Design Phone with Touchscreen.Carefully read all the terms of this agreementprior to using this product. Using this productindicates your acceptance of these terms.Copyright:The software is protected by copyright lawsand international treaty provisions, and allother applicable laws. You acknowledge thatyou are receiving only a limited licence to usethe software and related documentation, andthat you shall obtain no title, ownership norany other rights in or to the software and itsrelated documentation, all of which title andrights shall remain with Panasonic or itslicensor.Licence:1. You may use the software installed in and/
or delivered by this product.2. You may transfer your rights under this
licence agreement on a permanent basis,provided that you transfer this agreement,all copies of the software, all relateddocumentation and your PanasonicPremium Design Phone with Touchscreen,and the recipient thereof agrees to theterms of this agreement.
Restrictions:You may not reverse engineer, decompile ordisassemble the software, except as expressly
permitted by applicable law. You may not use,copy, modify, alter, rent, lease or transfer thesoftware, its related documentation, or anycopies thereof, in whole or in part, except asexpressly provided in this agreement. Youmay not export the software in contraventionof any applicable U.S. or foreign export lawsand regulations.
Open source softwarenoticeParts of this product use open source softwaresupplied based on the relevant conditions ofthe Free Software Foundation’s GPL and/orLGPL and other conditions. Please read alllicence information and copyright noticesrelated to the open source software used bythis product. This information is available atthe following web page:www.panasonic.net/pcc/support/tel/sdectAt least three (3) years from delivery of thisproduct, Panasonic System Networks Co.,Ltd. will give to any third party who contacts usat the contact information provided below, fora charge of no more than the cost ofphysically distributing source code, a completemachine-readable copy of the correspondingsource code and the copyright noticescovered under the GPL and the LGPL. Pleasenote that software licensed under the GPL andthe LGPL is not under warranty.www.panasonic.net/pcc/support/tel/sdect
DisclaimerPanasonic System Networks Co., Ltd.(“Panasonic”) shall not be liable for loss ofdata or other incidental or consequentialdamages resulting from the use of thisproduct. This product can download, store,forward, and receive additional content, suchas applications, ringtones, contact information,and media files. The use of such content maybe restricted or prohibited by the rights of thirdparties, including but not limited to restrictionunder applicable copyright laws. You areentirely responsible for additional content that
10
Important Information
you download to or forward from this product;Panasonic is not responsible for such contentor its use. Before using such content, it is yourresponsibility to verify that your intended useis properly licenced or is otherwise authorised.Panasonic does not warrant or guarantee theaccuracy, integrity or quality of any additionalcontent or any other third-party content. Underno circumstances will Panasonic be liable inany way for the improper use of additionalcontent or other third-party content by thisproduct or its operator. This document andany related product documentation may referto services and applications that are providedby third parties. The use of such services orprograms may require separate registrationwith the third-party provider and may besubject to additional terms of use. Forapplications accessed on or through athird-party web site, please review the website’s terms of use and applicable privacypolicy in advance.
SpecificationsConnectivityR GAP (Generic Access Profile)R Wi-Fi: IEEE 802.11b/g/nR Bluetooth: version 3.0, Class 2R USB: version 2.0Frequency rangeR DECT: 1.88 GHz to 1.90 GHzR Wi-Fi: 2.4 GHz to 2.4835 GHzRF transmission powerR DECT: Approx. 10 mW (average power per
channel)R Wi-Fi: 80 mW (peak transmission power)Handset operating systemR Android™ 4.0, Ice Cream SandwichHardwareR Display: TFT colour 3.5-inch (HVGA:
320 ´ 480 pixels), capacitive touch screenR Front camera: 0.3 MR Memory card: microSD, microSDHC up to
32 GB (not supplied)BatteryR Lithium Ion (Li-Ion) 3.7 V/1,450 mAhTalk timeR Landline calls: up to 10 hoursStandby time
R Up to 220 hoursPower sourceR 220–240 V AC, 50/60 HzBase unit power consumptionR Standby: approx. 0.4 WR Maximum: approx. 0.8 WCharger power consumptionR Standby: approx. 0.1 WR Maximum: approx. 4.0 WOperating conditionsR 0 °C–40 °C, 20 %–80 % relative air
humidity (dry)Charging conditionsR 5 °C–40 °C
11
Important Information
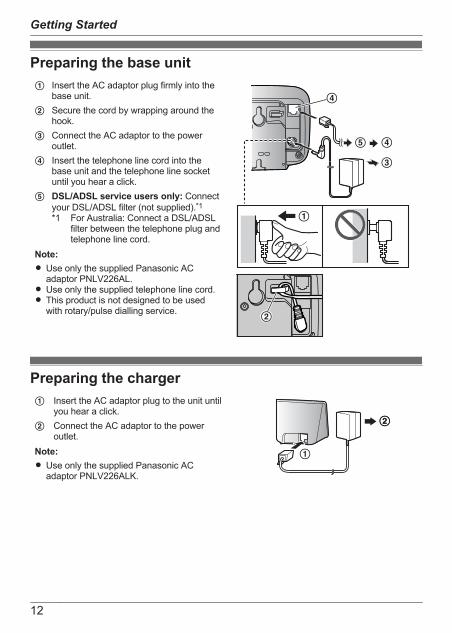
Preparing the base unitA Insert the AC adaptor plug firmly into the
base unit.
DE
C
D
A
B
B Secure the cord by wrapping around thehook.
C Connect the AC adaptor to the poweroutlet.
D Insert the telephone line cord into thebase unit and the telephone line socketuntil you hear a click.
E DSL/ADSL service users only: Connectyour DSL/ADSL filter (not supplied).*1*1 For Australia: Connect a DSL/ADSL
filter between the telephone plug andtelephone line cord.
Note:R Use only the supplied Panasonic AC
adaptor PNLV226AL.R Use only the supplied telephone line cord.R This product is not designed to be used
with rotary/pulse dialling service.
Preparing the chargerA Insert the AC adaptor plug to the unit until
you hear a click.BB
A
B Connect the AC adaptor to the poweroutlet.
Note:R Use only the supplied Panasonic AC
adaptor PNLV226ALK.
12
Getting Started
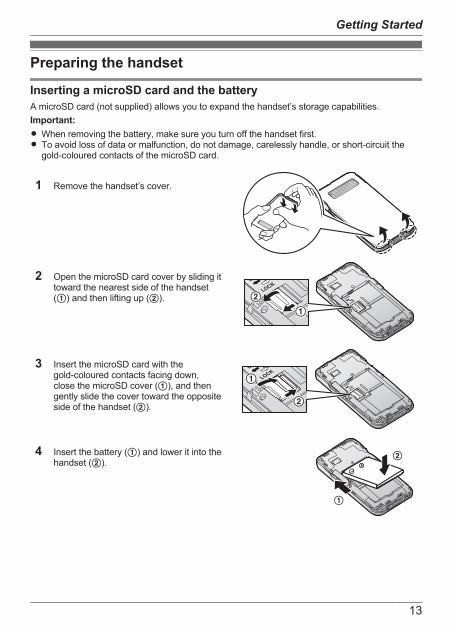
Preparing the handset
Inserting a microSD card and the batteryA microSD card (not supplied) allows you to expand the handset’s storage capabilities.Important:R When removing the battery, make sure you turn off the handset first.R To avoid loss of data or malfunction, do not damage, carelessly handle, or short-circuit the
gold-coloured contacts of the microSD card.
1 Remove the handset’s cover.
2 Open the microSD card cover by sliding ittoward the nearest side of the handset(A) and then lifting up (B).
A
B
3 Insert the microSD card with thegold-coloured contacts facing down,close the microSD cover (A), and thengently slide the cover toward the oppositeside of the handset (B). B
A
4 Insert the battery (A) and lower it into thehandset (B).
A
B
13
Getting Started
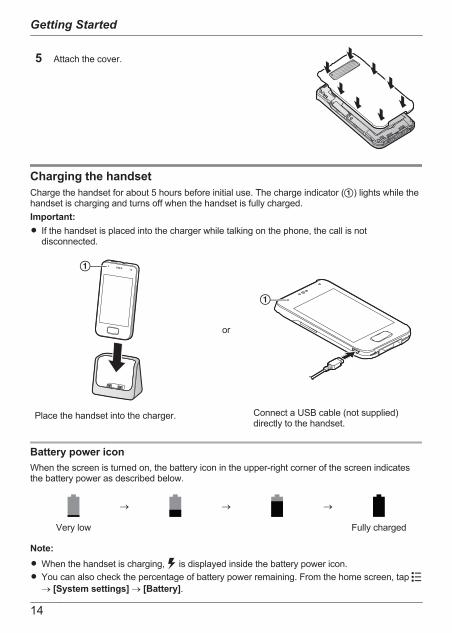
5 Attach the cover.
Charging the handsetCharge the handset for about 5 hours before initial use. The charge indicator (A) lights while thehandset is charging and turns off when the handset is fully charged.Important:R If the handset is placed into the charger while talking on the phone, the call is not
disconnected.
A
Place the handset into the charger.
or
A
Connect a USB cable (not supplied)directly to the handset.
Battery power iconWhen the screen is turned on, the battery icon in the upper-right corner of the screen indicatesthe battery power as described below.
® ® ®
Very low Fully charged
Note:R When the handset is charging, is displayed inside the battery power icon.R You can also check the percentage of battery power remaining. From the home screen, tap
® [System settings] ® [Battery].
14
Getting Started
Information about power and chargingAC adaptor connectionR The AC adaptor must remain connected at all times. (It is normal for the adaptor to feel warm
during use.)R The AC adaptor should be connected to a vertically oriented or floor-mounted AC outlet. Do
not connect the AC adaptor to a ceiling-mounted AC outlet, as the weight of the adaptor maycause it to become disconnected.
Power failureR The unit will not work during a power failure. We recommend connecting a corded-type
telephone (without AC adaptor) to the same telephone line or to the same telephone linesocket using a telephone double adaptor (for Australia)/a BT double adaptor (for NewZealand).
Battery use and replacementR Use only the supplied battery. For replacement, use only the Panasonic rechargeable battery
noted on page 3.R The battery might swell when its life is close to an end. This is dependent on the usage
conditions and is not a problem.Battery chargingR It is normal for the handset to feel warm during charging.R Clean the charge contacts of the handset, base unit, and charger with a soft and dry cloth
once a month. Before cleaning the unit, disconnect from power outlets and any telephone linecords. Clean more often if the unit is exposed to grease, dust, or high humidity.
Saving battery powerR The amount of time you can use the handset before the battery needs to be charged varies
depending on how you are using it. Each of the following can help you save battery power.– Turn off the screen when you are not using the handset (page 17).– Use the control panel (page 20) to turn off the handset’s Wi-Fi, GPS, and Bluetooth
features.– When you are away from home, use the control panel (page 20) to turn off the handset’s
DECT connection to the base unit. Note that if you do not turn the connection back on whenyou return home, you will not be able to make or receive calls using the handset.
15
Getting Started
Getting to know your phone system
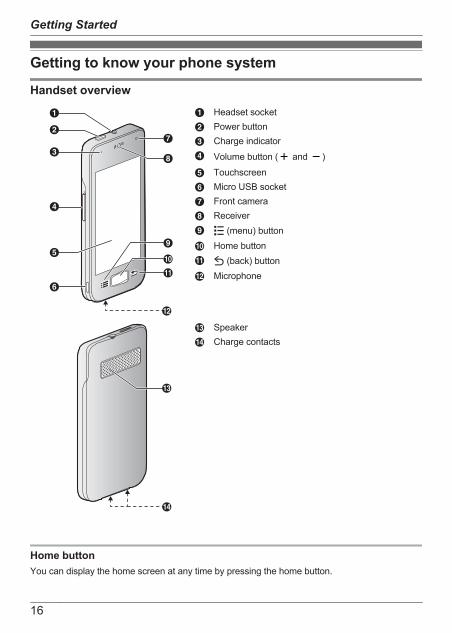
Handset overview
A
B
CH
J
K
G
D
F
EI
L
A Headset socketB Power buttonC Charge indicatorD Volume button ( and )
E TouchscreenF Micro USB socketG Front cameraH ReceiverI (menu) buttonJ Home buttonK (back) buttonL Microphone
N
M
M SpeakerN Charge contacts
Home buttonYou can display the home screen at any time by pressing the home button.
16
Getting Started
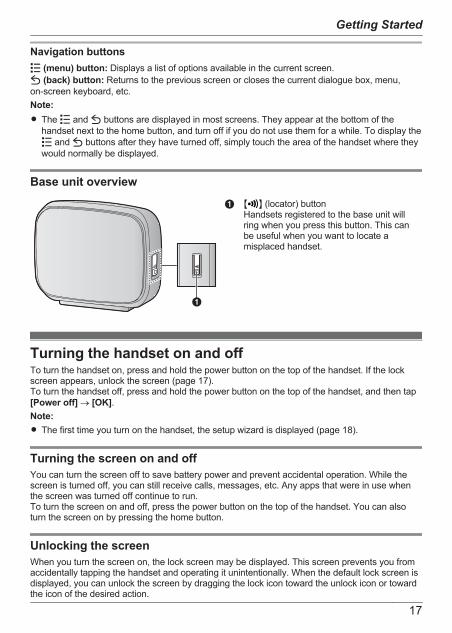
Navigation buttons (menu) button: Displays a list of options available in the current screen. (back) button: Returns to the previous screen or closes the current dialogue box, menu,
on-screen keyboard, etc.Note:R The and buttons are displayed in most screens. They appear at the bottom of the
handset next to the home button, and turn off if you do not use them for a while. To display the and buttons after they have turned off, simply touch the area of the handset where they
would normally be displayed.
Base unit overview
A
A M N (locator) buttonHandsets registered to the base unit willring when you press this button. This canbe useful when you want to locate amisplaced handset.
Turning the handset on and offTo turn the handset on, press and hold the power button on the top of the handset. If the lockscreen appears, unlock the screen (page 17).To turn the handset off, press and hold the power button on the top of the handset, and then tap[Power off] ® [OK].Note:R The first time you turn on the handset, the setup wizard is displayed (page 18).
Turning the screen on and offYou can turn the screen off to save battery power and prevent accidental operation. While thescreen is turned off, you can still receive calls, messages, etc. Any apps that were in use whenthe screen was turned off continue to run.To turn the screen on and off, press the power button on the top of the handset. You can alsoturn the screen on by pressing the home button.
Unlocking the screenWhen you turn the screen on, the lock screen may be displayed. This screen prevents you fromaccidentally tapping the handset and operating it unintentionally. When the default lock screen isdisplayed, you can unlock the screen by dragging the lock icon toward the unlock icon or towardthe icon of the desired action.
17
Getting Started
Setup wizardThe first time you turn on the handset, the setup wizard prompts you to configure the followingsettings. Follow the on-screen instructions and configure each item as needed.1 Select the language.2 Configure date and time settings.3 Select the desired automatic time adjustment setting.R If you select [Use network provided time], an Internet connection is needed for the
handset to adjust its date and time setting automatically.4 Add or create a Google account.5 Configure Wi-Fi settings (displayed only if you choose to configure a Google account).Note:R Some items may be displayed in English regardless of the display language setting.
Setting up a Google accountConfiguring your handset to synchronise with your Google account is an easy way to synchronisecontacts and other information between different devices, such as computers or smartphones,and your phone system’s handset. For example, you can use your computer to add your contactsto your Google account, and then configure the handset to synchronise with your Googleaccount. Your contacts will be automatically downloaded to your handset.The setup wizard will prompt you to either add your existing Google account information to thehandset or create a new account. You can skip this step if desired. To configure Google accountsettings later, see page 45.Note:R An Internet connection is required to configure a Google account. If you choose to use or
create a Google account during the setup wizard, you will be prompted to enter Wi-Fiinformation so that the handset can connect to the Internet.
Wi-Fi settingsIf you have a wireless router and an Internet connection, you can configure the handset toconnect to your Wi-Fi network and access the Internet for synchronising your handset with yourGoogle account, using the [Browser] app to view web pages, etc. If the setup wizard promptsyou to enter Wi-Fi information, use the following procedure. To configure these settings later, seepage 44.1 Select a Wi-Fi network.R If the desired Wi-Fi network is not displayed, you may need to enter the network name
(also called the “SSID”) manually. See page 44 for more information.2 Enter the password if you are connecting to a secure Wi-Fi network.3 Tap [Connect].
18
Getting Started
Home screenThe home screen is the main screen from which you can launch apps, such as the phone,camera, and web browser, and check widgets. It’s available any time by simply pressing thehome button. You can customise the home screen to suit your needs, and add, move, andremove items as desired.
Browsing the home screenThe home screen contains multiple pages of app icons and widgets. Flick the screen left andright to view other pages. To open an app, tap the app’s icon.
Moving an item on the home screen1 Tap and hold the item.2 Drag the item to the new location.R You can move the item to another page by dragging the item to the left or right edge of
the screen.
Using the app listThe app list gives you access to all the apps and widgets stored on the handset. You can viewthe app list by tapping in the home screen. Similar to the home screen, the app list alsocontains multiple pages that you can view by flicking the screen left and right.Use the following procedure to add an item in the app list to the home screen.1 Browse to the page of the home screen where you want to add an app or widget, and then
tap .
2 Browse to the page of the app list that contains the desired item.3 Tap and hold the item.R The screen switches to the home screen.
4 Drag the item and drop it on the home screen.
Erasing an item from the home screen1 Tap and hold the item.2 Drag the item and drop it on [Remove] at the top of the screen.
19
Getting Started

Status and notifications
Status barThe status bar is displayed at the top of the handset’s screen when using most apps. It displaysthe time and provides icons and other indicators that let you know the status of the handset’sbattery, network signal strength, and certain features of the handset.
See page 57 for a list of commonly used status icons and their meanings.
Notifications panelThe notifications panel provides detailed information about incoming email messages, missedcalls, calendar events, etc. You can open the notifications panel by sliding your finger down fromthe top to the bottom of the screen. To close the notifications panel, slide your finger up from thebottom to the top of the screen. While the notifications panel is open, you can tap a notificationand open the corresponding app, and some notifications can be removed by flicking them left orright.See page 58 for a list of commonly used notification icons and their meanings.
Control panelThe control panel is displayed at the top of the notifications panel and allows you to changesettings for certain features quickly without switching to another screen. Simply tap the featureicons that are displayed in the control panel to toggle through the available settings. You can seemore settings by flicking the control panel left and right.
See page 59 for a list of the settings available in the control panel.
Landline appThe [Landline] app is displayed by default on the handset’s home screen, and allows you toaccess commonly used features of your phone system.
20
Getting Started
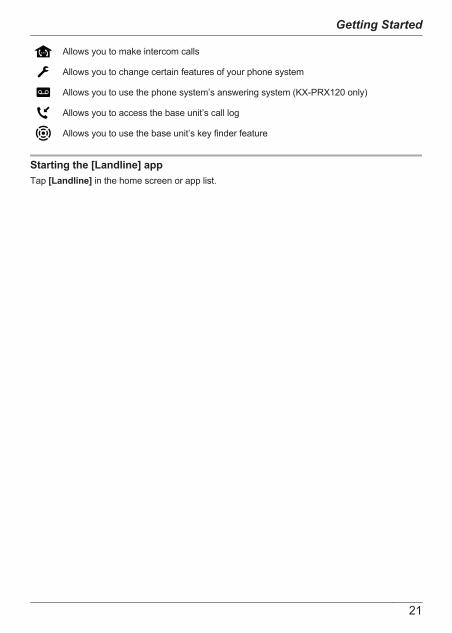
Allows you to make intercom calls
Allows you to change certain features of your phone system
Allows you to use the phone system’s answering system (KX-PRX120 only)
Allows you to access the base unit’s call log
Allows you to use the base unit’s key finder feature
Starting the [Landline] appTap [Landline] in the home screen or app list.
21
Getting Started
Making callsYou can use the [Phone] app to make and receive calls, check your call logs, and use servicesprovided by your phone service provider.The [Phone] app consists of the following tabs.
Used to dial manually, make intercom calls, etc.
Used to check the call log (page 25).
Used to quickly browse for a person stored in your contacts (page 28).
Important:R When the handset is connected to the base unit, or is displayed in the status bar. If
neither of these icons is displayed, the handset cannot make or receive calls.R If the handset is placed into the charger while talking on the phone, the call is not
disconnected.
Dialling manually1 Tap [Phone] in the home screen or app list.2 Select the tab at the top of the screen.
3 Enter the phone number and then tap at the bottom of the screen.R To erase a number, tap .R To enter a dialling pause, tap and hold .
4 When finished, tap to end the call.
Searching while dialling manuallyAs you enter digits on the keypad, the handset searches for items in the handset call log andphonebook that match the entered digits. You can display the matched items by tapping , andyou can call an item by tapping next to it.
Calling a contactYou can add contacts to the handset by adding them manually (see page 28) or bysynchronising the handset with your Google account (see page 45).1 Tap [Phone] in the home screen or app list.
2 Select the tab at the top of the screen.
3 Tap the desired contact.4 When finished, tap to end the call.
22
Phone Features
Adding a phone number to your contacts while dialling1 After dialling a number manually, tap .
2 To add the number to an existing contact:→ Tap the desired contact.To add the number to a new contact:→ Tap [CREATE NEW CONTACT].
3 If prompted, follow the on-screen instructions to determine where the contact will be saved.R Contacts can be stored in the handset’s memory or synchronised with your Google
account.R Tap [Add new account] (if displayed) if you want to register a Google account to the
handset. You can also register an account later (page 45).4 Enter or edit the information as needed and tap [DONE].
Using other features during a callSpeakerphoneTap to turn on the speakerphone during a call. Tap again to switch back to the receiver.
Receiver or speaker volumePress the volume button up ( ) and down ( ) repeatedly during a call.
MuteTap during a call to mute the handset’s microphone so that the other party cannot hear you.Tap again to turn the mute off.
HoldTap during a call to place the call on hold so that you and the other party cannot hear eachother. Tap again to return to the call.R The handset sounds an alarm if a call is held for 9 minutes. If the call remains on hold, the
alarm sounds again 30 seconds later (i.e., after 9 minutes and 30 seconds of being on hold).The call is disconnected 30 seconds later if it continues to be on hold (i.e., after 10 minutes ofbeing on hold).
Recall/flashTap to use call waiting and answer a second call or switch between calls (page 25). You canchange the recall/flash time if necessary (page 42).
Activating the screen during a callThe handset’s proximity sensor detects when you raise the phone to your ear and automaticallyturns off the screen. This not only saves battery power, but also prevents you from inadvertentlyoperating the screen while talking. The screen turns on again when you move the handset awayfrom your ear.
23
Phone Features

You can also turn the screen off and on manually when on a call by pressing the power button onthe top of the handset.Note:R If you turn off the screen while on a call, the call will continue.
KeypadTap during a call if you need to enter numbers, such as when navigating a call centre’s voiceguided menu system. Tap to hide the keypad.
Recording a call (KX-PRX120 only)Important:R Before recording a conversation, inform the other party that the conversation will be recorded.
Recording without consent is a violation of privacy and may be against the law.
1 While on a call, tap ® [Record call].2 When finished, tap ® [Stop recording], or tap to end the call.Note:R To listen to the recording, see page 31.R For Australia:
All persons using this device for recording telephone conversations shall comply withAustralian laws. This requires that at least one party to the conversation is to be aware that itis being recorded. In addition, the principles enumerated in the AustraliaTelecommunications(Interception and Access) Act 1979 shall be complied with in respect to the nature of thepersonal information collected, the purpose for its collection, how it is used and what isdisclosed to any other party.
R For New Zealand:All persons using this device for recording telephone conversations shall comply with NewZealand law. This requires that at least one party to the conversation is to be aware that it isbeing recorded. In addition, the principles enumerated in the Privacy Act 1993 shall becomplied with in respect to the nature of the personal information collected, the purpose for itscollection, how it is used and what is disclosed to any other party.
Answering calls
Answering a call1 When a call is being received, tap and drag it to .
2 Tap to end the call.
Choosing not to answer a callWhen a call is being received, tap and drag it to . The handset stops ringing.
24
Phone Features
Ringer volumePress the volume button up ( ) and down ( ) repeatedly to adjust the ringer volume. While thehandset is ringing, press the button up or down to turn the ringer off temporarily.
Changing ringtone and audio settings quickly1 Press and hold the power button on the top of the handset.2 Select the desired audio profile.
Selects the [Silent] audio profile. The ringer is turned off.
Selects the [General] audio profile. Your customised ringtone and audiosettings are used (page 38).
Note:R For details about ringtones and audio settings, see page 38.
Answering a second call (call waiting)If you receive a second call while you are talking on the phone, the handset will let you know bysounding a call waiting tone. If caller information is also received, you can confirm the informationon the screen and answer the second call if desired.Operation varies by phone service provider. Consult your provider for details.Important:R You may need to subscribe to your phone service provider’s call waiting service in order to
answer a second call. Consult your phone service provider for information about this feature.
1 When you hear the call waiting tone, tap .2 To switch between calls, tap again.
Caller ID Type II users (for users in Australia)If you are talking on a call and receive a second call, the current call will be interrupted ormuted for a short time when the call waiting tone sounds. This is normal and is not a fault of theproduct.R The tones are generated by your phone service provider.
Using the call logsThe handset and base unit each log your calls, allowing you to check a record of your calls. Thefollowing symbols are used to indicate each type of call stored in the call logs.Important:R Caller ID is required to log missed and answered calls (page 45).
25
Phone Features
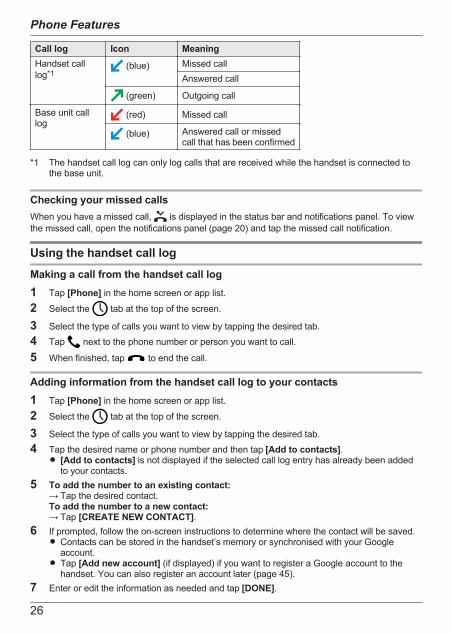
Call log Icon MeaningHandset calllog*1
(blue) Missed callAnswered call
(green) Outgoing call
Base unit calllog
(red) Missed call
(blue) Answered call or missedcall that has been confirmed
*1 The handset call log can only log calls that are received while the handset is connected tothe base unit.
Checking your missed callsWhen you have a missed call, is displayed in the status bar and notifications panel. To viewthe missed call, open the notifications panel (page 20) and tap the missed call notification.
Using the handset call log
Making a call from the handset call log1 Tap [Phone] in the home screen or app list.
2 Select the tab at the top of the screen.
3 Select the type of calls you want to view by tapping the desired tab.4 Tap next to the phone number or person you want to call.
5 When finished, tap to end the call.
Adding information from the handset call log to your contacts1 Tap [Phone] in the home screen or app list.
2 Select the tab at the top of the screen.
3 Select the type of calls you want to view by tapping the desired tab.4 Tap the desired name or phone number and then tap [Add to contacts].R [Add to contacts] is not displayed if the selected call log entry has already been added
to your contacts.5 To add the number to an existing contact:
→ Tap the desired contact.To add the number to a new contact:→ Tap [CREATE NEW CONTACT].
6 If prompted, follow the on-screen instructions to determine where the contact will be saved.R Contacts can be stored in the handset’s memory or synchronised with your Google
account.R Tap [Add new account] (if displayed) if you want to register a Google account to the
handset. You can also register an account later (page 45).7 Enter or edit the information as needed and tap [DONE].
26
Phone Features

Erasing the handset call log1 Tap [Phone] in the home screen or app list.
2 Select the tab at the top of the screen.
3 Select the type of calls you want to view by tapping the desired tab.4 Tap ® [Delete].5 Select the desired entries.R Tap to select all entries. Tap to deselect all entries.
6 Tap ® [OK].
Using the base unit call log
Making a call from the base unit call log1 Tap [Landline] in the home screen or app list.2 Tap [Call log list].R The handset connects to the base unit.
3 Tap next to the phone number or person you want to call.
4 When finished, tap to end the call.
Erasing the base unit call log1 Tap [Landline] in the home screen or app list.2 Tap [Call log list].R The handset connects to the base unit.
3 To erase information for one call:→ Select the desired call and then tap ® [Delete from call log].To erase information for all calls:→ Tap ® [Delete all calls] ® [OK].
27
Phone Features

Adding contactsYou can use the [People] app to store all your contact information in the handset. Entries (alsocalled “contacts”) contain information about your friends, family, and colleagues, such as theiraddresses, phone numbers, and email addresses.Note:R If you have a Google account and an Internet connection, you can synchronise your contacts
with the handset automatically (page 45).R For New Zealand:
Your phone service provider may charge you for a local call if the number dialled has the areacode prefix included. If this is unacceptable, dial only the 7-digit local number. Do not dial the“0” prefix or the area code.
Adding a contact manually1 Tap [People] in the home screen or app list.
2 Tap .
3 If prompted, follow the on-screen instructions to determine where the contact will be saved.R Contacts can be stored in the handset’s memory or synchronised with your Google
account.R Tap [Add new account] (if displayed) if you want to register a Google account to the
handset. You can also register an account later (page 45).4 Enter the information as needed.R To add an image, tap the image icon.R To undo the changes you have made, tap ® [Discard] ® [OK]. Note that if you tap
, the changes will be saved.R To add the new contact information to an existing contact, tap ® [Join].
5 Tap [DONE].Note:R If you store domestic and/or international phone numbers in your contacts using “+” and the
country code, store the phone number conversion codes in the base unit so that phonenumbers will be dialled correctly (page 42).
Adding yourself to your contacts1 Tap [People] in the home screen or app list.2 Tap [Set up my profile].R If [Set up my profile] is not displayed, tap the content displayed under [ME], and then
tap ® [Edit].3 Enter the information as needed.4 Tap [DONE].
28
Phonebook Features

Calling contactsSearching for a contact1 Tap [People] in the home screen or app list.2 Tap and then enter the search text.R You can also scroll using the slider on the right side of the screen to search for a contact
by first letter.
Calling or emailing a contact1 Tap [People] in the home screen or app list.2 Tap the contact and then select the desired method of communication.
Managing contactsEditing a contact1 Tap [People] in the home screen or app list.2 Select the desired contact and then tap ® [Edit].3 Edit the information as needed.4 Tap [DONE].
Erasing a contact1 Tap [People] in the home screen or app list.2 Select the desired contact and then tap ® [Delete] ® [OK].
Speed diallingYou can assign phone numbers stored in your contacts to the dial keys 2 to 9, and then dialthose phone numbers by pressing and holding the dial keys in the [Phone] app.1 Tap [Phone] in the home screen or app list.2 Tap ® [Speed dial].3 Select an unused speed dial location.R To erase a speed dial assignment, tap ® [Remove].
4 Select the desired contact.
29
Phonebook Features
Message recording featuresThe following features can record your missed calls for you.– The base unit’s answering system (KX-PRX120 only; described in this section)– Your phone service provider’s voicemail service (page 46)
Answering systemThe base unit’s answering system can answer calls after a certain number of rings. When itanswers a call, it plays a greeting message and can then record caller messages. Messages arestored in the base unit, and you can play them using a handset when at home or remotely byusing an outside telephone. The answering system cannot answer calls if you are talking on thephone.Important:R For New Zealand:
The base unit’s answering system will not answer calls if your phone line has FaxAbilityservice.
Recording capacityThe total recording capacity is about 40 minutes. A maximum of 64 messages can be recorded.Note:R The following occur if the recording memory becomes full.
– [Memory full] will be displayed when the answering system is turned on or off.– A beep will sound.– A memory full announcement will be heard.– If you use a pre-recorded greeting message, the base unit will answer calls with a different
pre-recorded message that asks callers to call again later. (If you have recorded your owngreeting message, it will continue to be played for callers.) No new messages will berecorded.
Turning the answering system on and offThe answering system is already turned on at the time of purchase.1 Tap [Landline] in the home screen or app list.2 Tap [Answering system].R The handset connects to the base unit.
3 Turn the [Answer] switch on or off.R is displayed in the status bar while the answering system is turned on.
30
Answering System Features (KX-PRX120 only)
Greeting messagesRecording a greeting messageBy default, the answering system uses a pre-recorded greeting message. You can record yourown greeting message if you prefer.1 Tap [Landline] in the home screen or app list.2 Tap [Answering system].R The handset connects to the base unit.
3 Tap [Greeting] ® [Record greeting].4 Tap [OK] and speak your message after the beep.5 Tap to stop recording and save your new greeting message.R Your new greeting message is played back for confirmation.
Playing your greeting message1 Tap [Landline] in the home screen or app list.2 Tap [Answering system].R The handset connects to the base unit.
3 Tap [Greeting] ® [Play greeting].
Erasing your greeting message1 Tap [Landline] in the home screen or app list.2 Tap [Answering system].R The handset connects to the base unit.
3 Tap [Greeting] ® [Reset to default greeting] ® [OK].R A pre-recorded greeting message will be used until you record a new greeting.
Playing your messages is displayed in the status bar and notifications panel when the answering system has recorded
new messages. You can access the answering system by tapping this icon in the notificationspanel.
Playing messages1 Tap [Landline] in the home screen or app list.2 Tap [Answering system].R The handset connects to the base unit.R The number of messages is displayed at the top of the screen.
3 To play all new messages:→ Tap [Play new message].To play all messages:→ Tap [Play all messages].
31
Answering System Features (KX-PRX120 only)
To play a specific message:→ Tap [Message list] and then tap next to the desired message.
Note:R Messages that have been played have a checkmark next to them in the message list.
Using message playback controlsThe following controls are available when playing messages.
Tap to stop playback.Tap to skip to the previous message (if tapped within the first 5 seconds ofplayback) or to repeat the current message from the beginning.Tap to skip to the next message.
Tap to erase the current message.
Tap to switch between speaker and receiver.
Tap to call the caller back. (Caller ID required; see page 45)
Editing a phone number when calling backThis feature is not available when playing back a message that does not have a phone numberassociated with it.1 Play the desired message.2 Tap ® [Edit & call].R The [Phone] app starts.
3 Edit the number as desired and then tap .
Erasing messagesTo erase a message, tap while playing the message.
Erasing all messages1 Tap [Landline] in the home screen or app list.2 Tap [Answering system].R The handset connects to the base unit.
3 Tap [Delete all messages] ® [OK].
32
Answering System Features (KX-PRX120 only)
Remote operation featuresWhile away from home, you can use a touch-tone phone to access the base unit and listen toanswering system messages or change answering system settings. The base unit’s voiceguidance prompts you to press certain dial keys to perform different operations.You can access the answering system remotely using the following methods.– New message notification: The base unit calls you at an outside phone number.– Standard remote access: You call the base unit while away from home.
Remote operation settings overview
SettingsRemote operation method
New message notification Standard remote accessFirst time setup page 33 –Turn feature on page 34 –Change notificationdestination phone number
page 34 –
Making remote code requiredor not required
page 34 –
Set remote code page 37(optional)
page 37
Remote operation overview
New message notification Standard remote access
1 While away from home, the base unitcalls you when new message is recorded.
2 Answer call.3 Enter remote code (if required).4 Operate answering system (page 35).
1 While away from home, call your phonenumber.
2 When answering system answers yourcall, enter remote code.
3 Operate answering system (page 35).
New message notificationAfter the answering system records a caller message, the base unit can call a phone number ofyour choosing and then play the new message back when you answer the phone. You canassign a remote code to maintain the privacy of your messages; if the remote code is assigned,the base unit will not play new messages unless the code is entered.Important:R When this feature is enabled, the base unit will call the specified phone number when it
records a caller message. Make sure you carefully check the phone number assigned to thisfeature.
First time setup1 Tap [Landline] in the home screen or app list.
33
Answering System Features (KX-PRX120 only)

2 Tap [Answering system].R The handset connects to the base unit.
3 Turn on the [New message alert] switch.4 Tap [Notification to] ® [(No entry)].5 To select a person and phone number from your contacts:
→ Tap [Phonebook] and then select the desired contact and phone number.To enter a name and phone number manually:→ Tap [Keypad], enter a name and phone number, and then tap [Done].
Making remote code entry required or not requiredIf this setting is set to [Active], you must enter the remote code (page 37) in order to accessthe answering system remotely via the new message notification feature.1 Tap [Landline] in the home screen or app list.2 Tap [Answering system].R The handset connects to the base unit.
3 Tap [New message alert] ® [Remote code].4 To make remote code entry required:
→ Tap [Active]. If you are prompted to enter the remote code, enter the desired code andthen tap [Done].
To make remote code entry not required:→ Tap [Inactive].
Turning new message notification on or off1 Tap [Landline] in the home screen or app list.2 Tap [Answering system].R The handset connects to the base unit.
3 Turn the [New message alert] switch on or off.Note:R While operating the answering system remotely, you can turn off the new message notification
feature by pressing #9.
Changing the phone number for new message notification1 Tap [Landline] in the home screen or app list.2 Tap [Answering system].R The handset connects to the base unit.
3 Tap [New message alert] ® [Notification to].4 To edit the name and phone number assigned to this feature:
→ Tap [Edit], edit the information, and then tap [Done].To erase the name and phone number assigned to this feature:→ Tap [Delete] ® [OK].
34
Answering System Features (KX-PRX120 only)

Answering a new message notification call1 When the base unit calls the outside phone number you specified, answer the call and enter
the remote code if prompted to do so.2 Follow the voice guidance prompts as necessary or control the unit using remote commands
(page 35).3 When finished, hang up.
Standard remote accessImportant:R You must set the remote access code in order to use standard remote access (page 37).
1 Dial your phone number from a touch-tone phone.2 After the greeting message starts, enter the remote access code.3 Follow the voice guidance prompts as necessary or control the unit using remote commands
(page 35).4 When finished, hang up.
Voice guidanceDuring remote operation, the unit’s voice guidance starts and prompts you to press 1 to performa specific operation, or press 2 to listen to more available operations.Note:R If you do not press any dial keys within 10 seconds after a voice guidance prompt, the unit
disconnects your call.
Remote operationYou can press dial keys to operate answering system features as explained below.
Key Operation1 Repeat message (during playback)*1
2 Skip message (during playback)4 Play new messages5 Play all messages6 Play greeting message7 Record greeting message9 Stop recording or playback0 Turn answering system off#9 Turn new message notification off*4 Erase currently playing message*5 Erase all messages
35
Answering System Features (KX-PRX120 only)
Key Operation*6 Reset to a pre-recorded greeting message (during greeting message playback)*# End remote operation and end call
*1 If pressed within the first 5 seconds of playback, the previous message is played.
Turning on the answering system remotely1 Dial your phone number from a touch-tone phone.2 Let the phone ring 15 times.R A long beep is heard.
3 Enter your remote access code within 10 seconds after the long beep.R The greeting message is played back.R You can either hang up, or enter your remote access code again and begin remote
operation.
Answering system settingsNumber of ringsYou can change the number of times the phone rings before the unit answers a call.1 Tap [Landline] in the home screen or app list.2 Tap [Answering system].R The handset connects to the base unit.
3 Tap [Settings] ® [Number of rings].4 Select the desired setting.R If you select [Auto], the answering system answers at the end of the 2nd ring when new
messages have been recorded, or at the end of the 5th ring when there are no newmessages. If you call your home phone from outside to listen to new messages usingremote operation (page 33), you will know that there are no new messages when thephone rings for the 3rd time. You can then hang up without being charged for the call.
For voicemail service subscribersTo receive voicemail and use the answering system properly, please note the following:R To use your phone service provider’s voicemail service (page 46) rather than the unit’s
answering system, turn off the answering system (page 30).R To use the base unit’s answering system rather than your phone service provider’s voicemail
service, please ask the service provider to deactivate your voicemail service.If your phone service provider cannot do this:– Set the answering system’s [Number of rings] setting (page 36) so that it answers calls
before your voicemail service does. It is necessary to check the number of rings required toactivate your voicemail service before changing this setting.
– Increase the number of rings required for your phone service provider’s voicemail service,so that the base unit’s answering system can answer calls before your voicemail servicedoes. Contact your phone service provider as necessary.
36
Answering System Features (KX-PRX120 only)
Recording timeThis setting determines the maximum recording time allowed for each caller.1 Tap [Landline] in the home screen or app list.2 Tap [Answering system].R The handset connects to the base unit.
3 Tap [Settings] ® [Recording time].4 Select the desired setting.R If you select [Greeting only], the answering system does not record caller messages.
Tap [OK] to save the setting.R If you do not record your own greeting message and [Greeting only] is selected, the
answering system will play the pre-recorded greeting-only message asking callers to callagain later. If you record your own greeting message (page 31), ask callers to call againlater.
Remote codeThe remote access code is a 3-digit code that must be entered in order to access the answeringsystem remotely using standard remote access. This code prevents unauthorised parties fromlistening to your messages remotely.1 Tap [Landline] in the home screen or app list.2 Tap [Answering system].R The handset connects to the base unit.
3 Tap [Settings] ® [Remote code].4 Enter the desired code and then tap [Done].
Call screeningThis setting determines whether the handset can screen calls while a caller is leaving a message.When screening a call, you can adjust the speaker volume by pressing the volume button up( ) and down ( ) repeatedly, and you can answer the call by tapping and dragging it to
.
1 Tap [Landline] in the home screen or app list.2 Tap [Answering system].R The handset connects to the base unit.
3 Tap [Settings] ® [Call screening].4 Select the desired setting.
37
Answering System Features (KX-PRX120 only)
Ringtones and audio settingsYou can adjust the handset’s ringtone, ringer volume, and other audio settings, and save thesettings as an audio profile. Audio profiles allow you to change multiple ringtone and audiosettings easily.
Selecting an audio profile1 From the home screen, tap ® [System settings] ® [Audio profiles].2 Tap next to the desired audio profile.Preset audio profiles– [General]: You can select the desired ringtone, ringer volume, etc.– [Silent]: The ringer is turned off.– [Outdoor]: The settings of the [General] profile are used. The ringer volume is set to the
maximum level.
Changing audio settings1 From the home screen, tap ® [System settings] ® [Audio profiles].2 Tap the name of the desired audio profile.R You can change the settings of the [General] audio profile, but the other default audio
profiles cannot be changed.3 Change the settings as desired.4 When finished, tap the home button.Frequently used settings– [Volumes]: Allows you to adjust the volume for ringtones and other alerts.– [Landline call ringtone]: Allows you to select the ringtone used for incoming calls.– [Dial pad touch tones]: Determines whether touch tones are heard when you dial using the
keypad.Note:R The ringtone heard for intercom calls cannot be changed.
Creating an audio profile
1 From the home screen, tap ® [System settings] ® [Audio profiles] ® .
2 Enter a name for the audio profile and then tap [OK].3 Select the new audio profile and then change the settings as desired.4 When finished, tap the home button.
Resetting audio profile settingsFrom the home screen, tap ® [System settings] ® [Audio profiles] ® ® [OK].
38
Other Features and Settings
Night modeNight mode allows you to select a period of time during which the handset will not ring for calls.This feature is useful for time periods when you do not want to be disturbed, for example, whilesleeping.Important:R Make sure the unit’s date and time setting is correct (page 43).
Turning night mode on and off1 From the home screen, tap ® [System settings] ® [Audio profiles].2 Turn the [Night mode] switch on or off.
Changing the start and end timeYou can set the start and end times, and set the ring delay.1 From the home screen, tap ® [System settings] ® [Audio profiles].2 Turn on the [Night mode] switch, and then tap [Night mode] ® [Start/end].3 Select the desired settings and then tap [Set].
Changing the ring delayThis setting allows the handset to ring during night mode if the caller waits long enough. After theselected amount of time passes, the handset rings. If you select [No Ringing], the handset neverrings during night mode.1 From the home screen, tap ® [System settings] ® [Audio profiles].2 Turn on the [Night mode] switch, and then tap [Night mode] ® [Ring delay].3 Select the desired setting.
Auto talkWhen this feature is enabled, you can answer an incoming call simply by lifting the handset offthe charger or by unplugging the USB cable.1 Tap [Phone] in the home screen or app list.2 Tap ® [Settings].3 Turn the [Auto talk] checkbox on or off.
Blocking incoming calls (caller barring)You can use the caller barring feature to block junk calls or calls from certain people. When a callis received from a phone number that you have added to the blocked caller list, the base unitdisconnects the call.
39
Other Features and Settings
Important:R Caller ID is required to use this feature (page 45).R Once phone numbers have been added to the blocked caller list, the handset does not ring
when a call is received until it has received the Caller ID and can confirm that the phonenumber is not stored in the blocked caller list.
Adding a phone number manuallyYou can store 100 phone numbers.Important:R You must store the full phone number, including the area code, in order to block calls from that
number.
1 Tap [Landline] in the home screen or app list.2 Tap [Landline settings] ® [Caller barred].R The handset connects to the base unit.
3 Tap ® [Add to barred list].4 Enter the desired phone number and then tap [Done].
Adding a phone number from the base unit call log1 Tap [Landline] in the home screen or app list.2 Tap [Call log list].R The handset connects to the base unit.
3 Tap the desired information.4 Tap ® [Add to barred list] ® [OK].
Editing or erasing a phone number1 Tap [Landline] in the home screen or app list.2 Tap [Landline settings] ® [Caller barred].R The handset connects to the base unit.
3 Select the desired phone number.4 To edit the phone number:
→ Tap [Edit], edit the phone number, and then tap [Done].To erase the phone number:→ Tap [Delete] ® [OK].
Blocking outgoing calls (call restriction)You can use the call restriction feature to block up to 6 phone numbers so that selected handsetscannot call those phone numbers. If you store an area code in the restricted phone number list,you can prevent the selected handsets from making any calls to phone numbers in that areacode.1 Tap [Landline] in the home screen or app list.
40
Other Features and Settings

2 Tap [Landline settings] ® [Initial settings].R The handset connects to the base unit.
3 Tap [Call restrict].4 Enter the base unit PIN and then tap [OK].5 Turn on the checkbox for each handset that will be prevented from calling restricted phone
numbers and then tap [Next].R To allow a handset to call restricted numbers, turn off its checkbox and then tap [Next] to
finish.6 Select a memory location, enter the phone number to be restricted, and then tap [Done] at
the top of the screen.
Omitting a specific area code when making callsYou can specify an area code that will be omitted when making calls from the call logs, contacts,etc. For example, if you specify the area code “09” and use the call log to call “09-456-7890”, theunit dials “456-7890”.1 Tap [Landline] in the home screen or app list.2 Tap [Landline settings] ® [Initial settings].R The handset connects to the base unit.
3 Tap [Area code].4 Enter an area code (5 digits max.) and then tap [OK].Note:R For New Zealand:
The use of this feature can prevent a National Call from being dialled. E.g., in the case of theSouth Island, the “03” will be omitted and will therefore prevent a National Call to other areasof the South Island.
ECO modeYou can reduce the amount of power that the base unit consumes by enabling ECO mode. Thisfeature reduces the transmission power of the base unit by up to 90% during standby mode.1 Tap [Landline] in the home screen or app list.2 Tap [Landline settings] ® [Initial settings].R The handset connects to the base unit.
3 Turn the [ECO mode] checkbox on or off.R is displayed in the status bar when ECO mode is on.
Note:R If [Repeater mode] is turned on (page 50), ECO mode is automatically turned off and the
[ECO mode] checkbox is not displayed.R During standby mode, the transmission range of the base unit is reduced when ECO mode is
on.R If there is another cordless phone in use nearby, the base unit transmission power may not be
reduced.
41
Other Features and Settings

Phone number conversion codesIf you store phone numbers in your contacts using “+” and the country code, store the followingcodes in the base unit so that phone numbers will be dialled correctly.1 Tap [Landline] in the home screen or app list.2 Tap [Landline settings] ® [Initial settings].R The handset connects to the base unit.
3 Tap [Phone number conversion].4 Select a code to edit, enter the code (4 digits max.) and then tap [OK].
– [International code]: This is the international dialling prefix that you need to dial whendialling international phone numbers manually.
– [Country code]: This is the country code required when calling your country fromoverseas.
– [National access code]: If you store domestic phone numbers in your handset using “+”and the country code, this is the number that should replace the country code whencalling domestically.
First ringThis setting determines whether the first ring is heard when a call is received. If your phone linehas Caller ID service and you do not want your phone system to ring before caller information isreceived, select [Off]. Note that you can only remove the first ring if the phone system rings 2times or more by default, which depends on your phone service.1 Tap [Landline] in the home screen or app list.2 Tap [Landline settings] ® [Initial settings].R The handset connects to the base unit.
3 Tap [First ring].4 Select the desired setting.
Recall/flash time1 Tap [Landline] in the home screen or app list.2 Tap [Landline settings] ® [Initial settings].R The handset connects to the base unit.
3 Tap [Set recall time].4 Select the desired setting.
42
Other Features and Settings
Base unit PINThe base unit PIN is required to register handsets to the base unit and change certain base unitsettings. The default PIN is “0000”. You can change the PIN if desired, however, note that thebase unit will not reveal the PIN to you. If you forget the PIN, contact an authorised service centre.1 Tap [Landline] in the home screen or app list.2 Tap [Landline settings] ® [Initial settings].R The handset connects to the base unit.
3 Tap [Base unit PIN].4 Enter the current base unit PIN (4 digits) and then tap [Continue].5 Enter the desired base unit PIN (4 digits) and then tap [OK] ® [OK].
Region settingThis setting resets certain base unit settings to their default values based on the region youselect.1 Tap [Landline] in the home screen or app list.2 Tap [Landline settings] ® [Initial settings].R The handset connects to the base unit.
3 Tap [Country].4 Select the desired country.Note:R Changing the unit’s region setting may cause the settings for your country or your customised
settings to return to their default settings.
Display language1 From the home screen, tap ® [System settings] ® [Language & input] ®
[Language].2 Select the desired language.Note:R Some items may be displayed in English regardless of the display language setting.
Date and timeSelecting automatic or manual date and time setting1 From the home screen, tap ® [System settings] ® [Date & time] ® [Automatic date
& time].
43
Other Features and Settings
2 To set the date and time automatically:→ Select the desired method.R If you select [Use network provided time], an Internet connection is needed for the
handset to adjust its date and time setting automatically.To set the date and time manually:→ Select [Off].
Setting the date and time manually1 From the home screen, tap ® [System settings] ® [Date & time].2 Make sure that [Automatic date & time] is set to [Off].3 To set the date:
→ Tap [Set date], select the desired date, and then tap [Set].To set the time:→ Tap [Set time], select the desired time, and then tap [Set].
Wi-Fi settingsIf you have a wireless router and an Internet connection, you can configure the handset toconnect to your Wi-Fi network and access the Internet for synchronising your handset with yourGoogle account, using the [Browser] app to view web pages, etc.1 From the home screen, tap ® [System settings].2 Turn on the [Wi-Fi] switch.3 Tap [Wi-Fi].4 Select a Wi-Fi network.R If the desired Wi-Fi network is not displayed, you may need to enter the network name
(also called the “SSID”) manually. See page 44 for more information.5 Enter the password if you are connecting to a secure Wi-Fi network.6 Tap [Connect].
Adding a Wi-Fi network manuallySome wireless routers do not broadcast their availability. In this case you need to enter thenetwork name (SSID) as well as the network’s password.1 From the home screen, tap ® [System settings].2 Tap [Wi-Fi] ® [ADD NETWORK].3 Enter the Wi-Fi network’s SSID.4 Select the network’s security type and enter its password, if required.5 Tap [Save].
44
Other Features and Settings

Google™ accountIf you have a Google account and an Internet connection, you can register your accountinformation in the handset and synchronise your contacts, Gmail™ messages, calendar, anddata for other Google services with the data stored in your handset. This is a convenient way totransfer your contacts to the handset.Use the following procedure to enter your Google account information.1 From the home screen, tap ® [System settings] ® [Accounts & sync] ® [ADD
ACCOUNT] ® [Google].2 Follow the on-screen instructions.
Caller ID supportThe base unit is Caller ID compatible. Caller ID is a service provided by your phone serviceprovider which may require a subscription. Contact your phone service provider for details andavailability.Important:For New Zealand:R For all local and national incoming calls, your display will show the area code (e.g. 09 for
Auckland) or the cellular prefix (e.g. 0274 for Telecom Cellular) followed by the caller’stelephone number. An Auckland caller’s number will be displayed as 09XXXXXXX. The sevenX’s represent the seven digits of the caller’s telephone number. A caller from a 6-digit TelecomCellular number will be displayed as 0274XXXXXX. For incoming international calls, yourdisplay may only show “0000”.For business users on a Centrex line, your display will show Centrex extension numbers in theshorter extension number format used within your company.
R The Caller ID information will not be presented on incoming fax calls if Telecom FaxAbility isused.
Using toll services from Telecom or another company (for New Zealand)Your telephone company may charge you for a local call if the number dialled has the area codeprefix included. If this is unacceptable, dial only the 7-digit local number. Do not dial the “0” prefixor the area code.
Caller ID featuresWhen you receive a call, Caller ID allows the base unit to receive caller information provided fromyour phone service provider. The base unit automatically logs caller information for the last 50callers and stores this information in the base unit call log. The handset also logs information forcalls that are received while the handset is connected to the base unit.
Caller information displayIf a caller’s phone number matches the phone number stored in the handset contacts (page 28),the stored name is displayed and logged in the call log.
45
Other Features and Settings

VoicemailVoicemail is an automatic answering service that may be offered by your phone service provider.After you subscribe to this service, your service provider’s voicemail system answers calls for youwhen you are unavailable to answer the phone or when your line is busy. Messages are recordedby your service provider, not by your telephone.When you have new messages, is displayed in the status bar and notifications panel if yourservice provider supports message indication service. Please contact your service provider fordetails.Important:R Make sure you read the information for voicemail service subscribers on page 36.R KX-PRX120 only: To use your phone service provider’s voicemail service rather than the unit’s
answering system, turn off the answering system (page 30).
Setting the voicemail access number1 Tap [Landline] in the home screen or app list.2 Tap [Landline settings] ® [Voicemail].R The handset connects to the base unit.
3 Tap [Voicemail number].4 Enter the access number and then tap [OK] ® [OK].
Listening to voicemail1 Tap [Phone] in the home screen or app list.2 Select the tab at the top of the screen.
3 Tap and hold 1.4 Operate your service provider’s voicemail service.R Contact your service provider for details.
46
Other Features and Settings
Adding handsetsIn order to use a handset and base unit together, the handset must be registered to the base unit.You can register additional handsets to the base unit for a total of 6 handsets.Important:R See page 4 for information about recommended handsets. Certain features may not be
available if a different handset model is used.
Registering an additional handset to your base unitThe supplied handset is pre-registered to the base unit.1 Tap [Landline] in the home screen or app list.2 Tap [Landline settings] ® [Initial settings].3 If a dialogue is displayed prompting you to press M N on the base unit:
→ Follow the on-screen instructions. You do not need to follow the steps below.If the [Initial settings] screen is displayed:→ Tap [Registration] ® [Register handset].
or→ Tap [Register handset].
4 Select a base unit number.R This number is used by the handset as a reference only.
5 Press and hold M N on the base unit for about 5 seconds, and then tap [OK].R If all registered handsets start ringing, press M N again to stop, then repeat this step.
6 Enter the base unit PIN and then tap [OK].R The handset beeps when registration is complete.R If you forget the base unit PIN, contact an authorised service centre.
Changing the handset nameYou can customise the name of your handset. This can help you easily identify handsets whenmaking intercom calls, transferring calls to other handsets, etc.1 Tap [Landline] in the home screen or app list.2 Tap [Landline settings] ® [Initial settings].R The handset connects to the base unit.
3 Tap [Handset name].4 Edit the name and then tap [OK].
Deregistering a handsetThis procedure erases registration information for the selected handset from both the handsetand its base unit.1 Tap [Landline] in the home screen or app list.2 Tap [Landline settings] ® [Initial settings].R The handset connects to the base unit.
3 Tap [Registration] ® [Cancel registration].
47
Expanding Your Phone System
4 Select the desired handset and then tap [OK].
Intercom featuresMaking an intercom callYou can call another handset that is connected to the same base unit.1 Tap [Phone] in the home screen or app list.2 Tap and then select the desired handset.R You can customise the handset name (page 47).
3 When finished, tap to end the call.
Answering an intercom call1 When a call is being received, tap and drag it to .
R To reject an intercom call, tap and drag it to .
2 When finished, tap to end the call.
Transferring and sharing a callYou can transfer and share calls between two handsets that are connected to the same base unit.1 While talking on a call, tap .R The call is put on hold.
2 Select the desired handset.3 Wait for the other handset user to answer the call.R The other handset rings for 1 minute.R To cancel and return to the call, tap .
4 TransferringAfter the other handset user answers the call, tap to end the intercom call.R The other handset user may continue to talk on the call.SharingAfter the other handset user answers the call, tap to talk on the call together with theother handset user.R The other handset user may continue to talk on the call.
5 When finished, tap to leave the call.R When both handset users have left the call, the call is disconnected.
Joining a callIf another handset user is talking on a call, you can use your handset to join the call and talk onthe call with the handset user.1 While another handset user is talking on a call, tap [Phone] in the home screen or app list.2 Select the tab at the top of the screen.
3 Tap at the bottom of the screen.
48
Expanding Your Phone System
Note:R You can prevent other handset users from joining your calls by enabling privacy mode
(page 49).
Privacy modeIf a handset user is talking on a call, this feature prevents other handset users from joining thecall (page 48).1 Tap [Landline] in the home screen or app list.2 Tap [Landline settings] ® [Initial settings].R The handset connects to the base unit.
3 Turn the [Privacy mode] checkbox on or off.
Adding base unitsHandsets can be registered to up to 4 base units, allowing you to extend the area in which yourhandsets can be used, or use the same handset in other locations where you have base units.
Adding a base unitUse the procedure for registering a handset (page 47).
Selecting a base unitIf the handset is registered to more than one base unit, you can specify which base unit thehandset connects to, or configure the handset to connect to one of its registered base unitsautomatically.Important:R A handset can only make and receive calls and intercom calls using one base unit at a time.
1 Tap [Landline] in the home screen or app list.2 Tap [Landline settings] ® [Initial settings].R The handset connects to the base unit.
3 Tap [Select base unit].4 Select the desired base unit number, or [Auto].R If you select [Auto], the handset automatically uses any available base unit it is registered
to. If the handset moves out of range of one base unit, it looks for another base unit.R If you select a specific base unit, the handset makes and receives calls using that base
unit only. If the handset is out of range of that base unit, no calls can be made.
Cancelling a base unitThis procedure erases the selected base unit’s information from the handset.1 Tap [Landline] in the home screen or app list.2 Tap [Landline settings] ® [Initial settings].R The handset connects to the base unit.
3 Tap [Cancel base unit].
49
Expanding Your Phone System
4 Select the desired base unit number, and then tap [OK].
Adding a DECT repeaterYou can increase the signal range of the base unit by registering a DECT repeater to the baseunit.Important:R See page 3 for information about the recommended DECT repeater. Your phone system may
not function properly if a different repeater model is used.R Do not use more than one repeater at a time.R If the repeater is already registered to a base unit, deregister it from that base unit before
adding it to another base unit. Refer to the documentation supplied with the repeater for details.
Registering a DECT repeater1 Tap [Landline] in the home screen or app list.2 Tap [Landline settings] ® [Initial settings].R The handset connects to the base unit.
3 Turn on the [Repeater mode] checkbox.4 Press and hold M N on the base unit for about 5 seconds.5 Connect the repeater’s AC adaptor and then wait for the and indicators to light in
green.6 Press M N on the base unit to exit registration mode.
Turning DECT repeater mode on and off1 Tap [Landline] in the home screen or app list.2 Tap [Landline settings] ® [Initial settings].R The handset connects to the base unit.
3 Turn the [Repeater mode] checkbox on or off.
Using key findersYou can register up to 4 optional key finders to your phone system (page 3). By registering a keyfinder to the base unit and then attaching the key finder to an easily misplaced item, such as yourhouse or car keys, you can use your handset to find the item. When you use the handset’s keyfinder search mode, the key finder will emit a sound that changes as the handset moves closer tothe item.For more information, refer to the documentation supplied with your key finder or visit thefollowing web site.http://panasonic.net/pcc/products/telephone/p/tga20/
50
Expanding Your Phone System
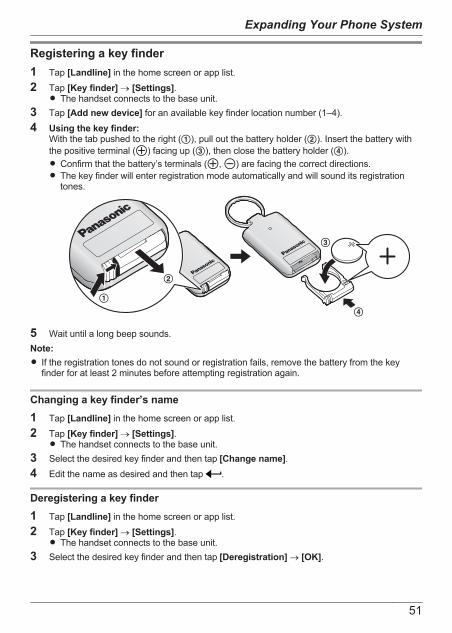
Registering a key finder1 Tap [Landline] in the home screen or app list.2 Tap [Key finder] ® [Settings].R The handset connects to the base unit.
3 Tap [Add new device] for an available key finder location number (1–4).4 Using the key finder:
With the tab pushed to the right (A), pull out the battery holder (B). Insert the battery withthe positive terminal ( ) facing up (C), then close the battery holder (D).R Confirm that the battery’s terminals ( , ) are facing the correct directions.R The key finder will enter registration mode automatically and will sound its registration
tones.
C
D
B
A
5 Wait until a long beep sounds.Note:R If the registration tones do not sound or registration fails, remove the battery from the key
finder for at least 2 minutes before attempting registration again.
Changing a key finder’s name1 Tap [Landline] in the home screen or app list.2 Tap [Key finder] ® [Settings].R The handset connects to the base unit.
3 Select the desired key finder and then tap [Change name].4 Edit the name as desired and then tap .
Deregistering a key finder1 Tap [Landline] in the home screen or app list.2 Tap [Key finder] ® [Settings].R The handset connects to the base unit.
3 Select the desired key finder and then tap [Deregistration] ® [OK].
51
Expanding Your Phone System
Searching for a key finder1 Tap [Landline] in the home screen or app list.2 Tap [Key finder] ® [Search].R The handset connects to the base unit.
3 Select the desired key finder.4 Try to locate the key finder.R While searching for the key finder, the handset beeps and displays the key finder’s signal
strength (1–5) and level (1–100). The key finder beeps in response.R Searching stops automatically after 3 minutes. To continue searching for the key finder,
repeat step 3.5 To stop searching, tap .
Checking key finder battery level1 Tap [Landline] in the home screen or app list.2 Tap [Key finder] ® [Battery check].R The handset connects to the base unit.
3 Select the desired key finder.R If the battery is good, the key finder beeps and [OK] is displayed.R If the battery is dead, the key finder does not beep and [Battery dead] is displayed.R [Battery dead] may be displayed if there is radio interference or if the key finder is out of
range of the handset.
52
Expanding Your Phone System

Phone settings overviewYou can customise general phone settings to suit your needs using the [Settings] app. Settingsare grouped into the categories explained below.To open the [Settings] app, tap [Settings] in the home screen or app list.
Settings category Description[Phone management] Contains settings related to the handset’s DECT
features.[Wi-Fi] Contains wireless network settings.[Landline settings] Contains various base unit features and settings.[Bluetooth] Contains Bluetooth wireless technology settings.[More...] Contains settings related to wireless networks, such as
airplane mode and Wi-Fi Direct.[Audio profiles] Contains settings related to night mode, ringer volume,
and ringtones.[Display] Contains settings such as brightness and screen
timeout.[Storage] Allows you to confirm the available space in your
phone.[Battery] Allows you to confirm and manage battery performance.[Apps] Allows you to manage and remove the apps installed
on your phone.[Accounts & sync] Allows you to add and remove new accounts, as well
as manage how your phone synchronises to servers tokeep its data up-to-date.
[Location services] Contains settings related to how your phone useslocation information.
[Security] Contains settings that control security-related featuressuch as screen lock.
[Language & input] Contains settings related to display language, inputlanguage, the keyboard, speech, and the userdictionary.
[Backup & reset] Contains data backup and deletion related settings thathelp you manage and back up your personalinformation to Google servers. You can also reset yourphone and its information using settings found here.
[Date & time] Contains settings that determine your phone’s date,time, time zone, and time format.
[Schedule power on/off] Allows you to set the handset to turn on and off andscheduled times.
[Accessibility] Contains settings that can make the phone easier tointeract with.
53
Other Information
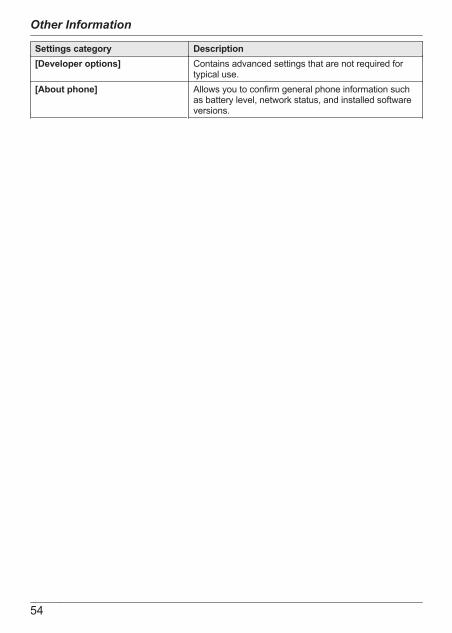
Settings category Description[Developer options] Contains advanced settings that are not required for
typical use.[About phone] Allows you to confirm general phone information such
as battery level, network status, and installed softwareversions.
54
Other Information
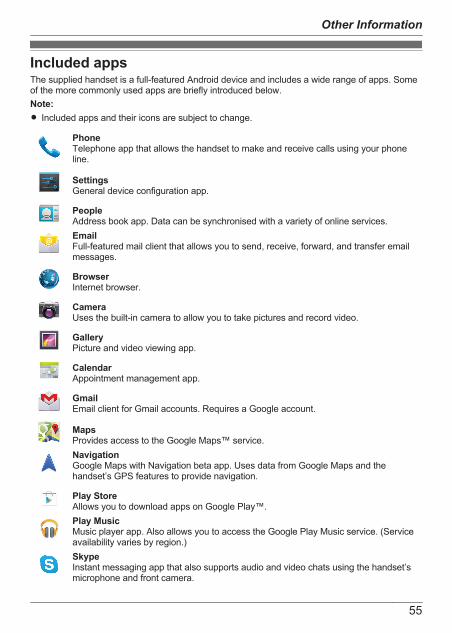
Included appsThe supplied handset is a full-featured Android device and includes a wide range of apps. Someof the more commonly used apps are briefly introduced below.Note:R Included apps and their icons are subject to change.
PhoneTelephone app that allows the handset to make and receive calls using your phoneline.
SettingsGeneral device configuration app.
PeopleAddress book app. Data can be synchronised with a variety of online services.EmailFull-featured mail client that allows you to send, receive, forward, and transfer emailmessages.
BrowserInternet browser.
CameraUses the built-in camera to allow you to take pictures and record video.
GalleryPicture and video viewing app.
CalendarAppointment management app.
GmailEmail client for Gmail accounts. Requires a Google account.
MapsProvides access to the Google Maps™ service.NavigationGoogle Maps with Navigation beta app. Uses data from Google Maps and thehandset’s GPS features to provide navigation.
Play StoreAllows you to download apps on Google Play™.Play MusicMusic player app. Also allows you to access the Google Play Music service. (Serviceavailability varies by region.)SkypeInstant messaging app that also supports audio and video chats using the handset’smicrophone and front camera.
55
Other Information
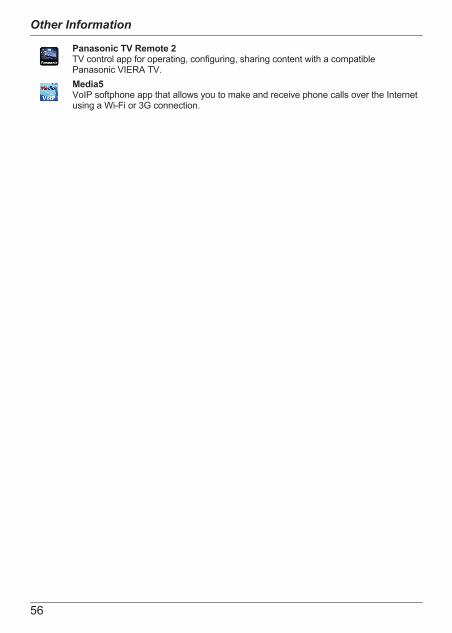
Panasonic TV Remote 2TV control app for operating, configuring, sharing content with a compatiblePanasonic VIERA TV.Media5VoIP softphone app that allows you to make and receive phone calls over the Internetusing a Wi-Fi or 3G connection.
56
Other Information

Status iconsIcons that appear in the status bar vary depending on the apps that are installed in the handset.Some common icons are described below.
Connection to base unit is available
Connection to base unit is available, ECO mode is turned on
No connection to base unit
Airplane mode is on
Connected to Wi-Fi network
Bluetooth feature is on
Bluetooth device is connected
Battery is charging
Speakerphone is on
Microphone is muted
[Silent] audio profile is selected
Night mode is on
Privacy mode is on
Answering system is on*1
Answering system is set to “greeting only” mode*1
*1 KX-PRX120 only
57
Other Information
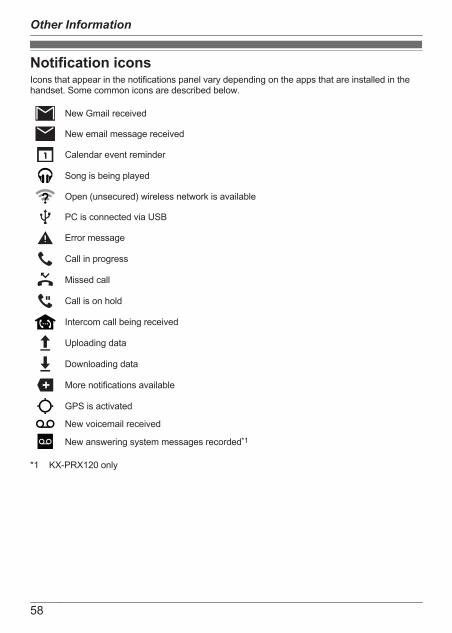
Notification iconsIcons that appear in the notifications panel vary depending on the apps that are installed in thehandset. Some common icons are described below.
New Gmail received
New email message received
Calendar event reminder
Song is being played
Open (unsecured) wireless network is available
PC is connected via USB
Error message
Call in progress
Missed call
Call is on hold
Intercom call being received
Uploading data
Downloading data
More notifications available
GPS is activated
New voicemail received
New answering system messages recorded*1
*1 KX-PRX120 only
58
Other Information
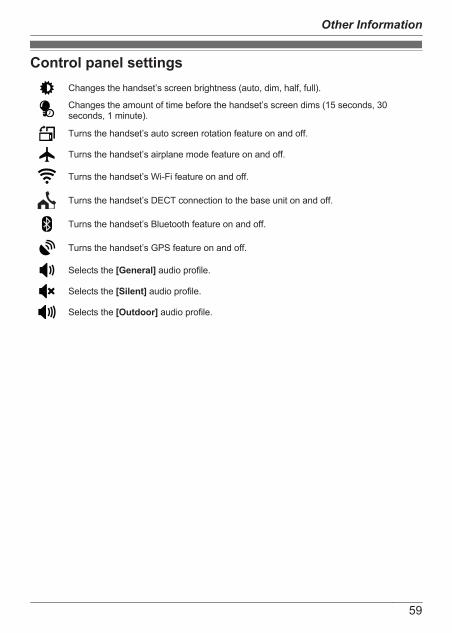
Control panel settingsChanges the handset’s screen brightness (auto, dim, half, full).
Changes the amount of time before the handset’s screen dims (15 seconds, 30seconds, 1 minute).
Turns the handset’s auto screen rotation feature on and off.
Turns the handset’s airplane mode feature on and off.
Turns the handset’s Wi-Fi feature on and off.
Turns the handset’s DECT connection to the base unit on and off.
Turns the handset’s Bluetooth feature on and off.
Turns the handset’s GPS feature on and off.
Selects the [General] audio profile.
Selects the [Silent] audio profile.
Selects the [Outdoor] audio profile.
59
Other Information
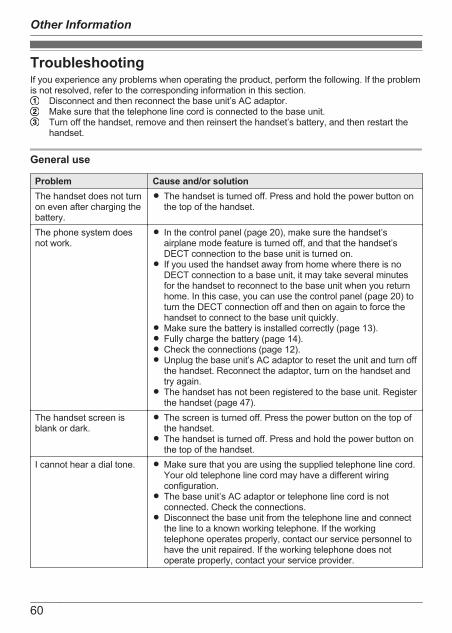
TroubleshootingIf you experience any problems when operating the product, perform the following. If the problemis not resolved, refer to the corresponding information in this section.
Disconnect and then reconnect the base unit’s AC adaptor.Make sure that the telephone line cord is connected to the base unit.Turn off the handset, remove and then reinsert the handset’s battery, and then restart thehandset.
General use
Problem Cause and/or solutionThe handset does not turnon even after charging thebattery.
R The handset is turned off. Press and hold the power button onthe top of the handset.
The phone system doesnot work.
R In the control panel (page 20), make sure the handset’sairplane mode feature is turned off, and that the handset’sDECT connection to the base unit is turned on.
R If you used the handset away from home where there is noDECT connection to a base unit, it may take several minutesfor the handset to reconnect to the base unit when you returnhome. In this case, you can use the control panel (page 20) toturn the DECT connection off and then on again to force thehandset to connect to the base unit quickly.
R Make sure the battery is installed correctly (page 13).R Fully charge the battery (page 14).R Check the connections (page 12).R Unplug the base unit’s AC adaptor to reset the unit and turn off
the handset. Reconnect the adaptor, turn on the handset andtry again.
R The handset has not been registered to the base unit. Registerthe handset (page 47).
The handset screen isblank or dark.
R The screen is turned off. Press the power button on the top ofthe handset.
R The handset is turned off. Press and hold the power button onthe top of the handset.
I cannot hear a dial tone. R Make sure that you are using the supplied telephone line cord.Your old telephone line cord may have a different wiringconfiguration.
R The base unit’s AC adaptor or telephone line cord is notconnected. Check the connections.
R Disconnect the base unit from the telephone line and connectthe line to a known working telephone. If the workingtelephone operates properly, contact our service personnel tohave the unit repaired. If the working telephone does notoperate properly, contact your service provider.
60
Other Information
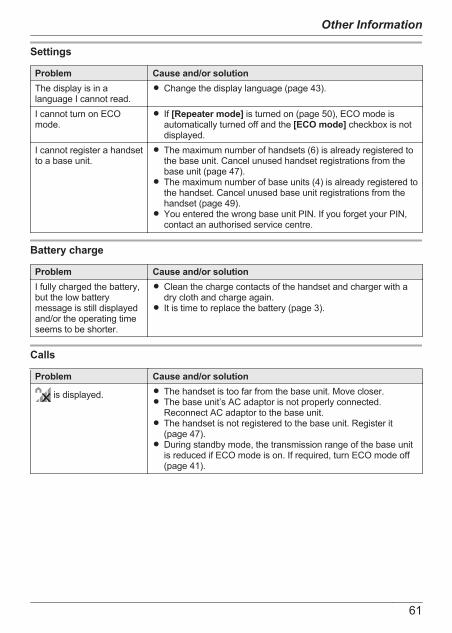
Settings
Problem Cause and/or solutionThe display is in alanguage I cannot read.
R Change the display language (page 43).
I cannot turn on ECOmode.
R If [Repeater mode] is turned on (page 50), ECO mode isautomatically turned off and the [ECO mode] checkbox is notdisplayed.
I cannot register a handsetto a base unit.
R The maximum number of handsets (6) is already registered tothe base unit. Cancel unused handset registrations from thebase unit (page 47).
R The maximum number of base units (4) is already registered tothe handset. Cancel unused base unit registrations from thehandset (page 49).
R You entered the wrong base unit PIN. If you forget your PIN,contact an authorised service centre.
Battery charge
Problem Cause and/or solutionI fully charged the battery,but the low batterymessage is still displayedand/or the operating timeseems to be shorter.
R Clean the charge contacts of the handset and charger with adry cloth and charge again.
R It is time to replace the battery (page 3).
Calls
Problem Cause and/or solution
is displayed. R The handset is too far from the base unit. Move closer.R The base unit’s AC adaptor is not properly connected.
Reconnect AC adaptor to the base unit.R The handset is not registered to the base unit. Register it
(page 47).R During standby mode, the transmission range of the base unit
is reduced if ECO mode is on. If required, turn ECO mode off(page 41).
61
Other Information
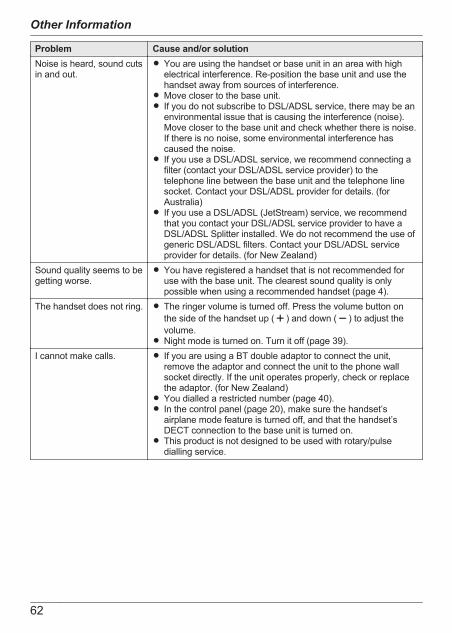
Problem Cause and/or solutionNoise is heard, sound cutsin and out.
R You are using the handset or base unit in an area with highelectrical interference. Re-position the base unit and use thehandset away from sources of interference.
R Move closer to the base unit.R If you do not subscribe to DSL/ADSL service, there may be an
environmental issue that is causing the interference (noise).Move closer to the base unit and check whether there is noise.If there is no noise, some environmental interference hascaused the noise.
R If you use a DSL/ADSL service, we recommend connecting afilter (contact your DSL/ADSL service provider) to thetelephone line between the base unit and the telephone linesocket. Contact your DSL/ADSL provider for details. (forAustralia)
R If you use a DSL/ADSL (JetStream) service, we recommendthat you contact your DSL/ADSL service provider to have aDSL/ADSL Splitter installed. We do not recommend the use ofgeneric DSL/ADSL filters. Contact your DSL/ADSL serviceprovider for details. (for New Zealand)
Sound quality seems to begetting worse.
R You have registered a handset that is not recommended foruse with the base unit. The clearest sound quality is onlypossible when using a recommended handset (page 4).
The handset does not ring. R The ringer volume is turned off. Press the volume button onthe side of the handset up ( ) and down ( ) to adjust thevolume.
R Night mode is turned on. Turn it off (page 39).I cannot make calls. R If you are using a BT double adaptor to connect the unit,
remove the adaptor and connect the unit to the phone wallsocket directly. If the unit operates properly, check or replacethe adaptor. (for New Zealand)
R You dialled a restricted number (page 40).R In the control panel (page 20), make sure the handset’s
airplane mode feature is turned off, and that the handset’sDECT connection to the base unit is turned on.
R This product is not designed to be used with rotary/pulsedialling service.
62
Other Information
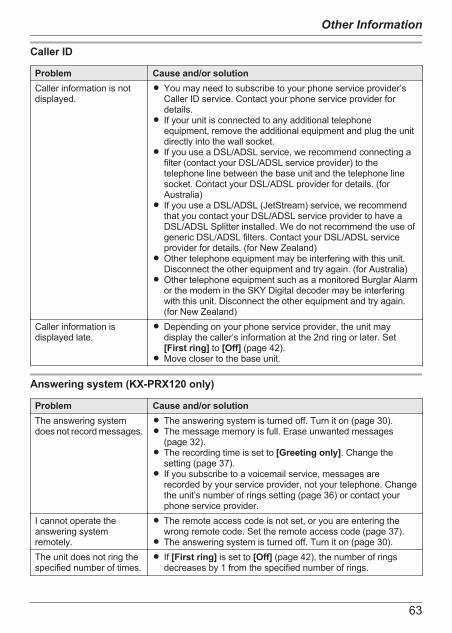
Caller ID
Problem Cause and/or solutionCaller information is notdisplayed.
R You may need to subscribe to your phone service provider’sCaller ID service. Contact your phone service provider fordetails.
R If your unit is connected to any additional telephoneequipment, remove the additional equipment and plug the unitdirectly into the wall socket.
R If you use a DSL/ADSL service, we recommend connecting afilter (contact your DSL/ADSL service provider) to thetelephone line between the base unit and the telephone linesocket. Contact your DSL/ADSL provider for details. (forAustralia)
R If you use a DSL/ADSL (JetStream) service, we recommendthat you contact your DSL/ADSL service provider to have aDSL/ADSL Splitter installed. We do not recommend the use ofgeneric DSL/ADSL filters. Contact your DSL/ADSL serviceprovider for details. (for New Zealand)
R Other telephone equipment may be interfering with this unit.Disconnect the other equipment and try again. (for Australia)
R Other telephone equipment such as a monitored Burglar Alarmor the modem in the SKY Digital decoder may be interferingwith this unit. Disconnect the other equipment and try again.(for New Zealand)
Caller information isdisplayed late.
R Depending on your phone service provider, the unit maydisplay the caller’s information at the 2nd ring or later. Set[First ring] to [Off] (page 42).
R Move closer to the base unit.
Answering system (KX-PRX120 only)
Problem Cause and/or solutionThe answering systemdoes not record messages.
R The answering system is turned off. Turn it on (page 30).R The message memory is full. Erase unwanted messages
(page 32).R The recording time is set to [Greeting only]. Change the
setting (page 37).R If you subscribe to a voicemail service, messages are
recorded by your service provider, not your telephone. Changethe unit’s number of rings setting (page 36) or contact yourphone service provider.
I cannot operate theanswering systemremotely.
R The remote access code is not set, or you are entering thewrong remote code. Set the remote access code (page 37).
R The answering system is turned off. Turn it on (page 30).The unit does not ring thespecified number of times.
R If [First ring] is set to [Off] (page 42), the number of ringsdecreases by 1 from the specified number of rings.
63
Other Information
Liquid damage
Problem Cause/solutionLiquid or other form ofmoisture has entered thehandset or charger.
R Disconnect the AC adaptor from the charger, and remove themicroSD card and battery from the handset. Allow the unitexposed to liquid to dry for at least 3 days. After the exposedunit is completely dry, reconnect the AC adaptor, insert themicroSD card and battery into the handset, and charge thebattery fully before use. If the exposed unit does not workproperly, contact your place of purchase or nearest Panasonicservice centre.Caution:R To avoid permanent damage, do not use a microwave oven
to speed up the drying process.
64
Other Information

Updating the softwareIf a system update is available, you can update the system software contained in the handset. AmicroSD card must be installed in the handset in order to update the system software.Important:R For best performance, we recommend using a computer to download the software update file,
and then using a USB connection to copy the file to the microSD card installed in the handset.R Connect the handset to your computer using a USB cable (not supplied) with a Micro-B plug
for connecting to the handset. Refer to the following illustration for plug shape and pin layout.
1 Use a computer to access the support page for this product at the address below and checkwhether there is a software update available for the handset.http://www.panasonic.net/pcc/support/tel/sdectR If a software update is available, continue to the next step, otherwise there is no need to
continue with this procedure.2 Connect the handset to your computer using a USB cable.3 When the [USB connected] screen is displayed on the handset, tap [Turn on USB
storage].4 Using your computer, download the software update file and save it to the root directory of
the handset’s microSD card.R Save the file as is (i.e., as a “.zip” file). Do not change the file extension.R When you connect the handset to your computer, the handset’s internal memory and its
microSD card are mounted on your computer as removable disks. If you do not knowwhich removable disk corresponds to the microSD card, remove the card from thehandset and observe the name of the handset’s internal memory when it is mounted, andthen insert the microSD card into the handset again.
5 After the file has been saved, tap [Turn off USB storage] on the handset.6 Disconnect the handset from your computer.7 Using the handset, go to the home screen and then tap ® [System settings] ® [About
phone] ® [Software update].8 Follow the on-screen instructions.R The software update file is automatically erased from the microSD card after the update is
complete.
65
Other Information
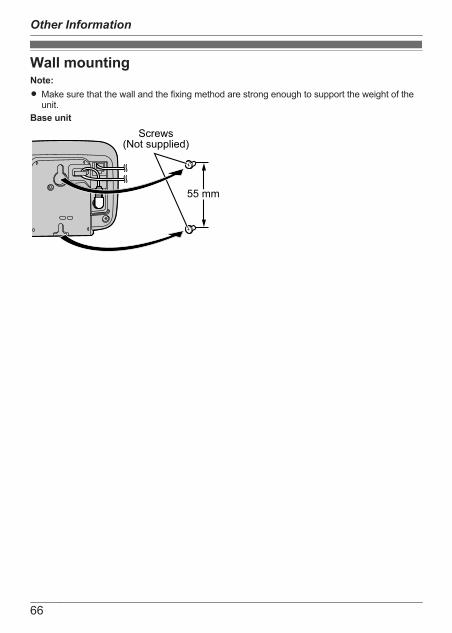
Wall mountingNote:R Make sure that the wall and the fixing method are strong enough to support the weight of the
unit.Base unit
Screws(Not supplied)
55 mm
66
Other Information

Warranty (for New Zealand)Panasonic New Zealand undertakes to:
Repair or at its option, replace without cost to the owner, either for material or labour,
part which is found to be defective within two years of the date of purchase.
THIS EXPRESS WARRANTY DOES NOT COVER:
IF YOUR PANASONIC PRODUCT FAILS WITHIN THE
WARRANTY PERIOD:
Take it to the Authorised Panasonic Dealer from whom you purchased the product
will repair it (or arrange to have it repaired) during their normal business
enquiries regarding warranty or otherwise, please call – Customer
e Tel. No.: (09) 272 0178
NOTE: THIS EXPRESS WARRANTY IS OFFERED AS AN
BENEFIT AND DOES NOT AFFECT YOUR LEGAL
1) Pick up and delivery.
2) Batteries.
3) Repairs when the product has not been used in accordance with the Operating
Instructions Manual or has been modified.
4) Normal maintenance and cleaning as required in the product’s Operating
Instructions Manual.
5) Service calls to: a Correct the set up of the product
b Instruct you how to use the product
c Replace fuses or correct your building’s wiring
6) Damage to the product caused by accident, misuse or Act of God.
7) Repairs when the product has been dismantled, repaired, modified or serviced
by other than a Panasonic Authorised Dealer authorised to service that type of
product.
any
Centr
All
who
RIGHTS.
EXTRA
Support
hours.
67
Other Information
IndexA AC adaptor: 12
Accessories: 3, 4Adding base units: 49Adding handsets: 47Answering system: 30
Call screening: 37Erasing messages: 32Greeting message: 31New message notification: 33Number of rings: 36Playing messages: 31Recording time: 37Remote code: 37Remote operation: 33, 35Turning on/off: 30Voicemail users: 36
App list: 19Area code: 41Audio profiles: 25, 38Auto talk: 39
B Base unitCancelling: 49Selecting: 49
Base unit PIN: 43Battery: 15
Installation: 13Replacement: 3
Battery icon: 14Blocking incoming calls: 39Blocking outgoing calls: 40
C Call log: 25Base unit: 27Handset: 26
Call restrict: 40Call waiting: 25Caller barred: 39Caller ID: 45Calls
Answering: 24Blocking: 39, 40Joining: 48Making: 22Recording: 24Sharing: 48Transferring: 48
Charger: 12, 14Connections: 12Contacts: 28
Control panel: 20, 59Country code: 42Country setting: 43
D Date and time: 43DECT repeater: 3, 50Display language: 43
E ECO mode: 41F First ring: 42G Google account: 45H Handset
Adding: 47Charging: 14Deregistering: 47Name: 47Registering: 47Ringtones: 38
Headset: 3Hold: 23Home screen: 19
I Icons: 55, 57, 58Intercom: 48International code: 42
K Key finder: 3, 50L Landline app: 20
Language: 43M Making calls: 22
microSD card: 13Mute: 23
N National access code: 42Night mode: 39Notifications panel: 20, 58
P Phone number conversion: 42Power failure: 15Power on/off: 17Privacy mode: 49
R Recall/flash: 23, 42Recording calls: 24Region setting: 43Repeater: 3, 50Repeater mode: 50
S Set recall time: 42Setup wizard: 18Software update: 65Speakerphone: 23Specifications: 11Speed dialling: 29Status bar: 20, 57
T Troubleshooting: 60U USB: 14
68
Index

V Voicemail: 36, 46Volume
Receiver: 23Speakerphone: 23
W Wall mounting: 66Wi-Fi: 44
69
Index

70
Notes

71
Notes

For AustraliaCustomer Care Centre Tel. No.: 132600or website www.panasonic.com.auFor New ZealandCustomer Care Centre Tel. No.: (09) 272 0178 or website www.panasonic.co.nz
Sales Department:
1 Innovation Road, Macquarie Park NSW 2113, Australia
Sales Department:
350 Te Irirangi Drive, East Tamaki, Private Bag 14911 Panmure, Auckland, New Zealand
Phone: (09) 272 0100
Fax: (09) 272 0137
1-62, 4-chome, Minoshima, Hakata-ku, Fukuoka 812-8531, Japan
© Panasonic System Networks Co., Ltd. 2013 PNQP1054ZA CC0913YK0