
Operating and installation instructions Oven - Miele · Operating and installation instructions...
108
Operating and installation instructions Oven To prevent the risk of accidents or damage to the appliance, it is essential to read these instructions before it is installed and used for the first time. en-AU, NZ M.-Nr. 10 692 210
-
Upload
truongdien -
Category
Documents
-
view
231 -
download
0
Transcript of Operating and installation instructions Oven - Miele · Operating and installation instructions...
Operating and installation instructionsOven
To prevent the risk of accidents or damage to the appliance, it isessential to read these instructions before it is installed and used forthe first time.
en-AU, NZ M.-Nr. 10 692 210

Contents
2
Warning and Safety instructions .......................................................................... 5
Caring for the environment ................................................................................ 15
Oven overview ..................................................................................................... 16
Oven controls....................................................................................................... 17Function selector .................................................................................................. 18Temperature selector ............................................................................................ 18
Temperature indicator light ........................................................................... 18Clock/Timer ........................................................................................................... 19
Display.............................................................................................................. 19Sensors controls .............................................................................................. 19
Features................................................................................................................ 20Model numbers .................................................................................................... 20Data plate ............................................................................................................. 20Items supplied with delivery.................................................................................. 20Standard and optional accessories....................................................................... 20
Shelf runners .................................................................................................... 21Baking tray, universal tray and rack with non-tip safety notches..................... 21FlexiClip telescopic runners HFC 70 ................................................................ 22
Oven controls ....................................................................................................... 26Oven safety features ............................................................................................. 26
System lock for the oven ............................................................................. 26Cooling fan ....................................................................................................... 26Vented oven door ............................................................................................. 26Door lock for Pyrolytic cleaning ....................................................................... 26
PerfectClean treated surfaces .............................................................................. 27
Before using for the first time ............................................................................ 28Before using for the first time................................................................................ 28Heating up the oven for the first time.................................................................... 29
Overview of functions ......................................................................................... 30
Tips on saving energy ......................................................................................... 32
Operation.............................................................................................................. 34Basic operation ..................................................................................................... 34Cooling fan ............................................................................................................ 34Pre-heating the oven ............................................................................................. 35

Contents
3
Clock/Timer ......................................................................................................... 36Display................................................................................................................... 36
Symbols in the display ..................................................................................... 36Sensors ................................................................................................................. 36How to set the time or a duration.......................................................................... 37
Displaying times/durations ............................................................................... 37When the time/duration has elapsed ............................................................... 37
Using the minute minder ................................................................................... 38Setting the minute minder ................................................................................ 38Changing the time set for the minute minder................................................... 39Cancelling the time set for the minute minder ................................................. 39
Switching cooking programmes on and off automatically .................................... 40Setting a cooking duration ............................................................................... 40At the end of the cooking duration:.................................................................. 41Setting a cooking duration and finish time....................................................... 42Changing the cooking duration ........................................................................ 43Deleting a cooking duration ............................................................................. 44Deleting a finish time ........................................................................................ 44
Changing the time of day ...................................................................................... 45Changing settings ................................................................................................. 46
Baking................................................................................................................... 48Notes on using the baking charts ......................................................................... 49Baking charts ........................................................................................................ 50
Creamed mixture.............................................................................................. 50Rubbed in mixture ............................................................................................ 52Yeast mixtures and quark dough...................................................................... 54Whisked mixture............................................................................................... 56Choux pastry, puff pastry, meringue................................................................ 57
Roasting ............................................................................................................... 58Notes on using the roasting charts ....................................................................... 59Roasting charts ..................................................................................................... 60
Beef, veal.......................................................................................................... 60Pork .................................................................................................................. 61Lamb, game ..................................................................................................... 62Poultry, fish....................................................................................................... 63
Low temperature cooking .................................................................................. 64
Grilling .................................................................................................................. 66Notes on the grilling chart ..................................................................................... 68Fan Grill ........................................................................................................... 69Grill ................................................................................................................. 71

Contents
4
Further applications ............................................................................................ 72Defrost................................................................................................................... 72Gentle Bake........................................................................................................... 73Frozen food/Ready meals...................................................................................... 74Drying food............................................................................................................ 75Bottling .................................................................................................................. 76Heating crockery ................................................................................................... 77
Cleaning and care ............................................................................................... 78Unsuitable cleaning agents ................................................................................... 78Useful tips ............................................................................................................. 79Normal soiling........................................................................................................ 79Stubborn soiling (excluding the FlexiClip telescopic runners)............................... 80Stubborn soiling on the FlexiClip telescopic runners............................................ 81Pyrolytic cleaning of the oven interior ............................................................ 82
Setting up for the Pyrolytic cleaning programme............................................. 82Starting the Pyrolytic cleaning programme ...................................................... 83Delaying the start time of the Pyrolytic cleaning programme .......................... 84At the end of the Pyrolytic cleaning programme.............................................. 84The Pyrolytic cleaning programme is cancelled............................................... 85
Removing the door................................................................................................ 86Dismantling the door ........................................................................................ 87
Fitting the door ...................................................................................................... 91Removing the shelf runners with FlexiClip telescopic runners.............................. 92Lowering the top heat/grill element....................................................................... 93
Problem solving guide ........................................................................................ 94
After sales service and warranty ....................................................................... 98
Electrical connection .......................................................................................... 99
Building-in diagrams ......................................................................................... 100Appliance dimensions and unit cut-out .............................................................. 100
Installation in a base unit................................................................................ 100Installation in a tall unit ................................................................................... 101
Front dimensions................................................................................................. 102
Installing the oven ............................................................................................. 103

Warning and Safety instructions
5
This appliance conforms to current safety requirements.Inappropriate use can, however, lead to personal injury anddamage to property.
To avoid the risk of accidents and damage to the appliance,please read these instructions carefully before using it for the firsttime. They contain important notes on installation, safety, use andmaintenance. Miele cannot be held liable for non-compliance withthese instructions. Keep these instructions in a safe place andensure that new users are familiar with the contents. Pass them onto any future owner.

Warning and Safety instructions
6
Correct application
This oven is designed for domestic use and for use in similarenvironments by guests in hotel or motel rooms, bed & breakfastsand other typical living quarters. This does not include common/shared facilities or commercial facilities within hotels, motels or bed& breakfasts.
The oven is not suitable for outdoor use.
The oven is intended only to cook, bake, roast, grill, defrost,bottle, dry fruit etc.Any other usage is at the owner's risk.
This oven is not intended for use by persons (including children)with reduced physical, sensory or mental capabilities, or lack ofexperience and knowledge, unless they are supervised whilst using itor have been given instruction concerning its use by a personresponsible for their safety.They must be able to recognise the dangers of misuse.
This oven is supplied with a special lamp to cope with particularconditions (e.g. temperature, moisture, chemical resistance, abrasionresistance and vibration). This special lamp must only be used forthe purpose for which it is intended. It is not suitable for roomlighting.

Warning and Safety instructions
7
Safety with children
Young children must not be allowed to use this appliance.
Older children may only use the appliance when its operation hasbeen clearly explained to them and they are able to use it safely,recognising the dangers of misuse.
Cleaning work may only be carried out by older children under thesupervision of an adult.
Children should be supervised near the appliance. Ensure thatthey do not play with the appliance.
Danger of suffocation! Children may be able to wrap themselves inpacking material or pull it over their head with the risk of suffocation.Keep children away from any packing material.
Danger of burning! Children's skin is far more sensitive to hightemperatures than that of adults. Great care should be taken toensure that children do not touch the appliance when it is beingused. External parts of the oven such as the door glass, controlpanel and the vents become quite hot.
Danger of burning!Children's skin is far more sensitive to high temperatures than that ofadults. The oven becomes hotter during the Pyrolytic cleaningprogramme than it does in normal use. Do not let children touch theoven while the Pyrolytic cleaning programme is running.
Danger of injury! The maximum load capacity for the door is15 kg. Children can hurt themselves on an open door.Ensure that children do not sit on or swing on the door.

Warning and Safety instructions
8
Technical safety
Repairs and other work by unqualified persons could bedangerous. Installation, maintenance work and repairs to electricalappliances must only be carried out by a Miele approved servicetechnician.
A damaged appliance is dangerous. Check it for any visibledamage. Never install or attempt to use a damaged appliance.
Reliable and safe operation of this oven can only be assured if ithas been connected to the mains electricity supply.
The electrical safety of this appliance can only be guaranteedwhen continuity is complete between it and an effective earthingsystem. It is most important that this basic safety requirement ispresent and tested regularly and, where there is any doubt, thehousehold wiring system should be inspected by a qualifiedelectrician.
Before connecting the appliance to the mains supply, make surethat the rating on the data plate (voltage and frequency) correspondsto that of the household supply.This data must correspond in order to avoid risk of damage to theappliance. Consult a qualified electrician if in any doubt.
Do not connect the appliance to the mains electricity supply by amulti-socket unit or an extension lead. These do not guarantee therequired safety of the appliance (e.g. danger of overheating).
For safety reasons, this appliance may only be used when it hasbeen built in.
This oven must not be installed and operated in mobileinstallations (e.g. on a ship).
Tampering with electrical connections or components andmechanical parts is highly dangerous to the user and can causeoperational faults.Do not open the outer casing of the appliance.

Warning and Safety instructions
9
The manufacturer's warranty will be invalidated if the appliance isnot repaired by a Miele approved service technician.
Faulty components must only be replaced by genuine Miele spareparts. The manufacturer can only guarantee the safety of theappliance when Miele replacement parts are used.
If the oven is delivered without a mains connection cable, or if themains connection cable is damaged, it must only be replaced by aMiele approved service technician with a specialist connection cableof type H 05 VV-F, available from Miele, (see "Electrical connection")in order to avoid a hazard.
During installation, maintenance and repair work, the appliancemust be disconnected from the mains electricity supply, e.g. if theoven lighting is faulty (see "Problem solving guide"). It is onlycompletely isolated from the electricity supply when:
– it is switched off at the mains circuit breaker, or
– it is switched off at the wall socket and the plug is withdrawn fromthe socket. Do not pull the mains connection cable but the mainsplug to disconnect your appliance from the mains electricitysupply.
For the oven to function correctly, it requires a sufficient intake ofcool air. Ensure the intake of cool air to the oven is not impaired (e.g.due to the installation of insulation material inside the housing unit).Furthermore, the incoming cool air must not be excessively heatedby other heat sources (e.g. fuel furnaces).
If the oven is installed behind a furniture door, do not close thedoor while the oven is in operation. Heat and moisture would buildup behind a closed furniture door, potentially causing damage to theoven, the furniture unit and the flooring. Wait until the oven hascooled down completely before closing the furniture door.

Warning and Safety instructions
10
Correct use
Danger of burning!The oven becomes hot when in use.Exercise care when handling food and trays so as not to burnyourself on heating elements, the walls of the oven, shelf runners,trays and hot food itself.Use oven gloves when placing food in the oven, turning orremoving it and when adjusting oven shelves etc. in a hot oven.
Do not use the oven to heat up the room.Due to the high temperatures radiated, objects left near theappliance could catch fire.
Never leave the appliance unattended when cooking with oil orfat. They can ignite if overheated.Do not use water on grease fires. Turn off the oven immediately andsuffocate the flames by keeping the oven door closed.
Make sure that you keep to the recommended grilling times whenusing grilling functions.Excessively long grilling times can lead to food drying out andburning or could even cause the food to catch fire.
Some foods dry out very quickly and can be ignited by highgrilling temperatures.Do not use grilling functions for crisping rolls or bread or to dryflowers or herbs. Instead use Fan Plus or Conventional Heat .
If using alcohol in your recipes, please be aware that hightemperatures can cause the alcohol to vaporise and even to ignite onthe hot heating elements.
When residual heat is used to keep food warm, the high level ofhumidity and condensation can cause corrosion in the oven. Thecontrol panel, worktop or furniture unit may also be damaged.Do not switch the oven off completely while food is inside it, butselect the lowest possible temperature for the oven function you areusing. This will ensure the fan will automatically continue to run.

Warning and Safety instructions
11
Food which is stored in the oven or left in it to be kept warm candry out and the moisture released can lead to corrosion damage inthe oven. Always cover food that is left in the oven to keep warm.
A build-up of heat can cause the enamel on the floor of the ovento crack or shatter.Do not line the floor of the oven with anything, e.g. aluminium foil oroven liners.If you wish to place dishes on the floor of the oven during cooking,or place crockery on the floor of the oven to heat it up, you can doso, but only with the Fan Plus or Gentle Bake function.
The enamelling on the oven floor can become damaged by itemsbeing pushed around on it. If using the oven to store pots and pans, ensure that you avoidpushing them around on the oven floor.
Never pour cold water onto hot surfaces in a hot oven.The steam created could cause serious burns or scalding and thesudden change in temperature can damage the enamel in the oven.
It is important that the heat is allowed to spread evenly throughoutthe food being cooked.This can be achieved by stirring or turning the food.
Plastic containers, which are not heat-resistant, melt and mayignite at high temperatures and can damage the oven.Use only plastic containers that are indicated by the manufacturer asbeing suitable for use in ovens.
Do not use the appliance to heat up or bottle food in sealed jarsand tins.Pressure will build up inside them and they can explode causingdamage to the appliance, as well as the risk of injury and scalding.
Do not leave the oven door open unnecessarily as someone maytrip over it or be injured by it.

Warning and Safety instructions
12
The oven door can support a maximum load of 15 kg. Do not leanor sit on an open oven door, or place heavy items on it. Also makesure that nothing can get trapped between the door and the ovencavity. This could damage the oven.
For ovens with a stainless steel front:
The coated stainless steel surface can be damaged by adhesivesand will lose its protective effect against pollution. Do not adheresticky notes, transparent tape, masking tape or other adhesives ontothe stainless steel surface.
The surface is susceptible to scratching. Even magnets can causescratches.

Warning and Safety instructions
13
Cleaning and care
Do not use a steam cleaning appliance to clean this oven.Pressurised steam could reach the electrical components and causea short circuit.
Scratches on the door glass can result in the glass breaking.Do not use abrasive cleaners, hard sponges, brushes or sharp metaltools to clean the door glass.
The shelf runners can be removed for cleaning (see "Cleaning andcare").Ensure that they are replaced correctly and do not use the ovenwithout them fitted.
Coarse soiling should be removed before running the Pyrolyticcleaning programme. If not removed, coarse soiling can smoke andcause the Pyrolytic cleaning programme to switch itself off.
In areas which may be subject to infestation by cockroaches orother vermin, pay particular attention to keeping the appliance andits surroundings clean at all times. Any damage caused bycockroaches or other vermin will not be covered by the warranty.

Warning and Safety instructions
14
Accessories
Use only genuine original Miele spare parts. If spare parts oraccessories from other manufacturers are used, the warranty will beinvalidated, and Miele cannot accept liability.
If you have a Miele HUB 5000-M/HUB 5001-M/HUB 5000-XL/HUB 5001-XL (if available) oven dish, do not place it on shelf level 1.This would damage the floor of the oven. The very small gapbetween the bottom of the dish and the oven floor would cause abuild-up of heat and could cause the enamel to crack or chip.Do not place Miele oven dishes on the top rail of shelf level 1 as theywill not be secured in this position by the non-tip safety notches onthe sides of the dishes.Instead, use shelf level 2 for these oven dishes.
The high temperatures used during pyrolytic cleaning will damageaccessories that are not designed for cleaning in the Pyrolyticcleaning programme.Please remove these accessories from the oven interior beforestarting the Pyrolytic cleaning programme. This also applies to non-pyrolytic accessories purchased separately to the oven.
Caring for the environment
15
Disposal of the packingmaterialThe transport and protective packaginghas been selected from materials whichare environmentally friendly fordisposal, and can normally be recycled.
Recycling the packaging reduces theuse of raw materials in themanufacturing process and alsoreduces the amount of waste in landfillsites. Ensure that any plasticwrappings, bags etc. are disposed ofsafely and kept out of the reach ofbabies and young children. Danger ofsuffocation.
Disposing of your oldapplianceElectrical and electronic appliancesoften contain valuable materials. Theyalso contain specific materials,compounds and components, whichwere essential for their correct functionand safety. These could be hazardousto human health and to the environmentif disposed of with your domestic wasteor if handled incorrectly. Please do not,therefore, dispose of your old appliancewith your household waste.
Please dispose of it at your localcommunity waste collection / recyclingcentre for electrical and electronicappliances. You are also responsible fordeleting any personal data that may bestored on the appliance prior todisposal. Please ensure that your oldappliance poses no risk to childrenwhile being stored prior to disposal.

Oven overview
16
a Oven controls
b Door lock for Pyrolytic cleaning
c Top heat/grill element
d Air inlet for the fan with ring heating element behind it
e Shelf runners with 5 shelf levels
f Oven floor with bottom heat element underneath it
g Front frame with data plate
h Door

Oven controls
17
a Function selectorFor selecting oven functions
b Clock/TimerDisplays the time of day and settings
c Temperature selectorFor setting the temperature
d sensorFor changing times and settings
e OK sensorFor selecting functions and confirming settings
f sensorFor changing times and settings

Oven controls
18
Function selectorThe function selector is used to selectoven functions and to switch on theoven lighting separately.
The function selector can be turnedclockwise or anti-clockwise.When the function selector is in the0 position, it can be retracted bypushing it in.
Oven functions
Lighting
Conventional Heat
Bottom Heat
Grill
Pyrolytic cleaning
Rapid Heat-up
Fan Plus
Intensive Bake
Fan Grill
Gentle Bake
Temperature selectorUse the temperature selector to selectthe temperature for the cookingprocesses.
The temperature selector can be turnedclockwise as far it will go, and thenback again. When the temperatureselector is in the position, it can beretracted by pushing it in.
The temperature settings are marked onthe temperature selector and on thecontrol panel.
Temperature indicator light
The temperature indicator light in thedisplay lights up whenever the oven isheating up.
As soon as the set temperature isreached:
– The oven heating switches off.
– The temperature indicator light goesout.
The temperature control unit ensuresthat the oven heating and thetemperature indicator light switch backon if the oven temperature falls belowthe level set.

Oven controls
19
Clock/TimerThe clock/timer is operated via thedisplay and the , OK and sensorcontrols.
Display
The display shows the time of day oryour settings.
It goes dark if settings are not beingentered.
Please refer to "Clock/Timer" for moreinformation.
Sensors controls
The sensor controls respond to thetouch of a fingertip. Every touch on thesensors is confirmed by an audibletone.The tone can be switched off bychanging setting to status (see"Clock/Timer - Changing settings").

Features
20
Model numbersA list of the ovens described in theseoperating instructions can be found onthe back page.
Data plateThe data plate located on the frontframe of the oven is visible when thedoor is open.
On the data plate are printed the modelnumber, serial number and theconnection data (voltage/frequency/maximum rated load).
Have this information available if youneed to contact Miele so that anyissues can be rectified as quickly aspossible.
Items supplied with deliveryThe oven is supplied with:
– the operating and installationinstructions for using the ovenfunctions,
– screws for fixing the oven to thehousing unit,
– various accessories.
Standard and optionalaccessories
Depending on model.All ovens are supplied with shelfrunners, a universal tray and bakingand roasting rack (rack for short).Depending on the model, Miele ovensmay be supplied with the accessorieslisted below.
All accessories and cleaning and careproducts in these instructions aredesigned to be used with Miele ovens.
These are available to order via theMiele Webshop or directly from Miele(see end of this booklet for contactdetails).
Please state the model number of youroven and that of any accessories youwish to purchase.

Features
21
Shelf runners
Shelf runners for accessories (trays,racks, FlexiClip telescopic runners etc.)are fitted on either side of the ovencavity for shelf levels .
The shelf level numbers are indicatedon the front of the oven frame.
Each shelf runner has two rails:
– Accessories (e.g. the rack) arepushed into the oven between thetwo rails.
– FlexiClip telescopic runners(depending on model) are fitted onthe lower rail.
The shelf runners can be removed forcleaning (see "Cleaning and care").
Baking tray, universal tray and rackwith non-tip safety notches
Baking tray HBB 71:
Universal tray HUBB 71:
Rack HBBR 71:
Insert these accessories into the shelfrunners between the two rails of a shelflevel.
Always place the rack with the loadingsurface in the lower position and thenon-tip safety notches towards theback.
Non-tip safety notches are located onaccessories to prevent the trays beingpulled out completely when you onlywish to pull them out partially. They alsoprevent trays from tipping.
– The non-tip safety notches arelocated in the middle of the shortsides of the baking tray and universaltray.
– The non-tip safety notches arelocated towards the back of the shortsides of the rack.
If you are using the universal tray withthe rack on top, insert the tray betweenthe rails of a shelf runner and the rackwill sit on top of it.
These accessories have been treatedwith PerfectClean enamel.

Features
22
FlexiClip telescopic runners HFC 70
The FlexiClip telescopic runners can beattached to any shelf level.
Push the FlexiClip telescopic runnersright into the oven before placingaccessories on them.The accessories will thenautomatically sit securely in betweenthe stoppers at either end of eachrunner and be prevented from slidingoff.
The FlexiClip runners can support amaximum load of 15 kg.
Fitting and removing the FlexiCliptelescopic runners
Danger of burning!Make sure the oven heatingelements are switched off and theoven interior is cool.
The FlexiClip telescopic runners arefitted in between the two rails that makeup a shelf level.
The telescopic runner with the Mielelogo must be fitted on the right.
When fitting or removing thetelescopic runners, do not extendthem.
Hook the FlexiClip telescopic runneronto the bottom rail of a shelf level atthe front (1.) and push it along the railinto the oven interior (2.).

Features
23
Then secure the telescopic runner tothe bottom of the two rails asillustrated (3).
If the telescopic runners are difficultto pull out after fitting, you may needto pull firmly on them once to releasethem.
To remove a FlexiClip telescopic runner:
Push the FlexiClip telescopic runnerall the way in.
Remove the FlexiClip telescopicrunner by raising it at the front (1)then pulling it forwards along the railand out (2).
Round baking tray HBF 27-1
The round baking tray is suitable forcooking pizzas, flat cakes made withyeast or whisked mixtures, sweet andsavoury tarts, baked desserts, and canalso be used for frozen cakes.
The surface has been treated withPerfectClean enamel.
Gourmet perforated baking trayHBBL 71
The Gourmet perforated baking tray hasbeen specially developed for thepreparation of baked goods made fromyeast and quark/oil mixtures.The tiny perforations assist in browningthe underside of baked goods.The tray can also be used for dryingfood.
The surface has been treated withPerfectClean enamel.
The round perforated baking trayHBFP 27-1 can be used for the samethings.

Features
24
Baking stone HBS 60
The baking stone is ideal for itemswhich need a well-baked base such aspizza, quiche, bread, bread rolls andsavoury snacks.The baking stone is made from heatretaining fire brick and is glazed. Placeit directly on the rack.A paddle made of untreated wood issupplied with it for placing food on thebaking stone and taking it off.
Grilling and roasting insert HGBB 71
The grilling and roasting insert shouldbe placed in the universal tray whengrilling or roasting.The juices from the food being cookedcollect under the insert. This preventsthem from spitting and making the ovendirty. The juices can then be used formaking gravy and sauces.
The surface has been treated withPerfectClean enamel.
HUB Gourmet oven dishes HBD Gourmet oven dish lids
Unlike other oven dishes, the MieleGourmet oven dishes can be placed inthe oven directly on the shelf runners.They have non-tip safety notches likethe rack to prevent them from beingpulled out too far.The surface of the oven dishes has anon-stick coating.
Gourmet oven dishes are available indifferent sizes. The width and the heightare the same for both.
Suitable lids are available separately.Please quote the model number of yourMiele oven dish when ordering a lid.
Depth: 22 cm Depth: 35 cm
HUB 5000-M HUB 5001-M *
HUB 5001-XL *
HBD 60-22 HBD 60-35
* Suitable for use on induction cooktops

Features
25
Handle HEG
The handle makes it easier to take theuniversal tray, baking tray and rack outof the oven, or to put them into it. Thetwo prongs at the top go inside the trayor above the rack, and the U-shapesupports underneath.
Original Miele all purpose microfibrecloth
Light soiling and fingerprints can beeasily removed with the microfibrecloth.
Original Miele oven cleaner
The Original Miele oven cleaner issuitable for removing very stubbornsoiling. It is not necessary to pre-heatthe oven beforehand.

Features
26
Oven controlsThe oven controls enable you to use thevarious cooking functions to bake, roastand grill.
They are also used for:
– Time of day display
– Minute minder
– Switching cooking processes on andoff automatically
– Settings that can be customised
Oven safety features
System lock for the oven
The system lock prevents the oven frombeing used unintentionally (see "Clock/timer - Changing settings - ").When the system lock is engaged, will appear in the display.
Cooling fan
The cooling fan comes on automaticallywhen a cooking programme is started.The cooling fan mixes hot air from theoven cavity with cool room air beforeventing it out into the kitchen throughvents located between the appliancedoor and the control panel.
The cooling fan will continue to run for awhile after the oven has been switchedoff to prevent any humidity building upin the oven, on the control panel or inthe oven housing unit.
The cooling fan will switch itself offautomatically after a certain period oftime.
Vented oven door
The door panes have a heat-reflectivecoating.
When the oven is operating, air ispassed through the door to keep theouter pane cool.
The door can be removed anddismantled for cleaning (see "Cleaningand care").
Door lock for Pyrolytic cleaning
For safety reasons, the door is lockedas soon as the Pyrolytic cleaningprogramme is started. After thePyrolytic cleaning programme hasfinished, the door will remain lockeduntil the temperature in the oven hasfallen below 280 °C.

Features
27
PerfectClean treated surfacesSurfaces treated with PerfectCleanenamel are characterised by theirexceptional non-stick properties andease of cleaning.
Food can be taken off easily, andsoiling from baking and roasting issimple to remove.
You can cut up food on surfaces treatedwith PerfectClean enamel.
However, do not use ceramic knivesas these will scratch thePerfectClean surface.
Surfaces treated with PerfectCleanenamel can be cleaned as you wouldclean glass.Read the instructions in "Cleaning andcare" so that the benefits of the non-stick properties and easy cleaning areretained.
The following have been treated withPerfectClean enamel:
– Universal tray
– Baking tray
– Grilling and roasting insert
– Gourmet perforated baking tray
– Round baking tray
– Round perforated baking tray

Before using for the first time
28
Before using for the first time
The oven must be built into itshousing unit before it can be used.
Press and release the function andtemperature selectors if they areretracted.
The time of day can only be changedwhen the function selector is at 0.
Set the time of day.
Setting the time of day for thefirst timeThe time of day is shown in the 24-hourformat.
After connecting the oven to theelectricity supply, flashes in thedisplay.
The time of day is set in segments: firstthe hours, then the minutes.
Confirm with OK.
will light up and will flash.
While the symbol is flashingconfirm with OK.
The hours will flash.
Use or to set the hours.
Confirm with OK.
The hours are saved and the minuteswill flash.
Use or to set the minutes.
Confirm with OK.
The time of day is now saved.
The time of day can be displayed in12-hour format by setting in thesettings menu to status (see "Clock/time - Changing settings").

Before using for the first time
29
Heating up the oven for thefirst timeNew ovens can give off a slight smell onfirst use. Heating up the oven for atleast 1 hour with nothing in it will get ridof this smell.
Ensure that the kitchen is wellventilated while the appliance isbeing heated up for the first time.Close doors to other rooms toprevent the smell spreadingthroughout the house.
Remove any protective wrapping andsticky labels from the oven.
Take all accessories out of the ovenand clean them (see "Cleaning andcare").
Before heating the oven up, wipe theinterior with a damp cloth to removeany dust or bits of packaging thatmay have accumulated in the ovencavity during storage and unpacking.
Select Fan Plus .
The oven heating, lighting and coolingfan will switch on.
Select the maximum temperature(250 °C).
Heat up the empty oven for at leastone hour.
At the end of the heating up time,turn the function selector to 0 and thetemperature selector to .
Danger of burning! Allow theoven to cool down before cleaningby hand.
Clean the oven interior with a cleansponge and a solution of warm waterand washing-up liquid or a dampmicrofibre cloth.
Dry all surfaces with a soft cloth.
Leave the oven door open until theoven interior is completely dry.

Overview of functions
30
Your oven has a range of functions for preparing a wide variety of recipes.
Oven function DescriptionConventional Heat For baking and roasting traditional recipes, preparing
soufflés and cooking at low temperatures.
If using an older recipe or cookbook, set the oventemperature for Conventional Heat 10 °C lower than thatrecommended. This won't change cooking times.
Bottom Heat Use this function towards the end of cooking to reheat orbrown the base of a cake, quiche or pizza.
Grill For grilling thin cuts (e.g. steaks) and for browning bakeddishes.
Rapid Heat-up For pre-heating the oven compartment quickly. The ovenfunction required must then be selected once the desiredtemperature has been reached.

Overview of functions
31
Oven function DescriptionFan Plus This function is used for baking and roasting on different
levels at the same time. A lower temperature can beselected than when using Conventional Heat as thefan distributes the heat around the oven compartmentstraight away.
Intensive Bake For baking cakes, tarts, pies, quiches and pizzas thatrequire a crisper base or moist toppings. Intensive Bakeis not suitable for baking thin biscuits or for roasting asthe juices will become too dark.
Fan Grill For grilling thicker cuts of meat (e.g. chicken). Lowertemperatures can be used than when using the Grill function as the fan distributes the heat around the ovencompartment straight away.
Gentle Bake For small amounts e.g. of frozen pizza, bake-off rolls,biscuits and for meat dishes and roasts. You can save upto 30% energy compared to cooking with a standardoven function as long as the door is kept shut duringcooking.

Tips on saving energy
32
Cooking Remove any accessories from the
oven that you do not require forcooking.
Pre-heat the oven only if instructed todo so in the recipe or the cookingchart.
Avoid opening the door duringcooking.
In general, if a range of temperaturesis given, it is best to select the lowertemperature and to check the foodafter the shortest given time.
It is best to use dark baking tins andcontainers with a matt finish madefrom non-reflective materials(enamelled steel, ovenproofglassware, non-stick coated castaluminium). Shiny materials such asstainless steel or aluminium reflectheat, preventing it reaching the foodefficiently. Do not cover the oven flooror the rack with heat-reflectivealuminium foil.
Observe cooking durations to avoidenergy wastage when cooking food.
Wherever possible set the cookingduration, or use a food probe.
Fan plus can be used for cookingmany types of food. Because the fandistributes the heat to food straightaway, it allows you to use a lowertemperature than you would withConventional Heat . It alsoenables you to cook on several shelflevels at the same time.
Gentle bake is an innovativefunction that makes optimum use ofheat. You can save up to 30 %energy compared to cooking with astandard oven function as long as thedoor is kept shut during cooking.
Fan grill can be used for a widevariety of food. With Fan grill you canuse lower temperatures than withother grill functions which use themaximum temperature setting.
Whenever possible you should cookseveral dishes at the same time.Place them next to each other in theoven or on different shelf levels.
Dishes which you are unable toprepare at the same time should, ifpossible, be cooked one after theother in order to make use of existingheat in the oven.

Tips on saving energy
33
Using residual heat
The temperature in cookingprogrammes using temperaturesabove 140 °C which take longer than30 minutes to cook can be turneddown to the lowest possibletemperature about 5 minutes beforethe end of cooking. The residual heatin the oven is sufficient for cookingthe food. However, do not switch theoven off (see "Warning and safetyinstructions").
If you wish to run the Pyrolyticcleaning programme, it is best to startit immediately after a cookingprogramme. The residual heat in theoven will help reduce the amount ofenergy required to run theprogramme. To avoid soiling bakingon the door, ensure you remove anysoiling from it before running thePyrolytic cleaning programme.
Operation
34
Basic operation Place the food in the oven.
Select the required oven function withthe function selector.
The oven lighting and the fan will switchon.
Select the temperature with thetemperature selector.
The oven heating will switch on.
After the cooking process:
Turn the function selector to 0 andthe temperature selector to .
Take the food out of the oven.
Cooling fanThe cooling fan will continue to run for awhile after the oven has been switchedoff to prevent any humidity building upin the oven, on the control panel or inthe oven housing unit.
The cooling fan will switch itself offautomatically after a certain period oftime.

Operation
35
Pre-heating the ovenIt is only necessary to pre-heat the ovenin a few instances.
Most dishes can be placed in a coldoven. They will then make use of theheat produced during the heating-upphase.
If the recipe requires pre-heating, placethe food in the oven once thetemperature indicator light goes out.
Pre-heat the oven when cooking thefollowing food with the following ovenfunctions:
Fan Plus
– dark bread doughs
– beef sirloin joints and fillets
Conventional Heat
– cakes or biscuits with a short bakingtime (up to 30 minutes)
– delicate mixtures (e.g. sponges)
– dark bread doughs
– beef sirloin joints and fillets
Rapid Heat-up
With Rapid Heat-up the heating-upphase can be shortened.
Do not use Rapid Heat-up topre-heat the oven when bakingpizzas or delicate mixtures (e.g. smallbaked goods with a high sugarcontent, pizza, choux pastries,sponges).Otherwise they will brown too quicklyfrom the top.
Select Rapid heat-up .
Select a temperature.
When the temperature indicatorlight goes out for the first time, setthe oven function you require forcontinued cooking.
Place the food in the oven.

Clock/Timer
36
The clock/timer offers the followingfunctions:
– Time of day display
– Minute minder
– Switching cooking processes on andoff automatically
– Altering settings The clock/timer is operated via thedisplay and the sensor controls , OKand .
The functions available are indicated bysymbols.
Display
Symbols in the display
Depending on the position of thefunction selector and/or whether asensor has been pressed, the followingsymbols appear:
Symbol/Function
Minute minder Any
Duration
Ovenfunction
Finish time
Temperature indicatorlight
Time of day
0 Settings
Setting status
System lock
You can only set or change a function ifthe function selector is in the correctposition.
Sensors
Sensor Use – Highlighting functions
– Reducing times
– Calling up settings – Changing the status of a
setting – Highlighting functions
– Increasing times
– Changing the status of asetting
OK – Calling up functions
– Saving set times andadjusted settings
– Calling up set times
Set minutes or seconds with or inincrements of 1.If you hold the sensor down the displaywill count faster.

Clock/Timer
37
How to set the time or adurationTimes are set in segments:
– for the time of day and cookingdurations, first the hours, then theminutes.
– for a minute minder duration, first theminutes, then the seconds.
Confirm with OK.
Depending on the position of thefunction selector, the functions (, , or ) will appear.
Highlight the required function using or .
The corresponding symbol will flash forapprox. 15 seconds.
While the symbol is flashing, confirmwith OK.
The function is selected and the leftnumeric block will start to flash.
You can only set the time while thenumeric block is flashing. If the timehas elapsed and the numeric block isno longer flashing, you have to selectthe function again.
Set the required value using or .
Confirm with OK.
The right numeric block will start toflash.
Set the required value using or .
Confirm with OK.
Your time/duration setting is now saved.
Displaying times/durations
If you have set times, the symbols and or indicate which timefunctions have been set.
If you are using the minute minder ,cooking duration and end of cookingtime functions simultaneously, thelast time that you set will be displayed.
If you have selected a cooking duration,the time of day cannot be displayed.
When the time/duration has elapsed
Once a set time has elapsed, therelevant symbol will flash and a buzzerwill sound, if this option is selected (see"Clock/Timer - Changing settings").
Confirm with OK.
The buzzer will stop and the symbols inthe display will go out.
Clock/Timer
38
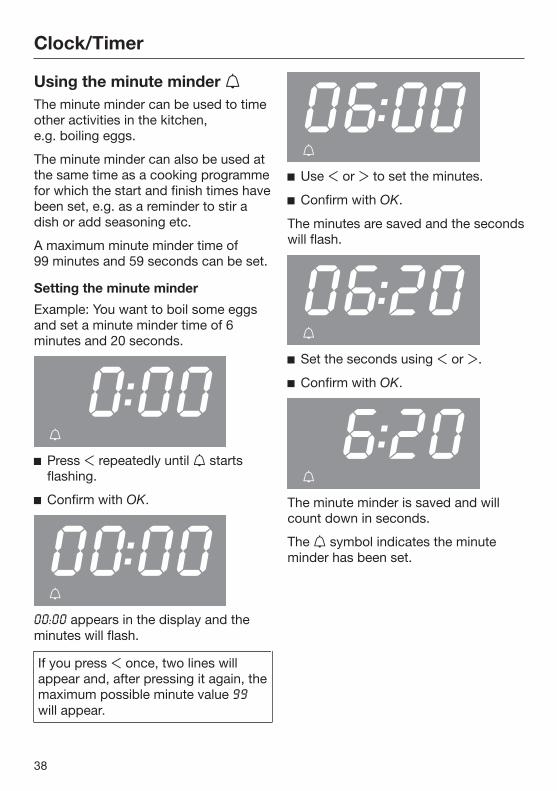
Using the minute minder The minute minder can be used to timeother activities in the kitchen,e.g. boiling eggs.
The minute minder can also be used atthe same time as a cooking programmefor which the start and finish times havebeen set, e.g. as a reminder to stir adish or add seasoning etc.
A maximum minute minder time of99 minutes and 59 seconds can be set.
Setting the minute minder
Example: You want to boil some eggsand set a minute minder time of 6minutes and 20 seconds.
Press repeatedly until startsflashing.
Confirm with OK.
appears in the display and theminutes will flash.
If you press once, two lines willappear and, after pressing it again, themaximum possible minute value will appear.
Use or to set the minutes.
Confirm with OK.
The minutes are saved and the secondswill flash.
Set the seconds using or .
Confirm with OK.
The minute minder is saved and willcount down in seconds.
The symbol indicates the minuteminder has been set.
Clock/Timer
39
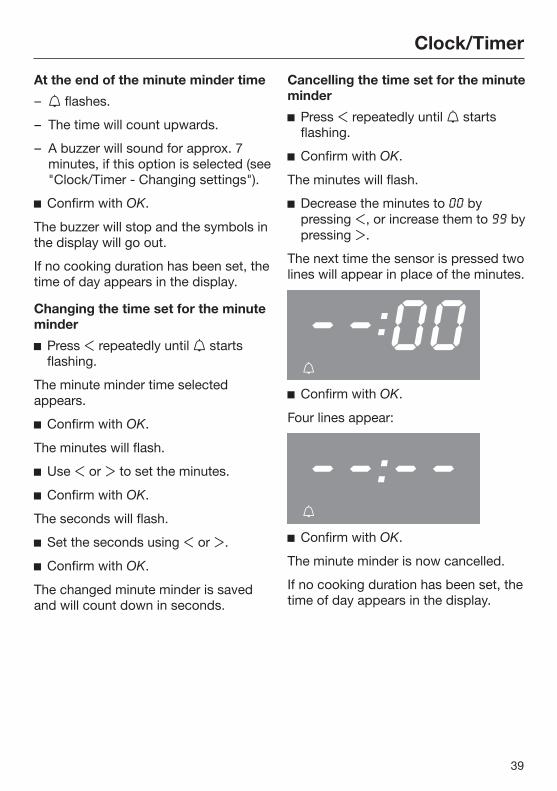
At the end of the minute minder time
– flashes.
– The time will count upwards.
– A buzzer will sound for approx. 7minutes, if this option is selected (see"Clock/Timer - Changing settings").
Confirm with OK.
The buzzer will stop and the symbols inthe display will go out.
If no cooking duration has been set, thetime of day appears in the display.
Changing the time set for the minuteminder
Press repeatedly until startsflashing.
The minute minder time selectedappears.
Confirm with OK.
The minutes will flash.
Use or to set the minutes.
Confirm with OK.
The seconds will flash.
Set the seconds using or .
Confirm with OK.
The changed minute minder is savedand will count down in seconds.
Cancelling the time set for the minuteminder
Press repeatedly until startsflashing.
Confirm with OK.
The minutes will flash.
Decrease the minutes to bypressing , or increase them to bypressing .
The next time the sensor is pressed twolines will appear in place of the minutes.
Confirm with OK.
Four lines appear:
Confirm with OK.
The minute minder is now cancelled.
If no cooking duration has been set, thetime of day appears in the display.

Clock/Timer
40
Switching cookingprogrammes on and offautomaticallyCooking programmes can be switchedon or off automatically.
To do this, set a duration or a durationand finish time after selecting an ovenfunction and a temperature.
The maximum duration which can beset for a cooking programme is11 hours and 59 minutes.
We recommend using automaticswitching on and off when roasting.However, do not delay the start for toolong when baking as the cake mixtureor dough will dry out, and the raisingagents will lose their effectiveness.
Setting a cooking duration
Example: To bake a cake for 1 hour and5 minutes:
Place the food in the oven.
Select the required oven function andthe temperature.
The oven heating, lighting and coolingfan will switch on.
Press repeatedly until startsflashing.
appears in the display.
Confirm with OK.
appears in the display and thehours will flash.
If you press once, two lines willappear and, after pressing again, themaximum possible hour value willappear.

Clock/Timer
41
Use or to set the hours.
Confirm with OK.
The hours are saved and the minuteswill flash.
Use or to set the minutes.
Confirm with OK.
The cooking duration is saved and thencounts down in minutes, with the lastminute counting down in seconds.
The symbol indicates a cookingduration has been set.
At the end of the cooking duration:
– appears in the display.
– flashes.
– The oven heating switches offautomatically.
– The cooling fan continues to run.
– A buzzer will sound for approx. 7minutes, if this option is selected (see"Clock/Timer - Changing settings").
Confirm with OK.
– The buzzer will stop and the symbolsin the display will go out.
– The time of day appears.
– The oven heating will switch back on.
Turn the function selector to 0 andthe temperature selector to .
Take the food out of the oven.

Clock/Timer
42
Setting a cooking duration and finishtime
A cooking duration and finish time canbe set to switch a cooking programmeon and off automatically.
Example: The time is now 11:15; youwant a dish with a cooking duration of90 minutes to be ready by 13:30.
Place the food in the oven.
Select the required oven function andthe temperature.
The oven heating, lighting and coolingfan will switch on.
Set the cooking duration first:
Press repeatedly until startsflashing.
Confirm with OK.
appears in the display and thehours will flash.
Use or to set the hours.
Confirm with OK.
The hours are saved and the minuteswill flash.
Use or to set the minutes.
Confirm with OK.
The cooking duration is now saved.
The symbol indicates a cookingduration has been set.
Then set the finish time:
Press repeatedly until startsflashing.
appears in the display (currenttime of day + cooking duration = +).
Confirm with OK.
The hours will flash.
Use or to set the hours.
Confirm with OK.
The hours are saved and the minuteswill flash.
Clock/Timer
43
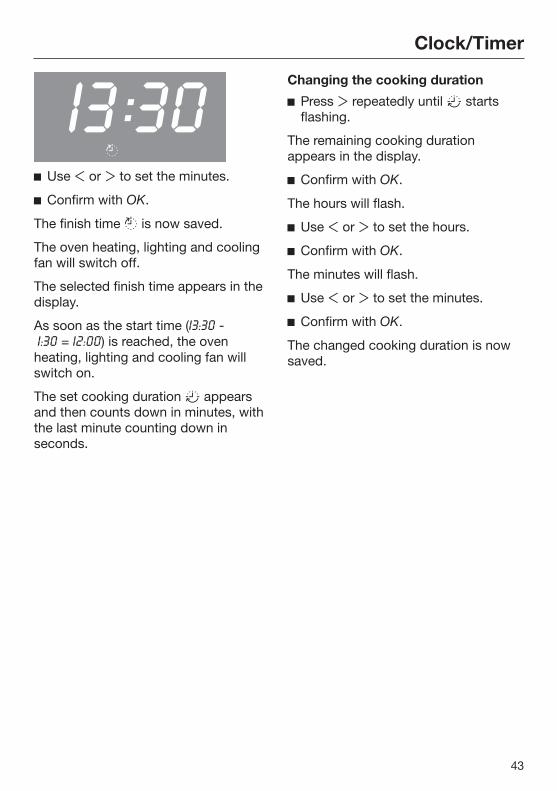
Use or to set the minutes.
Confirm with OK.
The finish time is now saved.
The oven heating, lighting and coolingfan will switch off.
The selected finish time appears in thedisplay.
As soon as the start time ( - = ) is reached, the ovenheating, lighting and cooling fan willswitch on.
The set cooking duration appearsand then counts down in minutes, withthe last minute counting down inseconds.
Changing the cooking duration
Press repeatedly until startsflashing.
The remaining cooking durationappears in the display.
Confirm with OK.
The hours will flash.
Use or to set the hours.
Confirm with OK.
The minutes will flash.
Use or to set the minutes.
Confirm with OK.
The changed cooking duration is nowsaved.

Clock/Timer
44
Deleting a cooking duration
Press or repeatedly until starts to flash.
Confirm with OK.
The hours will flash.
Press or repeatedly until twolines appear:
Confirm with OK.
Four lines appear:
Confirm with OK.
The cooking duration and any finishtime will be deleted.
The time of day appears if no minuteminder has been set.
The oven heating, lighting and coolingfan will switch on.
If you want to end the cookingprogramme:
Turn the function selector to 0 andthe temperature selector to .
Take the food out of the oven.
Deleting a finish time
Press or repeatedly until starts to flash.
Confirm with OK.
The hours will flash.
Press or repeatedly until twolines appear:
Confirm with OK.
Four lines appear:
Confirm with OK.
The symbol appears and the setcooking duration counts down inminutes, with the last minute countingdown in seconds.
If you want to end the cookingprogramme:
Turn the function selector to 0 andthe temperature selector to .
Take the food out of the oven.
If you turn the function selector to 0,the settings for the cooking durationand the finish time will be deleted.

Clock/Timer
45
Changing the time of day
The time of day can only be changedwhen the function selector is at 0.
Turn the function selector to 0.
Press repeatedly until startsflashing.
Confirm with OK.
The hours will flash.
Use or to set the hours.
Confirm with OK.
The hours are saved and the minuteswill flash.
Use or to set the minutes.
Confirm with OK.
The time of day is now saved.
After a power cut, the time of dayneeds to be re-entered.

Clock/Timer
46
Changing settingsYour appliance is supplied with anumber of default factory settings (see"Settings overview").
A setting is changed by altering itsstatus .
Turn the function selector to 0.
Press and hold until appears.
If you want to change another setting,
press or repeatedly until therelevant number appears.
Confirm with OK.
The setting is selected and the currentstatus appears, e.g. .
To change the status:
Press or repeatedly until therequired status appears in thedisplay.
Confirm with OK.
The selected status is saved and thesetting appears again.
To change further settings, proceed inthe same way.
If you do not want to change any furthersettings:
Wait approx. 15 seconds until thetime of day appears.
Settings remain in the memory evenafter a power cut.

Clock/Timer
47
Settings overview
Setting Status
Buzzervolume
The buzzer is switched off.
to *
The buzzer is switched on.The volume can be altered. When you select a status,you will hear the corresponding buzzer.
Clock format
* The time of day is shown in the 24-hour format.
The time of day is shown in the 12-hour format. If you change the clock after 1:00 pm from a 12-hourclock to a 24-hour clock you will need to update thehour accordingly.
System lockfor the oven
* The system lock is switched off.
The system lock is on and appears in the display.The system lock prevents the oven from being usedinadvertently, for example by children.The system lock remains active even after a power cut.
Keypad tone
The keypad tone is switched off.
* The keypad tone is switched on.
* Factory default
Baking
48
Eating food which has been cookedcorrectly is important for preventingfood poisoning or other ailments.Only bake cakes, pizza, chips etc.until they are golden brown. Do notovercook them.
Oven functionsDepending on how the food isprepared, you can use Fan Plus ,Intensive Bake or ConventionalHeat .
BakewareThe choice of bakeware depends onthe oven function and how the food isprepared.
– Fan Plus , Intensive Bake : universal tray, any heat-resistantbaking dishes.
– Conventional Heat :Dark baking tins with a matt finish.Avoid using bright, shiny metal tinsas they give an uneven and poorbrowning result and in some casescakes might not cook properly.
– Always place baking tins on the rack.Position rectangular tins with thelonger side across the width of therack for optimum heat distributionand even baking results.
– When baking cakes with fresh fruittoppings and deep sponge cakes,place the tin on the universal tray tocatch any spillages and keep theoven cleaner.
Baking paper, greasing
Miele accessories, e.g. the universaltray, are treated with PerfectCleanenamel (see "Features").
Surfaces treated with PerfectCleanenamel generally do not need to begreased or covered with baking paper.
Baking paper is only necessary whenbaking:
– anything prepared using a lyecontaining sodium hydroxide (e.g.pretzels, bread sticks) because thelye can damage the PerfectCleansurface.
– meringues or sponges with a highegg white content.These are more likely to stick.
– frozen food cooked on the rack.

Baking
49
Notes on using the bakingchartsIn the charts the data for therecommended function is printed inbold.
Unless otherwise stated, the timesgiven are for an oven which has notbeen pre-heated. With a pre-heatedoven, shorten times by up to 10minutes.
Temperature
As a general rule, select the lowertemperature given in the chart.
Baking at temperatures higher thanthose recommended may reduce thecooking time, but will lead to unevenbrowning, and unsatisfactory cookingresults.
Baking duration
Check if the food is cooked at the endof the shortest time quoted. To check ifa cake is ready, insert a wooden skewerinto the centre. It is ready if the skewercomes out clean, without dough orcrumbs sticking to it.
Shelf levels
The shelf level on which you place yourfood for baking depends on the ovenfunction and number of trays beingused.
– Fan Plus1 tray: Shelf level 22 trays: Shelf levels 1+3/2+43 trays: Shelf levels 1+3+5
The universal tray should be placedunderneath the baking tray if you areusing a universal tray and a bakingtray on several levels at the sametime.
Bake moist biscuits and cakes on amaximum of two levels at the sametime.
– Intensive Bake 1 tray: Shelf level 1 or 2
– Conventional Heat 1 tray: Shelf level 1 or 2

Baking
50
Baking charts
Creamed mixture
Cakes/biscuits
[°C]
[min.]
Muffins (1 tray) 140–150 2 35–45
150–160 2 30–40
Muffins (2 trays) 140–150 2+4 35–45 2)
Small cakes (1 tray) * 150 2 30–40
160 1) 3 20–30
Small cakes (2 trays) * 150 1) 2+4 23–33Small cakes/biscuits (1 tray) 140–150 2 25–35
150–160 1) 3 15–25
Small cakes/biscuits (2 trays) 140–150 2+4 25–35 2)
Sand cake 150–160 2 60–70
150–160 1) 2 60–70Ring cake 150–160 2 50–60
170–180 2 55–65
Function / Fan Plus / Conventional Heat Temperature / Shelf level / Duration
* The settings also apply for testing in accordance with EN 60350-1.Do not use the FlexiClip telescopic runners (depending on model).
1) Pre-heat the oven. Do not use the Rapid heat-up function for this.2) Take the baking trays out of the oven early if the food is sufficiently browned before the
specified time has elapsed.

Baking
51
Creamed mixture
Cakes/biscuits
[°C]
[min.]
Foam cake (tray) 150–160 2 25–35
150–160 1) 2 30–40Marble, nut cake (tin) 150–160 2 55–75
150–160 2 55–75Fresh fruit cake, with meringue topping (tray) 150–160 2 40–50
170–180 2 45–55Fresh fruit cake (tray) 150–160 2 35–45
160–170 2 35–55Fresh fruit cake (tin) 150–160 2 55–65
170–180 1) 1 35–45Flan base 150–160 2 25–35
170–180 1) 2 15–25
Function / Fan Plus / Conventional Heat Temperature / Shelf level / Duration
1) Pre-heat the oven. Do not use the Rapid heat-up function for this.

Baking
52
Rubbed in mixture
Cakes/biscuits
[°C]
[min.]
Small cakes/biscuits (1 tray) 140–150 2 20–30
160–170 1) 3 15–25
Small cakes/biscuits (2 trays) 140–150 1+3 20–30 2)
Drop cookies (1 tray) * 140 2 35–45
160 1) 3 20–30
Drop cookies (2 trays) * 140 1+3 35–45 2)
Flan base 150–160 2 35–45
170–180 1) 2 20–30Streusel cake 150–160 2 45–55
170–180 2 45–55Cheese cake 150–160 2 85–95
170–180 2 80–90
150–160 2 80–90
Function / Fan Plus / Conventional Heat / Intensive Bake Temperature / Shelf level / Duration
* The settings also apply for testing in accordance with EN 60350-1.Do not use the FlexiClip telescopic runners (depending on model).
1) Pre-heat the oven. Do not use the Rapid heat-up function for this.2) Take the baking trays out of the oven early if the food is sufficiently browned before the
specified time has elapsed.
Baking
53
Rubbed in mixture
Cakes/biscuits
[°C]
[min.]
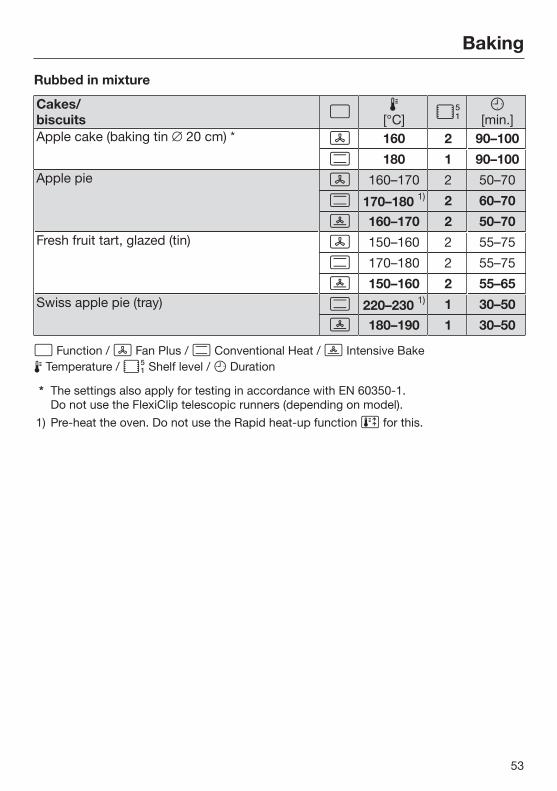
Apple cake (baking tin 20 cm) * 160 2 90–100
180 1 90–100Apple pie 160–170 2 50–70
170–180 1) 2 60–70
160–170 2 50–70Fresh fruit tart, glazed (tin) 150–160 2 55–75
170–180 2 55–75
150–160 2 55–65Swiss apple pie (tray) 220–230 1) 1 30–50
180–190 1 30–50
Function / Fan Plus / Conventional Heat / Intensive Bake Temperature / Shelf level / Duration
* The settings also apply for testing in accordance with EN 60350-1.Do not use the FlexiClip telescopic runners (depending on model).
1) Pre-heat the oven. Do not use the Rapid heat-up function for this.

Baking
54
Yeast mixtures and quark dough
Cakes/biscuits
[°C]
[min.]
Gugelhupf 150–160 2 50–60
160–170 1 50–60Stollen 150–160 2 45–65
160–170 2 45–60Streusel cake 150–160 2 35–45
170–180 3 35–45Fresh fruit cake (tray) 160–170 2 40–50
170–180 3 50–60Apple turnovers (1 tray) 150–160 2 25–30
160–170 2 1) 25–30
Apple turnovers (2 trays) 150–160 1+3 25–30 2)
Function / Fan Plus / Conventional Heat Temperature / Shelf level / Duration
1) For yeast dough. For quark dough use shelf level 3.2) Take the baking trays out of the oven early if the food is sufficiently browned before the
specified time has elapsed.

Baking
55
Yeast mixtures and quark dough
Cakes/biscuits
[°C]
[min.]
White bread 180–190 2 35–45
190–200 2 30–40Wholegrain bread 180–190 2 55–65
200–210 1) 2 45–55Pizza (tray) 170–180 2 30–45
190–200 1) 2 2) 30–45
170–180 2 2) 30–45Onion tart 170–180 2 30–40
180–190 1) 2 2) 25–35
170–180 2 30–40Proving yeast dough 50 3) 15–30
50 3) 15–30
Function / Fan Plus / Conventional Heat / Intensive Bake Temperature / Shelf level / Duration
1) Pre-heat the oven. Do not use the Rapid heat-up function for this.2) For yeast dough. For quark dough use shelf level 3.3) The dish can be placed on the oven floor. Depending on the size of the dish, you may
need to remove the shelf runners. If using Conventional heat , also place the rack onthe oven floor.

Baking
56
Whisked mixture
Cakes/biscuits
[°C]
[min.]
Tart / flan base (2 eggs) 160–170 2 20–30
160–170 1) 2 15–25Sponge cake (4 to 6 eggs) 170–180 2 20–35
150–160 1) 2 30–45Whisked sponge cake * 180 1) 2 20–30
150–170 1) 2 30–45Swiss roll 170–180 1) 2 15–20
180–190 1) 2 15–20
Function / Fan Plus / Conventional Heat Temperature / Shelf level / Duration
* The settings also apply for testing in accordance with EN 60350-1.Do not use the FlexiClip telescopic runners (depending on model).
1) Pre-heat the oven. Do not use the Rapid heat-up function for this.

Baking
57
Choux pastry, puff pastry, meringue
Cakes/biscuits
[°C]
[min.]
Choux buns (1 tray) 160–170 2 30–45
180–190 1) 3 25–35
Choux buns (2 trays) 160–170 1+3 30–45 2)
Puff pastry (1 tray) 170–180 2 20–30
190–200 3 20–30
Puff pastry (2 trays) 170–180 1+3 20–30 2)
Macaroons (1 tray) 120–130 2 25–50
120–130 1) 3 25–45
Macaroons (2 trays) 120–130 1+3 25–50 2)
Function / Fan Plus / Conventional Heat Temperature / Shelf level / Duration
1) Pre-heat the oven. Do not use the Rapid heat-up function for this.2) Take the baking trays out of the oven early if the food is sufficiently browned before the
specified time has elapsed.

Roasting
58
Oven functionsDepending on how the food isprepared, you can use either FanPlus or Conventional Heat .
Cooking containerYou can use any heat-resistant dishes:
Miele Gourmet oven dishes, roastingpans, ovenproof glass trays, roastingbags, dishes made from earthenware orcast iron, the universal tray, rack and/orgrilling and roasting insert (if available)on top of the universal tray.
We recommend roasting in coveredoven dishes as this ensures thatsufficient stock remains for makinggravy.The oven also stays cleaner than withopen roasting.
Useful tips– Browning: Browning only occurs
towards the end of the roasting time.If cooking with a roasting dish,remove the lid about halfway throughthe roasting time if a more intensivebrowning result is desired.
– Standing time: At the end of theprogramme, take the roast out of theoven, wrap in aluminium foil andleave to stand for about 10 minutes.This helps retain juices when themeat is carved.
– Roasting poultry: For a crisp skin,baste the poultry 10 minutes beforethe end of the cooking time withslightly salted water.

Roasting
59
Notes on using the roastingchartsIn the charts the data for therecommended function is printed inbold.
Unless otherwise stated, the timesgiven are for an oven which has notbeen pre-heated. With a pre-heatedoven, shorten times by up to 10minutes.
Temperature
As a general rule, select the lowertemperature given in the chart.If higher temperatures are used, themeat will brown on the outside, but willnot be properly cooked through.
When cooking with Fan Plus , selecta temperature 20 °C lower than whenusing Conventional Heat .
For cuts which weigh more than 3 kg,select a temperature approx. 10 °Clower than that given in the roastingchart. Roasting will take longer at thelower temperature, but will be moreeven.
When roasting on the rack, set atemperature approx. 10 °C lower than ifusing an oven dish.
Pre-heating
Pre-heating is only required whenroasting beef sirloin joints and fillets.
Roasting duration
The roasting time can be determined bymultiplying the thickness of the roast[cm] with the time per cm [min./cm]stated below, depending on the type ofmeat:
– Beef/Venison: 15–18 min./cm
– Pork/Veal/Lamb: 12–15 min./cm
– Sirloin joints/Fillets: 8–10 min./cm
Roasting times are approx. 20 minuteslonger per kilo for frozen meat. Frozenmeat weighing less than approx. 1.5 kgdoes not need to be defrosted beforeroasting.
Check if the meat is cooked after theshortest time quoted.
Shelf levels
As a general rule, use shelf level 2.

Roasting
60
Roasting charts
Beef, veal
[°C]
[min.]Topside of beef, approx. 1 kg 170–180 2 100–130 3)
190–200 2 110–140 3)
Fillet of beef, approx. 1 kg 1) 150–160 2) 2 20–50 4)
180–190 2) 2 20–50 4)
Sirloin joint, approx. 1 kg 1) 150–160 2) 2 30–60 4)
180–190 2) 2 30–60 4)
Veal, approx. 1.5 kg 190–200 2 70–90 3)
200–210 2 90–110 3)
Function / Temperature / Shelf level / Cooking duration Fan plus / Conventional heat
1) Use the universal tray. Sear the meat on the cooktop first.2) Pre-heat the oven. Do not use the Rapid heat-up function for this.3) Roast with the lid on first. Remove the lid halfway through the cooking duration and add
approx. 0.5 l of liquid.4) Depending on the desired degree of cooking (when using a food probe): rare: 40–45 °C,
medium: 50–60 °C, well done: 60–70 °C

Roasting
61
Pork
[°C]
[min.]Pork roast/neck, approx. 1 kg 170–180 2 100–120 1)
190–200 2 90–110 1)
Pork joint with crackling, approx. 2 kg 170–180 2 120–160 2)
190–200 2 130–150 2)
Gammon joint, approx. 1 kg 150–160 2 60–80 2)
170–180 2 80–100 2)
Meat loaf, approx. 1 kg 170–180 2 60–70 2)
200–210 2 70–80 2)
Function / Temperature / Shelf level / Cooking duration Fan plus / Conventional heat
1) Roast with the lid on first. Remove the lid halfway through the cooking duration and addapprox. 0.5 l of liquid.
2) Add approx. 0.5 l of liquid halfway through roasting.

Roasting
62
Lamb, game
[°C]
[min.]Leg of lamb, approx. 1.5 kg 170–180 2 90–110 1)
180–190 2 90–110 1)
Saddle of lamb, approx. 1.5 kg 220–230 2) 3 40–60 3)
230–240 2) 3 40–60 3)
Venison, approx. 1 kg 200–210 2 80–100 1)
200–210 2 80–100 1)
Function / Temperature / Shelf level / Cooking duration Fan plus / Conventional heat
1) Roast with the lid on first. Remove the lid halfway through the cooking duration and addapprox. 0.5 l of liquid.
2) Pre-heat the oven. Do not use the Rapid heat-up function for this.3) Add approx. 0.5 l of liquid halfway through roasting.

Roasting
63
Poultry, fish
[°C]
[min.]Poultry, 0.8–1 kg 180–190 2 60–70
190–200 2 60–70Poultry, approx. 2 kg 180–190 2 100–120
190–200 2 100–120Poultry, stuffed, approx. 2 kg 180–190 2 110–130
190–200 3 110–130Poultry, approx. 4 kg 160–170 2 120–160 1)
180–190 2 120–160 1)
Fish, whole, approx. 1.5 kg 160–170 2 45–55
180–190 2 45–55
Function / Temperature / Shelf level / Cooking duration Fan plus / Conventional heat
1) Add approx. 0.5 l of liquid halfway through roasting.

Low temperature cooking
64
This type of cooking is ideal for cookingbeef, pork, veal or lamb when a tenderresult is required.
First briefly sear the meat all over at ahigh temperature on the cooktop inorder to seal it.
Then place the meat in the pre-heatedoven where the low temperature andlong cooking duration will cook it toperfection and ensure it is very tender.
The meat will relax and the juices insidewill start to circulate evenly throughoutthe meat to reach the outer layers.This will give very tender and succulentresults.
Useful tips
– Use lean meat which has beencorrectly hung and trimmed. Bonesshould be removed before cooking.
– For searing, use a suitable cooking oilor fat that can withstand hightemperatures (e.g. clarified butter).
– Do not cover meat during cooking.
The cooking duration is approx. 2–4hours and depends on the weight andsize of the meat, as well as the desireddegree of doneness and browning.
Low temperature cookingprocedure
Use the universal tray with the rackplaced on top of it.Do not use the Rapid Heat-up function to pre-heat the oven.
Place the rack together with theuniversal tray on shelf level 2.
Select Conventional Heat and atemperature of 130 °C.
Pre-heat the oven together with theuniversal tray and rack for approx.15 minutes.
While the oven is pre-heating, searthe meat on all sides on the cooktop.
Danger of burning!Wear oven gloves when placing foodin the oven or removing it and whenadjusting oven shelves etc. in a hotoven.
Place the seared meat on the rack.
Reduce the temperature to 100 °C.
Continue cooking until the end of thecooking duration.
On models with a clock/timer, you canset the cooking process to finishautomatically (see "Clock/timer -Setting the cooking duration").

Low temperature cooking
65
After cooking– Meat can be carved straight from the
oven. It does not need to rest.
– The cooking result will not beaffected if the meat is left in the ovenafter the programme has finished. Itcan be kept warm until you serve it.
– The meat is at an ideal temperatureto eat straight away. Serve on pre-heated plates with very hot sauce orgravy to prevent it cooling down tooquickly.
Cooking duration/Coretemperatures
Meat [min.]
[°C]
Fillet of beef 105–120 60–75Sirloin joint– Rare 60–90 55–60– Medium 120–150 65–70– Well-done 180–240 70–75Pork fillet 120–150 65–80Gammon* 150–210 75–80Veal fillet 80–100 60–75Saddle of veal* 180–210 65–75Saddle of lamb* 90–120 65–75
Duration
Core temperatureIf you have a separate food probe, youcan use the core temperature shown.
* Boned

Grilling
66
Danger of burning!Grill with the oven door closed. If yougrill with the door open, hot air willescape from the oven instead ofbeing cooled by the cooling fan.The controls will get hot.
Oven functions
Grill
For grilling and toasting bread, opensandwiches etc. and browning bakeddishes.
The whole of the top heat/grill elementwill get hot and glow red.
Fan Grill
For grilling thicker items, e.g. rolledmeat, poultry pieces.
Cooking container
Use the universal tray with the rack orgrilling and roasting insert (if available)on top. The juices from the food beingcooked collect under the insert. Thisprevents them from spitting and makingthe oven dirty. The juices can be usedfor making gravy and sauces.
Do not use the baking tray.

Grilling
67
Preparing food for grillingRinse meat under cold running waterand then pat dry. Do not season meatwith salt before grilling as this draws thejuices out.
Add a little oil to lean meat if necessary.Do not use other types of fat as theycan burn and cause smoke.
Clean fish in the normal way. Toenhance the flavour, add a little salt orsqueeze a little lemon juice over thefish.
Grilling Place the rack or the roasting and
grilling insert (if available) in theuniversal tray.
Place the food on top.
Select the required oven function andthe temperature.
Pre-heat the top heat/grill element forapprox. 5 minutes with the doorclosed.
Danger of burning!Wear oven gloves when placing foodin the oven or removing it and whenadjusting oven shelves etc. in a hotoven.
Place the food on the appropriateshelf level (see Fan Grilling guide).
Close the door.
Turn the food halfway through grilling.

Grilling
68
Notes on the grilling chartCheck the food after the shortest timequoted.
Take note of the temperature range, theshelf levels and the durations. Thesetake the size of the meat and cookingpractices into account.
Temperature
As a general rule, select the lowertemperature given in the chart.If higher temperatures are used, themeat will brown on the outside, but willnot be properly cooked through.
Pre-heating
Always pre-heat the top heat/grillelement for approx. 5 minutes with thedoor closed.
Shelf levels
Select the shelf level according to thethickness of the food.
– Thin cuts: shelf level 4 or 5
– Thick cuts: shelf level 2 or 3
Grilling duration
– Flat pieces of fish and meat usuallytake 6–8 minutes per side.Thicker pieces require more time foreach side. It is best to grill food of asimilar thickness at the same time sothat the grilling time for each itemdoes not vary too greatly.
– Turn the food halfway through grilling.
Testing to see if cooked
One way of finding out how far througha piece of meat has been cooked is topress down on it with a spoon:
Rare: If there is very littleresistance to the pressureof the spoon, it will still bered on the inside.
Medium: If there is some resistance,the inside will be pink
Well-done: If there is great resistance,it is cooked through.
Check if the meat is cooked after theshortest time quoted.
Useful tip: If the surface of thicker cutsof meat is cooked but the centre is stillraw, continue grilling at a lowertemperature setting or use a lower shelflevel to allow the food to cook throughto the centre.

Grilling
69
Fan Grill – Use the Fan Grill function for meat, fish, poultry and vegetables.
– Always pre-heat for at least 5 minutes before Fan Grilling.
– It is not necessary to turn food when Fan Grilling . Only one side of the food,however, will become brown.
– The door must be closed when using Fan Grill .
– When using red meat, pat the meat dry before Fan Grilling as this encourages aricher colour.
All temperatures are approximations and must be varied according to thethickness and preparation of the meat. The chart below is a suggested guideonly. Personal taste and size of serves will vary times and temperatures. Werecommend you monitor cooking results for best outcomes.

Grilling
70
Food to be grilled [°C]
[min.]
Lean thin sausages 180 4 8–10
Thick sausages 180 4 15–20
Lean beef fillet steak 220 5 6–12
Chicken breast fillet 200 4 14–18
Whole butterflied chicken 200 3 30–35
Thin white fish fillets 220 5 6–10
Thick fish fillets, cutlets or steaks 200 4 10–15
Oily fish 200 4 8–12
Lamb loin chops 190 4 12–16
Lamb back straps 220 5 8–10
Vegetables, capsicum, zucchini, sweetpotato, eggplant
200 5 12–15
Potato wedges or small roast potatoes 220 3 20–25
Kebabs and satays (red meat) 200 5 12–15
Chicken satays 200 4 12–15
Temperature / Shelf level / Duration
Fan Grill can be used for small roasts but is only recommended for lean,tender cuts of meat, e.g. lamb racks, rump roasts, and beef fillet. Fan Grill theroast at 200 °C on shelf level 3 for approximately 25 minutes, depending onthickness.

Grilling
71
Grill – Use Grill for thick toasts, muffins, cheese on toast, focaccia, bruschetta and
bacon.
– Pre-heat the grill for at least 5 minutes at 200–220 °C.
– Select the appropriate shelf level for the thickness of the food.
– The door must be closed when using the Grill function.
This is a suggested guide only. Personal taste and size of serves will vary timesand temperatures.

Further applications
72
DefrostUse the Fan Plus function withoutsetting the temperature for gentlydefrosting food.
The fan will switch on and circulate airat room temperature around the ovencavity.
Danger of salmonella poisoning!It is particularly important to observefood hygiene rules when defrostingpoultry.Do not use the liquid from thedefrosted poultry. Pour it away, andwash the tray, the sink and yourhands.
Useful tips
– Where possible, remove thepackaging and put the food to bedefrosted on the universal tray or intoa suitable dish.
– When defrosting poultry, put it on therack over the universal tray to catchthe defrosted liquid so that the meatis not lying in this liquid.
– Meat and poultry need to be fullydefrosted before cooking. Fish, onthe other hand, can be partiallydefrosted before cooking. Defrost sothat the surface is sufficiently soft totake herbs and seasoning.
Defrosting times
The time needed for defrostingdepends on the type and weight of thefood, and at what temperature it wasdeep frozen. The following chart is forguidance only. It is important to checkthat food is thoroughly defrosted.
Frozen food [g]
[min.]
Chicken 800 90–120
Meat500 60–901000 90–120
Sausages 500 30–50Fish 1000 60–90Strawberries 300 30–40Yeast butter cake 500 20–30Bread 500 30–50
weight / defrosting duration

Further applications
73
Gentle BakeGentle Bake is suitable for smallamounts, e.g. frozen pizzas, bake-offrolls, biscuits and for meat dishes androasts. The optimal use of residual heatenables savings of up to 30% energy tobe made compared to cooking with astandard oven function withcomparatively good cooking results.
This function is not suitable for largeramounts of food such as sponge cake,fresh fruit cake or small cakes wherethe cake mix needs to be thoroughlybaked through. No energy savingswould be achieved.
The temperature can be set between100 and 250 °C.
For optimum energy savings, keep thedoor closed whilst cooking.
Examples of use
Food [°C] [min.]
Biscuits 150 25–30Ratatouille 180 40–60Fish fillet in foil, approx.500 g 200 25–35
Frozen pizza, pre-cooked 200 20–25
Ham roast,approx. 1.5 kg 160 130–160
Braised beef,approx. 1.5 kg 180 160–180
Temperature / Duration
– Use shelf level 1 or 2 depending onthe height of the food.
– The durations given are for an ovenwhich has not been pre-heated.
– Roast with the lid on first. Removethe lid three-quarters of the waythrough roasting and add approx.0.5 l of liquid.
– Check the food after the shortestduration quoted.

Further applications
74
Frozen food/Ready meals
Useful tips
Cakes, pizza, baguettes
– Large frozen items such as cakes,pizzas or baguettes cover anextensive area of the baking tray oruniversal tray.The temperature difference if largefrozen items are cooked in these trayscan cause the tray to distort in such away that it cannot be removed fromthe oven when it is hot. Further usewill make the distortion worse. Placethis type of food on baking paper onthe rack to prevent the risk of thishappening.
– Use the lowest temperaturerecommended on the manufacturer'spackaging.
Oven chips, croquettes or similaritems
– Small items of frozen food such asoven chips can be cooked on thebaking tray or universal tray. Place baking paper on the tray sothat they cook gently.
– Use the lowest temperaturerecommended on the manufacturer'spackaging.
– Turn several times during cooking.
Preparation
Eating food which has been cookedcorrectly is important for preventingfood poisoning or other ailments.Only bake cakes, pizza, chips etc.until they are golden brown. Do notovercook them.
Select the function and temperaturerecommended on the manufacturer'spackaging.
Pre-heat the oven.
Place the food in the oven on theshelf level recommended on thepackaging when the temperatureindicator light goes out.
Check the food at the end of theshortest time recommended on thepackaging.

Further applications
75
Drying foodDrying is a traditional method ofpreserving fruit, certain vegetables andherbs.
It is important that fruit and vegetablesare ripe and not bruised before they aredried.
Prepare the food for drying.
– Peel and core apples, and cut intoslices 0.5 cm thick.
– Stone plums, if necessary.
– Peel, core and cut pears into wedges.
– Peel and slice bananas.
– Clean mushrooms, then either halveor slice them.
– Remove parsley and dill from thestem.
Distribute the food evenly over theuniversal tray.
You can also use the Gourmetperforated baking tray (if available).
Select Fan Plus or ConventionalHeat .
Select a temperature of 80–100 °C.
Place the universal tray on shelflevel 2.If you are using Fan Plus , you candry produce on levels 1+3 at thesame time.
Food [min.]Fruit 120–480Vegetables 180–480Herbs 50–60
Function / Drying time Fan Plus / Conventional Heat
Reduce the temperature ifcondensation begins to form in theoven.
Danger of burning!Wear oven gloves when removingthe dried food from the oven.
Allow the dried fruit or vegetables tocool down after drying.
Dried fruit must be completely dry, butalso soft and elastic. Juice must notescape when cut.
Store in sealed glass jars or tins.

Further applications
76
Bottling
Containers for bottling
Danger of injury! Do not use the appliance to heat upor bottle food in sealed tins.Pressure will build up inside themand they can explode causingdamage to the appliance, as well asthe risk of injury and scalding.
Only use special jars for bottling:
– bottling jars
– jars with twist-off lids
Bottling fruit and vegetables
We recommend using Fan Plus .
The instructions are for 6 jars with acapacity of 1 litre each.
Place the universal tray on shelflevel 2 and place the jars on the tray.
Select Fan Plus and atemperature of 150–160 °C.
Wait until bubbles evenly rise in thejars.
Reduce the temperature in time toprevent the contents from boilingover.
Fruit/Cucumbers
Turn the function selector to Ovenlighting as soon as you can seethe bubbles forming in the jars. Leavethe jars to stand for a further25-30 minutes in the warm oven.
Vegetables
Reduce the temperature to 100 °C assoon as you can see the bubblesforming in the jars.
[min.]
Carrots 50–70Asparagus, peas, beans 90–120
Bottling duration
When the bottling duration haselapsed turn the function selector toOven lighting . Leave the jars tostand for a further 25-30 minutes inthe warm oven.
After bottling
Danger of burning!Wear oven gloves when removingthe jars from the oven.
Take the jars out of the oven.
Cover the jars with a towel and leaveto set for approx. 24 hours.
Make sure all jars are closed properlywhen storing them.

Further applications
77
Heating crockeryUse Fan Plus for pre-heatingcrockery.
Only pre-heat heat-resistant dishes.
Place the rack on shelf level 2 andplace the crockery to be pre-heatedon it. Depending on the size of thecrockery, you can also place it on theoven floor and additionally take theshelf runners out to make more room.
Select Fan Plus .
Set the temperature to 50–80 °C.
Danger of burning!Wear oven gloves when removingthe dishes from the oven. Droplets ofwater may have accumulatedunderneath the dish.
Remove the heated crockery from theoven.

Cleaning and care
78
Danger of burning!Make sure the oven heatingelements are switched off and thatthe oven cavity is cool.
Danger of injury!The steam from a steam cleaningappliance could reach electricalcomponents and cause a shortcircuit.Do not use a steam cleaner to cleanthe oven.
All surfaces can become discolouredor damaged if unsuitable cleaningagents are used. The front of theoven, in particular, will be damagedby oven cleaners and descalingagents.All surfaces are susceptible toscratching. Scratches on glasssurfaces may cause a breakage.Remove any cleaning agent residuesimmediately.
Unsuitable cleaning agentsTo avoid damaging the surfaces of yourappliance, do not use:
– cleaning agents containing soda,ammonia, acids or chlorides
– cleaning agents containing descalingagents on the oven front
– abrasive cleaning agents, e.g.powder cleaners and cream cleaners
– solvent-based cleaning agents
– stainless steel cleaning agents
– dishwasher cleaner
– glass cleaning agents
– cleaning agents for ceramic cooktops
– hard, abrasive brushes or sponges,e.g. pot scourers, brushes orsponges which have been previouslyused with abrasive cleaning agents
– dirt erasers
– sharp metal tools
– steel wool or metal scourers
– spot cleaning with mechanicalcleaning agents
– oven cleaner
– stainless steel spiral pads

Cleaning and care
79
If soiling is left on for any length oftime, it may become impossible toremove. If items are used frequentlywithout being cleaned, it maybecome very difficult to clean them.
Soiling is best removed after eachuse.
The accessories are not dishwasher-proof.
Useful tips– Soiling caused by spilled juices and
cake mixtures is best removed whilstthe oven is still warm. Exercisecaution and make sure the oven isnot too hot - danger of burning.
– To make cleaning by hand easier, youcan dismantle the oven door, removethe shelf runners and the FlexiCliptelescopic runners (if present), andlower the top heat/grill element.
Normal soiling
The fibreglass seal around the frontof the oven should be handledcarefully. Do not rub and scour it. If possible, you should avoid trying toclean it.
It is best to remove normal soilingimmediately using a clean spongeand a solution of hot water andwashing-up liquid or with a clean,damp microfibre cloth.
After cleaning, make sure all residualcleaning agents are thoroughlyremoved with clean water. This isparticularly important when cleaningsurfaces treated with PerfectCleanenamel as cleaning agent residuescan impair the non-stick properties.
After cleaning, wipe the surfaces dryusing a soft cloth.

Cleaning and care
80
Stubborn soiling (excluding theFlexiClip telescopic runners)
Spilled fruit and roasting juices maycause lasting discolouration or mattpatches on enamelled surfaces. Thisdiscolouration is permanent but willnot affect the functionalcharacteristics of the finish. Do notattempt to remove these marks.Clean them following the instructionsgiven here.
Baked on deposits can be removedwith a glass scraper or with a non-abrasive stainless steel spiral pad,warm water and washing-up liquid.
Very stubborn soiling on PerfectCleansurfaces can be cleaned using MieleOven Cleaner. This cleaner must onlybe applied to cold surfaces. Followthe instructions on the packaging.
Non-Miele oven cleaner must only beused in a cold oven and not left on forlonger than a maximum of 10 minutes.
If necessary, the scouring pad on theback of a non-scratching washing-upsponge can be used to remove thesoiling.
After cleaning, remove all ovencleaning agent residues thoroughlywith clean water, and dry with a softcloth.

Cleaning and care
81
Stubborn soiling on theFlexiClip telescopic runners
Do not clean FlexiClip telescopicrunners in a dishwasher. The speciallubricant used in the telescopicrunners will wash out duringdishwashing.
In the case of stubborn soiling on thesurfaces of the telescopic runners, orclogged bearings caused by fruit juicesspilling over, proceed as follows:
Soak the FlexiClip telescopic runnersfor approx. 10 minutes in a solution ofhot water and washing-up liquid.If necessary, use the back of awashing-up sponge to remove thesoiling. The bearings can be carefullycleaned with a soft brush.
The runners may appear discolouredor a lighter colour in places after theyhave been cleaned. This will not affectthe functioning of the runners in anyway.

Cleaning and care
82
Pyrolytic cleaning of theoven interiorInstead of cleaning the oven by hand,you can run the Pyrolytic cleaningprogramme .
During the Pyrolytic cleaningprogramme the oven interior is heatedup to over 400 °C. Any residual soilingis broken down and reduced to ash bythe high temperatures.
This oven has three levels of pyrolyticcleaning, each with a different duration.Select:
– Level 1 for light soiling
– Level 2 for heavier soiling
– Level 3 for very heavy soiling
The oven door locks automatically assoon as the Pyrolytic cleaningprogramme starts. It cannot be openeduntil after the programme has finished.
The timer can be used to delay the starttime of the Pyrolytic cleaningprogramme, for instance to make use ofcheaper electricity tariffs.
At the end of the Pyrolytic cleaningprogramme any residues such as ashfrom the pyrolytic process can be easilywiped away.
Setting up for the Pyrolytic cleaningprogramme
The high temperatures used duringpyrolytic cleaning will damageaccessories that are not designed forcleaning in the Pyrolytic cleaningprogramme.Please remove these accessoriesfrom the oven interior before startingthe Pyrolytic cleaning programme.This also applies to non-pyrolyticaccessories purchased separately tothe oven.
Take the shelf runners out (see"Cleaning and care - Removing theshelf runners with the FlexiCliptelescopic runners") and remove anyother accessories from the ovencavity.
Coarse soiling in the ovencompartment can cause anaccumulation of smoke which canlead to the Pyrolytic cleaningprogramme switching off.Burnt on residues can leavediscolouration or matt areas onenamelled surfaces.
Before running the Pyrolytic cleaningprogramme, remove coarse soilingfrom the oven compartment andloosen any burnt on residues with ascraper suitable for use on glass.

Cleaning and care
83
Starting the Pyrolytic cleaningprogramme
Danger of burning!The oven door gets much hotterduring Pyrolytic cleaning than duringnormal use.Prevent children from touching theoven during the Pyrolytic cleaningprogramme.
Select Pyrolytic cleaning .
appears in the display. The numberwill flash.
Use or to select between , and .
Select the required Pyrolytic cleaninglevel.
Confirm with OK.
The Pyrolytic cleaning programme willstart.
will also appear in the display.
While is flashing, the door is lockedautomatically. lights up as long as itis locked.
The oven heating and the temperatureindicator light will come onautomatically, even with thetemperature selector pointing to the position.
If you want to see how the Pyrolyticcleaning programme is progressing, youneed to highlight the duration symbol in the display.
Confirm with OK.
Press repeatedly until startsflashing.
The time remaining for Pyrolyticcleaning will appear in the display. Itcannot be changed.
If you have set a minute minder at thesame time as running the cleaningprogramme, the buzzer will sound andthe symbol will start flashing at theend of the minute minder time. Thetime will then continue to increase inthe display. The buzzer will stop andthe symbols in the display will go outas soon as you confirm with OK. and the number of the selectedPyrolytic cleaning programme willappear again.

Cleaning and care
84
Delaying the start time of thePyrolytic cleaning programme
Start the programme as describedabove and then set the required finishtime within the first five minutes ofstarting the programme.
Confirm with OK.
Press repeatedly until startsflashing.
The display will show the finish timecalculated from the current time of dayplus the duration of the selectedPyrolytic cleaning programme.
Confirm with OK.
The hours will flash.
Set the hours using .
Confirm with OK.
The minutes will flash.
Set the minutes using .
Confirm with OK.
The finish time is now saved.
The oven heating switches off.
The finish time can be changed at anytime up until the start time for theprogramme.
As soon as the start time is reached,the oven heating and the cooling fanwill switch on. The duration will appearin the display.
At the end of the Pyrolytic cleaningprogramme
, and will appear in thedisplay.
As long as lights up, the door islocked. When flashes, the door isunlocked.
When the door lock has been released,
– goes out.
– flashes.
– A buzzer will sound if this option isselected (see "Clock/Timer -Changing settings").
Turn the function selector to 0.
The visual and acoustic signals willswitch off.
Danger of burning! Wait until theoven has cooled down beforeremoving residual soiling left in theoven compartment from pyrolyticcleaning.
Cleaning and care
85
Wipe any residues (e.g. ash) leftbehind after the Pyrolytic cleaningprogramme out of the oven cavity.The amount of ash will varydepending on how dirty the oven wasto start with.
The fibreglass seal around the frontof the oven should be handledcarefully. Do not rub and scour it. If possible, you should avoidcleaning it.
Useful tips
– Most residues can be removed withwarm water, a little washing-up liquidand a clean sponge or a clean, dampmicrofibre cloth.
– Depending on the level of soiling, avisible deposit can build up on theglass on the inside of the oven door.This can be removed with adishwashing sponge, a glass scraperor a stainless steel spiral and a littlewashing-up liquid.
– Enamelled surfaces can bepermanently discoloured by spilledfruit juice. Such discolouration doesnot affect the properties of theenamel. Do not attempt to removethese marks.
The Pyrolytic cleaning programme iscancelled
If the Pyrolytic cleaning programme iscancelled, the oven door will remainlocked until the temperature inside theoven drops to below 280 °C. remainslit up until the temperature of the ovencavity has fallen below this temperature.When flashes, the door is unlocked.
The following will cause the Pyrolyticcleaning programme to stop:
– The function selector is turned to adifferent function or to the 0 position.
Turn the function selector back to thePyrolytic cleaning programmeposition if you want to restart theprogramme.
– A power cut.
When power is restored, remainslit up until the temperature of theoven cavity has fallen below 280 °C.After that the numeric block willappear, will flash and the door willunlock. Then will flash in thedisplay.
Confirm with OK if you want to startthe Pyrolytic cleaning programmeagain. You can select the Pyrolyticcleaning programme you want andstart it again.
As soon as you turn the functionselector to the 0 position following aninterruption to the power supply, will continue flashing. Confirm withOK to enter the time of day again (see"Before using for the first time").

Cleaning and care
86
Removing the door
The door weighs approx. 10 kg.
The oven door is connected to thehinges by retainers.Before removing the door from theretainers, the locking clamps on bothhinges have to be released.
Open the door fully.
Release the locking clamps byturning them as far as they will go.
Do not pull the door horizontally offits retainers, as they will spring backagainst the oven.
Do not pull the door off the retainersby the handle, as the handle couldbreak off.
Raise the door up till it rests partiallyopen.
Hold the door on either side and pullit diagonally upwards from the hingeguides. Make sure that you lift thedoor off straight.

Cleaning and care
87
Dismantling the door
The oven door is an open system with 4glass panes which have a heat-reflective coating on some of theirsurfaces.
When the oven is operating, air isdirected through the door to keep theouter pane cool.
If soiling has worked its way in betweenthe glass panes, the door can bedismantled in order to clean in betweenthe panes.
Take particular care as scratches candamage the glass. When cleaningthe glass panes, do not use abrasivecleaning agents, hard sponges orbrushes, and do not use sharp metaltools or scrapers.Please also read the general noteson cleaning the oven front beforecleaning the glass panes.
The glass panes are coated indifferent ways with a heat-reflectivecoating on the sides facing into theoven cavity. The glass panes mustbe fitted the right way round afterbeing cleaned.
Oven spray will damage thealuminium trims inside the door.These should only be cleaned usinghot water and washing-up liquidapplied with a clean sponge or aclean, damp microfibre cloth.
Be especially vigilant afterdismantling the door that the glasspanes do not break.
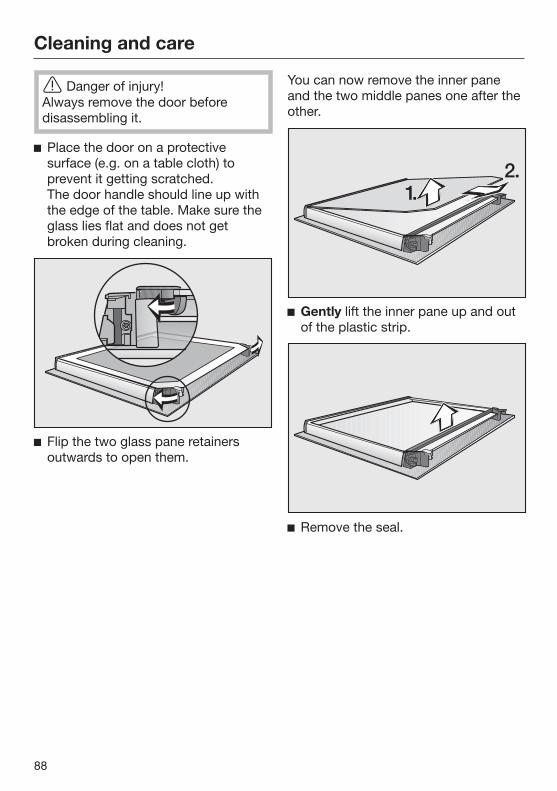
Cleaning and care
88
Danger of injury!Always remove the door beforedisassembling it.
Place the door on a protectivesurface (e.g. on a table cloth) toprevent it getting scratched.The door handle should line up withthe edge of the table. Make sure theglass lies flat and does not getbroken during cleaning.
Flip the two glass pane retainersoutwards to open them.
You can now remove the inner paneand the two middle panes one after theother.
Gently lift the inner pane up and outof the plastic strip.
Remove the seal.

Cleaning and care
89
Gently lift the top of the two middlepanes up and take it out.
Then lift the bottom of the two middlepanes up carefully and take it out.
Clean the door panes and otherindividual parts with a clean spongeand a solution of hot water andwashing-up liquid or a clean, dampmicrofibre cloth.
Dry all parts with a soft cloth.
Then reassemble the door carefully:
The two middle panes are identical. Tohelp you put them back in correctly,the material number is printed on thepanes.
Refit the lower of the two middlepanes in such a way that the materialnumber is legible (i.e. not reversed).
Flip both glass pane retainers inwardsin such a way that they fit over thelower of the two middle panes.
Then refit the upper of the middle twopanes in such a way that the materialnumber is legible (i.e. not reversed).The glass pane should lie on top ofthe retainers.

Cleaning and care
90
Refit the seal.
Push the inner pane with the mattprinted side facing downwards intothe plastic strip and place it betweenthe retainers.
Flip the two glass pane retainersinwards to close them.
The door is now reassembled and isready to fit back on the oven.

Cleaning and care
91
Fitting the door
Hold the door securely on both sidesand carefully fit it back into the hingeretainers.Make sure that the door goes backon straight.
Open the door fully.
If the locking clamps are not locked,the door could work loose resultingin damage.Ensure that the locking clamps arelocked after refitting the door.
Flip both locking clamps back up asfar as they will go into a horizontalposition.

Cleaning and care
92
Removing the shelf runnerswith FlexiClip telescopicrunnersYou can remove the shelf runnerstogether with the FlexiClip telescopicrunners (if present).
If you wish to remove the FlexiCliptelescopic runners separatelybeforehand, please follow theinstructions in "Features – Fitting andremoving the FlexiClip telescopicrunners".
Danger of burning!Make sure the oven heatingelements are switched off and theoven interior is cool.
Pull the runners out of the holder (1)at the front of the oven and then pullthem out of the oven (2).
Refit in the reverse order.
Ensure that all parts are correctlyfitted.

Cleaning and care
93
Lowering the top heat/grillelement
Danger of burning!Make sure the oven heatingelements are switched off and thatthe oven cavity is cool.
Remove the shelf runners.
Undo the wing nut.
Use caution not to damage the topheat/grill element.Do not use force to lower the topheat/grill element as this can cause itto break.
Carefully lower the top heat/grillelement.
You can now clean the oven ceiling.
Raise the top heat/grill element andtighten the wing nut securely.
Refit the shelf runners.
Problem solving guide
94
With the aid of the following guide, minor problems can be easily correctedwithout contacting Miele. If, after reading this guide, you can't remedy the problemyourself, please call Miele (see back cover for details).Please note, however, that a call-out charge will be applied to unnecessary servicevisits where the problem could have been rectified as described in these operatinginstructions.
Danger of injury! Installation, maintenance and repairs must only be carriedout by a suitably qualified and competent person. Repairs and other work byunqualified persons could be dangerous. Miele cannot be held liable forunauthorised work. Do not attempt to open the casing of the appliance yourself.
Problem Possible cause and remedy
The display is dark. There is no power to the oven. Check whether the mains fuse has tripped. If it
has, contact a qualified electrician or Miele.
The oven does not heatup.
You have only selected an oven function or atemperature. Select both a function and a temperature.
The system lock has been switched on. Switch off the system lock (see "Clock/timer -
Changing settings").There is no power to the oven. Check whether the mains fuse has tripped. If it
has, contact a qualified electrician or Miele.

Problem solving guide
95
Problem Possible cause and remedy
is flashing in thedisplay.
There has been a power cut. Reset the time of day (see "Using for the first
time").Cooking times will also need to be reset.
is lit up or flashing inthe display.
There has been a power cut which has caused thePyrolytic cleaning programme to stop.
The symbol will remain lit up and the doorlocked until the temperature inside the oven dropsto below 280 °C.
The time of day display will start flashing as soonas you turn the function selector to 0. Please enterthe time of day again (see "Using for the firsttime").
appearsunexpectedly in thedisplay and isflashing at the sametime. The buzzer mightalso be sounding.
The oven has been operating for an unusually longtime and this has activated the safety switch-offfunction. Turn the function selector to 0. The oven is now
ready to use again immediately.
appears in thedisplay.
The Pyrolytic cleaning programme door lock is notlocking. Turn the function selector to the 0 position and
select the required Pyrolytic cleaning programmeagain.If the problem persists, contact Miele.
appears in thedisplay.
The door lock for the Pyrolytic cleaning programme isnot being released. Turn the function selector to the 0 position.
If the problem persists, contact Miele.
appears in thedisplay.
There is a problem that you cannot resolve. Call Miele.

Problem solving guide
96
Problem Possible cause and remedy
A noise can be heardafter a cooking process.
The cooling fan will continue to run for a while afterthe oven has been switched off to prevent anyhumidity building up in the oven, on the control panelor in the oven housing unit.The cooling fan will switch itself off automaticallyafter a certain period of time.
Cakes and biscuits arenot baked properly afterfollowing the timesgiven in the bakingchart.
A different temperature from the one given in therecipe was used. Select the temperature required for the recipe.
The ingredient quantities are different from thosegiven in the recipe. Check whether there has been a change to the
recipe. The addition of more liquid or more eggsmakes a moister mix which would take longer tocook.
Browning is uneven. The wrong temperature or shelf level was selected. There will always be a slight unevenness. If the
unevenness is pronounced, check whether thecorrect temperature and shelf level have beenselected.
The material or colour of the baking tin is not suitablefor the oven function. With Conventional Heat light-coloured, shiny
tins are less suitable. Use matt, dark-coloured tins.
FlexiClip telescopicrunners do not push inor pull out smoothly.
The bearings in the FlexiClip telescopic runners arenot sufficiently lubricated. Lubricate the bearings with the special Miele
lubricant.Only use this special lubricant, as it is designed towithstand high temperatures in the oven. Otherlubricants can harden and stick to the FlexiCliprunners when they are heated. The Miele lubricantis available to order from Miele.
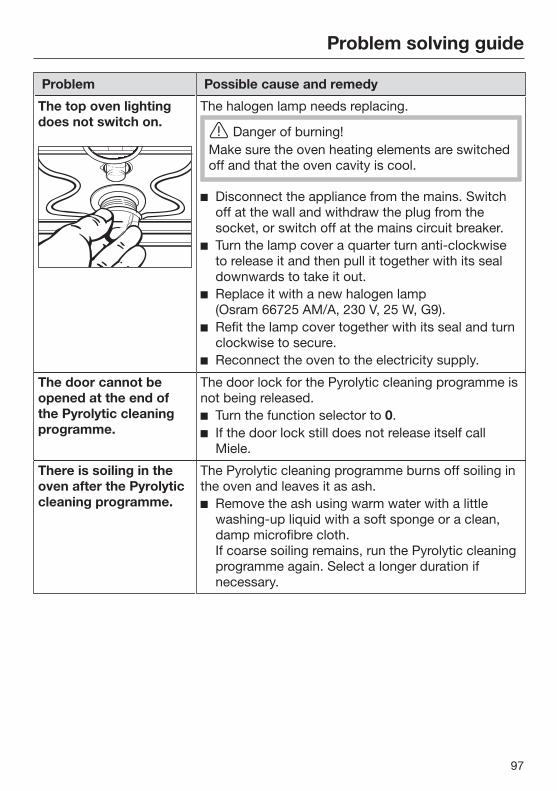
Problem solving guide
97
Problem Possible cause and remedy
The top oven lightingdoes not switch on.
The halogen lamp needs replacing.
Danger of burning!Make sure the oven heating elements are switchedoff and that the oven cavity is cool.
Disconnect the appliance from the mains. Switchoff at the wall and withdraw the plug from thesocket, or switch off at the mains circuit breaker.
Turn the lamp cover a quarter turn anti-clockwiseto release it and then pull it together with its sealdownwards to take it out.
Replace it with a new halogen lamp(Osram 66725 AM/A, 230 V, 25 W, G9).
Refit the lamp cover together with its seal and turnclockwise to secure.
Reconnect the oven to the electricity supply.
The door cannot beopened at the end ofthe Pyrolytic cleaningprogramme.
The door lock for the Pyrolytic cleaning programme isnot being released. Turn the function selector to 0. If the door lock still does not release itself call
Miele.
There is soiling in theoven after the Pyrolyticcleaning programme.
The Pyrolytic cleaning programme burns off soiling inthe oven and leaves it as ash. Remove the ash using warm water with a little
washing-up liquid with a soft sponge or a clean,damp microfibre cloth.If coarse soiling remains, run the Pyrolytic cleaningprogramme again. Select a longer duration ifnecessary.

After sales service and warranty
98
After sales serviceIn the event of any faults which youcannot easily remedy, please contactMiele.
See back of this booklet for contactdetails.
Please quote the model and serialnumber of your appliance whencontacting Miele.
This information is given on the dataplate, visible on the front frame of theoven, with the door fully open.
WarrantyThe manufacturer's warranty for thisappliance is 2 years.
For further information, please refer toyour warranty booklet.

Electrical connection
99
Danger of injury!Installation, repairs and other workby unqualified persons could bedangerous. Miele cannot be heldliable for unauthorised work.
Ensure power is not supplied to theappliance until after installation orrepair work has been carried out.
All electrical work must beundertaken by a suitably qualifiedand competent person in strictaccordance with current national andlocal safety and building coderegulations.
Connection of this appliance mustcomply with national and local safetyregulations.
Connection to a switched socket isrecommended as this provides easieraccess in the case of a service call.
For extra safety, it is advisable toprotect the appliance with a suitableresidual current device (RCD) with a tripcurrent of 30 mA.
If the switch is not accessible afterinstallation an additional means ofdisconnection must be provided for allpoles. The means of disconnectionmust be incorporated in the fixed wiringin accordance with the wiring rules.
When switched off there must be an all-pole contact gap of 3 mm in the isolatorswitch (including switch, fuses andrelays).
Connection data
AC 230V, 50 HzThe voltage and rated load are given onthe data plate situated at the front ofthe oven frame visible with the ovendoor open. Please ensure theconnection data matches thehousehold supply.
When contacting Miele, please quotethe following:
– Model number
– Serial number
– Connection data (voltage/frequency/maximum rated load).
If the mains connection cable isdamaged, it must be replaced by asuitably qualified electrician with aspecialist connection cable of typeH 05 VV-F, available from Miele, inorder to avoid a hazard.
WARNING - THIS APPLIANCEMUST BE EARTHED

Building-in diagrams
100
Appliance dimensions and unit cut-outDimensions are given in mm.
Installation in a base unit
If the appliance is to be installed under a cooktop, observe the instructions forinstallation of the cooktop, as well as the building-in depth of the cooktop.
* Ovens with glass front
** Ovens with metal front

Building-in diagrams
101
Installation in a tall unit
* Ovens with glass front
** Ovens with metal front

Building-in diagrams
102
Front dimensionsDimensions are given in mm.
A H25xx: 45 mm
H26xx: 42 mm
B Ovens with glass front: 2.2 mm
Ovens with metal front: 1.2 mm

Installing the oven
103
The oven must be built into itshousing unit before it can be used.
The oven must have an adequatesupply of cool air for properoperation. The required air must notbe heated excessively by other heatsources, e.g. wood burning stove.
Observe the following wheninstalling:Do not fit a back panel in the housingunit.Make sure that the shelf that theoven sits on does not touch the wall.Do not fit insulation to the side wallsof the housing unit.
Before installation
Before connecting the appliance tothe mains, you must disconnect thepower supply to the isolator switch.
Installing the oven
Connect the mains cable from theoven to the isolator.
Do not carry the oven by the doorhandle. The door can be damaged.Use the handles on each side of thecasing to carry it.
It is advisable to remove the doorbefore installing the appliance (see"Cleaning and Care - Removing thedoor") and remove accessories fromthe oven cavity. This will make it easierto install in its niche and you will notbe tempted to use the handle to carryit.
Push the oven into the housing unitand align it.
Open the door (if you have notremoved it previously).
Use the screws supplied to securethe oven to the side walls of thehousing unit through the holes in theoven trim.
Refit the door, if necessary (see"Cleaning and care - Refitting thedoor").


www.miele.com.au
Miele Experience Centre and Head Office Melbourne:1 Gilbert Park DriveKnoxfield, VIC 3180
Miele Experience Centre South Melbourne:206-210 Coventry StreetSouth Melbourne, VIC 3205
Miele Experience Centre and Office Sydney:3 Skyline PlaceFrenchs Forest, NSW 2086
Miele Experience Centre and Office Brisbane:39 Harvey Street NorthEagle Farm, QLD 4009
Miele Experience Centre and Office Perth:
83-85 Sir Donald Bradman DriveHilton, SA 5033
205-207 Stirling HighwayClaremont, WA 6010
Miele Experience Centre and Office Adelaide:
Miele Australia Pty. Ltd.
Miele New Zealand Limited
Level 2, 10 College HillFreemans Bay, Auckland 1011
Miele Experience CentreAuckland:8 College HillFreemans Bay, Auckland 1011Telephone:0800 464 353 (0800 4 MIELE)www.miele.co.nz
Miele Global HeadquartersGermanyMiele & Cie. KGCarl-Miele-Straße 2933332 GüterslohFederal Republic of Germany
Head Office:
IRD 98 463 631
ACN 005 635 398ABN 96 005 635 398
Miele Experience Centre Gold Coast:131 Ferry RoadSouthport, QLD 4215

M.-Nr. 10 692 210 / 02en-AU, NZ
H2661BP


