
OpenOffice -...
54
OpenOffice.org impress tutorial
-
Upload
truongkhanh -
Category
Documents
-
view
232 -
download
0
Transcript of OpenOffice -...

OpenOffice.org
impress tutorial
Creating a new presentationAutoPilot
Inserting SlidesSelecting Slides
Formatting a PageFormatting SlidesWorkspace views
Running the slide show
Editing slidesInserting Text
Formatting TextCreating Bulletted/Numbered Lists
Changing the Slide BackgroundImporting Graphics
Slide Transitions and AnimationsSlide TransitionsAnimation Effects
Differences between PowerPoint and OpenOfficeFeatures that may be implemented differently
OpenOffice.org

AutoPilot
Inserting Slides
Selecting Slides
Formatting a Page
Formatting Slides
Workspace views
Running the slide show
Creating a new presentation
OpenOffice.org

Creating a new presentationAutoPilot
Empty presentation creates a presentation from scratch. From template uses a template design already created as the base
of a new presentation. Open existing presentation continues work on a previusly created
presentation.
OpenOffice.org
After launching OpenOffice.org an AutoPilot Presentation window appears.

OpenOffice.org
Select a slide design. Choose <Original> for no slide design (plain white).
Select how presentation will be used.
Click "Next >>" to continue.
Creating a new presentationAutoPilot

OpenOffice.org
The Effect option creates transitions between all the slides in the presentation.
Select No Effect for no transition effect.
Transitions can be added and changed later.
Click "Create" to end the AutoPilot.
Creating a new presentationAutoPilot

OpenOffice.org
Type in a title for the slide in the area marked Name.
Click a thumbnail slide from a "Select an Autolayout" section to select that layout.
Click OK.
Creating a new presentationAutoPilot

OpenOffice.org
To add a slide to the new presentation, go to the Insert menu and select "Slide..."
Creating a new presentationInserting Slides

OpenOffice.org
Insert a title for the slide in the Name field.
Choose the slide layout from the "Select an AutoLayout" section.
Click OK.
Creating a new presentationInserting Slides

OpenOffice.org
A new slide tab appears at the bottom of the workspace for each inserted slide.
Click on a slide tab to select and display that tab.
Creating a new presentationSelecting Slides

OpenOffice.org
Go to the Format menu and click "Page..."
Creating a new presentationFormatting a Page

OpenOffice.org
In this window you can change the format, the orientation and the margins of the page.
Creating a new presentationFormatting a Page

OpenOffice.org
Select "Modify layout..." from the Format menu.The Modify Slide window appears.
Creating a new presentationFormatting Slides

OpenOffice.org
Modify the layout by choosing a new layout from the "Select an AutoLayout" section.
Creating a new presentationFormatting Slides

OpenOffice.org
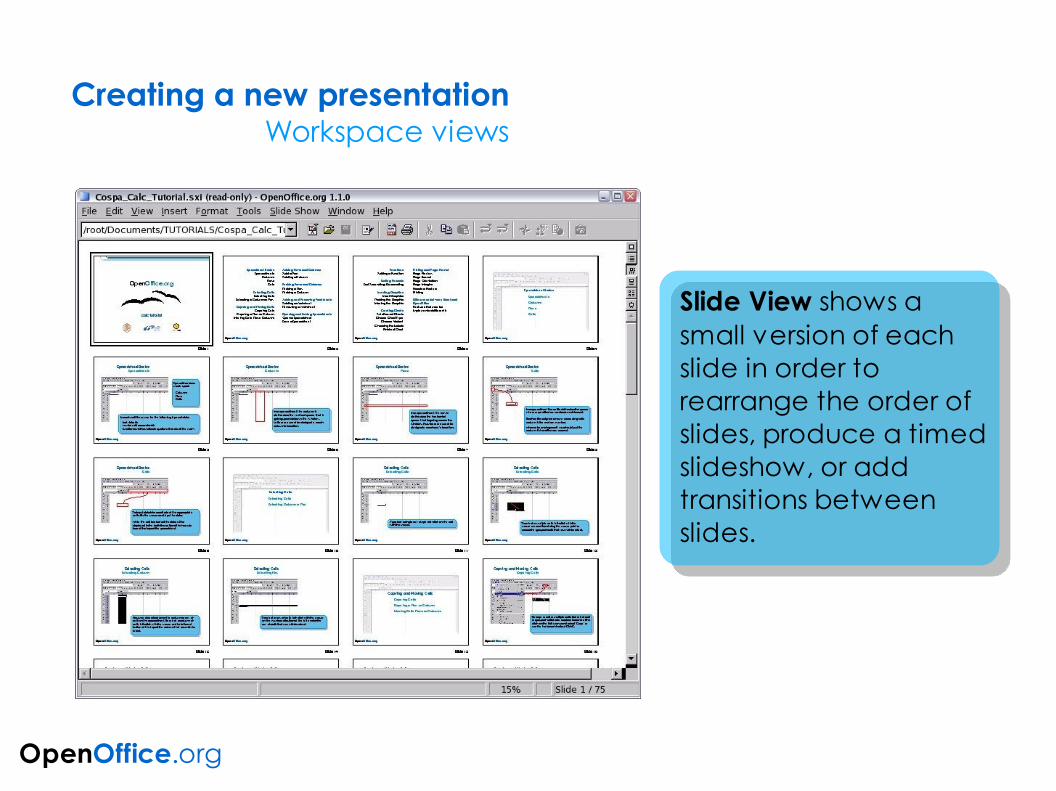
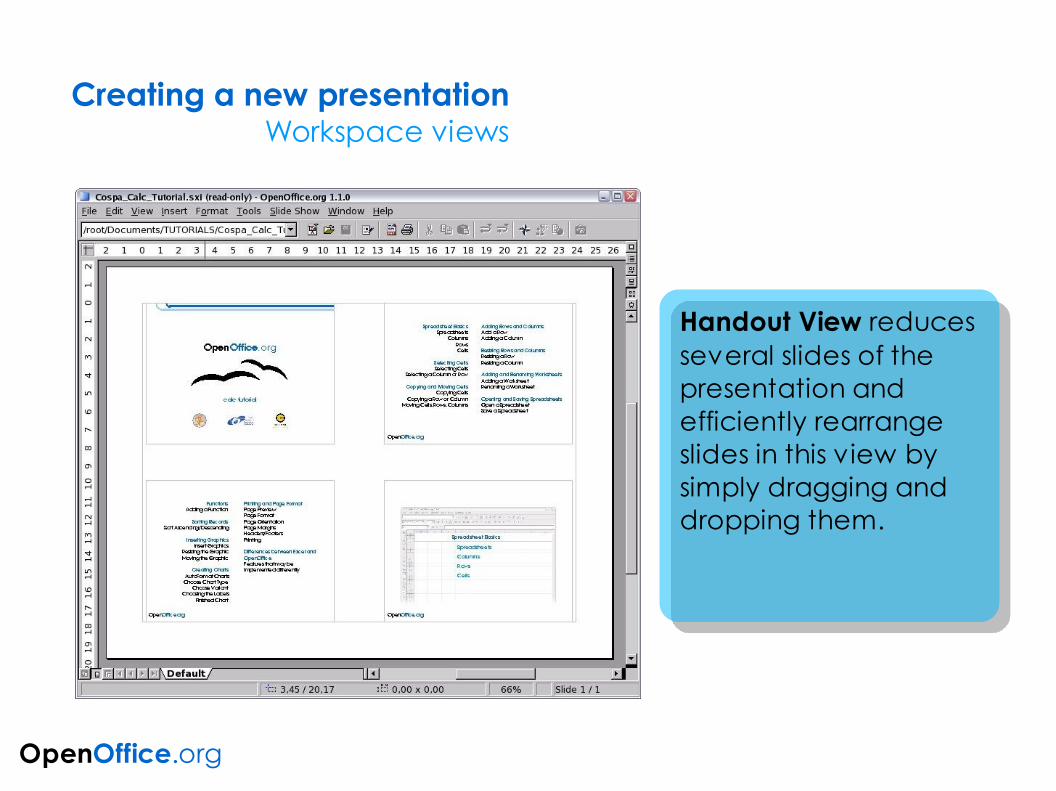
Impress has five different workspace views from which to choose. Each view is designed to make completing certain tasks easier.
Drawing View
Outline View
Slide View
Notes View
Handout View
Creating a new presentationWorkspace views

OpenOffice.org
Drawing View is the main view for creating individual slides. Use this view to format and design, add text, graphics, and animation effects.
Creating a new presentationWorkspace views

OpenOffice.org
Outline View shows topic titles, bulleted lists, and numbered lists for each slide in outline format. This view lets you rearrange the order of the slides, edit titles and headings, rearrange the order of items in a list, and add new slides.
Creating a new presentationWorkspace views
OpenOffice.org
Slide View shows a small version of each slide in order to rearrange the order of slides, produce a timed slideshow, or add transitions between slides.
Creating a new presentationWorkspace views

OpenOffice.org
Notes View lets you add notes to each slide that are not seen when the presentation is shown. You can print these notes and refer to them while giving a presentation.
Creating a new presentationWorkspace views
OpenOffice.org
Handout View reduces several slides of the presentation and efficiently rearrange slides in this view by simply dragging and dropping them.
Creating a new presentationWorkspace views

OpenOffice.org
To view the presentation click on the "Start Slide Show" button or go to the "Slide Show" menu and select "Slide Show".The shortcut key for this feature is "F9".
Use the arrow keys on the keyboard to go to the next slide or to go back the previous one. You can also click the mouse or press the spacebar on the keyboard to advance to the next slide
When the last slide appears, the message "Click to exit presentation" appears. Click the mouse or press any key to exit the presentation.
Slide Show
Creating a new presentationRunning the slide show

Inserting Text
Formatting Text
Creating Bulletted/Numbered Lists
Changing Slide Background
Importing Graphics
Editing slides
OpenOffice.org
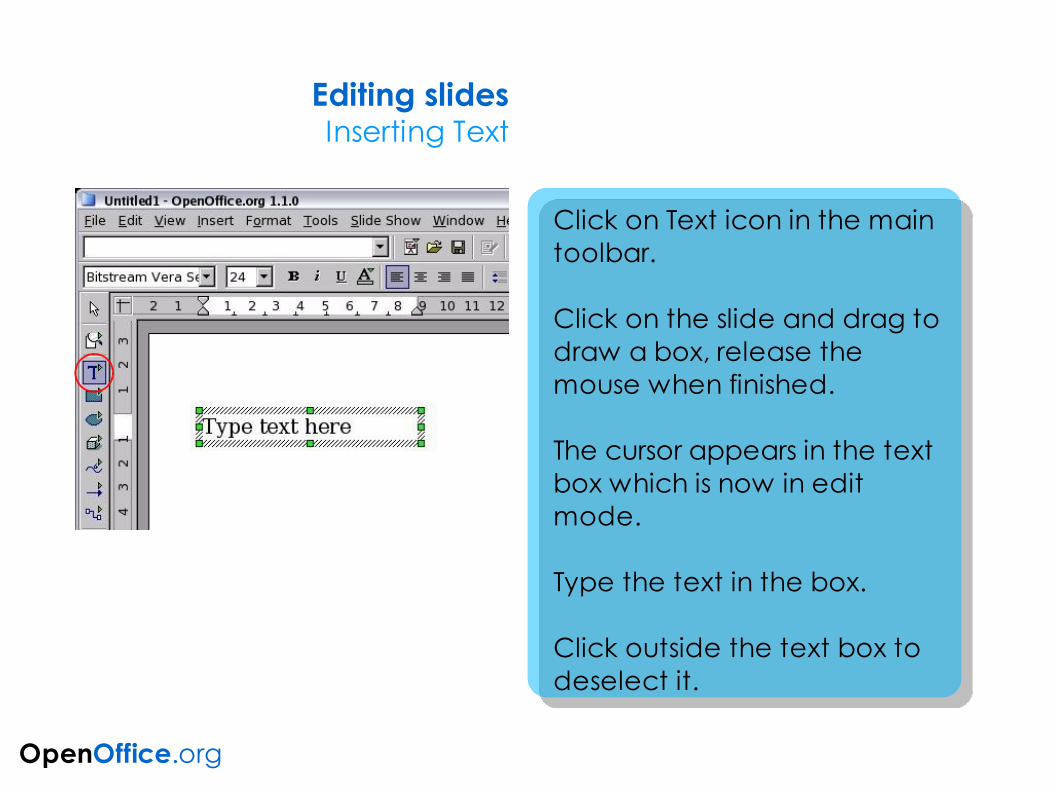
Click on Text icon in the main toolbar.
Click on the slide and drag to draw a box, release the mouse when finished.
The cursor appears in the text box which is now in edit mode.
Type the text in the box.
Click outside the text box to deselect it.
OpenOffice.org
Editing slidesInserting Text

The text must be selected before it can be formatted:
To format all text in a text box, click on the text, then click once on the border of the text box. Now any formatting changing will apply to all text in the box.
To format only a part of the text, click once on the text, then select the part to be formatted by clicking and dragging (highlighting) over it.Formatting changes will apply only to the selected text.
OpenOffice.org
Editing slidesFormatting Text

OpenOffice.org
Editing slidesFormatting Text
To view the Character Formatting options, select "Character..." from the Format menu or click the Character button on the Object Bar.

OpenOffice.org
Editing slidesFormatting Text
In this window you can specify the font, the typeface and the size of the text.At the bottom of the window there is a preview of the selected font.

OpenOffice.org
Editing slidesFormatting Text
To view the Paragraph Formatting options, select "Paragraph..." from the Format menu or click the Paragraph button on the Object Bar.

OpenOffice.org
Editing slidesFormatting Text
In this window you can specify options about paragraphs.

OpenOffice.org
Editing slidesCreating Bulletted/Numbered Lists
To create a bulletted or numbered list from AutoLayout text boxes, insert a new slide or modify the current one and then select an AutoLayout that contains a numbered list.

OpenOffice.org
Editing slidesCreating Bulletted/Numbered Lists
Click in the box that reads "Click to add an outline"Type the the text, then press Enter to start a new bulletted line or the next sequential numbered line.
Press Shift + Enter to start a new line without creating a new bullet or number.

OpenOffice.org
Editing slidesCreating Bulletted/Numbered Lists
Creating a new outline level
Press tab. Each time you press tab the line indents to the new outline level. Pressing Enter creates a new line at the same level as the previeous one.

OpenOffice.org
Editing slidesCreating Bulletted/Numbered Lists
Changing bullet type
Click in the list, then click on the gray border of the text box so that just the green resizing handles are displayed.
Select Numbering/Bullets from the Format menu or click on the Numbering Symbols button.
Click a bullet style to choose it.
Click OK.

OpenOffice.org
Editing slidesCreating Bulletted/Numbered Lists
Changing from bulletted lists <-> numbered lists
Click in the list, then click on the gray border of the text box so that just the green resizing handles are displayed.
Select Numbering/Bullets from the Format menu or click on the Numbering Symbols button.
Click the Numbering type tab if switching from bullets to numbers.Click the Bullets tab if switching from numbers to bullets.
Click a bullet style to choose it.
Click OK.

OpenOffice.org
Editing slidesChanging the Slide Background
To change the slide background select "Page..." from the format menu and then select on the background tab.
OpenOffice.org
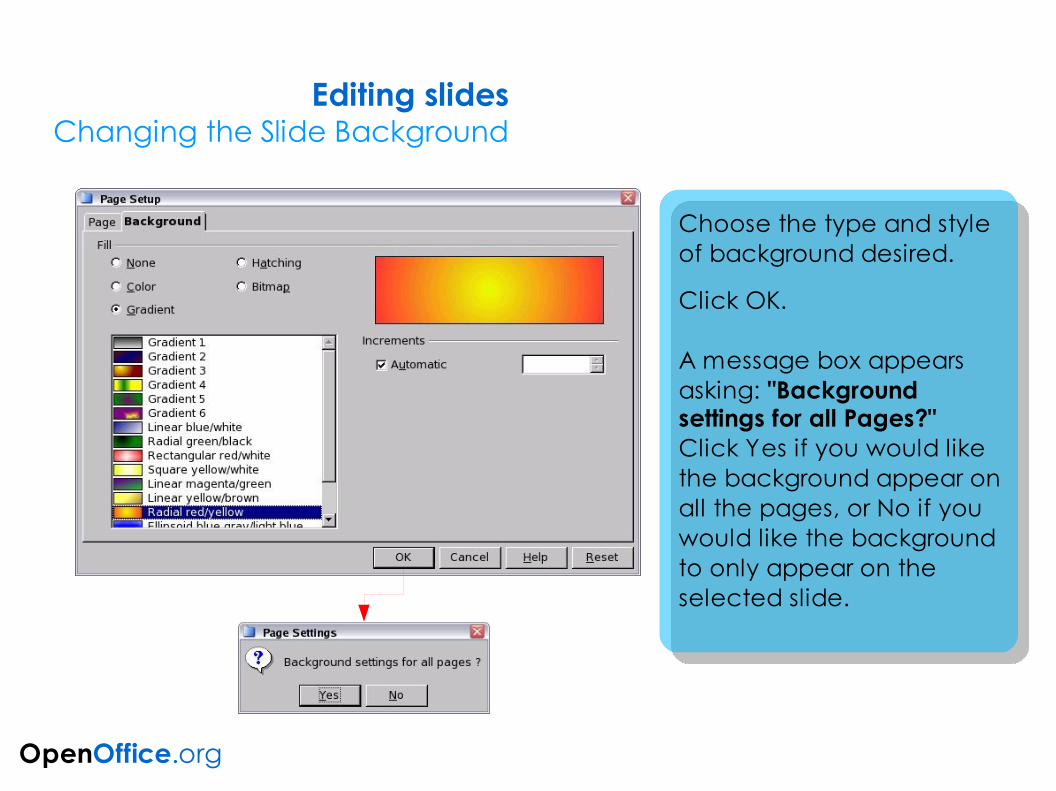
Editing slidesChanging the Slide Background
Choose the type and style of background desired.
Click OK.
A message box appears asking: "Background settings for all Pages?" Click Yes if you would like the background appear on all the pages, or No if you would like the background to only appear on the selected slide.

OpenOffice.org
Editing slidesChanging the Slide Background
If you choose Yes all slides have the same background.

OpenOffice.org
Editing slidesImporting Graphics
To insert an image select "Graphics..." from the Insert menu.

OpenOffice.org
Editing slidesImporting Graphics
Choose an image to insert in your document and click Open. If the preview checkbox is selected, a preview of the image content is displayed on the right.

OpenOffice.org
Editing slidesImporting Graphics
You can resize the image just by dragging one of the eight green points surrounding the picture.

OpenOffice.org
Editing slidesImporting Graphics
When the move cursor appears over the image you can move the picture.

OpenOffice.org
Editing slidesImporting Graphics
To delete an image, click on it and then press Delete.

Slide Transitions
Animation Effects
Slide Transitions and Animations
OpenOffice.org

OpenOffice.org
Slide transitions are the effects that take place when a slide gives way to the next one in the presentation. You can apply a different transition to all slides in the presentation or apply different transition to any single slide.
Slide Transitions and AnimationsSlide Transitions

OpenOffice.org
There are two ways to add a transition.First way: add a transition from the Slide View. When you switch in this mode, the Object Bar presents many options for choosing and controlling slide effects.
Slide Transitions
Slide Transitions and AnimationsSlide Transitions

OpenOffice.org
Second way: select "Slide Transition" from the "Slide Show" menu to open the Slide Transition Window. The Effects button displays the various
transitions.
The Extras button displays the options for timing transitions and making them automatic, semi-automatic, or manual.
The Update button displays the transition settings for the selected slide.
The Assign button applies the chosen effect to the selected slide.
The Preview button opens a handly window for viewing an applied transition.
Slide Transitions and AnimationsSlide Transitions

OpenOffice.org
Applaying a slide transition effect● From Slide View, click on a slide to select it. The transition you apply to this slide will appears when the slides comes into view in the slideshow. ● Choose "Slide Transition" from the "Slide Show" menu.● Choose an effects category from the pop-up menu above the main Effects window.● Click on a thumbnail image to select that transition.● Choose a transition speed from the pop-up menu above the main Effects window.
●Click the Assign button.
Slide Transitions and AnimationsSlide Transitions

OpenOffice.org
Animations are similar to Transition effects, but they are applied to individual elements within a single slide.
Slide Transitions and AnimationsAnimation Effects

OpenOffice.org
Slide Transitions and AnimationsAnimation Effects
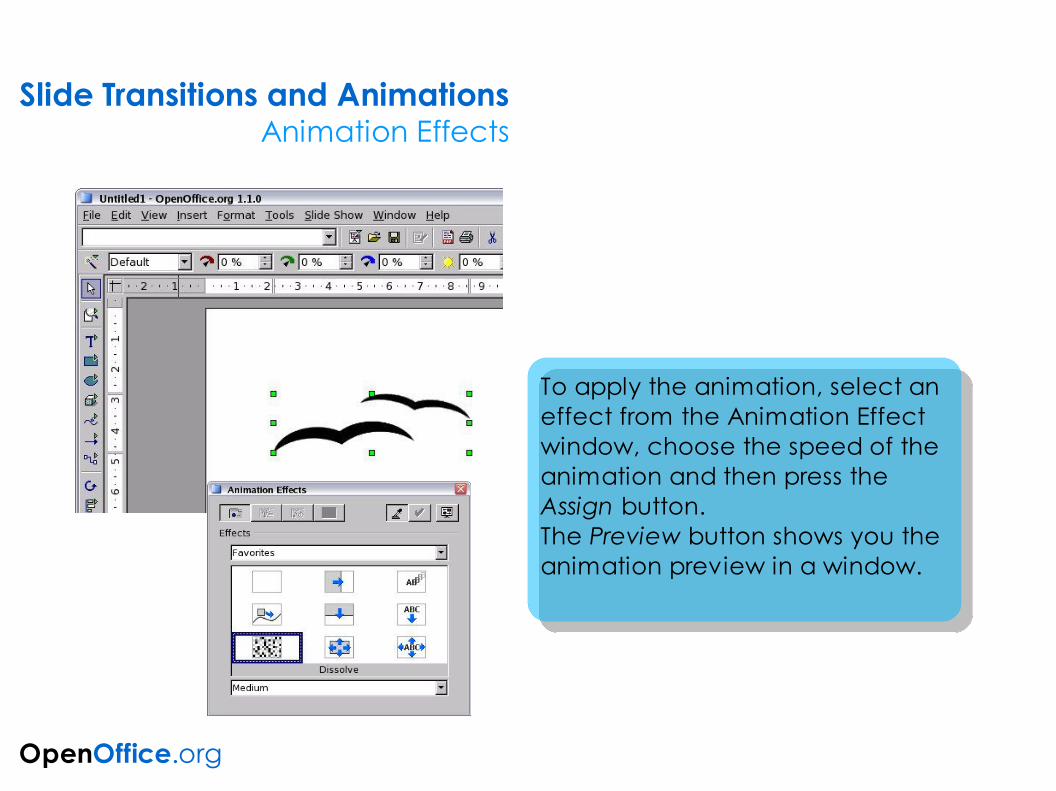
Animation effects must be applied from Drawing View.
Slect the object and then choose "Effects" from the "Slide Show" menu or click the Animation Effects button in the main toolbar.

OpenOffice.org
The Effects button displays the various animations.
The Text Effect button is only active when a text box containing text is selected. It displays the various animation effects that you can apply to text objects.
The Extra button displays additional options for text and sound.
The Order button displays an outline of objects that are on the selected slide in the order effects will play.
The Update, Assign and Preview button are the same as in the Slide Transition window.
Slide Transitions and AnimationsAnimation Effects
OpenOffice.org
Slide Transitions and AnimationsAnimation Effects
To apply the animation, select an effect from the Animation Effect window, choose the speed of the animation and then press the Assign button.The Preview button shows you the animation preview in a window.
Differences between PowerPoint and OpenOffice
OpenOffice.org
Features that may be implemented differently
Differences between PowerPoint and OpenOfficeFeatures that may be implemented differently
OpenOffice.org
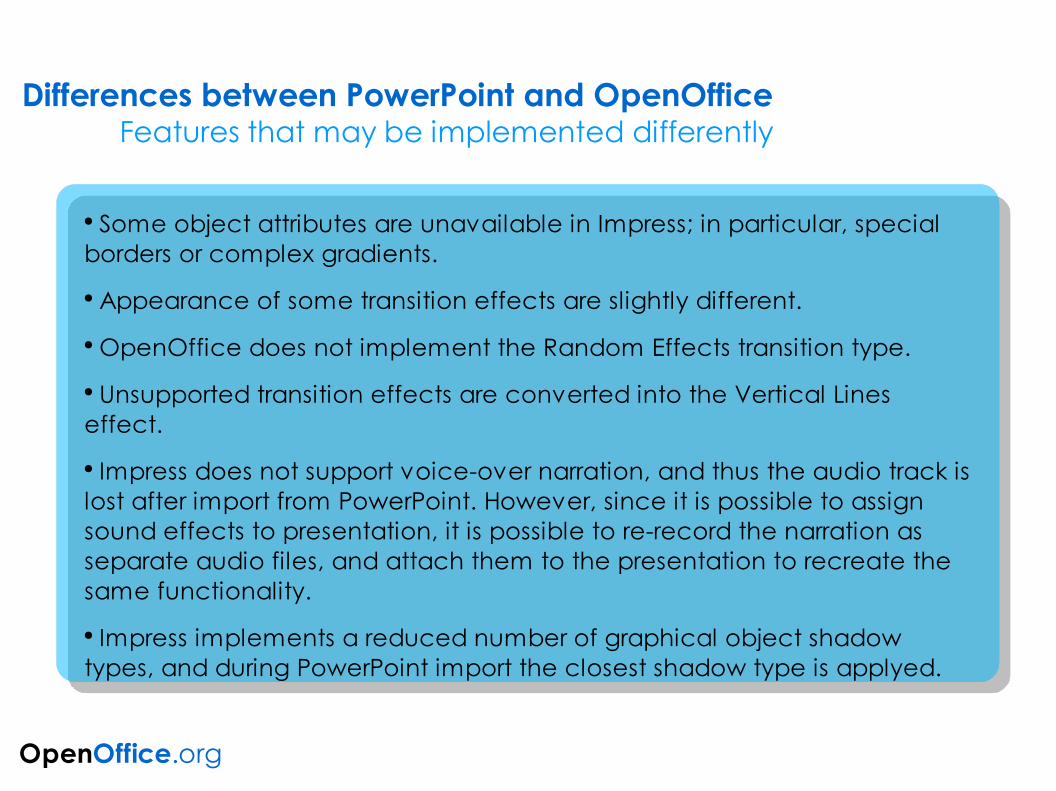
● Some object attributes are unavailable in Impress; in particular, special borders or complex gradients. ● Appearance of some transition effects are slightly different. ● OpenOffice does not implement the Random Effects transition type. ● Unsupported transition effects are converted into the Vertical Lines effect. ● Impress does not support voice-over narration, and thus the audio track is lost after import from PowerPoint. However, since it is possible to assign sound effects to presentation, it is possible to re-record the narration as separate audio files, and attach them to the presentation to recreate the same functionality.● Impress implements a reduced number of graphical object shadow types, and during PowerPoint import the closest shadow type is applyed.

Differences between PowerPoint and OpenOfficeFeatures that may be implemented differently
OpenOffice.org
Shadow 3 Shadow 4
10
11 12 151313
2016
987
18 19
Shadow 3 Shadow 4
11 12 1513
2016 1918
87 109
Unsupported PowerPoint shadow styles (left) and their corresponding OpenOffice Impress mappings (right).

Differences between PowerPoint and OpenOfficeFeatures that may be implemented differently
OpenOffice.org
● Impress does not support the same header and footer model of PowerPoint; the same functionality can be recreated using the field add feature anywhere on the slide. ● Dynamic areas (like date and number fields) by default when exported from Impress are translated into static, fixed text. Dynamic areas must be recreated in PowerPoint after the export phase. ● Date formats may translate incorrectly when converted from PowerPoint; and unrecognized styles are converted in the default OpenOffice format. ● Impress does not support the same Color Scheme model used in PowerPoint, instead it uses graphics and presentation styles. When exporting from OpenOffice, these formats are lost and the converted document will not allow the selection of color schemes. ● Impress does not support the mouseover action; documents that use that feature are converted to use mouseclick instead.