Opening Wedge High Tibial Osteotomy …sports-doc.net/Publications/ch016-X4397.pdftibia in an...
12
PROCEDURE 16 Opening Wedge High Tibial Osteotomy Ammar Anbari, Adam B. Yanke, and Brian J. Cole ch016-X4397.indd 247 4/11/2008 10:51:31 AM
Transcript of Opening Wedge High Tibial Osteotomy …sports-doc.net/Publications/ch016-X4397.pdftibia in an...
PR
OC
ED
UR
E 1
6 Opening Wedge High Tibial OsteotomyAmmar Anbari, Adam B. Yanke, and Brian J. Cole
ch016-X4397.indd 247 4/11/2008 10:51:31 AM
248O
pen
ing
Wed
ge
Hig
h T
ibia
l O
steo
tom
y Indications■ Standing varus alignment■ Symptomatic, isolated medial compartment arthritis
with or without ligamentous instability■ Medial knee pain associated with any cartilage defect
(osteochondritis dissecans, avascular necrosis, focal chondral defect) with varus malalignment
Examination/Imaging■ Examination includes:
• Observation of standing and ambulation alignment (varus thrust)
• Correctability of varus deformity• Range of motion• Ligamentous stability
■ A lateral offset short-leg walking cast, popularized by the senior author, is placed prior to surgery for 3 days to predict the potential success of an osteotomy.
■ Alternatively, unloader braces can also be tried to determine if an osteotomy is a viable option.
■ Radiographs include four views: standing anteroposterior, lateral, Merchant’s, and 45° flexion posteroanterior (PA).• The PA view allows better analysis of the weight-
bearing portion of the articular surface.• In addition, bilateral long cassette view standing
films are taken to measure the mechanical axis and degree of correction needed.◆ Double-leg stance radiographs: to assess the
bony deformity◆ Single-leg stance radiographs: to assess any soft
tissue deformity (ligamentous insufficiency)■ Magnetic resonance imaging is only useful with
suspected cartilage or ligament damage.■ Calculating degree of correction (coronal plane):
• For medial compartment arthrosis, overcorrection is usually needed to the 62% lateral weight bearing line (roughly two-thirds of the width of the tibia plateau).◆ The point of the desired mechanical axis is
marked on the tibial plateau.◆ A line is drawn from the center of the femoral
head to the desired point on the plateau.◆ Another line is drawn from the point on the
plateau to the center of the tibial plafond.
Contraindications• Deformity over 15°• Flexion contracture over 15°• Knee flexion under 90°• Medial/lateral tibial subluxation
over 1 cm• Excessive medial bone loss (over
3 mm)• Inflammatory arthritis• Arthritis in the lateral
compartment• Patella baja• Morbid obesity (select a closing
wedge osteotomy instead)• Age over 60 (relative
contraindication)
Treatment Options• Oral anti-inflammatory
medications• Nutricueticals• Cortisone injections• Viscosupplementation• Activity modifications• Unloader braces• Assistive devices (canes, walkers)
ch016-X4397.indd 248 4/11/2008 10:51:32 AM
249O
pen
ing
Wed
ge H
igh
Tib
ial Osteo
tom
y
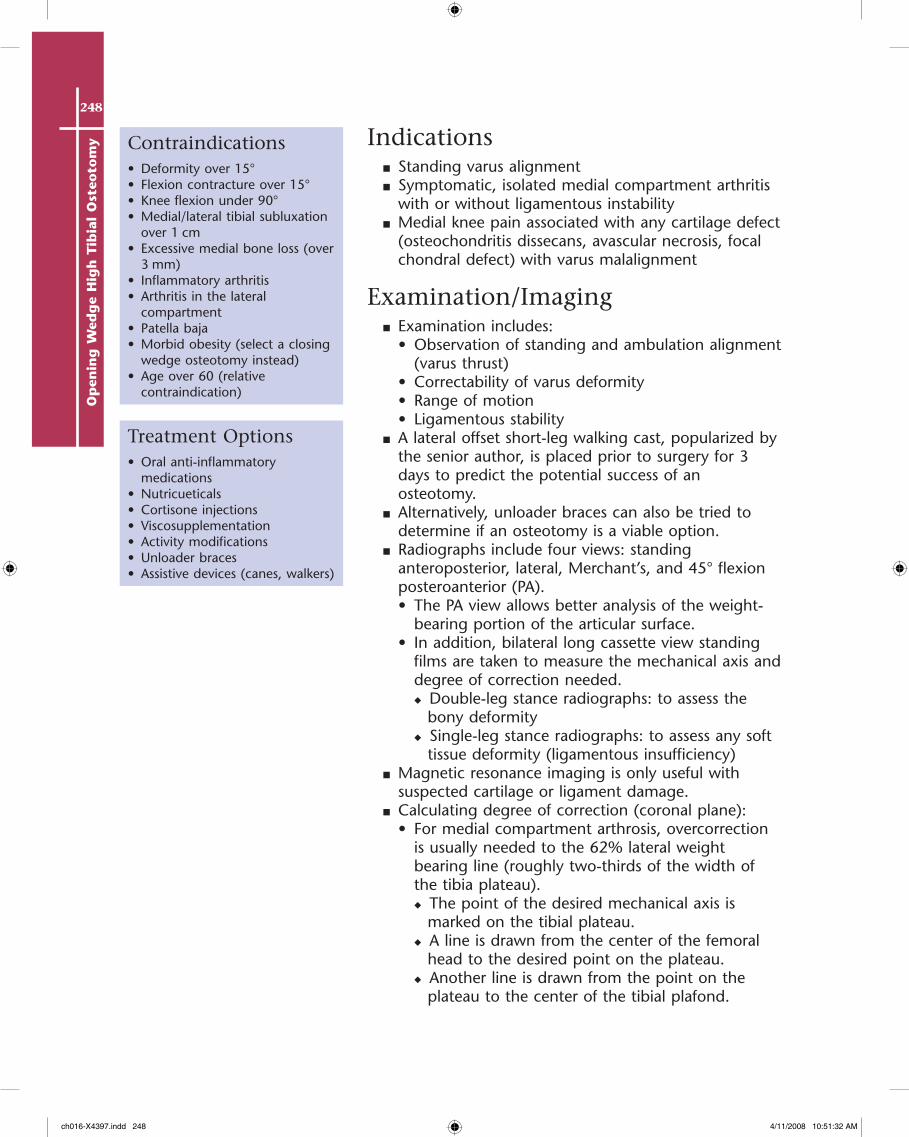
◆ The angle formed by the two lines is the degree of correction needed (Fig. 1A and 1B).
◆ Generally, 1 mm of opening corresponds to 1° of correction. This is only true for a tibial width of 56 mm.
• For unloading cartilage restoration procedures, correction of the mechanical axis to neutral (center of plateau) is sufficient.
■ Calculating degree of correction (sagittal plane):• Increasing the tibial slope will:
◆ Worsen symptoms with anterior cruciate ligament (ACL) instability
◆ Improve symptoms with posterior cruciate ligament (PCL) instability
• Decreasing the tibial slope will:◆ Improve symptoms with ACL instability◆ Worsen symptoms with PCL instability
BA
FIGURE 1
ch016-X4397.indd 249 4/11/2008 10:51:37 AM
250O
pen
ing
Wed
ge
Hig
h T
ibia
l O
steo
tom
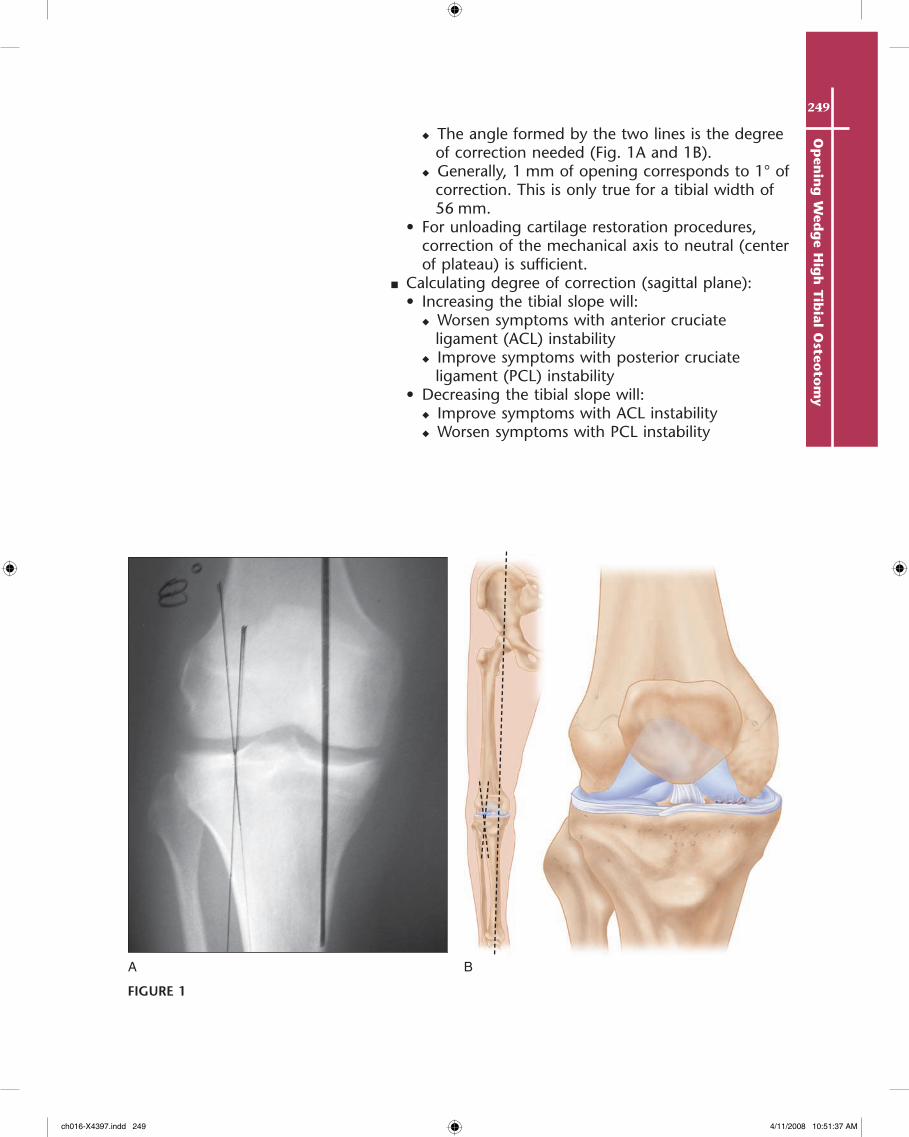
y Positioning■ The patient is placed supine on the operating table.
A radiolucent extension is applied to enable fluoroscopic examination. Alternatively, the patient can be placed on the ipsilateral edge of the table to enable fluoroscopic access by abducting the leg.
■ A lateral post is applied in the middle of the thigh for the arthroscopic procedure.
■ A tourniquet is applied and can be used if needed. It is usually deflated prior to closure to obtain adequate hemostasis.
■ If a large correction is anticipated, the ipsilateral iliac crest is draped and a rolled blanket is placed under the same buttock (Fig. 2).
Portals/Exposure■ A quick diagnostic arthroscopy is routinely performed
to verify the status of the articular cartilage and menisci. Two standard arthroscopy portals (anteromedial and anterolateral) are utilized.
■ A marking pen is used to mark the tibial tubercle, the patellar tendon, and the pes anserine.
■ The high tibial osteotomy (HTO) incision can be planned by drawing a line from the distal aspect of
Instrumentation• Opening wedge osteotomy
system (Arthrex, Inc., Naples, FL)
• Power drill and saw• A large saw blade• Fluoroscan• Allograft cortical wedges
FIGURE 2
ch016-X4397.indd 250 4/11/2008 10:51:40 AM
251O
pen
ing
Wed
ge H
igh
Tib
ial Osteo
tom
y
the anteromedial portal distally to the level of the pes on the medial side of the tibial tubercle.• The portion below the joint line can be used to
perform the actual incision.• The incision falls roughly between the tibial crest
and the posteromedial tibial border.■ Dissection is made down to the anteromedial tibia
and the sartorius fascia.■ The hamstring tendons are palpated and an
electrocautery device is used to make a transverse cut along their superior aspect extending from the posteromedial tibia to the level of the patellar tendon.• The cut is curved inferiorly to follow along the
medial side of the patellar tendon.• A sleeve including the superficial medial collateral
ligament (MCL) is raised subperiosteally to the posteromedial tibia.
• A large retractor is placed behind the tibia to protect the neurovascular structures.
ProcedureStep 1: DiagnoStic arthroScopy
■ A diagnostic arthroscopy is performed to verify that the patient is a good candidate for the osteotomy procedure. Any necessary concomitant procedures are done prior to performing the osteotomy (meniscus work, cartilage débridement or repair).
■ The irrigation fluid is aspirated at the end of the arthroscopic evaluation.
Step 2: placing guiDe pinS
■ An incision is made, and the appropriate retractor is placed to protect the posterior neurovascular structures.
■ A 2.4-mm breakaway guide pin is inserted into the tibia in an inferomedial-to-superolateral direction.• The guide pin tip should be seated in the lateral
cortex approximately 1–2 cm distal to the lateral tibial joint line.
• The position is verified with fluoroscopy. As a fluoroscopic guideline, the pin should traverse the superomedial tibial tuberosity at the junction of the patellar tendon insertion and end at the tip of the fibular head.
■ Insert another pin parallel to the first, taking into account the proximal slope of the tibia.
ch016-X4397.indd 251 4/11/2008 10:51:40 AM
252O
pen
ing
Wed
ge
Hig
h T
ibia
l O
steo
tom
y
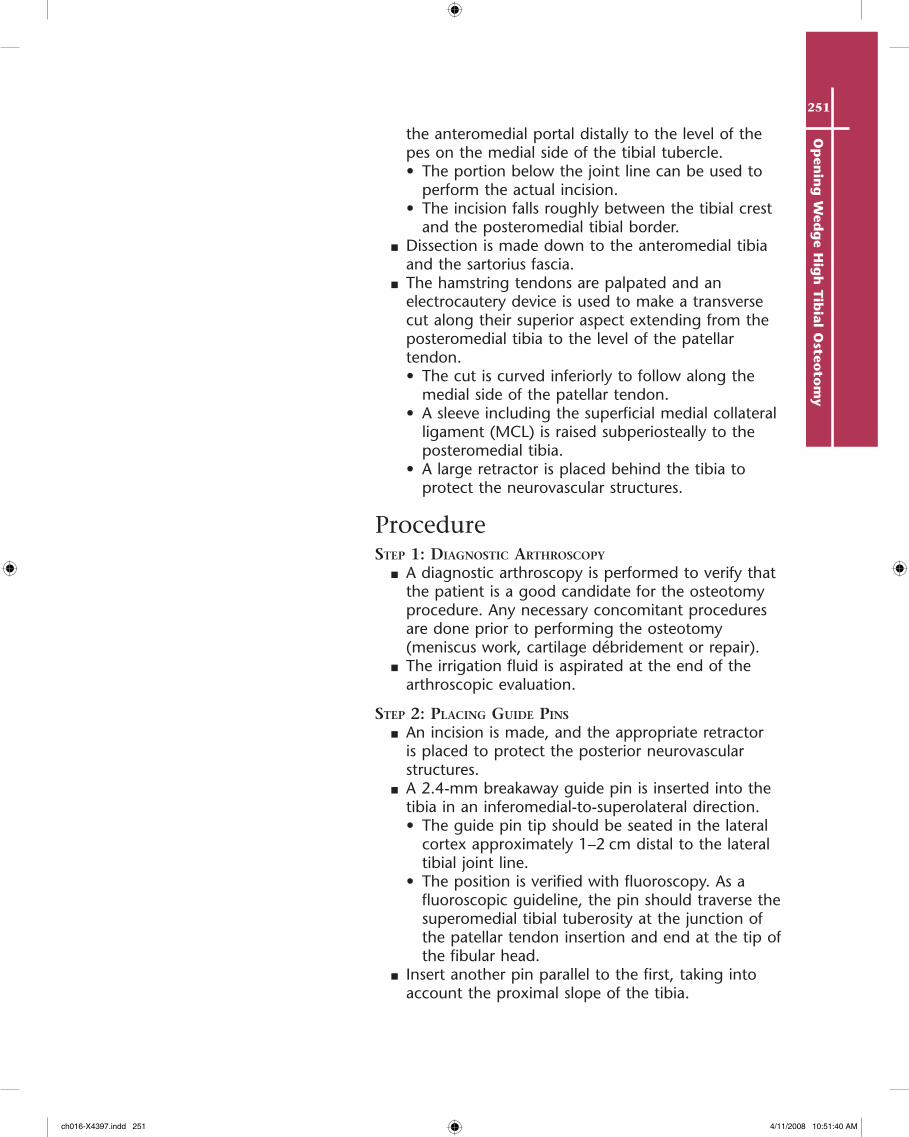
■ The pins are bent and broken at their breakaway point (Fig. 3).
■ A retractor is placed beneath the patellar tendon for protection.
Step 3: performing the oSteotomy cut
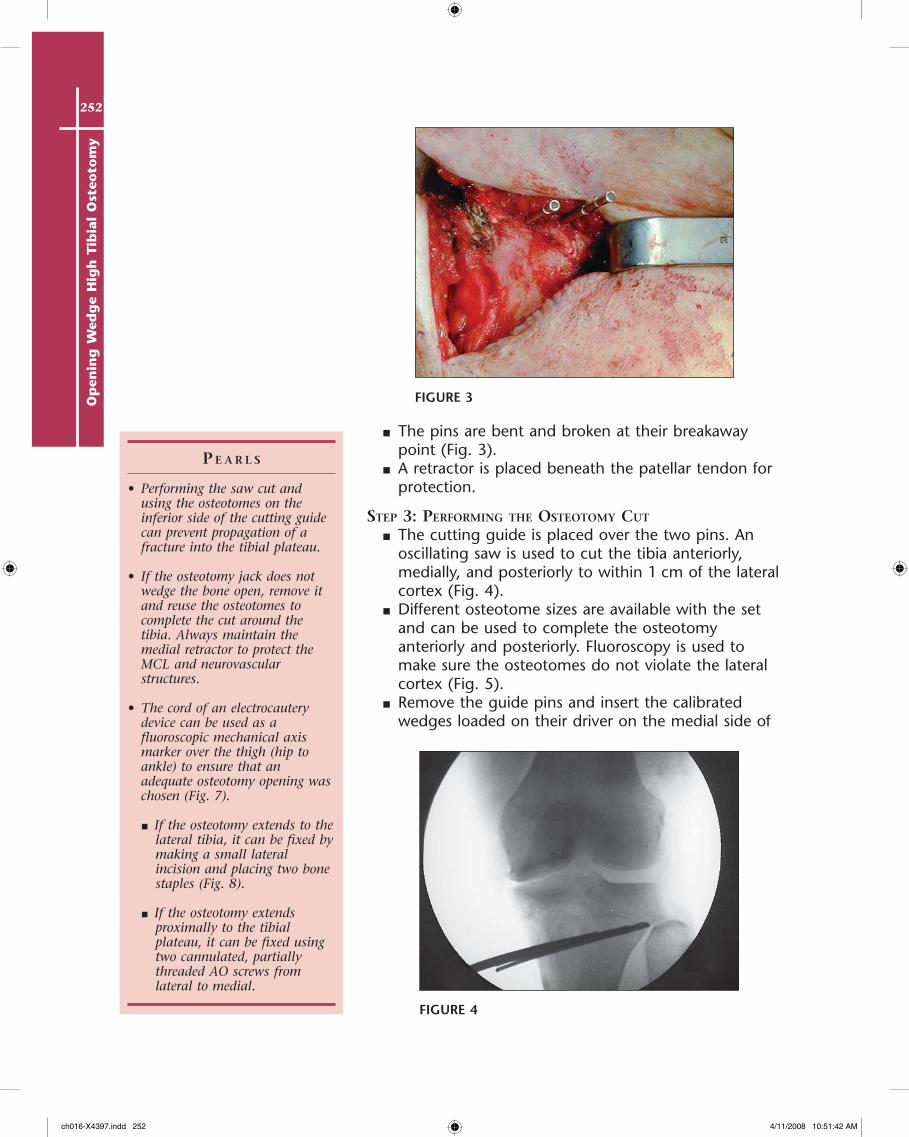
■ The cutting guide is placed over the two pins. An oscillating saw is used to cut the tibia anteriorly, medially, and posteriorly to within 1 cm of the lateral cortex (Fig. 4).
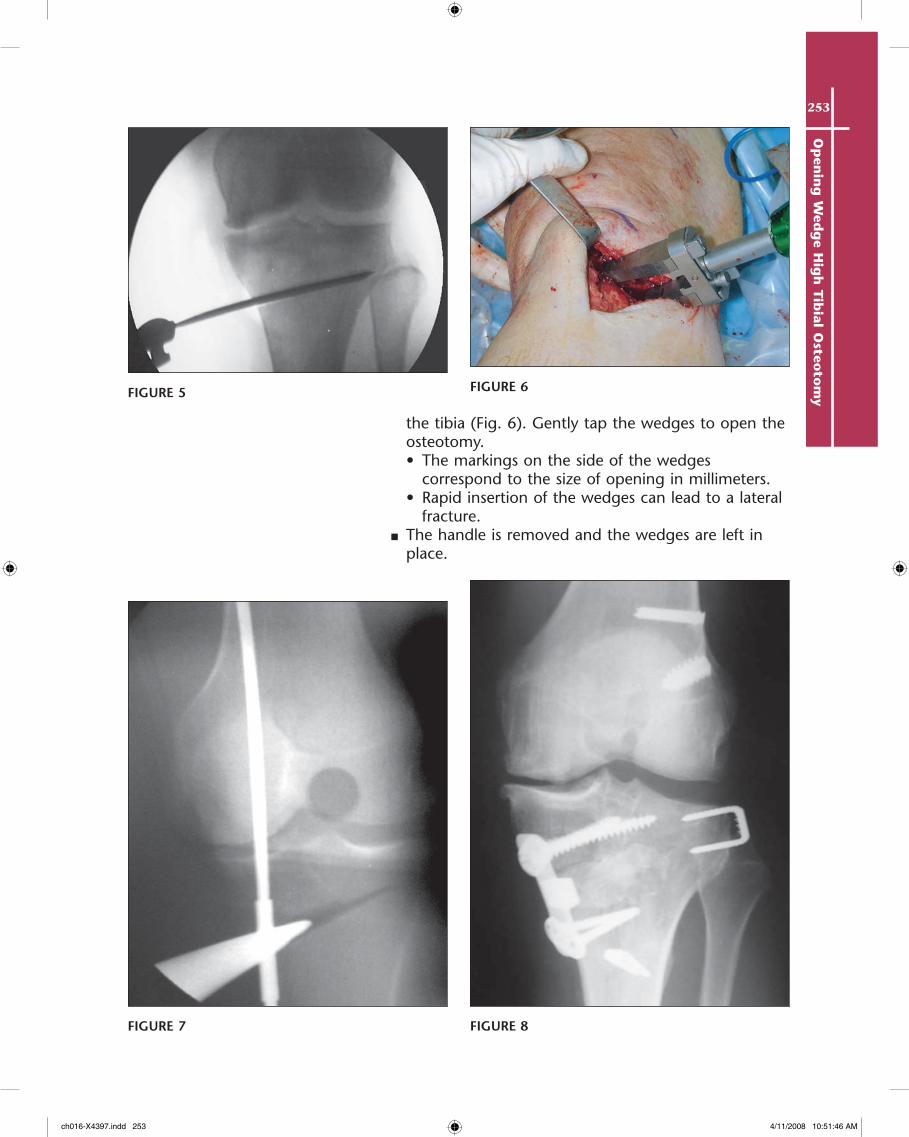
■ Different osteotome sizes are available with the set and can be used to complete the osteotomy anteriorly and posteriorly. Fluoroscopy is used to make sure the osteotomes do not violate the lateral cortex (Fig. 5).
■ Remove the guide pins and insert the calibrated wedges loaded on their driver on the medial side of
p e a r l S
• Performing the saw cut and using the osteotomes on the inferior side of the cutting guide can prevent propagation of a fracture into the tibial plateau.
• If the osteotomy jack does not wedge the bone open, remove it and reuse the osteotomes to complete the cut around the tibia. Always maintain the medial retractor to protect the MCL and neurovascular structures.
• The cord of an electrocautery device can be used as a fluoroscopic mechanical axis marker over the thigh (hip to ankle) to ensure that an adequate osteotomy opening was chosen (Fig. 7).
■ If the osteotomy extends to the lateral tibia, it can be fixed by making a small lateral incision and placing two bone staples (Fig. 8).
■ If the osteotomy extends proximally to the tibial plateau, it can be fixed using two cannulated, partially threaded AO screws from lateral to medial.
FIGURE 3
FIGURE 4
ch016-X4397.indd 252 4/11/2008 10:51:42 AM
253O
pen
ing
Wed
ge H
igh
Tib
ial Osteo
tom
y
the tibia (Fig. 6). Gently tap the wedges to open the osteotomy.• The markings on the side of the wedges
correspond to the size of opening in millimeters.• Rapid insertion of the wedges can lead to a lateral
fracture.■ The handle is removed and the wedges are left in
place.
FIGURE 5 FIGURE 6
FIGURE 7 FIGURE 8
ch016-X4397.indd 253 4/11/2008 10:51:46 AM
254O
pen
ing
Wed
ge
Hig
h T
ibia
l O
steo
tom
y Step 4: plate fixation
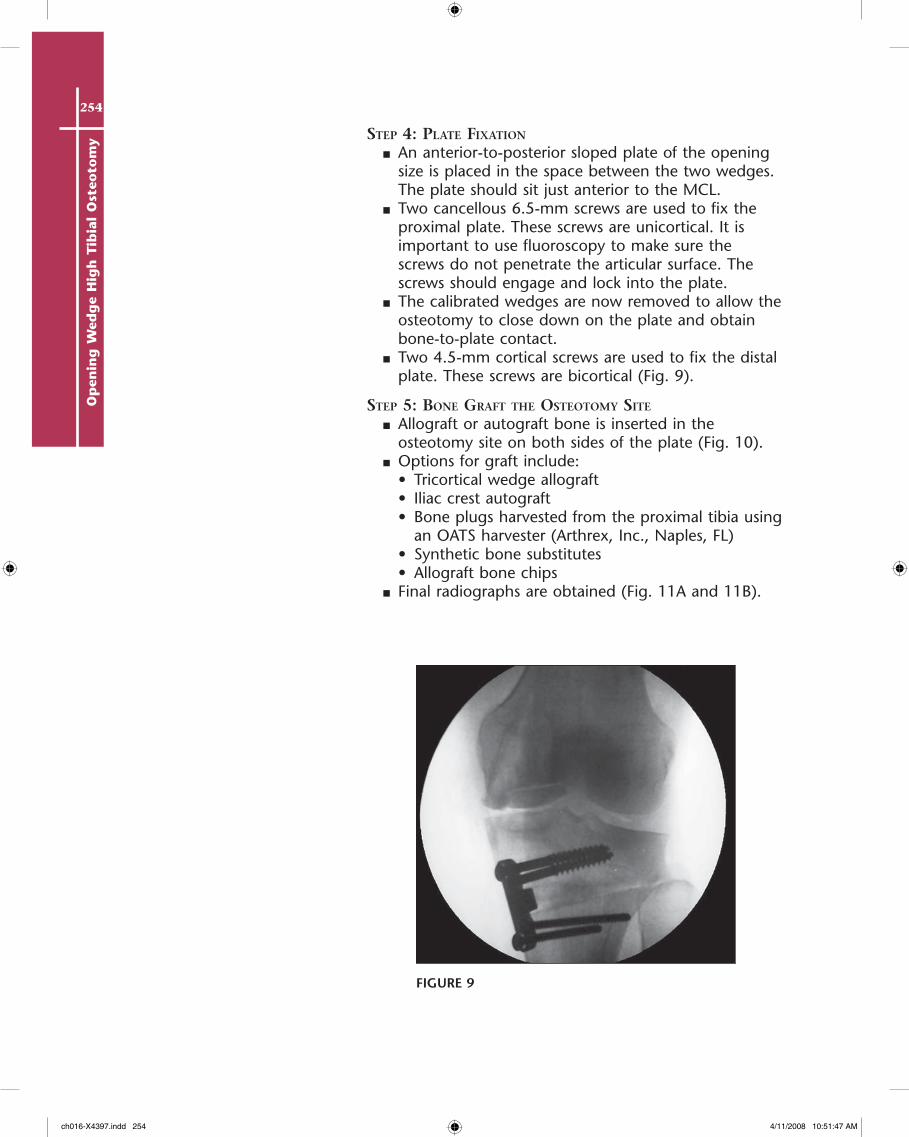
■ An anterior-to-posterior sloped plate of the opening size is placed in the space between the two wedges. The plate should sit just anterior to the MCL.
■ Two cancellous 6.5-mm screws are used to fix the proximal plate. These screws are unicortical. It is important to use fluoroscopy to make sure the screws do not penetrate the articular surface. The screws should engage and lock into the plate.
■ The calibrated wedges are now removed to allow the osteotomy to close down on the plate and obtain bone-to-plate contact.
■ Two 4.5-mm cortical screws are used to fix the distal plate. These screws are bicortical (Fig. 9).
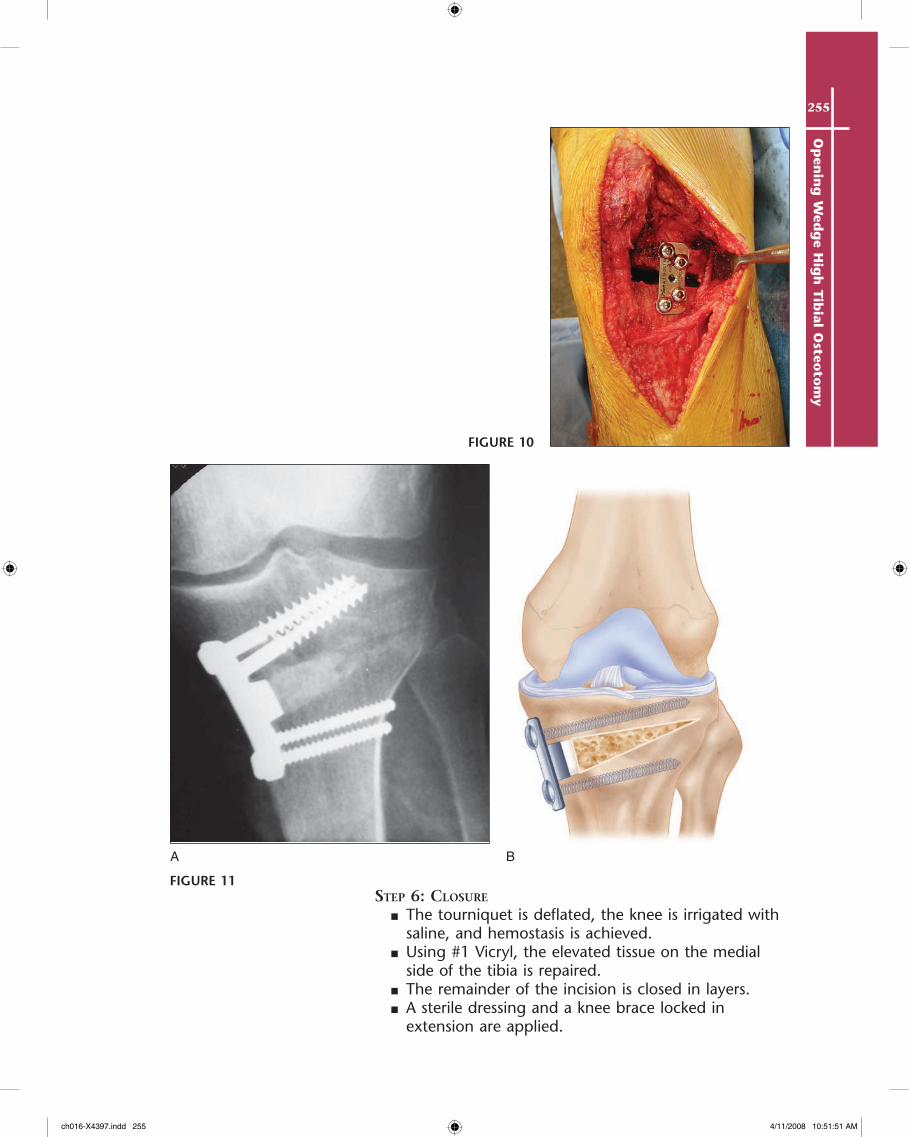
Step 5: Bone graft the oSteotomy Site
■ Allograft or autograft bone is inserted in the osteotomy site on both sides of the plate (Fig. 10).
■ Options for graft include:• Tricortical wedge allograft• Iliac crest autograft• Bone plugs harvested from the proximal tibia using
an OATS harvester (Arthrex, Inc., Naples, FL)• Synthetic bone substitutes• Allograft bone chips
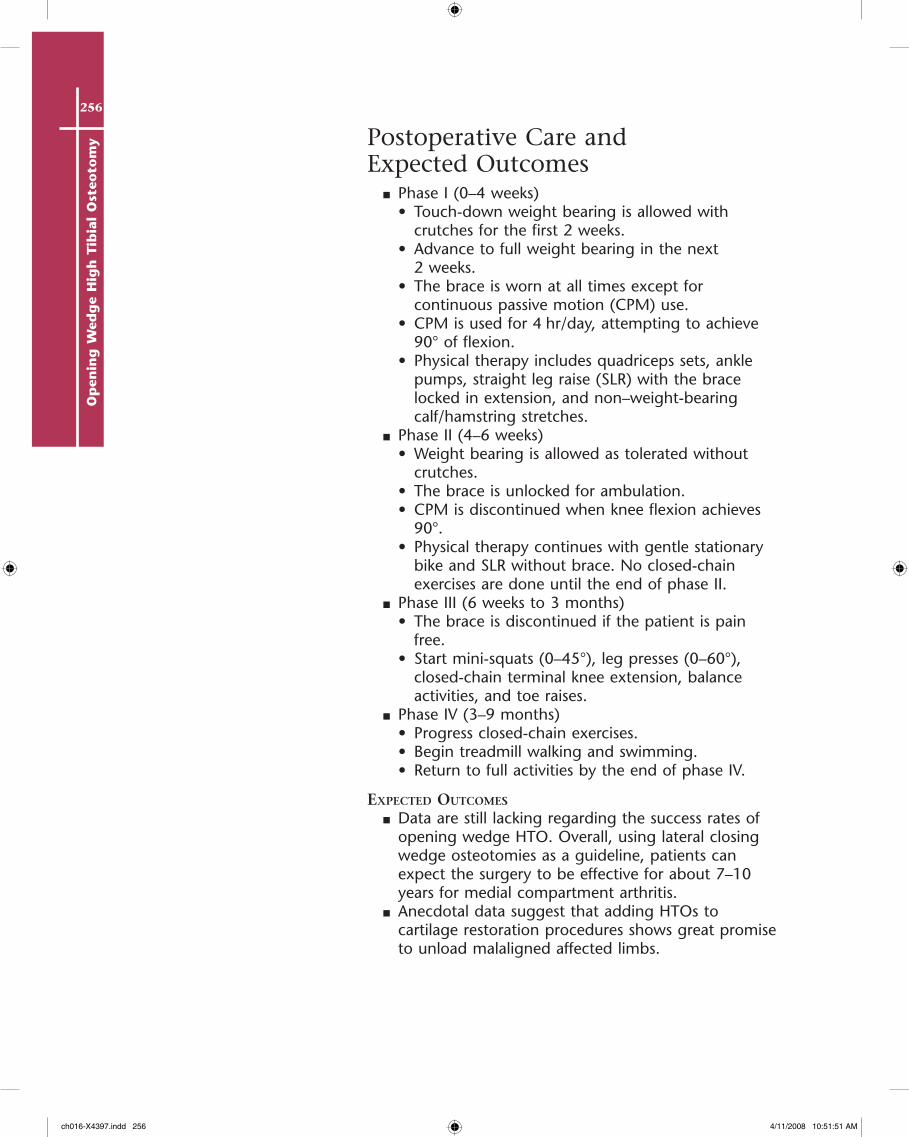
■ Final radiographs are obtained (Fig. 11A and 11B).
FIGURE 9
ch016-X4397.indd 254 4/11/2008 10:51:47 AM
255O
pen
ing
Wed
ge H
igh
Tib
ial Osteo
tom
y
Step 6: cloSure
■ The tourniquet is deflated, the knee is irrigated with saline, and hemostasis is achieved.
■ Using #1 Vicryl, the elevated tissue on the medial side of the tibia is repaired.
■ The remainder of the incision is closed in layers.■ A sterile dressing and a knee brace locked in
extension are applied.
A B
FIGURE 10
FIGURE 11
ch016-X4397.indd 255 4/11/2008 10:51:51 AM
256O
pen
ing
Wed
ge
Hig
h T
ibia
l O
steo
tom
y Postoperative Care and Expected Outcomes
■ Phase I (0–4 weeks)• Touch-down weight bearing is allowed with
crutches for the first 2 weeks.• Advance to full weight bearing in the next
2 weeks.• The brace is worn at all times except for
continuous passive motion (CPM) use.• CPM is used for 4 hr/day, attempting to achieve
90° of flexion.• Physical therapy includes quadriceps sets, ankle
pumps, straight leg raise (SLR) with the brace locked in extension, and non–weight-bearing calf/hamstring stretches.
■ Phase II (4–6 weeks)• Weight bearing is allowed as tolerated without
crutches.• The brace is unlocked for ambulation.• CPM is discontinued when knee flexion achieves
90°.• Physical therapy continues with gentle stationary
bike and SLR without brace. No closed-chain exercises are done until the end of phase II.
■ Phase III (6 weeks to 3 months)• The brace is discontinued if the patient is pain
free.• Start mini-squats (0–45°), leg presses (0–60°),
closed-chain terminal knee extension, balance activities, and toe raises.
■ Phase IV (3–9 months)• Progress closed-chain exercises.• Begin treadmill walking and swimming.• Return to full activities by the end of phase IV.
expecteD outcomeS
■ Data are still lacking regarding the success rates of opening wedge HTO. Overall, using lateral closing wedge osteotomies as a guideline, patients can expect the surgery to be effective for about 7–10 years for medial compartment arthritis.
■ Anecdotal data suggest that adding HTOs to cartilage restoration procedures shows great promise to unload malaligned affected limbs.
ch016-X4397.indd 256 4/11/2008 10:51:51 AM
257O
pen
ing
Wed
ge H
igh
Tib
ial Osteo
tom
y
BA
C
D
Potential Complications• Tibia fractures (<2%)• Deep venous thrombosis (15%)• Nonunion (<1%)
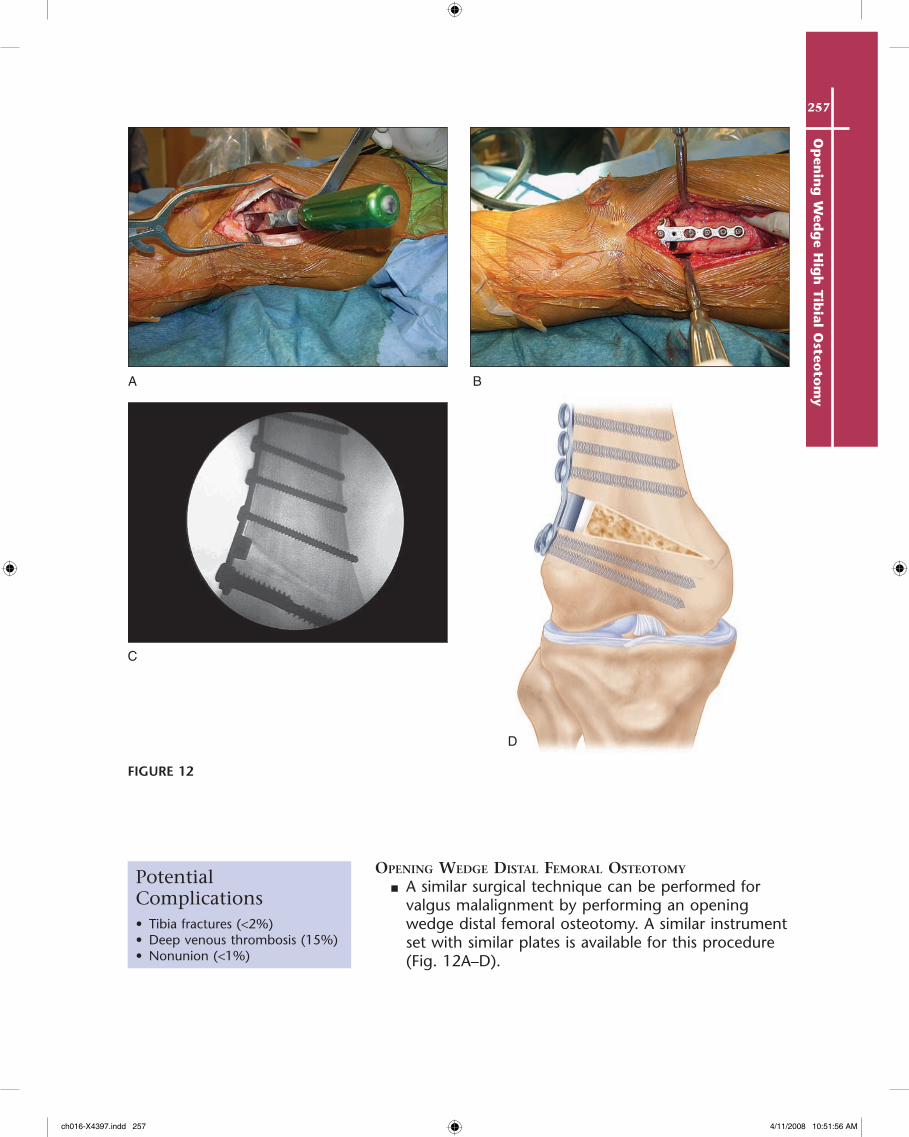
opening WeDge DiStal femoral oSteotomy
■ A similar surgical technique can be performed for valgus malalignment by performing an opening wedge distal femoral osteotomy. A similar instrument set with similar plates is available for this procedure (Fig. 12A–D).
FIGURE 12
ch016-X4397.indd 257 4/11/2008 10:51:56 AM
258O
pen
ing
Wed
ge
Hig
h T
ibia
l O
steo
tom
y EvidenceCole BJ, Freedman KB, Taksali S, Hingtgen B, DiMasi M, Bach BR Jr, Hurwitz DE. Use of
a lateral offset short-leg walking cast before high tibial osteotomy. Clin Orthop. 2003;408:209-17.
The authors evaluated the effect of a lateral offset walking cast on patients with varus medial arthritis indicated for HTO. Nineteen patients were placed in a cast for 3 days and pre- and postcast gait analysis was performed. The cast led to 53% reduction of pain and 36% reduction in adduction moment in 17 of 19 patients who tolerated the cast. There was a correlation between the reduction of pain and adduction moment (r = .63).
Franco V, Cerullo G, Cipolla M, Gianni E, Puddu G. Open wedge tibial osteotomy. Tech Knee Surg. 2002;1:43-53.
Thirty patients were treated with opening wedge HTO and followed for between 36 and 48 months. The average age was 49 years. The authors used International Knee Documentation Committee (IKDC) and HSS scoring systems for evaluation. Preoperatively, 11 patients were in the C group and 19 in the D group according the IKDC scales. At the latest follow-up, 17 patients were in the B group and 13 in the C group. All patients improved at least one category.
Gaasbeek RD, Welsin RT, Verdonschot N, Rijnberg WJ, van Loon CJ, van Kampen A. Accuracy and initial stability of open- and closed-wedge high tibial osteotomy: a cadaveric study. Knee Surg Sports Traumatol Arthrosc. 2005;13:689-94.
The authors analyzed the differences in angle accuracy and initial stability between closing and opening wedge high tibial osteotomy using cadaveric specimens. There was a tendency to overcorrection with the closing wedge samples, but it was not statistically significant. There was no difference in the initial stability between the two techniques.
Hernigou P, Medevielle D, Debeyre J, Goutallier D. Proximal tibial osteotomy for osteoarthritis with varus deformity. J Bone Joint Surg Am. 1987;69:332-54.
Using an opening wedge technique, the authors treated 93 knees. At a 5-year follow-up, 90% of the knees had good or excellent results. The results deteriorated over time and, after 10 years, 45% of the patients had excellent or good results.
Naudie DD, Amendola A, Fowler PJ. Opening wedge high tibial osteotomy for symptomatic hyperextension varus thrust. Am J Sports Med. 2004;32:60-70.
Seventeen knees with instability rather than osteoarthritis were treated with an opening wedge high tibial osteotomy. Functional results were evaluated based on the scoring systems by Lysholm and Tegner and using a 5-point analog scale to assess knee stability and satisfaction. Patients were followed for 56 months. All patients had an increase in their activity level. All but one were satisfied with their outcome. Radiographic results showed a correction of the mechanical axis to about 46% toward the lateral side.
ch016-X4397.indd 258 4/11/2008 10:51:56 AM


![Dictionnaire des termes d'escrime - synec-doc.net · Petit dictionnaire éclectique des termes d'escrime LE FRANÇAIS étant la langue internationale de l'escrime, ... • [R] = Le](https://static.fdocuments.net/doc/165x107/5b9919c609d3f2fd558d27a5/dictionnaire-des-termes-descrime-synec-doc-petit-dictionnaire-eclectique.jpg)