OneClick Administration Guide (5166) - CA...
102
SPECTRUM ® OneClick Administration Guide (5166) r9.1
Transcript of OneClick Administration Guide (5166) - CA...
SPECTRUM ®
OneClick Administration Guide (5166)r9.1

This documentation and any related computer software help programs (hereinafter referred to as the “Documentation”) is for the end user’s informational purposes only and is subject to change or withdrawal by CA at any time.
This Documentation may not be copied, transferred, reproduced, disclosed, modified or duplicated, in whole or in part, without the prior written consent of CA. This Documentation is confidential and proprietary information of CA and protected by the copyright laws of the United States and international treaties.
Notwithstanding the foregoing, licensed users may print a reasonable number of copies of the Documentation for their own internal use, and may make one copy of the related software as reasonably required for back-up and disaster recovery purposes, provided that all CA copyright notices and legends are affixed to each reproduced copy. Only authorized employees, consultants, or agents of the user who are bound by the provisions of the license for the product are permitted to have access to such copies.
The right to print copies of the Documentation and to make a copy of the related software is limited to the period during which the applicable license for the product remains in full force and effect. Should the license terminate for any reason, it shall be the user’s responsibility to certify in writing to CA that all copies and partial copies of the Documentation have been returned to CA or destroyed.
EXCEPT AS OTHERWISE STATED IN THE APPLICABLE LICENSE AGREEMENT, TO THE EXTENT PERMITTED BY APPLICABLE LAW, CA PROVIDES THIS DOCUMENTATION “AS IS” WITHOUT WARRANTY OF ANY KIND, INCLUDING WITHOUT LIMITATION, ANY IMPLIED WARRANTIES OF MERCHANTABILITY, FITNESS FOR A PARTICULAR PURPOSE OR NONINFRINGEMENT. IN NO EVENT WILL CA BE LIABLE TO THE END USER OR ANY THIRD PARTY FOR ANY LOSS OR DAMAGE, DIRECT OR INDIRECT, FROM THE USE OF THIS DOCUMENTATION, INCLUDING WITHOUT LIMITATION, LOST PROFITS, BUSINESS INTERRUPTION, GOODWILL, OR LOST DATA, EVEN IF CA IS EXPRESSLY ADVISED OF SUCH LOSS OR DAMAGE.
The use of any product referenced in the Documentation is governed by the end user’s applicable license agreement.
The manufacturer of this Documentation is CA.
Provided with “Restricted Rights.” Use, duplication or disclosure by the United States Government is subject to the restrictions set forth in FAR Sections 12.212, 52.227-14, and 52.227-19(c)(1) - (2) and DFARS Section 252.227-7014(b)(3), as applicable, or their successors.
All trademarks, trade names, service marks, and logos referenced herein belong to their respective companies.
Copyright © 2009 CA. All rights reserved.

Contents
PrefaceOverview of OneClick Administration . . . . . . . . . . . . . . . . . . . . . . . . . . . . . . . . . . . . . . . . . . . . . viiText Conventions . . . . . . . . . . . . . . . . . . . . . . . . . . . . . . . . . . . . . . . . . . . . . . . . . . . . . . . . . . viiiDocumentation Feedback. . . . . . . . . . . . . . . . . . . . . . . . . . . . . . . . . . . . . . . . . . . . . . . . . . . . . .ixOnline Documentation . . . . . . . . . . . . . . . . . . . . . . . . . . . . . . . . . . . . . . . . . . . . . . . . . . . . . . . .ix
Chapter 1: SPECTRUM OneClick Web Server AdministrationCommonly Used SPECTRUM OneClick Terms . . . . . . . . . . . . . . . . . . . . . . . . . . . . . . . . . . . . . . . . 1Start and Stop the OneClick Web Server . . . . . . . . . . . . . . . . . . . . . . . . . . . . . . . . . . . . . . . . . . . 2
Start and Stop the OneClick Web Server from the Command Line . . . . . . . . . . . . . . . . . . . . . . . 2Start and Stop the OneClick Web Server from an Administration Web Page . . . . . . . . . . . . . . . . . 2Start and Stop the OneClick Web Server from the Windows Control Panel . . . . . . . . . . . . . . . . . . 3
Configure OneClick Server to Support Over 100 Users. . . . . . . . . . . . . . . . . . . . . . . . . . . . . . . . . . 4Launch OneClick Clients with Context . . . . . . . . . . . . . . . . . . . . . . . . . . . . . . . . . . . . . . . . . . . . . 4Configure OneClick Memory Settings. . . . . . . . . . . . . . . . . . . . . . . . . . . . . . . . . . . . . . . . . . . . . . 5
OneClick Client Memory Settings . . . . . . . . . . . . . . . . . . . . . . . . . . . . . . . . . . . . . . . . . . . . . . 5OneClick Web Server Memory Settings . . . . . . . . . . . . . . . . . . . . . . . . . . . . . . . . . . . . . . . . . . 6
Configure the OneClick Web Server URL . . . . . . . . . . . . . . . . . . . . . . . . . . . . . . . . . . . . . . . . . . . 7Configure the OneClick MySQL Server Password . . . . . . . . . . . . . . . . . . . . . . . . . . . . . . . . . . . . . . 7
Chapter 2: OneClick Server Communications and Network ConfigurationName Resolution Requirements . . . . . . . . . . . . . . . . . . . . . . . . . . . . . . . . . . . . . . . . . . . . . . . . . 9Configure OneClick for Secure Sockets Layer . . . . . . . . . . . . . . . . . . . . . . . . . . . . . . . . . . . . . . . . 9
Import a Certificate Authority-Signed Certificate . . . . . . . . . . . . . . . . . . . . . . . . . . . . . . . . . . 11Configure the Secure Socket on the OneClick Web Server Host . . . . . . . . . . . . . . . . . . . . . . . . 12Configure OneClick and Report Manager for Secure Sockets Layer . . . . . . . . . . . . . . . . . . . . . . 13Troubleshoot a Secure Sockets Layer Configuration . . . . . . . . . . . . . . . . . . . . . . . . . . . . . . . . 14
Configure OneClick to Communicate through a Web Proxy Server. . . . . . . . . . . . . . . . . . . . . . . . . 14Configure the OneClick Web Server to Communicate with the SpectroSERVER Using Secure CORBA . 16Firewalled Environments . . . . . . . . . . . . . . . . . . . . . . . . . . . . . . . . . . . . . . . . . . . . . . . . . . . . . 16Load Balancers . . . . . . . . . . . . . . . . . . . . . . . . . . . . . . . . . . . . . . . . . . . . . . . . . . . . . . . . . . . . 17
Chapter 3: OneClick Administration Web PagesCharacter Set . . . . . . . . . . . . . . . . . . . . . . . . . . . . . . . . . . . . . . . . . . . . . . . . . . . . . . . . . . . . . 20eHealth Configuration . . . . . . . . . . . . . . . . . . . . . . . . . . . . . . . . . . . . . . . . . . . . . . . . . . . . . . . 21
eHealth Configuration . . . . . . . . . . . . . . . . . . . . . . . . . . . . . . . . . . . . . . . . . . . . . . . . . . . . . 21eHealth Map Maintenance . . . . . . . . . . . . . . . . . . . . . . . . . . . . . . . . . . . . . . . . . . . . . . . . . . 21
Email Configuration. . . . . . . . . . . . . . . . . . . . . . . . . . . . . . . . . . . . . . . . . . . . . . . . . . . . . . . . . 21EvFormat/PCause Configuration . . . . . . . . . . . . . . . . . . . . . . . . . . . . . . . . . . . . . . . . . . . . . . . . 21JNLP Configuration . . . . . . . . . . . . . . . . . . . . . . . . . . . . . . . . . . . . . . . . . . . . . . . . . . . . . . . . . 22Landscapes . . . . . . . . . . . . . . . . . . . . . . . . . . . . . . . . . . . . . . . . . . . . . . . . . . . . . . . . . . . . . . 23
Contents iii

LDAP Configuration. . . . . . . . . . . . . . . . . . . . . . . . . . . . . . . . . . . . . . . . . . . . . . . . . . . . . . . . . 23MySQL Password . . . . . . . . . . . . . . . . . . . . . . . . . . . . . . . . . . . . . . . . . . . . . . . . . . . . . . . . . . 23NSM Configuration . . . . . . . . . . . . . . . . . . . . . . . . . . . . . . . . . . . . . . . . . . . . . . . . . . . . . . . . . 24Service Desk Configuration . . . . . . . . . . . . . . . . . . . . . . . . . . . . . . . . . . . . . . . . . . . . . . . . . . . 24Single Sign-On Configuration . . . . . . . . . . . . . . . . . . . . . . . . . . . . . . . . . . . . . . . . . . . . . . . . . . 24SPECTRUM Configuration. . . . . . . . . . . . . . . . . . . . . . . . . . . . . . . . . . . . . . . . . . . . . . . . . . . . . 24SPM Data Export . . . . . . . . . . . . . . . . . . . . . . . . . . . . . . . . . . . . . . . . . . . . . . . . . . . . . . . . . . 25SPM Template Naming. . . . . . . . . . . . . . . . . . . . . . . . . . . . . . . . . . . . . . . . . . . . . . . . . . . . . . . 25SSL Certificates . . . . . . . . . . . . . . . . . . . . . . . . . . . . . . . . . . . . . . . . . . . . . . . . . . . . . . . . . . . 26Web Server Logs Configuration . . . . . . . . . . . . . . . . . . . . . . . . . . . . . . . . . . . . . . . . . . . . . . . . 26Web Server Memory . . . . . . . . . . . . . . . . . . . . . . . . . . . . . . . . . . . . . . . . . . . . . . . . . . . . . . . . 26
Chapter 4: User Administration in OneClickOneClick User Administration Terminology . . . . . . . . . . . . . . . . . . . . . . . . . . . . . . . . . . . . . . . . . 27OneClick User Administration . . . . . . . . . . . . . . . . . . . . . . . . . . . . . . . . . . . . . . . . . . . . . . . . . . 28
Best Practices for Creating and Managing User Accounts. . . . . . . . . . . . . . . . . . . . . . . . . . . . . 28Default Administrator User . . . . . . . . . . . . . . . . . . . . . . . . . . . . . . . . . . . . . . . . . . . . . . . 28Creating and Managing Individual User Accounts. . . . . . . . . . . . . . . . . . . . . . . . . . . . . . . . 28Creating and Managing User Accounts Within a User Group . . . . . . . . . . . . . . . . . . . . . . . . 29
Who Can Perform User Administration? . . . . . . . . . . . . . . . . . . . . . . . . . . . . . . . . . . . . . . . . 29Licenses and Privileges . . . . . . . . . . . . . . . . . . . . . . . . . . . . . . . . . . . . . . . . . . . . . . . . . . . . 30
OneClick User Administration Interface . . . . . . . . . . . . . . . . . . . . . . . . . . . . . . . . . . . . . . . . . . . 30Users Tab . . . . . . . . . . . . . . . . . . . . . . . . . . . . . . . . . . . . . . . . . . . . . . . . . . . . . . . . . . . . . 30
Manage an Existing User or User Group . . . . . . . . . . . . . . . . . . . . . . . . . . . . . . . . . . . . . . 31Users List Tab . . . . . . . . . . . . . . . . . . . . . . . . . . . . . . . . . . . . . . . . . . . . . . . . . . . . . . . . . . 31
View and Change User or User Group Details . . . . . . . . . . . . . . . . . . . . . . . . . . . . . . . . . . 33Access Tab . . . . . . . . . . . . . . . . . . . . . . . . . . . . . . . . . . . . . . . . . . . . . . . . . . . . . . . . . . . . 33
View and Change Privileges . . . . . . . . . . . . . . . . . . . . . . . . . . . . . . . . . . . . . . . . . . . . . . 34Implement User Administration . . . . . . . . . . . . . . . . . . . . . . . . . . . . . . . . . . . . . . . . . . . . . . . . 36
Create User Accounts and User Groups. . . . . . . . . . . . . . . . . . . . . . . . . . . . . . . . . . . . . . . . . 36Manage Users Within User Groups . . . . . . . . . . . . . . . . . . . . . . . . . . . . . . . . . . . . . . . . . . . . 39
Inheritance Details for Users in User Groups . . . . . . . . . . . . . . . . . . . . . . . . . . . . . . . . . . . 39Edit Existing Users and User Groups. . . . . . . . . . . . . . . . . . . . . . . . . . . . . . . . . . . . . . . . . . . 40
Create and Assign Roles to Users or User Groups . . . . . . . . . . . . . . . . . . . . . . . . . . . . . . . 40Grant a User All Privileges by Designating It a Super User . . . . . . . . . . . . . . . . . . . . . . . . . 44Allow Users to Login if No Corresponding LDAP User Found. . . . . . . . . . . . . . . . . . . . . . . . . 45Change Details Displayed for a User or User Group . . . . . . . . . . . . . . . . . . . . . . . . . . . . . . 46Change Licenses Assigned to a User or Group . . . . . . . . . . . . . . . . . . . . . . . . . . . . . . . . . . 46Change the Landscapes in Which the Selected User Is Present . . . . . . . . . . . . . . . . . . . . . . 47Change Individual Privileges for a User or User Group . . . . . . . . . . . . . . . . . . . . . . . . . . . . 48Move an Existing User to a User Group. . . . . . . . . . . . . . . . . . . . . . . . . . . . . . . . . . . . . . . 49Remove a User from a User Group. . . . . . . . . . . . . . . . . . . . . . . . . . . . . . . . . . . . . . . . . . 50
Delete a User or User Group . . . . . . . . . . . . . . . . . . . . . . . . . . . . . . . . . . . . . . . . . . . . . . . . 50Use Security Communities to Manage User Access to Models and Devices. . . . . . . . . . . . . . . . . 51
Manage Users From the Client Details Web Page . . . . . . . . . . . . . . . . . . . . . . . . . . . . . . . . . . . . 54Manage OneClick Licenses by Limiting Concurrent User Logins. . . . . . . . . . . . . . . . . . . . . . . . . . . 55
iv OneClick Administration Guide
Chapter 5: Configuring Additional OneClick ApplicationsConfigure Service Performance Manager (SPM) Data Export Parameters in OneClick . . . . . . . . . . . . 57Display Topology Tab Contents in a Web Page. . . . . . . . . . . . . . . . . . . . . . . . . . . . . . . . . . . . . . . 59
Chapter 6: Model Security in OneClickModel Security Terminology . . . . . . . . . . . . . . . . . . . . . . . . . . . . . . . . . . . . . . . . . . . . . . . . . . . 61What is Model Security in OneClick? . . . . . . . . . . . . . . . . . . . . . . . . . . . . . . . . . . . . . . . . . . . . . 62Using Security Strings to Secure Modeled Elements . . . . . . . . . . . . . . . . . . . . . . . . . . . . . . . . . . 62Scenarios for Implementing Model Security . . . . . . . . . . . . . . . . . . . . . . . . . . . . . . . . . . . . . . . . 65
Chapter 7: Setting Preferences for Users and GroupsIntroduction to Preferences . . . . . . . . . . . . . . . . . . . . . . . . . . . . . . . . . . . . . . . . . . . . . . . . . . . 71Preferences Editor. . . . . . . . . . . . . . . . . . . . . . . . . . . . . . . . . . . . . . . . . . . . . . . . . . . . . . . . . . 72Set or Lock Preferences . . . . . . . . . . . . . . . . . . . . . . . . . . . . . . . . . . . . . . . . . . . . . . . . . . . . . . 72
Set Alarm Filter Preferences . . . . . . . . . . . . . . . . . . . . . . . . . . . . . . . . . . . . . . . . . . . . . . . . 74Reset Preferences . . . . . . . . . . . . . . . . . . . . . . . . . . . . . . . . . . . . . . . . . . . . . . . . . . . . . . . 74
Import and Export Preferences . . . . . . . . . . . . . . . . . . . . . . . . . . . . . . . . . . . . . . . . . . . . . . . . . 75
Chapter 8: Managing SearchesCreate a Simple Search . . . . . . . . . . . . . . . . . . . . . . . . . . . . . . . . . . . . . . . . . . . . . . . . . . . . . . 77Advanced Options in the Create Search Dialog . . . . . . . . . . . . . . . . . . . . . . . . . . . . . . . . . . . . . . 79Create an Advanced Search . . . . . . . . . . . . . . . . . . . . . . . . . . . . . . . . . . . . . . . . . . . . . . . . . . . 80Edit a Search . . . . . . . . . . . . . . . . . . . . . . . . . . . . . . . . . . . . . . . . . . . . . . . . . . . . . . . . . . . . . 82Delete a Custom Search . . . . . . . . . . . . . . . . . . . . . . . . . . . . . . . . . . . . . . . . . . . . . . . . . . . . . 83Organize Custom Searches . . . . . . . . . . . . . . . . . . . . . . . . . . . . . . . . . . . . . . . . . . . . . . . . . . . 83Example Search: Find All Router Class or Switch Router Class Devices In Critical Condition . . . . . . . 84
Appendix A: Troubleshooting OneClick Web Server IssuesExport Fails Due to Java Memory Resources Setting . . . . . . . . . . . . . . . . . . . . . . . . . . . . . . . . . . 87Troubleshoot OneClick in Fault Tolerant Environments . . . . . . . . . . . . . . . . . . . . . . . . . . . . . . . . . 87
Appendix B: System Customizationscontext.xml Customization Parameters . . . . . . . . . . . . . . . . . . . . . . . . . . . . . . . . . . . . . . . . . . . 89web.xml Customization Parameters. . . . . . . . . . . . . . . . . . . . . . . . . . . . . . . . . . . . . . . . . . . . . . 90
Index
Contents v

vi OneClick Administration Guide
Preface
Welcome to the OneClick Administration Guide (5166).
The SPECTRUM OneClick product suite is a framework that houses and integrates SPECTRUM network management features (core and add-on management). The OneClick Administration Guide (5166) identifies server and client administration concepts and procedures.
Overview of OneClick AdministrationOneClick administration tasks fall into the following broad categories:
Web server physical plant related
Communications and network configuration
Integrating with infrastructure, including email servers and authentication systems
User accounts
Model security
SPECTRUM application configuration
OneClick customizations
Some of these tasks are performed by a OneClick administrator in the OneClick user interface, such as user configuration and setting preferences. Some tasks are performed in the OneClick administration web pages, while others are done by editing files on the OneClick server to modify server settings or make customizations in OneClick. These administration topics are presented in the following chapters:
Chapter 1: SPECTRUM OneClick Web Server Administration discusses tasks the OneClick administrator can perform to optimize and configure the OneClick server. Other server-related and client-related maintenance and configuration issues are also addressed. This chapter is most helpful following the installation of SPECTRUM OneClick.
Chapter 2: OneClick Server Communications and Network Configuration describes how to configure the OneClick server with Secure Sockets Layer, web proxy servers, and fire-walled environments.
vii
Text Conventions
Chapter 3: OneClick Administration Web Pages introduces the OneClick administration web pages available to users with administrative privileges from the OneClick home page.
Chapter 4: User Administration in OneClick instructs OneClick administrators on how to create and administer users in the OneClick environment. This includes a discussion of basic SPECTRUM security concepts and more advanced tasks that must be performed to implement OneClick user and network security.
Chapter 5: Configuring Additional OneClick Applications describes how to configure additional OneClick applications, such as Service Performance Manager.
Chapter 6: Model Security in OneClick instructs OneClick administrators on how to implement SPECTRUM model security in the OneClick environment. This includes a discussion of basic SPECTRUM security concepts and more advanced tasks that must be performed to implement OneClick network security.
Chapter 7: Setting Preferences for Users and Groups instructs OneClick administrators on how to configure preference settings for one or more OneClick users.
Chapter 8: Managing Searches describes how to create, edit, and organize searches.
Appendix A: Troubleshooting OneClick Web Server Issues identifies problems and error messages that may be generated during the operation of the OneClick web server and includes corrective action where feasible.
Appendix B: System Customizations discusses parameters to edit in certain XML configuration files on the OneClick web server to customize the server and client environment.
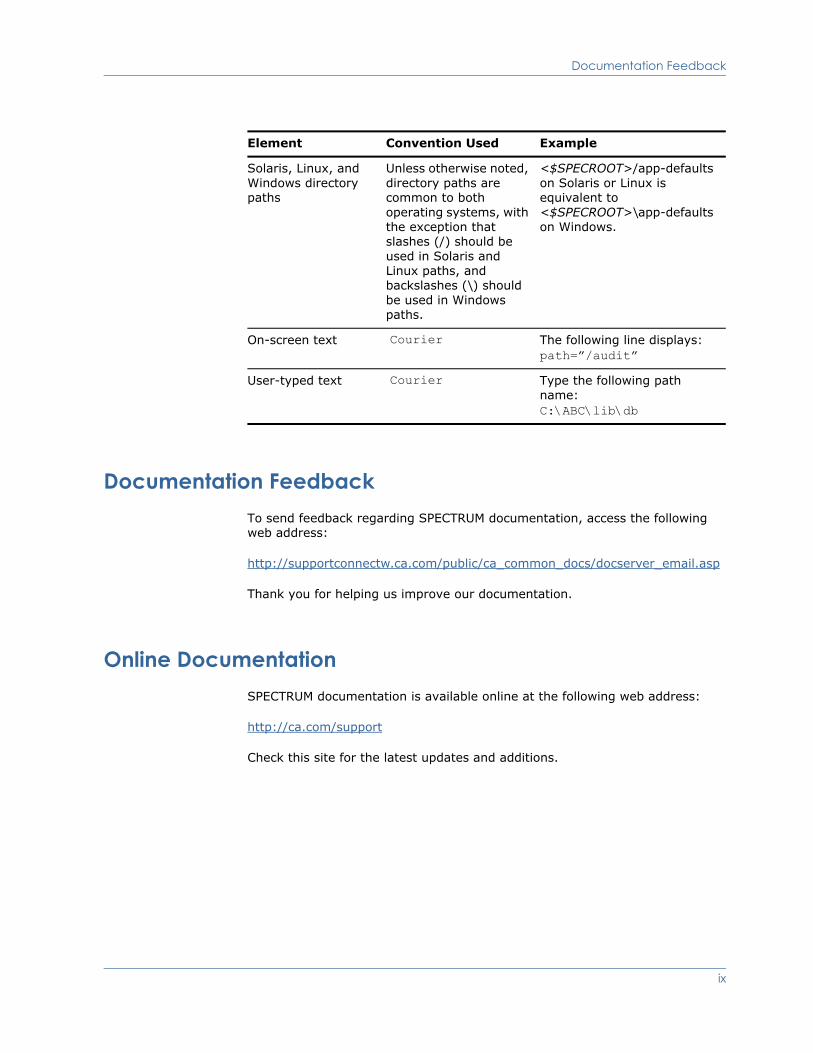
Text ConventionsThe following text conventions are used in this document:
Element Convention Used Example
Variables
(The user supplies a value for the variable.)
Courier and Italic in angle brackets (<>)
Type the following:
DISPLAY=<workstation name>:0.0 export display
The directory where you installed SPECTRUM
(The user supplies a value for the variable.)
<$SPECROOT> Navigate to:
<$SPECROOT>/app-defaults
viii OneClick Administration Guide
Documentation Feedback
Documentation FeedbackTo send feedback regarding SPECTRUM documentation, access the following web address:
http://supportconnectw.ca.com/public/ca_common_docs/docserver_email.asp
Thank you for helping us improve our documentation.
Online DocumentationSPECTRUM documentation is available online at the following web address:
http://ca.com/support
Check this site for the latest updates and additions.
Solaris, Linux, and Windows directory paths
Unless otherwise noted, directory paths are common to both operating systems, with the exception that slashes (/) should be used in Solaris and Linux paths, and backslashes (\) should be used in Windows paths.
<$SPECROOT>/app-defaults on Solaris or Linux is equivalent to <$SPECROOT>\app-defaults on Windows.
On-screen text Courier The following line displays:path=”/audit”
User-typed text Courier Type the following path name:C:\ABC\lib\db
Element Convention Used Example
ix

Online Documentation
x OneClick Administration Guide
Chapter 1: SPECTRUM OneClick Web Server Administration
This chapter discusses tasks that a OneClick administrator can perform to configure and optimize the OneClick web server. It also covers server-related and client-related configuration and maintenance issues.
Commonly Used SPECTRUM OneClick TermsThe following are commonly used OneClick terms that you should be familiar with before reading the chapters in this guide.
Landscape
The landscape is the network domain managed by a single SpectroSERVER.
SpectroSERVER
The SpectroSERVER is the server responsible for providing network management services such as polling, trap management, notification, data collection, fault management, and so on.
Also referred to as the Virtual Network Machine (VNM).
Distributed SpectroSERVER (DSS) Environment
A Distributed SpectroSERVER (DSS) environment consists of more than one SpectroSERVER. This environment enables management of a large-scale infrastructure. The SpectroSERVERs in this environment may be located within a single physical location or multiple physical locations.
OneClick web server
The OneClick web server is the server responsible for moving data between the SpectroSERVER(s) and OneClick clients.
OneClick client
The OneClick client is a Java JNLP (Java Network Launching Protocol) application that provides network operators with a view into the details and health of the network.
SPECTRUM OneClick Web Server Administration 1

Start and Stop the OneClick Web Server
Start and Stop the OneClick Web ServerYou can start, stop, and restart the OneClick web server from the following locations:
Command line
OneClick administration web pages (described in Chapter 3: OneClick Administration Web Pages)
(On Windows only) Control Panel
Start and Stop the OneClick Web Server from the Command Line
To stop or start the OneClick web server on Solaris or Linux
As root, use the following commands:
To stop the web server:
<$SPECROOT>/tomcat/bin/stopTomcat.sh
To start the web server:
<$SPECROOT>/tomcat/bin/startTomcat.sh
To restart (stops, then starts) the web server:
<$SPECROOT>/tomcat/webapps/spectrum/restart.sh
To stop or start the OneClick web server on Windows
From a command prompt in Windows:
To stop the web server:
C:\> net stop spectrumtomcat
To start the web server:
C:\> net start spectrumtomcat
Start and Stop the OneClick Web Server from an Administration Web Page
Several of the OneClick administration web pages include Restart OneClick Server buttons so that you can easily restart the OneClick web server in order to apply a configuration change that you have made. These restart buttons use the ‘at’ utility to schedule a restart script to run, and you may need to configure the utility differently on different platforms.
If an error occurs while restarting the OneClick web server using one of the restart buttons, you are notified by means of an error message on the administration web page. If this occurs, use the troubleshooting tips in one of the following sections to help to identify the problem. Alternatively, you can restart the web server from the command line as described in Start and Stop the OneClick Web Server from the Command Line on page 2.
2 OneClick Administration Guide
Start and Stop the OneClick Web Server
Troubleshooting the at utility on WindowsBy default, SPECTRUM users have permissions to execute ‘at’ on Windows. However, verify that the current user and the current user group has Read and Execute permissions on the C:\WINDOWS\system32 folder.
Check the status of the ‘at’ operation by typing ‘at’ in a command prompt shell to view the ‘at’ queue. The queue contains all jobs scheduled through ‘at’ that are still pending. If earlier attempts on these scheduled jobs have failed, the jobs also have an error status code.
Troubleshooting the at utility on Solaris or LinuxUsers listed in the following file are denied permission to use the ‘at” utility:
– (Solaris) /usr/lib/cron/at.deny
– (Linux) /etc/at.deny
Verify that the user currently running the OneClick process (the OneClick web server) is not listed in this file. Typically, this user is the SPECTRUM Installation Owner user. You can identify the user by entering the following command in a command shell:
ps -eaf | grep OneClick
If the ‘mail’ utility is set up for the operating system and the current OneClick user, ‘at’ automatically emails notifications about scheduled jobs and their output or error messages. Check these emails for pertinent information.
Start and Stop the OneClick Web Server from the Windows Control Panel1. From the Windows Desktop, select Start, Control Panel.
The Windows Control Panel opens.
2. In the Control Panel, double-click Administrative Tools, then double-click Services.
The Services window opens.
3. Select SpectrumTomcat from the services list and determine its status.
4. Do one of the following:
If the SpectrumTomcat service is running, click Stop to stop the web server. Alternatively, click Restart to stop and then start the web server.
If the SpectrumTomcat service is stopped, click Start to start the web server.
SPECTRUM OneClick Web Server Administration 3
Configure OneClick Server to Support Over 100 Users
Configure OneClick Server to Support Over 100 UsersTo support a large number of users on a single Solaris OneClick server, increase the hard limit on the number of file descriptors. We recommend that you do this to help ensure support for more than 100 OneClick console users.
To change the /etc/system file
1. Make a backup of your /etc/system file.
2. Add the following line to your /etc/system file:
set rlim_fd_max=4096
Launch OneClick Clients with ContextYou may want to launch OneClick clients within the context of a certain topology or model. This can be done by passing contextual parameters and values with the URL that launches OneClick. The URL can include parameters in the following form:
http://<hostname>/spectrum/oneclick.jnlp?<parameter>=<value>
The available parameters and examples of their use are described below.
topology Parameter
The value of the topology parameter can be a model handle or an IP address. Using this parameter in a URL launches a OneClick client or reuses an existing one, selects the Explorer tab if not already selected, expands the tree to show the model, selects the Topology tab if not already selected, and selects in the Topology panel the model specified by the topology parameter in the URL.
Examples:
http://<hostname>/spectrum/oneclick.jnlp?topology=0x3780003d
http://<hostname>/spectrum/oneclick.jnlp?topology=10.253.9.7
explorer Parameter
The value of the explorer parameter can be a model handle or an IP address. Using this parameter in a URL launches a OneClick client or reuses an existing one, selects the Explorer tab if not already selected, and expands the tree to show the model. The currently selected tab in the Contents panel will reflect the new model.
Examples:
http://<hostname>/spectrum/oneclick.jnlp?explorer=0x3780003d
http://<hostname>/spectrum/oneclick.jnlp?explorer=10.253.9.7
4 OneClick Administration Guide
Configure OneClick Memory Settings
alarm Parameter
The value of the alarm parameter can be either the integer alarm ID (to facilitate integration with legacy applications), the complete global alarm ID (in the form 3f983d3d-2045-1000-012b-000bdb5a1c31), or <model handle>@<alarm ID>. Using this parameter in a URL launches a OneClick client or reuses an existing one, selects the Explorer tab if not already selected, expands the tree to show the model, selects the Alarms tab if not already selected, and selects the alarm.
Examples:
http://<hostname>/spectrum/oneclick.jnlp?alarm=0x3780003d@7710
where 0x3780003d@7710 is <modelhandle>@<alarm ID> and
http://<hostname>/spectrum/oneclick.jnlp?alarm=7710
where 7710 is the integer <alarm ID>.
If passing the integer alarm ID, it is best to also pass the model handle because the integer alarm ID is not guaranteed to be unique across SpectroSERVERs. The full global alarm ID is preferable as it is unique across SpectroSERVERs, but it may not be available to the application launching OneClick.
Note: When launching in context, a new instance of OneClick is not launched if an instance is already running on the host machine. The context is changed in the current instance of OneClick.
Configure OneClick Memory SettingsOneClick has default settings for the server and client systems. You can adjust these settings after installing OneClick.
OneClick Client Memory Settings
By default, the initial memory footprint of OneClick clients is 64 megabytes, with a maximum size of 256 megabytes. We recommend increasing these minimum and maximum values to 128 and 256, respectively. However, you can set them higher if necessary.
If you change the client memory settings, keep in mind that the settings apply to all OneClick clients. Therefore, take into account any client machines that might not have sufficient resources.
To configure memory settings for OneClick clients
1. Navigate to the OneClick home page at http://<hostname>:<portnumber>/spectrum/index.jsp.
2. Click Administration at the top of the page.
SPECTRUM OneClick Web Server Administration 5
Configure OneClick Memory Settings
3. In the left panel that lists the administration pages, click JNLP Configuration.
4. For Minimum client memory usage (megabytes), enter the minimum amount of memory that must be available on the client in order to start OneClick.
5. For Maximum client memory usage (megabytes), enter the maximum amount of memory that OneClick can use on the client.
6. Click Save.
7. Restart any running OneClick clients for the changes to take effect.
OneClick Web Server Memory Settings
By default, the maximum memory the OneClick web server uses is 512 megabytes. As a guideline, if the OneClick web server is using more than 75 percent of its configured maximum memory, consider increasing the maximum memory value.
To configure OneClick web server memory settings
1. Verify the OneClick web server memory usage:
a. Navigate to the OneClick home page at http://<hostname>:<portnumber>/spectrum/index.jsp.
b. Click the Administration link to open the Administration web page.
c. In the left panel that lists the administration pages, click Web Server Memory.
d. Check the OneClick Server Memory Usage field to see if memory usage is greater than 75 percent of the configured maximum.
2. Configure the maximum OneClick web server memory usage:
a. In the Maximum Memory the Server Can Use (In MB) field, enter the new value.
Note: Do not set the maximum memory to a value larger than the available memory for the system.
b. Click Save.
A dialog prompts you to commit your changes and restart the OneClick web server. The OneClick web server must be restarted for these changes to take effect.
c. Click OK to save your changes and restart the OneClick web server.
6 OneClick Administration Guide

Configure the OneClick Web Server URL
Configure the OneClick Web Server URLAs described in the OneClick Console User Guide (5130) in the discussion on launching the OneClick Console, the OneClick home page provides a central place where users can launch the OneClick client. By default, all OneClick users must use the following URL to reach the OneClick home page:
http://<OneClick web server>/spectrum
Also by default, the URL http://<OneClick web server> launches a Tomcat web server configuration page. In environments where you would prefer all users to launch the OneClick home page using http://<OneClick web server>, you can configure the OneClick web server to automatically redirect from http://<OneClick web server> to http://<OneClick web server>/spectrum.
To configure the OneClick web server URL
1. Navigate to the <$SPECROOT>\tomcat\webapps\ROOT directory.
2. In the text editor of your choice, create a new file named index.html.
3. Edit the index.html file to contain the following text:
<html>
<head>
<meta http-equiv="refresh" content="0;url=/spectrum">
</head>
<body>
</body>
</html>
4. Save the index.html file in the ROOT directory referenced in step 1.
All OneClick users navigating to http://<OneClick web server> will now be redirected automatically to http://<OneClick web server>/spectrum.
Configure the OneClick MySQL Server PasswordOneClick has its own MySQL Server user and password. OneClick uses this user (OC_user) and its credentials to access the MySQL reporting database on behalf of SPECTRUM applications such as Report Manager and Service Manager. For greater security, SPECTRUM includes a utility that lets you change the password of the OneClick MySQL user.
Important! Do not attempt to manually change the MySQL user password using a MySQL client connection. Due to the dependency between OneClick's storage of the password and MySQL connectivity, the only safe way to change this user's password is through the OneClick utility.
SPECTRUM OneClick Web Server Administration 7
Configure the OneClick MySQL Server Password
To change the MySQL Server user password used by OneClick
1. Navigate to the OneClick home page at http://<hostname>:<portnumber>/spectrum/index.jsp
2. Click the Administration link to open the administration web page.
3. In the left panel that lists the administration pages, click MySQL Password.
The Change MySQL Password administration web page opens. Use this page to change the password for the MySQL user that SPECTRUM uses to access the reporting database.
OneClick maintains the MySQL server's user credentials so that it knows what password to use when connecting to MySQL. OneClick stores this password in an encrypted form for security purposes.
4. Enter the current password, the new password, and confirm the new password in the fields provided. The default password for this user is ‘0n3cl1Ck’ (case sensitive).
5. Click the Change Password button to modify the MySQL server's user credentials.
The password is changed immediately after clicking Change Password and does not require MySQL or Tomcat to be restarted in order to take effect.
8 OneClick Administration Guide
Chapter 2: OneClick Server Communications and Network Configuration
This chapter identifies OneClick administrative tasks. Other maintenance and optional configuration issues are also addressed.
Name Resolution RequirementsFor the OneClick web server system to communicate with a SpectroSERVER, the OneClick web server system must be able to resolve the non-fully-qualified hostname of the SpectroSERVER to an IP that can be used to reach the SpectroSERVER.
We recommend that hosts files be used for the name resolution of SpectroSERVER hostnames to help ensure that name resolution will not be impacted by a network failure.
Configure OneClick for Secure Sockets LayerOneClick supports the use of Secure Sockets Layer (SSL) to encrypt communications between the OneClick web server and OneClick clients. This enables OneClick clients to access information securely across unsecured networks such as the Internet. In addition to encryption, SSL uses certificates for authentication. Authentication protects users from downloading and running applications from suspicious or “un-trusted” sources.
While both Certificate Authority (CA)-signed certificates and self-signed certificates provide secure connections using SSL encryption, CA-signed certificates provide an additional level of security by verifying the creator of the certificate and certifying that the product signed with the CA-signed certificate is truly from that vendor. CA-signed certificates protect host machines that have them from attackers by making it much harder to impersonate a trusted entity (that is, the certified vendor). However, self-signed certificates may be appropriate if you require the encryption that an SSL certificate affords but not necessarily proof of the certificate’s source.
OneClick Server Communications and Network Configuration 9
Configure OneClick for Secure Sockets Layer
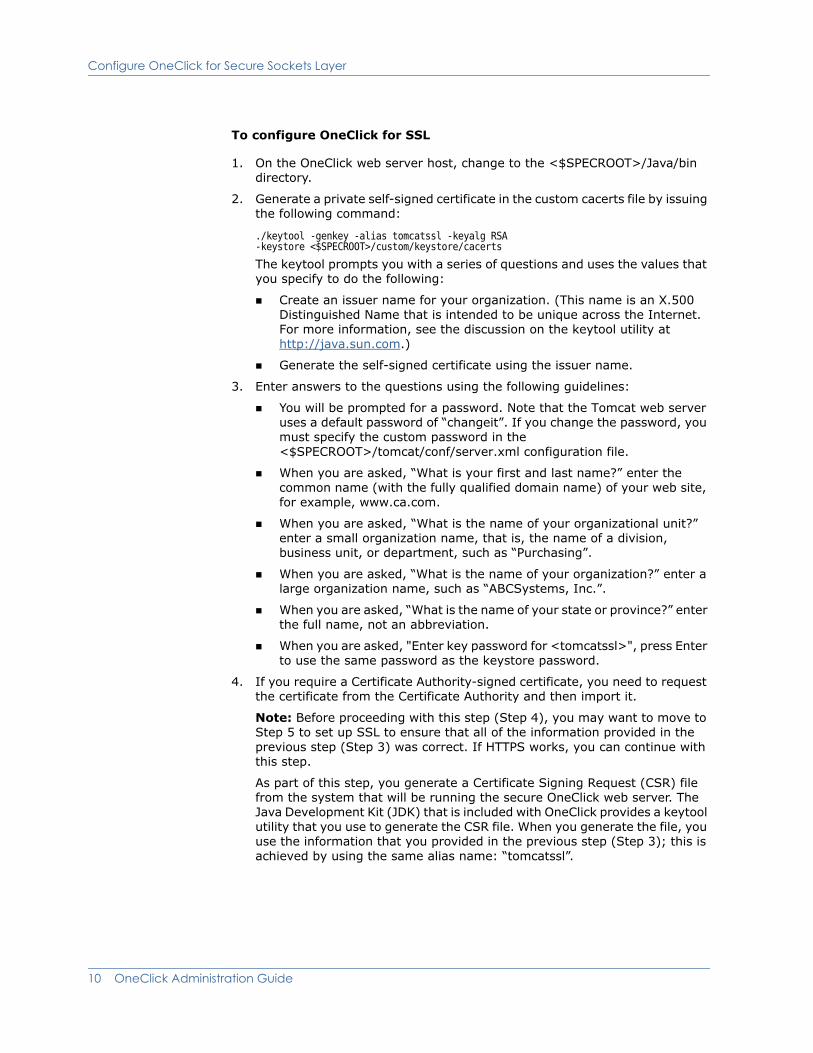
To configure OneClick for SSL
1. On the OneClick web server host, change to the <$SPECROOT>/Java/bin directory.
2. Generate a private self-signed certificate in the custom cacerts file by issuing the following command:
./keytool -genkey -alias tomcatssl -keyalg RSA -keystore <$SPECROOT>/custom/keystore/cacerts
The keytool prompts you with a series of questions and uses the values that you specify to do the following:
Create an issuer name for your organization. (This name is an X.500 Distinguished Name that is intended to be unique across the Internet. For more information, see the discussion on the keytool utility at http://java.sun.com.)
Generate the self-signed certificate using the issuer name.
3. Enter answers to the questions using the following guidelines:
You will be prompted for a password. Note that the Tomcat web server uses a default password of “changeit”. If you change the password, you must specify the custom password in the <$SPECROOT>/tomcat/conf/server.xml configuration file.
When you are asked, “What is your first and last name?” enter the common name (with the fully qualified domain name) of your web site, for example, www.ca.com.
When you are asked, “What is the name of your organizational unit?” enter a small organization name, that is, the name of a division, business unit, or department, such as “Purchasing”.
When you are asked, “What is the name of your organization?” enter a large organization name, such as “ABCSystems, Inc.”.
When you are asked, “What is the name of your state or province?” enter the full name, not an abbreviation.
When you are asked, "Enter key password for <tomcatssl>", press Enter to use the same password as the keystore password.
4. If you require a Certificate Authority-signed certificate, you need to request the certificate from the Certificate Authority and then import it.
Note: Before proceeding with this step (Step 4), you may want to move to Step 5 to set up SSL to ensure that all of the information provided in the previous step (Step 3) was correct. If HTTPS works, you can continue with this step.
As part of this step, you generate a Certificate Signing Request (CSR) file from the system that will be running the secure OneClick web server. The Java Development Kit (JDK) that is included with OneClick provides a keytool utility that you use to generate the CSR file. When you generate the file, you use the information that you provided in the previous step (Step 3); this is achieved by using the same alias name: “tomcatssl”.
10 OneClick Administration Guide
Configure OneClick for Secure Sockets Layer
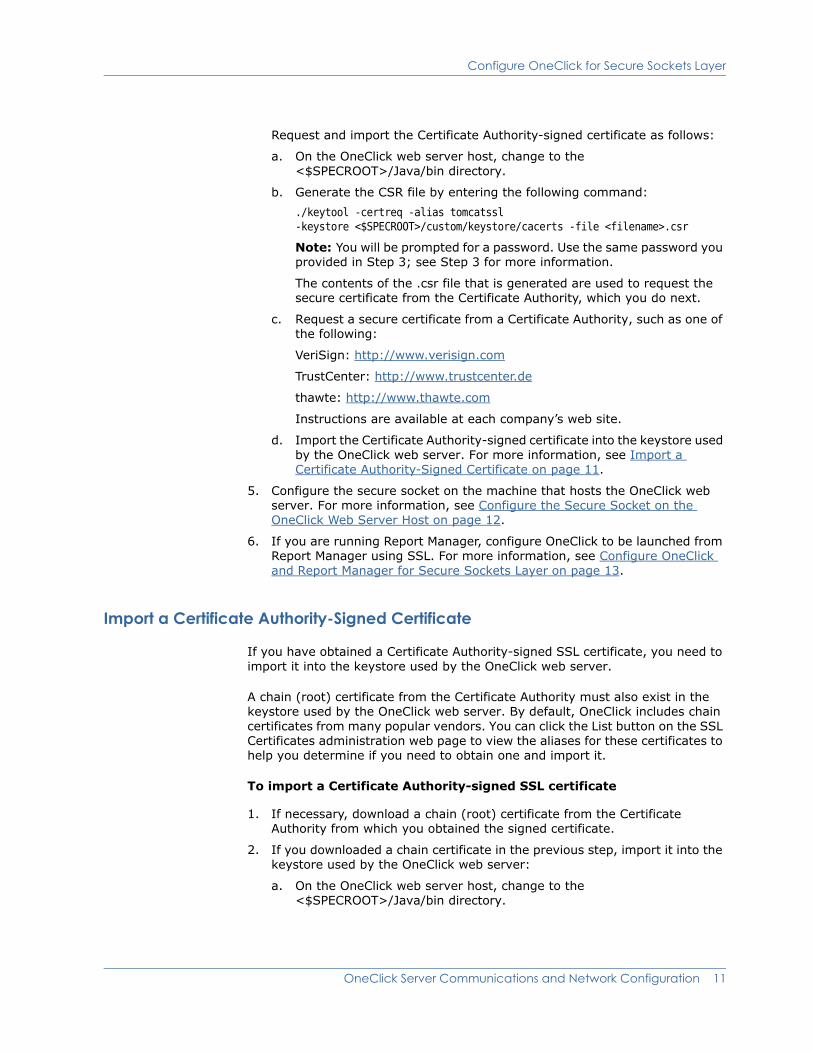
Request and import the Certificate Authority-signed certificate as follows:
a. On the OneClick web server host, change to the <$SPECROOT>/Java/bin directory.
b. Generate the CSR file by entering the following command:
./keytool -certreq -alias tomcatssl -keystore <$SPECROOT>/custom/keystore/cacerts -file <filename>.csr
Note: You will be prompted for a password. Use the same password you provided in Step 3; see Step 3 for more information.
The contents of the .csr file that is generated are used to request the secure certificate from the Certificate Authority, which you do next.
c. Request a secure certificate from a Certificate Authority, such as one of the following:
VeriSign: http://www.verisign.com
TrustCenter: http://www.trustcenter.de
thawte: http://www.thawte.com
Instructions are available at each company’s web site.
d. Import the Certificate Authority-signed certificate into the keystore used by the OneClick web server. For more information, see Import a Certificate Authority-Signed Certificate on page 11.
5. Configure the secure socket on the machine that hosts the OneClick web server. For more information, see Configure the Secure Socket on the OneClick Web Server Host on page 12.
6. If you are running Report Manager, configure OneClick to be launched from Report Manager using SSL. For more information, see Configure OneClick and Report Manager for Secure Sockets Layer on page 13.
Import a Certificate Authority-Signed Certificate
If you have obtained a Certificate Authority-signed SSL certificate, you need to import it into the keystore used by the OneClick web server.
A chain (root) certificate from the Certificate Authority must also exist in the keystore used by the OneClick web server. By default, OneClick includes chain certificates from many popular vendors. You can click the List button on the SSL Certificates administration web page to view the aliases for these certificates to help you determine if you need to obtain one and import it.
To import a Certificate Authority-signed SSL certificate
1. If necessary, download a chain (root) certificate from the Certificate Authority from which you obtained the signed certificate.
2. If you downloaded a chain certificate in the previous step, import it into the keystore used by the OneClick web server:
a. On the OneClick web server host, change to the <$SPECROOT>/Java/bin directory.
OneClick Server Communications and Network Configuration 11

Configure OneClick for Secure Sockets Layer
b. Enter the following command:
./keytool -import -alias root -keystore <$SPECROOT>/custom/keystore/cacerts -trustcacerts -file <root_chain_certificate_filename>
Note: You will be prompted for a password; note that the Tomcat web server uses a default password of "changeit". Also note that the alias name does not need to be root; it can be a more descriptive name for the type of root certificate you are importing. The alias name needs to be one that does not already exist.
3. Import the Certificate Authority-signed SSL certificate into the keystore used by the OneClick web server:
a. If necessary, on the OneClick web server host, change to the <$SPECROOT>/Java/bin directory.
b. Enter the following command:
./keytool -import -alias tomcatssl -keystore <$SPECROOT>/custom/keystore/cacerts -trustcacerts -file <your_certificate_filename>
Note: You will be prompted for a password; note that the Tomcat web server uses a default password of "changeit". In addition, be sure to use the same alias that you did when you generated the private self-signed certificate (see Name Resolution Requirements on page 9).
Configure the Secure Socket on the OneClick Web Server Host
As a final step in configuring the OneClick web server for SSL, you need to configure the secure socket on the machine that hosts the OneClick web server.
To configure the secure socket on the OneClick web server host
1. Shutdown the OneClick web server. See Start and Stop the OneClick Web Server on page 2.
2. Open <$SPECROOT>/tomcat/conf/server.xml in a text editor.
3. Locate the following section in the server.xml file:
<!-- Define a SSL Coyote HTTP/1.1 Connector on port 443 -->
<!--
<Connector
port="443" minProcessors="5" maxProcessors="75"
enableLookups="true" disableUploadTimeout="true"
acceptCount="100" debug="0" scheme="https" secure="true"
clientAuth="false" sslProtocol="TLS"
keystoreFile="<SPECROOT>/custom/keystore/cacerts"
keystorePass="changeit">
</Connector>
-->
By default the <Connector> element in the section is commented out.
12 OneClick Administration Guide
Configure OneClick for Secure Sockets Layer
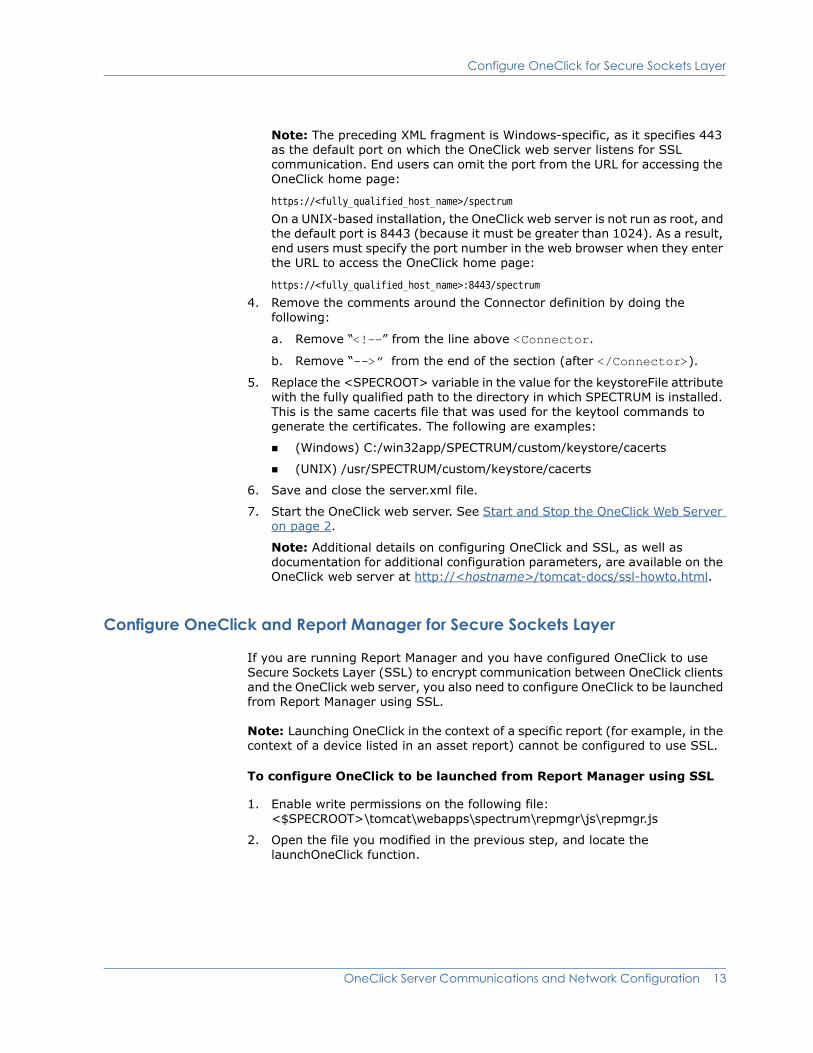
Note: The preceding XML fragment is Windows-specific, as it specifies 443 as the default port on which the OneClick web server listens for SSL communication. End users can omit the port from the URL for accessing the OneClick home page:
https://<fully_qualified_host_name>/spectrum
On a UNIX-based installation, the OneClick web server is not run as root, and the default port is 8443 (because it must be greater than 1024). As a result, end users must specify the port number in the web browser when they enter the URL to access the OneClick home page:
https://<fully_qualified_host_name>:8443/spectrum
4. Remove the comments around the Connector definition by doing the following:
a. Remove “<!--” from the line above <Connector.
b. Remove “-->” from the end of the section (after </Connector>).
5. Replace the <SPECROOT> variable in the value for the keystoreFile attribute with the fully qualified path to the directory in which SPECTRUM is installed. This is the same cacerts file that was used for the keytool commands to generate the certificates. The following are examples:
(Windows) C:/win32app/SPECTRUM/custom/keystore/cacerts
(UNIX) /usr/SPECTRUM/custom/keystore/cacerts
6. Save and close the server.xml file.
7. Start the OneClick web server. See Start and Stop the OneClick Web Server on page 2.
Note: Additional details on configuring OneClick and SSL, as well as documentation for additional configuration parameters, are available on the OneClick web server at http://<hostname>/tomcat-docs/ssl-howto.html.
Configure OneClick and Report Manager for Secure Sockets Layer
If you are running Report Manager and you have configured OneClick to use Secure Sockets Layer (SSL) to encrypt communication between OneClick clients and the OneClick web server, you also need to configure OneClick to be launched from Report Manager using SSL.
Note: Launching OneClick in the context of a specific report (for example, in the context of a device listed in an asset report) cannot be configured to use SSL.
To configure OneClick to be launched from Report Manager using SSL
1. Enable write permissions on the following file: <$SPECROOT>\tomcat\webapps\spectrum\repmgr\js\repmgr.js
2. Open the file you modified in the previous step, and locate the launchOneClick function.
OneClick Server Communications and Network Configuration 13
Configure OneClick to Communicate through a Web Proxy Server
3. In the launchOneClick function, change the following line from:
url = "http://"+servername+contextApp+"/oneclick.jnlp";
to:
url = "https://"+servername+contextApp+"/oneclick.jnlp";
More specifically, change “http” to “https” in the line.
4. Save and close the file.
Important! If you upgrade to a newer version of SPECTRUM, this file is overwritten during the process. As a result, you must repeat this modification after an upgrade.
Note: For more information on Report Manager, which allows you to create reports on the inventory, performance, change history, and fault history of the network assets managed by SPECTRUM, see the Report Manager User Guide (5158).
Troubleshoot a Secure Sockets Layer Configuration
If you encounter errors connecting to the secure OneClick web server from a OneClick client using SSL, verify the following:
The fully qualified domain name of the host on which the OneClick web server is running was specified in the private key you generated for signing the security certificate used for authentication. When you generated the key, you should have entered the fully qualified domain name at the following prompt: “What is your first and last name?”
Both the Certificate Authority chain (root) certificate and the security certificate were imported into the cacerts file in the custom directory on the secure OneClick web server.
If you encounter errors launching a OneClick client from Report Manager using SSL, verify that you have completed the configuration procedure described in Configure OneClick and Report Manager for Secure Sockets Layer on page 13.
Configure OneClick to Communicate through a Web Proxy Server
If you use a Web proxy server that relays HTTP and HTTPS requests (such as the iPlanet and Microsoft proxy servers), OneClick honors the proxy settings used by Java Web Start and supports both HTTP and HTTPS proxies as well as proxy authentication. An administrator must configure the OneClick web server to communicate through a proxy server.
Note: All clients connecting through a proxy must configure the proxy settings in the Java Web Start preference console. See the Installation Guide (5136) for details about the Java Web Start proxy settings. Setting this may be the only change required if you are connecting through an HTTP 1.1 proxy.
14 OneClick Administration Guide
Configure OneClick to Communicate through a Web Proxy Server
To configure the OneClick web server for HTTP 1.0 proxy support
Note: The following changes are not necessary to connect to a proxy that supports HTTP 1.1.
1. Open the <$SPECROOT>/tomcat/conf/server.xml file for editing.
2. Find the attribute maxKeepAliveRequests="-1" and change it to maxKeepAliveRequests="1".
Setting this attribute to 1 turns off keep-alive.
Note: Directions to do this also appear in the server.xml file itself.
3. Save the server.xml file changes.
4. Open the <$SPECROOT>/tomcat/webapps/spectrum/oneclick.jnlp file for editing.
5. Find the following three lines and remove the lines containing <!-- and -->:
<!--
<property name="reuseConnections" value="false"/>
-->
Removing <!-- and --> leaving just the <property name="reuseConnections" value="false"/> line in this file turns off the reuse of connections.
6. Stop and restart the OneClick web server (see Start and Stop the OneClick Web Server on page 2).
Troubleshoot Proxy Issues
A failed attempt to launch a OneClick client with a proxy results in the normal conditions described in step 1 and step 2 and the failure in step 3 (below):
1. A web browser can access the OneClick web server and load the OneClick home page at http://<hostname>:<portnumber>/spectrum/index.jsp (through the proxy).
2. Java Web Start can access the OneClick web server and download the needed OneClick files.
3. The OneClick client cannot access the OneClick web server and fails with a “Can't connect to ...” error.
Note: If the procedures in Configure OneClick to Communicate through a Web Proxy Server on page 14 do not allow OneClick to communicate through the proxy server in your environment, see the Installation Guide (5136) for information about disabling web proxies.
OneClick Server Communications and Network Configuration 15
Configure the OneClick Web Server to Communicate with the SpectroSERVER Using Secure CORBA
Configure the OneClick Web Server to Communicate with the SpectroSERVER Using Secure CORBA
The OneClick web server must communicate with processes on the SpectroSERVER host system in order to gather data for display in OneClick clients. This communication uses a Common Object Request Broker Architecture (CORBA)-based application programming interface that is unencrypted by default. However, you can configure the OneClick web server to use secure CORBA (using Secure Sockets Layer or SSL) to encrypt its communications with the SpectroSERVER. This enables the web server to access information securely.
Note: For more information on the implementation of CORBA in SPECTRUM, see the Development API Reference Guide (5010).
To configure the OneClick web server to use secure CORBA communication
1. Access the OneClick home page, and click the Administration link at the top of the page.
The administration pages are listed in the left panel.
2. Click SPECTRUM Configuration in the left panel.
3. Select Yes for Secure CORBA Communication Configuration.
4. Click Save.
5. Click Restart OneClick Server to immediately apply the change by restarting the web server.
Firewalled EnvironmentsThe OneClick web server must communicate with processes on the SpectroSERVER host system in order to gather data for display to OneClick clients. For the most part, this communication is initiated by the OneClick web server, which establishes connections to specific TCP ports for sending requests and receiving responses. The SpectroSERVER uses bidirectional IIOP (Internet Inter-ORB protocol) to communicate with its CORBA clients. Because SpectroSERVERs use client-initiated connections to transmit information to the OneClick web server, it is not necessary to open additional ports on the firewall of the OneClick web server for these communications.
If you use network address translation (NAT) on your network, it is not necessary to perform any additional configuration steps for the OneClick web server to communicate with the SpectroSERVER. However, since SpectroSERVER communication is based on resolving an advertised host name to an IP address, you must configure name resolution on your systems appropriately. Consider a SpectroSERVER machine (host name: “spectrumss”) that is behind a NAT firewall with a private IP address of 192.168.0.2 and a public address of 128.113.0.2. Hosts on the private side of the NAT need to resolve “spectrumss” to 192.168.0.2, and those on the public side need to resolve “spectrumss” to 128.113.0.2.
16 OneClick Administration Guide
Load Balancers
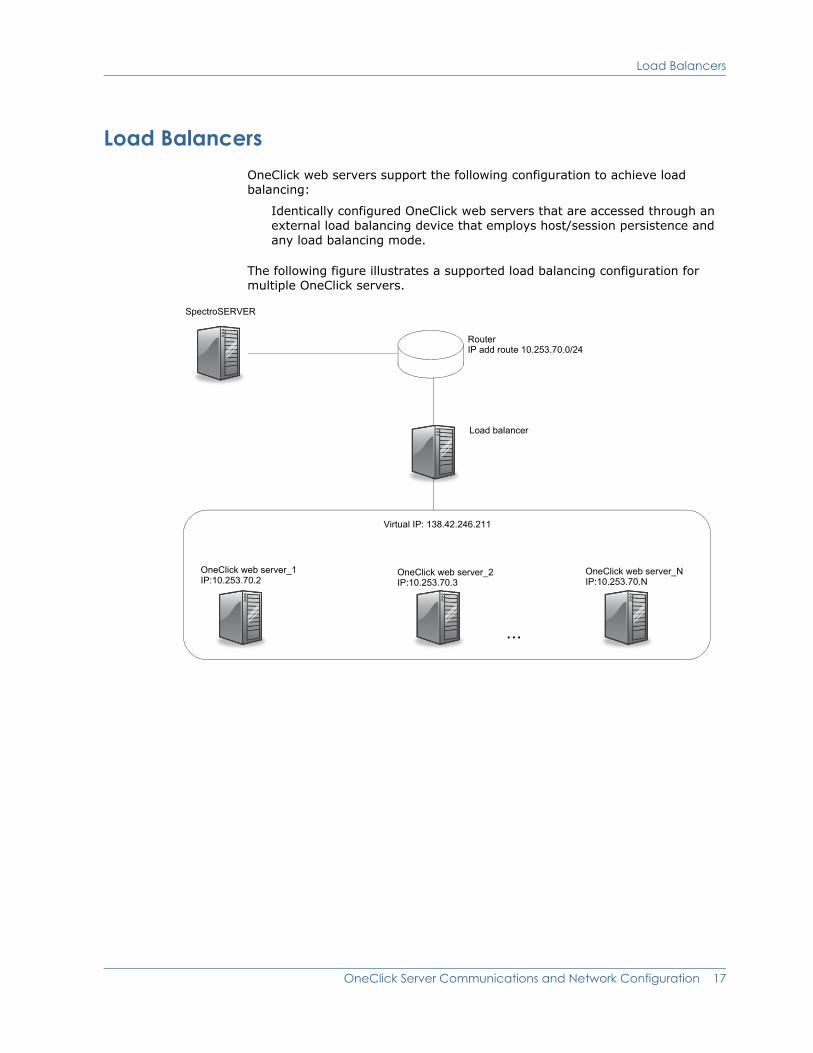
Load BalancersOneClick web servers support the following configuration to achieve load balancing:
Identically configured OneClick web servers that are accessed through an external load balancing device that employs host/session persistence and any load balancing mode.
The following figure illustrates a supported load balancing configuration for multiple OneClick servers.
SpectroSERVER
Load balancer
OneClick web server_1 OneClick web server_2 OneClick web server_N
RouterIP add route 10.253.70.0/24
IP:10.253.70.2 IP:10.253.70.3 IP:10.253.70.N
Virtual IP: 138.42.246.211
...
OneClick Server Communications and Network Configuration 17

Load Balancers
18 OneClick Administration Guide
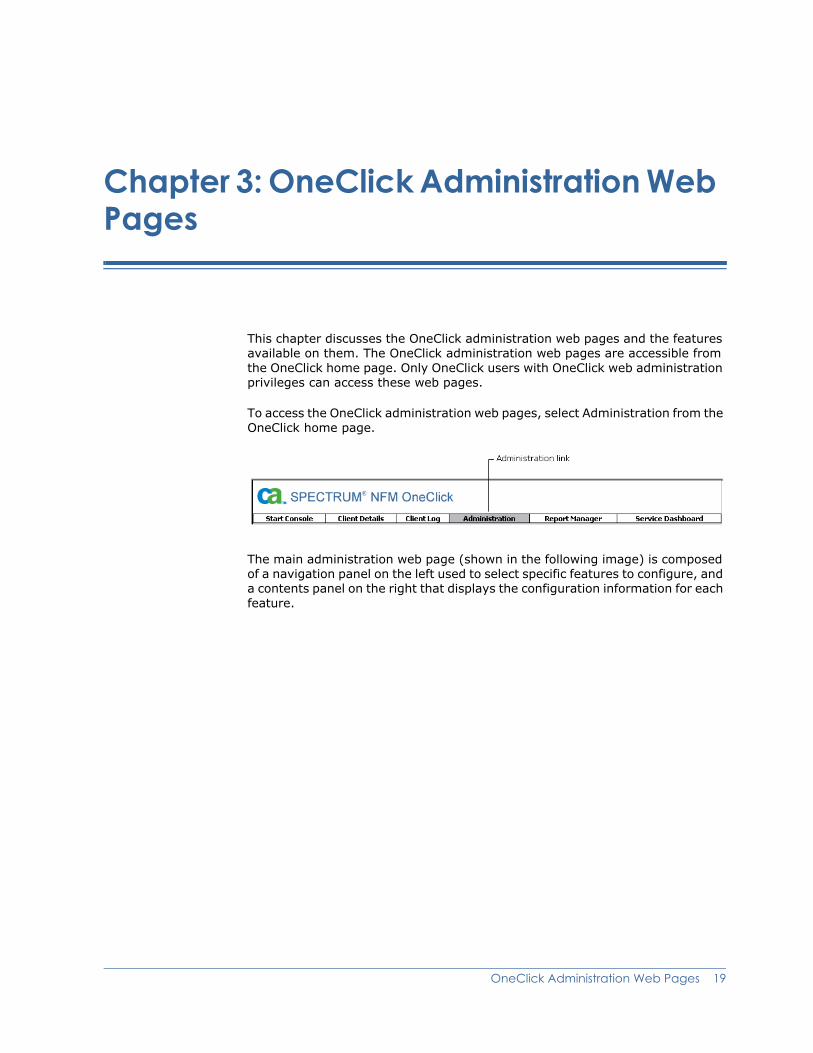
Chapter 3: OneClick Administration Web Pages
This chapter discusses the OneClick administration web pages and the features available on them. The OneClick administration web pages are accessible from the OneClick home page. Only OneClick users with OneClick web administration privileges can access these web pages.
To access the OneClick administration web pages, select Administration from the OneClick home page.
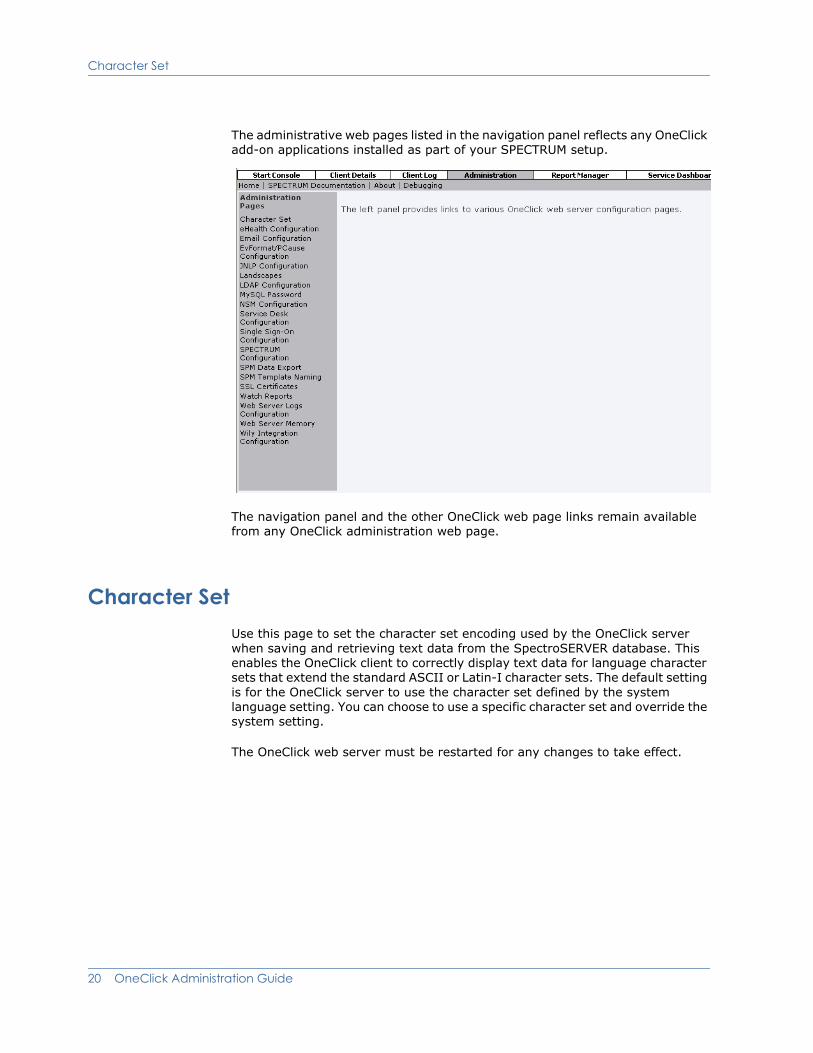
The main administration web page (shown in the following image) is composed of a navigation panel on the left used to select specific features to configure, and a contents panel on the right that displays the configuration information for each feature.
OneClick Administration Web Pages 19
Character Set
The administrative web pages listed in the navigation panel reflects any OneClick add-on applications installed as part of your SPECTRUM setup.
The navigation panel and the other OneClick web page links remain available from any OneClick administration web page.
Character SetUse this page to set the character set encoding used by the OneClick server when saving and retrieving text data from the SpectroSERVER database. This enables the OneClick client to correctly display text data for language character sets that extend the standard ASCII or Latin-I character sets. The default setting is for the OneClick server to use the character set defined by the system language setting. You can choose to use a specific character set and override the system setting.
The OneClick web server must be restarted for any changes to take effect.
20 OneClick Administration Guide
eHealth Configuration
eHealth ConfigurationUse this page to configure OneClick for connection to an eHealth server. Any changes you make on this page are reflected in OneClick clients launched after you complete the configuration changes.
eHealth Configuration
You can use the Test button to test any eHealth configuration changes you make in this section of the page before saving them.
eHealth Map Maintenance
Use this section to perform maintenance tasks on the Spectrum and eHealth mappings. The Spectrum and eHealth mappings attempt to match eHealth elements related to routers and systems to corresponding models in SPECTRUM. These are broken out into the following maintenance categories:
eHealth server topology
eHealth mapping utilities
Email ConfigurationUse this web page to configure OneClick to integrate with your existing email system so that operators can email alarm-related information from OneClick to assigned troubleshooters and other individuals.
The default SMTP Server Host entry for the mail server is "mailhost", which is a common DNS alias for the mail server. If your environment does not use this alias, an alternative to setting the host on this web page is to add an entry for “mailhost” to the /etc/hosts file on the OneClick web server machine.
EvFormat/PCause ConfigurationIf you make changes to any EvFormat or PCause files, you can reload them into the OneClick server using this web page.
OneClick Administration Web Pages 21
JNLP Configuration
JNLP ConfigurationOneClick utilizes the Java Web Start framework developed by Sun Microsystems to launch the OneClick console from the OneClick home page in a browser.
To determine how to launch the OneClick console (for example, the location of necessary JAR files), the Java Web Start framework relies on several Java Network Launching Protocol (JNLP) configuration files for the values of various launch parameters.
You can use the JNLP Configuration page to configure the following JNLP parameters:
Required JRE Version
The required version of the Java Runtime Environment (JRE) that must be installed on the client to start OneClick. If the specified version is not installed, the user cannot start the OneClick console from the OneClick home page and, instead, receives an error message that indicates the required minimum version (which must be installed manually).
Newer versions allowed
Selecting this check box allows OneClick clients to run using a JRE version equivalent to, or higher than, the specified Required JRE Version.
Note: SPECTRUM will support a documented minimum JRE version level, and we will support running the SPECTRUM OneClick UI in that minimum version, or in any later version, unless noted otherwise in the product documentation. We will also test with new JRE versions as they become available and update the SPECTRUM product documentation, the online Support knowledge base, or both, if specific JRE versions are incompatible.
Minimum client memory usage (megabytes)
The minimum amount of memory, in megabytes, that must be available on the client in order to start OneClick.
Maximum client memory usage (megabytes)
The maximum amount of memory, in megabytes, that OneClick can use on the client.
The JNLP files provided with SPECTRUM are located in:
<$SPECROOT>\tomcat\webapps\spectrum
Any modifications that you make are saved to custom files located in:
<$SPECROOT>\custom\common\config
Note: For more information on specifying the minimum and maximum memory usage on OneClick clients, including recommendations, see OneClick Client Memory Settings on page 5.
22 OneClick Administration Guide
Landscapes
LandscapesUse this page to view the status for all the landscapes (SpectroSERVERs) that the OneClick server is currently monitoring. You can identify information related to a distributed SpectroSERVER (DSS) setup, including any parent and child landscapes. You can perform a manual synchronization between all distributed models with their corresponding models on the master landscape using the Sync With Master button.
You can manually add or remove landscapes monitored by this OneClick server. You can remove only landscapes that you have manually added.
LDAP ConfigurationUse this web page to configure the OneClick web server to use an external LDAP server for user authentication. For SPECTRUM and OneClick user settings related to LDAP configurations, see Chapter 4: User Administration in OneClick.
This administration web page includes the following settings and functionality:
LDAP Server Settings
Settings you can configure include identifying a primary and secondary LDAP server by IP address and port number, using SSL, adding an SSL certificate, and the connection timeout with the LDAP server. For information about viewing and adding SSL certificates used by the OneClick web server, see SSL Certificates on page 26.
Save LDAP Passwords to SPECTRUM Database
This option allows you to give access to OneClick users if the LDAP server is down based on their last known correct LDAP password.
User Name Lookup
Configure how OneClick performs a lookup of user names either as a User by Search or a User by Pattern lookup, depending on the LDAP system with which you are interfacing.
Test LDAP Configuration
Once you have configured the OneClick interface with an external LDAP server, you can test the configuration using the Test LDAP Configuration section of this web page.
MySQL PasswordUse this OneClick administration web page to change the password for the MySQL user that accesses the reporting database used in OneClick web applications. For the procedure, see Configure the OneClick MySQL Server Password on page 7.
OneClick Administration Web Pages 23

NSM Configuration
NSM ConfigurationThis page allows you to configure OneClick for connecting to a NSM dashboard and a NSM report server. Only OneClick clients launched after any changes are saved reflect the changed settings.
Service Desk ConfigurationYou can view, configure, test, and save SPECTRUM and CA Service Desk integration settings using the Service Desk Configuration administration web page.
Note: Prior to configuring OneClick to connect to Service Desk using this configuration page, you must download and install the integration components on your Service Desk server.
You can create and modify CA Service Desk server and admin user parameters, enable and disable the SPECTRUM and CA Service Desk integration, and add and remove SPECTRUM alarms that generate Service Desk tickets.
Single Sign-On ConfigurationThis page allows you to enable and select a Single Sign-On option for SPECTRUM. SPECTRUM supports Single Sign-On using CA EEM or CA SITEMINDER.
When you save changes to these configuration settings, the OneClick server is automatically restarted in order to apply the changes. If you encounter errors during the restart, see Start and Stop the OneClick Web Server from an Administration Web Page on page 2 for troubleshooting tips.
SPECTRUM ConfigurationYou can view and set the following SPECTRUM configuration parameters:
Main Location Server Name
Backup Location Server Name
Admin User Name
SpectroSERVER Polling Interval (sec)
SpectroSERVER Request Timeout (sec)
The properties of the object request broker (ORB) used by the OneClick web server for CORBA-based communication with the SpectroSERVER
24 OneClick Administration Guide
SPM Data Export
Whether secure CORBA (using Secure Sockets Layer or SSL) is used to encrypt communication between the OneClick web server and the SpectroSERVER
You can also restart the OneClick server so that any setting changes that require a server restart can take effect. If you encounter errors during the restart, see Start and Stop the OneClick Web Server from an Administration Web Page on page 2 for troubleshooting tips.
Note: For more information on the implementation of Common Object Request Broker Architecture (CORBA) in SPECTRUM, see the Development API Reference Guide (5010).
SPM Data ExportThis page allows you to change the following settings for SPM Data Export:
SPM Data Export Enabled
This must be set to Yes for the settings that follow to be available.
Log File Cycle Time (min)
This parameter controls when (in minutes) the SPM log file is saved and closed, and a new file is opened for logging.
Log File Directory
This sets the full path to the directory where SPM log files are stored. The directory structure specified must be created prior to saving.
Select which landscapes SPM data is obtained from using the landscape selection columns.
You can also restart the OneClick server so that any setting changes that require a server restart can take effect. If you encounter errors during the restart, see Start and Stop the OneClick Web Server from an Administration Web Page on page 2 for troubleshooting tips.
SPM Template NamingThis page allows you to specify the naming convention for tests created on test hosts that have had a SPM test template applied to them:
IP Address
The test name consists of the template name and the IP address of the test target, which may be the test host or a particular device.
OneClick Administration Web Pages 25
SSL Certificates
Model Name
The test name consists of the template name and the model name of the test target, which may be the test host or a particular device.
For information about working with SPM test templates, see the Service Performance Manager User Guide (5093).
SSL CertificatesYou can use this web page to view and add SSL certificates used by the OneClick web server. Use this web page to add an SSL certificate used as part of the OneClick SSL configuration. For LDAP, see LDAP Configuration on page 23 for LDAP configuration information. For OneClick SSL configuration, see Name Resolution Requirements on page 9.
You can also restart the OneClick server so that any setting changes that require a server restart can take effect. If you encounter errors during the restart, see Start and Stop the OneClick Web Server from an Administration Web Page on page 2 for troubleshooting tips.
Web Server Logs ConfigurationYou can use this web page to view and set OneClick server log file rotation settings. The OneClick web server log files are located in the <$SPECROOT>/tomcat/logs directory.
You can set an alarm notification when the log file directory becomes larger than a specified size in megabytes. You can view the current size of the log file directory. You can specify the age in days at which a log file is deleted from the directory.
Web Server MemoryYou can use this web page to view and set the maximum amount of memory the OneClick server uses. Any changes you make require you to restart the OneClick server. You can also view the percentage of the maximum memory allocation the OneClick server is currently using.
For the procedure to set the OneClick server memory settings, see OneClick Web Server Memory Settings on page 6.
If you encounter errors during the server restart, see Start and Stop the OneClick Web Server from an Administration Web Page on page 2 for troubleshooting tips.
26 OneClick Administration Guide
Chapter 4: User Administration in OneClick
This chapter discusses SPECTRUM user administration in OneClick from the perspective of a OneClick administrator. This includes managing SPECTRUM users and user groups. For more information about configuring SPECTRUM model security, see Chapter 6: Model Security in OneClick.
OneClick User Administration TerminologyThe following is a list of common OneClick user administration terms.
User
A OneClick user account. This account is created by a OneClick administrator. It provides a single OneClick user with access to OneClick and stores information about the user, such as password, access, and privileges in the SPECTRUM database.
In OneClick, the term User can represent the account of a user who has access to OneClick and/or the actual user tied to the account.
User Group
A user group in OneClick is a logical grouping of users that are organized together for a common purpose. Users within the same group can share the privileges granted by the group. When you specify privileges at the group level, OneClick grants each group member those privileges in addition to any privileges they have at the user level.
License
A license determines which privileges can be granted to holders of that license. Launching a OneClick client consumes any licenses granted to that user.
Security Community
Grants privileges to users and members of user groups. The default OneClick security community (ADMIN) provides users and groups with read/write access to all SPECTRUM models.
User Administration in OneClick 27
OneClick User Administration
Role
A reusable set of user privileges that you can assign to an access group. For example, the default role (OperatorRW) grants the set of read/write privileges typically needed by a OneClick operator.
Model
A model in SPECTRUM represents a modeled network element.
OneClick User AdministrationUser administration involves creating and managing OneClick user accounts. As the OneClick system administrator, you must create a user account for each new user you want to access the system.
As you create new user accounts in OneClick, you can choose to add them within user groups or as standalone users. When you have multiple users with similar needs, consider creating user groups to manage their user accounts. When you have users with unique needs, you may want to create user accounts independent of user groups.
Best Practices for Creating and Managing User Accounts
This section describes the best practices for creating and managing user accounts in OneClick.
Default Administrator User
WARNING! OneClick includes a default Administrator user with full privileges; this is the Installation Owner user that you created during the SpectroSERVER installation. While you cannot delete this user using the Users tab, it is possible to do so from the Results list of a search using the Locater tab, or by removing the landscape of the main location server from the user. Do not remove this default Administrator user, as doing so produces undesirable results, such as preventing access to OneClick for all other users.
Creating and Managing Individual User Accounts
The benefits of creating and managing individual user accounts include:
Simplest method
Best for environments with a small number of users
Best for users with unique OneClick access requirements
Individual user accounts can be moved to a user group later if needed
28 OneClick Administration Guide
OneClick User Administration
Creating and Managing User Accounts Within a User Group
The benefits of creating and managing user accounts within user groups include:
Best for environments with a large number of users. Enables you to group multiple users by geographic area, function, department, and so on.
Ability to grant all users within a group the same access and privileges at one time. You can define a minimum set of privileges that all users within the group should have. Then, you can customize the individual privileges of any user in the group.
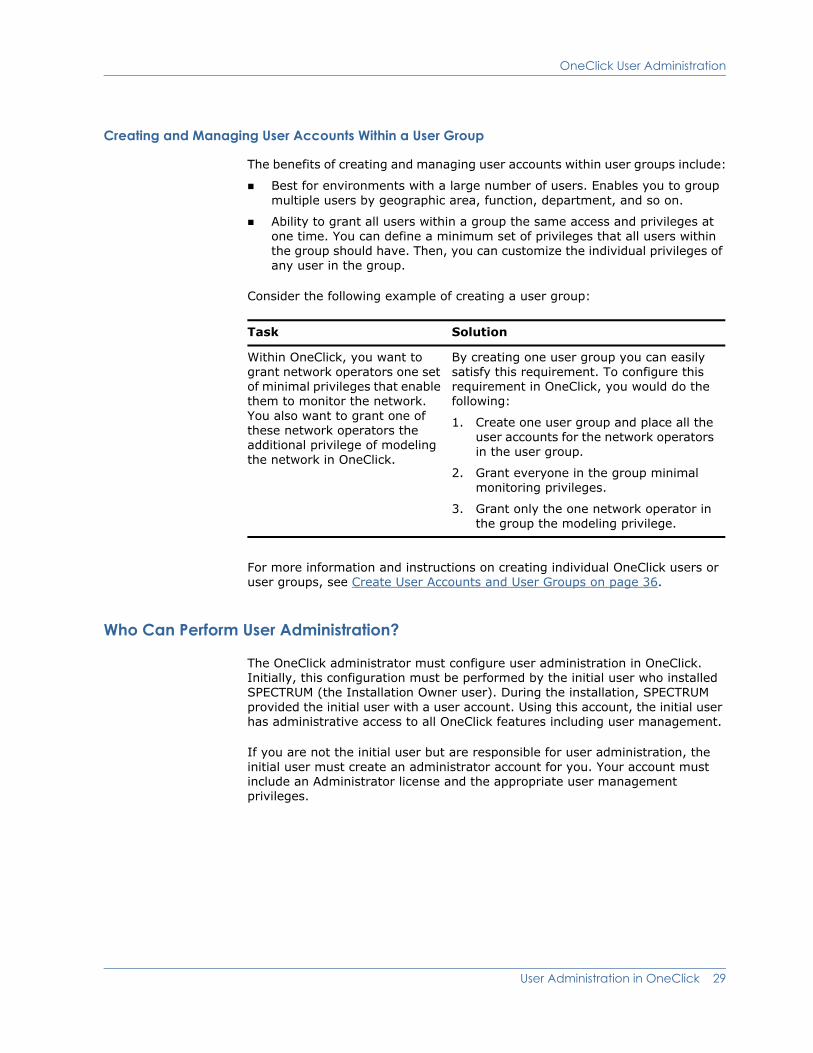
Consider the following example of creating a user group:
For more information and instructions on creating individual OneClick users or user groups, see Create User Accounts and User Groups on page 36.
Who Can Perform User Administration?
The OneClick administrator must configure user administration in OneClick. Initially, this configuration must be performed by the initial user who installed SPECTRUM (the Installation Owner user). During the installation, SPECTRUM provided the initial user with a user account. Using this account, the initial user has administrative access to all OneClick features including user management.
If you are not the initial user but are responsible for user administration, the initial user must create an administrator account for you. Your account must include an Administrator license and the appropriate user management privileges.
Task Solution
Within OneClick, you want to grant network operators one set of minimal privileges that enable them to monitor the network. You also want to grant one of these network operators the additional privilege of modeling the network in OneClick.
By creating one user group you can easily satisfy this requirement. To configure this requirement in OneClick, you would do the following:
1. Create one user group and place all the user accounts for the network operators in the user group.
2. Grant everyone in the group minimal monitoring privileges.
3. Grant only the one network operator in the group the modeling privilege.
User Administration in OneClick 29
OneClick User Administration Interface
Licenses and Privileges
OneClick includes a set of Administrator licenses and Operator licenses. These licenses determine which privileges a system administrator can assign to a OneClick user. The privileges available with a given license are enabled by default. As the system administrator, you can choose to leave these privileges enabled or you can individually disable them, customizing license privileges.
For more information about creating user accounts and assigning licenses and privileges, see Implement User Administration on page 36. For more information about managing license use, see Manage OneClick Licenses by Limiting Concurrent User Logins on page 55.
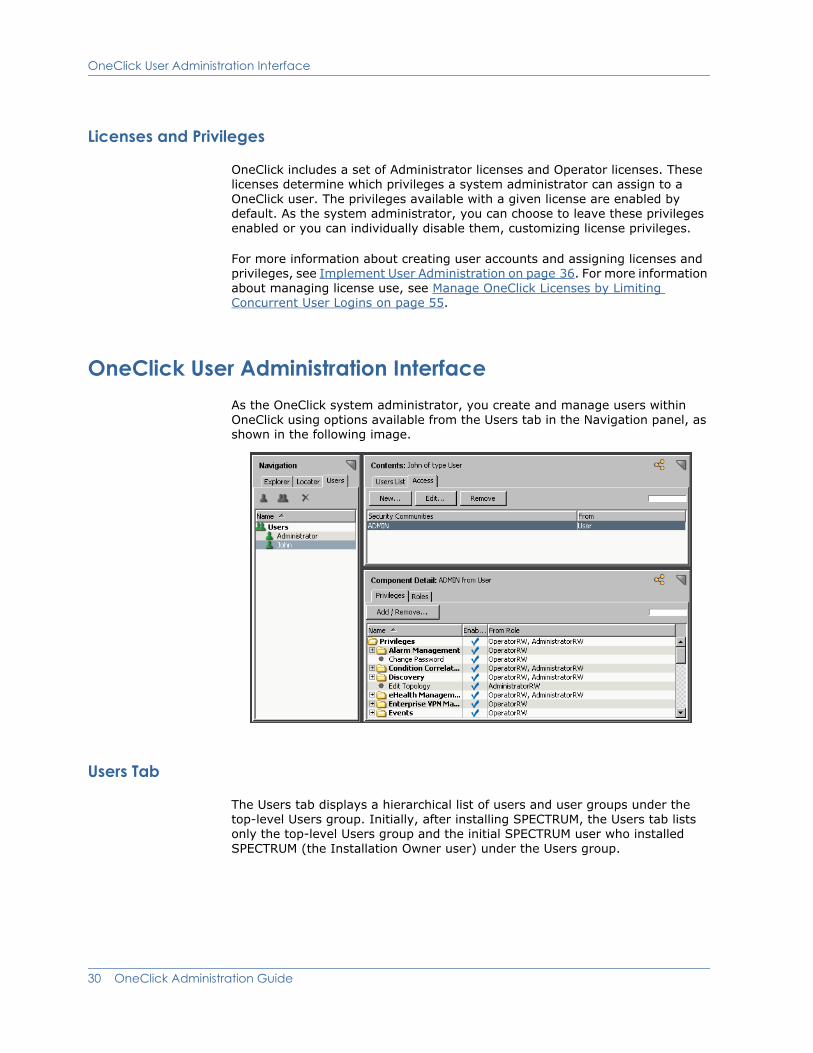
OneClick User Administration InterfaceAs the OneClick system administrator, you create and manage users within OneClick using options available from the Users tab in the Navigation panel, as shown in the following image.
Users Tab
The Users tab displays a hierarchical list of users and user groups under the top-level Users group. Initially, after installing SPECTRUM, the Users tab lists only the top-level Users group and the initial SPECTRUM user who installed SPECTRUM (the Installation Owner user) under the Users group.
30 OneClick Administration Guide
OneClick User Administration Interface
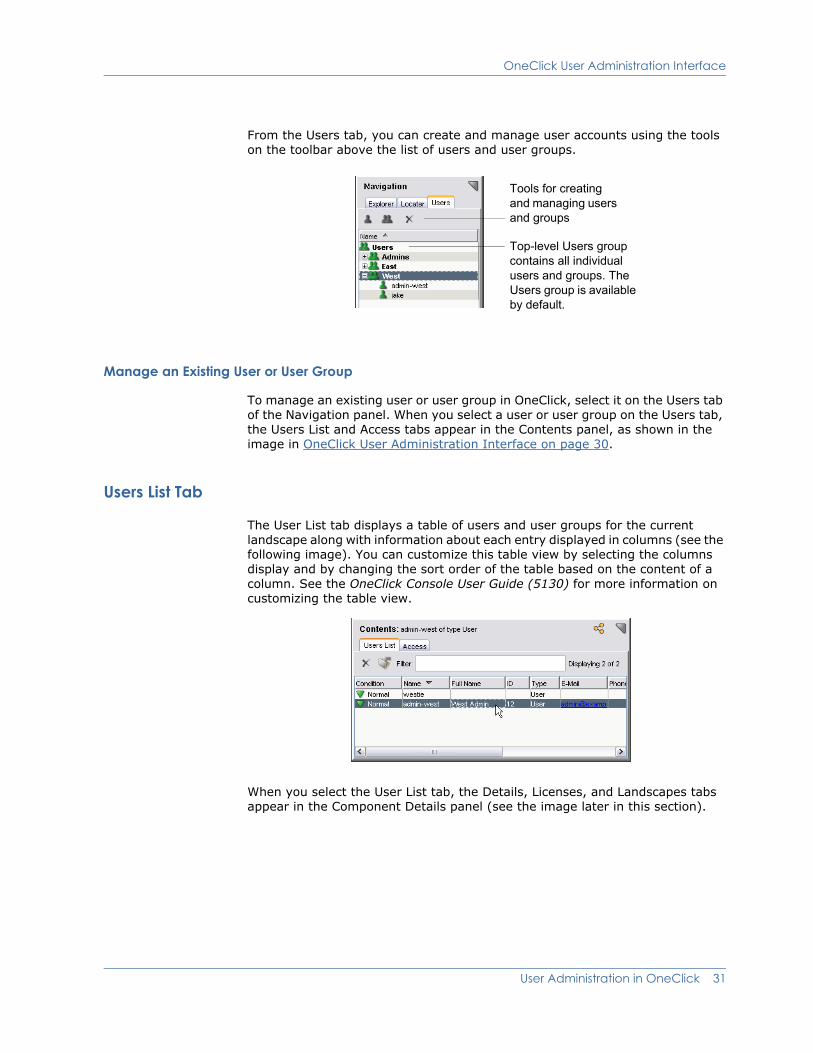
From the Users tab, you can create and manage user accounts using the tools on the toolbar above the list of users and user groups.
Manage an Existing User or User Group
To manage an existing user or user group in OneClick, select it on the Users tab of the Navigation panel. When you select a user or user group on the Users tab, the Users List and Access tabs appear in the Contents panel, as shown in the image in OneClick User Administration Interface on page 30.
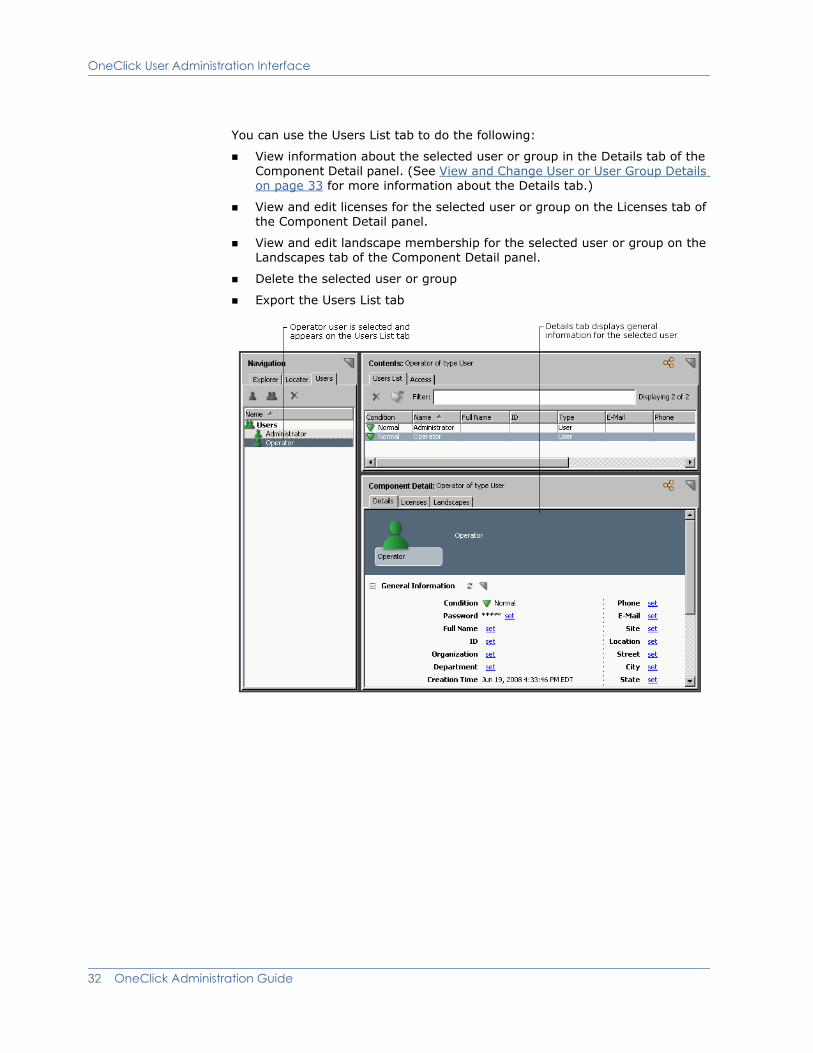
Users List Tab
The User List tab displays a table of users and user groups for the current landscape along with information about each entry displayed in columns (see the following image). You can customize this table view by selecting the columns display and by changing the sort order of the table based on the content of a column. See the OneClick Console User Guide (5130) for more information on customizing the table view.
When you select the User List tab, the Details, Licenses, and Landscapes tabs appear in the Component Details panel (see the image later in this section).
Top-level Users group contains all individual users and groups. The Users group is available by default.
Tools for creating and managing users and groups
User Administration in OneClick 31
OneClick User Administration Interface
You can use the Users List tab to do the following:
View information about the selected user or group in the Details tab of the Component Detail panel. (See View and Change User or User Group Details on page 33 for more information about the Details tab.)
View and edit licenses for the selected user or group on the Licenses tab of the Component Detail panel.
View and edit landscape membership for the selected user or group on the Landscapes tab of the Component Detail panel.
Delete the selected user or group
Export the Users List tab
32 OneClick Administration Guide
OneClick User Administration Interface
View and Change User or User Group Details
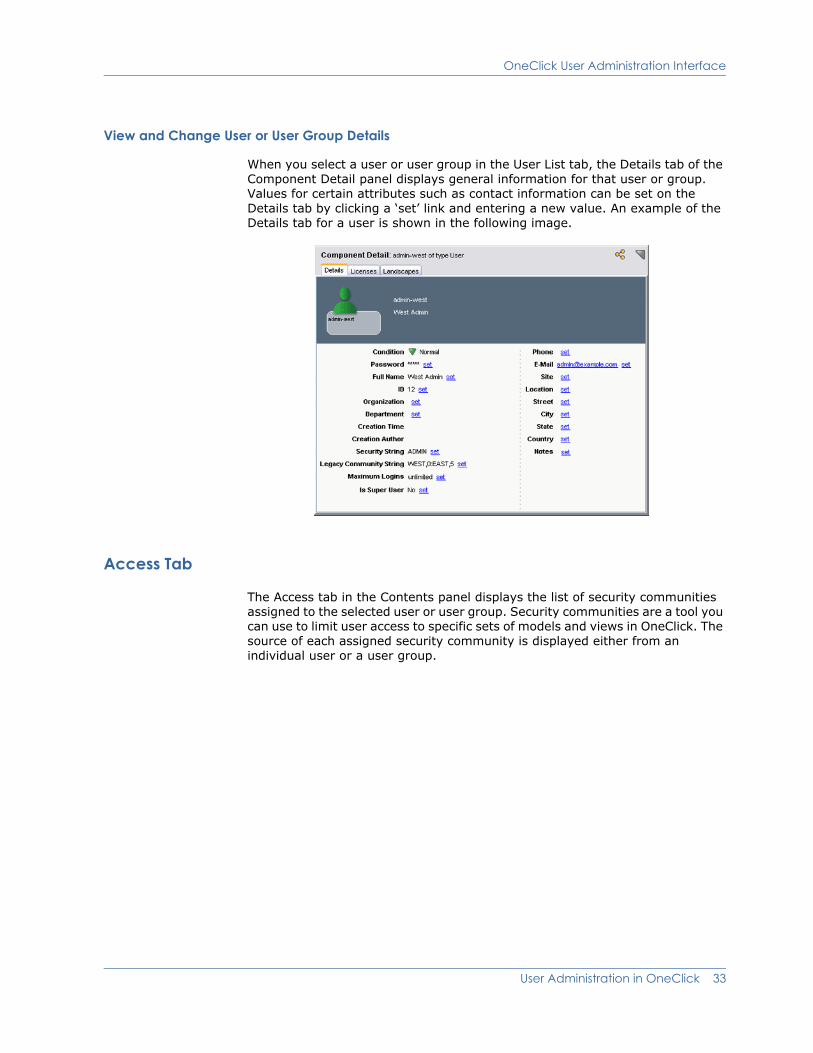
When you select a user or user group in the User List tab, the Details tab of the Component Detail panel displays general information for that user or group. Values for certain attributes such as contact information can be set on the Details tab by clicking a ‘set’ link and entering a new value. An example of the Details tab for a user is shown in the following image.
Access Tab
The Access tab in the Contents panel displays the list of security communities assigned to the selected user or user group. Security communities are a tool you can use to limit user access to specific sets of models and views in OneClick. The source of each assigned security community is displayed either from an individual user or a user group.
User Administration in OneClick 33

OneClick User Administration Interface
When you select the Access tab, the Privileges and Roles tabs appear in the Component Details panel, as shown in the following image.
View and Change Privileges
Access groups appear on the Access tab for a selected user as shown in the following image.
Access group
34 OneClick Administration Guide

OneClick User Administration Interface
After selecting an access group for a user, the available privileges appear in the Privileges tab of the Component Detail panel as shown in the following figure.
The example Component Detail label shows that these privileges are associated with the selected ADMIN access group at the user level (ADMIN from User). A checkmark is displayed in the Enabled column for each privilege granted to this user. The From Role column shows that all of these enabled privileges are being granted by the OperatorRW role.
Clicking Add/Remove lets you enable and disable privileges for this user at the selected ADMIN access group. You cannot use Add/Remove at the user level to manage privileges for an access group that is inherited from a user group.
Effects of Customizing Privileges
In OneClick you can customize the privileges assigned to an individual user account and/or a user group. When you edit privileges for an individual user account, the changes only affect that user. When you edit the privileges assigned to a user group, the change affects all users within that user group. Users within a group automatically inherit privileges from the group but also retain all assigned individual-level privileges.
Note: You can add privileges to an access group at the user level for users that are members of a group. You can also edit privileges for an access group at the user group level. You cannot remove privileges at the user level that are granted to the user by a user group.
Effects of Removing Privileges Granted by a Role for a User
When you customize the privileges granted by a role for a user, the user is removed from the role. The user retains any privileges granted by the role that are not removed. The role itself does not change. If the privilege is added back for the user, the user does not regain membership in the role.
Customizing the privileges granted by one of the default SPECTRUM roles (such as AdministratorRW or OperatorRW) for a user—which also results in the removal of the role from the user and the direct assignment of the remaining, enabled privileges—has additional consequences:
User Administration in OneClick 35
Implement User Administration
If you later create a custom privilege for the default role, which is an assignment specified in the XML file that defines the privilege, the privilege is not automatically granted to the user.
If you later upgrade SPECTRUM, any new privileges available in the newer version of SPECTRUM that are associated with the default role are not automatically granted to the user.
In either situation, to grant the custom or new privileges to the user, you must either explicitly add them to the user or reassign the default role to the user.
Implement User AdministrationThis section provides the necessary procedures and information for implementing user administration in OneClick, including:
Create User Accounts and User Groups on page 36
Manage Users Within User Groups on page 39
Edit Existing Users and User Groups on page 40
Manage OneClick Licenses by Limiting Concurrent User Logins on page 55
Important! OneClick user administration requires the administrator user to have at a minimum the Administrator license and user management privileges.
Create User Accounts and User Groups
When you create a new user or user group, by default OneClick assigns an Operator license and the OperatorRW privilege role to the new user or user group. When you create a new user or group you can choose to assign an Administrator license in addition to the Operator license. When you assign an Administrator license to a user or group, the user(s) automatically inherit all of the privileges associated with both the OperatorRW and the AdministratorRW privilege roles.
To quickly get started administering user accounts in OneClick, consider creating user accounts using OneClick’s default settings. When you create a user account or user group, OneClick provides an Operator license and the ADMIN access group by default.
36 OneClick Administration Guide
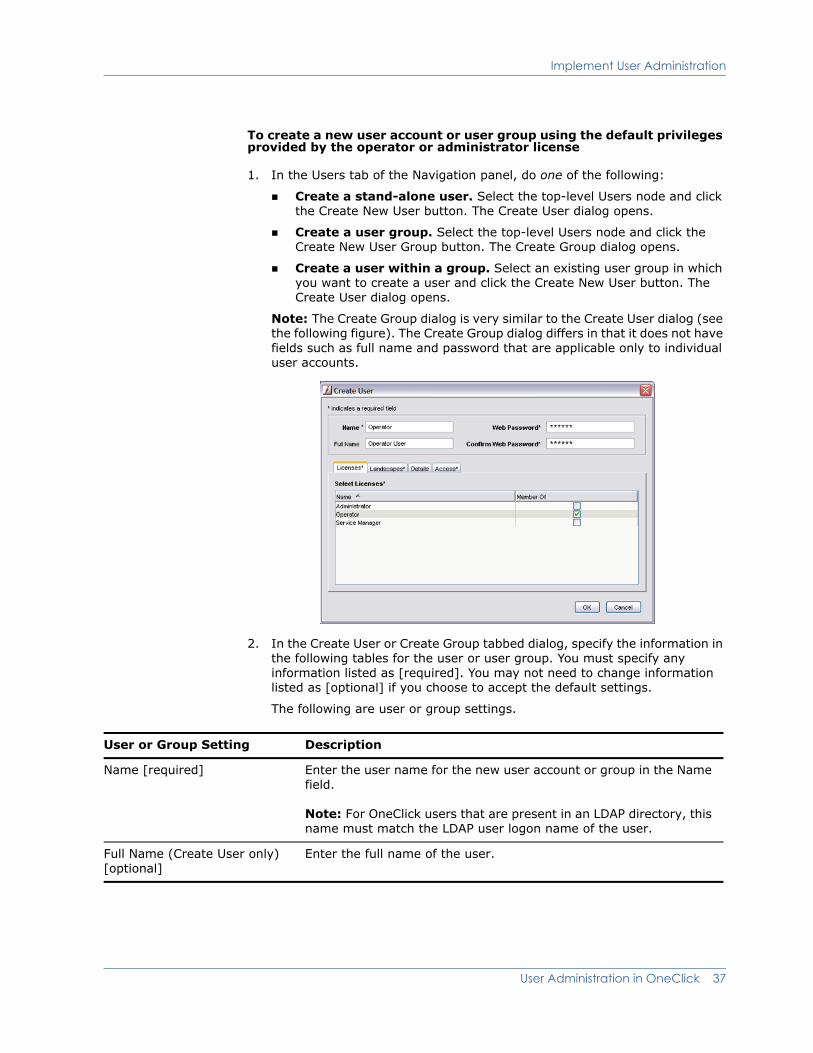
Implement User Administration
To create a new user account or user group using the default privileges provided by the operator or administrator license
1. In the Users tab of the Navigation panel, do one of the following:
Create a stand-alone user. Select the top-level Users node and click the Create New User button. The Create User dialog opens.
Create a user group. Select the top-level Users node and click the Create New User Group button. The Create Group dialog opens.
Create a user within a group. Select an existing user group in which you want to create a user and click the Create New User button. The Create User dialog opens.
Note: The Create Group dialog is very similar to the Create User dialog (see the following figure). The Create Group dialog differs in that it does not have fields such as full name and password that are applicable only to individual user accounts.
2. In the Create User or Create Group tabbed dialog, specify the information in the following tables for the user or user group. You must specify any information listed as [required]. You may not need to change information listed as [optional] if you choose to accept the default settings.
The following are user or group settings.
User or Group Setting Description
Name [required] Enter the user name for the new user account or group in the Name field.
Note: For OneClick users that are present in an LDAP directory, this name must match the LDAP user logon name of the user.
Full Name (Create User only) [optional]
Enter the full name of the user.
User Administration in OneClick 37
Implement User Administration
The following are license and landscape settings.
Web Password (User only) [required]
Enter a web password for this user. This password is used by OneClick to authenticate this user.
Note: If LDAP is configured, this field is not shown.
Confirm Web Password (User only) [required]
Confirm the web password you entered by entering it again in this field.
Note: If LDAP is configured, this field is not shown.
User or Group Setting Description
Tab: Setting Description
License tab: Select License(s) [optional]
In the Select Licenses table in the Licenses tab, you can enable or disable the licenses you want to assign using the Member of license checkbox. By default, new users receive an Operator license and the OperatorRW privilege role. The following list provides an overview of the privilege categories and privileges granted by this role:
Alarm Management—Grants access to various alarm management tasks in OneClick.
Explorer Views—Grants view access to various hierarchies in OneClick Explorer tab.
Export—Grants access to export various views including tables and topology views.
Model Management—Grants access to various model management tasks in OneClick.
Policy Manager—Grants various Policy Manager access privileges in OneClick.
Tabs—Grants access to various tabbed views in OneClick.
Tools—Grants access to various tools available in OneClick.
View Alarms—Grants read access to alarms. This will grant access to the alarm totals in the Explorer tab and all other alarm information.
View Models—Grants read access to models. This determines whether or not the models are displayed in the Explorer tab and whether or not the user can view the Information Details.
Landscapes tab: Select Landscapes [optional]
Configuring this tab is optional when you accept default settings during user or group creation. By default, all available landscapes are selected. In a distributed environment, you can choose additional landscapes in which you want this user to be present. At least one landscape must be selected.
38 OneClick Administration Guide
Implement User Administration
3. Click OK in the Create User or Create Group dialog to create the user or user group.
The new user or group is displayed in the Users tab of the Navigation panel.
Manage Users Within User Groups
An excellent way to manage multiple users in OneClick is with user groups. After you have created a user group, you can configure it to provide a minimum set of user privileges for all users within that user group. Each user account you place within this group automatically inherits the group-level privileges.
Inheritance Details for Users in User Groups
Users within a user group inherit the following values from the user group:
Security community
Legacy community string
Access group(s)
Privilege role(s)
Details tab: Various user/user group detail fields [optional]
Enter user or user group details such as location and organization.
Note: The Security String field (ADMIN by default) must be filled in.
Access tab: Read-write and read only access configuration [optional]
The Access tab enables you to edit the default model security setting for this user. By default, the user or user group receives the read/write ADMIN access group. Additional access groups can be created here.
Important! By default, when you create new users, OneClick assigns them the default ADMIN access group. The ADMIN access group provides access to all models including secured models. You can use the Add, Remove, and Modify buttons to edit access group settings. For more information about model security, see Chapter 6: Model Security in OneClick.
We recommend keeping the default ADMIN access group for administrator users or any users that need access to all models.
Note: At least one security community (for example, the default ADMIN community) must be specified here.
Tab: Setting Description
User Administration in OneClick 39
Implement User Administration
Special Considerations
The following special considerations apply to users contained within user groups:
Any changes made at the group level are automatically inherited by users within the group.
Membership in SPECTRUM landscapes is not inherited from the user group. This must be set at the individual user level.
Edit Existing Users and User Groups
This section describes common tasks and procedures for editing existing users and user groups in OneClick.
Each of the following procedures assumes a selected user or user group in the Users tab:
Create and Assign Roles to Users or User Groups on page 40
Grant a User All Privileges by Designating It a Super User on page 44
Allow Users to Login if No Corresponding LDAP User Found on page 45
Change Details Displayed for a User or User Group on page 46
Change Licenses Assigned to a User or Group on page 46
Change the Landscapes in Which the Selected User Is Present on page 47
Change Individual Privileges for a User or User Group on page 48
Move an Existing User to a User Group on page 49
Remove a User from a User Group on page 50
Delete a User or User Group on page 50
Use Security Communities to Manage User Access to Models and Devices on page 51
Create and Assign Roles to Users or User Groups
As described previously, you can individually disable and enable privileges for a user or user group. You can also use roles to grant a set of privileges to a user or user group. You can use the default privilege roles in OneClick, or you can create your own custom privilege roles. Note that you cannot edit the default privilege roles themselves. After users are assigned a license category, they can have access privileges provided by predefined roles.
There are six default roles:
OperatorRW
OperatorRO
AdministratorRW
AdministratorRO
40 OneClick Administration Guide
Implement User Administration
ServiceManagerRW
ServiceManagerRO
If these predefined roles do not meet your requirements, you can create custom roles. While you cannot modify the predefined roles, you can modify individual privileges.
When you upgrade to a newer version of SPECTRUM, any new privileges available in the newer version are automatically added to the appropriate default roles. However, you need to explicitly add them to the appropriate custom roles.
Editing Privileges and Roles
When you edit privileges for an individual user, the changes only affect that user. When you edit the privileges granted by a user group, the changes affect all of the users within that user group. Users within a user group inherit privileges from the group level but they also retain all individual privileges they have.
To edit privileges and roles, you modify settings in the Privileges tab and/or the Roles tab for a selected user, as shown in the following image.
User Administration in OneClick 41
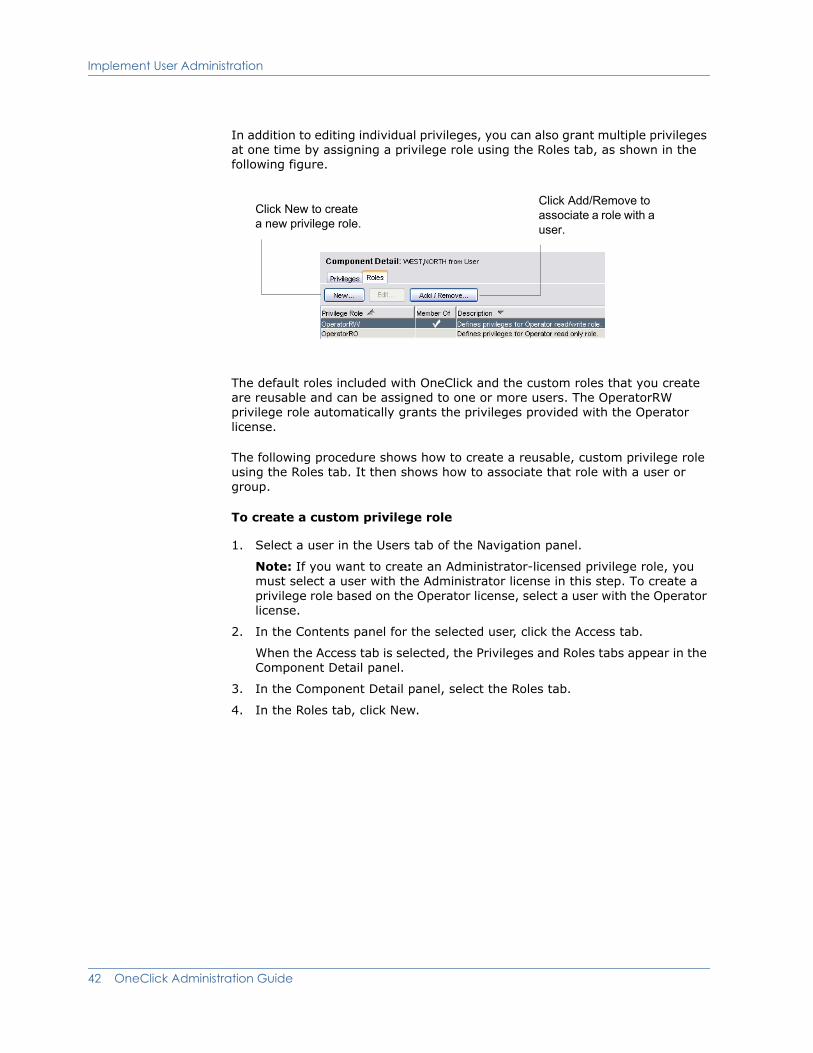
Implement User Administration
In addition to editing individual privileges, you can also grant multiple privileges at one time by assigning a privilege role using the Roles tab, as shown in the following figure.
The default roles included with OneClick and the custom roles that you create are reusable and can be assigned to one or more users. The OperatorRW privilege role automatically grants the privileges provided with the Operator license.
The following procedure shows how to create a reusable, custom privilege role using the Roles tab. It then shows how to associate that role with a user or group.
To create a custom privilege role
1. Select a user in the Users tab of the Navigation panel.
Note: If you want to create an Administrator-licensed privilege role, you must select a user with the Administrator license in this step. To create a privilege role based on the Operator license, select a user with the Operator license.
2. In the Contents panel for the selected user, click the Access tab.
When the Access tab is selected, the Privileges and Roles tabs appear in the Component Detail panel.
3. In the Component Detail panel, select the Roles tab.
4. In the Roles tab, click New.
Click New to create a new privilege role.
Click Add/Remove to associate a role with a user.
42 OneClick Administration Guide
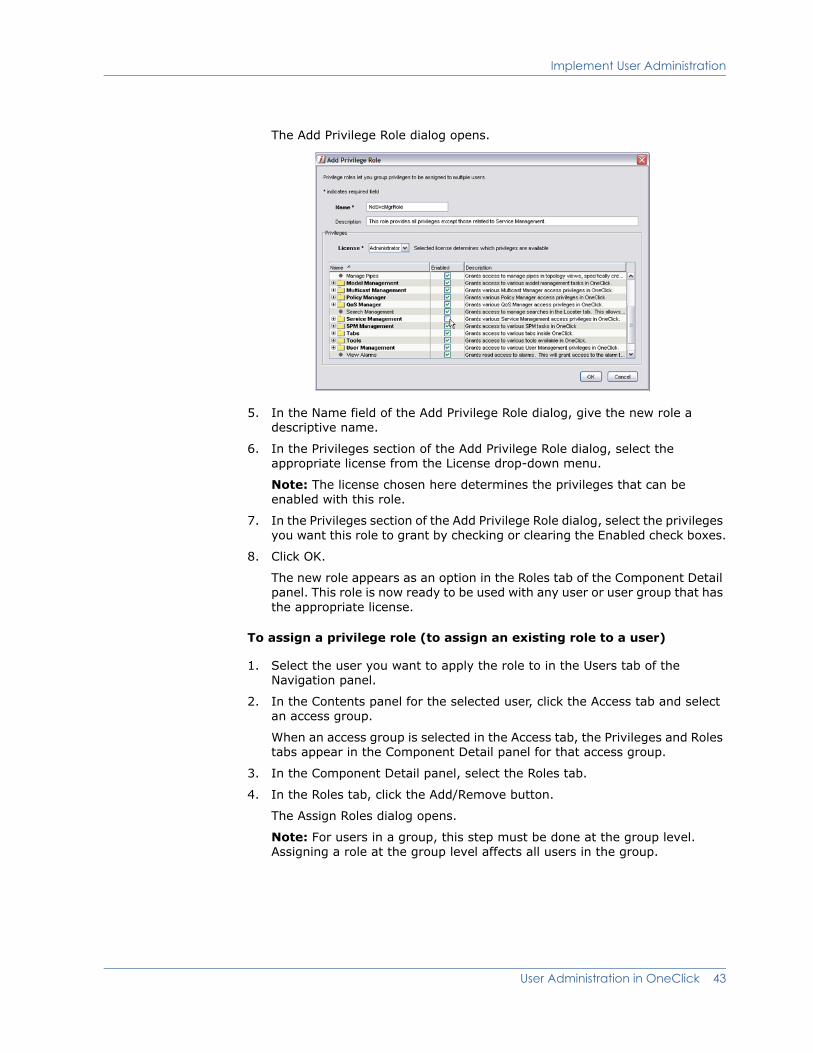
Implement User Administration
The Add Privilege Role dialog opens.
5. In the Name field of the Add Privilege Role dialog, give the new role a descriptive name.
6. In the Privileges section of the Add Privilege Role dialog, select the appropriate license from the License drop-down menu.
Note: The license chosen here determines the privileges that can be enabled with this role.
7. In the Privileges section of the Add Privilege Role dialog, select the privileges you want this role to grant by checking or clearing the Enabled check boxes.
8. Click OK.
The new role appears as an option in the Roles tab of the Component Detail panel. This role is now ready to be used with any user or user group that has the appropriate license.
To assign a privilege role (to assign an existing role to a user)
1. Select the user you want to apply the role to in the Users tab of the Navigation panel.
2. In the Contents panel for the selected user, click the Access tab and select an access group.
When an access group is selected in the Access tab, the Privileges and Roles tabs appear in the Component Detail panel for that access group.
3. In the Component Detail panel, select the Roles tab.
4. In the Roles tab, click the Add/Remove button.
The Assign Roles dialog opens.
Note: For users in a group, this step must be done at the group level. Assigning a role at the group level affects all users in the group.
User Administration in OneClick 43
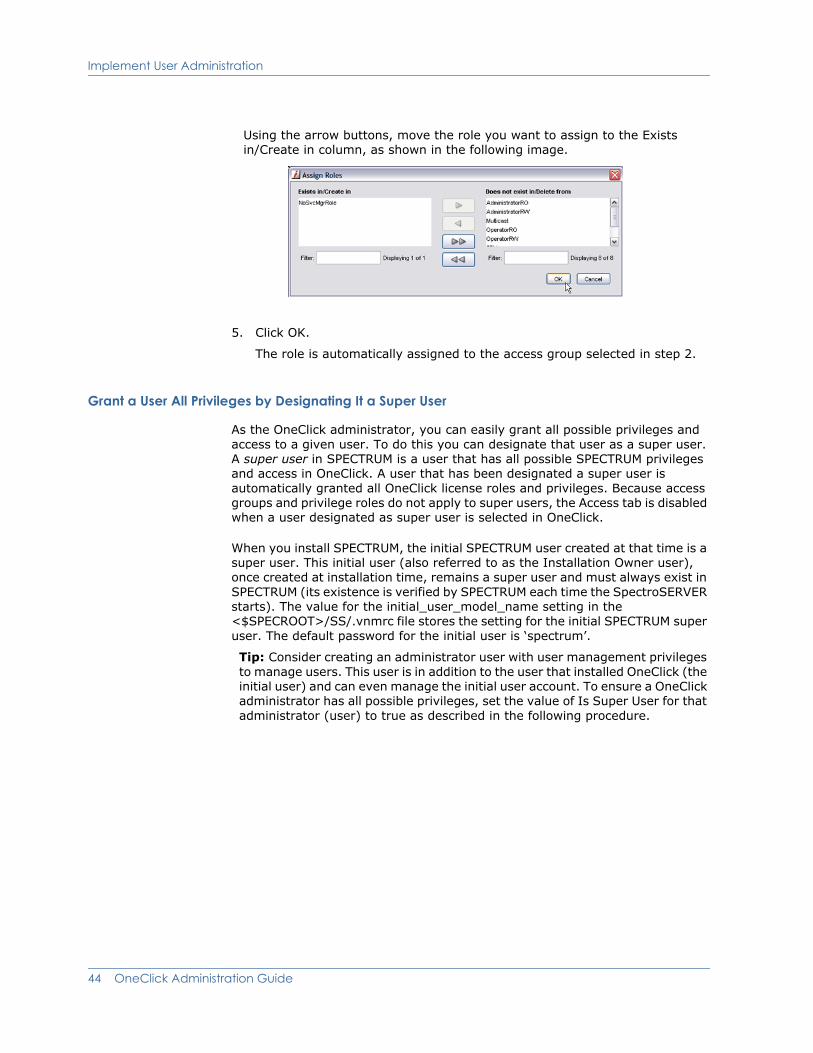
Implement User Administration
Using the arrow buttons, move the role you want to assign to the Exists in/Create in column, as shown in the following image.
5. Click OK.
The role is automatically assigned to the access group selected in step 2.
Grant a User All Privileges by Designating It a Super User
As the OneClick administrator, you can easily grant all possible privileges and access to a given user. To do this you can designate that user as a super user. A super user in SPECTRUM is a user that has all possible SPECTRUM privileges and access in OneClick. A user that has been designated a super user is automatically granted all OneClick license roles and privileges. Because access groups and privilege roles do not apply to super users, the Access tab is disabled when a user designated as super user is selected in OneClick.
When you install SPECTRUM, the initial SPECTRUM user created at that time is a super user. This initial user (also referred to as the Installation Owner user), once created at installation time, remains a super user and must always exist in SPECTRUM (its existence is verified by SPECTRUM each time the SpectroSERVER starts). The value for the initial_user_model_name setting in the <$SPECROOT>/SS/.vnmrc file stores the setting for the initial SPECTRUM super user. The default password for the initial user is ‘spectrum’.
Tip: Consider creating an administrator user with user management privileges to manage users. This user is in addition to the user that installed OneClick (the initial user) and can even manage the initial user account. To ensure a OneClick administrator has all possible privileges, set the value of Is Super User for that administrator (user) to true as described in the following procedure.
44 OneClick Administration Guide
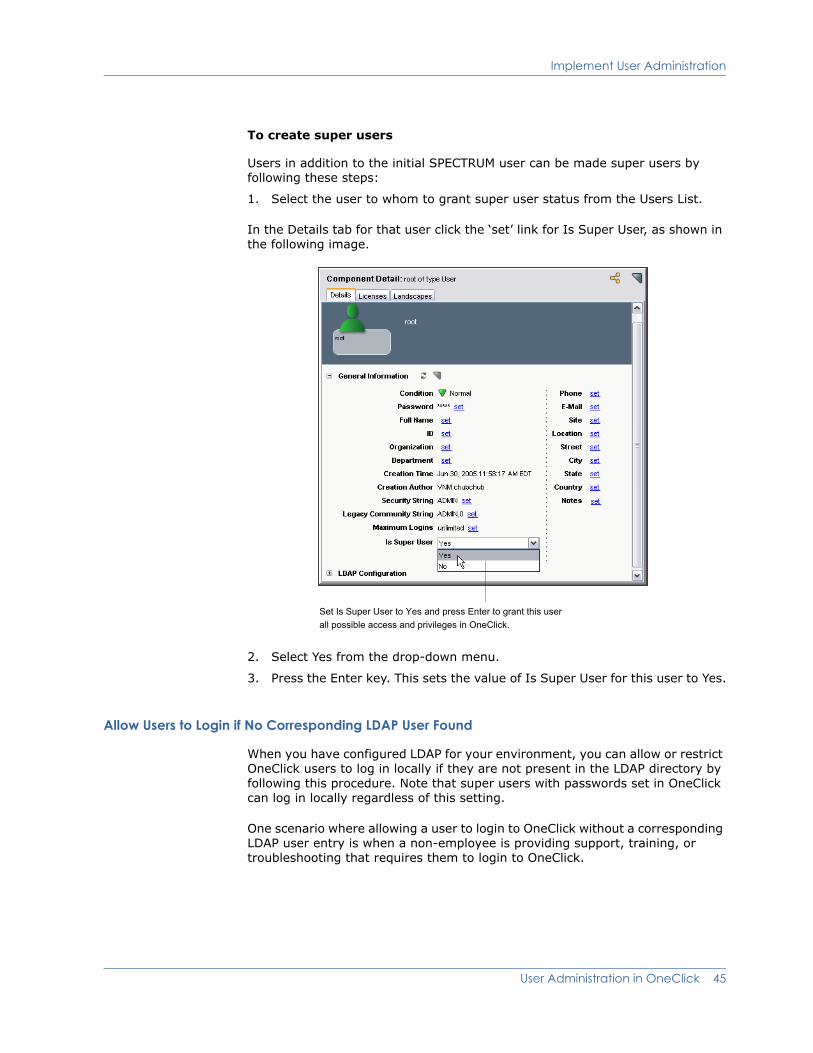
Implement User Administration
To create super users
Users in addition to the initial SPECTRUM user can be made super users by following these steps:
1. Select the user to whom to grant super user status from the Users List.
In the Details tab for that user click the ‘set’ link for Is Super User, as shown in the following image.
2. Select Yes from the drop-down menu.
3. Press the Enter key. This sets the value of Is Super User for this user to Yes.
Allow Users to Login if No Corresponding LDAP User Found
When you have configured LDAP for your environment, you can allow or restrict OneClick users to log in locally if they are not present in the LDAP directory by following this procedure. Note that super users with passwords set in OneClick can log in locally regardless of this setting.
One scenario where allowing a user to login to OneClick without a corresponding LDAP user entry is when a non-employee is providing support, training, or troubleshooting that requires them to login to OneClick.
Set Is Super User to Yes and press Enter to grant this user all possible access and privileges in OneClick.
User Administration in OneClick 45
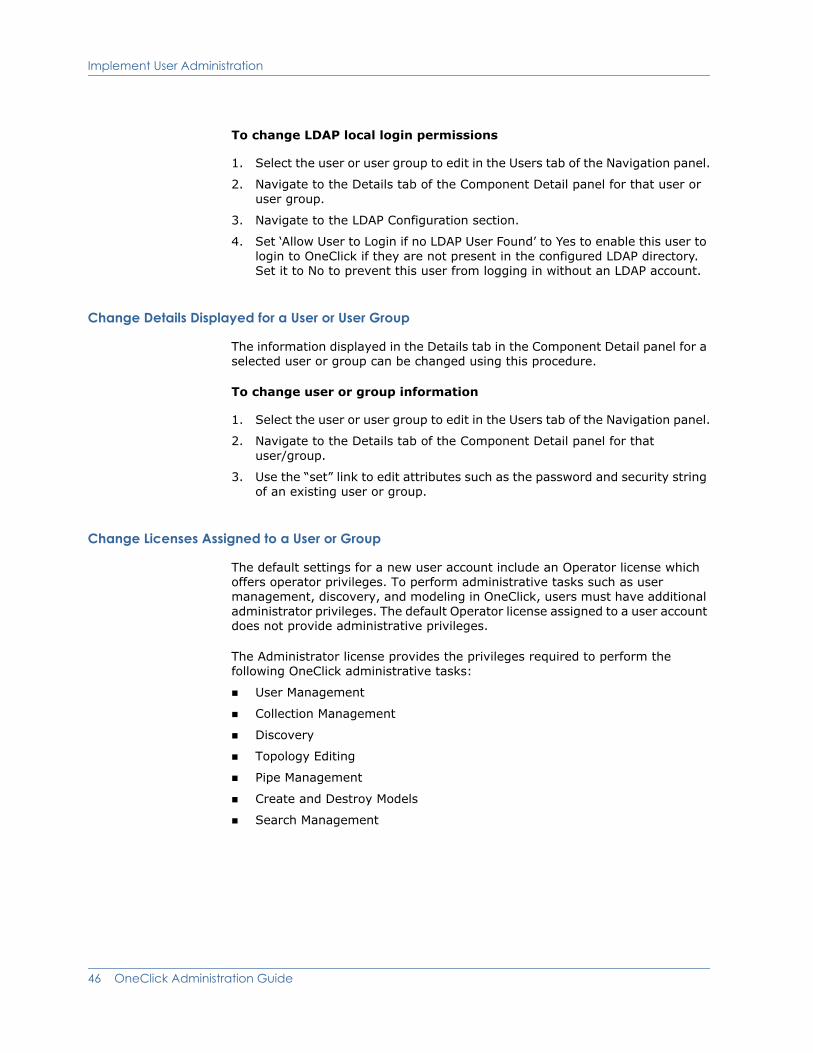
Implement User Administration
To change LDAP local login permissions
1. Select the user or user group to edit in the Users tab of the Navigation panel.
2. Navigate to the Details tab of the Component Detail panel for that user or user group.
3. Navigate to the LDAP Configuration section.
4. Set ‘Allow User to Login if no LDAP User Found’ to Yes to enable this user to login to OneClick if they are not present in the configured LDAP directory. Set it to No to prevent this user from logging in without an LDAP account.
Change Details Displayed for a User or User Group
The information displayed in the Details tab in the Component Detail panel for a selected user or group can be changed using this procedure.
To change user or group information
1. Select the user or user group to edit in the Users tab of the Navigation panel.
2. Navigate to the Details tab of the Component Detail panel for that user/group.
3. Use the “set” link to edit attributes such as the password and security string of an existing user or group.
Change Licenses Assigned to a User or Group
The default settings for a new user account include an Operator license which offers operator privileges. To perform administrative tasks such as user management, discovery, and modeling in OneClick, users must have additional administrator privileges. The default Operator license assigned to a user account does not provide administrative privileges.
The Administrator license provides the privileges required to perform the following OneClick administrative tasks:
User Management
Collection Management
Discovery
Topology Editing
Pipe Management
Create and Destroy Models
Search Management
46 OneClick Administration Guide
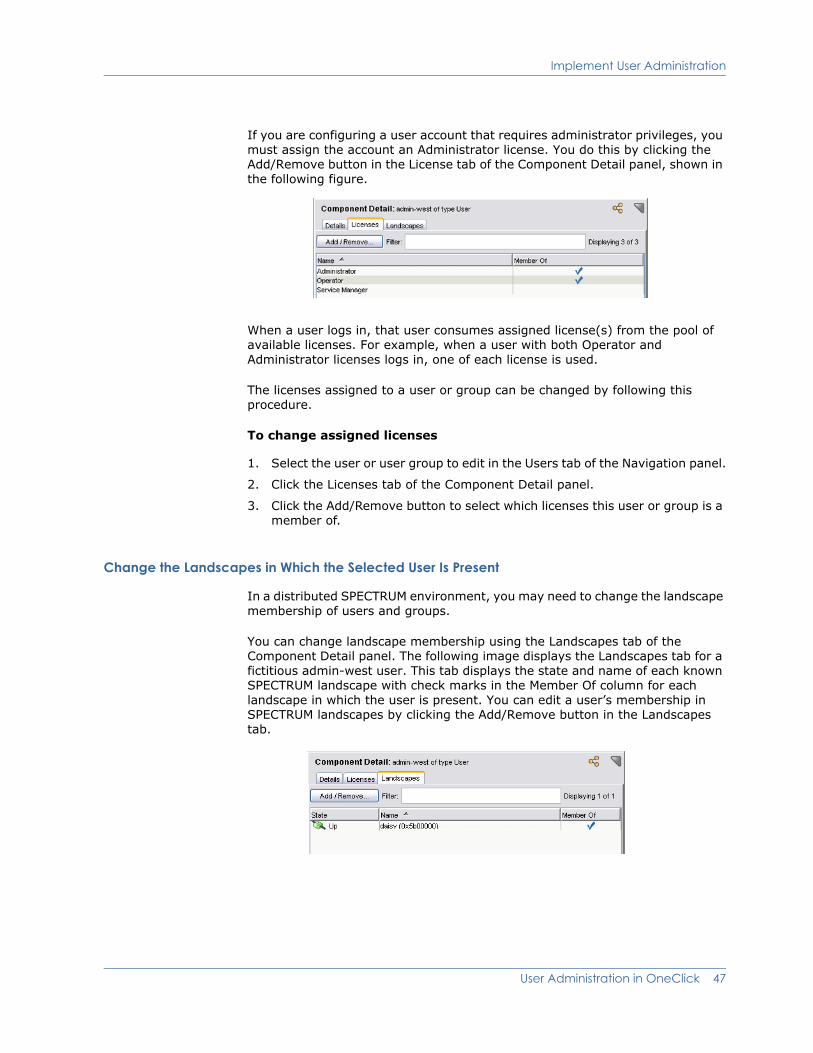
Implement User Administration
If you are configuring a user account that requires administrator privileges, you must assign the account an Administrator license. You do this by clicking the Add/Remove button in the License tab of the Component Detail panel, shown in the following figure.
When a user logs in, that user consumes assigned license(s) from the pool of available licenses. For example, when a user with both Operator and Administrator licenses logs in, one of each license is used.
The licenses assigned to a user or group can be changed by following this procedure.
To change assigned licenses
1. Select the user or user group to edit in the Users tab of the Navigation panel.
2. Click the Licenses tab of the Component Detail panel.
3. Click the Add/Remove button to select which licenses this user or group is a member of.
Change the Landscapes in Which the Selected User Is Present
In a distributed SPECTRUM environment, you may need to change the landscape membership of users and groups.
You can change landscape membership using the Landscapes tab of the Component Detail panel. The following image displays the Landscapes tab for a fictitious admin-west user. This tab displays the state and name of each known SPECTRUM landscape with check marks in the Member Of column for each landscape in which the user is present. You can edit a user’s membership in SPECTRUM landscapes by clicking the Add/Remove button in the Landscapes tab.
User Administration in OneClick 47
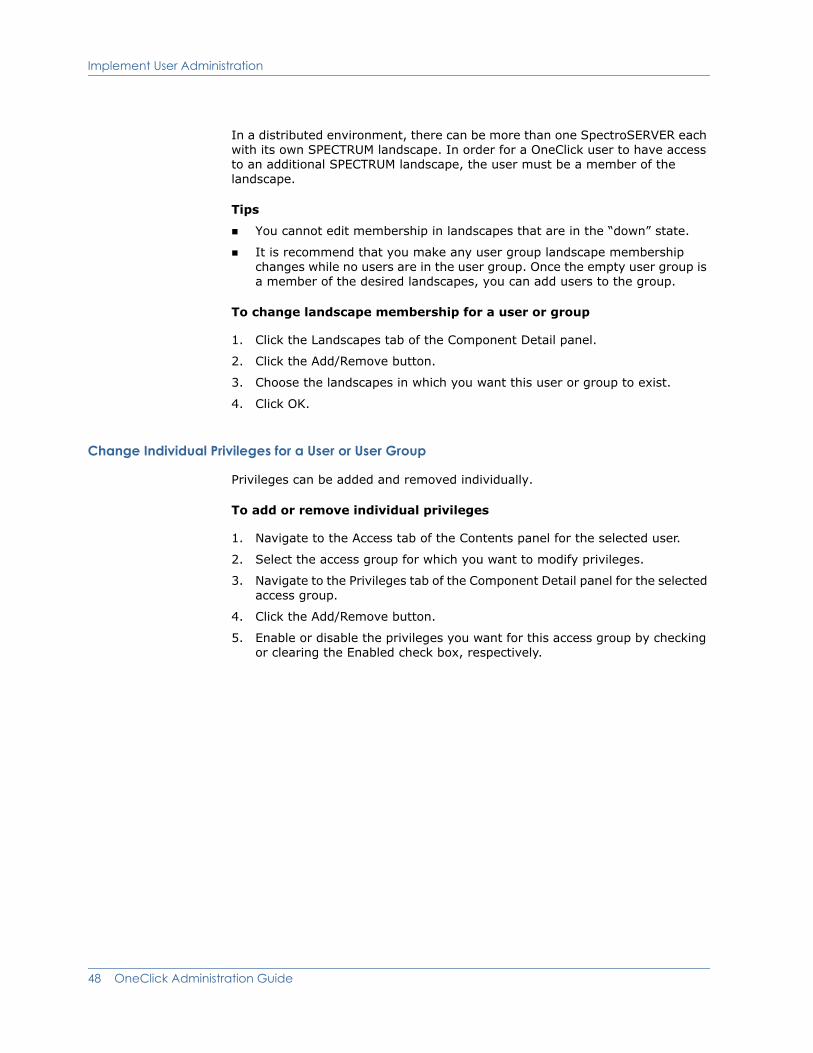
Implement User Administration
In a distributed environment, there can be more than one SpectroSERVER each with its own SPECTRUM landscape. In order for a OneClick user to have access to an additional SPECTRUM landscape, the user must be a member of the landscape.
Tips
You cannot edit membership in landscapes that are in the “down” state.
It is recommend that you make any user group landscape membership changes while no users are in the user group. Once the empty user group is a member of the desired landscapes, you can add users to the group.
To change landscape membership for a user or group
1. Click the Landscapes tab of the Component Detail panel.
2. Click the Add/Remove button.
3. Choose the landscapes in which you want this user or group to exist.
4. Click OK.
Change Individual Privileges for a User or User Group
Privileges can be added and removed individually.
To add or remove individual privileges
1. Navigate to the Access tab of the Contents panel for the selected user.
2. Select the access group for which you want to modify privileges.
3. Navigate to the Privileges tab of the Component Detail panel for the selected access group.
4. Click the Add/Remove button.
5. Enable or disable the privileges you want for this access group by checking or clearing the Enabled check box, respectively.
48 OneClick Administration Guide

Implement User Administration
Move an Existing User to a User Group
You can move existing users to user groups. However, you cannot move the user you are currently logged in as.
To move a user to a user group
1. Right-click on a user in the Users tab or the Users List tab, and then select Move To Group.
The Select User Group dialog opens.
2. Select the destination group and click OK, as shown in the following image.
User Administration in OneClick 49
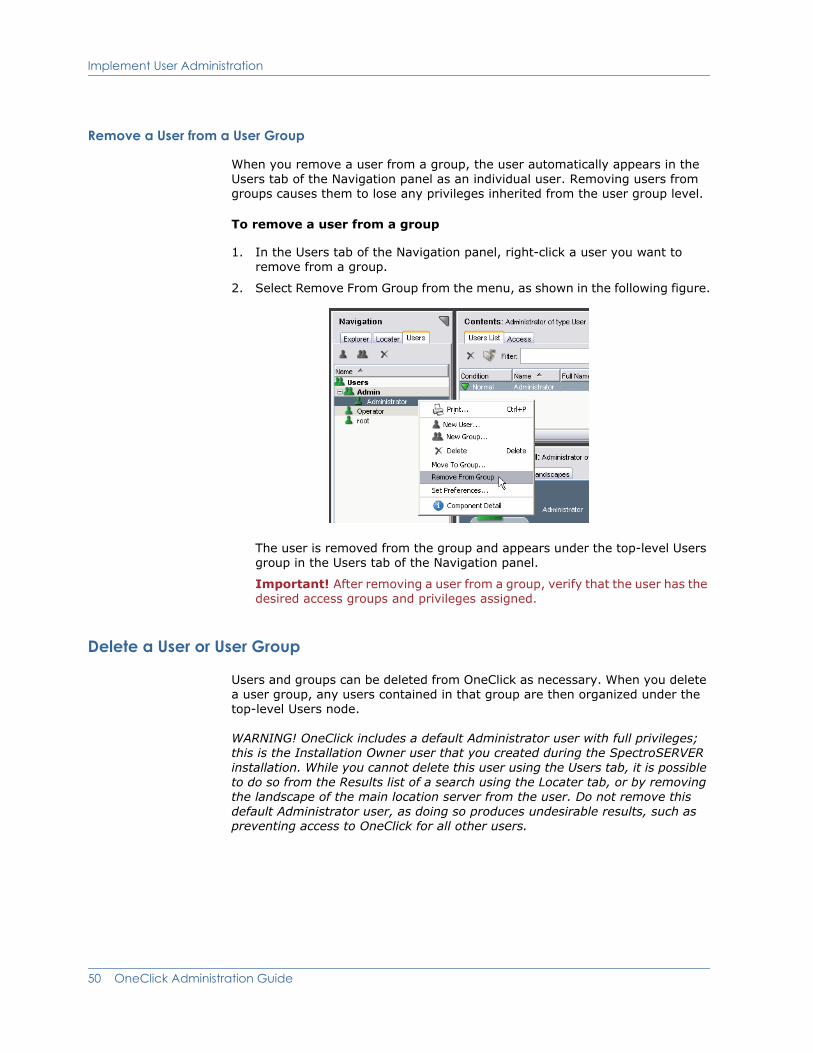
Implement User Administration
Remove a User from a User Group
When you remove a user from a group, the user automatically appears in the Users tab of the Navigation panel as an individual user. Removing users from groups causes them to lose any privileges inherited from the user group level.
To remove a user from a group
1. In the Users tab of the Navigation panel, right-click a user you want to remove from a group.
2. Select Remove From Group from the menu, as shown in the following figure.
The user is removed from the group and appears under the top-level Users group in the Users tab of the Navigation panel.
Important! After removing a user from a group, verify that the user has the desired access groups and privileges assigned.
Delete a User or User Group
Users and groups can be deleted from OneClick as necessary. When you delete a user group, any users contained in that group are then organized under the top-level Users node.
WARNING! OneClick includes a default Administrator user with full privileges; this is the Installation Owner user that you created during the SpectroSERVER installation. While you cannot delete this user using the Users tab, it is possible to do so from the Results list of a search using the Locater tab, or by removing the landscape of the main location server from the user. Do not remove this default Administrator user, as doing so produces undesirable results, such as preventing access to OneClick for all other users.
50 OneClick Administration Guide

Implement User Administration
To delete a user or user group
1. Select the User or User Group for deletion in the Users tab.
2. Click Delete.
Use Security Communities to Manage User Access to Models and Devices
Security communities limit user access to specific sets of models and views that use the same security string. Only users with membership in a security community that matches the security string on a model can access the model. You can assign security communities to an individual user or to a user group. All users in a user group inherit the privileges of the security communities assigned to the group. Refer to Chapter 6: Model Security in OneClick for information about applying device and model security.
ADMIN is the default security community provided, applied to all models and users. By default, ADMIN allows users to see all models. To limit user access, you can either edit the ADMIN privileges for specific users or user groups, or create a new security community with the desired privileges, and delete the ADMIN security community for the users and user groups for which you want to limit or modify access.
Restricted View of Community Names
By default, the Operator Read Only privilege role restricts its users from viewing community names. A OneClick Administrator needs to enable this privilege for specific Operator Read Only users as needed.
From the Access tab, Privileges tab, you can view, create, edit, and remove security community assignments from a user or user group.
Note: You cannot configure security communities for super users. If you select a user who is a super user, the Access tab is disabled.
To view a user’s or group’s current privileges for viewing a community name
1. In the Users tab, select the user or group for which you want to view privileges to a community name.
2. Select the community name in the Security Community list in the Access tab.
User Administration in OneClick 51

Implement User Administration
3. In the Privileges tab of Component Detail panel, select Model Management, View Attributes, Community Names. Privileges for viewing that community name are determined by whether or not Enable is selected.
To add or remove community names from a user’s view
1. In the Users tab, select the user or group for which you want to change community name viewing privileges.
2. In the Security Community list on the Access tab, select the community name that you want to change the users access to.
3. Click Add/Remove in the Privileges tab in the Component Detail panel.
The Add/Remove Privileges dialog opens.
4. Click Model Management, View Attributes, Community Names.
5. Change the existing privilege by selecting or deselecting the Enabled check box.
6. Click OK.
The change is implemented.
Alternatively, you can create a new role that adds the community name privilege and then assign the new role to the user or group.
To create and assign security communities to a user or user group
1. In the Navigation panel, click the Users tab, and select the user or user group to which you want to assign a security community.
2. In the Contents panel, click the Access tab.
3. Click New in the Access tab.
The New dialog opens.
4. Enter the name of the new security community that you want to create.
Note: Do not use spaces when naming security communities.
5. Click Add.
6. Enter any additional security communities that you want to share the same privileges.
7. Click OK.
52 OneClick Administration Guide
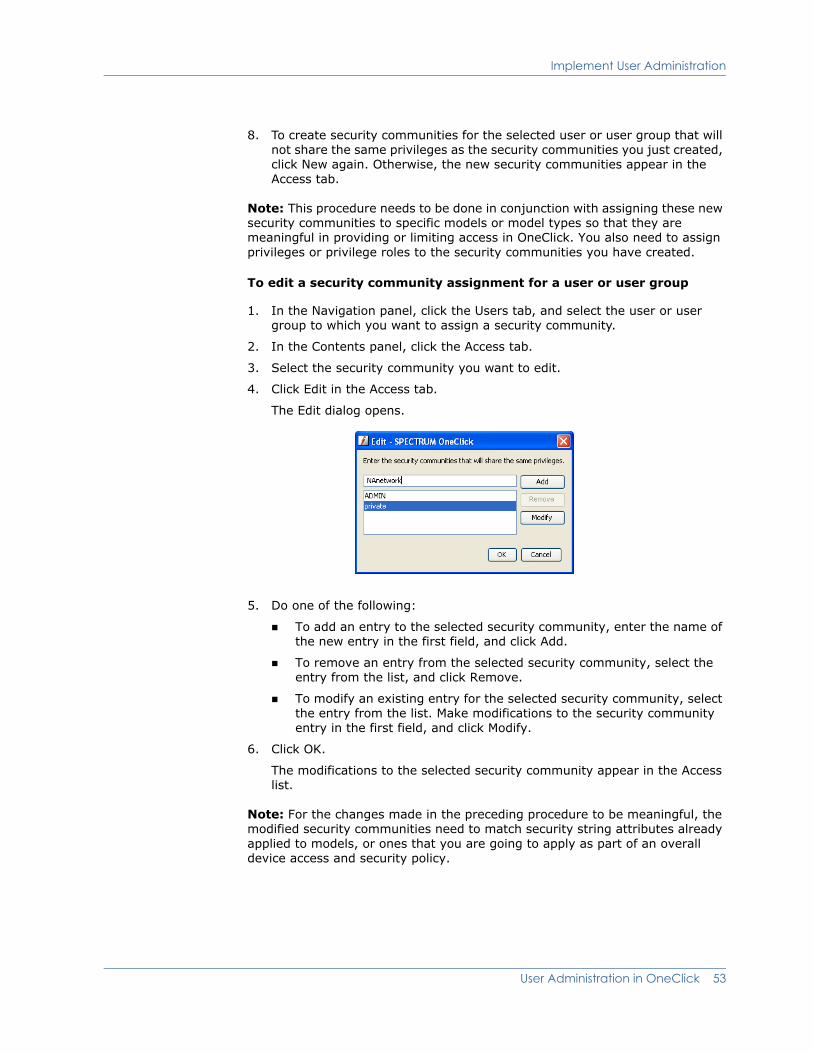
Implement User Administration
8. To create security communities for the selected user or user group that will not share the same privileges as the security communities you just created, click New again. Otherwise, the new security communities appear in the Access tab.
Note: This procedure needs to be done in conjunction with assigning these new security communities to specific models or model types so that they are meaningful in providing or limiting access in OneClick. You also need to assign privileges or privilege roles to the security communities you have created.
To edit a security community assignment for a user or user group
1. In the Navigation panel, click the Users tab, and select the user or user group to which you want to assign a security community.
2. In the Contents panel, click the Access tab.
3. Select the security community you want to edit.
4. Click Edit in the Access tab.
The Edit dialog opens.
5. Do one of the following:
To add an entry to the selected security community, enter the name of the new entry in the first field, and click Add.
To remove an entry from the selected security community, select the entry from the list, and click Remove.
To modify an existing entry for the selected security community, select the entry from the list. Make modifications to the security community entry in the first field, and click Modify.
6. Click OK.
The modifications to the selected security community appear in the Access list.
Note: For the changes made in the preceding procedure to be meaningful, the modified security communities need to match security string attributes already applied to models, or ones that you are going to apply as part of an overall device access and security policy.
User Administration in OneClick 53
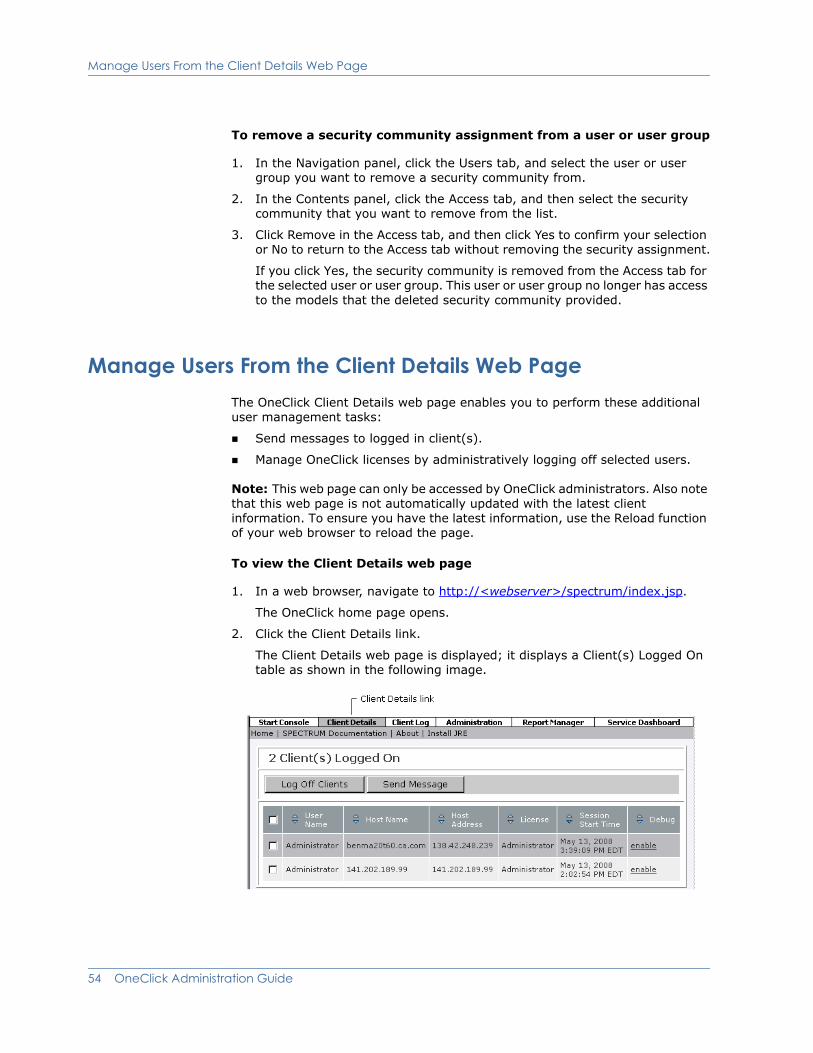
Manage Users From the Client Details Web Page
To remove a security community assignment from a user or user group
1. In the Navigation panel, click the Users tab, and select the user or user group you want to remove a security community from.
2. In the Contents panel, click the Access tab, and then select the security community that you want to remove from the list.
3. Click Remove in the Access tab, and then click Yes to confirm your selection or No to return to the Access tab without removing the security assignment.
If you click Yes, the security community is removed from the Access tab for the selected user or user group. This user or user group no longer has access to the models that the deleted security community provided.
Manage Users From the Client Details Web PageThe OneClick Client Details web page enables you to perform these additional user management tasks:
Send messages to logged in client(s).
Manage OneClick licenses by administratively logging off selected users.
Note: This web page can only be accessed by OneClick administrators. Also note that this web page is not automatically updated with the latest client information. To ensure you have the latest information, use the Reload function of your web browser to reload the page.
To view the Client Details web page
1. In a web browser, navigate to http://<webserver>/spectrum/index.jsp.
The OneClick home page opens.
2. Click the Client Details link.
The Client Details web page is displayed; it displays a Client(s) Logged On table as shown in the following image.
54 OneClick Administration Guide
Manage OneClick Licenses by Limiting Concurrent User Logins
To send a message to clients using the Client Details web page
1. In the Client(s) Logged On table, select the checkboxes next to the user names of the clients to whom you want to send a message, and click Send Message.
2. Enter a message in the Enter Message dialog, and click Send.
To administratively log off clients using the Client Details web page
1. In the Client(s) Logged On table, select the checkboxes next to the user names of the clients that you want to log off, and click Log off Clients.
2. Click OK in the dialog.
The client(s) are logged off, and they receive a message indicating the administrator user who logged them off.
Manage OneClick Licenses by Limiting Concurrent User Logins
Each time a user launches a OneClick client, that client consumes one instance of each OneClick license assigned to the user. By default, OneClick users can launch unlimited clients with a single set of login credentials. In this case, it is possible for a single user to consume all of the available OneClick licenses by launching clients again and again without exiting the previously logged-in clients.
Note: Maximum logins must be set at the user level and cannot be set at the user group level.
As an administrator, you can restrict the number of concurrent OneClick licenses a user can consume at one time. By using this feature, you can distribute the available OneClick licenses among multiple users. Additionally, the maximum number of logins may be set to zero to effectively lock out a user without destroying the user account and information.
The Details tab of the Component Detail panel for a user selected on the Users tab enables you to perform the following related user management tasks:
View the number of OneClick logins permitted for a user
Restrict concurrent logins for a user.
Restrict a user from launching any OneClick clients
Allow a user to launch as many clients as there are licenses (the default setting)
User Administration in OneClick 55
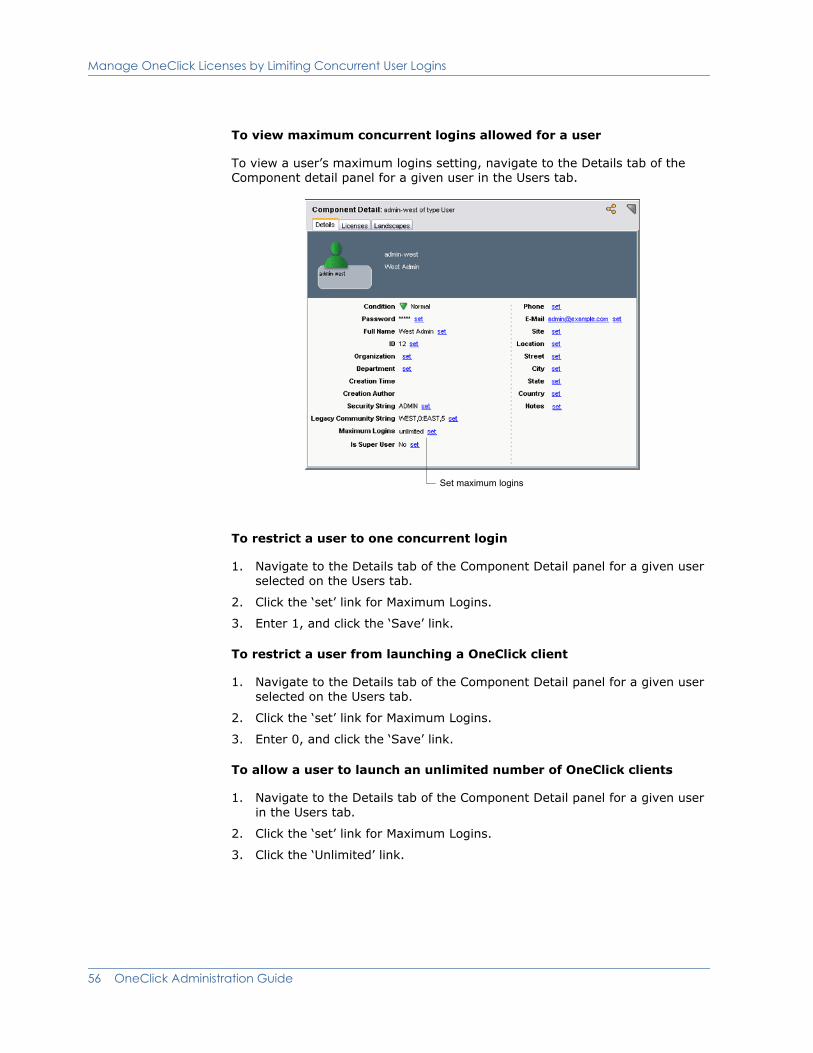
Manage OneClick Licenses by Limiting Concurrent User Logins
To view maximum concurrent logins allowed for a user
To view a user’s maximum logins setting, navigate to the Details tab of the Component detail panel for a given user in the Users tab.
To restrict a user to one concurrent login
1. Navigate to the Details tab of the Component Detail panel for a given user selected on the Users tab.
2. Click the ‘set’ link for Maximum Logins.
3. Enter 1, and click the ‘Save’ link.
To restrict a user from launching a OneClick client
1. Navigate to the Details tab of the Component Detail panel for a given user selected on the Users tab.
2. Click the ‘set’ link for Maximum Logins.
3. Enter 0, and click the ‘Save’ link.
To allow a user to launch an unlimited number of OneClick clients
1. Navigate to the Details tab of the Component Detail panel for a given user in the Users tab.
2. Click the ‘set’ link for Maximum Logins.
3. Click the ‘Unlimited’ link.
Set maximum logins
56 OneClick Administration Guide
Chapter 5: Configuring Additional OneClick Applications
This chapter discusses SPECTRUM add-on application administration and configuration in OneClick from the perspective of a OneClick administrator. This includes managing and configuring other SPECTRUM applications.
Configure Service Performance Manager (SPM) Data Export Parameters in OneClick
Note: For more information about SPM, see the Service Performance Manager User Guide (5093).
You can enable and disable SPM data export logging in OneClick as well as set the duration for which data is written to the output log file and the directory location of the output log file. When SPM logging is configured and enabled in OneClick, SPM creates and saves text files that contain SPM test result data. SPM data files are in SPECTRUM SSLogger format and can be used by a reporting utility. SPM export data files include model handle, time stamp, and a list of SPM test-specific result statistics on each line. These files are created and saved in the following form:
SPMResults.<timestamp>
To configure SPM data export in OneClick, you must first enable SPM data export logging, then set the period for which data is written to each log file, and, finally create and specify the directory location of the output log file. The log files are saved in an output directory you must first create on the OneClick web server host and then specify. At the end of the interval you specify, the file is saved and a new file is created containing the latest result data. By default, when SPM data export is enabled, 60 minutes of data is captured before the SPM log file is saved and closed and a new file opened for logging. New log files are created after an interval you specify (by default this is 60 minutes).
Note: By default, when SPM data export is enabled, OneClick attempts to save SPM data files to the directory /tmp. You must first create the /tmp directory or create and specify an alternate directory structure in which to save the SPM log files.
Configuring Additional OneClick Applications 57
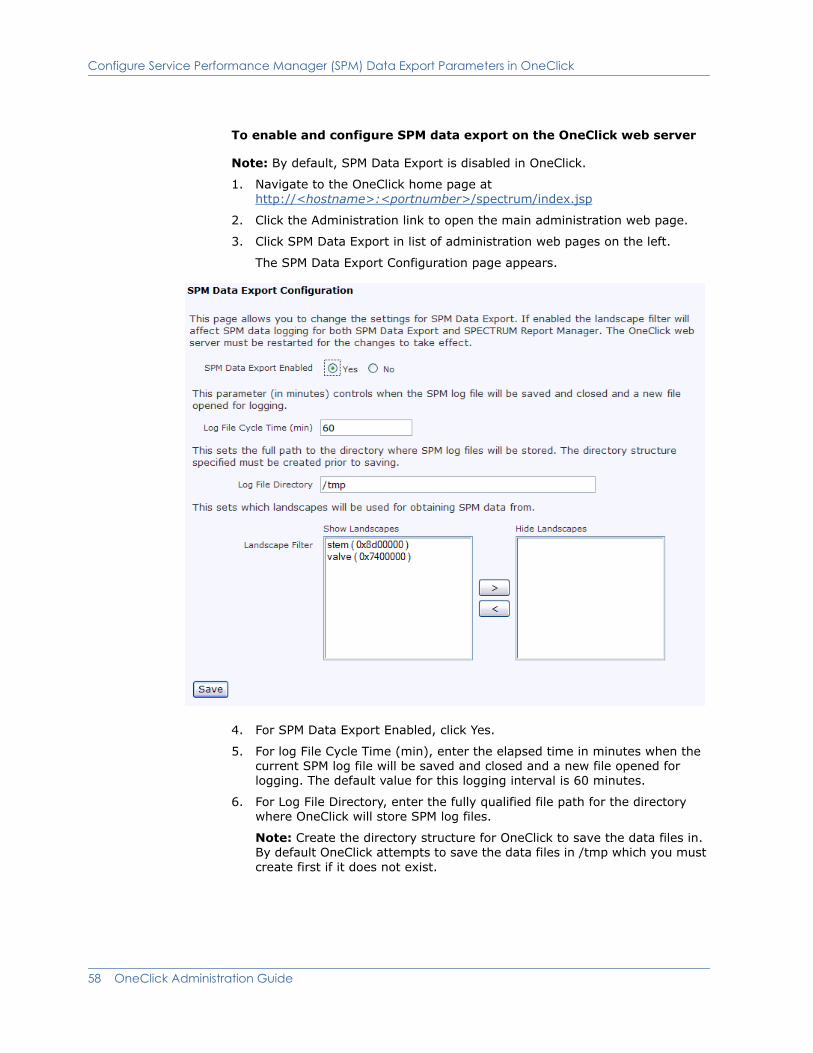
Configure Service Performance Manager (SPM) Data Export Parameters in OneClick
To enable and configure SPM data export on the OneClick web server
Note: By default, SPM Data Export is disabled in OneClick.
1. Navigate to the OneClick home page at http://<hostname>:<portnumber>/spectrum/index.jsp
2. Click the Administration link to open the main administration web page.
3. Click SPM Data Export in list of administration web pages on the left.
The SPM Data Export Configuration page appears.
4. For SPM Data Export Enabled, click Yes.
5. For log File Cycle Time (min), enter the elapsed time in minutes when the current SPM log file will be saved and closed and a new file opened for logging. The default value for this logging interval is 60 minutes.
6. For Log File Directory, enter the fully qualified file path for the directory where OneClick will store SPM log files.
Note: Create the directory structure for OneClick to save the data files in. By default OneClick attempts to save the data files in /tmp which you must create first if it does not exist.
58 OneClick Administration Guide
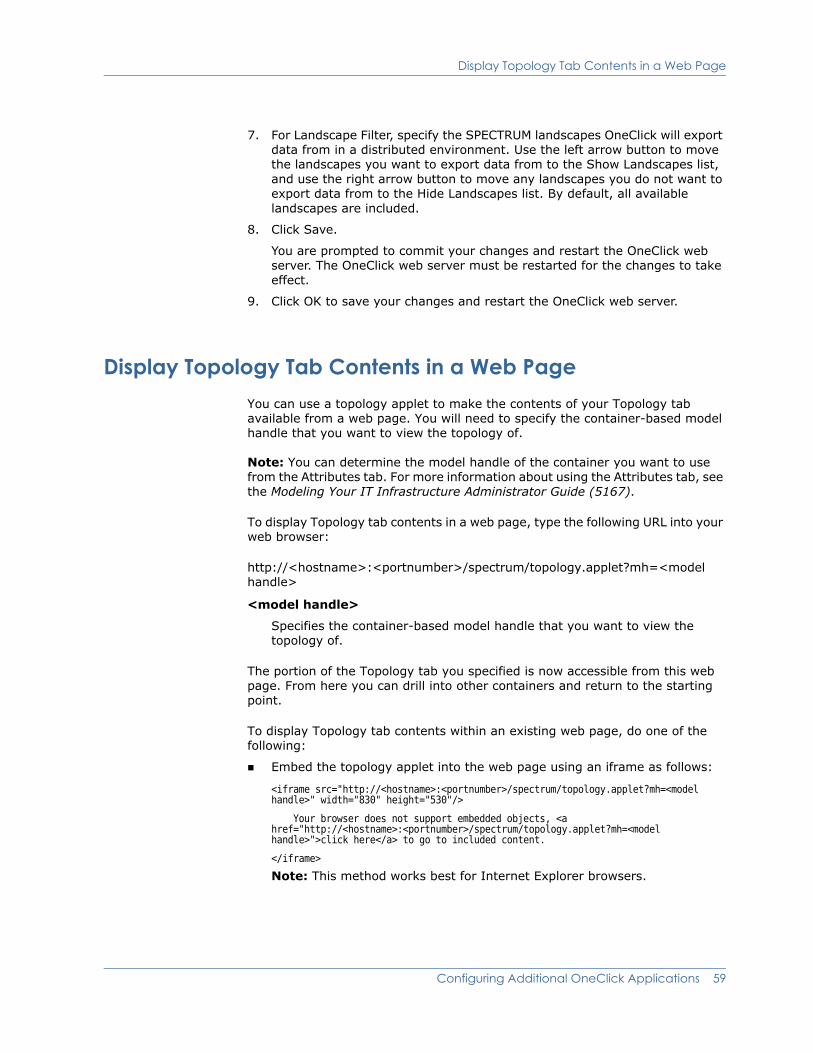
Display Topology Tab Contents in a Web Page
7. For Landscape Filter, specify the SPECTRUM landscapes OneClick will export data from in a distributed environment. Use the left arrow button to move the landscapes you want to export data from to the Show Landscapes list, and use the right arrow button to move any landscapes you do not want to export data from to the Hide Landscapes list. By default, all available landscapes are included.
8. Click Save.
You are prompted to commit your changes and restart the OneClick web server. The OneClick web server must be restarted for the changes to take effect.
9. Click OK to save your changes and restart the OneClick web server.
Display Topology Tab Contents in a Web PageYou can use a topology applet to make the contents of your Topology tab available from a web page. You will need to specify the container-based model handle that you want to view the topology of.
Note: You can determine the model handle of the container you want to use from the Attributes tab. For more information about using the Attributes tab, see the Modeling Your IT Infrastructure Administrator Guide (5167).
To display Topology tab contents in a web page, type the following URL into your web browser:
http://<hostname>:<portnumber>/spectrum/topology.applet?mh=<model handle>
<model handle>
Specifies the container-based model handle that you want to view the topology of.
The portion of the Topology tab you specified is now accessible from this web page. From here you can drill into other containers and return to the starting point.
To display Topology tab contents within an existing web page, do one of the following:
Embed the topology applet into the web page using an iframe as follows:
<iframe src="http://<hostname>:<portnumber>/spectrum/topology.applet?mh=<model handle>" width="830" height="530"/>
Your browser does not support embedded objects, <a href="http://<hostname>:<portnumber>/spectrum/topology.applet?mh=<model handle>">click here</a> to go to included content.
</iframe>
Note: This method works best for Internet Explorer browsers.
Configuring Additional OneClick Applications 59
Display Topology Tab Contents in a Web Page
Embed the topology applet into the web page using following syntax if you would prefer not to use iframes:
<div>
<object data="http://<hostname>:<portnumber>/spectrum/topology.applet?mh=<model handle>" type="text/html" width="830" height="530">
Your browser does not support embedded objects, <a href="http://<hostname>:<portnumber>/spectrum/topology.applet?mh=<model handle>"> click here</a>to go to included content.
</object>
</div>
Note: This method works best for Firefox browsers.
The portion of the Topology tab you specified is now accessible in a web portlet. From here you can drill into other containers and return to the starting point.
60 OneClick Administration Guide
Chapter 6: Model Security in OneClick
This chapter describes model security and how to configure it in OneClick.
Model Security TerminologyThe following are common terms you should understand before reading farther in this guide.
Security Community
A security community determines user access to secure models. SPECTRUM provides a default ADMIN security community that provides access to all models including models secured with a security string.
Security String
Security strings are expressions that define security communities. This defines access to models, securing them from unauthorized users. Security strings are set at the model level for modeled elements in OneClick. The legacy Security & User Maintenance (2602) guide contains more information about security communities and security strings.
Legacy User Community String
The SPECTRUM legacy user community string has been replaced in OneClick by access groups and privileges. The legacy community string can still be viewed and edited in OneClick under the Details tab for a selected user in the Users tab. The legacy community string is still used by non-OneClick SPECTRUM applications.
Model Security in OneClick 61
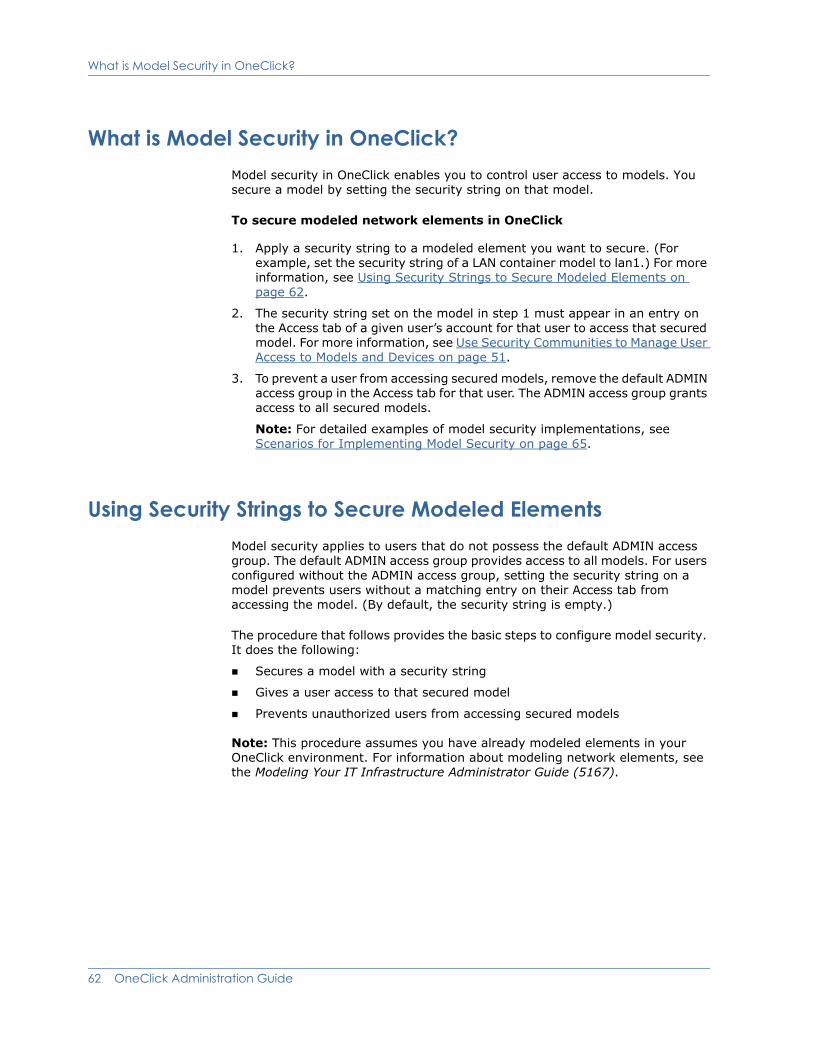
What is Model Security in OneClick?
What is Model Security in OneClick?Model security in OneClick enables you to control user access to models. You secure a model by setting the security string on that model.
To secure modeled network elements in OneClick
1. Apply a security string to a modeled element you want to secure. (For example, set the security string of a LAN container model to lan1.) For more information, see Using Security Strings to Secure Modeled Elements on page 62.
2. The security string set on the model in step 1 must appear in an entry on the Access tab of a given user’s account for that user to access that secured model. For more information, see Use Security Communities to Manage User Access to Models and Devices on page 51.
3. To prevent a user from accessing secured models, remove the default ADMIN access group in the Access tab for that user. The ADMIN access group grants access to all secured models.
Note: For detailed examples of model security implementations, see Scenarios for Implementing Model Security on page 65.
Using Security Strings to Secure Modeled ElementsModel security applies to users that do not possess the default ADMIN access group. The default ADMIN access group provides access to all models. For users configured without the ADMIN access group, setting the security string on a model prevents users without a matching entry on their Access tab from accessing the model. (By default, the security string is empty.)
The procedure that follows provides the basic steps to configure model security. It does the following:
Secures a model with a security string
Gives a user access to that secured model
Prevents unauthorized users from accessing secured models
Note: This procedure assumes you have already modeled elements in your OneClick environment. For information about modeling network elements, see the Modeling Your IT Infrastructure Administrator Guide (5167).
62 OneClick Administration Guide

Using Security Strings to Secure Modeled Elements
To configure model security
1. On the Topology tab of the Contents panel in OneClick, select a modeled element, such as a device model, that you want to secure. An example is shown in the following image.
2. On the Information tab of the Component Detail panel, click the Security String “set” link, type a security string, and press Enter.
This model is now inaccessible for users who do not have the ADMIN access group or an Access tab entry with this security string.
3. To give a user access to this secured model:
a. Select the user on the Users tab of the Navigation panel, and click the Access tab of the Contents panel.
Model Security in OneClick 63
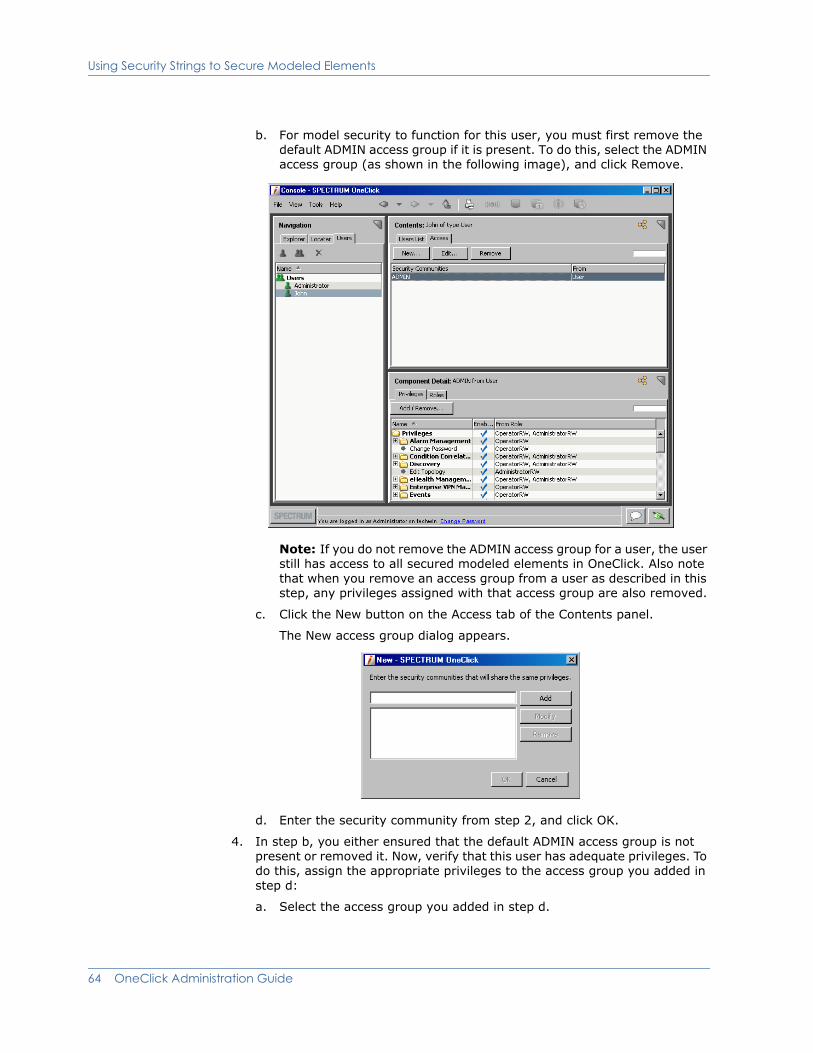
Using Security Strings to Secure Modeled Elements
b. For model security to function for this user, you must first remove the default ADMIN access group if it is present. To do this, select the ADMIN access group (as shown in the following image), and click Remove.
Note: If you do not remove the ADMIN access group for a user, the user still has access to all secured modeled elements in OneClick. Also note that when you remove an access group from a user as described in this step, any privileges assigned with that access group are also removed.
c. Click the New button on the Access tab of the Contents panel.
The New access group dialog appears.
d. Enter the security community from step 2, and click OK.
4. In step b, you either ensured that the default ADMIN access group is not present or removed it. Now, verify that this user has adequate privileges. To do this, assign the appropriate privileges to the access group you added in step d:
a. Select the access group you added in step d.
64 OneClick Administration Guide
Scenarios for Implementing Model Security
b. On the Privileges or Roles tab for the selected access group, assign the privileges you want this user to have for this security community. For example, in the case of an operator user, you might assign the OperatorRW privilege role using the Roles tab. See Create and Assign Roles to Users or User Groups on page 40 for more information about roles.
When this user logs on, models that have a security string that matches the access group entry from step 3d and all non-secured models appear on the Topology tab for the user. This user will also see any container models that contain models that are accessible to the user.
Scenarios for Implementing Model SecurityThe following scenarios provide examples of both simple and more complex model security use cases.
Secure a model in a remote office from local users
To help you understand security strings in OneClick, a simple example follows:
You want to secure a single model in a remote office so that local OneClick users cannot access it. Setting the security string of the model (to “remote” for example) would secure it. Users without the ADMIN access group would need to have an access group with an entry of “remote” to access that model. Users with only an access group entry of “local”, for example, would not have access to this model.
Secure administrative access to a branch office network
As a complete example of a security implementation in OneClick, consider an East coast office and a West coast office. Network administrators in the East coast office must have read/write access to the East coast office’s network in OneClick. They must also have read-only access to the West coast network. The inverse is true for the West coast administrators.
The following procedure could be used to create a solution to this requirement. It can also be modified to suit your needs.
1. Create two LAN containers in OneClick representing the two networks. Name one LAN container WEST, and name the other EAST.
2. Populate each container with different modeled network assets.
Model Security in OneClick 65
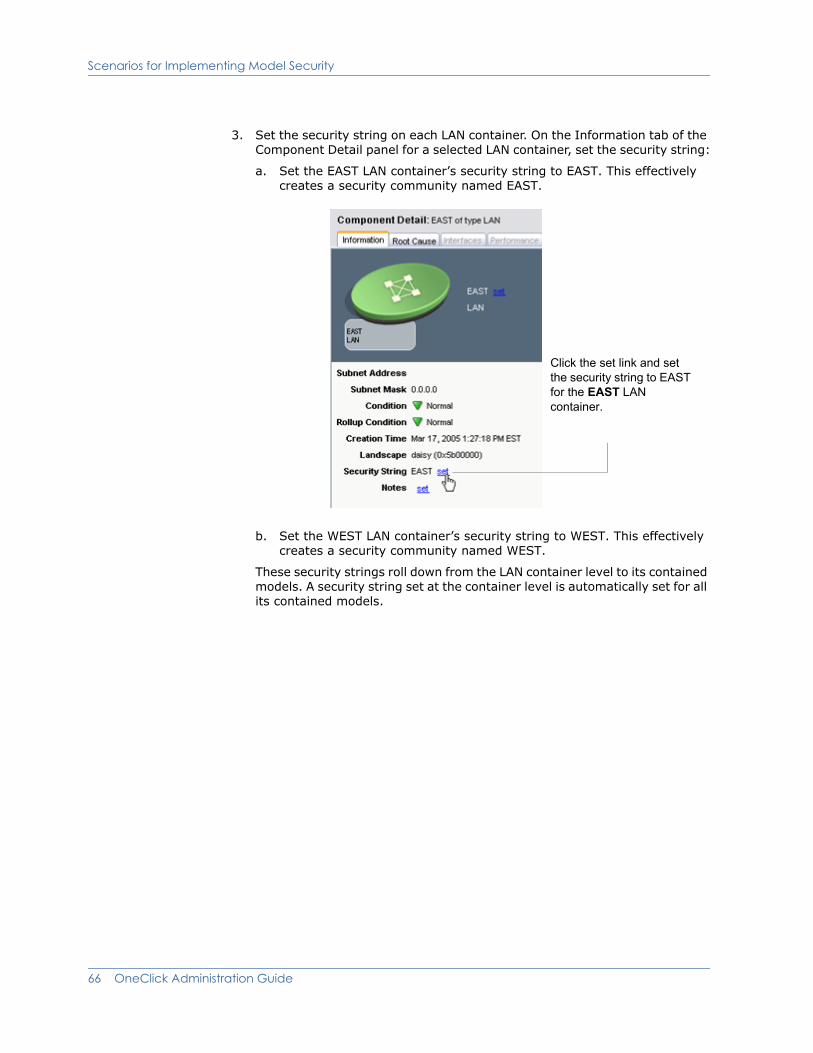
Scenarios for Implementing Model Security
3. Set the security string on each LAN container. On the Information tab of the Component Detail panel for a selected LAN container, set the security string:
a. Set the EAST LAN container’s security string to EAST. This effectively creates a security community named EAST.
b. Set the WEST LAN container’s security string to WEST. This effectively creates a security community named WEST.
These security strings roll down from the LAN container level to its contained models. A security string set at the container level is automatically set for all its contained models.
Click the set link and set the security string to EAST for the EAST LAN container.
66 OneClick Administration Guide
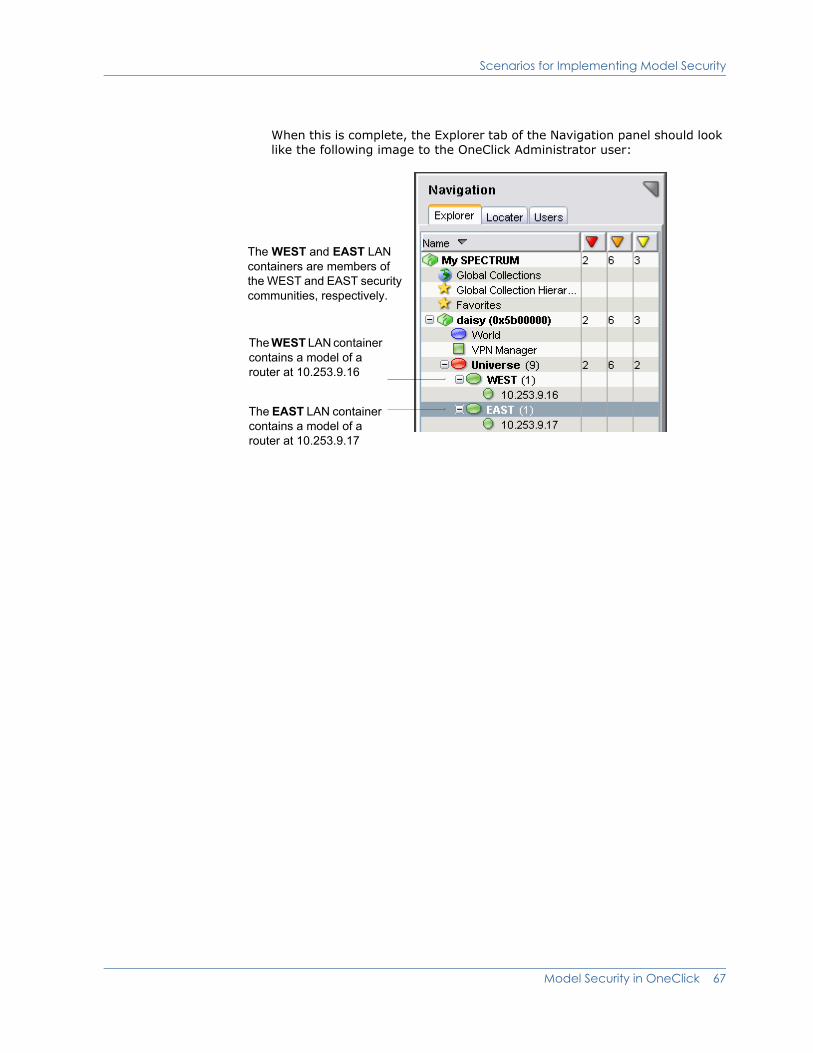
Scenarios for Implementing Model Security
When this is complete, the Explorer tab of the Navigation panel should look like the following image to the OneClick Administrator user:
The EAST LAN container contains a model of a router at 10.253.9.17
The WEST LAN container contains a model of a router at 10.253.9.16
The WEST and EAST LAN containers are members of the WEST and EAST security communities, respectively.
Model Security in OneClick 67
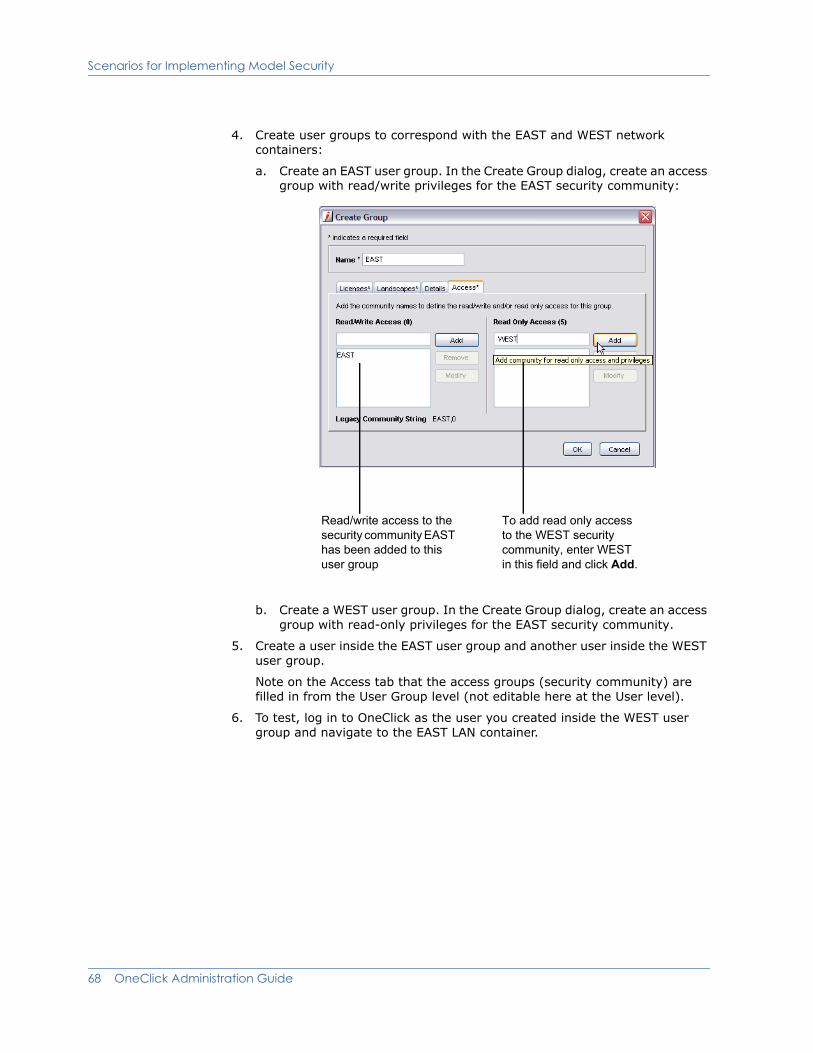
Scenarios for Implementing Model Security
4. Create user groups to correspond with the EAST and WEST network containers:
a. Create an EAST user group. In the Create Group dialog, create an access group with read/write privileges for the EAST security community:
b. Create a WEST user group. In the Create Group dialog, create an access group with read-only privileges for the EAST security community.
5. Create a user inside the EAST user group and another user inside the WEST user group.
Note on the Access tab that the access groups (security community) are filled in from the User Group level (not editable here at the User level).
6. To test, log in to OneClick as the user you created inside the WEST user group and navigate to the EAST LAN container.
Read/write access to the security community EAST has been added to this user group
To add read only access to the WEST security community, enter WEST in this field and click Add.
68 OneClick Administration Guide

Scenarios for Implementing Model Security
7. When viewing models inside the EAST LAN container, users in the WEST user group have Administrator read-only rights as shown in the following image. For example, the image illustrates the fact that values in SPECTRUM Modeling Information cannot be edited by this user at this model.
This user in the WEST user group has administrator read only access to this model in the EAST LAN container and cannot edit its values.
Model Security in OneClick 69
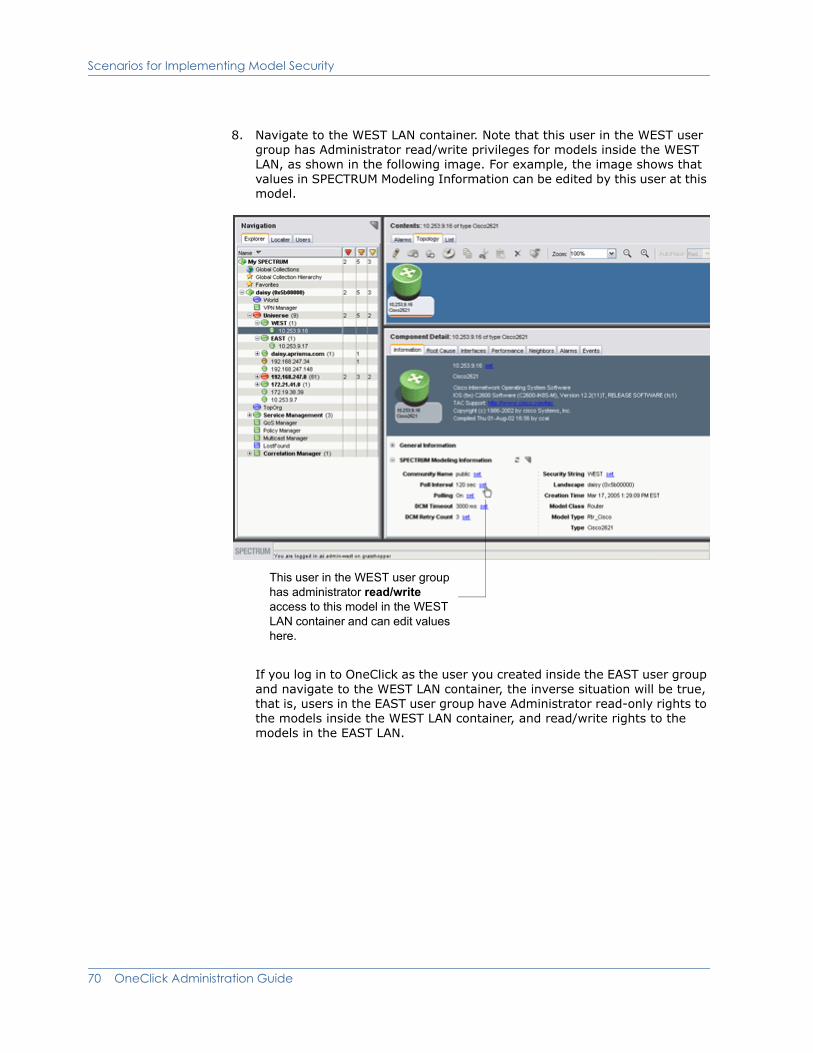
Scenarios for Implementing Model Security
8. Navigate to the WEST LAN container. Note that this user in the WEST user group has Administrator read/write privileges for models inside the WEST LAN, as shown in the following image. For example, the image shows that values in SPECTRUM Modeling Information can be edited by this user at this model.
If you log in to OneClick as the user you created inside the EAST user group and navigate to the WEST LAN container, the inverse situation will be true, that is, users in the EAST user group have Administrator read-only rights to the models inside the WEST LAN container, and read/write rights to the models in the EAST LAN.
This user in the WEST user group has administrator read/write access to this model in the WEST LAN container and can edit values here.
70 OneClick Administration Guide
Chapter 7: Setting Preferences for Users and Groups
This chapter describes preferences in OneClick and how to use the OneClick Preferences Editor to set preferences for users and groups.
Introduction to PreferencesPreferences in OneClick control the appearance of the OneClick Console (for example, the fonts used in tables and the sort order of columns) and the behavior of certain aspects of the user interface. Not only can you configure privileges for users and user groups in OneClick as described in Chapter 4: User Administration in OneClick, but you can also administratively set preferences for users and groups. The OneClick Preferences Editor lets administrators set, lock, and save preferences for multiple users and groups.
Important! Selecting View, Preferences from the main OneClick menu opens user-level preference editing for the currently logged-on user. The Alarm Filter dialog once accessed from this menu item can now be launched from a button on the Alarms toolbar.
To access the Preferences Editor to set preferences for a user or user group:
1. On the Users tab, right-click a user or user group for which you want to set preferences.
2. Choose Set Preferences from the menu to open the Preferences Editor.
To access the Preferences Editor to set preferences for all users (globally):
1. Right-click the top-level user group (Users) on the Users tab.
2. Choose Set Preferences from the menu to open the Preferences Editor.
Setting Preferences for Users and Groups 71
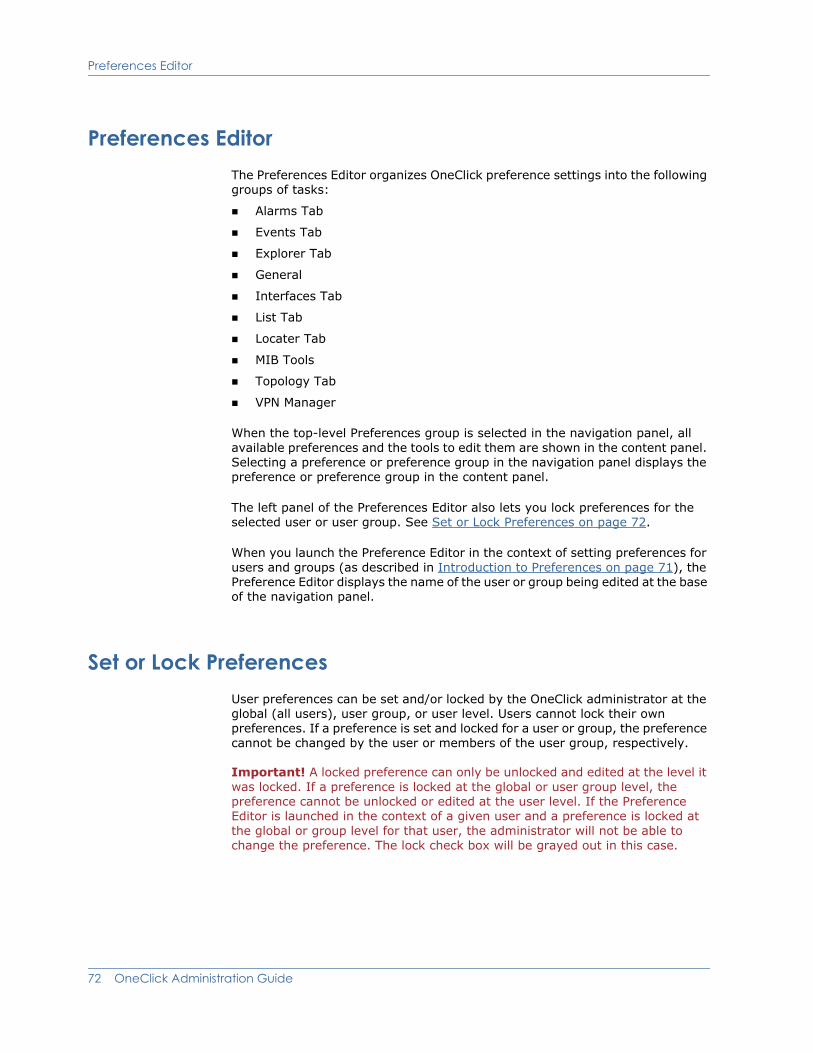
Preferences Editor
Preferences EditorThe Preferences Editor organizes OneClick preference settings into the following groups of tasks:
Alarms Tab
Events Tab
Explorer Tab
General
Interfaces Tab
List Tab
Locater Tab
MIB Tools
Topology Tab
VPN Manager
When the top-level Preferences group is selected in the navigation panel, all available preferences and the tools to edit them are shown in the content panel. Selecting a preference or preference group in the navigation panel displays the preference or preference group in the content panel.
The left panel of the Preferences Editor also lets you lock preferences for the selected user or user group. See Set or Lock Preferences on page 72.
When you launch the Preference Editor in the context of setting preferences for users and groups (as described in Introduction to Preferences on page 71), the Preference Editor displays the name of the user or group being edited at the base of the navigation panel.
Set or Lock PreferencesUser preferences can be set and/or locked by the OneClick administrator at the global (all users), user group, or user level. Users cannot lock their own preferences. If a preference is set and locked for a user or group, the preference cannot be changed by the user or members of the user group, respectively.
Important! A locked preference can only be unlocked and edited at the level it was locked. If a preference is locked at the global or user group level, the preference cannot be unlocked or edited at the user level. If the Preference Editor is launched in the context of a given user and a preference is locked at the global or group level for that user, the administrator will not be able to change the preference. The lock check box will be grayed out in this case.
72 OneClick Administration Guide
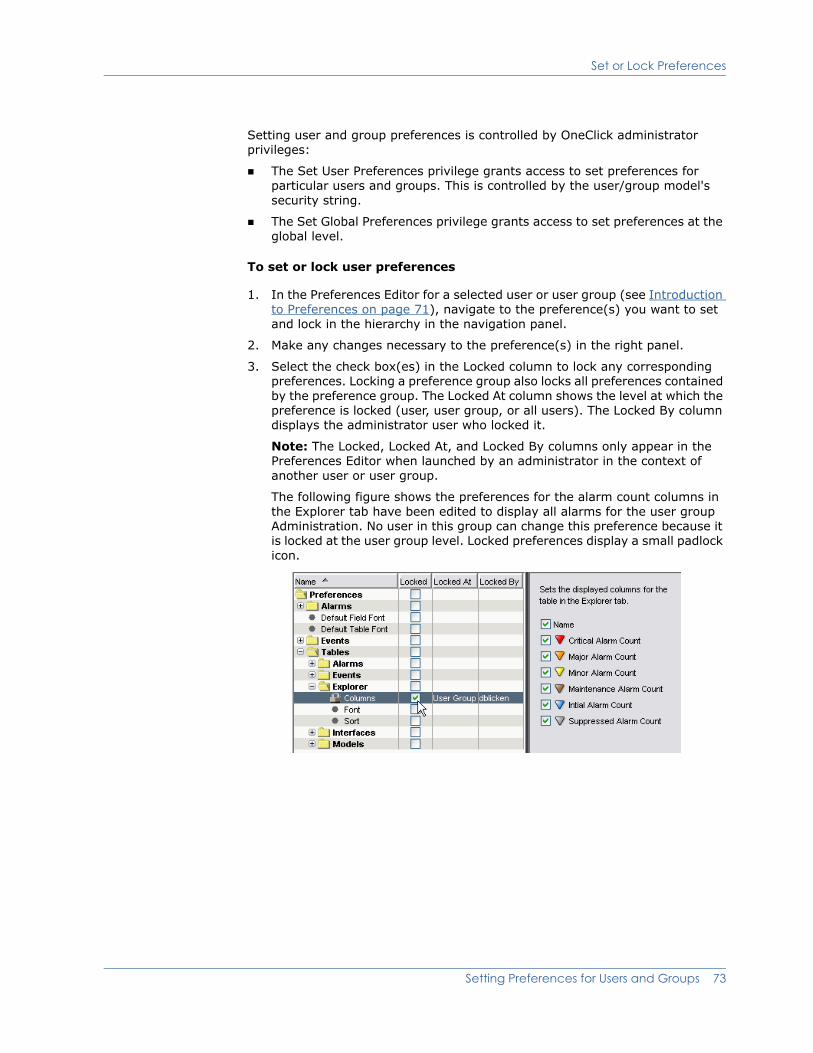
Set or Lock Preferences
Setting user and group preferences is controlled by OneClick administrator privileges:
The Set User Preferences privilege grants access to set preferences for particular users and groups. This is controlled by the user/group model's security string.
The Set Global Preferences privilege grants access to set preferences at the global level.
To set or lock user preferences
1. In the Preferences Editor for a selected user or user group (see Introduction to Preferences on page 71), navigate to the preference(s) you want to set and lock in the hierarchy in the navigation panel.
2. Make any changes necessary to the preference(s) in the right panel.
3. Select the check box(es) in the Locked column to lock any corresponding preferences. Locking a preference group also locks all preferences contained by the preference group. The Locked At column shows the level at which the preference is locked (user, user group, or all users). The Locked By column displays the administrator user who locked it.
Note: The Locked, Locked At, and Locked By columns only appear in the Preferences Editor when launched by an administrator in the context of another user or user group.
The following figure shows the preferences for the alarm count columns in the Explorer tab have been edited to display all alarms for the user group Administration. No user in this group can change this preference because it is locked at the user group level. Locked preferences display a small padlock icon.
Setting Preferences for Users and Groups 73
Set or Lock Preferences
Set Alarm Filter Preferences
In addition to being available from a button on the Alarms toolbar, the Alarm Filter dialog can also be launched from the Preference Editor using the Alarms, Alarm Filter preference. The right panel displays the Set Alarm Filter button. Access to the alarm filter can be administratively locked down as described in Set or Lock Preferences on page 72.
You can create multiple alarm filters that are selectable using the Available Filters pulldown in the Alarm Filter dialog. You can configure the available filters for a user or user group and then lock it so the filters cannot be changed but the user can still select from the list of available filters. The Available Filters pulldown is also available on the Alarms tab.
Note: If the alarm filter preference is locked, the filter button in the Alarms toolbar is not available.
Reset Preferences
The Reset button lets you reset preference values back to the default. Resetting the preference will automatically apply to the selected user or user group. When you reset the preference, the following occurs:
For a user, it defaults to:
– The setting on the User Group if the user is in a group and the preference is set for the group
– Otherwise, the global setting for all users if set
– Otherwise, the factory default setting
For a User Group, it defaults to:
– The global setting for all users if set
– Otherwise, the factory setting
For all users (the top-level Users node), it defaults to:
– The factory setting
You cannot reset preferences that are locked. If you are modifying the preferences for a user and a given preference is locked at the user's group level, you cannot edit, import, or reset that preference.
74 OneClick Administration Guide

Import and Export Preferences
Import and Export PreferencesPreferences can be imported from a user or user group and exported to other users and user groups.
To import or export preferences from or to a user or a user group
1. Select the user or group, and open the Preference Editor (see Introduction to Preferences on page 71).
2. In the left panel of the Preferences Editor, select the preference(s) you want to import or export, using CTRL+click to select multiple items. Selecting a preference group selects all preferences it contains, as it does when locking an entire preference group. If the top-level Preferences node is selected, all preferences are implicitly selected.
3. Click Import or Export to import or export preferences, respectively.
4. Verify the preferences you want to import or export are selected in the dialog, and click OK.
5. The Select User/Group dialog displays the available users and user groups. When exporting preferences, select the user(s) and/or user group(s) to which to export. Selecting the top-level Users node specifies all users (global). When importing preferences, select a single user or group from which to import. When exporting preferences, you will only see users/groups for which you have the Set User Preferences privilege. If you do not have the Set Global Preferences privilege, you will not see the top-level Users node. For both import and export, you will only see users and user group for which you have permission to view.
Note: For both import and export, the lock state of each preference is also transferred. For example, importing a locked preference from another user will result in that preference also being locked for the target user. If you export a preference to a user/group but that preference is locked at a higher level for that user/group, the preference setting will not be saved.
Setting Preferences for Users and Groups 75

Import and Export Preferences
76 OneClick Administration Guide
Chapter 8: Managing Searches
You can create custom searches based on attribute values and various comparison criteria. This chapter describes how to create and manage custom searches. These search management tasks are privileges that are granted only to OneClick administrators, not OneClick operators.
Note: While OneClick operators cannot create and manage searches, they can launch them. For information on how to launch searches, see the OneClick Console User Guide (5130).
Create a Simple SearchA simple search contains only a single expression.
Note: You can also create a search that uses more complex criteria, that is, a combination of AND clauses and OR clauses. For more information, see Advanced Options in the Create Search Dialog on page 79 and Create an Advanced Search on page 80.
To create a simple search
1. Select the Locater tab in the Navigation panel.
2. Do one of the following in the Locater tab:
If you want to create a new search from a blank template, click
(Create a new search).
If you want to create a new search based on an existing search, select any search (except the Devices > By IP Address search), and click
(Copy the selected search).
The Create Search dialog opens.
Managing Searches 77
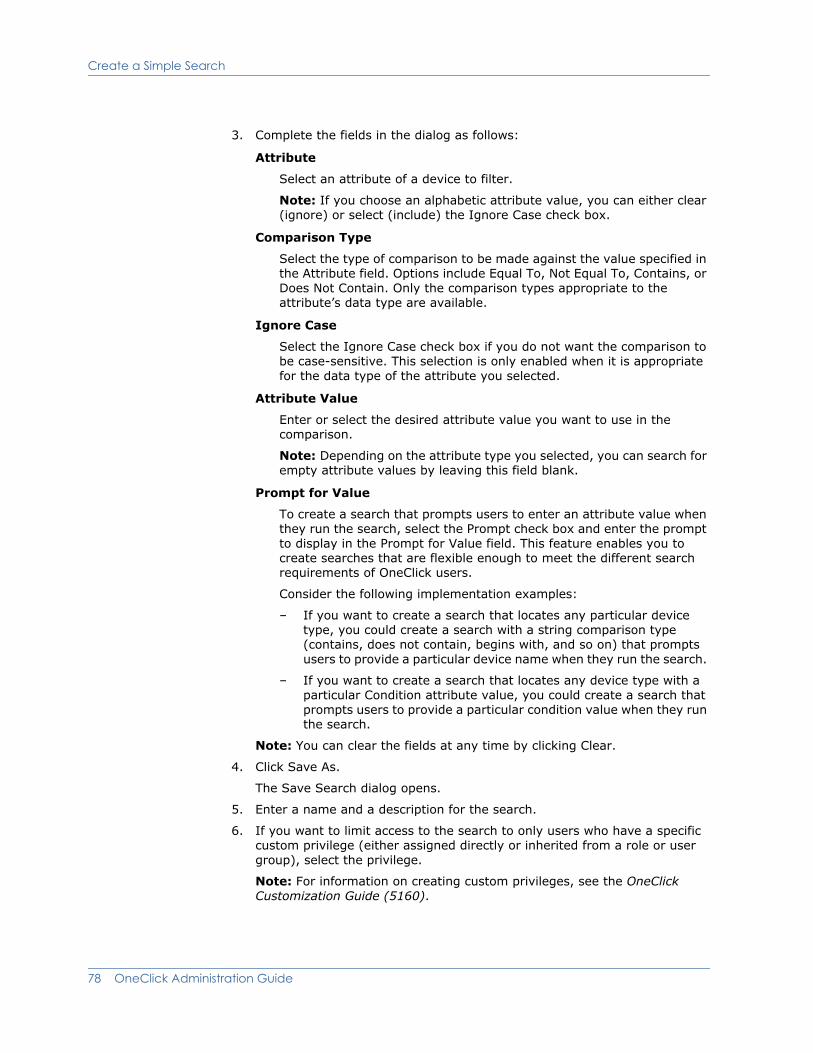
Create a Simple Search
3. Complete the fields in the dialog as follows:
Attribute
Select an attribute of a device to filter.
Note: If you choose an alphabetic attribute value, you can either clear (ignore) or select (include) the Ignore Case check box.
Comparison Type
Select the type of comparison to be made against the value specified in the Attribute field. Options include Equal To, Not Equal To, Contains, or Does Not Contain. Only the comparison types appropriate to the attribute’s data type are available.
Ignore Case
Select the Ignore Case check box if you do not want the comparison to be case-sensitive. This selection is only enabled when it is appropriate for the data type of the attribute you selected.
Attribute Value
Enter or select the desired attribute value you want to use in the comparison.
Note: Depending on the attribute type you selected, you can search for empty attribute values by leaving this field blank.
Prompt for Value
To create a search that prompts users to enter an attribute value when they run the search, select the Prompt check box and enter the prompt to display in the Prompt for Value field. This feature enables you to create searches that are flexible enough to meet the different search requirements of OneClick users.
Consider the following implementation examples:
– If you want to create a search that locates any particular device type, you could create a search with a string comparison type (contains, does not contain, begins with, and so on) that prompts users to provide a particular device name when they run the search.
– If you want to create a search that locates any device type with a particular Condition attribute value, you could create a search that prompts users to provide a particular condition value when they run the search.
Note: You can clear the fields at any time by clicking Clear.
4. Click Save As.
The Save Search dialog opens.
5. Enter a name and a description for the search.
6. If you want to limit access to the search to only users who have a specific custom privilege (either assigned directly or inherited from a role or user group), select the privilege.
Note: For information on creating custom privileges, see the OneClick Customization Guide (5160).
78 OneClick Administration Guide
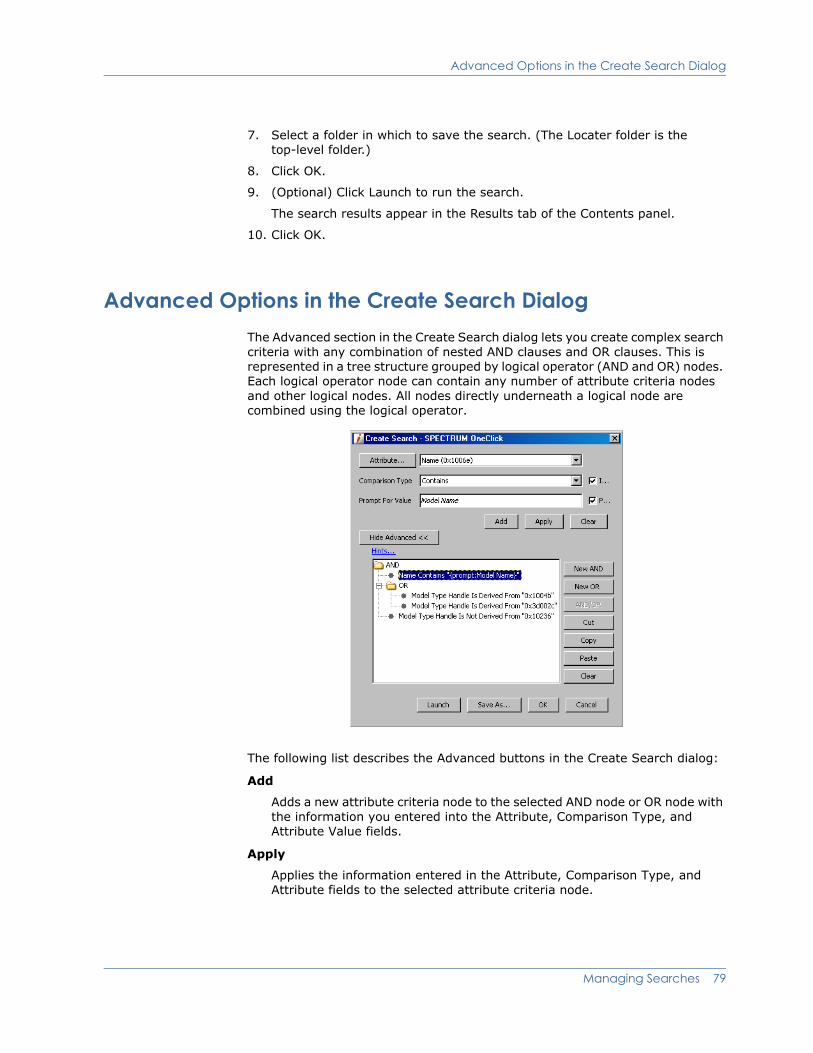
Advanced Options in the Create Search Dialog
7. Select a folder in which to save the search. (The Locater folder is the top-level folder.)
8. Click OK.
9. (Optional) Click Launch to run the search.
The search results appear in the Results tab of the Contents panel.
10. Click OK.
Advanced Options in the Create Search DialogThe Advanced section in the Create Search dialog lets you create complex search criteria with any combination of nested AND clauses and OR clauses. This is represented in a tree structure grouped by logical operator (AND and OR) nodes. Each logical operator node can contain any number of attribute criteria nodes and other logical nodes. All nodes directly underneath a logical node are combined using the logical operator.
The following list describes the Advanced buttons in the Create Search dialog:
Add
Adds a new attribute criteria node to the selected AND node or OR node with the information you entered into the Attribute, Comparison Type, and Attribute Value fields.
Apply
Applies the information entered in the Attribute, Comparison Type, and Attribute fields to the selected attribute criteria node.
Managing Searches 79
Create an Advanced Search
New AND
Adds a new AND operator node to the selected AND node or OR node.
New OR
Adds a new OR operator node to the selected AND node or OR node.
AND/OR
Toggles the selected AND node or OR node. That is, if the logical operation is currently AND, clicking this button changes it to OR and vice versa.
Cut
Removes the selected node. It can be pasted below another node.
Paste
Pastes the last removed node below the selected AND node or OR node.
Clear
Removes all the nodes below the root node.
Create an Advanced SearchYou use the Advanced section in the Create Search dialog to create complex search criteria with any combination of nested AND clauses and OR clauses. (For an overview of this section in the dialog, see Advanced Options in the Create Search Dialog on page 79.)
To create an advanced search
1. Select the Locater tab in the Navigation panel.
2. Do one of the following in the Locater tab:
If you want to create a new search from a blank template, click
(Create a new search).
If you want to create a new search based on an existing search, select any search (except the Devices > By IP Address search), and click
(Copy the selected search).
The Create Search dialog opens.
3. Complete the fields in the Create Search dialog as follows:
Attribute
Select an attribute of a device to filter.
Note: If you choose an alphabetic attribute value, you can either clear (ignore) or select (include) the Ignore Case check box.
80 OneClick Administration Guide
Create an Advanced Search
Comparison Type
Select the type of comparison to be made against the value specified in the Attribute field. Options include Equal To, Not Equal To, Contains, or Does Not Contain. Only the comparison types appropriate to the attribute’s data type will be displayed.
Ignore Case
Select the Ignore Case check box if you do not want the comparison to be case-sensitive. This selection is only enabled when it is appropriate for the data type of the attribute you selected.
Attribute Value
Enter or select the desired attribute value you want to use in the comparison.
Prompt for Value
To create a search that prompts users to enter an attribute value when they run the search, select the Prompt check box and enter the prompt to display in the Prompt for Value field. This feature enables you to create searches that are flexible enough to meet the different search requirements of OneClick users.
Consider the following implementation examples:
– If you want to create a search that locates any particular device type, you could create a search with a string comparison type (contains, does not contain, begins with, and so on) that prompts users to provide a particular device name when they run the search.
– If you want to create a search that locates any device type with a particular Condition attribute value, you could create a search that prompts users to provide a particular condition value when they run the search.
Note: You can clear the fields at any time by clicking Clear.
4. Click Show Advanced in the Create Search dialog to create complex search criteria that includes a combination of AND clauses and/or OR clauses.
The compound expression box and logical operator buttons appear.
5. Click Add to move the single expression created in Step 3 to the compound expression box.
The single expression appears in the compound expression box.
6. Click one of the following logical operator buttons to build a compound expression:
New AND
New OR
AND/OR
The selected operator is inserted into the compound expression box.
7. Repeat Step 3, Step 5, and Step 6 for each compound expression you want to build.
Managing Searches 81
Edit a Search
8. Click Save As.
The Save Search dialog opens.
9. Enter a name and a description for the search.
10. If you want to limit access to the search to only users who have a specific custom privilege (either assigned directly or inherited from a role or user group), select the privilege.
Note: For information on creating custom privileges, see the OneClick Customization Guide (5160).
11. Select a folder in which to save the search. (The Locater folder is the top-level folder.)
12. Click OK.
13. (Optional) Click Launch to run the search.
The search results appear in the Results tab of the Contents panel. The applicable entities have been excluded from the results list based on the compound search expressions you specified.
14. Click OK.
Edit a SearchNote: Preconfigured searches cannot be edited.
To edit a search
1. In the Locater tab, select the search you want to edit from the available searches, and click the Edit button.
2. Edit the simple search using the controls described in Create a Simple Search on page 77.
Alternatively, edit the advanced search using the controls described in Advanced Options in the Create Search Dialog on page 79 and Create an Advanced Search on page 80. When an attribute criteria node is selected, its information appears in the dialog’s fields. You can then modify the fields and click the Apply button to change the selected node. You can also click the Add button to create a new attribute criteria node.
3. Click OK to save the modified search.
82 OneClick Administration Guide
Delete a Custom Search
Delete a Custom SearchNote: Preconfigured folders and searches cannot be deleted.
To delete a custom search
1. Click (Organize, rename, or delete your searches) on the Locater tab.
The Organize Searches dialog opens.
2. Navigate to the custom search you want to delete, and select it.
3. Click Delete.
4. Click OK.
Organize Custom SearchesNote: Preconfigured folders and searches cannot be edited.
To organize custom searches
1. Click on the Locater tab.
The Organize Searches dialog opens.
Managing Searches 83
Example Search: Find All Router Class or Switch Router Class Devices In Critical Condition
2. Use the dialog to create a hierarchy of folders and move searches you have created into them. You can also rename or delete your custom folders and searches here.
3. Click OK.
Example Search: Find All Router Class or Switch Router Class Devices In Critical Condition
This example describes how to create a compound search that will find all routers or switch routers with a condition of “Critical.” The following image displays the search as it will appear in the Create Search dialog after you have finished adding the appropriate compound expressions:
The following procedure describes how to create this search.
To create a compound search expression to find all router class or switch router class devices in critical condition
1. Select the Locater tab in the Navigation panel.
2. In the Locater tab, click (Create a new search).
The Create Search dialog opens.
84 OneClick Administration Guide
Example Search: Find All Router Class or Switch Router Class Devices In Critical Condition
3. Complete the fields as follows:
Attribute = Condition (0x1000a)
Comparison Type = Equal To
Ignore Case = N/A
Attribute Value = Critical
4. Click the ‘Show Advanced’ button.
The compound expression box and logical operator buttons appear.
5. Click Add to move the single expression created in Step 3 to the compound expression box.
The single expression appears in the compound expression box.
6. Click the ‘New OR’ button.
The OR operator is inserted into the compound expression box, beneath the expression: Condition Equal To “Critical.”
7. Complete the fields at the top of the Create Search dialog again, using the following parameters:
Attribute = Model Class (0x11ee8)
Comparison Type = Equal To
Ignore Case = N/A
Attribute Value = Router
8. Click Add to move this expression to the compound expression box.
This expression (Model Class Equal To “Router”) is inserted into the compound expression box, beneath the OR operator.
9. Complete the fields at the top of the Create Search dialog again, using the following parameters:
Attribute = Model Class (0x11ee8)
Comparison Type = Equal To
Ignore Case = N/A
Attribute Value = Switch-Router
10. Click Add to move this expression to the compound expression box.
This expression (Model Class Equal To “Switch-Router”) is inserted into the compound expression box, beneath the OR operator.
11. (Optional) Click Save As to save this search in the Locater tab so that you can run it at any time.
12. Click Launch to run the search immediately.
The search results appear in the Results tab of the Contents panel.
Managing Searches 85

Example Search: Find All Router Class or Switch Router Class Devices In Critical Condition
86 OneClick Administration Guide
Appendix A: Troubleshooting OneClick Web Server Issues
This appendix identifies problems and error messages that may be generated during the operation of the OneClick web server and client; it also describes corrective action where feasible. Other maintenance and optional configuration issues are also addressed.
Export Fails Due to Java Memory Resources SettingWhen exporting very large (4000x4000 pixels and greater) Topology view images from OneClick (as described in discussion about exporting data and images in the OneClick Console User Guide (5130)), you may receive an error similar to this:
“The memory resources required to complete the operation were not available.”
To resolve this error, either reduce the image size by zooming out in the Topology view or increase the OneClick client memory settings as described in Configure OneClick Memory Settings on page 5.
Troubleshoot OneClick in Fault Tolerant EnvironmentsIn certain cases in fault tolerant environments, OneClick clients can display blank panels after failover to the secondary SpectroSERVER has occurred. OneClick clients will display three empty (gray) panels but connection status will show that the failover switch has occurred. The blank panels occur because user privileges are not in sync between the primary and secondary servers, and the privileges are lost during failover.
Solution: All user models must be created and completely configured on the primary SpectroSERVER before the primary server's database is copied to the secondary SpectroSERVER. If they are not, any actions done to User models (user associations made to license roles, access groups, and so on) will not be in sync with the secondary server until an online backup occurs. For more information, see the discussion about online backups in the Database Management Guide (2601).
Troubleshooting OneClick Web Server Issues 87

Troubleshoot OneClick in Fault Tolerant Environments
88 OneClick Administration Guide
Appendix B: System Customizations
The following section lists the parameters that can be edited in the context.xml file and the web.xml file to customize the server and client environment.
context.xml Customization ParametersThe context.xml file, located in the <$SPECROOT>/webapps/spectrum/META-INF directory, contains many OneClick customization parameters. You must restart the OneClick web server after making changes to this file.
maxProcessors
Controls the maximum number of OneClick clients that can be running:
<parameter> <name>maxProcessors</name> <value>75</value>
</parameter>
locServerName
Provides the hostname of the SPECTRUM location server:
<parameter> <name>locServerName</name> <value>snowball</value>
</parameter>
orbAgentName
<parameter> <name>orbAgentName</name> <value>snowball</value>
</parameter>
orbAgentPort
<parameter> <name>orbAgentPort</name> <value>14000</value>
</parameter>
adminUserName
<parameter> <name>adminUserName</name> <value>admin</value>
</parameter>
System Customizations 89
web.xml Customization Parameters
smtpHostName and smtpPort
Configure these parameters to set the host name of your mail server and the port that it uses, respectively:
<parameter> <name>smtpHostName</name> <value>mailhost</value>
</parameter>
<parameter> <name>smtpPort</name> <value>25</value>
</parameter>
useSecondarySS
A value of false prevents failover:
<parameter> <name>useSecondarySS</name> <value>true</value>
</parameter>
web.xml Customization ParametersThe web.xml file, located in the <$SPECROOT>/tomcat/webapps/spectrum/WEB-INF directory, contains additional customization parameters. You must restart the OneClick web server after making changes to this file.
Change the Location of SG-Support
To configure the OneClick web server to use a path to SG-Support other than the default, edit the value of the com.aprisma.spectrum.root.install parameter in the following section of the web.xml file:
<context-param> <param-name>com.aprisma.spectrum.root.install</param-name> <param-value>/usr/SPECTRUM/WebApps/SG-Support</param-value> <description> This parameter defines the absolute path to the directory where SG-Support was installed for the Spectrum core product. This directory should be <$SPECROOT>/SG-Support. </description>
</context-param>
90 OneClick Administration Guide
Index
A
Admin User Name • 24
at utility • 2
B
Backup Location Server Name • 24
C
Character Set • 20
Client Details • 54
Client(s) Logged Ontable • 54
communicating with CORBA clients • 16
Context Launching • 4
CORBA communication, secured • 25
D
Data Export • 57
Delete a User or User Group • 50
E
Editing information for a user or group • 46
eHealth Configuration • 21
Email Configuration • 21
I
IIOP (Internet Inter-ORB protocol) • 16
initial SPECTRUM user • 44, 45
iPlanet • 14
Is Super User, value • 45
J
JNLP configuration • 22
JRE versions • 22
L
Landscape Filter • 59
Landscapes • 23Changing for a user • 47
LDAPLocal login setting • 45Save LDAP Passwords to SPECTRUM Database • 23Test LDAP Configuration • 23User Name Lookup • 23User name requirement • 37
LDAP Configuration • 23
LDAP Server Settings • 23
LicensesChanging licenses assigned to a user or group • 46
load balancing • 17
Log File Directory • 58
Logging offforcibly log off client(s) • 55
M
Main Location Server Name • 24
MySQL passwordchanging • 7
N
NAT firewall • 16
O
OneClick home page • 19
OneClick web servermemory settings • 6ORB properties • 24starting and stopping • 2supporting over 100 users per web server • 4
Index 91
URL of, configuring • 7
ORB properties • 24
P
PreferencesAlarm Filter • 74Resetting to defaults • 74
Privilegesgrant all to a user • 44
Prompt check box • 78
Prompt for Value field • 78
Proxy Servers • 14
R
Reload EvFormat and PCause files • 21
Restart OneClick Server button • 2
Restricted View of Community Names • 51
S
Searchesdelete custom types • 83editing custom types • 82organize custom types • 83
secure CORBA communication • 25
Secure Sockets Layer (SSL) • 9
Sending messagesto logged in client(s) • 55
Service Performance Manager (SPM) • 57
Single Sign-On Configuration • 24
SpectroSERVER Polling Interval • 24
SpectroSERVER Request Timeout • 24
SPECTRUMadd-on applications • 57
SPM Data ExportConfiguration • 58
SPM Template Naming • 25
SSL • 25
SSL Certificates • 26
starting and stoppingOneClick Web Service (Tomcat) • 2
startTomcat.sh • 2
stopTomcat.sh • 2
Super User • 44
T
Tomcatstarting and stopping • 2
U
User account • 27
User AdministrationCreating Users • 36Limiting Concurrent Logins • 55
User GroupsAdd users to • 49Inheritance details for users in • 39Landscape membership changes • 48Managing users within • 39Remove users from • 50
Users and user groupsEditing existing • 40
Users tab • 30
W
Web Server Logs Configuration • 26
Web Server Memory • 26
92 OneClick Administration Guide