on Amazon AWS - Imperva · SecureSphere on Amazon AWS Configuration Guide 2 ... (WAF) configured as...
61
on Amazon AWS On-Demand Configuration Guide Version 11.0 May 2016
Transcript of on Amazon AWS - Imperva · SecureSphere on Amazon AWS Configuration Guide 2 ... (WAF) configured as...

on Amazon AWS
On-Demand
Configuration Guide
Version 11.0
May 2016

SecureSphere on Amazon AWS Configuration Guide 2
Copyright Notice
© 2016 Imperva, Inc. All Rights Reserved.
Follow this link to see the SecureSphere copyright notices and certain open source license terms:
https://www.imperva.com/sign_in.asp?retURL=/articles/Reference/SecureSphere-License-and-Copyright-Information
This document is for informational purposes only. Imperva, Inc. makes no warranties, expressed or implied.
No part of this document may be used, disclosed, reproduced, transmitted, transcribed, stored in a retrieval system, or translated into any language in any form or by any means without the written permission of Imperva, Inc. To obtain this permission, write to the attention of the Imperva Legal Department at: 3400 Bridge Parkway, Suite 200, Redwood Shores, CA 94065.
Information in this document is subject to change without notice and does not represent a commitment on the part of Imperva, Inc. The software described in this document is furnished under a license agreement. The software may be used only in accordance with the terms of this agreement.
This document contains proprietary and confidential information of Imperva, Inc. This document is solely for the use of authorized Imperva customers. The information furnished in this document is believed to be accurate and reliable. However, no responsibility is assumed by Imperva, Inc. for the use of this material.
TRADEMARK ATTRIBUTIONS
Imperva and SecureSphere are trademarks of Imperva, Inc.
All other brand and product names are trademarks or registered trademarks of their respective owners.
PATENT INFORMATION
The software described by this document is covered by one or more of the following patents:
US Patent Nos. 7,640,235, 7,743,420, 7,752,662, 8,024,804, 8,051,484, 8,056,141, 8,135,948, 8,181,246, 8,392,963, 8,448,233, 8,453,255, 8,713,682, 8,752,208, 8,869,279 and 8,904,558, 8,973,142, 8,984,630, 8,997,232, 9,009,832, 9,027,136, 9,027,137, 9,128,941, 9,148,440 and 9,148,446.
Imperva Inc.
3400 Bridge Parkway, Suite 200
Redwood Shores, CA 94065
United States
Tel: +1 (650) 345-9000 Fax: +1 (650) 345-9004
Website: http://www.imperva.com
General Information: [email protected]
Sales: [email protected]
Professional Services: [email protected]
Technical Support: [email protected]
Imperva-SecureSphere-v11.0-Amazon-AWS-On-Demand-Configuration-Guide-Patch-40-v1

SecureSphere on Amazon AWS Configuration Guide 3
End User License and Services Agreement
To view the End User License and Service Agreement for this product, please visit http://www.imperva.com/Other/LicenseAgreement

SecureSphere on Amazon AWS Configuration Guide 4
Table of Contents Copyright Notice ..................................................................................................................................... 2
End User License and Services Agreement ............................................................................................ 3
Chapter 1 - Introduction to SecureSphere on AWS ............................................................................... 6
Deployment Overview ...................................................................................................................... 7
A Note for New SecureSphere Customers ....................................................................................... 7
Chapter 2 - Understanding SecureSphere Deployment in AWS ............................................................ 8
Topology Overview ........................................................................................................................... 9
AWS Deployment Options ................................................................................................................ 9
Deployment Example without SecureSphere ................................................................................ 10
Deployment Example with SecureSphere ...................................................................................... 11
HTTP vs. HTTPS Support................................................................................................................. 12
System Prerequisites ...................................................................................................................... 12
AWS Configuration Checklist ......................................................................................................... 13
Deploying the SecureSphere Management Server .............................................................................. 14
Setting up a Management Server Stack ......................................................................................... 14
Windows Client - Connecting to the SecureSphere Management Server ..................................... 16
Sealed CLI ....................................................................................................................................... 16
Terminating a Management Server................................................................................................ 17
Chapter 3 - Deploying a SecureSphere Gateway ................................................................................. 18
Setting up a WAF Gateway Stack ................................................................................................... 19
Configuring a SecureSphere Gateway ........................................................................................... 20
Creating a SecureSphere Server Group and HTTP Service ............................................................ 20
Configuring KRP Rules ................................................................................................................... 21
Configuring Operation Mode .......................................................................................................... 22
Important Notes ............................................................................................................................. 22
Chapter 4 - Licensing SecureSphere - On-Demand .............................................................................. 23
Chapter 5 - Configuring AWS Infrastructure ....................................................................................... 24
AWS Console ................................................................................................................................... 26
VPC (Virtual Private Cloud) ............................................................................................................ 27
Subnets ........................................................................................................................................... 29
Key Pair ........................................................................................................................................... 31
Enable Internet Connection ........................................................................................................... 31
NAT Instance................................................................................................................................ 31
HTTP Proxy .................................................................................................................................. 32
Route Table ..................................................................................................................................... 33
Elastic Load Balancers .................................................................................................................... 34
External ELB .................................................................................................................................... 35
DNS ............................................................................................................................................. 35
Health Check ................................................................................................................................ 35
XFF .................................................................................................................................................. 35
SSL .................................................................................................................................................. 35
Session Stickiness (Affinity) ........................................................................................................... 35
Elastic IP Address ........................................................................................................................... 35

Table of Contents
SecureSphere on Amazon AWS Configuration Guide 5
Security Groups .............................................................................................................................. 36
NAT Instance Security Groups ....................................................................................................... 38
VPC Peering .................................................................................................................................... 38
Chapter 6 - Post Deployment Review ................................................................................................... 39
Secure Access ................................................................................................................................. 39
Minimizing Traffic Costs and Delays .............................................................................................. 39
Scaling Rules / License .................................................................................................................. 40
Cross-Region Load Balancing ......................................................................................................... 40
IP Address Change ......................................................................................................................... 40
Chapter 7 - Patching AWS..................................................................................................................... 41
Patching an AWS Gateway ............................................................................................................. 41
Patching an AWS Management Server .......................................................................................... 43
Appendix A - Troubleshooting .............................................................................................................. 44
Troubleshooting Checklist .............................................................................................................. 45
Troubleshooting Errors ................................................................................................................... 46
Get AWS System Log ...................................................................................................................... 47
HTTP Health Check ......................................................................................................................... 48
Debugging a Failed Gateway.......................................................................................................... 50
Collecting AWS Data for Troubleshooting ..................................................................................... 51
Appendix B - Backup and Restore ........................................................................................................ 52
Backup ............................................................................................................................................ 52
Restore ............................................................................................................................................ 53
Management Server ...................................................................................................................... 53
Management Server EBS ............................................................................................................... 53
Appendix C - Upgrading SecureSphere on AWS ................................................................................... 54
Upgrading a Management Server .................................................................................................. 54
Exporting the Management Server Configuration ............................................................................. 55
Bringing Up a Second Management Server with the New SecureSphere Version.................................. 56
Importing the Management Server Configuration to the Second Management Server .......................... 56
Upgrading a Gateway ..................................................................................................................... 56
Appendix D - Migrating an AWS On Demand Deployment to a BYOL Deployment ............................. 57
Appendix E - Amazon Instance Type Mapping ..................................................................................... 59
Index 60

SecureSphere on Amazon AWS Configuration Guide 6
C H A P T E R 1
Introduction to SecureSphere on AWS
This publication is intended for administrators tasked with deploying an Imperva SecureSphere Web Application Firewall (WAF) configured as a Kernel Reverse Proxy (KRP) in an Amazon Web Services (AWS) environment. It assumes the reader has a working knowledge of AWS and details the configuration steps required to achieve a successful deployment.
Note: This guide assumes the user conducting deployment has good working knowledge of AWS.
Deployment Overview 7
A Note for New SecureSphere Customers 7

Introduction to SecureSphere on AWS
SecureSphere on Amazon AWS Configuration Guide 7
Deployment Overview This document describes deployment of SecureSphere on AWS in the order it should take place. It contains the following:
Task/Subject Description
1 Understanding SecureSphere Deployment in AWS on page 8
Provides an overview of Deploying SecureSphere in AWS, includes topology examples, and lists prerequisites.
2 Deploying the SecureSphere Management Server on page 14
Provides instructions on how to deploy the SecureSphere Management Server once AWS infrastructure has been configured.
3 Deploying a SecureSphere Gateway on page 18
Once the license key has been uploaded, you need to deploy SecureSphere Gateways.
4 Licensing SecureSphere - On-Demand on page 23
Once the SecureSphere Management Server has been deployed, you need to upload a license key to the Management Server before deploying gateways.
4 Licensing Procedure - BYOL Once the SecureSphere Management Server has been deployed, you need to upload a license key to the Management Server before deploying gateways.
5 Configuring AWS Infrastructure on page 24
Provides step-by-step instructions on how to prepare and configure the AWS infrastructure so that it is ready for the deployment of the SecureSphere Management Server and Gateway.
6 Post Deployment Review on page 39
After having deployed both the SecureSphere Management Server, you should conduct a review to verify that you are ready to go online.
7 Patching AWS on page 41 Provides instructions on how to patch AWS SecureSphere deployments.
A Note for New SecureSphere Customers Welcome to Imperva SecureSphere. If you are a new Imperva SecureSphere customer it is important to note that intial SecureSphere setup in Amazon Web Services is complex, requiring both the setting up of a number of native AWS components, as well as initial SecureSphere configuration.
Subsequently, it is important that you thoroughly review this guide and follow all required steps to get SecureSphere up and running.
If you encounter difficulties during setup, you can refer to the section Troubleshooting on page 44. Additionally, customers purchasing SecureSphere on AWS are entitled to Imperva’s standard support package. After purchasing SecureSphere through AWS, you receive an email with instructions on how to contact support.
For more information on what this includes, please visit our website at www.imperva.com and under Support, choose Technical Support.

SecureSphere on Amazon AWS Configuration Guide 8
C H A P T E R 2
Understanding SecureSphere Deployment in AWS
In AWS deployments, the SecureSphere Management Server, the SecureSphere Gateways, the protected web servers and the Elastic Load Balancers (ELBs) – everything is virtual. Moreover, the Gateways are scalable: in periods of peak demand, additional Gateways can be added to the Gateway Group and torn down when they are no longer needed. The web servers too can be scaled in the same way, in response to changes in the volume of traffic.
Notes:
SecureSphere is available for AWS only in a WAF KRP configuration.
SecureSphere AMIs are provided as Hardware Virtual Machines (HVM)
In AWS the Management Server holds the license for itself and the Gateways it manages. In order to enable auto scaling, your license should allow the number of desired gateways; otherwise a perpetual or time-based license must be acquired before being able to scale up.
Topology Overview 9
AWS Deployment Options 9
Deployment Example without SecureSphere 10
Deployment Example with SecureSphere 11
HTTP vs. HTTPS Support 12
System Prerequisites 12
AWS Configuration Checklist 13

Understanding SecureSphere Deployment in AWS
SecureSphere on Amazon AWS Configuration Guide 9
Topology Overview This section provides an overview of SecureSphere deployment in AWS and is meant to provide a model for deploying SecureSphere in AWS to match your requirements.
The configuration described here deploys SecureSphere in an existing AWS web server deployment, with two Availability Zones in the VPC.
Note: Configuration in this document includes two availability zones to illustrate deployment which provides High Availability (HA). Users who don’t require High Availability can deploy SecureSphere on AWS with one Availability Zone.
AWS Deployment Options SecureSphere on AWS can be deployed in a number of configurations, as shown in the following table. Each row represents a different deployment and its options.
AWS Deployment Options
# of
External ELBs Gateways Internal ELB Web Servers
1 Single Gateway Group per Availability Zone
Spanning single or multiple Availability Zones
Gateway Group within Availability Zone or spanning multiple Availability Zones
2 Single Gateway Group spanning multiple Availability Zones
Spanning single or multiple Availability Zones
Gateway Group within Availability Zone or spanning multiple Availability Zones
3 Multiple Single Gateway Group spanning multiple Availability Zones
Spanning single or multiple Availability Zones
Gateway Group within Availability Zone or spanning multiple Availability Zones
4 Multiple Gateway Group per Availability Zone
Spanning single or multiple Availability Zones
Gateway Group within Availability Zone or spanning multiple Availability Zones
5 VPC Peering across multiple VPCs, within a single region, across one or more AWS accounts. For more information, see VPC Peering on page 38.

Understanding SecureSphere Deployment in AWS
10 SecureSphere on Amazon AWS Configuration Guide
Deployment Example without SecureSphere The figure below shows a typical deployment before SecureSphere. It includes:
Two availability zones
An external Elastic Load Balancer
A scaling group for each set of virtual web servers

Understanding SecureSphere Deployment in AWS
SecureSphere on Amazon AWS Configuration Guide 11
Deployment Example with SecureSphere The image below shows the deployment with SecureSphere. This example includes:
Two availability zones
Access for the SecureSphere Administrator, typically provided via a Windows Client installed from the AWS Marketplace or a VPN
An external and two internal Elastic Load Balancers
A scaling group for SecureSphere Gateways
A scaling group for each set of virtual web servers
A NAT Instance (or any other technology that provides external access)
A Windows client to provide access to the browser based SecureSphere user interface
Please note that this is not the only deployment possibility. There are others: for example, a single internal ELB might be used for the web application servers (though this is not recommended for the reasons set out in Minimizing Traffic Costs and Delays on page 39) or several different applications might be deployed behind the SecureSphere WAF.
Note: The SecureSphere Virtual Management Server is in a private subnet, not a public subnet. See Subnets on page 29 for a more detailed diagram, and Windows Client - Connecting to the SecureSphere Management Server on page 16 for information on the connection from the SecureSphere GUI Client to the Management Server.

Understanding SecureSphere Deployment in AWS
12 SecureSphere on Amazon AWS Configuration Guide
HTTP vs. HTTPS Support Configuration described in this guide is based on a deployment where HTTPS communication is terminated at the External ELB, meaning that all traffic within the VPC is via HTTP. SecureSphere also supports full HTTPS traffic within the VPC.
The configuration below is relevant when working with HTTPS within the VPC.
To configure HTTPS support, you must:
Configure a listener to HTTPS in the Load Balancer window.
Upload an SSL certificate to the Load Balancer.
Set the Instance Protocol to HTTPS.
Please note that using HTTPS will significantly impact performance, and traffic will be limited up to 100Mbps. Therefore, if using HTTPS it is recommended to use the SecureSphere AV1000.
System Prerequisites Before beginning the deployment, you need obtain the following:
Component Definition
Amazon Account ID You will get these when you open your account with Amazon Web Services.
The user who will perform the SecureSphere deployment should be defined as a Power User and granted the minimum required privileges for configuring the VPC and instantiating the SecureSphere Management Server, Gateway and the other components. See the Amazon IAM (Identity and Access Management) documentation for more detailed information about defining users and their privileges.
Amazon Username and Password
Amazon Access Key and Amazon Secret Key These are the Amazon Security Credentials.
SecureSphere License File
Obtained via e-mail after purchasing SecureSphere directly from Imperva.
You will need a license that will cover the Management Server and all the Gateways you plan to deploy, including Gateways to be scaled-up in the future. The license must be installed on the Management Server before you can deploy Gateways.
See Licensing for information on SecureSphere AWS licenses.
SecureSphere License Key
Obtained in the same e-mail as the license file, after purchasing SecureSphere directly from Imperva. A SecureSphere license key is required when deploying the SecureSphere Management Server and Gateway via Cloud Formation.

Understanding SecureSphere Deployment in AWS
SecureSphere on Amazon AWS Configuration Guide 13
Component Definition
SecureSphere Cloud Formation Template Files
These files are downloaded from the Imperva FTP site. You need these files to create AWS stacks. These files are in JSON format. The possible AWS setups and their corresponding template files are as follows:
DAM Gateway: SecureSphere-DAM-Gateway-AWS-CloudFormation-<SecureSphere-Version>-BYOL.json
WAF Gateway: SecureSphere-WAF-Gateway-AWS-CloudFormation-<SecureSphere-Version>-BYOL.json
Management Server, single mode: SecureSphere-Management-AWS-CloudFormation-<SecureSphere-Version>-BYOL.json
Notes:
Making changes to the original JSON files provided by Imperva beyond what is instructed in this document is not allowed. Any changes to these files without being approved by Imperva will not be supported.
For GovCloud deployments, you need special template files. For more information, see Gov Cloud Template files.
In addition, you must ensure that your AWS Service Limits enable you to configure a sufficient number of instances and other resources for your specific deployment. Running out of instances in the course of the deployment will cause unnecessary delays. For more information, refer to the AWS documentation.
Note: This guide assumes that your application web servers are already deployed in AWS.
AWS Configuration Checklist If you already have your AWS environment set up, you must confirm that all the items in the checklist below are properly configured. Failure to do so can lead to difficulties in getting your SecureSphere deployment to work. More details are given in the Configuring AWS Infrastructure on page 24 chapter.
Configuration Step
1 Design the deployment. Determine which AWS components you will need and confirm that your AWS Service Limits enable you to configure them all.
2 Create the VPC.
Make sure that the VPC exists and the web servers are already deployed in it. If this is not the case in your deployment, create the VPC at this point. For more information, see VPC (Virtual Private Cloud) on page 27.
3 Create the subnets. Create a subnet for each group of AWS components. For more information, see Subnets on page 29.
4 Create a key pair. Key pairs are used to launch instances and to connect to them. For more information, see Key Pair on page 31.

Deploying the SecureSphere Management Server
14 SecureSphere on Amazon AWS Configuration Guide
Configuration Step
5 Enable Internet Connection.
Use either a NAT instance or an HTTP Proxy to enable routing traffic from the Management Server and Gateways to the internet (for example, for a syslog server), and to notify AWS of the success or failure of instance creation. For more information, see NAT Instance on page 31 and HTTP Proxy on page 32.
6 Update route tables. An AWS route table corresponds to the route table of a physical router. For more information, see Route Table on page 33.
7 Create Elastic Load Balancers. See Elastic Load Balancer "Elastic Load Balancers" on page 34 .
8 Elastic IP Addresses See Elastic IP Address on page 35.
9 Create security groups. A security group corresponds to an internal firewall. For more information, see Security Groups on page 36.
10 Elastic IP Addresses See Elastic IP Address on page 35.
11 Create security groups. A security group corresponds to an internal firewall. For more information, see Security Groups on page 36.
Deploying the SecureSphere Management Server
To deploy a SecureSphere Management Server, you must set up a Management Server stack in AWS. Before commencing, make sure you have implemented the System Prerequisites. For more information, see System Prerequisites on page 12.
Setting up a Management Server Stack 14
Windows Client - Connecting to the SecureSphere Management Server 16
Sealed CLI 16
Terminating a Management Server 17
Setting up a Management Server Stack Note that setting up a stack is an operation conducted entirely in Amazon Web Services. The following procedure represents the most up-to-date AWS configuration. Imperva is not responsible for any changes that Amazon may make in their configuration.
To set up a SecureSphere Management Server stack in AWS:
1. In your browser, navigate to your Amazon Web Services page, and log in using your AWS account information.
2. Under Deployment and Management, click CloudFormation. The CloudFormation page appears.

Deploying the SecureSphere Management Server
SecureSphere on Amazon AWS Configuration Guide 15
3. Click Create Stack. The Select Template page appears.
4. Under Stack, enter a name for your new Management Server stack.
5. Under Template, select Upload a template to Amazon S3 and click Browse. The File Upload dialog box appears.
6. Navigate to the management server json file (SecureSphere-Management-AWS-CloudFormation-<SecureSphere-Version>-BYOL.json) on your computer, then click Open. The dialog box closes.
7. In the Select Template page, click Next. The Specify Parameters page appears.
8. Enter values for the parameters in accordance with the table below. Click Next. The Options page appears.
9. Optional - Under Tags, for Key enter Name, and for Value enter the name you gave the stack.
10. Click Next. The Review page appears, summarizing the values for the parameters of your new stack.
11. Review these values to ensure they are correct.
12. Check the box I acknowledge that this template might cause AWS CloudFormation to create IAM resources. Click Create. The CloudFormation page appears, showing the progress of the creation of your new stack.
Management Server instance
parameters Description
AvailabilityZone Specify the Availability Zone in which the Management Server is to be instantiated. For example: us-west-1a.
DNSDomain The default is to use Amazon’s DNS server domain, but you can specify another domain.
DNSServers The default is to use Amazon’s DNS servers, but you can specify the IP addresses of other servers.
ImpervaLicenseKey This license key is provided in the Imperva license email you receive after activation.
InstanceType Specify the AWS instance type, for example m3.large.
KeyPairName Specify the name of the key pair to be used when accessing the Management Server with SSH.
NewUserName
The name of a SecureSphere administrative user who will be accessing the Management Server using CLI commands.
Note: The user will authenticate using the key pair (see the KeyPairName parameter above).
NTPServers
The default is to use Amazon’s NTP servers, but you can specify the IP addresses of other servers.
Note: It is strongly recommended that you configure the NTP servers on the AWS instances in accordance with Amazon's instructions. Failure to do so can cause AWS permission issues in the long term.
PrivateIPAddress
The IP address to which SecureSphere administrators will connect in order to configure SecureSphere. If you use the default, the IP address will be assigned by AWS DHCP.
SecurePassword The password used for Gateway-Management Server communication. The same password must be entered when configuring the SecureSphere Gateways.
SecurePasswordRetype
SubnetId Specify the ID of the subnet in which the Management Server is to be instantiated.

Deploying the SecureSphere Management Server
16 SecureSphere on Amazon AWS Configuration Guide
Management Server instance
parameters Description
SystemPassword The password used by the Management Server to access the SecureSphere database.
SystemPasswordRetype
Timezone
The timezone of the Management Server in POSIX format. A list of valid time zone formats is available at http://il1.php.net/manual/en/timezones.php http://il1.php.net/manual/en/timezones.php. Click on the continent and enter one of the time zones exactly as displayed there, for example, America/Halifax or Africa/Nairobi. The default value is Israel Standard Time (IST), UTC +2.
VpcId Specify the ID of the VPC in which to instantiate the Management Server. For example: vpc-a0f832c5.
Windows Client - Connecting to the SecureSphere
Management Server There are two possibilities for connecting a client to the SecureSphere Management Server and configuring SecureSphere using the GUI:
Over a VPN – This method takes advantage of an existing internal enterprise VPN to provide security. For more information, search for OpenVPN in the Amazon documentation.
Remotely running a Windows client within the VPC – This method uses Microsoft RDP. You will have to create a Windows client instance and assign a key pair for this option.
Note: Windows clients are available in the Amazon marketplace.
Sealed CLI The following commands are available in the Command Line interface (CLI) in On-Demand deployments.
Command Function
date Display the system date and time.
df Display file system disk space usage.
hades-show Display hades parameters.
hades-watch Monitor changes to hades parameters.
help List available commands and their parameters.
history Display command history.
hostname Display the system hostname.
ifconfig Display network interface settings.
impctl The Imperva SecureSphere command line control utility.
netstat Display network statistics.

Deploying the SecureSphere Management Server
SecureSphere on Amazon AWS Configuration Guide 17
ping Send ICMP ECHO_REQUEST to network hosts.
quit Exit SecureSphere shell.
reboot Reboot the machine.
shutdown Shutdown the machine.
traceroute Print the route packets trace to network host.
patch-remote Download and install SecureSphere patch from URL.
export-local Export database to local file.
export-remote Export database and upload it to URL.
import-local Import database from local file.
import-remote Import database from URL.
gti-gw-remote Download the Gateway's get-tech-info from the Management Server.
gti-remote Upload get-tech-info to URL.
version Display version information.
wget Test URL connectivity.
To obtain help for any of these commands (except exit), enter either of the following commands:
help <command name>
or
<command-name> -h
or
? <command-name>
Terminating a Management Server Termination Protection is configured by default for Management Servers. To terminate a Management Server instance, you must first turn off Termination Protection (Services > EC2) and then terminate the Management Server.

SecureSphere on Amazon AWS Configuration Guide 18
C H A P T E R 3
Deploying a SecureSphere Gateway
Note: Before deploying the SecureSphere Gateway, install the Imperva license on the Management Server and start the Management Server. For more information, see Licensing.
To deploy a SecureSphere Gateway in AWS, use Services > CloudFormation to create a stack, and upload the Gateway Server template file available on the Imperva FTP site.
During the course of creating the Gateway instance, you will be asked to enter a number of parameters. Some of these are the standard First Time Login parameters while others are specific to the AWS environment.
A Gateway should have exactly two NICs on different segments (subnets) in the same Availability Zone:
One NIC (eth0) is for monitoring traffic and should be facing the internal and external ELBs. This interface cannot be on the same subnet as the Management Server.
The other NIC (eth1) is for management (including health checks) and communication with the SecureSphere Management Server.
Note: In contrast to a physical deployment, in the AWS environment the Gateway is configured so that management traffic is on eth1 and monitored traffic is on eth0.

Deploying a SecureSphere Gateway
SecureSphere on Amazon AWS Configuration Guide 19
A gateway, like any other EC2 instance is created by default with one NIC. You need to create an IAM user with limited permissions to create the second NIC. Once you create this user, you are provided an AWSAccessKey and AWSSecretKey which is described in the table below, which is then used to create the second NIC. Configure the limited user in the IAM with the following permissions:
ec2:DescribeSubnets
ec2:AttachNetworkInterface
ec2:CreateNetworkInterface
ec2:DescribeNetworkInterfaces
ec2:ModifyNetworkInterfaceAttribute
cloudformation:DescribeStackResources
iam:GetRole
iam:PassRole
autoscaling:DescribeLifecycleHooks
autoscaling:PutLifecycleHook
autoscaling:DescribeAutoScalingInstances
Setting up a WAF Gateway Stack 19
Configuring a SecureSphere Gateway 20
Creating a SecureSphere Server Group and HTTP Service 20
Configuring KRP Rules 21
Configuring Operation Mode 22
Important Notes 22
Setting up a WAF Gateway Stack Note that setting up a stack is an operation conducted entirely in Amazon Web Services. The following procedure represents the most up-to-date AWS configuration. Imperva is not responsible for any changes that Amazon may make in their configuration.
To set up a SecureSphere WAF Gateway stack in AWS:
1. In your browser, navigate to your Amazon Web Services page, and log in using your AWS account information.
2. Under Deployment and Management, click CloudFormation. The CloudFormation page appears.
3. Click Create Stack. The Select Template page appears.
4. Under Stack, enter a name for your new WAF Gateway stack.
5. Under Template, select Upload a template to Amazon S3 and click Browse. The File Upload dialog box appears.
6. Navigate to the WAF Gateway json file (SecureSphere-WAF-Gateway-AWS-CloudFormation-<SecureSphere-Version>-BYOL.json) on your computer, then click Open. The dialog box closes.
7. In the Select Template page, click Next. The Specify Parameters page appears.
8. Enter values for the parameters in accordance with the table below. Click Next. The Options page appears.
9. Optional - Under Tags, for Key enter Name, and for Value enter the name you gave the stack.
10. Click Next. The Review page appears, summarizing the values for the parameters of your new stack.
11. Review these values to ensure they are correct.

Deploying a SecureSphere Gateway
20 SecureSphere on Amazon AWS Configuration Guide
Check the box I acknowledge that this template might cause AWS CloudFormation to create IAM resources. Click Create. The CloudFormation page appears, showing the progress of the creation of your new stack.
The SecureSphere Gateways are in effect reverse proxies for the internal ELBs, and the details of the web application servers can be hidden from the Gateways. See the figure 4 in VPC for an example of this configuration.
Configuring a SecureSphere Gateway Once you have configured AWS infrastructure, deployed the SecureSphere management server, licensed SecureSphere, and deployed SecureSphere gateways, you then need to access SecureSphere via the SecureSphere GUI and configure a number of items to get up and running. These items include:
Configuration in SecureSphere For more information…
1 Create a server group. Creating a SecureSphere Server Group and HTTP Service on page 20
2
Define one or more KRP rules for the SecureSphere Gateway, so that traffic is correctly directed to the web servers.
Configuring KRP Rules on page 21
3 Configure the Server Group’s Operation Mode. Configuring Operation Mode on page 22
For more information on configuring a SecureSphere gateway, see the SecureSphere Web Security User Guide. The following sections describe configuration issues specific or particularly important in the AWS environment.
Creating a SecureSphere Server Group and HTTP Service To create a SecureSphere server group and HTTP service:
1. Once the gateway has been deployed, access SecureSphere configuration via a web browser using the following path: https://<Your Management IP address>:8083/ and log on.
2. Place all the Gateways in the same Gateway Group.
3. For each Gateway in the Gateway Group, create an alias. Give all the aliases in the same Gateway Group the same name.
4. In the SecureSphere Main workspace under Setup > Sites, right click the Sites tree and click Create Server Group.
5. Right click the new Server Group and click Create Service > HTTP Service.
See the SecureSphere Web Security User Guide for assistance with these tasks.

Deploying a SecureSphere Gateway
SecureSphere on Amazon AWS Configuration Guide 21
Configuring KRP Rules When defining a KRP rule in SecureSphere, the traffic should be directed to the internal ELB fronting the web application servers.
If you choose the topology recommended elsewhere in this guide, then the internal ELB(s) should be in the same availability zone as the corresponding Gateway group. In the image below, GW-Group-AZ1 should forward traffic to ELBs in AZ1, while GW-Group-AZ2 should forward traffic to ELBs in AZ2.
On the other hand, if you choose a topology in which a single gateway group spans multiple availability zones, using a single inner ELB, which means traffic can cross between availability zones, then the traffic should be directed from that single gateway group to the single ELB.
To access KRP rule configuration, in the Server Group you created, create an HTTP service and select it in the Sites tree. Click the Reverse Proxy tab. Then under Gateway IP alias, click New and configure the relevant details.
In an AWS deployment, in the field Internal IP / Hostname, enter the AWS DNS Name of the internal ELB rather than an IP address, because the internal ELB’s IP address may change from time to time. You can see the DNS Name in Load Balancers under EC2 Dashboard > Network & Security.
Note: In order to avoid the ELB health check failures, you need to create a default reverse proxy rule. If you want to automate the process, see Create Default Reverse Proxy Rule.
For more information about defining SecureSphere KRP rules, see the SecureSphere Web Security User Guide.

Deploying a SecureSphere Gateway
22 SecureSphere on Amazon AWS Configuration Guide
Configuring Operation Mode There are three operation modes:
Active: SecureSphere monitors traffic and apply policies. This means that alerts are generated and traffic is blocked when required by a policy.
Simulation (default): SecureSphere simulates monitoring, that is, it monitors traffic and generates alerts and violations, but does not block traffic. It is recommended to use simulation mode when SecureSphere is learning traffic.
Disabled: SecureSphere neither monitors nor blocks traffic. Traffic does not access the server. This mode should be used only in exceptional circumstances, for example, for debugging.
Initially, after SecureSphere is first installed, it is configured in simulation mode. While in this mode, you can identify suspicious traffic by examining whatever alerts are generated. At some point, you will want to switch to active mode in order to block this traffic, some of which will be blocked by SecureSphere’s default security policies. There will be a period of time during which you may wish to fine tune the policies, possibly defining new ones, in order to adapt your configuration to your specific requirements, for example, to eliminate false positives.
To configure the operation mode:
1. In the Main workspace, select Setup > Sites.
2. In the Sites window, click the server group whose operating mode you want to modify.
3. Click the Definitions tab.
4. Select the desired Operation Mode.
5. Click Save.
For information on fine tuning your configuration, see the SecureSphere Web Security User Guide.
Important Notes Gateway Group Names: SecureSphere Gateway group names should not be changed after they are initially
defined. The reason is that scaled-up Gateways will continue to be assigned to the old group name.
Auto Scaling: You can change the default auto scaling rules in Amazon CloudWatch if you find them unsuitable for your specific environment. Auto scaling cannot be disabled, but you can configure the rules in such a way that no auto scaling ever takes place.
Gateway Configuration Changes: Changing the configuration of Gateways is complicated by the need to ensure that scaled-up Gateways receive the changed configuration rather than the previous one. To do this, update the stack (Services > CloudFormation) with the changed values, then manually scale the Gateways down and then up.

SecureSphere on Amazon AWS Configuration Guide 23
C H A P T E R 4
Licensing SecureSphere - On-Demand
Your copy of SecureSphere On-Demand does not require a license. You can begin using SecureSphere On-Demand immediately after you install and configure it.
After configuring SecureSphere, it is recommended that you notify Imperva of your contact details. To do this, go to Admin > Licenses and click in the Amazon On-Demand Registration Form section.
Note: SecureSphere supports both BYOL and On-Demand Licenses at the same time. If your implementation uses both of these license types, they will both appear in the Management Server licensing window.
After completing the registration process, you will be have access to the following:
1. Imperva Support and Professional Services.
2. The full range of ThreatRadar feature included with SecureSphere On-Demand.

SecureSphere on Amazon AWS Configuration Guide 24
C H A P T E R 5
Configuring AWS Infrastructure
The following sections – which assume a working knowledge of AWS on the part of the reader – describe the special considerations in configuring a SecureSphere deployment in AWS, and provide suggested configuration guidelines. However, since every deployment is unique, the reader should approach these guidelines with some flexibility and be prepared to depart from them if warranted by the particular characteristics, requirements and constraints of the specific environment.
The table below lists the required configuration steps to configure AWS Infrastructure.
Configuration Step
1 Design the deployment. Determine which AWS components you will need and confirm that your AWS Service Limits enable you to configure them all.
2 Create the VPC.
In the deployment described here, the VPC already exists and the web servers are already deployed in it. If this is not the case in your deployment, create the VPC at this point. For more information, see VPC (Virtual Private Cloud) on page 27.
3 Create the subnets. Create a subnet for each group of AWS components. For more information, see Subnets on page 29.
4 Create a key pair. Key pairs are used to launch instances and to connect to them from outside the VPC. For more information, see Key Pair on page 31.
5 Create a NAT instance.
A NAT instance enables routing traffic from the Management Server and Gateways to the internet (for example, for to a syslog server), and to notify AWS of the success or failure of instance creation. For more information, see NAT Instance on page 31.
6 Update route tables. An AWS route table corresponds to the route table of a physical router. For more information, see Route Table on page 33.

Configuring AWS Infrastructure
SecureSphere on Amazon AWS Configuration Guide 25
Configuration Step
7 Create Elastic Load Balancers. See Elastic Load Balancers on page 34.
8 Elastic IP Addresses See Elastic IP Address on page 35.
9 Create security groups. A security group corresponds to an internal firewall. For more information, see Security Groups on page 36.
AWS Console 26
VPC (Virtual Private Cloud) 27
Subnets 29
Key Pair 31
Enable Internet Connection 31
Route Table 33
Elastic Load Balancers 34
External ELB 35
XFF 35
SSL 35
Session Stickiness (Affinity) 35
Elastic IP Address 35
Security Groups 36
NAT Instance Security Groups 38
VPC Peering 38

Configuring AWS Infrastructure
26 SecureSphere on Amazon AWS Configuration Guide
AWS Console When you log in to AWS, the Amazon Console is displayed.
Figure 1: Amazon Console
The Amazon Web Services you will be using in this deployment are the following:
Amazon Web Services
Component will be used in order to …
EC2 Create virtual servers in the Amazon Cloud. In this deployment, the web application servers have already been created and deployed (see the figure in Deployment Example without SecureSphere on page 10).
VPC Create a Virtual Private Cloud in which the deployment will be located. In this deployment, the VPC already exists.
Cloud Formation Create the SecureSphere Management Server and Gateways from templates provided by Imperva.
Cloud Watch Monitor the success / failure of the deployment itself and afterwards, events in the VPC.

Configuring AWS Infrastructure
SecureSphere on Amazon AWS Configuration Guide 27
VPC (Virtual Private Cloud) VPCs are configured by clicking Start VPC Wizard in the VPC Dashboard.
Figure 2: Creating a Virtual Private Cloud

Configuring AWS Infrastructure
28 SecureSphere on Amazon AWS Configuration Guide
Then the following is displayed once staring the VPC Wizard.
All the SecureSphere components should be instantiated in the same VPC as the web servers. Additionally, a SecureSphere Gateway scaling group should span all the Availability Zones in which the web servers are located. In this deployment, the VPC already exists, and consists of two Availability Zones (see Deployment Example with SecureSphere on page 11).

Configuring AWS Infrastructure
SecureSphere on Amazon AWS Configuration Guide 29
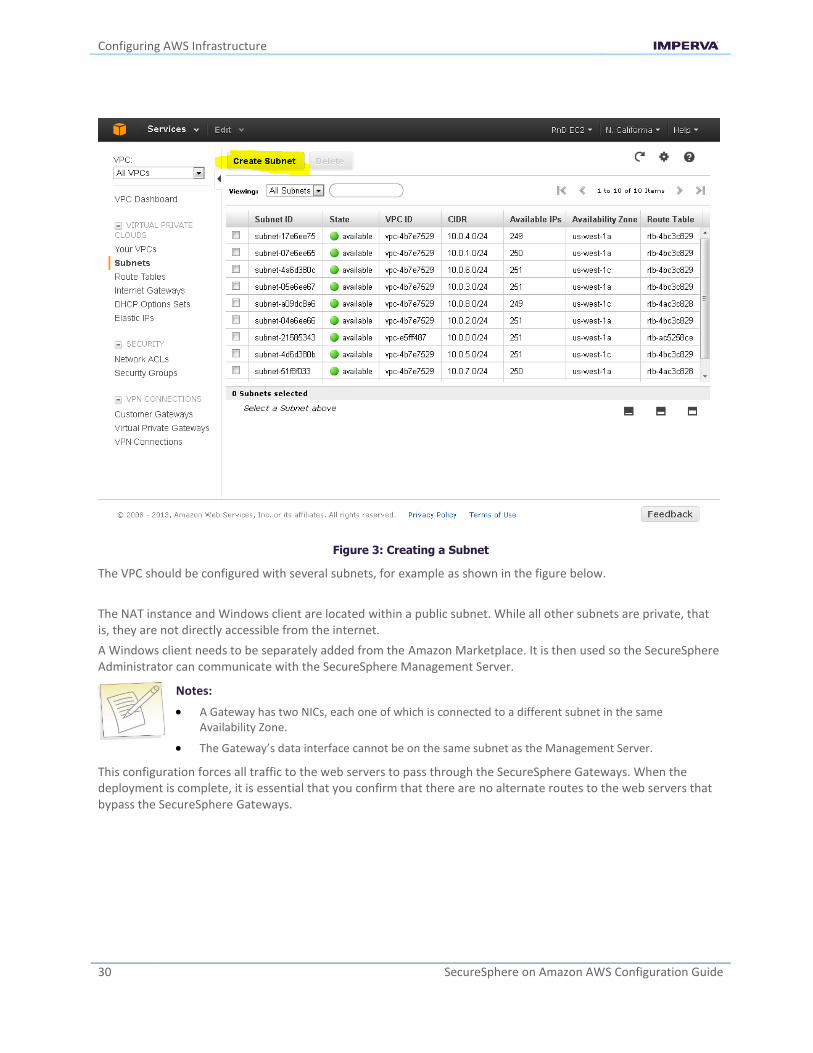
Subnets Subnets are configured in VPC Dashboard > Subnets.
Configuring AWS Infrastructure
30 SecureSphere on Amazon AWS Configuration Guide
Figure 3: Creating a Subnet
The VPC should be configured with several subnets, for example as shown in the figure below.
The NAT instance and Windows client are located within a public subnet. While all other subnets are private, that is, they are not directly accessible from the internet.
A Windows client needs to be separately added from the Amazon Marketplace. It is then used so the SecureSphere Administrator can communicate with the SecureSphere Management Server.
Notes:
A Gateway has two NICs, each one of which is connected to a different subnet in the same Availability Zone.
The Gateway’s data interface cannot be on the same subnet as the Management Server.
This configuration forces all traffic to the web servers to pass through the SecureSphere Gateways. When the deployment is complete, it is essential that you confirm that there are no alternate routes to the web servers that bypass the SecureSphere Gateways.

Configuring AWS Infrastructure
SecureSphere on Amazon AWS Configuration Guide 31
Key Pair Amazon EC2 uses public–key cryptography to encrypt and decrypt login information. Public–key cryptography uses a public key to encrypt a piece of data, such as a password, then the recipient uses the private key to decrypt the data. The public and private keys are known as a key pair.1
To log in to your instance, you must create a key pair in AWS, then specify the name of the key pair when you launch an instance, and provide the private key when you connect to the instance.
Linux/Unix instances have no password, and you use a key pair to log in using SSH. With Windows instances, you use a key pair to obtain the administrator password and then log in using RDP.
Key Pairs are configured in Services > EC2 Dashboard > Key Pairs.
You will need to define at least one key pair that will be used, for example, when you:
Launch an instance, for example, a SecureSphere Gateway, Management Server or NAT instance
Connect to an instance, using SSH for example
If lost, the key file cannot be restored, so you must store the Key Pair file in a safe and secure manner.
Enable Internet Connection Either set up a NAT Instance or a HTTP Proxy for each VPC.
NAT Instance
NAT Instances are used in this deployment in order to provide access to the SecureSphere Management Server and Gateway from the public domain. However you can alternatively decide to use other means, such as an HTTP Proxy.
NAT instances are configured in Services > EC2 > Instances.
Note: For detailed information about NAT instances, refer to the Amazon documentation.
Figure 4: Configuring a NAT Instance

Configuring AWS Infrastructure
32 SecureSphere on Amazon AWS Configuration Guide
A NAT instance enables SecureSphere Gateways and Management Servers in the private subnets to access the internet, for example, for syslogs, Imperva FPS services, and to notify AWS of the success or failure of instance creation.
Note: For information about configuring a Security Group for a NAT instance, see NAT Instance Security Groups on page 38.
A NAT instance is located in a public subnet (see the figure in Subnets on page 29).
Additionally, in order to provide public access you need to configure the associated Security Group protocol with a Source IP address of 0.0.0.0.
You should disable source/destination checking for the NAT instance, because it must be able to send and receive traffic when the source or destination is not itself. For more information, search for Disabling Source/Destination Checks in the Amazon AWS documentation.
HTTP Proxy
If your deployment includes an HTTPS proxy, you must edit the Gateway and MX JSON template files before deploying it and specify values for the following parameters as appropriate to your configuration.
Parameter Definition
https.proxyHost The IP address or of the HTTPS proxy.
https.proxyPort The port number on the HTTPS proxy to which to send HTTPS traffic.
http.proxyUser The user name for the connection to the HTTP proxy.
http.proxyPass The password for the connection to the HTTP proxy.
Note: HTTPS support is required in a proxy-only environment for AWS deployment.

Configuring AWS Infrastructure
SecureSphere on Amazon AWS Configuration Guide 33
Route Table You need to set up the subnets' routing as follows:
NAT: The Nat subnet is public. It must be routed to the IGW.
Management Server: The Management Server subnet is private. Set the default route (0.0.0.0/0) to the NAT subnet.
Gateway: The Gateway subnet is private. Set the default route (0.0.0.0/0) to the NAT subnet.
For deployments with a complex arrangement of subnets, it is recommended that you set up a route table dedicated to the SecureSphere elements. The routing table for the private subnets (both Management Server and Gateway) can be the same routing table.
Route tables are configured in Services > VPC > Route Tables.
Figure 5: Create Route Table Window - Public Subnet Routing
Figure 6: Create Route Table Window - Private Subnet Routing

Configuring AWS Infrastructure
34 SecureSphere on Amazon AWS Configuration Guide
Elastic Load Balancers Elastic Load Balancers are configured by clicking Create Load Balancer in Services > EC2 > Load Balancers.
Figure 7: Create an Elastic Load Balancer
In the deployment shown in Deployment Example without SecureSphere on page 10, there is only an external Load Balancer fronting the web servers.
In the deployment shown in Deployment Example with SecureSphere on page 11, you will need three ELBs: an external ELB to balance traffic between the SecureSphere Gateways in the two Availability Zones, and an internal ELB in each Availability Zone to balance traffic among the web servers in that Availability Zone.
Notes:
The Availability Zones selected in the ELB should be public subnets (with IGW routing).
It is strongly recommended that you configure the ELBs to work in HTTP mode, and not TCP mode, as TCP mode could have a negative impact on the WAF functionality.

Configuring AWS Infrastructure
SecureSphere on Amazon AWS Configuration Guide 35
External ELB This topic addresses details regarding the following items:
DNS 35
Health Check 35
DNS
After completing the deployment you must associate the DNS entry for the web application with the external ELB.
Health Check
When configuring the external ELB’s Health Check, you must set the Ping Protocol to TCP and the Ping Port to 80.
XFF Because the external ELB is in effect a Reverse Proxy, XFF should be enabled in SecureSphere. For more information, see Supporting Web Load Balancers in the SecureSphere Web Security User Guide.
SSL It is recommended, for performance reasons, that SSL be offloaded to the external ELB. For more information, see Adding SSL Keys in the SecureSphere Web Security User Guide.
Session Stickiness (Affinity) If the web application does not maintain its own session cookies, then an ELB can be configured – by defining a stickiness policy in the AWS Console – to insert its own cookie to bind subsequent requests from the same user to the same web application instance.
Elastic IP Address Elastic IP addresses are configured in Services > EC2 > Elastic IPs.
An Elastic IP address is a publicly available IP address, enabling access from the internet.
If you are connecting to the Management Server from a Windows client using RDP, you should define an Elastic IP address for the Management Server.
If you are connecting to the SecureSphere Management Server over a VPN, you may not need to define any Elastic IP addresses.

Configuring AWS Infrastructure
36 SecureSphere on Amazon AWS Configuration Guide
Security Groups A Security Group acts as a firewall for instances, for example, for the SecureSphere Gateway instance. CloudFormation automatically creates two Security Groups: one for the Management Server and another for the Gateways. You may wish to modify the automatically-created Security Groups, for example, to protect ports other than the default port 80.
Figure 8: Creating a Security Group
Configuring AWS Infrastructure
SecureSphere on Amazon AWS Configuration Guide 37
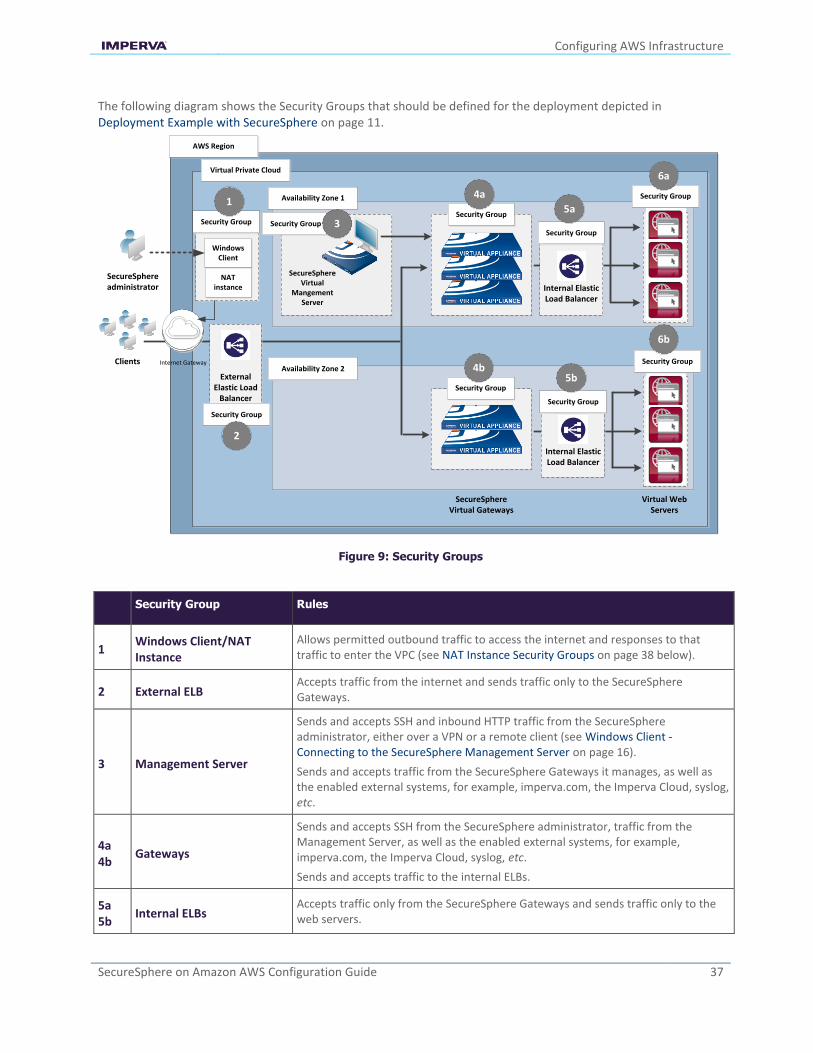
The following diagram shows the Security Groups that should be defined for the deployment depicted in Deployment Example with SecureSphere on page 11.
Figure 9: Security Groups
Security Group Rules
1 Windows Client/NAT Instance
Allows permitted outbound traffic to access the internet and responses to that traffic to enter the VPC (see NAT Instance Security Groups on page 38 below).
2 External ELB Accepts traffic from the internet and sends traffic only to the SecureSphere Gateways.
3 Management Server
Sends and accepts SSH and inbound HTTP traffic from the SecureSphere administrator, either over a VPN or a remote client (see Windows Client - Connecting to the SecureSphere Management Server on page 16).
Sends and accepts traffic from the SecureSphere Gateways it manages, as well as the enabled external systems, for example, imperva.com, the Imperva Cloud, syslog, etc.
4a 4b
Gateways
Sends and accepts SSH from the SecureSphere administrator, traffic from the Management Server, as well as the enabled external systems, for example, imperva.com, the Imperva Cloud, syslog, etc.
Sends and accepts traffic to the internal ELBs.
5a 5b
Internal ELBs Accepts traffic only from the SecureSphere Gateways and sends traffic only to the web servers.
Virtual Web Servers
SecureSphere Virtual
Mangement Server
SecureSphere administrator
Virtual Private Cloud
Clients
AWS Region
Availability Zone 2
Availability Zone 1
SecureSphere Virtual Gateways
Security Group
Security Group
External Elastic Load
Balancer
Security Group
Internal Elastic Load Balancer
Security Group3
2
Security Group5a
Internet Gateway
Internal Elastic Load Balancer
Security Group
Security Group
Security Group
6a
Security Group
6b
4b
1
5b
4a
NAT instance
Windows Client

Configuring AWS Infrastructure
38 SecureSphere on Amazon AWS Configuration Guide
Security Group Rules
6a 6b
Application web servers
Typically, accepts and sends traffic only from/to the internal ELBs, but other rules are possible as well as long as the only publicly-available path to the application web servers is through the SecureSphere Gateways.
You may find it necessary to adjust these rules for your specific deployment. In addition, you must take care that the Security Group rules are synchronized with changes to the configuration, for example, when new services are added.
NAT Instance Security Groups Configure the NAT instance Security Group as described in the table below in order to allow the NAT instance to:
receive internet-bound traffic from the private subnet
receive SSH traffic from your network
send traffic to the internet, which enables the instances in the private subnet to get software updates
Inbound
Source Protocol Port Comments
the private subnet TCP 80 Allows inbound HTTP traffic from servers in the private subnet.
the private subnet TCP 443 Allows inbound HTTPS traffic from servers in the private subnet.
the public IP address range of your network
TCP 22 Allows inbound SSH access to the NAT instance from your network (over the Internet gateway)
Outbound
Destination Protocol Port Comments
0.0.0.0/0 TCP 80 Allows outbound HTTP access to the internet.
0.0.0.0/0 443 443 Allows outbound HTTPS access to the internet.
Note: For detailed information about NAT instances and Security Groups, refer to the Amazon documentation.
VPC Peering In a situation where there is more than one VPC within the same region, there are Gateways on all the VPCs, but only one Management Server on one of the VPCs, you use VPC Peering to enable communication between these VPCs to enable the Management Server to connect with all the Gateways.
Note: A VPC with no NAT instance has no internet access, and VPC Peering alone does not solve this. In order for SecureSphere to work across multiple VPCs, you must create a NAT instance for each VPC.

SecureSphere on Amazon AWS Configuration Guide 39
C H A P T E R 6
Post Deployment Review
This section lists some of the issues you should review after completing the deployment.
Secure Access 39
Minimizing Traffic Costs and Delays 39
Scaling Rules / License 40
Cross-Region Load Balancing 40
IP Address Change 40
Secure Access Ensure that the only publicly-available path to your application web servers is through the SecureSphere Gateways.
Minimizing Traffic Costs and Delays You should configure your deployment in a way that reduces to a minimum the traffic flowing among multiple Availability Zones. This has two benefits: you will avoid the extra costs as well as the delays associated with cross-Availability Zone traffic. For example, if you have two Availability Zones, configure an internal ELB for each Availability Zone (as in Deployment Example with SecureSphere on page 11) rather than a single internal ELB for both.

Post Deployment Review
40 SecureSphere on Amazon AWS Configuration Guide
Scaling Rules / License You should take care to configure the scaling rules to match your Imperva license, that is, to ensure that AWS will not attempt to scale up SecureSphere Gateways beyond the number permitted by the license and to scale down Gateways when their time-based licenses expire.
Cross-Region Load Balancing If you require the capability to perform load balancing across Amazon regions, you should employ third-party tools for this purpose.
IP Address Change It may happen that the IP address of the SecureSphere Management Server changes, for example, after a crash or after Amazon maintenance. If this occurs, the Gateways will be unable to communicate with the Management Server until you manually restore the previous IP address.
You should enable detailed AWS monitoring so that you can respond in a timely manner to IP address changes and other important events.

SecureSphere on Amazon AWS Configuration Guide 41
C H A P T E R 7
Patching AWS
The procedure for patching an AWS SecureSphere deployment is different for Management Servers and for Gateways.
For information on patching an AWS Gateway, see Patching an AWS Gateway on page 41.
For information on patching an AWS Management Server, see Patching an AWS Management Server on page 43.
Patching an AWS Gateway 41
Patching an AWS Management Server 43
Patching an AWS Gateway Gateways are deployed using Cloud Formation. Because a Gateway instance does not store persistent data, it can be created and destroyed by the AWS scaling mechanism. For this reason, directly patching a running Gateway instance is not effective: new Gateways will not include the patch.
The patch procedure therefore consists of updating the scaling group (Cloud Formation stack).
To patch an AWS Gateway:
1. Back up your current CFN template as follows:
Select the Cloud Formation stack.
Click the Template tab.
Save the template.
Click the Parameters tab.
Save the parameters.
This procedure is described in the AWS documentation.

Patching AWS
42 SecureSphere on Amazon AWS Configuration Guide
Note: If you are already running the maximum number of Gateways allowed by the Management Server license, the new Gateway will not be able to register to the Management Server. You will have to take down one of the Gateways before continuing with this procedure. If you have a High Availability deployment and do not want to lose High Availability functionality during the patch update, create an additional On-Demand Gateway stack to handle the traffic during the update.
2. In Cloud Formation, select the Gateway stack.
3. Click Update Stack.
4. Click Upload a template to Amazon S3.
5. Upload the JSON file of the patch AMI.
6. Review the JSON parameters and verify them. The parameter values are carried over from the previous version, and you can change them if required.
7. Password parameters are empty and you must select Use existing value to copy them to the new template.
8. In the Options screen, leave the default settings and click Next.
9. Check the box I acknowledge that this template might cause AWS CloudFormation to create IAM resources.
10. Click Update to start the patch installation.
11. The Gateway stack will now perform a “rolling update,” that is, it will take down one Gateway after another and bring up a new instance (which includes the patch) in its place, by default at ten minute intervals until all the Gateways are updated.
If for whatever reason you want to restore the previous version, update the Cloud Formation stack to use the previous template and parameters and the stack will be updated, that is, restored to the previous unpatched version.
For information on patching an AWS Management Server, see Patching an AWS Management Server on page 43.

Patching AWS
SecureSphere on Amazon AWS Configuration Guide 43
Patching an AWS Management Server This procedure describes how to patch an AWS Management Server.
To patch an AWS Management Server:
1. Stop the Management Server (using the impctl teardown CLI command).
2. Create a snapshot of the Management Server.
3. Run the patch file using the patch-remote command, as follows:
patch-remote [-h] [--insecure] [--user USER:PASSWORD] [--proxy HOST:PORT]
[--proxy-user USER:PASSWORD] PATCH_URL.
For details regarding optional download flags, see the table Optional Download Flags below.
4. When the installation ends, reboot the Management Server instance.
If for whatever reason you want to restore the previous version, you can do this from the snapshot.
For information on patching an AWS Gateway, see Patching an AWS Gateway on page 41.
Optional Download Flags
Name Description
--insecure Allows connections to SSL sites without certificates
--user USER:PASSWORD Sets the server's usename and password
--proxy HOST:PORT Tells SecureSphere to use an HTTP proxy on the listed port
--proxy-user USER:PASSWORD Defines the proxy's username and password
PATCH_URL
Patch URL address (e.g. ftp://ftp.imperva.com/SS_patch.enc).
Syntax example: SecureSphere> patch-remote --insecure --user my_user:my_password
scp://host_ip/tmp/SecureSphereV11.0.0-x86_64-Patch4_0.x.en
c

SecureSphere on Amazon AWS Configuration Guide 44
A P P E N D I X A
Troubleshooting
This section includes some guidelines for troubleshooting deployment problems. The following information for troubleshooting is available:
Troubleshooting Checklist 45
Troubleshooting Errors 46
Get AWS System Log 47
HTTP Health Check 48
Debugging a Failed Gateway 50
Collecting AWS Data for Troubleshooting 51

Troubleshooting
SecureSphere on Amazon AWS Configuration Guide 45
Troubleshooting Checklist The following is a list of items that you can check when trying to troubleshoot installation or operation of SecureSphere on AWS.
Troubleshooting Checklist
Item to Verify Description
AWS System Log
The AWS System Log lists errors encountered in AWS infrastructure and can give an indication as to problems that may be occurring.
When experiencing issues during setup, it is recommended you examine this log. For more information see Get AWS System Log on page 47
MX and Gateway have outside access
The NAT instance must be configured to enable outside access for a variety of purposes. The following provides an overview of what needs to be configured for the NAT instance:
The MX and gateway must have a route table associated with the subnets directing to the NAT Instance - e.g : "0.0.0.0 -> Nat instance id"
The NAT instance must have a public route table connected to the internet gateway - e.g. "0.0.0.0 - > igXXXX instance ID"
Note that the gateway will probably be stuck (in "WaitCondition" state) as part of the first time login if access is not be available
You must disable the source/destination check in the NAT instance.
For more information, see Amazon documentation on Disabling Source/Destination Checks.
For information on configuring a NAT instance, see NAT Instance on page 31.
Connectivity between Devices
For SecureSphere to properly operate, there needs to be connectivity between its various devices. When encountering issues you should check to verify the below:
Security Groups: Needed for relevant ports between the MX, gateway and ELBs. usually ports 8083, 22, 443, 80. For more information on security groups, see Security Groups on page 36.
Subnets and routing: Configured accordingly to allow access. For information on configuring subnets, see Subnets on page 29.
Elastic's IPs: Must be configured to reach within the VPC. Alternatively a VPN can be configured to allow for direct access from within your IP addresses. For information on configuring Elastic IPs, see Elastic IP Address on page 35.
ELB is configured to listen to and Forward HTTP Protocol
The Elastic Load Balancer (ELB) must be configured to listen for the HTTP protocol and forward HTTP traffic on the ports used by the SecureSphere gateway and web servers. To verify this is taking place:
Make sure that the health check is configured per the recommended guidelines. For information on the ELB Health Check, see Health Check on page 35.
Check that ELBs show instances as in service (Health check are getting response). For more information on ELBs, see External ELB on page 35
Troubleshooting
46 SecureSphere on Amazon AWS Configuration Guide
Item to Verify Description
Scaling Group is configured as required and that scaling policies applied there have not been changed
Scaling policies should be based on CPU and Throughput , for 5 minutes polling interval.
KRP Rules are Configured
KRP rules must be defined so that the KRP will listen to the relevant port. The server IP address should be the IP address associated with the relevant Inner ELB name. For more information on KRP Rules, see Configuring KRP Rules on page 21.
ec2_auto_ftl.log
A log is available at /var/log/ec2_auto_ftl.log which contains an overview of initial setup of SecureSphere listing the status of tasks including first tome login, creating a new users, setting passwords, asset tag, timezone and more.
On-Demand customers can user the command ec2log to display the log file.
Troubleshooting Errors The following is a list of errors that may be encountered and suggested resolutions to these errors
Problem Possible Cause
Instance creation fails (ROLLBACK_COMPLETE)
The reason for the failure is available in the stack’s Services > CloudFormation > Events tab.
The event shows the reason for the failure. If the event shows a WaitHandle Timeout message, the NAT instance through which communication with AWS takes place may be misconfigured, or the proxy is not configured properly.
Deletion of Management Servers fails (DELETE_FAILED).
Termination Protection is configured by default for Management Servers. To delete the Management Server stack you must manually disable Termination Protection in Services > EC2.
Instance creation of Management Server fails (ROLLBACK_FAILED)
When there is a stack creation failure for a Management Server, which is configured by default with Termination Protection, rollback fails.
Failed connecting to CloudFormation, validate NAT Instance or Proxy Configuration
Displayed in the AWS System Log, this error indicates there is a problem with the NAT configuration. It is recommended that you check NAT settings as described in NAT Instance on page 31.

Troubleshooting
SecureSphere on Amazon AWS Configuration Guide 47
Get AWS System Log The AWS System Log can contain information that will assist you in diagnosing problems you're encountering.
When encountering deployment issues, its always recommended that you download the AWS system log to see if there are any messages.
To access the AWS System Log:
1. In AWS, under Instances, right click the Instance.
2. Under Instance Settings, Select Get System Log.
Figure 10: Get System Log

Troubleshooting
48 SecureSphere on Amazon AWS Configuration Guide
The System Log opens in a separate window as shown below. in this example, the message states "Failed connecting to CloudFormation, validate NAT Instance or Proxy Configuration." So to troubleshoot, you could check NAT instance configuration as described in NAT Instance on page 31.
Figure 11: AWS System Log Example
HTTP Health Check If the ELB Health Check is configured to use HTTP, the Gateway can be configured to periodically log the health check and its "health status" in a cyclical log. The health check confirms that the connection through the External ELB > Gateway > Internal ELB > Web Server path and back is up, using HTTP packets.
The log file is in the /proc/hades/http_health_check directory, and it is limited to 3,000 entries, after which the entries are overwritten cyclically.
If you are using this feature, you should configure it for all Gateway stacks and Gateway Groups managed by the Management Server.
To configure the HTTP health check:
1. In the Main workspace, select Setup > Gateways.
2. Select the Gateway group.
3. In the Details tab, open the Advanced Configuration section.
4. Enter the following text and the click Save.

Troubleshooting
SecureSphere on Amazon AWS Configuration Guide 49
<http-health-check-monitoring>
<health-check-url url="<URL>" interval-sec="<n>" />
</http-health-check-monitoring>
For example:
<http-health-check-monitoring>
<health-check-url url="/healthCheck/health.html" interval-sec="300" />
</http-health-check-monitoring>
Name Description
url
The URL of the host whose health is to be checked. You can define multiple URLs, each one on a separate line.
Note: It is recommended you created a custom page for the Health Check URL and not use a default page. Otherwise the log may fill up and it may be difficult to identify relevant issues.
interval-sec The interval in seconds between health checks.
Click Save.
The log entries contain the following information:
timestamp
details of the IP addresses and ports in the path
URL
status
To delete the HTTP health check:
1. In the Main workspace, select Setup > Gateways.
2. Select the Gateway group.
3. In the Details tab, open the Advanced Configuration section.
4. Delete all the text between the opening and closing http-health-check-monitoring tags, so that all that remains is the following, and click Save.
<http-health-check-monitoring>
</http-health-check-monitoring>

Troubleshooting
50 SecureSphere on Amazon AWS Configuration Guide
Debugging a Failed Gateway The Management Server monitors the AWS SQS for requests to terminate a Gateway, which can occur for one of 3 reasons:
The Gateway instance failed an ELB health check.
The Gateway instance was scaled down.
The Gateway instance was manually terminated by the user.
In all of these cases, AWS removes the Gateway from the stack and scales up another Gateway in its place, and the Management Server unregisters the Gateway, so that it is no longer counted against the license.
If the reason for the Gateway instance termination is that the Gateway failed an ELB health check, the following events occur:
AWS delays terminating the failed Gateway instance for a pre-defined period (up to 30 minutes).
The Management Server runs the get-tech-info command on the failed Gateway (rebooting the Gateway if necessary) and stores the output file locally (on the Management Server).
The Management Server requests that AWS terminate the failed Gateway instance.
The SecureSphere administrator can then review the get-tech-info file to determine the reason for the Gateway’s failure.
If the reason for the Gateway instance termination is that the Gateway instance was scaled down or terminated by the user, the Management Server does not generate a get-tech-info file but allows AWS to immediately terminate the Gateway instance.
If more than one Gateway instance fails, the Management Server deals with them successively. There can be complications in unusual circumstances, for example, if many Gateways fail at the same time and AWS terminates a failed Gateway instance before the Management Server is able to run get-tech-info on it.
During the time a failed Gateway instance remains up pending the retrieval of its get-tech-info file and before AWS terminates its instance, the string “Under_Log_Retrieval” is appended to its instance name.

Troubleshooting
SecureSphere on Amazon AWS Configuration Guide 51
Collecting AWS Data for Troubleshooting You can collect logs about the operation and status of the AWS environment that can help with troubleshooting. You do this by running the aws-logs-remote command. SSH to the Gateway and enter the command into the CLI.
The command is to upload AWS logs and configuration to a URL. The syntax of the command is as follows:
aws-logs-remote [-h] --protocol {ftp,http,https,scp} [--user USERNAME]
[--password PASSWORD] [--insecure] [--proxy HOST:PORT]
[--proxy-user USER:PASSWORD]
URL
mandatory upload flags:
--protocol {ftp,http,https,scp} upload protocol
optional upload flags:
--user USERNAME upload server user
--password PASSWORD upload server password
--insecure allow connections to SSL sites without certs
--proxy HOST:PORT <host[:port]> use HTTP proxy on given port
--proxy-user USER:PASSWORD <user[:password]> set proxy user and password
positional arguments:
URL upload URL address - where file will be sent (e.g. ftp.imperva.com/support/customer_id/, 192.168.1.8/home/user_name/file_name)

SecureSphere on Amazon AWS Configuration Guide 52
A P P E N D I X B
Backup and Restore
This section review the process of backup and restore, as follows:
Backup 52
Restore 53
Backup Backing up the SecureSphere Management Server EBS (the Management Server data) is performed by running a Full System Export and then creating an AWS snapshot. These two actions should be coordinated as follows:
1. Create an Action Set of type Archiving.
2. To the Action Set, attach an action interface of type AWS Snapshot > Create AWS Snapshot.
3. Provide the Amazon credentials (Access Key ID and Secret Access Key) for creating the AWS snapshot.
4. Configure the Action Set as an Archiving Action in Full System Export (Admin > Maintenance > Export Settings).
5. Schedule the Full System Export.
A system event is issued upon the completion of the Archiving Action.
These actions should be scheduled at regular and frequent intervals and run by a user whose permissions are restricted to taking snapshots. The user must have URL access to the relevant Amazon Region in order to perform the snapshot. See the Amazon documentation for detailed information about defining users and their privileges.
The snapshot is created in the AWS environment. Only the last two snapshots are saved.

Backup and Restore
SecureSphere on Amazon AWS Configuration Guide 53
Restore This section reviews the various procedures involved with restoring a system and includes:
Management Server 53
Management Server EBS 53
Management Server
If the SecureSphere Management Server fails, you can restore it as follows:
To restore the SecureSphere Management Server:
1. Create a new SecureSphere Management from the AMI as described in Deploying the SecureSphere Management Server on page 14.
2. Confirm that Management Server still has the same IP address; otherwise the Gateways will be unable to communicate with it.
3. Restore the EBS from the snapshot, as described below.
Management Server EBS
If the SecureSphere Management Server EBS fails, it can be restored from the snapshot.
To restore the SecureSphere Management Server EBS:
1. In AWS EC2 > Snapshots, from the Snapshots page, right-click the snapshot from which to restore the SecureSphere Management Server EBS.
2. Select Create volume.
3. In Type, select the appropriate volume type, for example, Standard volume.
4. In the Instances page, stop the Management Server.
5. Wait for the Management Server to shut down completely.
6. Locate the volume used by the Management Server in the Volumes page.
7. Right-click the volume and select Detach volume.
8. Locate the volume created from the snapshot and select Attach volume.
9. Select the Management Server instance.
10. Select the Device /dev/sda1.
11. Click Attach.
12. Start the Management Server instance.
13. Connect to the Management Server using SSH.
14. Stop the Management Server with the impctl server stop command.
15. Import the export file that was created with the system export function. To import the file use the full_expimp.sh utility.
16. The export file location in the snapshot is /var/tmp/server-backup.
17. Start the Management Server with the impctl server start command.
For more information on exporting and importing the SecureSphere configuration and on starting and stopping the Management Server, see SecureSphere Administration Guide.

SecureSphere on Amazon AWS Configuration Guide 54
A P P E N D I X C
Upgrading SecureSphere on AWS
This procedure describes how to upgrade SecureSphere on AWS from earlier versions to a later version. It reviews the following topics:
Upgrading a Management Server 54
Upgrading a Gateway 56
Upgrading a Management Server This is a multi-step process:
Bring up a second MX and install the new SecureSphere version on this MX
Export the MX configuration.
Import the MX configuration to the second MX.
Bring down the old MX.
Exporting the Management Server Configuration 55
Bringing Up a Second Management Server with the New SecureSphere Version 56
Importing the Management Server Configuration to the Second Management Server
56

Upgrading SecureSphere on AWS
SecureSphere on Amazon AWS Configuration Guide 55
Exporting the Management Server Configuration
Notes:
In order to export the Management Server and conduct the upgrade, you must be using SecureSphere version 10.5 Patch 10 or newer.
You can upgrade from any version (from version 10.5 Patch 10) to any version.
To export the Management Server configuration, connect to SecureSphere via SSH, then execute the following command:
impctl platform export
The exported file is named UpgradeExport.tar.gz.zip.
--zip-password=<password> A password to protect the exported file. Valid password must contain 7-14 letters, digits or * ( ) - + = # % ^ : / ~ . , [ _ ]
--protocol=<protocol> <protocol> can be one of:
local
nfs
ftp
cifs
s3
The table below lists the arguments required for each of the possible protocols.
Protocol Arguments Explanation
local --path
nfs --path --server server must be an IP address
ftp --server --user --password --path server must be an IP address. This argument is optional.
cifs --server --user --password --path server must be an IP address
s3 --awsAccessKey –awsSecretKey --region --bucketName All the arguments are standard AWS parameters.

Upgrading SecureSphere on AWS
56 SecureSphere on Amazon AWS Configuration Guide
Examples
The following are a number of examples for how to run the Upgrade.
impctl platform export -–protocol=local --path=/tmp --zip-password=<password>
impctl platform export --protocol=nfs --path=/tmp --server 10.1.2.3 --zip-password=<password>
impctl platform export --protocol=ftp --server=10.5.6.7 --user=admin –-password=123456 –-path=/usr/tmp --zip-password=<password>
impctl platform export --protocol=cifs --server=10.1.2.3 --user=admin --password=123456 --path=/usr/tmp --zip-password=<password>
impctl platform export --protocol=s3 --awsAccessKey=[awsAccessKey] --awsSecretKey=[awsSecretKey] --region=[region] –-bucketName=[bucketName]
Bringing Up a Second Management Server with the New SecureSphere Version
Deploy a CloudFormation stack from the new CloudFormation templates, just like doing a clean installation of a new version.
Importing the Management Server Configuration to the Second Management Server
Import the Management Server configuration to the second Management Server by executing the following command:
impctl platform import
The arguments are the same as for the export step.
Note: The imported file must be named UpgradeExport.tar.gz.zip, otherwise SecureSphere won’t find the file for import.
Upgrading a Gateway As a Gateway is stateless, to upgrade it you must upgrade the gateway stack using the new JSON file which points to the new SecureSphere version AMI.

SecureSphere on Amazon AWS Configuration Guide 57
A P P E N D I X D
Migrating an AWS On Demand Deployment to a BYOL Deployment
Notes:
Before beginning this procedure, contact Imperva and obtain a BYOL license suitable to your requirements. The individual steps in this procedure are documented in detail elsewhere in this Deployment Guide and in the SecureSphere User and Administration Guides.
The On Demand license is not supported on AWS GovCloud (US) deployments.
To migrate an AWS deployment from On-Demand to BYOL:
1. Login to the On-Demand Management Server using ssh.
2. Run the CLI “export-remote” command and save the exported file to a remote location.
You will need the exported file later in this procedure.
3. Using Cloud Formation, create a new BYOL Management Server.
4. Login to the BYOL Management Server using ssh.
5. Stop the BYOL Management Server.
6. Run the CLI “import-remote” command and import the file you previously exported.
7. After the import successfully completes, start the BYOL Management Server.
8. Log into the BYOL Management Server GUI.

Migrating an AWS On Demand Deployment to a BYOL Deployment
58 SecureSphere on Amazon AWS Configuration Guide
9. Apply the BYOL license you obtained before you began this procedure (see the note above) to the BYOL Management Server.
10. Remove the individual On-Demand Gateways from the BYOL Gateway screen, but do not remove the Gateway Group.
11. Create a new BYOL Gateway stack pointing to the BYOL Management Server.
12. Associate the Gateway stack with the Gateway Group.
13. After determining that the BYOL deployment is functioning correctly, you can stop and terminate the On-Demand deployment.

SecureSphere on Amazon AWS Configuration Guide 59
A P P E N D I X E
Amazon Instance Type Mapping
The table below lists the recommended mapping of SecureSphere virtual appliance model numbers and the corresponding minimum Amazon Instance Types.
SecureSphere Virtual Appliance Model SecureSphere Appliance Type Minimum Amazon Instance Type
AV1000 Gateway M3.large
AV2500 Gateway M3.xlarge
AVM150 Management Server M3.xlarge

SecureSphere on Amazon AWS Configuration Guide 60
Index
A
A Note for New SecureSphere Customers • 7
Amazon Instance Type Mapping • 59
AWS Configuration Checklist • 13
AWS Console • 26
AWS Deployment Options • 9
B
Backup • 52
Backup and Restore • 52
Bringing Up a Second Management Server with the New SecureSphere Version • 56
C
Collecting AWS Data for Troubleshooting • 51
Configuring a SecureSphere Gateway • 20
Configuring AWS Infrastructure • 7, 13, 24
Configuring KRP Rules • 20, 21, 46
Configuring Operation Mode • 20, 22
Copyright Notice • 2
Creating a SecureSphere Server Group and HTTP Service • 20
Cross-Region Load Balancing • 40
D
Debugging a Failed Gateway • 50
Deploying a SecureSphere Gateway • 7, 18
Deploying the SecureSphere Management Server • 7, 14, 53
Deployment Example with SecureSphere • 11, 28, 34, 37, 39
Deployment Example without SecureSphere • 10, 26, 34
Deployment Overview • 7
DNS • 35
E
Elastic IP Address • 14, 25, 35, 45
Elastic Load Balancers • 14, 25, 34
Enable Internet Connection • 31
End User License and Services Agreement • 3
Examples • 56
Exporting the Management Server Configuration • 55
External ELB • 35, 45
G
Get AWS System Log • 45, 47
H
Health Check • 35, 45
HTTP Health Check • 48
HTTP Proxy • 14, 32
HTTP vs. HTTPS Support • 12
I
Important Notes • 22
Importing the Management Server Configuration to the Second Management Server • 56
Introduction to SecureSphere on AWS • 6
IP Address Change • 40
K
Key Pair • 13, 24, 31
L
Licensing SecureSphere - On-Demand • 7, 23
M
Management Server • 53
Management Server EBS • 53
Migrating an AWS On Demand Deployment to a BYOL Deployment • 57
Minimizing Traffic Costs and Delays • 11, 39
N
NAT Instance • 14, 24, 31, 45, 46, 48
NAT Instance Security Groups • 32, 37, 38
P
Patching an AWS Gateway • 41, 43
Patching an AWS Management Server • 41, 42, 43
Patching AWS • 7, 41
Post Deployment Review • 7, 39

Index
SecureSphere on Amazon AWS Configuration Guide 61
R
Restore • 53
Route Table • 14, 24, 33
S
Scaling Rules / License • 40
Sealed CLI • 16
Secure Access • 39
Security Groups • 14, 25, 36, 45
Session Stickiness (Affinity) • 35
Setting up a Management Server Stack • 14
Setting up a WAF Gateway Stack • 19
SSL • 35
Subnets • 11, 13, 24, 29, 32, 45
System Prerequisites • 12, 14
T
Terminating a Management Server • 17
Topology Overview • 9
Troubleshooting • 7, 44
Troubleshooting Checklist • 45
Troubleshooting Errors • 46
U
Understanding SecureSphere Deployment in AWS • 7, 8
Upgrading a Gateway • 56
Upgrading a Management Server • 54
Upgrading SecureSphere on AWS • 54
V
VPC (Virtual Private Cloud) • 13, 24, 27
VPC Peering • 9, 38
W
Windows Client - Connecting to the SecureSphere Management Server • 11, 16, 37
X
XFF • 35