
ODBIORNIK DWUKANAŁOWY DAJĄCY SIĘ PROGRAMOWAĆ … · - digitando “0” si attiva la modalità...
24
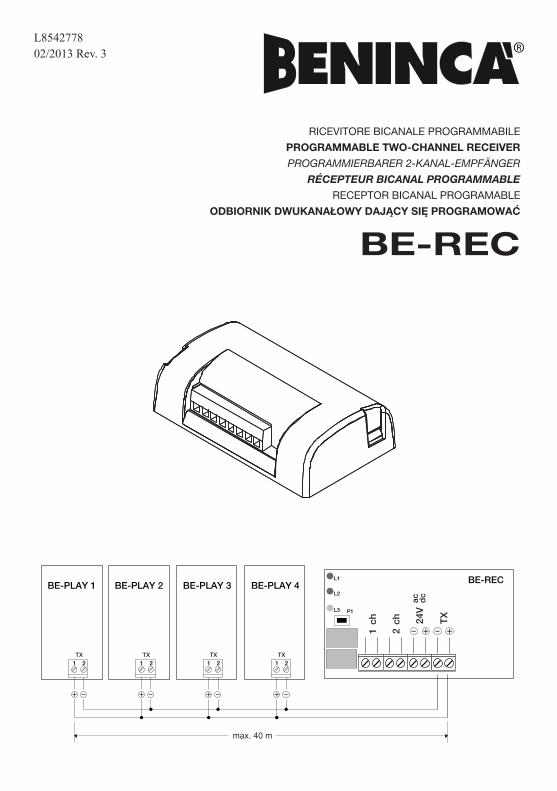
L8542778 02/2013 Rev. 3 BE-PLAY 1 BE-PLAY 2 BE-PLAY 3 BE-PLAY 4 BE-REC TX 1 2 TX 1 2 TX 1 2 TX 1 2 P1 L2 L3 1 ch 2 ch 24V TX ac dc L1 max. 40 m BE-REC RICEVITORE BICANALE PROGRAMMABILE PROGRAMMABLE TWO-CHANNEL RECEIVER PROGRAMMIERBARER 2-KANAL-EMPFÄNGER RÉCEPTEUR BICANAL PROGRAMMABLE RECEPTOR BICANAL PROGRAMABLE ODBIORNIK DWUKANAŁOWY DAJĄCY SIĘ PROGRAMOWAĆ
-
Upload
hoangkhanh -
Category
Documents
-
view
213 -
download
0
Transcript of ODBIORNIK DWUKANAŁOWY DAJĄCY SIĘ PROGRAMOWAĆ … · - digitando “0” si attiva la modalità...
L854277802/2013 Rev. 3
BE/PLAY
BE-PLAY 1 BE-PLAY 2 BE-PLAY 3 BE-PLAY 4
BE/REC
BE-REC
TX1 2
TX1 2
TX1 2
TX1 2
P1
L2
L3
1�ch
2�ch 24
V
TX
ac dc
L1
max. 40 m
BE/PLAY
BE-PLAY 1 BE-PLAY 2 BE-PLAY 3 BE-PLAY 4
BE/REC
BE-REC
TX1 2
TX1 2
TX1 2
TX1 2
P1
L2
L3
1�ch
2�ch 24
V
TX
ac dc
L1
max. 40 m
BE-REC
RICEVITORE BICANALE PROGRAMMABILE
PROGRAMMABLE TWO-CHANNEL RECEIVER
PROGRAMMIERBARER 2-KANAL-EMPFÄNGER
RÉCEPTEUR BICANAL PROGRAMMABLE
RECEPTOR BICANAL PROGRAMABLE
ODBIORNIK DWUKANAŁOWY DAJĄCY SIĘ PROGRAMOWAĆ

Dichiarazione CE di ConformitàDichiarazione in accordo alla Direttiva 2004/108/CE(EMC)
Fabbricante:Automatismi Benincà SpAIndirizzo:Via Capitello, 45 - 36066 Sandrigo (VI) - ItaliaDichiara che il prodotto:Sistema pulsantiera digitale e ricevente, modello:BE.RECè conforme alle condizioni delle seguenti Direttive CE:• DIRETTIVA 2004/108/CE DEL PARLAMENTO EUROPEO E DEL CONSIGLIO del 15 dicembre 2004 concernente il ravvicinamento delle legislazioni degli Stati membri relative alla compatibilità elettromagnetica e che abroga la direttiva 89/336/CEE, secondo le seguenti norme armonizzate:EN 61000-6-2:2005, EN 61000-6-3:2007.
Benincà Luigi, Responsabile legale.Sandrigo, 02/11/2010.
CE Declaration of ConformityDeclaration in accordance with Directive 2004/108/CE (EMC)
The Manufacturer:Automatismi Benincà SpAAddress:Via Capitello, 45 - 36066 Sandrigo (VI) - ItalyDeclares that the product:Digital keypad and receiver system, model:BE.RECconforms with the requirements of the following EU Directives:• DIRECTIVE 2004/108/CE OF THE EUROPEAN PARLIAMENT AND COUNCIL, 15 December 2004, in relation to the harmonisation of the legislation of member states regarding electromagnetic compatibility , in abrogation of Directive 89/336/CEE, per the following harmonised standards:EN 61000-6-2:2005, EN 61000-6-3:2007.
Benincà Luigi, Legal representative.Sandrigo, 02/11/2010.
2

CE-KonformitätserklärungErklärung im Einklang mit der Richtlinie 2004/108/CE(EMC)
Hersteller:Automatismi Benincà SpAAnschrift:Via Capitello, 45 - 36066 Sandrigo (VI) - ItalienErklärt, dass das Produkt:Digitales Schalttafelsystem und Empfänger, Modell:BE.RECdie Bedingungen der folgenden CE-Richtlinien erfüllt:• RICHTLINIE 2004/108/CE DES EUROPÄISCHEN PARLAMENTS UND EUROPARATS vom 15. Dezember 2004 in Bezug auf die Annäherung der Rechtsprechungen der Mitgliedsstaaten über die elektromagnetische Kompatibilität, welche die Richtlinie 89/336/CEE laut den folgenden harmonisiertenNormen:EN 61000-6-2:2005, EN 61000-6-3:2007.
Benincà Luigi, Leiter der Rechtsabteilung.Sandrigo, den 02.11.2010.
Déclaration de conformité CEDéclaration en accord avec la Directive 2004/108/CE(CEM)
Fabricant :Automatismi Benincà SpAAdresse :Via Capitello, 45 - 36066 Sandrigo (VI) - ITALIEDéclare que le produit :Système clavier numérique et récepteur, modèle :BE.RECest conforme aux conditions des Directives CE suivantes :• DIRECTIVE 2004/108/CE DU PARLEMENT EUROPÉEN ET DU CONSEIL du 15 décembre 2004 concernant le rapprochement des législations des États membres relatives à la compatibilité électromagnétique et qui abroge la directive 89/336/CEE, selon les normes harmonisées suivantes :EN 61000-6-2:2005, EN 61000-6-3:2007.
Benincà Luigi, Responsable légal.Sandrigo, 02/11/2010.
3

Declaración CE de ConformidadDeclaración según la Directiva 2004/108/CE(EMC)
Fabricante:Automatismi Benincà SpADirección:Via Capitello, 45 - 36066 Sandrigo (VI) - ItaliaDeclara que el producto:Sistema botonera digital y receptor, modelo:BE.RECes conforme a las condiciones de las siguientes Directivas CE:• DIRECTIVA 2004/108/CE DEL PARLAMENTO EUROPEO Y DEL CONSEJO del 15 de diciembre de 2004 sobre la armonización de las legislaciones de los Estados miembros sobre la compatibilidad electromagnética y que abroga la directiva 89/336/CEE, según las siguientes normasarmonizadas:EN 61000-6-2:2005, EN 61000-6-3:2007.
Benincà Luigi, Responsable legal.Sandrigo, 02/11/2010.
Deklaracja zgodności CESporządzona zgodnie z dyrektywami europejskimi 2004/108/WE (EMC)
Producent: Automatismi Benincà SpAAdres: Via Capitello, 45 - 36066 Sandrigo (VI) - Italiaoświadcza, że produkt: Odbiornik dwukanałowy dający się programowaćBE.RECjest zgodny z wymogami następujących dyrektyw WE:• DYREKTYWY 2004/108/WE RADY I PARLAMENTU EUROPEJSKIEGO z dnia 15 grudnia 2004 r. w sprawie zbliżania ustawodawstwa państw członkowskich w zakresie kompatybilności elektromagnetycznej i anulującej postanowienia Dyrektywy 89/336/EWG, zgodnie z następującymi normami zharmonizowanymi: EN 61000-6-2:2005, EN 61000-6-3:2007.
Benincà Luigi, Upoważniony przedstawiciel prawny.Sandrigo, 02/11/2010.
4

Ricevitore BE/REC
Ricevitore bicanale programmabile, da abbinare a una o più tastiere “BE/PLAY”.
Caratteristiche tecniche Ricevitore BE/REC
Alimentazione 24 Vac/VdcUscite 2 canali carico max 500mA-48Vac/dc. N. tastiere collegabili 4 tastiere BE/PLAY collegabili ad ogni ricevitoreDistanza massima tra dispositivi BE/PLAY-BE/REC
40m utilizzando cavo schermato
Codici memorizzabili Fino a 250 codici. Ogni codice può essere composto da un massimo di 9 cifre
Grado di protezione IP30Temperatura di funzionamnento
da -20°C a +70°C
Caratteristiche tecniche Tastiera BE/PLAY
Numero conduttori 2
1
2
3
4
7
8
5
6
9
0
Tasti 10 tasti numerici 0-9 più 1 tasto attivazioneSegnalazioni Tastiera retroilluminata per uso notturno e buzzer di
segnalazione acustica disinseribile.Grado di protezione IP54Temperatura di funzionamnento
da -20°C a +70°C
Funzioni Ingressi/Uscite ricevente BE/REC
1-2 Uscita canale 1* (500mA-48Vac/dc max)3-4 Uscita canale 2* (500mA-48Vac/dc max)5-6 Ingresso alimentazione 24 Vac/Vdc (5-,6+)7-8 Ingresso seriale per ricezione codice dalla tastiera/e (7-,8+)
*La configurazione di fabbrica prevede che le uscite 1-2 presentino un contatto normalmente aperto (N.O.). E’ possibile modificarle in contatto normalmente chiuso (N.C.) seguendo le indicazioni riportate nel paragrafo”Modifica del contatto di uscita NO<>NC”.
Funzioni Ingressi/Uscite Tastiera BE/PLAY
1-2 Uscita seriale per trasmissione codice (1-,2+)
CONFIGURAZIONE DEL RICEVITORE
Sono possibili due modalità di funzionamento: Base e Avanzata.Funzioni in modalità BASE:- Inserimento codice- Cancellazione codice- Cancellazione completa della memoriaFunzioni in modalità AVANZATA:- Inserimento codice- Inserimento di codici a scalare: al codice è consentito solo un determinato numero di accessi (da
1 a 999)- Cancellazione codice- Disabilitazione codici con determinata cifra iniziale
5

- Riattivazione codici con determinata cifra iniziale- Riattivazione di tutti i codici- Modifica password di programmazione.Note: L’inserimento dei codici in modalità base avviene tramite il pulsante PGM sulla ricevente. In modalità avanzata l’inserimento avviene tramite la tastiera numerica attraverso una password di accesso, senza necessità di accedere alla ricevente.
Configurazione dei canali
In entrambe le modalità i canali (relè) possono avere due diverse modalità di funzionamento:1 - contatto temporizzato: il relè cambia stato per un tempo impostabile da 1 a 6000 secondi.2 - contatto bistabile: il relè cambia stato fino all’inserimento di un nuovo codice.
Per modificare la modalità:1 Premere 3 volte il tasto PGM sul ricevitore. Il LED inizia a lampeggiare con frequenza di 3 lampeggi
seguiti da una pausa.2 Selezionare sulla tastiera il canale (relè) che si intende configurare (1 per il canale 1, 2 per il canale
2).3 Premere il tasto conferma (Æ�Å)4 Inserire il tempo di attivazione in secondi, tenendo presente che: - digitando “0” si attiva la modalità bistabile - digitando un numero da “1” a “6000”, viene attivata la modalità temporizzata. L’impostazione di fabbrica prevede una temporizzazione di 1 secondo.3 Premere il tasto conferma (Æ�Å), il buzzer emette tre beep a conferma dell’avvenuta
programmazione.
1 - MODALITà BASE1.1 - Memorizzazione codici1 Premere 1 volta il pulsante PGM sul ricevitore. II LED inizia a lampeggiare.2 Digitare sulla tastiera il codice da memorizzare (minimo 4, massimo 9 cifre) ad ogni pressione il
buzzer emette un suono a conferma della digitazione. 3 Premere il tasto conferma (Æ�Å), il buzzer emette un suono prolungato.4 Selezionare sulla tastiera il canale (relè) che si intende associare al codice tenendo presente che: - digitando “1” si attiva il canale 1. - digitando “2” si attiva il canale 2. - digitando “3” si attivano entrambi i canali.3 Premere il tasto conferma (Æ�Å), il buzzer emette tre beep.
1.2 - Cancellazione di un codice1 Premere 2 volte il pulsante PGM sul ricevitore. ll LED inizia a lampeggiare con frequenza di 2
lampeggi seguiti da una pausa.2 Digitare sulla tastiera il codice da cancellare ad ogni pressione il buzzer emette un suono a
conferma della digitazione. 3 Premere il tasto conferma (Æ�Å), il buzzer emette tre beep.
1.3 - Cancellazione completa della memoria1 Premere e mantenere premuto il pulsante PGM per 15s. I LED rosso e verde inizialmente spenti
lampeggiano alternativamente, al termine del lampeggio la cancellazione è completata.2 Dopo la cencellazione la ricevente ritorna alle impostazioni di default: uscita temporizzta di 1s e
password di accesso alla modalità avanzata 123456.
2 - MODALITà AVANZATA2.1 - Personalizzazione della Password di programmazione. 1 Digitare la password di fabbrica “123456” e premere Æ�Å2 Digitare 6 e premere Æ�Å3 Digitare la nuova password personale (6 cifre) e premere Æ�Å4 Ridigitare la nuova password personale a conferma dell’inserimento e premere Æ�Å5 Il buzzer emette tre beep.6

2.2 - Inserimento di un codice/codice a scalare. 1 Digitare la password personale e premere Æ�Å2 Digitare 1 e premere Æ�Å3 Digitare il codice da inserire e premere Æ�Å4 Selezionare il canale da associare al codice (1:ch1, 2:ch2, 3:entrambi) e premere Æ�Å5 Digitare 1 per disattivare o 2 per attivare gli accessi a scalare e premere Æ�Å6 Se nella fase precedente si è selezionato 2 digitare il numero di accessi a scalare (1-999) e premere
Æ�Å7 Il buzzer emette tre beep.
2.3 - Cancellazione di un codice. 1 Digitare la password personale e premere Æ�Å2 Digitare 2 e premere Æ�Å3 Digitare il codice da eliminare e premere Æ�Å4 Il buzzer emette tre beep.
2.4 - Disabilitazione di tutti i codici con una specifica cifra inziale. 1 Digitare la password personale e premere Æ�Å2 Digitare 3 e premere Æ�Å3 Digitare la cifra iniziale dei codici da disabilitare e premere Æ�Å4 Il buzzer emette tre beep.
2.5 - Riabilitazione di tutti i codici con una specifica cifra inziale. 1 Digitare la password personale e premere Æ�Å2 Digitare 4 e premere Æ�Å3 Digitare la cifra iniziale dei codici da riattivare e premere Æ�Å4 Il buzzer emette tre beep.
2.6 - Riabilitazione di tutti i codici disabilitati. 1 Digitare la password personale e premere Æ�Å2 Digitare 5 e premere Æ�Å3 Il buzzer emette tre beep.
Note e avvertenze : • Nonutilizzatecomecodicediaccessolapassworddiprogrammazione.• Lapausamassimatralapressionediunpulsanteelasuccessivaèdi10secondi,trascorsiiquali
vengono annullate le digitazioni precedenti. Dopo la pressione del tasto PGM sono disponibili 35 secondi per l’inserimento del codice, trascorsi i quali si esce dalla modalità programmazione.
• L’immissionedivalorinonammessivienesegnalatadalbuzzercon5beepbrevi• L’immissionedicodicicorrettivienesegnalatadalbuzzercon1beepprolungato• Laconfermadell’avvenutaprogrammazionediunafunzionevienesegnalatadatrebeep
MODIFICA DEL CONTATTO DI USCITE (N.O. > N.C.)Nel caso sia necessario è possibile modificare il contatto N.O. (normalmente aperto) presente sui canali di uscita 1 e 2 in contatto N.C. (normalmente chiuso). Sulla scheda sono presenti in prossimità dei relè dei contatti a saldare (vedi figura a fianco): i contatti J2 si riferiscono al canale 1, i contatti J3 si riferiscono al canale 2:Utilizzando un saldatore per elettronica rimuovere la saldatura che connette i contatti B-C e realizzare un ponticello tra i contatti A-B.
P1
J3
J4
J2
L2
C
L3
BA
CBA
7

BE/REC Receiver
Programmable two-channel receiver, to be combined with one or more “BE/PLAY” keypads.
BE/REC Receiver Technical Characteristics
Power supply 24 Vac/Vdc
Outputs 2 channels max load 500mA-48Vac/dc.
No. connectable keypads 4 BE/PLAY keypads connectable to each receiver
Maximum distance between BE/PLAY-BE/REC devices
40m using screened cable
Storable codes Up to 250 codes. Each code may be composed of a maximum of 9 figures
Degree of protection IP30
Working temperature from -20°C to +70°C
BE/PLAY Keypad Technical Characteristics
Number of leads 2
1
2
3
4
7
8
5
6
9
0
Keys 10 numerical keys 0-9 plus 1 activation keySignals Rear-lit keypad for night use and acoustic warning
buzzer which may be disabled.Degree of protection
IP54
Working temperature
from -20°C to +70°C
BE/REC Receiver Inputs/Outputs functions
1-2 Channel 1* output (500mA-48Vac/dc max)
3-4 Channel 2* output (500mA-48Vac/dc max)
5-6 Power supply input 24 Vac/Vdc (5-,6+)
7-8 Serial input for receiving code from the keypad(s) (7-,8+)
*In the factory configuration the outputs 1-2 present a normally open contact (N.O.). This may be changed to a normally closed contact (N.C.) by following the indications given in the paragraph ”Changing the output contact NO<>NC”.
BE/PLAY Keypad Inputs/Outputs functions
1-2 Serial output for transmitting code (1-,2+)
RECEIVER CONFIGURATION
There are two possible operating modes: Basic and Advanced.Functions in BASIC mode:- Inserting the code- Erasing the code- Completely erasing the memoryFunctions in ADVANCED mode:- Inserting the code- Inserting countdown codes: the code is allowed only a determined number of accesses (from 1 to
999)- Erasing the code- Disabling codes with a determined first figure
8

- Reactivating codes with a determined first figure- Reactivating all the codes- Changing the programming password.
Note: In basic mode codes are inserted using the PGM key on the receiver. In advanced mode they are inserted by means of the numerical keypad using an access password, without any need of access to the receiver.
Configuring the channels
In both modes the channels (relays) can have two different operating modes:1 – timed contact: the relay changes state for a time that may be set from 1 to 6000 seconds.2 - bistable contact: the relay changes state until a new code is inserted.
To change the mode:1 Press the PGM key on the receiver 3 times. The LED starts to blink with a frequency of 3 blinks
followed by a pause.2 On the keypad, select the channel (relay) that you intend to configure (1 for channel 1, 2 for channel
2).3 Press the confirmation key Æ�Å4 Insert the activation time in seconds, bearing in mind that: - typing “0” activates bistable mode - typing a number from “1” to “6000” activates timed mode. The factory setting considers a timing of 1 second.3 Press the confirmation key Æ�Å), the buzzer gives three beeps to confirm that programming has
been completed.
1 - BASIC MODE 1.1 – Storing codes1 Press the PGM key on the receiver once. The LED starts to blink.2 Type the code to be stored on the keypad (minimum 4, maximum 9 figures); each time a key is
pressed the buzzer gives a sound to confirm typing. 3 Press the confirmation key Æ�Å, the buzzer gives a prolonged sound.4 On the keypad, select the channel (relay) that you intend to associate with the code, bearing in
mind that: - typing “1” activates channel 1. - typing “2” activates channel 2. - typing “3” activates both channels.3 Press the confirmation key Æ�Å, the buzzer gives three beeps.
1.2 – Erasing a code1 Press the PGM key on the receiver twice. The LED starts to blink with a frequency of 2 blinks
followed by a pause.2 On the keypad, type the code to be erased; each time a key is pressed the buzzer gives a sound to
confirm typing. 3 Press the confirmation key Æ�Å, the buzzer gives three beeps.
1.3 - Completely erasing the memory1 Press and hold down the PGM key for 15s. The red and green LEDs which were originally off blink
alternately; when they stop blinking, the memory is completely erased.2 After erasure the receiver returns to the default settings: 1s timed output and access password to
advanced mode 123456.
2 – ADVANCED MODE 2.1 – Customisation of the programming Password. 1 Type in the factory-set password “123456” and press Æ�Å2 Type 6 and press Æ�Å3 Type in the new personal password (6 figures) and press Æ�Å
9

4 Type in the new personal password again, confirm insertion and press Æ�Å5 The buzzer gives three beeps.
2.2 – Inserting code/countdown code. 1 Type in the personal password and press Æ�Å2 Type 1 and press Æ�Å3 Type the code to be inserted and press Æ�Å4 Select the channel to be associated with the code (1:ch1, 2:ch2, 3: both) and press Æ�Å5 Type 1 to deactivate or 2 to activate countdown accesses and press Æ�Å6 If you selected 2 in the previous phase, type the number of countdown accesses (1-999) and press
Æ�Å7 The buzzer gives three beeps.
2.3 – Erasing a code. 1 Type the personal password and press Æ�Å2 Type 2 and press Æ�Å3 Type the code to be eliminated and press Æ�Å4 The buzzer gives three beeps.
2.4 – Disabling all the codes with a determined first figure. 1 Type the personal password and press Æ�Å2 Type 3 and press Æ�Å3 Type the first figure of the codes to be disabled and press Æ�Å4 The buzzer gives three beeps.
2.5 – Reactivating all the codes with a determined first figure. 1 Type the personal password and press Æ�Å2 Type 4 and press Æ�Å3 Type the first figure of the codes to be reactivated and press Æ�Å4 The buzzer gives three beeps.
2.6 - Reactivating all the disabled codes. 1 Type the personal password and press Æ�Å2 Type 5 and press Æ�Å3 The buzzer gives three beeps.
Notes and warnings: • Donotusetheprogrammingpasswordastheaccesscode.• Themaximumpausebetweenpressingonekeyandthenextis10seconds,afterwhicheverything
previously typed is cancelled. After pressing the PGM key you have 35 seconds to insert the code, after which the system leaves programming mode.
• Ifanyvaluestypedinareinadmissible,thisisindicatedbythebuzzerwith5shortbeeps• Whenthecodestypedinarecorrectthisisindicatedbythebuzzerwith1prolongedbeep• Theconfirmationofsuccessfulprogrammingofafunctionisindicatedbythreebeeps
CHANGING THE OUTPUT CONTACT (N.O. <> N.C.)If necessary it is possible to change the N.O. (normally open contact) present on the output channels 1 and 2 to a N.C. contact (normally closed). On the board there are some weld-on contacts near the relays (see figure alongside): the J2 contacts refer to channel 1, the J3 contacts refer to channel 2:Using a welding machine for electronic items, remove the weld that connects the contacts B-C and make a jumper between the contacts A-B.
P1
J3
J4
J2
L2
C
L3
BA
CBA
10

Empfänger BE/RECProgrammierbarer 2-Kanal-Empfänger zur Kombination mit einer oder mehreren Tastaturen “BE/PLAY”.
Technische Merkmale Empfänger BE/REC
Versorgung 24 Vac/Vdc
Ausgänge 2 Kanäle Höchstlast 500mA-48Vac/dc.
Zahl der anschließbaren Tastaturen
4 Tastaturen BE/PLAY pro Empfänger
Max. Abstand zwischen den Vorrichtungen BE/PLAY-BE/REC
40 m, bei Verwendung von Schirmkabeln
Speicherbare Codes Bis zu 250 Codes. Die einzelnen Codes können aus max. 9 Ziffern bestehen
Schutzart IP30
Betriebstemperatur von -20°C bis +70°C
Technische Merkmale Tastatur BE/PLAY
Zahl der Leiter 2
1
2
3
4
7
8
5
6
9
0
Tasten 10 Nummerntasten 0-9, sowie 1 Ein-/AustasteAnzeigen Tastatur mit Hintergrundbeleuchtung für den Einsatz bei
Nacht und ausschließbare akustische Anzeige mittels Buzzer.
Schutzart IP54Betriebstemperatur von -20°C bis +70°C
Funktionen der Ein-/Ausgänge Empfänger BE/REC
1-2 Ausgang Kanal 1* (500mA-48Vac/dc max.)
3-4 Ausgang Kanal 2* (500mA-48Vac/dc max.)
5-6 Eingang Versorgung 24 Vac/Vdc (5-,6+)
7-8 Serieller Eingang für Code-Empfang seitens der Tastatur/en (7-,8+)
*Die werkseitige Konfiguration sieht vor, dass die Ausgänge 1-2 einen Arbeitskontakt (NO) haben. Dieser kann in einen Ruhekontakt (NC) umgewandelt werden, indem die Anweisungen des Absatzes „Änderung des Ausgangskontakts NO<>NC” befolgt werden.
Funktionen der Ein-/Ausgänge Tastatur BE/PLAY
1-2 Serieller Ausgang für Code-Übertragung (1-,2+)
KONFIGURATION DES EMPFÄNGERS
Es sind zwei Funktionsmodi möglich: Basis und Weiterführend.Funktionen im BASIS-Modus:- Eingeben eines Codes- Löschen eines Codes- Vollständiges Löschen des SpeichersFunktionen im WEITERFÜHRENDEN Modus:- Eingeben eines Codes- Eingabe abnehmend gestaffelter Codes: für jeden Code ist nur eine bestimmte Zugriffszahl zulässig
(von 1 bis 999)- Löschen eines Codes- Deaktivieren von Codes mit bestimmter Anfangsziffer
11

- Erneute Aktivierung von Codes mit bestimmter Anfangsziffer- Erneute Aktivierung aller Codes- Ändern des Programmierungs-Passworts.Hinweis: Die Eingabe der Codes im Basis-Modus erfolgt mit der Taste PGM am Empfänger. Im weiterführenden Modus erfolgt die Eingabe mittels eines Zugriffpassworts über die numerische Tastatur, ohne dass auf den Empfänger zugegriffen werden muss.
Konfiguration der Kanäle
In beiden Modi können die Kanäle (Relais) zwei verschiedene Funktionsarten haben:1 Zeitgeregelter Kontakt: das Relais ändert den Status für eine Zeit, die von 1 bis 6000 Sekunden
einstellbar ist.2 Bistabiler Kontakt: das Relais ändert den Status, bis ein neuer Code eingegeben wird.
Ändern des Modus:1 3 Mal die Taste PGM am Empfänger drücken. Die LED blinkt jeweils 3 Mal, gefolgt von einer Pause.2 An der Tastatur den zu konfigurierenden Kanal (Relais) selektieren (1 für Kanal 1, 2 für Kanal 2).3 Die Bestätigungstaste Æ�Å drücken4 Die Aktivierungszeit in Sekunden eingeben, dabei beachten, dass: - bei Eintippen von “0” der bistabile Modus aktiviert wird - bei Eintippen einer Zahl von “1” bis “6000” der zeitgeregelte Modus aktiviert wird. Die werkseitige Einstellung sieht eine Zeitregelung von 1 Sekunde vor.3 Die Bestätigungstaste Æ�Å drücken, der Buzzer gibt drei Beep-Töne, als Bestätigung der erfolgten
Programmierung.
1 – BASIS-MODUS1.1 – Speichern der Codes1 1 Mal die Taste PGM am Empfänger drücken. Die LED beginnt zu blinken.2 An der Tastatur den zu speichernden Code eintippen (mindestens 4 und höchstens 9 Ziffern); bei jedem
Drücken gibt der Buzzer einen Ton zur Bestätigung der Eingabe. 3 Die Bestätigungstaste Æ�Å drücken, der Buzzer gibt einen anhaltenden Ton.4 An der Tastatur den Kanal (Relais) selektieren, der dem Code zugeordnet werden soll, dabei beachten,
dass: - mit Eingabe von “1” der Kanal 1 aktiviert wird. - mit Eingabe von “2” der Kanal 2 aktiviert wird. - mit Eingabe von “3” beide Kanäle aktiviert werden.3 Die Bestätigungstaste Æ�Å drücken, der Buzzer gibt drei Beep-Töne.
1.2 – Löschen eines Codes1 2 Mal die Taste PGM am Empfänger drücken. Die LED blinkt jeweils 2 Mal, gefolgt von einer Pause.2 An der Tastatur den zu löschenden Code eintippen; bei jedem Drücken gibt der Buzzer einen Ton zur
Bestätigung der Eingabe. 3 Die Bestätigungstaste Æ�Å drücken, der Buzzer gibt drei Beep-Töne.
1.3 – Vollständiges Löschen des Speichers1 Die Taste PGM drücken und 15 s gedrückt halten. Die roten und grünen LEDs, die zu Beginn
ausgeschaltet sind, blinken abwechselnd; sobald sie das Blinken einstellen, ist der Löschvorgang abgeschlossen.
2 Nach erfolgtem Löschen kehrt der Empfänger zur Default-Einstellung zurück: auf 1 s zeitgeregelter Ausgang und Zugriffpasswort zum weiterführenden Modus 123456.
2 - WEITERFÜHRENDER MODUS2.1 – Personalisierung des Programmierungs-Passworts. 1 Das werkseitige Passwort “123456” eintippen und Æ�Å drücken2 Die Ziffer 6 eintippen und Æ�Å drücken3 Das neue persönliche Passwort eintippen (6 Ziffern) und Æ�Å drücken4 Das neue persönliche Passwort zur Bestätigung nochmals eintippen und Æ�Å drücken5 Der Buzzer gibt drei Beep-Töne.
12

2.2 – Eingeben eines Codes/Eingabe abnehmend gestaffelter Codes1 Das persönliche Passwort eintippen und Æ�Å drücken2 Die Ziffer 1 eintippen und Æ�Å drücken3 Den einzufügenden Code eintippen und Æ�Å drücken4 Den Kanal selektieren, der dem Code zugeordnet werden soll (1:ch1, 2:ch2, 3: beide) und Æ�Å
drücken5 Die Ziffer 1 eintippen, um die abnehmend gestaffelten Zugriffe zu deaktivieren, oder 2, um sie zu
aktivieren und Æ�Å drücken6 Wenn während der vorhergehenden Phase 2 selektiert wurde, die Zahl der abnehmend gestaffelten
Zugriffe (1-999) eintippen und Æ�Å drücken7 Der Buzzer gibt drei Beep-Töne.
2.3 – Löschen eines Codes. 1 Das persönliche Passwort eintippen und Æ�Å drücken2 Die Ziffer 2 eintippen und Æ�Å drücken3 Den zu löschenden Code eintippen und Æ�Å drücken4 Der Buzzer gibt drei Beep-Töne.
2.4 – Deaktivierung aller Codes mit einer bestimmten Anfangsziffer. 1 Das persönliche Passwort eintippen und Æ�Å drücken2 Die Ziffer 3 eintippen und Æ�Å drücken3 Die erste Ziffer des zu deaktivierenden Codes eintippen und Æ�Å drücken4 Der Buzzer gibt drei Beep-Töne.
2.5 –Erneute Aktivierung aller Codes mit einer bestimmten Anfangsziffer. 1 Das persönliche Passwort eintippen und Æ�Å drücken2 Die Ziffer 4 eintippen und Æ�Å drücken3 Die erste Ziffer des wieder zu aktivierenden Codes eintippen und Æ�Å drücken4 Der Buzzer gibt drei Beep-Töne.
2.6 - Erneute Aktivierung aller deaktivierten Codes. 1 Das persönliche Passwort eintippen und Æ�Å drücken2 Die Ziffer 5 eintippen und Æ�Å drücken3 Der Buzzer gibt drei Beep-Töne.
Hinweise: • NichtdasProgrammierungs-PasswortalsZugriffscodeverwenden.• DermaximaleIntervallzwischendemBetätigeneinerTasteunddemfolgendenbeträgt10Sekunden,
nach deren Ablauf werden die vorhergehenden Eingaben annulliert. Nach Betätigen der Taste PGM stehen 35 Sekunden für die Eingabe des Codes zur Verfügung, nach deren Ablauf der Programmier-Modus verlassen wird.
• DieEingabevonunzulässigenWertenwirdvomBuzzermit5kurzenBeep-Tönengemeldet• DieEingabekorrekterCodeswirdvomBuzzerdurch1anhaltendenBeep-Tongemeldet• DieBestätigungdererfolgtenProgrammierungeinerFunktionwirdvondreiBeep-Tönengemeldet
ÄNDERN DES AUSGANGSKONTAKTS (NO <> NC)Falls erforderlich, kann der Arbeitskontakt NO an den Ausgangskanälen 1 und 2 in Ruhekontakt NC umgewandelt werden. An der Platine sind in der Nähe der Relais Lötkontakte vorhanden (siehe seitliche Abbildung): die Kontakte J2 beziehen sich auf den Kanal 1, die Kontakte J3 beziehen sich auf den Kanal 2:Mit einem Lötgerät für Elektronik die Lötstelle zwischen den Kontakten B-C entfernen und eine Brücke zwischen den Kontakten A-B herstellen.
P1
J3
J4
J2
L2
C
L3
BA
CBA
13

Récepteur BE/REC
Récepteur bicanal programmable, à associer à un ou à plusieurs claviers “BE/PLAY”.
Caractéristiques techniques Récepteur BE/REC
Alimentation 24 Vca/Vcc
Sorties 2 canaux charge max. 500 mA-48 Vca/Vcc
Nb de claviers connectables 4 claviers BE/PLAY connectables à chaque récepteur
Distance maximum entre dispositifs BE/PLAY-BE/REC
40 m en utilisant un câble blindé
Codes mémorisables Jusqu’à 250 codes. Chaque code peut être composé d’un maximum de 9 chiffres
Indice de protection IP30
Température de fonctionnement
de -20°C à +70°C
Caractéristiques techniques clavier BE/PLAY
Nombre de conducteurs
2
1
2
3
4
7
8
5
6
9
0
Touches 10 touches numériques 0-9 plus 1 touche d’activationSignalisations Clavier rétro-éclairé pour usage nocturne et signalisation
acoustique désactivable.Indice de protection IP54Température de fonctionnement
de -20°C à +70°C
Fonctions Entrées/Sorties récepteur BE/REC
1-2 Sortie canal 1* (500 mA-48 Vca/Vcc max.)
3-4 Sortie canal 2* (500 mA-48 Vca/Vcc max.)
5-6 Entrée alimentation 24 Vca/Vcc (5-,6+)
7-8 Entrée série pour réception code par le/les clavier(s) (7-,8+)
*La configuration d’usine prévoit que les sorties 1-2 présentent un contact normalement ouvert (N.O.). Il est possible de les modifier en contact normalement fermé (N.F.) en suivant les indications données dans le paragraphe « Modification du contact de sortie NO<>NF ».
Fonctions Entrées/Sorties Clavier BE/PLAY
1-2 Sortie série pour transmission code (1-,2+)
CONFIGURATION DU RÉCEPTEUR
Deux modes de fonctionnement sont possibles : Base et Avancé.Fonctions en mode BASE:- Insertion code- Effacement code- Effacement complet de la mémoireFonctions en mode AVANCÉ:- Insertion code- Insertion de codes avec compte à rebours : chaque code n’a le droit qu’à un nombre donné
d’accès (d’1 à 999)- Effacement code
14

- Désactivation des codes commençant par un certain chiffre- Réactivation des codes commençant par un certain chiffre- Réactivation de tous les codes- Modification du mot de passe de programmation
Note : L’insertion des codes en mode de base s’effectue avec la touche PGM sur le récepteur. En mode avancé, l’insertion s’effectue à l’aide du clavier numérique à travers un mot de passe sans avoir besoin d’accéder au récepteur.
Configuration des canaux
Dans les deux modes, les canaux (relais) peuvent avoir deux modes de fonctionnement différents :1 – contact temporisé : le relais change d’état pendant un temps programmable d’1 à 6000 secondes.2 - contact bistable : le relais change d’état jusqu’à l’insertion d’un nouveau code.
Pour modifier le mode :1 Presser 3 fois la touche PGM sur le récepteur. La LED commence à clignoter à la fréquence de 3
clignotements suivis d’une pause.2 Sélectionner sur le clavier le canal (relais) que l’on souhaite configurer (1 pour le canal 1, 2 pour le
canal 2).3 Presser la touche confirmer Æ�Å4 Insérer le temps d’activation en secondes, en tenant compte que : - en tapant “0”, on active le mode bistable - en tapant un numéro de “1” à “6000”, on active le mode temporisé. Le réglage effectué en usine prévoit une temporisation d’1 seconde.3 Presser la touche confirmer Æ�Å, trois bips confirment la programmation.
1 – MODE BASE1.1 – Mémorisation des codes1 Presser 1 fois la touche PGM sur le récepteur. La LED commande à clignoter.2 Taper sur le clavier le code à mémoriser (minimum 4 chiffres, maximum 9) à chaque pression, un
signal acoustique confirme la frappe.3 Presser la touche confirmer Æ�Å, l’action est confirmée par un bip prolongé.4 Sélectionner sur le clavier le canal (relais) que l’on souhaite associer au code en tenant compte
que : - en tapant “1” on active le canal 1. - en tapant “2” on active le canal 2. - en tapant “3” on active les deux canaux.3 Presser la touche confirmer Æ�Å, l’action est confirmée par trois bips.
1.2 - Effacement d’un code1 Presser 2 fois la touche PGM sur le récepteur. La LED commence à clignoter à la fréquence de 2
clignotements suivis d’une pause. 2 Taper sur le clavier le code à effacer, chaque pression d’une touche est confirmée par un signal
acoustique. 3 Presser la touche confirmer Æ�Å, l’action est confirmée par trois bips.
1.3 - Effacement complet de la mémoire1 Presser et maintenir enfoncée la touche PGM pendant 15 s. Les LED rouge et verte qui étaient
éteintes se mettent à clignoter en alternance ; à la fin du clignotement, l’effacement est complété.2 Après l’effacement, le récepteur revient aux paramétrages par défaut : sortie temporisée d’1 s et
mot de passe pour accéder au mode avancé 123456.
2 – MODE AVANCÉ2.1 – Personnalisation du mot de passe de programmation. 1 Taper le mot de passe d’usine “123456” et presser Æ�Å2 Taper 6 et presser Æ�Å3 Taper le nouveau mot de passe personnel (6 chiffres) et presser Æ�Å
15

4 Retaper le nouveau mot de passe personnel pour confirmer l’insertion et presser Æ�Å5 L’action est confirmée par trois bips.
2.2 - Insertion code/Insertion de codes avec compte à rebours1 Taper le mot de passe personnel et presser Æ�Å.2 Taper 1 et presser Æ�Å.3 Taper le code à insérer et presser Æ�Å.4 Sélectionner le canal à associer au code (1 :canal 1, 2 : canal 2, 3 : canaux 1 et 2) et presser
Æ�Å.5 Taper 1 pour désactiver ou 2 pour activer les accès avec compte à rebours et presser Æ�Å.6 Si l’on a sélectionné 2 dans la phase précédente, taper le nombre d’accès à mettre en compte
(1-999) et presser Æ�Å.7 L’action est confirmée par trois bips.
2.3 - Effacement d’un code. 1 Taper le mot de passe personnel et presser Æ�Å.2 Taper 2 et presser Æ�Å.3 Taper le code à éliminer et presser Æ�Å.4 L’action est confirmée par trois bips.
2.4 – Désactivation de tous les codes commençant par un certain chiffre. 1 Taper le mot de passe personnel et presser Æ�Å.2 Taper 3 et presser Æ�Å.3 Taper le chiffre initial des codes à désactiver et presser Æ�Å.4 L’action est confirmée par trois bips.
2.5 – Réactivation de tous les codes commençant par un certain chiffre. 1 Taper le mot de passe personnel et presser Æ�Å.2 Taper 4 et presser Æ�Å.3 Taper le chiffre initial des codes à réactiver et presser Æ�Å.4 L’action est confirmée par trois bips.
2.6 – Réactivation de tous les codes désactivés. 1 Taper le mot de passe personnel et presser Æ�Å.2 Taper 5 et presser Æ�Å.3 L’action est confirmée par trois bips.
Notes et recommandations : • N’utilisezjamaiscommecoded’accèslemotdepassedeprogrammation.• Lapausemaximumentre lapressiond’unetoucheet lasuivanteestde10secondes,passéce
délai, les pressions précédentes sont annulées. Après la pression de la touche PGM on dispose de 35 secondes pour l’insertion du code, passé ce délai on sort du mode programmation.
• L’insertiondevaleursnonadmisesestsignaléeacoustiquementpar5bipsbrefs.• L’insertiondecodescorrectsestsignaléacoustiquementpar1bipprolongé.• Laconfirmationdelaprogrammationd’unefonctionestsignaléepartroisbips.
MODIFICATION DU CONTACT DE SORTIE (N.O. <> N.F.)Si nécessaire, il est possible de modifier le contact N.O. (normalement ouvert) présent sur les canaux de sortie 1 et 2 en contact N.F. (normalement fermé). Sur la carte, à proximité des relais il y a des contacts à souder (voir figure ci-contre) : les contacts J2 se réfèrent au canal 1, les contacts J3 se réfèrent au canal 2.En utilisant un fer à souder pour composants électroniques, enlever la soudure qui connecte les contacts B-C et souder un fil de liaison entre les contacts A-B.
P1
J3
J4
J2
L2
C
L3
BA
CBA
16

Receptor BE/REC
Receptor bicanal programable, a acoplar con uno o varios teclados “BE/PLAY”.
Características técnicas del receptor BE/REC
Alimentación 24 Vac/Vdc
Salidas 2 canales carga máx 500mA-48Vac/dc.
N. teclados simultáneos 4 teclados BE/PLAY simultáneos por receptor
Distancia máxima entre dispositivos BE/PLAY-BE/REC
40m utilizando cable blindado
Códigos memorizables Hasta 250 códigos. Cada código puede estar compuesto por un máximo de 9 cifras
Grado de protección IP30
Temperatura de funcionamiento
de -20°C a +70°C
Características técnicas del teclado BE/PLAY
Número de cables 2
1
2
3
4
7
8
5
6
9
0
Teclas 10 teclas numéricas 0-9 más 1 tecla de activaciónSeñalizaciones Teclado retroiluminado para uso nocturno y zumbador
de señalización acústica desconectable.Grado de protección IP54Temperatura de funcionamiento
de -20°C a +70°C
Funciones entradas/salidas del receptor BE/REC
1-2 Salida canal 1* (500mA-48Vac/dc máx)
3-4 Salida canal 2* (500mA-48Vac/dc máx)
5-6 Entrada de alimentación 24 Vac/Vdc (5-,6+)
7-8 Entrada serie para la recepción del código de teclado/s (7-,8+)
*La configuración de fábrica prevé que el contacto de las salidas 1-2 esté normalmente abierto (N.O.). Es posible sustituirlas con contactos normalmente cerrados (N.C.) siguiendo las indicaciones del párrafo ”Modificación del contacto de salida NO<>NC”.
Funciones entradas/salidas del teclado BE/PLAY
1-2 Salida serie para transmisión del código (1-,2+)
CONFIGURACIÓN DEL RECEPTOR
Son posibles dos modos de funcionamiento: Base y Avanzado.Funciones en modo BASE:- Introducción del código- Anulación del código- Borrado completo de la memoriaFunciones en modo AVANZADO:- Introducción del código- Introducción de códigos sucesivamente: le está permitido al código sólo un determinado número
de accesos (de 1 a 999)
17

- Anulación del código- Deshabilitación de los códigos con determinada cifra inicial- Reactivación de los códigos con determinada cifra inicial- Reactivación de todos los códigos- Modificación de la contraseña de programación.Notas: Los códigos en modo base se introducen con la tecla PGM del receptor. En modo avanzado se introducen con el teclado numérico, usando una contraseña de acceso y sin necesidad de acceder al receptor.
Configuración de los canales
En ambos modos, los relés pueden funcionar de dos maneras:1 - contacto temporizado: el relé cambia estado por un tiempo programable de 1 a 6000 segundos.2 - contacto biestable: el relé cambia estado hasta que se introduzca un nuevo código.
Para modificar el modo:1 Pulsar 3 veces la tecla PGM del receptor. El LED empieza a destellar con frecuencia de 3 destellos
seguidos por una pausa.2 Seleccionar en el teclado el canal que se desea configurar (1 para el canal 1, 2 para el canal 2).3 Pulsar la tecla confirmar Æ�Å4 Introducir el tiempo de activación en segundos, teniendo presente que: - al introducir “0” se activa el modo biestable - introduciendo un número de “1” a “6000”, se activa el modo temporizado. La configuración de fábrica prevé una temporización de 1 segundo.3 Pulsar la tecla confirmar Æ�Å, el zumbador emite tres tonos para confirmar que la programación
se ha terminado.
1 - MODO BASE1.1 - Memorización de los códigos1 Pulsar 1 vez la tecla PGM del receptor. EI LED empieza a destellar.2 Introducir el código de memorizar (mínimo 4, máximo 9 números) con el teclado; con cada
pulsación el zumbador emite un sonido para confirmar la introducción. 3 Pulsar la tecla confirmar Æ�Å, el zumbador emite un tono prolongado.4 Seleccionar en el teclado el relé que se desea asociar al código, teniendo en cuenta que: - al introducir “1” se activa el canal 1 - introduciendo “2” se activa el canal 2 - al introducir “3” se activan los dos canales.3 Pulsar la tecla confirmar Æ�Å, el zumbador emite tres tonos.
1.2 – Anulación de un código1 Pulsar 2 veces la tecla PGM del receptor. El LED empieza a destellar con frecuencia de 2 destellos
seguidos por una pausa.2 Introducir el código a anular con el teclado, por cada pulsación el zumbador emite un tono para
confirmar la introducción del número. 3 Pulsar la tecla confirmar Æ�Å, el zumbador emite tres tonos.
1.3 – Anulación completa de la memoria1 Pulsar y mantener presionada la tecla PGM por 15 seg. Los LEDS rojo y verde, antes apagados,
destellan de forma alterna; el final del destello significa anulación aceptada.2 Finalizada la anulación, el receptor vuelve a las configuraciones por defecto: salida temporizada de
1 seg. y contraseña de acceso 123456 del modo avanzado.
2 - MODO AVANZADO2.1 – Personalización de la contraseña de programación. 1 Escribir la contraseña de fábrica “123456” y pulsar Æ�Å2 Introducir 6 y pulsar Æ�Å3 Introducir la nueva contraseña personal (6 números) y pulsar Æ�Å4 Introducir otra vez la nueva contraseña personal para confirmar la introducción y pulsar Æ�Å18

5 El zumbador emite tres tonos.
2.2 – Introducción de códigos/códigos sucesivamente1 Escribir la contraseña personal y pulsar Æ�Å2 Introducir 1 y pulsar Æ�Å3 Escribir el código a introducir y pulsar Æ�Å4 Seleccionar el canal a asociar al código (1 para el canal 1, 2 para el canal 2, 3 para ambos) y pulsar
Æ�Å5 Introducir 1 para desactivar o 2 para activar los accesos sucesivamente y pulsar Æ�Å6 De haberse seleccionado 2 en la fase anterior, introducir el número de accesos sucesivamente
(1-999) y pulsar Æ�Å7 El zumbador emite tres tonos.
2.3 - Anulación de un código. 1 Introducir la contraseña personal y pulsar Æ�Å2 Introducir 2 y pulsar Æ�Å3 Escribir el código a eliminar y pulsar Æ�Å4 El zumbador emite tres tonos.
2.4 – Deshabilitación de todos los códigos con un número inicial específico. 1 Escribir la contraseña personal y pulsar Æ�Å2 Introducir 3 y pulsar Æ�Å3 Introducir el número inicial de los códigos a deshabilitar y pulsar Æ�Å4 El zumbador emite tres tonos.
2.5 - Rehabilitación de todos los códigos con una cifra inicial específica. 1 Escribir la contraseña personal y pulsar Æ�Å2 Introducir 4 y pulsar Æ�Å3 Introducir la cifra inicial de los códigos a reactivar y pulsar Æ�Å4 El zumbador emite tres tonos.
2.6 - Rehabilitación de todos los códigos deshabilitados. 1 Escribir la contraseña personal y pulsar Æ�Å2 Introducir 5 y pulsar Æ�Å3 El zumbador emite tres tonos.
Notas y advertencias: • Noutilizarcomocódigode acceso la contraseña de programación.• Lapausamáximaentre 2pulsaciones esde 10 seg.; si se superara este intervalo, habría que
reiniciar el proceso. Tras pulsar la tecla PGM se dispone de 35 segundos para introducir el código; en caso contrario, se saldría del modo programación.
• Laintroduccióndevaloresnoadmitidosseseñalizacon5tonosbrevesdelzumbador.• La introducción correcta de los códigos se señaliza con 1 tono prolongado del zumbador.• Seconfirmalaprogramacióndeunafunciónmediantetrestonos.
MODIFICACIÓN DEL CONTACTO DE SALIDAS (N.O. <> N.C.)De ser necesario, se puede modificar el contacto N.O. (normalmente abierto) puesto en los canales de salida 1 y 2 en contacto N.C. (normalmente cerrado). En la tarjeta están situados en proximidad de los relés de los contactos a soldar (véase la figura de al lado): los contactos J2 se refieren al canal 1, los contactos J3 al canal 2:Utilizando un soldador para electrónica quitar la soldadura que conecta los contactos B-C y realizar un puente entre los contactos A-B.
P1
J3
J4
J2
L2
C
L3
BA
CBA
19

Odbiornik BE/RECOdbiornik dwukanałowy dający się programować, współpracujący w zestawieniu z jedną lub kilkoma klawiaturami “BE/PLAY”.
Dane techniczne Odbiornika BE/REC
Zasilanie 24 Vac/Vdc
Wyjścia 2 kanały obciążenie max 500mA-48Vac/dc.
Liczba klawiatur podłączalnych
4 klawiatury BE/PLAY nadające się do podłączenia do każdego z odbiorników
Odstęp maksymalny między aparaturą BE/PLAY-BE/REC
40m stosując kabel ekranowany
Kody zapisywalne w pamięci
Do 250 kodów. Każdy z kodów może składać się maksymanie z 9 cyfr
Stopień ochrony IP30
Temperatura eksploatacji od -20°C do +70°C
Dane techniczne Klawiatury BE/PLAY
Liczba przewodów 2
1
2
3
4
7
8
5
6
9
0
Klawisze 10 klawiszy cyfrowych 0-9 plus 1 klawisz włączającySygnalizacje Klawiatura z tylnym oświetleniem do pracy w warunkach
nocnych i buczek do sygnalizacji akustycznej, z wyłączaniem.
Stopień ochrony IP54Temperatura eksploatacji
od -20°C do +70°C
Funkcje Wejść/Wyjść odbiornika BE/REC
1-2 Wyjście kanału 1* (500mA-48Vac/dc max)
3-4 Wyjście kanału 2* (500mA-48Vac/dc max)
5-6 Wejście zasilania 24 Vac/Vdc (5-,6+)
7-8 Wejście szeregowe do odbierania kodu z klawiatur/y (7-,8+)
W/g konfiguracji fabrycznej wyjścia 1-2 posiadają styk rozwarty (N.O.). Istnieje możliwość zamiany na styk zwarty (N.C.) postępując w/g instrukcji podanych w paragrafie ”Modyfikacja styku wyjścia NO<>NC”.
Funkcje Wejść/Wyjść Klawiatury BE/PLAY
1-2 Wyjście szeregowe do transmisji kodu (1-,2+)
KONFIGURACJA ODBIORNIKA
Możliwe są dwa układy funkcjonowania: Podstawowy i Zaawansowany.Funkcje dla układu PODSTAWOWEGO:- Wprowadzenie kodu- Wycofanie kodu- Całkowite wycofanie pamięciFunkcje dla układu ZAAWANSOWANEGO:- Wprowadzenie kodu- Wprowadzenie kodów w kolejności: każdemu z kodów przysługuje tylko pewna określona liczba
wejść (od 1 do 999)- Wycofanie kodu- Unieważnienie kodów poprzez sprecyzowaną cyfrę początkową
20

- Przywrócenie ważności kodów poprzez sprecyzowaną cyfrę początkową- Przywrócenie wszystkich kodów- Zmiana password’u dla programowania.Uwagi: Wprowadzanie kodów w podstawowym układzie działania odbywa się za pomocą klawisza PGM znajdującego się na odbiorniku. Wprowadzanie kodów w zaawansowanym systemie działania odbywa się za pomocą klawiatury cyfrowej poprzez password dostępu, bez konieczności zbliżania się do odbiornika.
Konfiguracja kanałówW obydwu układach działania, kanały (przekaźniki) mają dwa odmienne systemy funkcjonowania:1 - styk przerywany: przekaźnik zmienia stan na czas możliwy do nastawiania pomiędzy 1 a 6000 sekund.2 – styk dwubiegunowy: przekaźnik zmienia stan aż do momentu wprowadzenia nowego kodu.
By dokonać zmiany systemu należy:1 Przycisnąć 3 razy klawisz PGM na odbiorniku. Światło LED zaczyna migać z przerwą co 3
mignięcia.2 Wyselekcjonować na klawiaturze kanał (przekaźnik) który zamierza się konfigurować (1 dla kanału
1, 2 dla kanału 2).3 Nacisnąć klawisz potwierdzający Æ�Å4 Nastawić czas uruchamiania w sekundach, biorąc pod uwagę że:
- naciskając “0” włącza się system dwubiegunowy- naciskając jeden z numerów od “1” do “6000”, włącza się system przerywany.
Nastawienie fabryczne posiada częstotliwość co 1 sekundę.3 Nacisnąć klawisz potwierdzający Æ�Å, buczek wyda trzy beep na potwierdzenie dokonanego
zaprogramowania.
1 – UKŁAD PODSTAWOWY
1.1 – Zapisywanie kodów w pamięci1 Przycisnąć 1 raz klawisz PGM na odbiorniku. Światło LED rozpocznie miganie.2 Zlecić za pomocą klawiszy kod przeznaczony do zapisania w pamięci (minimum 4, maksymum 9
cyfr) po każdym nacisku klawisza buczek wyda dźwięk na potwierdzenie wykonania nacisku. 3 Nacisnąć klawisz potwierdzający Æ�Å, buczek wyda dźwięk przedłużony.4 Wyselekcjonować na klawiaturze kanał (przekaźnik) który zamierza się zestawić z podanym kodem
pamiętając że: - wciskając “1” włącza się kanał 1. - wciskając “2” włącza się kanał 2. - wciskając “3” włączają się obydwa kanały.3 Nacisnąć klawisz potwierdzający Æ�Å, buczek wyda trzy beep.
1.2 - Wycofanie jednego z kodów1 Przycisnąć 2 razy klawisz PGM na odbiorniku. Światło LED rozpocznie miganie z przerwą co 2
mignięcia.2 Zlecić za pomocą klawiszy kod przeznaczony do wycofania, po każdym nacisku buczek wyda
dźwięk na potwierdzenie wykonania nacisku. 3 Nacisnąć klawisz potwierdzający Æ�Å, buczek wyda trzy beep.
1.3 - Całkowite wycofanie pamięci1 Przycisnąć i trzymać wciśnięty klawisz PGM przez 15s. Zgaszone światła LED czerwone i zielone
zaczynają migać na zmianę, na zakończenie migania pamięć zostaje wycofana.2 Po wycofaniu pamięci odbiornik wraca do nastawień default: wyjście nastawione na styk
przerywany co 1s i password dostępu do układu zaawansowanego o numerze 123456.
2 - UKŁAD ZAAWANSOWANY
2.1 - Osobisty Password programowania. 1 Zlecić za pomocą klawiszy password fabryczny “123456” i nacisnąć Æ�Å2 Wcisnąć 6 i następnie nacisnąć Æ�Å3 Zlecić za pomocą klawiszy nowy password osobisty (6 cyfr) i nacisnąć Æ�Å4 Powtórzyć zlecenie nowego password’u osobistego na potwierdzenie jego wprowadzenia i
21
nacisnąć Æ�Å5 Buczek wyda trzy beep.
2.2 – Wprowadzenie kodu/Wprowadzenie kodów w kolejności. 1 Zlecić za pomocą klawiszy password osobisty i nacisnąć Æ�Å2 Wcisnąć 1 i następnie nacisnąć Æ�Å3 Zlecić za pomocą klawiszy kod przeznaczony do wprowadzenia i nacisnąć Æ�Å4 Wyselekcjonować kanał do zestawienia z kodem (1:ch1, 2:ch2, 3:obydwa) i nacisnąć Æ�Å5 Wcisnąć 1 dla wyłączenia lub 2 dla włączenia dostępów w kolejności i nacisnąć Æ�Å6 Jeśli w poprzedniej fazie wyselekcjonowano 2 wystukać liczbę dostępów w kolejności (1-999) i
nacisnąć Æ�Å7 Buczek wyda trzy beep.
2.3 - Wycofanie kodu. 1 Zlecić za pomocą klawiszy password osobisty i nacisnąć Æ�Å2 Wcisnąć 2 i nacisnąć Æ�Å3 Zlecić za pomocą klawiszy kod przeznaczony do wycofania i nacisnąć Æ�Å4 Buczek wyda trzy beep.
2.4 – Unieważnienie wszystkich kodów przez sprecyzowanie jednej cyfry początkowej. 1 Zlecić za pomocą klawiszy password osobisty i nacisnąć Æ�Å2 Wcisnąć 3 i następnie nacisnąć Æ�Å3 Podać przez naciśnięcie odpowiedniego klawisza początkową cyfrę kodów przeznaczonych do
unieważnienia i nacisnąć Æ�Å4 Buczek wyda trzy beep.
2.5 – Przywrócenie ważności wszystkich kodów przez sprecyzowanie jednej cyfry początkowej. 1 Zlecić za pomocą klawiszy password osobisty i nacisnąć Æ�Å2 Wcisnąć 4 i następnie nacisnąć Æ�Å3 Wcisnąć klawisz z cyfrą początkową dla przywrócenia ważności kodów i nacisnąć Æ�Å4 Buczek wyda trzy beep.
2.6 – Przywrócenie ważności wszystkich kodów unieważnionych. 1 Zlecić za pomocą klawiszy password osobisty i nacisnąć Æ�Å2 Wcisnąć 5 i następnie nacisnąć Æ�Å3 Buczek wyda trzy beep.
Uwagi i ostrzeżenia: • Niestosowaćpassword’uprogramowaniajakokodudostępu.• Maksymalna przerwa pomiędzy naciskaniem klawiszy wynosi 10 sekund, po upływie których
zostają unieważnione poprzednie zlecenia. Po naciśnięciu klawisza PGM pozostaje do dyspozycji 35 sekund dla wprowadzenia kodu, po upływie których następuje wyjście z systemu programowania.
• Wprowadzaniewartościniedopuszczalnychsygnalizowane jestprzezbuczekzapomocą 5-ciukrótkich beep
• Wprowadzaniekodówwłaściwychsygnalizowanejestprzezbuczekzapomocą 1-go przedłużonego beep
• Potwierdzeniewykonaniazaprogramowanejfunkcjisygnalizowanejestprzeztrzybeep
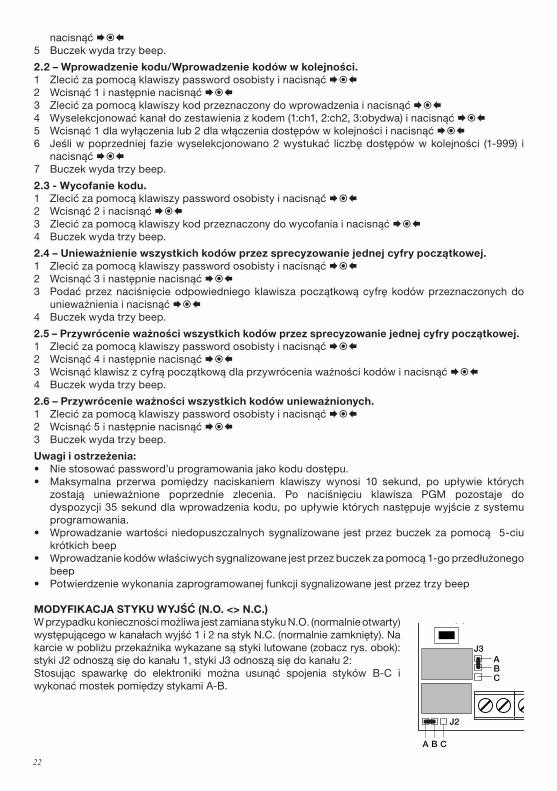
MODYFIKACJA STYKU WYJŚĆ (N.O. <> N.C.)W przypadku konieczności możliwa jest zamiana styku N.O. (normalnie otwarty) występującego w kanałach wyjść 1 i 2 na styk N.C. (normalnie zamknięty). Na karcie w pobliżu przekaźnika wykazane są styki lutowane (zobacz rys. obok): styki J2 odnoszą się do kanału 1, styki J3 odnoszą się do kanału 2:Stosując spawarkę do elektroniki można usunąć spojenia styków B-C i wykonać mostek pomiędzy stykami A-B.
P1
J3
J4
J2
L2
C
L3
BA
CBA
22


AUTOMATISMI BENINCÀ SpA - Via Capitello, 45 - 36066 Sandrigo (VI) - Tel. 0444 751030 r.a. - Fax 0444 759728
![(8_Carboidrati [modalità compatibilità])](https://static.fdocuments.net/doc/165x107/577d1ea61a28ab4e1e8ef14c/8carboidrati-modalita-compatibilita.jpg)
![(4_proteine [modalità compatibilità])](https://static.fdocuments.net/doc/165x107/5571ffa149795991699dba66/4proteine-modalita-compatibilita.jpg)
![BARBERO [modalità compatibilità]](https://static.fdocuments.net/doc/165x107/568bd8761a28ab2034a36ff5/barbero-modalita-compatibilita.jpg)
![Farbood [modalità compatibilità]](https://static.fdocuments.net/doc/165x107/568c485e1a28ab49168fdc16/farbood-modalita-compatibilita.jpg)
![GuidaStudentiProfiloOrario.ppt [modalità compatibilità]](https://static.fdocuments.net/doc/165x107/62512cb6f1da8a488757db98/guidas-modalit-compatibilit.jpg)


![(CARDIOSTIMOLAZIONE [modalità compatibilità])](https://static.fdocuments.net/doc/165x107/5870b8381a28ab431c8b72d9/cardiostimolazione-modalita-compatibilita.jpg)

![bonegraft [modalità compatibilità]](https://static.fdocuments.net/doc/165x107/615a8a08af5a327be556877d/bonegraft-modalit-compatibilit.jpg)


![MELANOMA [modalità compatibilità]](https://static.fdocuments.net/doc/165x107/62d80fad0839c9645b41aa72/melanoma-modalit-compatibilit.jpg)
![1_lezioneintroduttiva [Modalità Compatibilità]](https://static.fdocuments.net/doc/165x107/577c7d4c1a28abe0549e30ba/1lezioneintroduttiva-modalita-compatibilita.jpg)

![febbre [modalità compatibilità]](https://static.fdocuments.net/doc/165x107/616888e3d394e9041f70548e/febbre-modalit-compatibilit.jpg)

![alcooli [modalità compatibilità]](https://static.fdocuments.net/doc/165x107/62c5d188d2548d3ce471a05b/alcooli-modalit-compatibilit.jpg)
