OCTOBER 12th, 13th, 14th, 2018 Teachers Kathy … · The Badlands Quilters Guild welcomes you to...
17
OCTOBER 12th, 13th, 14th, 2018 Teachers Kathy Johnson, Vickie Loh, Kris Jacobson, Faye Grandalen, Denise Fried, Carol Kummer, Kari Huber
Transcript of OCTOBER 12th, 13th, 14th, 2018 Teachers Kathy … · The Badlands Quilters Guild welcomes you to...

OCTOBER 12th, 13th, 14th, 2018
Teachers
Kathy Johnson, Vickie Loh, Kris Jacobson, Faye Grandalen,
Denise Fried, Carol Kummer, Kari Huber
REGISTRATION INFORMATION
The Badlands Quilters Guild welcomes you to our 26th retreat. The 2018 retreat offers many
different classes with varied projects and difficulty levels. Hopefully you will find several that
interest you. There is also a free sewing area where you are able to continue work on a class
project, prep for a class or work on whatever you like! Retreat officially starts with dinner on Friday and runs thru 4pm Sunday. To please those quilters who never get enough and can come early, classes are offered Friday starting at 8:30 and running till 4PM. Lunch Friday is included with Friday class registration.
REGISTRATION DEADLINES: MEMBER registration begins on July 1. (Dues must be paid by March 31st to register as a member) Classes
will be filled on a first come basis.
NON Members can start registration after July 15th.
Please be sure to indicate a second choice for each time slot in case your first choice for a class
is full or canceled. THE BEST WAY TO INSURE YOUR CHOICE OF CLASSES IS OFFERED IS TO REGISTER
BEFORE THE SEPTEMBER 1st CANCELLATION DATE!!
CANCELLATION POLICY & CLASS CHANGES-BQG reserves the right to cancel classes that do not
meet the minimum class size. In the event that a class must be canceled, notification will be made once
the retreat committee meets after the September 1st deadline. As registrations are received, a notice will
be posted on the Badlands Quilters Guild website when a class has enough participants signed up to
insure it will be offered. After the classes offered are finalized, you will be notified by email a list of your
classes. It is suggested that you refrain from purchasing class supplies until you know the class will be
offered. Last minute registrations are welcomed, but acceptance will be based on class availability. A
class may be full or require a kit or pattern not available on short notice. Please call, text or email last
minute requests to: Jenny Yearous at [email protected] or call 701-255-6942 so we can get you
taken care of.
MOTEL RESERVATIONS- A block of rooms has been reserved for retreat participants at a special rate
of $99.90 Double Queen per room per night at the AmericInn. Please contact the Americlnn at the local
number (701-623-4800) for reservations. Please request special quilter’s rate. This special room rate will
expire on September 6, 2018. Reservations can also be made at the Roughrider Hotel by calling the local
number (701-623-4444). A block of rooms has NOT been reserved at the Roughrider Hotel.
SHOW AND TELL- Show and Tell will be held as part of the Friday evening activities. Be sure to bring a
couple of your favorite projects from the past years to share. Class show and tell will be held during the
Sunday noon meal.
JOIN THE BQG-The Badlands Quilters Guild was formed in 1993 to promote the art of quilt making and
to preserve our quilting heritage. Today the group includes about 60 members from western North
Dakota and eastern Montana striving to improve their skills, while enjoying the company of our fellow
quilters. The guild meets four times a year at various locations (usually the third Saturday at 12:00
p.m. local time). We enjoy a sleep-over in Medora in connection with our January meeting. The 2

meetings often include demonstrations, show and tell, and visits to local quilt shops. Members receive a
newsletter prior to each meeting. To join BQG, send a check for $20 to Martha Downs, PO Box 656,
Bismarck, ND 58502. 701-751-3809 [email protected] cell 303-726-5681. (dues must be paid by
March 31sts to attend retreat as a member)
RETREAT MEALS-Four Corners of Fairfield will be our caterer this year. Friday night dinner, Saturday
lunch and dinner, and Sunday lunch are included with your retreat registration. Additional meals may be
purchased in advance for guests. Friday lunch is included with registration for a Friday day class or
may be purchased separately, if you are not taking a Friday day class. Please remember choices
for eating in Medora are limited after Labor Day.
VENDOR- Designer Fabric from Carrington
OUR FAMOUS HOSPITALITY/GOODIES TABLE-This is a GREAT place for guild members to catch
up with old or new friends and grab a quick refresher so you have the energy to get lots of
quilting done. Members are asked to bring something to share at the hospitality table
throughout the retreat. Coffee, Tea, Hot Chocolate and water will be available.
Open Sewing-An area will be available to open sew, prep for classes or work on a project of your
choice. If you wish to stay and sew after the evening meals or Friday PM class, keep in mind that we need
to be out of the building at 11:00pm and classes end at 4pm on Sunday so everyone can be packed up
and gone and the retreat committees can have all the guild things packed by 5PM. The facility is rented
for these hours and there are extra charges if they are not followed.
CHALLENGE BLOCKS-Here is a free pattern for a paper pieced bra block.
http://www.paperpanache.com/free/ppfreebs/freebpdfs/PPbra.pdf
BOOKS, PATTERNS, KITS-Books, Pattern and kit fees are payable to the teachers at the
beginning of the class. Be sure to contact local teachers or retreat chair prior to the retreat to
reserve what you need, or if you need assistance. PRE-CLASS CUTTING AND SEWING INSTRUCTIONS-
For pre-class cutting and preparation, check under class description in the brochure on our website.
Some classes will have links on the website for added information.
The website is www.badlandsquilters.com.
You should receive your confirmation notice shortly after the September 1st class cancellation date.
Please remember that BQG reserves the right to cancel classes that do not meet the minimum class size.
In the event that a class must be canceled, notification will be made soon after September 1st. Therefore,
it is suggested that you refrain from purchasing class supplies until you are sure the class will be offered.
RETREAT THEME- Cancer Awareness. You are encouraged to wear pink to the Saturday evening banquet
to support our theme. (it is not required, please come with or without pink.)
SATURDAY NIGHT: Trunk Show by Denise Fried with Fun and Games afterward
3

DEFINITIONS
BSS: Basic Sewing Supplies (Thread, needles, scissors, pins, extension cords, etc.)
RCS: Rotary Cutting Supplies (mat, rotary cutter, rulers)
Please make sure your sewing machine is in good running order and you may want to bring your owner’s
manual.
All Day Friday Classes 9:00 am-12:00 noon & 1:00 pm – 4:00 pm
2018 Badlands Quilters Retreat Class Schedule
Friday All Day – Oct.12, 2018 9:00 am - 12:00 noon & 1:00 pm - 4:00 pm
Spot-On – Kathy Johnson
Spice Island – Vickie Loh
Friday Evening – Oct.12, 2018 _ 6:30 pm - 9:30 pm
Mystery Quilt – Kathy Johnson
3-D Pinwheel Table Runner – Vickie Loh
Saturday Morning – Oct.13, 2018 9:30 am – 11:30 am
Rock n’ Jelly Roll Table Runner – Kris Jacobson
Saturday Afternoon – Oct.13, 2018 1:00 pm - 4:00 pm
Soft Baskets – Faye Grandalen
Saturday All Day – Oct.13, 2018 8:30 am - 11:30 am & 1:00 pm - 4:00 pm
Poppin’ In or Convex Illusions – Day 1 – Kathy Johnson
Kira – Denise Fried
Melba Pintuck Bag – Carol Kummer
Sunday All Day – Oct 14, 2018 8:30 am - 11:30 am & 1:00 pm - 4:00 pm
Poppin’ In or Convex Illusions – Day 2 – Kathy Johnson
Wedges – Kris Jacobson
Hexagon Star – Kari Huber
On Point – Denise Fried
4

Spot On-Kathy Johnson Full Day
You will have the choice in this class
to make 2 different blocks.
First there is just a simple Hexagon
Shape. You can make a table runner
making 5 of these blocks. Use the
diagram on the side for your fabric
choices.
Your second choice for blocks is the
Diamond Star Block. You may choose
to make the same table runner with
this block or start a quilt.
Fabric for Second Choice
For each block you will need a 2 ½”
strip of the star color and a 2” strip
of a background color. For the center
you will need a 2 ½” X 11” strip. If
you want to use these blocks in the
above table runner you will need 2 border fabrics. For the center and end blocks you will need 3
– 1 ½” strips and the 2nd and 4th blocks will require 2 – 1 ½” strips. Or you can choose to just
start making blocks for a quilt.
Supplies
Sewing Machine Rotary Equipment
General Sewing Supplies Rotating Cutting Mat – optional
Spot On Tool by Phillips Fiber Art – Kathy will have them available for sale
5

Spot On option
Spice Island-Vickie Loh Full Day-Beginner
6

Just as a combination of spices enhances your cooking, a combination of fabric scraps can spice
up your quilts. The scrappy blocks in this quilt are also wonderful when planned with
coordinating full width of fabric (WOF) yardage, or fat quarters, or even layer cakes. And you
can make a wonderful variation using only 5 fabrics plus a colorful striped fabric. Learn different
techniques to cover each of these fabric choices.
Fabric List – Because you can make any size and number of blocks, it is difficult to give a
definite fabric list. Sashing and border fabrics can be determined later and could include a piano
key strip between an inner and outer border.
(A)-For scrappy blocks, bring LOTS of scraps cut in strips 1 ¼”, 1 ½”, 1 ¾”, 2” and 2 ¼” wide and
with as much length as possible. My blocks finished at 9” and have almost 20 different fabrics
per block. I used mostly scraps but also cut some yardage.
(B)-For more color controlled, well-planned blocks using full WOF yardage, use ¼ to 1/3 yard
cuts of 10 to 20 coordinating fabrics cut in 1 ¼”, 1 ½”, 1 ¾”, 2” and 2 ¼” wide strips. If you are
uncertain about cutting, bring fabric to class to cut. Blocks finish around 9”.
(C)- For blocks using fat quarters, bring 10 to 20 fat quarters that are either scrappy or color
coordinated. Please bring the fat quarters to class to cut. Blocks finish around 6”.
(D)-Layer cakes also work well but please bring them to class to cut. Blocks finish about 6” and
one layer cake of 42 fabrics will make 60 to 70 blocks or a combo of blocks and piano keys.
(E)-For the striped fabric variation bring 1/3 yard full WOF for each of five coordinating fabrics
(black and white) and one yard of striped fabric. If you want any of these fabrics used for
borders, sashing or binding, buy extra. This will make twenty blocks each about 9”. More blocks
and a piano key border will require additional fabric.
Supply List
BSK (basic sewing kit) – Walking foot (optional)
RCE (rotary cutting equipment) Revolving cutting mat – (optional)
9 ½” square ruler – for those making scrappy blocks (A). If you don’t have that size, bring
something close like a 9”, 10” or 12”.
Setting triangle – for those making blocks from full width fabric (D) and striped variation (E).
Masking tape to mark ruler
Friday Evening Classes 6:30 pm – 9:30pm
2018 Mystery – Kathy Johnson It is time for the Retreat Mystery!!
Fabric:
5 yards background fabric
48 – 2 ½” X 18 ½” strips. This can be scraps or a jelly roll. You will be able to get 2 strips from
each jelly roll strip, choose your darker fabrics from the jelly roll. There must be a contrast with
the background fabric.
96 – 5” squares. This can be from your scraps, 2 Charm Packs or a Layer Cake cut into 5”
squares. Again use your darker squares from the charm packs and layer cake.
Prep before Class:
Cut 48 – 10” squares of the background fabric. Then cut them once diagonally. I like to use
starch or Best Press on these before cutting. 7

Draw a diagonal line on the wrong side of all the 5” squares.
Supplies:
Sewing Machine Rotary Equipment
General Sewing Supplies 10 ½” or 12 ½” square ruler
3-D Pinwheel Table Runner-Vicki Loh
This fun 3-D pinwheel wall hanging or table runner is easy and quick. Grab a packet of charm
squares, add one more fabric for your binding, four buttons and you are set. Or cut your own
squares from yardage. It’s so much fun to try seasonal, traditional or modern. Makes a great
gift.
Fabric List
One charm square pack (must have 42 pieces) , 1/3 yard binding from which you will also cut
one more 5” square (should coordinate with your charm square fabrics) , ½ yard backing, 42” x
16” piece of batting, 4 buttons (won’t need backing, batting or buttons for class)
Supply List
BSK (basic sewing kit), RCE (rotary cutting equipment)
Saturday Morning Classes 8:30 am – 11:30 am
Rock N Roll Table Runner-Kris Jacobson
Finished size 16 ¼” x 40 ¼”, Beginner
8

Rock N Roll Table Runner continued
Choose a theme fabric that is not overly busy and 2 ½ inch strips to create this fun table runner.
Let your strips be the star by adding in accent colors and make your runner Rock!
Materials:
Theme fabric: ½ yard
16 or more 2 1/2” strips (more is always better)
Accent border #1: 1/8 yard Accent border #2: 1/8 yard
Backing: 1 yard Batting: 18” x 52”
Binding: ¼ yard
Supplies
Rock n’ Jelly Roll Pattern by Tiger Lily Press required
12” Square ruler Scotch Tape
Basic sewing supplies Basic cutting supplies
Saturday Afternoon Classes 1:00 pm – 4:30 pm
Soft Baskets – Faye Grandalen ½ Day- Beginner
This is a soft sided basket made with soft and stable, handles are made with heavy interfacing.
Use it to store all kinds of things in plain sight and create a decorative statement at the same
time. Great for gifts also. The basket size is approximately 12 inches in diameter.
The kit includes:
Stabilizers (double sided fusible for both)
Template for the bottom
Written instructions.
Kit for class is mandatory $12.00
Fabric
½ yd focus fabric
¾ yd contrasting fabric for handles, bag bottom and binding
Supplies for Soft Basket
Coordinating buttons, I will bring some if they cannot find what they need
Matching thread for binding 9
Soft Baskets continued
Pearl cotton or embroidery floss for sewing buttons on
Walking foot
Jean needle or 90/14 will work
Wonder Clips would be helpful
Flower Head pins work well
larger scissors for cutting stabilizers
Saturday All Day Classes 8:30 am -11:30 am & 1:00 pm – 4:30 pm
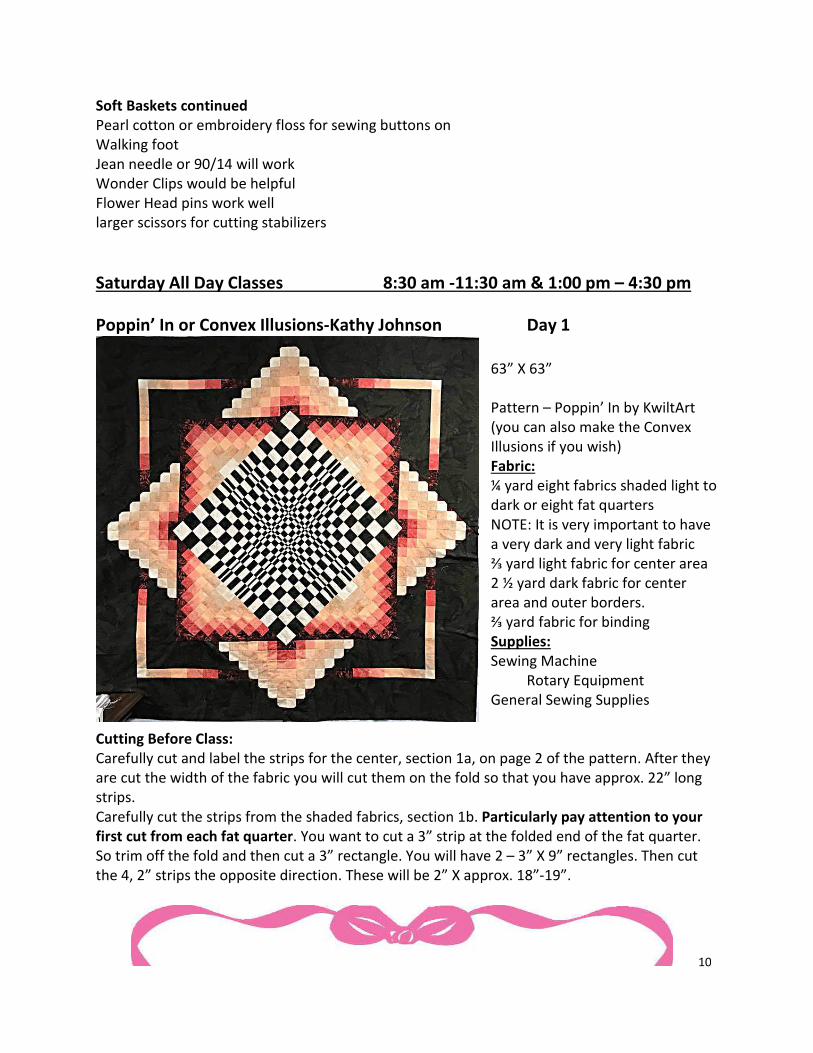
Poppin’ In or Convex Illusions-Kathy Johnson Day 1
63” X 63”
Pattern – Poppin’ In by KwiltArt
(you can also make the Convex
Illusions if you wish)
Fabric:
¼ yard eight fabrics shaded light to
dark or eight fat quarters
NOTE: It is very important to have
a very dark and very light fabric
⅔ yard light fabric for center area
2 ½ yard dark fabric for center
area and outer borders.
⅔ yard fabric for binding
Supplies:
Sewing Machine
Rotary Equipment
General Sewing Supplies
Cutting Before Class:
Carefully cut and label the strips for the center, section 1a, on page 2 of the pattern. After they
are cut the width of the fabric you will cut them on the fold so that you have approx. 22” long
strips.
Carefully cut the strips from the shaded fabrics, section 1b. Particularly pay attention to your
first cut from each fat quarter. You want to cut a 3” strip at the folded end of the fat quarter.
So trim off the fold and then cut a 3” rectangle. You will have 2 – 3” X 9” rectangles. Then cut
the 4, 2” strips the opposite direction. These will be 2” X approx. 18”-19”.
10

Kira – Denise Fried
This quilt uses assorted 10”
squares of light and dark fabrics as
well as innovative piecing and
cutting with the Stripology
Squared ruler by GE Designs.
Instructions for using regular
rulers are included. The pattern
comes with 5 different size
options: crib, lap, full, queen, king.
Materials:
Crib
44 x 61
Lap
63 x 80
Full
80 x 97
Queen
97 x 114
King
114 x 114
Dark 10”
squares 12 squares 24 squares 40 squares 60 squares 72 squares
Light 10”
squares or
background
fabric
12 squares
Or
1 yd
24 squares
Or
1 ¾ yds
40 squares
Or
2 ¾ yds
60 squares
Or
4 ¼ yds
72 squares
Or
5 yds
Narrow
border 1/3 yd ½ yd ½ yd 2/3 yd 2/3 yd
Wide border ¾ yd 1 1/3 yd 1 ½ yd 2 yds 2 ¼ yds
Binding
Fabric ½ yd ½ yd 2/3 yd ¾ yd 7/8 yd
Backing 1 ½ yd 3 2/3 yds 5 ¼ yds 7 2/3 yds 9 ¼ yds
Stripology Squared ruler recommended but not required.
Cutting Prior to Class:
You should have your dark and light 10” squares cut. If you are using a single background fabric
for the light fabric, you do not need to cut into 10” squares. Bring it and we will cut strips and
sub cut at class.
11

Melba Pintuck Bag – Carol Kummer
This stylish bag has lots to love! It
features 3D pintucks, pockets, and
ample space for sewing supplies or
shopping.
Fabric Requirements:
1 yard - Main Bag Fabric - (If you’re
making more inside pockets
purchase -1 1/3 yards)
-¾ yards – side panels, pintuck,
background & handles
-2/3 yard – lining
-1/6 yard or 1 fat quarter
contrasting fabric for pintucks
-1 yard Shape Flex Pellon SF101
-1 ½” yards Fusible Fleece
-1 magnetic snap
'Melba Pintuck Bag' pattern by Leesa Chandler Designs.
BSE and RCS
Pre Cutting instructions
Main Bag Fabric
Outer back panel Cut 1 14” w x 12 ¼” h
Outer left front panel Cut 1 7 ½” w x 12 ¼” h
Outer side pockets Cut 2 6” w x 12 ¼” h
Lining side panels Cut 2 6” w x 12 ¼” h
Handles Cut 2 2 ½” w x 30” h
Outer base Cut 1 14” w x 6” h
Outer side pockets Cut 2 6” w x 12 ¼” h
Coordinating Fabric
Pintuck Background Cut 13 1 ½’ x 5” strips
Outer side panels Cut 2 6” w x 12 ¼” h
Right trim along pintucks Cut 1 2” w x 12 ¼” h
Left trim along pintucks Cut 1 1 ½” w x 12 ¼” h
Handles Cut 2 2 ½” w x 30” h
Lining Fabric Lining panels Cut 2 14” w x 12 ¼” w
lining pockets Cut 2 6” w x 12 ¼” h
lining base Cut 1 6” w x 14” h
Pintucks contrasting fabric Cut 12 1 ½” x 5” strips
coordinating fabric Cut 12 1 ½” x 5” strips
12

Melba Bag continued
Cut and bring ____ Shape Flex & Fusible Fleece Cut 1 of each 7 ½” w x 12 ¼” h
____ Fusible Fleece Cut 2 6” x 6”
____ Any scrap fabric (it will not be seen) Cut 1 12 ¼” h x 5” w If you want more pockets on the inside, please (Cut 2) 14” w x 12 ¼” h panels, fold them in half to
create (2) 14” w x 6 1/8” h pockets. Cut (2) 14” x 6” pieces of fusible fleece and iron them onto the
wrong sides of half of each pocket starting at the fold. ***Please bring all extra fabrics and stabilizers
with you to class, just in case.***
Sunday All Day Classes 8:30 am -11:30 am & 1:00 pm – 4:30 pm
Poppin’ In or Convex Illusions-Kathy Johnson Day 2 Refer to Saturday Class List
Wedges-Kris Jacobson
Level- Advanced Beginner to Intermediate. Using a 10 degree ruler students will cut wedges
and make 60 degree wedges. Then you play with the wedges to find a layout of their choice.
The photos show one choice of a layout and what one block looks like. In class we will look at
some of the layout options. Any 60 degree layout will work with these blocks. You quilt blocks
can be very modern looking or more traditional depending on your fabric choice.
Materials
Fabric for wedges: various colors, 1/4 yards or fat quarters or 9” x 12” strips of scraps
Fabric for triangle points: 4” Strips of a contrasting color.
I started with 20 blocks and then made more. In class you will want to make at least 6 blocks
and you can make a table runner with that many. I also choose to do it scrappy and my strips
were 9 x 3 for each 10 degree wedge and there are 6 wedges in each block.
One Block
13

Wedges Continued
Supplies
10-degree ruler (Phillips Fiber Art carry’s one)
60 degree ruler or mat with 60 degree markings
A square ruler with 60 Degree markings
Basic sewing supplies
Basic cutting supplies
Optional Book: Wedge Quilt Workshop by Christine Cameli
Hexagon Star – Kari Huber
Class level - confident
beginner/intermediate
In this class, students will be
constructing a deceptively simple
hexagon star with a jelly roll and
background yardage. Pre-sewing
the strip sets before class is
recommended but not required.
Those who pre-sew can expect to
have a finished quilt top at the end
of class.
Pre-sewing instructions:
Divide jelly roll into four distinct
color groupings, for example: Blue,
orange, green and yellow (my
sample colors). You will need 7
strips of each color, so 7 blue, 7
orange, etc. Sewing the strata in
the same order, i.e.: blue orange,
green, yellow, create 7 strata.
Press seams all in one direction. If
you have questions about how to
do this, please contact me. You can expect to get your strip sets sewn in about 3-4 hours or less.
Supply list:
Book: New Ways with Jelly Rolls by Pam and Nicky Lintott available at Dakota Sew and So,
Dickinson. Holly will be glad to ship the book to you if you aren't able to get to the shop. The
shop phone is 701 225-1408.
14

Hexagon Star Continued
One jelly roll with at least 4 distinct colors and good contrast. Batiks work beautifully for this,
but other, "solid" looking fabrics would also work.
3 yards background fabric. We will be using this in class to finish the top.
1/2 yard binding fabric - not needed in class.
60 degree triangle ruler that you probably already have. It must be large enough to make 8 1/2"
triangles. I prefer the Clearview Triangle Ruler.
Basic sewing kit - neutral thread (I prefer lime green, of course, but go with what works for
you!), sewing machine, cutting mat and rotary cutter, design wall, 24" long ruler, 12" square
ruler if you have it and any other basic sewing items you find necessary. Don't forget the
Snickers bar for the teacher.
On Point – Denise Fried
This quilt is easy to pull together. All you need is a jelly roll, background fabric that contrast
with the fabrics in the jelly roll. You'll have this quilt On Point in no time at all.
Pattern required (can be obtained online at Craftsy under the Midnight Quilter, On Point)
15

On Point Continued
Materials:
2 ½” wide strips 40 (jelly roll works well)
Background and border fabric 3 ½ yards
Backing 4 ½ yards
Binding 5/8 yard cut into 2 ½” wide strips
Helpful tools Strip Tube Ruler or Strip Tube Junior by Cozy
Quilt Designs or 6 ½” square ruler
Cutting Prior to Class:
40 – 2 ½” strips or a jelly roll
From background fabric, cut 20 – 4 ½” strips from width of fabric.
Sewing Prior to Class:
Sew together 2 of the 2 ½” strips together using a ¼” seam allowance. Press in one direction.
Your strip set should measure 4 ½” wide.
Supply List:
BSK=Basic Sewing Kit. RCE=Rotary Cutting Equipment
Quilters Bios
Kathy Johnson: Kathy started quilting in 1983. Little did she know where that first class would
lead? Kathy loves teaching techniques that students have instant success with. Kathy has been
published in several books and calendars and has her own pattern line. Check out her web page
at www.augustwindquiltdesigns.com. Contact Kathy at [email protected] or 701-828-3159.
Denise Fried: Denise has been involved in many different hobbies and crafts throughout the
years. She started sewing in 4-H and high school. She decided to give quilting a try in 2004
when her daughter wanted a t-shirt quilt for graduation. This is currently her oldest UFO! Since
catching the quilting bug, she has jumped in with both feet. There isn’t a notion or ruler that
she doesn’t want to try. The smaller the pieces the better! She loves to attend retreats, quilt
shows and take classes to learn new techniques. She loves to spread her love of quilting to
others by teaching classes or one on one with friends. Her husband, Ralph, has embraced her
love of quilting and is building her dream quilting studio.
16

Carol Kummer: Carol started sewing in 4-H and continued thru Home Ec. She made clothing
and many craft items. Then she started to quilt and was hooked. Carol likes to try new
techniques and taking classes. This has led to a large number of UFOS. With quilting you always
have friends in each quilt shop you stop at. She has found that traveling and finding new quilt
shops is so much fun. You can buy fabric a lot faster than you can sew it up. This has led to large
stash that she is not sure she can sew up in her life time. But she keeps working at it. Carol is
married to Brooks and has two children and three grandkids. They live on a ranch and have a
full menagerie of animals.
Kris Jacobson: Kris started sewing in 4-H and acquired a Minor in Textiles and Clothing in
College. In the late ‘80’s she started getting interested in quilting. Kris loves the process of
playing with colors and fabrics and likes to learn new things. She has won awards at local quilt
shows and fairs and was juried into the Minnesota Quilt Show. There is always something new
to try. She began teaching at Badlands Quilters Retreat in 1995. Kris and her husband also own
a ranch that Kris has a full time job to support at the County Courthouse. They have one son
and daughter-in-law and 5 grandchildren. You can contact Kris at [email protected] or
call her at 701-279-5797.
Vickie Loh: Vickie started quilting in the mid 1980’s and has been teaching since 1995. She
enjoys all aspects of quilting from choosing the fabrics to sewing on the binding. She has won
awards at local quilt shows and the state fair, but the highlight of her quilting hobby was
winning a trip to the 2001 Paducah, KY quilt show with her leap frog quilt, which featured hand
appliqué and 3 dimensional flowers. Vickie lives on a ranch in southwestern ND where she also
runs an architectural drafting business out of her home. She has two children and 8
grandchildren. Besides quilting, she enjoys gardening in the summer and deer hunting in the
fall. Contact Vickie at [email protected] or 701-863-6761
Faye Grandulen: Faye has been sewing since she was a child and seriously quilting for 23 years.
She has been longarm quilting for 22 years. Faye opened "Faye's Henhouse Quilts in 1996. She
is retiring and closing my shop on May 1, 2018 to travel and work on UFO's at home and
retreats. Faye grew up in a large family on a cattle ranch in the middle of the Mountains in
Montana. She married a North Dakota farmer in 1972. Jim passed away in 2014. (They had 41
years together) Faye & Jim moved to ND in 1984. Faye still lives on the Farm 10 miles west of
Portland. Faye has two wonderful Daughters, one great son-in-law and three super wonderful
granddaughters.
Kari Huber has been teaching quilting since the 1900's. In that time, she has learned a thing or
two and now uses that knowledge and love of quilting and fabric daily in her job as a fabric
sales rep for Jaftex Corporation. Being on a permanent shop hop is a great adventure and has
lead to many wonderful friendships and opportunities. It has also lead to a stash roughly the
size of Rhode Island! My advice to you is to always support your local quilt shops! They
appreciate your business!
17