Objectives
48
Objectiv es © Paradigm Publishing, Inc. 1 Objectiv es
-
Upload
glenna-murray -
Category
Documents
-
view
48 -
download
0
description
Objectives. Chapter 24: Creating and Managing Styles Performance Objectives. Apply Styles Create Styles CHECKPOINT 1 Modify a Style Save Styles in a Template Modify an Applied Style Display All Styles Reveal Style Formatting. Save a Custom Style Set Change Default Settings - PowerPoint PPT Presentation
Transcript of Objectives

Objectives© Paradigm Publishing, Inc. 1 Objectives

© Paradigm Publishing, Inc. 2 Objectives
Chapter 24: Creating and Managing StylesPerformance Objectives Apply Styles Create Styles CHECKPOINT 1 Modify a Style Save Styles in a Template Modify an Applied Style Display All Styles Reveal Style Formatting
Save a Custom Style Set Change Default Settings Delete a Custom Style Set Create Multilevel List and
Table Styles Use the Style Inspector Manage Styles CHECKPOINT 2

© Paradigm Publishing, Inc. 3 Objectives
Apply Styles
A style is a set of formatting instructions that you can apply to text.
Word provides a number of predesigned styles and groups styles that apply similar formatting into sets called style sets.
Whereas a theme changes the overall colors, fonts, and effects used in a document, a style set changes how the colors, fonts, and effects are combined and which color, font, and effect is dominant.
A variety of methods is available for applying styles to text in a document. You can apply a style by clicking the style thumbnail in the Styles group on the HOME tab or by clicking the More button and then clicking the desired style at the drop-down gallery.

© Paradigm Publishing, Inc. 4 Objectives
Apply Styles - continued
The Styles task pane provides another method for applying a style. Display the Styles task pane by clicking the Styles group task pane launcher or pressing Alt + Ctrl + Shift + S.
If you hover the mouse pointer on a style in the Styles task pane, a ScreenTip displays with information about the formatting applied by the style.

© Paradigm Publishing, Inc. 5 Objectives
Apply Styles - continued
To apply a style:1. Click the HOME tab.2. Click the desired style in the Styles group.OR3. Click the HOME tab.4. Click the More button in the Styles group.5. Click the desired style. More button
Styles group

© Paradigm Publishing, Inc. 6 Objectives
Apply Styles - continued
To apply a style using the Styles task pane:1. Click the HOME tab.2. Click the Styles group task pane launcher.3. Click the desired style in the task pane.
Styles group task pane launcher
© Paradigm Publishing, Inc. 7 Objectives
Apply Styles - continued
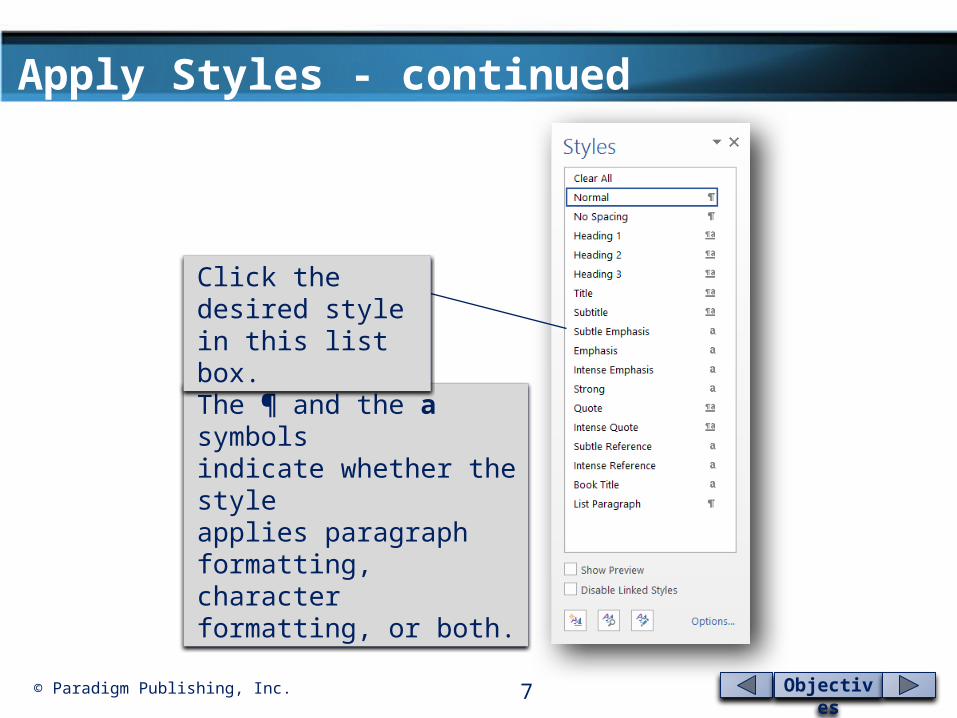
The ¶ and the a symbolsindicate whether the styleapplies paragraph formatting,character formatting, or both.
Click the desired style in this list box.

© Paradigm Publishing, Inc. 8 Objectives
Apply Styles - continued
To apply a style at the Apply Styles window:1. Click the HOME tab.2. Click the More button in the
Styles group.3. Click the Apply Styles option
at the drop-down gallery.4. Click the down-pointing
arrow at the right of the Style Name option box.
5. Click the desired style at the drop-down list.
Apply Styles option

© Paradigm Publishing, Inc. 9 Objectives
Apply Styles - continued
Click this down-pointing arrow to display a list of styles available in the current document.

© Paradigm Publishing, Inc. 10 Objectives
Create Styles
If none of the predesigned styles provided by Word contains the formatting you want, you can create your own style.
You can create a style based on existing formatting, create a new style and apply all of the formatting, or modify an existing style.
© Paradigm Publishing, Inc. 11 Objectives
Create Styles - continued
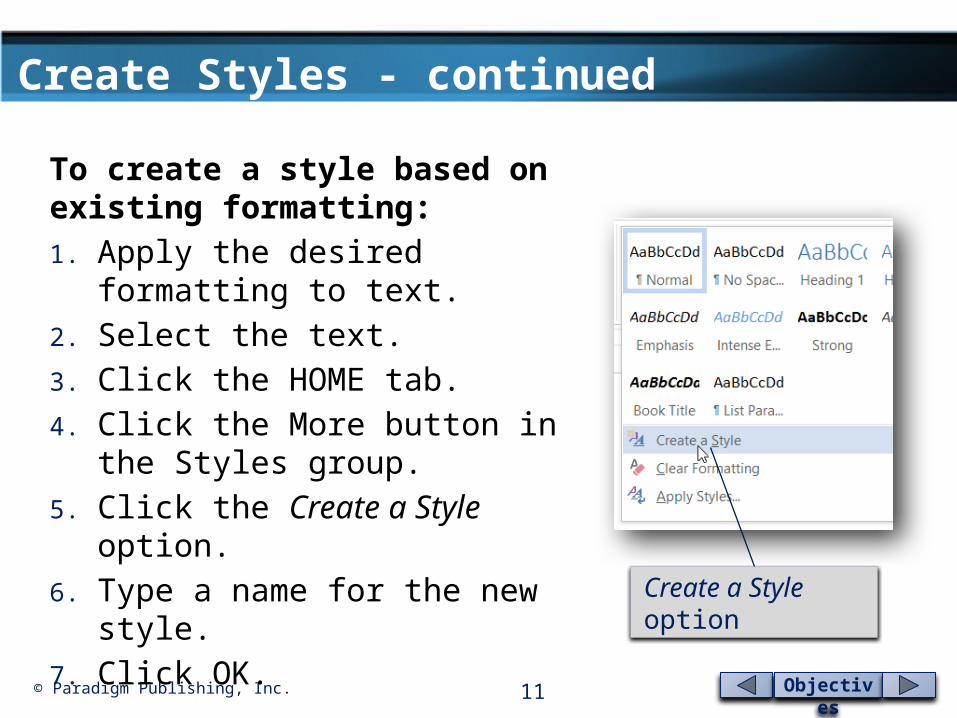
To create a style based on existing formatting:1. Apply the desired formatting to text.2. Select the text.3. Click the HOME tab.4. Click the More button in the Styles
group.5. Click the Create a Style option.6. Type a name for the new style.7. Click OK.
Create a Style option

© Paradigm Publishing, Inc. 12 Objectives
Create Styles - continued
Type a new name for the style in this text box.

© Paradigm Publishing, Inc. 13 Objectives
Create Styles - continued
To create a style based on an existing style:1. Apply a style to the desired text.2. Make the desired formatting
changes.3. Select the text.4. Click the HOME tab.5. Click the More button in the
Styles group.6. Click the Create a Style option.7. Type a name for the new style.8. Click OK.
Create a Style option

© Paradigm Publishing, Inc. 14 Objectives
Create Styles - continued
To create a new style:1. Click the HOME tab.2. Click the More button in
the Styles group.3. Click the Create a Style
option.4. Click the Modify button.5. Type a new name for the
style.6. Apply the desired
formatting.7. Click OK.
Modify button

© Paradigm Publishing, Inc. 15 Objectives
Create Styles - continued
Type a name for thestyle in this text box.
Click this buttonto display a list offormatting options.

© Paradigm Publishing, Inc. 16 Objectives
Create Styles - continued
The Style based on option has a default setting of ¶ Normal. You can base a new style on an existing style.
To do this, click the down-pointing arrow at the right of the Style based on option box and then click the desired style at the drop-down list.
If a predesigned style contains some of the formatting you want for your new style, choosing the predesigned style at the Style based on option drop-down list saves you formatting time.
© Paradigm Publishing, Inc. 17 Objectives
Create Styles - continued
The Create New Style from Formatting dialog box contains a number of options for specifying formatting for the new style.
Use options in the Formatting section to apply character and paragraph formatting, such as changing the font, font size, font color, and font effects and changing paragraph alignment, spacing, and indenting.
Click the Format button that displays in the lower left corner of the dialog box and a drop-down list displays with a number of formatting options.

© Paradigm Publishing, Inc. 18 Objectives
Create Styles - continued
Unless the Create New Style from Formatting dialog has been customized, the Add to the Styles gallery check box located in the lower left corner of the dialog box contains a check mark.
With this option active, the style you create will display in the Styles group on the HOME tab.
Additionally, the Only in this document option is active. With this option active, the style is saved only with the current document.

© Paradigm Publishing, Inc. 19 Objectives
Create Styles - continued
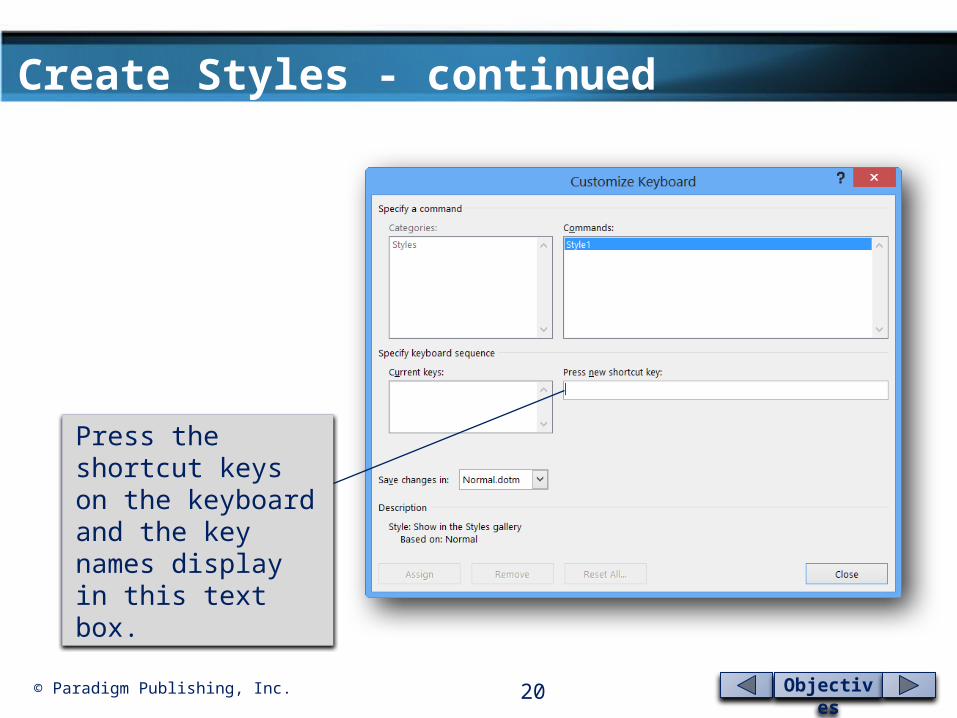
Consider assigning a keyboard shortcut to a style that you apply on a regular basis.
A keyboard shortcut can be assigned to a style with any of the following combinations: Alt + letter Alt + Ctrl + letter Alt + Shift + letter Ctrl + Shift + letter Alt + Ctrl + Shift + letter
Word already uses many combinations for Word functions. For example, pressing Ctrl + Shift + F displays the Font dialog box.
© Paradigm Publishing, Inc. 20 Objectives
Create Styles - continued
Press the shortcut keys on the keyboard and the key names display in this text box.

Objectives© Paradigm Publishing, Inc. 21
CHECKPOINT 11) This is a set of formatting
instructions that you can apply to text.a. styleb. shapec. text boxd. script
3) The Styles group is located on this tab.a. FILEb. PAGE LAYOUTc. HOMEd. INSERT
2) If you hover the mouse pointer on a style in the Styles task pane, this displays with information about the style formatting applied.a. shortcut menub. ScreenTipc. pop-up boxd. StyleTip
4) You can display the Apply Styles window by pressing these keys.a. Ctrl + Alt + Shift + Sb. Ctrl + Alt + Sc. Alt + Shift + Sd. Ctrl + Shift + S
Next Question
Next Question
Next Question
Next Slide
Answer
Answer
Answer
Answer
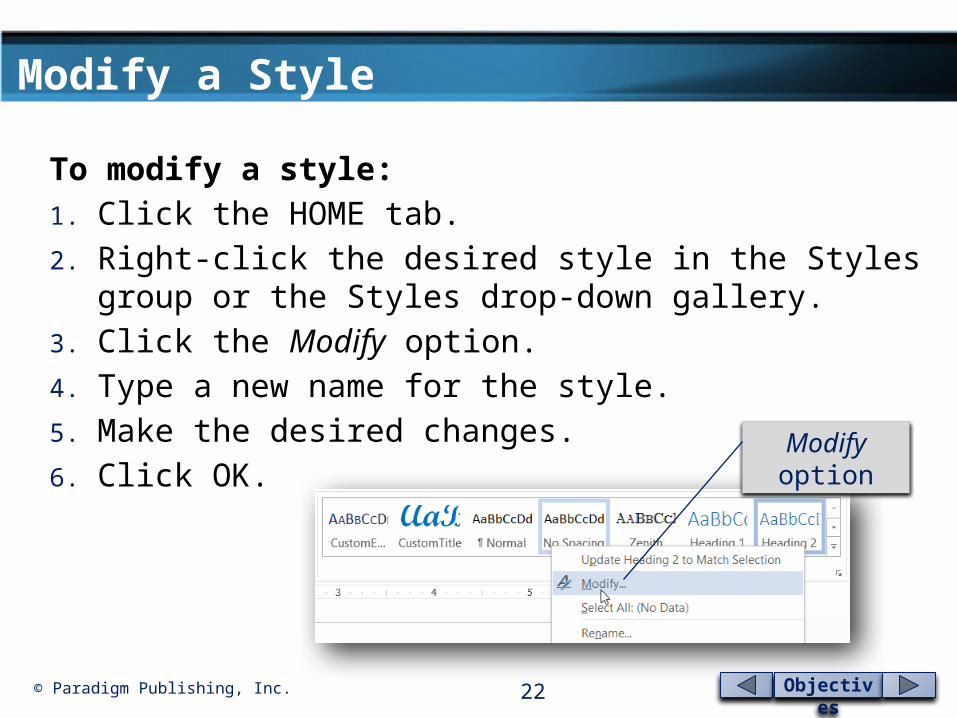
© Paradigm Publishing, Inc. 22 Objectives
Modify a Style
To modify a style:1. Click the HOME tab.2. Right-click the desired style in the Styles group or the Styles
drop-down gallery.3. Click the Modify option.4. Type a new name for the style.5. Make the desired changes.6. Click OK.
Modify option

© Paradigm Publishing, Inc. 23 Objectives
Modify a Style - continued
Modify Style dialog box

© Paradigm Publishing, Inc. 24 Objectives
Save Styles in a Template
To create a document based on a template:1. Click the FILE tab.2. Click the New option.3. Click the PERSONAL option.4. Click the desired template
thumbnail.
PERSONAL option

© Paradigm Publishing, Inc. 25 Objectives
Modify an Applied Style
One of the advantages of applying styles in a document is that if you modify the style formatting, all of the text in the document to which that style has been applied automatically updates.
Using styles streamlines formatting and maintains consistency in your documents.

© Paradigm Publishing, Inc. 26 Objectives
Display All Styles
To display the Style Pane Options dialog box:1. Click the HOME tab.2. Click the Styles group task
pane launcher.3. Click the Options hyperlink.
Options hyperlink
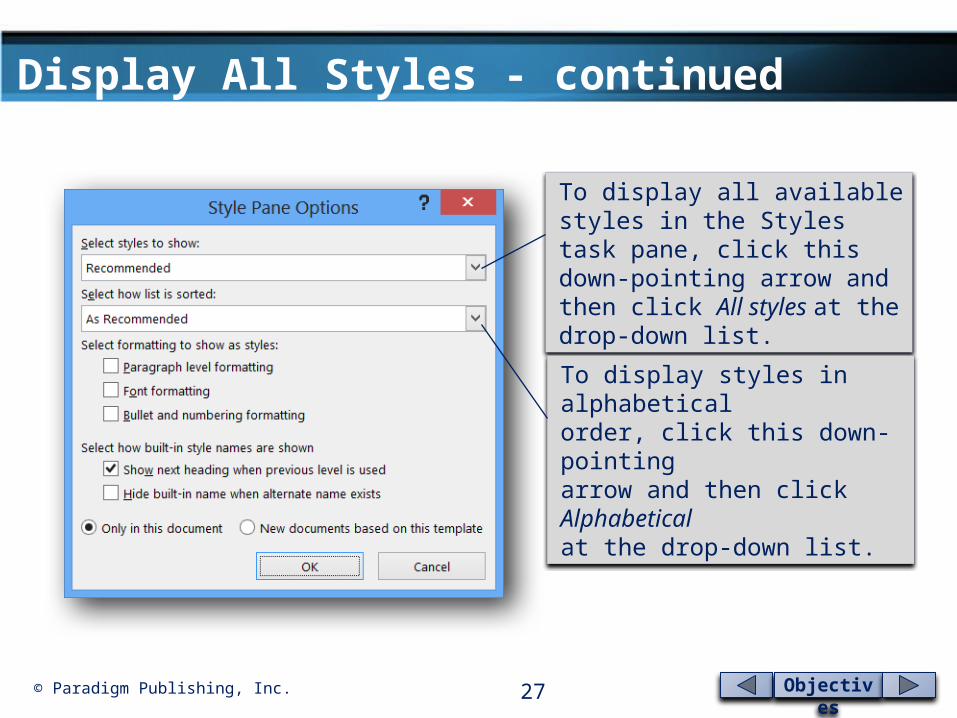
© Paradigm Publishing, Inc. 27 Objectives
Display All Styles - continued
To display all available styles in the Styles task pane, click this down-pointing arrow and then click All styles at the drop-down list.
To display styles in alphabeticalorder, click this down-pointingarrow and then click Alphabeticalat the drop-down list.

© Paradigm Publishing, Inc. 28 Objectives
Reveal Style Formatting
As you learned earlier, if you hover the mouse pointer over a style in the Styles task pane, a ScreenTip displays with information about the formatting applied by the style.
The styles in the Styles gallery display with a visual representation of the formatting applied by the style.
You can also display a visual representation of styles by clicking the Show Preview check box in the Styles task pane.

© Paradigm Publishing, Inc. 29 Objectives
Reveal Style Formatting - continued
Reveal Formatting task pane

© Paradigm Publishing, Inc. 30 Objectives
Save a Custom Style Set
To save a custom style set:1. Click the DESIGN tab. 2. Click the More button at the right
side of the style set thumbnails.3. Click Save as a New Style Set.4. Type a custom style set file name.5. Click the Save button.
Save as a New Style Set option

© Paradigm Publishing, Inc. 31 Objectives
Change Default Settings
If you apply a predesigned or custom style set to most documents, you can set that style set as the default and it will be available for all future documents.
Change the default style set with the Set as Default button in the Document Formatting group on the DESIGN tab.
In addition to changing the default style set, making changes to the theme, theme colors, theme fonts, theme effects, and paragraph spacing will make them default settings, as well.

© Paradigm Publishing, Inc. 32 Objectives
Delete a Custom Style Set
To delete a custom style set:1. Click the DESIGN tab.2. Click the More button at the right
side of the style set thumbnails.3. At the drop-down gallery, right-click
your custom style set in the Custom section.
4. Click Delete at the shortcut menu.5. At the message that displays asking
if you want to delete the style set, click the Yes button.
Delete option
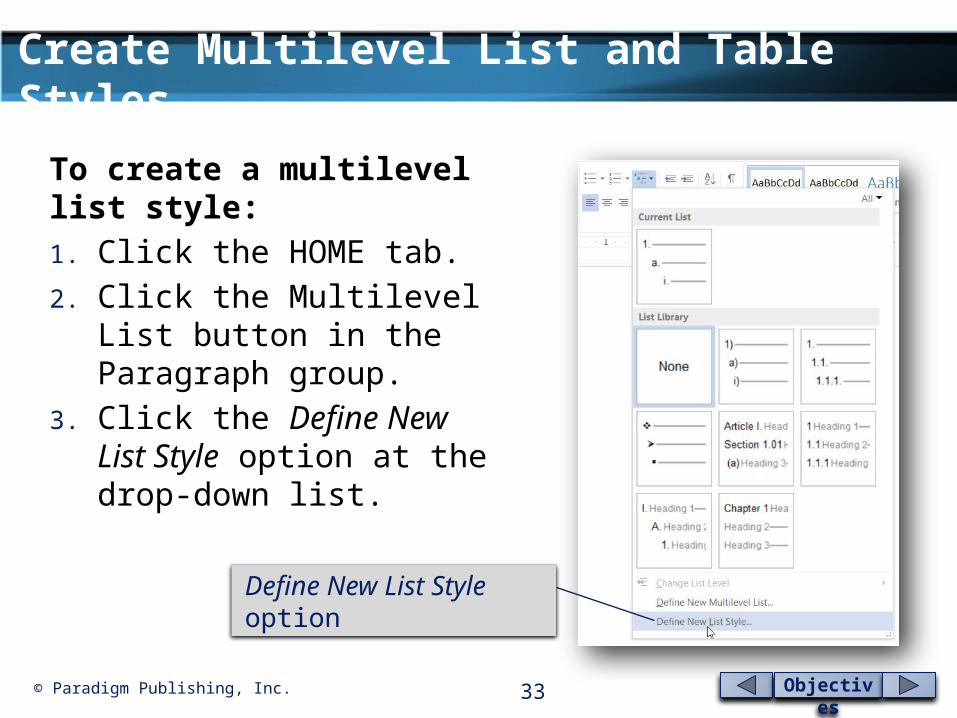
© Paradigm Publishing, Inc. 33 Objectives
Create Multilevel List and Table Styles
Define New List Style option
To create a multilevel list style:1. Click the HOME tab.2. Click the Multilevel List button
in the Paragraph group.3. Click the Define New List Style
option at the drop-down list.

© Paradigm Publishing, Inc. 34 Objectives
Create Multilevel List and Table Styles - continued
Define New List Style dialog box

© Paradigm Publishing, Inc. 35 Objectives
Create Multilevel List and Table Styles - continued
If you open a document based on a template and then create a style, you can specify that you want the style saved in the template and available for any future documents created with the template.
A document based on a template is attached to the template. To save a style in a template, open a document based on the
template, create a style, and then click the New documents based on this template option at the Create New Style dialog box.
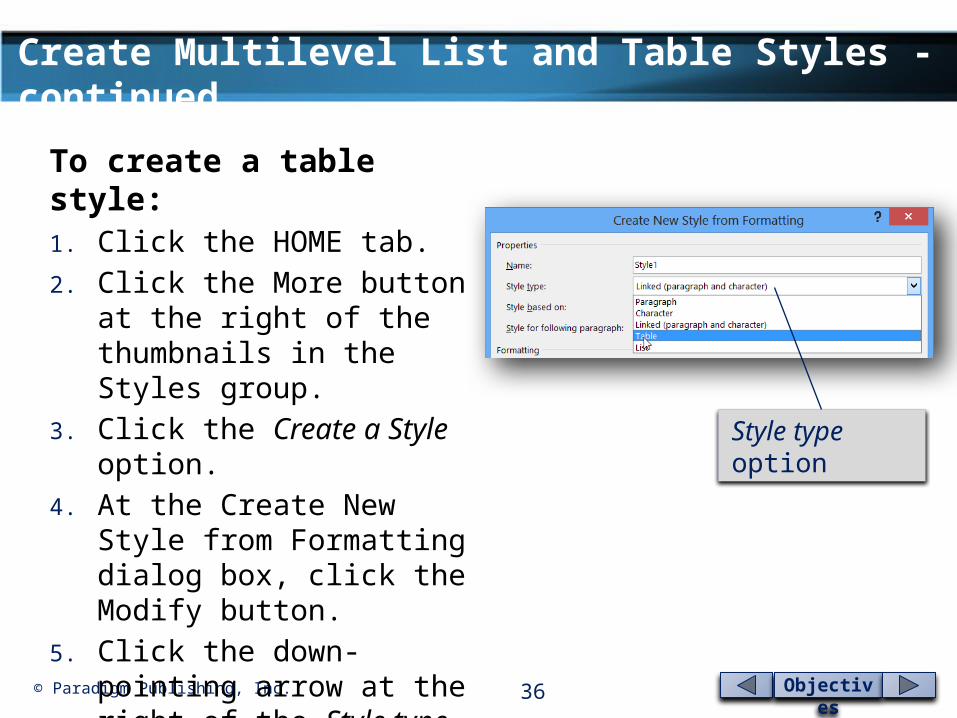
© Paradigm Publishing, Inc. 36 Objectives
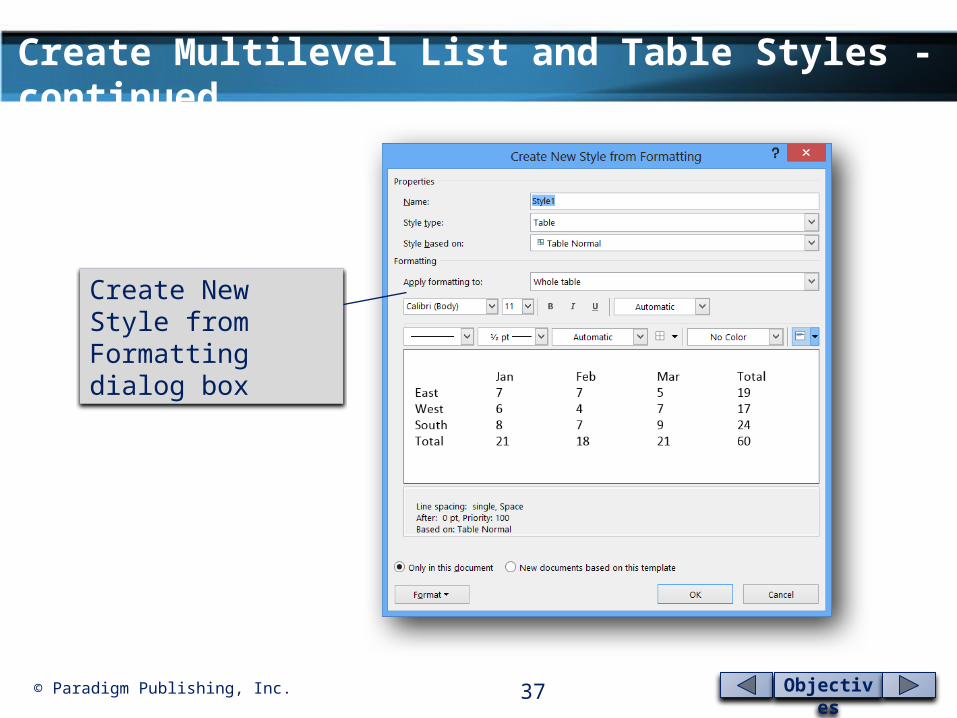
Create Multilevel List and Table Styles - continued
To create a table style:1. Click the HOME tab. 2. Click the More button at the
right of the thumbnails in the Styles group.
3. Click the Create a Style option.4. At the Create New Style from
Formatting dialog box, click the Modify button.
5. Click the down-pointing arrow at the right of the Style type option and then click the Table option at the drop-down list.
Style type option
© Paradigm Publishing, Inc. 37 Objectives
Create Multilevel List and Table Styles - continued
Create New Style from Formatting dialog box

© Paradigm Publishing, Inc. 38 Objectives
Create Multilevel List and Table Styles - continued
The Create New Style from Formatting dialog box with Table selected as the style type contains options for formatting the entire table or specific portions of the table.
By default, Whole table is selected in the Apply formatting to option. With this option selected, any formatting options you choose will affect the entire table.
To format a specific portion of the table, click the down-pointing arrow at the right of the Apply formatting to option and then click the desired option at the drop-down list.

© Paradigm Publishing, Inc. 39 Objectives
Create Multilevel List and Table Styles - continued
To modify a multilevel list style:1. Click the HOME tab.2. Click the Multilevel List button
in the Paragraph group.3. Right-click the style you want
to modify.4. Click the Modify option at the
shortcut menu.5. Select the desired options in
the Modify Style dialog box.6. Click OK.
Modify option

© Paradigm Publishing, Inc. 40 Objectives
Create Multilevel List and Table Styles - continued
To modify a table style:1. Click in the table.2. Click the TABLE TOOLS
DESIGN tab.3. Right-click your table style in
the Table Styles group.4. Click the Modify Table Style
option at the shortcut menu.5. Select the desired options in
the Modify Style dialog box.6. Click OK.
Modify Table Style option
© Paradigm Publishing, Inc. 41 Objectives
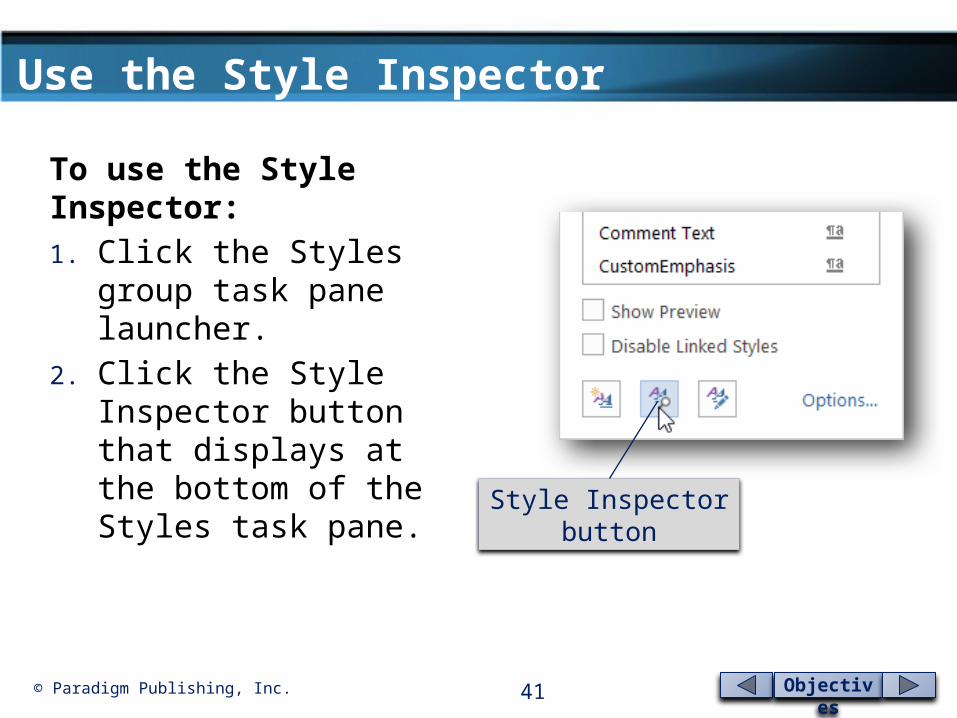
Use the Style Inspector
To use the Style Inspector:1. Click the Styles group task
pane launcher.2. Click the Style Inspector
button that displays at the bottom of the Styles task pane.
Style Inspector button

© Paradigm Publishing, Inc. 42 Objectives
Use the Style Inspector - continued
Style Inspector dialog box

© Paradigm Publishing, Inc. 43 Objectives
Use the Style Inspector - continued
Hover your mouse over the Paragraph formatting option box or Text level formatting option box and a down-pointing arrow displays.
Click the arrow and a drop-down list displays with options for clearing the formatting applied to the text, applying a new style, and displaying the Reveal Formatting task pane.
Click the New Style button, which displays to the right of the Reveal Formatting button, and the Create New Style from Formatting dialog box displays.

© Paradigm Publishing, Inc. 44 Objectives
Manage Styles
To display the Manage Styles dialog box:1. Click the Styles group task
pane launcher.2. Click the Manage Styles button
that displays at the bottom of the Styles task pane.
Manage Styles button
© Paradigm Publishing, Inc. 45 Objectives
Manage Styles - continued
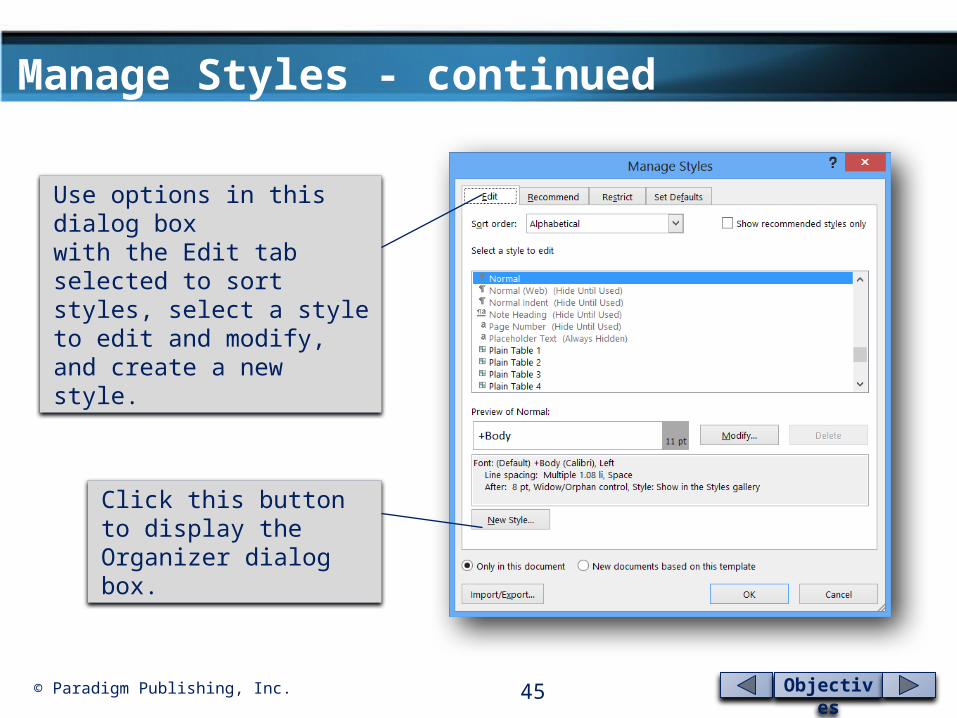
Use options in this dialog boxwith the Edit tab selected to sort styles, select a style to edit and modify, and create a new style.
Click this button to display the Organizer dialog box.

© Paradigm Publishing, Inc. 46 Objectives
Manage Styles - continued
Click the Recommend tab and options display for specifying which styles you want to display in the Styles pane and in what order.
With the Restrict tab selected, you can permit or restrict access to styles. This allows you to control which styles other individuals can apply or modify in a document.
Click the Set Defaults tab to display character and formatting options. You can specify whether changes made in this dialog box will affect the current document or all documents based on the current document.
© Paradigm Publishing, Inc. 47 Objectives
Manage Styles - continued
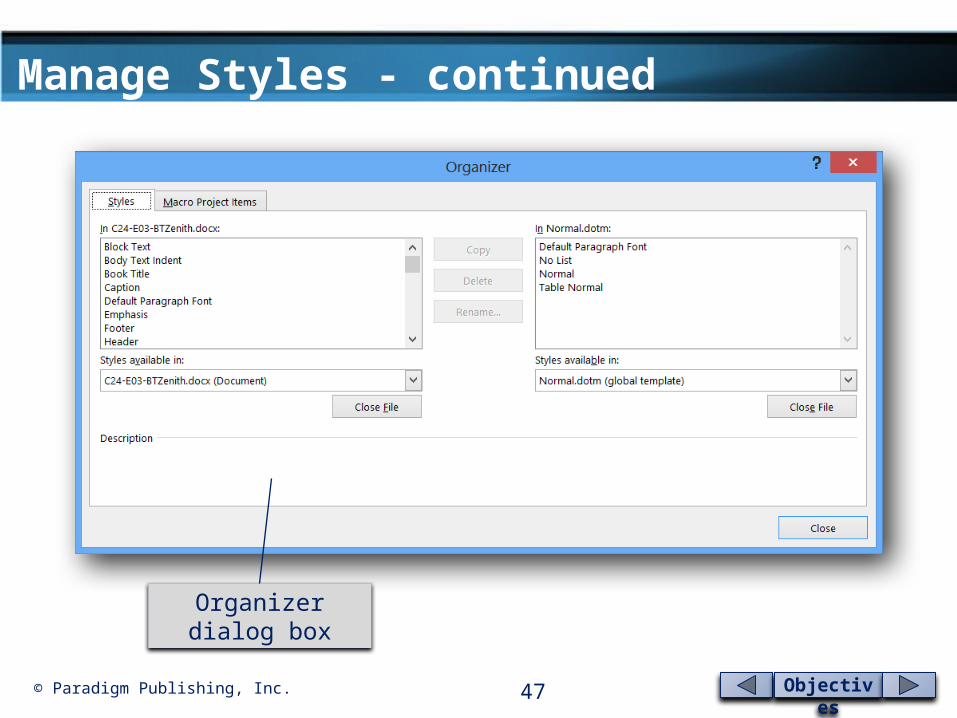
Organizer dialog box
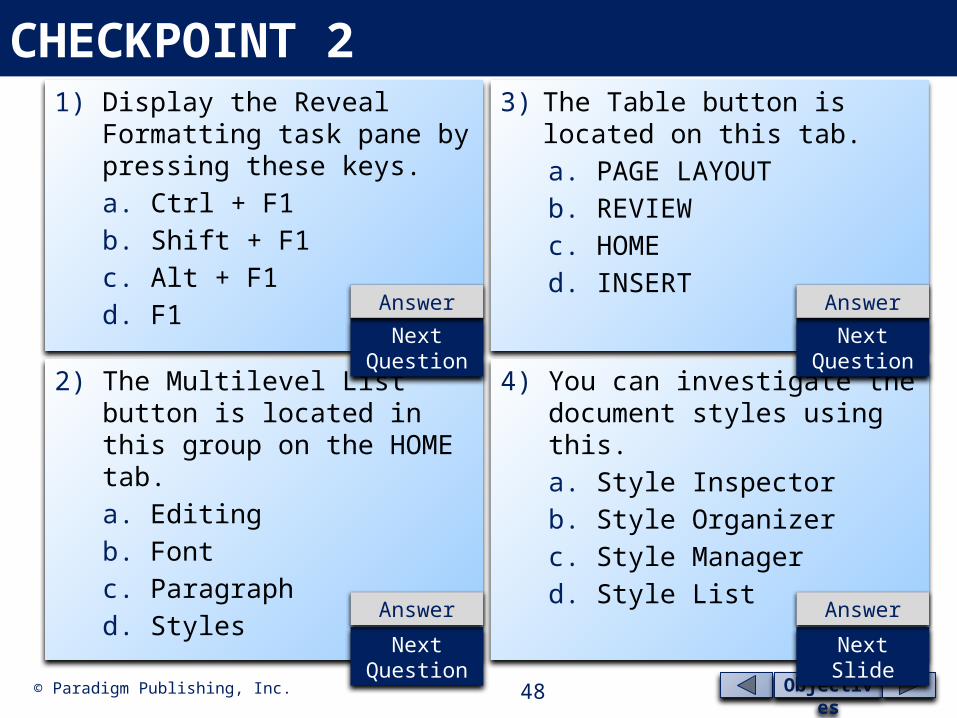
Objectives© Paradigm Publishing, Inc. 48
CHECKPOINT 21) Display the Reveal Formatting task
pane by pressing these keys.a. Ctrl + F1b. Shift + F1c. Alt + F1d. F1
3) The Table button is located on this tab.a. PAGE LAYOUTb. REVIEWc. HOMEd. INSERT
2) The Multilevel List button is located in this group on the HOME tab.a. Editingb. Fontc. Paragraphd. Styles
4) You can investigate the document styles using this.a. Style Inspectorb. Style Organizerc. Style Managerd. Style List
Next Question
Next Question
Next Question
Next Slide
Answer
Answer
Answer
Answer


![Learning Objectives Epidemiology - … Objectives ... • Barium enemaBarium enema ... Microsoft PowerPoint - Siddiqui handout w objectives,disclosure.ppt [Compatibility Mode]](https://static.fdocuments.net/doc/165x107/5ad44f597f8b9a6d708b6dd4/learning-objectives-epidemiology-objectives-barium-enemabarium-enema.jpg)


![[ OBJECTIVES ]](https://static.fdocuments.net/doc/165x107/61d432ab7761d92b9c077f35/-objectives-.jpg)