NSI DIGITAL DIMMING SYSTEM DDS 6000 DIMMER PACK · MOUNTING The NSI DDS 6000 dimmer pack is...
12
NSI DIGITAL DIMMING SYSTEM DDS 6000 DIMMER PACK INSTALLATION AND OPERATION GUIDE Software Revision 1.0 and above, Version C, UL Versions INTRODUCTION The NSI DDS 6000 represents a key part of a state of the art, integrated lighting control system. These dimmers may operate in a "stand alone" mode for automated lighting of displays or may be combined with an NSI memory lighting console for total lighting control. The DDS 6000 provides four channels of 1200 watts each. This dimmer is designed for portable or permanent use for entertainment or display lighting. Several DDS dimmer packs may be combined for more channels of lighting. SPECIFICATIONS Number of Channels: 4 Output capacity: 1200 Watts per channel. Input Power: DDS 6000-15: 120 VAC 1800 Watts max (one power source) DDS 6000-20: 120 VAC 2400 Watts max (one power source) DDS 6000Plus-15: 120 VAC 3600 Watts max (two power sources) DDS 6000Plus-20: 120 VAC 4800 Watts max (two power sources) Dimmer control system: Microprocessor digital phase control dimming or zero-crossing relay mode. Load filtering: ~ 400us rise time. Control Input Types: 0 - 10VDC each channel on 5 pin Din connector. MICROPLEX multiplex signal (128 channel) on three pin XLR type connector. DMX-512 digital signal (512 channel) on five pin XLR optional. Control Wiring: Class 2 low voltage. Output Connections: 2 NEMA 5-15 outlets per channel. Screw terminals optional Cooling System: Passive external aluminum heatsinks. Ambient Temperature: 100 degree F Maximum. Load Type: AC lighting loads only Enclosure Type: For indoor use only, (Utilizer dans un endroit a l’abri.) DDS 6000 DIMMER PACK Software Revision 1.0 and above, Version C, UL Versions INTRODUCTION NSI CORPORATION 1
Transcript of NSI DIGITAL DIMMING SYSTEM DDS 6000 DIMMER PACK · MOUNTING The NSI DDS 6000 dimmer pack is...

NSI DIGITAL DIMMING SYSTEM
DDS 6000 DIMMER PACKINSTALLATION AND OPERATION GUIDE
Software Revision 1.0 and above, Version C, UL Versions
INTRODUCTION
The NSI DDS 6000 represents a key part of a state of the art, integrated lighting control system. These dimmers may operate ina "stand alone" mode for automated lighting of displays or may be combined with an NSI memory lighting console for total lightingcontrol. The DDS 6000 provides four channels of 1200 watts each. This dimmer is designed for portable or permanent use forentertainment or display lighting. Several DDS dimmer packs may be combined for more channels of lighting.
SPECIFICATIONS
Number of Channels: 4
Output capacity: 1200 Watts per channel.
Input Power: DDS 6000-15: 120 VAC 1800 Watts max (one power source) DDS 6000-20: 120 VAC 2400 Watts max (one power source) DDS 6000Plus-15: 120 VAC 3600 Watts max (two power sources) DDS 6000Plus-20: 120 VAC 4800 Watts max (two power sources)
Dimmer control system: Microprocessor digital phase control dimming orzero-crossing relay mode.
Load filtering: ~ 400us rise time.
Control Input Types: 0 - 10VDC each channel on 5 pin Din connector.
MICROPLEX multiplex signal (128 channel) on three pin XLR type connector.
DMX-512 digital signal (512 channel) on five pin XLR optional.
Control Wiring: Class 2 low voltage.
Output Connections: 2 NEMA 5-15 outlets per channel.Screw terminals optional
Cooling System: Passive external aluminum heatsinks.
Ambient Temperature: 100 degree F Maximum.
Load Type: AC lighting loads only
Enclosure Type: For indoor use only, (Utilizer dans un endroit a l’abri.)
DDS 6000 DIMMER PACKSoftware Revision 1.0 and above, Version C, UL Versions INTRODUCTION
NSI CORPORATION 1

MOUNTING
The NSI DDS 6000 dimmer pack is designed to be mounted VERTICALLY. Each dimmer pack is provided with two mountingflanges or ears designed for securing to the center of truss bars or attaching to other vertical surfaces. Since the DDS 6000 dependsupon convection cooling, room air flow must be insured. Keep the air vents located on front and each side of the dimmer packclear of dust or any obstructions. In order for the unit to cool properly the control receptacles must be oriented towards the floor.If several units are to be operated in a small enclosed room, adequate ventilation must be provided to prevent the room temperaturefrom exceeding 100 degrees Fahrenheit
AC POWER CABLE(S) - PORTABLE CONNECTION
This is the main power cord(s) for your dimmer pack which ultimately carries all of the ac power consumed by lights connected tothe dimmer pack. The DDS6000 with the NEMA 5-15 plug is limited to 1800 watts max. While the unit with NEMA 5-20 plugwill support 2400 watts. The DDS6000 Plus includes two cords, one per each two channels, which doubles the maximum capacity.The power cord(s) must be connected to a power source capable of supplying the total power drawn by the lights. (See specificationsfor details on maximum power capability.)
WARNING: Do not remove grounding prong of AC plug. To do so may allow exposure to potentially lethal voltage levelsand will void the warranty on this product.
AC OUTPUT RECEPTACLES
The DDS 6000 has two AC receptacles for each channel. These receptacles provide power to the lamps in your lighting system.The amount of power supplied to these outlets controls the intensity of the lamps connected.
The total lamp wattage connected to each channel must not exceed the rating of each channel (see specifications). For inductiveloads, the total lamp volt-amperes plus the volt-amperes of any ballast or transformer must not exceed the rating of each channel.
NOTE: Some inductive type loads such as transformers, ballasts, and motors, with poor power factor may cause the dimmerto output D.C. type current. This may cause the load to draw excessive current and overheat, causing damage to the
DDS 6000 DIMMER PACKMOUNTING Software Revision 1.0 and above, Version C, UL Versions
2 NSI CORPORATION

transformer, ballast, or motor. For this reason, it is necessary to insure any inductive loads are fused individually for theirrespective normal operating current.
PERMANENT CONNECTION
The DDS6000 is available as an optional DDS6000 Plus-20 terminal version. This version must be installed by qualified personnelin accordance with applicable electrical codes.
AC Input
Conduit containing line conductors enters pack through one of the knock-outs in the top end. The two 20A, 120V, 60HZ, 2 wireline circuits, A and B, are terminated to their respective terminals labeled Line and Line N. The terminals accept wire sizes 22-8AWG CU and have a torque rating of 8 in-lbs. Line equipment grounding conductor, if a wire, terminates to the lug labeled Gnd.The ground lug accepts wire size 14-6 AWG CU and has a torque rating of 35 in-lbs. (14-10 AWG), 40 in-lbs. (8 AWG), and 45in-lbs. (6 AWG).
AC Output
Conduit containing load conductors enters pack through on of the knock-outs in the top end. The four 1200W max, 120V, 2 wireload circuits, 1 through 4, are terminated to their respective terminals labeled Load and Load N. Circuits 1 and 2 are supplied frominput A, and circuits 3 and 4 from input B. The control power supply is also supplied by input A. Terminal rating are the sameas indicated above for line terminals.
MICROPLEX MULTIPLEX CONTROL WIRING.
Microplex is the control protocol used on most NSI lighting consoles. This system uses a single three conductor cable to transmitup to 128 channels of dimmer control. For short distances (50 feet or less) a standard microphone cable may be used to carry boththe control signal and the DC power source for NSI control consoles. Longer distances may be accommodated with 18 gauge orbetter cable to reduce voltage losses of the power supply.
Connect the Microplex control cable to either of the three pin XLR jacks. Since both jacks are wired in parallel, another controlcable may connected between the remaining jack and another dimmer pack. Many dimmer packs may be "daisy chained" togetherin this manner.
Be sure to set the Channel Address dip switch as required (see DIP SWITCH SETTINGS).
ANALOG 0 - 10 VDC CONTROL WIRING.
DDS 6000 DIMMER PACKSoftware Revision 1.0 and above, Version C, UL Versions PERMANENT CONNECTION
NSI CORPORATION 3
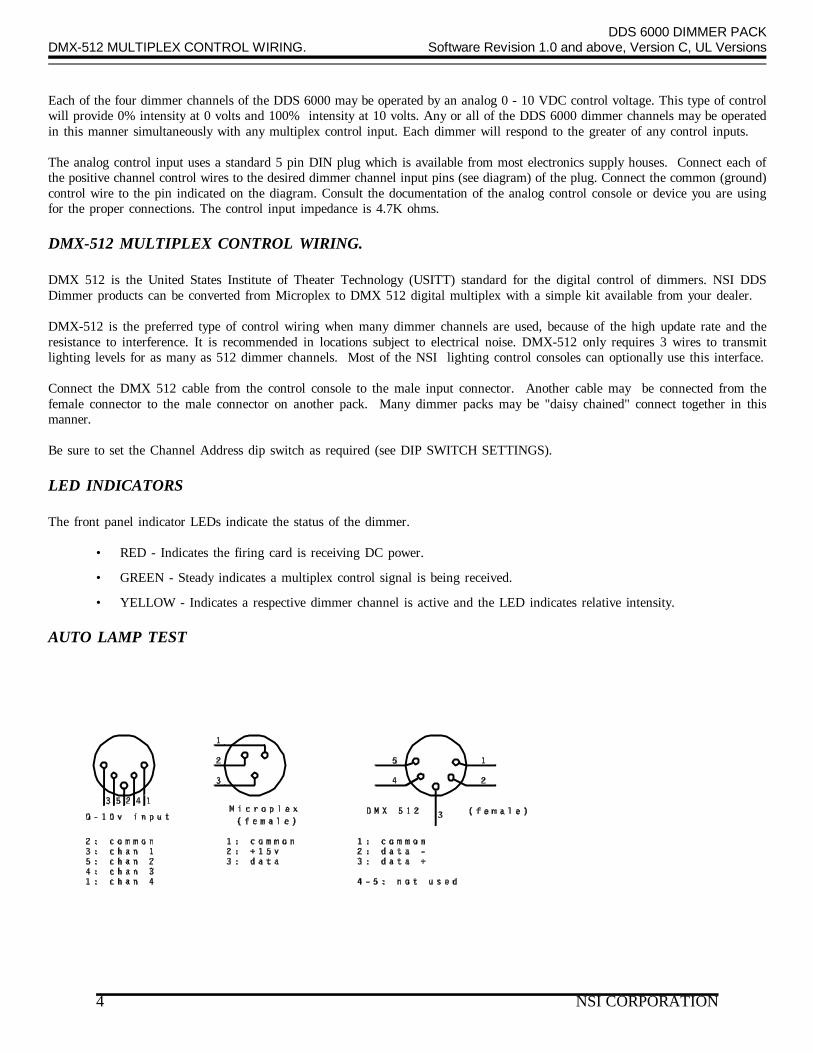
Each of the four dimmer channels of the DDS 6000 may be operated by an analog 0 - 10 VDC control voltage. This type of controlwill provide 0% intensity at 0 volts and 100% intensity at 10 volts. Any or all of the DDS 6000 dimmer channels may be operatedin this manner simultaneously with any multiplex control input. Each dimmer will respond to the greater of any control inputs.
The analog control input uses a standard 5 pin DIN plug which is available from most electronics supply houses. Connect each ofthe positive channel control wires to the desired dimmer channel input pins (see diagram) of the plug. Connect the common (ground)control wire to the pin indicated on the diagram. Consult the documentation of the analog control console or device you are usingfor the proper connections. The control input impedance is 4.7K ohms.
DMX-512 MULTIPLEX CONTROL WIRING.
DMX 512 is the United States Institute of Theater Technology (USITT) standard for the digital control of dimmers. NSI DDSDimmer products can be converted from Microplex to DMX 512 digital multiplex with a simple kit available from your dealer.
DMX-512 is the preferred type of control wiring when many dimmer channels are used, because of the high update rate and theresistance to interference. It is recommended in locations subject to electrical noise. DMX-512 only requires 3 wires to transmitlighting levels for as many as 512 dimmer channels. Most of the NSI lighting control consoles can optionally use this interface.
Connect the DMX 512 cable from the control console to the male input connector. Another cable may be connected from thefemale connector to the male connector on another pack. Many dimmer packs may be "daisy chained" connect together in thismanner.
Be sure to set the Channel Address dip switch as required (see DIP SWITCH SETTINGS).
LED INDICATORS
The front panel indicator LEDs indicate the status of the dimmer.
• RED - Indicates the firing card is receiving DC power.
• GREEN - Steady indicates a multiplex control signal is being received.
• YELLOW - Indicates a respective dimmer channel is active and the LED indicates relative intensity.
AUTO LAMP TEST
DDS 6000 DIMMER PACKDMX-512 MULTIPLEX CONTROL WIRING. Software Revision 1.0 and above, Version C, UL Versions
4 NSI CORPORATION

Whenever dipswitch #8 is in the off (down) position and there is no multiplex signal detected, all channel outputs will come to fullintensity. The automatic sequencing feature must be disabled for this Auto Lamp test to operate (see INTERNAL CONFIGURATIONDIPSWITCH SELECTIONS).
CHANNEL FUSES
Each channel is protected by a fuse to help prevent overload and damage to the power control devices used in the dimmer. Besure to replace the fuse with the same type and rating. Replacement with the wrong fuse is dangerous and will void your warranty.
Note: Lamps may sometimes cause a temporary "short-circuit" when the filament burns out and cause the fuse to blow.This is normal and protects the internal dimmer circuitry from damage.
INSTALLATION and OPERATION TIPS
Care should always be taken to:
1) Keep all AC wiring away from control wiring.
2) We also recommend powering up and performance checks be done one unit at a time. This can be a real time saver shouldproblems arise thus eliminating unnecessary isolation techniques to resolve problems.
DDS 6000 DIMMER PACKSoftware Revision 1.0 and above, Version C, UL Versions CHANNEL FUSES
NSI CORPORATION 5
FRONT PANEL DIP SWITCH SETTINGS
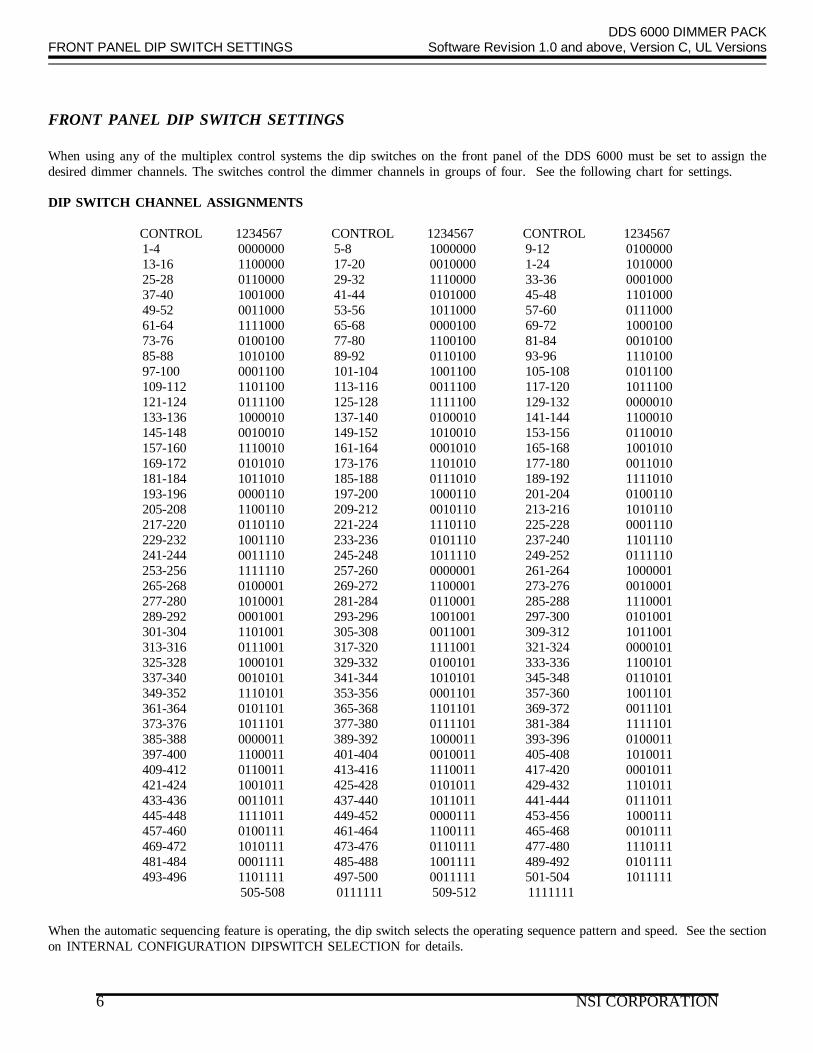
When using any of the multiplex control systems the dip switches on the front panel of the DDS 6000 must be set to assign thedesired dimmer channels. The switches control the dimmer channels in groups of four. See the following chart for settings.
DIP SWITCH CHANNEL ASSIGNMENTS
CONTROL 1234567 CONTROL 1234567 CONTROL 1234567 1-4 0000000 5-8 1000000 9-12 010000013-16 1100000 17-20 0010000 1-24 101000025-28 0110000 29-32 1110000 33-36 000100037-40 1001000 41-44 0101000 45-48 110100049-52 0011000 53-56 1011000 57-60 011100061-64 1111000 65-68 0000100 69-72 100010073-76 0100100 77-80 1100100 81-84 001010085-88 1010100 89-92 0110100 93-96 111010097-100 0001100 101-104 1001100 105-108 0101100109-112 1101100 113-116 0011100 117-120 1011100121-124 0111100 125-128 1111100 129-132 0000010133-136 1000010 137-140 0100010 141-144 1100010145-148 0010010 149-152 1010010 153-156 0110010157-160 1110010 161-164 0001010 165-168 1001010169-172 0101010 173-176 1101010 177-180 0011010181-184 1011010 185-188 0111010 189-192 1111010193-196 0000110 197-200 1000110 201-204 0100110205-208 1100110 209-212 0010110 213-216 1010110217-220 0110110 221-224 1110110 225-228 0001110229-232 1001110 233-236 0101110 237-240 1101110241-244 0011110 245-248 1011110 249-252 0111110253-256 1111110 257-260 0000001 261-264 1000001265-268 0100001 269-272 1100001 273-276 0010001277-280 1010001 281-284 0110001 285-288 1110001289-292 0001001 293-296 1001001 297-300 0101001301-304 1101001 305-308 0011001 309-312 1011001313-316 0111001 317-320 1111001 321-324 0000101325-328 1000101 329-332 0100101 333-336 1100101337-340 0010101 341-344 1010101 345-348 0110101349-352 1110101 353-356 0001101 357-360 1001101361-364 0101101 365-368 1101101 369-372 0011101373-376 1011101 377-380 0111101 381-384 1111101385-388 0000011 389-392 1000011 393-396 0100011397-400 1100011 401-404 0010011 405-408 1010011409-412 0110011 413-416 1110011 417-420 0001011421-424 1001011 425-428 0101011 429-432 1101011433-436 0011011 437-440 1011011 441-444 0111011445-448 1111011 449-452 0000111 453-456 1000111457-460 0100111 461-464 1100111 465-468 0010111469-472 1010111 473-476 0110111 477-480 1110111481-484 0001111 485-488 1001111 489-492 0101111493-496 1101111 497-500 0011111 501-504 1011111
505-508 0111111 509-512 1111111
When the automatic sequencing feature is operating, the dip switch selects the operating sequence pattern and speed. See the sectionon INTERNAL CONFIGURATION DIPSWITCH SELECTION for details.
DDS 6000 DIMMER PACKFRONT PANEL DIP SWITCH SETTINGS Software Revision 1.0 and above, Version C, UL Versions
6 NSI CORPORATION
INTERNAL CONFIGURATION DIPSWITCH SELECTIONS
Caution: The follow procedures should be performed by qualified personnel only.
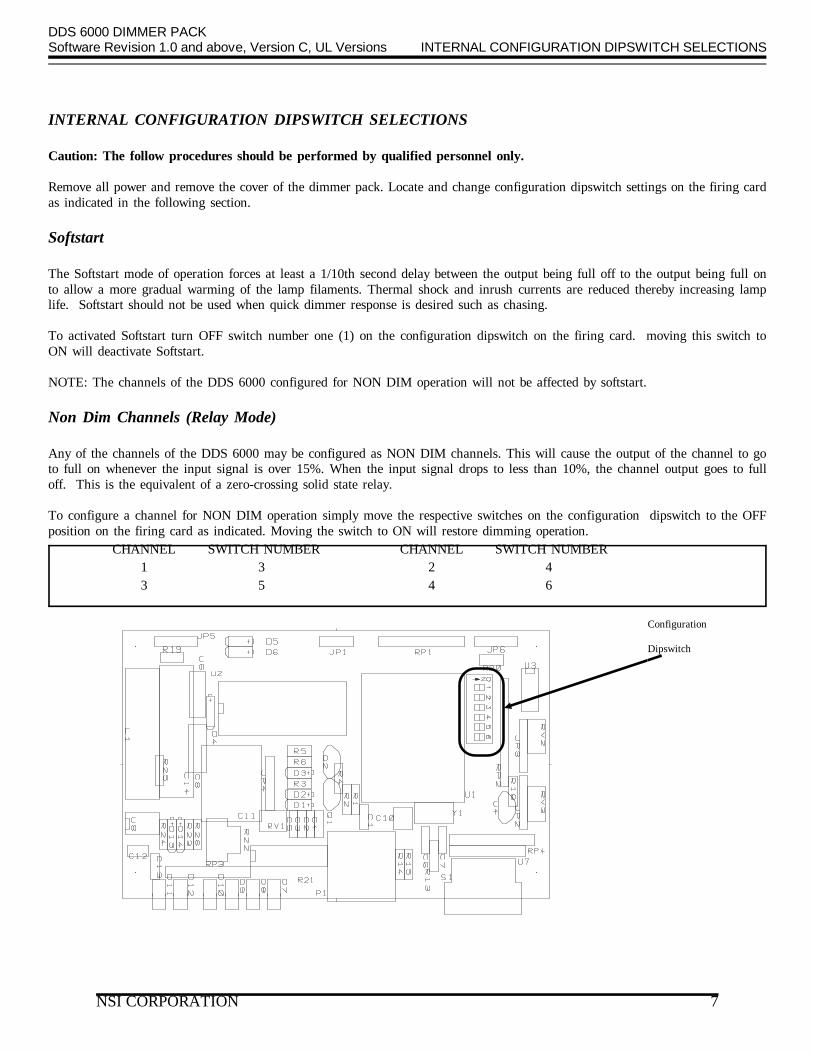
Remove all power and remove the cover of the dimmer pack. Locate and change configuration dipswitch settings on the firing cardas indicated in the following section.
Softstart
The Softstart mode of operation forces at least a 1/10th second delay between the output being full off to the output being full onto allow a more gradual warming of the lamp filaments. Thermal shock and inrush currents are reduced thereby increasing lamplife. Softstart should not be used when quick dimmer response is desired such as chasing.
To activated Softstart turn OFF switch number one (1) on the configuration dipswitch on the firing card. moving this switch toON will deactivate Softstart.
NOTE: The channels of the DDS 6000 configured for NON DIM operation will not be affected by softstart.
Non Dim Channels (Relay Mode)
Any of the channels of the DDS 6000 may be configured as NON DIM channels. This will cause the output of the channel to goto full on whenever the input signal is over 15%. When the input signal drops to less than 10%, the channel output goes to fulloff. This is the equivalent of a zero-crossing solid state relay.
To configure a channel for NON DIM operation simply move the respective switches on the configuration dipswitch to the OFFposition on the firing card as indicated. Moving the switch to ON will restore dimming operation.
Configuration
Dipswitch
CHANNEL SWITCH NUMBER CHANNEL SWITCH NUMBER1 3 2 4 3 5 4 6
DDS 6000 DIMMER PACKSoftware Revision 1.0 and above, Version C, UL Versions INTERNAL CONFIGURATION DIPSWITCH SELECTIONS
NSI CORPORATION 7

Auto Sequencing Mode
The DDS 6000 dimmers can be configured to perform stand alone Automatic Sequencing in place of Auto Lamp Test. This isuseful for lighting displays and show windows. The four channels will automatically fade from one to another in a preprogrammedpattern and time selected by the front panel dipswitch whenever front panel dipswitch #8 is up and no multiplex signal is detected.The Analog control input will continue to operate while the dimmer is sequencing.
To enable Automatic Sequencing Mode move the switch on the internal configuration dipswitch #2 to OFF.
Front panel Dipswitch sequence settings. (not internal dipswitch)
STEP TIME SWITCH 1,2,3 PATTERN SWITCH 4,5,6
1 SECOND OFF,OFF,OFF 2 CHAN BUILD OFF,OFF,OFF
3 SECOND ON,OFF,OFF 3 CHAN SEQUENCE ON,OFF,OFF
5 SECOND OFF,ON,OFF 3 CHAN BUILD OFF,ON,OFF
10 SECOND ON,ON,OFF 2&4 CHAN ALT ON,ON,OFF
15 SECOND OFF,OFF,ON 4 CHAN SEQUENCE OFF,OFF,ON
30 SECOND ON,OFF,ON 4 CHAN BUILD ON,OFF,ON
45 SECOND OFF,ON,ON 4 CHAN BUILD + OFF,ON,ON
60 SECOND ON,ON,ON 4 CHAN RANDOM ON,ON,ON
Dipswitch # 7 on causes all above sequences to ping-pong.
DDS 6000 DIMMER PACKSoftware Revision 1.0 and above, Version C, UL Versions
8 NSI CORPORATION
NSI CORPORATION 9

10 NSI CORPORATION

Service Information
DDS 6000 DIMMER PACKSoftware Revision 1.0 and above, Version C, UL Versions Service Information
NSI CORPORATION 11

WARRANTY
NSI Corporation Limited Warranty
NSI Corporation warrants new electronics products to be free from defective materials and workmanship for aperiod of one (1) year from the date of purchase to the original owner when purchased from an authorized NSIdealer.
The purchaser is responsible for completing and mailing to NSI, within 15 days of purchase, the warranty registrationcard enclosed with each product. NSI products that have been subject to accident, alteration, abuse, or defacingof the serial number are not covered by this warranty. The normal wear and tear of items such as knobs, jacks,and switches are not covered under this warranty.
If your NSI product requires service during the warranty period, NSI will repair or replace, at its option, defectivematerials provided you have identified yourself as the original owner of the product to NSI or any authorized NSIdealer. Transportation charges to and from an authorized dealer or the NSI factory for repair shall be the responsibilityof the owner. All products returned to NSI must have factory authorization for return prior to shipping.
NSI Corporation is not liable for any incidental or consequential damages resulting from defect or failure otherthan repairs of the NSI product subject to the terms of this warranty. This warranty gives you specific legal rights,and you may have other rights which vary from state to state. This warranty is expressly in lieu of all otheragreements and warranties expressed or implied except as may be otherwise required by law.
DDS 6000 DIMMER PACKNSI Corporation Limited Warranty Software Revision 1.0 and above, Version C, UL Versions