
NPD - Naperville Park District · NPD COACHING MANUAL Kindergarten, First, and Second Grades...
99
NPD COACHING MANUAL Kindergarten, First, and Second Grades Prepared by: Jim Konrad Jay Konrad For the exclusive use of the Naperville Park District coaching staff.
Transcript of NPD - Naperville Park District · NPD COACHING MANUAL Kindergarten, First, and Second Grades...

NPD COACHING MANUAL
Kindergarten, First, and Second Grades
Prepared by:
Jim Konrad Jay Konrad
For the exclusive use of the Naperville Park District coaching staff.
Dear Coaches,
First of all we would like to thank you for volunteering to coach a youth soccer team. The next few months will be an incredibly rewarding experience for both you and your players. As you coach, please keep in mind that the Park District soccer program is based upon providing an environment where the kids can have fun and enjoy the game of soccer. This is not about winning and losing. If at the end of the season you can reflect back and say that every player had fun and possibly learned a little soccer, you have had a successful season.
Because many of you are new to this, my brother and I were asked to write up a practice plan for each age group in order to help you along. By no means is this the only practice plan for the season, it is only meant to be a guide. We designed it with the new coach in mind, so hopefully the drills are explained and diagramed as needed. Each drill also includes the main coaching points for you to look for and stress as you are coaching. It would be a good idea for you to attend one of the coaching clinics provided by the Park District in order to see the skills and drills up close. We have taught the clinic for a number of years and have enjoyed interacting with the new coaches. It is a perfect setting to exchange ideas with other new coaches and have your questions answered. The clinics cover the basic rules and how to run a practice, the skills of the game and drills.
You will notice that every practice starts off with some type of skill work with the ball. We feel that this is essential to a player’s development. The more times a player gets to touch the soccer ball, the more successful he or she will be. The general flow of each practice is the same. Following the ball skills there will be a review of the last week’s skill. This is to reinforce what was taught at the last practice. The next idea covered is the skill of the day. It has been shown that players learn skills more easily if only one skill is emphasized at practice. For this reason, we have made each practice revolve around one skill. The drills are intended to go from simple to more gamelike as the practice continues. This allows the player to learn the fundamentals of each skill before using it in a game situation. Finally, the practice ends with some sort of scrimmage or game. Use this scrimmage time to coach what the players need to know in the weekly game.
We would encourage you to be creative. Feel free to plug in different drills at any time or adjust the provided drills to fit your needs. The drills were designed with the age groups in mind, but some variations may be needed based on the overall skill level of your team.
We have been fortunate enough to play soccer at the collegiate and professional level as well as coach many players of all ages for several years. Currently, I am the varsity boys coach at Naperville North and Jay is the Naperville Central varsity boys coach. We are both extremely active in the summer camps offered through the Park District. These experiences have added greatly to our ability to instruct players and coaches alike.
Feel free to stop either one of us after a high school game if you have any coaching questions or concerns. All of the work you do at the youth level directly translates into success for us at the high school level (Boys state champs 1998, 4 th place 2002, Girls 2 nd place 1998, 4 th place 1999, 3 rd place 2001). We hope this manual will be of some help to you and that you have a fantastic coaching experience this year. Good luck!!
In Soccer, Jim & Jay

KINDERGARTEN, FIRST, and SECOND GRADE
9 week practice plan
*****Every practice will include a warmup designed to develop each player’s ball skills which is the foundation for success in soccer. The more times a player touches the ball during practice the better! Keep this in mind during the 10 minute warmup session.
PRACTICE #1
Main Skill: Dribbling
0:00 – 10:00 th minute: Warmup
Put all players inside of a box that is 25 x 25 yards. All players must start out by dribbling the ball at a jogging pace. Start with normal dribbling, emphasize keeping heads up (eyes on the field in front of them), using both feet, and dribbling into space away from other players.
Coach is free now to change the rule or vary them in order to make the drill more challenging and skill appropriate. Examples of variation are:
1. dribble with left foot only 2. dribble with right foot only 3. stop and start on coaches command 4. stop and sit on ball then get up and continue dribbling on the whistle 5. change directions on coaches command
*Be creative, anything that forces the players to use different parts of their foot or go in different directions is good!

10:00 th – 15:00 th minute: Fast footwork
There are two fast footwork drills that can be used for players at this level of soccer. They are used to increase the number of times the player touches the ball in a certain amount of time and to increase their comfort level with the ball. The players should work for a minute and then rest a minute when doing these drills.
1. Climb the Mountain: The ball should always stay in the same place for this drill. The player starts with one foot on top of the ball and one on the ground. The player then switches feet location in a hop motion. This is a continuous motion. It may seem hard at first, but the kids will pick it up quickly. The player will touch the ball with the bottom of each foot alternatively.
2. Happy Feet: In this exercise the player puts the ball in between their feet. The ball is knocked back and forth from left to right foot in continuous motion. The knees should be slightly bent, and the players should always be on their toes. The ball should be hitting the area on the inside of the foot directly above the ball of the foot. Players should look at the ball at first while they are doing this. Once they become comfortable they should try to take their eyes off the ball.
15:00 th – 25:00 th minute: Dribbling Drill #1
CRAB SOCCER
Purpose: To increase a player’s ability to dribble the ball under pressure.
Setup: See diagram to the right.
How to play: A player is placed in each zone on their hands and feet in a crab position. The object is to dribble past all of the crabs without letting them kick the ball out of the playing area marked by the cones. You should switch the crab every minute or so.
Emphasis: 1. Keep the ball close to your body 2. Accelerate past the crabs

25:00 th – 35:00 th minute: Dribbling Drill #2
RELAY RACES
Purpose: To increase the player’s ability to dribble at high speeds under control.
Setup: Put the players into groups of two. We want as many players working at one time as possible. Set up cones as shown below.
How to play: Make the players dribble around each cone there and back. The player waiting in line should be working on ball skills as well, so have them either work on climb the mountain, happy feet, or another footwork exercise. Variations of this are possible (both feet, only left, only right, alternating feet). It is never too early to force the players to use both feet!!!!!!!!!!!!!!
Emphasis: 1. Using both feet 2. Dribbling at speed 3. Staying under control
35:00 th – 45:00 th minute: Scrimmage
SMALLSIDED GAMES
Make teams of two or three and play three or four minigames. This is good for the players because it forces them to touch the ball more times in the game. It is a good idea to make the goals pretty big (at least 3 yards) so that the kids score many goals.
45:00 th – 60:00 th minute: Scrimmage
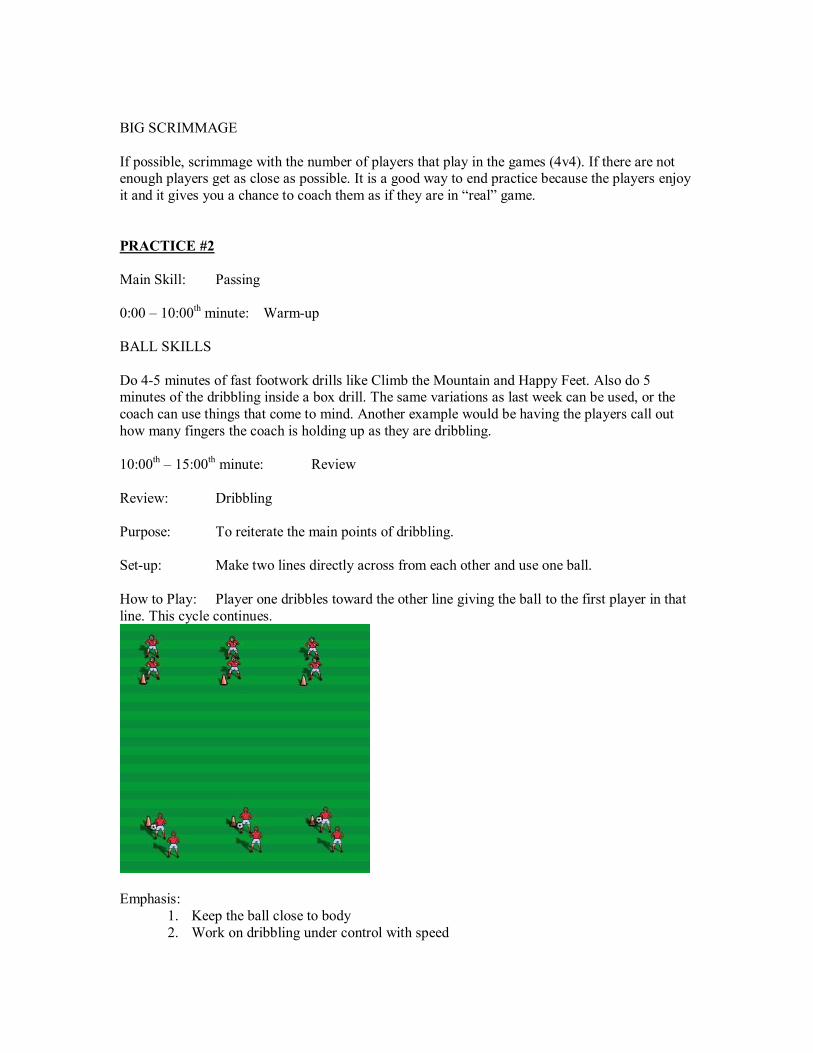
BIG SCRIMMAGE
If possible, scrimmage with the number of players that play in the games (4v4). If there are not enough players get as close as possible. It is a good way to end practice because the players enjoy it and it gives you a chance to coach them as if they are in “real” game.
PRACTICE #2
Main Skill: Passing
0:00 – 10:00 th minute: Warmup
BALL SKILLS
Do 45 minutes of fast footwork drills like Climb the Mountain and Happy Feet. Also do 5 minutes of the dribbling inside a box drill. The same variations as last week can be used, or the coach can use things that come to mind. Another example would be having the players call out how many fingers the coach is holding up as they are dribbling.
10:00 th – 15:00 th minute: Review
Review: Dribbling
Purpose: To reiterate the main points of dribbling.
Setup: Make two lines directly across from each other and use one ball.
How to Play: Player one dribbles toward the other line giving the ball to the first player in that line. This cycle continues.
Emphasis: 1. Keep the ball close to body 2. Work on dribbling under control with speed

15:00 th – 25:00 th minute: Passing Drill #1
Purpose: To teach the fundamentals of passing. .
Setup: Set up cones as seen here. Players will be in groups of two.
How to Play: Pass back and forth between the cones. Variations: 1. Only left foot (right) 2. Only two touches each player 3. Go for most passes in a minute 4. Move players further apart
Emphasis: 1. Use the inside of the foot 2. Strike through the middle of the ball 3. The nonkicking foot’s toe should be pointing at the target 4. Put the ball right to your partner’s feet 5. Pass it hard enough so that it gets there

25:00 th – 35:00 th minute: Passing Drill #2
INDIANA JONES AND THE TEMPLE OF DOOM
Purpose: To promote the player’s ability to pass a ball with distractions and to teach close dribbling.
Setup: Set up the drill as seen below.
How to Play: The line at the end is trying to dribble through the pairs of players passing back and forth without being hit by the ball.
Emphasize using both feet, making the pass right to your partner’s foot, and putting good speed on the ball. Tell the person dribbling to keep the ball close to their body and to avoid getting hit by the passing balls. The coach can change the rules for the passers as the game goes on (only left foot, etc.)

35:00 th – 45:00 th minute: Passing Drill #3
STATUE DRILL
Purpose: To teach passing on the move.
Setup: Use about half of the field.
How to Play: Half of the team (statues) is standing in one place without a ball. The other half (movers) has balls and are dribbling around the area. When the coach says “go” the players find one of the statues and pass them the ball and then get it back while they are moving. Make sure the statues are spread out all over the playing area. Tell the moving players that they cannot pass to the same statue twice in a row. The players should be moving when they pass the ball and when they get it back (not the statues of course, they stay in one spot). Switch the statues and the movers every couple minutes.
45:00 th – 60:00 th minute: Scrimmage
Play either one big game or a couple smaller games. Passing was the skill of the day so emphasize it during the scrimmage.

PRACTICE #3
Main Skill: Trapping
0:00 – 10:00 th minute: Ball Skills
The players should be getting used to the warmup pattern by now and will be showing improvement in the drills, especially the fast footwork drills. Do the fast foot work drills for 5 minutes, and then go to the drill with the players dribbling in a square.
10:00 th – 20:00 th minute: Review
Review: Passing
Do passing drill #1 from last week with variations.
Emphasis: 1. Put the ball right on your partner’s foot 2. Have the correct ball speed 3. Swing through the middle of the ball
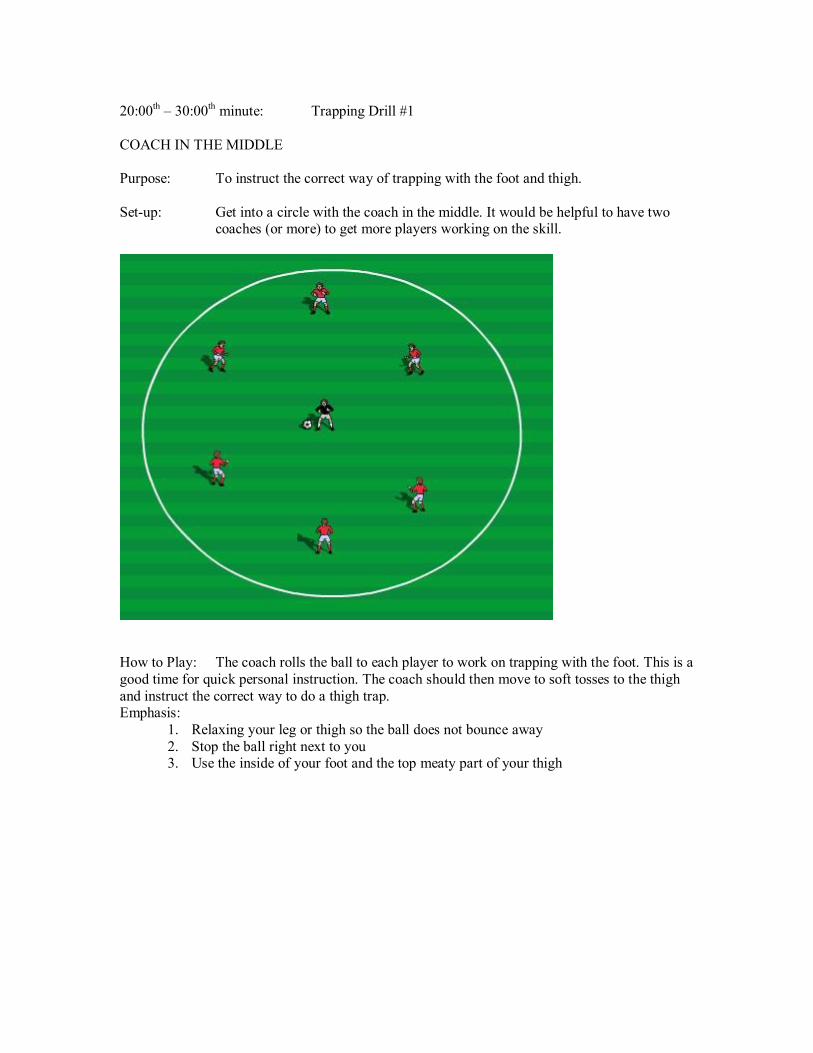
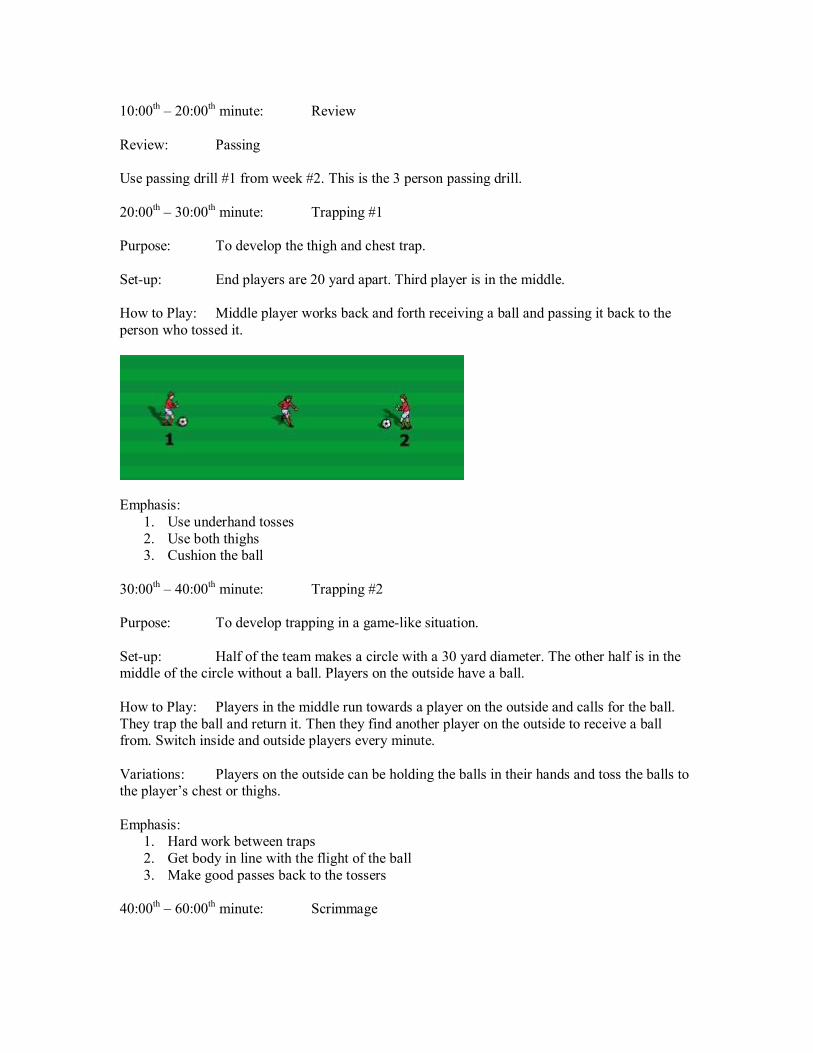
20:00 th – 30:00 th minute: Trapping Drill #1
COACH IN THE MIDDLE
Purpose: To instruct the correct way of trapping with the foot and thigh.
Setup: Get into a circle with the coach in the middle. It would be helpful to have two coaches (or more) to get more players working on the skill.
How to Play: The coach rolls the ball to each player to work on trapping with the foot. This is a good time for quick personal instruction. The coach should then move to soft tosses to the thigh and instruct the correct way to do a thigh trap. Emphasis:
1. Relaxing your leg or thigh so the ball does not bounce away 2. Stop the ball right next to you 3. Use the inside of your foot and the top meaty part of your thigh

30:00 th – 40:00 th minute: Trapping Drill #2
3 MAN TRAP DRILL
Purpose: To develop the ability to trap on the move.
Setup: This drill is done in groups of three. Two kids will be stationary and one will be working. See the diagram below for setup.
How to Play: The player in the middle will run towards one player, trap the ball, and pass it back. Then they will run to the other person and do the same. The same person should work in the middle for a minute then rotate to the next player.
Emphasis: 1. Work hard when you are in middle 2. Have to stop ball then pass it 3. Use inside of foot to both trap and pass 4. Use both feet
40:00 th – 60:00 th minute: Scrimmage
Play small sided games of 2 v. 2 or 3 v. 3. Encourage good traps and passes.
PRACTICE #4
Main Skill: Shooting
0:00 – 10:00 th minute: Warmup
Ball Skills
Do 5 minutes of climb the mountain and happy feet, and then go on to the dribbling in a box drill. Once again, the coach should add variations to the drill to keep it fresh. Remember, the more times the player touches the ball, the better!!!!

10:00 th – 20:00 th minute: Review
Review: Trapping
Put the players in a circle around the coach. Have the coach pass or toss the ball to each player. This is a good time to correct any errors and praise good efforts. You should move quickly from player to player hitting both thighs and both feet. If there are two coaches make two circles.

20:00 th – 35:00 th minute: Shooting Drill #1
BASICS OF SHOOTING
Purpose: To develop the basic skills involved in shooting.
Setup: Start with no goalkeeper and have the players shoot the ball back and forth through cones set up to act as a goal between them. The next step is to put a goalkeeper in between the cones to play goalkeeper in both directions. See diagram below. Rotate positions every two minutes. This drill allows the players to take many shots in a short amount of time and for the coach to correct mistakes. Make it a contest after a while to add excitement.
Emphasis: 1. Keep the ball low and to the corners 2. Shoot for the far post 3. No toe kicks 4. CONTROL!!! 5. Encourage the players to dribble one time then shoot to practice hitting a moving ball.
35:00 th – 45:00 th minute: Shooting Drill #2
Purpose: To develop shooting under pressure.
Setup: See diagram (below). Use 56 balls.
How to Play: Make a very small field with large goals and no goalkeepers. Divide team into three groups. The group that scores gets to stay on the field. The team that gets scored on is replaced by the team waiting on the side. If no one scores in two minutes switch teams.

Emphasis: 1. Shoot quickly 2. Shoot low and hard to corners
45:00 th 60:00 th minute: Scrimmage
Make the goals especially large today to encourage goal scoring and taking shots.
PRACTICE #5
Main Skill: Heading
0:00 – 10:00 th minute: Warmup
Ball skills: Continue ball skills from the previous weeks. A variation the kids might enjoy is soccer freeze tag. Everyone has a ball except the two people who are “it”. The two people who are “it” try to tag anyone else. When you are tagged you must pick up your soccer ball and stand with your legs spread apart. You are unfrozen when another player passes their ball between your legs. Game continues until all players are frozen or until the coach decides to switch the people who are it. Use a large playing space, so that the kids do not get tagged too quickly.
****You should do Climb the Mountain and Happy Feet for at least a couple minutes as well.

10:00 th – 20:00 th minute: Review
Review: Shooting Drill #1
Setup: Start with no goalkeeper and have the players shoot the ball back and forth through cones set up to act as a goal between them. The next step is to put a goalkeeper in between the cones to play goalkeeper in both directions. See diagram below. Rotate positions every two minutes. This drill allows the players to take many shots in a short amount of time and for the coach to correct mistakes. Make it a contest after a while to add excitement.
Emphasis: 1. Keep the ball low and to the corners 2. Shoot for the far post 3. No toe kicks 4. CONTROL!!! 5. Encourage the players to dribble one time then shoot to practice hitting a moving ball.
20:00 th – 30:00 th minute: Heading Drill #1
Purpose: To develop a level comfort with heading the soccer ball.
Setup: Young kids are afraid of the ball so use a soft ball or balloon when you introduce heading. DO NOT use a hard soccer ball. It will probably scare them for life.
1. Have kids head ball which is held in coach’s hands at their head level. 2. Drop ball on each player’s head. 3. Use short soft tosses and have the player head the ball back. *****We just want to get the players so that they are not afraid of the ball!!

Emphasis: 1. Mouth shut 2. Eyes open 3. Use forehead, not top of head
30:00 th – 40:00 th minute: Game #1
KNOCKOUT
Purpose: To develop the player’s ability to control the ball in tight places.
Setup: All players in a box about 20x20 yards, dribbling a soccer ball.
How to play: When the coach says go, it is every person for himself. The object is to keep your ball in the square while trying to knock the other players’ balls out of the square. Players must keep the ball close to their bodies so that others cannot kick their ball out of the square. When your ball is kicked out of the square you must go do 25 climb the mountains or happy feet then dribble your ball around the outside of the square until the game is over. The last one in the box is the winner. Force the last two or three players to attack each other so the game does not go on forever.
Emphasis: 1. Keeping ball close to body 2. Dribble into open space 3. Keeping your eyes on the field

40:00 th – 60:00 th minute: Scrimmage
Setup a 2 v. 2 tournament. As usual, use goals big enough to encourage shooting and scoring.
PRACTICE #6
Main Skill: Dribbling 2
0:00 – 10 th minute: Warmup
Ball Skills: Return to basic drills of dribbling in the square obeying coach’s commands. Coach can mix things up according to the ability level of the team. Players should really be used to the drill by now and will be having more success which is good for their confidence. Make a game of seeing who can remember all the different commands you have used up to this point. Remember to do the two fast footwork drills as well.
10:00 th – 20:00 th minute: Review
Review: Heading
Do the circle drill with the coach in the middle or have them in a single file line. The main thing here is to have the players head the ball again in a safe situation so they become comfortable with the ball.
20:00 th – 30:00 minute: Dribbling #1
FOUR CORNER DRILL
Purpose: To develop the player’s ability to dribble at speed.
Setup: Use the four corner drill diagrammed above.
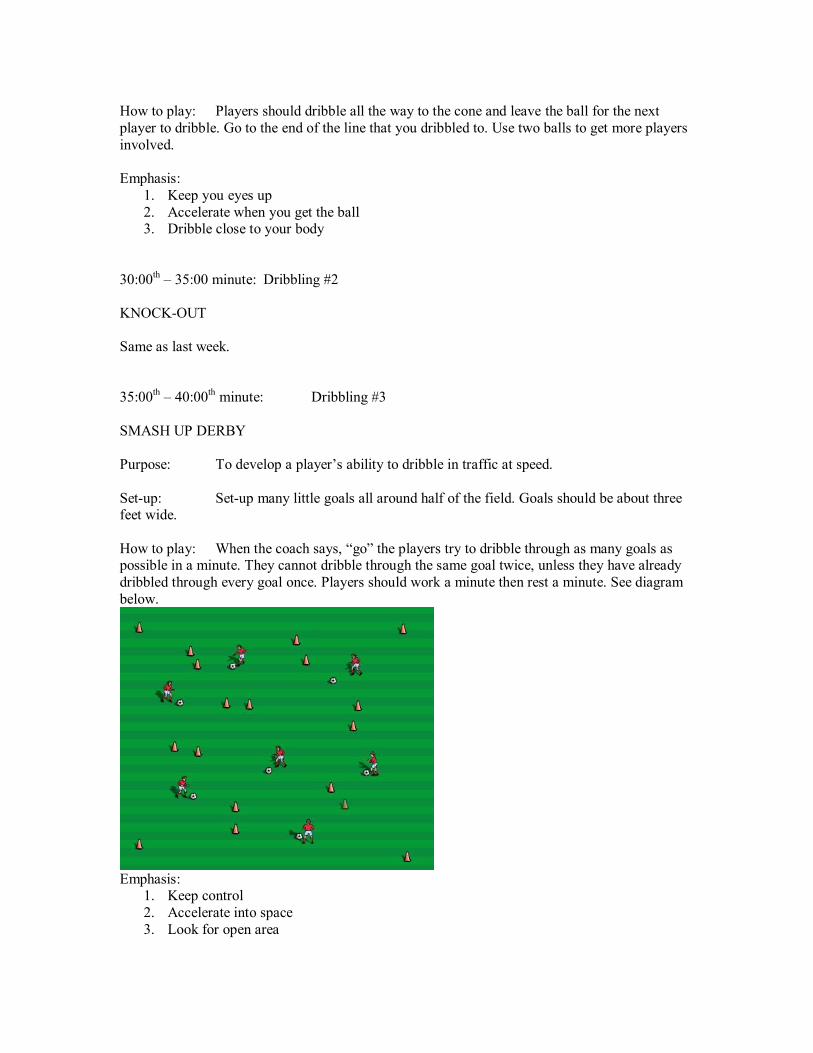
How to play: Players should dribble all the way to the cone and leave the ball for the next player to dribble. Go to the end of the line that you dribbled to. Use two balls to get more players involved.
Emphasis: 1. Keep you eyes up 2. Accelerate when you get the ball 3. Dribble close to your body
30:00 th – 35:00 minute: Dribbling #2
KNOCKOUT
Same as last week.
35:00 th – 40:00 th minute: Dribbling #3
SMASH UP DERBY
Purpose: To develop a player’s ability to dribble in traffic at speed.
Setup: Setup many little goals all around half of the field. Goals should be about three feet wide.
How to play: When the coach says, “go” the players try to dribble through as many goals as possible in a minute. They cannot dribble through the same goal twice, unless they have already dribbled through every goal once. Players should work a minute then rest a minute. See diagram below.
Emphasis: 1. Keep control 2. Accelerate into space 3. Look for open area

40:00 th – 60:00 th minute: Scrimmage
PRACTICE #7
Main Skill: Passing #2
0:00 – 10:00 th minute: Warm –up
Ball Skills
10:00 th – 20:00 th minute: Review
Review: Dribbling
A relay race of the coach’s choice, knockout, or three man dribbling drill would all work well here. Let the kids pick!!!!
20:00 th – 30:00 th minute: Passing #1
4 CORNER ZIG ZAG DRILL
Purpose: To develop a player’s ability to make longer passes.
Setup: See the drill diagramed below.
How to Play: Pass and follow the ball to line you passed it to. Follow the rotation outlined in the diagram.
Emphasis: 1. Pass with inside of foot 2. Strike through middle of the ball 3. Pass with good pace

30:00 th – 40:00 th minute: Passing #2
PASSING CONTEST
Purpose: To develop passing accuracy.
Setup: Have players get into pairs and face each other at about 6 yards apart. Each group of two has one ball.
How to Play: The object is to pass the ball through your partner’s legs. Players should stand with legs spread apart when their partner is shooting. First player to score five goals wins. Trade partners when you have winners.
40:00 th – 60:00 th minute: Scrimmage
PRACTICE #8
Main Skill: Trapping
0:00 – 10:00 th minute: Warmup
Ball Skills
10:00 th – 20:00 th minute: Review
Review: Passing
Purpose: To develop an ability to pass and find the open space.
Setup: Players should get into groups of two with one ball per group. See the field setup below.
How to Play: The object of this drill is to score as many goals as possible by passing the ball between two cones to your partner. A pair cannot score two goals in a row at any one goal. Play
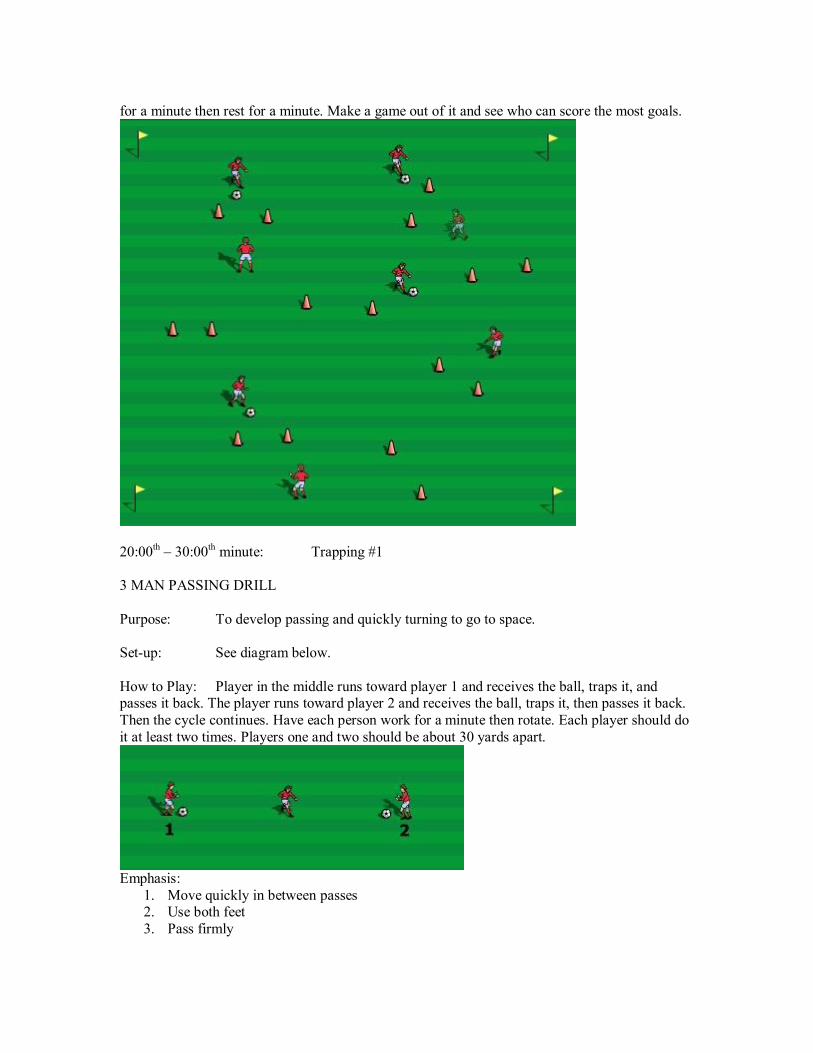
for a minute then rest for a minute. Make a game out of it and see who can score the most goals.
20:00 th – 30:00 th minute: Trapping #1
3 MAN PASSING DRILL
Purpose: To develop passing and quickly turning to go to space.
Setup: See diagram below.
How to Play: Player in the middle runs toward player 1 and receives the ball, traps it, and passes it back. The player runs toward player 2 and receives the ball, traps it, then passes it back. Then the cycle continues. Have each person work for a minute then rotate. Each player should do it at least two times. Players one and two should be about 30 yards apart.
Emphasis: 1. Move quickly in between passes 2. Use both feet 3. Pass firmly

30:00 th – 35:00 th minute: Trapping #2
COACH IN THE MIDDLE
Coach throws the ball to each player, correctly instructing how to do the thigh trap.
35:00 th – 40:00 th minute: Trapping #3
TRAPPING INDIVIDUALLY
Purpose: To develop the ability to trap balls at different heights and angles.
Setup: Have each player with a ball in their hands. The ball is thrown into the air slightly above head level and then trapped by the foot or thigh.
Emphasis: 1. Cushion the ball when it hits your leg or foot 2. After the player traps the ball, they should take two or three dribbles and then pick the
ball up to do it again.
40:00 th – 60:00 th minute: Scrimmage
PRACTICE #9
Main Skill: Shooting
0:00 – 10:00 th minute: Warmup
Basic Skills Fast footwork
10:00 th – 20:00 th minute: Review
Review: Trapping
Use one of the drills from last week or the first practice on trapping.
20:00 th 30:00 th minute: Shooting #1
CRISSCROSS SHOOTING
Setup: Make four lines as shown in the diagram. All the balls will be in the two lines by the goal.
How to Play: The ball will be passed diagonally to the line in front of the goal. The player who is shooting should take two touches to prepare the ball for shooting and then shoot it. Chase your ball after shooting, and follow the rotation in the diagram.

Emphasis: 1. Shoot into corners 2. Keep head over ball 3. Keep ball low
30:00 th – 40:00 th minute: Shooting #2
ONEONONE TO GOAL
Purpose: To develop the skills to go to goal under pressure.
Setup: Setup two lines as shown below. The players will face forward so they cannot tell when the ball is coming.
How to Play: The coach will roll the ball past the two players from behind. When they see the ball they will race each other for it and try to score. The two are playing against each other.
Emphasis: 1. Control the ball quickly 2. Shoot at the first opportunity

40:00 th – 60:00 th minute: Scrimmage
******This ends the kindergarten, first and second grade level practice schedule. We hope that it has been helpful and that you had an enjoyable season!!!!

NPD COACHING MANUAL
Third and Fourth Grades
Prepared by:
Jim Konrad Jay Konrad
For the exclusive use of the Naperville Park District coaching staff.

Dear Coaches,
First of all we would like to thank you for volunteering to coach a youth soccer team. The next few months will be an incredibly rewarding experience for both you and your players. As you coach, please keep in mind that the Park District soccer program is based upon providing an environment where the kids can have fun and enjoy the game of soccer. This is not about winning and losing. If at the end of the season you can reflect back and say that every player had fun and possibly learned a little soccer, you have had a successful season.
Because many of you are new to this, my brother and I were asked to write up a practice plan for each age group in order to help you along. By no means is this the only practice plan for the season, it is only meant to be a guide. We designed it with the new coach in mind, so all the drills are explained and diagramed as needed. Each drill also includes the main coaching points for you to look for and stress as you are coaching. It would be a good idea for you to attend one of the coaching clinics provided by the Park District in order to see the skills and drills up close. We have taught the clinic for a number of years and have enjoyed interacting with the new coaches. It is a perfect setting to exchange ideas with other new coaches and have your questions answered. The clinics cover the basic rules and how to run a practice, the skills of the game and drills.
You will notice that every practice starts off with some type of skill work with the ball. We feel that this is essential to a player’s development. The more times a player gets to touch the soccer ball, the more successful he or she will be. The general flow of each practice is the same. Following the ball skills there will be a review of the last week’s skill. This is to reinforce what was taught at the last practice. The next idea covered is the skill of the day. It has been shown that players learn skills more easily if only one skill is emphasized at practice. For this reason, we have made each practice revolve around one skill. The drills are intended to go from simple to more gamelike as the practice continues. This allows the player to learn the fundamentals of each skill before using it in a game situation. Finally, the practice ends with some sort of scrimmage or game.
We would encourage you to be creative. Feel free to plug in different drills at any time or adjust the provided drills to fit your needs. The drills were designed with the age groups in mind, but some variations may be needed based on the overall skill level of your team.
We have been fortunate enough to play soccer at the collegiate and professional level as well as coach many players of all ages for several years. Currently, I am the varsity boys coach at Naperville North and Jay is the Naperville Central varsity boys coach. We are both extremely active in the summer camps offered through the Park District. These experiences have added greatly to our ability to instruct players and coaches alike.
Feel free to stop either one of us after a high school game if you have any coaching questions or concerns. All of the work you do at the youth level directly translates into success for us at the high school level (Boys state champs 1998, 4 th place 2002, Girls 2 nd place 1998, 4 th place 1999, 3 rd place 2001). We hope this manual will be of some help to you and that you have a fantastic coaching experience this year. Good luck!!
In Soccer,
THIRD and FOURTH GRADE 8 week practice plan
******Every practice will include a warmup designed to develop each player’s ball skills, which is the foundation for success in soccer. The more times a player touches the ball during practice the better!! Keep this in mind during the ten minute warmup session.
PRACTICE #1
Main Skill: Dribbling
0:00 – 10:00 th minute: Warmup
Put all players inside of a box that is 25 x 25 yards. All players must start out by dribbling the ball at a jogging pace. Start with normal dribbling; emphasize keeping heads up (eyes on the field in front of them), using both feet, and dribbling into space away from other players.
Coach is free now to change the rules or vary them in order to make the drill more challenging and skill appropriate. Examples of variations are:
1. dribble with left foot only 2. dribble with right foot only 3. stop and start on coaches command 4. stop and sit on ball then get up and continue dribbling on the whistle 5. change directions on coaches command
*Be creative, anything that forces the players to use different parts of their foot or go in different directions is good!!
10:00 th – 15:00 th minute: Fast footwork
There are two fast footwork drills that can be used for players at this level of soccer. They are used to increase the number of times the player touches the ball in a certain amount of time and to increase their comfort level with the ball.
1. Climb the Mountain: The ball should always stay in the same place for this drill. The player starts with one foot on top of the ball and one on the ground. The player then switches feet location in a hop motion. This is a continuous motion. It may seem hard at first, but the kids will pick it up quickly. The player will touch the ball with the bottom of each foot alternatively.
2. Happy Feet: In this one the player puts the ball in between their feet. The ball is knocked back and forth from left to right foot in continuous motion. The knees should be slightly bent, and the players should always be on their toes. The ball should be hitting the area on the inside of the foot directly above the ball of the foot, on the inside of the foot. Players should look at the ball at first while they are doing this. Once they become comfortable, they should try to take their eyes off the ball.

15:00 th – 25:00 th minute: Dribbling #1
SHADOW DRILL:
Purpose: To develop dribbling under passive pressure.
Setup: Setup 20 x 20 yard grid. Group the players in 2’s. The first player starts with the ball in front of him, with the second player behind him without the ball.
How to Play: The game is played by the first player (with the ball) trying to lose the “shadow” player. The second player is not allowed to touch the first player or the ball. Players one and two switch positions every 30 seconds, then after two full sets, the players pick new partners and repeat game.
Emphasis: 1. Concentrate on the ball, not the partner. 2. Push the ball 23 feet in front of you while you are trying to lose the shadow.
25:00 th – 35:00 th minute: Dribbling #2
SHARKS AND MINNOWS
Purpose: To develop beating an opponent under pressure.
Setup: In a 20 X 30 yard area two players are it, everyone else on the end line with a ball.
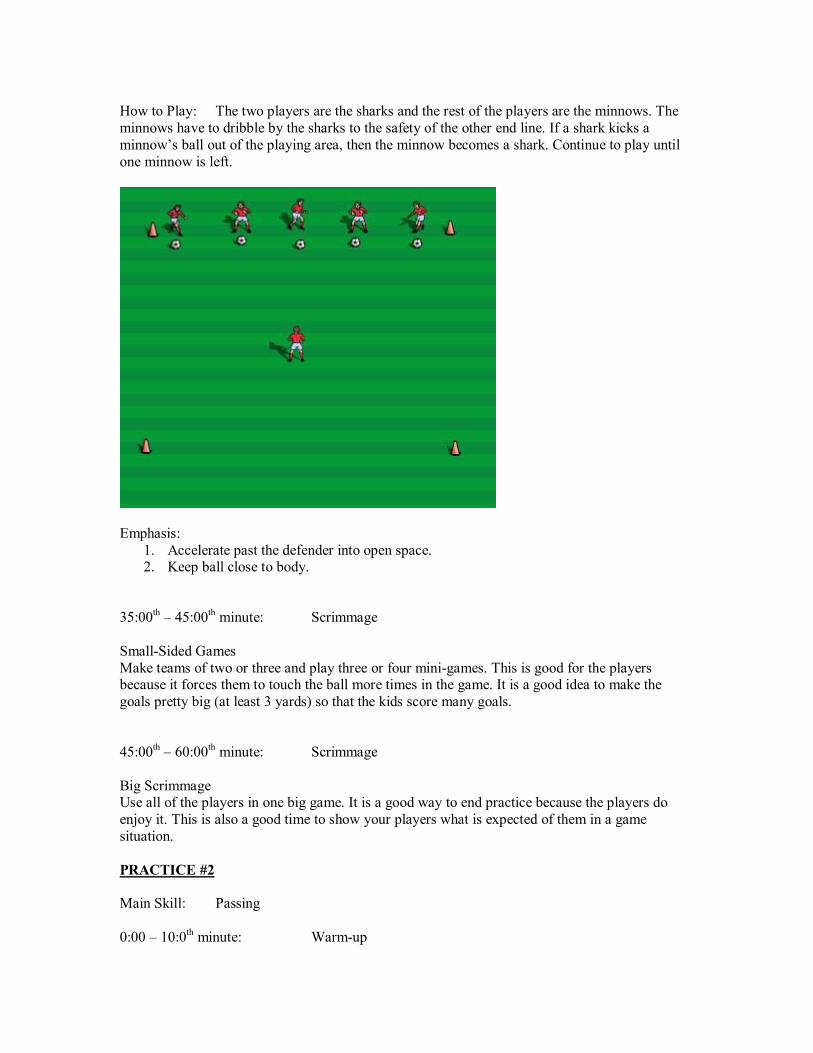
How to Play: The two players are the sharks and the rest of the players are the minnows. The minnows have to dribble by the sharks to the safety of the other end line. If a shark kicks a minnow’s ball out of the playing area, then the minnow becomes a shark. Continue to play until one minnow is left.
Emphasis: 1. Accelerate past the defender into open space. 2. Keep ball close to body.
35:00 th – 45:00 th minute: Scrimmage
SmallSided Games Make teams of two or three and play three or four minigames. This is good for the players because it forces them to touch the ball more times in the game. It is a good idea to make the goals pretty big (at least 3 yards) so that the kids score many goals.
45:00 th – 60:00 th minute: Scrimmage
Big Scrimmage Use all of the players in one big game. It is a good way to end practice because the players do enjoy it. This is also a good time to show your players what is expected of them in a game situation.
PRACTICE #2
Main Skill: Passing
0:00 – 10:0 th minute: Warmup
BALL SKILLS DRILLS
Do 45 minute of fast footwork drills Climb the Mountain and Happy Feet. Also do 5 minutes of the dribbling inside a box drill. The same variations as last week can be used, or the coach can use things that come to mind. Another example would be having the players call out how many fingers the coach is holding up as they are dribbling.
10:00 th – 20:00 th minute: Review
Skill Review: Dribbling
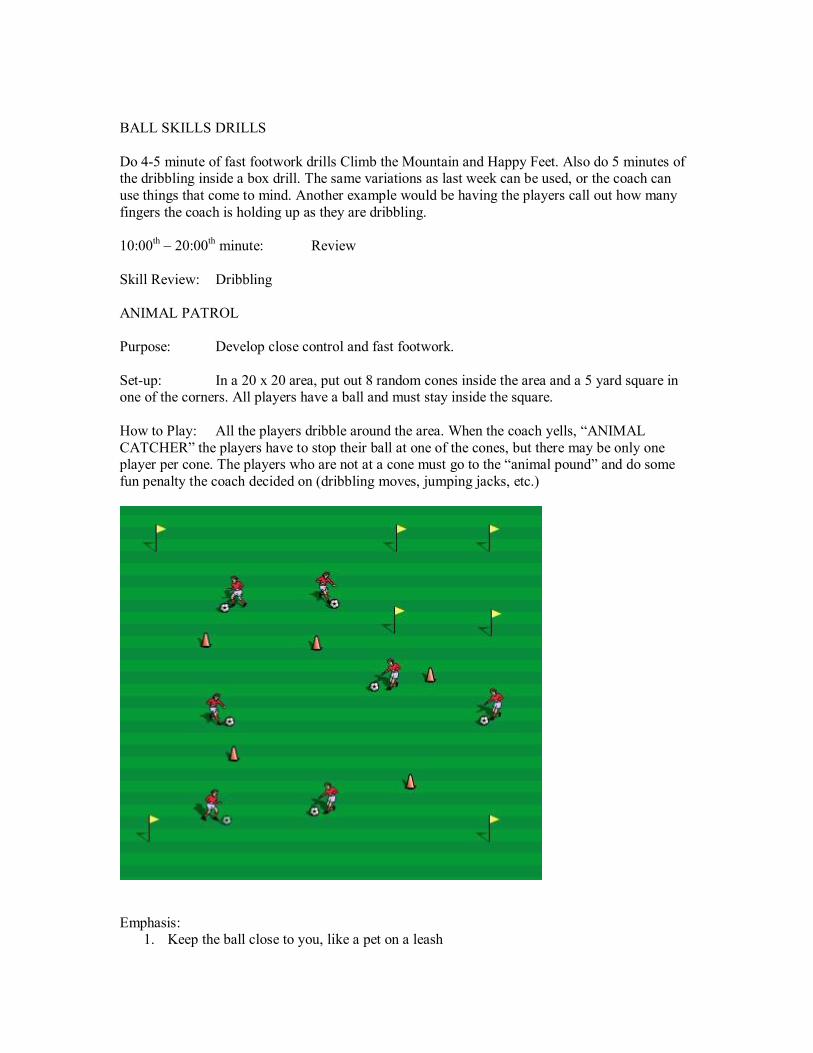
ANIMAL PATROL
Purpose: Develop close control and fast footwork.
Setup: In a 20 x 20 area, put out 8 random cones inside the area and a 5 yard square in one of the corners. All players have a ball and must stay inside the square.
How to Play: All the players dribble around the area. When the coach yells, “ANIMAL CATCHER” the players have to stop their ball at one of the cones, but there may be only one player per cone. The players who are not at a cone must go to the “animal pound” and do some fun penalty the coach decided on (dribbling moves, jumping jacks, etc.)
Emphasis: 1. Keep the ball close to you, like a pet on a leash

20:00 th – 30:00 th minute: Passing Drill #1
BALL TAG
Purpose: Develop passing accuracy over a short distance.
Setup: In a 20 x 20 grid, one player starts in the grid with a ball. The rest of the players are spread out in the area without a ball.
How to Play: The player with the ball must hit the other player below the knee with their ball. When a player is hit they become “it” also. Each person who is “it” only can use one ball. Play until one player is left.
Emphasis: 1. Hit the ball with the inside of the foot 2. Keep the ball on the ground
30:00 th – 40:00 th minute: Passing Drill #2
WESTERN FRONTIER
Purpose: To develop passing accuracy.
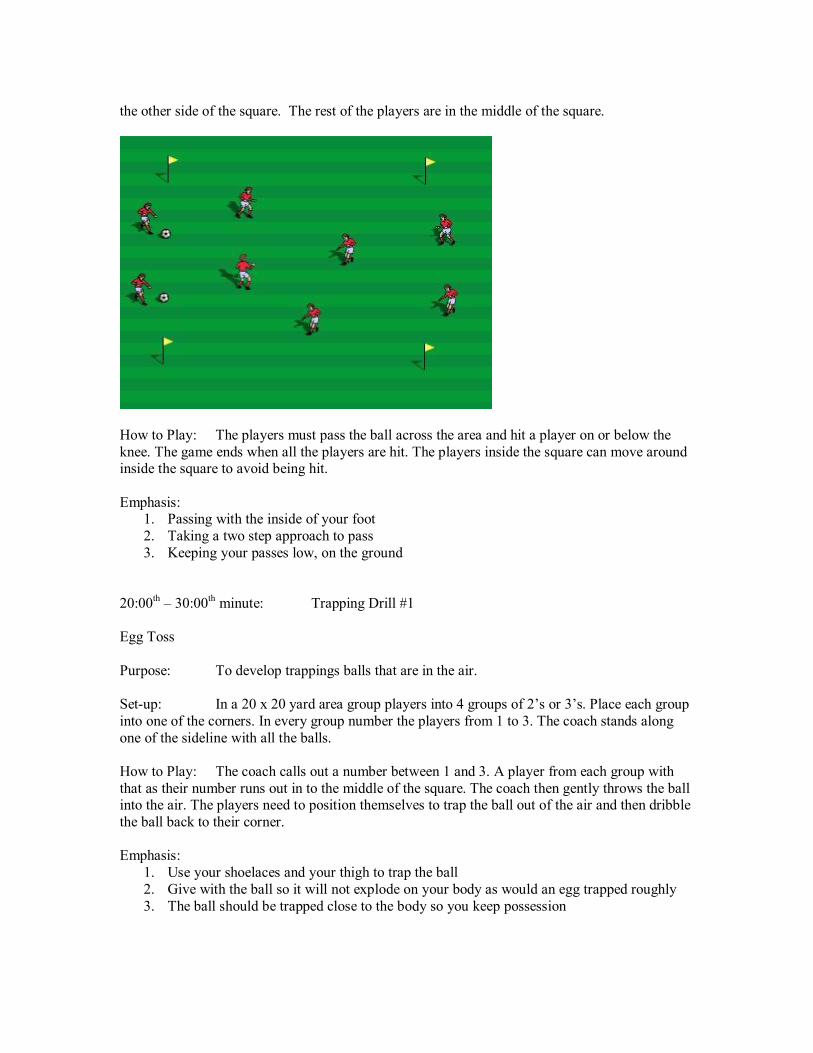
Setup: In a 20 x 20 yard area, position 2 players on each side of the square. Both players on two of the sides start with a ball. They are passing to the player directly across from them on the other side of the square. The rest of the players are in the middle of the square.
How to Play: The players must pass the ball across the area and hit a player on or below the knee. The game ends when all the players are hit. The players inside the square can move around inside the square to avoid being hit.

Emphasis: 1. Passing with the inside of your foot 2. Taking a two step approach to pass 3. Keeping your passes low, on the ground
40:00 th – 60:00 th minute: Scrimmage
Play either one big game or a couple smaller games. Passing was the skill of the day so emphasize it during the scrimmage.
PRACTICE #3
Main Skill: Trapping
0:00 – 10:00 th minute: Warmup
The players should be getting used to the warmup pattern by now and will be showing improvement in the drills, especially the fast footwork drills. Do the fast foot work drills for 5 minutes, and then go to the drill with the players dribbling in a square.
10:00 th – 20:00 th minute: Review
Skill Review: Passing
Passing Drill
Purpose: To develop a player’s passing ability.
Setup: See diagram below.
How to Play: Players will be in groups of two. Pass back and forth between the cones. Variations: 1. Only left foot (right) 2. Only two touches each player 3. Go for most passes in a minute 4. Move players further apart
Emphasis: 1. Passing with the inside of the foot 2. Nonkicking toe pointed in direction of pass
20:00 th – 30:00 th minute: Trapping Drill #1
THE BOMB
Purpose: To develop a player’s ability to trap balls coming out of the air.
Setup: Play in a 20 x 20 yard area, with equal groups at each corner. Number the players of each group 13.
How to Play: The coach will call out a number from one to three. The player from each group with that number must step out into the middle of the square. The coach will then throw a “bomb” into the air for each of the four players and the four players will trap the ball and dribble it back to their corner. Throw the four balls up as quickly as possible so they are doing it at the same time.
Emphasis: 1. Get your body in the path of the ball 2. Cushion the ball so it stays close to your body
30:00 th – 40:00 th minute: Trapping Drill #2
3 PERSON DRILL
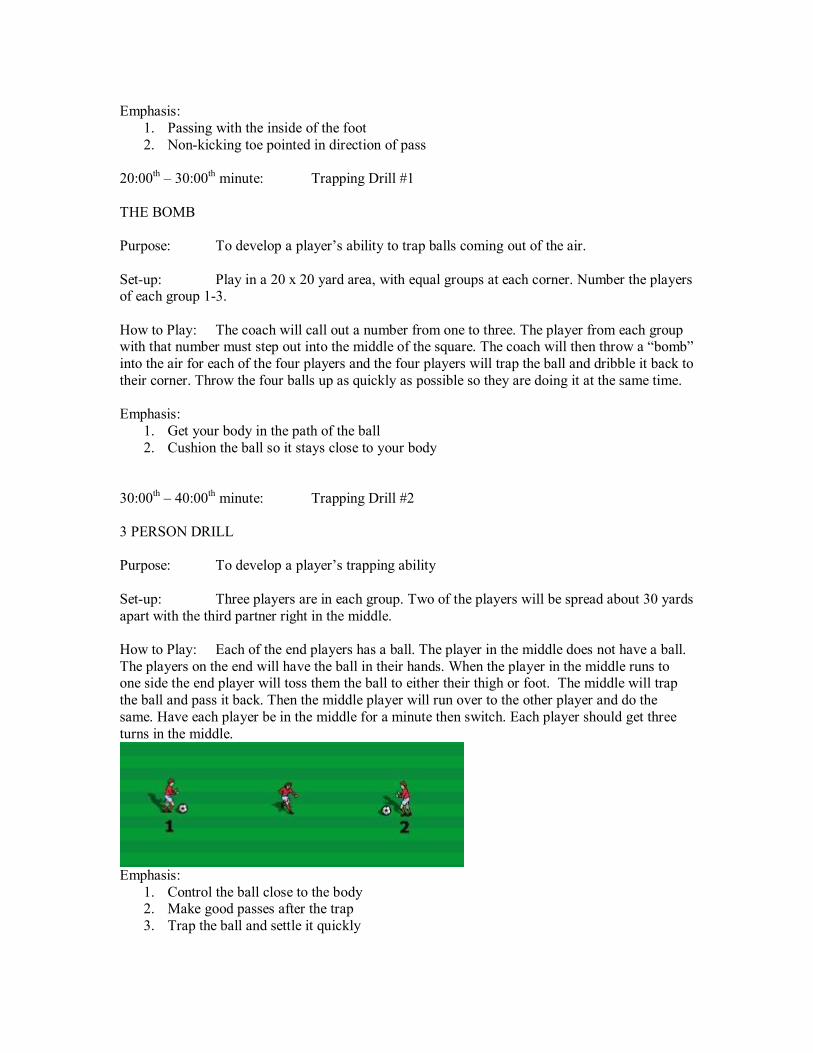
Purpose: To develop a player’s trapping ability
Setup: Three players are in each group. Two of the players will be spread about 30 yards apart with the third partner right in the middle.
How to Play: Each of the end players has a ball. The player in the middle does not have a ball. The players on the end will have the ball in their hands. When the player in the middle runs to one side the end player will toss them the ball to either their thigh or foot. The middle will trap the ball and pass it back. Then the middle player will run over to the other player and do the same. Have each player be in the middle for a minute then switch. Each player should get three turns in the middle.
Emphasis: 1. Control the ball close to the body 2. Make good passes after the trap 3. Trap the ball and settle it quickly

40:00 th – 60:00 th minute: Scrimmage
PRACTICE #4
Main skill: Shooting
0:00 – 10:00 th minute: Warmup
Ball Skills
Do a continuation of the fast footwork drills and the square dribbling warmup drill.
10:00 th – 20:00 th minute: Review
Skill Review: Trapping
3 PERSON DRILL – same as drill #2 from last week
Purpose: To develop a player’s trapping ability.
Setup: Three players are in each group. Two of the players will be spread about 30 yards apart with the third partner right in the middle.
How to Play: Each of the end players has a ball. The player in the middle does not have a ball. The players on the end will have the ball in their hands. When the player in the middle runs to one side the end player will toss them the ball to either their thigh or foot. The middle player will trap the ball and pass it back. Then the middle player will run over to the other player and do the same. Have each player be in the middle for a minute then switch. Each player should get three turns in the middle.
20:00 th – 30:00 th minute: Shooting Drill #1
STEAL THE BACON
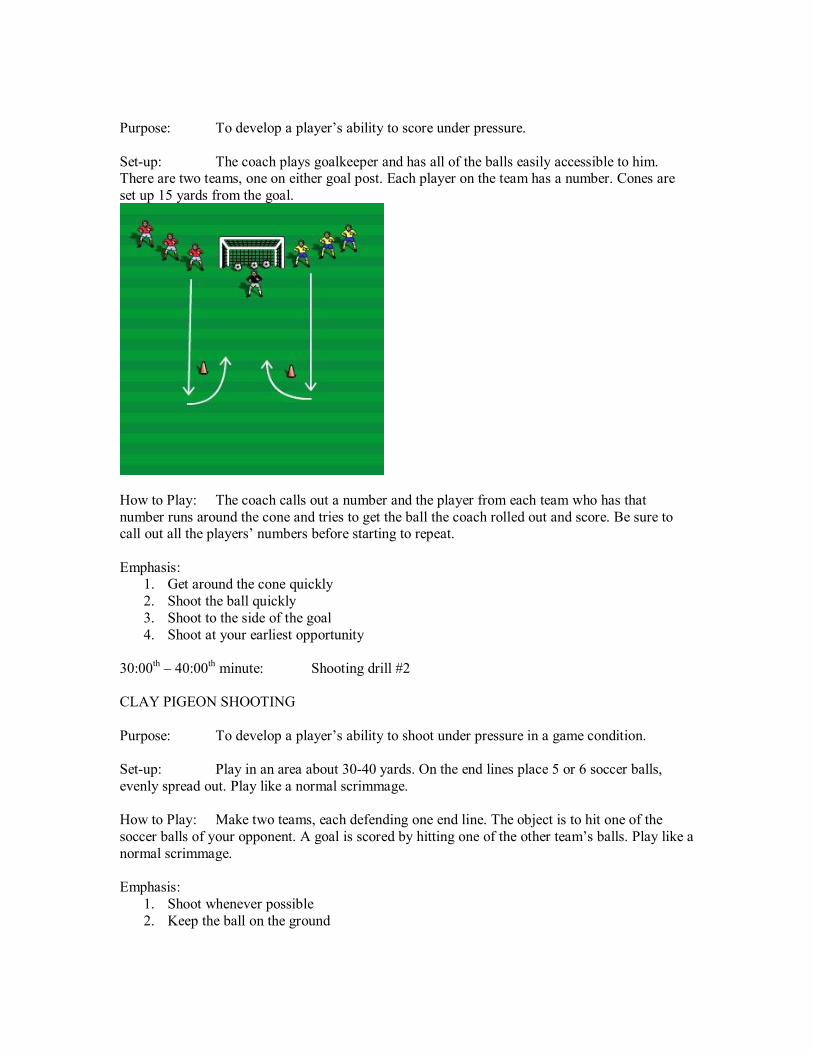
Purpose: To develop a player’s ability to score under pressure.
Setup: The coach plays goalkeeper and has all of the balls easily accessible to him. There are two teams, one on either goal post. Each player on the team has a number. Cones are set up 15 yards from the goal.
How to Play: The coach calls out a number and the player from each team who has that number runs around the cone and tries to get the ball the coach rolled out and score. Be sure to call out all the players’ numbers before starting to repeat.
Emphasis: 1. Get around the cone quickly 2. Shoot the ball quickly 3. Shoot to the side of the goal 4. Shoot at your earliest opportunity
30:00 th – 40:00 th minute: Shooting drill #2
CLAY PIGEON SHOOTING
Purpose: To develop a player’s ability to shoot under pressure in a game condition.
Setup: Play in an area about 3040 yards. On the end lines place 5 or 6 soccer balls, evenly spread out. Play like a normal scrimmage.
How to Play: Make two teams, each defending one end line. The object is to hit one of the soccer balls of your opponent. A goal is scored by hitting one of the other team’s balls. Play like a normal scrimmage.
Emphasis: 1. Shoot whenever possible 2. Keep the ball on the ground
40:00 th – 60:00 th minute: Scrimmage
PRACTICE #5
Main Skill: Dribbling
0:00 th – 10:00 th minute: Warmup
Ball skills in the square and fast foot work drills.
10:00 th – 20:00 th minute: Review
Skills Review: Shooting
3 MAN SHOOTING DRILL
Purpose: To review the fundamentals of shooting.
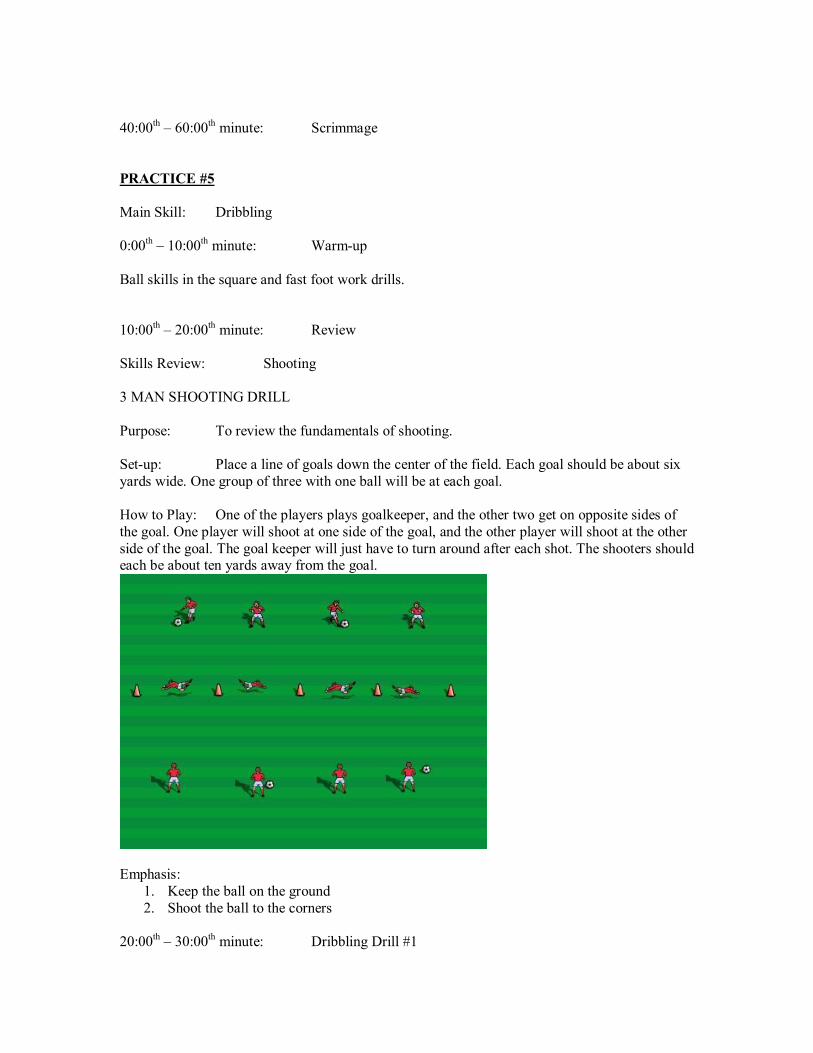
Setup: Place a line of goals down the center of the field. Each goal should be about six yards wide. One group of three with one ball will be at each goal.
How to Play: One of the players plays goalkeeper, and the other two get on opposite sides of the goal. One player will shoot at one side of the goal, and the other player will shoot at the other side of the goal. The goal keeper will just have to turn around after each shot. The shooters should each be about ten yards away from the goal.
Emphasis: 1. Keep the ball on the ground 2. Shoot the ball to the corners
20:00 th – 30:00 th minute: Dribbling Drill #1
KNOCKOUT
Purpose: To develop a player’s ability to protect the ball and avoid defenders.
Setup: This game can be played in the center circle or in a square made by the coach. A good size would be 15 x 15 yards.
How to Play: All of the players get into the circle or square with a ball. Everyone should start dribbling. When the coach says “knockout” it is every player for himself. The object is to keep your ball in the square while trying to knock everyone else’s out of the square. When your ball is knocked out of the square, you have to dribble around the outside of the square until the game is over. The game is over when there is one person left in the square.
Emphasis: 1. Keep the ball close to your body 2. Keep your body between the defender 3. Accelerate into open space
30:00 th – 40:00 th minute: Dribbling Drill #2
LINE SOCCER
Purpose: To develop change of direction dribbling with speed.
Setup: Set a 20x20 yard grid. Divide the players into two teams. One player on each team is given a number until all players have been numbered. Each team will have a number 1,2,3 and so on. Position the teams on opposite sides of the grid.
How to Play: The coach rolls the ball into the middle of the square, and calls out a number. One player from each team with the respective number will run out to the ball. The player will try to retrieve the ball and bring it back across their end line. The game is over if the ball rolls outside the grid, or if a player stops the ball on his team’s line. Each earns them one point.
Emphasis: 1. Run quickly to the ball 2. Quickly change direction to bring the ball towards your line 3. Speed dribble to your line to earn one point
40:00 th – 60:00 th minute: Scrimmage
Setup a 2 v. 2 tournament.
PRACTICE #6
Main Skill: Passing
0:00 – 10:00 th minute: Warmup

The players should be getting used to the warmup pattern by now and will be showing improvement in the drills, especially the fast footwork drills. Do the fast foot work drills for 5 minutes and then go to the drill with the players dribbling in a square.
10:00 th – 20:00 th minute: Review
Skill Review: Dribbling
Crab Soccer A player is placed in each zone on his hands and feet in a crab position. The object is to dribble past all of the crabs without letting them kick the ball out of the playing area marked by the cones. You should switch the crabs every minute or so. Emphasize keeping the ball close to your body and using both feet. The crabs do have to always be on all fours.
20:00 th 30:00 th minute:Passing Drill #1
The Game Show Passing Game
Purpose: To develop weight and accuracy of the pass.
Setup: Lay out a 20 x 20 yard area into 5 x 10 grids. Split the team into two teams and then put them at opposite ends of the large box. Set 4 cones randomly in the large box.
How to Play: Each player has a set number (coach determines) of attempts to score points by passing their ball and having it stop in one of the grids. One point is awarded for the closest grid and four points awarded for the furthest grid. The player at the opposite side collects the balls and then repeats the game. If the pass hits one of the cones, that pass does NOT earn the passer any

points. Variations include: most total points in a set number of tries, who can get to 100 without going over it, or the most consecutive 4 points in a row.
Emphasis: 1. Use plant foot as aimer 2. Pass through the middle of the ball 3. Pass with the inside of the foot 4. Remember the strength needed to make the longer pass
30:00 th – 40:00 th minute: Passing Drill #3
Statue Drill: Half of the team is standing in one place without a ball. The other half have balls and are dribbling around the area (use about half the field). When the coach says “go” the players find one of the statues and pass them the ball and then get it back while they are moving. Make sure the statues are spread out all over the playing area. Tell the moving players that they cannot pass to the same statute twice in a row. The players should be moving when they pass the ball and when they get it back (not the statues of course, they stay in one spot). Switch the statues and the movers every couple minutes.
40:00 th – 60:00 th minute: Scrimmage
Play either one big game or a couple smaller games.
PRACTICE #7
Main Skill: Trapping
0:00 – 10:00 th minute: Warmup
Ball Skills: Continue ball skills from the previous weeks. A variation the kids might enjoy is soccer freeze tag. Everyone has a ball except the two people who are it. The two people who are it try to tag anyone else. When you are tagged you must pick up your soccer ball and stand with your legs spread apart. You are unfrozen when another player passes their ball between your legs. Game continues until al players are frozen or until the coach decides to switch the people who are it. Use a large playing space, so that the kids do not get tagged too quickly.
*****You should do Climb the Mountain and Happy Feet for at least a couple minutes as well.
10:00 th – 20:00 th minute: Review
Skill Review: Passing
WESTERN FRONTIER
Purpose: To develop passing accuracy.
Setup: In a 20 x 20 yard area, position 2 players on each side of the square. Both players on two of the sides start with a ball. They are passing to the players directly across from them on
the other side of the square. The rest of the players are in the middle of the square.
How to Play: The players must pass the ball across the area and hit a player on or below the knee. The game ends when all the players are hit. The players inside the square can move around inside the square to avoid being hit.
Emphasis: 1. Passing with the inside of your foot 2. Taking a two step approach to pass 3. Keeping your passes low, on the ground
20:00 th – 30:00 th minute: Trapping Drill #1
Egg Toss
Purpose: To develop trappings balls that are in the air.
Setup: In a 20 x 20 yard area group players into 4 groups of 2’s or 3’s. Place each group into one of the corners. In every group number the players from 1 to 3. The coach stands along one of the sideline with all the balls.
How to Play: The coach calls out a number between 1 and 3. A player from each group with that as their number runs out in to the middle of the square. The coach then gently throws the ball into the air. The players need to position themselves to trap the ball out of the air and then dribble the ball back to their corner.
Emphasis: 1. Use your shoelaces and your thigh to trap the ball 2. Give with the ball so it will not explode on your body as would an egg trapped roughly 3. The ball should be trapped close to the body so you keep possession
30:00 th – 40:00 th minute: Trapping #2
You’re in the Army Now
Purpose: To develop basic trapping techniques.
Setup: Each player has a ball and starts on one end line of a 20 x 20 area.
How to Play: Players have to march in place, holding the ball in front of them with both hands. The coach then gives a command; left thigh, right thigh, left foot, or right foot. The player must drop the ball on the commanded body part and try to kick it or use their thigh to hit the ball back up to their hands. If the correct surface is used, the player takes 1 step forward. If the correct body part is used and the player catches the ball before it hits the ground they can take 3 steps forward. The winner is the first person to cross the opposite end line.
Emphasis: 1. Thigh – use the meaty part (between the knee and hip) to contact the ball when it is
parallel to the ground 2. When using the feet, the ball should contact the instep (shoe laces) 3. The ball should bounce straight up, not forward in front of you
40:00 th – 60:00 th minute: Scrimmage
Make teams of two or three and play three or four minigames. This is good for the players because it forces them to touch the ball more times in the game. It is a good idea to make the goals pretty big (at least 3 yards) so that the kids score many goals.
PRACTICE #8
Main Skill: Shooting
0:00 – 10:00 th minute: Warmup
The players should be getting used to the warmup pattern by now and will be showing improvement in the drills, especially the fast footwork drills. Do the fast foot work drills for 5 minutes and then go to the drill with the players dribbling in a square.
10:00 th – 20:00 th minute: Review
Skill Review: Trapping
Trapping Drill
This drill is done in groups of three. Two kids will be stationary and one will be working. See the diagram below for setup. The player in the middle will run towards one player, trap the ball, and pass it back. Then they will run to the other person and do the same. The same person should work in the middle for a minute then rotate to the next player.

Emphasis: 1. Work hard when you are in the middle 2. Have to stop ball then pass it 3. Use inside of foot to both traps and pass 4. Use both feet
20:00 th – 30:00 th minute: Shooting Drill #1
TARGET PRACTICE
Purpose: To develop shooting technique
Setup: In a 10 x 20 yard area, pair up players on opposite sides of the grid. Each pair has one ball at their feet and one ball in between them in the middle of the square.
How to Play: Each group of two is a team. Each team tries to hit the ball in the middle. The receiving partner will need to move along the end line when a shot is off target, which will happen. Variations include: most hits in three minutes, most consecutive hits, and total team hits.
Emphasis: 1. Take a 23 step approach to the ball 2. Keep your head down and eyes on the ball. 3. Use the instep of your foot (shoe laces) or the inside of your foot to strike the ball.

30:00 th – 40:00 th minute: Shooting Drill #2
MR. OR MS. HUSTLE
Purpose: To develop shooting under pressure.
Setup: In a 20 X 20 yard grid, split team into 2 teams. Place each team on opposite corners of the same end line. Number the players on each team so that each player will have a partner/opponent on the other team. Place cones on the other end line 3 yards apart. The coach is server and goalie.
How to Play: When the coach calls out a number, the appropriate player runs from their team’s corner, around the cones on the opposite end line, and back to the ball. The first player to the ball shoots on the goal. The turn ends when a goal is scored or the ball goes out of bounds. Each goal is worth one point. The coach may bounce some balls to the players for variety and increase difficulty.
Emphasis: 1. Keep your head down and eyes on the ball when shooting 2. Shoot as quickly as you can to insure a shoot.
40:00 th – 60:00 th minute: Scrimmage
Play either one big game or a couple smaller games.
******This ends the third and fourth grade level practice schedule. We hope that it has been helpful and that you had an enjoyable season!!!!!!!!!

NPD COACHING MANUAL
Fifth and Sixth Grades
Prepared by:
Jim Konrad Jay Konrad
For the exclusive use of the Naperville Park District coaching staff.

Dear Coaches,
First of all we would like to thank you for volunteering to coach a youth soccer team. The next few months will be an incredibly rewarding experience for both you and your players. As you coach, please keep in mind that the Park District soccer program is based upon providing an environment where the kids can have fun and enjoy the game of soccer. This is not about winning and losing. If at the end of the season you can reflect back and say that every player had fun and possibly learned a little soccer, you have had a successful season.
Because many of you are new to this, my brother and I were asked to write up a practice plan for each age group in order to help you along. By no means is this the only practice plan for the season, it is only meant to be a guide. We designed it with the new coach in mind, so all the drills are explained and diagramed as needed. Each drill also includes the main coaching points for you to look for and stress as you are coaching. It would be a good idea for you to attend one of the coaching clinics provided by the Park District in order to see the skills and drills up close. We have taught the clinic for a number of years and have enjoyed interacting with the new coaches. It is a perfect setting to exchange ideas with other new coaches and have your questions answered. The clinics cover the basic rules and how to run a practice, the skills of the game and drills.
You will notice that every practice starts off with some type of skill work with the ball. We feel that this is essential to a player’s development. The more times a player gets to touch the soccer ball, the more successful he or she will be. The general flow of each practice is the same. Following the ball skills there will be a review of the last week’s skill. This is to reinforce what was taught at the last practice. The next idea covered is the skill of the day. It has been shown that players learn skills more easily if only one skill is emphasized at practice. For this reason, we have made each practice revolve around one skill. The drills are intended to go from simple to more gamelike as the practice continues. This allows the player to learn the fundamentals of each skill before using it in a game situation. Finally, the practice ends with some sort of scrimmage or game.
We would encourage you to be creative. Feel free to plug in different drills at any time or adjust the provided drills to fit your needs. The drills were designed with the age groups in mind, but some variations may be needed based on the overall skill level of your team.
We have been fortunate enough to play soccer at the collegiate and professional level as well as coach many players of all ages for several years. Currently, I am the varsity boys coach at Naperville North and Jay is the Naperville Central varsity boys coach. We are both extremely active in the summer camps offered through the Park District. These experiences have added greatly to our ability to instruct players and coaches alike.
Feel free to stop either one of us after a high school game if you have any coaching questions or concerns. All of the work you do at the youth level directly translates into success for us at the high school level (Boys state champs 1998, 4 th place 2002, Girls 2 nd place 1998, 4 th place 1999, 3 rd place 2001). We hope this manual will be of some help to you and that you have a fantastic coaching experience this year. Good luck!!
In Soccer,

FIFTH and SIXTH GRADE 8 week practice plan
********Every practice will include a warmup designed to develop each player’s ball skills, which is the foundation for success in soccer. The more times a player touches the ball during practice the better!! Keep this in mind during the fifteen minute warmup session.
PRACTICE #1
Main Skill: Dribbling
0:00 – 10:00 th minute: Warmup
Ball Skills
Purpose: To develop a player’s comfort level with the ball.
Setup: Put players in a 25 x 25 yard area. All players must have a ball.
How to Play: While this drill is basic in nature it is essential for developing player’s ball skills. Have players start by dribbling at a jog. Players should look to find open areas and accelerate into them. Coach should introduce restrictions and variations to this drill. There are many examples such as; only left or right foot, startstop, call out the number of fingers the coach is holding up. Also, coach can have players switch balls with another player when he yells “Switch”. Players can stop, sit on the ball, and then start dribbling again. “Change direction” can be a command as well. Coach should be creative. Let a word act as the command, so to players can learn them and be easier to use in practice. The key is to have the players touch the ball as many times as possible in different ways and different directions.
Emphasis: 1. Get as many touches as possible 2. Accelerate into space 3. Keep ball close to the body 4. Keep eyes up and on the field
10:00 th – 20:00 th minute: Dribbling Drill #1
Purpose: To develop ball confidence.
Setup: A 10 x 20 yard area with two teams of 2. Use cones to mark the halfway line.
How to Play: It is 1 v. 1 in the middle. You must cross the half line before passing to a teammate successfully. If the defender takes the ball away he immediately attacks the other half. Change players in the middle every 1 minute. Score by passing to teammate on end line.
Emphasis: 1. Accelerate past the defender 2. Make a good pass to score 3. Protect the ball
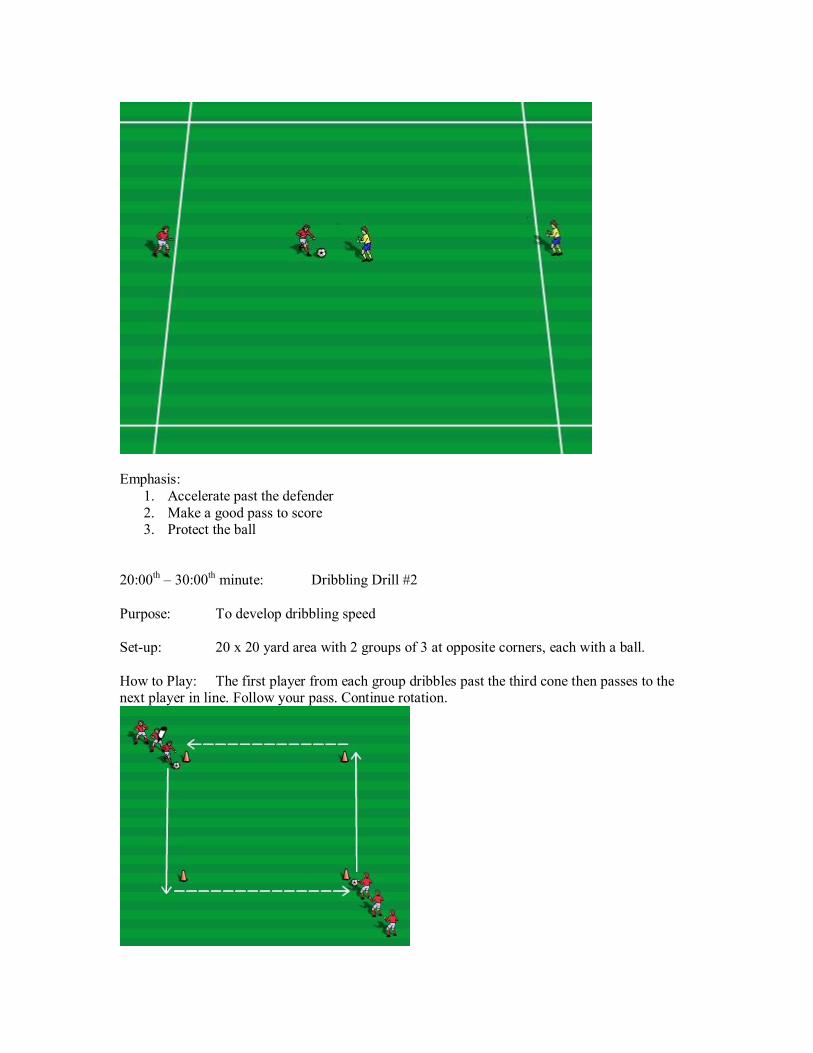
20:00 th – 30:00 th minute: Dribbling Drill #2
Purpose: To develop dribbling speed
Setup: 20 x 20 yard area with 2 groups of 3 at opposite corners, each with a ball.
How to Play: The first player from each group dribbles past the third cone then passes to the next player in line. Follow your pass. Continue rotation.

Emphasis: 1. Explode with first touch 2. Dribble with laces 3. Using speed, but in control
30:00 th – 50:00 th minute: Scrimmage
It is extremely beneficial to play small sided games like 2 v. 2 or 3 v. 3. This enables the players to touch the ball often and always be a part of the game. Large scrimmages are useful because they provide an avenue for the coach to do tactical coaching. A large full team scrimmage is the time to discuss positioning and strategy as well.
50:00 th – 60:00 th minute: Organization
Because this is the first practice, you may need some time to pass out papers or discuss team policies.
PRACTICE #2
Main Skill: Passing
0:00 – 10:00 th minute: Warmup
Ball Skills: Same as practice #1, plus add “happy feet” and “climb the mountain”.
1. Happy Feet: With knees slightly bent and the ball between the feet, gently touch the ball back and forth in between the inside of the right foot and the inside of the left foot. Players should keep their weight on the balls of their feet. The players are not moving around the square, but stay in basically the same are.
2. Climb the Mountain: Start with the ball a couple of inches in front of you feet. Use the bottom of your right foot to gently touch the top of the ball. Then, while your right foot is returning to the ground, lift your left foot so it gently touches the top of the ball. Continually repeat motions.
10:00 th – 20:00 th minute: Review
Review: Dribbling/Knockout
Purpose: To develop dribbling in limited space.
Setup: Use a 20 x 20 yard area. Each player has a ball.
How to Play: Players dribble freely in the area until the coach says “Go”. Then each player tries to knock other balls out of the square while keeping theirs in. If your ball gets knocked out you must dribble around the outside of the square. Last player left in the square with their ball is the winner.
Emphasis: 1. Keep the ball close to your body 2. Keep your body between the ball and your opponent
20:00 th – 30:00 th minute: Passing Drill #1
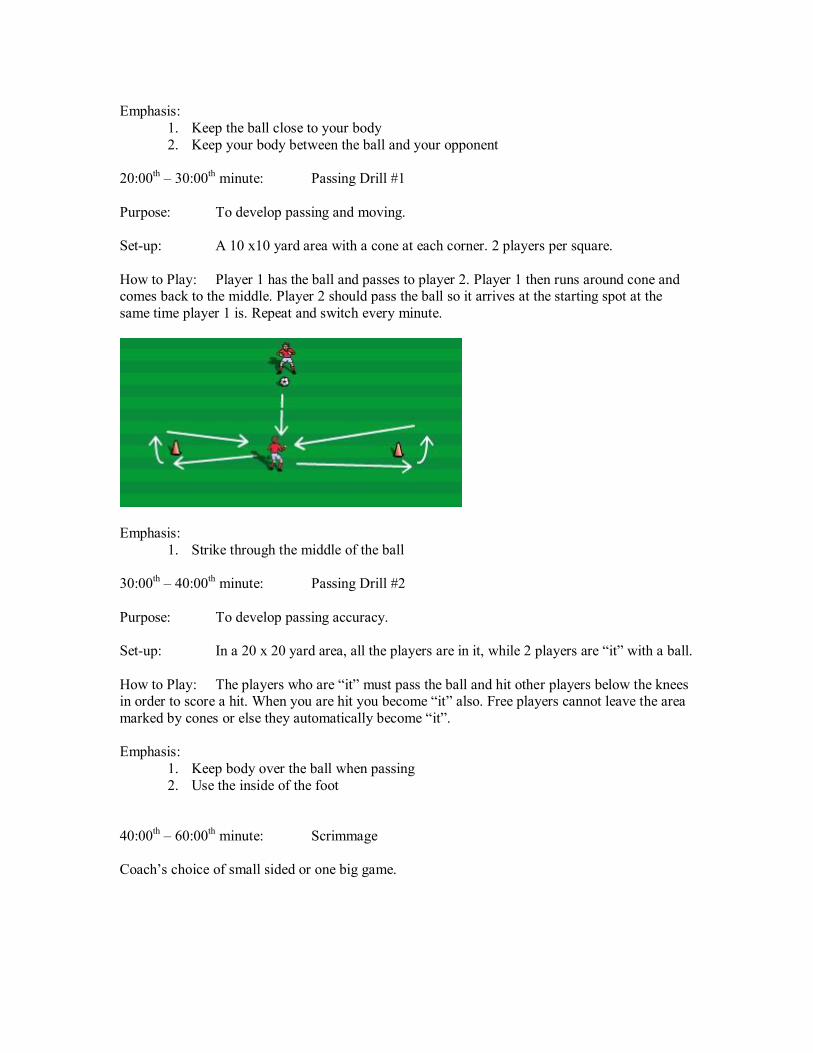
Purpose: To develop passing and moving.
Setup: A 10 x10 yard area with a cone at each corner. 2 players per square.
How to Play: Player 1 has the ball and passes to player 2. Player 1 then runs around cone and comes back to the middle. Player 2 should pass the ball so it arrives at the starting spot at the same time player 1 is. Repeat and switch every minute.
Emphasis: 1. Strike through the middle of the ball
30:00 th – 40:00 th minute: Passing Drill #2
Purpose: To develop passing accuracy.
Setup: In a 20 x 20 yard area, all the players are in it, while 2 players are “it” with a ball.
How to Play: The players who are “it” must pass the ball and hit other players below the knees in order to score a hit. When you are hit you become “it” also. Free players cannot leave the area marked by cones or else they automatically become “it”.
Emphasis: 1. Keep body over the ball when passing 2. Use the inside of the foot
40:00 th – 60:00 th minute: Scrimmage
Coach’s choice of small sided or one big game.

PRACTICE #3
Main Skill: Trapping
0:00 th – 10:00 th minute: Warmup
Coaches should continue to review the skills and activities already performed in the previous warmups. Coaches may want to introduce juggling. The object of juggling is to keep the ball in the air without it touching the ground by using any body part except your hands. At first it is okay for the players to use a bounce to keep the ball juggling. Emphasize the use of feet and thighs. Have the players drop the ball from their hands to their thigh and hit it back up to their hands. Then try for 2 juggles. This technique also works for juggling with the feet. *****Experienced players can juggle the ball for over 1000 touches without letting the ball touch the ground.
10:00 th – 20:00 th minute: Review
Review: Passing
Purpose: To develop passing accuracy.
Setup: In a 20 x 20 yard area, all the players are in it, while 2 players are “it” with a ball.
How to Play: The players who are “it” must pass the ball and hit other players below the knees in order to score a hit. When you are hit you become “it” also. Free players cannot leave the area marked by cones or else they automatically become “it”.
Emphasis: 1. Keep body over the ball when passing 2. Use the inside of the foot

20:00 th – 30:00 th minute: Trapping Drill #1
Purpose: To develop trapping and traveling with the ball in one motion.
Setup: Use a 10 x 10 yard area. See diagram.
How to Play: Player 1 passes to player 2 who controls the ball toward one of the 2 cones. Player 2 then dribbles around the cone and back to the middle. Player 2 then passes to player 1 who repeats the process.
Emphasis: 1. First touch should be in the direction you want to go 2. Use inside and outside of the foot to direct the ball
30:00 th – 40:00 th minute: Trapping Drill #2
Purpose: To develop foot and thigh control of the ball.
Setup: Play in a 20 x 20 yard area.
How to Play: All players will dribble around the area. When coach says, “FOOT”, all the players will pick up their ball and drop it from shoulder height on their FOOT. Players will cushion the ball and continue dribbling. When the coach says, “THIGH”, all the players will pick up their ball and drop it to their THIGH. Player will cushion the ball and then continue dribbling. Coach may also use left and right commands.
Emphasis: 1. Cushion or contact 2. Dribble quickly once ball has been settled
40:00 th – 60:00 th minute: Scrimmage
Coach’s choice of small sided or one big game.
PRACTICE #4
Main Skill: Shooting
0:00 – 10:00 th minute: Warmup
Be sure to review activities. Include; juggling, happy feet, climb the mountain, and the different dribbling games.
10:00 th – 20:00 th minute: Review
Review: Trapping
Purpose: To develop ground and air control.
Setup: Pairs of 2’s about 6 yards apart.
How to Play: Player 1 underhand tosses the ball to player 2. Player 2 will settle the ball and pass it back to player 1. Tosses should vary to both the right and left side of the body and to the feet and thighs. Switch every 60 seconds.
Emphasis: 1. Cushion the ball 2. Keep body behind the ball 3. Trap the ball, keeping it close to your body

20:00 th – 30:00 th minute: Shooting Drill #1
Purpose: To develop low shooting to the corners.
Setup: Make a goal about 6 yards wide. See diagram for player placement.
How to Play: One player plays goalie. The other 2 players try to shoot and score by alternating turns. Players can push the ball at different angles before they shoot. Rotate every minute.
Emphasis: 1. Low hard shots to the corners 2. Proper technique; head over ball, use the instep, and follow through.

30:00 th – 40:00 th minute: Shooting Drill #2
Purpose: To develop shooting under pressure.
Setup: Position 2 teams on either side of the goal. The teams should have even number of players. Coach plays goalie and server. Number players on each team from 16.
How to Play: Coach calls out a number from 16. The players with that number run around the cones and try to score the ball the coach throws out.
Emphasis: 1. Shoot the ball quickly and with proper form
40:00 th – 60:00 th minute: Scrimmage
Coach’s choice of small sided or one big game.
PRACTICE #5
Main Skill: Dribbling
0:00 – 10:00 th minute: Warmup
Be sure to review activities. Include juggling, happy feet, climb the mountain, and the different dribbling games.

10:00 th – 20:00 th minute: Review
Review: Shooting
Purpose: To develop shooting under pressure.
Setup: Position 2 teams on either side of the goal. The teams should have even number of players. Coach plays goalie and server. Number the players on each team from 16.
How to Play: Coach calls out a number form 16. The players with that number turn around the cones and try to score the ball the coach throws out. See diagram from last week.
Emphasis: 1. Shoot the ball quickly and with proper form
20:00 th – 30:00 th minute: Dribbling Drill #1
Purpose: To develop dribbling under pressure.
Setup: Play in a 20 x 20 yard area. Play in pairs. The player with the ball starts in front of the player without the ball.
How to Play: Players with the balls try to lose their shadows. The shadows cannot touch the players they are chasing.
Emphasis: 1. Focus on the ball, not the defender 2. Quick change of direction

30:00 th – 40:00 th minute: Dribbling Drill #2
Purpose: To develop beating an opponent with the ball.
Setup: A 30 x 30 yard square is broken up as shown. There is a crab in each box in the middle row. The crab is on hands and feet with the back to the ground.
How to Play: Player 1 dribbles past crab to player 2, who tries to dribble past crab to player 3. Continue pattern with crab trying to knock the ball away.
Emphasis: 1. Keep ball close to body 2. Quickly beat the crab
40:00 th – 60:00 th minute: Scrimmage
Coach’s choice of small sided or one big game.

PRACTICE #6
Main Skill: Passing
0:00 – 10:00 th minute: Warmup
Fast Footwork: Climb the Mountain and Happy Feet. Also do the dribbling in the square warm up.
10:00 th – 20:00 th minute: Review
Review: Dribbling
Knockout
20:00 th – 30:00 th minute: Passing #1
Purpose: To develop passing accuracy.
Setup: 20 x 30 yard area. One player has the ball and stands in the middle of the area. This person is the “passer”. The rest of the team lines up on one of the end lines.
How to Play: The players try to run past the “passer” without getting hit by the ball. The “passer” must hit the runners below the waist for a hit to count. If one of the runners gets hit they have to get a ball and be a passer also. The last runner left is the winner.
Emphasis: 1. Strike with the inside of the foot 2. Keep the ball low 3. Follow through towards the target

30:00 th – 40:00 th minute: Passing Drill #2
Purpose: To develop passing in game situation.
Setup: Play in 30 x 30 yard area. Make endzones five yards deep. Play 6 v. 6.
How to Play: Object is to stop the ball in your opponents’ endzone. You can only score on a pass. You cannot dribble into the endzone. Player has to have full control of the ball in order for it to be a goal.
Emphasis: 1. Attack quickly 2. Make runs into endzone
40:00 th – 60:00 th minute: Scrimmage
PRACTICE #7
Main Skill: Trapping
0:00 – 10:00 th minute: Warmup
Continue previous skill development drills.
10:00 th – 20:00 th minute: Review
Review: Passing
Use passing drill #1 from week #2. This is the 3 person passing drill.
20:00 th – 30:00 th minute: Trapping #1
Purpose: To develop the thigh and chest trap.
Setup: End players are 20 yard apart. Third player is in the middle.
How to Play: Middle player works back and forth receiving a ball and passing it back to the person who tossed it.
Emphasis: 1. Use underhand tosses 2. Use both thighs 3. Cushion the ball
30:00 th – 40:00 th minute: Trapping #2
Purpose: To develop trapping in a gamelike situation.
Setup: Half of the team makes a circle with a 30 yard diameter. The other half is in the middle of the circle without a ball. Players on the outside have a ball.
How to Play: Players in the middle run towards a player on the outside and calls for the ball. They trap the ball and return it. Then they find another player on the outside to receive a ball from. Switch inside and outside players every minute.
Variations: Players on the outside can be holding the balls in their hands and toss the balls to the player’s chest or thighs.
Emphasis: 1. Hard work between traps 2. Get body in line with the flight of the ball 3. Make good passes back to the tossers
40:00 th – 60:00 th minute: Scrimmage

PRACTICE #8
Main Skill: Shooting
0:00 – 10:00 th minute: Warm up
Continue developing player skills by using the aforementioned drills.
10:00 th – 20:00 th minute: Review
Review: Trapping
Use the circle trap drill from last week (drill #2).
20:00 th 30:00 th minute: Shooting #1
Purpose: To develop shooting of a wall pass.
Setup: Wall player (#1) stands with back to goal facing the two lines of players.
How to Play: Player in line passes ball to player #1 who plays the ball off to the side. Player runs up and shoots the ball. Switch lines after each shot.
Emphasis: 1. Shoot low to corner 2. Shoot with laces 3. Accelerate after you pass the ball
30:00 th – 40:00 th minute: Shooting Drill #2
Purpose: To develop shooting in a game situation,
Setup: 20 x 20 yard field. Play 2 v. 2 on the field with a goalie in each goal. Make goals large (6 yards).
How to Play: Simply play soccer trying to score at each opportunity. The smaller field gives players more chances to score.
Emphasis: 1. Look to make good passes 2. Shoot at every opportunity 3. Follow for rebounds or deflections
40:00 th – 60:00 th minute: Scrimmage
******This ends the fifth and sixth grade practice schedule. We hope that this has been helpful and that you have had a fun season!

NPD COACHING MANUAL
Seventh and Eighth Grades
Prepared by:
Jim Konrad Jay Konrad
For the exclusive use of the Naperville Park District coaching staff.

Dear Coaches,
First of all we would like to thank you for volunteering to coach a youth soccer team. The next few months will be an incredibly rewarding experience for both you and your players. As you coach, please keep in mind that the Park District soccer program is based upon providing an environment where the kids can have fun and enjoy the game of soccer. This is not about winning and losing. If at the end of the season you can reflect back and say that every player had fun and possibly learned a little soccer, you have had a successful season.
Because many of you are new to this, my brother and I were asked to write up a practice plan for each age group in order to help you along. By no means is this the only practice plan for the season, it is only meant to be a guide. We designed it with the new coach in mind, so all the drills are explained and diagramed as needed. Each drill also includes the main coaching points for you to look for and stress as you are coaching. It would be a good idea for you to attend one of the coaching clinics provided by the Park District in order to see the skills and drills up close. We have taught the clinic for a number of years and have enjoyed interacting with the new coaches. It is a perfect setting to exchange ideas with other new coaches and have your questions answered. The clinics cover the basic rules and how to run a practice, the skills of the game and drills.
You will notice that every practice starts off with some type of skill work with the ball. We feel that this is essential to a player’s development. The more times a player gets to touch the soccer ball, the more successful he or she will be. The general flow of each practice is the same. Following the ball skills there will be a review of the last week’s skill. This is to reinforce what was taught at the last practice. The next idea covered is the skill of the day. It has been shown that players learn skills more easily if only one skill is emphasized at practice. For this reason, we have made each practice revolve around one skill. The drills are intended to go from simple to more gamelike as the practice continues. This allows the player to learn the fundamentals of each skill before using it in a game situation. Finally, the practice ends with some sort of scrimmage or game.
We would encourage you to be creative. Feel free to plug in different drills at any time or adjust the provided drills to fit your needs. The drills were designed with the age groups in mind, but some variations may be needed based on the overall skill level of your team.
We have been fortunate enough to play soccer at the collegiate and professional level as well as coach many players of all ages for several years. Currently, I am the varsity boys coach at Naperville North and Jay is the Naperville Central varsity boys coach. We are both extremely active in the summer camps offered through the Park District. These experiences have added greatly to our ability to instruct players and coaches alike.
Feel free to stop either one of us after a high school game if you have any coaching questions or concerns. All of the work you do at the youth level directly translates into success for us at the high school level (Boys state champs 1998, 4 th place 2002, Girls 2 nd place 1998, 4 th place 1999, 3 rd place 2001). We hope this manual will be of some help to you and that you have a fantastic coaching experience this year. Good luck!!
In Soccer,

SEVENTH and EIGHTH GRADE 8 week practice plan
*****Every practice will include a warmup designed to develop each player’s ball skills, which is the foundation for success in soccer. The more times a player touches the ball during practice the better!! Keep this in mind during the fifteen minute warmup session.
PRACTICE #1
0:00 th – 15:00 th minute: Warmup
Have all the players in a 30 x 30 yard area with a ball. Players will continually move and touch the ball throughout this warmup. Players start out by dribbling the ball in the box. They should be looking for open space and should accelerate into it, keeping the ball close to their body. On the coach’s command, the players will perform various warmup and skill developing activities. Listed are some commands, then the description on how to perform them.
1. PENDULUM: With knees slightly bent and the ball between the feet, gently touch the ball back and forth in between the inside of the right foot and the inside of the left foot. Players should keep their weigh on the balls of their feet. The players are not moving around the square, but stay in basically the same area.
2. SETUPS: Start with the ball a couple of inches in front of your feet. Use the bottom of your right foot to gently touch the top of the ball. Then, while your right foot is returning to the ground, lift your left foot so it gently touches the top of the ball. Continually repeat motions.
3. PUSHPULLS: To simplify this activity, start with one foot at a time. Place the ball in front of your right foot. Push the ball forward with the instep (shoelaces) of your right foot, then pull it back with the bottom of your right foot. It may be easier to develop the pushpull rhythm if the players hop on their left foot every time they touch the ball with their right foot. Repeat this motion over and over. Then repeat the “pushpull” with your left foot while hopping on your right foot. Once the player can successfully complete the “pushpull” with the right and left foot alone, they will need to combine them. To do this do a pushpull with your right foot then do a pushpull with your left foot. Repeat!!!
4. QUARTER TURN: Of the warmup activities this may be the most difficult This move starts with the players doing the pendulum. After several touches, instead of touching the ball across your body with your right foot, put the bottom of your right foot on top of the ball. Pull the ball back, while you turn your body into it. (Visualize a clock. You started facing 12, then after the “quarter turn” with your right foot you are now facing the 3.) Then player performs the pendulum. After several touches instead of playing the ball across the body, put the bottom of your left foot on the top of the ball. Pull the ball back while you turn your body into it. (Continuing our clock visualization, if you started this move facing the 3, at the end you were facing the 12 again.) Repeat this process, making sure that players use both their right and left feet often.
The coach can also mix the above 4 activities with different dribbling exercises, such as:

1. Right foot only, inside only, outside only, or alternate 2. Left foot only, inside only, outside only, or alternate 3. Inside only, both feet are used, but only the inside 4. Outside only: both feet are used, but only the outside
15:00 th – 25:00 th minute: Dribbling Drill #1
Purpose: To develop running and changing direction with the ball.
Setup: Have players partner up and stand in a 20 x 20 yard area. One player per group of two has the ball and starts behind their partner, without the ball.
How to Play: The goal of the game is for the player without the ball to lose the player with the ball by changing speed and direction. Rotate and repeat.
Emphasis: 1. Speed dribble with the instep 2. Eyes up to locate partner
25:00 th – 35:00 th minute: Dribbling Drill #2
Purpose: To develop deception and feints
Setup: In a 10 x 10 yard area, partner up all the players, each group having one ball. Position one player on each side of an imaginary line made by 2 cones.
How to Play: One player starts with the ball. Neither player is allowed to cross the imaginary line made between the two cones. The player with the ball tries to dribble to either cone before the defender (partner without the ball) touches the same cone. After the first player scores a point, switch roles.
Emphasis: 1. Use feints and change of speed and direction to beat opponent.
35:00 th – 60:00 th minute: Scrimmage
This 25 minute scrimmage can and should be used a variety of ways. Some time should be spent on short sided games like, 1 v. 1, 2 v. 2, 3 v. 3 and full sided scrimmages. The size of the field (s) and goals should vary from very small to game size.
65:00 th – 75:00 th minute: Organization
Since this is your first practice of the season, there is bound to be paperwork and handouts for practice and game schedules. Use this time to wrap up today’s practice and to distribute necessary information to the players.
PRACTICE #2
0:00 15:00 th minute: Warmup
Same as practice #1
15:00 th – 25:00 th minute: Review
Review: Dribbling
Purpose: To develop change of speed and direction.
Setup: One pair of players, each with a ball, in a 10 x 10 yard area.
How to Play: One player is “it” and their goal is to tag their partner, while they are both dribbling a ball. Once player becomes tagged, separate and start over with the new player being “it”.
Emphasis: 1. Use change of speed and direction to stay away from partner
25:00 th – 35:00 th minute: Passing Drill #1
Purpose: To develop accurate passing
Setup: 2 players pass the ball back and forth between the cones, but without hitting the cones. Continue and see how many consecutive passes can be made in a row.
Emphasis: 1. Pass with the inside of the foot 2. Head down and eyes on the ball

35:00 th – 45:00 th minute: Passing Drill #2
Purpose: To develop passing into space.
Setup: In a 10 x 10 yard area there will be 2 players and one ball. Set a cone at each corner.
How to Play: Player 1 passes to player 2 with the inside of the foot, then runs around one of the corner cones and back to the starting position. Player 2 returns the pass in the space that player one is running into. After passing the ball, player 2 runs around one of the corner cones and back to the starting position, where the ball is being passed into that space.
Emphasis: 1. Judge speed and weight of the pass 2. Use the inside of both feet
45:0 th – 55:00 th minute: Passing Drill #3
Purpose: To develop passing accuracy over various distances.
Setup: Make a 20 x 20 yard area with half the players on one end line and the other half on the opposite end line. One side starts out with each player having a ball. There is one game ball placed in the center of the square.
How to Play: Each team tries to pass their balls and hit the game ball so that it crosses the other team’s end line. Game ends when the game ball crosses an end line or after every player has passed their ball.
Emphasis: 1. Pass with the inside of the foot 2. Weight pass properly
55:00 th – 75:00 th minute: Scrimmage
This 20 minutes can and should be used in a variety of ways. Some time should be spent on short sided games like 1 v. 1, 2 v. 2, 3 v. 3, and full sided scrimmages. The size of the field (s) and goals should vary from very small to game size.
PRACTICE #3
0:00 – 15:00 th minute: Warmup
Same as practice #1
15:00 th 25:00 th minute: Review
Review: Passing
Purpose: To develop passing accuracy from a dribble.

Setup: Have players form a circle about 20 yards wide, with a cone marking a spot for every player, and one cone in the middle of the circle. Only one ball is needed.
How to Play: Player 1 starts with the ball, dribbles to the center one, and passes to any of the teammates. Afterward player 1 follows the pass to fill that now vacant cone. The player receiving the ball dribbles to the center cone, passes to a teammate and then follows the pass. Repeat!!
Emphasis: 1. Concentrate on proper form, head down, eye son ball, and inside of foot
25:00 th – 35:00 th minute: Trapping Drill #1
Purpose: To develop trapping close to the body
Setup: In a 10 x 10 yard area, have 2 players and one ball. Players should be passing and moving.
How to Play: Player 1 passes the ball to player 2 who must trap the ball with the inside of the foot. Player 2 then passes the ball back to player 1 who must trap it with the inside of the foot. Repeat!!!!
Emphasis: 1. Use both feet to trap 2. Keep the trapped ball close to the body
35:00 th – 45:00 th minute: Trapping Drill #2
Purpose: To develop a constructive first touch.
Setup: A 10 x 10 yard area with 2 players and one ball.
How to Play: Player 1 passes the ball to player 2 who must control the ball by angling it to the left or right. Player 2 then dribbles to the cone nearest to the ball and then passes to player 1. Repeat process!!!!!

Emphasis: 1. First touch to the side with inside or outside of the foot
45:00 th – 55:00 th minute: Trapping Drill #3
Purpose: To develop trapping and turning with the ball.
Setup: A 20 x 20 yard area, 4 players, one ball and a cone in the middle.
How to Play: Player 1 passes to player 2, who controls the ball and turns it using the outside of the foot. Player 2 then passes to player 3. Player 3 passes to player 4 who follows the process.
Emphasis: 1. Cushion pass to keep control 2. Using the outside of the foot touch the ball to the side for easier turn
55:00 th – 75:00 th minute: Scrimmage
This 20 minutes can and should be used in a variety of ways. Some time should be spent on short sided games like, 1 v.1, 2 v. 2, 3 v. 3 and full sided scrimmages. The size of the field (s) and goals should vary from very small to game size.

PRACTICE #4
0:00 – 15:00 th minute: Warmup
Same as practice #1
15:00 th – 25:00 th minute: Review
Review: Trapping
Purpose: To develop first touch for constructive positioning.
Setup: A 10 x 10 yard area, 4 players and one ball.
How to Play: Player 1 passes to player 2 who controls the ball with the outside of the foot with an angling touch that leaves the ball in a position for an easy pass player 3. Repeat and change directions routinely.
Emphasis: 1. Angle the outside of the foot trap for a constructive first touch
25:00 th – 35:00 th minute: Shooting Drill #1
Purpose: To develop shooting strategies.
Setup: In a 10 x 20 yard area, 3 players, one ball and 2 cones marking a 6 yard goal.
How to Play: Player 1 shoot at the goal, trying to score with a low shot a corner. Whether player 1 scores, misses, or has the shot saved, player 2 then gets to shoot. Ball must be stationary when shot. Repeat process!!!!
Emphasis: 1. Shoot with the instep 2. Head over the ball and eyes focused on the ball

35:00 th – 45:00 th minute: Shooting Drill #2
Purpose: To develop trapping ball into a shooting position.
Setup: A 20 x 20 yard area with 5 players, one ball, and 2 cones to mark a regulation size goal.
How to Play: Server 1 passes to player 1, who takes a constructive first touch, then shoots on goal. Then, server 2 passes to player 2 who takes a constructive first touch and then shoots on goal. Alternate shooters and servers.
Emphasis: 1. Trap the ball into a shooting position 2. Shoot with the instep, follow through toward target
45:00 th – 55:00 th minute: Shooting Drill #3
Purpose: To develop shooting from a turning move.
Setup: A 20 x 20 yard area, 5 players, one ball, and 2 cones marking a regulation goal.
How to Play: Server 1 passes to player 1 who has their back to the goal. Player 1 takes a touch to turn the ball, faces the goal and shoots. Server 2 then passes to player 2 and the process continues.
Emphasis: 1. Control the ball with the outside of the foot 2. Shoot with proper technique 3. Follow for rebound
55:00 th – 75:00 th minute: Scrimmage
This 20 minutes can and should be used in a variety of ways. Some time should be spent on short sided games like, 1 v. 1, 2 v.2, 3 v. 3 and full sided scrimmages. The size of the field (s) and goals should vary from very small t game size.
PRACTICE #5
0:00 th – 15:00 th minute: Warmup
Same as practice #1
15:00 th – 25:00 th minute: Review
Review: Shooting
Purpose: To develop shooting with some pressure.
Setup: A 20 x 20 yard area with 2 teams on opposite sides of one end line. Between the
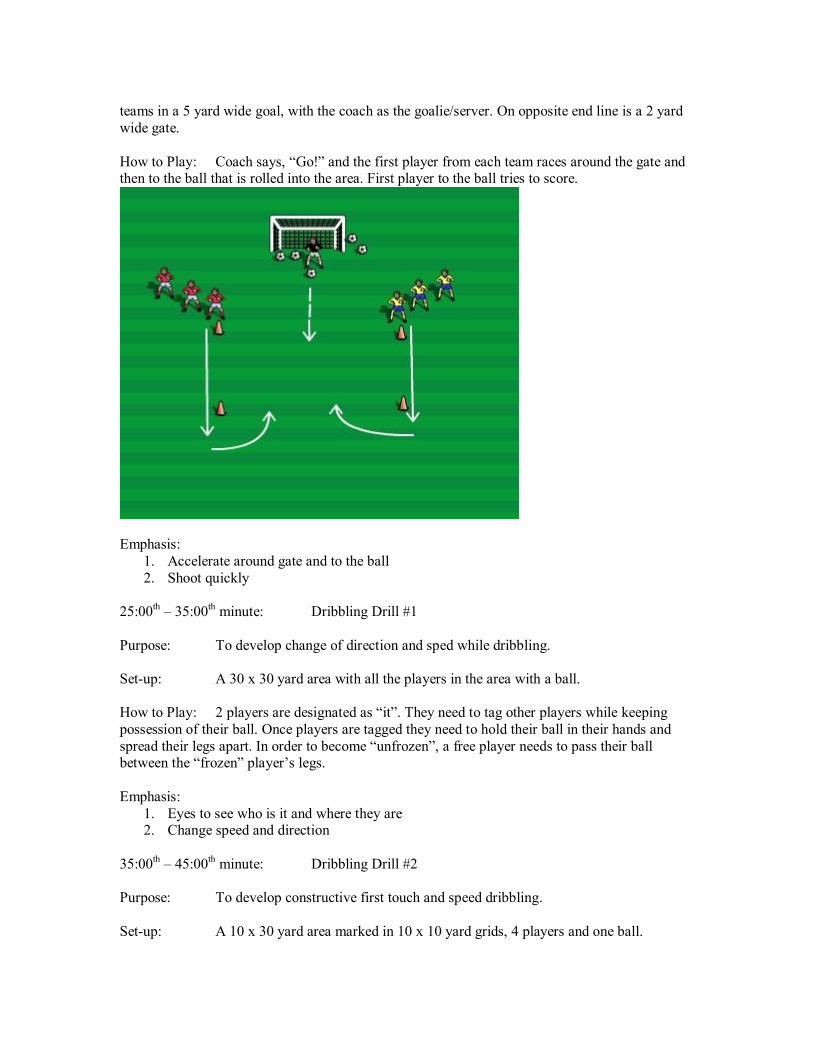
teams in a 5 yard wide goal, with the coach as the goalie/server. On opposite end line is a 2 yard wide gate.
How to Play: Coach says, “Go!” and the first player from each team races around the gate and then to the ball that is rolled into the area. First player to the ball tries to score.
Emphasis: 1. Accelerate around gate and to the ball 2. Shoot quickly
25:00 th – 35:00 th minute: Dribbling Drill #1
Purpose: To develop change of direction and sped while dribbling.
Setup: A 30 x 30 yard area with all the players in the area with a ball.
How to Play: 2 players are designated as “it”. They need to tag other players while keeping possession of their ball. Once players are tagged they need to hold their ball in their hands and spread their legs apart. In order to become “unfrozen”, a free player needs to pass their ball between the “frozen” player’s legs.
Emphasis: 1. Eyes to see who is it and where they are 2. Change speed and direction
35:00 th – 45:00 th minute: Dribbling Drill #2
Purpose: To develop constructive first touch and speed dribbling.
Setup: A 10 x 30 yard area marked in 10 x 10 yard grids, 4 players and one ball.

How to Play: Player 1 dribble to first line, then passes to player 2, who dribbles to nearest line and passes to player 3, while player 1 runs to stand behind player 4. Continue pattern.
Emphasis: 1. Speed dribble to the line 2. Head up between touches

45:00 th – 55:00 th minute: Dribbling Drill #3
Purpose: To develop speed dribbling and beating an opponent.
Setup: A 10 x 30 yard area coned into 10 x 10 yard grids, with 4 players and one ball. Set up players as shown.
How to Play: Player 1 speed dribbles to second grid, where they have to dribble past the crab without losing the ball. When player 1 enters the last grid, the ball is passed to player 2 who repeats the process, while player fills in the now vacant slot where player 2 was.
Emphasis: 1. Speed dribble 2. Use feints to beat the crab
55:00 th – 75:00 th minute: Scrimmage
This 20 minutes can and should be used in a variety of ways. Some time should be spent on short sided games like. 1 v. 1, 2 v. 2, 3 v. 3, and full sided scrimmages. The size of the field (s) and goals should vary from very small to game size.

PRACTICE #6
0:00 – 15:00 th minute: Warmup
Same as practice #1
15:00 th – 25:00 th minute: Review
Review: Dribbling
Purpose: To develop feints, deception, and beating an opponent.
Setup: In a 10 x 10 yard area, put 2 players and one ball. Place one player on either side of an imaginary line made by the “A” cones.
How to Play: The offensive player starts with the ball and the defender cannot cross the imaginary line between the “A” cones. The offensive player receives 1 point for beating the defender to an “A” cone, or 2 points for beating the defender to the “B’ cone behind the defender. Switch positions.
Emphasis: 1. Use feints and change of speed and direction to beat opponent to cone
25:00 th – 35:0 th minute: Passing Drill #1
Purpose: To develop passing and following technique.
Setup: A 30 x 30 yard area with all players partnered up with one ball per group of 2.
How to Play: Partners are facing each other. Player 1 starts with the ball and passes to player 2, who stops the ball then runs backwards. Player 1 runs forward and repeats process until the partners reach the far end line, where players switch roles.
Emphasis: 1. Quality passes and traps
35:00 th – 45:00 th minute: Passing Drill #2
Purpose: To develop accurate passing and field awareness.
Setup: A 20 x 20 yard area with 6 players (numbered 16) and one ball
How to Play: Player 1 starts with the ball. All players are jogging in the area. Player 2 calls for the ball and receives a pass from player 1. Continue 1>2>3>4>5>6>1…

Emphasis: 1. Passing for accuracy while moving to a moving target
45:00 th – 55:00 th minute: Passing Drill #3
Purpose: To develop passing accuracy toward a moving target.
Setup: In a 20 x 20 yard area, position 8 players outside (2 players per side) and 4 players in the middle. Both players on two of the sides start with a ball.
How to Play: The players must pass the ball across the square to their partner while trying to hit a player n the middle below the knees. Switch positions after all players are hit. Emphasis:
1. Quick approach to the ball 2. Keep passes on the ground
55:00 th – 75:00 th minute: Scrimmage
This 20 minutes can and should be used in a variety of ways. Some time should be spent on short sided games like 1 v. 1, 2 v. 2, 3 v. 3, and full sided scrimmages. The size of the field (s) and goals should vary from very small to game size.
PRACTICE #7
0:00 – 15:00 th minute: Warmup
Same as practice #1
15:00 th – 25:00 th minute: Review
Review: Passing
Purpose: To develop passing into space.
Setup: In a 10 x 10 yard area there will be 2 players and one ball. Set a cone at each corner.
How to Play: Player 1 passes to player 2 with the inside of the foot, then runs around one of the corner cones and back to the starting position. Player 2 returns the pass in the space that player one is running into. After passing the ball, player 2 runs around one of the corner cones and back to the starting position, where the ball is being passed into that space.
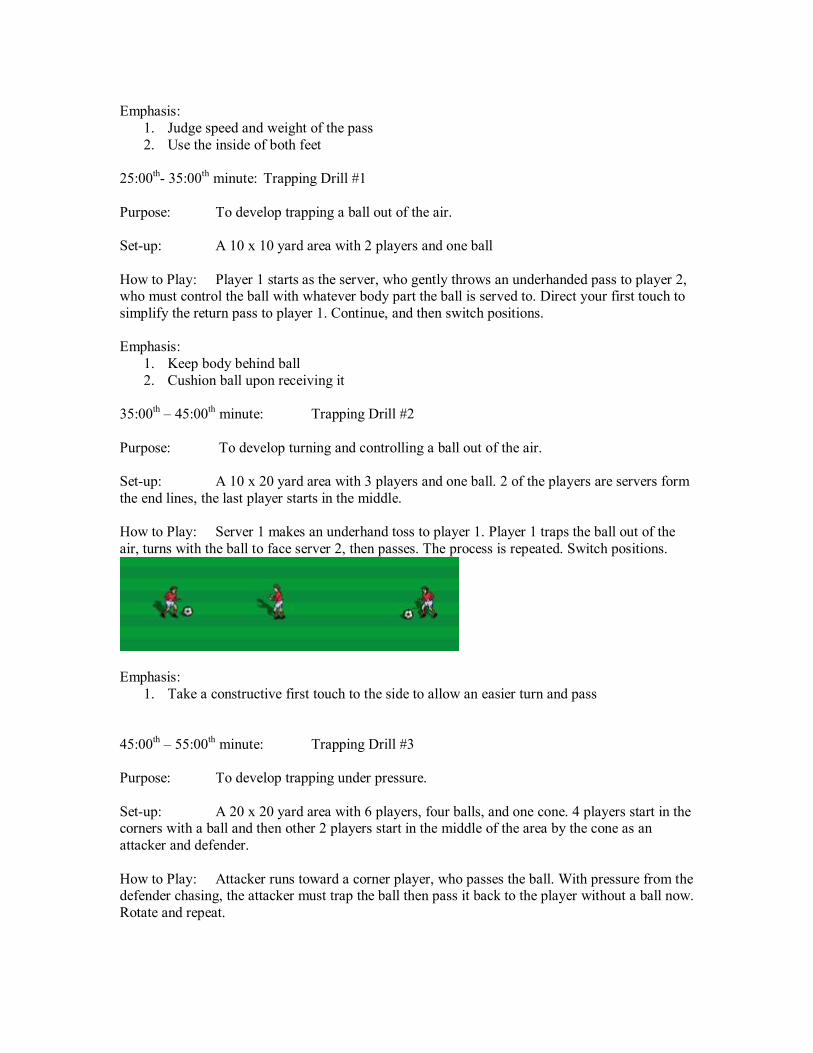
Emphasis: 1. Judge speed and weight of the pass 2. Use the inside of both feet
25:00 th 35:00 th minute: Trapping Drill #1
Purpose: To develop trapping a ball out of the air.
Setup: A 10 x 10 yard area with 2 players and one ball
How to Play: Player 1 starts as the server, who gently throws an underhanded pass to player 2, who must control the ball with whatever body part the ball is served to. Direct your first touch to simplify the return pass to player 1. Continue, and then switch positions.
Emphasis: 1. Keep body behind ball 2. Cushion ball upon receiving it
35:00 th – 45:00 th minute: Trapping Drill #2
Purpose: To develop turning and controlling a ball out of the air.
Setup: A 10 x 20 yard area with 3 players and one ball. 2 of the players are servers form the end lines, the last player starts in the middle.
How to Play: Server 1 makes an underhand toss to player 1. Player 1 traps the ball out of the air, turns with the ball to face server 2, then passes. The process is repeated. Switch positions.
Emphasis: 1. Take a constructive first touch to the side to allow an easier turn and pass
45:00 th – 55:00 th minute: Trapping Drill #3
Purpose: To develop trapping under pressure.
Setup: A 20 x 20 yard area with 6 players, four balls, and one cone. 4 players start in the corners with a ball and then other 2 players start in the middle of the area by the cone as an attacker and defender.
How to Play: Attacker runs toward a corner player, who passes the ball. With pressure from the defender chasing, the attacker must trap the ball then pass it back to the player without a ball now. Rotate and repeat.

Emphasis: 1. Attacker must gain space on the defender with a quick check back to the ball 2. Constructive first touch, 34 feet in front of your moving body
55:00 th – 75:00 th minute: Scrimmage
This 20 minutes can and should be used in a variety of ways. Some time should be spent on short sided games like 1 v. 1, 2 v. 2, 3 v. 3, and full sided scrimmages. The size of the field (s) and goals should vary from very small to game size.
PRACTICE #8
0:00 15:00 th minute: Warmup
Same as practice #1
15:00 th – 25:00 th minute: Review
Review: Trapping
Purpose: To develop trapping and turning with the ball.
Setup: A 20 x 20 yard area, 4 players, one ball, and a cone in the middle
How to Play: Player 1 passes to player 2 who controls the ball and turns it using the outside of the foot. Player 2 then passes to player 3. Player 3 passes to player 4 who follows the process.
Emphasis: 1. Cushion pas to keep control 2. Using the outside of the foot touch the ball to the side for easier turn

25:00 th – 35:00 th minute: Shooting Drill #1
Purpose: To develop proper shooting technique.
Setup: A 10 x 30 yard area with 3 players, 4 cones, and one ball. Set up a goal 6 yards wide with a 2 yard alley on either side of the goal.
How to Play: Player 1 starts with the ball, takes a couple of dribbles, then shoots on goal. Player 2 moves to control the shot, then repeats process for a shot on goal. If the ball passes through the goal, one point is earned. If the ball passes through one of the side alleys, 2 points are earned.
Emphasis: 1. Proper shooting technique 2. Accurate shooting
35:00 th – 45:00 th minute: Shooting Drill #2
Purpose: To develop shooting a passed ball.
Setup: A 10 x 40 yard area with 5 players and one ball.
How to Play: Second player in line passes the ball three yards in front of shooter, who approaches the rolling ball and takes a one touch shot on goal. Repeat through line.
Emphasis: 1. Accurate and quick shooting
45:00 th – 55:00 th minute: Shooting Drill #3
Purpose: To develop shooting resulting from combination play.
Setup: A 10 x 20 yard area with two cones to mark a regulation goal, a goalie, wall player, and two lines with the rest of the players.
How to Play: Player 1 passes to the wall player who makes a return pass (give and go) to player 1 running forward for a one touch shot on goal. Alternate lines and switch lines after shooting. Set up more than one goal if possible to get more players shooting instead of standing in line.
Emphasis: 1. Proper shooting technique 2. Aim to corners
55:00 th – 75:00 th minute: Scrimmage
This 20 minutes can and should be used in a variety of ways. Some time should be spent on short sided games like 1 v. 1, 2 v. 2, 3 v. 3, and full sided scrimmages. The size of the field (s) and goals should vary from very small to game size.
****This ends the seventh and eighth grade level practice schedule. We hope that it has been helpful, and that you had an enjoyable season!!!!!

NPD COACHING MANUAL
High School
Prepared by:
Jim Konrad Jay Konrad
For the exclusive use of the Naperville Park District coaching staff.

Dear Coaches,
First of all we would like to thank you for volunteering to coach a youth soccer team. The next few months will be an incredibly rewarding experience for both you and your players. As you coach, please keep in mind that the Park District soccer program is based upon providing an environment where the kids can have fun and enjoy the game of soccer. This is not about winning and losing. If at the end of the season you can reflect back and say that every player had fun and possibly learned a little soccer, you have had a successful season.
Because many of you are new to this, my brother and I were asked to write up a practice plan for each age group in order to help you along. By no means is this the only practice plan for the season, it is only meant to be a guide. We designed it with the new coach in mind, so all the drills are explained and diagramed as needed. Each drill also includes the main coaching points for you to look for and stress as you are coaching. It would be a good idea for you to attend one of the coaching clinics provided by the Park District in order to see the skills and drills up close. We have taught the clinic for a number of years and have enjoyed interacting with the new coaches. It is a perfect setting to exchange ideas with other new coaches and have your questions answered. The clinics cover the basic rules and how to run a practice, the skills of the game and drills.
You will notice that every practice starts off with some type of skill work with the ball. We feel that this is essential to a player’s development. The more times a player gets to touch the soccer ball, the more successful he or she will be. The general flow of each practice is the same. Following the ball skills there will be a review of the last week’s skill. This is to reinforce what was taught at the last practice. The next idea covered is the skill of the day. It has been shown that players learn skills more easily if only one skill is emphasized at practice. For this reason, we have made each practice revolve around one skill. The drills are intended to go from simple to more gamelike as the practice continues. This allows the player to learn the fundamentals of each skill before using it in a game situation. Finally, the practice ends with some sort of scrimmage or game.
We would encourage you to be creative. Feel free to plug in different drills at any time or adjust the provided drills to fit your needs. The drills were designed with the age groups in mind, but some variations may be needed based on the overall skill level of your team.
We have been fortunate enough to play soccer at the collegiate and professional level as well as coach many players of all ages for several years. Currently, I am the varsity boys coach at Naperville North and Jay is the Naperville Central varsity boys coach. We are both extremely active in the summer camps offered through the Park District. These experiences have added greatly to our ability to instruct players and coaches alike.
Feel free to stop either one of us after a high school game if you have any coaching questions or concerns. All of the work you do at the youth level directly translates into success for us at the high school level (Boys state champs 1998, 4 th place 2002, Girls 2 nd place 1998, 4 th place 1999, 3 rd place 2001). We hope this manual will be of some help to you and that you have a fantastic coaching experience this year. Good luck!!
In Soccer,

HIGH SCHOOL LEVEL 8 week practice plan
*****Every practice will include a warmup designed to develop each player’s ball skills, which is the foundation for success in soccer. The more times a player touches the ball during practice the better!! Keep this in mind during the fifteen minute warmup session.
PRACTICE #1
0:00 th – 15:00 th minute: Warmup
Have all the players in a 30 x 30 yard area with a ball. Players will continually move and touch the ball throughout this warmup. Players start out by dribbling the ball in the box. They should be looking for open space and should accelerate into it, keeping the ball close to their body. On the coach’s command, the players will perform various warmup and skill developing activities. Listed are some commands, then the description on how to perform them.
1. PENDULUM: With knees slightly bent and the ball between the feet, gently touch the ball back and forth in between the inside of the right foot and the inside of the left foot. Players should keep their weigh on the balls of their feet. The players are not moving around the square, but stay in basically the same area.
2. SETUPS: Start with the ball a couple of inches in front of your feet. Use the bottom of your right foot to gently touch the top of the ball. Then, while your right foot is returning to the ground, lift you left foot so it gently touches the top of the ball. Continually repeat motions.
3. PUSHPULLS: To simplify this activity, start with one foot at a time. Place the ball in front of your right foot. Push the ball forward with the instep (shoelaces) of your right foot, then pull it back with the bottom of your right foot. It may be easier to develop the pushpull rhythm if the players hop on their left foot every time they touch the ball with their right foot. Repeat this motion over and over. Then repeat the “pushpull” with your left foot while hopping on your right foot. Once the player can successfully complete the “pushpull” with the right and left foot alone, they will need to combine them. To do this do a pushpull with your right foot then do a pushpull with your left foot. Repeat!!!
4. QUARTER TURN: Of the warmup activities this may be the most difficult This move starts with the players doing the pendulum. After several touches, instead of touching the ball across your body with your right foot, put the bottom of your right foot on top of the ball. Pull the ball back, while you turn your body into it. (Visualize a clock. You started facing 12, then after the “quarter turn” with your right foot you are now facing the 3.) Then player performs the pendulum. After several touches instead of playing the ball across the body, put the bottom of your left foot on the top of the ball. Pull the ball back while you turn your body into it. (Continuing our clock visualization, if you started this move facing the 3, at the end you were facing the 12 again.) Repeat this process, making sure that players use both their right and left feet often.
The coach can also mix the above 4 activities with different dribbling exercises, such as:
1. Right foot only, inside only, outside only, or alternate

2. Left foot only, inside only, outside only, or alternate 3. Inside only, both feet are used, but only the inside 4. Outside only: both feet are used, but only the outside
15:00 th – 25:00 th minute: Dribbling Drill #1
Purpose: To develop change of pace and direction.
Setup: 2 players with balls in a 10 x 10 yard area.
How to Play: Player 1 is designated “it”. Player 1 dribbles his ball and tries to tag player 2 who is also dribbling his soccer ball. If player 2 is tagged or dribbles out of the square, he becomes “it”.
Emphasis: 1. Control the ball 2. Eyes up 3. Quick change of direction
25:00 th – 35:00 th minute: Dribbling Drill #2
Purpose: To develop deception and feints.
Setup: In 10 x 10 yard areas, partner up all the players, each group having one ball. Position one player on each side of an imaginary line made by 2 cones.
How to Play: One player starts with the ball. Neither player is allowed to cross the imaginary line made between the two cones. The player with the ball tries to dribble to either cone before the defender (partner without the ball) touches the same cone. After the first player scores a point, switches roles.
Emphasis: 1. Use feints and change of speed and direction to beat opponent

35:00 th – 45:00 th minute: Dribbling Drill #3
Purpose: To develop feints, deception, and beating an opponent.
Setup: In a 10 x 10 yard area, put 2 players and one ball. Place one player on either side of an imaginary line made by the “A” cones.
How to Play: The offensive player starts with the ball and the defender cannot cross the imaginary line between the “A” cones. The offensive player receives 1 point for beating the defender to an “A” cone, or 2 points for beating the defender to the “B” cone behind the defender. Switch positions.
Emphasis: 1. Use feints and change of speed and direction to beat opponent to cone.
45:00 th – 65:00 th minute: Scrimmage
This 20 minutes can and should be used in a variety of ways. Some time should be spent on short sided games like 1 v. 1, 2 v. 2, 3 v. 3, and full sided scrimmages. The size of the field (s) and goals should vary from very small to game size.
65:00 th 75:00 th minute: Organization
Since this is your first practice of the season, there is bound to be paperwork and handouts for practice and game schedules. Use this time to wrap up today’s practice and to distribute necessary information to the players.

PRACTICE #2
Main Skill: Passing
0:00 – 15:00 th minute: Warmup
Same as practice #1
15:00 th – 25:00 th minute: Review
Review: Dribbling
Purpose: To develop dribbling under pressure.
Setup: All the players with a ball in a 30 x 30 yard area.
How to Play: All players start by dribbling in the marked area. When coach says, “KNOCK OUT”, all the players try to keep their balls in the square while knocking all the other balls out of the square. Last player left is the winner.
Emphasis: 1. Close ball control 2. Protect the ball 3. Change speed and direction
25:00 th – 35:00 th minute: Passing Drill #1
Purpose: To develop passing on the attack.
Setup: Two teams of 2 and a ball in a 10 x 20 yard area as show in the diagram.
How to Play: Player 1 starts with the ball and must beat player 2, cross the imaginary midline, and then pass to player 3. Player 3 repeats the process. If the defender wins the ball, they must immediately attack and pass to player 4. Continue pattern.

Emphasis: 1. Use feints and speed change to beat defender
35:00 th – 45:00 th minute: Passing Drill #2
Purpose: To develop passing accuracy for short and long distances.
Setup: A 10 x 10 yard area with 2 players and a ball. Set cones at the 5 yard mark.
How to Play: Player 1 starts with the ball on the end line. Player 2 starts 5 yards away. Player 1 passes to player 2, who returns the pass. After returning the pass, player 2 jogs back to the 10 yard cones. Player 1 passes the ball to player 2 who again passes the ball back and then jogs back to the 5 yard cones. (Player 1 is stationary while player 2 runs from 5 to 1 to 5 to 10…) Switch every minute.
Emphasis: 1. Start with 2 touches, using both feet 2. Quality passes, crisp and on the ground
45:00 th 55:00 th minute: Passing Drill #3
Purpose: To develop passing accuracy and field vision.
Setup: 6 players with a ball in a 30 x 30 yard area. Number each player 16.
How to Play: This is a “follow the leader” passing game. Player 1 passes to player 2 who passes to player 3… Players must always be moving. Switch to reverse order for a change every minute or so.
Emphasis: 1. Quality passes 2. Head up to locate partner

55:00 th – 75:0 th minute: Scrimmage
This 20 minutes can and should be used in a variety of ways. Some time should be spent on short sided games like 1 v. 1, 2 v. 2, 3 v. 3, and full sided scrimmages. The size of the field (s) and goals should vary from very small to game size.
PRACTICE #3
Main Skill: Trapping
0:00 – 15:00 th minute: Warmup
Same as practice #1
15:00 th – 25:00 th minute: Review
Review: Passing
Purpose: To develop accurate passing to a moving target.
Setup: 2 players and a ball in a 10 x 20 area.
How to Play: Player 1 starts with the ball and passes to player 2 who is moving to a cone. Player 2 returns the pass then runs to the other cone, where a pass will come from player 1.
Emphasis: 1. Quality passing 2. Judge weight needed for timing

25:00 th – 35:00 th minute: Trapping Drill #1
Purpose: To develop receiving skills while moving.
Setup: A 30 x 30 yard area with all the players partnered up. Each group has a ball.
How to Play: The players with the ball form a large circle in the square. The players without the ball start in the middle. To start, players from the middle check to an outside player with a ball, receive a 10 yard pass, trap it, and then make an accurate return pass. Repeat the process then with another player with the ball. Switch outside and inside players every minute.
Emphasis: 1. Body behind the ball 2. Constructive first touch,
35:00 th – 45:00 th minute: Trapping Drill #2
Purpose: To develop control from balls out of the air.
Setup: In a 10 x 10 yard area, place 2 players and a ball.
How to Play: Player 1 starts with the ball in hands, and tosses the ball in an underhand fashion to player 2, who is 68 yards away. Player 2 uses an appropriate surface to control the ball, then pass back to player 1. Vary throws. Repeat!!
Emphasis: 1. Use all surfaces
45:00 th – 55:00 th minute: Trapping Drill #3
Purpose: To develop controlling and turning a ball out of the air.
Setup: In a 10 x 20 yard area are 3 players and one ball.
How to Play: Player 1 makes an underhanded toss to player 2. Player 2 has to control the ball with the appropriate surface, turn the ball and make a pass to player 3. Player 3 picks up the ball and repeats the process. Switch every minute.
Emphasis: 1. Use all surfaces to control ball 2. Turn and pass quickly

55:00 th – 75:00 th minute: Scrimmage
This 20 minutes can and should be used in a variety of ways. Some time should be spent on short sided games like 1 v. 1, 2 v. 2, 3 v. 3, and full sided scrimmages. The size of the field (s) and goals should vary from very small to game size.
PRACTICE #4
Main Skill: Shooting
0:00 – 15:00 th minute: Warmup
Same as practice #1
15:00 th – 25:00 th minute: Review
Review: Trapping
Purpose: To develop angling and directing your first touch.
Setup: A 10 x 10 yard area with 4 players and one ball.
How to Play: Player 1 passes the ball to player 2, who takes a constructive first touch, that is an angling touch to make an easier pass to player 3. Player 3 repeats the process. Change direction of the pass every minute.
Emphasis: 1. Constructive first touch 2. Quality passes

25:00 th – 35:00 th minute: Shooting Drill #1
Purpose: To develop shooting from combination play.
Setup: A 10 x 20 yard area with a regulation size goal, a wall player and two lines. All the players in the lines have a ball.
How to Play: Player 1 passes to the wall player, who returns the ball to a moving player 1 (give and go). Player 1 shoots the ball then returns to the end of the opposite line. Player 2 then passes to the wall player and the process is repeated. Use more than one goal if possible to allow more players to shoot instead of standing in line.
Emphasis: 1. Quality shots with both feet
35:00 th – 45:00 th minute: Shooting Drill #2
Purpose: A 20 x 20 yard area setup as shown below. Make goal regulation size and on its opposite side a 2 yard wide gate.
How to Play: Player 1 dribbles and plays a “give and go” with a wall players, then dribbles around the corner cone and through the gate. Player 1 then performs another “give and go” with the wall player. On the return pass, player 1 shoots the ball on its first touch. The other line then repeats process.
Emphasis: 1. Quality combination play 2. Shoot on your first touch after the second “give and go”

45:00 th – 55:00 th minute: Shooting Drill #3
Purpose: To develop turning and shooting under pressure.
Setup: A 20 x 20 yard area with 6 players, 3 balls, and 2 cones to mark a regulation size goal. See diagram for setup.
How to Play: Server 1 passes the ball to player 1 who has their back to the goal. Player 1 must turn the ball and shoot with a defender player at 75% difficulty. After the shot, player 1 moves back into a receiving position for server 2 to start the next round. The pattern continues.
Emphasis: 1. Quick turns and shots 2. Follow shots for rebounds
55:00 th – 75:00 th minute: Scrimmage
This 20 minutes can and should be used in a variety of ways. Some time should be spent on short sided games like 1 v. 1, 2 v. 2, 3 v. 3, and full sided scrimmages. The size of the field (s) and goals should vary from very small to game size.
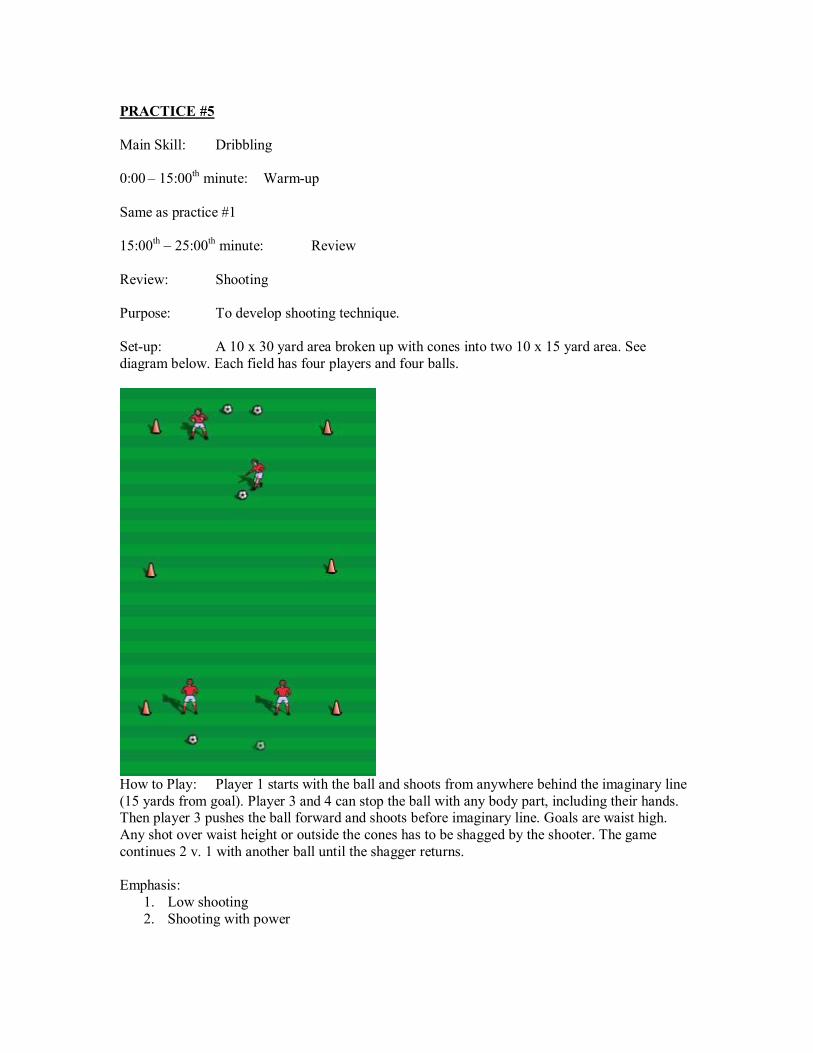
PRACTICE #5
Main Skill: Dribbling
0:00 – 15:00 th minute: Warmup
Same as practice #1
15:00 th – 25:00 th minute: Review
Review: Shooting
Purpose: To develop shooting technique.
Setup: A 10 x 30 yard area broken up with cones into two 10 x 15 yard area. See diagram below. Each field has four players and four balls.
How to Play: Player 1 starts with the ball and shoots from anywhere behind the imaginary line (15 yards from goal). Player 3 and 4 can stop the ball with any body part, including their hands. Then player 3 pushes the ball forward and shoots before imaginary line. Goals are waist high. Any shot over waist height or outside the cones has to be shagged by the shooter. The game continues 2 v. 1 with another ball until the shagger returns.
Emphasis: 1. Low shooting 2. Shooting with power

25:00 th – 35:00 th minute: Dribbling Drill #1
Purpose: To develop dribbling under pressure.
Setup: A 10 x 40 yard area with 2 players and one ball.
How to Play: Player 1 starts with the ball and player 2 is on defense. Player 1 dribbles from one end to the other, the whole time changing pace and direction. If player 1 can beat the defender, do it, but then wait for the defender to continue to the end line. Player 2 cannot steal the ball from player 2.
Emphasis: 1. Change of pace and direction 2. Close dribbling
35:00 th – 55:00 th minute: Dribbling Drill #2
Purpose: To develop attacking skills under pressure.
Setup: A 10 x 20 yard area with a 2 yard goal at each end, 2 players and one ball.
How to Play: 1 v. 1 is a great way to improve individual dribbling and attacking skills. Using this setup, have a round robin tournament with all your players. Each game should last for 90 seconds to 2 minutes.
Emphasis: 1. Keep possession of the ball by using the shielding technique
55:00 th – 75:00 th minute: Scrimmage
This 20 minutes can and should be used in a variety of ways. Some time should be spent on short sided games like 1 v. 1, 2 v. 2, 3 v. 3, and full sided scrimmages. The size of the field (s) and goals should vary from very small to game size.
PRACTICE #6
Main Skill: Passing
0:00 – 15:00 th minute: Warmup
Same as practice #1
15:00 th – 25:00 th minute: Review
Review: Dribbling
Purpose: To develop feints, deception, and beating an opponent.
Setup: In a 10 x 10 yard area, put 2 players and one ball. One player on either side of an

imaginary line made by the “A” cones.
How to Play: The offensive player starts with the ball and the defender cannot cross the imaginary line between the “A” cones. The offensive player receives 1 point for beating the defender to an “A” cone, or 2 points for beating the defender to the “B” cone behind the defender. Switch positions.
Emphasis: 1. Use feints and change of speed and direction to beat opponent to cone.
25:00 th – 35:00 th minute: Passing Drill #1
Purpose: To develop passing in a game like situation.
Setup: A 40 x 40 yard area with all the players partnered and one ball per group.
How to Play: Player 1 starts with the ball and remains stationary. Player 2 runs around any stationary player from another group, then gets a pass from his partner. After passing, player 1 runs around any player from a different group, then looks to receive a return pass from player 2. Repeat the pattern.
Emphasis: 1. Quality pass to moving player 2. Positive movement off the ball
35:00 th – 45:00 th minute: Passing Drill #2
Purpose: To develop accurate short passes with a moving ball.
Setup: A 20 x 20 yard area with 7 players and a ball. See diagram for initial positioning.
How to Play: Player 1 starts with the ball and passes to player 2. While player 2 makes a one touch pass to player 3, player 1 follows their pass to the middle. While player 3 makes a one

touch pass to player 1 (now in the middle), player 2 follows their pass to the outside. Repeat pattern around the circle. By this point players and coaches should be used to the warmup activities. Change up the order or see if any players can do all the activities from memory.
45:00 th —75:00 th SCRIMMAGE
This 20 minutes can and should be used in a variety of ways. Some time should be spent on short sided games like 1 v. 1, 2 v. 2, 3 v. 3, and full sided scrimmages. The size of the field (s) and goals should vary from very small to game size.
PRACTICE #7
15:00 th – 25:00 th minute: Review
Review: Passing
Purpose: To develop passing accuracy and field vision.
Setup: 6 players with a ball in a 30 x 30 yard area. Number each player 16.
How to Play: This is a “follow the leader” passing game. Player 1 passes to player 2 who passes to player 3… Players must always be moving. Switch to reverse order for a change every minute or so.
Emphasis: 1. Quality passes 2. Head up locate partner
25:00 th – 35:00 th minute: Trapping Drill #1
Purpose: To develop a constructive first touch under pressure:
Setup: A 15 x 15 yard area with 4 players and one ball.
How to Play: The three players at the corners start with the ball. The last player is defense. The game is keepaway, but try to keep the touches per player under four. The payer with the ball should always have two options at the nearest corners.
Emphasis: 1. Constructive first touch 2. Move to the corners closest to the ball
35:00 th – 45:00 th minute: Trapping Drill #2
Purpose: To develop trapping in a restrictive space.
Setup: A 15 x 15 yard area broken up into three 5 x5 yard areas with cones. The two end grids have a player in them, one with a ball.
How to Play: Player 1 starts with the ball and passes to player 2. Player 2 had to trap the ball, keeping it in their grid. Vary the passes from medium to hard, to work on game like play. Use your hands to throw some of the balls in the air for work on other body parts.
Emphasis: 1. Body behind the ball 2. Use proper trapping technique
45:00 th – 55:00 th minute: Trapping Drill #3
Purpose: To develop trapping the ball in gamelike conditions.
Setup: A 15 x 15 yard area broken up into three 5 x 5 yard areas with cones. The two end grids have a player in them one with a ball.
How to Play: Player 1 starts with the ball and passes to player 2. Player 2 has to trap the ball, keeping it in their grid. After player 1 passes the ball follow the pass and try to steal it before player 2 can control the ball. Vary the passes from medium to hard, to work on game like play. Use your hands to throw some of the balls in the air for work on other body parts. Emphasis:
1. Constructive first touch 2. Shield when necessary
55:00 th – 75:00 th minute: Scrimmage
This 20 minutes can and should be used in a variety of ways. Some time should be spent on short sided games like 1 v. 1, 2 v. 2, 3 v. 3, and full sided scrimmages. The size of the field (s) and goals should vary from very small to game size.

PRACTICE #8
Main Skill: Shooting
0:00 – 15:00 th minute: Warmup
By this point players and coaches should be used to the warmup activities. Change up the order or see if any of the players can do all the activities from memory.
15:00 th – 25:00 th minute: Review
Review: Trapping
Purpose: To develop receiving skills while moving.
Setup: A 30 x 30 yard area with all the players partnered up. Each group has a ball.
How to Play: The players with the ball form a large circle in the square. The players without the ball start in the middle. To start, players from the middle check to an outside player with a ball, receive a 10 yard pass, trap it, and then make an accurate return pass. Repeat the process then with another player with the ball. Switch every minute.
Emphasis: 1. Body behind the ball 2. Constructive first touch
25:00 th – 35:00 th minute: Shooting Drill #1
Purpose: To develop first touch shooting on a rolling ball.
Setup: In a 30 x 30 yard area have 5 players each with a ball on an end line and a regulation size goal on the other. Number each player.
How to Play: Coach calls out two numbers, like 2 and 5. Player 2 would pass their ball to player 5, who approaches and shoots on the first touch. Repeat the process.
Emphasis: 1. Shoot first touch 2. Keep shots low
35:00 th – 45:00 th minute: Shooting Drill #2
Purpose: To develop shooting under pressure.
Setup: In a 30 x 30 yard area, have a regulation size goal, 3 attacking players (each with a ball), 2 defenders and a goalie. The attackers go to goal trying to beat the defenders.
Emphasis: 1. Shoot as soon as you have an opportunity 2. Pass and move to create space to shoot
45:00 th —75:00 th minute: SCRIMMAGE
This 20 minutes can and should be used in a variety of ways. Some time should be spent on short sided games like 1 v. 1, 2 v. 2, 3 v. 3, and full sided scrimmages. The size of the field (s) and goals should vary from very small to game size.
****This ends the high school level practice schedule. We hope that it has been helpful, and that you had an enjoyable season!!!!!