November 30th - ILCCO Materials/Podcasting 101 tutorial.pdfILCCO, Podcasting in Community Colleges A...
25
November 30 th , 2006 Written and presented by Jeff Newell & Susan Nugent
Transcript of November 30th - ILCCO Materials/Podcasting 101 tutorial.pdfILCCO, Podcasting in Community Colleges A...

November 30th, 2006
Written and presented by Jeff Newell & Susan Nugent

ILCCO, Podcasting in Community Colleges A Train-the-Trainer Event
What is a Podcast? You may be wondering just what is a podcast and what can I do with it? If we break the word podcast down, we see first part of the word “pod” coming from the ever popular iPod music storage device that Apple sells and the second part of the word “casting” comes from the radio/TV broadcast community. So basically a podcast is a broadcast coming from a person or a group people that is made available as a downloadable MP3 file that can be stored on an MP3 player such the iPod.
How do I get a Podcast? Typically the podcast is downloaded from a web site or subscribed to using a technology called RSS. The acronym RSS stands for Real Simple or Summary Syndication. RSS is fast becoming a popular technology to syndicate web pages such as blogs through what is known as a “feed”. This makes it possible to “subscribe” to the “Feed” with RSS aggregator programs.
Podcatchers such as iTunes catch RSS feeds for media files, especially MP3 podcasts. Often web pages with an RSS feed will display an icon similar to the one displayed in this paragraph.
Subscribing With iTunes Before you get going into creating your own podcasts you may want find some podcasts that interest you to see how others are doing it. Below is quick tutorial on how to subscribe to podcasts using iTunes. iTunes is a popular music organizer software/service from Apple and works great with iPods as well. You can get it at the following address:
http://www.apple.com/itunes/overview
Podcast Settings Before downloading podcasts, it is a good idea to check the settings to make sure they are set for your download and storage preferences. Your Internet connection speed and computer hard disk storage may affect your choices.
1. Go to Edit > Preferences. 2. Click the Podcast tab.
3. Change the settings to what will work best for you. In the example below I have set to manually check for new episodes and to only download the most recent one. This can be very important if you subscribe to a frequently updated podcast that may several episodes already posted. Additionally you can change settings to keep all podcasts or choose a custom setting.
Figure 1.1
November 30, 2006 2

ILCCO, Podcasting in Community Colleges A Train-the-Trainer Event
How to Subscribe to a Podcast using the Music Store This section shows you how to subscribe to a podcast using the iTunes music store. The store often showcases popular and new podcasts.
1. In the left pane of iTunes, click the iTunes Store.
2. Click Podcasts in the first box on the left of the screen.
Figure 1.2
3. iTunes will display the podcast page. Featured podcasts will display at the top of
the screen. On the left is a directory to help you locate podcasts in subjects of interest. Select a podcast or subject you would like to view.
Figure 1.3
November 30, 2006 3

ILCCO, Podcasting in Community Colleges A Train-the-Trainer Event
4. Once a category is chosen, a list of featured podcasts in that category will display. If none of those podcasts look interesting to you, click See All in upper right corner of the featured box.
5. Once you have found a podcast you like click subscribe. A dialog box will display with the following message, Are you sure you want to subscribe to “Title of Podcast”? Click Subscribe.
Figure 1.4
6. On the left pane of iTunes under the Store section the download icon will appear
as the podcast is being downloaded. Once complete, click Podcasts in the left pane under Library.
7. Click the arrow next to the podcast you just subscribed to display the list of podcasts. If the podcast is still being downloaded a small orange icon will display next to the episode.
Figure 1.5
8. Depending on your podcast settings, most likely only the most recent episode will
download. Click Get next to any other episodes you wish to download.
Figure 1.6
November 30, 2006 4

ILCCO, Podcasting in Community Colleges A Train-the-Trainer Event
Subscribing to Podcasts using a RSS web address For your classes, do not use the 1 Click service. Instead, use the Advanced Menu for student subscriptions. This way you are in charge of your files and you can delete past files and start fresh each semester. With 1 Click, files from your past classes will be available to current students and iTunes is a middleman to get the files deleted.
Students can subscribe to your podcast’s feed through iTunes' Advanced menu. In the example we will use today is your Edublog’s feed. Go to the web address of your blog. For example, http://llcfsd.edublogs.org. Substitute llcfsd for username of your blog.
1. In the example here, the RSS feed is located under the archive menu. It may appear in a different place on your blog depending on the theme or presentation you choose for your blog. The example below is using the Regulus theme by Ben Gillbanks. Figure 1.7
2. Typically WordPress will give you options to subscribe to the full feed or just
comments. Click on the full feed link. The page that displays is an xml file. All you need to do is copy the link in the address bar of the web browser. You can do this by right-clicking over the URL in the address bar of the browser and selecting Copy from the shortcut menu.
Figure 1.8
3. Open iTunes and on the menu bar click Advanced > Subscribe to Podcast…
4. In the Subscribe to Podcast dialog box, paste the URL you copied earlier by using the shortcut keys Ctrl + V. Click OK. The podcast should display in your list of podcasts in iTunes.
Figure 1.9
November 30, 2006 5

ILCCO, Podcasting in Community Colleges A Train-the-Trainer Event
Creating a Podcast It is very easy to create a podcast with any audio editing software. For this workshop we will be using a free software program called Audacity. Audacity is free program for editing and recording audio and is available for Windows and Mac computers. It can be downloaded at the web address below.
http://audacity.sourceforge.net
You will also need to download the LAME encoder to export your recording in the MP3 format. The LAME encoder can be downloaded at the following web address: Follow the instructions on the website for downloading the LAME encoder*.
http://audacity.sourceforge.net/help/faq?s=install&item=lame-mp3
*Tip: Place the LAME encoder inside the Audacity program folder to find it easily later.
Audio File Formats There are two file formats we will be using in this Workshop.
AUP – Audacity source file When you create a recording and save it in Audacity, the file will be saved with the .AUP extension. This file format will retain all the track information and provide greater flexibility in editing. Once you are finished editing the Audacity file you will export the file to a MP3 format. Be sure to save often especially when applying effects.
MP3 (MPEG 1, layer 3)
MP3 is a popular audio format and is the format of choice for podcasts. It can be opened in just about all players and uses a lossy compression format. The lossy compression allows the file to be much smaller but doesn’t reduce sound quality. When exporting your podcast in Audacity the LAME Encoder will be used to encode and embed ID3 tags in the file. This will allow you to include title, artist, album, track number and year, genre, and comment information in the MP3 audio file. This information will display in the playlist in music software (i.e Window Media Player or iTunes) when someone downloads your podcast.
Other File Formats Audacity can Import Below are some other file formats Audacity can handle. You may come across these formats in your journey into podcasting.
• WAV – Windows Wave Format. Default uncompressed audio format on Windows computers
• AIFF – Audio Interchange File Format. Default uncompressed audio format on Mac computers.
• Sun Au/NeXT – Default audio format on Sun and NeXT computers
• OGG Vorbis – Designed to be a free alternative to MP3
November 30, 2006 6

ILCCO, Podcasting in Community Colleges A Train-the-Trainer Event
The Audacity Interface Figure 2.1
Audacity Tools We Will Use
Selection Tool: The Selection tool is on the Control Toolbar and allows you to select a portion of an audio track to edit the track. The cursor will change to a hand with a pointed finger as you make the selection.
Time Shift Tool: The Time Shift tool allows you to move a track to a different location on the track’s timeline. When the tool is selected, the cursor will become a double pointed arrow.
Trim Outside Selection Tool: With a portion of a track selected, this option deletes the unselected portion of a track.
Cut Tool: Deletes selected portion of a track.
Zoom in Tool: Use to zoom in on tracks.
Zoom out Tool: Use to zoom out on tracks. (With the Zoom Tool selected, hold down the Shift key and click on the waveform to zoom out.)
November 30, 2006 7
ILCCO, Podcasting in Community Colleges A Train-the-Trainer Event
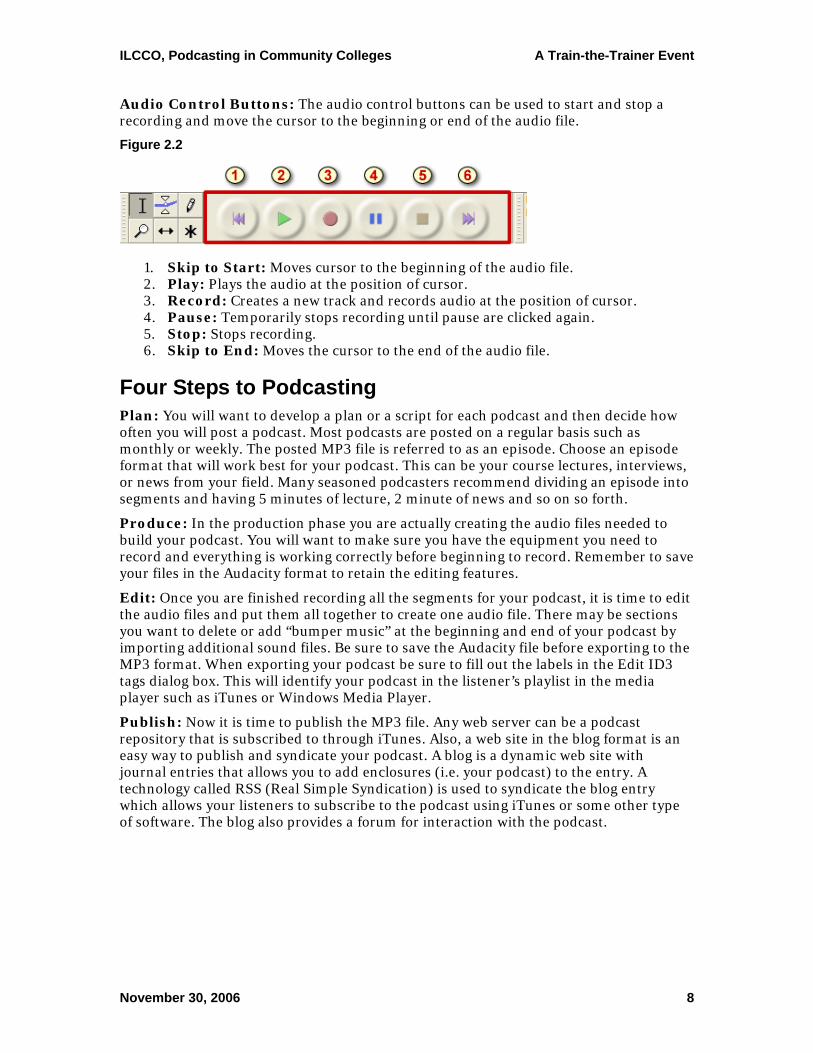
Audio Control Buttons: The audio control buttons can be used to start and stop a recording and move the cursor to the beginning or end of the audio file.
Figure 2.2
1. Skip to Start: Moves cursor to the beginning of the audio file. 2. Play: Plays the audio at the position of cursor. 3. Record: Creates a new track and records audio at the position of cursor. 4. Pause: Temporarily stops recording until pause are clicked again. 5. Stop: Stops recording. 6. Skip to End: Moves the cursor to the end of the audio file.
Four Steps to Podcasting Plan: You will want to develop a plan or a script for each podcast and then decide how often you will post a podcast. Most podcasts are posted on a regular basis such as monthly or weekly. The posted MP3 file is referred to as an episode. Choose an episode format that will work best for your podcast. This can be your course lectures, interviews, or news from your field. Many seasoned podcasters recommend dividing an episode into segments and having 5 minutes of lecture, 2 minute of news and so on so forth.
Produce: In the production phase you are actually creating the audio files needed to build your podcast. You will want to make sure you have the equipment you need to record and everything is working correctly before beginning to record. Remember to save your files in the Audacity format to retain the editing features.
Edit: Once you are finished recording all the segments for your podcast, it is time to edit the audio files and put them all together to create one audio file. There may be sections you want to delete or add “bumper music” at the beginning and end of your podcast by importing additional sound files. Be sure to save the Audacity file before exporting to the MP3 format. When exporting your podcast be sure to fill out the labels in the Edit ID3 tags dialog box. This will identify your podcast in the listener’s playlist in the media player such as iTunes or Windows Media Player.
Publish: Now it is time to publish the MP3 file. Any web server can be a podcast repository that is subscribed to through iTunes. Also, a web site in the blog format is an easy way to publish and syndicate your podcast. A blog is a dynamic web site with journal entries that allows you to add enclosures (i.e. your podcast) to the entry. A technology called RSS (Real Simple Syndication) is used to syndicate the blog entry which allows your listeners to subscribe to the podcast using iTunes or some other type of software. The blog also provides a forum for interaction with the podcast.
November 30, 2006 8

ILCCO, Podcasting in Community Colleges A Train-the-Trainer Event
Hardware Connections Audio recording requires a microphone for sound input and headphones or speakers for sound output. Many computers now have headphone jacks on the front of the computer, but they will also be located on the back of the PC on the sound card. The microphone input will have a microphone icon next to it and is often colored coded in pink. The output for speakers or headphones will typically be colored coded green. The use of headsets – headphones with a built-in microphone – allow for convenience and reduce potential conflicts between active microphones and speakers.
Figure 3.1
Testing the Microphone Before recording you will want to test the microphone to make sure it is connected properly to the computer and is recording quality audio. Put your headset on and position the microphone towards your mouth and about a half inch from your face. Don’t position it too close or the recording will have additional unwanted static noise. Create a new Audacity project and press Record. Talk for about 30 seconds to a minute. Press Stop and then Play to hear the recording. If you are satisfied with the test recording then you are ready to record.
Figure 3.2
November 30, 2006 9

ILCCO, Podcasting in Community Colleges A Train-the-Trainer Event
Troubleshooting Microphone Problems If you don’t hear your test recording, you may want to open the volume control to check the settings. The easiest way to do this is to double-click the sound icon in the notification area on the Desktop. It can also be found by going to the Start menu and clicking on Control Panel. Then double-click on Sounds and Audio Devices. In the Sounds and Audio Devices Properties dialog box, click on the Audio tab and then the Volume button in the Sound Recording section.
Volume Control Dialog Box 1. In the Volume Control dialog box click Options > Properties.
2. In the Properties dialog box make sure there is a checkmark next to Microphone and Line In. Click OK.
3. In the Volume Control dialog box make sure there is not a checkmark next to Mute under Microphone and Line In.
Figure 3.3
Testing Hardware Sometimes there may be an issue with the microphone and the computer not talking to one another. Note: This may not be possible in the lab.
1. To test the hardware (microphone) go to Start > Control Panel.
2. In the Control Panel Window, click Sounds and Audio Devices.
3. Select the Voice tab.
4. Click Test hardware.
5. The Sound Hardware Test Wizard will appear. Click Next.
6. The next screen of the Wizard will display a progress bar as it checks the microphone. Wait until it finishes and then click Next.
7. The next screen will display the Microphone Test. Read the text on the page. The Recording green vertical meter should move up and down as you talk. Click Next.
November 30, 2006 10

ILCCO, Podcasting in Community Colleges A Train-the-Trainer Event
8. The next screen will display the Speaker test. Read the paragraph. The Recording and playback green vertical meter should move up and down as you speak and you should hear yourself as you speak. Click Next.
9. Click Finish on the last screen to close the Wizard.
Recording Your Podcast 1. When you have your microphone adjusted and are ready to record, press the
Record button on Control Toolbar. 2. Begin talking and continue until you are finished. Don’t worry about mess ups. If
you mess up, stop talking for a few seconds and then resume talking at the point where you made the error or back up to a natural break in your text. This can be edited out later.
3. If you need to stop recording for a moment, click the Pause button. When you are ready to record again press Pause again to resume recording.
4. When you are finished, click Stop. Take time now to save your project! On the menu bar go to File > Save Project. Be sure to save the project in the native Audacity format (.aup) in an appropriate location on your computer. Even though our goal is making MP3s, keeping the original recording files at their original quality level allows for flexibility if re-editing of the material is needed later.
Editing the Recording Sometimes the recording volume is too low or too loud. You also may want to edit out sneezes, coughs, and other noises you don’t want in the recording. Below are a few common editing techniques.
Steps to Adjust the Volume of a Recording The sound file can be edited to increase or decrease the volume.
1. Click the Selection Tool icon on the Control Toolbar. 2. Select the track
3. On the menu bar go to Effect > Amplify. 4. In the Amplify dialog box move the slider up or down and click Preview to hear
the selection. If you move the slider up, the OK button may become grayed out unless you allow clipping. It is not recommended to clip an audio file because the quality will suffer.
5. Once satisfied with the selection click OK.
Figure 4.1
November 30, 2006 11
ILCCO, Podcasting in Community Colleges A Train-the-Trainer Event
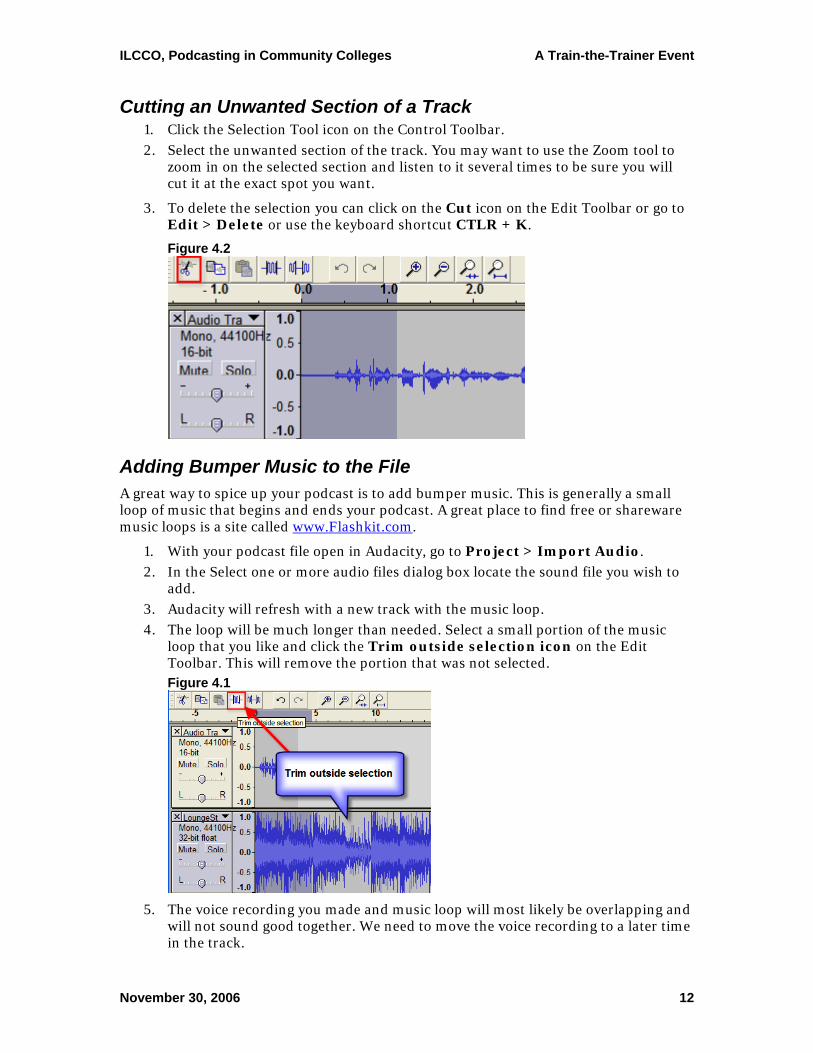
Cutting an Unwanted Section of a Track 1. Click the Selection Tool icon on the Control Toolbar.
2. Select the unwanted section of the track. You may want to use the Zoom tool to zoom in on the selected section and listen to it several times to be sure you will cut it at the exact spot you want.
3. To delete the selection you can click on the Cut icon on the Edit Toolbar or go to Edit > Delete or use the keyboard shortcut CTLR + K.
Figure 4.2
Adding Bumper Music to the File A great way to spice up your podcast is to add bumper music. This is generally a small loop of music that begins and ends your podcast. A great place to find free or shareware music loops is a site called www.Flashkit.com.
1. With your podcast file open in Audacity, go to Project > Import Audio. 2. In the Select one or more audio files dialog box locate the sound file you wish to
add. 3. Audacity will refresh with a new track with the music loop. 4. The loop will be much longer than needed. Select a small portion of the music
loop that you like and click the Trim outside selection icon on the Edit Toolbar. This will remove the portion that was not selected. Figure 4.1
5. The voice recording you made and music loop will most likely be overlapping and
will not sound good together. We need to move the voice recording to a later time in the track.
November 30, 2006 12

ILCCO, Podcasting in Community Colleges A Train-the-Trainer Event
6. Select the Time Shift Tool on the Control Toolbar. The cursor will display as a double arrow.
7. Select the voice recording with the cursor and move it further down the track so it is barely overlapping the sound file. This will be better but will still sound funny. Figure 4.2
8. The next step is fade out the music loop so it is barely playing as you start to talk.
To do this click the Selection tool on the Control Toolbar.
9. Select the music loop and go to Effect > Fade Out. This option will slowly fade out the music as you start speaking. The process can be repeated at the end of the podcast as well only this time the effect you want to use for the music loop is Fade In.
Figure 4.3
Additional Audacity Tutorials • http://audacity.sourceforge.net/manual-1.2/tutorials.html
• http://audacitybook.org/html
• http://www.tsof.edu.au/resources/sound/Support/tutorials.asp
• http://www.how-to-podcast-tutorial.com/17-audacity-tutorial.htm
• https://wiki.brown.edu/confluence/display/CISDOC/Audacity+Tutorial
November 30, 2006 13

ILCCO, Podcasting in Community Colleges A Train-the-Trainer Event
Locating the LAME Encoder & Adjusting Bit Rate Audacity requires the LAME encoder to export MP3 files. The LAME encoder must be manually associated with the Audacity program. In preparation for exporting an MP3 file, you need to point Audacity to the LAME encoder. You also need to adjust the MP3 bit rate to compress the audio file at an appropriate level. Adjusting the bit rate affects the file size and the sound quality. A higher bit rate means less compression and higher sound quality. Also, higher bit rates translate into larger file sizes. For music, 128, 160, or 192 are appropriate bit rates. For voice-only, 128 is sufficient, but you can record as low as 56 with adequate results. To associate the LAME encoder to Audacity:
1. Go to Edit > Preferences. 2. The Preferences dialog box will appear. Choose the File Formats tab. 3. Click on Find Library.
4. The MP3 Export Setup section will indicate that the MP3 exporting plugin is not found. You will see this same message when you export an MP3 and Audacity cannot find the LAME encoder.
Figure 5.1
5. In the Where is lame_enc.dll dialog box, browse to find the LAME encoder and
click Open.
Figure 5.2
6. Back in the Audacity Preferences dialog box, in the MP3 Export Setup section,
adjust the Bit Rate to 128.
Figure 5.3
November 30, 2006 14

ILCCO, Podcasting in Community Colleges A Train-the-Trainer Event
Exporting to the MP3 format Before exporting the Audacity file be sure to save it again and any time you make edits to it. Follow the steps below to Export the file to the MP3 format.
1. Go to File > Save As MP3.
Figure 5.4
2. The Save MP3 File As dialog box will appear. If you get an error message refer to
the previous page. Choose the appropriate location to save the file. Give the file a name and click Save.
3. The Edit the ID3 Tags for the MP3 file dialog box will appear. In the dialog box type a title for your podcast and fill in as much of the other information as you desire. This information will display in the playlist in a program like iTunes or Window Media Player.
Figure 5.5
4. Click OK. Congratulations! You have created your podcast in the MP3 format.
November 30, 2006 15

ILCCO, Podcasting in Community Colleges A Train-the-Trainer Event
Syndicate Your Podcast The last step of creating a podcast is to syndicate the podcast and the easiest way to do that is with a blog type web site. Let’s take a look at the possibilities.
What is a Blog The Wikipedia’s definition of blog is "web-based publication consisting primarily of periodic articles (normally, but not always, in reverse chronological order)." Blogs have grown in popularity and are very easy to set-up and maintain. With a blog you can create posts and attach the MP3 file as an enclosure. The blog’s RSS feed will aggregate the enclosure and allow listeners to download the MP3 file in iTunes.
Audioblogging vs. Podcasting Posting an MP3 file on a blog site is called audioblogging. It becomes a podcast when it is syndicated to a podcatcher such as iTunes. The blog post with audio can be an RSS feed that drives people to the web site, making it an audioblog. The RSS feed can also be used with a podcatcher to download the blog's MP3 files, then it becomes a podcast. Sometimes the line between audioblogging and podcasting can be a bit blurry.
Creating a Blog For the blogs we will create today, we are going to use Edublogs.org. This is a free service for educators. The blog software used at Edublogs is called WordPress. WordPress is a free open source blogging tool that makes it very easy to publish web page content.
Set up Blog Account 1. Go to www.edublogs.org and create an account. Choose the user name wisely.
This will be part of your web address for your blog.
2. Type a title for the blog.
3. Type your email address (use one that you can access today). I recommend using one such as a yahoo or gmail account. Sometimes with your college account the WordPress generated email gets caught in the spam filter.
4. Click Create.
5. Login to your email account to view the email sent to you from Edublogs. You should receive two emails from edublogsEdublogs. The first email will ask you to validate your account and the second email will have user name and password information. Login into your blog and use the username and password provided in the email.
November 30, 2006 16
ILCCO, Podcasting in Community Colleges A Train-the-Trainer Event
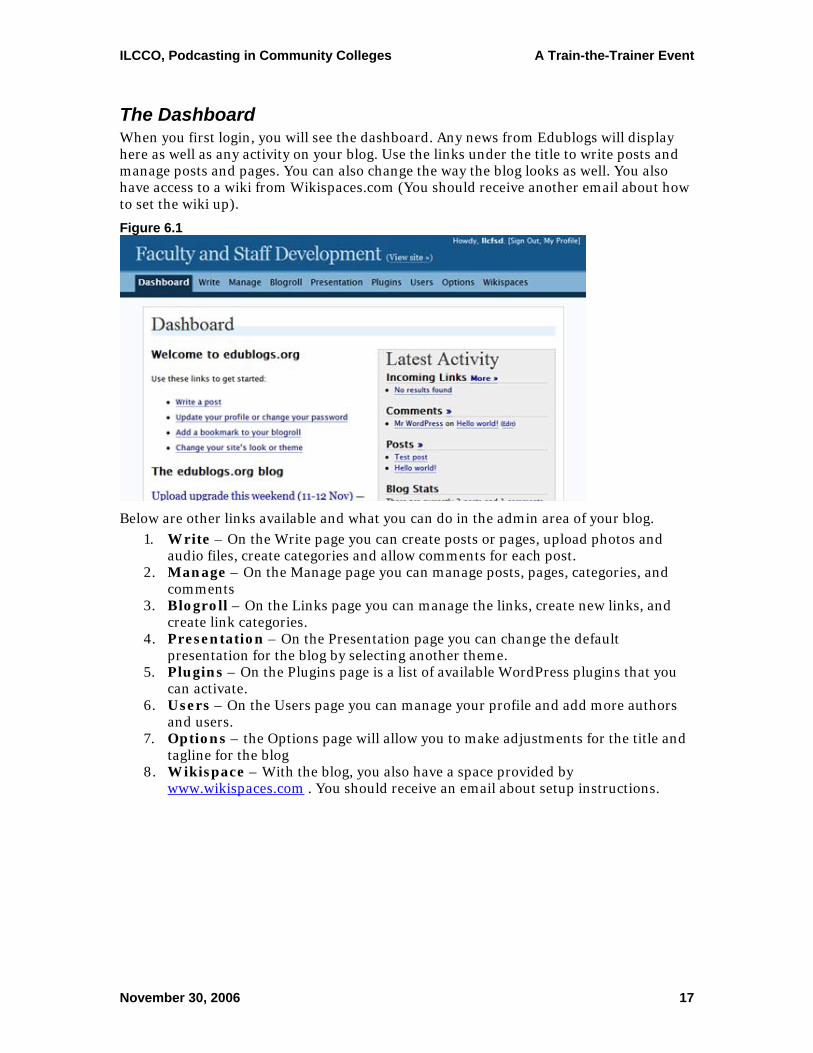
The Dashboard When you first login, you will see the dashboard. Any news from Edublogs will display here as well as any activity on your blog. Use the links under the title to write posts and manage posts and pages. You can also change the way the blog looks as well. You also have access to a wiki from Wikispaces.com (You should receive another email about how to set the wiki up).
Figure 6.1
Below are other links available and what you can do in the admin area of your blog.
1. Write – On the Write page you can create posts or pages, upload photos and audio files, create categories and allow comments for each post.
2. Manage – On the Manage page you can manage posts, pages, categories, and comments
3. Blogroll – On the Links page you can manage the links, create new links, and create link categories.
4. Presentation – On the Presentation page you can change the default presentation for the blog by selecting another theme.
5. Plugins – On the Plugins page is a list of available WordPress plugins that you can activate.
6. Users – On the Users page you can manage your profile and add more authors and users.
7. Options – the Options page will allow you to make adjustments for the title and tagline for the blog
8. Wikispace – With the blog, you also have a space provided by www.wikispaces.com . You should receive an email about setup instructions.
November 30, 2006 17

ILCCO, Podcasting in Community Colleges A Train-the-Trainer Event
Create a New Post with Your Podcast 1. Click Write on the menu bar below the title of the blog.
2. The Write Post page will display. In the Title box, type a title for the new post 3. In the Post box, type your post in the box provided. You may use the formatting
bar to format the post if desired. Figure 6.2
9. Under the post, click the Browse... button next to File: Locate the podcast on
your local computer and click Open.
10. Type a title and description of your file and click Upload. 11. Once uploaded, the Browse tab will display with the file. 12. To place the podcast in the post, select the option next to File and click Send to
editor. (FYI I have found this feature works best in Firefox) Figure 6.3:
November 30, 2006 18

ILCCO, Podcasting in Community Colleges A Train-the-Trainer Event
13. Click Save when you are ready to publish the new post to the blog. Figure 6.4
14. Once published, the post will be available on your blog web site. Click View site to
see your new post on your blog web site. Wordpress creates a nice graphic for the MP3 file. Figure 6.5
November 30, 2006 19

ILCCO, Podcasting in Community Colleges A Train-the-Trainer Event
15. Your viewers can click on the link to listen to the file now or subscribe to the RSS feed to download the audio files. Depending on the theme used for your Edublog, the RSS feed link will display on the sidebar or at the bottom page. When clicked, the web address will be something like http://llcfsd.edublogs.org/feed. This feed address is what students or your listeners will use to subscribe the podcast.
Figure 6.6
November 30, 2006 20

ILCCO, Podcasting in Community Colleges A Train-the-Trainer Event
Using Blogger (Another Option) Blogger provides similar features to edublogs.org. The main difference is that Blogger does not allow you to post your MP3 on its website. To use Blogger you will need to post your MP3 file to another web server and link to the file on your blog. The RSS feed with the MP3 enclosure will be created through a service called FeedBurner, allowing you to turn the audioblog into a podcast.
Use these steps for Blogger:
1. Upload your MP3 to a web server. For this workshop, we will use this location, http://test.ilcco.net/ilcco/podcast/uploadPods.cfm to upload the MP3 files.
2. Create a blog at blogger – http://www.blogger.com 3. At your Dashboard, at the administrative side of your blog, click on Settings.
4. Underneath the Settings tab, click on Basic and complete the Description for your blog
Figure 7.1
5. Underneath the Settings tab, click on Publishing and select Yes to Notify
Weblogs.com
Figure 7.2
November 30, 2006 21

ILCCO, Podcasting in Community Colleges A Train-the-Trainer Event
6. Underneath the Settings tab, click on Formatting and select Yes to Show Link Field
Figure 7.3
7. Click on the Posting tab and create a new blog post. In the Link field, type in the
URL of the MP3 for your podcast (what you uploaded in Step 1). Complete the Title field and a brief description in the text posting area. When done, click on Publish. The link to your MP3 is now a new post at your blog.
Figure 7.4
8. Now, go to FeedBurner at http://www.feedburner.com.
9. Register your blog as an RSS feed by typing in the name of your blog followed by "atom.xml". Check the box to indicate you are a podcaster.
November 30, 2006 22

ILCCO, Podcasting in Community Colleges A Train-the-Trainer Event
Figure 7.5
10. The “Create or Sign in to Your Feedburner account” page should appear. Click
Next to complete the registration process.*
*Information: Atom is an XML format used by Blogger. FeedBurner will convert it for RSS and podcasting syndication. Choosing the "I am a podcaster" option when registering, FeedBurner enables their SmartCast service to podcast MP3 links.
11. When registration is completed, FeedBurner will provide you the link to your FeedBurner RSS feed. Sometimes FeedBurner will alter your blog's name for your feed, removing special characters. In general, your feeds name will be http://feeds.feedburner.com/yourfeedname, understanding that "yourfeedname" may be slightly different from your blog's name.
12. On the web, go to Feed Validator at http://feedvalidator.org/ and test your feed's URL. If the result is a valid RSS feed (and it should be) then your feed is ready to go.
13. Your feed is now ready for use with a podcatcher such as iTunes. You can post the link on your website or in your course management system. If you want to publish the feed on your blog, use FeedBurner’s Publicity tools to create a piece of code you can copy and paste into your blogger template. This will display a link to your feed on your blog.
Podcasting from Your Campus Server Edublogs.org runs on the WordPress open-source software, http://wordpress.org/. WordPress can be installed on a server running PHP version 4.2 or higher and MySQL 3.23.23 or higher. If your campus makes blogging available to faculty through this software, you may also install the PodPress plugin for podcasting with your blog. The plugin and tutorials are at http://www.mightyseek.com/podpress/. This arrangement may produce a better set of data and tags for your podcasts.
Managing Podcasting Feeds on Your Own Server You can manage your own podcasts on your own web server. This allows you to add or subtract files as needed.
Podcasting Web Server No special web server is needed for podcasting. The files are downloaded for playback and not streamed. How robust of a server you need is up to you. The biggest consideration is storage space. The more storage you have, the more files can be housed there.
November 30, 2006 23

ILCCO, Podcasting in Community Colleges A Train-the-Trainer Event
Course Space on the Server Use standard folder structures on the web server to create course spaces. An example of the folder structure for a Communication 101 course is:
• The URL for your server space is podcasts.mycollege.edu
• The course folder is called com101 – podcasts.mycollege.edu/com101
• The podcast files are in a folder called "audio" – podcasts.mycollege.edu/com101/audio
In the com101 folder you will house the default xml page for the podcasting information. The default page for the class will be an xml file that tells podcatchers what files are available for download. The xml file consists of 2 sections: 1) the xml language that describes the podcast feed, and 2) the individual sections of code for each available podcast. In the audio folder you will place the actual audio files. No web page is needed for the audio folder.
The Default XML Page for the Course Use the tutorial at http://www.podcastdirectory.com/help/createxml.php to create the XML page for your course site on your podcasting server. Note that you are creating both XML and iTunes-specific language for both the main podcasting feed and the individual podcasts.
The page can be updated as needed, adding and subtracting code for individual podcasts. The default xml page is what podcatchers use for updates.
Upload Podcast
Each time your default xml page is updated with information on a newly available podcast, upload the podcast to the audio folder within the course site.
iTunes Technical Specifications You may want to submit your podcasts to the iTunes store. Information about submitting podcasts to the iTunes Music Store can be found at the following web address:
http://www.apple.com/itunes/store/podcaststechspecs.html
Feed Validators It is important to make sure your code is correct so it is understood by RSS and podcatchers. Two free services that do this are at: http://www.feedvalidator.org (for RSS feeds in general)
http://www.smoothouse.com/podcast/validator.php (specific for podcasting)
November 30, 2006 24

ILCCO, Podcasting in Community Colleges A Train-the-Trainer Event
Podcasting Availability in Course Management Systems Course Management Systems are in varying states with podcasting as an available feature. Below is the status of podcasting in different systems
ANGEL http://www.angellearning.com ANGEL will have podcasting available in version 7.2 due out May 2007.
BlackBoard / WebCT http://www.blackboard.com BlackBoard and WebCT have Building Blocks for purchase to incorporate podcasting into their platforms. One free open-source building block is available and one more is in development.
Moodle http://moodle.org Moodle has at least one third-party podcasting module available.
Sakai http://sakaiproject.orgThe Sakai Project has podcasting available now through its built-in RSS feed.
Resources Resource links are posted on at the following web address: http://llcfsd.edublogs.org/7
November 30, 2006 25